In my studio, air-dry modeling clay is my go-to for kid crafts because it’s simple, forgiving, and doesn’t need any heat to finish. Here are my favorite kid-friendly clay ideas that use easy shapes and big, cheerful details so your little makers can actually feel successful.
Pinch-Pot Animal Treasure Bowls
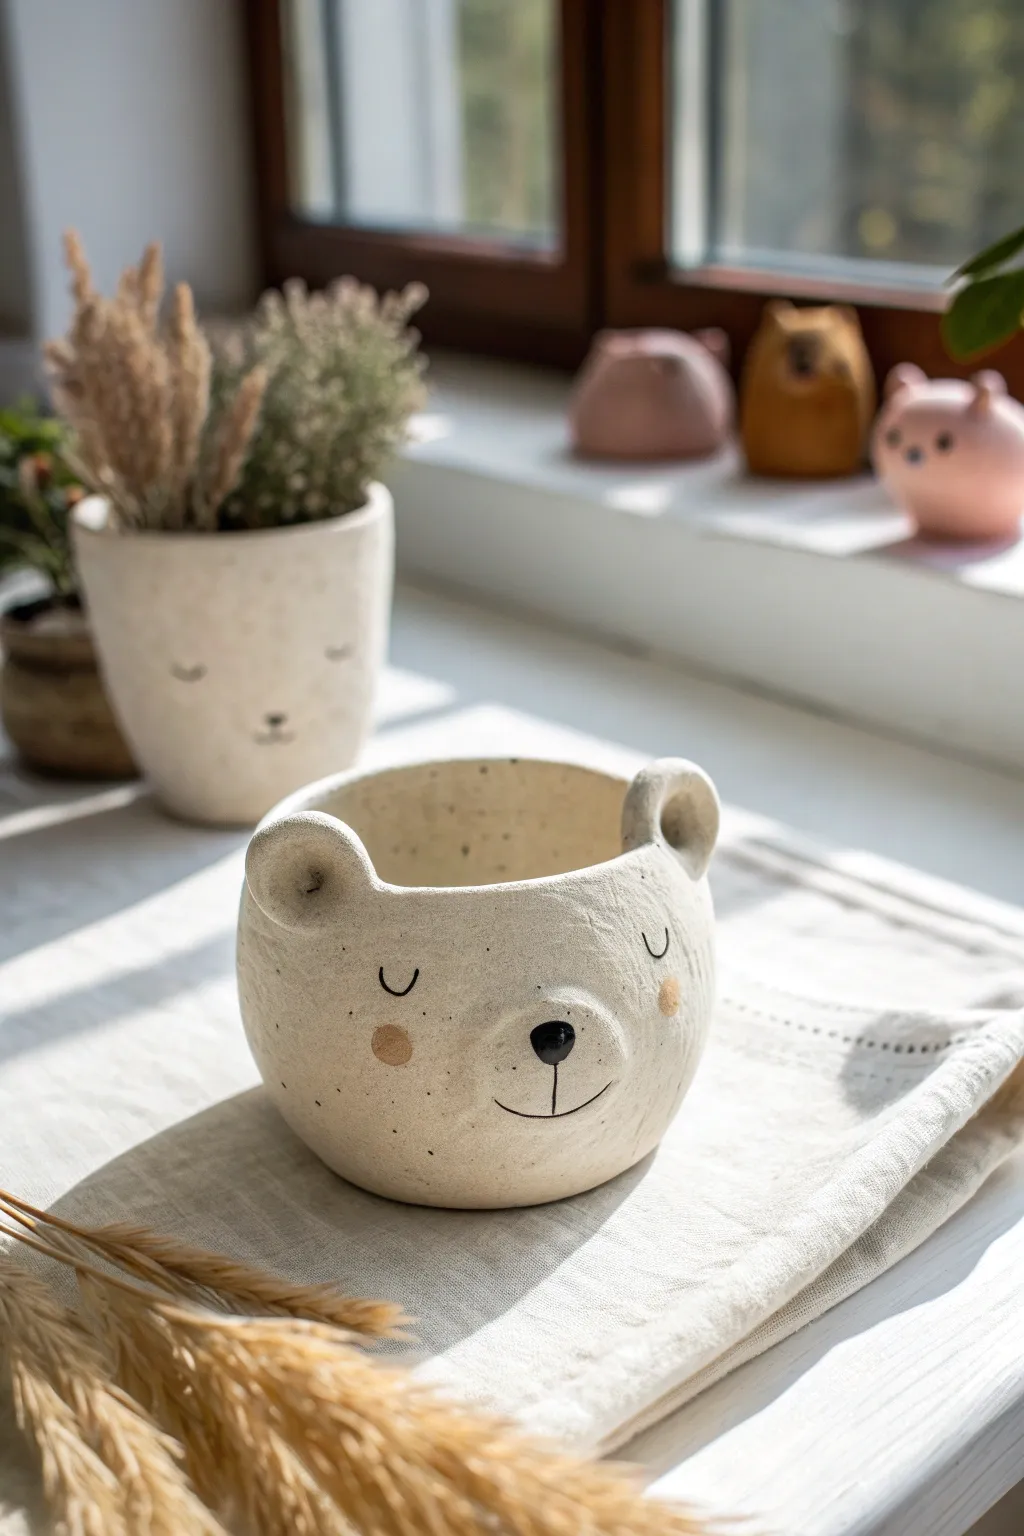
This adorable bear-themed treasure bowl combines the simple charm of speckled clay with a sweet, sleepy expression. It’s the perfect size for holding tiny trinkets, coins, or even a small air plant.
Step-by-Step
Materials
- Air-dry clay (white or beige)
- Speckled clay additive or coarse black pepper (optional for texture)
- Small bowl or cup of water
- Modeling tools or a butter knife
- Fine-grit sandpaper
- Black acrylic paint or magic marker
- Soft pink pastel chalk or acrylic paint
- Small paintbrush
- Matte varnish or sealant
Step 1: Forming the Base
-
Prepare your clay:
Start with a ball of clay roughly the size of a tennis ball. If you want that lovely speckled pottery look shown in the photo, knead in a tiny pinch of coarse black pepper or dried coffee grounds into the white clay before you start shaping. -
Start the pinch pot:
Push your thumb gently into the center of the ball, stopping about a half-inch from the bottom. This creates the initial opening for your bowl. -
Pinch the walls:
Using your thumb on the inside and fingers on the outside, gently pinch and rotate the clay in your hand. Work your way from the bottom up to the rim. -
Even it out:
Aim for a consistent thickness of about a quarter-inch all around. If the clay starts to crack, dip your finger in water and smooth it over the fissures immediately. -
Flatten the bottom:
Gently tap the bottom of the pot against your table surface to create a flat base so the bear will sit steadily without wobbling.
Coffee Speckle Hack
To mimic the speckled stoneware look without buying special clay, mix dry used coffee grounds or cracked black pepper into your white clay before sculpting.
Step 2: Adding the Bear Features
-
Shape the ears:
Roll two small marble-sized balls of clay. Flatten slightly and use your thumb or a rounded tool to create a small indentation in the center of each, forming the inner ear. -
Attach the ears:
Score (scratch) the bottom of the ears and the rim of the pot where you want them to sit. Add a dab of water to the scored areas and press the ears firmly onto the rim. -
Blend the seams:
Using a modeling tool or your finger, drag the clay from the base of the ear down onto the pot to seamless join them. I like to smooth this area thoroughly with a wet brush to ensure they don’t pop off later. -
Create the muzzle:
Take a small button-sized piece of clay and flatten it into an oval. Attach this to the lower center of the pot face using the score-and-slip method, pressing the edges down until they blend smoothly into the main bowl. -
Add the nose:
Roll a tiny, lentil-sized ball of clay for the nose. Attach it to the upper center of the muzzle bump you just created.
Step 3: Refining and Drying
-
Smooth the surface:
Dip a sponge or your finger in water and go over the entire piece to remove fingerprints and bumps. The smoother you get it now, the less sanding you’ll need later. -
Let it dry completely:
Place the bear in a cool, dry spot away from direct sunlight. Depending on thickness and humidity, this could take 24 to 48 hours. The clay will turn lighter and feel chalky when fully dry. -
Sand for perfection:
Once bone dry, use fine-grit sandpaper to gently buff away any remaining rough spots or sharp edges, especially around the rim and ear connections.
Level Up: Texture
Before the clay dries, gently press a piece of rough linen or canvas fabric against the outside of the bowl to give it a subtle, woven texture.
Step 4: Painting the Details
-
Draw the eyes:
Using a very fine paintbrush with black acrylic paint (or a black marker), draw two small U-shapes for sleepy, closed eyes. Place them fairly wide apart for a cuter look. -
Paint the nose and mouth:
Paint the tiny nose nub black. Then, carefully paint a vertical line down from the nose and curve it into a smile on the muzzle. -
Add rosy cheeks:
Take a soft pink pastel chalk (or a tiny bit of watered-down pink paint) and gently dab circles onto the cheeks. If using chalk, you can shave a bit of dust off and apply it with your finger for a soft, airbrushed effect. -
Seal the piece:
Finish by applying a coat of matte varnish. This seals the paint, protects the clay from moisture, and gives it that professional ceramic finish.
Now you have a charming little friend ready to guard your favorite small treasures on a windowsill or desk


Heart Trinket Dishes With Bead Edges
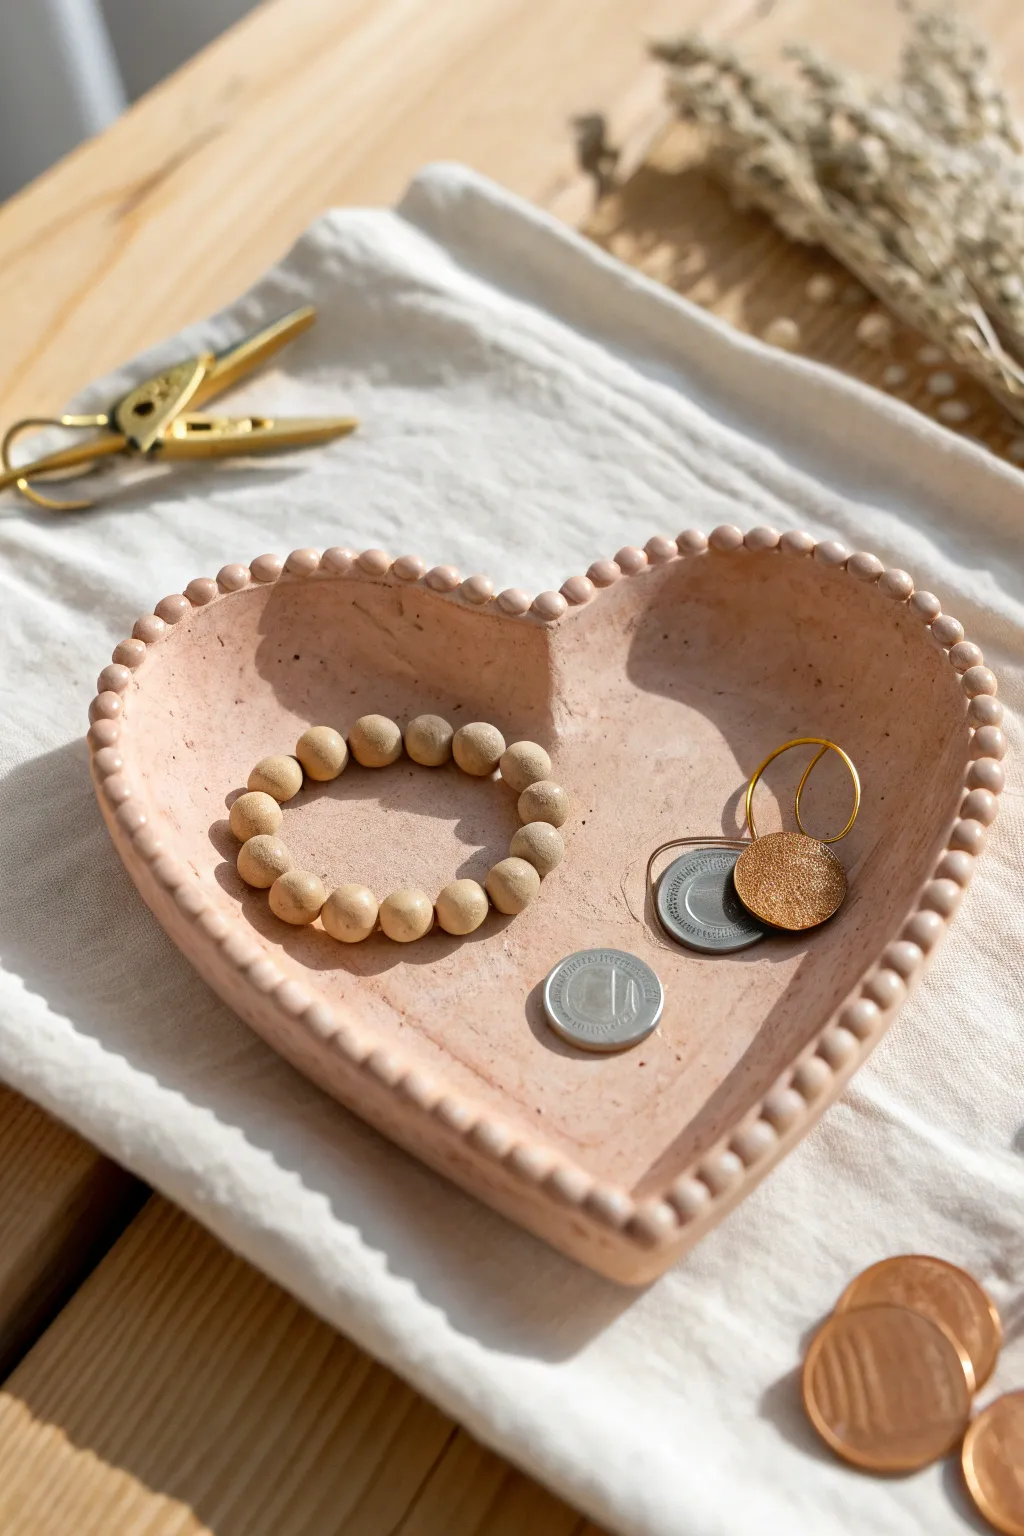
This sweet, textured trinket dish combines a soft, earthy pink tone with a charming beaded rim for a true bohemian feel. It makes a lovely catch-all for jewelry or coins and adds a handmade touch to any bedside table.
Detailed Instructions
Materials
- Air-dry modeling clay (white or terracotta)
- Acrylic paint (pale dusty pink or peach)
- Rolling pin
- Heart-shaped cookie cutter (large) or paper template
- Craft knife or clay tool
- Small cup of water
- Fine-grit sandpaper
- Matte sealant or varnish
- Paintbrush
Step 1: Shaping the Dish
-
Prepare the clay:
Begin by taking a generous handful of air-dry clay. Knead it in your hands for a minute or two until it feels warm, pliable, and free of cracks. -
Roll it out:
On a clean, flat surface or a silicone mat, use your rolling pin to flatten the clay. You want a slab that is roughly 1/4 inch thick—not too thin, or it will be fragile. -
Cut the heart shape:
Press a large heart-shaped cookie cutter firmly into the clay. If you don’t have a cutter large enough, lightly trace around a paper heart template with a craft knife to cut out your base shape. -
Create the curvature:
Gently lift the clay heart and pinch the edges upward slightly to create a shallow bowl shape. You can also smooth the edges with a bit of water on your finger to remove any harsh cut lines.
Step 2: Adding the Beaded Edge
-
Roll tiny spheres:
Pinch off very small pieces of the remaining clay. Roll them between your palms or fingers to create tiny, uniform spheres about the size of a pea. You will need quite a few to go all the way around the rim. -
Score and slip:
Before attaching, lightly scratch the top rim of your heart dish and dampen it with a wet finger or brush. This helps the beads stick securely. -
Attach the beads:
Place the little clay balls one by one along the rim of the heart. Press them down gently so they bond with the base, but try not to flatten their round shape too much. -
Blend the seams:
For extra durability, you can use a small clay tool to gently blend the underside of each bead into the dish rim, keeping the connection hidden. -
Smooth everything out:
Dip your finger in water and run it lightly over the beads and the interior of the dish to smooth out any fingerprints or cracks. -
Let it dry:
Place your finished sculpture in a safe, dry spot. Depending on the humidity and brand of clay, this usually takes 24 to 48 hours to dry completely.
Cracks happen!
If small cracks appear as the clay dries, don’t panic. Mix a tiny bit of fresh clay with water to make a paste and fill the cracks, then sand smooth once dry.
Step 3: Painting and Finishing
-
Sand the imperfections:
Once the clay is bone dry and hard, take a piece of fine-grit sandpaper and gently buff away any rough patches on the surface or sharp edges on the beads. -
Mix your color:
If you don’t have a pre-mixed dusty pink, mix a tiny bit of brown or orange into white and pink acrylic paint to achieve that earthy, clay-like tone shown in the photo. -
Apply the first coat:
Paint the entire dish, ensuring you get the brush into the crevices between the beads. I find a smaller brush works best for these tight spots. -
Add a second coat:
Let the first layer dry to the touch, then apply a second coat for solid, opaque coverage. -
Seal the piece:
To protect your dish from moisture and scratches, finish it with a coat of matte varnish or sealant. This also gives it a professional, finished look.
Make it marble
Knead two different colors of clay together slightly before rolling out the slab to create a gorgeous, swirling marble effect for the base.
Place your favorite rings inside and enjoy your beautiful new handmade accessory


Rainbow And Cloud Hanging Charm
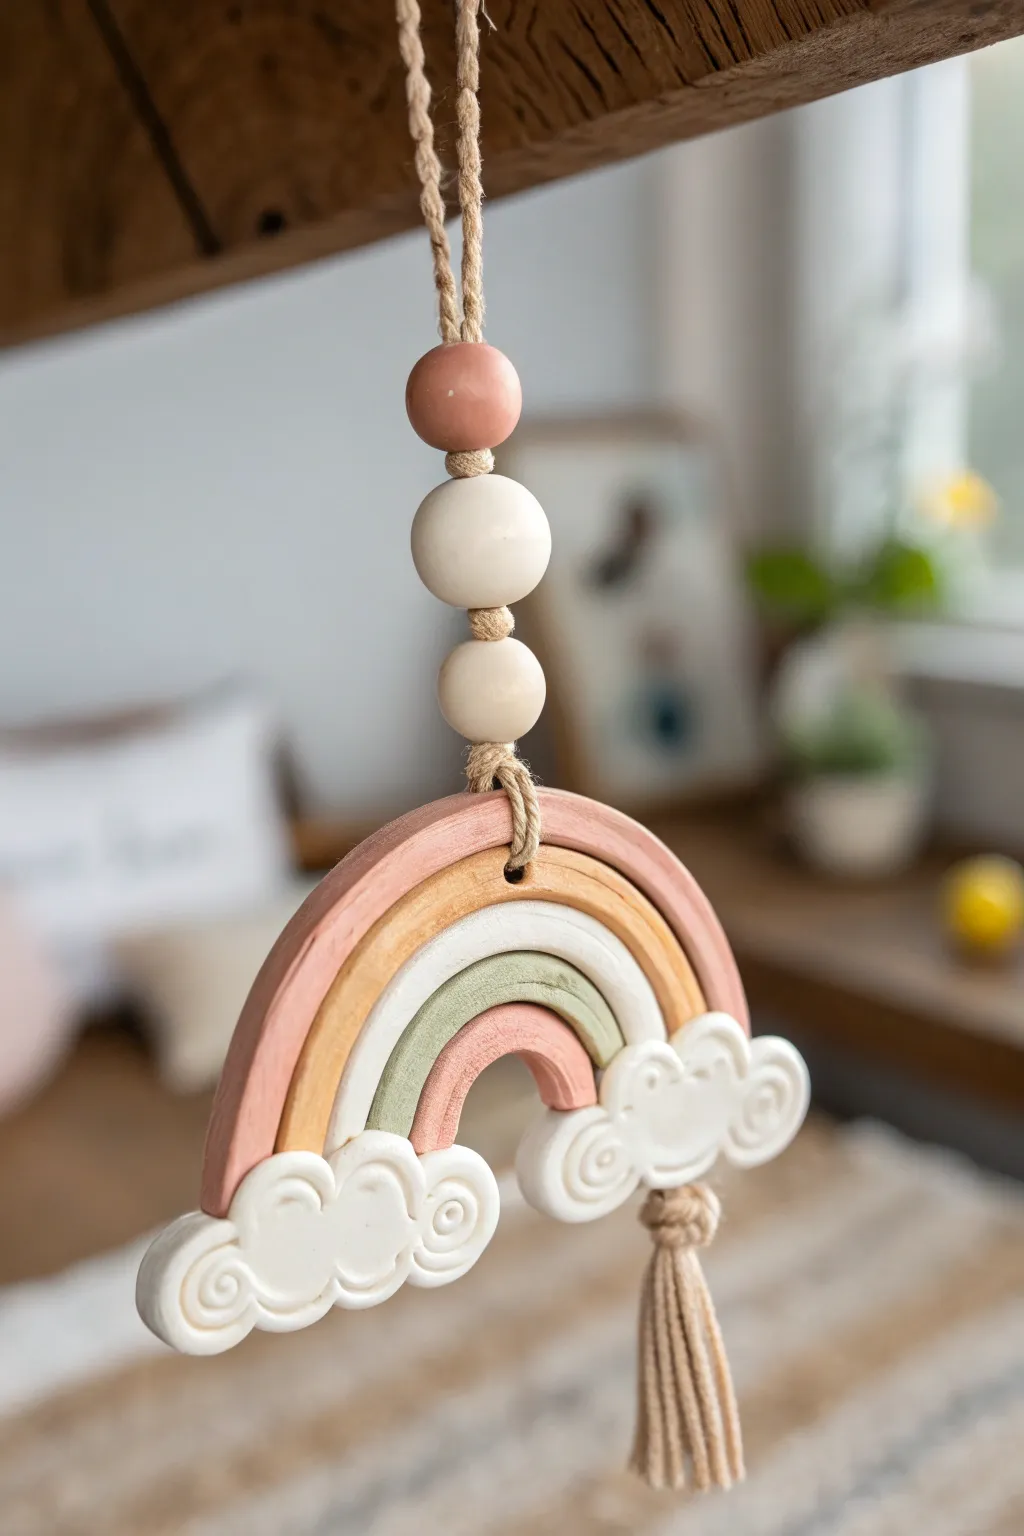
This charming pastel rainbow combines the smooth finish of modeling clay with rustic textures to create a delightful nursery accent. With chunky neutral beads and soft cloud bases, it captures a trendy bohemian aesthetic that looks beautiful hanging in a window or above a crib.
Step-by-Step
Materials
- Air-dry modeling clay (white)
- Acrylic paints (terracotta/dusty pink, mustard yellow, sage green, beige)
- Paintbrushes (small-medium)
- Jute twine or hemp cord
- Wooden beads (assorted sizes: 1 small, 2 medium, 1 large painted)
- Rolling pin
- Clay knife or craft knife
- Needle tool or toothpick
- Large-eye needle
- Strong craft glue or super glue
- Small circle cutter (optional, for clouds)
Step 1: Shaping the Rainbow Arches
-
Roll the coils:
Begin by taking four generous chunks of white air-dry clay. Roll them out on a clean surface into long, even snake-like coils about 1/2 inch thick. -
Form the arches:
Curve the first coil into a tight ‘U’ shape to form the smallest, innermost arch. Take the next coil and curve it snugly around the first one. Repeat this for all four coils until you have a complete rainbow shape. -
Trim the edges:
Once your arches are aligned, use a clay knife to cut straight across the bottom of the rainbow legs so they are perfectly flush and even. -
Create the hanging hole:
Poke a hole straight through the top center of the outermost (largest) arch using a needle tool or toothpick. Make sure the hole is wide enough for your jute twine to pass through later. -
Separate and dry:
Carefully separate the four arches from each other slightly so they don’t stick together while drying. Let them air dry on a flat surface for 24-48 hours, flipping them halfway through.
Smooth Operator
Before drying, dip your finger in a tiny bit of water and rub it over the clay surface. This smooths out fingerprints and cracks for a professional finish.
Step 2: Crafting the Clouds
-
Form cloud bases:
While the arches dry, roll out two flat, chunky oval shapes of white clay roughly 2 inches wide and 1 inch tall. -
Add swirl details:
Roll very thin, tiny snakes of clay. Coil these into small spirals and press them gently onto the front surface of your cloud bases to create a textured, fluffy look. -
Create tassel attachment:
On the bottom of just one of the clouds (pick either left or right), poke a hole vertically near the center or bottom edge to attach a tassel later. -
Dry the clouds:
Set these aside to dry completely alongside your rainbow arches.
Shrinking Pains
Clay shrinks as it dries. If your arches separate and create gaps, simply fill the spaces with a mix of white glue and white paint before varnishing.
Step 3: Painting and Assembly
-
Paint the arches:
Paint each dry arch a different color to match the reference: the outermost arch in dusty terracotta, the next in mustard/beige, then creamy white, and the smallest center arch in sage green or dusty pink. I prefer applying two thin coats for better coverage. -
Glue the rainbow:
Once the paint is fully dry, arrange the arches back into the rainbow shape. Apply strong craft glue along the sides where they touch and press them together firmly. -
Attach the clouds:
Glue the textured cloud pieces onto the bottom front of the rainbow legs, covering the cut ends of the arches. -
Prepare the hanger:
Cut a length of jute twine (about 15 inches). Fold it in half to create a loop at the top. -
Thread the beads:
Thread the two ends of the twine through a small wooden bead, then a painted medium bead (terracotta color), then two natural wooden beads. -
Secure to rainbow:
Thread the twine ends through the hole you made in the top arch. Tie a sturdy knot underneath the arch or loop it back through and tie it off above the rainbow to secure it. -
Make the tassel:
Wrap jute twine around three fingers about 10–15 times. Slide the loop off, tie a piece of twine near the top to create a ‘head,’ and cut the bottom loops to form fringe. -
Attach the tassel:
Tie this small tassel to the bottom of the cloud where you created the hole earlier, completing the hanging mobile.
Now your handcrafted rainbow is ready to add a touch of warmth and whimsey to any corner of the room


Bug And Ladybug Fridge Magnets
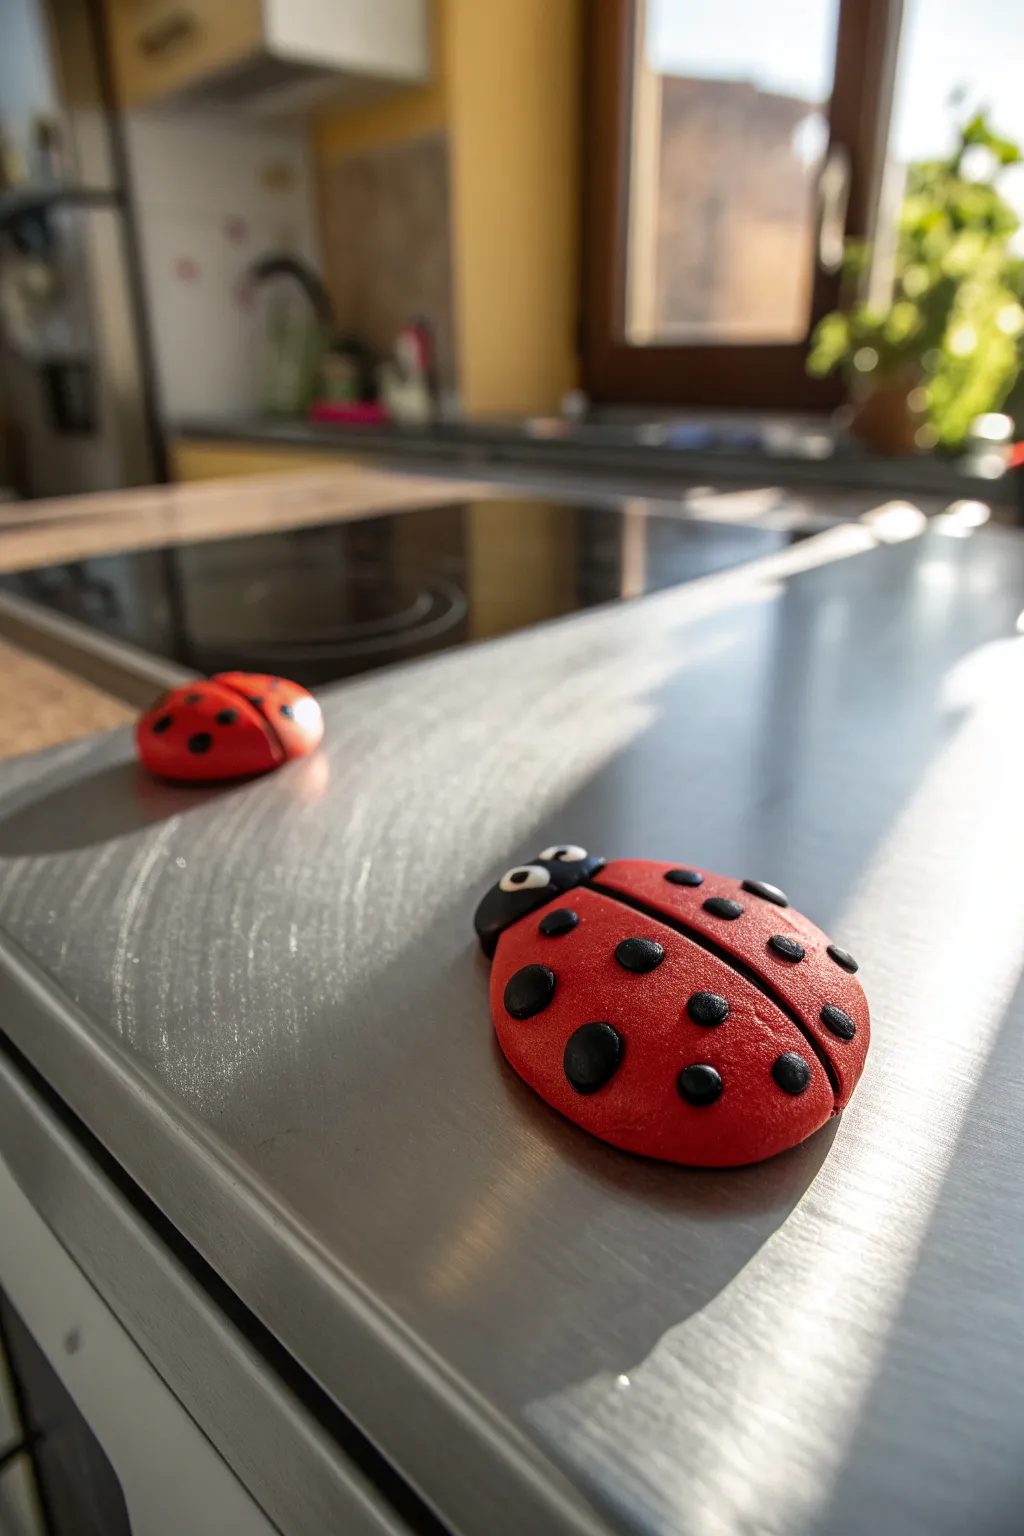
Brighten up your kitchen with these adorable, shiny ladybug magnets that look almost ready to crawl up the fridge door. Their rounded, smooth bodies and comical white eyes give them a charming cartoon personality that kids will love molding.
Detailed Instructions
Materials
- Red air-dry clay or modeling dough
- Black air-dry clay
- White air-dry clay
- Round neodymium magnets (strong)
- Plastic modeling tool or butter knife
- Smooth rolling pin or acrylic roller
- Toothpick or dotting tool
- Glossy varnish or clear nail polish (optional)
- Strong craft glue (like E6000)
Step 1: Shaping the Body
-
Prepare the red base:
Start by kneading a golf-ball-sized amount of red clay until it is soft and pliable. -
Form the dome:
Roll the red clay into a perfect sphere between your palms to remove any cracks or seams. -
Flatten the bottom:
Press the sphere gently onto your work surface to flatten the bottom while keeping the top nice and domed. You want a semi-circle shape. -
Refine the shape:
Smooth out the sides with your finger so the dome is even all around. It should look like a little red bun. -
Create the wings:
Take your plastic modeling tool or the back of a butter knife and gently press a line down the center of the red dome, starting from the back and stopping about a quarter-inch from the front. -
Deepen the groove:
Widen this central line slightly so the two ‘wings’ look distinct from each other.
Clay Cracking?
If you see cracks forming as the clay dries, smooth them over immediately with a tiny drop of water on your finger to seal them back up.
Step 2: Adding the Head and Details
-
Form the head base:
Take a smaller piece of black clay and roll it into a flattened semi-circle or crescent shape. -
Attach the head:
Press this black crescent firmly against the front of the red body where your central line stopped. Smooth the seam underneath so it sticks well. -
Make the spots:
Roll several tiny balls of black clay. They don’t all have to be the exact same size; variety looks natural. -
Apply the spots:
Gently press the black balls onto the red wings and flatten them down so they are flush with the surface of the body. -
Create the eyes:
Roll two very small balls of white clay and press them onto the top of the black head piece, side by side. -
Add pupils:
Roll two minuscule specks of black clay and press them into the center of the white eyes for a focused look. -
Texture the neck:
Use a toothpick to gently define the line where the black head meets the red body to make the separation crisp.
Step 3: Finishing Touches
-
Drying time:
Let your ladybug sit undisturbed for at least 24 hours. I usually place mine on a wire rack to ensure air circulates underneath. -
Prepare the magnet:
Once the clay is rock hard, flip the ladybug over to expose the flat bottom. -
Attach the magnet:
Apply a dab of strong craft glue to the center of the bottom and press your round magnet into it. -
Wait for glue:
Allow the glue to cure completely according to the package instructions. -
Add the shine:
For that wet, bug-shell look, coat the top of the ladybug with a layer of glossy varnish or clear nail polish.
Flush Spots
To make the spots look painted on rather than bumpy, firmly roll over the ladybug’s back with an acrylic roller once after attaching the black dots.
Now stick these cheerful little critters on your fridge and enjoy their company

The Complete Guide to Pottery Troubleshooting
Uncover the most common ceramic mistakes—from cracking clay to failed glazes—and learn how to fix them fast.
Dinosaur Fossil Impression Stones
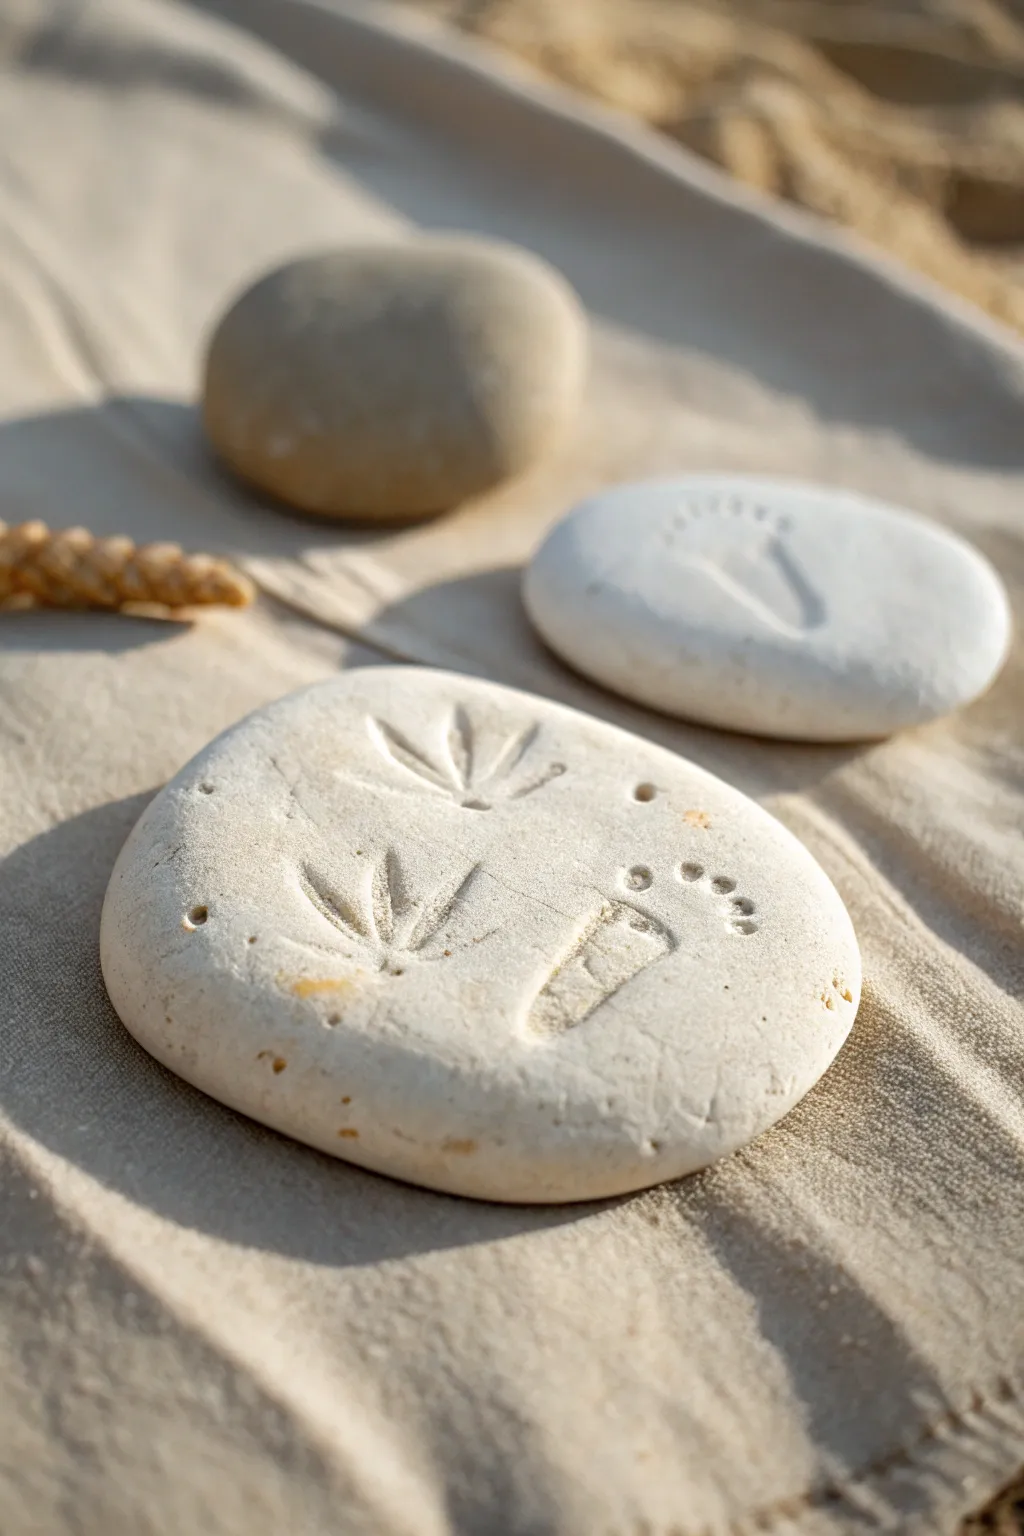
Transform simple air dry clay into ancient-looking artifacts with these charming fossil impression stones. The smooth, matte finish and delicate indentations make them feel like real archaeological treasures discovered on a sandy beach.
Step-by-Step Tutorial
Materials
- White or cream air dry clay
- Small rolling pin
- Fine-grit sandpaper (optional)
- Small plastic dinosaur toys (for footprints)
- Small twigs, pine needles, or plastic leaves
- Modeling tool or toothpick
- Water in a small cup
- Sponge
Step 1: Shaping the Stones
-
Prepare the Clay:
Pinch off a lump of air dry clay roughly the size of a tangerine. Squeeze and knead it in your hands for a minute to warm it up and ensure it is pliable and crack-free. -
Form a Sphere:
Roll the clay between your palms to create a smooth, tight ball. Try to eliminate any major seams or fold lines during this rolling process. -
Flatten the Stone:
Place the ball on your work surface and press down gently with your palm. You want an organic, slightly irregular oval shape rather than a perfect circle. -
Refine the Thickness:
Use a small rolling pin to flatten the surface slightly further until the ‘stone’ is about half an inch thick. Keep the edges rounded and soft to mimic water-worn pebbles. -
Smooth the Edges:
Dip your finger in a little bit of water and run it along the perimeter of the clay. This helps seal any tiny cracks and gives that polished river-stone look seen in the photo.
Cracked Clay?
If small cracks appear while drying, mix a tiny bit of fresh clay with water to make a paste (slip). Smooth this into the cracks with your finger and let dry again.
Step 2: Creating the Impressions
-
Plan Your Design:
Visualize where you want your fossil marks to go. The example uses a combination of animal tracks and plant life. -
Pressing Leaves:
Take your plastic leaves or real twigs and press them firmly into the clay surface. Apply even pressure to get a clear outline without pushing all the way through the stone. -
Refining Plant Marks:
If your plant impressions aren’t defined enough, I like to use a simple modeling tool or toothpick to gently deepen the main veins or stems. -
Make the Tracks:
Take a plastic dinosaur toy and press its foot into the clay. Rock the toy slightly forward and backward to ensure the toes and heel make a deep, clean impression. -
Detailing the Toes:
For added realism, use the rounded end of a paintbrush or a dotting tool to add small circular indentations at the end of the footprint, mimicking toe pads. -
Enhancing the Texture:
Add a few random, tiny pinpricks or shallow scratches around the main designs to simulate natural weathering and imperfections in the rock. -
Smooth the Surface Again:
Lightly dampen a sponge and tap it very gently over the surface. This softens any sharp ridges created by the impression tools, making the fossil look worn by time.
Make it Ancient
Mix a watery wash of brown acrylic paint. Brush it over the whole stone and immediately wipe it off with a paper towel. The dark color stays in the fossil grooves.
Step 3: Drying and Finishing
-
Initial Drying:
Place your stones on a wire rack or a piece of parchment paper. Let them dry undisturbed for at least 24 hours. -
Flip for Even Drying:
After the first day, flip the stones over to allow the bottom side to dry completely. This prevents warping. -
Sand for Realism:
Once fully cured and hard, take a piece of fine-grit sandpaper and lightly buff the surface. This removes any fingerprints and gives the clay a true stone-like matte texture. -
Optional Dusting:
If you want them to look freshly dug up, dust a tiny amount of brown chalk pastel or cocoa powder into the crevices and wipe the surface clean.
Arrange your finished fossils in a sandbox or display them on a shelf for a prehistoric touch
Handprint Or Thumbprint Keepsake Tiles
Preserve a fleeting moment in time with this charming, rustic keepsake tile adorned with a sweet handprint, painted hearts, and delicate botanical sprigs. The thick, white clay base creates a sturdy canvas for the warm terracotta and teal colors, making it perfect for display on a windowsill or wall.
Step-by-Step Guide
Materials
- White modeling clay (air-dry)
- Rolling pin
- Square cookie cutter or knife and ruler
- Sandpaper (fine grit)
- Acrylic paints (terracotta/rust, teal, orange)
- Paintbrushes (medium flat, thin liner/detail)
- Straw or skewer (for hole)
- Jute twine
- Clear matte varnish or sealant
Step 1: Creating the Base
-
Prepare the Clay:
Take a generous ball of white air-dry clay and knead it briefly until it is smooth and pliable. This helps remove any air bubbles that might cause cracking later. -
Roll the Slab:
On a clean, flat surface, roll out the clay to a uniform thickness of about 0.5 to 0.75 inches. You want a substantial, chunky look for this tile. -
Cut the Square:
Using a square cookie cutter or a ruler and knife, cut a perfect square shape from the rolled slab. Measure about 5×5 or 6×6 inches, depending on the size of the child’s hand. -
Smooth the Edges:
Dip your finger in a little water and run it along the cut edges to smooth out any roughness or sharp corners. -
Add the Hanging Hole:
While the clay is still wet, use a drinking straw to punch a hole in the center of the top edge. Position it about 1/2 inch down from the top so the clay remains strong. -
Dry Completely:
Set the tile aside in a dry, room-temperature area. Turn the tile over carefully once a day to ensure even drying and prevent warping. Depending on thickness and humidity, this may take 24-48 hours. -
Sand for Finish:
Once fully cured and hard, gently sand the surface and edges with fine-grit sandpaper to create a smooth, paint-ready surface.
Step 2: Painting the Design
-
Prepare the Handprint:
Instead of pressing the hand into wet clay, we are painting it on. Pour a small amount of terracotta or rust-colored acrylic paint onto a palette. -
Apply Paint to Hand:
Paint a generous, even layer of the rust color directly onto the palm and fingers of the child’s hand. Ensure full coverage but avoid drips. -
Stamp the Tile:
Guide the hand to the center of the dry clay tile. Press down firmly on the palm and each finger to ensure a clear transfer, then lift the hand straight up carefully. -
Paint the Top Leaves:
Using a thin liner brush and teal paint, create a curved vine branching out over the top of the handprint. Add small, leaf-like dashes along the vine. -
Add Large Hearts:
Switch to a small flat or round brush. Paint two medium hearts in the upper corners—one orange on the left, one orange on the right—and teal hearts on the sides. -
Paint Bottom Foliage:
In the bottom left corner, use the teal paint and liner brush to paint a sprig of leaves. In the bottom right, replicate the shape using a thin orange line for a contrasting botanical element. -
Fill in Details:
Scatter smaller hearts around the remaining empty spaces using alternation colors of teal and orange to balance the composition. -
Let Paint Dry:
Allow the painted design to dry completely, which usually takes about 20-30 minutes for acrylics.
Clean Prints
Practice the handprint on a piece of scrap paper first. This helps you gauge how much paint creates the clearest print without smudging.
Step 3: Assembly
-
Seal the Tile:
Apply a coat of clear matte varnish or sealant over the entire front surface to protect the paint and give the clay a finished look. -
Add the Hanger:
Cut a short length of jute twine. Fold it in half, push the loop through the hole from front to back, and pass the loose ends through the loop to create a lark’s head knot.
Texture Twist
Before the clay dries, gently press a piece of lace or burlap into the corners for a subtle textured background behind where the painted hearts will go.
Now you have a timeless piece of decor that captures a precious stage of childhood forever


What Really Happens Inside the Kiln
Learn how time and temperature work together inside the kiln to transform clay into durable ceramic.
Initial Letter Bag Tags
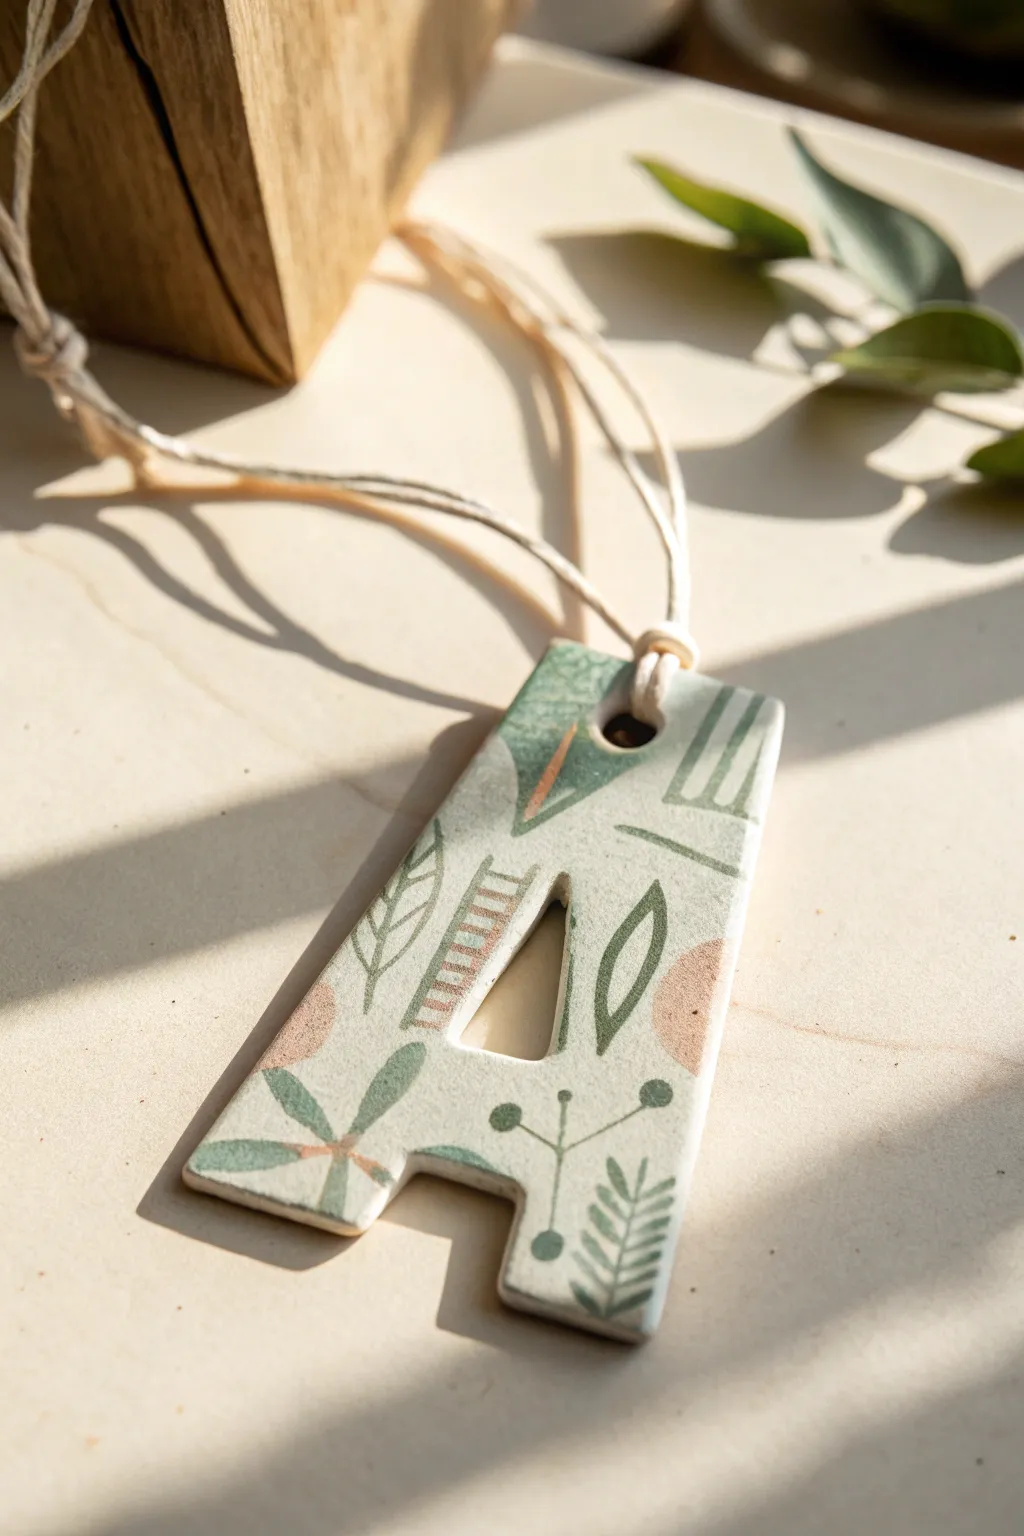
Customize a backpack or tote with this charming initial bag tag that looks just like expensive ceramic. The smooth, matte finish features delicate botanical patterns in earthy greens and terracottas, making it a sophisticated yet achievable project for aspiring clay artists.
Detailed Instructions
Materials
- White air-dry modeling clay
- Rolling pin
- Parchment paper or craft mat
- Letter template (printed on paper)
- Craft knife or clay cutter tool
- Straw or cocktail stick
- Fine-grit sandpaper
- Acrylic paints (sage green, forest green, terracotta, white)
- Fine detail paintbrush (size 0 or 00)
- Matte varnish or sealant
- Natural twine or cord
Step 1: Shaping the Base
-
Prepare your workspace:
Lay down parchment paper or a silicone mat to prevent the clay from sticking to your table. Take a handful of air-dry clay and knead it gently until it’s pliable and smooth. -
Roll the slab:
Using your rolling pin, flatten the clay to an even thickness of about 1/4 inch (6mm). If you want a uniform thickness, you can place two wooden rulers on either side of the clay as guides while rolling. -
Trace the letter:
Cut out your paper letter template (like the blocky ‘A’ shown here) and place it gently on top of the smoothed clay slab. Choose a font with thick lines so the tag won’t be fragile. -
Cut the shape:
Carefully trace around the template with a craft knife or clay tool. Use slow, steady pressure to get clean lines, cutting straight down rather than slicing at an angle. -
Remove excess clay:
Lift away the scrap clay from around your letter first, then gently peel the paper template off the letter shape. Set the scraps aside for future projects. -
Clean the edges:
Dip your finger in a little water and run it along the cut edges to smooth out any roughness or jagged bits. Don’t use too much water, or the clay might get slimy. -
Create the hanging hole:
Before the clay starts to dry, use a straw to punch a hole at the top center of your letter. Twist the straw slightly as you pull it out to get a clean circle. -
Dry completely:
Let the letter dry on a flat surface for 24-48 hours. I find flipping it over halfway through the drying process helps keep it perfectly flat and prevents warping. -
Sand for smoothness:
Once fully cured and hard, take a piece of fine-grit sandpaper and lightly buff the surface and edges. This gives it that professional ceramic look.
Smooth Operator
To get a truly stone-like finish, wipe the dried clay with a slightly damp sponge before sanding. This re-wets just the surface layer for ultra-smooth polishing.
Step 2: Painting the Design
-
Mix your palette:
Prepare your acrylic paints. You’ll need a muted sage green, a darker forest green for contrast, and a soft terracotta or peach tone. -
Start with main leaves:
Using your fine detail brush, paint simple leaf shapes on the letter. Keep them scattered and varying in size. Don’t worry about perfection; the organic look is part of the charm. -
Add contrasting elements:
Switch to the terracotta color and add geometric accents. Try painting a small ladder shape, a semi-circle, or filling in some organic blobs to balance the green leaves. -
Paint fine stems:
With the very tip of your brush and the darker green paint, connect your leaves with thin stems. Add tiny dots at the end of some stems to mimic berries or buds. -
Fill the gaps:
Look for empty white spaces and add small details like single lines, tiny dashes, or hollow leaf outlines to balance the composition. -
Let the paint set:
Allow the paint to dry completely. Acrylics dry fast, so this should only take about 15-20 minutes. -
Seal the piece:
Apply a coat of matte varnish over the entire front and sides. This protects the paint from scratching and seals the porous clay. -
Attach the cord:
Cut a length of natural twine. Fold it in half, push the loop through the hole in your tag, and pull the tails through the loop to create a lark’s head knot.
Warped Letter?
If the edges curl up while drying, place a heavy book on top of the clay once it’s ‘leather hard’ (firm but still cool to the touch) to press it flat again.
Using this simple technique allows you to create personalized gifts that look professionally crafted in just an afternoon
Cute Desk Pencil Holder Critters
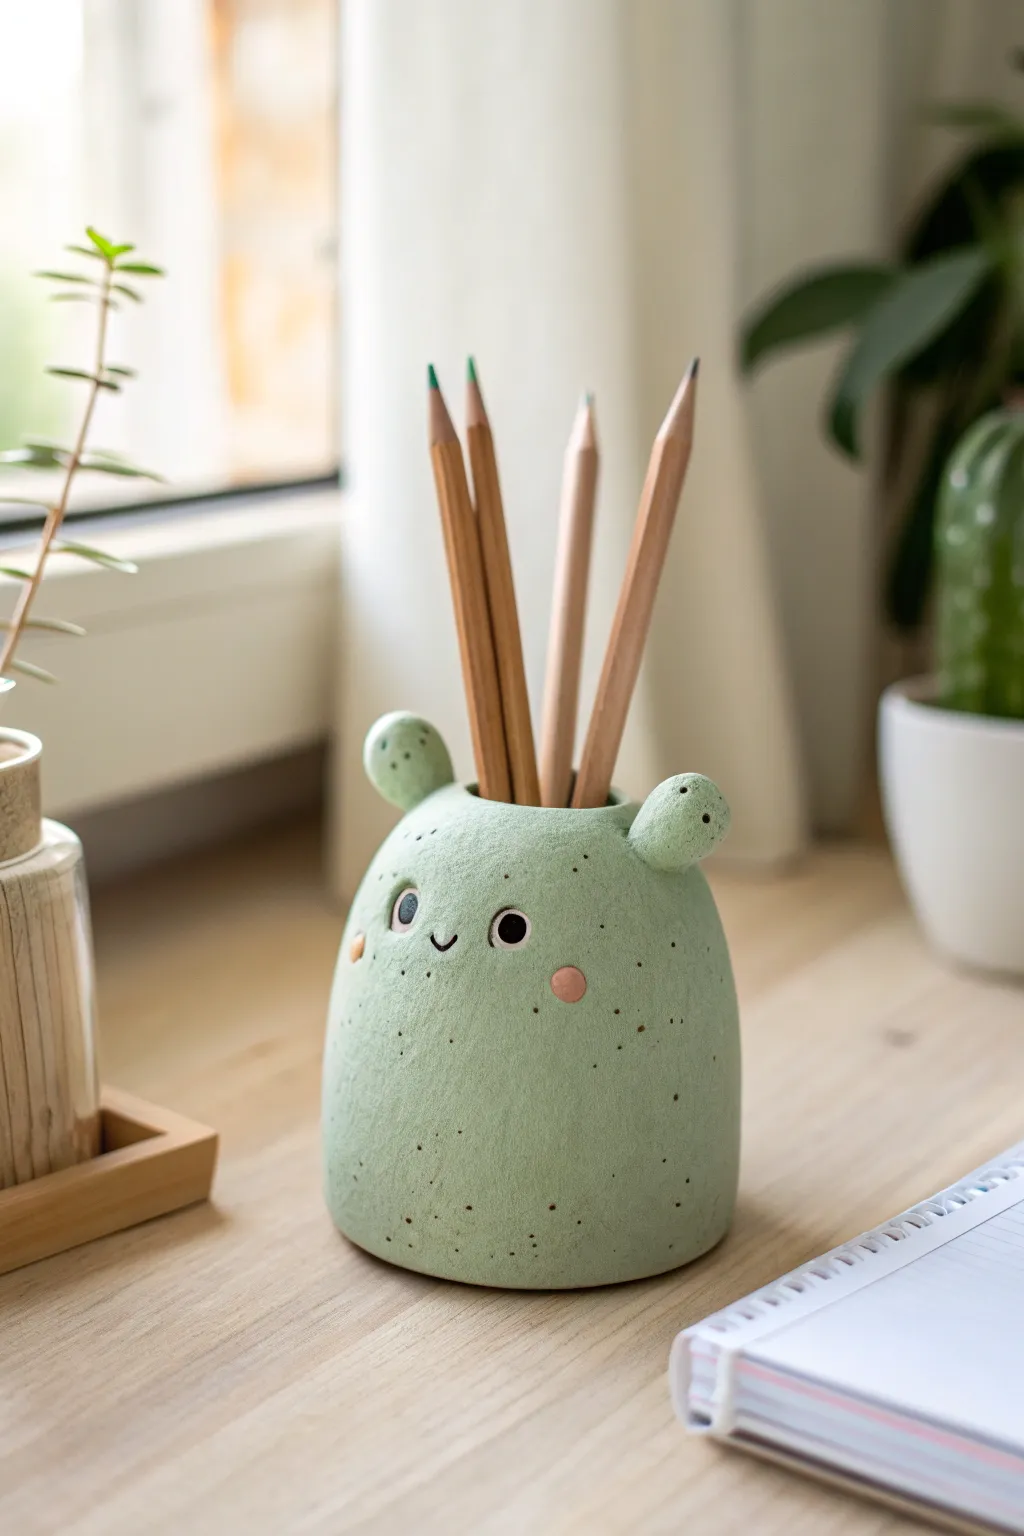
Brighten up any study nook with this adorable, speckled green pencil holder that looks like a friendly little forest spirit. Its chunky, organic shape and sweet, simple face make it the perfect clay project for beginners looking to add personality to their desk.
Step-by-Step Guide
Materials
- Air-dry clay (white or pre-colored green)
- Acrylic paint (sage green, black, pink, white)
- Small rolling pin
- Empty toilet paper roll or cardboard tube (for structure)
- Mod Podge or matte sealant
- Paintbrushes (medium flat, fine detail)
- Old toothbrush (for splashing texture)
- Sandpaper (fine grit)
- Water formatting and smoothing
Step 1: Shaping the Clay Base
-
Prepare the Core:
Start by cutting a cardboard tube to your desired height, around 3 to 4 inches tall. This will act as the internal skeleton to ensure your holder stays hollow and sturdy. -
Roll Out a Slab:
Take a large chunk of air-dry clay and roll it out into a rectangular slab about 1/4 inch thick. Make sure it’s long enough to wrap completely around your cardboard tube. -
Wrap the Tube:
Gently wrap the clay slab around the tube. Where the ends meet, score the clay with a tool (or a toothpick), add a dab of water, and press the seams together firmly to join them. -
Smooth the Seam:
Use your fingers and a little water to smooth out the seam until it disappears completely. Aim for a seamless, cylindrical shape. -
Build the Bottom:
Trace the bottom of your cylinder onto a fresh piece of rolled clay. Cut out this circle, score the edges, and attach it to the bottom of the cylinder, blending the clay upwards to seal it shut. -
Bulk it Up:
To get that chubby, rounded look from the photo, add extra clay to the lower half of the cylinder. Smooth it upward to create a pear-like, bottom-heavy silhouette. -
Round the Top Edge:
Gently curve the clay at the top rim inward slightly over the cardboard edge. Smooth it down so the cardboard is completely hidden and the opening looks soft and rounded.
Cracks happen!
If small cracks appear as the clay dries, don’t panic. Mix a tiny bit of fresh clay with water to make a paste (slip) and fill the cracks, then sand smooth once dry.
Step 2: Adding Details & Drying
-
Form the Ears:
Roll two small balls of clay, then flatten them slightly into thick discs. These will be the nubby little ears. -
Attach the Ears:
Score the attachment points on the top sides of the head and the bottom of the ears. Stick them on securely, blending the clay at the base so they don’t pop off later. -
Poke Texture Holes:
Using a toothpick or a small dotting tool, gently press tiny indentations into the ears to give them a porous, sponge-like texture. -
Refine the Surface:
Dip your finger in water and do a final smoothing pass over the entire sculpture. Remove any fingerprints or harsh bumps before letting it rest. -
Let it Dry:
Allow the sculpture to dry completely. For a piece this thick, I usually let it sit for at least 48 to 72 hours. Rotate it occasionally for even drying. -
Sand Roughly:
Once fully dry, use fine-grit sandpaper to gently buff away any unwanted bumps, focusing on rounding out the bottom curve.
Go wild with color
Make a whole family in different pastel colors like lavender, baby blue, or soft yellow to organize rainbow markers on your desk.
Step 3: Painting the Character
-
Base Coat:
Paint the entire creature with a lovely matte sage green acrylic paint. You might need two coats to get a solid, opaque finish. -
Create the Speckles:
Mix a slightly darker green or brownish-grey paint with a little water. Dip an old toothbrush into it and flick the bristles with your thumb to spray tiny speckles all over the body. -
Paint the Eyes:
Use a small brush or a dotting tool to paint two solid black circles for the eyes. Space them wide apart for a cuter look. -
Add Eye Highlights:
Once the black paint is dry, add a tiny white dot to the upper corner of each eye. This ‘catchlight’ brings the character to life. -
Draw the Mouth:
Using a very fine liner brush or a black paint pen, draw a tiny, simple ‘u’ shape between the eyes for a smiling mouth. -
Rosy Cheeks:
Dab two soft pink circles just below and outside the eyes to give your critter a blushing, sweet expression. -
Seal the Deal:
Finish by applying a coat of matte sealant or Mod Podge to protect the paint and give the clay a nice, finished texture.
Now you have a charming little desk companion ready to hold your creative tools

TRACK YOUR CERAMIC JOURNEY
Capture glaze tests, firing details, and creative progress—all in one simple printable. Make your projects easier to repeat and improve.
Beaded Clay Bracelets And Bangles
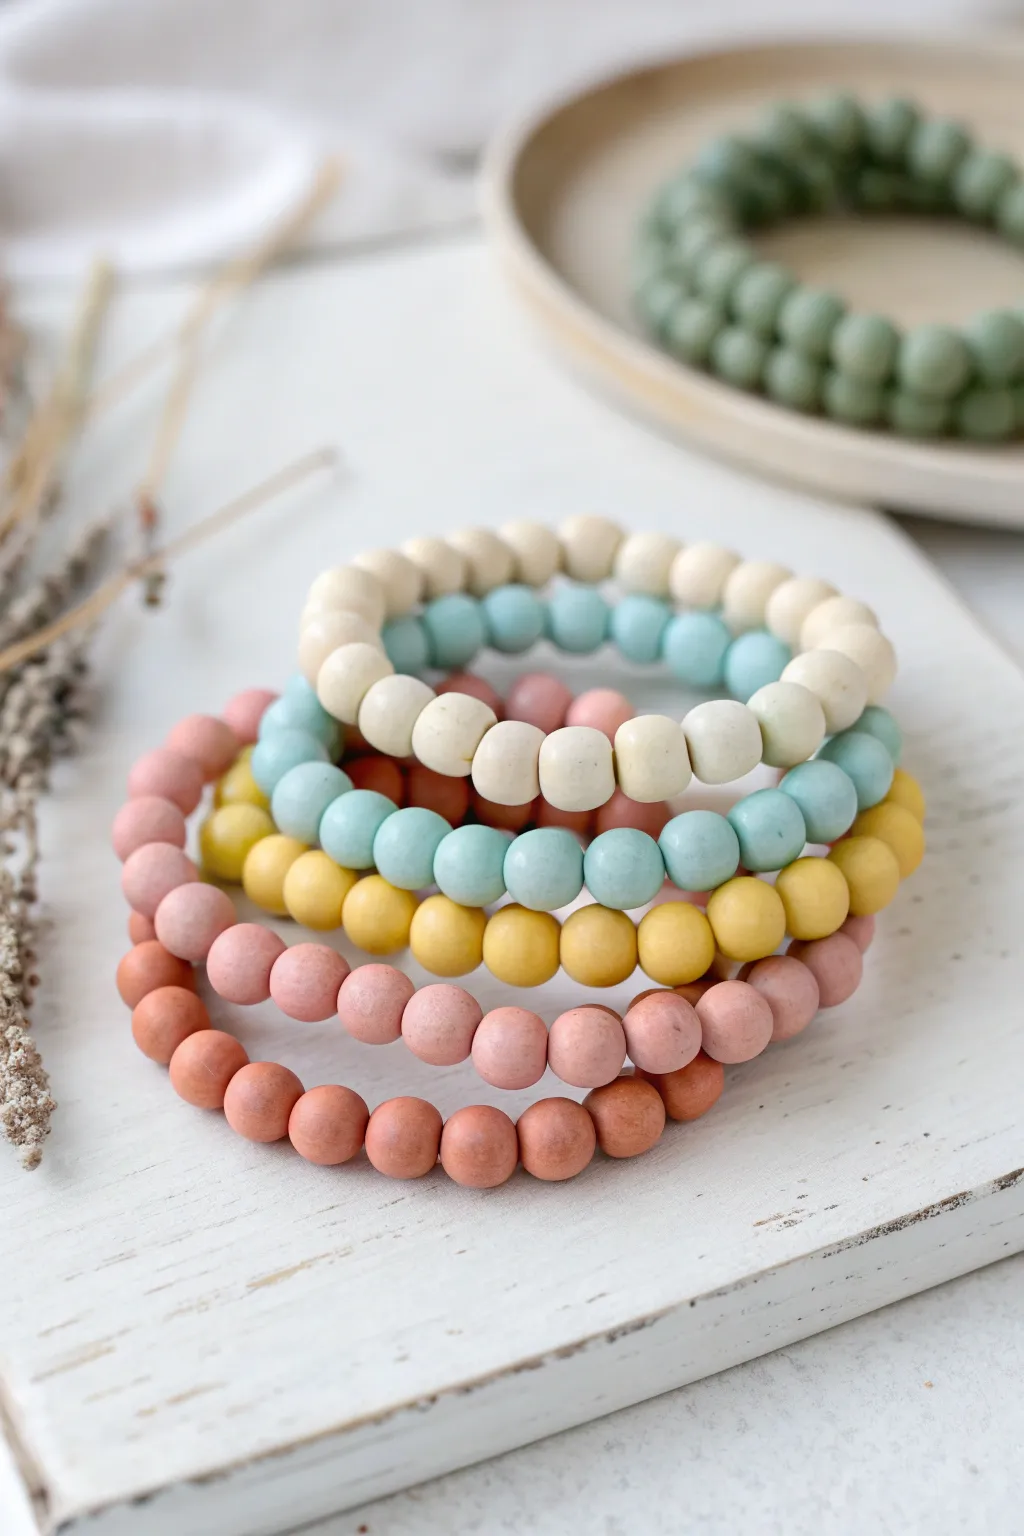
These charming bracelets feature handmade clay beads with a soft, matte finish that mimics the look of painted wood. The stackable design combines earthy terracotta and pastel tones for a versatile accessory that’s surprisingly simple to craft at home.
Detailed Instructions
Materials
- Air dry clay (white)
- Acrylic paints (cream, light blue, yellow mustard, dusty rose, terracotta)
- Elastic cord (0.8mm or 1mm)
- Jewelry glue (GS Hypo Cement or similar)
- Toothpicks or bamboo skewers
- Fine grit sandpaper (optional)
- Piece of foam or cardboard (as drying stand)
- Ruler
- Rolling pin (acrylic or smooth wood)
- Scissors
Step 1: Preparing the Clay
-
Condition the clay:
Take a chunk of your white air dry clay and knead it in your hands until it becomes soft, pliable, and free of cracks. -
Roll a snake:
On a clean, smooth surface, roll the clay into a long, even snake shape. Aim for a thickness of about 1/2 inch (roughly 1.2 cm), trying to keep the diameter consistent along the entire length. -
Measure segments:
Using a ruler and a knife or clay tool, mark intervals along the clay snake every 1/2 inch to ensure your beads will be roughly the same size.
Cracking Clay?
If your beads crack while drying, you can fill hairline fractures with a mix of clay paste (clay + water). To prevent future cracks, slow down drying by covering loosely with plastic wrap.
Step 2: Forming the Beads
-
Cut the segments:
Slice the clay at your measured marks. You should end up with little cylindrical nuggets of clay. -
Roll spheres:
Take each nugget and roll it between your palms. Use a gentle circular motion to form a smooth, round sphere. Repeat this for as many beads as you need—usually about 20-25 per bracelet. -
Pierce the holes:
While the bead is still soft, gently push a toothpick or skewer through the center to create a hole. I find that twisting the toothpick as you push helps prevent the bead from squishing out of shape. -
Smooth the edges:
Check the exit hole where the toothpick came out; if the clay pushed out slightly, tap it gently with your finger to smooth it back down.
Design Idea: Texture
Before drying, gently roll your beads over a clean piece of canvas or linen fabric. This transfers a subtle woven texture to the surface that looks incredible under the matte paint.
Step 3: Drying and Refining
-
Set up for drying:
Leave the beads on the toothpicks if possible, and stick the ends of the toothpicks into a block of foam or a cardboard box so the beads are suspended in the air. This ensures they dry evenly without flat spots. -
Wait patiently:
Allow the beads to dry completely according to your clay package instructions, usually at least 24 hours. They should feel hard and room temperature to the touch, not cool. -
Light sanding:
Once fully dry, inspect your beads. If there are any fingerprints or rough spots, gently buff them away with fine-grit sandpaper for a professional finish.
Step 4: Painting and Assembly
-
Select your palette:
Prepare your acrylic paints. The image uses a muted palette: cream, baby blue, mustard yellow, soft pink, and terracotta. You may need to mix white or brown into bright colors to achieve these dusty tones. -
Paint the beads:
Place the beads back on clean toothpicks for easy handling. Paint each bead thoroughly, including inside the hole if visible. You will likely need two coats for opaque coverage. -
Second drying phase:
Let the paint dry completely. If you want a matte look like the photo, leave them as is. For durability, you can add a matte varnish, but avoid glossy finishes to keep the natural aesthetic. -
Measure the cord:
Cut a length of elastic cord about 10-12 inches long. This gives you plenty of extra room to tie the knot comfortably. -
String the beads:
Thread your painted beads onto the elastic cord. Test the fit around your wrist periodically to see if you need to add or remove a bead. -
Secure the bracelet:
Tie a strong surgeon’s knot (right over left, left over right). Pull it tight to secure. -
Final touches:
Apply a tiny dot of jewelry glue to the knot to prevent it from slipping. Once dry, snip off the excess elastic, tucking the knot inside a bead if the hole is large enough.
Now you have a beautiful set of custom bracelets ready to wear or gift to a friend
Mini Monster Figurine Collection
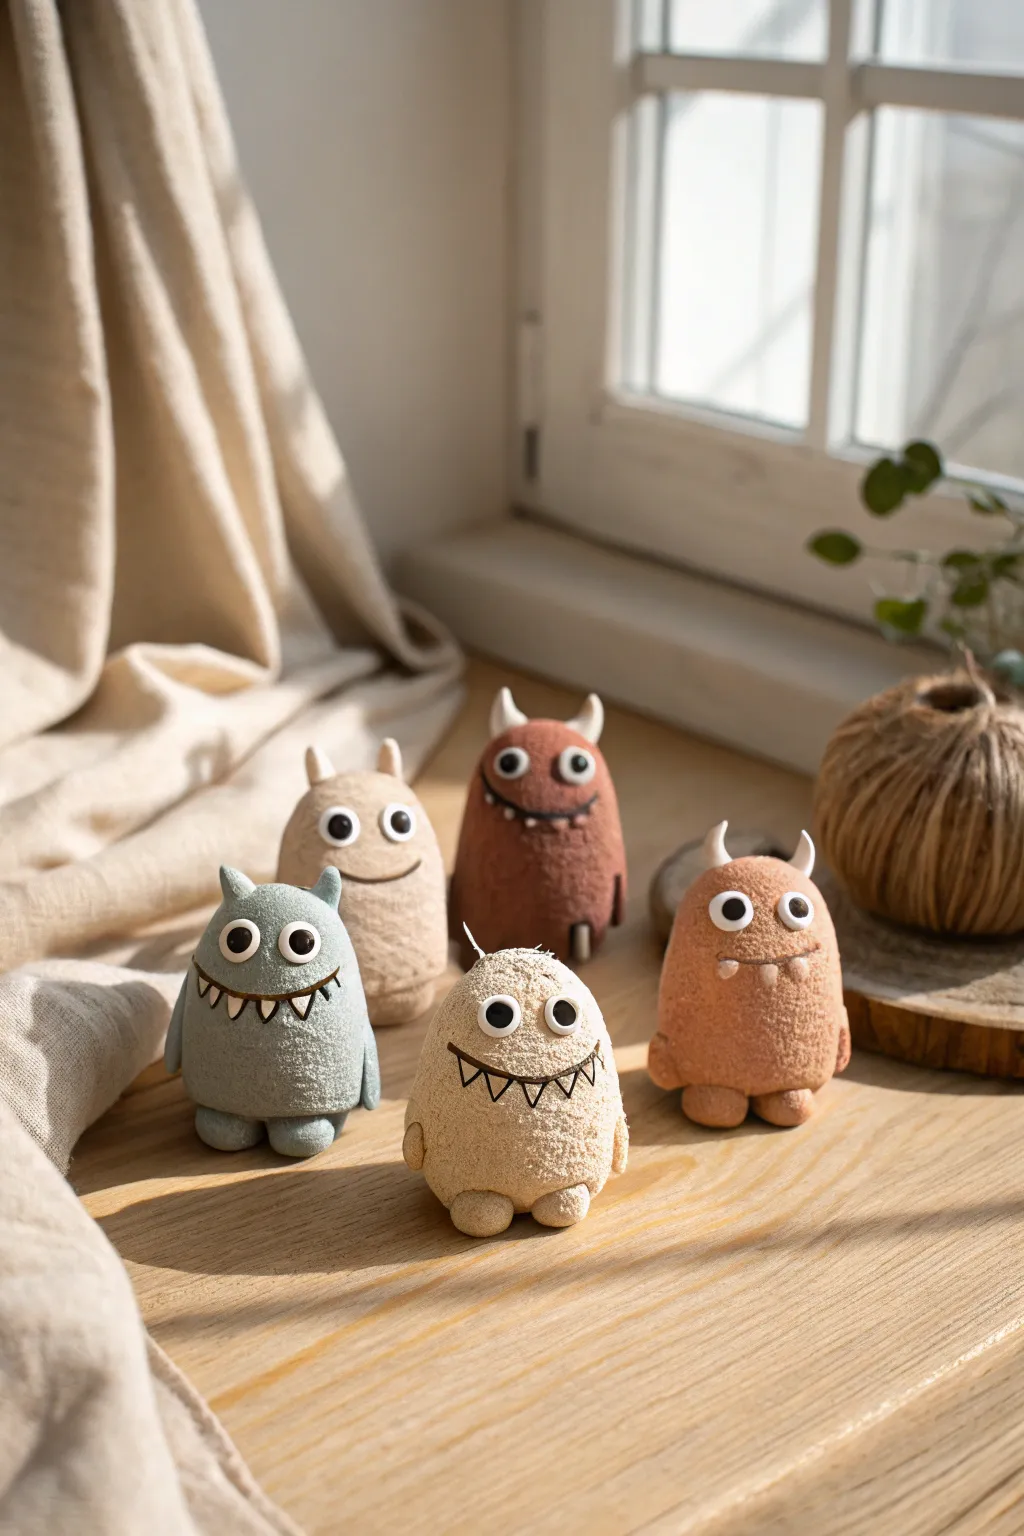
These adorable mini monsters feature a delightful speckled texture that mimics natural stone while keeping a whimsical charm. With their simple blob-like shapes and expressive faces, they make for a perfect beginner-friendly sculpting project.
Step-by-Step
Materials
- Air-dry stone clay (or beige clay mixed with sand/coffee grounds)
- White air-dry clay (for eyes/horns)
- Black air-dry clay (for pupils)
- Fine-point black marker or black acrylic paint
- Sculpting tools (needle tool, small ball stylus)
- Water in a small cup
- Aluminum foil (optional, for armature)
- Toothbrush or stiff bristle brush
Step 1: Shaping the Bodies
-
Prepare the clay:
Start by kneading your stone-textured clay until it’s pliable and smooth. If you are making your own texture, knead sand or dried coffee grounds into beige clay now. -
Form the base:
Roll a ping-pong ball sized amount of clay into a smooth sphere. Gently tap the bottom against your work surface to create a flat base so the monster stands upright. -
Refine the shape:
Mold the sphere into a gentle egg or gumdrop shape. Some monsters can be taller and thinner, while others look cute being short and stout. -
Add texture:
Take a stiff toothbrush or a texturing tool and gently tap the entire surface of the body to enhance the stone-like, pockmarked effect. -
Create feet:
Roll two very small balls of the main body clay and press them firmly onto the bottom front of the body for feet. Blend the seams slightly at the back so they stay attached. -
Attach arms (optional):
For monsters with arms, roll thin sausage shapes and blend them onto the sides of the body, letting them hang down naturally.
Step 2: Crafting the Face
-
Make the eye whites:
Roll small balls of white clay. Flatten them into discs and press them onto the upper half of the face. Vary the sizes for a goofy look. -
Add pupils:
Roll tiny specks of black clay and press them into the center of the white discs. I often place them slightly cross-eyed or looking sideways to give them more personality. -
Secure the eyes:
Gently press the finished eyes into the body surface so they bond well. You can use a tiny dab of water as glue if the clay feels dry. -
Add horns or ears:
Using white clay, shape small cones or rounded triangles. Attach these to the top of the head for horns. For ears, use the body-colored clay.
Making Stone Texture
Make your own ‘stone’ clay by mixing used, dried coffee grounds or black pepper into plain white or beige air-dry clay.
Step 3: Details & Finishing
-
Dry the figures:
Allow the figurines to dry completely. Depending on the thickness and humidity, this usually takes 24 to 48 hours. -
Draft the mouth:
Once fully dry and hard, use a pencil to lightly sketch a wide, curved smile or a zig-zag grin onto the face. -
Draw the smile:
Trace over your pencil line with a fine-point black marker or a very thin brush with black paint. Keep the line crisp. -
Add teeth:
Draw small triangles hanging down from the upper lip line for teeth. Alternatively, you can paint these triangles white for extra pop. -
Final touches:
Check for any loose bits or rough drawing lines and clean them up. Your little monster squad is now complete and ready for display.
Variations
Try painting the horns with gold or silver paint after drying, or give them tiny clay accessories like bow ties or hats.
Group your finished monsters together on a shelf or windowsill to create a charming little family scene
Under-The-Sea Starfish And Shell Charms
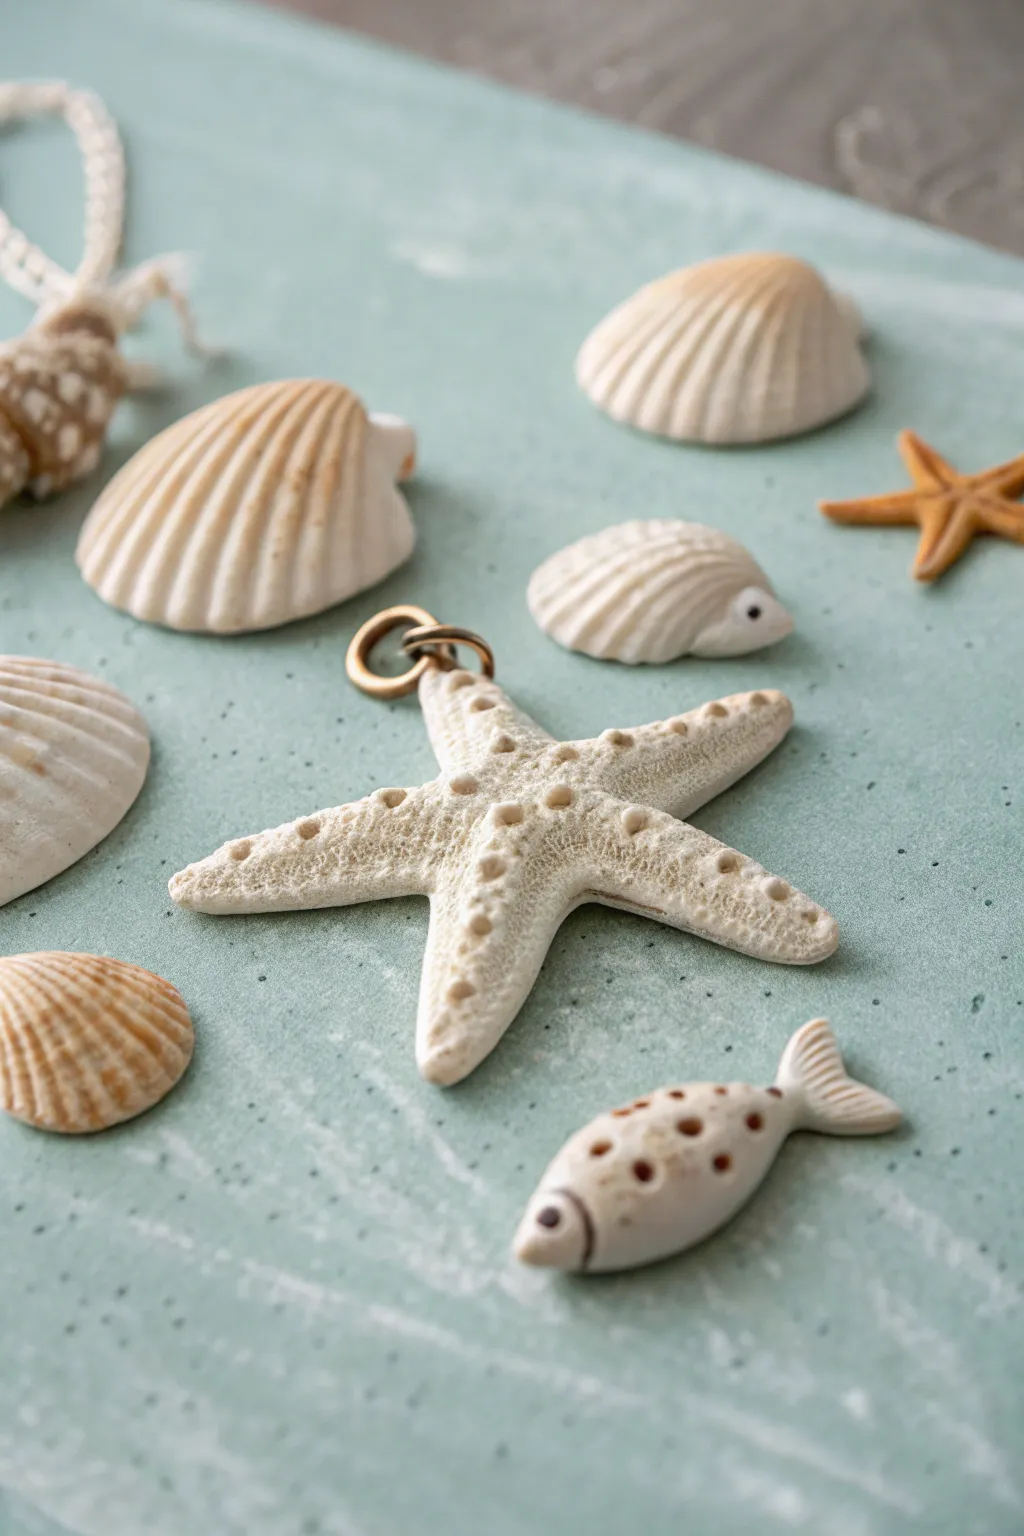
Bring the magic of the ocean floor to your craft table with these incredibly detailed air-dry clay charms. This project features a textured starfish pendant, realistic ridged shells, and even a tiny spotted fish, all finished with a natural, sandy look.
Detailed Instructions
Materials
- White or cream-colored air-dry clay
- Modeling tools (or toothpicks/skewers)
- Small rolling pin
- Textured sponge or sandpaper
- Gold jump rings (for the charms)
- Brown watercolor or diluted acrylic paint
- Fine paintbrush
- Small amount of water
Step 1: Sculpting the Starfish
-
Form the base:
Start by rolling a ball of clay about the size of a walnut. Flatten it slightly into a thick disk. -
Pull the arms:
Gently pinch and pull five distinct points from the center of the disk to create the starfish arms. Try to keep them relatively symmetrical, tapering them to soft points. -
Texture the surface:
Before adding details, gently press a textured sponge or a piece of crumpled foil over the entire surface to give it a realistic, sandy skin texture. -
Create the central spine:
Using a modeling tool or your fingers, pinch slightly along the center of each arm to create a subtle ridge or spine running from the middle to the tip. -
Add sensory bumps:
Roll tiny spheres of clay—really tiny!—and press them in lines along the ridges of the starfish arms. Use the back of a small paintbrush to secure them if needed. -
Detail the bumps:
Take a needle tool or toothpick and prick the center of each tiny bump to create a pore-like appearance. -
Attach the hardware:
While the clay is still wet, carefully press a gold jump ring into the top of one arm. Ensure the clay wraps slightly around the metal so it stays secure once dry.
Natural Texture
For realistic texture, press real seashells into your wet clay to create an instant, perfect mold of the patterns.
Step 2: Crafting Shells & Fish
-
Shape the scallop shell:
Roll another ball of clay and flatten it into a fan shape. I like to keep the bottom edge thicker and taper the top edge thin. -
Carve the ridges:
Use a knife tool to press deep, evenly spaced lines radiating from the bottom point to the wide edge just like a scallop shell. -
Form the fish body:
Mold a small, elongated teardrop shape for the fish. Flatten the tail end and use a knife tool to press lines for the fin texture. -
Add fish features:
Use a small dotting tool to indent an eye socket and use a knife tool to carve a curved line for the gill.
Make it a Necklace
String your dried starfish onto a leather cord or hemp string for a beachy, wearable piece of summer jewelry.
Step 3: Color & Finish
-
Let it dry:
Allow all your pieces to dry completely for at least 24 hours. They should feel hard and chalky to the touch. -
Prepare the wash:
Mix a very small amount of brown paint with plenty of water to create a translucent ‘wash’. -
Highlight the texture:
Brush this watery brown mix over the textured areas, especially the ridges of the shell and the bumps of the starfish. -
Wipe back:
Immediately use a damp paper towel to wipe the surface. The paint will stay in the crevices and holes, emphasizing the realistic texture. -
Paint the details:
With a fine brush and undiluted brown paint, carefully add the spots to the fish and define its eye.
Now you have a collection of sea-worthy charms ready for display or jewelry making
Fairy Houses With Nature Bits
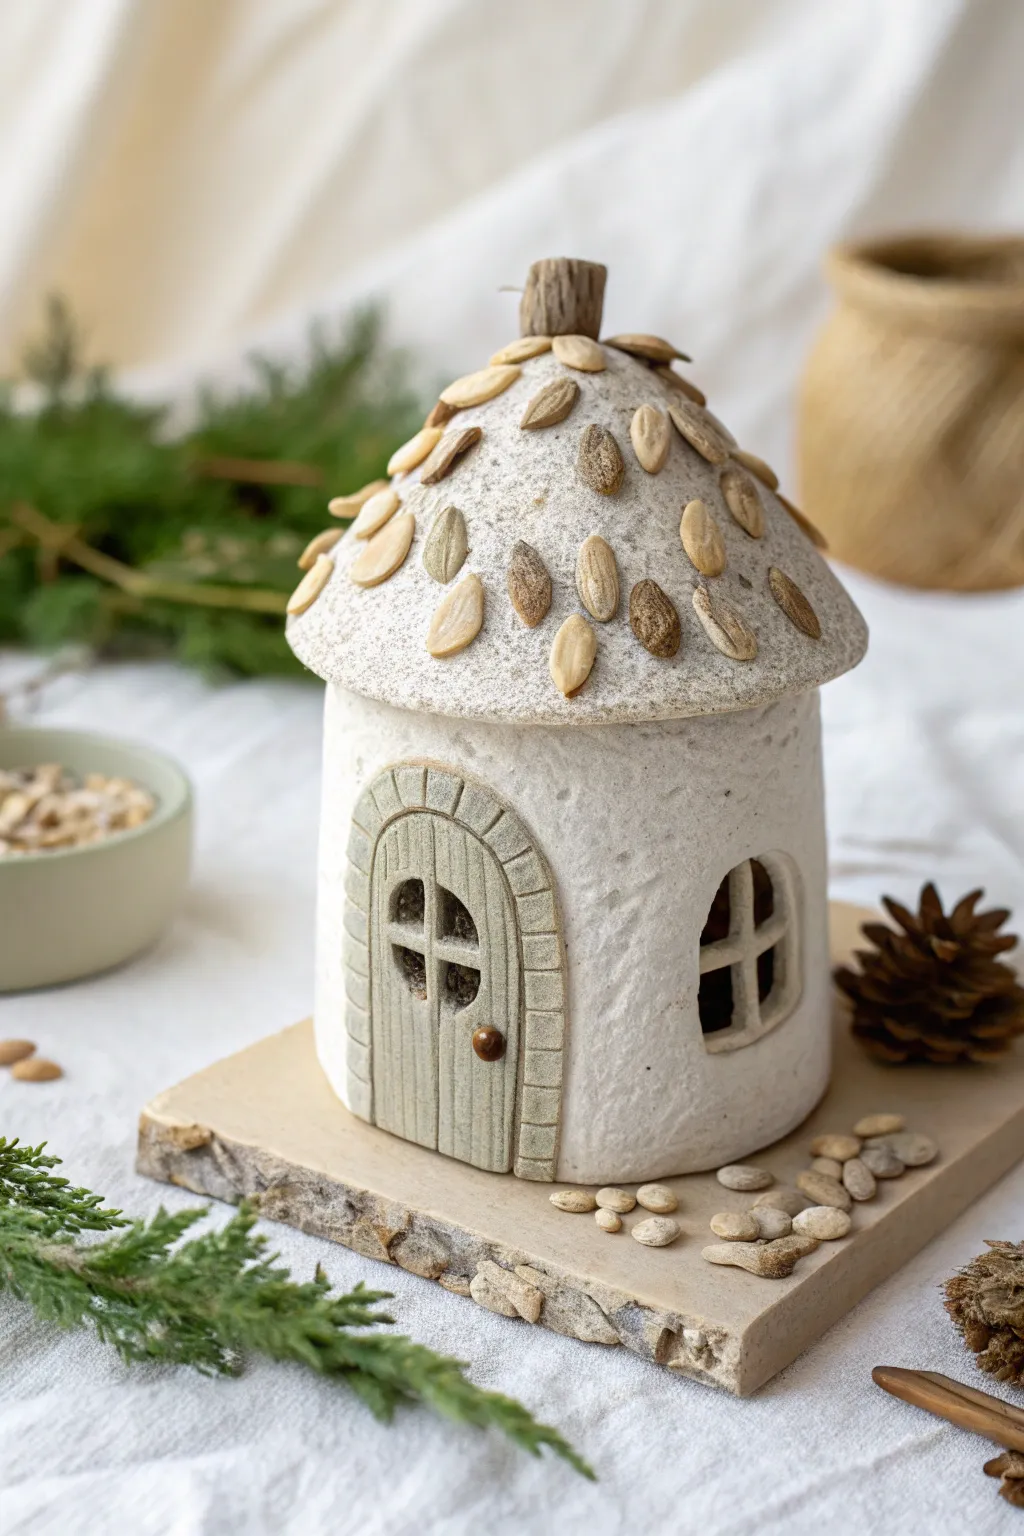
This enchanting little dwelling combines the rustic texture of paper clay with natural seeds to create a woodland fairy home. It features a cozy round structure, an arched door, and a whimsical roof tiled with real pumpkin seeds.
Step-by-Step Tutorial
Materials
- White air-dry clay (stone or paper clay recommended for texture)
- Raw pumpkin seeds (pepitas)
- Small rolling pin
- Clay sculpting tools (knife, needle tool)
- Cardboard tube or foil (for armature)
- Water in a small cup
- Rectangular stone or wood slab for display
- Small wooden twig (for chimney)
- Acrylic paints (light grey, dark grey, brown)
- Small paintbrush
- Clear matte varnish (optional)
Step 1: Building the Structure
-
Prepare the base form:
Start by rolling a ball of foil or cutting a cardboard tube to act as the inner support for your house. This ensures the structure stays light and dries evenly. -
Roll out the walls:
Roll your white air-dry clay into a slab about a quarter-inch thick. You want it substantial enough to stand but not too heavy. -
Wrap the walls:
Cut a rectangle from your clay slab and wrap it around your armature form. Blend the seam together using a bit of water and your fingers until it’s smooth and invisible. -
Create the roof cone:
Form a second piece of clay into a flattened cone shape that is slightly wider than your house walls. This will sit on top like a mushroom cap. -
Attach the roof:
Score the top rim of the walls and the underside of the roof with a needle tool. Add a dab of water (slip) and press the roof firmly onto the walls, smoothing the connection underneath.
Seed Security
If the seeds feel loose after the clay dries, brush a mixture of white glue and water over the entire roof to seal them in place beautifully.
Step 2: Adding Architectural Details
-
Cut the openings:
Use a craft knife or clay tool to carefully cut out an arched window shape on one side. Save the clay you remove to help form the door later. -
Form the window frame:
Roll thin snakes of clay to create a cross shape inside the window opening, pressing them gently into the interior edges to secure them. -
sculpt the door slab:
Create a separate arched slab of clay for the door. Use a knife tool to score vertical lines into it, mimicking wooden planks. -
Make the stone arch:
Roll a snake of clay and flatten it slightly. drape this over the top of your door slab to create the frame. Use a tool to press lines into this frame to look like individual stone blocks. -
Attach the door:
Score the back of your door assembly and the front of the house wall. Press the door onto the house. Add a tiny ball of brown clay for the doorknob.
Mossy Magic
Glue patches of dried moss near the foundation or tuck small bits between the roof seeds to make the cottage look like it has been in the forest for years.
Step 3: Roofing and Finishing
-
Tile the roof:
Starting at the bottom edge of the roof, press raw pumpkin seeds into the clay. Push them in just enough so they stick securely. -
Layer the seeds:
Work your way up the roof in spiraling or concentric circles, slightly overlapping the seeds if you wish, until you reach the peak. -
Add the chimney:
Take a small, thick wooden twig and press it into the very top center of the roof. Secure it by pressing the clay around its base. -
Texture the walls:
Use an old toothbrush or a crumpled ball of foil to gently tap against the white walls. This gives the house a stucco or stone-like texture rather than being perfectly smooth. -
Dry completely:
Let the house sit in a dry, warm spot for at least 24-48 hours. I find that turning it occasionally helps the bottom dry thoroughly. -
Paint the details:
Once dry, paint the door frame a soft grey and the wooden door a muted brown. Leave the seeds natural or give them a very light wash of brown paint for an aged look. -
Mount on base:
Place your finished house on a stone tile or wood slice. You can scatter a few loose pumpkin seeds around the base for extra decoration.
Place your little cottage on a shelf or windowsill to bring a bit of woodland magic into your home
Texture-Stamp Tiles With Lace And Dots
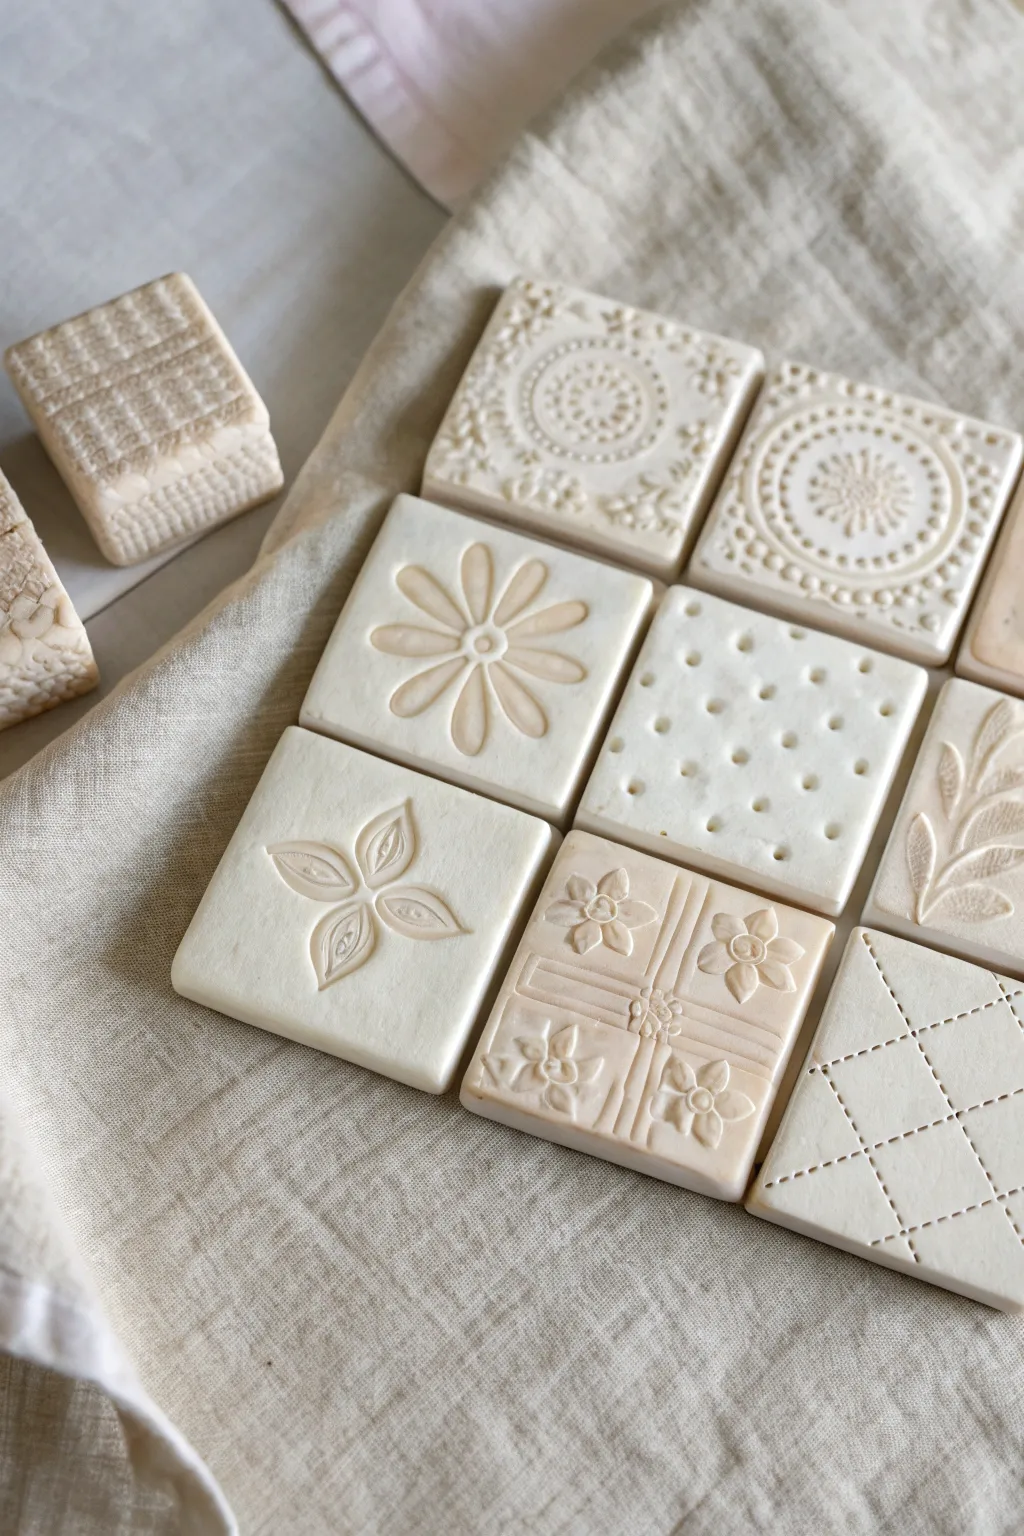
These charming, monochromatic clay tiles are a wonderful way to explore texture using everyday objects you likely have around the house. The finished pieces have a clean, ceramic-like quality that looks lovely displayed in a grid or used individually as coasters or magnets.
Step-by-Step Guide
Materials
- White air-dry clay (or polymer clay)
- Rolling pin
- Square cookie cutter (approx. 2-3 inches)
- Parchment paper or non-stick craft mat
- Tools for rolling out clay (guide strips or rulers)
- Textured items for stamping: lace doilies, rubber stamps, fabric scraps
- Modeling tools or a dull pencil for dotting
- A smooth blade or craft knife
- Fine-grit sandpaper (optional)
- Acrylic matte varnish (optional)
Step 1: Preparing the Base
-
Condition the Clay:
Begin by taking a substantial chunk of white air-dry clay. Knead it thoroughly in your hands until it becomes warm, pliable, and free of cracks. -
Set up your Workspace:
Lay down a sheet of parchment paper. This will prevent the clay from sticking to your table and makes moving the wet tiles easier later. -
Roll the Slab:
Use a rolling pin to flatten the clay into a large, even slab. Aim for a thickness of about 1/4 inch (6mm). If you enjoy precision like I do, place two identical wooden rulers on either side of the clay to act as depth guides for the rolling pin. -
Smooth the Surface:
Once rolled, look for any air bubbles or uneven spots. Gently smooth the top surface with a slightly damp finger or a soft rib tool to ensure a pristine canvas for stamping.
Clean Release
Dust your stamps or lace lightly with cornstarch before pressing them into the clay. This acts as a release agent and prevents the clay from sticking inside the detailed crevices.
Step 2: Stamping and Texture
-
Plan Your Designs:
Before cutting, look at your textured objects. You might use a small lace doily for a mandala look, a simple flower stamp, or even the end of a paintbrush for polka dots. -
Impressing Lace Patterns:
For designs using fabric or lace, lay the material gently onto the clay slab. Pass the rolling pin over it once with firm, even pressure to embed the texture, then carefully peel the fabric away to reveal the intricate relief. -
Creating Geometric Grids:
To make the diamond grid pattern, use a ruler edge or a dull knife to gently press diagonal lines into the clay. After making the lines, use a needle tool or toothpick to prick tiny holes at every intersection. -
Adding Simple Motifs:
For floral designs, press a clean rubber stamp directly into the smooth clay. Ensure you press deep enough to get a clear image but not so hard that you distort the slab’s thickness. -
Making the Dot Pattern:
Create the polka-dot tile by using the back end of a small paintbrush or a ball stylus tool. Press gently into the clay in evenly spaced rows to create a uniform, recessed dot pattern. -
Carving Freehand Designs:
If you want to create the four-petal flower shown in the image, use a fine carving tool to incise the petal outlines, then gently press down inside the petals to scoop out a shallow relief.
Step 3: Cutting and Finishing
-
Position the Cutter:
Once your textures are stamped all over the slab, take your square cookie cutter and position it over a design to frame it perfectly. -
Cut the Tiles:
Press the cutter straight down firmly. Wiggle it slightly to ensure a clean cut, then lift it straight up. Repeat this for all your textured areas. -
Remove Excess Clay:
Carefully peel away the excess clay from around the squares. Keep the tiles on the parchment paper so you don’t warp their shape by lifting them while wet. -
Refine the Edges:
Dip your finger in a little water and gently run it along the cut edges of each square to smooth out any sharpness or crumbs left by the cutter. -
Drying Process:
Allow the tiles to dry completely for 24-48 hours. Start them face up, but flip them carefully halfway through the drying time to encourage even drying and prevent curling. -
Sanding:
Once bone dry, check the edges again. If there are any rough spots, lightly buff them with fine-grit sandpaper for a professional finish. -
Seal (Optional):
To protect the surface from dust or moisture, apply a thin coat of clear matte acrylic varnish.
Antique Wash
Mix a tiny drop of brown acrylic paint with water. Brush it over the dried tile and wipe the surface immediately with a rag. The color will stay in the grooves for an aged look.
Now you have a set of beautifully textured tiles ready to be gifted or displayed in your home
Tiny Photo Or Note Holders
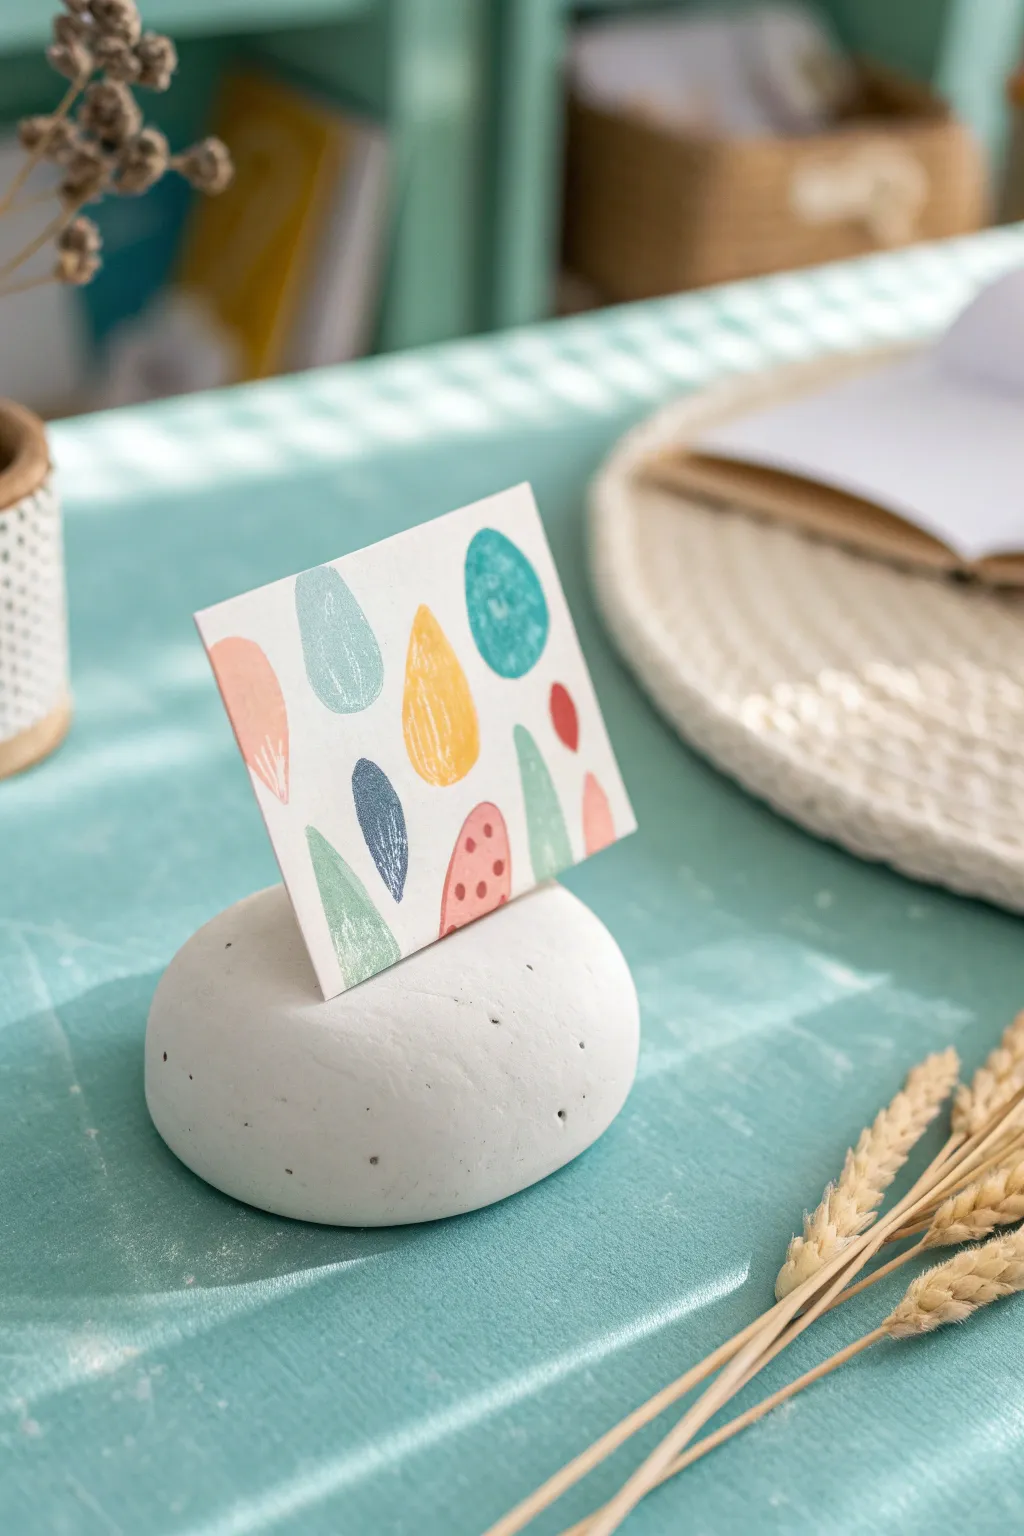
Transform a simple lump of white clay into a functional and stylish desk accessory that mimics the organic look of a smooth river stone. Paired with a hand-decorated card, this minimalist holder is surprisingly sturdy and perfect for displaying notes, photos, or seating assignments.
Step-by-Step
Materials
- White air-dry clay (or polymer clay)
- Craft knife or old credit card
- Fine-grit sandpaper (optional)
- Heavy cardstock or watercolor paper
- Acrylic paints or stamping ink (Teal, Ochre, Coral, Deep Blue, Sage Green)
- Small foam pouncer or potato stamp
- Paintbrush
- Scissors
Step 1: Shaping the Base
-
Condition the clay:
Start with a ball of white air-dry clay roughly the size of a tangerine. Keep kneading it in your hands until it feels warm, pliable, and free of any cracks. -
Form the initial shape:
Roll the clay into a smooth, tight sphere between your palms to eliminate seams. -
Flatten the pebble:
Place the sphere on your work surface and gently press down with the palm of your hand until it forms a rounded, flattened disc shape, about 1.5 inches tall. -
Refine the edges:
Use your fingers to smooth out the sides, ensuring it looks like a naturally eroded stone rather than a perfect cylinder. -
Create the slot:
Take a craft knife or the edge of an old credit card and press it vertically into the center of the clay shape. -
Widen the gap:
Wiggle the tool slightly back and forth to create a slot just wide enough to hold a piece of thick cardstock without pinching it too tightly. -
Add texture (optional):
To mimic the porous look of the stone in the photo, you can take a needle tool or toothpick and prick a few tiny, random holes around the surface. -
Allow to dry:
Let the clay dry completely according to the package instructions—usually 24 to 48 hours for a piece this thick. -
Sand for smoothness:
Once fully dry, you can lightly buff the surface with fine-grit sandpaper if you want an ultra-smooth finish.
Loose Slot Fix
If the slot dries too wide to hold the paper upright, squeeze a tiny drop of white glue into the bottom of the crack, insert the paper, and let it dry permanently in place.
Step 2: Creating the Art Card
-
Cut the cardstock:
Cut a small rectangle from your heavy paper, roughly 3 inches by 2 inches. -
Prepare your palette:
Squeeze out small amounts of your muted pastel colors: teal, ochre yellow, soft coral, deep blue, and sage green. -
Stamp the shapes:
Using a small foam pouncer or a carved potato stamp, press abstract oval and teardrop shapes onto the card. -
Layer the design:
Allow the shapes to overlap slightly or interact with each other, varying the direction of the teardrops. -
Add details:
For the coral shape at the bottom, use a small brush to add darker dots for a speckled texture. -
Etch the yellow shape:
While the ochre paint is still slightly wet, use the dry end of a paintbrush to gently scratch lines into it for a scraffito effect. -
Let the card dry:
Ensure the paint is fully dry before handling to prevent smudging. -
Assemble:
Slide your finished art card into the slot of the dried clay pebble.
Natural Stone Look
Mix a pinch of black pepper or dried tea leaves into the white clay while kneading. This creates realistic speckles that look just like granite or sandstone.
Place your new holder on a sunny windowsill or desk to enjoy your miniature art display
Hanging Mobile With Clay Shapes
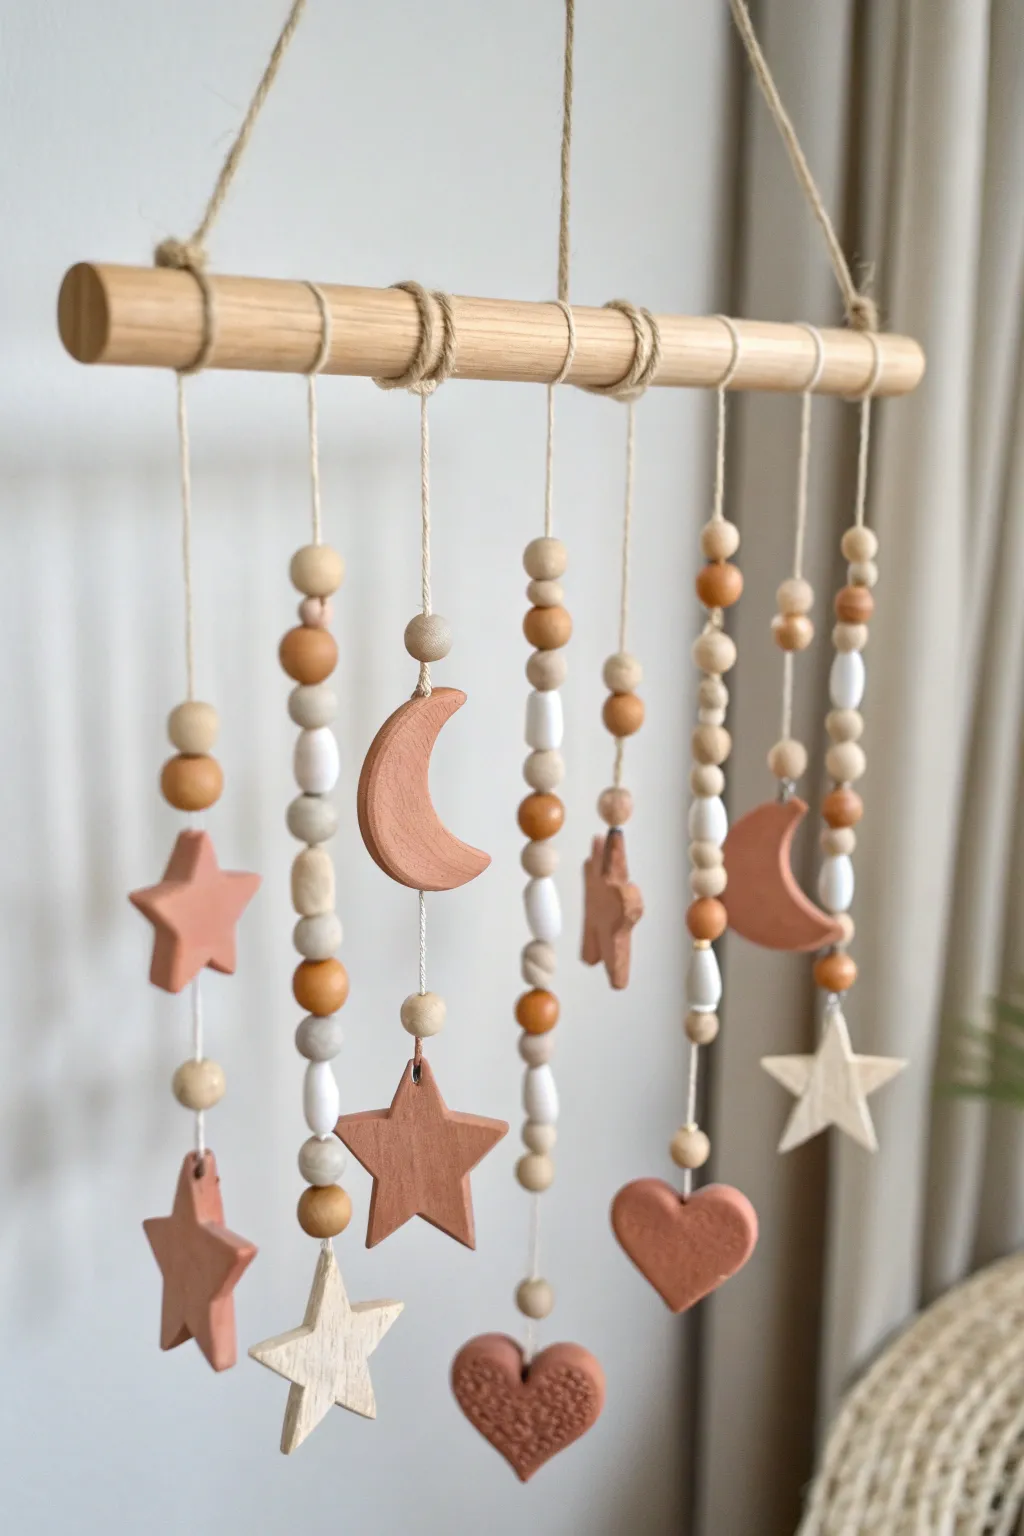
Bring a touch of cosmic charm to any nursery or playroom with this handcrafted mobile, featuring celestial shapes and natural textures. The combination of warm terracotta clay, untreated wooden beads, and soft cotton twine creates a soothing, modern aesthetic.
Step-by-Step Tutorial
Materials
- Air-dry modeling clay (terracotta color)
- Air-dry modeling clay (white or cream)
- Wooden dowel (approx. 12-14 inches)
- Wooden beads (assorted sizes: 8mm, 10mm, 12mm)
- Cotton or jute twine (natural color)
- Small cookie cutters (star, crescent moon, heart)
- Rolling pin
- Parchment paper
- Plastic straw or toothpick
- Fine-grit sandpaper
- Scissors
Step 1: Clay Preparation & Cutting
-
Condition the clay:
Begin by taking portions of your terracotta and white air-dry clay. Knead them well in your hands until they are soft, pliable, and free of cracks. -
Roll it out:
Place the clay on a sheet of parchment paper to prevent sticking. Use your rolling pin to flatten the clay to an even thickness of about 1/4 inch. If you want a textured look on some pieces, you can gently press a piece of lace or fabric into the clay before cutting. -
Cut the shapes:
Using your cookie cutters, press firmly into the rolled clay to create your shapes. For the design shown, you will need approximately 3-4 large terracotta stars, 2 crescent moons, 2 hearts, and 2-3 smaller white stars. -
Smooth the edges:
Dip your finger in a little bit of water and gently run it along the cut edges of each shape to smooth out any roughness or loose clay bits. -
Create hanging holes:
Before the clay starts to dry, use a plastic straw to poke a hole near the top of each shape. For pieces that will hang in the middle of a strand (like the top stars), carefully poke a hole through the center from top to bottom, or simply make a top and bottom hole to thread through.
Clean Edges Trick
If the clay edges look rough after cutting, wait 20 minutes for it to stiffen slightly, then smooth with a water-dampened finger or sponge.
Step 2: Drying & Assembly
-
Allow to dry:
Let all your clay pieces sit on the parchment paper to dry completely. This typically takes 24-48 hours depending on humidity; turn them over halfway through so the backs dry evenly. -
Prepare the dowel:
While the clay dries, cut a long piece of twine and tie it to both ends of your wooden dowel to create the main hanging loop. -
Cut suspension strings:
Cut 7 lengths of twine, each about 20-24 inches long. These will be the vertical strands that hold your beads and shapes. -
Tie to the dowel:
Attach each of the 7 strings to the dowel using a simple lark’s head knot or double knot. Space them out evenly along the wood. -
String the beads:
Start threading wooden beads onto your hanging strings. Mix and match sizes and alternate with white clay beads (if you made any) or simply stick to the natural wood beads. Creating a random pattern often looks best. -
Add midway shapes:
For strands with multiple clay elements, thread the string through the top hole of a star or moon, run it down the back (or through a center channel if you made one), and secure it with a knot underneath before adding more beads below. -
Attach the bottom charms:
Tie your final clay shapes (hearts, large stars, moons) to the very bottom of each string. Use a secure double knot and trim any excess tail. -
Balance the mobile:
Hold up the dowel by its main hanger. Adjust the spacing of the vertical strings slightly left or right to ensure the mobile hangs level and isn’t too heavy on one side. -
Secure the knots:
I like to add a tiny dot of clear craft glue to the final knots at the bottom of the clay pieces to ensure they don’t slip over time.
Cracking Issues?
If minor cracks appear while drying, mix a tiny amount of fresh clay with water to make a paste and fill in the cracks. Smooth and let dry again.
Hang your beautiful new mobile near a window or crib to enjoy the gentle movement of your art
Recycled Mosaic Clay Plaques
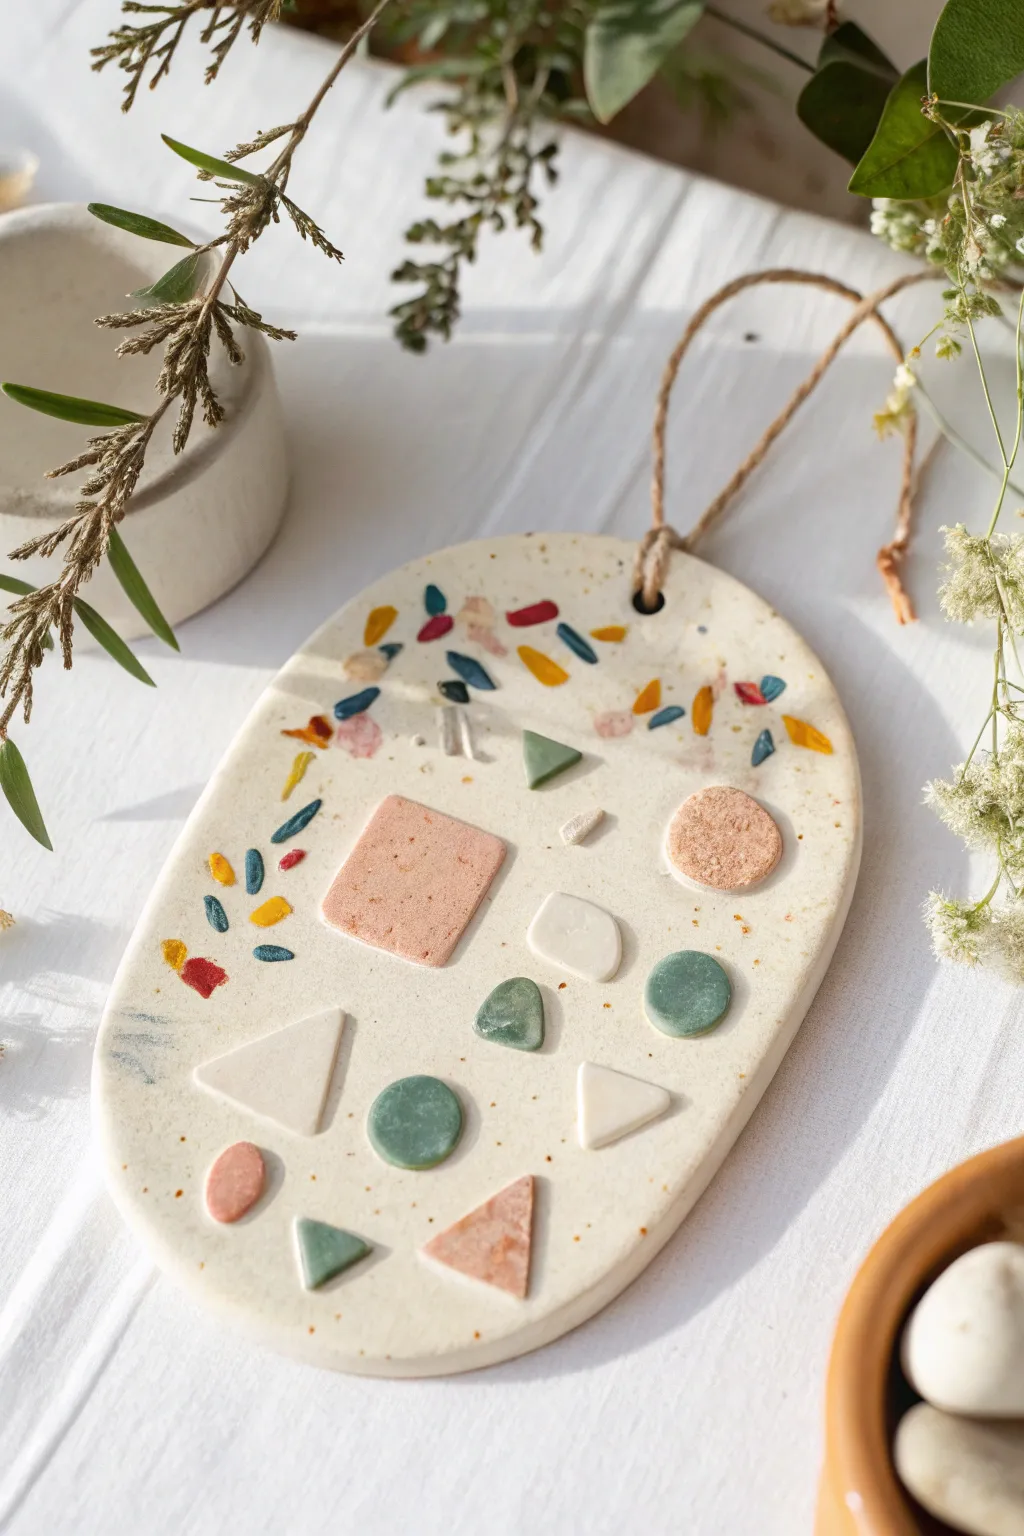
This charming wall hanging combines the fun of collage with the tactile joy of clay, resulting in a speckled, terrazzo-inspired art piece. The soft geometric shapes and scattered confetti details create a playful yet sophisticated decoration perfect for brightening up any nook.
Detailed Instructions
Materials
- Air-dry modeling clay (white or cream)
- Air-dry modeling clay (small amounts of terracotta/pink, sage green, mustard yellow, deep blue)
- Rolling pin
- Parchment paper or craft mat
- Oval cookie cutter (large) or a knife and paper template
- Small geometric cutters (circle, square, triangle) or a craft knife
- Drinking straw or skewer
- Sandpaper (fine grit)
- Jute twine or string
- Clear matte varnish (optional)
- Small bowl of water
Step 1: Preparing the Components
-
Roll the colored clay:
Begin by taking small portions of your colored clays—pink, sage green, and white. Roll each color out individually on parchment paper until they are about 1/8 inch thick. -
Cut geometric shapes:
Use your small cutters or a craft knife to create a variety of shapes. You’ll need a mix of squares, triangles, and circles. Aim for about 10-12 distinct pieces in different sizes. -
Create the confetti:
For the confetti sprinkles seen at the top, take tiny pinches of blue, yellow, red, and pink clay. Roll them into tiny rice-grain shapes or simply flatten tiny crumbs to create irregular chips. -
Let the shapes harden:
Set all your cut shapes and confetti pieces aside on a flat surface to firm up slightly. They don’t need to be fully dry, but they should be stiff enough to handle without deforming.
Clean Edges Pro-Tip
To get perfectly smooth edges on your geometric shapes, dip your cutting tool or craft knife into water or cornstarch before slicing into the clay.
Step 2: Assembling the Base
-
Prepare the speckle mix:
Take a large ball of white or cream clay. To get that stone-like speckled effect, grate a tiny amount of dry brown or black clay (or even dried coffee grounds) into the fresh white clay and knead until distributed. -
Roll the base slab:
Roll out your speckled white clay into a smooth slab, approximately 1/4 inch thick. Ensure it’s thick enough to support the inlaid pieces. -
Cut the oval shape:
Place your large oval cutter or paper template onto the slab. Cut out the main oval shape and smooth the edges with a wet finger to remove any jagged bits. -
Make the hanging hole:
While the clay is still soft, use a drinking straw or skewer to punch a hole near the top center. Rotate the straw slightly as you pull it out to get a clean hole.
Step 3: Creating the Mosaic
-
Arrange the large shapes:
Gently place your pre-cut geometric shapes onto the oval base. Experiment with the layout first; a random, abstract pattern usually looks best. -
Press the shapes in:
Once you are happy with the placement, press each shape firmly into the base. I like to use the rolling pin very lightly over the top to ensure they adhere flatly without distorting the oval. -
Add the confetti border:
Take your tiny confetti chips and arrange them around the top edge of the oval, creating a festive border that cascades down slightly. -
Embed the confetti:
Press these small chips into the surface just like the larger shapes. Use your finger to smooth them down so they become part of the surface texture. -
Check adhesion:
Dip your finger in a little water and gently run it over any seams where the shapes meet the base clay to ensure a strong bond.
Level Up: Texture
Before drying, gently press a piece of canvas or textured fabric over just the pink square or green circle to add a subtle contrasting fabric texture to specific shapes.
Step 4: Finishing Touches
-
Dry the project:
Place the plaque on a wire rack or a piece of mesh to dry. Flip it over carefully every few hours to ensure it dries flat and doesn’t curl. -
Sanding:
Once fully dry (usually 24-48 hours), use fine-grit sandpaper to gently smooth the edges and the surface. This helps the inlaid pieces look more seamless. -
Seal:
Apply a coat of matte varnish if desired. This will protect the clay and make the colors of the confetti pop slightly more. -
String it up:
Cut a length of jute twine, thread it through the hole, and tie a secure knot. Your mosaic plaque is ready to hang.
Hang your beautiful new artwork in a spot that catches the light and enjoy the handmade charm
Make-Your-Own Clay Game Set
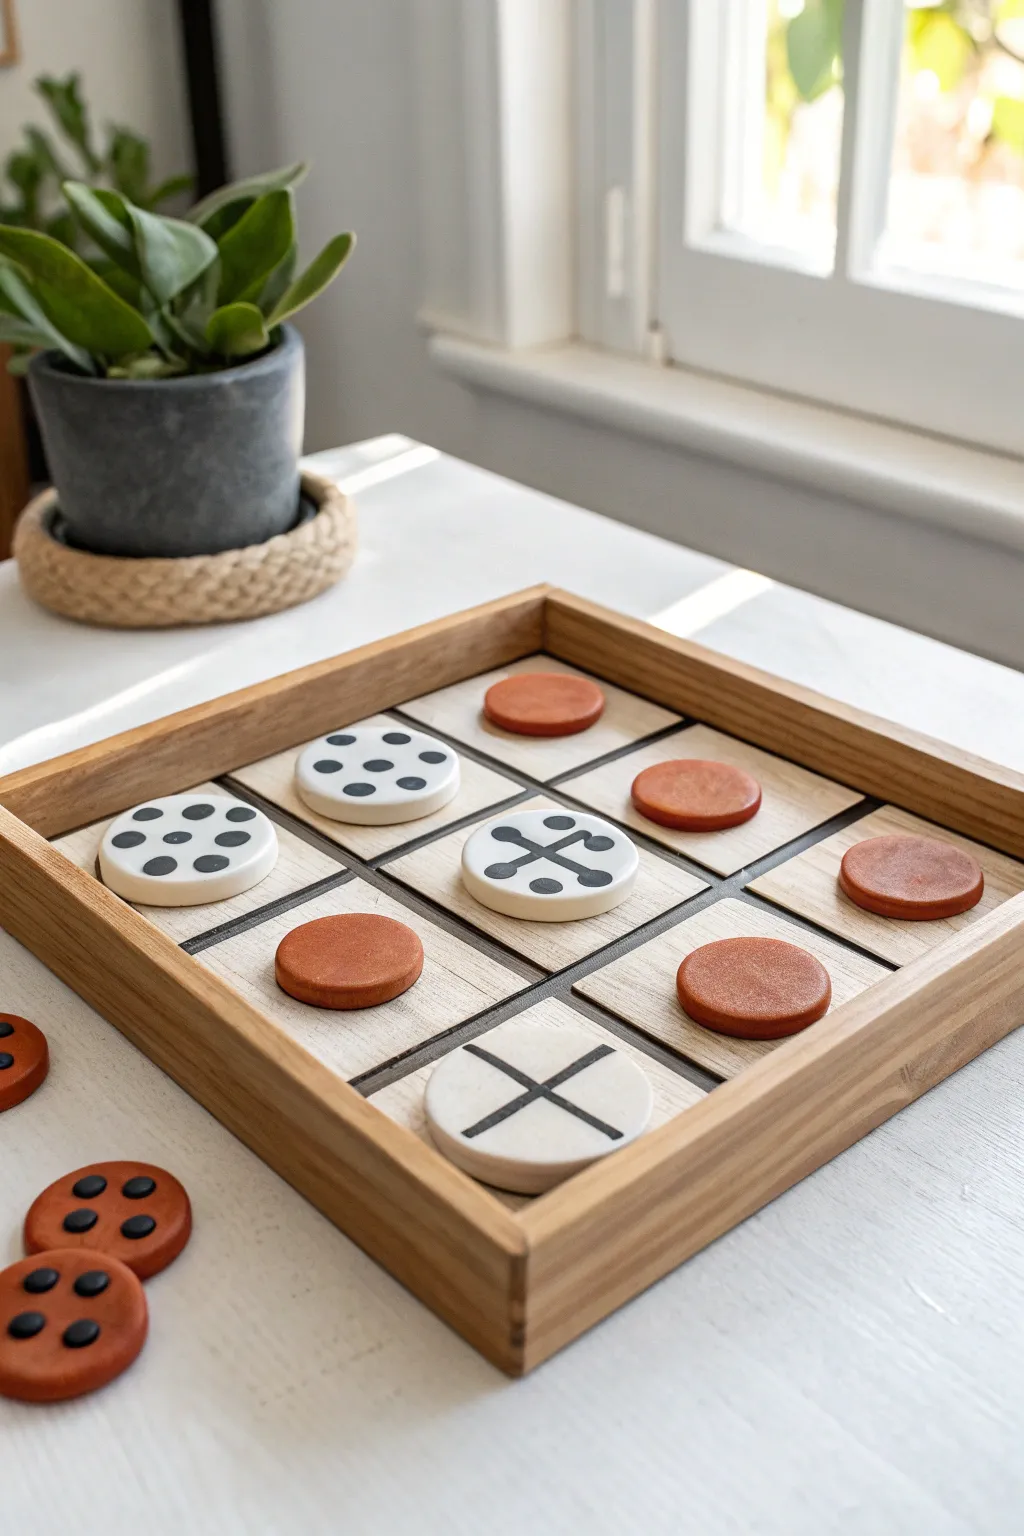
Elevate a classic game with this sleek, minimalist Tic-Tac-Toe set that doubles as coffee table decor. Using air-dry clay and a simple wooden box frame, you’ll craft tactile playing pieces with a stylish, matte finish.
Step-by-Step Guide
Materials
- White air-dry clay
- Terracotta air-dry clay (or brown acrylic paint)
- Small square wooden tray or shadow box frame (approx. 8×8 inches)
- Black acrylic paint
- Fine detail paintbrush
- Rolling pin
- Circular cookie cutter (approx. 1.5 – 2 inches)
- Sandpaper (fine grit)
- Ruler
- Black thin washi tape or black paint pen
- Matte varnish (optional)
Step 1: Crafting the Playing Pieces
-
Prepare the White Clay:
Start by kneading a generous portion of white air-dry clay until it’s smooth and pliable. Roll it out on a non-stick surface to a uniform thickness of about 1/4 inch. -
Cut the ‘X’ Tokens:
Using your circular cookie cutter, punch out five discs. These will serve as your ‘X’ pieces (or the patterned team). -
Prepare the Terracotta Clay:
Clean your roller and surface, then knead the terracotta-colored clay. If you don’t have colored clay, use white clay and paint it later. Roll it to the same 1/4 inch thickness. -
Cut the ‘O’ Tokens:
Punch out five more discs from the terracotta clay. These will be your opposing team pieces. -
Smoothing Edges:
Dip your finger in a little water and gently smooth the cut edges of all ten discs to remove any rough texture or loose bits. -
Drying Phase:
Lay all the tokens on a flat surface lined with parchment paper. Let them dry completely for 24-48 hours, flipping them halfway through to prevent warping.
Clean Lines Hack
Use the end of a paintbrush handle dipped in paint to make perfectly round dots on your white game pieces instantly.
Step 2: Designing the Board
-
Prep the Wooden Base:
Take your wooden tray or shadow box frame. Ensure the inside surface is clean and dust-free. -
Measure the Grid:
Measure the interior width and height of the box. Divide this number by three to determine where your grid lines should sit. -
Create the Grid:
I find using thin black washi tape is the easiest way to make straight, clean lines. Apply two vertical strips and two horizontal strips to create a 3×3 grid. Alternatively, draw the lines carefully with a ruler and black paint pen.
Warped Discs?
If edges curl up while drying, gently weigh the nearly-dry pieces down with a heavy book for the final few hours.
Step 3: Decorating and Finishing
-
Sand the Tokens:
Once the clay discs are bone dry, lightly sand the surfaces and edges with fine-grit sandpaper for a professional, smooth feel. -
Paint the ‘X’ Patterns:
On the white discs, use black acrylic paint and a fine brush to create modern patterns. You can vary them—paint a simple cross on one, a circle of dots on another, or abstract lines. -
Paint the ‘O’ Tokens (If Needed):
If you used white clay for the opposing team, paint those five discs entirely in a burnt orange or terracotta acyclic paint now. -
Replicate the Dot Pattern:
For the specific look in the example, try painting a ring of six dots with one central dot on a few white pieces for a stylized domino effect. -
Seal the Pieces:
Apply a coat of matte varnish to all clay pieces. This protects the paint from chipping during intense gaming sessions. -
Final Assembly:
Place your finished dry tokens into the wooden tray grid and get ready to play.
This charming, handmade set is ready for family game night or to be displayed as a piece of functional art