I still get that little rush when a lithophane goes from “just a textured panel” to pure magic the second you add backlighting. Here are my favorite lithophane ideas—starting with the classics everyone loves, then sliding into some artsy, studio-style twists you can totally make your own.
Classic Framed Photo Lithophane Panel
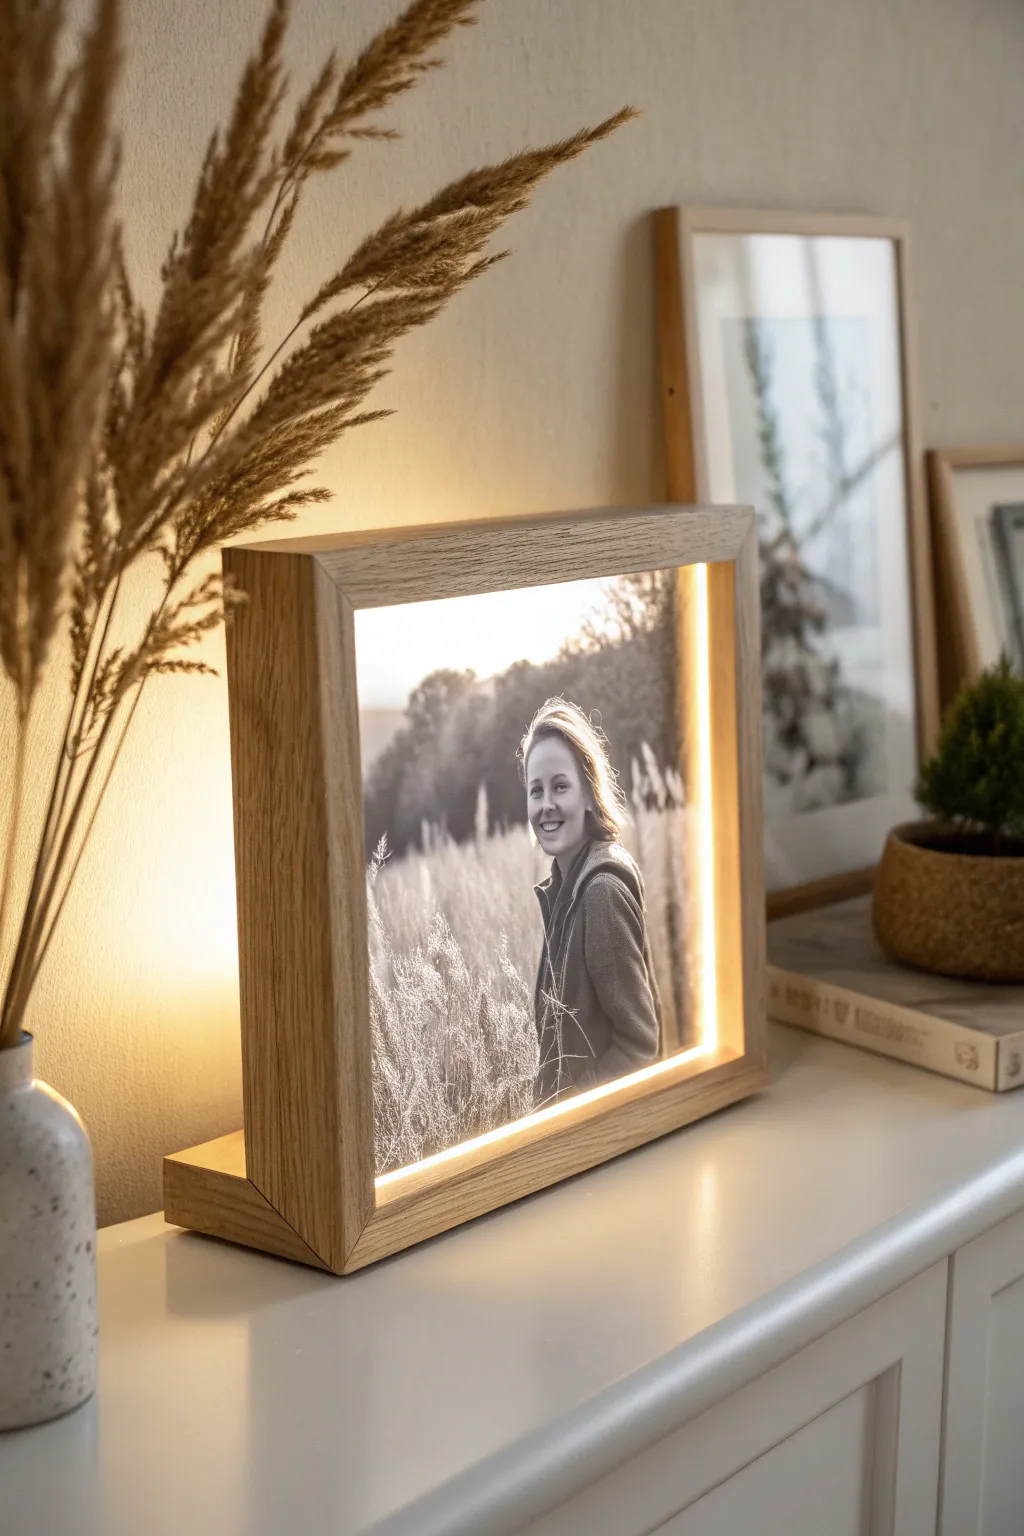
Bring your favorite memories to life with this elegant backlit display that combines traditional woodworking with modern 3D printing technology. The warm LED glow transforms a simple plastic relief into a stunning, high-contrast photograph nestled within a minimalist oak frame.
Step-by-Step
Materials
- White PLA filament
- 3D printer
- Solid oak or ash lumber (approx. 1×4 inch board)
- Table saw or miter saw
- Router with a rabbet bit (or dadoblade)
- LED strip light (warm white, USB powered)
- Wood glue
- Sandpaper (120 to 320 grit)
- Wood finish (Danish oil or matte varnish)
- Soldering iron (optional, depending on LED strip)
- Clear epoxy or hot glue
Step 1: Creating the Lithophane Panel
-
Select your image:
Choose a high-contrast photo like the portrait shown. Images with good separation between subject and background work best for the lithophane effect. -
Generate the STL file:
Upload your photo to a free online lithophane generator tool. Select ‘Flat’ shape and ensure you choose ‘Positive Image’ typically, though some slicers handle negatives differently. I aim for a thickness of about 3mm to 4mm for the darkest parts. -
Configure slicer settings:
Import the STL into your slicer software. Set infill to 100% (crucial for light transmission) and layer height to a fine setting like 0.12mm or 0.16mm. -
Print vertical for quality:
Orient the lithophane vertically on the build plate, aligned with the Y-axis to minimize wobbling. Add a large brim to keep it stable during the print. -
Print the panel:
Run the print using standard white PLA. Avoid matte white filaments as they can sometimes block too much light.
Pro Tip: Better Resolution
Print your lithophane vertically! While printing flat is faster, printing upright results in significantly smoother gradients and sharper details because the Z-axis resolution is finer than the nozzle width.
Step 2: Crafting the Wooden Frame
-
Measure and cut stock:
Based on the final dimensions of your printed lithophane, measure your oak board. You’ll need four pieces for the frame sides and one wider, heavier piece for the base. -
Cut the rabbet groove:
On the inside edge of your frame pieces, route a rabbet (a step-shaped recess) or a dado groove. This needs to be wide enough to hold the lithophane panel and deep enough to hide the LED strip behind it. -
Miter the corners:
Cut 45-degree miters on the ends of your four frame pieces. Dry fit them around your lithophane to ensure a snug but not overly tight fit. -
Assemble the perimeter:
Glue and clamp the four mitered corners together to form the square frame. Use a strap clamp or masking tape trick to hold the corners while the glue cures. -
Prepare the angled base:
Cut your base piece. For the angled look in the photo, rip a bevel along the top edge or cut a matching angled groove so the main frame leans back slightly. -
Attach frame to base:
Glue the assembled square frame onto the wooden base. Ensure it is centered and stable. -
Sand the assembly:
Once fully dry, sand the entire wood assembly. Start with 120 grit to flush up the joints, moving through up to 320 grit for a silky smooth feel. -
Apply finish:
Wipe on a coat of Danish oil or a matte clear varnish to bring out the grain of the oak without making it look plastic.
Step 3: Lighting and Assembly
-
Install LED strip:
Cut your warm white LED strip to length to fit the inner perimeter of the frame behind the groove. Peel the backing and stick it to the inner wood surface, facing inward toward where the picture will be. -
Route the cable:
Drill a small hole in the back bottom corner of the frame or base to feed the USB power cable out discreetly. -
Insert the lithophane:
Slide your 3D printed panel into the front rabbet or groove. It should sit flush with the front edge of the wood. -
Secure the panel:
Use a few dabs of hot glue or clear silicone on the back corners of the print to hold it firmly in place against the wood frame. -
Test the light:
Plug it in to ensure the LEDs light up the image evenly without hotspots. If visible hotspots appear, you may need a thin sheet of diffuser paper behind the print.
Level Up: Smart Control
Solder a small Wi-Fi LED controller (like an ESP32 or a pre-made USB dimmer) inside the base. This lets you adjust brightness or set timers using your phone.
Plug in your new frame and watch that plain white plastic transform into a warm, nostalgic moment.


Slim LED Light Box Lithophane
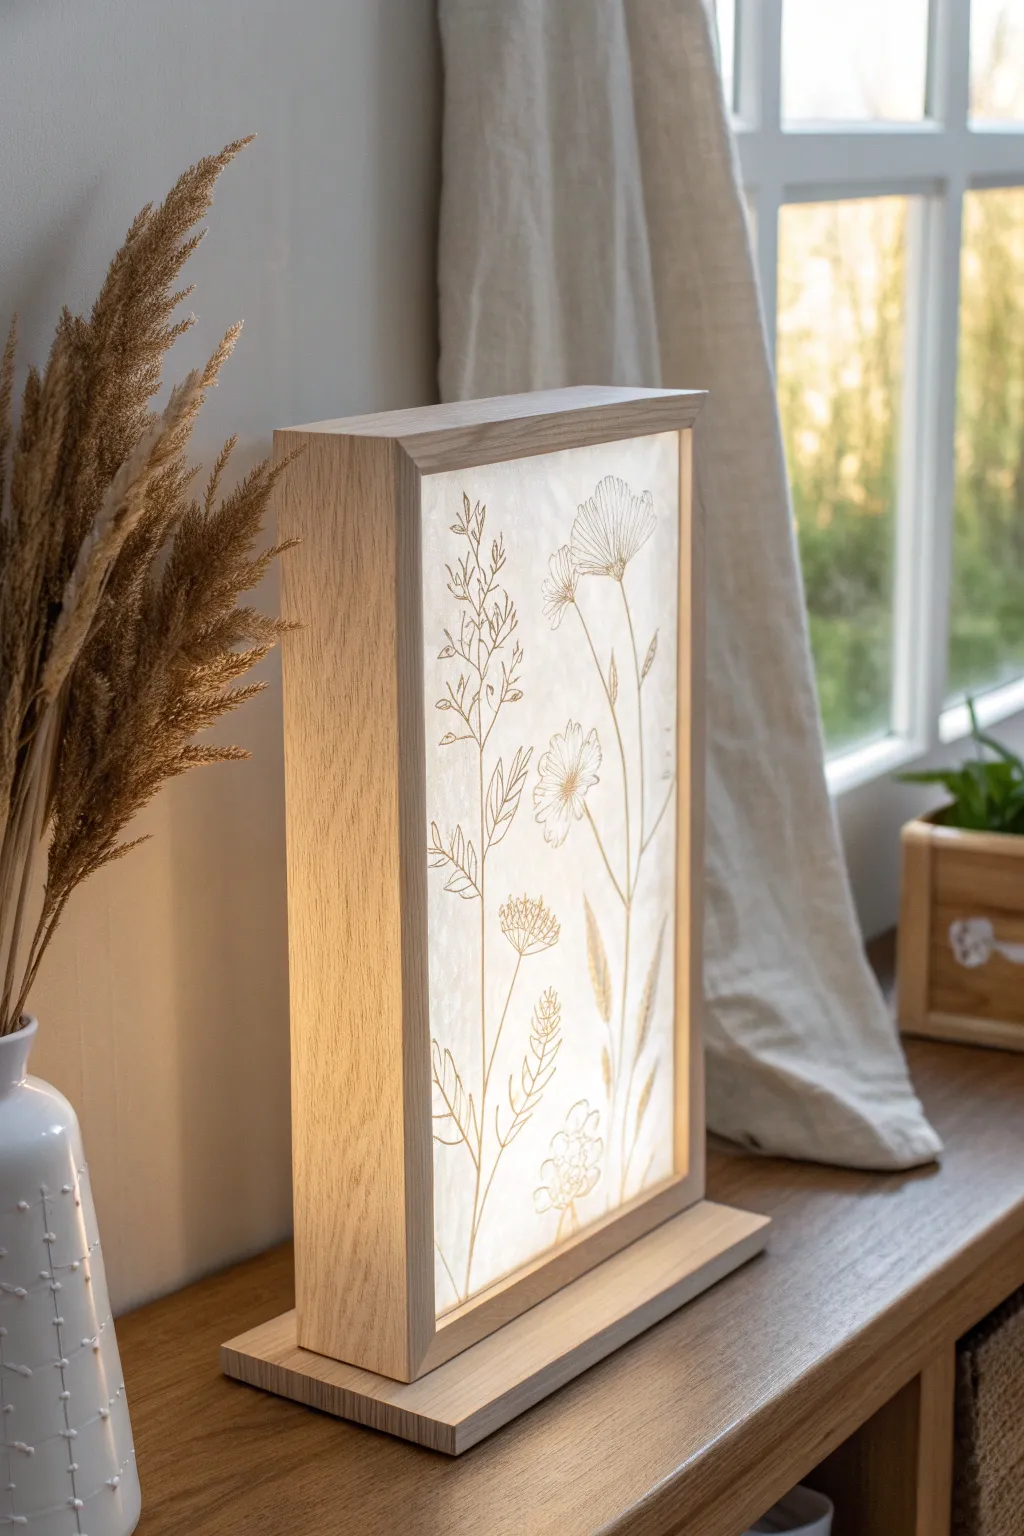
This elegant slimline light box combines fundamental woodworking with the delicate art of lithophane printing to create a warm, ambient accent piece. The minimalist oak frame encases a vertical panel illuminated from behind, highlighting intricate wildflower details that come alive when the light is switched on.
Step-by-Step Guide
Materials
- Light-colored hardwood (Oak or Maple recommended)
- White PLA filament for 3D printer
- Digital floral line art file (high contrast)
- White LED strip lights (warm white recommended)
- 12V DC power supply and adapter
- Small rocker switch (optional)
- Wood glue
- Sandpaper (120 to 320 grit)
- Clear matte wood finish or oil
- Table saw or miter saw
- Soldering iron and heat shrink tubing (or wire connectors)
Step 1: Creating the Lithophane Panel
-
Select and Prep Your Image:
Choose a high-contrast floral line drawing or photograph. For this specific look, a graphic with thin, dark lines against a white background works best. Convert your image to grayscale and invert it if necessary, ensuring the ‘dark’ lines will be printed thicker to block light. -
Generate the STL File:
Use an online lithophane generator tool. Upload your image and select the ‘Flat’ shape option. Set the maximum thickness to around 3.0mm and the thinnest part to 0.8mm for good contrast. -
Slice Settings:
Import the STL into your 3D printer slicer. Set the infill to 100% (crucial for proper light diffusion) and layer height to a fine setting like 0.12mm or 0.16mm. Print the panel vertically along the Y-axis to achieve the smoothest surface finish. -
Print the Panel:
Load white PLA filament and start your print. Printing vertically requires good bed adhesion, so consider using a generous brim to keep the tall, thin panel stable during the multi-hour print.
Step 2: Constructing the Frame
-
Measure and Cut Stock:
While the panel prints, measure its final dimensions. Cut four strips of your hardwood for the frame sides. The depth should be about 2-3 inches to allow space for the LEDs to diffuse properly behind the panel. -
Cut the Dado Grooves:
Set your table saw blade height to roughly 1/4 inch. Cut a groove (dado) on the inside face of all four frame pieces, positioned about 1/4 inch from the front edge. Test the fit with your printed lithophane to ensure it slides in snugly but not too tight. -
Miter the Corners:
Cut 45-degree miters on the ends of your frame pieces, measuring carefully so the internal groove aligns perfectly at the corners. -
Create the Back Panel:
Cut a thin piece of plywood or hardboard to fit into the back of the box. You’ll need to cut a rabbet (recessed groove) on the back of your frame pieces to accept this back panel, or simply plan to screw it onto the rear edges later. -
Assemble the Box:
Apply wood glue to the mitered corners. Assemble the frame around the lithophane panel (capturing it in the groove) and clamp securely. I find using a strap clamp helps apply even pressure on all four corners at once. -
Craft the Base Stand:
Cut a separate, slightly wider piece of hardwood for the base stand. It should extend about an inch beyond the main frame on all sides for stability.
Dim Lighting?
If the image looks washed out or too dim, your lithophane is likely too thick. Reduce the max thickness to 2.5mm and increase contrast in your original image file.
Step 3: Electrical & Finishing
-
Draft the LED Layout:
On the inside of the back panel, map out your LED strips. For even lighting without hot spots, run vertical strips spaced about 1 inch apart. Cut the strips to length at the designated cut markers. -
Wire the Lights:
Adhere the LED strips to the back panel. Solder wires connecting the positive and negative terminals of each strip in a parallel circuit. Run the main power wire out through a small hole drilled in the bottom of the back panel. -
Sand and Refine:
Once the frame glue is dry, sand the wood thoroughly. Start with 120 grit to flush up the corners, then move to 220 and 320 for a silky smooth feel. -
Apply Finish:
Apply a clear matte wood finish or Danish oil. Wipe it on with a lint-free cloth, let it penetrate, and wipe off the excess. This protects the wood while keeping that natural, raw look seen in the photo. -
Final Assembly:
Attach the main frame to the base stand using screws from underneath (countersink them so the base sits flat). Insert the wired back panel and secure it in place. -
Light It Up:
Connect your power supply, plug it in, and switch on the light to verify your connections. The floral design should glow warmly against the oak frame.
Pro Tip: Better Diffusion
Line the inside back panel with reflective aluminum foil tape before attaching LEDs. This bounces more light forward through the plastic for a brighter, more even glow.
Place your completed light box on a shelf or windowsill to enjoy the serene glow of your custom botanical art


Four-Sided Lithophane Lantern Box
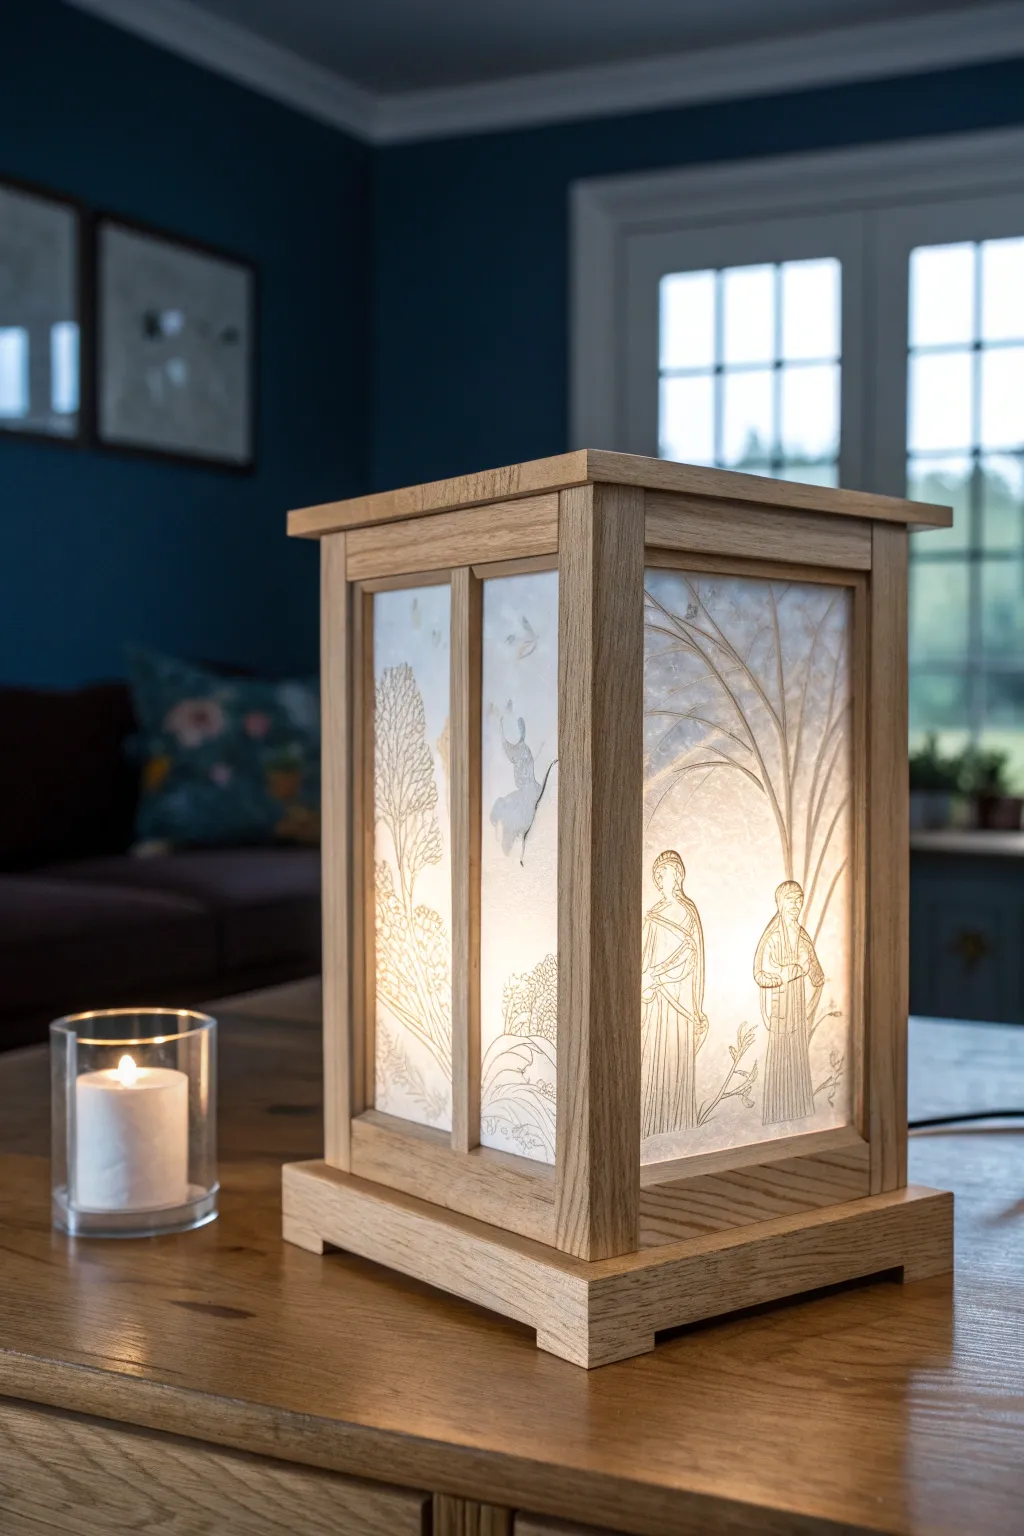
This elegant lantern combines the warmth of solid oak with the delicate storytelling of lithophane panels. Its four-sided design features gentle scenes of nature and figures, casting a soft, inviting glow perfect for a mantelpiece or side table.
Step-by-Step Tutorial
Materials
- Solid oak boards (approx. 10mm thick)
- White or ivory lithophane filament (PLA)
- 3D printer
- Lithophane generation software (or online tool)
- Wood glue
- Clear matte varnish
- LED light strip or puck light (warm white)
- Sandpaper 120-400 grit
- Table saw or miter box
- Router with chamfer bit (optional)
- Clamps
Step 1: Designing & Printing the Panels
-
Selecting artwork:
Choose four high-contrast line drawings or photographs. The example features classical figures and trees; these delicate line-art styles transfer beautifully into lithophanes. -
Generating the STL files:
Upload your images to a lithophane generator. Set the shape to ‘flat’ and ensure a border of at least 3mm is added to slot into the wooden frame. -
Slice settings:
Use a layer height of 0.12mm or lower for maximum detail. Set infill to 100% so the light travels through the plastic correctly. -
Printing orientation:
Print the panels vertically along the Y-axis. This prevents layer lines from obscuring the image details and results in a smoother finish. -
Cooling and cleaning:
Let the panels cool completely on the bed to avoid warping. Gently remove any brims or support structures.
Step 2: Constructing the Oak Frame
-
Cutting the corner posts:
Cut four oak strips for the corner posts, approximately 20mm x 20mm square and 25cm tall. -
Routing the grooves:
Using a router table or a table saw dado blade, cut a central groove (dado) down two adjacent sides of each post. These grooves must match the thickness of your printed lithophanes. -
Creating the top and base caps:
Cut two larger squares of oak for the top and bottom. The base should double-step, with a smaller square supporting the main box and a wider one as the footer. -
Routing the top edge:
Add a decorative overhang to the top lid piece. I like to use a small chamfer bit here to soften the harsh edges and match the classic look. -
Cutting horizontal rails:
Measure the width of your lithophanes plus the groove depth. Cut eight horizontal rails to connect the corner posts at the top and bottom.
Printing Tip
Align your lithophanes along the Y-axis (front to back) on the print bed. This reduces wobbling during printing, ensuring sharper details.
Step 3: Assembly & Finishing
-
Dry fitting:
Assemble the corner posts, rails, and lithophane panels without glue first. Check that the panels float freely in the grooves to allow for wood movement. -
Gluing the frame:
Apply wood glue to the tenons of the rails and the slots in the posts. Assemble carefully, sliding the lithophane panels in before closing the final side. -
Clamping:
Use strap clamps or bar clamps to hold the box square while drying. Wipe away any squeeze-out immediately with a damp cloth. -
Sanding the wood:
Once dry, sand the wooden exterior progressively from 120 up to 400 grit until the oak feels silky smooth. -
Applying finish:
Apply a clear matte varnish or Danish oil to the wood only. Use painter’s tape to protect the lithophane panels if necessary. -
Attaching the base:
Glue or screw the main lantern box onto the stepped base structure you created earlier. -
Installing the light:
Mount a warm LED puck light or strip inside the base. Ensure the cord exits discreetly through a small notch or hole drilled in the back of the base.
Level Up The Look
Apply a light sepia wash to the back of the lithophane panels before assembly. When lit, this gives the image an antique, parchment-like glow.
Place your finished lantern in a dim corner and watch the images come to life with a gentle glow


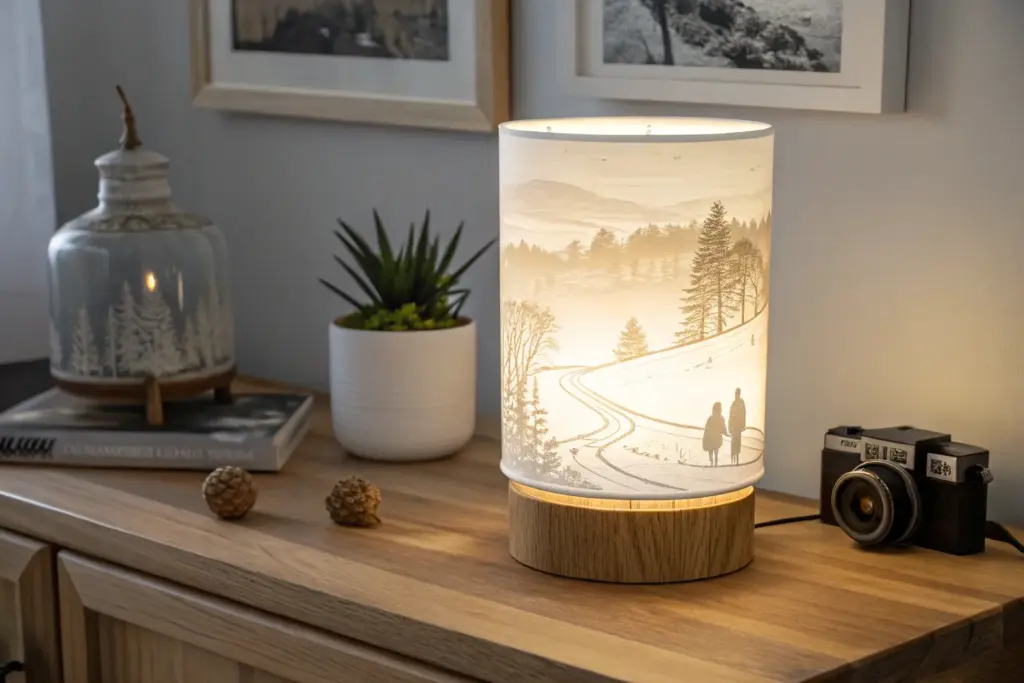
Cylindrical 360° Lithophane Lamp Shade
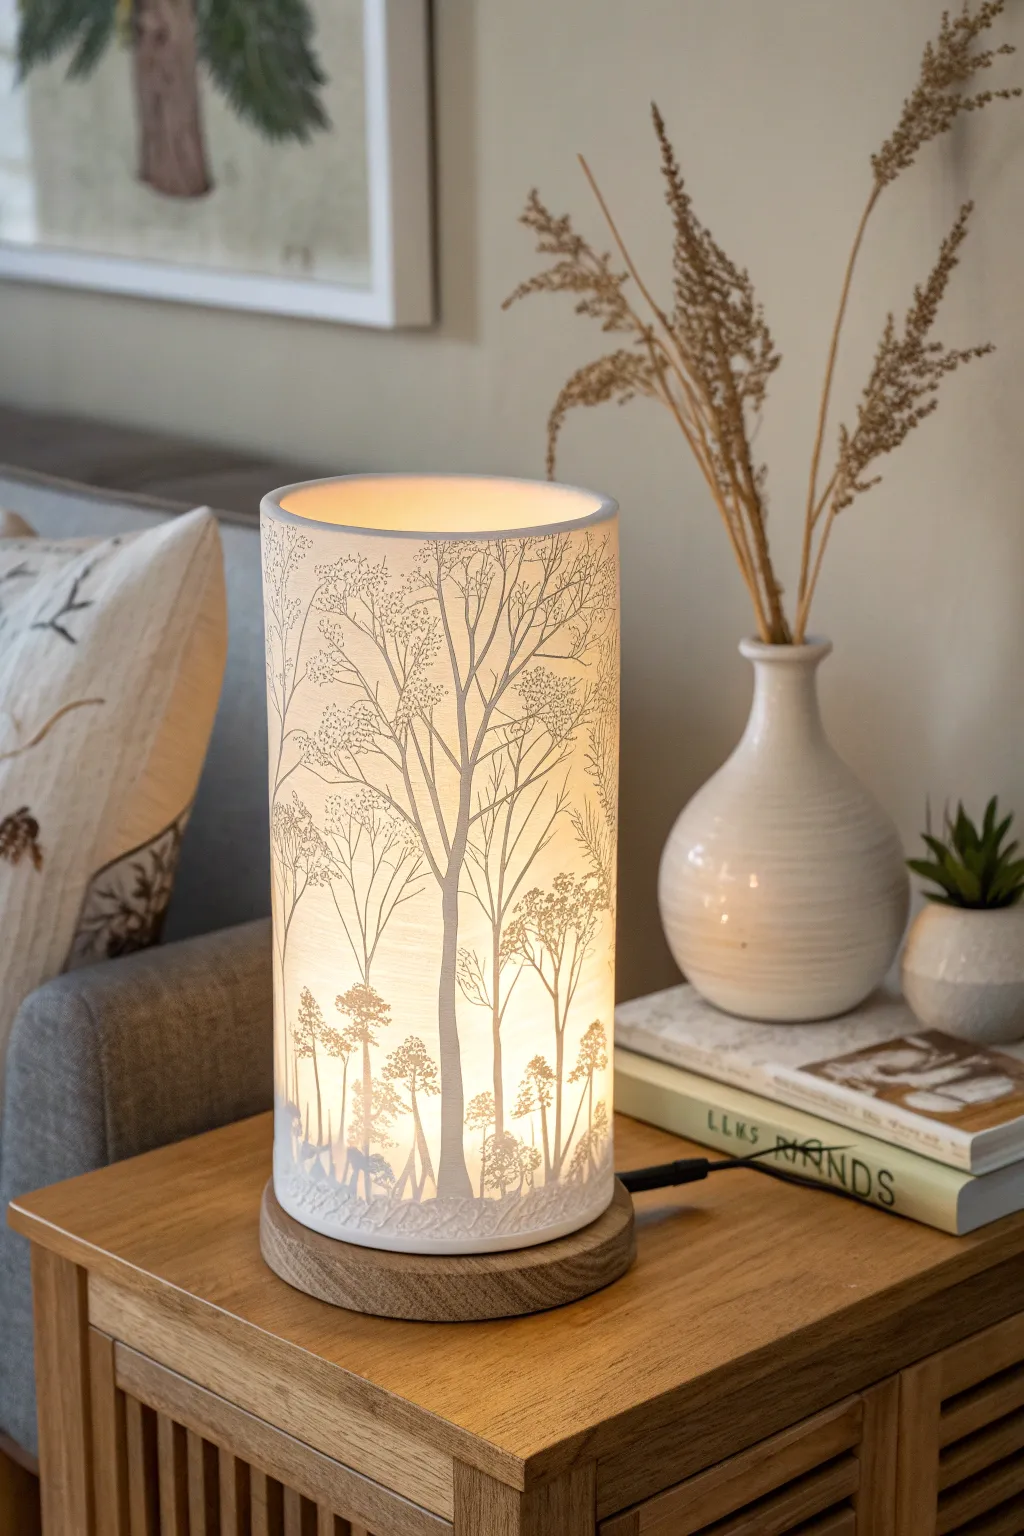
Bring the serene beauty of a woodland hike indoors with this stunning cylindrical lithophane lamp. When illuminated, the varying thickness of the 3D printed shade reveals a detailed, monochromatic forest scene that glows with a warm, inviting ambiance.
Detailed Instructions
Materials
- White PLA filament
- 3D printer (FDM)
- Wooden lamp base (circular, with LED fixture)
- High-resolution panoramic forest image (or seamless texture)
- Lithophane generation software (e.g., ItsLitho, Lithophanemaker)
- Digital calipers
- Super glue or clear epoxy (optional)
- Sanding paper (high grit)
- Warm white LED bulb
Step 1: Design Preparation
-
Select your image:
Choose a high-contrast, panoramic image of a forest. The best results come from images with distinct silhouettes—like the bare winter trees seen here—against a lighter sky background. -
Measure your base:
Using digital calipers, precisely measure the diameter of the recessed groove or the top surface of your wooden lamp base. This measurement dictates the diameter of your cylinder. -
Configure lithophane settings:
Upload your image to a lithophane generator. Select ‘Cylinder’ or ‘Tube’ as the shape. Set the diameter to match your base measurement minus a small tolerance (about 0.5-1mm) to ensure a fit. -
Adjust thickness parameters:
Set the minimum thickness around 0.8mm for the brightest parts (the sky) and the maximum thickness around 2.4mm-3.0mm for the darkest parts (the tree trunks). This range provides excellent contrast without making the print too distinct. -
Add a rim (optional):
If your software allows, add a small, solid rim to the bottom of the cylinder design. This provides a stable mounting surface and strengthens the base of the delicate print.
Step 2: 3D Printing Process
-
Prepare the slicer:
Import the generated STL file into your slicer software. Orient the cylinder vertically. Lithophanes print best standing up to capture the fine X/Y resolution details. -
Slicer settings for quality:
Set layer height to 0.12mm or 0.16mm. Lower layer heights yield smoother gradients. Crucially, set the infill to 100% (or 9999 walls) so the light passes through solid plastic, rather than distinct infill patterns which would ruin the image. -
Print speed considerations:
Reduce your print speed to roughly 30-40mm/s. I find that going slow minimizes wobble on tall, thin prints like this, preventing layer shifts that would break the illusion. -
Use a brim:
Enable a wide brim (10-15mm) to securely hold the cylinder to the build plate. Tall, hollow objects are prone to being knocked over or detaching during printing. -
Start the print:
Load your white PLA. White is essential for the proper grayscale transmission of light. Begin the print and watch the first few layers carefully to ensure perfect adhesion.
Alignment Pro-Tip
Orient the seam of the 3D print (the Z-seam) to align with the ‘back’ of your image or a thick tree trunk. This hides the vertical line where the nozzle moves up, keeping the main view flawless.
Step 3: Post-Processing and Assembly
-
Remove from build plate:
Once the print has cooled completely, gently remove it from the bed. Carefully deburred the brim using a sharp hobby knife or a deburring tool. -
Clean up artifacts:
Inspect the print for any stringing, especially between the fine branches of the trees. A quick blast from a heat gun helps melt away tiny wisps, or you can gently sand them with high-grit paper. -
Prepare the base:
If you are making the wooden base from scratch, use a router or a lathe to create a shallow groove that matches the cylinder’s diameter. Otherwise, ensure your pre-bought base is clean and ready. -
Mount the light source:
Install the LED hardware into the center of the wooden base. Ensure the cord is routed neatly through the side or bottom channel. -
Final assembly:
Place the lithophane cylinder onto the base. If it’s a friction fit, gently press it into the groove. If it’s loose, apply a few small dots of clear epoxy or super glue to the bottom rim to secure it permanently. -
Light it up:
Install a warm white bulb (around 2700K-3000K). The warmer tone mimics sunlight filtering through trees much better than cool white. Switch it on to reveal your hidden forest.
Level Up: Rotating Base
Install a slow-moving, silent turntable motor inside the base instead of a static mount. This creates a slowly revolving forest panorama that adds dynamic movement to the room.
Enjoy the peaceful glow of your custom forest lamp as it transforms your room

The Complete Guide to Pottery Troubleshooting
Uncover the most common ceramic mistakes—from cracking clay to failed glazes—and learn how to fix them fast.
Arched Stand-Up Lithophane Desktop Light
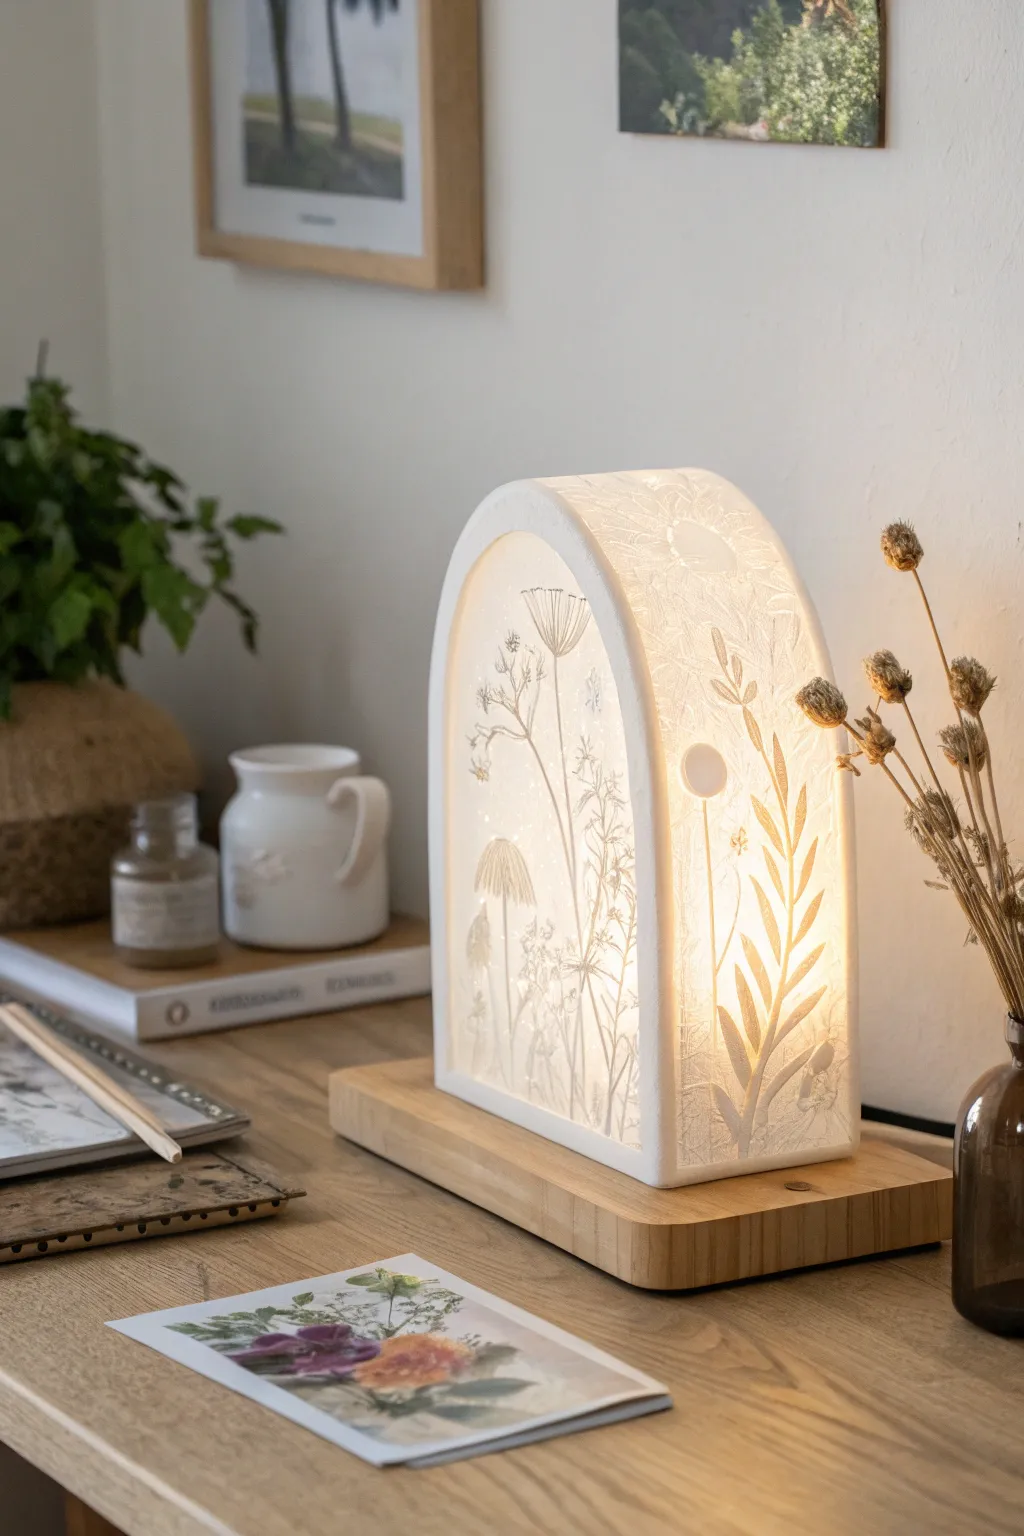
Bring the delicate beauty of a meadow indoors with this stunning curved lithophane lamp. The soft, warm glow highlights intricate botanical reliefs, turning a simple 3D print into an elegant piece of functional art.
How-To Guide
Materials
- White PLA filament (high quality, consistent opacity)
- Wood PLA or real wood block for the base
- LED strip lights (warm white, 3000K)
- USB switch cable or battery pack
- 3D printer (FDM or SLA)
- Sandpaper (220 to 600 grit)
- Lithophane generation software (online or slicer-based)
- Digital botanical line art or high-contrast photos
- Super glue or epoxy
Step 1: Designing the Lithophane
-
Select your imagery:
Choose high-contrast botanical images. Line drawings of wildflowers, ferns, or seed pods work exceptionally well for this specific look because the distinct lines create sharp, visible ridges in the final print. -
Configure the shape:
Using a lithophane generator tool, select a ‘Curved’ or ‘Arc’ profile. Adjust the angle to approximately 180 degrees to create a deep U-shape that stands stable on its own base. -
Set dimensions:
An ideal desktop size is roughly 150mm to 180mm tall. Ensure the thickness settings are appropriate: usually 0.8mm for the thinnest (lightest) parts and up to 3.0mm for the thickest (darkest) parts. -
Add a frame border:
In your generator settings, add a sturdy frame border of at least 3-4mm thickness around the entire arch. This frame is crucial for structural integrity and gives you a surface to glue onto the base.
Step 2: Printing the Arch
-
Orient the model:
The most critical step is orientation: align the arch vertically along the Y-axis. Printing it standing up ensures the layer lines follow the vertical height, providing the highest resolution for the image detail. -
Adjust slicer settings:
Set your infill to 100% or just increase the wall count (perimeters) until the model is solid; lithophanes rely on varying thickness of solid plastic, not infill patterns, to create the image. -
Slow it down:
Reduce your print speed to around 30-40mm/s. I find that printing slowly prevents wobbling near the top of the tall arch, ensuring crisp details in the upper botanical stems. -
Add a brim:
Since the contact area with the build plate is just a thin line, use a wide brim (8-10mm) to keep the print firmly adhesion during the long print time.
Slicer Orientation
Always print lithophanes standing upright, aligned with the Y-axis. Printing flat ruins the resolution, as the image quality becomes limited by your nozzle width rather than layer height.
Step 3: Creating the Base
-
Measure the footprint:
Once the print is done and removed from the bed, measure the exact width and depth of the arch’s footprint. -
Prepare the wood block:
Cut a piece of hardwood or solid wood PLA to size. It should be slightly wider than your lithophane for a balanced look. Sand the edges smooth, rounding the corners slightly for a soft aesthetic. -
Route the groove:
Using a router or by carving carefully, create a shallow channel or U-groove in the top of the wood base where the lithophane will sit. This hides the glue joint and adds stability. -
Drill for wiring:
Drill a hole through the back or center of the wooden base to feed the LED power cable through.
Level Up: Seasonal Swap
Instead of gluing the arch permanently, use small magnets in the base groove. This allows you to print different arches—like snowflakes for winter or suns for summer—and swap them out.
Step 4: Assembly and Lighting
-
Install the lights:
Cut a strip of warm white LEDs to fit inside the arch. Adhere them to a small central column or directly onto the wood base, facing upwards to illuminate the arch evenly. -
Test the glow:
Before gluing, hold the arch over the lights to check for hotspots. You may need to add a small diffuser (like parchment paper) around the LEDs if the individual diodes are visible through the front. -
Secure the arch:
Apply a thin bead of epoxy or strong super glue into the groove on your wooden base. Press the lithophane arch firmly into place and hold until set. -
Final polish:
If there were any stringing or rough spots on the print, lightly sand them with high-grit sandpaper. Wipe the exterior clean with a microfiber cloth to remove oils before the final reveal.
Enjoy the tranquil atmosphere this personalized light brings to your workspace
Sphere Lithophane Globe Lamp
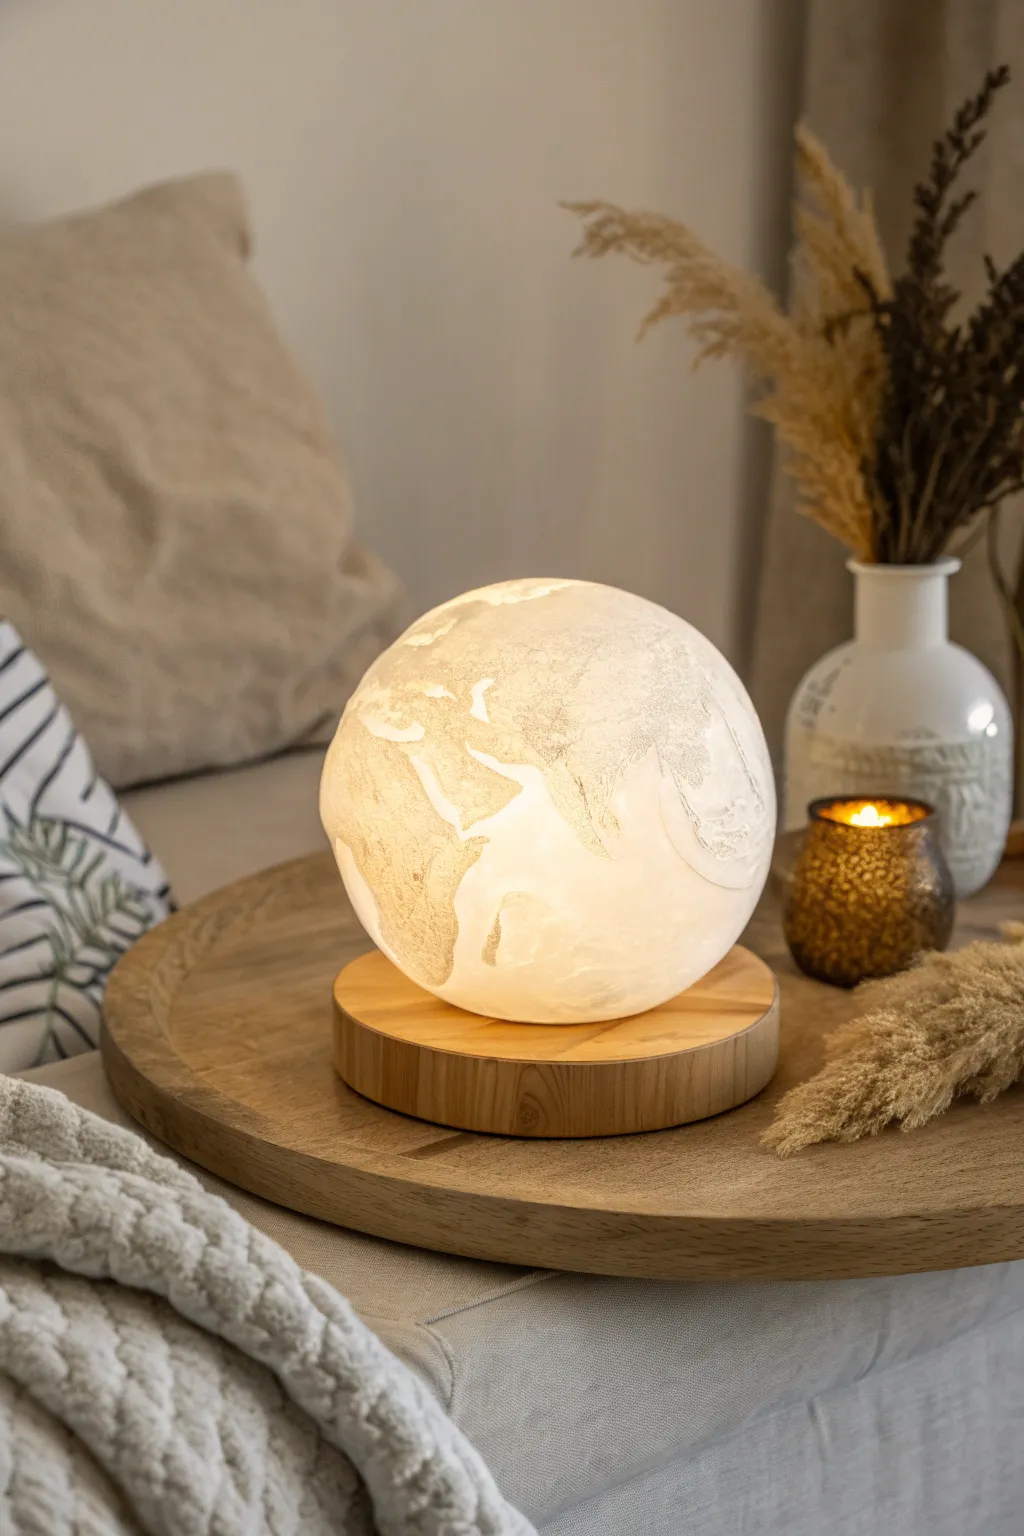
Bring the world into your living room with this stunning spherical lithophane of Earth, radiating a warm, comforting glow. This project combines precise 3D printing with a simple wooden base assembly to create a sophisticated lamp that looks beautiful both lit and unlit.
Step-by-Step
Materials
- White PLA filament (high quality, consistent opacity)
- Circular wooden base (approx. 4-5 inches diameter)
- USB LED puck light or small LED bulb socket kit
- 3D Printer (FDM recommended)
- High-resolution Earth map image (flat projection)
- Lithophane generator software (e.g., Lithophane Maker or Cura)
- Fine grit sandpaper (220-400 grit)
- Cyanoacrylate (CA) glue or clear epoxy
- Power drill with spade bit (if modifying a blank wood base)
- Computer for slicing software
Step 1: Digital Preparation
-
Source the map image:
Find a high-resolution, grayscale topographic map of Earth or a clean black-and-white silhouette map. The contrast is key; darker areas will be thicker (continents) and lighter areas thinner (oceans), or vice versa depending on your preference for the light effect. -
Configure software settings:
Upload your image to a sphere lithophane generator. Set the shape to ‘Sphere’ or ‘Globe’. Ensure the ‘Maximum Thickness’ is around 2.5mm to 3.0mm and ‘Minimum Thickness’ is 0.6mm to 0.8mm for optimal light diffusion without fragility. -
Adjust the cylinder hole:
In the generator settings, create a bottom opening (often called a cylinder or fitter) that matches the diameter of your LED light source or the wooden base’s mounting point. A 60mm opening is usually standard for many puck lights. -
Generate the STL:
Download the resulting STL file. If the sphere is too complex for one print, some generators allow you to split it into hemispheres, but printing as a single hollow object is cleaner if your printer tuning is dialed in.
Blobs on the surface?
If you see small pimples on the print, adjust your ‘Z-seam alignment’ to ‘Random’ in the slicer settings. This scatters the layer start points so they don’t form a visible scar on the ocean.
Step 2: 3D Printing
-
Slicer setup:
Import the STL into your slicer. Orient the globe so the opening is facing downwards on the build plate. This provides a stable footprint for adhesion. -
Layer height and infill:
Choose a fine layer height, ideally 0.12mm or 0.16mm, to capture the geographic details. Crucially, set infill to 100% (or use 999 perimeter walls). Lithophanes rely on solid plastic to block light correctly; any hollow infill pattern will show through as an ugly grid. -
Print speed and temperature:
Slow your print speed down to around 30-40mm/s for the outer walls. This ensures the continents are sharp and reduces ringing artifacts. Print at the lower end of your filament’s temperature range to minimize stringing. -
Start the print:
Launch the print. This will likely take quite a while—often 15 to 24 hours depending on size—so ensure your filament spool has enough material before starting. -
Post-processing:
Once finished, carefully remove the globe from the bed. If you used a brim for adhesion, deburr the bottom edge with a sharp craft knife so it sits flush on the wood.
Use Warm White LEDs
For that cozy, sun-drenched look in the photo, use a 2700K-3000K warm white LED. Cool white (5000K+) looks harsh and makes the lithophane look like medical plastic rather than art.
Step 3: Base Assembly
-
Prepare the wood base:
If you bought a pre-made LED base, test the fit of the globe. If you are making your own from a raw wooden disc, mark the center point clearly. -
Drill the light cavity:
Using a spade bit or Forstner bit slightly larger than your light kit, drill a shallow recess into the center of the wood. Don’t go all the way through; just deep enough to nest the LED puck securely. -
Create a wire channel:
Drill a small horizontal hole from the side of the base to meet the central cavity. Thread your USB power cord through this channel so the lamp sits flat on the table. -
Sand the wood:
Sand the wooden base with fine-grit sandpaper until smooth. I usually wipe it down with a tack cloth afterwards to remove dust before applying any finish. -
Install the light:
Secure the LED unit into the recess using a dab of hot glue or double-sided tape. Ensure the light is pointing straight up.
Step 4: Final Assembly
-
Test the fit:
Place the lithophane globe over the base. Check for any light leakage around the bottom rim. If the gap is uneven, lightly sand the bottom of the 3D print against a flat surface. -
Secure the globe:
Apply a few tiny dots of clear epoxy or CA glue to the rim of the wooden base where the globe will sit. You don’t need much; you want to avoid glue squeezing out onto the visible wood. -
Final cure:
Press the globe firmly in place and hold for a minute until the glue sets. Let it cure fully before moving the lamp. -
Light it up:
Plug in your USB cable and switch it on. The geographical details should pop instantly as the light diffuses through the varying thickness of the plastic.
Enjoy the gentle ambiance of your new custom world lamp, perfect for a nightstand or reading nook


What Really Happens Inside the Kiln
Learn how time and temperature work together inside the kiln to transform clay into durable ceramic.
Window-Lit Lithophane Suncatcher Frame
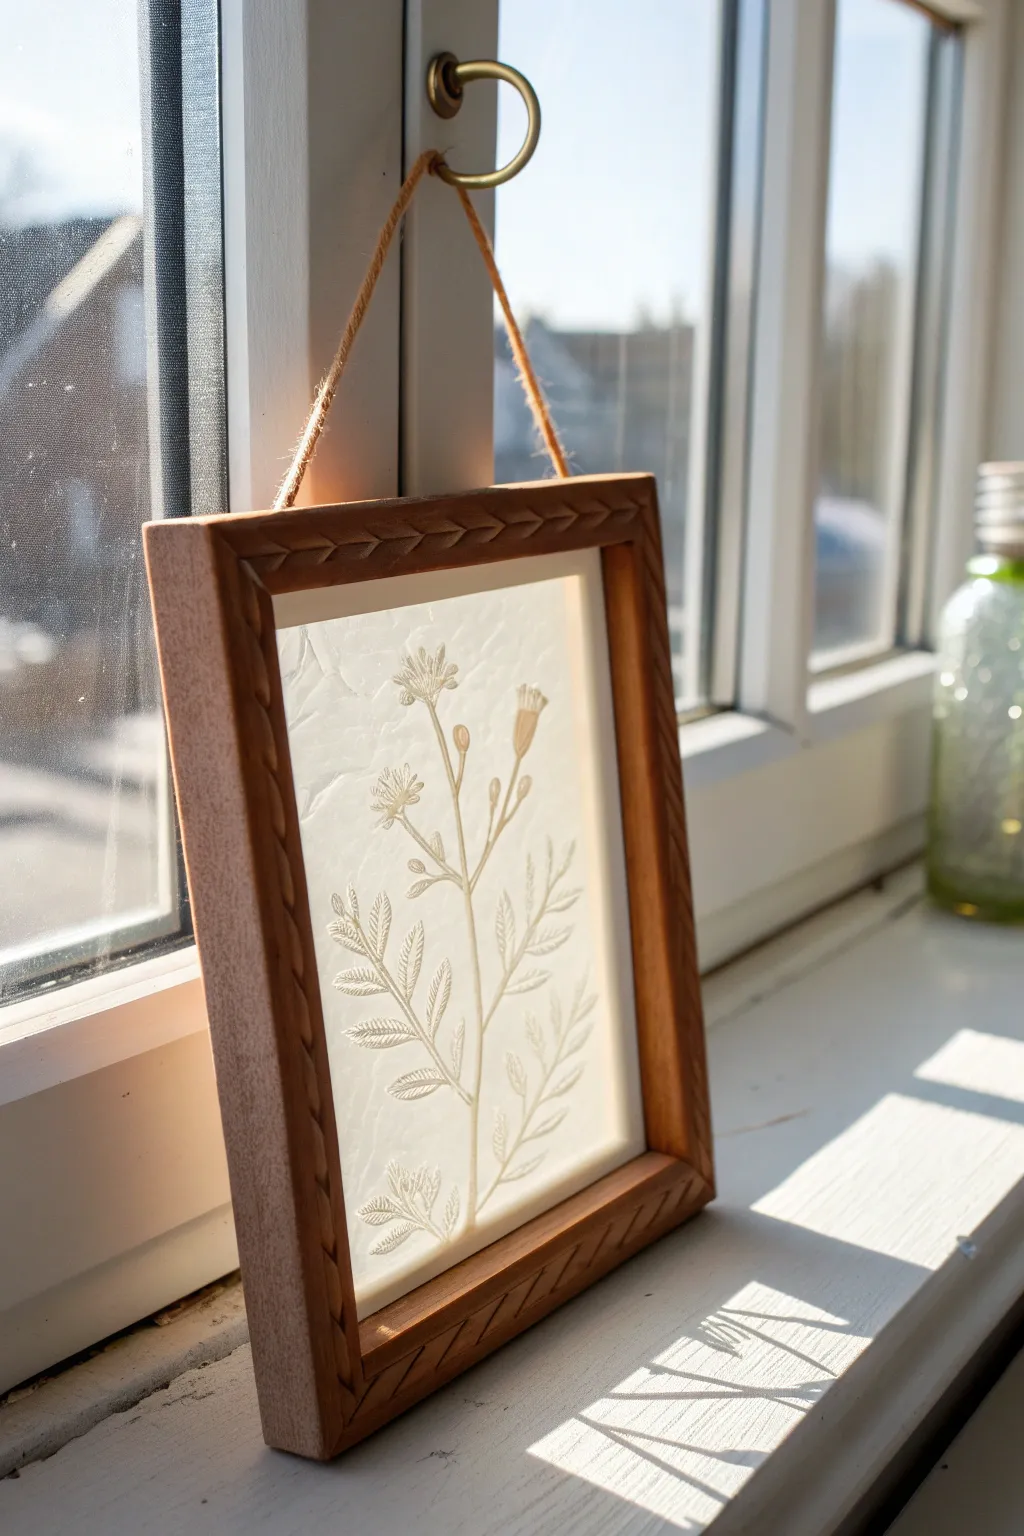
Transform digital art into a glowing masterpiece with this elegant window-hanging project. The combination of a carved wooden frame and a translucent 3D print creates a stunning interplay of light and shadow when placed against a sunny pane.
Detailed Instructions
Materials
- High-quality white PLA filament
- 3D printer
- Botanical line art or photo (digital file)
- Wooden picture frame (approx. 5×7 inch)
- Small carving chisel or Dremel (optional for custom frame)
- Jute twine or rustic string
- Small brass eye hooks (2)
- Sandpaper (medium and fine grit)
- Wood stain (warm oak or similar)
- Hot glue gun or silicone adhesive
- Lithophane generation software (online or slicer-based)
Step 1: Designing the Lithophane
-
Select your image:
Choose a high-contrast botanical image. Line art or black-and-white photos with clear separation between the subject and background work best for this crisp, etched look. -
Process the file:
Upload your image to a lithophane generator tool. Set the shape to ‘Flat’ and ensure the ‘Positive Image’ setting is selected so the thicker parts represent the darker lines of the plant. -
Adjust thickness settings:
Set your maximum thickness to around 2.5mm to 3mm and your minimum thickness to 0.6mm-0.8mm. This range ensures enough contrast without making the print too dense for sunlight to penetrate. -
Add a border:
Include a 2-3mm border in your settings. This structure is crucial for sliding the print into the frame or gluing it securely later.
Print Standing Up
Always print lithophanes vertically along the Y-axis rather than flat. This aligns the layer lines with the Z-axis, resulting in significantly smoother gradients and sharper image details.
Step 2: Printing Process
-
Prepare the slicer:
Open your generated STL file in your slicer. Orient the lithophane vertically along the Y-axis (standing up, not flat) to achieve the highest resolution details. -
configure print settings:
Set infill to 100% and layer height to a fine detail setting, such as 0.12mm or 0.1mm. Use a broad brim to keep the thin vertical print stuck firmly to the bed. -
Print the lithophane:
Run the print using white PLA. Keep the fan speed standard to ensure clean cooling on the fine vertical details. Once finished, carefully remove the brim.
Colorize It
Print a color photo on standard paper at the same size as your lithophane. Glue it behind the 3D print using spray adhesive for a vibrant, colored suncatcher effect.
Step 3: Crafting the Frame
-
Prepare the wood:
If you are starting with a plain wooden frame, remove any glass or backing. Sand the surface lightly to prepare it for carving or staining. -
Carve the pattern:
To match the image, sketch a chevron or arrow pattern along the frame face. Use a small v-gouge chisel or a rotary tool to carve these shallow grooves. I find that clamping the frame down makes this much safer and more precise. -
Stain the wood:
Apply a warm oak or walnut wood stain with a rag. Wipe off excess stain quickly so it settles darker into the carved grooves, highlighting the texture. -
Drill pilot holes:
Mark two spots on the top edge of the frame. Pre-drill tiny pilot holes to prevent the wood from splitting when you add hardware. -
Attaching hardware:
Screw a small brass eye hook into each pilot hole until flush with the wood.
Step 4: Assembly & Finish
-
Fit the lithophane:
Place the 3D printed lithophane into the back of the frame. It should fit snugly. If your frame has flexible metal tabs, bend them down to secure the print. -
Secure with adhesive:
If the frame lacks tabs, run a thin bead of hot glue or silicone around the inner edge of the frame backside to hold the lithophane permanently in place. -
Add the hanger:
Cut a length of jute twine roughly 12 inches long. Feed the ends through the eye hooks and knot them securely to create a rustic drying loop. -
Hang and enjoy:
Find a window that receives direct sunlight. Hang the frame on the latch or a suction cup hook to see the hidden image reveal itself.
Now you have a timeless piece of decor that changes mood with the shifting sun throughout the day
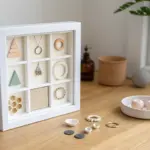
Heart Collage Lithophane Keepsake
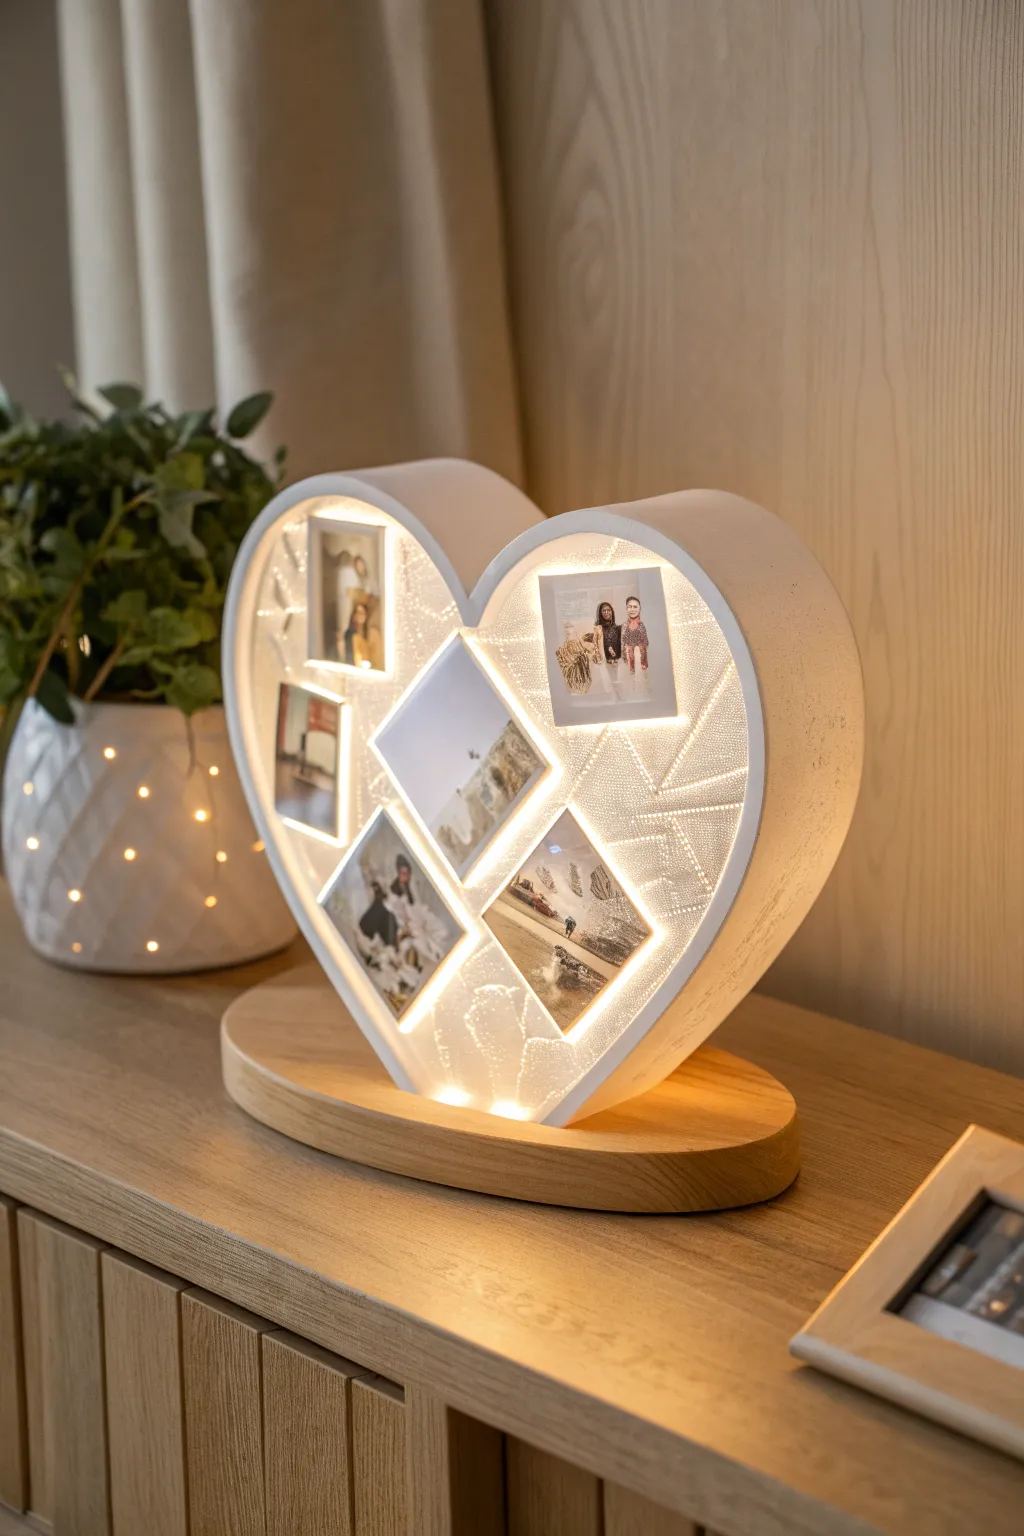
This stunning keepsake combines the nostalgic charm of family photos with modern 3D printing technology, creating a glowing heart-shaped lamp. The design features a sturdy white frame with geometric openings that illuminate your favorite moments with a soft, warm light.
Step-by-Step Tutorial
Materials
- White PLA filament (high quality, opaque)
- White PLA filament (translucent or dedicated lithophane white)
- Wood PLA filament (or real wood specifically for the base)
- LED strip lights (warm white, 5V or 12V)
- Sanding paper (various grits)
- CA glue or epoxy
- Power supply for LED strip
- Digital photos for the collage
- Lithophane generation software (e.g., HueForge, Luban, or online tools)
Step 1: Digital Preparation & Design
-
Select your photos:
Choose 5-6 high-contrast photos that will work well in small formats. You’ll need a mix of portrait and square orientations to fit the geometric slots. -
Generate the lithophanes:
Using your preferred lithophane software, upload each image. Set the settings to ‘flat’ or ‘pane’ mode. Ensure the maximum thickness is around 3mm and the thinnest part is 0.6mm-0.8mm for good contrast. -
Design or download the frame:
If modeling from scratch, create a heart-shaped outline with a depth of about 40mm to house the lights. Create internal dividers for your photos in a diamond and square pattern as seen in the reference. -
Create the background texture:
For the areas between photos, design a thin, patterned backplate (like the dotted/mesh texture shown) to diffuse light interestingly around the pictures. -
Isolate the base:
Design an oval base with a slot or groove to hold the heart frame securely. Ensure there is a channel for the power cord to exit discreetly.
Dim Spots?
If photos look dark, your LED strip might be too far back. Add a white reflective backing inside the case or use a brighter, denser LED strip (60+ LEDs/m).
Step 2: 3D Printing
-
Print the frame component:
Slice the heart frame and print it in opaque white PLA. Use a high infill percentage (80-100%) to prevent light from leaking through the walls where you don’t want it. -
Print the lithophane panels:
Print your photo panels vertically along the Y-axis. This orientation provides the highest resolution and smoothest gradients. Use a brim for stability. -
Print the base:
Print the oval base using Wood PLA for a natural look, or use standard PLA and paint it later. If creating a real wood base, cut and route an oval piece now. -
Clean up the prints:
Remove all supports and brims. Lightly sand the edges of the lithophanes to ensure a perfect fit into the frame slots.
Step 3: Assembly & Wiring
-
Install the lighting:
Adhere the LED strip to the inner back wall of the heart frame, spiraling it or zig-zagging to ensure even light distribution behind all photo slots. -
Insert the lithophanes:
Test fit the photo panels. Once satisfied, apply a tiny dot of CA glue to the corners and press them into their designated geometric windows. -
Secure the frame to the base:
Feed the LED power cable down through the bottom of the heart and into the base channel. Glue the heart frame firmly into the slot on the wooden base. -
Final wiring check:
Connect your power supply and switch on the light. Check for any light leaks around the edges of the photos and seal them with a small dab of white filler if necessary.
Colorize It!
Print a color transparency of your photo on regular paper and glue it to the *back* of the lithophane. When lit, the photo will appear in full color.
This glowing heart is now ready to serve as a beautiful nightlight or a centerpiece on your mantle

TRACK YOUR CERAMIC JOURNEY
Capture glaze tests, firing details, and creative progress—all in one simple printable. Make your projects easier to repeat and improve.
Seasonal Ornament Lithophane

Capture the serene beauty of a snowy landscape in this delicate, hanging lithophane ornament. When backlit by natural window light or nestled near Christmas tree bulbs, the varying thickness of the print reveals a stunningly detailed, grayscale winter scene.
Step-by-Step Guide
Materials
- White PLA filament (high quality, opaque white)
- 3D printer (FDM or SLA/Resin)
- Lithophane generation software (or online tool)
- High-resolution photo of a winter landscape
- Cream or off-white silk ribbon (approx. 1/4 inch wide)
- Fine-grit sandpaper (400-800 grit)
- Small drill bit (if hole needs widening)
- Clean microfiber cloth
Step 1: Digital Preparation
-
Select your image:
Choose a high-contrast photo of a winter scene. Images with bare trees against a light sky, like the one shown, work best because the stark branches create defined dark lines against the thinner, lighter sky sections. -
Configure lithophane settings:
Upload your image to a lithophane generator. Select a ‘Round’ or ‘Circle’ shape profile. Set the maximum thickness to around 3.0mm and the minimum thickness to 0.6mm or 0.8mm for optimal contrast without fragility. -
Add the border style:
Look for a frame or border setting in your generator. Choose a ‘Scalloped’ or ‘Rope’ edge design to mimic the decorative rim seen in the project image. If a specific scalloped edge isn’t available, a simple raised rim will also frame the scene nicely. -
Integrate the hanging loop:
Ensure you enable a hole or loop feature at the very top of the model. Set the hole diameter to approximately 3-4mm to accommodate your silk ribbon comfortably. -
Generate the STL:
Preview the result to ensure the positive/negative values are correct (darker areas should be thicker) and download the STL file.
Lines in your sky?
If horizontal lines appear, your Z-axis might be binding. Clean and lubricate your printer’s lead screw. printing slightly hotter can also improve layer fusion for smoother gradients.
Step 2: Printing Process
-
Slicer orientation:
Import the STL into your slicer software. IMPORTANT: Stand the lithophane vertically on its edge. Printing flat creates a topographic map effect, while printing vertically produces the smooth gradient needed for a high-quality photo look. -
Align with axis:
Align the flat plane of the lithophane along the Y-axis (so the bed moves front-to-back, not side-to-side) to minimize wobbling during the print. -
Set print parameters:
Set layer height to 0.12mm or even 0.1mm for fine detail. Set infill to 100% (this is crucial—hollow spaces ruin the light effect). Use a brim for bed adhesion since the contact area is narrow. -
Print the model:
Start the print using your white PLA. I prefer to slow the print speed down slightly (around 40mm/s) for the outer walls to ensure the delicate tree branches render sharply. -
Cool and remove:
Allow the build plate to cool completely before removing the print. Vertical lithophanes can be brittle while warm, so patience prevents snapping.
Pro Tip: Hidden warmth
For the warm glow seen here, hang the ornament in front of a window during ‘golden hour,’ or place a warm-white (2700K) LED fairy light directly behind it.
Step 3: Finishing and Assembly
-
Clean up the brim:
Carefully peel away the brim from the bottom edge. Use flush cutters or a hobby knife to trim any stubborn burrs for a smooth finish. -
Check the hanging hole:
Inspect the small hole at the top. If there is any stringing or blocked filament, gently twist a small drill bit by hand to clear the opening. -
Light sanding:
If there are tiny blobs or z-seams on the scalloped border, gently buff them with fine-grit sandpaper. Avoid sanding the actual image face, as scratches will show up as artifacts when backlit. -
Wipe down:
Clean the ornament with a microfiber cloth to remove any plastic dust or oils from your hands. -
Prepare the ribbon:
Cut a length of cream silk ribbon, approximately 12-14 inches long. -
Threading the loop:
Fold the ribbon in half. thread the folded loop through the hole from front to back. -
Secure the knot:
Pass the loose ends of the ribbon through the loop you just pushed through the hole and pull tight to create a lark’s head knot right at the top of the ornament. -
Tie the bow:
Tie the loose ends together at your desired hanging length, or tie a decorative bow a few inches up the string as shown in the photo for added elegance.
Now, hang your creation in the window and watch the winter scene emerge as the light shines through.
LED Candle Lithophane Shade
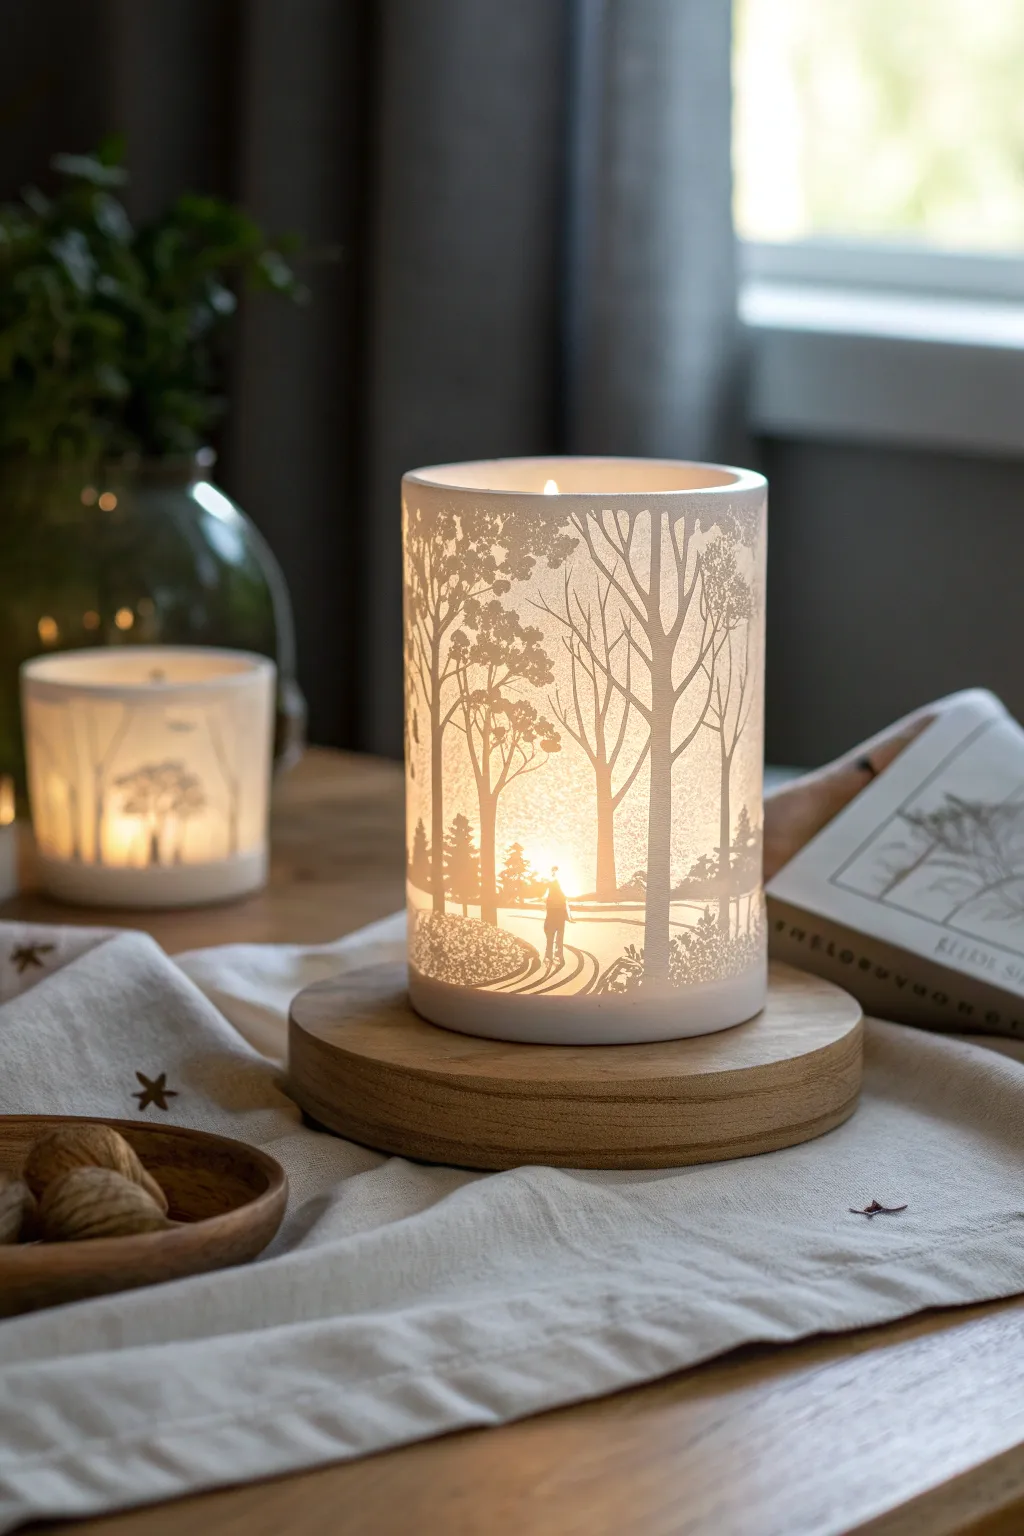
Bring the serene beauty of a woodland walk into your home with this glowing cylindrical lithophane shade. Designed to fit over a standard LED candle, the varying thickness of the ghostly white print transforms into a rich, detailed silhouette scene when illuminated from within.
How-To Guide
Materials
- White PLA filament
- 3D Printer (FDM)
- Digital photo of a forest scene (high contrast works best)
- Lithophane generation software (e.g., ITSLite, Cura, or online tools)
- Wooden coaster or custom-turned wood base (approx. 4-5 inches diameter)
- LED pillar candle or puck light
- Digital calipers
- Sandpaper (220 to 400 grit)
- Isopropyl alcohol
Step 1: Image Preparation & Design
-
Selecting the Image:
Choose a high-resolution photo with clear separation between the foreground trees and the background sky. A black-and-white conversion helps you visualize how the light will pass through; dark areas will be thick plastic, and light areas will be thin. -
Measuring the Base:
Use your calipers to measure the diameter of your wooden base and your LED candle. You need the cylinder’s inner diameter to be slightly larger than the candle, but small enough to sit comfortably on the wood. -
Generating the STL:
Upload your image to a lithophane generator tool. Select the ‘Cylinder’ or ‘Curved’ shape option. -
Adjusting Settings:
Set your maximum thickness to around 3.0mm and minimum thickness to 0.8mm for good contrast. Ensure the ‘Positive/Negative’ setting is correct so the dark parts of the image become the thickest parts of the print. -
Sizing the Cylinder:
Input the diameter you measured earlier. Set the height to completely cover your LED candle flame source, usually around 100-120mm.
Print Alignment
Align the seam of your 3D print with the least important part of the image, like a dark tree trunk, to hide the vertical line created by the Z-seam.
Step 2: Slicing & Printing
-
Slicer Orientation:
Import the generated STL file into your slicer software. Keep the cylinder standing upright on the print bed. -
Perimeter Settings:
Set your perimeters (shells) to a high number, like 10 or 99. You want the entire wall to be solid perimeters with no infill, as infill patterns create ugly cross-hatching when lit up. -
Layer Height:
Choose a low layer height, such as 0.12mm or 0.16mm. Lower layer heights provide significantly better resolution for the image details. -
Speed and Cooling:
Slow down your outer wall speed to around 30-40mm/s to prevent ringing artifacts. Ensure part cooling is at 100% to handle the overhangs in the texture. -
Adding a Brim:
Enable a 5-10mm brim to secure the tall, thin cylinder to the build plate and prevent it from toppling during the print. -
Printing:
Start the print. Step back and let the machine work; these prints can take 10+ hours depending on height. I usually let these run overnight so I don’t obsess over every layer.
Step 3: Post-Processing & Assembly
-
Removing the Print:
Once the bed has cooled, carefully pop the cylinder off. Deburr the bottom edge where the brim was attached using a deburring tool or craft knife. -
Cleaning the Strings:
Inspect the inside and outside for any fine stringing. A quick blast with a heat gun (careful not to warp the print!) or a light sanding with 400-grit paper cleans this up. -
Preparing the Base:
If using a raw wooden coaster, sand it smooth and apply a light oil or stain to match your decor. Ensure the surface is flat so the LED candle sits level. -
Final Assembly:
Place your LED candle or puck light onto the center of the wooden base. -
The Reveal:
Lower the printed cylinder over the light. Turn off the room lights to see the image pop; the thick plastic will block light to create tree trunks, while the thin areas glow bright like the sun.
Dark Spots appearing?
If you see unwanted gaps or holes in the print, increase your ‘minimum thickness’ setting in the generator. Walls below 0.6mm may not print solid.
Enjoy the warm, detailed glow of your custom forest scene every evening.
Hexagon Honeycomb Lithophane Wall Grid
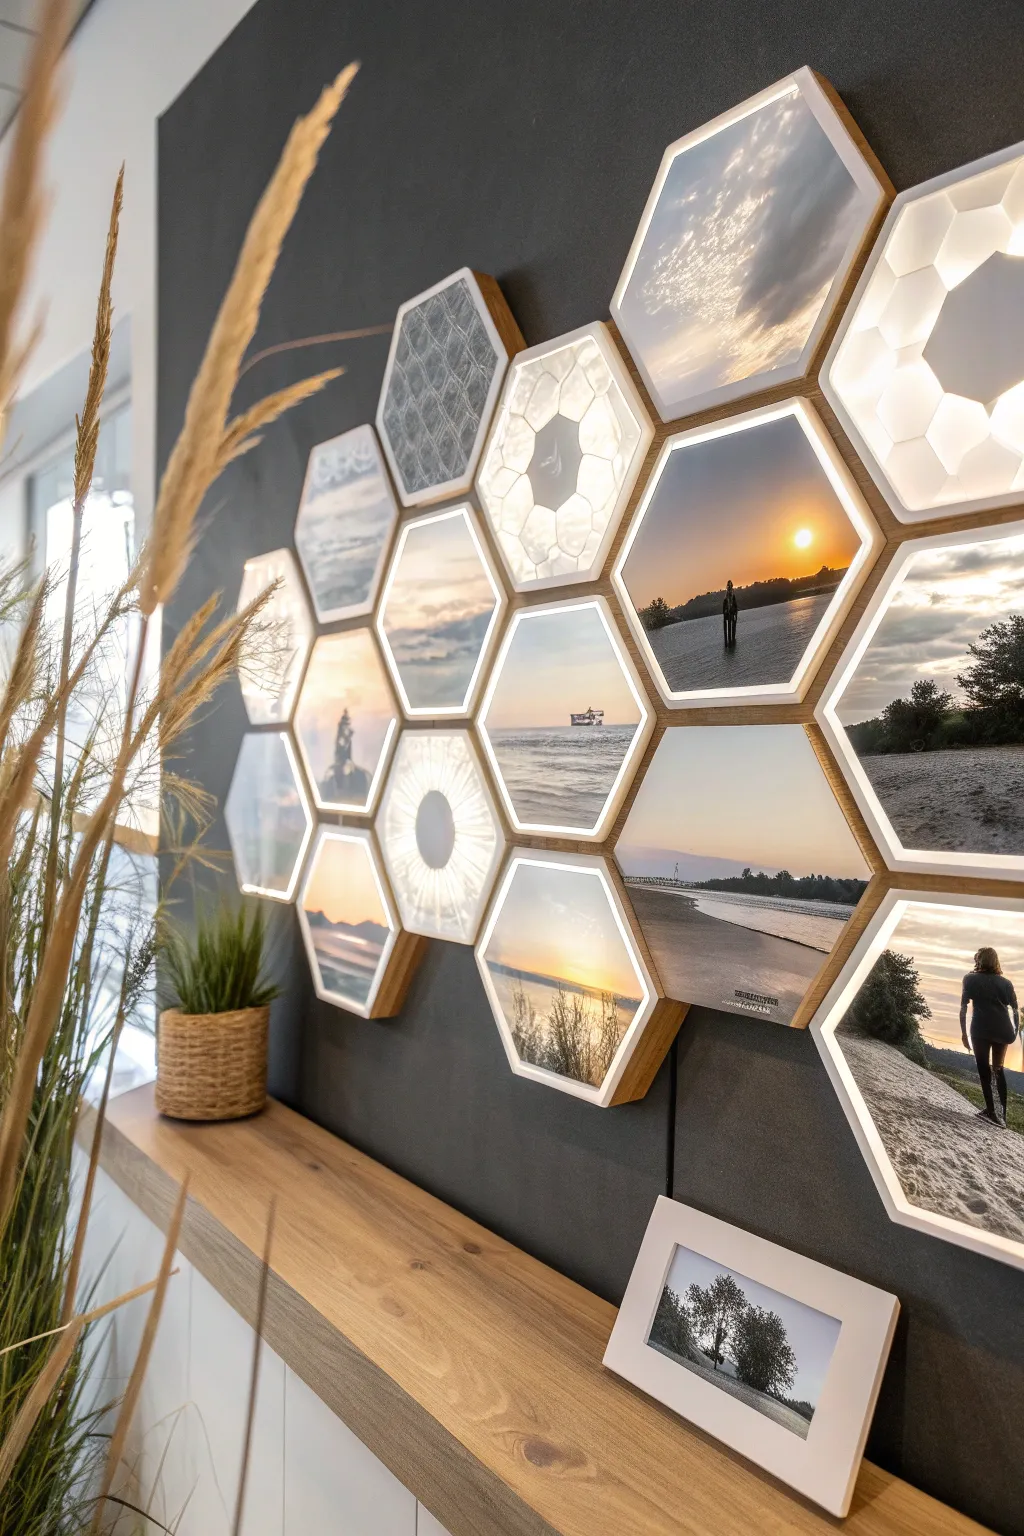
Transform your favorite memories into a stunning, modular light feature with this hexagonal lithophane display. The warm backlighting brings hidden details to life, creating a cozy and personalized atmosphere in any room.
Step-by-Step
Materials
- White PLA filament (for lithophanes)
- Wood-infused PLA or matte brown PLA (for frames)
- 3D printer
- LED strip lights (warm white, 12V or 24V)
- Small DC power supply
- Connecting wires and soldering iron
- Double-sided mounting tape or Command strips
- Various digital photos (landscapes, textures)
Step 1: Design & Preparation
-
Select your images:
Choose a mix of high-contrast photos. Sunsets, silhouettes, and landscapes work best for lithophanes. Include a few abstract textures or geometric patterns to break up the visual density. -
Generate the lithophane STLs:
Use an online lithophane generator. Select a hexagonal shape and ensure you set a consistent size (e.g., 100mm width) for all tiles. Set the maximum thickness to around 3mm and the thinnest part to 0.8mm for optimal light transmission. -
Design or download the frames:
Create a hexagonal frame model that fits your lithophane panel snugly. Include a small lip on the front to hold the image and a hollow back to accommodate the LED strips. Alternatively, search for ‘modular hex lithophane frame’ on model repositories.
Step 2: 3D Printing
-
Slice the lithophanes:
Import your lithophane STLs into your slicer. Critical setting: Print vertically (standing up) aligned with the Y-axis for the highest resolution. Use a brim to keep them stable. -
Print settings for lithophanes:
Set infill to 100% (or 99 walls) so the image is solid plastic. Use a lower layer height, such as 0.12mm or 0.1mm, to capture fine details. -
Print the frames:
Swap to your wood or brown filament. Print the frames flat on the bed. Standard 0.2mm layer height works fine here. I find wood PLA gives a fantastic organic look but requires a slightly larger nozzle (0.6mm) to prevent clogs. -
Clean up parts:
Once printed, remove all brims and supports. lightly sand the edges of the lithophanes if they are too tight for the frames.
Light Diffusion Tip
If you see ‘hot spots’ from individual LEDs through the picture, line the inside back of the frame with aluminum foil tape to reflect light, or add a sheet of tracing paper behind the lithophane.
Step 3: Assembly & Electronics
-
Prepare the LED strips:
Cut your LED strip into short segments that fit inside the hexagonal frames. Usually, 3-6 LEDs per hexagon is sufficient for even brightness. -
Wiring the harness:
Solder wires connecting the LED segments in a parallel circuit. Leave enough wire distinct slack between segments so you can arrange the hexagons freely on the wall later. -
Mount LEDs to frames:
Peel the adhesive backing and stick the LED segments to the inside back wall of each frame. Secure with a dab of hot glue if the adhesive feels weak. -
Insert the lithophanes:
Press-fit the white lithophane photo plates into the front of the frames. Use a small drop of superglue in the corners from the inside if the fit is loose. -
Test the circuit:
Connect your power supply to the wire chain before mounting. Check that every panel lights up uniformly.
Colorize It
Print a color photo on standard paper, cut it to size, and glue it to the *back* of the lithophane. When the light shines through, it will project the colors onto the white plastic front.
Step 4: Installation
-
Plan your layout:
Lay the finished modules on a table or floor to finalize your honeycomb pattern. Mix the textures and photo subjects for a balanced look. -
Mount to the wall:
Apply strong double-sided mounting tape to the back edges of the frames. Start from a central tile and work outward, pressing firmly for 30 seconds per tile. -
Hide the wires:
Tuck the connecting wires behind the frames as you go. For the main power cord, consider running it down a corner or using a cable channel for a clean finish.
Flip the switch and enjoy the warm, nostalgic glow of your custom gallery wall
Stacked Cube Lithophane Tower
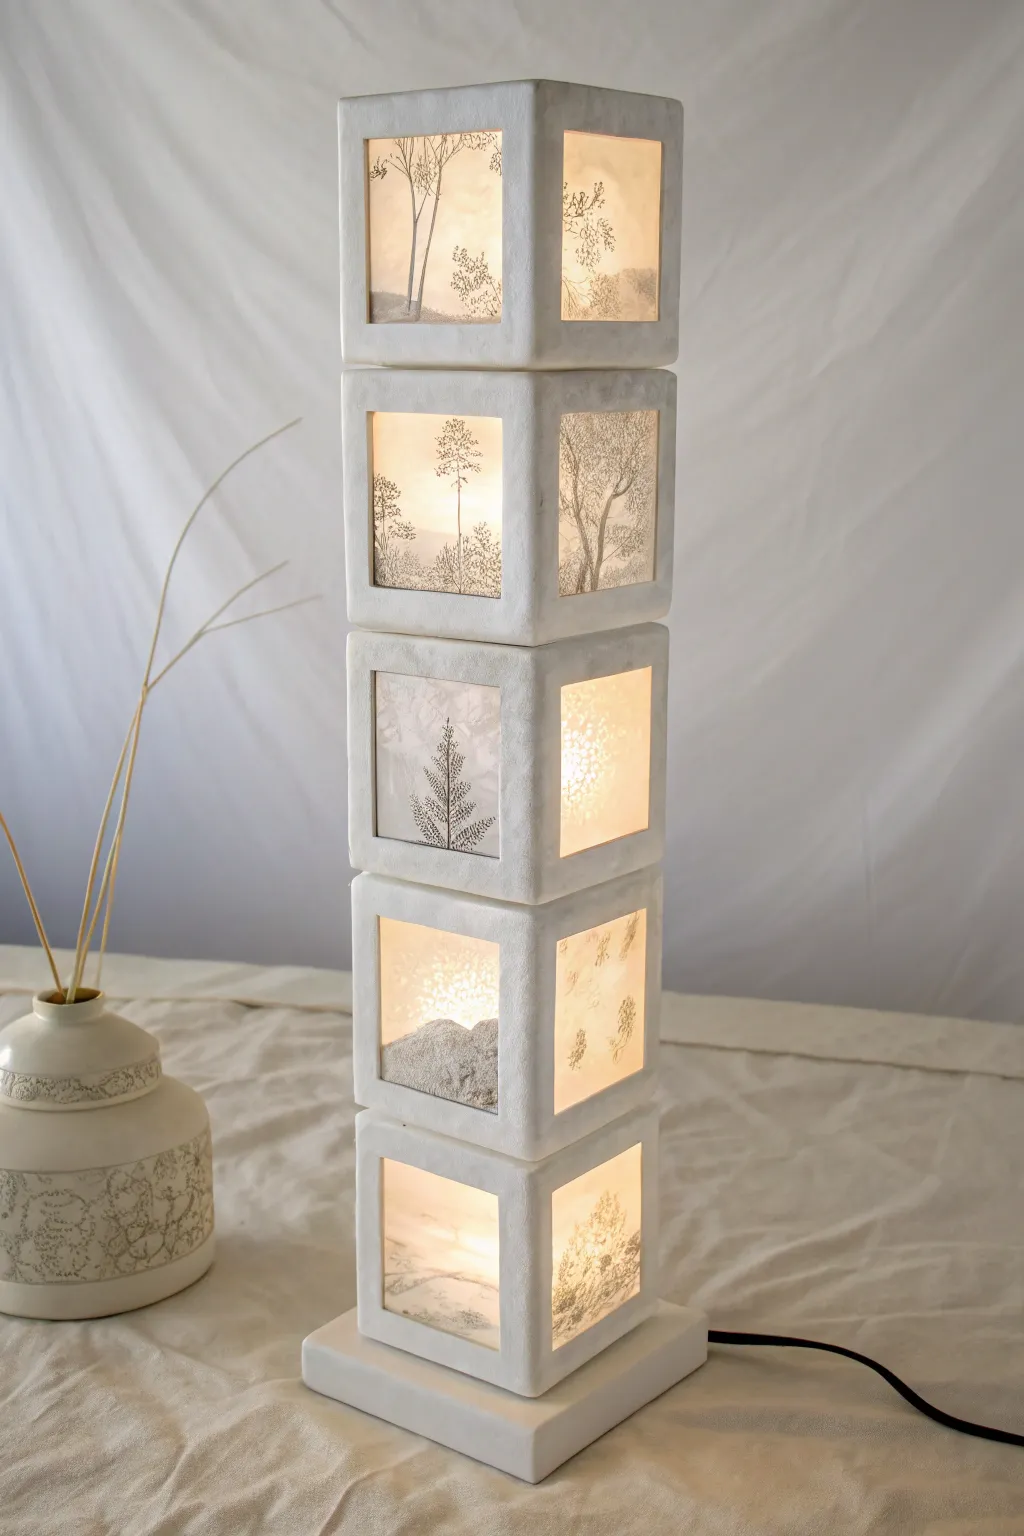
This elegant floor or table lamp transforms simple lithophane panels into a structural masterpiece, featuring five stacked cubes that glow with warm, diffused light. The nature-inspired silhouettes of trees and foliage create a serene atmosphere perfect for a cozy reading nook.
How-To Guide
Materials
- White PLA filament (for 3D printed frames)
- White lithophane filament or high-quality white PLA
- 3D printer
- Lithophane generation software (online or local)
- Translucent vellum paper suitable for printing (alternative to 3D printing panels)
- Square wooden or 3D printed base plate
- LED strip lights (warm white) or a central LED bulb column
- CA glue (superglue) or epoxy
- Power drill
- Sandpaper (220 to 400 grit)
- Power cord with switch
Step 1: Designing the Lithophanes
-
Select your imagery:
Choose high-contrast nature images like tree silhouettes, fern fronds, or delicate branches. Black and white line art works exceptionally well for this specific look, as it mimics the sharp details seen in the example. -
Configure software settings:
Upload your images to a lithophane generator. Set the shape to ‘Square’ or ‘Flat Panel’. Ensure your dimensions match the opening size of your cube frames (e.g., 100mm x 100mm). -
Adjust thickness parameters:
Set the minimum thickness to around 0.8mm and maximum thickness to 2.5-3.0mm. This range provides the crisp contrast visible in the photo without blocking too much light. -
Generate the files:
Create four distinct panels for each of the five cubes. You’ll need 20 panels total, so mix and match your nature scenes to create variety up the tower.
Printing Orientation
Always print lithophanes standing vertically, aligned with the Y-axis (bed movement). This produces much smoother gradients than printing flat.
Step 2: Printing the Components
-
Print the structural frames:
Design or download a modular open-cube frame with recessed channels to hold the lithophane panels. Print five identical open-cube frames using white PLA at 100% infill for solidity. -
Print the lithophane panels:
Print your 20 panels vertically (standing up) rather than flat. Align them along the Y-axis of your printer to minimize wobbling. Use a brim for adhesion and print slowly (30-40mm/s) for the finest detail. -
Prepare the base:
Print or cut a slightly wider, flat base with a central hole for wiring. This stabilizes the tall tower and prevents tipping.
Step 3: Assembly and Lighting
-
Test fit panels:
Gently slide the printed lithophane panels into the recessed grooves of your cube frames. If they are tight, lightly sand the edges. Do not glue them yet. -
Install the lighting core:
Run a central support rod or a rigid LED strip tower up from the base. I like to use an aluminum channel with LED strips on two or four sides to ensure even illumination through every face of the cubes. -
Wire the base:
Feed the power cord through the base hole and solder or connect it to your LED column. Secure the wire with a strain relief knot or clip inside the base. -
Stack the first cube:
Slide the bottom cube frame (with panels inserted) over the lighting column. Secure it to the base using CA glue specifically formulated for plastics. -
Continue stacking:
Apply a thin bead of glue to the top rim of the first cube and place the second cube directly on top, ensuring the corners are perfectly flush. Repeat until all five cubes are stacked. -
Cap the tower:
Place a solid white square lid on the very top cube to hide the internal wiring and give the piece a finished look.
Seasonal Swap
Design the top of the cube frames to be removable. This allows you to slide out the panels and swap them for seasonal themes like snowflakes or flowers.
Step 4: Finishing Touches
-
Check for light leaks:
Turn on the lamp in a dark room. If light bleeds through the seams between cubes, you can carefully fill the gaps with a tiny amount of white wood filler or thick white paint. -
Clean up the surface:
Wipe down the exterior with a microfiber cloth to remove any fingerprints or plastic dust from standing.
Once assembled, finding the perfect corner for your new light sculpture creates an instant focal point in the room
Retro TV-Style Lithophane Display
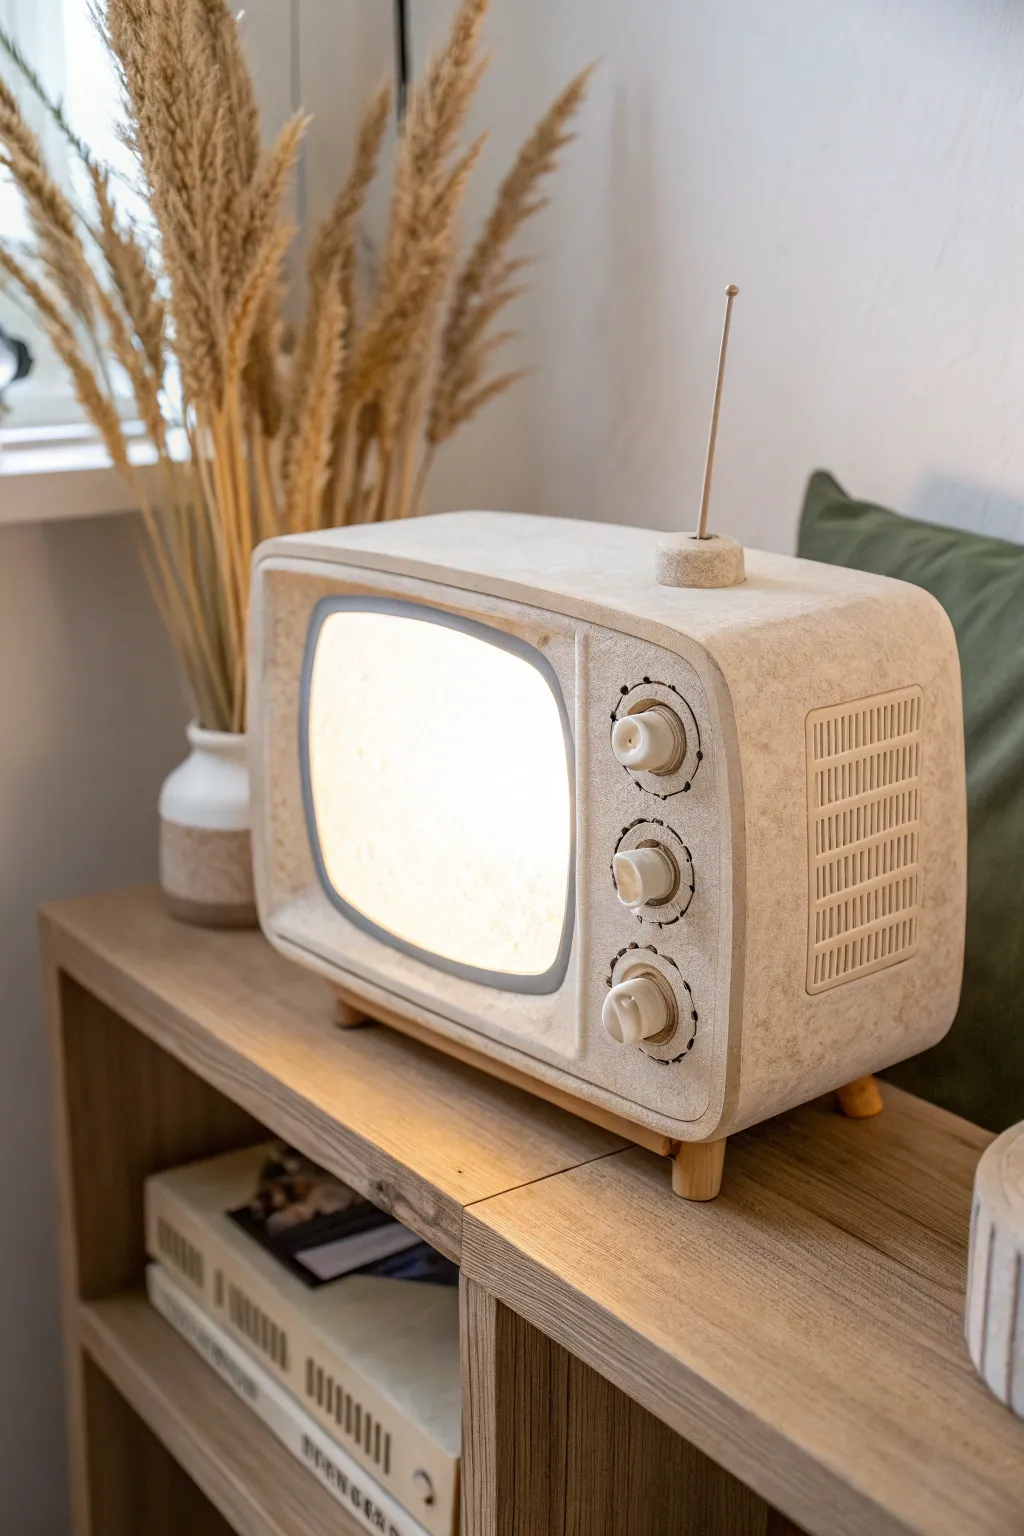
Bring a touch of nostalgic charm to your shelf with this 1950s-inspired television lamp. Featuring a speckled stone-like finish and tactile knobs, this project turns a standard lithophane pane into a cozy, illuminated decor piece.
Step-by-Step Guide
Materials
- White PLA filament (for the lithophane)
- Marble or speckled ivory PLA filament (for the case)
- Wood PLA filament (for the legs and antenna base)
- Small metal rod or stiff wire (antenna)
- LED strip lights (warm white recommended)
- 5V power supply or USB cord
- Super glue (cyanoacrylate)
- 3D modeling software (e.g., Fusion 360, Tinkercad)
- Slicer software
- 3D Printer
- Sandpaper (220 grit)
- Digital photo for the lithophane
Step 1: Designing the Model
-
Create the main body:
Start by modeling a hollow, rounded-rectangular box in your CAD software. Fillet the corners generously to achieve that classic mid-century CRT television silhouette. -
Design the screen bezel:
Extrude a smaller, recessed rounded rectangle on the front face. Create a lip inside this opening that is roughly 3-4mm deep; this groove will verify securely hold your lithophane panel later. -
Add functional details:
Model three circular holes vertically on the right side of the face for your knobs. Don’t forget to add a small hole on the top surface for the antenna and cable management holes in the back. -
Model the accessories:
Separately design three flared control knobs, four short conical legs, and a small dome-shaped base for the antenna. Keep these as individual parts to print in contrasting materials.
Step 2: Generating the Lithophane
-
Prepare your image:
Choose a high-contrast photo and use an online lithophane generator tool. Set the shape to ‘Plane’ or ‘Flat’. -
Dimensioning:
Measure the screen opening you designed in the previous phase exactly. Resize your lithophane generation settings to match these dimensions, adding a 1mm tolerance to ensure it fits the groove. -
Slicing settings:
When slicing the lithophane, set infill to 100% and use a layer height of 0.12mm or lower for the best resolution. Print this vertically along the Y-axis to minimize wobbling artifacts.
Uneven lighting?
If the center is too bright, arrange your LEDs in a perimeter loop around the inside edges facing inward, rather than sticking them directly on the back wall.
Step 3: Printing and Assembly
-
Print the casing:
Load your marble or speckled ivory PLA. I prefer to print the main body face-up with supports enabled for the interior to ensure the front surface texture is uniform. -
Print the accents:
Swap to your wood-fill PLA or a brown filament to print the legs and antenna base. Print the knobs in the same marble material as the case, or a contrasting white. -
Install the lighting:
Cut your LED strip to size. Adhere the strips in horizontal rows along the inside back wall of the TV casing. Solder your power wires or thread the USB cable through the rear gap. -
Insert the screen:
Slide your printed white lithophane into the bezel groove from the inside. Secure the corners with a tiny dot of super glue if the friction fit isn’t tight enough. -
Attach the feet:
Glue the four conical legs to the underside of the TV. Ensure they are spaced evenly for stability. -
Mount the controls:
Glue the three knobs into their respective slots on the front panel. You can add small tick marks with a fine-tip black marker around the knobs for extra realism. -
Final antenna assembly:
Insert the metal rod into the small wood-printed dome base, then glue this assembly to the top right corner of the TV case. -
Light test:
Plug in the LEDs to check the diffusion. If you see ‘hot spots’ (individual LED dots) through the picture, simple adhere a sheet of parchment paper or thin vellum behind the lithophane to soften the light.
Level Up: Sound
Hide a small Bluetooth speaker inside the case behind the lights. Now your retro TV can play vintage radio broadcasts or lo-fi beats while glowing.
Now you have a charming, illuminated keepsake that captures a favorite memory in retro style
City Map Lithophane Night Lamp
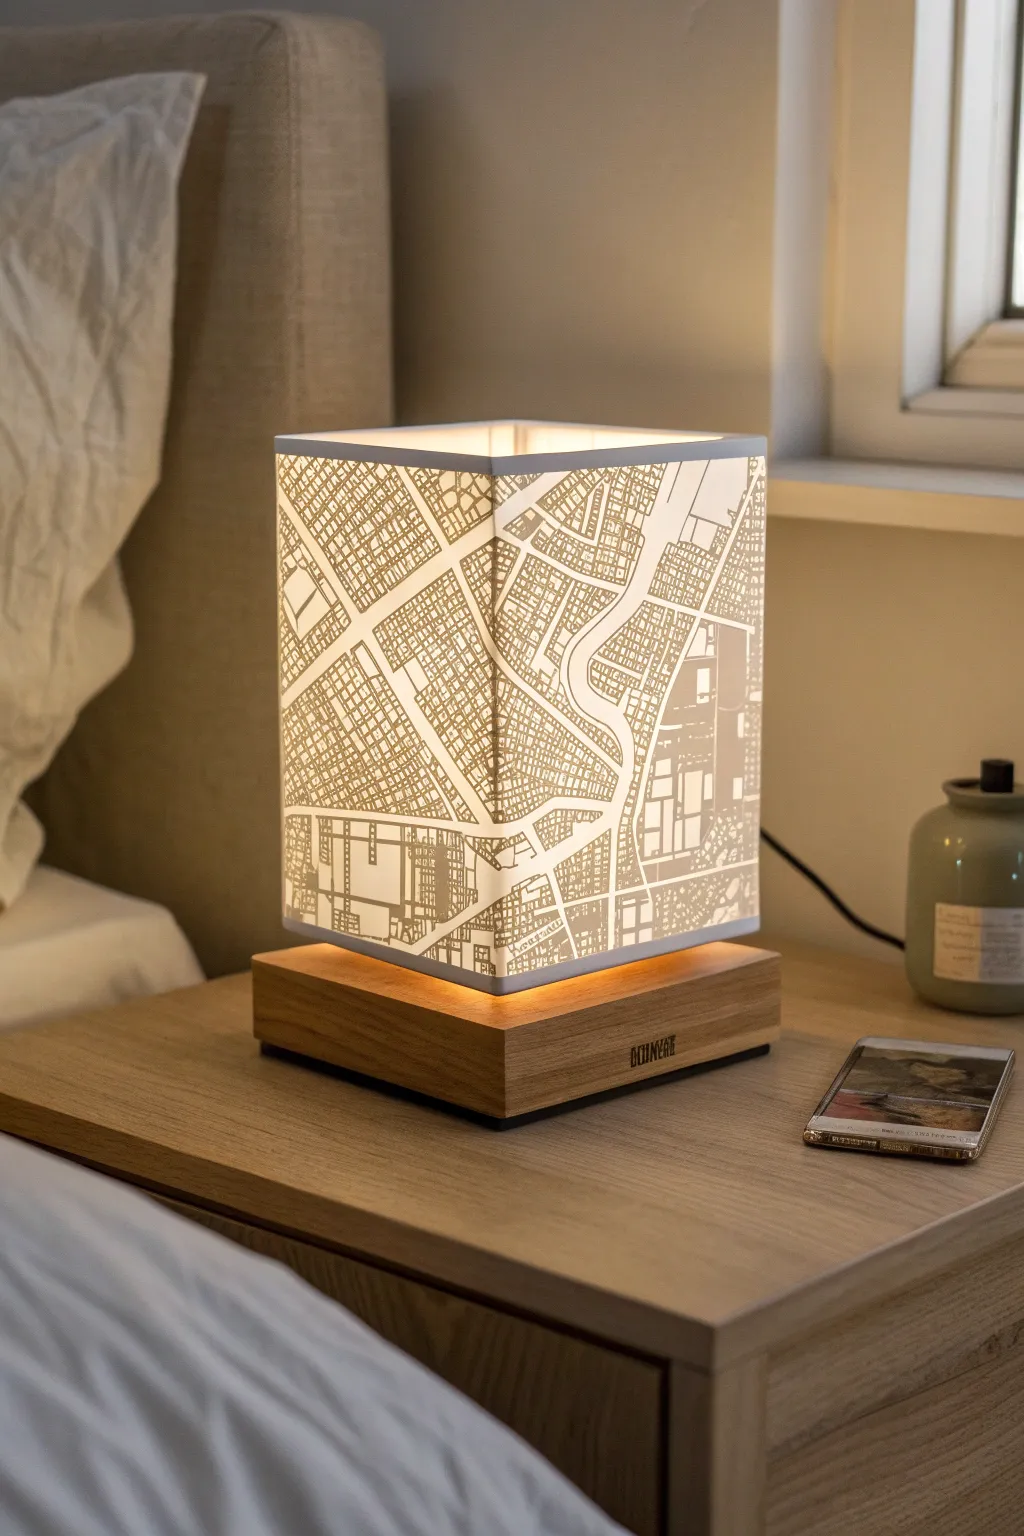
Transform your favorite cityscape into a functional piece of art with this elegant lithophane night lamp. The detailed street map glows warmly through the translucent shade, casting soft light perfect for a bedside table.
Step-by-Step
Materials
- White PLA filament
- 3D Printer (FDM)
- Map data source (e.g., Google Maps or specialized lithophane generator)
- Square wooden base (pre-made or custom cut)
- LED strip lights or small bulb socket kit
- Sandpaper (various grits)
- Super glue or epoxy
- Wood stain (optional)
- Caliper
- Power drill (if making custom base)
Step 1: Designing the Map
-
Select your location:
Choose a city or neighborhood with distinct features like rivers, dense grids, or diagonal avenues to make the lithophane visually interesting. -
Generate the lithophane file:
Use an online lithophane creation tool. Upload a high-contrast screenshot of your map. Ensure roads are light (thin) and blocks are dark (thick) for the best light transmission. -
Configure shape settings:
Set the output shape to a ‘Square Box’ or ‘Cylinder’ depending on your preference, though the image shows a square pillar design. I recommend setting the minimum thickness to 0.8mm and maximum to 3.0mm. -
Size the model:
Measure your wooden base carefully. Scale the X and Y dimensions of your lithophane model to sit perfectly centered on the base, leaving a small margin if desired. -
Add a framed edge:
In your slicing software or generator, add a simple 3-5mm border to the top and bottom of the model. This creates the solid white rim seen in the photo and adds structural stability.
Map Contrast Trick
Before generating the STL, convert your map image to grayscale and boost the contrast. Make water features black and streets pur white for the sharpest final detail.
Step 2: Printing the Shade
-
Slice for quality:
Load your STL into your slicer. Set the layer height to 0.12mm or 0.16mm. Crucially, set infill to 100% so the light passes through solid plastic rather than a hollow grid. -
Orient the print:
Print the box vertically, standing upright on the print bed. This orientation provides the highest resolution for the map details compared to printing flat. -
Adjust print speed:
Slow down your outer wall speed to around 30-40mm/s. This helps prevent ringing artifacts that could distort the fine street lines. -
Print the model:
Start the print using white PLA. Avoid transparent or grey filaments, as standard white offers the best balance of diffusion and contrast for lithophanes.
Step 3: Preparing the Base
-
Prep the wooden block:
If cutting your own base, cut a square block slightly larger than your lithophane shade. Sand all sides until smooth, finishing with a fine grit. -
Create the light cavity:
Route or chisel a recessed area in the center of the wood top to house the LED lights. Drill a channel through the back or bottom for the power cord to exit. -
Install the lighting:
Adhere a small cluster of warm white LED strips or mount a low-profile bulb socket into the cavity. Ensure the light source is centered so the map illuminates evenly.
Make it Rotate
Install a slow-moving turntable bearing and motor inside the base to make the city map slowly rotate, adding a dynamic element to your nightstand.
Step 4: Assembly
-
Test fit the shade:
Place the printed lithophane over the base to check the fit. If it’s too tight, lightly sand the bottom interior edge of the print. -
Secure the shade:
Apply a thin bead of super glue or epoxy to the bottom rim of the lithophane. Carefully press it onto the wooden base, ensuring it is perfectly square. -
Final clean up:
Wipe away any excess glue immediately. Once dry, plug in the lamp to check for any light leaks around the base and seal them from the inside if necessary.
Switch on your new lamp and enjoy the warm glow of your personalized urban landscape
Pet Portrait Lithophane Memorial Light
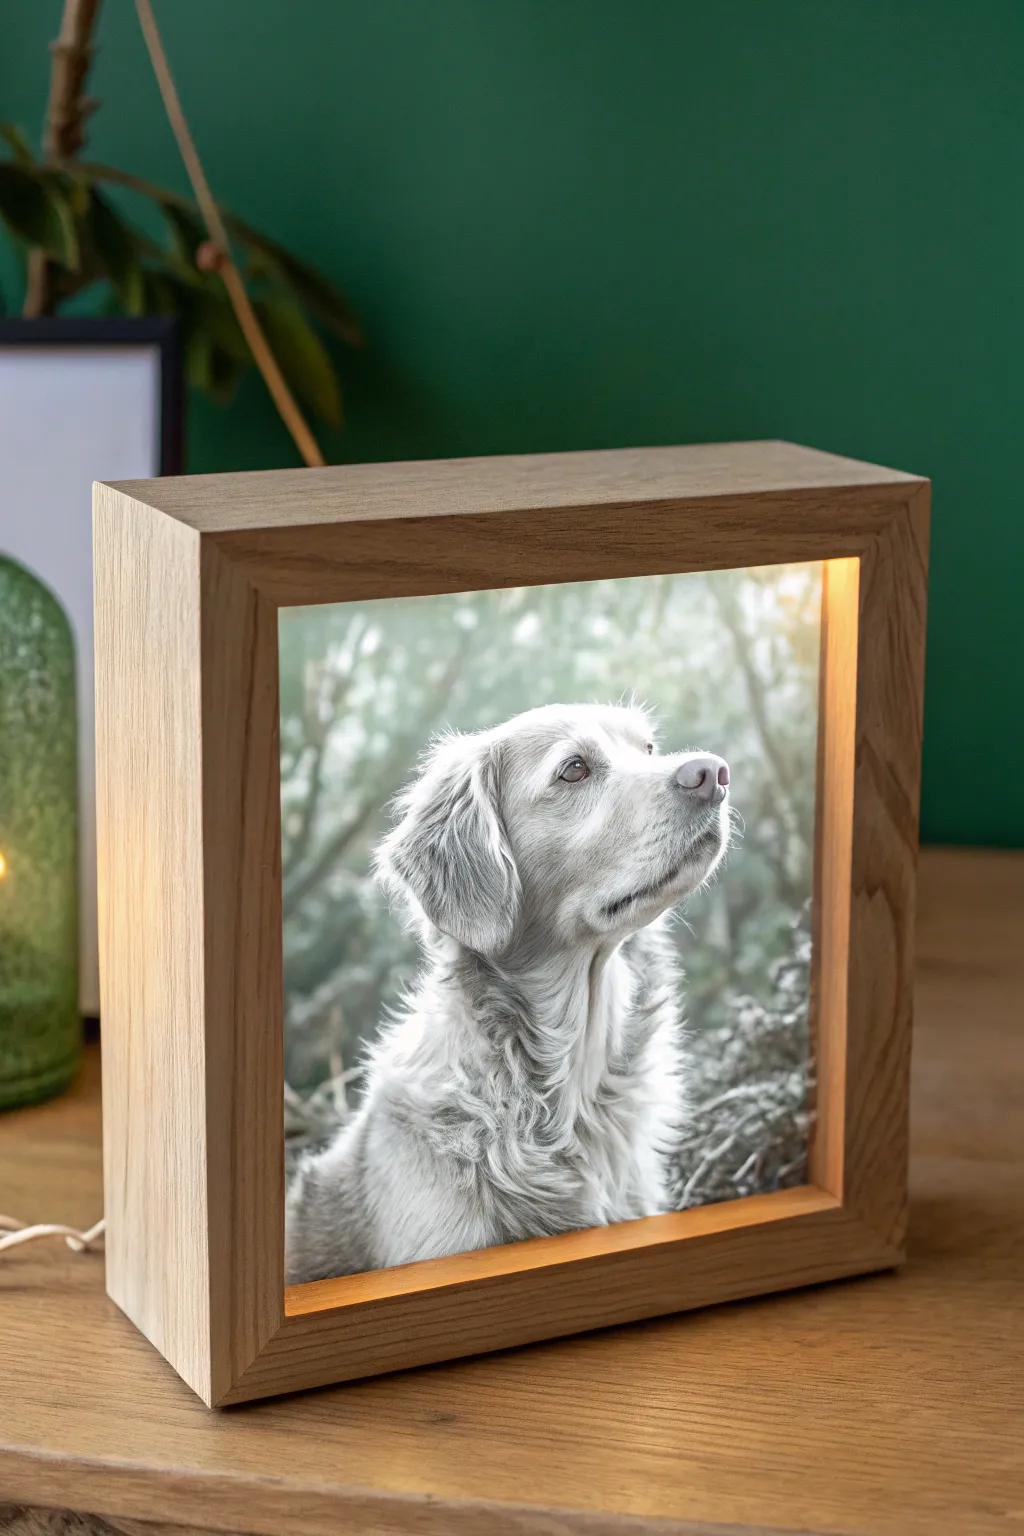
Immortalize your furry friend with this warm, wooden shadow box that illuminates a detailed lithophane from within. The soft glow brings out the incredible depth of a printed photograph, turning a favorite snapshot into a serene memorial piece.
Step-by-Step Tutorial
Materials
- White PLA filament
- 3D Printer
- High-resolution photo of your pet
- Solid Oak or Pine wood (approx 1 inch thick)
- Table saw or hand saw
- Router with rabbeting bit
- Wood glue
- Sandpaper (120 – 400 grit)
- LED strip lights (warm white, USB powered)
- Clear acrylic sheet (optional backing)
- Wood finish (Danish oil or matte varnish)
- Soldering iron (optional for LED strips)
- Clamps
Step 1: Generating & Printing the Lithophane
-
Prepare your photo:
Choose a high-contrast photo of your pet. Images with a clear foreground subject and blurred background work best for lithophanes. Crop it to a square aspect ratio to match the intended frame design. -
Convert to STL:
Upload your image to a free online lithophane generator. Select the ‘Flat’ shape option. Ensure you set the image to ‘Positive’ (darker areas are thicker) so the light reveals the image correctly. -
Adjust printing settings:
Key settings are crucial here: set your infill to 100% to ensure light travels consistently. Use a layer height of 0.12mm or 0.16mm for fine details. -
Slice and print:
Print the file vertically (standing up) along the Y-axis rather than flat on the bed. This orientation produces significantly smoother gradients and prevents topographic map-like lines on the dog’s face. -
Add a brim:
Since the print is tall and thin, enable a wide brim in your slicer settings to keep it firmly adhered to the print bed during the several hours it takes to complete.
Step 2: Crafting the Wooden Frame
-
Measure and cut stock:
Measure your finished lithophane print. Cut four pieces of your hardwood stock to length, mitering the corners at 45 degrees so the interior dimension perfectly matches or slightly overlaps your print. -
Route the groove:
On the inside face of each wood piece, use a router or table saw to cut a small rabbet or groove about ¼ inch from the front edge. This is where the lithophane will slide in or rest. -
Assemble the box:
Apply wood glue to the mitered corners. Use a strap clamp or corner clamps to hold the square shape tight while the glue cures completely. Wipe away any squeeze-out immediately with a damp cloth. -
Sand for smoothness:
Once dry, sand the entire frame. Start with 120 grit to flush up the joints, then move to 220 and 400 grit for a silky finish. I usually round over the sharp outer edges slightly for a softer look. -
Apply finish:
Rub in a coat of Danish oil or a matte varnish to protect the wood and enhance the grain. Let it dry according to the manufacturer’s instructions.
Uneven Lighting?
If you see ‘hot spots’ of light behind the image, line the inside back panel with aluminum foil or white paper to diffuse the LEDs more evenly.
Step 3: Assembly and Lighting
-
Install the LEDs:
Cut a strip of warm white LEDs to fit the inner perimeter of the box behind the groove. Adhere them to the inside walls, ensuring the power connector remains accessible. -
Create a back panel:
Cut a small notch in a back panel (wood or heavy cardstock) for the power cord to exit. This panel will close off the back of the box to trap the light and push it forward. -
Insert the artwork:
Place your 3D printed lithophane into the front groove. It should fit snugly. If you cut the groove deep enough, you shouldn’t need glue, allowing you to swap it later. -
Secure the back:
Attach the back panel using small screws or finishing nails. This protects the electronics and gives the piece a finished furniture feel. -
First light up:
Plug in the USB cable and switch it on. The thick white plastic should instantly transform into a stunning greyscale photograph of your beloved pet.
Colorize It
Print a color photo on standard paper at the exact same size and glue it to the back of the lithophane. The light pushes the color through for a vivid effect.
Place your warm memorial light on a shelf or bedside table for a comforting reminder of your faithful companion.
Layered Diorama Lithophane Shadow Box
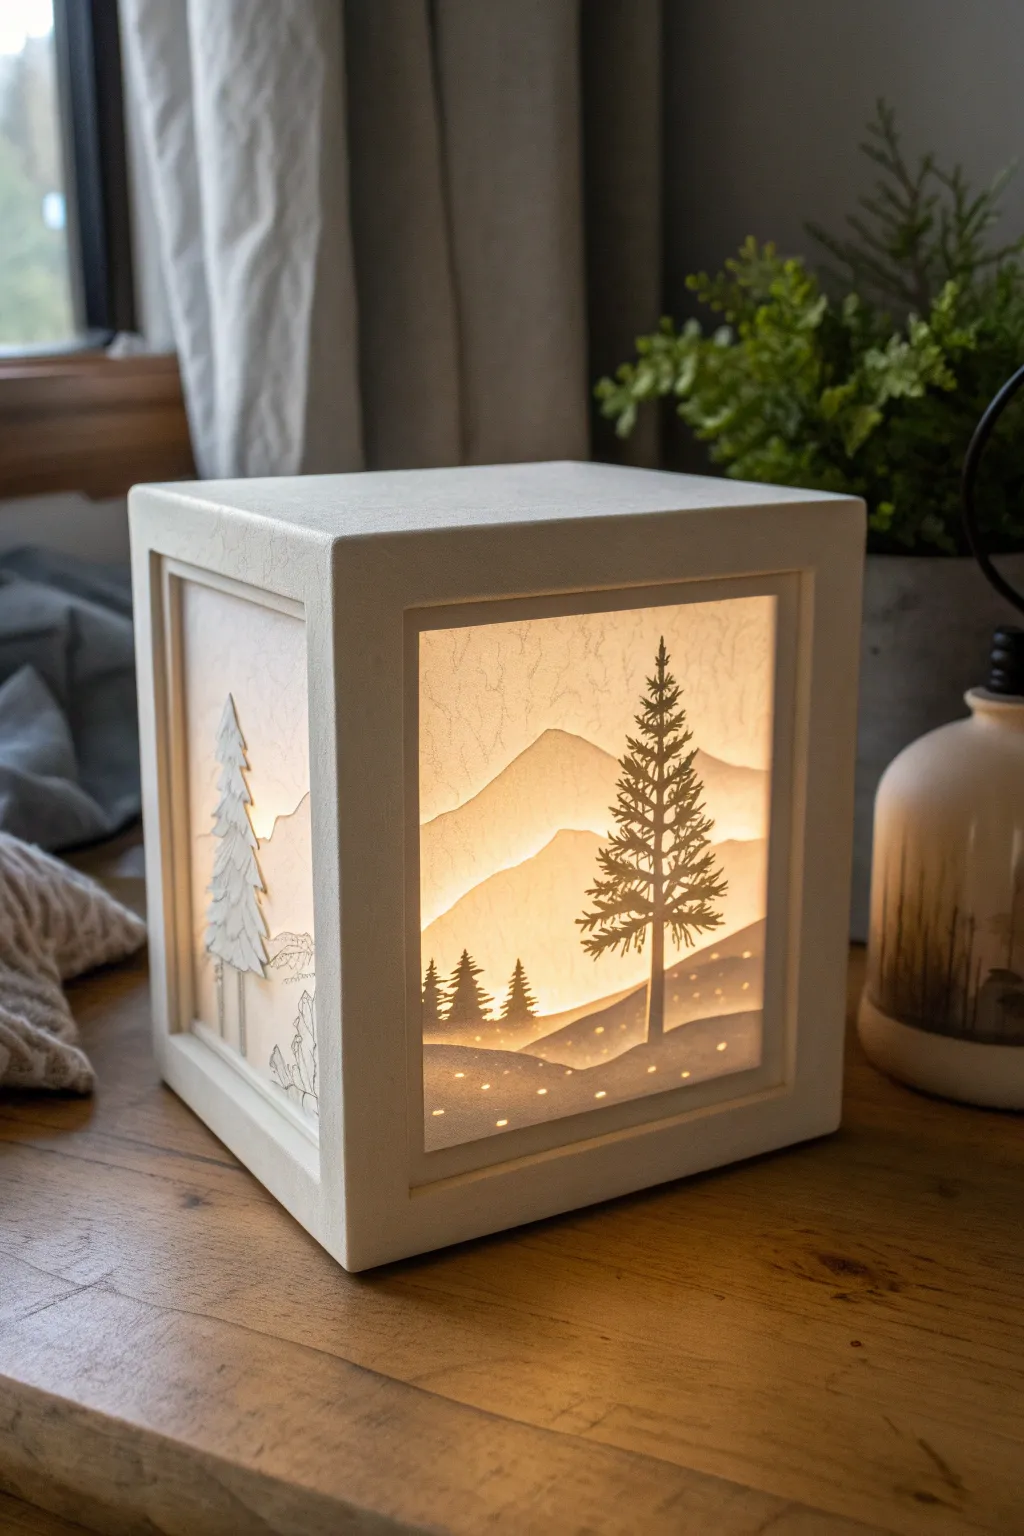
This project transforms a simple white cube into a mesmerizing, glowing landscape using the magic of layered lithophanes. By stacking cut paper or 3D-printed layers, you create depth and shadows that reveal a stunning mountain forest scene when backlit.
Step-by-Step Guide
Materials
- White PLA filament (for 3D printing) or heavy white cardstock (for manual cut)
- Translucent vellum paper
- Shadow box frame (cube, approximately 6×6 inches)
- LED strip lights or a small puck light (warm white)
- Craft knife and cutting mat (if using paper)
- 3D Printer (optional but recommended for frame)
- Super glue or double-sided tape
- White acrylic paint (if using a wooden frame)
- Frosted acrylic sheet (optional diffuser)
- Vector software (Inkscape or Illustrator)
Step 1: Designing the Layers
-
Plan your depth:
Visualize the scene. For the front panel shown, you need three distinct planes: a background mountain range, a mid-ground range, and a foreground hill with the prominent pine tree. -
Create vector outlines:
Using vector software, draw the outlines for each layer. The background layer should be the tallest mountain peaks. The middle layer should be slightly lower, and the foreground should be the lowest hill containing the detailed tree silhouette. -
Add texture and details:
For the foreground layer, add small circular holes scattered across the ground to mimic snow or magical dust. Ensure the tree branches are connected to the main trunk so they don’t fall out when cut.
Light Bleed Fix
If you see bright spots where layers join the frame, line the inner corners with opaque white tape or paint black on the hidden edges to block stray light.
Step 2: Fabricating the Scene
-
Method A: 3D Printing (Lithophane style):
Import your vector shapes into a 3D modeling tool. Extrude them as thin plates (about 0.8mm to 2mm thick). If you want true lithophane shading, vary the thickness of the mountains—thicker areas will block more light and appear darker. -
Method B: Paper Cutting:
If working with cardstock, print your templates and carefully cut them out with a sharp craft knife. I find a fresh blade is essential for the tiny needles on the pine tree. -
Prepare the side panels:
Create a different scene for the side panel, like the lone pine tree shown on the left face. This can be simpler, perhaps just one or two layers to add variety. -
Diffuser layer:
Cut a square of vellum paper or frosted acrylic to the exact size of your frame’s opening. This will sit behind all your layers to soften the light source.
Step 3: Constructing the Cube
-
Prepare the frame:
and ensure it is clean. If you are 3D printing the frame yourself, print it in a matte white filament to match the paper or lithophane vibe. -
Painting (if needed):
If you used a wooden box or raw material, paint it with matte white acrylic. Apply two thin coats for an even finish, letting it dry completely between coats. -
Install the backdrop:
Place the vellum or acrylic diffuser at the very back of the front opening recess. -
Layer assembly:
Insert your layers from back to front. Place the background mountains against the diffuser. Add a small spacer (strips of foam board work well) along the hidden edges before placing the middle mountain layer. -
Foreground placement:
Add another set of spacers and place the foreground layer with the tree. These gaps between layers are crucial—they create the shadows that give the box its magical depth. -
Side panel install:
Repeat the layering process for the side panel. It’s often easier to assemble these panels flat on a table before securing them into the main cube structure.
Colorize the Sky
Place a strip of orange or yellow cellophane behind the bottom half of the rear vellum layer to create a permanent sunset gradient effect.
Step 4: Lighting and Finishing
-
Prepare the light source:
Wrap a small LED strip around an inner cylinder or simply mount a puck light to the base of the cube. Warm white (around 3000K) creates the cozy sunset glow seen in the photo. -
Secure the lights:
Run the power cord through a notch in the back or bottom. Ensure the light bulb isn’t touching any paper components to safely manage heat. -
Close the box:
Place the lid or top panel on the cube. If your design is modular, it might just snap shut; otherwise, a dab of super glue on the corners will seal it permanently. -
Final test:
Turn on the light in a dim room. Check for any light leaking through the seams of the frame and seal them with a bit of white caulk or tape from the inside if necessary.
Place your glowing cube on a shelf and enjoy the serene mountain atmosphere it brings to your room
Handbuilt Ceramic Lantern With Porcelain Lithophane Panels
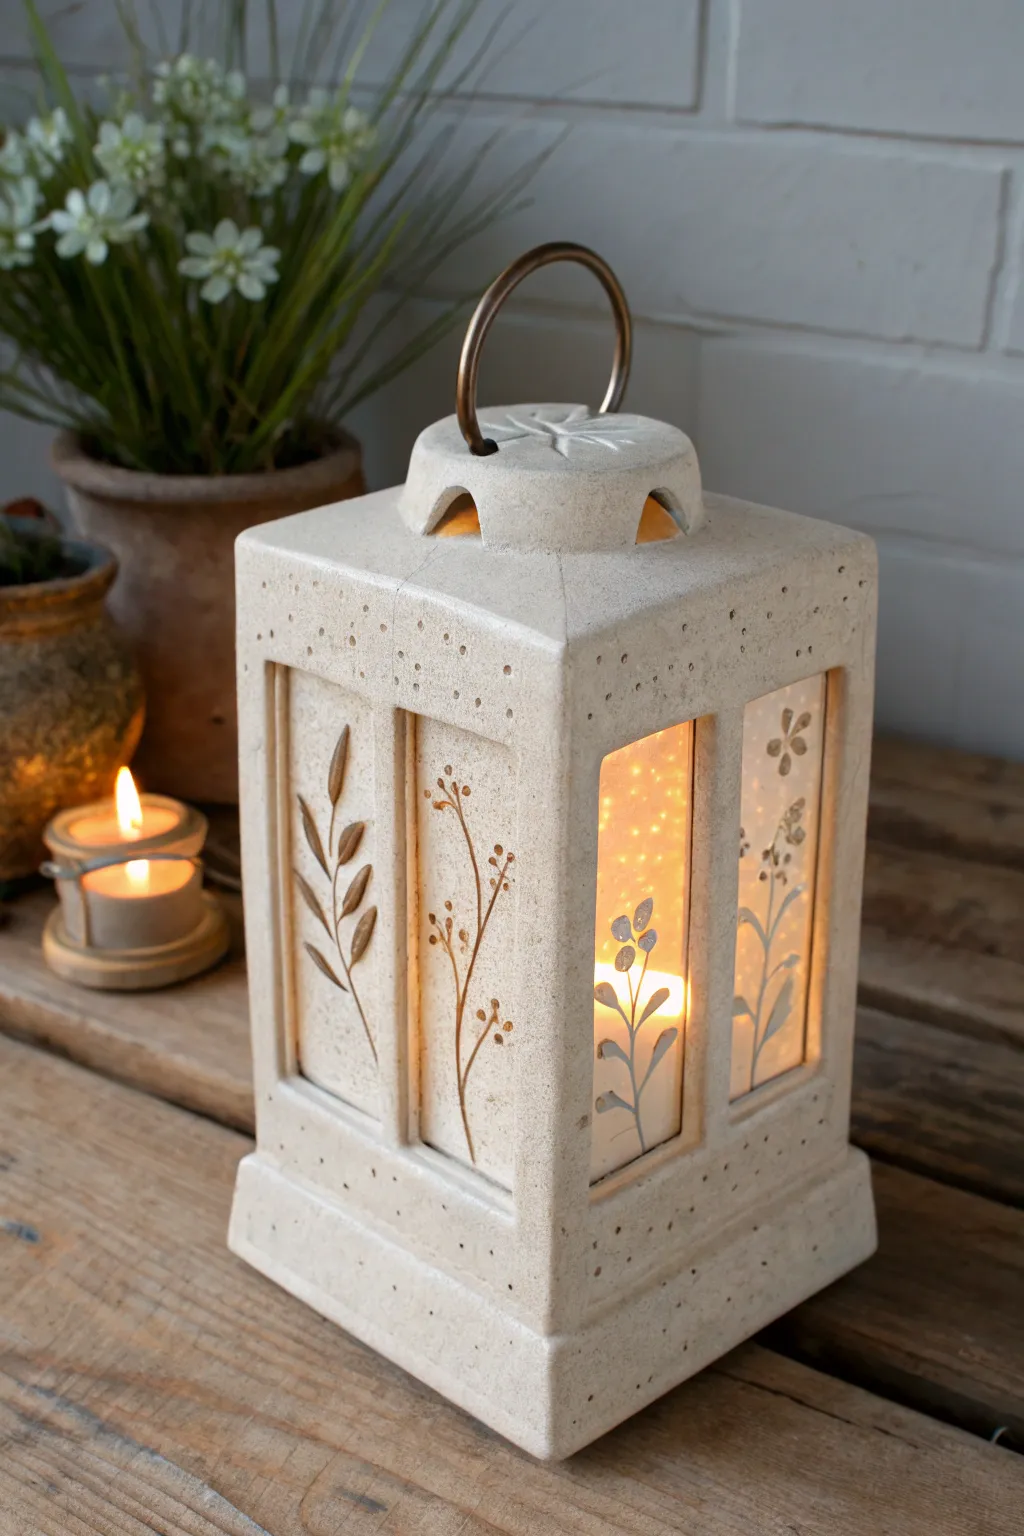
This project combines the structural charm of hand-built stoneware with the delicate translucency of porcelain lithophanes. The result is a sturdy, earthy lantern that comes alive with warm, botanical silhouettes when illuminated from within.
Step-by-Step Tutorial
Materials
- Stoneware clay (buff or speckled)
- Porcelain casting slip or translucent porcelain clay body
- Plaster bat or mold for casting panels
- Carving tools (needle tool, loop tool)
- Clay slab roller or rolling pin
- Guide sticks (wooden slats) for uniform thickness
- Slip and score tool
- Metal ring handle (copper or brass)
- Botanical stencils or dried flowers for impressing
- Knife or fettling tool
- Sponge and water
- Kiln
Step 1: Creating the Lithophane Panels
-
Prepare the porcelain:
If using a porcelain clay body, roll it out extremely thin—about 1/8 inch or 3mm. If using casting slip, pour a thin layer onto a plaster bat and let it firm up until it’s leather hard. -
Carve or impress designs:
While the porcelain is in a leather-hard state, gently carve your botanical designs. I prefer to carve deeper for the darker stems and leaves, leaving the background thicker to block more light. Alternatively, you can press dried flowers into the wet slip before it sets to create texture. -
Cut to size:
Measure and cut four rectangular panels that will fit inside the window openings of your lantern. Remember that porcelain shrinks significantly more than stoneware, so cut them slightly larger than your intended final size. -
Dry carefully:
Sandwich the delicate porcelain panels between two pieces of drywall board or heavy cardboard to ensure they dry perfectly flat without warping.
Step 2: Building the Stoneware Frame
-
Roll the main slabs:
Roll out your stoneware clay to a uniform thickness of about 1/4 inch using guide sticks. You will need four walls, a base, and a top piece. -
Cut the walls and windows:
Cut four equal rectangular walls. In two adjacent walls, cut out large rectangular windows where the lithophane panels will eventually sit. For the other two walls, simply impress a botanical design into the surface rather than cutting a window, mimicking the look of the lithophanes but in relief. -
Add texture:
Use a needle tool or a stiff brush to stipple small dots around the window frames and borders. This rustic detailing adds character to the unglazed surface. -
Assemble the box:
Wait until the slabs are leather hard. Score and slip the vertical edges of all four walls and join them together to form a square column. -
Attach the base:
Score and slip the bottom of your column and attach it to a slightly larger square slab base. Trim the excess clay at an angle to create a beveled foot like the one in the photo.
Shrinkage Woes
Porcelain shrinks ~15% vs stoneware’s ~10%. Calculate your shrinkage rates precisely beforehand by making test rulers for both clays to ensure the panels fit.
Step 3: Constructing the Roof and Finish
-
Form the lid:
Create a shallow, matching square lid that sits on top. Cut a central hole or vents to allow heat to escape—this is crucial for a candle lantern. -
Add a handle mount:
Fashion a small dome or raised area for the center of the lid. If you’re adding a metal ring later, poke holes now to accommodate the wire, or embed high-temp wire loops securely into the clay. -
Create panel channels:
On the inside of the lantern walls behind the window cutouts, add small coils or tabs of clay to create a channel or shelf. This is where the porcelain panels will slot in. -
First firing:
Bisque fire the stoneware frame and the porcelain panels separately. Place the porcelain on a flat, kiln-washed shelf to prevent warping. -
Assembly and Glazing:
Since we want a raw stone look, mask off any areas you don’t want glazed if you choose to glaze the interior. Often, leaving the outside unglazed stoneware is best. -
High fire:
Fire the pieces to maturity (likely Cone 5/6 or 10 depending on your clay). Ensure the porcelain panels are fired to full vitrification for maximum translucency. -
Final assembly:
Once everything is fired and cooled, use a strong epoxy specifically for ceramics to secure the porcelain panels into the window frames from the inside. -
Attach handle:
Thread your copper or brass ring through the pre-made holes in the lid.
Make it Glowier
Instead of static white light, place a color-changing LED tea light inside. The varying colors will interact beautifully with the different thicknesses of the porcelain.
Light a candle inside and watch your carved garden glow softly against the night