Little clay projects are my favorite kind because you get that instant “I made a thing!” feeling without committing to a big build. If you’re craving cute, quick, and totally doable minis, these little clay ideas will keep your hands busy and your shelf extra charming.
Tiny Kawaii Animal Figurines
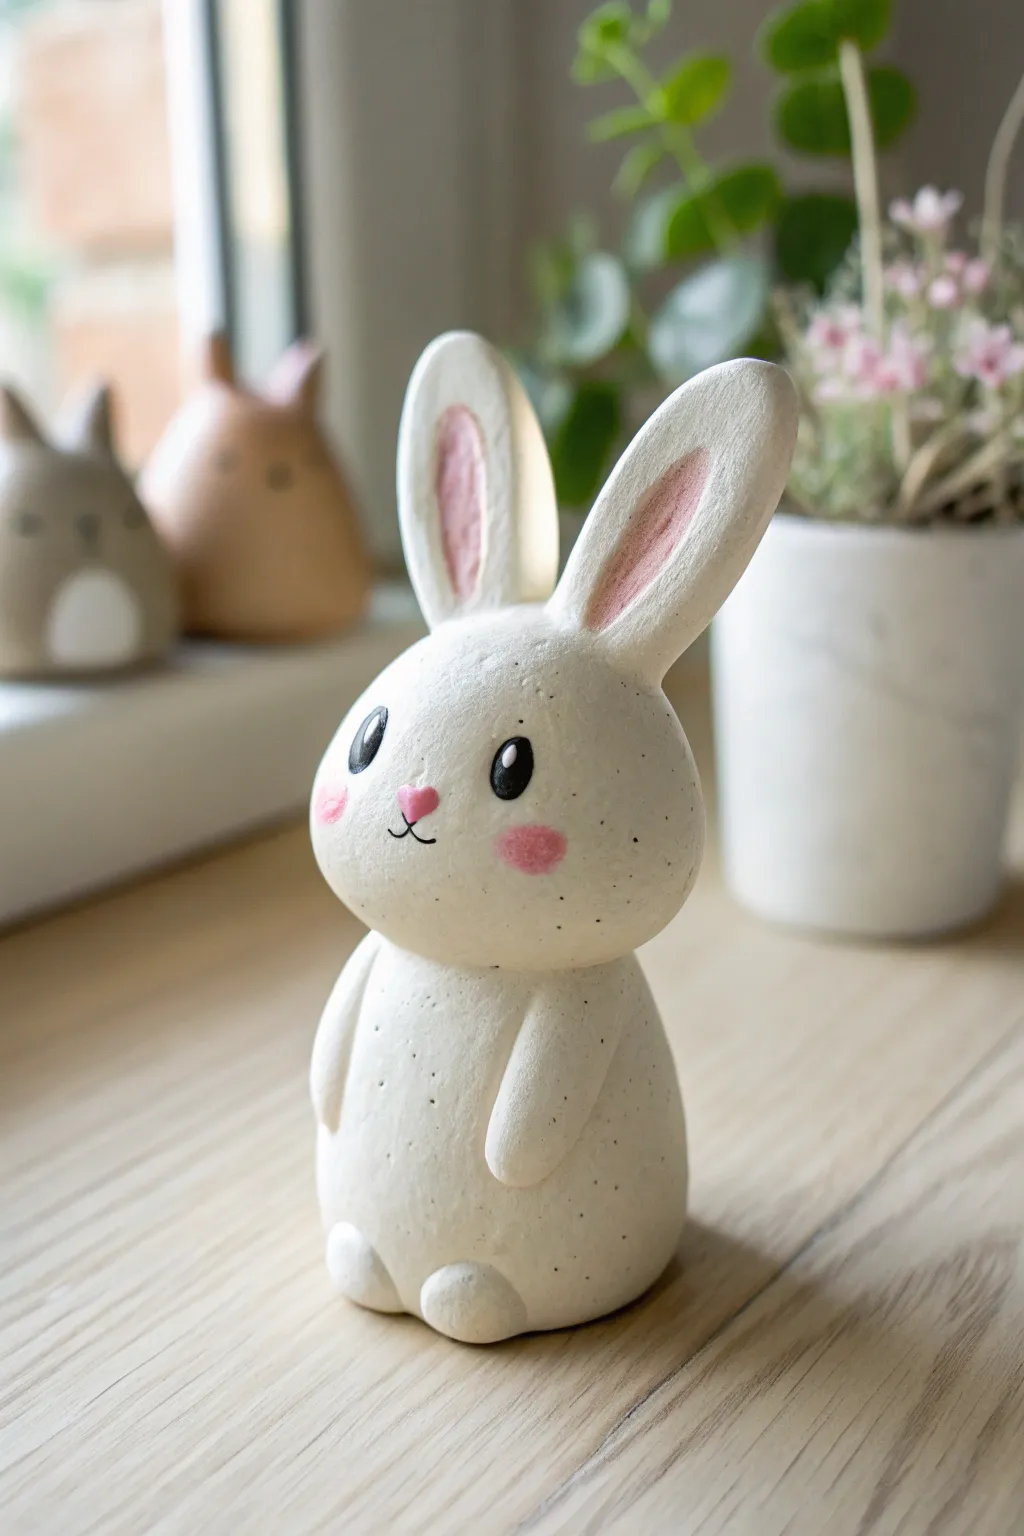
Create this adorable, upright standing bunny figurine that brings a touch of calm to any shelf. With its simple shapes, sweet pink details, and subtle speckled texture, this project captures the essence of kawaii minimalism perfectly.
How-To Guide
Materials
- White polymer clay (cernit or fimo soft)
- Speckled clay (or black pepper/sand to mix in)
- Pink acrylic paint (soft pastel shade)
- Black acrylic paint
- White acrylic paint
- Fine detail paintbrush (size 0 or 00)
- Ball tool or dotting tool
- Needle tool
- Matte varnish
- Aluminum foil (for armature core, optional)
Step 1: Shaping the Base
-
Prepare the clay:
Start by conditioning your white clay until it is soft and malleable. If you are using pre-speckled clay, you are ready to go. If not, mix a tiny pinch of coarse black pepper or black craft sand into your white clay to achieve that organic, stone-like texture seen in the photo. -
Form the body:
Roll a medium-sized ball of clay into a smooth egg shape. This will be the main body. gently flatten the bottom against your work surface so the bunny stands up on its own without wobbling. -
Create the head:
Roll a second, slightly smaller ball for the head. Press it gently to slightly flatten the shape into a rounded oval rather than a perfect sphere. I like to keep the cheeks a bit fuller for a cuter look. -
Attach head to body:
Place the head on top of the narrower end of the body egg. Blend the clay at the seam gently with a modeling tool or your finger to secure them together. Alternatively, insert a short piece of toothpick or wire between the two pieces for internal strength.
Stone Effect Hack
No granite clay? Mix black pepper or loose tea leaves into white clay. It mimics the speckled pottery look perfectly without buying new supplies.
Step 2: Adding Features
-
Shape the ears:
Roll two small logs of clay. Flatten them gently into long ovals that taper at the top and bottom. These will be the ears. -
Detail the inner ear:
Using a small ball tool or the rounded end of a paintbrush, press an indentation into the center of each ear to create the inner ear cavity. -
Attach the ears:
Press the bottom of the ears onto the top of the head. Blend the seams at the back and base so they look seamless. Position them upright and slightly apart. -
Make the arms:
Roll two small sausage shapes for the arms. They should be slightly thicker at the bottom (the ‘hand’ end) and tapered at the top. -
Attach the arms:
Press the arms against the sides of the body. Angle them slightly forward so the hands rest gently on the bunny’s tummy. Blend the top shoulder area into the body. -
Add the feet:
Create two small, slightly flattened balls for the feet. Attach these to the very bottom front of the body, positioning them close together. -
Refine the surface:
Before baking, give the entire sculpture a once-over. Smooth out any fingerprints with a drop of baby oil or clay softener on your finger to ensure that matte, stone-like finish.
Step 3: Baking and Painting
-
Bake the figurine:
Bake your clay creation according to the manufacturer’s instructions on your clay package. Let it cool completely before moving to the painting stage. -
Paint the inner ears:
Using your fine brush and soft pink acrylic paint, carefully fill in the indented areas of the ears. -
Paint the nose and cheeks:
Paint a tiny, inverted triangle or heart shape for the nose in bright pink. Then, dip a dry brush into pink paint, wipe most of it off, and dab soft, rosy circles onto the cheeks. -
Draw the mouth:
With a very fine liner brush and black paint (or a fine-tip drawing pen), draw a simple anchor shape (a ‘w’ or ‘3’ on its side) connected to the bottom of the nose for the mouth. -
Paint the eyes:
Paint two vertical black ovals for the eyes. Space them widely apart to increase the kawaii factor. -
Add eye highlights:
Once the black paint is fully dry, use a dotting tool or toothpick to add a tiny white dot in the upper corner of each eye. This spark of life is crucial. -
Seal the piece:
Finish by applying a coat of matte varnish. This protects the paint and unifies the sheen, making it look like a high-end ceramic piece.
Accessorize Your Bun
Make a tiny clay carrot, flower, or heart for the bunny to hold. Bake it separately and glue it between the paws after cooling.
Place your finished bunny on a windowsill near some greenery for the perfect photo opportunity


Mini Food Charms With Tiny Faces
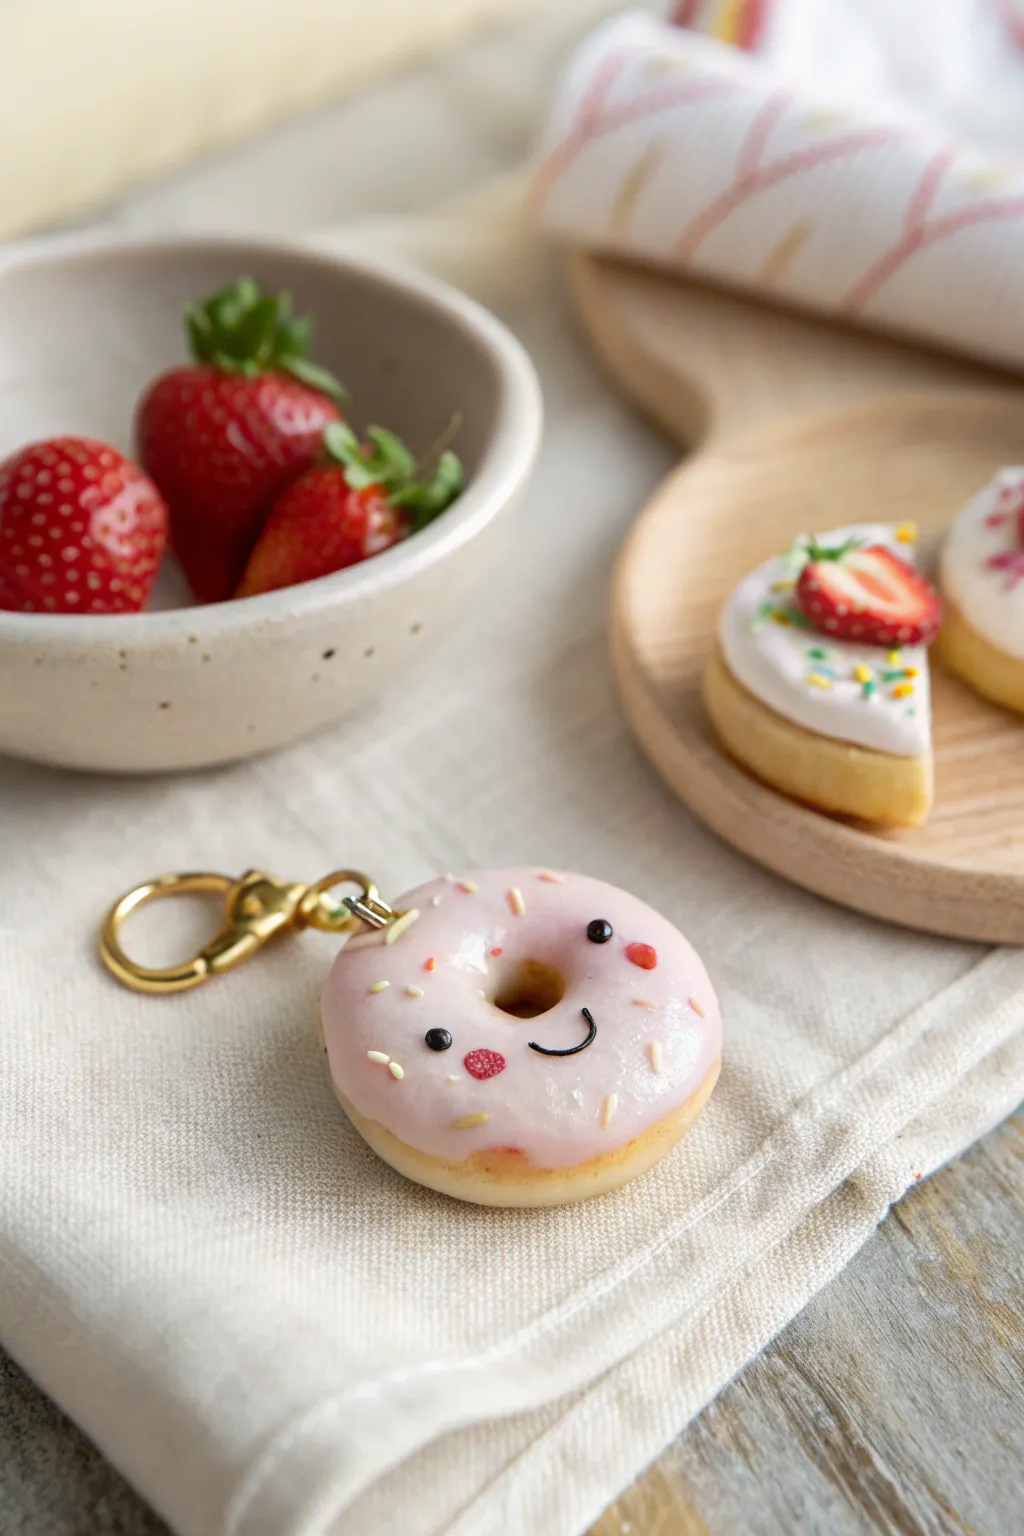
Treat yourself to a guilt-free sweet with this adorable polymer clay donut charm. Featuring a soft pink glaze, delicate sprinkles, and a cheerful little face, this durable accessory adds a touch of whimsy to any keychain or zipper.
Step-by-Step
Materials
- Polymer clay (dough/beige color)
- Liquid polymer clay (translucent or white mixed with pink)
- Polymer clay (pink, red, black)
- Pastel chalks or acrylic paint (for shading)
- Gloss glaze or UV resin
- Eye pin or screw eye
- Gold keychain hardware
- Jump rings
- Needle tool or toothpick
- Dotting tool or ball stylus
- Round cutters (small set)
- Soft paintbrush
- Oven for baking
Step 1: Shaping the Base
-
Condition the clay:
Start by warming up a chunk of beige or dough-colored polymer clay in your hands until it becomes soft and pliable. This conditioning step prevents cracks during baking. -
Form the dough ball:
Roll the clay into a smooth, seamless ball about the size of a large marble or a ping-pong ball, depending on how big you want your final charm. -
Flatten the shape:
Gently press the ball down against your work surface with the palm of your hand to create a thick disc. Smooth the edges so they are rounded, mimicking a fluffy fried donut. -
Create the center hole:
Use a small round cutter or the back end of a paintbrush to punch a hole directly in the center of the disc. Soften the sharp edges of the hole with your fingertip to make it look baked. -
Add baked texture:
For realistic texture, lightly shade the edges of the donut with scraped orange or brown pastel chalk using a soft brush. Focus on the areas that would touch the fryer oil.
Handling Tiny Details
Use a needle tool or toothpick to pick up tiny clay facial features. A tiny dab of liquid clay acts like glue to keep them from sliding off the round surface.
Step 2: Frosting & Face
-
Mix the glaze:
Combine liquid polymer clay with a tiny amount of pink clay or pigment. You want a consistency that helps it flow slightly but stays put, like real icing. -
Apply the frosting:
Carefully spread the pink mixture over the top of the donut. Let it drizzle naturally down the sides a tiny bit, but keep the shape mostly round. Use a needle tool to guide the drips. -
Place the eyes:
Roll two minuscule balls of black clay. Position them wide apart on one side of the donut to create that signature kawaii look, pressing them gently into the wet frosting. -
Sculpt the mouth:
Roll an incredibly thin snake of black clay. Cut a small ‘U’ shape and place it centrally between the eyes. I find using a needle tool helps to curve the corners upwards into a smile. -
Add rosy cheeks:
Add two tiny flattened dots of darker pink or red clay just below the eyes. Alternatively, you can use a dab of pink acrylic paint later, but clay provides nice dimension. -
Highlight the eyes:
Using a needle tip, place a speck of white clay or a tiny dot of white paint in the corner of each black eye to bring the character to life.
Sticky Clay?
If your clay gets too soft or sticky from the heat of your hands, pop it in the fridge for 10 minutes. This firms it up and makes detail work much cleaner.
Step 3: Finishing Touches
-
Sprinkle time:
Roll very thin snakes of yellow and white clay. Pre-bake these for 5 minutes, chop them into tiny bits, and press them into the unbaked frosting for realistic sprinkles. -
Insert hardware:
Insert an eye pin into the top of the donut. If the frosting makes this tricky, create a small pilot hole with a needle first. -
Bake the charm:
Bake the piece according to your specific clay brand’s instructions (usually around 275°F/135°C for 15-30 minutes). Let it cool completely inside the oven to prevent cracking. -
Secure the pin:
Once cool, gently tug the eye pin. If it’s loose, remove it, add a drop of super glue, and reinsert it immediately. -
Glaze for shine:
Coat the frosting area and the eyes with a gloss glaze or a thin layer of UV resin to simulate a wet, sugary glaze. Cure or dry as directed. -
Assemble the keychain:
Use pliers to open a jump ring and attach your donut to the gold keychain clasp. Close the ring securely so your new friend doesn’t get lost.
Now you have a sweet little companion to brighten up your daily routine


Little Mushroom Friends
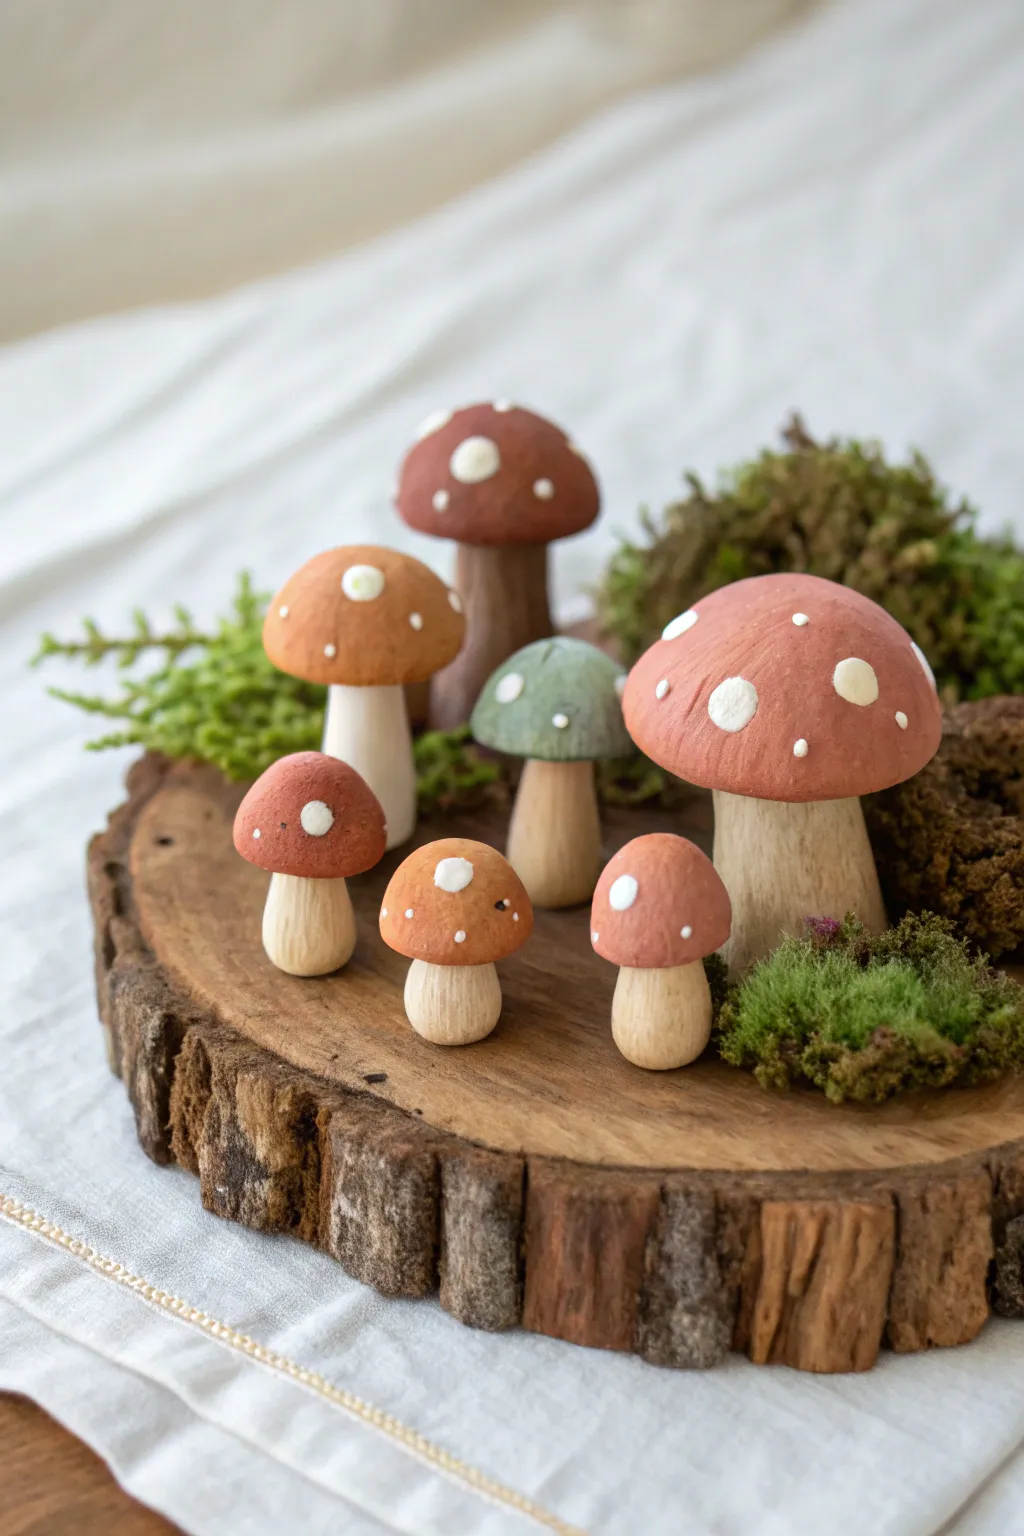
These charming little forest dwellers combine the natural texture of wood with the versatility of clay for a rustic, fairytale feel. The earthy tones and varied sizes make for a perfect woodland display piece.
Detailed Instructions
Materials
- Air-dry clay (terra cotta or white)
- Wooden peg doll bodies or unfinished wood dowels (various sizes)
- Acrylic paints (Burgundy, Burnt Sienna, Sage Green, White)
- Small paintbrushes (flat and detail)
- Wood glue or strong craft glue
- Fine-grit sandpaper
- Matte varnish or sealant
- Wooden slice base
- Preserved moss
Step 1: Prepping the Stems
-
Select your bases:
Gather a variety of wooden shapes for the stems. Wooden peg doll bodies work perfectly because they already have a rounded top, but thick dowels cut to different lengths add wonderful variety. -
Sand for texture:
Lightly sand the wooden stems. You don’t want them perfectly smooth; a little vertical scratching helps mimic the natural texture of a mushroom stalk and helps the paint adhere if you choose to wash them. -
Optional wood stain:
If your wood looks too fresh, dilute a tiny drop of brown paint in water and give the stems a quick wash to age them, then wipe off the excess immediately.
Natural Texture Hack
Before the paint dries completely, blot it gently with a paper towel. This lifts pigment slightly, giving the caps a weathered, porous look rather than a flat plastic finish.
Step 2: Sculpting the Caps
-
Portion the clay:
Pinch off balls of air-dry clay corresponding to the size of your stems. You’ll want some large, some medium, and some tiny button-sized caps. -
Form the basic dome:
Roll a piece of clay into a smooth sphere, then gently press your thumb into the center to create a hollow indentation. This is where the stem will eventually sit. -
Shape the brim:
Place the clay cap loosely onto its intended wooden stem to check the fit. While it’s resting there, gently pull the edges of the clay downward to create a slight overhang. -
Refine the surface:
Dip your finger in a little water and smooth out any fingerprints or cracks on the top of the dome. -
Add character:
I like to gently tap the clay with a toothbrush or a crumpled foil ball to add a tiny bit of organic texture so they don’t look like plastic. -
Drying time:
Remove the caps from the stems so they don’t stick prematurely. Set them aside to dry completely according to your clay package instructions, usually 24-48 hours.
Step 3: Painting & Assembly
-
Base coat colors:
Once dry, paint the caps. Use burgundy and terra cotta for the majority, and save a soft sage green for one or two accent mushrooms. -
Adding depth:
Mix a slightly darker shade of your base color and dry-brush it near the bottom edge of the caps to create a shadow effect. -
The signature spots:
Using a small detail brush or the handle end of a paintbrush, dot on the white spots. Vary the sizes—some large and irregular, some tiny speckles. -
Glue the assembly:
Apply a strong wood glue to the top of the wooden stem and press the finished clay cap firmly onto it. Hold for a minute to ensure a good bond. -
Seal the work:
Protect your painting with a coat of matte varnish. Avoid glossy finishes, as the natural look is key here. -
Prepare the scene:
Taking your large wood slice base, plan where your mushroom cluster will stand. Odd numbers usually look best grouped together. -
Final placement:
Glue the bottoms of the mushroom stems to the wood slice. Tuck clumps of preserved moss around the bases to hide any glue and complete the forest floor look.
Loose Caps?
If the dried cap is too loose on the stem, add a small ball of fresh wet clay inside the cap as filler, add glue, and press onto the wood. It will harden and bond everything custom-tight.
Now you have a permanent piece of the enchanted forest to display on your shelf


Little Desk Buddy Monsters
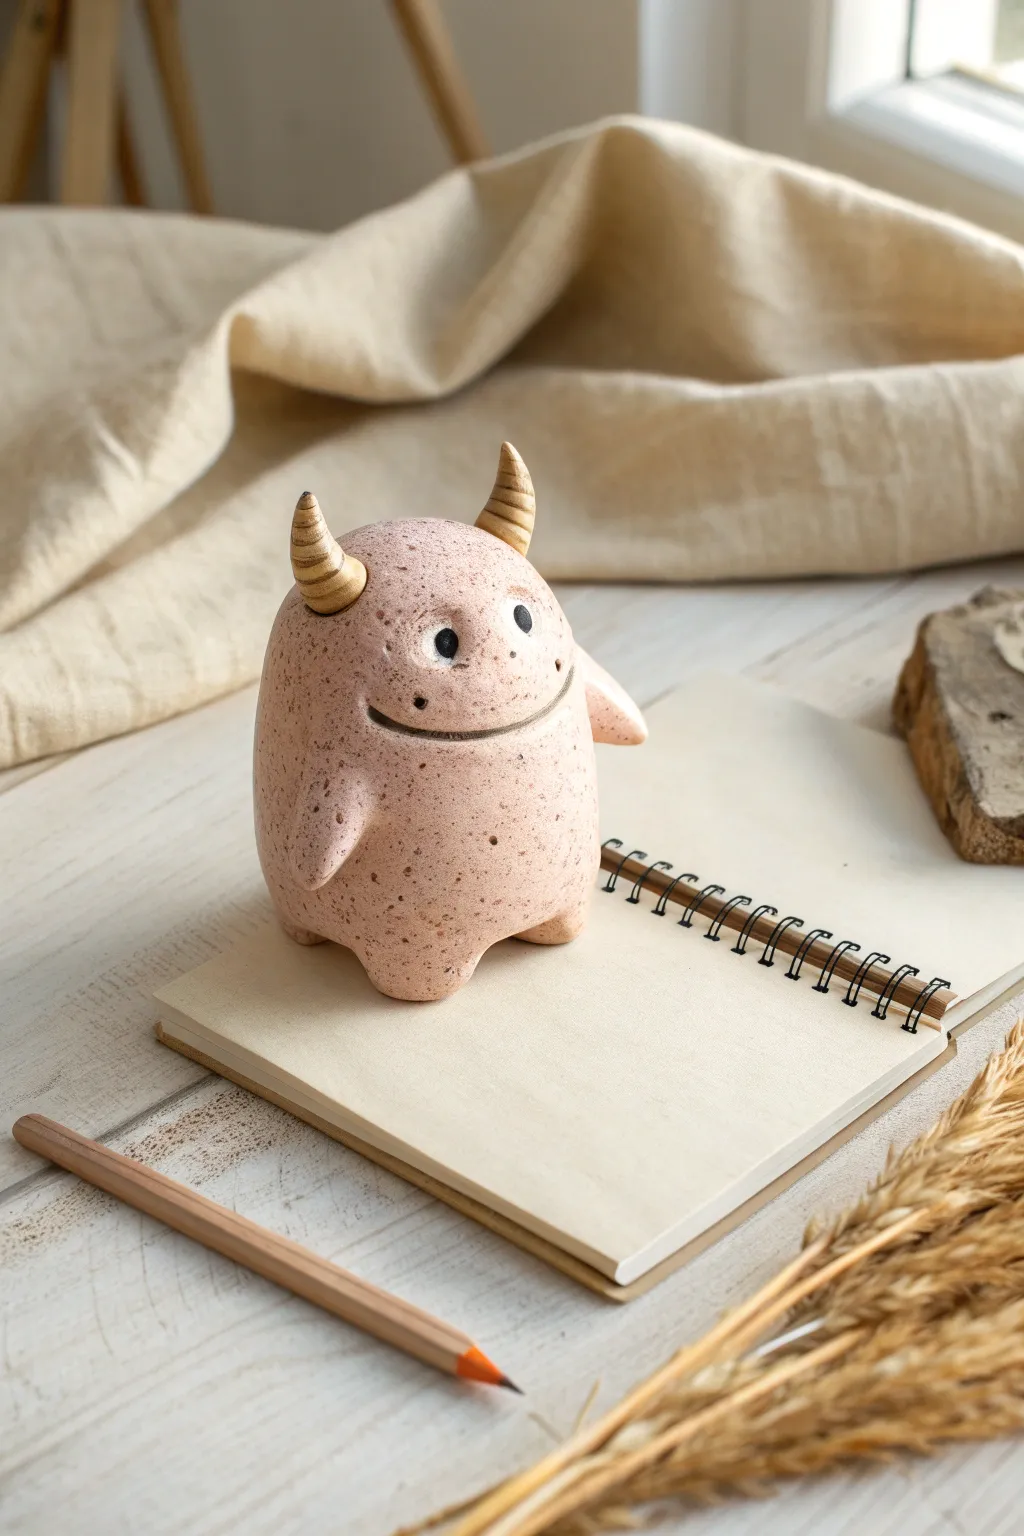
Meet your new desk companion, a charmingly round clay monster with gentle horns and a speckled texture that mimics natural stone. This project is perfect for beginners looking to practice simple shapes and smooth joining techniques.
Step-by-Step Tutorial
Materials
- Polymer clay (pale pink or beige)
- Small amount of gold or tan clay (for horns)
- Acrylic paint (brown or black for speckling)
- Toothbrush or splatter brush
- Googly eyes or small black beads
- Needle tool or toothpick
- Small ball stylus tool
- Gloss glaze (optional)
- Baking sheet and parchment paper
- Clean toothbrush (for texture optional)
Step 1: Shaping the Base
-
Prepare the main body:
Start with a generous amount of your pale pink clay. Knead it until it’s soft and conditioned, then roll it into a smooth, seamless ball about the size of a tangerine. -
Form the oval:
Gently gently flatten the bottom of the ball against your work surface so it stands upright. Use your palms to elongate the ball slightly into a sturdy, tall egg shape. -
Create the feet:
Instead of adding separate legs, pinch the bottom corners of your oval. Gently pull and smooth the clay downwards to form two small, stubby feet that blend seamlessly into the main body. -
Check stability:
Set the monster down and give it a little tap. Adjust the feet until it stands solidly on its own without wobbling. -
Add the arms:
Roll two small cones of pink clay. Attach these to the sides of the body, slightly below the halfway point, blending the clay at the shoulder joint so they look integrated rather than stuck on.
Step 2: Facial Features
-
Carve the mouth:
Use a needle tool or a thin clay knife to cut a long, curved smile line across the face. Make it deep enough to be visible but don’t cut all the way through. -
Define the lips:
Gently press down on the lower edge of your cut line to open the smile slightly, creating a friendly, slightly goofy expression. -
Position the eyes:
Use a ball stylus to press two indentations above the mouth. I like to space them a bit widely for a cuter look. -
Insert the eyes:
Press small black clay balls or heat-safe beads into the sockets you just made. If using black clay, roll tiny balls and flatten them slightly into the indentations. -
Add nostrils:
Below and between the eyes, use a smaller needle tool to poke two tiny holes for nostrils.
Clean Breaks
To prevent the paint splatter from getting messy, mask off the horns and eyes with small bits of tape or paper before flicking the toothbrush over the body.
Step 3: Horns & Details
-
Shape the horns:
Take your gold or tan clay and roll two small cone shapes, curving the tips slightly to give them character. -
Texture the horns:
Use a knife or needle tool to gently press horizontal rings around the horns, starting from the base and working up to the tip to create a ribbed texture. -
Attach the horns:
Place the horns on top of the head. Use a blending tool or your finger to smooth the very base of the horn onto the head so they remain secure during baking. -
Create the speckles:
Dilute a small amount of brown acrylic paint with water. Dip an old toothbrush into the mix and run your thumb across the bristles to flick tiny specks of paint all over the raw clay body. -
Final smooth:
Check the back and bottom for any fingerprints. Gently buff them away with a finger dipped in a tiny bit of baby oil or cornstarch. -
Bake carefully:
Bake according to your clay manufacturer’s instructions, usually around 275°F (135°C) for 30 minutes depending on thickness. Let it cool completely in the oven. -
Optional glaze:
Once fully cool, apply a thin layer of satin or gloss glaze to the eyes and horns to make them pop against the matte body.
Texture Twist
Before baking, gently roll a piece of sandpaper or a textured sponge over the pink clay body to give it a realistic, stone-like surface feel.
Place your little monster on your desk and enjoy the whimsical company while you work

The Complete Guide to Pottery Troubleshooting
Uncover the most common ceramic mistakes—from cracking clay to failed glazes—and learn how to fix them fast.
Little Heart and Initial Magnets
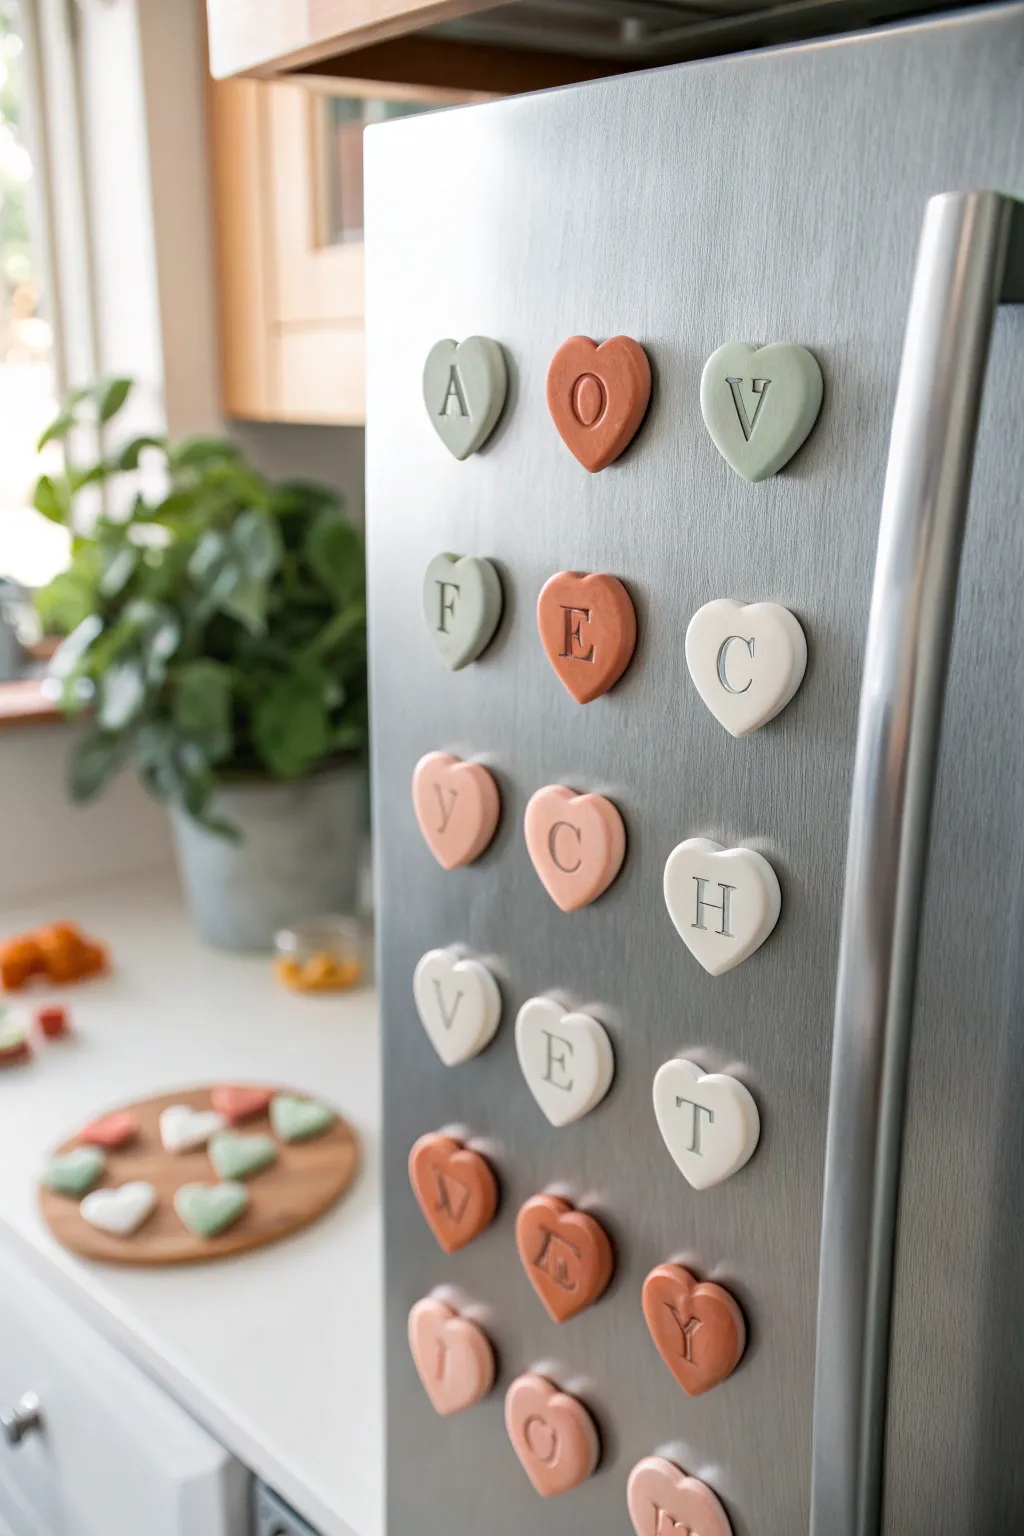
Transform your refrigerator door into a charming message board with these handmade clay magnets. Featuring a soft, muted color palette of sage, terracotta, and cream, these simple hearts add a personal and tactile touch to your kitchen decor.
Step-by-Step Tutorial
Materials
- Polymer clay (white, or pre-colored in sage green, terracotta, peach)
- Heart-shaped cookie cutter (approx. 1.5 inches)
- Alphabet stamp set (serif font)
- Rolling pin or pasta machine
- Parchment paper or baking mat
- Small round magnets (choose strong neodymium ones)
- Superglue or heavy-duty craft adhesive
- Acrylic paint (if using white clay)
- Fine-grit sandpaper (optional)
- Matte finishing varnish (optional)
Step 1: Prepping and Cutting
-
Condition the clay:
Begin by warming the polymer clay in your hands. Knead it thoroughly until it is soft, pliable, and free of any air bubbles. If you are mixing custom colors, combine your clays now to achieve those muted pastel tones seen in the example. -
Roll it out:
Place the clay on a smooth surface covered with parchment paper. Use a rolling pin to flatten the clay to an even thickness of about 1/4 inch. I like to use guide rails or stacked playing cards on either side of the roller to ensure the thickness is perfectly uniform. -
Cut the shapes:
Press your heart-shaped cutter firmly into the clay. Give it a tiny wiggle before lifting to ensure a clean cut. Repeat this process until you have as many hearts as you need. -
Smooth the edges:
Gently lift the hearts and use your fingertip to lightly smooth down any sharp edges left by the cutter. This gives the finished magnet a softer, more finished ceramic look.
Clean Impressions
Dust your stamps lightly with cornstarch or dip them in water before pressing into the clay. This prevents the clay from sticking to the stamp specifically inside the tight letter grooves.
Step 2: Stamping and Baking
-
Select your letters:
Plan out the words or initials you want to create. Pick out the corresponding letters from your alphabet stamp set. -
Test the impression:
Before stamping your actual hearts, press the stamp into a scrap piece of clay to gauge how much pressure is needed. You want a deep, clear impression without distorting the heart shape. -
Stamp the hearts:
Carefully center the letter stamp over a clay heart and press straight down. Lift the stamp straight up to avoid smudging the edges of the letter. -
Prepare for baking:
Arrange the stamped hearts on a baking sheet lined with parchment paper. Make sure they aren’t touching each other. -
Bake:
Bake the clay according to the manufacturer’s instructions on your specific package. Usually, this is around 275°F (135°C) for 15-30 minutes. -
Cool down:
Once baked, remove the tray from the oven and let the hearts cool completely. Do not handle them while hot, as the clay is still slightly fragile.
Make It Gold
After baking, fill the indented letter impression with liquid gold leaf or metallic paint using a tiny detail brush for a chic, high-end anthropologie-style look.
Step 3: Finishing Touches
-
Sand imperfections:
If there are any rough spots or fingerprints, lightly buff the surface with fine-grit sandpaper under running water. Dry them thoroughly. -
Paint (Optional):
If you used white clay, apply 2-3 coats of acrylic paint in your chosen colors (sage, terracotta, peach, cream). Let each coat dry fully before adding the next. -
Highlight the letter:
To make the letter pop, you can leave it plain or use a very fine brush to darken the inside of the impression with a slightly darker shade of paint. -
Seal (Optional):
Brush on a thin layer of matte varnish to protect the surface and give it a professional finish. Let this cure completely. -
Attach the magnet:
Flip the heart over. Place a small drop of superglue or strong craft adhesive in the center of the back. -
Secure the magnet:
Press a magnet firmly into the glue. Hold it in place for 30 seconds to ensure a good bond. -
Final dry:
Allow the glue to cure for at least 24 hours before sticking your new creations to the fridge.
Now you can spell out sweet messages or organize your fridge with style
Little Ring Cones and Mini Cactus Holders
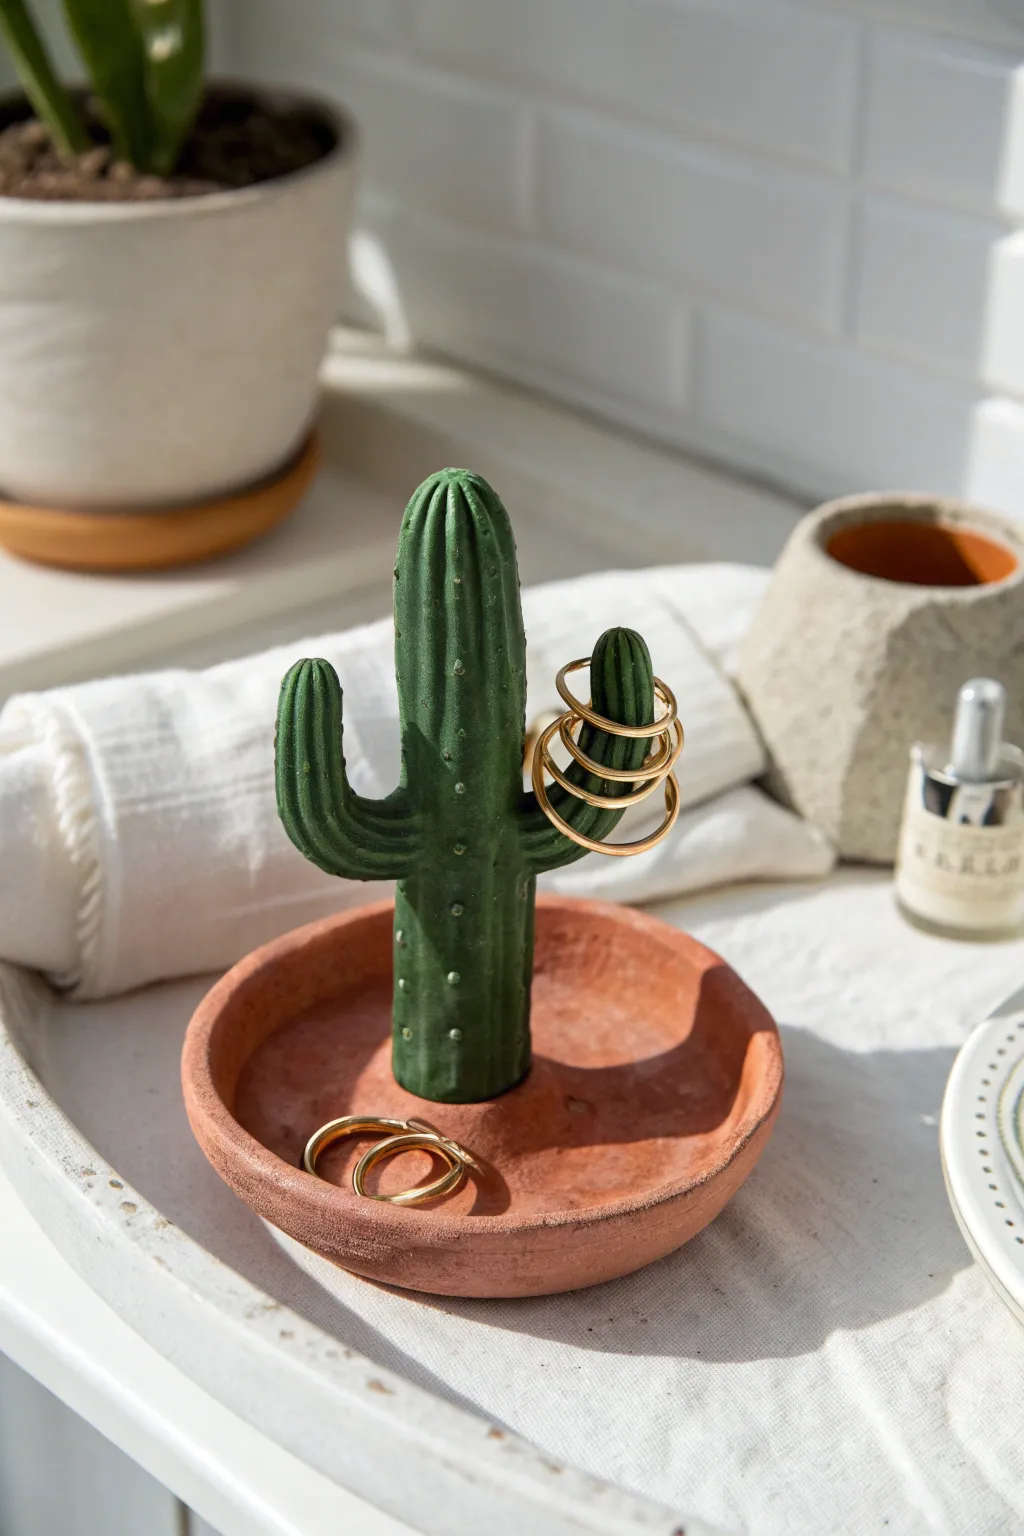
This charming, functional sculpture combines a classic terracotta base with a vibrant green cactus centerpiece. Perfect for holding rings on its arms or tiny trinkets in the dish below, it brings a touch of Southwestern warmth to any vanity.
How-To Guide
Materials
- Polymer clay (terracotta color)
- Polymer clay (deep green)
- Acrylic paint (white or very light green)
- Fine detail paintbrush or toothpick
- Rolling pin or clay roller
- Circle cutter (approx. 3-4 inches)
- Liquid polymer clay (Bake & Bond)
- Sculpting tools (needle tool, smoothing tool)
- Craft knife
- Ceramic tile or oven-safe work surface
- Oven
Step 1: Forming the Base
-
Condition the terracotta clay:
Begin by warming the terracotta-colored polymer clay in your hands, kneading it until it is soft and pliable. -
Roll the slab:
Roll the clay out onto your work surface until it is about 1/4 inch thick. Aim for an even thickness throughout to prevent cracking during baking. -
Cut the circle:
Use your circle cutter or a bowl template with a craft knife to cut out a clean circle for the base of the dish. -
Create the rim:
Roll a separate snake or coil of terracotta clay. It should be long enough to go around the circumference of your circle and about a 1/2 inch thick. -
Attach the rim:
Place the coil on top of the circle’s outer edge. Use a smoothing tool or your thumb to drag the clay from the coil down onto the base, blending the seam completely so they become one piece. -
Shape the dish:
Gently pinch and smooth the walls upwards to create a shallow dish shape. I like to keep the texture slightly rustic to mimic real earthenware pottery.
Drooping Arms?
If the cactus arms sag while sculpting, insert a small piece of wire or a toothpick inside the clay to act as an internal armature for support.
Step 2: Sculpting the Cactus
-
Shape the main stem:
Take a portion of the green clay and roll it into a thick cylinder, slightly rounded at the top. This will be the main body of the cactus. -
Create the arms:
Form two smaller, shorter cylinders for the cactus arms. Bend them slightly into an ‘L’ shape so they curve upwards. -
Score the surface:
Using a needle tool, gently drag vertical lines down the length of the main stem and the arms. These ridges mimic the ribbed texture of a real cactus. -
Attach the arms:
Position the arms on opposite sides of the main stem at slightly different heights. Use a dab of liquid polymer clay at the join, then smooth the seams with a sculpting tool until the transition is invisible. -
Texture the joins:
Re-score the lines over the joined areas to ensure the texture flows uninterrupted from the stem to the arms. -
Secure to base:
Place a small amount of liquid polymer clay in the center of your terracotta dish. Press the cactus firmly onto the center. -
Blend the bottom:
Use your smoothing tool to drag a little green clay down onto the terracotta base to secure it, but keep this minimal to maintain the look of a cactus ‘potted’ in soil.
Make It Speckled
Mix some black pepper or dark sand into your terracotta clay before rolling it out to give the pot a realistic, stony texture.
Step 3: Details & Baking
-
Bake the project:
Follow the instructions on your specific brand of polymer clay for temperature and timing. Usually, this is around 275°F (135°C) for 15-30 minutes. -
Cool completely:
Let the piece cool fully in the oven or on a wire rack. The clay is fragile while hot. -
Add the spines:
Once cool, dip a toothpick or a very fine detail brush into white acrylic paint. Carefully tap tiny vertical rows of dots along the ridges of the cactus. -
Varnish (optional):
If you want a glossy ceramic look, coat the terracotta base (or the whole piece) with a polymer clay glaze. For a natural matte look, leave it as is.
Now you have an adorable spot to keep your favorite rings safe and sound


What Really Happens Inside the Kiln
Learn how time and temperature work together inside the kiln to transform clay into durable ceramic.
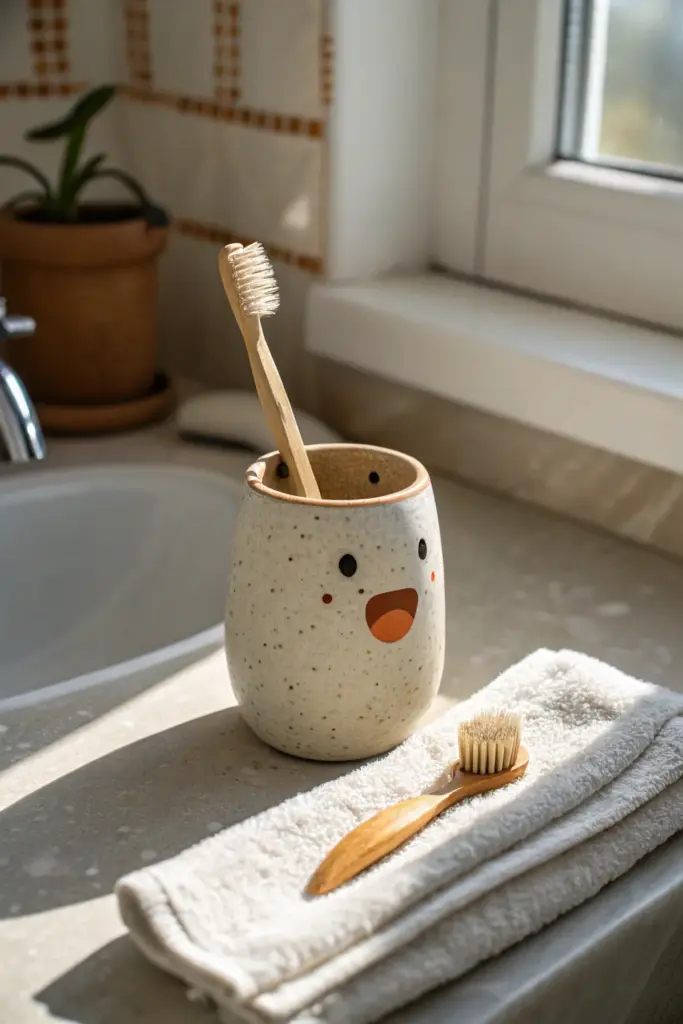
Little “Open Mouth” Bathroom Creatures

This charming ceramic toothbrush holder features a specked clay body and a delightful open-mouthed expression that brightens up any bathroom counter. It is a simple hand-building project that combines functional form with whimsical character design.
Detailed Instructions
Materials
- Speckled cone 6 stoneware clay
- Rolling pin
- Canvas work surface
- Needle tool
- Soft rib tool (silicone or rubber)
- Small round cookie cutter or cylindrical object (approx. 3-inch diameter)
- Scoring tool or serrated rib
- Slip (clay slurry)
- Modeling tool with a small round tip
- Black underglaze
- Orange-red underglaze (for mouth interior)
- Small detail brushes
- Clear transparent glaze
- Sponge
Step 1: Building the Form
-
Roll the slab:
Begin by wedging your speckled clay to remove air bubbles. Roll it out on your canvas into an even slab that is approximately 1/4 inch thick. -
Cut the base:
Use your round cutter or a template to cut a perfect circle for the base. Set this aside but keep it handy. -
Measure the walls:
Cut a rectangular strip from the remaining slab. The length should equal the circumference of your base circle plus a tiny bit of overlap, and the height should be about 4-5 inches depending on your toothbrush handle length. -
Form the cylinder:
Stand the rectangular strip up and curve it into a cylinder. Score the short ends where they will meet, apply slip, and press them firmly together to create a seam. -
Attach the base:
Score the bottom edge of your cylinder and the outer edge of your base circle. Apply slip to both scored areas. -
Join the pieces:
Place the cylinder onto the base circle. Use your fingers or a wooden tool to blend the clay from the cylinder down onto the base, ensuring a tight, water-tight seal. -
Refine the shape:
Use a soft rib to smooth the outside of the cylinder, gently expanding the middle from the inside as you work to give it a slightly rounded, convex belly shape.
Step 2: Adding Character
-
Smooth the rim:
Use a damp sponge to round off the top rim of the holder so it is comfortable to the touch and won’t scratch the toothbrush. -
Position the face:
Examine your cylinder and choose the smoothest side for the face. Lightly mark the eye positions with a needle tool to ensure symmetry before committing. -
Paint the eyes and cheeks:
Dip a small round brush or dowel end into black underglaze and press two solid dots for the eyes. Add two tiny cheek freckles under the eyes using a reddish-brown underglaze if desired. -
Create the open mouth:
Paint a semi-circle or D-shape for the open mouth using a deep orange or terracotta-colored underglaze. It should look like it’s shouting or singing. -
Add the tongue details:
If you want a tongue effect, you can layer a slightly lighter orange curve at the bottom of the mouth shape once the first layer is dry.
Seam Splitting?
If the side seam cracks during drying, score it deeply, add fresh slip, and compress again. Drying it slowly under plastic helps prevent tension stress.
Step 3: Firing and Finishing
-
Bisque fire:
Allow the piece to bone dry completely, which may take several days. Fire it to bisque temperature (usually cone 04) in a kiln. -
Apply clear glaze:
Once the bisque firing is complete and the piece is cool, wipe it down with a damp sponge to remove dust. Dip the entire piece into a clear transparent glaze. -
Wipe the foot:
Clean the bottom of the vessel (the foot) thoroughly with a sponge to remove any glaze so it won’t stick to the kiln shelf. -
Glaze fire:
Fire the piece again to the maturation temperature of your clay body (likely cone 6) to vitrify the clay and melt the glaze.
Smoother Specs
After the final glaze firing, sand the bottom with wet-dry sandpaper (400 grit) to ensure it sits perfectly flat and won’t scratch your vanity counter.
Now you have a cheerful companion to greet you during your morning routine