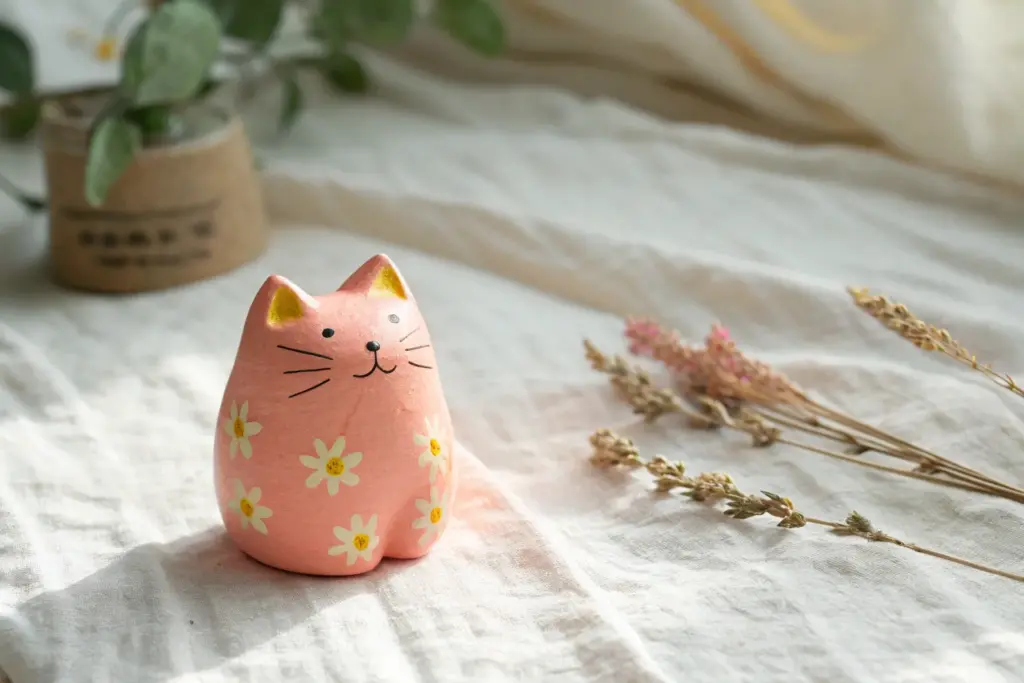
Little clay sculptures are my favorite kind of project because you can finish something adorable in one sitting and actually see progress fast. If you can roll a few basic shapes like balls, coils, and teardrops, you’re already ready for these mini clay sculptures.
Chibi Mini Cat Figurines
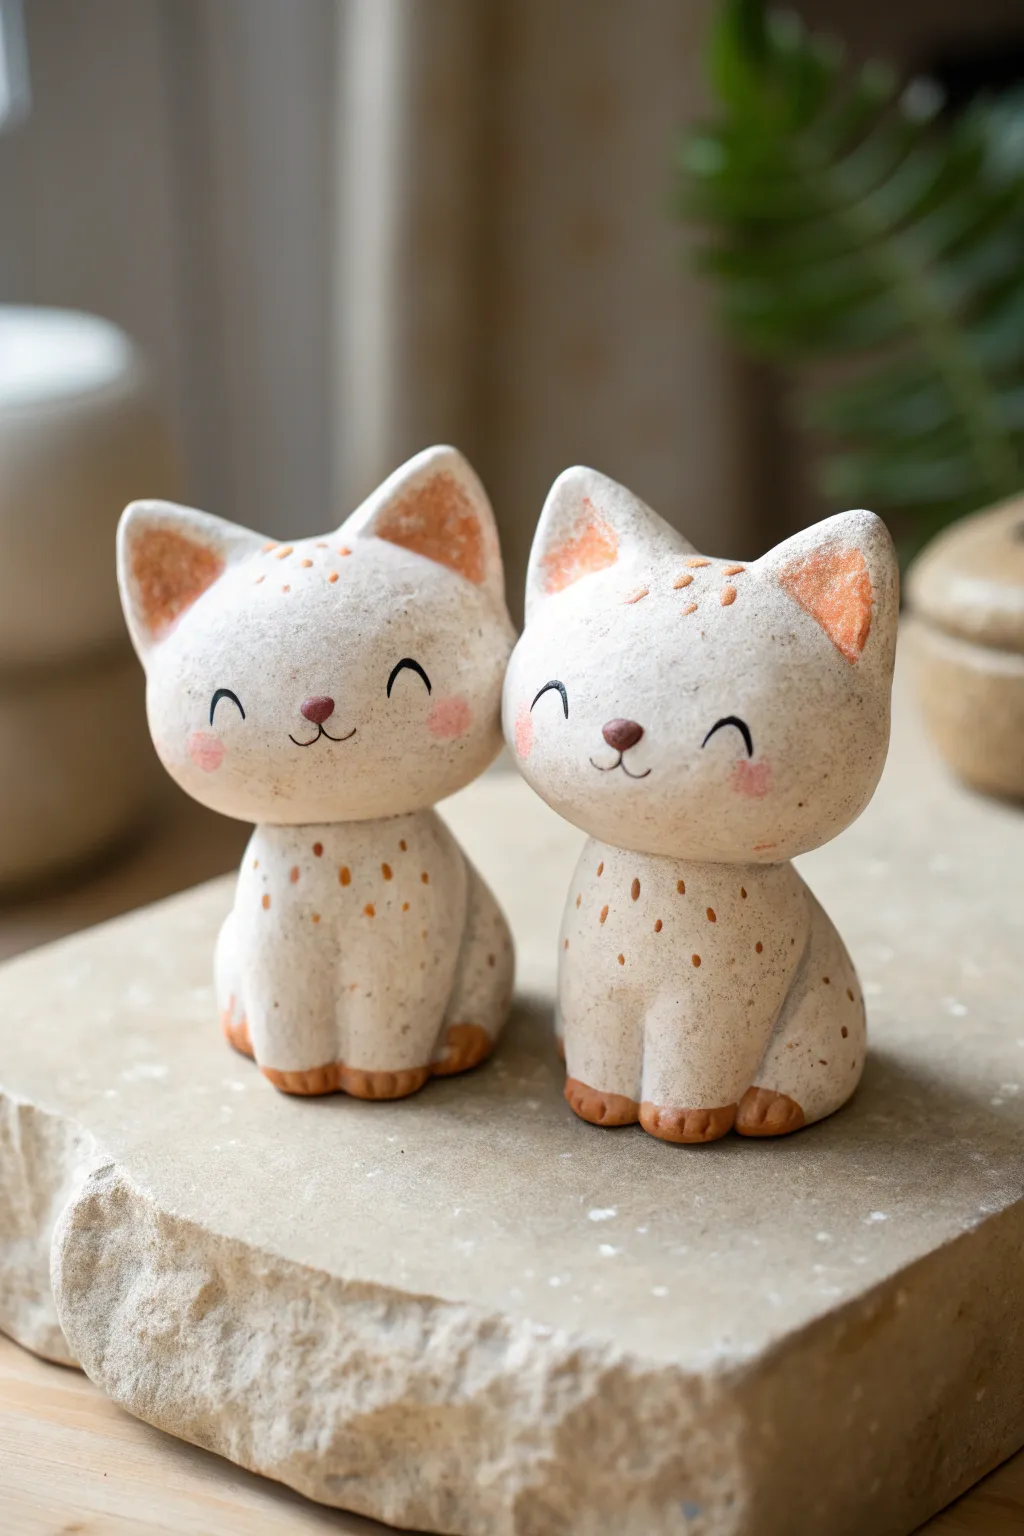
These adorable chibi kittens feature oversized heads and simple, rounded bodies for a sweet, minimalist look. The charm lies in the speckled, stone-like texture and soft ginger accents that make them feel organic and handmade.
How-To Guide
Materials
- White or cream-colored polymer clay (or air-dry clay)
- Speckled clay additive (or finely ground black pepper/dried tea leaves)
- Terracotta or warm brown pastel chalks (for tinting)
- Black acrylic paint
- Pink soft pastel or blush
- Detailing brush (size 000)
- Ball stylus tools
- Clay blending tool or silicone shaper
- Aluminum foil (for armature core)
- Matte varnish or sealant
Step 1: Prepping and Shaping the Base
-
Mix the Speckles:
Start by conditioning your white clay. If you don’t have pre-speckled clay, knead in a tiny pinch of speckled additive, ground pepper, or dried tea leaves to achieve that lovely stone-effect texture. -
Form the Body Armour:
Create a small, crumpled ball of aluminum foil about the size of a walnut to serve as a lightweight core for the head. Cover this smoothly with a layer of your speckled clay, rolling it into a slightly flattened sphere. -
Shape the Torso:
Roll a second, smaller piece of solid clay into a teardrop shape. Flatten the bottom so it sits stable on your work surface. This will be the cat’s body. -
Connect Head and Body:
Gently press the head onto the top of the teardrop body. I find that inserting a small piece of toothpick or wire between the two pieces adds necessary structural stability.
Step 2: Sculpting the Features
-
Create Ear Triangles:
Fashion two symmetrical triangles from clay. Make them relatively large compared to the head for that cute chibi look. Soften the points slightly so they aren’t sharp. -
Attach the Ears:
Place the ears on top of the head, spacing them wide apart. Use a blending tool to smooth the seams where the ears meet the head so they look like one continuous piece. -
Add Inner Ear Texture:
Before baking or drying, use a small ball stylus to gently indent the inner triangle of each ear, creating depth for where the color will go later. -
Sculpt the Paws:
Roll two tiny ovals of clay. Press them onto the front bottom of the body. Use a craft knife or needle tool to make two small indents in each oval to suggest toes. -
Define the Nose:
Roll a minuscule ball of clay for the nose. Press it gently onto the center of the face, slightly lower than looking straight on, to enhance the ‘cute’ proportion.
Clean Clay Pro-Tip
Keep baby wipes or rubbing alcohol nearby. Wiping your hands and tools often prevents dust and lint from getting trapped in the white clay.
Step 3: Color and Finish
-
Apply Ginger Accents:
Scrape some terracotta or warm brown soft pastel into a powder. Using a soft, dry brush, gently dust this powder onto the inner ears, the tips of the toes, and lightly on the forehead spots. -
Add Speckled Details:
Mix a tiny amount of brown acrylic paint with water. Using your smallest brush, paint tiny, random dots on the chest and forehead to mimic ginger freckles. -
Bake or Dry:
Follow the instructions for your specific clay type. If using polymer clay, bake it in the oven. If using air-dry, let it cure fully for 24-48 hours. -
Paint the Face:
Once hardened and cooled, use black acrylic paint and a fine detail brush to paint two upward-curving arches for closed, happy eyes. Paint a small mouth line extending down from the nose. -
Color the Nose:
Paint the small relief nose with a mix of brown and dusty pink paint to make it stand out against the pale face. -
Add Blushing Cheeks:
Using a dry brush and pink pastel powder (or real makeup blush), gently dab circular rosy cheeks just below the outer corners of the eyes. -
Seal the Figurine:
Finish by applying a thin coat of matte varnish over the entire piece. This protects the paint and locks in the pastel powders without making the clay look shiny or plastic.
Level Up: Accessories
Before baking, sculpt a tiny clay yarn ball or a fish bone and place it next to the paws to transform this into a storytelling scene.
Give your new little desk companions a special spot where their cheerful smiles can brighten your day


Tiny Frog Desk Buddy
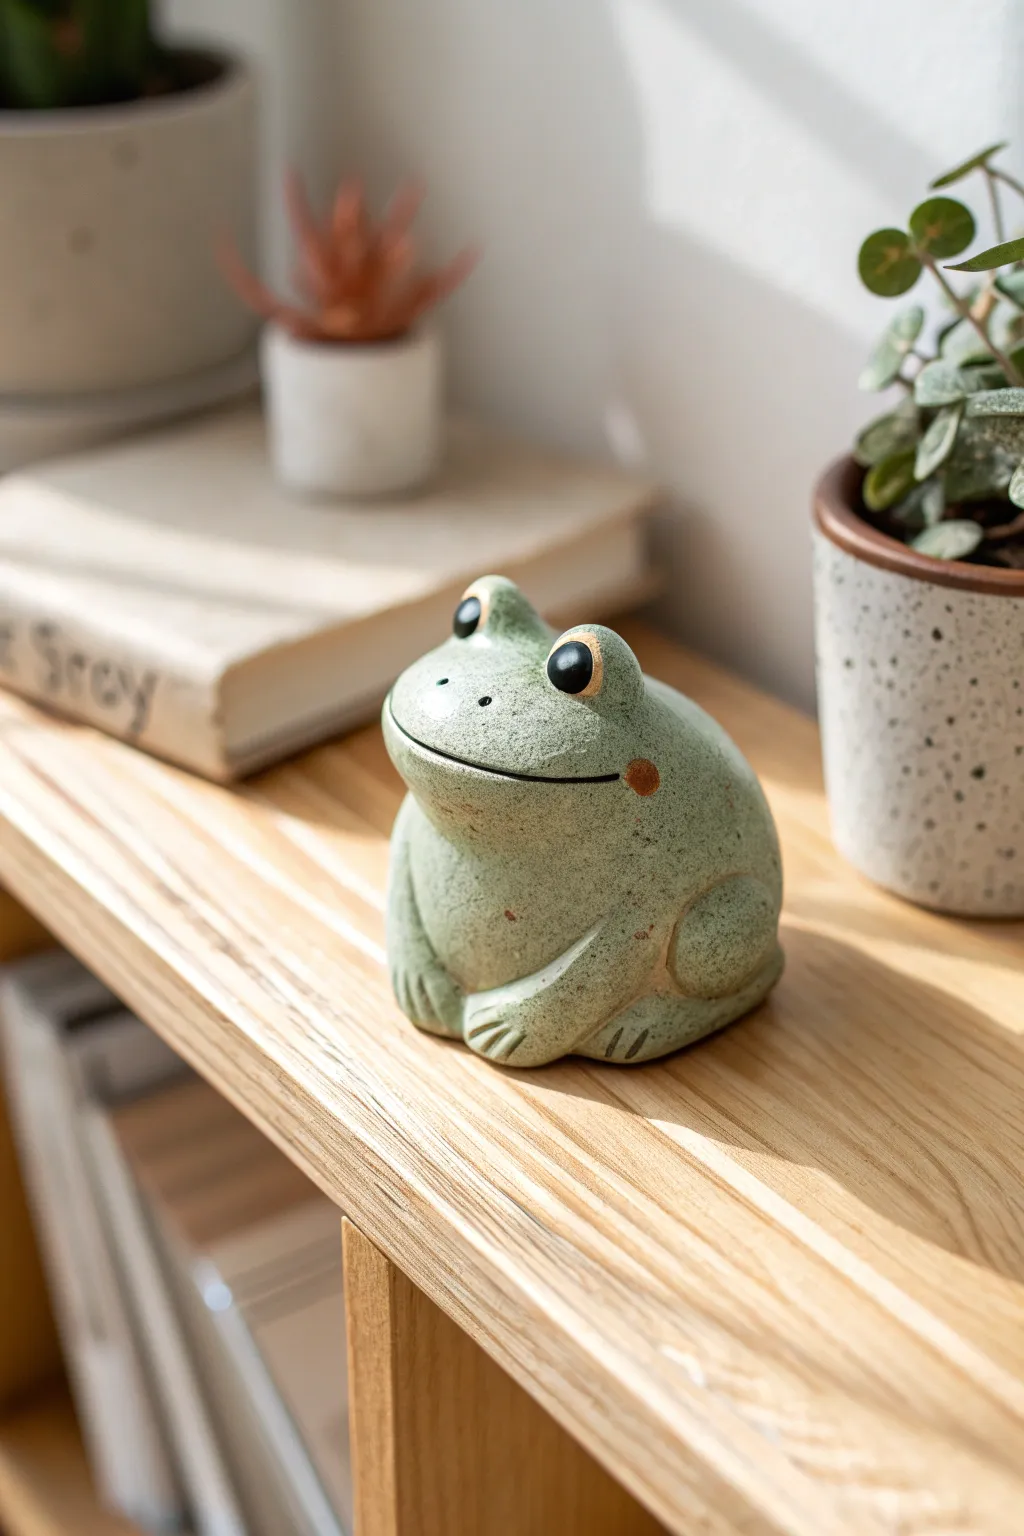
Create a charming desk companion with this ceramic-style frog sculpture. Using stone-effect clay and simple shaping techniques, you’ll craft a chunky, textured amphibian that looks like it hopped right out of a garden pottery shop.
Step-by-Step
Materials
- Polymer clay (granite or stone effect)
- Black polymer clay
- Terracotta or burnt orange polymer clay
- Acrylic roller
- Needle tool
- Ball stylus tool (medium and large)
- Flexible clay blade
- Gloss glaze (water-based polyurethane)
- Small fine-point paintbrush
- Aluminum foil (for armature core)
- Sandpaper or texture sponge
Step 1: Forming the Body Base
-
Prepare the foil core:
Crumple a piece of aluminum foil into a tight ball, slightly flattened at the bottom, roughly the size of a golf ball. This saves clay and keeps the sculpture lightweight. -
Condition the main clay:
Knead your stone-effect clay until it is soft and pliable. I find that warming it in my hands for a few minutes makes it much easier to work without cracking. -
Cover the core:
Flatten a large portion of the clay into a pancake about 1/4 inch thick. Wrap this sheet fully around your foil ball, smoothing the seams together until they disappear completely. -
Shape the torso:
Roll the clay-covered ball on your work surface to smooth it. Then, gently pinch and pull the top third upwards slightly to differentiate a head area, though keep it very integrated and chubby—no skinny necks here. -
Flatten the base:
Tap the bottom of the frog firmly against your table to create a flat, stable base so he sits upright without wobbling.
Wonky Eyes?
If the eyes look uneven after placing them, look at the frog from directly above. This top-down view makes it easier to align the protrusions symmetrically.
Step 2: Sculpting the Legs
-
Create the thigh masses:
Roll two medium-sized balls of clay for the rear legs. Flatten them slightly into thick discs. -
Attach rear legs:
Press these discs onto the lower sides of the body towards the back. Blend the edges into the main body using your thumb or a modeling tool, leaving the center rounded to look like folded legs. -
Form the front arms:
Roll two thick logs of clay, about an inch long. These will be the front legs supporting the frog’s weight. -
Position the arms:
Attach the logs vertically to the front of the belly. Blend the top of the logs into the shoulder area seamlessly. -
Detail the toes:
Use your needle tool to press three indentations into the bottom of each front leg to suggest toes. Do the same for the rear feet, which should peek out slightly from under the thighs.
Stone Effect Hack
Don’t have granite clay? Mix regular translucent clay with black pepper and dried tea leaves to create your own convincing speckled stone texture.
Step 3: Facial Features
-
Make the eye sockets:
Using the large ball stylus, press two deep indentations into the top of the head area where the eyes will go. Space them apart for a friendly look. -
Sculpt the eye mounds:
Roll two small balls of stone clay and place them into the sockets. Blend the bottom edges into the head so they look like protrusions rather than stuck-on marbles. -
Insert the pupils:
Press a small indentation into the center of each eye mound. Roll tiny balls of black clay, flatten them slightly, and press them into these hollows. -
Carve the mouth:
Use the flexible blade or needle tool to carve a wide, slightly curved line across the face. Curve the ends upward slightly to give him a permanent smile. -
Add cheek blushes:
Take a tiny amount of terracotta clay and smear it very thinly onto the cheeks, just past the ends of the smile mouth. Blend it well so it looks like a soft blush. -
Nostril details:
Use the small end of your needle tool to poke two tiny holes above the mouth for nostrils.
Step 4: Finishing Touches
-
Refine the texture:
If your fingerprints have smoothed out the stone texture too much, gently dab the surface with a coarse sponge or crumpled foil to bring back that earthy, pitted look. -
Bake the piece:
Bake according to your clay manufacturer’s instructions (usually 275°F/135°C for 15-30 minutes per 1/4 inch of thickness). Let it cool completely in the oven. -
Glaze the eyes:
Once cool, carefully paint a layer of high-gloss glaze only on the black pupils of the eyes. This gives them a wet, lifelike shine.
Place your little stone frog on a shelf or near a potted plant to enjoy his calming presence


Mini Turtle With a Removable Shell
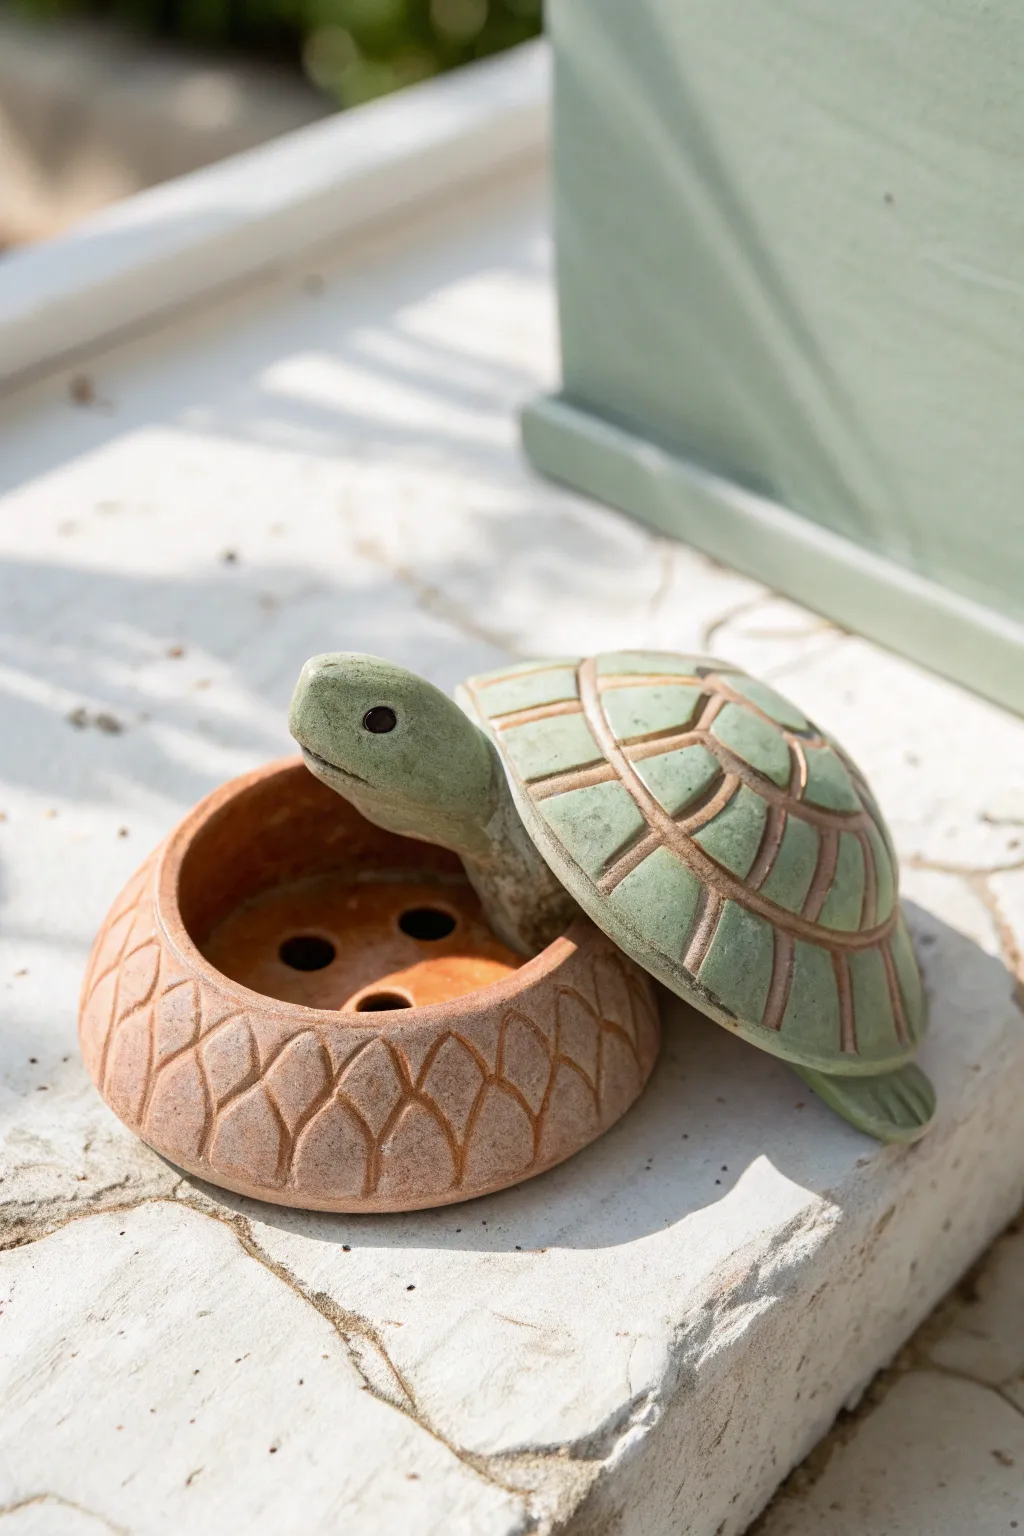
This whimsical two-piece sculpture features a terracotta-colored base with a removable green shell that reveals a hidden compartment. The carved details on the shell and the textured scales around the base give it a charming, earthy feel perfect for a garden accent or trinket dish.
Step-by-Step Guide
Materials
- Red-brown earthen clay or terracotta clay
- Rolling pin
- Needle tool or clay knife
- Loop carving tool
- Small bowl or sphere mold (approx. 3-inch diameter)
- Slip and scoring tool
- Green underglaze or acrylic paint (sage or moss tone)
- Black underglaze or acrylic paint (for eyes)
- Clear matte sealer or glaze
- Sponge and water
- Small paintbrush
Step 1: Sculpting the Base
-
Prepare the clay:
Start by wedging a fist-sized ball of terracotta clay to remove air bubbles. Divide it into two main portions: one slightly larger for the shell lid and one for the base. -
Form the pinch pot base:
Take the smaller portion and form a smooth ball. Press your thumb into the center and pinch the walls upwards and outwards to create a shallow bowl shape. This will be the turtle’s belly and the container part. -
Refine the rim:
Gently tap the rim of the bowl on your work surface to flatten it slightly. This ensures the lid will sit flush later. Smooth the interior with a damp sponge. -
Add the rim texture:
Using a needle tool, carve a repeating leaf or scale pattern around the exterior vertical wall of the base bowl. I like to make these overlapping curves to mimic the scaly texture of reptile skin. -
Create the interior platform:
Roll a small, flat disk of clay that fits inside the bowl. Use a straw or small hole cutter to punch 3-4 holes in this disk (this is great for incense or flower stems). Score and slip the bottom of the disk and press it into the bottom of the bowl. -
Sculpt the head and neck:
Roll a thick coil of clay for the neck, tapering it slightly at one end. Bend it into a gentle curve. Score and slip the thicker end and attach it firmly to the inside rim of the bowl, angling it outwards and upwards. -
Detail the face:
Smooth the clay where the neck meets the bowl so it looks seamless. Use a sculpting tool to carve a simple mouth line and use the back of a small paintbrush to indent sockets for the eyes.
Clean Grooves
After carving the shell pattern, run a damp brush over the grooves to smooth out any clay ‘crumbs’ or sharp burrs for a professional finish.
Step 2: Creating the Shell Lid
-
Shape the carapace:
Take the remaining clay and roll it into a slab about 1/4 inch thick. Drape this over your sphere mold or a small bowl covered in plastic wrap to create a perfect dome shape. -
Trim the edges:
Once the dome holds its shape but is still workable, trim the edges so the diameter matches your base bowl. Test the fit frequently—it should rest comfortably on the base’s rim, leaving the head exposed. -
Add the feet:
Form two small, flat flipper shapes from scrap clay. Score and slip them onto the back rim of the shell lid (not the base), so they hang down slightly and cover the seam when the lid is on. -
Carve the shell pattern:
Using a loop tool or needle tool, carve a hexagonal pattern on the top of the dome. Deep, wide grooves work best here to hold the glaze later. Start with a central shape and work your way out to the rim.
Incense Upgrade
Make the holes in the interior disk specific sizes to hold stick incense. The removable shell acts as a clever cover when not in use.
Step 3: Finishing Touches
-
Dry slowly:
Let both pieces dry to a leather-hard state. Keeping the lid on the base during drying helps prevent warping so they stay matched. -
Bisque fire or dry completely:
If using kiln clay, fire to cone 04. If using air-dry clay, allow 24-48 hours for complete drying before painting. -
Apply green color:
Paint the top shell and the turtle’s head/neck with a mossy green underglaze or acrylic. Use a technique called ‘wipe-back’: paint it solid, let it dry slightly, then wipe the high points with a damp sponge. This leaves color in the carved grooves but reveals the terracotta clay on the ridges. -
Detail the eyes:
Use a fine-point brush and black paint to fill in the eye sockets. -
Seal or Glaze:
If kiln firing, apply a clear glaze and fire again. If using air-dry clay, seal the entire piece with a matte varnish to protect the surface.
Now you have a charming little reptile companion to guard your tiny treasures


Little Mushroom Characters
Bring a forest fairytale to life with these adorable, expressive mushroom characters. Featuring textured stems and cheerful dual faces, this clay project combines simple sculpting with charming painted details perfect for beginners.
How-To Guide
Materials
- Air-dry clay (white) or polymer clay
- Acrylic paints (Red, Mustard Yellow, Teal, Cream/Off-White, Black)
- White Posca paint pen (fine tip) or small detail brush
- Sculpting tools (needle tool and ball tool)
- Fine grit sandpaper
- Matte varnish or sealant
- Small paintbrushes (flat shader and fine liner)
- Water cup and palette
Step 1: Sculpting the Forms
-
Divide the clay:
Start by dividing your clay into six pieces: three slightly larger chunks for the caps and three smaller cylinders for the stems. Keep the balls for the caps roughly the size of a walnut. -
Shape the stems:
Roll the stem pieces into thick, sturdy cylinders. Tap the bottom of each on your work surface to flatten it so the mushroom will stand upright on its own. -
Form the caps:
Roll the cap pieces into smooth balls, then gently flatten the bottom and round the top to creative a classic dome shape. Vary the roundness slightly for character. -
Create texture:
Using a needle tool or a stiff bristled brush, gently scratch vertical lines up and down the stems. This mimics the fibrous texture of a real mushroom stalk. -
Attach the pieces:
Score the top of the stem and the underside of the cap with a cross-hatch pattern. Add a dab of water (for air-dry clay) or liquid clay (for polymer) and press the parts firmly together. -
Smooth the join:
Use a small modeling tool or your finger to smooth out the connection point underneath the cap, ensuring the head won’t fall off later. -
Dry or bake:
If using air-dry clay, let the figures dry completely for 24-48 hours. If using polymer clay, bake according to the manufacturer’s instructions.
Cracked Clay?
If small cracks appear in air-dry clay while drying, mix a tiny amount of fresh clay with water to make a paste and fill the cracks, then sand smooth once dry.
Step 2: Painting & Personality
-
Base coat the stems:
Mix a warm cream color using off-white and a tiny drop of brown. Paint the stems completely, working the paint into the textured grooves you created earlier. -
Dry brushing:
Once the base is dry, take a slightly lighter cream shade on a dry brush. Lightly sweep it vertically over the stem texture to highlight the ridges. -
Paint the caps:
Paint each mushroom cap a distinctive color. Use a deep berry red for the first, a mustard yellow-orange for the second, and a rich teal blue for the third. Apply two thin coats for opacity. -
Add the spots:
Using a small round brush or the back of a paintbrush handle, dot clean white paint onto the colored caps. Vary the sizes from tiny specks to larger polka dots. -
Face placement:
Decide where your faces will go. Notice that these characters have faces on both the colored cap *and* the stem. Lightly sketch the positions with a pencil if needed. -
Paint the eyes:
Using a fine liner brush and black paint, create small circles for the eyes. Space them fairly wide apart for a cute, innocent look. -
Add eye highlights:
This is the most crucial step for cuteness: add a tiny white dot inside the black of each eye using a pin or toothpick. It brings them to life instantly. -
Draw the smiles:
With your thinnest brush or a fine-tip black pen, draw a simple, small ‘U’ shape between the eyes for the mouth. -
Final sealing:
Once all paint is perfectly dry, coat the entire sculpture with a matte varnish to protect the paint and give the clay a finished feel.
Forest Floor Display
Glue actual dried moss or tiny pebbles around the base of your mushrooms on a wood slice for a complete diorama look.
Now you have a trio of friendly fungi ready to brighten up your bookshelf or desk

The Complete Guide to Pottery Troubleshooting
Uncover the most common ceramic mistakes—from cracking clay to failed glazes—and learn how to fix them fast.
Kawaii Fruit With Faces
Bring a touch of sweetness to your shelf with these adorable kawaii fruit sculptures. This project guides you through creating a cheerful strawberry, a blushing peach, and a zesty lemon, all featuring charming little faces and clay textures.
Detailed Instructions
Materials
- Polymer clay or air-dry clay (Red, Pink, Yellow, Green, White)
- Acrylic paints (Black, Pink)
- Fine detail paintbrush
- Dotting tool or toothpick
- Needle tool or awl
- Soft pastel chalks (optional, for shading)
- Gloss glaze or varnish
Step 1: Sculpting the Strawberry
-
Base Shape:
Start with a ball of red clay about the size of a walnut. Gently roll and tap it on your work surface to flatten the bottom, then pinch the top slightly to form a classic strawberry cone shape. -
Creating Seeds:
Take a needle tool or the tip of a toothpick and gently press small indentations all over the surface of the fruit. Space them somewhat evenly, but keep it organic. -
Leafy Top:
Roll out a small piece of dark green clay. Use a blade or cutter to create a star shape or cut individual teardrop shapes. -
Attaching the Greens:
Press the green star onto the top of the strawberry, smoothing the edges down so they hug the fruit’s curve. Add a tiny brown stem in the center.
Step 2: Forming the Lemon and Peach
-
Lemon Shape:
Roll a ball of bright yellow clay. Gently pinch the top into a distinct point and broaden the bottom so it sits stable, creating a teardrop silhouette. -
Lemon Texture:
To mimic citrus skin, gently texture the yellow surface by tapping it lightly with an old toothbrush or a crumpled ball of aluminum foil. -
Peach Shape:
For the pink fruit, roll a soft pink ball of clay and flatten the bottom. It should look round and plump, like a mochi. -
Peach Details:
Use your needle tool to add vertical indentations around the top curve, giving it a stylized, segmented look. Add two small, textured green leaves on top.
Clean Clay Tip
Use baby wipes or wash your hands thoroughly between clay colors. Red and green pigments are strong and can easily stain your yellow clay if you aren’t careful.
Step 3: Adding the Kawaii Faces
-
Baking or Drying:
Follow the manufacturer instructions for your specific clay. If using polymer, bake at the recommended temperature; for air-dry, let them sit for 24-48 hours. -
Painting Eyes:
Dip a dotting tool or the back of a paintbrush into black acrylic paint. Press gently onto the dried sculptures to create round eyes. -
Smiling Mouths:
Using your finest detail brush and black paint, carefully draw a small, U-shaped smile between the eyes. For the pink fruit, try a winking eye expression with curved lines. -
Rosy Cheeks:
Mix a tiny bit of pink paint or use pink pastel dust. Apply small dots or soft smudges under the eyes for blush. I find a dry brush works best for a soft, powdery look. -
Seed Details:
For the strawberry, use a tiny amount of yellow or light brown paint to fill inside the seed indentations you made earlier. -
Finishing Glaze:
Once all paint is completely dry, coat your fruits with a gloss glaze to give them a ceramic-like shine and protect the paint.
Make them Magnets
Before baking or drying, press a strong round magnet into the back of each fruit. Secure it with a dab of superglue after the project is finished for custom fridge decor.
Now you have a trio of delightful fruity friends to brighten up your desk space
Tiny Octopus With Curled Tentacles
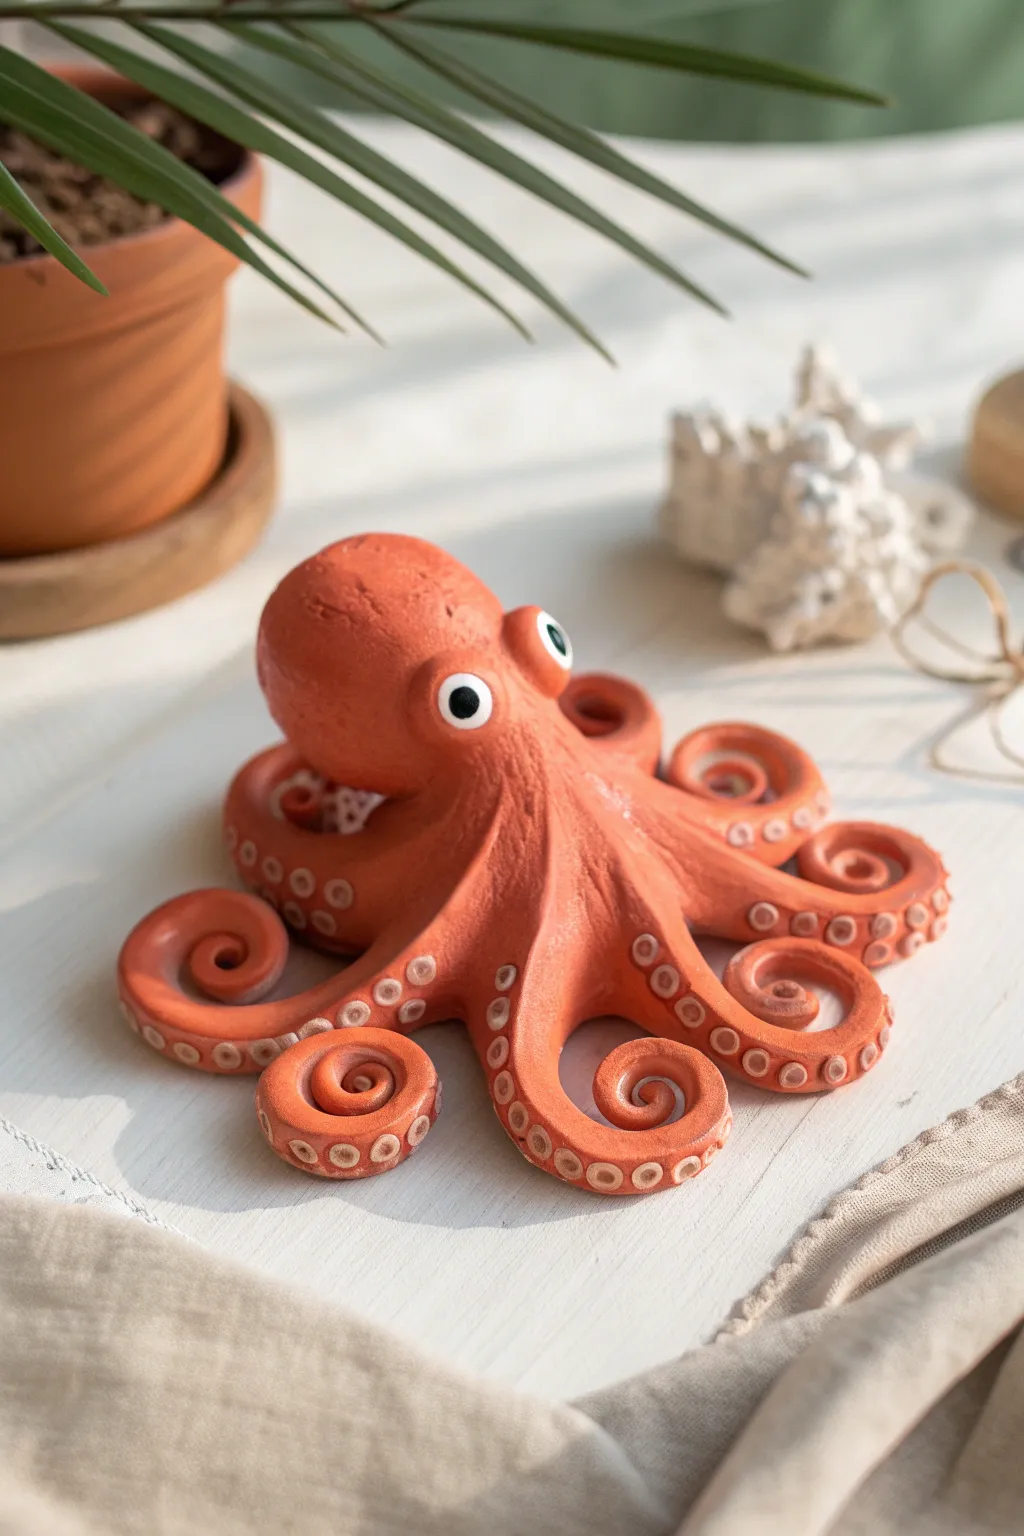
This charming little sea creature features a smooth, rounded head and dynamic, spiraling tentacles that seem to dance on the table. Its warm, terracotta finish gives it a classic pottery look while the expressive eyes add a splash of personality.
Detailed Instructions
Materials
- Light terracotta or orange polymer clay (or air-dry clay)
- White clay (pre-colored or paintable)
- Black clay (tiny amount) or black acrylic paint
- Sculpting tools (needle tool, small ball stylus)
- Small straw or hollow tube tool (for sucker details)
- Smooth work surface (glass or silicone mat)
- Oven (if using polymer clay)
Step 1: Sculpting the Head & Body
-
Form the main shape:
Start with a healthy chunk of your terracotta-colored clay and condition it until it’s pliable. Roll a large ball for the head, slightly elongating it into an oval or egg shape to mimic the bulbous mantle of an octopus. -
Create the base:
Flatten the bottom of the head piece slightly so it sits stable on your work surface. You can pinch the lower section just a bit to create a subtle neck area where the tentacles will attach. -
Prepare the tentacle clay:
Take a separate portion of the orange clay and roll it into a long, even snake. You’ll want enough thickness to handle tapering later, about the width of your pinky finger to start.
Step 2: Forming the Tentacles
-
Divide the clay:
Cut your long snake into eight equal segments. If you want a more natural look, you can make some slightly longer than others, but aim for general consistency. -
Taper the legs:
Roll each individual segment on your surface so that one end remains thick (for attaching to the body) and the other end tapers down to a fine, decorative coil point. -
Attach the legs:
Flip the head piece over and press the thick ends of the tentacles into the underside center. Smooth the seams together with a modeling tool or your finger so they look like one continuous piece of clay. -
Flip and arrange:
Turn the octopus back onto its stomach. Gently fan the legs out radially around the body. -
Curl the ends:
Here is the fun part: take the tip of each tentacle and tightly curl it inward into a spiral. Vary the direction or tightness slightly for a more organic, undulating appearance.
Tentacles Drooping?
To specific curled shapes during baking or drying, tuck small balls of aluminum foil or tissue under the raised parts of the tentacles for support.
Step 3: Adding Details
-
Create the suckers:
Using a very small ball of white or lighter orange clay, press tiny flattened discs onto the top surface of the tentacles. Alternatively, you can impress the clay directly. -
Impress the texture:
To get the precise look in the image, use a small straw or hollow tube tool. Gently press into the clay along the length of each tentacle to create ring-shaped indentations mimicking suction cups. -
Refine the skin:
Use a toothbrush or a texture sponge to lightly tap the head surface if you want a rougher, more earthy texture, or smooth it perfectly with a drop of baby oil for a sleek finish. -
Make the eye sockets:
Use a large ball stylus or your thumb to press two shallow indentations into the front of the head where the eyes will go. -
Add the eye whites:
Roll two balls of white clay and press them firmly into the sockets you just made. They should bulge out slightly to give that cartoonish, wide-eyed look. -
Add pupils:
Place tiny dots of black clay in the center of the white eyes. I find a needle tool helps position these tiny specks accurately without smudging.
Display Idea
Make a tiny clay rock or piece of driftwood for the octopus to sit on, draping two of the tentacles over the edge for a dynamic pose.
Step 4: Finishing Up
-
Final inspection:
Check around the base of the tentacles to ensure all connections are smooth and secure. Re-curl any tips that might have flattened during the detailing phase. -
Bake or Dry:
If using polymer clay, bake according to the manufacturer’s instructions (usually around 275°F/135°C for 15-30 minutes). If using air-dry clay, leave it in a dry, safe spot for 24-48 hours. -
Seal (Optional):
Once cool or fully dry, you can brush on a matte varnish to protect the clay and deepen the terracotta color.
Place your new eight-legged friend on a desk or shelf to add a whimsical touch to your decor


What Really Happens Inside the Kiln
Learn how time and temperature work together inside the kiln to transform clay into durable ceramic.
Little Hedgehog With Texture Spikes
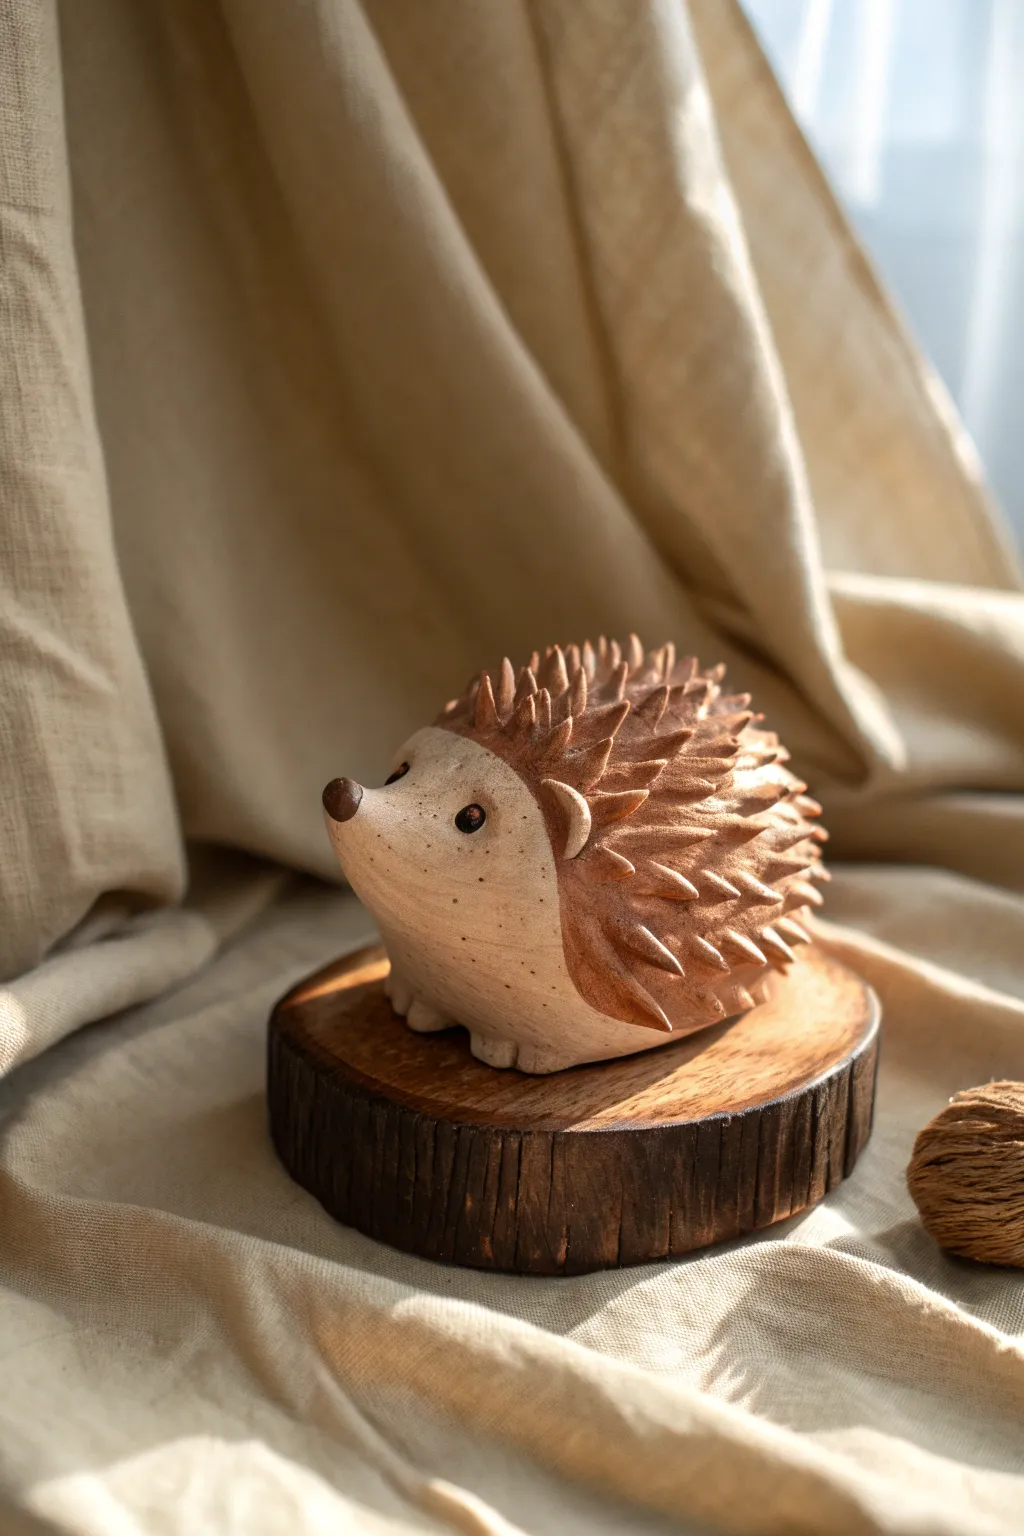
This charming little hedgehog combines smooth clay modeling with sharp, satisfying texture work. The contrast between the smooth, pale face and the rusty-brown spiked back makes it an engaging piece to hold and admire.
Step-by-Step Tutorial
Materials
- Polymer clay (beige/light sand for the body)
- Polymer clay (terracotta or reddish-brown for the spikes)
- Black clay or small black beads (for eyes)
- Dark brown clay (for nose)
- Sculpting tools (needle tool, small ball stylus)
- X-acto knife or craft blade
- Soft pastel chalks (browns/oranges for shading)
- Small fluffy paintbrush
- Aluminum foil (for core)
- Oven for baking
Step 1: Base Form Construction
-
Build the core:
Start by crumpling a small piece of aluminum foil into a tight egg shape. This saves clay and keeps the sculpture lightweight while preventing cracking during baking. -
Cover with base clay:
Condition your beige or light sand colored clay until soft. Roll it into a sheet about 1/4 inch thick and wrap it completely around your foil core, smoothing out all seams. -
Shape the body:
Gently roll the clay-covered egg on your work surface to smooth it. Pinch one end slightly to begin forming the snout area, creating a tapered teardrop shape. -
Refine the face:
Using your thumb, gently press upward under the snout to create a slight lift. Smooth the facial area repeatedly to ensure it is pristine and free of fingerprints. -
Add the feet:
Roll four tiny balls of the beige clay. Flatten them slightly and attach them to the bottom of the body, two near the front and two near the back. Blend the seams upward into the body so they look integrated.
Step 2: Creating the Spiky Coat
-
Prepare the spike clay:
Condition the terracotta or reddish-brown clay. Roll it out into a thin sheet, roughly 1/8 inch thick. -
Drape the back:
Lay this darker sheet over the back of your hedgehog, leaving the face and underbelly exposed. The shape should look like the hedgehog is wearing a little cape. -
Secure the layer:
Gently press the brown clay down so it adheres to the beige base. Trim around the face area in a curved line to frame the cheeks and forehead. -
Texturing strategy:
I prefer starting the spikes from the bottom edge and working my way up toward the center of the back. -
Form individual spikes:
Using a needle tool or a small curved blade, pull up small bits of the brown clay layer to form raised triangular points. Don’t remove the clay; just lift and pinch slightly to sharpen the tip. -
Layer the texture:
Continue lifting these little spikes in staggered rows. Ensure the spikes point somewhat backward toward the tail, mimicking natural quill growth. -
Refine the spike tips:
Go back over any blunt spikes and gently pinch them with your fingers or smooth them with a tool to make them look sharp and defined. -
Add the ears:
Make two small semi-circles of beige clay. Attach them right at the seam where the brown ‘cape’ meets the beige face. Press the center with a ball tool to cup them.
Spikes looking flat?
If your spikes flatten while you work, try freezing the sculpture for 5 minutes. The firmer clay holds detail better. Also, use a lighter touch when holding the body.
Step 3: Features and Finishing
-
Set the eyes:
Use a ball tool to make two small indentations on the smooth face. Press tiny balls of black clay (or small beads) into these sockets. -
Add the nose:
Roll a tiny ball of dark brown clay and attach it to the very tip of the snout. Shape it slightly into a rounded triangle. -
Subtle speckling:
To recreate the speckled look on the face, dip a stiff bristle brush or toothbrush into watered-down brown acrylic paint and lightly flick speckles onto the beige clay. Wipe off any large drops immediately. -
Shading with pastels:
Scrape some brown pastel chalk into a fine powder. Use a soft brush to dust this powder into the crevices between the spikes and around the ears to add depth. -
Baking:
Place your hedgehog on an oven-safe tile or tray. Bake according to your specific clay manufacturer’s instructions (usually 275°F/130°C for 15-30 minutes). -
Cooling and cleaning:
Let the piece cool completely inside the oven to prevent cracks. Once cool, you can lightly buff the smooth face with a soft cloth for a subtle sheen.
Make it autumnal
Mix tiny bits of orange, gold, and dark brown clay together for the spiky back layer but don’t fully blend them. This creates a marbled, leaf-pile effect for the quills.
Place your finished hedgehog on a shelf or a slice of wood to add a touch of woodland charm to your room
Mini Snail With a Swirl Shell
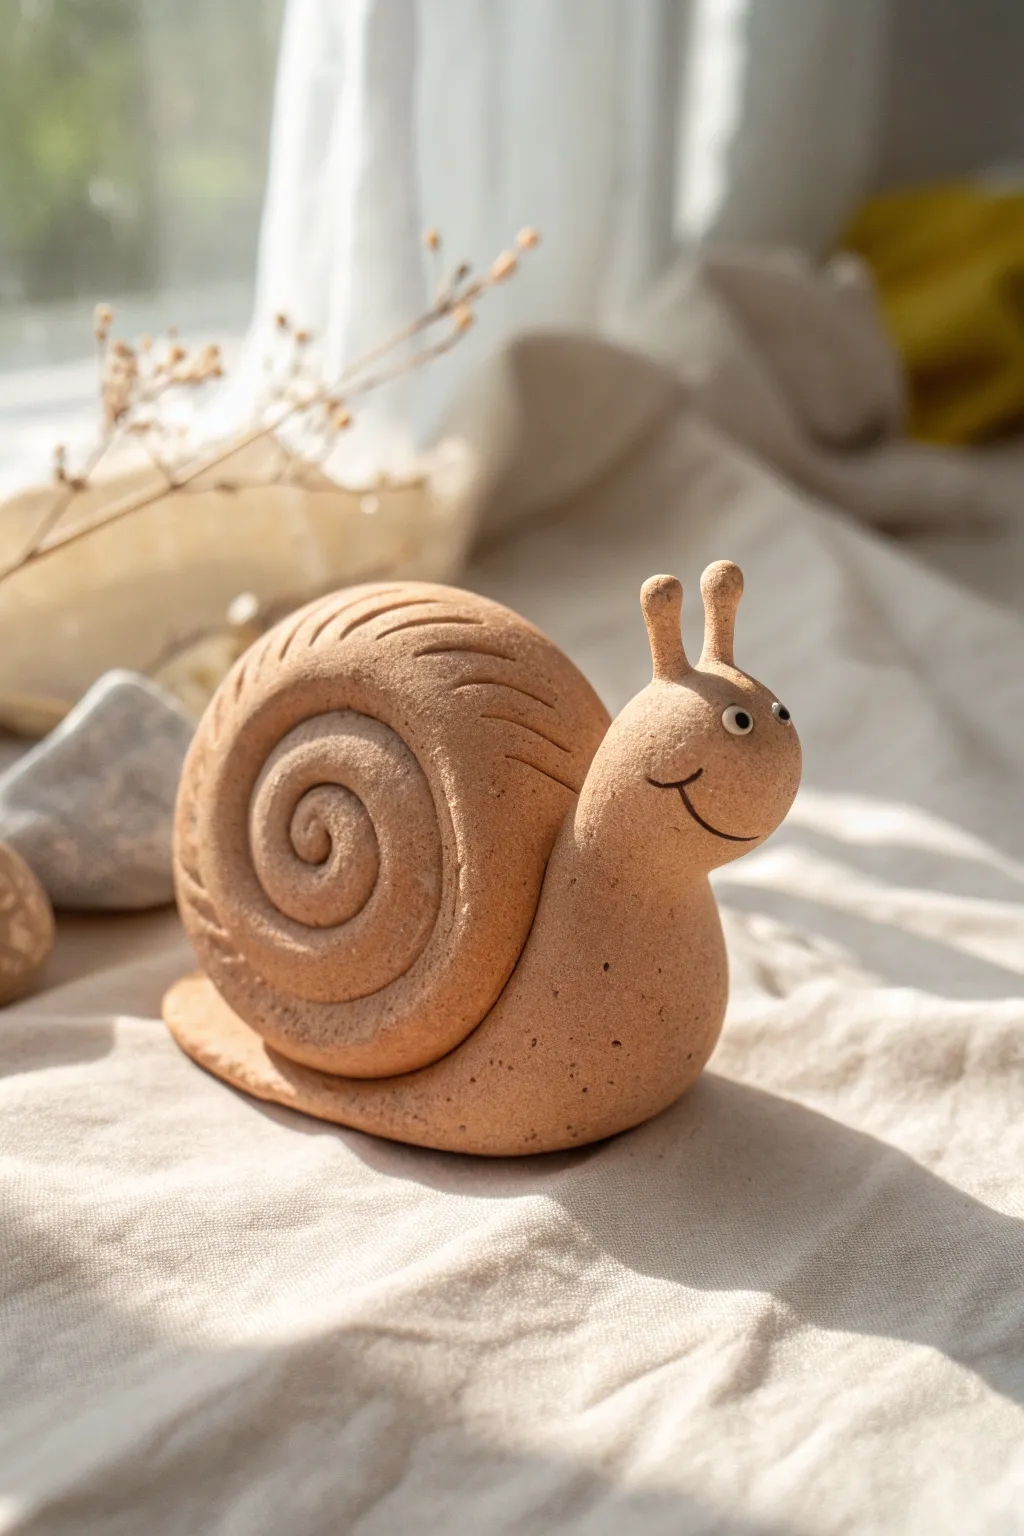
This adorable little garden friend is bursting with personality, featuring a classic spiral shell and a cheerful expression. The natural, earthy tone of the clay gives it a warm, organic feel that looks perfect on a sunny windowsill or nestled among your potted plants.
Step-by-Step
Materials
- Terracotta-colored polymer clay (or air-dry clay)
- Small amount of white clay (for eyes)
- Tiny amount of black clay (for pupils)
- Basic sculpting tools (needle tool, ball stylus)
- Smooth work surface
- Aluminum foil (optional, for internal structure)
Step 1: Forming the Body
-
Prepare the base:
Start by conditioning a medium-sized ball of your terracotta clay until it is soft and pliable. Roll it into a thick log shape, slightly tapered at one end to form the tail. -
Shape the head and neck:
Gently pinch and pull the bulkier end of the log upwards to create an upright neck. Smooth the transition so it curves naturally from the base. -
Round the head:
Mold the top of the neck into a distinct, rounded head shape. It should look slightly bulbous compared to the neck, giving the snail a cute, cartoonish profile. -
Flatten the base:
Press the bottom of humanity gently onto your work surface to create a flat, stable base. You can slightly flatten the edges of the ‘foot’ to make it look like it’s gliding.
Step 2: Creating the Shell
-
Roll a long coil:
Take a separate, large chunk of clay and roll it into a long, even snake. The length will determine how many spirals your shell has, so go longer than you think you need. -
Taper the coil:
Taper one end of the snake to a point; this will be the center of your spiral. -
Start the spiral:
Beginning with the tapered end, tightly roll the clay in on itself like a cinnamon roll. Keep the coil vertical as you roll so the sides stay relatively flat. -
Finish the shell shape:
Continue rolling until you have a size that looks proportional to your snail’s body. Smooth the loose end into the side of the shell so it doesn’t unravel. -
Texture the shell:
Using a needle tool or a blunt knife, gently press curved lines into the outer rings of the spiral. These indentations mimic the growth lines found on real snail shells. -
Attach the shell:
Score the back of the snail body and the bottom of the shell (scratch crisscross lines) to create texture for gripping. Press the shell firmly onto the body’s back, blending the clay slightly underneath where it’s hidden to secure it.
Smoother Transitions
Use a drop of baby oil (for polymer) or water (for air-dry) on your finger to smooth seams where you attach the antennae or shell. It erases lines instantly.
Step 3: Adding Details
-
Make the antennae:
Roll two small, thin cylinders of terracotta clay. Round off the tops slightly so they aren’t sharp. -
Attach antennae:
Place the two cylinders on top of the head. Use a small ball tool to blend the base of the antennae into the head for a seamless connection. -
Sculpt the smile:
I like to use the side of a needle tool or a small curved blade to press a smile into the face. Make it deep enough to be seen but not so deep it distorts the head shape. -
Create the eye sockets:
Use a small ball stylus to make two shallow indentations where the eyes will go. This helps the eyeballs sit securely. -
Add the whites:
Roll two tiny balls of white clay and press them into the sockets. Flatten them just slightly. -
Add the pupils:
Roll even tinier balls of black clay. Press these onto the white eyeballs. Placement is key here—putting them slightly off-center or looking up can add a goofy charm. -
Finish the surface:
Before baking or drying, inspect your snail for fingerprints. You can gently buff them out with a tiny bit of baby oil on your finger or a soft brush.
Glossy Shine
After your snail is fully baked or dried, apply a coat of satin or gloss varnish just to the shell and eyes. The contrast with the matte body looks great.
Once your little snail is hardened, find a cozy spot for it to brighten up your shelf

TRACK YOUR CERAMIC JOURNEY
Capture glaze tests, firing details, and creative progress—all in one simple printable. Make your projects easier to repeat and improve.
Teeny Cloud and Star Shelf Set
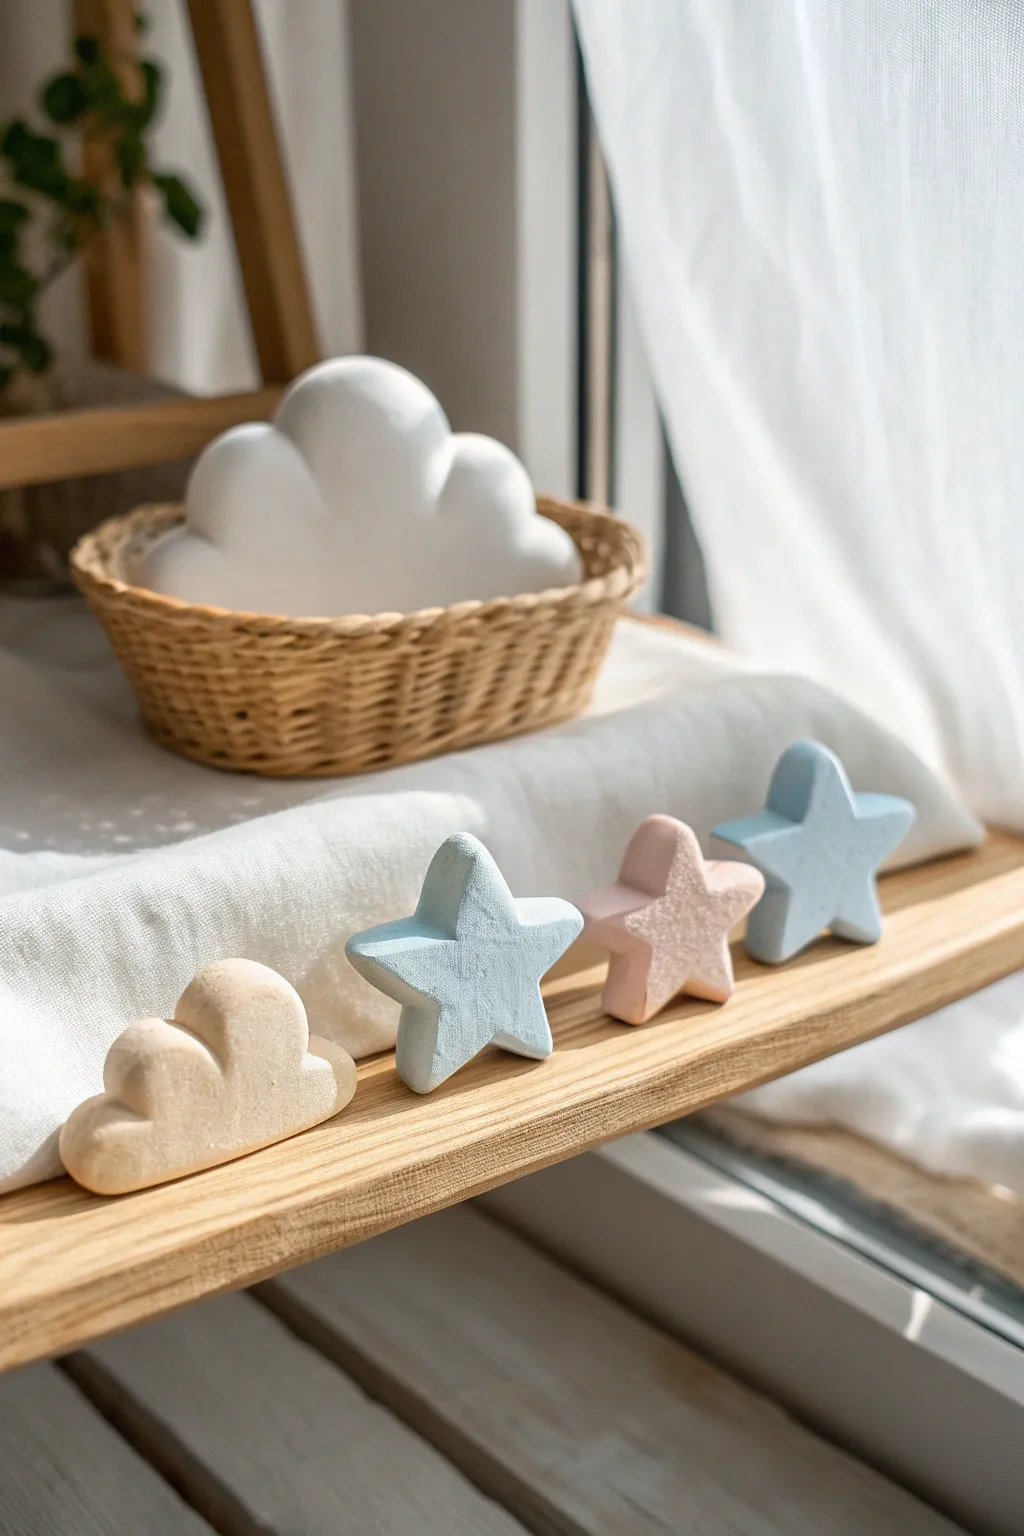
Bring a touch of whimsy to your shelves with these soft, matte-finished clay clouds and stars. This tutorial guides you through shaping a few simple forms into a cohesive, dreamy set that looks beautiful in a nursery or on a bookshelf.
How-To Guide
Materials
- White smooth air-dry clay (or polymer clay)
- Acrylic paints (baby blue, pastel pink, warm cream, white)
- Fine-grit sandpaper (400-600 grit)
- Small bowl of water
- Rolling pin or smooth glass jar
- Star-shaped cookie cutters (optional, but helpful)
- Modeling tools or a dull butter knife
- Sponge or soft paintbrush
- Matte varnish or sealant
Step 1: Shaping the Clouds
-
Prepare your clay:
Start by kneading a large handful of white clay until it is warm and pliable. This prevents cracks later on. -
Form the base:
Roll the clay into a thick oval log. This will be the main body of your cloud. -
Create the puffs:
Pinch and pull small sections of clay outward from the center mass to create rounded protrusions. -
Refine the shape:
Use your thumbs to smooth the transitions between the lumps so they look like one continuous, fluffy cloud rather than separate balls stuck together. -
Flatten the bottom:
Gently tap the bottom of your cloud on your work surface to create a flat base so it stands upright on its own. -
Smooth it out:
Dip your finger in a little water and rub away any fingerprints or cracks. Repeat this process to make a smaller accompanying cloud.
Step 2: crafting the Stars
-
Roll out a slab:
Take a new portion of clay and roll it out until it is about 1 inch thick. You want these chunky so they can stand up. -
Cut the shapes:
Press a star cookie cutter into the slab. If you don’t have one, lightly sketch a star with a needle tool and cut it out with a knife. -
Soften the edges:
I like to gently pat down the sharp edges created by the cutter to give the stars a soft, pillowy look. -
Check stability:
Stand each star up on its bottom two points to ensure it balances. If it tips, gently press it down slightly to flatten the contact points.
Cracks Appearing?
If small cracks appear while drying, mix a tiny bit of clay with water to make a paste (slip) and fill them in before painting.
Step 3: Drying and Finishing
-
Dry thoroughly:
Let your pieces dry for 24-48 hours. Turn them over halfway through so the bottoms dry evenly. -
Sand for perfection:
Once bone dry, use fine-grit sandpaper to buff out any remaining uneven spots. Wipe away the dust with a damp cloth. -
Paint the stars:
Paint two stars in a soft baby blue and one in a gentle pastel pink. Use a sponge for a texture-free application. -
Paint the small cloud:
Mix a tiny drop of brown or yellow into white paint to get a warm cream color, and apply this to the smaller cloud. -
Paint the large cloud:
Paint the large cloud pure white to make it pop against the other colors. Applying two thin coats is better than one thick one. -
Seal the work:
Finish with a coat of matte varnish to protect the paint while keeping that soft, non-glossy aesthetic.
Add Sparkle
Mix a tiny amount of very fine white glitter into your matte varnish for the stars to give them a magical, subtle shimmer.
Arranging your new pastel sky set on a sunny windowsill will instantly brighten the room
Mini Monster Blob With Extra Eyes
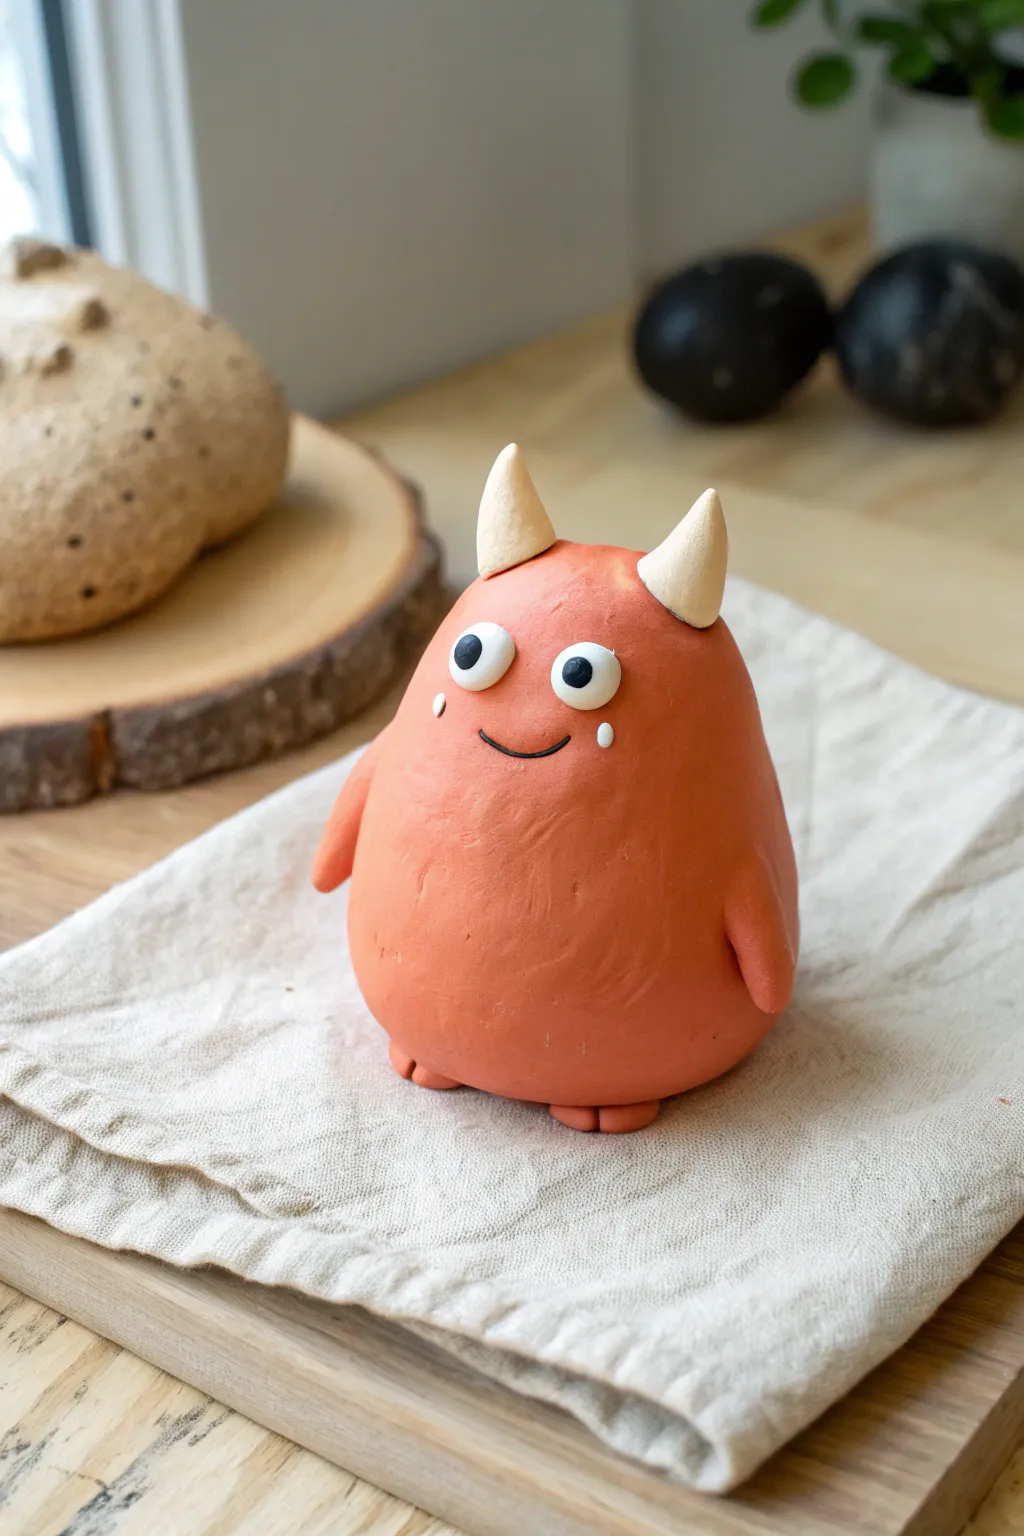
This charming, teardrop-shaped monster is a delightful project that combines simple shapes with expressive details. With its bright orange body, tiny horns, and wide-eyed stare, creating this little friend is surprisingly easy and fun.
Step-by-Step
Materials
- Orange polymer clay
- White polymer clay
- Black polymer clay
- Beige or light tan polymer clay
- Clay sculpting tools (needle tool, small ball stylus)
- Baking sheet
- Parchment paper
- Wet wipes (for cleaning hands)
Step 1: Shaping the Body
-
Condition the clay:
Start by taking a golf-ball-sized chunk of orange clay. Knead it thoroughly in your hands until it becomes soft, warm, and pliable to prevent cracking later. -
Form the base shape:
Roll the orange clay into a smooth ball. Once smooth, gently roll one side against your work surface to taper it, creating a teardrop or pear shape with a wider bottom and slightly narrower top. -
Flatten the bottom:
Tap the wider end of your teardrop gently on your table to flatten it so the monster can stand upright on its own without wobbling. -
Add texture:
Using a finger or a smooth modeling tool, gently rub the surface to ensure no fingerprints remain, though a very slight, natural unevenness adds to the organic ‘blob’ look.
Keep it Clean
Since white clay picks up dust easily, always wipe your hands and tools thoroughly with a wet wipe before switching from the dark or orange clay to the white eye parts.
Step 2: Adding Arms and Feet
-
Create the arm pieces:
Roll two small, pea-sized balls of orange clay. Gently roll them into elongated teardrops or fat cone shapes. -
Attach the arms:
Press one arm onto each side of the body, about halfway down. Smooth the top seam where the arm meets the body so it looks connected, but leave the tips hanging slightly loose. -
Make the feet:
Create two tiny flattened ovals of orange clay for the feet. They should be quite small to keep the focus on the round body. -
Attach the feet:
Place the feet under the front of the body. Press the body down gently onto them to secure the bond. -
Detail the toes:
I find using a needle tool here works best to press two tiny vertical indentations into each foot to suggest toes without needing to sculpt them individually.
Step 3: Face and Horns
-
Form the eyes:
Roll two small balls of white clay. Flatten them slightly into thick discs and press them onto the upper third of the monster’s face. -
Add pupils:
Take tiny specs of black clay and roll them into balls. Press one into the center of each white eye. Placing them slightly off-center or cross-eyed can give a goofier expression. -
Refine the eyes:
Add tiny highlight dots of white clay to the black pupils if you want extra sparkle, though simple black dots work perfectly too. -
Sculpt the mouth:
Roll a very thin snake of black clay. Cut a small curved section and press it gently below the eyes to form a smile. Use a needle tool to gently curve the ends upward. -
Add cheek details:
Roll two microscopic balls of white clay and place them just below the eyes on the cheeks for cute little accent spots. -
Shape the horns:
Take your beige clay and shape two distinct cones. Keep the base flat and the tip pointy but slightly rounded. -
Attach the horns:
Press the horns onto the very top of the head. Position them slightly apart. -
Blend the horns:
Use a sculpting tool to gently blend the base of the horns into the orange head just a tiny bit for a secure hold.
Make it a Trio
Make two friends for your monster in different colors like teal and purple. Vary their shapes—make one tall and skinny, and another short and square, for a fun set.
Step 4: Finishing Up
-
Final inspection:
Check your sculpture from all angles. Smooth out any accidental fingernail marks or dust specks. -
Bake carefully:
Place your monster on a baking sheet lined with parchment paper. Bake according to your clay manufacturer’s instructions (usually 275°F or 130°C for 15-30 minutes). -
Cool down:
Let the figure cool completely on the baking sheet before handling, as the clay is fragile while hot.
Your adorable desk companion is now ready to bring a smile to your workspace
Mini Sea Creature Magnet Set
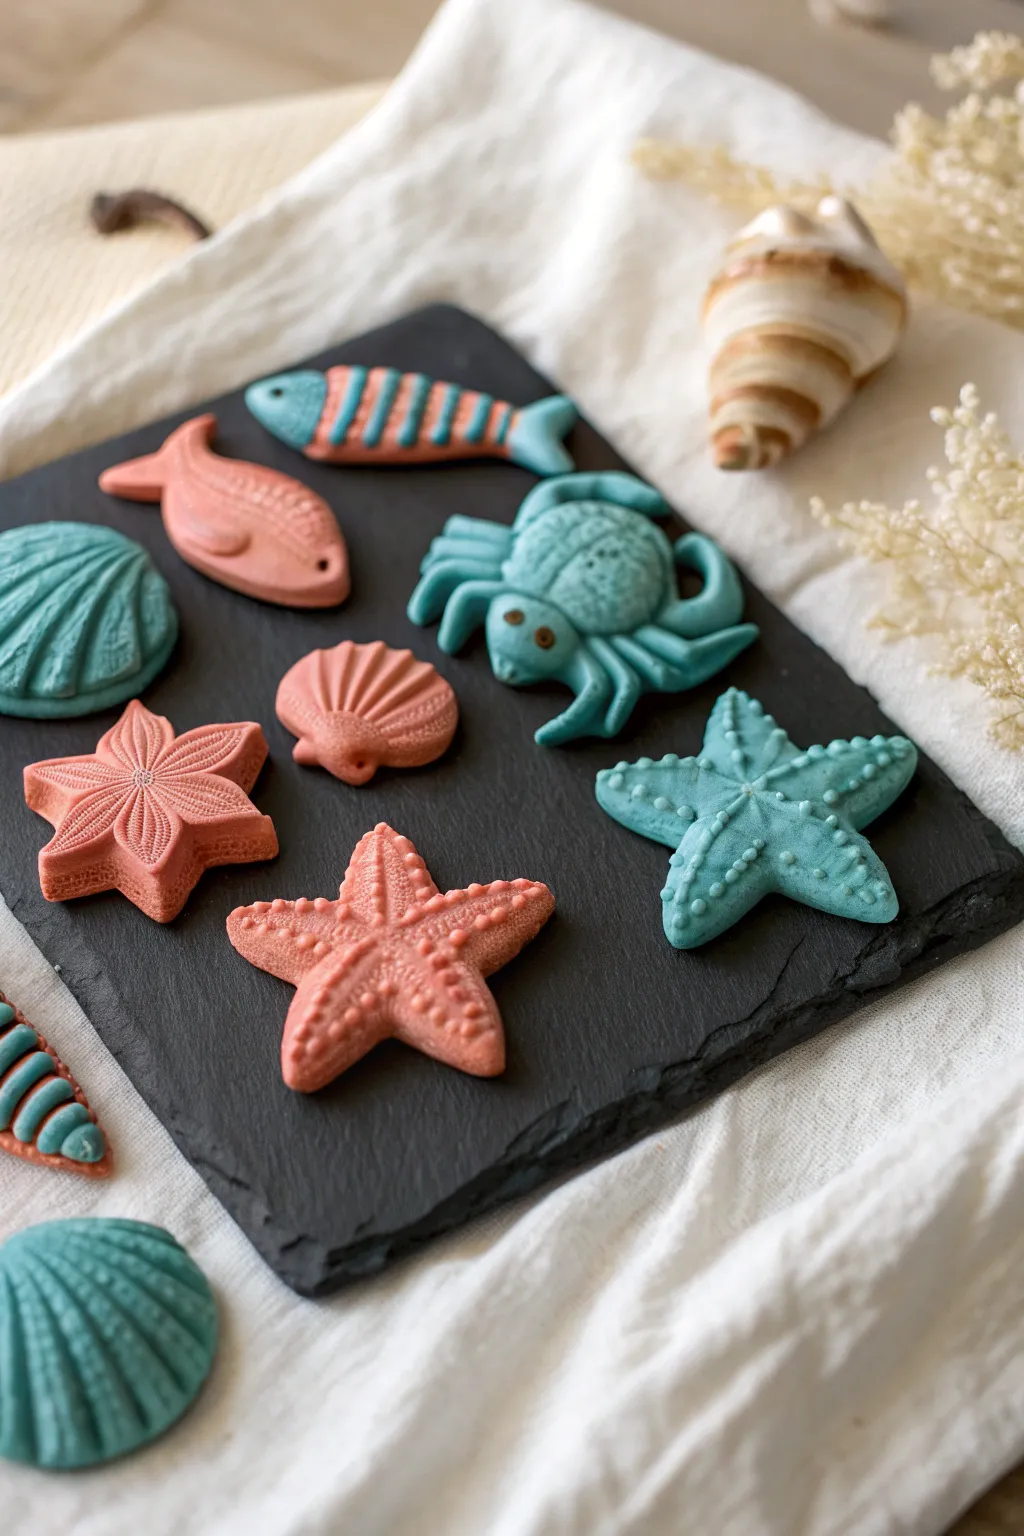
Bring the calming vibes of the ocean into your home with these adorable, pastel-toned sea creature magnets. Using soft shades of teal and coral clay, you’ll sculpt detailed shells, starfish, and playful critters perfect for brightening up your fridge or magnetic board.
Step-by-Step
Materials
- Polymer clay (Teal, Coral Pink, White for mixing)
- Clay sculpting tools (needle tool, small ball stylus)
- Small circle cutter or scalloped cutter (optional)
- Texturing tools (clean toothbrush or sandpaper)
- Strong craft glue (e.g., E6000)
- Small round magnets
- Parchment paper or baking tile
- Oven for baking
Step 1: Preparation & Color Mixing
-
Condition the Clay:
Start by kneading your teal and coral pink polymer clay separately until they are soft and pliable. If the colors feel too saturated, mix in a small amount of white clay to achieve the soft, matte pastel look visible in the photo. -
Create a Workspace:
Lay down parchment paper or work directly on a ceramic tile. This prevents the clay from sticking and allows you to bake the pieces without moving them, preserving their shape.
Step 2: Sculpting the Shapes
-
Form the Starfish Base:
To make the blue and pink starfish, roll a small ball of clay and flatten it slightly. Pinch five points outward from the center to create the arms, smoothing the edges with your finger. -
Texture the Starfish:
Using a small ball stylus or a blunt needle tool, press rows of tiny dots running down the center of each arm. For the pink starfish, create a central cluster of dots for added realism. -
Sculpt the Crab Body:
Roll a larger ball of teal clay for the crab’s shell and flatten it into a rounded oval. Attach smaller logs of clay for legs—four bent legs on each side—blending the seams underneath the body. -
Add Crab Details:
Use a needle tool to gently press texture onto the crab’s back, giving it a bumpy shell appearance. Press two small indentations for eye sockets and add tiny balls of brown clay for the eyes. -
Create the Striped Fish:
Form a fish shape using teal clay. Roll very thin snakes of coral pink clay and lay them vertically across the fish’s body. Gently roll over them with an acrylic roller or smooth them with your finger until they are embedded flush with the surface. -
Make the Coral Fish:
Shape a simple coral pink fish silhouette. Use a needle tool to impress a scale pattern on the body and lines on the tail. Use the tip of a tool to poke a small eye hole. -
Form the Scallop Shells:
For the teal and pink shells, roll a ball and flatten it into a fan shape. Use a needle tool to press deep grooves radiating from the bottom point to the top edge to mimic ridges. -
Sculpt the Flower-Star:
For the pink star-flower shape, flatten a piece of clay and cut or pinch it into a five-pointed star. Use a knife tool to press a deep line down the center of each petal, creating a veined look like a sand dollar or sea flower.
Magnet Won’t Stick?
If the magnet slides off the baked clay, lightly sand the back of the clay piece to create a rougher surface for the glue to grip.
Step 3: Finishing & Baking
-
Final Smoothing:
Before baking, give every piece a once-over. Remove any fingerprints by lightly brushing the surface with a little bit of baby oil or cornstarch. -
Bake the Pieces:
Bake the clay pieces according to the manufacturer’s instructions (usually 275°F or 130°C for 15-30 minutes provided on your clay package). I always recommend using an oven thermometer to ensure the temperature is accurate. -
Cool Down:
Allow the clay pieces to cool completely on the baking tray. They will be slightly soft when hot but harden as they cool. -
Attach Magnets:
Flip each cooled creature over. Apply a dab of strong craft glue to the back and press a small magnet firmly into place. Let the glue cure fully before stickig them to a metal surface.
Add a Sea-Washed Look
After baking, lightly brush white acrylic paint over the textured areas and wipe the excess off immediately to highlight the details.
Now you have a charming collection of miniature sea life ready to organize your notes