There’s just something extra sweet about making matching clay pieces—like a tiny handmade promise that says, “I’m with you.” These ideas are all about creating paired charms and minis that feel connected, even when you’re miles apart.
Split Heart Keychains
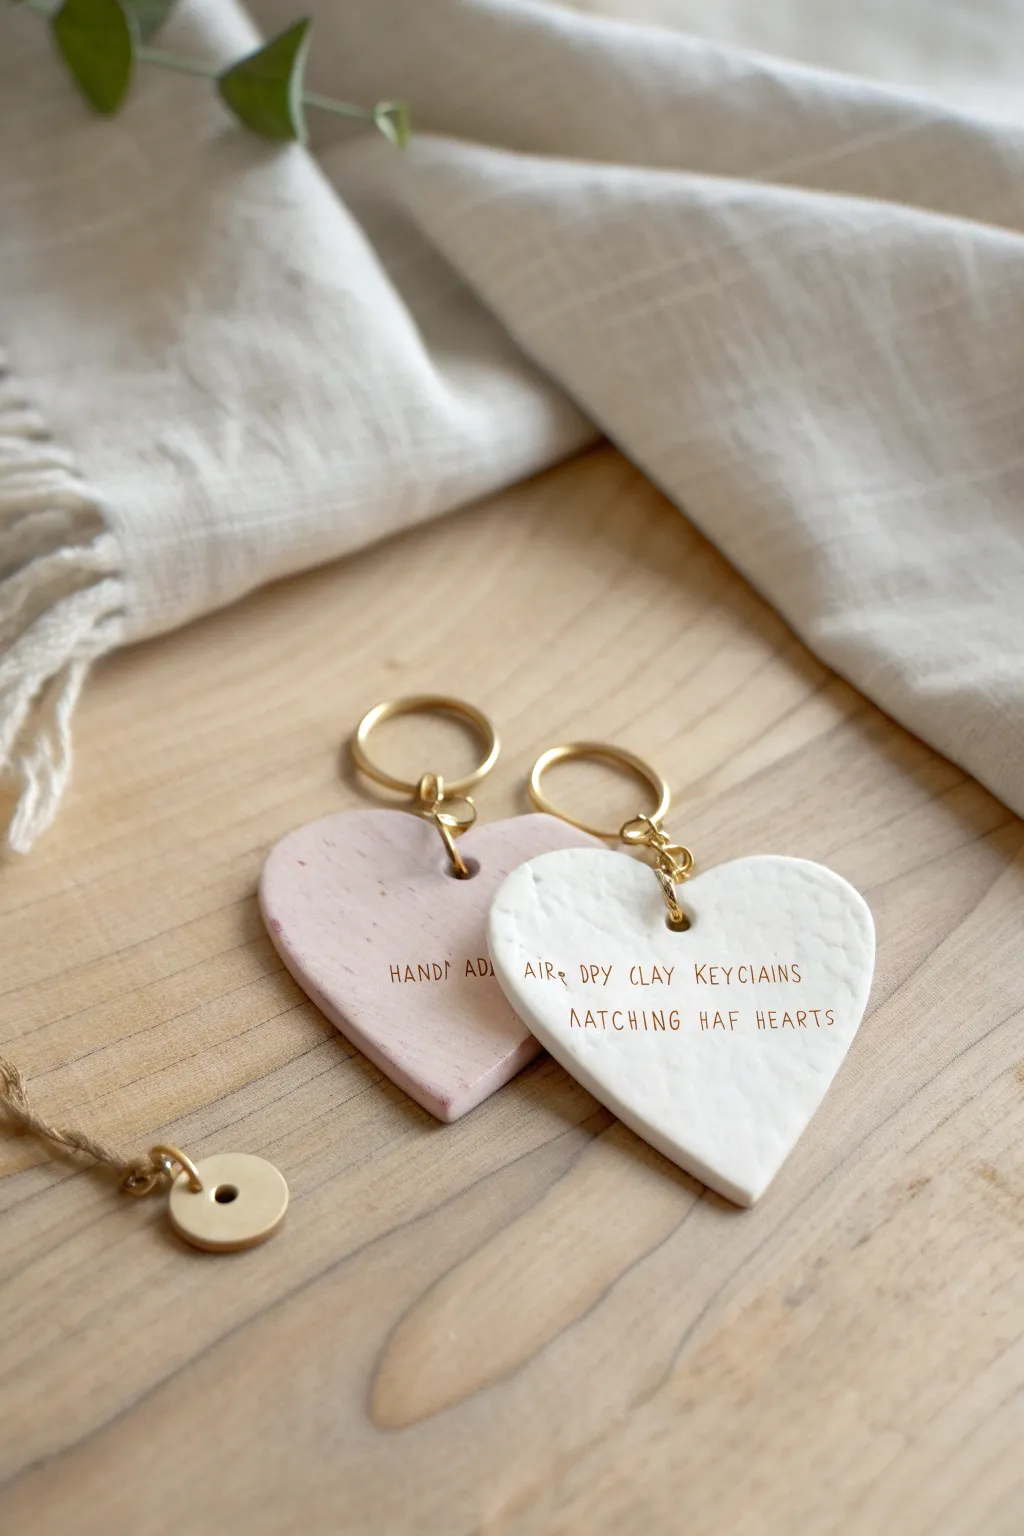
Celebrate friendship or connection with these sweetly rustic split-heart keychains. Crafted from air-dry clay in soft blush and white tones, they feature personalized stamped messages and elegant gold hardware for a chic finish.
Step-by-Step Tutorial
Materials
- Air-dry clay (white)
- Acrylic paint (dusty rose or pink)
- Heart-shaped cookie cutter (medium size)
- Rolling pin
- Parchment paper or clay mat
- Alphabet stamp set (small serif font)
- Gold Jump rings (6-8mm)
- Gold split-ring keychains
- Wooden skewer or straw
- Fine-grit sandpaper (400 grit)
- Gloss varnish or sealant (optional)
- Jewelry pliers
Step 1: Preparing the Clay
-
Condition the clay:
Start by taking a chunk of white air-dry clay and kneading it in your hands until it becomes soft, pliable, and free of cracks. -
Tint the pink batch:
Separate the clay into two equal balls. Leave one white. For the pink heart, add a very small drop of dusty rose acrylic paint into the second ball and knead thoroughly until the color is uniform and streak-free. -
Roll it out:
Place a sheet of parchment paper down. Flatten the white clay ball slightly with your palm, then use a rolling pin to roll it to an even thickness of about 1/4 inch (6mm). -
Repeat for pink:
Clean your roller to prevent color transfer, then roll out the pink clay to the exact same thickness.
Clean Cuts
If your cookie cutter is sticking, lightly dust the clay surface with cornstarch or dip the cutter in water before pressing down.
Step 2: Shaping and Stamping
-
Cut the shapes:
Press your heart-shaped cookie cutter firmly into the white clay slab and wiggle it slightly to cut cleanly. Repeat this process with the pink clay. -
Smooth the edges:
Dip your finger in a little water and gently run it along the cut edges of the hearts to smooth out any roughness or loose clay bits. -
Create the hole:
Use a skewer or a small straw to punch a hole near the top dip of the heart. Ensure the hole is noticeably larger than your jump ring, as clay shrinks slightly when drying. -
Plan your text:
Before stamping, lightly practice your spacing on a scrap piece of flattened clay. This helps you gauge how hard to press. -
Stamp the message:
Gently press your alphabet stamps into the surface. For the look in the photo, align your text centrally or near the bottom curve. You don’t need ink; the impression creates the shadow. -
Texture option:
The hearts in the image have a lovely, subtle organic texture. If yours are too smooth, lightly pat the surface with a piece of crumpled aluminum foil or a texture sponge.
Mix & Match
Make a third heart combining the two colors to create a beautiful marble effect by twisting the pink and white ropes together before rolling.
Step 3: Finishing Touches
-
Dry the hearts:
Lay the hearts on a flat surface lined with clean paper towels. Let them dry for 24-48 hours. I like to flip them over halfway through so the bottom dries evenly. -
Sand for perfection:
Once fully bone dry, take your fine-grit sandpaper and very gently go over the edges to remove any final sharp points. -
Enhance text (Optional):
If you want the text to pop, fill the stamped impressions with diluted brown paint, then wipe the surface clean with a damp cloth, leaving pigment only in the letters. -
Seal the piece:
Apply a thin coat of matte or gloss varnish to protect the clay from moisture and everyday wear. -
Open the jump ring:
Using two pairs of jewelry pliers, twist a gold jump ring open sideways (never pull it apart). -
Assemble the keychain:
Slide the jump ring through the hole in the clay heart, then loop on the gold keyring hardware. -
Close the ring:
Twist the jump ring back into a closed position, ensuring the ends meet perfectly flush so the clay doesn’t slip out.
You now have a charming set of handmade accessories ready to gift to your favorite person


Puzzle Piece Bestie Charms
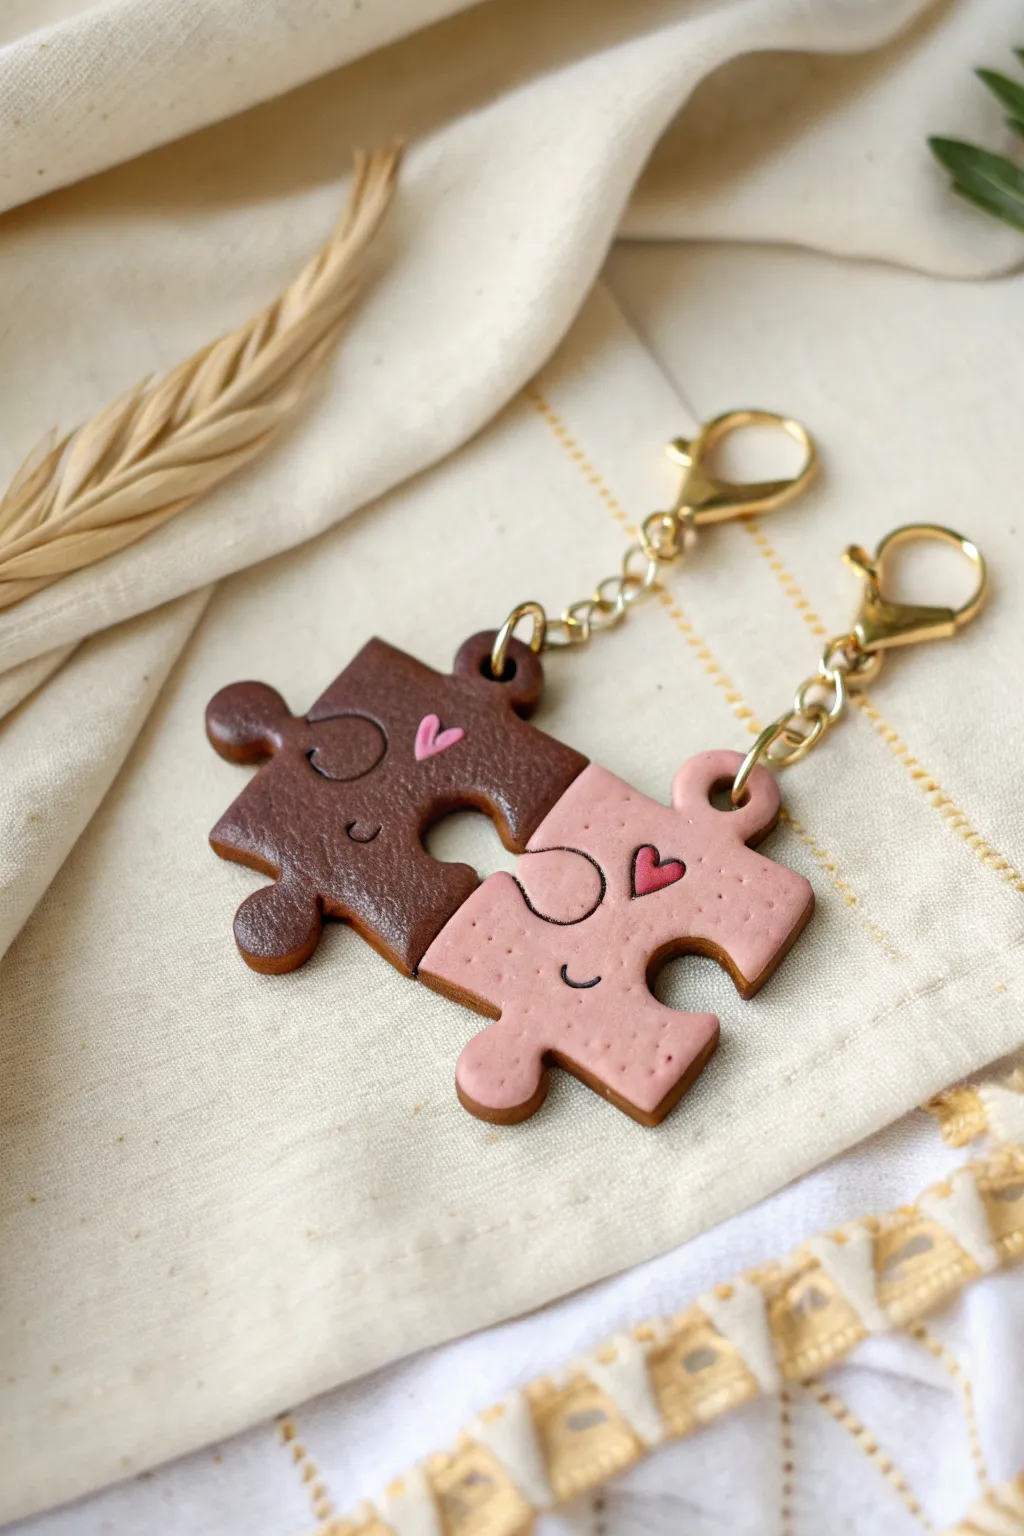
Celebrate your connection with these adorable, interlocking puzzle piece keychains that fit together perfectly just like you and your best friend. Crafted from polymer clay in complementary chocolate and strawberry shades, these charms feature sweet smiling faces and heart details for a truly personalized touch.
Step-by-Step Guide
Materials
- Polymer clay (dark brown and light pink)
- Rolling pin or pasta machine
- Puzzle piece cookie cutter (or a sharp craft knife)
- Small heart-shaped cutter (optional micro-cutter)
- Needle tool or toothpick
- Small dotting tool
- Acrylic paint (black and pink/red)
- Fine detail paintbrush
- Gloss glaze or resin (optional)
- 2 Gold screw eye pins
- 2 Gold keychains with lobster clasps
- Jump rings
- Pliers (flat nose and round nose)
- Sandpaper (high grit)
- Oven
Step 1: Shaping the Clay
-
Condition the clay:
Begin by kneading your brown and pink clay separately until they are soft, pliable, and free of air bubbles. Clean your hands between colors to avoid staining the lighter pink clay usually. -
Roll out slabs:
Roll each color out into a slab that is roughly 1/4 inch thick. You want them to be sturdy enough for everyday use, so avoid making them too thin. -
Cut the shapes:
If you have a puzzle piece cutter, press it into the clay. If not, draft a simple puzzle shape on paper first, place it on the clay, and carefully trace around it with your craft knife. -
Create the fit:
This is the crucial part: gently press the two cut pieces together while they are still raw to ensure the ‘outie’ nub of one fits the ‘innie’ slot of the other. The clay might spread slightly when cutting, so reshape gently with your fingers until they lock comfortably. -
Smooth the edges:
Use your finger or a little baby oil to smooth down any rough ridge left by the cutter or knife. Rounded edges look more pro and resist chipping.
Loose Fit?
If the puzzle pieces don’t fit well after baking, carefully sand the inside curve of the ‘innie’ piece or the sides of the ‘outie’ nub until they slide together easily.
Step 2: Adding Details & Baking
-
Indent the eyes:
Use a small ball tool or a rounded tool end to gently press two closed-eye shapes (like little curved U’s) into the clay. Doing this before baking creates a guide for painting later. -
Add the smile:
Use a needle tool to etch a tiny, simple smile below the eyes. -
Add hearts:
You can either paint the hearts later or, for a 3D effect, press a tiny shaped cutter lightly into the cheek area to create an impression. -
Insert hardware:
Screw a small eye pin into the top corner of each puzzle piece. I find adding a dab of liquid clay or bake-and-bond on the screw threads helps it stay secure permanently. -
Bake:
Bake the pieces in your oven according to your specific brand of clay’s instructions (usually around 275°F/130°C for 15-30 minutes). Let them cool completely before handling.
Initial Charm
Personalize these even further by stamping your bestie’s initial on the back of your piece (and yours on theirs) before baking for a hidden friendship message.
Step 3: Finishing Touches
-
Sand imperfections:
Once cool, use high-grit sandpaper to gently buff away any fingerprints or sharp edges on the sides. -
Paint the details:
Using a very fine detail brush, paint the indented eye curves and mouth with black acrylic paint. -
Add the pop of love:
Paint a small heart on the cheek of each piece using pink or red paint. A contrasting color works best—light pink on the brown piece, and darker pink or red on the pink piece. -
Seal the piece:
To protect the paint from scratching off inside a pocket or bag, apply a thin coat of matte or gloss varnish over the entire piece. -
Attach the keychain:
Using your pliers, open a jump ring and connect the eye pin loop to the gold keychain hardware. Close the jump ring securely so there is no gap.
Clip these onto your bags or keys and enjoy having a little reminder of your best friend with you wherever you go.


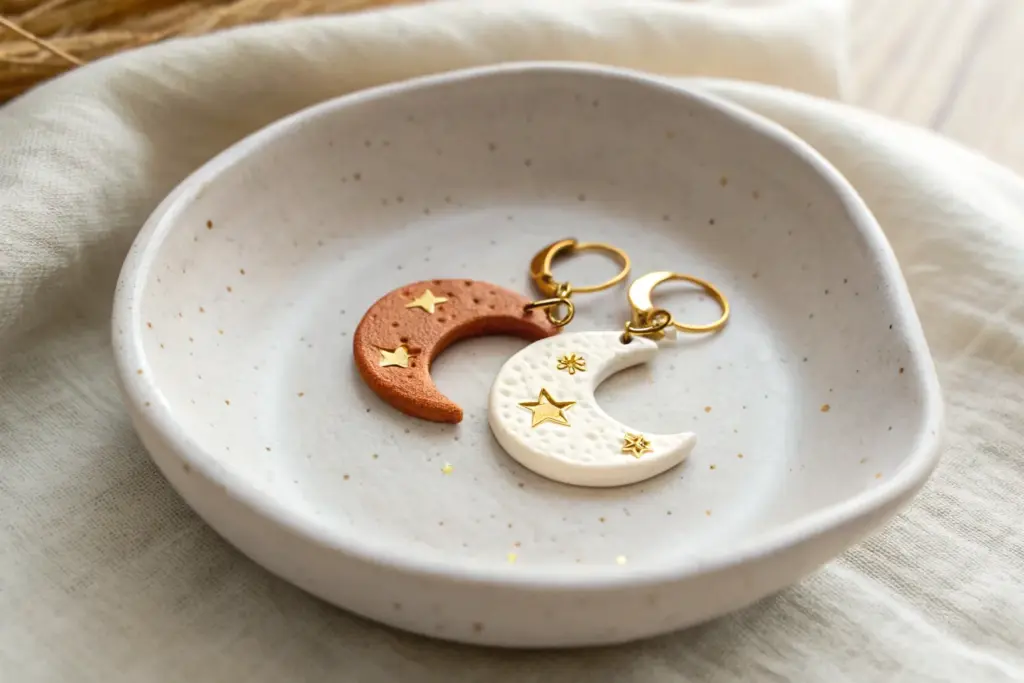
Sun and Moon Pendant Set
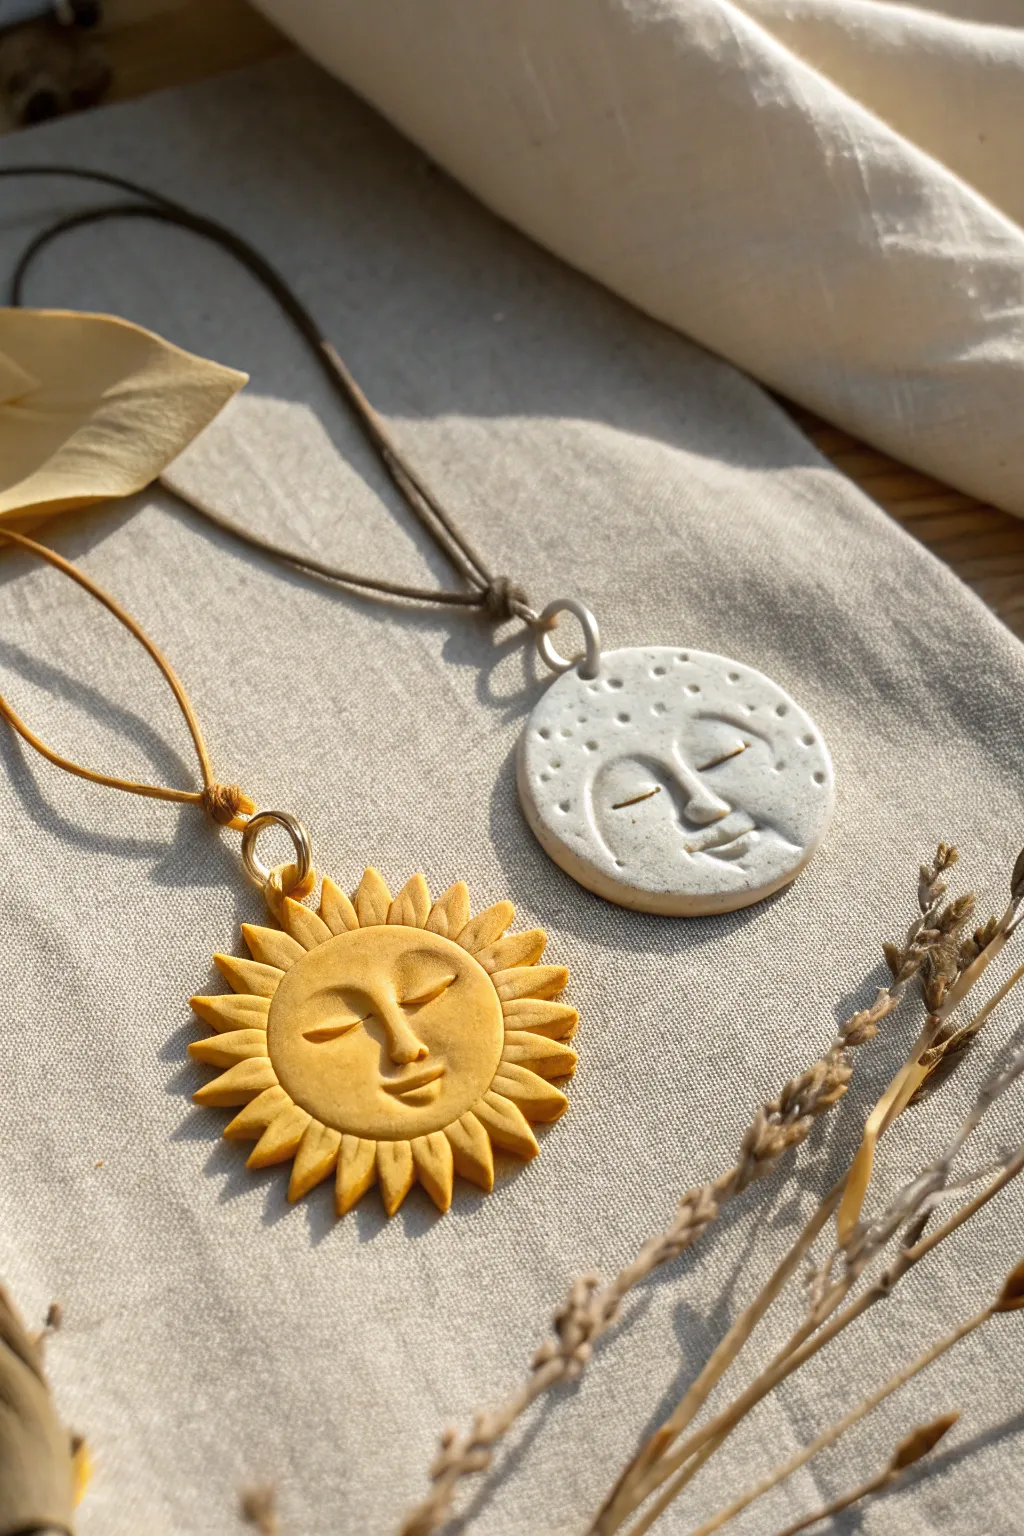
Create a harmonious balance of day and night with this charming clay pendant set. Featuring a warm, radiating sun and a serene, spotted moon, these pieces use simple carving techniques to achieve a professional, artisanal look.
Step-by-Step
Materials
- Polymer clay (mustard yellow and granite/speckled white)
- Rolling pin or pasta machine
- Round clay cutter (approx. 1.5 – 2 inches)
- Needle tool or toothpick
- Small ball stylus tool
- X-Acto knife or craft scalpel
- Jump rings (gold and silver)
- Jewelry pliers
- Leather or waxed cotton cord (honey brown and taupe)
- Parchment paper
Step 1: Shaping the Sun
-
Condition the Clay:
Begin by kneading the mustard yellow polymer clay until it is soft and pliable. This warmth prevents cracks during the sculpting process. -
Roll and Cut Base:
Roll the clay out to a thickness of about 1/4 inch. Use your round cutter to punch out a clean circle. -
Create the Rays:
Using an X-Acto knife, make vertical cuts all around the edge of the circle, slicing inward about 1/4 inch toward the center to create the individual sun rays. -
Refine the Rays:
Gently pinch the tip of each cut section to form a point. Use the side of your needle tool to press a groove down the center of each ray for added texture. -
Form the Face:
Roll a slightly smaller ball of yellow clay and flatten it into a disc. Press this firmly onto the center of your sun base, blending the edges slightly so it adheres well. -
Carve Facial Features:
Use your needle tool to gently etch two closed, curved eyes. I like to press a tiny bit of clay in the center to build up a nose bridge before carving the nostrils. -
Finishing the Expression:
Carve a small, serene smile below the nose. Smooth any harsh lines with a fingertip or a soft silicone tool. -
Add Hardware Hole:
Pierce a hole through one of the top sun rays using a needle tool or a small straw, ensuring it’s large enough for your jump ring.
Step 2: Sculpting the Moon
-
Prepare Speckled Clay:
Condition the granite or speckled white clay. Roll it out to the same 1/4 inch thickness as the sun. -
Cut the Shape:
Use the same round cutter to create the moon’s disc shape. -
Build the Face Profile:
Unlike the sun, the moon face is often carved directly into the flat surface, or you can add a very thin overlaid crescent of clay to the left side to give the face dimension. -
Sculpt the Features:
Carve the closed eye, nose, and mouth similar to the sun, ensuring the expression is peaceful. The nose should be slightly more prominent on the moon. -
Add Crater Texture:
take your small ball stylus and press it randomly around the perimeter of the face to create crater-like indentations. -
Create Hanging Loop:
Instead of a hole, form a small clay loop/bail and attach it to the top of the moon, blending the clay seams on the back so it holds secure.
Fixing Fingerprints
Before baking, brush a tiny amount of baby oil or cornstarch over the clay surface. This lightly smooths away visible fingerprints without ruining the details.
Step 3: Baking and Assembly
-
Bake:
Place both pendants on parchment paper and bake according to your specific clay package instructions (usually 275°F for 15-30 minutes). -
Cool Down:
Allow the pieces to cool completely in the oven to prevent thermal shock and brittleness. -
Attach Jump Rings:
Use pliers to open a large gold jump ring for the sun and a silver one for the moon. Loop them through the respective holes. -
Knot the Cord:
Thread the honey cord through the sun’s ring and the taupe cord through the moon’s ring. Tie a secure lark’s head knot or a simple overhand knot right above the ring to secure the pendant.
Pro Detailer
After baking, rub a little brown acrylic paint into the grooves of the sun’s rays and wipe off the excess immediately. It makes the texture pop!
Wear your celestial set together or share one with a friend for a lovely matching statement piece


Avocado Half Charms
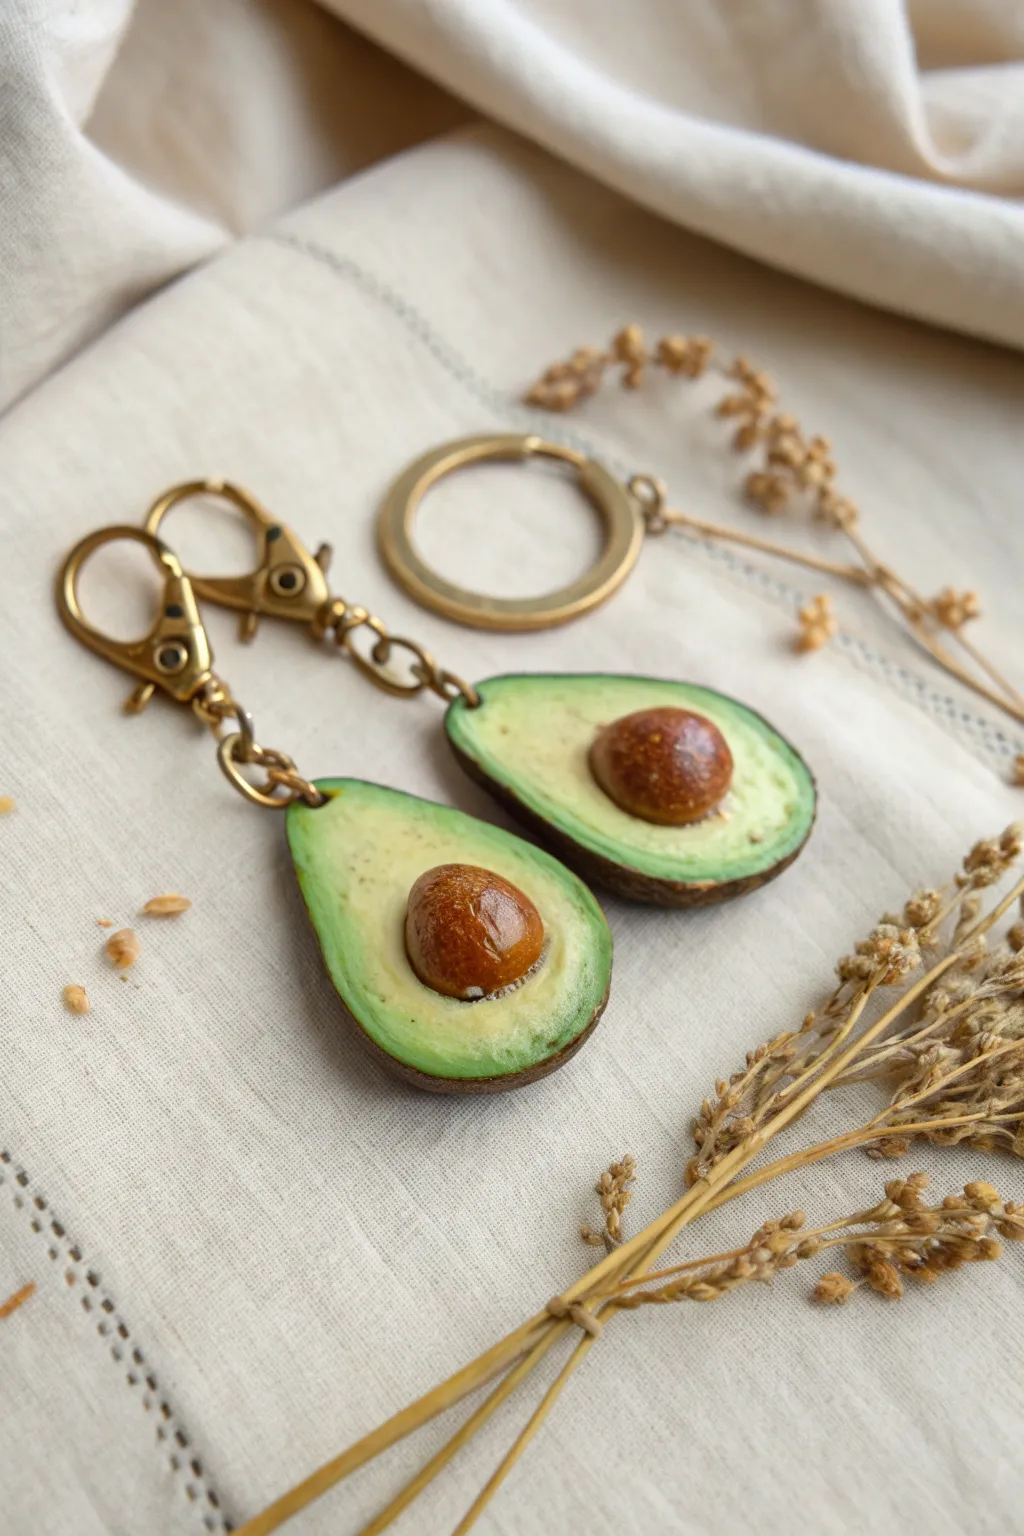
These realistic avocado charms are a playfully perfect project for matching friendship keychains or jewelry. With their textured skin, gradient flesh, and shiny pits, they capture all the delicious details of a perfectly ripe avocado half.
Step-by-Step Guide
Materials
- Polymer clay (dark brown, yellow-green, white, light green)
- Gloss glaze (UV resin or polyurethane)
- Textured blending tool or needle tool
- Ball stylus tool
- Soft pastel chalks in brown and burnt orange
- Small paintbrush
- Headpins or eye pins (bronze tone)
- Keychains with lobster clasps
- Jump rings and chain
- Craft knife
- Oven for baking
Step 1: Sculpting the Avocado Skin
-
Mix skin color:
Start by mixing dark brown polymer clay with a tiny pinch of green to create a realistic, earthy avocado skin tone. Knead it until soft and pliable. -
Form the base:
Split your dark mixture into two equal balls. Flatten each slightly into an oval shape, pinching the top to create the classic pear silhouette of an avocado. -
Create a vessel:
Using your thumbs or a large ball tool, gently press into the center of each pear shape to create a shallow ‘bowl’ or cradle. This will hold the inner flesh. -
Texture the exterior:
On the outside curve (the back) of the skin, dab repeatedly with a stiff texture tool, sandpaper, or an old toothbrush to mimic the bumpy, rough texture of avocado skin.
Sticky Situation?
If your clay gets too soft and fingerprints are showing, pop the sculpted pieces in the fridge for 10 minutes before doing the final texturing steps.
Step 2: Creating the Flesh Gradient
-
Mix flesh colors:
You will need a gradient. I usually mix a bright yellow-green for the outer rim and a very pale, creamy green (mix white with a speck of green) for the center. -
Blend the gradient:
Using a pasta machine or rolling pin, create a ‘Skinner blend’ or simply overlap the two colors and smooth them together until the transition from bright green to pale cream is seamless. -
Fill the skin:
Cut a shape from your gradient sheet that roughly matches your skin boat. Place it inside the brown skin vessel, smoothing the edges downward so they meet the rim cleanly. -
Shape the face:
Gently press the light green clay so it mounds slightly in the center, just like a real fruit. -
Make the pit socket:
Use a large ball stylus to press a round indentation into the lower, wider part of the light green flesh on both halves.
Step 3: The Pit and Details
-
Sculpt the pit:
Mix a warm reddish-brown clay. Roll two balls that fit perfectly into the sockets you just made. -
Texture the pit:
Before placing them, roll the pits gently over a piece of fine sandpaper or tap with a toothbrush for a subtle texture, less rough than the skin. -
Place the pits:
Press the pits firmly into the indentations. They should protrude definitively, not sit flush. -
Add realistic shading:
Scrape some brown and burnt orange soft pastel into dust. Use a dry brush to dust the pit and the very edge of the pit socket to give it organic depth. -
Speckle the flesh:
For hyper-realism, dip a toothbrush in diluted acrylic paint (green or brown) and flick tiny speckles onto the light green flesh, or use a needle tool to add tiny porous dots.
Make It a Set
Make one half with the pit and the other half with just the empty pit crater. This way, the two charms fit together like a puzzle when friends unite.
Step 4: Assembly and Finish
-
Insert hardware:
Insert a bronze-tone eye pin into the top of each avocado half. A dab of liquid clay on the pin helps secure it permanently during baking. -
Bake:
Bake the pieces according to your polymer clay manufacturer’s instructions (usually 275°F/135°C for 15-30 minutes). Let them cool completely. -
Glaze the pit:
Apply a coat of gloss glaze or UV resin ONLY to the pit to make it look wet and shiny. Leave the flesh matte or use a satin glaze if preferred. -
Glaze the skin:
I like to add a very light semi-gloss to the outside skin to enhance the dark color, but keep it subtle. -
Attach keychain:
Once dry, use pliers to open jump rings and attach your avocado charms to the chain and lobster clasp assembly.
Now you have a charming set of accessories ready to share with your best friend or keep for yourself

The Complete Guide to Pottery Troubleshooting
Uncover the most common ceramic mistakes—from cracking clay to failed glazes—and learn how to fix them fast.
Egg and Toast Duo
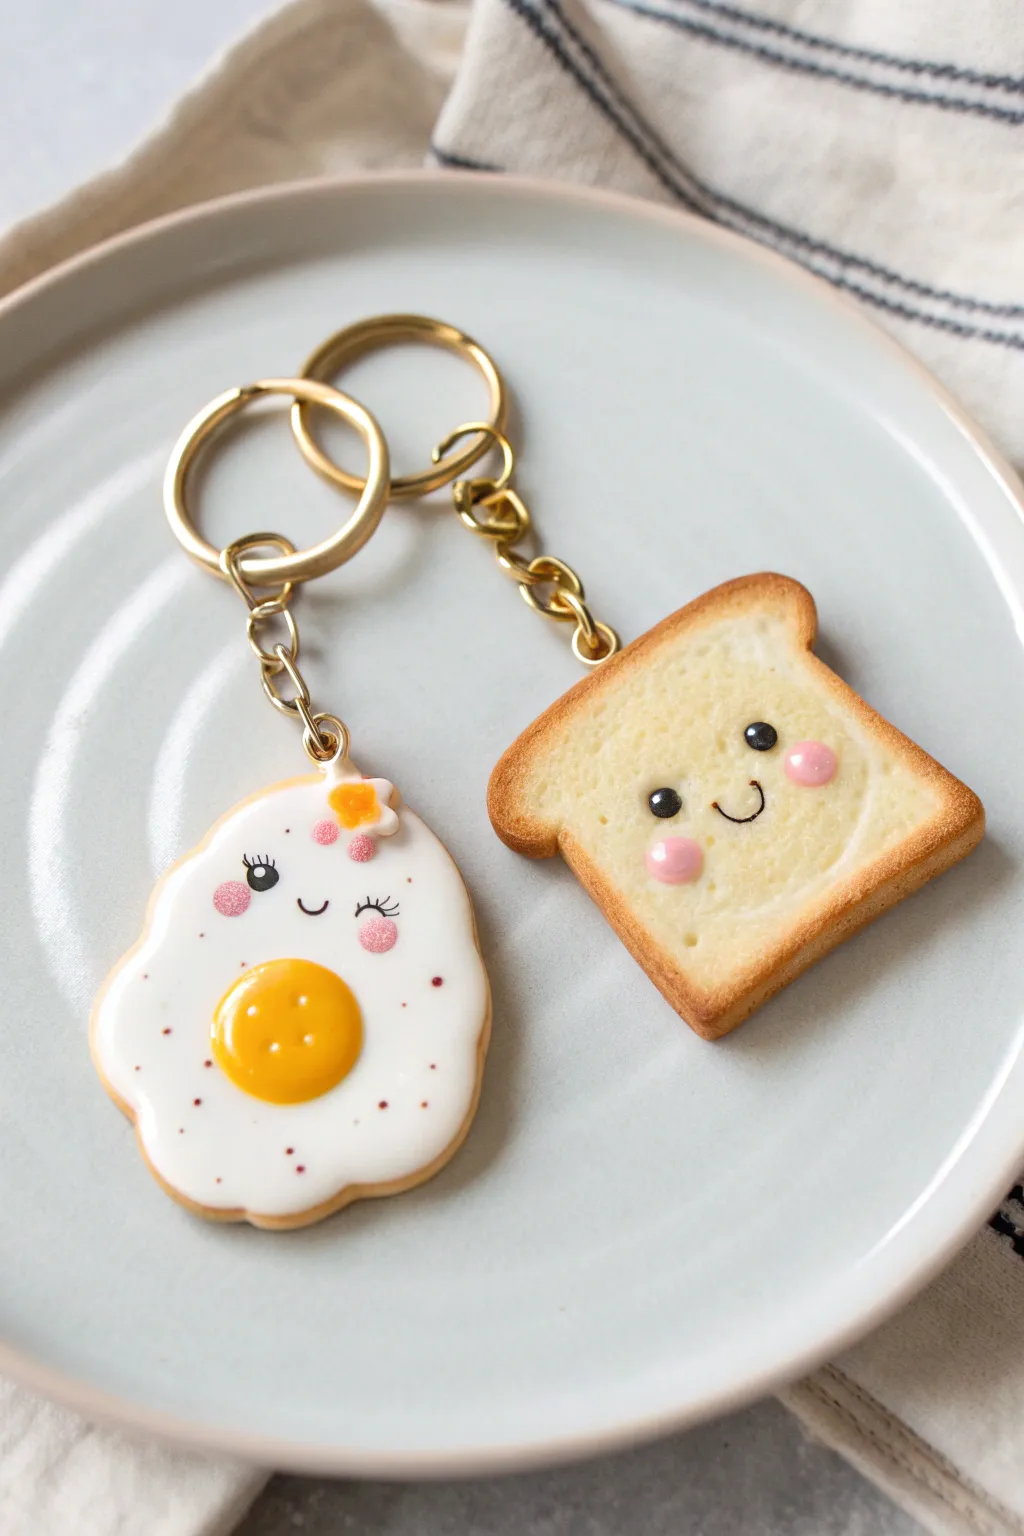
These adorable matching keychains feature a sunny-side-up egg and a perfectly browned slice of toast, both sporting sweet kawaii expressions. The glossy finish and realistic texture details make this polymer clay duo an irresistible charm set for best friends.
Step-by-Step Tutorial
Materials
- Polymer clay (white, translucent white, yellow, orange, tan/beige, black, pink)
- Liquid polymer clay (translucent)
- Chalk pastels (orange, brown, yellow)
- Soft paintbrush for shading
- Ball stylus tools (various sizes)
- Pin tool or needle
- Eye pins (gold)
- Gold keychain hardware (rings and chains)
- UV resin or polyurethane gloss varnish
- UV lamp (if using resin)
- Small flower clay cane or mold (optional for egg accessory)
- Texture tool (sandpaper or toothbrush)
Step 1: Sculpting the Toast
-
Mix the bread color:
Start by mixing white clay with a small amount of translucent and a tiny pinch of yellow and tan. This creates a realistic, airy bread dough color rather than a flat white. -
Shape the slice:
Roll the clay into a ball, then flatten it into a thick square slab about 1/4 inch thick. Gently pinch the bottom corners to square them off and make an indentation at the top center to form the classic bread loaf shape. -
Create the crust:
Roll a thin snake of tan clay. Wrap this around the entire perimeter of your bread slice, smoothing the seam where the crust meets the white bread so it looks like one baked piece. -
Add texture:
Use a toothbrush or a crumpled ball of aluminum foil to gently tap over the white surface of the bread. This mimics the porous texture of crumb. -
Shade the edges:
Shave some brown and orange chalk pastels into a powder. Using a dry, soft brush, gently dust the edges of the toast, concentrating on the crust and the corners for a ‘toasted’ gradient effect.
Fixing Fingerprints
If you notice fingerprints on your smooth egg yolk before baking, lightly brush it with a tiny amount of baby oil or clay softener to smooth them away.
Step 2: Sculpting the Fried Egg
-
Form the egg white:
Take white polymer clay and flatten it into an irregular, wavy shape. Keep the edges rounded and slightly uneven to look like a natural egg white cooking in a pan. -
Make the yolk:
Roll a ball of yellow clay, perhaps mixing in a tiny bit of orange for richness. Press this firmly onto the center of the white base, flattening it slightly so it domes but doesn’t roll off. -
Add speckles:
For a realistic fried look, create tiny indents with a needle tool around the edges. You can also mix tiny specks of reddish-brown clay or paint to simulate pepper or crispy bits. -
Accessorize:
If desired, create a tiny flower shape using a mold or by arranging small clay dots, and place it gently on the upper ‘hair’ area of the egg white.
Step 3: Adding Kawaii Faces
-
Indent eye sockets:
Use a small ball tool to make two shallow indentations on both the toast and the egg yolk area where the eyes will sit. This helps the black clay sit flush. -
Place the eyes:
Roll tiny balls of black clay and press them into the sockets. For the egg, create eyelashes by rolling microscopic snakes of black clay or painting them on after baking. -
Create the smiles:
Roll two very thin threads of black clay. Curve them into ‘U’ shapes and press them gently between the eyes using a needle tool. -
Add rosy cheeks:
Use a dotting tool to apply rounds of pink clay or pink acrylic paint just below the eyes. -
Highlight the eyes:
Place a minuscule dot of white clay (or paint) in the upper corner of each black eye for that sparkling anime look.
Make it a Set
Create a matching ‘Bacon’ charm or a tiny ‘Avocado’ slice to turn this duo into a complete breakfast squad for your whole friend group.
Step 4: Assembly and Finishing
-
Insert eye pins:
Trim your eye pins if they are too long. Dip the end in a little liquid clay for extra grip and insert them into the top center of each charm. -
Bake:
Bake the pieces according to your clay manufacturer’s instructions (usually 275°F/135°C for 15-30 minutes). Let them cool completely. -
Glazing:
Apply a coat of UV resin or gloss varnish to the yolk and the front of the toast to give them a shiny, ‘wet’ or buttery appearance. Cure under a UV lamp if using resin. -
Attach hardware:
Using pliers, open the jump rings on your keychain hardware and attach them securely to the eye pins on your finished charms.
Now you have a charming breakfast set ready to gift to your favorite person
Boba Cup Pair With Shared Straw
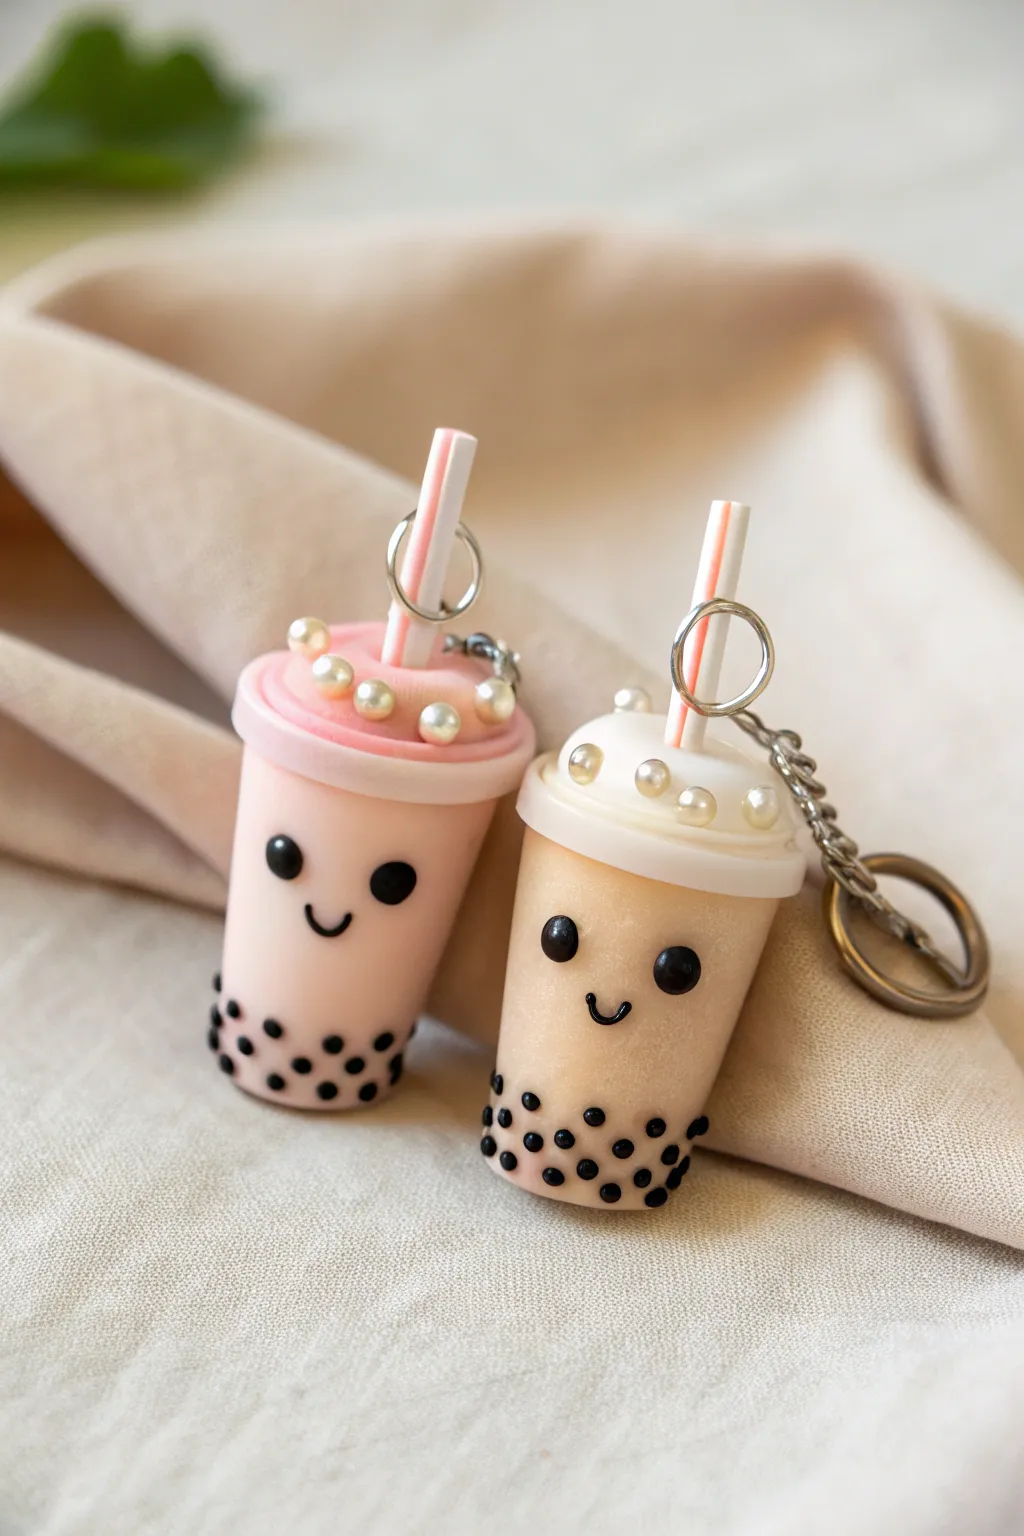
Celebrate your friendship with these impossibly cute matching boba tea keychains made from polymer clay. These pint-sized drinks feature customizable “flavors,” charming little faces, and pearlescent toppings for a sweet, shared accessory.
Step-by-Step
Materials
- Polymer clay (pale pink, tan, white, and black)
- Liquid polymer clay (translucent)
- Small pearl beads (approx. 2-3mm)
- Two striped plastic straws or thin craft tubes
- Silver keychain findings with chain
- Two jump rings
- Headpins or eye pins
- Needle tool or toothpick
- Dotting tool or small ball stylus
- Craft blade
- Gloss glaze (optional)
Step 1: Shaping the Cups
-
Mix your milk tea base:
Start by conditioning your clay. For the pink cup, mix a tiny amount of red or dark pink into white to get a soft pastel hue. For the classic cup, blend white with a touch of translucent and a small crumb of brown or ochre for a creamy beige. -
Form the tapered cylinder:
Roll your mixed clay into a smooth ball, then gently roll it back and forth on your work surface while applying slightly more pressure to one end. This creates a tapered cylinder shape that mimics a disposable plastic cup. -
Flatten the ends:
Tap the wider top and narrower bottom against your table to flatten them. Ensure the cup stands up straight on its own without wobbling. -
Top it off:
Roll out a thick sheet of white clay. Use a circular cutter slightly larger than the top of your cup to cut out the lid shape. This overhang adds realism. -
Attach the lid:
Press the white circle firmly onto the top of your cup base. Smooth the seam underneath gently with your finger if needed, but keeping a crisp edge looks more like a real lid.
Clean Clay Tip
Keep baby wipes nearby to clean your hands between colors. White clay picks up lint instantly, so roll it in clean hands before sculpting the lids.
Step 2: Adding the Details
-
Create the tapioca pearls:
Roll very tiny snakes of black clay. Cut extremely small, uniform bits from these snakes and roll each one into a miniature ball. You will need about 15-20 pearls per cup. -
Apply the boba:
Press the black balls onto the bottom third of the cup. I like to cluster them slightly irregularly so they look like they have settled at the bottom of the drink. -
Add the face:
Make two slightly larger black balls for the eyes and press them into the center of the cup. Use a very thin snake of black clay to form a small “U” shape for the smile and place it centered between the eyes. -
Prepare the straw:
Cut your plastic straw or craft tube into short segments (about 1.5 cm) at a slight angle. If using clay for the straw, extrude a white snake and attach a thin stripe of colored clay down the side before cutting. -
Insert hardware:
Push an eye pin or a trimmed headpin down through the center of the white lid. If using a straw, insert the pin through the hollow center of the straw first, then push the whole assembly into the clay cup.
Flavor Variations
Make a matcha version using pastel green clay, or taro with light purple. You can even mix translucent clay into the main body color for a jelly-like effect.
Step 3: Finishing Touches
-
Decorate the lid:
Apply a thin layer of translucent liquid polymer clay to the top of the white lid to act as an adhesive. -
Place the pearls:
Carefully arrange your small pearl beads in a circle around the straw using tweezers. Press them gently into the liquid clay so they embed slightly. -
Bake securely:
Bake the pieces according to your specific clay package directions (usually 275°F/135°C for 15-30 minutes). I recommend propping them up in a bed of baking soda or cornstarch to prevent flat spots on the back. -
Cool and seal:
Once completely cool, you can choose to paint a layer of gloss glaze strictly over the ‘drink’ part of the cup and the boba for a wet, plastic look, leaving the lid matte. -
Assemble the keychain:
Open a jump ring using pliers and loop it through the eye pin emerging from the straw. Attach your keychain hardware and close the jump ring securely.
Give one to your best friend and keep the other for a sweet reminder of your shared bubble tea dates


What Really Happens Inside the Kiln
Learn how time and temperature work together inside the kiln to transform clay into durable ceramic.
Frog Best Friends Set
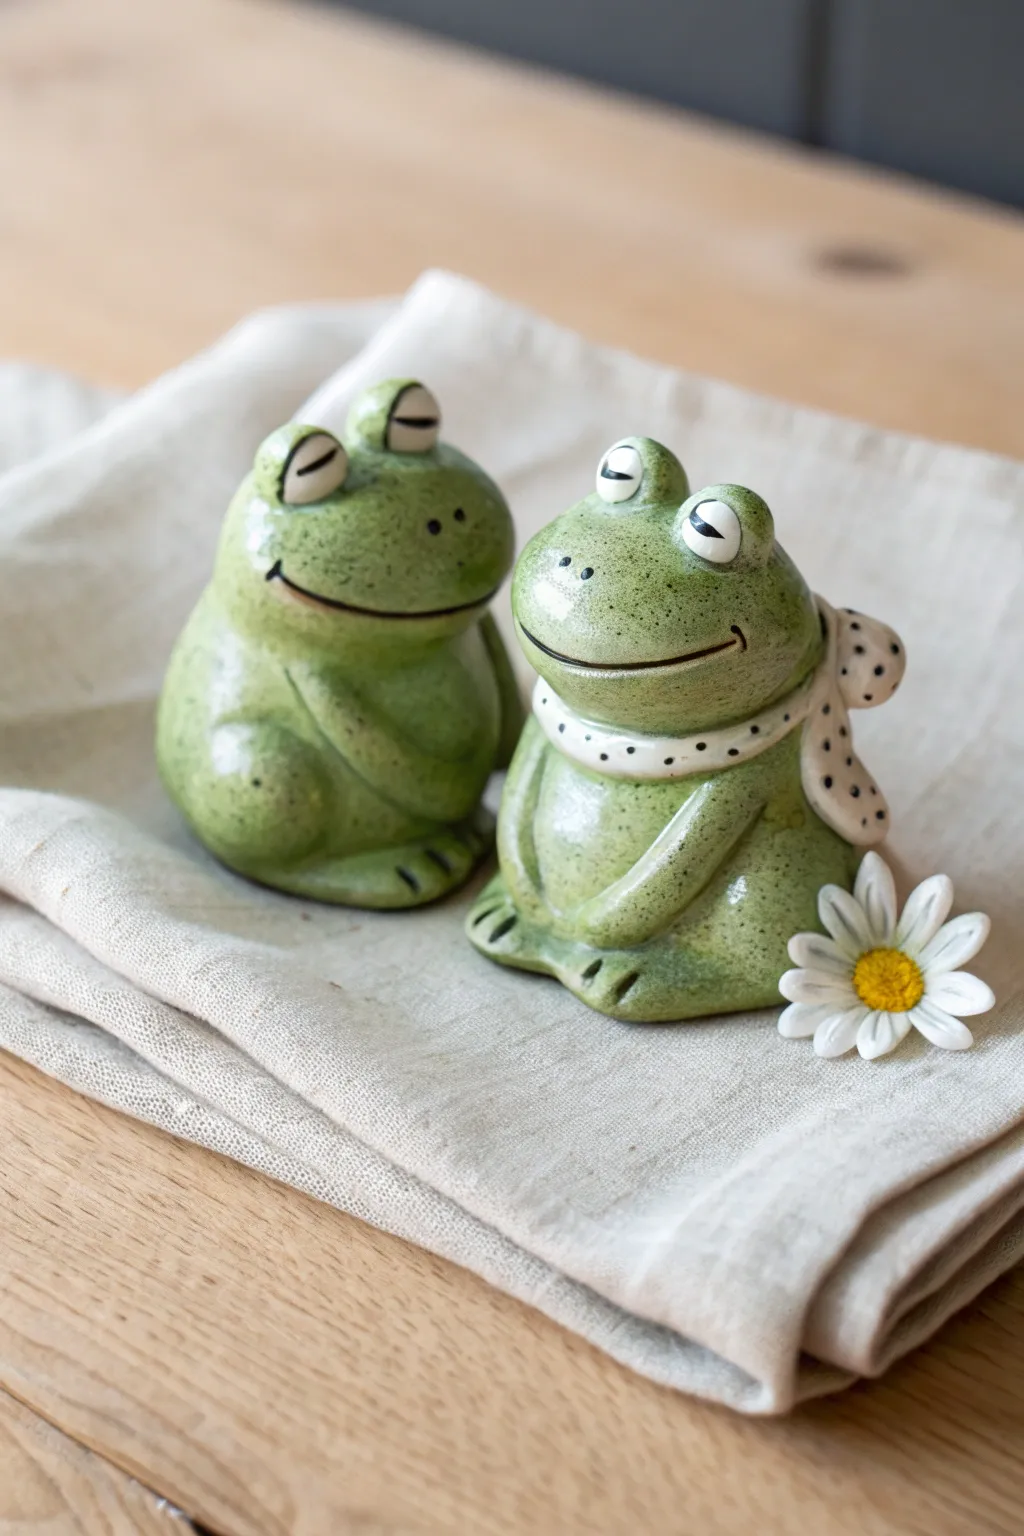
These charming frog companions make for an adorable decorative duo, perfect for guarding a bookshelf or brightening up a window sill. With their speckled green finish, sleepy expressions, and that sweet polka-dot scarf, they have a wonderfully rustic, handcrafted feel.
Step-by-Step Tutorial
Materials
- Polymer clay or air-dry clay (white)
- Modeling tools (ball styluses, needle tool)
- Acrylic paints (light green, moss green, black, white)
- Small flat paintbrush
- Fine detail brush
- Gloss varnish or glaze
- Old toothbrush (for speckling)
- Water cup and paper towels
- Small piece of foil (for armature core, optional)
Step 1: Shaping the Bodies
-
Form the base:
Start with two equal balls of white clay, roughly the size of a golf ball. Roll them until smooth, then gently press the bottom onto your work surface to create a flat base so they sit stably. -
Create the pear shape:
Mold each ball into a stout pear shape, keeping the ‘belly’ area round and full while slightly tapering the top for the head. There shouldn’t be a distinct neck; just a smooth transition. -
Add the legs:
Roll two thick sausage shapes for each frog’s hind legs. Press these against the lower sides of the body, blending the clay at the back so they look attached seamlessly. Use a tool to carve two simple toes into the bottom of each foot. -
Form the arms:
Roll thinner coils for the front arms. Attach them starting from the ‘shoulder’ area, curving them down to rest naturally on the belly. Blend the top attachment seam completely.
Cracking Clay?
If using air-dry clay, cracks often happen if it dries too fast. Let them dry away from direct heat or sun. If a crack appears, fill it with a slip (wet clay slurry) and sand once dry.
Step 2: Adding Personality
-
Sculpt the eyes:
For the eyes, roll small balls of clay and press them onto the top of the head. Use a modeling tool to smooth the back of the eyes downwards into the head so they don’t look like they are just stuck on. -
Carve the smiles:
Using a needle tool or a thin blade, carefully carve a wide, curved smile across the face. For that contented look, make the smile stretch almost cheek-to-cheek. -
Create the nostrils:
Add two tiny pinpricks above the mouth for nostrils. Keep them small and relatively close together. -
Fashion the scarf:
For the second frog, roll a thin, flat strip of clay. Wrap it around the ‘neck’ area. Create a separate bow shape by pinching a small strip and attaching it to the side, blending the seams. -
Drying time:
Allow your frogs to cure completely. If using oven-bake clay, bake according to the package temperature. If using air-dry clay, let them sit for 24-48 hours until fully hard.
Step 3: Painting and Finishing
-
Base coat:
Paint both frogs entirely with a light green acrylic paint. You may need two thin coats to get solid coverage. Avoid the scarf area on the second frog. -
Paint the scarf:
Paint the scarf and bow white or a very pale cream. Let this dry completely before moving to details to avoid smudging. -
Add the speckles:
Dip an old toothbrush into slightly watered-down moss green or brown paint. Run your thumb over the bristles to flick tiny speckles onto the green skin. I find it helps to practice on paper first to control the spray. -
Paint the facial features:
Using your finest detail brush and black paint, carefully fill in the carved smile line and the nostrils. Paint thin, curved lines on the eye bumps to create closed, sleepy eyelids. -
Detail the eyes:
Paint the bottom half of the eyelids white to give them dimension. -
Scarf pattern:
Using the handle end of a paintbrush or a dotting tool, add small black or dark brown dots to the white scarf. -
Add highlights:
Add tiny white reflection dots to the cheeks or top of the head if you want them to look extra shiny. -
Seal the work:
Once all paint is bone dry, coat the entire piece in a high-gloss varnish. This mimics the glazed ceramic look shown in the photo.
Make it a Set
Turn these into functional salt and pepper shakers by hollowing out the bodies first and adding a hole with a rubber stopper at the bottom before baking or drying.
Now you have a pair of delightful amphibious friends ready to add character to your home decor
Cow Twins With Different Spots
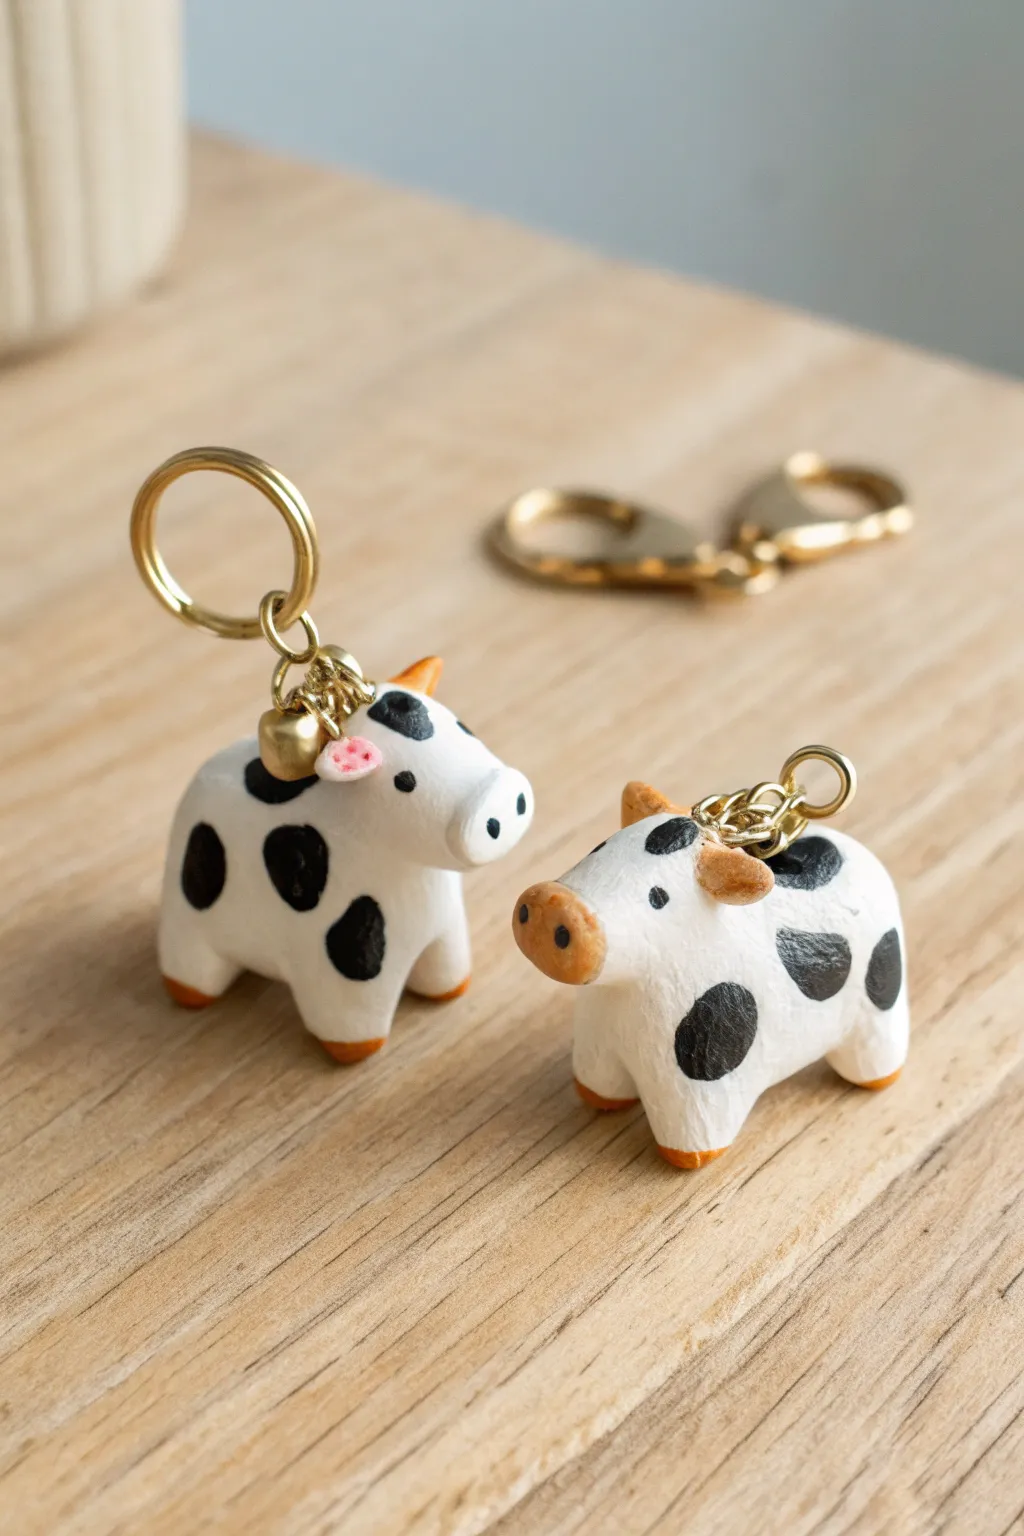
These adorable fraternal twin cow charms demonstrate how small variations in pattern and expression can give character to matching clay pieces. The soft, rounded shapes and distinct black spots create a charming, rustic aesthetic perfect for keychains or bag dangles.
Step-by-Step Guide
Materials
- White polymer clay or air-dry clay
- Tan or light brown clay (or acrylic paint)
- Black acrylic paint
- Fine detail paintbrush
- Needle tool or toothpick
- Gold screw-eye pins (small)
- Gold jump rings
- Gold split ring keychains
- Small pink clay scrap or pink paint (optional for flower detail)
- Matte or satin varnish (optional)
- Super glue (if using screw eyes after baking)
Step 1: Sculpting the Base Form
-
Portion the clay:
Start by cutting two equal blocks of white clay for the bodies. You’ll need about a walnut-sized amount for each cow to match the scale of typical keychains. -
Shape the body:
Roll one piece of clay into a smooth ball, then gently elongate it into a thick oval or bean shape. This forms the main torso of the cow. -
Form the legs:
Pull four small nubs from the bottom of the oval to create legs. I find it easiest to gently pinch the corners and blunt them by tapping the figure on your work surface so it stands level. -
Create the head shape:
For the head, you want to differentiate the snout area. Pinch the front of the oval slightly to define a face, or attach a separate, slightly smaller flattened ball if you prefer a more segmented look. -
Add the snout:
Take a very small piece of tan clay (or white, if you plan to paint it later), flatten it into an oval disc, and press it firmly onto the front of the face area to create the muzzle. -
Attach the ears:
Shape two tiny triangles of tan or white clay. Press these onto the top sides of the head. Use your needle tool to blend the seam where the ear meets the head so they don’t pop off later. -
Insert hardware:
While the clay is still soft, carefully screw a gold eye pin into the center of the cow’s back or top of the head. If using polymer clay, adding a dab of liquid clay or ‘bake and bond’ on the screw threads helps secure it. -
Repeat for the twin:
Follow the same steps to create the second cow. Don’t worry about them being identical; slight differences in posture make them cuter as a pair.
Step 2: Painting and Details
-
Bake or dry:
If using polymer clay, bake according to package directions (usually 275°F/135°C for 15-30 mins). If using air-dry clay, allow to dry completely for 24-48 hours until hard. -
Paint the muzzle and hooves:
If you used all white clay, use a small brush to paint the snout oval and the very tips of the feet with a warm tan or caramel acrylic paint. -
Add the spots:
Using black acrylic paint and a fine liner brush, add organic, rounded blotches. Vary the placement: give one a heavy patch on the back and the other spots near the neck. -
Detail the face:
Dip the back end of a paintbrush or a dotting tool into black paint. Dot two eyes wide apart on the face, and two smaller nostrils on the tan snout. -
Add unique accessories:
To distinguish them further, you can glue a tiny pink clay flower or bell near the ear of one cow, just like the image shows. -
Seal the work:
Once the paint is fully dry, coat the cows with a matte or satin varnish. This protects the acrylic paint from scratching off when used as a keychain.
Eye Pin Loose?
If the screw eye feels loose after baking, unscrew it gently, add a drop of super glue to the hole, and screw it back in immediately for a permanent hold.
Step 3: Final Assembly
-
Open jump rings:
Using two pairs of pliers, twist open your gold jump rings. Never pull them apart; twist one side forward and one back to maintain the circle shape. -
Connect the hardware:
Loop the open jump ring through the eye pin on the cow and the bottom loop of the keychain mechanism. -
Secure the closure:
Twist the jump ring closed again, ensuring the two ends meet perfectly flush so the charm doesn’t slip off.
Pro Tip: Texture
For a ‘furry’ or rustic clay texture, lightly dab the unbaked clay surface with a stiff toothbrush before baking to remove fingerprints and add softness.
Your charming bovine twins are now ready to tag along on your keys or bag

TRACK YOUR CERAMIC JOURNEY
Capture glaze tests, firing details, and creative progress—all in one simple printable. Make your projects easier to repeat and improve.
Cat Pair With Coordinated Markings
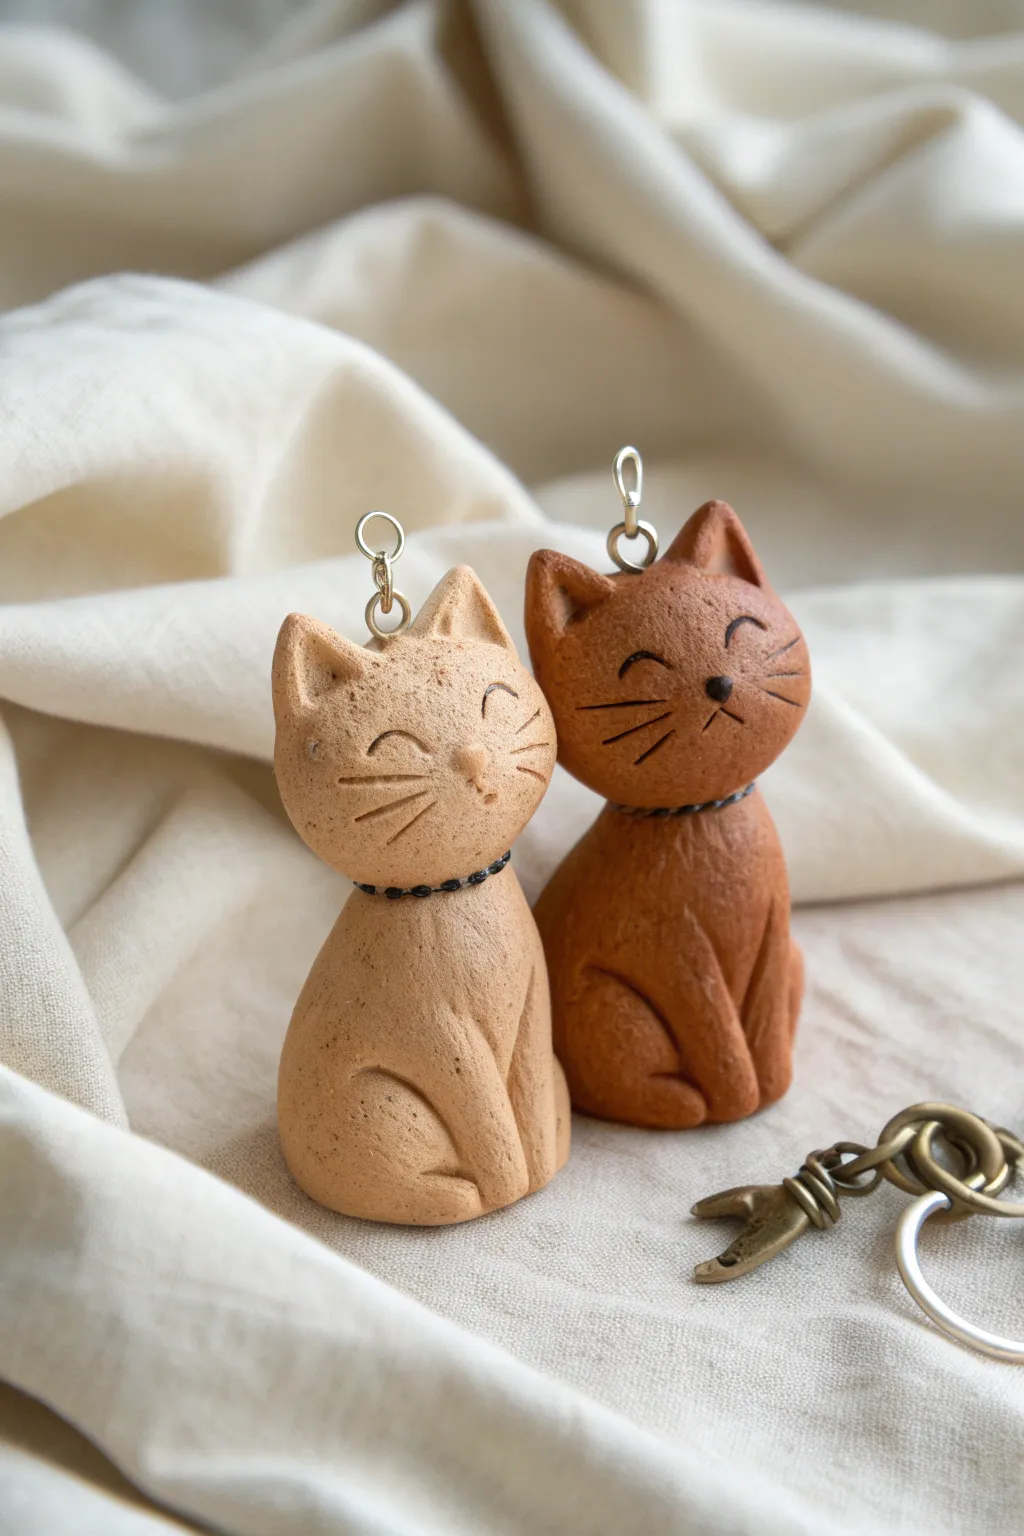
Create a charming pair of feline friends that look like miniature ceramic sculptures, featuring distinctive speckled textures and sweet, smiling expressions. These matching charms sit perfectly side-by-side and include attached metal loops, making them ideal for keychains or pendants.
Step-by-Step Tutorial
Materials
- Polymer clay (light tan and rust brown)
- Faux stone or granite spray (optional for texture)
- Needle tool or toothpick
- Ball stylus tool
- Small eye pins (silver tone)
- Black acrylic paint
- Thin paintbrush (00 size)
- Clear matte varnish
- Sandpaper or texture sponge
- Clay roller
- Flexible blade
Step 1: Shaping the Bodies
-
Prepare the base:
Condition your light tan clay until it is soft and pliable. Roll a ball about the size of a walnut to form the main body of the first cat. -
Form the teardrop:
Gently roll the ball into a fat teardrop shape with a flat bottom so the figure stands stably on your work surface. This creates the seated posture. -
Create the head:
Roll a slightly smaller ball for the head. Press it gently to flatten it just a bit, so it isn’t a perfect sphere but more of a rounded oval. -
Attach head to body:
Press the head onto the top of the body piece. You can use a small piece of wire or a toothpick inside to strengthen the neck connection if you like. -
Add the ears:
Pinch off two tiny triangles of clay. Attach them to the top of the head, blending the seams at the back with your finger or a sculpting tool until smooth. -
Repeat for partner:
Repeat this entire process using the rust brown clay to create the second cat, ensuring they are approximately the same height.
Step 2: Adding Details and Texture
-
Sculpt the legs:
Roll two small sausages of clay for the front legs. Press them vertically onto the front of the body, blending the top edge so it disappears into the chest. -
Define the paws:
Use a needle tool to press small vertical lines into the bottom of the leg shapes to suggest toes. -
Add haunches:
For the back leg, add a curve of clay on the side of the body that looks like a bent knee, blending it smoothly into the main form. -
Refine the face shape:
Press gently into the middle of the face with your thumb to create a slight indentation for the eye area, which helps the cheeks pop out. -
Texturize the surface:
To achieve that stone-like look, gently dab a coarse sponge or a crumpled ball of aluminum foil over the entire surface of the clay. I find this hides fingerprints perfectly. -
Insert hardware:
Trim an eye pin to about half an inch. Insert it into the center of the head between the ears. Twist it slightly as you push it in to help it grip.
Stone Effect Secret
Mix black pepper or sand into the raw clay before sculpting. It creates authentic speckles that won’t rub off like surface paint.
Step 3: Finishing Touches
-
Carve the features:
Use a needle tool or sharp blade to carefully carve three horizontal whiskers on each cheek. Make these grooves deep enough to hold paint later. -
Bake the clay:
Bake the figures according to your clay manufacturer’s instructions (usually 275°F for 15-30 minutes). Let them cool completely. -
Paint the details:
Dilute a tiny drop of black acrylic paint with water. Carefully paint inside the whisker grooves, the nose, and draw two curved arches for the smiling eyes. -
Add the collars:
Using the very tip of your brush, paint small black dots in a ring around the neck to simulate a beaded collar. Alternatively, you can use a fine-tip permanent marker for more control. -
Seal the work:
Once the paint is fully dry, apply a thin coat of matte varnish to protect the surface without making it glossy, preserving that natural ceramic look. -
Final assembly:
Attach a jump ring to the eye pin loop, then connect your keychain hardware or cord to finish the project.
Make Them Magnetic
Embed small round magnets into the sides of the cats where they touch, so they ‘snap’ together when placed side-by-side.
You now have a durable and adorable pair of clay companions ready to accompany you anywhere
Axolotl Twins in Two Colors
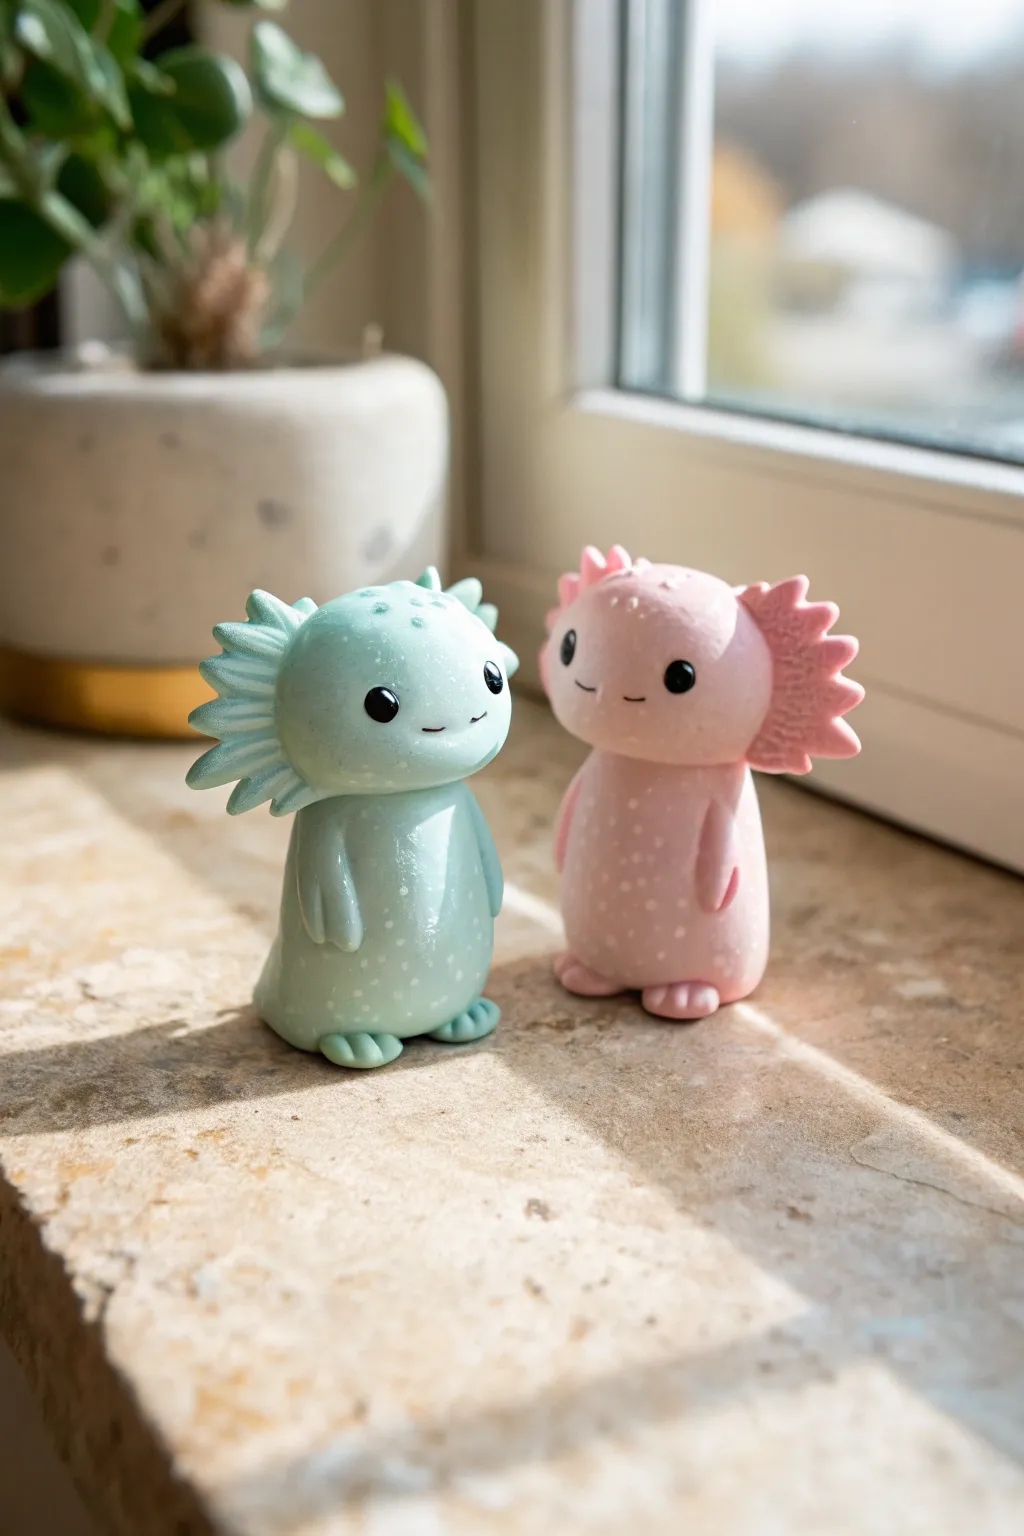
These charming polymer clay twosome features a minty green and soft pink axolotl standing side-by-side with sweet, smiling expressions. Their smooth, glossy finish and subtle speckled texture make them look like high-end vinyl toys, perfect for brightening up a windowsill.
Step-by-Step Guide
Materials
- Polymer clay within pastel mint green and baby pink
- Polymer clay with glitter or granite effect (translucent shimmer)
- Black polymer clay (tiny amount)
- Glossy polyurethane varnish or UV resin
- Sculpting tools (ball styluses, needle tool)
- Acrylic roller
- Craft knife
- Soft paintbrush
- Baking sheet and parchment paper
- Oven
Step 1: Preparing the Clay
-
Mix the colors:
Start by conditioning your mint green and pink clays separately until they are soft and pliable. To achieve that subtle speckled look seen in the photo, mix a small amount of granite-effect or glitter-inclusion clay into your solid colors. Knead thoroughly until the speckles are evenly distributed. -
Portioning body parts:
For each axolotl, you will need one large lump for the main body/head (which are molded as one unit), two small balls for feet, two small elongated pieces for arms, and six small pieces for the gill stalks.
Head Heavy?
baking, ensure the figures don’t tip over. If they lean, prop them up with a small snake of scrap clay or crumpled foil behind their backs until they are hardened
Step 2: Sculpting the Body
-
Shape the main form:
Roll your large lump of clay into a smooth ball, then gently roll it back and forth on your work surface to create a thick teardrop shape. This should be bottom-heavy to help the figure stand up. -
Refine the head:
While keeping the teardrop shape, gently pinch and smooth the upper portion to define a rounded, slightly flattened head area. The transition from head to body should be smooth, not a sharp neck indent. -
Flatten the base:
Tap the bottom of your figure firmly against your table to create a flat standing surface. Check that it doesn’t wobble.
Glow Up
Use glow-in-the-dark clay for the lighter speckles instead of standard glitter clay. Your axolotl twins will look like magical bioluminescent creatures at night
Step 3: Adding Features
-
Create the arms:
Roll two small sausages of clay for the arms. Flatten one end of each slightly to attach to the body. Press them onto the sides of the torso, blending the seam with a silicone tool so they look integrated. -
Make the feet:
Form two small, flattened ovals for the feet. Use a needle tool or small knife to press three little indentations into the front of each foot to create toes. -
Attach the feet:
Place the feet under the front of the body, pressing the body down onto them securely so they bond. -
Craft the gills:
For the iconic axolotl gills, shape six small flattened triangles or petal shapes (three per side). I like to gently texture the edges with a needle tool to give them a frilly appearance. -
Attach the gills:
Press three gill pieces onto each side of the head, arranging them in a fan shape. Use a small ball tool to blend the base of each gill into the head for a seamless look.
Step 4: The Face & Finishing
-
Mark eye sockets:
Use a medium-sized ball stylus to press two indentations into the face where the eyes will go. Spacing them wide apart creates a cuter look. -
Insert the eyes:
Roll tiny balls of black clay and press them firmly into the sockets you just made. Flatten them slightly so they aren’t bulging out too far. -
Carve the smile:
Using a needle tool or a very thin blade, gently press a small, curved line between the eyes to create a simple smile. -
Smooth fingerprints:
Before baking, lightly brush the entire surface with a tiny bit of baby oil or clay softener on your finger to remove any fingerprints and dust. -
Bake carefully:
Bake according to your clay manufacturer’s instructions (usually 275°F/130°C for 15-30 minutes). Let them cool completely in the oven to prevent cracking. -
Apply the gloss:
Once fully cool, apply two or three thin coats of glossy polyurethane varnish or UV resin. This step is crucial for achieving that ‘wet’ amphibian look and making the speckles pop.
Place your shiny new friends near a window to catch the light and show off their sparkles
Otters Holding Hands Charms
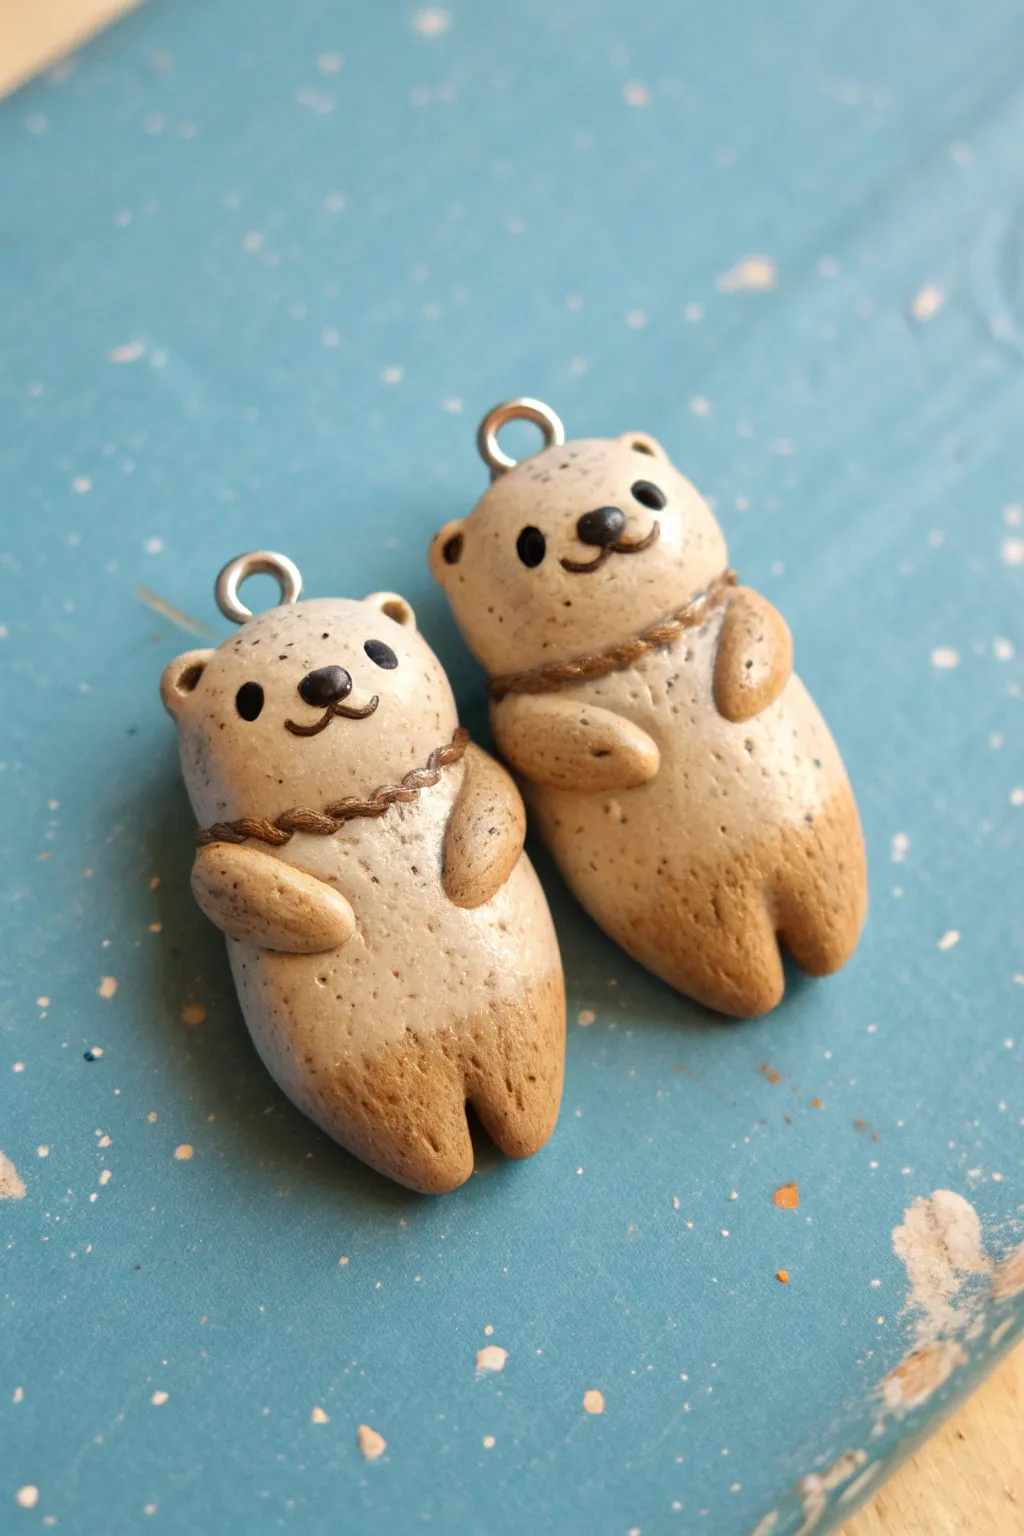
These adorable twin otter charms are designed to look like they are floating on their backs in the water, waiting to hold hands. With their speckled stone-like finish and sweet smiling faces, they make the perfect matching set for best friends or partners.
Step-by-Step
Materials
- Polymer clay in ‘Granite’ or speckled beige
- Polymer clay in translucent tan or light brown
- Black polymer clay (tiny amount)
- Two silver screw-eye pins
- Sculpting tools (needle tool, ball stylus)
- Baking tile or parchment paper
- Oven
- Clear glaze (optional)
Step 1: Shaping the Bodies
-
Condition the clay:
Start by thoroughly conditioning your speckled beige clay until it is soft and pliable. This particular color often mimics stone and hides fingerprints well. -
Form the base logs:
Roll two equal-sized balls of clay, then gently elongate them into thick, pill-shaped logs. These should be slightly narrower at the top for the head and wider at the bottom for the body. -
Create the legs:
At the bottom of each log, use a dull blade or your finger to press a vertical indentation, separating the bottom mass into two stubby legs. Round off the edges so they look soft and chubby. -
Attach the ears:
Roll four tiny balls of the speckled clay. Press two onto the top corners of each otter’s head area. Use a ball stylus or the back of a paintbrush to create a small dimple in the center of each ear.
Fixing Smudges
Work with the lightest colors first. If black clay smudges onto the beige face, use a Q-tip dipped in a tiny bit of rubbing alcohol or baby oil to gently wipe the stain away before baking.
Step 2: Adding Details & Scarf
-
Mix the gradient color:
Take a small amount of the tan or light brown clay. I like to mix it with a tiny bit of the speckled clay so the transition looks natural and not too stark. -
Apply foot patches:
Flatten tiny bits of the tan mixture and gently blend them onto the bottom of the feet. Smooth the edges upward so the color fades into the main body rather than having a hard line. -
Create the arm nubs:
Roll four small tear-drop shapes from the speckled clay for the arms. Press them onto the sides of the bodies, curving them inward so they rest on the belly. -
Add arm shading:
Just like the feet, add a minuscule amount of the tan clay to the tips of the paws, blending it backwards towards the shoulder. -
Make the rope collar:
Roll a very thin snake of brown clay. Twist it gently to look like a rope or braid, then wrap it around the neck area of each otter, pressing lightly to secure it. -
Insert the hardware:
Carefully screw the eye pins into the top center of each head. verify they are straight and deep enough to be secure after baking.
Smoother Blends
To make the tan paws blend seamlessly into the speckled body, use a tiny bit of liquid clay or translucent clay as a mixing medium right at the seam where the colors meet.
Step 3: Bringing the Faces to Life
-
Position the eyes:
Roll ultra-tiny balls of black clay for the eyes. Press them firmly onto the face, spacing them wide apart for a cute expression. -
Shape the nose:
Create a slightly larger oval of black clay for the nose. Place it centrally between and slightly below the eyes. -
Draw the mouth:
Roll a microscopic snake of black clay—thinner than a thread. cut two tiny pieces and curve them under the nose to form a ‘w’ shape, or use a needle tool to gently etch the smile if the clay is too finicky.
Step 4: Finishing Touches
-
Texture the belly:
If you want extra realism, gently tap the belly area with a toothbrush or stiff bristles to give it a furry texture. -
Inspect the set:
Look at both otters side-by-side. Make sure their arms are positioned so that if you place the charms next to each other, their inner hands look like they could touch. -
Bake:
Place the otters on your baking tile. Bake according to your brand of polymer clay’s instructions (usually 275°F/135°C for 15-30 minutes). -
Cool and glaze:
Let them cool completely before handling. If desired, apply a coat of matte varnish to protect the surface, or a gloss glaze just on the eyes and nose for a wet look.
Once cooled, hook your little otters onto a keychain or necklace so they can always stay together
Strawberry and Chocolate Pair
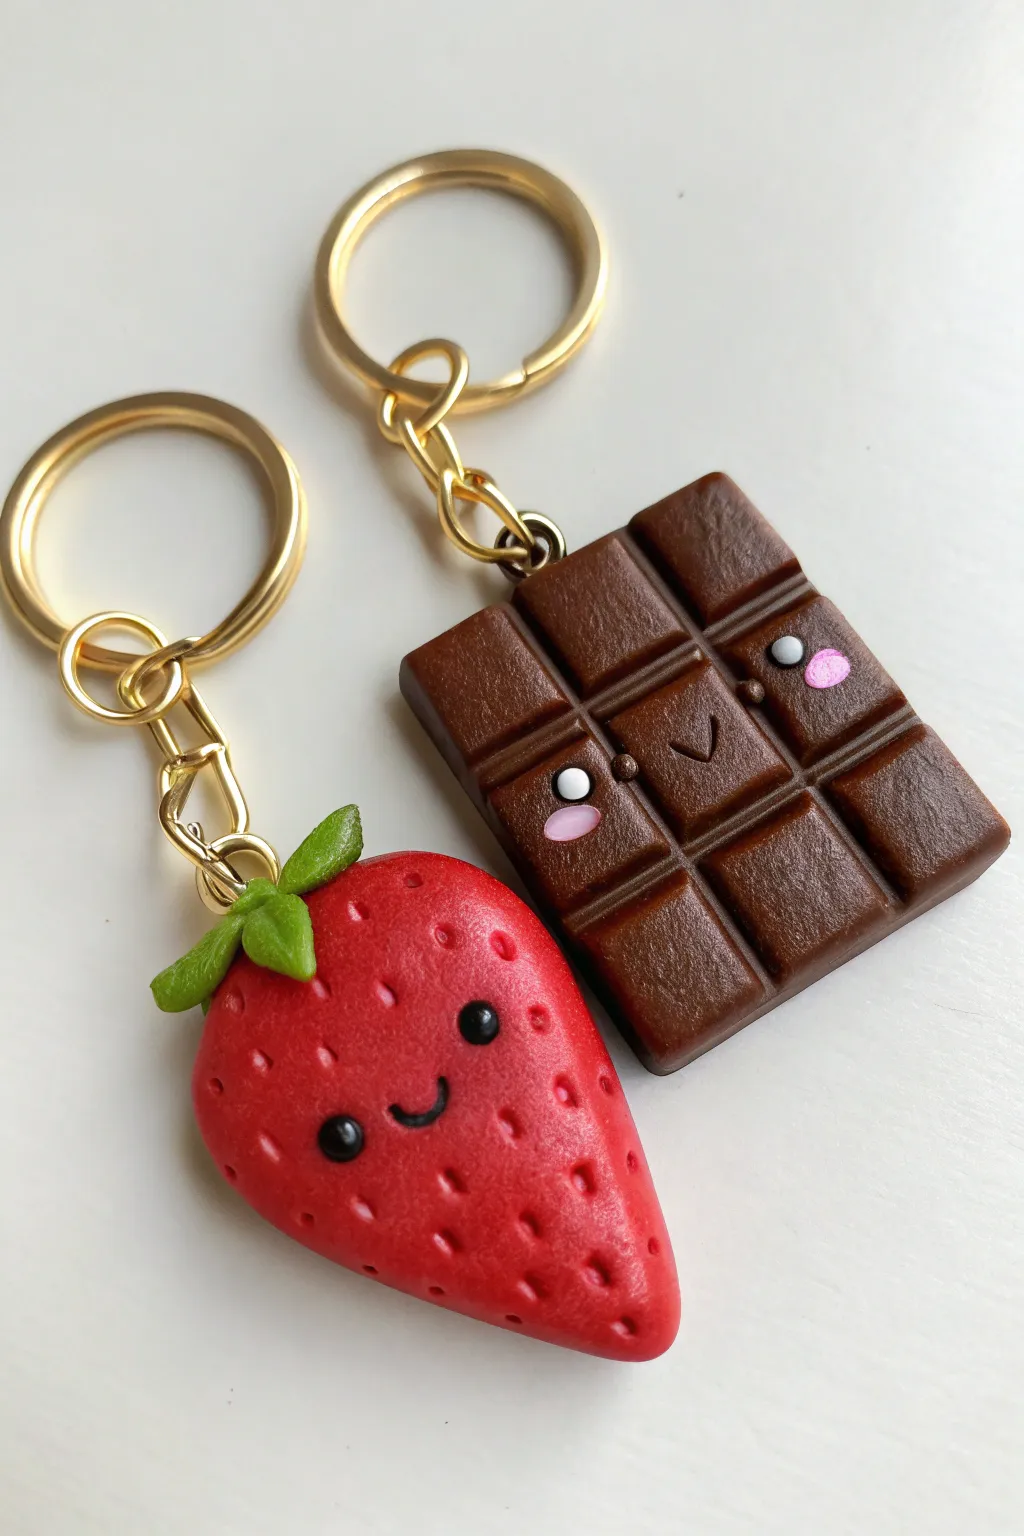
These utterly adorable matching keychains feature a blushing chocolate bar and a cheerful red strawberry, perfect for best friends with a sweet tooth. Crafted from polymer clay and finished with shiny gold hardware, their textured details and kawaii faces make them charming little accessories.
Step-by-Step Guide
Materials
- Polymer clay (Red, Chocolate Brown, Leaf Green, Black, White, Pink)
- Clay sculpting tools (needle tool, dotting tools)
- Small square cookie cutter (or sharp blade)
- Eye pins (two, gold)
- Gold keychain rings and jump rings
- Toothbrush or texturing tool
- Glaze or varnish (optional)
- Jewelry pliers
- Oven
Step 1: Sculpting the Strawberry
-
Base Shape:
Condition a piece of red polymer clay until it is soft and pliable, then roll it into a smooth ball about the size of a large grape. -
Refining the Form:
Gently gently flatten the ball between your palms and pinch the bottom end to create a tapered, triangular strawberry silhouette. -
Adding Texture:
Using a needle tool or a very fine dotting tool, press small indentations all over the surface of the strawberry to mimic seeds, leaving a smooth space near the center for the face. -
Creating the Leaves:
Take three small pieces of green clay and shape them into teardrops. Flatten them slightly and press them onto the top widest part of the strawberry. -
Adding Leaf Detail:
Use your needle tool to score a central vein down the middle of each green leaf for realistic texture. -
Adding the Stem:
Roll a tiny cylinder of green clay and attach it to the very center of the leaves to form the stem.
Fingerprint Fix
If you notice fingerprints on your unbaked clay, lightly brush the surface with a tiny amount of baby oil or cornstarch to smooth them out instantly.
Step 2: Crafting the Chocolate Bar
-
Base Rectangle:
Condition the brown clay and roll it out into a thick slab, roughly 1/4 inch thick. Use a small square cutter or blade to cut a neat rectangle. -
Creating the Grid:
Use the back of a knife or a flat sculpting tool to press horizontal and vertical lines into the rectangle, dividing it into six even squares (2 by 3 grid) without cutting all the way through. -
Beveling the Edges:
Gently press down the outer edges of the chocolate bar with your finger to soften the sharp cuts, giving it a molded chocolate look. -
Adding Surface Texture:
Lightly tap the surface with a clean toothbrush or texturing sponge to remove fingerprints and add a subtle matte finish.
Step 3: Bringing Them to Life
-
Making Eye Sockets:
On both figures, use a medium dotting tool to press two small indentations where you want the eyes to be. -
Inserting Eyes:
Roll tiny balls of black clay and press them into the eye sockets. For the chocolate bar, you can place them on the intersecting grid lines for a quirky look. -
Adding the Shine:
Place microscopically small dots of white clay onto the black eyes to create a reflective ‘sparkle’ highlight. -
Creating Smiles:
Roll a very thin snake of black (for the strawberry) or brown (for the chocolate) clay and shape it into a ‘U’ or ‘V’ shape, pressing it gently between the eyes. -
Blushing Cheeks:
For the chocolate bar, add tiny flattened ovals of pink clay under the eyes. I find this really adds that signature kawaii personality. -
Securing Hardware:
Insert a gold eye pin into the top of each charm. You may want to add a dab of liquid clay or ‘Bake and Bond’ to the pin before inserting to ensure it holds tight. -
Baking:
Bake the pieces according to your specific brand of clay’s instructions (usually around 275°F/135°C for 15-30 minutes). Let them cool completely. -
Assembly:
Once cool, use your jewelry pliers to open the jump rings and attach the charms to the gold keychain loops.
Make it Sparkle
After baking, paint a thin layer of UV resin or glossy glaze over just the eyes and the chocolate segments to make them look wet and shiny.
Now you have a charming set of matching accessories to keep or share with a friend
Magnet-Back Matching Mini Faces
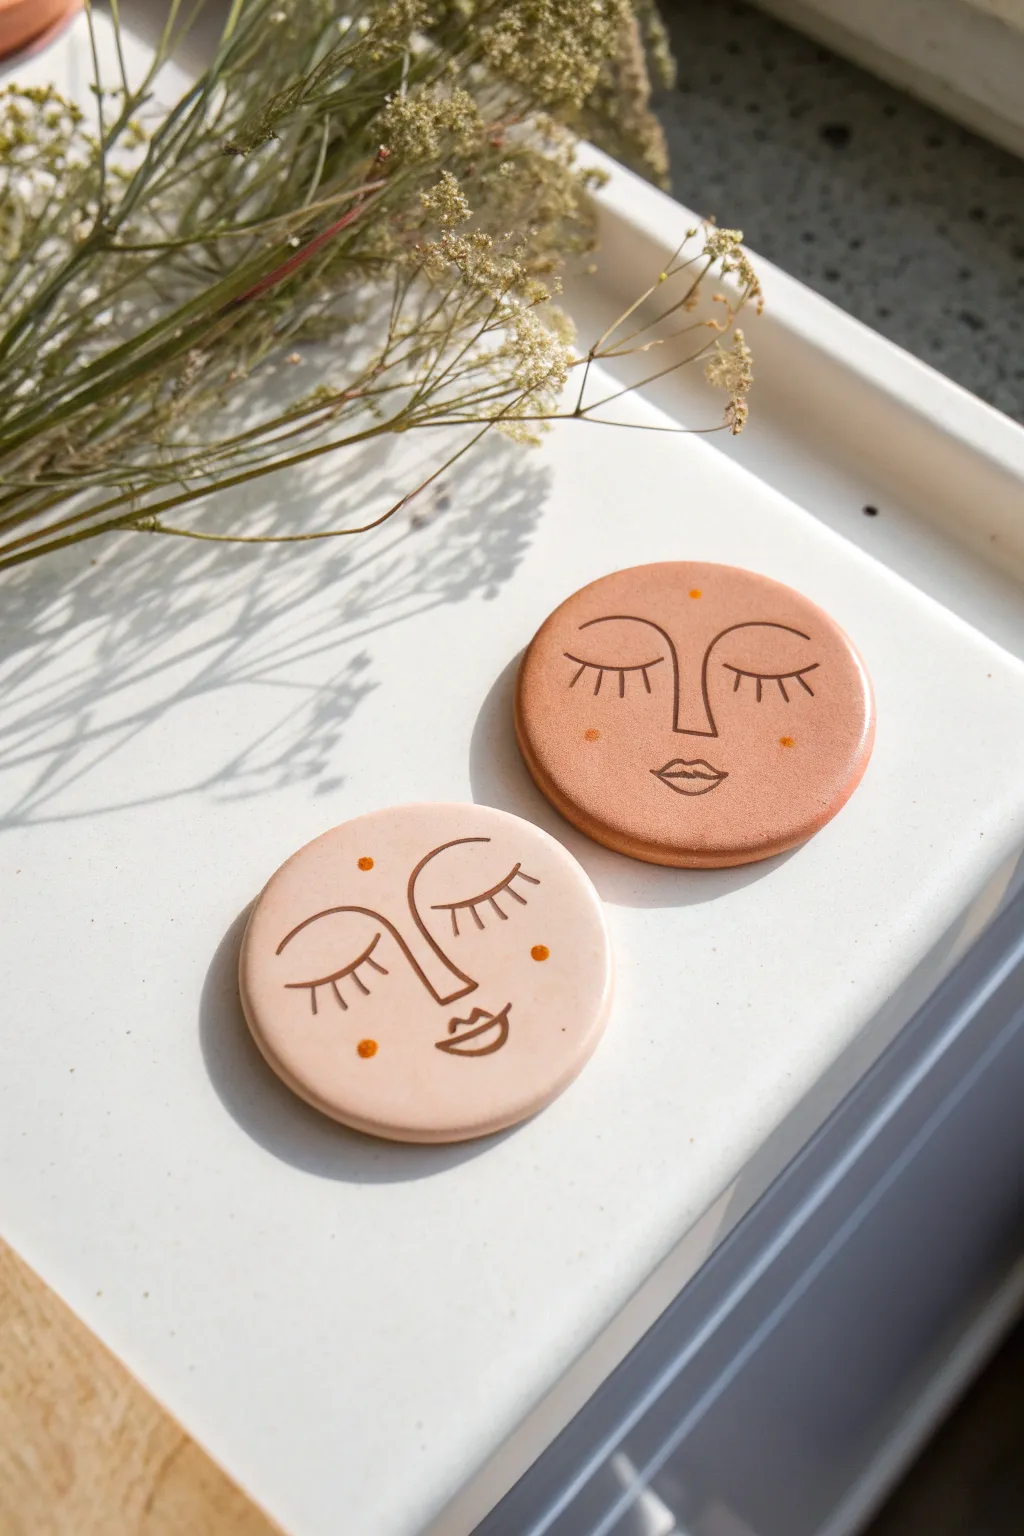
These charming, minimalist clay discs feature serene faces with stylized line art, offering a modern bohemian touch to your fridge or locker. The project combines the warmth of polymer clay with delicate carving and painting techniques for a subtle, artisanal finish.
Step-by-Step Guide
Materials
- Polymer clay (terracotta and pale blush/beige colors)
- Circular clay cutter (approx. 2-3 inches)
- Acrylic roller or pasta machine
- Fine-point needle tool or clay sculpting tool
- Dark brown or black acrylic paint
- Mustard yellow or gold acrylic paint
- Fine detail paintbrush (size 0 or 00)
- Gloss or matte varnish (optional)
- Small round magnets
- Strong craft glue (E6000 or similar)
- Wet wipes or paper towels
- Oven for baking
Step 1: Shaping the Base
-
Condition the Clay:
Begin by warming the polymer clay in your hands. Knead both the terracotta and blush colors separately until they are soft and pliable, ensuring there are no air bubbles trapped inside. -
Roll the Slabs:
Using an acrylic roller or a pasta machine on a thick setting, roll out your clay into even sheets. Aim for a thickness of about 1/4 inch (6mm) to ensure the magnets will be sturdy enough to handle daily use. -
Cut the Circles:
Press your circular cutter firmly into the clay sheets to create perfect rounds. Be sure to press straight down and lift up cleanly to avoid distorting the circular shape. -
Smooth the Edges:
Gently run your finger along the cut edge of each circle to soften any sharpness or potential burrs left by the cutter. You want a smooth, rounded rim.
Fixing Smears
If the dark paint dries on the surface before you can wipe it off, dampen a Q-tip with a tiny bit of rubbing alcohol or acetone to gently spot-clean the specific area without removing the groove paint.
Step 2: Carving the Design
-
Draft the Face:
Before carving, lightly sketch your design onto the raw clay surface with a very light touch using your needle tool. Draw two closed eyelids with lashes, a simple nose line, and lips. -
Deepen the Lines:
Once you are happy with the placement, retrace your lines with firmer pressure using the needle tool. The groove needs to be deep enough to hold paint later, but not so deep that it weakens the clay. -
Refine the Groove:
If the carving tool pushed up small ridges of clay along the lines, smooth them down gently with a silicone tool or your finger so the surface remains flat. -
Add Decorative Dots:
Using the blunt end of a paintbrush or a dotting tool, press small, shallow indentations where you want the colored dots to go—typically on the forehead and cheeks. -
Bake the Clay:
Place your clay rounds on a baking sheet lined with parchment paper or cardstock. Bake according to the manufacturer’s instructions for your specific brand of clay, then let them cool completely.
Make it a Set
Create a whole celestial family by making different sizes. Try a tiny ‘star’ face or a large ‘sun’ with clay rays attached to the rim before baking for a varied, eclectic collection.
Step 3: Painting and Finishing
-
Prepare the Wash:
Dilute a small amount of dark brown acrylic paint with water. I find a ratio of about 50/50 creates a nice flow that settles easily into the crevices. -
Fill the Lines:
Paint the wash over the carved lines. Don’t worry about being neat; just ensure the paint gets all the way into the bottom of the grooves. -
Wipe the Excess:
Quickly take a damp wet wipe or paper towel and wipe the surface of the clay. The paint will stay trapped in the carved lines while the surface is cleaned, creating a crisp outline. -
Paint the Accents:
Using your fine detail brush and the mustard/gold paint, carefully fill in the small indented dots on the cheeks and forehead. Let this layer dry completely. -
Seal the Piece:
If desired, apply a thin coat of matte or gloss varnish to protect the paint and give the clay a professional finish. -
Attach the Magnet:
Flip the finished face over. Apply a strong craft glue to the back of a magnet and press it firmly into the center of the clay disc. -
Final Cure:
Allow the glue to cure fully (usually 24 hours) before placing your new art on the refrigerator.
Now you have a serene set of matching magnets to bring a little calm to your kitchen space
Yin-Yang Inspired Clay Discs
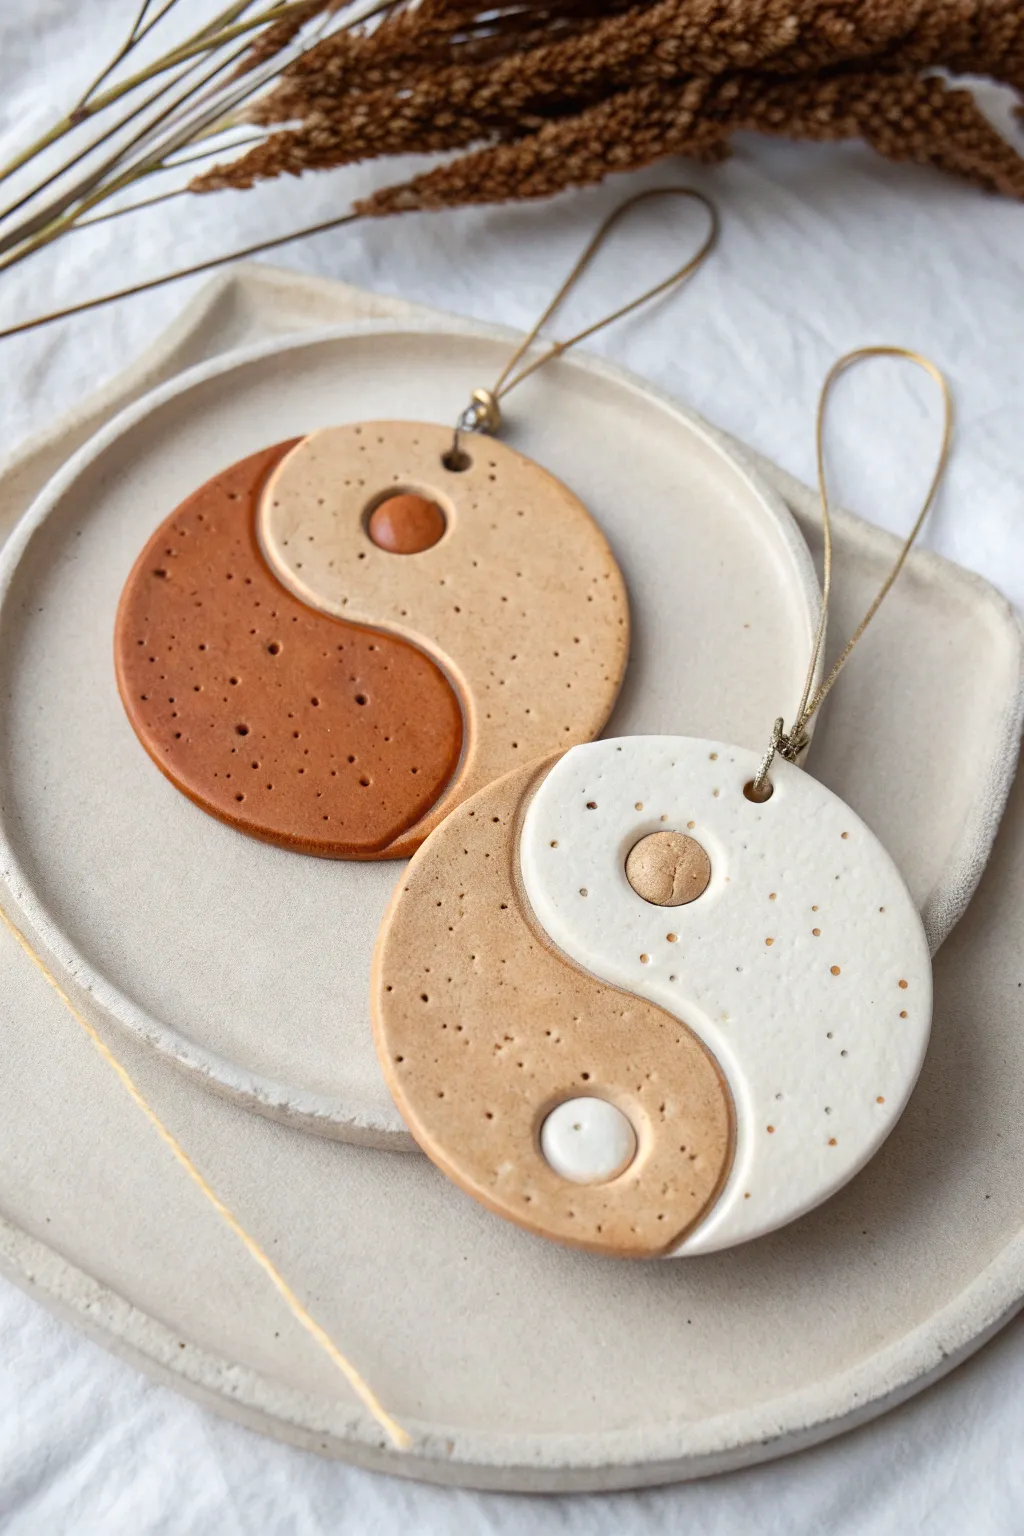
Embrace balance and harmony with these earthy, speckled clay ornaments inspired by the classic Yin-Yang symbol. With their warm terracotta tones and organic texture, they make beautiful wall hangings or minimalist holiday decor.
Detailed Instructions
Materials
- Polymer clay (white, beige/tan, and terracotta/rust colors)
- Acrylic rolling pin
- Circle cookie cutter (approx. 3-4 inches)
- S-shaped clay blade or flexible tissue blade
- Small circle cutter (approx. 0.5 inch) or a piping tip
- Toothbrush or coarse sandpaper (for texturing)
- Ground pepper or dried coffee grounds (optional for speckles)
- Needle tool or toothpick
- Parchment paper
- Oven
- Gold cord or twine for hanging
- Clear matte varnish (optional)
Step 1: Preparing the Clay
-
Condition the clay:
Start by warming up your clay blocks in your hands. Knead each color—white, beige, and terracotta—separately until they are soft and pliable. If you want that lovely speckled pottery look shown in the darker ornament, mix a pinch of ground black pepper or dried coffee grounds into the terracotta clay during this step. -
Roll out slabs:
Place your clay on parchment paper to prevent sticking. Use your acrylic roller to flatten each color into a slab of even thickness, approximately 1/4 inch (6mm). Aim for a consistent level so the two halves of your Yin-Yang match up perfectly later. -
Cut the base circles:
Using your large circle cutter, punch out one circle from the terracotta slab and two from the beige slab (one for each ornament pair). Then, cut one circle from the white slab. You’ll be mixing and matching these cutout pieces.
Seam Separation?
If the two halves pull apart after baking, apply a tiny amount of liquid polymer sealant or superglue into the gap and press together. Next time, score the edges before joining.
Step 2: Creating the Yin-Yang Shape
-
The S-curve cut:
Take your flexible clay blade and gently bend it into an ‘S’ shape. Press this curved blade firmly through the center of each clay circle to divide them into two teardrop-like halves. Try to make this curve identical for all circles so the pieces are interchangeable. -
Swap and detailed fitting:
Now for the puzzle part. Take one terracotta half and pair it with a beige half to form the first circle. Pair the white half with the remaining beige half for the second circle. Gently press the seam together where the two colors meet so they bond slightly without distorting the round shape. -
Smooth the seams:
Use your finger or a soft silicone tool to gently smooth the back of the seam to ensure structural integrity. On the front, you want a clean line, so avoid smudging the colors into each other too much.
Step 3: Adding Texture and Details
-
Add surface texture:
To mimic the stone-like finish seen in the photo, lightly tap the surface of the clay with a clean toothbrush or press a piece of coarse sandpaper against it. This removes the plastic-like sheen of polymer clay. -
Create the contrast dots:
Using your smallest circle cutter (or the back of a piping tip), cut holes in the center of the widest part of each teardrop shape. Save the small clay plugs you just removed! -
Insert the dots:
Swap the small clay plugs you just cut. Place a terracotta dot into the beige side, and a beige dot into the terracotta side (and vice versa for the white/beige ornament). Press them in gently so they sit slightly flush or raised, depending on your preference. -
Add faux freckles:
Using a needle tool, poke tiny, random holes across the surface of the clay. Vary the depth slightly to create that porous, ceramic-like texture. I find less is more here—start sparsely and add more if needed. -
Make the hanging hole:
Use a straw or a tool slightly larger than your cord to punch a hole at the very top of each circle. Ensure it’s not too close to the edge to prevent tearing.
Scent Your Space
Use terracotta air-dry clay instead of polymer. Once dry, add drops of essential oil to the unsealed back. The porous clay acts as a natural diffuser for your room.
Step 4: Baking and Finishing
-
Bake carefully:
Transfer the parchment paper with your ornaments onto a baking sheet. Bake according to your clay package instructions (usually 275°F/130°C for 15-30 minutes). Tent foil over them to prevent the white clay from yellowing. -
Cool down:
Allow the pieces to cool completely in the oven with the door cracked, or on a wire rack. Clay is fragile when hot, so don’t handle them until they are at room temperature. -
Optional varnish:
If you want to seal the pepper speckles or add durability, brush on a very thin layer of matte varnish. Avoid glossy finishes if you want to maintain the natural, earthen aesthetic. -
Add the cord:
Cut a length of gold cord or natural twine. Thread it through the top hole and tie a secure knot to form a loop.
Hang these harmonious discs near a window or combine them with dried flowers for a peaceful display
Mini Message Tokens That Match

Create a set of charming, rustic tokens perfect for sharing small sentiments or acting as unique oversized buttons. These tactile pieces feature a speckled finish—one in deep starry blue with gold accents, and a companion in warm terracotta—stampable with custom messages.
Step-by-Step
Materials
- Polymer clay (navy blue and terracotta/brick red)
- Acrylic rolling pin
- Round cookie cutter (approx. 2 inches)
- Letter stamp set (small size)
- Gold mica powder or fine gold glitter
- White acrylic paint (fluid or ink)
- Old toothbrush or stiff bristle brush
- Small straw or specialized hole cutter
- Parchment paper
- Baking sheet
- Glossy glaze or sealant (optional)
- Sandpaper (fine grit)
Step 1: Preparing the Clay Base
-
Conditioning the Navy Clay:
Start with your navy blue polymer clay. Knead it thoroughly in your hands until it becomes warm, soft, and pliable. This conditioning step is crucial to prevent cracking later. -
Adding the Gold Flecks:
Flatten the conditioned blue clay slightly. Sprinkle a tiny pinch of gold mica powder or very fine gold glitter onto the surface. Fold the clay over itself to trap the powder. -
Marble the Gold:
Twist and knead the clay again just enough to disperse the gold specks throughout the mixture without blending it into a solid metallic color. You want distinct starry flecks. -
Conditioning the Terracotta:
Clean your hands or switch to the terracotta clay. Knead this batch until it is equally soft and smooth. -
Rolling Out:
Place the terracotta clay on a piece of parchment paper. Use your acrylic roller to roll it out to a thickness of about 1/4 inch (6mm). Repeat this process for the blue clay.
Stamp Alignment Tip
To keep words straight, place a strip of masking tape gently across the clay as a guide. Press your letters right above the tape line.
Step 2: Shaping and Stamping
-
Cutting the Discs:
Press your round cookie cutter firmly into the rolled blue clay to create a clean circle. Remove the excess clay from around the cutter before lifting it. Repeat for the rust-colored clay. -
Smooth the Edges:
Gently run your finger around the circumference of each clay disc to soften the sharp edge left by the cutter. This gives the token a more finished, ceramic look. -
Stamp the Message:
Take your letter stamps and arrange your desired text. For the blue token shown, press the letters firmly into the clay. If the clay sticks to the stamps, you can dust them lightly with cornstarch or water. -
Creating Button Holes:
For the terracotta token, use a small straw or a clay hole cutter to punch two distinct holes in the center. This mimics a classic button style and offers a different texture than the text token. -
Adding Texture:
To enhance the rustic feel visible in the photo, you can lightly tap the surface of the terracotta clay with a stiff brush or texture sponge to give it a slightly porous appearance.
Turn Them Into Magnets
Glue strong neodymim magnets to the backs after baking. They make fantastic fridge decor or gifts to hold up photos and notes.
Step 3: Finishing Touches
-
Baking:
Transfer the parchment paper with the tokens to a baking sheet. Bake according to your specific polymer clay manufacturer’s instructions (usually around 275°F/135°C for 15-30 minutes). -
Cooling Down:
Remove the tray from the oven and allow the tokens to cool completely. The clay is still fragile when hot, so patience is key here. -
Speckling the Terracotta:
Once cool, dip an old toothbrush into white acrylic paint. Run your thumb across the bristles to flick tiny splatters of paint onto the terracotta button. I like to practice on a scrap paper first to control the spray. -
Highlighting the Text:
For the blue token, dip a very fine brush or your finger into black acrylic paint and gently rub it into the stamped letters. Quickly wipe the surface with a damp cloth, leaving the dark paint only inside the impressions. -
Sanding and Sealing:
If there are any rough spots on the edges, lightly sand them with fine-grit sandpaper. Apply a coat of matte or glossy varnish if you want extra durability, or leave them raw for a natural stone effect.
Arrange your finished tokens together to admire how the contrasting colors and textures play off one another beautifully
Two-Piece Pizza Heart Slices
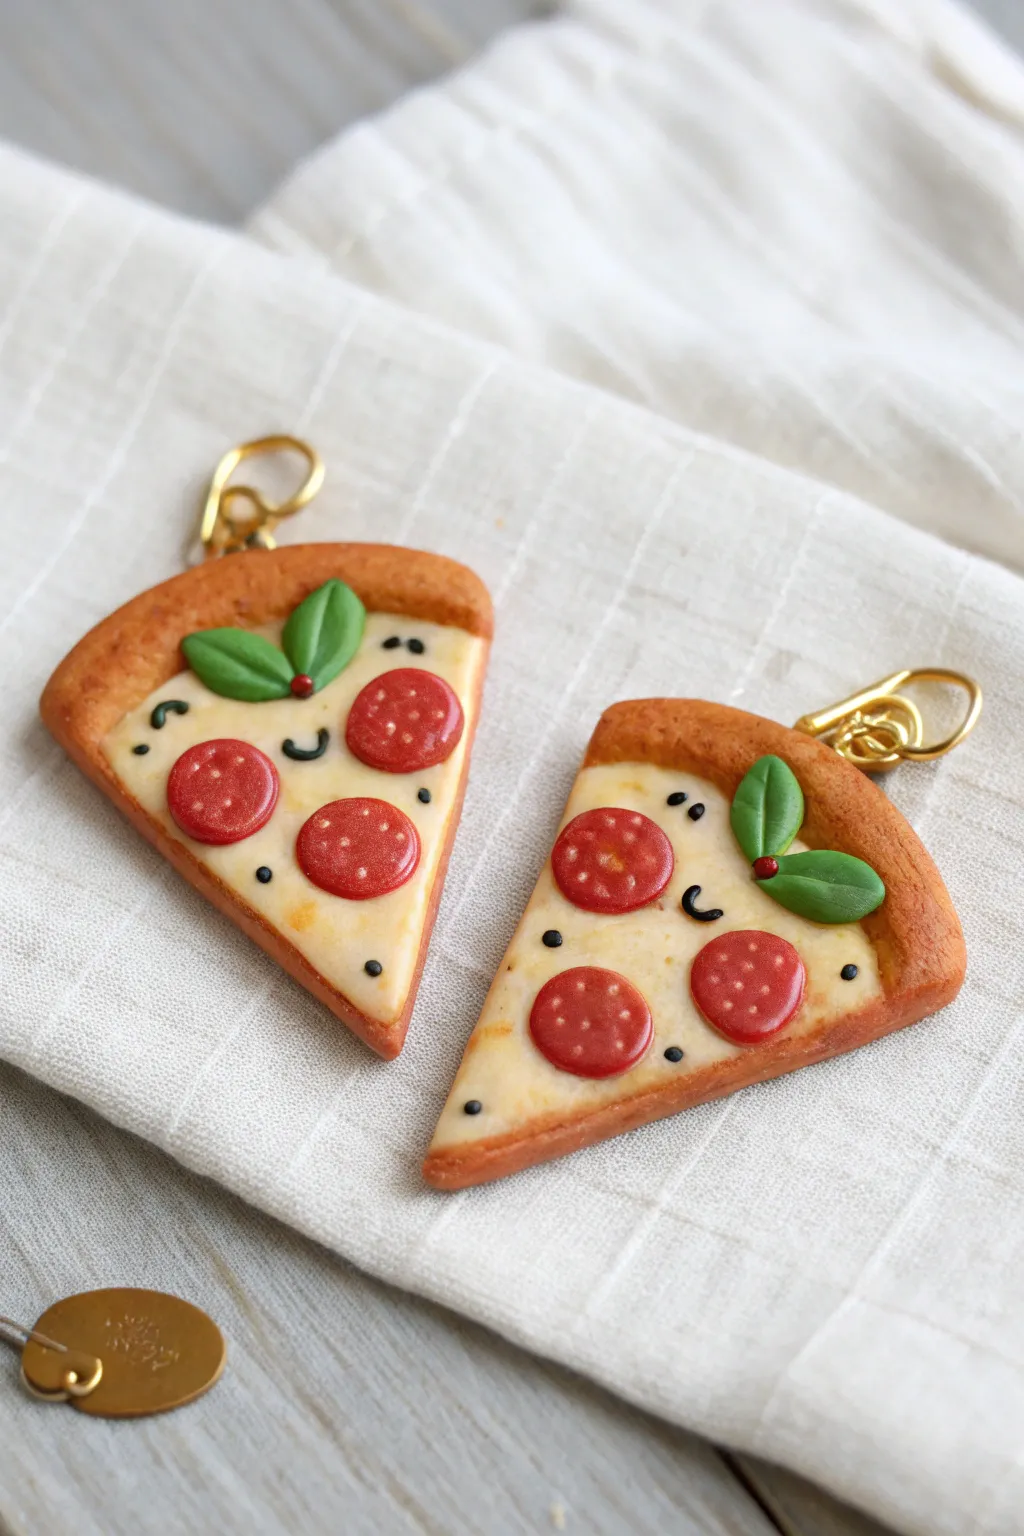
Celebrate friendship with these adorable matching pizza slice charms, featuring cheerful little pepperoni faces and fresh basil leaves. Made from polymer clay with a golden-baked crust, these miniature slices are perfect for splitting between best friends as keychains or necklaces.
Step-by-Step Guide
Materials
- Polymer clay (dough color, translucent white/cream, red, green, black)
- Soft pastel chalks (orange, brown, yellow ochre)
- Paintbrush (soft, for shading)
- Liquid polymer clay (optional, for sauce adhesion)
- Dotting tool or ball tool
- Needle tool or toothpick
- X-Acto knife or clay blade
- Small circle cutter (roughly 5-7mm)
- Eye pins or screw eyes (gold)
- Two gold lobster clasps and jump rings
- Gloss glaze or polyurethane varnish (optional)
- Oven
Step 1: Forming the Crust & Cheese
-
Mix the dough color:
Start by conditioning your dough-colored clay. If you don’t have a pre-mixed shade, combine beige with a tiny dot of translucent and yellow to get a realistic baked bread look. -
Create the base shape:
Roll the clay into a ball, flatten it slightly, and cut it into two equal triangles. Round the corners gently with your fingertips so they resemble pizza slices rather than sharp geometric shapes. -
Add the crust rim:
Roll a small snake of the dough-colored clay. Press this along the top (the widest part) of each triangle to create the raised pizza crust, blending the seam underneath so it looks like one piece. -
Texture the crust:
Use an old toothbrush or a balled-up piece of aluminum foil to gently tap texture onto the crust area. This mimics the porous surface of baked bread. -
Apply the cheese:
Mix white clay with translucent clay (about 1:1) and a speck of yellow for a melty mozzarella look. Roll this out very thinly and cut triangles slightly smaller than your base. -
Melt the edges:
Place the cheese layer onto the dough base. Use your finger or a smoothing tool to gently smudge the edges of the cheese down, making it look like it has melted onto the dough.
Fixing “Raw” Looks
If your crust looks too pale after baking, don’t worry. You can post-shade with acrylic paint diluted with water (a wash), wiping off the excess quickly to leave color in the textures.
Step 2: Shading & Toppings
-
Pre-bake shading:
Shave some orange, brown, and yellow ochre soft pastels into dust. With a soft dry brush, dust the crust rim and the edges of the cheese to give it a golden-brown, oven-baked appearance. -
Make the pepperoni:
Roll out red clay into a thin sheet. Use a small circle cutter (or a straw) to punch out six small circles for the pepperoni slices. -
Texture the meat:
Before attaching, lightly dab the surface of each red circle with your toothbrush/foil tool to give it a meaty texture. I like to add tiny specks of white clay here for ‘fat’ rendering, but that’s optional. -
Place the pepperoni:
Arrange three pepperoni slices on each pizza wedge. Press them down firmly so they bond with the cheese layer. -
Create the basil leaves:
Take two tiny balls of green clay. Flatten them into teardrop shapes. Use a needle tool to press an indentation down the center of each leaf for the vein. -
Attach the greenery:
Place two leaves at the top corner of the cheese area on each slice, having them overlap slightly at their stems. -
Add the tiny berry:
Roll a microscopic ball of red clay and place it right where the two basil leaves meet, acting as a decorative center or a tiny spice.
Step 3: The Kawaii Face & Finishing
-
Position the eyes:
Roll very tiny balls of black clay. Place two on each slice in the open ‘cheese’ areas to serve as eyes. Press them gently so they don’t fall off. -
Sculpt the smile:
Roll an incredibly thin snake of black clay. Cut a tiny segment and curve it into a ‘U’ shape. Place this between the eyes to create a happy smile. -
Add freckles:
Using a needle tool, add tiny dots of black clay or use black acrylic paint later to add little freckles or decorative dots around the face area. -
Insert hardware:
Insert a gold eye pin or screw eye into the center of the crust at the top. Ensure it goes deep enough to be secure. -
Bake:
Bake the pieces according to your polymer clay package instructions (usually 275°F/135°C for 15-30 minutes). Let them cool completely. -
Assembly:
Once cool, open a gold jump ring using pliers, loop it through the eye pin and your lobster clasp, and close it securely.
Pro Tip: Saucy Details
For ultra-realism, mix red soft pastel dust with liquid polymer clay. Dab this mixture strictly around the edges of the pepperoni to make it look like grease is pooling slightly.
Attach these to your keys or bag zipper and enjoy your charming, calorie-free slice of friendship
Matching Initial Tag Keychains
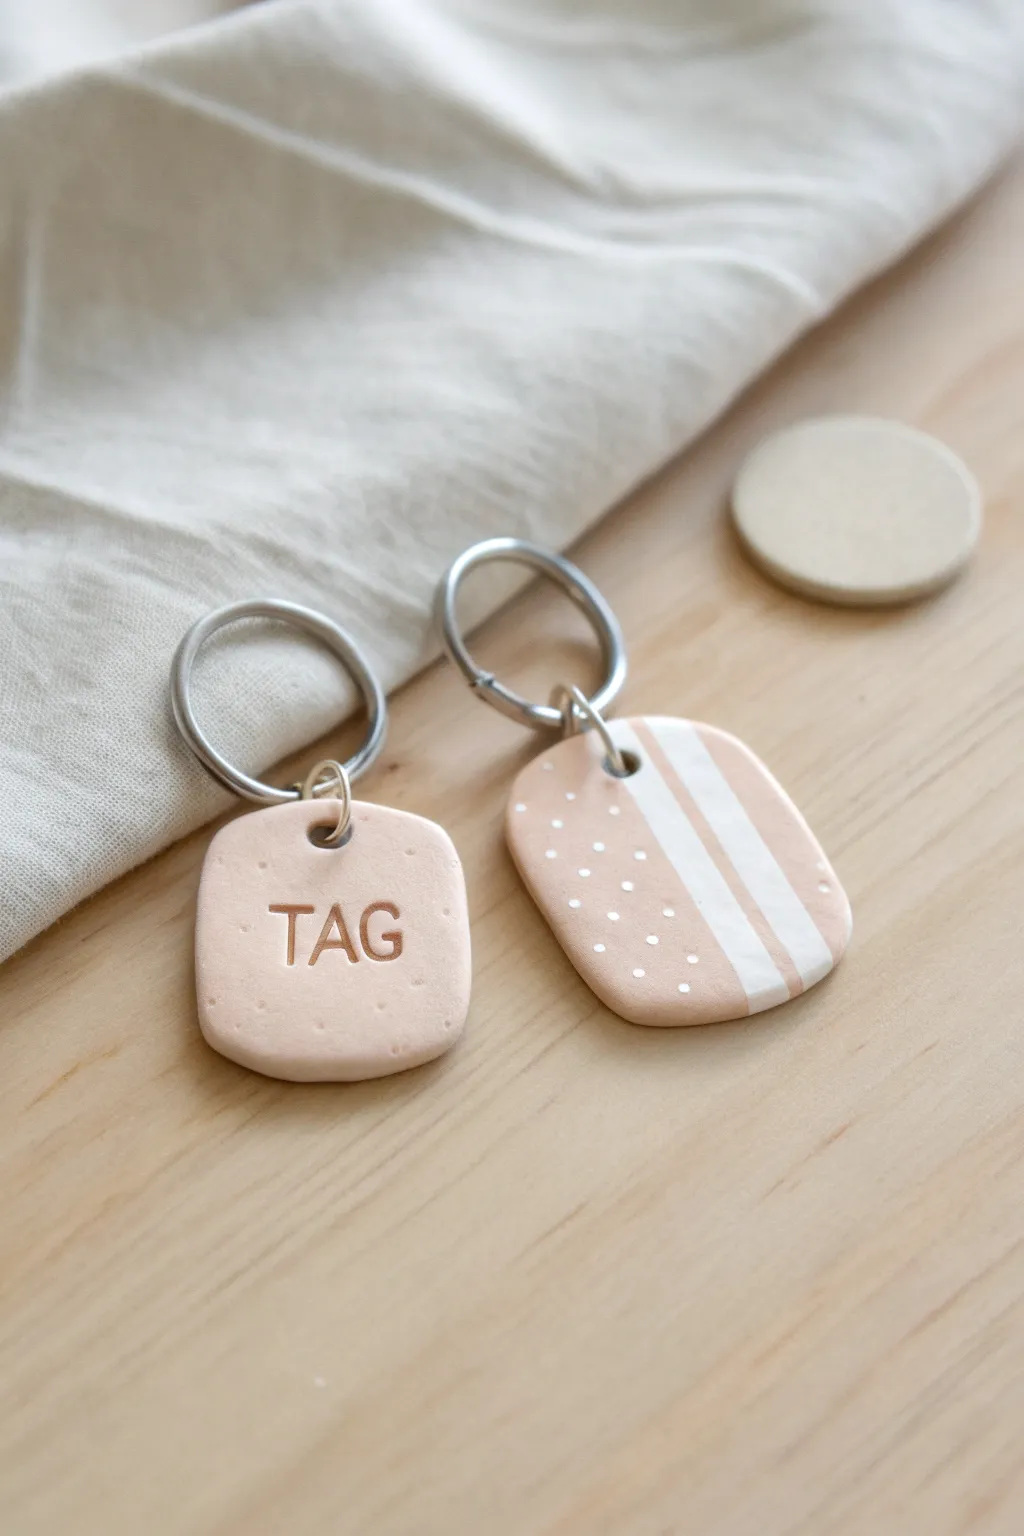
These charming, personalized keychains are crafted from polymer clay in a soft peach hue, offering a modern and minimalist aesthetic. One features stamped lettering while its partner showcases a playful pattern of white stripes and delicate dots, making them perfect complementary accessories.
How-To Guide
Materials
- Polymer clay (peach/beige color)
- White acrylic paint or white liquid clay
- Rolling pin or acrylic roller
- Small square and rectangle clay cutters (approx. 1-1.5 inches)
- Letter stamp set
- Needle tool or toothpick
- Detail paintbrush
- Jump rings
- Split ring keychains
- Parchment paper
- Oven (for baking)
Step 1: Shaping the Base
-
Condition the clay:
Begin by taking your peach-colored polymer clay and kneading it in your hands until it becomes soft, pliable, and free of cracks. Warm clay is much easier to work with. -
Roll it out:
Place the conditioned clay on a piece of parchment paper to prevent sticking. Use your rolling pin to flatten the clay to an even thickness of about 1/4 inch (6mm). -
Cut the shapes:
Using your cutters, press firmly into the clay to create one square tag and one rectangular tag. If you don’t have cutters, you can freehand these shapes with a craft knife for a more organic look. -
Smooth the edges:
Gently run your finger along the cut edges of both clay pieces to soften the sharpness and rounds the corners slightly. This gives the finished piece a more polished, stone-like feel. -
Create the hole:
Use a needle tool or a toothpick to poke a hole near the top center of each tag. Wiggle the tool slightly to ensure the hole is large enough for your jump ring to fit through later.
Smooth Moves
Before baking, dip your finger in a tiny bit of baby oil or water and rub it over the clay surface to remove any distinct fingerprints.
Step 2: Designing the Tags
-
Stamp the text:
On the square tag, arrange your letter stamps to spell ‘TAG’ or your chosen initials. Press them gently but firmly into the center of the clay to leave a clean impression without distorting the shape. -
Texture the surface:
For a subtle finish, I like to lightly tap the surface of the stamped tag with a toothbrush or crumpled foil to give it a stone-like texture, though leaving it smooth works too. -
Prepare the patterned tag:
Ensure the rectangular tag is smooth and clean. This surface will be your canvas for the painted design after baking. -
Bake the clay:
Transfer the clay pieces on their parchment paper to a baking sheet. Bake according to your clay package instructions (usually around 275°F/135°C for 15-30 minutes). -
Cool down:
Remove the pieces from the oven and let them cool completely before moving to the decoration phase. The clay hardens fully as it cools.
Make it Shine
Add gold leaf flakes onto the clay before baking for a chic, metallic terrazzo effect that pairs beautifully with the peach tone.
Step 3: Decorating and Assembly
-
Paint the stripes:
On the cooled rectangular tag, use a fine detail brush and white acrylic paint to draw two vertical stripes on the right side. Make one line thick and the other thin for visual interest. -
Add the dots:
Dip the non-brush end of your paintbrush or a toothpick into the white paint. Dot a random pattern on the left side of the rectangular tag, filling the space beside the stripes. -
Highlight the text:
If you want the stamped letters to stand out more, you can lightly brush a darker paint into the grooves and wipe away the excess on the surface, or leave them natural as shown in the inspiration. -
Seal the design (optional):
To protect the white paint from chipping, you can apply a thin layer of matte varnish over the decorated tag once the paint is fully dry. -
Attach the hardware:
Open a jump ring with pliers and thread it through the hole in the clay tag. Loop the jump ring onto the main split ring keychain. -
Close the ring:
Use your pliers to twist the jump ring closed securely, ensuring there is no gap where the clay tag could slip out. -
Final check:
Give the keychain a little tug to make sure completely secure and wipe off any lingering fingerprints with a soft cloth.
Your custom matching keychains are now ready to be gifted or attached to your favorite bag
Complementary Mini Planters Set
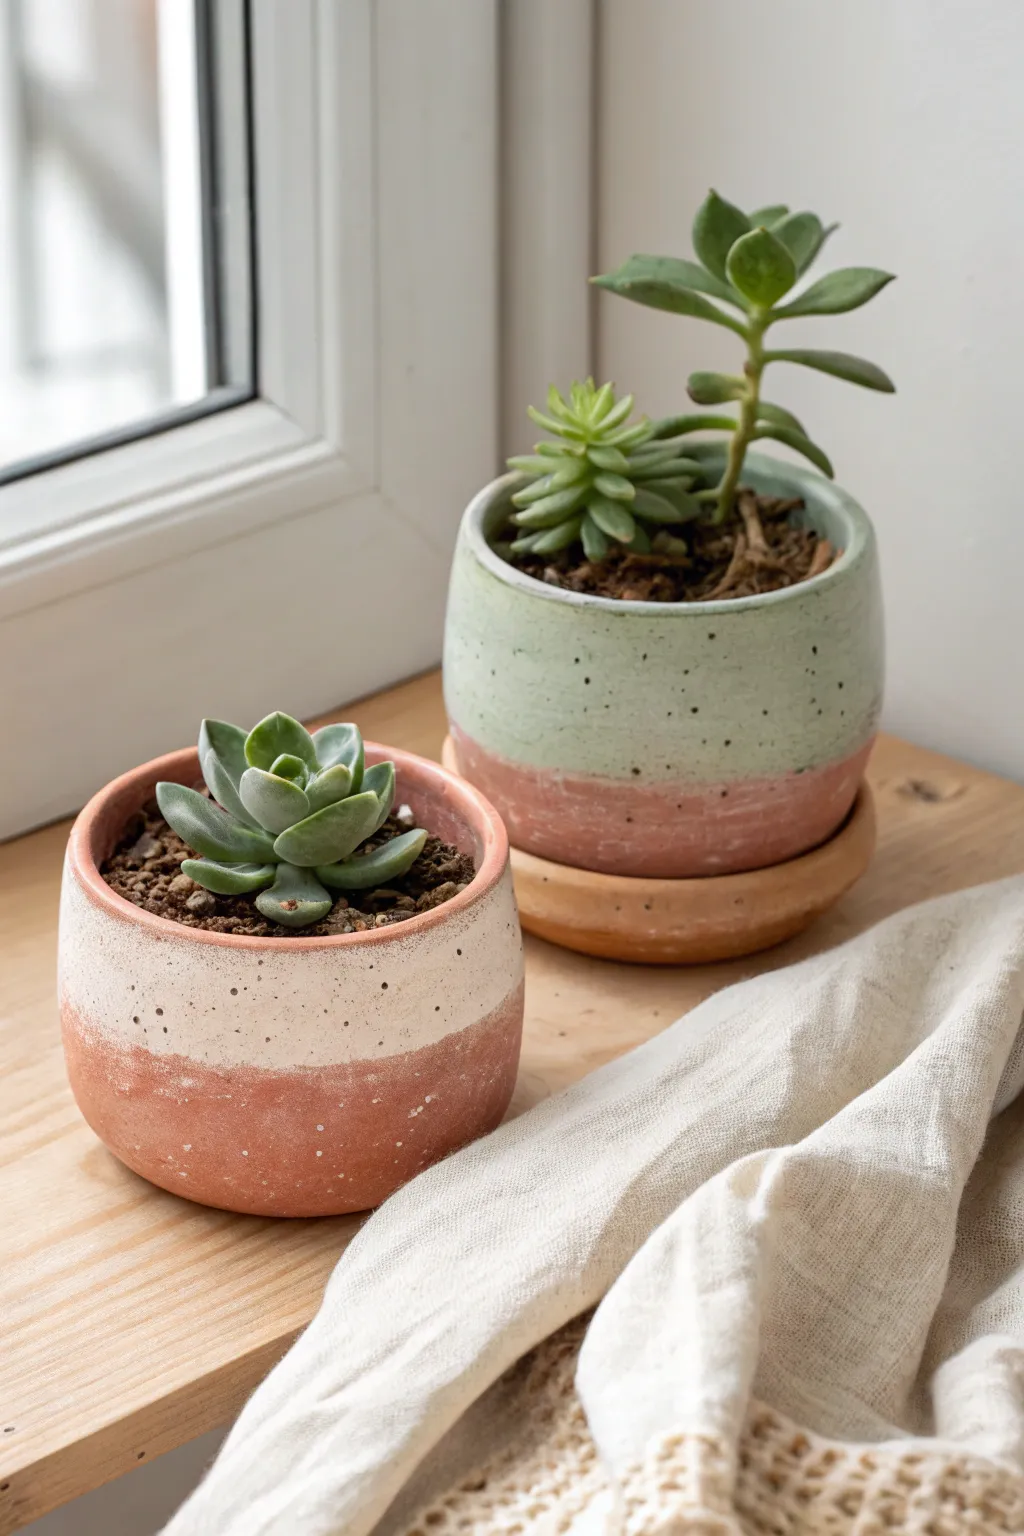
These charming mini planters feature a delightful two-tone design that contrasts natural terracotta warmth with soft, speckled glazes. Perfect for small succulents, this project emphasizes subtle texture and complementary color blocking to create a cohesive yet distinct pair.
Step-by-Step
Materials
- Air-dry clay or kiln-fire terracotta clay
- Rolling pin
- Canvas mat or work board
- Circular cookie cutters or templates (approx. 3-4 inches diameter)
- Fettling knife or clay cutter
- Small bowl or form for shaping (optional)
- Slip (clay and water mixture) and scoring tool
- Sponge
- Acrylic paints (terracotta, creamy white, mint green)
- Matte varnish or sealant
- Old toothbrush (for speckling)
- Brown or black acrylic paint (diluted for speckling)
Step 1: Shaping the Vessels
-
Prepare the Clay Slabs:
Begin by rolling out your clay on a canvas mat to a consistent thickness of about 1/4 inch. If you want matching pots, ensure you roll enough clay for two bases and two wall strips. -
Cut the Bases:
Using a circular cutter or a template, cut out two circles for the bottoms of your pots. For the slightly larger pot, cut a base that is about half an inch wider in diameter. -
Create the Walls:
Measure the circumference of your base circles. Cut two rectangular strips of clay; the length should equal the circumference plus a slight overlap for joining, and the height is your desired pot depth. -
Score and Slip:
Score the outer edge of your base circles and the bottom edge of your wall strips with a needle tool or fork. Apply a generous amount of slip to these rough areas. -
Assemble the Cylinder:
Wrap the wall strip around the base, pressing the scored edges together firmly. Seal the vertical seam where the wall overlaps by blending the clay with your thumb or a modeling tool until the join is invisible. -
Refine the Shape:
Gently smooth the exterior and interior seams. For the shorter pot, curve the walls slightly inward at the top to create a rounded, bowl-like silhouette. Keep the taller pot straighter but soften the rim. -
Make the Saucer:
Roll a smaller ball of clay and flatten it into a thick disc slightly wider than the taller pot. Press the center down with your thumb to create a shallow indentation for the pot to sit in. -
Dry Completely:
Set your pieces aside in a dry, room-temperature area. Let them air dry for 24-48 hours until they are hard and light in color. If using kiln clay, fire them now.
Step 2: Painting and Glazing Effects
-
Base Coat Application:
Once dry (and fired if applicable), paint the bottom third of both pots and the entire saucer with a terracotta-colored acrylic paint to mimic raw clay. I like to apply two thin coats for opaque coverage. -
Tape the Horizon Line:
To get a crisp line between the two colors, apply painter’s tape horizontally around the pots where you want the color shift to happen. Press the tape edge down firmly to prevent bleeding. -
Apply the Top Colors:
Paint the top section of the shorter pot with a creamy white acrylic. For the taller pot, mix a soft sage or mint green and apply it to the upper section. -
Remove Tape and Refine:
Peel off the tape while the paint is still slightly tacky to avoid chipping. If the line is too sharp, you can gently sand it after drying to distress it, or use a fine brush to soften the transition. -
Create the Speckle Effect:
Dilute a small value of dark brown or black paint with water until it’s inky. Dip an old toothbrush into the mixture, then run your thumb across the bristles to flick tiny droplets onto the painted sections. -
Focus the Splatter:
Aim for an uneven, organic distribution of speckles. Concentrate slightly more dots near the rim or the color transition line for visual interest. -
Seal the Pots:
Once all paint is perfectly dry, finish with a coat of matte varnish inside and out. This creates a glaze-like sheen and protects the paint from moisture when watering your plants.
Fixing Cracks
If hairline cracks appear during drying, create a thick paste of clay and vinegar (called ‘magic water’). Fill the crack, smooth it over, and let it dry slowly away from drafts.
Faux Glaze Look
Mix a drop of gloss medium into your top color paint. This mimics the shine of ceramic glaze against the matte ‘raw’ bottom without needing a kiln.
Now you have a serene little garden vignette ready to brighten up your windowsill
Matching Memory Game Tiles
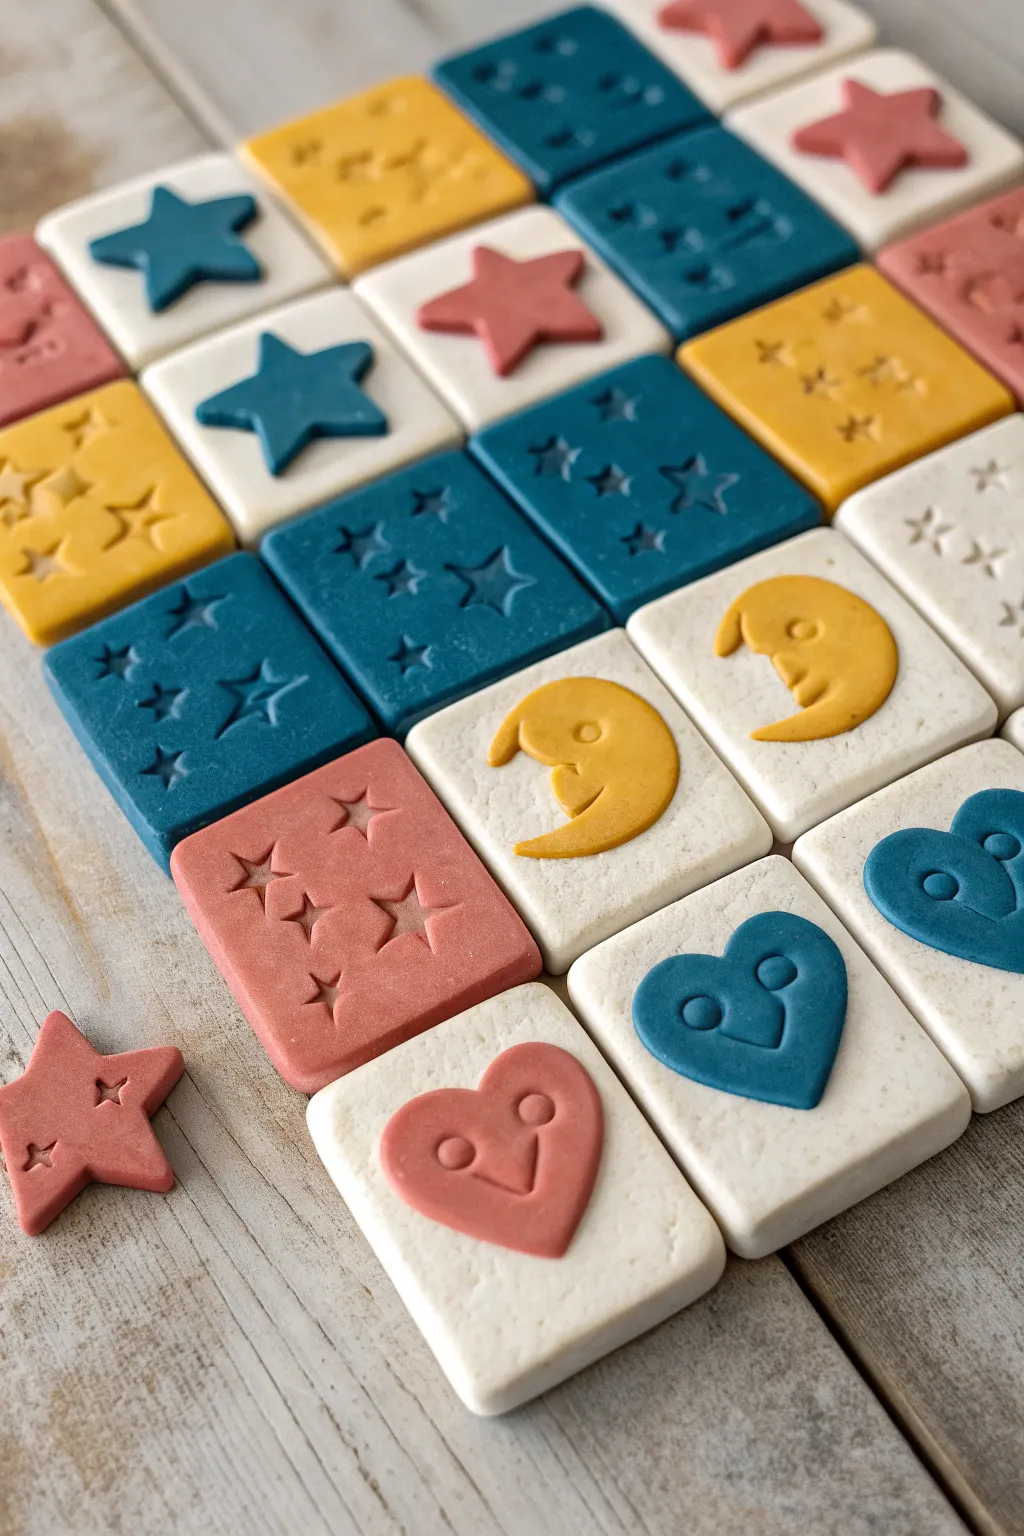
Create a charming, tactile memory game using polymer clay in a soothing palette of teal, mustard, pink, and cream. These durable tiles feature both raised and impressed designs, offering a sensory play experience that is as beautiful to display as it is fun to use.
How-To Guide
Materials
- Polymer clay (white, teal, mustard yellow, terracotta pink)
- Acrylic roller or pasta machine
- Square clay cutter (approx. 1.5 inches)
- Small shape cutters (stars, circles)
- Sculpting tools or dotting tool
- Parchment paper or baking mat
- Craft knife
- Oven (for baking)
- Fine grit sandpaper
Step 1: Preparing the Base Tiles
-
Condition the white clay:
Start by thoroughly conditioning your white polymer clay until it is soft and pliable. This prevents cracking later. -
Roll out the slab:
Roll the white clay into a uniform slab, about 1/4 inch thick. Using depth guides or a pasta machine ensures every tile is the exact same thickness, which is crucial for a fair game. -
Cut the squares:
Use your square cutter to punch out an even number of white base tiles. I find that wiping the cutter blade with a little cornstarch helps the clay release cleanly. -
Prepare colored bases:
Repeat the process with your teal, mustard, and pink clay if you want some tiles to have colored backgrounds. Roll them to the same thickness and cut an equal number of squares. -
Smooth the edges:
Gently run your finger along the edges of every cut square to soften the sharp cut lines, giving them a more finished, stone-like look.
Sticky Clay Problems?
If your clay is sticking to the table or roller, chill it in the fridge for 10 minutes or lightly dust your work surface with cornstarch.
Step 2: Creating Raised Designs
-
Roll colored clay thin:
Roll out small amounts of the teal, mustard, and pink clay much thinner than your base tiles—about 1/8 inch thick. -
Cut shapes:
Use small cutters or a craft knife to cut out pairs of shapes: stars, crescent moons, and hearts. -
Add facial details:
For the moon and heart tiles, use a dotting tool to gently press eye sockets and a needle tool or small blade to carve a smiling mouth directly onto the cut shape. -
Adhere to base:
Place the colored shapes onto the white base tiles. Press them down gently to bond the raw clays together without distorting the shape. -
Texture the moon:
If making the crescent moon face, use a needle tool to add a tiny nostril or extra detail to give it character.
Pro Tip: Consistent Thickness
Stack two stacks of playing cards to the desired height on either side of your clay. Roll your rolling pin over these stacks to get a perfectly even slab.
Step 3: Creating Impressed Designs
-
Select colored tiles:
Take your solid colored squares (teal, mustard, pink) and your remaining white squares. -
Stamp the pattern:
Take a small star cutter or stamp and press it gently into the surface of the clay to create an indented pattern. Don’t cut all the way through. -
Vary the patterns:
Create some tiles with a single large centered star indentation, and others with a scattered pattern of smaller stars. -
Detail the indents:
For added texture, you can use a small ball tool to press into the corners of the star indentations, making the relief pop.
Step 4: Baking and Finishing
-
Final smooth:
Do a final check for fingerprints. A light brush with baby oil can smooth them away before baking. -
Bake:
Arrange all tiles on a parchment-lined baking sheet. Bake according to your clay manufacturer’s instructions (usually 275°F for 15-30 minutes per 1/4 inch of thickness). -
Cool down:
Allow the tiles to cool completely in the oven with the door slightly ajar to prevent thermal shock. -
Sand edges:
Once fully cool and hard, use fine-grit sandpaper to buff away any sharp edges or slight irregularities on the sides. -
Clean up:
Wipe the tiles with a damp cloth to remove sanding dust, revealing your smooth, finished game pieces.
Now you have a custom, handcrafted game set ready for years of play