If you love the look of bracelets but want something that feels more low-key and wearable, men’s clay bead bracelets are such a satisfying project. In my studio, I lean on muted earth tones, clean patterns, and a few rugged details to keep the vibe simple and masculine.
Matte Black Heishi Bracelet
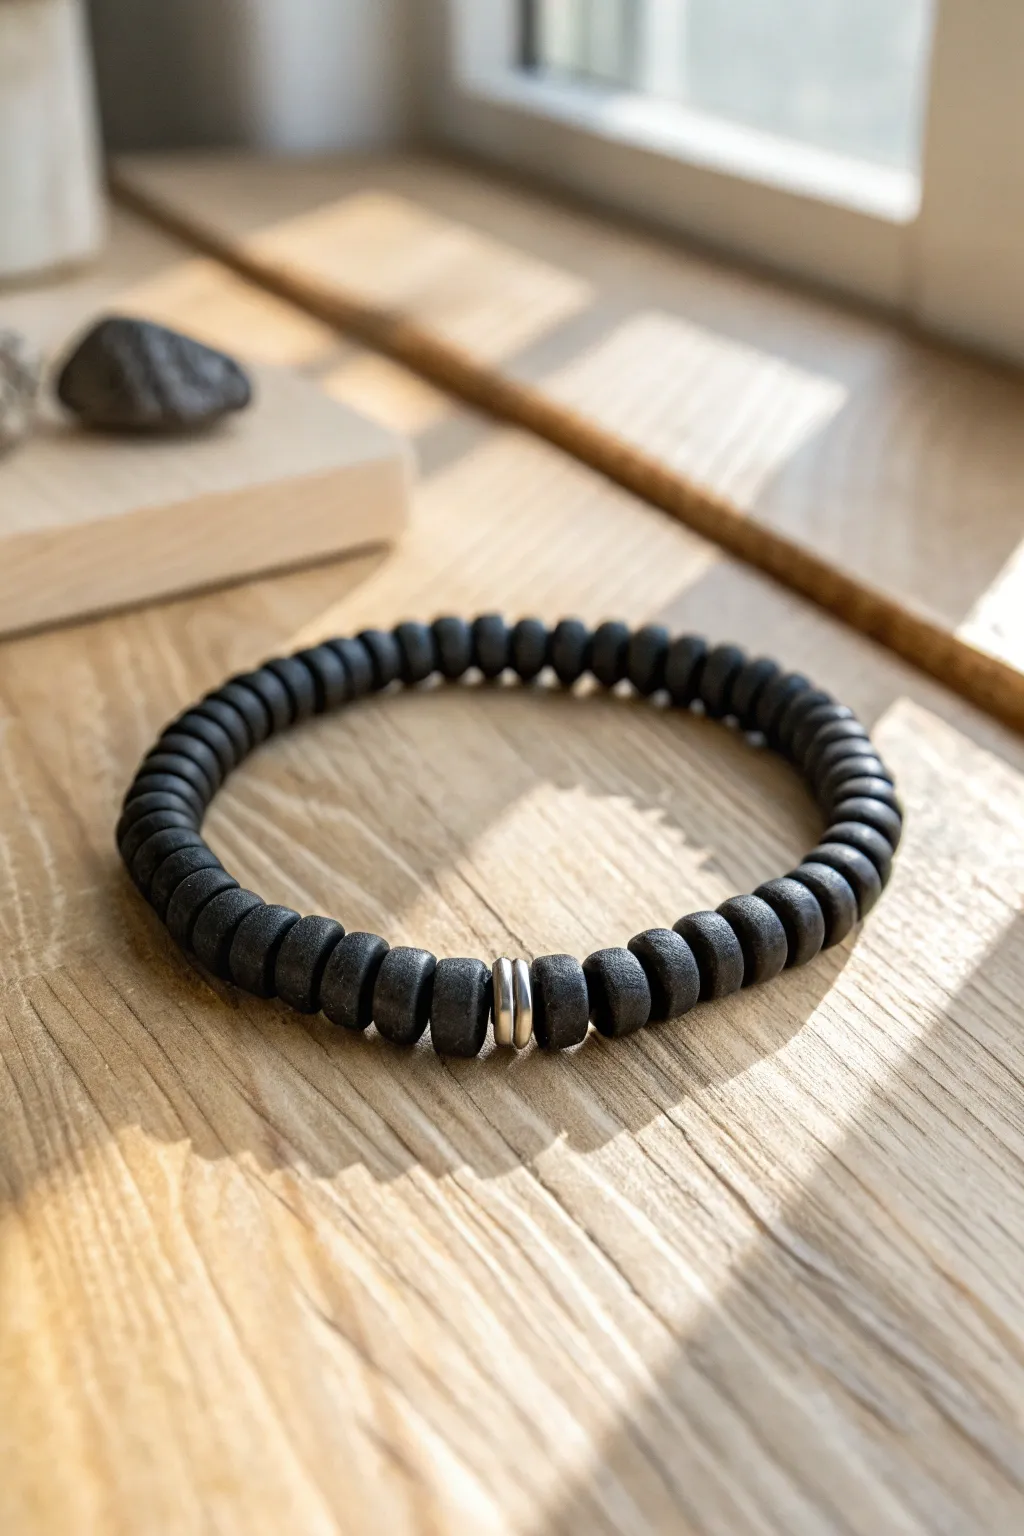
This sleek bracelet combines the rugged texture of matte black clay heishi beads with a striking silver accent for a masculine, modern look. It’s an understated piece perfect for everyday wear, balancing earthy tones with a touch of industrial cool.
Step-by-Step Tutorial
Materials
- Matte black polymer clay heishi beads (6mm or 8mm diameter)
- Small silver spacer beads or a single silver tube connector
- Strong elastic cord (0.8mm or 1mm transparent)
- Jewelry glue or clear nail polish
- Scissors or jewelry wire cutters
- Tape or a bead stopper clip
- Ruler or measuring tape
Step 1: Sizing and Preparation
-
Measure your wrist:
Wrap a measuring tape comfortably around your wrist where you want the bracelet to sit. Note the measurement and add about 0.5 inches (1.2 cm) to ensure a comfortable fit that isn’t too tight. -
Cut the cord:
Cut a piece of elastic cord about 10-12 inches long. Having this extra length makes tying the final knot significantly easier than struggling with short ends. -
Pre-stretch the elastic:
Before adding any beads, firmly pull on the elastic cord several times to stretch it out. This prevents the bracelet from drooping or becoming loose shortly after you finish making it. -
Secure the end:
Place a piece of tape over one end of the cord or attach a bead stopper clip. This simple step saves you the headache of beads sliding right off while you work.
Secret to Matte Finish
To keep that ultra-matte look clean, wipe beads with a baby wipe before stringing. Clay naturally attracts dust and lint, which shows up clearly on black.
Step 2: Stringing the Design
-
Sort your beads:
Pour out your matte black heishi beads onto a soft surface like a bead mat or towel so they don’t roll away. Identify any beads that are chipped or uneven and set them aside. -
Start stringing:
Begin threading the black beads onto the elastic cord. I like to count them as I go to ensure I place the centerpiece exactly in the middle, though eyeballing works top. -
Check the halfway point:
Once you have filled approximately half the length of your desired bracelet size with black beads, pause to check your measurement against a ruler. -
Add the accent:
Slide on your silver spacer beads or tube connector. In the reference image, there appear to be two thin silver disc spacers acting as a focal point. -
Finish the strand:
Continue threading the remaining black heishi beads until you reach the total length you calculated in the first phase. -
Test the fit:
Carefully wrap the unfinished strand around your wrist to check the size. Remove or add a few beads if necessary to get that perfect comfortable fit.
Step 3: Securing the Bracelet
-
Prepare for the knot:
Remove the tape or clip from the end of the cord. Hold both ends of the elastic securely so you don’t lose any tension. -
Tie the first loop:
Cross the ends and make a simple overhand knot, pulling it tight against the beads to remove any slack in the line. -
The surgeon’s knot:
For the main secure knot, perform a surgeon’s knot: cross the ends, loop one side through twice instead of once, and pull firmly. -
Tighten securely:
Pull the elastic ends away from each other to tighten the knot, then pull the bracelet itself to stretch the knot into place. -
Apply adhesive:
Place a tiny drop of jewelry glue or clear nail polish directly onto the knot. This bonds the elastic together and prevents it from slipping undone over time. -
Hide the knot:
While the glue is still slightly tacky but not wet, pull the elastic so the knot slides inside the hole of the adjacent bead. This hides the mechanics for a professional finish. -
Trim the excess:
Once the glue is fully dry, use your scissors to trim the remaining tail ends of the elastic cord as close to the bead as possible without cutting the knot itself.
Level Up: Texture Mix
Swap every fifth black bead for a dark grey lava stone bead. It adds subtle variation and allows the bracelet to double as an essential oil diffuser.
Slip on your new custom accessory and enjoy the refined, handmade touch it adds to your style


Charcoal and Gray Gradient
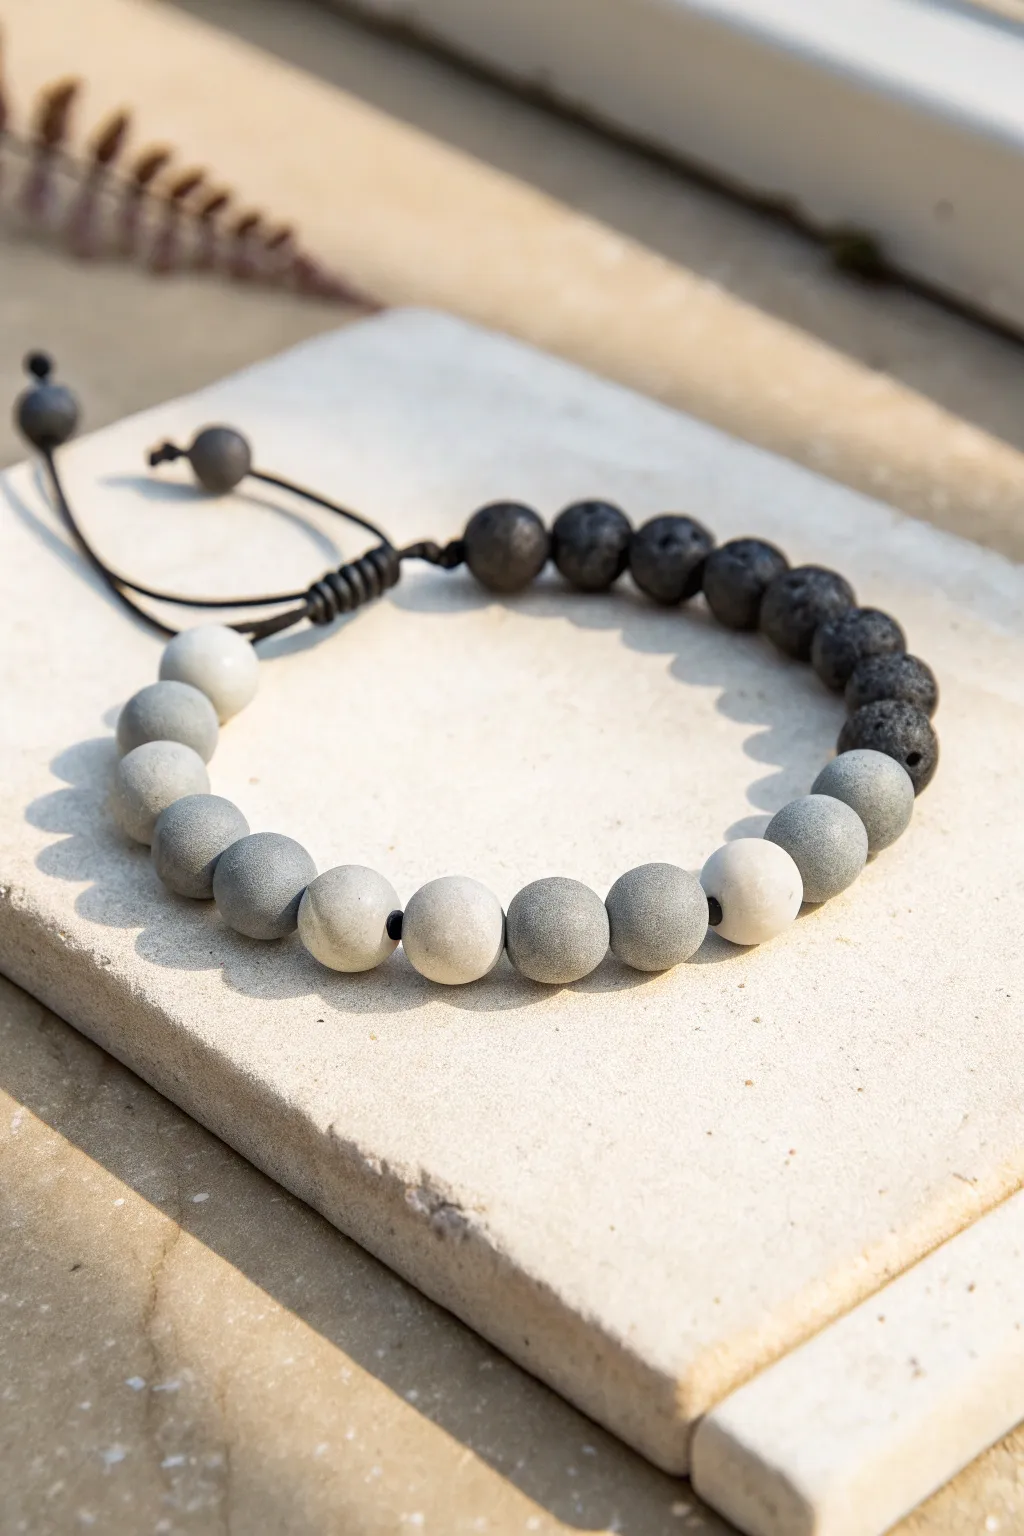
Achieve a sophisticated, understated look with this gradient bracelet that transitions from airy whites to deep volcanic blacks. The adjustable sliding knot closure makes it a comfortable fit for any wrist size while highlighting the beautiful matte texture of the beads.
Step-by-Step
Materials
- 1mm black waxed cotton cord or nylon macramé cord
- 6mm or 8mm white matte agate or polymer clay beads (approx. 4)
- 6mm or 8mm grey matte map stone or jasper beads (approx. 8)
- 6mm or 8mm black lava stone beads (approx. 8-10)
- 2 smaller black accent beads (for the drawstrings)
- Scissors
- Lighter (for sealing cord ends)
- Tape or a clip board
- Measuring tape
Step 1: Preparation and Layout
-
Measure the cord:
Cut a piece of your black cord to approximately 24 inches (60 cm). This generous length gives you plenty of room to work with the knots later. -
Plan the gradient:
Before stringing, lay your beads out on a flat surface or bead board to establish the pattern. -
Create the sequence:
Start with the black lava beads on one side, transition into the medium grey stones, place the lightest white beads in the center, undergo the grey stones again, and finish with the remaining black lava beads to complete the gradient loop.
Sticky Slider?
If the sliding knot is too tight to move, you pulled your square knots too hard. If it’s too loose, the bracelet will fall off. Aim for firm but moveable tension.
Step 2: Stringing the Beads
-
Burn the tip:
Quickly pass the end of your cord through a lighter flame and roll it between your fingers (careful, it’s hot!) to create a stiff, needle-like point for easier stringing. -
String the beads:
Thread the beads onto the cord in the order you laid them out. Since this is a simple stringing project, you just want to ensure the gradient flows smoothly from dark to light and back to dark. -
Center the design:
Slide all beads to the middle of the 24-inch cord so you have equal lengths of tail on either side. -
Secure the ends:
Tie a simple overhand knot snugly against the first and last bead of the strand. This keeps the beads strictly in place so they don’t slide around while you wear it.
Step 3: Creating the Adjustable Closure
-
Form a circle:
Bring the two loose cord ends together, overlapping them parallel to each other to form a circle with the bracelet. -
Prepare the knotting cord:
Cut a separate piece of black cord, about 10 inches long. This will be used to create the sliding square knot (macramé closure). -
Start the square knot:
Place the 10-inch cord underneath the two overlapped main cords. Bring the left end over the main cords, and the right end over that left tail, under the main cords, and up through the loop on the left. -
Tighten the first half:
Pull both ends of the short cord firmly to create the first half of the square knot. -
Complete the knot:
Repeat the process in reverse: bring the right end over, the left end over the right tail, under the center cords, and up through the right loop. Pull tight. -
Build the closure:
Referencing the photo, continue tying square knots for about a half-inch of length. I find about 5 or 6 full square knots creates a sturdy, professional-looking clasp. -
Trim and seal:
Trim the excess tails of the knotting cord (not the main bracelet cords!) very close to the knot. carefully melt the cut ends with a lighter and press them flat against the knot to seal it.
Add Aromatherapy
Use the porous black lava stones as an essential oil diffuser. Rub a drop of sandalwood or cedarwood oil onto the black beads for a subtle, masculine scent.
Step 4: Finishing Touches
-
Add end beads:
Thread one small black accent bead onto each of the hanging drawstring tails. -
Position the stops:
Decide how wide the bracelet needs to open to fit over your hand, and position the accent beads at that max extension point. -
Tie off tails:
Tie an overhand knot right after each accent bead to hold it in place. -
Final trim:
Cut off any remaining excess cord after the final knots and quickly singe the tips to prevent fraying.
Now you have a versatile, modern accessory that looks great stacked with a watch or worn solo


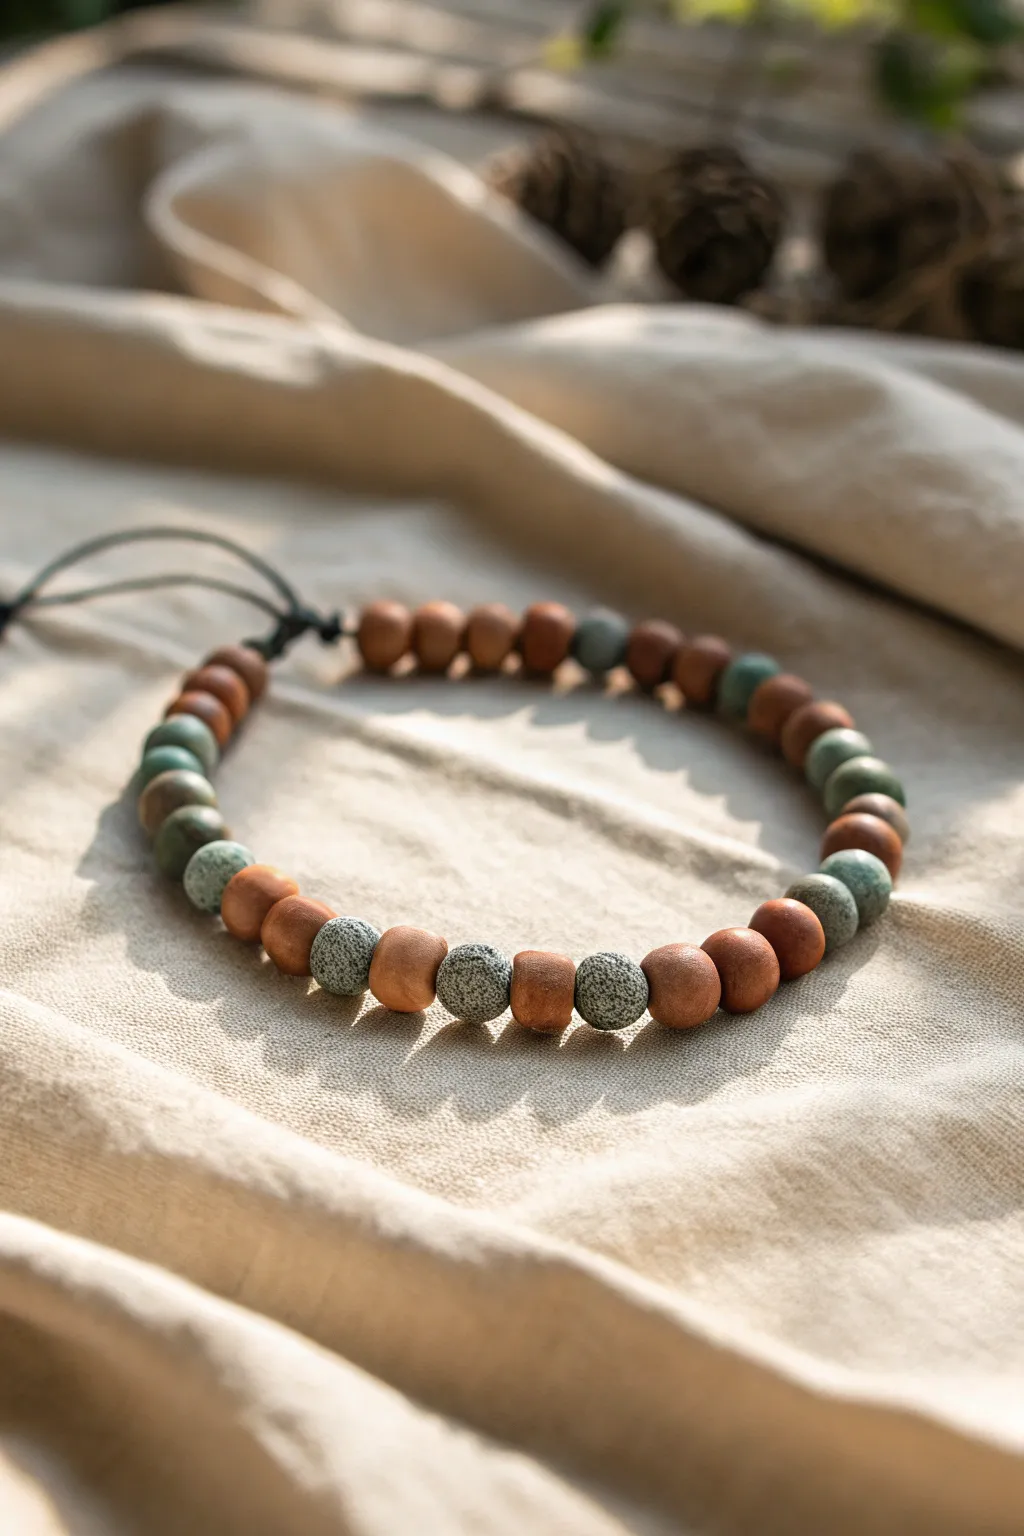
Navy and Sandstone Stripes
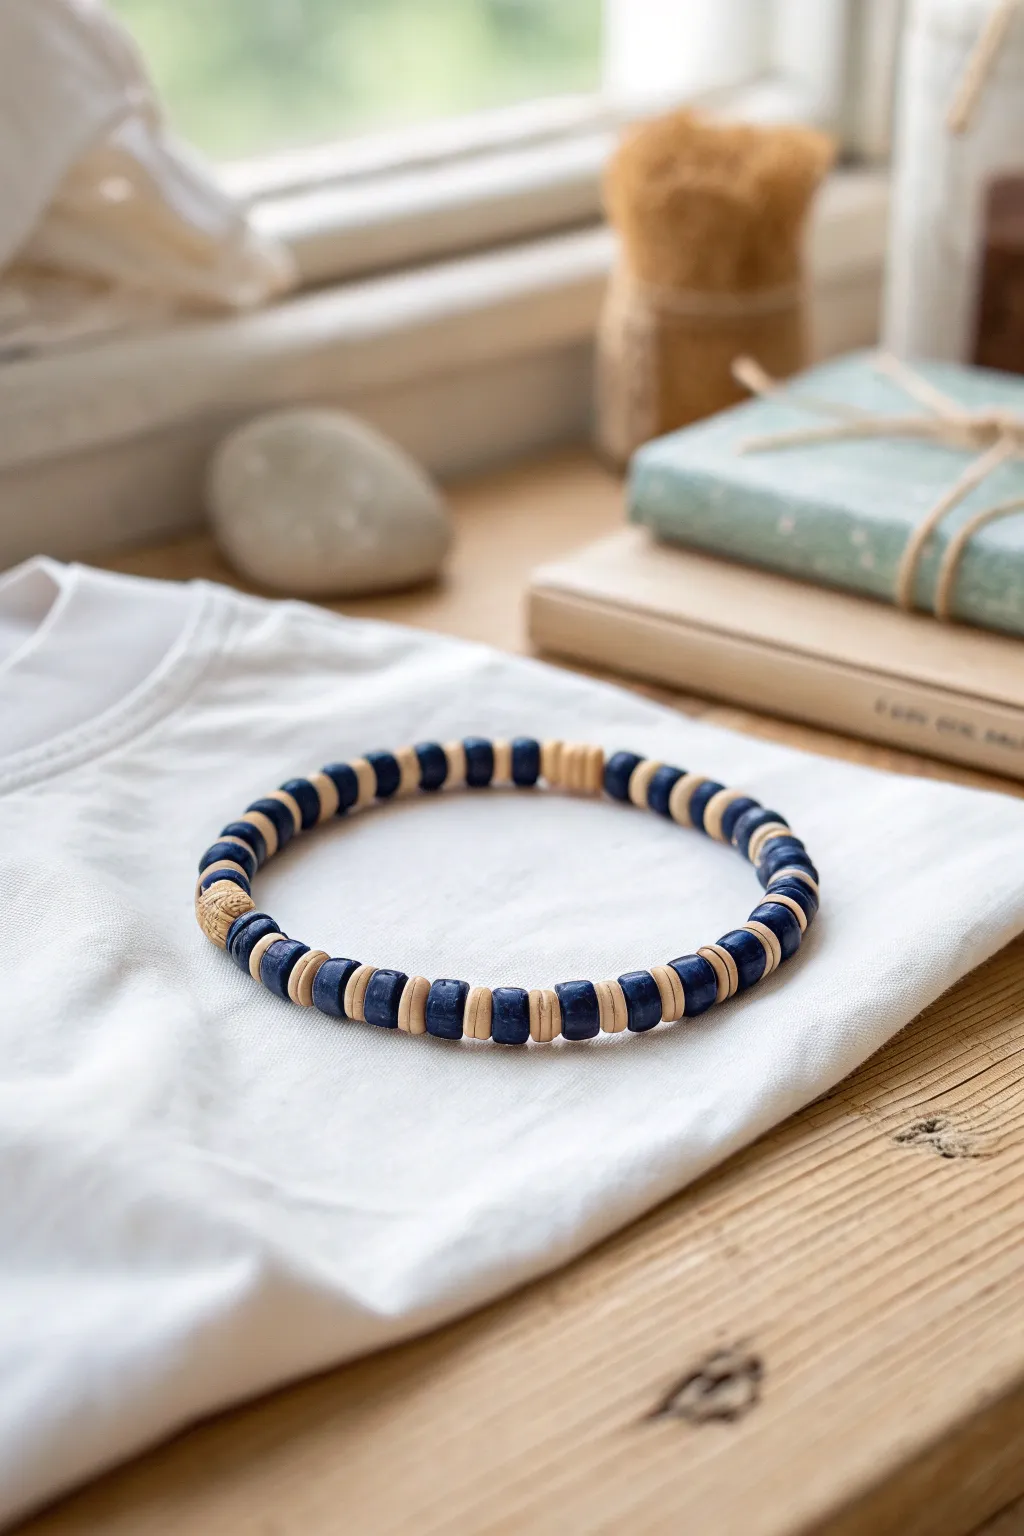
This masculine bracelet combines the deep, classic appeal of navy blue with the organic warmth of sandstone clay beads. The alternating pattern creates a rhythmic, striped look that pairs effortlessly with casual summer wear or everyday denim.
Detailed Instructions
Materials
- Navy blue polymer clay heishi beads (approx. 6mm diameter)
- Sandstone or beige polymer clay heishi disc beads (approx. 6mm diameter)
- Two textured wooden or raw clay focal beads (approx. 8mm)
- Strong elastic cord (0.8mm or 1mm)
- Beading needle (optional, but helpful)
- Super glue or jewelry cement
- Scissors
- Bead design board or soft cloth
- Tape or binder clip
Step 1: Preparation & Planning
-
Measure your wrist:
Before cutting any cord, measure the wrist where the bracelet will sit. Add about half an inch to this measurement to ensure a comfortable fit that isn’t too tight against the skin. -
Prepare the workspace:
Lay out a bead design board or a soft towel on your table. This prevents your round beads from rolling away while you are planning your pattern. -
Cut the elastic:
Cut a piece of elastic cord about 10-12 inches long. Having this extra length makes tying the final knot much easier than struggling with short ends. -
Secure the end:
Attach a piece of tape or a binder clip to one end of your elastic cord. This acts as a stopper so your beads represent slide right off as you string them. -
Pre-stretch the cord:
Give your elastic cord a few gentle tugs. Pre-stretching helps prevent the bracelet from sagging or becoming loose after the first few times you wear it.
Step 2: Creating the Pattern
-
Start the sequence:
Begin stringing your beads. The primary pattern consists of one navy blue cylinder bead followed by one thin sandstone disc bead. -
Check the rhythm:
Repeat this 1-to-1 alternating pattern for about 2 inches of length. Ensure the navy beads are uniform in size to keep the ‘striped’ effect clean. -
Add the first focal point:
Slide on one of the larger textured wooden or raw clay focal beads. This breaks up the stripes and adds a nice visual anchor to the design. -
Resume the pattern:
Continue with your navy and sandstone alternating sequence. This middle section should be the longest part of the bracelet, wrapping around most of the wrist. -
Second focal point (optional):
If you are using a second focal bead like in the photo, add it now. I find placing it opposite the first one creates a nice symmetry, but asymmetrical placement looks great too. -
Finish the strand:
Continue the alternating pattern until you reach your desired total length. Double-check the size by wrapping the strand loosely around your wrist.
Knot Security Trick
Use a flexible jewelry glue like G-S Hypo Cement. It has a pinpoint applicator that prevents mess and stays slightly flexible, so the knot won’t crack over time.
Step 3: Finishing Touches
-
Verify the fit:
Bring the two ends together carefully to check the circle size one last time. It should sit comfortably without pinching or drooping. -
Tie the knot:
Remove the tape or clip. Tie the ends together using a surgeon’s knot: cross left over right, then right over left, looping the end through twice before pulling tight. -
Tighten securely:
Pull all four strands (the two loose ends and the two bracelet sides) firmly to lock the knot in place. You want the tension high enough that gaps don’t show between beads. -
Apply adhesive:
Apply a tiny drop of jewelry cement or super glue directly onto the knot. Be careful not to get glue on the neighboring clay beads, as it can discolor them. -
Hide the knot:
Before the glue fully sets, gently pull the knot inside the hole of one of the larger focal beads or adjacent navy beads if the hole is large enough. -
Trim the ends:
once the glue is completely dry, use your scissors to trim the excess elastic cord close to the bead hole. Be careful not to nip the main knot.
Texture Twist
Swap the sandstone discs for small brass spacer beads or coconut shell rings. The metallic or wood sheen adds a more rugged, traveled look to the piece.
Slip on your new bracelet to add a touch of handcrafted, coastal style to any outfit


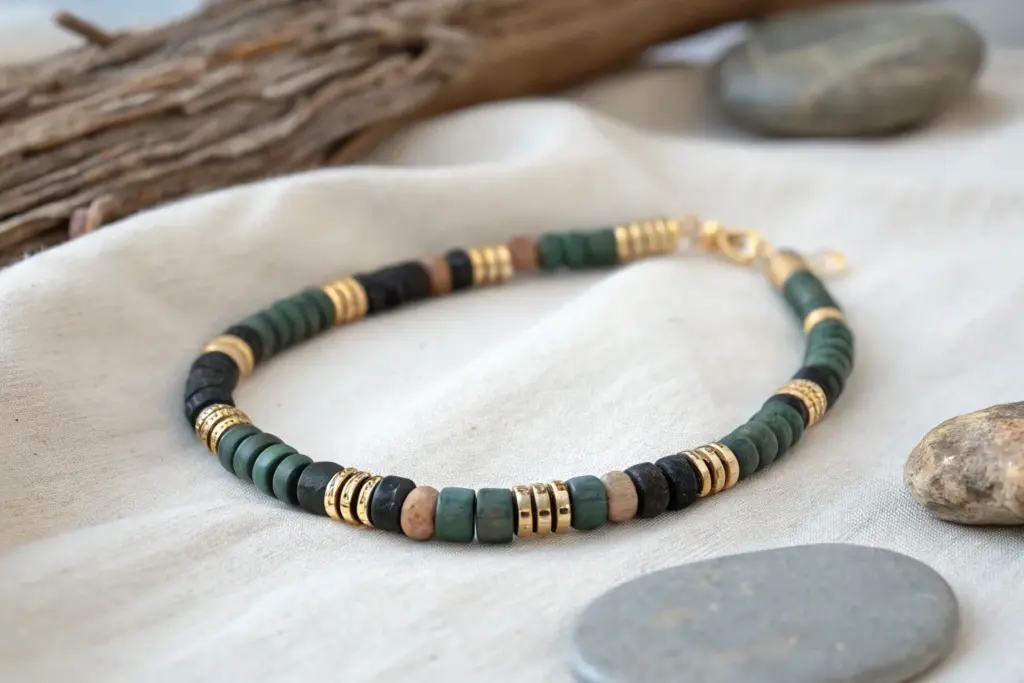
Olive Green With a Single Accent Bead
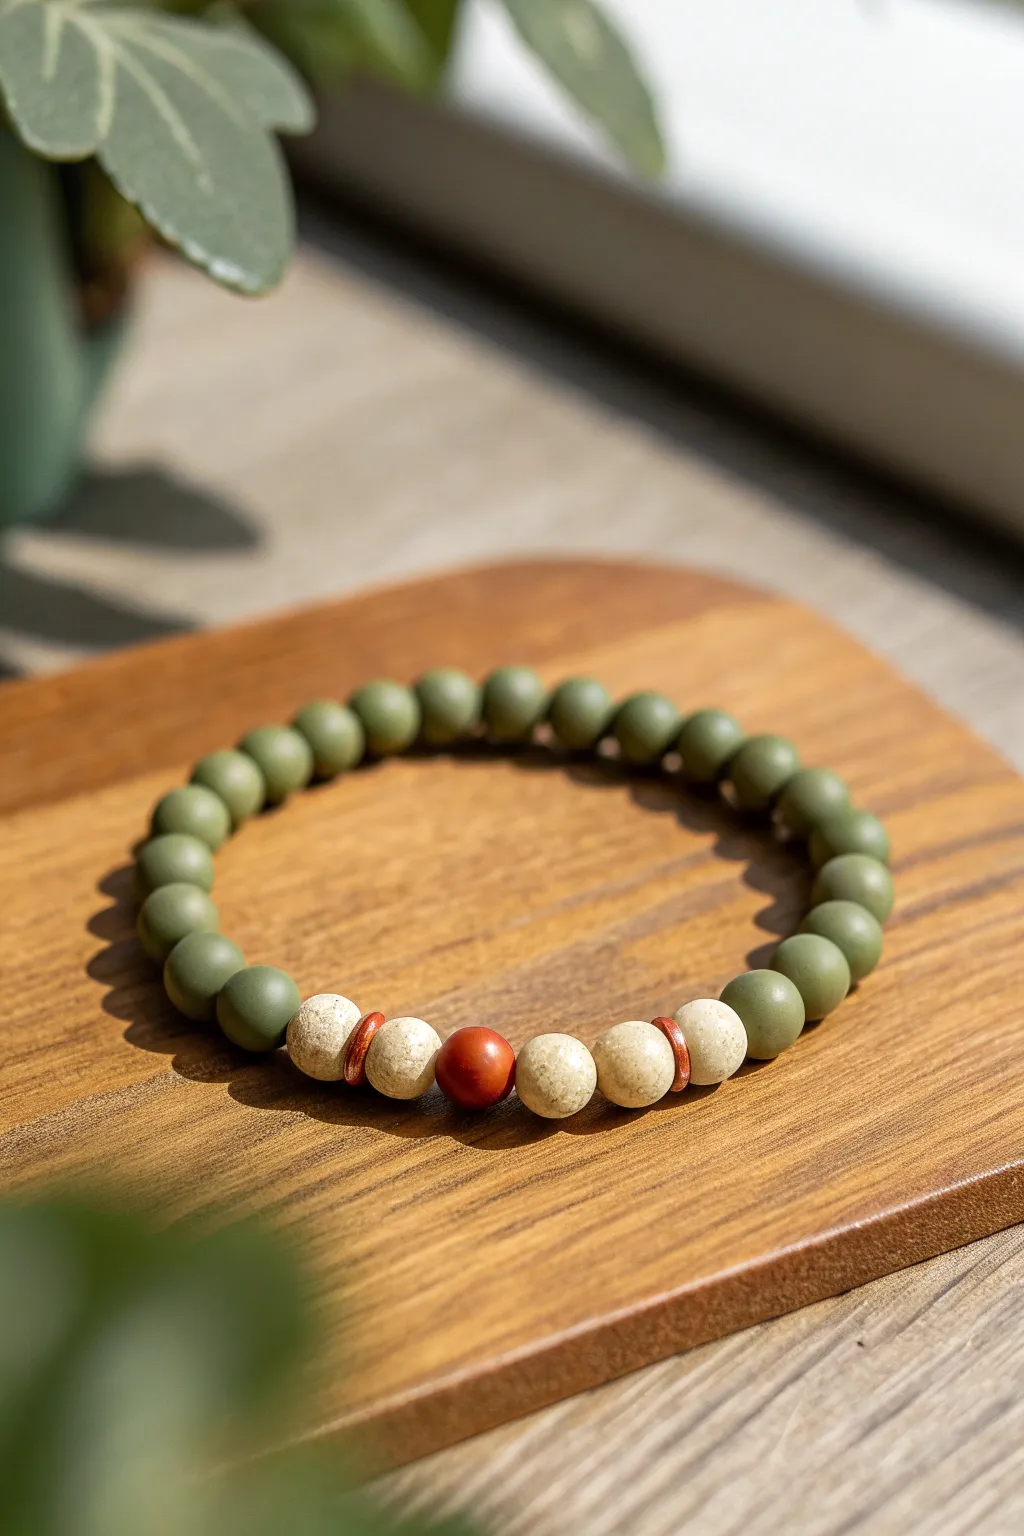
This masculine design balances matte olive tones with the grounded texture of cream jasper and a single striking pop of russet red. It’s an understated accessory perfect for everyday wear, evoking a calm walk through the woods.
Step-by-Step
Materials
- Matte olive green round beads (8mm or 10mm, approx. 20-24 beads)
- Cream/beige patterned stone beads (10mm, 4 beads – likely picture jasper or river stone)
- Single russet red/carnelian round bead (10mm)
- Small copper or bronze spacer discs (2 spacers)
- Stretch cord (0.8mm or 1mm clear elastic)
- Jewelry glue (GS Hypo Cement or similar)
- Scissors or bead nippers
- Bead design board (optional but helpful)
- Tape (masking or washi)
Step 1: Setting the Scene
-
Prepare your workspace:
Clear a flat surface and lay out your bead design board if you have one. If not, a soft cloth or felt mat works perfectly to stop beads from rolling away. -
Measure your wrist:
Wrap a flexible measuring tape around your wrist where you want the bracelet to sit. Note the measurement and add about 0.5 to 0.75 inches for a comfortable fit. -
Select your beads:
Sort through your olive green beads to ensure they are uniform in color and have clean drill holes. Pick four cream stone travel beads that have interesting speckles or texture. -
Cut the cord:
Cut a piece of stretch cord about 10-12 inches long. I always like to have plenty of excess cord to make knotting easier at the end. -
Pre-stretch the cord:
Hold the ends of the cord and give it a few firm (but not snapping) tugs. This helps prevent the bracelet from stretching out permanently after the first few wears. -
Secure the end:
Attach a piece of tape to one end of the cord or use a bead stopper clip. This is a simple safety measure to save you from chasing beads across the floor.
Knot Slipping?
If the knot won’t stay tight, your cord might be slippery. Try roughening the cord ends slightly with sandpaper before tying, or use a second overhand knot on top of the first.
Step 2: Creating the Focal Point
-
Start the center sequence:
Slide one cream stone bead onto the cord, followed by a copper spacer disc. -
Add the accent:
Thread the single russet red bead next. This is your central focal point. -
Complete the center:
mirror the first side by adding the second copper spacer disc, followed by another cream stone bead. -
Extend the pattern:
Add one more cream stone bead to the left side of your current group, and one more cream stone bead to the right side. You should now have a sequence: Cream, Cream, Spacer, Red, Spacer, Cream, Cream. -
Check the symmetry:
Hold the cord up briefly to ensure your focal section looks balanced and the spacers are framing the red bead correctly.
Natural Texture
Swap smooth olive beads for rough lava stones. You can then add a drop of essential oil (like cedarwood or pine) to the porous lava beads for a subtle, earthy scent diffuser.
Step 3: Finishing the Loop
-
Add the body beads:
Begin stringing the matte olive green beads onto the cord. Start adding them to one side of your focal group. -
Distribute unevenly if needed:
To keep the knot hidden later, you don’t have to put an equal number of green beads on each side. Just string them all on until you reach the desired length. -
Test the fit:
Wrap the unfinished strand around your wrist. The ends should meet comfortably without gaps, but it shouldn’t be tight enough to leave an impression on your skin. -
Remove excess beads:
If the fit is too loose, take off one olive bead at a time until it feels right. -
Prepare the knot:
Remove the tape or bead stopper. Bring the two ends of the cord together, ensuring there’s no slack between the beads. -
Tie the knot:
Tie a surgeon’s knot. This is a simple overhand knot, but pass the cord end through the loop twice instead of once before pulling tight. -
Tighten securely:
Pull the cords firmly to cinch the knot. You want the beads to be snug against each other so the cord doesn’t show. -
Secure with glue:
Apply a tiny dab of jewelry glue directly onto the knot. Let it dry for a few minutes before moving. -
Hide the knot:
Once the glue is tacky or dry, trim the excess cord ends close to the knot (leave about 1mm). Gently pull the beads apart slightly to slide the knot inside the hole of the nearest olive bead.
Enjoy the rugged elegance of your new handmade accessory

The Complete Guide to Pottery Troubleshooting
Uncover the most common ceramic mistakes—from cracking clay to failed glazes—and learn how to fix them fast.
Black and White Minimal Block Pattern
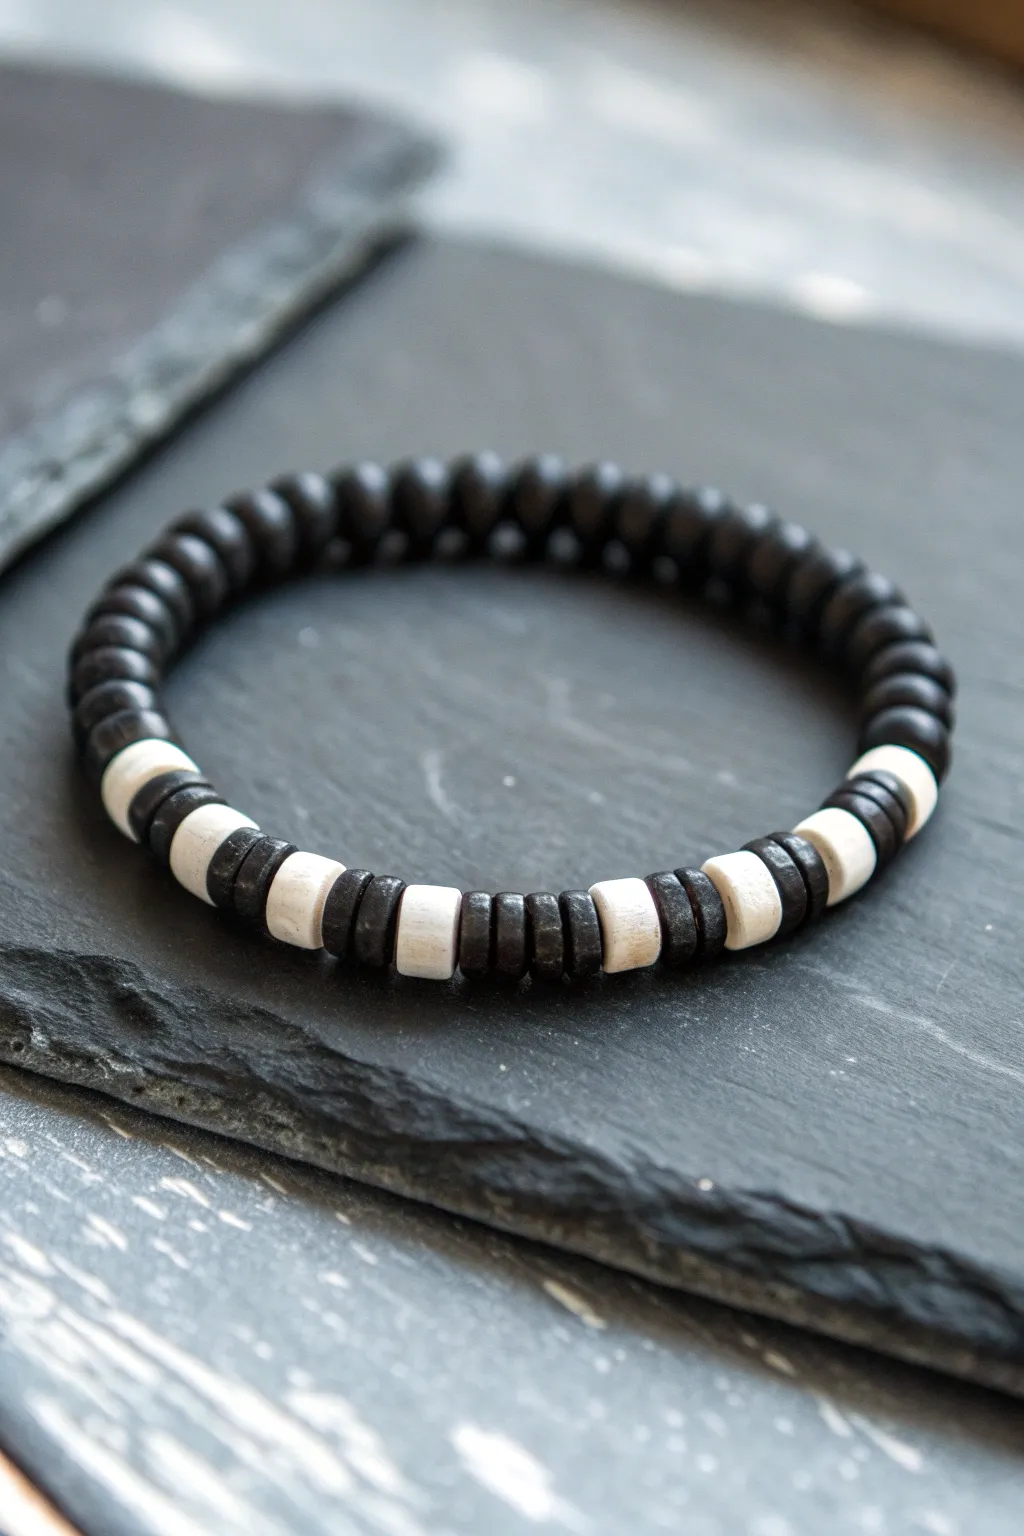
This striking men’s bracelet relies on high-contrast patterning to create a modern, minimalist accessory. By alternating sections of matte black heishi beads with stark white accents, you’ll build a rhythmic design that looks sophisticated on any wrist.
Detailed Instructions
Materials
- 6mm black polymer clay heishi beads (flat discs)
- 6mm white polymer clay heishi beads (flat discs)
- 0.8mm clear elastic stretch cord
- Jewelry adhesive or clear superglue
- Scissors or jewelry snips
- Bead stopper or masking tape
- Ruler
- Toothpick (optional, for glue application)
Step 1: Preparation and Setup
-
Measure the wrist:
Begin by wrapping a flexible measuring tape comfortably around the wrist you are designing for. Note the measurement and add about 0.5 to 1 inch depending on how loose you want the fit. -
Cut the cord:
Cut a length of your elastic cord that is at least 4 inches longer than your final wrist measurement. This extra length is crucial for tying a secure knot later without struggling. -
Stretch the elastic:
Before stringing a single bead, give your elastic cord a few firm tugs. This ‘pre-stretching’ prevents the bracelet from drooping or becoming loose immediately after you wear it. -
Secure the end:
Attach a bead stopper clamp to one end of your cord. If you don’t have one, simply fold a piece of masking tape over the end to stop beads from sliding off while you work.
Knot Slipping Out?
If the knot keeps popping out of the bead hole, your bead holes might be too small for the cord size. Try gently reaming the hole of the hiding bead with a wide needle.
Step 2: Creating the Solid Section
-
Start the black base:
Begin threading your black heishi beads onto the cord. Since these are thin disc beads, you can often pick up 3-4 at a time with the tip of the cord to speed things up. -
Check density:
Periodically push the beads down to ensure they are nesting together smoothly without any large gaps, but avoid compressing them too tightly. -
Build the solid half:
Continue adding black beads until you have covered approximately 60% of your total desired bracelet length. This creates the solid dark back section seen in the reference image.
Level Up: Wood Accents
Swap the white clay beads for light coconut wood or bone spacers. This adds an organic texture while keeping the high contrast look intact.
Step 3: Building the Pattern
-
Position the first white bead:
Thread on a single white heishi bead. This marks the beginning of the patterned focal section. -
Add a spacer group:
Follow the white bead with a group of three black beads. This creates the separation between your white highlights. -
Repeat the sequence:
Add another single white bead, followed by another group of three black beads. I find that keeping this 1-white-to-3-black ratio is key to getting that specific ‘block’ look from the photo. -
Continue the rhythm:
Repeat this pattern (1 white, 3 black) five or six times, depending on your wrist size. The goal is to create a distinct striped segment that sits on top of the wrist. -
Cap the pattern:
Finish the patterned section with one final white bead. -
Balance the design:
Add any remaining black beads needed to reach your total length measurement. Depending on your start, you might need a few here to make the transition back to the solid black look seamless.
Step 4: Finishing Touches
-
Check the fit:
Carefully remove the stopper/tape and bring the two ends together around your wrist (or a sizing cone) to ensure the size feels right before knotting. -
Tie the first knot:
Tie a simple overhand knot to bring the beads together. Pull the elastic tight enough to close gaps, but not so tight that the bracelet buckles. -
Secure with a surgeon’s knot:
Tie a surgeon’s knot for security: loop the ends over and under each other twice before pulling tight. This extra loop provides the friction needed to hold elastic. -
Apply adhesive:
Dab a tiny drop of jewelry glue onto the knot using a toothpick. Be careful not to get glue on the surrounding beads, as it can discolor the matte finish. -
Hide the knot:
While the glue is still slightly tacky, gently tug on the bracelet to pull the knot inside the hole of the nearest black bead. This makes the finish invisible. -
Final trim:
Once the glue is fully cured (check your glue’s instructions), trim the excess cord ends as close to the bead/knot as possible.
Now you have a sleek, versatile accessory ready to complement any casual outfit
Gunmetal Spacer Rhythm
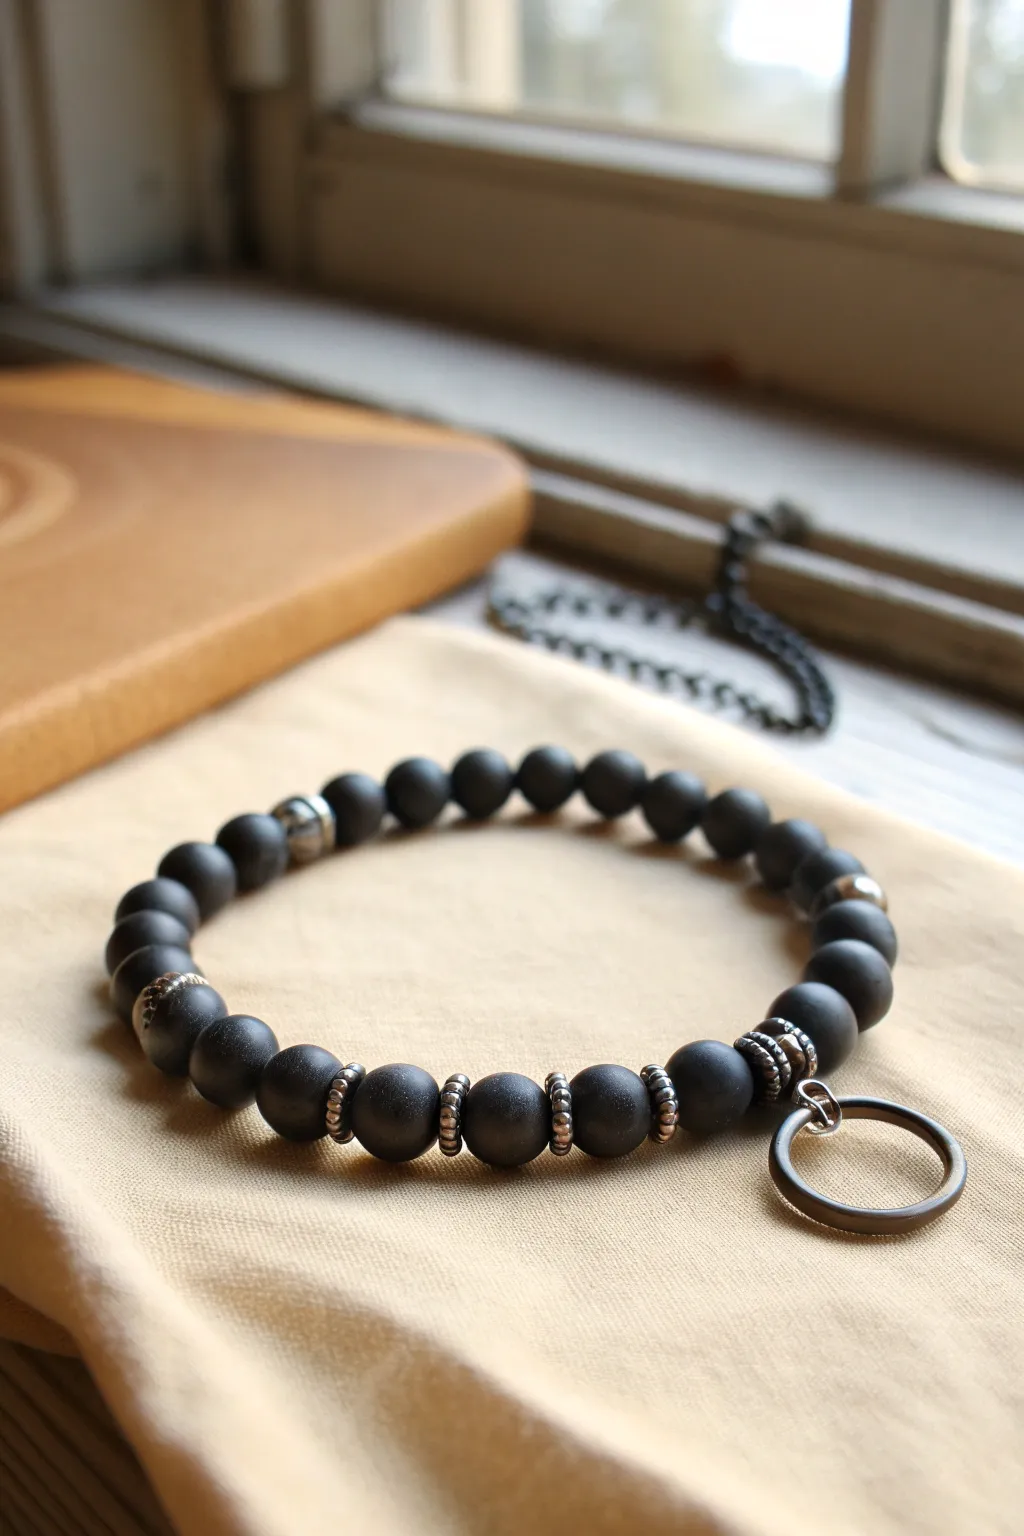
This sophisticated bracelet combines the smooth, modern texture of matte black beads with the industrial edge of ribbed gunmetal spacers. The addition of a sleek metal ring charm creates a unique focal point, making it a perfect accessory for a minimalist yet bold style.
How-To Guide
Materials
- 8mm matte black round beads (polymer clay or matte onyx)
- 6mm gunmetal tonal spacer beads (ribbed or corrugated design)
- Strong elastic beading cord (0.8mm or 1mm transparent)
- Large gunmetal jump ring (approx 10-12mm)
- Gunmetal flat ring charm (approx 15-20mm)
- Beading needle (collapsible eye)
- Super glue or specialist jewelry cement
- Scissors or precision cutters
- Measuring tape
- Bead stopper or masking tape
Step 1: Planning and Layout
-
Measure your wrist:
Wrap a measuring tape comfortably around your wrist where you want the bracelet to sit. Add about 0.5 to 0.75 inches to this measurement to account for the bulk of the 8mm beads. -
Prepare the cord:
Cut a length of elastic cord about 12 inches long. This generous length gives you plenty of room to tie knots without struggling. Pre-stretch the cord by pulling it firmly several times to prevent the bracelet from sagging later. -
Secure the end:
Attach a bead stopper or a piece of masking tape to one end of the cord to keep your beads from sliding off while you work. -
Design the rhythm:
Lay out your beads on a soft cloth or bead board. The pattern shown uses a specific rhythm: a long run of plain black beads for the back, followed by an alternating pattern of black bead, spacer, black bead, spacer for the front focal section.
Knot Slipping?
If your elastic knot feels loose, try a drop of ‘GS Hypo Cement’. It’s a precision glue with a fine tip that stays flexible when dry, preventing brittle knots.
Step 2: Stringing the Pattern
-
Start the sequence:
Begin stringing with the main run of plain black beads. Thread approximately 10 to 12 matte beads onto the cord, depending on your total required length. -
Add first spacers:
After the plain section, slide on your first ribbed gunmetal spacer. Follow this immediately with a black matte bead. -
Build the focal section:
Continue the alternating pattern: spacer, black bead, spacer, black bead. You want about 5 or 6 spacers total interspersed with the black beads to create that metallic ‘rhythm’ section. -
Prepare the charm assembly:
Open your jump ring using two pliers (twist, don’t pull). Slide the flat gunmetal ring charm onto the jump ring. -
Insert the charm:
Before closing the jump ring, slip it over the elastic cord. Position it so it sits between two of the textured spacers or next to a specific accent bead if you prefer an asymmetrical look. I usually place it near the end of the rhythmic section. -
Close the loop:
Add any remaining black beads needed to reach your target length. Double-check the size by wrapping the unfinished strand around your wrist.
Step 3: Finishing Touches
-
Tie the initial knot:
Remove the bead stopper. Bring the two ends of the elastic together and tie a single overhand knot, pulling it tight so there are no gaps between the beads. -
Secure with a surgeon’s knot:
Tie a surgeon’s knot for extra security. Loop the right cord over the left twice, then pull tight. This friction knot holds elastic much better than a standard square knot. -
Apply adhesive:
Place a tiny drop of jewelry cement or super glue directly onto the knot. Be careful not to get glue on the adjacent matte beads, as it will ruin the finish. -
Hide the knot:
While the glue is still tacky, gently pull the cord so the knot slides inside the hole of the nearest black bead. This hides the mechanics for a professional finish. -
Final trim:
Once the glue is fully dry (wait at least 15 minutes), trim the excess cord ends as close to the bead hole as possible using precision cutters. -
Buff and polish:
Wipe the gunmetal spacers and the ring charm with a soft cloth to remove any fingerprints from the assembly process.
Level Up: Texture Mix
Swap the matte black beads in the ‘rhythm’ section for lava stone beads. The porous texture contrasts beautifully with the smooth gunmetal spacers.
Your wrist now sports a piece of sleek, industrial armor ready for daily wear


What Really Happens Inside the Kiln
Learn how time and temperature work together inside the kiln to transform clay into durable ceramic.
Earth-Tone Trio Color Block
This men’s bracelet combines warm terracotta hues with cool speckled sage tones for a grounded, natural aesthetic. Using polymer clay allows you to craft perfectly imperfect beads that feel rugged yet refined on the wrist.
Step-by-Step
Materials
- Polymer clay (terracotta or burnt sienna color)
- Polymer clay (granite or speckled green/grey mix)
- Bead rolling tool (optional, for uniformity)
- Toothpick, bamboo skewer, or thick needle tool
- Waxed cotton cord (dark grey or black, approx. 1mm)
- Oven for baking
- Baking sheet with parchment paper
- Scissors
- Ruler
Step 1: Crafting the Clay Beads
-
Condition the reddish clay:
Begin with your terracotta-colored polymer clay. Knead it in your hands until it is soft, pliable, and free of cracks. This ensures the beads won’t be brittle after baking. -
Form the terracotta base beads:
Pinch off small amounts of the conditioned clay. Roll them between your palms to create spheres approximately 8-10mm in diameter. You will need about 20-30 beads total, so make around 15-20 of this color. -
Condition the speckled clay:
Clean your hands to avoid color transfer, then condition the speckled grey-green clay. If you don’t have a pre-mixed granite effect, you can mix a sage green clay with tiny flecks of black pepper or black clay. -
Shape the accent beads:
Roll this speckled clay into spheres matching the size of your terracotta beads. Aim for roughly 10-15 of these beads to complete your pattern. -
Refine the shape:
For a more organic, distinct look, gently press the top and bottom of each sphere to create a slightly flattened ‘rondelle’ or drum shape, rather than a perfect ball. -
Pierce the holes:
Using a toothpick or skewer, carefully pierce a hole through the center of each bead. I find twisting the skewer as I push creates a cleaner exit hole without deforming the bead. -
Check the fit:
Ensure the hole is wide enough for your waxed cord to pass through twice (for the adjustable knot later) or at least easily once. Wiggle the tool slightly to widen the channel. -
Bake the beads:
Arrange the beads on a parchment-lined baking sheet. Bake according to your specific clay package instructions (usually around 275°F/135°C for 15-30 minutes). Let them cool completely before handling.
Step 2: Stringing and Assembly
-
Prepare the cord:
Cut a length of waxed cotton cord, roughly 24 inches long. This generous length gives you plenty of room to tie the adjustable knots. -
Begin the pattern:
Start stringing your cooled beads. The pattern shown uses an alternating rhythm: string 1 speckled bead, then 1 terracotta bead. Repeat this simple 1-to-1 pattern for the center section. -
Switch the pattern:
As you move toward the sides, switch to solid blocks of terracotta. String 3-5 terracotta beads in a row on both ends of your alternating center section. -
Add side accents:
Break up the solid terracotta sections with single speckled beads as seen in the design to keep the rhythm interesting. -
Check the length:
Wrap the strung beads around your wrist to check the fit. The beaded section should cover most of your wrist, leaving a small gap of cord for the closure. -
Tie stopper knots:
Once satisfied with the length, tie an overhand knot snugly against the first and last bead to keep them in place on the central strand. -
Create the sliding closure:
Cross the two tail ends of the cord over each other. Cut a separate 8-inch piece of cord and use it to tie a series of square knots (macrame style) around the overlapped tails. -
Finish the tails:
Trim the sliding knot cords and carefully burn or glue the ends. Tie a small knot at the very end of each main tail cord so they don’t slip through the closure.
Sticky Situation?
If clay gets too soft or fingerprints are visible, pop the beads in the fridge for 10 mins before piercing. Smooth prints with a drop of baby oil.
Natural Texture
Before baking, roll your beads gently over coarse sandpaper or a textured fabric to give them a stone-like, pitted surface finish.
Now you have a rugged accessory perfect for everyday wear
Desert Neutrals Mix
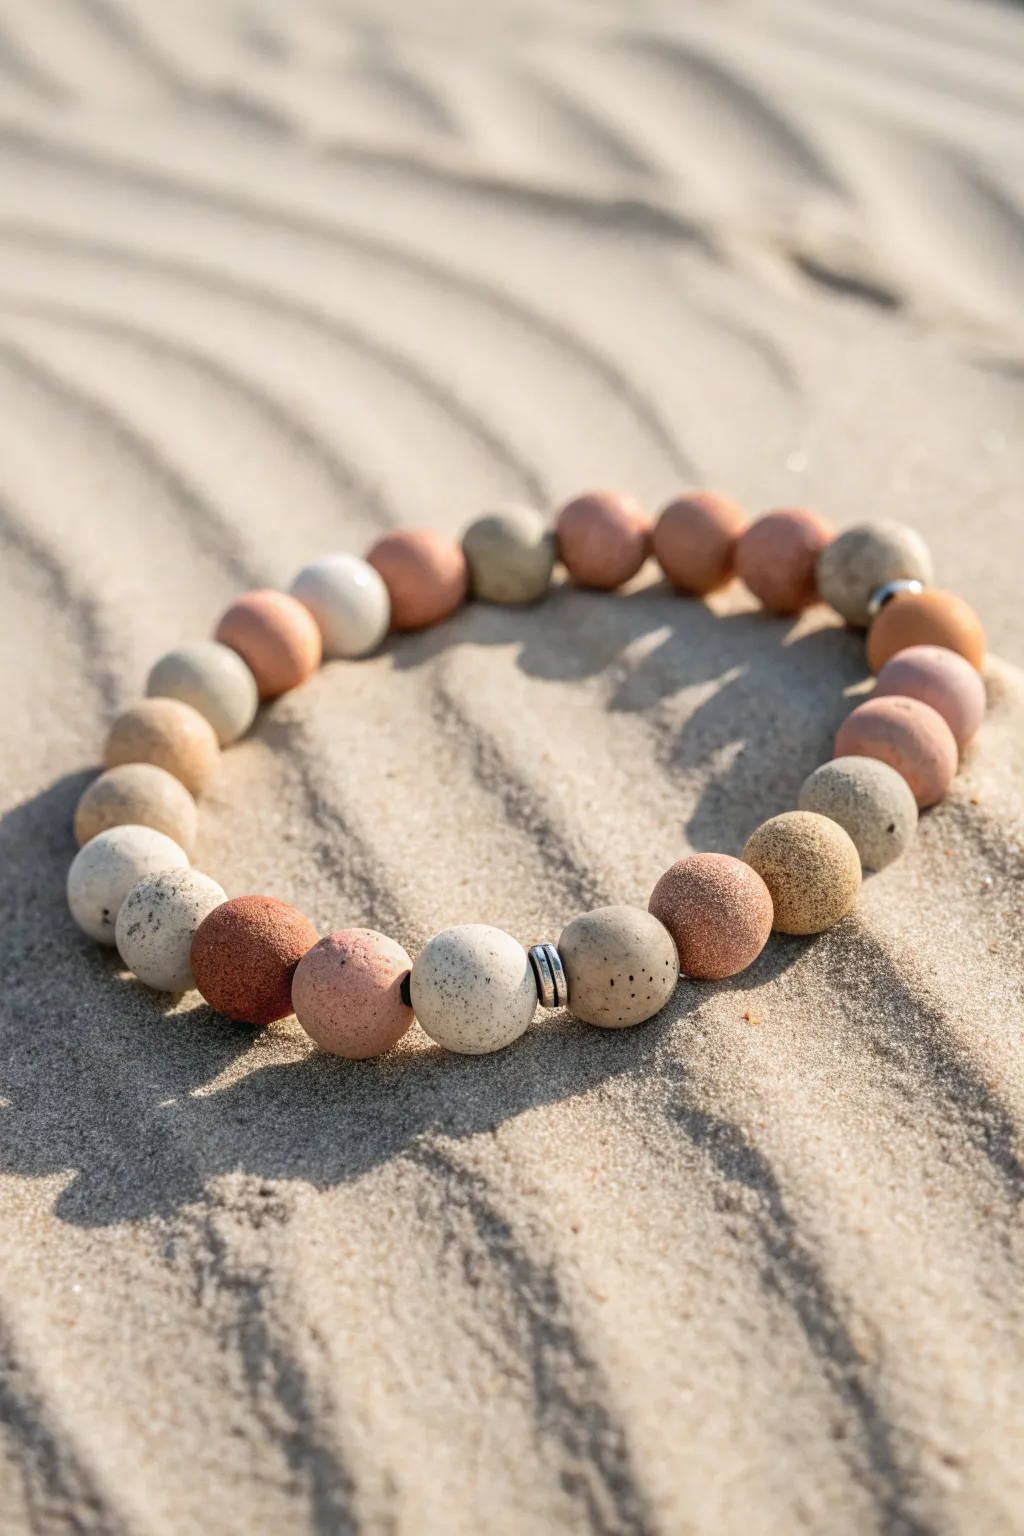
Capture the serene palette of the desert with this textured clay bead bracelet featuring a mix of matte earth tones. The combination of porous surfaces and subtle color variations creates a rugged yet refined accessory perfect for everyday wear.
Detailed Instructions
Materials
- Matte round clay or ceramic beads (8mm-10mm) in assorted earth tones: cream, beige, terracotta, warm brown, and grey
- Silver-tone metal spacer beads (thin disc shape)
- Strong elastic jewelry cord (0.8mm or 1mm thickness)
- Super glue or jewelry cement
- Scissors
- Bead design board or a soft towel
- Tape or binder clip
Step 1: Planning the Pattern
-
Prepare your workspace:
Lay out a bead design board or a soft towel on your work surface. The texture of a towel helps keep round beads from rolling away while you plan. -
Select your palette:
Sort through your clay beads and pick out a variety of desert-inspired shades. You want a mix of speckled cream, soft terracotta, sandy beige, and matte grey. -
Arrange the sequence:
Begin laying out your beads in a circle to visualize the final look. Aim for a random, organic pattern rather than a strict repeating sequence. -
Mixing the tones:
Alternate between lighter cream beads and darker terracotta or brown beads to create visual balance. Grouping two similar tones occasionally can look very natural. -
Place the accents:
Identify two spots in your loop where you want a metallic break. Insert a single silver spacer bead between two clay beads at these points. -
Check the length:
For a standard men’s fit, aiming for about 7.5 to 8 inches is usually safe, but measure your wrist generally first. Add or remove clay beads until the loop looks correct.
Embrace Imperfection
Don’t stress over slight size differences in clay beads. The variation adds to the rugged, organic desert aesthetic.
Step 2: Stringing the Beads
-
Prepare the cord:
Cut a piece of elastic cord about 12 inches long. This extra length makes tying the final knot much easier. -
Secure the end:
Place a piece of tape or a binder clip on one end of the elastic cord to prevent beads from sliding off as you work. -
Pre-stretch the elastic:
Give the cord a few gentle tugs. I find this pre-stretching step crucial because it helps prevent the bracelet from sagging shortly after you finish making it. -
Start stringing:
Transfer your beads from the design board onto the cord one by one, maintaining the pattern you designed. -
Check fit again:
Once all beads are strung, wrap the strand around your wrist to verify the sizing. It should sit comfortably without pinching skin or sliding too freely.
Step 3: Finishing the Bracelet
-
Remove the stopper:
Carefully remove the tape or clip from the end, gripping both ends of the cord firmly. -
Tie the first loop:
Cross the ends and make a simple overhand knot, pulling it tight against the beads to remove any slack. -
Secure with a surgeon’s knot:
Form another loop, but pass the tail end through the loop twice instead of once before pulling tight. This is a surgeon’s knot and holds very well. -
Apply adhesive:
Place a tiny drop of super glue or jewelry cement directly onto the knot. Be careful not to glue the beads themselves. -
Hide the knot:
While the glue is still slightly tacky, gently pull the knot inside the hole of the nearest large clay bead to conceal it. -
Trim the excess:
Once the glue is fully dry, use your scissors to snip the excess cord ends as close to the bead hole as possible.
Knot Slipping?
If the elastic feels slippery, dab the knot with glue immediately before tightening it, then hold for 30 seconds.
Now you have a rugged, earth-toned accessory that brings a touch of nature to any outfit

TRACK YOUR CERAMIC JOURNEY
Capture glaze tests, firing details, and creative progress—all in one simple printable. Make your projects easier to repeat and improve.
Monochrome Set for Stacking
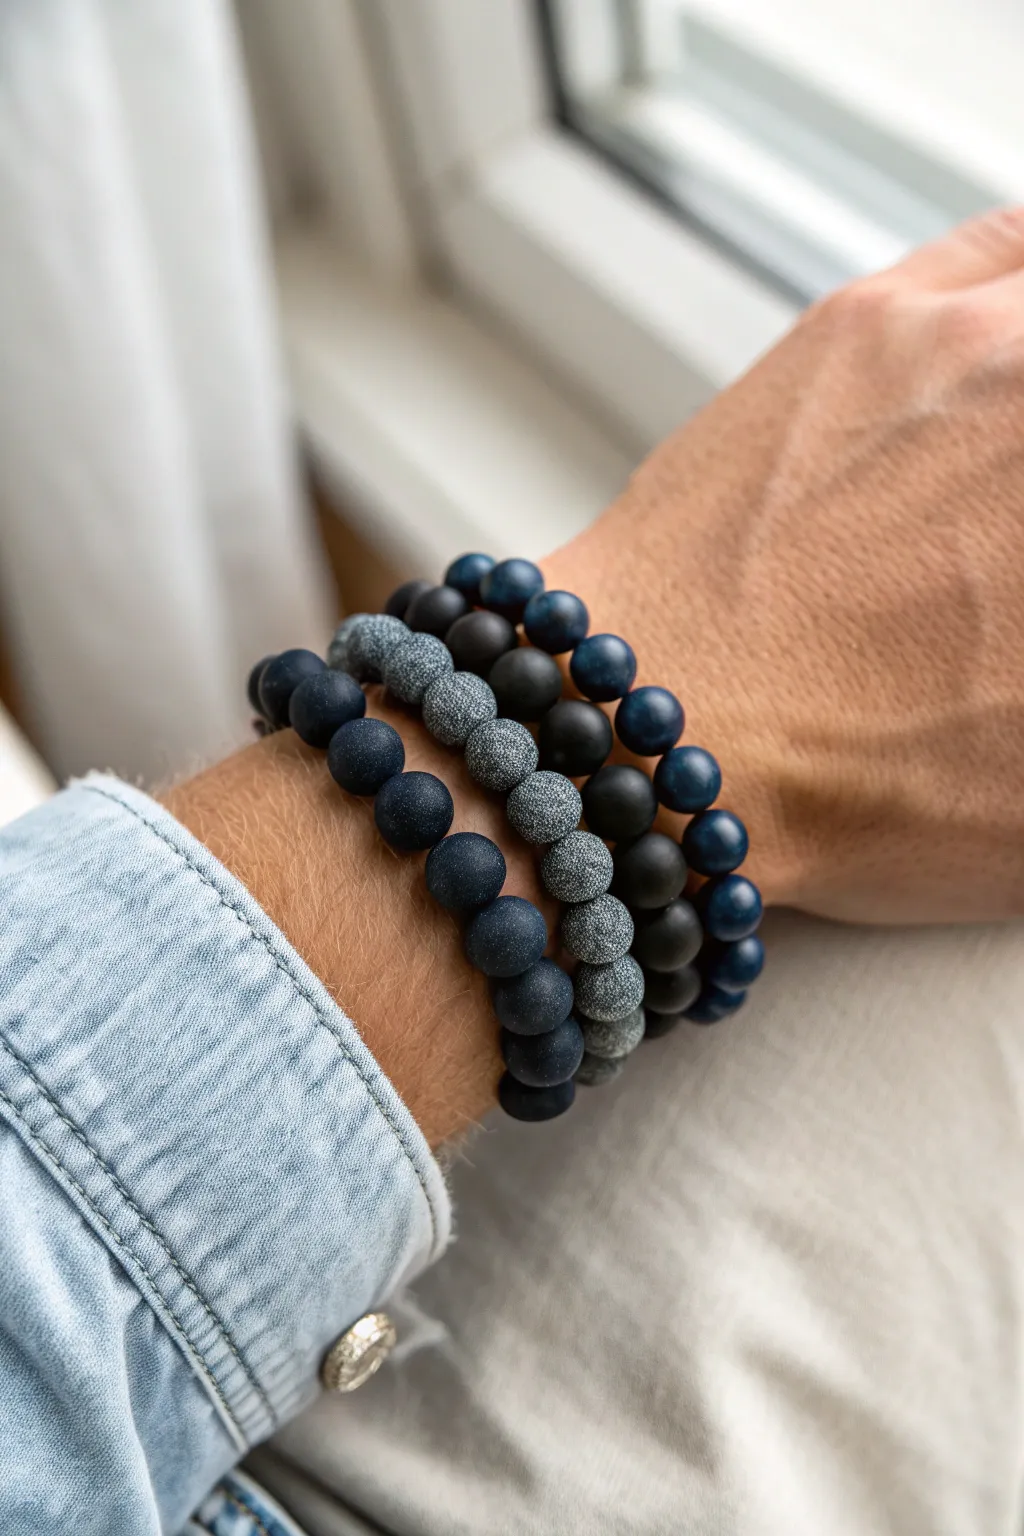
This project creates a sophisticated four-piece bracelet stack combining matte, textured, and subtly glossy finishes for a modern masculine look. By mixing textures within a monochrome palette, you achieve a rugged yet polished accessory perfect for daily wear.
Step-by-Step Guide
Materials
- 8mm matte black agate or onyx beads
- 8mm matte sodalite or dark blue lapis beads
- 8mm speckled gray ‘map stone’ or gray jasper beads
- 8mm polished blue tiger’s eye or cat’s eye beads
- Strong elastic cord (0.8mm or 1mm thickness)
- Jewelry adhesive or clear nail polish
- Scissors or precise bead cutters
- Bead stopper or masking tape
- Measuring tape
Step 1: Preparation and Design
-
Measure the wrist:
Before buying beads or cutting cord, measure the wrist where the bracelets will sit. Add about 0.5 to 0.75 inches to this measurement to ensure a comfortable fit that isn’t too tight. -
Pre-stretch the cord:
Cut four lengths of elastic cord, each about 10-12 inches long. Give each piece a few firm tugs to pre-stretch the elastic; this crucial step prevents the bracelets from stretching out and becoming loose after the first few wears. -
Secure the ends:
Attach a bead stopper or simply place a piece of masking tape folded over one end of each cord. This simple safety measure saves you from chasing runaway beads across the floor.
Knot Slipping?
If your elastic knots keep unravelling before the glue dries, try a ‘square knot’ followed by a simple overhand knot on top. This triple-layer approach adds bulk but ensures it won’t slip.
Step 2: Creating the Solid Matte Layers
-
Thread the matte black bracelet:
For the first bracelet, thread your matte black agate beads onto the first cord. Continue until the beaded length matches your calculated comfortable wrist size. -
Check the fit:
Wrap the strand around your wrist to verify sizing before tying. Add or remove a bead if necessary to get that perfect balance between snug and sliding. -
Tie the knot:
Tie a surgeon’s knot (right over left, left over right twice). Pull the knot tight, stretching the elastic slightly as you do so to secure it. -
Secure and trim:
Apply a tiny dab of jewelry adhesive to the knot. Let it dry for a moment, then trim the excess cord carefully. Ideally, slide the knot inside the hole of an adjacent bead to hide it. -
Thread the matte blue bracelet:
Repeat the process for the second bracelet, using only the matte dark blue beads. This provides a subtle color shift against the black while maintaining the velvet-like texture.
Clean Trim Tip
When trimming elastic, pull the cord slightly taut away from the knot, snip it, and let it snap back. This helps the cut end retract slightly, hiding it better between beads.
Step 3: Adding Texture and Shine
-
Compose the speckled strand:
For the third bracelet, use the gray speckled ‘map stone’ beads. I find this specific texture is essential as it acts as a visual bridge between the solid dark colors, lightening the overall stack. -
Assemble the final mixed strand:
For the fourth and final bracelet, create a subtle pattern. Alternate between matte black beads and the polished blue tiger’s eye beads. You can do a simple 1:1 pattern or group them (two blue, two black) depending on your preference. -
Final knotting:
Tie off both the speckled and mixed bracelets using the same surgeon’s knot method used previously. -
Glue reinforcement:
Don’t forget to apply adhesive to these final knots. Ensuring the structural integrity of every strand is key for a bracelet stack that sees daily use. -
Hide the knots:
Gently tug on the elastic to pull the knots inside the nearest bead hole. If the holes are too small, rotate the knot to the least visible side. -
Final trim:
Snip any remaining tail ends of the elastic as close to the bead as possible without nicking the knot itself.
Step 4: Styling the Stack
-
Arrange the order:
To recreate the look in the image exactly, place the bracelets on your wrist starting from the hand upwards: Matte Blue, Speckled Gray, Matte Black, Mixing/Shiny Strand. -
Adjust alignment:
Roll the bracelets gently so they settle comfortably against each other. The friction of the matte beads helps keep them vertically stacked rather than twisting around each other.
Wear your new monochrome stack confidently with denim or casual wear to add a touch of rugged texture to your outfit
Two-Tone Split Bracelet
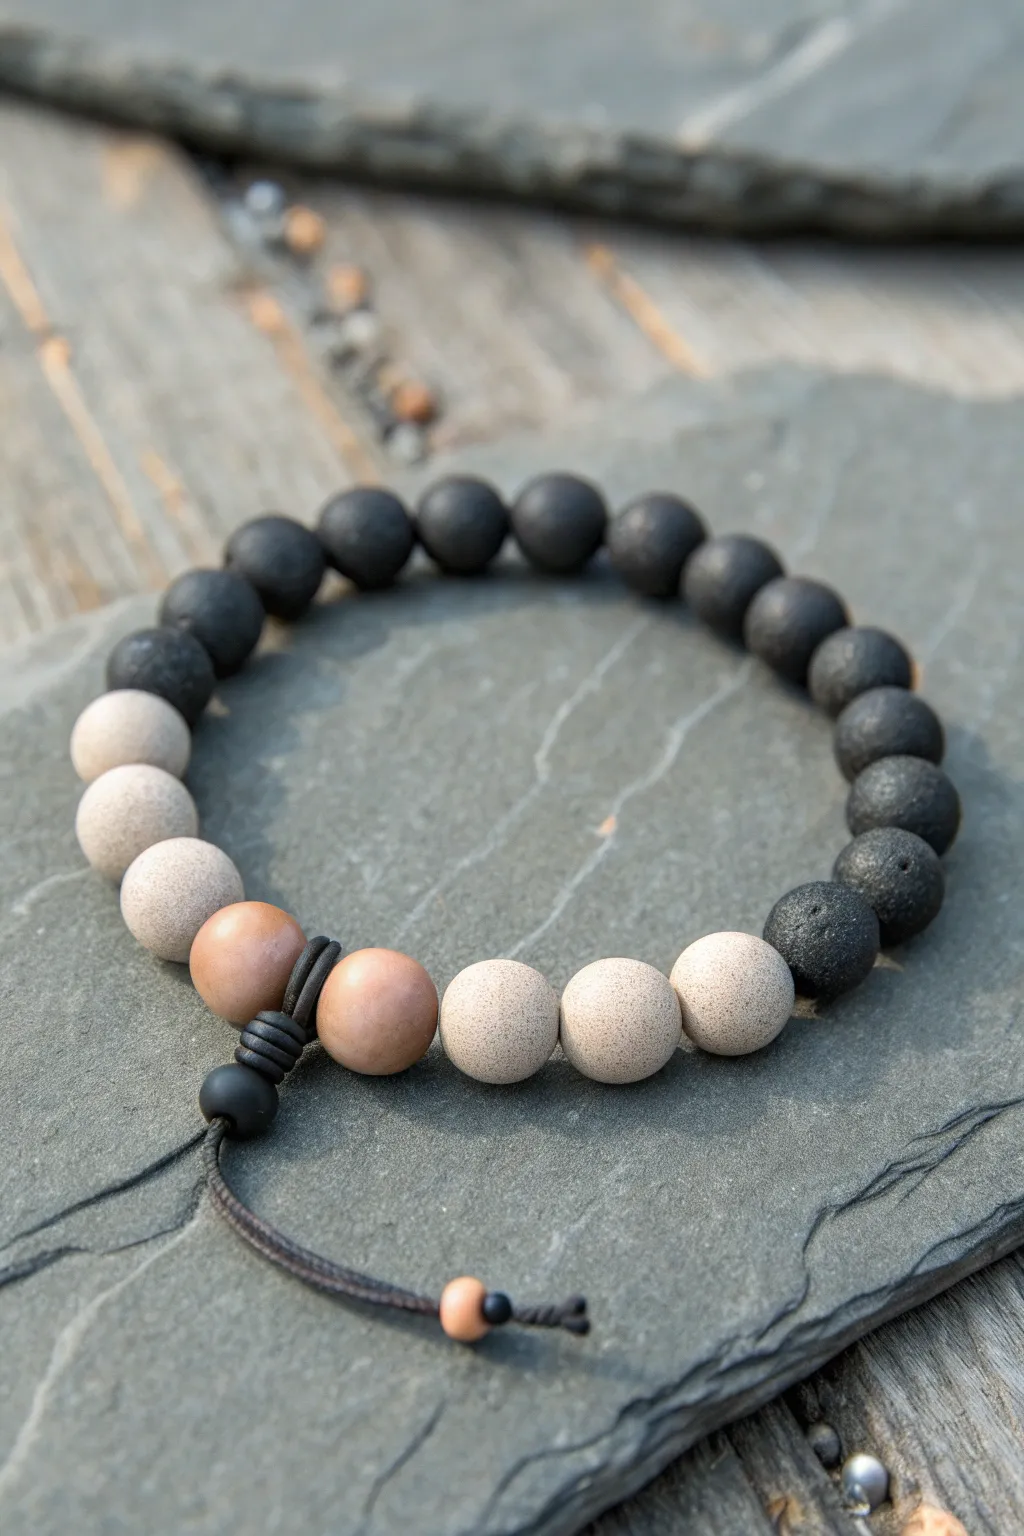
This masculine design balances rugged textures with smooth matte finishes in a striking 60/40 split pattern. Pairing porous black lava stone with soft beige clay beads creates a grounded, two-tone accessory perfect for everyday wear.
Detailed Instructions
Materials
- 12-14 Matte black lava stone beads (8mm or 10mm)
- 6 Light beige matte clay or sandstone beads (8mm or 10mm)
- 2 Medium brown accent beads (slightly larger, approx 10-12mm)
- 1 Small wooden spacer bead (approx 4-6mm)
- Black nylon or waxed cotton cord (1.5mm thickness)
- Scissors
- Measuring tape
- Lighter or clear nail polish (for sealing ends)
Step 1: Preparation & Layout
-
Measure the wrist:
Wrap your measuring tape comfortably around the wrist where the bracelet will sit. Add about 1 inch to this measurement to account for the bulk of the larger beads. -
Cut the cord:
Cut a length of your black cord approximately 24 inches long. This generous length gives you plenty of room to work on the adjustable sliding knot later. -
Design the pattern:
Lay out your beads on a bead board or soft cloth to define the split. Place the 12-14 black lava beads in a row, followed by 3 beige beads, then your 2 focal brown beads, then 3 more beige beads to complete the circle.
Essential Oil Diffuser
Rub a drop of essential oil onto the porous black lava beads; they absorb the oil and will diffuse the scent throughout the day.
Step 2: Stringing the Core
-
String the main run:
Thread the cord through your main sequence of beads, starting with the black lava stones and moving into the lighter clay beads. -
Grouping the beige beads:
When you reach the light section, thread three beige beads first. -
Add the focal point:
Slide on the two slightly larger brown accent beads. These act as the visual anchor opposite the black section. -
Finish the light side:
Thread the remaining three beige beads after the brown ones. Double-check the total length against your wrist measurement now before tying anything.
Texture Contrast
Swap the two focal brown beads for metallic copper or bronze spacer beads to add a touch of industrial shine to the matte design.
Step 3: Creating the Closure
-
Tighten the circle:
Bring both ends of the cord together so the beads form a tight circle. You don’t want gaps between beads, but don’t pull so hard that the bracelet becomes stiff and won’t curve. -
The gathering knot:
Just below the two brown focal beads, tie an overhand knot using both cord ends together. This secures the loop of beads in place. -
Thread the slide bead:
Take a single loose black bead (or a dedicated large-hole bead) and thread both cord ends through it. This will cover your gathering knot and act as the base for the slider. -
Form the sliding knot:
Using a separate 10-inch piece of cord, create a macramé square knot or a ‘snake knot’ around the two main tail cords. I usually wrap it 3-4 times to ensure it’s grippy enough to stay put but loose enough to slide. -
Trim the slider:
Trim the excess ends of the knotting cord close to the knot and carefully singe them with a lighter to melt and secure the ends.
Step 4: Finishing Touches
-
Adjust the tails:
Decide how long you want the dangling tails to be. A length of about 2-3 inches usually looks proportional. -
Add the end stopper:
Thread your small wooden spacer bead onto one of the tail ends. -
Secure the tips:
Tie a small, tight overhand knot at the very end of the tail cord to trap the wooden bead. Repeat a simple knot for the other tail end. -
Final trim:
Cut any remaining excess cord below your final stopper knots. -
Seal the ends:
Use a lighter to carefully melt the very tips of the tail knots so they don’t fray, or dab them with a bit of clear nail polish.
Slide the closure open, slip it on your wrist, and enjoy the grounded feel of natural stone against your skin
Thin Disc Beads for a Sleek Profile
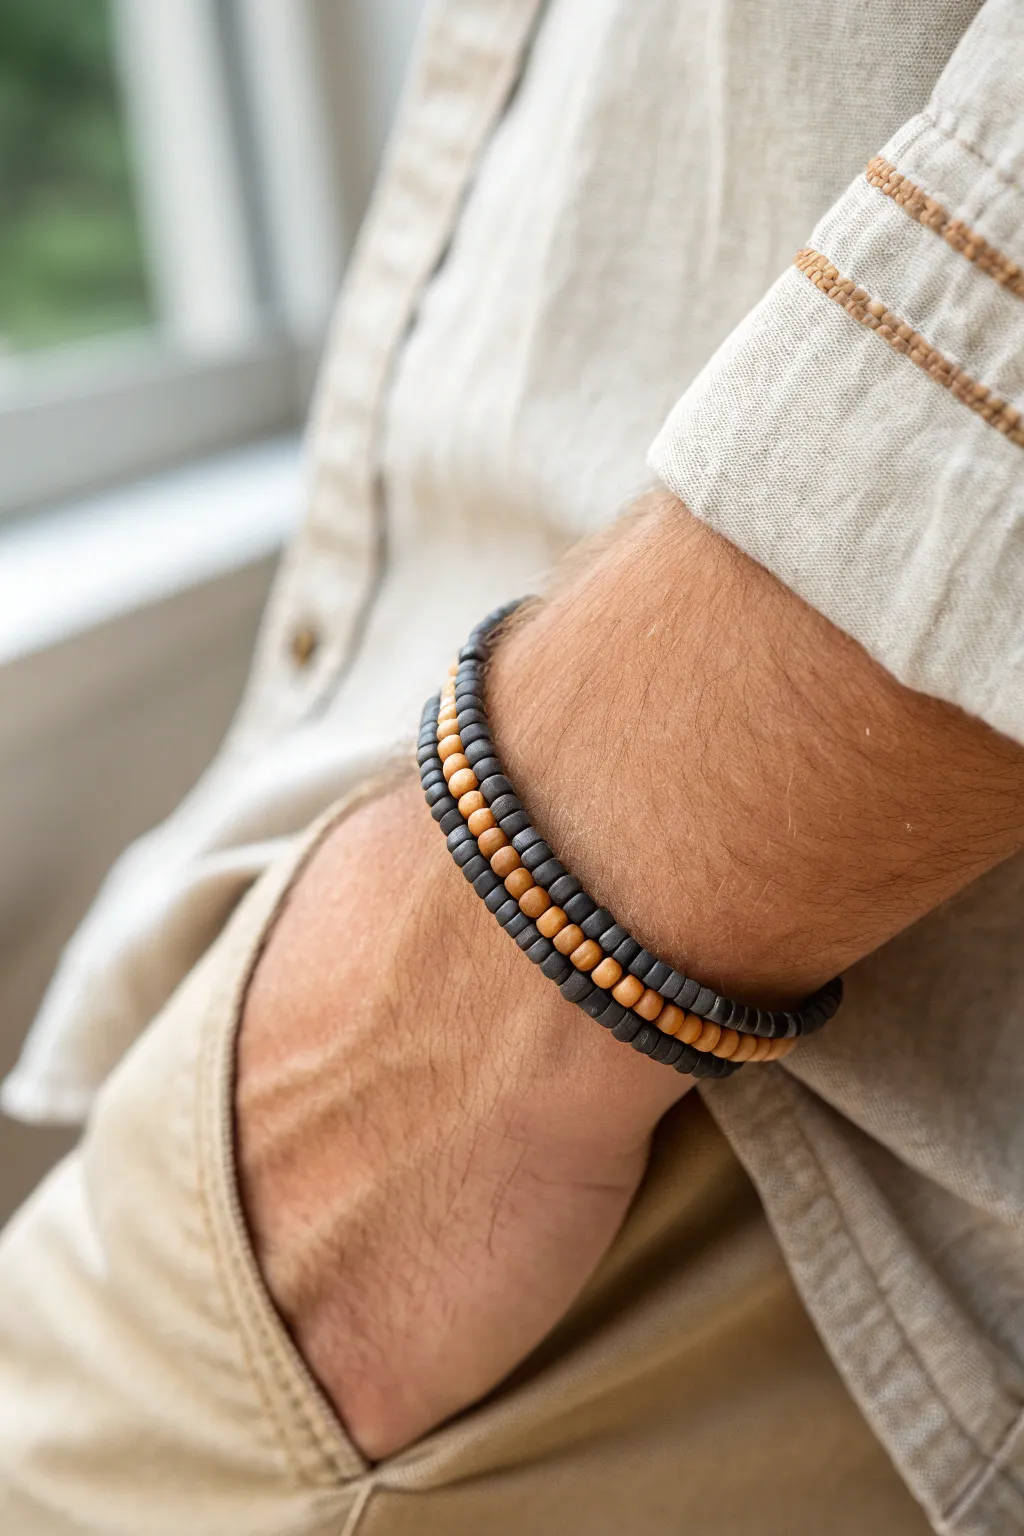
Achieve a rugged yet refined aesthetic with this triple-strand style bracelet featuring thin clay disc beads. The combination of matte charcoal and warm terracotta tones creates a versatile accessory that pairs perfectly with linen and casual wear.
How-To Guide
Materials
- 4mm or 5mm polymer clay disc beads (heishi) in matte charcoal/black
- 4mm or 5mm polymer clay disc beads (heishi) in matte terracotta or beige
- 0.8mm clear elastic cord (strong stretch)
- Jewelry glue or clear nail polish
- Scissors
- Bead stopper or tape
- Ruler or measuring tape
Step 1: Planning and Measuring
-
Measure your wrist:
Wrap a measuring tape loosely around your wrist where you want the bracelet to sit. Note this measurement. -
Calculate length:
For a triple-wrap style like the one pictured, multiply your wrist measurement by three. Add about 4-5 inches extra for tying the knot comfortably. -
Prepare the cord:
Cut your elastic cord to the calculated length. It’s always better to have too much than too little. -
Secure the end:
Place a bead stopper or a piece of tape about 2 inches from one end of the cord to prevent beads from sliding off while you work.
Knot Slipping?
If your elastic knot feels slick, dip the knot in water before pulling tight. The friction helps the elastic bite into itself for a firmer hold.
Step 2: Creating the Pattern
-
Start with charcoal:
Begin threading the matte charcoal beads onto the elastic. You are aiming to create the first full wrap. -
Check the first section:
String enough charcoal beads to equal your single wrist measurement. Verify this by wrapping just that section around your wrist to ensure it isn’t too tight. -
Transition to terracotta:
Switch to your terracotta or beige beads. Thread a continuous section of these lighter beads equal to your single wrist measurement. -
Adjusting the contrast:
I like to periodically hold the strands together to ensure the color blocks look distinct and bold against each other. -
Finish with charcoal:
Return to the charcoal beads for the final third section. String these until the entire beaded length is three times your wrist measurement. -
Verify the fit:
Wrap the entire beaded strand around your wrist three times. It should sit comfortably without pinching skin or sliding too freely.
Step 3: Finishing the Bracelet
-
Pre-stretch the cord:
Before tying, gently pull on the ends of the elastic cord. This pre-stretching prevents the bracelet from sagging later on. -
Remove the stopper:
Carefully remove the bead stopper or tape, holding both ends of the cord firmly. -
Tie the first knot:
Cross the ends and tie a simple overhand knot. Pull it tight, bringing the beads together snugly. -
Secure with a surgeon’s knot:
Tie a second knot, but loop the end through twice before pulling tight (this is a surgeon’s knot). This adds significant security. -
Apply adhesive:
Place a tiny drop of jewelry glue or clear nail polish directly onto the knot. Allow it to dry for a few minutes. -
Hide the knot:
Once the glue is tacky but not fully hard, thread one of the adjacent beads over the knot to conceal it. -
Trim excess:
Use sharp scissors to trim the remaining tail ends close to the bead, ensuring they don’t poke out.
Add a Spacer
Insert a single metallic brass or silver spacer bead between the color changes to add a tiny hint of industrial shine.
Enjoy wearing your custom-fitted bracelet as a subtle statement piece with your favorite casual outfits
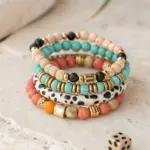
Wide Heishi Stack Look
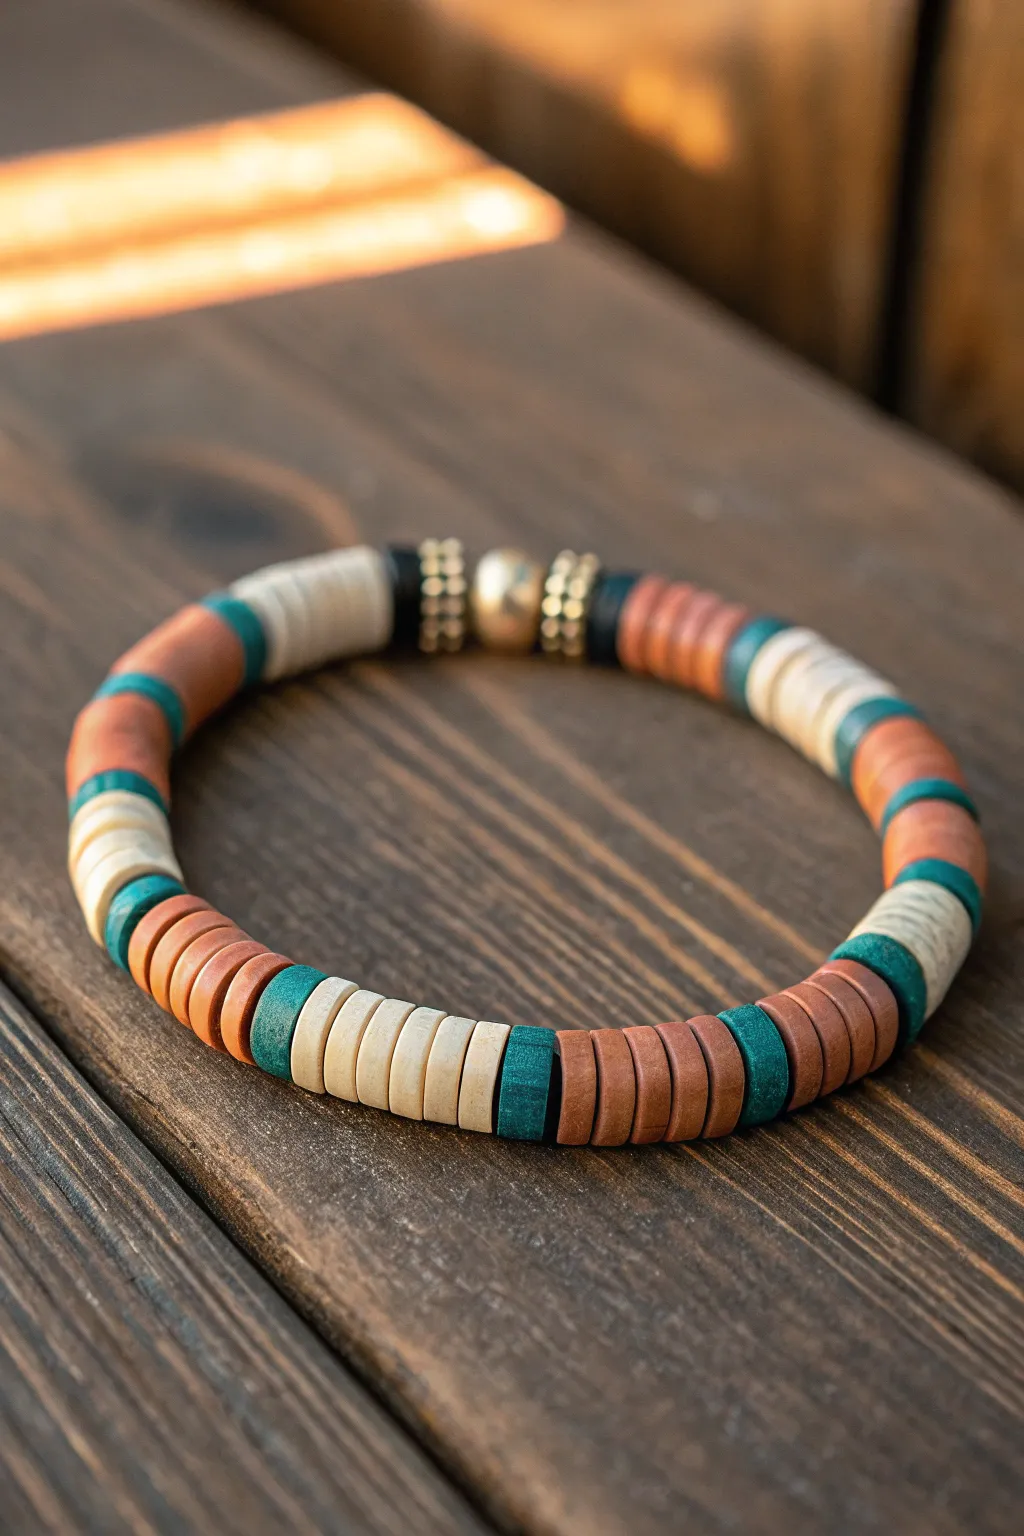
Embrace a rugged, earthy aesthetic with this simple yet striking men’s bracelet design. By alternating warm terracotta and cool teal heishi beads with natural cream accents, you’ll create a versatile accessory that looks just as good solo as it does in a stack.
Step-by-Step Tutorial
Materials
- 6mm Polymer clay heishi beads (Terracotta/Brick Red)
- 6mm Polymer clay heishi beads (Dark Teal/Forest Green)
- 6mm Polymer clay heishi beads (Cream/Bone White)
- 1 large Gold accent bead (centerpiece)
- 2 Gold spacer beads with rhinestone details
- 2 Black flat spacer beads
- 0.8mm clear elastic stretch cord
- Scissors
- Jewelry glue or clear nail polish
- Tape or a bead stopper
Step 1: Preparation
-
Measure your wrist:
Wrap a flexible measuring tape around your wrist where you want the bracelet to sit. Note the measurement and add about 0.5 inches for a comfortable fit. -
Cut the cord:
Cut a piece of elastic cord about 10-12 inches long. This generous length gives you plenty of room to tie the knot later without struggling. -
Stretch the elastic:
Before stringing, give your elastic cord a few firm tugs. This ‘pre-stretching’ helps prevent the bracelet from sagging or loosening up after you wear it a few times. -
Secure the end:
Place a piece of tape or a bead stopper on one end of the cord so your beads don’t slide off while you work.
Pattern variation tip
Don’t stress if bead counts vary. Slightly irregular sections (like 5 beads vs 6) add to the organic, rustic look.
Step 2: Stringing the Pattern
-
Start the main pattern:
Begin stringing your heishi beads. The primary pattern block consists of roughly 5-6 terracotta beads followed by 1 teal bead. -
Add a cream section:
After your terracotta block, string a section of about 5-6 cream/white beads. Follow this immediately with another single teal separator bead. -
Repeat the rhythm:
Continue alternating these blocks: 5-6 terracotta beads, 1 teal bead, 5-6 cream beads, 1 teal bead. Repeat this until you have covered about half the length of your bracelet. -
Prepare the focal point:
Once you reach the halfway point opposite where your knot will be, pause the color pattern to add the focal beads. -
Assemble the centerpiece:
Slide on one black flat spacer, followed by a gold rhinestone spacer. -
Add the main bead:
Thread on the large, smooth gold centerpiece bead. This adds a nice metallic weight to the design. -
Finish the centerpiece:
Mirror the design by adding the second gold rhinestone spacer, followed by the second black flat spacer. -
Resume the pattern:
Go back to your rhythm of alternating color blocks (terracotta and cream) separated by single teal beads until you reach your desired total length. -
Check the fit:
Wrap the unfinished strand around your wrist to check the size. I usually like it to be snug but not tight enough to leave an imprint.
Knot slipping?
If the knot won’t hold, try an extra surgeon’s knot. Pull all four strands (two tails, two loop sides) firmly to lock it.
Step 3: Finishing Up
-
Tie the first knot:
Remove the tape or stopper. Bring the two ends together and tie a simple overhand knot, pulling it tight against the beads. -
Secure with a surgeon’s knot:
Tie a second knot, but this time loop the end through twice before pulling tight (this is a surgeon’s knot). This prevents slipping. -
Apply adhesive:
Dab a tiny drop of jewelry glue or clear nail polish directly onto the knot. This is crucial for longevity. -
Hide the knot:
While the glue is still slightly tacky but not wet, slide the nearest bead over the knot to hide it inside. If the hole is too small, just ensure the knot is nestled tightly between two beads. -
Trim the excess:
Once the glue is fully dry, use your scissors to snip the excess elastic cord close to the knot.
Slide it on your wrist and enjoy the earthy, handcrafted vibe you’ve created
Jersey-Inspired Color Bands
Channel the energy of your favorite team with this rugged, jersey-inspired bracelet featuring matte clay beads in a striking black, terracotta, and cream palette. The combination of textured spherical beads and metallic brass accents gives this piece a sophisticated, masculine edge suitable for game day or everyday wear.
Detailed Instructions
Materials
- Polymer clay (Black, Terracotta/Dark Red, Cream/Off-White)
- Speckled clay or ground black pepper (for the cream bead texture)
- Brass or gold-tone heishi spacer beads (flat disc shape, approx. 4mm-6mm)
- Brass or gold-tone textured ring spacers (optional, for variety)
- Sturdy elastic cord (0.8mm or 1mm thickness)
- Bead rolling tool or acrylic block
- Toothpick or bead piercing pin
- Super glue or jewelry adhesive
- Scissors
- Oven for baking clay
- Baking sheet with parchment paper
Step 1: Prepping Your Clay
-
Condition the Clay:
Begin by warming up your polymer clay. Take the black, terracotta, and cream blocks and knead them separately until they are soft and pliable. -
Add Texture to Cream:
To achieve the speckled look seen in the white beads, mix a very tiny amount of black clay or even ground black pepper into the cream clay. Knead until the specks are evenly distributed but subtle. -
Portion Control:
Roll each color into a long, even log or snake about the thickness of a pencil. Use a clay blade to slice equal-sized segments. You will need roughly 8-10 black segments, 8-10 terracotta segments, and 4-6 cream segments, depending on your wrist size.
Sanding Secret
To get that ultra-matte, stone-like look, vigorously sand your baked beads with fine-grit sandpaper under running water to remove any plastic sheen.
Step 2: Forming the Beads
-
Roll Spheres:
Take a clay segment and roll it between your palms to form a rough ball. For a perfectly round shape, I like to use a bead rolling tool or gently roll the ball under an acrylic block in a circular motion. -
Create the Matte Texture:
The beads in the image have a lovely matte, almost stone-like finish. Before baking, gently roll the unbaked spheres on a piece of coarse sandpaper or a textured sponge to remove fingerprints and add surface grain. -
Pierce the Holes:
While the bead is still on your work surface, gently twist a bead piercing pin or toothpick through the center. Rotate the bead as you push to keep the shape from distorting. -
Repeat for All Colors:
Process all your clay segments until you have a full pile of black, terracotta, and cream spheres. -
Bake:
Arrange the beads on a parchment-lined baking sheet. Bake according to your polymer clay manufacturer’s instructions (usually around 275°F/135°C for 15-30 minutes). Let them cool completely before handling.
Step 3: Designing the Pattern
-
Lay Out the Sequence:
Before stringing, lay your beads on a bead board or towel to plan the pattern. The image uses an asymmetrical pattern, grouping colors together (e.g., three black, one cream, one red) rather than a strict 1-1-1 pattern. -
Insert Spacers:
Place your brass heishi spacers between the clay beads. Notice how the image uses them irregularly—sometimes flanking a single beat, sometimes grouping two or three clay beads together before a spacer appears. -
Check Length:
Measure the laid-out design against your wrist. For an average men’s bracelet, aim for about 8 to 8.5 inches in total length.
Level Up: Texture Mix
Use a toothbrush or stiff bristle brush to tap texture onto the raw ‘terracotta’ beads specifically. This creates a realistic lava stone effect.
Step 4: Assembly
-
Cut the Cord:
Cut a piece of elastic cord about 12 inches long. Pre-stretch it by pulling on the ends firmly several times; this prevents the bracelet from stretching out later. -
String the Beads:
Thread your beads onto the elastic, following your laid-out pattern. Start and end with a bead that has a slightly larger hole if possible, to hide the knot later. -
Tie the Knot:
Bring the two ends of the elastic together. Tie a surgeon’s knot (loop the right end over the left twice, then pull tight). Ensure there are no gaps between beads, but don’t pull so tight that the bracelet puckers. -
Secure the Knot:
Add a tiny drop of super glue or jewelry adhesive to the knot. Let it dry for a minute. -
Hide and Trim:
Tuck the knot inside the adjacent bead hole if possible. Trim the excess elastic tails close to the bead.
Slip on your custom color-band bracelet and tackle the day with confidence
Sport Charm Centerpiece
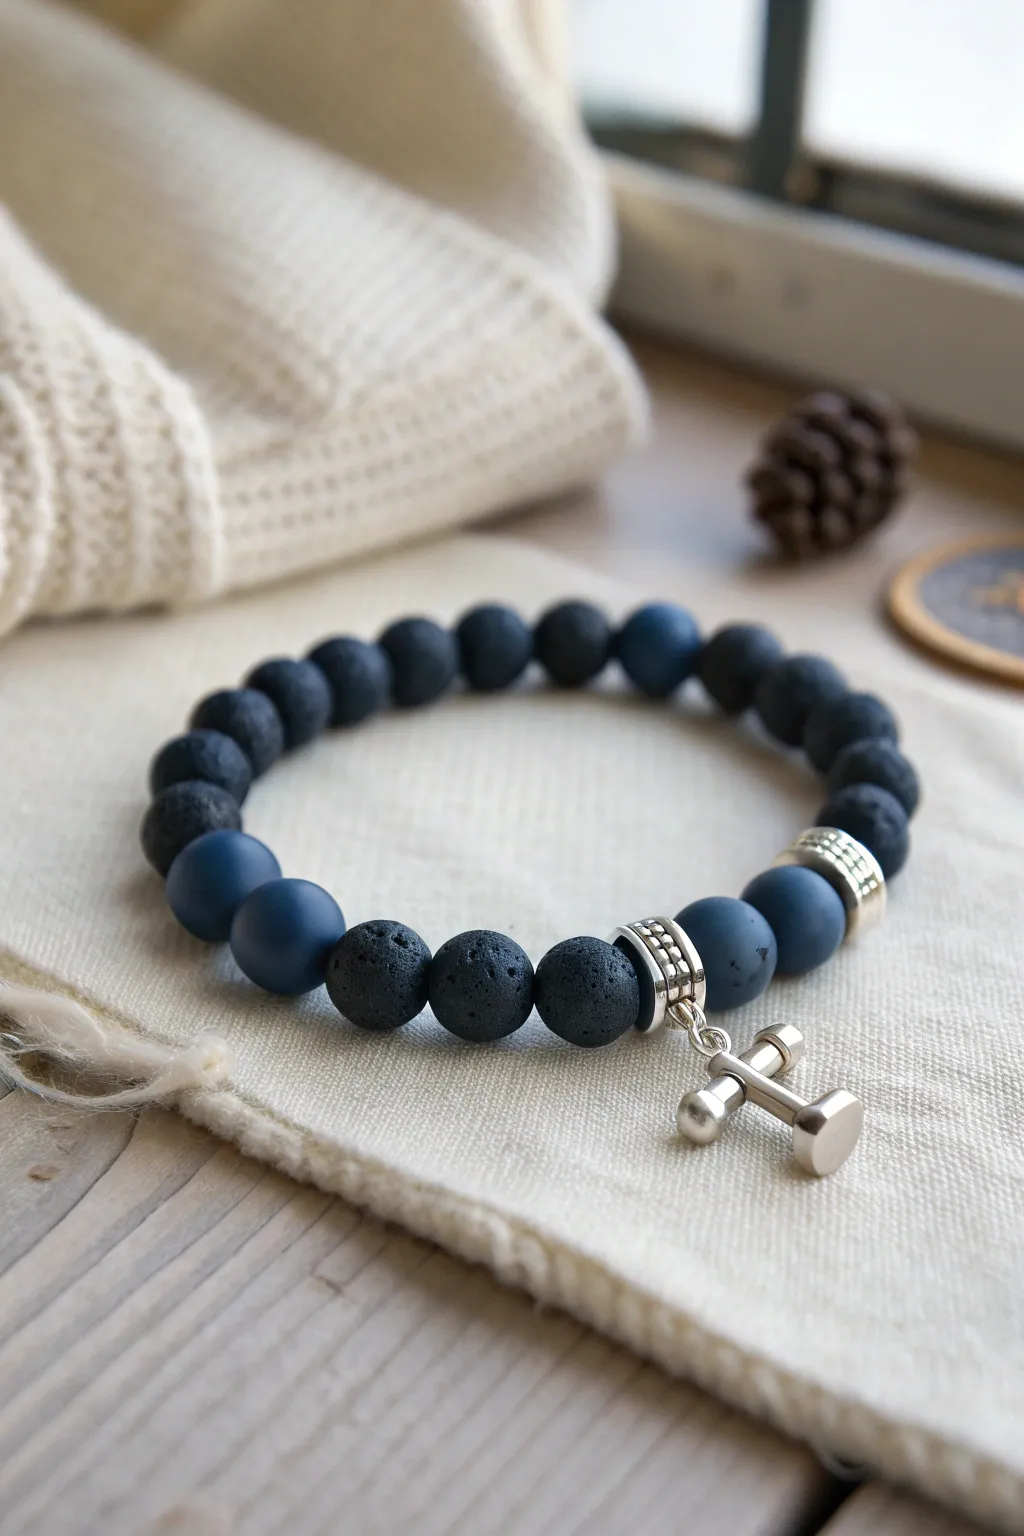
This masculine accessory combines the rugged texture of black lava stone with smooth matte blue beads, all centered around a unique dumbbell charm. It’s an ideal project for fitness enthusiasts or anyone looking for a sporty, understated piece of jewelry.
Step-by-Step Tutorial
Materials
- 8mm black lava stone beads (approx. 14-16 beads)
- 8mm matte navy blue agate or sodalite beads (6 beads)
- Silver-tone dumbbell charm with jump ring
- Silver-tone bail bead (tube style with loop)
- Two silver-tone decorative rondelle spacer beads
- 0.8mm or 1mm clear elastic jewelry cord
- Jewelry adhesive (like G-S Hypo Cement)
- Scissors
- Bead stopper or masking tape
Step 1: Preparation
-
Measure and Cut:
Cut a piece of elastic cord approximately 10-12 inches long. This generous length makes tying the final knot much easier than struggling with short ends. -
Pre-stretch the Elastic:
Hold the cord firmly at both ends and give it a few gentle stretched. This helps prevent the bracelet from stretching out and becoming loose after the first few times you wear it. -
Secure the End:
Place a bead stopper on one end of your cord, or simply tape it to your work surface. This saves you the frustration of beads sliding right off as you string them.
Knot Security Tip
Use a ‘surgeon’s knot’ (looping through twice on the first pass) rather than a regular square knot. It holds elastic significantly better and prevents slipping.
Step 2: Design and Assembly
-
Lay Out the Pattern:
Before stringing, arrange your beads on a bead board or soft cloth. The pattern shown uses a block of black lava beads for the back, flanked by blue beads, spacer beads, and the central charm section. -
String the First Section:
Start by threading on about 14 to 16 black lava stone beads. These will form the back and sides of the bracelet. -
Add the First Accent:
Slide on two of the matte blue beads. These provide a subtle color transition before the metallic elements. -
Place the First Spacer:
Thread on one of the silver decorative rondelle spacer beads. Ensure the patterned side faces the way you prefer, though most are symmetrical. -
Continue the Center Pattern:
Add one more matte blue bead next to the spacer. -
Attach the Centerpiece:
Slide on the silver bail bead (the tube with the loop). This will hold your dumbbell charm. -
Complete the Center Pattern:
Mirror the design by adding one matte blue bead, followed by the second silver rondelle spacer, and then finally two more matte blue beads. -
Check the Size:
Wrap the strung beads around your wrist to check the fit. It should sit comfortably without pinching. Add or remove lava beads from the back section if you need to adjust the size.
Step 3: Finishing Touches
-
Tie the Knot:
Remove the bead stopper and bring the two cord ends together. Tie a surgeon’s knot: cross the ends, loop one over twice, pull tight, and then tie a standard overhand knot on top. -
Secure with Glue:
Dab a tiny amount of jewelry adhesive onto the knot. I usually stretch the knot slightly to let the glue seep into the fibers of the elastic. -
Hide the Knot:
Before the glue fully hardens but after it’s tacky, slide the nearest lava bead over the knot to hide it inside. This creates a seamless finish. -
Trim Excess Cord:
Once the glue is fully dry (wait at least 15 minutes), use your scissors to trim the excess elastic cord close to the bead hole. Be careful not to clip the bracelet itself. -
Attach the Charm:
Using small pliers, open the jump ring on your dumbbell charm. Hook it onto the loop of the central bail bead you strung earlier, then close the jump ring securely. -
Add Essential Oil (Optional):
Since lava stones are porous, you can add a drop of your favorite essential oil to one of the black beads for a wearable diffuser effect.
Custom Theme
Swap the dumbbell charm for a compass or anchor to change the theme from fitness to travel or nautical without altering the bead pattern.
Enjoy wearing your new custom accessory or gift it to the fitness fan in your life
Nautical Navy, White, and Rope Tones
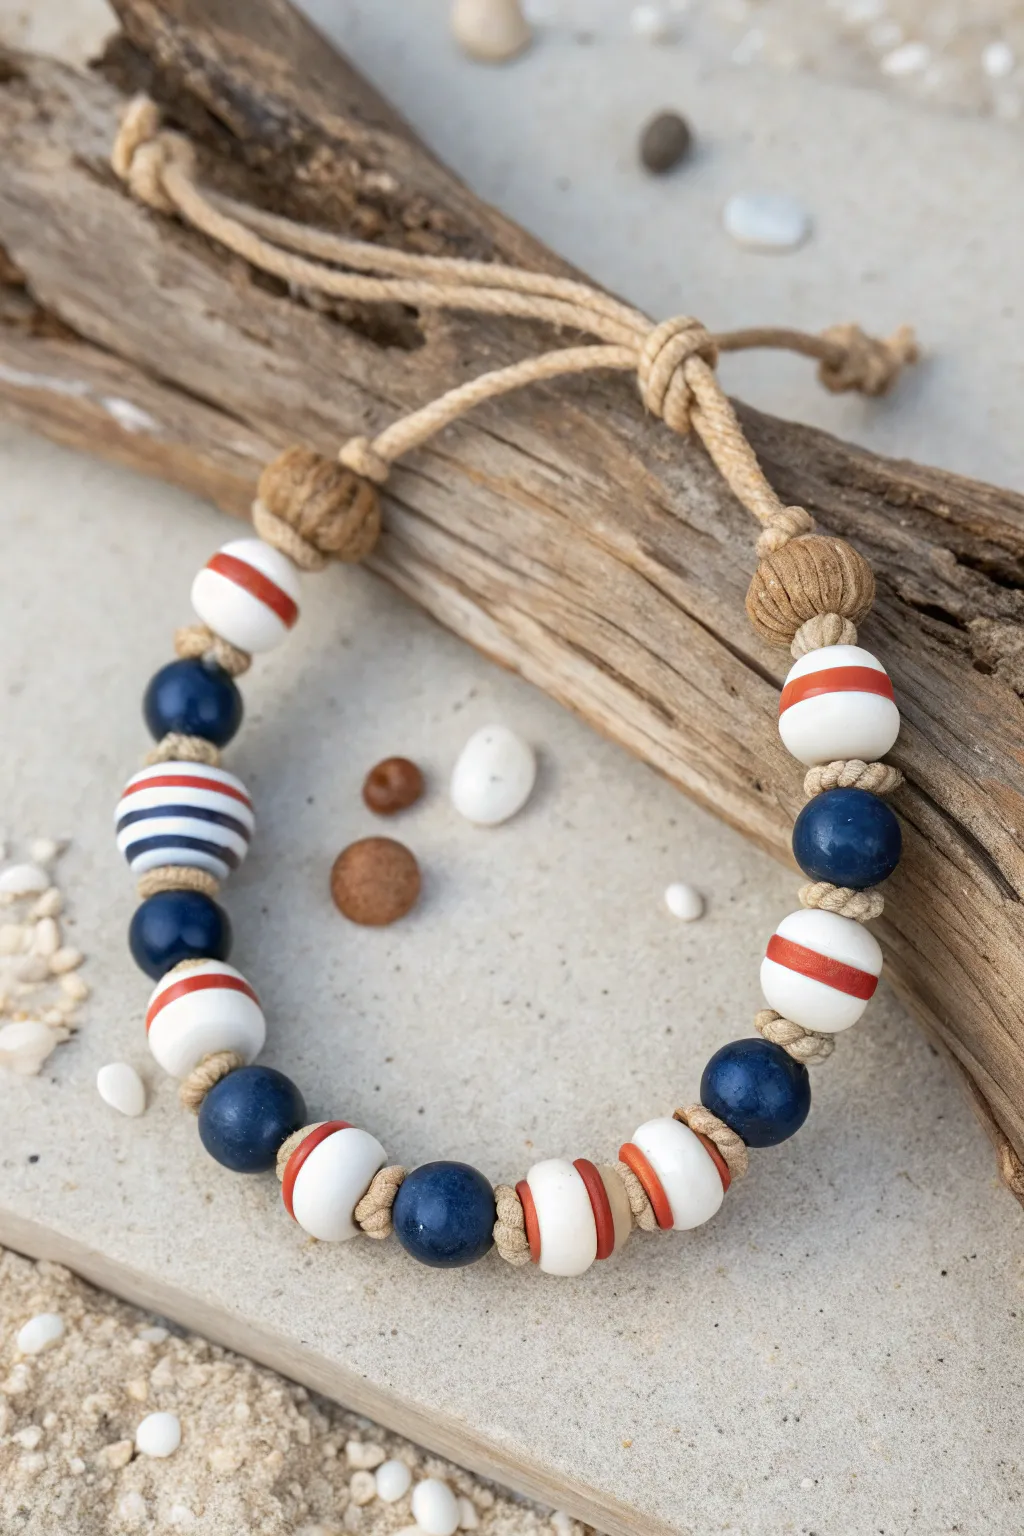
Evoking the spirit of weathered driftwood and ocean waves, this rugged bracelet combines natural cordage with striking nautical beads. The interplay of smooth clay textures and intricate rope knots creates a piece that feels both handcrafted and timelessly stylish.
Step-by-Step
Materials
- Hemp or jute cord (approx. 1.5mm thickness)
- White clay beads with red/orange stripes (approx. 10-12mm)
- Solid navy blue clay or ceramic beads (approx. 10mm)
- White clay bead with navy/red stripes (focal bead)
- Large-hole wooden or clay spacer beads (textured, earthy brown)
- Simple disc spacers (white and orange)
- Scissors
- Tape or clipboard (to secure work)
- Superglue or clear nail polish
Step 1: Preparation & Knotting Base
-
Measure and Cut:
Cut two lengths of hemp cord. One should be your core strand (about 20 inches) and the other a shorter knotting strand (about 12 inches) if you are doing a complex closure, though for this single-strand style, simply cut one long piece about 30 inches to fold in half. -
Create the Anchor Loop:
Fold your long cord in half to create a loop at the top. This loop needs to be large enough to eventually fit your closure knot through. -
Tie the Starting Knot:
Secure the loop by tying an overhand knot about half an inch down from the fold. I find it helps to tape this loop to a table or clipboard now for tension. -
Add the First Texture Bead:
Thread both tail ends through one of your large, textured earthy brown spacer beads. Push it snug up against the starting knot. -
Secure with a Spacer Knot:
Tie a simple overhand knot with both cords immediately after the brown bead to lock it in place.
Step 2: Beading the Pattern
-
Start the Sequence:
Thread a white bead with a single red stripe onto the cords. Follow it with a knot. -
Add Navy Contrast:
Slide on a solid navy blue bead. Tie another overhand knot directly after it. The knots acts as spacers, giving the bracelet flexibility. -
Introduce the Focal Bead:
Add the feature bead—the white one with multiple navy and thin red stripes. Ensure the knot preceding it is tight so it sits centered. -
Continue the Rhythm:
Tie a knot, then add a solid navy bead, another knot, and then a white bead with a red stripe. -
Mirror the Design:
If you want symmetry, repeat the pattern in reverse order. However, looking at the inspiration, the pattern shifts slightly for an organic feel. -
Adding Disc Details:
Towards the center or opposite side, thread a sequence involving thin disc beads: one white disc, one orange disc, then a white round bead. -
Final Symmetry:
Complete the main beaded section with a navy bead, followed by the final white-and-red striped bead.
Knot Consistency
Make sure your spacer knots are tied with equal tension. If one is too loose, use a toothpick to guide the knot closer to the bead before tightening.
Step 3: Closure & Finishing
-
End with Texture:
Tie a knot after your last painted bead, then thread on the second large earthy brown spacer bead to match the beginning. -
Secure the End:
Tie a firm overhand knot immediately after the brown bead to secure the entire bead strand. -
Create the Sliding Knot:
Leave about 2 inches of bare cord. Gather the tails and fold them back towards the main bracelet body. -
Macramé Finish:
Using a spare piece of cord, tie a few square knots (a ‘cobra stitch’) around the gathered tails to create a sliding mechanism, or simply tie a large, bulky overhand knot with the tails that acts as a toggle for your starting loop. -
Trim and Seal:
Trim any excess cord from your knots. Apply a tiny dot of superglue to the final knots to prevent fraying.
Weathered Effect
For a truly nautical look, lightly sand the surface of the painted clay beads with fine-grit sandpaper to distress the stripes.
Slide it on for a casual, beach-ready accessory that captures the essence of the coast
Speckled “Stone” Clay Beads Effect
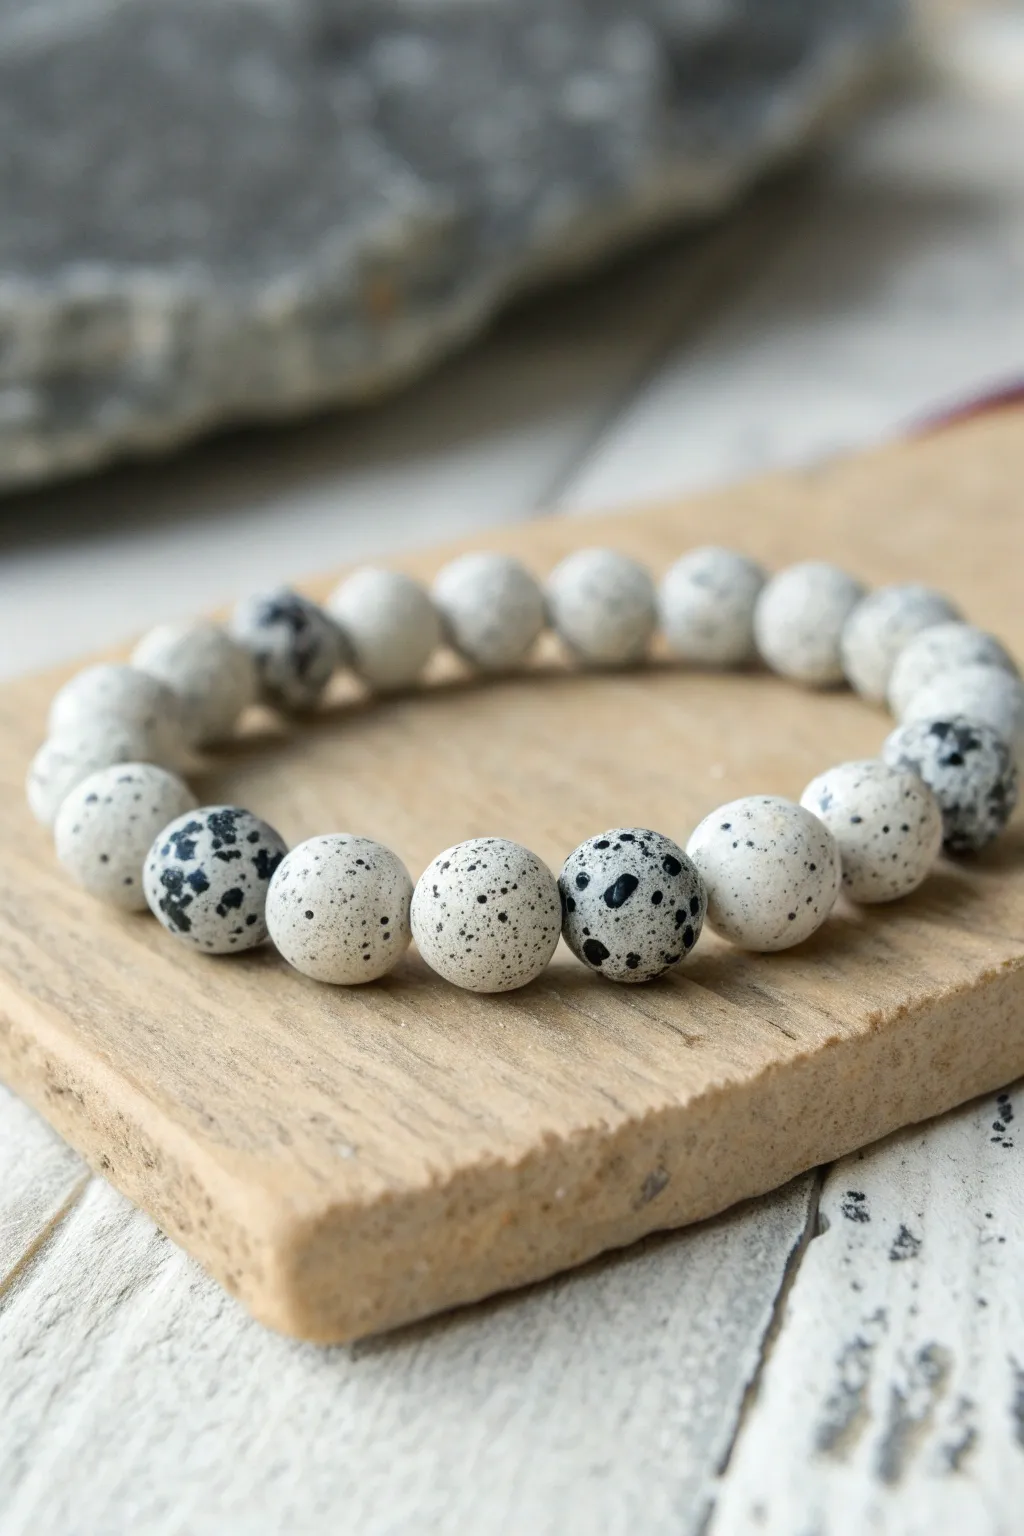
Recreate the sophisticated look of natural semi-precious stones using polymer clay and a bit of faux-finishing magic. This project yields beads with a realistic matte texture and organic black speckling that looks stylishly masculine.
Detailed Instructions
Materials
- White or off-white polymer clay (e.g., Premo, Fimo)
- Black polymer clay
- Rolling pin or pasta machine
- Circle cutter (approx. 1/2 inch or 12mm)
- Bead piercing pins or toothpicks
- Coarse grit sandpaper (80 grit)
- Fine grit sandpaper (400 grit)
- Black acrylic paint
- Old toothbrush
- Paper plate or cardboard
- Elastic clear cord (0.8mm or 1mm)
- Super glue or jewelry cement
Step 1: Prepping the Clay Base
-
Condition the white clay:
Begin by thoroughly kneading your white or off-white clay until it is soft, pliable, and easy to work with. Warm hands make this process much faster. -
Add the inclusions:
Take a very small pea-sized amount of black clay and chop it into tiny, irregular crumbs using a craft knife or blade. You want minuscule specks, not large chunks. -
Mix the clays:
Sprinkle the black crumbs over your flattened white clay. Fold the white clay over and roll it gently to incorporate the specks without blending the colors into gray—you want distinct black dots. -
Sheet the clay:
Roll your speckled clay out into a thick sheet, approximately 6mm to 8mm thick. A pasta machine on the widest setting works great for consistency.
Step 2: Forming the Beads
-
Cut uniform pieces:
Use your small circle cutter to punch out rounds from the thick sheet. This ensures every bead starts with exactly the same volume of clay. -
Roll into spheres:
Place a clay cutout between your palms and roll in a circular motion. Apply gentle pressure until you have a perfect, smooth sphere. -
Texture the surface:
To mimic the porous look of natural stone visible in the photo, gently roll each raw bead over a piece of coarse 80-grit sandpaper. Just a light pass will remove the plastic shine. -
Pierce the holes:
Insert your bead pin or toothpick through the center of each sphere. Use a gentle twisting motion to avoid squashing the bead’s shape. -
Baking time:
Arrange the beads on a baking sheet lined with cardstock to prevent shiny spots. Bake according to your brand’s package instructions (usually 275°F/130°C for 30 minutes).
Fixing Smudged Dots
If your black clay specks smeared into gray streaks while rolling, your clay was likely too warm. Leech the clay on paper, cool it in the fridge for 10 minutes, and start fresh.
Step 3: Finishing the Stone Effect
-
Cool and inspect:
Allow the beads to cool completely. If any beads have sharp edges around the holes, lightly sand them with the fine 400-grit sandpaper. -
Prepare the splatter paint:
Place a small dollop of black acrylic paint on your paper plate and water it down slightly until it has an inky consistency. -
Apply the speckles:
Dip your old toothbrush into the paint, aim it at the beads, and run your thumb across the bristles to flick tiny splatters of paint onto the surface. This adds depth and simulates randomization. -
Add larger spots:
I like to use the tip of a toothpick dipped in undiluted black paint to add a few deliberate, larger spots to match the Dalmatian Jasper look. -
Let dry:
Wait for the paint to dry completely. Since the clay simulates matte stone, no varnish is needed unless you prefer a glossy finish.
Level Up: Earth Tones
Mix a tiny pinch of translucent clay into your white base. It adds a subtle depth that makes the ‘stone’ look less like plastic and more like genuine high-end mineral.
Step 4: Assembly
-
Measure the cord:
Cut a piece of elastic cord about 10 inches long. This gives you plenty of slack for tying the knot later. -
Pre-stretch the elastic:
Give the cord a few firm tugs. This pre-stretching step prevents the bracelet from becoming loose and sagging after the first few wears. -
String the beads:
Thread your faux stone beads onto the elastic until the strand measures the desired wrist circumference (usually 7.5 to 8 inches for men). -
Secure the knot:
Tie a surgeon’s knot (right over left twice, then left over right). Pull tight to secure. -
Trim and glue:
Place a tiny drop of super glue on the knot. Once dry, trim the excess cord and gently tuck the knot inside the hole of the nearest bead.
Enjoy the rugged, natural aesthetic of your handmade stone-effect bracelet
Geometric Pattern With Square Spacers
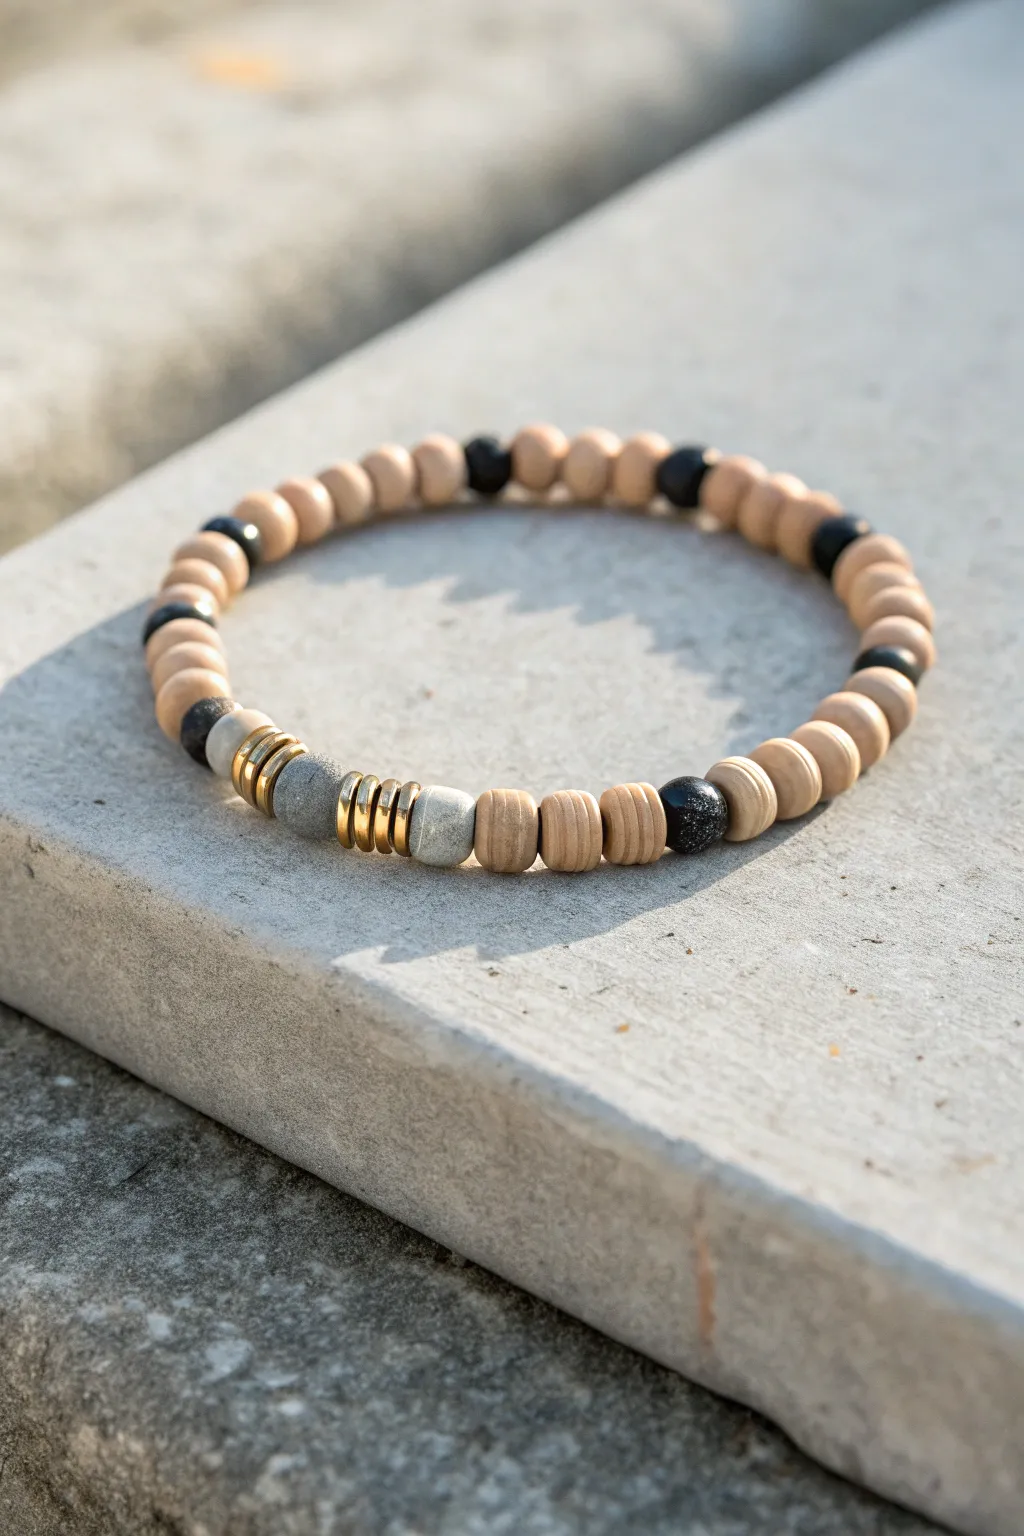
This masculine design balances rustic textures with refined metallic accents for a versatile everyday accessory. By combining ridged clay-style disc beads with matte stone and gold spacers, you achieve a sophisticated geometric look that works perfectly with casual wear.
Step-by-Step Guide
Materials
- Light tan ridged disc beads (approx. 6-8mm, wood or polymer clay)
- Black matte round spacer beads (4mm)
- Grey matte stone beads (6mm or 8mm)
- Gold flat disc spacers (heishi style)
- Strong elastic bead cord (0.8mm or 1mm)
- Jewelry glue or clear nail polish
- Scissors
Step 1: Preparation
-
Measure your wrist:
Wrap a measuring tape around your wrist to determine the correct size. Add about 0.5 inches to this measurement to ensure the bracelet fits comfortably without pinching. -
Cut the cord:
Cut a piece of elastic cord about 10-12 inches long. Having this extra length makes tying the final knot much easier than fighting with short ends. -
Pre-stretch the elastic:
Hold both ends of the cord and give it a few gentle tugs. This pre-stretching step prevents the bracelet from loosening up and becoming baggy after the first few wears. -
Secure the end:
Place a piece of tape or a bead stopper on one end of the cord to stop your beads from sliding off while you work.
Design Balance Pro-Tip
Use odd numbers for your focal beads (like the 3 grey stones here). Odd numbers are naturally more pleasing to the eye and create a distinct center point.
Step 2: Creating the Pattern
-
Start the main sequence:
Begin stringing your light tan ridged beads. Add these in groups of three or four to create solid blocks of neutral color. -
Add contrast spacers:
After a group of tan beads, slide on one small black matte spacer. This creates the rhythmic, segmented look seen in the photo. -
Repeat the pattern:
Continue lighter bead groups separated by single black spacers until you’ve filled about three-quarters of your transparent cord.
Step 3: Building the Focal Point
-
Transition to the focal section:
Once you reach the front section of the bracelet, stop the tan/black pattern. Add one grey matte stone bead. -
Add first gold accents:
Thread on three or four gold flat disc spacers immediately after the grey stone. These metallic slices add a touch of luxury to the rustic design. -
Center stone placement:
Add the central grey stone bead. This larger bead acts as the visual anchor of the piece. -
Mirror the gold accents:
Add another stack of three or four gold disc spacers on the other side of the central stone to keep the design symmetrical. -
Complete the focal section:
Finish this highlighted area with a third grey stone bead. -
Close the loop:
Fill any remaining space on your cord with the tan ridged beads until the total length matches your wrist measurement plus the allowance.
Knot Slipping Solution
If your surgeon’s knot feels slippery, try a tiny dot of clear nail polish instead of superglue. It dries slightly flexible, preventing the knot from becoming brittle.
Step 4: Finishing Touches
-
Check the fit:
Wrap the unfinished strand around your wrist to verify the size. Add or remove a few tan spacer beads if necessary. -
Tie the knot:
Remove the tape/stopper and bring the ends together. Tie a surgeon’s knot (right over left twice, then left over right) and pull it tight. -
Secure with glue:
Dab a tiny drop of jewelry glue directly onto the knot. I find a toothpick helps apply the glue precisely without getting it on the visible beads. -
Hide the knot:
While the glue is still tacky, gently pull the elastic so the knot slides inside the hole of one of the larger beads adjacent to it. -
Trim the ends:
Once the glue is fully dry, trim the excess elastic cord close to the bead hole, being careful not to nick the main knot.
Now you have a stylish, geometrically balanced bracelet ready to stack or wear solo
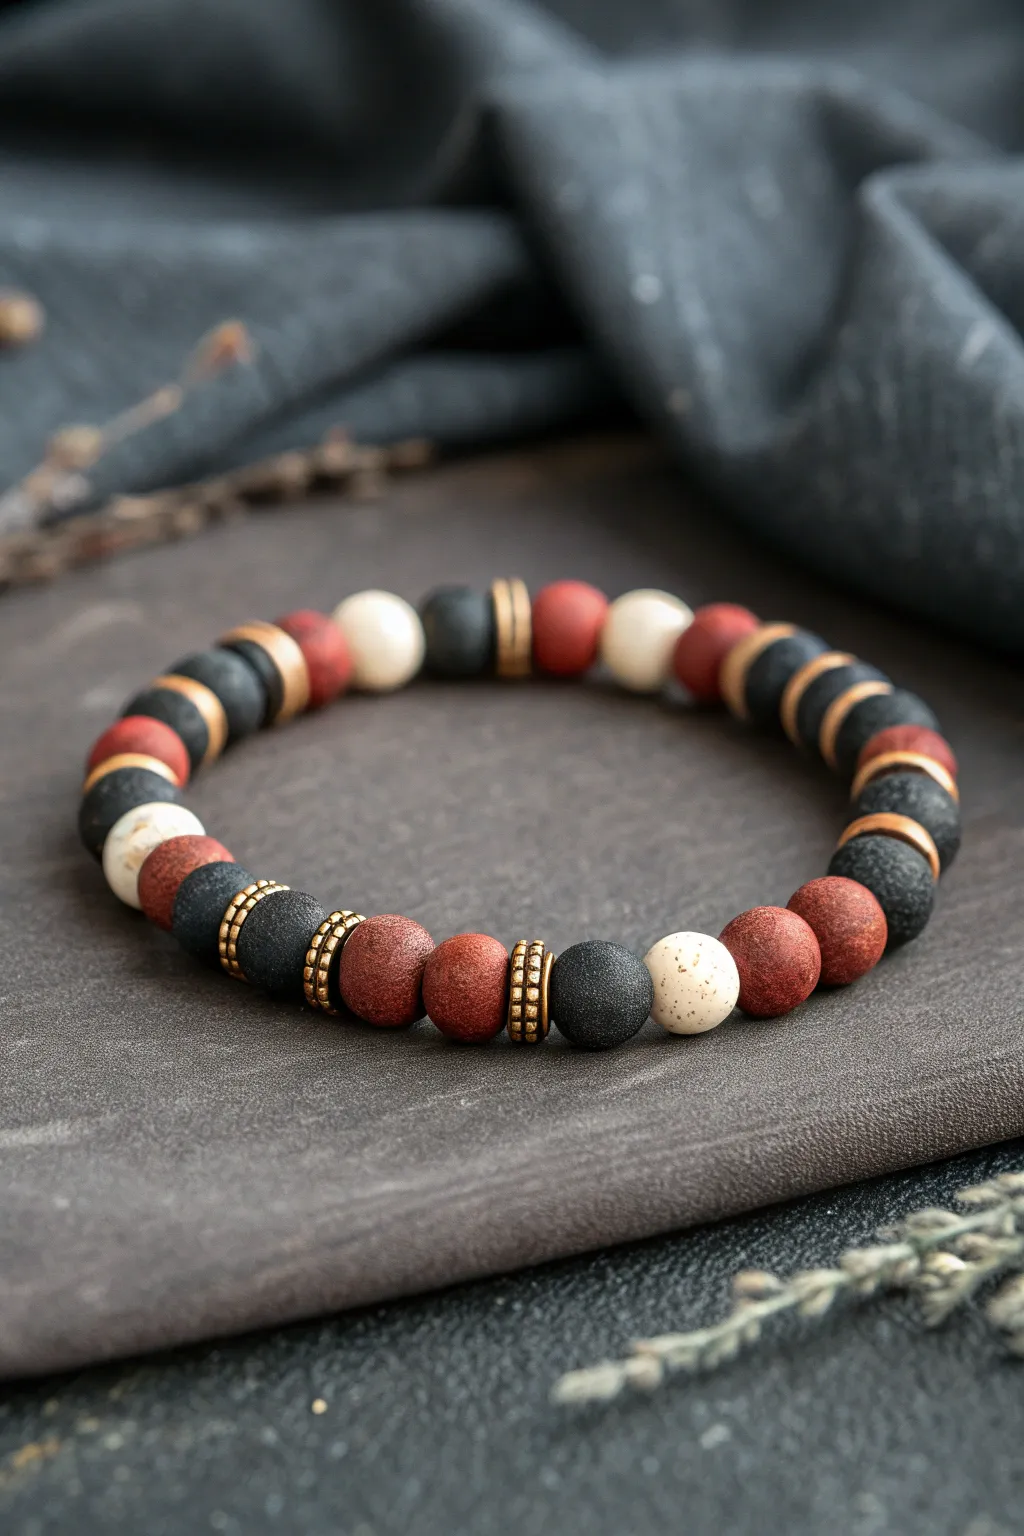
Rust and Charcoal Industrial Palette
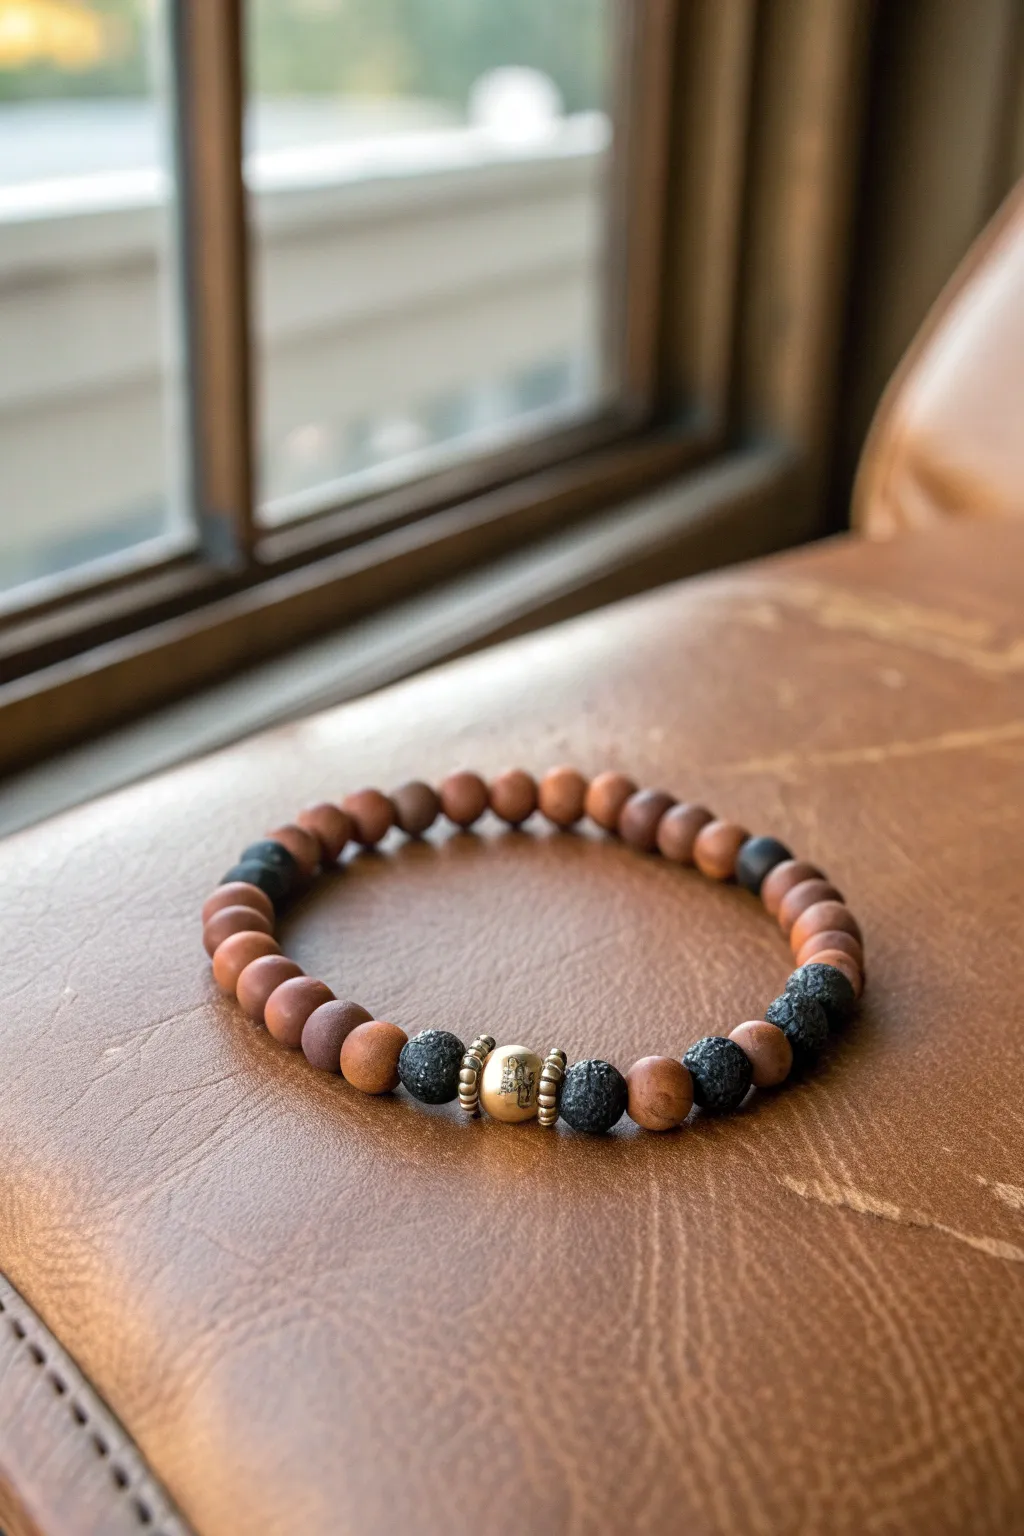
This masculine design balances earthy warmth with cool industrial tones, featuring a mix of matte rust-colored clay beads and porous black lava stones. The centerpiece adds a touch of refined grit with a metallic gold focal bead flanked by textured spacers.
Step-by-Step Tutorial
Materials
- 8mm matte rust/terracotta polymer clay beads (approx. 20-25)
- 8mm black lava stone beads (4-6 beads)
- 10mm antique gold-tone focal bead (round or barrel shape)
- Small antique brass or gold spacer discs (2 pieces)
- Rough-textured gold rondelle spacers (2 pieces)
- Heavy-duty elastic stretch cord (0.8mm or 1mm thickness)
- Bead stopper or masking tape
- Jewelry adhesive (e.g., G-S Hypo Cement)
- Scissors or jewelry snips
Step 1: Planning the Design
-
Measure and Cut:
Cut a piece of elastic cord about 10-12 inches long. You want plenty of excess to tie the knot comfortably later. Pre-stretch the cord by pulling on it gently several times to prevent the finished bracelet from sagging. -
Secure the End:
Place a bead stopper or a piece of masking tape on one end of the cord to stop beads from sliding off while you work. -
Layout the Pattern:
Lay your beads out on a bead board or soft cloth. The pattern shown uses a central focal point. Place the large gold bead in the center. -
Create the Focal Section:
Flank the central gold bead with one metallic ring spacer on each side to add texture. -
Add Contrast:
Next to those spacers, place one 8mm black lava bead on each side. This creates the immediate dark industrial contrast against the gold.
Knot Slipping?
If the elastic is slippery, dust the knot area with a tiny bit of cornstarch before pulling tight. It adds grip.
Step 2: Stringing the Beads
-
Start Stringing:
Pick up the ‘focal’ section you just designed—lava bead, spacer, gold focal, spacer, lava bead—and thread them onto the cord. Slide them to get a feel for the weight. -
Build the Sides:
On the right side of the focal section, add a slightly lighter terracotta bead, then a black lava bead. Repeat this on the left side to maintain symmetry. -
Fill with Clay:
Fill the rest of the strand with your matte rust/terracotta clay beads. I usually alternate sides when adding these, threading two on the left, then two on the right, to keep the focal point perfectly centered. -
Check the Length:
Periodically wrap the strand around your wrist (or a sizing cone) to check the fit. Men’s bracelets typically range from 7.5 to 8.5 inches. Add or remove the rust clay beads until the ends meet comfortably without gaps. -
Add Final Accents:
If you want to break up the solid rust section at the back, you can sneak in one more solitary black lava bead near the closure point, as seen on the left side of the sample image.
Aromatic Upgrade
Add a drop of essential oil (like cedarwood or sandalwood) to the black lava beads; their porous nature acts as a natural diffuser.
Step 3: Finishing Touches
-
Prepare to Knot:
Once the size is correct, remove the bead stopper. Bring both ends of the cord together, ensuring there is no slack between the beads. -
Tie the Knot:
Tie a surgeon’s knot. This is like a standard square knot, but you loop the cord through twice on the first pass for extra friction. Pull it tight. -
Secure with Glue:
Apply a tiny dot of jewelry adhesive directly onto the knot. Be careful not to get glue on the neighboring clay beads, as it can ruin the matte finish. -
Hide the Knot:
Let the glue dry for a moment until tacky, then slide the knot inside the hole of the nearest bead (lava beads usually have larger holes, making them perfect for hiding knots). -
Trim Excess:
Once the glue is fully cured (check manufacturer instructions for full cure time), use your sharp scissors to trim the excess cord as close to the bead hole as possible.
Now you have a rugged, stylish accessory that pairs perfectly with casual wear
Mixed Shape Clay Beads for Texture
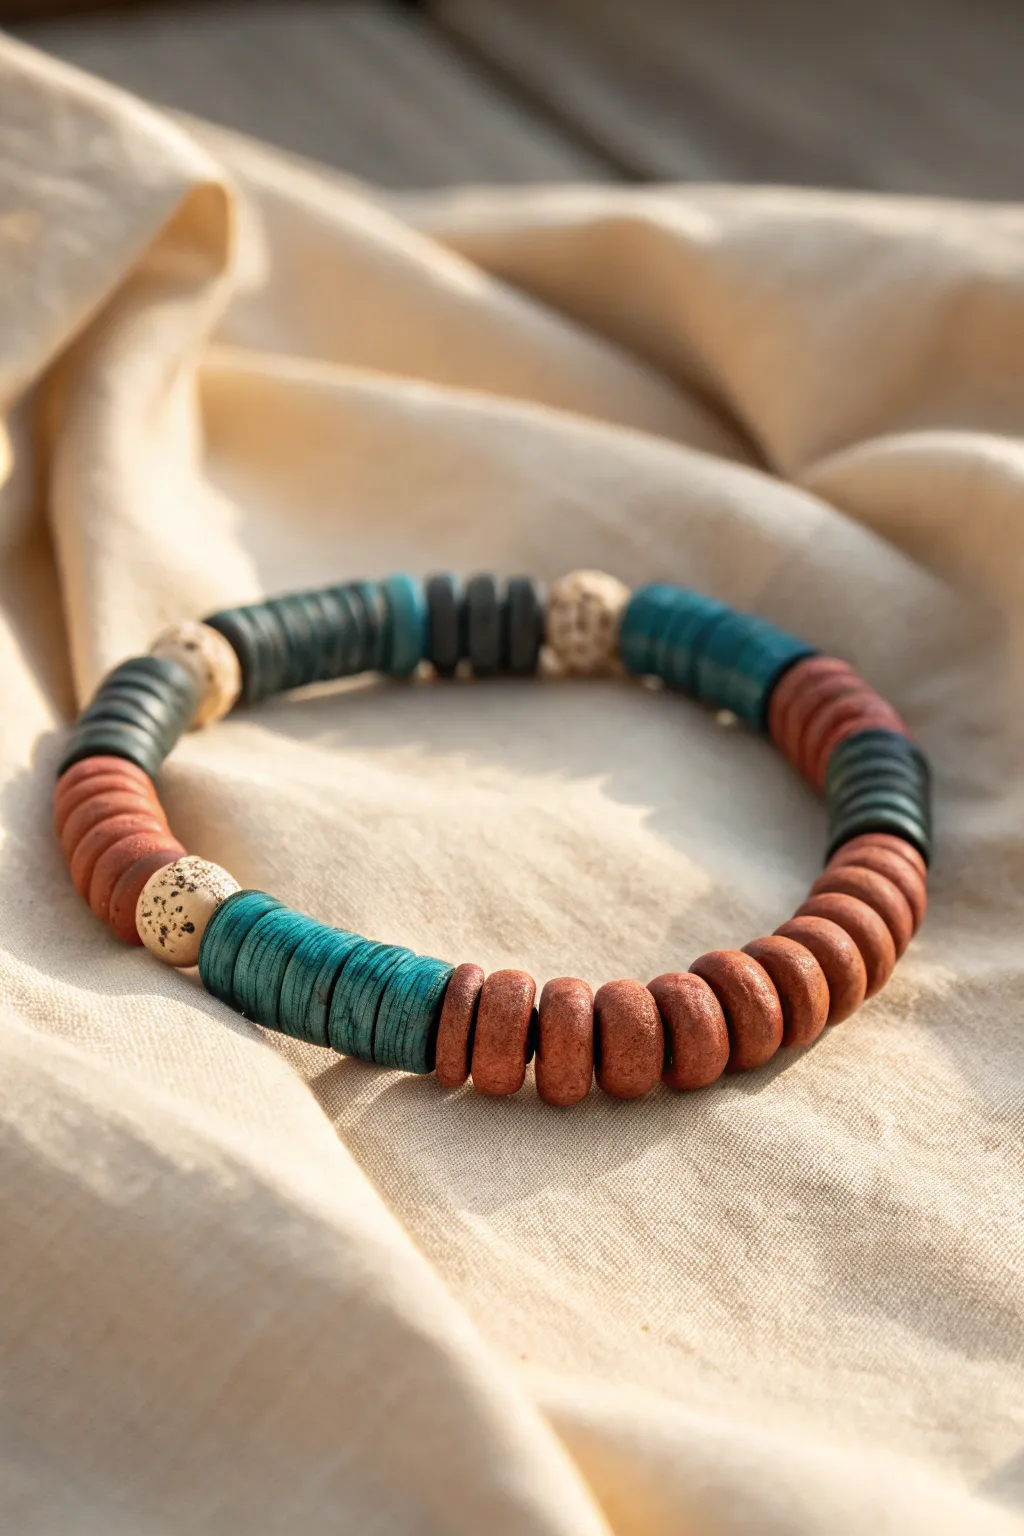
This rustic yet refined bracelet balances earthy terracotta tones with striking teal accents, perfect for a casual, rugged look. The combination of simple heishi discs and larger, speckled focal beads creates a satisfying rhythm that feels both handmade and polished.
Detailed Instructions
Materials
- Polymer clay in Terracotta, Deep Teal, Dark Slate Grey, and Beige/Cream
- Coarse black pepper or dried coffee grounds (for speckling)
- Acrylic roller or pasta machine
- Circle cutters (approx. 8mm and 10mm diameter)
- Needle tool or bead piercing pins
- Strong elastic cord (0.8mm or 1mm)
- Super glue or jewelry knot cement
- Baking sheet and parchment paper
- Oven (for curing clay)
- Fine grit sandpaper (optional)
Step 1: Crafting the Clay Discs
-
Condition the Clay:
Begin by warming the polymer clay in your hands. Knead each color—Terracotta, Teal, and Dark Slate—separately until they are soft and pliable to prevent cracking later. -
Roll the Sheets:
Using your acrylic roller or pasta machine, roll the colored clays into slabs of even thickness. Aim for about 3-4mm distinct thickness for a chunky look. -
Cut the Basic Discs:
Use an 8mm circle cutter to punch out numerous discs from the Terracotta, Teal, and Dark Slate slabs. You will need roughly 30-40 terracotta, 20 teal, and 10 dark slate beads, though making extras is always wise. -
Create the Speckled Focal Beads:
Take the Beige or Cream clay and mix in a pinch of coarse black pepper or dried coffee grounds. Knead gently to distribute the textural elements. -
Form Larger Beads:
Roll this speckled mixture into a slightly thicker slab (about 5-6mm) or form small balls by hand. Use a slightly larger cutter or shape them rounder than the discs for contrast. -
Pierce the Holes:
Carefully use a needle tool to poke a hole through the center of every bead. I like to twist the needle as I push through to avoid distorting the circular shape. -
Bake the Components:
Arrange all your beads on a baking sheet lined with parchment paper. Bake according to the manufacturer’s instructions for your specific brand of clay (usually around 275°F/130°C for 15-30 minutes). -
Cool and Refine:
Allow the beads to cool completely. If any edges are sharp or uneven, gently buff them with fine-grit sandpaper to achieve that smooth, matte finish seen in the photo.
Step 2: Assembly and Finishing
-
Pre-stretch the Elastic:
Cut a length of elastic cord about 10-12 inches long. Give it a few firm tugs to pre-stretch it; this prevents the bracelet from sagging after the first wear. -
Plan the Pattern:
Lay your beads out on a bead board or towel. The pattern in the image features blocks of color: a long run of terracotta, a section of teal, a few dark slate discs, separated occasionally by the larger speckled beads. -
Start Stringing:
Begin threading the beads onto the elastic. Start with the main terracotta section to anchor the design. -
Add Contrast Sections:
Thread a block of teal discs followed by one dark slate disc. Then, add one of your special speckled focal beads to act as a spacer. -
Complete the Pattern:
Continue following the visual rhythm: a few dark slate discs, another speckled bead, then a block of teal, and back to terracotta. Check the length against your wrist as you go. -
Tie the Knot:
Once you have the correct size, bring the ends of the elastic together. Tie a surgeon’s knot (right over left twice, then left over right) and pull tight. -
Secure the Knot:
Place a tiny drop of super glue or jewelry cement directly onto the knot. Let it dry for a moment before trimming the excess elastic tails closely. -
Hide the Knot:
Gently pull the elastic so the knotted section slips inside the hole of one of the larger speckled beads or a thick terracotta disc to conceal it.
Sticky Situation?
If clay sticks to your cutter, dip the cutter in cornstarch or water before pressing down. This helps the raw clay discs release cleanly without warping.
Matte Magic
To get that ultra-matte, stone-like texture, lightly tap the raw clay surface with a stiff toothbrush or crumpled aluminum foil before baking.
Slip on your new custom accessory and enjoy the earthy, rugged vibe you’ve created.