Middle school is my favorite clay zone because kids are ready for real skills, but they still want projects that feel fun and a little weird. These middle school clay ideas hit that sweet spot—totally doable in class, packed with personality, and built around the big three: pinch, coil, and slab.
Middle School Funny Face Pinch Pot Holder
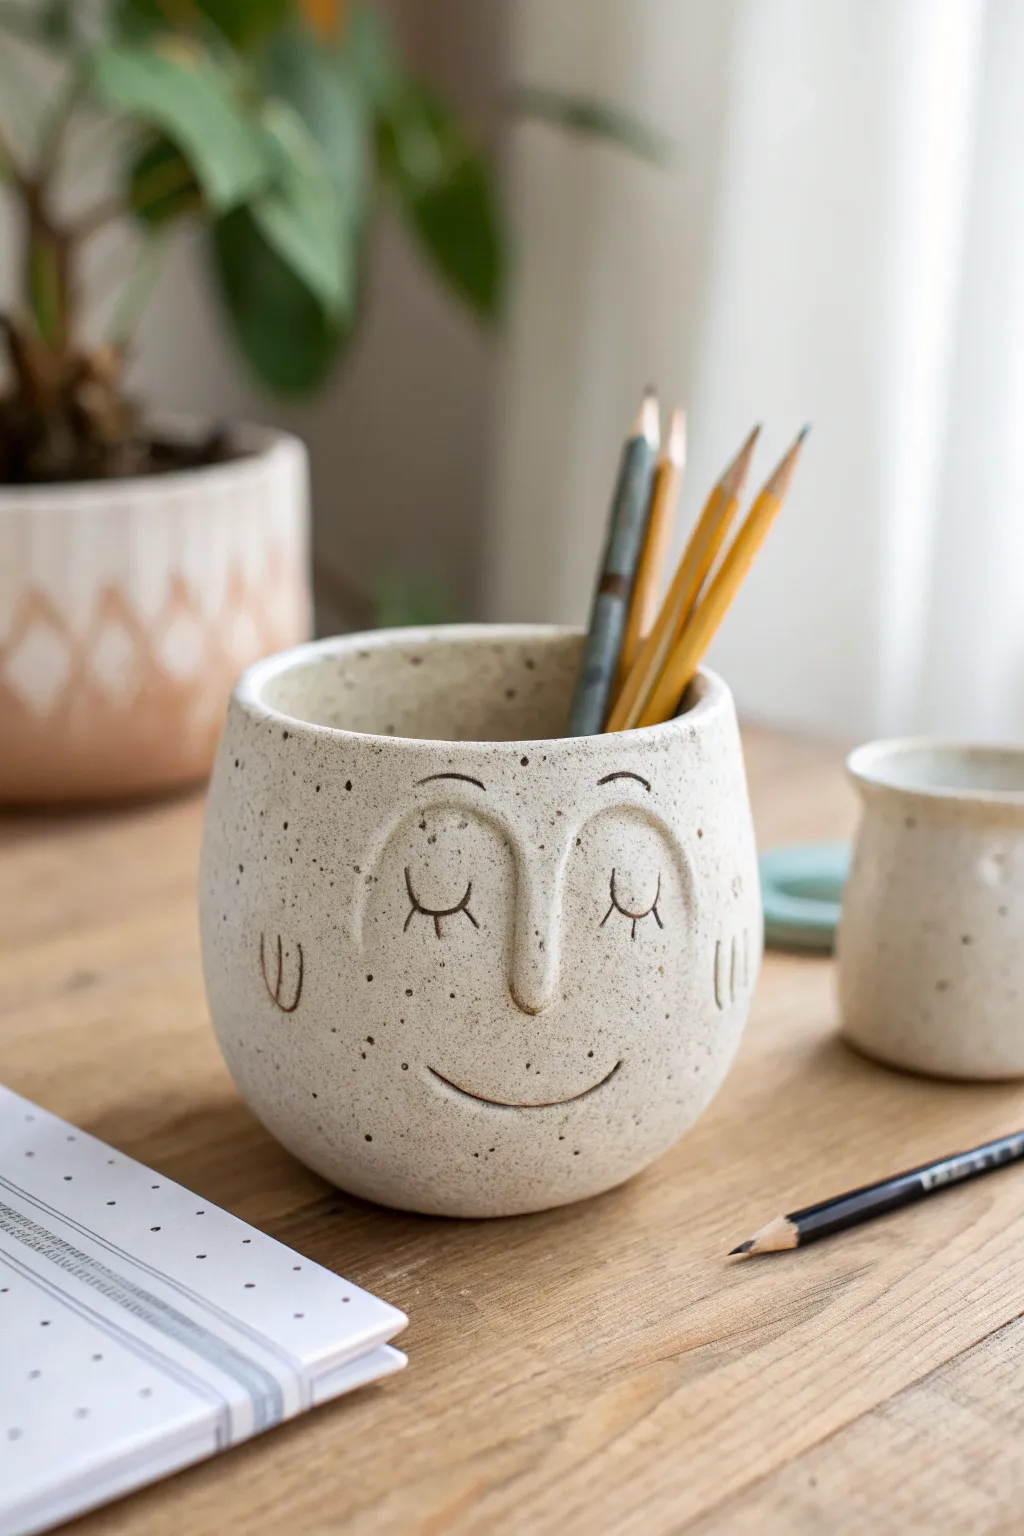
This charming desk companion combines functional pottery with whimsical character design. The speckled clay body features a serene, sleepy face relief that creates an inviting spot to store your favorite pencils and pens.
Step-by-Step
Materials
- Speckled Stoneware Clay (e.g., Laguna Speckled Buff or similar)
- Small sponge
- Water cup
- Wooden modeling tool
- Needle tool
- Scoring tool (or an old fork)
- Black underglaze (optional, for face detail)
- Matte clear glaze
- Plastic bag
Step 1: Forming the Base
-
Prepare the Clay:
Start by wedging a baseball-sized ball of speckled clay to remove air bubbles. Compress it into a smooth, round sphere using your palms. -
Open the Pinch Pot:
Hold the sphere in your non-dominant hand. Press your thumb into the center, stopping about a half-inch from the bottom. This will be the floor of your pot. -
Pinch the Walls:
Gently pinch the clay between your thumb (inside) and fingers (outside). Rotate the ball as you pinch, working from the bottom up to thin the walls evenly to about 1/4 inch thickness. -
Shape the Cylinder:
As you pinch upward, guide the clay into a tall cylinder shape rather than a wide bowl. Gently tap the bottom on the table to create a flat, stable base. -
Refine the Rim:
Use a damp sponge to smooth the top rim. If it’s uneven, you can trim it with a needle tool while slowly rotating the pot on a banding wheel or the table.
Step 2: Sculpting the Face
-
Make the Eyebrow Coil:
Roll a small, thin coil of clay, roughly the thickness of a shoelace. Cut a piece about 3 inches long to form the connected eyebrow-and-nose bridge. -
Attach the Relief:
Score the surface of the pot where the ‘M’ shape of the eyebrows/nose will go, and score the back of your coil. Add a drop of water or slip, then press the coil firmly onto the pot. -
Blend the Edges:
Using a wooden modeling tool, blend the outer edges of the coil into the main pot so it looks seamless, but leave the inner curves raised to define the nose and brow ridge. -
Detail the Nose:
Smooth the central drop of the coil so it forms a gentle, elongated nose. It should fade seamlessly into the pot at the tip.
Pro Tip: Crack Prevention
When attaching the nose coil, ensure both surfaces are scratched up (scored) thoroughly. If they aren’t rough enough, the nose might pop off as the clay shrinks during drying.
Step 3: Drawing Features & Finishing
-
Sketch the Eyes:
Using a needle tool, very lightly trace the closed eyelids. Place them centered under the eyebrow arches you just sculpted. -
Carve the Lines:
Once happy with placement, use the needle tool to carve deeper, confident lines for the curved eyelids and the vertical eyelashes. -
Carve the Smile:
Below the nose, carve a wide, gentle curve for the smile. Add small perpendicular ticks at the ends of the smile line for dimples. -
Add Cheeks (Optional):
Carve three small vertical lines or a small ‘U’ shape on the far left and right sides of the face to suggest flushed cheeks or sideburns. -
Enhance Contrast:
I prefer to paint a tiny amount of black underglaze into the carved lines and then wipe the surface clean with a damp sponge. This leaves the dark color only in the recesses. -
Smoothing:
Do a final pass with a slightly damp sponge to remove any sharp clay burrs or crumbs created during carving. -
Drying:
Cover the pot loosely with plastic for the first day to let it dry slowly, then uncover it until bone dry. -
Firing and Glazing:
After the bisque fire, apply a matte clear glaze to preserve the natural speckled look of the clay. Fire again according to your clay’s instructions (usually Cone 5 or 6).
Troubleshooting: Uneven Walls
If one side feels thicker while pinching, focus pressure only on the thick spots. Establish your wall thickness at the bottom first before moving up to the rim.
Fill your new serene pot with tools and enjoy the calm vibe it brings to your desk


Middle School Character Face Mug
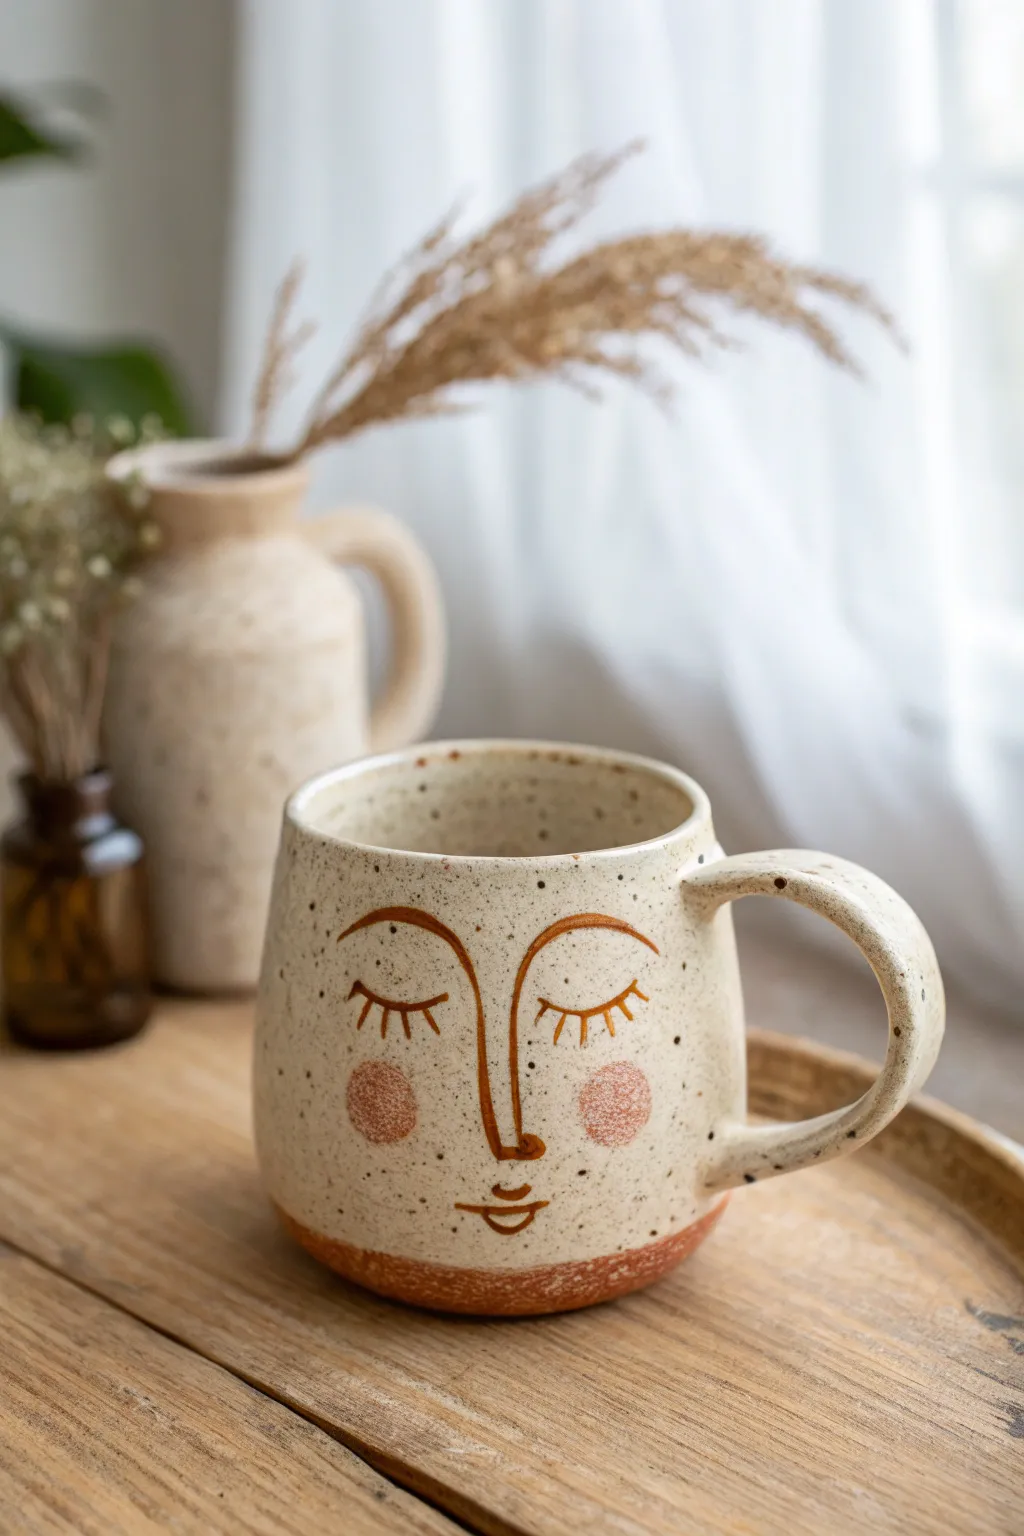
This whimsical project turns a simple slab-built cup into a personality-filled functional piece. With its speckled cream glaze, raw red clay bottom, and sleepy linear expression, this mug captures a serene, modern aesthetic perfect for middle school creatives.
How-To Guide
Materials
- Red earthenware or stoneware clay
- Rolling pin and guide sticks (approx. 1/4 inch thick)
- Fettling knife or needle tool
- Score and slip tool (or fork and water)
- Sponge
- Underglaze pencil or fine liner brush
- Black or brown underglaze
- Pink or terra cotta underglaze (for cheeks)
- Speckled cream or white glaze (glossy)
- Wax resist
- Round paintbrushes (small and medium)
- Kiln
Step 1: Building the Form
-
Roll the Slab:
Begin by wedging your red clay to remove air bubbles. Roll it out into a smooth, even slab using your rolling pin and guide sticks to ensure a consistent 1/4-inch thickness. -
Cut the Body:
Measure and cut a rectangle from your slab. A good size for a standard mug is roughly 10-11 inches long and 4-5 inches tall. Be sure to cut the edges straight and clean. -
Create the Cylinder:
Gently curve the slab into a cylinder. Bevl the short edges at opposite 45-degree angles so they overlap seamlessly without added bulk. -
Join the Seam:
Score the beveled edges aggressively and apply slip. Press the edges together firmly, then use your fingers or a rib tool to smooth the seam inside and out until it disappears. -
Add the Base:
Place your cylinder on a leftover piece of slab. Trace around the bottom, remove the cylinder, cut out the circle, and score/slip both surfaces to join them securely. -
Pull and Attach Handle:
Pull a strap of clay for the handle or roll a coil. Shape it into a ‘C’ or ear shape. Score and slip the attachment points on the mug body and the handle ends, then press firmly to attach. Smooth the joints with a damp finger.
Step 2: Adding the Face Design
-
Bisque Fire:
Allow the mug to dry slowly to the bone-dry stage. Once dry, bisque fire it in the kiln according to your clay body’s specifications. -
Wax the Bottom:
Apply wax resist to the bottom 1/2 inch of the mug’s exterior and the entire underside. I prefer to leave this area unglazed to show off the beautiful red clay body, matching the original image. -
Outline the Features:
Using a fine liner brush and thinned brown or black underglaze (or an underglaze pencil), carefully draw the face. Start with the ‘U’ shape for the nose, running directly into the eyebrow curves. -
Refine the Eyes:
Paint two downward curves for closed eyelids. Add short, distinct lashes pointing downward to emphasize the sleepy, peaceful expression. -
Add the Details:
Draw a small, gentle curve for the mouth. Keep the lines fluid and slightly organic rather than perfectly geometric. -
Paint the Cheeks:
Dip a round paintbrush or a sponge dabber into pink or terracotta underglaze. Gently dab two circular rosy cheeks onto the face. The texture should look a bit soft and powdery, not like a solid sticker. -
Apply Speckled Glaze:
Choose a semi-transparent cream or white glaze that contains specks (often called ‘speckled vanilla’ or similar). If your glaze doesn’t have specks, you can flick a toothbrush loaded with iron oxide over the glaze surface. -
Glazing Technique:
Dip the mug into the glaze (holding it by the waxed bottom area) or brush on 2-3 coats. Be careful not to smudge your underglaze drawing; dabbing the first coat over the design helps prevent smearing. -
Clean and Fire:
Wipe away any glaze beads that may have settled on the wax resist line. Glaze fire the piece to the appropriate cone temperature (usually Cone 5 or 6 for stoneware).
Smudge Prevention
If underglaze smears when brushing clear glaze over it, try ‘biscuiting’ the underglaze first (refiring to a low temp) or simply dab the first coat of glaze on rather than dragging the brush.
Texture Tip
To get that specific earthy look at the bottom, gently wipe the raw clay section with a damp sponge before firing to expose the grog (gritty texture) in the clay body.
Once cooled, your mug is ready to hold warm tea and bring a calm vibe to your morning routine


Middle School Texture Bowl Stamping Party
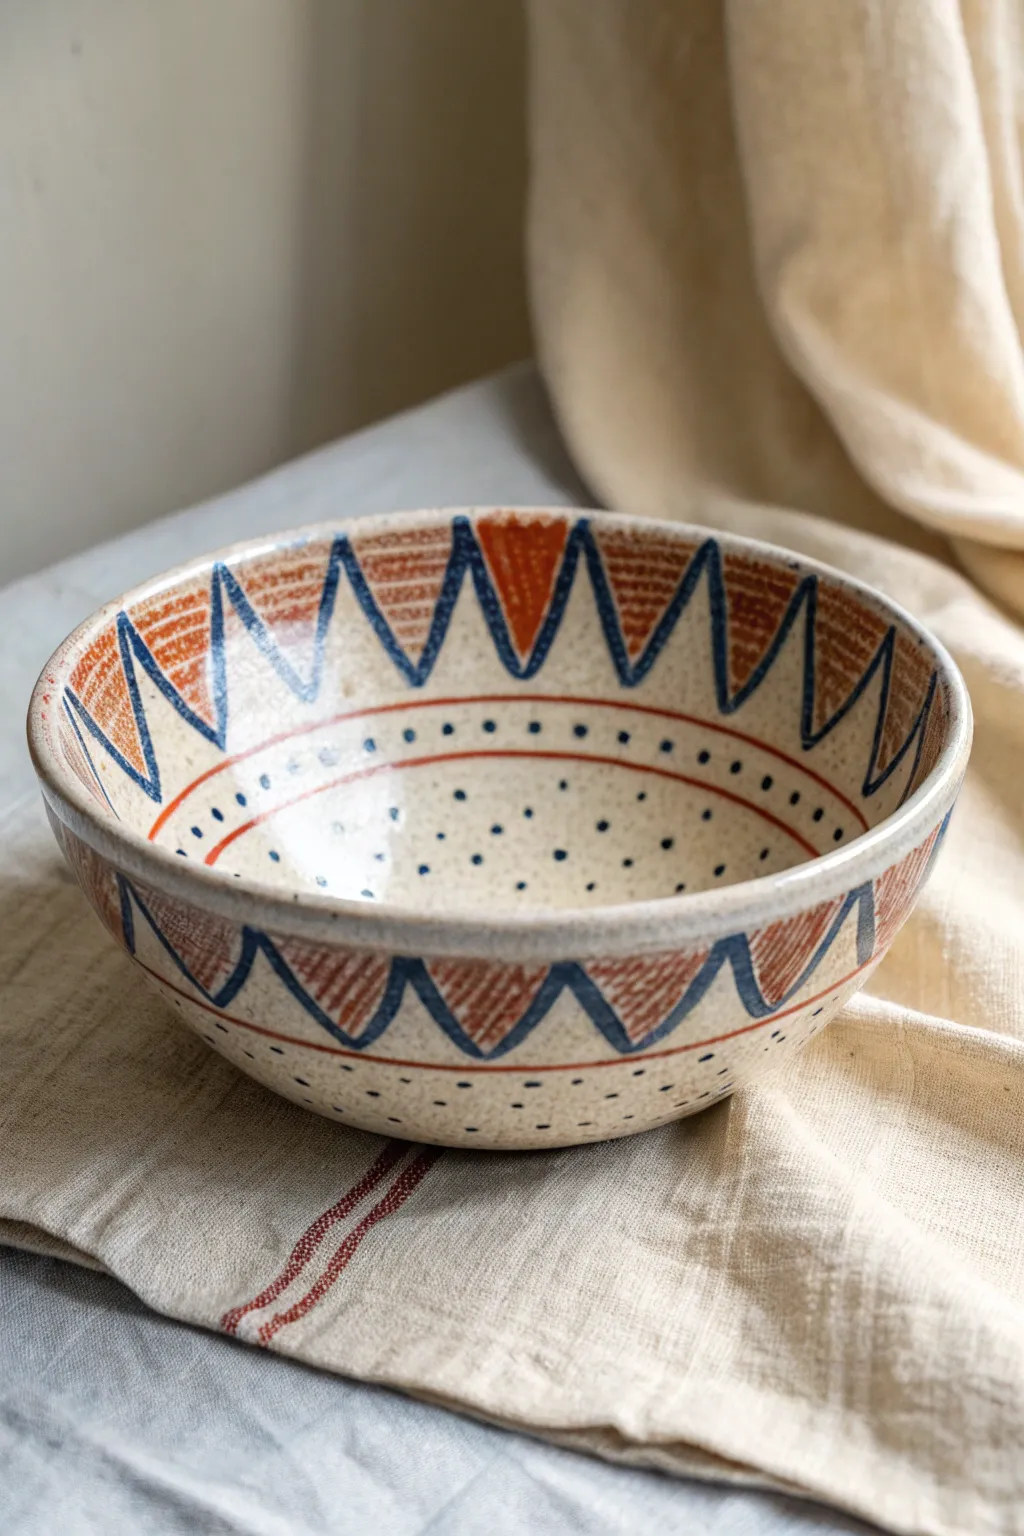
This project combines simple hand-building techniques with striking geometric decoration to create a functional piece of art. The finished bowl features a speckled cream glaze accented with rusty-orange triangles and deep blue outlines, giving it a playful yet sophisticated folk-art vibe.
Step-by-Step Guide
Materials
- Stoneware clay (preferably speckled)
- Small bowl for use as a slump or hump mold
- Rolling pin and canvas mat
- fettling knife or needle tool
- Flexible metal or rubber rib
- Sponge
- Underglaze pencil or distinctively shaped stamp (triangle shape)
- Small detail paintbrushes (round size 0-2)
- Rust/terracotta colored underglaze
- Deep navy blue underglaze
- Clear or transparent matte glaze
Step 1: Forming the Bowl
-
Roll the slab:
Begin by wedging your clay to remove air bubbles. Roll it out into a smooth, even slab about 1/4 inch thick on your canvas mat. -
Cut the circle:
Place your selected bowl mold upside down on the clay slab to trace a circle, or use a template that is slightly larger than your intended finished size. Cut it out using a needle tool. -
Shape the clay:
Gently lift your clay circle and drape it into your slump mold (inside a bowl) or over a hump mold (outside a bowl). Press gently from the center outwards to ensure it takes the shape without trapping air. -
Smooth the surface:
Use a damp sponge or a flexible rib to smooth the clay surface while it is in the mold. This compresses the clay particles and creates that professional, refined finish we want for the inside. -
Define the rim:
While the clay is still leather-hard in the mold, trim the rim to be even. You can run a damp chamois or sponge over the edge to round it off so it isn’t sharp after firing.
Stamp It Out
Make a custom stamp from an old eraser or a small piece of bisque clay to quickly repeat the triangle shapes instead of painting them all by hand.
Step 2: Decorating the Surface
-
Map out the design:
Once the bowl is leather-hard and can hold its shape, remove it from the mold. Lightly sketch a guideline about an inch below the rim on both the inside and outside using a pencil (graphite burns off in the kiln). -
Create the triangle borders:
Using a needle tool or a very fine brush with navy blue underglaze, draw a zig-zag line between the rim and your guideline. Do this for the interior upper band and the exterior middle band. -
Fill the geometric shapes:
Switch to your rust or terracotta underglaze. Using a small brush, carefully fill in the downward-pointing triangles created by your zig-zag line. Apply 2-3 coats for solid, opaque coverage. -
Texture the color:
While the underglaze is slightly damp, I like to gently scratch through the rust triangles with a stiff bristle brush or a scoring tool to create a subtle, hatched texture that mimics the look of fabric. -
Outline the triangles:
Go back over your zig-zag lines with the navy blue underglaze to create a bold, crisp border around your rust shapes. Add a concentric circle line below the triangles to frame the band. -
Add dotted details:
Dip the non-brush end (the handle) of a paintbrush into the navy underglaze. Stamp small dots in a ring around the center of the bowl’s interior and below the exterior band pattern. -
Bisque fire:
Allow the piece to dry completely until bone dry. Fire it to bisque temperature (usually cone 04) to prepare it for glazing.
Step 3: Glazing and Finishing
-
Applying clear glaze:
Wipe the bisque-fired bowl with a damp sponge to remove dust. Dip the entire bowl into a clear or transparent matte glaze. This will seal the clay while letting your underglaze design show through perfectly. -
Clean the foot:
Use a sponge to wipe away any glaze from the bottom foot of the bowl to prevent it from sticking to the kiln shelf. -
Final firing:
Fire the bowl a second time to your clay body’s maturity temperature (likely Cone 5 or 6). Once cooled, your geometric texture bowl is ready for use.
Wobbly Lines?
If your hand is shaky while painting lines, rest your pinky finger on the bowl’s surface or use a banding wheel to slowly rotate the piece while you hold the brush steady.
Now you have a stunning, functional bowl that combines ancient geometric motifs with a fresh, modern feel


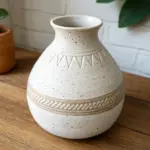
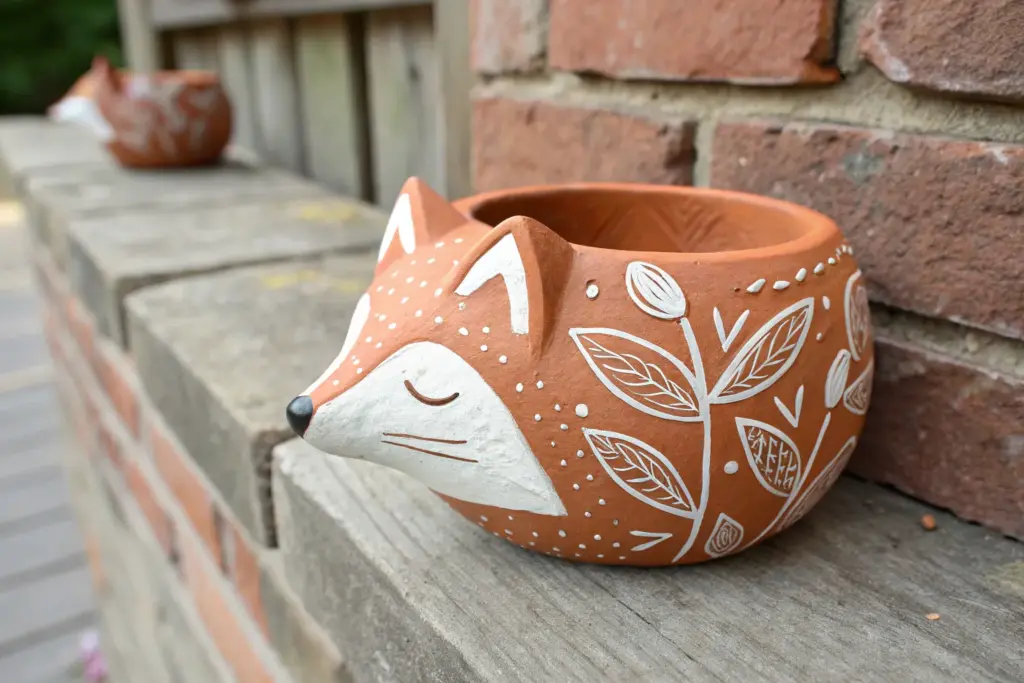
Middle School Exposed-Coil Pots
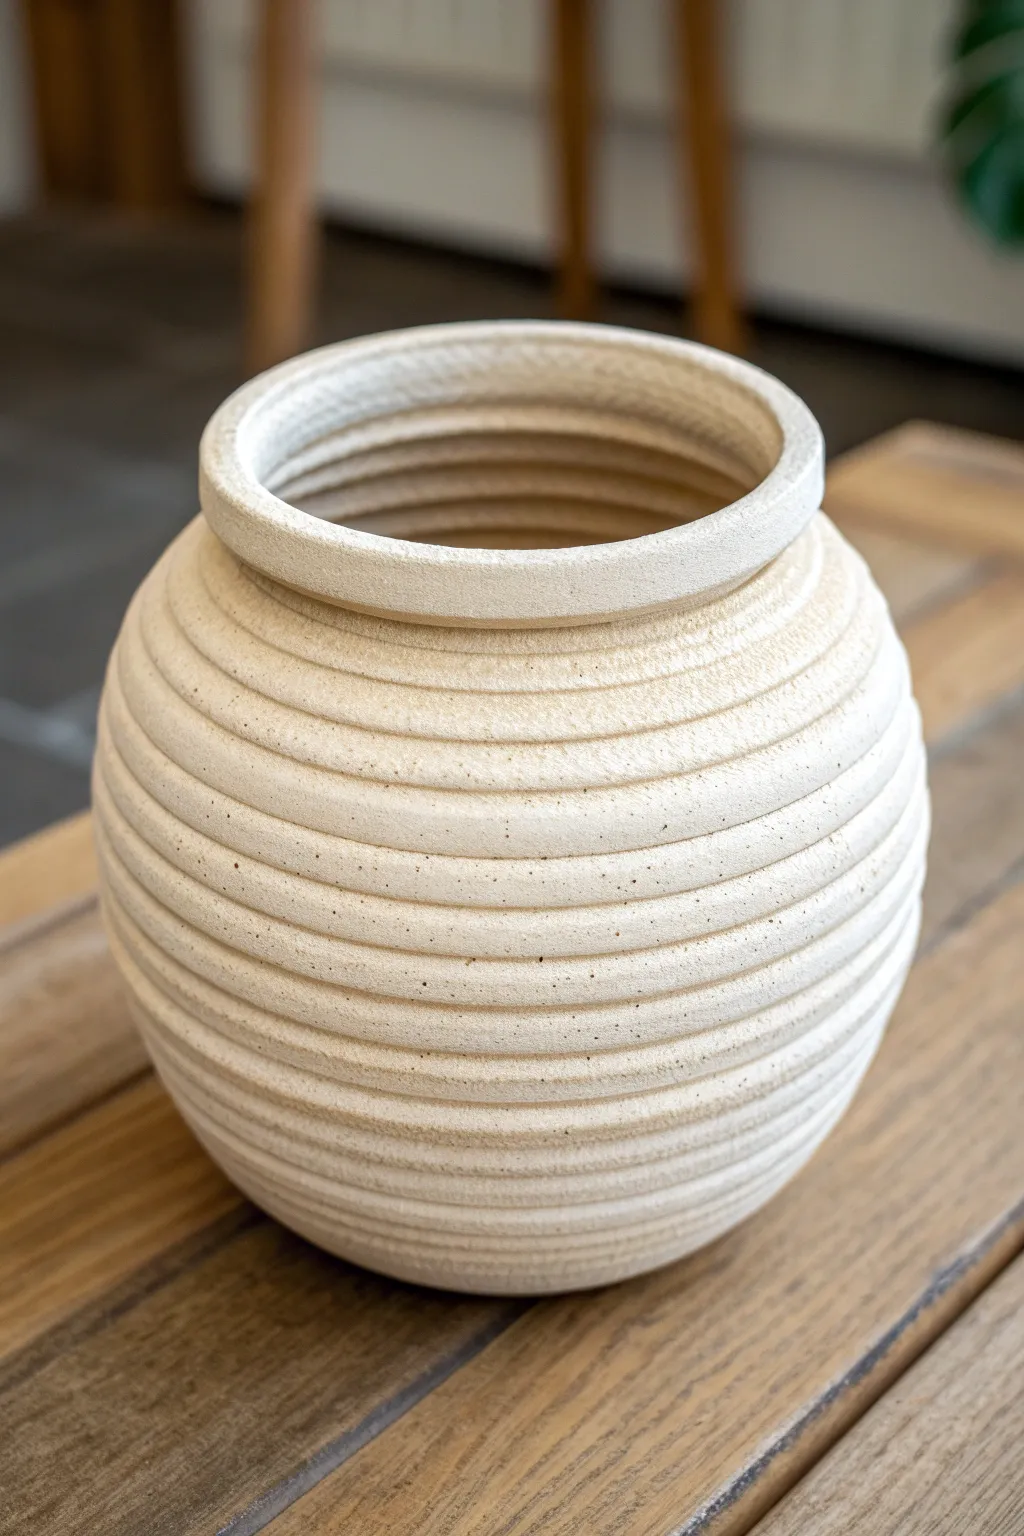
This project takes the classic coil pot technique and elevates it with precision and texture. The result is a beautifully spherical vessel with a satisfying, rhythmic ribbed surface and a natural, sandy finish.
Detailed Instructions
Materials
- Speckled buff stoneware clay (or white clay with grog)
- Clay scoring tool or fork
- Slip (clay mixed with water)
- Rolling pin or slab roller (optional but helpful)
- Wooden modeling tool
- Metal rib tool
- Sponge
- Canvas mat or wooden board
Step 1: Creating the Base
-
Prepare your clay:
Begin by wedging your speckled clay thoroughly to remove air bubbles. This clay type is key for that sandy look, so ensure the grog is evenly distributed. -
Form the floor:
Roll out a slab of clay to about 1/2 inch thickness. Using a needle tool, cut out a perfect circle, roughly 4 inches in diameter, to serve as the base of your pot. -
Score and slip:
Use your scoring tool or a fork to scratch up the outer rim of your circular base. Dab a generous amount of slip onto the scratched area to act as glue.
Step 2: Building the Form
-
Roll the first coils:
Roll out several long coils (snakes) of clay. Aim for a consistent thickness, slightly thicker than a pencil—roughly 1/2 inch thick is ideal for this sturdy look. -
Attach the first layer:
Place your first coil directly on top of the scored edge of the base. Cut the ends at an angle to perform a seamless join where the coil meets itself. -
Blend the inside:
This is crucial: Support the outside with one hand, and use your thumb or a wooden tool to smear the clay from the *coil down onto the base* on the inside only. Do not smudge the outside; we want to keep those ridges visible. -
Build outward:
Add the next 3-4 layers of coils. Place each new coil slightly toward the *outer* edge of the coil below it. This will make the pot get wider as it goes up. -
Score between layers:
Remember to score and slip between every single coil layer. Without this, the coils might separate during drying or firing. -
Continue blending interior:
After every 2-3 coils, stop and smooth the interior completely. A smooth inner wall adds structural integrity. -
Curve inward:
Once you reach the widest point of the belly (about halfway up), start placing coils slightly toward the *inner* edge of the coil below. This technique creates the rounded shoulder of the vase.
Smooth Operator
Use a barely damp sponge during the final smoothing step. Too much water brings the grog (rough sand) to the surface and can make the finish scratchy.
Step 3: Refining and Finishing
-
Shape the rim:
When you reach the top opening, add one final thick coil. Instead of blending it entirely, gently flatten the top to create a distinct, substantial rim like the one in the photo. -
Smooth the ridges:
I like to take a damp sponge and very gently run it horizontally along the outside grooves. You aren’t blending the coils together completely, just softening the sharp edges to look like smooth ribs. -
Refine the profile:
Use a metal rib on the inside of the pot. Press outward gently while supporting the outside to round out any lumpy areas and perfect that sphere shape. -
Final texture check:
If you smoothed too much texture away, use a wooden modeling tool to gently redefine the grooves between the coils. -
Dry slowly:
Loosely cover the pot with plastic for the first day. Coil pots have variable thickness and tension, so slow drying prevents cracks. -
Fire and glaze:
Bisque fire the piece. For the finish shown, apply a matte cream or ‘oatmeal’ glaze that allows the iron speckles from the clay body to bleed through, or leave the exterior unglazed if your clay vitrifies nicely.
Level Up: Extruder Power
Use a clay extruder to create perfectly uniform coils. This mechanical assistance ensures every horizontal ‘rib’ on your vase is exactly the same size.
Now you have a timeless vessel that balances rustic texture with modern geometry

The Complete Guide to Pottery Troubleshooting
Uncover the most common ceramic mistakes—from cracking clay to failed glazes—and learn how to fix them fast.
Middle School Slab Lidded Trinket Box

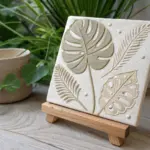
This elegant trinket box teaches precision slab building with a lovely natural finish. The combination of the creamy speckled glaze, the raw terracotta dip, and the delicate leaf carving creates a piece that feels both modern and organic.
How-To Guide
Materials
- White stoneware clay (preferably with speckles)
- Rolling pin
- Two wooden thickness strips (quarter-inch)
- Fettling knife or needle tool
- Ruler and square template (paper or cardboard)
- Scoring tool or serrated rib
- Slip (clay and water slurry)
- Small carving tool or V-gouge
- Loop tool (for lid gallery)
- Soft sponge
- Creamy matte white glaze
- Terracotta or pink underglaze/glaze
- Iron oxide wash or brown underglaze
Step 1: Preparing the Slabs
-
Roll the clay:
Begin by wedging your clay to remove air bubbles. Place the clay between two wooden guide strips and roll it out until it is perfectly flat and uniform in thickness. -
Smooth the surface:
Before cutting, take a soft, slightly damp sponge or a rubber rib and compress the clay slab. This removes canvas texture and prevents warping later. -
Measure and cut:
Using a square template (about 4×4 inches is good for a start) and a ruler, cut out your pieces. You will need one square for the base, one square for the lid, and four rectangular strips for the walls. -
Let them firm up:
This is crucial: Let your cut pieces sit until they are ‘leather hard.’ They should be stiff enough to hold their shape without slumping but still dark with moisture.
Warped Walls?
If your slab walls are bowing inward or outward during assembly, the clay was likely too soft. Let your slabs dry a bit longer next time, or prop the walls up with crumpled newspaper inside while drying.
Step 2: Assembling the Box
-
Score the edges:
Take your scoring tool and roughen up the edges of the base square and the ends of your wall pieces. Apply a generous amount of slip to these scored areas. -
Attach the walls:
Press the first wall onto the base. Repeat with the remaining walls, ensuring you score and slip the vertical seams where the walls meet each other. -
Reinforce the seams:
Roll a very thin coil of soft clay. Press this into the interior corners of the box to act as a reinforcement weld, then smooth it out completely with a modeling tool or your fingertip. -
Top check:
Flip the box upside down gently onto a flat table to ensure the top rim is perfectly level.
Step 3: Fitting the Lid
-
Measure the gallery:
To keep the lid from sliding off, we need a catch or ‘gallery.’ Measure the inner dimension of your box opening. -
Add the catch:
Create a smaller square slab that fits just inside the box opening. Score and slip this smaller square onto the center of the underside of your lid slab. Alternatively, create a flange using coils. -
Refine the fit:
Place the lid on the box. If it’s too tight, shave down the inner catch; if it’s too loose, the lid will wobble, but that is better than not fitting at all. -
Smooth the edges:
With the lid on, use a paddle or flat tool to gently tap the sides, aligning the lid walls with the box walls for a seamless exterior profile.
Clean Carving
When carving the leaf, small clay crumbs (burrs) will form. Don’t brush them away while the clay is wet or you’ll ruin the line. Wait until bone dry, then gently brush them off with a soft brush.
Step 4: Design and Glazing
-
Carve the leaf:
Once the lid is leather hard, use a pencil to lightly sketch a leaf design in the center. Use a small carving tool to incise the lines, varying the depth slightly for visual interest. -
Bisque fire:
Let the piece dry slowly and fully before bisque firing it in the kiln. -
Apply the wash:
Paint iron oxide wash or brown underglaze into the carved leaf lines and the gap where the lid meets the box. Sponge off the excess so the color remains only in the recesses. -
Dip the base:
Dip the bottom third of the box into a pinkish-terracotta glaze (or paint on underglaze). Wipe the very bottom clean so it doesn’t stick to the kiln shelf. -
Glaze the body:
Dip or brush the rest of the box (and the lid) with a creamy matte white glaze. Be careful not to obscure your carved lines too much. -
Fire:
Glaze fire the piece according to your clay and glaze specifications.
Once fired, fill your beautiful new box with jewelry or small treasures to keep them safe
Middle School Clay Whistle Creatures
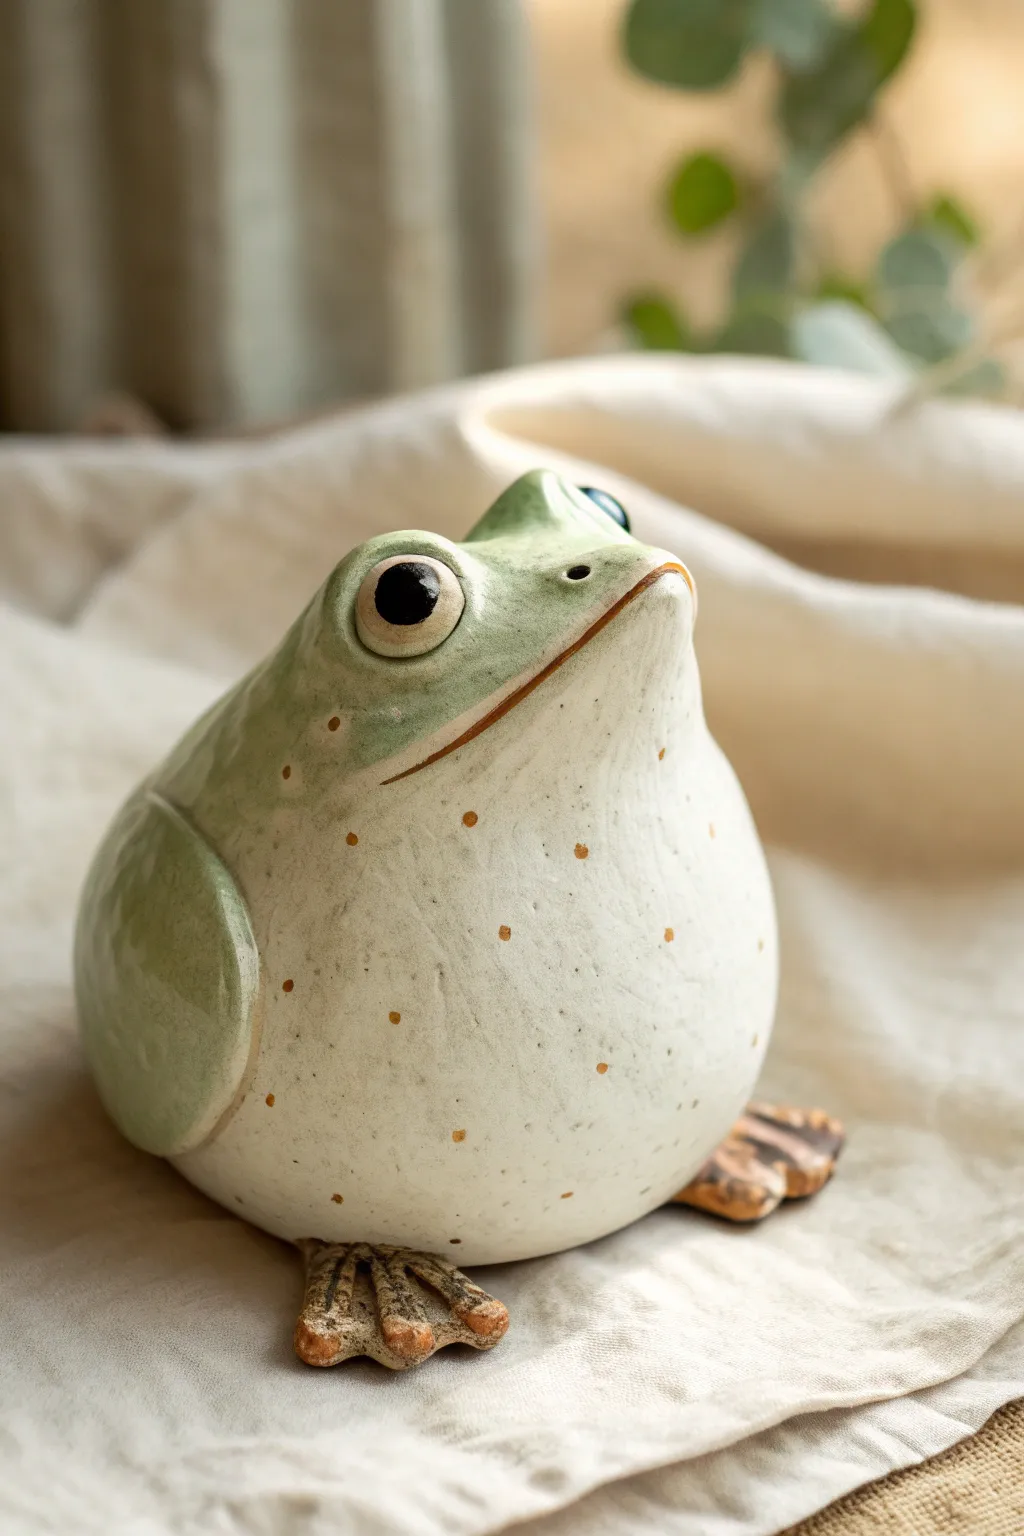
Transform a simple pinch pot into a charming, bulbous frog that doubles as a functional musical instrument. This project combines hand-building techniques with the science of sound to create a delightful, speckled amphibian friend.
Step-by-Step Tutorial
Materials
- Low-fire white earthenware clay (approx. 1 lb)
- Popsicle stick or fettling knife
- Small loop tool
- Slip and score tool (needle tool or fork)
- Small cup of water or vinegar
- Smooth wooden rib or metal rib
- Paintbrushes (flat shader and detail round)
- Underglazes: Light sage green, creamy white, dark brown/black, earthy orange
- Clear glaze (brush-on or dip)
- Sponge
Step 1: Forming the Body
-
Create pinch pots:
Start by dividing your clay into two equal balls about the size of a tennis ball. Press your thumb into the center of each and pinch the walls evenly to create two matching bowl shapes. -
Join the halves:
Score the rims of both pinch pots thoroughly with your needle tool and apply a generous amount of slip. Press the two halves together firmly to create a sealed hollow sphere. -
Shape the frog:
Gently paddle the sphere on your table to flatten the bottom slightly for stability. Then, use your palms to smooth the seam completely, coaxing the form into a slightly taller, pear-like shape that tapers toward the top where the head will be.
Clean Sounds
If the whistle sound is airy or weak, check the airway for clay burrs. The path must be totally smooth. Re-insert the stick and clean the window edge delicately.
Step 2: Creating the Sound Mechanism
-
Form the mouthpiece:
Add a small rectangular block of clay to the back of the frog’s ‘head’ area. Smooth it on securely; this will become the mouthpiece. -
Cut the fipple window:
Use a fettling knife to cut a small square hole (the window) on the underside of the frog’s neck area, just below the mouthpiece. The cut should go straight down into the hollow cavity. -
Create the airway:
Insert a flat popsicle stick through the mouthpiece end. Push it straight through until you can see the stick appear in the window you just cut. The goal is to aim the air directly at the sharp edge of the window—this splitting of the air is what creates the whistle sound. -
Refine the bevel:
Carefully angle the edge of the window on the side opposite the mouthpiece so it is sharp like a blade. I find using a small cleanup tool works best here to get that precise 45-degree angle needed for a clear tone.
Tuning Up
Drill extra holes on the frog’s sides to turn your whistle into an ocarina. Cover holes with fingers to change pitch—larger holes create higher notes!
Step 3: Sculpting Details
-
Add the eyes:
Roll two small balls of clay and attach them to the top of the head. Use your thumb to blend the bottom of the balls into the head seamlesslessly, creating prominent eye ridges. -
Attach the legs:
Roll out two thick coils for the haunches and flatten two leaf-shapes for the feet. Score and slip the haunches to the sides of the body and attach the feet underneath, pressing lines into the toes for webbing. -
Define the mouth:
Use a needle tool or knife to carve a long, curving smile line that wraps around the front of the face, separating the green upper lip from the white belly area. -
Smooth surfaces:
Use a damp sponge or a soft rib to smooth out any fingerprints or rough textures on the frog’s body, ensuring a nice canvas for the glaze.
Step 4: Glazing and Finishing
-
Apply base colors:
Once bisque fired, paint the belly and lower jaw with three even coats of creamy white underglaze. Paint the upper body, legs, and eyelids with a light sage green. -
Paint the feet:
Carefully paint the flat feet with an earthy orange or terra cotta underglaze to give them that distinctive amphibian look. -
Add speckles:
Dip a stiff brush or toothbrush into a watered-down brown underglaze. Run your thumb over the bristles to flick tiny speckles across the belly and sides of the frog. -
Detail the eyes:
Paint the eyeballs white, allow to dry, then add large, solid black pupils. A tiny dot of white inside the black pupil adds a spark of life. -
Clear coat:
Apply two coats of clear glaze over the entire piece (avoiding the bottom of the feet if creating a bare foot ring) and fire again according to clay specifications.
Now you have a glossy, musical creature ready to sit on your shelf or play a tune


What Really Happens Inside the Kiln
Learn how time and temperature work together inside the kiln to transform clay into durable ceramic.
Middle School Clay Bell Chime Set

These hanging chimes combine the earthy warmth of terracotta clay with striking geometric carvings to create a decoration that sounds as lovely as it looks. The set features four bells suspended from a natural branch, adding a rustic and calming touch to any space.
Step-by-Step
Materials
- Terracotta air-dry or kiln-fire clay
- Rolling pin
- Template (paper cone or plastic cup)
- Needle tool or fettling knife
- Loop tool or carving gouge
- Wooden dowel or natural branch (approx. 12 inches)
- Jute twine
- Wooden beads (assorted sizes)
- Sponge and water
- Clay hole cutter or straw
Step 1: Forming the Bells
-
Roll your slabs:
Begin by rolling out your clay on a canvas board to a consistent thickness of about 1/4 inch. You will need enough slab area to cut out four separate bell shapes. -
Cut the templates:
Using a paper cone template or by tracing the arc of a plastic cup, cut out four fan-shaped wedges from the clay slab using a needle tool. -
Shape the cones:
Gently curve each wedge into a cone shape. Overlap the straight edges slightly where they meet. -
Join the seams:
Score the overlapping edges with a needle tool and apply a dab of water or slip. Press the edges together firmly to create a strong seam. -
Smooth the exterior:
Use a damp sponge or your finger to smooth over the seam on the outside so the bell looks like one continuous piece of clay. -
Refine the rim:
Tap the bottom , wide edge of the bell gently on the table to level it out, then smooth the rim with a damp sponge to remove any sharp edges. -
Create the hanging hole:
At the very top point of the cone, use a hole cutter or a straw to punch a clean hole. Make sure it is wide enough for your jute twine to pass through later.
Step 2: Carving and Finishing
-
Let the clay stiffen:
Allow the bells to dry to a ‘leather hard’ stage. The clay should start holding its shape firmly without warping but still be soft enough to carve into. -
Plan your design:
Lightly sketch your geometric patterns onto the clay surface using a needle tool. Triangles, zig-zags, and diamonds work beautifully for this rustic style. -
Carve the lines:
Using a small loop tool, carve out the clay along your sketched lines. I find creating a mix of single lines and double-parallel lines adds nice variety to the texture. -
Clean up burrs:
Once you’ve finished carving, use a slightly damp sponge to wipe away any little clay crumbs or rough burrs created by the carving tool. -
Dry and fire (or seal):
If using kiln clay, fire the bells to bisque temperature. If using air-dry clay, allow them to dry completely for 24-48 hours and seal with a matte varnish.
Slumping Shapes?
If your bells collapse while drying, gently stuff the inside with crumpled newspaper or paper towels to support the walls until the clay becomes leather hard.
Step 3: Assembly
-
Prepare the hanger:
Take your wooden branch or dowel and tie a long piece of jute twine to both ends to create the main hanger for the wall. -
Attach the clappers:
Cut four lengthy pieces of twine. Tie a small wooden bead to the very bottom of each string; this bead will act as the ‘clapper’ inside the bell to make noise. -
String the bells:
Thread the twine up through the inside of the bell and out the top hole. The internal bead should catch inside, while the string continues upward. -
Add top beads:
Thread a larger wooden bead onto the twine right above the bell. This anchors the bell visually and helps it hang straight. -
Hang to the branch:
Tie each bell assembly onto the main wooden branch at varying heights. Using a decorative knot, like a lark’s head or a wrapped knot, adds a professional finish.
Create Contrast
After firing or drying, apply a dark acrylic wash (watered down paint) over the carvings and wipe off the excess. The dark color stays in the grooves, making the pattern pop.
Hang your new chime set near a window or door where a gentle breeze can help show off your hard work
Middle School Tic-Tac-Toe Clay Game
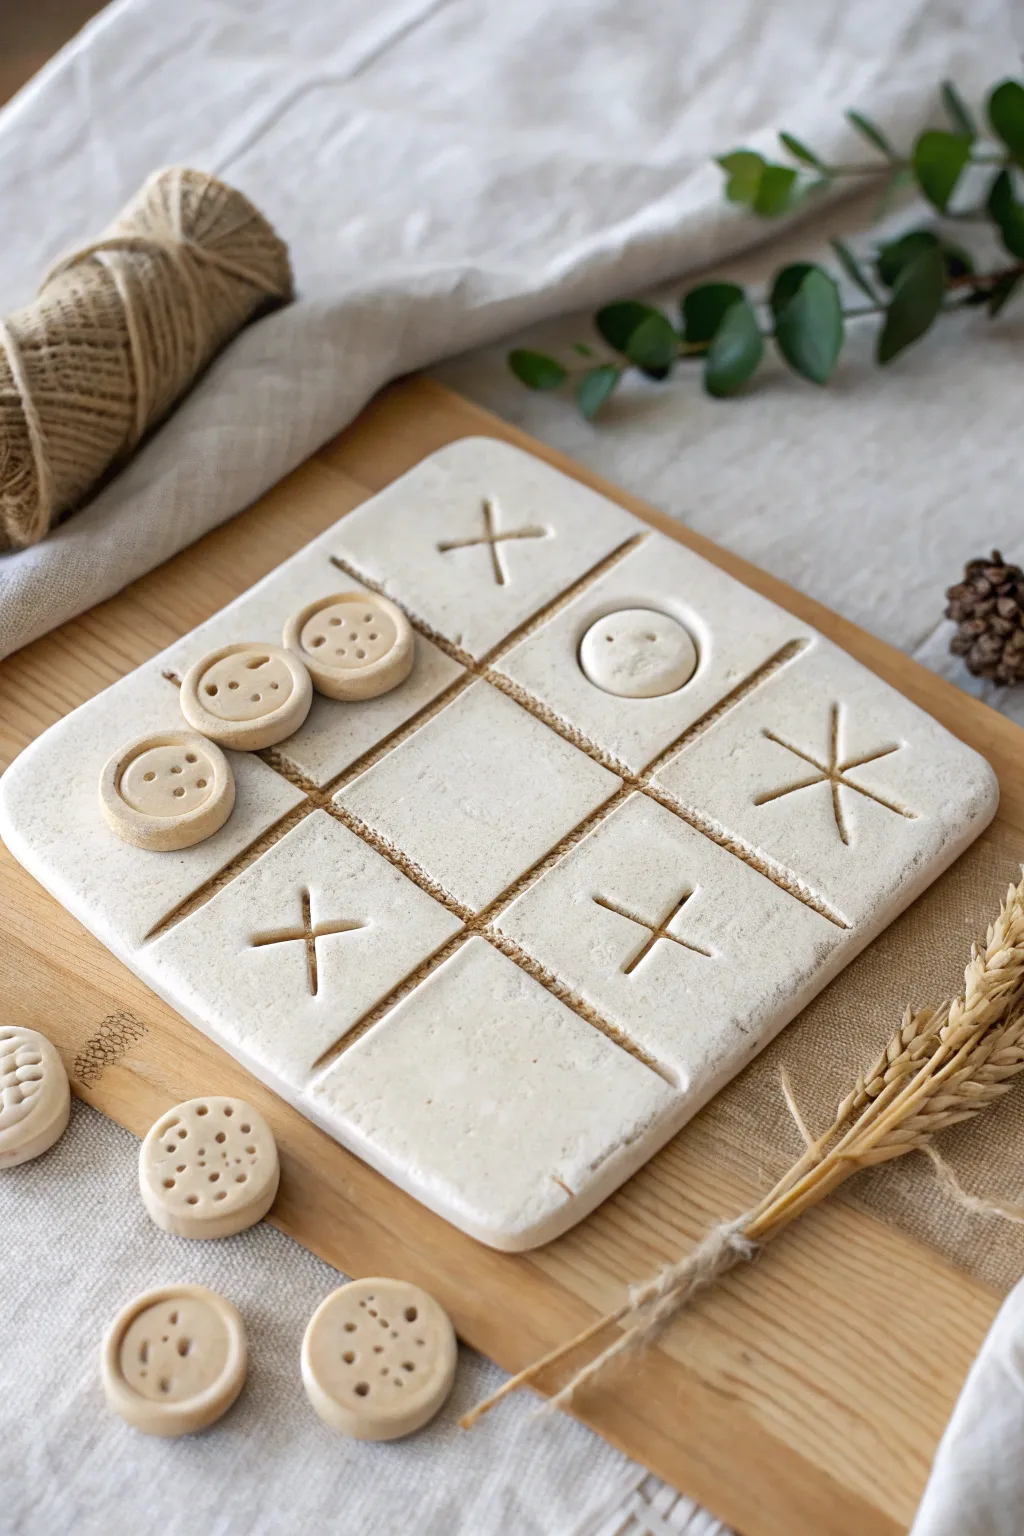
This charming project reimagines the classic pen-and-paper game as a tactile, durable clay set with a lovely natural finish. Students will learn slab-building and incision techniques to create a textured board and matching patterned counters.
How-To Guide
Materials
- Air-dry clay or white stoneware clay
- Rolling pin
- Two wooden guide strips (approx. 1/4 inch thick)
- Ruler or straight edge
- Fettling knife or clay cutter
- Needle tool or wooden skewer
- Small circular cookie cutter (approx. 1 inch)
- Rib tool (wooden or rubber)
- Measuring tape
- Bowl of water and sponge
- Canvas mat or cloth for rolling
- Sandpaper (fine grit)
Step 1: Creating the Board Base
-
Prepare the workspace:
Lay down your canvas mat to prevent the clay from sticking to your table. Wedge a grapefruit-sized ball of clay to remove air bubbles and ensure a uniform consistency. -
Roll the slab:
Place the wooden guide strips on either side of your clay ball. Using the rolling pin, roll the clay out until the pin rests flat on the guides, creating an even slab about 1/4 inch thick. -
Cut the square:
Use your ruler and fettling knife to measure and cut a perfect square. A 5×5 inch or 6×6 inch square works well for a travel-sized game. -
Smooth the edges:
Dip your finger or a slightly damp sponge into water and run it along the cut edges of the square to soften them. You want a rounded, finished look rather than a sharp cut. -
Smooth the surface:
Gently run a rib tool over the top surface of the square to compress the clay and remove any canvas texture.
Warping Woes?
If the corners of your board lift while drying, gently weigh them down with small bean bags or wood blocks. Ensure air can still reach the center of the board to dry evenly.
Step 2: Carving the Grid and Board Pieces
-
Measure the grid:
Using your ruler, lightly mark the clay to divide the square into nine equal sections. Don’t cut yet; just make tiny guide marks. -
Inscribe the lines:
Hold the ruler firmly in place connecting your marks. Drag a needle tool or skewer along the edge to carve the grid lines deeply into the clay. -
Widen the channels:
Go back over your grid lines with a slightly thicker tool or the back of a paintbrush to widen the grooves, making them distinct and visible. -
Carve permanent decoration:
To mimic the designated look, choose a few random squares on the board to permanently carve an ‘X’. Use the needle tool to incise these directly into the slab. -
Add a raised element:
Create one permanent raised ‘O’ on the board by rolling a small ball of clay, flattening it slightly, and scoring and slipping it onto one of the grid squares. This adds visual interest.
Custom Stamp Idea
Make the game pieces unique! Instead of poking holes, press found objects like shells, screw heads, or burlap into the damp game counters for cool, instant textures.
Step 3: Making the Game Pieces
-
Roll remaining clay:
Gather your clay scraps or fresh clay and roll out another slab, keeping it the same thickness as the board. -
Cut the counters:
Use the small circular cutter to punch out at least 5 game pieces (or 10 if you want a set for both players). These will serve as the mobile ‘O’ pieces. -
Texture the pieces:
Using the needle tool, poker, or even a real button, press patterns into the circular pieces. The example uses a pattern of small dots to mimic a button or cracker. -
Refine the shapes:
Smooth the edges of each small circle with a damp finger so they feel nice to hold.
Step 4: Drying and Finishing
-
Slow drying:
Place the board and all pieces on a flat board to dry. Cover them loosely with plastic for the first day to prevent the corners of the board from curling up. -
Check flatness:
I like to flip the board over once a day during the drying process to ensure it dries evenly on both sides and stays perfectly flat. -
Let fully cure:
Allow the clay to dry completely according to the manufacturer’s instructions, usually 24-48 hours depending on humidity. -
Sand and soften:
Once bone dry, take fine-grit sandpaper and gently rub away any burrs or sharp bits on the edges of the board and the game pieces. -
Optional sealing:
You can leave the natural stone look, or apply a matte varnish to protect the clay from dirt and oils from handling.
Now you have a timeless, handcrafted game set ready for play or display.

TRACK YOUR CERAMIC JOURNEY
Capture glaze tests, firing details, and creative progress—all in one simple printable. Make your projects easier to repeat and improve.
Middle School Cuneiform Message Tablet
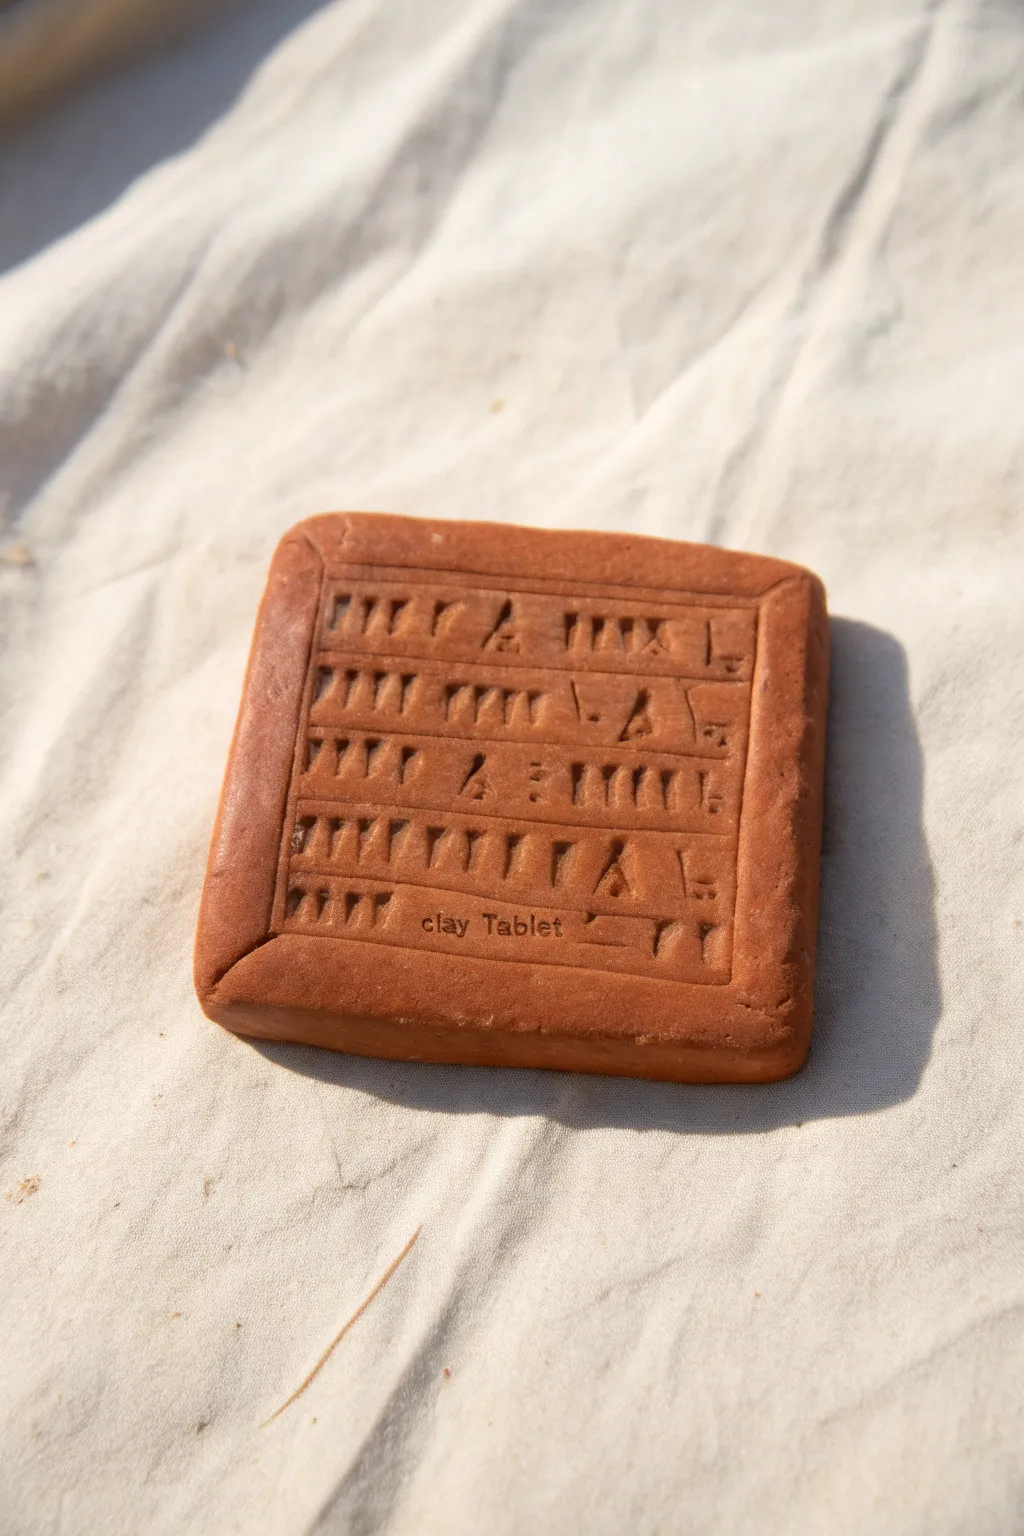
Travel back to ancient Mesopotamia by creating your own historic artifact using simple clay techniques. This project replicates the look of an ancient cuneiform tablet, complete with wedge-shaped markings and a distinctive terracotta finish.
Step-by-Step Guide
Materials
- Terracotta colored air-dry clay (or polymer clay)
- Rolling pin or smooth cylindrical object
- Ruler
- Wooden chopstick (square profile is best)
- Butter knife or clay cutter
- Small bowl of water
- Wax paper or craft mat
- Optional: Alphabet stamp set
Step 1: Shaping the base
-
Condition the clay:
Start by taking a handful of terracotta clay and warming it up in your hands. Knead it thoroughly until it is pliable and free of cracks. -
Form a ball:
Roll the conditioned clay into a smooth, tight ball between your palms to eliminate major air pockets. -
Initial flattening:
Place the ball on your wax paper and press it down firmly with the palm of your hand to create a thick puck. -
Roll the slab:
Use a rolling pin to flatten the clay evenly until it is about 1/2 inch thick. You want it substantial, not flimsy. -
Cut the square:
Using a ruler and a butter knife, trim the edges of your rounded slab to create a square or rectangle shape, roughly 4×4 inches. -
Create the pillow shape:
Gently tap the cut edges of the square with the flat side of your ruler to blunt them. I like to smooth the corners with a wet fingertip to give it that worn, ancient look.
Stylus Secrets
Real scribes used reeds for styluses. To mimic this perfectly, use a square chopstick and sand one end into a sharp chisel shape for crisper wedges.
Step 2: Inscribing the Tablet
-
Define the writing area:
Using the ruler’s edge, gently press an inner border about 1/4 inch from the outside edge. Don’t cut through; just make an indentation. -
Create guidelines:
Press horizontal lines across the inner square to create rows for your text. Space them evenly, leaving enough room for your symbols. -
Prepare the stylus:
Take your square chopstick. The sharp corner of the square end will act as your stylus to create the wedge shapes. -
Practice the wedge:
Test on a scrap piece of clay first. Press the corner of the chopstick into the clay and pivot slightly to make a triangle or wedge shape. -
Start writing:
Begin pressing wedge shapes into the top row. Combine vertical, horizontal, and diagonal wedges to mimic real cuneiform characters. -
Fill the rows:
Work your way down the tablet, row by row. Vary the patterns of the wedges to make it look like a distinct message. -
Add a modern touch:
If you have small alphabet stamps, gently press a label like ‘clay Tablet’ or your initials into the bottom row for a museum-label effect.
Step 3: Finishing Touches
-
Detail the border:
Use the chopstick to add small notches or diagonal lines to the corner areas of the border frame for added texture. -
Smooth imperfections:
Dip your finger in a tiny bit of water and very lightly brush over any clay crumbs or sharp ridges raised by the carving. -
Check for flatness:
Ensure the tablet hasn’t warped while you were writing. Gently press it flat against the table one last time. -
Dry the artifact:
Let the clay air dry for 24-48 hours. Turn it over halfway through the drying process to ensure the bottom dries evenly.
Crackled Finish
For an ancient aesthetic, let the clay dry slightly before writing. The surface will crack slightly as you press the tool in, looking centuries old.
Once fully dry, you will have a durable piece of history ready for display on a shelf or desk
Middle School Collaborative Relief Tile Mural

This stunning collaborative mural brings together individual clay tiles to create a unified masterpiece of texture and form. With a mix of creamy white and warm terracotta tones, repeating patterns like sunbursts, waves, and scales flow together to create a cohesive, large-scale installation.
Detailed Instructions
Materials
- White stoneware clay (mid-fire)
- Terracotta or red stoneware clay (for accents)
- Clay slab roller or rolling pins
- Wooden guide strips (1/2 inch thick)
- Square tile cutters or templates (6×6 or 8×8 inches)
- Loop tools and carving tools
- Fettling knife
- Texture tools (shells, stamps, textured rollers)
- Slip and scoring tool
- Clear matte glaze (optional)
- Tile adhesive or mounting board
- Wooden framing trim (optional)
Step 1: Planning and Design
-
Brainstorm themes:
Gather your group and decide on a unifying theme. The example uses organic patterns like water, sun rays, wind, and scales. Sketch out a master grid on paper to see how lines might flow from one tile to the next. -
Assign tile sections:
Cut your paper grid into squares and distribute them to students. This paper square becomes their ‘map’ for where their design lines need to enter and exit the tile to connect with neighbors.
Warp-Free Zone
To prevent curling corners, dry tiles between two pieces of drywall (sheetrock). The gypsum absorbs moisture evenly from both sides.
Step 2: Slab Construction
-
Roll the slabs:
Using a slab roller or rolling pin with guide strips, roll out the white stoneware clay to a uniform thickness, ideally about 1/2 inch. Consistency is key here to ensure the tiles dry flat. -
Cut the shapes:
Use a square cutter or a template and fettling knife to cut precise squares. I find it helpful to cut them slightly larger than the final desired size to account for shrinkage during firing. -
Smooth the edges:
Compress and smooth the cut edges with a damp sponge or your finger. Sharp clay edges can be brutal after firing, so round them off slightly now.
Cracked Connectors?
If added clay pieces pop off during drying, you didn’t score enough. Vinegar works great as a slip substitute to really bond damp clay parts.
Step 3: Creating Relief and Texture
-
Establish the main lines:
Using the paper sketch as a guide, lightly trace the primary design lines (the waves, the rays) onto the wet clay. Ensure the entry and exit points match the master plan. -
Carve the relief:
Use loop tools to carve away background areas, leaving the design raised (bas-relief). Create depth by varying how deep you carve, but be careful not to trigger cracking by going too thin. -
Add terracotta accents:
For the two-tone look seen in the example, roll thin coils or small slabs of the red terracota clay. Score and slip these onto the white tile to create raised waves or geometric lines. -
Texturizing:
Press textures into specific sections. You can use stamps for the ‘scale’ patterns, or rough tools to stipple the background behind a spiral. Contrast between smooth and rough areas makes the design pop. -
Refining details:
Go back in with a modeling tool to clean up the seams where the red and white clays meet. The distinctive look comes from clean, sharp transitions between materials.
Step 4: Drying and Firing
-
Slow drying process:
Place the finished tiles on a drywall board or canvas. Cover them loosely with plastic to dry very slowly over several days. Flip them occasionally to prevent warping. -
Bisque fire:
Once bone dry, bisque fire the tiles to the appropriate cone (usually Cone 04 or 06). Stack them carefully in the kiln. -
Glazing (Optional):
For the natural matte look in the photo, you might leave the clay raw. If you want protection, brush on a very thin coat of clear matte glaze, or just wash the textured areas with a dark oxide wash to enhance depth. -
Final firing:
Fire the tiles to maturity (Cone 5/6 for stoneware). Ensure flat firing to keep the tiles distinct and square.
Step 5: Installation
-
Prepare the substrate:
Cut a piece of plywood or MDF to the size of your total grid. Provide a border if you plan to frame it. -
Layout and adhere:
Arrange the fired tiles on the board to confirm the pattern flow. Use a strong construction adhesive or tile mastic to glue them down, using spacers to keep gaps even. -
Add the trim:
To mimic the ‘shelf’ look in the image, attach a wooden ledge below the tiles and simple wooden molding around the perimeter.
Step back and admire how the individual artistic voices blend into a single, flowing tapestry of texture
Middle School Slab Fantasy House
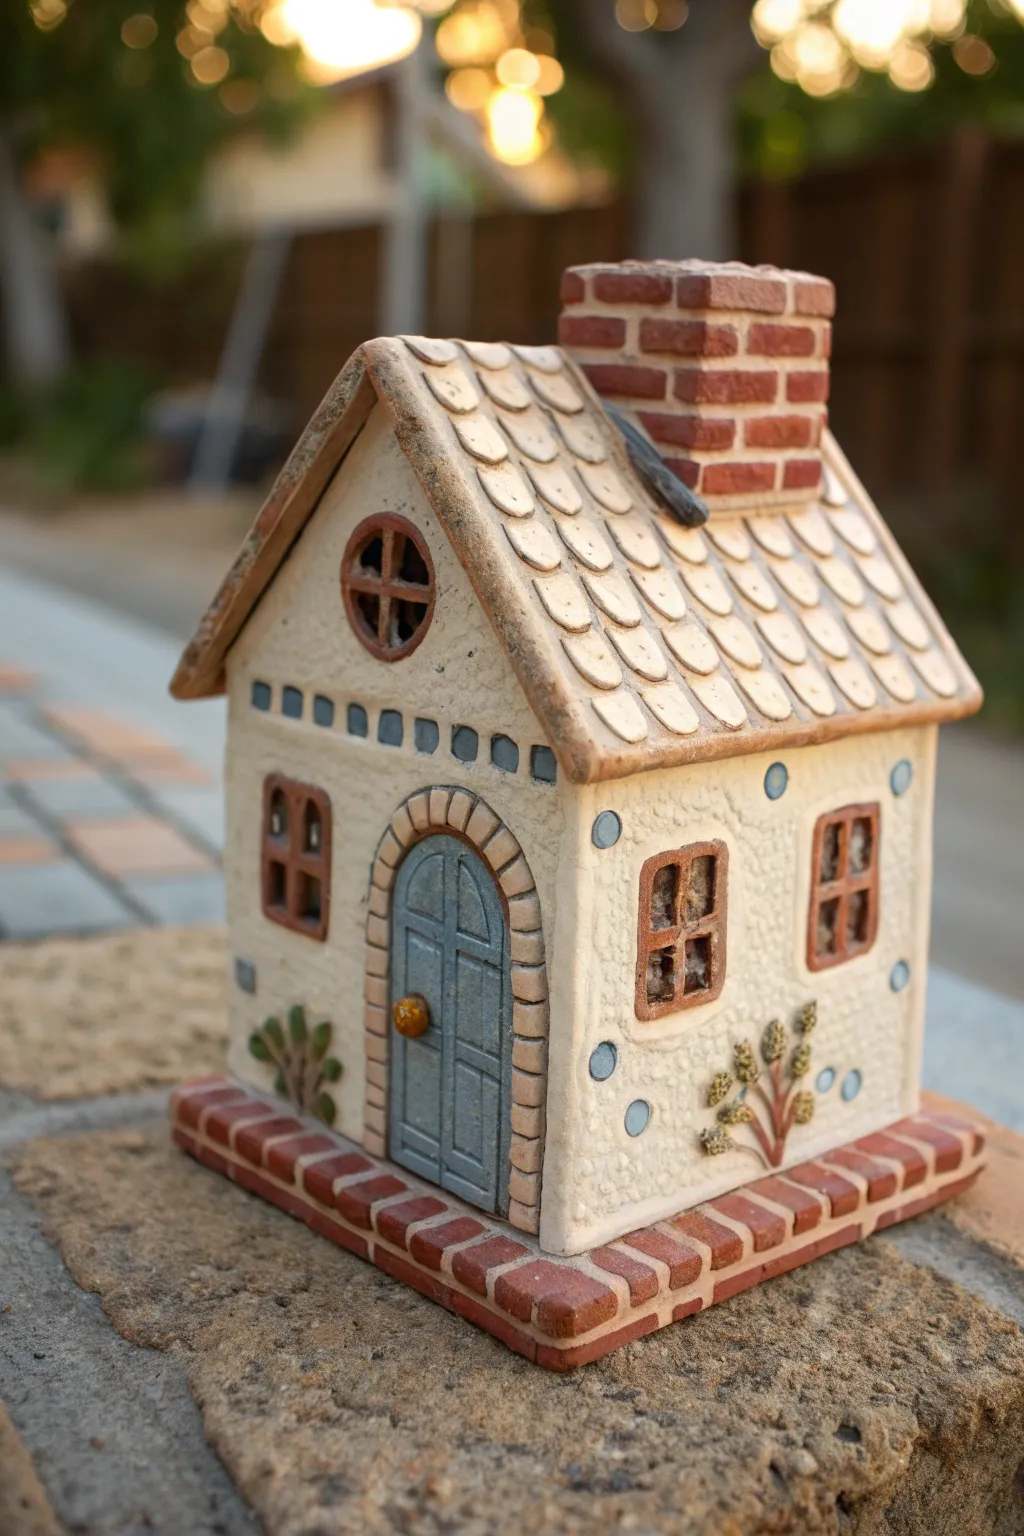
This charming ceramic house project teaches students the fundamentals of slab construction while encouraging creative surface decoration. The finished piece features a textured roof, brick details, and a welcoming arched doorway, perfect for a garden accent or a tea light holder.
Step-by-Step
Materials
- Low-fire white earthenware clay (or stoneware)
- Dough roller or slab roller
- Fettling knife or needle tool
- Ruler and template paper/cardstock
- Scoring tool (serrated rib or fork)
- Slip (clay and water mixture)
- Underglazes: Brick red, dusty blue, slate grey, brown, green
- Clear transparent glaze
- Various loop tools for carving
- Small round paintbrushes
- Wooden modeling tools
Step 1: Creating the Structure
-
Prepare the templates:
Before touching clay, sketch out your house dimensions on cardstock. You will need two rectangular side walls, two peaked walls (for the front and back), and two rectangular roof pieces that are slightly wider than the walls to create an overhang. -
Roll the slabs:
Roll out a large slab of clay to an even ¼-inch thickness. Compress the clay on both sides with a rubber rib to smooth the surface and align the clay particles, which helps prevent warping later. -
Cut the components:
Place your templates onto the slab and trace around them with a needle tool. Cut out all four walls, the two roof pieces, and a square base piece. Let these stiffer up slightly to a ‘soft leather-hard’ stage so they can stand up. -
Assemble the walls:
Score (scratch) and slip the edges of your walls where they will join. Press the side walls against the peaked front and back walls. Add a thin coil of clay to the interior corners and smooth it down for reinforcement. -
Attach the roof:
Bevel the top edges of the peaked walls slightly to match the angle of the roof. Score, slip, and attach the two roof slabs, ensuring they meet at the peak and overhang the sides. -
Build the chimney:
Construct a small rectangular chimney from leftover slab scraps. Cut the bottom at an angle so it sits flush against the sloped roof, then score and slip it into place.
Step 2: Adding Texture and Detail
-
Carve the roof tiles:
Using a U-shaped loop tool or a modeling tool, carve overlapping scallop shapes into the roof slabs. Start from the bottom edge and work your way up to the peak to mimic shingles. -
Create the brick foundation:
Roll a long, flat strip about ½ inch thick and wrap it around the base of the house. Use a needle tool to incise vertical lines, creating a brick pattern. -
Form the doorway:
Roll a thin slab and cut out an arch shape for the door. Attach it to the front wall. Roll a thin coil to frame the arch, creating a stone surround. Use a needle tool to draw vertical planks on the door. -
Add windows:
Cut small square openings on the sides and a circle in the gable. Frame them with thin clay coils. Add a ‘plus sign’ of clay inside each window to create mullions. -
Sculpt decorative elements:
Roll tiny balls of clay to create polka dots or flowers on the walls. Add small coils for vines and leaves near the base. Don’t forget a tiny round doorknob.
Clean Seams
When joining walls, use a damp paintbrush to smooth the outer seams immediately. This erases the join line and makes the house look like one solid piece rather than glued parts.
Step 3: Glazing and Finishing
-
Bisque fire:
Allow the house to dry slowly under plastic for a few days to prevent cracking, then bisque fire it in the kiln. -
Apply base colors:
Paint the roof shingles with a creamy beige underglaze. Use a dusty blue for the door and circle accents, and a brick red for the chimney and base foundation. -
Enhance text ure:
I find that wiping a slightly darker wash over textured areas like the roof helps pop the details. Wipe away the excess with a sponge so the color sits only in the recesses. -
Paint details:
Use a fine liner brush to paint the window frames brown and add greenery to your sculpted vines. Leave the main walls the natural white of the clay or paint them a soft cream. -
Final glaze and fire:
Apply a coat of clear transparent glaze over the entire piece to seal it and give it a glossy finish. Fire the piece a second time to the glaze temperature.
Level Up: Luminary Effect
Before the clay dries, cut the window panes all the way through the walls. This turns your sculpture into a functional luminary that glows when an LED tea light is placed inside.
Once fired, you’ll have a durable piece of architectural art ready for display