I love mini clay art because you get all the satisfying sculpting and detail work without committing to a giant project. Whether you’re using polymer clay or air-dry clay, these tiny ideas are perfect for quick wins and seriously cute results.
Kawaii Toast and Egg Minis
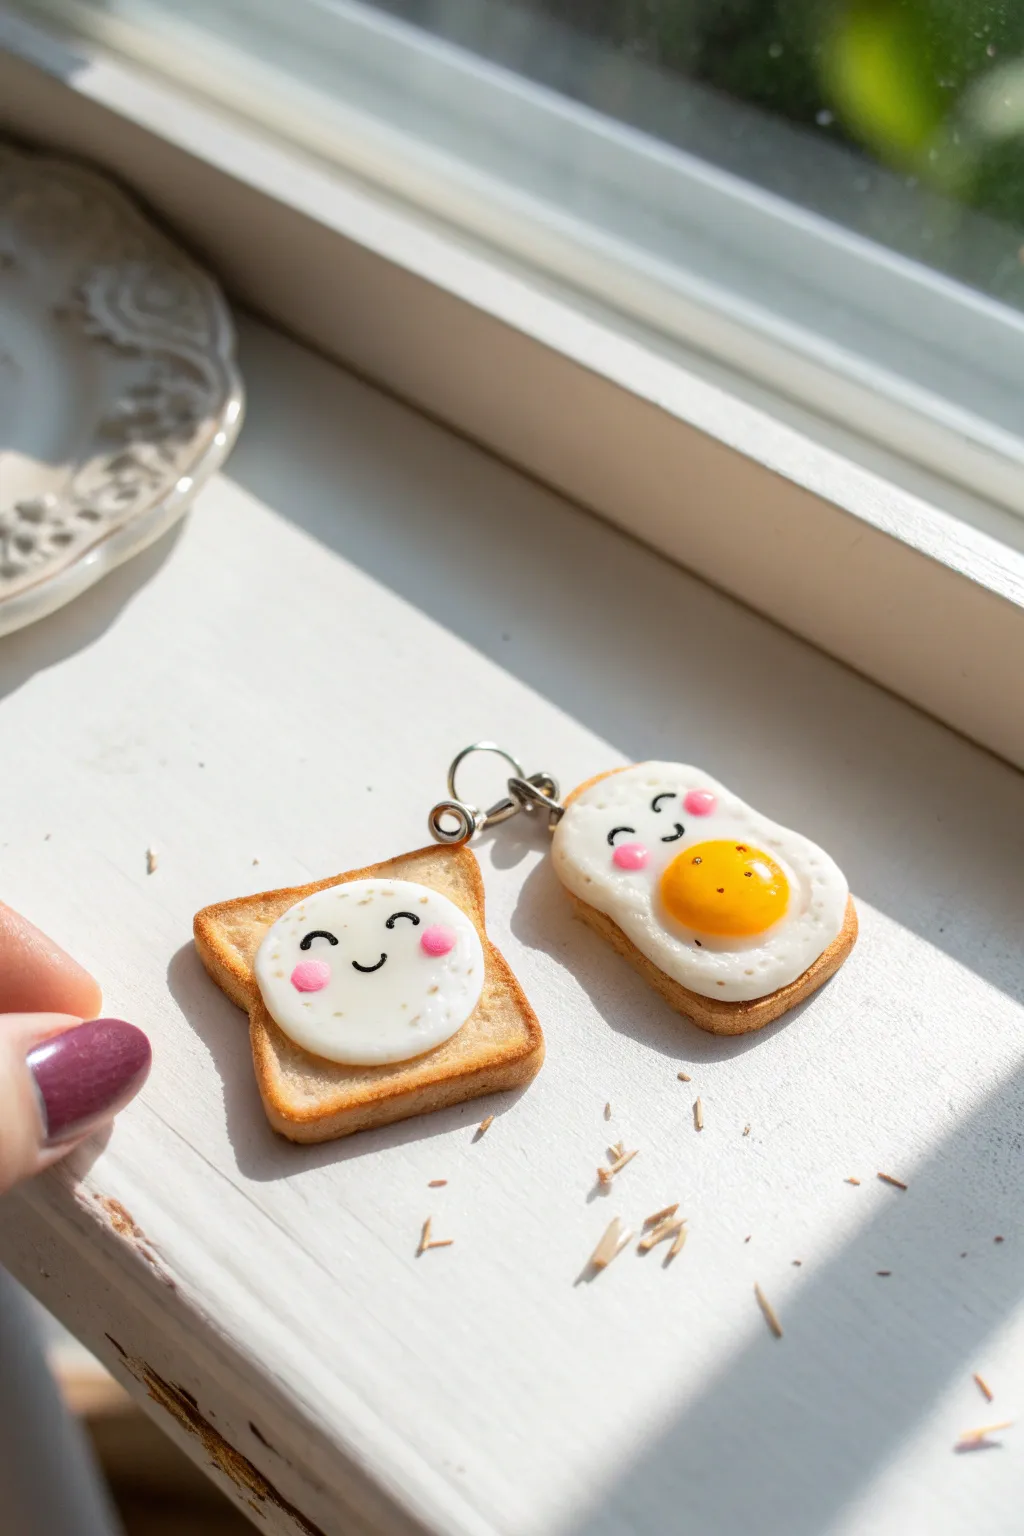
Brighten up your accessories with this adorable duo featuring a happy slice of toast and a sunny-side-up friend. These polymer clay charms capture the cozy warmth of breakfast with realistic texturing and sweet, smiling expressions.
How-To Guide
Materials
- Polymer clay (white, translucent, yellow, ecru/beige)
- Soft artist pastels (brown, orange, yellow ochre)
- Liquid polymer clay (translucent)
- Black acrylic paint
- Pink acrylic paint or pink clay
- Paintbrush (small and fine-detail)
- Toothbrush or texturing tool
- Needle tool or toothpick
- Blade or X-acto knife
- Ball stylus tool
- Jump rings and jewelry pliers
- Eye pins
- Gloss glaze (UV resin or polyurethane varathane)
Step 1: Baking the Bread
-
Mix the Dough:
Start by mixing white clay with a small amount of ecru and translucent clay. You want a light, airy bread color that looks slightly baked, not stark white. -
Shape the Slices:
Roll the clay into a thick sheet (about 4-5mm). Cut out two squares. For the toast slice, indent the top slightly to form the crust shape. For the egg-shaped toast, cut the dough to match the irregular wavy shape of a fried egg. -
Texture the Surface:
Using a clean toothbrush or a ball of crumpled aluminum foil, tap firmly all over the surface of both clay pieces. This creates those realistic airy bread pockets. -
Shade the Crusts:
Shave some brown and yellow ochre chalk pastels into a powder. Use a dry brush to dust the edges of your toast shapes. Build the color up slowly—darker on the very edge, fading inward for that perfect golden-brown toast look.
Needle Tool Secret
For ultra-realism, use a needle tool to gently tear and pull at the clay on the sides of the toast bread. This mimics the rough, torn texture of actual bread better than a toothbrush alone.
Step 2: Frying the Eggs
-
Form the Whites:
Mix white clay with a tiny bit of translucent clay. For the square toast, flatten a small round disk. For the shaped toast, create a wavy, irregular layer that matches the underlying bread shape but leaves a visible crust border. -
Attach the Whites:
Press the white shapes firmly onto their respective toast bases. Smooth the edges down slightly so they look melted onto the bread rather than just sitting on top. -
Create the Yolk:
Mix yellow clay with a touch of orange for a rich yolk color. Roll a small ball and press it onto the larger egg-shaped charm. Flatten the dome slightly so it isn’t a perfect sphere. -
Add Eye Pins:
Before baking, insert a small metal eye pin into the top of each charm. You may need to trim the pin wire so it doesn’t poke through the other side.
Level Up: Butter It Up
Make a tiny square of pale yellow clay and place it on a corner of the toast before baking. Use liquid clay to make it look like it’s melting for an extra delicious detail.
Step 3: Bringing them to Life
-
First Bake:
Bake the charms according to your clay package instructions (usually 275°F/135°C for 15-30 minutes). Let them cool completely. -
Paint the Faces:
Using a very fine detail brush and black acrylic paint, carefully draw two small curved eyes and a tiny smile on the white of the egg and the yolk. Keep the lines thin for maximum cuteness. -
Blushing Cheeks:
Dip a ball stylus or the end of a toothpick into pink paint. Dot tiny cheeks just below the eyes. Alternatively, you can use dry pink pastel powder applied with a cotton swab for a softer look. -
Glaze the Yolk:
Mix a drop of yellow food coloring or yellow glass paint into liquid polymer clay or resin. Carefully dome a drop over the yellow yolk area only. This makes it look wet and runny. -
Textured Speckles:
Dilute a tiny bit of brown paint with water so it is very thin. Flick the bristles of a toothbrush or use a stiff brush to spatter tiny speckles over the egg white on the square toast, mimicking pepper or grill marks. -
Final Seal:
If using resin for the yolk, cure it under a UV lamp. I recommend sealing the bread areas with a matte varnish to protect the chalk shading, while keeping the egg white satin or glossy. -
Assembly:
Once everything is dry and cured, use pliers to open a jump ring. Loop it through the eye pins of both charms to connect them together, or attach them to a keychain finding.
Now you have a charming breakfast set ready to hang on your bag or keys


Tiny Donut and Pastry Charms
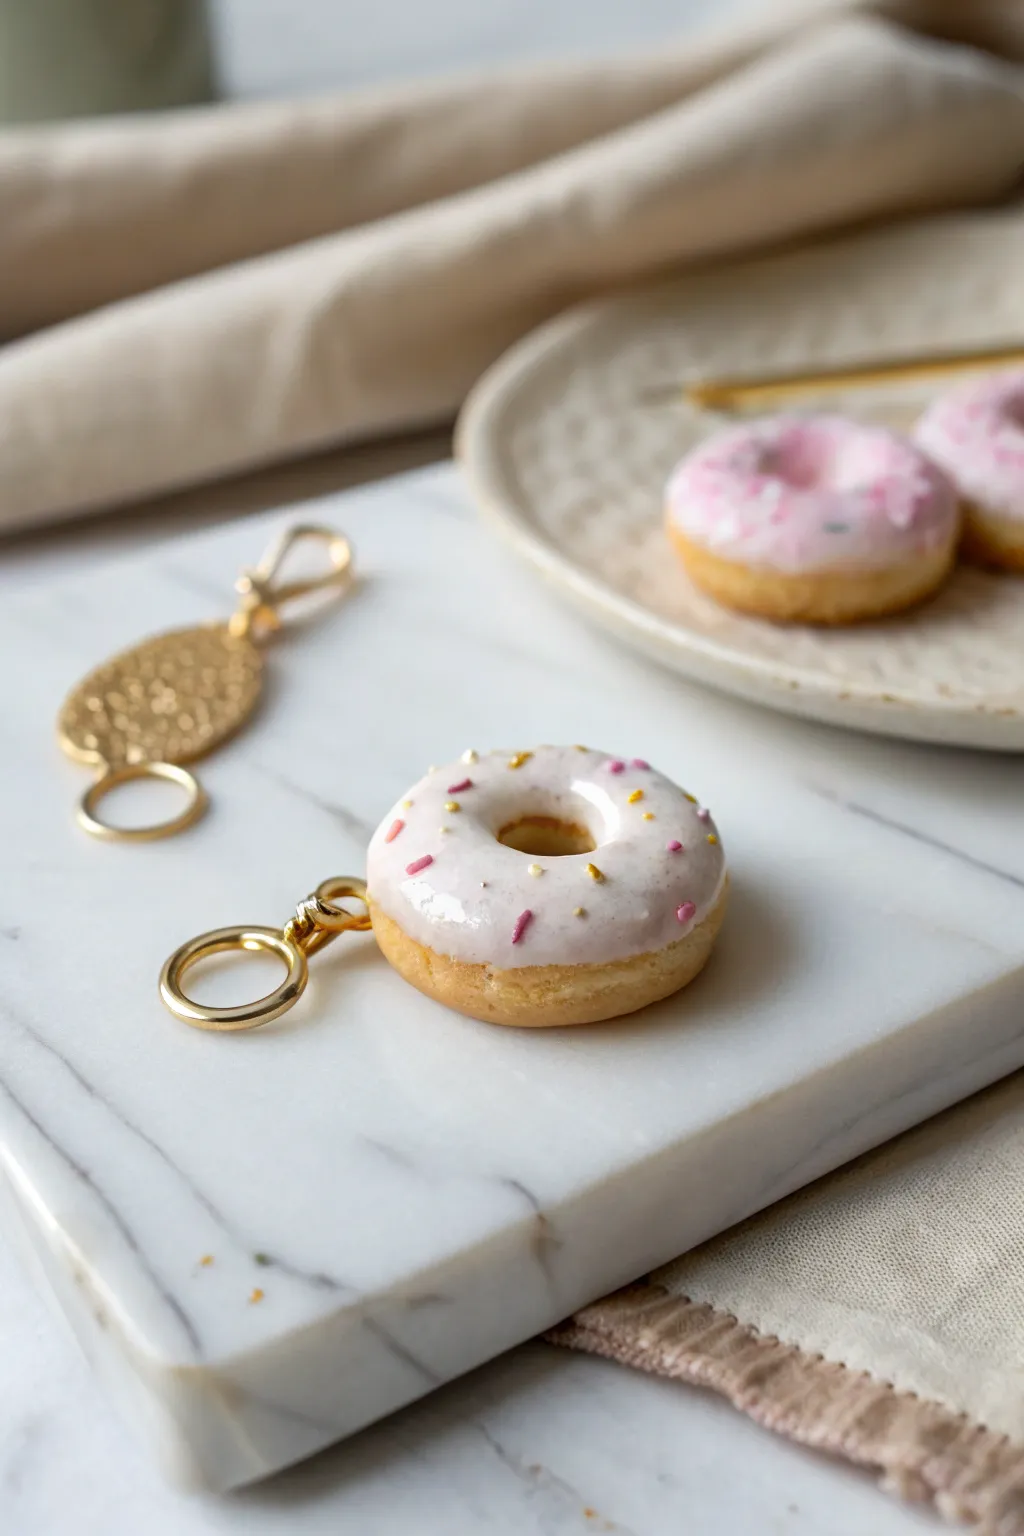
Transform a scrap of polymer clay into a sweet, calorie-free accessory that looks good enough to eat. This realistic donut charm features a perfectly baked golden base, a glossy pale pink glaze, and delicate sprinkle detailing for a touch of whimsy.
Detailed Instructions
Materials
- Polymer clay (Tan/Beige, White, Translucent, Pink, Yellow, Blue)
- Liquid polymer clay (Translucent or White)
- Soft artist pastels (Yellow ochre, Burnt sienna)
- Small paintbrush
- Dotting tool or toothpick
- X-acto knife or clay blade
- Gold screw eye pin
- Gold jump ring and keychain clasp
- Gloss glaze (polyurethane or UV resin)
- Oven for baking
Step 1: Shaping the Dough Base
-
Mix the dough color:
Start by mixing tan polymer clay with a small amount of white and translucent clay. The translucent clay adds that realistic, airy texture to the ‘dough’ rather than looking like opaque plastic. -
Form the basic shape:
Roll a small ball of the mixed clay, about the size of a marble (roughly 1 inch or 2.5 cm in diameter). Gently flatten it slightly between your thumb and forefinger to create a thick disc. -
Create the hole:
Using a dotting tool or the end of a paintbrush handle, press directly into the center of the disc to create the donut hole. Widen the hole gently by rotating the tool, smoothing the edges as you go so they look rounded, not sharp. -
Add texture:
Take a clean toothbrush or a crumpled ball of aluminum foil and gently tap it all over the surface of the donut. This creates the porous texture of fried dough. Be careful not to flatten the shape while doing this. -
Shade the dough:
Scrape some yellow ochre and burnt sienna pastels into fine dust. Using a soft, dry paintbrush, dust the donut with the yellow ochre first. I like to focus the darker burnt sienna around the edges and bottom to mimic that perfect golden-brown bake. -
Create the pale line:
Leave the very center horizontal line of the donut’s side slightly lighter or un-shaded. Real donuts have this ‘fry line’ where the dough floats in the oil, and adding it creates instant realism.
Step 2: Glazing and Decoration
-
Prepare the icing:
In a small container or on a piece of glass, mix liquid polymer clay with a tiny dot of white clay and a speck of pink clay. You want a very pale, milky pink color that looks semi-opaque. -
Apply the icing:
Carefully drip the liquid clay mixture onto the top of your donut shape. Use a needle tool or toothpick to guide the liquid down the sides randomly, creating natural-looking drips. -
Make the sprinkles:
Roll extremely thin snakes of pink, yellow, and blue clay. Bake these thin strands for just 5 minutes to harden them slightly, then chop them into tiny bits with a blade to create authentic-looking sprinkles. -
Decorate:
While the liquid clay icing is still wet, use tweezers or a slightly damp toothpick to place your pre-made sprinkles onto the glaze. Press them down very gently so they sit securely in the liquid. -
Insert hardware:
Before baking the final piece, screw a gold eye pin into the side or top of the donut. Adding a drop of liquid clay to the screw threads helps secure it permanently.
Sticky Glaze?
If your liquid clay glaze tends to run too much before baking, let the mixed liquid sit open to the air for 15-20 minutes to thicken up slightly before applying.
Step 3: Finishing Touches
-
Bake the charm:
Place the donut on a tile or parchment-lined tray and bake according to your clay manufacturer’s instructions (usually 275°F/135°C depending on the brand) for about 15-20 minutes. -
Cool down:
Let the piece cool completely inside the oven if possible, or on a cooling rack. This prevents the clay from becoming brittle due to thermal shock. -
Add shine:
Once cool, brush a coat of gloss glaze or UV resin strictly over the icing part of the donut. This makes the glaze look wet and sugary while keeping the dough part matte and realistic. -
Assemble the keychain:
Use pliers to open a heavy-duty gold jump ring. Attach your baked donut charm to the gold split ring or clasp mechanism through the eye pin. -
Final secure:
Close the jump ring tightly with your pliers, ensuring there is no gap where the charm could slip out.
Pro Tip: Realistic Texture
Use a toothbrush to texture the ‘dough’ area before shading. It mimics the tiny air pockets found in real fried pastry better than just smoothing it.
Clip your new bakery-fresh charm onto your keys or bag and enjoy a sweet treat that lasts forever


Tiny Hot Cocoa Mug Charms
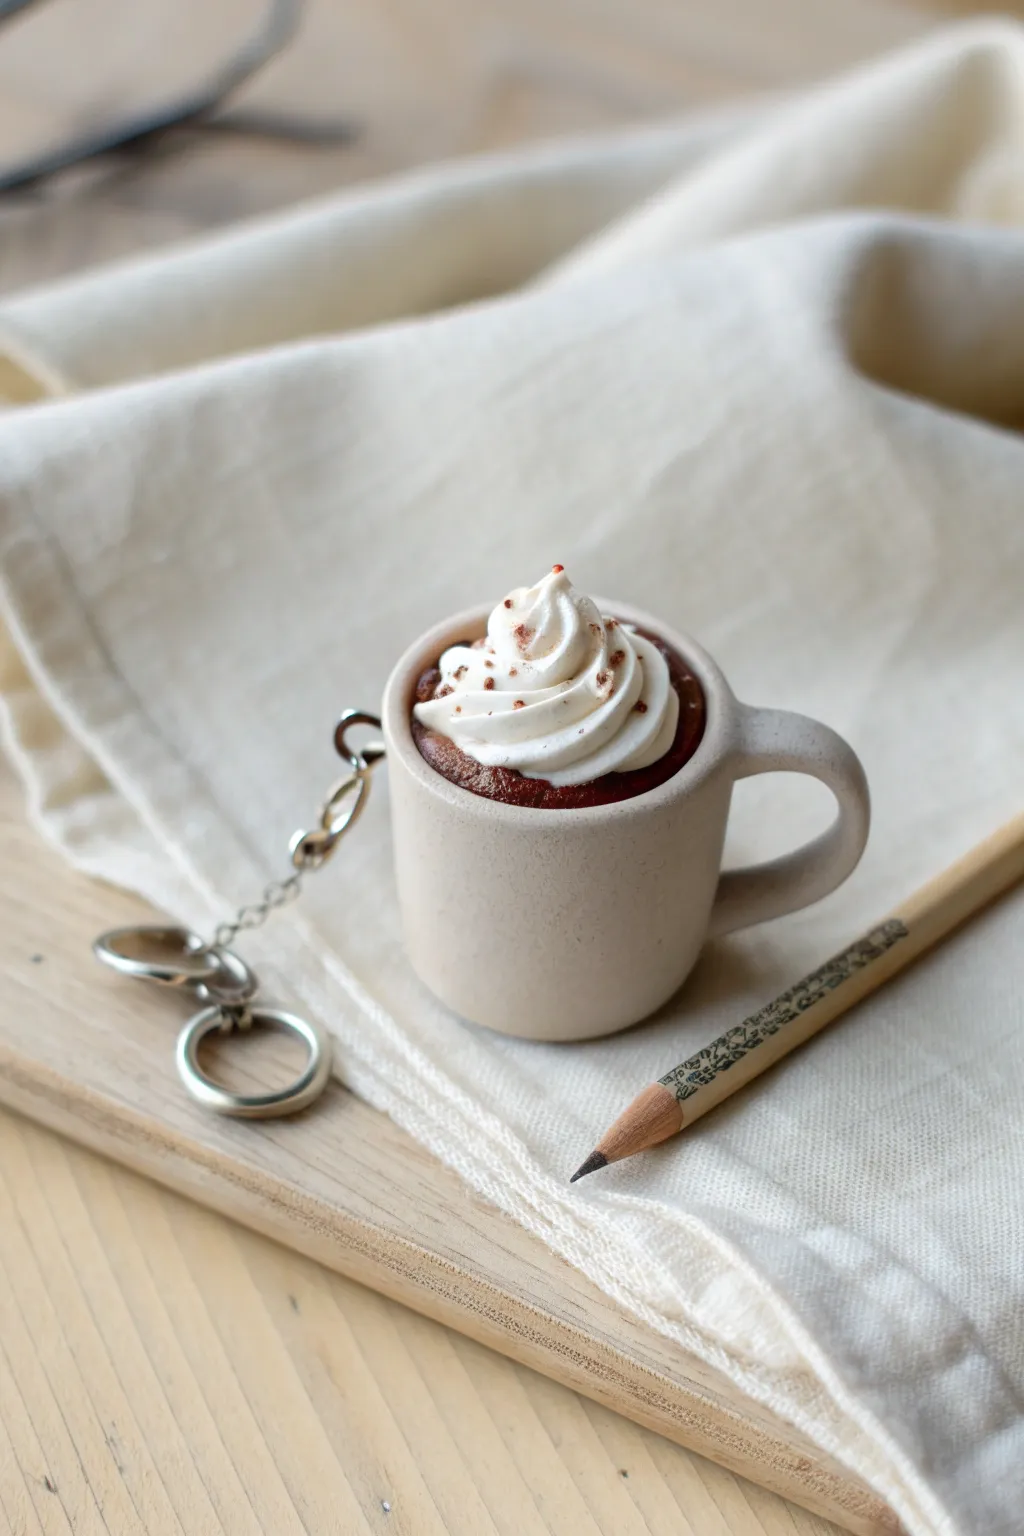
Capture the cozy essence of winter with this adorable polymer clay charm, featuring a tiny ceramic-style mug filled to the brim with chocolate and topped with realistic whipped cream. Attached to a keychain, it makes a perfect sweet accessory or a thoughtful handmade gift.
Step-by-Step Tutorial
Materials
- Polymer clay (beige/off-white for mug, dark brown for cocoa, white for cream)
- Liquid polymer clay (translucent or white mixed with clay)
- Needle tool or toothpick
- Ball stylus tool
- Small star piping tip (or a tiny DIY plastic nozzle)
- Pastel chalks (red-brown/rust)
- Soft paintbrush
- Eye pin
- Jump rings and keychain finding
- Oven for baking
- Gloss glaze (optional)
Step 1: Sculpting the Mug Base
-
Condition the Clay:
Begin by conditioning the beige or off-white clay until it is soft and pliable. Roll it into a smooth ball free of cracks. -
Form the Cylinder:
Gently press the ball onto your work surface to flatten the bottom. Roll the sides slightly to create a thick, short cylinder shape, ensuring the walls are straight. -
Indent the Center:
Using a large ball stylus or the end of a paintbrush, press into the center of the cylinder to create the hollow inside of the mug. Don’t go too deep; you need a solid base. -
Refine the Rim:
Smooth out the inner walls and the top rim with your finger or a tool so it looks like thrown pottery. The walls should have a consistent thickness. -
Create the Handle:
Roll a small snake of the same beige clay. Cut a short segment sized appropriately for the handle. -
Attach the Handle:
Curve the small snake piece into a ‘C’ shape. Blend the ends onto the side of the mug using a needle tool or silicone shaper to seamless join the clay.
Cream Collapse?
If your whipped cream swirls slump before baking, the clay mixture is too soft. Add more solid white clay to the mix to stiffen it up.
Step 2: Adding the Cocoa and Cream
-
Fill with Cocoa:
Condition a small ball of dark brown clay. Press it into the hollow of the mug, filling it almost to the rim but leaving a little space. -
Texture the Liquid:
Use a needle tool to gently rough up the surface of the brown clay or add a thin layer of liquid polymer clay mixed with brown chalk shavings for a glossy, liquid look. -
Prepare the Whipped Cream:
Mix a small amount of white clay with liquid polymer clay until it reaches a frosting-like consistency. It should be stiff enough to hold peaks but soft enough to pipe. -
Pipe the Swirl:
I like to use a tiny improvised piping bag made from plastic wrap for this. Pipe a generous swirl of the white mixture onto the center of the cocoa. -
Create the Spices:
Scrape a red-brown pastel chalk with a blade to create fine powder dust. -
Dust the Topping:
Dip a soft, dry brush into the chalk dust and gently tap it over the wet whipped cream clay to simulate cinnamon or nutmeg sprinkles.
Step 3: Finishing Touches
-
Insert Hardware:
Take a metal eye pin. If it’s too long, trim it. Gently push the straight end into the side of the mug, opposite the handle, or into the handle itself. -
Secure the Pin:
Ensure the clay closes slightly around the wire so it holds tight once baked. You can add a dab of liquid clay to the pin for extra security. -
Review Texture:
Check the mug exterior for fingerprints. If you find any, gently buff them out with a tiny bit of baby oil. -
Bake:
Bake the piece according to your specific clay manufacturer’s instructions (usually around 275°F or 130°C for 15-30 minutes). Let it cool completely. -
Assemble Keychain:
Once cool, use pliers to open a jump ring. Loop it through the eye pin on the mug and attach it to your keychain findings. -
Final Glaze:
Optionally, apply a thin coat of gloss glaze only to the brown cocoa section to make it look wet, keeping the mug surface matte for a ceramic feel.
Realistic Speckles
Mix tiny bits of black pepper or real vanilla bean specs into the beige mug clay before sculpting for a trendy speckled pottery look.
Enjoy carrying your cozy little cup of comfort wherever you go


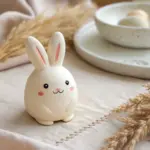
Chibi Bunny and Owl Charms
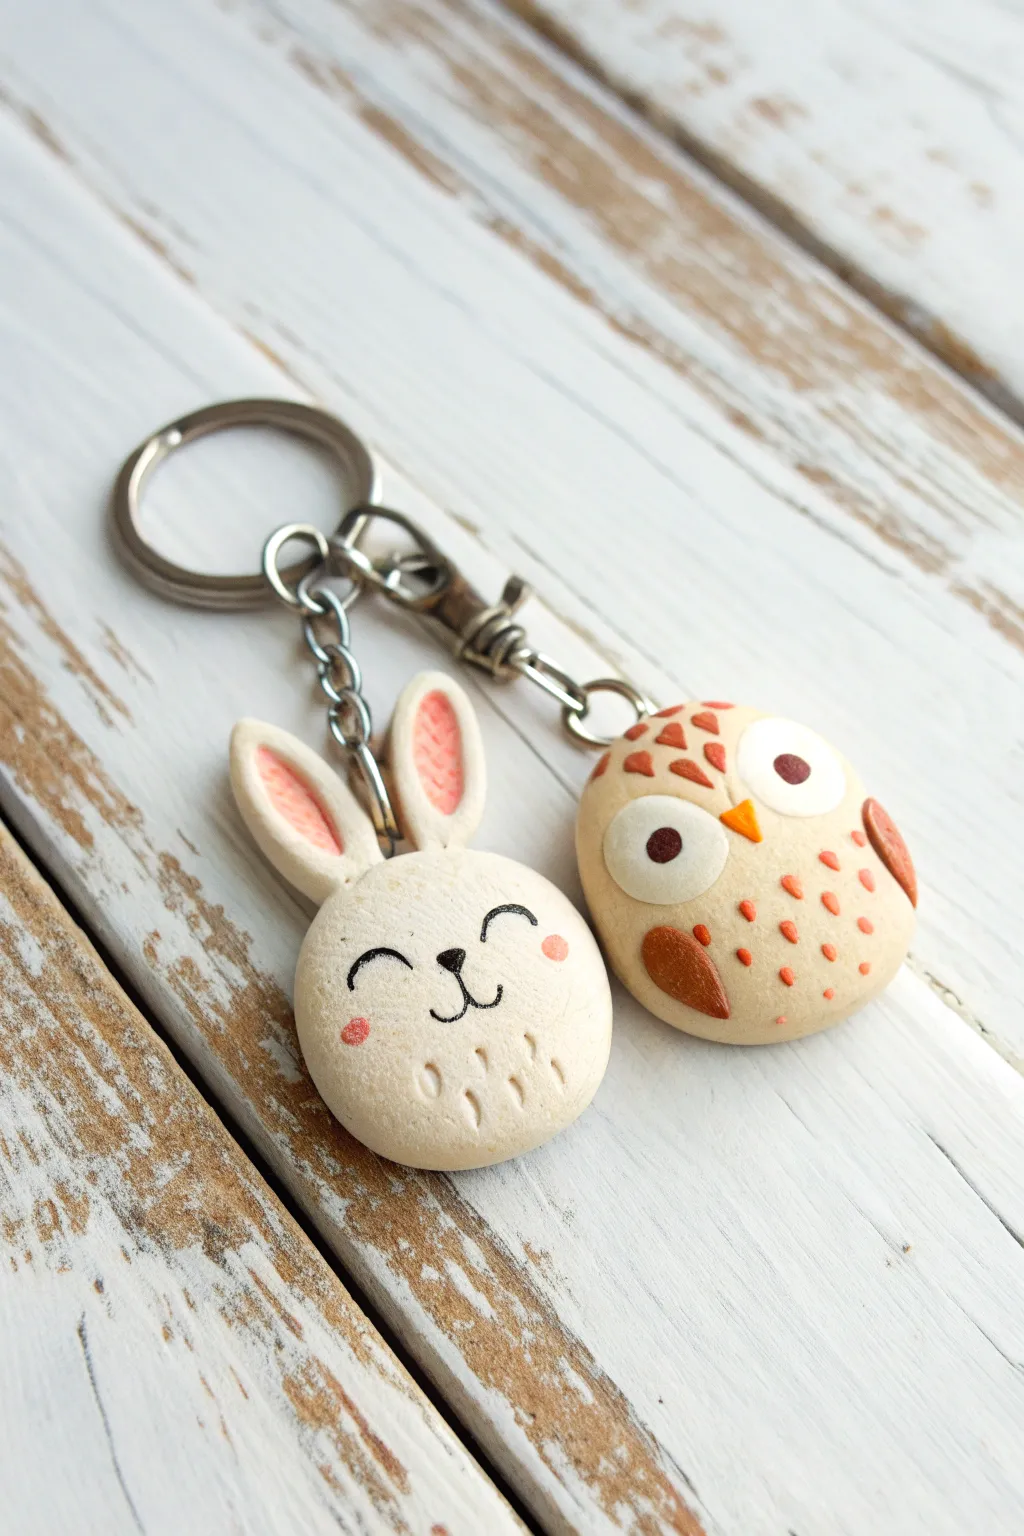
Craft a duo of adorable keychain charms featuring a sleepy, happy bunny and an inquisitive wide-eyed owl. These polymer clay creations use simple shapes and soft textures to bring a touch of woodland charm to your everyday carry.
How-To Guide
Materials
- Polymer clay (White, Beige/Cream, Pink, Orange, Rusty Brown)
- Black acrylic paint or fine detail pen
- Ball stylus tools (various sizes)
- Needle tool or toothpick
- Eye pins (2)
- Keychain hardware (split ring and clips)
- Needle-nose pliers
- Gloss glaze (optional for eyes)
Step 1: Shaping the Bases
-
Conditioning the Clay:
Begin by kneading your white and beige clay separately until they are soft and pliable. This ensures a smooth surface without cracks. -
Forming the Bodies:
Roll a sphere of white clay for the bunny and a slightly larger sphere of beige clay for the owl. Gently flatten them into thick, rounded discs or ‘buns’ rather than perfect balls. -
Smooth the Edges:
Use your finger to gently round off any sharp edges created during pressing, ensuring a soft, pebble-like shape for both characters. -
Insert Eye Pins:
Cut your eye pins to size if they are too long. Push an eye pin down into the top center of each body shape. I find adding a tiny dab of liquid clay or bake-and-bond on the pin shaft helps secure it permanently.
Step 2: Sculpting the Bunny
-
Creating Ears:
Roll two small logs of white clay and taper the ends. Flatten them slightly to create the ear shapes. -
Adding Pink Details:
Roll two smaller, thinner logs of pink clay. Press these into the center of your white ear shapes to create the inner ear. Texture this pink section by stippling it gently with a needle tool. -
Attaching the Ears:
Press the ears firmly onto the top of the white body, just beside the eye pin. Blend the clay seams at the back with a modeling tool for extra durability. -
Adding Cheeks:
Take two tiny dots of pink clay and press them onto the face area for rosy cheeks. -
Chest Texture:
Using a needle tool, gently scratch small vertical lines on the lower chest area to mimic soft fur.
Fixing Fingerprints
If you notice fingerprints on your raw clay, lightly brush the surface with a little baby oil or cornstarch before baking to smooth them out perfectly.
Step 3: Sculpting the Owl
-
Eye Sockets:
Use a large ball tool to press two indentations into the upper half of the beige body where the eyes will go. -
Placing the Eyes:
Roll two balls of white clay and press them into the sockets. Top these with two smaller flat discs of brown clay for the pupils. -
Beak Creation:
Form a tiny triangle of orange clay. Press this firmly between the eyes, pointing downward. -
Feather Details:
Roll small teardrop shapes of rusty brown clay. Flatten two for the wings on the sides, and place smaller triangles on the forehead for feather tufts. -
Chest Plumage:
Roll very tiny, thin snakes of orange clay and cut them into specks. Press these sporadically onto the owl’s tummy to create a speckled feather pattern.
Make it Sparkle
After baking and painting, apply a coat of UV resin or glossy polyurethane varnish to just the eyes and beaks for a wet, shiny look that pops.
Step 4: Finishing Touches
-
Baking:
Bake your pieces according to the instructions on your specific brand of polymer clay. Usually, this is around 275°F (130°C) for 15-30 minutes. -
Cooling Down:
Let the charms cool completely before handling. Polymer clay is fragile while hot. -
Painting the Bunny Face:
Using a fine paintbrush or detail pen, carefully draw two curved arches for closed happy eyes and a small ‘w’ shape for the mouth. -
Highlighting Owl Eyes:
Add a tiny dot of white paint to the brown pupils of the owl to give it life and sparkle. -
Assembly:
Use your pliers to open the jump rings on your keychain hardware and attach them to the eye pins on your finished charms.
Now your charming little woodland friends are ready to keep your keys company

The Complete Guide to Pottery Troubleshooting
Uncover the most common ceramic mistakes—from cracking clay to failed glazes—and learn how to fix them fast.
Mini Bird in a Pinch-Pot Nest

Capture the sweetness of spring with this charming clay project featuring a rustic, pinch-pot nest and a serene bluebird resting inside. The textured finish on the nest mimics birch bark, while the bird adds a delightful pop of color to any windowsill or shelf.
Step-by-Step
Materials
- Air-dry clay or polymer clay (white or light beige)
- Acrylic paints: Sky blue, dark blue, black, white, brown
- Fine-grit sandpaper
- Needle tool or toothpick
- Small paintbrush
- Dried grass or hemp twine for nesting material
- Water cup (for smoothing)
- Matte varnish (optional)
Step 1: Sculpting the Nest
-
Form the Base:
Start with a ball of clay about the size of a golf ball. Press your thumb into the center and gently pinch the walls upward while rotating the ball to create a simple bowl shape. -
Refine the Shape:
Flatten the bottom slighty on your work surface so the nest sits stable. Keep the walls somewhat thick—about 1/4 inch—to mimic a sturdy wooden feel. -
Add Bark Texture:
Before the clay hardens, use a needle tool or the edge of a credit card to score horizontal lines irregularly around the exterior. These will become your birch bark markings later. -
Create the Rim:
Rough up the top rim of the bowl slightly to look like layers of natural material rather than a perfect pottery edge.
Cracks in Your Clay?
If small cracks appear while the pinch pot dries, mix a tiny bit of fresh clay with water to make a paste (slip) and fill them in before painting.
Step 2: Creating the Bird
-
Shape the Body:
Roll a smaller piece of clay into a smooth teardrop shape. Gently curve the narrower end upward to form the tail. -
Form the Head:
Pinch the rounded front end to define a head shape, then pull a tiny bit of clay forward to create a small, pointed beak. -
Define the Wings:
Use your modeling tool to outline tear-drop shaped wings on either side of the body. I like to press these outlines in firmly so they remain visible after painting. -
Smooth and Dry:
Dip your finger in water to smooth out any fingerprints on the bird’s surface. Let both the bird and nest dry completely according to your clay package instructions (usually 24-48 hours).
Make it Speckled
Flick a toothbrush dipped in diluted brown paint over the finished bird to create a beautiful, organic speckled eggshell effect on the feathers.
Step 3: Painting and Assembly
-
Base Coat the Nest:
Paint the entire exterior of the nest a creamy white or pale beige. Let it dry. -
Detail the Bark:
Mix a watery brown wash. Paint it into the horizontal crevices you carved earlier, then quickly wipe the surface with a damp cloth/paper towel. The dark paint will stay in the grooves. -
Paint the Bird:
Coat the bird in a solid layer of sky blue paint. You may need two coats for full opacity. -
Add Feathery Texture:
Using a tiny brush and dark blue paint mixed with a little water, paint small dashed lines on the wings to suggest feathers. -
Detail the Face:
Paint the beak a darker blue or soft grey. Use the tip of a toothpick dipped in black paint to create the eye, adding a tiny white dot for a highlight once dry. -
Add a Wash:
To give the bird a stone-like texture similar to the photo, lightly dry-brush a bit of diluted white or grey paint over the raised areas of the body. -
Prepare the Bedding:
Take a small handful of dried grass, raffia, or unraveled hemp twine and coil it inside the dried clay nest. -
Final Placement:
Nestle the bluebird into the bedding. If you want it permanent, add a dab of strong glue to the bottom of the bird before placing it.
Now you have a peaceful little nature scene that captures a quiet moment perfectly
Mini Mushroom Buddy Figurines

These adorable desktop companions combine the natural warmth of unpainted wood with vibrant, glossy caps and charming little faces. They make perfect small gifts or cheerful additions to your windowsill garden.
Detailed Instructions
Materials
- Unfinished wooden mushroom pegs (various sizes)
- Acrylic paints (burnt orange, mustard yellow, sage green, white)
- Small flat paintbrush
- Fine tip black permanent marker or detail paint pen
- High-gloss varnish or clear glaze (brush-on)
- Fine grit sandpaper (320 or 400 grit)
- Pencil
- Palette or small dish for mixing
Step 1: Preparing and Painting
-
Smooth the Surface:
Begin by lightly sanding your wooden mushroom pegs. Pay special attention to the tops of the caps to ensure they are perfectly smooth, as any roughness will show up under the glossy finish later. -
Clean the Wood:
Wipe away all sanding dust with a dry cloth or tack cloth. The wood needs to be completely debris-free for the paint to adhere smoothly. -
Base Color Selection:
Choose your palette. For the look in the photo, you’ll want earthy, slightly muted tones: a deep burnt orange, a warm mustard yellow, and a soft sage green. -
Painting the Caps:
Using a small flat brush, carefully paint the cap of the mushroom. Start from the top center and stroke downward towards the rim. I like to rotate the mushroom constantly to keep the edge line clean. -
Defining the Edge:
Create a clean separation between the painted cap and the unpainted wooden stem. You don’t need tape; just use a steady hand to paint the underside of the rim, stopping exactly where the stem begins. -
Second Coat:
Allow the first layer of paint to dry completely (about 15-20 minutes). Apply a second coat to ensure the color is opaque and vibrant, hiding the wood grain on the cap. -
Adding Details (Optional):
If you want to recreate the red mushroom on the far left, dip the back end of your paintbrush in white paint and dot small speckles onto the dry red cap.
Pro Tip: Drying Stand
Stick the bottom of the mushroom stem into a lump of playdough or floral foam while you paint and varnish. This keeps your fingers off the wet surfaces.
Step 2: Bringing Them to Life
-
Drying Time:
Wait for the paint on the caps to be bone dry. This is crucial before handling them to draw the faces. -
Drafting Expressions:
To ensure symmetry, very lightly sketch the face placement with a pencil. Place the eyes wide apart for that “kawaii” look. -
Drawing Cap Faces:
Using a fine-tip black marker or paint pen, draw two small dots for eyes and a simple U-shape smile on the painted cap. Keep the lines crisp and confident. -
Drawing Stem Faces:
Repeat the process on the unpainted wooden stem. Create a matching tiny face lower down on the stalk. The ink might bleed slightly into the wood grain, so use a light touch. -
First Varnish Coat:
Load a clean soft brush with high-gloss varnish. Apply a thick, even coat over the painted cap. The goal is a glass-like finish. -
Sealing the Stem:
Apply a thinner coat of varnish or a matte sealer to the wooden stem. This protects the wood and the drawn face without making the stem look plastic. -
Final Gloss Layer:
Once the first coat is tacky or dry, apply one final generous layer of gloss specifically to the caps to achieve that extreme shine seen in the reference photo. -
Curing:
Set the mushrooms in a dust-free area to cure overnight. The thick gloss layer takes longer to harden than standard paint.
Troubleshooting: Bleeding Ink
If your marker bleeds into the raw wood grain on the stem, apply a thin layer of clear matte medium or white glue first to seal the wood fibers before drawing.
Now you have a little family of glossy, happy fungi ready to brighten up your bookshelf


What Really Happens Inside the Kiln
Learn how time and temperature work together inside the kiln to transform clay into durable ceramic.
Tiny Flower Bouquets in Magnet Vases
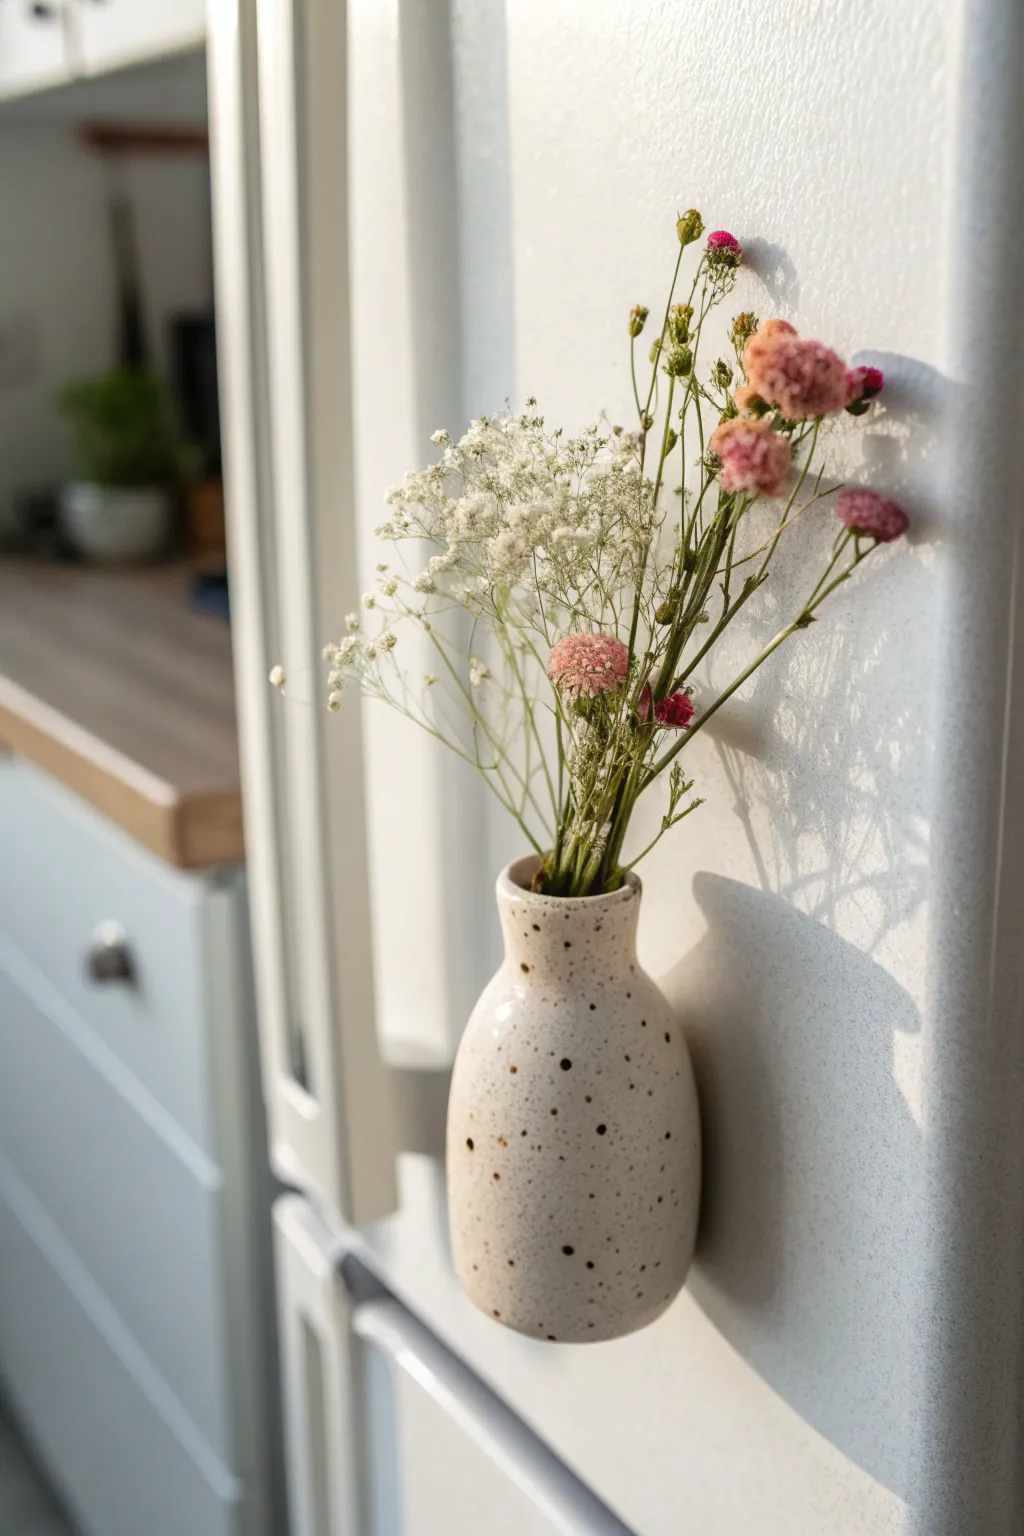
Brighten up your appliance doors with this adorable ceramic-look pocket vase magnet. Using polymer clay and a clever speckling technique, you can create a high-end pottery aesthetic that perfectly holds tiny sprigs of dried wildflowers.
Step-by-Step
Materials
- White polymer clay (approx. 2 oz)
- Black acrylic paint
- Brown acrylic paint
- Old toothbrush or stiff bristle brush
- Small rolling pin
- Craft knife or clay blade
- Modeling tool with a rounded end (or a paintbrush handle)
- Strong neodymium disc magnets (2 small or 1 large)
- Super glue (cyanoacrylate)
- Gluten-free flour or cornstarch (for dusting)
- Gloss or satin polyurethane varnish
- Assorted dried mini flowers (baby’s breath, dried pink florals)
Step 1: Shaping the Mini Vase
-
Condition the Clay:
Begin by kneading your white polymer clay until it is soft, pliable, and free of cracks. Warm clay is much easier to shape smoothly. -
Form the Base Shape:
Roll the clay into a smooth ball about the size of a walnut, then gently elongate it into a thick cylinder. -
Hollow the Center:
Using the rounded end of a modeling tool or the handle of a paintbrush, press down into the center of the cylinder to create the opening. Leave the walls thick enough to be sturdy, about 1/4 inch. -
Define the Neck:
Pinch slightly about a third of the way down from the top to create a distinct neck for your vase. Smooth the transition with your fingertips so it looks organic. -
Flatten the Back:
Lay the vase on your work surface and press it down gently to flatten the back completely. This ensures it will sit flush against the refrigerator. -
Refine the Rim:
Gently flare the top opening outwards slightly to create a delicate rim. I find smoothing this edge with a little water on my finger helps remove fingerprints.
Natural Texture Hack
Before baking, lightly roll the raw clay over a piece of sandpaper or canvas fabric. This adds a subtle, earthy texture that makes the ‘ceramic’ look even more convincing.
Step 2: Creating the Speckled Finish
-
Prepare the Paint Splatter:
Mix a tiny drop of water into a blob of brown acrylic paint and a separate blob of black paint. You want an inky consistency, not a heavy paste. -
Splatter the Clay:
Dip an old toothbrush into the brown mixture first. Run your thumb across the bristles to flick tiny specks onto the raw clay vase. Repeat sparingly with the black paint for depth. -
Embed the Magnets:
Flip the vase over. Press your neodymium magnets into the flat back to create indentations, then remove them. This ensures they won’t stick out later. -
Bake the Piece:
Place the vase on a baking sheet lined with parchment paper. Bake according to your clay package instructions (usually 275°F for 15-30 minutes). -
Cool Down:
Allow the clay to cool completely in the oven before handling. Removing it while hot can cause warping or cracks.
Heavy Vase Sliding?
If your vase slides down the fridge, your magnet isn’t strong enough for the clay’s weight. Glue a small strip of grippy rubber or sandpaper to the back to add friction.
Step 3: Assembly and Arrangement
-
Attach the Magnets:
Add a drop of super glue to the indentations you made on the back of the vase and press the magnets firmly into place. Let the glue cure fully. -
Apply Varnish:
Brush a coat of gloss or satin polyurethane varnish over the front and sides of the vase. This mimics the shine of real glazed ceramic and protects the paint speckles. -
Trim the Flowers:
Select your dried floral stems. Measure them against the vase and trim the bottoms so the flower heads sit nicely just above the rim. -
Arrange the Bouquet:
Start with the filler greenery or baby’s breath at the back to create volume. Insert the focal pink dried flowers in the front. -
Final Display:
Carefully place your finished magnet vase on the fridge, ensuring the magnet holds the weight of the clay and flowers securely.
Enjoy the fresh burst of nature every time you reach for a snack
Mini Succulent Planter Pots
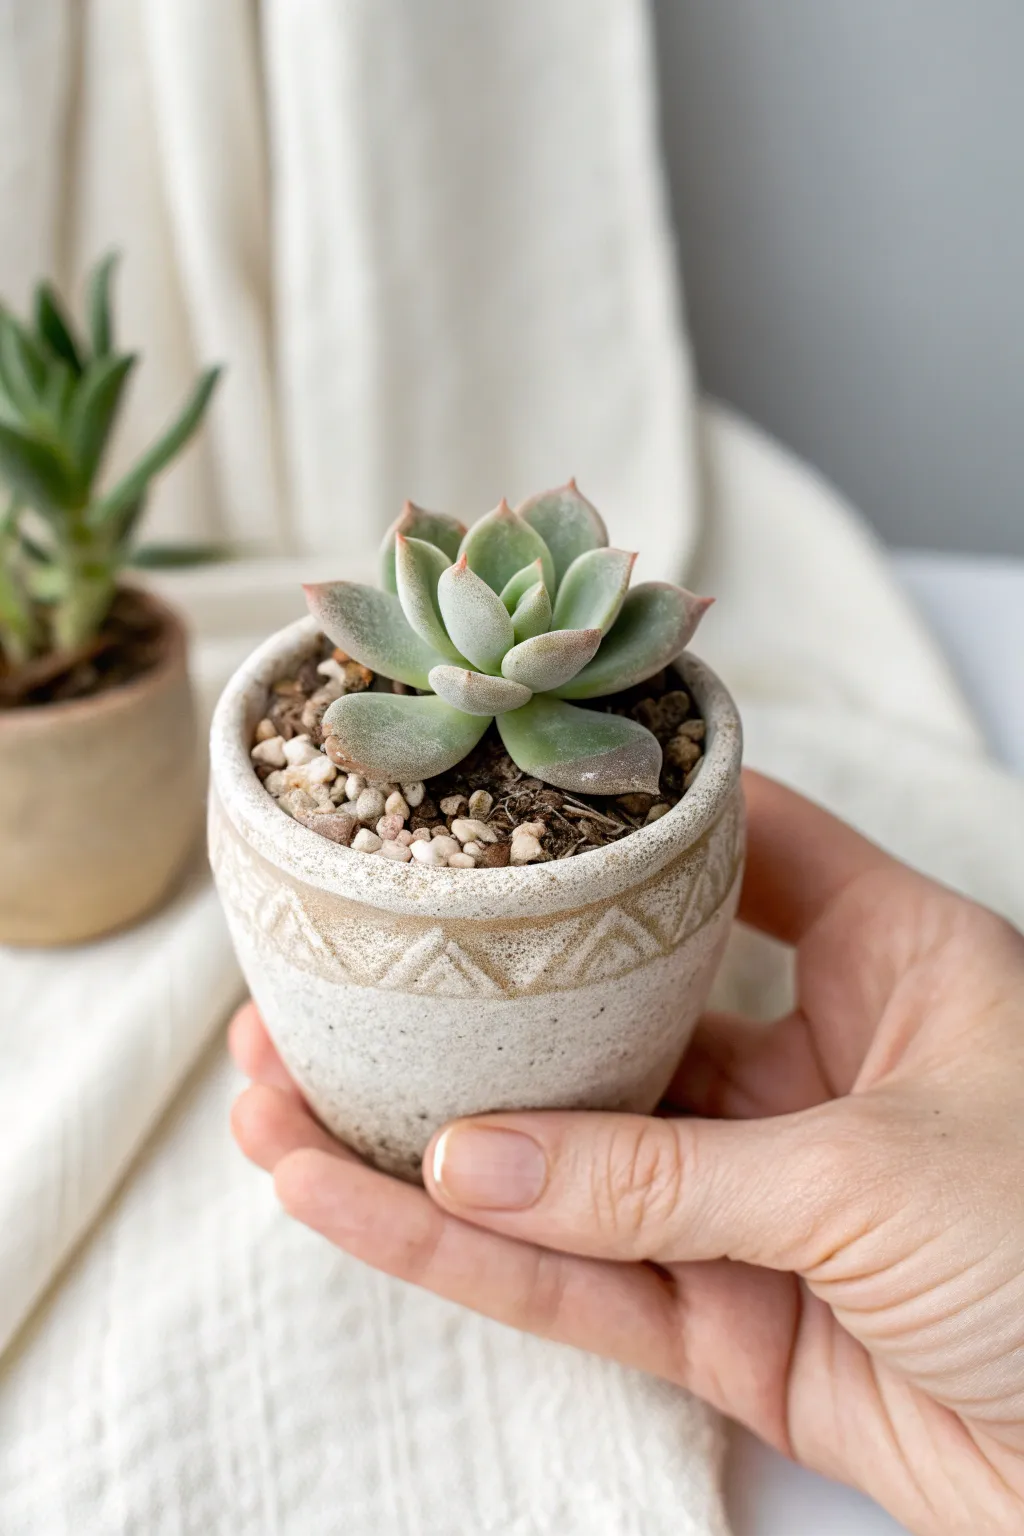
Create a cozy home for your tiniest succulents with this textured, earthenware-style pinch pot. Its charm lies in the natural speckle and the simple, hand-carved geometric band that circles the rim.
How-To Guide
Materials
- White or cream polymer clay (sculpey or fimo)
- Speckled clay additive or black pepper/sand (for texture)
- Small round cookie cutter or jar lid (approx. 2-3 inches)
- Needle tool or toothpick
- Carving tool or small flathead screwdriver
- Acrylic rolling pin
- Sandpaper (fine grit)
- Matte varnish or glaze
- Brown acrylic paint (optional for antiquing)
- Oven for baking
Step 1: Forming the Pot Base
-
Prepare the clay:
Begin by conditioning your white polymer clay until it is soft and pliable. To achieve that beautiful stone-like speckled look seen in the photo, mix in a tiny pinch of black pepper or craft sand. Knead it thoroughly until the speckles are evenly distributed throughout the white base. -
Shape the ball:
Roll your conditioned clay into a smooth, seamless ball about the size of a golf ball or slightly larger, depending on how big you want your final pot to be. -
Create the opening:
Hold the ball in your non-dominant hand. With your dominant thumb, press gently into the center of the ball to create an indentation, being careful not to push all the way through the bottom. -
Pinch the walls:
Using your thumb on the inside and fingers on the outside, gently pinch and turn the pot. Work your way from the bottom up to the rim, aiming for an even wall thickness of about 1/4 inch. -
Shape the cylinder:
As you pinch, guide the shape into a slight taper—narrower at the bottom and slightly wider at the top. Gently tap the bottom of the pot on your work surface to create a flat, stable base so it won’t tip over. -
Smooth the surface:
Use your finger or a little bit of baby oil to smooth out any distinct fingerprints or cracks on the exterior. The goal is a rustic but clean surface.
Insider Textures
Mix actual ground black pepper or dried used coffee grounds into white clay. It mimics expensive speckled stoneware pottery perfectly without needing a kiln.
Step 2: Detailing and Carving
-
Define the rim:
Flatten the top rim slightly with your finger so it isn’t sharp. Then, use a needle tool to score a horizontal line all the way around the pot, roughly 1/2 inch below the rim. This defines the area for your pattern. -
Mark the triangles:
Lightly sketch a zigzag line inside the band you just created using your needle tool. This will serve as the guide for your triangle pattern. -
Carve the pattern:
Using a small carving tool or the edge of a flathead screwdriver, gently press or carve out the clay within the zigzag lines to create the nested triangle effect. Vary the pressure to create texture within the carved lines, mimicking the raw finish in the image. -
Check the symmetry:
Rotate the pot and ensure the pattern meets neatly at the back. If there’s a gap, just smudge the clay slightly to adjust the spacing of your last few triangles. -
Drainage hole:
If you plan to use real plants, use a straw or small cutter to poke a drainage hole in the center of the bottom.
Uneven Walls?
If one side is thicker, don’t pull it. Instead, press the thicker clay towards the thinner area from the inside base, slowly working it up to the rim.
Step 3: Finishing Touches
-
Bake the clay:
Place your pot on a ceramic tile or baking sheet. Bake according to your clay manufacturer’s specific instructions (usually around 275°F for 15-30 minutes depending on thickness). I find using an oven thermometer really helps prevent scorching. -
Cool and sand:
Let the pot cool completely. Once hard, use fine-grit sandpaper to smooth any rough edges on the rim or base, but leave the carved texture rough. -
Antique the pattern (Optional):
To make the carving pop like in the photo, dilute a drop of brown acrylic paint with water. Brush it over the carved triangles and immediately wipe the surface with a damp paper towel/cloth. The paint will stay in the crevices. -
Seal the pot:
Apply a coat of clear matte varnish to protect the clay and give it a finished ceramic feel. Avoid glossy finishes if you want to maintain that natural stonewear look. -
Planting:
Once dried, fill with a bit of succulent potting mix and add your tiny plant, topping it off with small decorative pebbles to match the earthy aesthetic.
Now you have a charming, hand-crafted vessel ready to showcase your favorite little succulent on a sunny windowsill

TRACK YOUR CERAMIC JOURNEY
Capture glaze tests, firing details, and creative progress—all in one simple printable. Make your projects easier to repeat and improve.
Micro Trinket Dishes With Scalloped Edges
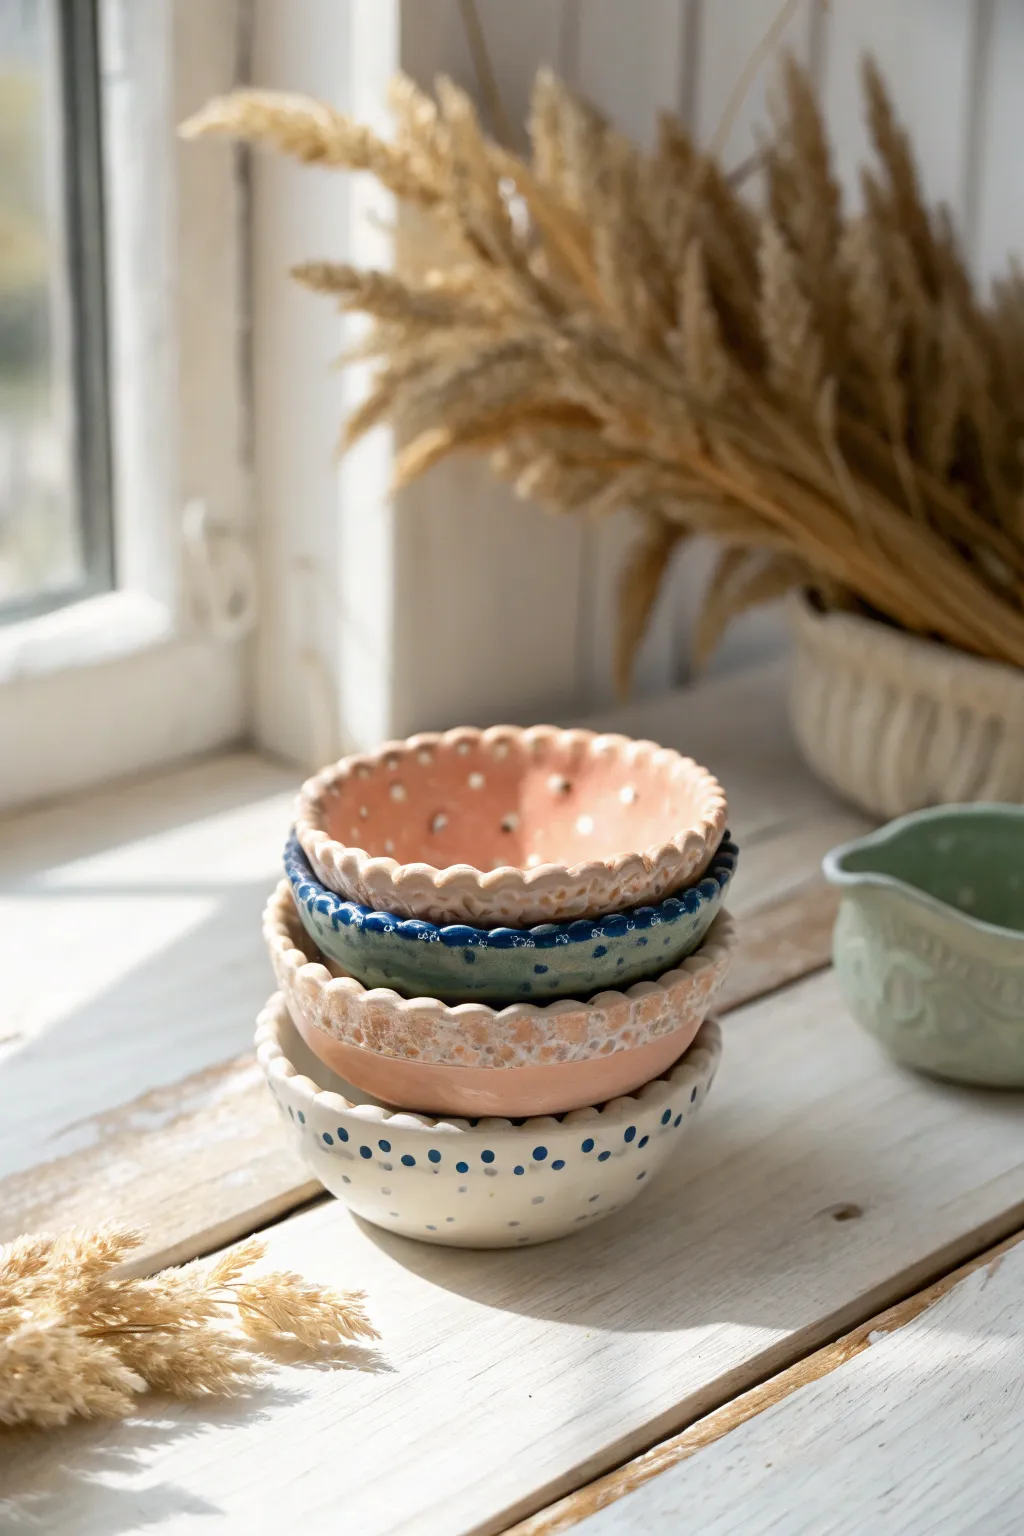
These charming micro dishes feature delicate scalloped rims and sweet glazed patterns, perfect for holding rings or finishing touches of salt. Their handmade, slightly imperfect shape adds a cozy, rustic elegance to any windowsill or dresser.
Step-by-Step Guide
Materials
- Air-dry clay or polymer clay (white or light stoneware color)
- Small rolling pin
- Circle cutter or small bowl (approx. 3-4 inch diameter)
- Modeling tools (ball stylus or small spoon)
- Small paintbrush
- Bowl of water (for smoothing)
- Fine grit sandpaper
- Acrylic paints (pale pink, navy blue, cream, light green)
- High-gloss varnish or sealant
- Straw or small tube for punching holes (optional)
Step 1: Forming the Dishes
-
Prepare the clay:
Begin by conditioning your clay. If using polymer clay, knead it until soft and pliable. If using air-dry clay, wedge it briefly to remove large air bubbles. -
Roll out the slab:
Roll your clay out into an even slab, aiming for a thickness of about 1/4 inch. Try to keep the thickness consistent so the bowl dries evenly. -
Cut the circles:
Use a circle cutter or place a small bowl upside down on the clay as a template to cut out your round base shapes. Make several if you plan to create a stack. -
Shape the curve:
Gently lift the clay circle and press it into the curve of your palm or drape it over a small overturned bowl to create a gentle, concave dish shape. -
Create the scalloped rim:
Using your thumb and forefinger, gently pinch the edge of the rim at regular intervals to create a wavy, pie-crust effect. Go around the entire circumference. -
Refine the scallops:
For a more defined look, press the rounded end of a paintbrush handle or ball stylus into each indentation of the wave to smooth and uniform the scallops. -
Smooth the surfaces:
Dip your finger in a little water (for simple air-dry clay) and run it over any rough edges or fingerprints on the rim and inside the bowl. -
Add decorative holes (optional):
If you want the perforated look seen on the top pink bowl, use a small straw to punch tiny holes randomly or in a pattern through the clay walls while it is still soft. -
Dry or bake:
Follow the manufacturer’s instructions for your specific clay. Let air-dry clay sit for 24-48 hours until bone dry, or bake polymer clay in the oven at the specified temperature.
Step 2: Decorating and Glazing
-
Sand imperfections:
Once hardened and cool, use fine-grit sandpaper to gently smooth out any sharp edges on the rim or bottom of the bowls. -
Base coat application:
Paint the interior and exterior with your chosen base colors—soft pink, cream, or light sage green. I like to apply two thin coats rather than one thick one for better coverage. -
Paint the rim details:
For the blue-rimmed bowl, use a fine brush to carefully paint the very edge of the scallops in navy blue. You can extend this into small dots just underneath the rim. -
Add polka dots:
To recreate the bottom bowl’s look, dip the end of a paintbrush handle into navy blue paint and dot it around the exterior of a cream-colored bowl in a random pattern. -
Create texture effects:
For a speckled, stone-like appearance on the pink bowls, dilute a little white or grey paint and flick it gently over the surface using an old toothbrush. -
Let paint cure:
Allow all paint layers to dry completely. This is crucial to prevent smudging when you apply the final sealant. -
Seal the piece:
Apply a coat of high-gloss varnish to mimic the look of fired ceramic glaze. This gives the bowls that shiny, finished quality seen in the photo. -
Final cure:
Let the varnish dry fully according to the bottle instructions before stacking or using your new mini dishes.
Smooth Operator Pro Tip
For perfectly smooth clay, wipe the raw clay with a little baby oil (polymer) or a damp sponge (air-dry) before texturing to remove fingerprints instantly.
Level Up: Gold Elegance
Use actual gold leaf or liquid gold gilding paint on just the very tips of the scalloped rims for a luxurious, high-end pottery finish.
Stack your finished dishes near a window to catch the light and enjoy their sweet, handmade charm
Tiny Ring Cones With Cute Details
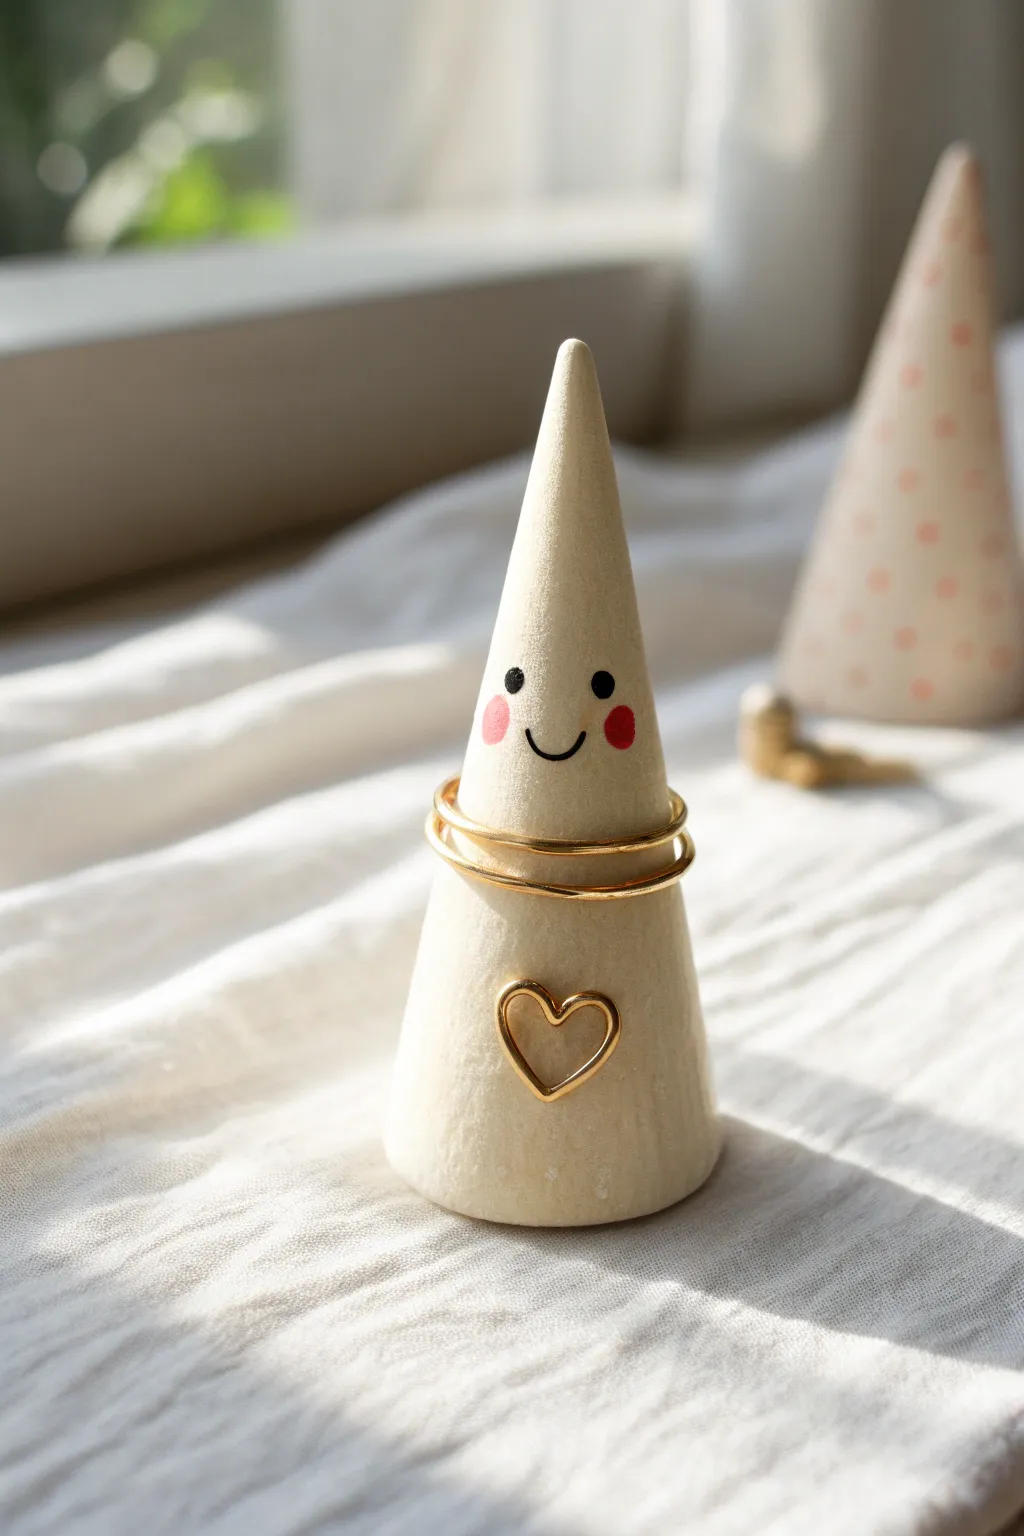
This adorable ring holder brings a touch of personality to your jewelry storage with its minimalist cone shape and sweet, hand-painted expression. The smooth, creamy finish and delicate gold heart detail make it both a functional organizer and a charming piece of mini decor.
Step-by-Step Tutorial
Materials
- White polymer clay (or air-dry clay)
- Gold crafting wire (approx. 20 gauge)
- Acrylic paints (black, pink, white)
- Fine detail paintbrush or dotting tool
- Rolling pin
- Craft knife
- Gloss glaze or varnish (optional)
- Sandpaper (fine grit)
- Super glue or heavy gel medium
Step 1: Shaping the Cone
-
Condition the clay:
Start by taking a chunk of white polymer clay and kneading it thoroughly in your hands until it becomes soft, pliable, and warm. This prevents cracks later on. -
Form a ball:
Roll the conditioned clay into a smooth sphere between your palms to ensure there are no air bubbles trapped inside. -
Create the taper:
Place the ball on your work surface and begin rolling it back and forth using the flat of your hand. Apply slightly more pressure to one side to start forming a tapered cone shape. -
Refine the height:
Stand the cone upright and tap the base gently on the table to flatten it. Gently pinch and smooth the clay upward to elongate the tip until it reaches your desired height, likely around 3-4 inches. -
Smooth the surface:
Use your finger to gently buff out any fingerprints or uneven spots on the clay surface. A drop of baby oil can help achieve a glass-smooth finish here.
Uneven Standing?
If your cone wobbles after baking, place a sheet of fine-grit sandpaper on a flat table. Rub the base of the cone in a circular motion against it until the bottom is perfectly flat and level.
Step 2: Adding the Gold Heart
-
Shape the wire:
Cut a small piece of gold wire and bend it into a tiny heart shape using needle-nose pliers or just your fingers. Aim for a heart about 1 centimeter wide. -
Embed the heart:
While the clay is still unbaked, gently press the wire heart into the lower front section of the cone. Push it deep enough that it sits flush with the surface but remains visible. -
Bake the clay:
Follow the package instructions for your specific brand of polymer clay to bake the cone. Usually, this involves 15-30 minutes at around 275°F (135°C). -
Cool down:
Allow the cone to cool completely before moving on to the decorating phase. The clay hardens fully as it returns to room temperature.
Step 3: Painting the Details
-
Create the base tone:
Mix a tiny amount of yellow ochre or cream into white acrylic paint to create a warm, off-white shade. Paint the entire cone surface for a uniform look, if desired, or leave the raw clay if it baked cleanly. -
Dot the eyes:
Dip the rounded end of a paintbrush or a dotting tool into black acrylic paint. Carefully place two small dots on the upper third of the cone for the eyes. -
Add the cheeks:
Using a separate dotting tool or the clean end of a brush, pick up a soft pink paint. Place two slightly larger dots just below and outside the eyes for rosy cheeks. -
Draw the smile:
With your finest detail brush, paint a delicate, curved black line connecting the area between the cheeks for a sweet smile. -
Secure the heart:
If the wire heart feels loose after baking, carefully pop it out, add a tiny dot of super glue to the indentation, and press the heart back into place. -
Final seal:
To protect the paint and give the piece a finished look, apply a thin coat of matte or satin varnish over the entire cone.
Add a Speckled Look
Before baking, mix tiny bits of black pepper or brown clay shavings into your white clay. This mimics a trendy ceramic stoneware effect without needing a kiln.
Now you have a cheerful little guardian for your favorite rings to sit on display
Tiny Dollhouse Chair or Stool
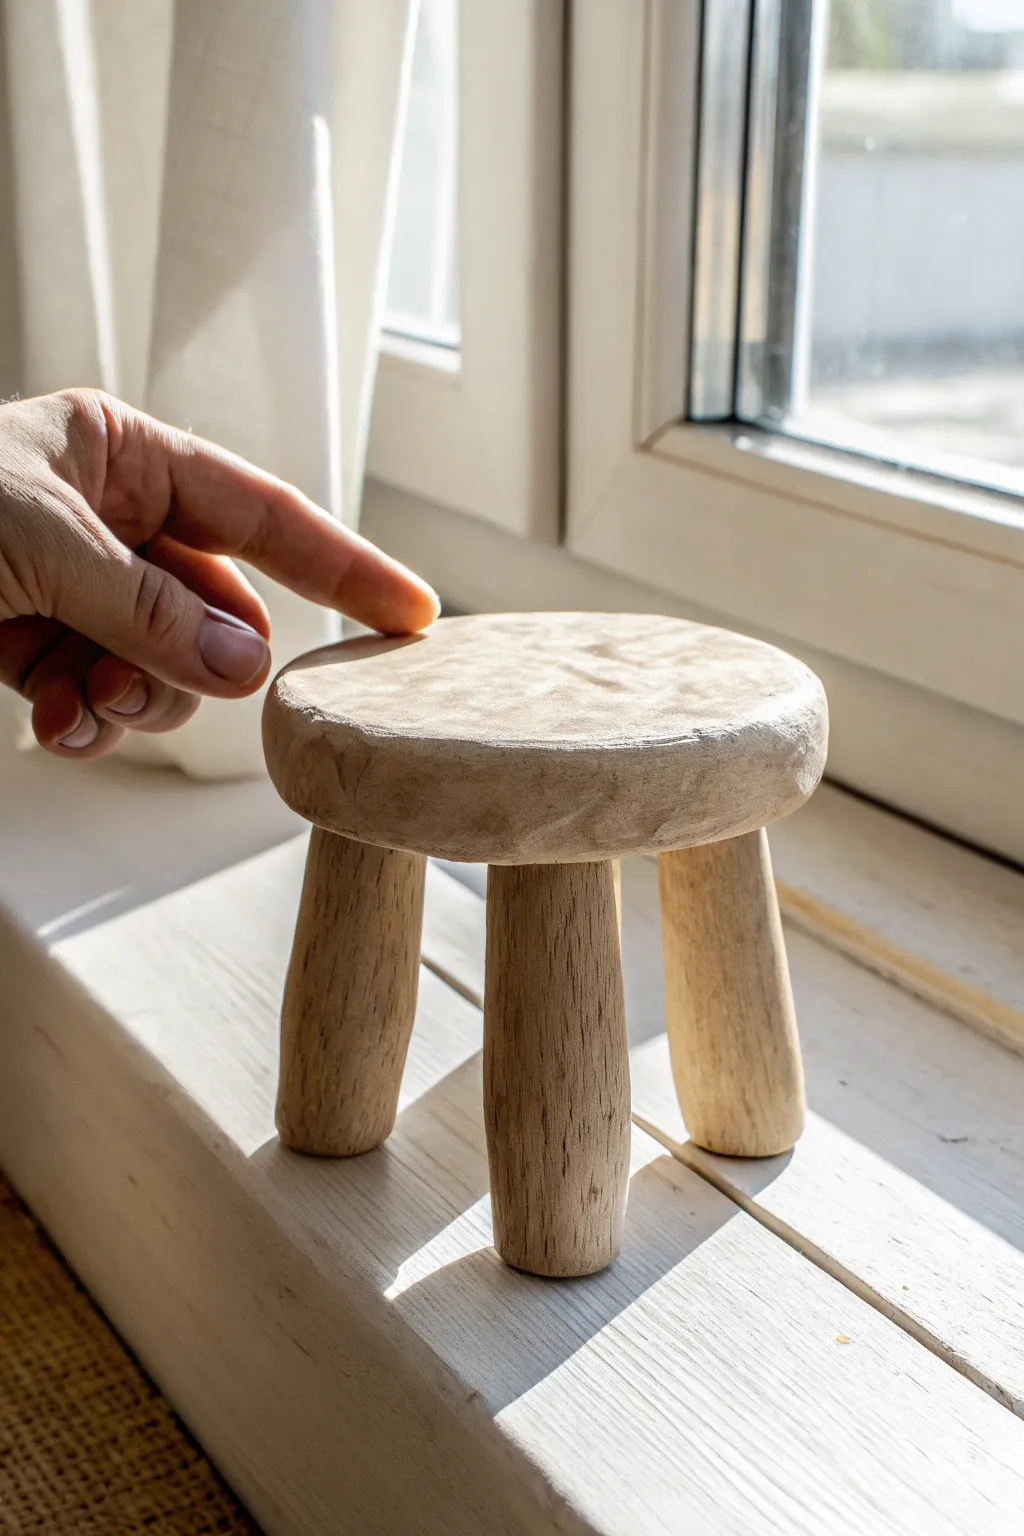
Create a charmingly rustic three-legged stool that looks like hand-carved wood but is actually sculpted from clay. This miniature piece features a textured, primitive finish perfect for a farmhouse-style dollhouse or whimsical shelf display.
Step-by-Step Guide
Materials
- Air-dry clay (stone, wood, or white color)
- Small rolling pin
- Modeling tools (knife tool, needle tool)
- Texture tool (stiff bristle brush or sandpaper)
- Acrylic paints (raw sienna, burnt umber, cream/white)
- Paintbrushes (small shader, fine detail)
- Water cup
- Fine-grit sandpaper (optional)
- Strong craft glue (e.g., tacky glue)
Step 1: Sculpting the Seat
-
Prepare the clay:
Start by conditioning a golf-ball-sized amount of air-dry clay. Knead it thoroughly until it is warm, pliable, and free of cracks. -
Form the seat shape:
Roll the clay into a smooth ball, then gently flatten it into a thick disc. Aim for a thickness of about 1/2 inch to give it a sturdy, chunky appearance. -
Refine the edges:
Instead of smoothing the edges perfectly, use your fingers to gently pinch and irregularities into the circumference. The goal is a hand-hewn look, not a perfect factory circle. -
Add surface texture:
Take a stiff bristle brush or a crumpled ball of aluminum foil and tap it firmly across the top surface of the seat. This creates a pitted, organic texture that mimics raw wood grain. -
Carve knife marks:
Using a clay knife tool, shave off tiny slivers from the rounded edge of the seat disc. I like to make these cuts slightly angular to look like whittling marks.
Faux Wood Hack
Use a toothbrush to flick tiny speckles of watered-down dark brown paint onto the dry clay. This mimics the natural pores and impurities found in real timber.
Step 2: Creating the Legs
-
Portion the legs:
Divide a smaller lump of clay into three equal portions. Roll each portion into a small log, tapering them slightly so one end is just a bit thicker than the other. -
Shape the feet:
Flatten the wider end of each leg log slightly by tapping it against your work surface. This ensures the stool will stand stably once assembled. -
Texturize the legs:
Drag a needle tool vertically down the sides of each leg to create deep grooves representing wood grain. Vary the pressure so some lines are deeper than others. -
Dry the components:
Set the seat and the three legs aside to dry separately. Letting them dry before assembly often prevents the weight of the seat from crushing the wet legs. Wait 24 hours or until fully hardened.
Age Your Stool
Create a ‘worn’ look by sanding one side of the seat more than the others before painting, simulating decades of use where people would have sat down.
Step 3: Assembly and Painting
-
Sand connection points:
Once dry, lightly sand the underside of the seat and the tops of the legs to create a rough surface for better adhesion. -
Attach the legs:
Apply a dab of strong craft glue to the top of each leg. Press them onto the underside of the seat in a triangle formation. You may need to prop the stool against something while the glue sets. -
Base coat application:
Mix a light cream or pale raw sienna acrylic paint. Cover the entire stool with this base coat and let it dry completely. -
Apply a dark wash:
Water down some burnt umber paint until it is very thin and ink-like. Brush this liberally over the stool, ensuring it flows into all the texture grooves and ‘knife marks’ you created. -
Wipe back:
Immediately use a damp paper towel or soft cloth to wipe away the excess dark wash from the raised surfaces. The dark paint will remain in the recesses, highlighting the texture. -
Dry brush highlights:
Dip a dry brush into a tiny amount of off-white paint. Wipe most of it off on a paper towel, then lightly dust the edges and top surface to simulate wear and catch the light.
Place your tiny stool near a window light to let those realistic textures shine creating a cozy miniature scene
Pocket-Size Fantasy Cloud Dioramas
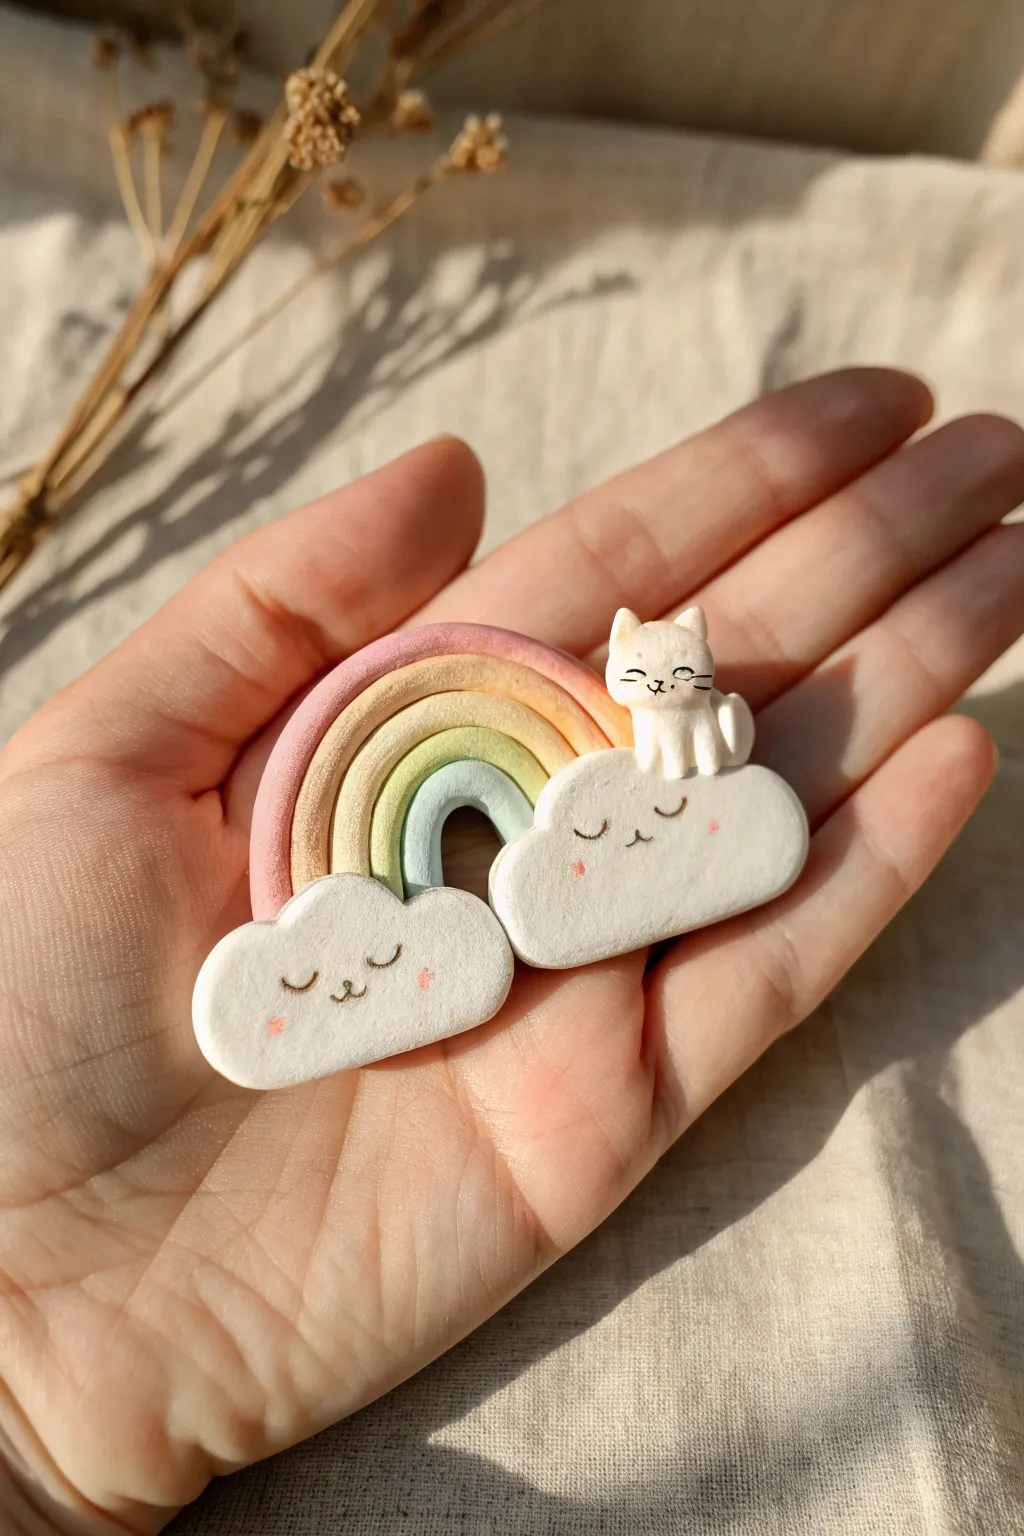
This whimsical little scene fits right in the palm of your hand, featuring a gentle pastel rainbow arching over two sleepy clouds. Perched atop one cloud sits a tiny white cat, making this the perfect accessory or pocket-sized companion to brighten your day.
Step-by-Step Tutorial
Materials
- Polymer clay (white, pink, orange, yellow, green, light blue)
- Acrylic rolling pin
- Clay knife or craft blade
- Ball stylus tool
- Black acrylic paint or fine detail pen
- Pink chalk pastel or blush
- Small paintbrush
- Liquid polymer clay (optional, for bonding)
- Gloss glaze (optional)
Step 1: Forming the Rainbow Arch
-
Prepare your colors:
Begin by conditioning small amounts of pink, orange, yellow, green, and light blue polymer clay until they are soft and pliable. You want these to be pastel shades, so mix in a generous amount of white clay if your starting colors are too vibrant. -
Roll the coils:
Roll each color into a thin, even snake or coil. Aim for a thickness of about 2-3mm for each strand. Try to keep them consistent so your rainbow is uniform. -
Assemble the stack:
Lay the coils next to each other in the order of a rainbow: pink, orange, yellow, green, then blue. Gently press them together side-by-side so they stick without flattening the round shape of the coils. -
Shape the arch:
Carefully bend the strip of attached coils into a U-shape to form the rainbow arch. Trim the bottom edges with your clay knife so they are flat and even.
Keep it Clean
White clay picks up dust easily. Keep a pack of baby wipes or rubbing alcohol nearby to clean your hands and tools before handling the white cloud and cat sections.
Step 2: Creating the Clouds
-
Shape the cloud base:
Take a larger piece of white clay and divide it into two slightly flattened oval shapes. These will be the bases for your clouds. -
Refine the edges:
Use your fingers or a smoothing tool to round off the edges, giving them a soft, puffy appearance rather than a sharp cutout look. Make one cloud slightly longer than the other if you like an asymmetrical look. -
Attach the rainbow:
Press the flat bottom ends of your rainbow arch onto the tops of the white clouds. You can use a tiny dab of liquid polymer clay here to ensure a strong bond between the arch and the clouds.
Step 3: Sculpting the Tiny Cat
-
Make the body:
Roll a very small ball of white clay into a teardrop shape for the cat’s body and press it gently onto the top of the right-hand cloud, right next to the rainbow. -
Form the head:
Roll a slightly smaller ball for the head. Pinch two tiny triangles of clay for ears and attach them to the top of the head. Smooth the seams with a rubber shaping tool. -
Attach the head:
Place the head onto the body. I sometimes insert a small piece of wire or toothpick between the head and body for extra stability, though for a piece this small, firm pressure usually works. -
Add the tail:
Roll a tiny snake of white clay for the tail. Curl it around the side of the cat’s body so it looks like it’s sitting neatly.
Texture Time
Use an old toothbrush to gently tap the surface of the clouds before baking. This texturing removes fingerprints and gives the clouds a realistic, fluffy matte finish.
Step 4: Adding Details and Finishing
-
Baking:
Preheat your oven according to the polymer clay package instructions. Place your piece on a ceramic tile or baking sheet and bake for the recommended time (usually around 15-30 minutes). -
Cooling down:
Let the piece cool completely before handling. This step is crucial because the clay hardens fully as it cools. -
Painting the faces:
Once cool, use a very fine detail brush with black acrylic paint or a fine permanent marker to draw sleepy closed eyes and smiling mouths on both clouds and the cat. -
Adding blush:
Scrape a little bit of pink chalk pastel into a powder. Use a dry paintbrush to gently dust pink cheeks onto the clouds and the cat for a sweet, rosy look. -
Final touches:
If you want to turn this into a brooch, glue a pin back to the reverse side using strong epoxy glue. Otherwise, it’s ready to display.
Now you have a charming pocket-sized scene to keep you company or gift to a friend