When I want a quick win at my worktable, I always reach for mini clay figures—they’re fast, forgiving, and ridiculously satisfying to line up as a little collection. These ideas are all about simple shapes, sweet faces, and that “I can totally make this tonight” vibe in polymer clay or air-dry clay.
Mini Cats With Dot-Eye Faces
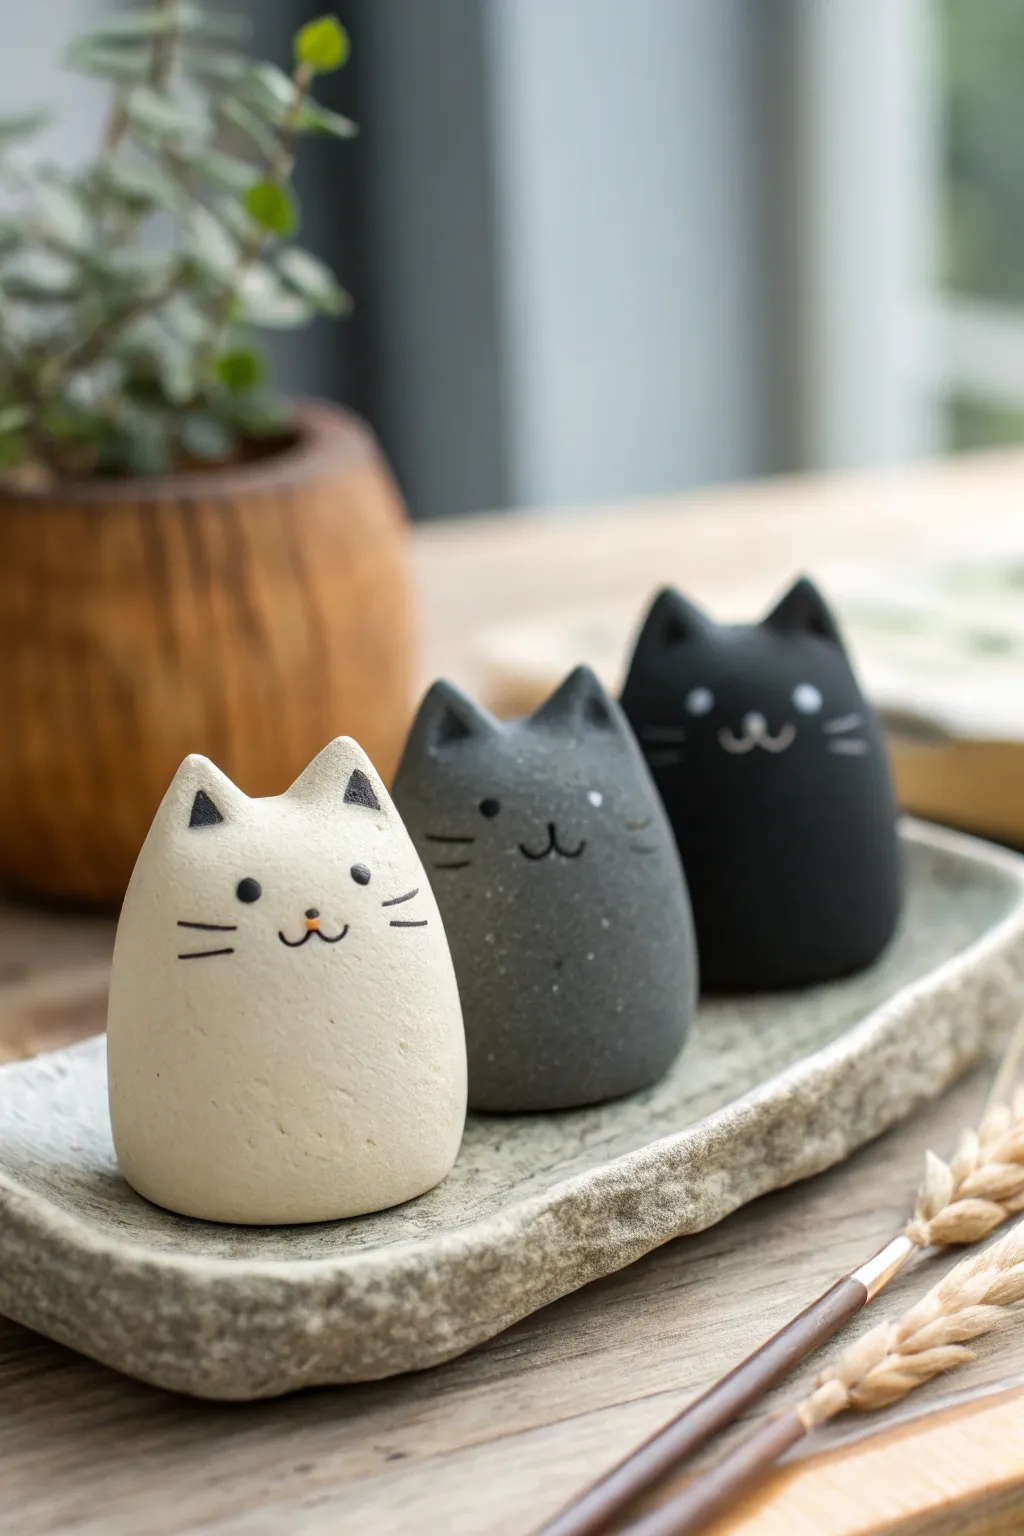
These simple, egg-shaped cat figurines are the definition of kawaii minimalism, perfect for brightening up a desk or shelf. Their charm lies in their smooth, stone-like texture and sweet, uncomplicated faces painted with just a few strokes.
How-To Guide
Materials
- Polymer clay or air-dry clay (white, grey, and black)
- Fine-grit sandpaper (optional, for smoothing)
- Acrylic paint (black and white)
- Fine detail paintbrush (000 size)
- Small dotting tool or toothpick
- Orange acrylic paint (tiny amount for the nose)
- Matte finish varnish or sealant
- Clean work surface (ceramic tile or silicone mat)
- Soft cloth or sponge
Step 1: Shaping the Bodies
-
Prepare the Clay:
Start with a golf-ball-sized amount of clay for each cat. Knead it thoroughly until it is soft, pliable, and free of air bubbles or cracks. If you are using polymer clay, the warmth of your hands will help condition it. -
Form the Base Shape:
Roll the clay into a smooth ball first. Then, gently roll it back and forth on your work surface while applying slightly more pressure to the top half to create a rounded, tapered egg shape. The bottom should be wider than the top. -
Flatten the Bottom:
Press the wide end of your egg shape gently onto a flat surface. Pick it up and tap it down a few times. You want the figurine to sit flat and stable without rocking. -
Pinch the Ears:
At the narrower top of the egg, use your thumb and forefinger to pinch up two small triangles of clay. Keep them small and spaced apart to mimic the image. -
Refine Ear Shape:
Use a modeling tool or your fingertips to smooth the transition between the ears and the head. The ears should look like they are seamlessly rising from the body, not stuck on separately. They should be slightly rounded at the tips, not needle-sharp. -
Smooth the Surface:
Wet your finger slightly with water (for air-dry clay) or baby oil (for polymer clay) and gently rub the entire surface. -
Check Symmetry:
Rotate the figurine and look at it from all angles. Ensure the ears are even and the body has a nice, gentle curve without any lumps. -
Create Variations:
Repeat this process for the other two cats using grey and black clay. Try making them slightly different heights or widths to add visual interest to the group.
Cracked Clay?
If air-dry clay cracks while drying, mix a tiny bit of fresh clay with water to make a paste (slip) and fill in the cracks, then sand smooth once dry.
Step 2: Finishing and Decorating
-
Drying or Baking:
Follow the manufacturer’s instructions for your specific clay. Bake polymer clay in the oven at the recommended temperature. For air-dry clay, let the pieces sit undisturbed in a dry spot for 24-48 hours. -
Sand for Texture:
Once fully cured or dried, inspect your cats. If you want that smooth, matte pottery look seen in the photo, gently sand the surface with fine-grit sandpaper to remove any fingerprints. -
Paint Ear Triangles:
Using a fine brush, carefully paint small triangles on the front of the ears. Use black paint on the white cat, and consider mixing a lighter grey for the black cat’s ears if you want them visible, though the image keeps the dark cats simple. -
Dot the Eyes:
Dip a dotting tool or the cut end of a toothpick into black paint for the white and grey cats. Press gently to create two small, widely spaced eyes. -
White Eyes for Black Cat:
For the black cat, clean your tool and use white paint for the eyes so they stand out against the dark clay. The contrast is key here. -
Add the Nose:
Using an extremely fine brush or the very tip of a toothpick, place a tiny dot of orange paint directly between and slightly below the eyes on the white cat. For the darker cats, you might omit the color or use a faint grey. -
Draw the Mouth:
With your finest brush or a specialized archival ink pen (if the clay is porous enough), draw a small ‘w’ shape starting from the bottom of the nose dot. -
Whiskers:
Add two short, horizontal floating lines on each cheek. Keep them thin and delicate; heavy lines can overwhelm these small faces. -
Seal the Work:
To achieve the stone-like finish shown, apply a matte varnish. Avoid glossy finishes as they will make the cats look like plastic rather than ceramic.
Pro Tip: Weighted Base
Before sealing the bottom, press a small divot into the underside and glue in a small washer or coin. This keeps your lightweight kitties from tipping over easily.
Now arrange your trio together on a textured tray for a serene and adorable display


Chubby Mini Frogs With Blush Cheeks

These delightfully round frog figurines bring a touch of springtime joy with their simplistic, smooth forms and sweet blushing cheeks. Their gentle, pastel green hue and distinct personalities—one thoughtful, one offering a flower—make them an adorable pair for any shelf.
Detailed Instructions
Materials
- Polymer clay (sage green, pink, white, black, red)
- Aluminum foil (for armature)
- Clay sculpting tools (ball stylus, needle tool, rubber shaper)
- X-Acto knife or clay blade
- Rolling pin
- Soft pastel chalks in pink (optional, for softer blush)
- Paintbrush (small detail)
- Clear matte varnish
- Ceramic tile or glass mat (work surface)
- Oven (for baking polymer clay)
Step 1: Body Formation
-
Core Structure:
Begin by crumpling a small ball of aluminum foil, roughly the size of a walnut, to act as the core. This saves clay and keeps the figurine light. Make two of these. -
Base Clay Layer:
Condition your sage green polymer clay until it is pliable. Roll it into a sheet about 3mm thick. -
Encasing the Core:
Wrap the green clay sheet around the foil ball, smoothing the seams completely until you have a seamless, slightly flattened teardrop shape. The wide bottom helps them sit stably. -
Smoothing the Form:
Gently roll the clay form on your work surface or between your palms to ensure a smooth, stone-like finish. Aim for a chubby, bottom-heavy look.
Uneven Seams?
If blending seams destroys your texture, use a rubber clay shaper tool. It smooths clay connections without leaving harsh tool marks or fingerprints.
Step 2: Adding Features
-
Creating Legs:
Roll two small sausages of green clay for the hind legs. Flatten one end and press it against the side of the body near the bottom, blending the top seam into the body so the leg looks integrated. -
Adding Feet:
For the front feet, simply make small indents at the bottom front of the body, or add tiny flat ovals of clay. Use a needle tool to impress two small lines on each foot to suggest toes. -
Eye Sockets:
At the top of the head, use a large ball stylus to press two distinct indentations where the eyes will go. Since frogs have protruding eyes, you want to build up the brow slightly around these dents. -
Placing the Eyes:
Roll tiny balls of black clay. Insert them into the sockets. For extra life, add a minuscule dot of white clay to the corner of each black eye as a highlight. -
The Smile:
Use a needle tool or a thin curved blade to carefully slice a long, wide smile across the face. For the frog on the right, make the smile slightly deeper to accommodate the tongue.
Step 3: Personalities & Details
-
Blushing Cheeks:
For the signature blush, roll tiny, flat discs of pink clay and press them onto the cheeks. Alternatively, for a softer look, brush on some scraped pink pastel chalk powder before baking. -
Simple Arms:
Roll thin coils of green clay for arms. Attach them starting from the shoulder area, blending the seam. Position them resting on the belly. -
Right Frog: The Flower:
For the flower-holding frog, create a tiny flower using five small balls of pink clay flattened into petals around a yellow or darker pink center. -
Right Frog: Holding the Flower:
Position the right frog’s arms so the hands meet in the center. Gently press the clay flower into the hands/chest area. -
Right Frog: The Tongue:
Add a tiny teardrop of red or dark pink clay hanging slightly out of the mouth’s center to look like a playful tongue. -
Left Frog: Resting Pose:
For the left frog, keep the pose simpler. Rest the hands gently on its stomach, perhaps angled slightly inward as if waiting patiently. -
Surface Texture:
Inspect the clay for fingerprints. I find lightly brushing the surface with a tiny bit of rubbing alcohol or baby oil smooths out imperfections beautifully before baking.
Make it a Trio
Make a third frog wearing a tiny rain hat or holding a leaf umbrella to complete a story-driven scene for your display.
Step 4: Finishing
-
Baking:
Bake the figures according to your clay manufacturer’s instructions. Usually, this is around 275°F (135°C) for 15-30 minutes depending on thickness. -
Cooling:
Let them cool completely in the oven or on a rack. Do not handle them while hot, as the clay is fragile until cool. -
Varnishing:
Once fully cooled, apply a thin coat of clear matte varnish to seal the clay and give it a finished, ceramic-like texture like in the photo.
Place your new ceramic-style friends near a window or potted plant to enjoy their peaceful smiles


Tiny Bunnies Holding Mini Carrots
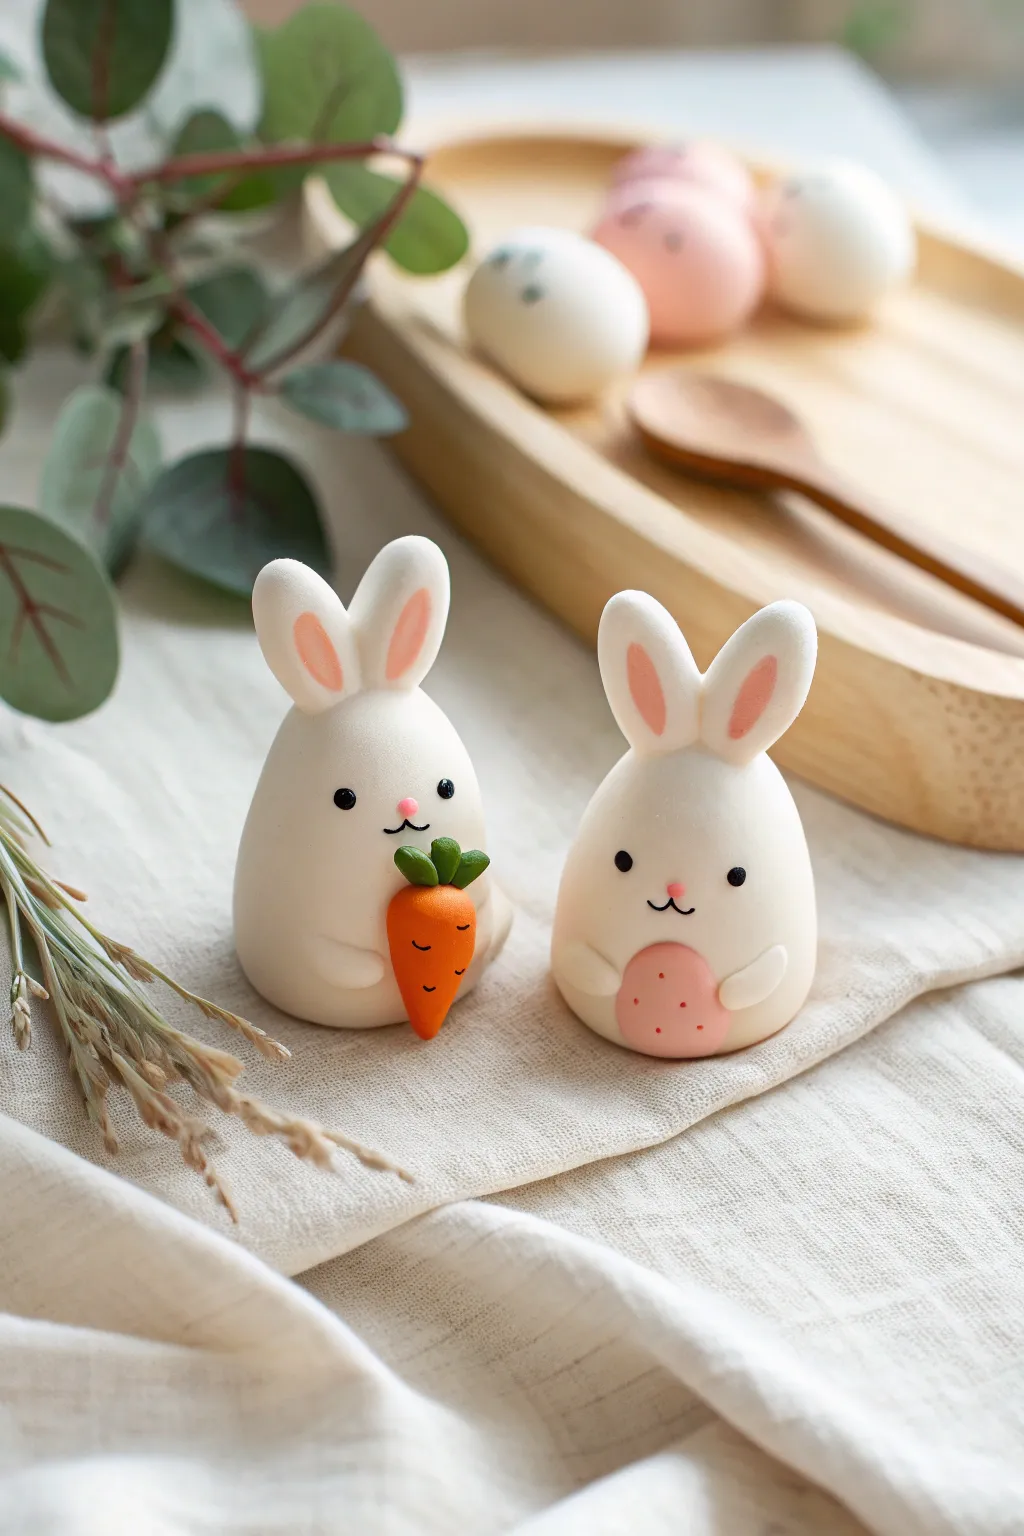
These charmingly round polymer clay bunnies are perfect for spring decor, featuring impossibly sweet expressions and miniature accessories. With their smooth, marshmallow-like finish and tiny details, creating this pair is a delightful exercise in shaping simple forms into emotive characters.
How-To Guide
Materials
- White polymer clay (soft variety recommended)
- Pastel pink polymer clay
- Orange polymer clay
- Green polymer clay
- Small ball stylus tool
- Needle tool or toothpick
- Black acrylic paint
- Very fine detail brush (000 size)
- Blush chalk pastel (soft pink)
- Small soft brush for blushing
- Baking sheet and parchment paper
- Gloss glaze (optional)
Step 1: Shaping the Bodies
-
Condition the white clay:
Begin by conditioning your white polymer clay until it is completely soft and pliable. This is crucial for avoiding cracks later. Roll two balls of equal size, roughly 1.5 inches in diameter, to form the base for both bunnies. -
Create the pear shape:
Take the first ball and gently roll it on your work surface while applying slightly more pressure to the top half. You want to create a smooth, rounded pear or teardrop shape that is wider at the bottom for stability. -
Flatten the base:
Tap the bottom of your pear shape gently against the table so the bunny sits flat and upright without tipping over. Repeat this shaping process for the second bunny.
Cleanliness Pro Tip
White clay picks up dust instantly. Before starting, wipe your hands and work surface with a baby wipe, and keep a scrap piece of ‘cleaning clay’ nearby to roll in your hands periodically.
Step 2: Ears and Limbs
-
Form the ears:
Roll four small, equal-sized logs of white clay. Pinch one end of each log to make a teardrop shape, then flatten them gently with your finger. These should be fairly long and rounded at the tips. -
Add pink centers:
Take tiny amounts of pink clay and roll them into smaller, thinner teardrops. I find it easiest to press these directly onto the center of the white ear shapes, smoothing the edges slightly so they bond. -
Attach the ears:
Press the ears firmly onto the top of the head. For the left bunny, attach them pointing straight up. For the right bunny, try angling them slightly for personality. Blend the clay at the attachment point on the back of the head using your tool to ensure they stay put. -
Make the arms:
Roll four tiny balls of white clay for the arms. Roll them into slight sausage shapes. Attach two to each bunny’s body, positioned fairly low, as if they are resting on a belly.
Step 3: Crafting Accessories
-
Shape the carrot:
Roll a small piece of orange clay into a cone shape. Use a needle tool to score horizontal lines across the cone, mimicking the texture of a real carrot. This detail adds a lovely touch of realism. -
Add carrot greens:
Create three tiny teardrops of green clay. Press them together at the wider end of the carrot to form the leafy top. -
Create the egg:
Roll a ball of pink clay into a smooth oval egg shape. Using a needle tool, add tiny indentations or texture dots all over its surface for a decorative look. -
Place the items:
Gently press the carrot against the chest of the first bunny, tucking it under one arm. For the second bunny, press the pink egg onto its belly, curving the small white arms around it to look like it’s holding it.
Fixing Fingerprints
If you notice fingerprints on your smooth bunny bodies before baking, lightly brush the clay with a tiny amount of baby oil or cornstarch to smooth the surface perfectly.
Step 4: Faces and Finishing
-
Pre-bake detailing:
Before baking, use your needle tool to create a tiny hole where the nose will go. For the mouth, intricate carving can be tricky, so simply marking the position is often enough. -
Bake the figures:
Bake your bunnies according to the clay package instructions (usually 275°F/135°C for 15-30 minutes). Let them cool completely before painting. -
Paint the eyes:
Using the back of your drill bit or a specialized dotting tool dipped in black paint, place two small dots for eyes wide apart on the face. Keep them symmetrical. -
Add the nose:
Roll an incredibly tiny ball of pink clay (or paint it) and glue it into the small indentation you made earlier for the nose. -
Draw the mouth:
With your finest brush or a fine-tip permanent marker, draw a tiny ‘w’ shape connecting to the nose. For the carrot bunny, stick to a simple curved line. -
Blush the cheeks:
Scrape a little pigment from your pink pastel chalk. Pick it up with a dry, soft brush and gently dust pink circles onto the bunnies’ cheeks for a rosy glow.
Enjoy displaying your adorable pair on a shelf or gifting them to a friend as a sweet handmade surprise


Mini Teddy Bears With Simple Scarves
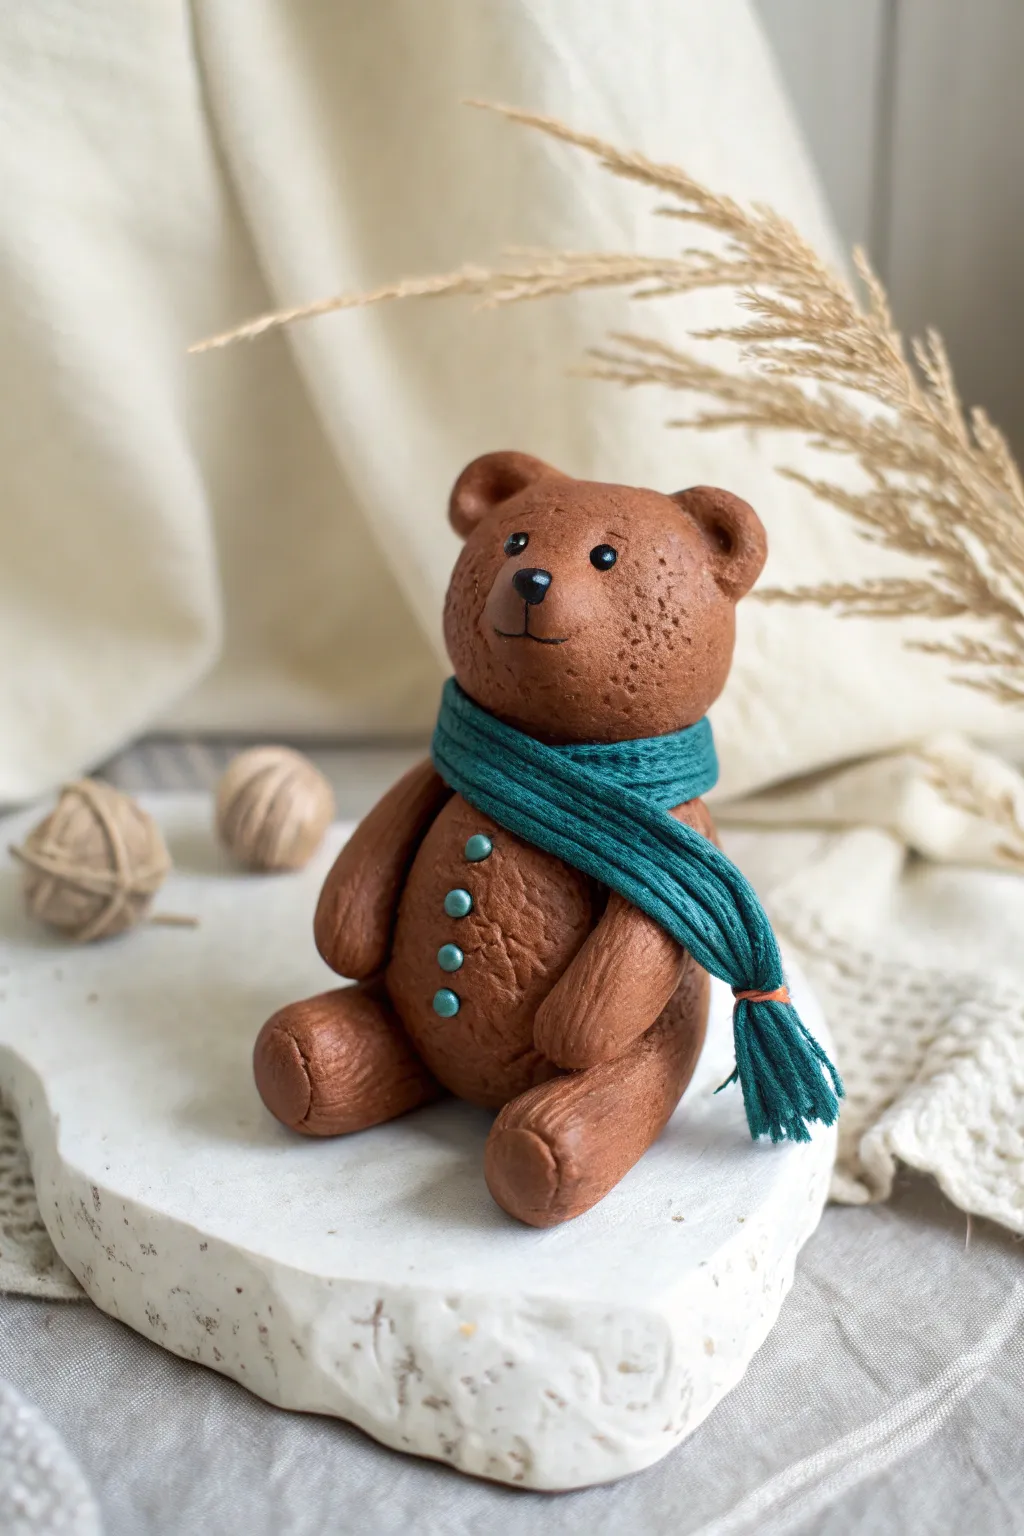
This rustic brown teddy bear exudes winter warmth with its textured fur and chunky teal scarf. It’s a charming polymer clay project that captures the nostalgic feel of a handmade toy.
Step-by-Step Tutorial
Materials
- Polymer clay (chocolate brown, teal/blue, black)
- Small dotting tool or toothpick
- Paring knife or clay blade
- Toothbrush or texturing foil
- Needle tool
- Liquid clay or bake and bond
- Black acrylic paint (optional for eyes)
- Matte finish varnish
Step 1: Shaping the Base Clay
-
Condition the brown clay:
Begin by kneading your chocolate brown clay warming it up until it is soft, pliable, and free of any cracks. -
Form the body:
Roll a smooth ball of brown clay about the size of a walnut. Gently flatten the bottom so it sits securely on your work surface, then slightly taper the top into a pear shape. -
Create the head:
Roll a second, slightly smaller ball for the head. Add a very small drop of liquid clay to the top of the body and press the head firmly onto it. -
Add the snout:
Take a tiny pinch of brown clay and flatten it into an oval. Press this onto the lower center of the face to create a distinct muzzle area.
Uneven Texture?
If the toothbrush texture looks too harsh, soften it by gently tapping the clay with your finger afterward to smooth the peaks down slightly.
Step 2: Adding Limbs and Texture
-
Shape the legs:
Roll two thick logs of brown clay for the legs. Round off one end for the paw and slightly flatten the other end to attach to the body. -
Attach the legs:
Press the legs against the lower sides of the body, positioning them so they point forward as if the bear is sitting. -
Shape the arms:
Create two smaller sausage shapes for the arms. tapering them slightly at the shoulder connection point. -
Attach the arms:
Secure the arms to the sides of the body, resting them gently on the legs or stomach. -
Create the ears:
Roll two tiny balls of brown clay. Use a dotting tool to press an indentation into the center of each, creating a cup shape, and attach them to the top of the head. -
Texture the fur:
Take a clean toothbrush or crumpled aluminum foil and gently tap it all over the surface of the bear. This creates a realistic, fuzzy fur texture rather than a smooth plastic look.
Make it Wintery
After baking, dry brush a tiny amount of white acrylic paint onto the tops of the ears and scarf to look like a light dusting of fresh snow.
Step 3: Details and Accessories
-
Make the nose:
Roll a miniscule triangle of black clay. Press it firmly onto the top of the muzzle snout. -
Add the eyes:
Use a needle tool to create two small eye sockets. Place tiny spheres of black clay inside, or bake the bear first and paint them on later depending on your preference. -
Score the mouth:
Use a needle tool or knife to gently press a vertical line down from the nose, curving into a smile at the bottom. -
Form the scarf:
Roll a long, thin snake of teal clay. Flatten it gently with your finger or a rolling pin to create a flat strip. -
Texture the scarf:
Before attaching, use a needle tool to scratch parallel lines along the length of the strip to mimic a knitted ribbed pattern. -
Wrap the scarf:
Wrap the clay strip comfortably around the bear’s neck, crossing the ends over the front chest area. -
Create the fringe:
Use your blade to make several small cuts at the ends of the scarf to simulate tassels or fringe. -
Add buttons:
Roll three extremely tiny balls of slightly lighter teal clay. Press them in a vertical row down the bear’s belly. -
Bake the project:
Bake your bear according to the clay manufacturer’s instructions, usually around 275°F (130°C) for 15-30 minutes.
Let your little bear cool completely before handling so the delicate scarf details stay perfect

The Complete Guide to Pottery Troubleshooting
Uncover the most common ceramic mistakes—from cracking clay to failed glazes—and learn how to fix them fast.
Mini Penguins With Round Bellies
Create an impossibly cute desk companion with this simple yet expressive clay penguin project. Its minimalist, egg-shaped body and wide-set eyes give it a quirky personality that sparks joy instantly.
Step-by-Step Guide
Materials
- Black polymer clay
- White polymer clay
- Orange polymer clay
- Modeling tools (ball styluses, needle tool)
- Clean work surface (tile or glass mat)
- Wet wipes (essential for switching colors)
- Oven for baking (as per clay instructions)
Step 1: Shaping the Body
-
Prepare the black clay:
Start by conditioning a chunk of black polymer clay. Knead it in your hands until it is soft, pliable, and free of cracks. -
Form the base shape:
Roll the black clay into a smooth ball between your palms to remove any seams. -
Refine the silhouette:
Gently taper the top of the ball slightly to create a very subtle egg shape. The bottom needs to remain heavy and rounded so the penguin sits stably without tipping. -
Flatten the base:
Press the shape gently onto your work surface to create a flat bottom, ensuring the penguin stands upright perfectly straight.
Smudged White Clay?
If black residue gets on the white belly, dip a cotton swab in rubbing alcohol or nail polish remover and gently wipe the dirty area before baking to clean it up.
Step 2: Adding the Details
-
Clean your hands:
Before touching the white clay, scrub your hands thoroughly with a wet wipe. Black pigment loves to transfer, and we want a pristine white belly. -
Create the belly patch:
Roll a small ball of clean white clay, then flatten it into a thin oval between your fingers. -
Attach the belly:
Press the white oval onto the lower front of the black body. Use your thumb to smooth the edges gently so it looks integrated, not just stuck on. -
Texture the belly (Optional):
I like to gently dab the white clay with a textured sponge or the side of a toothbrush to give it a slightly organic, matte finish. -
Make the wings:
Create two small teardrop shapes from black clay. Flatten them slightly. -
Attach the wings:
Press the wings onto the sides of the body, curving them slightly forward to hug the round belly.
Winter Wear
Before baking, sculpt a tiny scarf or earmuffs using red or green clay to give your penguin a cozy winter theme perfect for holiday decorations.
Step 3: Face and Feet
-
Form eye patches:
Roll two very small balls of white clay. Press them flat to create circles. -
Position the eyes:
Place these white circles on the upper part of the body, spacing them slightly apart for that goofy, cute look. -
Add pupils:
Using tiny specks of black clay, roll minuscule balls and press them into the center of the white eye patches. -
Highlight the eyes:
For extra life, add a microscopic dot of white clay to each black pupil as a reflection. -
Create the beak:
Roll a tiny piece of orange clay into a cone or teardrop shape. -
Attach the beak:
Place the beak right between the eyes, pressing firmly so it adheres well. -
Make the feet:
Roll two small balls of orange clay and flatten them slightly into ovals. -
Detail the toes:
Use a needle tool or knife to press two indentations into the front edge of each orange oval, creating three little toes. -
Final assembly:
Lift the penguin carefully and place the feet underneath the front edge of the body so they stick out just enough to be seen. -
Bake:
Bake your figurine according to your specific brand of polymer clay instructions (usually around 275°F/135°C for 15-30 minutes).
Once cooled, your little round penguin is ready to waddle onto your shelf
Tiny Chicks Peeking Out of Eggs

This adorable project features a bright yellow clay chick nestled comfortably inside a cracked white eggshell, creating a perfect vignette for spring or Easter. The combination of the smooth, stylized chick and the jagged, realistic edges of the shell brings a delightful textural contrast to your miniature collection.
Step-by-Step Tutorial
Materials
- White polymer clay (for the shell)
- Bright yellow polymer clay (for the body)
- Orange polymer clay (for the beak)
- Black polymer clay or small black beads (for eyes)
- Small rolling pin or acrylic roller
- Ball stylus tool (medium size)
- Needle tool or toothpick
- Hobby knife (X-Acto)
- Gloss glaze (optional)
- Oven for baking
Step 1: Creating the Eggshell
-
Condition the white clay:
Begin by kneading your white polymer clay until it is soft and pliable. Warm clay is less likely to crack when you roll it thin, so take your time with this step. -
Roll it out:
Use your rolling pin to flatten the white clay into a sheet about 2mm thick. You want it sturdy enough to hold its shape but thin enough to look like a realistic shell. -
Form the base cup:
Cut a circle from the sheet and gently pressing it over the end of a rounded object like the handle of a large tool, a marble, or even your thumb to create a deep bowl shape. -
Create the jagged edge:
Using a needle tool or hobby knife, carefully cut uneven, zigzag triangles out of the top rim of your bowl. Variation is key here; make some peaks higher and some lower for a natural broken effect. -
Smooth the interior:
Gently rub your finger inside the shell to smooth out any fingerprints or tool marks, ensuring the chick will have a nice seat. -
Pre-bake the shell:
I like to bake the shell separately first for about 10 minutes at the temperature recommended on your clay package. This makes it a solid base so you don’t accidentally squash it while adding the chick later.
Texturing Tip
For realistic ‘fluff,’ use a piece of coarse sandpaper to gently pat the yellow clay before baking. It leaves a subtle texture without deep holes.
Step 2: Sculpting the Chick
-
Shape the body:
While the shell cools, roll a ball of yellow clay. Shape it into a smooth egg-like oval, slightly narrower at the top for the head. -
Texture the surface (optional):
If you want a fluffy look like in the reference, gently tap the yellow surface all over with a stiff toothbrush or a texturing sponge. Or, keep it smooth for a modern look. -
Test the fit:
Place the yellow body inside the cooled white shell. It should sit low enough that it looks like it’s peeking out, but high enough to be seen clearly. Adjust the bottom of the yellow ball if needed. -
Make the wings:
Create two tiny teardrops of yellow clay. Flatten them slightly and attach them to the sides of the body, curving them forward just a bit so they look like they are resting against the shell edge.
Step 3: Adding the Face
-
Indent eye sockets:
Use your medium ball stylus to press two small indents into the face area where the eyes will go. This helps the eyes sit securely. -
Insert the eyes:
Roll two minuscule balls of black clay and press them into the sockets. Alternatively, press in two small black glass beads. -
Form the beak:
Take a tiny amount of orange clay and roll it into a small cone. Flatten the underside slightly so it isn’t round. -
Attach the beak:
Press the orange cone onto the center of the face, just below the eyes. Use a needle tool to gently blend the back edge of the beak into the face for a strong bond. -
Final assembly:
Ensure the chick is securely seated in the shell. Press down gently so the raw yellow clay grips the baked white shell. -
Final bake:
Bake the entire assembled piece again for the full duration recommended by the manufacturer (usually 15–30 minutes). -
Cool and finish:
Let the figure cool completely. If you want a wet look on the eyes or beak, apply a tiny dot of gloss glaze with a toothpick.
Fixing Cracks
If your eggshell cracks during the pre-bake, mix a tiny bit of liquid clay with white clay to make a paste and fill the crack, then rebake.
Set this little character on your desk or shelf to add a permanent touch of spring cheer to your day


What Really Happens Inside the Kiln
Learn how time and temperature work together inside the kiln to transform clay into durable ceramic.
Smiling Toast, Egg, and Pancake Breakfast Minis
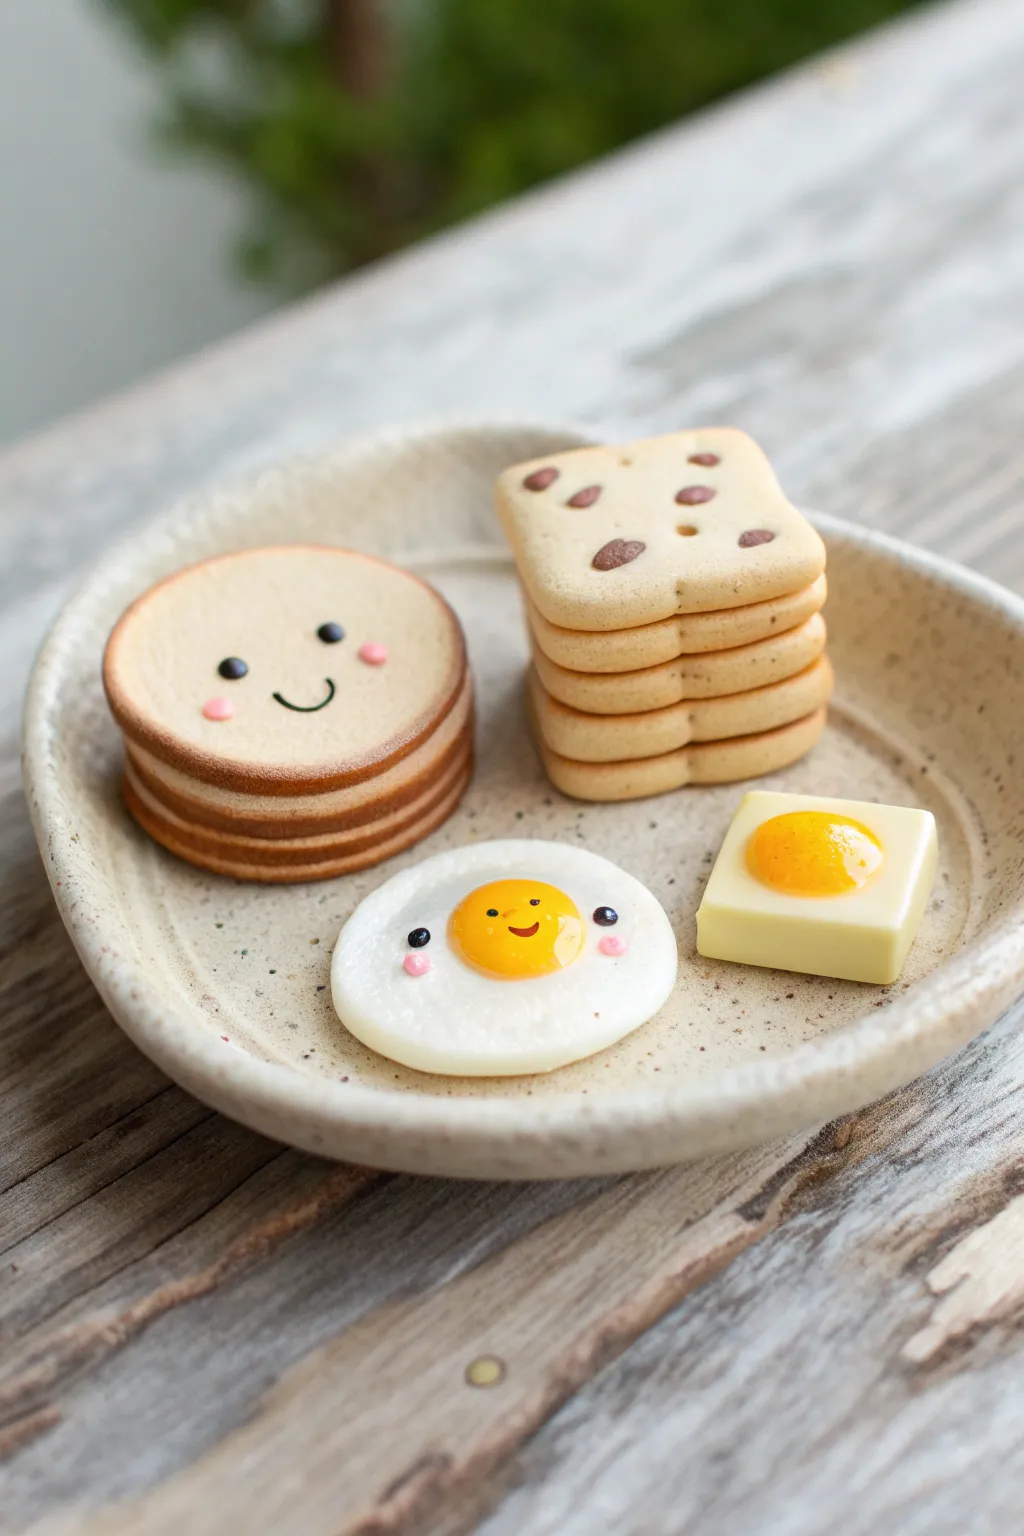
Brighten up your morning with this adorable set of kawaii breakfast foods sculpted from polymer clay. This project features smiling pancakes, perfectly browned toast squares, and a cheerful sunny-side-up egg, all arranged on a rustic handmade plate.
How-To Guide
Materials
- Polymer clay (white, translucent, yellow, ecru/beige, light brown)
- Soft pastel chalks (oranges, browns, pinks)
- Acrylic paint (black)
- Fine detail paintbrush
- Dotting tool or toothpick
- Liquid polymer clay (Fimo Liquid or TLS)
- Gloss glaze or UV resin
- Small round cutter
- Small square cutter
- Needle tool
- Texturing tool (sandpaper or toothbrush)
Step 1: Sculpting the Toast & Pancakes
-
Mix the batter color:
Start by mixing white clay with a small amount of ecru and yellow to create a pale, doughy color suitable for both the pancakes and the square toast. -
Cut the shapes:
Roll out the clay to a medium thickness (about 3mm). Use a small round cutter to stamp out 4-5 circles for the pancake stack and a square cutter for 4-5 square slices. -
Texture the edges:
Take a toothbrush or a piece of sandpaper and gently tap the sides of each piece to give them a realistic, airy crumb texture. Keep the top surfaces relatively smooth for the faces. -
Pre-shade the edges:
Scrape some orange and brown soft pastel chalk into a fine powder. Using a dry brush, gently dust the edges of the round pancakes to simulate a golden-brown crust. -
Add toast details:
For the square toast, use a needle tool to poke small holes on the surface. If you want chocolate chips, press tiny flattened balls of brown clay into the surface gently. -
Stack them up:
Carefully stack the layers. I find that pressing them together slightly helps them adhere without needing liquid clay between each layer, but don’t squish the texture.
Chalk Shading Secret
Apply lighter chalk colors first (yellows) before moving to oranges and browns. This layering builds depth and prevents the ‘burnt’ look of starting too dark.
Step 2: Creating the Egg & Butter
-
Shape the egg white:
Flatten a small ball of white clay into an organic, slightly irregular oval shape. It should be thicker than the pancakes but taper off slightly at the edges. -
Add the yolk:
Roll a small ball of yellow clay and press it gently onto the center of the white flexible shape. Round it off so it looks like a plump yolk. -
Make the butter pat:
Create a square block of pale yellow clay. If you are recreating the specific item in the photo, add a small yellow dome on top to mimic a melting effect or a unique cheese slice. -
Initial baking:
Place all your pieces (stacks, egg, butter) on a baking tile. Bake according to your clay manufacturer’s instructions for a partial cure (usually 10-15 minutes).
Step 3: Bringing them to Life
-
Paint the faces:
Once cool, use a fine detail brush or needle tool dipped in black acrylic paint to draw tiny simple smiles and eyes on the top pancake and the egg yolk. -
Add blush:
Use a dotting tool and light pink paint (or pink chalk dust) to add tiny rosy cheeks next to the smiles for that extra kawaii look. -
Enhance the browning:
Now that the pieces are hard, go back in with darker brown chalk pastels to deepen the crust colors on the pancake edges and the toast corners. -
Sculpt the plate:
Roll out a slab of speckled beige clay (or mix white with black pepper/craft sand). Form it into a shallow bowl shape over a rounded object or by hand. -
Assemble and texture plate:
Give the plate a rough, handmade pottery texture using a crumpled ball of foil. Place the baked food items onto the raw clay plate to ensure they fit, pressing them down slightly.
Smudged Faces?
If your painted face smudges, wipe it away quickly with a cotton swab dipped in rubbing alcohol, or gently scrape it off with a craft knife once dry.
Step 4: Final Glazing
-
Final Bake:
Bake the entire set together, ensuring the plate cures fully. Follow the package directions for the plate’s clay type. -
gloss the yolk:
After cooling completely, apply a coat of gloss glaze or a drop of UV resin specifically to the egg yolk and the melting butter to make them look shiny and wet. -
Seal the food:
Apply a matte varnish to the bread items if you want to protect the chalk shading without making them look unnaturally shiny.
Enjoy displaying your charming breakfast spread on a miniature table or turning them into magnets.
Mini Bubble Drink Characters With Tiny Straws
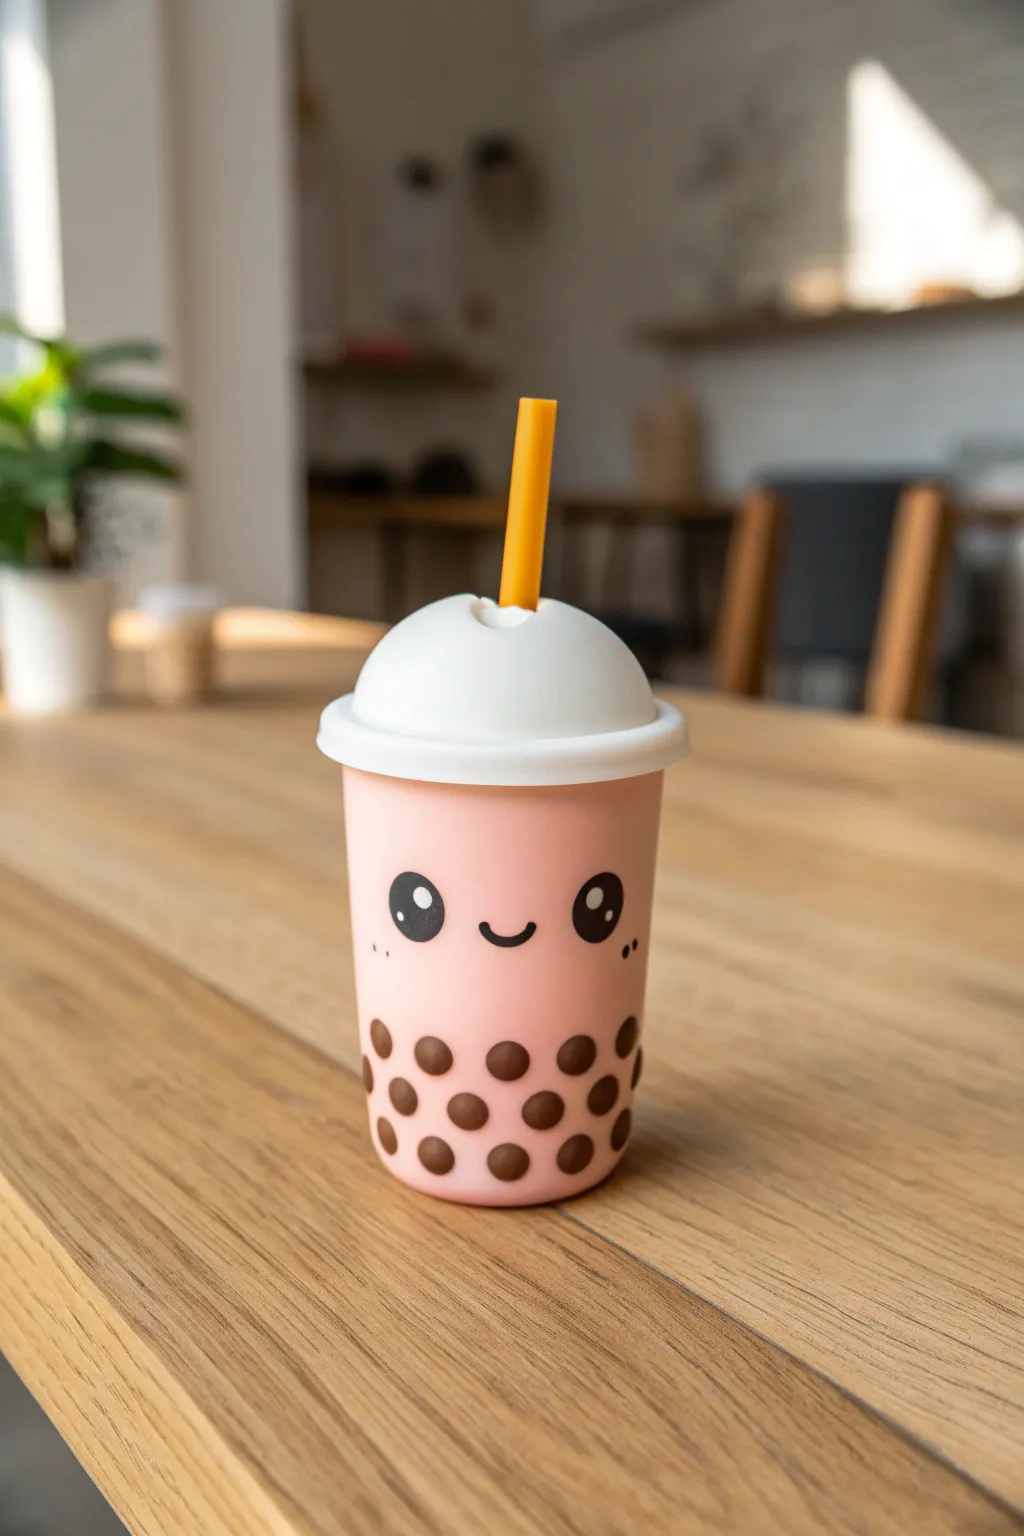
This adorable mini sculpture captures the sweet charm of bubble tea with a pastel pink cup, a fluffy white lid, and iconic tapioca pearls. The addition of a tiny smiley face brings this clay treat to life, making it a perfect desk companion or keychain charm.
Step-by-Step Tutorial
Materials
- Polymer clay (Pastel Pink, White, Dark Brown/Black, Bright Orange)
- Black acrylic paint or fine-tip permanent marker
- Rolling pin or pasta machine
- Circle cutter (small to medium size)
- X-acto knife or clay blade
- Modeling tools (ball tool, needle tool)
- Liquid polymer clay (optional, for adhesion)
- Gloss glaze (optional)
Step 1: Shaping the Cup Base
-
Prepare the pink clay:
Condition a piece of pastel pink polymer clay until it is soft and malleable. Roll it into a smooth ball to remove any air bubbles or cracks. -
Form the cylinder:
Gently roll the pink ball into a short, thick cylinder shape. Tap the bottom against your work surface to flatten it so it stands on its own. -
Creating the taper:
While the cylinder is standing, use your fingers to gently smooth the sides, tapering it slightly so the bottom is just a bit narrower than the top, imitating a classic cup shape. -
Ensure a flat top:
Make sure the top surface of your pink cylinder is flat and level to prepare it for the lid layer.
Step 2: Adding the Bubbles & Face
-
Make the tapioca pearls:
Take your dark brown clay and roll out a very thin snake. Cut off tiny, equal-sized segments and roll each one into a miniature sphere. -
Attach the bubbles:
Press the brown spheres gently onto the lower third of the pink cup. Arrange them in roughly two staggered rows for a natural look, flattening them slightly so they adhere well. -
Paint the eyes:
Using a very fine dotting tool and black acrylic paint (or clay if you prefer), place two small circles in the center of the cup for eyes. -
Add eye highlights:
For that signature kawaii sparkle, add two tiny white dots inside each black eye—one larger dot near the top and a smaller one below. -
Draw the smile:
Carefully paint a small u-shaped smile directly between the eyes. Add tiny blush marks or freckles on the cheeks if desired.
Sticky Situation?
If the tiny brown balls won’t stick to the cup, use a needle tool to scratch the surface slightly or apply a dot of liquid clay for extra grip.
Step 3: Creating the Lid & Straw
-
Form the dome lid:
Condition a piece of white clay and roll it into a ball slightly wider than your cup. Press it gently to flatten the bottom, creating a hemisphere or dome shape. -
Make the rim:
Roll a thin snake of white clay. Wrap this around the base of your white dome where it meets the cup, pressing it gently to create the slightly protruding rim of a plastic lid. -
Attach the lid:
Place the white dome onto the pink cup. Use a tiny dab of liquid clay if needed to ensure a secure bond between the pink and white sections. -
Prepare the straw:
Roll a small piece of bright orange clay into a thin, uniform cylinder. Cut it to your desired length. -
Make the straw hole:
Use a modeling tool to create an indentation in the center (or slightly off-center) of the white dome lid. -
Insert the straw:
Insert the orange straw into the indentation. You can slant it slightly for a playful, realistic angle.
Flavor Variations
Change the pink clay to light green for matcha tea, lavender for taro, or a creamy beige for classic milk tea to make a whole set.
Step 4: Finishing Touches
-
Final inspection:
Check the figurine from all angles. Smooth out any unintentional fingerprints using a drop of baby oil or a silicone tool. -
Baking:
Bake the piece according to your clay manufacturer’s instructions. Usually, this means around 275°F (130°C) for 15-30 minutes depending on thickness. -
Cooling:
Let the figure cool down completely inside the oven or on a safe surface before handling. -
Glazing:
Once cool, I recommend brushing a coat of gloss glaze over the eyes and bubbles to make them look wet and shiny.
Now you have a sweet little boba buddy to brighten up your workspace

TRACK YOUR CERAMIC JOURNEY
Capture glaze tests, firing details, and creative progress—all in one simple printable. Make your projects easier to repeat and improve.
Tiny Fruit Friends With Leaf Toppers
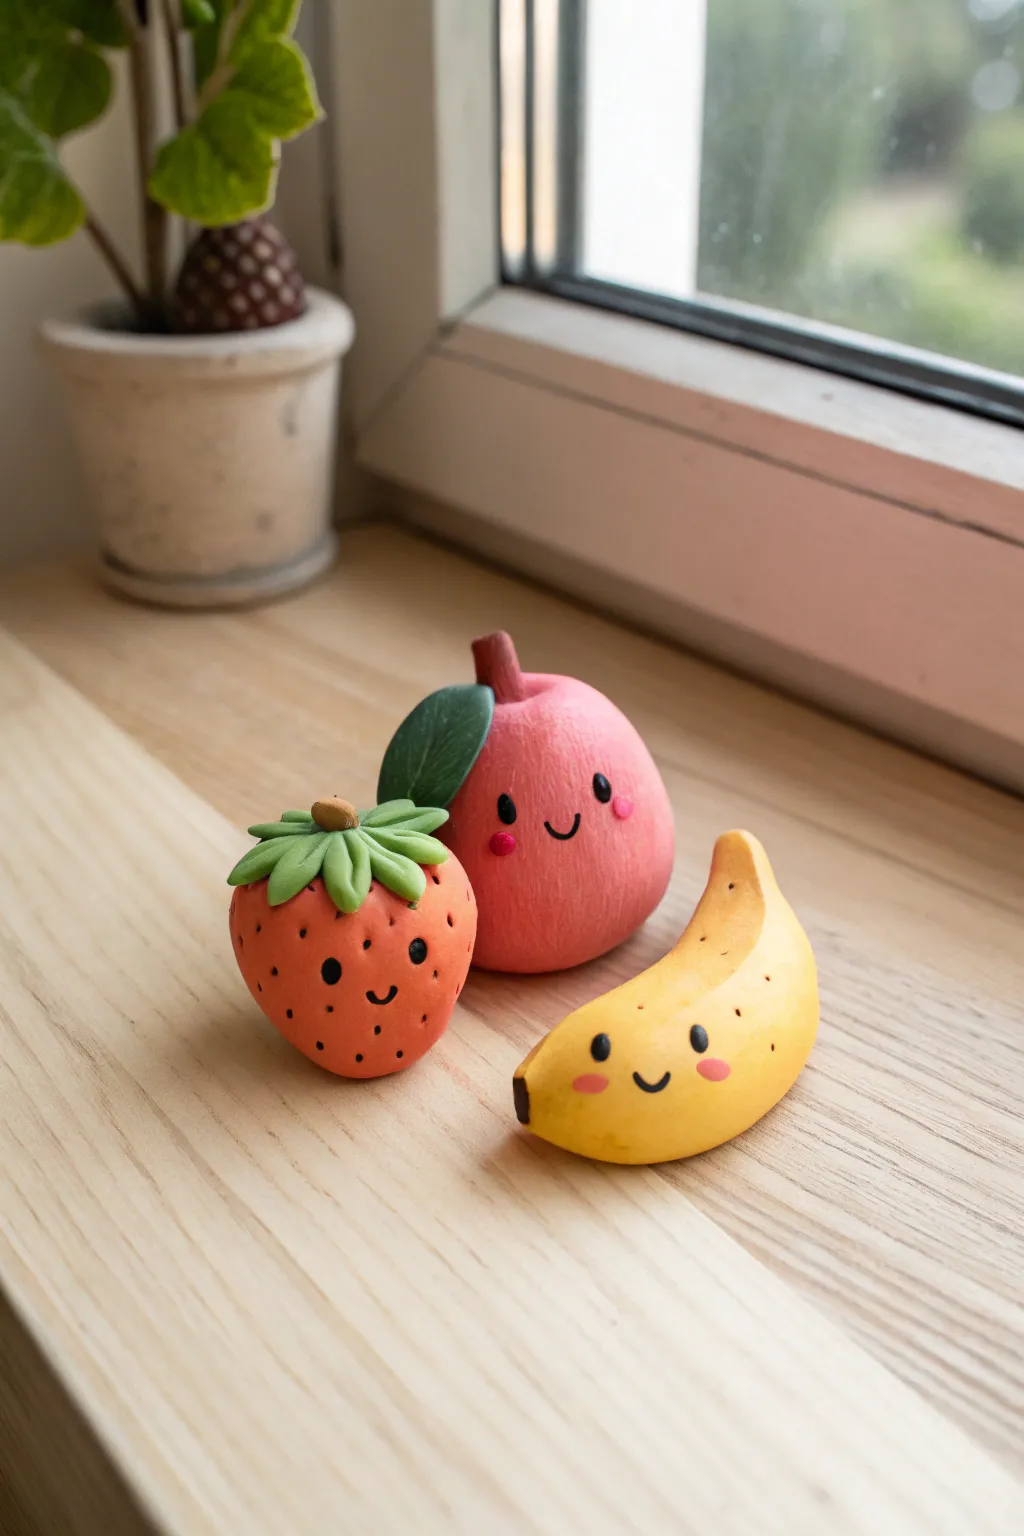
Brighten up your desk or shelf with this adorable trio of smiling clay friends. Featuring a strawberry, a pink pear, and a cheerful banana, these matte-finish figures get their charm from simple shapes and sweet little painted faces.
Step-by-Step
Materials
- Polymer clay (Red, Light Pink, Yellow, Green, Dark Brown)
- Acrylic paints (Black, Pink)
- Fine detail paintbrush or dotting tool
- Aluminum foil (optional core)
- Needle tool or toothpick
- Soft toothbrush or texture tool
- Tracing paper or smooth work surface
- Oven for baking
Step 1: Shaping the Fruit Bases
-
Condition the Clay:
Start by warming up your red, pink, and yellow clay in your hands until it becomes soft and pliable to prevent cracking later. -
Form the Strawberry:
Roll a walnut-sized ball of red clay. Gently taper one end to create a rounded cone shape, flattening the top slightly where the leaves will sit. -
Create the Pear:
Take a slightly larger piece of pink clay. Roll it into a ball, then pinch and pull the top third gently upwards to create a classic pear shape with a wider bottom. -
Mold the Banana:
Roll yellow clay into a thick cylinder. Curve it gently into a crescent shape. Taper one end to a blunt point and flatten the other end slightly where the stem connects. -
Add Texture:
For a realistic matte look like the photo, gently tap the surface of the strawberry and pear with a soft toothbrush or texture sponge. Leave the banana relatively smooth.
Step 2: Adding Details & Toppers
-
Strawberry Seeds:
Using a needle tool, poke shallow, tiny indentations all over the red strawberry body to mimic seed pockets. -
Strawberry Leaves:
Flatten a small piece of green clay. Cut out a star shape with about 6-7 points. Drape this over the top of the strawberry, curling the tips slightly upward. -
Strawberry Stem:
Add a tiny, beige-brown nub to the very center of the green leaves. -
Pear Leaf & Stem:
Roll a small brown cylinder for the pear’s stem and attach it vertically. Sculpt a single, plump green leaf with a central crease and press it next to the stem. -
Banana Tip:
Add a tiny square of dark brown clay to the bottom tip of the banana to look like the ripening point.
Fixing Smoothness
If fingerprints are visible before texturing, wipe the clay gently with a tiny bit of rubbing alcohol or baby oil on your finger to smooth them out immediately.
Step 3: Baking & Finishing
-
Bake the Figures:
Place your fruits on a baking sheet lined with paper. Bake according to your clay manufacturer’s specific instructions (usually 275°F/135°C for 15-30 minutes). -
Cool Down:
Let the figures cool completely before handling. This hardens the clay and prevents fingerprints during painting. -
Paint the Eyes:
Using a very fine brush or dotting tool dipped in black acrylic paint, add two wide-set eyes to each fruit. I like to place them slightly lower on the shape for extra cuteness. -
Add Smiles:
With the finest brush tip, paint a tiny, shallow U-shape between the eyes for the mouth. -
Rosy Cheeks:
Dip a rounded tool or cotton swab into pink paint. Dab off most of the paint, then gently stamp rosy cheeks next to the eyes. -
Banana Speckles:
Dilute a little brown acrylic paint and flick tiny speckles onto the banana using an old toothbrush, or paint tiny dots manually for control. -
Strawberry Seeds Painting:
Using a fine brush, carefully dab a speck of black paint into the seed indentations you made earlier, or paint small dots if you skipped the texture step.
Make Them Magnets
Before baking, press a strong neodymium magnet into the back of each fruit. Bake them normally, then glue the magnet in place for cute fridge decor.
Now you have a sweet set of fruit buddies ready to sit on your windowsill
Mini Veggie Crew With Big Personalities
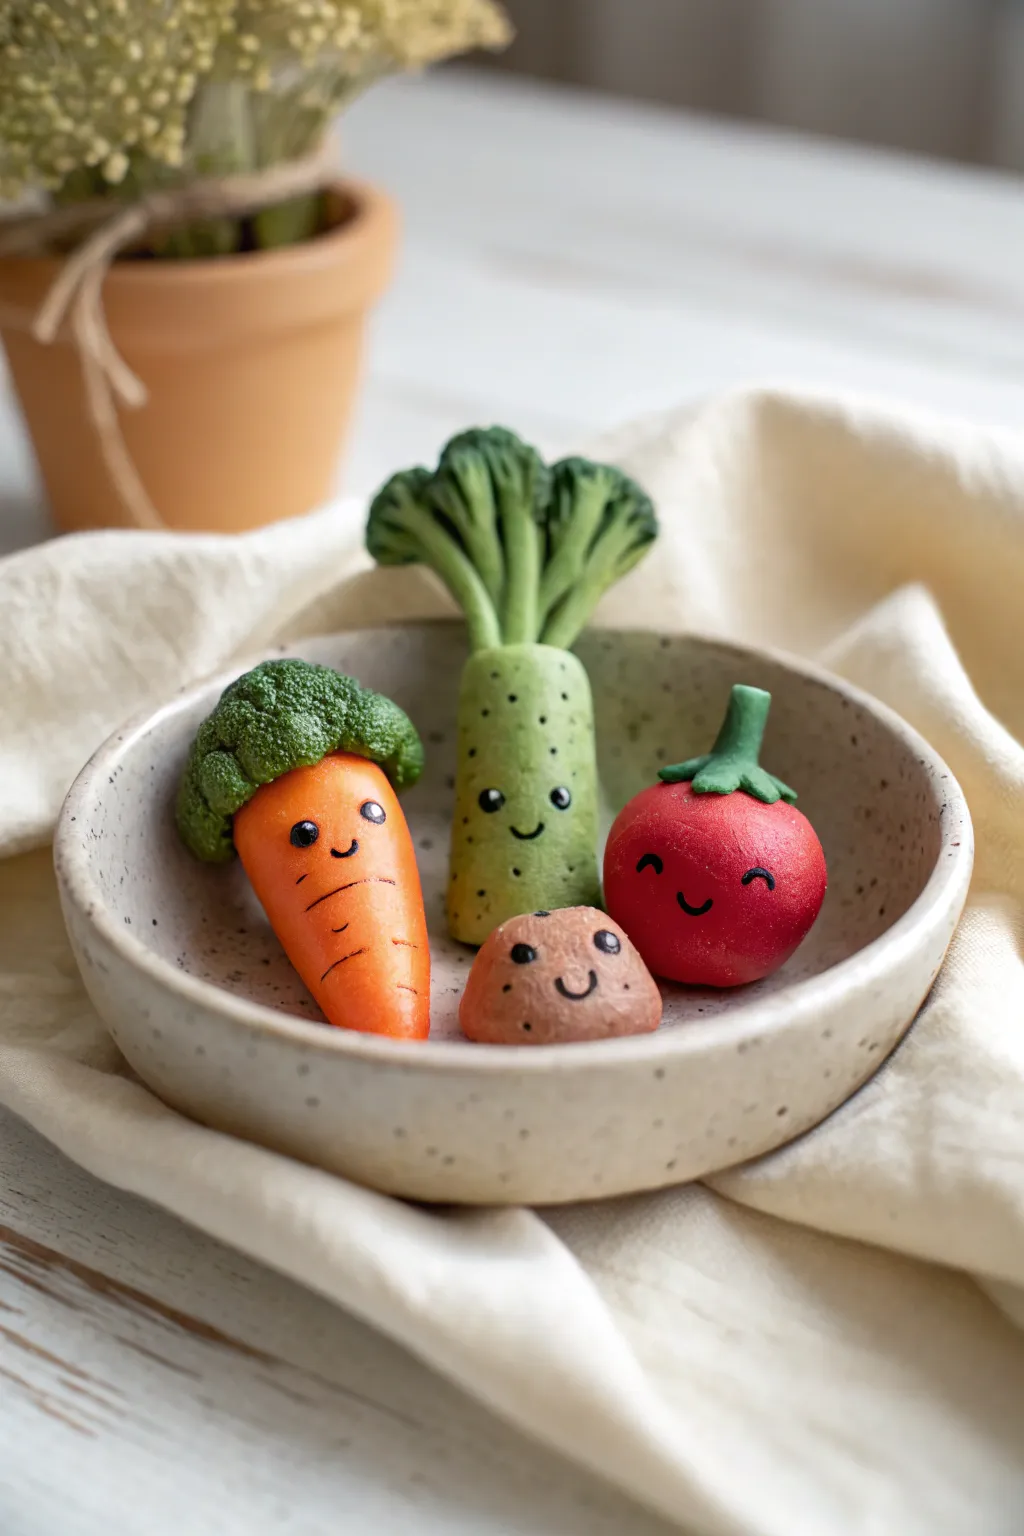
These adorable vegetable friends bring a smile to anyone’s face with their expressive features and whimsical combinations. Perfect for polymer clay beginners, this project turns simple shapes into a charming little salad squad sitting in their own bowl.
Step-by-Step Tutorial
Materials
- Polymer clay (Orange, Green, Dark Green, Red, Beige/Light Brown)
- Black acrylic paint or fine-point POSCA marker
- Ball stylus tool/dotting tool
- Needle tool or toothpick
- Clay roller or pasta machine
- Small ceramic bowl (for display)
- Gloss glaze (optional)
- Aluminum foil (for armature/texturing)
Step 1: Shaping the Carrot and Broccoli Hybrid
-
Form the base:
Condition a piece of orange clay and roll it into a smooth cone shape. Slightly flatten the wider top end to prepare it for the greenery. -
Add texture:
Using a needle tool, gently press short, horizontal lines randomly around the orange cone to mimic the natural ridges found on carrots. -
Create the broccoli top:
Take dark green clay and form a rough, flattened dome. Using a crumpled ball of aluminum foil or a stiff brush, tap the surface repeatedly to create a dense, bumpy broccoli texture. -
Attach the pieces:
Press the textured green dome firmly onto the flat top of your orange carrot cone. Smooth the seam slightly underneath with your finger or a blending tool so it adheres well.
Clean Clay Tip
Keep baby wipes nearby! When switching from dark red or green clay to the light beige potato, wipe your hands and tools thoroughly to avoid color transfer.
Step 2: Crafting the Tall Green Veggie
-
Roll the stalk:
Mix a small amount of green clay with beige to get a lighter, muted green. Roll this into a thick cylinder, slightly tapering it near the top. -
Texture the stalk:
Use the tip of your needle tool to poke tiny, shallow dots all over the surface of the cylinder for an organic, speckled look. -
Sculpt the leaves:
Using a darker green clay, shape five or six long, thin teardrops. Flatten them slightly and use a knife tool to score deep vertical lines for leaf veins. -
Assemble the top:
Arrange the leaves in a bunch on top of the cylinder, pinching them together at the base so they fan out like a palm tree or broccoli stem.
Step 3: Making the Tomato and Potato
-
Shape the tomato:
Roll a smooth, round ball of bright red clay. Gently press it down onto your work surface just enough so it sits flat without rolling away. -
Add the tomato stem:
Create a tiny star shape from green clay by flattening a small ball and pinching out five points. Place this on top of the red ball and add a small green stalk in the center. -
Form the potato:
Roll a lump of light brown or beige clay into an irregular, slightly flattened oval shape. Potatoes aren’t perfect spheres, so imperfection works well here. -
Texture the potato skin:
Using a toothbrush or crumpled foil, lightly texture the surface. I like to press a large ball tool into the clay in a few spots to create ‘eyes’ or dents.
Blush Effect
Before baking, use a soft brush to dust a tiny bit of pink soft pastel chalk onto the ‘cheeks’ of your veggies. It adds an instant kawaii effect that won’t rub off.
Step 4: Baking and Face Details
-
Bake the figures:
Arrange your veggies on a baking sheet lined with parchment paper. Bake according to your customized clay package instructions (usually 275°F/135°C for 15-30 minutes). -
Cool down:
Let the figures cool completely before handling. Painting on hot clay can cause the paint to dry too fast and clump up. -
Paint the eyes:
Dip a small dotting tool or the end of a paintbrush into black acrylic paint. Dot two small, wide-set eyes onto each vegetable. -
Draw the mouths:
Using a very fine detail brush or a fine-tip black marker, draw a simple U-shaped smile between the eyes. Vary the smiles—make the tomato’s smile wider and the potato’s smaller for distinct personalities. -
Add shine (Optional):
Once the paint is totally dry, you can add a small white dot to the eyes for a ‘sparkle’ and brush a coat of matte or gloss varnish over the veggies to protect them.
Arranging these little friends in a small ceramic dish creates a delightful display for your desk or kitchen shelf
Tiny Mushroom Buddies With Spots and Smiles
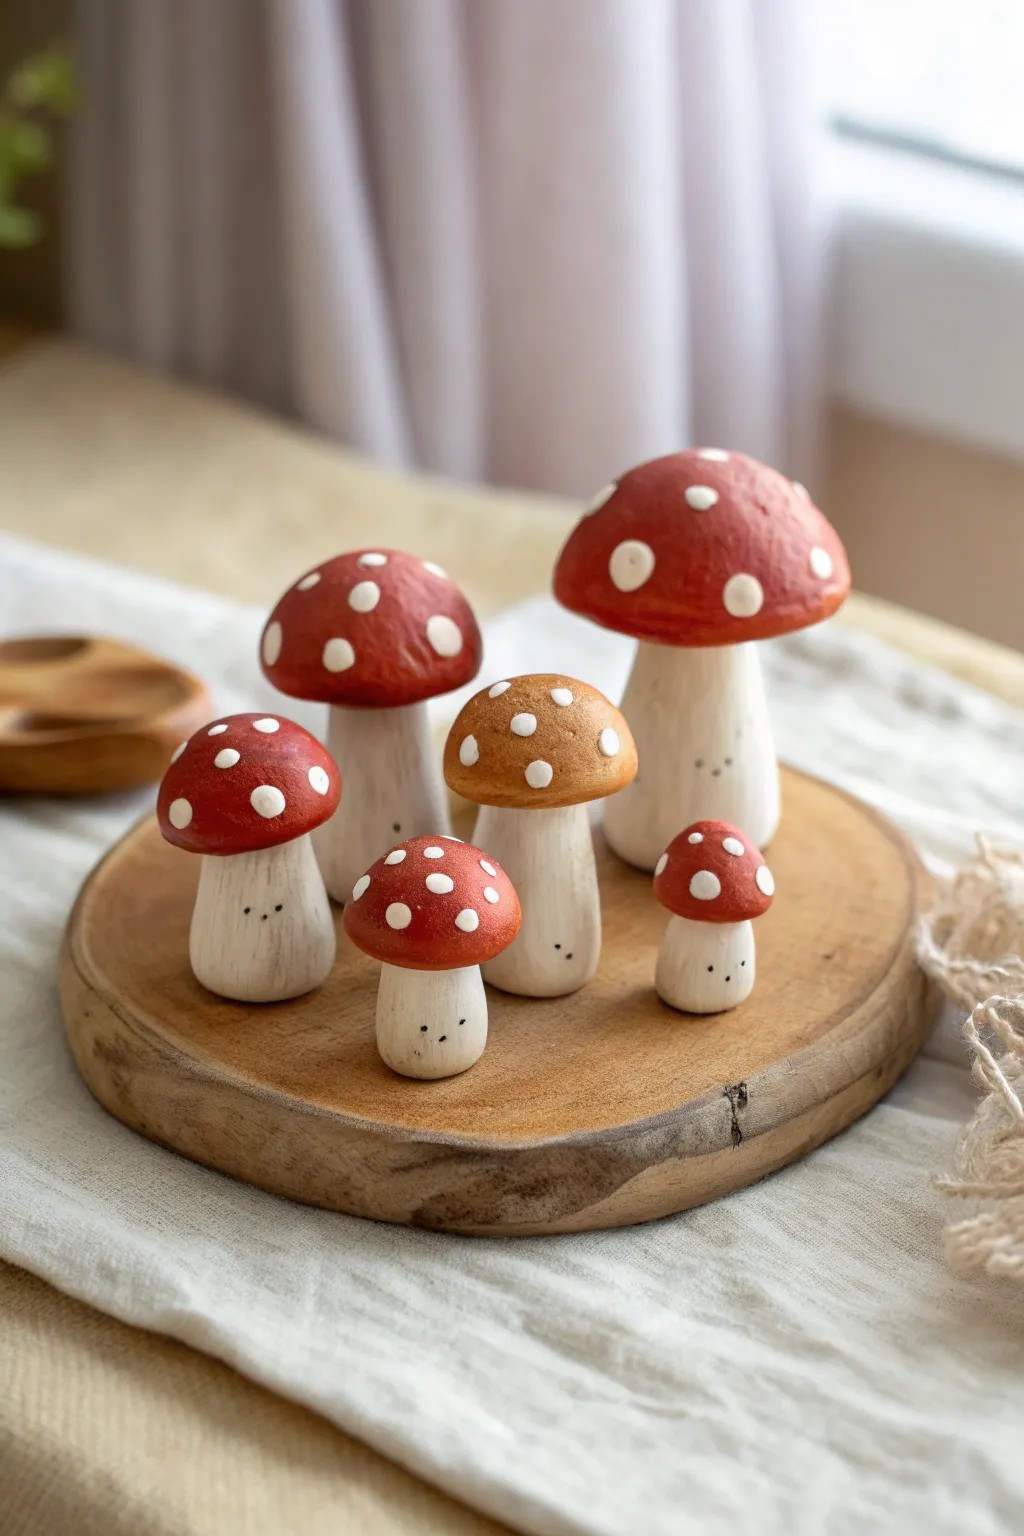
Bring a touch of forest charm to your space with these adorable, hand-sculpted mushroom figurines. With their classic red-and-white caps and sweet, tiny smiles, this little fungi family brings an instant woodland fairytale vibe to any shelf.
Step-by-Step Guide
Materials
- Air-dry clay (or polymer clay)
- Acrylic paints (Barn Red, Burnt Sienna, Antique White, Titanium White, Black)
- Fine grit sandpaper
- Small flat paintbrush
- Fine detail paintbrush or dotting tool
- Water cup and paper towels
- Sculpting tool or toothpick for texture
- Matte varnish (optional)
Step 1: Sculpting the Shapes
-
Portion the clay:
Start by dividing your clay into pairs of balls to create a range of sizes. You’ll need one larger ball for the cap and a slightly smaller, elongated piece for the stem for each mushroom. Aim for variety—make a tall ‘papa’ mushroom, a tiny ‘baby’ one, and a medium-sized unique one. -
Form the stems:
Roll the stem portions into thick cylinders. Gently taper the top where the cap will sit, but keep the bottoms wide and flat so they stand securely on their own. -
Shape the caps:
Take the cap portions and roll them into smooth spheres first. Then, press your thumb into the bottom center to create a slight indentation while gently molding the top into a rounded dome shape. -
Attach cap to stem:
Score the top of the stem and the underside of the cap with a toothpick (scratching cross-hatch marks). Dab a tiny bit of water (for air-dry clay) or liquid clay (for polymer) on the scored areas and press them firmly together. -
Smooth the seams:
Use your finger or a sculpting tool to smooth out the connection point underneath the cap, ensuring the two pieces look like one continuous organic form. -
Check for stability:
Stand each completed mushroom on your work surface. If any wobble, press the base gently against the table to flatten it perfectly before the drying process begins. -
Dry thoroughly:
Let your mushrooms dry completely according to the clay package instructions. I find waiting a full 24 hours ensures they are rock hard and ready for paint.
Step 2: Painting and Details
-
Sand imperfections:
Once fully dry, take a piece of fine-grit sandpaper and lightly buff away any fingerprints or rough bumps on the caps to get that smooth, matte finish. -
Base coat the stems:
Mix a tiny drop of Burnt Sienna into your Antique White to create a warm, creamy bone color. Paint the stems entirely, applying two thin coats for opaque coverage. -
Add stem texture:
Load a dry, stiff brush with a very small amount of diluted gray or diluted brown paint. Wipe most of it off on a paper towel, then lightly drag the brush vertically up the stems to create subtle wood-grain streaks. -
Paint the red caps:
Paint the caps of most mushrooms with Barn Red acrylic. Use a steady hand near the rim where the red meets the white stem. -
Paint the accent cap:
To add visual interest like in the reference photo, choose one medium-sized mushroom and paint its cap with a mixture of Burnt Sienna and a touch of yellow for a golden-brown variety. -
Dot the caps:
Dip the back end of a paintbrush or a dotting tool into Titanium White paint. Press gently onto the dried colored caps to create irregular polka dots. Vary the pressure to make some dots large and others tiny. -
Paint the faces:
Using your finest detail brush and black paint, add two tiny dots for eyes near the bottom of the stem. Place them wide apart for a cuter look. -
Add the smile:
With the very tip of your brush, paint the tiniest little arched line between the eyes to give each buddy a shy, sweet smile. -
Seal the work:
Protect your painting with a coat of matte varnish. Avoid glossy finishes if you want to maintain that natural, earthly clay look.
Cracks in air-dry clay?
If small cracks appear as the clay dries, mix a tiny bit of fresh clay with water to make a paste (slip). Fill the cracks, smooth with a finger, and let dry again.
Pro Tip: Organic dots
Don’t make your white dots perfectly round! Slightly irregular, distinct shapes look more natural and hand-crafted than perfect mechanical circles.
Arrange your little mushroom family on a shelf or plant pot and enjoy their cheerful company
Mini Succulent Pot Figures With Cute Faces
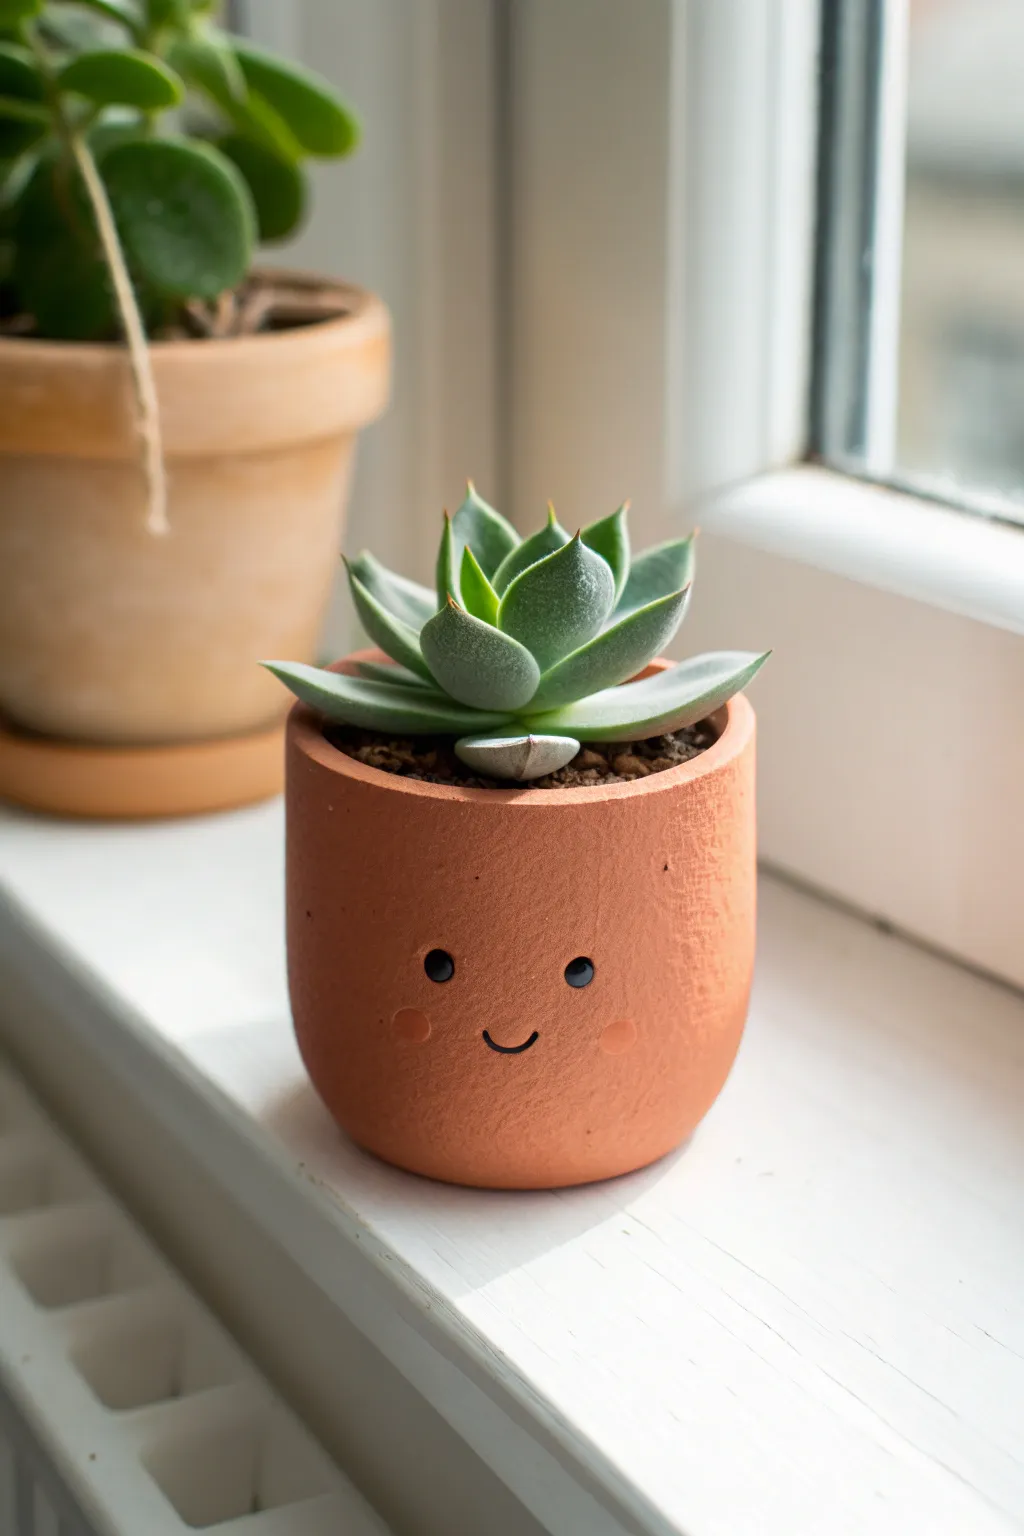
Transform a plain miniature planter into a charming character with just a few simple touches. This project features a warm, reddish-brown clay finish adorned with an irresistibly cute, minimalist face that brings personality to any windowsill succulent garden.
Detailed Instructions
Materials
- Small cylindrical terracotta or ceramic pot (approx. 2-3 inches diameter)
- Air-dry clay or polymer clay (if creating the pot from scratch)
- Acrylic paint (Terra Cotta/Burnt Sienna, Black, Light Pink)
- Matte sealant or varnish spray
- Fine-grit sandpaper
- Small round paintbrush (size 0 or 1)
- Dotting tool or toothpick
- Succulent plant and potting soil
Step 1: Preparing the Base
-
Surface Prep:
If you are using a store-bought ceramic pot, ensure it is clean and dry. If using a standard terracotta pot, give it a quick sanding with fine-grit sandpaper to smooth out any rough texture, creating a better canvas for your painting. -
Base Color Application:
Whether your pot is plastic, ceramic, or clay, apply a base coat of Terra Cotta or Burnt Sienna acrylic paint. I like to use a sponge brush here to avoid streaks. -
Developing Texture:
To mimic the soft, stone-like look in the photo, dab a second coat of paint using a dry sponge or stippling brush while the first coat is tacky. This creates a natural, matte earthenware finish. -
Drying Time:
Allow the base coats to dry completely for at least an hour. The surface needs to be perfectly dry so the facial features don’t bleed into the background color.
Paint Consistency
Mix a tiny drop of water into your black paint for the smile. Ink-like consistency flows smoother than thick paint, preventing jagged lines.
Step 2: Painting the Face
-
Positioning the Features:
Visualize where the face will sit. The eyes should be placed slightly below the vertical center of the pot to achieve that ‘kawaii’ proportional look, with enough space between them for a sweet expression. -
Painting the Eyes:
Dip the handle end of a paintbrush or a large dotting tool into black acrylic paint. Press gently onto the pot to create two solid, round circles for the eyes. -
Adding the Sparkle:
Once the black paint is tacky but not fully wet, use a toothpick or a very fine needle tool to add a tiny dot of white paint to the upper right corner of each eye. This ‘catchlight’ brings the character to life. -
Creating Rosy Cheeks:
Mix a very dilute wash of light pink paint. Using your pinky finger or a dry, soft brush, gently dab circular blushes just below and to the outside of each eye. Keep it subtle—you want a soft glow, not a solid circle. -
The Smile:
Using your finest brush (size 0) and slightly thinned black paint, draw a small, U-shaped curve centered between the eyes. Keep the line thin and delicate for the cutest result. -
Cleanup:
If any lines look shaky, use a damp Q-tip to gently erase mistakes before the paint sets, or cover with a dab of your terracotta base color once dry.
Step 3: Finishing Touches
-
Sealing the Work:
Protect your paint job with a coat of matte spray varnish. This is crucial if the pot will hold a real plant, as water seepage can ruin acrylic paint over time. -
Soil Preparation:
Once the sealer is dry, fill the bottom third of the pot with a succulent-specific soil mix or gravel to ensure proper drainage. -
Planting:
Gently remove your Echeveria or similar rosette succulent from its nursery container. Loosen the roots slightly and nestle it into the pot. -
Final Arrangement:
Fill in the gaps around the roots with more soil, pressing down gently with a spoon or your fingers to secure the plant without obscuring the painted face.
Make it a Family
Create a whole set of pots with different expressions—winking, sleeping, or surprised—to display a varied succulent collection.
Your adorable new plant friend is now ready to brighten up your desk or shelf with its cheerful smile
Mini Ghost Figures With Tiny Pumpkins
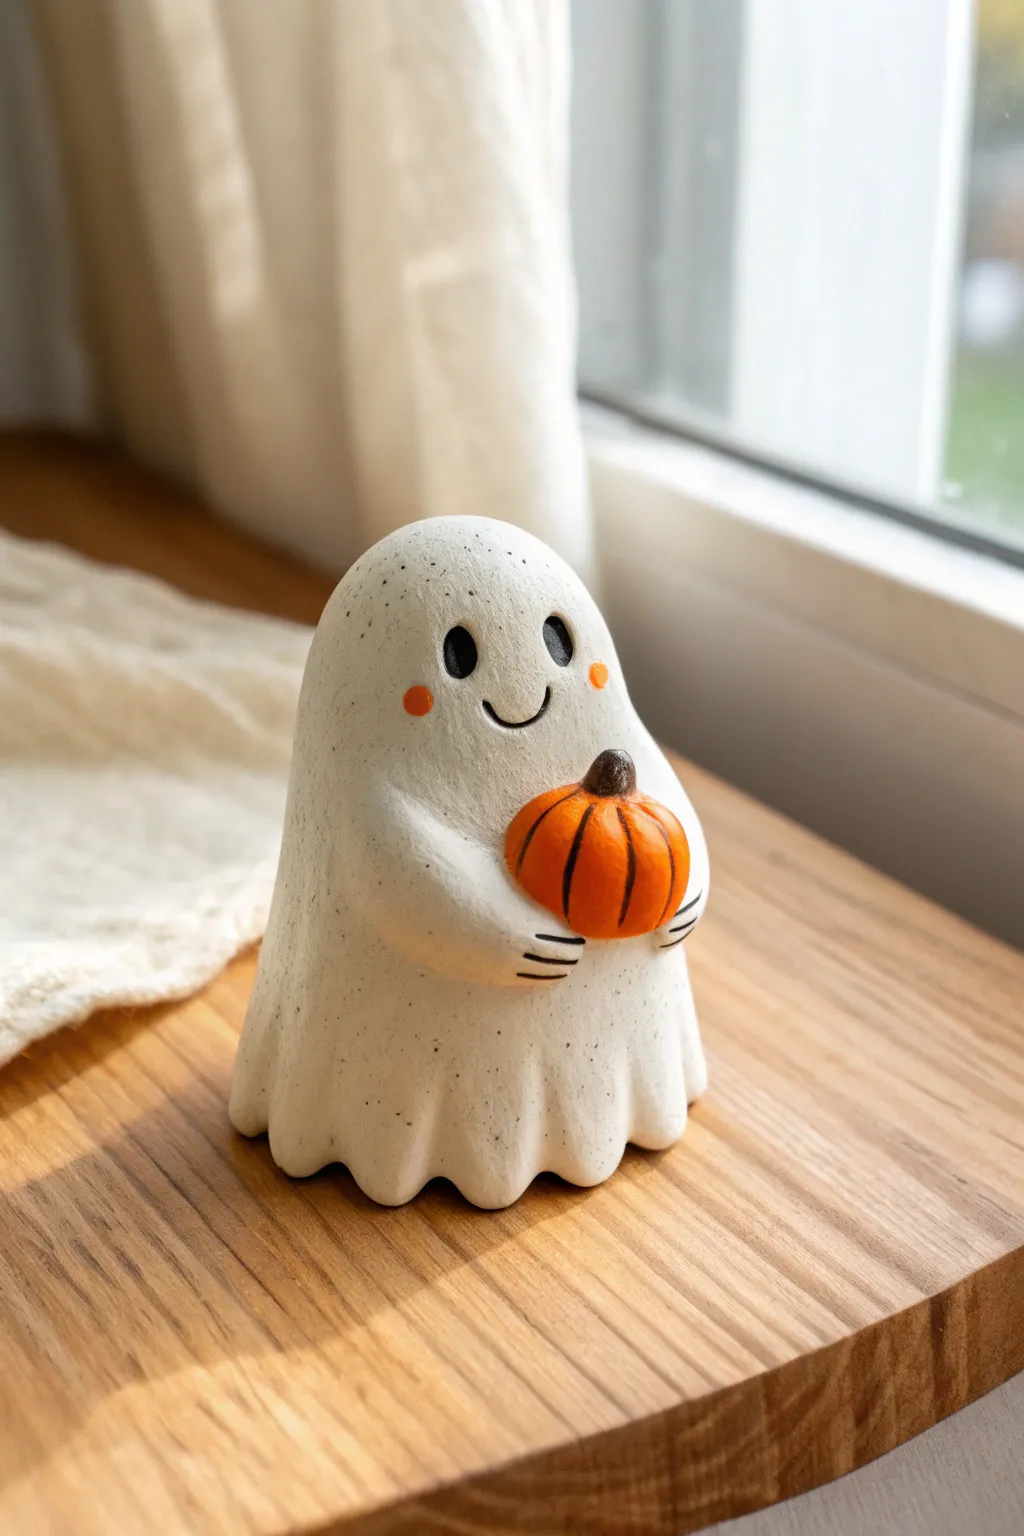
This adorable little ghost brings a wholesome touch to Halloween decor with its gentle smile and tiny pumpkin companion. The charming speckled finish and soft matte texture give it a cozy, handcrafted pottery look without needing a kiln.
Step-by-Step
Materials
- White polymer clay or air-dry clay
- Orange polymer clay
- Brown polymer clay
- Black acrylic paint
- Toothpick or needle tool
- Small round sculpting tool (ball stylus)
- Clean toothbrush or stiff bristle brush
- Fine-grit sandpaper (optional)
- Matte varnish or sealant
- Paintbrush (fine detail)
Step 1: Shaping the Ghost
-
Prepare the base:
Start with a ball of white clay about the size of a golf ball. Roll it in your palms until it is smooth and free of cracks. -
Form the body:
Gently roll the ball into a thick cylinder shape, slightly tapering the top to create a rounded dome for the head. The bottom should be wider than the top for stability. -
Create the ruffled edge:
Press the bottom of the ghost onto your work surface to flatten it. Using your thumb and forefinger, gently pinch and pull the bottom edge of the clay outward to create a wavy, skirt-like effect. -
Refine the folds:
Use a rounded sculpting tool or the back of a paintbrush to deepen the grooves in the bottom skirt, making the drapery look soft and flowing. -
Texture the surface:
Take a clean toothbrush and gently tap it all over the surface of the ghost. This creates a subtle stone-like texture that mimics the speckled look in the photo.
Clean Clay Tip
Keep wet wipes handy! Polymer clay picks up dust easily. Wipe your hands and tools before touching the white clay to keep your ghost bright and clean.
Step 2: Adding the Pumpkin
-
Shape the pumpkin:
Roll a small pea-sized ball of orange clay. Press it down slightly so it isn’t a perfect sphere, giving it a squat pumpkin shape. -
Add pumpkin ridges:
Using a needle tool or toothpick, press vertical lines around the orange ball, starting from the center top and going down the sides to create ridges. -
Create the stem:
Roll a tiny speck of brown clay into a small cone. Attach it firmly to the center top of your pumpkin. -
Position the arms:
Roll two small sausage shapes from white clay for arms. Attach them to the sides of the ghost’s body, angling them forward as if reaching out to hold something. -
Secure the pumpkin:
Place the pumpkin between the two arms. Gently press the ends of the arms against the pumpkin surface to secure it in place. -
Add hands:
Use your needle tool to carefully press two or three small indentations into the ends of the arms to suggest little fingers gripping the pumpkin.
Glow Up
Use glow-in-the-dark polymer clay for the ghost’s body instead of plain white. During the day it looks normal, but at night it becomes eerily awesome!
Step 3: Finishing Details
-
Create the face:
Use a medium-sized ball tool to press two indentations for the eyes about halfway down the head. Use a needle tool to carve a simple, curved smile below them. -
Bake or dry:
If using polymer clay, bake according to the package instructions (usually 275°F/135°C for 15-30 minutes). If using air-dry clay, let it sit for 24-48 hours until fully hardened. -
Paint the eyes:
Once cool or dry, drop a small amount of black acrylic paint into the eye sockets using a fine detail brush or the head of a pin. -
Paint the details:
Dilute a tiny bit of black paint with water and carefully run it into the mouth groove and the finger indents to define them. -
Add rosy cheeks:
Mix a tiny amount of orange and white paint (or use soft pastels). Dab two small circles just below the eyes for blushing cheeks. -
Create the speckled effect:
Load a stiff brush or toothbrush with watered-down black or dark grey paint. Run your thumb over the bristles to flick tiny specks of paint all over the ghost. I find practicing on paper first helps control the splatter size. -
Seal the piece:
Finish by applying a coat of matte varnish to protect your work and unify the surface sheen.
Now you have a charming little companion ready to sit on your windowsill during the spooky season
Mini Stars and Moons With Sleepy Faces
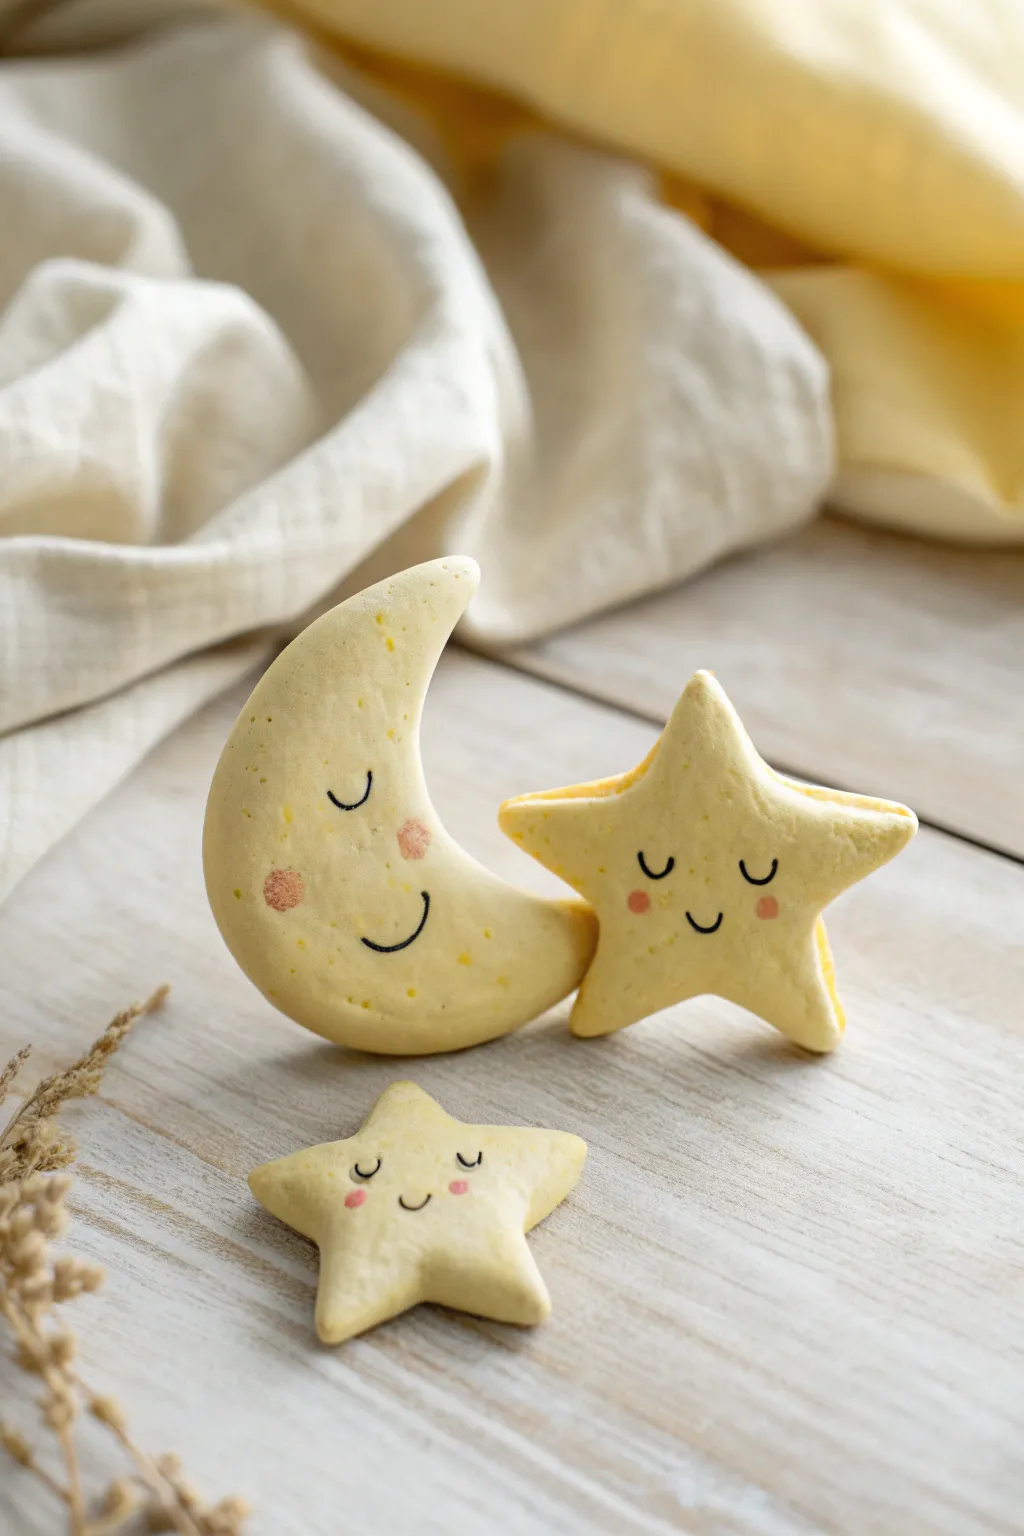
Create a dreamy night sky vignette with these adorable, sandwich-style star and moon figurines. Their soft yellow hue and gentle expressions make them perfect as nursery décor or soothing desk companions.
Detailed Instructions
Materials
- Polymer clay (pale yellow)
- Polymer clay (translucent or white for mixing)
- FolkArt acrylic paint (black, pink)
- Fine detail paintbrush (000 size)
- Star and moon cookie cutters (small)
- Rolling pin or pasta machine
- Toothbrush or textured sponge
- Soft pastels (pink or peach)
- Baking sheet and parchment paper
- Oven
- Satin varnish (optional)
Step 1: Shaping the Dough
-
Mix the Color:
Begin by conditioning your pale yellow polymer clay until it’s soft and pliable. If the yellow is too vibrant, mix in a small amount of white or translucent clay to achieve that soft, creamy, buttery shade seen in the photo. -
Roll the Sheets:
Roll your clay out into a thick, even sheet, approximately 1/4 inch thick. You want these figures to have a chunky, cookie-like thickness rather than being wafer-thin. -
Texture the Surface:
Before cutting, gently tap a clean toothbrush or a textured sponge over the surface of the clay sheet. This gives the clay a subtle, porous texture that mimics the look of a macaron shell or baked cookie. -
Cut the Shapes:
Using your cookie cutters, punch out two stars and two crescent moon shapes. For the standing star figure in the image, you will actually need two star cutouts to create the sandwich effect.
Needle Tool Trick
If you don’t have a tiny brush for the eyes, use a sharp needle tool dipped in paint. It offers more control for perfect curves.
Step 2: Creating the Sandwich Effect
-
Prepare the Filling:
Take a scrap of the same yellow clay (or a slightly lighter shade) and roll it into a small ball. Flatten it slightly. -
Assemble the Star:
Place the flattened ball between two star cutouts. Gently press them together so the filling is visible at the edges but doesn’t squish out completely, creating a 3D standing star. -
Shape the Single Figures:
For the crescent moon and the lying-down star, you can leave them as single thick cutouts. Gently round off the sharp edges with your fingertip to make them look softer and pillowy. -
Curve the Moon:
If your moon cutter is very straight, gently pull the tips of the crescent inward slightly to exaggerate the curve, giving it a more whimsical shape.
Turn it into a Mobile
Carefully poke a hole through the top point of the stars and moon before baking to string them up as a hanging mobile.
Step 3: Adding the Details
-
Pre-Bake Blushing:
Before baking, scrape a little powder from a pink soft pastel chalk. Use a soft, dry brush to gently dust two round circles onto the clay where the cheeks will be. -
Bake the Clay:
Place your figures on a baking sheet lined with parchment paper. Bake according to your polymer clay manufacturer’s instructions (usually 275°F/135°C for 15-30 minutes depending on thickness). -
Cool Down:
Allow the pieces to cool completely in the oven with the door cracked open. This prevents cracking due to thermal shock.
Step 4: Painting the Faces
-
Paint the Eyelashes:
Using your finest detail brush and black acrylic paint, carefully draw two ‘U’ shapes for the closed sleeping eyes. Add a tiny lash or two to the outer corners for sweetness. -
Draw the Smile:
Paint a small, simple curve for the mouth perfectly centered between the cheeks. Keep the line thin and delicate. -
Enhance the Cheeks:
If the pastel blush faded during baking, you can gently dab a tiny dot of watered-down pink acrylic paint over the cheek area. -
Add Speckles:
To mimic the organic look in the image, you can dilute some yellow-orange paint and flick tiny speckles onto the surface with an old toothbrush, though this is optional. -
Seal the Work:
Once the paint is fully dry, apply a thin coat of satin varnish to protect the surface without making it too glossy.
Now you have a serene little set of celestial friends ready to bring calm to any space
Mini Alien Figures With Tiny Antennae

Create a charming extraterrestrial friend with this simple polymer clay project. The figure features a vibrant cyan hue with subtle speckling, oversized glossy black eyes, and delicate antennae that give it an inquisitive personality.
Step-by-Step Guide
Materials
- Polymer clay (cyan/turquoise)
- Polymer clay (black)
- Thin crafting wire or jewelry wire (silver or matching color)
- Black acrylic paint (optional, for splattering)
- Toothbrush or stiff bristle brush (optional)
- Gloss glaze or UV resin
- Pointed sculpting tool or toothpick
- Ball stylus tool
- Wire cutters
- Oven for baking
Step 1: Forming the Body
-
Prep the clay:
Begin by conditioning your cyan polymer clay until it is soft and pliable. If you want the speckled effect shown in the photo, now is the time to mix in a tiny pinch of black pepper or use a ‘granitex’ style clay, but splattering paint later works too. -
Shape the torso:
Roll a medium-sized ball of cyan clay into a smooth cylinder. Gently tap the bottom on your work surface to flatten it so the figure can stand on its own. -
Define the legs:
At the bottom center of your cylinder, use a sculpting tool or knife to make a small vertical cut about a quarter of the way up. -
Round the limbs:
Gently smooth the edges of the cut you just made to form two distinct, stubby legs. Avoid making them too thin; the stout look adds to the cuteness. -
Create the arms:
Roll two smaller, elongated sausage shapes from the cyan clay for the arms. They should reach just past the figure’s hips. -
Attach the arms:
Press the arms firmly onto the sides of the torso. Blend the clay at the shoulder joint slightly with a tool to ensure they stick, but leave the hands unblended.
Clean Fingerprints
Before baking, lightly brush the clay with a little baby oil or cornstarch. This smooths out any accidental fingerprints for a professional finish.
Step 2: Sculpting the Head
-
Form the head shape:
Roll a large ball of cyan clay for the head. It should be slightly wider than the body to give it that classic alien proportion. -
Flatten the face:
Gently press the front of the sphere to create a slightly flatter facial plane where the eyes will go. -
Prepare eye sockets:
Use a large ball stylus or the end of a paintbrush to press two deep, large indentations into the face. Space them somewhat wide apart. -
Attach the head:
Insert a small piece of wire or a toothpick into the top of the body, then slide the head onto it. This internal armature keeps the heavy head from falling off. -
Make the eyes:
Roll two smooth balls of black clay. They should be just large enough to fill the sockets you created. -
Place the eyes:
Press the black balls into the sockets. Flatten them slightly as you press so they look flush but slightly bulging.
Cosmic Glow up
Mix glow-in-the-dark powder into your cyan clay before sculpting. Your little alien will look cute by day and eerie by night.
Step 3: Adding Details
-
Prepare the antennae:
Cut two short pieces of thin wire, roughly 1.5 cm long. I find using wire cutters here gives a cleaner end than trying to snap it. -
Insert wires:
Gently push the wires into the top of the head, spacing them evenly. Leave about 1 cm exposed. -
Cap the antennae:
Roll two tiny micro-balls of cyan clay. Carefully press each one onto the tip of the exposed wires to create the bobble ends. -
Speckle texture:
If you didn’t use speckled clay earlier, dip a toothbrush in diluted black acrylic paint. Run your thumb over the bristles to flick tiny specks all over the cyan clay. -
Surface detailing:
For added texture, take a needle tool and poke random, shallow pinholes across the body and head, mimicking organic skin pores. -
Bake:
Bake the figure according to your polymer clay package instructions (usually 275°F/135°C for 15-30 minutes). -
Glaze the eyes:
Once cool, paint a layer of high-gloss glaze or UV resin solely over the black eyes. This gives them that wet, reflective soulful look.
Place your new galactic traveler on a shelf or in a planter to oversee your home
Mini Figure Desk Buddies That Hold Toothpicks or Notes
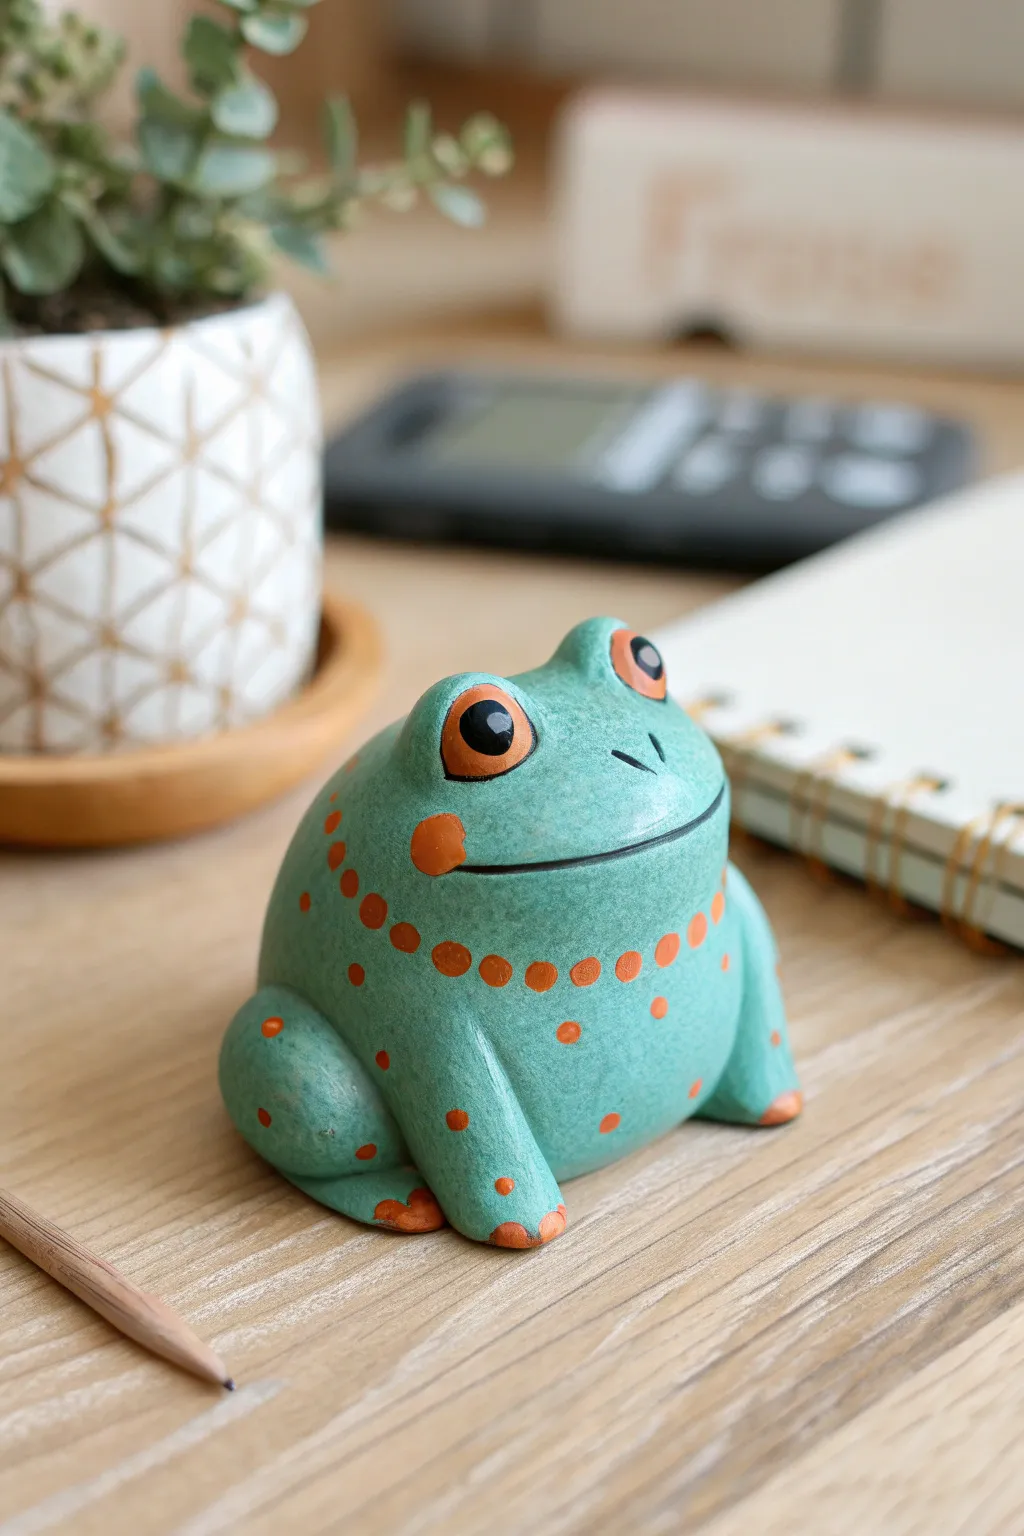
This charming little desk buddy brings a splash of color and cheer to your workspace with its smooth teal finish and playful orange spots. Molded from clay, this sturdy little frog is perfect for keeping you company while you work or study.
Step-by-Step Tutorial
Materials
- Teal polymer clay (or white clay + teal acrylic paint)
- Orange polymer clay (or orange paint)
- Black polymer clay (or black paint)
- White or cream clay (for eye highlights)
- Clay sculpting tools (ball stylus, needle tool)
- Rolling pin
- Aluminum foil (for armature core)
- Gloss varnish or glaze
- Soft paintbrush
Step 1: Shaping the Base
-
Create the core:
Start by crumpling a small piece of aluminum foil into a rounded, slightly flattened sphere. This will form the lightweight core of the frog’s body and save on clay. -
Prepare the teal clay:
Condition your teal clay until it is soft and pliable. If you’re mixing custom colors, aim for a muted sea-green shade. Roll it into a smooth sheet about 1/4 inch thick. -
Cover the core:
Wrap the clay sheet around your foil ball, smoothing out any seams with your thumbs. Gently roll it on your work surface to ensure it creates a plump, rounded mound shape for the body. -
Form the legs:
Take two medium balls of teal clay and shape them into thick teardrops. Press these onto the sides of the body towards the back to form the thighs. Blend the seams into the main body using a modeling tool. -
Add the front legs:
Roll two smaller logs of teal clay. Attach these vertically to the front of the body, blending the top portion seamlessly while letting the bottom flare out slightly for the feet.
Step 2: Sculpting the Face
-
Create eye sockets:
Using a large ball tool or your thumb, press two indentations on the top of the head where the eyes will go. I like to make these slightly raised like little mounds before indenting the centers. -
Carve the mouth:
Use a needle tool or a thin clay blade to slice a wide, curved line across the front face for the mouth. Curve the corners slightly upward to give him a subtle smile. -
Add nostrils:
Poke two tiny, angled slits just above the mouth line to create the nostrils. -
Form the eyes:
Roll two balls of orange clay and press them into the eye sockets. Flatten them slightly so they look bulbous but integrated. -
Add pupils:
Press a smaller flat circle of black clay into the center of each orange eye. Add a tiny speck of white clay to the upper corner of each pupil for a lively reflection.
Smooth Operator
Before baking, lightly brush the raw clay with a little cornstarch or baby powder. This helps soften finger marks and gives the final piece a velvety, stone-like texture.
Step 3: Applying Details and Finishing
-
Add the rosy cheeks:
Take two small circles of orange clay and press them onto the face, just below the eyes, to act as blush spots. -
Create the necklace pattern:
Roll tiny spheres of orange clay. Press these into a curved line along the frog’s chest area, creating a decorative ‘necklace’ pattern. -
Spot the body:
Continue adding small orange clay dots randomly across the back and legs. Vary the sizes slightly for a more organic, natural look. -
Smooth the surface:
Give the entire piece a final check. Use a drop of baby oil on your finger to gently buff away any fingerprints or rough textures on the clay. -
Bake the figure:
Bake according to your clay manufacturer’s instructions (usually around 275°F or 135°C for 15-30 minutes). Let it cool completely. -
Glaze specifically:
Once cool, apply a satin or matte varnish to the skin of the frog to protect it. For the eyes, use a high-gloss glaze to make them look wet and shiny. -
Final touches:
If you used paint instead of colored clay, this is the time to paint your details. Ensure all paint is fully dry before sealing.
Make it Functional
Before baking, slice a deep, thin slit into the frog’s back. This turns it into a functional photo or note holder for your desk.
Now you have a quiet, colorful friend to keep your desk organized and cheerful
Build a Mini Figure Series: Alphabet, Colors, or Moods
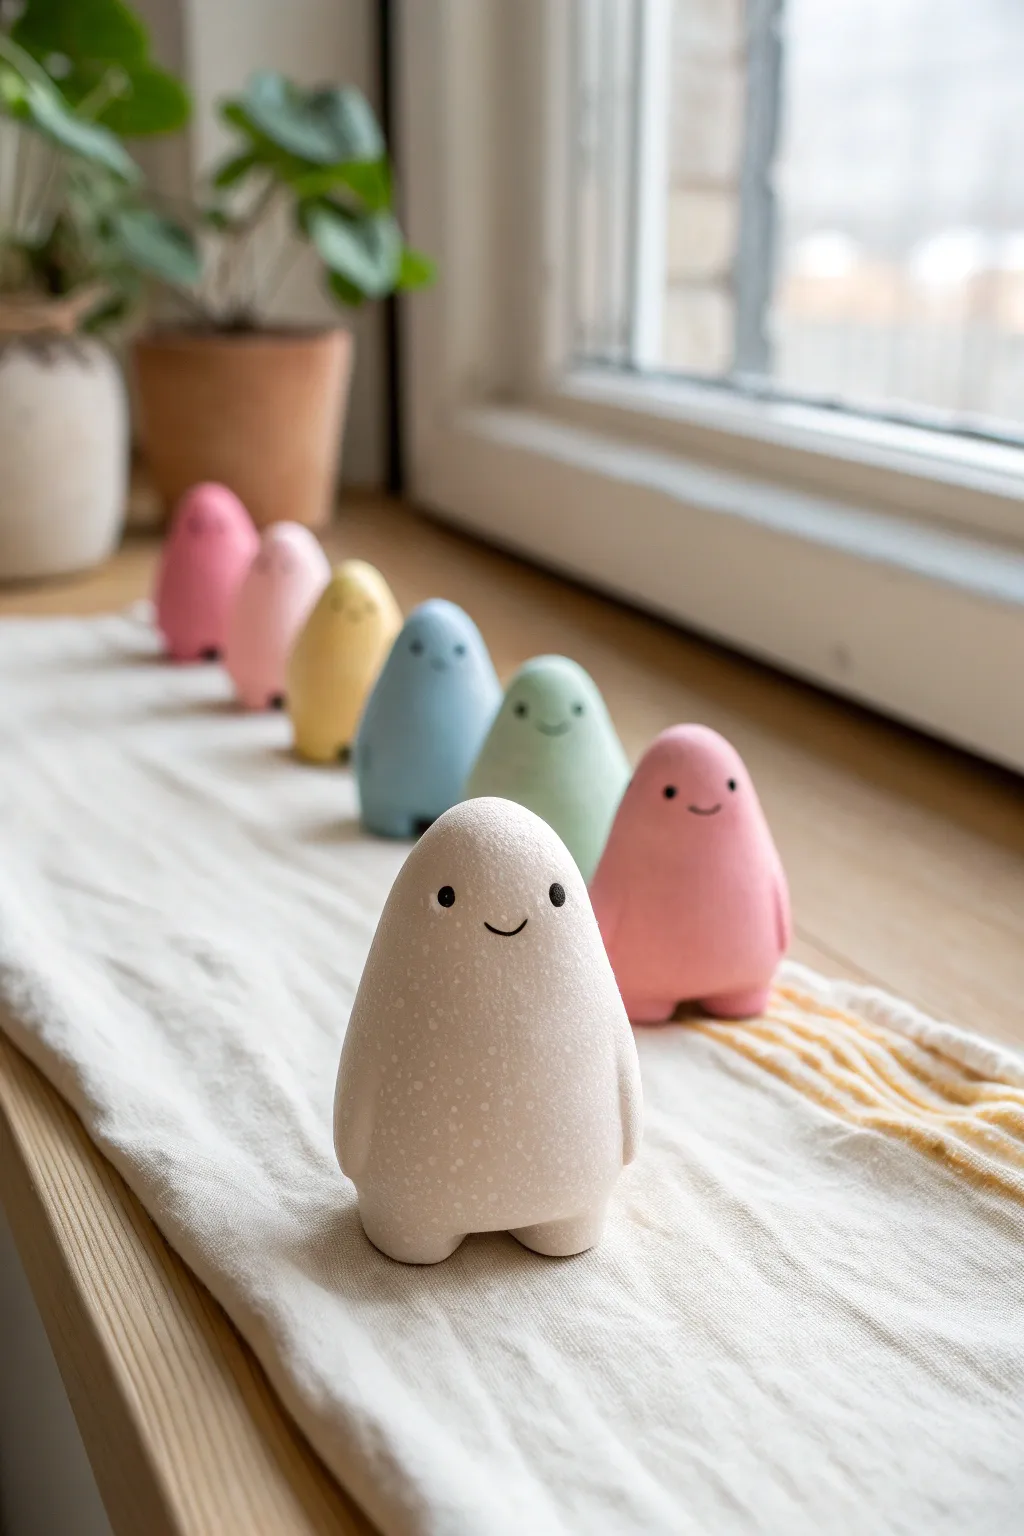
Create a charming lineup of minimalist figures that explore a soft gradient of pastel hues. These smooth, pebble-like characters feature incredibly simple faces, making them a perfect project for beginners looking to practice color mixing and surface smoothing.
How-To Guide
Materials
- White polymer clay (large block)
- Polymer clay in primary colors (red, blue, yellow) for tinting
- Acrylic roller or pasta machine
- Small ball stylus tool
- Black acrylic paint
- Fine detail paintbrush (size 00 or 000)
- Wet/dry sandpaper (400, 600, and 1000 grit)
- Baking sheet and parchment paper
- Oven
Step 1: Mixing the Pastel Palette
-
Prepare the base:
Start by conditioning a substantial amount of white polymer clay until it is soft and pliable. This will be the base for every figure to ensure a consistent milky quality to the colors. -
Create tinting portions:
Divide your white clay into seven equal balls (or however many figures you plan to make). -
Mix the first shade:
Take a tiny amount of colored clay—about the size of a lentil—and mix it into one of the white balls. Knead thoroughly until no streaks remain. The goal is a very pale, chalky pastel. -
Develop the gradient:
Repeat for the other balls, using slightly different colors or mixing ratios to create a rainbow spectrum: pale pink, peach, butter yellow, soft teal, mint green, and baby blue. Keep one ball white or extremely pale grey for the lead figure.
Stone Effect
Mix a tiny pinch of black pepper or craft sand into your white clay before adding color. This creates a speckled, faux-ceramic texture like the front figure.
Step 2: Sculpting the Forms
-
Roll a smooth sphere:
Take your first color ball and roll it vigorously between your palms to remove all seams and cracks. It needs to be perfectly spherical. -
Shape the body cone:
Gently gently roll the sphere into a tapered teardrop or cone shape. Flatten the bottom immediately against your work surface so it stands upright. -
Round the top:
Use the soft part of your thumb to gently buff the pointed top of the cone into a rounded, dome-like head. The silhouette should look like a smooth, tall gumdrop. -
Pull out the feet:
At the base of the figure, use your finger to gently nudge two small sections of clay outward to form stubby little feet. They shouldn’t be separate attachments, but rather extensions of the main body. -
Refine the stance:
Tap the figure gently on the table again to flatten the bottoms of the new feet, ensuring the figure doesn’t wobble. -
Smooth imperfections:
I find that using a tiny bit of baby oil on a fingertip helps erase fingerprints at this stage without distorting the clay.
Change the Mood
Give each color a different emotion. Make the blue one sad with a frown, or the red one angry with slanted eyebrows, to create a ‘moody’ set.
Step 3: Finishing and Faces
-
Bake the figures:
Arrange your army of blobs on a parchment-lined baking sheet. Bake according to your clay manufacturer’s instructions, typically around 275°F (135°C) for 30 minutes depending on thickness. -
Cool completely:
Let the figures cool fully before handling. Warm clay is fragile. -
Sand for matte finish:
Once cool, wet-sand the figures lightly if there are any rough spots or fingerprints. Start with 400 grit and move to 1000 grit for a silky, stone-like feel. -
Paint the eyes:
Using the small ball stylus tool (or the head of a pin), dip it into black acrylic paint and dot two wide-set eyes onto the upper third of the face. -
Add the smile:
With your finest detail brush, paint a very thin, small ‘U’ shape exactly centered between and slightly below the eyes. -
Seal (Optional):
Generally, these look best with a natural matte finish, but if you want protection, apply a clear matte varnish. Avoid glossy finishes to maintain the soft aesthetic.
Line them up on a windowsill to enjoy your soothing color gradient every day