Mini clay food is my favorite kind of tiny project because you get that instant “I made a whole meal!” feeling in one sitting. Below are my go-to mini clay food ideas—starting with the classic crowd-pleasers and ending with a few weirder, extra-fun bites.
Classic Mini Burger Stack
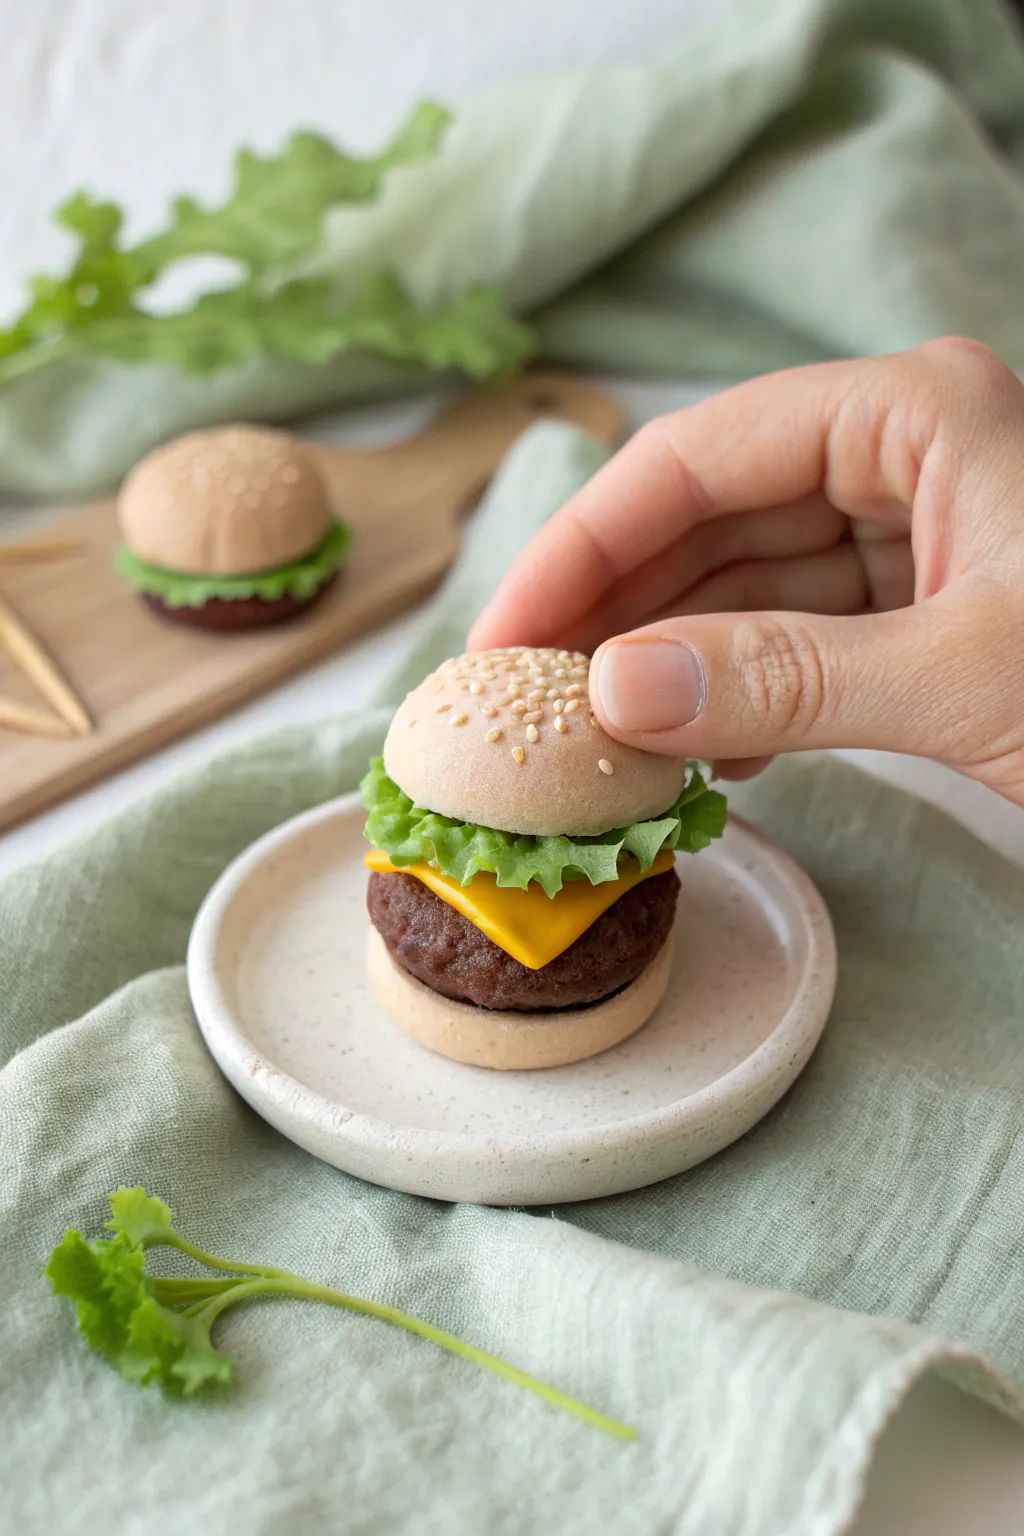
This bite-sized burger looks so realistic, your guests might do a double-take before realizing it’s made of clay. With textured buns, ruffled lettuce, and a glossy slice of ‘cheese,’ this classic stack is an essential project for any miniature food enthusiast.
Step-by-Step Tutorial
Materials
- Polymer clay (beige/tan, dark brown, leaf green, cheddar yellow)
- Liquid polymer clay (optional, for sauce)
- Pastel chalks (burnt ochre, dark brown)
- Soft-bristle paintbrush
- Texture tools (needle tool, ball tool, stiff toothbrush or balled-up foil)
- Rolling pin or pasta machine
- Small round cutter (approx. 1 inch)
- X-Acto knife or clay blade
- White or sesame-colored seed beads (or tiny clay bits)
- Gloss varnish (optional)
Step 1: Baking the Buns
-
Mix the Dough Color:
Start by conditioning your beige clay. To get a realistic ‘baked bread’ color base, I like to mix a tiny speck of yellow and white into the beige. -
Form the Shapes:
Split a ball of clay into two pieces: one slightly larger and domed for the top bun, and one flatter disk for the bottom bun. -
Texture the Surfce:
Gently tap the surface of both bun pieces with a stiff toothbrush or a ball of crinkled aluminum foil. This mimics the porous texture of real bread. -
Shade the Crust:
Use a soft brush to dust burnt ochre pastel chalk over the top bun, concentrating on the center and edges to simulate baking browning. -
Add Seeds:
Press tiny white seed beads or extremely small rolled bits of pale clay onto the very top of the domed bun for sesame seeds. Press them in firmly so they don’t fall off later.
Step 2: Grilling the Patty
-
Shape the Meat:
Roll a ball of dark brown clay into a thick disk. It should be slightly smaller in diameter than your buns, as burgers tend to be chunky. -
Texturizing:
Rough up the outside edge and the surface of the patty using a needle tool. Poke and drag the clay to create that craggy, ground-beef look. -
Color Depth:
Dust a little dark brown or black chalk powder into the crevices of the patty texture to add depth and make it look char-grilled.
Realistic Melt
Before baking, heat the cheese slice slightly with a warm finger or hair dryer for 5 seconds. It will drape naturally over the bumpy meat texture below.
Step 3: Prep the Toppings
-
Make the Cheese:
Roll out a very thin sheet of cheddar yellow clay. Use a blade to cut a square that is just large enough to drape over the burger patty. -
Soften the Look:
Gently pull the corners of the cheese square downward slightly so it looks like it’s beginning to melt. -
Create Lettuce:
Roll out translucent green or leaf green clay very thinly. Tear off rough, irregular pieces slightly larger than the bun. -
Ruffle the Edges:
Use a ball tool or a toothpick to thin out and frill the very edges of the green clay pieces, creating a wavy, crisp lettuce effect.
Level Up: Condiments
Mix red or yellow pastel chalk into liquid polymer clay to create ‘ketchup’ and ‘mustard.’ Let a tiny drop ooze out from under the bun before baking.
Step 4: Assembly & Finish
-
Base Layer:
Place the bottom bun on your work surface or baking tile. -
Meat and Cheese:
Stack the textured burger patty onto the bottom bun, and immediately lay the yellow cheese square over the patty. -
Lettuce Layer:
Arrange the ruffled lettuce pieces on top of the cheese. Ensure the frilly edges poke out past the rim of the burger so they’re visible. -
Closing the Stack:
Gently press the top sesame bun onto the lettuce. Use a light touch so you don’t squash the fluffy texture of the bread. -
Final Adjustments:
Check the stack from all angles to make sure it’s straight, or tilt the top bun slightly for a jaunty, handmade look. -
Baking:
Bake the finished piece according to your specific clay manufacturer’s instructions, usually around 275°F (130°C) for 15-20 minutes. -
Glazing:
Once cool, paint a thin layer of gloss varnish only on the cheese and the ‘meat’ sections to give them a moist, appetizing sheen.
Now you have a delicious-looking miniature burger ready to display in your dollhouse kitchen or turn into unique jewelry.


Mini Fries With Salt Texture
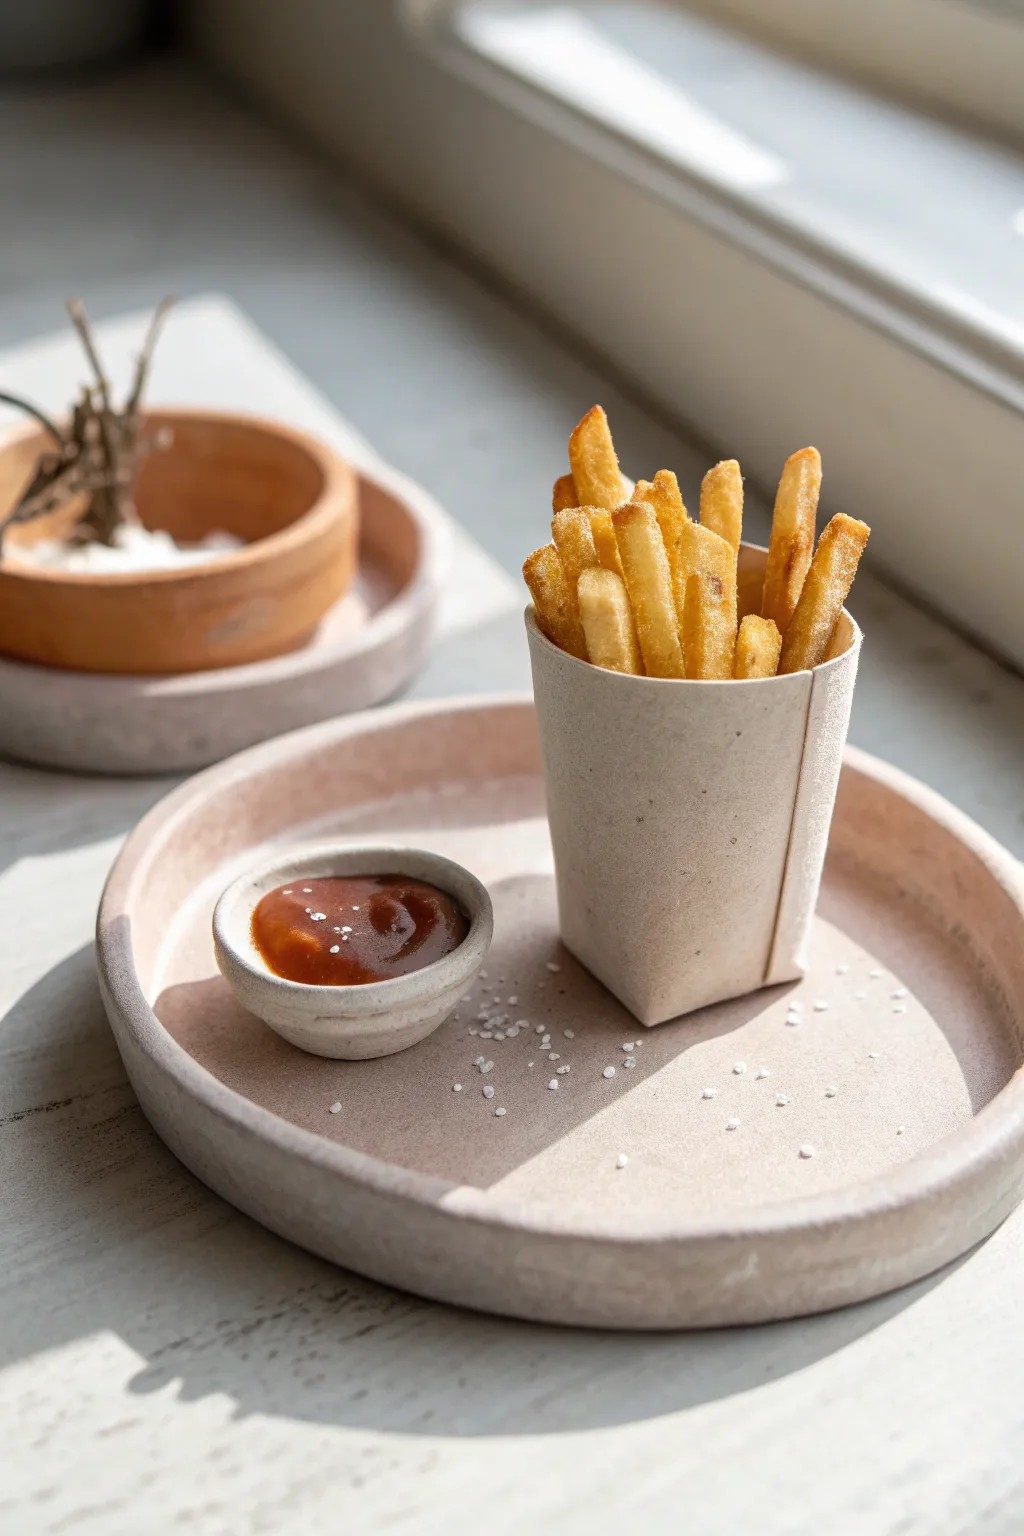
These miniature golden fries look fresh from the fryer, sitting in a chic paper cup beside the perfect dipping sauce. The realistic salt texture and glossy ketchup details bring this tiny snack scene to life.
Step-by-Step
Materials
- Polymer clay (translucent, white, yellow, ochre, red, brown)
- Soft pastel chalks within the yellow/brown/orange range
- Liquid polymer clay (translucent)
- Small paintbrush
- Heavy cardstock or watercolor paper (beige/cream)
- Craft knife or tissue blade
- Fine grain salt or white decorative sand
- Gloss glaze or varnish
- Sandpaper or nail file
- Tile or ceramic coaster (optional base)
Step 1: Sculpting the Fries
-
Mix the dough color:
Start by mixing translucent clay with a very small amount of white and yellow. You want a pale, raw potato color, not a bright yellow. It should look slightly waxy when held against light. -
Form the potato slab:
Roll your clay out into a thick slab, approximately 3mm to 4mm thick. Use a tissue blade to trim the edges so you have a neat rectangle. -
Texture the surface:
Before cutting, gently dab the surface of the clay with a toothbrush or a ball of aluminum foil. This gives the fries that realistic, bubbly fried texture rather than being perfectly smooth. -
Cut the strips:
Slice the slab into thin strips using your blade. Vary the lengths slightly—real fries aren’t uniform. Gently pinch the cut corners of each strip to soften the sharp geometric edges. -
Shade closely:
Scrape an ochre and a reddish-brown soft pastel into fine powder. Use a soft brush to dust the edges and tips of the raw clay strips. I like to concentrate the darker brown on just a few corners to mimic ‘extra crispy’ bits.
Sticky Situation
If the clay sticks to your blade when cutting thin strips, dust the blade with cornstarch or place the clay slab in the fridge for 10 minutes to firm it up.
Step 2: Creating the Container
-
Cut the template:
From your beige cardstock, cut a rectangular strip that is wide enough to wrap around a collection of your clay fries. The height should cover about two-thirds of the longest fry. -
Assemble the cup:
Roll the cardstock into a cylinder or slightly tapered cup shape. Glue the seam with strong craft glue. Fold the bottom in or glue a small circle of cardstock to the base to seal it. -
Fill the cup:
Fill the bottom half of the cup with scrap clay to act as a riser. Arrange your prepared raw fries inside, pressing them lightly into the scrap clay so they fan out naturally.
Grease Spots
For ultra-realism, dab a tiny amount of baby oil on the bottom of the paper cup after baking to mimic grease stains soaking through the paper wrapper.
Step 3: Making the Ketchup & Plates
-
Form the plates:
Mix a ‘stone’ color using white clay with a tiny speck of black or brown. Shape a large flat disc for the serving tray and a tiny bowl shape for the dip. -
Texture the ceramics:
Lightly sand the raw clay of the plates to give them a matte, stoneware finish. Bake the plates, the cup of fries, and the empty dip bowl according to your clay package instructions. -
Mix the sauce:
While the pieces bake, mix liquid polymer clay with a tiny amount of red solid clay or red creative pastel chalk. Add the tiniest dot of brown to make it look like rich tomato paste rather than bright candy red. -
Fill the dip bowl:
Once baked and cooled, pour your red liquid clay mixture into the small bowl. Swirl it slightly with a needle tool to create gentle ripples.
Step 4: Final Assembly & Details
-
Applying the salt:
Brush a very thin layer of liquid clay or matte varnish over the exposed tops of the fries. While wet, sprinkle your fine salt or white sand over them. Don’t overdo it; subtle seasoning looks best. -
Add scattered salt:
Dab tiny dots of glue on the large serving tray and sprinkle a few grains of ‘salt’ there as well, as if some fell off during eating. -
Final bake:
If you used liquid clay for the sauce or salt adhesion, pop the piece back in the oven for a short 5-10 minute bake to set the liquid. -
Glossing for realism:
Finish by applying a high-gloss glaze only to the ketchup dip. Keep the fries and the paper cup matte for accurate material contrast.
Enjoy displaying this satisfyingly savory miniature on your shelf


Pepperoni Pizza Slice With Stretchy Cheese Look
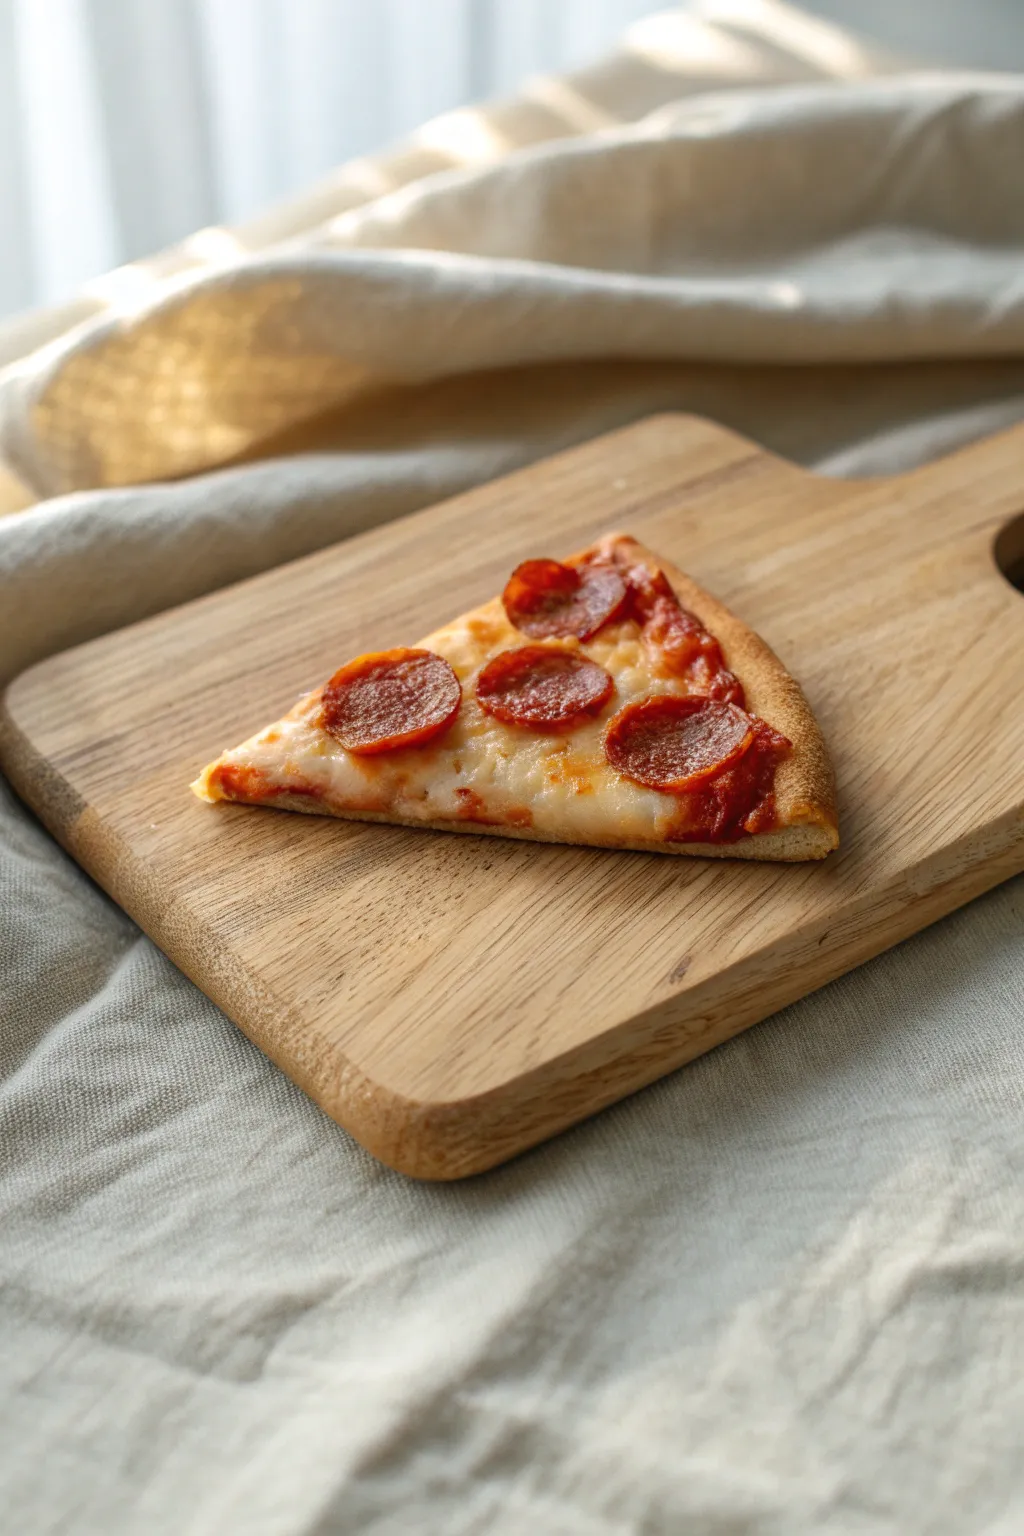
Capture the irresistible charm of a hot, cheesy pizza slice in miniature form. This project focuses on textures, creating a perfectly baked crust and that delicious, glossy melted cheese look.
Step-by-Step Tutorial
Materials
- Polymer clay (dough color, translucent white, red, brown)
- Liquid polymer clay (translucent)
- Chalk pastels (ochre, orange, brown)
- Needle tool or toothpick
- stiff bristle toothbrush
- Ball stylus tool
- Gloss glaze or UV resin
- Small craft paintbrush
- Blade or craft knife
- Sandpaper or textured sponge
- Oven for baking
Step 1: The Perfect Crust
-
Mix the dough color:
Blend beige polymer clay with a tiny speck of white and translucent clay. The translucent part helps it look like baked bread rather than opaque plastic. -
Shape the wedge:
Roll a small ball of your mixed clay and flatten it slightly. Cut it into a triangle shape, rounding off the wide end to form the crust edge. -
Texturize the surface:
Using a stiff bristle toothbrush, tap vigorously all over the dough triangle. Pay special attention to the rounded crust edge, as this needs the most realistic bread texture. -
Indent the toppings area:
Use the side of your thumb or a larger ball tool to gently press down the centers of the triangle, leaving the rounded crust ‘puffy’ and raised. -
Pre-bake shading:
Scrape some ochre and light brown chalk pastel into fine dust. With a dry brush, gently dust the raised crust edge to give it a ‘baked’ appearance before adding toppings.
Sticky Cheese Fix
If your liquid cheese runs too much, it’s too thin. Mix in more solid translucent clay to thicken the paste until it holds its peaks.
Step 2: Sauce and Toppings
-
Create the sauce base:
Mix a small amount of liquid polymer clay with red chalk pastel dust and a tiny touch of brown to get a deep tomato color. Apply a thin, uneven layer inside the indented area. -
Mix the cheese:
Combine translucent white clay with liquid polymer clay until you have a thick paste (like cake frosting). I find adding a tiny scrape of yellow pastel makes it look more like mozzarella. -
Apply the cheese:
Spread your cheese paste over the sauce layer, bringing it right up to the crust. Let it be uneven and slightly messy to simulate melting. -
Create pepperoni slices:
Mix dark red and translucent clay. Roll a very thin snake, let it firm up in the fridge for ten minutes, then slice extremely thin disks with your blade. -
Texture the meat:
Take a textured sponge or sandpaper and press it gently onto your raw pepperoni slices to give them a meaty grain. -
Place the pepperoni:
Arrange the slices on top of the wet liquid clay cheese. Gently press the centers down with a small ball tool so the edges curl up slightly, just like real baked pepperoni.
Step 3: Baking and Finishing
-
Post-bake shading:
Bake the piece according to your clay package instructions. Once cooled, use orange and brown chalk pastels to shade the cheese around the pepperoni for an oily look. -
Add the crust char:
Very lightly dry brush a tiny bit of dark brown pastel on the highest points of the crust to simulate oven char. -
Seal the cheese:
Apply a coat of gloss glaze or UV resin strictly over the cheese and pepperoni areas. This creates that mouth-watering wet look. -
Matte the crust:
Avoid putting gloss on the crust; bread should remain matte. If you accidentally get gloss on it, dab it with a wet wipe before curing or drying.
Add Some Oregano
Before glazing, scrape a tiny bit of dark green pastel dust or cut minuscule bits of green clay and sprinkle them over the cheese for seasoning.
Display your tiny slice on a miniature wooden board for the ultimate realistic presentation


Cute Mini Donuts With Glossy Icing
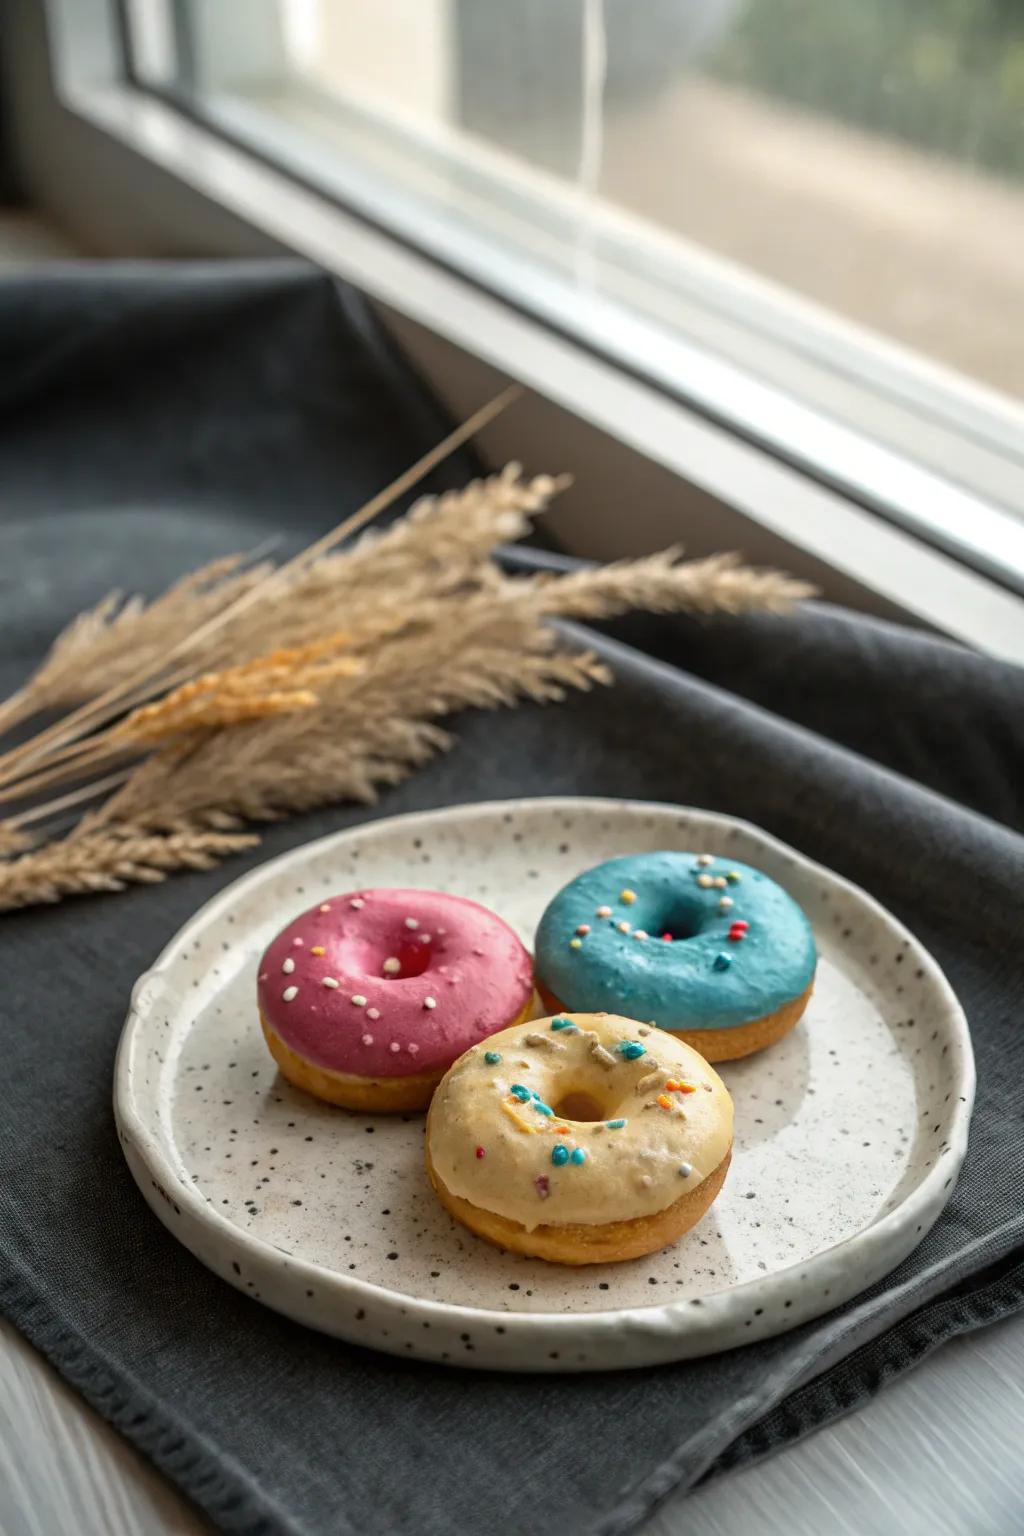
These miniature donuts look good enough to eat with their vibrant, glassy icing and perfectly imperfect sprinkles. They are a delightful project for beginners and result in realistic-looking treats perfect for dollhouse displays or jewelry charms.
Step-by-Step Guide
Materials
- Polymer clay (tan/light brown, white, pink, blue, yellow)
- Liquid polymer clay (translucent or white mixed with color)
- Glossy glaze or UV resin
- Soft pastel chalks (burnt ochre, orange)
- Small paintbrush
- Dotting tool or toothpick
- Small round cutter (approx 1 inch)
- Smaller round cutter (straw or mechanical pencil cap)
- Craft knife
- Ceramic tile or baking surface
- Oven
Step 1: Shaping the Dough
-
Mix the base color:
Start by conditioning your tan or light brown polymer clay until it is soft and pliable. If the color is too dark, mix in a significant amount of white clay and a tiny pinch of yellow to achieve a realistic ‘baked dough’ shade. -
Form the shape:
Roll the conditioned clay into a smooth, thick sheet, about 1/4 inch thick. Use your larger round cutter to punch out three circles. -
Create the hole:
Locate the center of each circle. Use your smaller cutter (a sturdy straw or pencil cap works wonders here) to remove the center, creating the classic ring shape. -
Soften the edges:
The cutters leave sharp, unnatural edges. Gently tap around the inside and outside perimeter with your finger to round them off, giving the donut a puffed, risen appearance. -
Texture the dough:
Take an old toothbrush or a ball of aluminum foil and lightly tap it over the entire surface of the donuts. This subtle texture mimics the porous nature of fried dough. -
Add baked shading:
Scrape some burnt ochre and orange soft pastel chalk into a powder. Using a soft, dry paintbrush, dust the powder gently onto the donuts, focusing on the edges and bottoms where a real donut would brown the most.
Step 2: Icing and Decorating
-
Prepare the icing:
In three separate small containers or on a palette, mix liquid polymer clay with small shavings of solid colored clay (pink, blue, and a creamy yellow). Stir until the solid clay dissolves completely and the mixture is smooth and opaque. -
Apply the icing:
Using a toothpick or a dedicated icing tool, carefully scoop the liquid clay mixture onto the top of each donut. Guide it gently towards the edges but let gravity do the work to create natural drips. -
Create mini sprinkles:
Roll out incredibly thin snakes of scrap colored clay (white, blue, pink, orange). Bake these thin strands for 5 minutes alone first to harden them slightly. -
Chop the sprinkles:
Once the thin strands are cool, use a sharp craft knife to chop them into tiny bits. These will be your customized sprinkles. -
Decorate the wet icing:
While the liquid clay icing is still wet on the donuts, carefully place your pre-baked sprinkles onto the surface. Use tweezers for precision placement.
Sticky Situation?
If your liquid clay icing is too runny and dripping too much, let it sit on a piece of paper for 10 minutes. The paper will leech out some plasticizer, thickening the mix.
Step 3: Finishing Touches
-
First bake:
Place your decorated donuts on a ceramic tile and bake according to your clay manufacturer’s instructions (usually 275°F for 15-20 minutes). I usually tent them with foil to prevent scorching. -
Cool down:
Let the donuts cool completely before handling. This ensures the clay hardens properly and prevents fingerprints. -
Add that sugar glaze shine:
Apply a coat of high-gloss glaze or UV resin exclusively over the colored icing areas. Avoid getting gloss on the ‘dough’ part, as that should remain matte for realism. -
Cure the gloss:
If using air-dry glaze, let it sit for a few hours. If using UV resin, cure it under a UV lamp for 2-3 minutes until hard and tack-free.
Level Up: Scented!
Mix a tiny drop of vanilla or strawberry essential oil into the clay before baking. The scent will linger, making your miniature treats engage another sense!
Display these darling donuts on a tiny plate or turn them into the sweetest pair of earrings you own

What Really Happens Inside the Kiln
Learn how time and temperature work together inside the kiln to transform clay into durable ceramic.
Mini Macarons in a Little Color Set

Capture the elegance of a French patisserie with these incredibly realistic miniature macarons made from polymer clay. This tutorial guides you through creating the iconic ruffled “feet” and smooth, colorful shells for a charming and sophisticated display.
Step-by-Step Tutorial
Materials
- Polymer clay in pastel pink, purple, teal, white, and translucent
- Liquid polymer clay (Translucent or white)
- Small circle cutter (approx. 1-1.5cm)
- Needle tool or toothpick
- Ball stylus tool
- Clean ceramic tile or glass work surface
- Soft pastel chalks or acrylic paint (for shading)
- Small soft brush
- Gloss varnish (optional)
- Sandpaper (fine grit)
Step 1: Creating the Macaron Shells
-
Mix Your Pastel Palette:
Start by conditioning your clay. Mix white clay with tiny amounts of pink, purple, and teal to achieve soft, muted pastel tones. Keep a portion of plain white or beige for the vanilla ones. -
Roll Even Sheets:
Roll your conditioned clay into a sheet that is approximately 3-4mm thick. Using a pasta machine on a medium setting ensures uniform thickness for all your cookies. -
Cut the Circles:
Place a piece of plastic wrap over the clay sheet before cutting. Press your circle cutter firmly down. The plastic wrap creates that classic domed, rounded edge on the top of the macaron shell. -
Smooth the Edges:
Gently remove the cut circles. If there are any fingerprints, lightly buff them away with your finger or a little cornstarch. You need two marching circles for each macaron. -
Create the ‘Feet’:
This is the most critical step for realism. Use a needle tool to drag and prick the clay around the bottom rim of each circle. Tease the clay outwards and downwards to create a textured, crumbly skirt. -
Refine the Texture:
Go back over the ‘feet’ with a ball stylus or toothpick to ensure the texture looks aerated and spongy, distinct from the smooth dome on top. -
Prepare for Baking:
Place all your finished shells (tops and bottoms) on a ceramic tile. I usually like to bake these shells first for about 10 minutes to firm them up before adding filling.
Step 2: Filling and Assembly
-
Mix the Filling:
Prepare the filling by mixing white clay with translucent clay (about a 50/50 mix) to give it a realistic ganache look. Form this into small balls slightly smaller than your shells. -
Flatten the Filling:
Press the filling ball gently until it is a flat disc. It should be thick enough to be seen but not spilling over the edges. -
Assemble the Sandwich:
Take a bottom shell (flat side up), place the filling disc in the center, and press the top shell gently down. Don’t squish the delicate textured feet you created earlier. -
Add Liquid Clay Bond:
For extra security, put a tiny drop of liquid polymer clay between the shell and the filling before pressing them together. -
Texture the Filling:
Use your needle tool to lightly texture the side of the filling cream if it looks too smooth. Standard ganache has a matte, creamy texture. -
Final Shaping:
Double-check the symmetry. The filling should just barely peek out from the edges without overflowing.
Uneven Feet?
If the textured skirt looks too messy, gently push it back up towards the dome with the side of your needle tool to create a distinct line where the smooth shell ends and the texture begins.
Step 3: Finishing Touches
-
Shading (Optional):
For a baked look, dust a tiny amount of pale orange or brown pastel chalk on the very edges of the feet, but keep it subtle to maintain the pastel aesthetic. -
Final Bake:
Bake the assembled macarons according to your clay manufacturer’s instructions, typically around 275°F (130°C) for 15-20 minutes. -
Cool and Varnish:
Let them cool completely. Macaron shells are naturally matte or satin, so avoid high-gloss varnish. A very light matte varnish can protect the chalk shading if needed. -
Arrangement:
Arrange your mini macarons in a small dish or box to complete the presentation, grouping them by alternating colors for visual balance.
Flavor Burst
Mix tiny bits of dried tea leaves or black pepper into the shell clay before cutting to mimic upscale flavors like Earl Grey or vanilla bean specs for added realism.
Now you have a precious set of sweets ready for a dollhouse tea party or miniature bakery display
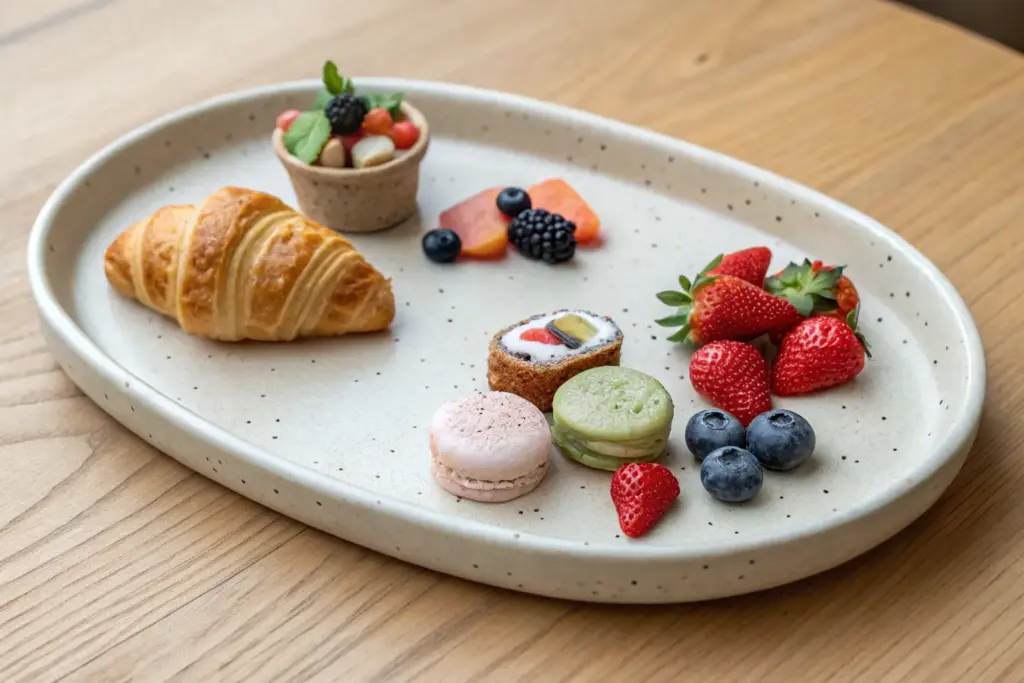
Mini Croissants With Flaky Layer Lines
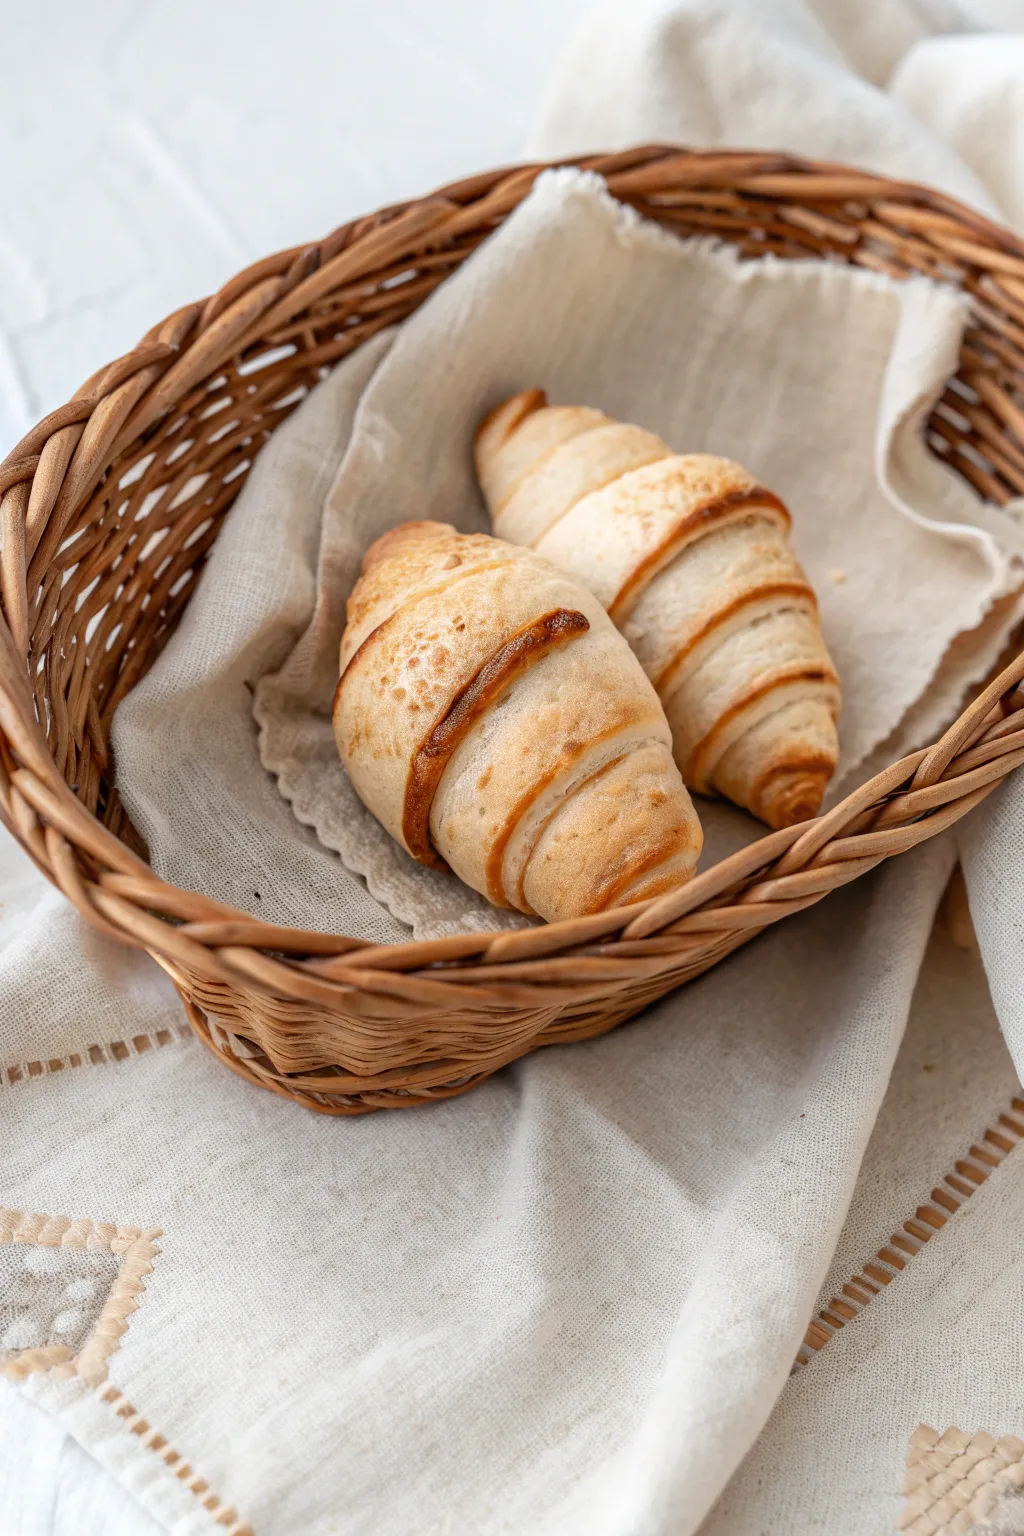
Capture the warmth of a fresh bakery with these hyper-realistic miniature croissants made from polymer clay. The secret lies in creating convincing pastry layers and achieving that perfect golden-brown toasted gradient.
How-To Guide
Materials
- Polymer clay (translucent, white, and ochre/ecru)
- Soft pastel chalks (yellow ochre, burnt sienna, dark brown)
- Small paintbrush (soft bristles)
- Craft knife or scalpel blade
- Modelling tool with a needle point
- Texturing brush or toothbrush
- Liquid polymer clay (optional)
- Matte or satin varnish
- Rolling pin or pasta machine
Step 1: Creating the Dough
-
Mix the Base Color:
Start by mixing translucent clay with a very small amount of white and a touch of ochre. You want a pale, off-white dough color that looks slightly airy, not solid opaque. -
Condition the Clay:
Knead the mixture thoroughly until it is soft and pliable. Warm clay prevents cracking when we start rolling tightly. -
Roll Flat:
Roll your clay out into a thin, even sheet. If you have a pasta machine, a medium-thin setting is perfect; otherwise, aim for about 2mm thickness. -
Cut Triangles:
Using a sharp craft knife, cut elongated triangles. The base should be narrow, and the point should be long—this creates those distinct ridges when rolled.
Layer Definition
If the rolls merge too much, refrigerate the triangular clay sheet for 5 minutes before rolling. Firmer clay holds the distinctive stepped shape better.
Step 2: Shaping the Croissant
-
Initial Roll:
Gentle grasp the wide base of your triangle and start rolling it towards the tip. Keep the roll slightly loose to simulate fluffiness. -
Form the Body:
Continue rolling until you reach the tip. Press the very end of the point gently into the body of the croissant to secure it. -
Curve the Edges:
Take the two ends of your rolled cylinder and gently curve them inward to create the classic crescent moon shape. -
Refine the Ridges:
Use a needle tool to gently deepen the separation lines between the rolled layers if they look too merged. This emphasizes the ‘rolled’ look. -
Add Texture:
Lightly tap the surface with an old toothbrush or a texturing brush. Real pastry isn’t perfectly smooth, and this adds realistic porosity.
Pro Tip: Translucency
Don’t skip the translucent clay in your mix! Pure white or beige opaque clay looks ‘heavy’ compared to the airy, light-filtering quality of real pastry.
Step 3: Coloring and Baking
-
Prepare Pastels:
Scrape fine dust from your yellow ochre, burnt sienna, and dark brown pastel chalks onto a piece of paper. -
Base Coat:
With a soft brush, dust the entire croissant lightly with yellow ochre. This gives it a raw dough turning into baked dough look. -
Adding the Crust:
Using the burnt sienna, brush the tops of the ridges more heavily. I like to focus on the highest points where an oven would naturally brown the pastry. -
Deep Toasted Accents:
Use the dark brown exceedingly sparingly on just the very tips of the ridges or the ends to simulate well-baked, crispy flaky areas. -
The Flaky Effect:
Take a sharp scalpel and make tiny, shallow horizontal cuts across the darker browned ridges to mimic flaking pastry layers. -
Bake:
Bake the pieces according to your specific brand of clay’s instructions (usually 275°F/130°C for 15-30 minutes). -
Cool Down:
Let the croissants cool completely before handling them to ensure the clay hardens fully.
Step 4: Finishing Touches
-
Sealing:
Apply a very thin coat of matte varnish to protect the pastel chalks. Avoid glossy finishes, as real croissants have a matte, floury sheen. -
Optional Egg Wash:
If you want a fresher look, mix a tiny drop of liquid clay with satin varnish and dab it only on the browned ridges for a slight ‘egg wash’ shine.
Arranging these tiny treats in a miniature basket completes a charming bakery scene really nicely


The Complete Guide to Pottery Troubleshooting
Uncover the most common ceramic mistakes—from cracking clay to failed glazes—and learn how to fix them fast.
Mini Cupcakes With Swirled Frosting Peaks
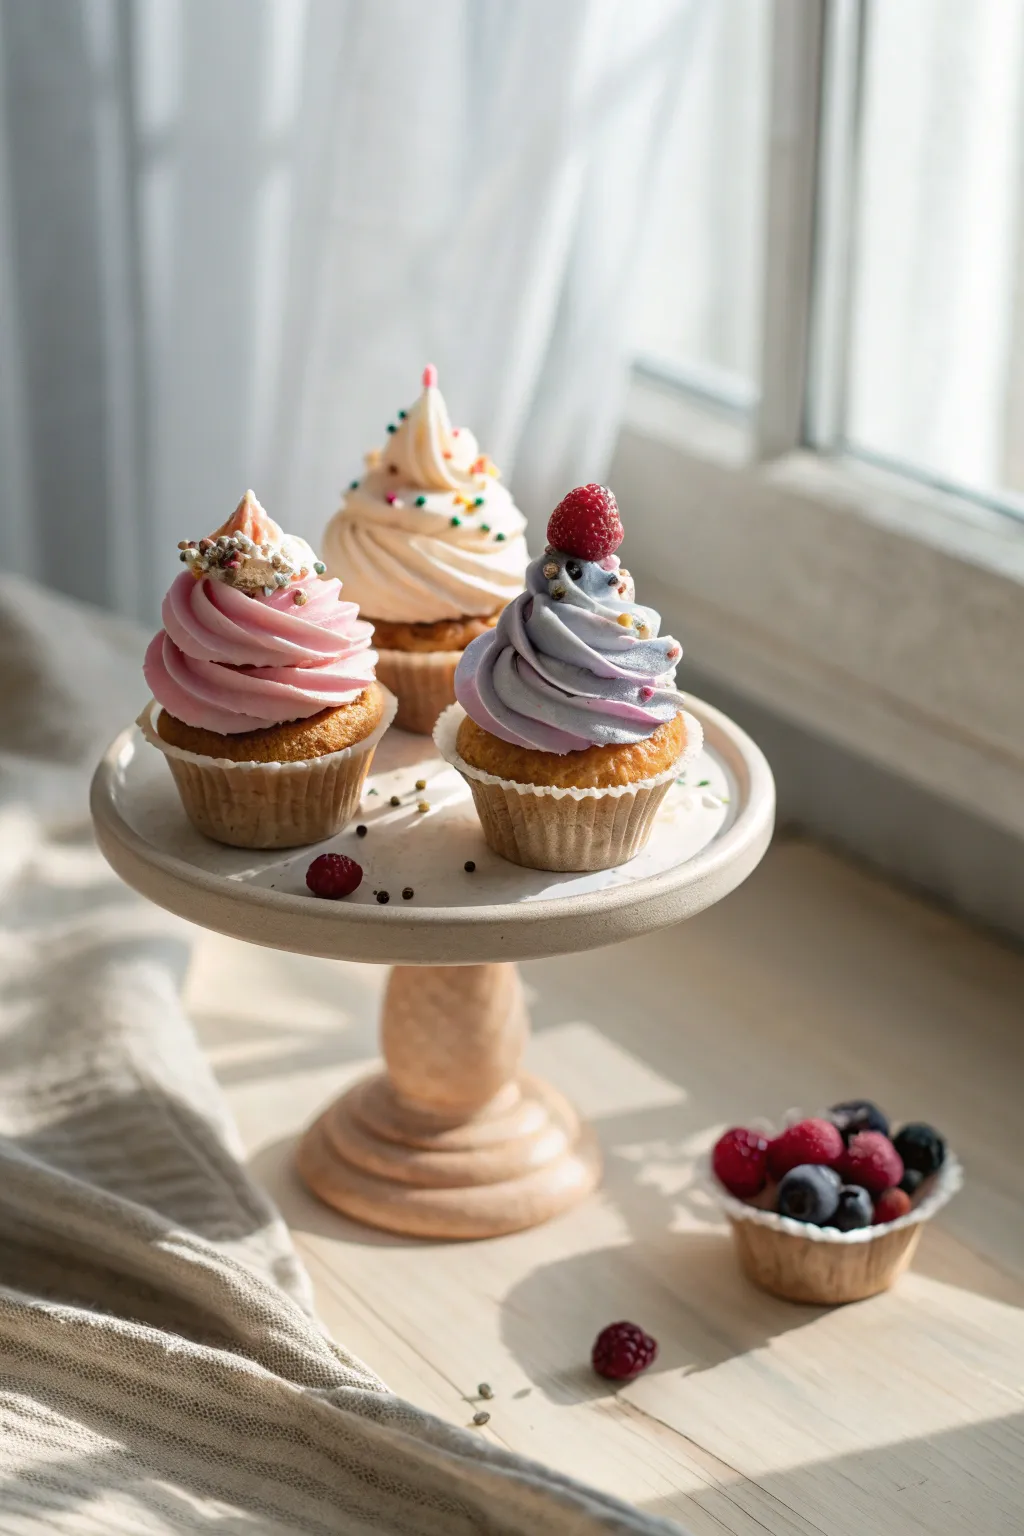
These miniature cupcakes capture the delicate beauty of a bakery display with realistic cake textures and elegant, piped frosting swirls. They are the perfect addition to a dollhouse tea party or a charming standalone display piece.
Detailed Instructions
Materials
- Polymer clay (colors: translucent, ecru, white, pink, purple/blue mix, red, berry tones)
- Liquid polymer clay (Translucent Liquid Sculpey or similar)
- Soft artist pastels (shades of yellow, ochre, and brown)
- Miniature cupcake liners (paper or molded clay)
- Needle tool or toothpick
- Old toothbrush or stiff bristle brush
- Ball stylus tool
- Star-shaped frosting tip (miniature/icing tip sized or DIY clay extruder)
- Microbeads or faux sprinkles (gold, rainbow)
- Gloss polymer clay varnish
- Craft blade
- Sandpaper
Step 1: Baking the Cake Base
-
Mix the batter color:
Start by mixing translucent clay with a small amount of ecru and white. You want a pale, raw dough color that looks slightly airy. -
Fill the liners:
Roll small balls of your dough mixture. If you are using real paper mini-liners, press the ball gently into the liner until it reaches just below the rim. If making liners from clay, roll a thin sheet of tan clay, crimp it into a circle, and fill. -
Texture the tops:
Use an old toothbrush to aggressively texture the top of the dough dome. I like to tap firmly to create those tiny bread-like pores. -
Add baked shading:
Shave some yellow ochre and brown chalk pastels into a powder. With a soft brush, gently dust the top edges of the textured dome to simulate a golden-brown oven bake. -
First bake:
Bake these bases according to your clay package instructions (usually 275°F/130°C for 15 minutes) to set them before frosting.
Step 2: Piping the Frosting
-
Prepare the frosting clay:
For the frosting, your clay needs to be very soft. Mix your chosen frosting color (pink, cream, or a purple-blue marble) with liquid polymer clay. Add the liquid drop by drop, mashing it in until the clay has the consistency of whipped cream or toothpaste. -
Load the piping bag:
You can use a real mini piping bag with a tiny star tip, or a syringe extruder. If you don’t have these, roll a tapered snake of soft clay and twist it manually, though piping yields the best ‘ridges.’ -
Create the swirl:
Start piping at the outer edge of the cooled cupcake base. Squeeze gently and rotate inward, spiraling upward to create a peak in the center. Ensure the ridges are defined and sharp. -
Marble effect (optional):
For the purple cupcake, put two colors of softened clay side-by-side in your extruder to create that beautiful two-tone swirl.
Sticky Frosting?
If your frosting mix is too sticky to pipe cleanly, let it sit on a piece of paper for 10 minutes. The paper will leech out some excess plasticizer, firming it up for sharper peaks.
Step 3: Berries & Toppings
-
Sculpting the raspberry:
For the topper, roll a tiny cone of red or berry-colored clay. Roll many microscopic balls of the same clay. -
Assemble the berry:
Using a needle tool, carefully press the tiny balls onto the cone surface, covering it completely to mimic the drupelets of a raspberry. -
Place the fruit:
Gently nestle the raspberry into the wet frosting peak. It should sink in just slightly to look realistic. -
Add sprinkles:
While the frosting is still ‘wet’ (unbaked), carefully drop micro beads or tiny flakes of metallic clay onto the swirl using a needle tool or tweezers. -
Final bake:
Bake the finished cupcakes again. Watch the temperature carefully so the white frosting doesn’t yellow—tenting with foil helps. -
Gloss finish:
Once cool, brush a tiny amount of gloss varnish onto the raspberry to make it look fresh and juicy. Leave the cake and frosting matte.
Display Stand
Create the rustic stand shown in the photo by gluing a wooden button or clay disk to a wooden spool or bead, then painting it cream with a matte finish.
Arrange your trio of cupcakes on a mini stand for a display that looks good enough to eat
Mini Ice Cream Scoops With Drippy Sauce
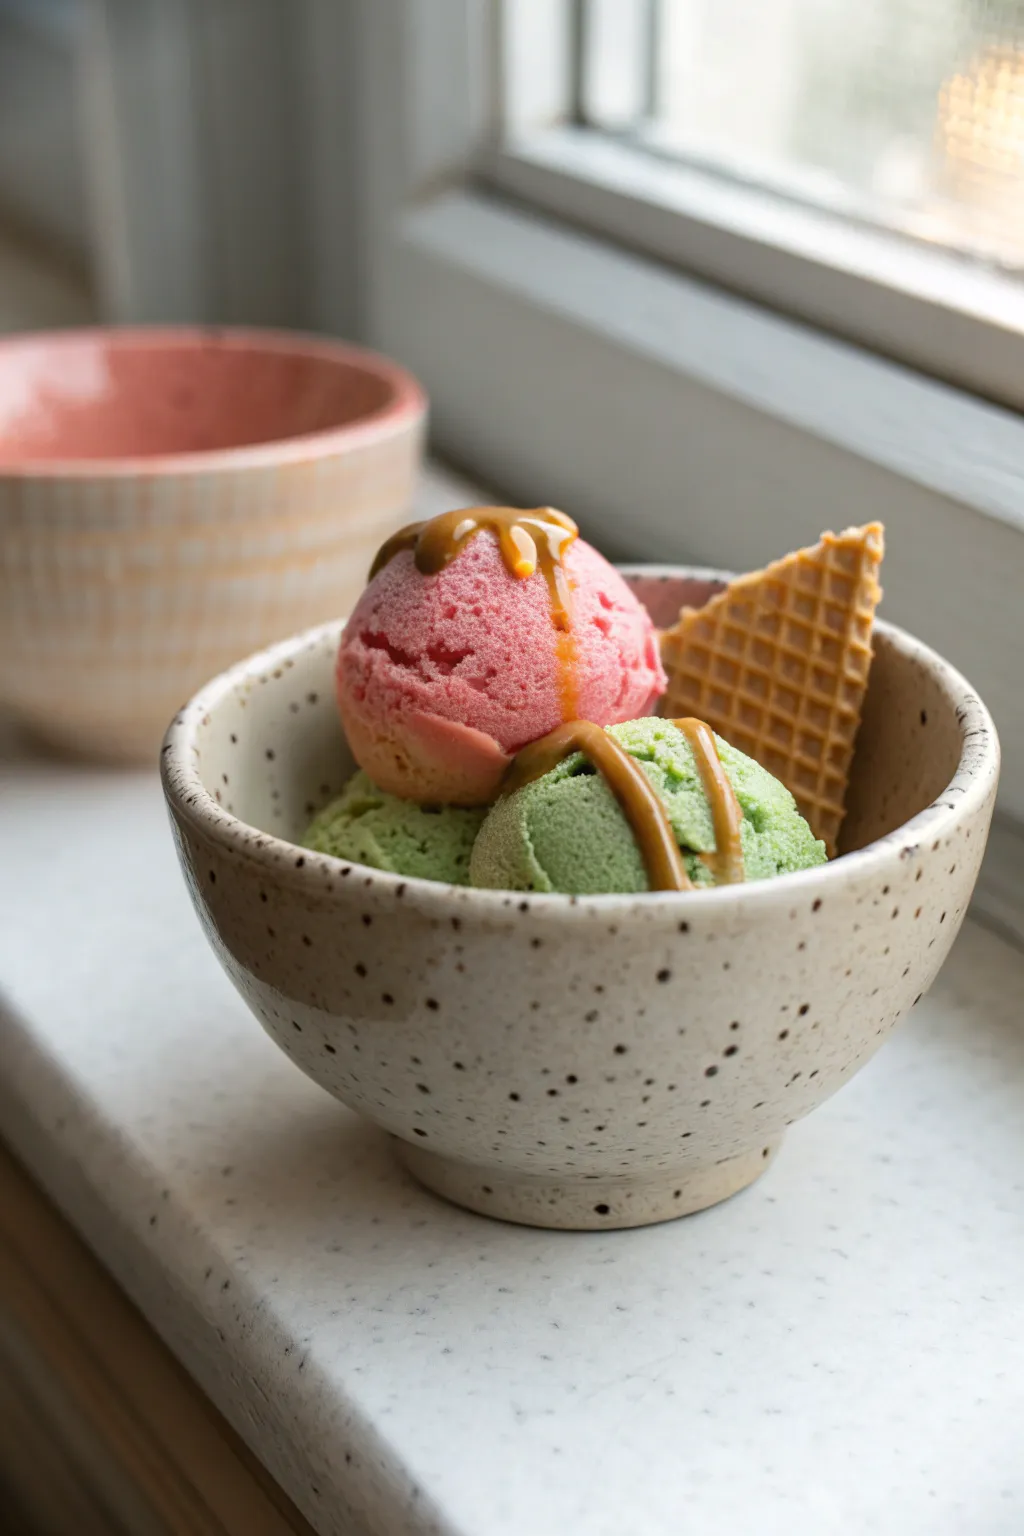
Create a delightful tiny treat that looks good enough to eat but won’t melt in your hands. This project captures the realistic texture of scooped ice cream and drippy caramel sauce served in a charming speckled ceramic-style bowl.
Step-by-Step Guide
Materials
- Polymer clay (white, translucent, pink, moss green, beige, ochre)
- Liquid polymer clay (translucent or white mixed with color)
- Chalk pastels (brown, tan, cream)
- Needle tool or toothpick
- Ball tool (large)
- Toothbrush or texturing brush
- Sandpaper or nail file
- Small craft paintbrush
- Gloss varnish or UV resin
- Craft knife or tissue blade
- Black acrylic paint
- Ceramic or glass baking tile
Step 1: Sculpting the Speckled Bowl
-
Condition the Clay:
Start by mixing white polymer clay with a tiny amount of beige or tan to create a warm, creamy off-white color for the bowl. Condition it well until it is soft and pliable. -
Speckle Effect:
To mimic the speckled stoneware look, grate a tiny amount of black baked clay or hardened pastel into the raw clay mix. Alternatively, you can add flecks of black pepper or black sand into the clay body. -
Form the Base:
Roll the clay into a ball about the size of a large marble, then flatten the bottom slightly to create a foot for the bowl. -
Hollow the Shape:
Press a large ball tool into the center of the clay sphere to create the hollow of the bowl. Gently rotate the tool to widen the opening while maintaining thick, rustic walls. -
Create the Foot Ring:
Flip the bowl over. Roll a thin snake of the same clay and attach it in a ring around the bottom. Blend the seam smoothly with a silicone tool so it looks like one piece. -
Painting Speckles:
If you didn’t add speckles into the clay, dip an old toothbrush into diluted black acrylic paint. Splatter tiny dots onto the raw clay surface for that classic ceramic finish.
Sauce Running Too Fast?
If your liquid clay is too runny, let it sit on a piece of paper for 10 minutes to leach out some oil, or mix in a tiny bit of solid clay to thicken it up.
Step 2: Creating the Ice Cream Scoops
-
Mix Ice Cream Colors:
For the strawberry scoop, mix pink clay with translucent clay (about 50/50) to get a realistic, slightly waxy look. Do the same for the matcha scoops using moss green and translucent. -
Form the Scoops:
Roll three balls of clay—one pink and two green. They should fit snugly inside your bowl but mound up generously over the rim. -
Create the ‘Feet’:
Pinch and drag small bits of clay at the bottom edges of each ball to create the ragged, uneven skirt that happens when an ice cream scoop pulls away from the tub. -
Texture the Surface:
Use a needle tool to pick at the surface of the clay balls aggressively. You want deep pits and tears. Follow this by dabbing heavily with a toothbrush to soften the sharp peaks into a creamy texture. -
Assemble the Scoops:
Place the two green scoops into the bowl first as a base, then nestle the pink scoop on top. Press them gently so they adhere to each other and the bowl.
Texture Pro Tip
Work quickly when texturing the ice cream. If the clay gets too warm and soft, pop it in the fridge for 5 minutes to harden up, making the textured details crisp again.
Step 3: Toppings and Details
-
Make the Waffle Wedge:
Roll out a small sheet of ochre or biscuit-colored clay. Use a craft knife to gently score a cross-hatch grid pattern into the surface. -
Cut and Shade:
Cut a small triangle wedge from the textured sheet. Dust the edges and the raised grid lines with brown chalk pastel to simulate a baked, crispy look. -
Insert Waffle:
Press the waffle wedge firmly into the side of the bowl, tucking it behind the green scoops so it stands upright. -
Prepare Caramel Sauce:
Mix liquid polymer clay with shaved scraping of caramel-colored chalk pastel (or a drop of alcohol ink). It should be thick enough to hold a drip but fluid enough to flow. -
Drizzle the Sauce:
Carefully drizzle the sauce over the top pink scoop and let it run down onto the green scoops. I carefully guide the drips with a needle tool to make them look gravity-defying. -
Bake:
Bake the entire piece according to your clay manufacturer’s instructions (usually 275°F/130°C for 15-30 minutes). Let it cool completely. -
Final Glaze:
Once cool, coat only the caramel sauce with a high-gloss varnish or UV resin to make it look wet and sticky. Leave the ice cream matte or use a satin finish.
Display this sweet little bowl in a miniature kitchen scene or turn it into a cute magnet given the sturdy shape

TRACK YOUR CERAMIC JOURNEY
Capture glaze tests, firing details, and creative progress—all in one simple printable. Make your projects easier to repeat and improve.
Mini Tacos Packed With Colorful Fillings
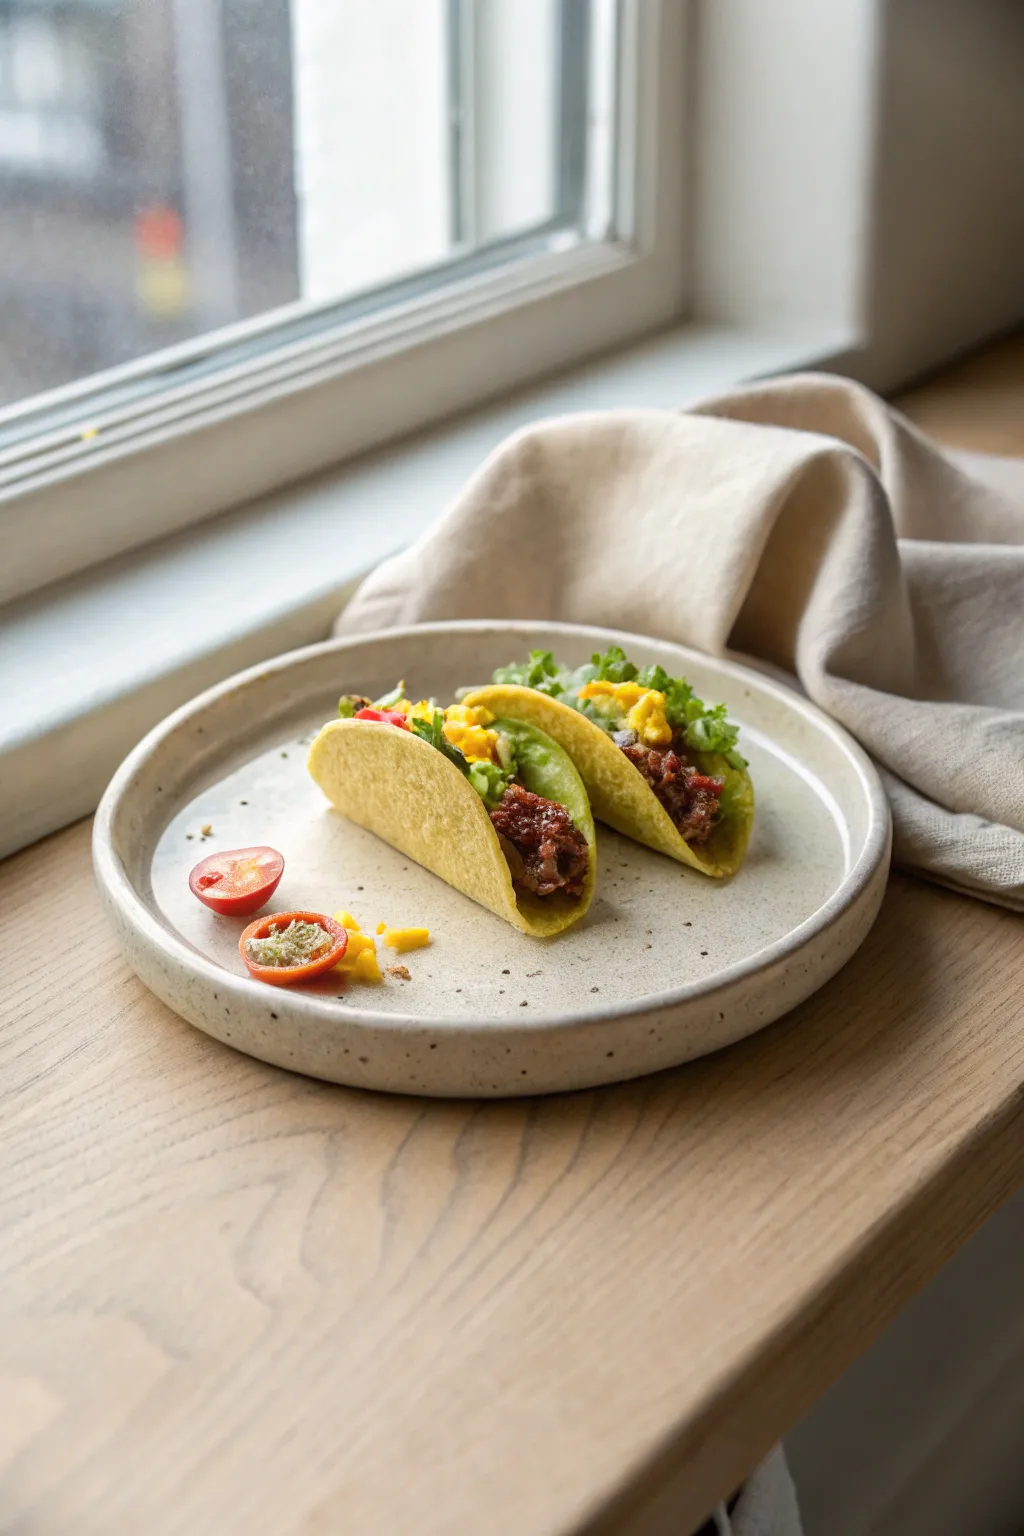
These miniature tacos are bursting with color and texture, from the crisp-looking shells to the seasoned ground meat and fresh toppings. This project focuses on achieving hyper-realistic food textures using polymer clay, perfect for a tiny windowsill display or dollhouse dinner.
How-To Guide
Materials
- Polymer clay (pale yellow, translucent, red, brown, black, green, orange)
- Liquid polymer clay (translucent)
- Chalk pastels (orange, brown, yellow)
- Fine-point needle tool
- Toothbrush or texturing foil
- Small circle cutter
- Razor blade
- Sandpaper
- Detail paintbrush
- Gloss varnish
Step 1: Crafting the Taco Shells
-
Mix the dough color:
Start by mixing pale yellow clay with a small amount of translucent clay and a tiny speck of orange. This combination mimics the look of corn masa better than straight yellow. -
Roll and cut:
Roll the clay out into a thin sheet. Use a circle cutter (about 1-1.5 inches in diameter, depending on your desired scale) to punch out two circles. -
Add corn texture:
Gently press sandpaper or a texturing sponge onto both sides of your clay circles. This creates the slightly rough, grainy surface of a corn tortilla. -
Shape the taco:
Fold the circles in half gently, but don’t crease them sharply. Insert a small roll of foil or a paintbrush handle into the fold. -
Pre-bake:
Allow the shells to drape over the support so they hold their ‘U’ shape. Bake for 5-10 minutes just to set the form, not fully cure. -
Shade for realism:
Once cool, use a dry brush to dust orange and brown chalk pastel powder around the edges and bottom curve of the shells to simulate baking spots.
Step 2: Creating the Fillings
-
Make the meat base:
Mix brown clay with a touch of black and red for a rich ground beef color. Crumble this mixture into tiny, irregular bits. -
Simulate sauce:
Mix some of your meat-colored clay crumbles with translucent liquid clay. This creates a wet, saucy texture essential for realistic taco meat. -
Fill the shells:
Applying the wet meat mixture into the bottom of the pre-baked shells ensures it sticks. Fill it about halfway up the shell. -
Shred the lettuce:
Roll green clay extremely thin—almost translucent. Let it sit for a few minutes so it isn’t sticky, then use a sharp blade to slice extremely fine strips. I like to crumple them gently for volume. -
Dice the tomatoes:
Use red translucent clay for the tomatoes. Chop small cubes, and if you want extra detail, mix a tiny bit of liquid clay with sand or poppy seeds for the seeds. -
Grate the cheese:
Take a block of orange clay and drag a needle tool across the surface to pull up tiny curls, or partially bake a small block of orange clay and grate it with a fine craft file for true ‘shreds’.
Pro Tip: Sauce Secret
Mix brown pastel chalk shavings into liquid clay without any solid clay for a ‘grease’ effect. Dab this carefully on the shell bottom for a messy, delicious look.
Step 3: Assembly & Plating
-
Layering toppings:
Use tweezers to place the lettuce strips on top of the meat. Follow with the tomato cubes, tucking them slightly into the greens. -
Add cheese and garnish:
Sprinkle the clay cheese shreds over the top. Add tiny flecks of dark green clay to represent cilantro if desired. -
Crafting the cherry tomato halves:
Make tiny spheres of red clay. Slice them in half. Use a needle tool to hollow out the center slightly, fill with pale yellow/green liquid clay, and texture the seeds. -
Shape the plate:
Roll out white or speckled clay (mix in ground pepper or sand for speckles) into a flat circle. Create a shallow rim by pressing a slightly smaller object into the center. -
Final bake:
Place the assembled tacos and sliced cherry tomatoes onto the clay plate. Bake the entire assembly according to your clay manufacturer’s instructions. -
Finishing touches:
Once cooled, dab a tiny amount of gloss varnish on the ‘meat’ and the cut surface of the cherry tomatoes to make them look juicy and fresh.
Level Up: Guac & Cream
Mix green clay with translucent liquid clay for guacamole texture. Add a swirl of white liquid clay for sour cream to add color contrast.
Now you have a delicious-looking miniature meal ready for display on your favorite shelf
Mini Hot Dog With Ketchup and Mustard Stripes
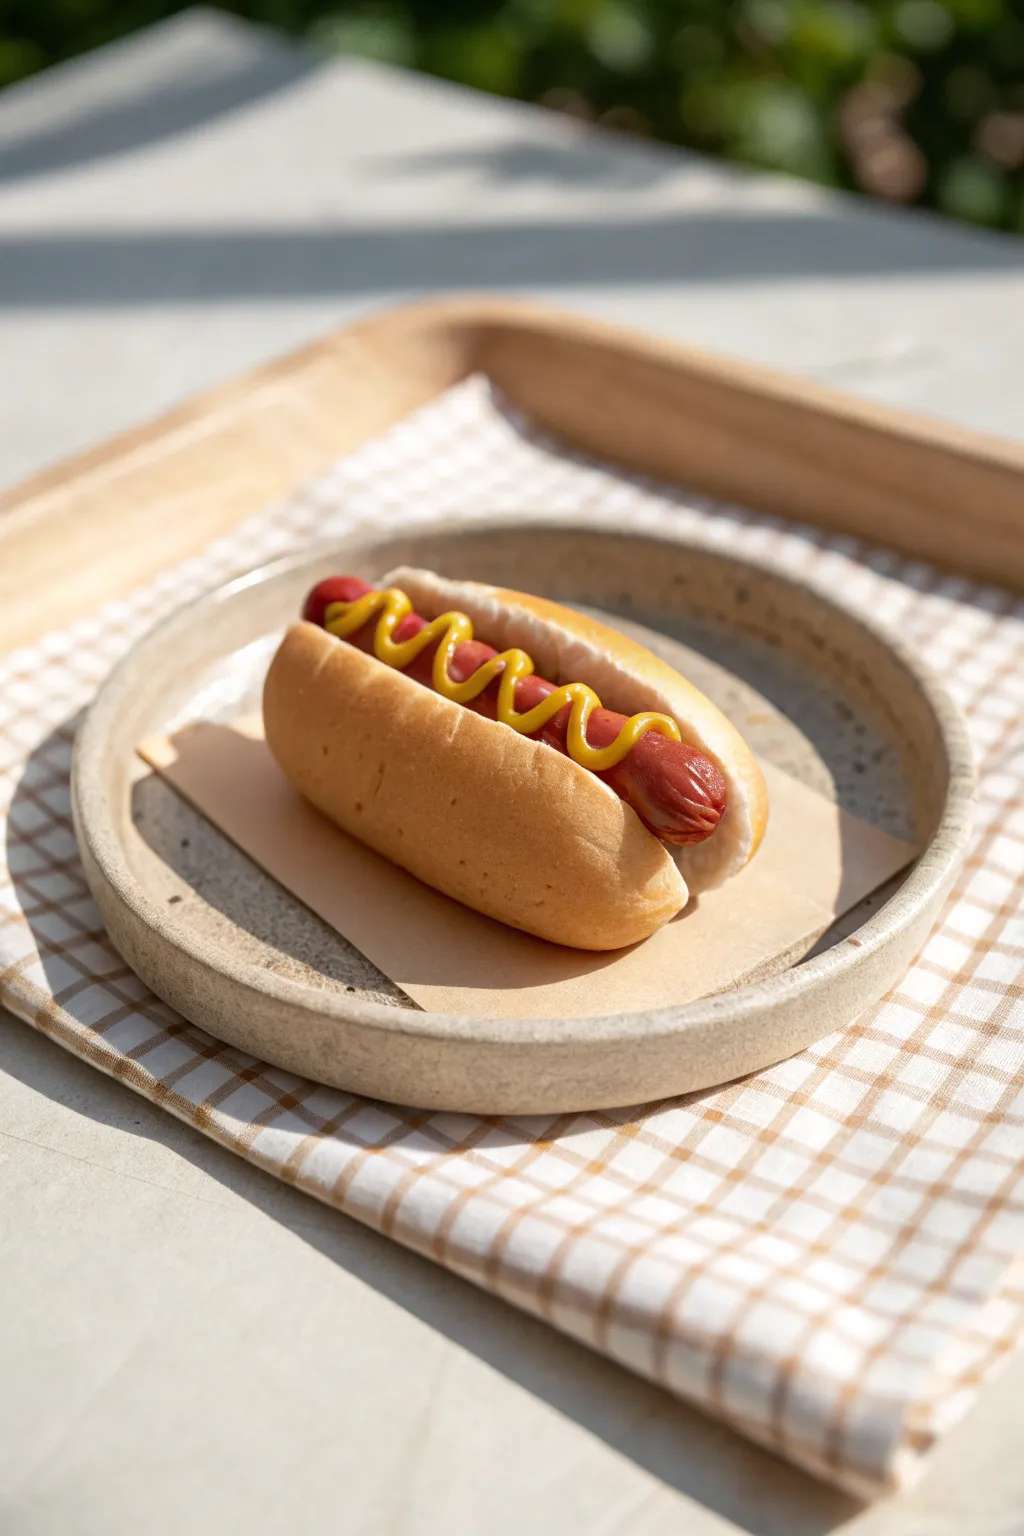
This charming miniature project captures the classic look of a street-style hot dog with perfectly swirled mustard. The simple shapes and focus on realistic texturing make it an ideal starting point for crafting tiny food.
Step-by-Step Tutorial
Materials
- Polymer clay (tan/beige, translucent, red-brown, yellow)
- Liquid polymer clay (translucent)
- Needle tool or toothpick
- Soft pastel chalks (golden brown, orange-brown)
- Fine paintbrush
- Toothbrush or balls of aluminum foil (for texturing)
- Gloss varnish or UV resin (optional)
- Craft knife or tissue blade
- Small piece of parchment paper or brown cardstock
Step 1: Baking the Perfect Bun
-
Mix the dough color:
Start by mixing tan polymer clay with a significant amount of translucent clay (about a 1:1 ratio). This gives the bread a realistic, slightly airy look rather than a flat ‘plastic’ appearance. -
Shape the bun log:
Roll the mixed clay into a short, thick log shape. Smooth out the ends with your fingertips to round them off, ensuring there are no sharp edges or fingerprints. -
Create the split:
Using a craft knife or a thin tissue blade, slice lengthwise down the center of the log. Do not cut all the way through; stop about three-quarters of the way down to keep the bottom intact. -
Open and shape:
Gently pull the two halves apart slightly to create space for the sausage. Soften the cut edges with your finger so they look like baked dough rather than sliced clay. -
Add bread texture:
Take a toothbrush or a crumpled ball of aluminum foil and gently press it all over the surface of the bun. Pay special attention to the inside cut areas to mimic the crumb of the bread. -
Shade the crust:
Shave some golden brown and orange-brown pastels into powder. Use a soft brush to dust the outside of the bun, concentrating the darker orange-browns on the top curves for a baked effect.
Realistic Bread Texture
For ultra-realistic bread interiors, tear a small piece of rough sandpaper and press it into the cut surfaces of the bun before shading. It mimics air pockets perfectly.
Step 2: Crafting the Sausage
-
Mix the meat color:
Combine red clay with a small bit of brown and a touch of translucent clay to achieve a realistic, cured meat color. It should look like a cooked frankfurter. -
Roll the sausage:
Roll a snake of clay that is slightly longer than your bun. Check the thickness against the bun’s opening to ensure a snug fit. -
detail the ends:
Using a needle tool, gently poke and gather the clay at the very tips of the sausage. This creates that characteristic wrinkled casing look found on the ends of hot dogs. -
Add grill marks (optional):
For extra detail, you can use a needle tool to press exceedingly faint diagonal lines across the sausage, though a boiled look works perfectly too. -
Assemble:
Place the sausage into the bun. Press it down gently so it settles into the bread texture you created earlier.
Step 3: Mustard and Finishing Touches
-
Prepare the mustard:
Mix a small amount of yellow clay with liquid polymer clay until you have a paste with the consistency of thick frosting. Alternatively, mix yellow acrylic paint with liquid clay. -
Apply the condiment:
Use a needle tool or a very fine piping bag to drape a squiggly line of the yellow mixture down the length of the sausage. Try to keep the loops even for a classic look. -
Create the wrapper:
Cut a tiny square of parchment paper or brown cardstock to serve as the serving paper. This adds a crucial scale reference. -
Final bake:
Place the assembled hot dog on a ceramic tile and bake according to your clay manufacturer’s instructions (usually 275°F/130°C for 15-30 minutes). -
Seal (optional):
Once cool, I like to apply a tiny dab of gloss varnish just to the sausage (avoiding the bread) to make it look juicy and hot.
Add Some Relish
Make tiny green chopped specs from cured clay and mix them into liquid translucent clay. Dab this alongside the mustard for a fancy loaded dog.
Display your tiny culinary creation on a miniature plate to admire the delicious details
Mini Sushi Nigiri and Maki Mix
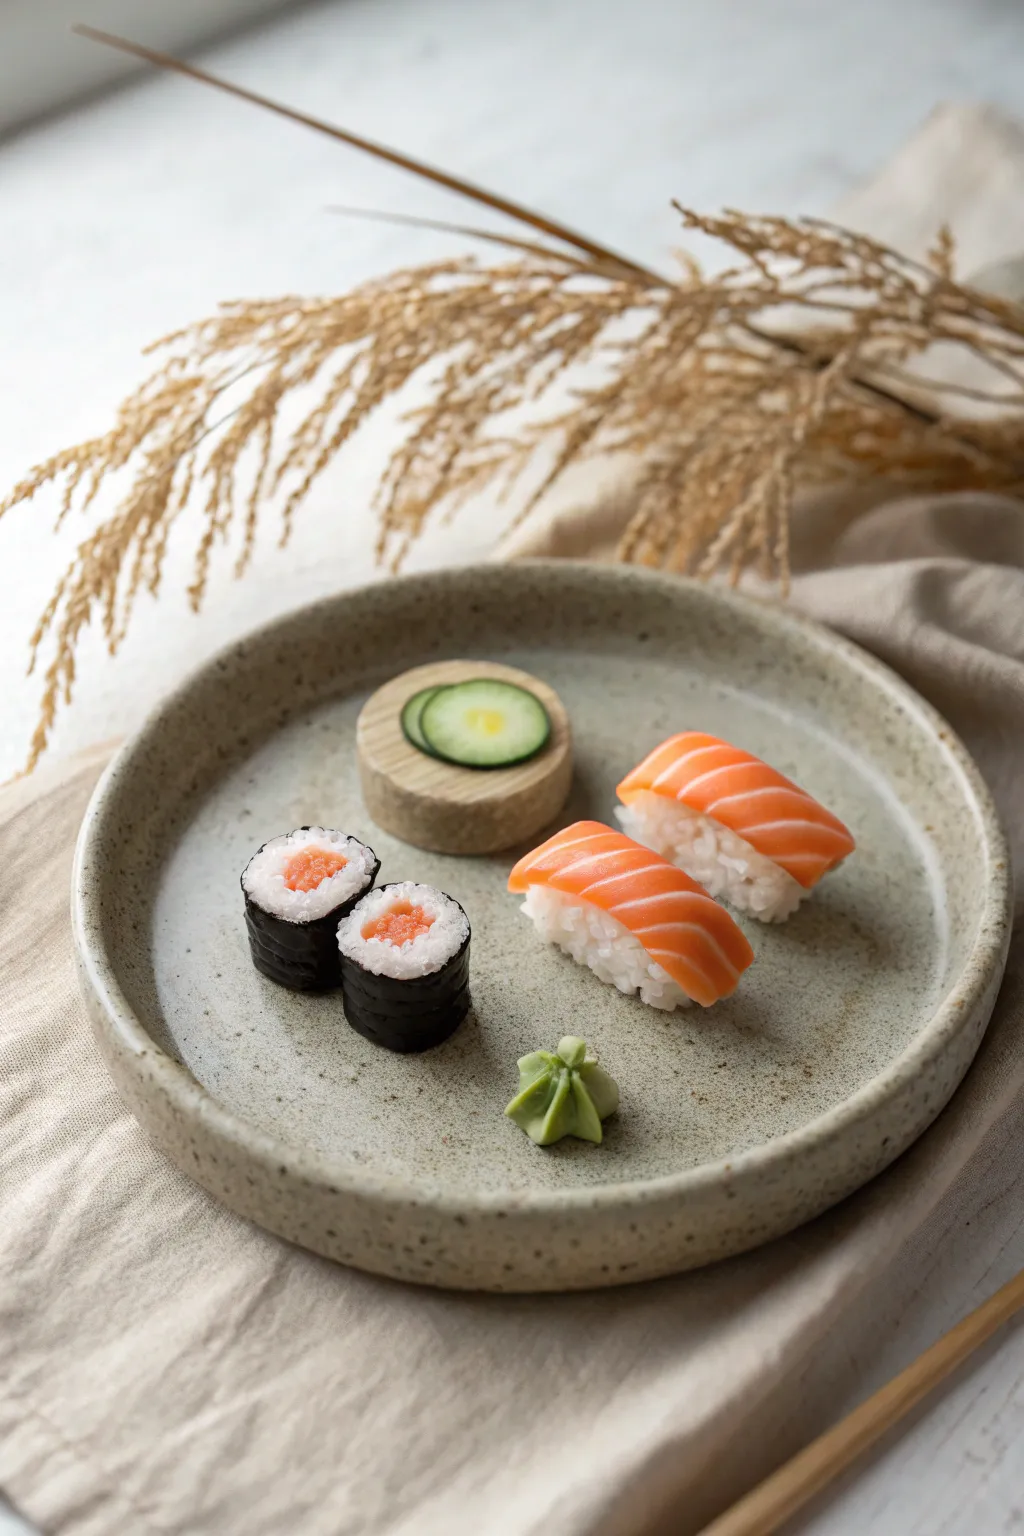
Create a remarkably realistic tiny sushi feast using polymer clay, featuring textured rice grains, translucent salmon slices, and perfectly wrapped maki rolls. This project focuses on achieving lifelike textures and colors to make your miniature food look good enough to eat.
Detailed Instructions
Materials
- Polymer clay (translucent white, opaque white, translucent orange, pink, black, green)
- Liquid polymer clay (Fimo liquid or TLS)
- Toothbrush or hard-bristled stippling brush
- Razor blade or tissue blade
- Needle tool
- Rolling pin or pasta machine
- Dotting tool
- Clear gloss glaze
- Matte varnish
Step 1: Creating the Realistic Rice
-
Mix the rice color:
Combine a large amount of translucent white clay with a tiny speck of opaque white. You want the clay to look frosty and slightly see-through, not solid white like chalk. -
Chop the rice grains:
Roll your rice mixture into very thin snakes. Bake these snakes for just 5 minutes to harden them slightly but keep them cuttable, or use raw clay if you have a steady hand. Chop them into tiny, rice-sized granules with your razor blade. -
Bind the rice:
Mix the chopped ‘grains’ with a little liquid polymer clay until it forms a sticky, moldable paste. This creates that authentic, sticky sushi rice texture. -
Form the nigiri bases:
Shape two small rectangular mounds from your rice paste. Press them gently to compact the grains but keep the surface textured. Set aside.
Make It Glossy
For ultra-realistic raw fish, apply UV resin instead of varnish on the salmon. The thick, glass-like finish mimics the wet sheen of fresh seafood perfectly.
Step 2: Crafting the Salmon Nigiri
-
Mix the salmon color:
Blend translucent orange clay with a touch of pink and a lot of translucent white. You want a fatty, rich salmon color that allows light to pass through. -
Create the fat lines:
Sheet out your salmon color and a separate sheet of pure translucent white. Stack them: thick salmon layer, thin white layer, thick salmon layer. Repeat 3-4 times to build a ‘slab’ or cane. -
Compress and slice:
Gently compress the stack so the layers adhere. Slice thinly across the grain using your tissue blade to reveal the striped pattern of the fish fillet. -
Shape the fish:
Cut two rectangular slices slightly larger than your rice mounds. Gently drape the clay over the rice bases, smoothing the edges down so it hugs the rice form naturally.
Level Up: Tableware
Make the plate too! Use speckled granite-colored clay, shape a shallow dish with a lip, and texture it with a stiff brush before baking for a complete set.
Step 3: Rolling the Maki
-
Prepare the filling:
Take a small pinch of your leftover salmon mix and roll it into a thin log. This will be the center of your roll. -
Add the rice layer:
Flatten a strip of your sticky rice paste. Wrap this carefully around the salmon log, ensuring an even thickness all the way around. -
Wrap the Nori:
Roll black clay into a very thin sheet—as thin as possible without tearing. Texture it lightly with a toothbrush or sandpaper to mimic dried seaweed. -
Assemble the roll:
Wrap the textured black clay around the rice cylinder. Trim any excess with a sharp blade for a seamless join. -
Slice the maki:
Let the cane rest in the fridge for 10 minutes to firm up. Slice two clean rounds using a very sharp blade to avoid squashing the shape.
Step 4: Finishing Touches and Baking
-
Make the cucumber garnish:
create a tiny cane with a translucent green center and a dark green rind. Slice three paper-thin rounds and arrange them on a small disk of light wood-colored clay. -
Sculpt the wasabi:
Mix light green clay. Pinch a tiny amount into a rough star or pyramid shape. Use a needle tool to create small indentations and texture, making it look like a dollop of paste. -
Bake:
Arrange all your pieces on a tile. Bake according to your brand’s instructions (usually 275°F/130°C for 15-30 minutes). Let cool completely. -
Glaze:
Brush a coat of gloss glaze over the salmon slices and the salmon center of the maki to make them look moist and fresh. Keep the rice and nori matte.
Display your tiny culinary masterpiece on a miniature table or turn these pieces into unique jewelry charms.
Mini Spaghetti Twirl With Meatballs
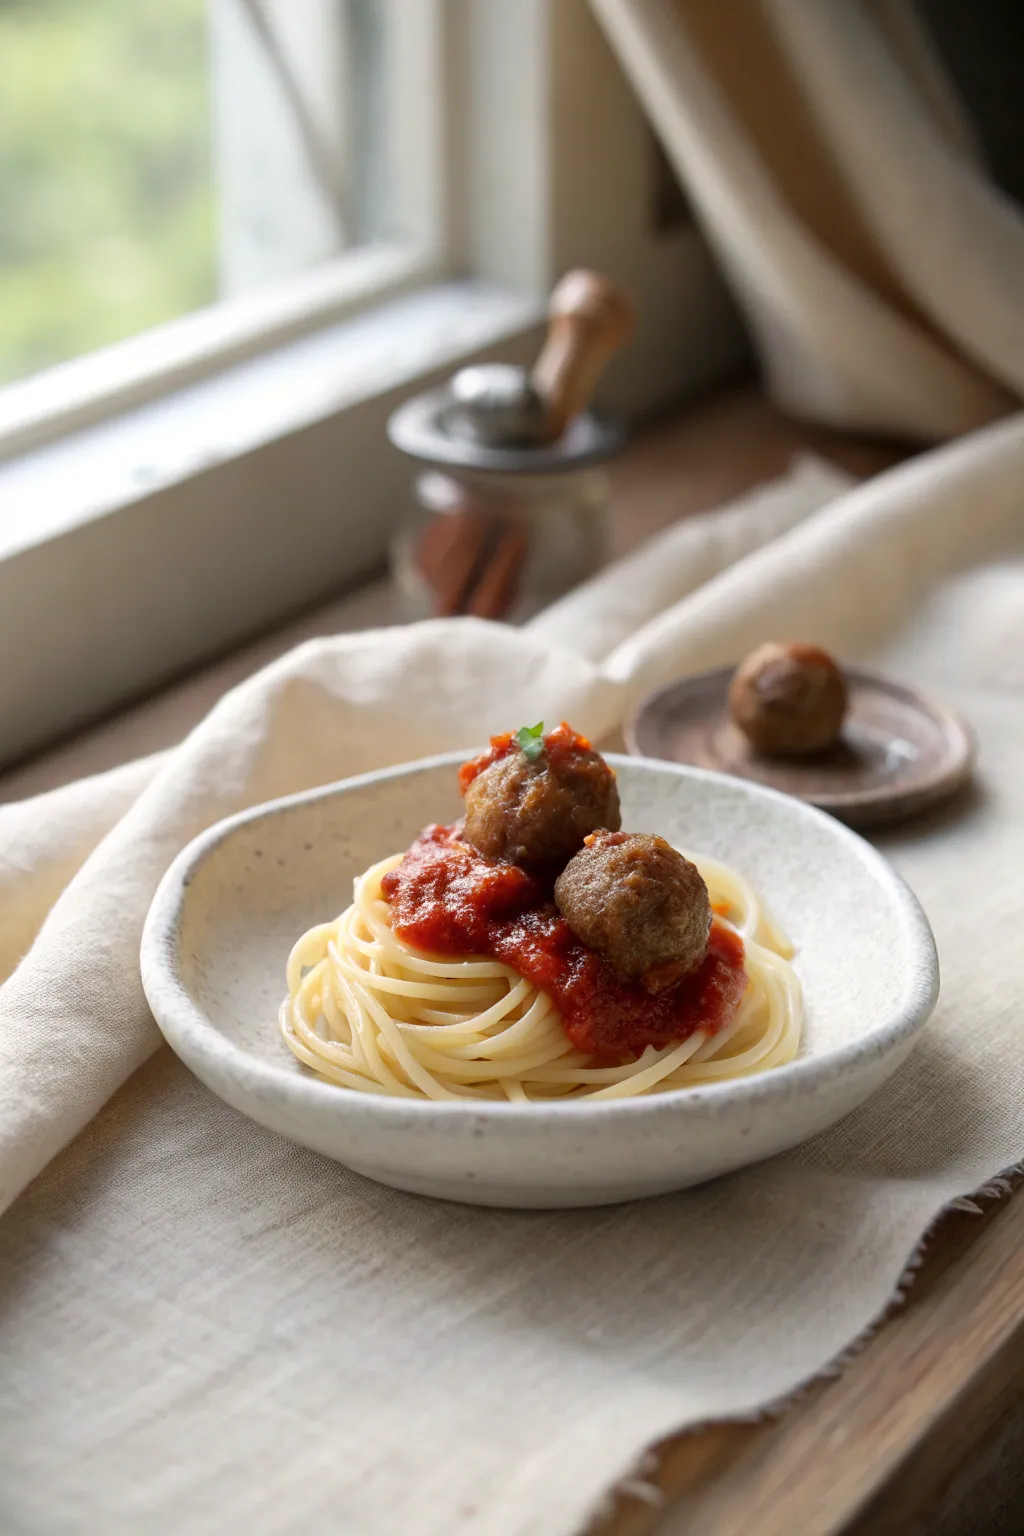
Capture the comforting essence of a home-cooked meal in miniature form with this hyper-realistic polymer clay project. You’ll learn to craft translucent noodles and rich, textured tomato sauce that looks good enough to eat.
Step-by-Step Guide
Materials
- Polymer clay (translucent, white, beige, brown, red, terracotta)
- Liquid polymer clay (translucent and red)
- Pastel chalks (burnt sienna, ochre, brown)
- Fine-tipped needle tool or sewing pin
- Extruder tool with a very fine round disc (optional but recommended)
- Ceramic or clay miniature bowl (pre-made or handmade)
- Gloss glaze or UV resin
- Old toothbrush or sandpaper
- Sand (fine grain for texture)
- Green clay or dried parsley flakes
- X-acto knife or crafting blade
- Tile or glass work surface
Step 1: Sculpting the Meatballs
-
Mix the meat color:
Begin by mixing brown clay with a touch of terracotta and a tiny bit of translucence. This prevents the ‘meat’ from looking too flat or plastic-like. -
Add texture:
Before rolling into balls, incorporate a pinch of fine sand or grated baked clay crumbs into your mix. This mimics the gristle and texture of real ground meat. -
Form the spheres:
Roll two small spheres roughly 4-5mm in diameter. They shouldn’t be perfectly round; slight irregularities add realism. -
Detail surface:
Gently roll the balls over a piece of sandpaper or tap them with an old toothbrush to create a porous, cooked surface texture. -
Shade:
Dust the meatballs lightly with burnt sienna pastel chalk to give them a browned, roasted appearance.
Sauce too runny?
If your liquid clay runs everywhere, let the mixed sauce sit on a piece of paper for 10 minutes. The paper absorbs excess plasticizer, thickening the ‘marinara’ for better control.
Step 2: Creating the Pasta
-
Prepare pasta dough:
Mix a large amount of translucent clay with a very small amount of white and a tiny speck of yellow/beige. You want an ‘al dente’ look, not solid white. -
Extrude noodles:
Load your clay into an extruder with the finest round disc. If you don’t have an extruder, roll tiny snakes by hand, but ensure they are consistent in thickness. -
Arrange the bed:
Squeeze a small blob of liquid clay into the bottom of your miniature bowl to act as glue. -
Twirl the pasta:
Using a needle tool, gently drop the long clay noodle strand into the bowl, twisting and overlapping it to create a natural, messy pile. Avoid pressing them down too hard; keep the volume airy. -
Pre-bake:
I like to bake the pasta and meatballs separately for a few minutes at this stage to set their shape before adding the sauce. This stops the noodles from getting squished.
Pro Tip: Translucency
Never use pure white clay for pasta! Real cooked pasta absorbs water and becomes semi-translucent. A heavy mix of translucent clay is the secret to that perfectly cooked look.
Step 3: Making the Marinara
-
Mix the sauce base:
Combine translucent liquid clay with shaved red and brown pastel chalks. Add a tiny drop of red liquid clay if you have it for vibrancy. -
Build texture:
Chop up tiny bits of semi-baked red/brown clay into microscopic crumbs and stir them into your liquid sauce. This simulates chunks of tomato and herbs. -
Apply the sauce:
Using your needle tool, carefully drip the sauce over the center of the pasta pile. Let gravity pull it down between the strands, but leave the outer edges of the pasta clean.
Step 4: Assembly & Finishing
-
Place meatballs:
Nestle your pre-baked meatballs into the wet sauce. Add a little extra dab of sauce on top of one meatball to make it look like it was tossed in the pot. -
Garnish:
Finely chop a tiny sliver of green clay or use real dried parsley flakes. Sprinkle a microscopic amount onto the very top of the meatballs. -
Final Bake:
Bake the entire piece according to your clay manufacturer’s instructions (usually 275°F/135°C for 15-20 minutes). -
Glaze:
Once cooled, mix a satin or gloss varnish with a tiny drop of water to thin it out. Brush this strictly over the sauce and meatballs to create that moist, oily sheen.
Now you have a comforting Italian dinner sized perfectly for a dollhouse pantry
Mini Breakfast Plate With Pancakes and Butter
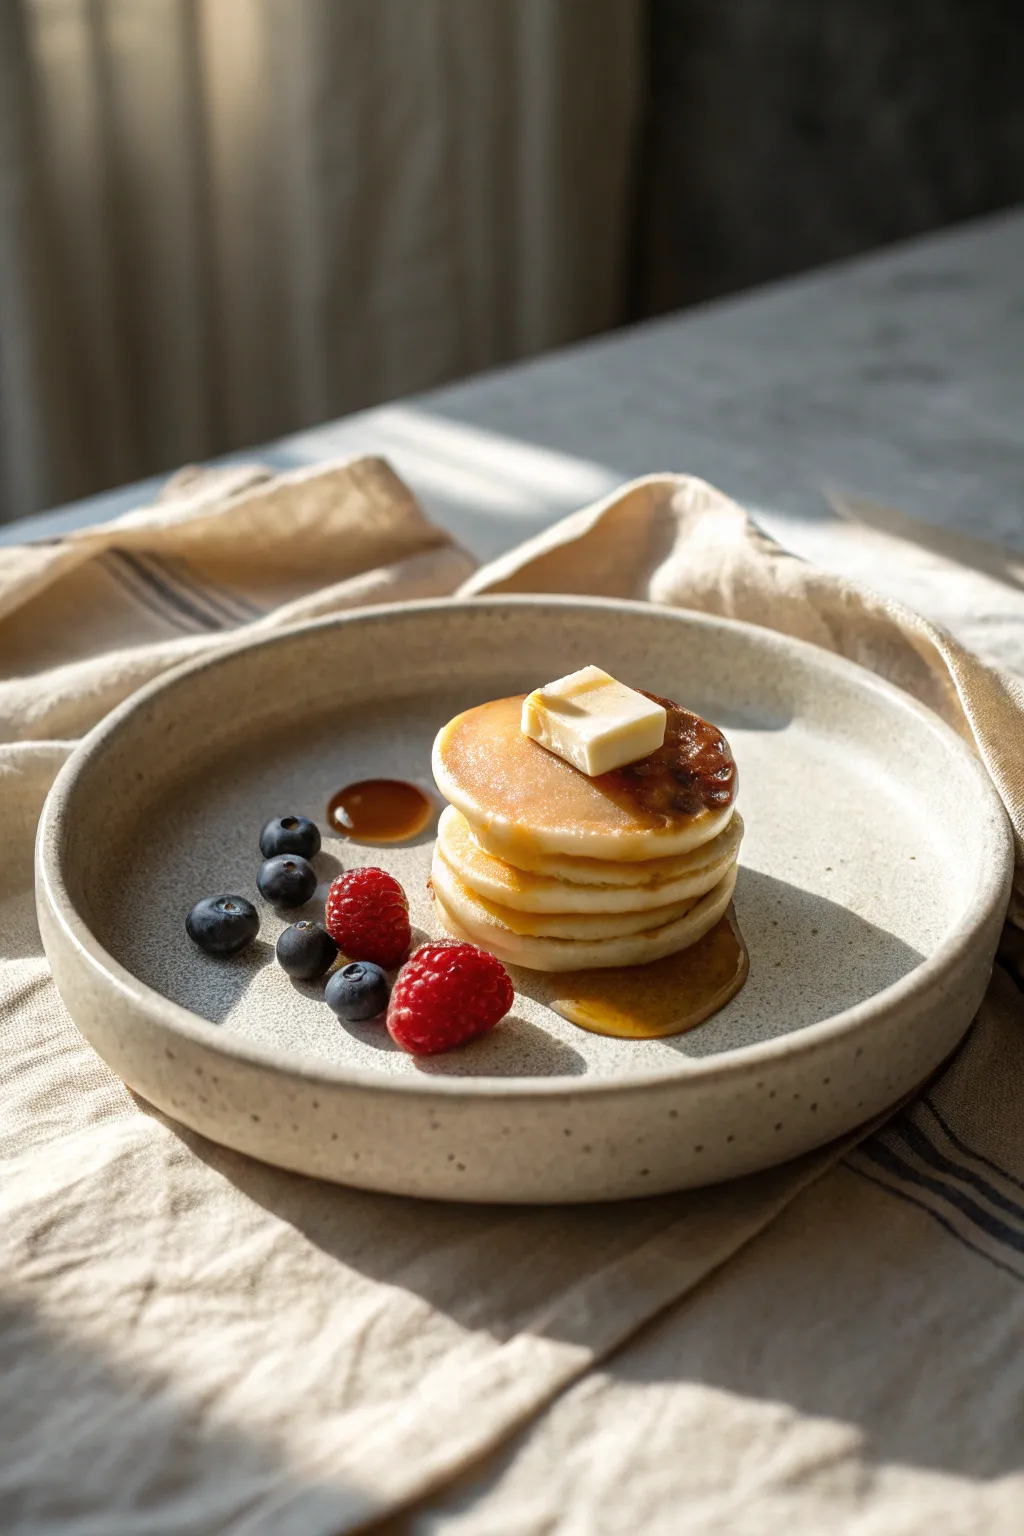
Tiny, fluffy pancakes are a staple for any miniature breakfast scene, and this stack dripping with artificial syrup looks good enough to eat. With polymer clay and some careful texturing, you can create a hyper-realistic morning meal that fits on a fingertip.
Step-by-Step
Materials
- Polymer clay (translucent, white, yellow ochre, beige, blue, red)
- Liquid polymer clay (translucent)
- Pastel chalks (yellow ochre, brown, orange)
- Soft paint brush / makeup sponge
- Toothbrush or texturing tool
- Small circle cutter (approx. 1cm or smaller)
- Gloss varnish or UV resin
- Brown glass paint or alcohol ink
- Needle tool
- Sandpaper
Step 1: Sculpting the Pancakes
-
Mix the batter color:
Start by mixing translucent clay with a small amount of white, beige, and a touch of yellow ochre. You want a creamy, uncooked batter color. The translucent clay is key for that fluffy, airy look later. -
Create the base sheet:
Roll your clay mixture into a sheet, roughly 2mm thick. You can use a pasta machine on a medium setting or a rolling pin with spacers to ensure evenness. -
Texture the surface:
Before cutting, gently dab the surface of the clay sheet with a clean toothbrush or a crumpled ball of aluminum foil. This creates the porous texture characteristic of a pancake’s surface. -
Cut the shapes:
Using your small circle cutter, punch out 4-5 circles. If the edges are too sharp, gently tap them with your finger to soften the silhouette so they look naturally poured. -
Texture the sides:
Using a needle tool, carefully tease the clay on the vertical sides of each pancake. This simulates the internal air pockets visible on the edges of real pancakes. -
Pre-shading:
Shave some yellow ochre and light brown pastel chalk into a fine powder. Use a soft brush to dust the top and bottom edges of each pancake very lightly, focusing on the center for that ‘golden brown’ griddle look.
Syrup spreading too fast?
If your liquid clay syrup is too runny, let it sit on a piece of paper for 10 minutes before applying. The paper absorbs some plasticizer, thickening the ‘syrup’ for better control.
Step 2: Creating the Berries & Butter
-
Blueberries:
Mix dark blue clay with a tiny bit of black. Roll tiny spheres. Use a needle tool to create the star-shaped indentation on top. Dust them slightly with white pastel powder to mimic the natural ‘bloom’ on blueberry skin. -
Raspberries:
Mix translucent clay with red. Roll many microscopic balls, then cluster them together into a hollow cone shape to form raspberries. The translucency makes them look juicy. -
Butter pat:
Mix pale yellow clay with translucent clay. Form a small cube. Gently soften the corners with your finger, so it looks like it is beginning to melt.
Step 3: Plate & Assembly
-
Form the plate:
Take beige or grey granite-effect clay. Roll a flat circle and curve the edges up slightly to form a shallow bowl-plate. Bake this first if you want a sturdy base to work on, or keep it raw to bake everything together. -
Stack and bake:
Stack your pancakes slightly off-center for a natural look. Place the butter on top. Arrange the berries on the plate casually. Bake according to your clay manufacturer’s instructions.
Level Up: Sizzling Butter
Before baking the final syrup layer, add tiny bubbles to the syrup pool using a needle tool, or add a wash of white liquid clay under the butter to simulate melting foam.
Step 4: Finishing Touches
-
Mixing the syrup:
Mix liquid polymer clay (or UV resin) with brown alcohol ink or glass paint. You want a rich amber color that remains transparent. -
The pour:
Drip the syrup mixture over the butter and top pancake, letting gravity guide it down the sides to pool on the plate. I like to let it pool naturally around the bottom pancake. -
Curing the syrup:
If using liquid clay, bake again briefly (5-10 mins) to set the syrup. If using UV resin, cure under a UV lamp. -
Final dusting:
For extra realism, create ‘powdered sugar’ by scraping white pastel chalk onto the berries or just barely onto the pancakes, sealing with a super matte varnish if needed to keep the powder in place.
Once the syrup has set, your delicious miniature breakfast is ready to be displayed in your dollhouse kitchen
Mini Charcuterie Board With Cheese and Fruit Slices
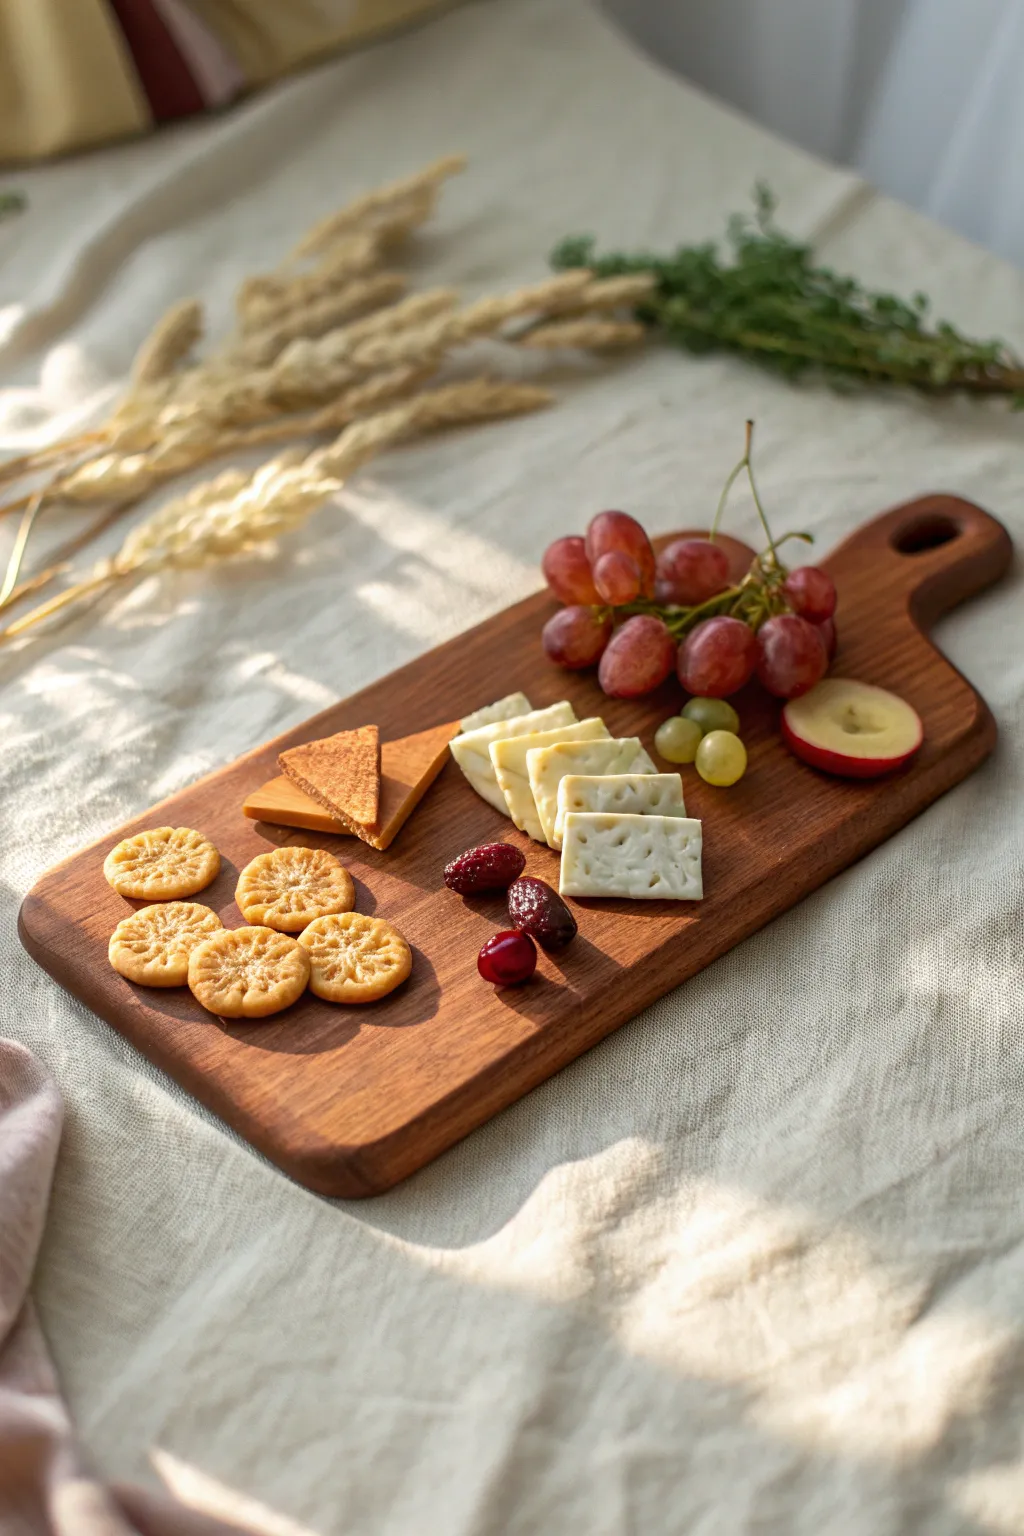
Capture the elegance of a rustic afternoon snack with this highly detailed miniature charcuterie board. You’ll learn the techniques to create realistic cheese textures, translucent grapes, and a perfectly stained wooden board, all scaled down for a delightful display.
Step-by-Step Tutorial
Materials
- Polymer clay (white, translucent, yellow, red, blue, purple, brown, ochre)
- Liquid polymer clay (translucent)
- Chalk pastels (brown, orange, yellow)
- Balsa wood strip or craft stick
- Wood stain (e.g., cherry or walnut)
- Sandpaper (fine grit)
- Needle tool
- Toothbrush (for texturing)
- Craft blade or X-Acto knife
- Small round piping tip (optional, for crackers)
- Gloss varnish
- Matte varnish
Step 1: Crafting the Wooden Board
-
Shape the board:
Cut your balsa wood into a rectangular shape, roughly 1.5 inches by 3 inches. Use sandpaper to round the corners gently. At one end, carve a small handle shape and carefully drill or poke a hole for hanging. -
Sand and smooth:
Sand the entire surface until it feels smooth to the touch, paying special attention to the edges so they look finished and worn, rather than sharp and freshly cut. -
Stain and seal:
Apply a thin layer of wood stain to the balsa wood. Wipe off excess stain with a cloth to let the wood grain show through. Once dry, seal it with a very thin coat of matte varnish.
Sticky Situation?
If your crackers stick to the surface when cutting, dip your cutter in cornstarch first. It acts as a release agent and adds a floury look.
Step 2: Creating the Cheese Selection
-
Mix cheese colors:
For the sliced cheese, mix white clay with a tiny speck of yellow and translucent clay. You want a creamy, off-white color that looks slightly waxy. -
Form the block:
Shape the mixture into a rectangular block. Use your blade to cut four or five thin, even slices, leaving them slightly stacked on top of each other like dominoes. -
Add texture:
Use a needle tool or a crumpled ball of aluminum foil to gently press tiny indents into the cheese slices to mimic air pockets found in semi-soft cheeses. -
Create the cheddar wedges:
Mix orange and yellow clay to create a cheddar tone. Form a flat triangle. Use a toothbrush to vigorously texture the surface, giving it that crumbly, aged cheddar look. -
Dust with pastels:
Shave a little dark orange or brown chalk pastel and brush it onto the textured cheddar wedges to enhance the depth and make the ‘rind’ look realistic.
Step 3: Sculpting Crackers and Fruit
-
Make the cracker dough:
Mix ochre clay with white and a lot of translucent clay. Roll it out very thinly on a tile or glass surface. -
Cut and detail crackers:
Use a small round cutter (or a clean pen cap) to cut out circles. Use a needle tool to create a decorative pattern on top—lines radiating from the center look great. -
Bake effect:
Before baking, shade the centers and edges of the crackers with light brown chalk pastel to simulate perfectly baked dough. -
Grape translucency:
Use translucent clay mixed with a tiny amount of red and purple for red grapes, and translucent with a touch of green/yellow for green grapes. The key is keeping them very translucent. -
Forming grapes:
Roll tiny balls of the grape mixtures. Cluster them together on the board. For the red grapes, dust them extremely lightly with cornstarch or baby powder after baking to simulate the natural ‘bloom’ or wax. -
Apple slice:
Create a cane with a white center and a thin red wrapper. Cut a slice and pinch it into a half-moon shape. Use a needle tool to texture the seed cavity in the center.
Pro Tip: Realistic bloom
Don’t glaze the red grapes! The matte finish of the clay combined with a faint dusting of baby powder looks exactly like real grape skin.
Step 4: Assembly and Finishing
-
Arrange layers:
Place the cheese stack near the center. Arrange the crackers in a small pile on the left. Cluster the grapes near the handle. -
Add garnishes:
Using dark reddish-brown clay, roll tiny ovals for olives or dried dates. I like to add a tiny stem of real dried moss to mimic the grape stems or herbs. -
Secure the pieces:
Use a drop of liquid polymer clay (TLS) under each component to bond it to the wooden board before the final bake. -
Final Bake:
Bake the entire piece according to your clay manufacturer’s instructions. Watch carefully to ensure the wood doesn’t darken too much. -
Glaze application:
Once cool, apply gloss varnish ONLY to the grapes, apple skin, and olives to make them look juicy. Keep the cheese, crackers, and wood matte.
Now you have a delectable miniature spread ready to serve in your dollhouse or display as a charming magnet.
Mini Produce Basket for Ingredient Builds
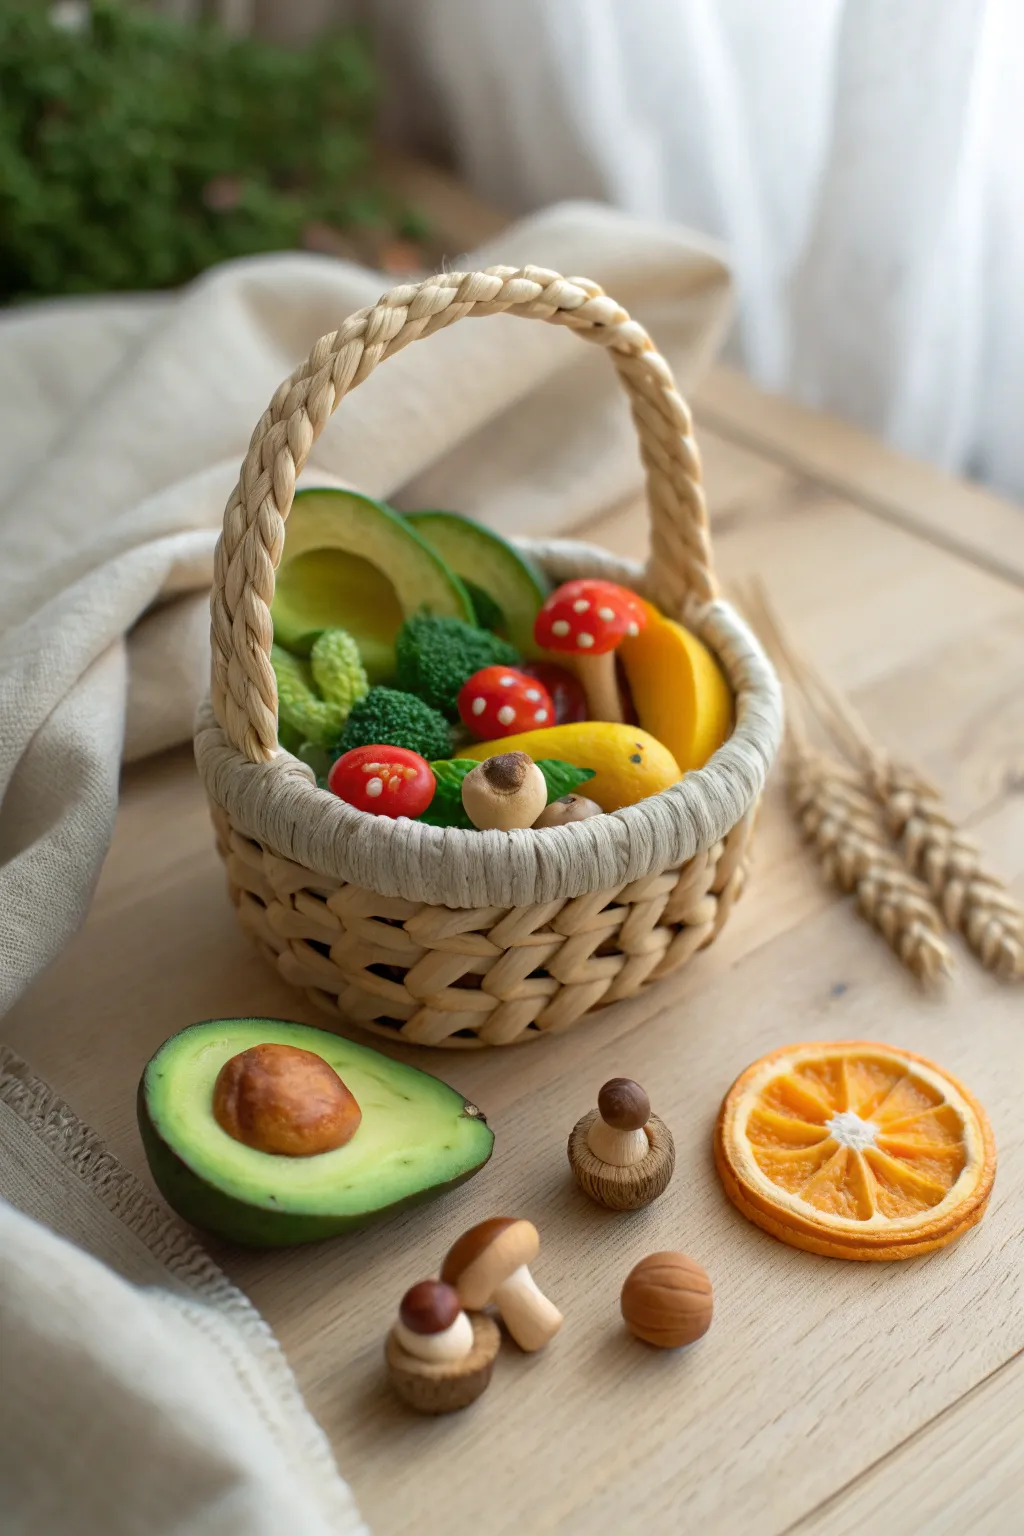
This charming project captures the wholesome feeling of a market haul in miniature form, featuring an array of vibrant veggies tucked into a hand-woven basket. You’ll create everything from textured broccoli to smooth avocados, practicing a variety of polymer clay techniques in one cohesive piece.
Detailed Instructions
Materials
- Polymer clay (various greens, red, white, yellow, brown, translucent)
- Liquid clay (translucent)
- Needle sculpting tool
- Ball tool set
- Jute twine or heavy hemp cord
- Craft glue or strong PVA glue
- Small round container (for basket mold)
- Chalk pastels (brown, orange, yellow)
- Soft paintbrush
- Sandpaper or texture sponge
- Gloss glaze
Step 1: Weaving the Basket
-
Prepare the base:
Cut a small circle of cardstock or flattened clay as your base. Apply a layer of glue to the center and begin coiling your jute twine in a tight spiral, pressing firmly as you go until the base is covered. -
Build the walls:
Place your coiled base onto a small round container (like a bottle cap) to use as a form. Continue gluing and coiling the twine up the sides of the form to create the basket walls. -
Create the rim and handle:
For the rim, braid three strands of twine together and glue this thicker braid around the top edge of your basket for a finished look. Create a separate handle by braiding three longer strands, bending it into an arch, and gluing the ends securely inside the basket walls.
Realism Pro Tip
Mix a tiny bit of translucent clay into your fruit and veggie colors. This prevents the clay from looking like solid plastic and gives it a realistic, organic waxiness.
Step 2: Sculpting the Produce
-
Mix avocado colors:
Create an avocado gradient by mixing a dark forest green for the skin, a bright yellow-green for the flesh near the skin, and a pale yellow-green for the inner flesh. -
Form the avocado:
Roll a teardrop shape of the pale inner color. Wrap a thin layer of the bright green around it, followed by a thin sheet of the dark green skin. Texture the dark skin by gently rolling it over sandpaper. -
Slice and seed:
Cut the avocado shape in half. For one half, use a ball tool to make an indentation and insert a brown ball of clay for the pit. Use a needle tool to add radial texture lines to the pit. -
Texture the broccoli:
Roll small balls of dark green clay. Using a needle tool, aggressively stipple the surface to create the florets’ tight texture. Attach these onto lighter green stalks. -
Shape mushrooms:
Form caps using red clay for the spotted variety and tan clay for the brown ones. Create stems from white or beige clay. Join the stems to the caps using a dot of liquid clay. -
Detail the mushrooms:
For the red mushrooms, roll tiny dots of white clay and press them onto the red caps. For the brown mushrooms, use chalk pastels to brush a slightly darker brown on the top for a baked look. -
Create the orange slice:
Make a ‘cane’ by wrapping orange triangles in thin white clay (for the pith) and arranging them in a circle. Wrap the whole bundle in white, then orange skin. Slice a thin disk. -
Texture the orange:
Use a needle tool to rough up the orange segments to mimic juicy pulp. Brush the skin edge with orange chalk pastel to deepen the color.
Step 3: Assembly & Finishing
-
Baking:
Arrange all your clay pieces on a tile or baking sheet. Bake according to your brand of polymer clay’s instructions (usually 275°F/135°C for 15-30 minutes). Let them cool completely. -
Arranging the basket:
Place a scrap of crumpled paper or tissue inside the basket bottom as filler so you don’t need to fill the whole depth. Glue your veggies in, starting with the larger leaves and avocado slices at the back. -
Final touches:
Apply a touch of gloss glaze to the avocado pit and the red mushroom caps to make them look fresh or dewy. Arrange the loose items (nut, orange slice, mushroom) around the basket base.
Level Up: Table Setting
Glue the basket and loose produce onto a small wooden coaster or balsa wood square to create a permanent diorama base that can be easily moved.
Now you have a harvest-fresh miniature display ready to brighten up any shelf or dollhouse kitchen
Mini Bento Box With Tiny Portions and Dividers
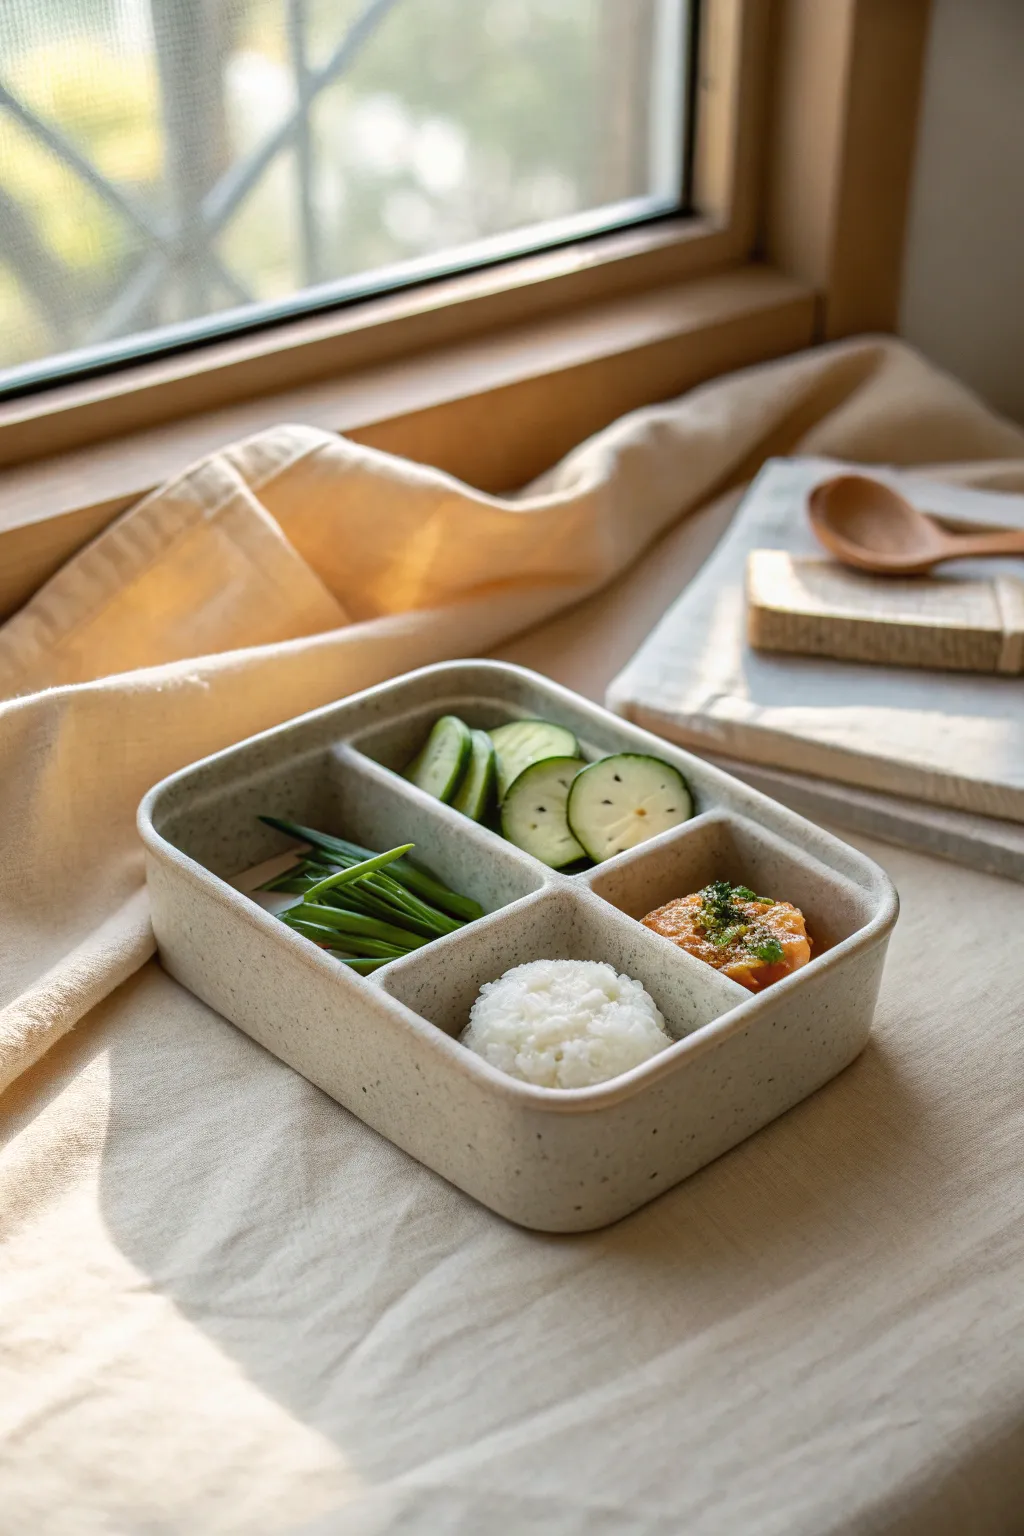
This delightful project captures the clean lines of a Japanese bento box filled with healthy, realistic-looking miniature sides. You will sculpt a divided container and fill it with glossy polymer clay cucumbers, textured rice, greens, and a savory main.
Step-by-Step Guide
Materials
- Polymer clay (white, translucent, leaf green, dark green, ochre yellow, cadmium red)
- Speckled granite or beige polymer clay (for the box)
- Liquid polymer clay (translucent)
- Pastel chalks (browns, oranges, burnt sienna)
- Gloss glaze or UV resin
- Modeling tools (needle tool, ball stylus)
- X-acto knife or craft blade
- Old toothbrush or stiff texture brush
- Sandpaper (fine grit)
- Rolling pin or pasta machine
Step 1: Sculpting the Bento Box
-
Base Formation:
Start by conditioning the speckled granite or beige clay until soft. Roll it out into a thick slab, approximately 3-4mm thick, to form the sturdy base of your container. -
Cutting the Shape:
Cut a clean rectangle from your slab, rounding the corners gently with your fingertips to soften the look. -
Building the Walls:
Roll a long snake of the same clay and flatten it into a strip. Attach this strip around the perimeter of the base to create the box walls, blending the seams on the inside and outside with a modeling tool for a seamless finish. -
Creating Dividers:
Cut two smaller strips of clay to act as dividers. Place one lengthwise to split the box, then add a shorter cross-section to create the four distinct compartments seen in the reference. -
Pre-Bake:
Bake just the empty box according to your clay manufacturer’s instructions (usually 275°F for 15 minutes) so it stays rigid while you fill it.
Step 2: Crafting the Contents
-
Making the Rice:
Mix white clay with a tiny amount of translucent clay. Roll hundreds of microscopic, rice-grain-sized logs. This takes patience, but the realism is worth it. -
Assembling the Rice Mound:
Fill one compartment with a ball of scrap clay as a filler, then coat it with liquid clay. Stick your tiny rice grains onto the mound, texturing gently with a needle tool to fluff it up. -
Cucumber Canes:
Create a ‘cane’ by wrapping a log of translucent white green (very pale) with a thin sheet of dark green clay. Reduce the cane by rolling it until it’s the correct scale. -
Slicing Cucumbers:
Slice the cane thinly. I like to press a few real sesame seeds or tiny bits of black clay into the center of a few slices for detail. -
Arranging the Slices:
Layer the cucumber slices in the top right compartment, slightly overlapping them. -
Green Beans:
Roll thin snakes of leaf green clay. Cut them into uniform lengths and taper the ends slightly. Arrange them in a parallel stack in the dedicated compartment. -
Texturing the Fried Patty:
Mix ochre, white, and a touch of red to get a golden-brown fried color. Shape a rough oval patty. -
Crispy Texture:
Aggressively texture the surface of the patty with an old toothbrush or a ball of aluminum foil to simulate breadcrumbs. -
Shading:
Use a soft brush to dust burnt sienna and orange chalk pastels over the textured patty to simulate perfect browning. -
Garnish:
Chop tiny bits of green clay to look like herbs and sprinkle them over the patty, securing with a dot of liquid clay.
Uneven Walls?
If your box walls warp during smoothing, insert a rectangle of cardstock or an eraser cut to size into the empty space to support the shape while you bake it.
Step 3: Finishing
-
Final Bake:
Bake the entire piece again to set the food items. -
Glazing:
Once cool, apply a gloss glaze or UV resin specifically to the cucumbers and the fried patty to give them a moist, appetizing sheen. Keep the rice and box matte.
Level Up: Texture
Mix real dried herbs or poppy seeds into the clay for the fried patty and garnish steps. The natural texture adds incredible realism compared to clay bits.
Display your tiny healthy lunch on a miniature windowsill for everyone to admire