
Mini clay projects are my favorite kind of satisfying because you get that “finished piece” feeling fast. If you’re craving tiny, cute, and totally doable ideas, these little builds will keep your hands busy and your desk covered in tiny joy.
Tiny Kawaii Fruit Charms With Sweet Faces
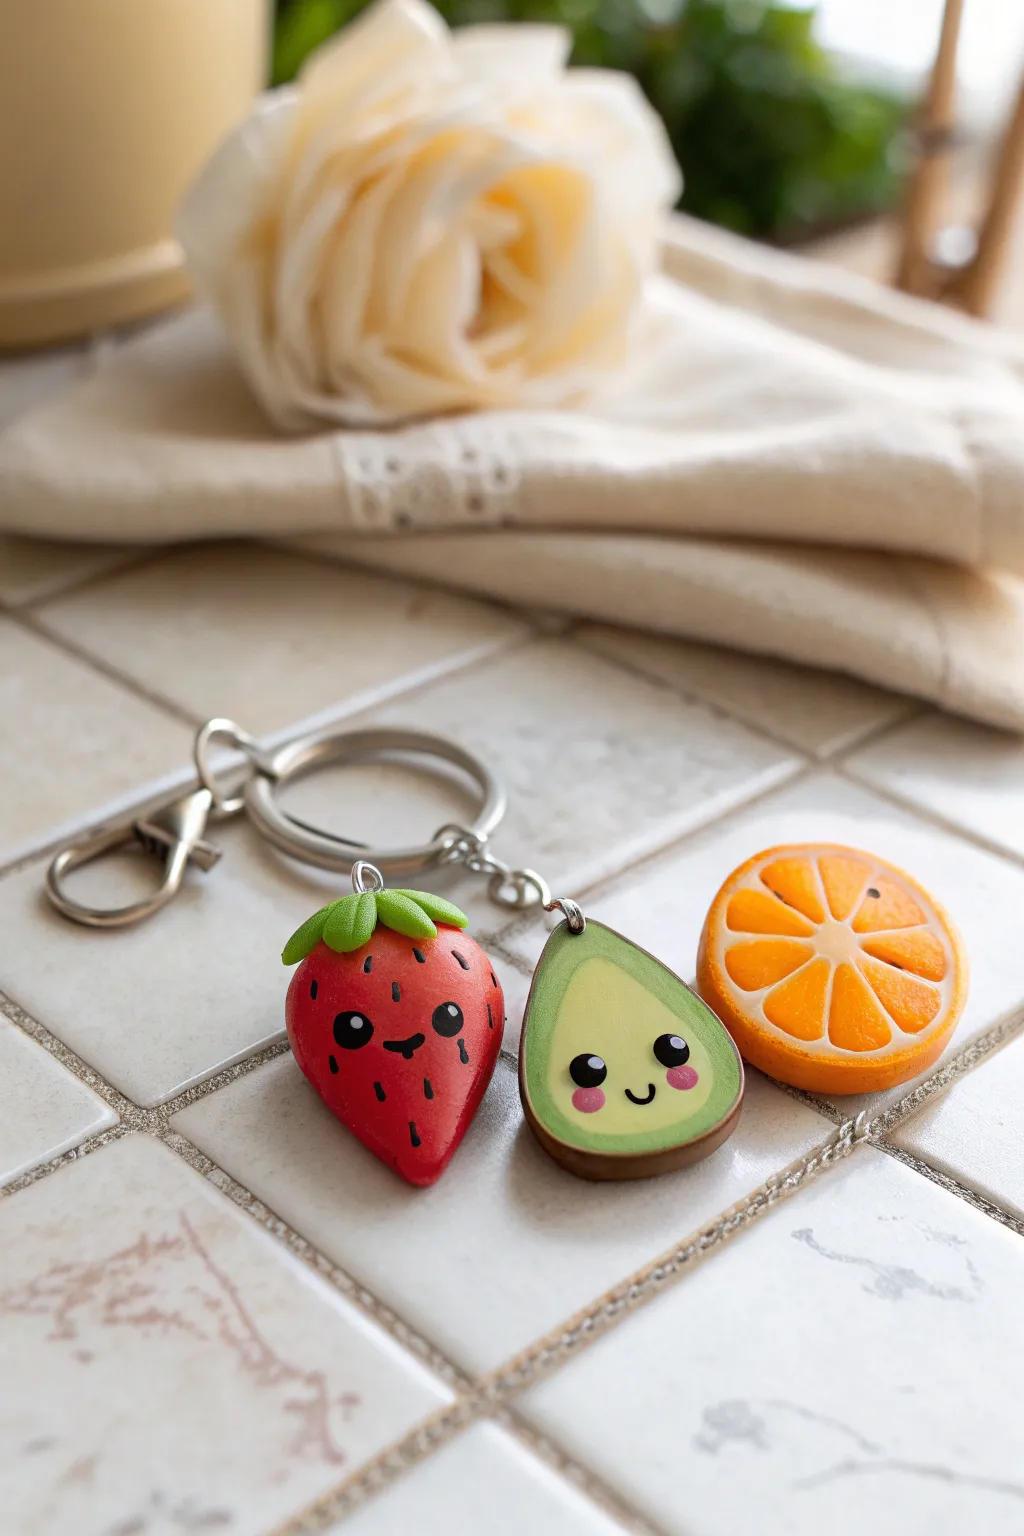
These adorable polymer clay charms bring a pop of sweetness to your keys or bag with their cheerful kawaii faces. You’ll learn how to sculpt a vibrant strawberry, a smiling avocado, and a juicy orange slice to create a delightful fruit salad accessory.
Step-by-Step
Materials
- Polymer clay (red, green, dark green, light green, orange, white, translucent)
- Black acrylic paint
- Pink chalk pastel or blush
- Dotting tools or ball stylus (various sizes)
- Needle tool or toothpick
- Small paintbrush (for detailing)
- Craft knife or clay blade
- Screw eye pins
- Jump rings and a keychain clasp
- Gloss glaze or UV resin (optional)
- Oven for baking
Step 1: Sculpting the Sweet Strawberry
-
Shape the base:
Start by conditioning a chunk of red clay until it’s soft. Roll it into a smooth ball, then gently taper one end to form a rounded cone shape resembling a whole strawberry. -
Texture the surface:
Using a needle tool or toothpick, gently press small indentations all over the red surface to mimic seeds. -
Create the leaves:
Flatten a small piece of light green clay. Cut out a small star shape or several small teardrops. Press these onto the top (wide end) of your strawberry. -
Detail the stem:
Add a tiny coil of green clay to the center of the leaves to form the stem. Use your needle tool to add texture lines to the leaves for a more realistic look. -
Add hardware:
Insert a screw eye pin into the top of the strawberry, right through the center of the leaves. Ensure it’s secure.
Needle Tool Trick
To texturize the orange rind perfectly, roll the side of the unbaked slice over a piece of sandpaper or poke it repeatedly with a coarse brush.
Step 2: Crafting the Happy Avocado
-
Mix your greens:
You will need two shades of green. If you don’t have them pre-mixed, blend green with a little brown for the skin, and green with plenty of yellow and white for the creamy inside. -
Form the interior:
Take the light green clay and shape it into a flat pear silhouette. This will be the face of the avocado. -
Wrap the skin:
Roll out a thin sheet of the darker green clay. Carefully wrap this strip around the edge of your light green pear shape to create the peel. -
Smooth the seams:
Gently blend the dark green edges inward slightly so the skin looks attached, but keep a distinct line between the two colors. -
Indent for the pit:
Though this is a halved avocado without the pit, you can gently press your thumb in the lower center to suggest where the pit would sit, or keep it flat for the face canvas. -
Secure the pin:
Insert a screw eye pin into the top center of the avocado.
Step 3: Creating the Juicy Orange Slice
-
Prepare the cane components:
Mix translucent clay with orange clay for a realistic pulp effect. Form this into a log. Then, roll out a very thin sheet of white clay. -
Wrap the segments:
Cut the translucent orange log into 8 equal wedges. Wrap each wedge in the thin white clay. -
Assemble the fruit:
Reassemble the wrapped wedges back into a round log shape. Wrap the entire bundle in a layer of white clay, followed by a thicker layer of plain orange clay for the rind. -
Slice the charm:
Using your clay blade, carefully cut a thick slice from your cane. You can stick a needle tool into the rind to texture it like distinct zest. -
Drill a hole:
If you want this as a charm, make a hole near the rind now, or plan to drill it after baking.
Gloss Like a Boss
Apply a coat of UV resin or glossy glaze, especially on the orange pulp and avocado center, to make them look perpetually fresh and juicy.
Step 4: Adding Kawaii Faces & Assembly
-
Bake the batch:
Bake all three charms according to your clay package instructions (usually around 275°F/130°C for 15-30 minutes). Let them cool completely. -
Paint the eyes:
Using a small dotting tool dipped in black acrylic paint, add two wide-set eyes to the strawberry and avocado. I usually place them lower on the shape for maximum cuteness. -
Add the smile:
Use a very fine detail brush or a needle tool with black paint to draw a tiny ‘U’ shape between the eyes for a mouth. -
Rosy cheeks:
Scrape some pink chalk pastel into a powder. Apply it gently with a dry brush or Q-tip underneath the eyes to give them a blushing look. -
Final highlights:
Once the black paint is dry, add a tiny white dot reflecting light inside the black eyes to bring them to life. -
Assemble the keychain:
Use jump rings to attach your strawberry and avocado charms to the main keychain loop. The orange slice can be glued onto a surface or added as a third charm.
Now you have a refreshing set of pocket-sized fruit friends to brighten up your daily routine


Mini Toast and Egg Best-Friend Pair
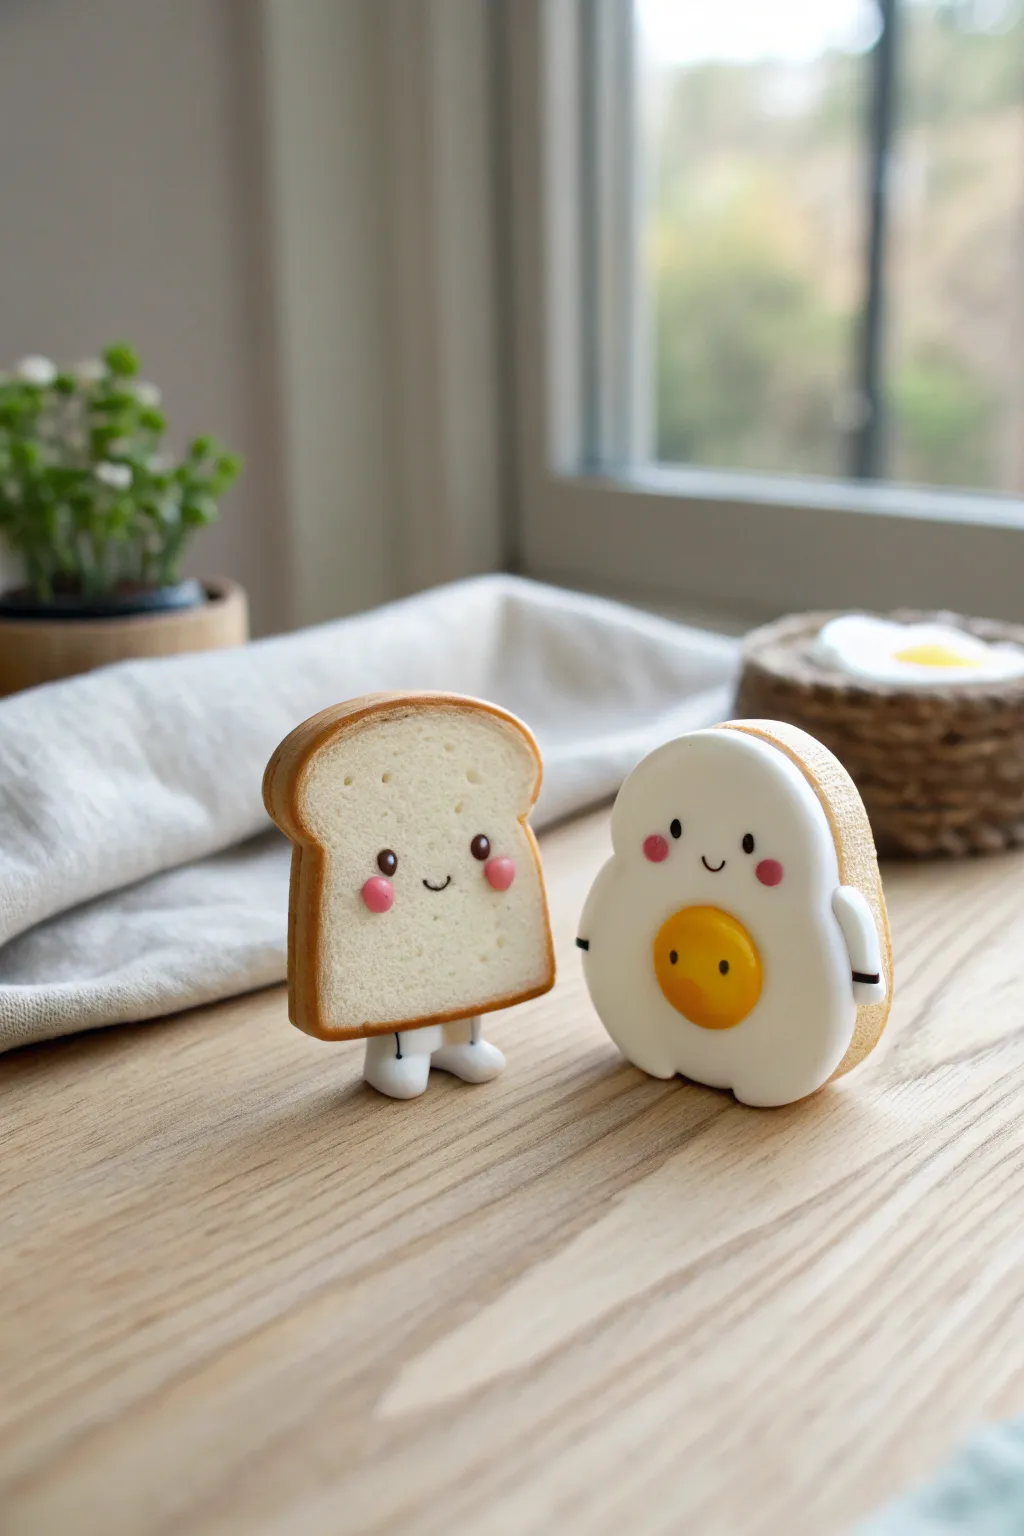
Create an adorable breakfast duo with this polymer clay project featuring a cheerful slice of bread and a sunny-side-up egg friend. These standing figures have sweet kawaii faces and make for perfect desk companions or charms.
Step-by-Step Guide
Materials
- Polymer clay (white, translucent, yellow, light brown, pink, black)
- Clay roller or pasta machine
- Scalpel or craft knife
- Needle tool
- Dotting tools (small and medium)
- Chalk pastels (orange/brown for shading)
- Soft paintbrush
- Liquid clay (TLS) or bake-and-bond
- Oven for baking
Step 1: Sculpting the Toast
-
Mix the bread color:
Start by mixing white clay with a tiny amount of yellow and translucent to create a soft, doughy off-white color. Roll a significant portion into a thick slabs, about 1/4 inch thick. -
Shape the slice:
Cut a square shape from your dough slab, but gently round the bottom corners. Press the top with your finger to create the dip for the classic bread loaf shape. -
Add the crust:
Roll a snake of light brown clay and flatten it into a long, thin ribbon. Wrap this ribbon around the entire perimeter of your white bread shape. Smooth the seam where the ends meet at the bottom. -
Texture the bread:
Use a toothbrush or a needle tool to gently stipple the white surface of the bread to give it a realistic airy texture. -
Shade the crust:
To make it look freshly baked, I like to brush a little orange chalk pastel powder along the edges where the white meets the brown crust. -
Create the face:
Use a small dotting tool to make indentations for eyes. Insert tiny balls of black clay. Add rosy cheeks with small flattened discs of pink clay, and roll a microscopic snake of black clay for the smile. -
Add tiny legs:
Form two small white cylinders for legs and attach them to the bottom of the toast so it can stand.
Fixing Top-Heavy Figures
If your figures fall over, bake them lying flat on a bed of cornstarch or polyester batting. You can glue them to a base later for stability.
Step 2: Crafting the Egg Friend
-
Form the egg white:
Roll a ball of white clay and flatten it into a thick, irregular oval shape. It should be roughly the same height as your toast figure. -
Make the yolk:
Roll a ball of yellow clay and flatten the back slightly. Press this firmly onto the tummy area of your white egg shape. You want it to look plump and round. -
Add the backing:
To make the egg sturdy and match the toast, cut a backing piece from light brown clay (like a piece of toast behind the egg) and press it onto the back of the white shape. -
Sculpt the face:
Just like the toast, add wide-set black eyes and pink cheeks to the upper part of the egg white. Add a tiny smile between the eyes. -
Add yolk detail:
For extra cuteness, place a secondary, smaller face on the yolk itself using tiny dots of black clay. -
Attach arms:
Roll tiny white sausages for arms. Attach them to the sides of the egg body. I added small black cuffs to make them look like little sleeves. -
Stand it up:
Fashion two small white feet, similar to the toast, and attach them to the bottom edge using a dab of liquid clay for strength.
Step 3: Baking and Finishing
-
Pre-bake check:
Ensure both figures can stand on their own. If they tip over, gently press them down onto your work surface to flatten the bottoms of their feet. -
Clean up:
Use a q-tip dipped in rubbing alcohol or baby oil to wipe away any dust or fingerprints from the white clay areas. -
Bake:
Bake the figures according to your clay manufacturer’s instructions (usually 275°F/135°C for 15-30 minutes). Let them cool completely before handling.
Make them Magnets
Skip the legs and embed a strong neodymium magnet into the back of the clay before baking for heavy-duty fridge magnets.
Once cooled, your breakfast buddies are ready to bring a smile to your desk setup


Tiny Hamburger and Fries Desk Buddy Set
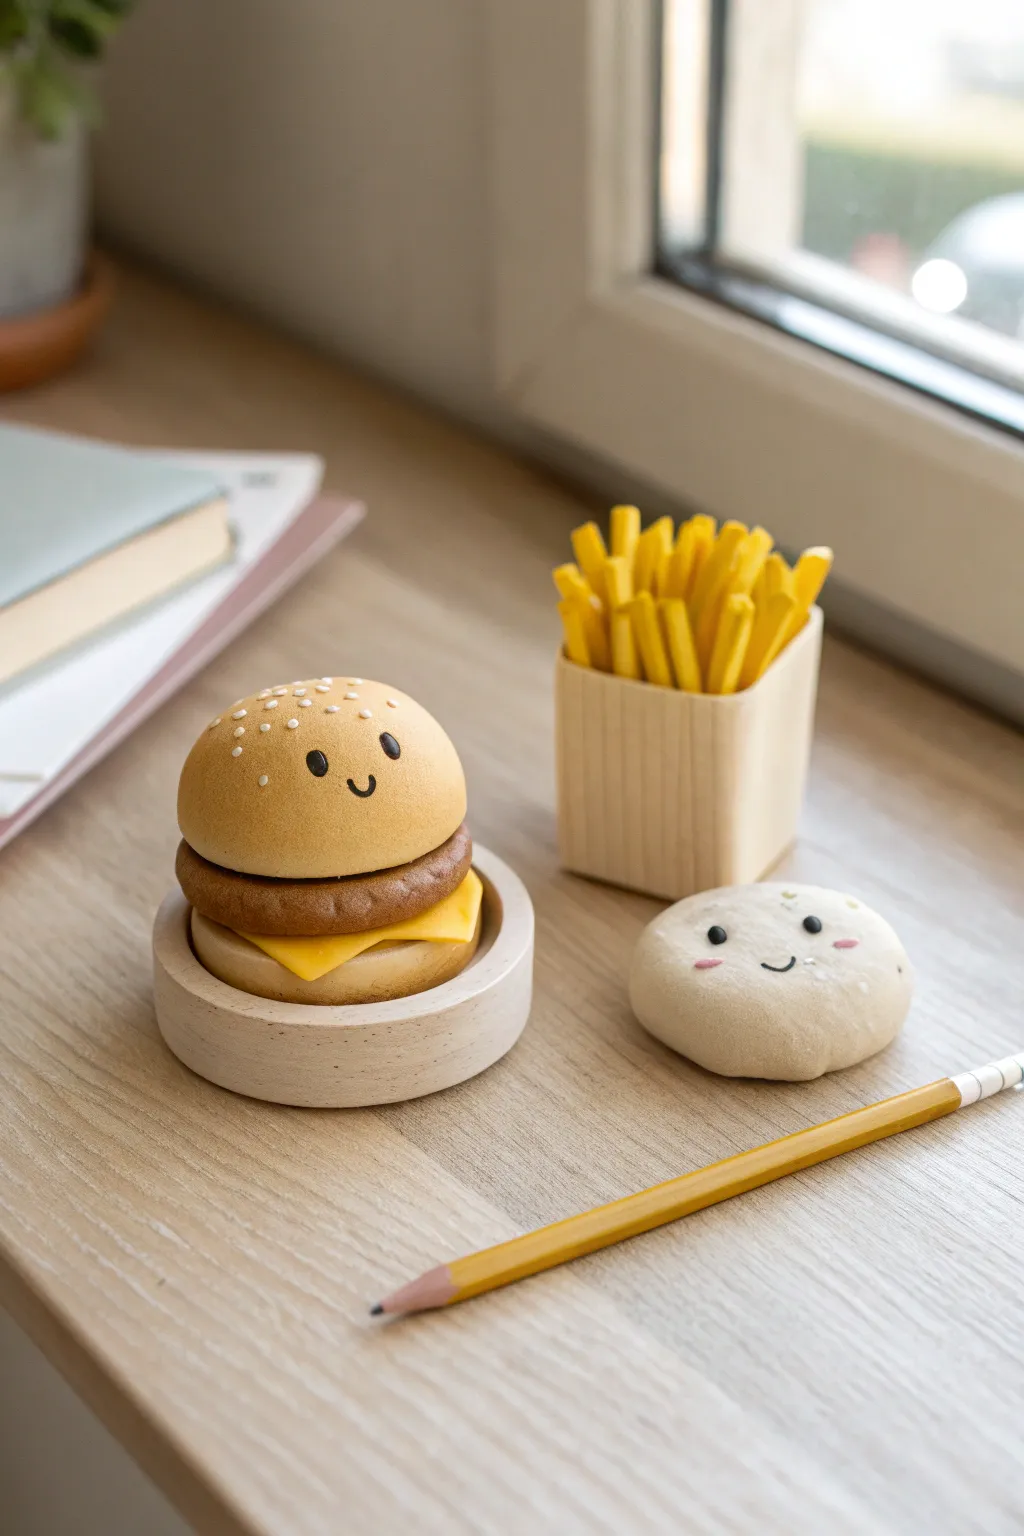
Add a dash of fast-food fun to your workspace with this adorable desktop trio made from air-dry or polymer clay. Featuring a smiling burger, a sturdy container of fries, and a sweet little bun sidekick, these characters bring personality to your pencil organization.
How-To Guide
Materials
- Light tan, dark brown, yellow, and white polymer or air-dry clay
- Light wood block (approx. 1.5 inch cube) with hollow center
- Small wooden ring or shallow dish base (for the burger)
- Black acrylic paint or fine-tip permanent marker
- Pink acrylic paint or pastel chalk (for cheeks)
- Sculpting tools (needle tool, small ball tool)
- Sandpaper (fine grit)
- Matte varnish or sealant
- Strong craft glue
Step 1: Sculpting the Burger Buddy
-
Form the bun base:
Start by rolling a ball of light tan clay for the bottom bun. Press it into a flattened disk shape that fits comfortably inside your wooden ring base. -
Prepare the cheese:
Roll out a thin sheet of yellow clay. Cut a square slightly larger than your bun base. Gently drape it over the bottom bun so the corners flop down naturally. -
Shape the patty:
Take a portion of dark brown clay and shape it into a thick disk. Texture the edges by tapping them lightly with a stiff brush or a ball of tin foil to mimic cooked meat. -
Create the top bun:
Roll a smooth, domed hemisphere from the tan clay for the top bun. Ensure it makes the burger look nicely proportioned—not too flat, not too tall. -
Add sesame seeds:
Using tiny bits of white clay, roll minuscule teardrop shapes and press them onto the top dome. Alternatively, create shallow indents and paint them white later. -
Assemble the stack:
If using polymer clay, verify the pieces fit together before baking. If using air-dry clay, use a dab of water or slip to join the bottom bun, cheese, patty, and top bun into a secure stack.
Clean lines
Wipe your clay tools with a little rubbing alcohol or baby oil before cutting the fries. This prevents the clay from dragging and keeps those edges crisp and square.
Step 2: Making the French Fries
-
Mix the perfect yellow:
Mix yellow clay with a tiny touch of orange or brown to get a golden-fried color. -
Cut the fries:
Roll the clay into a thick slab and cut it into long, rectangular strips. Vary the lengths slightly so they look realistic when bunched together. -
Texture the fries:
Use your fingers to slightly soften the sharp cut edges, giving them a more organic, crispy appearance. -
Arrange in container:
Stand the clay strips inside your hollow wooden block. Pack them tightly enough to stand upright but leave a few tilting for a casual look. If the block isn’t oven-safe, form the cluster separately to fit the hole, bake/dry it, and then glue it in.
Step 3: The Little Side Bun
-
Shape the bun:
Create a flattened, smooth stone shape from white or very light tan clay. This sidekick sits flat on the desk surface. -
Texture lightly:
If you want a floury texture, tap the surface very gently with a dry sponge before the clay hardens.
Menu expansion
Turn the side bun into a dumpling by pinching the top into pleats, or paint the wooden fry container red with a yellow logo for a classic diner vibe.
Step 4: Finishing Touches
-
Cure the clay:
Bake your polymer clay pieces according to the package instructions, or allow air-dry clay to dry completely (usually 24-48 hours). -
Paint the faces:
Using a fine-tip paintbrush or marker, draw wide-set black eyes and a small ‘u’ shaped smile on both the burger and the side bun. I find keeping the features low on the face makes them cuter. -
Add rosy cheeks:
Dab a tiny amount of pink paint or brush on some pink pastel chalk dust under the eyes to give them a sweet flush. -
Seal the deal:
Once the paint is dry, coat the clay pieces with a matte varnish to protect the surface and finalize that smooth, finished look. -
Final assembly:
Glue the burger into its wooden ring base and secure the fries into the wooden block if they were baked separately.
Now you have a cheerful set of desk friends ready to help you through the workday


Mini Sushi Rolls With Simple Seaweed Wrap
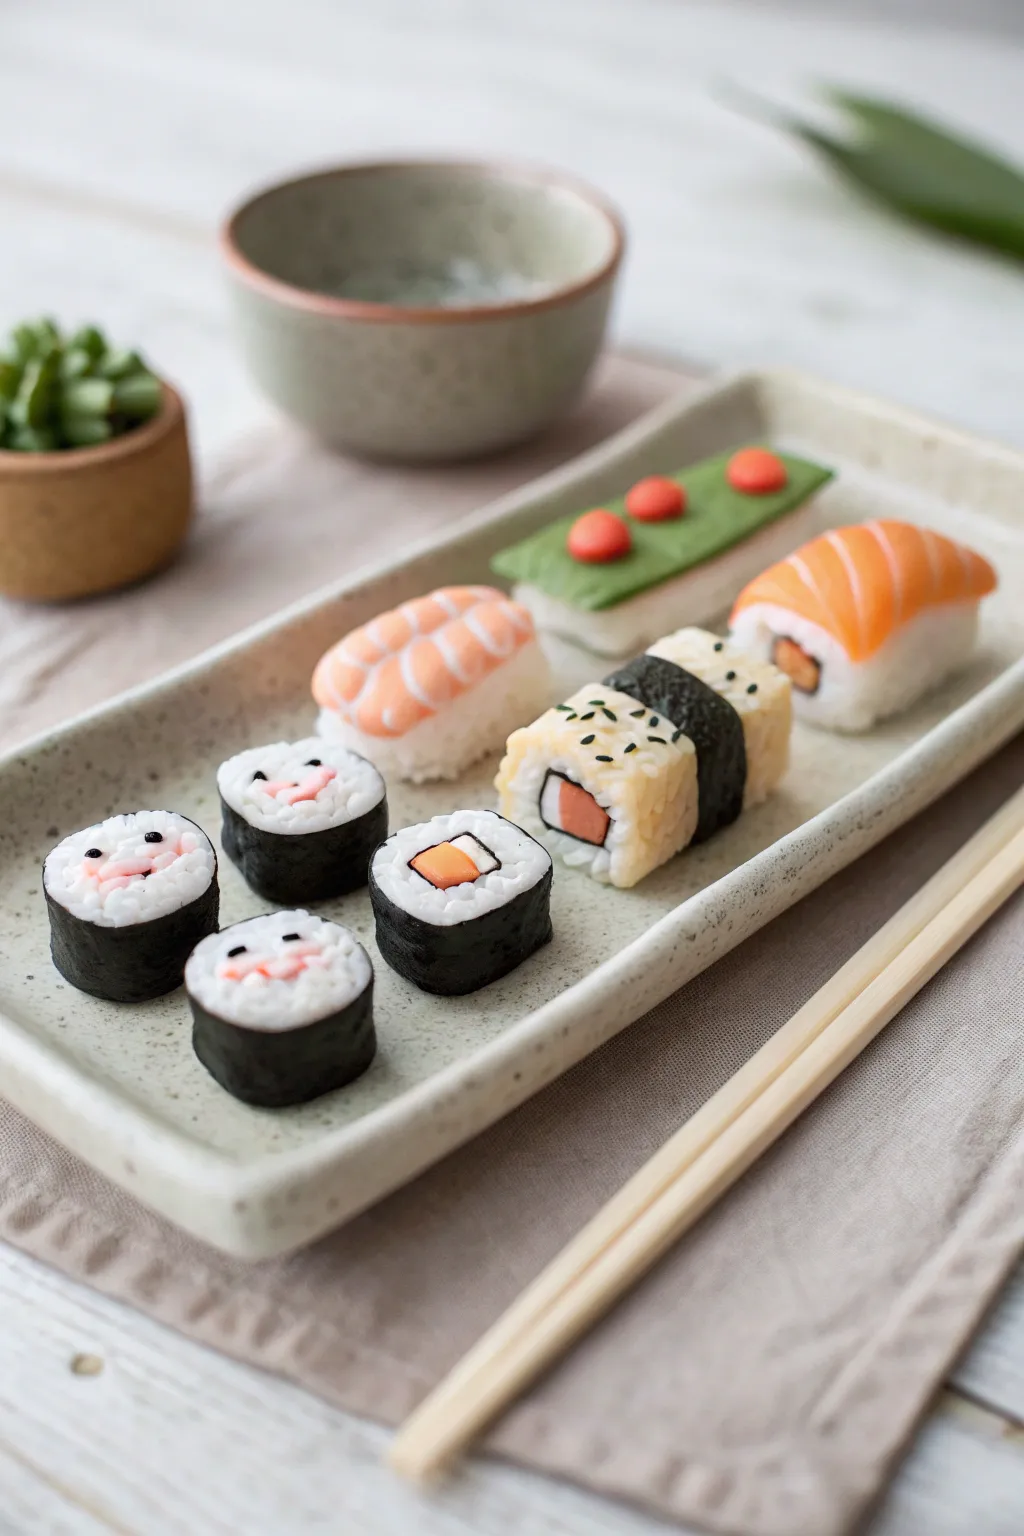
Recreate an appetizing spread of miniature sushi using polymer clay, complete with smiling maki rolls and textured nigiri. These tiny treats capture all the details of the real thing, from the translucent salmon to the individual grains of rice, making for a charming display piece.
Step-by-Step Guide
Materials
- White polymer clay (for rice)
- Translucent white polymer clay
- Orange polymer clay (for salmon)
- Black polymer clay (for seaweed)
- Green polymer clay (for avocado/wasabi)
- Red polymer clay (for tuna/roe)
- Beige polymer clay
- Liquid clay or bake-and-bond
- Needle tool or toothpick
- Craft knife or scalpel
- Toothbrush or texturing tool
- Rolling pin or pasta machine
- Gloss glaze (optional)
- Black acrylic paint (fine detail)
Step 1: Preparing the Rice Base
-
Mix the rice color:
Start by mixing a large portion of white clay with a small amount of translucent clay. This gives the ‘rice’ a realistic, slightly waxy finish rather than a solid, opaque white look. -
Texture the rice:
Chop the mixed clay into tiny, grain-sized bits using your craft knife. Gently pack these bits together into small rectangular mounds for nigiri or cylinders for maki rolls. Be careful not to mash them back into a smooth lump; you want that grainy texture to remain visible. -
Refine the shapes:
For the circular maki rolls, roll a smooth cylinder of white clay first, then press your chopped ‘rice’ bits onto the exterior faces deeply so the texture stands out.
Sticky Situation?
If your black clay stains the white rice, wipe your hands and tools often with baby wipes. Handle the light colors completely before touching the black clay.
Step 2: Creating the Maki Rolls (Face Sushi)
-
Wrap the seaweed:
Roll out a very thin sheet of black polymer clay. Cut a long strip that matches the height of your cylindrical rice shapes. -
Apply the wrap:
I find it helpful to lift the strip with a blade to avoid fingerprints. Wrap the black strip around the circumference of your rice cylinder, smoothing the seam where the ends meet. -
Add filling details:
For the rolls with visible fillings on top, create tiny square canes of orange (salmon) or red (tuna) clay and press them gently into the center of the rice. -
Sculpt the faces:
Roll two minuscule balls of black clay for eyes and a tiny thin snake of pink clay for the mouth. Press these onto the top surface of the rice to create the cute kawaii expressions seen in the image.
Step 3: Crafting the Nigiri & Special Rolls
-
Salmon Nigiri:
Mix orange clay with a good amount of translucent clay. Create a rectangular slab with rounded corners. Layer thin strips of lighter orange or white on top to simulate the fat marbling. -
Drape the fish:
Place the salmon slice over a rectangular mound of your textured rice, gently curving it so it hugs the sides. -
Shrimp Nigiri:
Form a shrimp shape using pale orange clay. Add thin stripes of darker orange across the back. Place this atop another rice mound. -
Avocado Roll:
Create a smooth green slab for the avocado topping. Cut three small red circles (roe) and place them in a diagonal line across the top for garnish. -
Inside-Out Roll:
For the square roll with seaweed inside, create a core of black clay wrapped around a filling color. Then, wrap a layer of textured rice clay around the black. Shape it into a cube and sprinkle tiny bits of black clay on top to mimic sesame seeds.
Serving Suggestion
Make a rectangular clay plate with speckled stoneware texture to display your sushi permanently, just like in the photo.
Step 4: Finishing Touches
-
Final inspection:
Check all your pieces for fingerprints. Use a soft brush or a bit of baby oil to smooth out any unwanted texture on the smooth parts like the fish or seaweed. -
Bake the clay:
Arrange your sushi on a tile or baking sheet. Bake according to your polymer clay manufacturer’s instructions, usually around 275°F (135°C) for 15-30 minutes. -
Glazing:
Once cool, apply a thin coat of gloss glaze to the ‘fish’ parts and the ‘roe’ to make them look fresh and moist. Leave the rice and seaweed matte for realistic contrast.
Now you have a delightful miniature sushi platter that looks good enough to eat but will last forever

The Complete Guide to Pottery Troubleshooting
Uncover the most common ceramic mistakes—from cracking clay to failed glazes—and learn how to fix them fast.
Tiny Animal Blob Figurines You Can Make in Batches
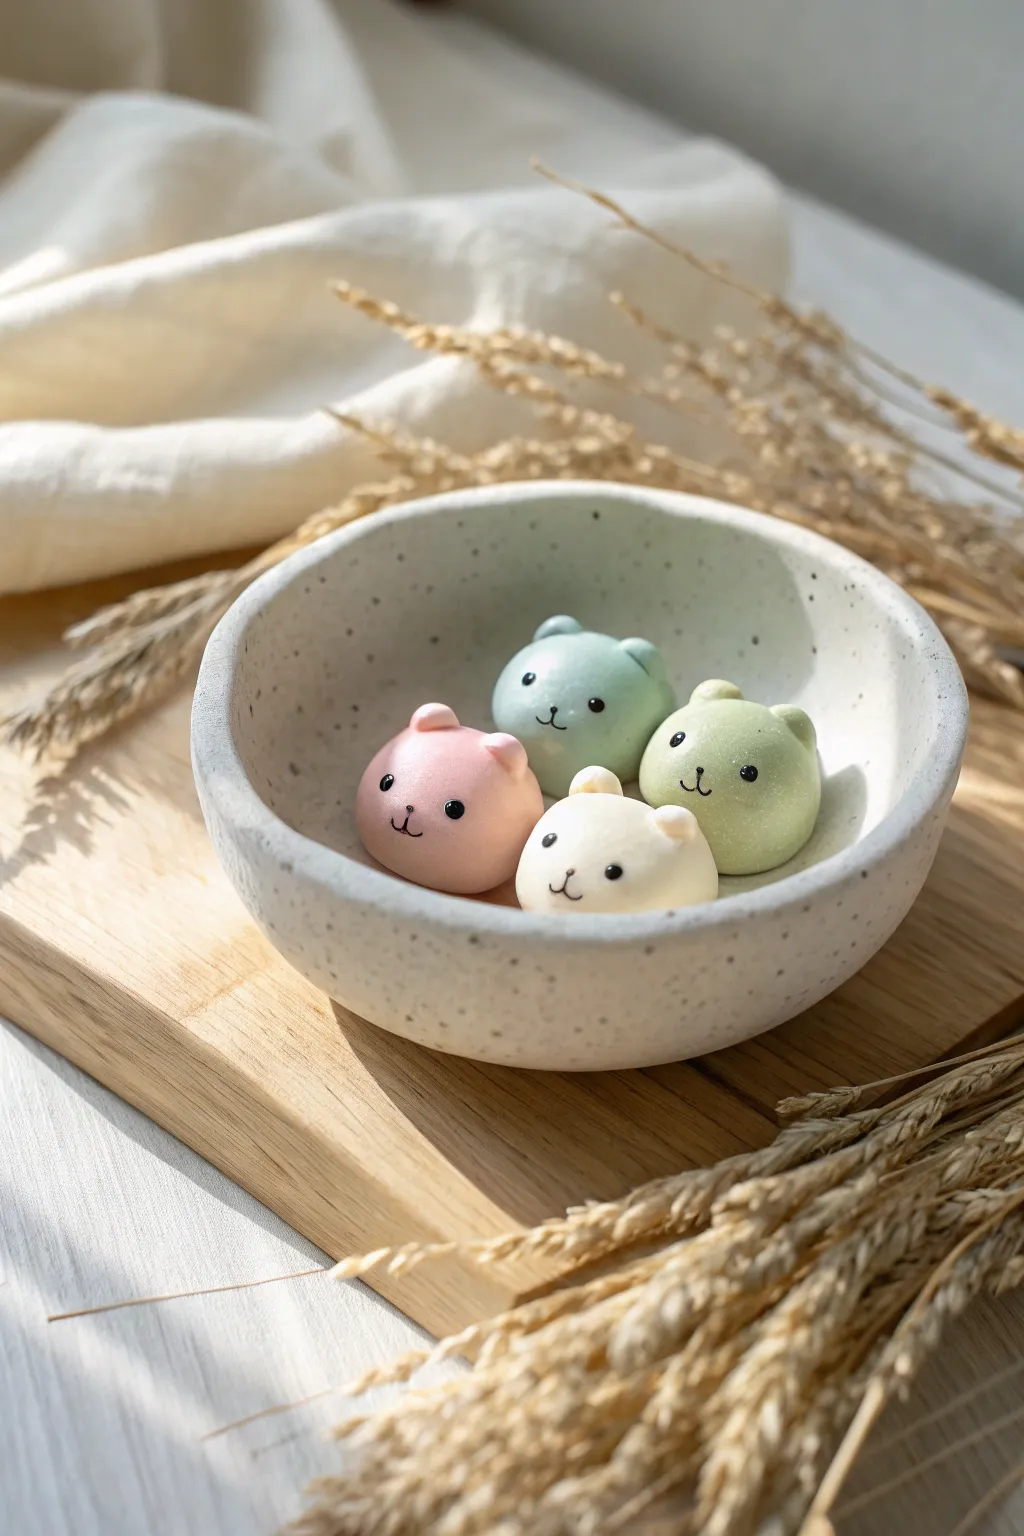
These delightfully chubby clay creatures are the perfect beginner project, relying on simple sphere shapes to create a family of soft, pastel animals. Their tiny size makes them ideal for turning into charms, magnets, or simply resting in a decorative dish as instant cheer.
Detailed Instructions
Materials
- Polymer clay or air-dry clay (White, Pastel Pink, Mint Green, Light Yellow/Green)
- Black acrylic paint
- Fine-point detail brush or toothpick
- Ball stylus tool (small)
- Needle tool or pin
- Smooth work surface (ceramic tile or glass)
- Wet wipes
- Gloss varnish or UV resin (optional)
Step 1: Basic Shape Formation
-
Condition the clay:
Begin by taking a small amount of white clay and kneading it in your hands until it is soft, pliable, and warm. Repeat this process for your pastel colors—pink, mint, and soft light green—cleaning your hands between colors to avoid staining. -
Roll the main body:
Pinch off a piece of clay roughly the size of a large marble or a chocolate truffle. Roll this repeatedly between your palms until you have a perfectly smooth, crack-free sphere. -
Create the base:
Once your sphere is smooth, gently tap the bottom against your work surface. You want to create a slightly flat bottom so the figure sits upright without rolling away, but keep the overall shape very round and chubby. -
Repeat for the batch:
Make three more body spheres in your other colors so you have a complete set of four blob bases ready for their details.
Fixing Cracks
If you see cracks forming while rolling, your clay is too dry. Add a tiny drop of baby oil or clay softener and knead it again until smooth.
Step 2: Adding Ears and Features
-
Form the ears:
Take two tiny specks of clay matching the body color. Roll them into minuscule balls, about the size of a peppercorn or smaller. -
Attach the ears:
Place the two tiny balls onto the top of the head, spacing them fairly wide apart to achieve that cute, round ‘bear’ look. I find that spacing them wider makes them look friendlier. -
Blend the seams:
Using a small ball stylus or just the tip of your finger, gently smooth the clay where the ear meets the head. You want the ears to look like they are growing out of the head, not just stuck on top. -
Shape the snouts:
If you want a slight dimension for the snout (like on the white and pink bears), roll an incredibly tiny, flat disc of white clay and press it onto the center of the face. -
Indent the ears (optional):
Use the smallest end of your ball tool to gently press an indentation into the center of each ear for added realism.
Step 3: Curing and Finishing
-
Final smoothing:
Give your figures one last check for fingerprints. You can gently brush them with a teeny bit of baby oil or cornstarch to smooth out any last imperfections before baking. -
Cure the clay:
Bake the figures according to your clay manufacturer’s instructions (usually 275°F/135°C for 15-30 minutes for polymer clay). If using air-dry clay, set them aside in a dry, room-temperature spot for 24-48 hours. -
Cool down:
Allow the figures to cool completely before attempting to paint. Painting on warm clay can make the paint dry too fast and become clumpy. -
Draft the face:
Use a pin to very lightly scratch where you want the eyes and mouth to go. This serves as a guide so you don’t commit to paint until you are happy with the placement. -
Paint the eyes:
Dip a toothpick or a very fine dotting tool into black acrylic paint. Carefully dot two small eyes wide apart on the face. -
Paint the mouth:
Using the very tip of a fine liner brush or a needle tool, paint a tiny ‘w’ shape or a simple curved smile between the eyes. Keep the lines extremely thin. -
Seal the piece:
Once the paint is totally dry, apply a thin coat of matte or gloss varnish to protect your tiny bears from dust and scratches.
Make Them Useful!
Before baking, gently press a strong magnet into the back of the blob to create adorable fridge magnets, or insert an eye-pin on top for a charm.
Arrange your completed pastel blobs in a small dish for a heartwarming miniature display
Mini Mushroom Friends With Polka Dots
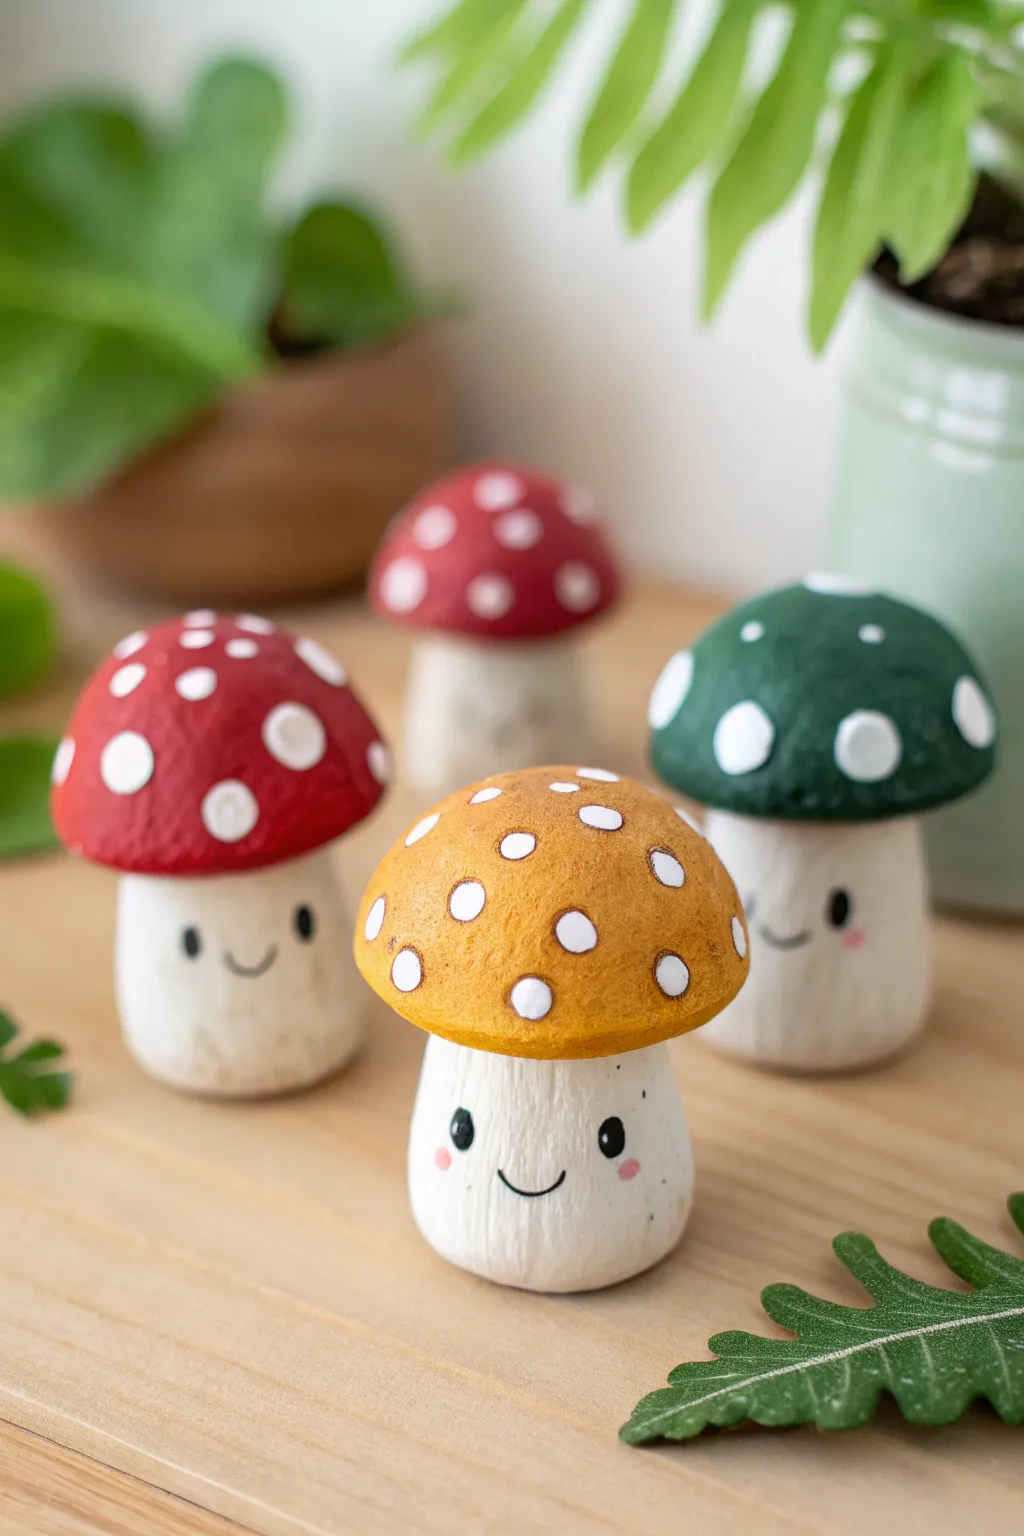
These adorable mini mushroom friends are bursting with personality, featuring chubby stems, vibrant polka-dot caps, and sweet smiling faces. Perfect for perching on a bookshelf or nestled among your potted plants, they make a charming addition to any tiny corner that needs a little joy.
Step-by-Step
Materials
- Air-dry clay or white polymer clay
- Rolling pin
- Craft knife
- Aluminum foil
- Acrylic paints (red, mustard yellow, forest green, white, black, pink)
- Small flat paintbrush
- Fine liner paintbrush
- Dotting tool or toothpick
- Matte varnish or sealant
Step 1: Sculpting the Shapes
-
Create the stems:
Start by taking a chunk of clay roughly the size of a walnut for the stem. Roll it into a smooth ball first, then gently roll it back and forth on your work surface to create a thick cylinder. You want the base to be slightly wider than the top for stability, creating a cute, chubby look rather than a thin stalk. -
Texture the stalks:
While the clay is still soft, use a craft knife or a needle tool to scratch delicate vertical lines up and down the stem. This mimics the fibrous texture of a real mushroom stalk and adds wonderful organic detail. -
Flatten the top:
Gently press the top of the stem against your table to flatten it slightly. This provides a secure platform for the cap to sit on later. -
Form the cap cores:
To keep the caps lightweight and save clay, scrunch a small piece of aluminum foil into a semi-circle or dome shape. This will act as the armature for the mushroom cap. -
Cover the caps:
Roll out a sheet of clay to about 1/4 inch thickness. Draper this over your foil dome, smoothing it down the sides. Trim the excess clay at the bottom and smooth the edges so the foil is completely hidden and the underside is flat or slightly concave. -
Assemble the pieces:
Score surface of the stem top and the underside of the cap with a cross-hatch pattern. Add a tiny dab of water (for air-dry clay) or liquid clay (for polymer) to the scored areas and press the cap firmly onto the stem. Smooth the join if necessary, though hiding it underneath usually works fine. -
Dry or bake:
Allow your mushrooms to dry fully according to your clay’s instructions—usually 24-48 hours for air-dry clay. If using polymer clay, bake at the recommended temperature stated on the package.
Smooth Surface Secret
Before painting air-dry clay, sand it lightly with fine-grit sandpaper. It removes fingerprints and creates a buttery smooth base for your paint.
Step 2: Bringing Them to Life
-
Base coat the caps:
Once fully dry and cool, paint the mushroom caps. Use a flat brush to apply a solid coat of deep red, forest green, or mustard yellow. I find that applying two thin coats gives much better coverage than one thick, gloopy one. -
Add the stem wash:
For the stems, mix a tiny bit of brown or grey paint into a lot of white water to create a very thin wash. Brush this over the textured stalk and quickly wipe the surface with a paper towel. The dark pigment will settle into the scratched lines, highlighting the texture. -
Paint the dots:
Dip a dotting tool or the handle end of a paintbrush into pure white acrylic paint. Press gently onto the colored caps to create random polka dots. Try to vary the spacing slightly for a more organic, playful feel. -
Draw the eyes:
Using a fine liner brush or a black paint pen, draw two small, oval-shaped eyes widely spaced on the stem. Add a tiny white reflection dot in the upper corner of each eye to make them look bright and alert. -
Add the smile:
paint a tiny, thin ‘U’ shape between the eyes for a simple, happy mouth. Keep the line weight very delicate. -
Rosy cheeks:
Dip a Q-tip or a dry brush into a tiny amount of pink paint. Dab off the excess on paper, then gently stipple small pink circles just below the eyes to give them a blushing look. -
Seal the work:
Finish by applying a coat of matte varnish over the entire piece. This protects the paint from chipping and gives the clay a finished, professional porcelain texture.
Fairy Garden Upgrade
Glue a small magnet to the back to make fridge decor, or add a wire loop into the wet clay cap to turn them into hanging ornaments.
Arranging your new cheerful mushroom family together creates an instant spot of happiness in your room


What Really Happens Inside the Kiln
Learn how time and temperature work together inside the kiln to transform clay into durable ceramic.
Mini Heart Magnets With Smiley Expressions
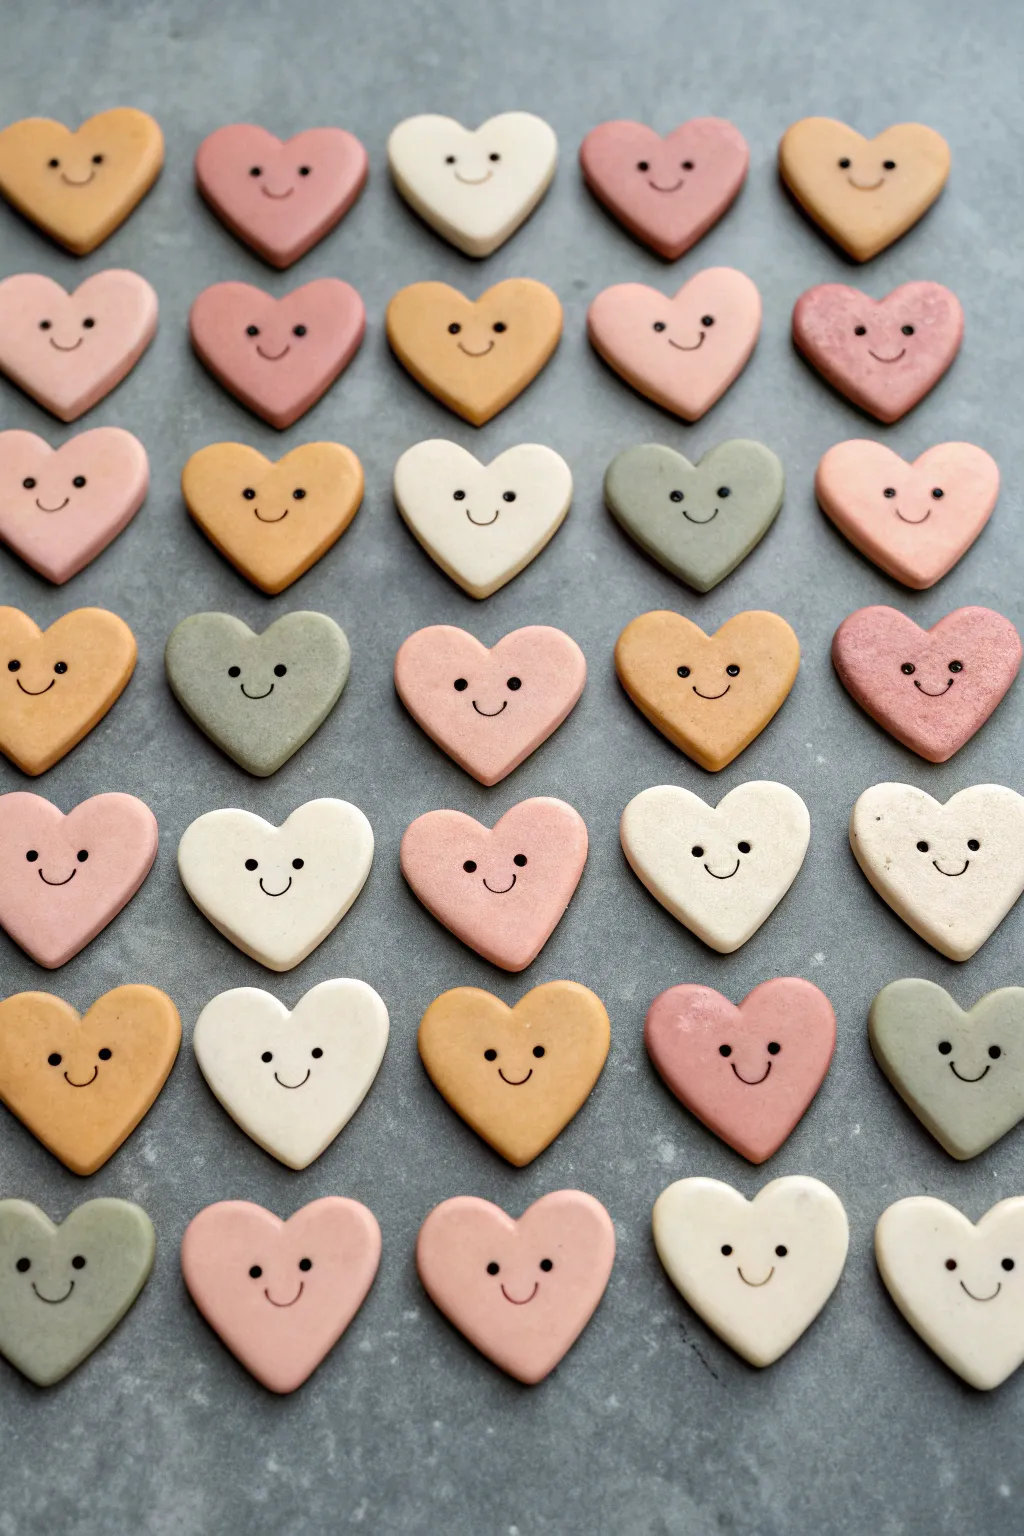
These charming mini heart magnets bring a dose of cheer to any fridge or locker with their soft pastel hues and sweet, simple expressions. Their smooth, matte finish and uniform shape give them a professional look that is surprisingly easy to achieve at home.
Step-by-Step Guide
Materials
- Polymer clay (white, beige, muted pink, ochre, sage green)
- Small heart-shaped cookie cutter (approx. 1-1.5 inches)
- Acrylic rolling pin or pasta machine
- Parchment paper or ceramic tile (for baking)
- Black acrylic paint
- Fine-point detail brush or ball stylus tool
- Matte varnish or sealant (optional)
- Small round magnets
- Strong craft glue (e.g., E6000)
Step 1: Shaping the Clay
-
Condition the clay:
Start by warming the polymer clay in your hands, kneading it until it is soft and pliable. If you are mixing custom colors to match the pastel palette shown, now is the time to blend your white clay with small amounts of colored clay. -
Roll it out:
Place the conditioned clay on a smooth work surface or silicone mat. Using an acrylic rolling pin, roll the clay out to a uniform thickness of about 1/4 inch (6mm). Using depth guides can help ensure every heart is the exact same thickness. -
Cut the shapes:
Press your heart-shaped cookie cutter firmly into the clay. Give it a tiny wiggle before lifting to ensure a clean cut. -
Soften the edges:
Once the heart is removed from the cutter, the edges might be a bit sharp. gently tap and smooth the edges with your fingertip to create that rounded, pillowy look seen in the photo. -
Repeat the process:
Continue rolling and cutting until you have a full grid of hearts in various coordinating colors. I like to make a few extra just in case I smudge a face later on.
Smudgy Smiles?
If you mess up a smile while painting, use a cotton swab dipped in rubbing alcohol to wipe away the acrylic paint immediately. Let the clay surface dry before trying again.
Step 2: Baking and Polishing
-
Prepare for baking:
Arrange your clay hearts on a parchment-lined baking sheet or a ceramic tile. Ensure they aren’t touching each other. -
Bake:
Bake the clay according to the manufacturer’s instructions for your specific brand. Typically, this is around 275°F (135°C) for 15-30 minutes depending on thickness. -
Cool down:
Let the hearts cool completely on the baking sheet. Do not attempt to paint them while they are still warm. -
Sand for smoothness:
If there are any fingerprints or rough spots, lightly sand the surface with high-grit wet/dry sandpaper (start with 400 and move to 800) under running water. Rinse and dry thoroughly.
Add More Expressions
Expand your heart army by adding variations like winking eyes, sleeping eyelids, or tiny pink cheeks using a blush tone paint diluted with water for a translucent effect.
Step 3: Adding Personality
-
Plan the expressions:
Look at the reference image to see the placement of the features. The eyes are wide-set, and the smile is a small, simple ‘U’ shape placed centrally between the eyes. -
Dot the eyes:
Dip the handle end of a paintbrush or a ball stylus tool into black acrylic paint. Carefully dot two eyes onto the heart. Keep them relatively small and symmetrical. -
Paint the smile:
Using your finest detail brush, paint a thin, curved line for the smile. You can sketch it lightly with a pencil first if you are nervous about freehanding it. -
Let the paint dry:
Allow the black paint to dry completely. Since the details are small, this shouldn’t take long. -
Seal the surface:
To protect the paint and give the clay that consistent matte finish, apply a thin coat of matte varnish over the entire front surface.
Step 4: Finishing Up
-
Attach the magnets:
Flip the hearts over once the varnish is dry. Place a small dab of strong craft glue on the back center of each heart. -
Secure and set:
Press a small round magnet into the glue. Let the adhesive cure fully according to the glue package directions (usually 24 hours) before sticking them to your fridge.
Now you have a whole grid of friendly faces ready to hold up your grocery lists and photos
Mini Star and Moon Charms for Simple Jewelry
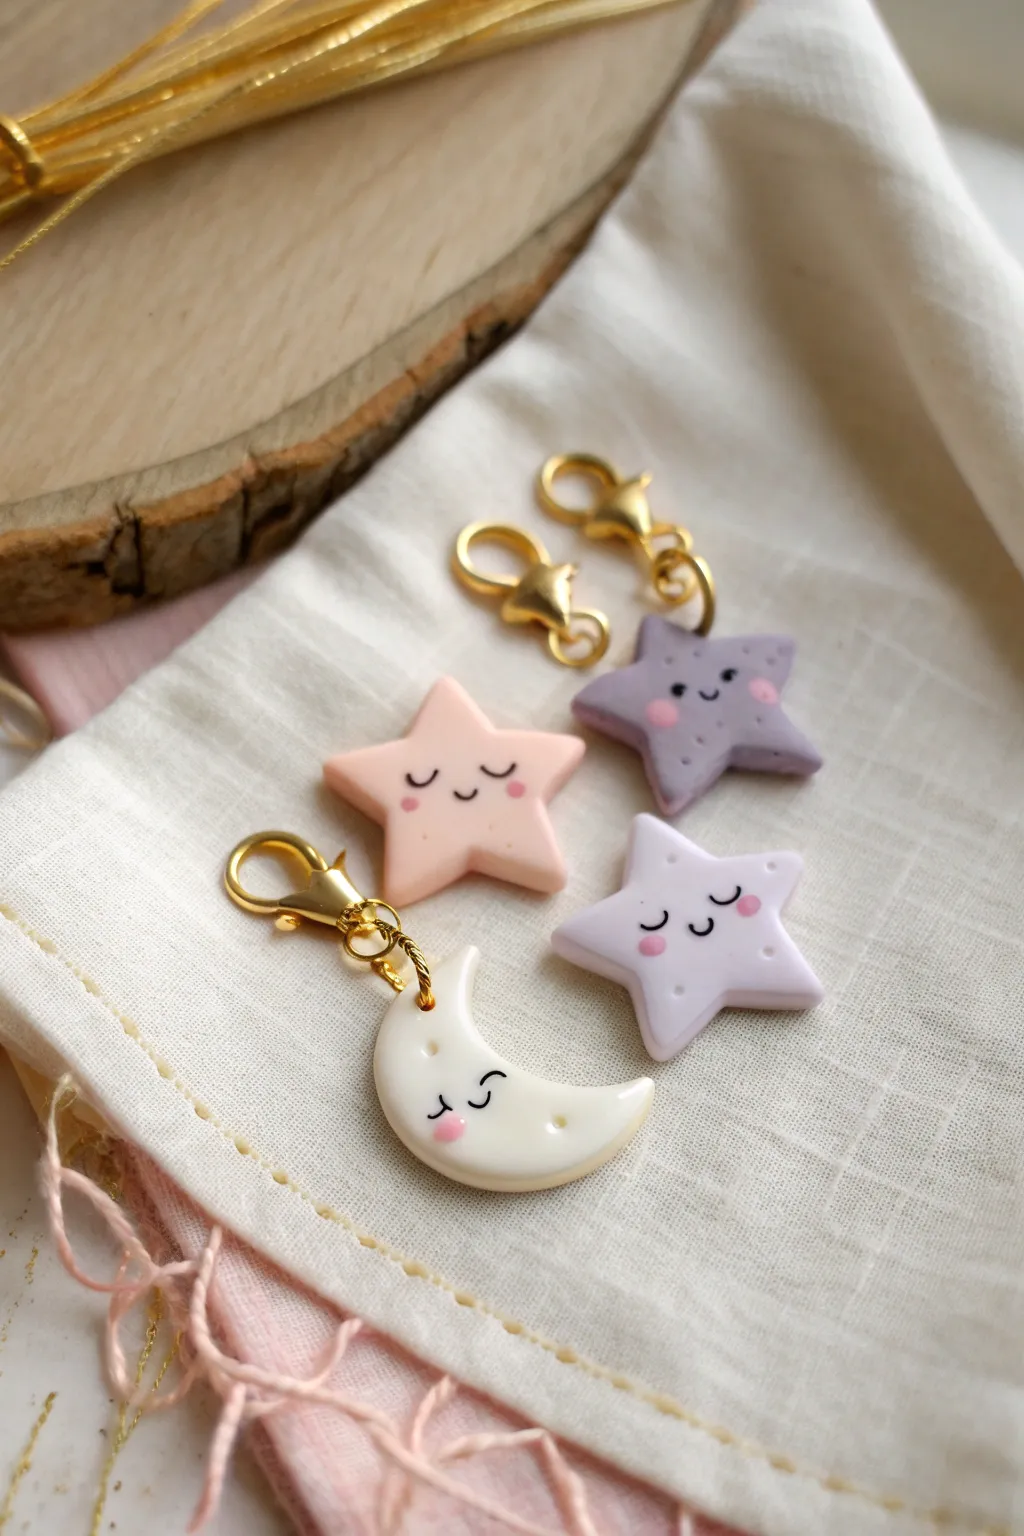
These adorable sun, moon, and star charms bring a touch of sleepy sweetness to any jewelry project or zipper pull. With their gentle pastel hues and kawaii sleeping faces, they are the perfect beginner-friendly project for creating dainty accessories.
Step-by-Step Tutorial
Materials
- Polymer clay (white, pastel pink, lavender, pastel yellow/cream)
- Acrylic paint (black and pink)
- Fine detail paintbrush or dotting tool
- Rolling pin or clay roller
- Star and moon mini cookie cutters (approx. 1 inch)
- Gold screw eye pins (mini size)
- Gold jump rings (4-6mm)
- Gold lobster clasps
- Pliers (needle nose and flat nose)
- Glossy glaze or UV resin (optional for sealing)
Step 1: Shaping the Charms
-
Condition the Clay:
Begin by taking small amounts of your polymer clay colors—white, pastel pink, and lavender. Knead each color in your hands until it becomes soft, pliable, and warm to the touch. -
Roll it Out:
Using your acrylic roller or rolling pin, flatten the conditioned clay into sheets. Aim for a thickness of about 4mm to 5mm; you want them to be sturdy and puffy, not wafer-thin. -
Cut the Shapes:
Press your mini star cutter into the pink, lavender, and white sheets. Use the moon cutter on the white or cream clay. If the clay sticks to the cutter, gently push it out from the back or use a piece of plastic wrap over the clay before cutting. -
Smooth the Edges:
Once cut, the edges might be a bit sharp or rough. Gently run your finger along the sides of each shape to soften the edges, giving the charm a more finished, rounded look. -
Add Hardware:
Take a gold screw eye pin and carefully twist it into the top point of each star and the top tip of the moon. Ensure it goes in straight and deep enough to be secure without poking through the back.
Smooth Operator
Before baking, wipe your raw clay shapes with a baby wipe or a Q-tip dipped in rubbing alcohol to remove any fingerprints or dust specks.
Step 2: Adding Details
-
Bake the Pieces:
Place your charms on a baking sheet lined with parchment paper. Bake according to your specific brand of clay’s instructions (usually around 230°F – 275°F for 15-30 minutes). Let them cool completely before handling. -
Paint the Face:
Using a very fine detail brush and black acrylic paint, carefully draw two small semi-circles for closed, sleeping eyes. Add a tiny connecting curve for a smiling mouth centered below the eyes. -
Add Rosy Cheeks:
dip a dotting tool or the non-brush end of a paintbrush into pink acrylic paint. Gently tap a small dot onto the clay just below each eye to create blushing cheeks. -
Let Paint Dry:
Allow the paint to dry completely. Since the details are small, this shouldn’t take long, but rushing it might smudge your lovely faces. -
Seal (Optional):
If you want extra durability and shine, coat the front of the charms with a thin layer of gloss glaze or UV resin. I like to do this to protect the paint from scratching off over time.
Glitter Galaxy
Mix a tiny pinch of fine iridescent glitter into your clay before rolling it out to give your stars a subtle, magical sparkle.
Step 3: Assembly
-
Open Jump Rings:
Using two pairs of pliers, grip a gold jump ring on either side of the split. Twist one hand away from you and the other toward you to open the ring sideways (never pull it apart). -
Connect the Clasp:
Slide the open jump ring through the eye of the screw pin you baked into the charm. Then, slide the loop of a gold lobster clasp onto the same jump ring. -
Close the Ring:
Using your pliers again, twist the jump ring back into position until the ends meet perfectly flush. Repeat this process for all your charms. -
Final Check:
Give a gentle tug on the hardware to ensure everything is secure. Your celestial charms are now ready to be clipped onto stitch markers, zippers, or chains.
You have crafted a sweet set of celestial friends ready to brighten up your day

TRACK YOUR CERAMIC JOURNEY
Capture glaze tests, firing details, and creative progress—all in one simple printable. Make your projects easier to repeat and improve.
Mini Pumpkin Cuties for Cozy Seasonal Decor
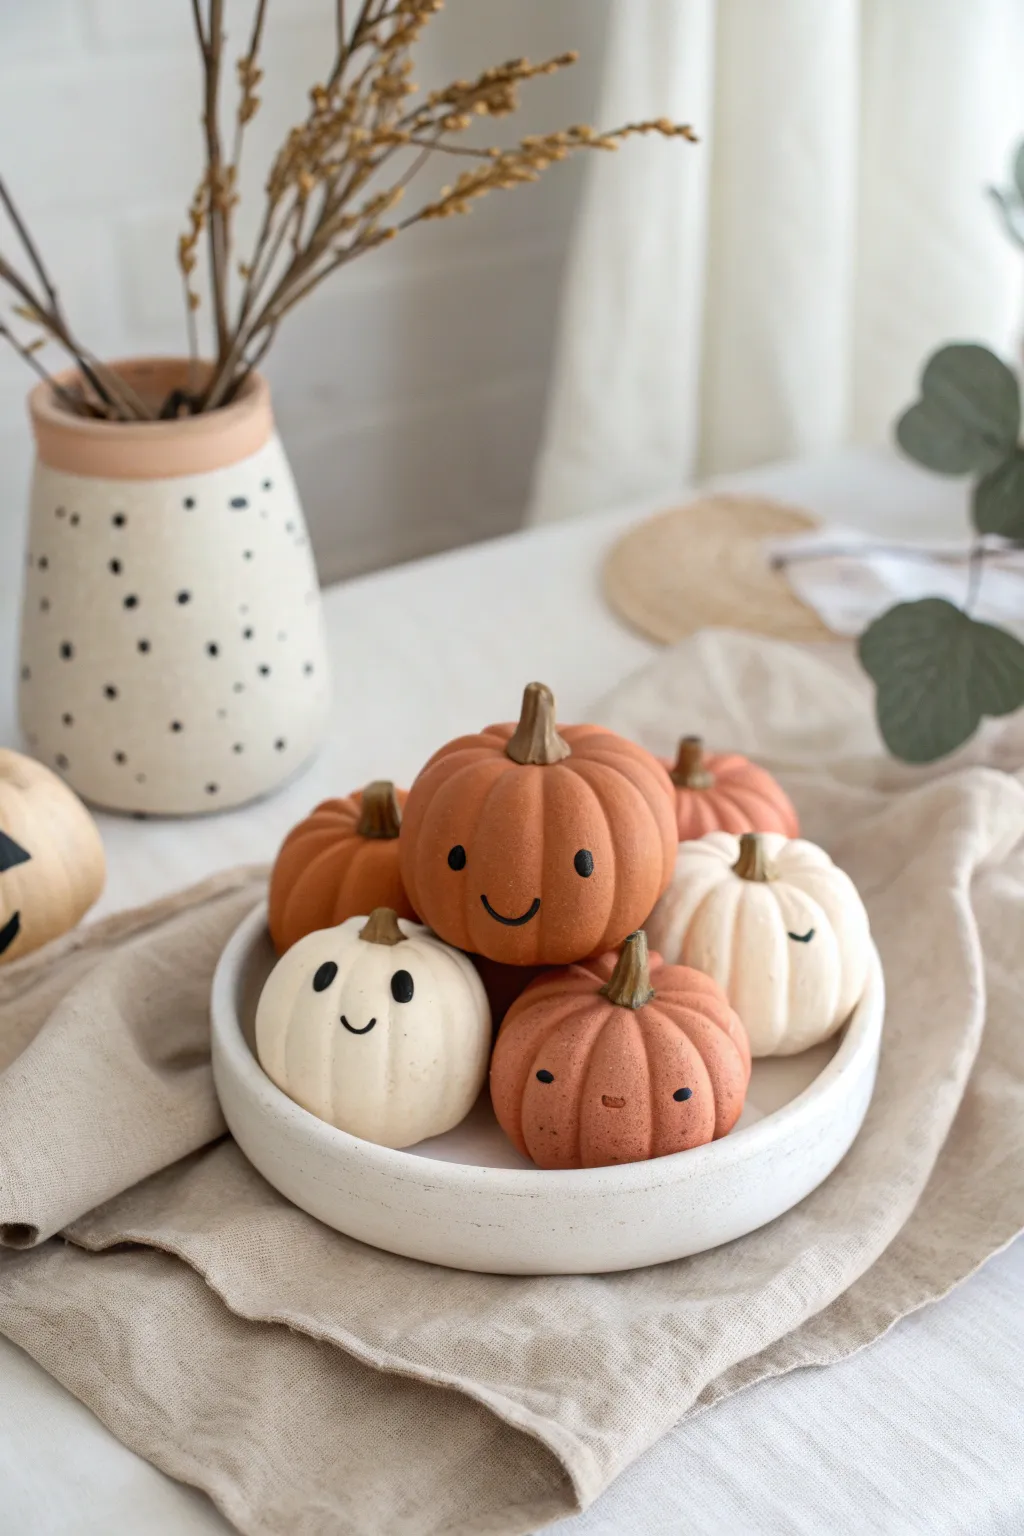
These adorable miniature pumpkins bring a touch of kawaii charm to your autumn decor with their simple shapes and sweet, painted expressions. Using air-dry or polymer clay, you can craft a delightful little pumpkin patch that fits perfectly on a desk or tiered tray.
How-To Guide
Materials
- Terracotta-colored polymer clay or air-dry clay
- White polymer clay or air-dry clay
- Brown polymer clay (for stems)
- Acrylic paints (black, dark brown)
- Fine detail paintbrush (size 0 or 00)
- Sculpting tools (needle tool and ball stylus)
- Toothbrush or textured sponge (optional)
- Matte varnish or sealant
Step 1: Sculpting the Pumpkins
-
Prepare the Clay:
Begin by conditioning your clay. Knead the terracotta and white clay separately until they are soft and pliable. If you want varied shades of orange like in the photo, mix a tiny bit of white into some of the terracotta clay to create a lighter, muted tone. -
Form the Base Spheres:
Roll the clay into smooth balls. Aim for a variety of sizes, ranging from golf ball size down to walnut size, to create visual interest in your arrangement. -
Flatten Slightly:
Gently press the balls onto your work surface to flatten the bottom so they sit stable. Then, use your thumb to press down slightly on the top to create the squat pumpkin shape. -
Create the Ribs:
Using a needle tool or the dull side of a crafting knife, press vertical indentations from the top center down to the bottom. Space these lines evenly around the sphere to mimic natural pumpkin ribs. -
Soften the Lines:
After making the indentations, gently rub your finger over the lines to smooth them out. You want soft, pillowy sections rather than sharp, deep cuts. -
Add Texture (Optional):
For a more organic, earthenware look, lightly tap the surface of the clay with an old toothbrush or a textured sponge. This removes fingerprints and adds a realistic matte finish. -
Make the Indentation:
Use a ball stylus or the end of a paintbrush handle to press a small hole into the center of the top where the stem will go.
Natural Texture
Before baking, gently roll the finished pumpkin shape over a piece of canvas fabric or denim. This imprints a subtle weave texture that makes the clay look like high-end ceramic.
Step 2: Adding Details & Finishing
-
Sculpt the Stems:
Take small pieces of brown clay and roll them into tapered logs. Twist them slightly or bend them to give them character. The bottoms should be just wide enough to fit into the indentation you made. -
Attach the Stems:
Insert the stems into the tops of the pumpkins. Gently press the clay around the base of the stem to secure it. If using bakeable clay, you can use a drop of liquid clay for a stronger bond. -
Curing or Drying:
If using polymer clay, bake according to the package instructions (usually 275°F/135°C for 15-30 minutes). If using air-dry clay, allow them to dry fully for 24-48 hours until hard. -
Painting the Faces:
Once the pumpkins are cool and dry, it’s time for the personality. Use a fine detail brush and black acrylic paint. For the classic smiling pumpkin, paint two small vertical ovals for eyes widely spaced apart. -
Adding the Smile:
Paint a simple, thin ‘U’ shape between the eyes for the mouth. Keep the lines delicate for that cute, minimalist look. -
Variation: Sleepy Eyes:
For the white pumpkin, try painting two small curved lines (like half-moons facing down) to create a peaceful, sleeping expression. -
Variation: Tiny Faces:
On the smallest pumpkins, make the features tiny and clustered low on the face. Small dots for eyes and a tiny line for a mouth create an extra-cute ‘chibi’ effect. -
Sealing the Pumpkins:
To protect the paint and give the clay a finished look, apply a coat of matte varnish. Avoid glossy finishes to maintain the natural, terra-cotta aesthetic shown in the photo.
Smudged Paint?
If you mess up a painted face, don’t panic. If the paint is wet, wipe with a damp Q-tip. If dry, you can gently scrape it off with a craft knife or sand it off lightly.
Now, pile your finished cuties into a small bowl or wooden tray for an instant seasonal centerpiece
Tiny Friendly Ghosts Holding Mini Treats
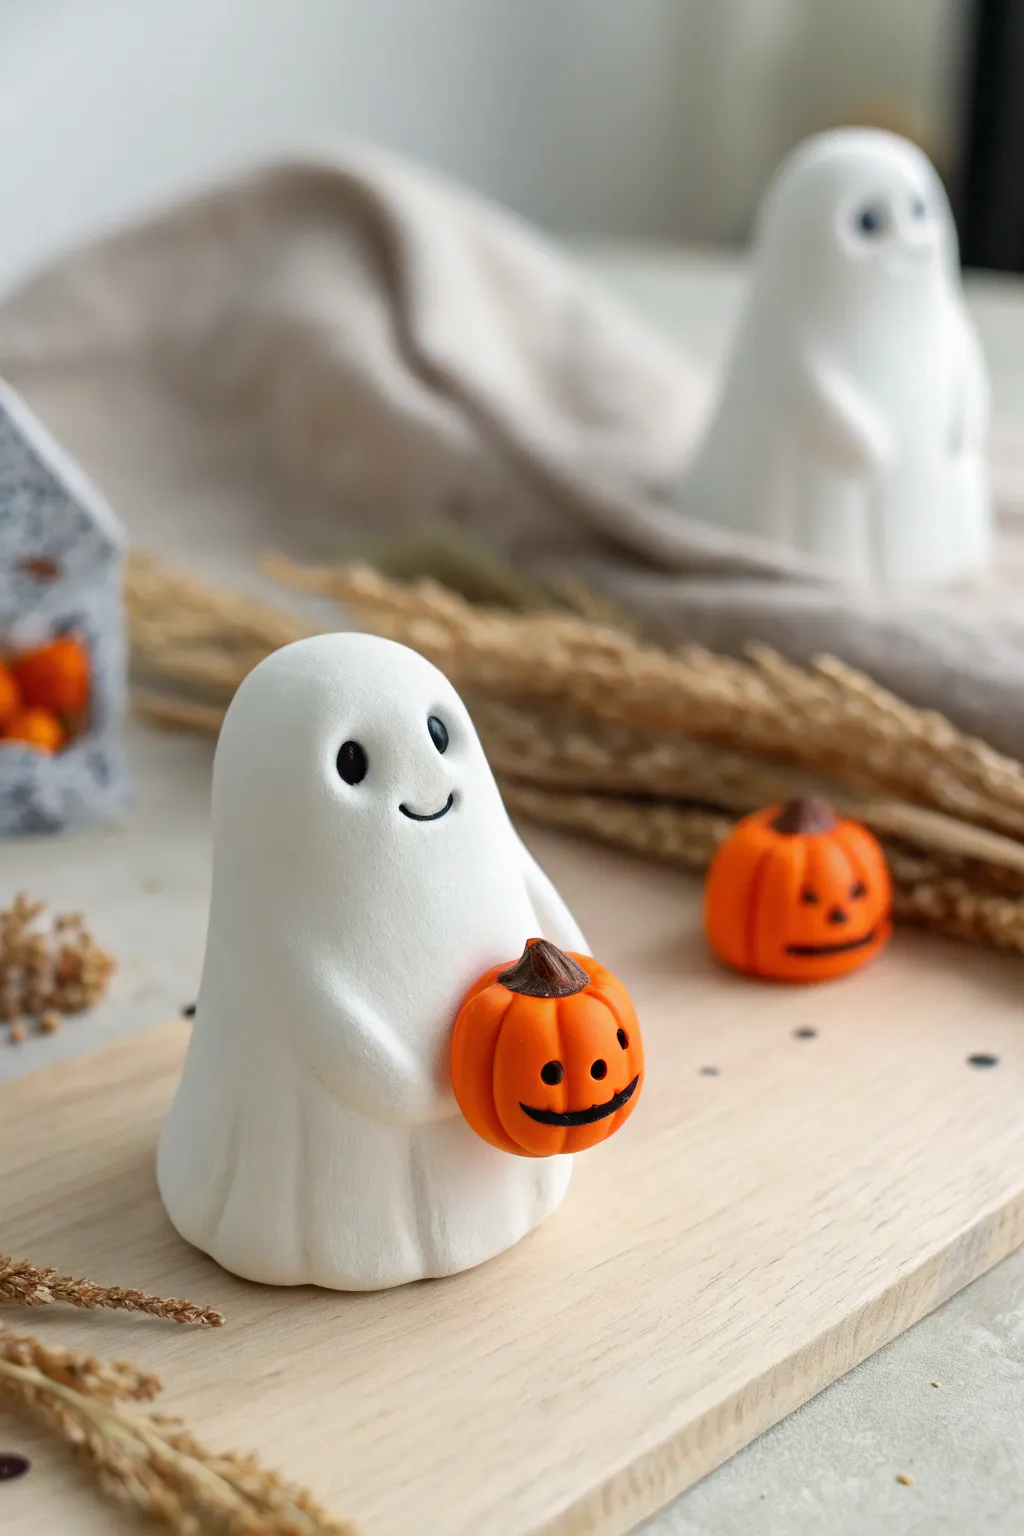
These miniature ghosts are the perfect blend of spooky and sweet, featuring smooth, matte white bodies and tiny, cheerful pumpkins. The soft, rounded finish gives them a charming, friendly personality that looks great on any autumn display.
Step-by-Step
Materials
- White polymer clay (soft variety)
- Orange polymer clay
- Brown polymer clay
- Black polymer clay
- Clay sculpting tools (needle tool, ball stylus)
- Black acrylic paint
- Fine detail paintbrush (size 000)
- Rolling pin
- Wet wipes (for cleaning hands)
- Baking sheet and parchment paper
- Matte varnish (optional)
Step 1: Shaping the Ghost Body
-
Condition the white clay:
Start by kneading a golf-ball-sized amount of white polymer clay until it is warm, pliable, and free of cracks. Clean hands are essential here, as white clay catches dust easily. -
Form the base cylinder:
Roll the clay into a smooth cylinder, slightly wider at the bottom than the top, creating a classic gumdrop shape. -
Round the head:
Gently smooth the top of the cylinder with your thumb to create a perfectly domed head, ensuring there are no sharp edges. -
Create the ghostly folds:
Using a modeling tool or your finger, gently press vertical indentations around the very bottom edge of the ghost to simulate the draped fabric folds of a sheet.
Dirty Clay Blues?
White clay shows dust instantly. Keep a pack of wet wipes nearby and clean your hands thoroughly before touching the white clay, especially after handling the orange or black colors.
Step 2: Creating the Pumpkin Treat
-
Roll the pumpkin base:
Take a pea-sized amount of orange clay and roll it into a tight, smooth ball. -
Flatten slightly:
Press gently on the top and bottom of the orange ball to give it a squat, pumpkin-like silhouette. -
Add pumpkin ridges:
Use a needle tool or the side of a toothpick to press vertical lines from the top center to the bottom center all around the orange ball. -
Make the stem:
Roll a tiny speck of brown clay into a small cone. Press it firmly into the center of the depression on top of the pumpkin. -
Add the pumpkin face:
Roll extremely tiny specks of black clay for the eyes and mouth, or wait to paint these details after baking for more precision. I prefer using clay for a textured look. -
Attach the pumpkin:
Press the finished pumpkin firmly against the ghost’s belly area. The clay should adhere on its own, but a dab of liquid clay can help if it’s dry.
Pro Tip: Seamless Pumpkin
To make the pumpkin look truly held, gently press it into the white clay of the ghost’s tummy *before* attaching the arms. This creates a natural indentation so it doesn’t just float.
Step 3: Arms and Features
-
Form the arms:
Create two small teardrop shapes from white clay, roughly half an inch long. -
Attach the arms:
Place the wider end of the teardrops onto the ghost’s sides, blending the clay smoothly into the body at the shoulder. -
Pose the hands:
Curve the pointed ends of the arms forward so they look like they are gently holding or resting on the pumpkin. -
Indent eye sockets:
Use a medium-sized ball stylus to press two symmetrical indentations into the ghost’s face where the eyes will go. -
Add the eyes:
Roll two small balls of black clay and press them into the eye sockets you just created. -
Sculpt the smile:
Use a needle tool to gently impress a small, curved smile right between the eyes. You can fill this with a tiny thread of black clay for contrast.
Step 4: Baking and Finishing
-
Check for fingerprints:
Before baking, give the ghost a once-over. Smooth out any accidental fingerprints using a tiny bit of baby oil on your finger. -
Bake carefully:
Place the ghost on parchment paper and bake according to your clay manufacturer’s instructions, usually around 275°F (135°C) for 15-20 minutes. -
Cool down:
Let the figurine cool completely inside the oven or on the baking sheet before handling to prevent cracking. -
Optional matte finish:
If you want to protect the piece but keep that soft look seen in the photo, apply a thin layer of matte varnish once fully cool.
Now you have an adorable, undying companion for your desk or Halloween shelf
Mini “Lucky Pocket” Worry Stones With Cute Faces
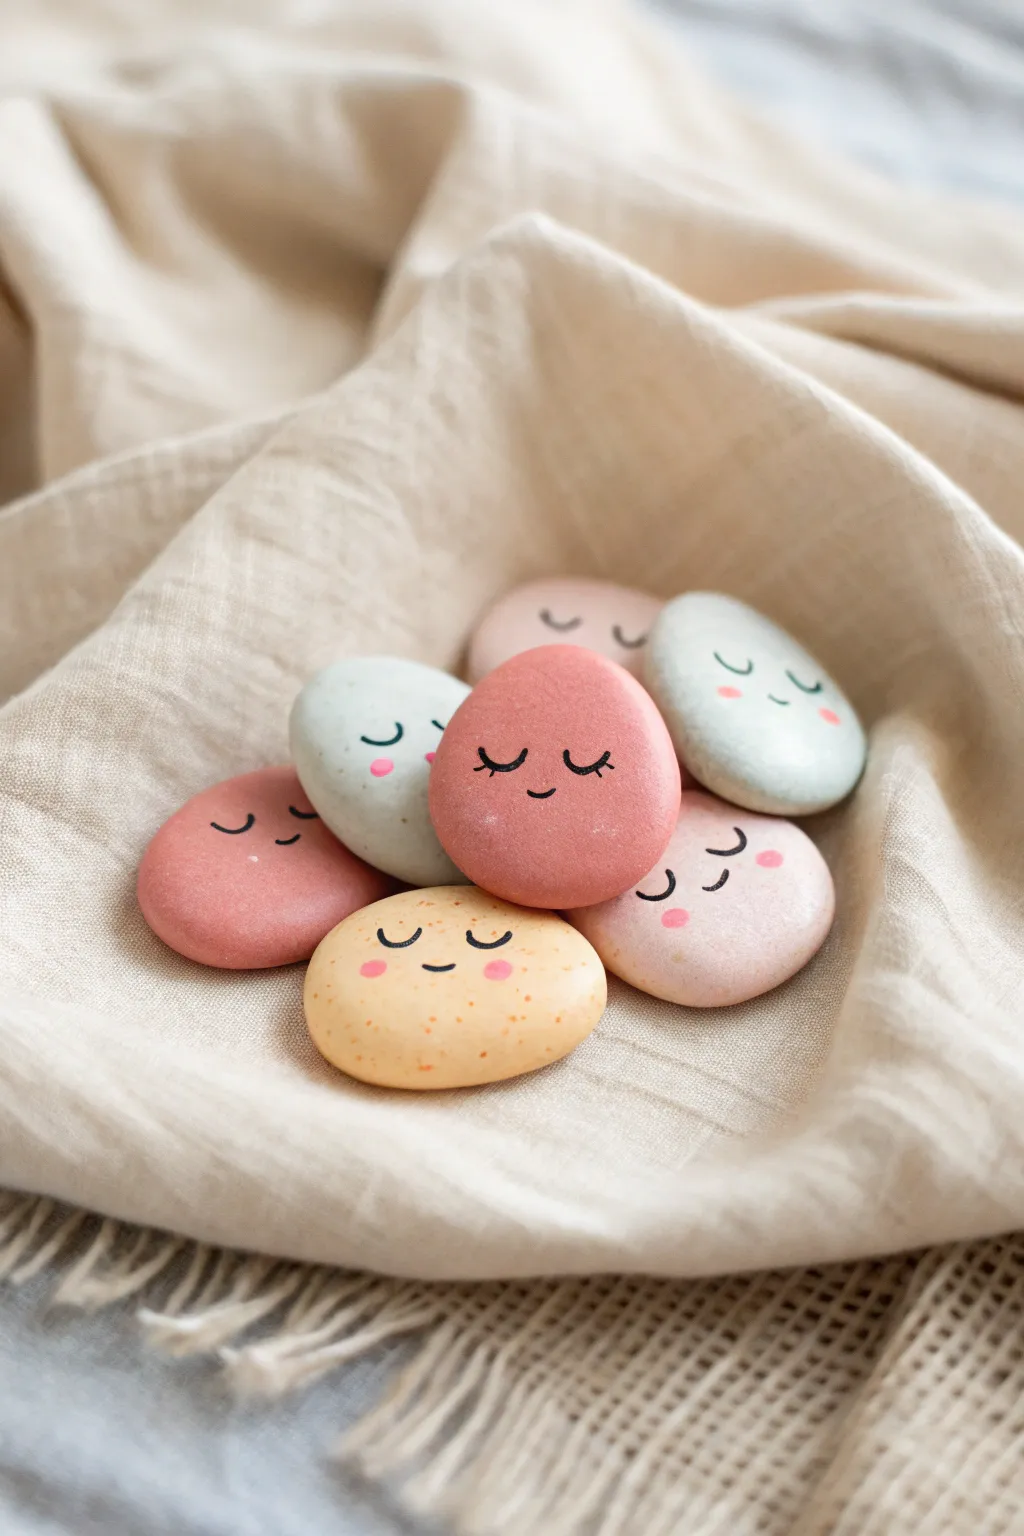
These gentle, soothing worry stones are crafted from smooth polymer clay in a palette of dreamy pastels. Each stone features a sweetly painted sleeping face, making them perfect little companions for calming anxiety or simply bringing a smile to your day.
Step-by-Step Guide
Materials
- Polymer clay (white, beige, pink, light blue, yellow)
- Acrylic rolling pin or glass jar
- Oval or circle cookie cutters (small, approx 1.5 inch)
- Fine-grit sandpaper (400 and 800 grit)
- Black fine-point permanent marker or black acrylic paint with a 0000 brush
- Pink acrylic paint or soft pink pastel chalk
- Small dotting tool or toothpick
- Matte or satin polyurethane varnish
- Soft paintbrush for glazing
- Toothbrush (for speckling, optional)
- Brown acrylic paint (diluted for speckling, optional)
Step 1: Shaping the Stones
-
Mix Custom Pastel Shades:
Begin by conditioning your polymer clay. To achieve the muted, natural pastel tones seen in the photo, mix a large amount of white clay with very small amounts of your colored clays. Aim for a dusty rose, a pale butter yellow, a soft sage-blue, and a light peach. -
Form Smooth Balls:
Roll pieces of the conditioned clay into spheres about the size of a large grape. Ensure there are no cracks or seams by rolling them firmly between your palms until perfectly smooth. -
Flatten into Pebbles:
Gently press each sphere down onto your work surface using the palm of your hand or an acrylic block. You want a flattened, organic pebble shape—thick enough to feel substantial (about 1/4 inch or 6-8mm), with rounded, comforting edges. -
Refine the Shape:
Pick up each flattened stone and run your finger around the edge to smooth out any sharp corners or fingerprints. The goal is a shape that feels satisfying to rub with a thumb. -
Optional Speckling:
For a natural stone look like the yellow one in the photo, dip an old toothbrush into diluted brown acrylic paint. Run your thumb across the bristles to flick tiny specks onto the raw clay. Let this dry completely before baking. -
Bake the Clay:
Place your clay stones on a tile or parchment-lined baking sheet. Bake according to your polymer clay manufacturer’s instructions (usually 275°F/130°C for 15-30 minutes depending on thickness).
Smooth Operator
To eliminate fingerprints before baking, lightly brush the raw clay with a little baby oil or cornstarch. This smooths the surface without altering the shape.
Step 2: Finishing and Painting
-
Sand for Smoothness:
Once the stones are baked and fully cooled, take them to a sink or bowl of water. Wet sand them gently with 400-grit sandpaper to remove any lint or unevenness, then polish with 800-grit for a silky, stone-like feel. -
Draft the Faces:
Before committing to ink, lightly sketch the facial features with a pencil. Place the eyes slightly lower than the center line to create a cute, ‘kawaii’ proportion. -
Draw the Eyes:
Using a fine-point black permanent marker (or a tiny brush with black acrylic), carefully draw the sleepy eyes. These are simple downward curves or ‘U’ shapes. Add tiny lashes by flickering the pen outward at the corners. -
Add the Mouth:
Draw a tiny, simple smile right between the eyes. Keep the line thin and delicate to maintain the gentle expression. -
Create Rosy Cheeks:
Dip a dotting tool or the flat end of a toothpick into pink acrylic paint. Gently stamp two small dots on either side of the smile. -
Soft Cheek Option:
Alternatively, for a softer look, scrape some pink pastel chalk into a fine powder. Use your finger or a cotton swab to gently rub a blush circle onto the clay cheeks instead of using paint. -
Dry and Seal:
Allow the paint or ink to dry completely to avoid smearing. This usually takes about 10-15 minutes. -
Apply Varnish:
Coat each stone with a thin layer of matte or satin varnish. This protects the painted face from rubbing off during use. I find a matte finish feels more natural and stone-like in the hand. -
Final Cure (Optional):
If using a heat-set varnish, pop them back in the oven for a final short bake. If air-drying, let them sit undisturbed for 24 hours to fully cure the finish.
Scented Stones
Before baking, mix a drop of essential oil like lavender into the raw clay. The scent will be subtle but adds an extra layer of sensory comfort.
You now have a pocketful of comforting friends ready to be gifted or kept close for a moment of calm