When you’re craving that quick creative win, mini clay projects are my favorite way to play without committing to anything big. These easy clay ideas stick to simple shapes and cute details, so you can finish something adorable even on a low-energy crafting day.
Little French Fry Cups
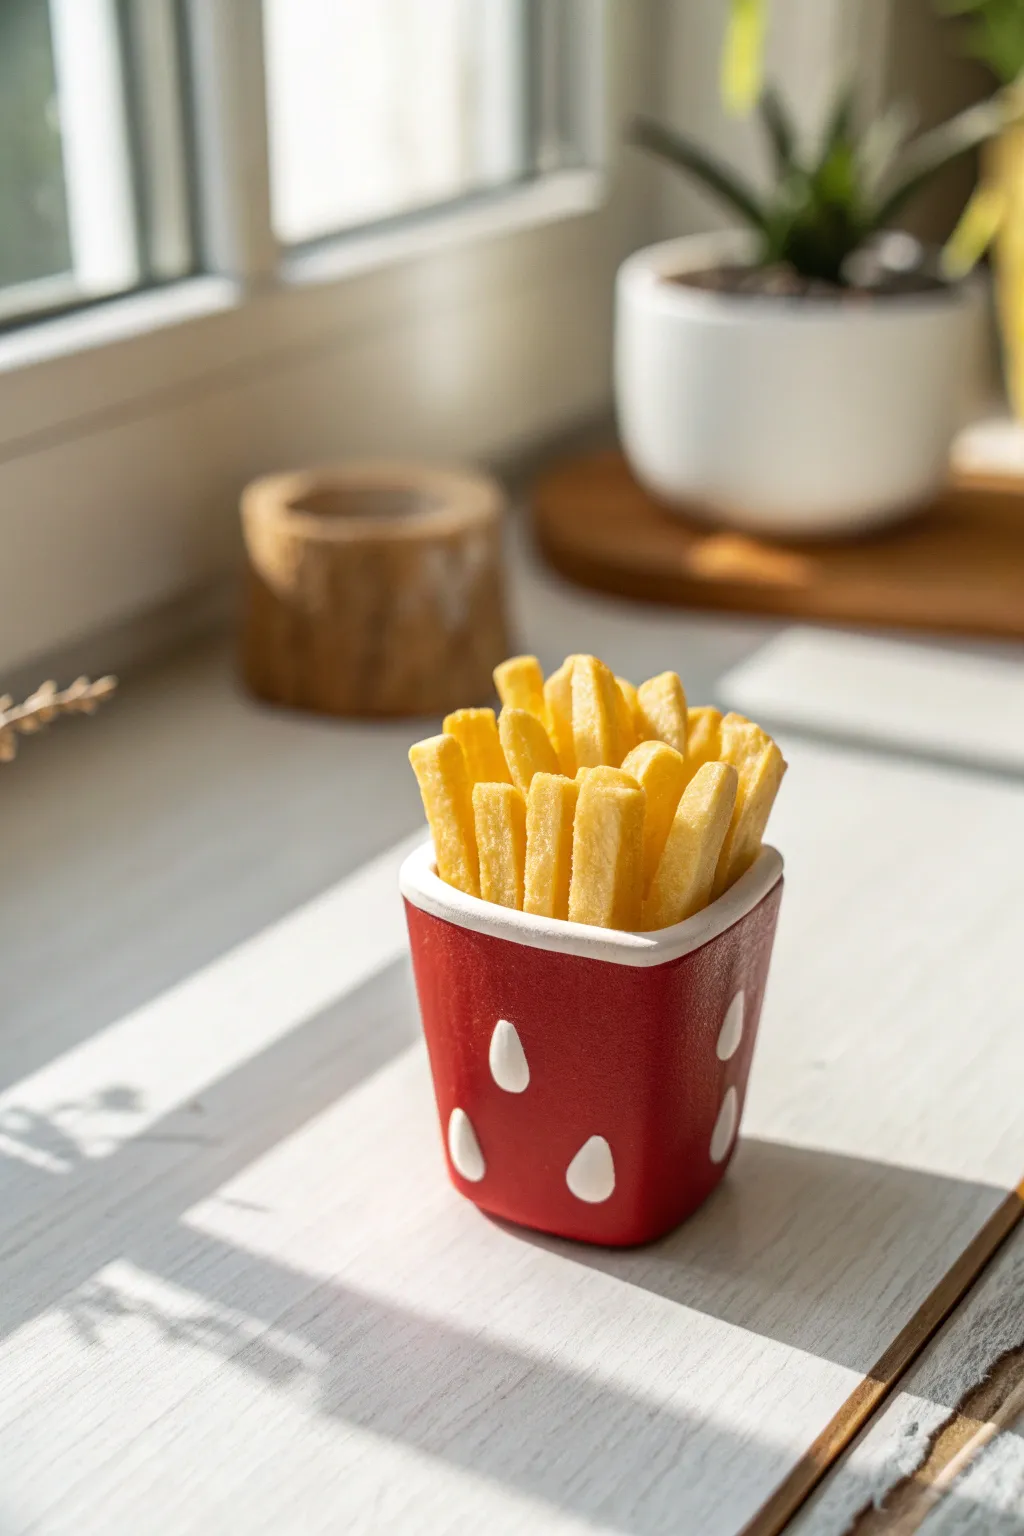
Create an adorable illusion of your favorite salty side dish with this miniature clay project. The bright red cup contrasting against the golden yellow fries makes for a cheerful desk accessory or dollhouse prop.
Step-by-Step
Materials
- Polymer clay (Bright Red)
- Polymer clay (Golden Yellow and White)
- Polymer clay (Translucent – optional)
- Clay blade or craft knife
- Rolling pin or pasta machine
- Soft pastel chalks (Yellow ochre and light brown)
- Small paintbrush
- Needle tool or toothbrush (for texturing)
- Gloss glaze (optional)
Step 1: Shaping the Carton
-
Condition the red clay:
Start by kneading your bright red polymer clay until it is soft, pliable, and free of air bubbles or cracks. -
Form the base block:
Roll the red clay into a smooth ball, then flatten the sides against your work surface to form a rectangular prism. The bottom should be slightly narrower than the top to mimic a fry carton shape. -
Hollow or intend the top:
Press your thumb or a rounded tool into the top of your red block to create a depression where the fries will eventually sit. You don’t need to hollow it out completely, just enough to nestle the fries. -
Add the white line:
Roll a very thin snake of white polymer clay. Carefully press this along the top rim of your red carton to create a clean, finished edge. -
Create the white accents:
Roll tiny balls of white clay and flatten them into teardrop shapes. Press these onto the red carton in a random pattern, pointing upward, to mimic a stylized pattern.
Step 2: Making the Fries
-
Mix the fry color:
Combine golden yellow clay with a small amount of translucent and white clay. This mixture gives you a more realistic, starchy potato look than plain yellow. -
Roll out the slab:
Flatten your yellow mixture into a thick sheet, about 3mm thick. I find a pasta machine works best for consistent thickness here. -
Slice the strips:
Use your clay blade to cut the slab into long, thin strips. Try to make them square in cross-section for that classic thick-cut fry appearance. -
Cut to length:
Cut your long strips into shorter segments. Vary the lengths slightly so the arrangement looks natural and not overly uniform. -
Texture the fries:
Gently tap a clean toothbrush or rough sandpaper against the sides of the fry strips. This adds a subtle potato texture rather than leaving them perfectly smooth giving them the cooked look. -
Shade for realism:
Scrape some yellow ochre and light brown soft pastel chalk into a powder. Dry brush this powder onto the edges and tips of the raw clay fries to mimic golden-brown crispy spots.
Pro Tip: Texturing
Use a ball of aluminum foil to gently texture the red carton before baking. It removes fingerprints and gives the surface a realistic paper-like matte finish.
Step 3: Assembly & Baking
-
Fill the carton:
Begin placing your fries into the depression of the red carton. Start with a few shorter ones in the middle to build a base. -
Fan them out:
Add longer fries around the edges and toward the back, angling them slightly outward to create a full, overflowing look. -
Secure the arrangement:
Gently press the fries together at the bottom where they are hidden inside the cup to ensure they stick to each other and the base. -
Final check:
Look at the piece from all angles. Add a little more pastel shading to any newly exposed yellow edges that look too clean. -
Bake the piece:
Place your sculpture on a tile or baking sheet. Bake according to your polymer clay manufacturer’s instructions, typically around 275°F (135°C) for 15-30 minutes. -
Cool down:
Allow the piece to cool completely before handling. It will be slightly soft when hot but hardens as it reaches room temperature. -
Optional finish:
For a greasy diner look, you can lightly brush a semi-gloss glaze over just the fries, leaving the carton matte.
Level Up: Saucy Details
Mix red liquid clay (or bake & bond with chalk pastel) to create a dollop of ketchup on one of the fries before baking for an extra pop of detail.
Place your tiny fry cup on a shelf and enjoy the zero-calorie cuteness


Mini Penguin Blob Figures
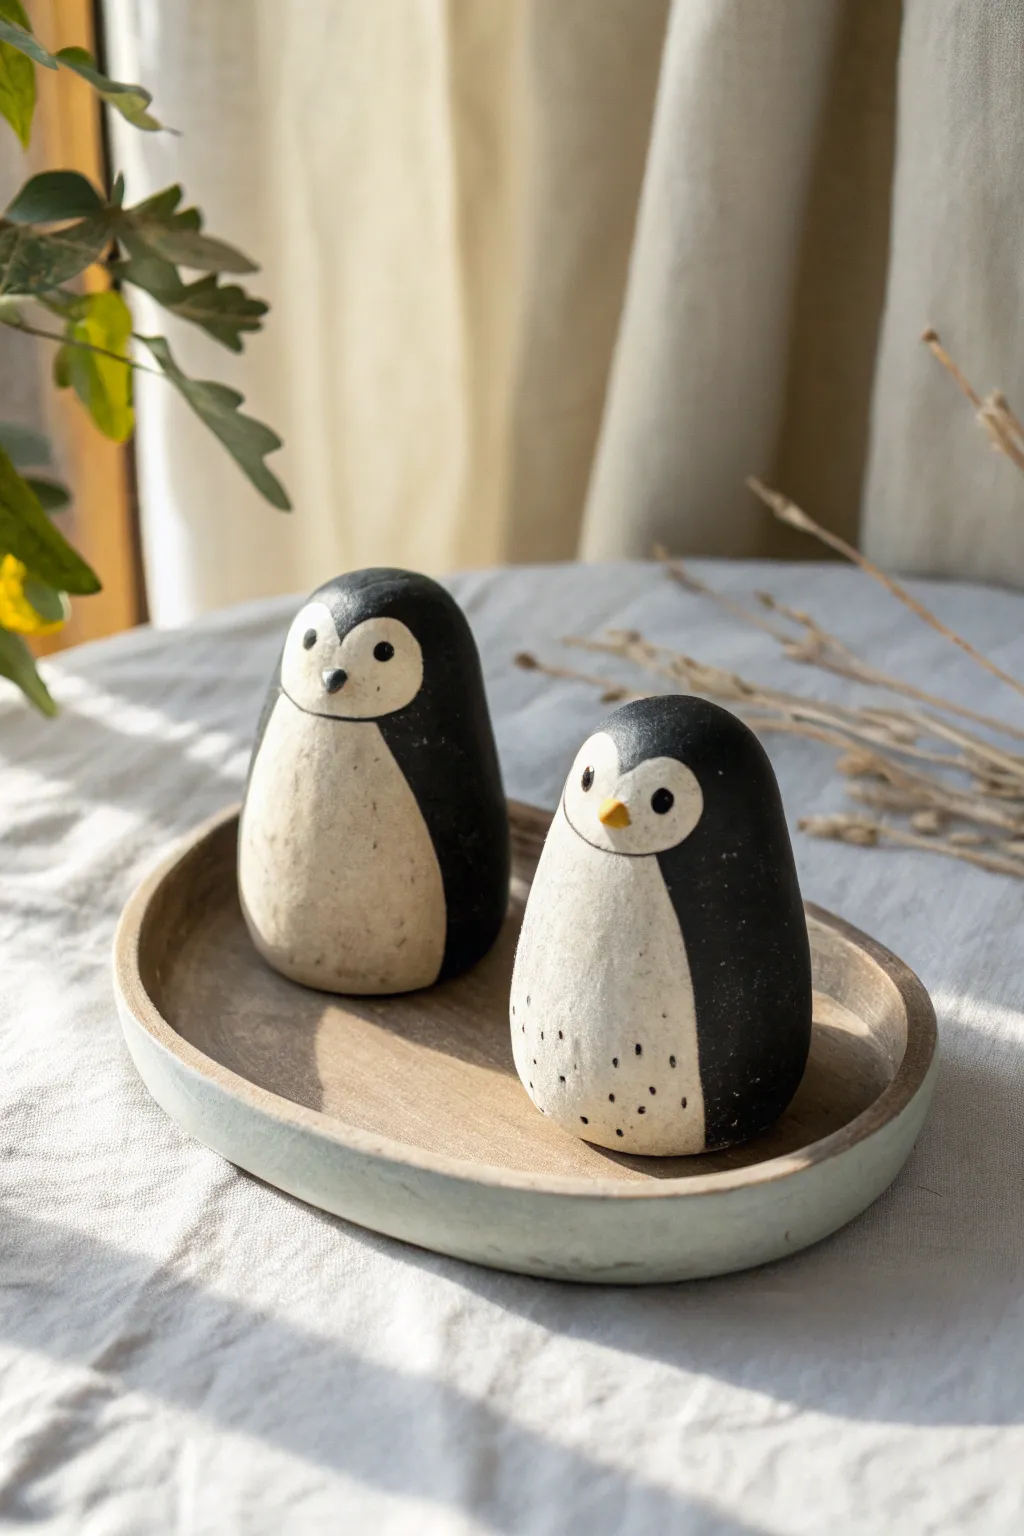
These miniature penguin figures embrace a charming, minimalist aesthetic with their smooth, stone-like shapes and primitive detailing. Perfect for beginners, this project relies on simple forming techniques to create a pair of distinct, blob-style arctic friends.
How-To Guide
Materials
- Air-dry clay (stone or white color recommended)
- Acrylic paint (black, white, muted yellow/orange)
- Fine grit sandpaper
- Small flat paintbrush
- Fine detail paintbrush or toothpick
- Matte spray varnish
- Small bowl for water
Step 1: Shaping the Bodies
-
Prepare the Clay:
Take a walnut-sized amount of air-dry clay and knead it well to remove air bubbles. This conditioning step prevents cracking later on. -
Form the Base Shape:
Roll the clay into a smooth ball between your palms. -
Elongate the Form:
Gently roll the ball on a flat surface to create a slight egg or pill shape. Keep the bottom flatter so it stands upright securely. -
Smooth the Surface:
Dip your finger in a tiny bit of water and rub it over the clay to smooth out any fingerprints or creases until the surface looks like a polished river stone. -
Create the Second Figure:
Repeat the process for the second penguin, but try using slightly less clay or shaping it shorter and rounder to give them individual personalities. -
Dry Completely:
Allow the figures to dry for at least 24 hours. I usually flip them gently halfway through so the bottom dries evenly.
Step 2: Refining and Painting
-
Sand for Texture:
Once fully dry, lightly gently buff the entire surface with fine-grit sandpaper. This mimics the smooth texture seen in the photo and prepares the surface for paint. -
Clean the Dust:
Wipe the figures with a slightly damp cloth or a dry soft brush to remove all sanding dust. -
Mark the Face Line:
Using a pencil very lightly, draw a curved ‘heart’ shape at the top (for the face) that flows down into a tall oval for the belly. -
Paint the Body:
Using black acrylic paint and a small flat brush, carefully paint the outside of your pencil lines, covering the back and sides. -
Refine the Edges:
Take your time with the curve where the black meets the unpainted area. A clean line here defines the penguin’s look. -
Paint the Front:
If your clay isn’t naturally off-white, paint the belly and face area with a creamy white or pale stone color. Avoid bright white for that natural, earthy look. -
Age the Belly (Optional):
To match the reference, you can water down a tiny drop of brown paint and create a very faint wash on the lower belly for an antiqued look.
Stone Effect
Mix a tiny amount of fine sand or baking soda into your clay before sculpting. This gives the dried surface a gritty, realistic stone texture.
Step 3: Adding Details
-
Add the Eyes:
Dip the non-brush end of your paintbrush (or a toothpick) into black paint. Dot two eyes wide apart on the face area. -
Highlight the Eyes:
Wait for the black dots to dry, then add a tiny speck of white to the eyes for a glint of life. -
Create the Beak:
Mix a muted yellow-orange paint. Using a fine detail brush, paint a small triangle between the eyes. -
Add Belly Speckles:
On the shorter penguin, use the very tip of your fine brush to dab tiny, irregular black dots near the bottom of the white belly section. -
Seal the Work:
Finish by spraying the figures with a matte varnish to protect the paint without making them look like shiny plastic.
Winter Wear
Before the clay dries, sculpt tiny scarves or hats from extra clay to wrap around them, painting them in red or green for a holiday version.
Place your new monochromatic friends on a desk or shelf for a touch of minimalist whimsy


Tiny Dino Buddies
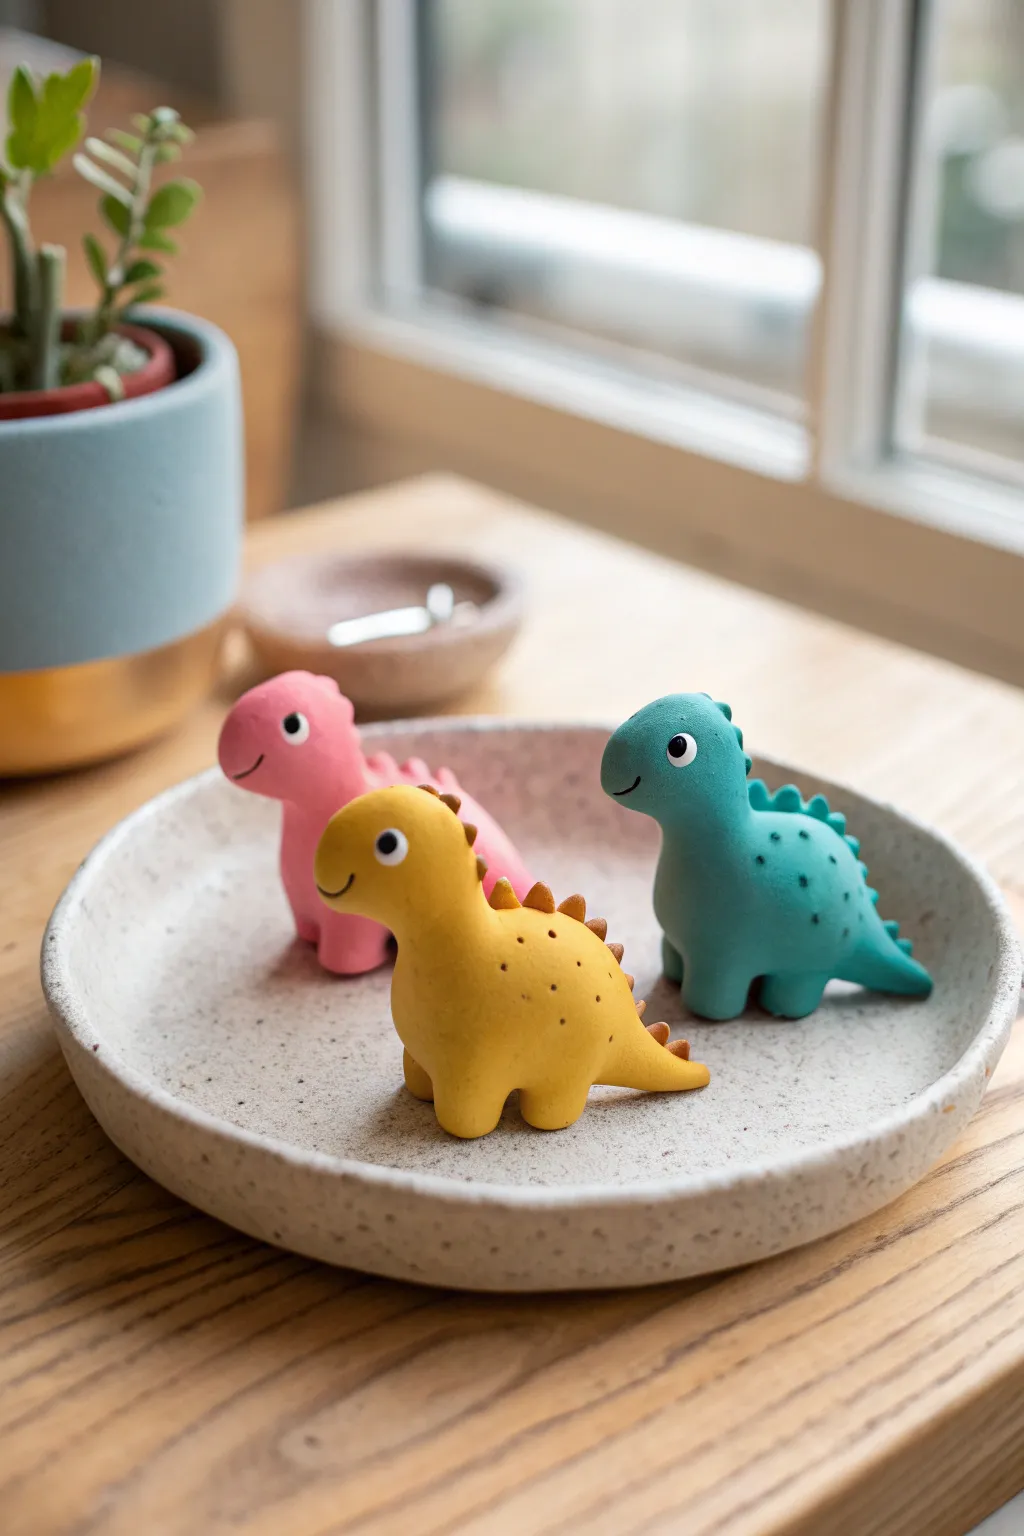
These miniature clay dinosaurs are bursting with prehistoric charm, featuring soft matte colors and adorable simple expressions. This trio of pink, yellow, and teal friends makes for a perfect beginner sculpting project that rests sweetly on any desk or shelf.
Step-by-Step
Materials
- Polymer clay (pink, yellow, teal, and a small amount of white and black)
- Clay sculpting tools (specifically a small ball tool and a needle tool)
- A smooth work surface (tile or glass mat)
- Oven for baking (if using polymer clay)
- Fine-grit sandpaper (optional)
- Matte varnish (optional)
Step 1: Shaping the Bodies
-
Prepare the clay:
Start by conditioning your pink, yellow, and teal clay separately. Knead each color in your hands until it is soft, pliable, and free of cracks to ensure a smooth finish. -
Form the main shape:
Take a walnut-sized ball of clay and roll it into a smooth sphere. Gently elongate one side to create a thick teardrop shape, like a very chubby pear. -
Define the neck:
Gently pinch and stroke the narrower end of the teardrop to curve it upwards. This vertical section will become the neck and head, while the wider base remains the body. -
Round the head:
Using your thumb, smooth and round off the top of the neck to create a distinct, bulbous head shape. It should flow seamlessly into the body without a sharp join. -
Create the tail:
On the opposite side of the body mass, pinch a small amount of clay and pull it outwards to form a short, pointed tail. Keep it relatively thick at the base so it’s sturdy. -
Stabilize the base:
Tap the bottom of your dinosaur gently against your work surface. This flattens the belly slightly so the figure sits upright without tipping over.
Step 2: Adding Legs and Details
-
Make the legs:
Roll four tiny balls of matching clay for each dinosaur. Press them gently onto the bottom sides of the body—two in front, two in back—and blend the seams upward with a sculpting tool. -
Add dorsal spikes:
For the spikes, roll a very thin snake of clay in a contrasting color (or a darker shade of the body color). Cut tiny triangles or pinch small bits off. -
Attaching spikes:
Starting at the back of the head and working down to the tail, press these tiny triangles along the spine. I find using a needle tool helps position them perfectly without squishing the body. -
Texture the skin:
Using a needle tool, randomly poke faint, tiny dots on the dinos’ backs and sides. This adds a subtle skin texture that makes them look more handcrafted.
Sticky Fingerprints?
To remove noticeable fingerprints before baking, lightly brush the raw clay with a little baby oil or cornstarch. This smoothes the surface instantly.
Step 3: Face and Finish
-
Create eye sockets:
Use a small ball tool to make a shallow indentation on either side of the head where the eyes will go. -
Add the whites:
Roll extremely tiny balls of white clay. Press these into the indentations you just made, flattening them slightly so they look like discs. -
Add pupils:
Take microscopic bits of black clay and press them into the center of the white discs. This instantly gives the dinosaur character. -
Carve the smile:
Use the edge of a small spoon tool or a curved blade to press a simple, U-shaped mouth into the snout area. -
Bake the figures:
Place your trio on a baking sheet lined with parchment paper. Bake according to your polymer clay package instructions (usually around 275°F or 135°C for 15-30 minutes). -
Cool and protect:
Allow the dinosaurs to cool completely before handling. If desired, brush on a coat of matte varnish to protect them from dust and fingerprints.
Make them Spotted
Before baking, press tiny flat discs of contrasting clay onto the body and roll over them gently to embed them flush with the surface for a spotted pattern.
Now you have a trio of prehistoric pals ready to guard your desk.


Mini Cat Head Charms
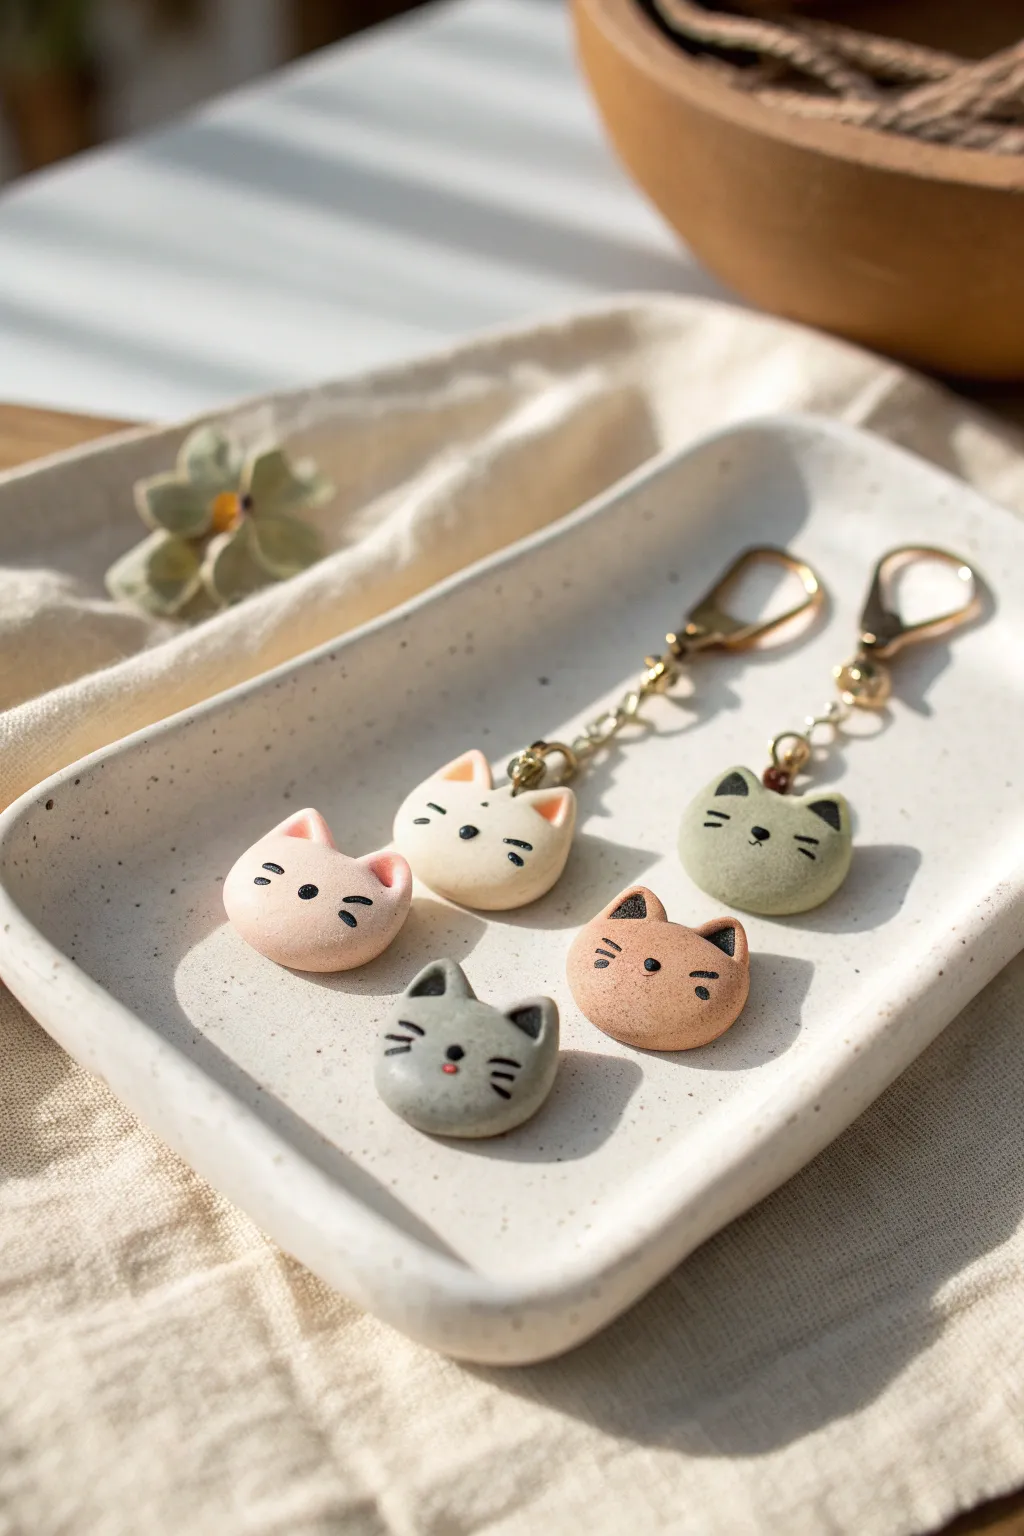
These adorable, minimalist cat charms are a quick and satisfying project perfect for using up scrap clay. With their soft matte finish and simple features, they make sweet keychains or subtle jewelry pieces.
Step-by-Step Tutorial
Materials
- Polymer clay (white, beige, grey, muted green, dusty pink)
- Acrylic paint (black, pink)
- Fine detail paintbrush or toothpick
- Ball stylus tool
- Eye pins (gold or silver)
- Jump rings and lobster clasp keychains
- Needle nose pliers
- Clay roller or pasta machine
- Small round cutter (approx. 1 inch) or template
- Smooth work surface (ceramic tile or glass)
- Oven for baking
Step 1: Shaping the Base
-
Condition the clay:
Begin by thoroughly kneading your chosen clay colors until they are soft and pliable. If you want the muted tones shown in the photo, try mixing a tiny bit of brown or grey into your base colors to tone them down. -
Roll spheres:
Pinch off equal amounts of clay for each cat head. Roll each piece between your palms to form a smooth, crack-free ball about the size of a large marble. -
Flatten deeply:
Place the ball on your work surface and press down gently with your palm or an acrylic block. You want a thick, rounded disc shape, not a flat pancake. The edges should remain soft and rounded. -
Form the ears:
Using your thumb and forefinger, gently pinch the top two ‘corners’ of the circle to pull out triangular ear shapes. Keep the pinching gentle so the ears look integrated rather than stuck on. -
Refine the shape:
Tap the clay gently on your work surface to flatten the bottom slightly if you want a more distinct chin, or keep it perfectly round. Use your fingertip to smooth the transition between the ears and head.
Step 2: Adding Hardware & Baking
-
Insert eye pins:
For the keychain versions, take a metal eye pin and trim it to size if necessary. Push it vertically into the center top of the head, right between the ears. I find twisting it slightly as it goes in helps grip the clay better. -
Smooth the entry point:
The clay might slightly bulge where the pin entered. Use a silicone tool or your finger to smooth the clay back around the metal wire to secure it. -
Final check:
Inspect your pieces for fingerprints. If you see any, lightly brush them with a little baby oil or cornstarch to smooth them away before baking. -
Bake:
Place your cat heads on a ceramic tile or baking sheet. Bake according to your polymer clay manufacturer’s instructions (usually 275°F/135°C for 15-30 minutes). Let them cool completely before handling.
Uneven Whiskers?
If your hand shakes while painting lines, use a fine-tip permanent manufacturing marker instead of paint. It offers much better control for tiny details like whiskers.
Step 3: Painting & Assembly
-
Paint the insides of ears:
Using a tiny brush and slightly diluted pink or darker contrasting paint, fill in the inner triangle of the ears. For the grey cat, you might use black; for the pink cat, a darker rose shade. -
Draw the eyes:
Dip a fine detail brush or the tip of a toothpick into black acrylic paint. Dab two small, widely spaced dots for the eyes. Keeping them wide apart gives that cute ‘kawaii’ look. -
Add the nose:
Make a tiny triangular or oval dot between and slightly below the eyes. Use black for a bold look or pink for a softer expression. -
Paint the whiskers:
With the very tip of your tool, paint two short, horizontal lines on each cheek. Try to keep your hand very steady and apply light pressure for thin lines. -
Seal the face (optional):
If you are worried about the paint scratching off, dab a tiny amount of matte varnish over just the painted areas, or seal the whole piece for durability. -
Attach keychain:
Once dry, use your pliers to open a jump ring. Loop it through the eye pin on the cat’s head and attach your lobster clasp keychain hardware. -
Close the ring:
Use the pliers to bend the jump ring back into a closed circle, ensuring the gap is tight so the charm doesn’t slip off.
Texture Twist
Before baking, gently press a piece of coarse sandpaper or a clean toothbrush over the clay surface. This adds a stone-like texture that looks amazing.
Clip your new feline friend onto your bag or keys regarding for a daily dose of cuteness

The Complete Guide to Pottery Troubleshooting
Uncover the most common ceramic mistakes—from cracking clay to failed glazes—and learn how to fix them fast.
Simple Bunny Pocket Minis
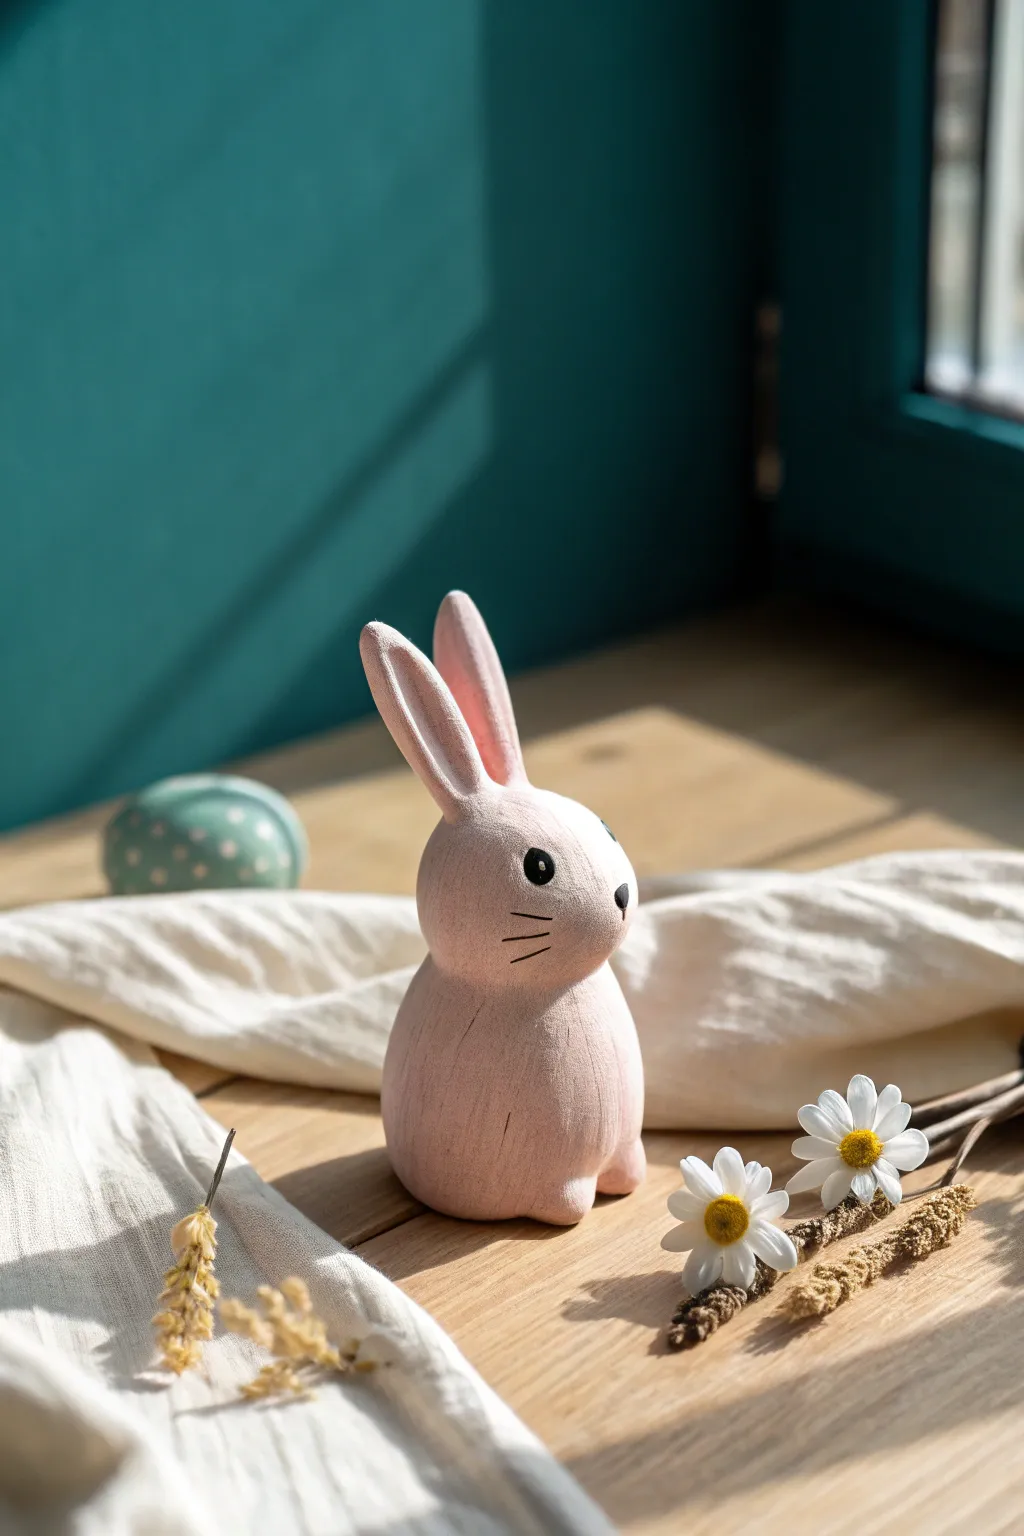
This adorable miniature rabbit features a smooth, matte pink finish and a sweet, simple expression. Its rounded, pebble-like body makes it a perfect tactile artwork to keep in your pocket or display on a sunny windowsill.
Detailed Instructions
Materials
- Polymer clay (white)
- Acrylic paints (pastel pink, titanium white, black)
- Fine-grit sandpaper
- Small round detail brush (size 0 or 00)
- Medium flat brush
- Sculpting tool or toothpick
- Matte varnish (optional)
Step 1: Sculpting the Base Form
-
Create the body:
Start with a ball of white polymer clay about the size of a walnut. Roll it between your palms until it is perfectly smooth. -
Shape the torso:
Gently taper the top of the ball slightly to create a very subtle pear shape, keeping the bottom wide and flat so it sits securely. -
Form the head:
Take a slightly smaller piece of clay and roll a second ball for the head. Press it gently onto the narrower top of the body piece to blend them together. You want a seamless transition at the neck, so smooth the clay downward with your thumb. -
Refine the silhouette:
Use your fingers to smooth out the entire form, ensuring it looks like one cohesive, rounded figure rather than two stacked balls.
Step 2: Adding Details & Ears
-
Shape the ears:
Roll two small logs of clay. Flatten them gently and taper the ends to create long, bunny ear shapes. -
Attach the ears:
Press the ears firmly onto the top of the head. Use a sculpting tool to blend the clay at the base of the ears into the head so they don’t pop off later. -
Add slight feet:
pinched two tiny bits of clay at the very bottom front of the body to suggest paws, blending them upwards into the main body. -
Create texture:
Using a needle tool or toothpick, gently scratch vertical lines into the surface if you want to mimic the wood-carved look seen in the photo, though smooth is also lovely. -
Bake:
Bake the figurine according to your specific clay brand’s package instructions. Let it cool completely before painting.
Wood Texture Trick
To mimic the wood grain texture, lightly drag coarse sandpaper vertically over the raw clay before baking. This creates perfect grooves for the dry-brushing step later.
Step 3: Painting the Finish
-
Base coat:
Mix a soft pastel pink using white and a tiny dot of red or pink acrylic. Apply a thin, even coat over the entire bunny. -
Second coat:
Once the first layer is dry, apply a second coat of pink to ensure solid, opaque coverage. -
Dry brushing:
I like to take a dry brush with a tiny amount of lighter pink paint and lightly sweep it over the textures to enhance the carved look. -
Face patch:
Using titanium white, paint a soft, round patch on the front of the face where the nose and eyes will go. -
Painting the eyes:
Dip the handle end of a paintbrush into black paint to dot two large, round eyes onto the white patch. -
Adding highlights:
When the black eyes are dry, add a tiny white sparkle dot to the upper corner of each pupil. -
Nose and mouth:
With your finest brush, paint a small inverted triangle for the nose and a single vertical line extending down from it. -
Whiskers:
Carefully paint three thin horizontal lines on each cheek for whiskers. Keep your hand steady and use very little pressure. -
Seal:
Finish with a matte varnish to protect the paint and maintain that soft, non-shiny finish.
Make It a Charm
Insert a metal eye pin into the top of the head between the ears before baking so you can turn this pocket mini into a keychain or necklace pendant.
Enjoy the calm, cheerful presence your little bunny brings to your desk or shelf
Mini Mushroom Friends

These adorable woodland companions bring a touch of rustic charm to any shelf or desk. With their chunky stems, cheerful smiles, and classic red-capped design, they are a simple yet satisfying project perfect for clay beginners.
Step-by-Step
Materials
- White air-dry clay or polymer clay (approx. 200g)
- Acrylic paints (Burnt Sienna, Deep Red, White, Black, Light Pink)
- Fine-grit sandpaper
- Small flat brush
- Fine-tip detail brush
- Sculpting tool with a curved edge
- Texture tool (or a stiff-bristled toothbrush)
- Matte varnish or sealant
Step 1: Sculpting the Shapes
-
Form the stems:
Start by dividing your clay into four portions of varying sizes to create a family of mushrooms. Roll each portion into a thick, cylindrical log for the stem, ensuring the base is flat so they can stand upright independently. -
Shape the caps:
Take four new balls of clay corresponding to the stem sizes. Flatten each ball slightly and press your thumb into the center of the underside to create a curved, dome-like concavity where the stem will attach. -
Refine the cap edges:
Smooth the edges of the caps so they aren’t sharp, but keep them irregular and organic rather than perfectly round. A slightly wavy edge adds to the natural, hand-carved look. -
Assemble the pieces:
Score the top of the stem and the underside of the cap with a needle tool or toothpick. Apply a dab of water (for air-dry clay) or liquid clay (for polymer) to the scored areas and press the cap firmly onto the stem. -
Blend the seams:
Use a sculpting tool or your finger to smooth out the connection point underneath the cap, ensuring the transition from stem to cap feels sturdy and seamless.
Step 2: Adding Texture and Curing
-
Texturize the stems:
To mimic the wood-like grain interaction seen in the reference, drag a stiff brush or a needle tool vertically down the stems. Create light, uneven vertical striations while the clay is still soft. -
Smooth the caps:
In contrast to the stems, keep the tops of the caps significantly smoother. Use a little water on your finger to buff out any fingerprints or major dents. -
Dry or bake:
If using air-dry clay, set the mushrooms aside in a dry area for 24-48 hours. If using polymer clay, bake according to the manufacturer’s instructions (usually around 275°F/135°C for 15 minutes per 1/4 inch thickness). -
Sand the surface:
Once fully cured and cooled, lightly sand any overly rough patches on the caps with fine-grit sandpaper to ensure a nice surface for the paint.
Wobbly Mushroom?
If a mushroom keeps tipping over, gently tap the bottom of the stem against a flat surface while the clay is soft to flatten the base perfectly.
Step 3: Painting and Detailing
-
Base coat the stems:
Paint the stems with an off-white or very light beige acrylic paint. I like to water this layer down slightly so it sinks into the vertical texture lines you carved earlier. -
Add stem definition:
Mix a tiny amount of Burnt Sienna with water to create a wash. Lightly brush this over the textured stem, then immediately wipe most of it off with a paper towel, leaving darker pigment only in the crevices. -
Paint the caps:
Using the Deep Red mixed with a touch of Burnt Sienna (to tone down the brightness), paint the tops of the caps. Brushing in a circular motion helps create a rich, earthy look. -
Create the white spots:
Dip the handle end of a paintbrush into white acrylic paint. Dot the red caps randomly, varying the size of the dots slightly. Some can be solid white, while others can be slightly translucent for a weathered feel. -
Paint the faces:
Using your finest detail brush and black paint, draw small, wide-set eyes and u-shaped smiles on the stems. Keep the features simple; two dots and a curved line are all you need for personality. -
Add rosy cheeks:
For the blush (seen on two of the mushrooms), mix a very pale pink or diluted red. Dab two tiny spots just outside the smile lines. You can smudge the edges gently with a clean finger for a soft effect. -
Seal the project:
Finish by applying a coat of matte varnish over the entire piece. This protects the paint and unifies the sheen, giving it that finished, ceramic-like quality.
Weathered Look
Apply the red paint in thin, uneven layers. Letting some of the white clay peek through creates a charming, sun-bleached vintage effect.
Arrange your little mushroom family together to create a cozy woodland vibe


What Really Happens Inside the Kiln
Learn how time and temperature work together inside the kiln to transform clay into durable ceramic.
Mini Happy Face Magnets
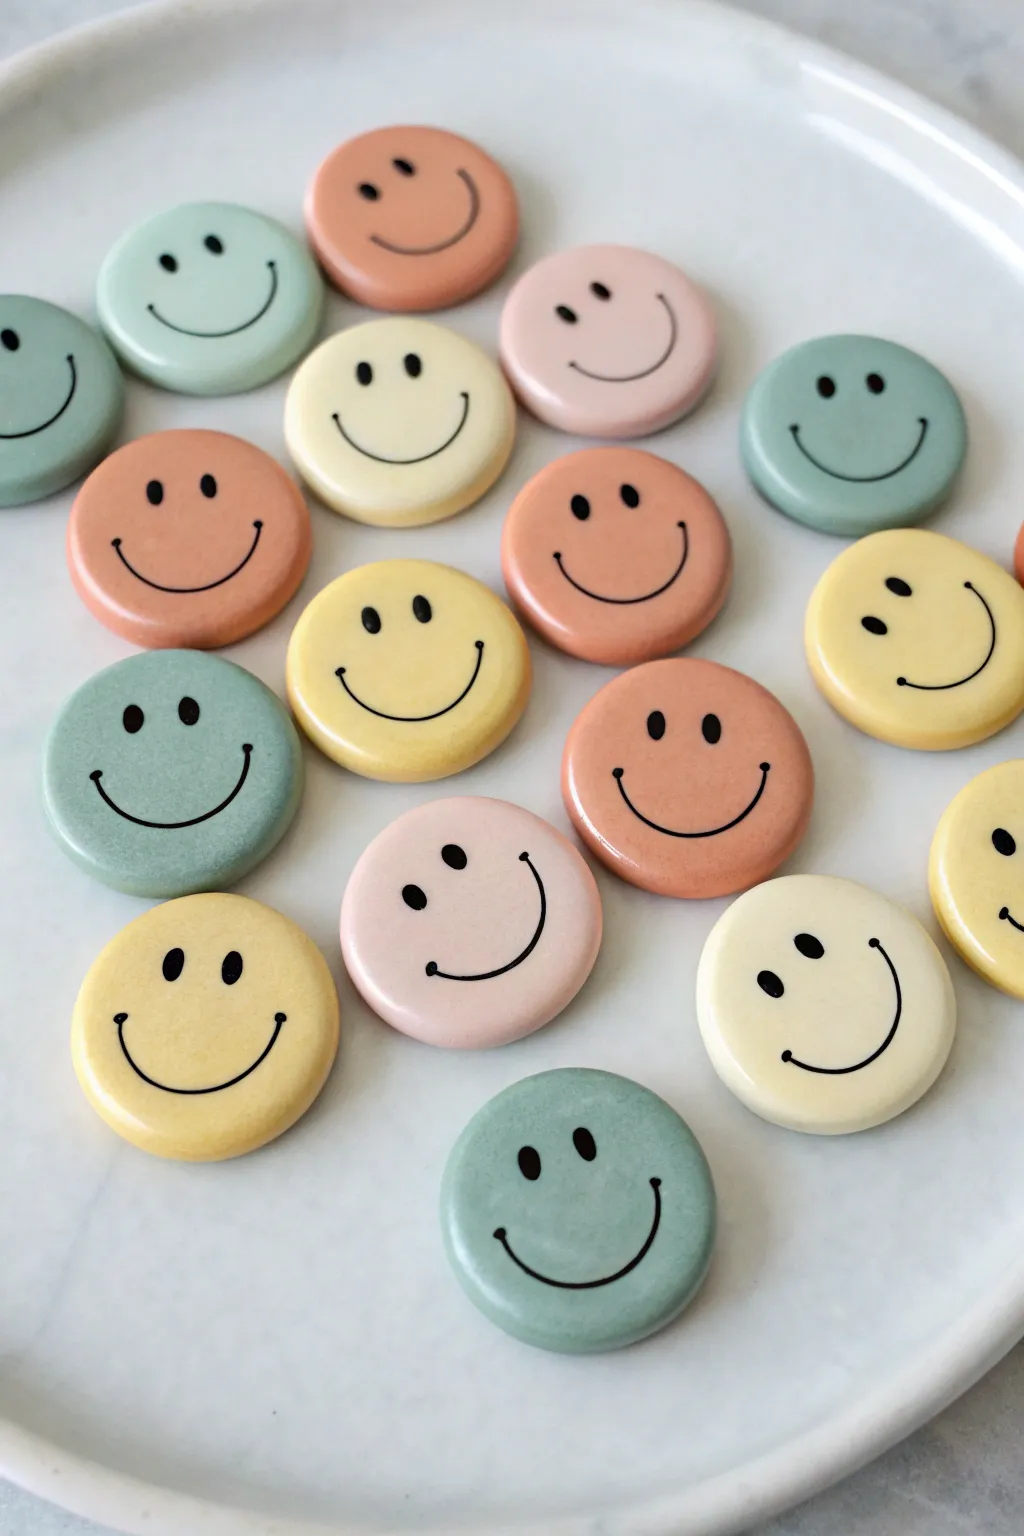
These adorable, pocket-sized magnets bring a cheerful vibe to any fridge or locker with their soft, muted palette and simple expressions. Using polymer clay and a few basic tools, you can easily craft a whole collection of these smiling friends.
How-To Guide
Materials
- Polymer clay in muted colors (sage green, mustard yellow, blush pink, terracotta, cream)
- Small round circle cutter (approx. 1 inch)
- Acrylic rolling pin or clay machine
- Black acrylic paint or black paint pen
- Fine detail paintbrush (if using paint)
- Glossy polymer clay glaze or UV resin
- Small round magnets
- Superglue or strong craft adhesive
- Parchment paper or baking tile
- Oven
Step 1: Prepping and Shaping
-
Condition the clay:
Start by taking a small amount of your first clay color. Knead it thoroughly in your hands until it becomes soft, pliable, and warm to the touch to prevent cracking later. -
Roll it out:
Place the conditioned clay on a smooth surface or parchment paper. Use your acrylic roller to flatten the clay into an even slab, aiming for a thickness of about 1/4 inch. -
Cut the circles:
Press your round circle cutter firmly into the clay slab. Wiggle it slightly and lift to release the shape. Repeat this process for as many faces as you want in this color. -
Smooth the edges:
Gently pick up each clay circle. Use your fingertip to lightly smooth the cut edges, softening any sharpness left by the cutter so the coin shape looks organic and rounded. -
Repeat for all colors:
Clean your roller and surface between colors to avoid staining. Repeat the conditioning, rolling, cutting, and smoothing process for your mustard, pink, terracotta, and cream clays.
Smooth Surface Secret
Before baking, wipe your raw clay circles very gently with a little rubbing alcohol or baby oil on your finger to remove dust and fingerprints.
Step 2: Baking and Painting
-
Bake the clay:
Arrange your clay circles on a parchment-lined baking sheet or a ceramic tile. Bake them in your oven according to the specific temperature and time instructions on your package of polymer clay. -
Cool completely:
Once baked, remove the tray from the oven and let the clay pieces cool down fully. They need to be room temperature before you apply any paint. -
Paint the eyes:
Using a black paint pen or a fine brush with black acrylic paint, gently dot two small eyes onto the upper half of the circle. Keep them somewhat widely spaced for that cute, wide-eyed look. -
Draw the smile:
Carefully draw a simple, curved ‘U’ shape for the smile. Start near the level of one eye, dip down, and curve back up to the other side. A steady hand is key here. -
Add detail dots:
Look closely at the reference: many smiles have tiny little perpendicular lines or dots at the very ends of the smile curve. Add these subtle details if you want that extra bit of character. -
Let the paint dry:
Allow the painted features to dry completely. If you used a paint pen, this will be quick; acrylic paint might need 10-15 minutes.
Make Them 3D
Instead of painting, try rolling tiny snakes of black clay for the smiles and tiny balls for eyes, pressing them gently into the raw clay before baking.
Step 3: Finishing Touches
-
Apply glaze:
Coat the front and sides of each face with a layer of glossy polymer clay glaze. This seals the paint and gives the magnets that polished, ceramic-like shine seen in the photo. -
Dry the glaze:
Let the glaze dry according to the bottle instructions. I usually let mine sit overnight just to be safe, so no fingerprints mar the shiny surface. -
attach the magnets:
Flip the dry clay pieces over. Apply a small dot of strong superglue to the center of the back. -
Secure the backing:
Press a small round magnet firmly into the glue. Hold it for a few seconds to ensure it bonds initially. -
Final cure:
Allow the glue to cure fully before sticking your new happy faces onto the fridge.
Enjoy brightening up your magnetic surfaces with these cheerful little faces
Mini Toothbrush Or Pen Cups
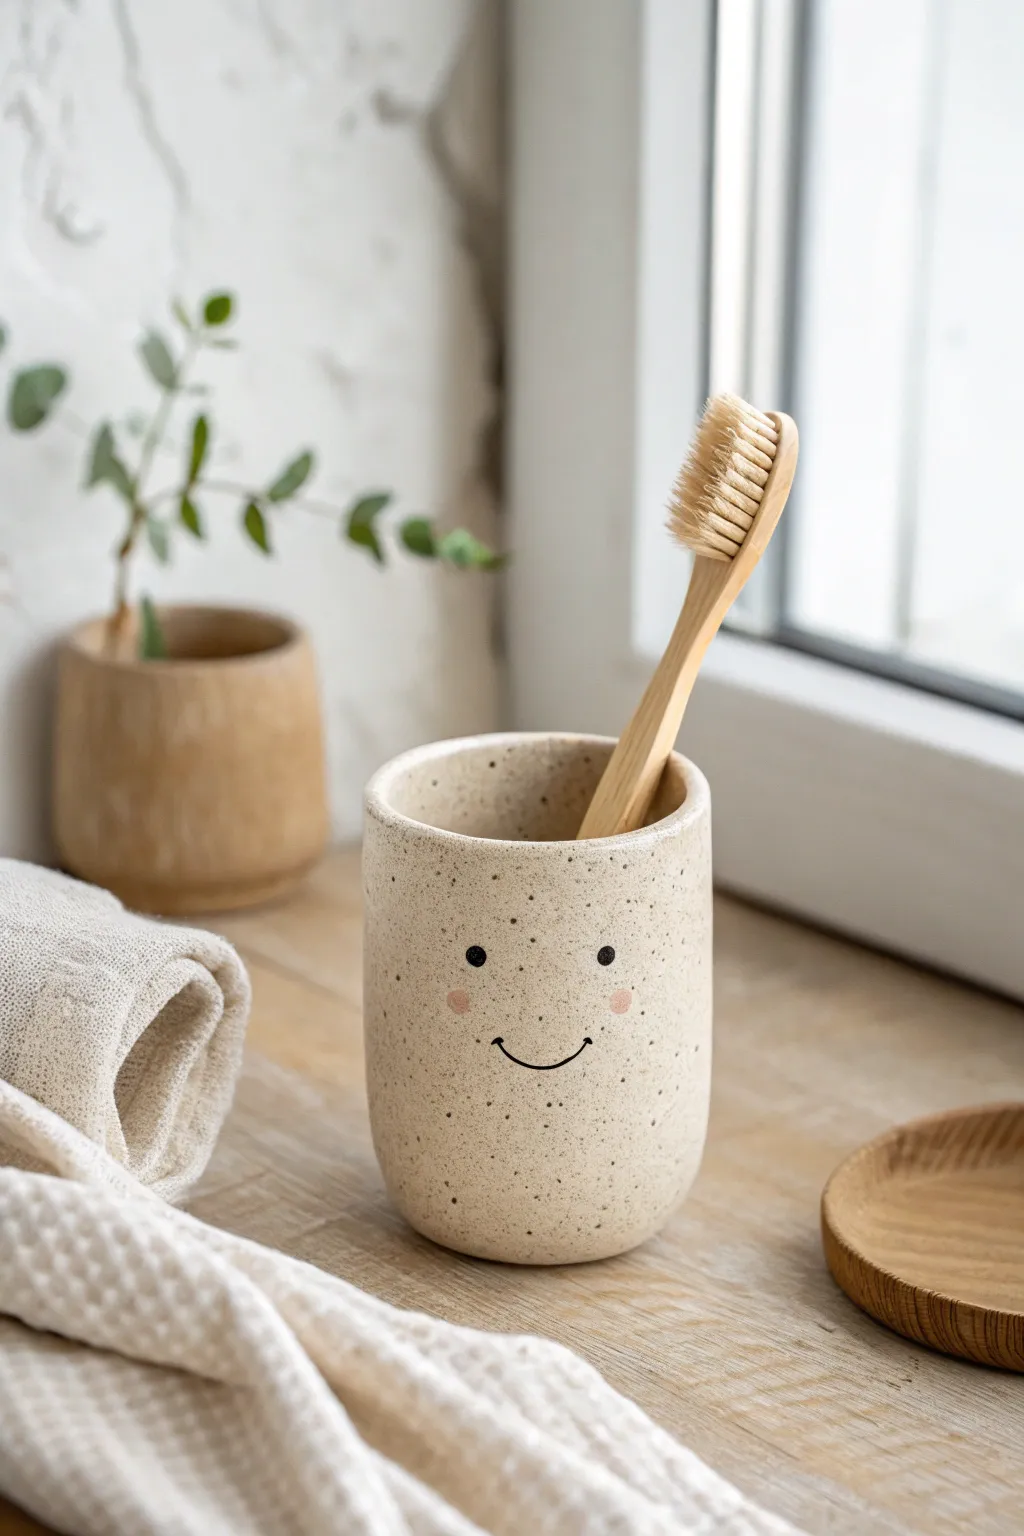
Brighten your mornings with this charming little toothbrush holder that beams a smile right back at you. Its organic, speckled finish and minimalist face give it a modern handmade look perfect for any bathroom counter.
Step-by-Step Guide
Materials
- Air-dry clay or polymer clay (white or beige base)
- Rolling pin
- Clay knife or craft blade
- Small cup or cookie cutter (for circle base)
- Rectangular template (paper cardstock)
- Small container of water (for smoothing)
- Scoring tool or toothpick
- Old toothbrush (for speckling)
- Brown acrylic paint (watered down slightly)
- Black fine-tip acrylic marker or paint
- Soft pink paint or chalk pastel
- Clear matte varnish or sealant
- Sandpaper (fine grit)
Step 1: Forming the Base
-
Prepare your clay:
Start by kneading your clay until it’s soft and pliable. If you are using polymer clay, make sure it is fully conditioned so it won’t crack during shaping. -
Roll out a slab:
Using your rolling pin, roll the clay out into an even slab, approximately 1/4 inch thick. Try to keep the thickness consistent for a sturdy cup. -
Cut the bottom:
Press your round cutter or trace around a small cup to cut out a perfect circle. This will serve as the base of your holder. -
Cut the wall:
Measure the circumference of your base circle. Cut a rectangular strip from your clay slab that is slightly longer than that circumference and as tall as you want your cup to be (about 3-4 inches).
Step 2: Assembling the Cup
-
Score the edges:
Rough up the outer edge of your circle base and the bottom long edge of your rectangular strip using a toothpick or scoring tool. This texture helps the pieces bond. -
Apply slip or water:
Dab a little water (for air-dry clay) or liquid clay (for polymer) onto the scored areas to act as glue. -
Attach the wall:
Carefully wrap the rectangular strip around the base circle. I find it easiest to stand the strip up and curl it around the base until the ends meet. -
Seal the seam:
Where the two ends of the wall meet, score and wet the edges again. Press them together firmly and use your finger or a tool to smooth the seam until it disappears. -
Smooth the connections:
Blend the darker seam where the wall meets the base. Use a wet finger to smooth out any fingerprints or tool marks, creating a seamless cylinder. -
Round the rim:
Gently gently run your finger around the top rim to soften the sharp edge, giving it that finished, hand-thrown pottery look.
Seam Struggles?
If the vertical seam keeps popping open, create a small ‘snake’ of spare clay, press it into the joint inside the cup, and smooth it flat for reinforcement.
Step 3: Decorating & Finishing
-
Create the speckles:
Dip an old toothbrush into slightly watered-down brown acrylic paint. Run your thumb across the bristles to flick tiny specks of paint all over the wet clay surface. -
Dry the cup:
Allow the cup to dry completely according to your clay’s instructions. Air-dry clay may take 24-48 hours; polymer clay will need baking. -
Sand for smoothness:
Once fully dry/hardened, lightly sand any rough spots or uneven edges with fine-grit sandpaper. -
Draw the eyes:
Using a fine-tip black marker or a tiny paintbrush, add two small, widely spaced black dots for the eyes about halfway down the cup. -
Add the smile:
Draw a thin, curved U-shape between the eyes for a simple, happy smile. -
Apply rosy cheeks:
Tap a pinky finger into soft pink paint or pink chalk dust and gently press it onto the cup cheeks, just outside the smile line, for a blushing effect. -
Seal the project:
Finish by applying two coats of clear matte water-resistant varnish. This is crucial for bathroom items to protect them from moisture and splashing water.
Use Real Speckles
Instead of painting speckles later, mix used dry coffee grounds or black pepper directly into the raw clay before rolling to create embedded texture.
Now you have a cheerful companion for your daily routine that keeps your space tidy and cute

TRACK YOUR CERAMIC JOURNEY
Capture glaze tests, firing details, and creative progress—all in one simple printable. Make your projects easier to repeat and improve.
Tiny Moon And Star Garland Pieces
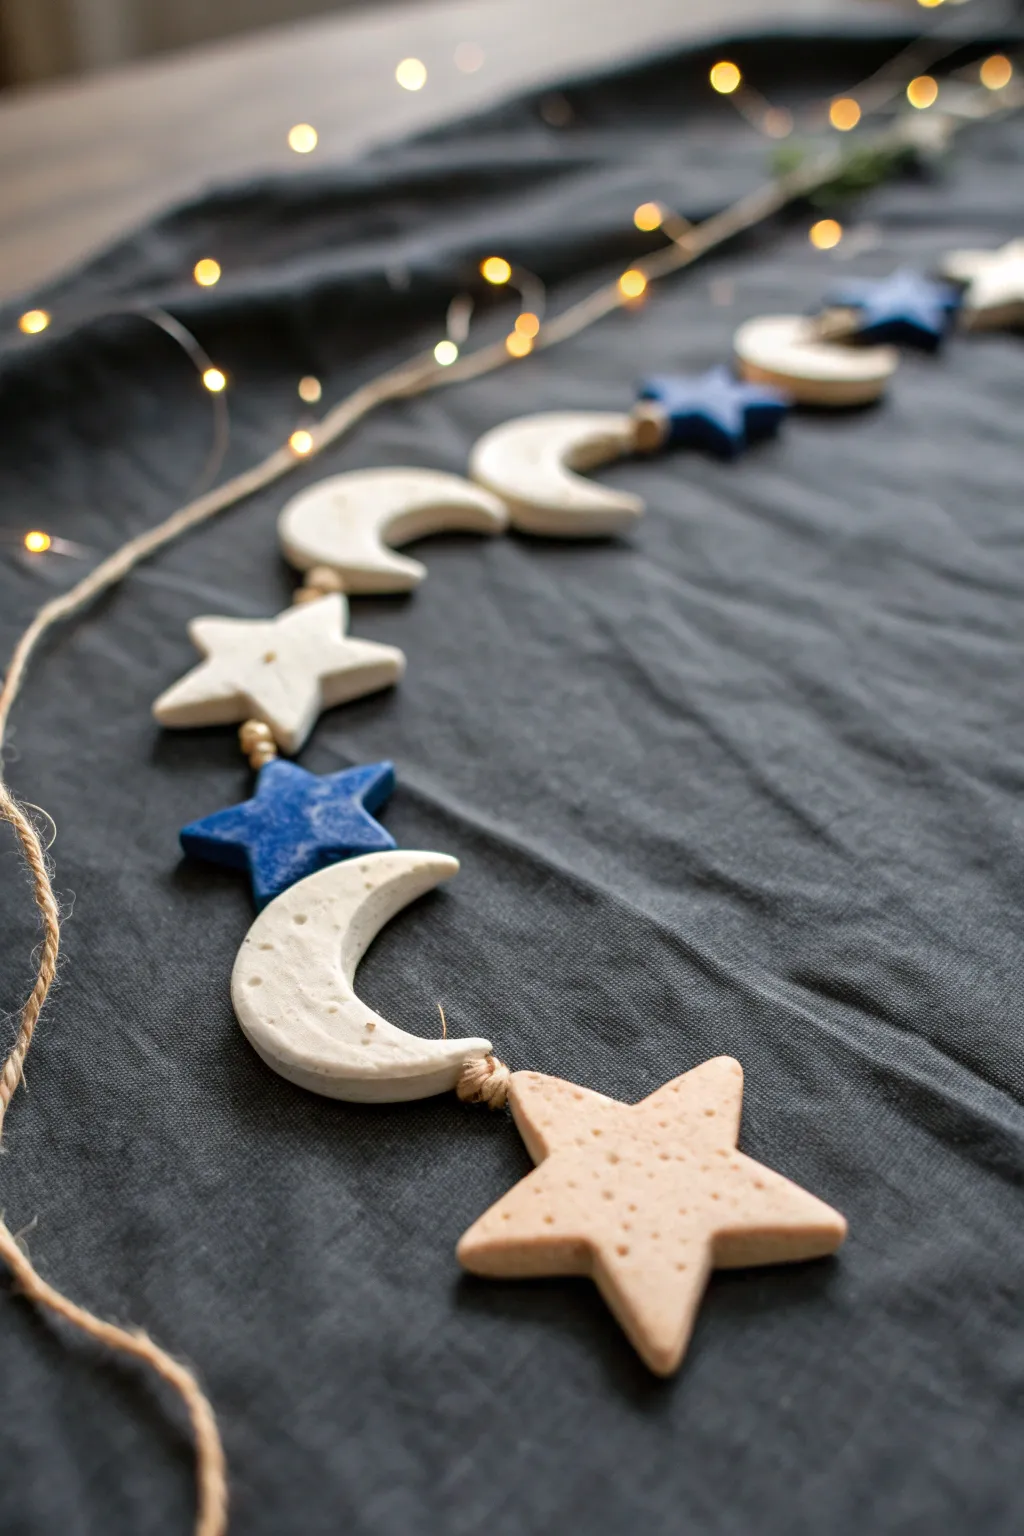
Bring the night sky indoors with this charming garland featuring rustic crescent moons and twinkling stars. Made from simple air-dry clay, these alternating white and deep blue shapes create a dreamy, textured decoration perfect for nurseries or cozy corners.
Step-by-Step Guide
Materials
- White air-dry clay (or polymer clay)
- Small star cookie cutter
- Small crescent moon cookie cutter (or a round cutter to improvise)
- Deep blue acrylic paint
- Small paintbrush
- Jute twine or hemp cord
- Rolling pin
- Toothpick or skewer
- Parchment paper
- Fine sandpaper (optional)
- Small wooden beads (optional spacer)
Step 1: Shaping the Heavens
-
Prepare your workspace:
Lay down a sheet of parchment paper on a flat surface to prevent the clay from sticking. Knead your clay until it is soft, pliable, and free of any cracks. -
Roll out the clay:
Using a rolling pin, flatten the clay to an even thickness of about 1/4 inch (6mm). If you want the rustic, speckled look shown in the inspiration, you can mix a pinch of sand or coffee grounds into the clay before rolling. -
Cut the shapes:
Press your star and moon cutters firmly into the clay. Aim for an equal number of stars and moons to create a balanced pattern. -
Create texture:
For the light-colored stars and moons, use a toothpick or an old toothbrush to gently stipple the surface, giving it a porous, stone-like texture. -
Poke holes for stringing:
Before the clay creates a crust, use a skewer or toothpick to poke a hole through the top point of each star and the center (or top curve) of each moon. Ensure the hole is wide enough for your twine to pass through. -
Smooth the edges:
Dip your finger in a little water and gently run it along the cut edges of each piece to smooth out any ragged bits left by the cutter. -
Let them dry:
Allow the pieces to dry completely according to package instructions. This usually takes 24-48 hours. flipping them halfway through ensures they dry flat.
Step 2: Adding Color to the Night
-
Sand imperfections:
Once fully dry, check for any sharp edges. I like to quickly run a piece of fine-grit sandpaper over the edges for a professional finish. -
Select stars for painting:
Separate about half of your star shapes to be painted blue. Leave the moons and the remaining stars in their natural clay color. -
Apply the blue coat:
Using deep blue acrylic paint, cover the selected stars entirely. You may need two coats to get that rich, opaque midnight blue shade. -
Add a speckled effect:
To mimic the look of a stone or a starry sky on the blue pieces, flick a tiny amount of diluted white paint or dabbing it with a sponge for subtle texture. -
Clear any blocked holes:
While the paint is still slightly wet, double-check that paint hasn’t clogged the stringing holes. Use a toothpick to clear them if necessary.
Clay Curling Up?
If your stars curl while drying, place a lightweight book on top of them (with parchment paper in between) once they are semi-dry to flatten them back out.
Step 3: Assembling the Garland
-
Measure the twine:
Cut a length of jute twine or hemp cord as long as you want your garland, plus an extra foot at each end for tying. -
Plan the pattern:
Lay out your dry pieces on a table to decide the order. The image suggests a pattern of: natural star, blue star, natural moon, and repeat. -
String the first piece:
Thread the twine through your first shape. If you have trouble getting the twine through, wrap a small piece of tape around the end to create a makeshift needle. -
Secure the position:
Tie a simple overhand knot in the twine right above the shape to keep it in place, or tie knots on both sides if you want it fixed firmly. -
Add spacers:
Between the clay shapes, you can tie a small knot in the twine itself or add a tiny wooden bead to act as a spacer and add visual interest. -
Finish stringing:
Continue threading the rest of your stars and moons, keeping the spacing consistent (about 2-3 inches apart looks lovely). -
Create hanging loops:
Tie a loop at each end of the twine for easy hanging.
Scented Garland
Add a drop of essential oil like lavender or chamomile to the clay before kneading. The garland will release a subtle, calming scent as it hangs.
Hang your beautiful celestial creation across a mantle or headboard to enjoy a touch of starlight every evening
Mini Whale Phone Rest
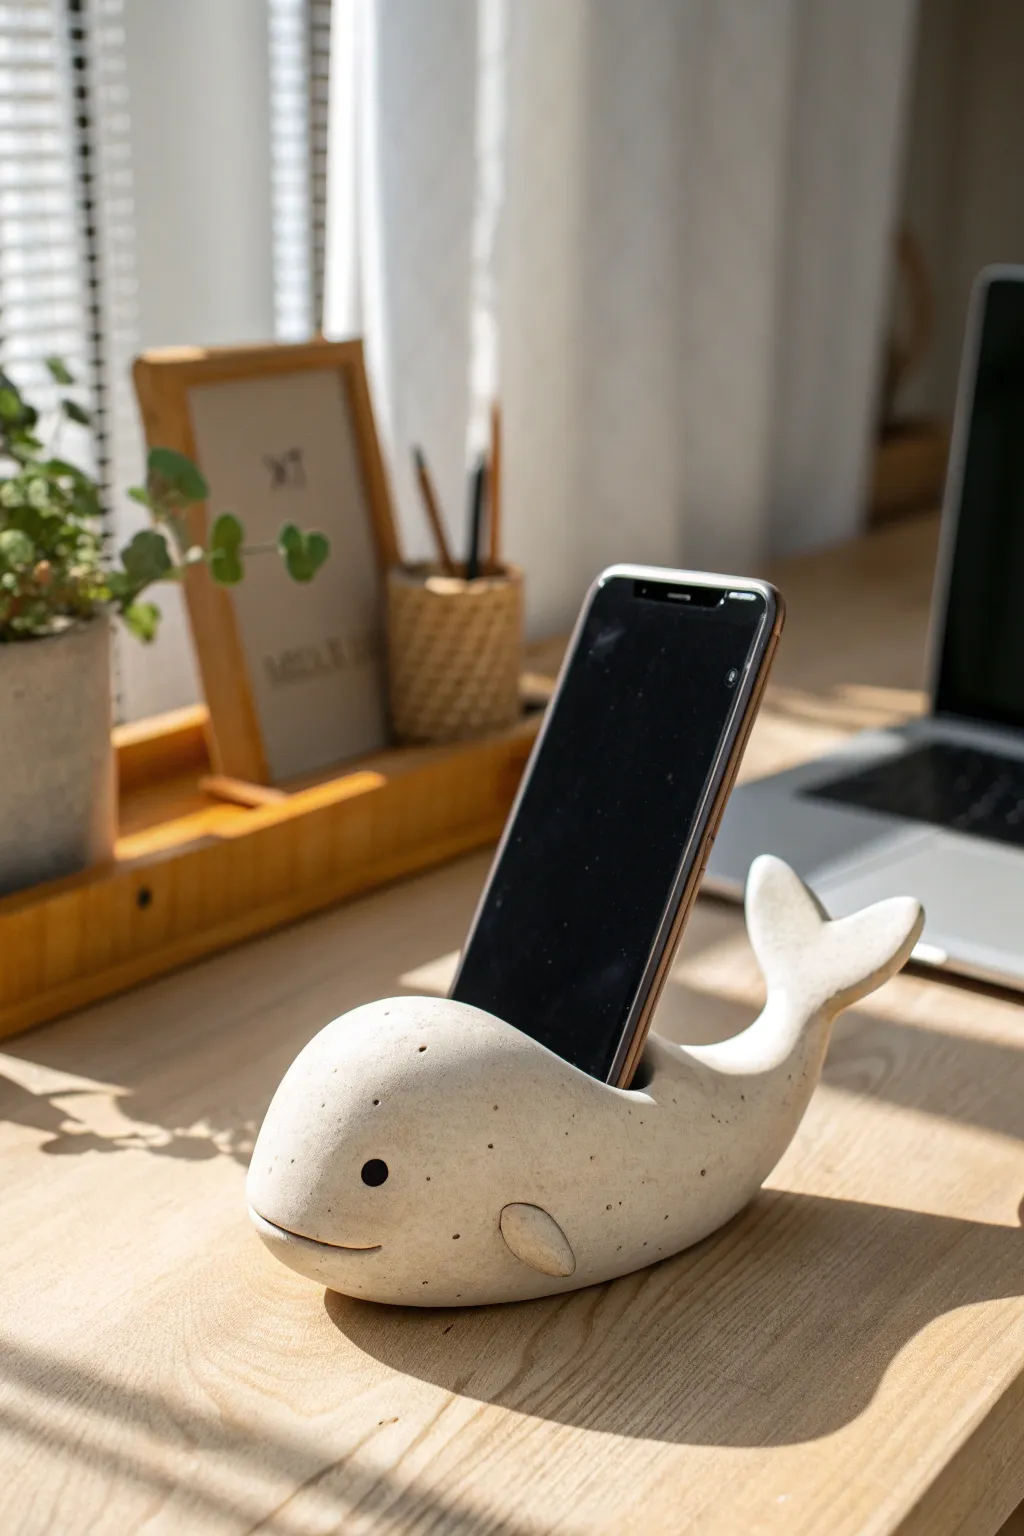
Brighten up your desk space with this charming whale-shaped phone holder, crafted from speckled clay for a modern, organic look. Its sturdy, curved body is perfectly shaped to cradle a smartphone while adding a touch of seaside serenity to your workspace.
Detailed Instructions
Materials
- Speckled stoneware clay or granite-effect polymer clay
- Rolling pin
- Small kitchen knife or clay needle tool
- Loop tool or spoon for hollowing
- Water and sponge (for smoothing)
- Black acrylic paint or glaze (for the eyes)
- Fine-grit sandpaper
- Kiln (if using stoneware) or oven (if using polymer clay)
Step 1: Shaping the Base Form
-
Prepare the clay:
Begin with a fist-sized ball of speckled clay. Choose a clay body with natural iron flecks or ‘granite’ inclusions to achieve that sandy, stone-like texture shown in the image. -
Form the body:
Roll the ball into a thick, elongated teardrop shape. One end should be bulbous for the head, tapering gently towards the back for the tail section. -
Flatten the base:
Tap the bottom of your teardrop firmly against your work surface. You want a flat, stable base so the whale won’t tip over when it’s holding a phone. -
Check the dimensions:
Ensure the body is wide enough to be stable—about 3 to 4 inches in width is usually sufficient to support the weight of a standard smartphone.
Wobbly Whale?
If the phone tips the whale over, flatten the base further or add a small weight (like a heavy washer) inside the clay body before sealing it up.
Step 2: Creating the Phone Slot
-
Mark the slot position:
About two-thirds of the way down the body (closer to the tail), gently mark a rectangular line across the top curve where the phone will sit. -
Carve the groove:
Using a loop tool or a spoon, carefully scoop out a deep wedge. The front wall of this wedge should be vertical or slightly angled back to support the phone. -
Test the fit:
If your clay is firm enough, gently test the slot with your phone (protected by plastic wrap). The phone should lean back slightly, resting against the tail section. -
Refine the slot walls:
Smooth the inside of the cut. I find using a slightly damp finger helps round off the sharp edges here so they don’t scratch your device later.
Step 3: Adding Details & Tail
-
Sculpt the tail flukes:
Take the tapered end of the body and split it slightly or attach a separate piece of clay shaped like a ‘V’. Flatten and curve the ends upwards to form the classic whale tail flukes. -
Attach the flippers:
Form two small, flat ovals of clay. Score and slip the sides of the whale’s body, then press these fins on securely. Smooth the seams until they disappear. -
Add the face:
Use a round formatting tool or the end of a paintbrush handle to press shallow indents for the eyes on either side of the head. -
Carve the mouth:
With a needle tool, slice a long, gentle curve wrapping around the front of the nose to create a smiling mouth line. -
Smooth the surface:
Take a damp sponge and wipe down the entire piece. This brings the speckled ‘stone’ texture to the surface and removes fingerprints.
Make It a Speaker
Hollow out the body more deeply and create a sound chanell from the phone slot to the mouth to amplify your music naturally.
Step 4: Finishing Touches
-
Let it dry or bake:
If using air-dry or kiln clay, allow it to dry slowly under plastic to prevent warping. For polymer clay, bake according to the manufacturer’s instructions. -
Sand for perfection:
Once fully cured or fired, use fine-grit sandpaper to buff out any remaining rough spots, especially around the phone slot and base. -
Paint the eyes:
Use a tiny dot of black acrylic paint or glaze inside the eye indentations to bring your whale to life. -
Seal the piece:
If you used polymer or air-dry clay, apply a matte varnish for protection. If ceramic, fire it with a clear matte glaze to keep that natural stone look.
Now you have a helpful little ocean friend ready to keep your phone safe and visible while you work