If you’re new to mini clay projects, you’re about to have so much fun with these tiny, satisfying little wins. I picked beginner-friendly ideas that lean on simple shapes and that cute, polished kawaii aesthetic—no fancy tools required.
Mini Donut Charms With Smiley Faces
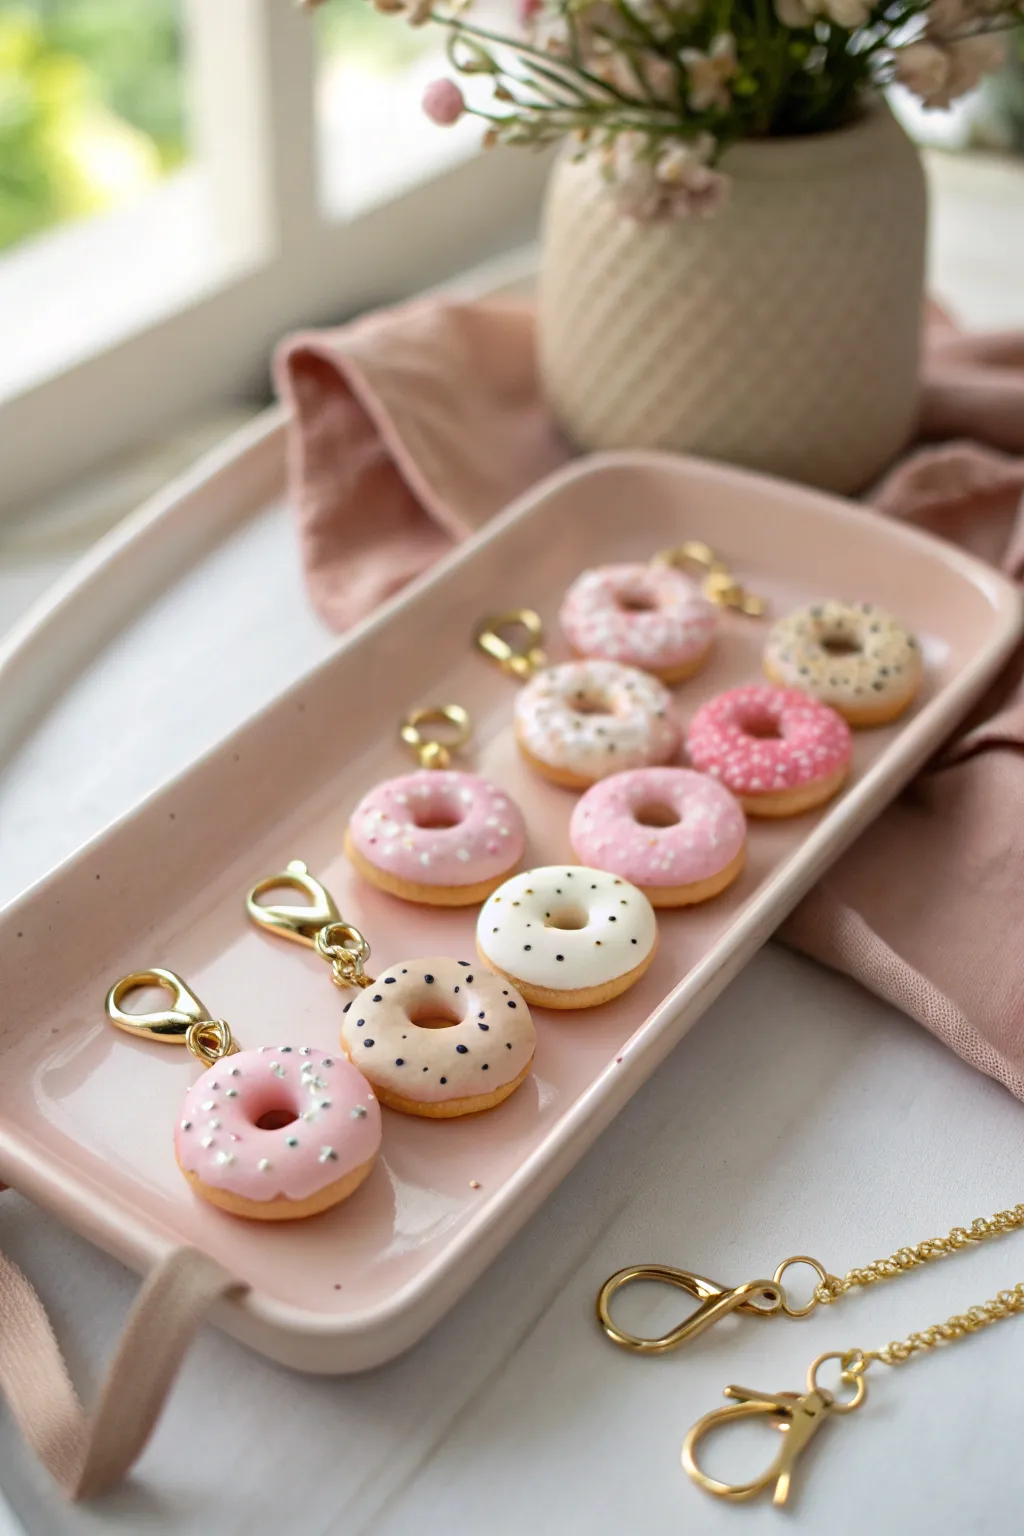
These miniature donut charms look good enough to eat with their realistic golden-brown dough and glossy icing. Perfect for beginners, this project transforms simple balls of clay into adorable accessories that can brighten up a keychain, zipper, or charm bracelet.
Step-by-Step Tutorial
Materials
- Polymer clay (dough color: mix white, translucent, and a tiny bit of yellow/brown)
- Liquid polymer clay (white, plus red/pink alcohol ink for tinting)
- Small dotting tool or toothpick
- Soft artist pastels (yellow ochre, burnt sienna)
- Soft paintbrush
- Gold screw-eye pins
- Gold lobster clasps and jump rings
- Glaze or UV resin (glossy)
- Needle tool
- Baking sheet and parchment paper
- Oven
Step 1: Shaping the Dough
-
Mix your dough color:
Start by mixing white polymer clay with a significant amount of translucent clay and just a speck of yellow and brown. You want a pale, raw cookie dough shade. -
Form the base:
Roll small pieces of the mixed clay into smooth spheres, about the size of a large marble or a macadamia nut. -
Flatten deeply:
Gently press down on each sphere to create a thick disc shape. Don’t flatten it too much; you want that fluffy donut height. -
Create the hole:
Use a medium-sized dotting tool to press through the center of the disc. Flip the donut over and press from the other side to ensure the hole is neat and doesn’t distort the shape. -
Texturize the surface:
Using an old toothbrush or a ball of aluminum foil, lightly tap the surface of the clay to mimic the texture of baked cake, focusing on the areas that won’t be covered by icing.
Step 2: Baking Effect & Hardware
-
Shade the clay:
Scrape some yellow ochre and burnt sienna pastels into a fine powder. Use a soft brush to dust these colors onto the donuts. -
Create the bake line:
Focus the darker brown shading on the top and bottom edges, leaving a lighter strip around the very middle equator of the donut to simulate a realistic fry line. -
Insert hardware:
Dip the end of a gold screw-eye pin into a tiny bit of liquid clay (which acts as glue) and screw it into the top of the donut. -
First bake:
Bake the naked donuts according to your clay package instructions (usually 275°F/135°C for 15-20 minutes). Let them cool completely.
Realistic Drips
Don’t overwork the icing. Let gravity do the work. Place a larger drop in the center and gently push it outward; if standard liquid clay is too runny, mix in a tiny bit of solid clay to thicken it.
Step 3: Icing and Decoration
-
Prepare the icing:
Pour liquid polymer clay into a small cup. For the pink donuts, mix in a tiny drop of pink alcohol ink or shavings of pink clay until smooth. Keep some plain white for the vanilla variation. -
Apply the glaze:
Using a needle tool or toothpick, carefully dab the liquid clay onto the top of the cooled donut. Let it pool naturally. -
Shape the drip:
Guide the liquid clay toward the edges, teasing it down slightly in random spots to create irregular, realistic drips. -
Add sprinkles:
While the icing is still wet, carefully place tiny sprinkles. You can use pre-made polymer clay sprinkles or tiny seed beads. For the black speckles seen in the photo, simple dots of acrylic paint can be added after baking. -
Final bake:
Bake the donuts again for roughly 10-15 minutes to set the liquid clay icing. Keep a close eye on them so the white icing doesn’t scorch. -
Gloss it up:
Once fully cooled, coat the icing part (not the bread part) with a high-gloss glaze or UV resin to give it that wet, sugary look. -
Assembly:
Using two pairs of pliers, open a gold jump ring and attach the donut’s eye pin to a gold lobster clasp.
Sprinkle Variety
Instead of polymer sprinkles, try using real cake nonpareils for texture, or use micro-gold beads for a luxurious touch. For a cruller look, twist two logs together before forming the circle.
Now you have a whole bakery’s worth of charms ready to gift or wear


Mini Fries In a Little Carton
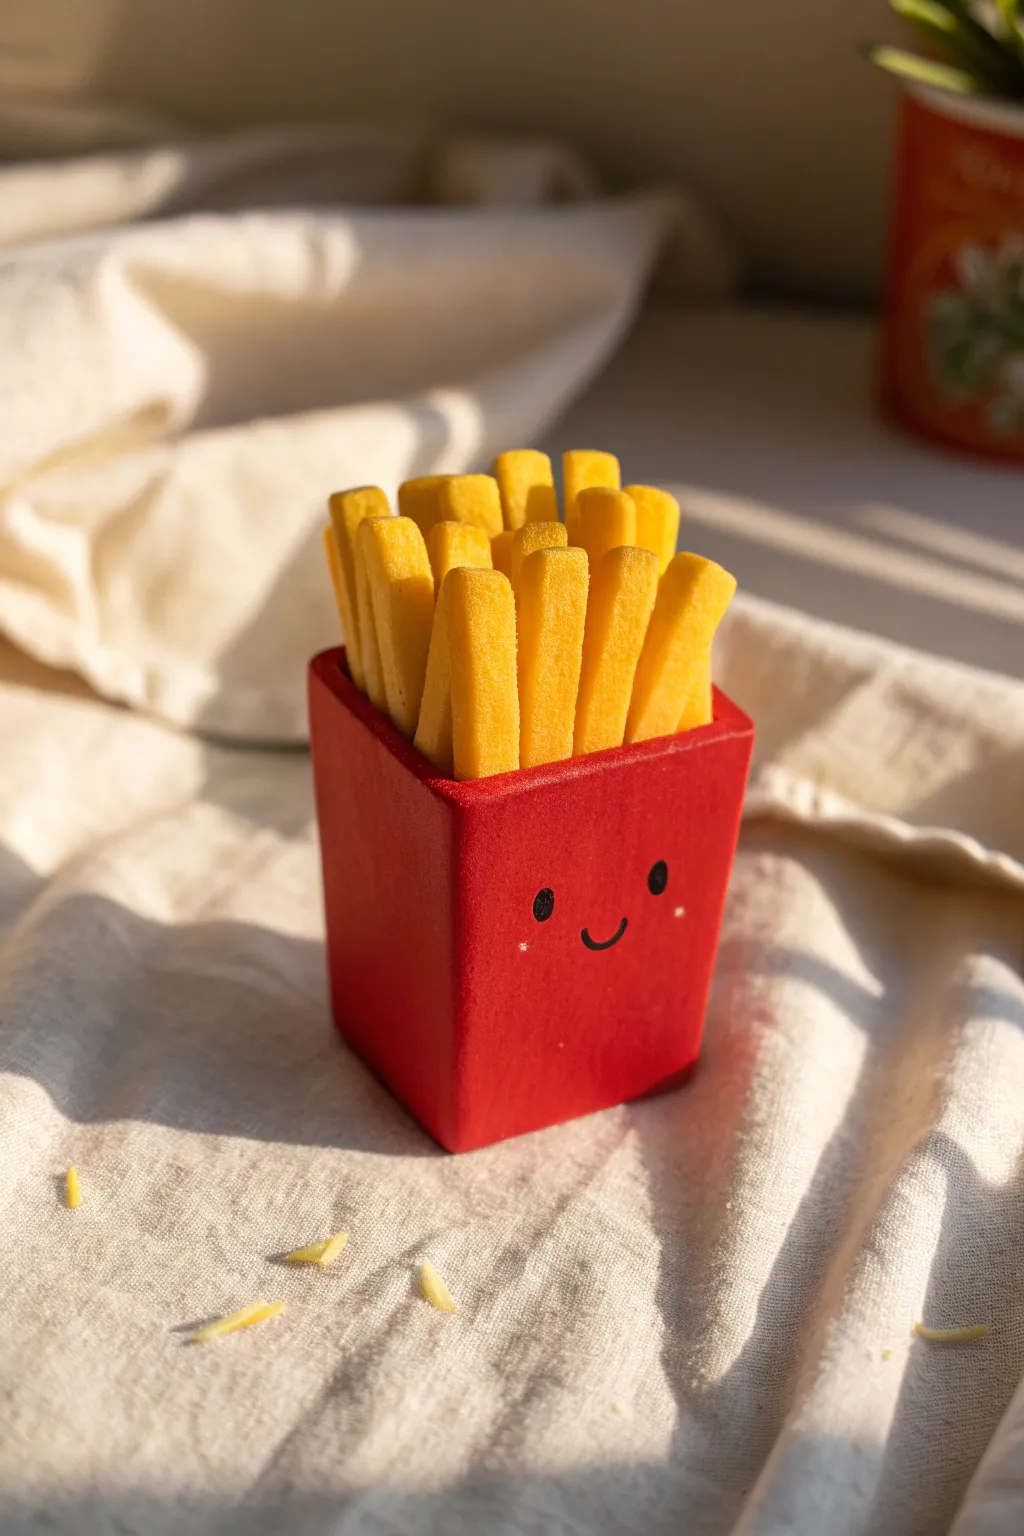
The only thing cuter than a fresh order of fries is this adorable miniature version complete with a blushing smile. This polymer clay project captures the golden texture of crispy potatoes tucked inside a classic red carton.
Step-by-Step Guide
Materials
- Red polymer clay
- Yellow or gold polymer clay
- Liquid polymer clay (optional)
- Black acrylic paint
- Pink acrylic paint or chalk pastel
- Fine detail paintbrush
- Toothbrush or textured tool
- Craft knife or clay blade
- Rolling pin
- Gloss glaze (optional)
Step 1: Shaping the Fries
-
Condition the Yellow Clay:
Start by warming up your yellow clay in your hands until it is pliable and smooth. If you want a more realistic color, try mixing a tiny speck of brown into bright yellow to tone it down. -
Roll a Slab:
Use your rolling pin or a pasta machine to roll the yellow clay into a thick slab, approximately 3-4mm thick. You want the fries to have a nice chunkiness to them. -
Add Texture:
Before cutting, gently press a clean toothbrush or a piece of crumpled aluminum foil onto the surface of the clay slab. This gives the fries that realistic, crispy-fried texture instead of looking smooth and plastic. -
Slice the Fries:
Use your clay blade to slice the slab into long, even strips. Don’t worry if the edges get slightly squished; just gently pinch them back into square shapes. -
Cut to Length:
Cut your strips into various lengths ranging from 1.5 cm to 2.5 cm. Having varied heights will make the arrangement in the carton look much more natural. -
Pre-Bake (Optional):
To prevent squishing your fries during assembly, I find it helpful to bake them for just 10 minutes at the manufacturer’s recommended temperature. This partial bake makes them firm enough to handle.
Sticky Situation
Red clay staining your yellow fries? Clean your hands and tools with alcohol or baby wipes thoroughly between colors to keep the yellow bright.
Step 2: Constructing the Carton
-
Prepare the Red Clay:
Condition your red clay nicely. Since red pigment can stain your hands, you might want to wipe your hands with a baby wipe before touching lighter clay later. -
Form the Base Block:
Roll a cube or rectangle of scrap clay (any color) to act as a filler core. This saves red clay and gives you a solid structure to build around. -
Wrap the Sides:
Roll out a sheet of red clay. Cut a strip that is wide enough to cover the height of your filler block. Wrap this strip tightly around the block, smoothing the seam where the edges meet. -
Create the Back:
The red carton should be slightly higher in the back than the front. Add a small extra rectangle of red clay to the back wall, blending the seams seamlessly so it looks like one piece. -
Refine the Shape:
Gently tap the carton on your work surface to flatten the bottom. Use your fingers to sharpen the corners so the box looks geometric and crisp.
Step 3: Assembly and Details
-
Insert the Fries:
If you used a filler block, press your yellow fries into the top of it. If you pre-baked them, you can use a dab of liquid clay to secure them in place. Arrange the taller ones in the back and shorter ones in the front. -
Crowd the Carton:
Make sure you pack them in tight. A sparse fry carton looks sad, so wedge in as many pieces as you can fit to create a bountiful look. -
Final Bake:
Bake the entire assembled piece according to your clay package instructions (usually 275°F/130°C for 15-30 minutes). Let it cool completely before painting. -
Paint the Eyes:
Using a very fine detail brush or a needle tool dipped in black acrylic paint, create two small oval shapes for eyes low on the front of the red carton. -
Add the Smile:
Paint a tiny ‘U’ shape between the eyes for the smile. Keep the line very thin for the cutest expression. -
Blushing Cheeks:
Use a dotting tool or toothpick to add two tiny white dots to the black eyes for highlights. Then, dry brush a tiny amount of pink pastel dust or paint near the cheeks for a rosy glow.
Level Up
Shave some yellow clay into tiny irregular crumbs and bake them. Glue these onto the surface around your carton for realistic ‘leftovers’
Place this cheerful little snack alongside your other miniatures for a pop of color and personality


Mini Burger Stacks With Chibi Layers
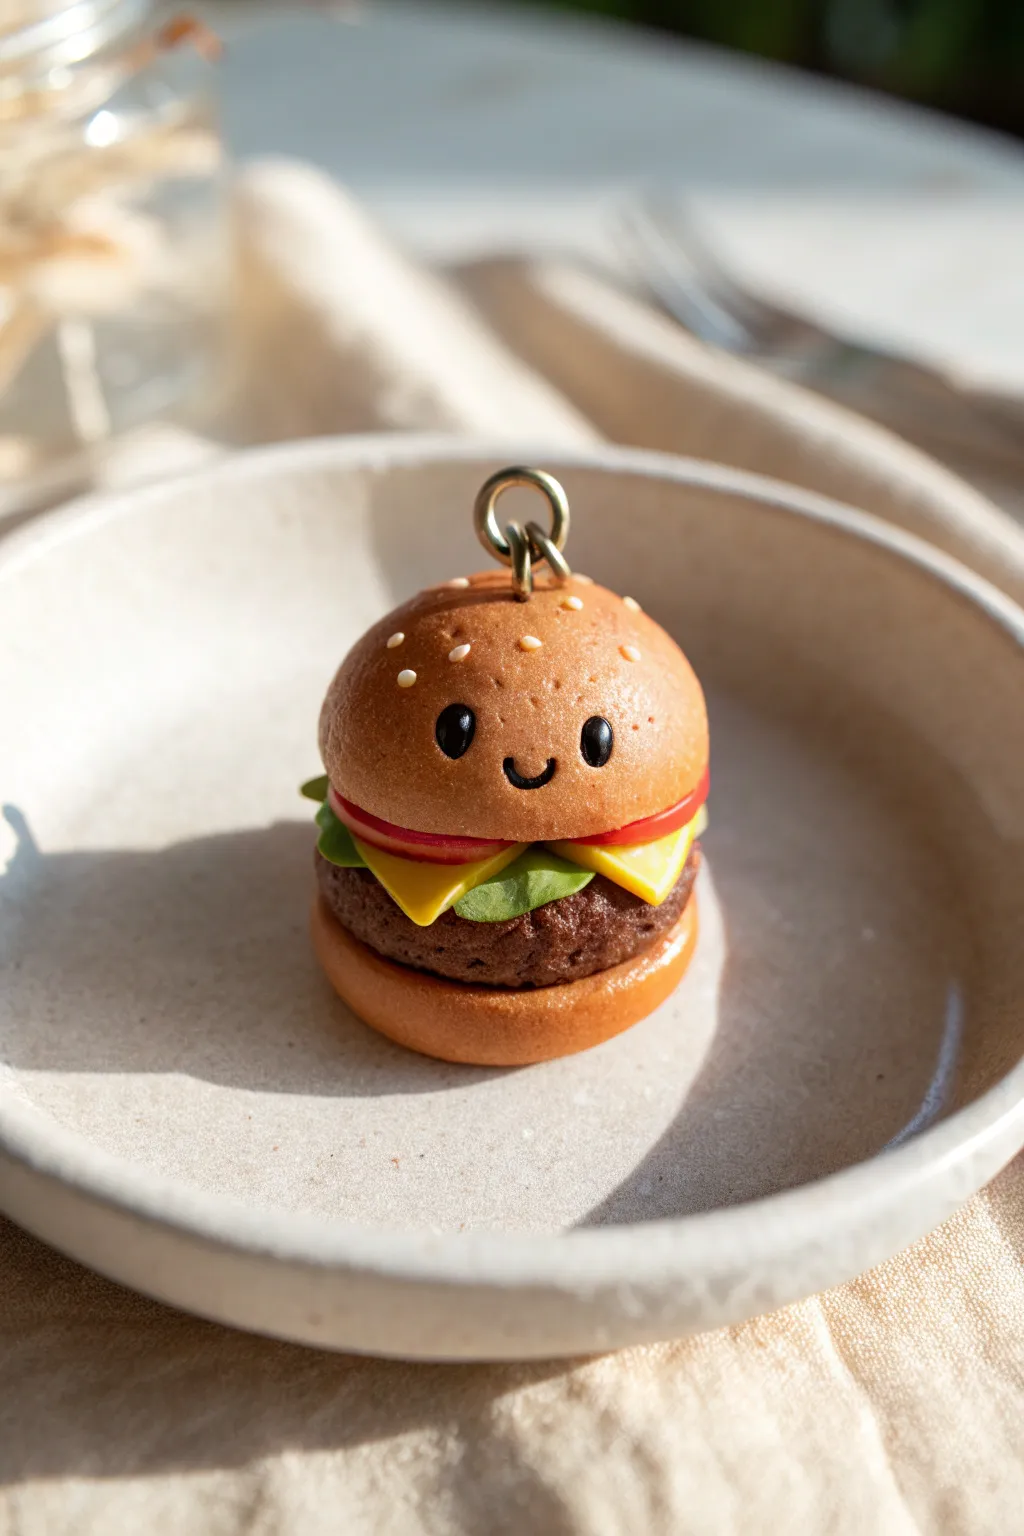
This adorable miniature burger charm features distinct, colorful layers and a sweet little face that brings the whole sandwich to life. It’s a perfect beginner sculpting project that results in a glossy, kawaii accessory you can actually wear.
Step-by-Step Tutorial
Materials
- Polymer clay (tan/ochre, dark brown, yellow, green, red, black, white)
- Liquid polymer clay or TLS (optional)
- Eye screw pin (silver or gold tone)
- Basic sculpting tools (needle tool, dotting tool)
- Small blade or craft knife
- Soft pastels (brown, orange) & brush for shading
- Toothbrush or texturing tool
- Gloss glaze (optional)
Step 1: Prepping the Buns
-
Mix the bun color:
Start by mixing translucent clay with a bit of ochre, tan, or light brown to create a realistic bread color. Split this clay into two portions: a slightly larger, domed piece for the top bun and a flatter disc for the bottom bun. -
Texture the surface:
For that freshly baked look, gently tap a clean toothbrush or a balled-up piece of aluminum foil over the domed surface of the top bun and the edges of the bottom bun to create bread texture. -
Shade the crust:
Scrape some brown and orange soft pastels into a powder. Using a dry brush, dust the top center of the bun dome to make it look deliciously golden brown.
Sticky Situation?
If your clay is too soft and sticky, especially the black for the face, stick it in the fridge for 10 minutes. Cold clay holds tiny details much better without smearing.
Step 2: Creating the Fillings
-
Form the patty:
Roll a ball of dark brown clay and flatten it into a thick disc, sized to match your bottom bun. Using a needle tool, poke and scratch the sides thoroughly to create a rough, meaty hamburger texture. -
Make the lettuce:
Take a small pinch of green clay and flatten it thinly. Use your fingers to ruffle the edges, tearing it slightly if needed for realism, and place it on top of the patty. -
Slice the cheese:
Roll out a very thin sheet of yellow clay. Use your craft knife to cut a square. Gently drape this over the lettuce so the corners droop down slightly. -
Add tomato slices:
Create a thin disc of red clay. You can adhere this directly on top of the cheese. Make sure a rim of red is visible from the side profile.
Step 3: Assembly and Cute Details
-
Stack the layers:
Place your prepared filling stack onto the bottom bun. Add the top bun dome to finish the structure. Press gently to secure everything without squashing the details. -
Add the smile:
Roll an incredibly thin snake of black clay. Cut a tiny U-shape and gently press it into the center of the top bun. Use a needle tool to refine the curve. -
Place the eyes:
Roll two tiny balls of black clay and press them onto the bun on either side of the mouth. Flatten them slightly so they aren’t protruding too much. -
Add eye highlights:
This is the secret to the ‘chibi’ look: place a microscopic dot of white clay in the upper corner of each black eye. It instantly adds life. -
Sprinkle sesame seeds:
Roll minuscule teardrops of white or very light tan clay. Press them randomly onto the top bun around the face area. -
Insert hardware:
Screw an eye pin deeply into the center top of the burger. I suggest removing it, adding a drop of liquid clay or super glue to the threading, and re-inserting it for extra durability. -
Bake and finish:
Bake according to your clay manufacturer’s instructions (usually 275°F/130°C for 15-30 minutes). Once cooled, applying a gloss glaze to just the tomato and eyes makes them pop.
Make It a Set
Don’t stop at a burger—use the same kawaii face technique to make a matching mini carton of fries or a tiny soda cup for a complete fast food charm bracelet.
Now you have a tiny, smiling burger friend ready to hang on a necklace or keychain


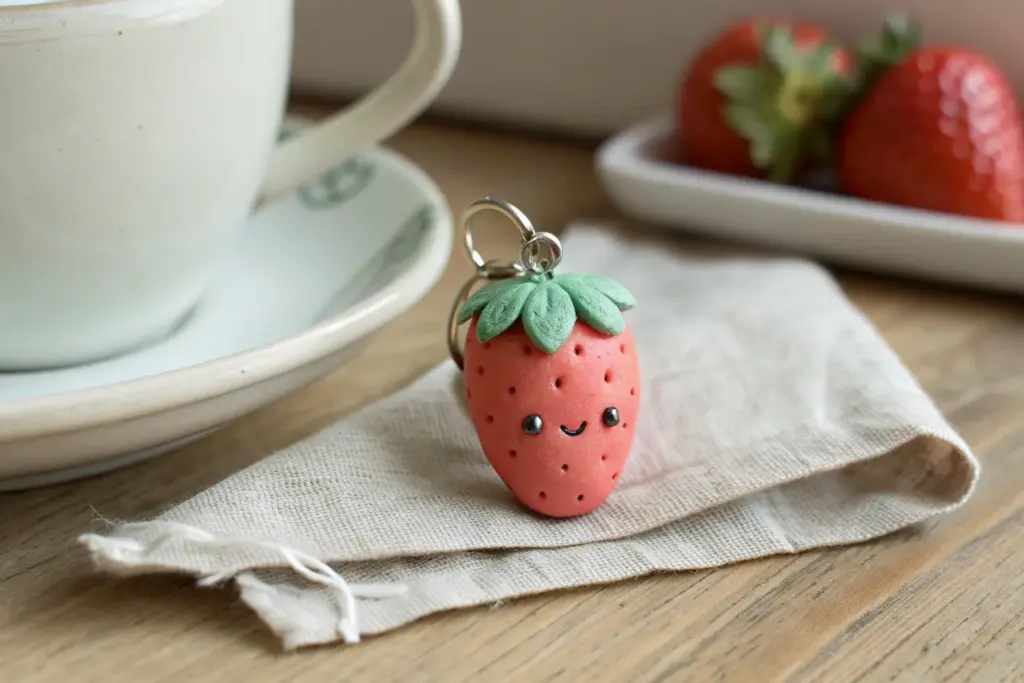
Mini Watermelon Slices With Blush Cheeks
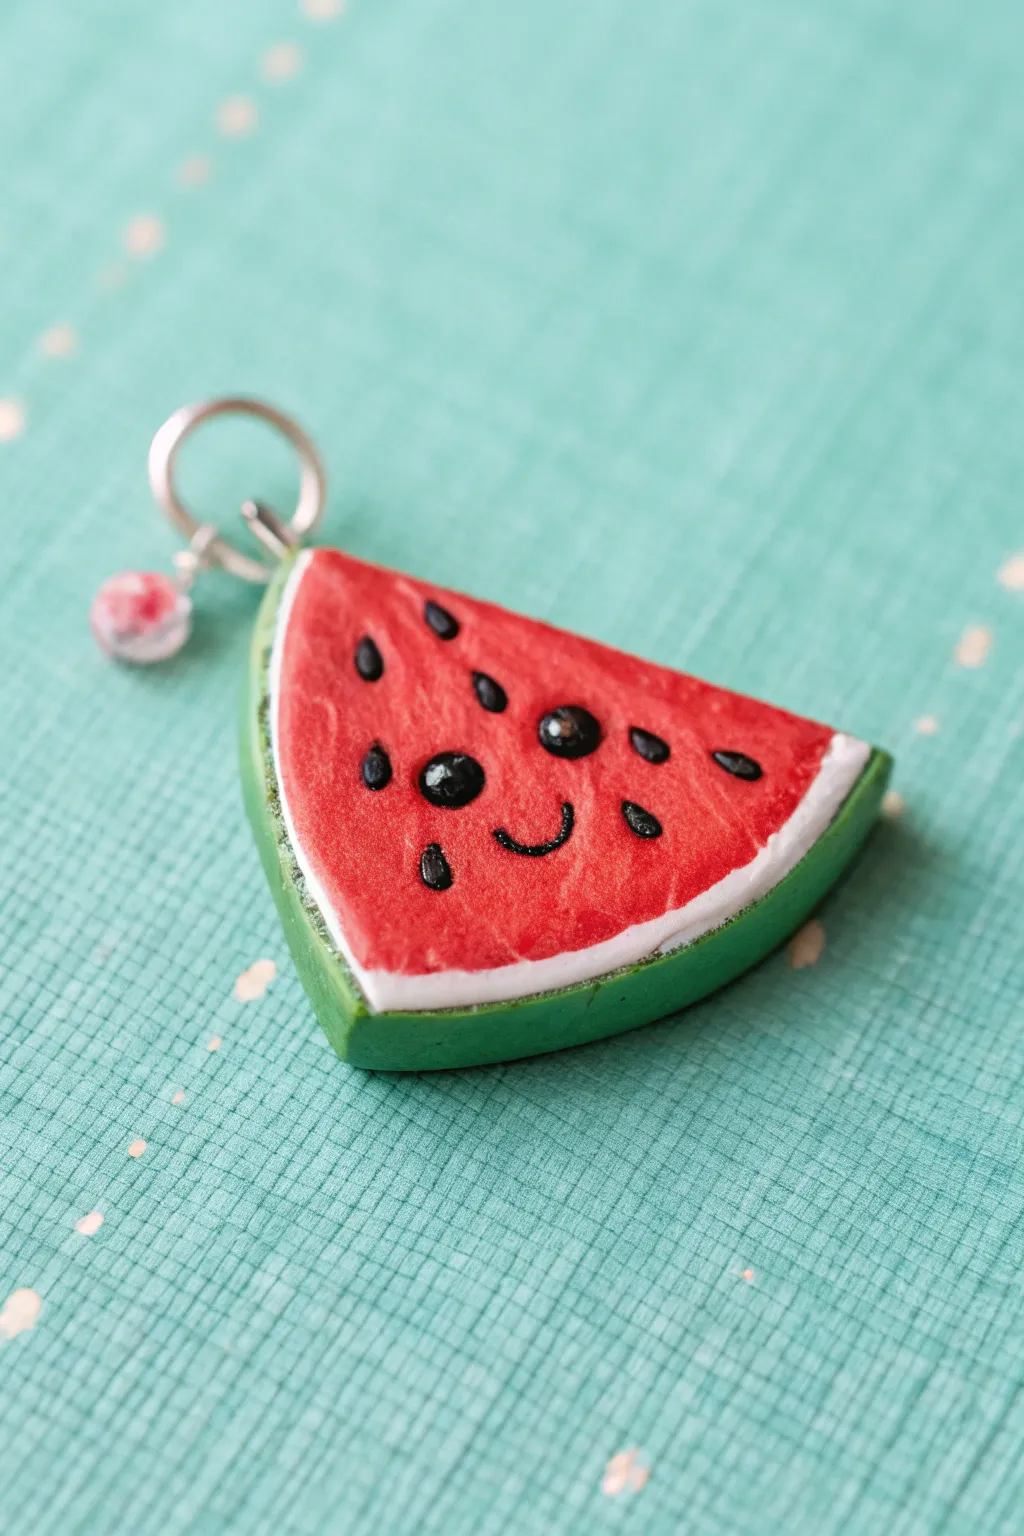
Capture the essence of summer with this adorable watermelon slice charm, featuring a charming kawaii face and realistic textures. This beginner-friendly project is perfect for creating cheerful keychains, pendants, or zipper pulls that look good enough to eat.
Step-by-Step Tutorial
Materials
- Polymer clay (emerald green, white, bright red, black)
- Clay roller or pasta machine
- sharp crafting blade or tissue blade
- Needle tool or toothpick
- Ball stylus tool
- Texturing tool (old toothbrush or stiff sandpaper)
- Headpin or eye screw
- Jump ring (silver)
- Small pink decorative bead (optional)
- Gloss glaze or UV resin
- Oven for baking
Step 1: Creating the Cane
-
Prepare the layers:
Start by conditioning your clays until they are soft and pliable. Roll a thick log of bright red clay about 1 inch in diameter; this will form the juicy flesh of the melon. -
Add the inner rind:
Roll out a sheet of white clay on a medium setting. Wrap this white sheet completely around the red log, smoothing the seam with your finger so it disappears. Trim any excess from the ends. -
Add the outer rind:
Roll out a sheet of emerald green clay, slightly thicker than the white layer. Wrap this around the white-covered log. Ensure the green layer covers the white entirely without trapping air bubbles. -
Consolidate the log:
Gently roll the entire log on your work surface to bond the layers together. I like to start from the center and roll outward to ensure even thickness. -
Form the slice shape:
Pinch the top of the log to create a teardrop or triangular prism shape. The rounded bottom will be the rind, and the pointed top will be the center of the slice.
Step 2: Slicing and Texturing
-
Slice the clay:
Using a very sharp tissue blade, slice the log into individual triangular pieces about 1/4 inch thick. A sharp blade is crucial here to prevent the layers from dragging or smearing. -
Apply texture:
Take a toothbrush or a piece of stiff sandpaper and gently tap it against the red red portion of the slice. This creates a realistic, porous fruit texture. -
Clean the edges:
If the texturing smudged the white or green lines, gently smooth them back into place with your finger or a flat tool.
Chill Out
If your clay cane gets too soft and the layers squash while slicing, pop the log in the fridge for 20 minutes to firm it up before cutting.
Step 3: Adding the Kawaii Face
-
Make the eyes:
Roll two tiny balls of black clay and press them onto the red area. Flatten them gently to create the eyes. -
Add eye highlights:
For that sparkling look, place a microscopic dot of white clay (or white paint after baking) in the upper corner of each black eye. -
Create the mouth:
Roll an incredibly thin snake of black clay. Cut a tiny U-shape and gently press it into the clay between the eyes to form a smile. -
Add seeds:
Roll several tiny teardrop shapes from black clay. Press these randomly around the face to represent watermelon seeds, pointing the narrow ends toward the center.
Seed Spacing
If your seeds look cluttered, use a needle tool to gently nudge them apart before baking, or pre-poke small holes where you want them to sit.
Step 4: Finishing Touches
-
Insert hardware:
Insert an eye screw or a headpin bent into a loop into the top corner of the slice. Ensure it goes deep enough to be secure. -
Bake the charm:
Bake the clay according to the manufacturer’s instructions (usually 275°F for 15-30 minutes). Let it cool completely before handling. -
Glazing:
Apply a coat of gloss glaze or UV resin over the red part and the eyes to make them look wet and juicy, leaving the rind matte if desired. -
Assembly:
Once dry, use pliers to attach a jump ring to the eye screw. Thread on a small pink bead for extra flair, and your charm is ready.
Now you have a refreshing little charm to brighten up your accessories collection

The Complete Guide to Pottery Troubleshooting
Uncover the most common ceramic mistakes—from cracking clay to failed glazes—and learn how to fix them fast.
Peas In a Pod Mini Charm
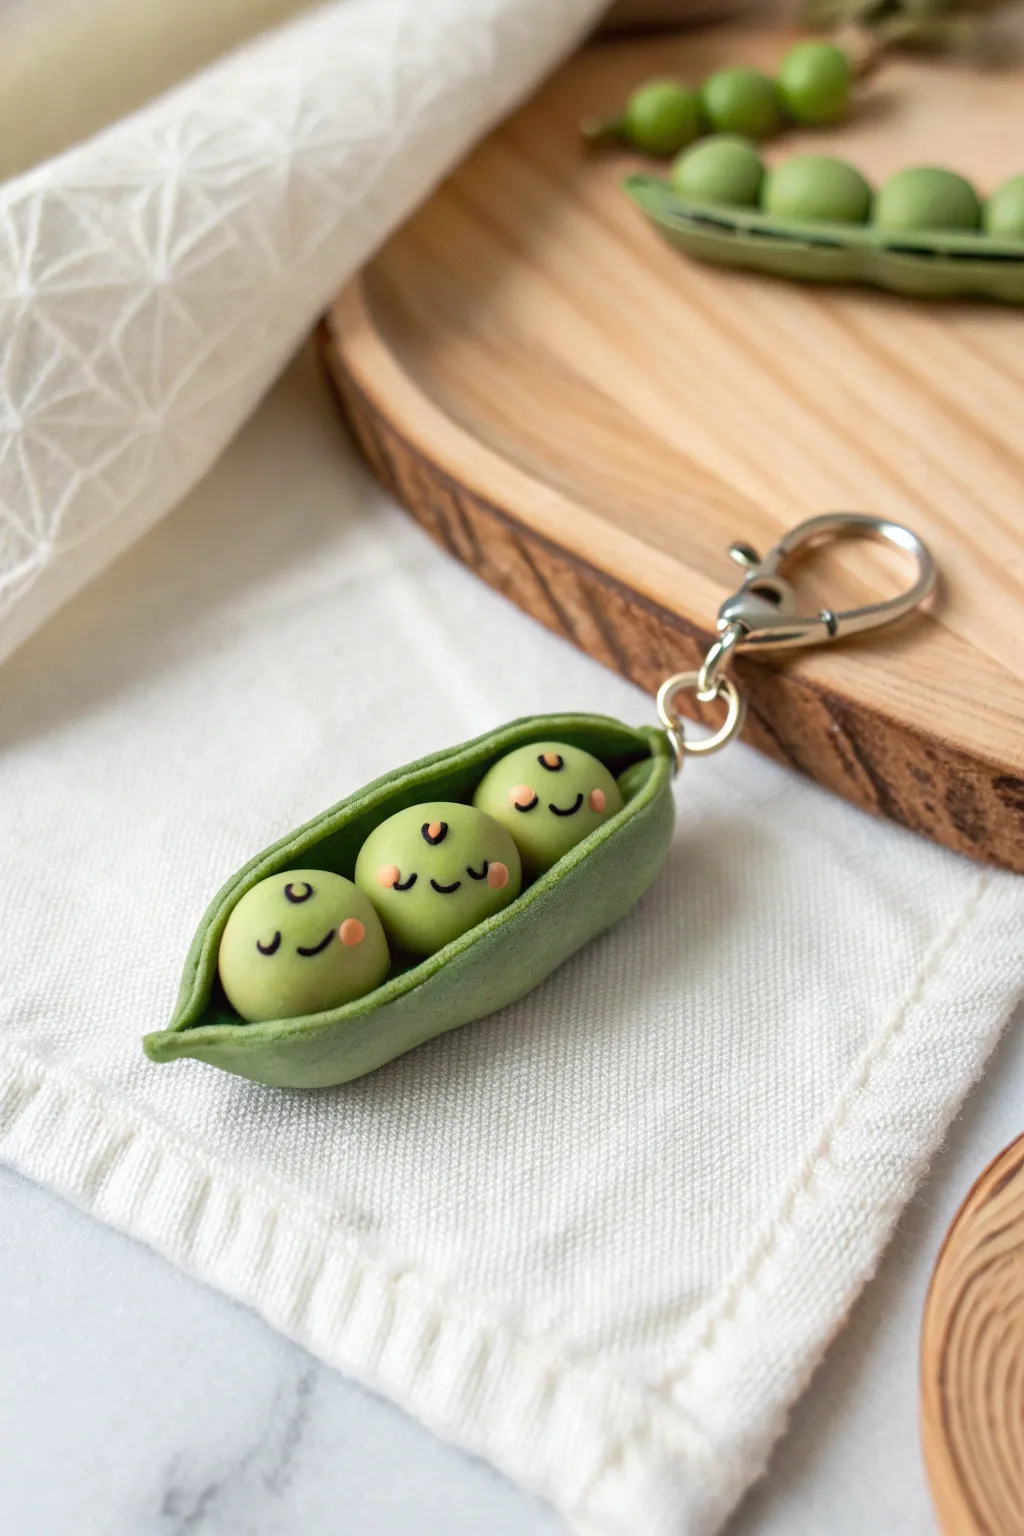
This adorable charm features three smiling peas snuggled inside a textured green pod. It’s a perfect beginner project to practice basic shaping and adding tiny, expressive details to polymer clay.
How-To Guide
Materials
- Polymer clay (light green, medium green, black, pink)
- Clay roller or pasta machine
- Ball tool or dotting tool
- Needle tool or toothpick
- Eye pin or screw eye
- Keychain hardware (lobster clasp, jump rings)
- Pliers
- Oven for baking
Step 1: Shaping the Peas
-
Portion the clay:
Start by taking a small amount of light green clay. We need to create the peas first so we know how big to make the pod later. Divide the clay into three equal portions. -
Roll spheres:
Roll each portion between your palms to create three smooth, identical spheres. Aim for a size just slightly larger than a dried pea, perhaps around 8-10mm in diameter. -
Check sizing:
Place the three spheres in a row to ensure they look uniform. If one looks too large or small, adjust the amount of clay now before moving on.
Step 2: Creating the Pod
-
Prepare darker green clay:
Condition a piece of medium green clay (slightly darker than the peas) until it’s soft and pliable. This contrast helps the peas pop visually. -
Form an oval log:
Roll the medium green clay into a short, thick log, then taper both ends to points so it resembles a grain of rice. -
Flatten the pod base:
Gently press the log down onto your work surface to flatten it slightly. You can use an acrylic roller to flatten the center while leaving the tapered tips slightly thicker. -
Create the cavity:
Use a ball tool or your finger to press a long indentation down the center of the flattened oval. This creates the ‘bed’ where the peas will sit. -
Texturizing:
For that realistic look shown in the photo, gently tap the outside of the pod with a clean toothbrush or stiff brush to give it a matte, natural texture.
Needle Tool Trick
Apply the tiny black clay facial features using the tip of a needle tool or toothpick. It’s much easier than trying to place them with your fingers.
Step 3: Assembly and Faces
-
Insert the peas:
Place your three light green spheres into the pod indentation. Press them down gently so they stick to the raw clay of the pod without losing their round shape. -
Shape the pod walls:
Carefully curl the edges of the pod up and around the peas. I like to pinch the very ends of the pod (the tapered tips) together to secure the shape. -
Add rosy cheeks:
Take tiny, microscopic amounts of pink clay and roll them into six small dots. Press these onto the peas—two for each pea—to create blushes. -
Create smiles:
Roll an incredibly thin snake of black clay. Cut tiny segments and curve them into ‘U’ shapes. Place one centered between the cheeks on each pea. -
Add eyes:
Using the same thin black snake, cut six smaller pieces. Curve them into downward arches (like sleeping eyes) and place them above the cheeks. You can use a needle tool to gently nudge them into perfect curves. -
Insert hardware:
Trim an eye pin to the correct length. Insert it into the top tapered end of the peapod. Secure it with a tiny bit of liquid clay if available for extra durability.
Glazed Finish
For a shiny, fresh-picked look, coat the baked peas with a gloss glaze, but leave the pod matte for a nice textural contrast.
Step 4: Baking and Finishing
-
Pre-bake check:
Give the piece a final look over. Use a baby wipe or cotton swab with rubbing alcohol to gently remove any fingerprints or dust specks. -
Bake:
Bake the piece according to the temperature and time instructions on your specific brand of polymer clay packaging. -
Cool down:
Allow the charm to cool completely before handling. Polymer clay is still slightly soft when hot and hardens as it cools. -
Attach keychain:
Use pliers to open a jump ring. Slide it through the eye pin loop on your charm and connect it to your keychain clasp. Close the jump ring securely.
Now you have a sweet trio of friends to keep your keys company
Mini Sunflower Magnets
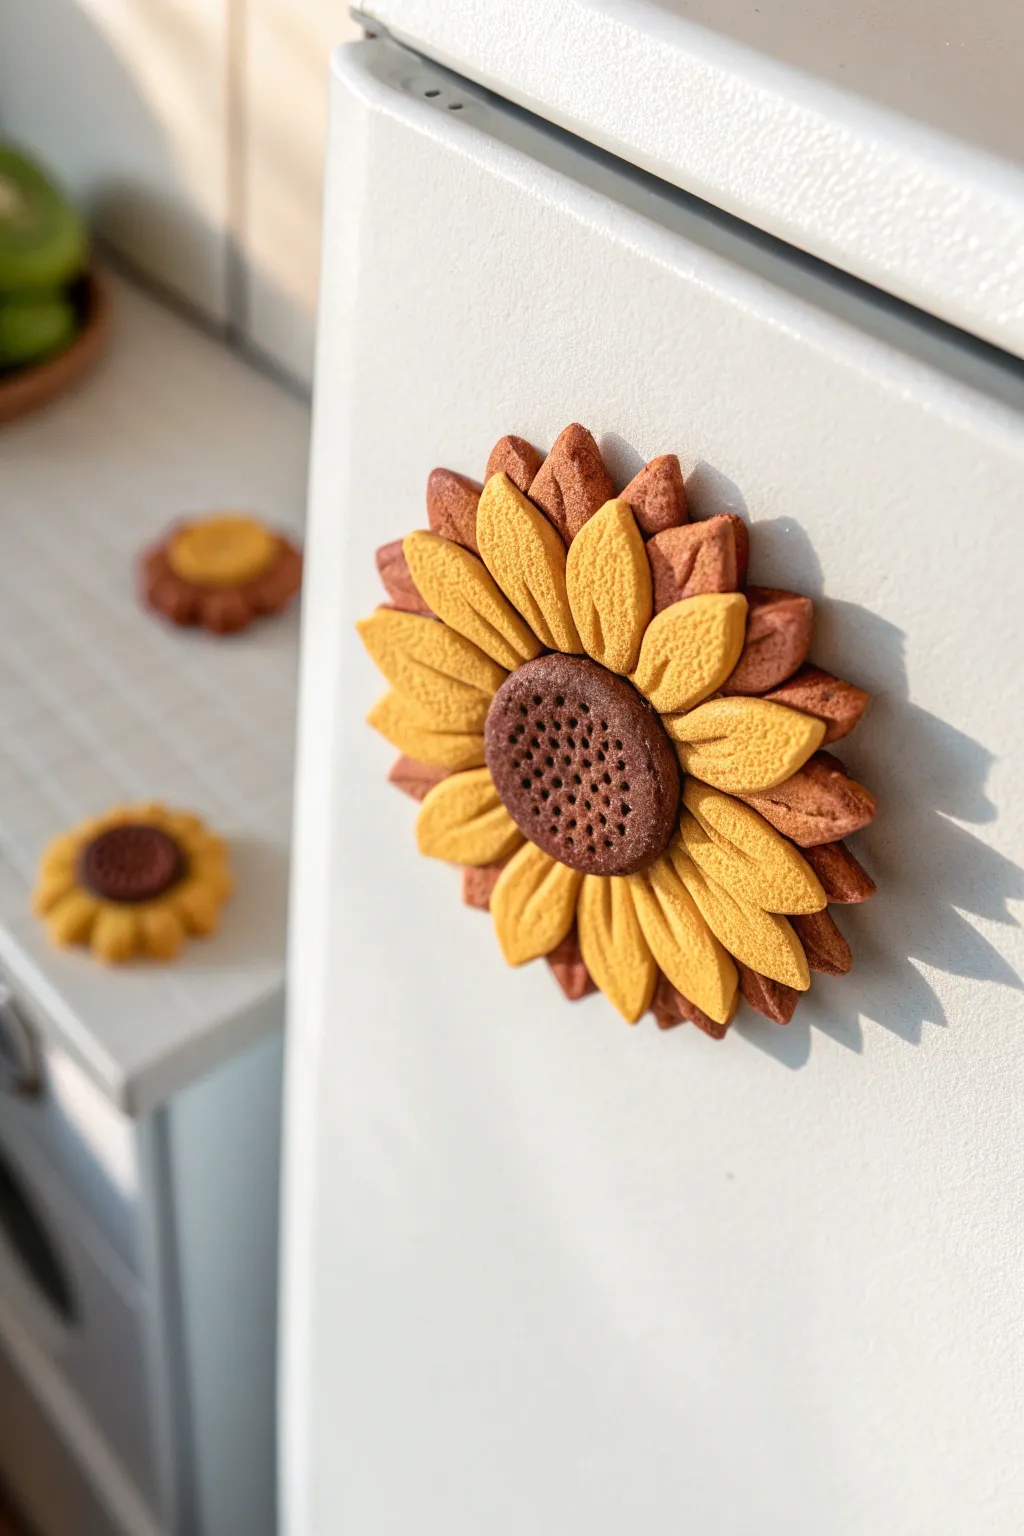
Brighten up your kitchen decor with these delightful sunflower magnets that look almost good enough to eat. With layered petals in rich yellow and warm brown tones surrounding a textured center, they add a cheerful, rustic touch to any magnetic surface.
Step-by-Step Guide
Materials
- Polymer clay (yellow, warm mid-brown, dark brown)
- Small round magnet
- Super glue or strong craft adhesive
- Needle tool or toothpick
- Small clay knife or X-Acto blade
- Rolling pin
- Texturing tool (clean toothbrush or stiff brush)
Step 1: Prepping the Base
-
Mix your colors:
Begin by conditioning your polymer clay until it is soft and pliable. You’ll need three distinct colors: a sunny yellow for the primary petals, a mid-brown (perhaps mixed with a touch of orange) for the back petals, and a dark coffee brown for the center disk. -
Form the base:
Flatten a small ball of scrap clay or the mid-brown clay into a thin disc about 1.5 inches in diameter. This will serve as the hidden base where you’ll attach your petals. -
Embed the magnet:
Press your round magnet gently into the back of this base disc so it sits flush. If you want a super secure hold, you can bury it slightly in the clay or wait to glue it on after baking—I usually prefer creating a designated indentation now and gluing later.
Step 2: Creating the Petals
-
Shape the back layer:
Take your mid-brown clay and roll it into a thin log. Slice off about 12-14 equal small pieces. Roll each piece into a teardrop shape. -
Flatten and arrange:
Flatten the teardrops gently with your finger. Arrange these brown petals around the perimeter of your base disc, pressing the pointed ends towards the center. They should slightly overlap to create a full look. -
Texture the back petals:
Using your needle tool or knife, press a central vein line down the middle of each brown petal. -
Shape the yellow layer:
Repeat the teardrop process with your yellow clay. Make these slightly smaller than the brown ones, as they will sit on top. -
Layer the yellow petals:
Place the yellow teardrops directly on top of the brown layer, nesting them in the gaps between the brown petals so the darker color peeks out from underneath. -
Add vein details:
Just like before, carefully press a central line down each yellow petal. For extra realism, add tiny, angled side veins branching off the center line to mimic a leaf texture.
Sticky Situation?
If your clay is too soft and sticky, leaching it helps. Place the clay between two sheets of plain white paper for an hour to absorb excess oil before shaping.
Step 3: The Center & Finishing
-
Form the seed head:
Roll a ball of the dark brown clay. Flatten it slightly into a thick button shape that is large enough to cover the messy center where all your petal points meet. -
Seed texture:
Place the dark button in the center of the flower. Use a needle tool to poke many small, deep holes into this center disk to mimic sunflower seeds. -
Surface texture:
For that soft, pollen-like look, gently tap a clean toothbrush or texturing brush over the surface of the petals and the center, removing any shiny fingerprints. -
Bake:
Bake the clay according to the manufacturer’s instructions for your specific brand. Usually, this is around 275°F (135°C) for 15-30 minutes. -
Cool down:
Allow the flower to cool completely before handling. Polymer clay is fragile when hot. -
Secure the magnet:
If you didn’t bake the magnet into the clay, apply a drop of super glue to the indentation on the back and press your magnet firmly in place.
Cookie Effect
To make them look like the baked cookies in the photo, brush a tiny bit of soft pastel powder (brown or orange) on the petal edges before baking for a toasted look.
Enjoy seeing your little sunflowers brighten the kitchen every time you reach for a snack


What Really Happens Inside the Kiln
Learn how time and temperature work together inside the kiln to transform clay into durable ceramic.
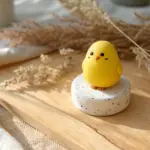
Mini Cat Head Figurines
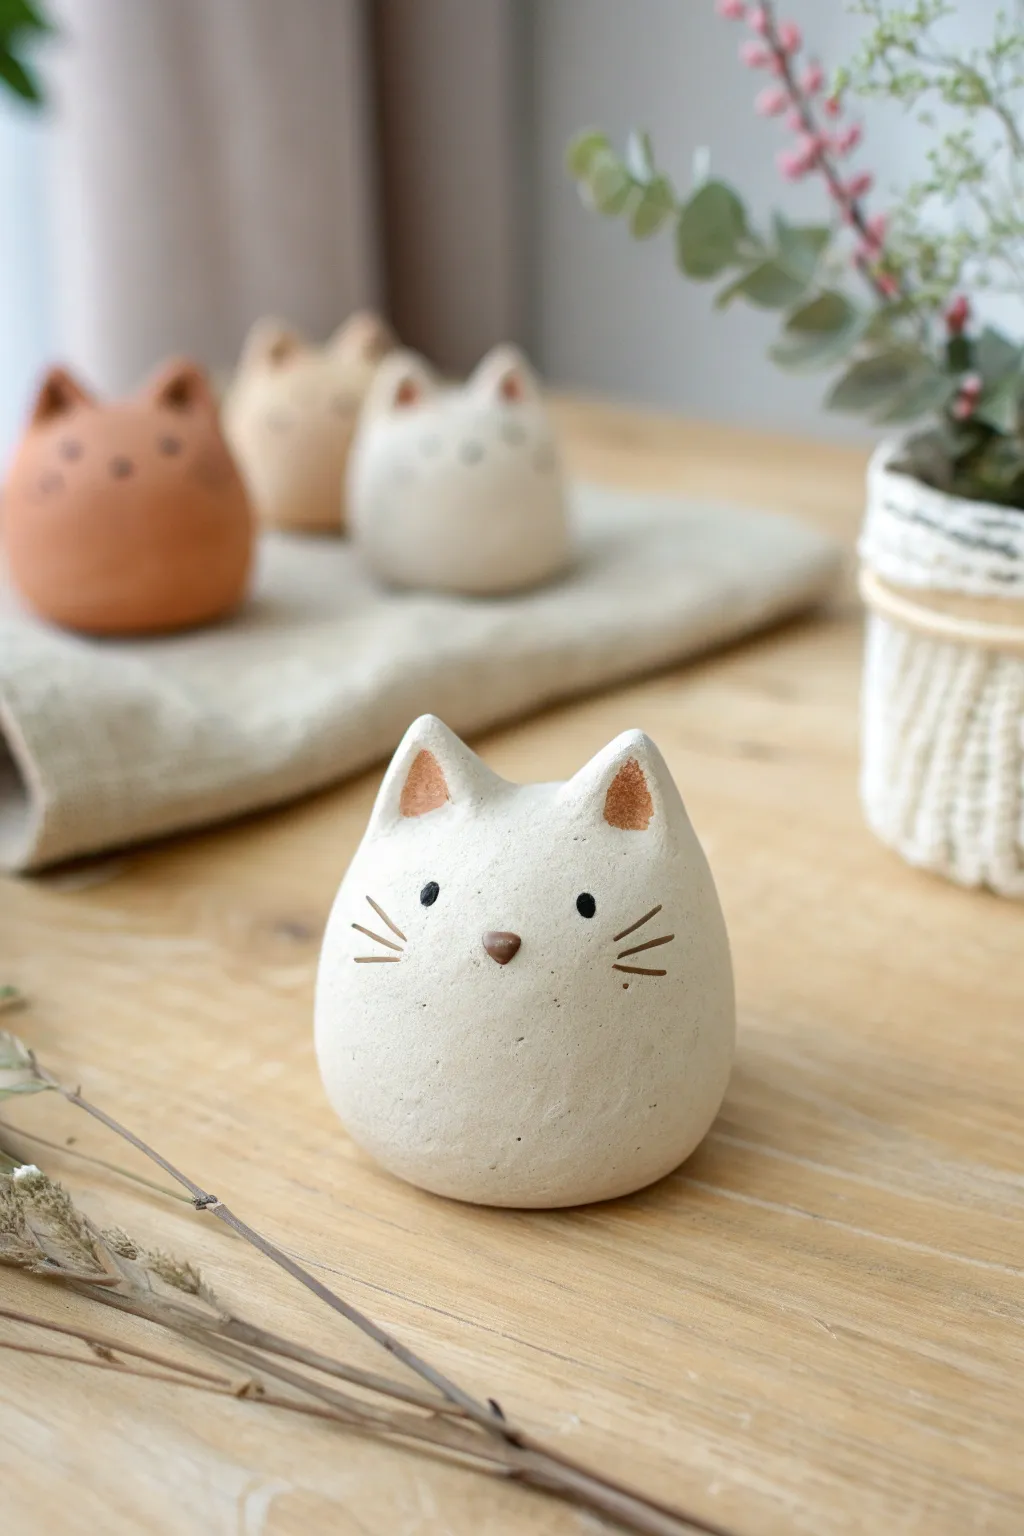
These charming, egg-shaped cat figurines are the perfect beginner project for mastering simple forms. With their minimalistic faces and earthy textures, they make adorable desk companions or tiny decor accents.
Step-by-Step
Materials
- White or light beige creative paper clay (air-dry) or polymer clay
- Acrylic paints (black, warm brown, terracotta/rust)
- Fine-grit sandpaper or sanding sponge
- Small bowl of water (for smoothing)
- Fine point detail paintbrush
- Dotting tool or toothpick
- Matte sealant or varnish (optional)
Step 1: Shaping the Base
-
Condition the clay:
Start by taking a golf-ball-sized amount of clay and kneading it firmly in your hands until it becomes warm, soft, and pliable, which prevents cracking later. -
Roll a sphere:
Roll the clay between your palms to create a smooth, tight ball. Press firmly at first to compress the clay, then lighten your touch to perfect the round shape. -
Form the egg shape:
Gently taper the top of the sphere slightly to create a very subtle egg shape, with the bottom remaining wider and heavier so the figurine will sit flat. -
Create the flat bottom:
Tap the wider end of your egg shape gently onto your work surface. Press down lightly to create a stable, flat base so the cat won’t wobble. -
Pinch the ears:
Using your thumb and index finger, gently pinch two small triangles of clay at the top of the head to form the ears. I find it helpful to keep them slightly rounded at the tips for a softer look. -
Refine the ears:
Use a modeling tool or your finger to smooth the transition between the ears and head, ensuring there are no visible seams or cracks where the clay was pulled. -
Smoothing process:
Dip your finger in a tiny bit of water and rub it over the entire surface of the cat to remove fingerprints and imperfections. -
Dry completely:
Allow the figurine to dry completely according to your clay package’s instructions. Air-dry clay usually takes 24-48 hours, while polymer requires baking.
Smooth Operator
For a truly stone-like finish, dab a textured sponge lightly over the wet clay before drying. This mimics the porous look of ceramic.
Step 2: Sanding and Detailing
-
Sand for texture:
Once hardened, gently sand the surface with fine-grit sandpaper. Don’t aim for perfection; a little irregularity adds to the rustic, stony aesthetic shown in the photo. -
Wipe clean:
Use a slightly damp cloth or a dry soft brush to remove all clay dust from the sanding process before you start painting. -
Paint the inner ears:
Mix a small amount of terracotta or rust-colored paint with a drop of water to create a wash. Dap this into the triangular inner section of each ear. -
Add the nose:
Using a fine brush, paint a small, inverted triangle in warm brown for the nose. Place it right in the center of the face, slightly lower than midway down. -
Dot the eyes:
Dip a dotting tool or the back of a paintbrush into black acrylic paint. Carefully press two dots onto the face, spacing them widely apart on either side of the nose. -
Draw whiskers:
With your finest brush and thinned brown paint, paint three short, quick strokes on each cheek for whiskers. Keep the lines thin and slightly radiating outward. -
Seal the work:
Finish by applying a coat of matte varnish to protect the paint and give the clay a unified, finished sheen without making it too glossy.
Purr-fect Variations
Make a whole family by using terracotta colored clay for the body instead of white, or add tiny gray spots for a tabby texture.
Enjoy arranging your little trio of minimalist cats on a shelf or windowsill
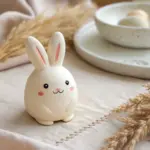
Mini Sleepy Bunny Buddies
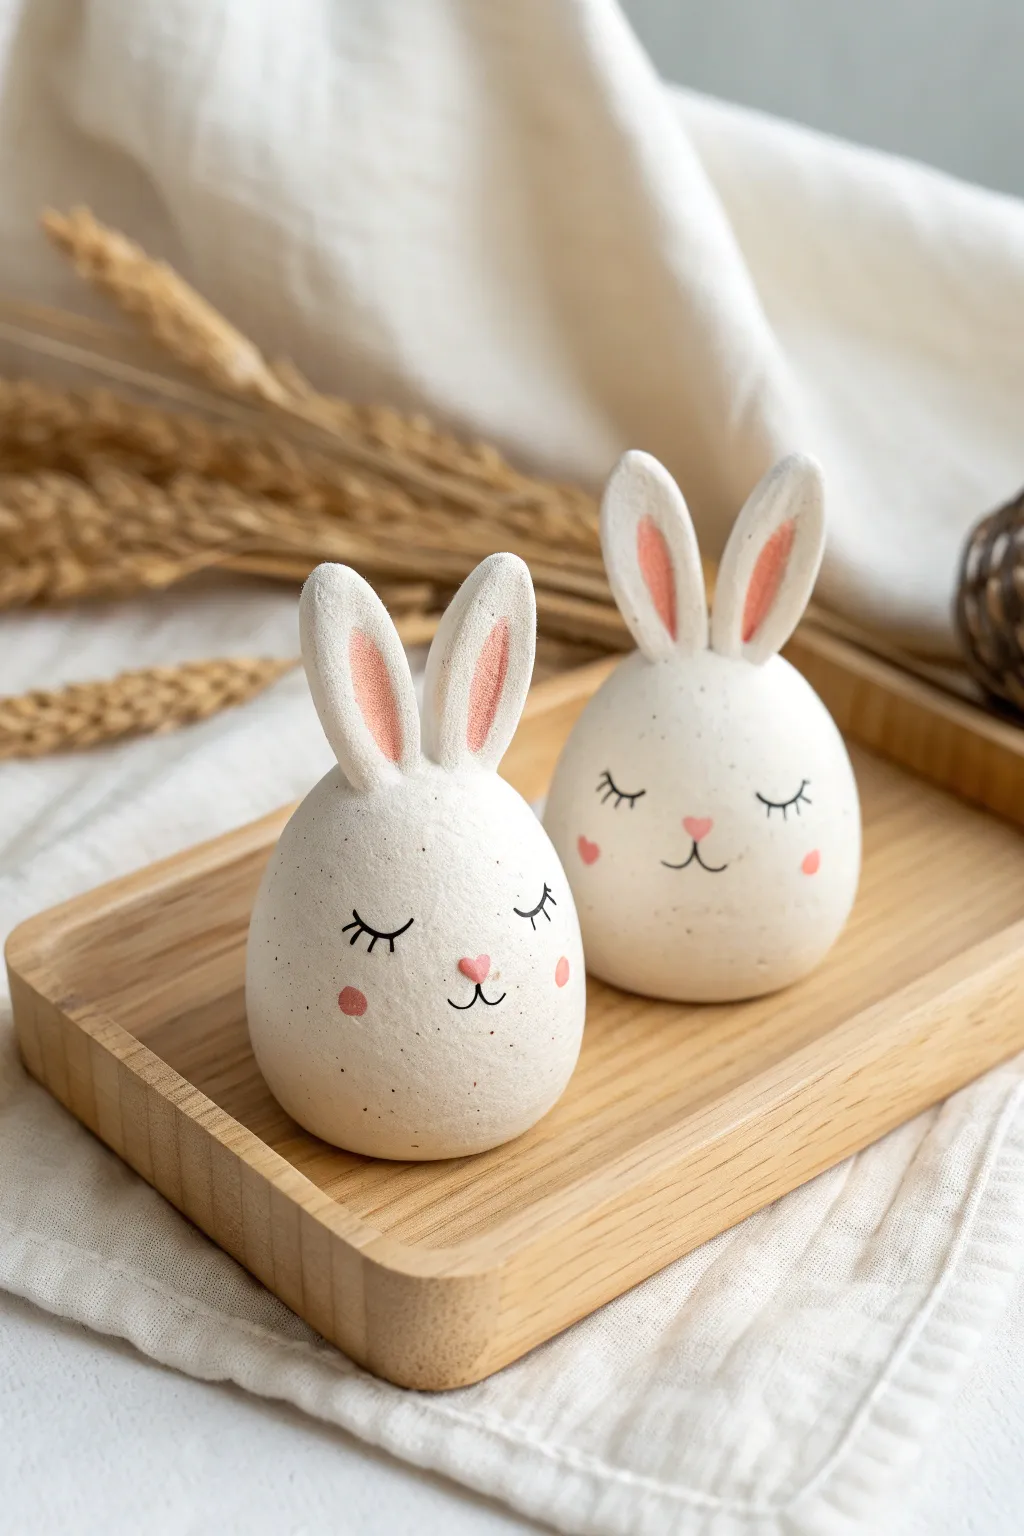
These adorable egg-shaped bunnies are perfect for adding a touch of whimsy to your desk or Easter decor. With their minimalist faces and textured ears, they are an approachable project that balances simple sculpting with delicate painting.
Step-by-Step Tutorial
Materials
- White polymer clay or air-dry clay (approx. 50g per bunny)
- Acrylic paints: Black, pastel pink, and white
- Fine detail paintbrush (size 0 or 00)
- Clay sculpting tools (specifically a needle tool or toothpick)
- Parchment paper or a ceramic tile (for a work surface)
- Sandpaper (fine grit, optional)
- Clear matte varnish (optional)
Step 1: Sculpting the Base
-
Prepare the Clay:
Condition your white clay by kneading it in your hands until it is soft, pliable, and free of cracks. If using polymer clay, the warmth of your hands is essential here. -
Form the Body:
Roll a ball of clay roughly the size of a golf ball or slightly larger. Gently roll one side against your palm to taper it slightly, creating a smooth egg shape. -
Flatten the Bottom:
Press the wider end of your egg shape gently onto your work surface. Tap it a few times to create a flat base so the bunny stands upright securely without wobbling. -
Check the Surface:
Inspect the body for fingerprints or lint. Smooth these out with your thumb or a drop of baby oil if you are using polymer clay.
Keeping It Clean
White clay attracts dust like a magnet. Keep a pack of baby wipes nearby and clean your hands and tools constantly before touching the white clay to avoid gray smudges.
Step 2: Creating the Ears
-
Shape the Ear Pieces:
Pinch off two smaller pieces of clay for the ears. Roll them into small logs, then taper one end to a point. -
Flatten and Texture:
Gently press the logs flat. Use a needle tool or toothpick to press an indentation into the center of each ear, running from the base almost to the tip. This creates the inner ear channel. -
Refine the Texture:
For that slightly rustic look seen in the photo, roughen the inside of the ear indentation by stippling it lightly with your needle tool or an old toothbrush. -
Attach the Ears:
Place the ears on the top of the head, spaced slightly apart. Blend the clay at the base of the ears downwards into the head using a modeling tool or your finger to ensure a seamless connection. -
Final Shaping:
Once attached, give the ears a gentle squeeze or curve them slightly if you want to add personality. Ensure they are standing straight up.
Make It a Set
Create a whole family by varying the sizes of the eggs. You can turn one bunny’s ear down for a ‘lop-eared’ look, or paint opened eyes on another for variety.
Step 3: Finishing and Painting
-
Initial Drying/Baking:
If using polymer clay, bake according to the package instructions. If using air-dry clay, let it sit in a dry place for 24-48 hours until completely hard. -
Sand Imperfections:
Once hardened, lightly sand any rough spots, especially where the ears join the head, using fine-grit sandpaper. -
Adding Speckles (Optional):
To mimic the stone-like texture in the image, you can dilute a tiny bit of brown or grey paint and flick it onto the bunnies with an old toothbrush. Let this dry completely. -
Paint the Inner Ears:
Mix a soft, pastel pink acrylic paint. Carefully fill in the textured indentation you made in the ears earlier. A dry-brush technique works well here to keep the texture visible. -
Paint the Cheeks:
Using the same pink, paint two small circles or soft ovals for cheeks on the wider, lower part of the face. You can also paint floating hearts in the ‘air’ like the photo shows. -
Add the Nose:
Paint a small, upside-down heart in pink right between the cheeks to serve as the nose. -
Paint the Eyes:
Switch to black paint and your finest brush. Paint two downward-curving arcs for sleepy eyes. Add three tiny eyelashes to the outer corner of each eye. -
Define the Mouth:
Paint a very thin, small ‘w’ shape or two curved lines extending downwards from the point of the heart nose to create the mouth. -
Seal the Project:
Allow all paint to dry fully. I usually give it an extra hour just to be safe. Coat the entire figurine with a clear matte varnish to protect your paint job.
Now you have a sweet little bunny friend ready to sit quietly on your shelf

TRACK YOUR CERAMIC JOURNEY
Capture glaze tests, firing details, and creative progress—all in one simple printable. Make your projects easier to repeat and improve.
Mini Mushroom Pals With Spots
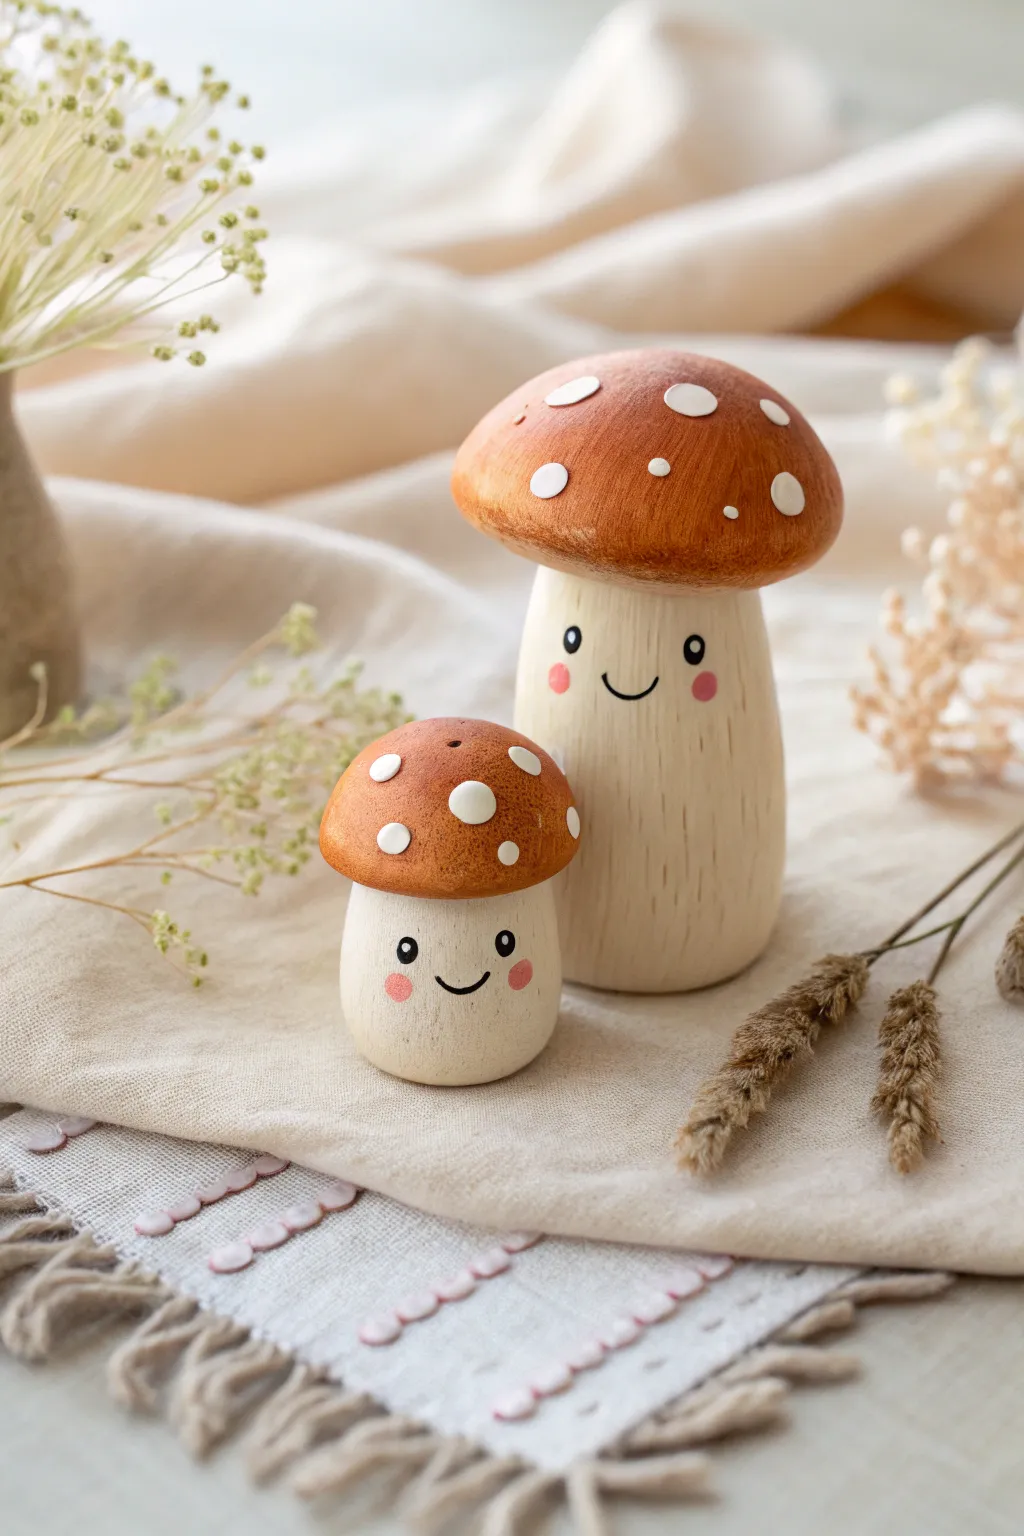
Create a pair of charming woodland friends that look like they were carved from wood but are actually sculpted from clay. These mini mushrooms feature sweet painted faces, speckled caps, and a faux-wood grain finish that brings a cozy, rustic vibe to your shelf.
Step-by-Step
Materials
- Polymer clay (white or beige)
- Aluminum foil
- Acrylic paints (burnt sienna, cream/off-white, black, pink, white)
- Small flat brush
- Fine detail brush
- Dotting tool or toothpick
- Coarse sandpaper or a stiff bristle brush
- Matte varnish (optional)
Step 1: Sculpting the Base Shapes
-
Create foil cores:
Crumple two small pieces of aluminum foil into rough approximations of the mushroom shapes. Make one slightly larger than the other to create size variation between the two pals. -
Condition the clay:
Knead your white or beige polymer clay in your hands until it becomes soft and pliable, which prevents cracking later. -
Check sizes:
Divide your clay into two portions corresponding to your foil cores. You will need about two-thirds of the clay for the larger mushroom. -
Form the stalks:
Roll a cylinder of clay and insert the smaller foil core inside, smoothing the clay over it to create a thick, sturdy stalk. The bottom should be flat so it stands on its own. Repeat for the larger stalk. -
Shape the caps:
Roll two balls of clay and flatten the bottoms slightly to create a dome shape. These should be wider than the stalks to create that classic mushroom overhang. -
Assemble the mushrooms:
Gently press the caps onto the stalks. I prefer to score the joining surfaces slightly with a needle tool to help them grip before blending the seam underneath just enough for stability.
Paint Slipping?
If acrylic paint beads up on the baked clay, the surface might be too slick. Lightly sand the smooth areas with fine-grit sandpaper to give the paint something to grab onto.
Step 2: Texturing and Baking
-
Add wood grain texture:
Before baking, take a stiff bristle brush or a crumpled ball of aluminum foil and drag it vertically down the stalk. This creates gentle grooves that mimic natural wood grain. -
Smooth the caps:
Ensure the tops of the caps are perfectly smooth. Minimal texture here helps the ‘painted’ look later. -
Bake the clay:
Place your mushrooms on a baking sheet and bake according to your specific clay package’s instructions (usually around 275°F/130°C for 15-30 minutes). Let them cool completely before painting.
Step 3: Painting the Faux Wood Finish
-
Apply base coat:
Paint the entire stalk with a cream or off-white acrylic paint. You might need two layers for full opacity. -
Enhance the grain:
Mix a very watery wash of light brown paint. Brush this over the stalk so the pigment settles into the vertical grooves you made earlier, highlighting the texture. -
Paint the caps:
Paint the mushroom caps with a warm burnt sienna or rust-orange color. Use a sponge or brush to dab the color on, leaving it slightly translucent in areas to look like stained wood.
Creating Organic Spots
Don’t make your white spots perfect circles! Wiggle your brush slightly when applying them. Irregular, rough-edged shapes look much more like real mushroom markings.
Step 4: Adding the Personality
-
Add the spots:
Using a white paint and a small round brush or dotting tool, dab irregular circular spots onto the orange caps. Vary the sizes—some large, some tiny specks—for a natural feel. -
Draft the faces:
Lightly mark where the eyes and mouth will go with a pencil to ensure the expression is centered on the stalk. -
Paint the eyes:
Use a dotting tool dipped in black paint to create two solid circles for eyes. Place them fairly wide apart for a cute look. -
Add eye highlights:
Once the black is dry, use a pin or the very tip of a toothpick to add a tiny white sparkle dot to the upper right of each eye. -
Draw the smile:
With an ultra-fine detail brush and thinned black paint, carefully paint a small ‘U’ shape between the eyes for the smile. -
Rosy cheeks:
Dip a cotton swab or a dry brush into a tiny amount of pink paint. Dab off the excess, then gently press pink circles just below and outside the eyes. -
Seal the work:
Finish by applying a coat of matte varnish over the entire piece to protect the paint and unify the sheens.
Place your little duo on a windowsill or among potted plants to add a touch of whimsy to your home decor