Whenever I need a kid-friendly project that feels like a quick win, I reach for mini clay—tiny shapes are easier to finish and way more satisfying to show off. These mini clay ideas for kids are all about simple rolls, balls, and pinches that turn into instantly recognizable little cuties.
Tiny Fruit Charms
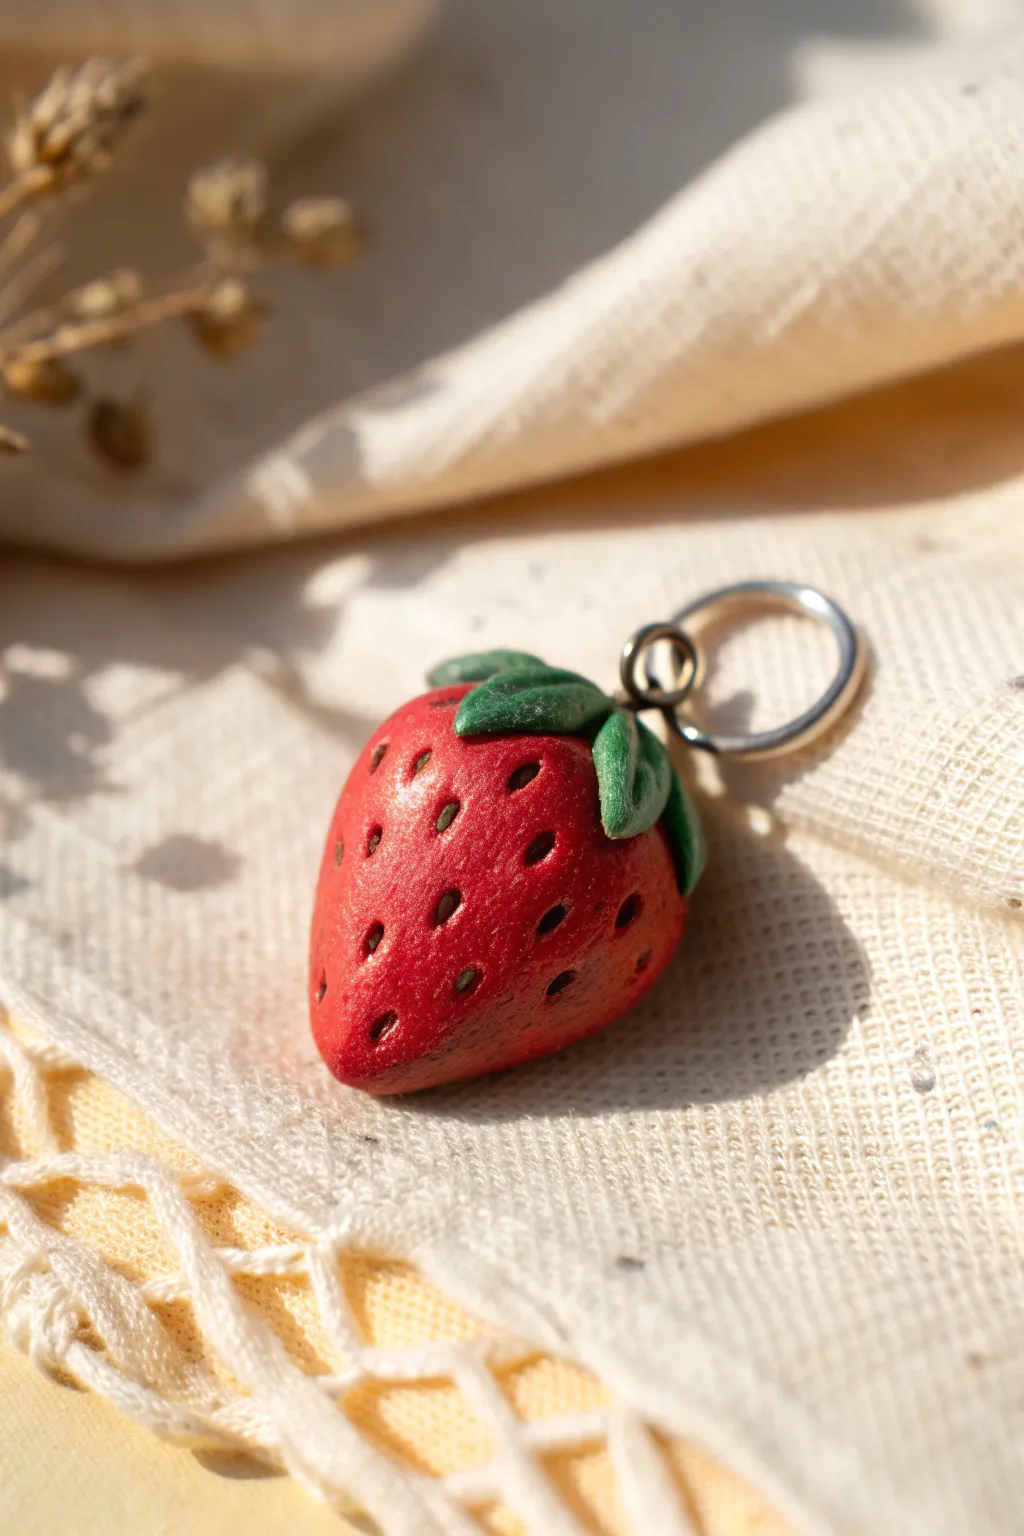
This miniature strawberry charm captures the sweetness of summer with its realistic texture and vibrant colors. It is a perfect beginner project that teaches basic sculpting and detailing techniques to create a durable, wearable accessory.
Detailed Instructions
Materials
- Red polymer clay
- Green polymer clay
- Liquid clay (translucent or red)
- Needle tool or toothpick
- Small metal jump ring
- Gloss glaze or polyurethane varnish
- Soft paintbrush
- Brown acrylic paint (optional for aging)
- Small eye pin (if burying inside before baking)
Step 1: Shaping the Berry
-
Condition the Clay:
Start by warming up a small chunk of red polymer clay in your hands. Knead and roll it until it is soft, pliable, and free of any cracks. -
Form the Base Ball:
Roll the red clay into a smooth sphere about the size of a marble. Ensure the surface is completely smooth before moving on. -
Create the Strawberry Shape:
Gently pinch and roll one end of the sphere to taper it, forming a soft cone shape. Flatten the wider top slightly to create a shoulder for the leaves. -
Add Texture:
Using a needle tool, gently poke small indents all over the surface of the red cone. These will represent the seed pockets. -
Define the Seeds:
Instead of just poking, press the needle tool in at a slight angle and drag downward just a fraction of a millimeter to create a teardrop-shaped indent.
Pro Tip: No Fingerprints
To avoid leaving fingerprints on your smooth berry, lightly dust your fingertips with a bit of cornstarch or baby powder before handling the soft clay.
Step 2: Adding the Greens
-
Prepare Green Clay:
Take a tiny amount of green clay and condition it well. Roll it into a very thin snake. -
Form the Sepals:
Cut five or six tiny pieces from the green snake. Flatten each piece slightly between your fingers to create small leaf shapes. -
Attach the Leaves:
Press the green leaves onto the flat top of the strawberry, radiating outward from the center. I find using a small dot of liquid clay acts as a great glue here. -
Texture the Leaves:
Use your needle tool to press a central vein into each leaf, which also helps bond the green clay firmly to the red base. -
Create the Stem Base:
Roll a tiny ball of green clay and place it right in the center where all the leaves meet to finish the cap.
Step 3: Finishing Touches
-
Insert the Hardware:
Push an eye pin or a small jump ring directly into the center of the green stem base. If using a jump ring, ensure the opening is submerged or the wire is secure. -
Secure the Metal:
Use the needle tool to gently nudge the green clay back around the wire of the jump ring to lock it in place. -
Bake the Piece:
Place your strawberry on a baking sheet or ceramic tile. Bake according to the specific temperature and time instructions on your package of polymer clay. -
Cool Down:
Let the piece cool completely before handling. It will still be slightly soft when hot but hardens as it cools. -
Highlight the Seeds (Optional):
If you want extra realism, dilute a tiny bit of brown acrylic paint with water. Brush it over the strawberry and quickly wipe away the excess, leaving paint only in the seed indents. -
Apply Glaze:
Using a soft brush, apply a thin coat of gloss glaze or varnish to the entire berry. This gives it that juicy, fresh-picked shine seen in the photo.
Level Up: Seed Details
Instead of just indenting, roll microscopic teardrops of yellow or tan clay and press them individually into the holes for ultra-realistic 3D seeds.
Now you have a sweet little charm ready to be added to a necklace or zipper pull


Mini Ladybugs and Caterpillars
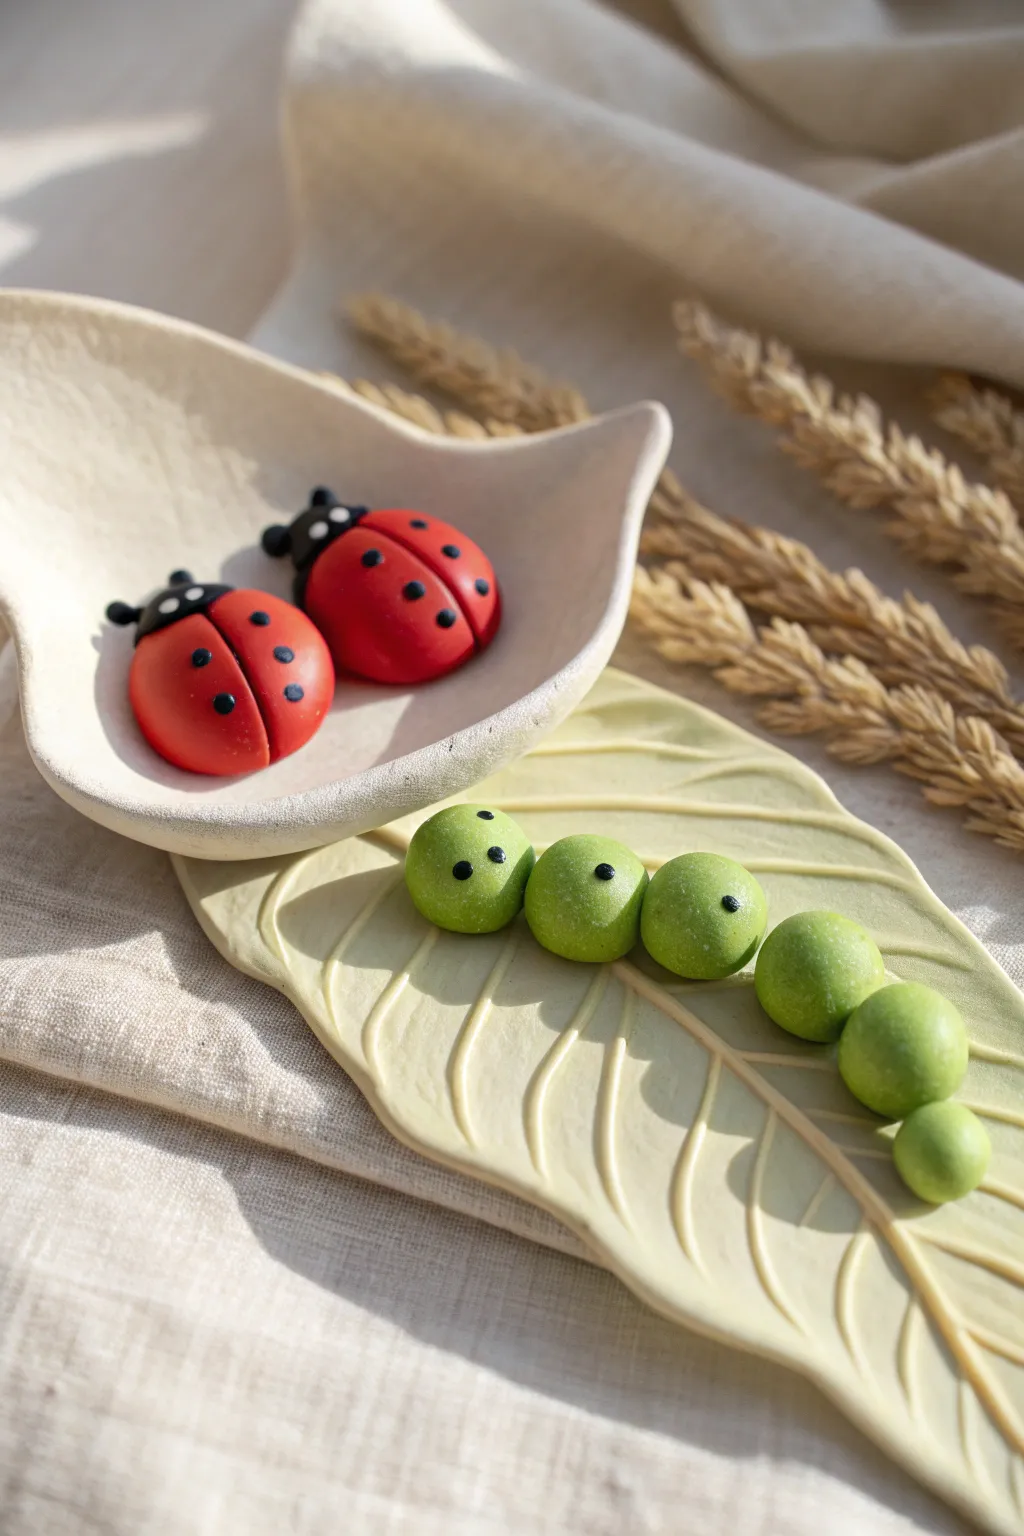
Bring a touch of the garden indoors with these adorable clay critters. This tutorial guides you through sculpting smooth red ladybugs and a segmented green caterpillar, perfect for a whimsical display.
How-To Guide
Materials
- Red polymer clay (or air-dry clay)
- Green polymer clay
- Black polymer clay
- White acrylic paint or tiny bits of white clay
- Needle sculpting tool or toothpick
- Small ball tool
- Clay roller or smooth surface
- Strong craft glue (optional)
Step 1: Sculpting the Ladybugs
-
Prepare the red clay:
Start by conditioning your red clay until it is soft and pliable. Roll two equal-sized balls, each about the size of a large gumdrop. -
Form the body shape:
Gently press each red ball onto your work surface to flatten the bottom while keeping the top domed and smooth. -
Create the head:
Take a small pinch of black clay and roll it into a ball. Attach this directly to the front of the red dome to form the ladybug’s head. -
Add detail to the head:
From the black clay, roll two extremely tiny tear-drop shapes. Press these onto the sides of the head to look like little antennae or feelers. -
Define the wings:
Using your needle tool or the edge of a toothpick, carefully press a line down the center of the red dome, starting from behind the head and going to the back, to simulate wing separation. -
Make the spots:
Roll several tiny specks of black clay into balls. Flatten them slightly and press them randomly onto the red wings. I like to use about five or six spots per ladybug. -
Add the eyes:
For the eyes, you can either use tiny dots of white clay pressed onto the black head or paint them on later. If using clay, add minuscule black pupils on top for extra cuteness.
Keeping It Clean
Red and black clay can stain your hands. Clean your hands or switch tools before working on the light green caterpillar to avoid color transfer.
Step 2: Crafting the Caterpillar
-
Mix your greens:
To give the caterpillar a natural look, you might want to blend a little yellow into your green clay for a lime shade. Condition the clay thoroughly. -
Roll body segments:
Roll six balls of green clay in graduating sizes. You will need one larger ball for the head and five slightly smaller ones for the body that taper off in size towards the tail. -
Connect the segments:
Line up the balls from largest to smallest. Press them gently together side-by-side so they stick. You can curve the line slightly to make the caterpillar look like it’s crawling. -
Sculpt the face:
On the largest green ball (the head), use a needle tool or toothpick to poke two small eye holes for placement, or simply prepare the surface for clay eyes. -
Add facial features:
Roll two very small black balls for eyes and press them onto the face. Add smaller black dots to the tops of the first two body segments for a decorative pattern. -
Final smoothing:
Check all your connections. If the clay feels loose, you can gently smudge the clay together on the underside or add a tiny dab of liquid clay or water (if using air-dry) between the segments.
Step 3: Finishing Touches
-
Baking or drying:
If using polymer clay, bake according to the package instructions, usually around 275°F (135°C) for 15-30 minutes. If using air-dry clay, let the pieces sit undisturbed for 24-48 hours. -
Painting details:
Once baked and cooled (or fully dried), use a fine brush and white acrylic paint to add the eye highlights if you didn’t use clay earlier. -
Varnish (Optional):
For a glossy ‘wet bug’ look, apply a coat of satin or gloss varnish to the ladybugs’ shells, or keep them matte for a natural clay texture.
Leafy Home
Roll out a slab of pale green clay and cut a leaf shape. Use a knife to draw veins, then bake your bugs directly on it for a custom display base.
Now you have a charming set of garden friends ready to brighten your desk or shelf


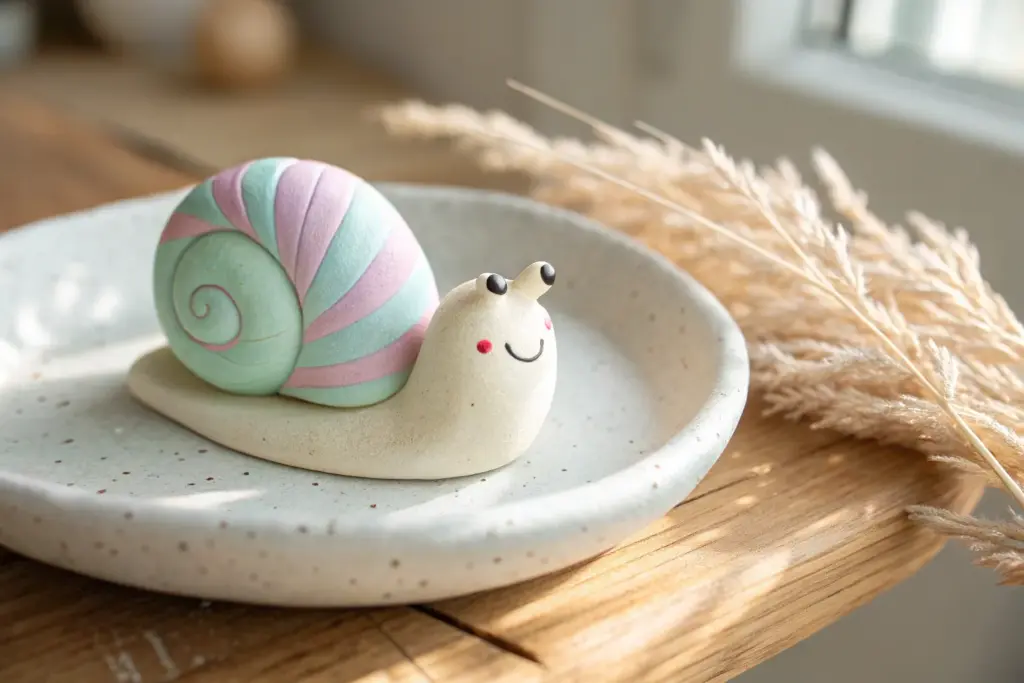
Tiny Snails With Swirly Shells
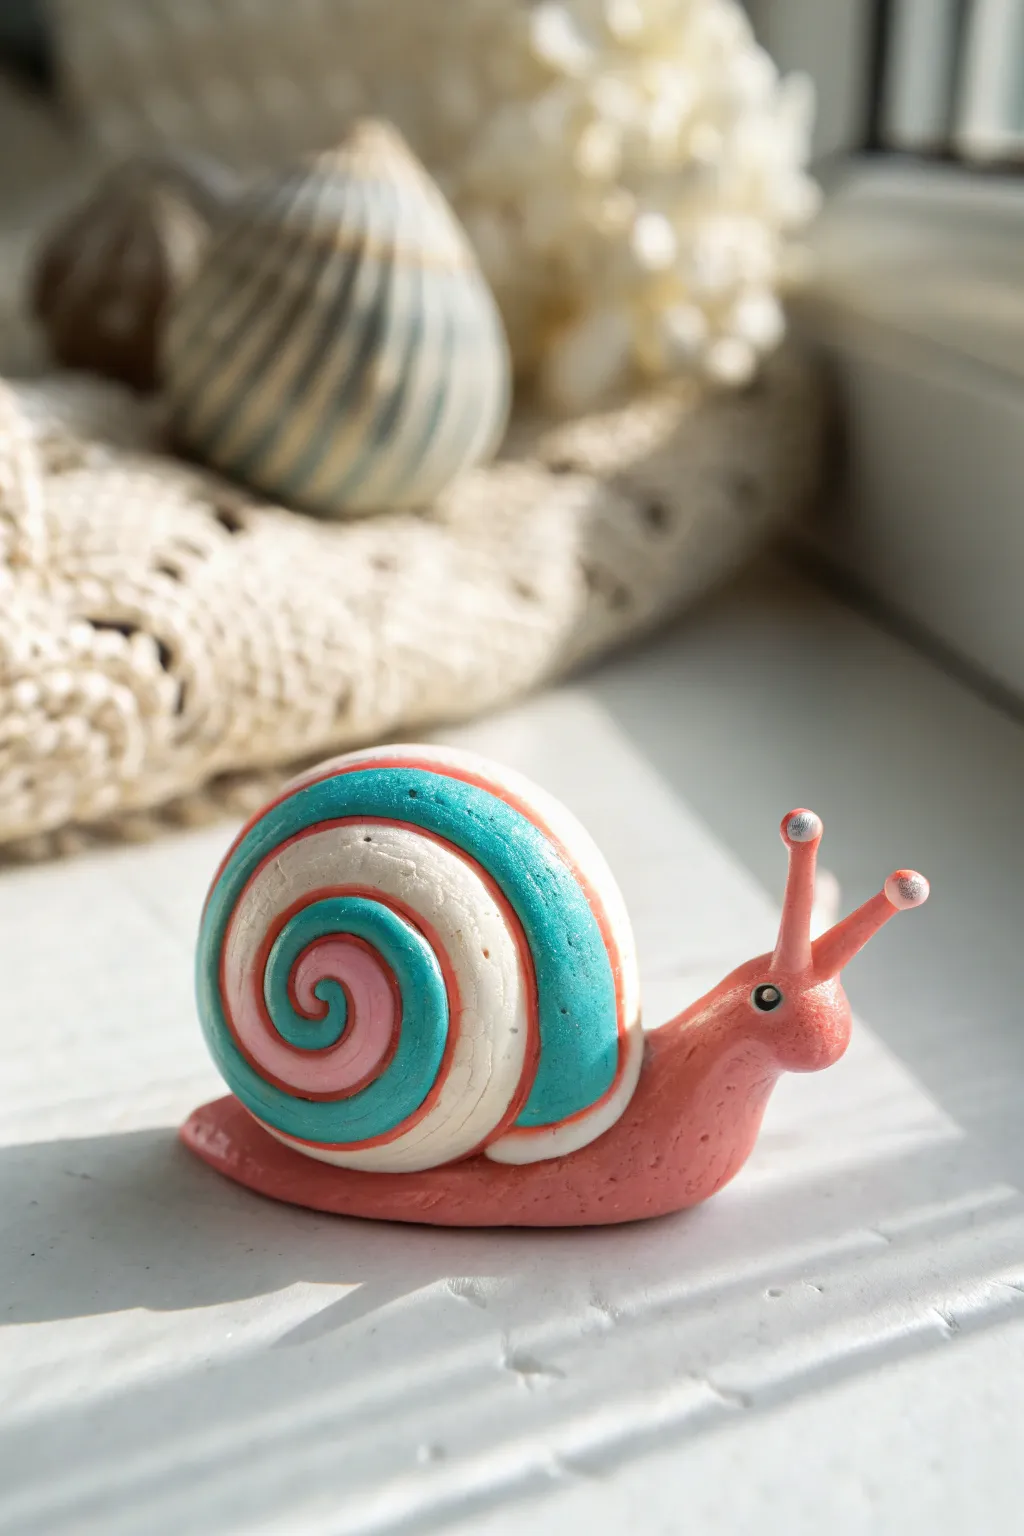
This cheerful little land-dweller brings a bright splash of color to any shelf with its distinctive spiral shell. The project combines candy-colored stripes with a classic snail shape for an adorable result that’s easier to make than it looks.
Step-by-Step
Materials
- Polymer clay (coral pink, white, teal, light pink)
- Clay roller or acrylic rolling pin
- Small dotting tool or toothpick
- Silver acrylic paint (optional)
- Tiny black beads or black paint for eyes
- Exacto knife or plastic clay blade
- Parchment paper (for work surface)
Step 1: Creating the Swirly Shell
-
Prepare the Colors:
Start by conditioning your white, teal, and light pink clay until it is soft and pliable. Roll each color into a long, thin snake. Aim for the white snake to be the thickest (about the width of a pencil), while the teal and pink snakes should be thinner. -
Flatten the White Base:
Gently flatten the white snake just slightly with your finger so it creates a wider surface to hold the other colors. -
Layer the Stripes:
Place the thin teal snake along one edge of the flattened white strip and the light pink snake along the center. Press them down gently so they stick to the white base but keep their rounded shape. -
Roll the Spiral:
Starting from one end, tightly roll the striped clay strip inward like a sleeping bag. Keep the edges aligned so the coil stays flat on the sides like a coin, rather than popping out like a cone. -
Check the Shape:
I like to gently press the flat sides of the coil against my work surface to ensure the shell stands upright nicely. Smooth the trailing end of the clay into the main body of the shell so the seam disappears.
Shell Keep Rolling Away?
If the round shell won’t stay on the body, slice a tiny bit off the bottom curve of the shell to create a flat spot before gluing or pressing it onto the body.
Step 2: Sculpting the Body
-
Form the Base:
Take a chunk of coral pink clay and roll it into a thick log. Taper one end to a gentle point for the tail and leave the other end thicker for the head. -
Lift the Head:
Bend the thicker end upward to create the snail’s neck and head. Gently flatten the bottom of the entire body so it sits securely on a table without wobbling. -
Add Texture:
Using a needle tool or toothpick, lightly scratch tiny, random lines along the side of the body to mimic rough snail skin texture. -
Attach the Shell:
Press your finished swirly shell firmly onto the center of the pink body. You might need to make a small indentation in the body first to help the round shell sit securely.
Pro Tip: Seamless Stripes
Before rolling the coil, run a smooth roller gently over your three colored strips. This bonds them together into one solid sheet, preventing gaps when you curl it.
Step 3: Adding Details
-
Make Eye Stalks:
Roll two tiny, short logs of coral pink clay. Attach them to the top of the head, blending the clay at the base so they don’t fall off. -
Create the Eyes:
Roll two minuscule balls of coral clay and place them on top of the stalks. Use a dotting tool to create a tiny dent in usually the front of each ball. -
Bake the Clay:
Follow the baking instructions on your specific package of polymer clay. Let the snail cool completely before moving to the next step. -
Add Shimmy:
Dip a tiny brush or toothpick into silver paint and carefully dab the tips of the eye stalks for a metallic highlight. -
Finish the Eyes:
Using a toothpick and black paint (or a permanent marker), add a tiny dot inside the silver area for the pupils to give your snail a focused gaze.
Set your new colorful friend on a sunny windowsill where the light can catch those silver details


Mini Dinosaur Nuggets
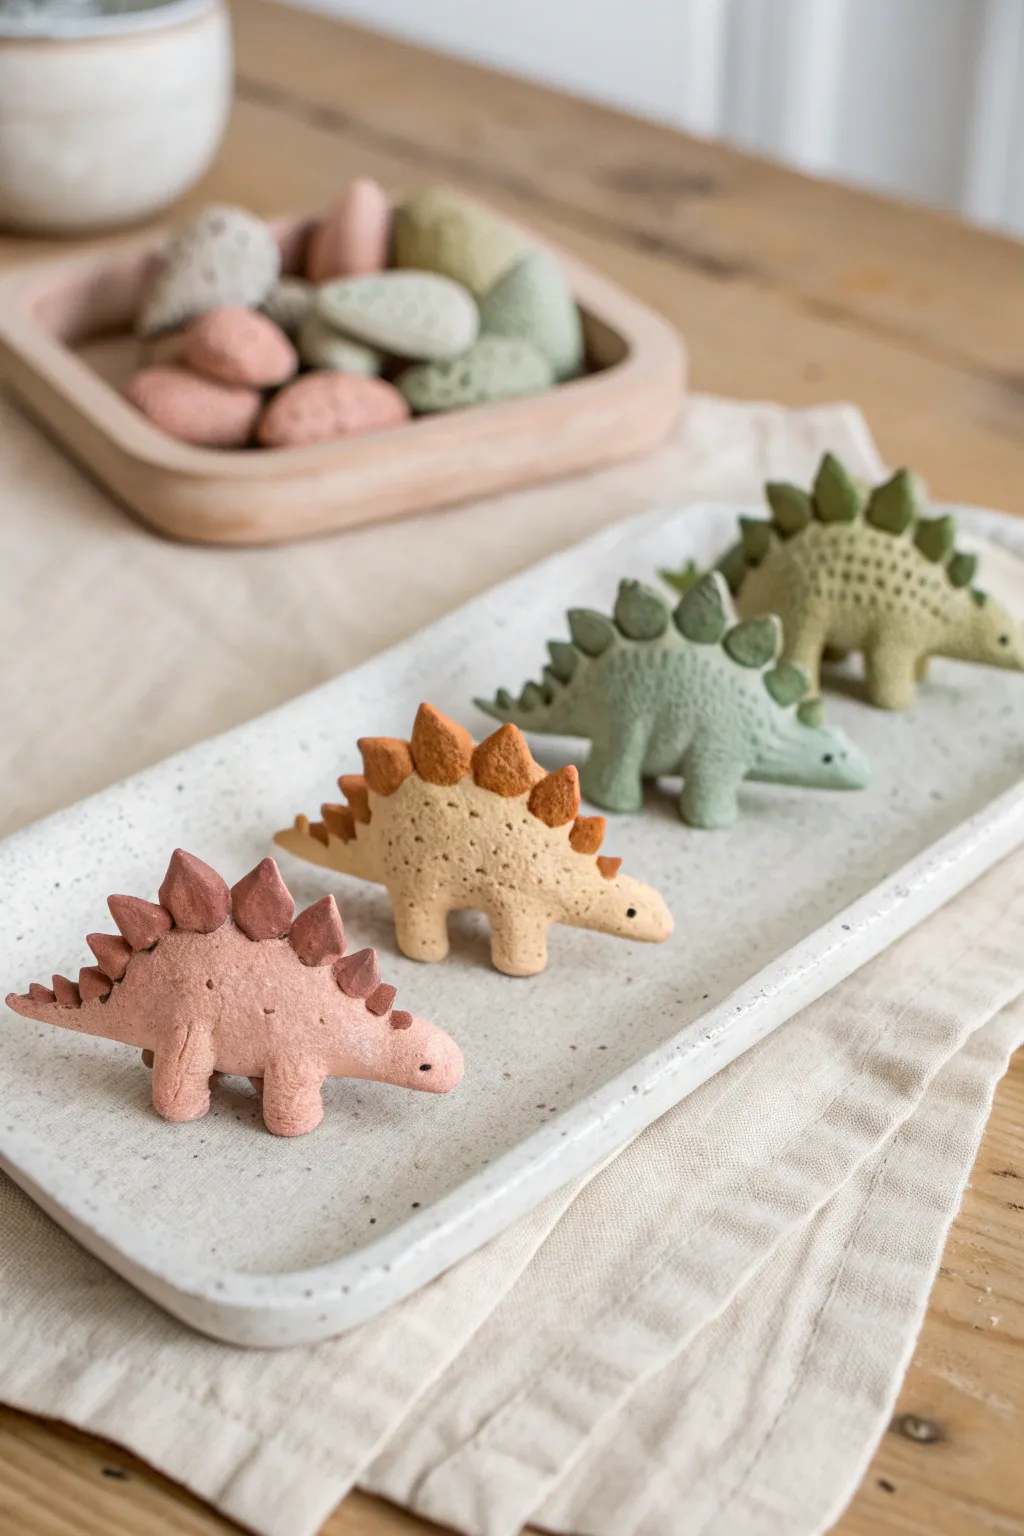
These adorable stegosaurus figures look good enough to eat with their soft, speckled texture reminiscent of dinosaur nugget snacks. They make charming desk companions or gentle play figures for older kids, crafted in a soothing palette of earthy pastels.
Step-by-Step Tutorial
Materials
- Polymer clay (terracotta, beige, sage green, olive green)
- Flecked/granite effect polymer clay (optional, for texture)
- Black acrylic paint or fine-tip marker
- Toothbrush or stiff bristle brush
- Modeling tools (or a toothpick)
- Baking sheet and parchment paper
- Oven (if using polymer clay)
Step 1: Shaping the Bodies
-
Mix your colors:
Start by conditioning your clay. To achieve that organic, stone-like look, I like to mix a tiny pinch of granite-effect clay or actual black pepper/sand into your solid colors. aim for four distinct shades: a dusty rose, a warm biscuit beige, a muted sage, and a deeper olive. -
Form the torso:
Take a portion of clay about the size of a walnut and roll it into a smooth ball. Gently elongate this into a thick oval shape. -
Define the silhouette:
Pinch one end of the oval to pull out a short, blunt tail. On the opposite end, pull and round the clay slightly to form the head, creating a distinct, rounded snout. -
Add the legs:
Roll four small, equal-sized balls of the same color clay for the legs. They should be short and stout cylinders. -
Attach the limbs:
Press the legs firmly onto the underside of the body. Blend the seams where the legs meet the torso using a modeling tool or your finger so they look like one continuous piece rather than stuck-on parts. -
Check stability:
Stand your dino on a flat surface and press down gently to flatten the bottom of the feet. Adjust balance until it stands sturdy without tipping.
Biscuit Texture Hack
If you lack texturing tools, rolling the raw clay ball gently over loose sandpaper or a piece of rough denim fabric creates an instant, realistic grainy surface.
Step 2: Adding the Plates
-
Prepare the plates:
For the stegosaurus back plates, you’ll need slightly darker clay than the body color. If you don’t have a darker shade, mix a little brown into your original body color. -
Shape triangular spines:
Roll tiny balls of this darker clay and pinch them into flat triangles. You will need roughly 5 to 7 plates per dinosaur, varying in size. -
Attach the spine line:
Press the triangular plates along the spine of the dinosaur, starting from the neck down to the tail. Place the largest plates in the center of the back and the smaller ones near the head and tail. -
Blend the plates:
Use a toothpick or a small blending tool to gently smooth the bottom edge of each plate into the dinosaur’s back so they are secure.
Step 3: Texturing and Details
-
Create the texture:
This is the secret to the ‘nugget’ look. Take an old toothbrush or a stiff stipple brush and gently tap it all over the surface of the clay. Don’t drag it; just press and lift. This mimics a breaded or stone-like texture. -
Add eye sockets:
Use a small ball tool or the end of a paintbrush to make a tiny indentation on the head for the eye. -
Refine the surface:
Go back over any areas where your fingerprints might have smoothed out the texture. The matte, rough finish is key to the aesthetic. -
Bake the clay:
Place your dinosaurs on a parchment-lined baking sheet. Bake according to your polymer clay package instructions (usually 275°F/135°C for about 15-20 minutes depending on thickness). -
Cool down:
Let the dinosaurs cool completely on the baking sheet. The clay hardens fully as it cools. -
Paint the eyes:
Once cool, dip a toothpick or fine brush into black acrylic paint. carefully dab a tiny dot into the eye indentation you made earlier.
Make ‘Em Magnets
Before baking, press a small, strong neodymium magnet into the side or belly of the dinosaur. Bake as normal to create adorable fridge magnets.
Now you have a whole herd of prehistoric pals ready to roam across your shelves

The Complete Guide to Pottery Troubleshooting
Uncover the most common ceramic mistakes—from cracking clay to failed glazes—and learn how to fix them fast.
Mini Bunny and Bear Faces
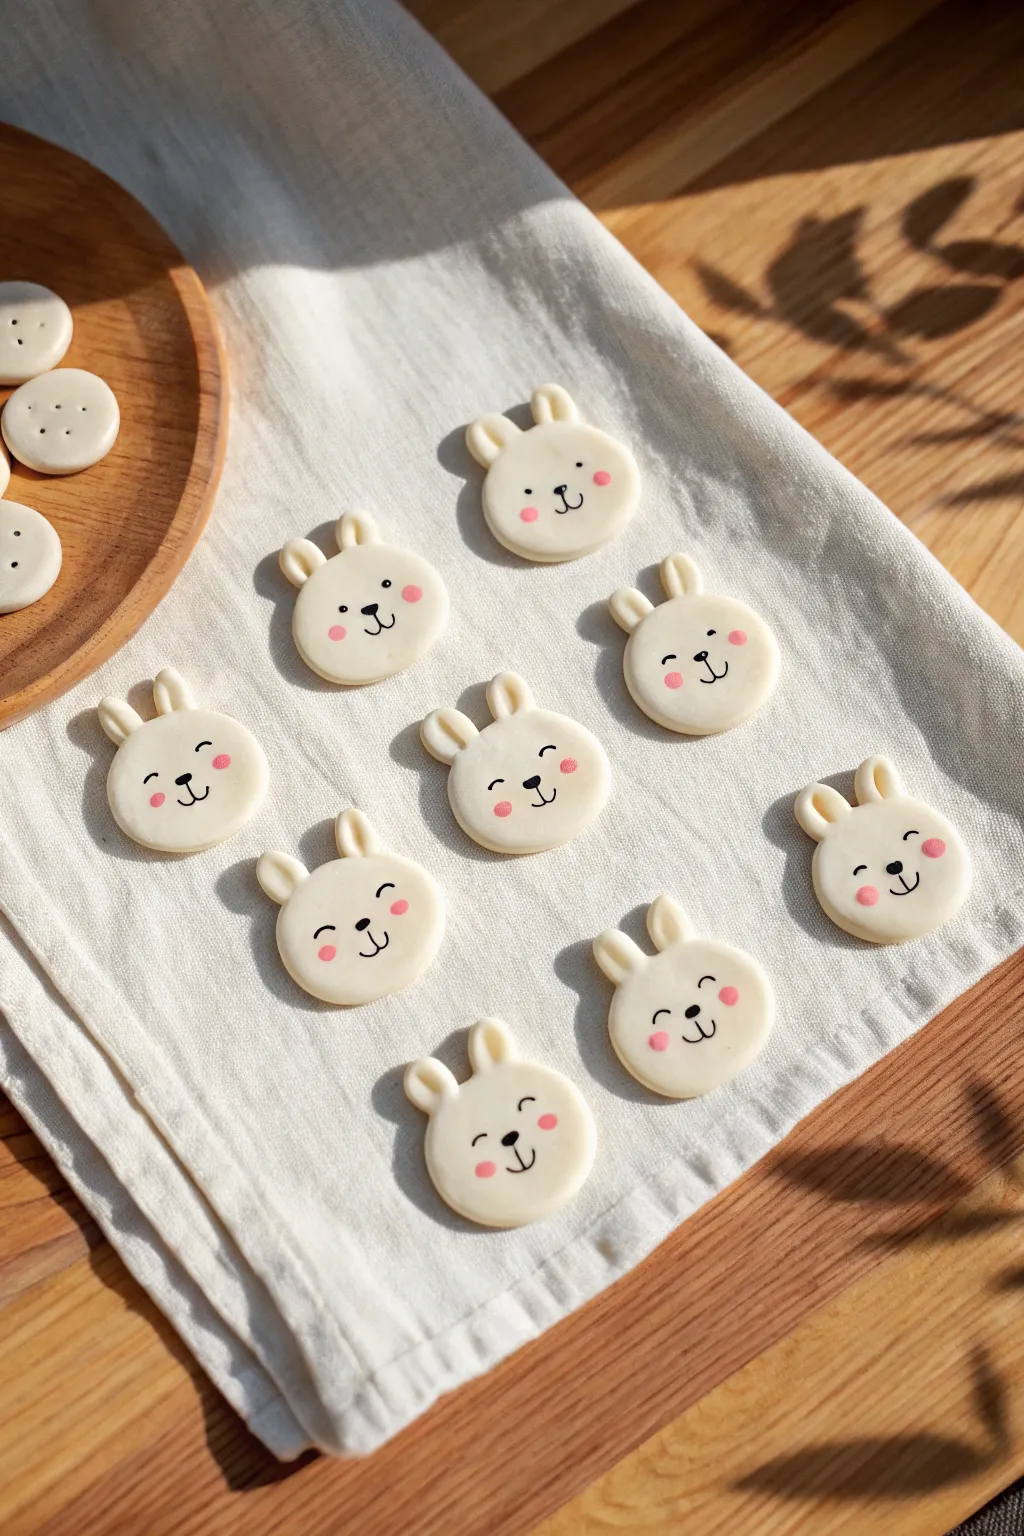
These adorable mini bunny faces are simple yet incredibly charming, perfect for turning into magnets, pins, or play food. With their sweet, minimalist expressions and rosy cheeks, they make for a delightful afternoon crafting session.
Step-by-Step
Materials
- White polymer clay or air-dry clay
- Rolling pin or smooth round marker
- Small round cookie cutter (approx. 1 inch)
- Black fine-point permanent marker or black acrylic paint with a tiny brush
- Pink chalk pastel or pink powder blush
- Small soft paintbrush (for the cheeks)
- Clay sculpting tool or toothpick
- Oven (if using polymer clay) or drying space
Step 1: Shaping the Faces
-
Review your clay:
Start by conditioning your white clay until it is soft and free of cracks. I generally knead it for a few minutes to ensure it’s pliable and smooth. -
Roll it out:
Flatten the clay on a clean work surface to a consistent thickness of about 1/4 inch (6mm). You can use playing cards on either side of your roller as depth guides. -
Cut the bases:
Use your small round cookie cutter to punch out several circles. These will be the main heads of your bunnies. -
Smooth the edges:
Gently tap the edges of each circle with your finger to round off any sharp cuts left by the cutter, giving them a soft, pillowy look. -
Make the ears:
Take leftover clay and roll tiny little logs—about the size of a grain of rice. You’ll need two for every bunny face. -
Attach the ears:
Press two small clay ‘rice grains’ onto the top edge of a circle. Gently blend the seam at the back so they stick firmly without distorting the round face shape. -
Refine the shape:
Use a rounded tool or your fingertip to softly indent the front of each ear slightly, giving it a natural, cupped appearance rather than just a flat sausage shape.
Clean Hands, Clean Clay
White clay picks up dust instantly. Keep baby wipes nearby to frequently clean your hands and tools, ensuring your bunnies stay snowy white.
Step 2: Adding Details & Curing
-
Pre-bake shading:
Before baking or drying, take your pink chalk pastel and shave a little powder off. Use a soft, dry brush to gently dust two pink circles for cheeks on the raw clay. -
Why blush now?:
Adding the blush to raw clay helps the pigment set into the surface permanently during the drying or baking process. -
Bake or dry:
If using polymer clay, bake according to the manufacturer’s instructions (usually 275°F/135°C for 15-30 mins). If using air-dry clay, let them sit undisturbed for 24 hours. -
Cool down:
Allow the pieces to cool completely. Painting on warm clay can ruin your marker tips or make the paint smudge. -
Draw the eyes:
Using a fine-point black marker, draw two small dots for eyes. Place them fairly wide apart to achieve that cute ‘kawaii’ look. -
Add the nose and mouth:
Draw a tiny oval nose centered between the eyes, then add a simple ‘w’ shape directly beneath it or a straight line down to a smile. -
Expression variety:
Try drawing some eyes as curved arches (happy squinting eyes) to give some bunnies a giggling expression. -
Seal the deal:
Once the ink is fully dry, you can brush on a thin layer of matte varnish to protect the face, though leaving them matte and unglazed looks very soft and natural.
Make Them Wearable
Before baking, gently press a flat pad earring post or a pin back into the reverse side to create instant bunny jewelry.
Once finished, you will have a delightful warren of tiny bunny faces ready to brighten up any space
Mini Heart Magnets
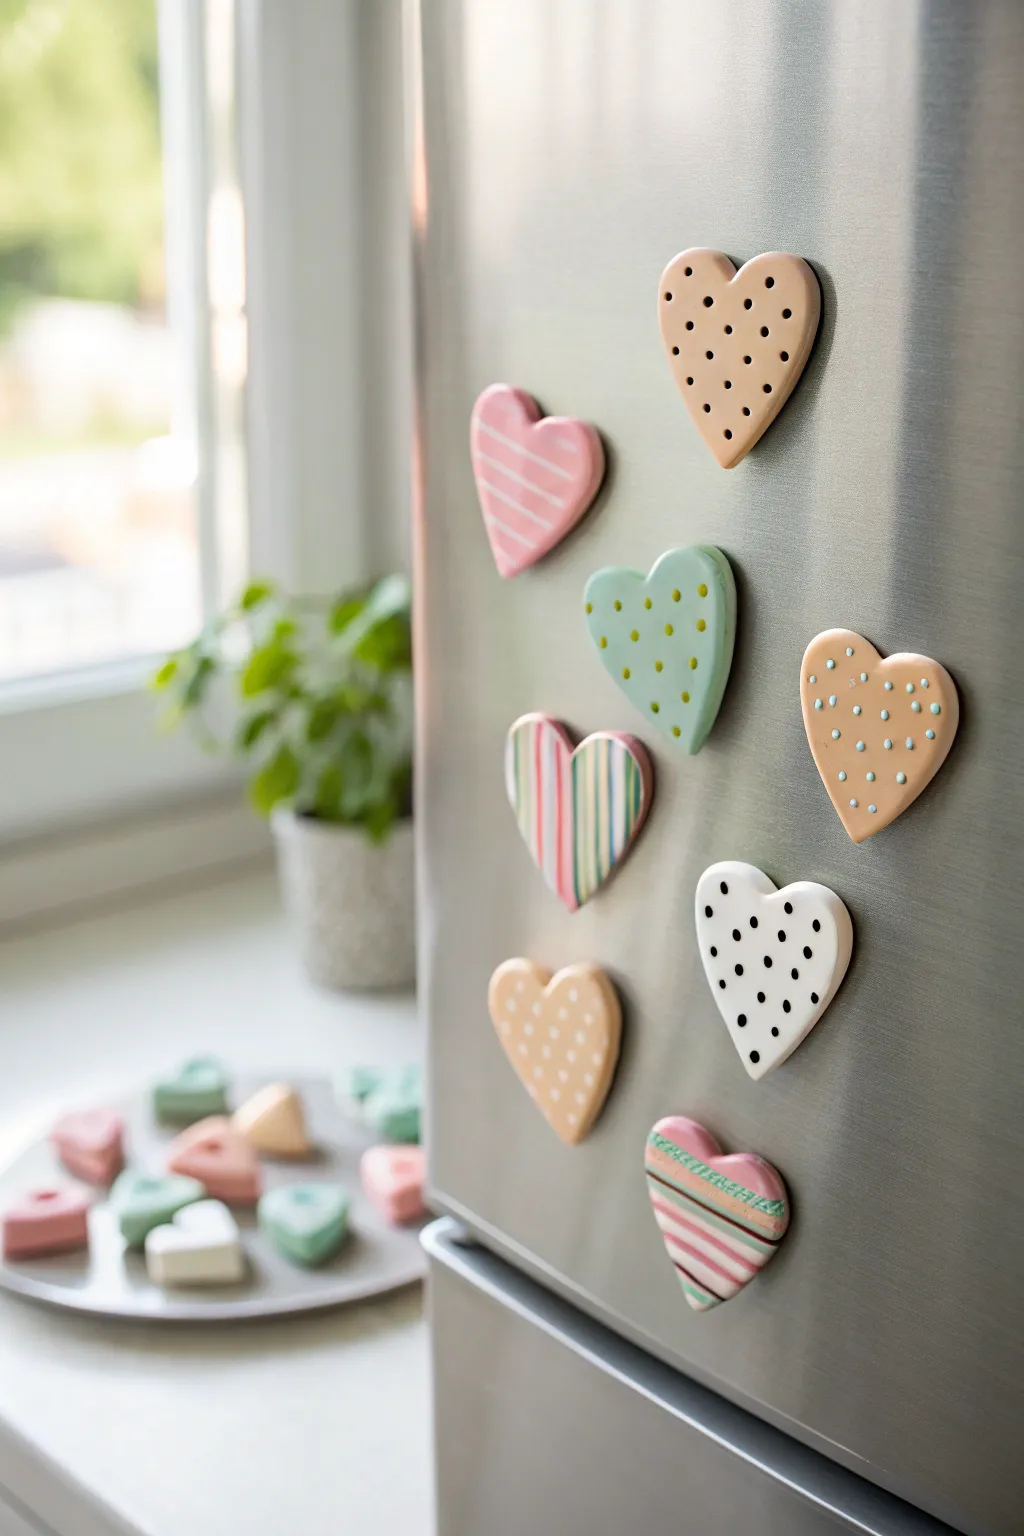
Brighten up your fridge or locker with these gentle pastel hearts, featuring delightful patterns like polka dots and stripes. This beginner-friendly project uses air-dry clay to create smooth, puffy shapes that are as fun to decorate as they are to display.
Step-by-Step Tutorial
Materials
- White air-dry clay or polymer clay
- Heart-shaped cookie cutters (small)
- Acrylic paints (pastel pink, peach, mint green, white, blue)
- Small round paintbrushes (size 0 and 2)
- Dotting tool or toothpick
- Rolling pin
- Parchment paper or smooth work mat
- Small round magnets
- Strong craft glue (E6000 or super glue)
- Gloss or matte varnish (optional)
- Fine grit sandpaper
Step 1: Shaping the Hearts
-
Prepare your workspace:
Lay down a sheet of parchment paper or a silicone mat to prevent the clay from sticking to your table. Take a handful of clay and knead it in your hands until it feels soft, warm, and pliable. -
Roll the clay:
Using a rolling pin, flatten the clay to an even thickness of about 1/4 inch (6mm). You want them thick enough to look puffy and hold a magnet, but not so heavy that they slide down the fridge. -
Cut the shapes:
Press your heart-shaped cutter firmly into the clay. Give it a tiny wiggle before lifting to get a clean cut. Repeat until you have as many hearts as you’d like to make. -
Smooth the edges:
Dip your finger in a little bit of water and gently run it along the cut edges of the fresh clay hearts. This softens the sharp angles and gives that rounded, finished look seen in the photo. -
Initial drying:
If using air-dry clay, lay the hearts flat on clean parchment paper. Let them dry for 24 to 48 hours, flipping them over halfway through so both sides dry evenly. -
Sanding:
Once completely hard, check for any rough spots. Gently sand the edges with fine-grit sandpaper until the surface is perfectly smooth for painting.
Smooth Surface Secret
Before painting, wipe the dried clay with a barely damp cloth to remove sanding dust. This ensures your paint adheres smoothly without bumps.
Step 2: Painting the Base Coats
-
Mix pastel colors:
Squeeze out your acrylic paints. I find that mixing a generous amount of white into primary colors creates those soft, milky pastel shades of peach, mint, and baby pink shown in the example. -
Paint the first layer:
Apply a solid base coat of paint to the front and sides of each heart. Use smooth strokes to avoid brush marks. -
Let it cure:
Allow the first coat to dry completely. If the clay color is still showing through, apply a second thin coat for an opaque, professional finish.
Step 3: Adding Patterns & Details
-
Create polkadots:
For the dotted hearts, dip a dotting tool or the back end of a paintbrush into a contrasting paint color (like navy blue on white, or mint on peach). Press gently onto the heart to create uniform circles. -
Make tiny pinholes:
Some hearts in the image have recessed dots rather than painted ones. You can simulate this with paint, or use a darker color on a toothpick tip to create a faux-indentation look. -
Paint simple stripes:
For the striped hearts, use your smallest detail brush. Paint thin, parallel lines across the heart. Don’t worry if they aren’t perfectly straight; that handmade charm is part of the appeal. -
Layer multiple colors:
On the multi-colored striped heart, paint wide bands of pink and thin lines of green and orange. Let one color dry briefly before painting the line next to it to prevent bleeding. -
Add texture details:
For the bottom right heart with the layered stripes, try using a slightly thicker paint application or even a metallic marker to add a zigzag or ‘stitched’ line effect over the existing stripes. -
Seal the surface:
Once all paint is bonedry, apply a thin layer of matte or gloss varnish. This protects the paint from chipping and gives the magnets a nice sheen.
Date the Back
Use a fine-tip permanent marker to write the date and your child’s initials on the back of the magnet before gluing. It makes a lovely keepsake.
Step 4: Assembly
-
Attach the magnet:
Flip the hearts over to the unpainted back side. Apply a small dab of strong craft glue to the center of the heart. -
Secure and dry:
Press a round magnet firmly into the glue. Let the glue cure according to the package instructions (usually at least a few hours) before sticking them to your fridge.
Arrange your beautiful collection on the refrigerator to hold up artwork or shopping lists


What Really Happens Inside the Kiln
Learn how time and temperature work together inside the kiln to transform clay into durable ceramic.
Mini Rainbow Cloud Charms
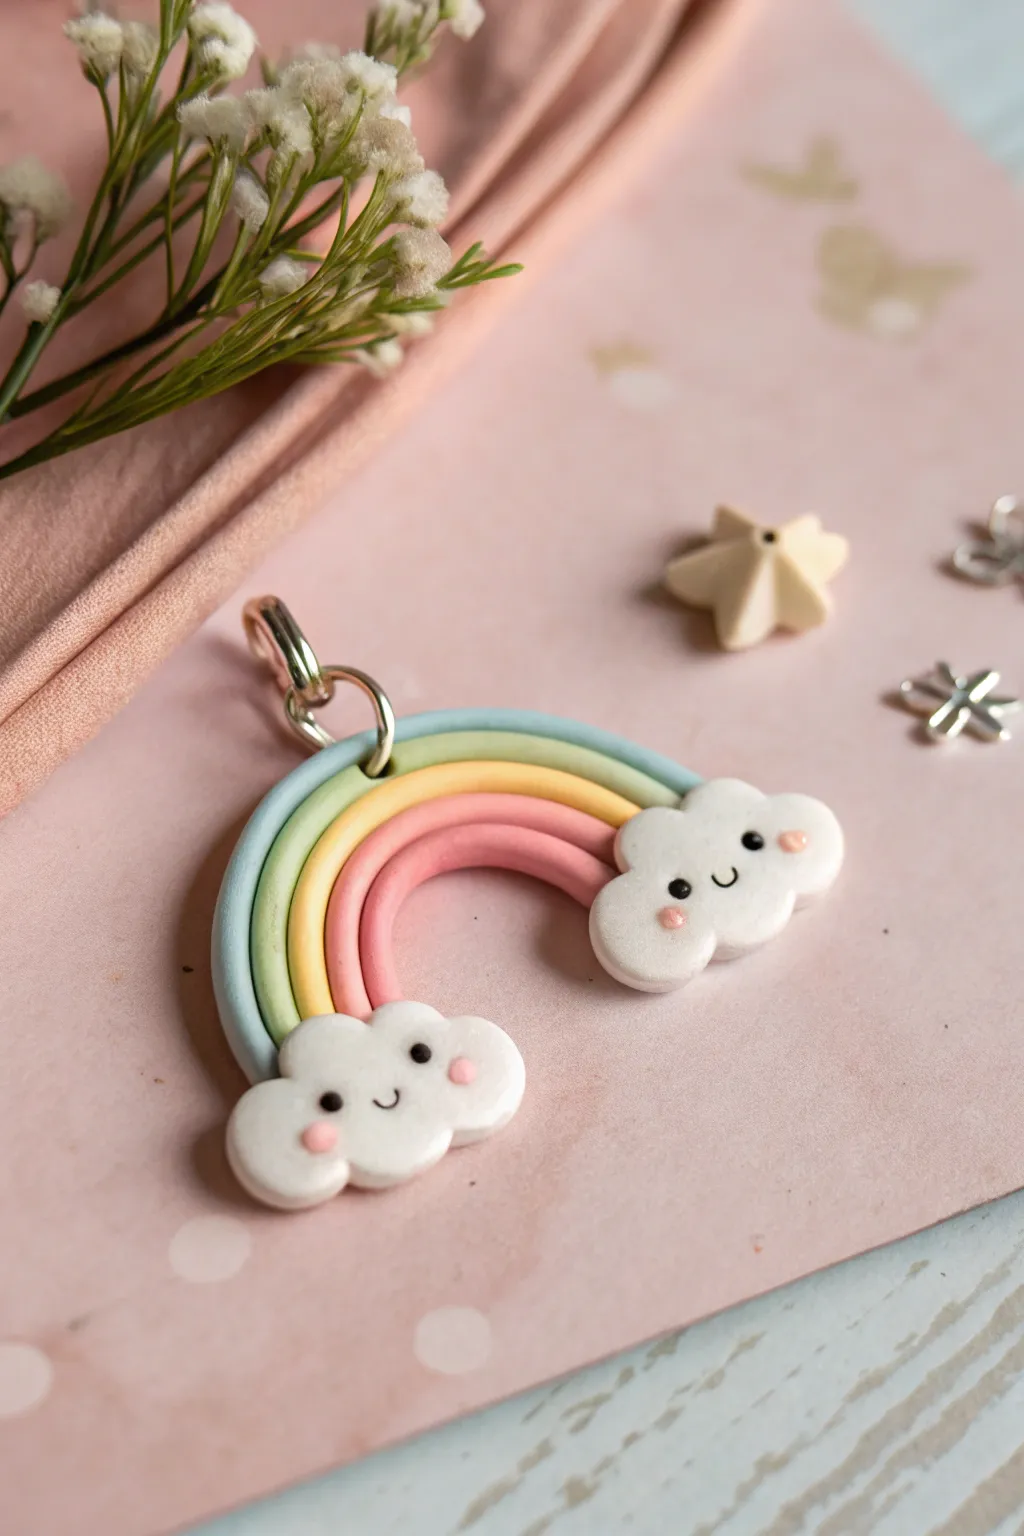
Capture the magic of a sunny day with this adorable polymer clay rainbow charm. Featuring soft pastel arches and sweet smiling clouds, this project is perfect for creating custom keychains or necklace pendants.
Detailed Instructions
Materials
- Polymer clay in pastel blue, light green, pale yellow, pastel pink, and white
- Tiny amount of black polymer clay (or black acrylic paint)
- Clay roller or pasta machine
- Clay knife or blade
- Dotting tool or small ball tool
- Needle tool
- Jump ring and jewelry pliers
- Eye pin (optional, for hanging)
- Oven for baking
Step 1: Creating the Arches
-
Prepare the Colors:
Condition your pastel clay colors—blue, green, yellow, and pink—until they are soft and pliable. If you don’t have pre-mixed pastels, mix a small amount of bright color with a large amount of white clay. -
Roll the Snakes:
Roll each color into a long, thin snake. Try to keep the thickness consistent across all four colors, aiming for about 3-4mm in diameter. -
Form the Blue Arch:
Start with the blue snake, creating a gentle U-shape on your work surface. This will be the outermost layer of your rainbow. -
Stack the Colors:
Take the green snake and nestle it tightly against the inner curve of the blue arch. Repeat this process with the yellow snake, and finally the pink snake on the inside. -
Secure the Bonds:
Run your finger gently over the top of the arches to help the clay strands adhere to each other without squashing the rounded shape. -
Trim the Ends:
Use your clay blade to slice straight across the bottom of the rainbow legs, ensuring all four colors end at the exact same flat line.
Clean Finish Trick
Before baking, use a cotton swab dipped in a tiny bit of rubbing alcohol or baby oil to gently wipe away any fingerprints or dust specks from the white clouds.
Step 2: Adding the Clouds
-
Shape the Clouds:
Condition a piece of white clay and divide it into two equal portions. Use your fingers to shape them into flat, fluffy cloud shapes with rounded bumps. -
Texture the Edges:
I like to use a small ball tool to gently indent the edges of the cloud blobs to make them look puffier and more defined. -
Attach to the Rainbow:
Place a cloud over the raw ends of each side of the rainbow. Press gently so the white clay bonds to the colored arches. -
Add Eye Pins:
If you plan to hang this, insert a metal jump ring or twist an eye pin into the top of the blue arch now. You can secure it slightly with a tiny dab of liquid clay if you have it.
Step 3: Kawaii Details & Baking
-
Create Cheeks:
Roll two impossibly tiny balls of pink clay for each cloud. Press them onto the white surface to create rosy cheeks on the far sides of the face. -
Add the Eyes:
Using black clay, roll tiny specks into balls and press them onto the clouds for eyes. Alternatively, use a dotting tool to make indentations to paint later. -
Make the Smiles:
Roll a microscopically thin thread of black clay and curve it into a ‘U’ shape for the mouth. Place it centered between the eyes using a needle tool. -
Bake:
Place your charm on a baking sheet or tile. Bake according to your brand of clay’s instructions (usually 275°F/135°C for 15-30 minutes). -
Cool Down:
Let the piece cool completely inside the oven or on a wire rack before handling, as warm clay is fragile. -
Varnish (Optional):
For a glossy finish and extra protection, coat the finished charm in a layer of polymer clay glaze or water-based polyurethane.
Sparkle Upgrade
Mix just a pinch of translucent glitter or mica powder into your white clay before shaping the clouds to make them shimmer like they are catching the sunlight.
Attach your new charm to a zipper pull or gift it to a friend to brighten their day