If you’ve got a little scrap of clay and a few minutes, you’ve got the perfect setup for mini clay magic. These mini clay project ideas are the kind of quick, cute wins that keep your creativity buzzing without committing to a big build.
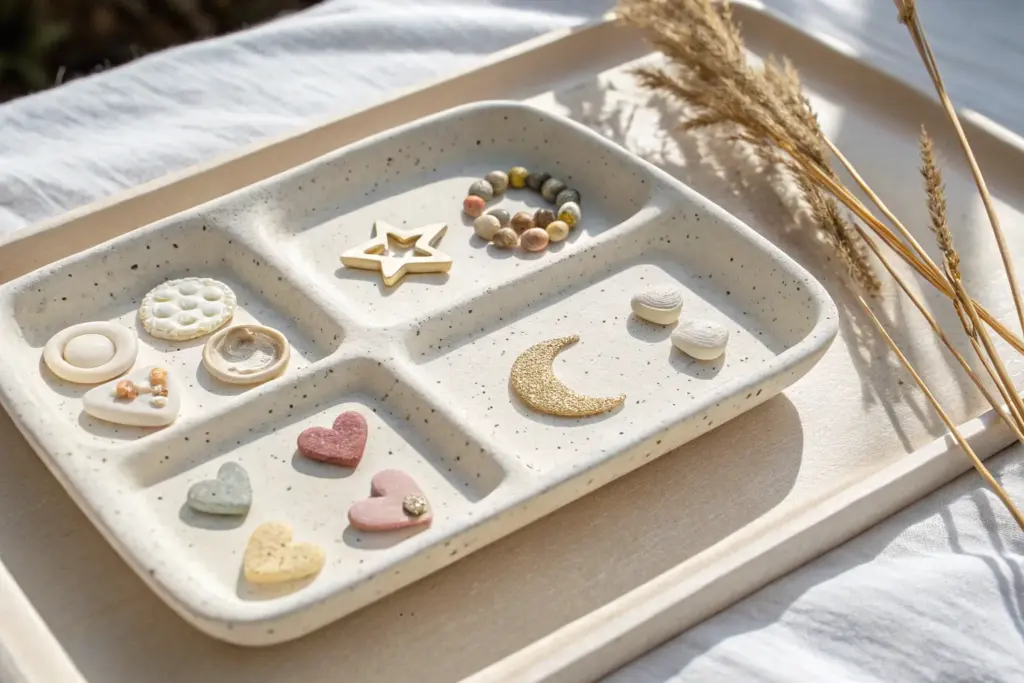
Tiny Trinket Dishes

Achieve the high-end look of speckled ceramic pottery right at home with polymer or air-dry clay. These organic, minimalist dishes are perfect for holding your favorite rings and jewelry while adding a modern touch to your dresser.
How-To Guide
Materials
- White polymer clay (or air-dry clay)
- Black pepper or black sand (for faux speckles)
- Rolling pin or smooth glass jar
- Circle cutters or a drinking glass
- Small bowl or sponge (for shaping)
- Sandpaper (fine grit)
- Gloss or satin varnish (optional for finish)
- X-acto knife or clay blade
Step 1: Preparing the Clay Body
-
Condition the clay:
Start by warming up your white polymer clay in your hands. Knead it thoroughly until it is soft, pliable, and free of any cracks. -
Add the speckles:
Flatten your clay slightly and sprinkle a generous pinch of coarsely ground black pepper or very fine black sand onto the surface to mimic the look of stoneware clay. -
Incorporate the texture:
Fold the clay over the pepper and knead it again repeatedly. Continue folding and rolling until the black specks are evenly distributed throughout the white ball.
Step 2: Shaping the Dishes
-
Roll out the slab:
Place your clay ball on a smooth work surface. Use a roller to flatten it into an even sheet, aiming for about 1/4 inch thickness for substantial, sturdy dishes. -
Cut the basic shape:
Select a circle cutter or use the rim of a glass to press shapes into the clay. You can cut multiple sizes to create a nesting set like the one shown. -
Soften the edges:
After cutting, dip your finger in a tiny bit of water (or baby oil for polymer) and gently run it around the cut edge to smooth out any sharpness or roughness. -
Create the curvature:
Pick up a clay circle and gently cup it in your palm. Press your thumbs into the center while pulling up on the edges slightly to create a shallow bowl shape. -
Alternate shaping method:
For a deeper bowl, gently drape the clay circle over the bottom of a small inverted bowl or inside a curved object to hold its shape. -
Refine the form:
Tap the bottom of your clay dish gently on the table to create a small flat spot. This ensures the finished dish will sit stably without wobbling. -
Add organic touches:
I prefer to manipulate the rim slightly with my fingers, making it a bit wavy or uneven. This organic irregularity gives it that authentic, handmade ceramic feel.
Sticky Situation?
If clay sticks to your work surface or roller, dust a small amount of cornstarch down first. It acts like flour for dough and brushes off easily after baking.
Step 3: Finishing and Curing
-
Bake or dry:
If using polymer clay, place your pieces on a baking sheet and bake according to package instructions (usually 275°F for 15-30 minutes). If using air-dry clay, let them sit undisturbed for 24-48 hours. -
Cool down:
Allow the pieces to cool completely in the oven or on a rack before handling them, as warm clay is still fragile. -
Sanding:
Once hardened, take a piece of fine-grit sandpaper and lightly buff the rims and any rough spots on the surface to get a professional, smooth matte finish. -
Final wipe:
Use a damp cloth to wipe away any sanding dust to reveal clean white clay and crisp black speckles. -
Sealing (Optional):
To give the inside a glazed look, apply a thin coat of gloss varnish to just the interior of the bowl, leaving the outside matte for contrast.
Gold Rim Glow-Up
Paint the very top edge of the rim with gold liquid leaf paint after baking. The metallic flash adds a luxe contrast to the rustic speckled surface.
Arrange these charming little organizers on your vanity to keep your tiny treasures safe and stylish


Mini Pinch Pots With Faces
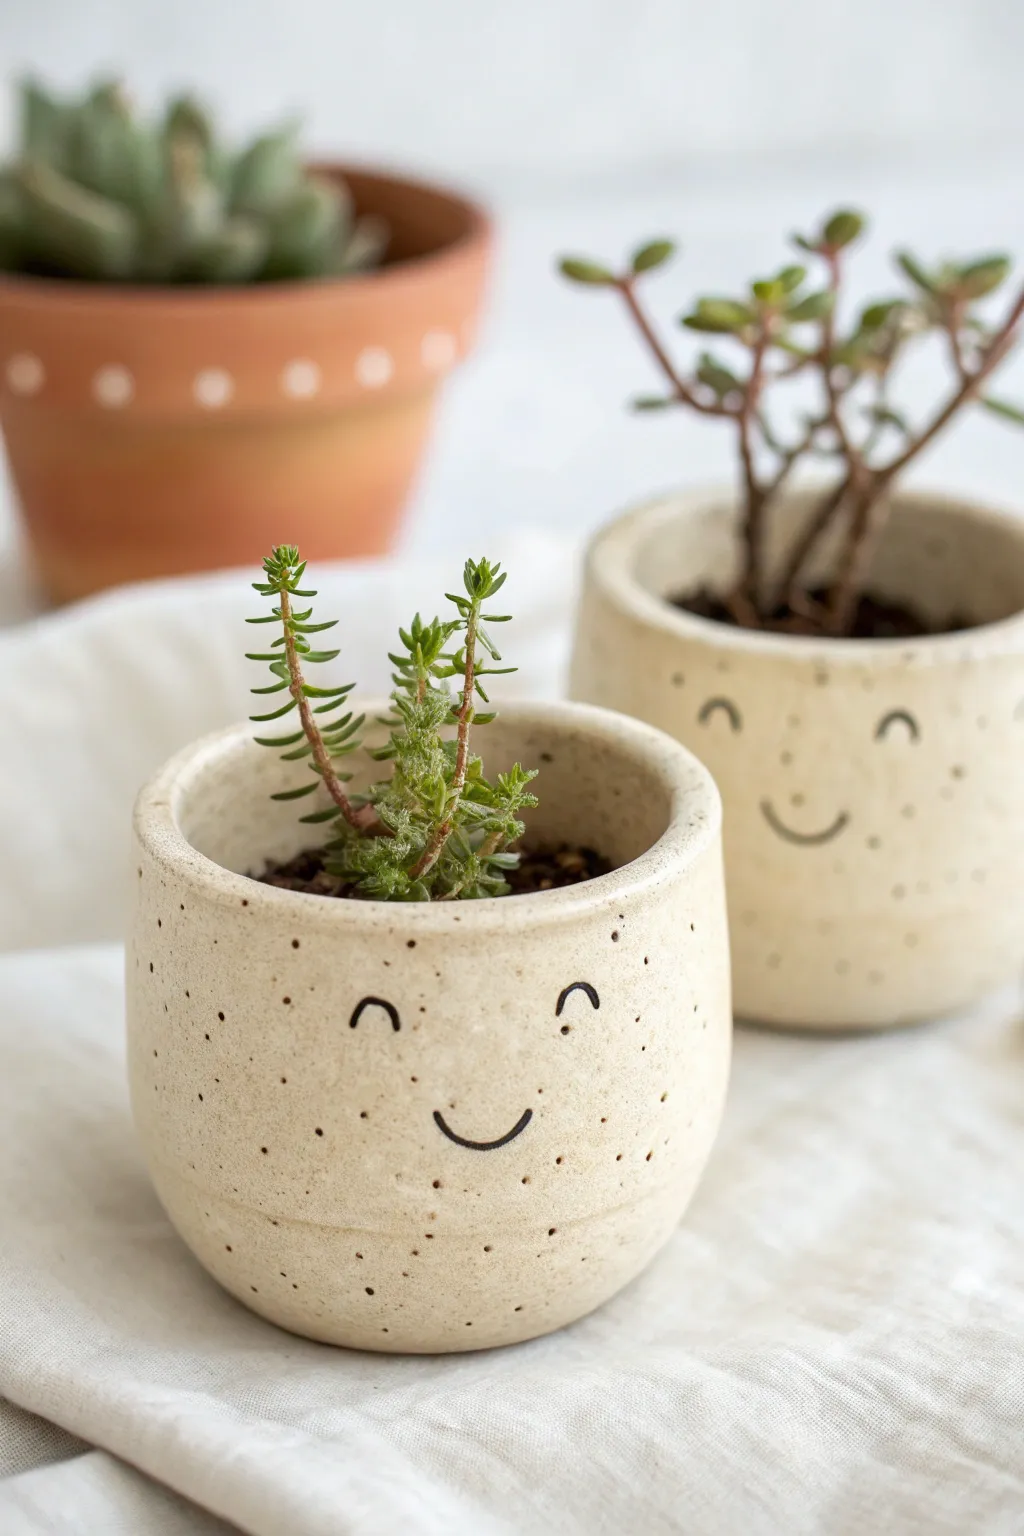
These adorable mini planters bring a touch of personality to your succulent collection with their sweet, simple expressions. Featuring a rustic speckled clay finish and charming hand-drawn faces, they are the perfect beginner-friendly project to brighten any windowsill.
Step-by-Step Guide
Materials
- Speckled stoneware clay (white or cream base)
- Small bowl of water
- Sponge
- Needle tool or toothpick
- Loop tool (optional for refining)
- Black underglaze or ceramic marker
- Fine detail paintbrush
- Clear matte or satin glaze
- Kiln (or oven-bake clay alternative if not firing)
Step 1: Forming the Pot
-
Prepare the Clay:
Start with a ball of clay roughly the size of a golf ball or slightly larger (about 2-3 ounces). Perform the ‘patting’ technique to ensure the ball is smooth and round before you begin. -
Open the Center:
Hold the clay ball in your non-dominant hand. Gently press your thumb into the center of the ball, pushing down until you are about a half-inch from the bottom base. Don’t push all the way through. -
Pinch the Walls:
Using your thumb on the inside and fingers on the outside, gently pinch the clay while rotating the ball. Work your way from the bottom upward in a spiral motion. -
Even Thickness:
Aim for a uniform wall thickness of about 1/4 inch. If you feel thick spots, gently pinch them out. If the rim gets uneven, don’t worry—we’ll fix that next. -
Shape the Base:
Tap the bottom of your pot gently against your table or work surface to create a flat, stable base so it doesn’t wobble. -
Refine the Rim:
For the look in the photo, you want a slightly rounded, smooth rim. Run a slightly damp sponge or your finger over the top edge to soften it. Ensure the walls stand mostly straight up, curving slightly inward at the top for a cozy shape.
Smudged Smile?
If you mess up the underglaze face, don’t panic. Let it dry for a minute, then gently scratch the mistake off with a sharp tool/knife before re-painting.
Step 2: Adding the Details
-
Smoothing the Exterior:
Before adding features, use a damp sponge or a soft rib tool to smooth the outside walls. This creates a clean canvas for the face while keeping that organic, handmade feel. -
Drafting the Face:
I find it helpful to lightly sketch where the eyes and mouth will go using a very light touch with a needle tool. Place the features lower on the pot—about halfway down or slightly below—to increase the cute factor. -
Painting the Expression:
Using a fine detail brush and black underglaze, carefully paint two small arches for closed, smiling eyes. Keep the lines thin and delicate. -
Adding the Smile:
Paint a simple, shallow U-shape for the smile centered below the eyes. The stroke should match the thickness of the eyes for a cohesive look. -
Adding Drainage (Optional):
If these are for real plants, use a small circular cutter or the back of a paintbrush to poke a drainage hole in the center of the bottom.
Hairdo Upgrade
Carve texture into the rim or add tiny clay loops near the top edge before firing to simulate ears or a fun hairstyle for your pot character.
Step 3: Finishing and Firing
-
Slow Drying:
Loosely cover your pots with plastic to let them dry slowly to the leather-hard stage, then uncover to bone dry. This prevents cracking. -
Bisque Fire:
Once completely bone dry, fire the pots in a kiln to bisque temperature (usually cone 04). -
Glazing:
Dip the bisqued pot into a clear matte or satin glaze. This seals the clay and makes the speckles pop without obscuring the painted face. -
Wipe the Foot:
Use a sponge to wipe any glaze off the very bottom of the pot so it doesn’t stick to the kiln shelf. -
Final Fire:
Fire the pots again to the glaze temperature appropriate for your clay body (usually cone 5 or 6 for stoneware).
Pop in a tiny succulent or cactus to give your new little friend a wild green hairstyle


Simple Charm Shapes for Keyrings
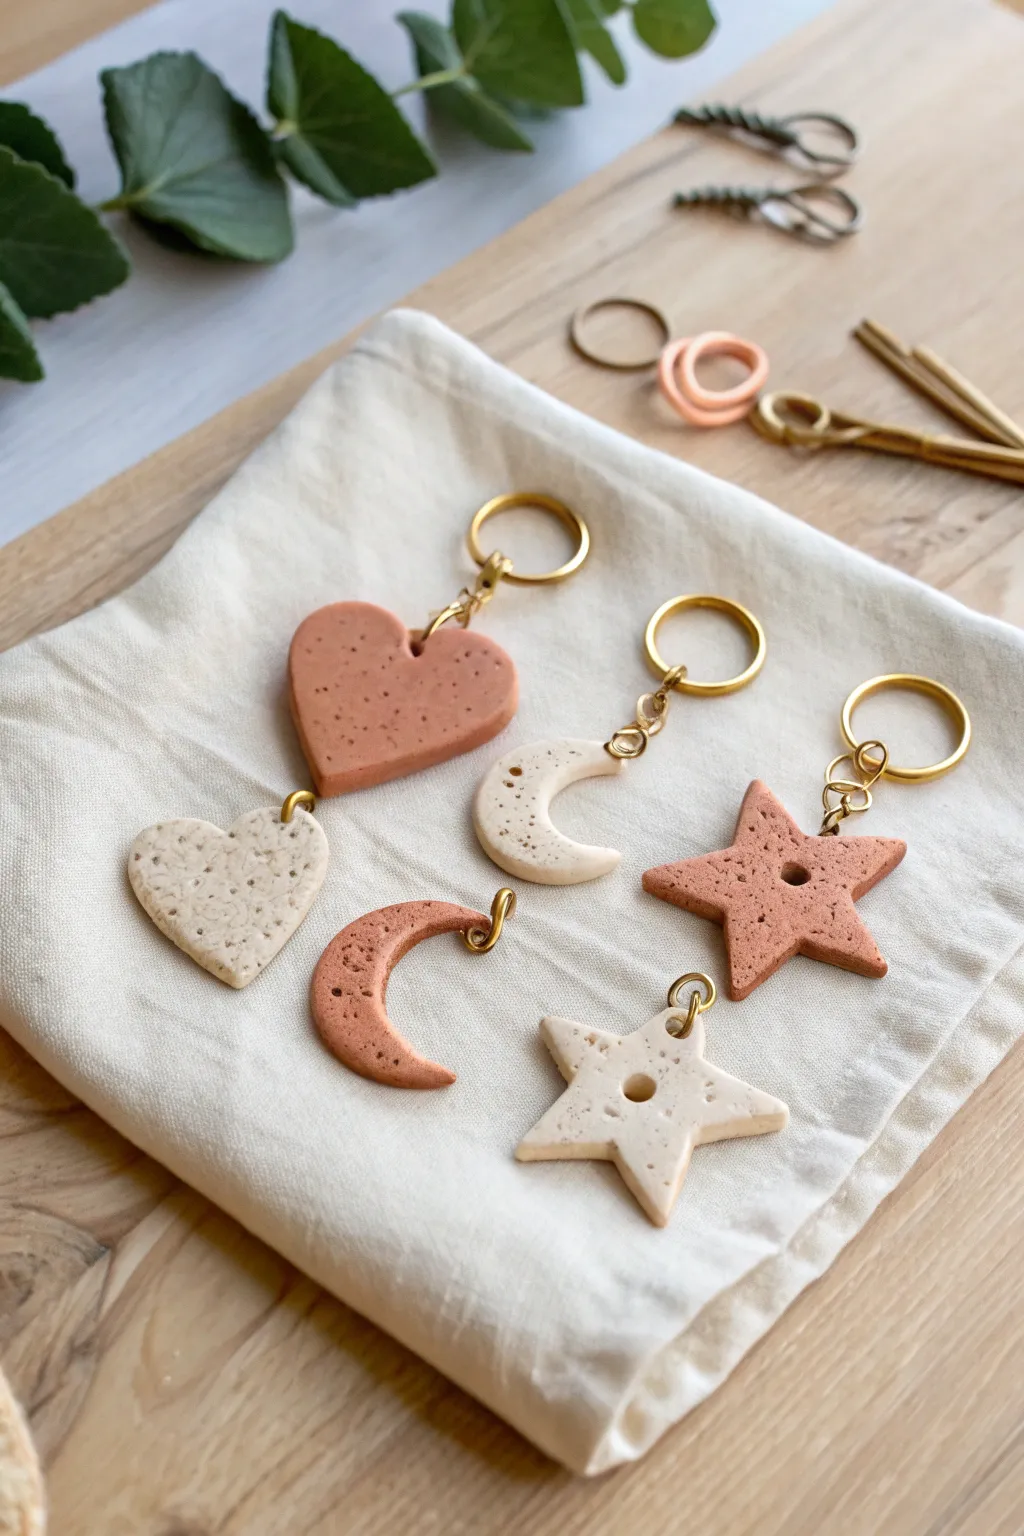
These minimalist clay keyrings feature a charming earthy palette and a lovely speckled stone texture. The geometric heart, moon, and star shapes create a modern bohemian look perfect for organizing your keys or gifting to friends.
Step-by-Step
Materials
- Polymer clay (terracotta or reddish-brown)
- Polymer clay (beige or cream)
- Black pepper or coarse sand (for speckling)
- Rolling pin or clay machine
- Cookie cutters (heart, crescent moon, star)
- Toothpick or small straw
- Gold jump rings
- Gold keyrings with chains
- Flat-nose pliers
- Baking sheet and parchment paper
- Oven
Step 1: Preparing the Clay
-
Condition the clay:
Begin by warming the terracotta clay in your hands, kneading it until it is soft and pliable. Repeat this process separately for the beige clay to ensure both are ready for molding. -
Create the speckled effect:
Flatten each clay ball slightly. Sprinkle a generous pinch of ground black pepper or very fine clean sand onto the clay. Fold the clay over the speckles and knead thoroughly until the particles are evenly distributed throughout the material. -
Roll it out:
Using your rolling pin or clay machine, roll the clay out into an even slab. Aim for a thickness of about 4-5mm; you want them thick enough to be durable but not too heavy.
Sticky Situation?
If clay sticks to your work surface or cutter, lightly dust the surface with cornstarch or dip the cutter in water before pressing down to ensure a clean release.
Step 2: Shaping and Refining
-
Cut the shapes:
Press your cookie cutters firmly into the clay slab to create your shapes. For this set, cut out two hearts, two moons, and two stars if you want to mix and match colors like the example. -
Clean edges:
Gently lift the shapes away from the excess clay. Run your fingertip lightly along the cut edges to smooth down any roughness or sharp ridges left by the cutter. -
Add texture (optional):
To enhance the raw stone look, you can lightly tap the surface with a stiff toothbrush or a crumpled ball of aluminum foil, though leaving them smooth highlights the speckles beautifully. -
Punch holes:
Using a toothpick or a small straw, poke a hole near the top of each shape. Ensure the hole is large enough for your jump rings to fit through later, and wiggle the tool slightly to ensure a clean opening. -
Add star centers:
For the star shapes specifically, use a slightly larger circular tool or straw to punch a decorative hole directly in the center of the star.
Step 3: Baking and Assembly
-
Bake the charms:
Arrange your clay pieces on a parchment-lined baking sheet. Bake according to your brand of polymer clay’s instructions (usually around 275°F or 135°C for 15-30 minutes). -
Cool down:
Once baked, turn off the oven and let the pieces cool considerably before handling. They are fragile when hot and harden fully as they cool. -
Prepare hardware:
While cooling, use your pliers to gently twist open your gold jump rings. Remember to twist the ends sideways away from each other rather than pulling them apart, which weakens the metal. -
Attach the jump ring:
Slide an open jump ring through the hole you created in the top of a clay charm. I find using two pairs of pliers makes holding the tiny ring much easier. -
Connect to chain:
Before closing the jump ring, loop the bottom link of the keyring chain onto it. If you are linking two charms together (like a double-charm keychain), thread both charms onto the same ring or link one to the other. -
Secure the closure:
Use your pliers to twist the jump ring back into a closed position, ensuring the ends meet perfectly flush so the charm doesn’t slip off.
Make it Shine
Apply a thin layer of UV resin or glossy water-based glaze after baking. This protects the clay and makes those pepper speckles pop with a ceramic-like finish.
Attach your new handmade charms to your keys or bag and enjoy the stylish earthy accent they provide


Easy Mini Pendant Necklaces
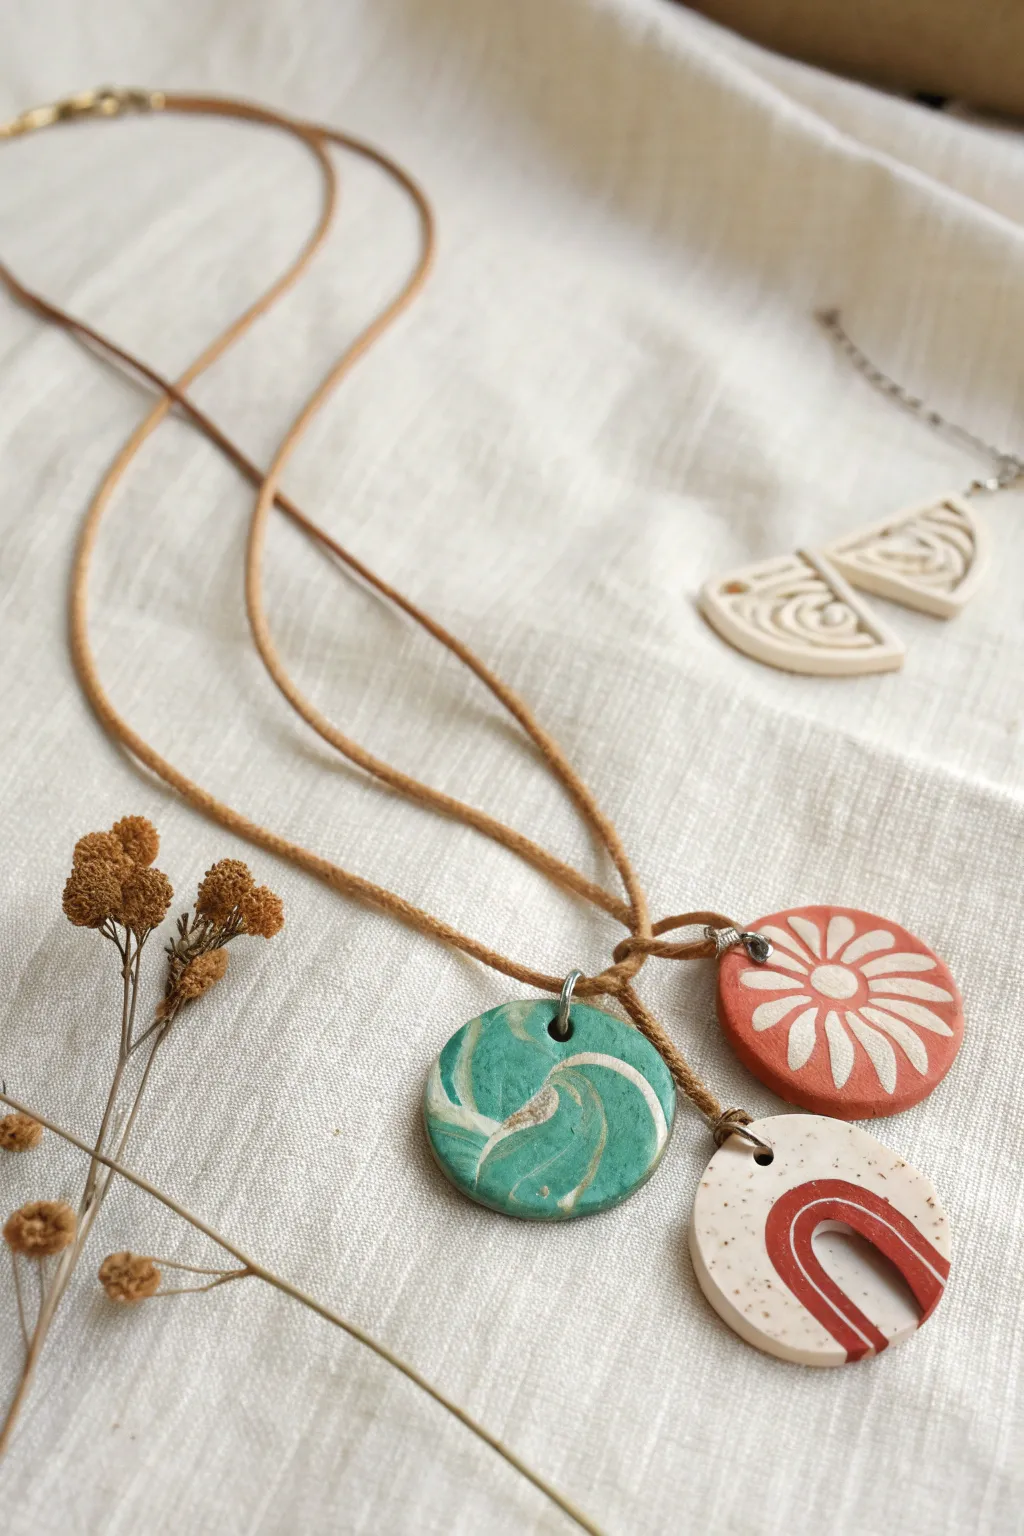
Create a charming set of rustic accessories with these mini clay pendant necklaces, featuring earthy tones and simple geometric designs. This project combines marbling, carving, and speckling techniques to give each piece a unique, handmade character that pairs perfectly with casual leather cording.
Detailed Instructions
Materials
- Polymer clay (Teal, Terracotta, White, Beige)
- Small circular clay cutter (approx. 1 inch)
- Acrylic rolling pin
- Parchment paper or ceramic tile (work surface)
- Needle tool or toothpick
- Small jump rings (6-8mm)
- Round nose and flat nose jewelry pliers
- Thin leather or suede cord (tan)
- Sandpaper (fine grit, optional)
- Oven for baking
- Blade or craft knife
- Dried spices (like nutmeg) or coarse pepper (for speckling)
Step 1: Marbled Green Swirl Pendant
-
Condition the clay:
Start by warming up a small chunk of teal clay and a sliver of white clay in your hands until they are soft and pliable. -
Create the marble mix:
Roll both colors into thin snakes. Twist them together like a candy cane, then fold the twist in half and twist again. -
Roll and stop:
Roll the twisted clay into a ball. Do not overmix, or the colors will blend into a solid light green instead of keeping distinct swirls. -
Flatten and cut:
Use your acrylic roller to flatten the ball to about 1/4 inch thickness. Position your circle cutter over the most interesting part of the swirl pattern and press down firm. -
Piercing the hole:
Use a needle tool or toothpick to poke a hole near the top edge for the jump ring. Ensure the hole is wide enough for your hardware, wiggling the tool slightly.
Step 2: Etched Terracotta Sunburst
-
Prepare the base:
Condition a piece of terracotta-colored clay and roll it out into a smooth sheet, similar in thickness to your first pendant. -
Cut the shape:
Cut out your circle shape. Smooth the edges with your fingertip to remove any stray clay bits. -
Draft the design:
Lightly mark the center of your circle with the needle tool. This will be the center of your flower or sunburst. -
Carve the petals:
Using the needle tool, gently carve radiating lines or petal shapes outward from the center. You want to create a groove, not cut all the way through. -
Create contrast:
To mimic the look in the image, roll a very tiny, thin snake of white clay and press it into the grooves, or plan to paint the grooves with white acrylic paint after baking. -
Add the hole:
Make your jump ring hole at the top, just like the previous pendant.
Smooth Edges Trick
Before baking, adhere a piece of plastic wrap over your clay. Cut the shape *through* the plastic; this creates softly rounded, professional edges instantly.
Step 3: Speckled Rainbow Arch
-
Make speckled clay:
Take white or beige clay and mix in a tiny pinch of dried spices (like nutmeg) or black pepper. Knead until the specks are evenly distributed for a stoneware look. -
Cut and clean:
Roll out the clay and cut your third circle. Gently pat down any rough edges. -
Design the arch:
Roll a very thin snake of terracotta clay. Form it into a ‘U’ or arch shape and press it gently onto the lower half of the speckled circle. -
Refine the lines:
Use your blade to trim the bottom of the arch so it sits flush with the clay surface, or carve lines into the attached clay for added texture. -
Final hole punch:
Pierce the top hole for suspension.
Fixing Fingerprints
If you notice fingerprints on your raw clay, dip your finger or a q-tip in a tiny bit of baby oil or acetone and gently buff them away before baking.
Step 4: Baking and Assembly
-
Bake the pieces:
Place all three pendants on parchment paper on a baking sheet. Bake according to your polymer clay package instructions (usually 275°F/135°C for 15-30 minutes). -
Cool down:
Allow the pieces to cool completely inside the oven or on a wire rack before handling to prevent cracking. -
Attach hardware:
Open a jump ring by twisting it sideways with pliers. Thread it through the hole in a pendant and close it securely. -
Add the cord:
Cut a length of leather cord (approx. 24-30 inches). Thread it directly through the jump ring. -
Finish the knot:
Tie the ends of the leather cord together in a simple overhand knot or use cord ends if you prefer a cleaner finish.
Enjoy mixing and matching these lightweight pendants with your favorite outfits for an effortless bohemian touch

The Complete Guide to Pottery Troubleshooting
Uncover the most common ceramic mistakes—from cracking clay to failed glazes—and learn how to fix them fast.
Tiny Stud Earrings in Pairs
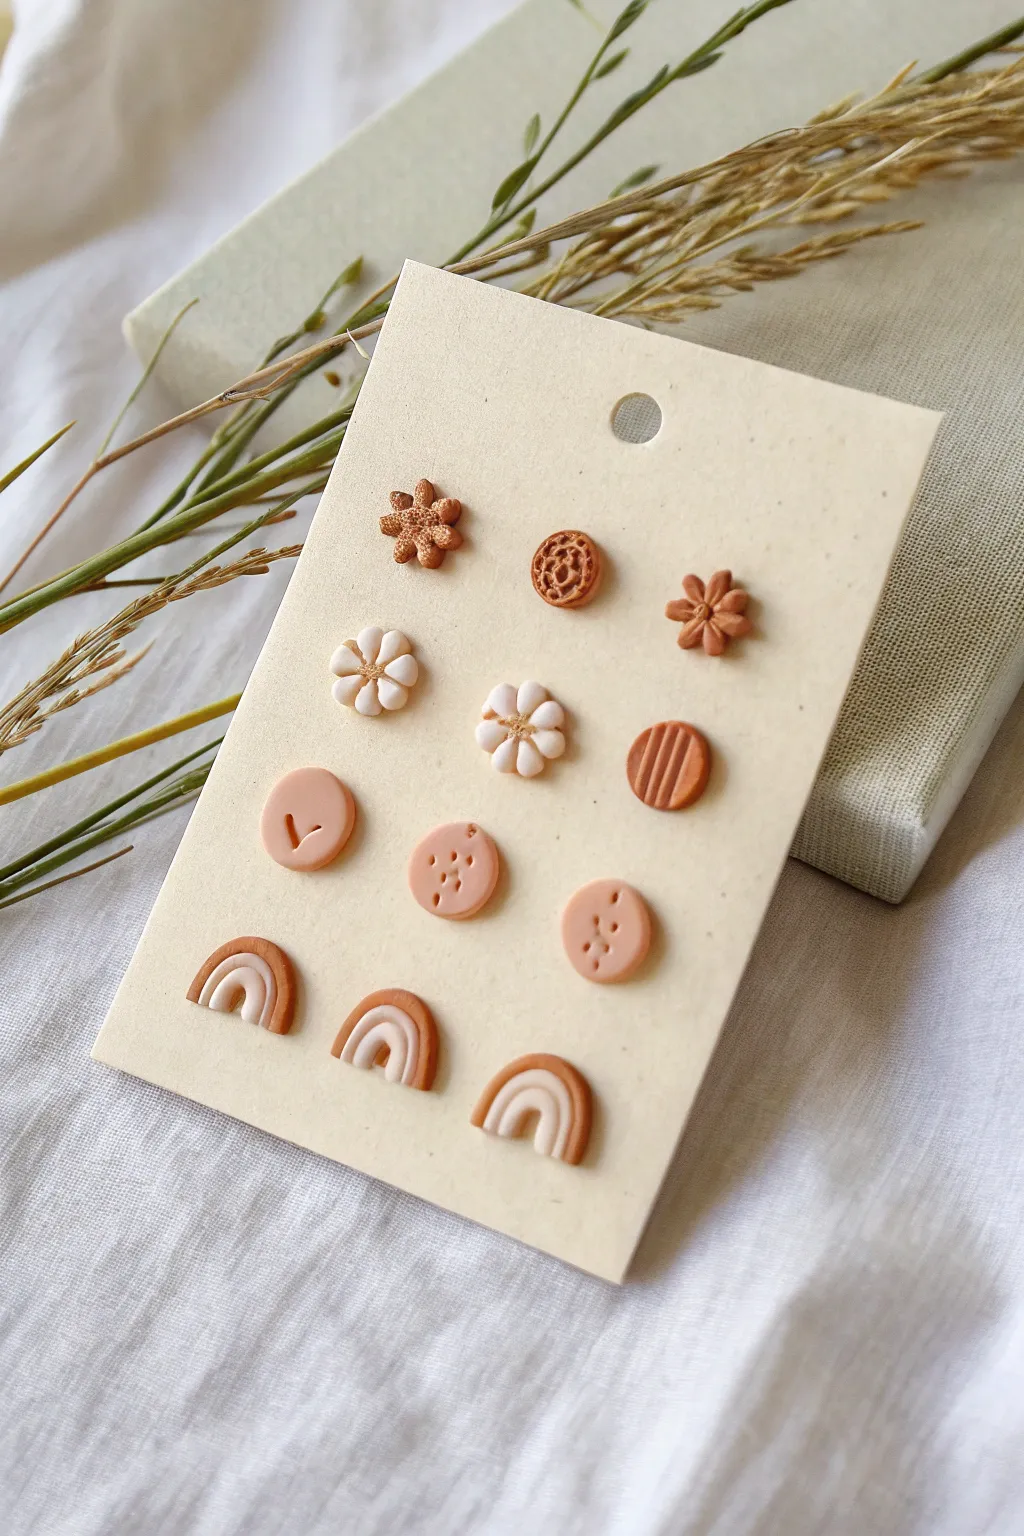
These delightfully tiny stud earrings showcase a warm, earthy color palette of terracotta, cream, and blush pink. Perfect for using up scrap clay, this collection features miniature rainbows, delicate daisies, textured circles, and abstract shapes mounted on a simple display card for gifting or keeping.
Step-by-Step Guide
Materials
- Polymer clay in Terracotta, White/Cream, and Blush Pink
- Liquid polymer clay or bake-and-bond
- Small circle cutters (approx 5mm – 8mm)
- Needle tool or toothpick
- Small dotting tool
- Sharp tissue blade or X-Acto knife
- Acrylic rolling pin
- Parchment paper or ceramic tile (for baking)
- Stainless steel stud earring posts (approx 4-6mm flat pad)
- Super glue (cyanoacrylate) or UV resin
- Sandpaper (optional, fine grit)
Step 1: Preparation & Color Mixing
-
Condition the Caly:
Start by thoroughly conditioning your polymer clay blocks until they are soft and pliable. Warm hands make this easier. -
Create Custom Shades:
If you don’t have the exact shades shown, mix small amounts of white into your terracotta to create a lighter peach tone, or mix a tiny bit of terracotta into white for a warm cream. -
Roll Flat Sheets:
Roll out a small portion of the blush pink and terracotta clays into thin, even sheets, roughly 2-3mm thick. These will be used for the flat circular studs.
Sticky Situation
If clay sticks to your needle tool during detailing, dip the tool tip in cornstarch or water before pressing into the clay to ensure a clean release.
Step 2: Sculpting the Shapes
-
Textured Daisies:
For the brown textured flowers, roll 6-7 tiny balls of terracotta clay. Press them together in a circle, flatten slightly, and prick the surface repeatedly with a needle tool for a stippled effect. -
Cream Petal Flowers:
Roll 5 small teardrops of cream clay and arrange them with points meeting in the center. Use a dotting tool to impress the center of each petal, creating a cupped flower shape. -
Center Accents:
Add a tiny ball of contrasting clay (terracotta or blush) to the center of your cream flowers to finish them off. -
Abstract Circles:
Using your smallest circle cutter, punch out circles from the pink sheet. Use a needle tool to gently impress simple abstract marks: a ‘V’ shape on one pair and small vertical dots on another. -
Grid Texture:
Punch out two terracotta circles. Use your blade to gently press parallel lines across the surface without cutting all the way through, creating a striped or grid texture. -
Miniature Rainbows:
Extrude or roll by hand extremely thin snakes of terracotta, cream, and white clay. You want them to be needle-thin for these micro studs. -
Assembling Rainbow Arches:
Bend the white snake into a tighter arch, then layer the terracotta snake over it. Trim the bottom edges flush with your sharp blade so the rainbow stands flat.
Add Some Sparkle
Before baking, brush a tiny amount of gold mica powder on the textured parts of the terracotta flowers for a subtle, unexpected shimmer.
Step 3: Baking & Assembly
-
Prepare for Baking:
Arrange all your tiny pieces on a ceramic tile or parchment-lined baking sheet. Because they are so small, I like to group pairs together so I don’t lose any. -
Baking:
Bake according to your specific clay brand’s instructions (usually 275°F/130°C). Since these are small, 15-20 minutes is typically sufficient, but check your package. -
Cooling:
Allow the pieces to cool completely before handling. This step ensures the clay hardens fully and isn’t brittle during assembly. -
Attaching Posts:
Apply a tiny drop of super glue or UV resin to the flat pad of an earring post. Press it firmly onto the back of a clay shape. -
Securing the Bond:
For extra durability, you can add a tiny smear of liquid clay over the post pad (encasing it slightly) and rebake for 10 minutes, or simply let the super glue cure fully.
Arrange your finished micro studs on a card for a delightful presentation of your handiwork
Mini Beads for Stretch Bracelets
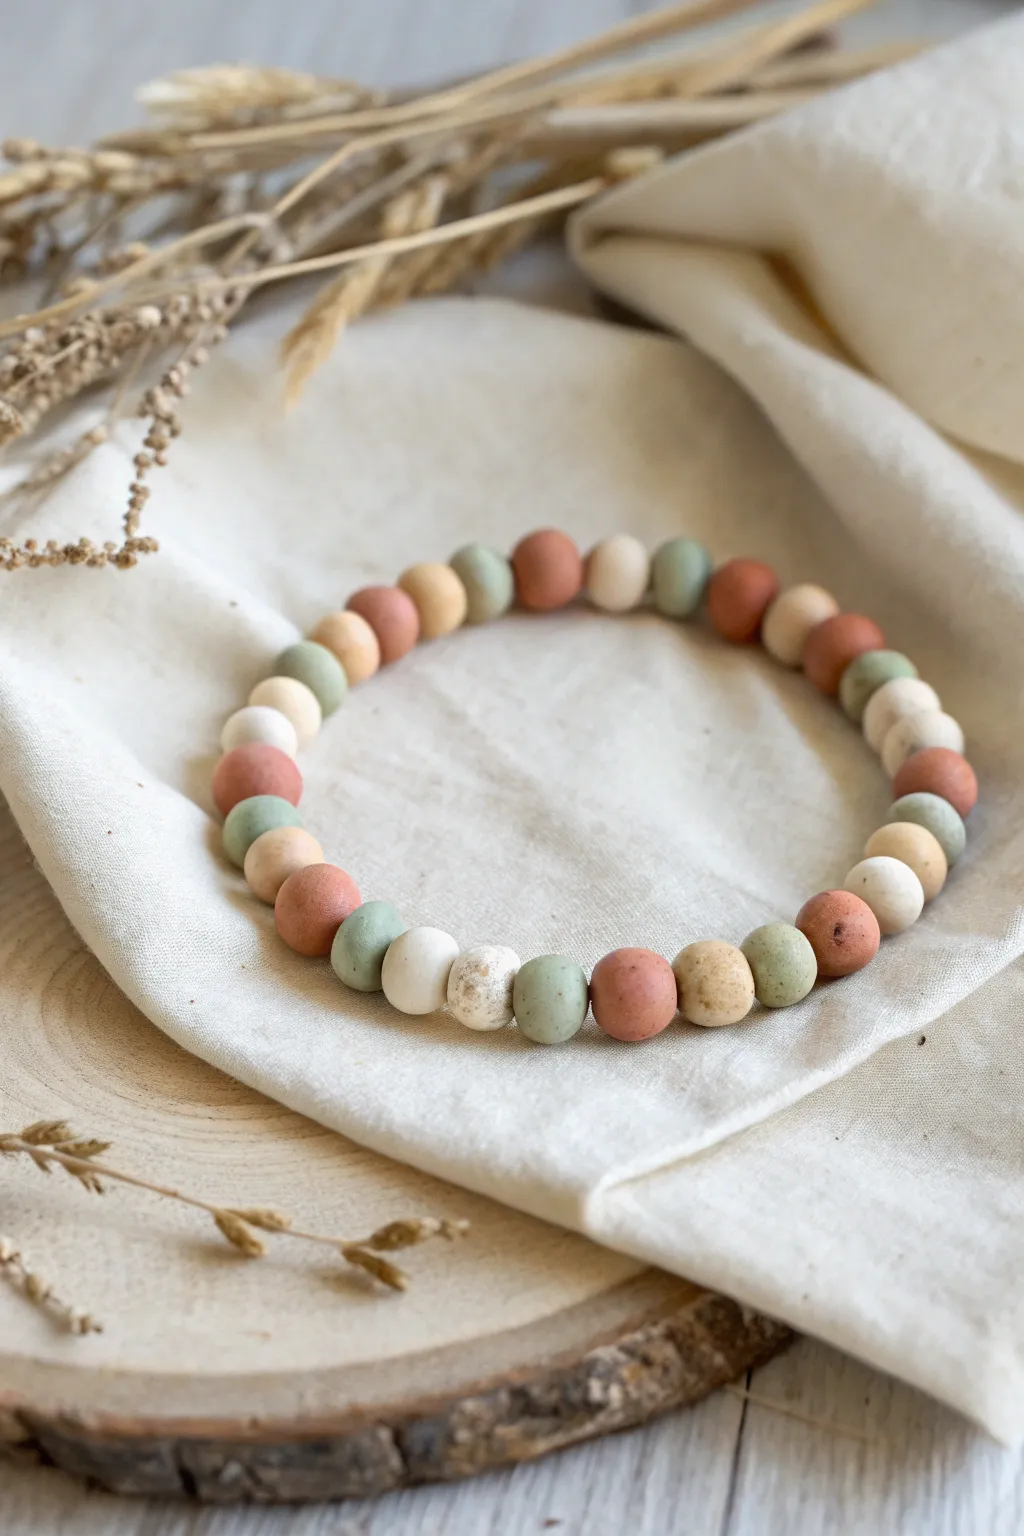
Create a soothing accessory inspired by nature with these handmade polymer clay beads. The muted rust, sage, cream, and mustard tones feature a lovely speckled finish that gives each bead distinct character and charm.
Detailed Instructions
Materials
- Polymer clay (terracotta, sage green, cream/white, mustard yellow)
- Black pepper or dried coffee grounds (for speckling)
- Acrylic rolling pin or clay machine
- Small round cutter or a drinking straw
- Pointed tool (toothpick, needle tool, or bead pin)
- Baking sheet and parchment paper
- Fine-grit sandpaper (optional)
- Elastic jewelry cord (0.8mm or 1mm)
- Jewelry glue or clear nail polish
Step 1: Clay Preparation
-
Condition the clay:
Begin by conditioning each color of polymer clay separately. Knead them warm in your hands until they are soft and pliable, ensuring there are no air bubbles trapped inside. -
Add texture:
To achieve that natural, stony look, sprinkle a pinch of ground black pepper or finely dried coffee grounds onto each flattened piece of clay. Fold the clay over and knead it again until the speckles are evenly distributed throughout. -
Roll out sheets:
Using an acrylic roller or a pasta machine, roll each clay color into a sheet of uniform thickness, roughly 1/4 inch thick. Keeping the thickness consistent now will help make your beads the same size later. -
Cut measured portions:
Use a small round cutter or even a stiff straw to punch out equal circles from your clay sheets. This ensures that every bead starts with the exact same amount of clay.
Uneven Bead Sizes?
If your hand-rolled beads vary too much in size, roll the clay into a long snake first. Use a ruler to cut exactly equal segments before rolling them into balls.
Step 2: Bead Formation
-
Roll spheres:
Take each punched-out circle and roll it vigorously between your palms. Use a gentle circular motion to smooth out any seams or fingerprints until you have a perfect sphere. -
Pierce the holes:
Hold a bead gently between your thumb and forefinger without squishing it. Using a needle tool or toothpick, carefully twist a hole through the center. I find twisting the bead onto the tool works better than pushing the tool through the bead. -
Refine the shape:
After piercing, the bead might be slightly distorted. Give it a very gentle roll between your fingers again to correct the shape, being careful not to close the hole you just made. -
Arrange for baking:
Place your raw beads onto a baking sheet lined with parchment paper. If you have a bead rack, you can suspend them on pins, but placing them on paper works fine for this matte, rustic style. -
Bake the beads:
Bake the clay according to the manufacturer’s instructions on your specific package (usually around 275°F or 130°C for 15-30 minutes). Let them cool completely before handling.
Step 3: Assembly
-
Sand imperfections:
Once cool, check your beads. If there are partial fingerprints or rough spots near the holes, gently buff them away with fine-grit sandpaper for a smooth, professional finish. -
Clean the holes:
Check that the bead holes are clear of debris. If needed, re-insert your needle tool or use a small drill bit to clean out any baked clay dust. -
Plan your pattern:
Lay your beads out on a surface to design your pattern. The example uses a random mix of colors, but alternating rusted red, sage green, and cream creates a balanced, earthy rhythm. -
Measure the cord:
Cut a piece of elastic cord about 10-12 inches long. This extra length gives you plenty of room to tie the knot comfortably without losing tension. -
Pre-stretch the elastic:
Give your elastic cord a few firm tugs before stringing. This ‘pre-stretching’ prevents the bracelet from sagging or loosening up immediately after you wear it. -
String the beads:
Thread your beads onto the elastic one by one according to your planned pattern. Check the fit around your wrist occasionally as you go. -
Tie the knot:
Tie a surgeon’s knot (right over left, left over right, and loop through an extra time). Pull the elastic tight to secure the knot firmly. -
Secure and hide:
Apply a tiny dot of jewelry glue or clear nail polish to the knot to prevent slipping. Once dry, trim the excess cord and gently tuck the knot inside the hole of an adjacent bead.
Durable Matte Finish
Avoid varnishing these beads to keep the modern matte look. Instead, buff baked beads with a piece of denim or heavy canvas to give them a soft, velvety sheen.
Now you have a custom piece of jewelry that carries the calm and beauty of natural earth tones


What Really Happens Inside the Kiln
Learn how time and temperature work together inside the kiln to transform clay into durable ceramic.
Mini Food Characters
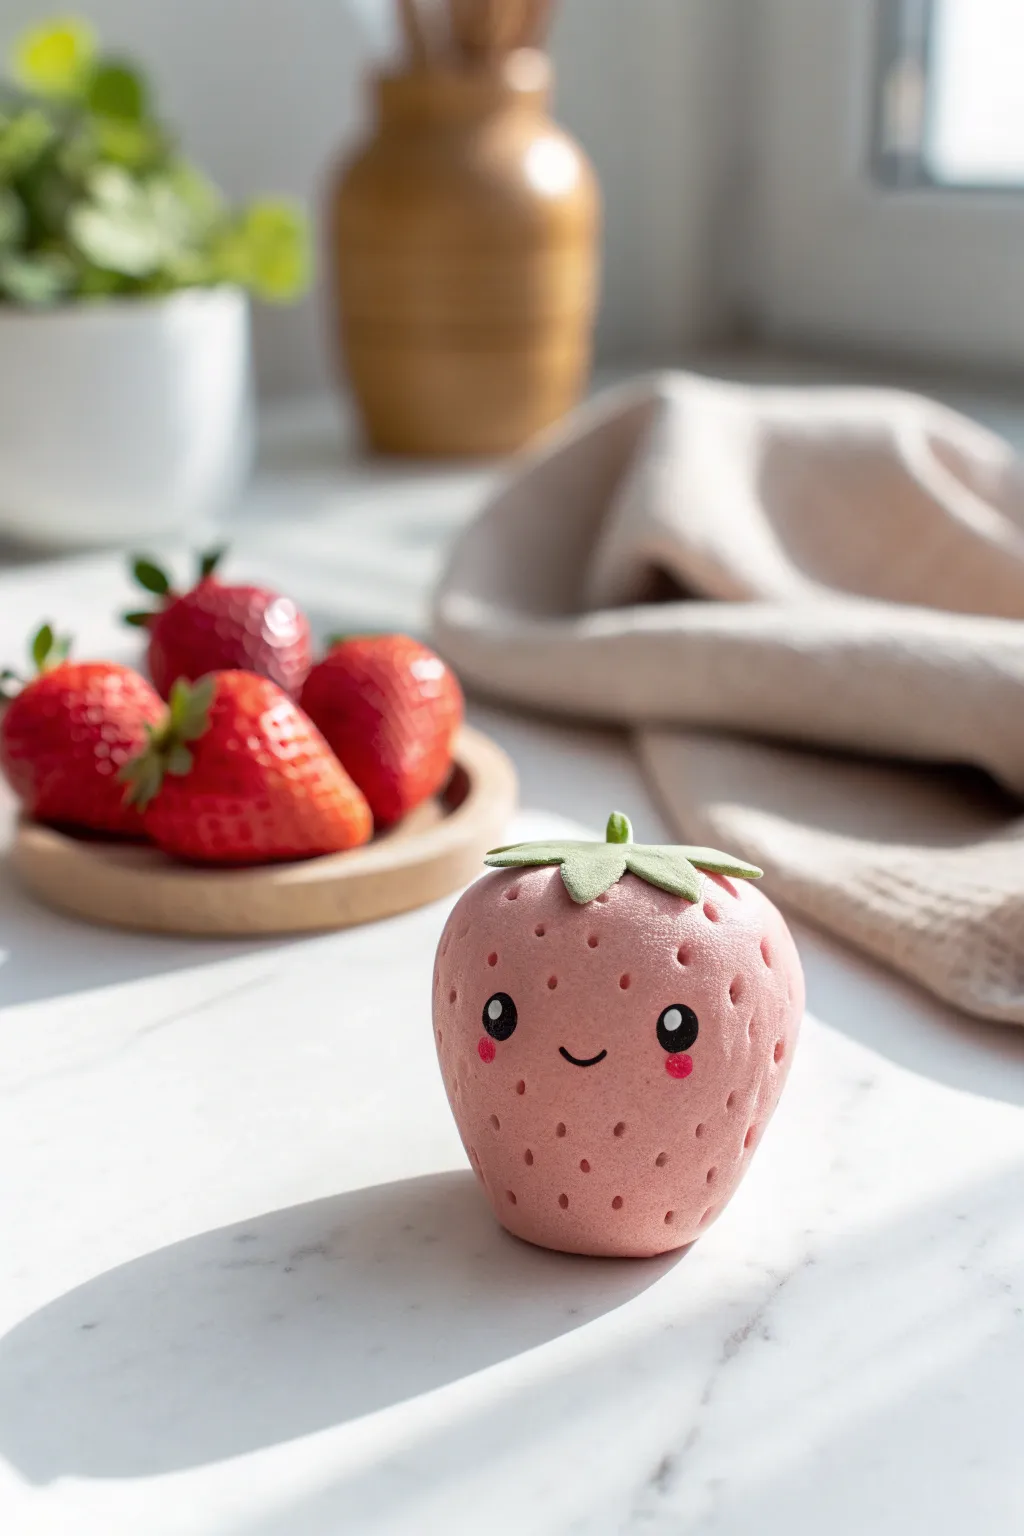
Bring a little sweetness to your desk with this adorable clay strawberry character, featuring a soft pink hue and a charming, hand-painted face. Its textured surface and leafy green crown make it a delightful mini sculpture that looks good enough to eat—but is definitely just for show.
Step-by-Step Tutorial
Materials
- Polymer clay (pale pink or strawberry pink)
- Polymer clay (moss green)
- Acrylic paint (black and pink)
- Fine detail paintbrush (size 0 or 00)
- Needle tool or toothpick
- Ball stylus tool
- Aluminum foil (for armature core)
- Gloss or matte varnish (optional)
Step 1: Shaping the Base
-
Prepare the core:
Start by balling up a small piece of aluminum foil, roughly the size of a walnut, to serve as a lightweight core. Compress it tightly into a rough teardrop shape. -
Condition the clay:
Warm up your pink polymer clay in your hands until it becomes soft and pliable, mixing in a tiny bit of white if the pink feels too vibrant for that soft, pastel look. -
Cover the core:
Flatten the pink clay into a thick pancake and wrap it completely around your foil core, ensuring there are no air bubbles trapped underneath. -
Refine the shape:
Roll the clay between your palms to smooth out seams, gently tapering the bottom to create the classic strawberry point. The top should remain somewhat broad and rounded. -
Flatten the base:
Gently tap the bottom point against your work surface just enough so the character can stand upright on its own without tipping over.
Seed Depth Trick
Don’t just poke straight in! Angle your needle tool slightly upward when making seed holes. This creates a teardrop shadow that looks much more realistic than a simple dot.
Step 2: Texturing
-
Mark the seeds:
Using a needle tool or the tip of a toothpick, gently press small indentations all over the surface of the strawberry. -
Create variation:
Vary the depth of your seed holes slightly for a natural look, but keep the front face area relatively smooth where the eyes will go. -
Smooth the surface:
I like to lightly brush my finger over the holes to soften any sharp ridges created by the needle tool, giving the strawberry a softer, spongy appearance.
Fingerprint Fix
If you notice fingerprints on your smooth clay before baking, lightly brush the surface with a little baby oil or cornstarch to smooth them away instantly.
Step 3: Adding the Crown
-
Form the leaves:
Condition a small amount of moss green clay and flatten it into a thin sheet. -
Cut the calyx:
Using a craft knife or clay tool, cut out a star shape with about five or six points to act as the leafy crown. -
Attach the crown:
Place the green star on top of your pink base, centering it carefully. -
Shape the leaves:
Gently press the center of the crown down to adhere it, then curl the tips of the leaves slightly upward for a perky, three-dimensional effect. -
Add the stem:
Roll a very tiny cylinder of green clay and attach it to the direct center of the leaves to finish the stem.
Step 4: Finishing Touches
-
Baking:
Bake your creation according to the instructions on your specific brand of polymer clay packages, usually around 275°F (135°C) for 15-30 minutes. -
Cool down:
Allow the strawberry to cool completely before attempting to paint; painting on warm clay can make the acrylics gummy. -
Paint the eyes:
Using your finest brush and black acrylic paint, create two solid black circles for eyes on the smoother patch of the face. -
Add the smile:
Paint a very thin, small ‘u’ shape between the eyes for a minimalist mouth. -
Add highlights:
Once the black paint is dry, use a toothpick to dot a tiny speck of white paint in the upper corner of each eye for that sparkling kawaii look. -
Blushing cheeks:
Dip a dry brush or a Q-tip into pink paint (wipe most of it off first) and gently dab rosy cheeks just below the eyes.
Place your little strawberry friend on a shelf or turn it into a paperweight to brighten your workspace
Tiny Fruit Slice Canes
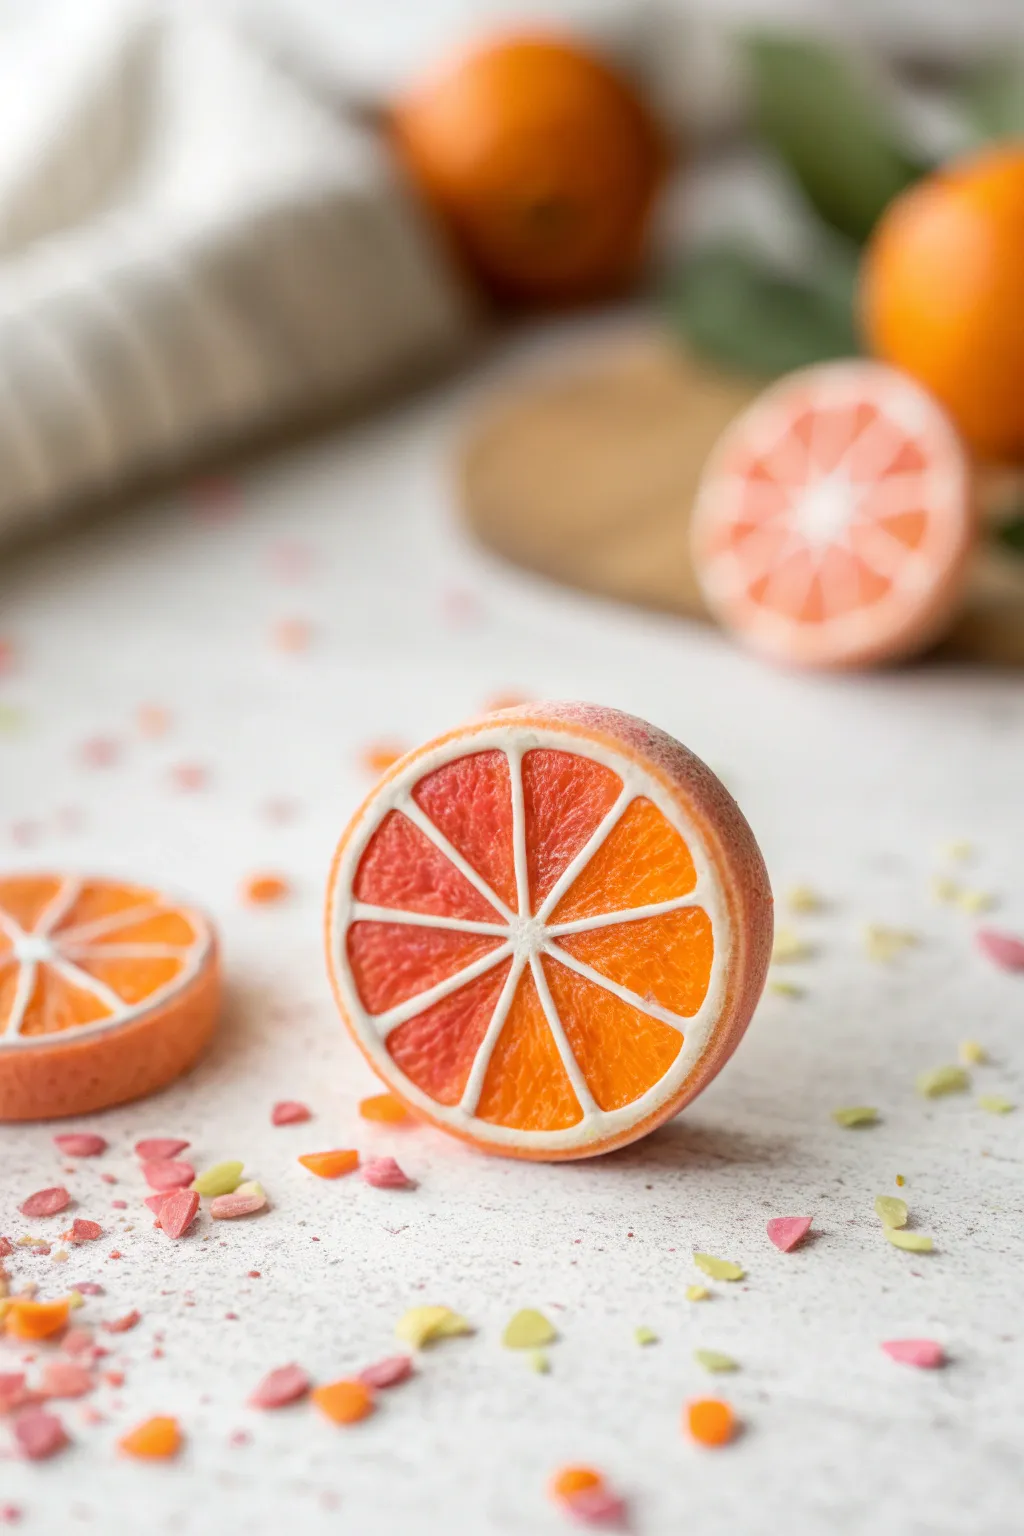
Brighten up your miniature collection with these remarkably realistic citrus canes, featuring a stunning blood orange gradient and distinct pith texture. This intermediate technique transforms simple clay logs into intricate fruit slices perfect for jewelry or dollhouse decor.
Step-by-Step Guide
Materials
- Polymer clay (Translucent, Red, Orange, White)
- Pasta machine or acrylic roller
- Tissue blade (long, flexible blade)
- Needle tool or stiff toothbrush
- Scalpel or craft knife
- Ruler
- Work surface (ceramic tile or glass mat)
Step 1: Creating the Skinner Blend
-
Prepare the Colors:
Begin by conditioning your translucent clay. Mix one portion with a small amount of red clay and another portion with a small amount of orange clay. You want the colors to remain semi-translucent, like real fruit flesh, so don’t overpower the clear base with too much pigment. -
Form the Triangles:
Shape the translucent red and translucent orange mixtures into right-angled triangles of equal thickness. Place them together to form a rectangle, creating a diagonal seam where the colors meet. -
Blend the Sheet:
Feed this rectangle into your pasta machine with the fold at the bottom. Fold the sheet in half (bringing the bottom up to the top, matching colors) and feed it through again. Repeat this process about 15-20 times until you have a smooth gradient transition from red to orange. -
Create the Plug:
Accordion-fold your blended sheet back and forth to create a block. Compress this block into a cylinder (a ‘plug’), ensuring the red is on one end of the cylinder face and orange is on the other, or radiating from the center depending on your preference. For this look, keep the gradient running side-to-side within the log.
Clean Cuts Only
Chill your finished cane in the fridge for 20 minutes before slicing. Firm clay resists squishing, giving you perfectly round slices with crisp internal patterns.
Step 2: Assembling the Cane Component
-
Elongate the Plug:
Gently roll and stretch the gradient plug until it is a long, thin snake, approximately 5-6 inches long. Let it rest for a few minutes so the clay isn’t too soft. -
Shape the Wedge:
Pinch one side of the cylinder along its entire length to turn the round snake into a teardrop or triangular prism shape. This will form the individual fruit segments. -
Wrap in Pith:
Roll out a sheet of solid white clay on a thin setting. Wrap this sheet around your triangular cane component. This white layer represents the membrane between fruit segments. -
Cut Segments:
Using your tissue blade, cut the long triangular cane into 8 to 10 equal lengths. Ensure the cut ends are clean and not distorted.
Smudged Whites?
If red clay bleeds onto the white pith during slicing, use a scrap of white clay or a baby wipe to gently lift the smear before baking. Keep blades meticulously clean.
Step 3: Final Assembly & Texturing
-
Arrange the Wheel:
Assemble the triangular segments into a circle, pointing the narrow tips toward the center. Press them gently together so they adhere to one another without losing their triangular definition. -
Fill the Core:
Roll a very thin snake of white clay and place it in the absolute center where all the tips meet to create the central pith core. -
Outer Rind Layer:
Wrap the entire assembled wheel in a thick sheet of white clay for the outer pith layer. Follow this with a final thin layer of textured orange-pink clay (mix red, orange, and white) to create the skin. -
Texture the Skin:
Roll the finished large cane over sandpaper or tap it gently with a toothbrush to simulate the porous texture of citrus peel. -
Reduce the Cane:
Carefully squeeze and stretch the large cane to reduce it to your desired diameter. Start by compressing the middle and working outward to avoid distorting the internal pattern. -
Slice and Finish:
Once the cane is reduced and rested (I always let mine sit for at least 30 minutes to firm up), use a sharp tissue blade to slice thin cross-sections. -
Add Surface Texture:
For the realistic look in the photo, take a needle tool and gently poke and drag tiny lines in the ‘flesh’ part of the slice to mimic juice vesicles. -
Bake:
Bake your slices according to your clay manufacturer’s instructions. If you have leftover clay crumbs from slicing, bake them too—they make great ‘sprinkles’ for photography.
Now you have a refreshing batch of citrus slices ready to be turned into earrings or miniature display pieces

TRACK YOUR CERAMIC JOURNEY
Capture glaze tests, firing details, and creative progress—all in one simple printable. Make your projects easier to repeat and improve.
Mini Animal Figurines
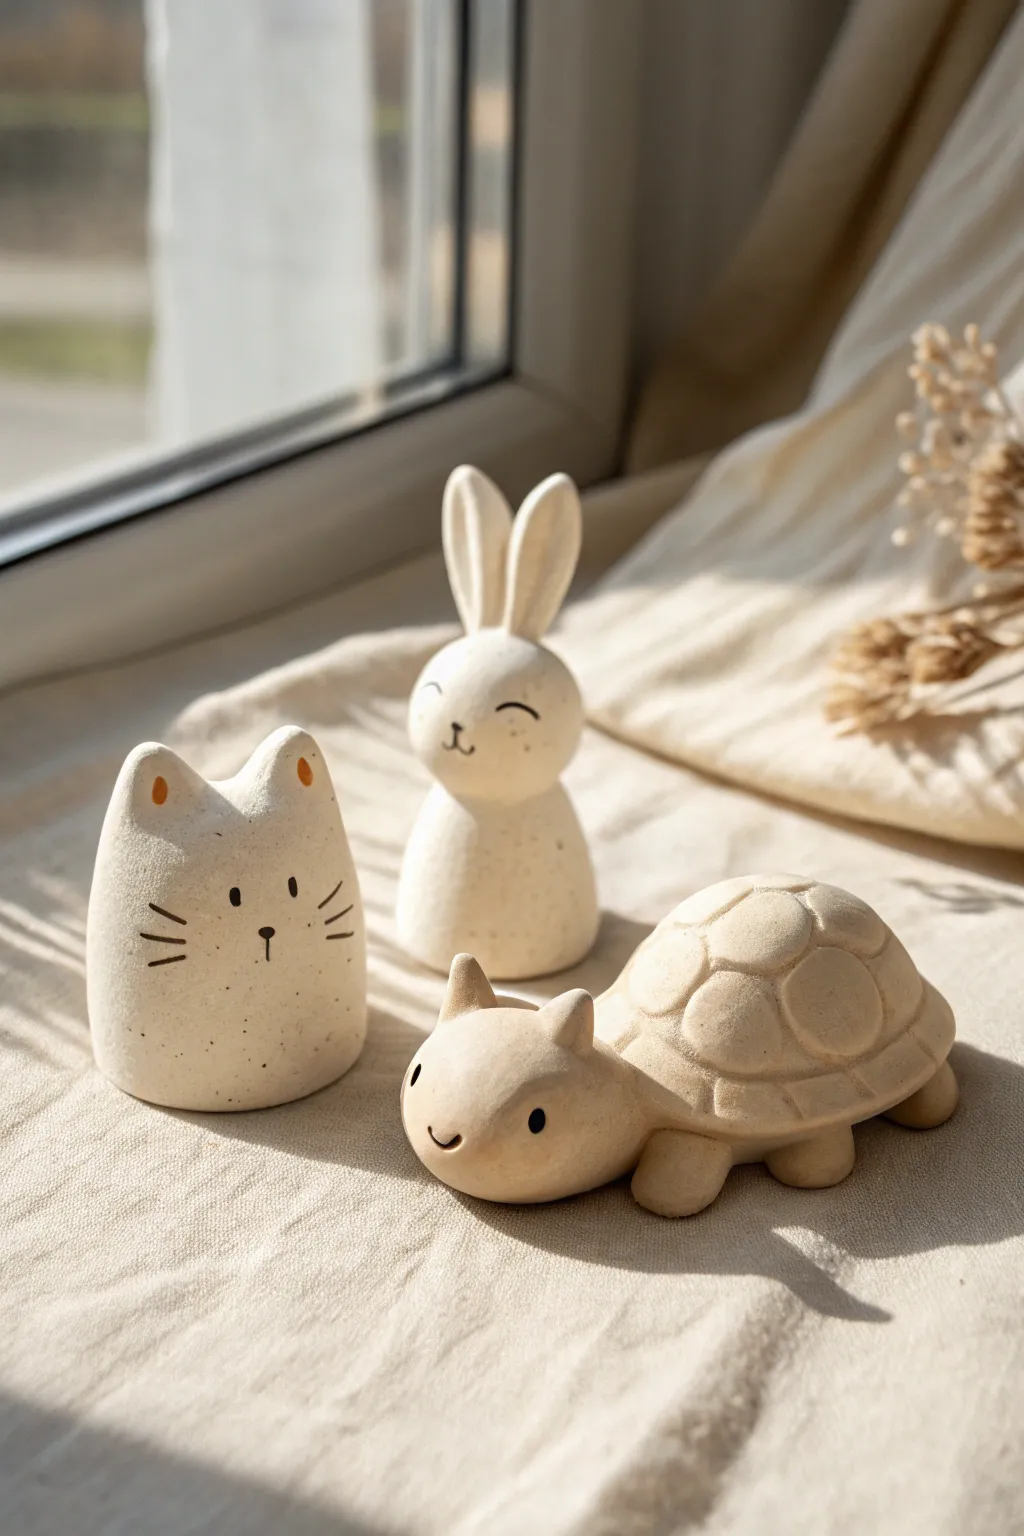
Create a charming set of minimalist animal friends using polymer or air-dry clay. These figures—a round cat, a tall bunny, and a textured turtle—feature a natural, stony finish with simple painted expressions.
Detailed Instructions
Materials
- White polymer clay or air-dry clay
- Faux granite texture paint or speckle additive (e.g., black pepper or dried herbs)
- Black acrylic paint
- Fine detail paintbrush (size 0 or 00)
- Small ball stylus tool
- Needle tool or toothpick
- Burnt orange acrylic paint (for ear details)
- Matte varnish (optional)
- Oven (if using polymer clay)
Step 1: Prepping the Clay
-
Mix the Speckles:
Before sculpting, condition your white clay until it is soft and pliable. If your clay isn’t pre-speckled, knead in a tiny pinch of black pepper, dried tea leaves, or specialty granite inclusions to achieve that organic, stony look shown in the photo. -
Divide the Portions:
Separate your clay into three equal-sized lumps. One will be the cat, one the rabbit, and the last will become the turtle.
Cracks while Drying?
For air-dry clay, smooth mixture of clay and water (slip) into any cracks. For polymer, bake at the correct temp; underbaking causes brittleness.
Step 2: Sculpting the Cat
-
Form the Body:
Roll the first lump into a smooth ball, then gently flatten the bottom so it sits stable. Push the sides slightly to create a soft, rounded gumdrop shape. -
Pinch the Ears:
Using your thumb and forefinger, gently pinch the top two corners of the gumdrop shape to pull up two small, triangular ears. Smooth the transition so the ears look seamless with the head.
Step 3: Sculpting the Bunny
-
Create the Stack:
Divide the second lump into two pieces: a slightly larger one for the body and a smaller round one for the head. Shape the body into a tapered cone with a flat bottom. -
Attach the Head:
Place the round head on top of the body cone. I find blending the clay at the neck seam with a modeling tool ensures it won’t pop off later. -
Make the Ears:
Roll two small logs of clay and taper the ends. Flatten them slightly to form long bunny ears. Attach them to the top of the head, standing straight up side-by-side.
Accessorize
Make tiny accessories like a clay carrot for the bunny or a flower on the turtle’s shell using leftover colored clay scraps.
Step 4: Sculpting the Turtle
-
Shape the Shell:
Take two-thirds of the final clay lump and roll it into a ball, then press it down to create a dome shape for the turtle’s shell. -
Detail the Shell:
Use a ball stylus or the back of a brush to gently press circular indentations into the shell. Start with one in the center and surround it with a ring of circles to mimic scutes. -
Add Limbs and Head:
With the remaining clay, make four tiny flattened balls for feet and one slightly larger teardrop for the head. Attach the feet under the shell edge and the head sticking out the front. -
Turtle Ears:
Add two tiny triangles to the top of the turtle’s head for a whimsical touch, matching the style of the other animals.
Step 5: Finishing Touches
-
Bake or Dry:
Follow the manufacturer’s instructions for your specific clay. If baking, place them on parchment paper to prevent shiny spots on the bottom. -
Painting Faces:
Once fully cured and cool, use your fine brush and black paint to add the faces. Keep it minimal: tiny dots for eyes and simple lines for whiskers on the cat. -
Adding Warmth:
Dip the tip of your brush in burnt orange paint. Add tiny oval patches inside the cat’s ears for a pop of color. -
Protection:
If desired, coat the figurines in a matte varnish to protect the paint without making them look glossy or plastic.
Now you have a trio of stoic little creatures ready to decorate your windowsill or desk
Cute Mini Magnets
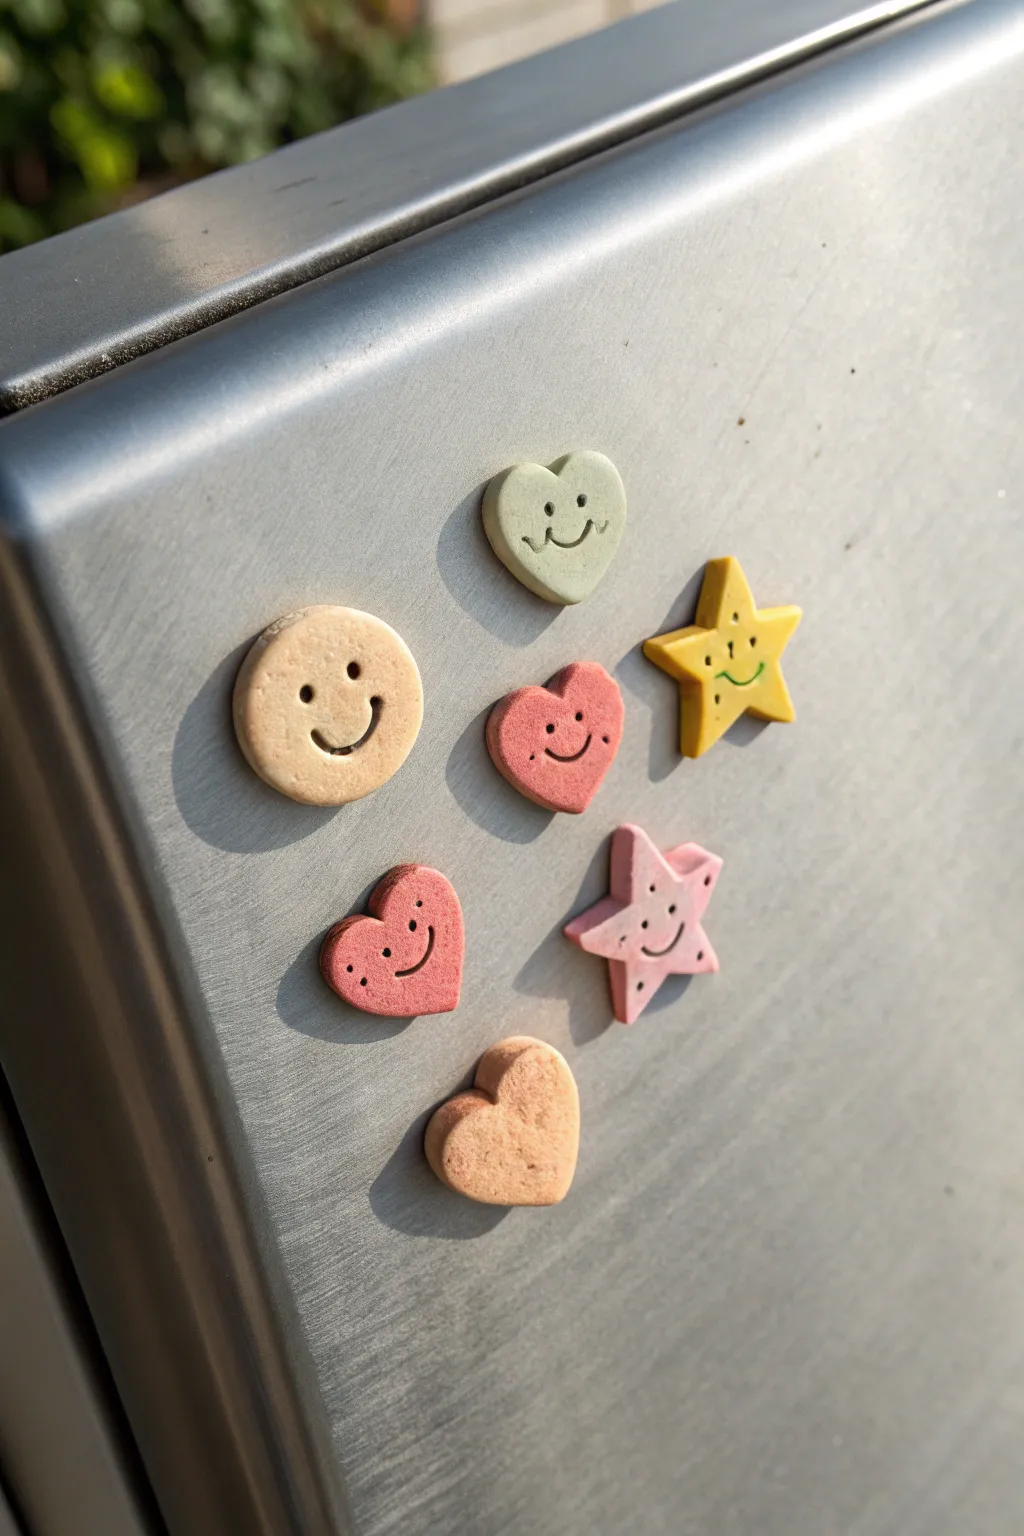
These adorable fridge magnets look just like tiny sugar cookies with their soft pastel colors and matte texture. With their cheerful expressions and simple shapes, they add a delightful touch of whimsy to any magnetic surface.
Step-by-Step Tutorial
Materials
- Polymer clay (beige, pastel green, yellow, pink, coral)
- Small cookie cutters (heart, star, circle)
- Rolling pin or acrylic roller
- Detail tool or toothpick
- Small straw or piping tip (for eyes)
- Needle tool
- Fine-grit sandpaper
- Strong craft glue (E6000 or similar)
- Small round magnets
- Parchment paper
- Baking sheet
Step 1: Prepping and Shaping
-
Condition the clay:
Begin by warming the polymer clay in your hands. Knead each color separately until it is soft, pliable, and free of cracks. For the ‘cookie’ base color, you might want to mix a little translucent clay into beige for a realistic dough look. -
Roll it out:
Place a ball of conditioned clay on a piece of parchment paper. Use your acrylic roller to flatten it to an even thickness, aiming for about 1/4 inch (6mm) thick. Keep it relatively thick so the magnets have a nice, chunky presence. -
Cut the shapes:
Press your mini cookie cutters firmly into the clay. Create a variety of shapes—hearts, stars, and circles—using different pastel colors for each batch. Gently wiggle the cutter to release the clay. -
Smooth the edges:
Once cut, the edges might be sharp or slightly ragged. Use your fingertip to very gently tap and smooth the borders of each shape, softening them just like a baked cookie edge.
Step 2: Adding the Faces
-
Mark the eyes:
To create uniform eyes, use a small straw, the end of a paintbrush, or a small piping tip. Press straight down into the clay to make small circular indentations. Don’t go all the way through. -
Draw the smiles:
Using a needle tool or a specialized clay detailing tool, carefully carve a curved line for the mouth. For some shapes, you can add little upturned corners to make the smile look extra happy. -
Add details:
Feel free to add tiny decorative dots or cheeks using a smaller needle tool, like the freckles on the pink heart or the cheeks on the yellow star. -
Darken the features (optional):
If you want the features to stand out more like the yellow star in the photo, you can gently trace the indented lines with a tiny bit of dark pigment powder or acrylic paint before baking, though leaving them plain creates a subtle, embossed look. -
Texture the surface:
I find that gently pressing a piece of sandpaper or an old toothbrush against the surface gives the clay a realistic, baked texture.
Fixing Fingerprints
Smudged the clay? Before baking, lightly brush the surface with a tiny amount of baby oil or cornstarch to smooth away accidental fingerprints.
Step 3: Baking and Assembly
-
Bake the clay:
Arrange your shapes on a parchment-lined baking sheet. Bake according to your specific brand of clay’s instructions (usually around 275°F/135°C for 15-30 minutes). Be careful not to burn the light colors. -
Cool down:
Allow the clay pieces to cool completely on the baking sheet. They will harden fully as they cool. -
Sand the back:
Use fine-grit sandpaper to lightly scuff the back of each clay piece. This creates a rougher surface that helps the glue adhere better. -
Attach the magnets:
Apply a small dab of strong craft glue to the back of a magnet. Press it firmly onto the center of the clay shape. -
Let it cure:
Let the glue dry undisturbed for at least 24 hours to ensure a permanent bond before placing them on your fridge.
Sweet Details
Use soft pastel chalks with a dry brush to add rosy ‘blush’ to the cheeks of your clay characters before baking for an extra cute effect.
Now your fridge is ready to greet you with a collection of sweet, permanent smiles
Mini Bud Vases
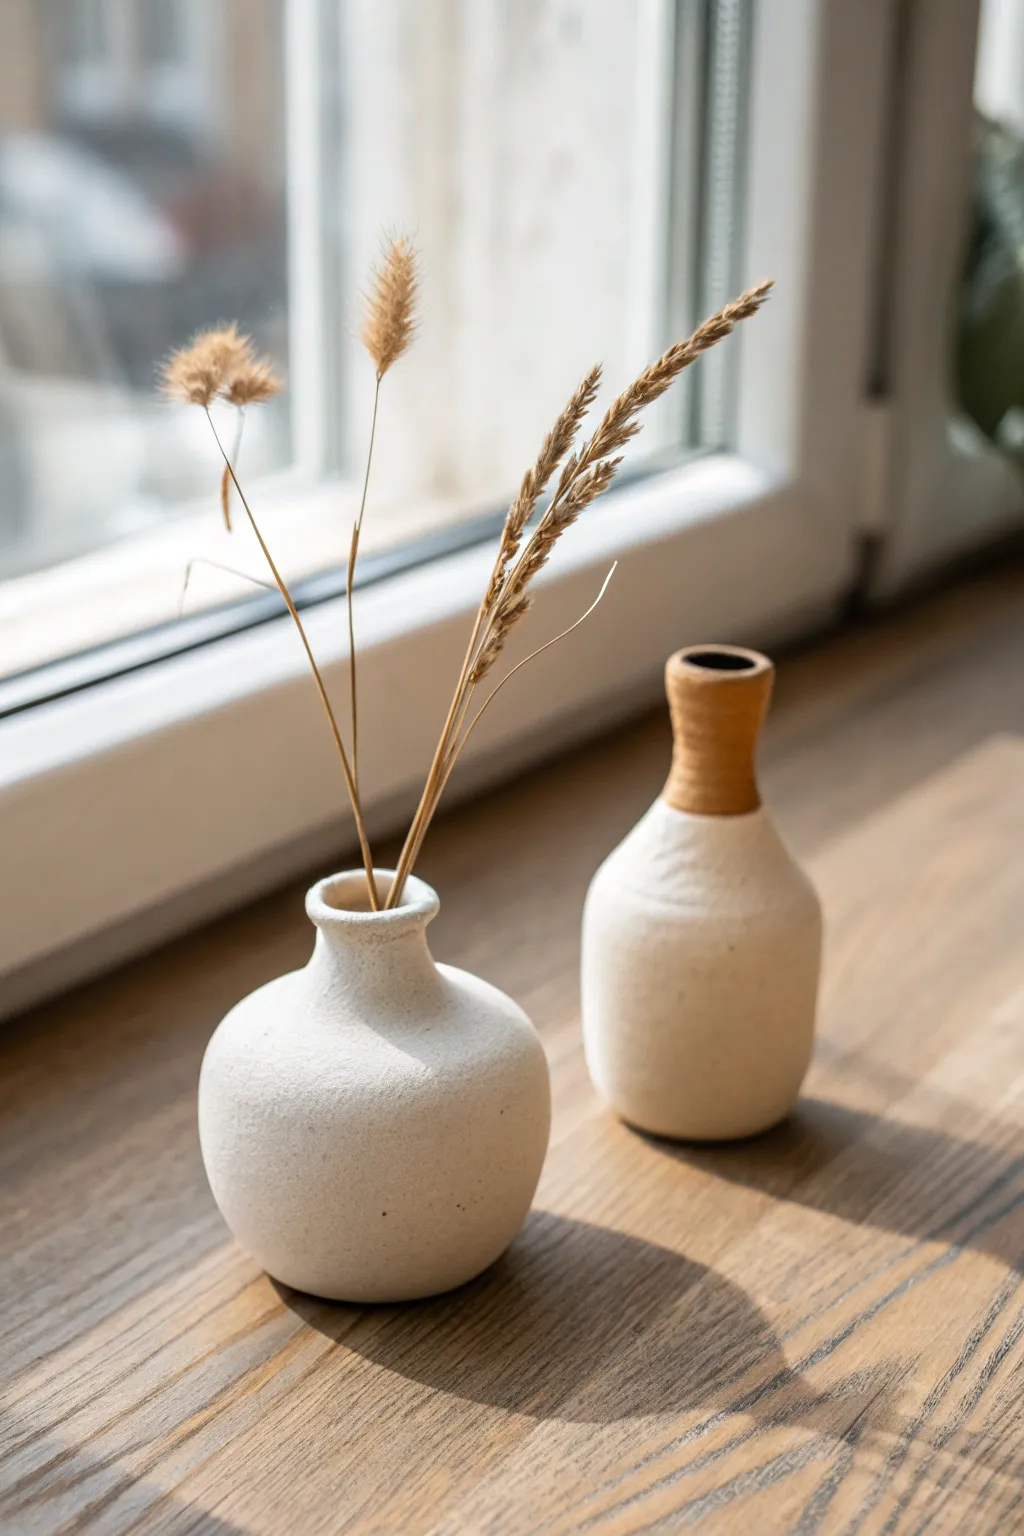
These charming miniature bud vases feature a tactile, stone-like texture and a minimalist silhouette perfect for holding delicate dried grasses. The duo contrasts a squat, rounded form with a taller, bottle-necked shape, creating a harmonious display for any windowsill.
Step-by-Step Guide
Materials
- Air-dry clay (white)
- Small rolling pin or acrylic roller
- Pottery sponge
- Clay sculpting tools (needle tool, smoothing rib)
- Slip (clay mixed with water)
- Fine-grit sandpaper
- Acrylic paint (warm white or cream)
- Acrylic paint (terracotta or warm brown)
- Baking soda (for texture)
- Matte sealant or varnish
Step 1: Shaping the Round Vase
-
Create the base:
Start by pinching off a ball of white air-dry clay roughly the size of a golf ball. Roll it between your palms until it is perfectly smooth and round. -
Form the pinch pot:
Gently press your thumb into the center of the ball, but stop before you poke through the bottom which would weaken the base. -
Build the walls:
Using a pinching motion with your thumb on the inside and fingers on the outside, gently rotate the ball to thin the walls and create a hollow interior. -
Refine the shape:
Tap the bottom gently on your table to create a flat, stable base so the vase won’t wobble. -
Create the neck:
Roll a small coil of clay. Score the top opening of your pinch pot and the coil, add a dab of slip, and attach the coil to form a narrow neck. -
Smooth the transition:
Use a sculpting tool or your finger to blend the clay coil downward into the body of the vase until the seam disappears completely.
Smoother Surfaces
Use a tiny amount of water on your fingertip to polish the clay as you work, but avoid soaking it, which creates cracks.
Step 2: Crafting the Bottle Vase
-
Roll the body:
Take a slightly smaller amount of clay than before and shape it into a thick cylinder rather than a ball. -
Hollow the form:
Insert a tool handle or dowel into the top of the cylinder to create the hollow space, keeping the walls relatively thick for stability. -
Narrow the shoulder:
Gently pinch and press the upper third of the cylinder inward to create sloping shoulders leading to a narrow opening. -
Elongate the neck:
Roll a taller, thinner coil of clay. Create a ring and attach it to the top opening using the score-and-slip method. -
Blend and smooth:
Carefully blend the seams on the outside so the bottle has a continuous, smooth profile from base to rim.
Natural Speckles
Mix used dried coffee grounds or cracked black pepper into the wet clay for an organic speckled pottery effect.
Step 3: Refined Finishing
-
Initial smoothing:
Isolate any distinct fingerprints or uneven bumps and smooth them out with a slightly damp sponge before the clay begins to harden. -
Drying:
Set both vases aside in a cool, dry place. I find turning them occasionally helps them dry evenly and prevents cracking. -
Sanding:
Once bone dry (typically 24-48 hours), use fine-grit sandpaper to gently sand away any remaining imperfections or sharp edges. -
Mixing texture paint:
Mix a small amount of baking soda into your warm white acrylic paint. This creates the gritty, stone-like texture seen in the photo. -
Painting the base coats:
Apply the textured white paint to the entire round vase and the bottom section of the bottle vase using a dabbing motion. -
Adding the accent:
For the bottle vase, paint the neck section with the terracotta-colored paint to create the specific two-tone look. -
Sealing:
Finish with a coat of matte spray varnish to protect the surface without adding unwanted shine.
Arrange your finished vases with a few sprigs of dried bunny tail grass for a serene, natural vignette
Tiny Ring Cones
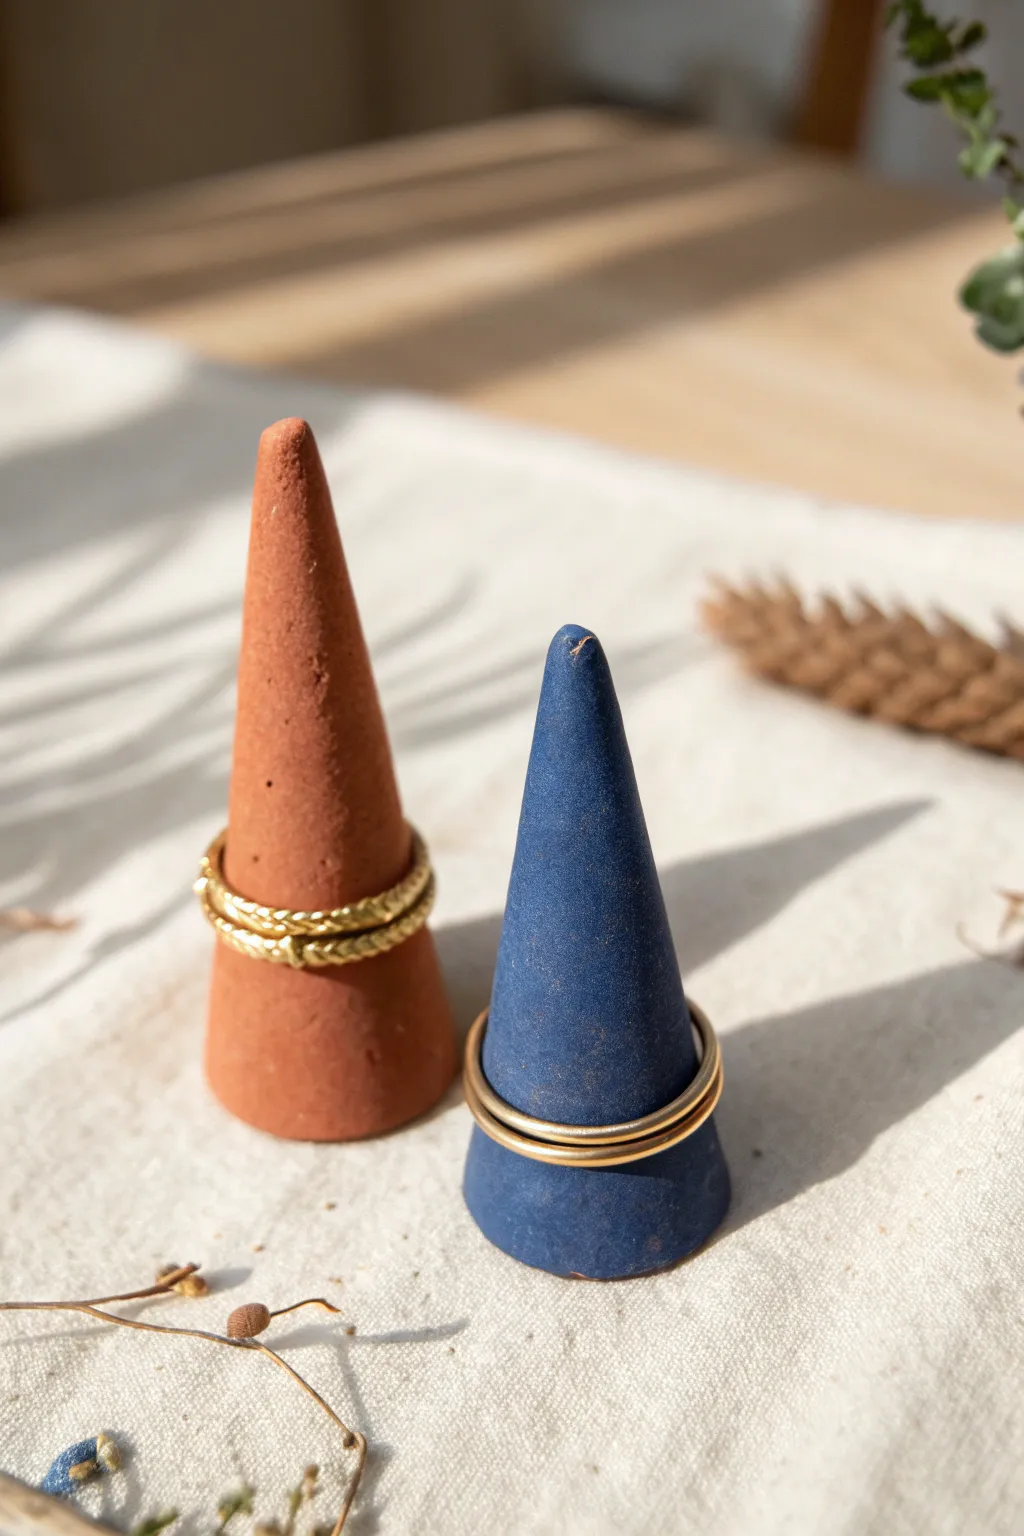
These elegant, matte ring cones are the perfect functional decor piece for your vanity. Their simple geometric shape and earthy tones offer a chic way to display your favorite rings while keeping them safe.
Detailed Instructions
Materials
- Air-dry clay or polymer clay (terracotta and navy blue colors)
- Small rolling pin or acrylic roller
- Sharp craft knife or scalpel
- Ruler
- Fine-grit sandpaper (400-600 grit)
- Smooth work surface or silicone mat
- Paper cone template (optional but helpful)
- Water (for smoothing air-dry clay)
- Matte varnish (optional)
Step 1: Shaping the Clay
-
Condition the clay:
Begin by taking a chunk of your terracotta-colored clay. Knead it thoroughly in your hands until it becomes warm, soft, and pliable. This conditioning step prevents cracks later on. -
Roll a smooth ball:
Once conditioned, roll the clay between your palms to form a smooth, crack-free sphere about the size of a walnut. -
Form the initial cone shape:
Place the ball on your work surface. Using the flat part of your palm, begin to roll the ball back and forth, applying slightly more pressure on one side to create a tapered carrot shape. -
Refine the height:
Stand the tapered coil up on its wider end to check the height. You are aiming for a cone that is roughly 2.5 to 3 inches tall. -
Smooth the sides:
Gently roll the standing cone between your flattened palms to smooth out any fingerprints and ensure the taper is even all the way to the tip. -
Flatten the base:
Press the cone firmly down onto your work surface to create a flat, stable bottom. You want a distinct sharp edge where the side meets the base. -
Trim for precision:
If the base looks uneven or wobbly, use your sharp craft knife to slice a thin layer off the bottom, ensuring it sits perfectly flat.
Step 2: Creating the Second Cone
-
Switch colors:
Clean your hands and work surface thoroughly to avoid color contamination. Take the navy blue clay and repeat the conditioning process. -
Roll and taper:
Just as before, roll the blue clay into a ball and then taper it into a cone shape. I like to make this one slightly varying in height—either taller or shorter than the first—for visual interest. -
Check stability:
Tap the base on the table to flatten it. Place a ring on the cone temporarily to ensure it doesn’t tip over; if it does, widen the base slightly. -
Refine the surface:
Inspect the clay for any tiny lint or dust particles. Pick them out gently with the tip of your knife or smooth over them with a drop of water if using air-dry clay.
Smooth Operator
To erase stubborn fingerprints without sanding, lightly brush the unbaked clay with a tiny bit of baby oil (polymer) or water (air-dry) before drying.
Step 3: Finishing Touches
-
Allow to dry or bake:
If using air-dry clay, let the cones sit in a dry spot for 24-48 hours. If using polymer clay, bake according to the manufacturer’s instructions on the package. -
Initial styling check:
Once fully hardened/cooled, check the texture. The look we want is matte and slightly earthy, not glossy. -
Sanding for texture:
Take your fine-grit sandpaper and very lightly sand the surface of the cones. This removes any lingering fingerprints and gives that stone-like, matte finish seen in the photo. -
Dust off:
Wipe the cones down with a slightly damp cloth to remove the sanding dust. -
Optional matte seal:
While the raw finish looks great, you can apply a thin coat of ultra-matte varnish if you want extra durability without adding shine.
Speckled Stone Effect
Mix cracked black pepper or dried tea leaves into lighter-colored clay before rolling. When sanded, it creates a stunning faux-granite texture.
Place your new sculptural cones on your dresser and arrange your favorite rings for a functional art display
Mini Incense Holders
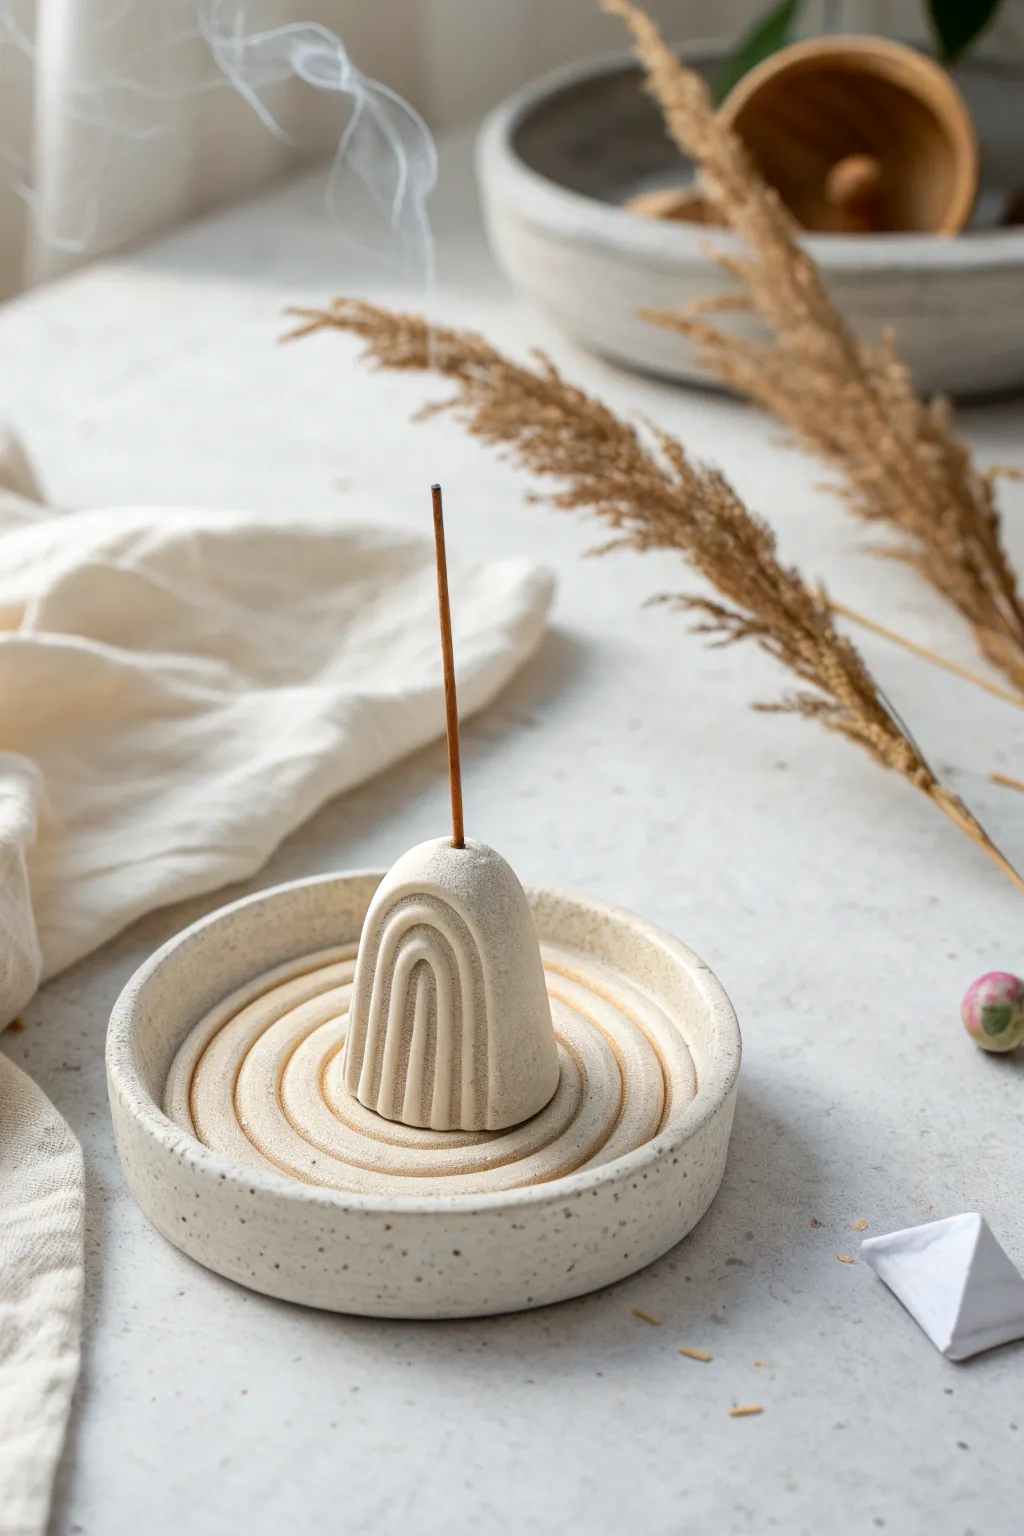
Embrace a moment of calm with this sculptural incense holder that feels both modern and grounded. The speckled stoneware look and repetitive arch motifs create a serene centerpiece perfect for holding your favorite stick incense.
Step-by-Step Tutorial
Materials
- White or cream polymer clay
- Faux granite or black pepper (for speckling)
- Acrylic rolling pin
- Circle cutter (approx. 4 inches)
- Needle tool or toothpick
- Small loop carving tool
- Incense stick (for sizing)
- Sandpaper (fine grit)
- Baking sheet
- Oven
Step 1: Preparing the Clay
-
Condition the clay:
Start by warming the white polymer clay in your hands, kneading it until soft and pliable. This prevents cracks later on. -
Create the speckle effect:
If you aren’t using pre-speckled clay, mix in a tiny amount of black faux granite clay or even coarse freshly ground black pepper. Fold and knead until the specks are evenly distributed but sparse.
Step 2: Sculpting the Base
-
Roll the slab:
Roll your clay out into a smooth, even slab about 1/4 inch thick. Aim for uniform thickness to ensure the base sits flat. -
Cut the circle:
Use your 4-inch round cutter to punch out a perfect circle. Peel away the excess clay. -
Create the rim:
Roll a long, thin snake of clay. Attach this coil along the very top edge of your clay circle to create a raised rim. -
Blend the rim seams:
Use your finger or a clay tool to smooth the inside and outside seams where the coil meets the base, blending it until it looks like one solid piece. -
Carve the spiral:
Using a small loop tool, gently carve a continuous spiral groove into the floor of the dish, starting from the center and working outward. Don’t cut all the way through; just create texture.
Stone Texture Trick
Use an old toothbrush to flick diluted brown acrylic paint over the baked piece for extra dimension and organic spotting.
Step 3: Forming the Central Arch
-
Shape the mound:
Take a leftover ball of clay and shape it into a tall, smooth gumdrop or rounded arch shape. It should be roughly 1.5 inches tall. -
Flatten the sides:
Gently press the front and back of the mound so it becomes slightly flattened rather than perfectly round, resembling a standing stone. -
Carve the concentric arches:
Use the loop tool or needle tool to carve three or four nested rainbow arches into the front face of the mound. -
Make the incense hole:
Use an actual incense stick to poke a hole directly into the peak of the arch. Wiggle it slightly so the hole is just loose enough to fit the stick after baking. -
Check the fit:
Place the arch in the center of your dish to ensure the proportions look right. I stick the arch to the base now if I want a one-piece unit, or keep them separate for modular cleaning.
Make It Modular
Keep the central arch separate from the dish! This makes it much easier to dump out the ash without moving the main sculpture.
Step 4: Finishing Touches
-
Smoothing:
Dip your finger in a little rubbing alcohol or baby oil and lightly smooth over any fingerprints or rough carving debris. -
Bake carefully:
Place your pieces on a baking sheet lined with parchment paper. Bake according to your specific clay package instructions. -
Cool down:
Let the clay cool completely in the oven before removing it to prevent thermal shock. -
Sand for stone texture:
Once cool, lightly sand the surface with fine-grit sandpaper. This removes any shine and enhances the matte, stoneware aesthetic.
Light your favorite scent and watch the smoke drift through your handmade sculpture