When I need a quick creative win, I reach for mini clay sculptures—they’re tiny, forgiving, and ridiculously satisfying. Here are my favorite beginner-friendly ideas you can finish in a cozy afternoon, whether you’re using polymer clay or air-dry clay.
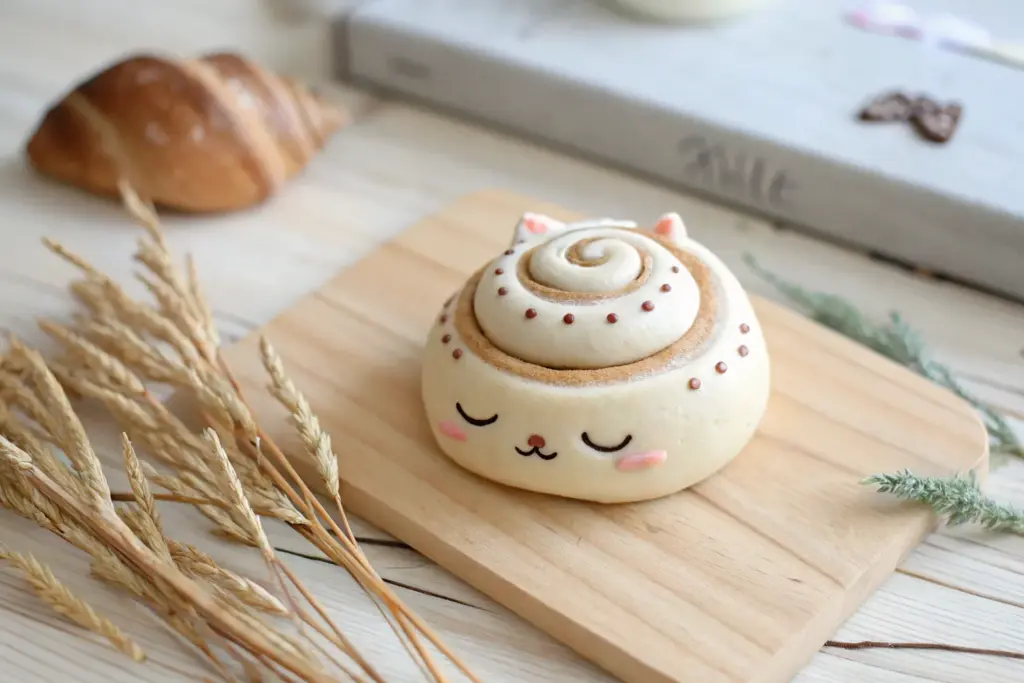
Kawaii Blob Cat
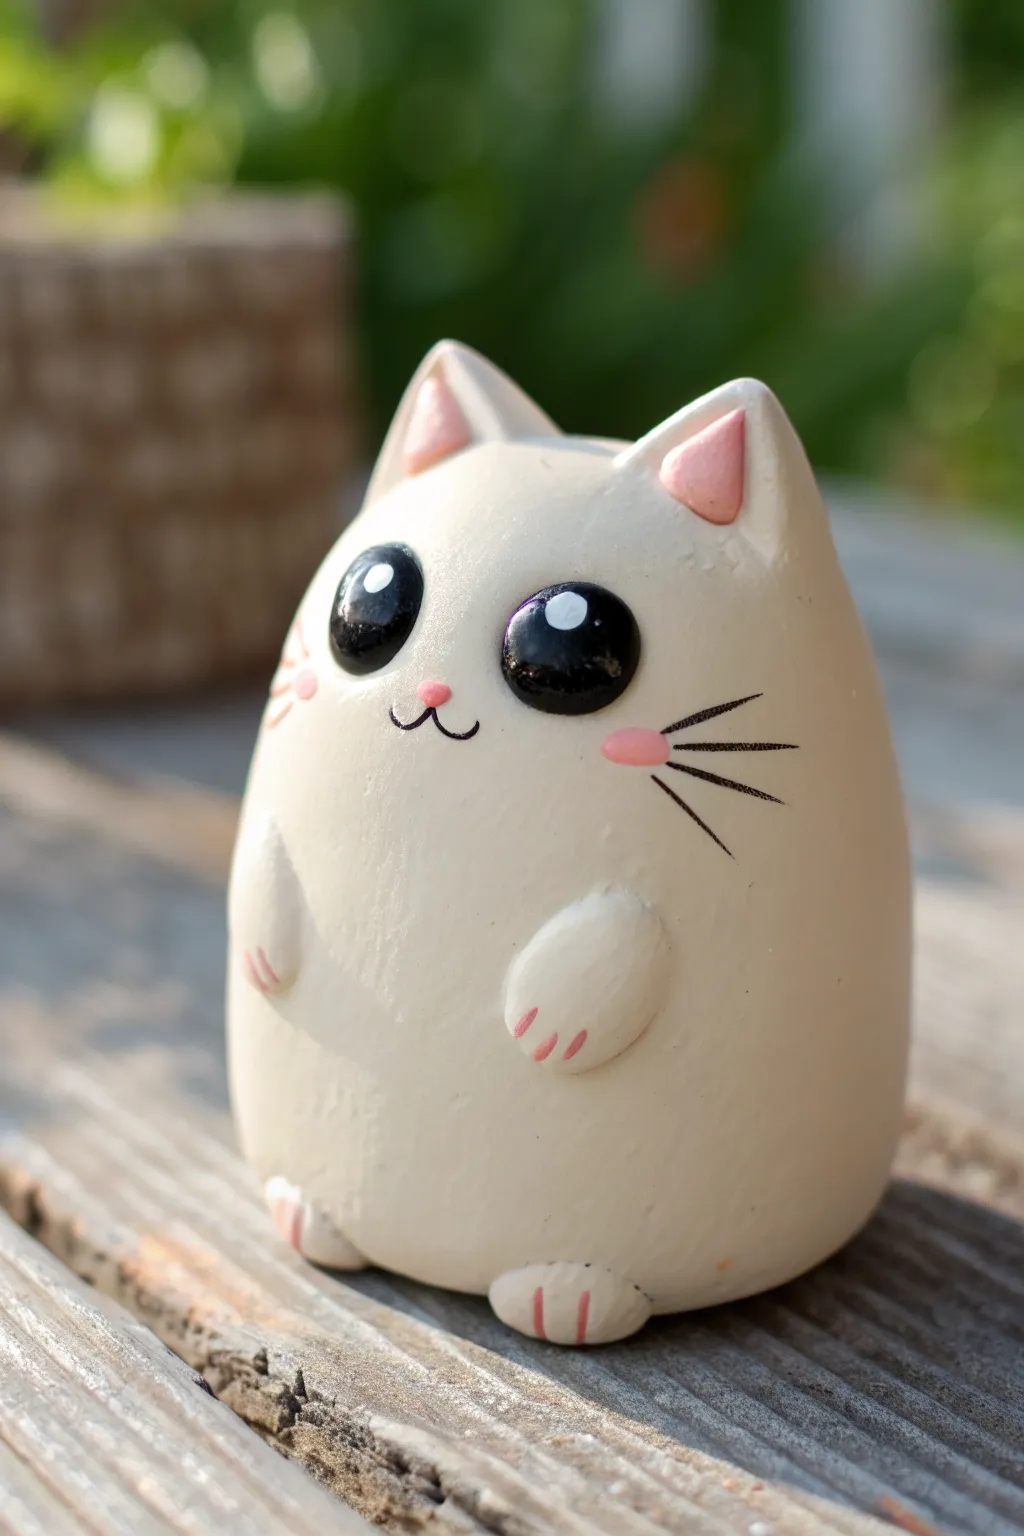
This adorable figurine captures the essence of cuteness with its delightfully round shape and minimal features. Perfectly palm-sized, this simple yet expressive sculpture uses basic shapes to create a charming desk companion that smiles back at you.
Detailed Instructions
Materials
- White polymer clay (approx. 2oz)
- Black polymer clay or black acrylic paint
- Pink polymer clay or pink acrylic paint
- High-gloss varnish or UV resin
- Black fine-tip detail pen (for whiskers)
- Dotting tools or ball stylus
- Smoothing tool or baby oil
- Basic sculpting tools (knife, needle tool)
- Oven and baking sheet
Step 1: Shaping the Base
-
Condition the clay:
Start by warming up your white polymer clay in your hands. Knead and roll it until it is completely soft, pliable, and free of any air bubbles. -
Form the main body:
Roll the white clay into a smooth ball about the size of a golf ball. Gently taper the top slightly to create an egg-like shape, but keep the bottom wide and flat so it stands securely. -
Smooth the surface:
Inspect the body for fingerprints or lint. Use a silicone smoothing tool or a tiny drop of baby oil on your finger to buff the surface until it is pristine and matte.
Clean Slate Strategy
White clay picks up everything. Keep a pack of baby wipes nearby and clean your hands and tools rigorously before touching the white clay to avoid gray smudges.
Step 2: Adding Details
-
Create the ears:
Pinch off two tiny, equal-sized pieces of white clay. Roll them into balls and then flatten them into triangles. Press these gently onto the top of the head. -
Add inner ear color:
Taking miniscule amounts of pink clay, create smaller triangles and press them into the centers of the white ears. Alternatively, you can shape the ears now and paint the pink insides after baking. -
Form the paws:
Roll two small oval shapes from the white clay for the arms. Press them flush against the front of the belly, angling them slightly inward. -
Make the feet:
Create two small semi-circles of white clay and attach them to the very bottom edge of the body, just peeking out to act as feet. -
Blend the seams:
Use a modeling tool to carefully blend the clay where the ears, arms, and feet attach to the body, ensuring a seamless, solid bond.
Step 3: The Face
-
Prepare the eye sockets:
I find it helpful to use a large ball stylus to gently press two indentations into the face area. This ensures the eyes sit flush rather than bulging out excessively. -
Insert the eyes:
Roll two small balls of black clay. Place them into the indentations you just made, flattening them slightly. They should be relatively large to achieve that ‘kawaii’ look. -
Add the eye shine:
To bring the cat to life, press a tiny speck of white clay into the upper corner of each black eye. This reflection is crucial for the cute expression. -
Create the nose:
Place a teeny tiny triangle or oval of pink clay right between and slightly below the eyes. -
Mark the mouth:
Using a needle tool or a very fine sculpting blade, gently impress a small ‘w’ shape directly under the nose for the mouth. -
Add pink accents:
Add tiny pink clay ovals to the cheeks for blush. If using clay for the paw pads, add three microscopic pink lines to each paw and foot.
Sticky Situation?
If the clay gets too soft and sticky to hold its shape, pop it in the fridge for 10 minutes. This firms it up, making it easier to carve details like the mouth.
Step 4: Finishing Touches
-
Bake the sculpture:
Place your cat on a baking sheet or ceramic tile. Bake according to your clay manufacturer’s instructions (usually 275°F/135°C for 15-30 minutes). -
Cool down:
Allow the figurine to cool completely inside the oven or on the counter before handling to prevent cracking. -
Draw the whiskers:
Once cool, use a fine-tip black pen or a very thin brush with black paint to carefully draw three whiskers on each cheek, extending from the blush area. -
Seal the eyes:
Apply a drop of high-gloss varnish or UV resin specifically to the black eyes. This gives them a wet, glass-like appearance that contrasts with the matte body. -
Final matte varnish:
Optionally, brush a matte varnish over the white body to protect it from dust and fingerprints over time.
Place your shiny new friend on a shelf or gift it to someone who needs a smile


Chubby Sitting Duck
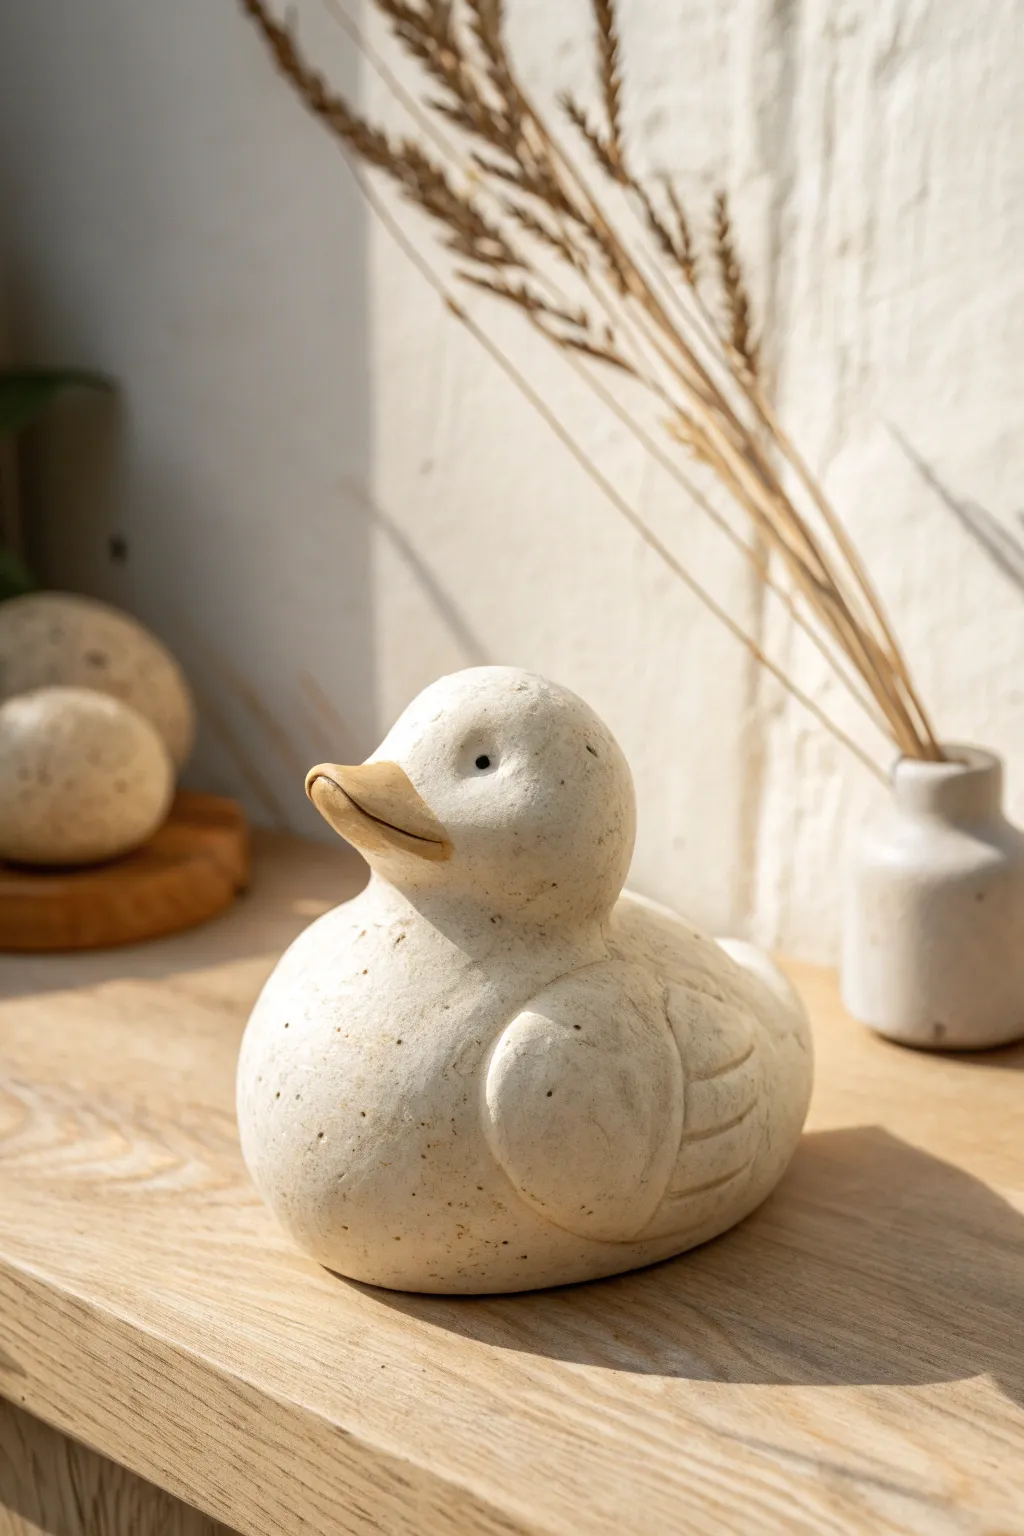
This adorable, slightly textured ceramic-style duck adds a touch of farmhouse charm to any shelf. With its simple shapes and speckled finish, it achieves a high-end pottery look without needing a kiln.
Step-by-Step Tutorial
Materials
- White polymer clay (approx. 2-3 oz)
- Small amount of warm beige or tan clay (for beak)
- Texture sponge or coarse sandpaper
- Small ball stylus or needle tool
- Acrylic paint: Brown or black (for speckling)
- Old toothbrush
- Matte varnish or sealant
- Sculpting wire or toothpick (internal support)
- Black clay or paint (for eyes)
Step 1: Forming the Body
-
Base shape:
Start by conditioning your white clay until it is soft and pliable. Roll a large ball, roughly the size of a tangerine, which will serve as the main body. -
Flattening the bottom:
Gently press the ball onto your work surface to create a flat base. This ensures your duck sits stably without rolling over. -
Creating the taper:
Using the side of your palm, gently stroke the back third of the ball to create a slight taper towards the tail end. It shouldn’t be a sharp point, just a subtle slope downwards. -
Adding texture:
I like to take a coarse sponge or a piece of crumpled aluminum foil and press it lightly all over the clay surface. This removes fingerprints and mimics that gritty stone effect seen in the photo.
Fixing Cracks
If you see cracks after baking, mix liquid clay with a bit of white clay to make a paste. Fill the crack, smooth it, and re-bake for 10 minutes.
Step 2: Sculpting the Head
-
Head shape:
Roll a second, smaller ball of white clay, about one-third the size of the body. Shape it slightly into an oval. -
Attaching the head:
Insert a short piece of wire or a toothpick into the front-center of the body. Push the head shape onto this support to secure it. -
Blending the neck:
Use your thumb or a blending tool to smooth the clay where the head meets the body. You want a distinct neck crease, but the pieces should be fused firmly together. -
Adding the beak:
Take a small piece of the tan clay and shape it into a flattened triangle. Gently press this onto the lower front of the face. -
Defining the mouth:
Use a needle tool or a thin blade to press a horizontal line into the beak, creating a gentle smile that curves up slightly at the corners.
Step 3: Wings and Details
-
Creating wing blanks:
Form two flattened teardrop shapes from white clay for the wings. They should cover about half the length of the body. -
Feather details:
Before attaching, use a plastic knife or needle tool to carve three or four curved lines into the wider end of each teardrop to suggest feathers. -
Attaching wings:
Press the wings firmly onto the sides of the body. Blend the top edge of the wing into the body, but leave the bottom and back edges raised for dimension. -
Eye placement:
Use a small ball stylus to make two indentations on the head. Insert tiny balls of black clay into these spots, or leave them indented to paint later. -
Final texturing:
Go over any smooth areas (like the joined neck or wings) with your texture tool again to ensure the ‘stone’ finish is consistent.
Rustic Wash
For an aged look, paint the whole duck with watered-down brown paint, then immediately wipe it off, leaving darker color in the crevices.
Step 4: Finishing
-
Baking:
Bake the piece according to your specific clay brand’s instructions. Usually, this is around 275°F (130°C) for 15-30 minutes per 1/4 inch of thickness. -
Speckling technique:
Once cool, mix a tiny amount of brown paint with water. Load an old toothbrush with the mixture and run your thumb over the bristles to flick tiny specks onto the duck. -
Sealing:
Allow the paint to dry completely. Finish the piece with a coat of matte spray varnish to protect the surface without making it look glossy or plastic.
Place your little stone-effect duck near a plant or window for a serene decorative accent


Round Frog on Lily Pad
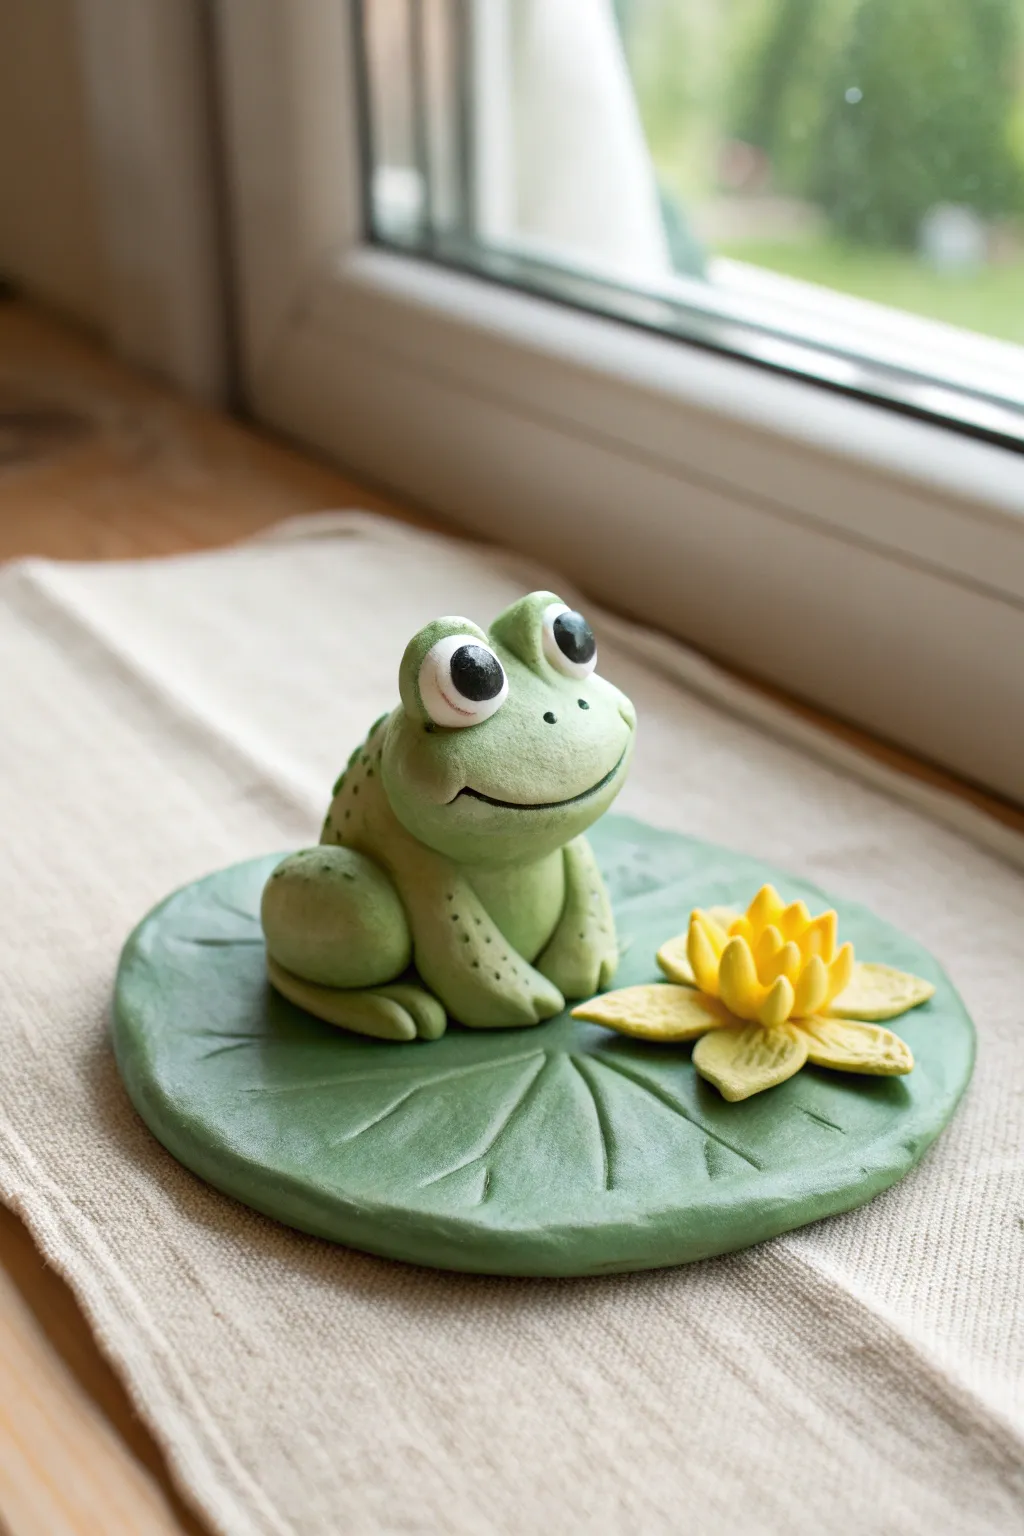
Create a charming desk companion with this polymer clay project featuring a round, smiling frog resting on a textured lily pad. This adorable sculpture combines simple shapes with subtle texturing techniques for a polished, whimsical finish.
Step-by-Step
Materials
- Polymer clay (Sage Green, Light Yellow, White, Black)
- Non-stick work surface or silicone mat
- Needle tool or toothpick
- Ball stylus tool/dotting tool
- Sculpting knife or blade
- Soft pastel chalks (dark green) and a small brush (optional for shading)
- Oven (for baking)
- Acrylic rolling pin
Step 1: Shaping the Lily Pad Base
-
Prepare the base clay:
Start by conditioning a chunk of sage green clay until it is soft and pliable. Roll it into a smooth ball about the size of a walnut to ensure there are no air bubbles trapped inside. -
Flatten the pad:
Place the ball on your work surface and flatten it into a disc using your palm or an acrylic roller. Aim for a thickness of about 1/4 inch so it’s sturdy enough to hold the frog. -
Add nature’s details:
Using a needle tool or the back of a knife, gently score lines radiating from the center of the disc to the edges to mimic the veins of a lily pad. Don’t cut all the way through; just impress the surface. -
Soften the edges:
Use your fingertip to gently smooth the rim of the lily pad, removing any sharp angles from flattening. If you like, make a small pie-slice indentation on one side for a realistic leaf shape.
Eye Highlight Trick
Add a tiny speck of white clay to the black pupil before baking. This ‘catchlight’ brings the frog instantly to life.
Step 2: Sculpting the Frog Body
-
Form the torso:
Take a fresh piece of sage green clay (slightly lighter than the pad if possible, or mix in a pinch of white) and roll a smooth, slightly pear-shaped ball for the frog’s body. Press it gently onto the center of your lily pad. -
Create the heavy legs:
Roll two smaller balls of green clay for the hind legs. Flatten them slightly into thick ovals and press them against the sides of the body towards the back. -
Add the front limbs:
Roll two sausage shapes for the front arms. Attach them vertically to the front of the body so they look like they are propping the frog up. Flatten the bottoms slightly where they meet the leaf. -
Define the toes:
Use your needle tool to make two small indentations on the end of each front arm and hind leg to suggest webbed toes. -
Texture the skin:
To give the frog realistic texture, gently poke shallow dimples into the clay along the back and legs using a needle tool. I find this subtle stippling adds a lot of character.
Step 3: Head and Floral Details
-
Shape the head:
The head is integrated with the body in this style, but define the mouth area by pressing a curved line into the clay with a modeling tool to create a wide, friendly smile. -
Make the eye sockets:
Roll two small balls of green clay and place them on top of the head for the eye mounds. Blend the bottom seams significantly so they look like part of the head. -
Add the eyes:
Press a small white disc into the front of each eye mound. Top each white disc with a smaller black disc for the pupil, placing them slightly inward-facing for a cute expression. -
Assemble the flower petals:
Roll tiny teardrop shapes from light yellow clay. Flatten them slightly and arrange five or six in a circle on the lily pad next to the frog. -
Build the bloom center:
Create a second, smaller tier of yellow teardrops and place them vertically in the center of the bottom petals, creating a cup shape. -
Texture the petals:
Lightly score a central vein down each flower petal with your needle tool. -
Optional shading:
If you have dark green pastel chalk, scrape a little into powder and brush it into the creases of the frog’s legs and the veins of the lily pad for depth. -
Bake the sculpture:
Follow the baking instructions on your specific brand of polymer clay. Usually, this means baking at 275°F (135°C) for about 15-20 minutes depending on thickness.
Dust Magnets?
Polymer clay loves dust. Keep baby wipes nearby to clean your hands between colors, especially before touching the white eye parts.
Once cooled, your little amphibious friend is ready to guard your desk or bookshelf


Tiny Bunny Holding a Carrot
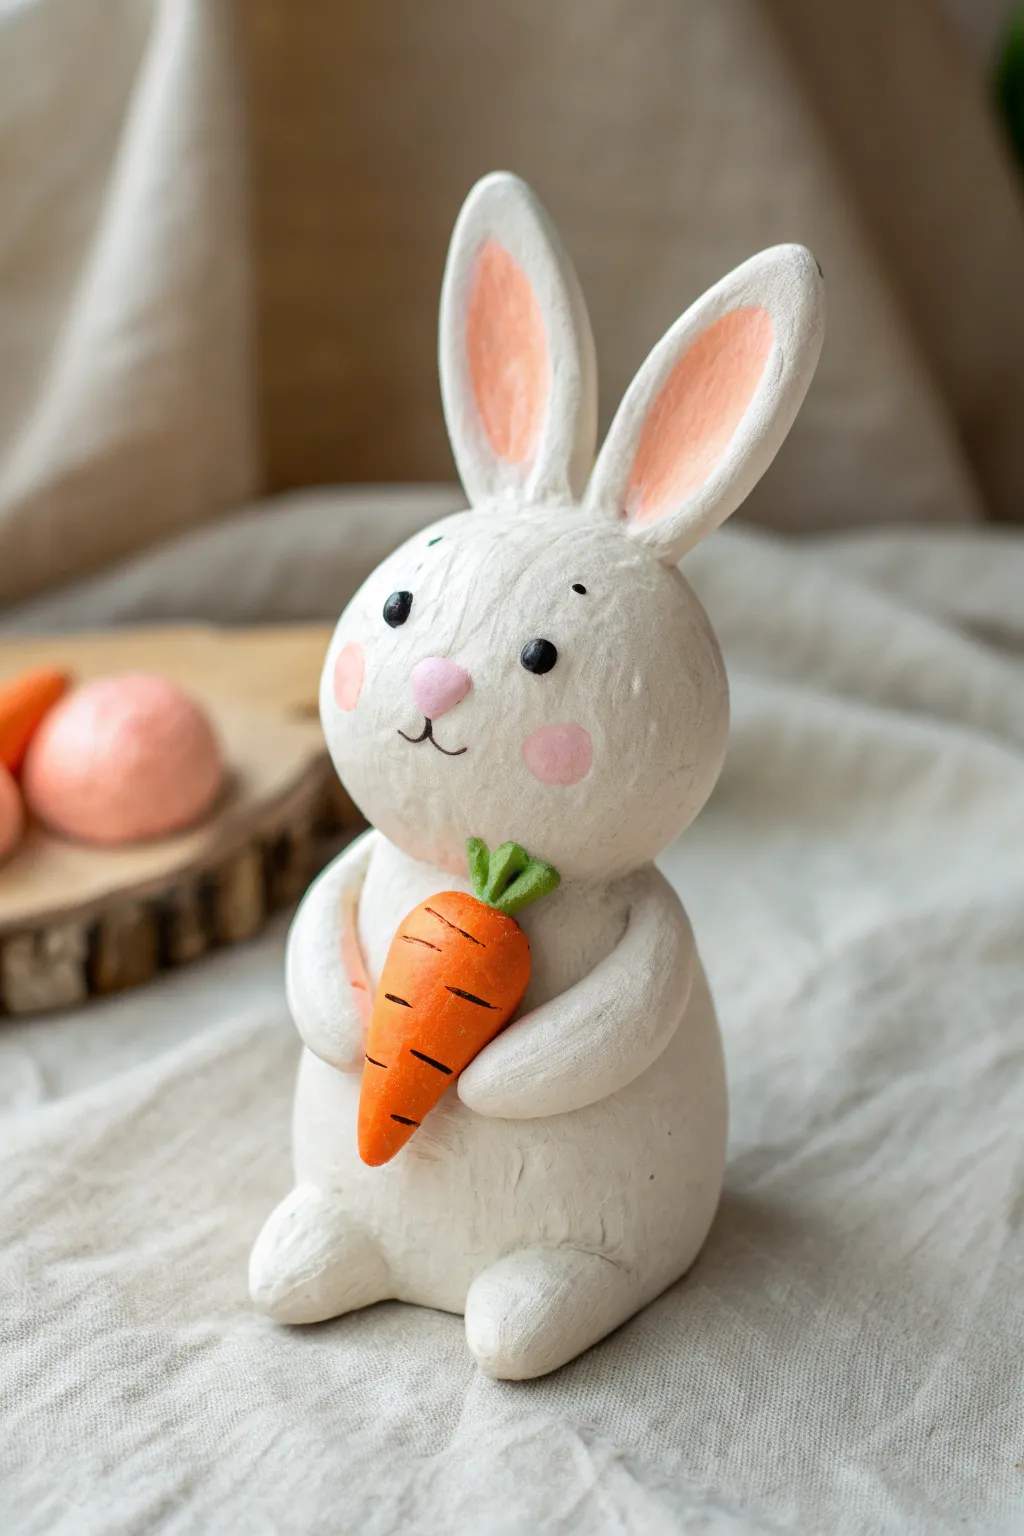
Sculpt a charming miniature rabbit that perfectly captures the innocence of spring with its oversized ears and tiny carrot prize. This project uses basic clay shaping techniques to create a textured, matte-finished keepsake that looks lovely on any shelf.
Step-by-Step Guide
Materials
- White polymer clay or air-dry clay
- Orange and green clay (or acrylic paints)
- Black acrylic paint
- Pink soft pastel chalk or pink acrylic paint
- Sculpting tools (needle tool, ball stylus)
- Aluminum foil (for armature core)
- Toothpicks or wire
- Matte varnish or sealant
- Small paintbrush
- Texturing brush or old toothbrush
Step 1: Sculpting the Body & Head
-
Shape the core:
Start by crumpling a small piece of aluminum foil into a pear shape. This acts as a lightweight armature for the body and saves on clay. Cover this foil core with a layer of white clay, rolling it until smooth. -
Form the base:
Flatten the bottom of your pear-shaped body gently against your work surface so the bunny sits securely without wobbling. The body should taper slightly upward towards the neck area. -
Create the head:
Roll a separate ball of white clay, slightly smaller than the body. Press it gently into an oval shape, making sure the cheeks are a bit wider than the forehead area. -
Attach the head:
Insert a half-toothpick or small piece of wire into the top of the body. Push the head onto this support to secure it. Blend the seam at the neck carefully with a silicone tool or your finger, or leave it distinct if you prefer a separate head look. -
Add texture:
To mimic the slightly rough, handmade look in the photo, gently tap the entire surface of the white clay with a stiff bristle brush or a crumpled ball of aluminum foil. This removes fingerprints and adds a fur-like quality.
Floppy Ear Fix
If the tall ears keep drooping while the clay is soft, prop them up with a small piece of cardboard or balled-up tissue paper behind them until the sculpture is baked or fully dried.
Step 2: Facial Features & Ears
-
Shape the ears:
Roll two long logs of white clay and flatten them into tall petal shapes. These should be quite large relative to the head to match the whimsical style. -
Detail the inner ears:
Using a smaller amount of pale pink clay (or by shading with pink pastel chalk later), create the inner ear sections. Press an indentation into the center of each white ear and fill it with the pink color. -
Attach the ears:
Press the ears firmly onto the top of the head. I like to blend the clay at the attachment point downwards into the head so they are seamless and sturdy. Position them upright with a slight curve. -
Make the muzzle:
Roll a tiny triangle of pink clay for the nose and place it centrally on the face. Use a needle tool to lightly etch a vertical line down from the nose and a curved ‘smile’ line on either side. -
Add eyes:
Use a medium ball stylus to create two small indents for eyes. Roll two tiny spheres of black clay and press them into these sockets. Add extremely tiny white highlight dots if desired, though plain black works well for this style.
Step 3: Limbs & Carrot
-
Form the feet:
Roll two small balls of white clay and shape them into tear-drops. Attach these to the bottom front of the body for the feet, texturing them to match the body. -
Sculpt the arms:
Create two elongated sausage shapes for the arms. Don’t attach them just yet; you need to position the carrot first to get the spacing right. -
Make the carrot:
Roll a piece of orange clay into a cone. Use a knife or needle tool to score horizontal lines across the carrot for texture. Add a tiny tuft of green clay to the top for the leaves. -
Position the hold:
Press the carrot against the bunny’s belly. Now, attach the arms at the shoulders and curve them around so the paws ‘hold’ the carrot securely. Blend the shoulders into the body.
Seasonal Swap
Make this bunny versatile by not permanently attaching the carrot! Sculpt the arms in a ‘hug’ shape, and you can swap the carrot for a tiny Easter egg, a flower, or a heart.
Step 4: Finishing Touches
-
Blush the cheeks:
Shave a little pink soft pastel chalk into a powder. Use a soft, dry paintbrush to gently dust pink circles onto the bunny’s cheeks for a rosy glow. -
Bake or dry:
If using polymer clay, bake according to the package instructions (usually 275°F/135°C for 15-30 minutes). If using air-dry clay, let it sit undisturbed for at least 24 hours. -
Paint details:
Once hardened, paint on tiny eyebrows or whiskers with a fine liner brush and black acrylic paint if you didn’t sculpt them earlier. -
Seal the work:
Finish by applying a coat of matte varnish. This removes the ‘plastic’ shine of polymer clay and gives it that soft, high-end ceramic look shown in the image.
Place your little rabbit on a windowsill or desk for a daily dose of cuteness

The Complete Guide to Pottery Troubleshooting
Uncover the most common ceramic mistakes—from cracking clay to failed glazes—and learn how to fix them fast.
Mini Turtle With Textured Shell
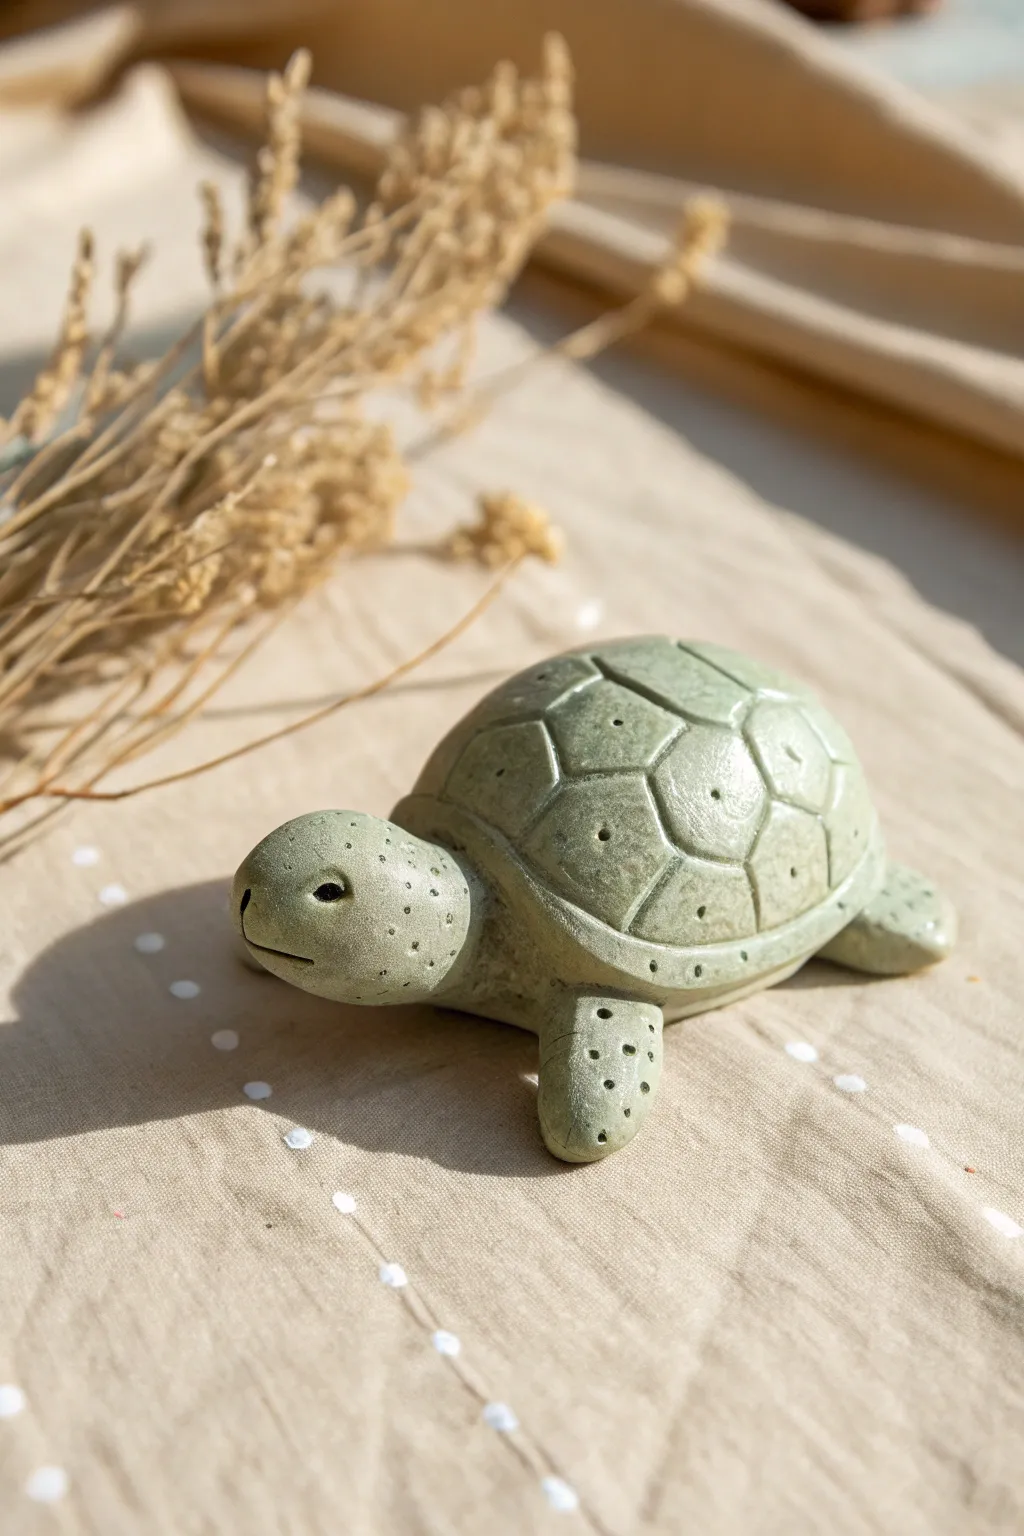
This charming little sculpture captures the sturdy essence of a tortoise with a beautifully patterned shell. Made from soft green clay with delicate stippled details, it’s a calming project that fits right in the palm of your hand.
Step-by-Step
Materials
- Polymer or air-dry clay (sage green or moss green)
- Small rolling pin
- Modeling tools (needle tool, small ball stylus)
- Small knife or clay blade
- Blending tool or smooth sponge
- Work surface (silicone mat or parchment paper)
- Optional: Clear matte varnish
Step 1: Forming the Body
-
Create the base:
Start with a ball of sage green clay roughly the size of a golf ball. Gently press it onto your work surface to flatten the bottom while keeping the top domed to form the main shell shape. -
Shape the head:
Roll a smaller ball of clay for the head. Shape it into a slightly elongated oval, making one end rounded for the snout and the other slightly flatter to attach to the body. -
Sculpt the limbs:
Create four equal-sized small logs for the legs and a tiny pointed piece for the tail. Flatten the bottom of the legs slightly so they sit flush with the ground. -
Assemble the parts:
Attach the head to the front of the shell body. Blend the clay at the connection point underneath so the seam disappears, ensuring a strong bond. -
Attach the legs:
Position the four legs under the shell’s edge. Press them firmly into place, blending the clay where they meet the underside of the body. Add the tail at the rear. -
Smooth the form:
Use your fingers or a smoothing tool to go over the entire sculpture, erasing fingerprints and ensuring the transition between the shell and the body parts is fluid.
Shell Geometry Tip
Don’t fret about perfect hexagons. Real turtle shells are organic and irregular. As long as the lines connect, it will look natural.
Step 2: Detailing the Shell
-
Outline the rim:
Use a needle tool or a clay knife to gently etch a continuous line around the base of the shell, creating a distinct rim or border that separates the dome from the legs. -
Mark the central scutes:
Lightly sketch a hexagon shape right in the center top of the shell with your needle tool. Then, draw connecting lines radiating outward to create the surrounding polygon plates. -
Deepen the lines:
Once you are happy with the geometric pattern, go back over your sketched lines with a V-tool or dragging the needle tool deeper to create definitive grooves between the shell segments. -
Create internal texture:
Inside each shell segment, scribe a smaller, faint outline parallel to the groove lines. This adds depth and makes the plates look slightly raised. -
Stipple the shell:
Take a needle tool and gently poke tiny random holes inside the center of each shell plate. I like to keep these sparse—just three or four dots per segment for subtle texture.
Natural Stone Look
Mix a tiny pinch of black or brown clay into your green but don’t blend fully. This marbling creates a realistic stone-like effect.
Step 3: Adding Character
-
Detail the head:
Use a ball stylus to press indented eye sockets on either side of the head. Add a very small dot of black clay or glaze inside for the pupil later, or simply leave it as a deep shadow. -
Carve the mouth:
Cut a horizontal slit for the mouth using a thin blade. Curve it slightly upwards at the corners to give the turtle a gentle, serene expression. -
Texture the skin:
Using your needle tool again, add stippled dots to the top of the head and the outer surfaces of the legs. Vary the depth of these dots to mimic rough reptilian skin. -
Define the toes:
Press faint lines into the front of the flippers or feet to suggest toes without fully sculpting individual digits. -
Final smooth:
Check the sculpture for any unwanted sharp bits of clay (burrs) created during the texturing process and gently brush them away with a soft brush or finger. -
Bake or dry:
Follow the specific instructions for your clay type to cure the piece. If baking, tent with foil to prevent scorching the green color.
Place your finished turtle on a shelf or near a plant for a lovely handcrafted companion
Sleepy Bear Cub
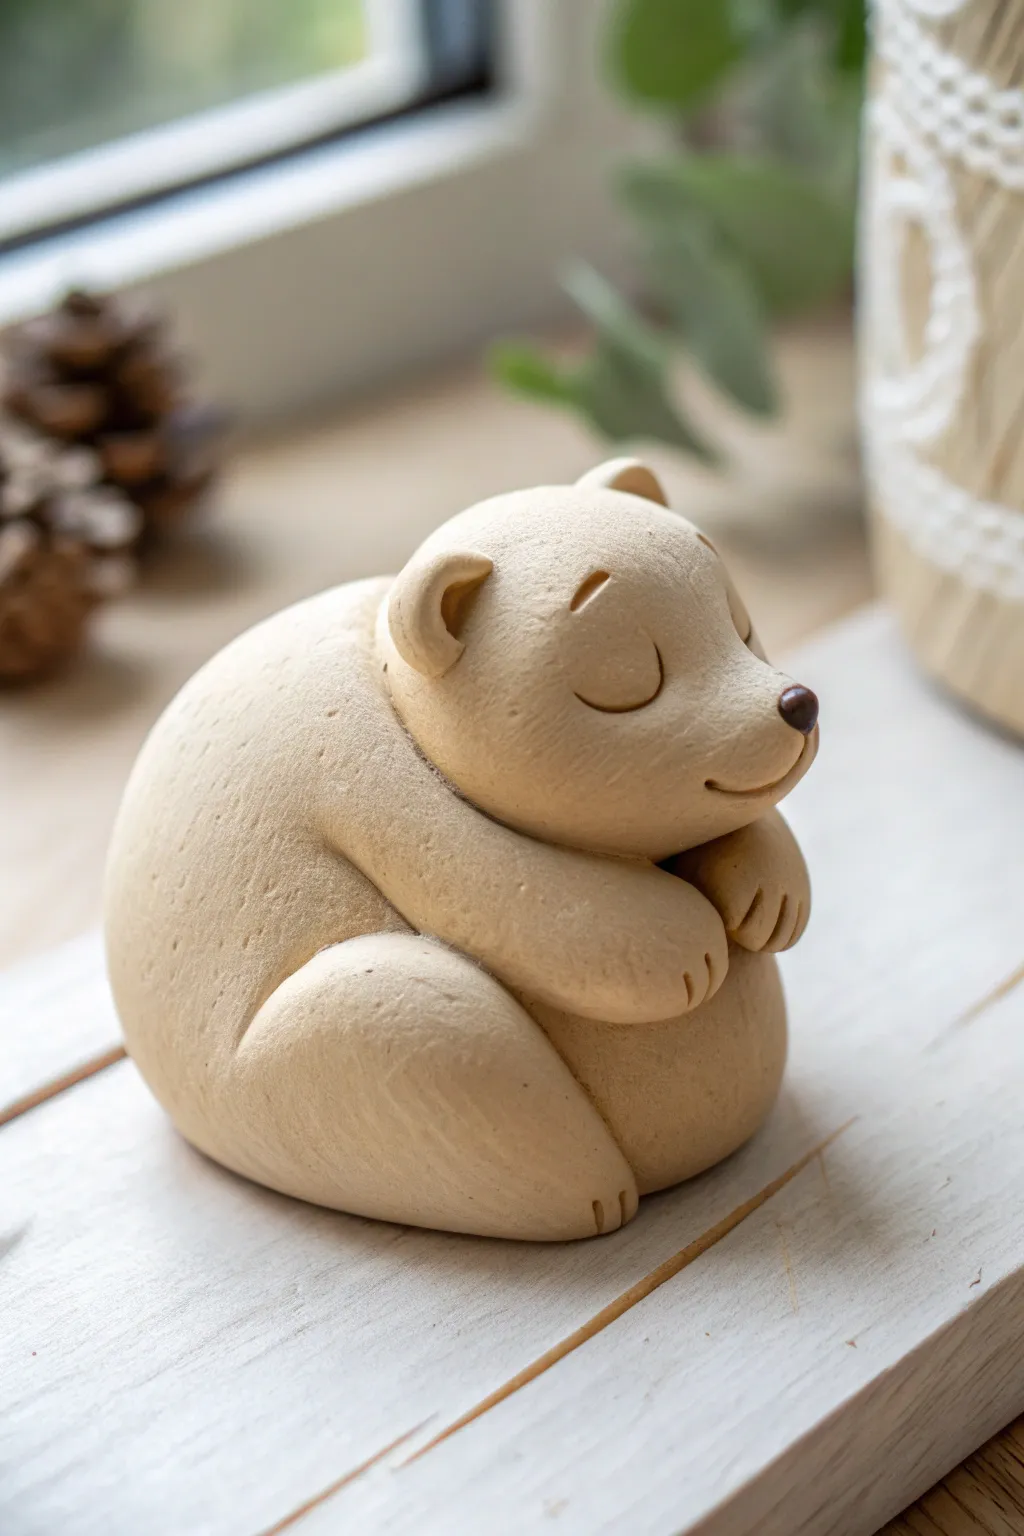
This adorable little bear captures the essence of hibernation with its rounded, compact form and serene expression. The natural, unpainted finish highlights the texture of the clay, giving it a minimalist ceramic look that feels both modern and cozy.
Step-by-Step Tutorial
Materials
- Light beige or biscuit-colored polymer clay (approx. 50g)
- Small amount of dark brown clay (for the nose)
- Needle tool or toothpick
- Ball stylus tool (medium size)
- Rubber shaping tool or finger cot (for smoothing)
- Curved sculpting tool or clay knife
- Soft bristle brush (for texture)
- Oven for baking
Step 1: Forming the Base Body
-
Create the core shape:
Start by conditioning your beige clay until it is soft and pliable. Roll a large ball, roughly the size of a golf ball, to serve as the main body. Gently press it onto your work surface to create a flat bottom so it sits stably without rolling. -
Shape the back:
Using your palms, gently smooth the top of the ball into a rounded hump shape. The goal here is to create a very curved, hunched back that suggests the bear is curled up tightly. -
Initial smoothing:
Before adding details, take a moment to smooth out any fingerprints. I find lightly dusting my finger with cornstarch helps glide over the clay without leaving ridges.
Visible Seams?
If limb blend lines look messy, roll a tiny ‘snake’ of clay, place it over the seam, and smooth it out with a rubber tool. This acts like caulk and creates a flawless invisible transition.
Step 2: Adding the Head and Features
-
Form the head:
Roll a second, slightly smaller ball for the head. Flatten one side slightly and press it firmly against the upper front part of the body. Blend the seam at the neck slightly on the underside so it stays secure, but leave a distinct line on top to show separation. -
Sculpt the snout:
Pinch the front of the face gently to pull out a short, rounded snout. It shouldn’t be too pointy; aim for a soft, blunt muzzle typical of a bear cub. -
Attach the ears:
Roll two tiny balls of beige clay. Press your ball stylus into the center of each to create a cup shape. Attach these to the top of the head, blending the back edges into the skull so they look integrated rather than just stuck on. -
Create the sleepy eyes:
Use your needle tool or a clay knife to impress two gentle crescent curves on the face for the closed eyes. Position them fairly wide apart for a sweet, young expression, adding small slanted indentations above for eyebrows. -
Add the nose:
Take a tiny speck of dark brown clay and roll it into a small oval. Press this firmly onto the tip of the snout. -
Detail the mouth:
Beneath the nose, use your needle tool to carve a subtle, curved smile line that connects up toward the cheek, giving the bear a contented look.
Step 3: Limbs and Texturing
-
Form the rear leg:
Roll a teardrop shape of clay and flatten it slightly. Press this onto the side of the body near the bottom. The wider part serves as the thigh, curving effectively into the roundness of the body. -
Shape the front arm:
Create a sausage-like cylinder for the arm. Attach it starting from the shoulder area, curving it around the front of the body as if the bear is hugging its knees or belly. -
Add the second paw:
Add a small rounded shape peeking out from under the chin to represent the other front paw tucked in comfortably. -
Carve the paws:
Use the edge of your sculpting tool to press three small indentations into the end of each limb. These simple lines suggest claws and toes without needing extreme detail. -
Refine the seams:
Go over the areas where limbs meet the body. Use a rubber shaping tool to deepen the crevices, emphasizing the shadows and making the limbs look distinct from the torso. -
Add surface texture:
To mimic the matte, stone-like texture in the image, take a soft bristle brush or a piece of textured sponge and verify gently tap it all over the surface. This removes the plastic shine of the clay. -
Final check:
Inspect the sculpture from all angles. Ensure the ears are symmetrical and the overall shape feels balanced. Smooth out any accidental nicks. -
Bake:
Bake the sculpture according to your polymer clay manufacturer’s instructions (usually 275°F/130°C for 15-30 minutes per 1/4 inch thickness). Let it cool completely in the oven to prevent cracking.
Pebble Effect
For a speckled stone look, mix black pepper or used dried coffee grounds into your beige clay before sculpting. It adds organic texture and mimics ceramic stoneware perfectly.
Once cooled, your peaceful little bear is ready to bring a sense of calm to any desk or shelf


What Really Happens Inside the Kiln
Learn how time and temperature work together inside the kiln to transform clay into durable ceramic.
Smiling Toast and Egg Duo
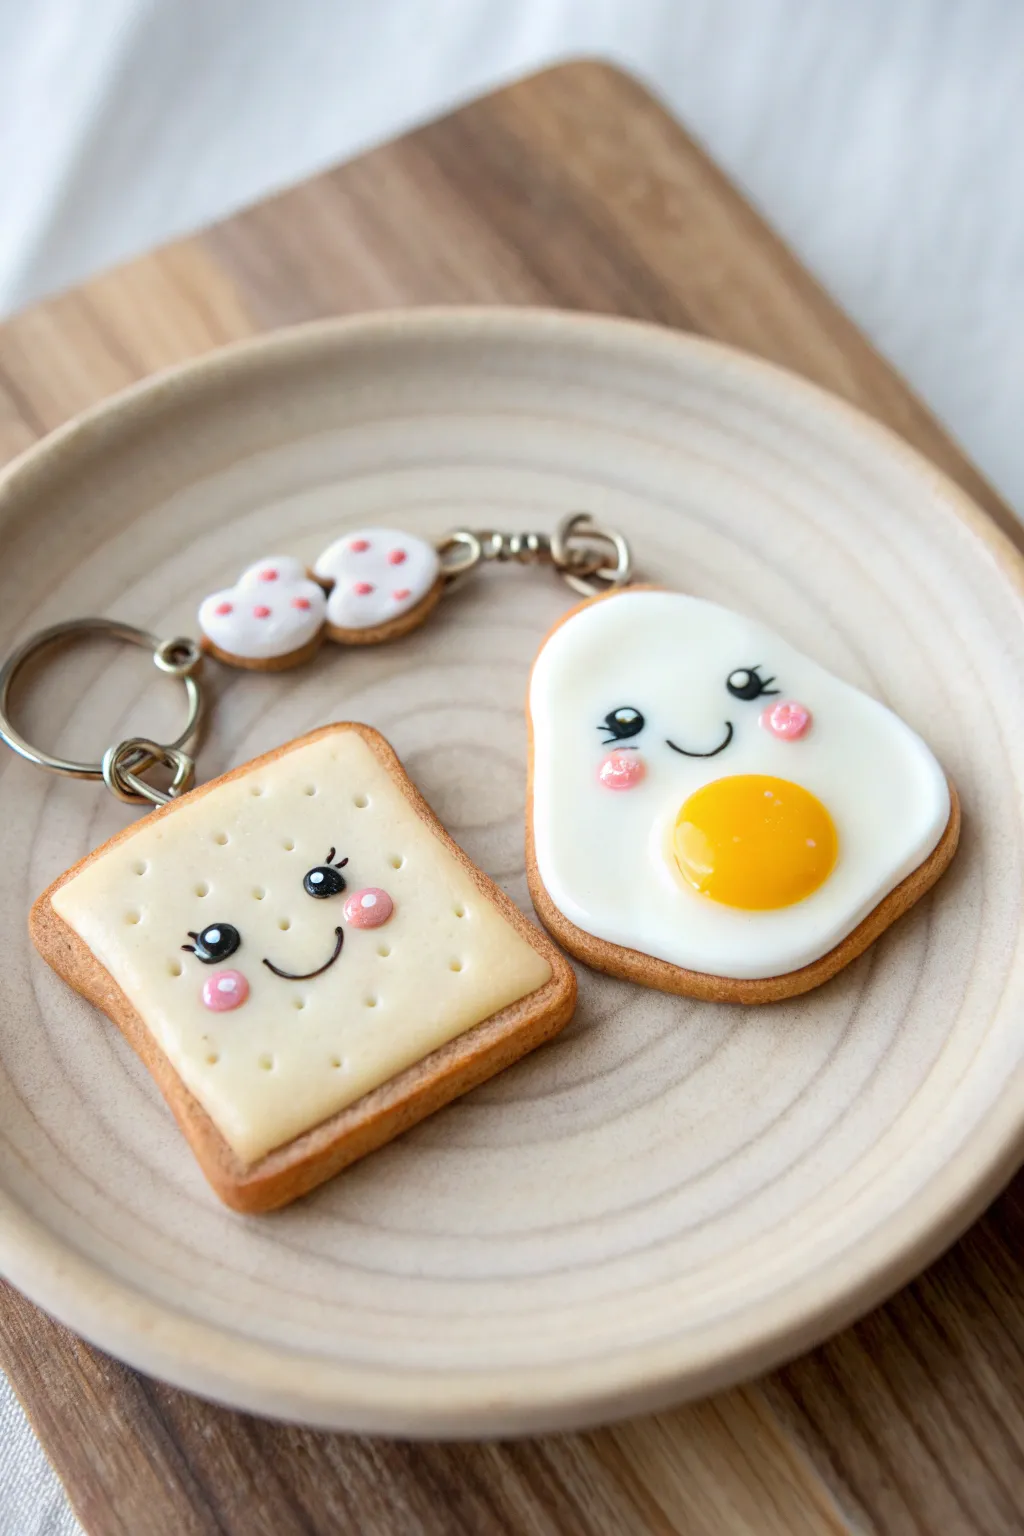
Bring your favorite breakfast staples to life with this adorable pair of polymer clay keychains. Featuring a happy slice of toast and a cheerful fried egg, this project uses simple shapes and kawaii expressions to create an ultra-cute accessory.
Detailed Instructions
Materials
- Polymer clay (colors: tan/ochre, white, yellow, pale beige, pink)
- Liquid polymer clay (translucent)
- Gloss glaze or UV resin
- Rolling pin or pasta machine
- Square cookie cutter (small)
- Ball tool or dotting tools
- Needle tool
- Chalk pastels (brown, orange)
- Soft paintbrush
- Eye pins (silver or gold)
- Jump rings and keychain hardware
- Black acrylic paint or fine detail marker
Step 1: The Tipsy Toast
-
Mix the bread color:
Start by mixing translucent white clay with a tiny bit of ochre or tan to get a realistic, slightly warm bread color. You want it to look baked but not burnt. -
Shape the slice:
Roll out a slab of your tan clay about 1/4 inch thick. Use a small square cutter to punch out a shape, then gently press the top edge inwards slightly with your finger to create the dip in the crust. -
Texture the crust:
Using a needle tool or a stiff toothbrush, gently texture just the outer edges of the toast to mimic the roughness of crust. -
Add the baked effect:
Shave some brown chalk pastel into a fine dust. Use a dry, soft brush to dust the edges of the toast, concentrating on the corners to give it that perfectly toasted golden-brown look. -
Add the cheese layer:
Roll out a very thin sheet of pale beige or off-white clay. Cut a square slightly smaller than your bread base and lay it on top. Smooth the edges down slightly so it looks melted. -
Create pores:
Use a small dotting tool to randomly press tiny indentations into the ‘cheese’ layer to simulate the texture of toasted bread or melted cheese bubbles. -
Insert hardware:
Carefully screw or push an eye pin into the top center of the toast slice. I find adding a dab of liquid clay to the pin helps it bond permanently during baking.
Clean Clay Tip
Keep baby wipes nearby when switching from the brown toast clay to the white egg clay. Any dark lint or pigment transfer will show up clearly on the bright white egg.
Step 2: The Sunny-Side Up Egg
-
Form the egg white:
Roll a ball of white clay and flatten it into an irregular, organic oval shape. Keep the edges soft and rounded rather than sharp. -
Add the baking tint:
Just like the toast, lightly dust the very bottom edges of the egg white with a tiny bit of orange-brown pastel dust to make it look crispy and fried. -
Make the yolk:
Roll a small ball of sunny yellow clay. Flatten it slightly so it isn’t a perfect sphere but still has a nice dome shape. -
Attach the yolk:
Press the yellow dome firmly onto the lower center of the white base. Use a smoothing tool to blend the seam just a tiny bit if needed. -
Insert hardware:
Insert an eye pin into the top of the egg white, ensuring it doesn’t poke through the back. -
Bake the batch:
Place both pieces on a baking tile and bake according to your clay manufacturer’s instructions (usually 275°F for 15-30 minutes).
Make It Bacon
Add a third charm! Twist strands of dark red and white clay together to create a marbling effect, flatten into a strip, and crinkle it to look like a strip of cooked bacon.
Step 3: Kawaii Details & Assembly
-
Paint the faces:
Once cool, use a fine dotting tool and black acrylic paint to create two wide-set eyes on both the toast and the egg. Add a tiny U-shaped smile between them. -
Add sparkle:
With a needle tool, add two tiny white specks inside the black eyes to bring them to life. -
Blush it up:
Mix a tiny amount of pink paint or use pink pastel dust to add rosy cheeks right under the eyes. -
Gloss finish:
Coat the yolk and the cheese layer with UV resin or a high-gloss glaze. This makes the yolk look runny and the cheese look melty. -
Mini hearts:
If you have leftover clay, make two tiny white hearts with pink polka dots. Bake them separately and glue them back-to-back over a small jump ring. -
Connect:
Use jump rings to attach the toast, egg, and heart charm to your main keychain hardware.
Now you have a charming set of breakfast buddies ready to keep your keys organized
Mini Fruit Slice Charms
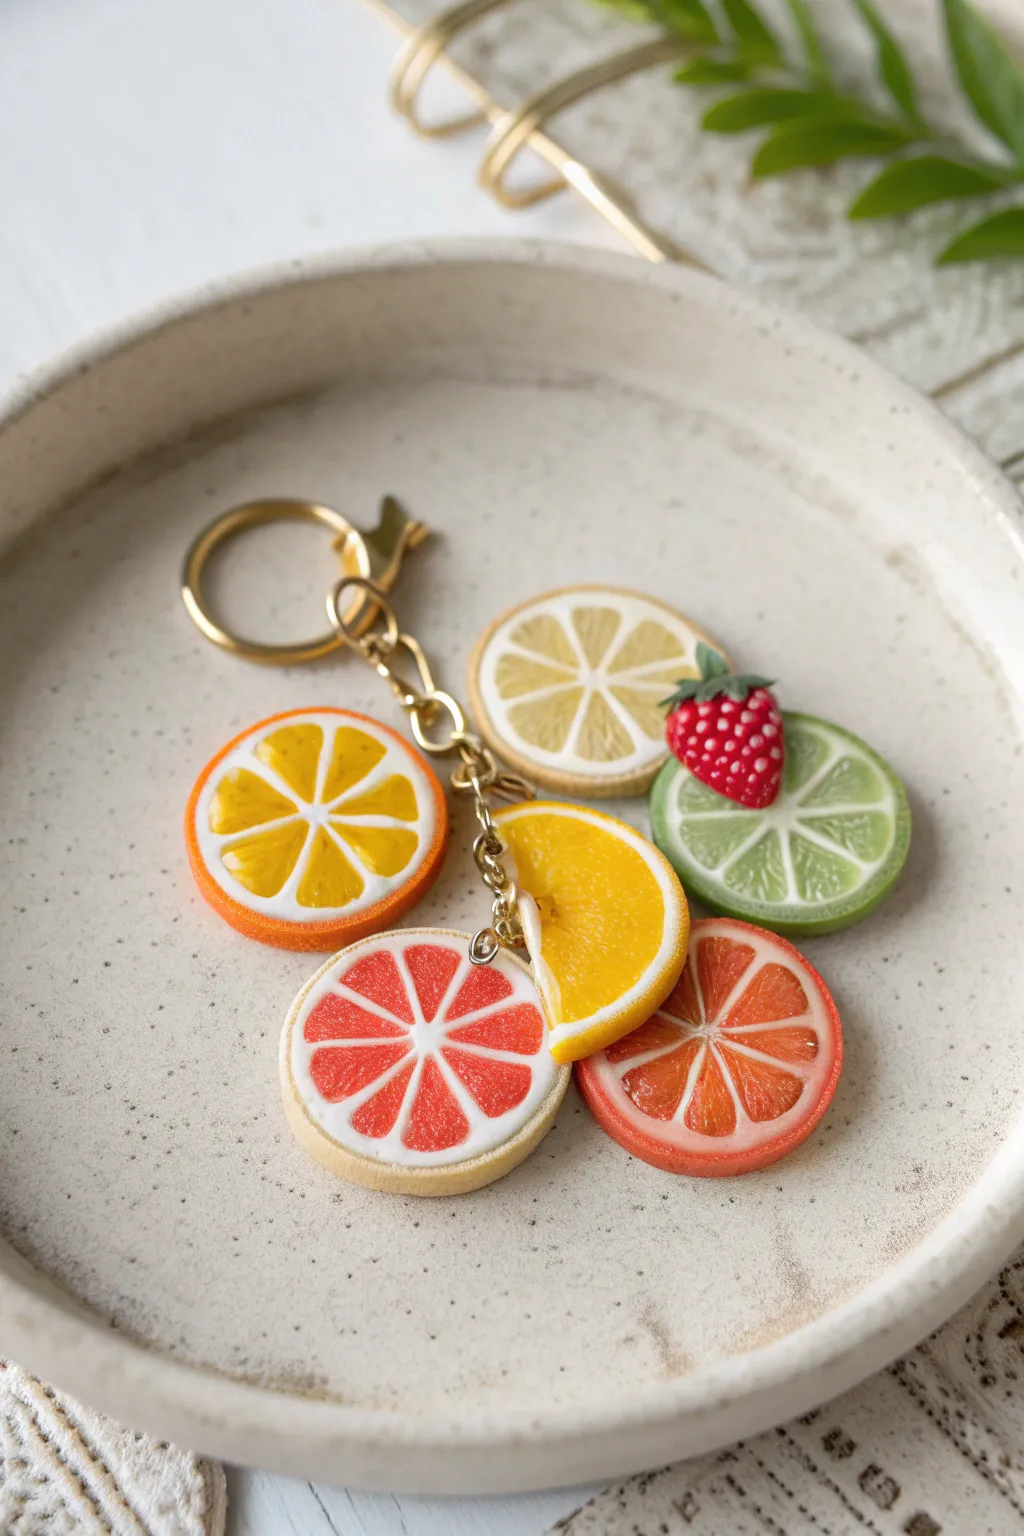
Brighten up your keys or bag with a burst of vitamin C using these vibrant polymer clay fruit slices. This project combines translucent and opaque clays to capture the realistic, juicy texture of freshly sliced citrus, complete with a tiny strawberry accent.
Step-by-Step
Materials
- Polymer clay (translucent, white, yellow, orange, red, green)
- Liquid polymer clay (translucent)
- Rolling pin or pasta machine
- Small round cutters (approx. 1 inch diameter)
- Needle tool or toothpick
- Texture tool (sandpaper or stiff bristle brush)
- Gold screw eye pins
- Gold keychain ring and jump rings
- Gloss glaze or UV resin
- Jewelry pliers
Step 1: Creating the Citrus Canes
-
Mix your colors:
Start by mixing translucent clay with tiny amounts of colored clay to create ‘juicy’ translucent versions of yellow (lemon), orange, pink (grapefruit), and green (lime). You want the light to pass through them slightly. -
Form the segments:
Roll your translucent colored mixture into a thick log. Then, roll a thin sheet of opaque white clay. Wrap the white sheet around the colored log. -
Shape the wedge:
Pinch the wrapped log into a teardrop or triangular wedge shape. This will form the individual juice segments of your fruit. -
Cut and assemble:
Cut the long wedge log into 6-8 equal lengths. Arrange these wedges in a circle with the points meeting in the center to form the wheel pattern of the fruit. -
Wrap the wheel:
Roll out a sheet of rind-colored clay (opaque yellow, orange, or green). Wrap a thin layer of white clay around your assembled segments first, fitting it into any gaps, then wrap the final rind color around the outside. -
Reduce the cane:
Gently squeeze and roll the entire cylinder to reduce its diameter, ensuring all layers adhere together without distorting the internal pattern. Aim for a diameter of about 1 inch.
Juice It Up
For ultra-realistic fruit pulp, mix your translucent clay with a tiny bit of glass bead grit or dried spices before shaping. It adds amazing internal texture.
Step 2: Slicing and Texturing
-
Slice the fruits:
Once your cane is firm (I like to let it rest in the fridge for 20 minutes first), slice it into discs about 3-4mm thick. Slice one disc in half to create the semi-circle wedge seen in the photo. -
Soften the edges:
Gently tap the edges of your slices with your finger to round them off slightly so they look like cookies or natural slices rather than sharp cuts. -
Texture the peel:
roll the outer edge of each slice over fine sandpaper or texture it with a toothbrush to mimic the porous look of citrus zest. -
Texture the pulp:
Use a needle tool to gently scratch tiny radiating lines and pits into the translucent segments. This rough surface catches the light and enhances the juicy effect.
Step 3: The Strawberry Accent
-
Shape the berry:
Form a small teardrop shape from red clay. Flatten the back slightly so it sits well against the other charms. -
Add the seeds:
Poke tiny indentations all over the red surface with your needle tool. You can fill these with tiny specks of white clay or paint them white after baking. -
Create the leaves:
Form tiny teardrops of dark green clay and press them onto the top of the berry for the calyx.
Sparkle Finish
Make a ‘sugar-coated’ version by brushing the unbaked clay with liquid clay and rolling the edges in clear embossing powder or white glitter.
Step 4: Assembly and Finishing
-
Insert hardware:
Screw a small gold eye pin into the top of each fruit slice and the strawberry. For the best hold, add a dab of liquid clay to the screw threads before inserting. -
Bake:
Bake all pieces according to your clay manufacturer’s instructions, usually at 275°F (135°C) for 15-30 minutes. -
Glaze for shine:
Once cool, coat just the ‘juicy’ inner segments of the fruit with gloss glaze or UV resin. Leave the white pith and outer rind matte for realistic contrast. -
Attach to chain:
Use jump rings and pliers to attach your fruit charms to the gold keychain, staggering their heights for a pleasing cluster effect.
Now you have a refreshing accessory that captures the essence of summer all year round

TRACK YOUR CERAMIC JOURNEY
Capture glaze tests, firing details, and creative progress—all in one simple printable. Make your projects easier to repeat and improve.
Tiny Cupcake With Swirl Top
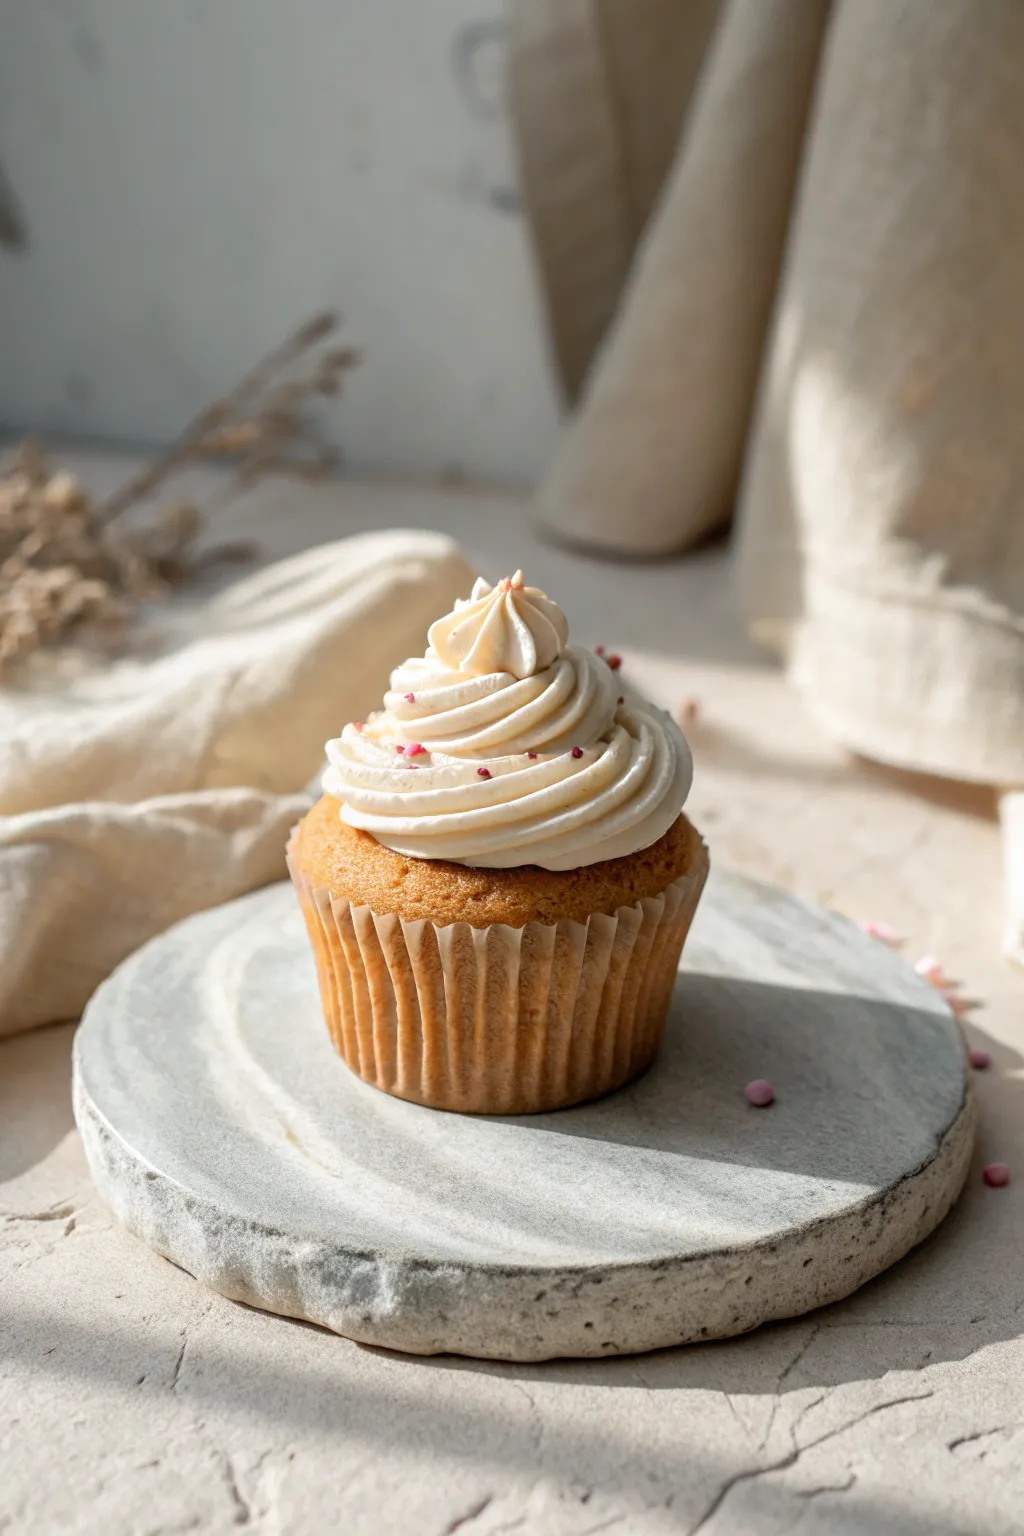
Capture the sweetness of a bakery treat in miniature form with this delightful clay cupcake sculpture. Featuring a textured golden base and a perfectly piped frosting swirl, this tiny creation looks good enough to eat but will last forever.
Step-by-Step Guide
Materials
- Polymer clay (golden yellow/ochre, translucent white, pastel pink)
- Liquid polymer clay (Translucent Liquid Sculpey or Fimo Liquid)
- Soft artist pastels (brown, orange, yellow ochre)
- Small paintbrush
- Star-shaped piping t tip (miniature/small size) or a star extruder disc
- Needle tool or toothpick
- Toothbrush (for texturing)
- Miniature cupcake mold (optional) or cylinder tool
- Gloss glaze (optional)
- X-acto knife or craft blade
- Small piece of foil
Step 1: Baking the Base
-
Mix the batter color:
Start by mixing golden yellow clay with a touch of translucent white and a tiny speck of brown. You want a realistic, baked-dough color that isn’t too saturated. -
Form the cupcake shape:
Roll your mixed clay into a smooth ball about the size of a large marble, then gently press it into a tapered cylinder shape. The top should be slightly domed like a rising muffin. -
Create the liner texture:
Using a needle tool or the back of a craft knife, press vertical lines all around the sides of the cylinder to mimic the pleated paper liner. -
Refine the ridges:
Go back over your vertical lines, gently pressing inward between them to make the pleats look deeper and more realistic. -
Add sponge texture:
Take a clean toothbrush or a ball of crinkled aluminum foil and tap it firmly over the domed top of the cupcake to create a porous, spongy cake texture. -
Mix the browning shades:
Scrape some brown, orange, and yellow ochre pastel chalks into fine powders using your blade. -
Apply the baked effect:
Use a dry paintbrush to dust the pastel powder over the textured dome. Focus the darker brown on the very edges where a real cake would crisp up.
Step 2: The Perfect Frosting
-
Prepare the frosting clay:
Condition white polymer clay vigorously until it is extremely soft. Mix in a few drops of liquid polymer clay to create a ‘whipped cream’ consistency. It should be sticky but hold its shape. -
Load the piping tool:
I prefer to use a specialized clay extruder with a star tip for this, but you can also put the softened clay into a heavy-duty plastic bag with a small star piping tip if the clay is soft enough. -
Pipe the first layer:
Squeeze a circle of frosting onto the outer edge of the cupcake top. Ensure it adheres well to the textured base. -
Build the height:
Continue piping in a spiral motion, moving inward and upward. Let the frosting overlap the previous layer slightly to build a beautiful peak. -
Finish the peak:
As you reach the center, stop applying pressure and pull the tool quickly upwards to create a sharp, delicate point at the very top. -
Create the sprinkles:
Roll out a microscopic snake of pastel pink clay. It should be as thin as a thread. -
Cut the sprinkles:
Bake this thin snake for just 5 minutes first to harden it, then chop it into tiny bits with your blade. This makes perfectly uniform sprinkles. -
Decorate:
Gently press the tiny pink bits into the soft frosting using tweezers or the tip of your needle tool. -
Final bake:
Bake the entire sculpture according to your clay manufacturer’s instructions, usually around 275°F (130°C) for 15-20 minutes.
Frosting Too Stiff?
If chipping occurs while extruding, add more liquid clay. The mix should feel like stiff chewing gum—soft enough to flow but firm enough to hold sharp ridges.
Realistic Liner
For an even better effect, roll out a super thin sheet of white clay, pleat it manually, and wrap it around the base instead of carving the lines directly.
Once cooled, you can glue this sweet sculpture to a ring base or simply display it as a charming miniature collectable.
Mini Noodle Bowl Scene
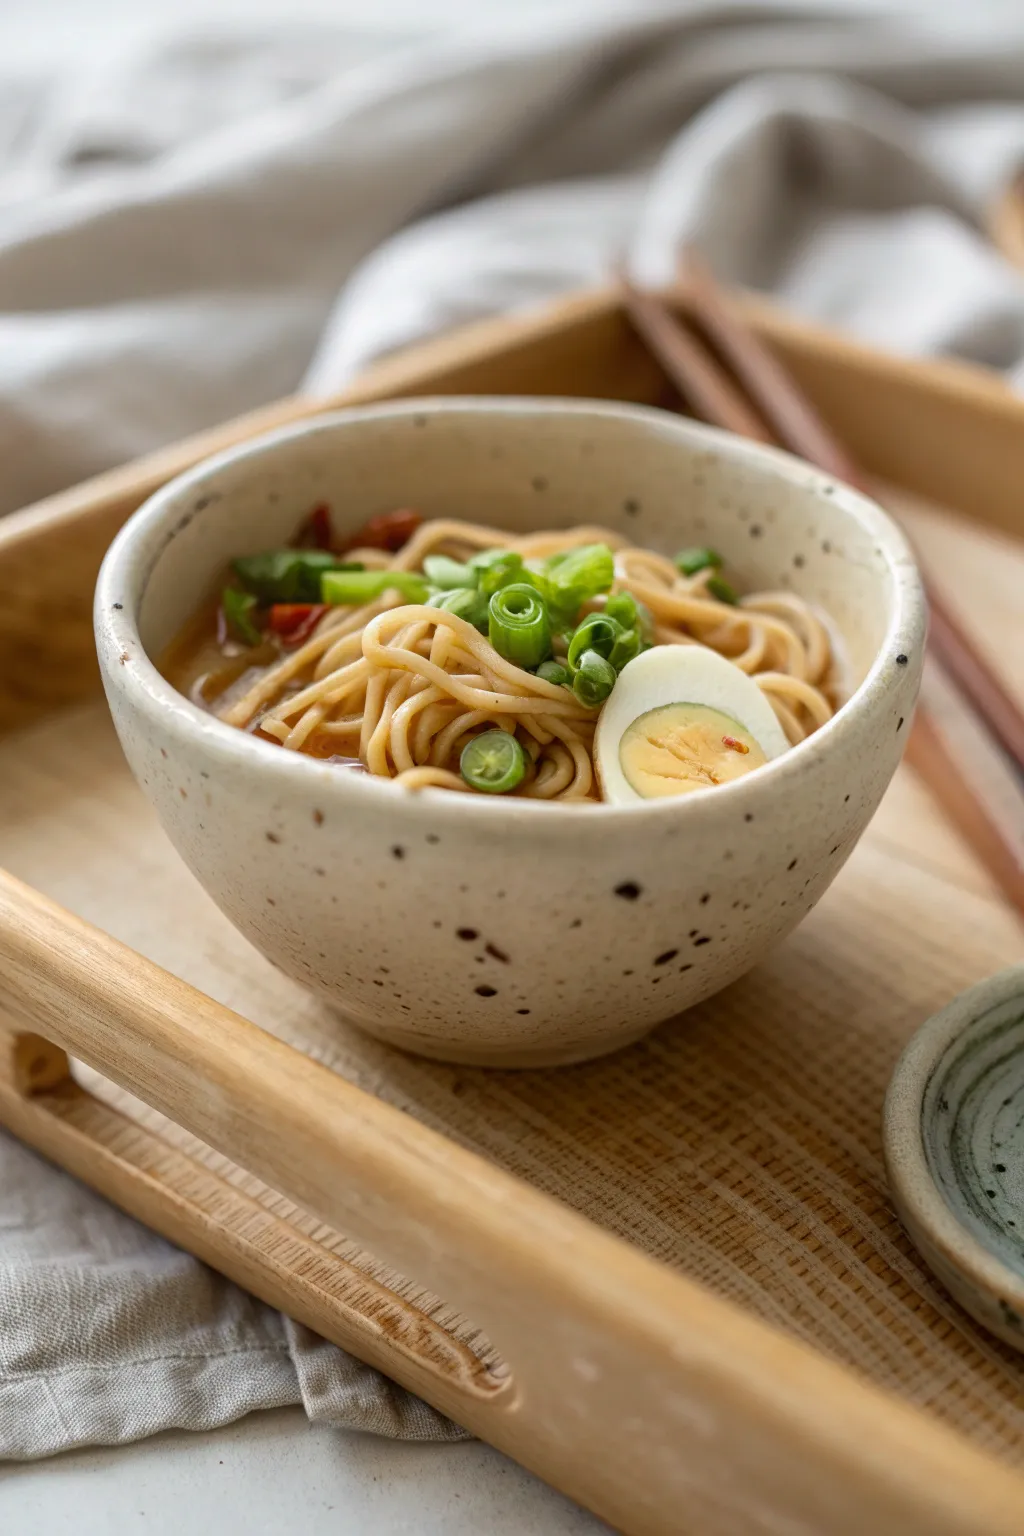
Capture the cozy warmth of a hot meal with this detailed polymer clay miniature. This tiny noodle bowl features realistic broth, hand-rolled noodles, and a perfectly sliced egg, all nestled in a speckled ceramic-style bowl.
Step-by-Step Tutorial
Materials
- Polymer clay (white, translucent, beige, yellow, green, brown)
- Liquid polymer clay (translucent)
- Chalk pastels (brown, ochre, red)
- Gloss glaze or UV resin
- Needle tool
- Ball stylus tool
- Small paintbrush
- Clay roller or pasta machine
- X-acto knife or razor blade
- Ceramic or glass tile (baking surface)
Step 1: Sculpting the Bowl
-
Mix the clay base:
Start by mixing white polymer clay with a tiny amount of beige to create an off-white, ceramic pottery color. Condition it until soft and pliable. -
Form the pinch pot:
Roll a marble-sized ball of your clay mixture. Gently press your thumb or a large ball stylus into the center to create a simple pinch pot shape, ensuring the walls are relatively thick for a rustic look. -
Texturize the surface:
To mimic the speckled stoneware in the image, shave tiny flecks of brown or black pastel onto the raw clay and gently roll over them to embed the specks. Alternatively, mix in tiny bits of black pepper or craft sand. -
Shape the rim:
Slightly curve the upper rim inward to give it that cozy, rounded bowl shape. Bake this base piece according to your clay package instructions so it becomes a solid foundation for the filling.
Cloudy Broth?
If your liquid clay broth looks milky after baking, you didn’t heat it high enough to activate the translucency. Re-bake carefully or use a heat gun.
Step 2: Creating the Noodles & Toppings
-
Mix noodle color:
Blend translucent clay with a small amount of beige and yellow ochre to get a cooked dough color. The translucency is key to making the noodles look boiled rather than raw. -
Create thin strands:
Roll the clay into a very thin snake. If you have a clay extruder, this is the perfect time to use it with the smallest hole disc. Otherwise, hand-roll patiently on your tile. -
Fill the bowl base:
Place a scrap ball of clay inside the baked bowl to act as a filler, stopping just below the rim. This saves your designated noodle clay. -
Arrange the noodles:
Coil your thin clay strands on top of the filler mound. Use a needle tool to gently mess them up so they look tangled and natural, not perfectly coiled. -
Making the egg:
Roll a tiny ball of white clay, then cut a smaller ball of yellow clay for the yolk. Flatten the white slightly, press the yellow into the center, and wrap the white around it. Slice the resulting egg shape in half to reveal the yolk. -
Adding scallions:
Roll a very thin snake of green clay. Slice it into tiny rings using your blade. For extra realism, I like to use a translucent green center wrapped in opaque green before slicing. -
Chili flakes:
Chop tiny bits of cured red clay or use red pastel shavings to simulate chili flakes or spicy oil residue.
Level Up: Steam
Glue a wispy bit of pulled cotton wool just above the bowl surface to simulate hot steam rising from the noodles.
Step 3: Assembly and broth
-
Prepare the broth:
Mix liquid polymer clay with shaved brown, yellow, and red chalk pastels. Aim for a rich, amber color that looks like soy-based broth. -
Pour the liquid:
Carefully drip the liquid clay over the noodles in the bowl. Let it settle into the crevices, but don’t completely drown the noodles—you want the texture to remain visible. -
Place the toppings:
Using tweezers or a needle tool, carefully place the sliced egg on top of the noodles. Scatter the green scallion rings and red chili flakes around the center. -
Final bake:
Bake the entire assembled bowl again. Watch the temperature carefully, as the liquid clay might require a slightly different duration than solid blocks.
Step 4: Finishing and Presentation
-
Glazing the broth:
Once cooled, brush a coat of UV resin or high-gloss varnish over the broth area and the egg yolk. This makes the soup look wet and oily. -
Wooden tray base:
Roll out a rectangle of tan clay. Score lines into it with a needle tool to mimic wood grain and use a brown pastel wash to darken the crevices. -
Adding chopsticks:
Carve two thin slivers of wood from a toothpick or matchstick. Sand the ends round and place them on the tray or resting on the bowl rim. -
Final assembly:
Glue the bowl onto the wooden tray base to complete the scene.
Place this steaming hot bowl in a dollhouse kitchen or display it on a shelf for a touch of miniature comfort food
Pocket Mushroom Cluster
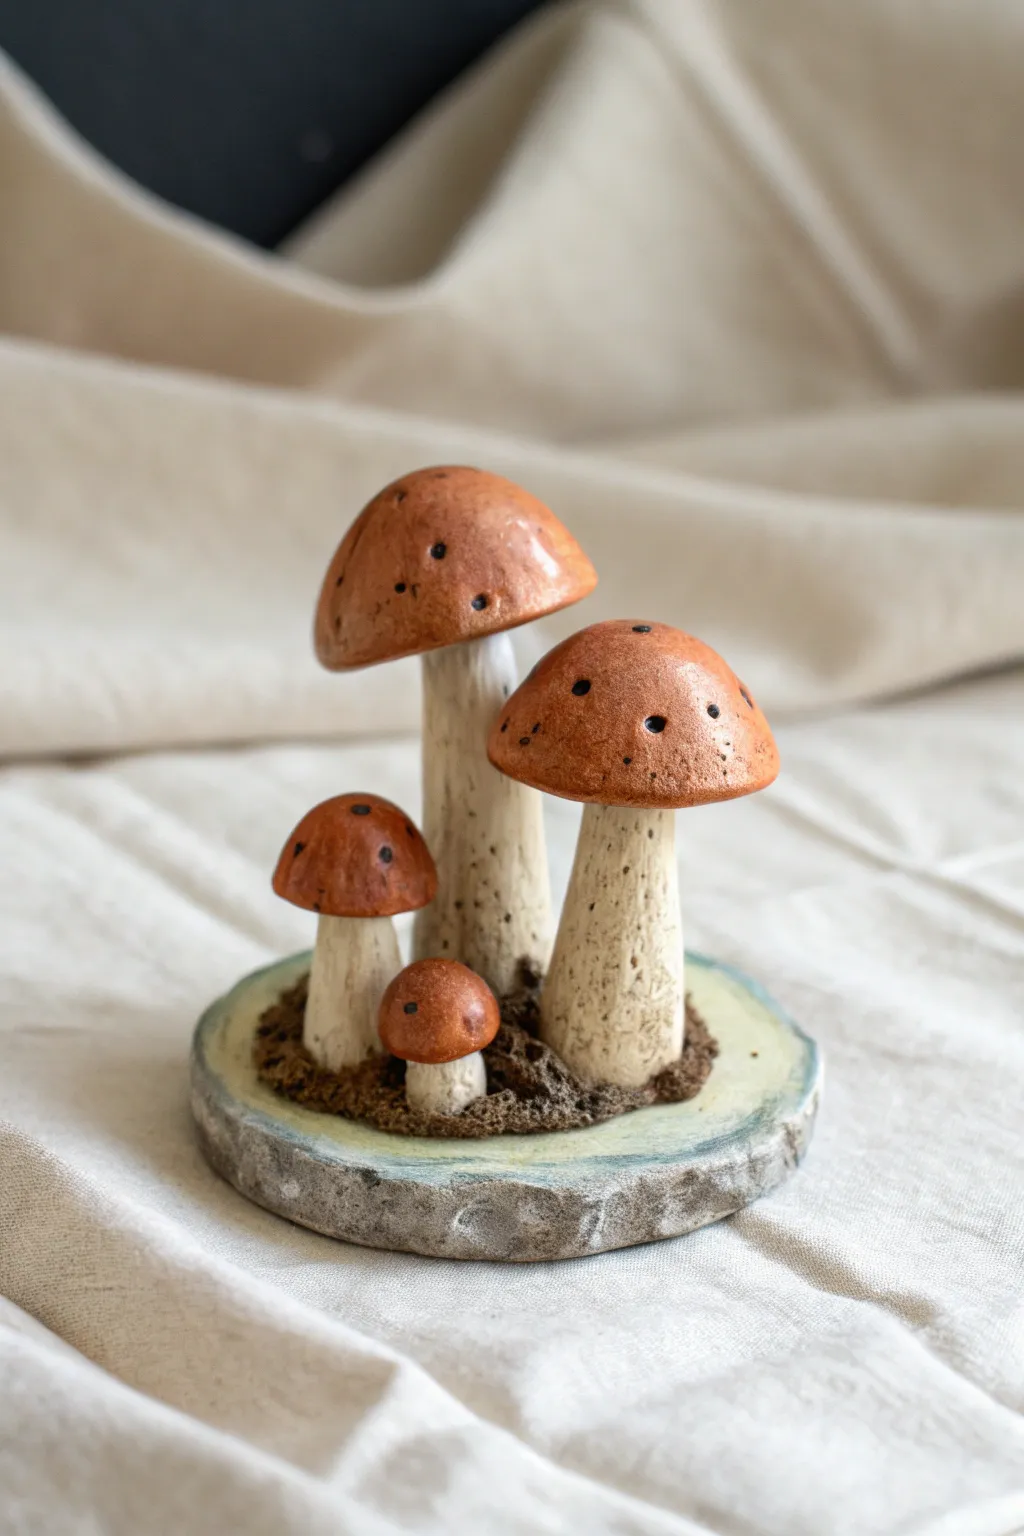
Capture the charm of the woodland undergrowth with this delightful cluster of pocket-sized mushrooms. Featuring textured stems and glazed caps, this clay sculpture sits perfectly on its own faux-stone base.
Step-by-Step Guide
Materials
- White or light beige polymer clay
- Aluminum foil
- Sculpting tools (needle tool, ball stylus)
- Acrylic paints (burnt sienna, raw umber, cream, dark grey)
- Texture brush (stiff bristle) or an old toothbrush
- Gloss varnish or liquid clay
- Strong craft glue or liquid polymer clay
- Dried tea leaves or coffee grounds (for the dirt effect)
Step 1: Sculpting the Base
-
Form the core:
Start by rolling a ball of aluminum foil about 2 inches wide and flattening it into a disk shape. This saves clay and keeps the sculpture lightweight. -
Cover the base:
Roll out a sheet of white or beige clay and wrap it completely around your foil disk, smoothing the seams so the foil is hidden. -
Add stone texture:
Use a crumpled ball of aluminum foil or a stiff texture brush to tap all around the edge of the base, giving it a rough, pitted stone look. -
Flatten the top:
Gently press the base onto your work surface to ensure the bottom is flat, and lightly flatten the top area where the mushrooms will sit.
Wire Support
For the tallest mushroom, insert a small piece of toothpick or wire through the stem and into the base before baking to prevent it from leaning.
Step 2: Creating the Mushrooms
-
Shape the stems:
Roll four cylinders of clay in varying sizes—one large, one medium, and two small. Taper them slightly so they are thicker at the bottom than the top. -
Texturize the stems:
Take a needle tool or a stiff brush and drag vertical lines down the length of each stem to mimic fibrous mushroom stalks. I like to make these lines slightly uneven for realism. -
Form the caps:
Roll four balls of clay corresponding to your stem sizes. Flatten them slightly into domes and create a small indentation underneath where the stem will attach. -
Attach caps to stems:
Using a dab of liquid clay or scoring the clay to create grip, press the stems firmly into the underside of the caps. Smooth the connection point slightly if needed. -
Detail the caps:
Use a small ball stylus to press random, shallow indentations into the tops of the caps to create natural imperfections.
Mossy Magic
Glue tiny bits of dried green landscaping foam or flocking around the base of the mushrooms after baking to add vibrant moss patches.
Step 3: Assembly and Baking
-
Arrange the cluster:
Position the four mushrooms on the center of your base. Keep them close together, almost touching, to create a cozy family grouping. -
Blend the bottoms:
Use a sculpting tool to smudge the bottom of the stems into the base so they are securely attached and look like they are growing out of it. -
Add the soil texture:
Mix a small amount of liquid clay with brown acrylic paint. Apply this sticky mixture around the base of the stems. -
Apply the grounds:
Sprinkle dried tea leaves or coffee grounds onto the wet liquid clay mixture, pressing them down gently to simulate forest floor debris. -
Bake the piece:
Bake the sculpture according to your clay manufacturer’s instructions (usually 275°F / 135°C for 15-30 minutes depending on thickness).
Step 4: Painting and Finishing
-
Base coat the stems:
Once cool, create a wash of watered-down brown paint (raw umber) and brush it over the stems. Wipe off the excess immediately with a paper towel so the dark color stays only in the textured crevices. -
Dry brush the stems:
Lightly dry brush cream paint over the raised areas of the stems to highlight the texture. -
Paint the caps:
Paint the caps with Burnt Sienna using a sponge or brush. You may need two coats for opaque coverage. -
Add cap details:
Use a fine-tip brush or a toothpick to carefully drop dots of dark brown or black paint inside the indentations you made on the caps. -
Paint the stone base:
Paint the edge of the base with a mix of grey and cream. Let the paint settle into the texture. -
Final glaze:
Apply a coat of gloss varnish only to the mushroom caps to give them that freshly-rained-on look, leaving the stems and base matte.
Now you have a permanent piece of nature to keep on your desk
Mini Succulent in a Pebble Pot
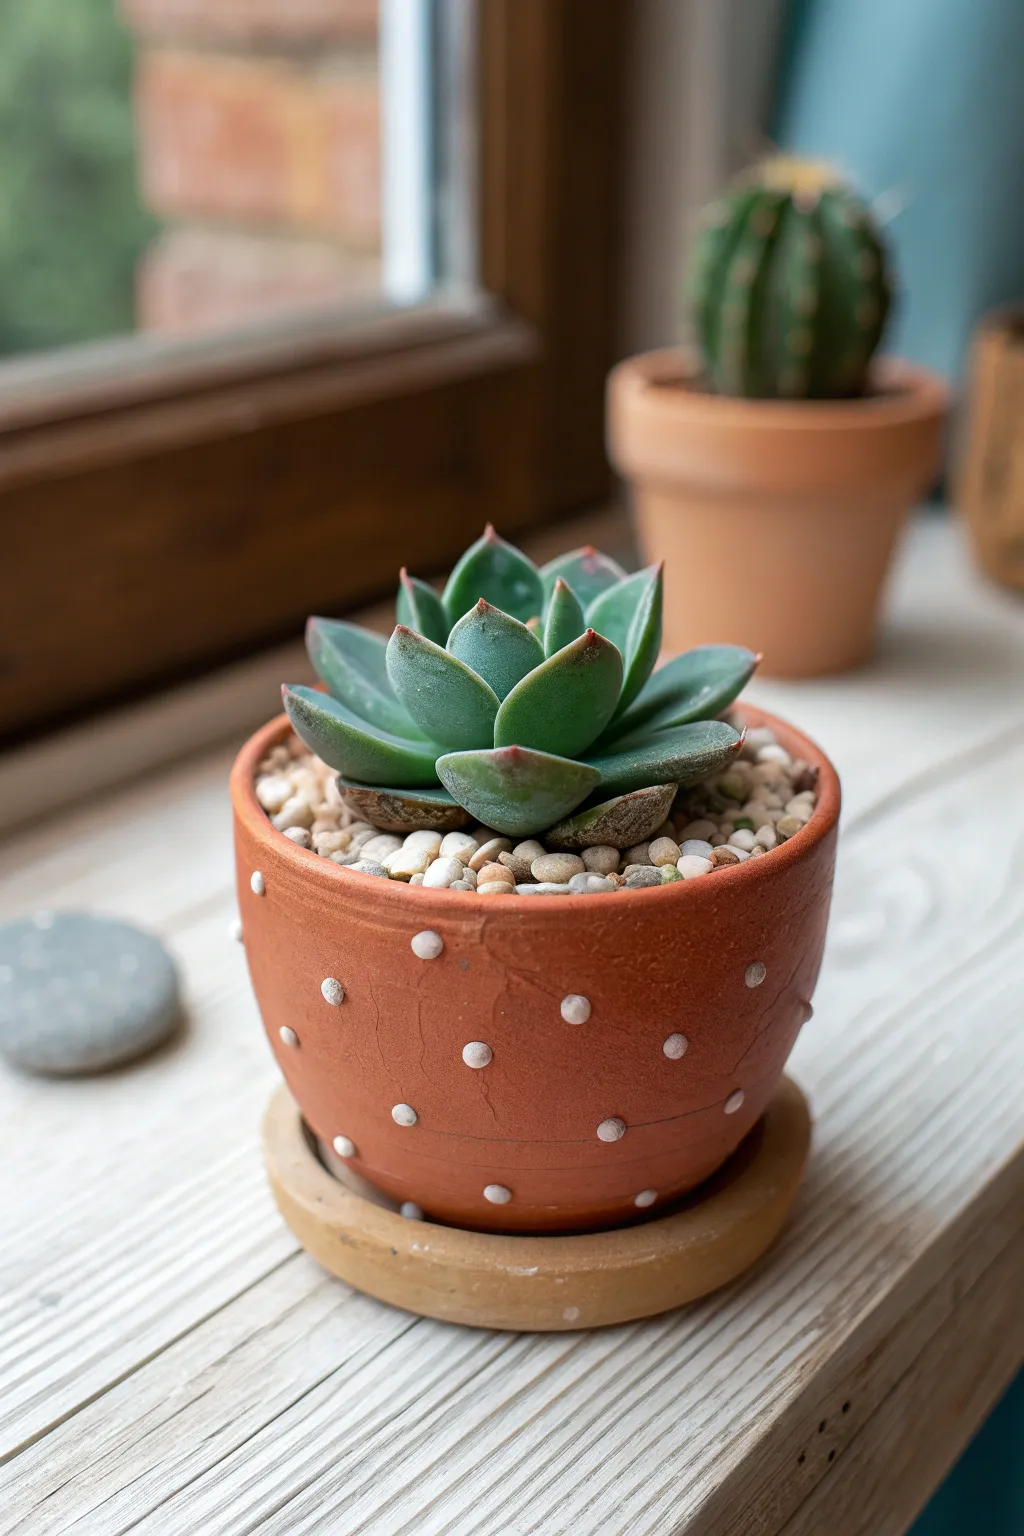
Bring a touch of everlasting greenery to your windowsill with this realistic polymer clay succulent project. You will sculpt a convincing Echeveria rosette nestled in a textured terracotta-style pot, complete with tiny clay pebbles.
Detailed Instructions
Materials
- Polymer clay (terracotta/burnt orange, translucent green, dark green, white, grey/beige mix)
- Liquid polymer clay (translucent)
- Acrylic paints (red oxide, burnt umber)
- Chalk pastels (dark red, deep green)
- Sculpting tools (ball styluses, needle tool)
- Create-your-own tools (rolled aluminum foil ball)
- Small paintbrush
- Gloss varnish (optional)
Step 1: Sculpting the Pot
-
Form the base shape:
Condition your terracotta-colored clay and roll it into a thick cylinder. Gently press your thumbs into the center to hollow it out, creating a classic pot shape with slightly tapered walls. -
Texture the surface:
To mimic an aged terracotta texture, gently roll a crumpled ball of aluminum foil over the exterior surface. This removes fingerprints and adds a realistic, porous finish. -
Add the rim detail:
Use a needle tool or the back of a knife to score a very faint horizontal line near the bottom third of the pot, suggesting a subtle groove. -
Create the polka dots:
Roll tiny spheres of white clay, all roughly the same size. Press them onto the pot in a staggered pattern, flattening them slightly so they look like raised ceramic bumps. -
Make the saucer:
Flatten a disk of beige or lighter terracotta clay. Press the pot onto it to measure the size, ensuring the saucer is slightly wider than the pot’s base. Create a slight lip around the edge. -
Pre-bake the container:
Bake the pot and saucer according to your clay package instructions (usually 15-20 minutes) to harden them before adding the delicate plant.
Pro Tip: Dust Off
Real succulents have a powdery coating called ‘farina.’ Dust your raw clay leaves with cornstarch before baking to simulate this matte, velvety texture instantly.
Step 2: Creating the Echeveria
-
Mix the leaf color:
Blend translucent green clay with a small amount of dark green and white. You want a dusty, muted green tone rather than a bright emerald. -
Form the center leaves:
Roll tiny teardrop shapes. Flatten them slightly and curve the pointed ends upward. Cluster three very small leaves together to form the tight central bud. -
Add outer layers:
Create slightly larger teardrop leaves for the next row. Attach them around the center bud, placing each new leaf in the gap between the previous row’s leaves. -
Shape the large leaves:
For the outermost whorl, make thick, broad leaves that taper to a sharp red-tinted point. Gently curve the sides upwards to create the characteristic spoon shape. -
Apply pastel shading:
Before baking, scrape some deep red chalk pastel into a powder. Use a soft brush to dust the very tips of the leaves to mimic sun-stress coloration. -
Dust the crevices:
Apply a tiny amount of dark green pastel powder deep near the stem where the leaves meet, adding depth and shadow.
Troubleshooting: drooping leaves
If your large outer leaves droop while sculpting, support them with small bits of tissue paper or batting during the bake. Remove the supports once the clay is hard.
Step 3: Assembly and Pebbles
-
Fill the pot:
Fill the bottom of your pre-baked pot with scrap clay or foil to save material, leaving about a half-inch of space at the top. -
Make the pebbles:
Mix scraps of white, grey, beige, and translucent clay. Don’t blend fully; leave streaks for a stone look. Rip off tiny, irregular chunks and roll them into rough pebble shapes. -
Secure the plant:
Place a dab of liquid polymer clay or bake-and-bond on top of the filler material. Press your raw succulent assembly firmly into the center. -
Place the stones:
Arrange your clay pebbles around the base of the succulent, covering the filler clay completely. Pack them tightly so no gaps reveal the scrap clay underneath. -
Adding withered leaves:
I like to add realism by making one or two shriveled, brownish leaves and tucking them under the fresh green ones near the ‘soil’ line. -
Final bake:
Bake the entire assembled piece again for the full duration recommended for your clay type. Let it cool completely inside the oven to prevent cracking. -
Finishing touches:
Once cool, use a dry brush with a tiny bit of white paint to lightly highlight the pebble tops.
Place your zero-maintenance botanical sculpture on a sunny shelf to enjoy some greenery that never needs watering
Little Cloud With Raindrop Friends
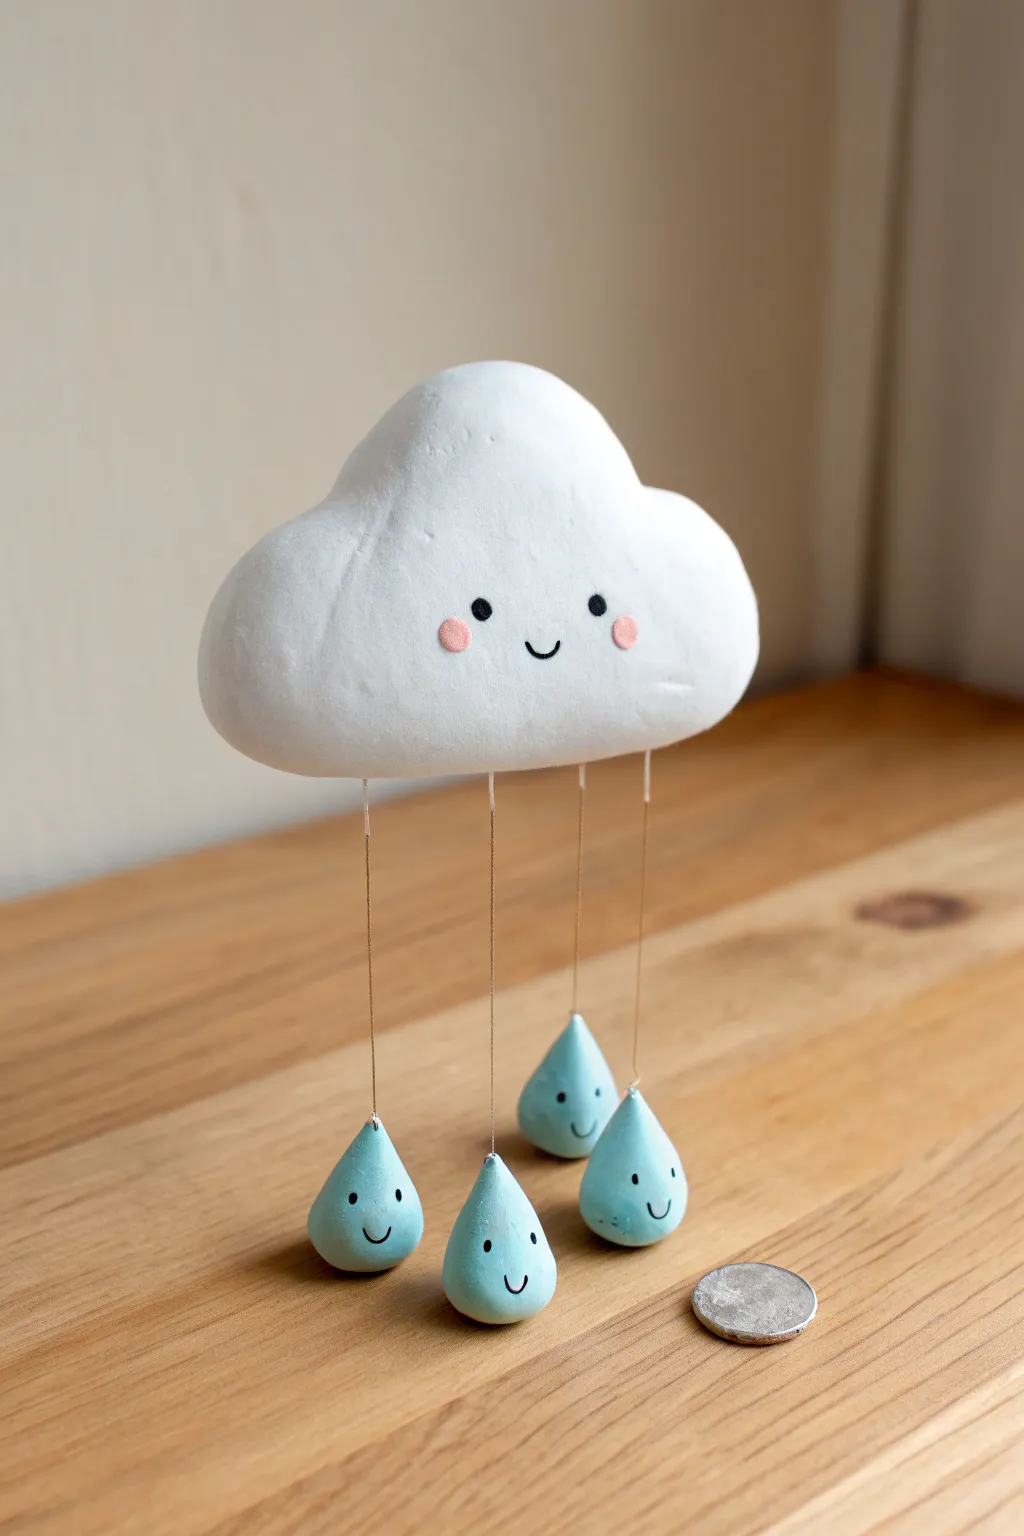
Brighten up any shelf with this adorable suspended sculpture featuring a cheerful cloud and its descending raindrop buddies. This mixed-media project combines simple clay modeling with delicate assembly to create a charming, floating rain shower effect.
Step-by-Step Tutorial
Materials
- White air-dry clay or polymer clay
- Light blue acrylic paint (or blue polymer clay)
- Black fine-point permanent marker or acrylic paint pen
- Pink acrylic paint or soft pastel shavings
- Thin transparent nylon thread or fine copper wire
- Sculpting rolling pin
- Needle tool or toothpick
- Super glue or strong craft adhesive
- Fine-grit sandpaper
- Matte finish sealant (optional)
Step 1: Sculpting the Cloud
-
Condition the clay:
Start by kneading a golf-ball-sized amount of white clay until it is warm, pliable, and free of cracks. -
Form the base shape:
Roll the clay into a smooth oval, then gently flatten the bottom edge against your work surface so it can stand relatively straight but retains a puffy, 3D quality. -
Refine the contours:
Use your thumbs to gently press indentations along the top and sides, creating the signature bumpy lobes of a fluffy cumulus cloud. Aim for an organic, asymmetrical look. -
Smooth firmly:
Dip your finger in a tiny bit of water (if using air-dry clay) or baby oil (for polymer) and run it over the surface to remove any fingerprints. -
Create attachment points:
Flip the cloud upside down. Using a needle tool, poke four small holes into the flat bottom surface about 1/4 inch deep. These will hold the rain threads later.
Balance Check
Before gluing the wires, hold the cloud up with strings taped in place to test the balance. Ensure weight is distributed evenly so the cloud doesn’t tilt forward.
Step 2: Making the Raindrops
-
Shape the drops:
Take pea-sized balls of clay (either pre-colored blue or white to be painted later). Roll them into balls, then pinch and pull the top into a tapered point to create a teardrop shape. -
Flatten the bottoms:
Tap the bottom wide part of each raindrop against the table to create a small flat base so they can sit upright. -
Add wire holes:
Carefully poke a small hole perfectly vertically into the tip of each raindrop using your needle tool. -
Baking or Drying:
Allow all pieces to dry completely according to package instructions. If using polymer clay, bake on a tile or parchment paper as directed by the manufacturer.
Level Up: Mobile Magic
Instead of rigid wire, use clear fishing line and embed a hook in the top of the cloud during sculpting. Now you can hang the whole piece as a kinetic mobile.
Step 3: Adding Personality
-
Sand for smoothness:
Once fully cured, use fine-grit sandpaper to buff away any rough edges or fingerprints on the cloud and raindrops. -
Paint the raindrops:
If you used white clay, paint the raindrops a soft pastel teal or baby blue. Apply two thin coats for even coverage. -
Draw the faces:
Using a fine-point black marker or paint pen, draw wide-set eyes and a small ‘u’ smile on the cloud and each raindrop. I find placing the eyes slightly lower makes them look cuter. -
Apply rosy cheeks:
Dip a cotton swab or a small round brush into pale pink paint (or use blush powder) and dab gentle circles on the cheeks of the cloud.
Step 4: Final Assembly
-
Prepare the strings:
Cut four lengths of thin wire or nylon thread, varying the lengths slightly so the raindrops hang at different heights. -
Attach strings to drops:
Dip one end of a wire into super glue and insert it quickly into the hole at the top of a raindrop. Hold for 10 seconds to set. Repeat for all four drops. -
Connect to cloud:
Apply a drop of glue to the holes in the bottom of the cloud. Insert the loose ends of the wires attached to the raindrops. -
Secure the structure:
Prop the cloud up so the raindrops hang freely while the glue cures completely to ensure the wires dry straight. -
Seal the work:
Finish by brushing a coat of matte sealant over the entire piece to protect the paint and clay.
Now you have a whimsical weather sculpture to bring a smile to anyone’s face on a rainy day
Mini Starry Moon Buddy
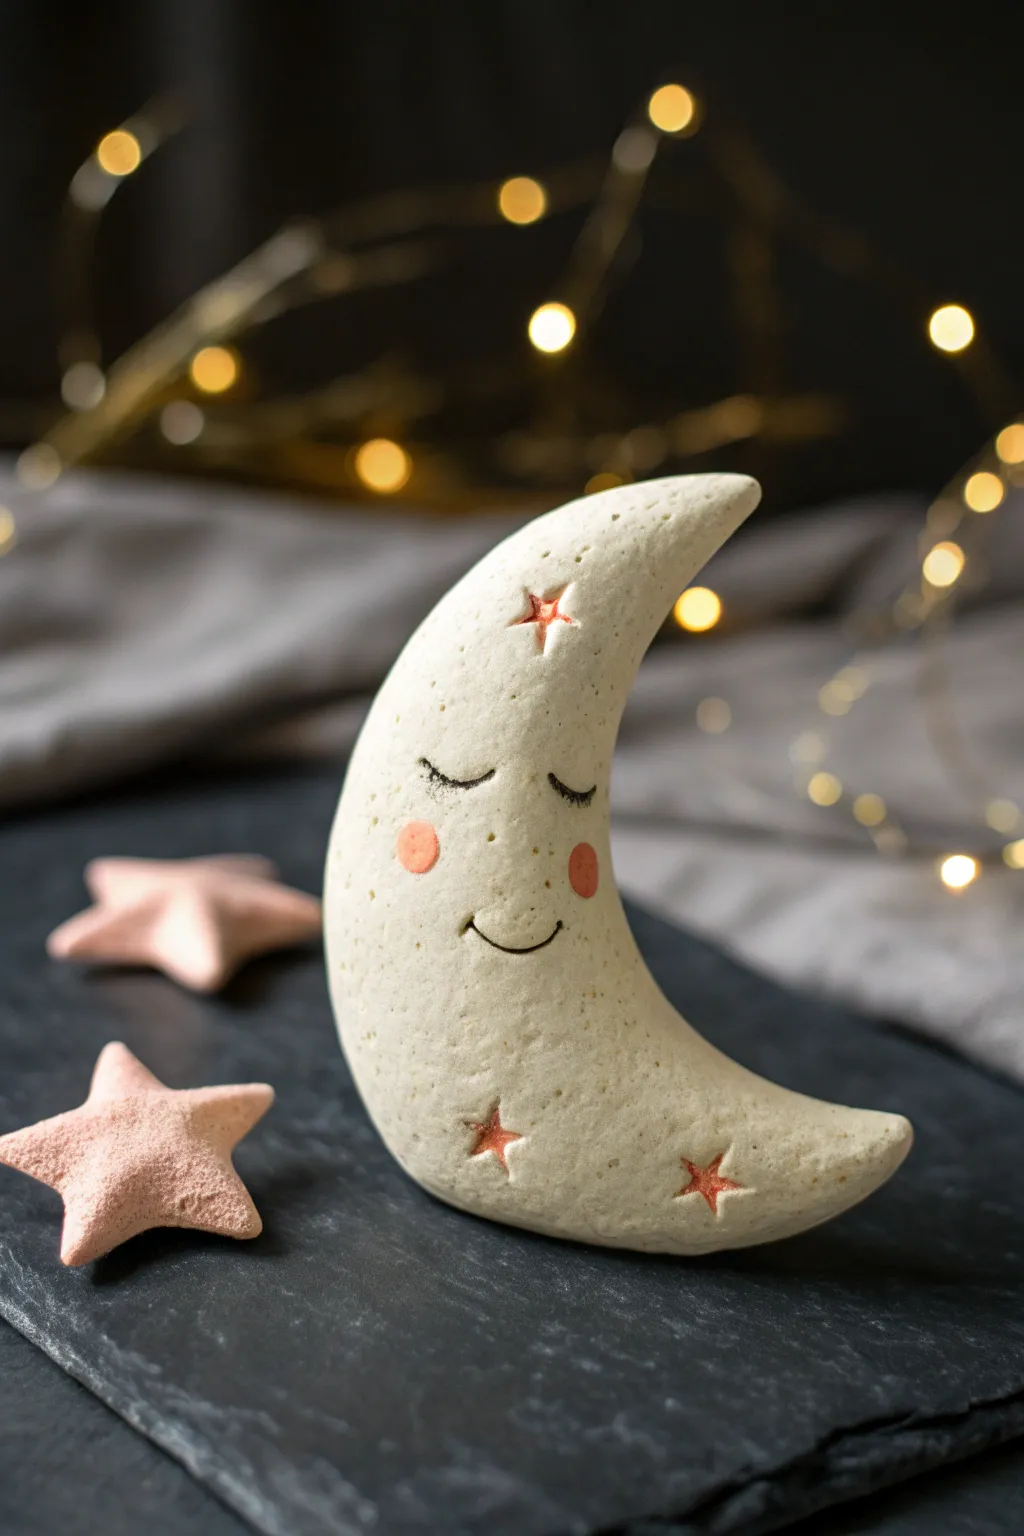
This whimsical crescent moon sculpture features a serene, sleepy expression and celestial details perfect for a nightstand companion. Withits speckled texture and soft rosy accents, this project brings a calming, dreamy vibe to any miniature collection.
Detailed Instructions
Materials
- White polymer clay (approx. 2oz)
- Small amount of pink polymer clay
- Rolling pin or acrylic roller
- Round cookie cutter (approx. 3-inch diameter)
- Small star-shaped cutter or modeling tool
- Needle tool or toothpick
- Black acrylic paint
- Fine detail brush (000 size)
- Soft pastel chalk (pink/red)
- Small fluffy brush (for blush)
- Sandpaper or old toothbrush (for texturing)
- Baking sheet and parchment paper
- Oven
Step 1: Shaping the Moon Base
-
Condition the Clay:
Start by thoroughly kneading your white polymer clay until it is soft and pliable. If you want the speckled look shown in the image, mix in a tiny pinch of black pepper or craft sand at this stage. -
Initial Roll:
Roll the clay into a smooth ball to remove any major air bubbles or seams. -
Flatten Slightly:
Using your acrylic roller or palm, flatten the ball into a thick disk, roughly 1/2 inch thick. -
Cut the Shape:
Use your round cookie cutter to cut a circle from the clay. Position the cutter again to cut an inner curve, removing a section to leave a crescent moon shape. -
Soften the Edges:
Gently tap the sharp edges cut by the tool with your fingertip to round them over. The moon should look puffy and soft, not geometric. -
Refine the Tips:
Pinch the top and bottom tips of the crescent gently to taper them slightly, giving the moon a classic, elegant curve.
Step 2: Adding Details & Texture
-
Create Texture:
For that stone-like finish, gently dab the surface of the clay with sandpaper or the bristles of an old toothbrush. Don’t press too hard; just create a subtle, uneven surface. -
Indent the Stars:
Press a small star-shaped cutter into the clay at random intervals—one near the top tip, one near the bottom, and one on the curve. If you don’t have a cutter, carefully trace a star shape with a needle tool. -
Deepen the Stars:
Use a small ball tool or the tip of your needle tool to slightly deepen the center of these star indentations so they catch shadows later. -
Color the Stars:
Before baking, scrape a little pink pastel chalk into dust. Use a small dry brush to dust the inside of the star indentations with this pink powder. -
Make Companion Stars:
Take your small amount of pink clay and roll it out. Cut or shape two small, puffy 5-point stars to accompany your moon buddy. -
Texture Companion Stars:
Give the pink stars the same toothbrush texture treatment so they match the moon’s finish nicely.
Clean Clay Pro-Tip
White clay attracts dust like a magnet. Keep a pack of baby wipes nearby to clean your hands and tools constantly, or wear latex finger cots to keep the finish pristine.
Step 3: Face & Finishing
-
Mark the Features:
Lightly sketch the position of the eyes and mouth using a very light touch with your needle tool to ensure symmetry before committing. -
Carve the Smile:
Using the needle tool, drag a curved line for the smile. Deepen the corners slightly to create cute dimples. -
Apply Blush:
Use your small fluffy brush and the pink pastel dust again. Dab soft circles onto the cheek area of the raw clay for a rosy glow. -
Bake the Pieces:
Arrange the moon and pink stars on a parchment-lined baking sheet. Bake according to your clay package instructions (usually 275°F/135°C for 15-30 minutes). -
Cool Down:
Allow the pieces to cool completely in the oven with the door cracked, or on a wire rack. I find letting them cool slowly prevents accidental cracking. -
Paint the Details:
Dip your fine detail brush into black acrylic paint. Carefully paint two U-shaped arches for the sleeping eyes and trace over the smile groove you carved earlier. -
Add Eyelashes:
Flick tiny, delicate lines outward from the corners of the closed eyes to create eyelashes. -
Seal (Optional):
If you want to protect the paint, apply a matte varnish over the face area once the paint is fully dry.
Wobbly Moon Fix
If the moon won’t stand up, gently flatten the bottom curve against your work surface before baking to create a small, hidden flat spot for stability.
Now you have a peaceful lunar friend to watch over your dreams or decorate a cozy shelf nook
Tiny Book Stack With a Face
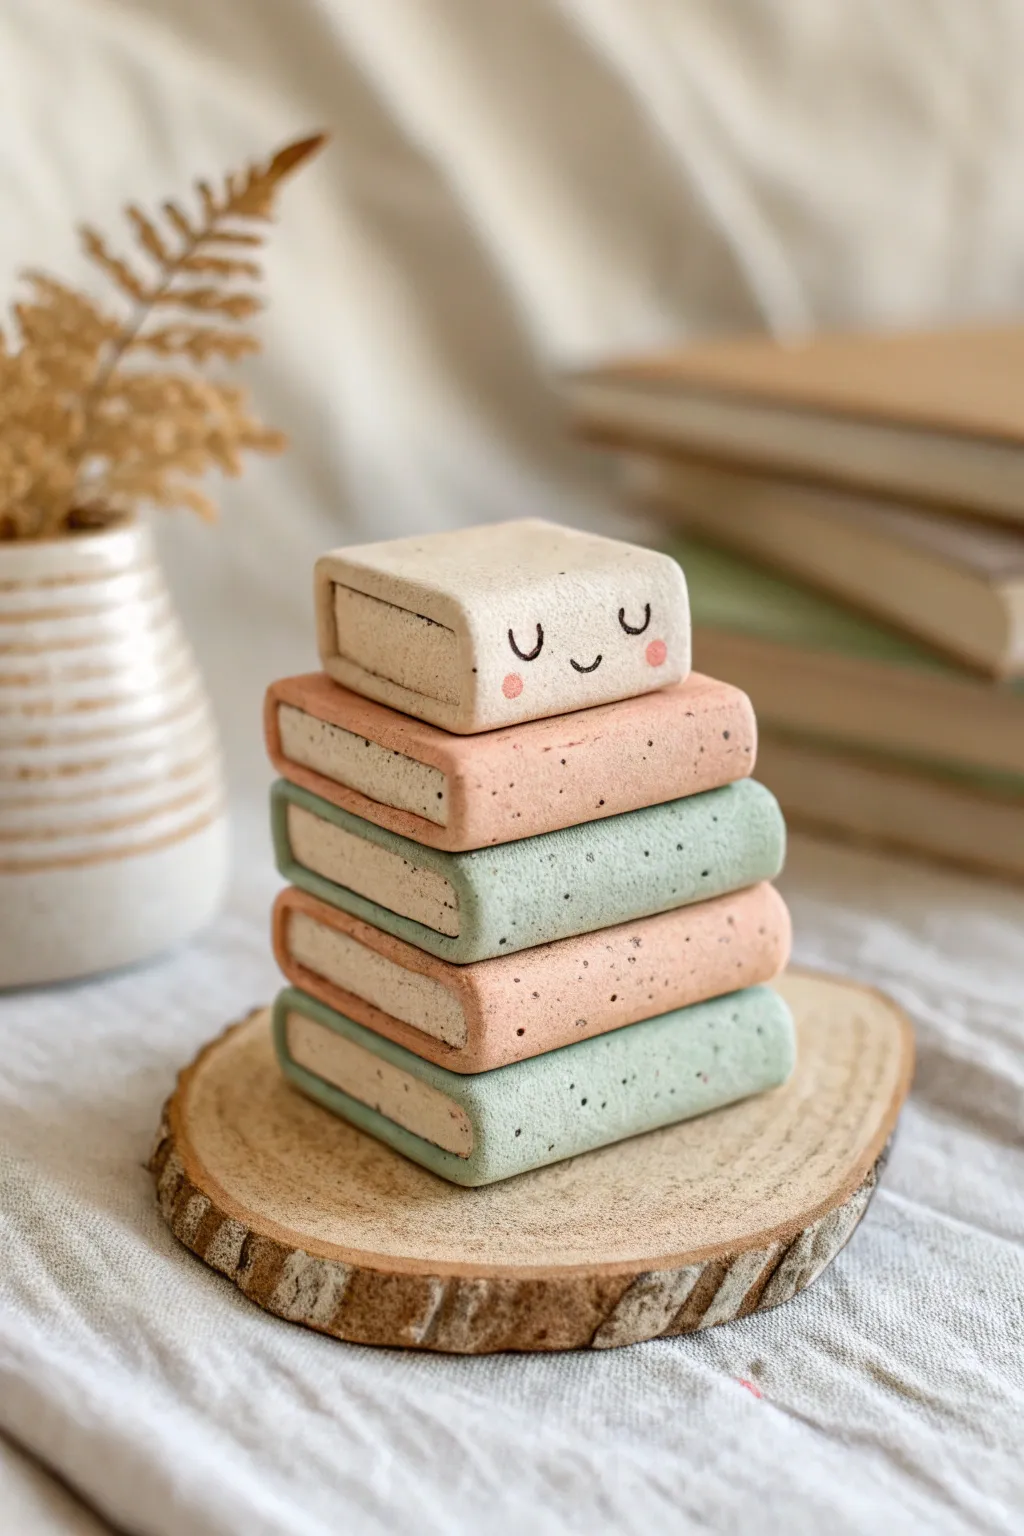
Create a charming miniature library that smiles back at you with this adorable polymer clay sculpture. This project features a stack of five tiny pastel books, topped with a sleepy character that adds a touch of personality to your desk or bookshelf.
Step-by-Step Tutorial
Materials
- Polymer clay (cream/white, peach, mint green)
- Black acrylic paint or fine detail pen
- Pink chalk pastel or blush
- Speckled clay or black pepper/sand (optional for texture)
- Clay roller or pasta machine
- Precision knife or clay blade
- Needle tool or toothpick
- Sculpting tool with a flat edge
- Oven for baking
Step 1: Preparing the ‘Paper’ Blocks
-
Condition the Clay:
Begin by conditioning your cream or white clay until it is soft and pliable. This core color will represent the pages of your books. -
Form the Pages:
Roll the clay into a thick slab, approximately 1/4 inch thick. Cut five identical rectangles using your precision knife; these should be roughly 1 inch long by 3/4 inch wide. -
Texture the Edges:
Take a needle tool and gently score horizontal lines along three sides of each rectangle to mimic the look of stacked paper pages. Leave the fourth long side smooth, as this will be covered by the book spine.
Uneven Pages?
If your page lines look messy, lightly drag an old toothbrush horizontally across the clay sides instead of using a needle tool. It creates subtle, uniform texture instantly.
Step 2: Creating the Covers
-
Mix Cover Colors:
Prepare your cover colors: a soft peach and a muted mint green. If you want the speckled effect shown in the example, mix a tiny pinch of black pepper or fine black sand into the clay. -
Roll Cover Slabs:
Roll out thin sheets of the peach, mint, and cream clay for the covers. These should be much thinner than your page blocks, about 1/16 inch thick. -
Cut Cover Strips:
Measure your page blocks and cut strips of the cover clay that are slightly wider than the blocks and long enough to wrap around the top, spine, and bottom. -
Assemble the Bottom Book:
Start with a mint green strip. Place a page block in the center, wrap the clay around the smooth spine edge, and fold it over the top and bottom faces. Trim any excess so the cover is flush with the ‘paper’ edges. -
Smooth the Seams:
Use your finger or a flat tool to gently press the cover onto the page block, ensuring a tight seal without squishing the texture you made earlier. -
Create the Stack:
Repeat the cover process for the next three books, alternating peach and mint green. Stack them slightly askew as you go to give the sculpture a relaxed, natural feel. -
The Character Book:
For the top book, use the cream or white clay for the cover instead of a color. Wrap it just like the others and place it at the very top of your stack.
Golden Edges
Make it fancy by brushing metallic gold mica powder onto the page edges before baking. This gives the appearance of antique, gold-gilded paper.
Step 3: Details & Finishing
-
Adding the Face:
Before baking, you can use a needle tool to lightly indent where the eyes and mouth will go on the spine of the top book, or wait to paint it later. I find indenting helps guide the brush. -
Pre-Bake Inspecton:
Check the stack for stability. Press down gently from the top to ensure all layers adhere to each other. Smooth out any fingerprints with a drop of baby oil. -
Bake:
Bake the sculpture according to your clay manufacturer’s instructions, usually at 275°F (135°C) for about 30 minutes. Let it cool completely. -
Paint the Features:
Using a very fine detail brush and black acrylic paint, carefully draw two ‘U’ shapes for closed eyes and a small smile on the spine of the top book. -
Add Cheeks:
Scrape a little pink chalk pastel into a powder. Use a dry brush or cotton swab to gently dab rosy cheeks onto the ‘face’ of the book. -
Seal (Optional):
If desired, apply a matte varnish to protect the paint, though bare polymer clay has a lovely finish on its own.
Place your little literary friend on a wooden coaster or shelf and enjoy the cozy vibes
Micro Fairy House on a Stone Base
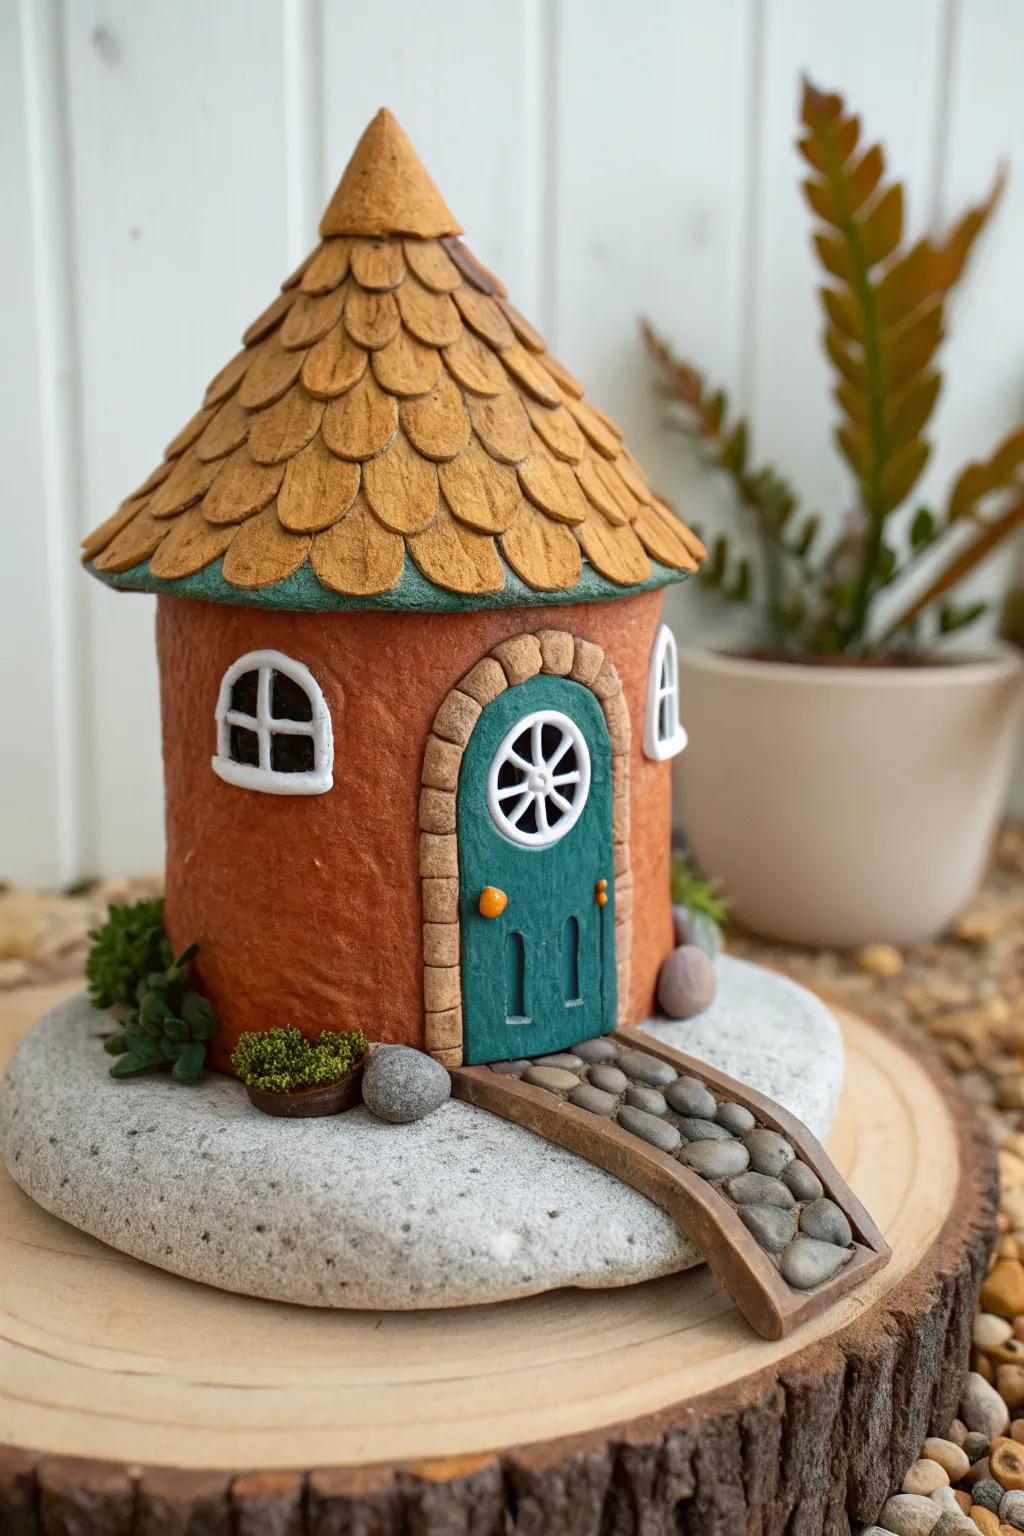
This charming project captures the essence of woodland magic by combining natural elements with polymer clay craftsmanship. You’ll construct a rustic, textured cylinder home perched atop a smooth river stone, complete with a scalloped roof and a tiny pebble pathway.
Detailed Instructions
Materials
- Polymer clay (terracotta, light brown, dark green, white, grey)
- Aluminum foil
- Smooth, flat river stone (palm-sized)
- Liquid polymer clay (Bake and Bond)
- Small circle cutter
- Needle tool and dotting tool
- Texture sponge or toothbrush
- Craft knife
- Acrylic rolling pin
- Oven for baking
Step 1: Building the Foundation
-
Prepare the core:
Crumple aluminum foil into a tight cylinder shape that fits comfortably on your chosen river stone. This will form the lightweight armature of the house. -
Cover the walls:
Roll out a sheet of terracotta-colored clay. Apply a thin layer of liquid clay to the foil cylinder, then wrap the terracotta sheet around it, trimming the excess and smoothing the seam with your finger. -
Texture the surface:
Gently press a texture sponge or an old toothbrush against the clay walls to create a stucco-like, earthy finish. -
Establish the base:
Apply a dab of liquid clay to the center of your river stone. Press the house structure firmly onto the stone to secure it.
Sticky Situation
Does your clay struggle to stick to the smooth river stone? Brush a thin layer of PVA glue or liquid clay on the stone first and let it get tacky before attaching your clay base.
Step 2: Crafting the Roof
-
Form the cone:
Create a cone shape from aluminum foil that matches the width of your house cylinder. Cover this cone with a sheet of light brown clay. -
Add the eaves:
Roll a thin snake of dark green clay and flatten it slightly. Wrap this around the very bottom edge of the roof cone to act as the trim or gutter area. -
Create shingles:
Roll out light brown clay and use a small circle cutter (or a straw) to punch out numerous small circles. Cut these circles in half to create semi-circle shingles. -
Apply the roofing:
Starting from the bottom just above the green trim, layer the shingles in overlapping rows, working your way up to the peak. Use a needle tool to gently texture each shingle. -
Assemble the structure:
Place the finished roof onto the main house cylinder. I find it helpful to add a little liquid clay at the connection point to ensure it survives baking.
Magic Glow
Make the windows glow! Instead of solid black clay for the panes, use glow-in-the-dark clay. After charging in the light, your fairy house will softly illuminate at night.
Step 3: Doors, Windows, and Details
-
Make the door:
Cut an arch shape from teal or dark green clay. Use a needle tool to score vertical wood grain lines into the surface. -
Frame the entrance:
Roll a thin snake of light tan clay and wrap it around the door arch. Use a tool to press indentations into it, making it look like individual stone blocks. -
Add the door window:
Place a small white clay circle near the top of the door. Roll tiny threads of white clay to create the spokes of the wheel window. -
Create side windows:
Form small arches from black clay for the window panes, then frame them with thin snakes of white clay. Add a cross of white clay over the black to simulate muntins. -
Attach the fixtures:
Press the door firmly onto the front of the house and the windows onto the sides. Add a tiny orange ball for a doorknob.
Step 4: Landscaping the Base
-
Lay the bridge:
Create a curved, rectangular bridge shape from brown clay that extends from the door down to the edge of the stone. -
Pave the path:
Form tiny, irregular balls of grey clay and press them flat onto the brown bridge surface to look like cobblestones. -
Plant greenery:
Crumple tiny bits of green clay and cluster them around the base of the house and near the path to mimic shrubs and moss. -
Final cure:
Bake the entire piece—stone and all—according to your clay manufacturer’s instructions (usually 275°F/135°C for 15-30 minutes). Let it cool completely before handling.
Place your finished cottage on a shelf or in a planter to add a secret world to your home decor
Cactus Critter Planter Pal
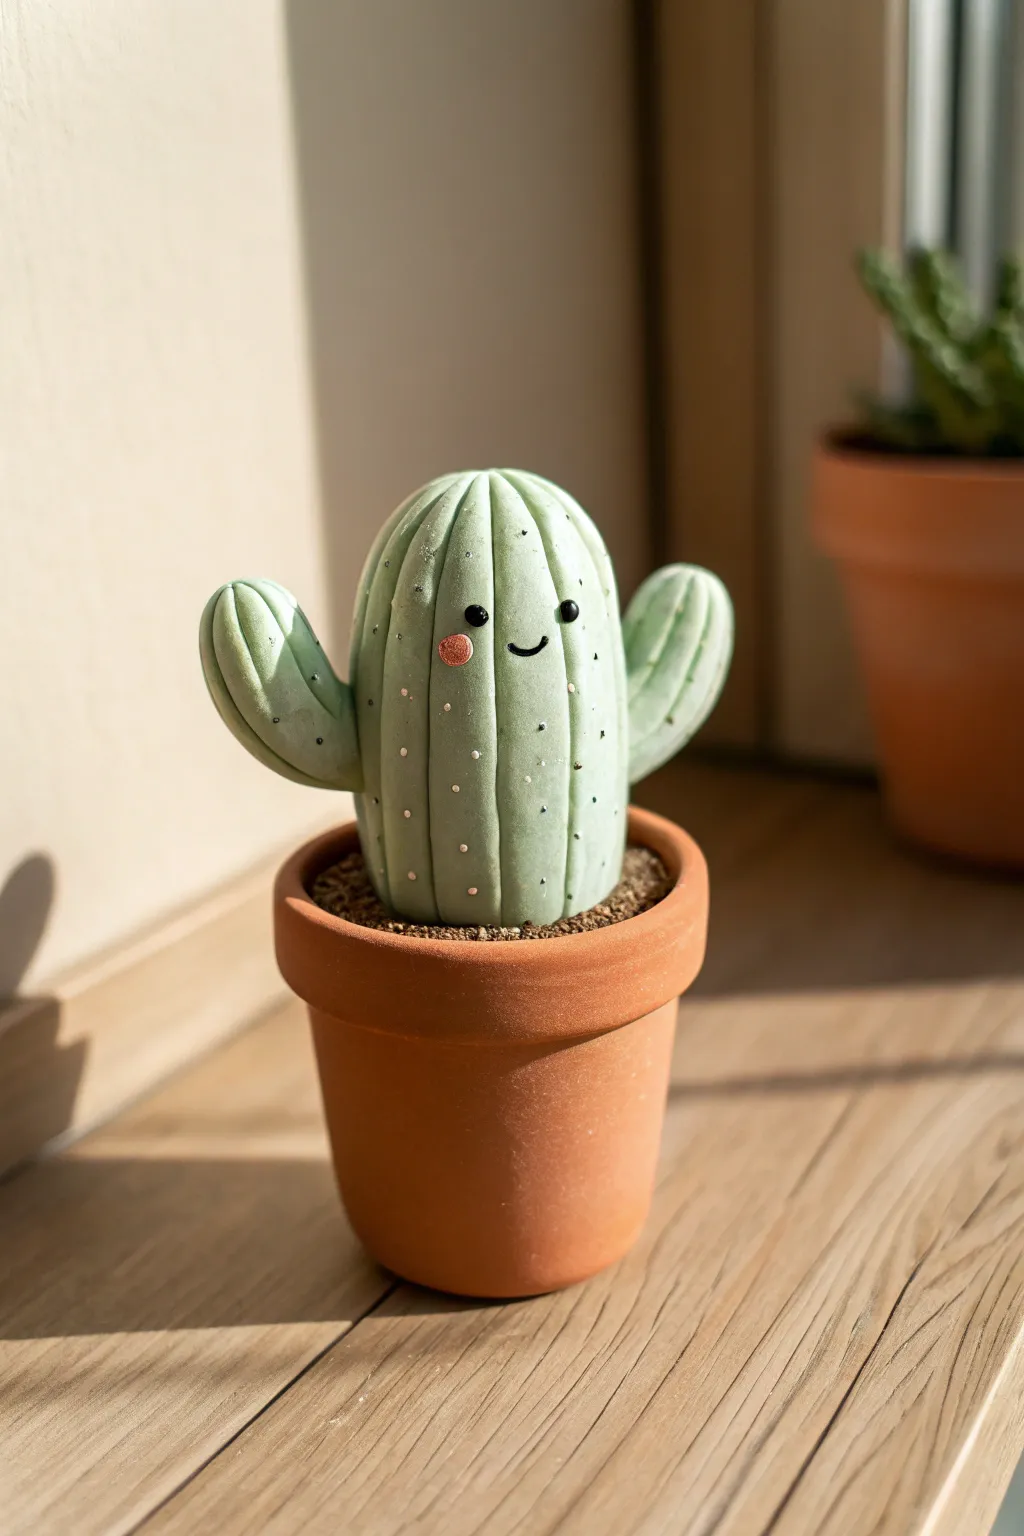
Bring a touch of desert charm to your desk without the prickly aftermath using this adorable polymer clay project. This smiling succulent features a soft matte finish, sweet blushing cheeks, and sits snugly in a real miniature terra cotta pot.
Step-by-Step Tutorial
Materials
- Polymer clay (light sage green, black, pink)
- Miniature terracotta pot (2-inch diameter)
- Needle tool or toothpick
- Ball stylus tool
- Brown acrylic paint (optional, for ‘dirt’)
- Dried coffee grounds or brown textured clay
- White acrylic paint
- Fine detail paintbrush or sewing pin
- Aluminum foil
- Oven (for baking clay)
- Matte varnish (optional)
Step 1: Forming the Base Body
-
Create the core:
Start by crumpling a small ball of aluminum foil about the size of a ping-pong ball. This saves clay and keeps the sculpture lighter, preventing it from drooping during baking. -
Prepare the green clay:
Condition your sage green polymer clay by kneading it until it’s soft and pliable. If the green looks too vibrant, I like to mix in a tiny pinch of white or beige to get that dusty desert look. -
Cover the core:
Flatten the green clay into a thick sheet and wrap it completely around your foil ball. Roll it smoother between your palms until you have a perfect, seamless oval shape. -
Test the fit:
Gently place your clay oval into the mini terracotta pot to ensure it fits snugly. It should sit just slightly below the rim to leave room for the ‘soil’ later.
Uneven Ridges?
If your ridge lines look wobbly, lightly wrap a piece of dental floss vertically around the cactus and press gently. This creates perfectly straight guide lines to follow with your tool.
Step 2: Adding Character Details
-
Sculpt the ridges:
Using a needle tool or the side of a toothpick, gently press vertical lines from the top center down to the bottom of the cactus. Space them evenly around the circumference to imitate cactus ribs. -
Form the arms:
Roll two smaller logs of green clay for the arms. Round off one end of each log and slightly curve them upward. -
Attach the arms:
Press the arms onto the sides of the main body. Use a silicone tool or your finger to smooth the seams where the clay joins so the arms look like they grew naturally from the body. -
Extend the ridges:
Continue your ridge lines onto the arms, ensuring they flow visually from the main body’s pattern. -
Create the face sockets:
Use a medium ball stylus to press two shallow indentations where you want the eyes to go. This helps the eyes sit flush rather than bulging out. -
Add the eyes:
Roll two exceptionally tiny balls of black clay. Place them into the sockets you just made and press gently to secure. -
Make the mouth:
Roll a very thin snake of black clay. Cut a tiny U-shape segment and press it onto the face between the eyes to create a happy smile. -
Apply the blush:
Take a tiny amount of pink clay and flattening it into a small oval. Press this onto the cactus cheek, just below one eye, blending the edges slightly for a soft look.
Step 3: Finishing Touches
-
Add the potting soil:
Remove the cactus from the pot temporarily. Fill the pot’s base with scrap clay or foil, then top it with a layer of brown clay mixed with dried coffee grounds for a realistic dirt texture. -
Bake the project:
Place the cactus (and the separate soil insert if removable) on a baking sheet. Bake according to your clay manufacturer’s instructions, typically around 275°F (135°C) for 15-30 minutes. -
Cool down:
Let the piece cool completely in the oven before handling. This prevents the clay from cracking due to thermal shock. -
Paint the spines:
Dip a fine sewing pin or a specialized detail brush into white acrylic paint. Dot tiny ‘spines’ along the vertical ridges of the cactus. Grouping them in sets of two or three looks best. -
Assembly:
Glue the soil disc into the pot, then glue the cactus securely onto the soil. A dab of superglue works perfectly here. -
Optional matte seal:
If you want to protect your paint without making the cactus shiny, brush on a coat of matte varnish.
Blooming Cactus
Make a tiny pink or yellow flower using five teardrop shapes of clay. Attach this to the top of the cactus head before baking for an extra pop of color.
Place your new cheerful friend on a windowsill where it can soak up the sun without ever needing water
Balloon-Animal Style Dog

Create a playful illusion with this sculpted take on a classic balloon animal, featuring smooth, shiny segments that mimic inflated rubber perfectly. This delightful pink pup captures the nostalgia of carnival prizes in a permanent, durable form that brightens any windowsill.
Step-by-Step
Materials
- Pink polymer clay
- Black polymer clay (tiny amount)
- White polymer clay (tiny amount)
- Glossy polyurethane varnish or UV resin
- Sculpting tools (needle tool, smoothing tool)
- Wire or armature wire (optional for structural support)
- Small paintbrush
- Aluminum foil (optional for core)
- Oven for baking
Step 1: Shaping the Segments
-
Prepare the clay:
Condition your pink polymer clay thoroughly by kneading it until it is soft and liable. This prevents cracks later on. -
Form the body:
Roll a smooth cylinder of pink clay about 1.5 inches long. Round off both ends gently so it looks like an inflated sausage shape. -
Create the legs:
Roll four identical sausage shapes, slightly shorter and thicker than the body. These will be the front and back legs. Smooth the ends to be rounded, not flat. -
Shape the neck:
Create a shorter, vertical cylinder for the neck. This piece connects the head to the body and needs to support the weight of the ears. -
Craft the head:
Roll a slightly tapered cylinder for the snout and head segment. The nose end should be slightly narrower than the back of the head. -
Sculpt the ears:
Form two large, flattened tear-drop or oval shapes for the ears. They should be quite substantial, just like inflated balloon ears. -
Make the tail:
Roll a tiny ball for the tail base and a very thin, short snake of clay for the little knot at the end found on real balloons.
Step 2: Assembly & Details
-
Connect the legs:
Ideally, use small pieces of wire as internal pins to connect the legs to the body. Press two legs together side-by-side, then attach them to the underside of the front of the body. Repeat for the back legs. -
Attach the neck:
Place the neck piece vertically on the front end of the body, blending the clay seams carefully with a smoothing tool just at the contact point, or keeping the definition sharp to mimic separate balloons. -
Position the head:
Secure the head piece horizontally on top of the neck. Ensure the ‘balloon knot’ look is maintained by not over-blending the segments. -
Add the ears:
Attach the ears to the top back of the head. I find angling them slightly backwards gives the dog a more dynamic, alert expression. -
Attach the tail:
Press the small tail segment onto the upper rear of the body. Add the tiny ‘knot’ piece sticking out from it. -
Sculpt the eyes:
Roll two tiny white balls and flatten them onto the head. Press a minuscule black ball into the center of each white circle for pupils. -
Add the nose:
Place a very small black triangle or oval at the very tip of the snout for the nose.
Sagging Segments?
If the heavy ears cause the head to droop, prop them up with crumpled aluminum foil or cornstarch while baking to hold the pose until hardened.
Step 3: Finishing Touches
-
Smooth fingerprints:
Before baking, lightly brush the entire sculpture with a tiny bit of baby oil or clay softener to remove any fingerprints and ensure a perfectly smooth surface. -
Bake the sculpture:
Bake according to your clay manufacturer’s instructions, usually around 275°F (135°C) for 15-30 minutes depending on thickness. -
Cool down:
Let the sculpture cool completely. It is fragile while warm. -
Apply the glaze:
To achieve that realistic rubber latex look, apply two to three generous coats of high-gloss polyurethane varnish or UV resin. Let each coat dry fully before adding the next.
Pro Glazing Tip
For a glass-like finish without brush strokes, dip the entire cooled sculpture into a jar of varnish and let the excess drip off while hanging.
Place your shiny new friend in a sunny spot to catch the light and fool everyone into thinking it’s lighter than air