If you’re craving a quick win with clay, mini clay sculptures are my favorite way to turn a tiny lump into something ridiculously cute. These easy mini clay sculpture ideas lean on simple shapes, sweet expressions, and beginner-friendly details you can totally handle in one relaxed session.
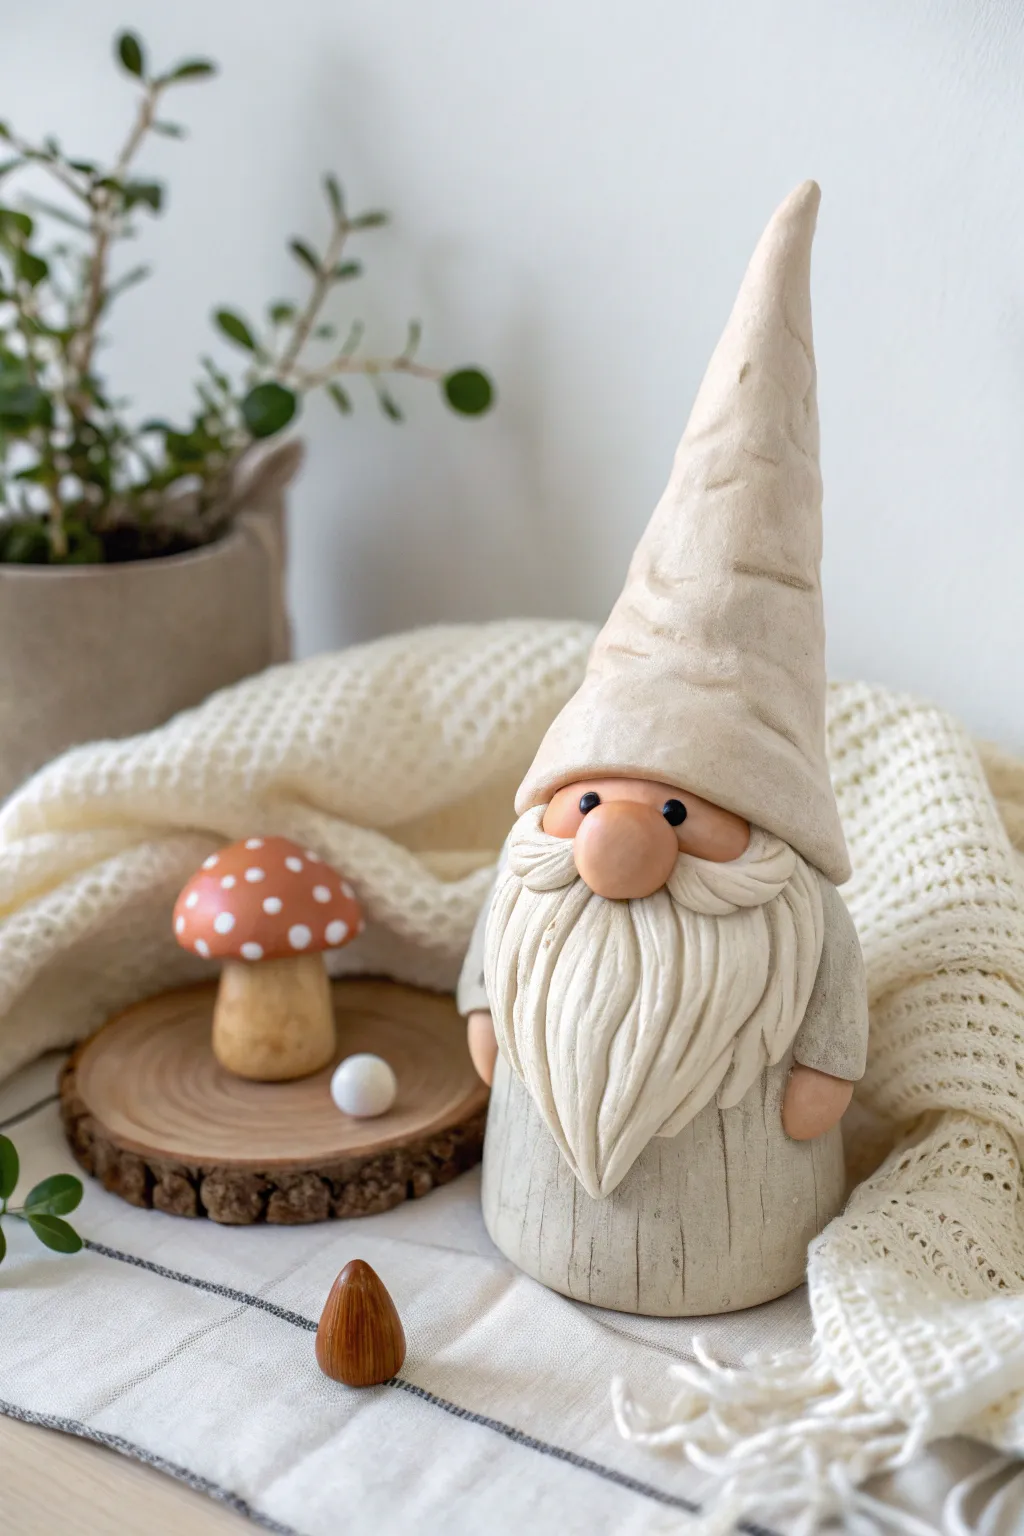
Tiny Mushroom Buddy
Bring a little charm to your shelf with this adorable, hand-sculpted mushroom friend. With its textured stalk and cheerful spotted cap, this tiny companion is the perfect beginner project for practicing clay shaping and detailed painting.
Detailed Instructions
Materials
- White air-dry clay or polymer clay
- Acrylic paints (terracotta/brown, cream/off-white, black, pink)
- Small fine-point paintbrushes
- Ball stylus tool or toothpick
- Sculpting tool with a serrated edge (or old toothbrush)
- Small flat river stone (for the base)
- Matte clear varnish (optional)
- Water cup (for smoothing)
- Fine grit sandpaper
Step 1: Sculpting the Form
-
Form the stalk:
Start by taking a walnut-sized ball of white clay and rolling it into a thick cylinder. Taper it slightly so it is wider at the bottom and slightly narrower at the top, creating a stable chunky base. -
Texturize the stem:
Before the clay hardens, use a serrated sculpting tool or a toothpick to drag vertical lines up the stalk. Keep these lines shallow and slightly uneven to mimic the organic texture of a real mushroom stem. -
Shape the cap:
Roll a second piece of clay into a ball, slightly larger than the first. Press it gently against your work surface to flatten the bottom, then use your fingers to dome the top into a classic mushroom cap shape. -
Soften the edges:
Smooth the bottom edge of the cap with a little water on your fingertip so it curves inward slightly, rather than having a sharp, harsh rim. -
Attach the pieces:
Score the top of the stalk and the underside of the cap with a crisscross pattern. Add a tiny dab of water (or liquid clay if using polymer) and press the cap firmly onto the stem. Smooth the seam underneath just a little to ensure a bond. -
Impress the details:
Using a ball stylus tool or the rounded end of a paintbrush, gently press circular indentations into the mushroom cap. Vary the sizes slightly for a natural look; these will become the white spots later. -
Final drying:
Let your mushroom sit undisturbed to dry completely. If using air-dry clay, this may take 24-48 hours; for polymer clay, bake according to the package instructions.
Step 2: Painting & Finishing
-
Base coat the stalk:
Paint the stalk with a cream or off-white acrylic paint. You want the texture to show, so using a slightly watered-down wash can help settle pigment into those vertical grooves you carved earlier. -
Paint the cap:
Carefully paint the entire top cap with a warm terracotta or reddish-brown hue. I find it helps to use a small flat brush to get a clean line where the cap meets the stem. -
Fill the spots:
Once the brown paint is dry to the touch, use a fine detail brush to fill in the indented circles on the cap with a creamy white paint. -
Extra spots:
Add a few tiny dots of white paint between the larger indented spots to create variety in the pattern. -
Paint the eyes:
Using your smallest brush or a dotting tool, place two small ovals of black paint on the upper half of the stalk for the eyes. -
Add eye highlights:
Wait for the black paint to dry completely. Then, add a tiny white dot in the upper corner of each black oval to give the eyes a spark of life. -
Create the smile:
With an ultra-fine brush or even a black micron pen, draw a tiny, shallow ‘U’ shape between the eyes for a sweet, simple smile. -
Rosy cheeks:
Mix a tiny amount of pink paint and dab two small dots just below and outside the eyes to give your mushroom blushing cheeks. -
Mounting:
Apply a strong adhesive to the bottom of your mushroom and press it firmly onto the center of your smooth river stone.
Clean Spots
If you struggle to paint perfect circles for the spots, dip the handle end of a paintbrush into the paint and stamp it onto the clay.
Garden Party
Make a whole family in different sizes and slightly different cap colors like mustard yellow or mossy green to create a forest scene.
Now you have a cheerful little nature-inspired sculpture to brighten up your desk or windowsill


Chubby Mini Cat Figurine
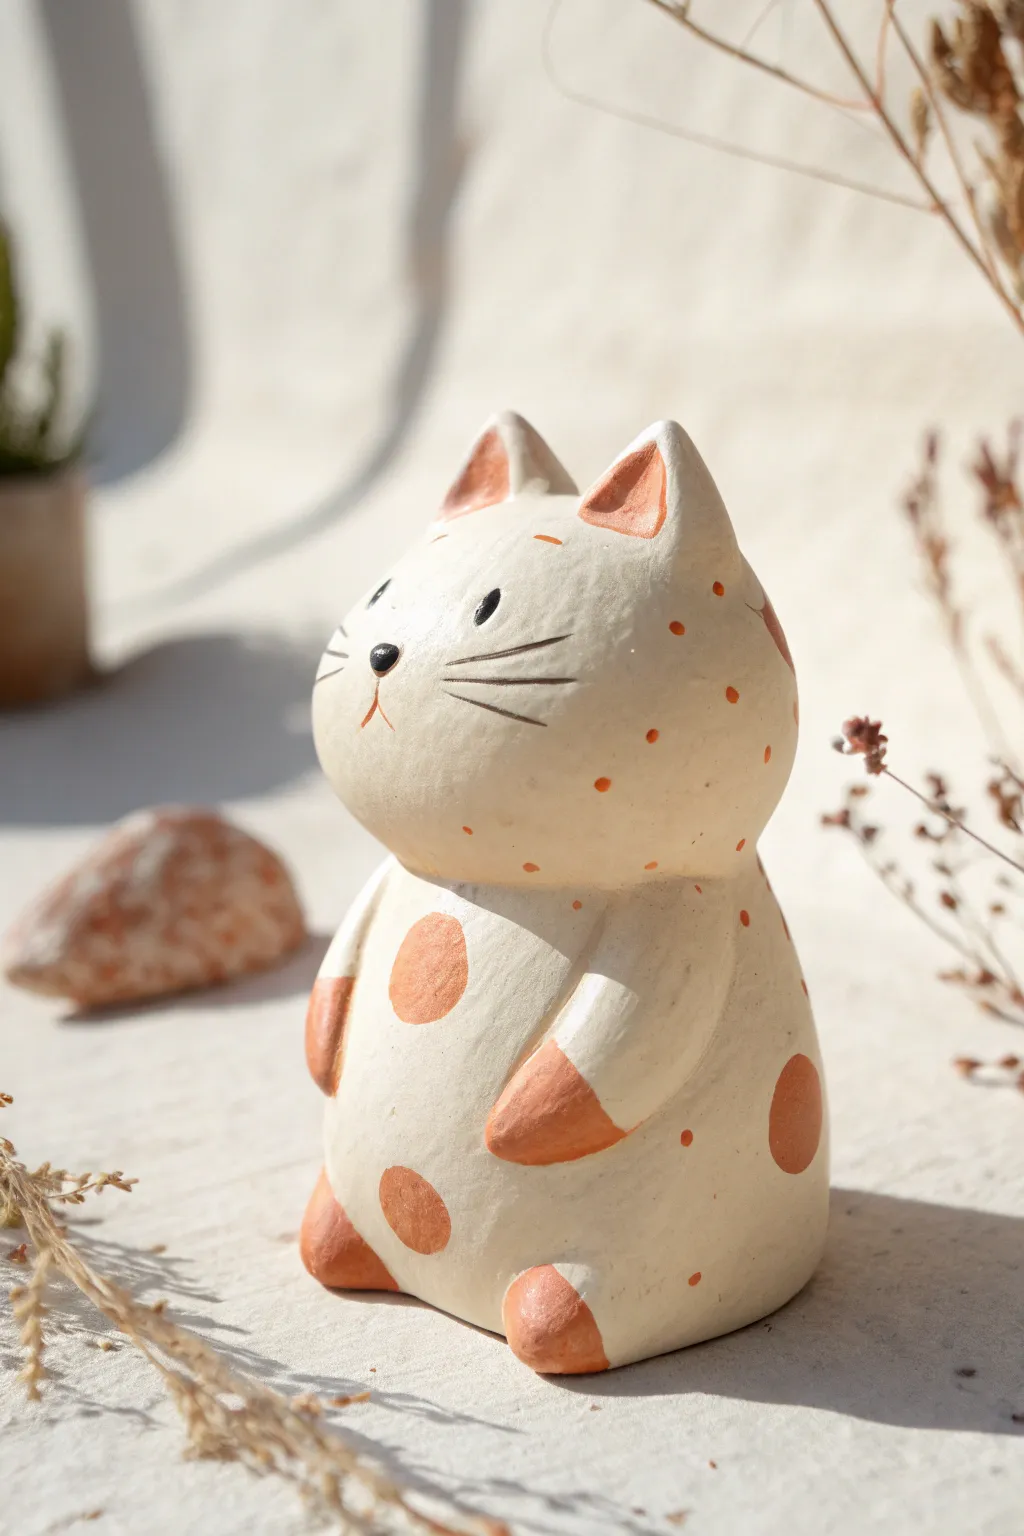
Embrace the charm of imperfection with this delightful chubby cat figurine, featuring earthy orange spots and a sweet, upturned expression. This simple project focuses on rounded forms and primitive painting techniques to create a piece that feels like instant folk art.
Step-by-Step Tutorial
Materials
- White classic air-dry clay (or polymer clay)
- Small bowl of water (for smoothing)
- Acrylic paints: warm white, terracotta orange, black
- Fine detail paintbrush
- Medium round paintbrush
- Modeling tool or toothpick
- Matte varnish or sealant
Step 1: Shaping the Body
-
Form the base:
Start with a ball of clay roughly the size of a tangerine. Roll it firmly between your palms to remove cracks, then gently shape it into a tear-drop or pear shape with a flattened bottom so it stands securely. -
Create the head:
Roll a second, slightly smaller ball for the head. Flatten the bottom slightly where it will join the body. -
Join the pieces:
Score (scratch) the top of the body and the bottom of the head. Dab a little water (or slip) on the scored areas and press them firmly together. Use your fingers or a smoothing tool to blend the clay across the seam until the neck join is seamless and smooth. -
Add the ears:
Pinch two small triangles of clay. Attach them to the top of the head using the slip-and-score method. Blend the base of the ears into the head so they look like they grew there, rather than just stuck on. -
Shape the arms:
Roll two small sausage shapes for arms. Attach them to the sides of the body, curving them slightly forward over the belly. Blend the shoulder area into the body but leave the paws distinct. -
Add feet and tail:
Create two small stump shapes for feet and attach them at the front base. If you like, add a small tail at the back for stability. -
Final smoothing:
Dip your finger in water and run it over the entire sculpture to smooth out fingerprints. I find this step crucial for getting that stone-like finish. Let the sculpture dry completely (24-48 hours for air-dry clay).
Step 2: Painting & Details
-
Base coat:
Mix a warm white (add a tiny drop of yellow or brown to pure white) to get a creamy ceramic look. Paint the entire dried cat with an even coat. Let it dry. -
Blocking the orange areas:
Using the terracotta orange paint, color the tips of the ears, the ends of the paws (arms and feet), and paint large circular spots on the belly and sides. -
Adding texture dots:
With the very tip of a brush or a toothpick dipped in orange paint, add tiny speckles all over the upper body and head for a textured, ceramic glaze effect. -
Painting the face:
Switch to black paint and a fine liner brush. Paint two small oval eyes, angled slightly outward. Add a small triangular nose and a thin vertical line for the mouth. -
Whiskers and highlights:
Paint three thin whiskers on each cheek. Paint the inner triangle of the ears with the terracotta color if you haven’t already. -
Refining the spots:
If the large orange spots look too solid, you can lightly sand them for a distressed look or dab a little cream paint over them to soften. -
Seal:
Once fully dry, coat the figurine with a matte varnish to protect the paint and give it a finished, professional sheen.
Cracks Appearing?
If small cracks appear while drying, mix a small amount of fresh clay with water to make a paste (slip) and fill the cracks. Smooth over with a damp finger and let dry again.
Pro Tip: Weighted Base
For a sturdier figurine that won’t tip over easily, press a small flat stone or a heavy coin into the bottom of the base clay before you start shaping the body.
Place your little spotted friend on a shelf or desk where its cheerful face can greet you every day


Round Penguin With Simple Belly

This adorable penguin sculpture boils design down to its friendliest essence with a smooth, egg-like shape and a clean, matte finish. Its minimalistic belly markings and tiny orange features make it a charming desk companion that feels modern yet handcrafted.
Step-by-Step
Materials
- Polymer clay (black, white, and orange)
- Acrylic rolling pin (optional)
- Needle tool or toothpick
- Ball stylus tool (small)
- Black acrylic paint (for details)
- Fine detail paintbrush
- Matte varnish or sealant
- Clay sculpting tools (smoothing tool)
- Oven for baking
Step 1: The Body and Base
-
Condition the Clay:
Start by taking a generous amount of black polymer clay. Knead it thoroughly in your hands until it becomes soft, warm, and pliable. This conditioning step prevents cracking later on. -
Form the Egg Shape:
Roll the black clay into a smooth ball first to remove any seams. Then, gently roll it between your palms, applying slightly more pressure at the top to create a tapered, egg-like shape. The bottom should be wider than the top. -
Flatten the Base:
Once you are happy with the taper, tap the wide bottom end firmly against your work surface. You want the penguin to stand upright comfortably without wobbling, so ensure the base is flat and level. -
Smooth the Surface:
Inspect your penguin shape for any fingerprints. Gently rub these away with your finger or use a silicone smoothing tool to ensure the black surface is perfectly sleek.
Step 2: Adding the White Belly
-
Roll Out White Clay:
Take a smaller portion of white clay and condition it. Roll it into a thin, even sheet. If the white clay feels sticky, I like to dust my fingers lightly with cornstarch. -
Cut the Oval:
Use a clay craft knife or a small oval cutter to create a long, rounded oval shape. This will form the penguin’s tummy patch. -
Attach the Belly:
Carefully lift the white oval and place it lower down on the front of the black egg body. It should sit near the bottom but not wrap underneath. -
Blend the Seams:
Gently press the white clay onto the black body. Use your finger or a smoothing tool to feather the edges ever so slightly so the white patch looks integrated rather than just stuck on top.
Smudge Alert
White clay easily picks up lint and dye from black clay. Wash your hands thoroughly between colors or use baby wipes to keep that white belly crisp and clean.
Step 3: Facial Features and Feet
-
Make the Eyes:
Roll two small, equal-sized balls of white clay. Flatten them into tiny discs and press them onto the upper part of the body, spacing them somewhat wide apart for a cute expression. -
Sculpt the Beak:
Take a tiny pinch of orange clay and roll it into a cone shape. Press this cone horizontally between the eyes, ensuring the point faces outward. -
Form the Feet:
Roll two small balls of orange clay. Slightly flatten them and shape them into tiny ovals. -
Detail the Toes:
Use a needle tool or toothpick to press two small indentations into the front of each orange foot to suggest toes. -
Attach the Feet:
Place the feet under the front edge of the body so they poke out just slightly. Press the body down gently to secure them.
Level It Up
Before baking, gently texture the black body with a toothbrush for a fuzzy look, or stick a tiny dried flower into the clay as if the penguin is holding a gift.
Step 4: Baking and Finishing
-
Bake the Piece:
Place your penguin on a baking sheet or ceramic tile. Bake according to the specific temperature and time directions on your package of polymer clay. -
Cool Completely:
Let the sculpture cool down completely inside the oven first or on a wire rack before handling it for painting. -
Paint the Pupils:
Using a fine detail brush or the tip of a toothpick dipped in black acrylic paint, add two tiny dots to the center of the white eyes. -
Add Belly Speckles:
Dip the very tip of a stiff brush or a needle tool into diluted black acrylic paint. Carefully add tiny, random speckles to the white belly patch for texture. -
Seal the Work:
Once the paint is fully dry, apply a coat of matte varnish over the entire piece to protect the paint and give the clay a unified, professional finish.
Now you have a wonderfully round little friend to sit on your shelf and bring a smile to your face


Easy Mini Duck With Button Eyes
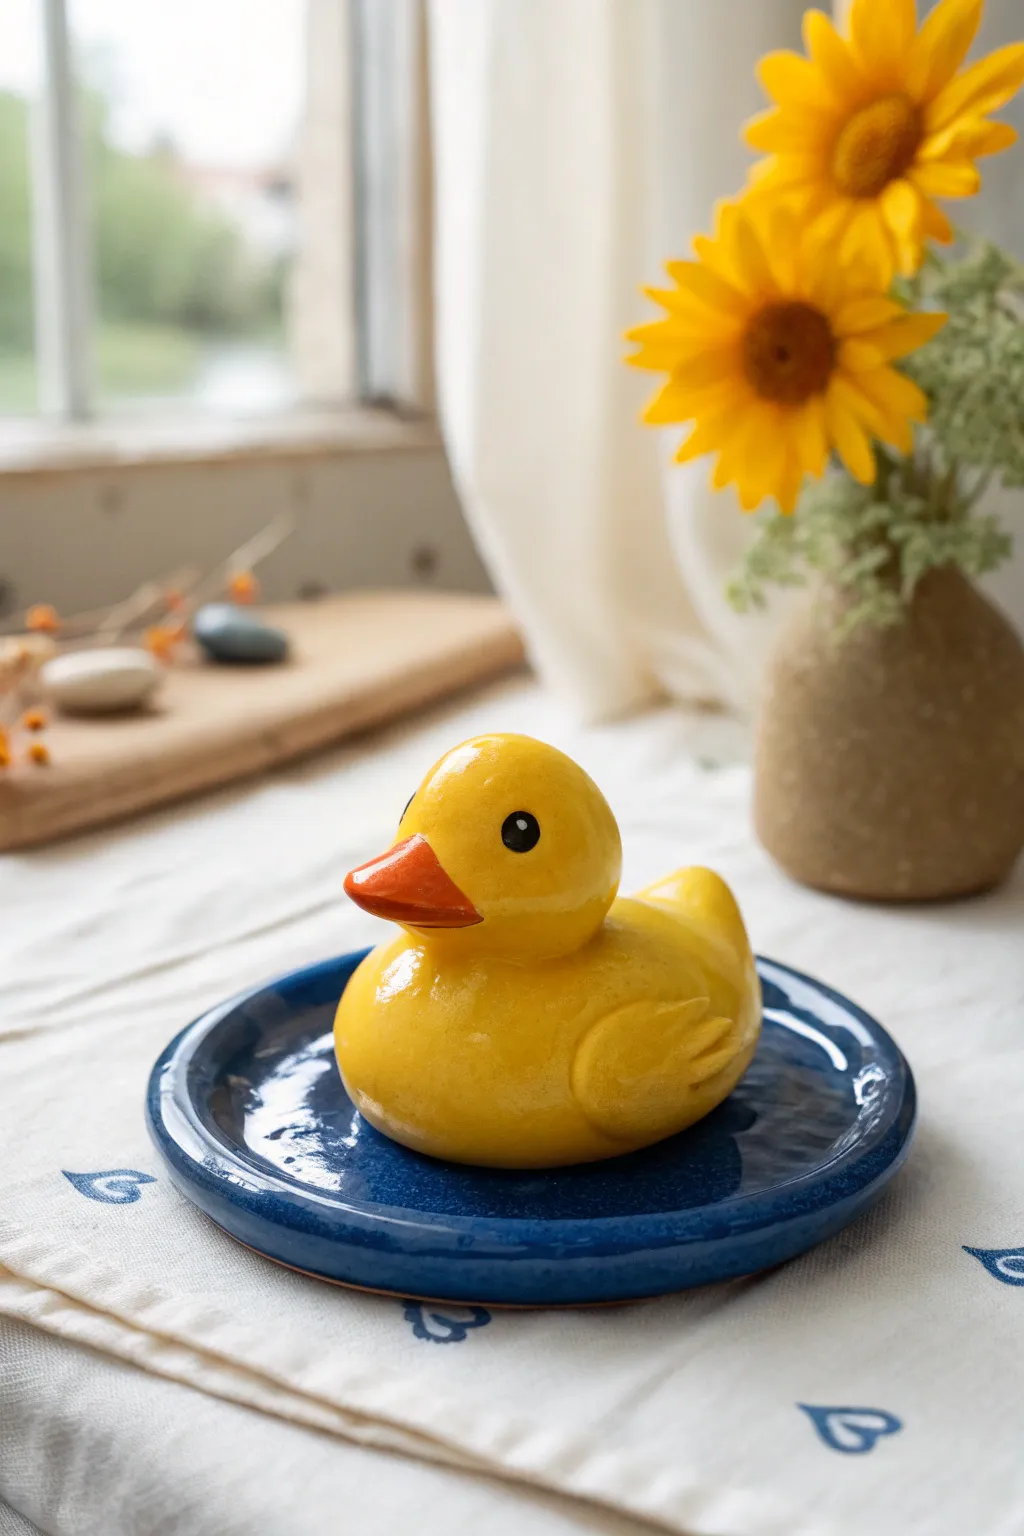
This charming little duck brings a splash of cheer with its rounded form and brilliant yellow finish. Modeled to look like glazed ceramic, this project is perfect for beginners wanting to practice smooth shapes and simple attachments.
Step-by-Step Guide
Materials
- Polymer clay (yellow, orange, black, white)
- Gloss glaze or UV resin
- Small paintbrush
- Sculpting tools (needle tool, ball stylus)
- Blue ceramic coaster or small plate (for display)
- Oven for baking (if using polymer clay)
Step 1: Forming the Body
-
Condition the Clay:
Start by taking a generous amount of yellow clay and kneading it in your hands until it becomes soft and pliable. Warm clay helps eliminate cracks later. -
Create the Base Shape:
Roll the clay into a smooth sphere, then gently elongate it into a teardrop shape. This will serve as the duck’s main body. Flatten the bottom slightly on your work surface so it sits stably. -
Shape the Head:
Roll a smaller sphere of yellow clay for the head. It should be proportional to the body but definitely smaller. -
Attach Head to Body:
Place the head sphere onto the larger end of the body teardrop. Blend the clay at the neck seam using a silicone tool or your finger to make it strong and seamless. -
Smooth the Form:
I like to take a moment here to rub out any fingerprints. The goal is a super smooth surface to mimic that ceramic look. -
Add the Tail Feathers:
Pinch the tapered end of the body slightly upwards to create a perky tail. You can use a modeling tool to create mild indentations suggesting feathers.
Step 2: Adding Details
-
Sculpt the Wings:
Flatten two small balls of yellow clay into teardrop shapes. Press these onto the sides of the body. -
Detail the Wings:
Use a needle tool or knife to press a few horizontal lines into the back edge of the wings, creating the illusion of folded feathers. -
Form the Beak:
Take a small pinch of orange clay and shape it into a flattened cone. Press this firmly onto the front of the face. -
Beak Refinement:
Use a needle tool to scratch a tiny line across the side of the beak to suggest a slight smile or separation. -
Create the Eyes:
Roll two tiny black balls of clay. Press them gently into the sides of the head. Since the prompt suggests ‘button eyes’, you keep them simple and round. -
Add a Highlights:
Place an infinitesimally small dot of white clay onto the black eye to give it life and a ‘wet’ look.
Fixing Cracks
If you see tiny cracks before baking, brush a tiny amount of baby oil or clay softener over the area and smooth it out with your finger
Step 3: Finishing and Display
-
Bake the Clay:
Bake the sculpture according to your specific brand of clay’s instructions. Usually, this is around 275°F (130°C) for 15-30 minutes. -
Cool Down:
Let the duck cool completely before moving to the glazing step. Handling it while warm can cause distortions. -
Apply Glaze:
To achieve the high-shine ‘ceramic’ effect seen in the photo, coat your duck with a thick layer of gloss glaze or UV resin. -
Let it Cure:
Allow the glaze to dry fully ensuring no dust settles on the wet surface. -
Set the Scene:
Place your finished duck on a small blue plate or coaster to mimic the water effect shown in the reference image.
Make it Splash
Use blue resin on the coaster base to create a realistic ‘water’ surface around your duck, adding visual ripples as it cures
Now you have a wonderfully glossy companion to brighten up your desk or shelf

The Complete Guide to Pottery Troubleshooting
Uncover the most common ceramic mistakes—from cracking clay to failed glazes—and learn how to fix them fast.
Mini Frog on a Lily Pad

Create your own pocket-sized pond scene with this adorable frog sculpture. Sitting contentedly on a textured green leaf, this little character features blushing cheeks and a delicate pink lotus companion that makes for a perfect desk accessory.
How-To Guide
Materials
- Polymer clay (Sage Green, Dark Green, Light Pink, White, Black, Yellow)
- Clay sculpting tools (needle tool, ball stylus)
- Small rolling pin
- Clean work surface (tile or mat)
- Soft pastel chalks (Pink) and soft brush
- Oven for baking (if using polymer clay)
Step 1: Sculpting the Lily Pad Base
-
Mix and flatten:
Begin with a walnut-sized ball of dark green clay. Roll it into a smooth sphere, then gently flatten it into an organic, slightly irregular circle about 2-3 inches wide. I like to make the edges slightly uneven to look more natural. -
Add leaf texture:
Using a needle tool or a dull knife, gently score veins into the leaf surface. Start from a center point and radiate lines outward toward the edges. -
Indent the edge:
Create the classic lily pad shape by cutting a small triangular notch out of one side of the circle, or simply pressing an indentation inward to disrupt the perfect roundness.
Fixing Cracks
If you see cracks forming while shaping the clay, dip your finger in a tiny bit of baby oil (or water for air-dry clay) and smooth them out gently before baking
Step 2: Creating the Frog Body
-
Form the main shape:
Take a chunk of sage green clay and roll it into a short, chubby oval for the body. The bottom should be slightly flatter to sit securely on the leaf. -
Shape the legs:
Roll two small sausages of the same green clay for the back legs. Bend them into a V-shape or crescent and press them against the sides of the body so the ‘knees’ point upward. -
Add front arms:
Roll two smaller, shorter logs for the front arms. Attach them vertically to the front of the body, angling them slightly inward so the hands rest between the legs. -
Detail the paws:
Use a needle tool to make tiny indentations on the ends of the hands and feet to suggest toes.
Water Droplets
After baking, add drops of clear UV resin or high-gloss varnish to the lily pad surface to simulate realistic water droplets on the leaf
Step 3: Adding the Face
-
Position the eyes:
Roll two small balls of sage green clay and attach them to the top of the head. Press them down gently so they blend seamlessly with the head shape but still protrude. -
Insert eye whites:
Press a small ball of white clay onto the front of each green eye mound. Follow this with a tiny black dot of clay in the center of the white for the pupil. -
Carve the smile:
Use a needle tool or a curved sculpting tool to press a wide, gentle U-shape into the face for the mouth. To make it stand out like the photo, you can roll an ultra-thin thread of black clay and press it into this groove. -
Add blushing cheeks:
Flatten two tiny discs of pink clay and press them onto the cheeks, just below the eyes. Alternatively, you can brush on pink pastel dust for a softer look. -
Refine the texture:
If you want a speckled stone look like the reference creates, tackle the surface with an old toothbrush or stiff brush to give the skin a slight texture.
Step 4: Crafting the Lotus Flower
-
Make the center:
Roll a tiny ball of yellow clay and flatten it slightly. Pattern the surface with a needle tool to create a stippled, pollen-like texture. -
Form the petals:
Create 8-10 tiny teardrop shapes from light pink clay. Flatten them gently between your fingers. -
Assemble the bloom:
Arrange the petals around the yellow center. Start with a bottom layer of larger petals, then add a second inner layer of slightly smaller petals that stand up a bit more. -
Final assembly:
Place the frog securely on the center of the lily pad and press the flower onto the leaf next to it. -
Bake:
Bake the finished sculpture according to your specific clay manufacturer’s instructions (usually around 275°F/135°C for 15-30 minutes). Let it cool completely before handling.
Place your little amphibian friend near a plant or window where he can enjoy the view
Pocket-Size Turtle With Patterned Shell
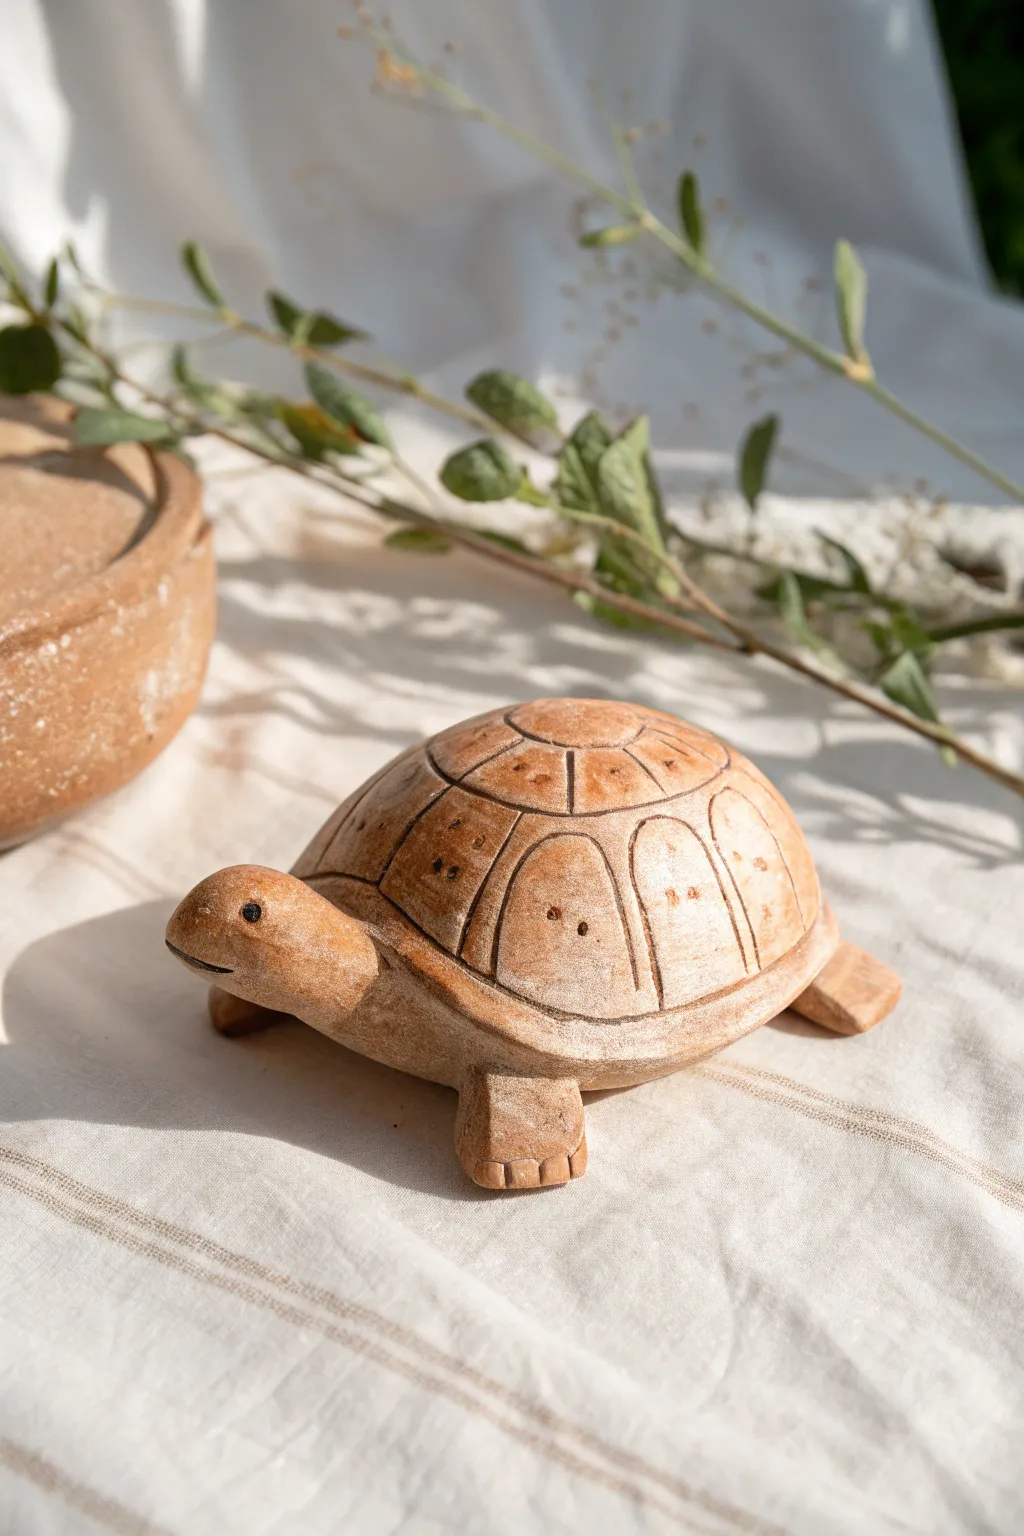
This charming little turtle sculpture features a smooth, rounded shell with etched geometric details and a warm, terracotta-like finish. Its simple, stylized form makes it a perfect project for getting comfortable with clay carving and shaping.
Detailed Instructions
Materials
- Air-dry clay or polymer clay (terracotta or reddish-brown color)
- Small needle tool or toothpick
- Loop tool or carving knife
- Fine-grit sandpaper
- Water (for smoothing)
- Sponge
- Acrylic paint (optional – dark brown for wash)
- Paper towel
Step 1: Basic Form
-
Condition the clay:
Begin by kneading a fist-sized ball of clay until it is warm and pliable to prevent cracking later on. -
Shape the shell:
Roll the majority of your clay into a smooth ball, then gently flatten the bottom against your work surface to create a semi-sphere or dome shape for the turtle’s back. -
Smooth the dome:
Refine the dome shape using water and your fingers, ensuring there are no lumps or fingerprints. -
Create the head:
Roll a smaller piece of clay into a thick cylinder that tapers slightly at one end. This will become the neck and head. -
Attach the head:
Score the underside of the shell’s front edge and the base of the neck piece. Add a dab of water or slip, then press them firmly together, smoothing the seam so the clay blends invisibly. -
Form the legs:
Shape four small, equal-sized rectangles or thick tabs of clay for the legs. They should be sturdy enough to support the shell. -
Attach the legs:
Flip the turtle gently or work from the side to attach the legs to the bottom four corners of the shell using the score-and-slip method. -
Add toe details:
Using a knife or needle tool, make two simple vertical indentations on the front of each foot to suggest toes. -
Refine the face:
Carefully poke two small holes for the eyes using a needle tool, and use a knife to slice a simple, horizontal line for the mouth.
Clean Lines Tip
Wait for the clay to be ‘leather hard’ (slightly stiff) before carving the shell patterns. The clay won’t drag, and your lines will be much crisper and cleaner without crumbling bits.
Step 2: Detailing and Finish
-
Map the central circle:
On the very top of the shell, use a needle tool to lightly sketch a medium-sized circle. -
Divide the center:
Draw lines radiating from the very center of that circle out to its edge, dividing it into pie-slice segments (about 6-8 sections). -
Create the outer rim:
Carve a second line running parallel to the bottom edge of the shell, creating a wide border or rim around the base. -
Draw the main scutes:
Connect the top circle to the bottom rim with vertical curved lines. These create the large, trapezoid-shaped panels (scutes) around the middle of the shell. -
Etch inner details:
Inside every other scute, poke a few tiny dots with your needle tool for texture. I find this pattern variation adds a lovely rustic touch. -
Deepen the lines:
Once you are happy with the sketch, go over all your lines with a slightly thicker tool or press harder to make the grooves deep and distinct. -
Initial Drying:
Let the piece dry until it is leather-hard (firm but still cool to the touch). -
Highlight the eyes:
If you wish, place a tiny speck of black paint or dark clay inside the eye indents to make them pop. -
Optional antique wash:
To mimic the image’s finish, dilute dark brown acrylic paint with water. Brush it over the shell, getting into the grooves, then immediately wipe the surface clean with a paper towel. The dark paint will remain in the carved lines. -
Final dry:
Allow the turtle to dry completely according to your clay package instructions before handling.
Display Idea
Scale this up slightly and leave the shell hollow underneath. It makes for an adorable hiding spot for a spare house key inside a garden pot or on a front porch shelf.
Now you have a sturdy little friend to keep you company on your desk or shelf


What Really Happens Inside the Kiln
Learn how time and temperature work together inside the kiln to transform clay into durable ceramic.
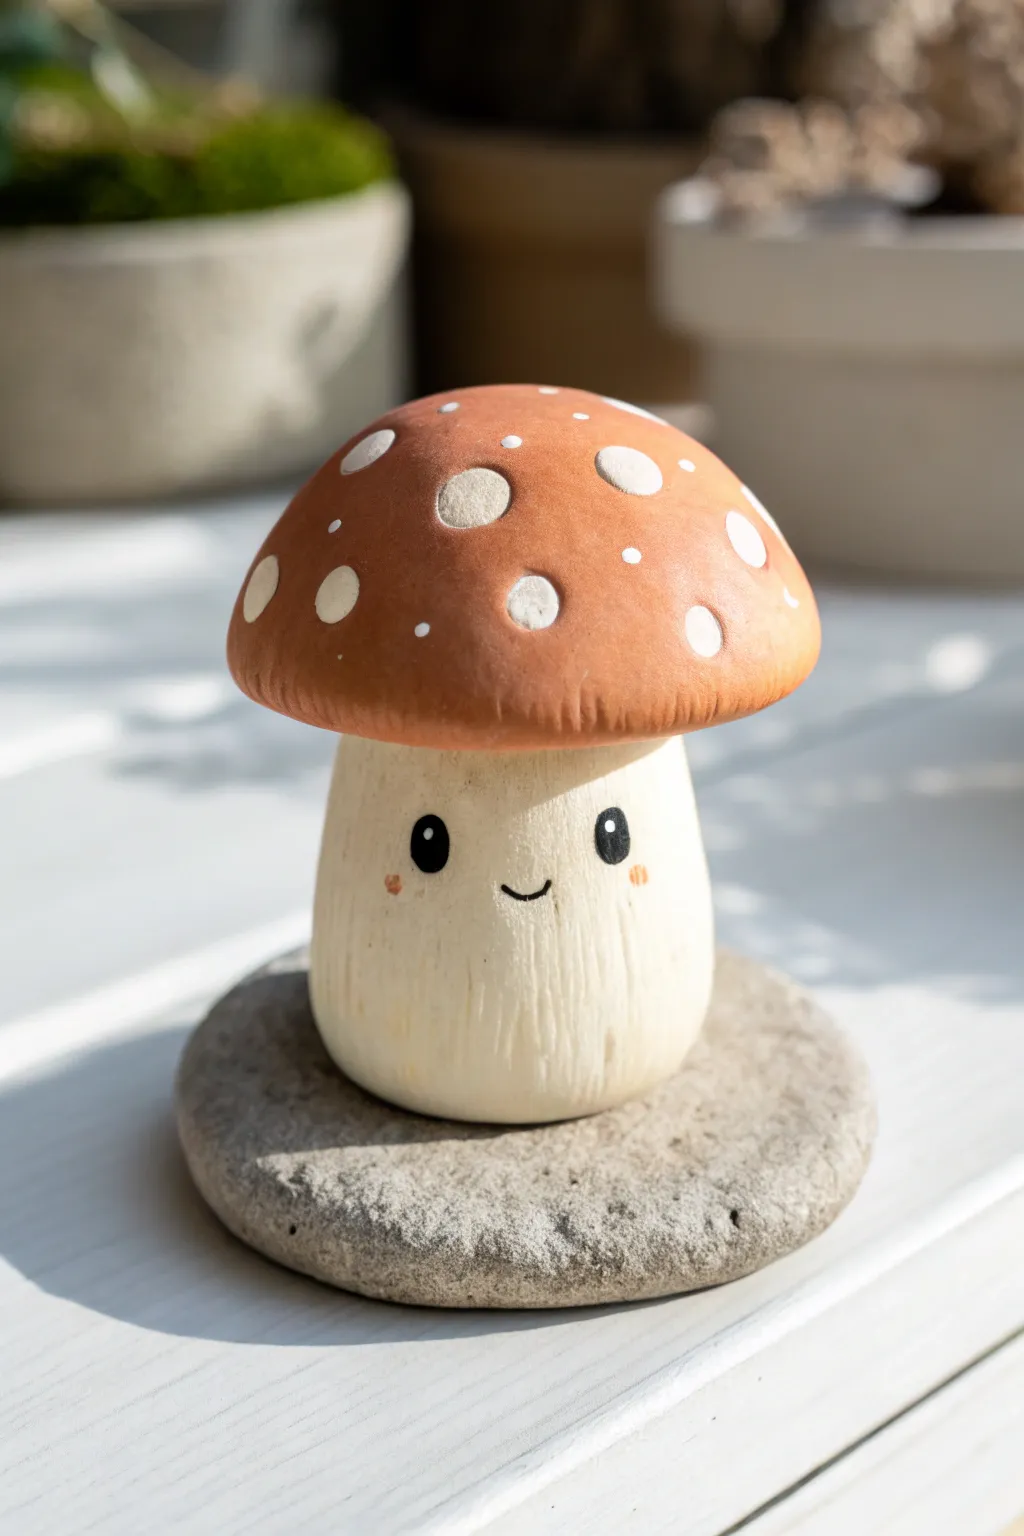
Mini Snail With Swirly Shell
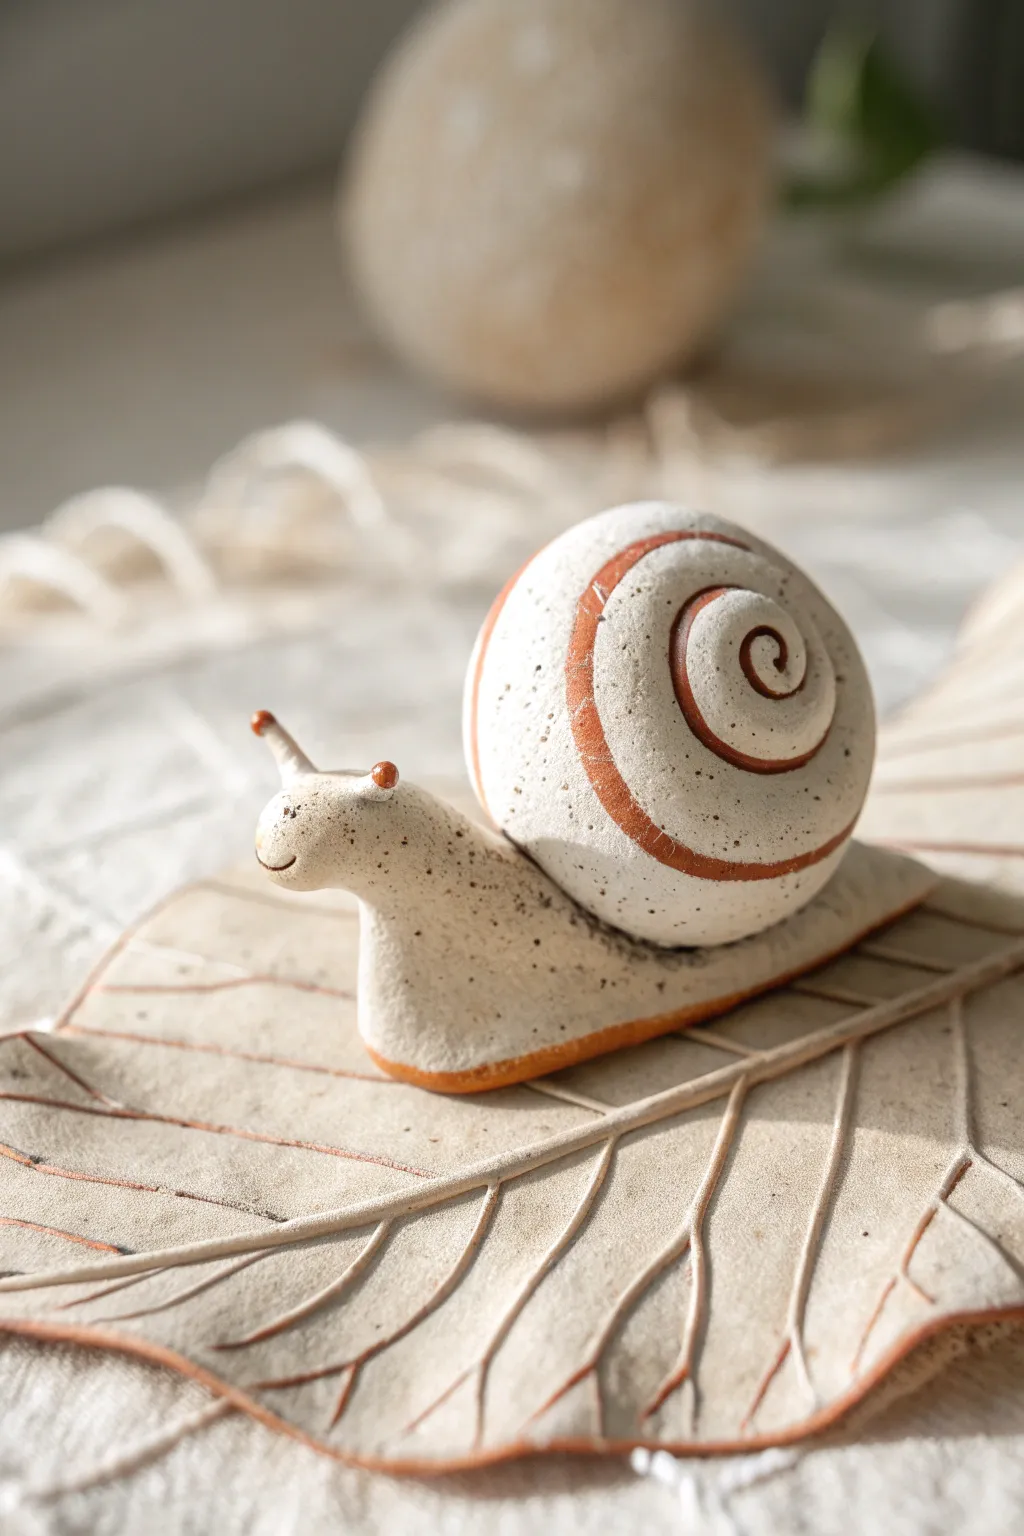
This charming little garden resident features a speckled stone-like texture and a classic spiraled shell highlighted with earthy terra cotta tones. It sits perfectly atop a textured clay leaf, making it a delightful addition to plant pots or nature tables.
Step-by-Step Tutorial
Materials
- Speckled cream polymer clay or air-dry clay (stone effect)
- Terra cotta colored clay (or acrylic paint for details)
- Clay sculpting tools (needle tool, ball stylus)
- Rolling pin
- Leaf with defined veins (for texture impression)
- Cutting blade or craft knife
- Liquid clay or slip (for joining)
- Small paintbrush
- Matte varnish (optional)
Step 1: Sculpting the Snail Body
-
Form the base log:
Start by conditioning a chunk of your speckled cream clay. Roll it into a smooth log that is roughly 2.5 inches long. -
Shape the taper:
Gently roll one end of the log back and forth to taper it into a rounded point for the tail. Keep the other end slightly thicker for the head/neck area. -
Lift the head:
Bend the thicker end upwards to create the snail’s neck. Smooth out any wrinkles that form at the bend with your finger or a modeling tool. -
Define the head:
Shape the lifted end into a rounded, slightly bulbous head shape. It should flow seamlessly from the neck. -
Add the eye stalks:
Roll two tiny, thin snakes of cream clay. Attach them to the top of the head using a dot of liquid clay or slip, blending the seams downward so they look like they grow from the head. -
Create the mouth smile:
Using a needle tool or a small curved blade, press a simple, sweet smile into the side of the snout. -
Flatten the movement foot:
Gently press the entire snail body down onto your work surface so the bottom flattens out, giving it a stable base to sit on.
Cracking Clay?
If using air-dry clay, smooth fissures immediately with a damp finger. Cover thin parts like eye stalks with plastic while the rest dries to prevent snapping.
Step 2: Building the Spiral Shell
-
Roll the shell coil:
Take a large portion of cream clay and roll it into a long, even snake. It needs to be tapered at one end (the center of the spiral) and thicker at the other. -
Inlay the terra cotta stripe:
This is the key detail. Roll a very thin string of terra cotta clay. Press this string gently into the center of your cream coil along its entire length, flattening it flush with the surface. -
Coil the shell:
Starting with the thin tapered end, begin rolling the clay snake into a tight spiral. Ensure the terracotta stripe is facing outward so it creates a continuous spiral pattern. -
Join shell to body:
Score the back of the snail body and the bottom of the shell. Apply a little slip or liquid clay, then press the shell firmly onto the back of the snail. -
Add accent details:
Roll tiny balls of terra cotta clay and place them on the tips of the eye stalks. I also like to add a thin flattened strip of terra cotta clay around the very bottom edge of the snail’s foot for a cohesive look.
Pro Detail Tip
For a true ceramic look without a kiln, buff the finished (baked/dried) piece with a soft denim cloth before varnishing to give it a soft, satin sheen.
Step 3: Creating the Leaf Base
-
Roll the slab:
Roll out a flat slab of cream clay, roughly 1/4 inch thick. -
Texture with nature:
Place a real leaf (vein side down) onto the clay slab and roll over it firmly with your rolling pin to transfer the texture. -
Cut the shape:
Use a needle tool or craft knife to cut out a loose leaf shape around the texture. It doesn’t need to be botanically perfect; an organic shape works best. -
Highlight the veins:
Roll extremely thin threads of terra cotta clay. Lay them into the major vein impressions of your leaf texture and press them gently so they sit inside the grooves. -
Add the rim:
Finish the leaf by outlining the cut edge with a thin trim of terra cotta clay, smoothing it slightly to adhere.
Place your little snail on its leaf and find a cozy spot for it to brighten your day
Tiny Whale With Cute Spout
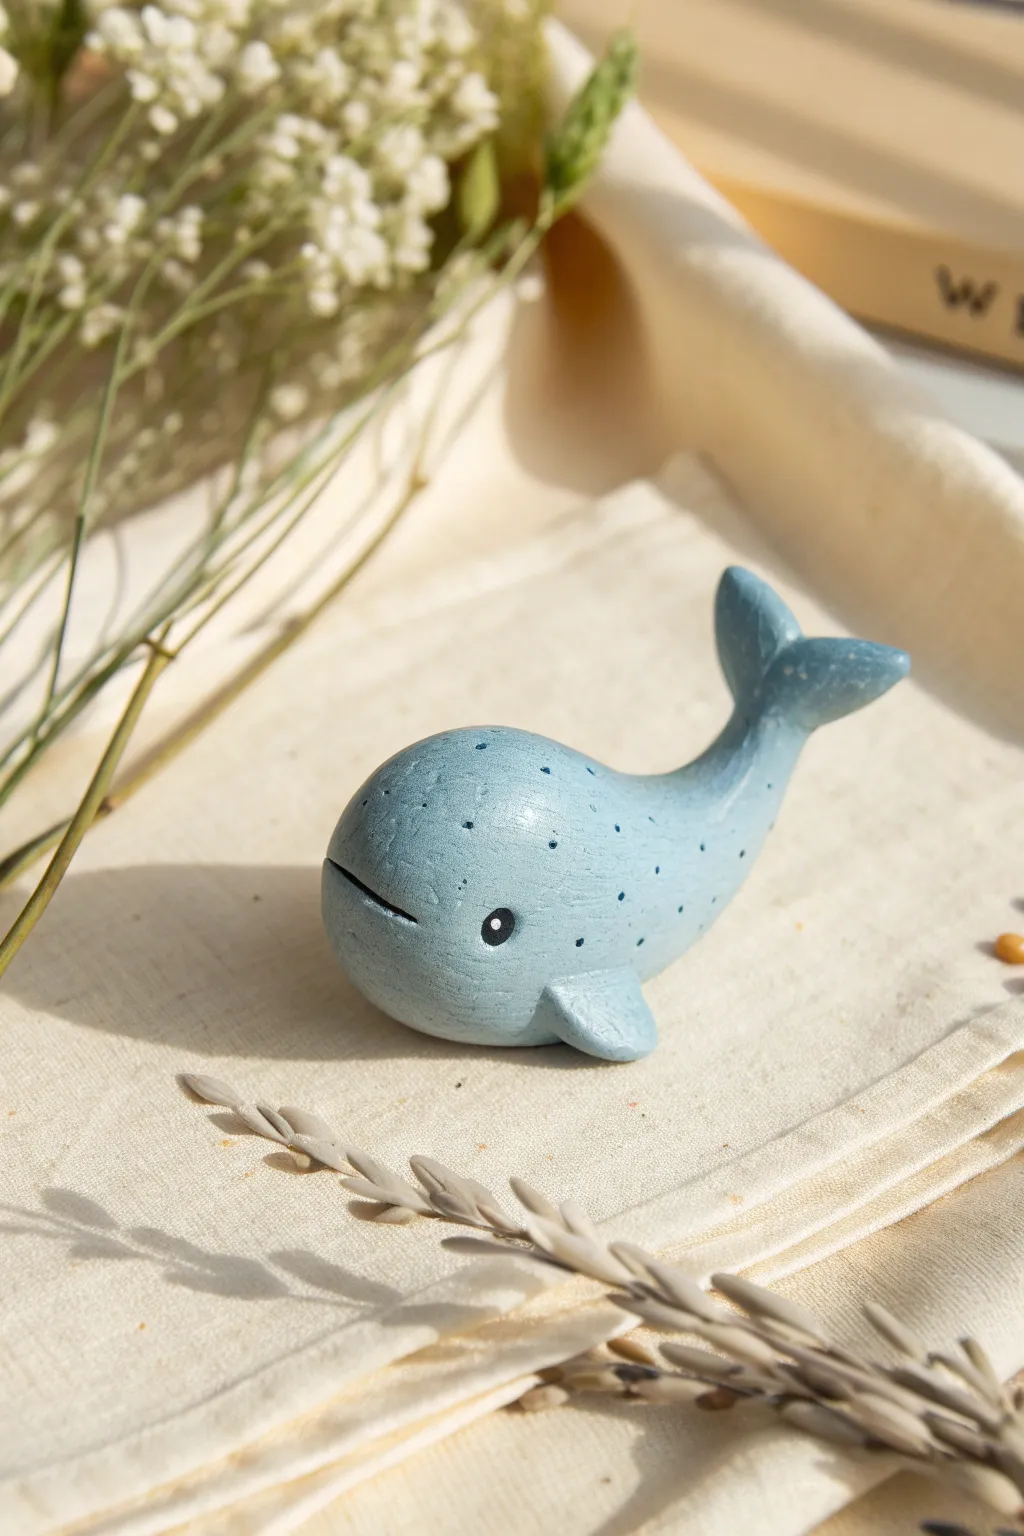
This charming little whale brings a touch of the ocean to your desk with its soft, dusty blue color and sweet speckled details. The smooth, curved shape and gentle expression make it a perfect beginner sculpture that captures a peaceful marine vibe.
Detailed Instructions
Materials
- Polymer clay or air-dry clay (white)
- Acrylic paints (dusty blue, white, black, dark blue)
- Fine-grit sandpaper
- Sculpting tools (needle tool, small ball tool)
- Small paintbrush
- Matte varnish or sealant
Step 1: Sculpting the Body
-
Create the base form:
Start with a golf-ball-sized amount of clay and roll it into a smooth egg shape, slightly tapered at one end for the tail. -
Curve the tail:
Gently pinch and pull the tapered end upwards to create the curve of the whale’s back, smoothing out any fingerprints as you work. -
Form the flukes:
Flatten the very tip of the raised tail and use a knife or sculpting tool to split it down the middle, shaping two distinct triangular flukes. -
Shape the fins:
Create two small, flattened teardrop shapes from extra clay to serve as the pectoral fins. -
Attach the fins:
Press the fins firmly onto the lower sides of the body, blending the clay seams carefully so they look like one continuous piece. -
Refine the mouth:
Use a needle tool or a thin blade to carefully press a curved line horizontally across the front of the face to create a gentle smile. -
Smooth the surface:
Check the entire sculpture for bumps or unevenness; I like to use a tiny bit of water on my fingertip to smooth air-dry clay to a porcelain-like finish. -
Dry the sculpture:
Allow the clay to dry completely according to the package instructions—this usually takes 24 hours for air-dry clay or a quick bake for polymer.
Uneven Paint?
If your blue paint looks streaky, mix a tiny bit of white gesso into your acrylics. It acts as a primer and helps the light blue color cover the white clay more opaquely in fewer coats.
Step 2: Painting and Details
-
Sand for smoothness:
Once hardened, gently rub the surface with fine-grit sandpaper to remove any remaining texture, creating a finish that mimics smooth wood. -
Apply base color:
Mix a soft, dusty blue acrylic paint and cover the entire whale; apply two thin coats for opaque, even coverage. -
Paint the eyes:
Dip the end of a paintbrush handle or a large dotting tool into black paint and place a solid round dot on each side of the head. -
Add eye highlights:
Once the black paint is dry, use a toothpick to add a tiny white reflection dot to the upper corner of the eye for life. -
Create the speckles:
Mix a slightly darker shade of blue than your base coat and use a fine-tip brush or toothpick to add random, tiny freckles across the back and top of the head. -
Darken the mouth:
Run a very fine brush with diluted black or dark grey paint into the mouth groove to define the smile. -
Seal the piece:
Finish the project with a coat of matte varnish to protect the paint and give it that velvety, high-quality look shown in the photo.
Add a Water Spout
Drill a tiny hole in the top of the head before painting. Insert a small tuft of white dried baby’s breath flowers or twisted wire to look like a water spout.
Place your finished whale near a plant or on a sunny shelf to enjoy its peaceful presence

TRACK YOUR CERAMIC JOURNEY
Capture glaze tests, firing details, and creative progress—all in one simple printable. Make your projects easier to repeat and improve.
Mini Toast and Egg Characters
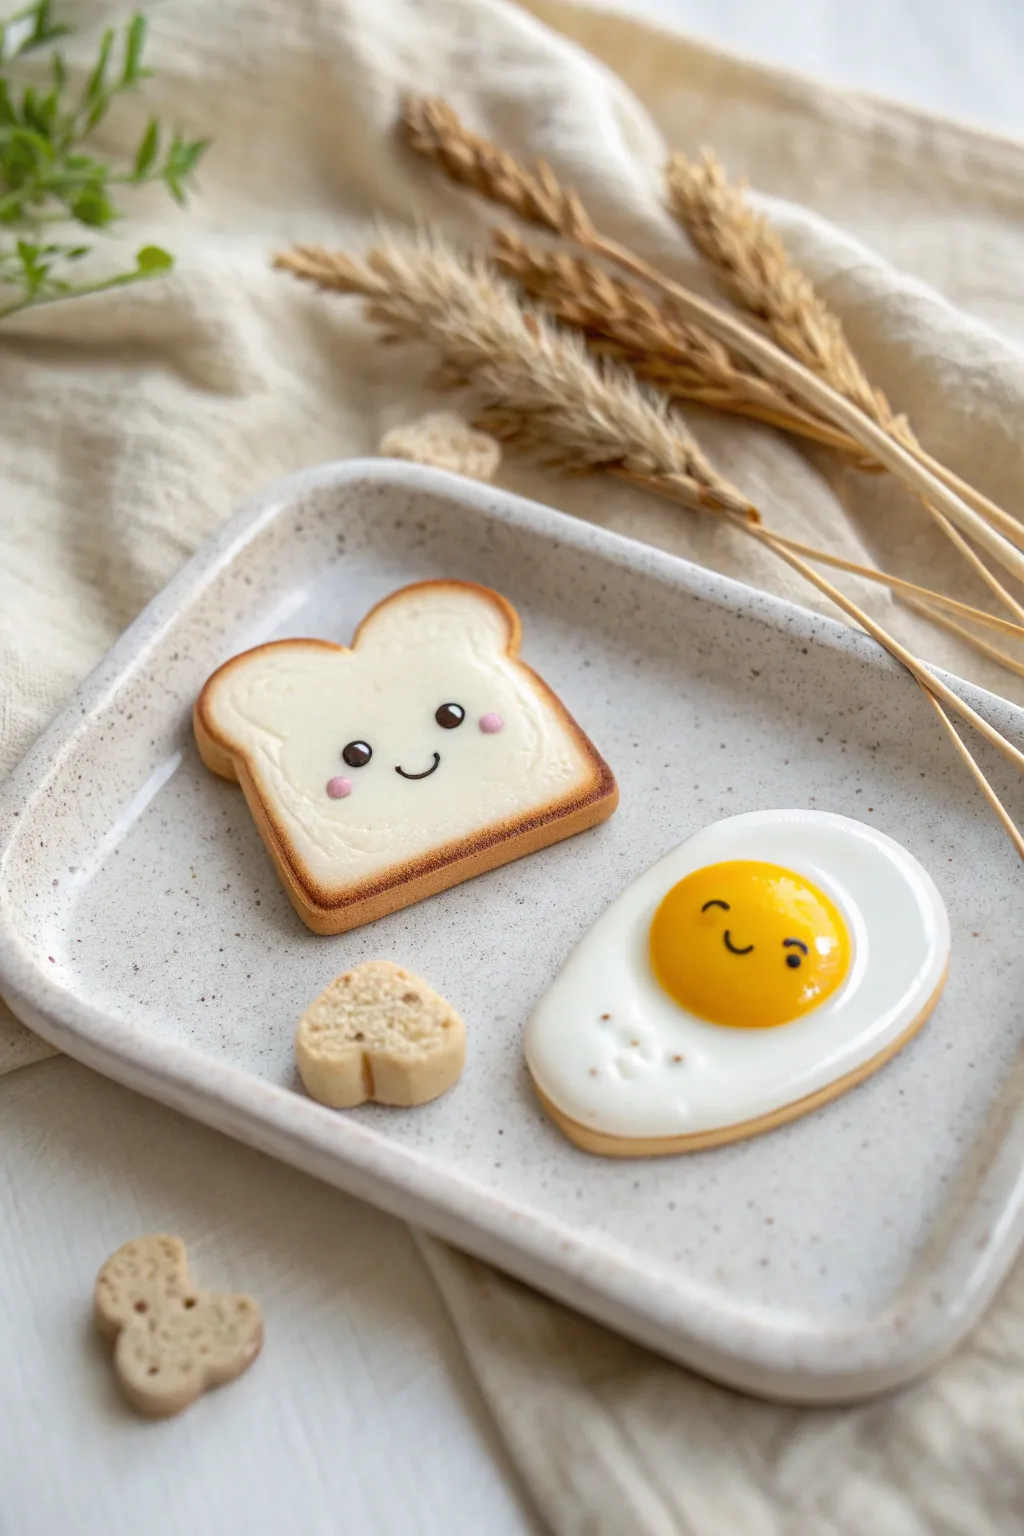
Start your day with a smile by crafting this adorable duo of happy breakfast foods. These kawaii-style toast and egg sculptures are perfect for beginners, featuring simple shapes brought to life with sweet little faces.
How-To Guide
Materials
- Polymer clay (white, translucent, yellow, beige/ecru, dark brown, pink)
- Soft pastels (brown, orange, yellow ochre)
- Small paintbrush for shading
- Liquid polymer clay (Fimo liquid, translucent)
- Sculpting tools (needle tool/dotting tool)
- Rolling pin or pasta machine
- Cookie cutter (slightly curved square for toast) or a craft knife
- Gloss glaze or UV resin
- Oven for baking
Step 1: Shaping the Crunchy Toast
-
Mix the dough color:
Start by mixing white clay with a small amount of beige or ecru to get a natural bread dough color. If it’s too stark white, add an unbelievably tiny dot of yellow. -
Form the base shape:
Roll your mixed clay into a slab purely by hand or with a roller to about 1/4 inch thickness. Cut out a square shape with rounded corners. Gently push the top edge inward to create the dip characteristic of a slice of bread. -
Wrap the crust:
Roll a snake of beige clay that is slightly darker than your main bread color. Flatten it into a long, thin ribbon. Wrap this ribbon around the sides and bottom of your bread slice, smoothing the seams so it looks like a continuous crust. -
Create texture:
Using a toothbrush or a ball of aluminum foil, gently tap the surface of the white bread area. This creates a realistic, airy bread texture. -
Pre-bake shading:
Shave some brown and orange soft pastels into a powder. Using a dry brush, gently dust the edges of the crust to make it look toasted. I like to dust the very top edges a bit heavier for that ‘crispy’ look.
Pastel Shading Tip
Apply the brown pastel shading mostly to the ‘crust’ strip and the very edges of the white bread face. Leave the center pale to create dimension and make it look freshly sliced.
Step 2: Cooking the Perfect Egg
-
Form the egg white:
Take white clay and flatten it into an organic, slightly irregular oval shape. It shouldn’t be a perfect circle; wobbly edges make it look more like a real fried egg. -
Add a base layer:
To make the egg sturdy, you can cut a thin slice of beige clay to match the shape of the white and place it underneath, acting as the ‘cooked’ bottom. -
Make the yolk:
Roll a ball of yellow clay. Mix in a tiny bit of orange or translucent clay if you want a richer yolk color. -
Attach the yolk:
Press the yellow ball gently onto the white base, slightly off-center. Flatten it just enough so it adheres well but keeps a nice dome shape. -
First baking:
Bake both your toast and egg pieces according to your clay manufacturer’s instructions (usually 20-30 minutes). Let them cool completely.
Sticky Situation?
If your white clay is picking up dust or lint, use a piece of scotch tape to dab the surface clean or wipe it gently with a baby wipe and a little rubbing alcohol before baking.
Step 3: Bringing Them to Life
-
Mix the facial features:
Roll tiny, almost microscopic balls of black or dark brown clay for the eyes. Roll extremely thin threads of the same color for the mouths. -
Apply the toast’s face:
Using a dotting tool or needle, press the eyes onto the center of the toast. Curve the tiny thread into a ‘U’ shape for a smile and place it between the eyes. -
Add blush:
Roll tiny dots of pink clay and place them under the eyes on the toast for rosy cheeks. Press them flat so they merge with the surface. -
Face the egg:
Repeat the process for the egg yolk. Place the eyes and smile directly onto the yellow dome. The curvature makes this tricky, so use a needle tool to guide the pieces. -
Secure with liquid clay:
If the tiny facial features aren’t sticking, apply a tiny dot of liquid polymer clay as ‘glue’ before placing them. -
The glossy finish:
Mix a drop of translucent liquid clay with the tiniest scraping of brown pastel if you want a ‘grease’ look, or use plain gloss glaze. -
Glaze the yolk:
Carefully coat just the yellow yolk with gloss glaze or UV resin. This mimics that shiny, uncooked sunny-side-up texture perfectly. -
Glaze the egg white:
Apply a thinner layer of gloss to the white part of the egg for a fried texture. -
Final cure:
If you used liquid clay or require a second bake for the facial features, pop them back in the oven for 10-15 minutes or cure your UV resin under a lamp.
Display your delightful breakfast friends on a tiny plate or turn them into charming fridge magnets
Smiling Mini Avocado Half
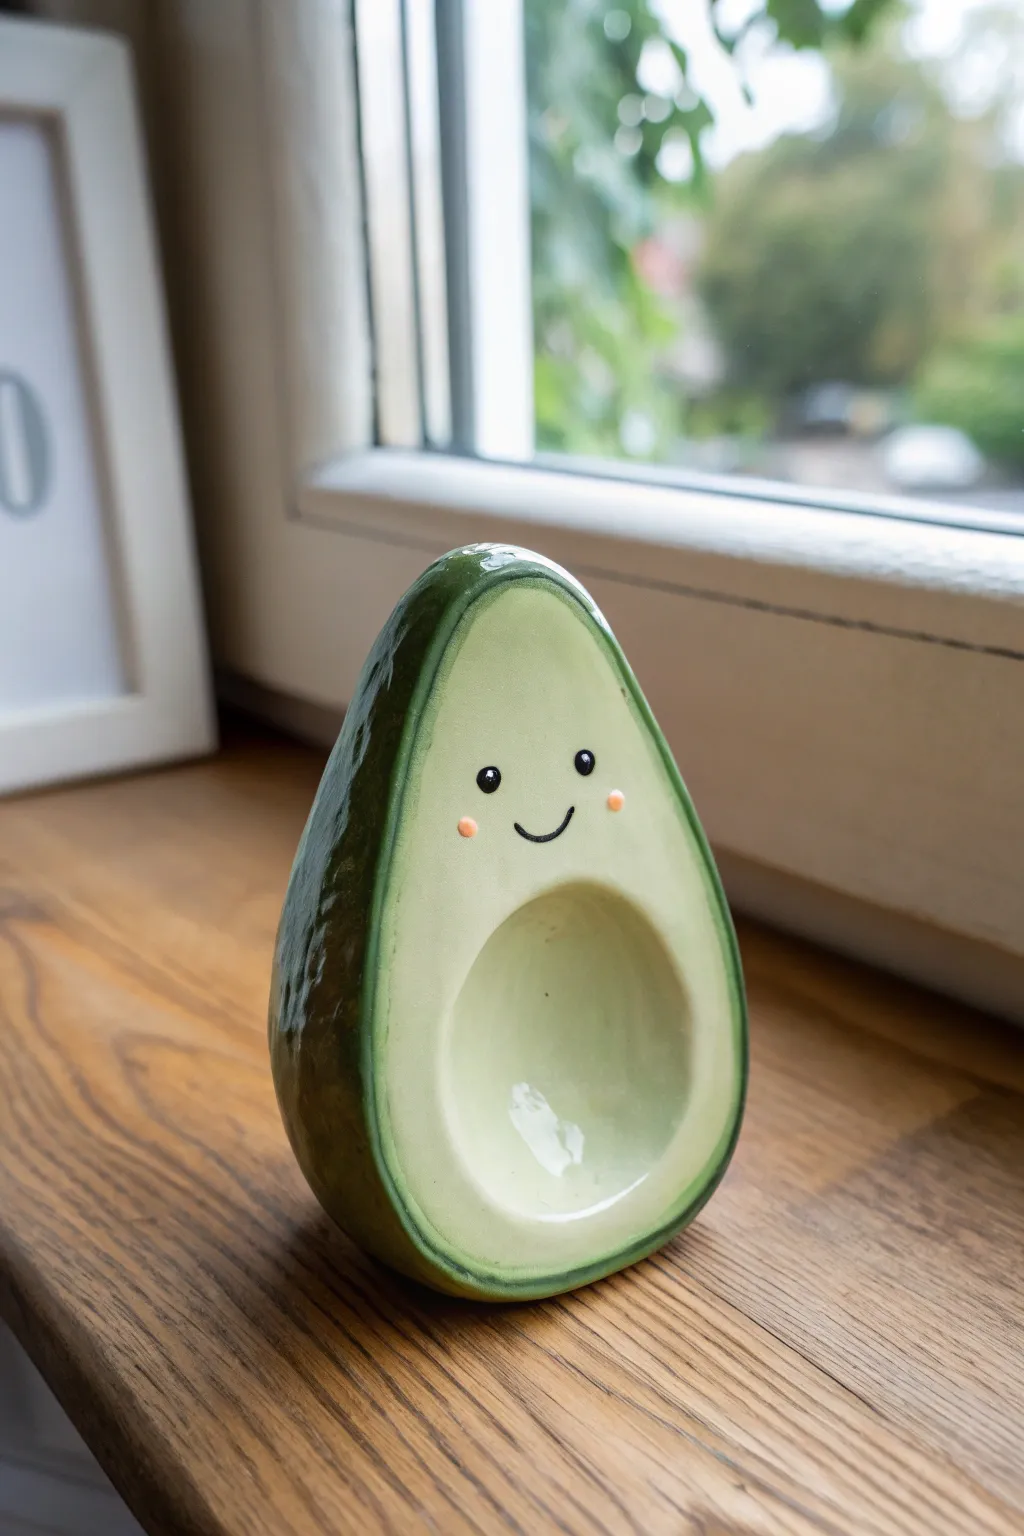
This adorable mini sculpture captures the simple joy of a perfectly ripe avocado with a sweet, friendly face. Its textured outer skin contrasts beautifully with the smooth, creamy interior, making it a delightful desk companion or windowsill accent.
Step-by-Step Tutorial
Materials
- Polymer clay (dark green, light pistachio green, translucent white)
- Aluminum foil
- Clay sculpting tools (needle tool, ball stylus)
- Texture sponge or stiff toothbrush
- Acrylic paints (black, pale pink)
- Fine detail paintbrush or dotting tool
- High-gloss glaze or UV resin
- Oven for baking
Step 1: Forming the Avocado Base
-
Create the core:
Start by crumpling a small piece of aluminum foil into a pear shape. This saves clay and keeps the sculpture lightweight while preventing cracks during baking. -
Mix the flesh color:
Blend your light pistachio green clay with a significant amount of translucent white. This mimics the slightly waxy, organic look of real avocado flesh better than opaque color alone. -
Cover the front:
Flatten a sheet of your mixed light green clay. Press the foil core into it, covering just the flat ‘cut’ side and wrapping the edges slightly around to the back. -
Create the skin:
Condition dark green clay and roll it into a thin sheet. Cover the rounded back of the foil shape, carefully smoothing the seam where it meets the light green front. The dark green should frame the light green face. -
Refine the shape:
Gently squeeze and roll the form between your palms to ensure it has that classic tapered pear silhouette. Flatten the bottom slightly so it can stand upright on its own.
Clean Edges Pro-Tip
Before baking, wipe the light green face with a Q-tip dipped in rubbing alcohol. This removes dust and lint instantly for a flawless finish.
Step 2: Sculpting Details and Texture
-
Hollow the pit:
Using a large ball stylus or your thumb, gently press a concave indentation into the lower center of the light green face. This represents where the seed would have been. -
Smooth the interior:
Dip your finger in a tiny bit of baby oil or water and smooth out any fingerprints on the light green surface. I find this step crucial for getting that creamy look. -
Texture the skin:
Take a coarse texture sponge, a crumpled ball of foil, or a stiff toothbrush and press it repeatedly into the dark green clay on the back and sides. This creates the bumpy ‘hass’ avocado skin effect. -
Define the rim:
Use a needle tool or clay knife to create a clean, distinct line separating the textured dark skin from the smooth light flesh. -
Bake the piece:
Place your avocado upright on a baking sheet. Bake according to your polymer clay package instructions (usually around 275°F/135°C for 15-30 minutes). Let it cool completely.
Step 3: Painting and Finishing
-
Paint the eyes:
Using a dotting tool or the back of a paintbrush dipped in black acrylic paint, place two small, wide-set dots on the upper portion of the face. -
Add the smile:
With an ultra-fine liner brush and black paint, draw a tiny, curved U-shape between and slightly below the eyes. -
Add the cheeks:
Mix a tiny drop of pale pink paint. Use a smaller dotting tool to add rosy cheeks just outside the smile line. -
Highlight the eyes:
Once the black paint is bone dry, add a microscopic dot of white paint to the upper right corner of each eye for a spark of life. -
Glaze the interior:
Apply a thick coat of high-gloss glaze or UV resin ONLY to the light green face and the pit indentation. This mimics the moisture of a fresh cut. -
Glaze the skin (optional):
For the dark skin, you can leave it matte for realism or use a satin varnish for a slight sheen. Avoid high gloss here to maintain contrast.
Level Up: BFF Necklace
Make a second half with the brown pit protruding out instead of indented. Add screw eyes before baking to turn them into matching ‘best friend’ charms.
Place your cheerful avocado on a shelf where its smile can brighten your daily routine
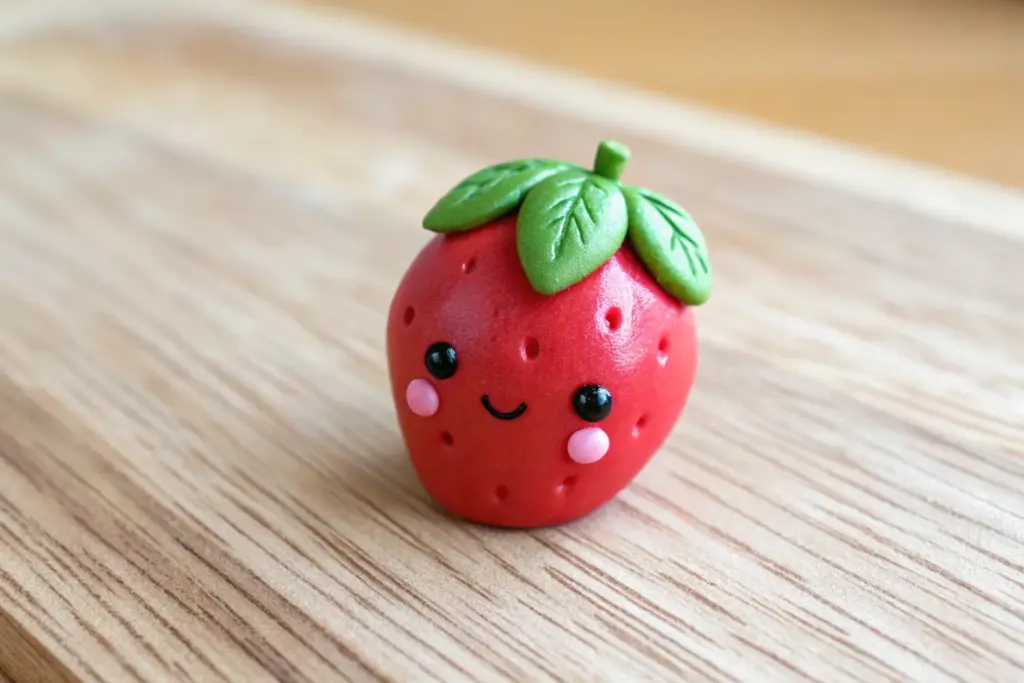
Mini Strawberry With Dot Seeds
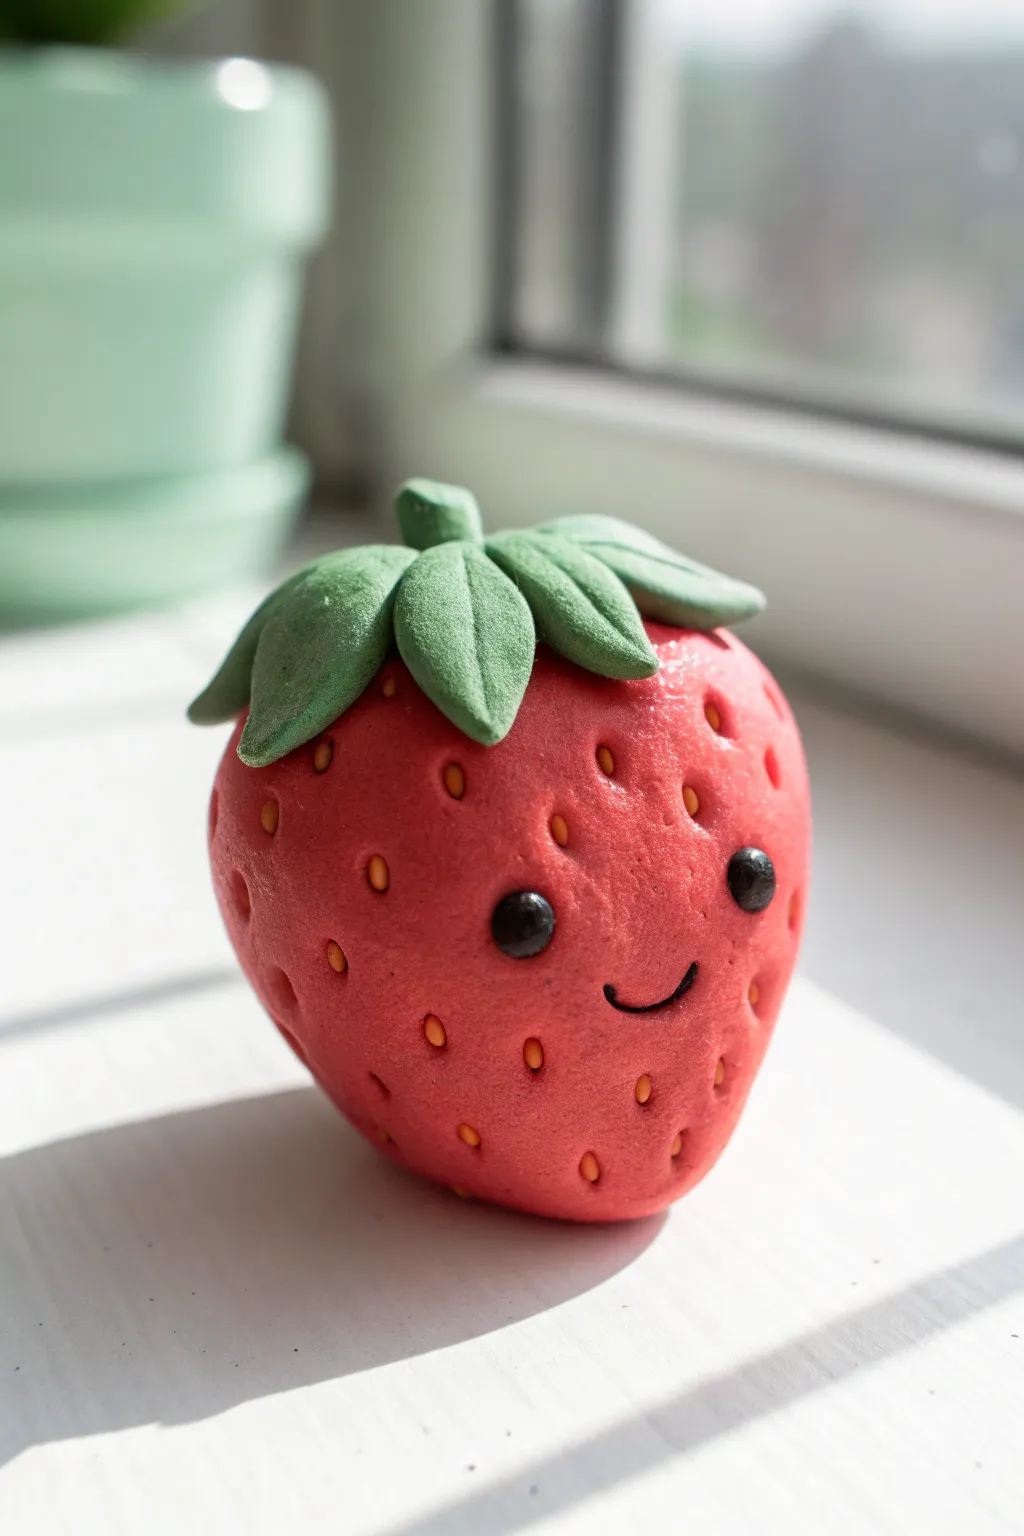
This adorable mini strawberry features a cheerful expression and plenty of realistic texture, making it the perfect introduction to clay sculpting. Its bright red body, contrasting green leaves, and charming little face will brighten up any small corner of your home.
How-To Guide
Materials
- Polymer clay (Bright Red)
- Polymer clay (Leaf Green)
- Polymer clay (Black)
- Polymer clay (Golden Yellow or Orange)
- Needle tool or toothpick
- Ball stylus tool (small)
- Small blade or craft knife
- Rolling pin for clay
- Clean work surface (tile or mat)
- Oven (for baking polymer clay)
Step 1: Shaping the Base
-
Condition the clay:
Begin by taking a chunk of bright red polymer clay and kneading it in your hands until it becomes soft, pliable, and warm. -
Roll a sphere:
Roll the red clay into a smooth, seamless ball between your palms -
Taper the shape:
Gently roll one end of the ball against your work surface to create a slight taper, forming a classic strawberry shape that is wider at the top and narrower at the bottom. -
Flatten the base:
Tap the tapered bottom very lightly on the table just so it can stand upright on its own without tipping over. -
Indent the top:
Use your thumb or a large ball tool to creating a slight depression on the broad top of the strawberry; this is where the leaves will sit later.
Fixing Fingerprints
If your strawberry gets covered in prints, lightly brush it with a little rubbing alcohol or baby oil before baking to smooth the surface without losing texture.
Step 2: Texturing and Seeds
-
Create seed pockets:
Using a needle tool or a small ball stylus, gently press small indentations all over the surface of the strawberry, avoiding the area where the face will go. -
Prepare seed clay:
Roll a very thin snake of golden yellow or orange clay. -
Cut tiny seeds:
Slice the thin snake into minuscule little bits using your blade. -
Place the seeds:
Carefully pick up each tiny yellow bit and place one into each indentation you made earlier. You can use the needle tool to help guide them in.
Make it a Keychain
Insert a metal eye screw into the center of the green stem before baking. Once baked and cooled, secure it with a drop of superglue to attach a keychain ring.
Step 3: Adding the Face
-
Mark eye placement:
Pick a smooth spot on the front and use a ball tool to press two eye sockets into the clay. -
Make the eyes:
Roll two tiny balls of black clay that match the size of your eye sockets. -
Insert the eyes:
Place the black balls into the sockets and gently press them flat so they are flush with the surface. -
Add a highlight:
For extra cuteness, stick a microscopic dot of white clay (or use white paint after baking) onto the black eyes to create a light reflection. -
Create the smile:
Roll an incredibly thin thread of black clay for the mouth. -
Attach the smile:
Shape the thread into a ‘U’ curve and press it gently onto the clay between the eyes using your needle tool.
Step 4: Creating the Foliage
-
Flatten green clay:
Take your green clay and roll it out into a flat sheet, about 2-3mm thick. -
Cut leaf shapes:
Use your blade or a small cutter to cut out 5 or 6 teardrop shapes for the leaves. -
Texture the leaves:
Use the needle tool to press a central vein line down the middle of each leaf. -
Assemble the stem:
Arrange the leaves in a star pattern on top of the strawberry, pressing the wide ends into the depression on top. -
Add the stalk:
Roll a small cylinder of green clay and attach it to the very center where all the leaves meet. -
Drape the leaves:
Gently curve the tips of the leaves downward so they look like they are hugging the fruit. -
Final smooth:
Give the whole piece a quick check for fingerprints; I like to use a tiny bit of baby oil on my finger to smooth out any unwanted marks before baking. -
Bake:
Bake the clay according to the manufacturer’s instructions on your specific package of clay.
Once cooled, your cheerful fruit figurine is ready to sit on a shelf and make you smile
Tiny Cupcake With a Swirl Top
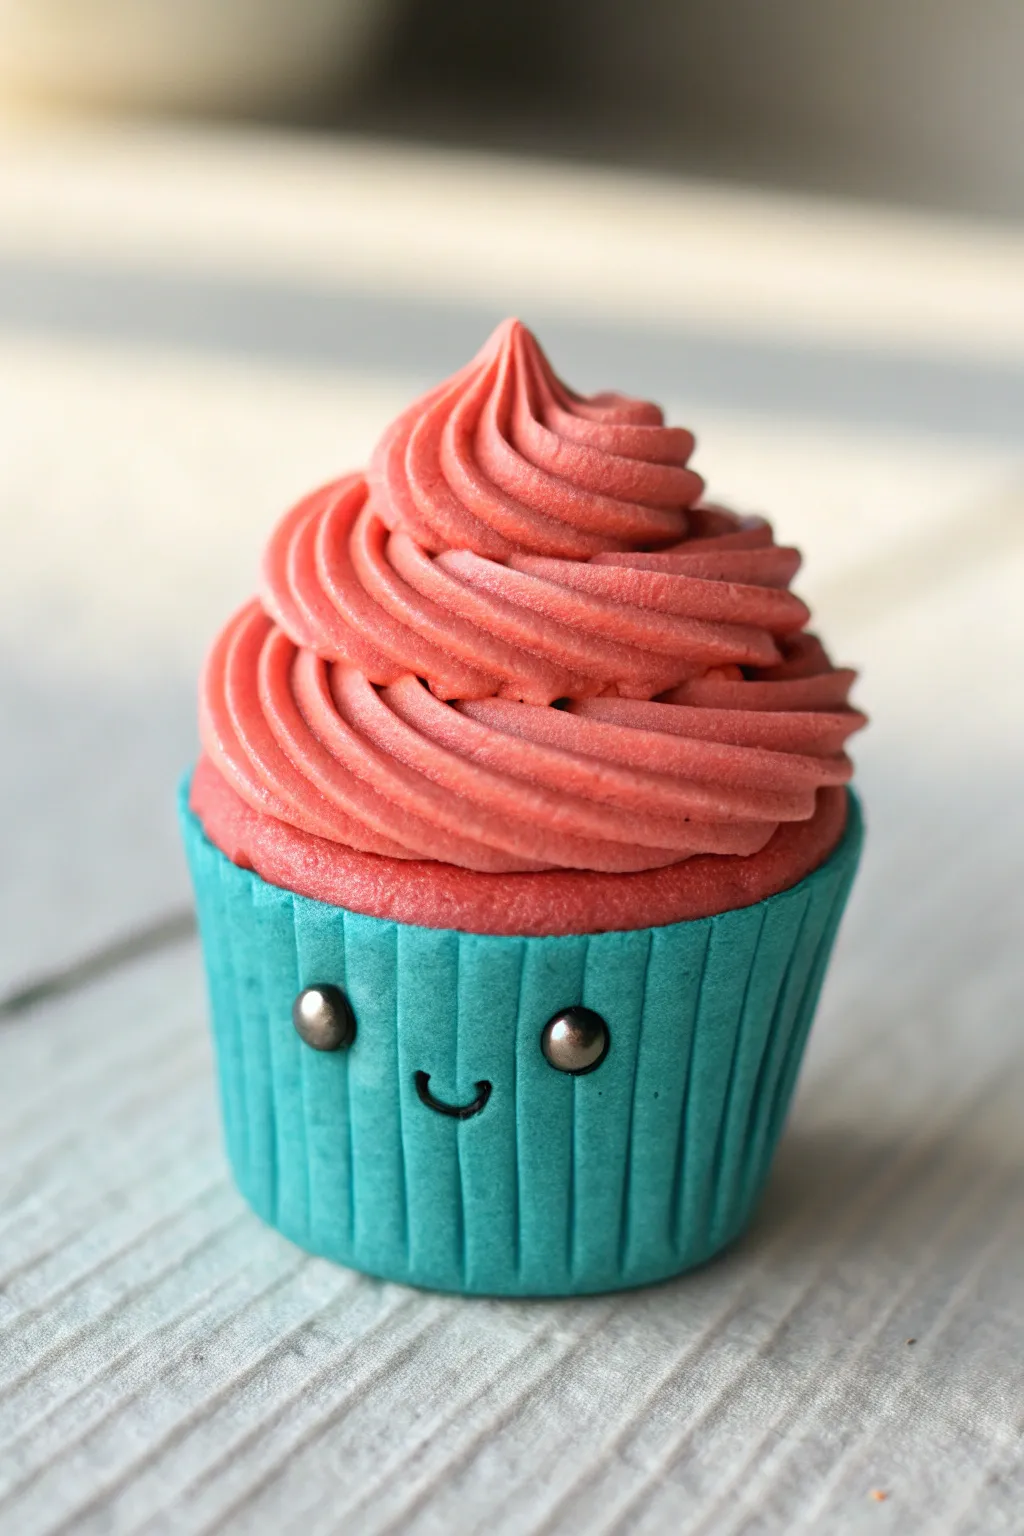
This adorable mini cupcake features a vibrant teal wrapper complete with a cheerful kawaii face and a generous swirl of strawberry-pink frosting. Perfect for beginners, this project teaches basic texturing and shaping techniques to create a sweet little desk companion.
Step-by-Step
Materials
- Polymer clay (teal, pink/red, and black)
- Small metal ball tool or dotting tool
- Two small silver micro-beads or ball bearings (for eyes)
- Translucent liquid polymer clay (optional, for frosting texture)
- Extruder tool with a star tip (or a DIY clay piping bag)
- Needle tool or toothpick
- Clay roller or pasta machine
- Ruler
- Craft blade
- Gloss glaze (optional)
Step 1: Creating the Wrapper Base
-
Prepare the Teal Clay:
Start by conditioning your teal clay until it is soft and pliable. Roll it into a smooth ball about the size of a large marble to ensure there are no air bubbles trapped inside. -
Shape the Cup:
Gently press the ball onto your work surface to flatten the bottom. Use your fingers to shape the sides upwards, creating a slightly tapered cylinder shape that resembles a cupcake liner. -
Refine the Top Edge:
Press the top of the cylinder flat so you have a solid platform for the frosting later. The overall shape should look like a small, squat bucket. -
Add Texture Lines:
To create the ribbed effect of a paper liner, use a needle tool or the back of a craft blade. Gently press vertical lines all around the circumference of the teal base, spacing them evenly.
Step 2: Adding the Kawaii Face
-
Position the Eyes:
Find the ‘front’ of your cupcake where the texture lines look best. Use a small ball tool to make two shallow indentations where the eyes will go, spacing them slightly apart. -
Insert the Eye Beads:
Press your two silver micro-beads firmly into the indentations. They should sit flush with the clay surface rather than bulging out excessively. -
Make the Smile:
Roll a microscopic snake of black clay—as thin as a thread. Cut a tiny curved section and carefully press it onto the teal base between the eyes to form a happy smile.
Frosting Textures
If you lack an extruder, twist three thin snakes of clay together into one rope. Coil this rope to mimic the piped look.
Step 3: Frosting the Cupcake
-
Prepare the Frosting Mix:
Condition your pink clay until it’s very soft. I like to mix in a drop or two of translucent liquid clay (or baby oil) to make it softer and easier to extrude without cracking. -
Load the Extruder:
Place the softened pink clay into a clay extruder fitted with a star-shaped disc. If you don’t have an extruder, roll a long snake and twist it gently to mimic the swirl texture. -
Pipe the Frosting:
Extrude a long rope of the star-shaped clay. Begin coiling this rope onto the top of your teal base, starting at the outer edge and spiraling inward. -
Build Height:
Continue spiraling upward, making each circle slightly smaller than the last to create a peaked mound shape. -
Finish the Peak:
When you reach the top, pull the clay upward quickly to break the rope, leaving a perfect little point at the summit. Gently press the start and end points of the coil to ensure they adhere to the layers below. -
Inspect and Smooth:
Check the connection between the pink frosting and the teal base. If there are gaps, gently use a tool to nudge the bottom layer of frosting down to meet the wrapper.
Turn it into a Charm
Insert a metal eye pin into the center of the frosting swirl before baking. Once baked, secure it with super glue to make a necklace pendant.
Step 4: Baking and Finishing
-
Pre-Bake Check:
Scan the clay for any dust or fingerprints. You can smooth minor fingerprints on the wrapper with a tiny bit of baby oil on your finger. -
Bake:
Bake the piece according to your polymer clay manufacturer’s instructions. Usually, this is around 275°F (130°C) for 15-20 minutes for a piece this size. -
Cool Down:
Let the cupcake cool completely in the oven or on the baking tray before handling it, as hot clay is fragile. -
Optional Glaze:
For a bakery-fresh look, lightly brush a semi-gloss or gloss glaze over just the pink frosting area to make it look moist and sweet.
Place your tiny creation on a shelf or gift it to a friend to brighten their day
Mini Cloud With Blush Cheeks
Create your own piece of sky with this adorable smiling cloud sculpture. Its soft, puffy shape and rosy cheeks make it a perfect beginner-friendly project that adds a touch of whimsy to any desk or shelf.
Step-by-Step Tutorial
Materials
- White polymer clay (plain or speckled)
- Pink polymer clay (soft pastel shade)
- Black polymer clay
- Rolling pin or smooth round tool
- Ball stylus tool (small)
- Needle tool or toothpick
- Small circle cutter (optional)
- Gloss glaze (optional for eyes)
Step 1: Forming the Cloud Base
-
Condition the Clay:
Start by taking a chunk of your white clay. Knead it thoroughly in your hands until it becomes warm, soft, and pliable. This prevents cracks later on. -
Roll the Main Shape:
Roll the white clay into a large, smooth ball. Flatten it slightly so it becomes a thick, rounded disc rather than a perfect sphere. -
Create the Puffs:
Break off 5 to 7 smaller pieces of white clay. Roll each one into a smooth ball. Vary the sizes slightly—some medium, some small—to give the cloud a natural, organic look. -
Attach the Top Puffs:
Begin pressing the smaller balls onto the edge of your main flattened disc. Start at the top center with a medium-sized ball and work your way outwards. -
Build the Sides:
Continue attaching balls around the perimeter of the main disc. Gently press them together so they adhere well, but try to maintain their individual rounded ‘puff’ shapes. -
Blend the Seams:
Turn the cloud over to the back. Use your thumb or a modeling tool to smear the clay across the seams where the balls join the main body. This strengthens the structure without ruining the puffy front. -
Smooth the Front:
Flip it back over. If any gaps look too deep, gently stroke the clay with your finger to soften the transition between puffs, ensuring it looks like one cohesive cloud.
Keeping It Clean
White clay attracts dust like a magnet! Keep a scrap piece of white clay nearby and roll it in your hands periodically to pick up lint before touching your sculpture.
Step 2: Adding the Cute Face
-
Make Eye Sockets:
Decide where the face will go on the main central area. Use a ball stylus tool to gently press two small indentations where the eyes will sit. -
Create the Eyes:
Take a tiny amount of black clay and roll two very small, equal-sized balls. I find it easier to roll a thin snake and cut two equal segments first. -
Insert the Eyes:
Place the black balls into the indentations you made. Press them in gently so they are secure but still slightly rounded and protruding. -
Blush the Cheeks:
Take your soft pink clay and roll two small balls, slightly larger than the eyes. Flatten them into little discs. -
Attach the Cheeks:
Press the pink discs onto the cloud face, just below and slightly outside the eyes. This gives that classic kawaii look. -
Carve the Smile:
Using a needle tool or a very thin piece of black clay rolled into a thread, create the smile. In the image, a thin black clay snake is gently curved into a U-shape and pressed between the cheeks. -
Refine the Surface:
Check the white clay for any fingerprints. Gently rub them away with a bit of baby oil on your finger or just a light touch. -
Add Speckles (Optional):
If you want the speckled vanilla bean look shown in the photo but only have plain white clay, you can mix in a tiny pinch of black pepper or ground vanilla bean before baking.
Step 3: Finishing Up
-
Bake:
Place your cloud on a ceramic tile or baking sheet covered with parchment paper. Bake according to your customized clay package instructions (usually 275°F/135°C for 15-30 minutes per 1/4 inch thickness). -
Click:
Let the cloud cool completely before handling. It will be slightly soft when hot but hardens as it cools. -
Glaze (Optional):
For extra shine and ‘life,’ apply a tiny dot of gloss glaze or UV resin just to the black eyes once the piece is fully cooled.
Face Placement
Place the eyes and mouth slightly lower on the shape than you think you should. A low face creates a ‘forehead’ that makes the character look much cuter and younger.
Now you have a sweet little cloud friend to brighten up even the gloomiest days
Easy Mini Star Charm Character

This adorable star charm uses speckled clay to create a warm, cookie-like appearance complete with a sweet, simple expression. It makes for a perfect beginner project that results in a durable charm for necklaces, keychains, or stitch markers.
Step-by-Step
Materials
- Polymer clay (beige/ecru with speckles or ‘granite’ effect)
- Black polymer clay (tiny amount)
- Pink or coral polymer clay (tiny amount)
- Rolling pin or acrylic roller
- Star-shaped cookie cutter (mini size, approx 1 inch)
- Needle tool or toothpick
- Eye pin or metal screw eye
- Jump ring (gold or silver)
- Pliers
- Gloss glaze or UV resin (optional for finish)
Step 1: Shaping the Star Base
-
Condition the main clay:
Start by warming up your beige speckled clay in your hands. Knead it until it is soft, pliable, and free of cracks. -
Roll out the slab:
Using an acrylic roller, flatten the clay into a slab. You want this to be relatively thick, about 1/4 inch (6mm), to give the charm a nice chunky, biscuit-like feel. -
Cut the shape:
Press your mini star cutter firmly into the clay. Give it a little wiggle to separate it from the surrounding clay, then lift the cutter. If the clay sticks, gently poke it out from the back. -
Soften the edges:
The cutter leaves sharp edges that look unnatural. Gently run your finger along the perimeter of the star to round off the harsh corners, making the star look soft and puffy. -
Add the hardware:
Take a metal eye pin or screw eye. Insert it carefully into the top point of the star, burying the stem deep enough that it feels secure but leaving the loop exposed.
Uneven Eyes?
If your tiny clay balls for the eyes vary in size, roll a single thin log of black clay first. Cut two equal slices from the log to ensure the volume of clay is identical before rolling.
Step 2: Creating the Face
-
Prepare the eye placement:
Use a needle tool or a small ball tool to make two tiny indents where the eyes will go. This helps seat the clay pieces so they don’t pop off later. -
Roll the eyes:
Pinch off two incredibly tiny specks of black clay. Roll them into spheres between your fingertips. They should be identical in size. -
Attach the eyes:
Place the black spheres into the indents you made. Press them down very gently so they flatten slightly against the surface. -
Make the cheeks:
Repeat the process with your pink or coral clay. Roll two slightly larger spheres for the cheeks. Place them just below and to the outside of the eyes. -
Flatten the cheeks:
Gently press the pink balls flat so they look like flush rosy cheeks on the surface of the star. -
Roll a snake for the mouth:
Take a tiny amount of black clay and roll it into an extremely thin, hair-like snake. You only need a piece about 3mm long. -
Shape the smile:
Using your needle tool to help pick it up, curve the tiny black snake into a ‘U’ shape. I find it easiest to shape it on my work surface first, then transfer it. -
Attach the smile:
Place the smile in the center of the face, centered between the cheeks. Press it lightly with a flat tool or your finger to bond it.
DIY Speckled Clay
No granite clay? Mix regular beige clay with black pepper or real vanilla bean specks. Knead it thoroughly to distribute the spices for an organic, cookie-dough texture.
Step 3: Finishing Up
-
Final inspection:
Check your star for any lint or fingerprints. You can smooth away fingerprints with a tiny drop of baby oil. -
Bake:
Bake the piece according to the instructions on your specific brand of polymer clay. Usually, this is around 275°F (135°C) for 15-30 minutes. -
Cool down:
Let the star cool completely before handling it. Polymer clay is fragile when hot. -
Secure the pin:
If the eye pin feels loose after baking, pull it out, add a dab of superglue to the stem, and reinsert it immediately. -
Glaze (Optional):
For a ceramic look, coat the star in a layer of gloss glaze or UV resin and cure it. -
Add jump ring:
Using two pairs of pliers, twist open a heavy-gauge jump ring. Slide it through the eye pin loop and twist it closed securely.
Now you have a cheerful little companion ready to hang on your bag or necklace
Mini Ghost With Wavy Bottom
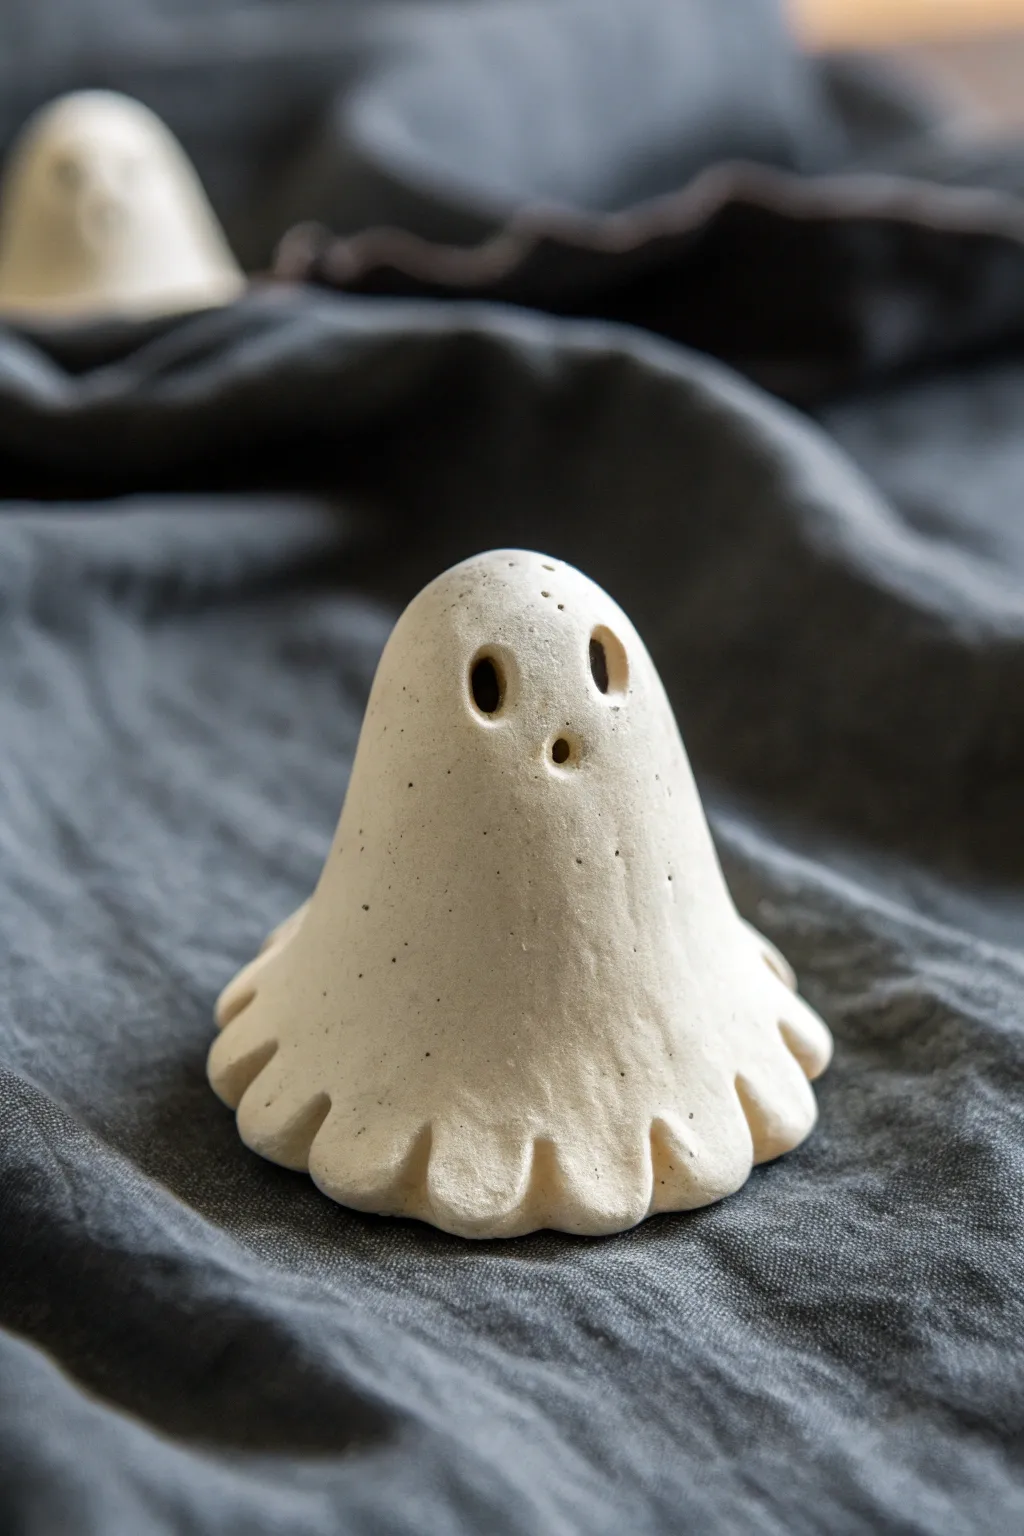
These adorable mini ghosts feature a charmingly ruffled hem and a naturally speckled finish that gives them a sophisticated, ceramic look. Perfect for Halloween or year-round haunting, their simple shape makes them an ideal project for beginners working with air-dry or polymer clay.
How-To Guide
Materials
- White polymer clay or air-dry clay (stone effect preferred)
- Small rolling pin
- Ball stylus tool or a round paintbrush handle
- Subtle speckled spice (like ground pepper or dried tea leaves) if your clay is plain
- Toothpick or needle tool
- Smooth work surface
- Optional: Cornstarch to prevent sticking
Step 1: Shaping the Body
-
Prepare the Clay:
Start by conditioning your clay in your hands until it becomes soft and pliable. If you are using plain white clay and want the speckled look from the photo, knead in a tiny pinch of ground pepper or dried tea leaves during this stage. -
Form a Ball:
Roll a piece of clay about the size of a large walnut into a smooth, crack-free sphere between your palms. -
Create a Cone:
Place the ball on your work surface and gently roll one side of it back and forth with your finger to elongate it into a blunt cone or teardrop shape. This will be the ghost’s body. -
Hollow the Core:
Pick up the cone and gently push your thumb into the wider base to start hollowing it out. Rotate the clay as you press, creating a pinch-pot structure. -
Thin the Walls:
Continue pinching and rotating the clay to thin out the walls of the ghost. Aim for an even thickness, but keep the very top of the head slightly thicker for stability. -
Smoothing the Shape:
Once hollowed, place the ghost back on the table. Gently pat and smooth the exterior with your finger to remove any fingerprints and refine the rounded top.
Step 2: Creating the Wavy Hem
-
Flatten the Base Edge:
Use your thumb and forefinger to gently pinch the very bottom rim of the ghost, flaring it outward slightly so it sits like a skirt. -
Mark the Indents:
Using the side of a toothpick or a small modeling tool, gently press vertical indentations around the flared skirt at regular intervals to map out where the waves will go. -
Scalop the Edges:
Press the rounded end of a paintbrush or a ball tool into the clay between the indentations you just made. Push gently from the inside out to create rounded scallops. -
Refine the Waves:
Pinch the points between the scallops slightly to sharpen the wave pattern. I find this gives the fabric fold illusion a bit more definition. -
Check the Stance:
Set the ghost down on a flat surface to ensure it stands straight. If it wobbles, gently press the whole piece down to level the bottom waves.
Slumping Ghost?
If the ghost starts sagging while you work, gently stuff the hollow inside with a small ball of paper towel or foil to support the shape until it dries or bakes.
Step 3: Adding the Face
-
Position the Eyes:
Choose a spot near the top third of the cone for the face. Use a needle tool to faintly mark two small dots where the eyes will go. -
Open the Eye Holes:
Using a small ball tool or the distinctive end of a paintbrush, press straight into the clay at your marks to create deep, dark sockets. Wiggle the tool slightly to widen them into ovals. -
Add the Mouth:
Create a smaller hole centered below the eyes for the mouth. This should be slightly smaller than the eyes to capture that surprised expression. -
Clean Up Edges:
If the clay puffed up around the holes, smooth it down gently with a fingertip or a soft silicone tool. -
Final Surface Texture:
To mimic the matte texture in the image, you can lightly tap the surface with an old toothbrush or a piece of crumpled aluminum foil. -
Bake or Dry:
Follow the instructions for your specific clay. If using polymer, bake at the recommended temperature. If using air-dry, let it sit in a dry spot for 24-48 hours.
Make It Glow
Before drying, use a straw to punch a hole in the back. Once finished, place an LED tea light inside to illuminate the face holes for a spooky lantern effect.
Once fully cured, your little phantom is ready to haunt your mantle or bookshelf
One-Shape Mini Blob Monster
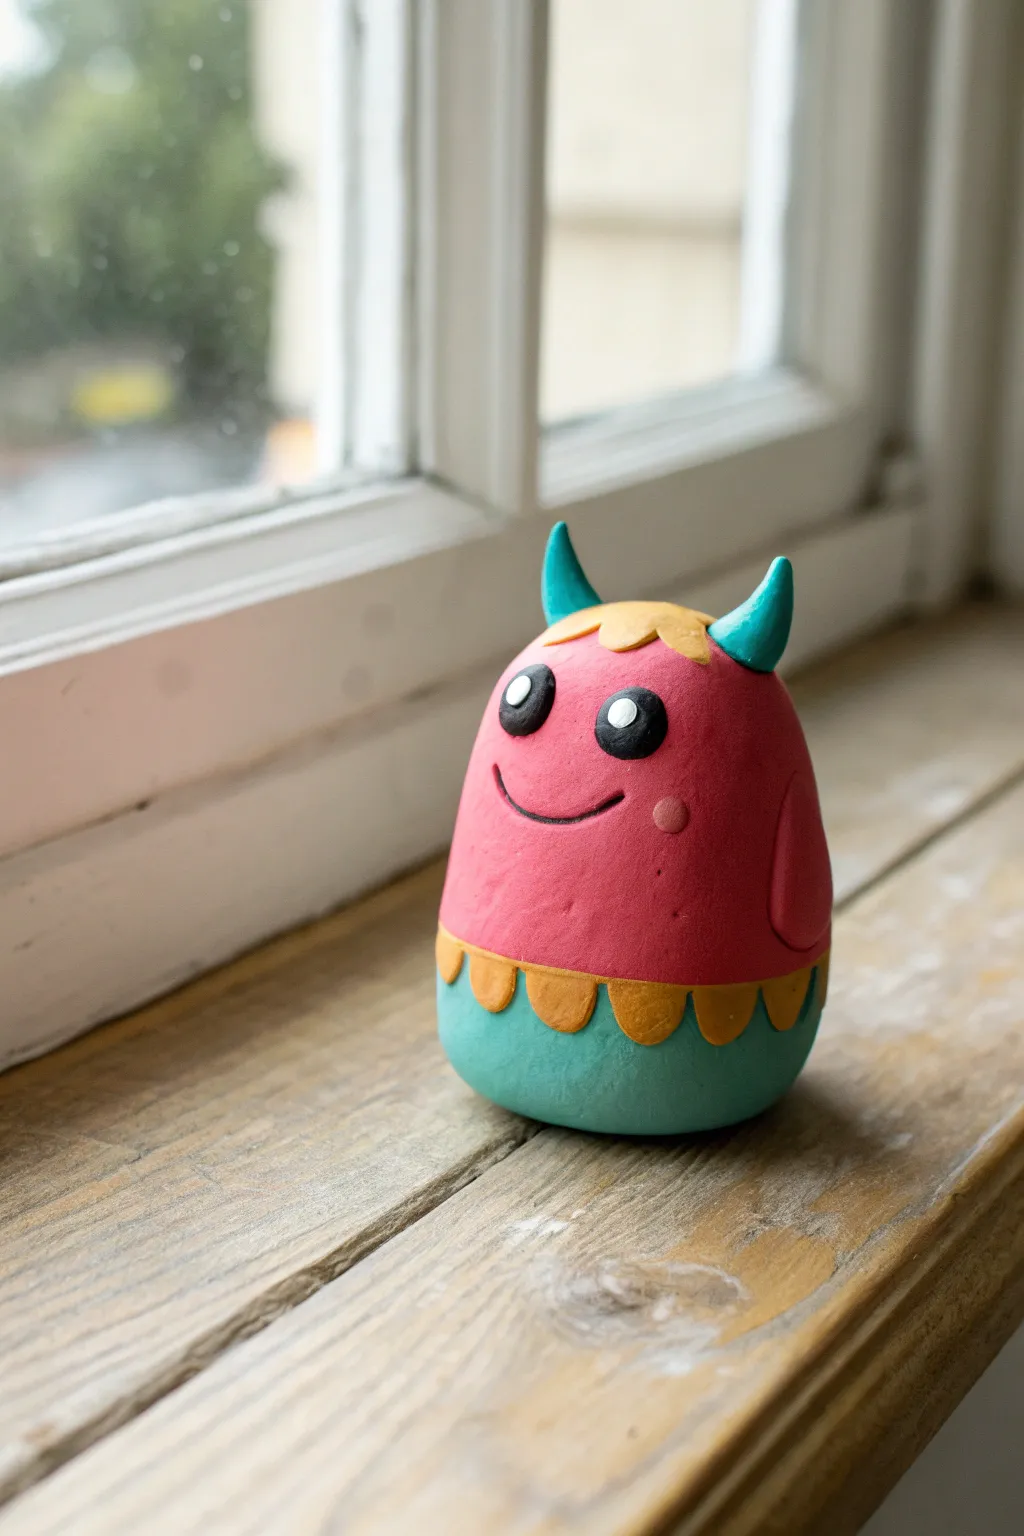
This charming little monster fits perfectly in the palm of your hand, sporting a vibrant pink and teal body with a cheerful, uneven smile. Its simple egg-like shape makes it an ideal beginner project, focusing on seamless color blending and adding expressive details.
Step-by-Step Tutorial
Materials
- Polymer clay (Pink/Magenta, Teal/Cyan, Yellow/Gold, Black, White)
- Set of small ball stylus tools
- Pointed silicone blending tool
- Clean work surface (ceramic tile or glass)
- Oven (if using polymer clay) or drying rack (if air-dry)
- Toothpick or needle tool
- Liquid clay or bake-and-bond (optional)
Step 1: Forming the Base Body
-
Prepare the clay:
Begin by conditioning your pink and teal clay separately. Knead them until they are soft and pliable, ensuring there are no air bubbles trapped inside. -
Shape the two halves:
Roll a larger ball of pink clay (about the size of a golf ball) and a slightly smaller ball of teal clay. Flatten the bottom of the pink ball and the top of the teal ball so they are distinct hemispheres. -
Join the sections:
Press the flat sides together firmly to create a single egg shape. The pink section should take up about two-thirds of the height. -
Smooth the seam:
Using your thumb or a flat modeling tool, gently drag a tiny bit of clay across the seam to bind them, though most of this will be covered later. Focus on maintaining a smooth, rounded ‘blob’ silhouette. -
Flat bottom:
Tap the bottom of the teal section gently on your work surface to create a flat base so your monster stands up without rolling over.
Fingerprint Woes?
If you see fingerprints on the smooth pink body, brush the raw clay lightly with a little baby oil or clay softener before baking to melt them away.
Step 2: Adding Decorative Details
-
Create the belt:
Roll out a thin snake of yellow clay and flatten it into a long ribbon. It should be long enough to wrap around the entire circumference of the monster. -
Scallop the edge:
Using a small round cutter or simply shaping by hand with a tool, create a scalloped pattern along one edge of the yellow ribbon. -
Attach the belt:
Wrap this yellow scalloped belt around the seam where the pink and teal clays meet. The scallops should point downwards onto the teal section. -
Refine the belt:
Press the yellow clay gently onto the body to adhere it. I like to use a silicone tip to smooth the top edge of the belt flush against the pink body. -
Make the hair patch:
Make a small, flat pancake of yellow clay and cut a wavy, jagged edge. Place this on the very top of the pink head for a splash of color.
Step 3: Bringing the Face to Life
-
Form the horns:
Roll two small cones of teal clay. Gently curve the tips slightly to give them character. -
Attach the horns:
Place the horns on either side of the yellow hair patch on top of the head. Blend the base of the horns into the head using a small tool or liquid clay for a stronger bond. -
Create eye sockets:
Use a medium ball stylus to press two indentations into the upper front of the pink face where the eyes will sit. -
Insert the whites:
Roll two small balls of white clay and press them into the sockets. Flatten them slightly so they aren’t bulging too much. -
Add pupils:
Roll tiny balls of black clay and press them onto the white eyes. Varying the position (e.g., looking sideways) adds personality. -
Add catchlights:
This is crucial for cuteness: place a microscopic dot of white clay on the upper corner of each black pupil for a shiny reflection. -
Carve the mouth:
Roll a very thin thread of black clay. Press it into a U-shape onto the face to form a smile, gently imbedding it into the pink clay. -
Add cheek spots:
Take a tiny amount of pink clay mixed with a speck of white (or just a lighter pink shade) to make two small flat circles. Press these onto the cheeks. -
Final texture check:
Before baking, give the whole piece a gentle smoothing with your finger to remove any stray fingerprints. You can dust it lightly with cornstarch if your fingers are sticking. -
Bake or dry:
Follow the specific instructions for your clay type to set the sculpture. Once cool, it’s ready to guard your windowsill.
Pro Tip: Eye Placement
Place the eyes lower on the face (closer to the mouth line) to make your monster look instantly cuter and younger.
Now you have a cheerful little desk buddy to brighten up your workspace
Mini Gnome With Oversized Hat
Create a charming rustic gnome featuring a distinctive, oversized hat and faux wood textures that add earthy character. This polymer clay project relies on simple shapes and clever texturing to bring a whimsical forest guardian to life.
Step-by-Step
Materials
- Polymer clay (white/cream, beige/flesh tone, grey)
- Acrylic rolling pin
- Modelng tools (needle tool, small ball tool)
- Texture tool or stiff bristle brush
- Acrylic paints (dark brown wash, white for dry brushing)
- Fine grit sandpaper
- Aluminum foil (for armature)
- Hobby knife
Step 1: Forming the Core Structure
-
Build the armature:
Creating a solid base saves clay and makes the gnome lighter. Scrunch aluminum foil into a cone shape about 3 inches tall for the body, and a thinner, taller cone for the hat core. -
Cover the body base:
Condition your grey or cream clay until soft. Roll it into a sheet about 1/4 inch thick and wrap it completely around the foil body cone, smoothing the seams with your fingers. -
Create the wood texture:
Before adding details, use a needle tool or a dull knife to drag vertical lines down the body. Vary the pressure to mimic bark or wood grain, making some cuts deeper than others. -
Add the arm sleeves:
Roll two small sausages of the body-colored clay. Press them onto the sides of the body where shoulders would be, blending the top edges into the main form. -
Attach the hands:
Roll two tiny balls of flesh-toned clay. Press a small indentation into the bottom of each sleeve and insert the hands, securing them by smoothing the clay slightly at the connection point.
Step 2: Sculpting the Face and Beard
-
Position the nose:
Roll a medium-sized ball of flesh-toned clay for the nose—gnomes are known for big noses! Choose a spot near the top third of the body and press it firmly in place. -
Form the beard base:
Take a flat, teardrop-shaped piece of white or cream clay. Attach this directly under the nose, letting it flow down over the chest. -
Add the mustache:
Make two smaller teardrops of the same beard color. Curl the pointed ends slightly upwards and place them horizontally right under the nose, overlaying the main beard. -
Texture the facial hair:
Using your needle tool, scratch fine, flowing lines into the beard and mustache pieces. Follow the curve of the clay to make the hair look natural and soft. -
Shape the face area:
Add a thin strip of flesh-toned clay above the nose to suggest the forehead area where the eyes will sit.
Texturing Tip
For realistic wood grain, vary the depth of your lines. I sometimes lightly drag a crumpled ball of aluminum foil over the surface before cutting the lines to add micro-texture.
Step 3: The Oversized Hat
-
Prepare the hat clay:
Roll a large cone of cream-colored clay, significantly taller than the body. You can use your foil armature inside if the clay is too heavy. -
Shape the hat:
Place the cone onto the head, pulling the brim down low so it rests just on top of the nose and covers the forehead. Curve the tip of the hat slightly for character. -
Add fabric creases:
Gently press horizontal indentations up the length of the hat using a modeling tool to simulate slouchy, wrinkled fabric folds. -
Insert the eyes:
Use a small ball tool to make two indentations on either side of the nose top. Insert tiny balls of black clay for the eyes, pressing them in gently.
Slumping Hat?
If the tall hat keeps drooping while you work, insert a stiff piece of floral wire or a toothpick into the center of the body going up into the hat to act as an internal spine.
Step 4: Finishing Touches
-
Inspect and smooth:
Check the sculpture from all angles. Smooth out any unintentional fingerprints with a drop of baby oil on your finger, but be careful not to erase your wood and hair textures. -
Bake the piece:
Bake according to your polymer clay package instructions. Usually, this means around 275°F (135°C) for 15-30 minutes per 1/4 inch of thickness. -
Apply an antique wash:
Once cool, mix a small amount of dark brown acrylic paint with water. Brush it over the body and hat, letting it settle into the cracks. -
Wipe back:
Quickly wipe away the excess paint with a damp paper towel or wet wipe. The dark paint will remain in the textured grooves, highlighting the wood grain and beard details. -
Seal (Optional):
If you plan to keep this gnome outside or handle it frequently, apply a matte varnish to protect the paint finish.
Place your finished gnome on a shelf or among your plants to add a touch of handcrafted magic to your home.
Mini Succulent Rosette Sculpture
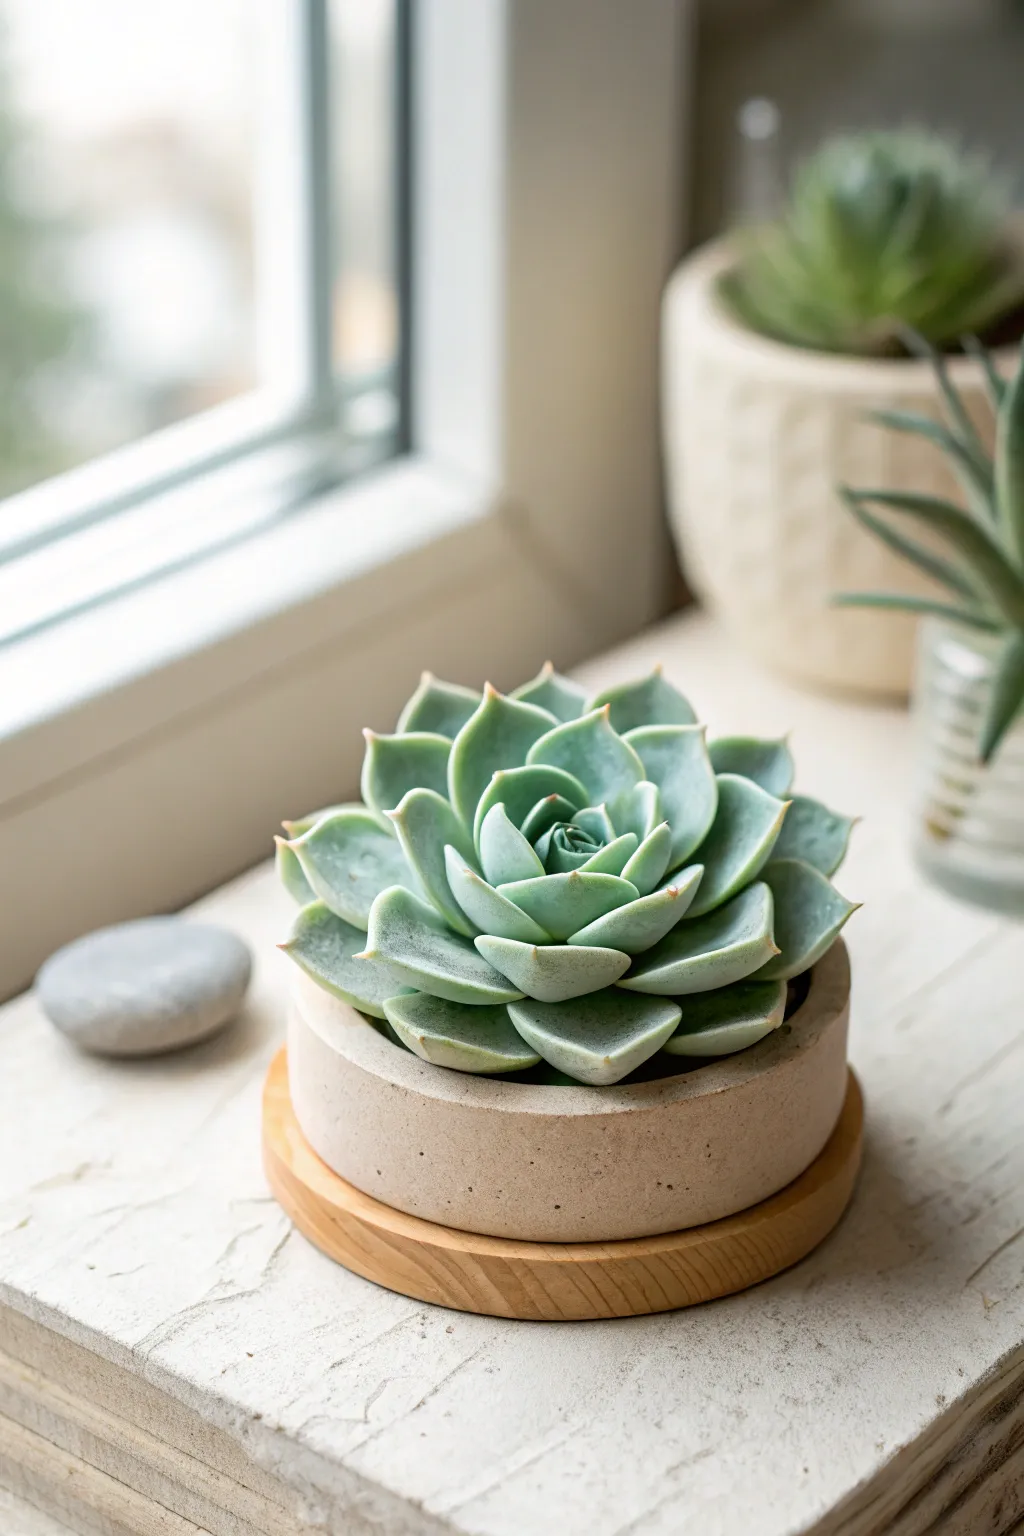
This project captures the delicate, powdery beauty of an Echeveria succulent using polymer or air-dry clay. You’ll create a lifelike rosette with soft, greenish-blue leaves nestled in a simple, modern planter base.
Step-by-Step Guide
Materials
- Polymer clay (translucent, white, and sap green)
- Pastel chalks (light blue, teal, purple)
- Clay carving tools or a toothpick
- Small round cutter (approx. 1 inch)
- Clay roller or pasta machine
- Small paintbrush (soft bristles)
- Small round planter mold or a pre-made mini concrete pot
- Wooden coaster or small wood round for the base
Step 1: Preparing the Clay Colors
-
Mix the base color:
Start by mixing translucent clay with a generous amount of white and a tiny dot of sap green. You want a very pale, milky mint color. The translucency is key to mimicking the fleshy look of real succulent leaves. -
Create a gradient:
Prepare a second, slightly darker shade by adding just a touch more green and a hint of teal to a portion of your base mix. This will be used for the older, outer leaves.
Step 2: Sculpting the Leaves
-
Roll teardrop shapes:
Pinch off roughly 20-30 small balls of clay in varying sizes. Roll each one into a teardrop shape. -
Flatten the leaves:
Gently press each teardrop flat between your thumb and forefinger. Aim for the leaf to be thicker in the middle and taper to a delicate edge, just like a real plant. -
Shape the tips:
Using your fingertips, pinch the very tip of each leaf to create a small, sharp point (the mucro). Curve the leaf slightly inward to give it a cupped shape.
Sticky Fingerprints?
Work with cornstarch on your fingers to avoid leaving prints on the smooth surface. If prints happen, brush them lightly with baby oil before baking to smooth them out.
Step 3: Adding Color Depth
-
Prepare pastel powder:
Scrape some light blue, teal, and a tiny bit of purple chalk into fine powders using a craft knife. -
Apply the ‘farina’:
Dip a soft, dry brush into the light blue chalk powder and gently dust the centers and edges of your raw clay leaves. This mimics the farina—the powdery coating natural to succulents. -
Accent the tips:
With a smaller brush, dab a minuscule amount of the purple or pinkish chalk just on the very pointy tips of the leaves to suggest stress coloration.
Level Up: Dew Drops
After baking, add tiny drops of UV resin or clear gloss varnish to a few leaf tips. Cure with a UV light to create permanent, realistic water droplets.
Step 4: Assembling the Rosette
-
Form the center bud:
Take three of your smallest leaves and press them together at the base, curling them tightly inward so they overlap to form a closed bud. -
Add the next layer:
Attach slightly larger leaves around this center bud. Place them in the gaps between the previous leaves (alternating) to maintain a natural symmetry. -
Build outward:
Continue adding layers of increasingly larger leaves. As I work outward, I like to open the leaves up slightly more, angling them flatter rather than vertical. -
Final leaf shaping:
Once assembled, gently adjust any leaves that look too uniform. A little irregularity adds realism. -
Trim the base:
If the bottom of your rosette has become too bulky or long, slice off the excess clay carefully with a blade so it sits flat.
Step 5: Potting and Finishing
-
Prepare the pot:
If you are making the pot from clay, roll a strip of beige or granite-effect clay and wrap it around a circle base to form a cylinder. Smooth the seams. -
Insert the succulent:
Place your clay rosette into your pot. If using a pre-made pot, you might want to fill it with a scrap clay mound first to give your succulent something to sit on. -
Texture the soil:
If any ‘soil’ is visible, stipple brown clay with a toothbrush or add real dried coffee grounds mixed with liquid clay for texture. -
Bake:
Bake the entire piece according to your polymer clay manufacturer’s instructions (usually 275°F/135°C for 15-30 minutes). -
Display:
Once cool, place the pot on a small wooden coaster or glue a wood circle to the bottom for the complete look shown in the image.
Place your eternal succulent on a bright windowsill to enjoy the greenery without the watering schedule
Tiny Fairy Garden Rock Scene
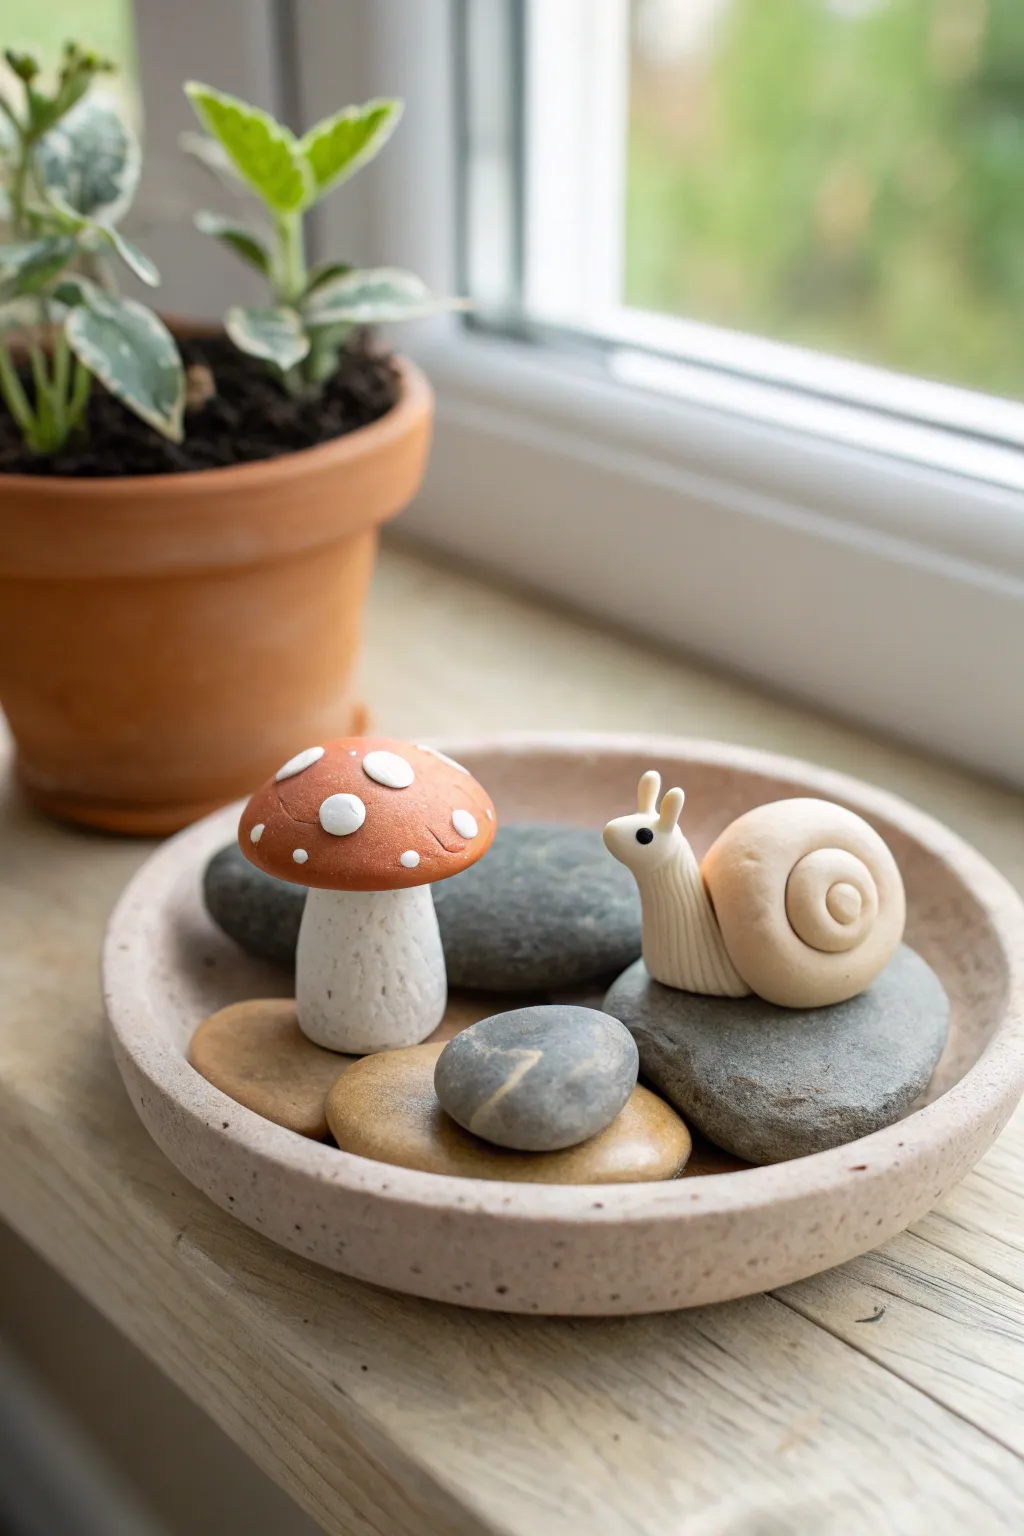
Create a peaceful miniature landscape featuring a sculpted mushroom and snail friend resting on river stones. This charming project combines natural elements with simple polymer clay sculpting for a delightful desk accessory or fairy garden piece.
Detailed Instructions
Materials
- Polymer clay (white, beige/tan, terracotta/red)
- Small shallow plant saucer or clay dish (beige speckled ideally)
- Smooth river stones (various sizes in grey and tan)
- Acrylic rolling pin or clay roller
- Detailing tool or needle tool
- Ball stylus tool
- Baking sheet
- Aluminum foil
- Oven (for baking)
- Strong craft glue (E6000 or similar)
Step 1: Sculpting the Snail
-
Prepare the Snail Shell:
Start by conditioning a chunk of beige polymer clay until it is soft and pliable. -
Roll the Coil:
Roll the beige clay into a long, tapered snake, keeping one end slightly thicker than the other. -
Form the Spiral:
Beginning at the thin end, roll the coil inward upon itself to create a tight spiral shell shape, pressing gently so the layers adhere. -
Shape the Snail Body:
Take a slightly lighter shade of beige or white clay and roll a short, thick log for the body. -
Lift the Head:
Bend the front third of the body upward to create the neck and head area. -
Add Texture:
I like to use a needle tool to drag thin lines vertically up the snail’s neck to mimic wrinkled skin texture. -
Attach the Antennae:
Roll two tiny, thin logs of the lighter clay and press them gently onto the top of the head for eye stalks. -
Attach the Eyes:
Add microscopic balls of black clay to the sides of the head for eyes, or mark the spots to paint later. -
Assemble the Snail:
Press the shell firmly onto the back of the body piece so they bond securely.
Clay Too Soft?
If your clay feels sticky or mushy and won’t hold the snail’s antenna shape, pop it in the fridge for 10 minutes to firm it up before sculpting.
Step 2: Sculpting the Mushroom
-
Form the Stalk:
Roll a thick cylinder of white clay, slightly wider at the base, to form the mushroom stem. -
Texture the Stalk:
Use a toothbrush or crumpled foil to gently press texture into the stem for an organic, earthy look. -
Shape the Cap:
Roll a ball of terracotta or red clay, then flatten the bottom and curve the top into a dome shape. -
Add Polka Dots:
Flatten tiny balls of white clay into thin discs and press them randomly onto the red cap. -
Connect Cap and Stem:
Place the cap onto the stem, blending the clay underneath slightly if needed for stability.
Add Mossy Details
Make the scene lush by tucking bits of preserved moss or faux grass in the gaps between the river stones for a forest floor vibe.
Step 3: Baking and Assembly
-
Bake the Clay:
Place your finished snail and mushroom on a foil-lined baking sheet and bake according to your clay package instructions (usually 275°F for 15-30 minutes). -
Cool Down:
Allow the pieces to cool completely before handling to prevent fingerprints or breakage. -
Arrange the Stones:
Fill your shallow dish with smooth river stones, creating flat areas where your sculptures can sit comfortably. -
Final Placement:
Nestle the mushroom and snail onto the stones. -
Optional Gluing:
For a permanent display, apply a small dot of strong craft glue to the bottom of the sculptures and adhere them to the rocks.
Enjoy the quiet charm this little nature scene brings to your windowsill or shelf