Mini polymer clay projects are my favorite kind of satisfying because you can finish something adorable in one sitting. If you’re craving tiny, cute, beginner-friendly makes, these ideas will keep your studio table happily busy.
Tiny Food Charms With Cute Faces
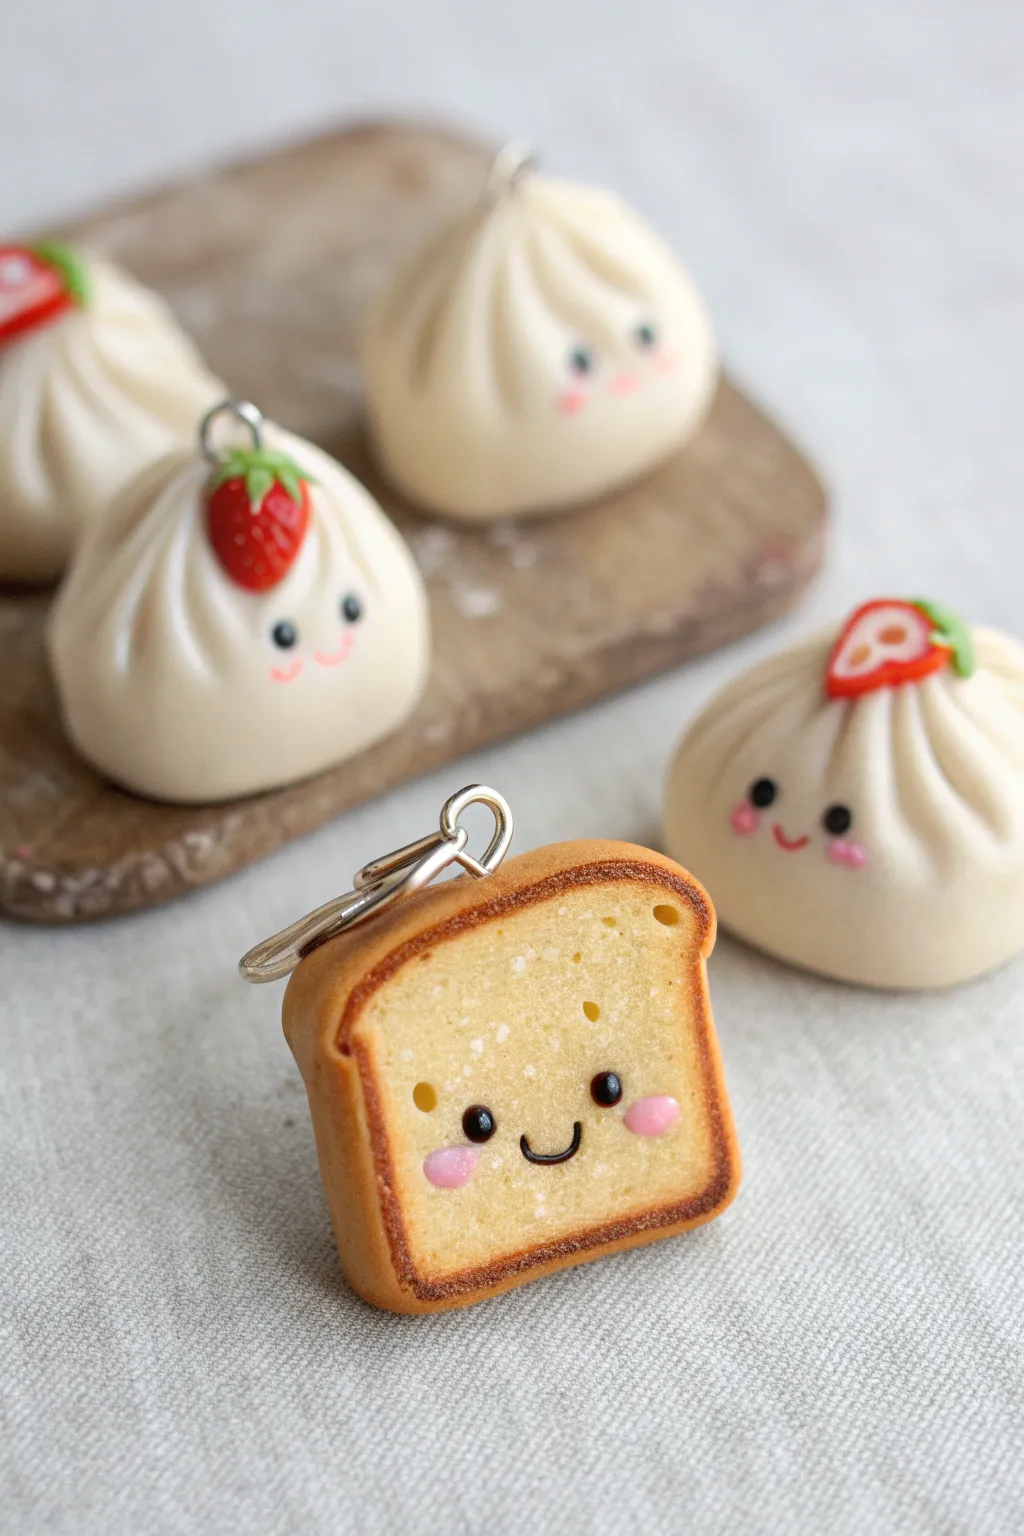
Brighten up your keychain collection with these adorable miniature food charms made from polymer clay. This project features fluffy steamed buns topped with strawberries and golden slices of toast, all brought to life with sweet, tiny smiles.
Step-by-Step Guide
Materials
- White polymer clay
- Translucent polymer clay
- Ecru or light beige polymer clay
- Red and green polymer clay (for strawberries)
- Soft floral pastels (soft pastels or chalk)
- Black and pink acrylic paint
- Liquid polymer clay (Fimo liquid or similar)
- Gloss glaze or UV resin
- Eye pins or screw eyes
- Texture tool (toothbrush or stiff brush)
- Needle tool or detailing tool
- Small paintbrush
- Dotting tool or toothpick
- Blade or craft knife
Step 1: Crafting the Happy Toast
-
Mix the dough color:
Begin by conditioning your clay. Mix white clay with a small amount of ecru and a touch of translucent clay to achieve a realistic, slightly airy bread color. Roll this out into a thick slab, about 1/4 inch thick. -
Shape the slice:
Use a square cutter or your blade to cut a square shape. Gently round the top two corners with your fingers to mimic the classic loaf shape, pressing in slightly at the sides to create the ‘waist’ of the bread slice. -
Create bread texture:
Take a stiff toothbrush or a crumpled ball of aluminum foil and tap it firmly all over the front and back surfaces of the clay. I find this creates those realistic little air pockets and crumbs seen in real bread. -
Color the crust:
Scrape some brown and orange soft pastels into a fine powder. Using a soft, dry paintbrush, carefully shade the outer edges of the toast slice to create a golden-brown crust effect, blending slightly inward. -
Add larger air holes:
Use a needle tool to poke a few deeper, irregular holes randomly across the surface for added realism, just like the pockets found in milk bread. -
Insert the hardware:
Carefully insert an eye pin or screw eye into the top center of the toast slice. Make sure it goes deep enough to be secure but doesn’t distort the shape.
Too Much Dust?
If you accidentally apply too much pastel powder for the crust, use a piece of raw clay or masking tape to gently lift the excess powder off before baking.
Step 2: Sculpting the Steamed Buns
-
Form the bun base:
Roll white clay into a smooth ball about 3/4 inch in diameter. Flatten the bottom slightly against your work surface so it sits stable. -
Create the pleats:
Using a needle tool or a clay shaper, press indentations starting from the bottom side and curving up toward the top center. Repeat this all around the bun to mimic the gathered dough look of a baozi. -
Twist the top:
Gently pinch and twist the clay at the very top center where all your pleat lines meet to create the little gathered peak. -
Make the strawberry garnish:
Shape a tiny teardrop from red clay. Flatten it slightly and slice it if you want a cut fruit look. Add tiny green leaves from green clay and attach this to the top or side of the bun. -
Attach hardware:
Insert an eye pin into the top of the bun, avoiding the strawberry detail.
Step 3: Baking & The Cute Face
-
Bake the charms:
Place your creations on a tile or parchment-lined tray. Bake according to your clay manufacturer’s instructions (typically 275°F/130°C for 15-30 minutes). Let them cool completely before handling. -
Paint the eyes:
Using a small dotting tool dipped in black acrylic paint, place two small dots for the eyes. Ideally, place these lower on the object for a ‘kawaii’ proportion. -
Draw the mouth:
Use a very fine detail brush or a needle tool dipped in black paint to draw a tiny ‘U’ shape between the eyes for a smiling mouth. -
Add rosy cheeks:
Mix a tiny amount of pink paint or use pink pastel powder. Dab two soft oval shapes right next to the eyes to give them a blushing look. -
Apply highlights:
Once the black paint is dry, add a minuscule white dot to the upper corner of each eye to bring the character to life. -
Seal the charm:
Coat the strawberry detail and the painted face area with a thin layer of gloss glaze or UV resin for protection and shine. The bread and bun main bodies can remain matte for a realistic texture.
Scented Charms
Mix a tiny drop of vanilla or bread-scented fragrance oil into the raw clay while conditioning. Your charms will smell like a bakery when finished
Attach a split ring or lanyard strap to your eye pin and enjoy your new tasty companions


Mini Animal Heads as Keychain Charms
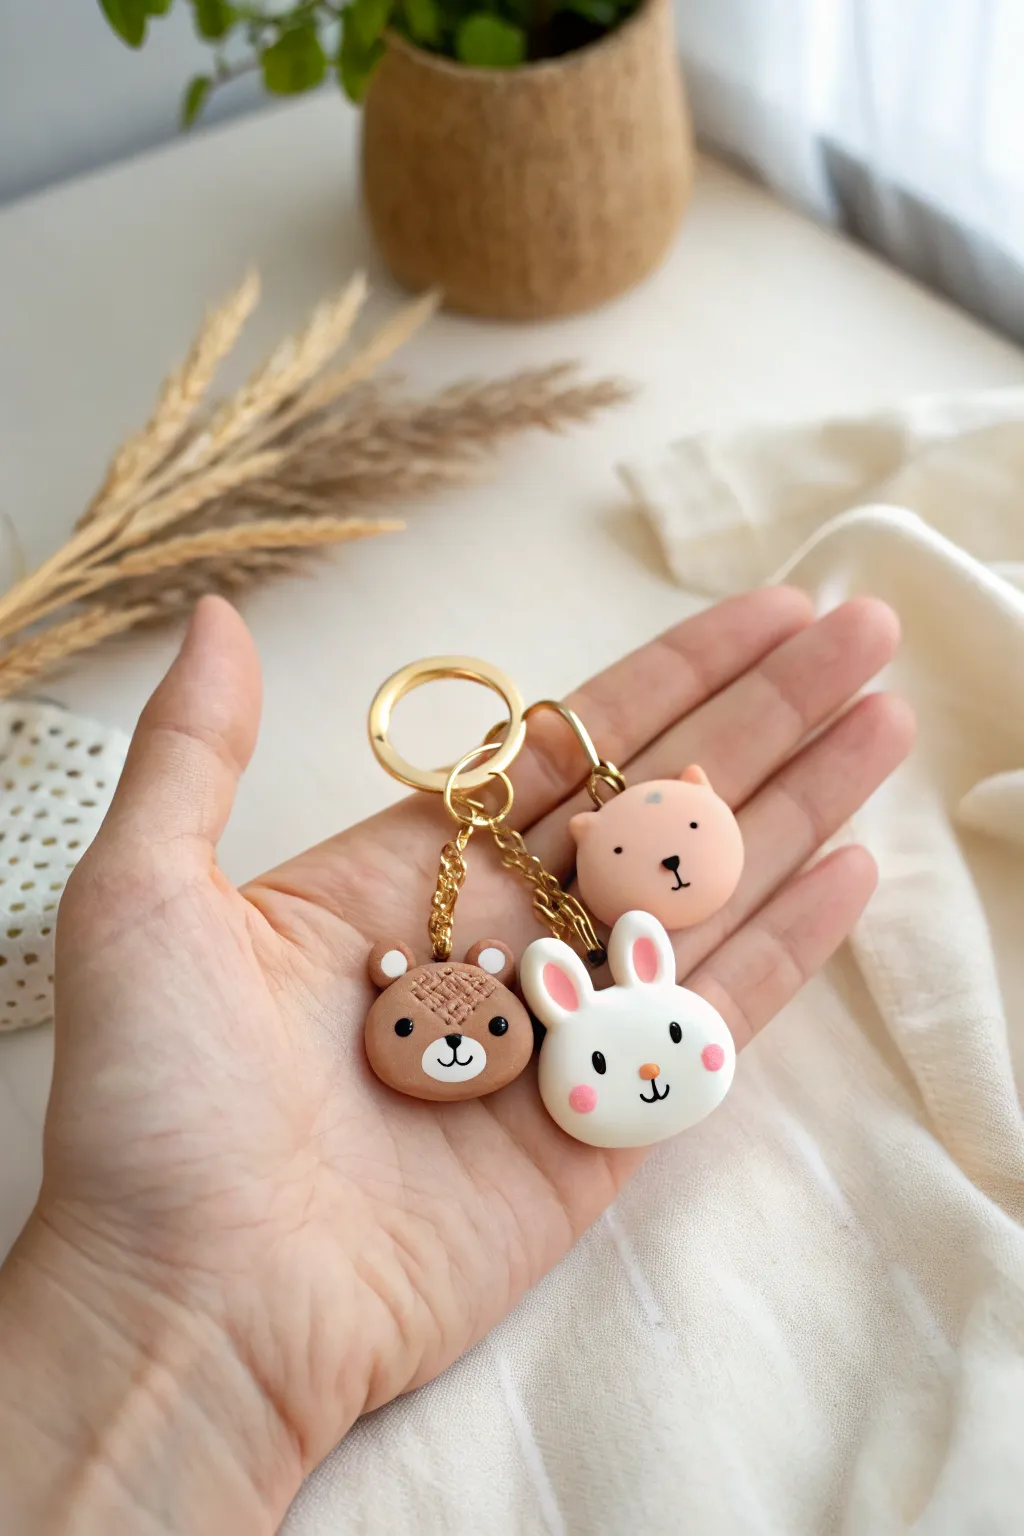
These utterly adorable keychain charms feature simple, rounded animal faces that are perfect for beginners to polymer clay sculpting. With their smooth matte finish and delicate painted details, the bear, bunny, and cat make for charming gifts or personal accessories.
Step-by-Step Tutorial
Materials
- Polymer clay in brown, white, and peach/light pink
- Small amount of black and pink polymer clay (for details)
- Eye pins (gold or silver)
- Gold keychain rings with chains
- Jump rings
- Jewelry pliers (round nose and flat nose)
- Dotting tool or ball stylus
- Needle tool or toothpick
- Acrylic rolling pin
- Soft pastel chalks (pink) for blushing cheeks
- Small fluffy paintbrush
- Liquid polymer clay (optional, for secure bonding)
- Oven for baking
Step 1: Shaping the Base Heads
-
Condition the clay:
Start by thoroughly kneading your brown, white, and peach clays separately until they are soft and pliable. This conditioning step is crucial to prevent cracks later on. -
Form the spheres:
Roll three equal-sized balls of clay—one in each color—about the size of a large grape or small walnut. Roll them between your palms until they are perfectly smooth with no seam lines. -
Flatten slightly:
Gently press each ball onto your work surface with your palm to create a smooth, flattened dome shape rather than a perfect sphere. Try to keep the edges rounded and soft.
Clean Clay Pro-Tip
Keep wet wipes or baby wipes nearby. Clean your hands and tools completely when switching from darker clay (like brown) to white to ensure the bunny stays pristine.
Step 2: Sculpting the Bear
-
Add the ears:
Roll two tiny balls of brown clay. Press them gently onto the top left and right of the brown head. Use a small ball stylus to indent the center of each ear. -
Texture the forehead:
For the unique thatch texture seen on the bear, create a small, slightly raised triangular area on the forehead. Use a needle tool to scratch delicate cross-hatching or fur lines into this specific patch. -
Create the muzzle:
Press a tiny flattened oval of white clay onto the lower center of the face for the snout.
Loose Eye Pins?
If an eye pin feels loose after baking, pull it out gently, add a drop of super glue or E6000 to the shaft, and slide it back into the existing hole.
Step 3: Sculpting the Bunny & Cat
-
Bunny ears:
Roll two small logs of white clay and flatten them slightly. Pinch one end of each log to a point. Attach these to the top of the white head. Add tiny strips of pink clay inside the ears for detail. -
Cat ears:
For the peach-colored charm, form two small triangles. Attach them to the top of the head using a touch of liquid clay if needed to help them stick. -
Insert eye pins:
Carefully trim your eye pins so they aren’t too long. Insert one into the top center of each animal head. I like to add a dab of liquid clay to the pin’s shaft before inserting strictly for extra security.
Step 4: Facial Details & Baking
-
Pre-bake blushing:
Before baking, scrape a little pink soft pastel into a powder. Use a small, dry brush to gently dust pink ‘cheeks’ onto the bunny and bear. -
Bake the charms:
Place your charms on a parchment-lined baking sheet or ceramic tile. Bake according to your specific clay manufacturer’s instructions (usually 275°F/130°C for 15–30 minutes). -
Cool down:
Allow the pieces to cool completely in the oven with the door cracked, or on a counter. Do not handle them while hot, as the clay is still fragile.
Step 5: Finishing Touches
-
Paint the faces:
Once cool, use a very fine detail brush or a needle tool dipped in black acrylic paint to draw the tiny eyes, noses, and mouths. Alternatively, you can use tiny bits of black clay for eyes before baking, but paint allows for finer lines. -
Add white highlights:
Use a needle tip to add the tiniest speck of white paint to the eyes to make them look alive. -
Seal:
Coat the charms with a matte polymer clay varnish to protect the paint and pastel blushing. -
Assemble the keychain:
Open a jump ring with your pliers using a twisting motion (never pull apart). Slide it through the eye pin loop and the keychain chain, then twist it closed securely.
Attach these sweet little faces to your keys or backpack and enjoy your handmade companions


Mini Mushroom Sprout Decorations
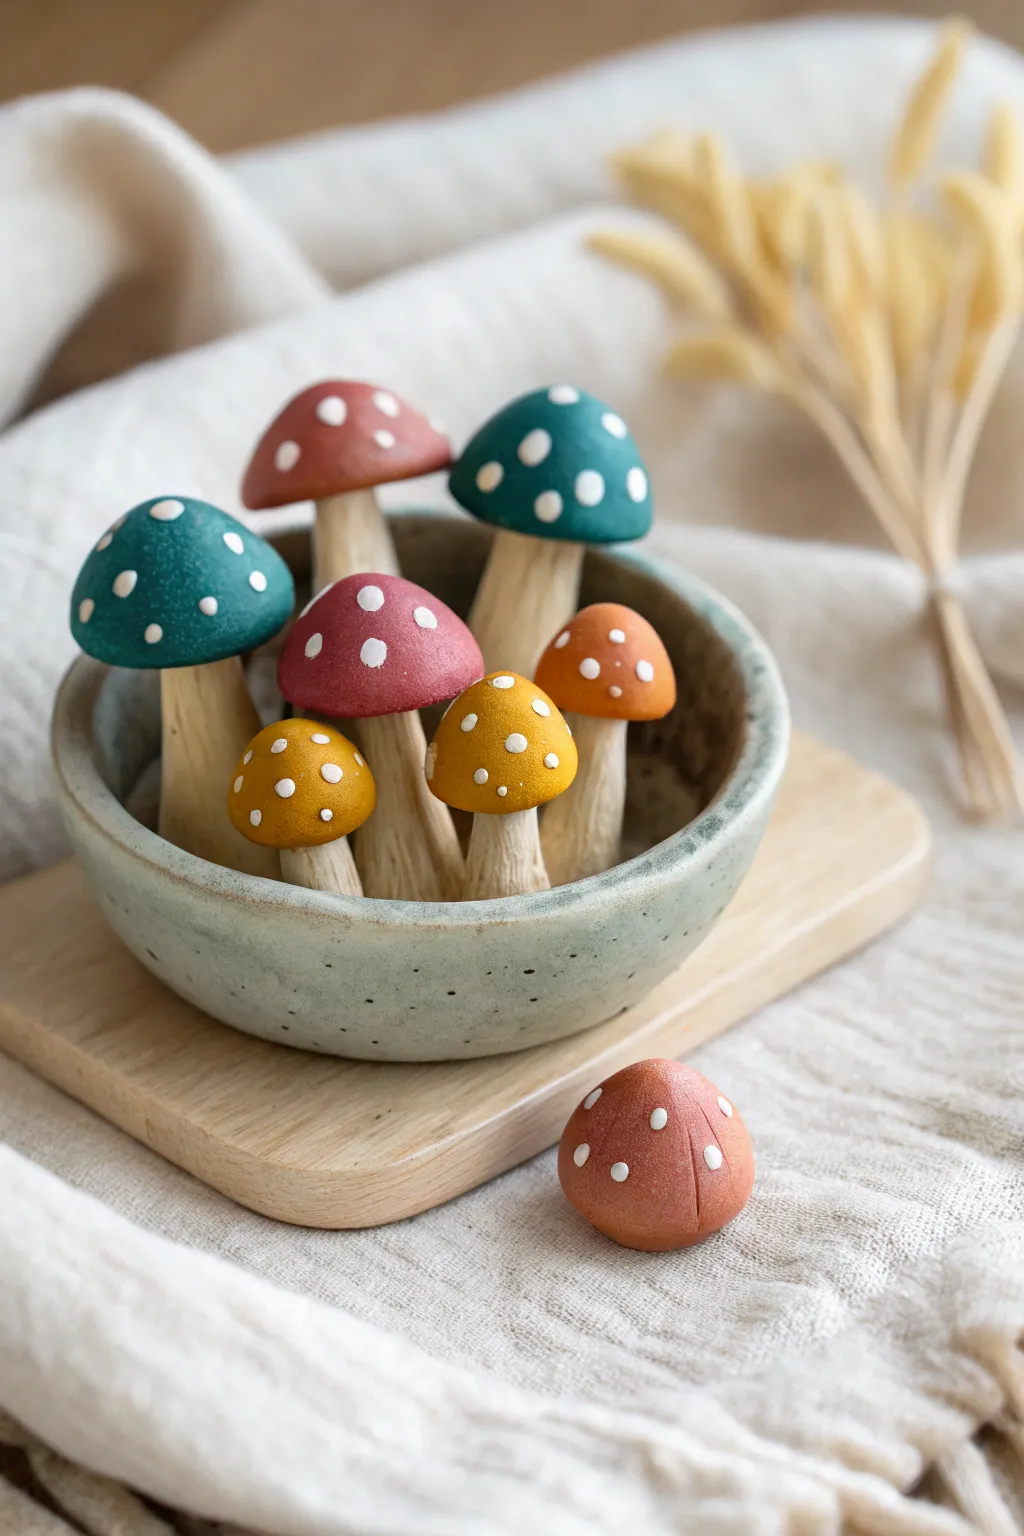
These charming miniature mushrooms feature earthy, matte-toned caps dotted with delicate white specks and textured, organic-looking stems. They make for enchanting desk companions or a sweet addition to a potted plant display.
Step-by-Step Guide
Materials
- Polymer clay (white, beige, teal, dusty rose, mustard yellow, rust orange)
- Needle tool or toothpick
- Small dotting tool or ball stylus
- Soft pastel chalks (browns and ochres)
- Small fluffy paintbrush
- Aluminum foil
- Liquid polymer clay (optional)
- Wire cutters
- Toothbrush (for texturing)
- Oven for baking
Step 1: Shaping the Stems
-
Prepare the stem color:
Mix a large portion of beige polymer clay with a tiny pinch of white to get a natural, bone-like color. Condition the clay until it is soft and pliable. -
Form the base shapes:
Roll the clay into thick logs of varying lengths. Pinch one end of each log slightly to create a tapered bottom, leaving the top end slightly wider to support the cap. -
Add vertical texture:
Using a needle tool, drag vertical lines down the length of each stem. Vary the pressure to create deep and shallow grooves that mimic the fibrous texture of a real mushroom stalk. -
Refine the texture:
Gently tap the surface of the stems with a dry toothbrush. This softens the harsh lines and adds a porous, organic look to the clay. -
Apply shading:
Scrape a bit of brown soft pastel into a fine dust. Using a small fluffy brush, dust the bottom third of the stems and the grooves to create an aged, earthy effect. -
Insert support (optional):
If you plan to plant these later, you can insert a small piece of wire into the bottom of the stem now, or just bake them flat if they will sit in a bowl.
Step 2: Creating the Caps
-
Mix earthy tones:
Prepare your cap colors—teal, dusty rose, mustard, and rust. Keep the colors somewhat muted rather than neon bright for a natural aesthetic. -
Shape the domes:
Roll small balls of colored clay. Gently flatten the bottom and round the top to create a classic hemispherical mushroom cap shape. -
Prepare the underside:
Indent the center of the flat bottom of each cap with a ball tool. This creates a socket for the stem to fit into securely. -
Attach stem to cap:
Apply a tiny drop of liquid polymer clay (or just press firmly) into the indentation and insert the textured stem. Smooth the seam slightly if needed, though a distinct separation looks realistic. -
Curve the edges:
Gently pull the edges of the cap downward slightly so it cups the top of the stem, giving it a lively, sprouting appearance.
Natural Texture Hack
Roll your stem clay over a piece of coarse sandpaper before refining with the needle tool. It adds instant, realistic micro-texture.
Step 3: Detailing and Baking
-
Create the white specks:
Roll a very thin snake of white polymer clay. Cut incredibly tiny, varied slices from it. -
Apply the dots:
Press these tiny white bits onto the mushroom caps in a random pattern. I find that pressing them down until they are flush with the cap surface looks best. -
Texture the dots:
Lightly tap the white dots with your finger or a smooth tool to ensure they are fully adhered and don’t look like bumps sitting on top. -
Make the ‘fallen’ cap:
For the separate cap shown in the project, create a rounded rust-colored dome. Instead of a stem, use a needle tool to score radial lines from the center to the edge on the outside to mimic gills or segments. -
Final inspection:
Check for any fingerprints. If you find any, brush them away with a little baby oil or cornstarch. -
Baking time:
Arrange your mushrooms on a tile or parchment-lined baking sheet. Bake according to your clay manufacturer’s instructions (usually 275°F/135°C for 15-30 minutes depending on thickness). -
Cooling:
Let the mushrooms cool completely in the oven before moving them to prevent the thin stems from cracking while hot.
Gloss vs. Matte
Keep the finish matte for a natural look. If you want a ‘dewy’ morning effect, add uv resin or gloss varnish only to the colored caps.
Arranging these little fungi in a small ceramic dish creates an instant woodland atmosphere.


Mini Sushi Bites With Simple Details
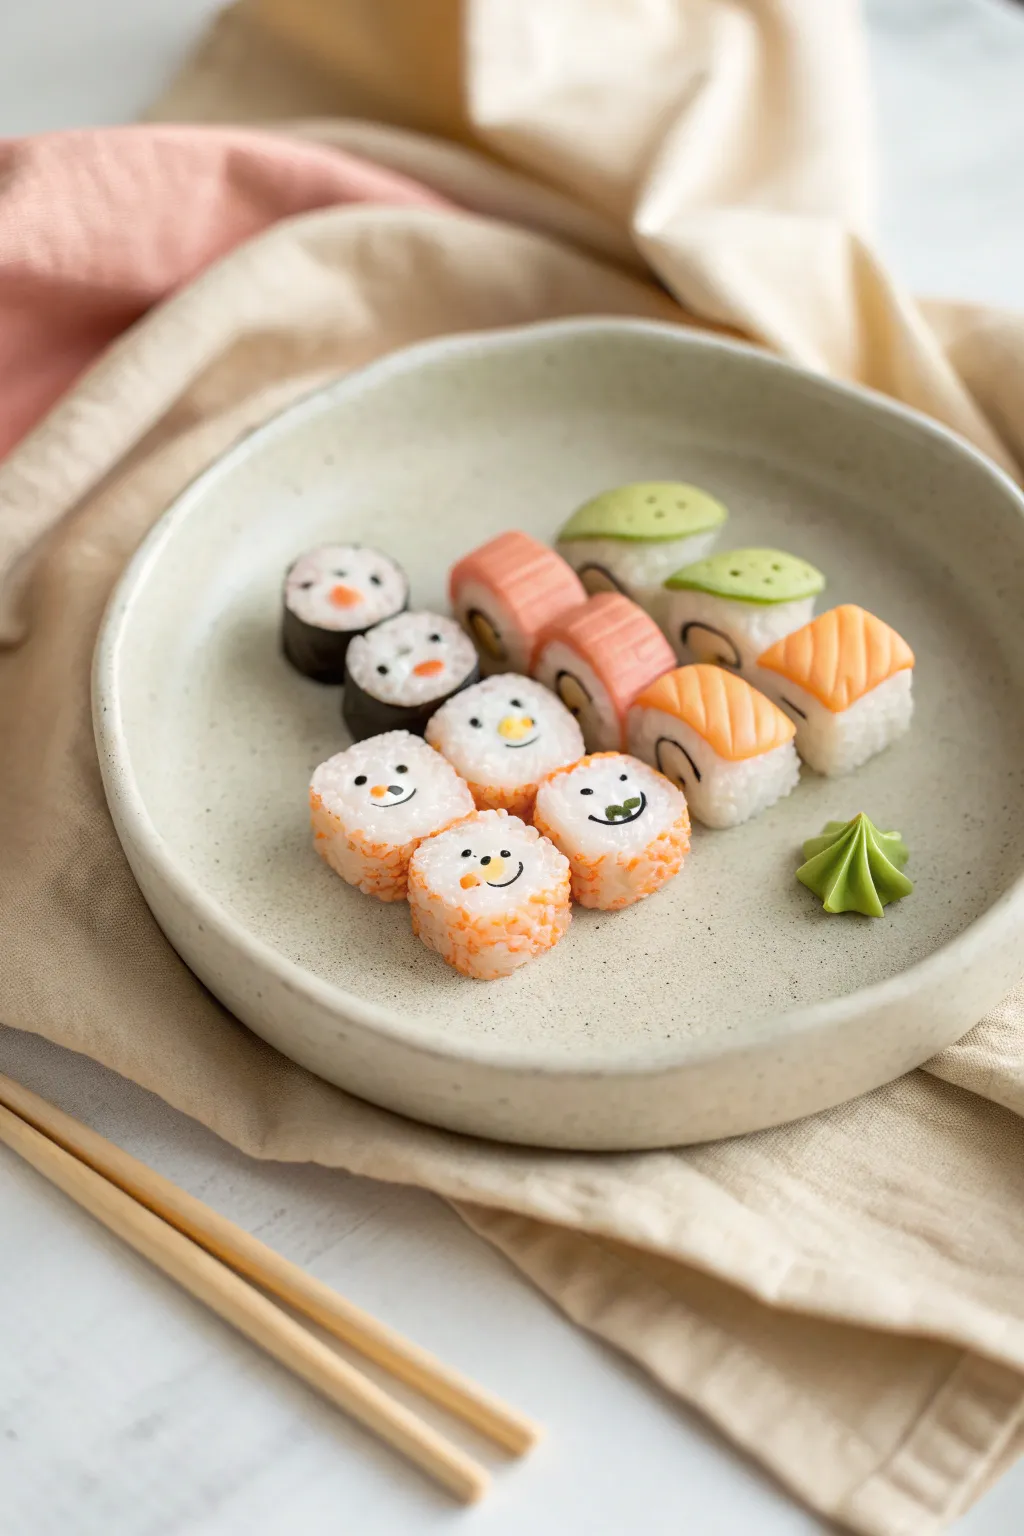
These miniature sushi bites are so adorable you’ll wish they were edible, featuring tiny smiling maki rolls and nigiri. Perfect for a dollhouse kitchen or a cute jewelry charm, this project uses simple shapes and careful coloring to achieve a realistic yet kawaii look.
How-To Guide
Materials
- White polymer clay (translucent and opaque)
- Black polymer clay
- Orange polymer clay
- Green polymer clay (light and regular)
- Pink polymer clay
- Liquid polymer clay (translucent)
- Needle tool or toothpick
- Exacto knife or tissue blade
- Soft pastel chalks (orange, salmon pink)
- Texturing tool (toothbrush or stiff brush)
- Gloss glaze or UV resin
- Black acrylic paint
- Fine detail brush or dotting tool
Step 1: Rice Preparation
-
Mix the perfect rice shade:
Combine a large chunk of opaque white clay with a small amount of translucent white. This gives the ‘rice’ that slightly waxy, realistic sushi texture rather than looking like flat plastic. -
Create the texture:
Roll your rice mixture into a small log. Before cutting individual pieces, gently pick at the surface with a needle tool or roll a toothbrush over it to create a grainy, rice-like texture all over.
Sticky Situation?
If your white ‘rice’ clay is picking up dust or lint, keep a piece of scrap clay nearby to roll in your hands periodically to clean them, or use baby wipes between colors.
Step 2: Crafting the Maki (Rolls)
-
Form the nori sheets:
Roll out black clay into a sheet as thin as paper. This will be the seaweed wrapper for your maki rolls. -
Assemble the sad maki:
Take small cylinders of your textured rice clay and wrap a strip of the thin black clay around the circumference. Trim the excess cleanly so the seam is invisible. -
Fill the center:
Use a small ball tool to press an indentation into the center top of the rice. Insert a tiny speck of orange or green clay to represent a filling like carrot or cucumber. -
Make the California rolls:
For the inside-out rolls, form small cylinders of rice clay. Instead of wrapping them in black clay, dab the sides lightly with liquid clay and roll them in finely chopped orange clay bits to mimic tobiko (fish roe).
Serving Suggestion
Make a tiny rectangular plate from beige granite-effect clay. Curve the edges upward slightly before baking to create the perfect serving vessel for your sushi set.
Step 3: Creating the Nigiri
-
Shape the rice bases:
Form small rectangular blocks from your textured white clay mixture. Round off the corners so they look comfortably soft, not geometric. -
Sculpt the salmon:
Mix orange, white, and a touch of translucent clay to get a salmon color. Flatten it into small rectangles that will drape over the rice blocks. -
Add fatty stripes:
Use a needle tool to gently impress diagonal lines across the salmon slices. I like to fill these lines with extremely thin threads of white clay, rolling flat to integrate them for that realistic fat marbling. -
Sculpt the avocado:
Create teardrop shapes from light green clay. Press them gently onto other rice bases. Use a darker green pastel dust on the very edges to mimic the avocado skin. -
Add toppings:
For the avocado nigiri, create tiny dots of regular green clay to look like seeds or scallions and place them on top.
Step 4: Bringing them to Life
-
Pre-bake prep:
Arrange all your pieces on a ceramic tile or baking sheet. Make sure they aren’t touching so they don’t fuse together. -
Bake:
Bake the pieces according to your clay manufacturer’s instructions, usually around 275°F (130°C) for 15-20 minutes. Let them cool completely before handling. -
Paint the faces:
Using a very fine detail brush or a needle tool dipped in black acrylic paint, add two tiny dots for eyes. Paint a simple curved line or a small ‘o’ for the mouth. -
Add rosy cheeks:
Scrape a bit of pink pastel chalk into a powder. Use a dry brush to gently dab pink cheeks onto the ends of the smiley faces. -
Shape the wasabi:
Take a tiny amount of green clay (you can do this post-bake if you use glue, or bake it separately) and pinch it into a star-like shape to resemble a dollop of wasabi. -
Glaze and finish:
Apply a thin coat of gloss glaze or UV resin to the ‘fish’ parts and the roe to make them look fresh and moist. Leave the rice matte for contrast.
Once the glaze is dry, your tiny sushi platter is ready to serve up a smile.

What Really Happens Inside the Kiln
Learn how time and temperature work together inside the kiln to transform clay into durable ceramic.
Mini Cat Paws and Beans Pieces
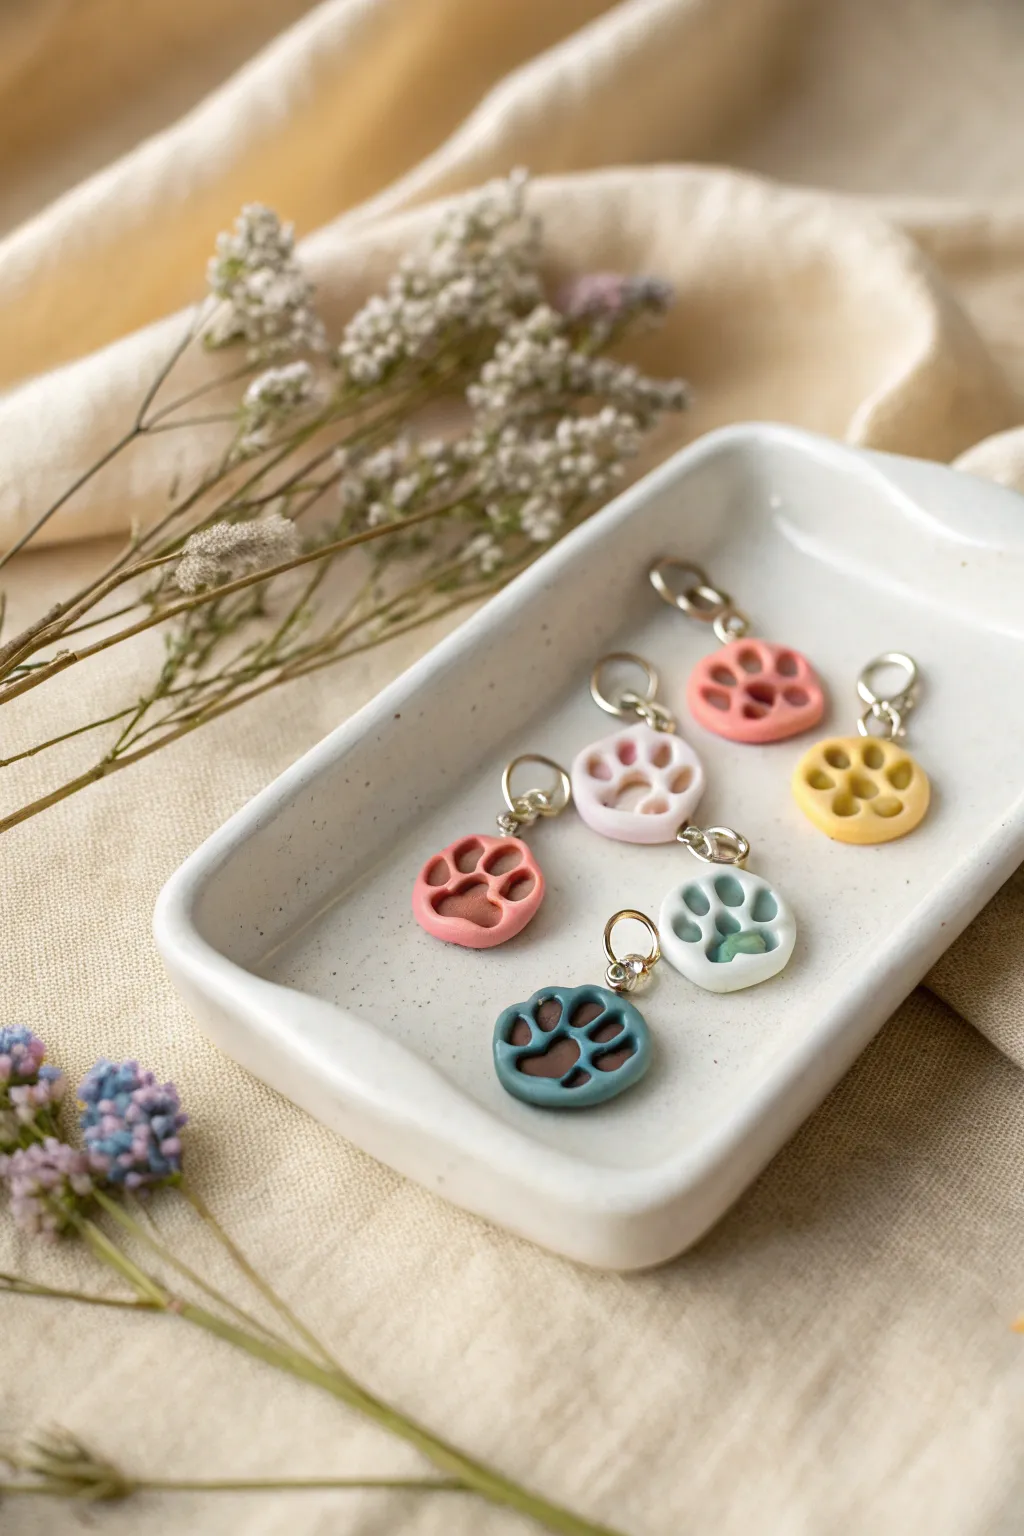
These adorable mini cat paw charms feature contrasting paw pads or ‘beans’ nestled into a soft, rounded base for a sweet, tactile finish. Perfect for attaching to zippers, stitch markers, or jewelry, this project creates durable keepsakes that capture the cuteness of feline feet.
Detailed Instructions
Materials
- Polymer clay in assorted base colors (white, pink, blue, yellow, red)
- Contrasting polymer clay colors for pads (brown, pink, yellow)
- Small circle cutters (approx. 1/2 inch) or a shaped paw mold (optional)
- Dotting tools or ball stylus tools (various sizes)
- Needle tool or toothpick
- Small jump rings (silver or gold tone)
- Baking tile or parchment paper
- Gloss glaze or UV resin (optional for shine)
- Clay roller or pasta machine
Step 1: Prepping the Dough
-
Condition the clay:
Start by warming up your base colors of polymer clay in your hands. Knead and roll them until they are soft, pliable, and free of cracks. -
Create uniform thickness:
Roll out your base color sheets to a medium thickness, roughly 3mm to 4mm. I like to use playing cards as depth guides on either side of my roller to ensure they are perfectly even. -
Cut the base shapes:
Using a small round cutter or a specialized paw-shaped cutter, punch out your main shapes. If using a round cutter, gently press the sides in slightly to give it a more organic, oval ‘paw’ silhouette. -
Smooth the edges:
Gently run your clean fingertip around the cut edge of each piece to soften the sharp cut lines, creating a rounded, stone-like ease to the shape.
Clean Clay Tip
Keep separate baby wipes handy for cleaning your hands between colors. Dark pigments like the brown ‘beans’ can easily stain light pastel base colors.
Step 2: Adding the Beans
-
Create indentations:
Using a large ball stylus tool, press a large indentation into the lower center of the shape for the main pad. Use a smaller stylus to press four smaller toes in an arc above the main pad. -
Prepare the filling clay:
Take your contrasting color clay (like chocolate brown or soft pink) and roll tiny snakes or balls. You need one larger ball for the palm pad and four tiny ones for the toes. -
Insert the main pad:
Place the larger ball of contrasting clay into the main indentation. Press it down gently with your finger or a flat tool so it fills the void but stays slightly domed. -
Add the toes:
Carefully place the four tiny balls into the toe indentations. Press them in securely to ensure the clays bond together seamlessly. -
Refine the shape:
If the pads look too bulging, gently roll over the surface strictly once with an acrylic roller to flatten them flush, or leave them raised for texture.
Step 3: Hardware and Baking
-
Pierce the hole:
Use a needle tool or a thick pin to pierce a hole through the top center of the paw. Make sure the hole is wide enough to accommodate your jump rings later. -
Check for lint:
Inspect your pieces for any dust or fingerprints. Lightly brush them with a bit of baby oil or rubbing alcohol on a brush to smooth imperfections before baking. -
Bake the charms:
Place the paws on a ceramic tile or parchment-lined tray. Follow the baking temperature and duration specified on your specific brand of polymer clay packaging. -
Cool slowly:
Allow the pieces to cool completely inside the oven with the door slightly ajar to prevent thermal shock, which can cause cracking. -
Attach hardware:
Once cool and hard, use jewelry pliers to twist open a jump ring. Thread it through the pre-made hole and close it securely. -
Optional glazing:
For extra protection and a ‘wet bean’ look, apply a thin coat of polyurethane gloss varnish or UV resin just to the colored pads, curing or drying according to instructions.
Make it Sparkle
Mix a tiny amount of mica powder or fine glitter into the translucent clay for the base to give these paws a magical, jelly-like shimmering effect.
Enjoy your collection of sweet, tiny paw prints as cute reminders of your furry friends
Mini Stars, Moons, and Clouds Charms
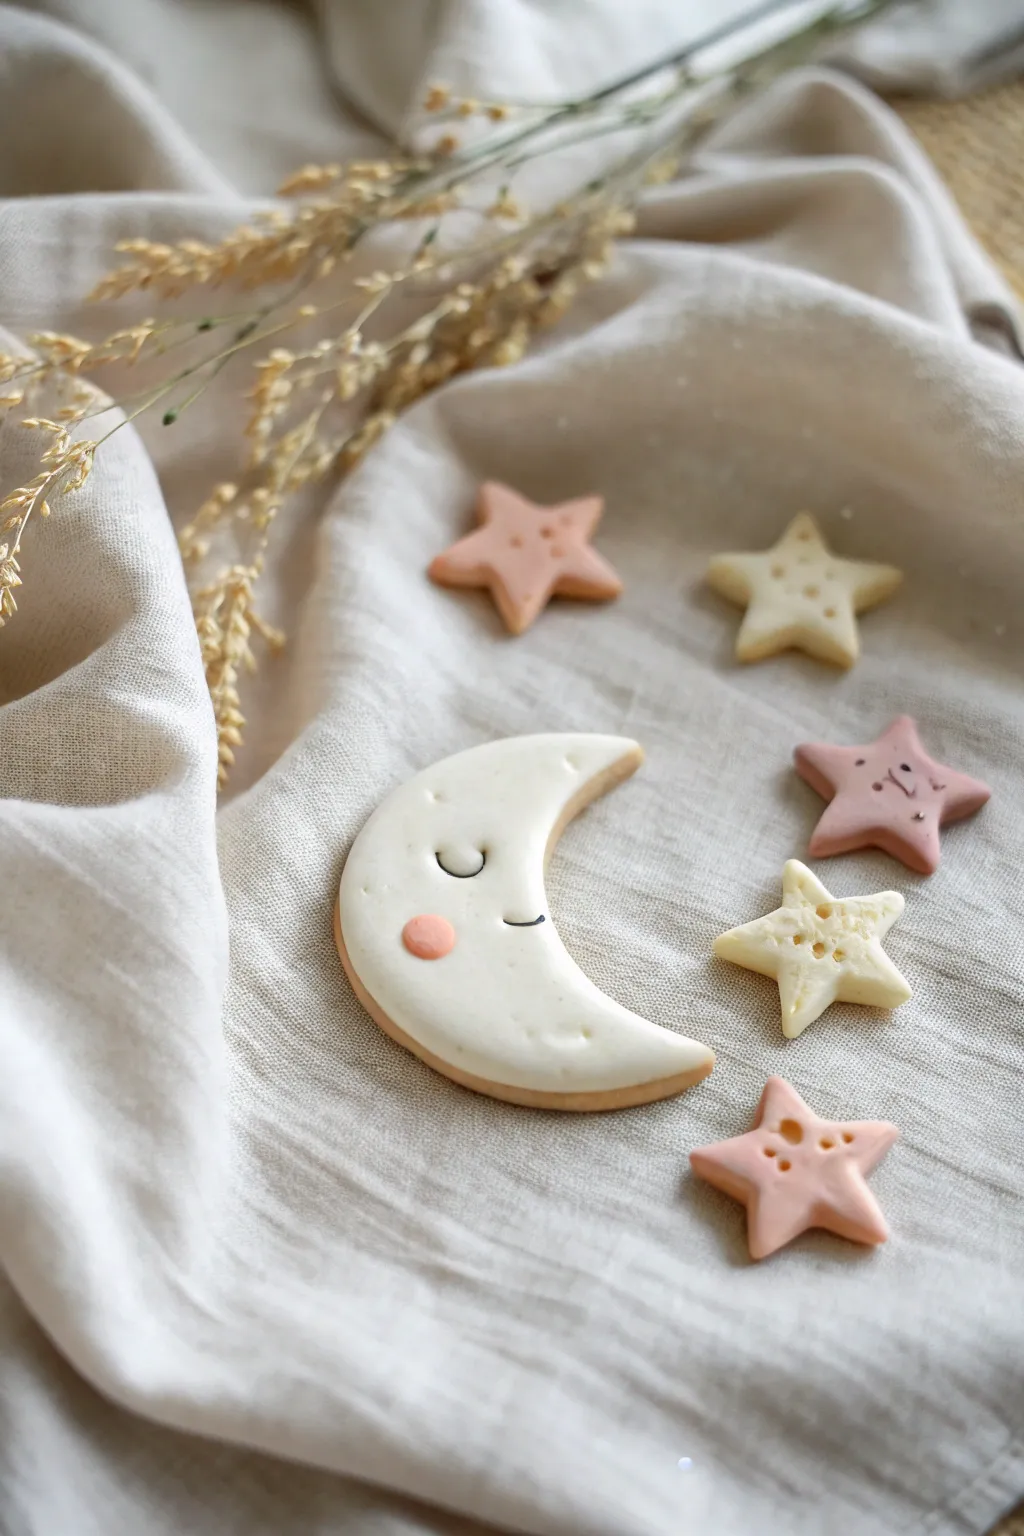
Create a dreamy night sky set featuring a gentle sleeping moon and constellation of pastel stars. These pieces have a soft, cookie-like finish perfect for nursery decor, mobiles, or oversized jewelry charms.
Step-by-Step
Materials
- Polymer clay (white, blush pink, translucent)
- Small rolling pin
- Moon and star cookie cutters (small sizes)
- Needle tool or toothpick
- Ball stylus tool
- Black acrylic paint or fine-tip permanent marker
- Soft pastel chalks (pink)
- Small paintbrush
- Gloss glaze (optional)
- Baking sheet and parchment paper
- Wet wipes
Step 1: Preparing the Moon
-
Condition the Clay:
Begin by conditioning your white polymer clay until it is soft and pliable. If you want a more distinctive, translucent look like the image, mix one part translucent clay with three parts white clay. -
Roll the Slab:
Roll the clay out onto a clean surface to a thickness of about 1/4 inch (6mm). You want these to be thick and sturdy, resembling sugar cookies. -
Cut the Shape:
Press your crescent moon cutter firmly into the clay. Give it a tiny wiggle to ensure clean edges, then lift away the excess clay before removing the cutter. -
Soften the Edges:
Use your fingertip to very gently smooth the cut edges of the moon. This removes the harsh ‘cut’ look and gives it that soft, rounded, baked-good appearance.
Clean Clay Pro-Tip
White clay picks up dust instantly. Keep a pack of baby wipes nearby to clean your hands and tools often, especially before handling the white clay after touching the pink.
Step 2: Adding the Moon’s Face
-
Sculpt the Eyelash:
Roll an incredibly thin snake of black clay—hair-thin is the goal. Carefully curve a tiny piece onto the moon’s face to create a sleeping eyelid. Alternatively, you can use a needle tool to impress a curved line and paint it later. -
Add the Smile:
Use a needle tool or small blade to gently press a tiny, curved smile near the bottom curve of the moon. -
Create the Cheek:
Take a tiny amount of pink clay and roll it into a ball. Flatten it slightly and press it onto the moon’s surface, just below the eye and next to the smile. -
Texture the Surface:
For added character, lightly press a few random indents with a small ball stylus to mimic craters or surface texture on the white areas, keeping them shallow.
Level Up: Mobile Magic
Before baking, insert small metal eye screws into the top of each piece. After baking, string them with fishing line on a hoop to create a custom nursery mobile.
Step 3: Creating the Stars
-
Mix Color Variations:
Divide your remaining white clay. Keep one portion white and mix a small amount of pink clay into the other to create a soft, dusty rose shade. -
Cut Star Shapes:
Roll out both colors to the same thickness as the moon. Cut out several stars in both white and pink. -
Add Decorative Dots:
Use your needle tool or a small dotting tool to pierce patterns into some of the stars. Group sharp pricks in the center or create linear patterns on the star arms. -
Create Star Faces:
Select one or two stars to have personalities. Use the needle tool to indent two small dots for eyes and a tiny curve for a smile, similar to the moon.
Step 4: Finishing Touches
-
Shade with Pastels:
Before baking, scrape a little pink pastel chalk into a powder. Use a soft, dry brush to gently dust the edges of the moon and stars to give them a warm, toasted look. -
Bake:
Place all pieces on a parchment-lined baking sheet. Bake according to your clay package instructions (usually 275°F/135°C for 15-30 minutes depending on thickness). -
Cool Down:
Allow the pieces to cool completely on the tray. Moving them while hot can cause warping or fingerprints. -
Paint Details:
If you didn’t use black clay for the facial features, take a fine-tip brush with black acrylic paint (or a marker) and carefully fill in the sleepy eye and smile lines. -
Glaze (Optional):
I like to leave these matte for a natural look, but if you prefer a ceramic finish, apply a thin coat of satin or gloss glaze to seal the pieces.
Now you have a serene set of celestial charms ready to bring a touch of magic to your space


The Complete Guide to Pottery Troubleshooting
Uncover the most common ceramic mistakes—from cracking clay to failed glazes—and learn how to fix them fast.
Mini Heart Lockets and Puffy Hearts
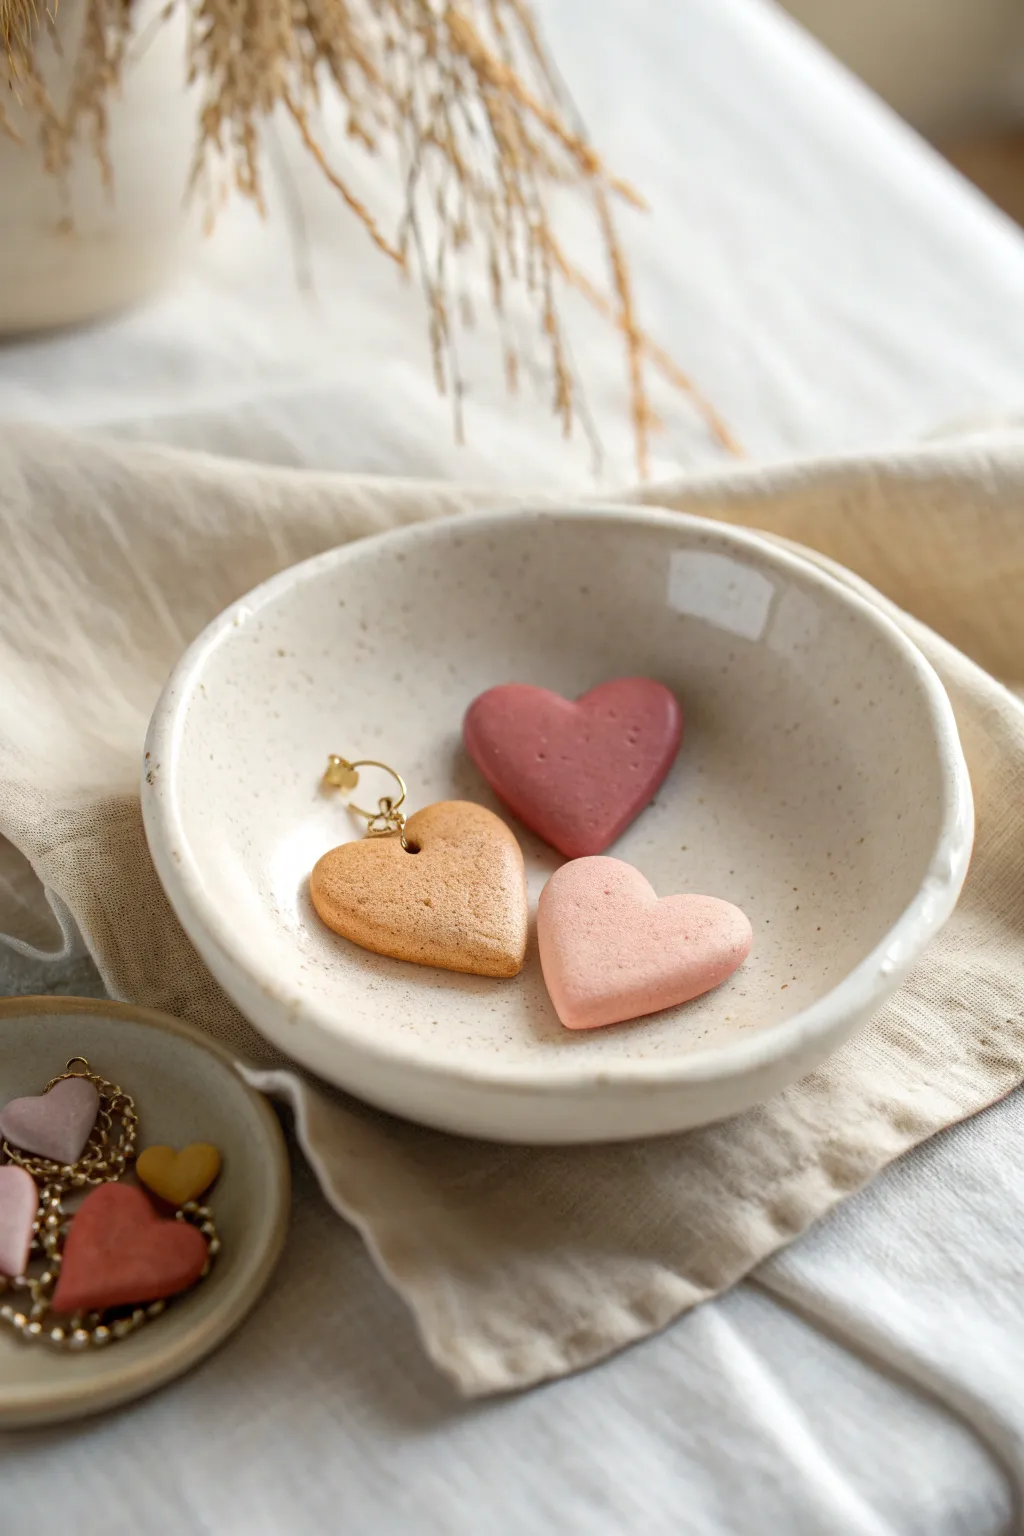
These delightfully dimensional hearts have a soft, stone-like texture and a gentle, puffy shape that feels wonderful to hold. They make perfect dainty pendants, keychains, or sweet standalone tokens of affection.
Step-by-Step Guide
Materials
- Polymer clay in dusty rose, beige/gold, and blush pink
- Faux stone clay or inclusions (black pepper or embossing powder)
- Heart-shaped cutters (various sizes)
- Acrylic roller
- Plastic wrap (cling film)
- Needle tool or toothpick
- Jump rings (gold)
- Pliers
- Baking sheet and parchment paper
- Fine-grit sandpaper (optional)
- Matte varnish (optional)
Step 1: Preparing the Clay
-
Condition the clay:
Start by warming the polymer clay in your hands. Knead each color—dusty rose, beige-gold, and blush pink—separately until they are soft and pliable. -
Create the stone effect:
To achieve the speckled look seen in the beige heart, mix a small amount of faux stone clay into your beige clay. Alternatively, knead in a pinch of ground black pepper or dried herbs for a natural speckled finish. -
Add shimmer:
For the golden beige heart on the left, you can incorporate a small amount of metallic gold mica powder or use a pre-mixed metallic gold clay for a subtle sparkle. -
Roll out a thick slab:
Roll your clay out on a smooth surface. Unlike flat cutouts, you want these to be quite thick to achieve that puffy look—aim for about 6mm to 8mm thickness.
Step 2: Shaping the Hearts
-
Apply plastic wrap barrier:
Place a sheet of plastic wrap (cling film) loosely over your rolled clay slab. This is the secret to getting those rounded, pillow-like edges instead of sharp, flat cuts. -
Cut the shapes:
Press your heart-shaped cutter firmly down through the plastic wrap and clay. The plastic pulls the clay edges down, creating a beautiful domed effect instantly. -
Release the hearts:
Remove the cutter and gently peel away the plastic wrap. Carefully lift your clay hearts from the work surface. -
Refine the form:
If the back edge is a bit sharp, gently smooth it with your fingertip. You can also press the center of the heart lightly to enhance the puffy curve.
Pillow Effect Pro-Tip
The tighter you pull the plastic wrap before cutting, the less rounded the edges will be. For maximum ‘puffiness,’ ensure the cling wrap is loose and has plenty of slack.
Step 3: Hardware and Finishing
-
Pierce the hole:
Using a needle tool, create a hole near the top of one lobe if you intend to hang it as a pendant (like the gold heart). Wiggle the tool slightly to ensure the hole is large enough for your hardware. -
Texture application:
For a rustic, organic feel, gently tap a toothbrush or a crumpled ball of foil against the surface of the clay. This adds the subtle pitting seen on the pink heart. -
Bake the batch:
Arrange your hearts on a baking sheet lined with parchment paper. Bake according to your specific clay brand’s instructions (usually around 275°F/130°C for 30 minutes). -
Cool down:
I always let the pieces cool completely inside the oven with the door slightly ajar; this helps prevent cracking from thermal shock. -
Sand for softness:
Once cool, use fine-grit sandpaper under running water to smooth out any fingerprints or rough edges, giving the ‘stone’ a polished feel. -
Adding hardware:
Open a gold jump ring using two pairs of pliers. Thread it through the hole you created earlier. -
Secure the ring:
Close the jump ring securely, ensuring the ends meet perfectly flush so the chain doesn’t slip out. -
Optional glazing:
Leave them matte for a natural look, or apply a very thin coat of matte varnish to protect the surface without adding unwanted glossy shine.
Level Up: Locket Style
Before baking, slice a thick heart in half horizontally. Hollow out the centers slightly, bake, and glue a tiny magnet inside each half to create a secret ‘hiding spot’ locket.
Now you have a collection of tactile, stone-like hearts ready to be worn or gifted
Mini “Army” Collections in One Theme
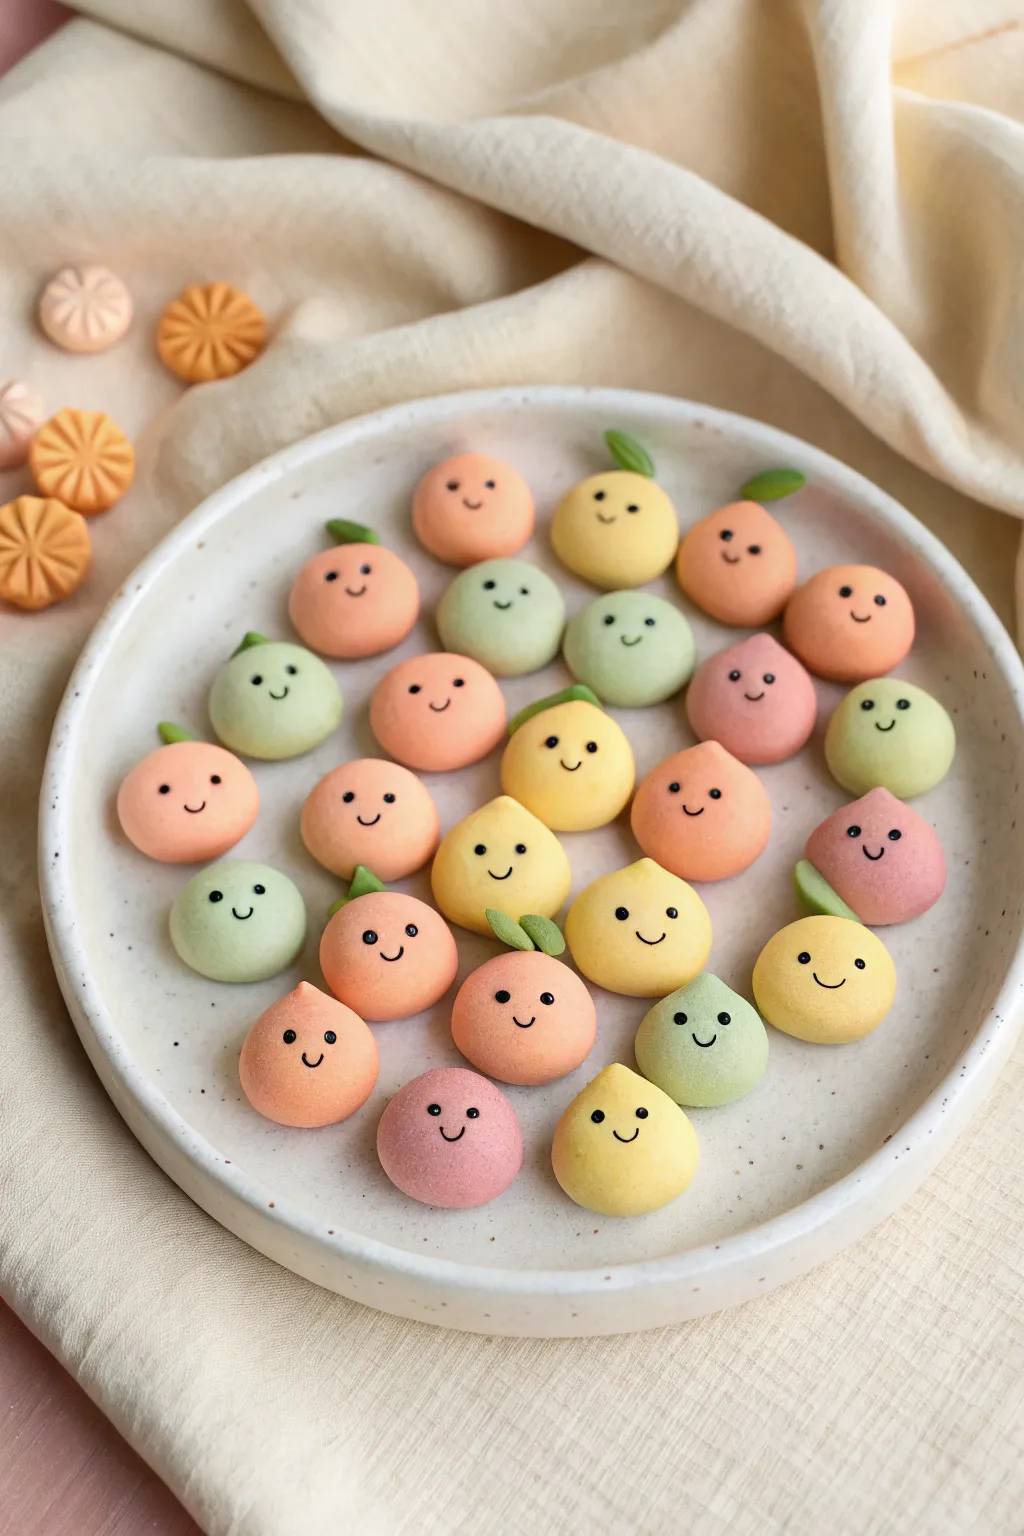
Create your own cheerful army of bite-sized fruit characters using soft pastel polymer clays. This project is perfect for beginners, featuring simple shapes that come together to form an irresistibly cute collection.
Detailed Instructions
Materials
- Polymer clay (white, peach, orange, yellow, mint green, cool pink)
- Black acrylic paint or fine-tip permanent marker
- Dotting tool or toothpick
- Ceramic tile or baking sheet
- Needle tool
- Soft paintbrush
- Matte or glossy glaze (optional)
Step 1: Color Mixing and Prep
-
Condition the clay:
Start by warming up your white clay in your hands until it is soft and pliable. This step is crucial to prevent cracking later. -
Mix pastel shades:
To achieve the soft, candy-like colors seen in the photo, mix a large amount of white clay with very tiny amounts of your colored clays. Aim for a ratio of about 4:1 (white to color) to keep them pale and dreamy. -
Create a palette:
Prepare five distinct balls of color: pale peach, soft tangerine, buttery yellow, mint green, and baby pink. Cover them lightly with plastic wrap if you’re working slowly to keep them from drying out. -
Portioning:
Pinch off small pieces of clay, roughly the size of a large marble or a chocolate truffle. I like to pre-roll all my portions first to ensure the army looks uniform in size.
Sticky Situation?
If your clay is getting too soft and sticky to hold its shape, pop it in the fridge for 10 minutes to firm it back up.
Step 2: Shaping the Bodies
-
Roll spheres:
Roll each portion between your palms into a smooth, seamless ball. Check closely for lint or fingerprints and smooth them away gently. -
Form the Hershey’s Kiss shape:
For the peach and lemon-style characters, gently pinch the top of the sphere while rotating it to create a subtle peak, resembling a teardrop or a fat Hershey’s kiss. -
Flatten the bottoms:
Tap the base of each shape onto your work surface so they sit flat without rolling away. -
Refine the shapes:
Leave some as simple rounds (like the mint ones) and make others slightly more tapered. Variety within the theme makes the collection interesting.
Step 3: Adding Details
-
Make tiny leaves:
Take a tiny scrap of green clay (slightly darker than the mint body color) and roll it into a minuscule rice grain shape. -
Attach the leaves:
Press the green grain onto the top or side of the fruit shapes. Use your needle tool to create a tiny indentation down the center of the leaf for realism. -
Smooth the seams:
Use a rubber shaper or your finger to gently blend the base of the leaf onto the fruit body so it doesn’t pop off during baking. -
Texture check:
Before baking, give your little army a final inspection. If you want a matte, soft look, you can gently pat them with cornstarch to remove shiny oils from your hands.
Make Them Wearable
Insert eye pins into the tops of the fruit before baking. Once baked, you can turn your mini army into adorable stitch markers or a charm bracelet.
Step 4: Baking and Faces
-
Baking:
Bake the pieces according to your clay manufacturer’s instructions (usually 275°F/135°C for 15-30 minutes). Use an oven thermometer to ensure you don’t scorch the light colors. -
Cooling down:
Let the pieces cool completely on the tray. They are fragile while warm, so patience is key here. -
Painting eyes:
Dip a toothpick or a very fine dotting tool into black acrylic paint. Carefully place two small dots widely spaced on the front of the shape for the eyes. -
Adding the smile:
Using the very tip of a needle tool or an ultra-fine paintbrush, draw a tiny ‘u’ shape between the eyes. Keep the line thin and delicate. -
Sealing (optional):
If you want them to look like glazed sweets, apply a coat of gloss varnish. For a natural look, leave them bare or stick to a matte varnish.
Arrange your completed pastel troop on a small dish to enjoy their cheerful company