Whenever I need a creative reset, I grab a chunk of modeling clay and let my hands do the thinking. Here are my favorite modeling clay art ideas—starting with the classics you’ll want to make right away, then drifting into the fun, quirky stuff that makes your shelf look like a tiny gallery.
Cute Mini Animal Figurines
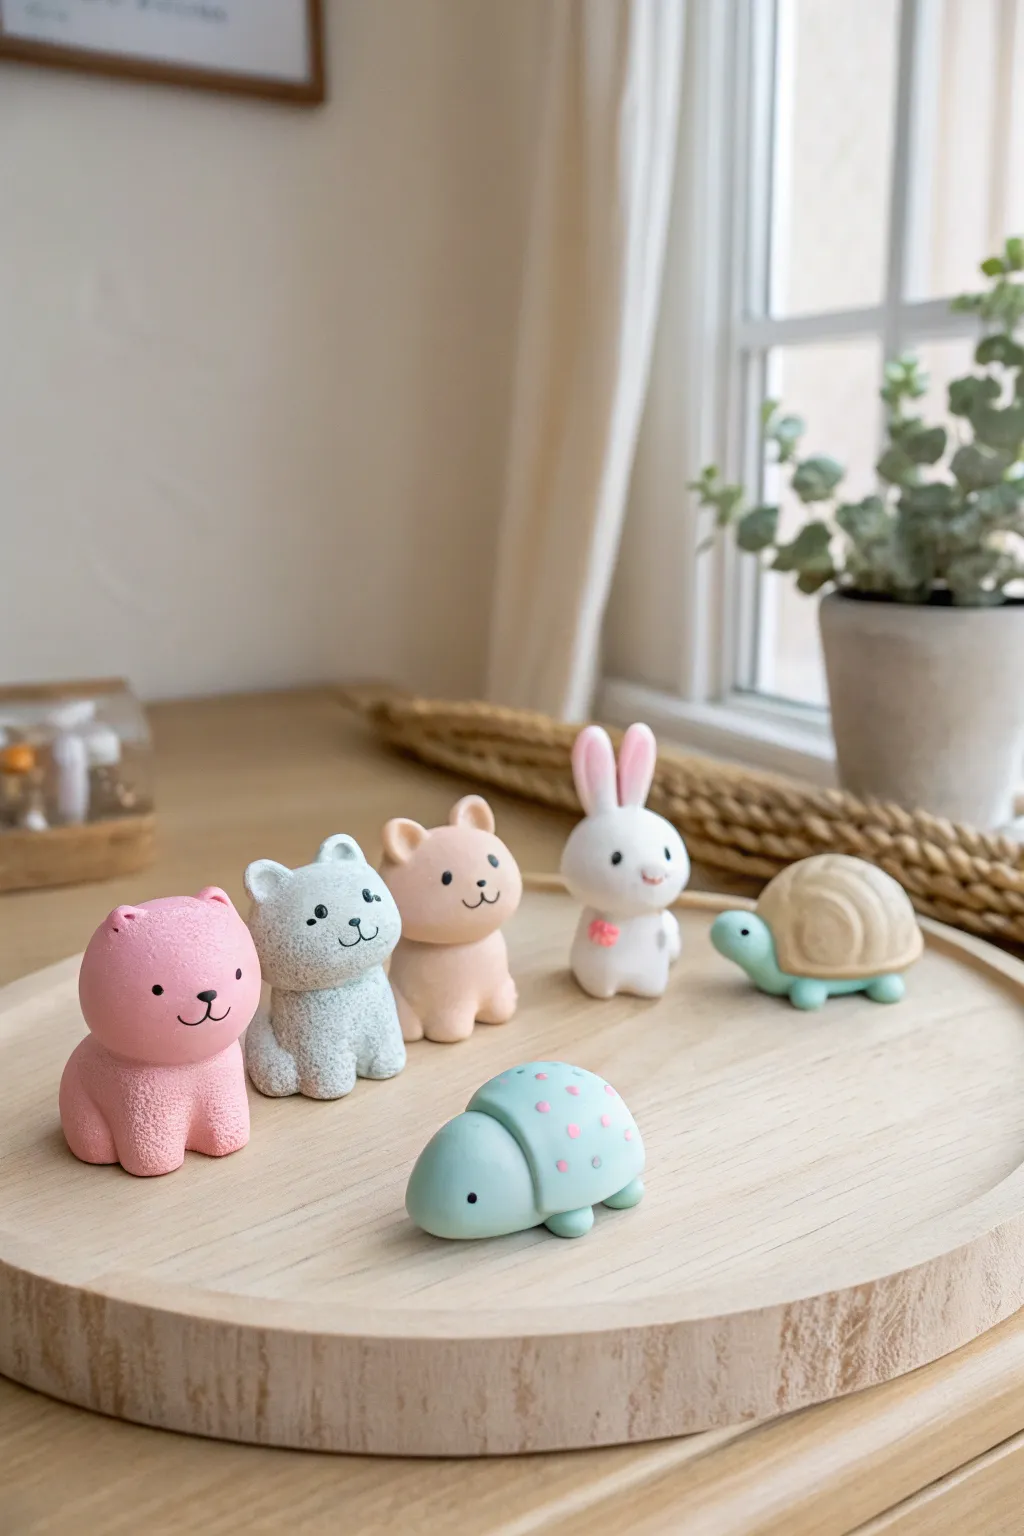
These adorable, smooth-finished animal figurines bring a touch of whimsy to any desk or shelf. With their soft pastel colors and minimalist faces, they offer a perfect introduction to shaping simple forms into expressive characters using polymer or air-dry clay.
Step-by-Step Tutorial
Materials
- Polymer clay (pink, light blue, peach, white, mint green, beige)
- Black acrylic paint or fine-point marker
- Ball stylus tools (various sizes)
- Needle tool or toothpick
- Soft texture sponge or sandpaper (for the textured look)
- Clean work surface (ceramic tile or glass)
- Oven (if using polymer clay)
Step 1: The Standing Pals (Cat, Bear, Bunny)
-
Creating the base body:
Start with a medium ball of clay (pink for the first cat, blue-grey for the second, peach for the bear). Roll it into a smooth sphere, then gently flatten the bottom so it stands up securely on your work surface. -
Adding feet:
Roll two small spheres of the same color for the front paws. Press them gently against the front bottom of the main body, blending the seams at the back so they look integrated rather than just stuck on. -
Shaping the head:
Roll a slightly smaller sphere for the head. Flatten the bottom slightly where it will join the body. Press it gently onto the top of the body piece. If you want extra security, insert a small piece of toothpick or wire between the head and body as an armature. -
Forming ears:
For the cats/bears, pinch off two tiny pieces of clay. Roll them into balls and press them onto the top of the head. Use your ball tool to gently indent the front of the bear/cat ears for depth. For the bunny, roll longer teardrop shapes and attach them upright. -
Texturing (Optional):
The blue cat has a subtle stony texture. To achieve this, gently press a coarse sponge or a crumpled ball of aluminum foil all over the surface before baking. I find this hides fingerprints beautifully while adding character. -
Adding tails:
Don’t forget the back! Roll a tiny ball for a tail and attach it to the lower back of each standing figure.
Fixing Cracks
If you see tiny cracks before baking, smooth them out with a drop of baby oil on your finger. If cracks appear after baking, fill them with a mix of matching clay and liquid clay, then re-bake briefly.
Step 2: The Crawling Critters (Turtle & Spotted Bug)
-
Making the ladybug body:
Take a portion of mint blue clay and roll it into an oval. Flatten the bottom side so it sits flush with the table. This is the main body shell. -
Creating the head:
Roll a smaller ball of the same blue clay and attach it to one end of the oval body. Smooth the connection point underneath so the seam disappears. -
Adding spots:
Take tiny pinhead-sized amounts of pink clay. flatten them into thin discs and press them randomly onto the blue shell body. -
Sculpting the turtle:
For the turtle in the back, start with a mint green body like the bug. Then, create a separate shell using beige clay. Roll a ball, flatten it slightly, and use a needle tool to carve a spiral pattern into it. Place this shell on the green body.
Accessorize!
Give your animals personality by making tiny clay accessories like scarves, bow ties, or holding a small flower. You can glue these on after baking for easier handling.
Step 3: Refining and Finishing
-
Checking stability:
Ensure all figures stand or sit flat without wobbling. Gently tap them on the table to level their bottoms. -
Baking or drying:
Follow the manufacturer instructions for your specific clay. If using polymer clay, bake on a tile or parchment-lined tray. Let them cool completely before handling. -
Painting the faces:
Once hardened and cool, use a very fine ball tool dipped in black paint (or a fine marker) to dot the eyes. Place them wide apart for that cute ‘kawaii’ look. -
Drawing the details:
Draw a tiny ‘w’ shape or a simple curved line for the mouth perfectly centered between the eyes. Add a tiny nose dot for the bear and cats. -
Adding blush:
For the bunny, consider painting a tiny pink flower on its chest or adding soft pink clay cheeks before baking.
Arrange your new little friends together and enjoy their charming company


Pinch-Pot Trinket Dishes

Embrace the beauty of imperfection with this delightful terracotta-style pinch pot. Its rustic charm and stamped rim make it the perfect minimalist home for your favorite rings and delicate jewelry.
How-To Guide
Materials
- Air-dry clay (terracotta or pink-tinted)
- Acrylic paint (pastel pink or coral if using white clay)
- Small pottery sponge
- Water in a small cup
- Detailing tool or toothpick
- Matte varnish or sealant
- Rolling pin (optional)
- Canvas cloth or baking paper
Step 1: Shaping the Base
-
Condition the clay:
Start with a ball of clay about the size of a golf ball or a large apricot. Warm it up in your hands by kneading it gently until it feels pliable and smooth, free of any cracks. -
Form the pinch pot:
Hold the clay ball in your non-dominant hand. With your thumb, press gently into the center of the ball, but stop before you push all the way through the bottom. -
Pinch the walls:
Using your thumb on the inside and fingers on the outside, gently pinch and rotate the clay. Work your way from the bottom up in a spiral motion to thin out the walls evenly. -
Check the thickness:
Aim for a uniform thickness of about 1/4 inch (6mm). Don’t worry if it’s slightly uneven; that hand-formed look adds to the organic aesthetic we are aiming for. -
Flatten the bottom:
Gently tap the base of your pot against your work surface. This ensures it creates a flat, stable bottom so it won’t wobble on your windowsill.
Cracking Up?
If small cracks appear while pinching, dip your finger in water and smooth them immediately. Cracks usually mean the clay is too dry.
Step 2: Adding Texture & Refining
-
Smooth the interior:
Dip your finger slightly in water and run it along the inside of the bowl. This smooths out any harsh fingerprints or deep cracks, although keeping some texture is perfectly fine. -
Create the rim detail:
To achieve the specific look in the photo, take a small modeling tool or the side of a toothpick. Gently press small indentations vertically all around the top rim. -
Rough it up naturally:
I like to gently tap the rim with the flat side of a tool or a small stone to create that weathered, chipped-edge appearance rather than a perfectly smooth lip. -
Refine the shape:
Step back and look at the overall silhouette. If the bowl has widened too much, cup it with both hands and gently squeeze it inwards to regain a deeper curve. -
Final smooth:
Use a barely damp sponge to wipe the exterior. You don’t want to erase your shaping marks, just soften any sharp burrs of clay.
Step 3: Finishing Touches
-
Let it dry completely:
Place your dish on a piece of parchment paper or a drying rack. Allow it to air dry for 24-48 hours. It will lighten in color and feel hard to the touch when ready. -
Sand specifically:
Inspect the rim for any sharp points that might scratch jewelry. Use fine-grit sandpaper only on the very sharpest spots, leaving the rest of the rough texture intact. -
Painting (Optional):
If you didn’t use colored clay, mix a soft, earthy pink acrylic paint. Apply a wash (paint mixed with a little water) to let the clay texture show through the color. -
Second coat:
For a more opaque look like the reference photo, add a second, thicker coat of paint once the wash is dry, focusing on the inside of the bowl. -
Seal the piece:
Finish with a coat of matte varnish. This protects the clay from moisture and gives it a finished, professional feel without making it too glossy.
Pro Tip: Rustic Texture
For that authentic stone look, mix a tiny pinch of dried coffee grounds or sand into your paint before applying it to the dried clay.
Place your new dish in a sunny spot and enjoy the warm, handmade character it brings to your space


Coil-Built Mini Bowls
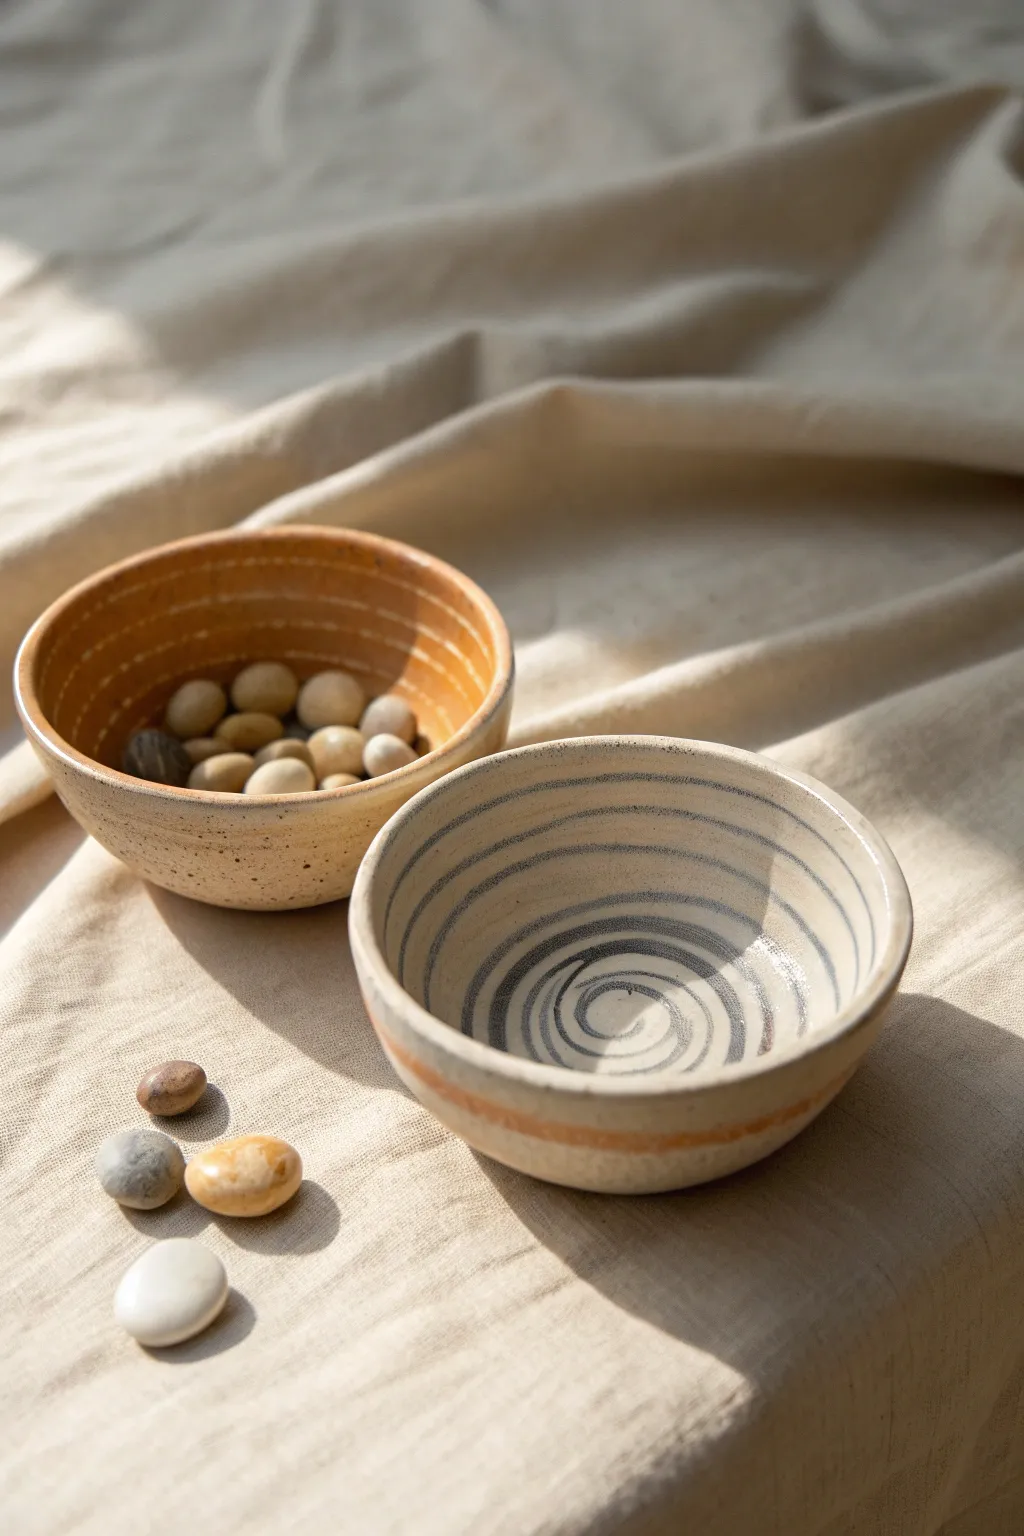
These charming mini bowls mimic the look of wheel-thrown pottery using humble modeling clay and clever hand-building techniques. The result is a set of earthy, organic vessels perfect for holding trinkets or simply displaying their beautiful spiral interiors.
Step-by-Step Tutorial
Materials
- Air-dry modeling clay (white or terracotta)
- Rolling pin or smooth glass bottle
- Small bowl or cup (approximately 3-4 inches diameter) to use as a mold
- Cling wrap
- Pottery sponge or damp crafting sponge
- Modeling tools (rib tool or old credit card)
- Acrylic paints (Cream, Terracotta/Burnt Orange, Slate Blue/Grey)
- Fine detail paintbrush
- Medium flat paintbrush
- Matte or satin varnish/sealant
Step 1: Forming the Base
-
Prepare the mold:
Select a small kitchen bowl to act as your slump mold. Turn it upside down and cover the exterior tightly with cling wrap to prevent sticking. -
Roll the coil:
Take a chunk of clay and roll it on a flat surface into a long, even snake. Aim for a thickness of about 1/4 inch throughout the entire length. -
Start the spiral:
On a flat work surface, curl the end of your clay snake into a tight spiral to create the center base of your bowl. -
Build the bottom:
Continue winding the coil around itself, pressing the edges gently together as you go, until you have a flat disc that matches the size of your mold’s flat bottom.
Cracking Clay?
If you see cracks forming as the clay dries, dip your finger in a slurry (clay mixed with water) and massage it into the crack to seal it while the clay is still semi-damp.
Step 2: Shaping and Smoothing
-
Build the walls:
Carefully transfer your spiral disc onto the upside-down mold. Continue spiraling the coil down the sides of the mold to build the bowl’s height. -
Merge the coils:
Using your thumb or a modeling tool, gently smear the clay across the coil lines on the *exterior* only. This bonds the structure while keeping the spiral pattern visible on the inside. -
Smooth the exterior:
Take a slightly damp sponge or a rib tool and smooth the outside surface until it is uniform, erasing the distinct coil bumps but maintaining the bowl shape. -
Rest and remove:
I like to let this firm up for about an hour so it holds its shape. Then, gently lift the clay bowl off the mold and peel away the cling wrap. -
Refine the interior:
Inspect the inside spiral. If there are gaps between coils, gently smudge them together, but try to preserve that distinct swirled texture shown in the photo. -
Dry completely:
Allow your bowls to air dry for 24-48 hours until they are hard and light in color. Turn them over occasionally for even drying.
Step 3: Painting and Finishing
-
Base coat:
Mix a creamy, off-white acrylic paint. Apply two layers to the entire bowl (inside and out) to create a ceramic-like canvas. -
Paint the spiral:
For the blue-patterned bowl, water down some slate blue paint slightly. Use a fine brush to carefully trace the indentation of the interior spiral, starting from the center and working outward. -
Add exterior details:
For the orange bowl, use a dry-brush technique with terracotta paint to highlight the upper rim and create horizontal band markings on the interior, mimicking etched pottery. -
Create the speckled look:
To achieve the stoneware effect, dilute a tiny amount of brown paint on a toothbrush. Run your thumb over the bristles to flick tiny speckles onto the exterior of the bowls. -
Seal the work:
Once the paint is fully dry, apply a coat of matte or satin varnish to protect the surface and give it a gentle, fired-clay sheen.
Smoother Coils
When rolling your clay snakes, use the full length of your hands from palm to fingertips to ensure the coil stays perfectly round and even thickness without flat spots.
Place your little faux-ceramic bowls on a linen cloth and fill them with tumbled stones for a serene, natural display


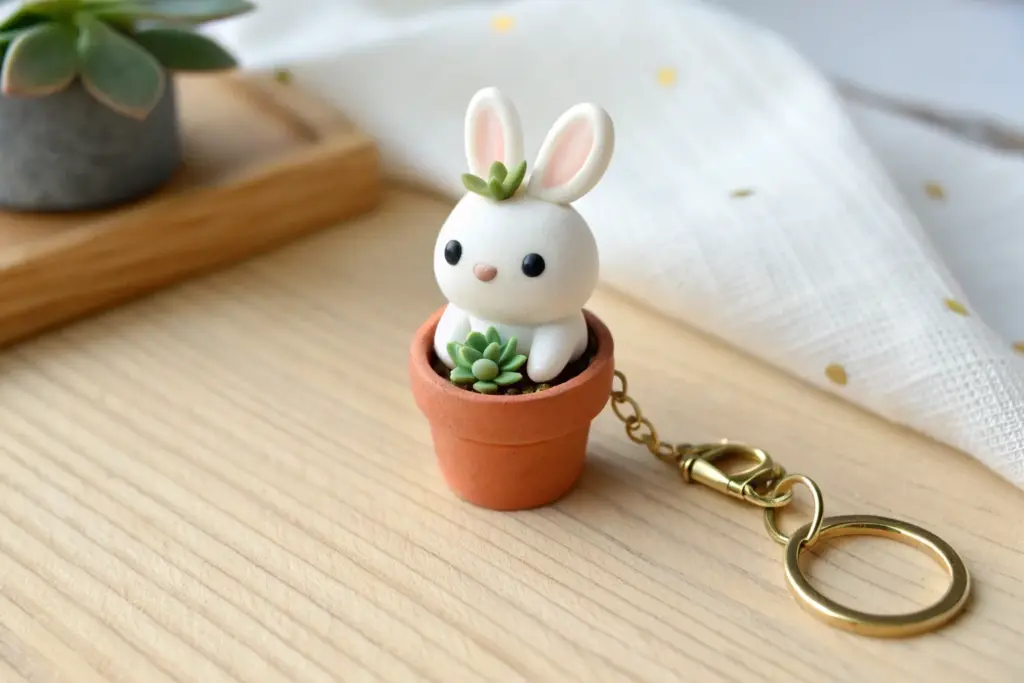
Simple Clay Charms and Key Tags
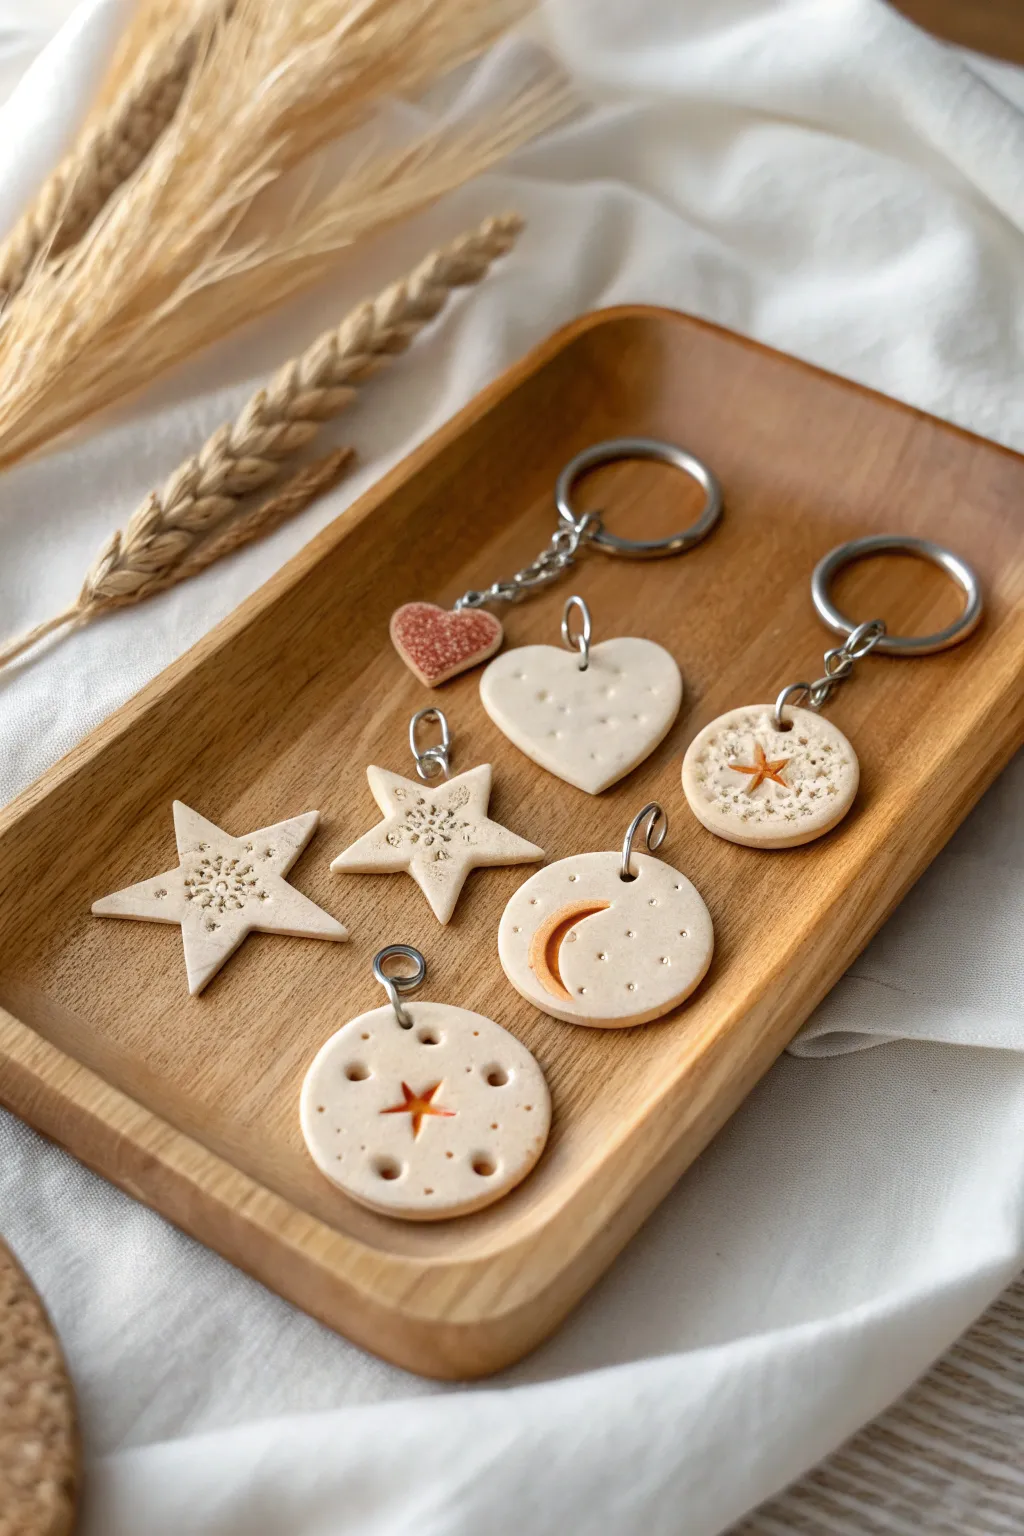
These delightful clay charms have a minimalist, cookie-like aesthetic that feels warm and handmade. Using basic shapes like stars, hearts, and moons, plus simple stamping techniques, you’ll create a lovely set of personalized accessories perfect for gifting.
How-To Guide
Materials
- Polymer clay (beige, sand, or white)
- Acrylic rolling pin
- Cookie cutters (star, heart, circle)
- Small jump rings (silver)
- Keychain hardware (split rings and chains)
- Needle tool or toothpick
- Small detail stamps (snowflake, star)
- Orange-brown acrylic paint or soft pastel
- Small paintbrush
- Sandpaper (fine grit)
- Pliers (jewelry)
- Gloss varnish (optional)
Step 1: Shaping the Base
-
Condition the Clay:
Begin by warming the polymer clay in your hands until it is soft and malleable. I prefer mixing a touch of translucent clay into beige to get that realistic ‘stoneware’ look. -
Roll it Out:
Use your acrylic roller to flatten the clay into a sheet about 1/4 inch thick. You want these charms to be sturdy, so avoid rolling them too thin. -
Cut the Shapes:
Press your cookie cutters firmly into the clay sheet to create your base shapes. For this set, cut out two stars, a heart, and two circles. -
Smooth the Edges:
Gently run your finger along the cut edges of each shape to soften any sharp ridges left by the cutter.
Fixing Cracks
If clay edges crack while rolling, your clay is likely too dry. Mix in a drop of baby oil or clay softener and knead thoroughly before rolling again.
Step 2: Adding Texture & Detail
-
Create the Moon Charm:
Take one of the circle cutouts. Use a smaller circle cutter or the edge of a spoon to gently press a crescent moon shape into the left side. Don’t cut all the way through; just create an impression. -
Detail the Moon:
Use a needle tool to poke tiny dots scattered across the ‘sky’ area of the moon charm for a starry night effect. -
Texture the Stars:
For the star charms, press a snowflake or floral texture stamp into the very center. If you don’t have a stamp, you can stipple the center with an old toothbrush for a similar rough texture. -
Design the Star Circle:
On the second circle, press a star-shaped tool into the center. Use the blunt end of a paintbrush handle to create four evenly spaced indentations around the perimeter. -
Texture the Heart:
Give the heart charm a simple quilted look by pressing small, blunt divots across the surface in a random pattern. -
Pierce Holes:
Before baking, use a straw or a tool to poke a clean hole at the top of each charm for the jump ring. Ensure the hole is not too close to the edge to prevent breakage.
Make it Sparkle
Press gold leaf flakes into the recessed stamp areas before baking, or mix fine glitter into a translucent topcoat for a subtle magical shimmer.
Step 3: Baking & Finishing
-
Bake the Clay:
Place your charms on a parchment-lined baking sheet. Bake according to your clay manufacturer’s instructions (usually around 275°F or 130°C for 15-30 minutes). -
Cool Down:
Let the pieces cool completely to harden. They will be slightly soft when hot, so resist the urge to handle them until they are room temperature. -
Add Warmth:
To enhance the details, dry-brush a tiny amount of orange-brown acrylic paint into the recessed areas (like the moon crescent and star centers). Wipe away excess immediately with a damp cloth. -
Sand the Edges:
Use fine-grit sandpaper to buff away any fingerprints or rough spots on the edges for a professional finish. -
Insert Jump Rings:
Using jewelry pliers, twist open a jump ring sideways. Thread it through the hole you made in the charm. -
Attach Hardware:
Before closing the jump ring, slide on the keychain chain or clasp. Twist the jump ring back into a closed circle. -
Final Seal:
If desired, apply a light coat of matte or gloss varnish to protect the paint and seal the clay.
Now you have a stunning set of custom charms ready to organize your keys or decorate your favorite bag

The Complete Guide to Pottery Troubleshooting
Uncover the most common ceramic mistakes—from cracking clay to failed glazes—and learn how to fix them fast.
Face Planters With Funny Expressions
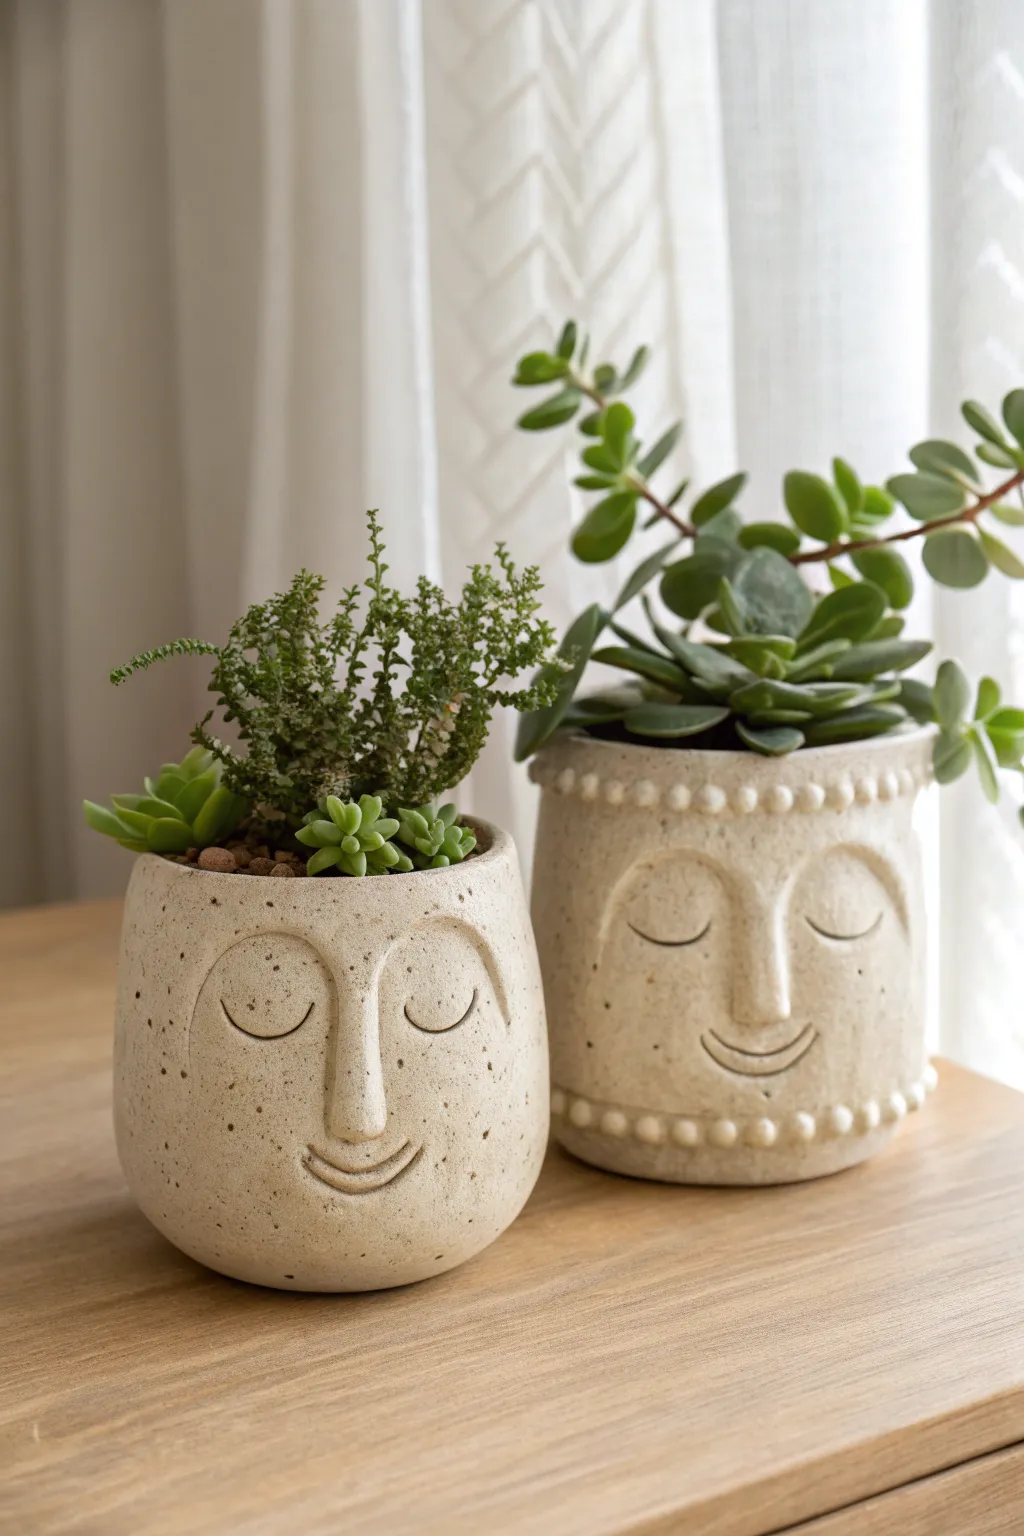
Bring a sense of calm to your indoor garden with these textured, expression-filled planters that mimic the look of carved stone. The project combines simple slab and pinch pot techniques with subtle facial modeling to create functional art pieces that seem to be peacefully dreaming.
Step-by-Step Guide
Materials
- Air-dry clay (white or cream)
- Speckled clay additive (or coffee grounds/sand)
- Rolling pin
- Canvas mat or non-stick surface
- Clay knife or fettling tool
- Small cup or bowl (to use as a mold)
- Slip (clay mixed with water)
- Modeling tools (or a spoon handle and toothpick)
- Sponge
- Water
- Clear matte sealant or varnish
Step 1: Preparing the Base
-
Mix your texture:
Before starting, wedge your air-dry clay. If you want that natural speckled stone look seen in the photo, knead in a small amount of dried coffee grounds or fine sand until it is evenly distributed throughout the batch. -
Roll the slab:
Roll out a portion of the clay into a long, even rectangular slab, approximately 1/4 inch thick. This will form the walls of your planter. -
Cut to size:
Using a ruler and your knife, cut a clean rectangle. The length needs to be enough to wrap around your chosen mold (the cup or bowl) with a little overlap. -
Form the cylinder:
Wrap the clay rectangle around your mold or simply form a cylinder by hand. Score the edges (make small cross-hatch scratches), apply a little slip, and press the ends together firmly. -
Smooth the seam:
Blend the seam on both the inside and outside using your thumb or a modeling tool until the join is invisible. I like to support the inside wall with one hand while smoothing the outside to prevent collapsing. -
Create the base:
Roll out a separate circular piece for the bottom. Score and slip the bottom edge of your cylinder and the edge of the circle, then join them. Smooth the clay upwards from the base to the wall to secure it.
Cracking Up?
If hairline cracks appear while drying, mix a tiny amount of vinegar into your slip (clay mush) and fill the crack. Both vinegar and slip act as glue to bond the gap.
Step 2: Sculpting the Face
-
Plan the features:
Decide where the nose will sit—this anchors the whole face. Mark the spot lightly with a tool. The nose should be roughly in the center vertical line of the pot. -
Build the nose:
Roll a small coil or tear drop shape of clay. Score the spot on the pot and the back of the nose piece, apply slip, and press it onto the cylinder. -
Blend the nose bridge:
Use a modeling tool to smooth the clay from the top of the nose up into the forehead area, making it look like it emerges naturally from the pot rather than just stuck on. -
Define the nostrils:
Use a small loop tool or the rounded end of a paintbrush to gently press in the sides of the nose and define the nostril shape. -
Carve the eyes:
For that peaceful sleeping look, use a curved tool or a spoon edge to impress two crescent shapes on either side of the nose bridge. Don’t dig too deep; just create a clean indentation. -
Add the smile:
Carve a gentle U-curve below the nose. To add dimension, you can roll a tiny, thin snake of clay and press it into the bottom lip of the smile, blending it downwards. -
Add decorative details:
If you are recreating the taller planter style, roll many small pea-sized balls of clay. Score and slip them around the top rim and bottom base creating a beaded border effect.
Faux Stone Wash
Dilute acrylic brown or gray paint with water. Brush it over the textured surface and wipe it off immediately with a rag. The pigment stays in the crevices for depth.
Step 3: Finishing Touches
-
Texture the surface:
To enhance the stone effect, lightly tap the surface with a stiff toothbrush or a textured sponge. This removes fingerprints and adds a weathered quality. -
Drainage holes:
If you plan to use real plants, poke a hole in the bottom center. Note that air-dry clay dissolves in water, so these are best for artificial plants or as cover pots for plastic nursery pots. -
Slow drying:
Place a loose plastic bag over the pot to let it dry slowly over 24-48 hours. This helps prevent cracks, especially where you attached the nose. -
Seal the piece:
Once fully bone dry, apply two coats of a matte varnish or sealant. This protects the clay and seals in the coffee grounds so they don’t mold.
Pop in your favorite succulents and enjoy the tranquil vibe these smiling faces bring to your shelf
Tiny Magnet Bud Vases
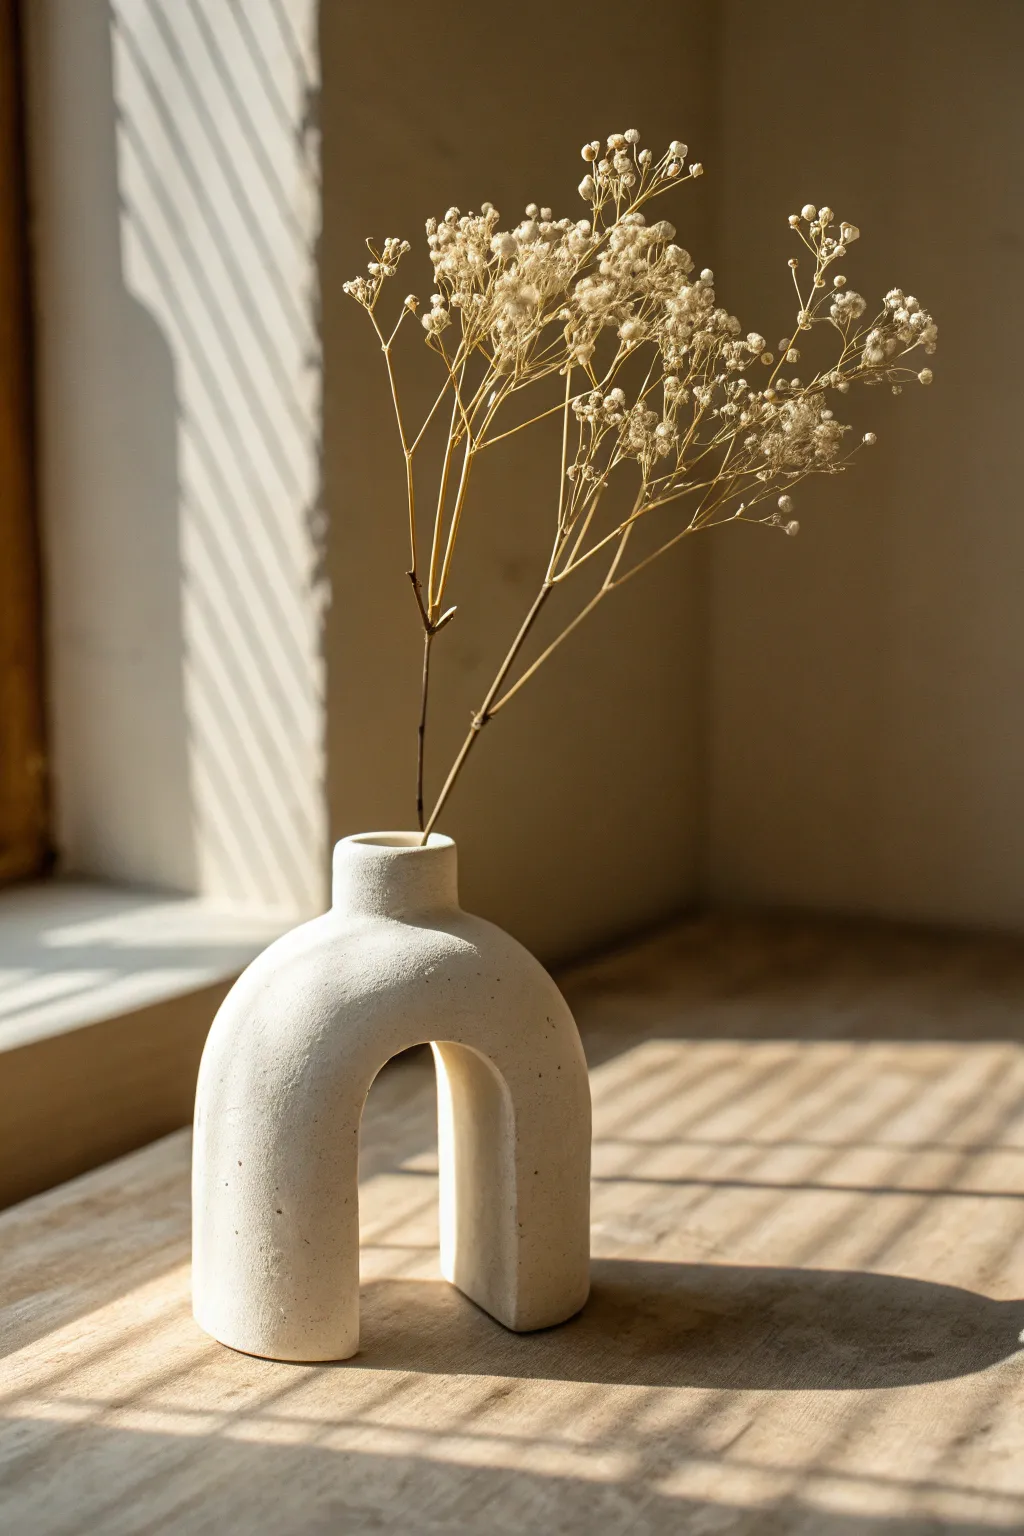
Embrace the beauty of minimalism with this stunning U-shaped arch vase that transforms simple modeling clay into high-end decor. The textured, matte stone finish captures the light beautifully, making it a perfect vessel for delicate dried botanicals.
Step-by-Step Tutorial
Materials
- White air-dry modeling clay (approx. 500g)
- Small rolling pin
- Craft knife
- Small bowl of water
- Sponge or smoothing tool
- Fine-grit sandpaper (220 grit)
- Acrylic paint (cream or off-white)
- Baking soda (for texture)
- Paintbrush
- Empty toilet paper roll or cardboard tube (for structure support)
Step 1: Shaping the Base
-
Prepare the clay:
Start by conditioning your air-dry clay. Knead it in your hands for several minutes until it is warm, pliable, and free of any large cracks. -
Roll out a log:
Roll the clay into a thick, even snake or log shape on a clean work surface. Aim for a thickness of about 1.5 to 2 inches (3-5 cm). -
Form the arch:
Gently bend the clay log into a U-shape. Stand it upright on the table to check that the two legs are roughly the same height. -
Flatten the bottom:
Press the structure down firmly onto your work surface to create flat bottoms on the legs. This ensures the vase will stand stable without wobbling. -
Create the neck:
Take a small separate ball of clay and shape it into a cylinder. This will be the spout for the flowers. Score the bottom of this cylinder and the top center of your arch using your craft knife. -
Attach the neck:
Apply a little water to the scored areas and press the neck firmly onto the top of the arch. Use your fingers or a modeling tool to blend the seam until the clay looks continuous.
Step 2: Refining and Hollowing
-
Hollow the spout:
Using the back of a paintbrush or a specialized clay tool, gently bore a hole down into the neck. Since this is for dried flowers, you only need to go deep enough to hold a stem secure, roughly 1-2 inches. -
Structural support:
If your clay feels soft or the arch is sagging, I sometimes wedge a trimmed cardboard tube between the legs to hold the shape while it begins to set. -
Smooth the surface:
Dip your sponge or fingers in water and run them over the entire piece. Smooth out fingerprints, bumps, and joining seams. -
Initial drying:
Let the piece dry for about 24-48 hours. Rotate it occasionally so all sides get airflow, preventing warping.
Cracking Up?
If cracks appear while drying, mix a small amount of fresh clay with water to make a paste (slip). Fill the cracks, smooth over, and let dry again.
Step 3: Finishing Touches
-
Sand imperfections:
Once fully dry and hard, use fine-grit sandpaper to buff away any remaining lumps or rough patches. The surface should feel smooth to the touch. -
Mix textured paint:
To achieve that stony, matte look, mix your white or cream acrylic paint with a teaspoon of baking soda. The mixture should be fluffy and thick. -
First coat:
Apply the paint mixture generously over the vase. Dab it on rather than brushing in long strokes to build up a stone-like texture. -
Second coat:
Allow the first layer to dry completely, then add a second coat if needed for full opacity and enhanced texture. -
Final dry:
Let the paint cure fully before handling. The baking soda paint will dry to a lovely matte finish that resembles unglazed ceramic.
Pro Tip: Weight it Down
For extra stability, embed a small, flat stone or metal washer into the bottom of each leg before the clay dries to prevent it from tipping over.
Place your favorite dried baby’s breath inside and enjoy this sculptural addition to your space


What Really Happens Inside the Kiln
Learn how time and temperature work together inside the kiln to transform clay into durable ceramic.
Rainbow Arch Sculptures
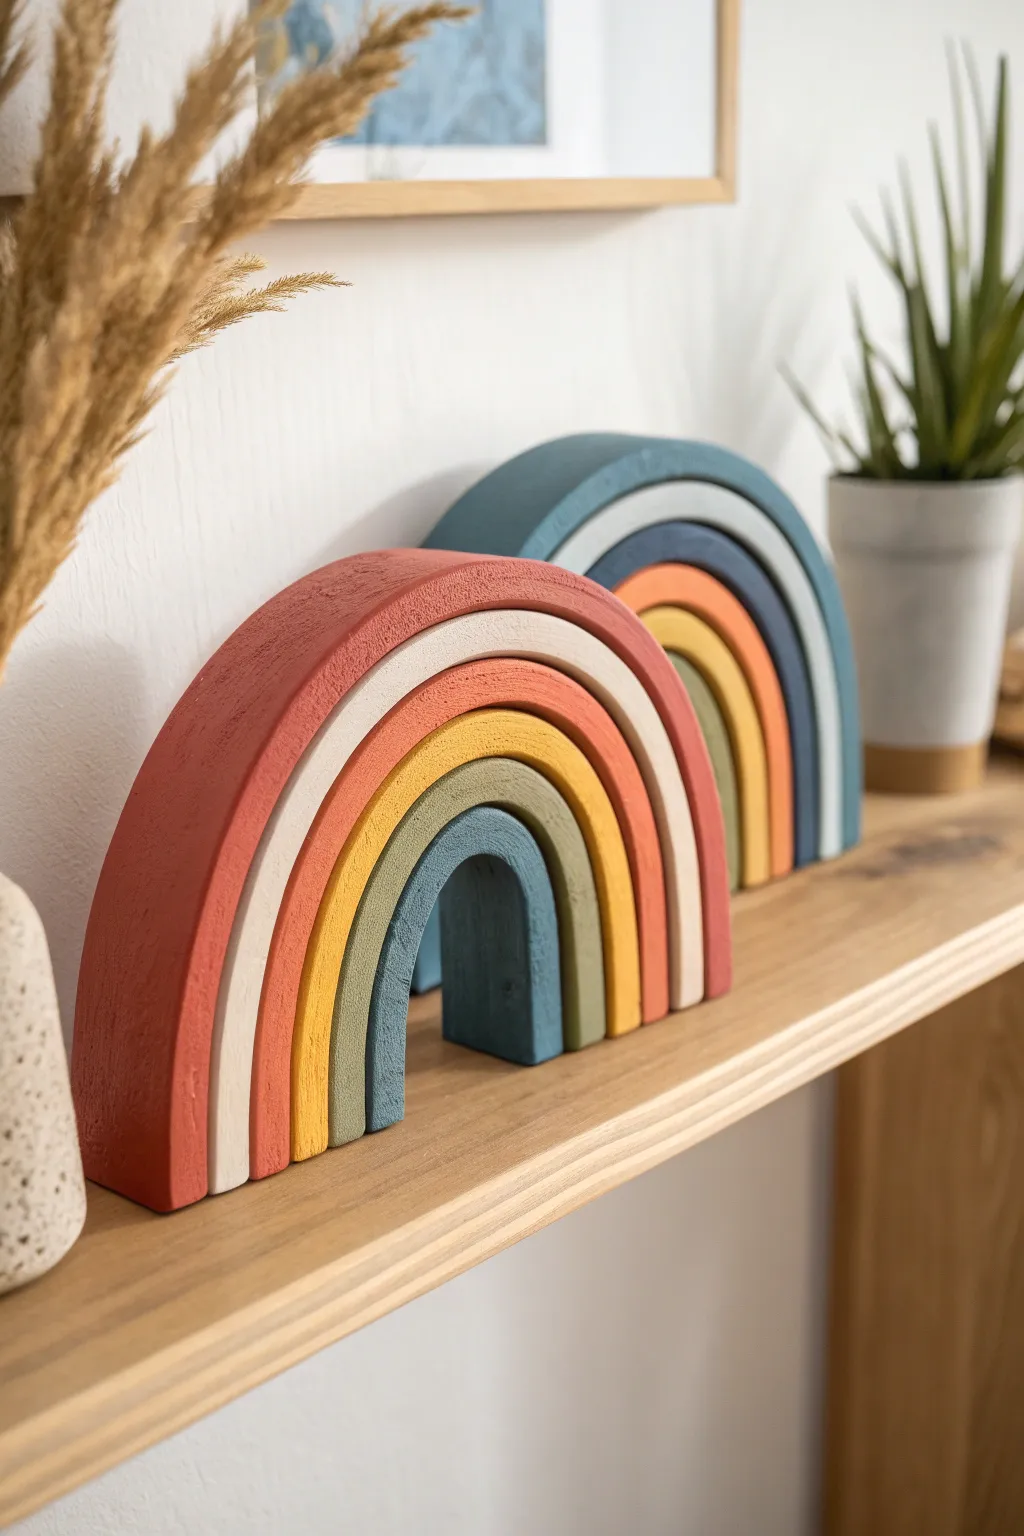
Recreate the trendy look of wooden stacking toys using air-dry or polymer modeling clay for a charming shelf accent. These muted, earthy rainbow arches require precision in rolling and shaping but result in a stunning, minimalist sculptural piece.
Step-by-Step
Materials
- Air-dry clay (terra cotta or white) or polymer clay
- Rolling pin or acrylic roller
- Craft knife or clay blade
- Ruler
- Sandpaper (fine grit)
- Acrylic paints (muted tones: rust red, cream, ochre, sage, slate blue)
- Small flat paintbrush
- Matte sealant or varnish
- Parchment paper or baking mat
Step 1: Preparing the Base Shapes
-
Condition the clay:
Begin by working your clay in your hands until it becomes warm, soft, and pliable. Getting rid of air bubbles now is crucial for structural integrity later. -
Roll a slab:
On a piece of parchment paper, roll out a large portion of clay into a thick, even slab. Aim for a thickness of about 3/4 inch to 1 inch so the arches can stand freely. -
Cut the clay strips:
Using a ruler and your clay blade, cut long, uniform strips from the slab. Make them roughly 1 inch wide to determine the depth of your rainbow. -
Form the smallest arch:
Take a short strip and gently curve it into a tight U-shape. This will be the center of your rainbow. Stand it up to ensure the bottom edges are flat against the table. -
Layering outward:
Take the next strip and mold it directly over the first arch. Use the inner arch as a form to ensure the next layer fits snugly without gaps. -
Continue building:
Repeat this process with subsequent strips, gradually increasing the length for each layer until you have 6 or 7 nested arches. I find it helpful to lightly dust the clay with cornstarch if layers stick too much while maneuvering. -
Trim the base:
Once all layers are stacked together, lay a long ruler across the bottom legs of the rainbow. Use your blade to slice straight across, creating a perfectly flat base so the sculpture stands without wobbling.
Clean Cuts Pro Tip
Chill your clay slab in the fridge for 10-15 minutes before cutting strips. Firm clay distorts less when sliced, giving you cleaner, sharper edges.
Step 2: Refining and Finishing
-
Separate and smooth:
Carefully separate the arches before they dry or bake. Smooth the sharp cut edges with a little water on your finger (for air-dry clay) or baby oil (for polymer clay) to soften the look. -
Dry or bake:
Follow manufacturer instructions. For air-dry clay, let the pieces dry separately on a wire rack for 24-48 hours. Turn them occasionally to prevent warping. -
Sand for texture:
Once fully cured, use fine-grit sandpaper to buff out any fingerprints or uneven spots. This step is key to mimicking the smooth finish of wood. -
Prepare your palette:
Mix your acrylic paints to achieve earthy, boho shades. You’ll need a deep rust red, a soft cream, a mustard yellow, an olive green, and a muted teal. -
Paint the largest arch:
Apply the rust red color to the largest, outermost arch. Use smooth, long brush strokes that follow the curve of the clay. -
Paint the middle layers:
Color the subsequent arches, perhaps moving from cream to mustard yellow, then olive green. Two thin coats are usually better than one thick coat. -
Paint the center arch:
Finish with the smallest center arch in a deep slate blue or teal to ground the color palette. -
Seal the work:
Apply a matte varnish to protect the paint without adding a glossy shine, preserving that natural, matte aesthetic seen in the photo.
Avoiding Warped Legs
If the arch legs start splaying outward while drying, place two heavy books or blocks on either side of the rainbow to hold the straight vertical shape.
Now you have a beautiful, modern decor piece that looks high-end but was made right at home
Smiley Face Pins and Magnets
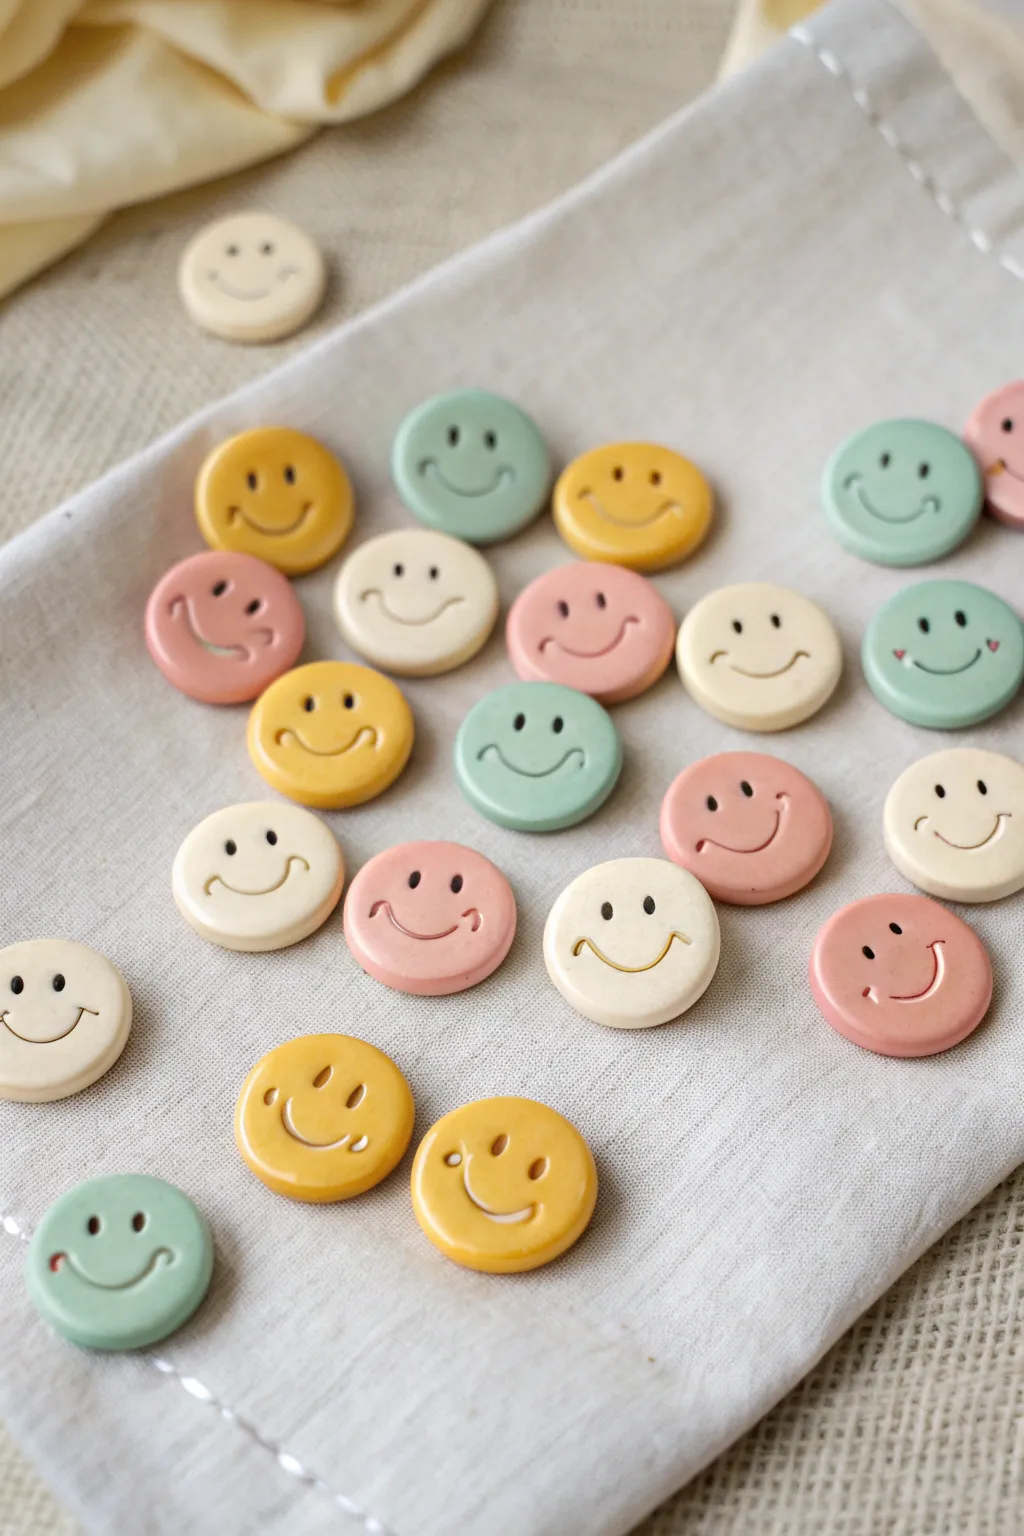
These charming smiley face pins are crafted from polymer clay in a soft, cheerful palette of yellow, mint, pink, and cream. With their glossy candy-like finish and indented facial features, they make perfect little gifts or playful accessories for denim jackets.
Detailed Instructions
Materials
- Polymer clay (pastel yellow, mint green, blush pink, cream)
- Small round cutter (approx. 1 inch diameter)
- Dotting tools or small ball stylus
- Clay roller or pasta machine
- Baking sheet and parchment paper
- Brown or dark grey acrylic paint
- Water and paper towels
- UV resin or glossy clay varnish
- Pin backs or small magnets
- Super glue or E6000
Step 1: Shaping the Bases
-
Condition the clay:
Start by warming up your polymer clay in your hands. Knead each color separately until it is soft, pliable, and free of cracks. I generally spend a good minute on each color to ensure a smooth finish. -
Roll out sheets:
Using a clay roller or a pasta machine on a medium setting, roll out your conditioned clay into even sheets. Aim for a thickness of about 1/4 inch (6mm) so the pins feel sturdy but not too heavy. -
Cut the circles:
Press your small round cutter firmly into the clay sheets to create your discs. If the clay sticks to the cutter, dip the cutter in a little cornstarch beforehand. -
Smooth the edges:
Gently pick up each circle and run your finger lightly around the rim to soften any sharp edges left by the cutter. This gives the final piece a softer, more finished ‘button’ look.
Step 2: Creating the Faces
-
Indent the eyes:
Use a medium-sized dotting tool or the end of a paintbrush to press two distinct holes for the eyes. Don’t go all the way through; just create deep, clean dimples. -
Mark the smile:
For the smile, you can use a U-shaped clay tool or carefully drag a smaller dotting tool in a curve. Make sure the indentation is deep enough to hold paint later without overflowing. -
Add detail:
For variety, add tiny ‘dimples’ at the corners of some smiles by pressing slightly deeper at the ends of the curve. -
Bake the clay:
Arrange your faces on a baking sheet lined with parchment paper. Bake according to your specific polymer clay’s package instructions (usually around 275°F/135°C for 15-30 minutes). Let them cool completely before handling.
Fixing Fingerprints
If you see fingerprints on your raw clay, lightly brush them with a tiny amount of baby oil or cornstarch before baking to smooth the surface perfectly.
Step 3: Finishing Touches
-
Apply the wash:
Mix a tiny drop of brown or dark grey acrylic paint with water to create a thin wash. Brush this freely over the indented eyes and mouths of the cooled clay pieces. -
Wipe away excess:
Before the paint dries fully, take a slightly damp paper towel and wipe the surface of the clay. The paint will stay trapped in the indented eyes and smile, defining the features, while the surface returns to its pastel color. -
Seal for shine:
Once the paint is bone dry, apply a coat of UV resin for a varying glass-like finish, or use a high-gloss clay glaze. If using resin, cure it under a UV lamp until hard and non-tacky. -
Attach findings:
Turn the dry faces over. Use a strong adhesive like super glue or E6000 to attach a pin back or a small magnet to the center of each disc. -
Final cure:
Allow the glue to cure fully (usually 24 hours for E6000) before wearing or using your new magnets.
Cheeky Details
Before baking, use a bit of soft pastel chalk in a pink shade. Brush it lightly onto the ‘cheek’ area of the clay with a soft brush for a rosy blush effect.
Now you have a handful of cheerful accessories ready to brighten up any day

TRACK YOUR CERAMIC JOURNEY
Capture glaze tests, firing details, and creative progress—all in one simple printable. Make your projects easier to repeat and improve.
Stamped Texture Tile Coasters
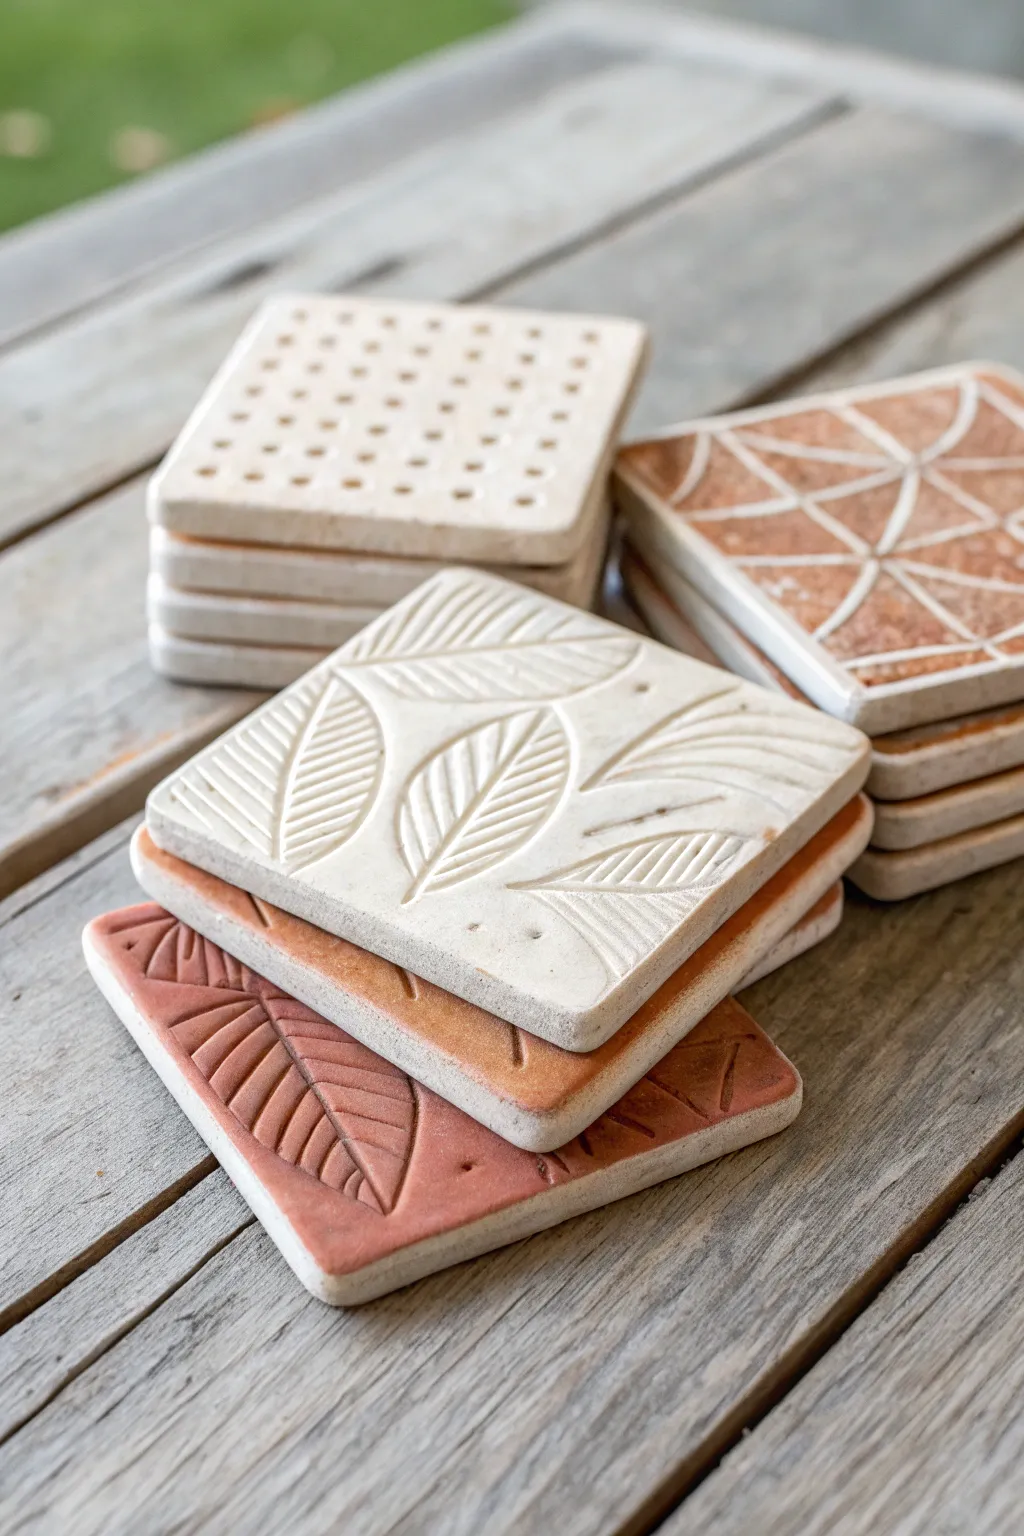
Bring an earthy, handmade touch to your coffee table with these delightful stamped clay coasters. Featuring minimalist leaf patterns, geometric grids, and abstract spiderweb designs, these tiles combine the satisfying texture of raw clay with functional durability.
Step-by-Step Tutorial
Materials
- Air-dry clay (white and terracotta colored) or polymer clay
- Rolling pin
- Square cookie cutter (approx. 4 inches) or a knife and ruler
- Leaf rubber stamps or actual leaves with prominent veins
- Wooden sculpting tools or skewers
- Texture grid mat or mesh (optional)
- Sandpaper (fine grit)
- Matte finish sealant or varnish
- Felt pads (for the bottom)
- Small sponge for smoothing
Step 1: Preparing the Clay Base
-
Roll the Slab:
Begin by conditioning your clay until it is pliable and smooth. Roll it out on a non-stick surface to a uniform thickness of about 1/4 inch (6mm). Using thickness guides or wooden slats on either side of the rolling pin helps ensure the coaster is perfectly level. -
Cut the Shape:
Press your square cookie cutter firmly into the clay slab to create clean, sharp edges. If you are using a knife and ruler, measure a 4×4 inch square and slice straight down rather than dragging the knife to prevent warping the shape. -
Smooth the Edges:
Dip your finger or a small sponge in a tiny bit of water and gently run it along the cut edges. This removes any sharp burrs or crumbs and gives the tile a more professional, finished look.
Step 2: Creating the Leaf Design
-
Plan the Composition:
For the leaf coaster, envision where your stems will flow. I like to have them entering from different corners for a dynamic look. -
Stamp the Leaves:
Press your leaf stamp (or a real stiff leaf, vein-side down) into the clay. Apply even pressure across the entire surface of the stamp to catch the delicate details of the veins. -
Define the Stems:
Using a fine-point sculpting tool, deepen the central stem line of each leaf if the stamp impression is too faint. Extend the stem lines slightly off the edge of the coaster to create a sense of movement. -
Add Texture Details:
Use the tip of a small rounded tool or a needle tool to add tiny dot accents in the negative space around the leaves, just as seen in the white coaster example.
Preventing Curled Corners
Clay likes to curl as moisture evaporates. To keep tiles perfectly flat, place a light book or a board on top of them once they are leather-hard (partially dry) but not fully rigid.
Step 3: Creating the Geometric Designs
-
Switch Clay Colors:
For variety, switch to the terracotta-colored clay for the next set of coasters, repeating the rolling and cutting process. -
Stamp the Grid:
For the dotted grid coaster, use a specialized texture mat or simply poke a series of evenly spaced holes using a blunt skewer. A ruler can help keep your lines straight. -
Carve the Spiderweb:
For the web-like patterned tile, use a carving tool to gently etch straight lines intersecting across the tile. Vary the angles to create irregular triangles and polygons. -
Inlay White Clay (Optional):
To achieve the white lines on the terracotta tile, roll a very thin snake of white clay. Press it into the grooves you just carved, then roll over the surface gently to fuse the clays together.
Troubleshooting Cracks
Tiny cracks while drying usually mean it dried too fast. If they appear, mix a small paste of clay and water (slip) to fill the gap, smooth it over, and cover loosely with plastic to slow the drying.
Step 4: Drying and Finishing
-
Dry Slowly:
Place your tiles on a wire rack or a piece of drywall to dry. Flip them over every few hours during the first day to ensure they dry evenly and don’t curl at the corners. -
Sand for Smoothness:
Once fully dry (usually 24-48 hours depending on humidity), take your fine-grit sandpaper and lightly sand the edges and surface. This is crucial for making the coaster flat enough for a cup to sit stably. -
Apply a Wash (Technique Variation):
If you want to highlight the texture, water down some acrylic paint. Brush it into the crevices and quickly wipe the surface clean with a damp cloth, leaving pigment only in the deeper lines. -
Seal the Surface:
Apply two to three thin coats of a matte waterproof varnish. Allow each coat to dry completely before adding the next. This step is essential to protect the clay from moisture rings caused by cold drinks. -
Add Backing:
Cut a piece of felt slightly smaller than the tile, or attach four small felt dots to the corners of the underside. This prevents the baked clay from scratching your furniture.
Stack your finished coasters on the table and enjoy the blend of natural textures and modern design
Mini House Keepsake Ornaments
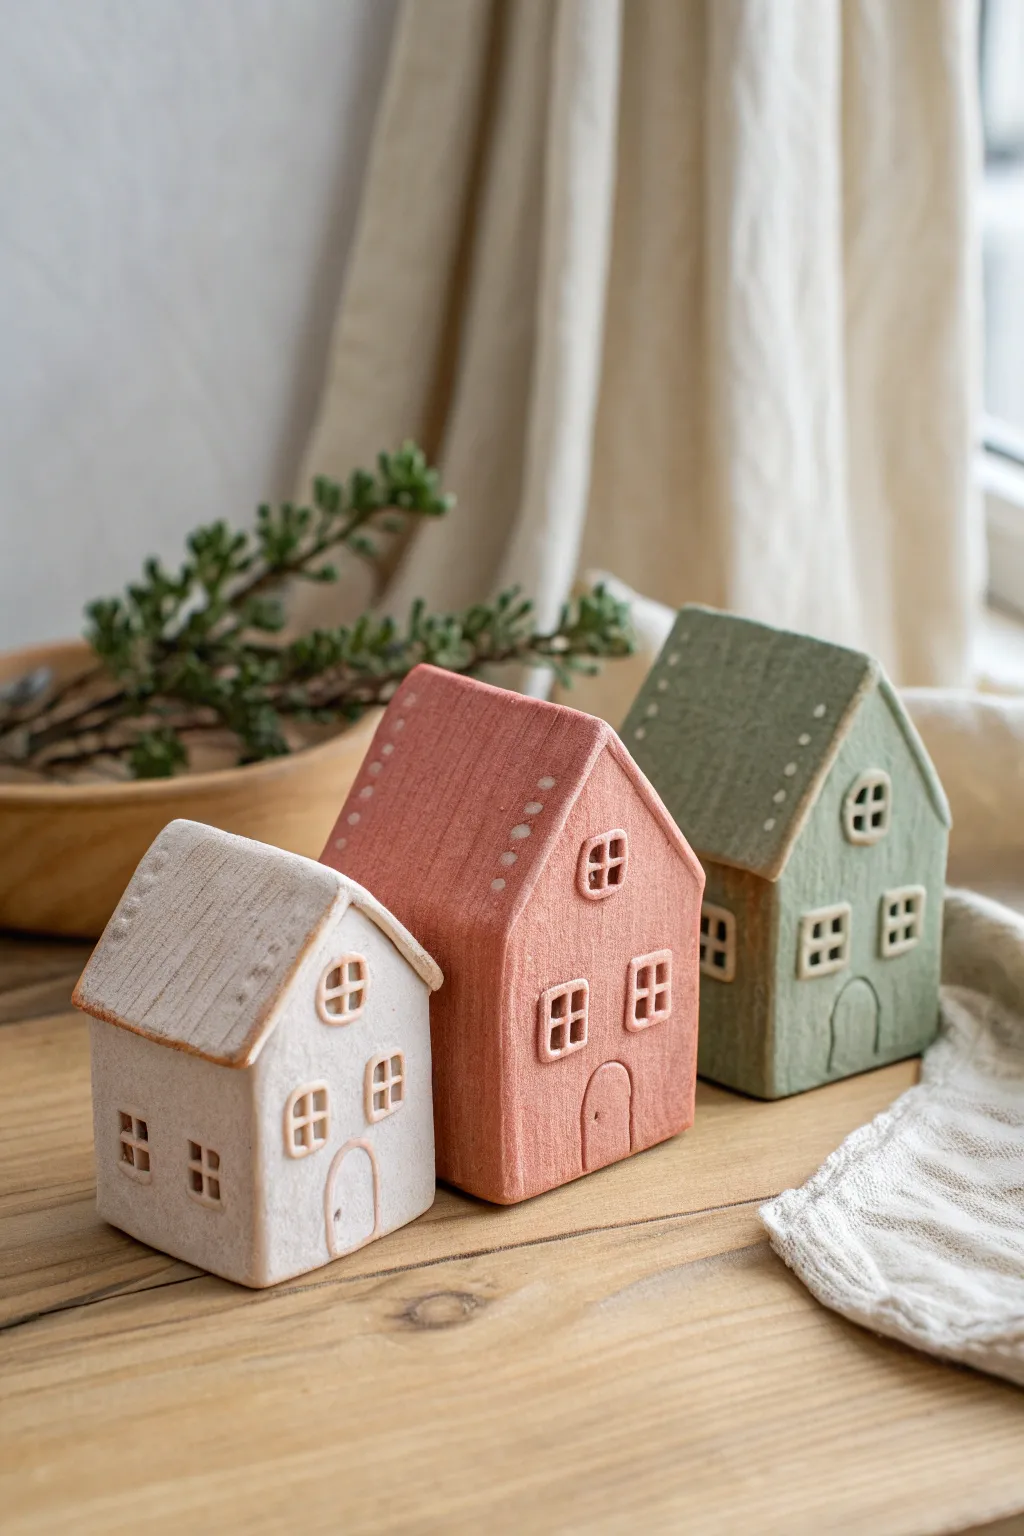
Bring a cozy, rustic charm to your shelf with these adorable miniature clay houses. Featuring a soft, matte finish and delicate window details, this trio captures the simple elegance of Scandinavian design.
Detailed Instructions
Materials
- White air-dry clay or polymer clay
- Rolling pin
- Craft knife or scalpel
- Clay sculpting or needle tools
- Ruler
- Dough scraper or spatula
- Acrylic paints (Cream, Terracotta/Dusty Rose, Sage Green)
- White acrylic paint (for details)
- Fine grit sandpaper
- Matte varnish or sealant
- Small flat brush and fine detail brush
- Texture sponge or stiff bristle brush
Step 1: Shaping the Structures
-
Roll the Base:
Start by conditioning your clay until it’s pliable. Roll it out into a slab that is approximately 1/4 to 1/3 inch thick. You want it substantial enough to stand upright without warping. -
Create Templates:
Using scrap paper, sketch out simple house shapes—a square or rectangle bottom with a triangular roof top. Create three slightly different sizes for variety. -
Cut the facades:
Place your templates on the clay slab and carefully cut around them using your craft knife. You will need a front and back piece for each house if you are building hollow forms, or simply cut the silhouette if creating solid blocks. -
Form the Block:
For the solid block style shown here, cut long strips of clay matching the width of your house sides. Assemble the four sides and roof slopes into a solid 3D form, smoothing the seams completely with a little water or slip until the join lines disappear. -
Square and Smooth:
Gently tap the bottom of each house on your work surface to ensure it stands flat. Check the roof angles and use your fingers to soften the sharp edges just slightly for that hand-molded look.
Seamless Smoothing
Use a damp sponge or baby wipe to smooth the clay before drying. This reduces sanding time later and creates a soft, organic finish perfect for this style.
Step 2: Adding Details
-
Sketch the Windows:
Lightly etch the placement of windows and doors using a needle tool. Vary the designs: a large square window for the attic, paired rectangular windows for the main floor, and arched doorways. -
Carve the Frames:
Instead of cutting all the way through, press a small square cutter or tool into the clay to create an indent for the window frames. Alternatively, roll tiny snakes of clay and press them onto the surface to build raised window frames. -
Add Texture:
Before the clay dries, take a stiff bristle brush or a texture sponge and gently tap it all over the surface. This removes fingerprints and gives the house a stone-like, slightly rough texture. -
Roof Details:
Use a needle tool to poke small decorative dots along the roofline or use the back of a knife to gently press linear striations onto the roof surface to simulate rustic roofing material. -
Deep Dry:
Allow the houses to dry completely. For air-dry clay, this often takes 24-48 hours. Turn them occasionally to ensure even drying and prevent cracking.
Step 3: Painting and Finishing
-
Base Coat:
Select your pastel palette. Paint one house a creamy white, one a dusty terracotta pink, and the third a muted sage green. Apply the paint in thin layers to keep that textured look visible. -
Dry Brushing:
Once the base color is dry, I like to take a dry brush with a tiny amount of white paint and whisk it lightly over the surfaces. This highlights the texture and gives the houses a ‘frosted’ or weathered appearance. -
Window Grids:
Using your finest detail brush and creamy white paint, carefully paint the window frames and the grid lines inside the windows. If you used raised clay earlier, simply highlight those ridges. -
Door Accents:
Don’t forget the door outlines and any small arched details. Keep these lines fine and delicate. -
Roof Dots:
If you added the decorative poked holes on the rooflines, fill them carefully with a dot of white paint to make them pop. -
Seal:
Finish the project with a coat of matte varnish. Avoid glossy finishes, as the matte look is essential to the cozy, ceramic aesthetic.
Illuminated Village
Cut the bottoms out and leave the houses hollow. Once dry, place battery-operated tea lights underneath to make the windows glow warmly at night.
Now you have a charming little village ready to display on a mantel or windowsill
Animal Pencil Cups and Desk Buddies
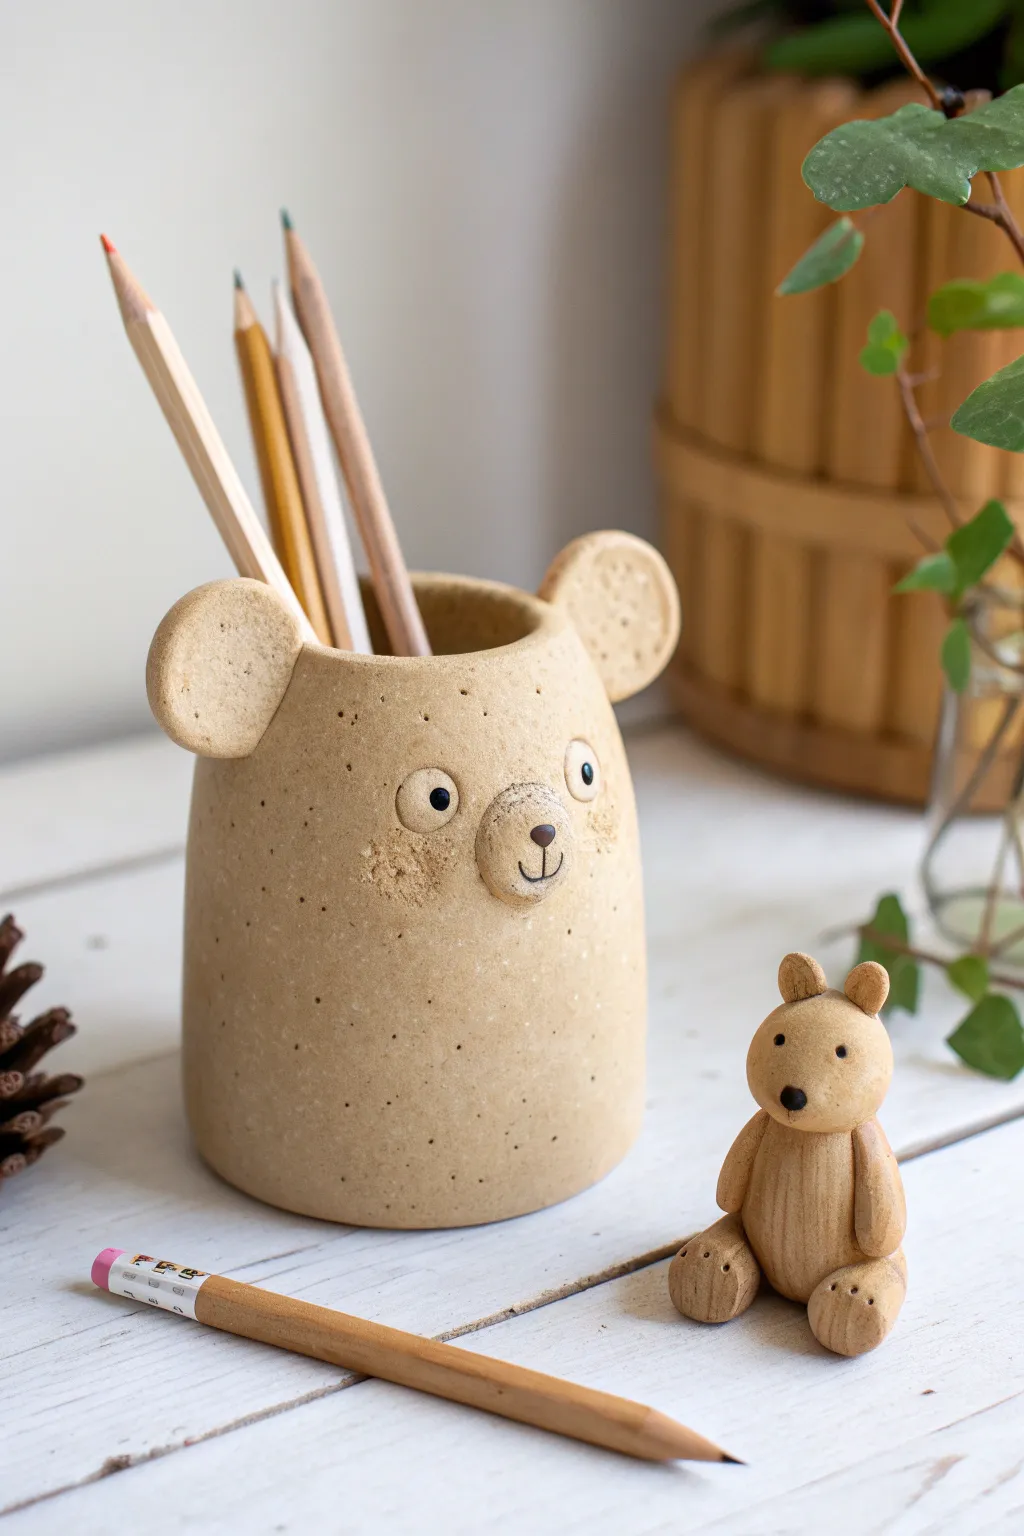
Brighten up your workspace with this adorable duo: a speckled beige bear pencil holder and a tiny, matching miniature companion sitting nearby. With their simple, clean lines and charming expressions, these clay creations bring a touch of cozy, handmade warmth to any desk.
Step-by-Step Tutorial
Materials
- Air-dry clay or polymer clay (beige/sand color)
- Speckled clay additive (like coarse sand or pepper) if using plain clay
- Modeling tools (or a toothpick and spoon)
- Circular cookie cutter or jar (approx 3-inch diameter)
- Rolling pin
- Slip (clay mixed with water) or liquid clay adhesive
- Black acrylic paint
- Very fine detail brush or a ball burnisher
- Sponge or fine sandpaper
- Matte varnish sealing spray
Step 1: Forming the Main Cup
-
Prepare the speckled clay:
If your clay isn’t pre-speckled, knead in a small amount of coarse sand, dried coffee grounds, or black pepper to achieve that textured, organic pottery look. -
Roll out the base:
Roll a portion of the clay into a flat slab about 1/4 inch thick. Use your circular cutter or a jar to cut out a perfect circle for the base. -
Create the walls:
Roll out a large rectangular slab of the same thickness. Typically, you’ll need a rectangle about 9-10 inches long and 4 inches high, but measure your base circumference to be sure. -
Assemble the cylinder:
Wrap the rectangular slab around the circular base. Join the vertical seam by scoring the edges (making hatch marks), applying a little slip or adhesive, and pressing them firmly together. -
Smooth the seams:
Use a modeling tool or your wet finger to blend the clay at the seam and along the bottom edge until the joins are invisible. I like to smooth the inside seam as well for structural integrity. -
Shape the rim:
Gently gently round off the top rim of the cup with a damp sponge or finger so it looks soft and finished rather than sharp.
Step 2: Sculpting the Bear’s Face
-
Make the ears:
Roll two medium-sized balls of clay and flatten them slightly into thick discs. Attach these to the rim of the cup—standing upright—making sure to blend the clay into the rim securely. -
Add ear texture:
Using a ball tool or the end of a paintbrush, gently press indents into the front center of each ear to give them depth. -
Form the muzzle:
Roll a small ball of clay and flatten it into an oval. Score and slip the back, then attach it to the center of the cup, slightly lower than the eyes will be. -
Create the nose:
Take a tiny pinch of clay (you can dye it dark brown beforehand or paint it later) and press it into a small triangle shape at the top of the muzzle. -
Sculpt the eyes:
Roll two small balls of clay for the eyes. Press them flat onto the face above the muzzle. Use a tool to make a tiny pupil indentation in the center of each. -
Add texture details:
To mimic the blushing cheeks shown in the photo, use a stiff-bristled toothbrush or a needle tool to gently stipple the area under the eyes.
Cracking Up?
If you see hairline cracks while air-dry clay is curing, smooth a mixture of clay and water (slip) into the cracks immediately and let it re-dry slowly away from direct heat.
Step 3: Crafting the Tiny Buddy
-
Shape the body:
Roll a smooth, egg-shaped piece of clay about 1.5 inches tall for the miniature bear’s body. -
Attach the limbs:
Create two small sausage shapes for legs and attach them sitting forward at the bottom. Add two smaller sausage shapes for arms resting at the sides. -
Add the head:
Roll a round ball for the head and attach it to the top of the body. Add two tiny pinch-ears on top. -
Detail the paws and face:
Use a needle tool or toothpick to press three tiny dots into the bottom of each foot for paw pads.
The Perfect Speckle
For the specific look in the photo, mix real crushed black pepper into beige polymer clay. It bakes perfectly and gives that trendy ceramic stoneware effect without a kiln.
Step 4: Finishing Touches
-
Dry completely:
Allow both pieces to dry fully. If using air-dry clay, this may take 24-48 hours. If using oven-bake, follow package instructions. -
Paint the details:
Using a very fine brush and black acrylic paint, carefully fill in the eyes, the nose (if not already colored), and paint a small anchor-shape for the mouth on the muzzle. -
Seal both pieces:
Once the paint is dry, coat both the pencil holder and the mini bear with a matte varnish to protect the surface and seal in the speckles.
Once dry and sealed, you have a sturdy new home for your colored pencils and a quiet little friend to keep you company while you work
Whimsical Garden Mini Scenes
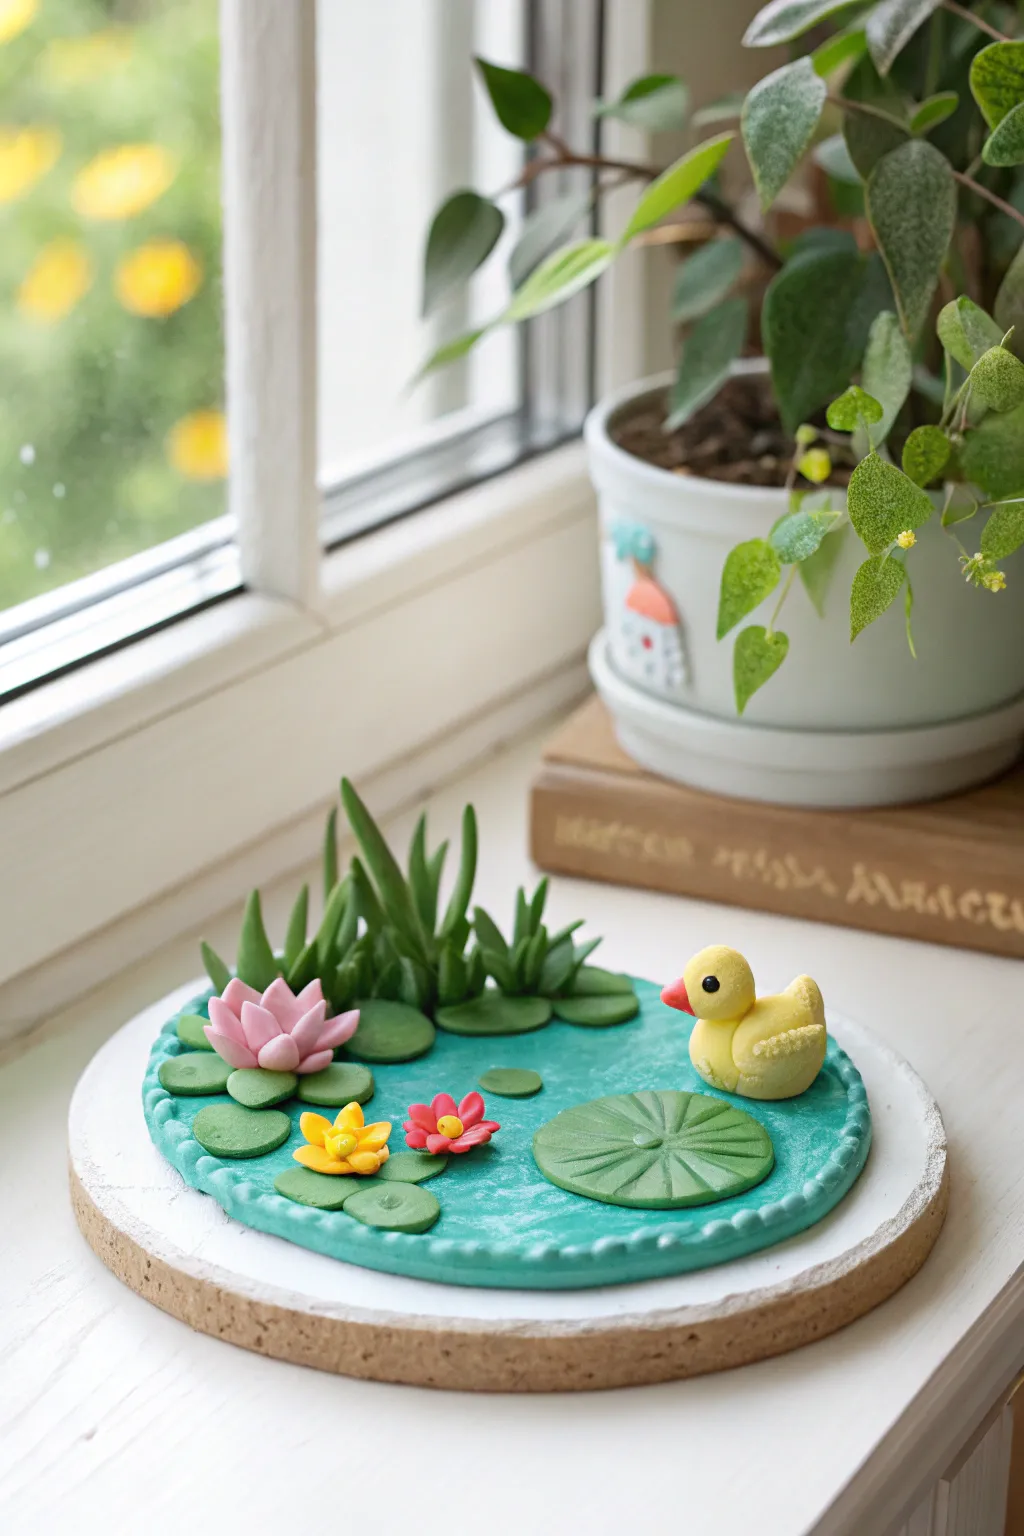
Bring the tranquility of a garden pond indoors with this delightful modeling clay scene. Featuring a cheerful yellow duck drifting among vibrant water lilies and reeds, this miniature world rests perfectly on a simple coaster base.
How-To Guide
Materials
- Polymer clay or air-dry clay (Teal, Deep Green, Light Green, Yellow, Pink, Orange/Red, White/Black)
- Circular wooden or cork coaster (approx. 4-5 inches diameter)
- Clay roller or acrylic rolling pin
- Ball stylus tool
- Needle tool or toothpick
- Clay knife or craft blade
- Liquid clay adhesive or white craft glue
- Optional: Gloss varnish for a wet look
Step 1: Setting the Scene
-
Prepare the base:
Start with a clean circular coaster. Condition a large ball of teal or turquoise clay until it is soft and pliable. -
Roll the water:
Roll the teal clay into a flat circle slightly larger than your coaster base to account for the rim. Aim for about 1/4 inch thickness. -
Create the texture:
Before attaching it, gently press your fingers or a texturing sponge onto the clay surface to give it subtle, rippled water texture rather than leaving it perfectly smooth. -
Attach the pond water:
Apply a thin layer of adhesive to the coaster. Lay the teal clay over it, pressing down gently to secure. Trim any excess that hangs over the edge of the coaster. -
Form the rim:
Roll a long, thin snake of the same teal clay. Wrap this around the outer circumference of the pond. -
Detail the border:
Use a small ball tool or the rounded end of a paintbrush to press indentations all along the rim snake, creating a decorative, beaded border effect.
Water Texture Trick
Before the blue clay dries/hardens, lightly brush it with a wet finger or baby oil to smooth fingerprints, then coat the finished ‘water’ with gloss varnish.
Step 2: Adding Flora
-
Make the lily pads:
Flatten small balls of varying shades of green clay into discs. Most should be small, but make one larger pad for the foreground. -
Detail the pads:
Use a knife tool to cut a small ‘V’ notch into the side of each pad. For the large pad, gently score radiating lines from the center to mimic leaf veins. -
Place the greenery:
Arrange the lily pads on the water surface, pressing them down lightly. Grouping them in clusters often looks more natural than spreading them evenly. -
Sculpt reeds:
Roll several tapered snakes of dark green clay to look like grass blades or reeds. They should be pointed at the top and thicker at the base. -
Plant the reeds:
Cluster these reed shapes together at the back of the pond, pressing their bases firmly into the teal clay so they stand partially upright and curve naturally. -
Form flower petals:
For the pink and yellow lilies, shape tiny teardrops of clay. Flatten them slightly. -
Assemble the blooms:
Arrange the teardrop petals in a circle, pressing the pointed ends together in the center. I like to layer a second, smaller circle of petals on top for fullness. -
Add flower centers:
Place a tiny dot of contrasting yellow or orange clay in the center of each flower and secure the finished blooms onto selected lily pads.
Drooping Reeds?
If your grass blades keep falling over while working, prop them up with small pieces of crumpled foil or cardboard until the clay firms up or is baked.
Step 3: Creating the Duck
-
Shape the body:
Roll a ball of yellow clay into a smooth oval shape for the duck’s body. Gently pinch the back end upward to form a tail. -
Form the head:
Roll a smaller sphere of yellow clay for the head and attach it to the front of the body. Use a tiny bit of liquid clay or blending tool to merge the neck seam smoothly. -
Add wings:
Create two small, flattened teardrop shapes for wings. Press them onto the sides of the body and use a needle tool to scratch in feather textures. -
Give it a face:
Shape a tiny orange triangle for the beak and attach it. Use a needle tool to make eye sockets, then insert minuscule balls of black clay for eyes. -
Final placement:
Place the duck onto the water surface, preferably looking toward the center of the scene. If using oven-bake clay, bake according to package instructions now; otherwise, let it air dry completely.
Once dry, display your miniature pond near a potted plant for the perfect nature-inspired vignette
Snails, Caterpillars, and Ladybugs
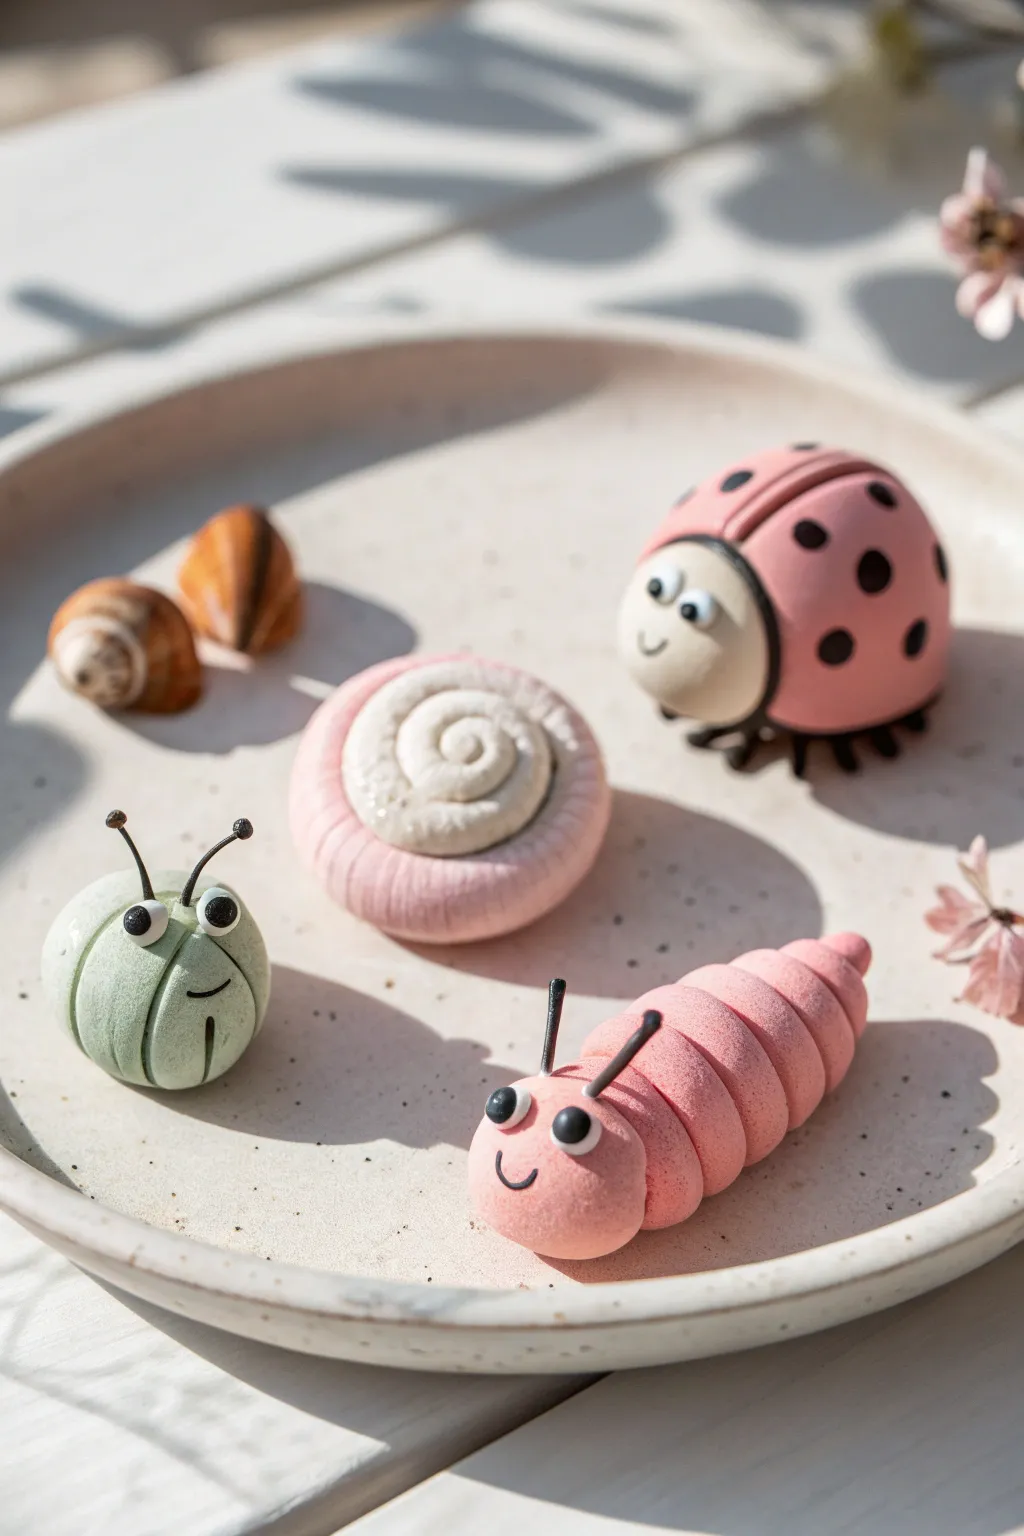
Bring a miniature garden to life with these adorable, pastel-colored clay insects. This project teaches you to sculpt a gentle green bug, a swirling snail shell, a segmented caterpillar, and a classic pink ladybug, all with a soft, matte finish.
Step-by-Step
Materials
- Polymer clay or air-dry clay (Sage Green, Baby Pink, Cream, Black, White)
- Modeling tools (or a toothpick and plastic knife)
- Small ball stylus or clean pencil eraser
- Wire cutters (if using wire antennae)
- Small piece of black crafting wire
- Rolling pin or acrylic roller
- Parchment paper (work surface)
Step 1: Sculpting the Round Green Bug
-
Form the Body:
Start by conditioning a chunk of sage green clay until it is soft and pliable, then roll it into a neat, smooth sphere about the size of a walnut. -
Add Texture Lines:
Using a plastic knife or a clay needle tool, gently press vertical lines down the sides of the sphere to create a segmented look, leaving the front face area smooth. -
Create the Eyes:
Roll two tiny balls of white clay and press them side-by-side onto the upper front of the body. Add two even tinier balls of black clay onto the white centers for pupils. -
Antennae and Smile:
Cut two short lengths of black wire (about 1cm each) and insert them into the top of the head. Lastly, use a curved tool or fingernail to impress a small smile below the eyes.
Clean Lines
Keep baby wipes handy! Pink and cream clay pick up dust easily. Wipe your hands and tools often, especially after working with the black clay
Step 2: Crafting the Pink Caterpillar
-
Prepare Segments:
Roll roughly seven balls of baby pink clay, starting with a larger one for the head and gradually making them smaller for the tail. -
Assemble the Body:
Press the balls gently together in a line. You can curve the line slightly to give the caterpillar a wiggling motion. -
Blend Seams:
Flip the caterpillar over and gently smudge the clay across the connection points on the bottom side to ensure it doesn’t fall apart, then flip it back. -
Add the Face:
Just like the green bug, add two white eye circles with black pupils to the largest segment. Insert two wire antennae and carve a happy mouth.
Step 3: Making the Swirled Snail Shell
-
Create the Outer Ring:
Roll a thick snake (cylinder) of pink clay. Flatten it slightly so it looks like a thick ribbon rather than a perfect tube. -
Create the Inner Swirl:
Roll a thinner snake of cream-colored clay. Coil this into a tight spiral to form the center of the shell. -
Combine Parts:
Wrap the thick pink ribbon around the cream center spiral. Use a texture tool or toothbrush to gently tap the cream section for a stony, organic look. -
Texture the Pink Shell:
Use a needle tool to press fine, radiating lines all around the pink outer ring, mimicking natural shell ridges.
Level Up: Glossy Shells
After baking or drying, apply a coat of water-based gloss varnish only to the ladybug’s shell and the snail’s center for a realistic shine contrast.
Step 4: shaping the Ladybug
-
Form the Dome:
Roll a large ball of pink clay and flatten the bottom against your work surface to create a hemisphere. -
Add the Head:
Take a smaller ball of cream or beige clay and press it onto one side of the pink dome to form the face. -
Create Wings:
Use a knife to gently score a straight line down the center of the pink back, dividing the wings. -
Apply Spots:
Roll several small, flat discs of black clay and press them randomly onto the pink shell. I prefer varying the sizes slightly for a natural look. -
Final Details:
Add the classic googly-style eyes (white clay with black pupils) to the beige face, mark a small smile, and add tiny black clay sausages underneath for feet.
Arranging these little creatures on a tray creates a delightful desktop decoration or a sweet handmade gift
Birds on a Little Branch Display
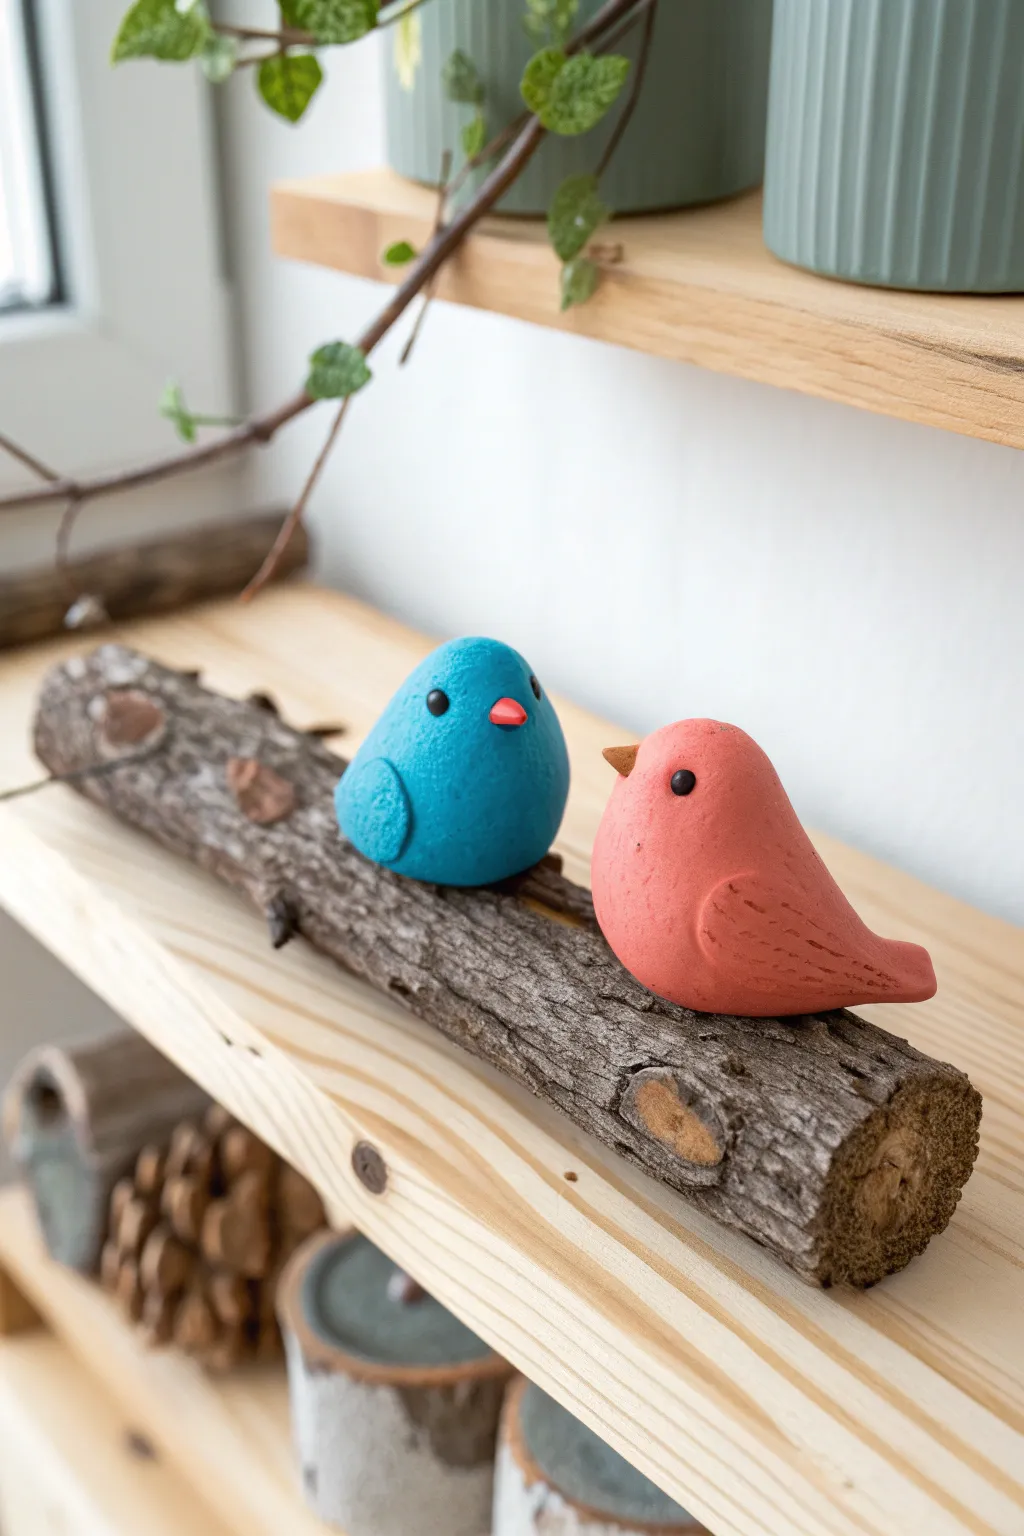
Perched on a natural wooden log, this adorable duo brings a touch of whimsy to any shelf or windowsill. Using simple shapes and vibrant modeling clay, you can craft these smooth, minimalist birds that look like high-end decor.
Detailed Instructions
Materials
- Air-dry modeling clay (blue, coral pink, orange, black)
- Natural wood branch (approx. 2-3 inches thick)
- Clay sculpting tools (needle tool, small spatula)
- Fine-grit sandpaper (optional)
- Matte sealant or varnish
- Strong craft glue (e.g., E6000)
- Rolling pin
- Water (for smoothing)
Step 1: Preparing the Base
-
Select your branch:
Find a sturdy, natural branch cutting similar to the one in the photo. Look for nice textures and natural knots. It should be stable when sitting flat. -
Clean the wood:
Brush off any loose dirt or moss from your branch. If the bottom doesn’t sit flat, ask an adult to sand or saw a flat section so it doesn’t roll.
Step 2: Sculpting the Blue Bird
-
Form the body:
Start by rolling a golf-ball-sized amount of bright blue clay into a smooth sphere. -
Shape the drop:
Gently taper one side of the sphere to create a fat teardrop shape. This will be the tail end, though this bird is quite round and stout. -
Flatten the base:
Press the shape gently onto your work surface to flatten the bottom slightly so the bird sits upright without tipping. -
Create the wings:
Take two small pea-sized pieces of blue clay. Flatten them into discs and press one onto each side of the body, smoothing the edges slightly to integrate them. -
Add the beak:
Roll a tiny cone of bright orange or coral clay. Press it firmly into the center of the face area. -
Add the eyes:
Roll two miniscule balls of black clay. Press them into the clay on either side of the beak. I like to press them in deep enough that they are flush with the surface.
Stone Effect Tip
To get that gritty, matte texture shown in the photo, mix a pinch of fine sand or baking soda into your clay before sculpting.
Step 3: Sculpting the Pink Bird
-
Form the pink body:
Take a slightly larger amount of coral pink clay compared to the blue bird. Roll it into a smooth ball. -
Elongate the tail:
Pull and smooth the clay on one side to create a longer, more pronounced tail than the blue bird has. Curve the tip upward slightly. -
Define the wings:
Instead of adding separate pieces, use a sculpting tool or the side of a toothpick to gently indent a wing shape into the side of the body. -
Add texture:
Use a needle tool to create small, dashed lines along the wing area to simulate feathers. -
Attach the face details:
Add a small brownish-orange cone for the beak and two small black beads for the eyes, just like you did for the blue bird.
Cracking Clay?
If you see tiny cracks forming while smooth the clay, dip your finger in water and gently rub the crack in a circular motion to seal it.
Step 4: Finishing Touches
-
Texture check:
For a stone-like finish visible in the photo, gently tap the surface of both birds with a clean, stiff-bristled toothbrush before the clay dries. -
Let them dry:
Allow the birds to dry completely according to your clay package instructions. This usually takes 24-48 hours. -
Optional sanding:
If there are any rough fingerprints after drying, lightly sand them away with fine-grit sandpaper. -
Seal the clay:
Apply a coat of matte varnish to protect the clay colors without adding too much shine. -
Final assembly:
Apply a generous dab of strong craft glue to the bottom of each bird and press them firmly onto the wooden branch. Hold for a minute to ensure a good bond.
Now you have a charming, rustic display that captures the sweet simplicity of nature
Abstract Wavy Jewelry Catch-Alls
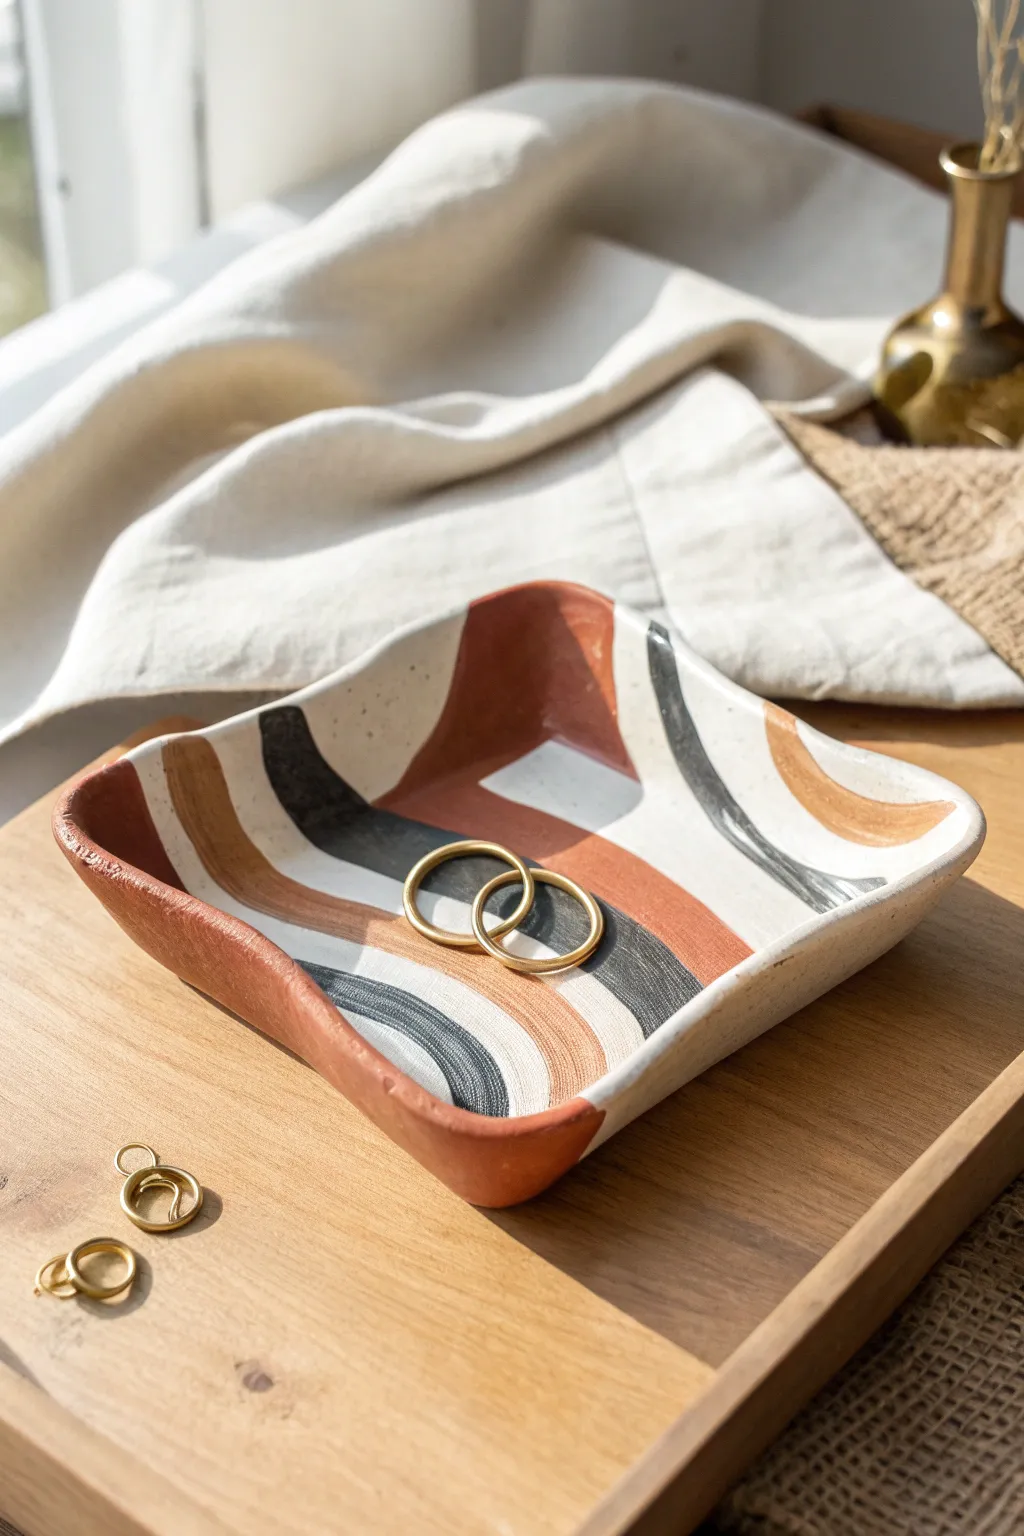
Bring earthy warmth to your dresser or bedside table with this modern, organically shaped catch-all. Featuring flowing abstract waves in terracotta, charcoal, and cream, this hand-formed clay dish is the perfect resting place for your favorite rings and small treasures.
Step-by-Step Tutorial
Materials
- Air-dry modeling clay (white or terracotta)
- Acrylic paints (terracotta/rust, black/charcoal, cream/off-white, camel/tan)
- Rolling pin
- Square template (cardstock or paper, approx. 4×4 or 5×5 inches)
- X-Acto knife or clay cutting tool
- Small bowl or sponge (for support)
- Fine-grit sandpaper
- Flat shader brushes (medium and small)
- Water cup and palette
- Matte or satin varnish sealer
Step 1: Shaping the Base
-
Condition the clay:
Start by taking a generous handful of air-dry clay and kneading it in your hands to warm it up. This removes air bubbles and makes the material more pliable, reducing the chance of cracks later on. -
Roll out the slab:
Place the conditioned clay on a clean, flat surface or canvas mat. Find a rolling pin and roll the clay out evenly until it is about 1/4 inch thick. Try to keep the thickness consistent across the entire slab. -
Cut the square:
Lay your square cardstock template gently on top of the rolled clay. Using your clay knife or X-Acto blade, trace around the template to cut out a clean square shape. Save the excess clay for future projects. -
Smooth the edges:
Dip your finger in a tiny bit of water and run it along the cut edges of the square. This softens the sharp cuts into a nice, rounded rim that looks more like fired ceramic. -
Form the curve:
This is the crucial shaping step. Gently lift the square slab and drape it into a shallow bowl, or simply curl the four corners upward with your fingers to create a sunken center. The goal is a gentle, organic curve rather than sharp, folded corners. -
Refine the shape:
While the clay is still soft, press gently into the center to ensure the bottom is somewhat flat so it will sit stable on a table. Adjust the wavy rim until you are happy with the silhouette. -
Initial drying:
Set the dish aside to dry for 24-48 hours. I like to let this dry in a cool spot away from direct sunlight to prevent warping. Rotate it occasionally so air reaches the bottom.
Fixing Cracks
If small cracks appear while drying, don’t panic. Mix a tiny bit of fresh clay with water to make a paste (slip) and fill cracks, then sand smooth once dry.
Step 2: Prepping and Painting
-
Sand imperfections:
Once the clay is bone dry and hard, take your fine-grit sandpaper and gently smooth out any rough spots on the rim or surface. Wipe away the dust with a slightly damp cloth. -
Apply the base coat:
Paint the entire top surface of the dish with your cream or off-white acrylic paint. You may need two coats to get solid, opaque coverage. Let the base layer dry completely. -
Plan the design:
Look at the dish and visualize where your abstract waves will flow. The design features wide, sweeping curves that move diagonally across the square form. -
Paint the terracotta corner:
Start with the rust or terracotta color. Paint a large, organic shape in one corner, and perhaps a sweeping wave on the opposite side. Don’t worry about perfect lines; a little wobble adds character. -
Add charcoal waves:
Using a separate brush, add the charcoal or black waves. These should run somewhat parallel to the terracotta shapes but can intersect or flow independently. vary the thickness of these lines for visual interest. -
Introduce the tan accent:
Mix a camel or tan shade and paint thinner accent curves tucked between the bolder colors. This lighter earth tone bridges the gap between the dark charcoal and the warm rust. -
Paint the exterior:
Flip the dish over or carefully hold it by the edges. Paint the underside and the outer rim with a solid color—either the rust shade or the cream base—to give it a finished look. -
Touch up details:
Go back in with a small detail brush to clean up any edges where the colors meet. If you want a more textured look, you can leave the brushstrokes visible.
Pro Tip: Texture
For an authentic pottery feel, mix a pinch of baking soda into your acrylic paint. It creates a subtle, grainy texture that mimics terracotta beautifully.
Step 3: Finishing
-
Seal the piece:
Once all paint layers are fully dry, apply a coat of matte or satin varnish. This protects the paint from chipping and gives the dish a professional sheen. -
Final cure:
Allow the varnish to cure according to the bottle’s instructions before placing any jewelry inside. Your custom clay catch-all is now ready for use.
Enjoy styling your new handmade dish with your favorite accessories
Storybook Character Mini Sculptures
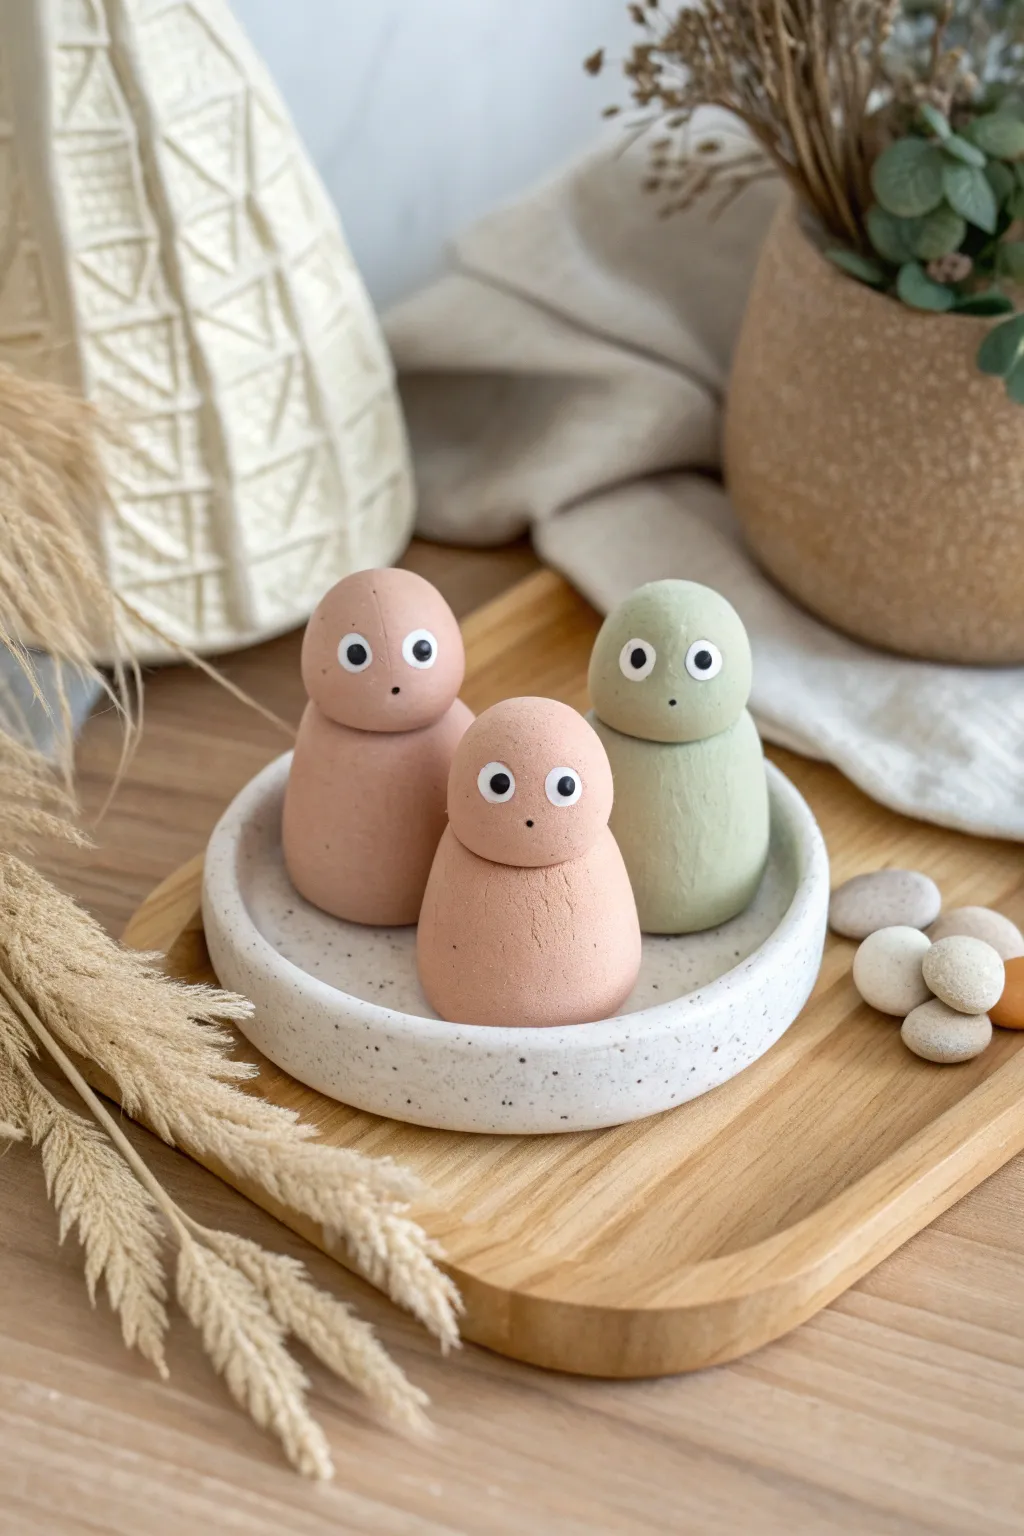
These charming, minimalist figures bring a touch of woodland magic to any shelf with their soft matte finish and expressive eyes. Using simple geometric shapes and earth-toned modeling clay, you can sculpt a trio of friendly sprites that look like they’ve just wandered out of a storybook.
Detailed Instructions
Materials
- Air-dry modeling clay (white or pre-colored)
- Acrylic paints (terracotta/dusty pink, sage green, black, white)
- Small round paintbrush (size 2 or 4)
- Fine detail brush (size 0 or 00)
- Small cup of water
- Sandpaper (fine grit)
- Palette or paper plate
- Matte spray varnish (optional)
Step 1: Sculpting the Base Forms
-
Condition the Clay:
Start by taking a chunk of your air-dry clay and kneading it in your hands until it becomes soft, pliable, and free of cracks. If the clay feels dry, dip your fingertips in water and work it in. -
Divide the Portions:
Separate your clay into three main portions for the bodies. You’ll want two slightly larger portions for the pink sprites and one slightly smaller one for the green sprite to create variety in height. -
Roll the Bodies:
Roll each portion into a smooth cylinder. Gently taper the top slightly so it’s narrower than the base, creating a rounded cone or gumdrop shape about 2 to 3 inches tall. -
Flatten the Bottoms:
Tap the bottom of each cylinder firmly against your work surface. This creates a flat, stable base so your sprites won’t tip over once they are dry. -
Create the Heads:
Pinch off three smaller balls of clay, roughly the size of a large bouncy ball or a small walnut. Roll them until they are perfectly spherical. -
Attach Head to Body:
Score the top of the body and the bottom of the head with a sculpting tool or toothpick (making cross-hatch scratches). Dab a little water or slip on the scratched areas and press the head firmly onto the body. -
Smooth the Seams:
While you want a distinct head shape, ensure the connection is strong. Use your finger to gently smooth just the very underside of the head where it meets the neck, or simply press down enough that they adhere well. -
Refining the Surface:
Dip your finger in a tiny bit of water and rub it over the entire surface of the sculptures to smooth out fingerprints and imperfections. Let them dry completely, usually for 24-48 hours depending on humidity.
Stone Texture Trick
Mix baking soda into your acrylic paint before applying the base coat. This creates a grainy, faux-ceramic texture that hides imperfections.
Step 2: Painting and Details
-
Sand for Smoothness:
Once fully dry, lightly sand any bumps or rough textures with fine-grit sandpaper. Wipe away the dust with a barely damp cloth. -
Mix the Base Colors:
On your palette, mix a custom terracotta shade using pink, a touch of brown, and white. For the second color, mix a muted sage green by adding grey or white to a forest green acrylic. -
Applying the Base Coat:
Paint the entirety of two figures with the terracotta mix and one with the sage green. I find that applying two thin coats gives a much smoother, deeper finish than one thick globs layer. -
Let the Paint Cure:
Allow the base coats to dry completely to the touch before moving on to the faces. -
Paint the Eye Whites:
Using a small round brush and white paint, create two large circles on the upper half of the head for the eyes. Space them somewhat wide apart for that innocent, quirky look. -
Add the Pupils:
Switch to your fine detail brush and black paint. Carefully paint a smaller black circle inside the white ones. You can place them centered or slightly off-center to give them a distracted, wandering gaze. -
The Tiny Mouth:
Using the very tip of your smallest brush or even a toothpick dipped in black paint, place a single tiny dot between and slightly below the eyes to create the mouth. -
Final Seal:
To protect the paint and give the figures a unified look, spray them with a matte varnish. This removes any glossy streaks from the acrylics and mimics a stone-like texture.
Make Them Functional
Before the clay dries, press a small divot into the very top of the head to turn these sprites into cute photo holders or dried flower stands.
Arrange your trio in a shallow dish or on a shelf to watch over your room.
Mixed-Media Clay Wall Plaques
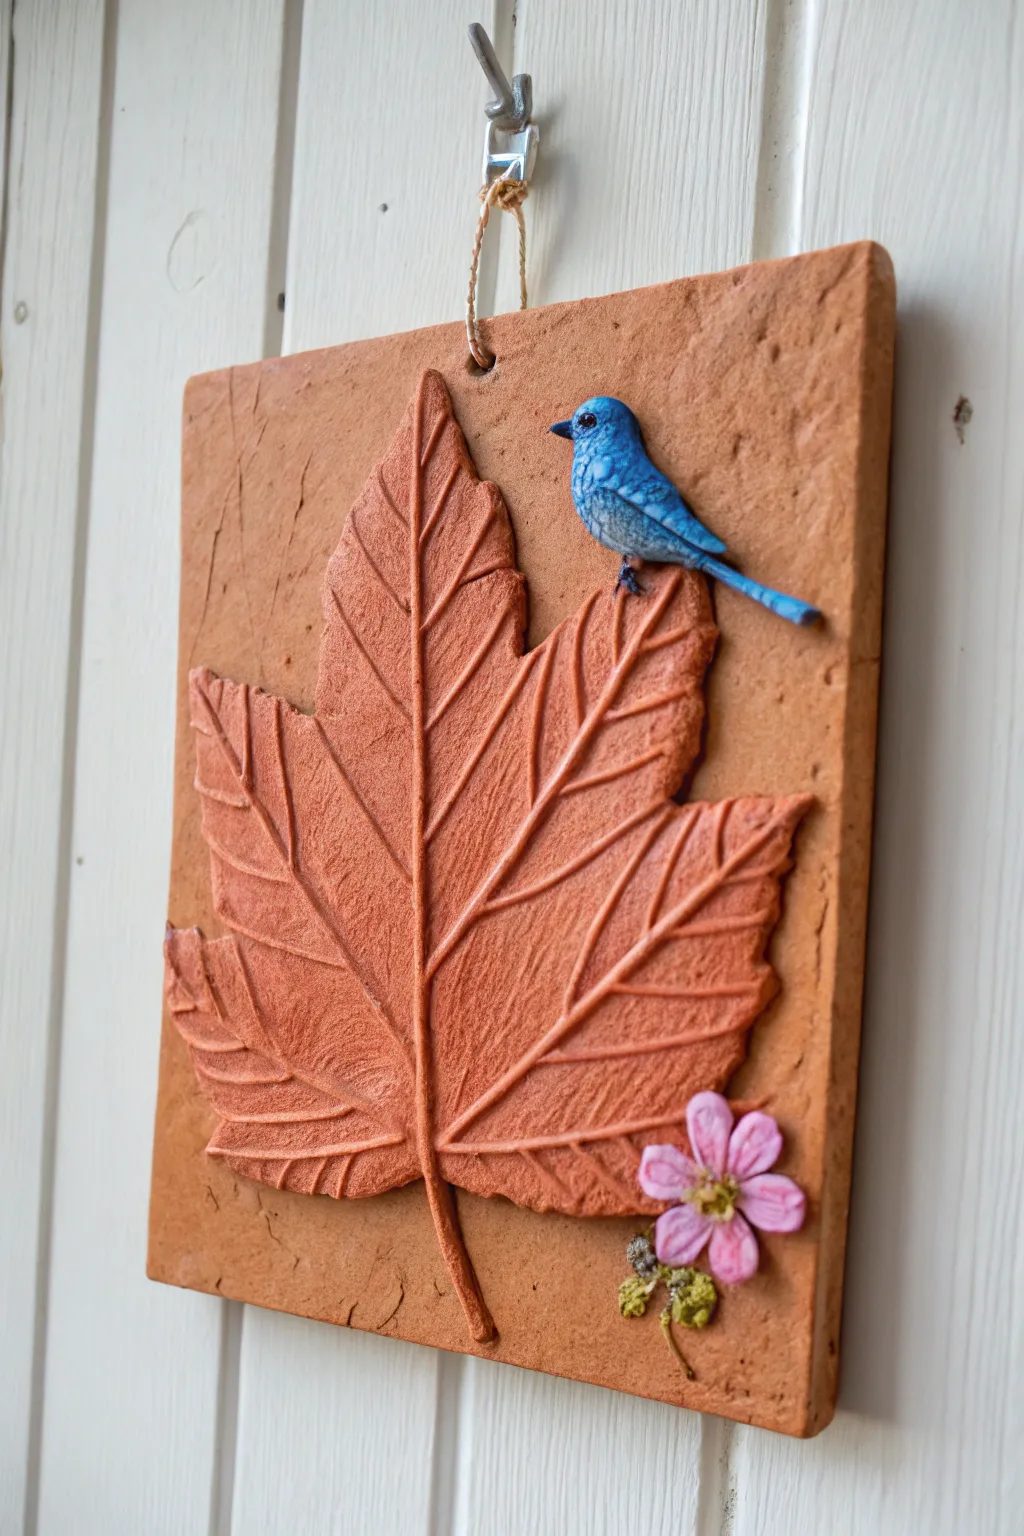
Bring the serene beauty of the outdoors inside with this charming mixed-media clay plaque. Combining the rustic warmth of terracotta with delicate painted details, this project captures a perfect moment of a bird perched on an autumn leaf.
Step-by-Step
Materials
- Air-dry clay (terracotta color)
- Large fresh leaf (maple or sycamore works best)
- Rolling pin
- Sharp craft knife or clay tool
- Small amount of white air-dry clay (or polymer clay)
- Acrylic paints (bright blue, black, white, pink, yellow, green)
- Fine detail paintbrushes
- Textured sponge or toothbrush
- Rolling board or parchment paper
- Twine
- Pencil or straw (for poking a hole)
- Matte varnish (optional)
Step 1: Creating the Base & Leaf Impression
-
Prepare the clay slab:
Begin by kneading a large handful of terracotta air-dry clay to remove air bubbles. Roll it out on parchment paper into a square slab approximately 1/4 to 1/2 inch thick. Don’t worry about perfect edges; a slightly rough edge adds rustic charm. -
Texture the surface:
Before pressing the leaf, give the background some character. Gently dab the surface of the clay slab with a textured sponge or crumpled aluminum foil to create a stone-like, pitted texture. -
Position the leaf:
Place your fresh leaf vein-side down onto the clay. I find that placing it slightly off-center makes the composition more dynamic. Ensure the stem is positioned well within the square. -
Impress the veins:
Use your rolling pin to firmly roll over the leaf once. You want to press it deep enough so the veins leave a crisp impression and the leaf shape is slightly recessed. -
Define the edges:
Carefully peel back the leaf to reveal the imprint. Use a modeling tool to gently deepen the outline of the leaf if needed, separating the ‘leaf’ area from the ‘background’ area to enhance the relief effect. -
Add the hanging hole:
Using a pencil, straw, or round tool, poke a hole near the top center of the square for your twine. Ensure it’s not too close to the edge to prevent cracking.
Step 2: Sculpting the Residents
-
Form the bluebird:
Using a small piece of clay (either white clay or more terracotta), shape a small teardrop for the bird’s body and a smaller sphere for the head. Flatten the tail slightly. -
Attach the bird:
Score the clay surface on the top edge of the leaf where the bird will sit. Add a tiny dab of water or clay slip, then press your bird shape firmly onto the relief. Smooth the seams where the bird meets the background. -
Add bird details:
Use a needle tool to scratch tiny texture lines for feathers on the wings and tail. Poke a tiny indentation for the eye and pull a tiny bit of clay to form the beak. -
Sculpt the flower:
Create five tiny teardrop shapes for petals and arrange them in a circle near the bottom right of the plaque. Add a small ball in the center. Use a needle tool to press a vein down the center of each petal. -
Drying time:
Allow the entire piece to dry completely. This usually takes 24-48 hours depending on humidity. Flip it over halfway through to ensure the back dries evenly.
Placement Tip
Don’t center the leaf perfectly! Placing it at a slight angle makes the artwork feel more organic and leaves better negative space for the bird and flower.
Step 3: Painting & Finishing
-
Base coat the bird:
Once dry, paint the bird with a bright cerulean blue acrylic. You may need two thin coats for opacity, especially if painting over terracotta clay. -
Detail the feathers:
Mix a darker blue or diluted black to gently wash over the wing and tail textures, wiping away the excess to highlight the feather details. -
Paint the face:
Using your smallest brush, paint the beak black and add a tiny black dot for the eye. A microscopic dot of white in the eye adds a lifelike glint. -
Color the flower:
Paint the flower petals a soft pink. Use yellow for the center and dot it with a bit of brown for texture. Paint two small leaves beneath the flower in olive green. -
Enhance the leaf:
To make the main leaf pop, dry-brush a slightly lighter terracotta or orange shade over the raised veins and edges of the imprint. -
Seal and hang:
Protect your work with a coat of matte varnish. Once dry, thread a natural twine loop through the hole and tie a knot to finish.
Cracking Issues?
If small cracks appear while drying, mix a tiny bit of clay with water to make a paste (slip) and smooth it into the cracks with your finger, then let dry again.
Hang this lovely nature scene on a sunlit wall to let the relief textures cast gentle shadows