If you’re looking for a sweet little project to make side-by-side, modeling clay for couples is basically the perfect creative date. I love ideas that come in pairs—matching, complementary, or literally designed to fit together—so you end up with keepsakes that feel like “us.”
Split Heart Keychains
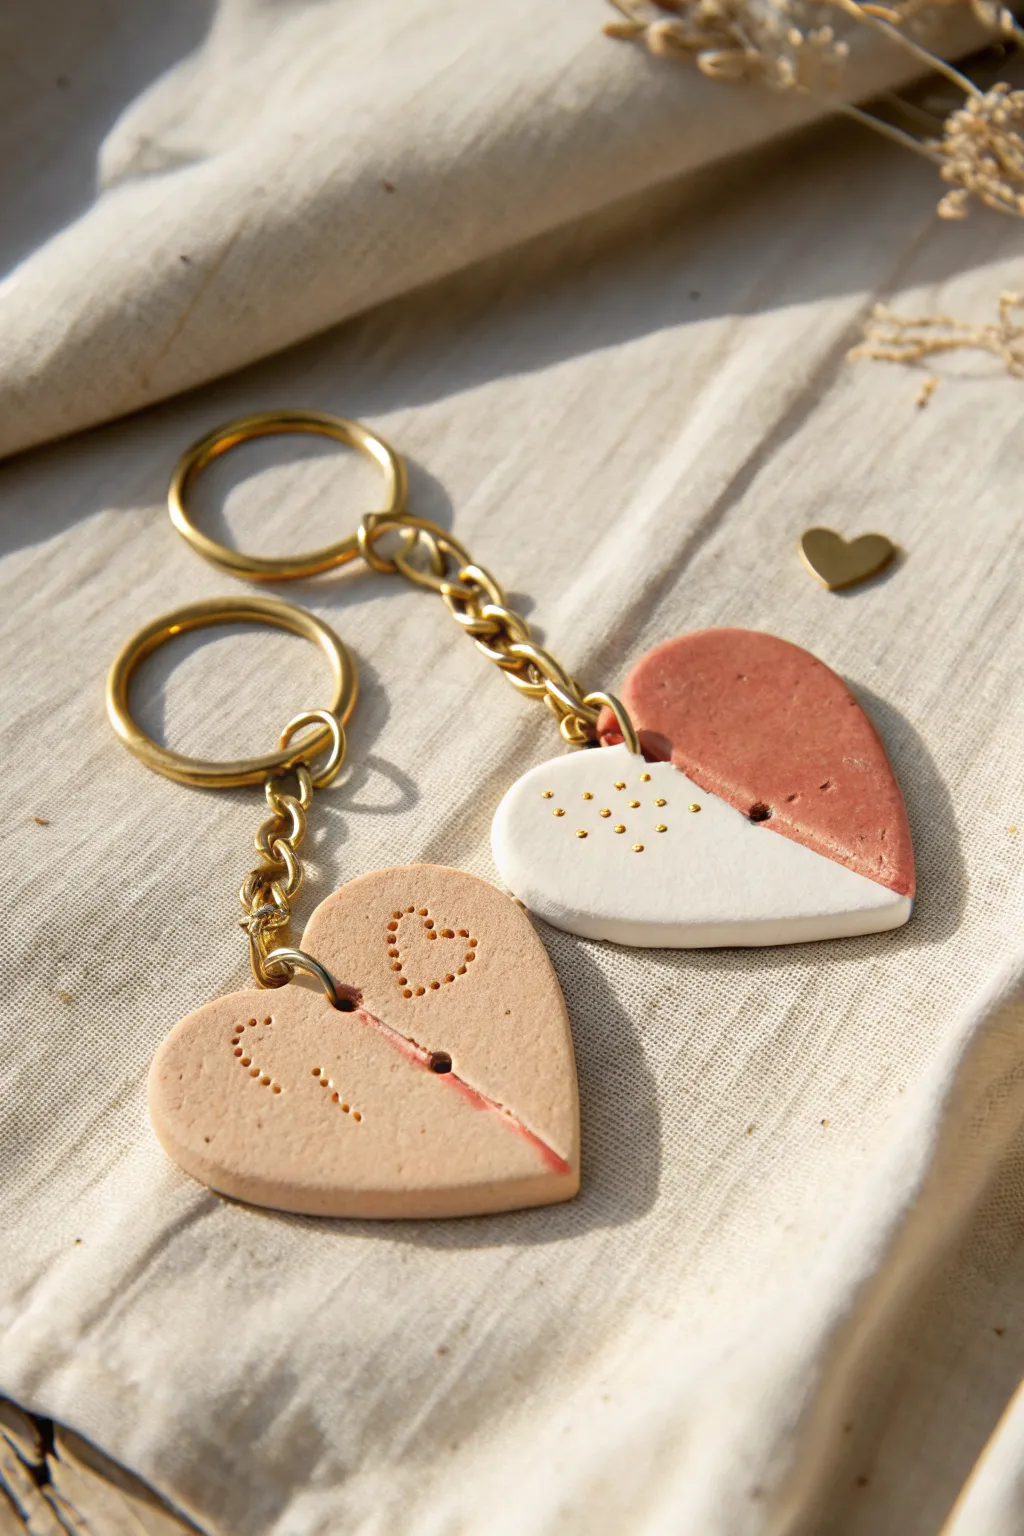
These charming keychains feature a single heart split into two distinct halves, symbolizing connection even when apart. One half is a soft, speckled beige with a dotted heart motif, while the other features a bold, abstract split of terracotta and white with delicate gold accents.
Detailed Instructions
Materials
- Polymer clay (beige/tan, terracotta/rust, white)
- Small rolling pin
- Heart-shaped cookie cutter (medium size)
- X-Acto knife or clay blade
- Needle tool or toothpick
- Gold acrylic paint
- Fine detail paintbrush
- Two gold keychain rings with chains
- Jump rings
- Pliers
- Baking sheet and parchment paper
- Oven (if using polymer clay)
Step 1: Prepping the Clay Base
-
Condition the Clay:
Begin by warming up your beige polymer clay in your hands until it is soft and pliable. This prevents cracking later on. -
Roll out the Slab:
Roll the beige clay out on a clean, flat surface to a thickness of about 1/4 inch (5-6mm). You want it sturdy enough to be a functional keychain. -
Cut the Heart:
Use your heart-shaped cookie cutter to punch out a clean heart shape from the rolled clay. Smooth the edges gently with your finger if there are any rough spots. -
Divide the Heart:
Take your clay blade and make a jagged, zig-zag cut down the center of the heart to separate it into two halves. This interlocking edge adds character compared to a straight line.
Sticky Situation?
If your clay sticks to the table or cutter, lightly dust your work surface with cornstarch or baby powder before rolling. This helps release the shapes cleanly without distortion.
Step 2: Designing the Halves
-
Create the Beige Half:
Set one half aside to remain solid beige. Using a needle tool, gently press a dotted pattern into the surface to form a small heart shape near the center. -
Add Decorative Dots:
On the same beige half, add a few scattered pin-pricks or dotted lines near the jagged edge to mirror the design style. -
Prepare the Two-Tone Half:
For the second half, you will need to create a new surface. Roll out small pieces of terracotta and white clay. -
Splice the Colors:
Cut the terracotta and white pieces at an angle and press them together firmly to create a single sheet. Roll over the seam gently so they bond completely. -
Cut the Second Shape:
Use the original beige half as a template or the cutter to cut this two-tone clay into the matching half-heart shape. -
Add Texture Details:
On the white section of the two-tone heart, use your needle tool to add a cluster of small indentations similar to the beige half.
Step 3: Finishing and Assembly
-
Pierce Holes:
Use a straw or a larger needle tool to punch a hole near the top outer curve of each heart half. Make sure the hole is big enough for your jump rings. -
Bake the Clay:
Place both halves on a parchment-lined baking sheet. Bake according to your clay package instructions (usually around 275°F or 135°C for 15-30 minutes). -
Cool Down:
Allow the pieces to cool completely before handling. I like to let them sit for an hour to ensure they harden fully. -
Paint Gold Accents:
Dip a fine brush into gold acrylic paint. Carefully paint inside the indented dots on the white section to make them pop. -
Attach Hardware:
Using pliers, open a jump ring and thread it through the hole in one clay piece. Attach the keychain chain and close the ring securely. -
Final Connection:
Repeat the process for the second half. Check that all links are tight so the clay won’t fall off during use.
Level Up: Magnet Magic
Embed small, strong magnets into the cut edges of the clay before baking (or glue them after). This way, the keychains will snap together satisfyingly when placed next to each other.
Now you have a unique set of keychains to share or keep as a reminder of a special bond


Interlocking Puzzle Piece Charms
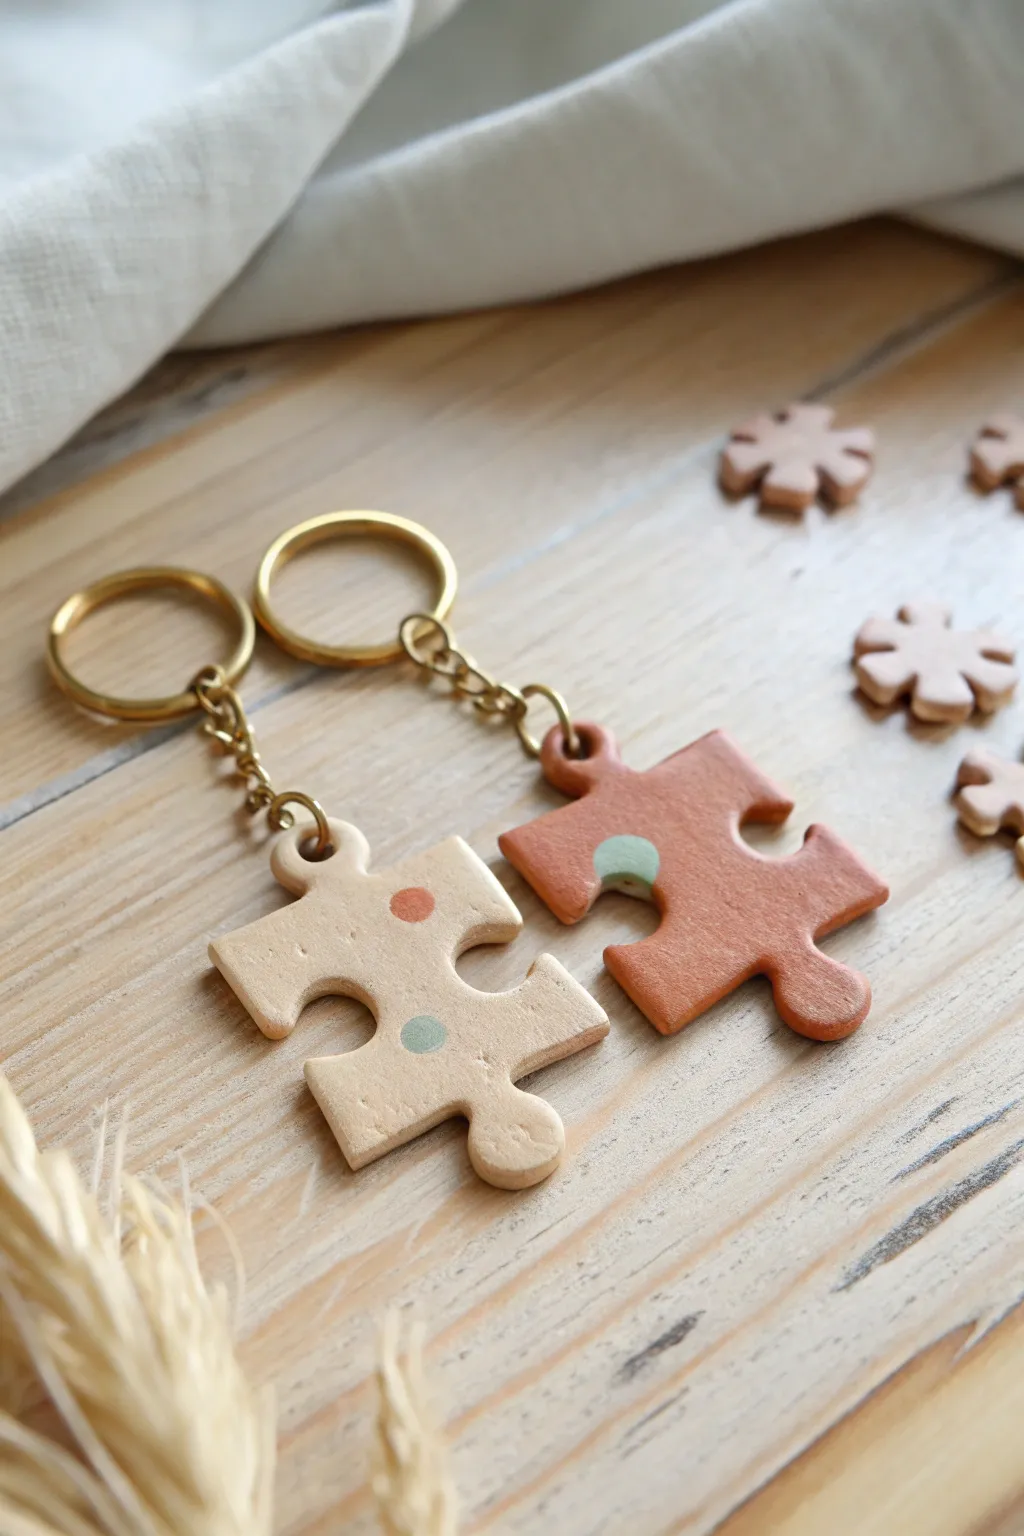
Celebrate your perfect fit with these charming, handmade puzzle piece keychains. The soft, earthy tones and minimalist dot accents give them a modern, organic look that feels special without being overly flashy.
Step-by-Step Guide
Materials
- Polymer clay (light beige/sand, terracotta/rust, and muted teal)
- Small puzzle piece cookie cutter (or a sharp craft knife and paper template)
- Rolling pin or acrylic roller
- Parchment paper or ceramic tile (work surface)
- Small round cutter or a straw (for the dots)
- Needle tool or toothpick
- Gold-tone keychain hardware (rings and chains)
- Jump rings (gold-tone)
- Jewelry pliers (round nose and flat nose)
- Oven for baking
- Fine-grit sandpaper (optional)
- Gloss or matte glaze (optional)
Step 1: Shaping the Base
-
Condition the clay:
Start by warming up your beige and terracotta clays in your hands. Knead them until they are soft, pliable, and free of any cracks or air bubbles. -
Roll out the canvas:
Place the conditioned beige clay on your parchment paper. Roll it out to an even thickness, roughly 4-5mm thick. You want it sturdy enough to withstand jangling in a pocket. -
Cut the first piece:
Using your puzzle piece cutter, press firmly into the beige clay sheet. If you don’t have a cutter, print a simple puzzle outline, lay it on the clay, and carefully trace around it with a craft knife. -
Create the partner piece:
Repeat the rolling and cutting process with the terracotta colored clay. Ensure both pieces are the exact same thickness for a cohesive look. -
Check the fit:
Before doing anything else, gently slide the two clay pieces together. They should interlock comfortably without forcing. If the fit is tight, carefully shave off a tiny bit of clay from the connector tab using your craft knife.
Smooth Surface Secret
Before baking, lightly wipe your unbaked clay with a little baby oil or rubbing alcohol on a q-tip to remove lint and accidental fingerprints.
Step 2: Adding the Details
-
Make the dot accents:
Roll out a very thin sheet of the teal clay and the leftover terracotta clay. Use a tiny round cutter or the end of a straw to punch out small circles. -
Apply dots to the beige piece:
Gently place one terracotta dot and one teal dot onto the beige puzzle piece. Press them down lightly with your finger so they bond with the surface but don’t squish flat. -
Apply dots to the terracotta piece:
Add a single teal dot to the terracotta puzzle piece to tie the color palette together. -
Create the hardware hole:
Using a needle tool or a larger toothpick, poke a hole near the top corner of each puzzle piece. Make sure the hole is large enough for your jump ring to pass through, and wiggle the tool slightly to ensure clean edges. -
Smooth the edges:
Run your finger lightly along the cut edges of the puzzle pieces to soften any sharp angles left by the cutter. This gives the finished keychain a more professional, finished feel.
Step 3: Baking and Assembly
-
Bake the pieces:
Place your clay pieces on a parchment-lined baking sheet or ceramic tile. Bake according to the specific temperature and time instructions on your package of polymer clay. I always recommend using an oven thermometer to be safe. -
Cool down completely:
Once bakes, let the pieces cool completely in the oven with the door slightly ajar. This helps prevent cracking from thermal shock. -
Sand for perfection:
If there are any rough spots or fingerprints, light wet-sanding with fine-grit sandpaper can make the surface buttery smooth. -
Seal (optional):
For extra durability, you can brush on a thin layer of matte or gloss glaze, though the raw clay finish has a lovely natural look on its own. -
Open the jump rings:
Using two pairs of pliers, twist your jump rings open sideways (never pull them apart outward) to preserve their circle shape. -
Attach the hardware:
Slide the open jump ring through the hole in the clay piece, then loop the keychain hardware onto the ring. -
Secure the finish:
Twist the jump ring closed again with your pliers, ensuring the two ends meet perfectly flush so the chain doesn’t slip out.
Texture Time
Before cutting the shapes, gently press a piece of coarse sandpaper or fabric onto the clay slab to imprint a subtle, stone-like texture.
Now you have a matching set that perfectly symbolizes how you and your partner complete each other


Matching Thumbprint Trinket Dishes
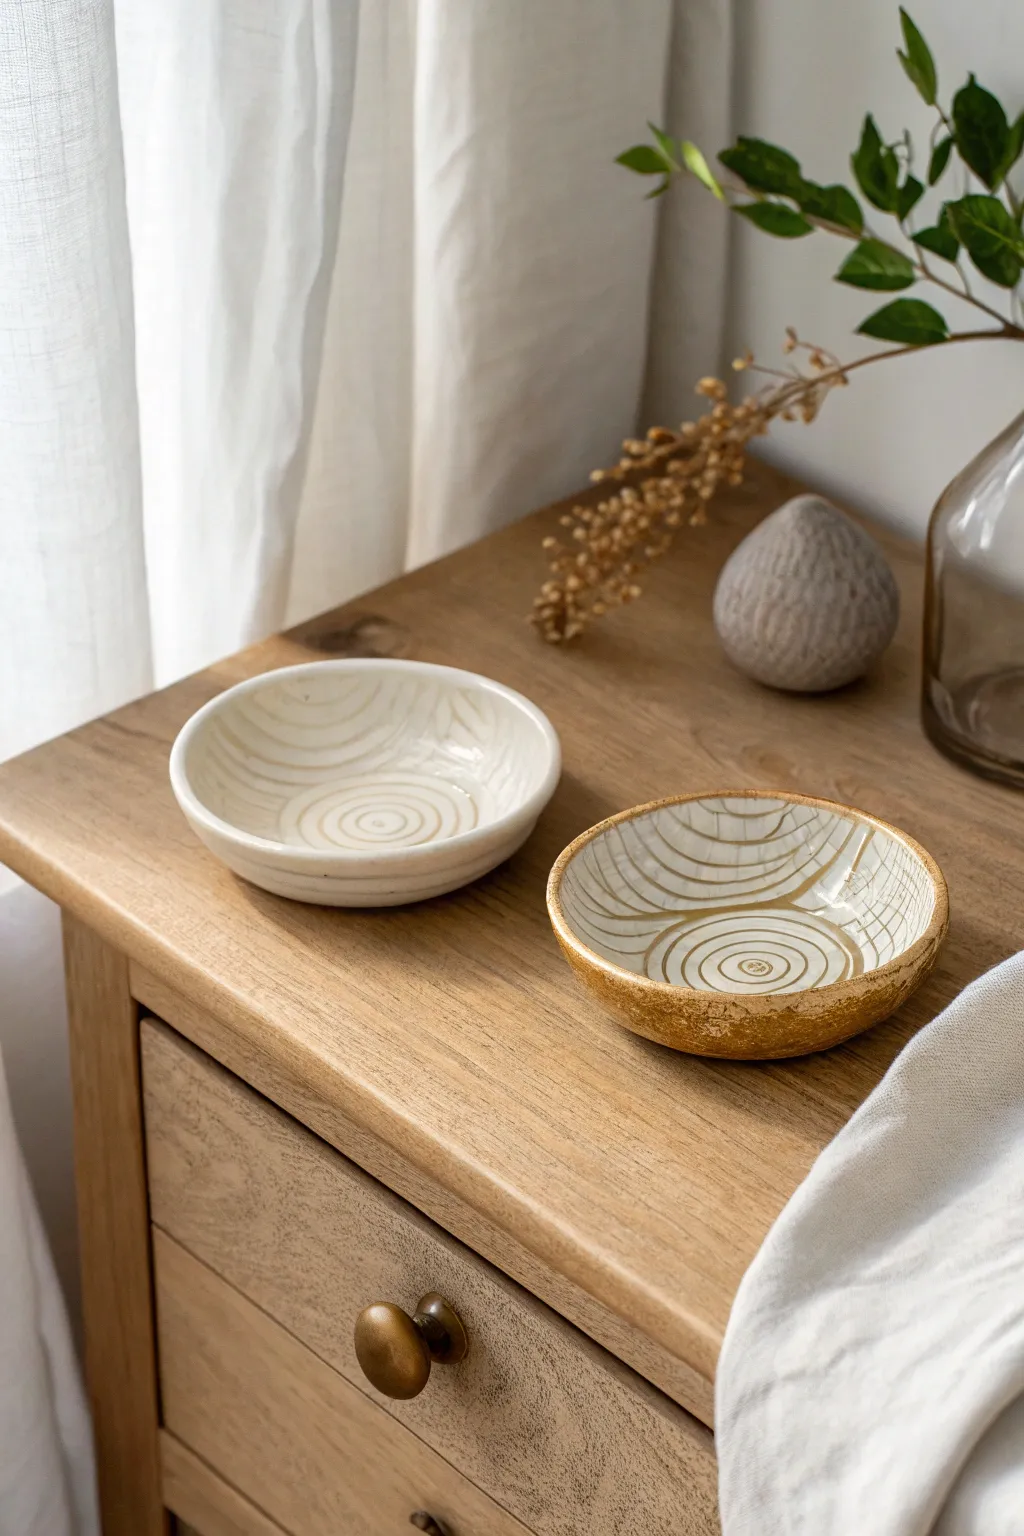
These elegant, shallow trinket dishes feature a mesmerizing concentric swirl pattern that symbolizes the connection between two people. With their organic, hand-shaped rims and delicate line work, they make perfect bedside catchalls for rings and jewelry.
Step-by-Step
Materials
- White beautiful modeling clay (air-dry or oven-bake)
- Rolling pin
- Round cookie cutter or bowl (approx. 4-5 inches diameter)
- Small sponge
- Water
- Fine-grit sandpaper
- Carving tool or needle tool
- White acrylic paint or gloss glaze
- Gold leaf or metallic gold paint (optional for rim)
- Soft paintbrush
- Clear sealant (if using air-dry clay)
Step 1: Shaping the Clay Base
-
Prepare the clay:
Begin by conditioning your clay. Knead a ball of white modeling clay in your hands until it becomes soft, pliable, and free of cracks. -
Roll it out:
Using a rolling pin, flatten the clay into a smooth slab. Aim for an even thickness of about 1/4 inch to ensure the dish is sturdy but elegant. -
Cut the circles:
Press your round cookie cutter or an upside-down bowl into the clay to cut out two identical circles. These will be the base for your matching dishes. -
Smooth the edges:
Dip your finger or a small sponge in a tiny bit of water and run it along the cut edge of the clay circles to round them off and remove any sharp angles. -
Form the curve:
Gently cup the clay circle in the palm of your hand. Using your thumb, press lightly into the center while pulling the edges upward to create a shallow bowl shape. -
Refine the shape:
Place the curved clay onto a flat surface. Adjust the rim so it is slightly irregular and organic, rather than perfectly machine-made. I find this gives the piece much more character.
Step 2: Carving the Design
-
Start the center swirl:
Locate the approximate center of your dish. Using a carving tool or needle tool, press gently to create a small central circle or thumbprint indentation. -
Carve the concentric lines:
Starting from that center point, slowly carve circular lines spiraling outward. These don’t need to be perfect circles; wobbly, hand-drawn lines add to the minimalist aesthetic. -
Vary the pressure:
As you carve the rings, vary your pressure slightly. Some sections of the line can be deeper while others are faint, creating a textured, weathered look. -
Complete the pattern:
Continue the concentric lines all the way up the sides of the dish until you reach the rim. Repeat the entire process for the second dish. -
Dry or bake:
Follow the instructions on your specific clay package. If baking, place them on a baking sheet. If air-drying, let them sit for 24-48 hours until hardened completely.
Cracked Clay?
If you see tiny cracks forming while smooth, dip your finger in a sludge of clay and water (called slip) and massage it into the crack to seal it.
Step 3: Finishing Touches
-
Sand for smoothness:
Once fully cured, use fine-grit sandpaper to gently smooth any rough patches on the rim or underside, being careful not to sand away your carved texture. -
Apply the base glaze:
Paint the entire dish with a creamy white acrylic paint or a gloss glaze. You want the paint to settle slightly into the carved grooves to highlight them. -
Wipe back (optional):
For a more rustic look, you can wipe the surface with a damp paper towel immediately after painting. This leaves paint in the grooves while revealing more of the raw clay on the high points. -
Add gold accents:
On one of the dishes (or both), use a small brush to apply metallic gold paint or gold leaf to the rim and the exterior. This creates the beautiful contrast seen in the inspiration image. -
Fill the grooves:
If you want the carved lines to pop on the gold dish, you can trace over the carved lines with a very fine brush and a darker beige or gold paint. -
Seal the work:
Finally, apply a coat of clear sealant or varnish to protect your dishes from moisture and wear, ensuring they last for years to come.
Make it Personal
Instead of abstract circles, try carving your partner’s initials or a significant date into the bottom of the dish before the clay dries.
Place your finished matching dishes on your nightstand as a daily reminder of your creativity together


Two Initial Letter Magnets
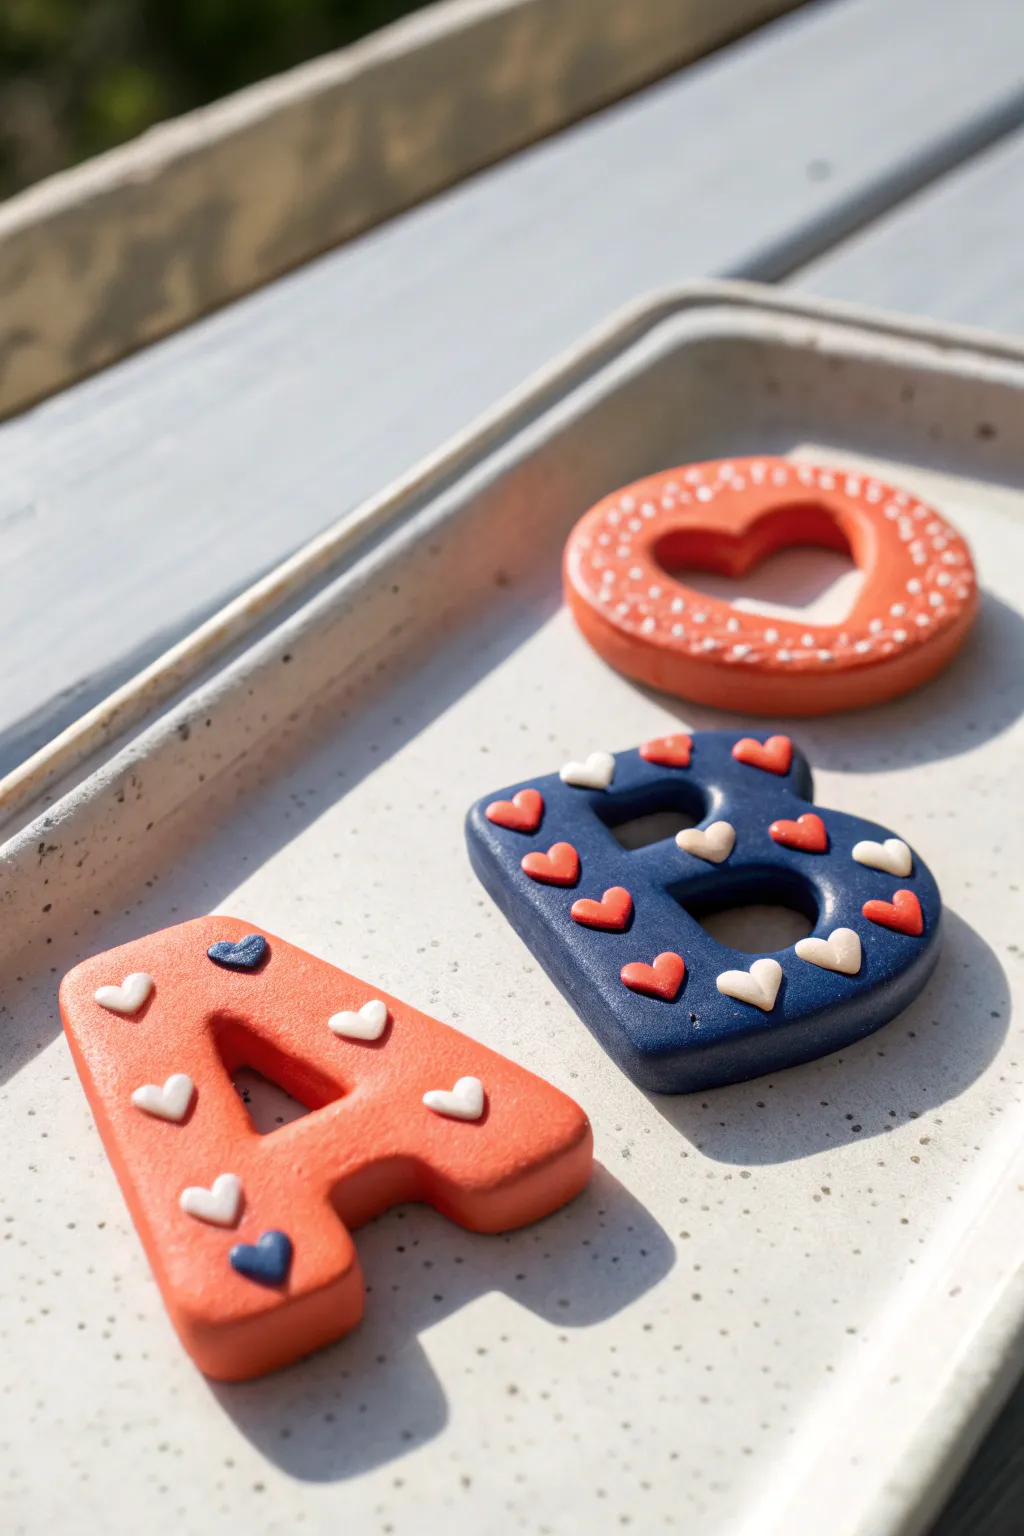
Celebrate your connection with these charming initials featuring delicate heart inlays. This couple’s project combines bold base colors with intricate detailing for a customized set of fridge magnets that are as functional as they are sweet.
Step-by-Step Guide
Materials
- Polymer clay (orange, navy blue, white)
- Small heart-shaped cutter or plunger
- Rolling pin or pasta machine
- Hobby knife or clay blade
- Paper template of desired letters
- Needle tool
- Strong craft magnets
- Industrial strength glue (E6000 or similar)
- Fine-grit sandpaper (optional)
- Oven and baking sheet
Step 1: Preparing the Base
-
Condition the clay:
Start by warming the orange and navy blue clay in your hands to condition it. Knead until it’s pliable and smooth, ensuring no air bubbles remain trapped inside. -
Roll out the slabs:
Roll each colored ball of clay into a thick slab, aiming for a thickness of about 1/4 inch (6mm). You want the letters to have a nice, chunky profile rather than being perfectly flat. -
Cut the letter shapes:
Place your paper letter templates onto the clay slabs. Using a sharp hobby knife, carefully trace around the edges to cut out your initials. Remove the excess clay and smooth the cut edges with your fingertip. -
Create the circle base:
For the decorative third piece, use a round cutter on the orange clay slab. Then, use a smaller heart cutter in the direct center to create a negative space heart window.
Clean Clay Tip
Keep baby wipes nearby. Wipe your hands and tools when switching from the dark blue clay to white to prevent color transfer stains.
Step 2: Creating the Inlays
-
Prepare the heart accents:
Roll out a very thin sheet of white clay and a small amount of the contrasting base colors (blue and orange). These should be much thinner than your base letters, almost paper-thin. -
Punch out tiny hearts:
Use your smallest heart plunger or cutter to punch multiple tiny hearts from the white, blue, and orange sheets. You’ll need about 10-15 hearts per letter. -
Place the hearts on ‘A’:
Gently press white hearts onto the orange ‘A’, mixing in one or two blue hearts for contrast. Arrange them randomly but evenly spaced. I find using a needle tool helps to pick up and place these tiny pieces. -
Decorate the ‘B’:
For the navy blue ‘B’, apply a mix of orange and white hearts. Press them gently so they adhere to the surface but still retain a slightly raised, embossed look. -
Detail the circle:
On the orange circle, create a border pattern using tiny white dots or very small white hearts along the outer rim and the inner heart cutout rim. -
Secure the decorative elements:
Once all hearts are placed, give them a final gentle press with your finger to ensure a strong bond with the base clay without distorting their shape.
Hearts won’t stick?
If the tiny hearts fall off, add a tiny dab of liquid polymer clay (Bake & Bond) to the back of each heart before pressing it onto the base.
Step 3: Baking and Finishing
-
Bake the pieces:
Place your letters on a parchment-lined baking sheet. Bake according to your customized polymer clay package instructions (usually around 275°F/135°C for 15-30 minutes). -
Cool down:
Allow the pieces to cool completely in the oven with the door cracked open. This gradual cooling helps prevent cracks. -
Sand edges (optional):
If there are any rough spots or fingerprints on the sides, lightly buff them away with fine-grit sandpaper for a professional finish. -
Attach magnets:
Flip the letters over. Apply a small dot of industrial-strength glue to the back of each letter and press a magnet firmly into the glue. -
Final cure:
Let the glue cure fully (usually 24 hours) before placing your new initials on the refrigerator.
Enjoy seeing your personalized initials brighten up your kitchen space every day

The Complete Guide to Pottery Troubleshooting
Uncover the most common ceramic mistakes—from cracking clay to failed glazes—and learn how to fix them fast.
His-and-Hers Ring Cones
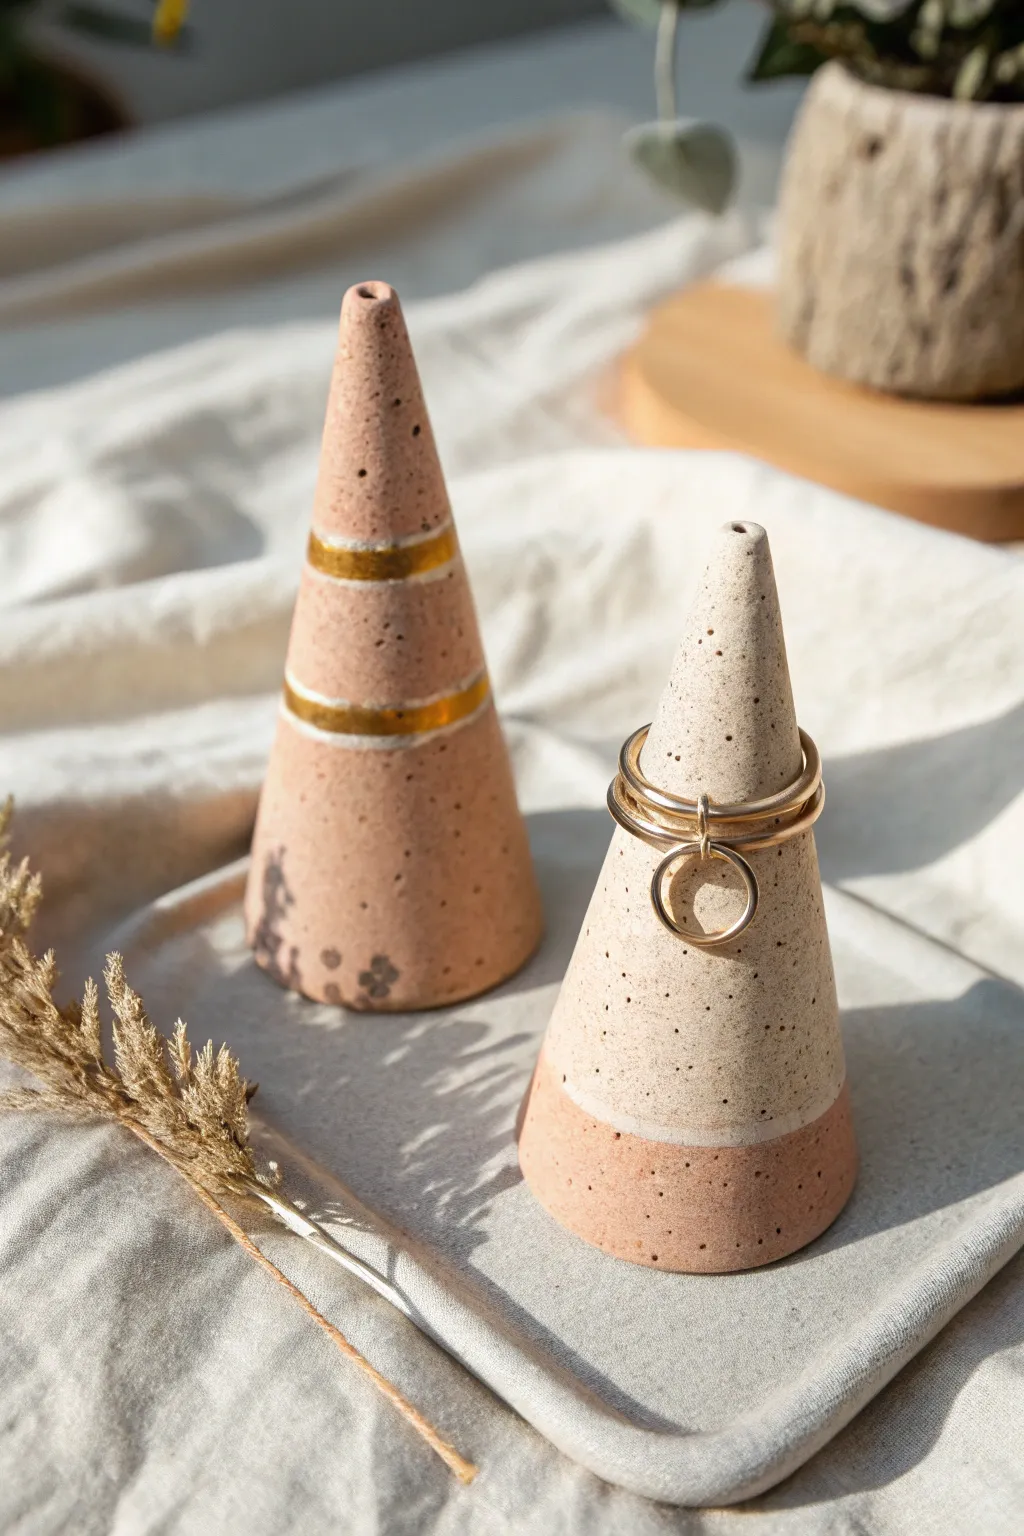
These minimalist ring holders combine earthy terra cotta tones with elegant gold accents for a modern stoneware look. The speckled finish adds a professional ceramic touch without needing a kiln, making them a perfect functional decor piece.
How-To Guide
Materials
- Polymer clay (Terra cotta/granite color)
- Polymer clay (Classic beige/sand color)
- Coarse black pepper or dried coffee grounds (for speckling)
- Liquid gold leaf or metallic gold acrylic paint
- Fine detail paintbrush
- Rolling pin or acrylic roller
- Clay blade or craft knife
- Cardstock paper
- Tape
- Medium-grit sandpaper
- Gloss glaze (optional)
Step 1: Prepping and Mixing the Clay
-
Condition the base clay:
Start by warming up your terra cotta and beige polymer clays in your hands. Knead them separately until they are soft, pliable, and free of any cracks. -
Create the speckled effect:
Flatten each clay ball slightly. Sprinkle a small pinch of coarse black pepper or dried used coffee grounds onto the clay. Fold the clay over the grounds and knead thoroughly until the specks are distributed evenly throughout the material. -
Make a paper template:
Cut a circle out of cardstock, roughly 4 inches in diameter. Cut a straight line from the outer edge to the center, then overlap the edges to form a cone shape. Tape it at your desired width to use as a sizing guide.
Step 2: Shaping the Cones
-
Form the first cone:
Take a large ball of the terra cotta speckled clay. Roll it into a thick snake, then manipulate it into a cone shape using your palms. -
Refine the shape:
Roll the cone gently on your work surface to smooth out fingerprints. Tap the base flat against the table frequently to ensure it stands straight up without wobbling. -
Create the two-tone cone:
For the second cone, form a smaller cone shape using the beige clay. Create a separate, flat disc of the terra cotta clay about 0.5 inches thick. -
Join the sections:
Place the beige cone on top of the terra cotta disc. Gently blend the seam where the two colors meet using your thumb or a clay tool until the transition is smooth and flush. -
Smooth the opening:
Use a rounded tool or the back of a paintbrush to create a small, shallow indentation at the very tip of each cone. This gives it a finished, wheel-thrown appearance.
Faux Ceramic Texture
Don’t over-knead after adding pepper! Leaving it slightly chunky creates larger, more realistic ‘mineral’ deposits that look just like fired stoneware potting clay.
Step 3: Creating the Tray
-
Roll out the tray base:
Using a mix of leftover beige clay, roll out a flat slab about 1/4 inch thick. I usually use guides on the side to keep the thickness even. -
Cut the rectangle:
Use your clay blade to cut a clean rectangle or square shape for the base tray. -
Lift the edges:
Gently curve the four edges of the rectangle upward to create a lip. Soften the corners with your finger so they aren’t sharp.
Marbled Magic
Twist your beige and terra cotta clays together before shaping to create a swirled marble effect, then paint the gold accents along the natural veins of the clay.
Step 4: Baking and Finishing
-
Bake the pieces:
Place the cones and the tray on a baking sheet lined with parchment paper. Bake according to your clay package instructions (usually around 275°F/135°C for 15-30 minutes). -
Cool down:
Allow the pieces to cool completely in the oven before removing them. This helps prevent cracking due to thermal shock. -
Sand for texture:
Once cool, lightly sand the surfaces with medium-grit sandpaper. This exposes more of the ‘speckles’ and gives the clay a true stone-like matte texture. -
Wipe clean:
Use a slightly damp cloth to wipe away any dust from sanding. Let the surface dry completely before painting. -
Paint the gold bands:
Dip a fine detail brush into your liquid gold leaf. On the solid terra cotta cone, carefully paint two horizontal rings around the body. You can use tape to mark the lines, or freehand it for a more organic look. -
Seal the deal:
For the two-tone cone, add a tiny rim of gold right at the very top opening. Let the paint dry fully. If you want a shiny finish rather than matte stone, apply a coat of gloss glaze now.
Your stylish new ring holders serve as a beautiful reminder that functional items can be art too
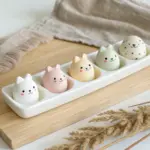
Bacon and Egg Bestie Set
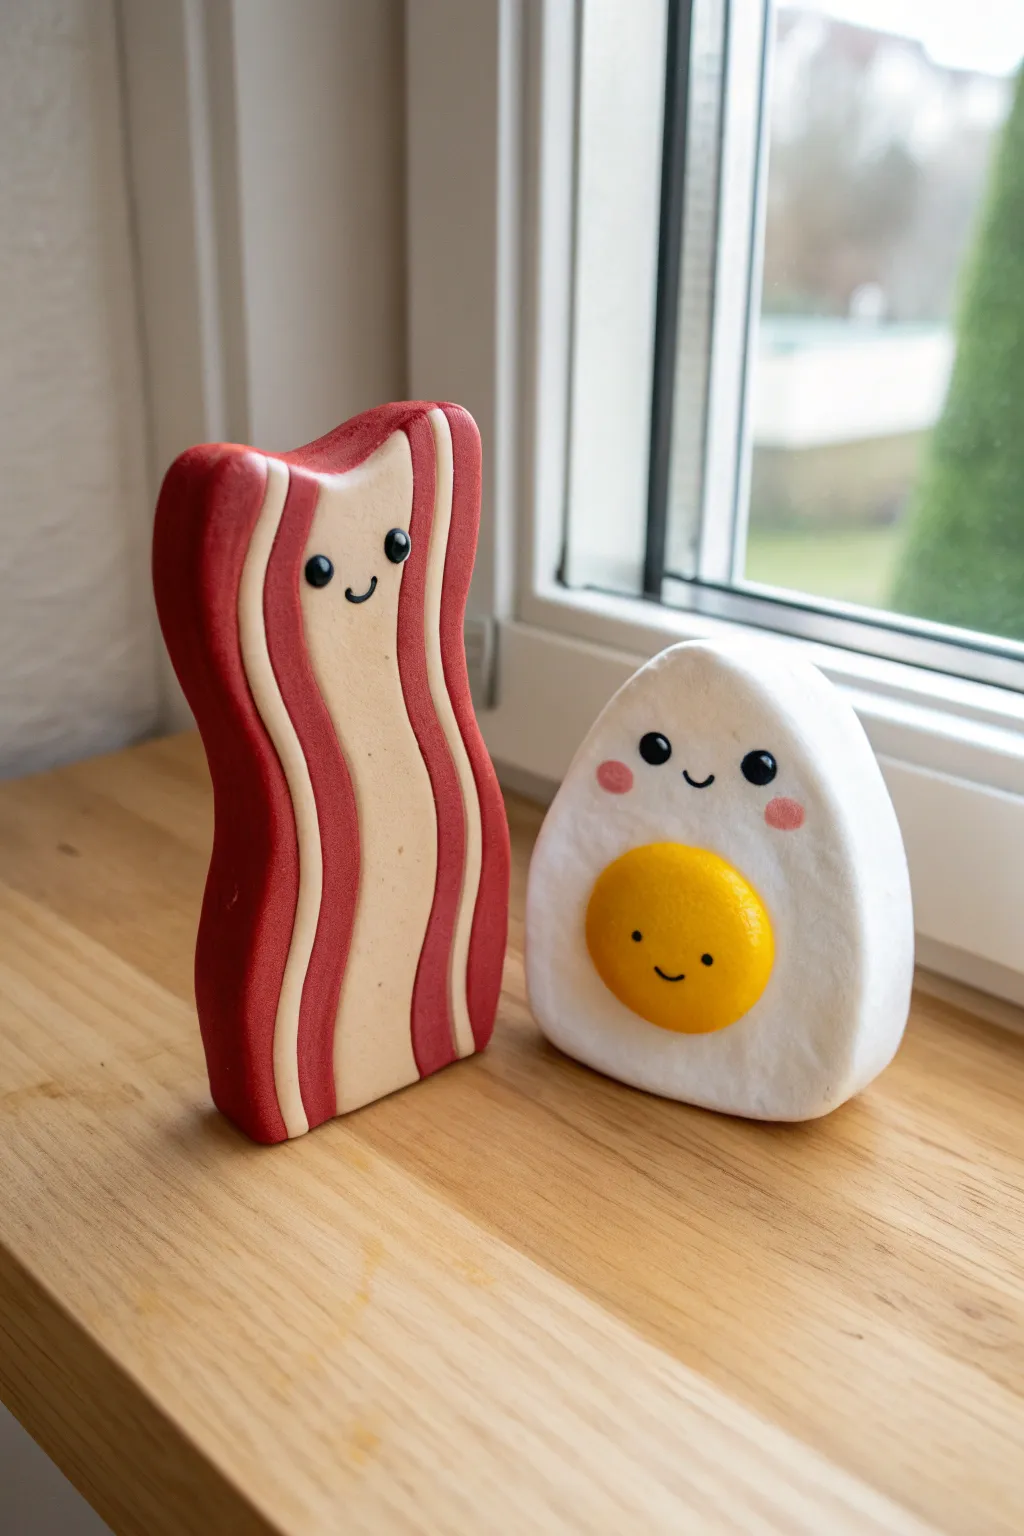
Celebrate your sizzling bond with this adorable kawaii breakfast set, perfect for crafting side-by-side with your partner. These chunky, free-standing figurines feature sweet smiling faces and smooth, stylized curves that make them irresistible desk companions.
How-To Guide
Materials
- Polymer clay (Dark Red, Cream/Beige, White, Yellow, Black, Pink)
- Clay roller or pasta machine
- Blade or craft knife
- Needle tool or dotting tool
- Translucent liquid clay (optional)
- Gloss glaze or polyurethane varnish
- Small oval cutter (optional)
- Sandpaper (fine grit)
Step 1: Sizzling Bacon Strip
-
Roll the slabs:
Start by conditioning your dark red and cream clay thoroughly so it’s pliable. Roll out three thick sheets of dark red clay (about 5-6mm thick) and two slightly thinner sheets of cream clay (about 4mm thick). -
Stack the stripes:
Stack your layers in an alternating pattern to create the meat and fat look: Red, Cream, Red, Cream, Red. Press the stack firmly together to ensure the layers adhere well without trapping air bubbles. -
Create the wave:
Stand your rectangular stack upright on your work surface. Gently bend the entire block into a subtle ‘S’ curve or wave shape. Don’t over-bend it; you want it to stand stably on its own. -
Smoothing the sides:
Use your fingers or a flat tool to smooth the seams on the front and back faces, blending the clay slightly if needed, though clean lines are preferred. Ensure the bottom is perfectly flat. -
Adding the face:
Roll two frequent tiny balls of black clay for the eyes and press them onto the upper cream stripe. Roll a tiny thin snake of black clay and curve it into a ‘U’ shape for the smile, placing it between the eyes.
Step 2: Sunny Side Up Egg
-
Form the egg white base:
Take a large portion of white clay and condition it well. Shape it into a thick, rounded triangle or gumdrop shape. It should be substantial and thick (about 2cm deep) so it can stand upright. -
Flatten the front:
Gently press the front face of the egg so it is relatively flat but still retains softness around the edges. The back can remain rounded or be flattened to match the front. -
Make the yolk:
Roll a ball of yellow clay and flatten it into a thick dome. This will be the yolk. I usually like to press this onto the lower center of the white base, blending the edges very slightly so it sticks. -
Double the faces:
The egg gets two faces! First, add wide-set black eyes and a smile to the upper white section. Add tiny pink clay circles for cheeks. -
Yolk personality:
Add a second, smaller face directly onto the yellow yolk bump using tiny specks of black clay for eyes and a micro-smile. This adds that extra layer of cute charm.
Uneven Layers?
If your bacon stack gets distorted while cutting or bending, pop the clay in the fridge for 20 minutes before slicing or shaping to firm it up.
Step 3: Finishing Touches
-
Texture check:
Before baking, check for fingerprints. Lightly brush with a tiny bit of baby oil or cornstarch to smooth out any imperfections. -
Bake:
Bake the figures according to your clay manufacturer’s instructions (usually 275°F/130°C for 15-30 minutes per 1/4 inch of thickness). Support the bacon with a prop if it seems wobbly. -
Cool and inspect:
Let the pieces cool completely inside the oven to prevent cracking. Once cool, inspect the bottoms to ensure they stand flat; if not, lightly sand the base. -
Varnish:
Apply a coat of satin or gloss varnish to the yolk to make it look shiny and ‘fresh.’ You can leave the rest matte or glaze the bacon stripes for a greasy look.
Magnetic Attraction
Embed small round magnets into the sides of the bacon and egg before baking so they ‘click’ together when placed side-by-side on your desk!
Now you have a charming set of breakfast buddies to display on your desks as a reminder of your perfect pairing


What Really Happens Inside the Kiln
Learn how time and temperature work together inside the kiln to transform clay into durable ceramic.
Color-Coded Penguin Pair
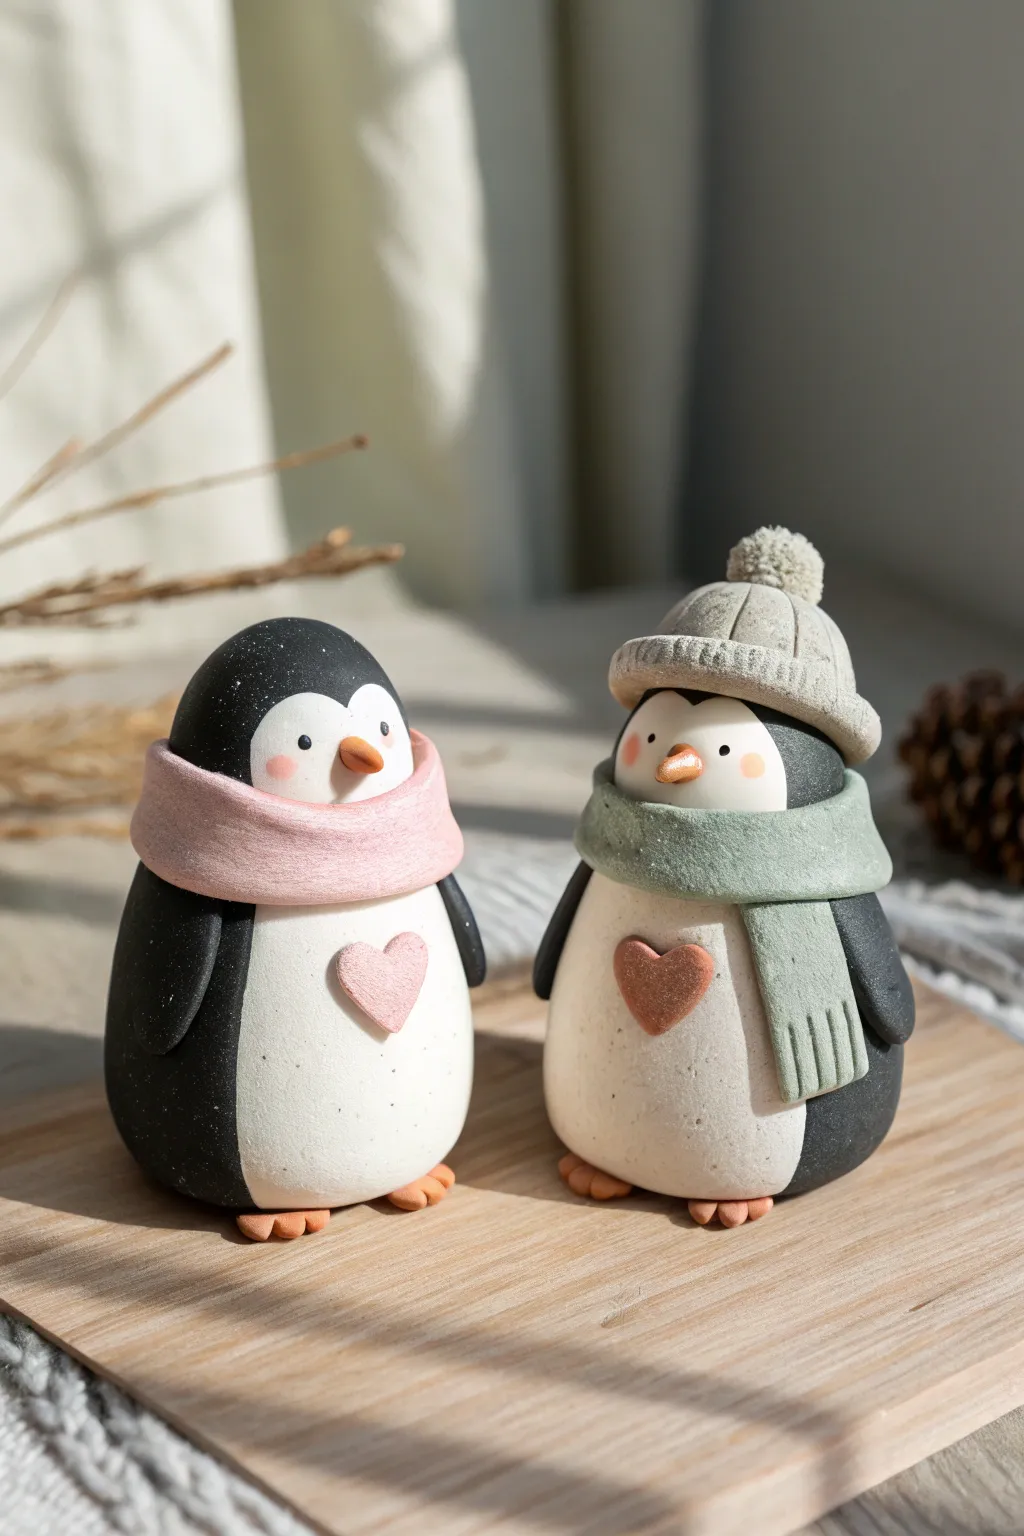
These adorable penguins are bundled up and ready for winter love, featuring matching pastel scarves and sweet heart details on their chests. Their rounded, smooth shapes make them a perfect beginner-friendly project for couples to create side-by-side.
Step-by-Step Tutorial
Materials
- Polymer clay (Black, White, Pastel Pink, Pastel Green, Gray, Pale Orange)
- Clay sculpting tools (needle tool, ball stylus)
- Acrylic rolling pin
- Blade or X-Acto knife
- Baking sheet and parchment paper
- Texture tool (or toothbrush) for fabric detail
- Gloss glaze (optional for eyes/beaks)
- Small circle cutter (optional)
Step 1: Shaping the Bodies
-
Mix the black clay:
Start by conditioning your black polymer clay until it is soft and pliable. Roll two large balls of equal size, roughly 1.5 to 2 inches in diameter. -
Form the egg shape:
Gently roll one end of each black ball to narrow it slightly, creating a smooth, egg-like shape with a wider base so the figures stand up sturdily on their own. -
Prepare the white bellies:
Condition white clay and roll it into two smaller balls. Flatten these into oval sheets using your acrylic roller, approximately 2-3mm thick. -
Attach the bellies:
Press a white oval onto the front of each black body. Gently smooth the edges with your thumb or a modeling tool so the white clay merges seamlessly with the black contour. -
Create the wings:
Roll four small teardrop shapes from black clay. Press them flat and attach one to each side of both penguins, blending the shoulder seam into the body so they hang naturally.
Fingerprint Fix
If you notice fingerprints on the smooth black clay, lightly brush the unbaked surface with a little baby oil or cornstarch to smooth them away instantly.
Step 2: Adding Faces & Details
-
Sculpt the beaks:
Using a tiny amount of pale orange clay, form two small cones. Press them gently onto the center of the face area, just above the white belly line. -
Add blush and eyes:
For the pink penguin, add tiny circles of pink clay to the cheeks. Use a small ball tool to indent eye sockets, then insert tiny balls of black clay for the eyes. -
Create the heart chests:
Cut a small heart from pink clay and one from bronze or dark pink clay. Press these gently onto the center of each white belly. -
Make the feet:
Roll small orange balls—four in total—and flatten them slightly. Use a knife tool to mark three toes on each, then place them under the penguins’ bodies.
Personalize It
Before baking, use a needle tool to scratch your initials or a special date into the bottom of the penguins’ feet for a secret keepsake.
Step 3: The Winter Accessories
-
Roll the scarf coils:
Roll a long snake of pastel pink clay and another of sage green clay. Flatten them slightly to create ribbons about 1cm wide. -
Texture the fabric:
Before attaching, lightly press a piece of coarse fabric or a toothbrush onto the clay strips to mimic a wool texture. -
Wrap the scarves:
Wrap the pink strip around the neck of the first penguin. Wrap the green strip around the second penguin, letting one end hang down the front like a real scarf. -
Fringe details:
Use your needle tool or knife to cut vertical fringe lines into the hanging end of the green scarf. -
Form the hat base:
For the green penguin, mold a small gray hemisphere and place it on top of the head. -
Add the hat brim:
Roll a thin gray coil, texture it with vertical lines to look like ribbing, and wrap it around the base of the hat. -
Top with a pom-pom:
Texture a small ball of gray clay by poking it repeatedly with a needle tool until it looks fluffy, then attach it to the very top of the hat. -
Final inspection:
Check for any fingerprints and smooth them out with a tiny bit of baby oil if needed before baking according to your clay package instructions.
Once cooled, these little companions will serve as a sweet reminder of your time crafting together
Couple Candle Holder Duo
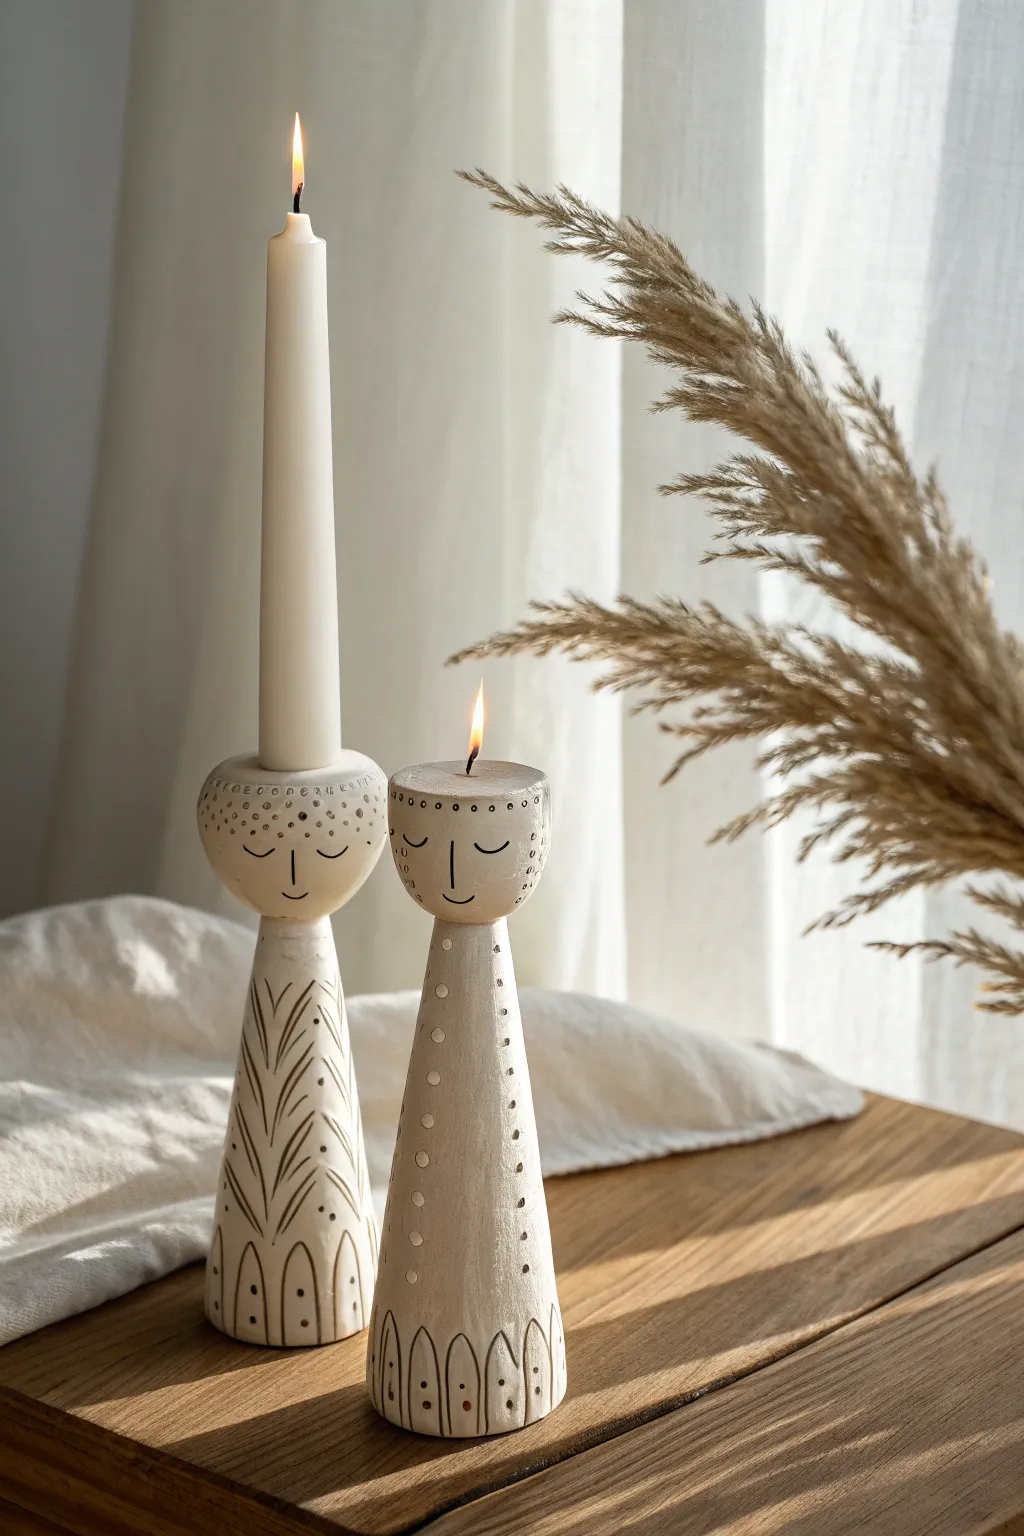
These serene, folk-art-inspired candle holders bring a gentle personality to your home décor with their stylized faces and simple shapes. Perfect for a cozy crafting date, this project allows you to build a complementary pair that looks lovely even without glowing flames.
Step-by-Step Guide
Materials
- Air-dry modeling clay (white or cream)
- Wide rolling pin
- Sharp crafting knife or scalpel
- Small cup of water (for slip)
- Small tapered candles (for sizing)
- Acrylic paint (black and brown)
- Fine-point paintbrush or toothpick
- Fine-grit sandpaper
- Cone-shaped mold (optional, like a thick cardstock cone)
- Clay sculpting tools (needle tool/dotting tool)
Step 1: Shaping the Bodies
-
Prepare the Clay:
Start with a large handful of clay for each holder. Knead it well until it is pliable and smooth to prevent cracks later on. -
Roll the Base:
For the tall conical bodies, you can either construct a solid cone by rolling a thick coil and smoothing it upwards, or roll out a slab to wrap around a temporary paper mold. A solid cone is sturdier for beginners. -
Refine the Form:
Shape the cone so it tapers gently towards the top. For the taller holder, make the base slightly narrower; for the shorter one, keep the base a bit wider. Ensure they stand perfectly flat on your work surface. -
Smooth the Surface:
Dip your finger in a little water and smooth out any bumps or fingerprints on the conical bodies. Let them firm up for about 30 minutes before adding weight.
Uneven Standing?
If the holder wobbles after drying, glue a circle of felt to the bottom or gently rub the base in circular motions on sandpaper.
Step 2: Creating the Heads
-
Form the Circles:
Roll two balls of clay, roughly the size of a tangerine or small apple. Flatten them slightly so they look like thick, rounded discs or doorknobs rather than perfect spheres. -
Create the Candle Socket:
Press the bottom of your actual taper candle into the top center of each head to create the hole. Wiggle it slightly to ensure the fit isn’t too tight, as clay shrinks when drying. -
Attach Head to Body:
Score the top of the cone and the bottom of the head with a needle tool. Apply a little water to make a slip, press the pieces together firmly, and smooth the seam with your thumb or a modeling tool so they become one unit.
Step 3: Adding Details
-
Carve the Features:
While the clay is still leathery, use a needle tool to gently crave the curved lines for the sleeping eyes. Keep the expression simple and serene. -
Add Texture:
Use a small dotting tool or the blunt end of a skewer to press small indentations around the ‘hairline’ or down the body for the shorter holder’s pattern. -
Pattern the Taller Holder:
For the leaf motif on the taller figure, use a sharp knife tip to lightly incise vertical leaf shapes. Press dots randomly inside or around the leaves for added texture. -
Base Details:
Don’t forget the bottom hem! Carve small arches around the very bottom edge of both holders to mimic a decorative skirt or robe hem. -
Final Surface Check:
Do a final pass with a damp sponge or finger to smooth any jagged edges created during carving, then let the pieces dry completely for 24-48 hours.
Make it Metallic
Rub a tiny amount of gold leaf or metallic wax into the carved patterns instead of black paint for a glamorous, glowing finish.
Step 4: Finishing Touches
-
Sand Smooth:
Once fully dry and hard, gently sand away any rough spots with fine-grit sandpaper. Wipe away the dust with a dry cloth. -
Paint the Details:
Dilute a tiny bit of black or dark brown acrylic paint with water. Using a very fine brush, carefully paint into the carved lines of the eyes, mouth, and body patterns. -
Wipe Back Excess:
I prefer to verify the look immediately—if the paint looks too harsh, quickly wipe the surface with a damp paper towel. This leaves paint in the grooves for an antiqued look while cleaning the high points. -
Highlighting Dots:
Dip the tip of a toothpick into white or cream paint (slightly lighter than the clay body) and add tiny dots to the forehead area if you want that subtle tiara effect shown in the shorter figure. -
Seal (Optional):
To protect against soot, apply a matte varnish spray over the entire piece once the paint is dry.
Place your new sculptural friends near a window or on a mantle to enjoy their peaceful expressions

TRACK YOUR CERAMIC JOURNEY
Capture glaze tests, firing details, and creative progress—all in one simple printable. Make your projects easier to repeat and improve.
Photo Holder Pair for Two Snapshots

These charming, minimalist photo holders feature a double-arch rainbow design with a warm, earthy terracotta finish that adds a touch of bohemian flair to any shelf. Perfect for displaying polaroids or business cards, their sturdy U-shape provides stability while the slot between the arches creates a clever, hidden grip.
Step-by-Step
Materials
- Air-dry modeling clay (terracotta color)
- Air-dry modeling clay (white or light beige)
- Rolling pin or smooth glass bottle
- Craft knife or scalpel blade
- Ruler
- Small cup with water
- Smooth work surface (silicone mat or wax paper)
- Fine-grit sandpaper (optional)
- Matte varnish spray (optional)
Step 1: Preparing the Clay
-
Condition the clay:
Start by taking a generous amount of your terracotta-colored clay. Knead it thoroughly in your hands for a few minutes until it feels warm, soft, and pliable. This step helps prevent cracks later on. -
Roll the main coil:
Place the ball of clay on your work surface and begin rolling it back and forth with your palms to create a long, even snake or coil. Aim for a thickness of about 3/4 of an inch (around 2 cm). -
Smooth the imperfections:
Inspect your coil for any lumps or thin spots. Gently roll over any uneven areas to ensure the diameter is consistent from end to end, which is crucial for a professional look. -
Mix the lighter shade:
To create the lighter arch seen in the front photo holder, mix a small amount of white clay into your terracotta clay. Knead until the color is uniform and slightly paler than the original batch. -
Roll the second coil:
Repeat the rolling process with this lighter shade (or stick to the original color for a matching set) to create a second coil of the same thickness.
Slumping Arches?
If your clay is too soft and the arch collapses, scrunch up a small ball of aluminum foil or paper and place it inside the inner U-shape to support the structure while it dries.
Step 2: Forming the Arches
-
Cut to length:
For the outer arch, cut a segment of the coil approximately 6-7 inches long. For the inner arch, cut a segment slightly shorter, about 4-5 inches long. -
Shape the inner arch:
Take the shorter coil and gently bend it into a tight U-shape. Stand it up on the work surface to ensure the feet are flat and level. -
Shape the outer arch:
Take the longer coil and bend it over the inner arch. You want it to hug the inner piece closely without merging into it just yet. -
Create the card slot:
This is the critical step: normally you would score and slip to join them, but here we need a gap. Place a piece of thick cardstock or a folded index card between the top curves of the two arches while molding them. This preserves the necessary space for your photo. -
Align the feet:
Press the newly formed double-arch gently onto your flat surface so all four ‘feet’ are flush. Use your ruler to trim the ends flat if they are uneven.
Step 3: Refining and Drying
-
Secure the base:
While preserving the top gap, gently press the legs of the two arches together near the base. You can use a tiny bit of water on your finger to smooth the clay where the legs touch, fusing them for stability at the bottom only. -
Smooth the surface:
Dip your finger in water and very lightly run it over the exterior surfaces to remove fingerprints or minor cracks. Don’t use too much water, or the clay will become sludge. -
Refine the edges:
I like using a flat tool or the side of a ruler to gently pat the sides of the arches, giving them slightly flattened, modern sides rather than perfectly round tubes. -
Initial dry:
Leave the cardstock spacer in place for the first hour of drying to ensure the clay doesn’t slump and close the gap. -
Full cure time:
Remove the spacer and let the piece dry completely in a cool, dry place for 24-48 hours. Rotate it occasionally so the bottom dries evenly. -
Sand and finish:
Once fully hard, use fine-grit sandpaper to gently buff away any remaining roughness or sharp edges on the bottom. -
Seal the piece:
Lightly mist with a matte varnish spray to protect the clay from moisture and dust without adding unwanted shine.
Textured Touch
To get the speckled, stone-like texture seen in the photo, mix a teaspoon of used, dried coffee grounds or black pepper into the clay before you start rolling your coils.
Now you have a stylish, handmade display ready to showcase your favorite memories together
Tiny Couple Portrait Figurines
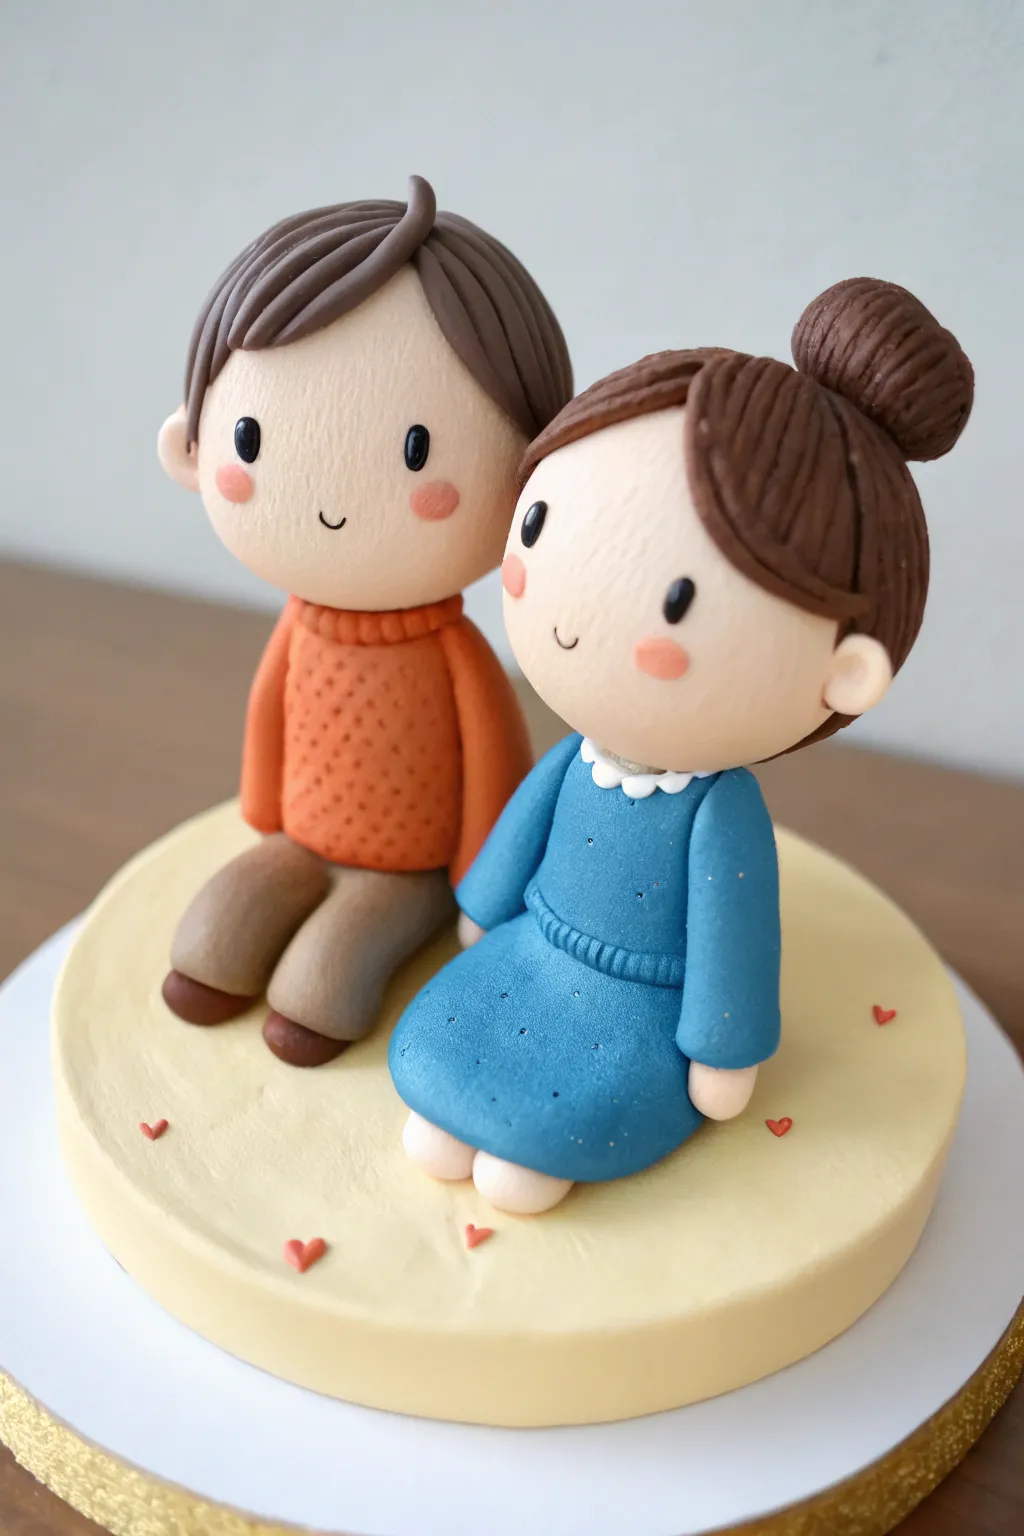
Capture a special bond with these adorable, simplified clay figurines. This project features clean shapes, charming details, and a soft matte finish that makes for a perfect cake topper or keepsake display.
How-To Guide
Materials
- Polymer clay or air-dry clay (Skin tone, dark brown, orange, blue, grey, white)
- Clean working surface (ceramic tile or glass)
- Needle tool or toothpick
- Ball tool (small)
- Fine-grit sandpaper (optional)
- Hobby knife or clay slicer
- Liquid clay or PVA glue
- Blush powder and a soft brush
- Texture sponge or fabric scrap
Step 1: Sculpting the Heads
-
Shape the base:
Roll two equal spheres of skin-tone clay, each about 1 inch in diameter. Smooth out any fingerprints until the surface is flawless. -
Create the eye sockets:
Using your thumbs, very gently press halfway down the face to create a subtle indentation line where the eyes will sit, giving the face a slight curve. -
Add the eyes:
Roll tiny specks of black clay into balls. Press them into the indented area, widened slightly apart for a cute, youthful look. Add a tiny white highlight dot to each eye if desired. -
Blush the cheeks:
Before baking or drying, use a soft brush to apply a small amount of pink pastel chalk or real blush to the cheeks just below the eyes. -
Add simple mouths:
Use a needle tool or small clay knife to press a tiny ‘u’ shape between the cheeks for a smile.
Clean Clay Tip
Keep separate baby wipes nearby for each color. Dark clay pigments can stain your hands and ruin the light skin-tone clay instantly.
Step 2: Forming the Bodies
-
Boy’s torso:
Roll a log of orange clay. Flatten the bottom so it sits upright and taper the top slightly. This will be the sweater. -
Sweater texture:
Gently press a texture sponge against the orange clay or use a needle tool to create a tiny knit pattern by poking rows of small holes. -
Boy’s legs:
Roll two grey sausages for trousers. attach them to the front bottom of the orange torso so they extend forward. Add tiny brown shoes to the ends. -
Girl’s dress:
Create a teardrop shape from blue clay. Flatten the wider bottom gently to create a sitting skirt shape. Indent the waist slightly with a tool. -
Collar detail:
Roll a very thin snake of white clay. Wrap it around the neck area of the blue dress. Use a needle tool to press tiny indents, creating a scalloped lace effect. -
Girl’s feet:
Add two small skin-tone balls peeking out from under the dress hem for feet.
Fixing Fingerprints
If you smudge the smooth faces, dip your finger in a tiny bit of baby oil (for polymer) or water (for air-dry) and gently buff the imperfection away.
Step 3: Hair and Assembly
-
Boy’s hair cap:
Flatten a disc of brown clay and drape it over the back of the boy’s head. Smooth the seams. -
Boy’s bangs:
Roll several teardrop shapes of brown clay. Attach them to the forehead, sweeping them to the side. Add a single stray hair sticking up at the crown for character. -
Girl’s hair base:
Apply a brown clay disc to the back of the girl’s head just like the boy’s. Smooth it down. -
Girl’s bangs:
Create a large, flattened teardrop shape and sweep it across her forehead to create a side-swept fringe. Use a knife tool to gently score hair lines. -
Bun and braid:
Twist a small coil of brown clay to look like a braid and wrap it around a ball of clay to form the bun. Attach this to the top right of her head. -
Final assembly:
Use a dab of liquid clay or glue to attach the heads to their respective bodies. I find inserting a small piece of toothpick helps stabilize the neck connection. -
Create the base:
Roll out a large thick disc of pale yellow clay. Place your figures on top. Decorate the base with tiny red hearts made from clay scraps.
Once dried or baked according to your clay package instructions, display your mini couple proudly on a shelf.
Mini Date-Night Picnic Diorama
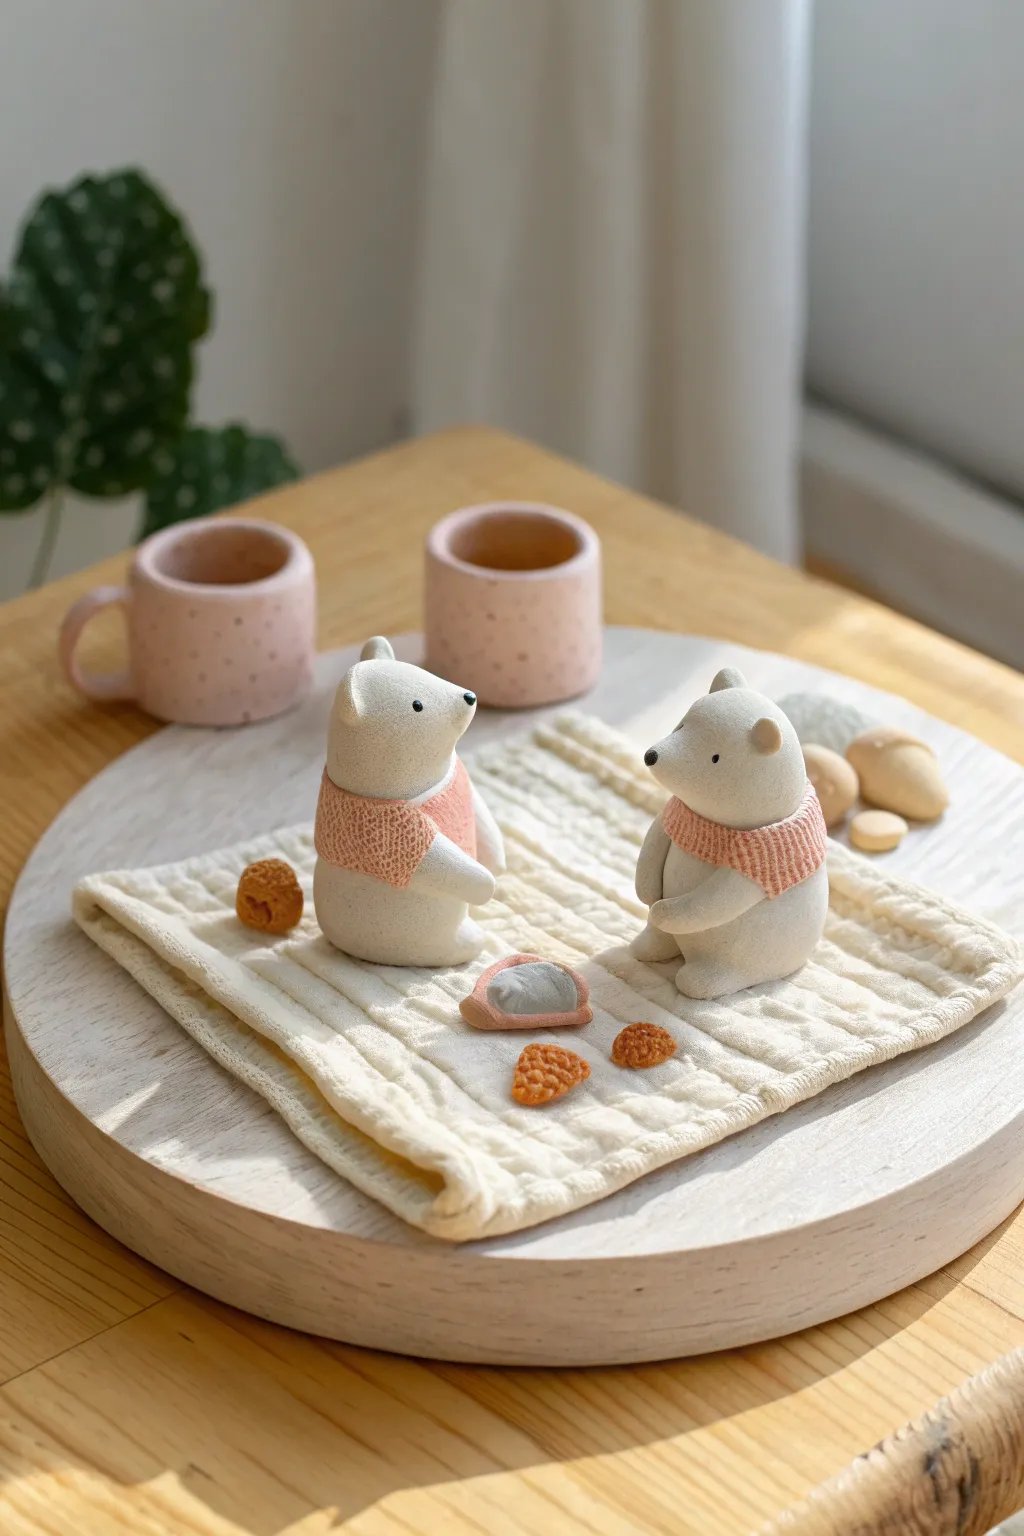
Capture the sweetness of a cozy date with this adorable miniature diorama featuring two polar bears enjoying a picnic. The project uses textured polymer clay to create a soft, fabric-like blanket and charming, simple figurines that evoke a warm, storybook feeling.
Step-by-Step Guide
Materials
- White polymer clay
- Soft pink polymer clay
- Terra cotta or light brown polymer clay
- Grey polymer clay
- Black acrylic paint or tiny black obsidians/beads (for eyes/nose)
- Texture tools: clean toothbrush, needle tool, coarse fabric or sandpaper
- Rolling pin
- Small circle cutter (optional)
- Liquid clay adhesive (Bake & Bond)
- Round wooden coaster or display board
Step 1: Sculpting the Textured Blanket
-
Roll the base:
Condition a large ball of white clay until pliable. Roll it out into a flat, roughly square sheet, about 3-4mm thick. Don’t worry about perfect edges; a natural look is better. -
Add texture:
Press a piece of coarse fabric, like linen or canvas, firmly onto the clay surface to imprint a weave pattern. Alternatively, gently dab the surface with a clean toothbrush to create a soft, napped texture. -
Create the quilted effect:
Using a blunt tool or the back of a knife, press a grid of indentations across the sheet to mimic a quilted picnic blanket. Press gently so you don’t cut all the way through. -
Form the folds:
Gently lift the edges of the clay sheet and create soft ripples and folds. Fold one corner slightly over itself to make the blanket look lived-in and comfortable. Place this on your baking tile.
Dust Bunny Alert
White clay attracts every speck of dust! Clean your hands and work surface thoroughly with baby wipes before handling the white clay, or dust will ruin the pristine look.
Step 2: Creating the Polar Bears
-
Body basics:
Roll two equal-sized balls of white clay. Shape them into smooth, slightly tapered gumdrop shapes—fat at the bottom and slightly narrower at the shoulder. -
Head shaping:
Roll two smaller white balls for the heads. Gently pinch the front of each ball to pull out a small, rounded snout. I find it helpful to look at the profile view frequently to get the snout angle right. -
Surface texture:
Before attaching anything, lightly texture the bodies and heads with a toothbrush. This stippling effect mimics fur and matches the organic pottery style of the image. -
Attaching the heads:
Use a dab of liquid clay to attach the heads to the bodies. Position them so the bears are looking at each other—one can be tilted slightly up while the other looks straight ahead. -
Adding ears:
Make four tiny balls of white clay. Flatten them slightly and press them onto the top of the heads using a ball tool to blend the seams. -
Making the scarves:
Roll out a thin strip of pink clay. Wrap a piece around the neck of each bear. Use a needle tool to scratch vertical lines into the scarf to simulate a knitted rib pattern. -
Arms and paws:
Roll small sausages of white clay for arms. Attach them so they rest naturally on the bellies. Texture them to match the body. -
Facial features:
Use a needle tool to make tiny indentations for eyes and noses. You can insert tiny black clay balls now, or paint them with black acrylic after baking.
Matte Finish Magic
To get that ceramic, unglazed pottery look shown in the photo, lightly dust the raw clay with cornstarch before baking. It removes sheen and enhances the texture.
Step 3: Accessories & Assembly
-
Sculpting the mugs:
Form two small cylinders from pink clay. Indent the top to make them hollow. Roll a tiny snake of pink clay to form a C-shaped handle and attach it to the side of each mug. -
Creating tiny snacks:
Use terra cotta clay to make small textured lumps resembling pine cones, acorns, or cookies. Use the needle tool to stipple the surface for a rough texture. -
The central dish:
Create a small, flat dish shape from pink clay. Place a small grey oval inside to represent a stone or a piece of food. -
Setting the scene:
Arrange the bears, blanket, mugs, and snacks on the blanket surface. Use liquid clay to secure the bears to the blanket so they don’t tip over during baking. -
Baking:
Bake the entire assembly according to your clay manufacturer’s instructions (usually 275°F/130°C for 15-30 minutes). Let it cool completely before moving.
Place your finished picnic on a wooden coaster or shelf to enjoy a permanent moment of quiet connection
Shared Hobby Icon Charms
Celebrate your creative connection with these adorable matching charms, perfect for the couple that loves to chronicle life together. Featuring a vintage-style camera for the photographer and a classic spiral notebook for the writer, these polymer clay minis are united by a warm peach and cream palette.
How-To Guide
Materials
- Polymer clay (White, Peach/Terracotta)
- Acrylic rolling pin
- Clay cutting blade or X-acto knife
- Small circle cutters (various sizes)
- Needle tool or toothpick
- Gold acrylic paint
- Fine detail paintbrush
- Small eye pins (gold)
- Gold jump rings
- Gold lobster clasp keychains
- Super glue (gel type recommended)
- Oven (for baking)
- Gloss glaze (optional)
Step 1: Sculpting the Vintage Camera
-
Base shape:
Start by conditioning a block of white clay. Roll it into a thick sheet (about 1/4 inch) and cut a neat rectangle, approximately 1.5 inches wide by 1 inch tall. Smooth the edges with your finger. -
Adding texture:
Roll out a thin sheet of peach-colored clay. Cut a strip that matches the width of your white base but only covers the bottom two-thirds. Press a piece of sandpaper or fabric against this strip to give it a leather-like texture before attaching it to the white base. -
Lens assembly:
Cut a medium circle from white clay and a slightly smaller circle from the peach clay. Stack the peach circle onto the white one. Roll a small ball of white clay, flatten it slightly into a dome, and place it in the center for the lens glass. -
Attaching the lens:
Center your lens stack on the camera body. Gently press it down so it adheres. I find a tiny dot of liquid clay helps keep these layers secure during baking. -
Top details:
Create small rectangular and square bits from white clay for the shutter button and viewfinder. Attach them to the top edge of the camera. Add a tiny vertical peach rectangle to the front left for a grip detail. -
Securing the hardware:
Make a tiny peach-colored loop or ‘lug’ out of clay and attach it to the top right corner. Insert a gold eye pin securely into this lug.
Sticky Fingerprints?
Warm clay shows fingerprints easily. Before baking, lightly brush your finished sculpts with a little baby oil or cornstarch to smooth out any unwanted prints without ruining the shape.
Step 2: Crafting the Writer’s Notebook
-
Notebook cover:
Roll out peach clay to about 1/8 inch thickness. Cut two identical rectangles (distinctly taller than they are wide). These represent the front and back covers. -
Paper pages:
Create a thick block of white clay the same size as your covers. Sandwich the white block between the two peach rectangles to form the book. -
Binding preparation:
Using a needle tool, gently indent the left side of the white ‘paper’ block to simulate page layers. Then, use the needle tool to poke evenly spaced holes along the top edge where the spiral binding will go. -
Making the spiral:
Roll a very thin snake of clay (peach or gold-colored clay if you have it; otherwise paint it later). Cut it into small segments and form tiny loops. Press these loops into the holes along the top edge to mimic a spiral binding. -
Decorative button:
Make a small white circle and place a smaller peach circle on top. Use a needle tool to poke four tiny holes in the center to look like a button. Place this in the center of the notebook cover. -
Surface texture:
Use a small dotting tool to gently impress a polka dot pattern onto the white surface around the button. Insert an eye pin into the top center of the spiral binding.
Date It
Use a needle tool or a tiny number stamp set to impress your anniversary date or initials onto the back of the camera or the back cover of the notebook before baking.
Step 3: Finishing Touches
-
Baking:
Bake both pieces according to your polymer clay package instructions (usually 275°F for 15-30 minutes). Let them cool completely. -
Painting details:
Using a fine brush and gold acrylic paint, carefully paint the spiral binding on the notebook if you didn’t use gold clay. Add metallic accents to the camera shutter button and any other hardware details. -
Assembly:
Once the paint is dry, use pliers to open your jump rings. Connect the eye pins on your charms to the gold keychain hardware. -
Sealing:
If desired, brush a light coat of glaze over the ‘lens’ of the camera to make it shine like glass, leaving the rest matte for texture contrast.
Attach these to your keys and enjoy a little daily reminder of your shared creativity
Two-Part Quote Tag Set
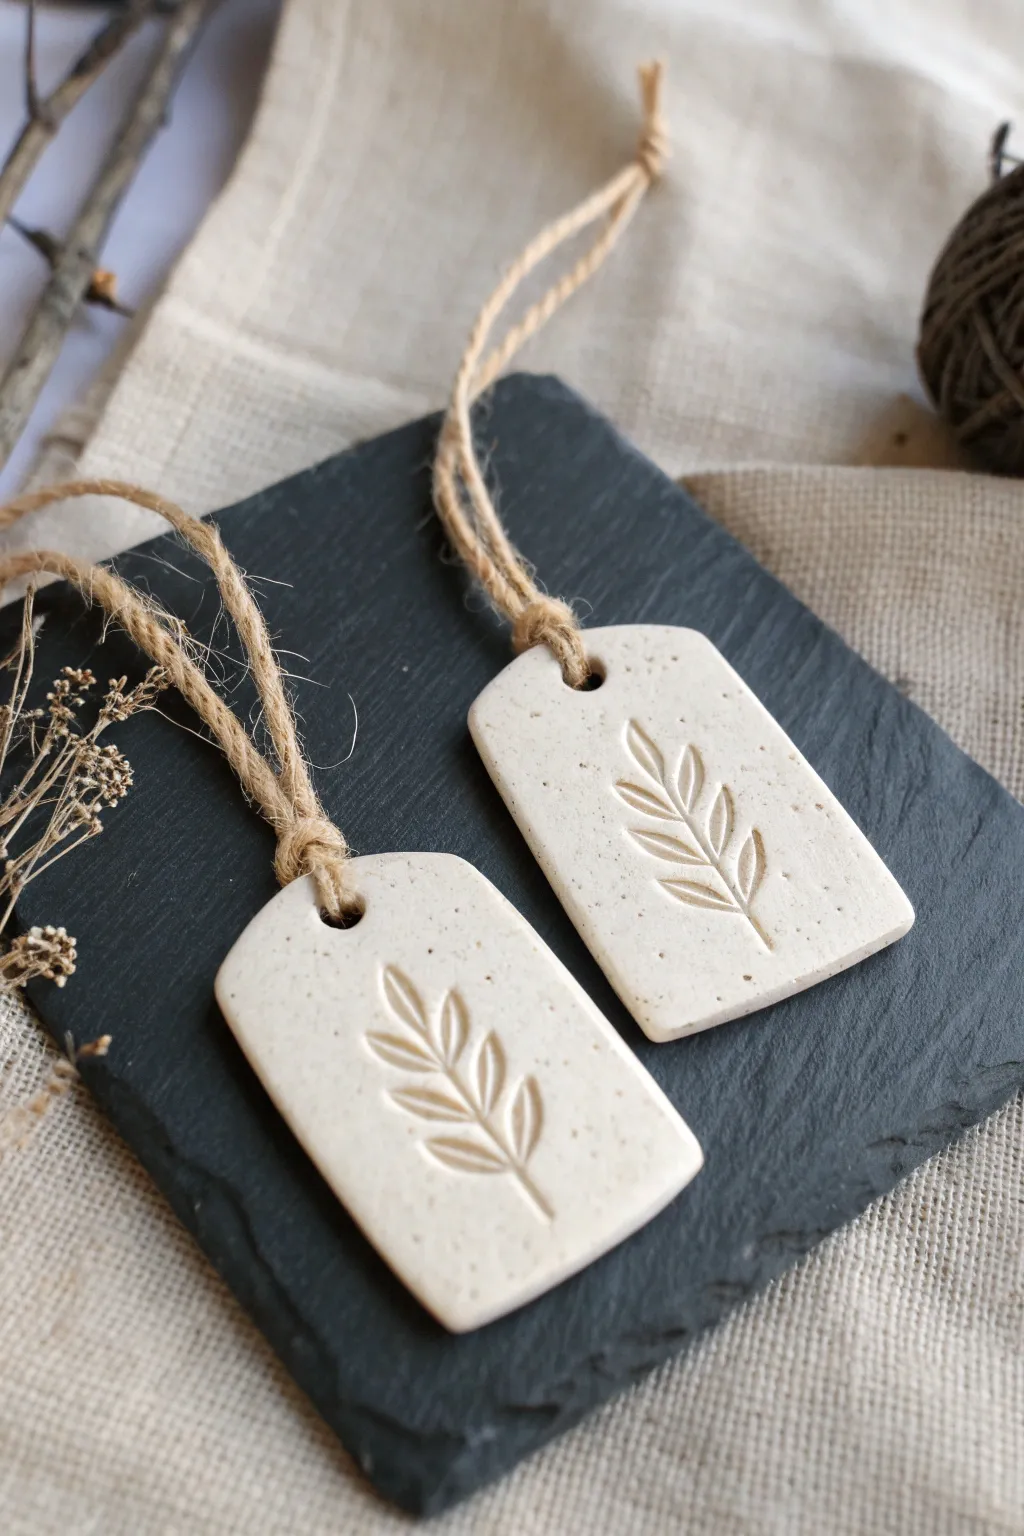
These elegant, understated clay tags feature a soft speckled finish and a delicate botanical imprint, perfect for adding a natural touch to gifts or home decor. Their rustic charm is enhanced by raw jute twine and the imperfect, handcrafted edges that give them unique character.
Step-by-Step Guide
Materials
- White polymer clay or air-dry clay
- Ground black pepper or dried coffee grounds (for speckling)
- Small rolling pin
- Rectangle clay cutter or craft knife
- Fresh or dried leaf/sprig (fern or lavender works well)
- Straw or cocktail stick for hole punching
- Fine-grit sandpaper
- Jute twine
- Parchment paper
Step 1: Preparing the Clay
-
Condition the clay:
Start by warming up your white clay in your hands. Knead it thoroughly until it is soft, pliable, and free of any cracks. -
Add the speckles:
To achieve that beautiful stonewear look without buying special clay, sprinkle a tiny pinch of ground black pepper or very finely dried coffee grounds onto the flattened clay. -
Mix the texture:
Fold the clay over the speckles and knead again until the particles are evenly distributed throughout the batch. I usually check a cross-section to make sure the speckles aren’t clumping. -
Roll it out:
Place the clay on parchment paper to prevent sticking. Roll it out to an even thickness of about 1/4 inch (6mm). Ensure the surface is smooth and level.
Natural Release
If the leaf sticks to the clay, lightly dust the plant with cornstarch or baby powder before pressing it down to ensure a clean release.
Step 2: Shaping and Designing
-
Cut the rectangles:
Using a rectangle cutter or a sharp craft knife and ruler, cut out your two tag shapes. If free-handing, aim for roughly 1.5 inches by 2.5 inches. -
Soften the corners:
Gently tap the corners with your finger to round them off slightly, removing the sharp geometric look for a softer aesthetic. -
Imprint the botanical:
Take your chosen leaf or sprig. Place it perfectly center on the first tag. Press it gently but firmly into the clay using your fingertip or lightly roll over it once with the rolling pin. -
Reveal the design:
Carefully lift the stem with tweezers or a needle tool to peel the plant away, revealing the clean impression left behind. -
Create the hanging hole:
Use a straw to punch a clean hole at the top center of each tag. Twist the straw as you push down to get a neat cut, then wiggle it out. -
Smooth the edges:
Dip your finger in a little water (if using air-dry clay) or baby oil (for polymer) and run it along the cut edges to smooth out any roughness.
Step 3: Finishing Touches
-
Bake or dry:
Follow the specific instructions for your clay type. If baking polymer clay, place the parchment paper directly onto the baking sheet to keep the back flat. -
Sand for perfection:
Once fully cured and cooled, take fine-grit sandpaper and lightly buff the edges and surface. This removes fingerprints and creates a professional matte finish. -
Prepare the twine:
Cut a length of jute twine approximately 8 inches long for each tag. -
Loop the thread:
Fold the twine in half. Push the folded loop through the hole from the front to the back. -
Secure the knot:
Thread the loose ends of the twine through the loop and pull tightly to create a lark’s head knot right at the top of the tag.
Gilded Edge
After baking, paint the outer rim or the inside of the leaf impression with liquid gold leaf for a hint of metallic luxury.
Hang these charming tags on a gift or use them as minimal holiday ornaments to enjoy your handiwork
Sun and Moon Wall Hanging Pair
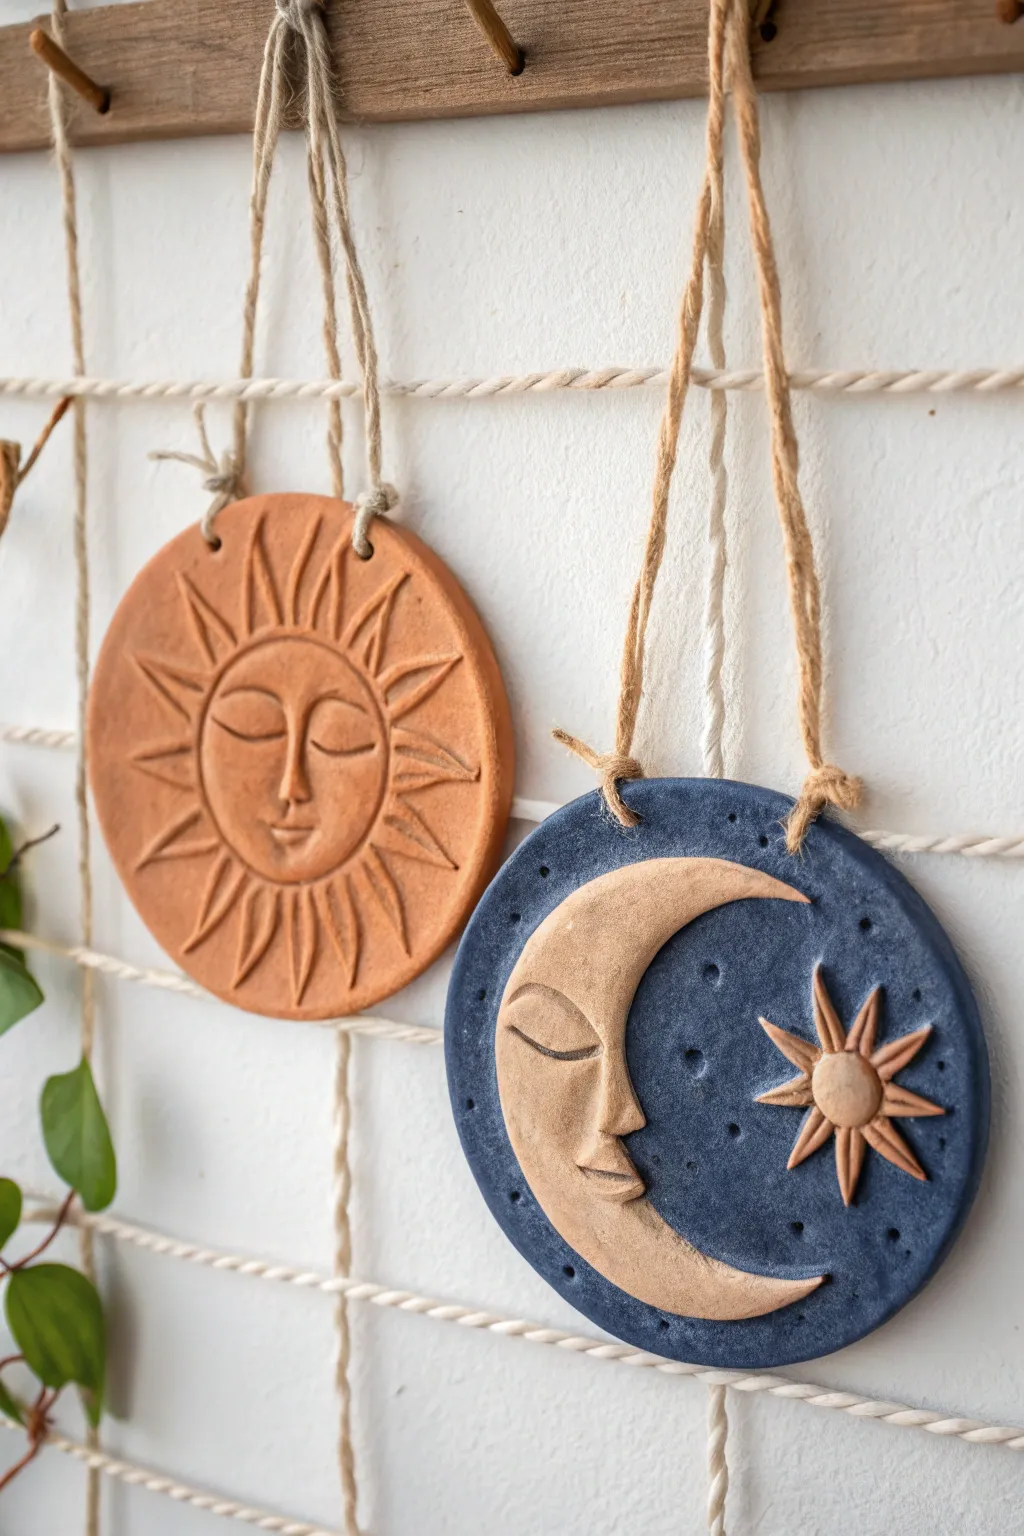
Capture the eternal dance of day and night with this charming pair of sun and moon clay reliefs. The warm terracotta tones of the sun contrast beautifully with the deep midnight blue of the moon, making them a perfect symbolic project for couples.
Step-by-Step
Materials
- Air-dry clay (white or natural)
- Rolling pin
- Circle cutter or bowl (approx. 4-5 inches)
- Modeling tools (or kitchen knife/toothpick)
- Acrylic paints (terracotta orange, dark navy blue, gold)
- Paintbrushes (flat and fine detail)
- Two lengths of jute twine
- Straw or pen cap (for making holes)
- Small cup of water
- Sandpaper (fine grit)
Step 1: Base Construction
-
Roll the clay:
Start by conditioning your clay with warm hands until pliable. Roll out a large slab regarding 1/4 inch thick. You want it substantial enough to be sturdy but not so heavy it’s hard to hang. -
Cut the circles:
Using your circle cutter or a bowl as a guide, cut out two identical circles. Smooth the rough edges with a little water on your finger. -
Create hanging holes:
Before adding any details, use a straw to punch two holes at the top of each circle. Space them about 2 inches apart to ensure the piece hangs balanced later.
Fixing Cracks
If small hairline cracks appear while drying, mix a tiny amount of clay with water to make a paste (slip) and fill the cracks. Smooth over with a damp finger and let dry again.
Step 2: Sculpting the Sun
-
Form the face:
For the sun, lightly sketch a smaller inner circle in the center. Score the clay here and attach a thin flattened disk of fresh clay to raise the face area slightly. -
Carve features:
Use a modeling tool to gently press in two closed, curved eyes. Add a small nose by blending a tiny snake of clay onto the face, and carve a serene smile. -
Add the rays:
I prefer to carve the rays directly into the outer rim. Use a sharp tool to incise triangle shapes radiating from the face to the edge. You can create depth by carving deeper on one side of each ray to simulate a bevel.
Step 3: Sculpting the Moon
-
Shape the crescent:
Roll a coil of clay and shape it into a ‘C’. Flatten it gently and attach it to the left side of your second circle using the score-and-slip method (scratching both surfaces and adding water). -
Detail the profile:
Refine the inner curve of the crescent to look like a facial profile—a forehead, nose, and lips. Carve a closed eye similar to the sun’s for continuity. -
Create the star:
On the right side of the moon disk, attach a small ball of clay. Flatten it and carve eight radiating points to create a starburst shape. -
Texture the sky:
Use the back of a paintbrush or a small stylus to press random little divots into the flat background area around the moon and star, mimicking distant stars.
Make it Shine
Mix just a drop of gold pearlescent medium into your terracotta paint for the Sun. It will give the piece a subtle, warm glow when the light hits it.
Step 4: Finishing Touches
-
Dry thoroughly:
Place both pieces on a wire rack to dry. This usually takes 24-48 hours depending on humidity. Flip them occasionally to prevent curling. -
Sand edges:
Once bone dry, gently sand any sharp edges or rough spots on the rim for a professional finish. -
Paint the Sun:
Paint the entire sun sculpture with a warm terracotta acrylic. You might need two coats for opaque coverage. Let the paint settle into the carved rays to emphasize the texture. -
Paint the Moon:
Carefully paint the background of the moon disk with dark navy blue, using a fine brush to get close to the raised clay. Leave the crescent face and the star unpainted (natural clay color) for contrast. -
Highlighting:
Add a wash of slightly darker orange to the sun’s carved lines, or brush a tiny bit of metallic gold onto the moon’s star for a subtle shimmer. -
Attach the twine:
Cut two lengths of jute twine. Thread the ends from front to back through the holes and tie sturdy knots on the backside to secure the hangers.
Hang these celestial partners side-by-side to bring a sense of balance and artistry to your space
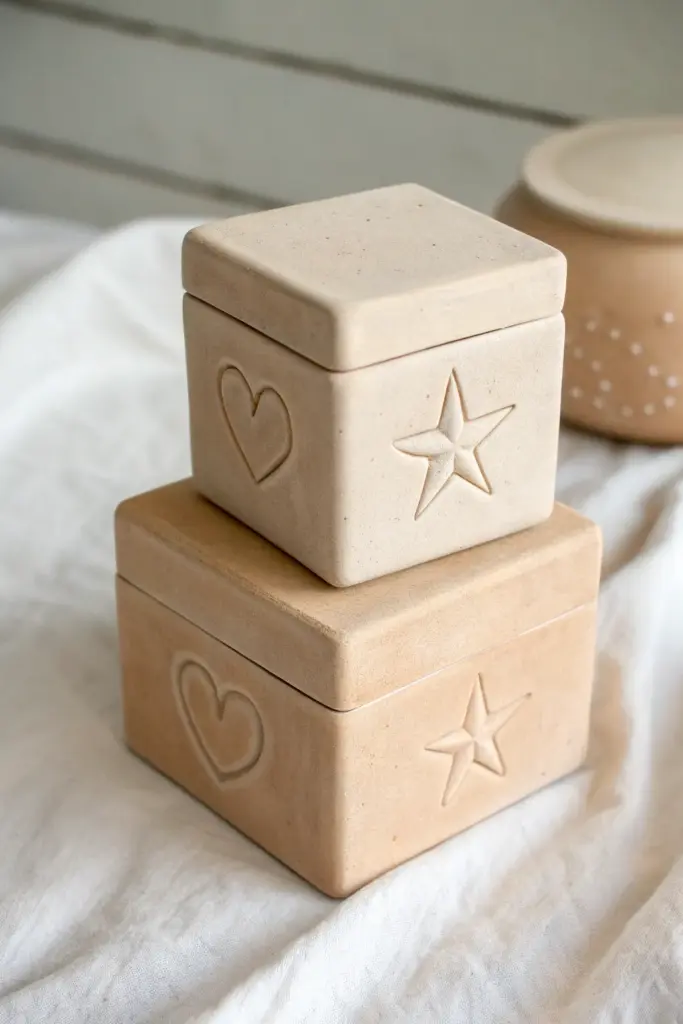
Stacking Keepsake Boxes That Nest

These charming, minimalist keepsake boxes are designed to stack perfectly together, featuring sweet hand-carved symbols like hearts and stars. The smooth, matte finish and natural tone give them a timeless pottery feel without needing a kiln.
How-To Guide
Materials
- High-quality air-dry clay (stone or natural color)
- Square cookie cutters (two sizes, differing by 1 inch)
- Rolling pin with thickness guides (1/4 inch)
- Clay knife or craft scalpel
- Carving tools (ribbon tool or needle tool)
- Small cup of water
- Slip (clay mixed with water to a paste consistency)
- Fine-grit sandpaper
- Clear matte varnish or sealant
Step 1: Forming the Base Squares
-
Roll the clay:
Begin by conditioning your clay with warm hands until pliable. Roll it out on a non-stick surface to an even 1/4-inch thickness using your guides to ensure uniformity. -
Cut the bases and lids:
Using the larger square cutter, cut two squares: one for the base of the large box and one for its lid. Repeat this process with the smaller cutter for the top box. -
Cut the walls:
Measure the side lengths of your squares. Roll out a long strip of clay, also 1/4-inch thick. Cut four rectangular strips for the large box walls and four for the small box walls. The height should be the same for all, roughly 2-3 inches.
Clean Corner Tip
For perfectly sharp 90-degree corners, prop the walls against a square wooden block or a sturdy book while the slip dries. This acts as a jig to keep everything straight.
Step 2: Assembling the Boxes
-
Score and slip the first base:
Take the large square base. Use a needle tool to scratch cross-hatch marks (scoring) along the outer edges where the walls will sit. Apply a generous dab of slip to these rough areas. -
Attach the walls:
Place your four wall strips onto the scored base. Press them firmly together at the corners and down onto the base. Ensure the corners are square and the walls stand straight. -
Reinforce the seams:
Roll a very thin coil of fresh clay. Place it inside the box along the bottom seams. Smooth this coil out with a modeling tool or your finger to structurally bond the wall to the floor. -
Smooth the exterior:
Dip your finger in a little water and smooth the outside seams where the walls meet. The goal is to make the join lines disappear completely for a seamless block look. -
Repeat for the smaller box:
Follow the same assembly steps for the smaller box, ensuring its outer dimensions are smaller than the large box lid so they visually stack well.
Textured Touch
Before the clay dries, gently press a piece of linen or canvas against the sides to imprint a subtle fabric texture, giving the boxes an even more rustic, handmade tactility.
Step 3: Constructing the Lids
-
Add the inner lip:
Flip your lid squares over. To keep the lid from sliding off, attach small strips of clay or a small square inset on the underside. This inner rim should fit snugly just inside the box walls. -
Check the fit:
Gently test the fit of the lids on their respective boxes while the clay is still workable. If it’s too tight, shave a little off the inner rim; if too loose, gently push the rim outward. -
Refine the edges:
Use a damp sponge to round over the sharp edges of the lids and the box rims for a softer, stone-like aesthetic.
Step 4: Carving and Finishing
-
Draft the designs:
Let the clay dry until it is leather-hard (firm but cool to the touch). Lightly sketch a heart on one side and a star on the adjacent side using a needle tool. -
Carve the symbols:
Using a small ribbon tool, carefully carve out the outline of your shapes. Use a steady hand to create a grooved channel rather than cutting all the way through the clay. -
Soften the carvings:
Dip a small brush in water and run it through your carved grooves to smooth out any rough clay crumbs or jagged edges. -
Drying phase:
Place the lids on the boxes loosely (or separately) and let them air dry completely. This usually takes 24-48 hours depending on humidity. Turn them occasionally to ensure even drying. -
Sanding:
Once fully dry and chalky white, take the boxes outside or wear a mask. Sand the flat surfaces with fine-grit sandpaper to achieve that ultra-smooth, professional finish seen in the photo. -
Seal the piece:
Apply a coat of matte varnish to protect the surface from moisture while maintaining the natural, unglazed look.
Stack your finished boxes on a bedside table to hold precious trinkets or jewelry