Whenever I’m stuck on what to make next, I go back to simple, satisfying modeling clay forms that look adorable even when they’re not “perfect.” Here are my go-to modeling clay sculpture ideas—starting with the classics and ending with a few studio-favorite curveballs.
Rounded Animal Buddy Figurines
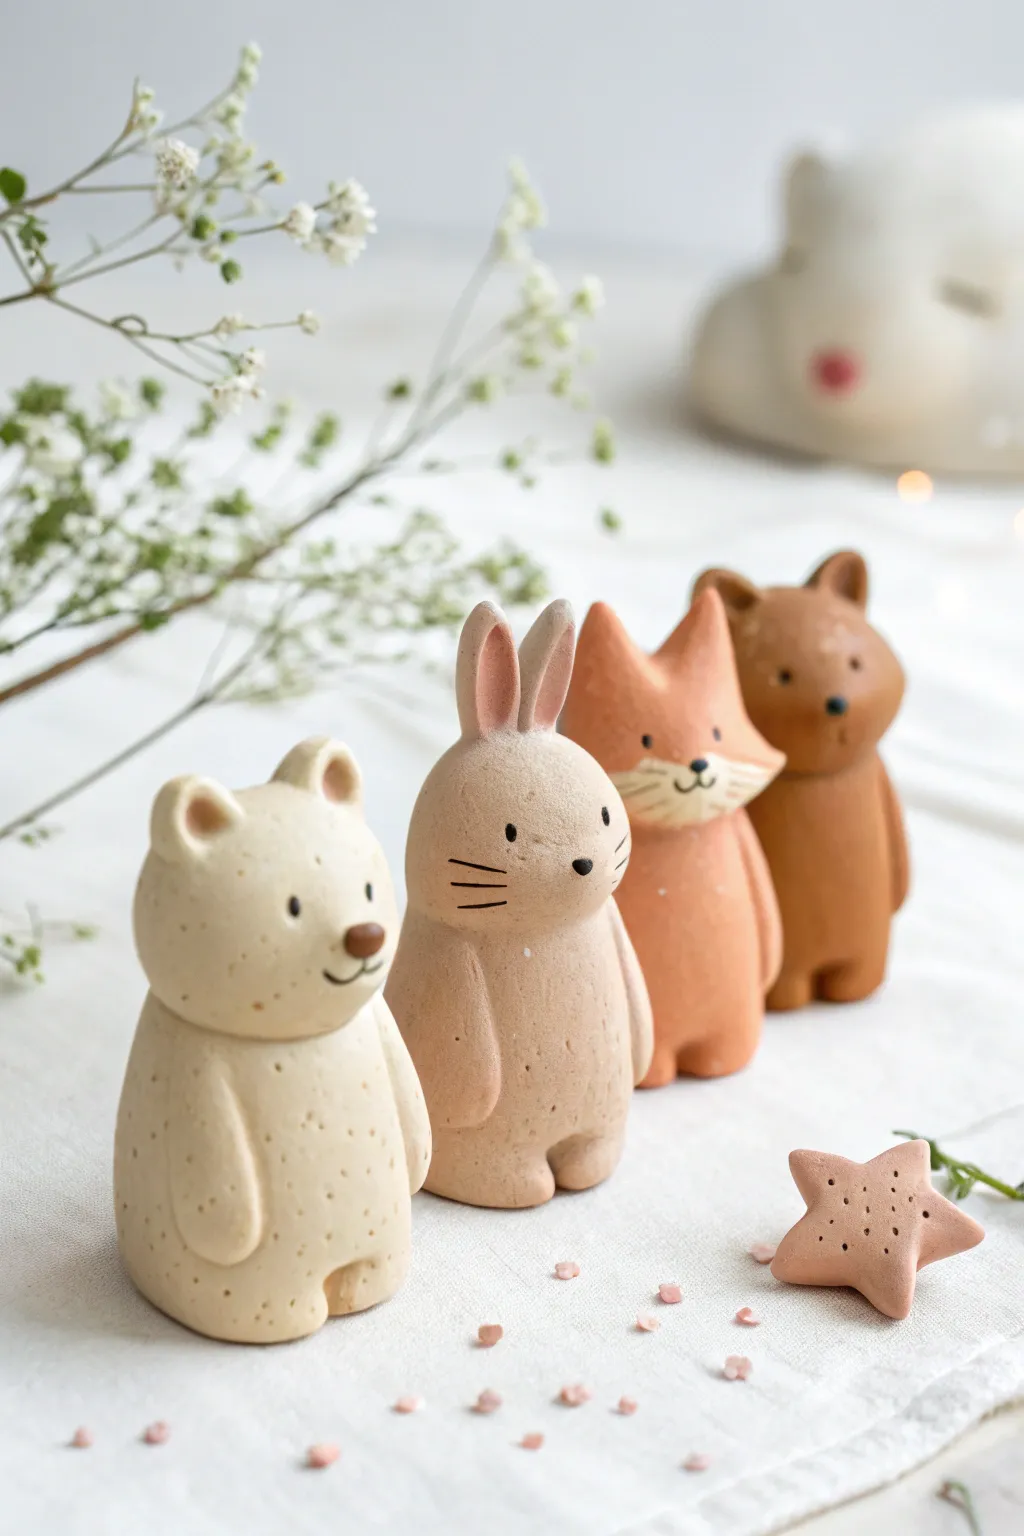
These adorable, minimalist animal figurines feature smooth, rounded bodies and sweet facial expressions that capture the charm of woodland creatures. With their matte, speckled finish and simple shapes, they make perfect decorative accents or handmade gifts.
Step-by-Step
Materials
- Polymer clay (beige, terracotta, brown, and translucent for mixing)
- Faux granite effects clay or fine ground pepper (to create speckles)
- Black acrylic paint
- Fine detail paintbrush (size 00 or smaller)
- Clay sculpting tools (needle tool, ball stylus)
- Rolling pin
- Clean work surface (ceramic tile or glass)
- Oven (for baking polymer clay)
Step 1: Preparing the Clay
-
Mix Your Base Colors:
Start by conditioning your polymer clay until it is soft and pliable. To achieve the natural, earthy tones seen in the photo, mix white or beige clay with small amounts of brown or terracotta. Aim for three distinct shades: a creamy off-white for the polar bear, a warm sandy beige for the rabbit, and a ruddy terracotta for the fox. -
Add Texture:
To recreate that lovely ceramic-like speckled effect, I like to knead a tiny pinch of faux granite clay into your solid colors. If you don’t have special effect clay, a tiny sprinkle of ground black pepper kneaded thoroughly into the dough works surprisingly well to mimic pottery specks.
Uneven Standing?
If your figurine wobbles, gently press the figure onto your designated baking tile before putting it in the oven. This flattens the bottom perfectly to the surface while the clay is still soft.
Step 2: Sculpting the Bodies
-
Create the Base Shape:
Roll a ping-pong ball sized sphere of clay for each animal. Gently roll this sphere on your work surface to elongate it slightly into a smooth, thick cylinder with a rounded top and a flat bottom so it stands securely. -
Smooth the Form:
Use your fingers to smooth out any fingerprints. The silhouette should be continuous and pear-shaped, wider at the bottom hips and slightly tapered toward the head, but keep it largely unsegmented for this minimalist style. -
Add Arms:
Roll two small, thin logs of clay for arms. Attach them vertically to the sides of the body, blending the top seam into the shoulder area so they look like they are resting heavily against the tummy. The bottom of the paws should remain slightly distinct. -
Define the Legs:
Instead of attaching separate legs, use a modeling tool or a craft knife to make a small vertical indentation at the very bottom center of the figure. This suggests feet while maintaining the solid, heavy look of the sculpture.
Texture Twist
After baking, dilute brown acrylic paint with water and brush it over the sculpture, then wipe it off immediately. The paint will stay in the crevices, making it look like aged pottery.
Step 3: Designing the Characters
-
Sculpt the Bear Ears:
For the bear, roll two tiny balls of clay. Press them gently onto the top of the head, spacing them wide apart. Use a small ball stylus to create the inner ear indentation, pressing firmly to help adhere the clay. -
Form the Rabbit Ears:
For the bunny, create two elongated teardrop shapes. Flatten them slightly and press a smaller piece of pink-tinted clay into the center of each. attach these upright on the head, blending the clay at the base to secure them. -
Create the Fox Shape:
The fox requires a slightly more triangular head shape. Pinch the sides of the head area gently to flare out ‘cheeks.’ Add two pointed triangles for ears on top. -
Add Snouts and Noses:
Roll tiny spheres of darker clay for the noses. For the bear, press a small ball of brown clay onto the face area to make a protruding snout, then add a tiny dark nose tip. For the rabbit and fox, the noses can be applied directly to the flat facial surface.
Step 4: Finishing Touches
-
Sculpt the Star:
Roll out a small piece of leftover pinkish-clay. Use a small star cookie cutter or cut a star shape freehand with a knife. Soften the sharp edges with your fingertip. -
Detail the Star:
Use a needle tool or toothpick to poke a random pattern of small holes across the surface of the star to mimic a porous cookie or coral texture. -
Bake the Figures:
Place all figures and the star on a baking sheet lined with parchment paper. Bake according to your polymer clay package instructions (usually 275°F/135°C for 15-30 minutes). Let them cool completely before handling. -
Paint facial Details:
Using a very fine detail brush and black acrylic paint, add two small dots for eyes. Keep them wide-set for a cute look. Paint thin whiskers on the rabbit and fox. -
Final Surface Check:
If the clay looks too shiny after baking, you can lightly sand it with ultra-fine sandpaper or apply a matte varnish to achieve that dry, ceramic biscuit look shown in the image.
Now you have a charming set of woodland friends ready to decorate your shelf


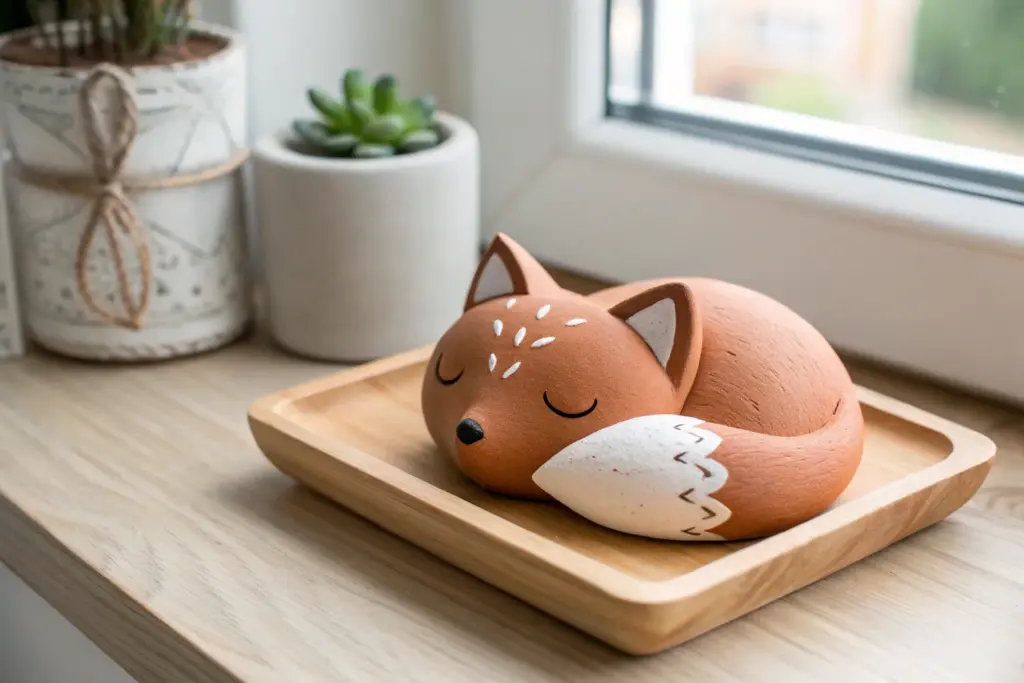
Sleepy Cat Desk Sculpture
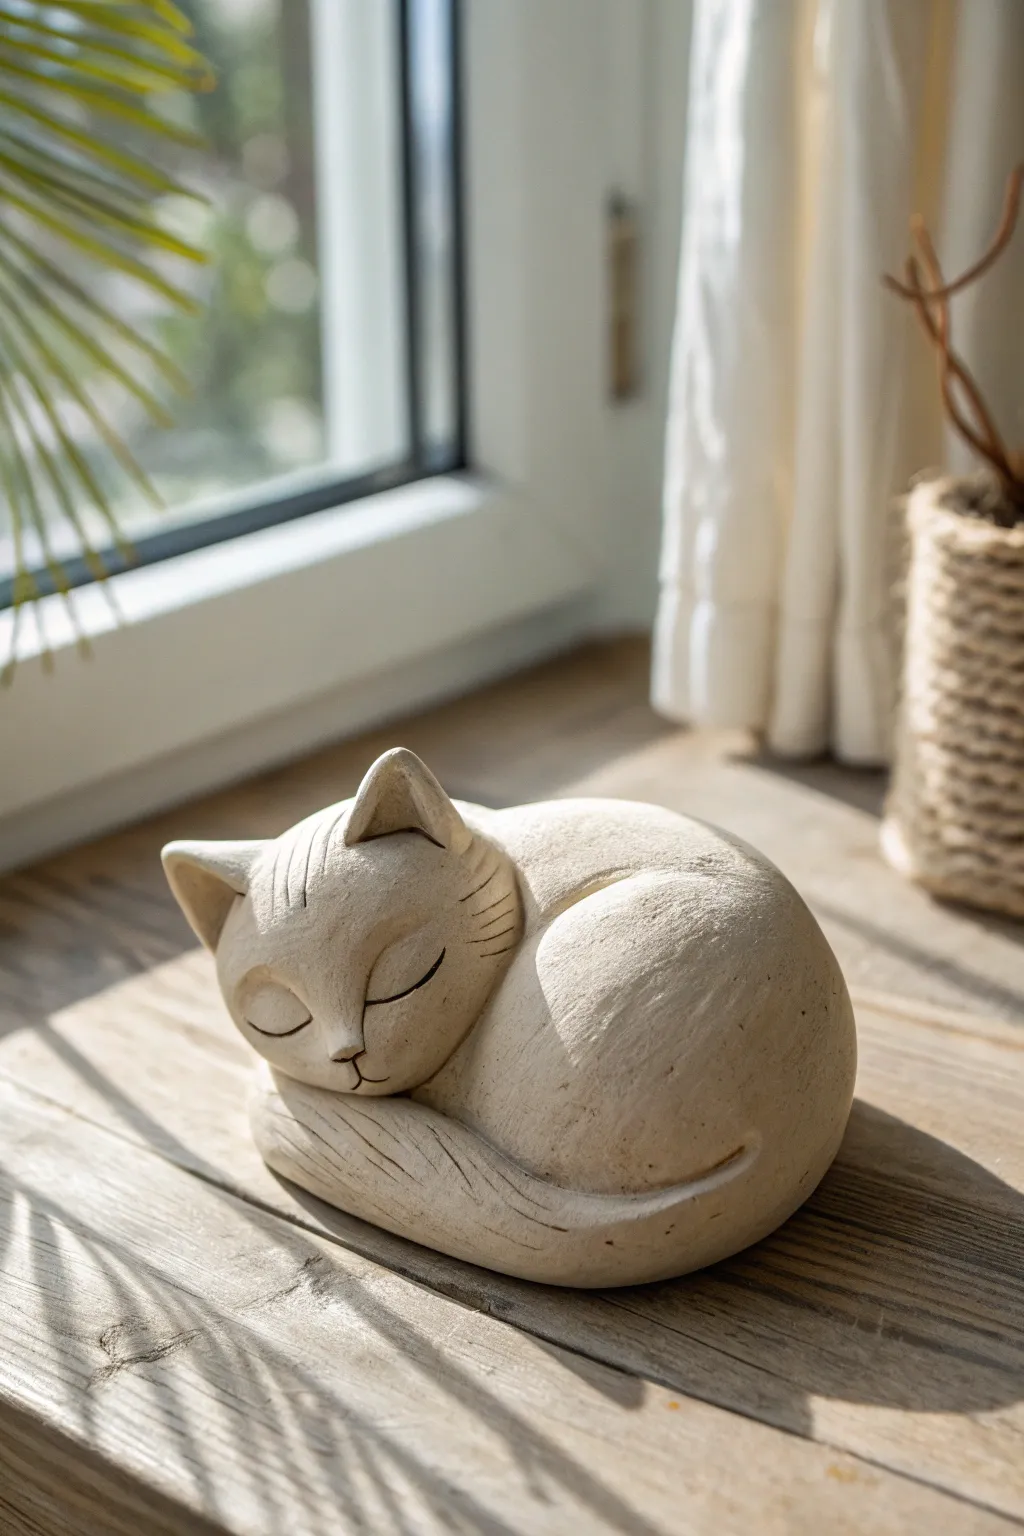
Capture the essence of total relaxation with this soothing sleepy cat sculpture, perfect for quieting your mind or decorating a sunny windowsill. The piece features a minimalist, curled-up form with a soft, sandstone-like texture and gentle carved details for distinct character.
Detailed Instructions
Materials
- Air-dry modeling clay (stone or cream color)
- Modeling tools (or a butter knife and toothpick)
- Fine-grit sandpaper (220 grit)
- Small bowl of water
- Wire or clay cutter
- Soft texture sponge or old toothbrush
- Matte sealant spray
Step 1: Forming the Base Shape
-
Prepare the Clay:
Start by conditioning a large handful of clay. Knead it thoroughly until it is soft, pliable, and free of air bubbles or cracks. -
Shape the Main Body:
Roll approximately two-thirds of your clay into a smooth oval or egg shape. This will serve as the combined body and haunches of the curled-up cat. -
Create the Head:
Roll the remaining third of the clay into a smaller, slightly flattened sphere. This will be the head. -
Attach the Head:
Score (scratch) the surfaces where the head will meet the body and dab them with a little water. Press the head firmly onto one end of the oval body, blending the clay at the neck seam until it is completely seamless.
Step 2: Sculpting the Posture
-
Refine the Curl:
Gently press the assembly down onto your work surface to create a flat base. Mold the body so it curves around the head slightly, emphasizing that classic kidney-bean sleeping shape. -
Define the Haunch:
Using your thumb, press gently into the side of the body to distinguish the raised rear leg (haunch) from the rest of the back. It should look like a rounded mound rising from the curve. -
Add the Tail:
Roll a small coil of clay for the tail. Wrap it around the base of the body, starting from the back and curling underneath the chin or alongside the face. Blend the starting point into the body so it looks natural. -
Shape the Ears:
Pinch two small triangles of clay from the top of the head to form the ears. Shape them to be soft and rounded rather than sharp, pressing a small indentation into the front of each.
Cracks Appearing?
If tiny cracks appear while drying, mix a small amount of clay with water to make a paste (slip). Fill the cracks with this paste and smooth it over with a damp finger.
Step 3: Carving Details & Texturing
-
Outline the Face:
Using a fine modeling tool or toothpick, lightly sketch the facial centerline to ensure symmetry. -
Carve the Eyes:
Press two gently curved, horizontal arcs into the face for the closed eyes. I like to make the outer corners dip slightly downwards to enhance the sleepy expression. -
Define the Nose and Mouth:
Carve a small ‘Y’ shape below the eyes for the nose and mouth cleft. Keep the lines minimal and clean. -
Engrave Whiskers and Fur:
Use a sharp tool to etch three simple lines on each cheek for whiskers. Add subtle, curved lines along the tail and the back of the neck to suggest the flow of fur without over-texturing. -
Add Stone Texture:
To mimic the stone look in the photo, gently tap the entire surface (avoiding the carved eyes) with a dry stiff toothbrush or a textured sponge. This creates a matte, grainy finish. -
Final Smoothing:
Dip your finger in water and run it very lightly over any sharp ridges created by the texturing to soften the look, ensuring the sculpture looks eroded and cozy rather than rough.
Weightier Feel
To make the sculpture feel more like real stone, ball up a piece of aluminum foil tightly and use it as the core for the body, wrapping the clay around it.
Step 4: Finishing Touches
-
Dry Completely:
Let the sculpture dry for 24-48 hours away from direct heat. Turn it over halfway through to ensure the bottom dries evenly. -
Sand Imperfections:
Once bone dry, use fine-grit sandpaper to gently smooth out any fingerprints or unwanted bumps, being careful not to erase your stone texture. -
Seal the Work:
Finish with a light coat of matte spray sealant. This protects the clay while preserving that natural, unglazed stone appearance.
Place your little sleeping companion on your desk to remind you to take restful breaks throughout your day


Frog on a Lily Pad Mini Scene
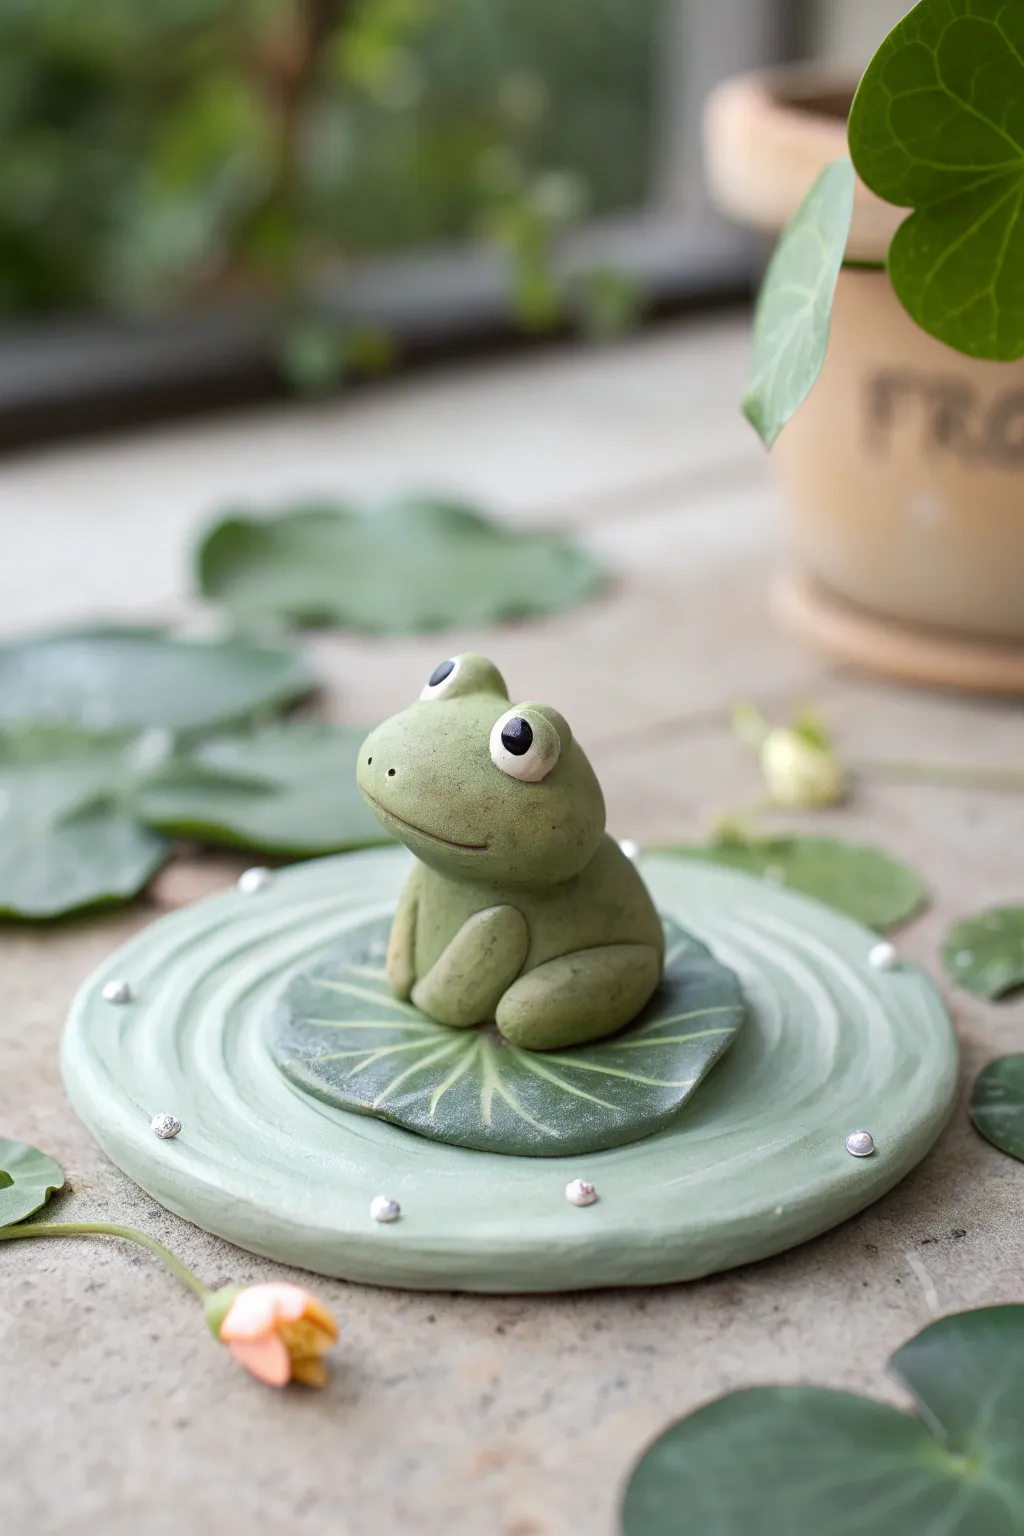
Bring a little zen to your desk with this peaceful frog scene, featuring a stylized clay amphibian resting on a multi-layered pond base. The soft greens and concentric water ripples create a calming miniature world perfect for beginner sculptors.
Step-by-Step Guide
Materials
- Polymer clay or air-dry clay (Sage Green, Dark Green, White, Black)
- Acrylic rolling pin
- Clay sculpting tools (needle tool, ball stylus)
- Small round cutter or jar lid (approx. 3-4 inches)
- Craft blade or X-Acto knife
- Silver microbeads or small pearl gems
- Matte varnish (optional)
Step 1: Creating the Pond Base
-
Roll the water base:
Start by conditioning a large ball of sage green clay until it is soft and pliable. Use your acrylic roller to flatten it into a thick pancake, about 1/4 inch thick. I like to keep this layer substantial so it acts as a sturdy display stand. -
Cut the circle:
Use your round cutter or a jar lid to stamp out a clean, perfect circle. Remove the excess clay and smooth the edges with your finger to remove any sharp cut marks. -
Sculpt the ripples:
To create the water effect, use a modeling tool with a rounded edge to press concentric circles into the clay. Start near the edge and work inward, making the grooves slightly irregular for a more organic water look. -
Add dew drops:
Take your tiny silver microbeads or pearls and press them gently into the ridges of the water ripples. Place them randomly around the perimeter to mimic sparkling morning dew.
Smooth Seams
Use a rubber-tipped clay shaper to blend the seams where legs attach to the body. This makes the frog look like one solid piece rather than parts stuck together.
Step 2: Sculpting the Lily Pad
-
Form the leaf:
Take a piece of darker green clay and roll it flat, significantly thinner than your base. Cut out a smaller circle, roughly the diameter of the frog’s future seating area. -
Texture the leaf:
Place the dark green circle in the center of your pond base. Using a needle tool, draw veins radiating from the center to the edges. Gently press a small ‘V’ notch out of one side to give it the classic heart-shaped lily pad silhouette. -
Soften edges:
Use your finger or a soft silicone tool to slightly curl the edges of the lily pad upward, giving it a bit of life and dimension rather than lying perfectly flat.
Make it Bloom
Add a tiny pink lotus flower made of small pointed teardrop shapes next to the frog for an extra pop of color.
Step 3: Building the Frog
-
Shape the body:
Roll a medium-sized ball of sage green clay into a smooth egg shape. This will be the main body and head combined. Flatten the bottom slightly so it sits securely on the lily pad. -
Form the legs:
Create two small sausage shapes for the hind legs. Bend them into a ‘U’ shape and attach them to the sides of the body, blending the clay where it meets the torso for a seamless look. -
Add front arms:
Roll two smaller logs for the front arms. Position them vertically in front of the chest, slightly angled inward as if the frog is politely sitting. -
Define the face:
Use a needle tool or a clay knife to gently press a wide, curved line for the mouth. Position it somewhat high on the face to give that cute, chubby appearance. -
Create the eyes:
Roll two small balls of sage green clay and attach them to the top of the head. Flatten the fronts slightly to create a surface for the eyeballs. -
Add details:
Press a small disk of white clay onto each eye mound, followed by a tiny black dot for the pupil. Use a needle tool to poke two tiny nostrils above the mouth.
Step 4: Assembly and Finishing
-
Mount the frog:
If you haven’t already, press the finished frog firmly onto the center of the dark green lily pad. Ensure the connection is secure. -
Final inspection:
Check for any fingerprints or lint on the clay. You can smooth these away with a tiny bit of baby oil on your finger before baking or drying. -
Curing:
Bake your piece according to the manufacturer’s instructions for your specific brand of polymer clay, or let it air dry completely in a dust-free are for 24-48 hours.
Once fully cured, your little pond friend is ready to keep you company on a shelf or windowsill


Chubby Penguin or Owl Totem
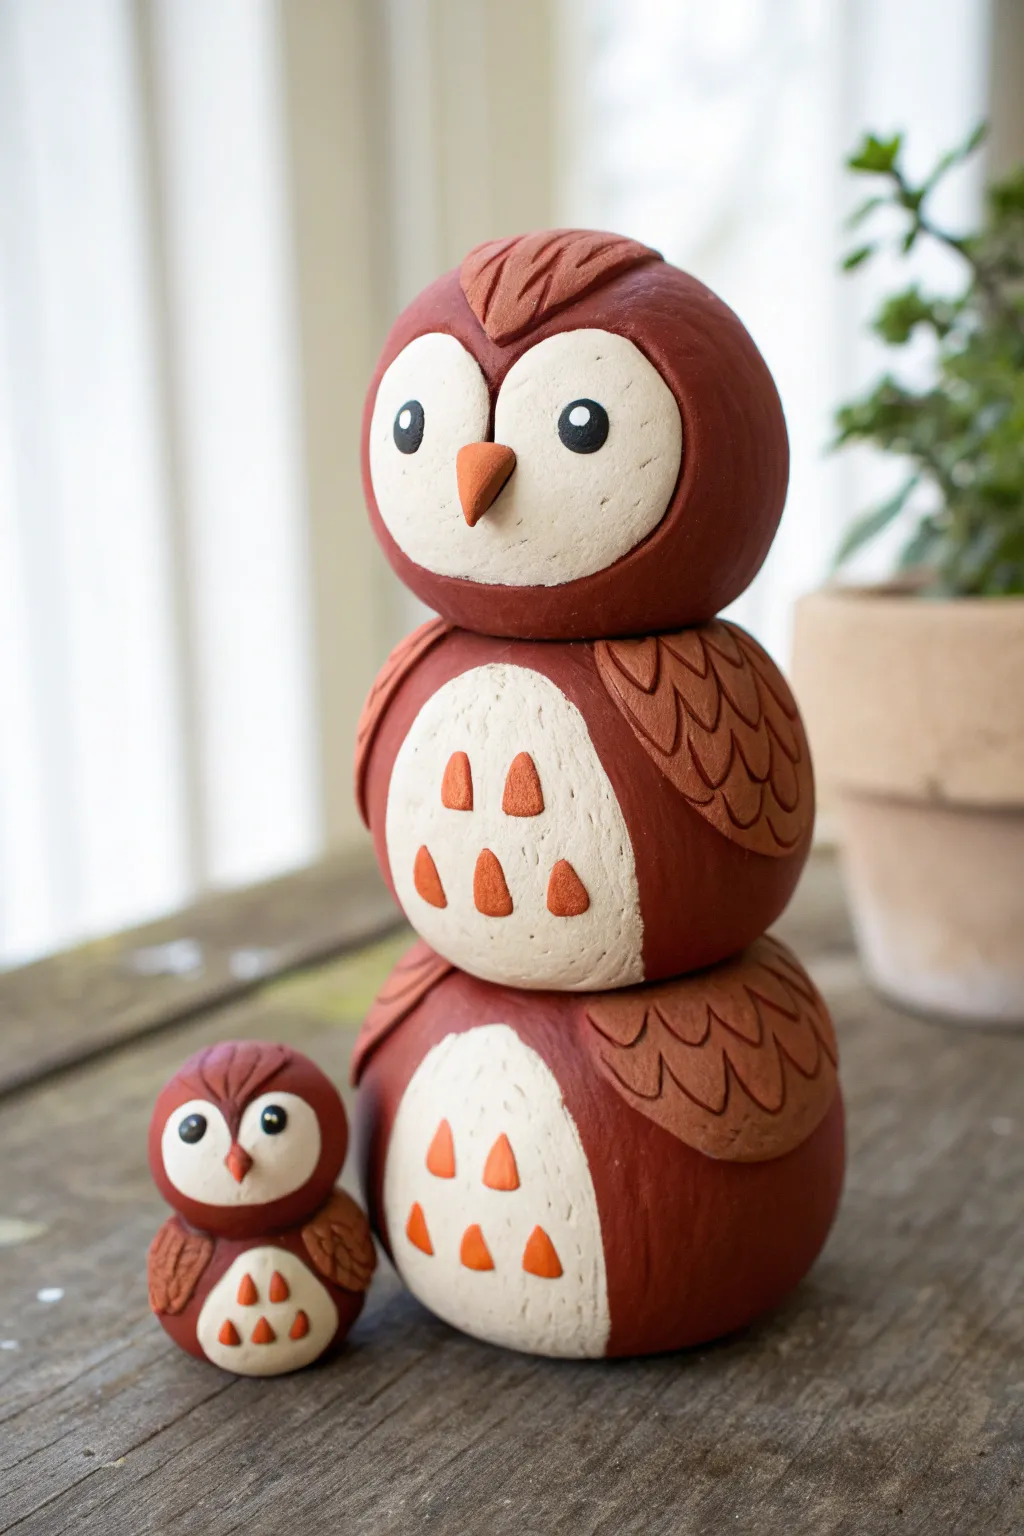
Create a charming, rustic display with this terracotta-colored owl stack and its tiny companion. The layered totem design uses simple spherical shapes and contrasting clay colors to build a sturdy, whimsical sculpture perfect for a desk or shelf.
Step-by-Step
Materials
- Red-brown modeling clay or polymer clay (terracotta color)
- Cream or off-white modeling clay
- Orange modeling clay
- Black modeling clay
- White acrylic paint (for eye highlights)
- Needle tool or toothpick
- Clay blending tool or smooth popsicle stick
- Small rolling pin
- Craft knife
Step 1: Forming the Base Totem
-
Roll the bottom body:
Start by taking a large chunk of terracotta clay and rolling it into a smooth, slightly flattened sphere to serve as the bottom of your totem. -
Shape the belly patch:
Roll a smaller ball of cream clay and flatten it into an egg shape. Press this firmly onto the front of the terracotta sphere to create the owl’s belly. -
Texture the belly:
Using a needle tool, gently scratch small vertical hash marks into the cream belly patch to simulate feathers or fur texture. -
Add the middle tier:
Create a second terracotta sphere, slightly smaller than the first. Repeat the process of adding a cream belly patch and texturing it, then stack this sphere securely on top of the base. -
Attach the wings:
For the wings, flatten two pieces of terracotta clay into teardrop shapes. Press them onto the sides of the middle tier, curving them slightly to hug the body shape. -
Detail the feathers:
Use a U-shaped clay tool or the tip of a small spoon to impress a scalloped feather pattern onto the wings. I find starting from the bottom of the wing and working up creates the best layering effect. -
Decorate the bellies:
Roll tiny cones of orange clay. Press them flat onto the cream belly patches—three on the bottom tier and five on the middle tier—to create decorative triangular accents.
Step 2: Creating the Head
-
Form the head sphere:
Roll a third terracotta sphere, similar in size to the middle body tier, and place it at the very top of your stack. -
Make the face mask:
Flatten a piece of cream clay into a wide heart shape or a joined pair of ovals. Press this onto the face area, wrapping it slightly around the sides. -
Texture the face:
Unlike the bellies, use a stippling motion with your needle tool to poke tiny dots all over the cream face mask for a porous texture. -
Add the eyes:
Roll two small balls of black clay and flatten them onto the face mask. Add tiny dots of white clay (or paint later) to the eyes for a life-like glint. -
Attach the beak:
Form a small pyramid or cone from orange clay. Press it firmly between the eyes, pointing downward. -
Create the head tuft:
Fashion a small patch of terracotta clay into a curved diamond shape. Place it on the forehead above the eyes and use a knife to score feather lines into it.
Stability Secret
Insert a toothpick or a crumpled core of aluminum foil through the center of the three large spheres before stacking. This acts as a hidden spine to keep your totem from toppling over.
Step 3: The Tiny Companion
-
Build the mini owl body:
Repeat the body steps on a miniature scale: roll a small terracotta ball, add a tiny cream belly patch, and attach small orange triangles. -
Add the mini head:
Attach a smaller sphere for the head. Add the cream face mask, stipple the texture, and place the tiny black eyes and orange beak. -
Attach mini wings:
Create tiny teardrop wings for the little owl, texture them with scalloped lines, and press them to the sides of its body. -
Final smoothing:
Check all connection points on both sculptures. Gently smooth the seams where clay colors meet using your finger or a blending tool to ensure they are secure.
Clean Edges
If your cream clay gets smeared with red clay from your fingers, use a cotton swap dipped in a little rubbing alcohol or baby oil to gently wipe the light clay clean.
Place your finished owl family near a potted plant or on a windowsill to enjoy their watchful company

The Complete Guide to Pottery Troubleshooting
Uncover the most common ceramic mistakes—from cracking clay to failed glazes—and learn how to fix them fast.
Tiny Dinosaur Pal Sculpture
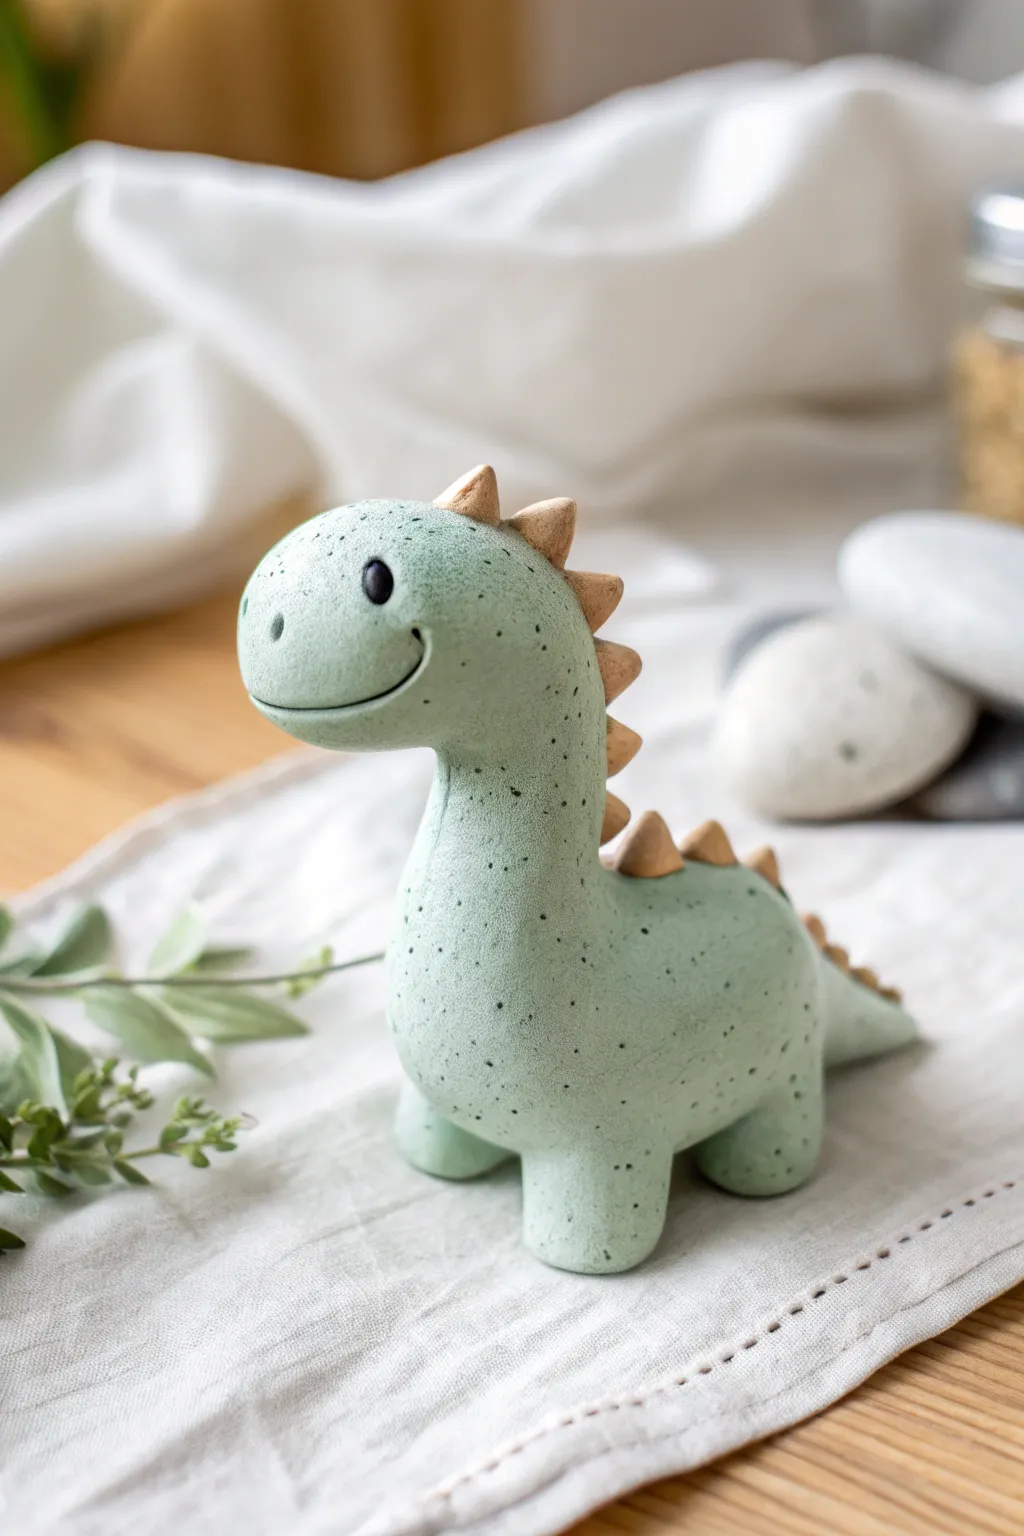
This adorable dinosaur figurine features a charming speckled texture and a friendly smile that’s sure to brighten any shelf. With a gentle mint-green body and natural beige spikes, this project captures a modern, minimalist aesthetic perfect for beginners.
Step-by-Step Tutorial
Materials
- Polymer clay (mint green or pale sage)
- Polymer clay (beige or light tan)
- Black glass beads or small glossy black clay balls (for eyes)
- Black acrylic paint (extremely diluted) or speckling medium
- Old toothbrush or stiff bristle brush
- Foil (for armature core, optional)
- Needle tool or toothpick
- Clay blending tool or silicone smoother
- Baking sheet and parchment paper
- Oven (preheated according to clay package)
Step 1: Shaping the Base
-
Create the body mass:
Start with a large ball of mint green clay. If you want to conserve clay, crumple a small tight ball of aluminum foil and wrap the clay around it, rolling it until smooth. -
Form the classic dino shape:
Gently elongate the ball into a pear shape. Pull the narrower top section upwards and slightly forward to form the neck and head, whilst keeping the bottom heavy and rounded for stability. -
Refine the head:
Use your thumbs to round out the head area, distinguishing it slightly from the neck. The snout should be blunt and friendly, not sharp. -
Pull the tail:
At the back of the base, pinch and pull a section of clay to create a short, tapered tail that rests on the ground. This also acts as a third point of balance.
Clean Clay Tip
Keep baby wipes nearby to clean your hands between colors. Light clay like mint green picks up dust easily, so work on a clean glass or tile surface.
Step 2: Adding Limbs and Details
-
Make the legs:
Roll four equal-sized small cylinders of green clay for the legs. They should be short and stout, like little marshmallows. -
Attach the legs:
Press the legs firmly onto the underside of the body. I find it helpful to blend the seams upward into the body using a clay tool so they don’t pop off later. -
Add the spikes:
Roll tiny balls of beige clay and pinch them into triangular points. You will need about 8-10 spikes, graduating in size from small (for the head) to larger (back) and small again (tail). -
Secure the spine:
Press the beige triangles in a single line running from the top of the head down to the tail. Blend the base of each triangle slightly into the green clay for a seamless look.
Level Up: Accessories
Make a tiny clay accessory for your dino to hold! A small red heart, a flower, or a miniature balloon adds huge personality to the finished piece.
Step 3: Texturing and Features
-
Create the speckled stone look:
Dip an old toothbrush into extremely diluted black acrylic paint (it should be watery). Run your thumb across the bristles to flick tiny specks all over the green clay. Let this dry completely before touching the clay again. -
Sculpt the face:
Use a needle tool or a small curving tool to carve a long, deep smile line on both sides of the snout. -
Add the nostrils:
Poke two small, shallow holes at the very front of the snout for nostrils. -
Place the eyes:
Press two small black glass beads (or balls of black clay) into the head just above the smile line. Push them in deep enough so they look embedded, not just stuck on the surface.
Step 4: Finishing Up
-
Final smooth check:
Check for any fingerprints. If you find any, you can gently buff them away with a tiny bit of baby oil on your finger, being careful not to smudge the speckles. -
Bake the sculpture:
Place your dinosaur on a parchment-lined baking sheet. Bake according to your specific polymer clay’s instructions (usually around 275°F for 15-30 minutes depending on thickness). -
Cool down:
Let the figure cool completely in the oven with the door cracked open to prevent cracking from thermal shock.
Now you have a charming prehistoric pal to keep you company on your desk
Smiling Octopus Paperweight
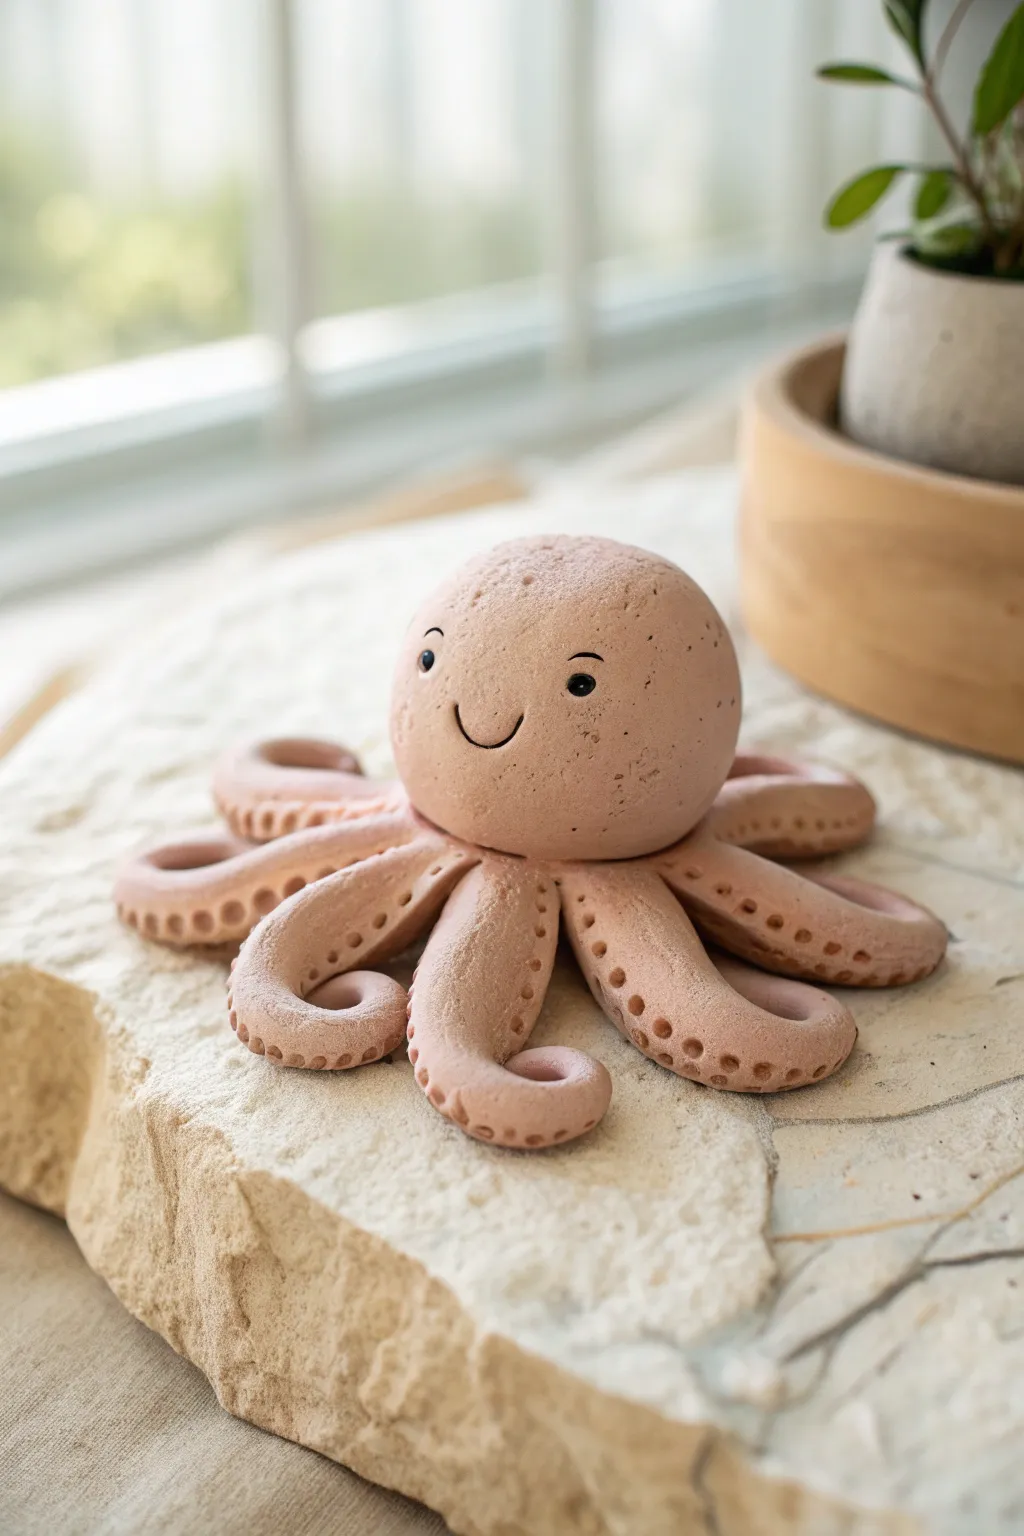
Brighten up your desk with this adorable, weighty octopus friend whose gentle smile is sure to improve any workday. Crafted from textured modeling clay in a soft terracotta pink, this project features eight curled tentacles dotted with delicate suction cups for a charming, organic finish.
Step-by-Step
Materials
- Air-dry clay or polymer clay (terracotta or dusty pink)
- Small rolling pin
- Aluminum foil (for the core)
- Ball stylus tool (medium size)
- Needle tool or toothpick
- Fine grit sandpaper
- Black acrylic paint
- Fine detail paintbrush (size 00)
- Water (for smoothing)
- Matte finish clear coat spray
Step 1: Forming the Body
-
Create the core:
To keep the head lightweight and save clay, crumple a piece of aluminum foil into a tight ball about the size of a golf ball. Compress it firmly so it holds its shape. -
Prepare the head clay:
Condition a large portion of your clay until it’s soft and pliable. Roll it into a smooth sphere, then flatten it slightly into a thick pancake. -
Cover the core:
Place the foil ball in the center of your clay pancake. Wrap the clay up and around the foil, pinching the seams together at the bottom. -
Smooth the sphere:
Roll the clay-covered ball between your palms to smooth out any seams or lumps. You want a nearly perfect sphere for the head. -
Create the tentacle base:
Flatten a separate, smaller ball of clay into a disk about 1/4 inch thick. This will serve as the connection point underneath the head.
Step 2: Sculpting the Tentacles
-
Roll clay coils:
Roll out eight even snakes of clay, each about 3 to 4 inches long. Taper one end of each snake to a blunt point. -
Arrange the stars:
Flip the head upside down or set it aside. Arrange the eight tentacles in a starburst pattern on your work surface, connecting the thicker ends in the center. -
Blend the connections:
Press the thick ends of the tentacles together firmly. I like to use a smoothing tool here to meld the clay so the legs don’t detach later. -
Attach the head:
Place the heavy head sphere onto the center of the joined tentacles. Use your thumbs or a sculpting tool to drag clay from the underside of the head down onto the tentacles, blending the seam entirely. -
Add suction cups:
Before curling the legs, use your ball stylus tool to press rows of small indentations along the underside/sides of each tentacle. These mimic the suction cups. -
Curl the legs:
Gently lift each tentacle and curl the tapered ends upward or outward. Vary the curls slightly to give the octopus a relaxed, natural look.
Droopy Arms?
If the tentacles sag while drying, prop them up with crumpled tissues or foam wedges. This supports the weight until the clay hardens in the correct curled position.
Step 3: Finishing Details
-
Texture the skin:
To achieve the stone-like texture seen in the photo, gently tap the surface of the head and upper legs with a stiff bristle brush or a crumpled ball of aluminum foil. -
Smooth imperfections:
Dip your finger in a little water and gently run it over any harsh fingerprints, but try not to erase your new texture. -
Let it dry:
Allow the sculpture to dry completely according to your clay’s instructions. Air-dry clay may need 24-48 hours given the thickness. -
Sand gently:
Once fully dry or cured, very lightly sand the bottom to ensure it sits flat on your desk without wobbling. -
Paint the face:
Using a very fine brush and black acrylic paint, add two small dots for eyes. Paint a simple, thin ‘U’ shape between them for the smile. Keep the features small to maintain the cute scale. -
Add eye details:
Carefully paint thin arched eyebrows above the eyes and add a tiny flick of ‘eyeliner’ to the outer corners for extra character. -
Seal the piece:
Finish by spraying the entire sculpture with a matte clear coat to protect the paint and give the clay a unified, stony finish.
Stone Effect
Mix a small amount of sand or used coffee grounds directly into the clay before sculpting. This creates a speckled, earthy texture that looks like real sandstone.
Place your new textured friend on a stack of papers and enjoy the calm vibe it brings to your space


What Really Happens Inside the Kiln
Learn how time and temperature work together inside the kiln to transform clay into durable ceramic.
Mushroom Couple Sculpture Set
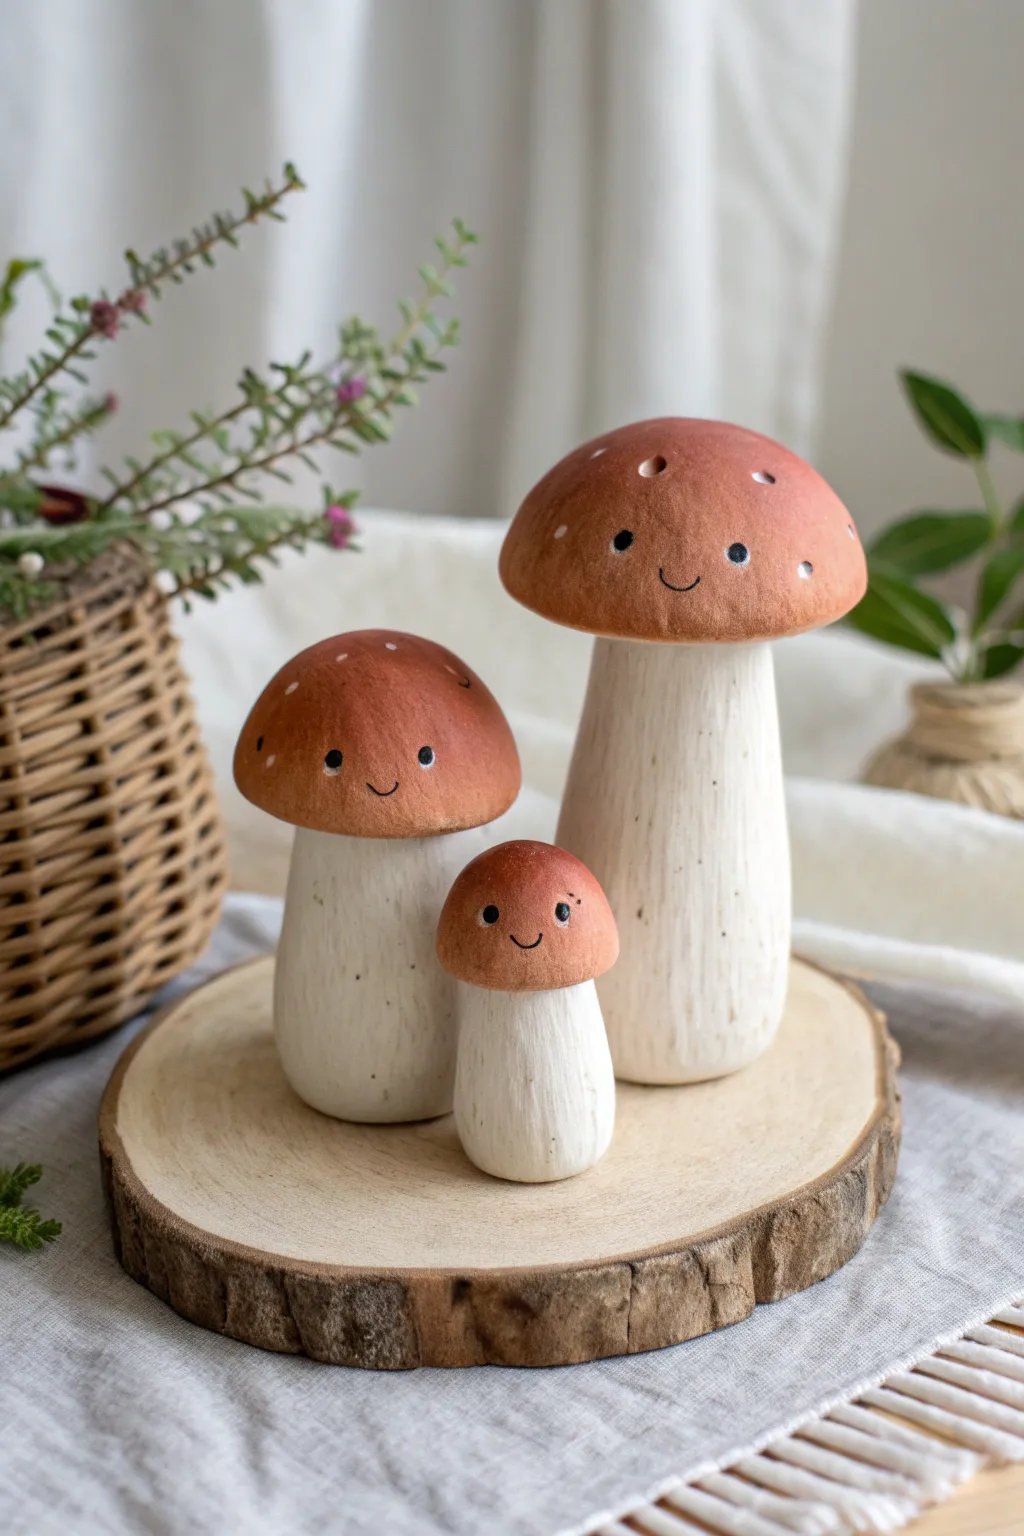
Create your own forest family with this set of three adorable mushroom sculptures, ranging from a tiny baby to a tall guardian. These pieces feature charming painted faces, textured stems, and graduated earth-toned caps that bring a touch of woodland magic to any shelf.
Step-by-Step Tutorial
Materials
- Air-dry clay or polymer clay (white)
- Acrylic paints (burnt sienna, burnt umber, white, black)
- Clear spray varnish or matte sealer
- Sculpting tools (needle tool, ball stylus)
- Aluminum foil (for armatures)
- Fine grit sandpaper
- Paintbrushes (flat shader, fine liner)
- Water cup and palette
- Toothbrush or stiff bristle brush
Step 1: Sculpting the Forms
-
Prepare the cores:
To save clay and reduce weight, crumple aluminum foil into three distinct cone-like shapes for the stems: one tall and thick, one medium, and one small stout one. Create three flattened dome shapes for the caps. -
Cover the stems:
Roll out sheets of white clay about 1/4 inch thick. Wrap these around your foil stem armatures, smoothing the seams completely so they disappear. The base should be slightly wider than the top for stability. -
Shape the caps:
Cover the foil cap armatures with clay, smoothing them into rounded, organic dome shapes. The largest cap should flare out slightly at the bottom, while the smallest can be more button-like. -
Attach parts:
Score the top of each stem and the underside of each cap with a needle tool. Apply a little water (for air-dry clay) or liquid clay (for polymer) and press the pieces together firmly to join them. -
Add stem texture:
Using a needle tool or a stiff toothbrush, gently drag vertical lines down the length of the white stems. This mimics the fibrous texture of real mushroom stalks. -
Refine and smooth:
Check your shapes from all angles. Smooth out any unwanted fingerprints on the smooth caps using a little water on your finger, but leave the texture on the stems rough. -
Dry or bake:
If using air-dry clay, let the mushrooms sit for 24-48 hours until fully hardened. For polymer clay, bake according to the manufacturer’s temperature instructions.
Step 2: Painting and Detailing
-
Base coat the stems:
Mix a tiny drop of brown into your white acrylic paint to create an off-white, creamy bone color. Paint the stems entirely, working the paint into the textured crevices. -
Dry brushing:
Once the base is dry, take a dry brush with pure white paint and lightly whisk it over the raised textures of the stem. I find this really makes the vertical lines pop. -
Painting the caps:
Mix burnt sienna with a touch of burnt umber for a rich, rusty red. Paint the caps smoothly, applying two thin coats rather than one thick one to avoid brush strokes. -
Creating the ombre effect:
While the red paint is still slightly wet, dab a little lighter reddish-orange near the very top and blend it downward for a subtle, sun-faded look. -
Adding the faces:
Using your finest liner brush or a ball stylus tool, paint two small black dots for eyes about halfway down the cap. Add a tiny, thin customized smile between them. -
Adding highlights:
Dip the tip of a toothpick or small stylus in white paint. Add a tiny white reflection dot to the upper corner of each black eye to bring the character to life. -
Polka dots:
Finish the caps by adding small, irregularly spaced white dots near the top of the domes. Keep them random and sparse for a natural feel. -
Sealing:
Once all paint is completely dry, apply a coat of matte varnish to protect your work without making it too shiny and plastic-looking.
Cracks happen
If air-dry clay cracks while drying, mix a small amount of fresh clay with water to make a paste (slip). Fill the cracks, smooth it over, and let it dry again.
Make a scene
Glue dried moss or small pebbles around the base of the mushrooms on a wood slice to create a complete diorama, or attach them to a jar lid for a cute container.
Arranging these three characters together instantly creates a heartwarming little scene on your desk or windowsill
Miniature Food Bite Sculptures
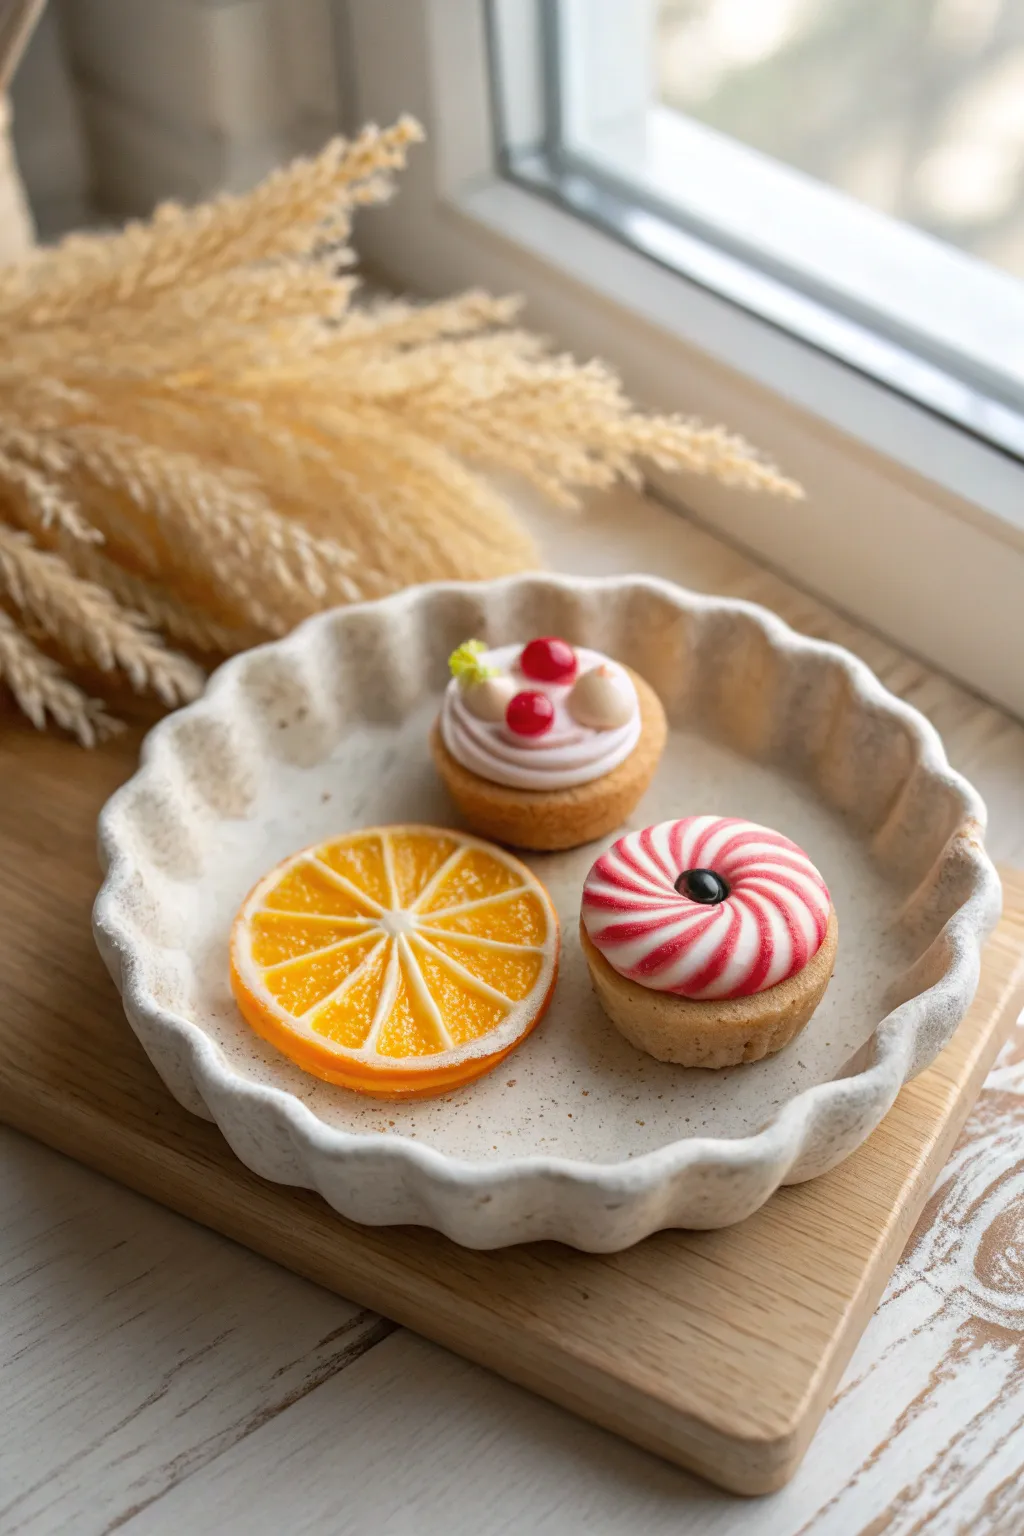
Create an adorable set of polymer clay miniatures featuring a hyper-realistic orange slice, a peppermint-swirl tart, and a delicate berry-topped cupcake. These bite-sized sculptures are perfect for dollhouse displays or creating charming jewelry charms.
How-To Guide
Materials
- Polymer clay (white, translucent, orange, red, tan/beige, light pink, green)
- Liquid polymer clay (translucent and white)
- Pastel chalks (orange, yellow, brown) for shading
- Detail tools (needle tool, ball stylus)
- X-acto knife or craft blade
- Gloss glaze or UV resin
- Small paintbrush
- Texturing tool (toothbrush or sandpaper)
- Miniature scalloped dish (optional, for display)
Step 1: Sculpting the Orange Slice
-
Create the segments:
Mix translucent clay with a tiny amount of orange. Roll this into a thin log. Roll a very thin sheet of white clay and wrap it around the orange log. -
Form the cane:
Stretch and reduce the wrapped log until it’s quite thin, then cut it into 8 equal lengths. Pinch one side of each length to form a teardrop shape. -
Assemble the orange:
Arrange the 8 teardrop segments in a circle, points facing inward. Wrap the entire bundle in a thin sheet of white clay (the pith), followed by a thicker sheet of orange clay (the rind). -
Texture the rind:
Gently roll the cane to adhere the layers. Use a toothbrush or sandpaper to texture the outside orange rind for a realistic skin effect. -
Slice and refine:
Use a sharp blade to cut a thin slice from your cane. Gently press down on the edges to slightly bevel them, giving it a natural, cut-fruit look. -
Add juicy texture:
Use a needle tool to scratch tiny radial lines into the translucent orange segments to mimic pulp.
Secret to Juicy Fruit
Mix just a drop of liquid clay into your solid translucent clay before shaping the orange segments. It increases clarity after baking.
Step 2: The Peppermint Swirl Tart
-
Base shape:
Roll tan clay into a ball and flatten slightly to form a tart base. Use a toothbrush to gently texture the sides for a baked dough appearance. -
Create the swirl candy:
Twist two ropes of clay—one white, one red—together tightly. Roll them on your work surface until they meld into a single striped log. -
Coil the topping:
Starting from the center, coil the striped rope into a flat spiral disc that matches the diameter of your tart base. -
Mount and finish:
Press the spiral onto the tan base. Add a tiny dollop of black or dark purple clay in the very center as a decorative accent.
Fixing Smudged Whites
If red clay stains your white stripes, wipe the raw clay gently with a Q-tip dipped in rubbing alcohol or baby oil before baking.
Step 3: The Berry Cream Cupcake
-
Cupcake base:
Form another tan base similar to the tart. Use shaded pastels (light brown) brush lightly over the edges to simulate a ‘golden brown’ baked effect. -
Frosting layer:
Mix white clay with a tiny touch of pink. Create a small flattened disc and place it on top of the base. Use a needle tool to drag lines from the bottom to the top center to mimic piped frosting ridges. -
Adding berries:
Roll tiny balls of translucent red clay for the berries. Press one firmly into the center and others around it slightly embedded in the ‘frosting’. -
Meringue accents:
Create tiny teardrops of cream-colored clay to represent meringue kisses and place them alongside the berries. -
Garnish:
Add a speck of green clay, textured with a needle, to look like a tiny mint leaf or lime zest garnish.
Step 4: Final Touches
-
Pre-bake shading:
I like to dust a little extra brown pastel chalk deeply into the crevices of the tart bases to add depth before hardening. -
Bake:
Bake all pieces according to your polymer clay package instructions (usually 275°F/130°C for 15-30 minutes). Let them cool completely. -
Glazing:
Coat the orange pulp section and the red berries with gloss glaze or UV resin to make them look wet and juicy. Leave the baked dough sections matte. -
Powdered sugar effect:
Dab a tiny amount of white acrylic paint on the orange rind or edges with a dry brush to mimic a dusting of powdered sugar or frost.
Arranging these tiny treats on a saucer creates a delightful illusion that looks good enough to eat

TRACK YOUR CERAMIC JOURNEY
Capture glaze tests, firing details, and creative progress—all in one simple printable. Make your projects easier to repeat and improve.
Cactus Buddy Planter Sculpture
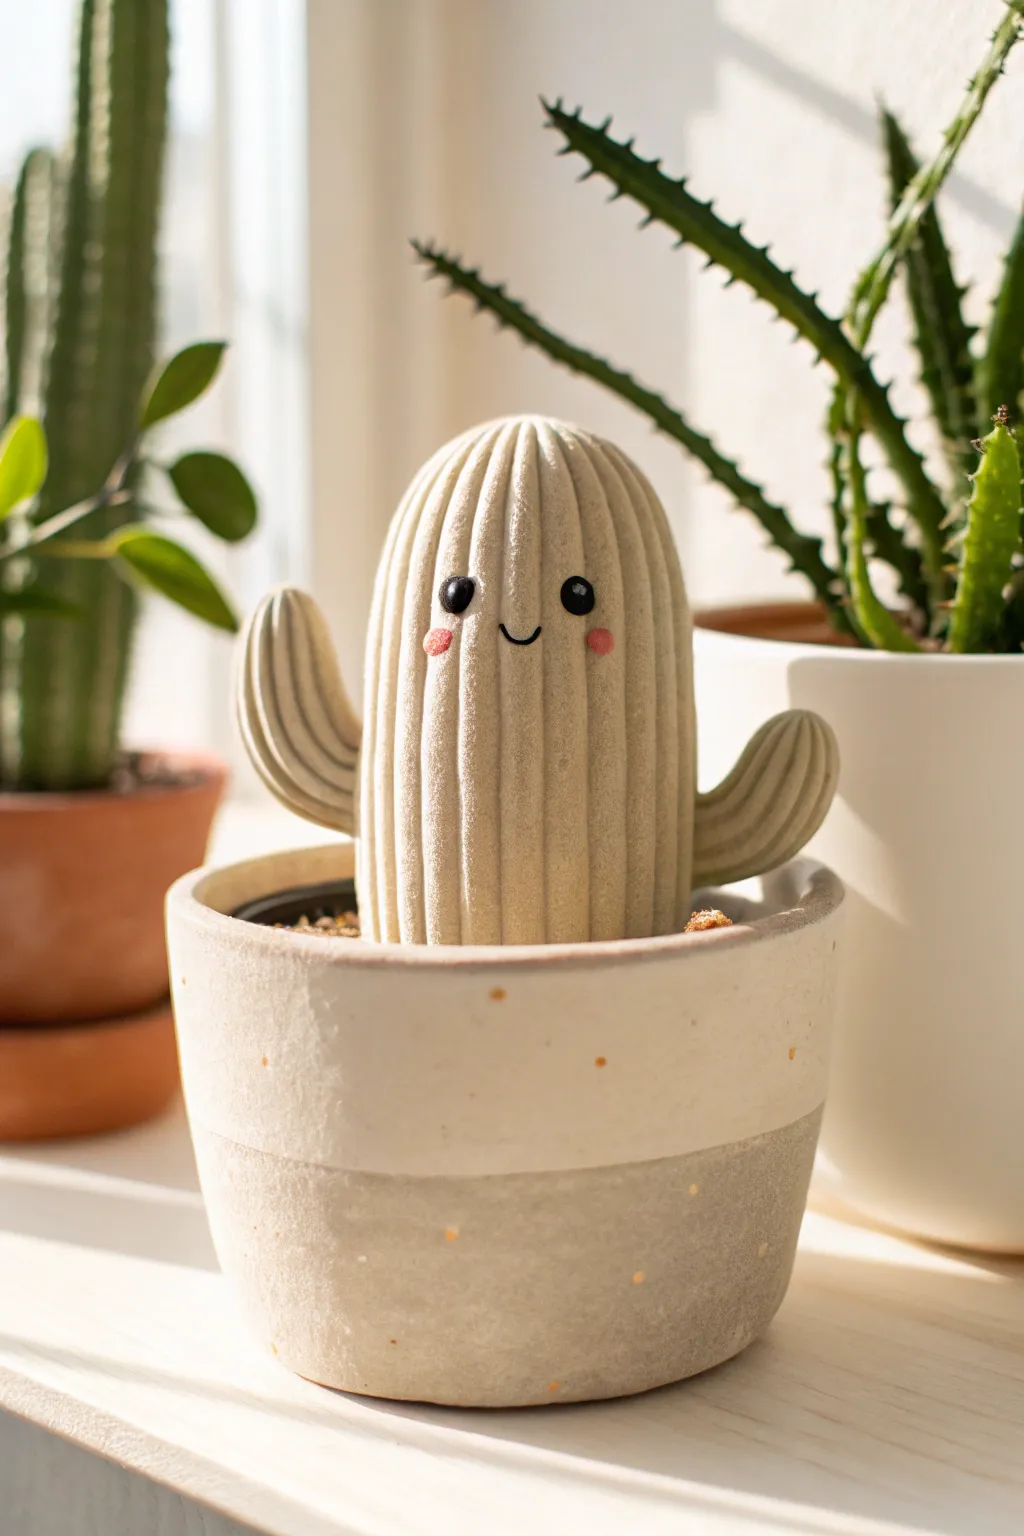
This adorable faux-cactus brings instant cheer to any windowsill without the prickles or the need for water. With its gentle ribbed texture, welcoming smile, and soft earthen tones, this happy little succulent sculpture makes for a perfect desk companion.
Detailed Instructions
Materials
- Polymer clay (pale beige or sandy cream color)
- Polymer clay (black and pink for details)
- Aluminum foil
- Sculpting tools (needle tool or toothpick, smooth modeling tool)
- Small terracotta pot or ceramic dish
- Acrylic paint (optional shading)
- Matte varnish
- Oven (for baking)
- Brown clay or real potting soil (for the base)
Step 1: Forming the Core
-
Create the armature:
Crumple a piece of aluminum foil into a tall, rounded cylinder shape. This saves clay and keeps the sculpture lightweight while baking. -
Prepare the main clay:
Condition your pale sandy-colored clay until it is pliable and smooth. Roll it into a sheet about 1/4 inch thick. -
Cover the core:
Wrap the clay sheet around the foil armature. Smooth the seams very carefully with your fingers or a smoothing tool so the join lines completely disappear. -
Shape the dome:
Gently gently round off the top of the cylinder to create a smooth, dome-like head. The bottom needs to be flat so it can stand upright.
Clean Clay Tip
Work with the lightest colors first. If your hands have dark lint or dye on them, use baby wipes or a piece of scrap white clay to ‘clean’ your fingers before touching the main body.
Step 2: Adding Texture and Limbs
-
Add vertical ribs:
Using a dull sculpting tool or the side of a toothpick, press vertical lines from the very top center down to the base. Space them evenly around the entire circumference to mimic cactus ribs. -
Soften the lines:
Lightly run a finger over the indented lines to soften any harsh ridges; we want an organic, soft cactus look rather than sharp geometry. -
Form the arms:
Roll two smaller sausages of the same clay. Bend them into ‘U’ or ‘L’ shapes to create the classic saguaro arm look. -
Texture the arms:
Add matching ribbed vertical lines to the arms before attaching them, following the curve of the clay. -
Attach the arms:
Score the side of the main body and the base of the arms. Press them firmly together, blending the clay at the seam so they don’t fall off during baking. I like to use a tiny bit of liquid clay here for extra grip.
Mini Garden Upgrade
Make tiny clay pebbles or a miniature clay flower to place on one of the cactus arms for extra color. A small yellow blossom adds a great pop of contrast.
Step 3: Bringing it to Life
-
Create the eyes:
Take two tiny balls of black clay and flatten them slightly. Press them onto the upper third of the cactus body, spacing them wide apart for a cute expression. -
Add the smile:
Roll an incredibly thin thread of black clay. Curve it into a small ‘U’ shape and press it gently between the eyes. -
Rosy cheeks:
Take two tiny specks of pink clay, flatten them into discs, and place them just below and to the outside of the eyes. -
Surface texturing:
Tap a stiff toothbrush or a texturing sponge lightly over the entire surface (avoiding the face) to give the clay a realistic, slightly sandy gritty texture. -
Bake the project:
Bake the sculpture according to your specific clay package instructions. Let it cool completely inside the oven to prevent cracking.
Step 4: Assembly and Finish
-
Optional shading:
Once cool, you can dry-brush a tiny amount of darker beige paint into the deep crevices of the ribs to emphasize the texture. -
Seal the piece:
Apply a coat of matte varnish to protect the clay, avoiding the eyes if you want them to remain glossy. -
Prepare the pot:
Fill your small ceramic pot with either hardened brown clay textured to look like dirt, or actual loose pebbles. -
Plant your buddy:
Nestle the finished cactus sculpture securely into the pot. If using a permanent clay base, glue it in place.
Place your smiling succulent in a sunny spot on your shelf and enjoy a plant that is always happy to see you
Face Pot With Sculpted Features
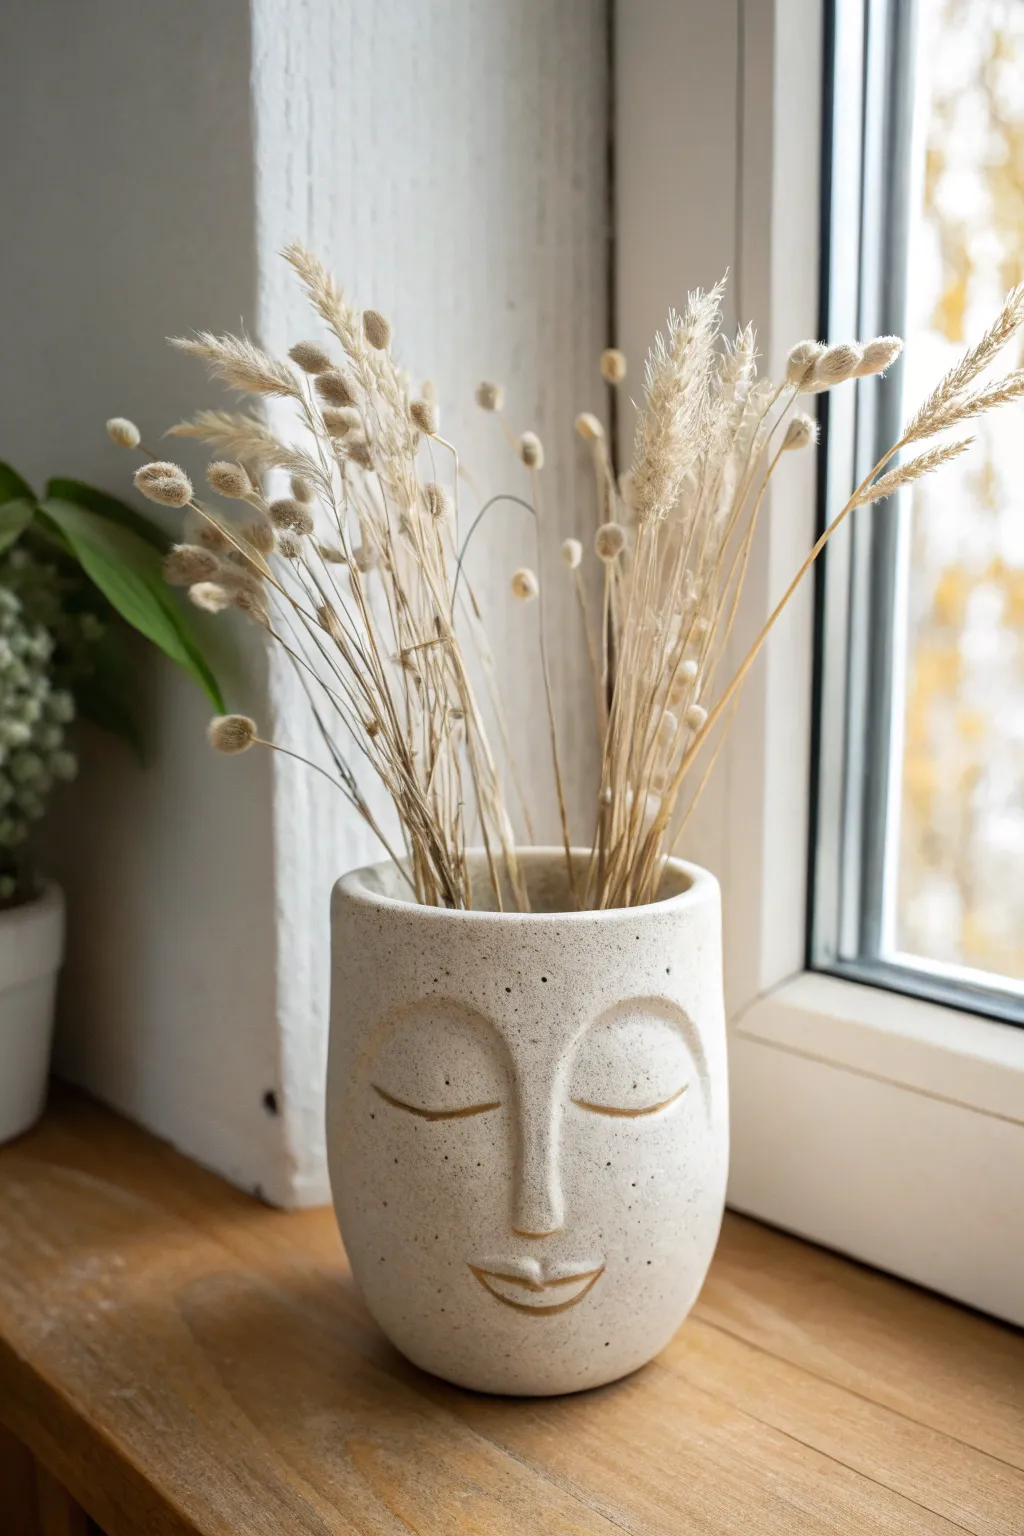
Bring a sense of calm to your windowsill with this minimalist face pot featuring gentle, sleeping features. The speckled clay texture gives it an organic, stone-like feel that perfectly complements dried arrangements.
Step-by-Step Tutorial
Materials
- Air-dry bubbling/speckled clay (or plain white clay mixed with dried coffee grounds)
- Rolling pin
- Wooden sculpting tools
- Small cup of water
- Sponge
- Sharp craft knife
- Large cylindrical object (like a glass jar) for a mold
- Cling film/plastic wrap
- Sandpaper (fine grit)
Step 1: Forming the Base Structure
-
Prepare the Mold:
Begin by wrapping your cylindrical mold (like a large glass jar or sturdy bottle) completely in cling film. This barrier is crucial so your clay doesn’t stick to the glass later. -
Roll the Clay:
Roll out a large slab of your speckled clay to an even thickness of about 1/4 inch. If you are using plain clay, knead in used dried coffee grounds or black pepper beforehand to achieve that faux-stone speckled look. -
Cut the Body:
Use your craft knife to cut a precise rectangle from the slab. The height should match your desired pot height, and the length must be enough to wrap around your cylinder with a slight overlap. -
Wrap and Seam:
Carefully lift the clay rectangle and wrap it around the plastic-covered mold. Where the ends meet, score the edges (scratch hatch marks) and add a dab of water. -
Blend the Join:
Press the scored edges together firmly. Use a flat wooden tool or your thumb to smear the clay across the seam until it disappears completely, creating a seamless tube. -
Add the Base:
Cut a circle of clay slightly larger than the mold’s bottom. Place your cylinder on top of it, score the joining areas, and blend the bottom circle up into the walls to seal the pot.
Step 2: Sculpting the Features
-
Map the Face:
Before adding clay, lightly trace a vertical line where the nose will go to ensure symmetry. Mark horizontal curves where the eyebrows/eyes will sit. -
Form the Nose:
Roll a small snake of clay for the nose. Attach it vertically to the center, blending the sides smoothly into the pot face but leaving the bridge and tip prominent. -
Shape the Brow Bone:
Roll two curved snakes of clay. Attach them above the eye line, blending the top edge into the forehead perfectly while leaving the bottom edge slightly defined to create the brow bone. -
Carve the Eyes:
Instead of adding clay for eyes, use a curved carving tool or a loop tool to incise two gentle, downward-curving crescents for the sleeping eyelids. Deepen the line slightly to catch shadows. -
Define the Mouth:
Roll a very thin, small coil of clay in a smile shape. Attach it below the nose, blending the edges so it looks like raised relief rather than a stuck-on piece. Use a tool to impress a line through the center for the lips. -
Smooth the Surface:
Dip your sponge in water (squeeze it out well so it’s just damp) and run it over the entire face to soften any harsh tool marks and unify the texture.
Stone Texture Secret
For that realistic speckled stone look without buying special clay, mix cracked black pepper or sand into white air-dry clay before rolling it out.
Step 3: Finishing Touches
-
Dry to Leather Hard:
Let the clay sit on the mold for a few hours until it becomes ‘leather hard’—firm but not fully dry. This ensures it holds its shape when you remove the support. -
Remove the Mold:
Gently slide the glass jar out of the clay cylinder. Peel away the plastic wrap carefully from the inside. -
Finish Drying:
Allow the pot to dry completely in a cool, dry place away from direct sunlight for 24-48 hours. Rotate it occasionally for even drying. -
Sand and Refine:
Once fully bone dry, use fine-grit sandpaper to smooth out the top rim and any rough patches on the seam. -
Seal (Optional):
If you plan to use this for fresh flowers, apply a waterproof sealant inside. For dried grasses as shown, a matte varnish is sufficient to protect the surface.
Seam Cracking?
If the back seam cracks while drying, fill it immediately with slip (a paste made of clay and water), smooth it over, and cover with plastic to slow the drying.
Fill your new serene pot with dried bunny tails or pampas grass to complete the peaceful aesthetic
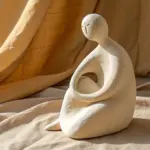
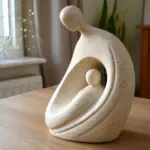
Hand-Shaped Ring Holder Sculpture
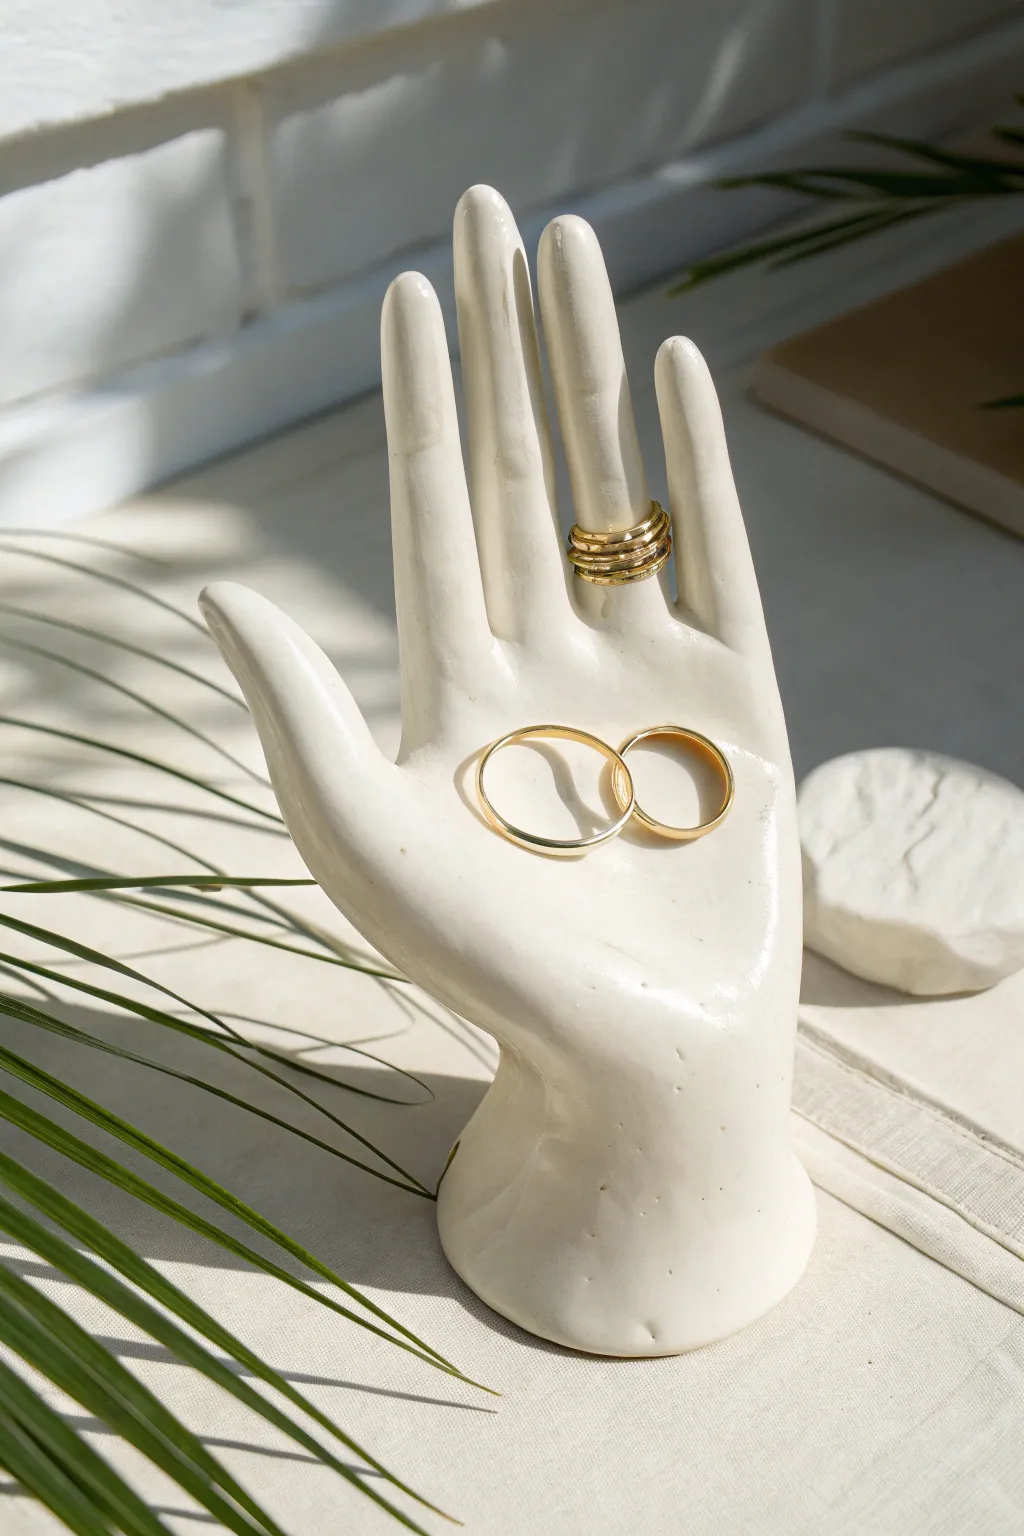
This chic, sculptural ring holder doubles as a piece of modern art for your vanity, featuring a glossy white finish that beautifully offsets gold jewelry. It captures the elegance of a resting hand, perfect for displaying your favorite rings on its fingers or palm.
Step-by-Step Guide
Materials
- Air-dry modeling clay (white)
- Wire armature or sturdy floral wire
- Wire cutters
- Rolling pin
- Sculpting tools (needle tool, smoothing tool)
- Sponge and water bowl
- Fine-grit sandpaper (220 and 400 grit)
- White acrylic gesso or primer
- High-gloss white acrylic paint or spray paint
- Gloss varnish or resin (optional for extra shine)
- Cardboard or foil (for structural support)
Step 1: Armature & Base Structure
-
Create the wire skeleton:
Cut five lengths of wire, each about 6-7 inches long. Twist them together at one end to form a wrist bundle, leaving the other ends free to act as fingers. Splay them out to mimic a hand’s basic skeletal structure. -
Wrap the foil core:
Crumple aluminum foil around the twisted wrist and palm section of your wire. This bulks up the form without using excessive clay and helps prevent cracking during drying. -
Establish the wrist:
Press a sphere of clay onto your work surface to create a heavy, stable base. Insert the twisted wire end (the wrist) firmly into this base. Ensure the hand stands upright on its own.
Step 2: Sculpting the Form
-
Roll out the clay slab:
Roll a slab of clay to about 1/4 inch thickness. Drape this over the foil palm area, smoothing the seams together on the underside or back of the hand. -
Wrap the fingers:
Take small coils of clay and wrap them around each individual wire finger. Roll them gently between your fingers to smooth the clay against the wire, ensuring there are no air pockets. -
Connect fingers to palm:
Blend the clay from the fingers into the palm area using a smoothing tool or your thumb. The transition should be seamless, mimicking the natural webbing and flow of skin. -
Refine the pose:
While the clay is still pliable, gently bend the wire fingers into a natural, slightly cupped position. The fingers should look relaxed, not stiffly straight. -
Elongate and stylize:
This specific sculpture has a stylized, elegant look. Gently pull and smooth the clay at the fingertips to slightly taper them, making the fingers look long and graceful rather than anatomically rugged. -
Smooth the surface:
Dip a sponge or your finger in a little water and run it over the entire sculpture to remove fingerprints and bumps. I find this step crucial for getting that porcelain look later. -
Prop for drying:
Since gravity can pull the fingers down, prop them up with crumpled paper towels or sponges to hold the specific pose as the clay begins to firm up.
Fixing Cracks
If small hairline cracks appear during drying, create a ‘slip’ paste by mixing a bit of dry clay with water. Smear this into the cracks, let dry, and sand smooth.
Step 3: Finishing & Glazing
-
Let it cure completely:
Allow the sculpture to dry for at least 24-48 hours. It must be bone dry and hard to the touch before sanding. -
Initial uniform sanding:
Use 220-grit sandpaper to gently smooth out any larger bumps or ridges, paying close attention to the sides of the fingers and the transition to the base. -
Polish sanding:
Switch to 400-grit sandpaper for a final polish. The surface should feel incredibly smooth, almost like chalk, to prepare for a glossy paint job. -
Apply the primer:
Brush on a coat of white gesso or primer. This seals the porous clay and ensures your topcoat of white looks opaque and bright. -
Paint for opacity:
Apply 2-3 thin coats of high-quality white acrylic paint or white spray paint. Let each coat dry fully before adding the next to avoid drips. -
Create the ceramic shine:
Finish with a high-gloss varnish. For that ultra-wet, ceramic look seen in the photo, you might want to pour a thin layer of resin or use a triple-thick glaze.
Marble Effect
Before rolling your clay slab, twist a small amount of grey or colored clay into the white clay. Stop mixing before fully blended to create veins of marble.
Now you have a stunning, custom-made display piece ready to hold your most treasured jewelry.
Animal Trinket Dish Sculpture
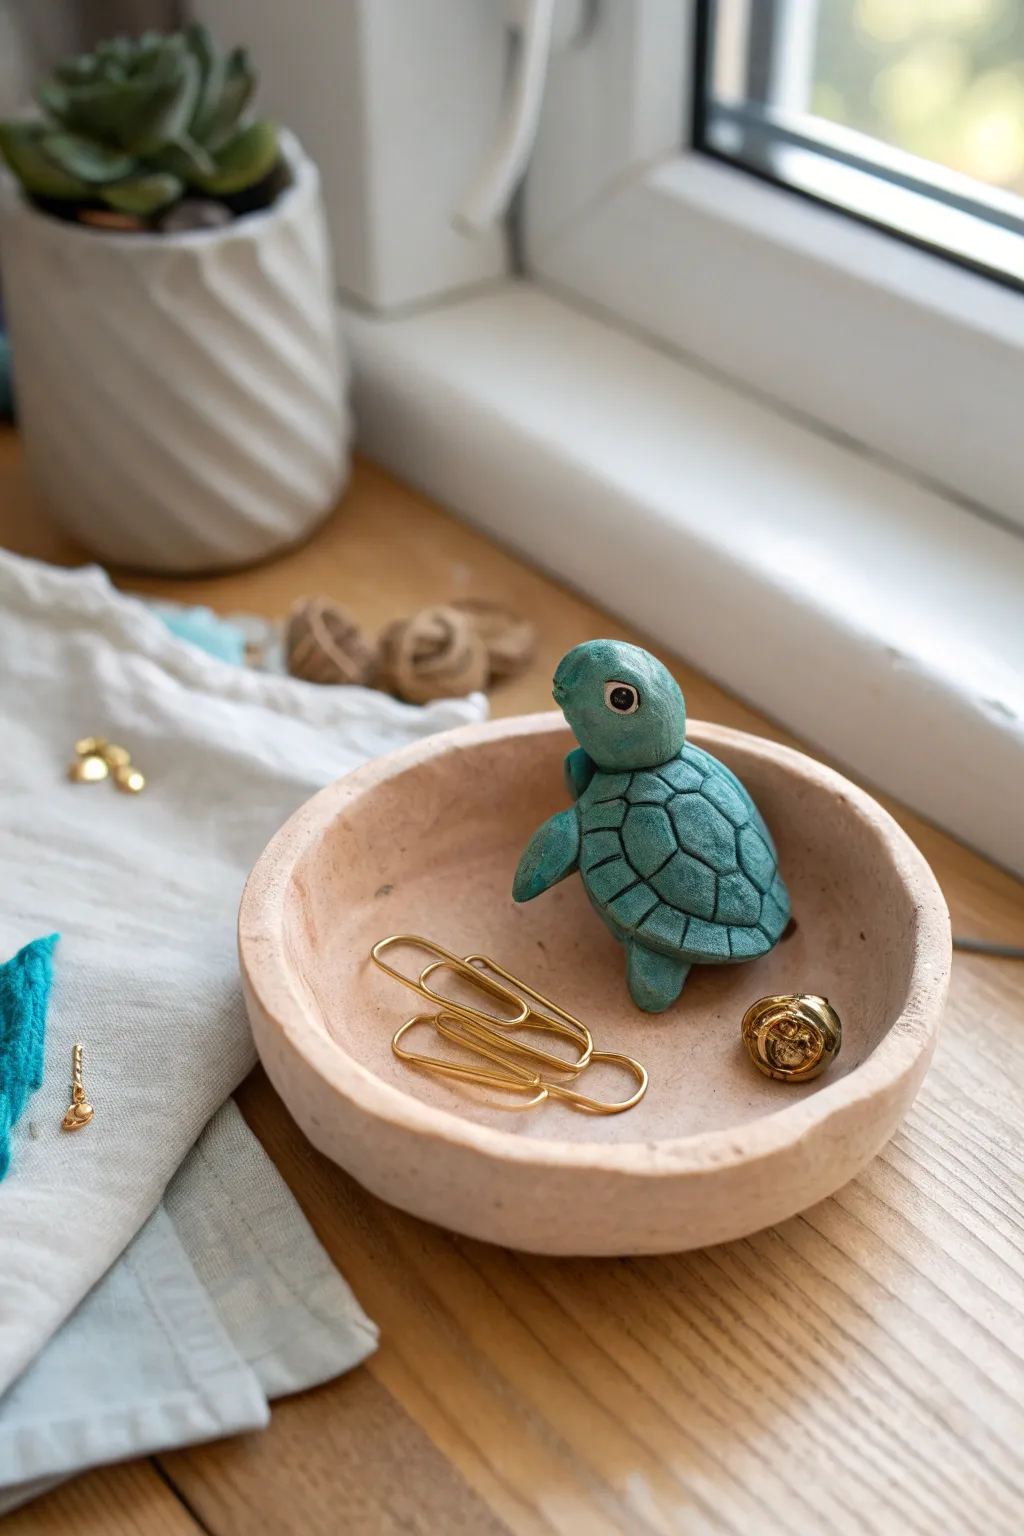
This charming little trinket dish combines a rustic, earthy bowl with a vibrant, sculpted sea turtle guardian. It’s the perfect size for holding rings, paperclips, or delicate earrings right on your windowsill.
Step-by-Step Tutorial
Materials
- Air-dry clay or polymer clay (white or terracotta)
- Acrylic paints (teal, dark green, black, white, pale pink)
- Small paintbrush
- Detail brush
- Sculpting tools or a toothpick
- Water cup (for smoothing)
- Rolling pin
- Small bowl or sphere (as a drying form)
- Matte varnish or sealant
Step 1: Forming the Dish
-
Prepare the base:
Start by taking a medium-sized ball of clay and kneading it until it’s soft and pliable. Use a rolling pin to flatten it into a circle about 1/4 inch thick. -
Shape the curvature:
Gently lift the edges of your circle to create a shallow bowl shape. You can press the clay into a small bowl found offering the kitchen to help maintain a consistent curve. -
Refine the rim:
Use your fingers to smooth out the rim. It doesn’t need to be perfectly mechanically round—a slightly organic, wavy edge adds to the handmade charm seen in the photo. -
Smooth the interior:
Dip your finger in a tiny bit of water and run it along the inside of the dish to remove any fingerprints or cracks. Set this aside to firm up slightly while you work on the turtle.
Cracks Appearing?
If you see tiny cracks as the clay dries, make a ‘slip’ paste mixture of clay and water. Brush it into the cracks and smooth it over with a finger.
Step 2: Sculpting the Turtle
-
Create the shell:
Roll a smaller ball of clay, roughly the size of a walnut, and flatten the bottom to create a dome shape for the turtle’s shell. -
Add the head:
Roll a cylinder for the neck and a rounded shape for the head. Attach the neck to the front of the shell, blending the clay seams carefully with a sculpting tool. -
Attach the flippers:
Shape four small teardrops for the flippers. Allow the front two to be slightly larger. Press them securely onto the underside of the shell, ensuring they angle naturally. -
Detail the shell:
Using a toothpick or a small needle tool, gently carve a hexagonal pattern onto the shell’s surface. Start with a hexagon in the center and draw lines radiating outward to the edges. -
Add facial features:
Use the tip of your tool to indent small sockets for eyes on the side of the head and a tiny line for the mouth. -
Join the pieces:
Place the turtle inside the dish, positioning it slightly off-center. Score the bottom of the turtle and the spot on the dish where it will sit, add a dab of water or liquid clay, and press them firmly together.
Step 3: Painting and Finishing
-
Dry completely:
Allow the entire sculpture to dry completely. If using air-dry clay, this might take 24-48 hours; if using polymer, bake according to package instructions. -
Base coat the dish:
Mix a pale pink or terracotta color and paint the entire dish. I like to apply this transparently specifically to let some texture show through, giving it a stone-like look. -
Paint the turtle:
Paint the turtle’s body with a solid coat of teal acrylic paint. You may need two thin coats for full coverage. -
Highlight the shell:
Once the base teal is dry, dry-brush a slightly lighter green or teal over the raised areas of the shell pattern to accentuate the carved lines. -
Paint the eyes:
Using your smallest detail brush, paint the eye sockets black. Once dry, add a tiny white dot to each eye to bring the turtle to life. -
Seal the work:
Finish by applying a matte varnish over the entire piece to protect the paint and give it a finished, durable surface.
Make it Aquatic
Paint the inside of the dish a glossy blue and add tiny sculpted starfish or shells around the turtle’s feet.
Place your new tiny reptile friend on a sunny ledge to guard your favorite small treasures
Coiled Snail With Texture Details
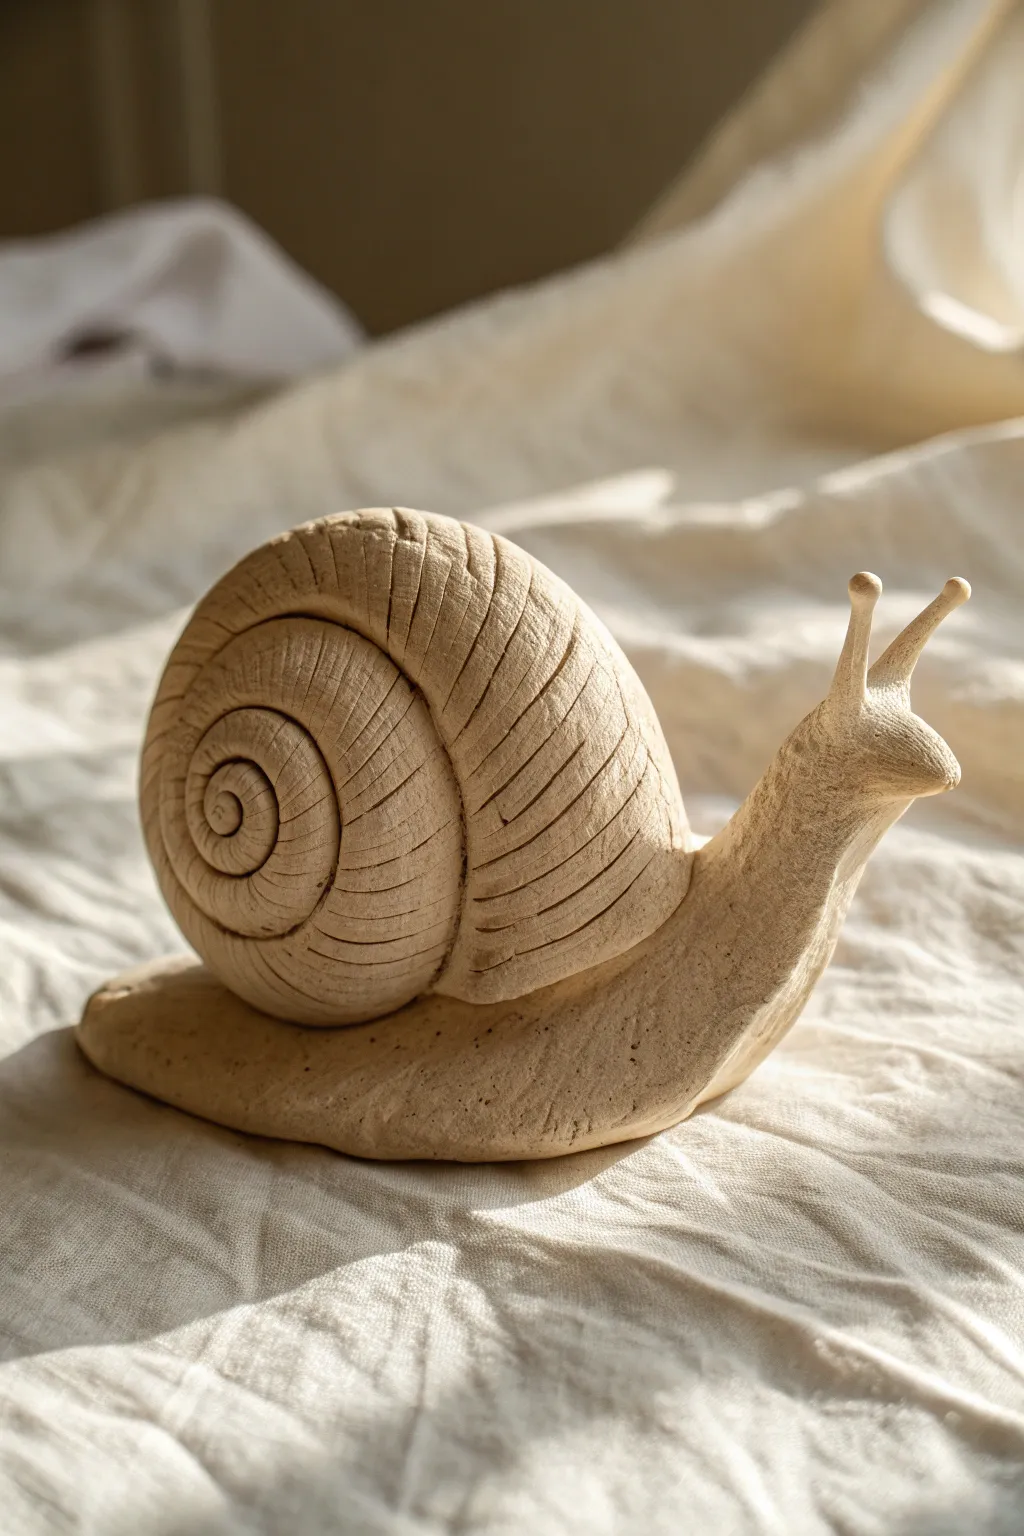
Embrace the slow, rhythmic process of sculpting with this charming coiled snail project. The finished piece features a beautifully textured shell and natural body shape, perfect for adding a touch of rustic whim to a bookshelf or plant pot.
Detailed Instructions
Materials
- Air-dry clay or polymer clay (stone or natural color recommended)
- Small rolling pin
- Sculpting wire or toothpick
- Loop tool (small)
- Needle tool
- Texture sponge or stiff bristle brush
- Water bowl (for smoothing)
- Clay knife or fettling knife
Step 1: Forming the Body Base
-
Roll the main coil:
Begin with a fist-sized ball of clay. Roll it back and forth on your work surface to create a thick, tapered coil. It should look like a long carrot or slug shape, with one end thicker (about 1 inch wide) for the head and the other tapering to a point for the tail. -
Flatten the base:
Gently press the bottom of your tapered coil against the table to flatten the underside. This creates the ‘foot’ of the snail, ensuring stability so your sculpture won’t tip over later. -
Lift the head:
Take the thicker end of the coil and gently bend it upward to create the snail’s neck and head. Smooth out any wrinkles that form at the bend using a tiny bit of water on your fingertip. -
Widen the foot:
Press down along the edges of the bottom section where the snail touches the ground. You want the skirt of the snail’s body to flare out slightly, mimicking how a real snail glides. This creates a pedestal for the shell to rest on.
Step 2: Constructing the Spiral Shell
-
Prepare the shell coil:
Roll out a second, much longer coil of clay. This one should be uniform in thickness, roughly about the width of your index finger. Keep rolling until it is approximately 12 to 15 inches long. -
Start the spiral:
Take one end of this long coil and tightly roll it inward on itself, like a cinnamon roll. Ensure each rotation touches the previous one securely. Continue winding until you have a flat disc shape. -
Dome the shell:
As you continue winding the outer layers of the coil, shift the placement slightly so the center of the spiral pushes outward. Instead of a flat disc, you want to create a gentle dome shape. -
Smooth the seams:
Using a modeling tool or your thumb, gently blend the seams between the coils *only* on the side that will attach to the body. Keep the spiral definition visible on the outer display side. -
Attach shell to body:
Score (scratch hatch marks) the back of the snail body and the underside of the shell. Apply a dab of water or slip (liquid clay) to the scratched areas. Press the shell firmly onto the snail’s back, centering it nicely.
Keep it clean
Wipe your tools frequently while texturing. Sticky clay buildup on the needle tool creates messy drags instead of clean, crisp lines on the shell.
Step 3: Sculpting Details & Texture
-
Shape the face:
Refine the uplifted head. Gently pinch the very front to create a subtle snout or rounded nose area. -
Add eye stalks:
Roll two very small, thin coils of clay (about half an inch long). Attach tiny balls to the tips. Use your needle tool to poke two small holes in the top of the head, insert the stalks, and blend the clay at the base so they don’t fall off. -
Carve shell ridges:
This is crucial for the visual effect. I like to use a sharp needle tool or knife to carve deep, parallel lines across the coiled shell. Follow the curve of the spiral, creating a ribbed texture that catches the light. -
Texture the body:
Use a stiff bristle brush, a texture sponge, or even a ball of crumpled foil to tap texture onto the snail’s skin. Avoid the shell; focus this rough, organic texture on the neck, head, and foot. -
Define the spiral gap:
Use a loop tool or knife to deepen the main spiral line that separates the coils. This emphasizes the continuous growth pattern of the shell. -
Smooth the transition:
Check where the shell meets the slimy body. Add a tiny snake of clay there if needed to make the transition look seamless, blending it downward into the body texture. -
Final refinements:
Go over the entire piece. Deepen any shell carvings that got smudged and ensure the eye stalks are pointing in a lively direction. Let the piece dry according to your clay’s instructions.
Make it ancient
After baking or drying, apply a dark brown acrylic wash (diluted paint) over the whole piece, then wipe it off with a rag. The dark color stays in the cracks.
Once fully dry, your textured snail will be a timeless little companion ready for display
Mini House or Room Box Diorama
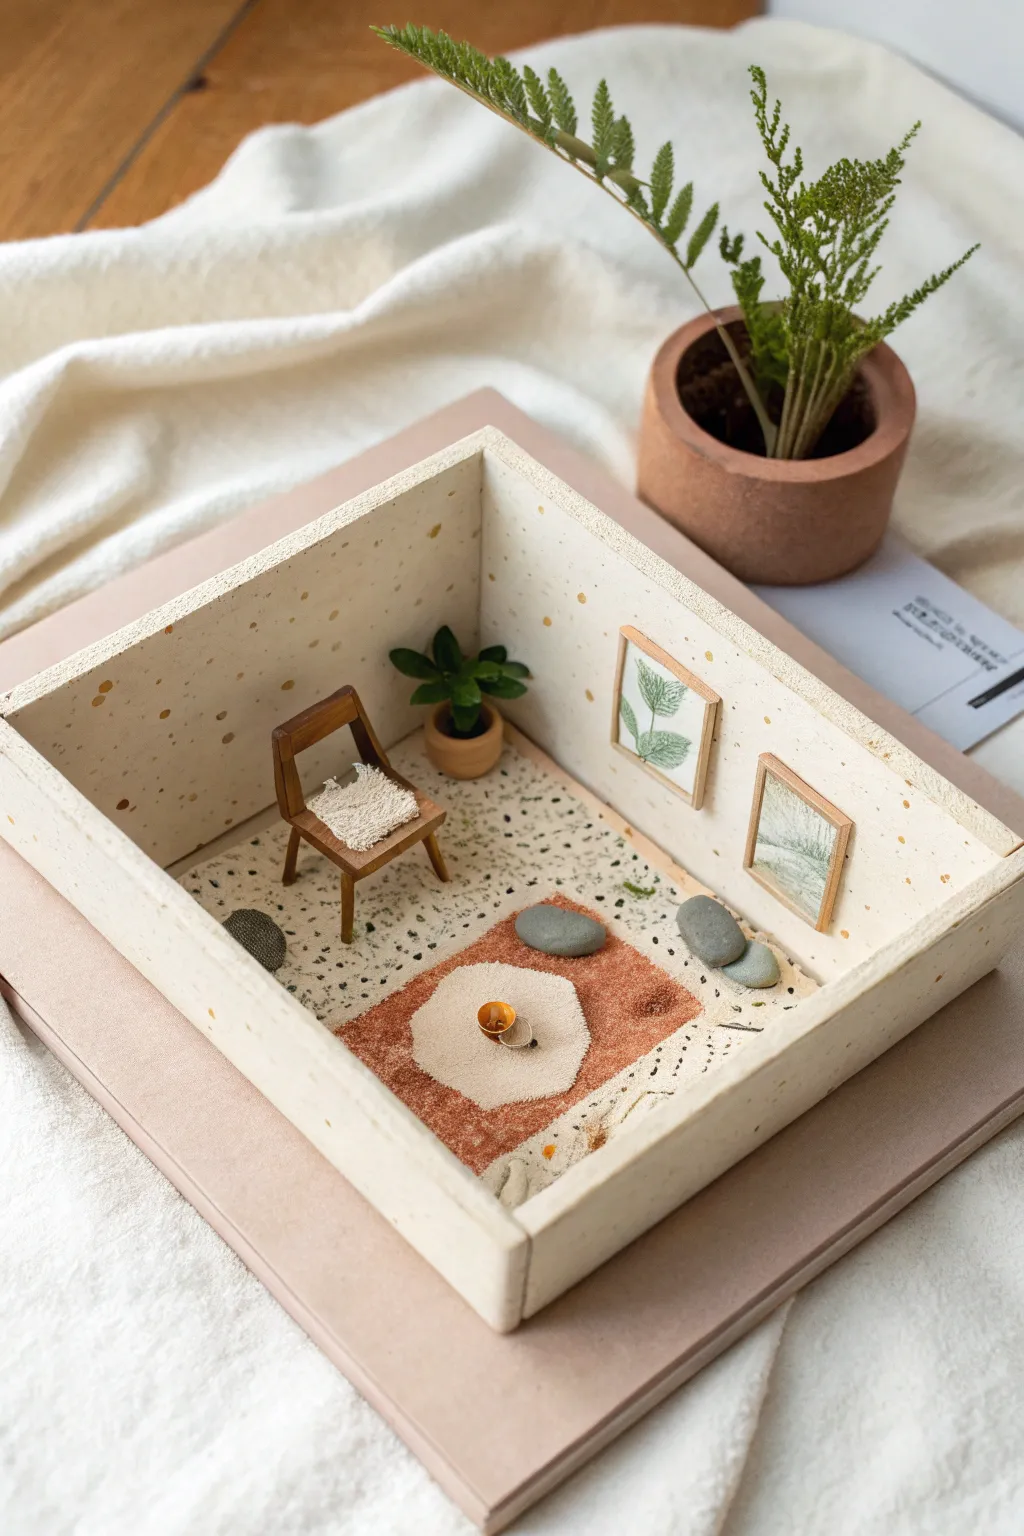
Capture the essence of calm with this minimalist room box diorama, featuring textured surfaces and natural tones. This project combines modeling clay techniques with simple mixed-media construction to create a peaceful tiny sanctuary.
How-To Guide
Materials
- White or cream polymer clay
- Terracotta or brown polymer clay
- balsa wood or basswood sheets (2mm thick)
- Speckled craft paper or scrapbook paper (terrazzo pattern)
- Felt scraps (cream and rust/orange)
- Small smooth stones or grey polymer clay
- Miniature wooden chair (pre-made or craft wood to build)
- Textured fabric or cheesecloth
- Green paper or artificial moss
- White acrylic paint
- Tacky glue or heavy gel medium
- Craft knife and cutting mat
- Sandpaper
Step 1: Constructing the Shell
-
Cut the walls:
Begin by cutting three rectangular pieces of balsa wood to form the corner of your room. You will need a floor piece (approx 4×4 inches) and two wall pieces of the same height to fit the chosen scale. -
Assemble the box:
Glue the two wall pieces together at a 90-degree angle, then adhere them to the floor base. Ensure everything is square and let the glue dry completely before moving on. -
Apply texture paint:
Mix white acrylic paint with a tiny amount of baking soda or fine sand to create a stucco-like texture. Paint the interior walls and even the top edges of the wood for a cohesive look. -
Add speckles:
Once dry, flick a toothbrush loaded with diluted gold or ochre paint across the walls to create a subtle, random speckled pattern that mimics the photo’s finish. -
Install the floor:
Cut your speckled terrazzo paper to size and glue it carefully to the floor section, smoothing out any air bubbles.
Wall Texture Issues
If your baking soda paint mix clumps up, add a drop of water to thin it. If it’s too runny and won’t hold texture, add more soda until it resembles thick frosting.
Step 2: Furnishing the Space
-
Create the rug:
Cut an irregular hexagon or organic shape from rust-colored felt. Cut a smaller, matching shape from cream felt and glue it on top to create the layered rug effect. -
Make the chair cushion:
Take your miniature wooden chair and cut a small square of cheesecloth or textured heavy fabric. Fray the edges slightly for a rustic look and glue it to the seat. -
Sculpt the plant pot:
Roll a small ball of terracotta polymer clay and flatten the top and bottom to create a cylinder. Use a dotting tool to indent the top, then bake according to package instructions. -
Assemble the plant:
Cut tiny leaf shapes from green paper or use small bits of artificial plastic greenery. Glue these into the indentation of your baked clay pot. -
Create stone seats:
Form two or three smooth, flat ovals from grey polymer clay to resemble river stones. Bake these along with your plant pot.
Step 3: Final Decorating
-
Frame the art:
Cut two tiny rectangles of balsa wood to serve as frames. Find mild, botanical images in a magazine or print tiny patterns, then glue them inside the wooden frames. -
Mount the frames:
Using a small dab of tacky glue, attach the framed art to the right-hand wall. I like to hang them slightly offset from each other for a more casual, modern feel. -
Position the furniture:
Glue the rug to the center of the floor. Place the stone seats near the edge of the rug and position the chair opposite them. -
Place the plant:
Tuck the potted plant into the corner where the two walls meet to add a pop of life to the scene. -
Add tiny details:
If you have a bead or a tiny scrap of gold foil, place it on the rug to act as a miniature bowl or decor object.
Light feature
Drill a tiny hole in the ceiling corner before painting. Thread a warm white LED through it to create a functional hanging lamp that illuminates your cozy scene.
Step back and admire your peaceful architectural model, ready for display on a bookshelf or desk
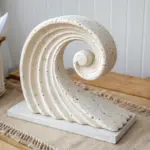
Modern Abstract Arch Sculpture
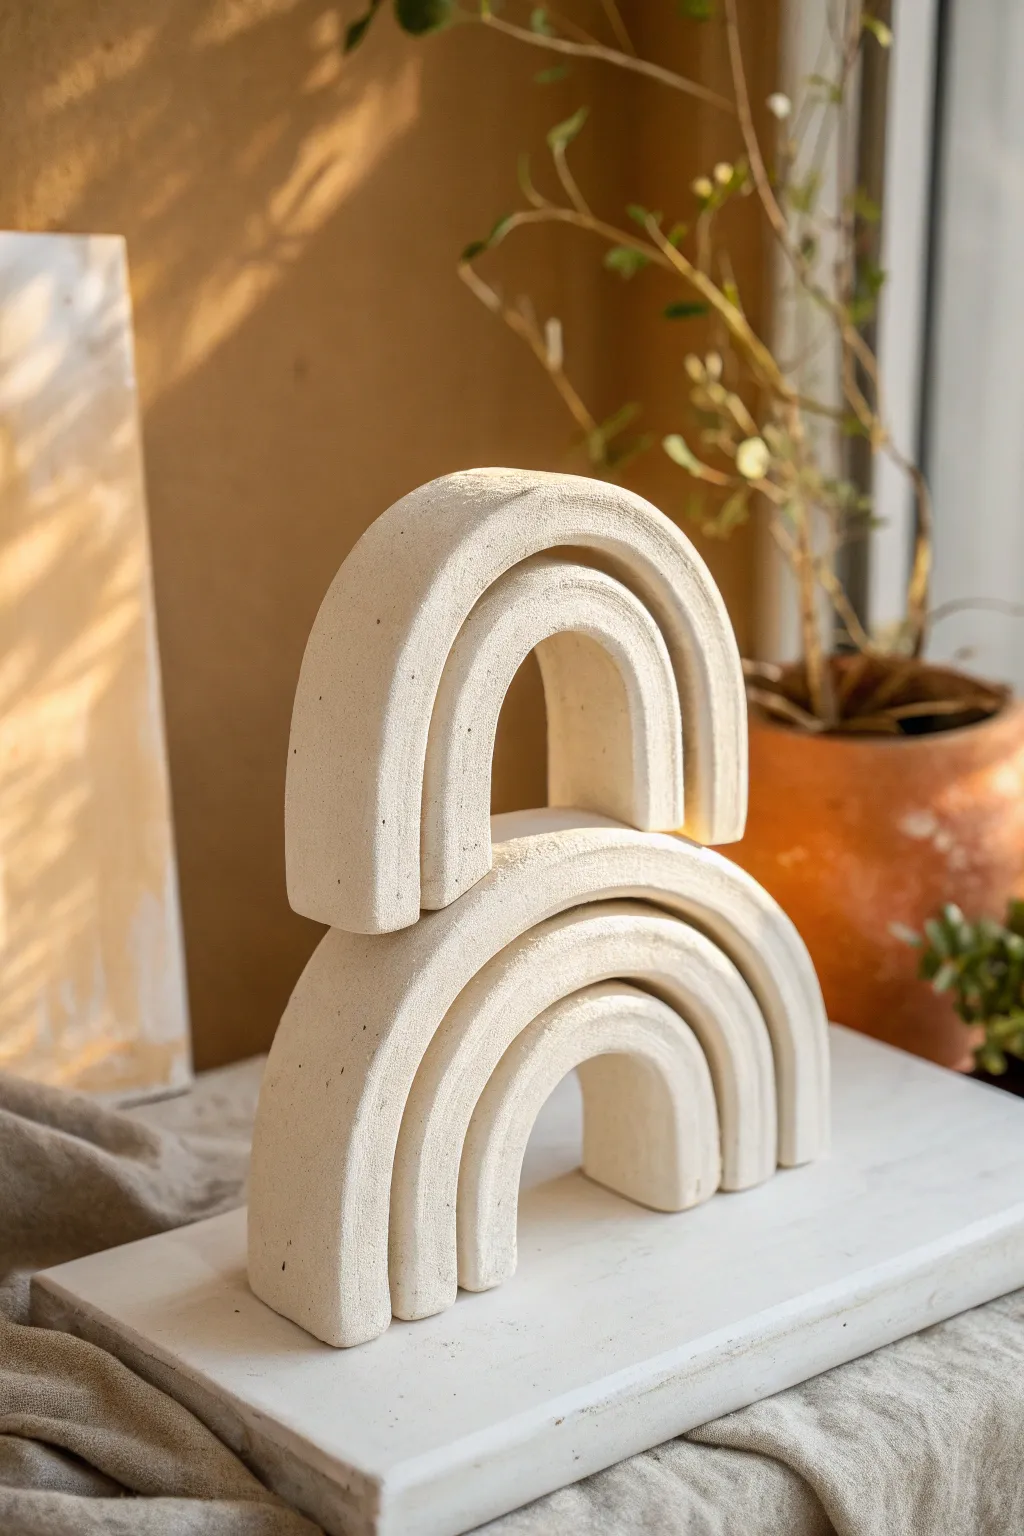
Embrace the beauty of modern simplicity with this nested arch sculpture that mimics the look of high-end ceramic decor. Using modeling clay and a clever texturing technique, this project creates a serene, geometric statement piece perfect for a mantle or bookshelf.
Step-by-Step Tutorial
Materials
- Air-dry modeling clay (white or stone color)
- Rolling pin
- Sharp clean craft knife or clay slicing blade
- Ruler
- Small cup of water
- Fine-grit sandpaper
- Parchment paper or non-stick mat
- Optional: Baking soda or textured paint for finishing
- Old toothbrush or stiff bristle brush
Step 1: Forming the Base Structure
-
Prepare the workspace:
Lay down your parchment paper or non-stick mat. This ensures your clay won’t stick and can be moved easily while drying. -
Roll out the slab:
Take a large chunk of air-dry clay and condition it by kneading it slightly until pliable. Roll it out into an even slab, approximately 1/2 to 3/4 inch thick. Uniform thickness is key for the stability of the arches. -
Cut the strips:
Using your ruler and sharp knife, cut three long strips of clay. These will form the bottom set of arches. Cut them to varying lengths, but keep the width identical (about 1 inch wide). -
Form the smallest arch:
Take the shortest strip and gently curve it into a tight U-shape. Stand it up on its edges to check the balance. -
Layer the middle arch:
Take the medium-length strip and drape it over the first arch. I like to score the touching surfaces lightly with a needle tool and dab a little water there to act as glue. Press them together firmly but gently. -
Add the outer arch:
Repeat the process with the longest strip, draping it over the previous two to create a cohesive stack of three nested arches. -
Smooth the seams:
Where the arches touch, use a little water on your finger or a modeling tool to smooth the joint slightly, though distinct separation lines are part of the aesthetic. -
Trim the base:
Once the three arches are stacked, use your long blade to slice straight across the bottom edges. This ensures the sculpture sits perfectly flat.
Step 2: Creating the Upper Tier
-
Roll and cut upper strips:
Roll out a second, slightly smaller slab of clay to the same thickness. Cut two strips for the top component. -
Form the top arches:
Create a second, smaller stack using just these two strips. Bend the smaller one into a U, and drape the larger one over it, using the score-and-slip method to adhere them. -
Verify sizing:
Hold this new two-arch piece over the bottom three-arch base to ensure the scale looks pleasing. It should look balanced, not top-heavy. -
Flatten the connection points:
Gently tap the top of the bottom sculpture to create a very slight flat spot for stability. Do the same for the bottom of the top piece. -
Initial drying phase:
Let both pieces—the bottom trio and the top duo—dry separately for about 24 hours. Don’t attach them yet; drying them flat ensures they don’t slump under weight.
Clean Cuts
If your clay drags when cutting, coat your knife blade with a tiny bit of lotion or oil. It helps the blade glide through for crisp, sharp edges.
Step 3: Assembly and Texturing
-
Sand for imperfections:
Once fully dry, use fine-grit sandpaper to smooth out any fingerprints or sharp edges on the sides of the arches. Wipe away the dust. -
Create the stone texture:
To achieve that gritty, stone-like finish seen in the photo, mix a small amount of baking soda into white acrylic paint (or use a textured stone spray paint). -
Apply the texture stipple:
Using an old toothbrush or stiff brush, dab this mixture onto the clay rather than brushing it. This creates a pitted, organic surface. -
Attach the tiers:
Apply a strong craft glue or heavy-body gel medium to the top center of the base arches. Place the top tier on. Use a prop (like a book) to hold it steady while the adhesive cures. -
Final touch-ups:
If the seam between the top and bottom looks too obvious, dab a little more of your textured paint mixture into the gap to blend the transition visually.
Terracotta Look
Mix cinnamon or paprika into your texture paint to create a speckled, warm terracotta finish instead of stark white.
Now let your stunning architectural sculpture take center stage on a sunlit shelf
Feathered Bird With Layered Pieces
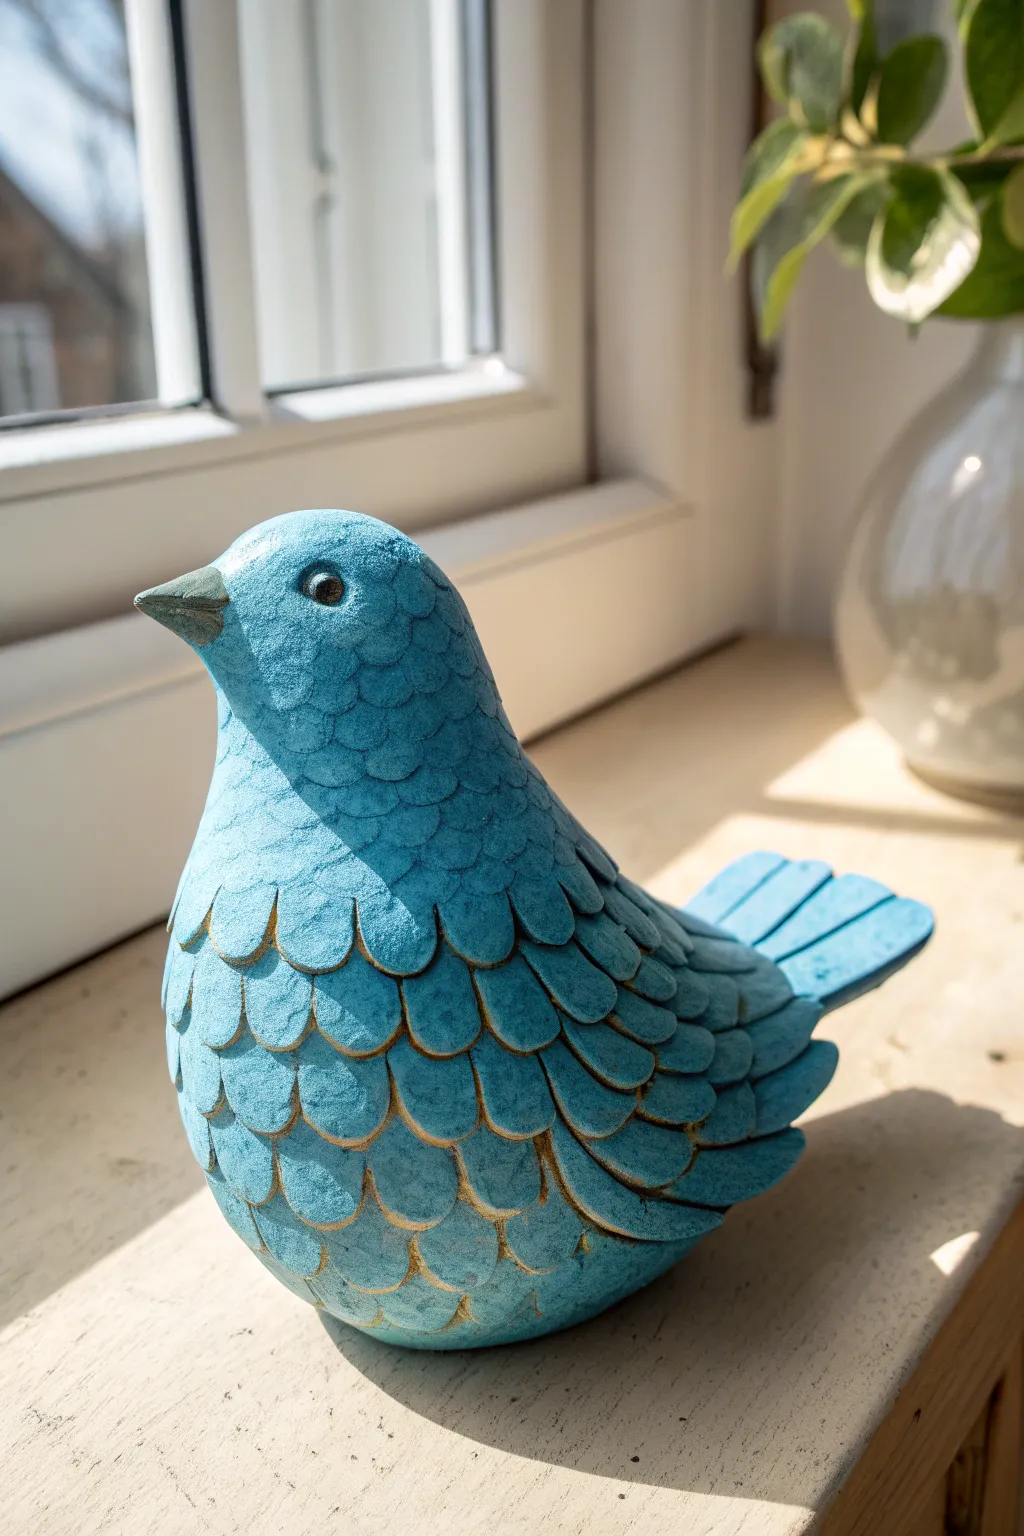
Capture the charm of nature with this stylized avian sculpture featuring layers of textured, scale-like feathers. The vibrant turquoise finish, highlighted by distressed gold edges, gives this piece a wonderful rustic yet elegant folk-art appeal.
How-To Guide
Materials
- Air-dry modeling clay (white or terracotta)
- Aluminum foil
- Masking tape
- Rolling pin
- Small round cookie cutter or bottle cap (approx. 0.5 – 0.75 inch)
- Sculpting tools (needle tool, smoothing tool)
- Acrylic paints: Turquoise/Teal, Dark Grey (for beak/eyes), Metallic Gold
- Paintbrushes (flat shader, fine detail, dry brush)
- Matte varnish or sealant
- Water and sponge for smoothing
Step 1: Building the Armature
-
Shape the core:
Crumple aluminum foil into a tight ball for the body (about the size of a tennis ball) and a smaller ball for the head. Press the foil firmly so it is dense. -
Form the bird shape:
Tape the head ball onto the body ball using masking tape. Add a small cone of foil for the tail area and a tiny beak protrusion. Wrap the entire foil form in masking tape to create a smooth surface for the clay to adhere to. -
Base layer:
Roll out a thin sheet of clay (about 1/4 inch thick). Wrap this entirely around your foil armature, smoothing the seams together with a bit of water until you have a seamless bird blank.
Step 2: Creating the Plumage
-
Prepare the feathers:
Roll out a fresh slab of clay to about 1/8 inch thickness. Use your small round cutter to punch out many circles. Cut these circles in half to create semi-circle scales. -
Start at the tail:
Apply a little slip or water to the back of your first row of semi-circles. Press them onto the tail area, overlapping slightly. -
Layering up:
Work your way up the bird’s back and sides, placing each new row so it overlaps the top edge of the row below it. Stagger the scales like bricks to create a natural feathered look. -
Detailing the chest:
Continue the layering process around the front chest area. As you move upward, you can gently curve the bottom edges of the clay scales outward slightly with your thumb to give them volume. -
Smoothing the head:
Stop the scales right at the neck line. For the head, leave the clay smooth or blend the top row of feathers seamlessly into the head clay so there isn’t a harsh ridge. -
Form the wings:
For the wings, create two teardrop-shaped slabs of clay. Attach them to the sides and cover them with slightly longer, more elongated clay scales to differentiate them from the body feathers. -
Sculpt the tail:
Attach a flat, fan-shaped piece of clay to the back for the tail feathers. Use a sculpting tool to carve deep grooves representing individual long feathers.
Cracking Issues?
If small cracks appear while drying, don’t panic. Mix a tiny bit of fresh clay with water to make a paste and fill the cracks, then smooth over with a finger.
Step 3: Refining Features
-
Beak and eyes:
Refine the beak shape to be sharp and conical. Use a round tool to press indentations for the eyes, or attach small balls of clay and smooth the edges. -
Create texture:
I like to gently press a dense sponge against the smooth head area and the feathers while the clay is still damp to give it a stone-like texture. -
Drying:
Allow the sculpture to dry completely. This usually takes 24-48 hours depending on thickness. Rotate it occasionally so the bottom dries evenly.
Color Shift
For a more antique look, apply a diluted brown wash over the turquoise base before doing the gold dry-brushing. Wipe it back quickly to leave darkness in the crevices.
Step 4: Painting and Finish
-
Base coat:
Paint the entire bird with a solid coat of turquoise or teal acrylic paint. You may need two coats for full opacity. Let it dry fully. -
Highlight the edges:
This is the magic step. Pour a small amount of metallic gold paint onto a palette. Dip a flat brush in, wipe most of it off on a paper towel, and lightly dry-brush over the edges of every feather scale. This highlights the layered texture. -
Face details:
Paint the beak a dark grey or muted green. Use a fine detail brush to paint the eyes glossy black with a tiny white reflection dot. -
Seal:
Apply a coat of matte varnish to protect your work and seal the paint, ensuring that lovely stone texture remains visible.
Place your finished bird near a sunny window where the light will catch those golden edges
Stackable Balancing Pebble Sculptures
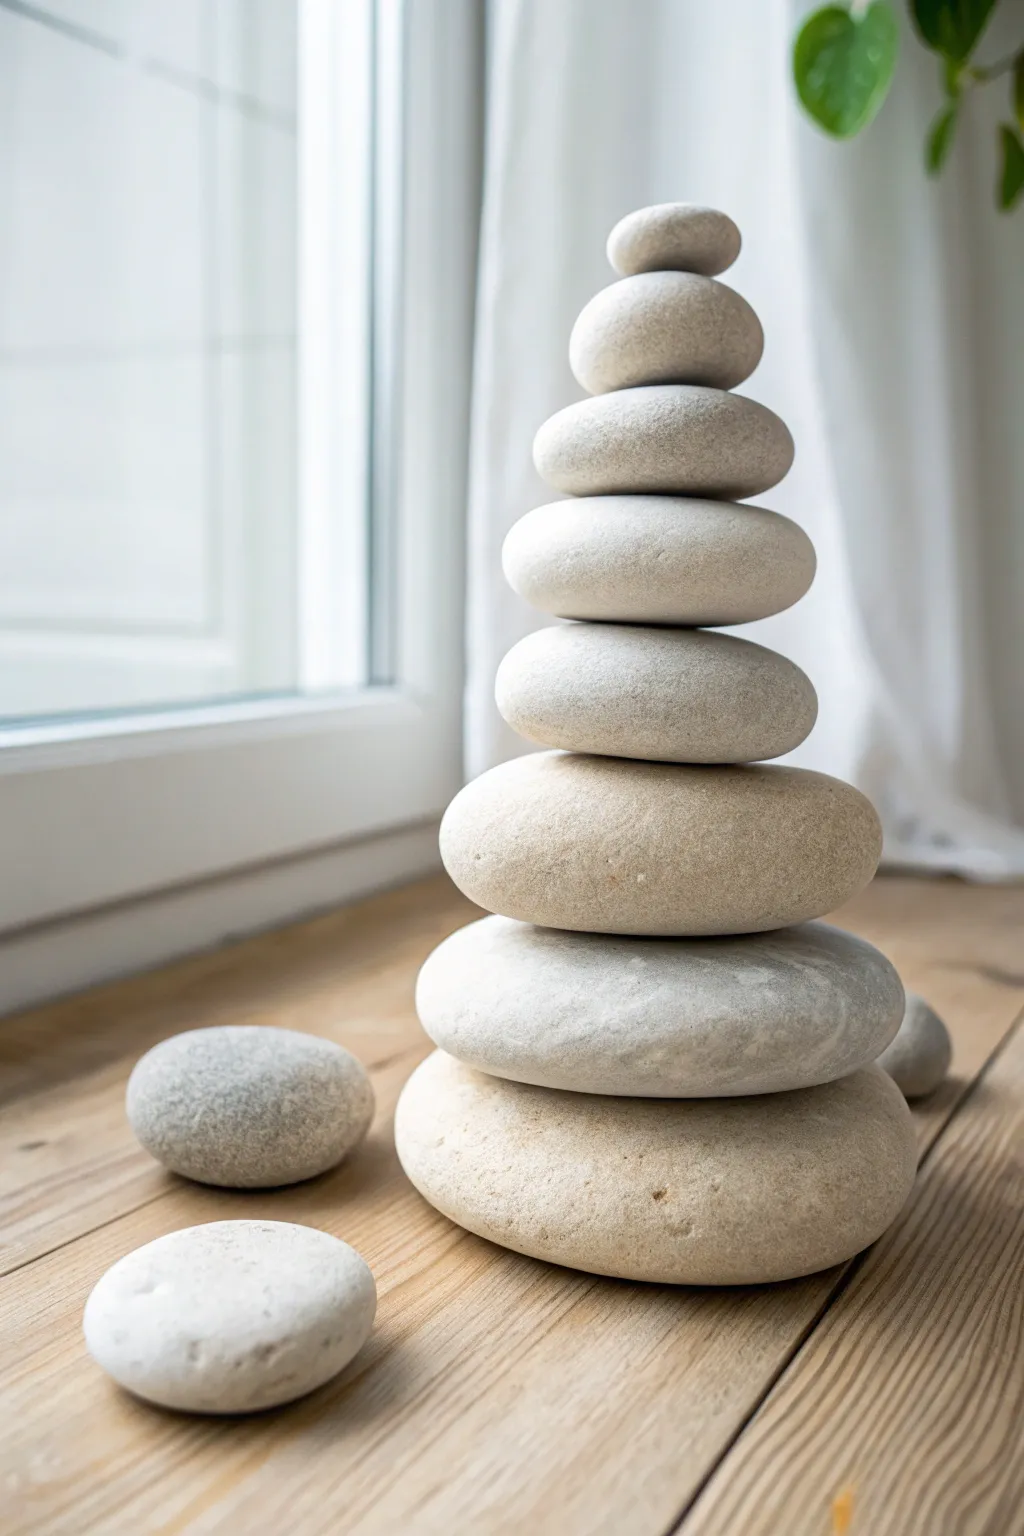
Recreate the calming beauty of a balanced rock stack using polymer or air-dry modeling clay. These faux pebbles mimic the smooth texture and varied hues of real river stones, creating a permanent sculpture that brings a sense of balance to any space without the risk of toppling over.
Step-by-Step
Materials
- Polymer clay or air-dry clay (white, beige, grey, and black)
- Acrylic paints (if using white clay only)
- Aluminum foil
- Sandpaper (fine grit)
- Sculpting tools or a smooth rolling pin
- Old toothbrush or texture sponge
- Matte varnish or sealant
- Strong adhesive (optional, for permanent stacking)
Step 1: Prepping the Clay Colors
-
Marbling the Base Tone:
Begin by taking a large chunk of white or beige clay and mixing in very small amounts of grey, brown, or black clay. Do not overmix; stop when you have streaks of color to mimic natural stone veins. -
Creating Color Variations:
Separate your clay into about 8-10 portions of varying sizes. Adjust the color of a few portions by adding a pinch more grey or tan so your stones aren’t all identical in shade. -
Speckling the Clay:
For a realistic grainy granite look, I like to grate a tiny bit of dry, hardened black clay or use ground black pepper and knead it into some of the wet clay portions.
Natural Imperfections
Real stones aren’t perfect circles. Press the side of a ruler into a few soft clay stones to create ‘chipped’ edges or natural flat spots.
Step 2: Sculpting the Pebbles
-
Forming the Core:
To save clay and reduce weight, crumple small balls of aluminum foil into flattened oval shapes. These foil cores should correspond to the graduated sizes of your final stones, from a wide base to a tiny top stone. -
Wrapping the Foil:
Flatten your marbled clay into sheets about 1/4 inch thick. Wrap these sheets completely around your foil cores, ensuring no foil is visible. -
Smoothing the Shape:
Roll each clay-covered shape in your palms to smooth out seams. Gently flatten them into varied organic disc shapes—some flatter, some rounder—just like real river rocks. -
Adding Texture:
While the clay is still soft, lightly tap the surface with an old toothbrush or a piece of sandstone to give it a subtle, porous texture rather than a plastic-smooth finish. -
Checking the Balance:
Before curing or drying, test stack your wet stones to ensure they sit well on top of one another. Gently press them together to create slight indentations for better stability later.
Mossy Accent
For an aged garden look, dab a bit of green acrylic paint with a dry sponge on the bottom stones to mimic growing moss.
Step 3: Finishing the Surface
-
Curing or Drying:
Bake your polymer clay stones according to the package instructions, or let air-dry clay set for 24-48 hours until fully hard. -
Sanding for Smoothness:
Once hardened, use fine-grit sandpaper to buff away any fingerprints or sharp edges. Real river stones are worn smooth by water, so aim for a soft, matte feel. -
Applying a Wash:
Mix a tiny drop of black or brown acrylic paint with lot of water. Brush this wash over the stones and immediately wipe it off with a paper towel. The color will stick in the subtle textures, highlighting the ‘stone’ surface. -
Sealing the Work:
Apply a coat of matte varnish to protect the clay. Avoid glossy finishes if you want to maintain the natural, dry stone appearance shown in the reference image.
Step 4: Assembly
-
Arranging the Stack:
Begin with your largest, heaviest faux stone at the bottom. Find the flattest side for stability. -
Stacking Up:
Place the next largest stone on top, centering it carefully. Continue stacking by size until you reach the smallest stone at the peak. -
Final Adjustments:
Create a few loose scattered stones around the base for a natural composition, similar to the reference photo. -
Optional Glue:
If you want a permanent sculpture that won’t get knocked over, apply a dab of strong clear adhesive or epoxy between each layer.
Now you have a serene, meditative sculpture that captures the essence of balance and calm