When you’ve got a lump of clay in front of you, the hardest part is deciding what to mold first. Here are my go-to molding clay ideas that feel doable, satisfying, and genuinely useful (with plenty of cute sprinkled in).
Pinch Pot Trinket Dish With a Soft Rim
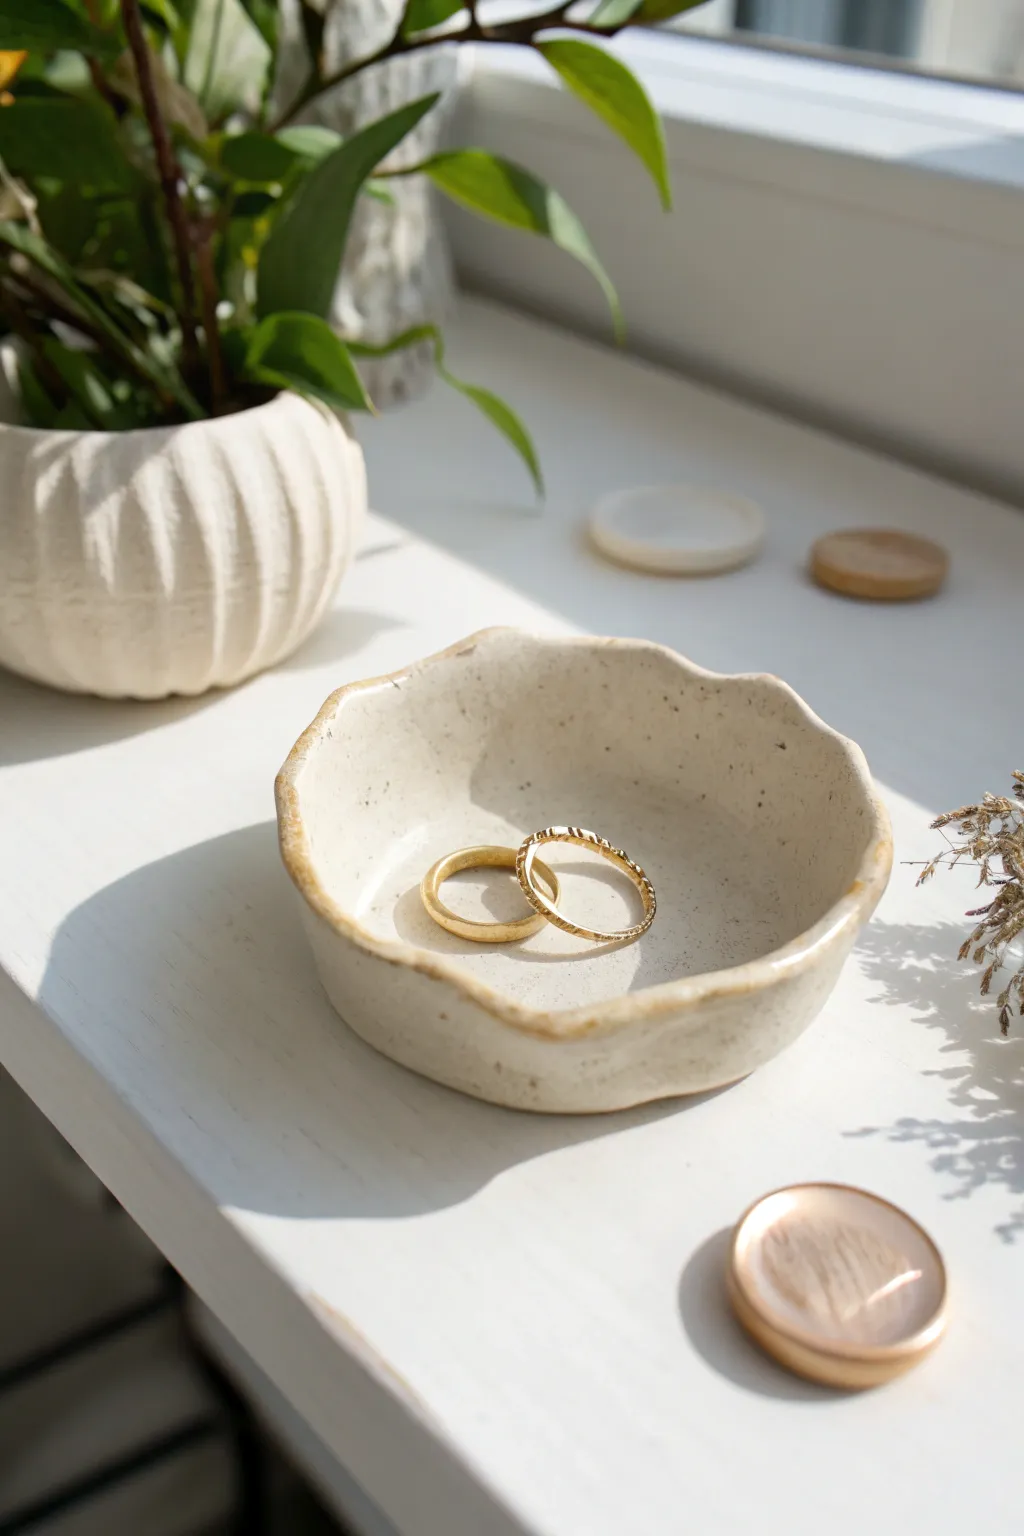
Embrace the beauty of imperfection with this delicate pinch pot trinket dish. The organic, undulating rim and subtle speckling give it a handmade charm perfect for holding your favorite rings or earrings.
Detailed Instructions
Materials
- White air-dry clay or polymer clay (oven-bake)
- Rolling pin
- Small bowl relative to desired dish size
- Sponge
- Bowl of water
- Potter’s needle tool or toothpick
- Sandpaper (fine grit)
- Acrylic paint (warm white or cream)
- Acrylic paint (brown or umber for speckling)
- Old toothbrush or stiff paintbrush
- Gloss varnish or sealant
Step 1: Forming the Base
-
Condition the Clay:
Begin by taking a lump of clay about the size of a golf ball. Knead it in your hands until it is soft, pliable, and free of cracks. -
Roll a Sphere:
Roll the clay between your palms to create a smooth, tight sphere. -
Insert Your Thumb:
Hold the sphere in your non-dominant hand. Gently push your thumb into the center of the ball, stopping just before you reach the bottom to leave a sturdy base. -
Pinch the Walls:
Starting at the bottom, rhythmically pinch the clay between your thumb and fingers while rotating the ball. Work your way upward to thin out the walls. -
Keep Even Base:
Aim for a consistent thickness of about 1/4 inch throughout the walls, ensuring the bottom stays flat so it sits stably. -
Smooth the Form:
Once you have a basic bowl shape, run a damp sponge or your finger over the clay to smooth out any fingerprints or deep cracks.
Step 2: Shaping the Distinctive Rim
-
Create the Waves:
To achieve the organic look from the photo, gently push down on the rim in random spots with your index finger while supporting the clay from underneath. -
Thin the Edge:
Pinch the very top edge of the rim slightly thinner than the rest of the wall to give it a delicate, erratic feel. -
Refine the Undulation:
Go around the rim again, exaggerating some dips and peaks. It shouldn’t be symmetrical; let the clay dictate the flow. -
Final Surface Smooth:
Do a final pass with a barely damp sponge to soften the lip of the rim so it isn’t sharp or jagged. -
Dry or Bake:
If using air-dry clay, let it sit for 24-48 hours until fully white and hard. If using polymer, bake according to the package instructions.
Natural Speckles
Mix dried coffee grounds or black pepper directly into white clay before sculpting. This creates organic texture and speckles without needing to paint them later.
Step 3: Decorating and Finishing
-
Sand Imperfections:
Once fully cured, use fine-grit sandpaper to gently buff away any rough patches on the rim or base. -
Apply Base Color:
Paint the entire dish with a creamy, warm white acrylic paint. You may need two coats for full opacity. -
Create the Speckles:
Dilute a small amount of brown paint with water. Dip an old toothbrush into it. -
Splatter Technique:
Hold the toothbrush over the dish and run your thumb across the bristles to flick tiny droplets onto the surface. I suggest practicing on scrap paper first to control the spray. -
Highlight the Rim:
Take a tiny amount of undiluted light brown or gold paint on your finger and very lightly run it along just the high points of the wavy rim for definition. -
Seal the Dish:
Finish by applying a coat of gloss varnish to protect the paint and give it that ceramic-glaze shine.
Cracks While Drying?
Cracking happens if air-dry clay dries too fast. Repair small cracks with a ‘slip’ paste made of water and clay dust, then smooth it over the crack.
Place your finished dish on a sunny windowsill to catch the light and hold your treasures safely


Coil-Molded Mini Bowl With Stacked Ropes
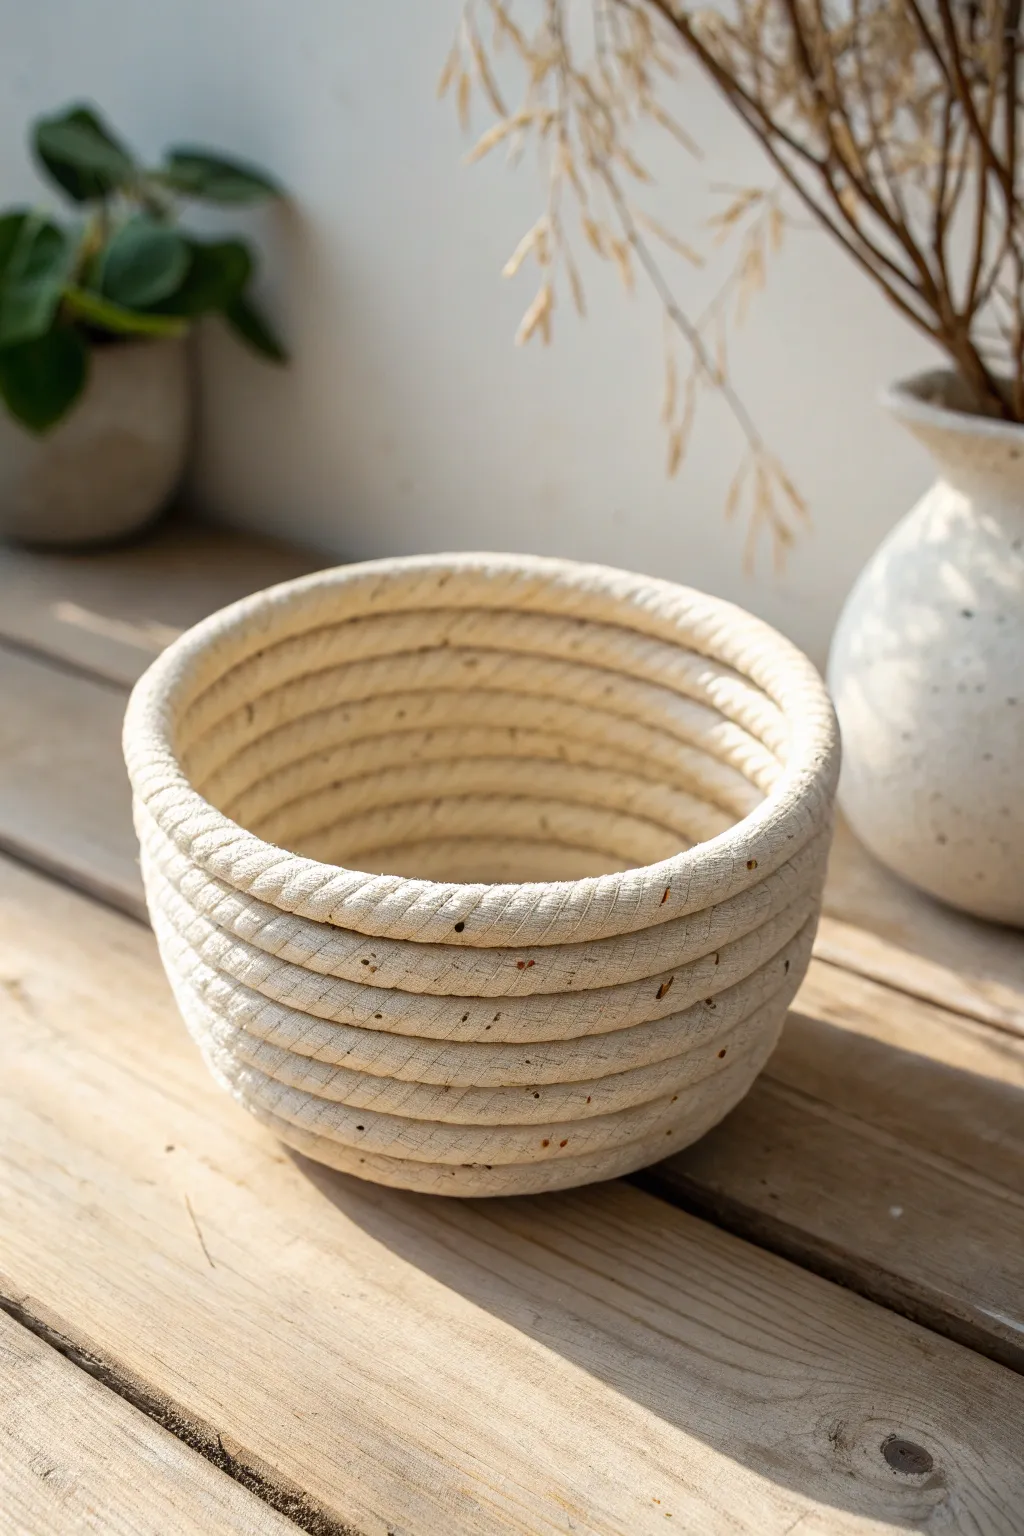
Capture the rustic charm of natural fiber baskets using nothing but air-dry clay and clever texturing. This project transforms simple clay coils into a convincing rope bowl that adds a warm, organic touch to any shelf or tabletop.
Detailed Instructions
Materials
- Air-dry clay (stone, concrete, or off-white color)
- Small bowl (to use as a mold)
- Plastic wrap
- Rolling pin
- Texturing tool (a clean toothbrush, stiff brush, or comb)
- Needle tool or toothpick
- Slip (clay mixed with water)
- Sponge
- Acrylic paint (thinned brown or tan)
- Matte varnish
Step 1: Preparing the Base
-
Prepare your mold:
Select a small bowl that has the shape you want for your final piece. Cover the outside of the bowl completely with plastic wrap, smoothing out as many wrinkles as possible to ensure the clay doesn’t stick. -
Condition the clay:
Take a generous chunk of your air-dry clay and knead it until it’s soft, pliable, and free of cracks. If it feels too dry, mist it lightly with water. -
Create the base disk:
Roll a small ball of clay and flatten it into a disk about 2-3 inches in diameter. This will form the solid bottom of your bowl. -
Texture the base:
Before attaching anything, gently tap your stiff brush or toothbrush over the surface of the disk to create a subtle, fabric-like texture.
Step 2: Creating the Rope Coils
-
Roll long snakes:
Roll out several long, even ropes (snakes) of clay. Aim for a thickness of about half an inch, keeping them as uniform as possible. -
Twist for rope effect:
To mimic the look of actual rope, you need to create a twisted texture. I like to gently twist the clay snake itself, or use a needle tool to drag diagonal lines across the surface at regular intervals. -
Add fiber details:
Once you have your twist marks, run your stiff brush or toothbrush along the length of the clay rope. This crucial step adds the tiny scratch marks that look like fibrous strands. -
Start coiling:
Place your clay base on top of the inverted bowl mold. Apply a little slip or water to the outer edge of the base disk. -
First coil:
Take your first textured rope and wrap it around the base disk, pressing gently to adhere it to the slip. Join the ends seamlessly by cutting them at an angle and smoothing the seam with a little water.
Cracking Up?
If you see tiny hairline cracks forming as the clay dries, mix a small paste of clay and vinegar. Smear this ‘spackle’ into the cracks and smooth it out for an invisible repair.
Step 3: Building the Walls
-
Stacking upwards:
Apply slip to the top of the first coil ring. Place the next rope on top, offsetting the spiral slightly if you are doing a continuous coil, or stacking distinct rings. -
Emphasize the definition:
Unlike traditional coil pots where you smooth the coils together, here you want to keep the separation visible. Do not blend the outside seams; the groove between coils creates the stacked rope illusion. -
Secure the inside:
While keeping the outside defined, gently smooth the clay on the *inside* of the bowl downwards with your thumb or a tool to bond the coils together for structural strength. -
continue building:
Keep stacking your textured ropes, working your way down the sides of the inverted bowl mold until you reach your desired height. -
Refine the rim:
Finish the top edge with a neat coil. Check that the rope texture is consistent all the way around the rim, retouching with your needle tool if any twisted details got smudged.
Twist Technique
For ultra-realism, roll two thinner snakes of clay and physically twist them together before coiling. It’s more work but creates a deeper, more authentic rope profile.
Step 4: Finishing Touches
-
Let it dry partially:
Allow the clay to dry on the mold until it is leather-hard—firm enough to hold its shape but not fully dry. -
Remove from mold:
Carefully lift the clay bowl off the mold and peel away the plastic wrap. Let it dry completely, which may take 24 to 48 hours depending on humidity. -
Add speckling:
Mix a very watery wash of brown or tan acrylic paint. Dip an old toothbrush in it and flick the bristles to spatter tiny speckles onto the dry clay. This imitates the natural flecks found in cotton rope. -
Seal the piece:
Once the paint is dry, apply a coat of clear matte varnish. This brings out the texture and protects the clay without making it look unnaturally shiny.
Place your faux-rope bowl in a sunny spot and enjoy its wonderfully deceptive handcrafted texture


Ring Holder Cone With Thumb-Pressed Facets
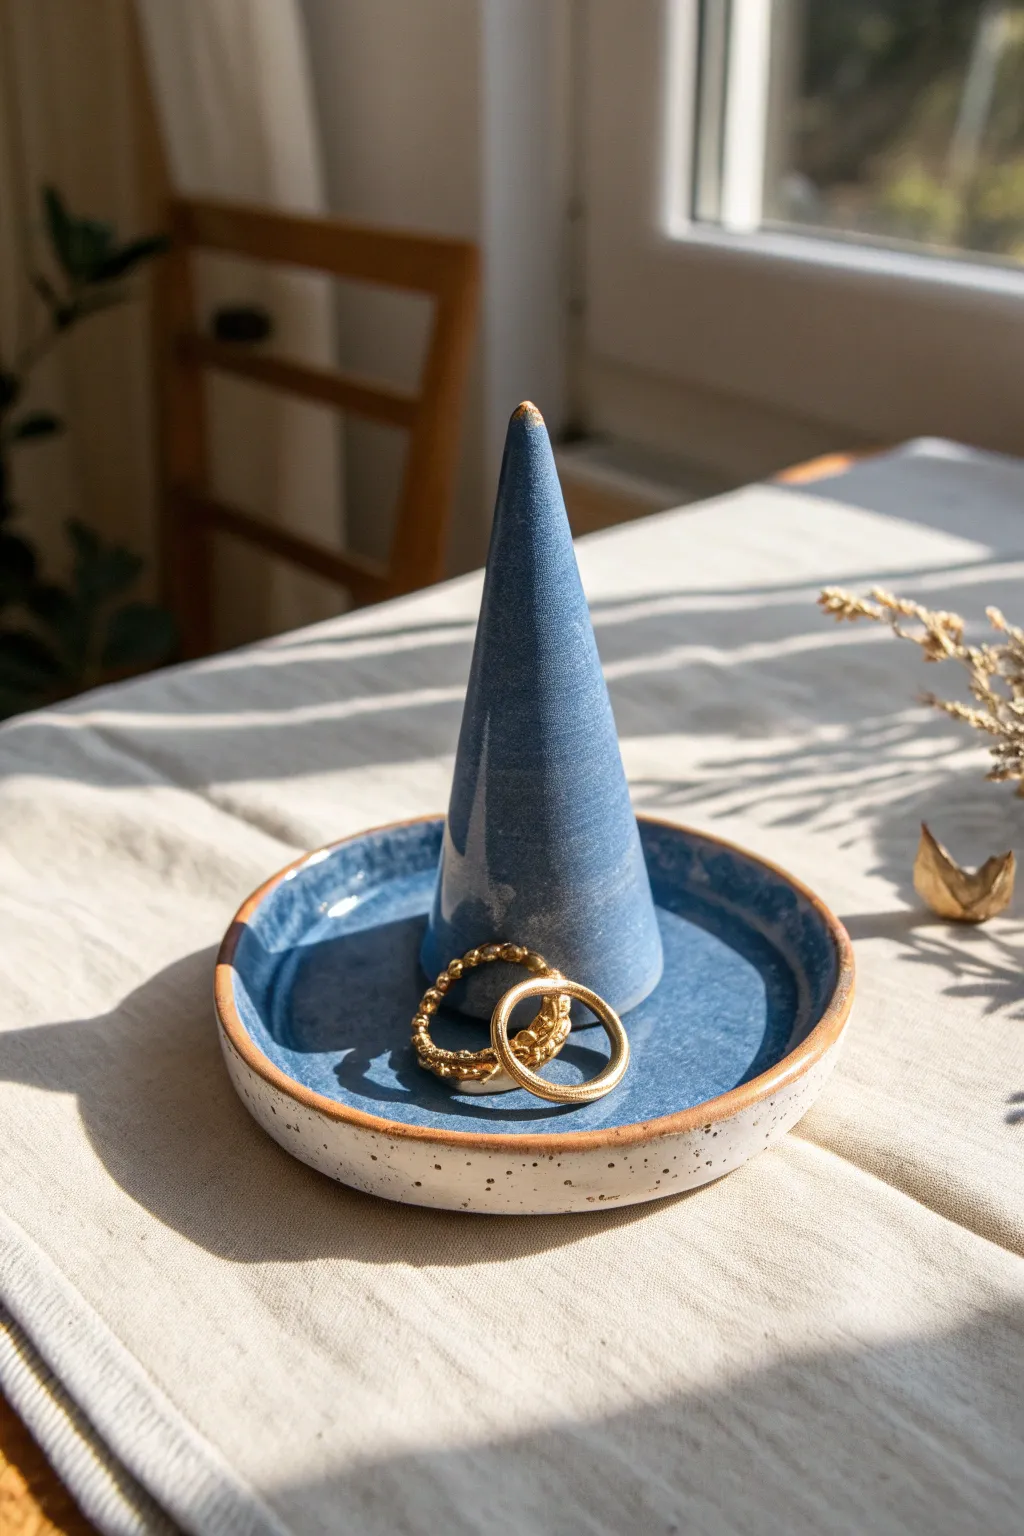
This elegant organizer combines a tall conical ring stand with a shallow catch-all dish for studs and other jewelry. The standout feature is the unique blue glaze contrasted against the speckled white base, giving it a modern, artisanal ceramic look.
Step-by-Step Guide
Materials
- White stoneware clay or white air-dry clay (if using air-dry, seal heavily)
- Ceramic rolling pin
- Circle cutter or bowl (approx. 4-5 inches diameter)
- Fettling knife (or sharp kitchen knife)
- Rib tool
- Slip and score tool
- Sponge
- Clear glaze (bottom)
- Deep cobalt blue glaze (top)
Step 1: Forming the Base Dish
-
Roll the Slab:
Start by wedging your clay to remove air bubbles, then roll it out into an even slab about 1/4 inch thick. -
Cut the Circle:
Use a circle cutter, or trace around a small bowl, to cut a perfect circle from your slab. This will be the base of your dish. -
Create the Rim:
Roll a long, thin coil of clay—roughly the thickness of a pencil—that is long enough to outline the circumference of your circle. -
Attach the Rim:
Score the outer edge of your circle base and one side of the coil. Apply slip, then press the coil firmly onto the edge of the base. -
Blend the Seams:
Using your thumb or a modeling tool, blend the coil downward on the inside and outside so it becomes one seamless piece with the base. -
Shape the Curve:
Gently pinch and smooth the rim to create a slight upward curve, forming a shallow lip that will keep items from rolling off.
Clean Lines
Use a damp sponge to wipe back any glaze that drips over the rim immediately. A clean transition line between the blue interior and raw exterior is key to this look.
Step 2: Sculpting the Central Cone
-
Form a Basic Cone:
Take a separate lump of clay and roll it into a thick cylinder. Gently taper one end by rolling it against your work surface at an angle until distinct cone shape forms. -
Check Proportions:
Place the cone in the center of your dish to check the height. It should look balanced—tall enough to hold rings, but not too heavy. -
Facet the Sides:
This is where the texture comes in. Using a wire tool or a very sharp knife, slice long, shallow strips off the sides of the cone to create flat facets, or gently press flat spots with your thumb. -
Hollow the Cone (Optional):
If the cone is quite thick and you are kiln-firing, use a needle tool to poke a hole up through the bottom center to help it dry evenly and prevent explosions. -
Attach to Base:
Score the center of your dish and the bottom of the cone aggressively. Apply plenty of slip. -
Secure the Bond:
Press the cone firmly into the center of the dish. Use a small tool to smooth the seam where the cone meets the floor of the dish. -
Final Smooth:
Wipe the entire piece down with a slightly damp sponge to remove fingerprints and subtle rough spots on the rim.
Gold Luster Accent
After the glaze firing, paint a rim of gold luster (overglaze) on the very tip of the cone and refire at a lower temp for a luxurious, high-end finish.
Step 3: Glazing and Finishing
-
Bisque Fire:
Allow the piece to dry completely (bone dry) before following your clay manufacturer’s instructions for the first bisque firing. -
Apply Wax Resist:
Paint a line of wax resist along the outer rim’s top edge if you want that crisp separation between the glaze and the raw clay body. -
Glaze the Interior:
Pour a deep cobalt blue glaze inside the dish and over the cone. Swirl it to coat evenly, then pour out the excess. Ensure the outside wall of the dish remains unglazed. -
Glaze the Exterior:
For the speckles on the outside, I sometimes flick a stiff toothbrush dipped in iron oxide wash or a brown glaze against the raw white clay. -
Final Fire:
Fire the piece a second time according to your glaze’s specific temperature requirements to achieve that glossy, durable finish.
Now you have a stunning, functional piece of art to display your favorite rings safely


Shallow Jewelry Catchall With a Wavy Lip

Embrace organic shapes with this wavy-lipped jewelry dish, perfect for keeping your everyday gold rings and delicate chains organized. The speckled clay finish combined with warm, abstract tan glazing gives it an effortless, artisan aesthetic.
Step-by-Step
Materials
- White or cream air-dry clay (or polymer clay)
- Rolling pin
- Circle cutter or a small bowl for tracing (approx. 4-5 inches diameter)
- Craft knife
- Small sponge or smoothing tool
- Sandpaper (fine grit)
- Acrylic paint (warm tan/caramel color and clear gloss varnish) OR ceramic glaze if using firing clay
- Soft paintbrush
- Water cup
Step 1: Shaping the Base
-
Prepare your clay:
Start by taking a handful of clay and kneading it in your hands until it is soft, pliable, and free of cracks. If you want that speckled look shown in the photo but only have plain clay, try kneading in a tiny pinch of black pepper or dried coffee grounds for texture. -
Roll out a slab:
Place the clay on a clean, flat surface. Use your rolling pin to flatten it into an even slab, aiming for a thickness of about 1/4 inch. Avoid rolling it too thin, as you want the dish to feel substantial. -
Cut the circle:
Place your circle template or bowl upside down onto the slab. Using your craft knife, trace around the edge to cut out a perfect circle. -
Smooth the edges:
Dip your finger or a small sponge in water and run it along the cut edge of the clay circle to smooth out any sharpness or roughness.
Cracking Edges?
If the rim starts cracking while shaping the waves, your clay might be too dry. Dip your finger in water and smooth the cracks immediately, or knead a drop of water back into the raw clay.
Step 2: Creating the Form
-
Lift the edges:
Gently cup the clay circle in the palm of your hand. Using your thumb and fingers, slowly start to pinch and lift the outer rim upwards to create a shallow wall. -
Form the wavy lip:
To get that signature wavy look, use your thumb to push out from the inside while using your index and middle fingers on the outside to support the clay. Create 5-6 gentle undulations around the rim. -
Refine the shape:
Place the dish back on the table. Adjust the waves so they look organic but deliberate. The rim shouldn’t be uniform—imperfection is the goal here. Smooth out any fingerprints inside the bowl with a damp sponge. -
Let it dry completely:
Allow the dish to air dry according to your clay manufacturer’s instructions. This usually takes 24-48 hours. Turn it over halfway through the drying process to ensure the bottom dries evenly.
Add Gold Accents
For a luxe upgrade, paint the very edge of the wavy rim with liquid gold leaf or a metallic gold paint pen after the varnish has dried. It adds a beautiful contrast to the raw clay.
Step 3: Finishing Touches
-
Sand for smoothness:
Once fully bone dry, use fine-grit sandpaper to gently smooth the rim and any rough spots on the surface. Wipe away the dust with a barely damp cloth. -
Plan the design:
Look at the dish and visualize where you want your color patches. The example uses an abstract, diagonal swoop of tan that covers part of the rim and basin, leaving the rest natural. -
Apply the color:
Mix your warm tan or caramel acrylic paint. Using a soft brush, paint your abstract shape. I like to keep the paint slightly watery to mimic the look of a ceramic glaze. -
Paint the rim detail:
Ensure the color wraps over the lip of the bowl in the painted sections, just like a dipped ceramic piece would. -
Seal the piece:
After the paint is dry, apply a coat of high-gloss varnish over the entire inside and rim of the dish. This mimics the glassy look of fired pottery and protects your jewelry from scratching the clay. -
Final cure:
Let the varnish cure completely before placing any jewelry inside. Your artisan-style catchall is now ready.
Now you have a chic spot to drop your rings at the end of the day

The Complete Guide to Pottery Troubleshooting
Uncover the most common ceramic mistakes—from cracking clay to failed glazes—and learn how to fix them fast.
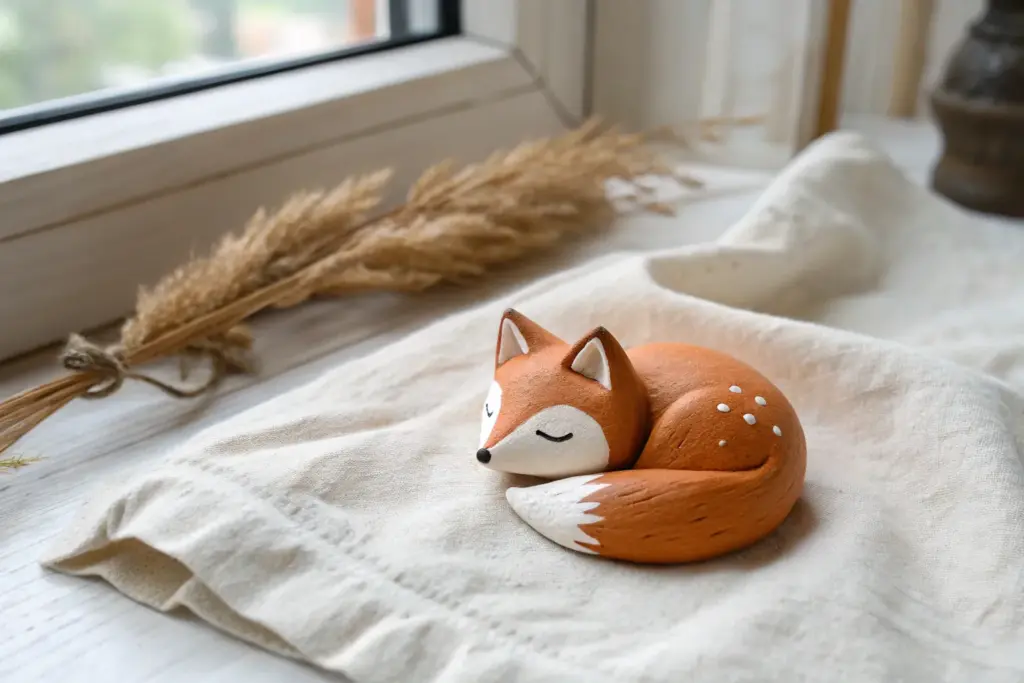
Easy Kawaii Animal Chonky Figurines
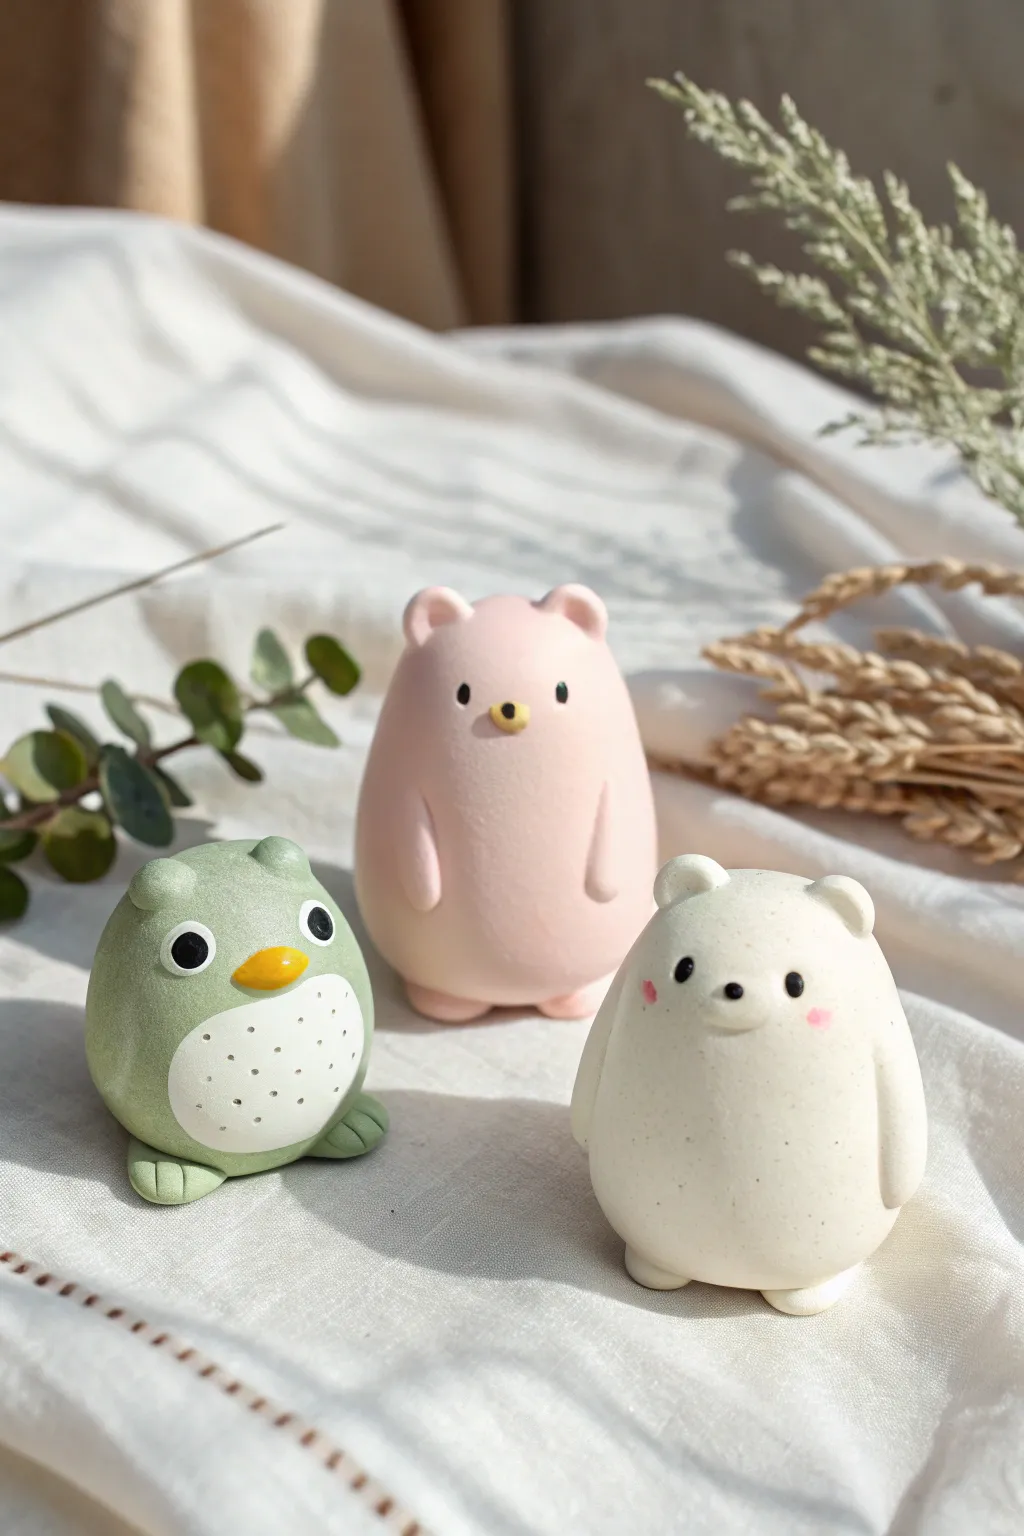
These delightfully chubby figurines are the definition of kawaii, featuring a smooth, matte finish and soft pastel tones. With their simple rounded shapes and minimalist expressions, this project is perfect for beginners wanting to create a serene little animal family.
Step-by-Step Tutorial
Materials
- Polymer clay (Sage Green, White, Pastel Pink, Pale Yellow, Black)
- Clean rolling surface or mat
- Basic clay sculpting tools (needle tool, ball stylus)
- Small blade or craft knife
- Soft paintbrush (for smoothing)
- Optional: Rubbing alcohol or baby oil (for fingerprint removal)
- Oven for baking (if using polymer) or air-drying setup
Step 1: Shaping the Base Bodies
-
Prep the clay:
Begin by conditioning your clay thoroughly. Knead the sage green, pastel pink, and white clay separately until they are soft and pliable. This prevents cracks later on. -
Create the main shapes:
Roll three balls of clay: one green, one pink, and one white. The pink and white balls should be slightly taller, forming an elongated egg shape, while the green one should stay rounder and squatter. -
Flatten the bases:
Gently tap the bottom of each shape onto your work surface. You want them to stand up independently without wobbling, but try to keep the overall rounded ‘chonkiness’ intact.
Step 2: Sculpting the Green Bird
-
Add the belly:
Roll a small ball of white clay and flatten it into a thin disc. Press this onto the lower front of the green body to create the belly patch. -
Texture the belly:
Using a needle tool, gently poke small, shallow holes in a grid pattern across the white belly patch for texture. -
Create the eyes:
Roll two small white balls and flatten them slightly. Place them near the top of the body. Add tiny black clay pupils to the center of each white disc. -
Form the beak:
Shape a tiny piece of yellow clay into a small triangle or cone. Press it horizontally between the eyes so it sticks out slightly. -
Add feet and ears:
Make two small, flattened balls of green clay. Use a tool to indent lines for toes and attach them to the bottom front. For the ears, pinch two tiny mounds on top of the head.
Clean Clay Tactic
White clay attracts dust like a magnet. Always wash your hands or use wet wipes before switching to the white bear to keep it pristine.
Step 3: Crafting the Bears
-
Form the ears:
For both the pink and white bears, roll two tiny balls of their respective body colors. Attaching them to the top of the heads, use a ball stylus to gently indent the center of each ear to blend the seam. -
Add the arms:
Roll very thin sausages of clay (pink for the pink bear, white for the white one). Curve them slightly and press them vertically against the sides of the bodies. They should look like they are resting at their sides. -
Create the pink bear’s face:
Place two tiny black dots wide apart for eyes. Add a tiny yellow oval for the snout area, and place a microscopic black dot on it for the nose. -
Create the white bear’s face:
Place two tiny black eyes wide apart. Add a small black oval nose right between them. I like to keep the features very close to the center line for maximum cuteness. -
add blushing cheeks:
For the white bear, take minuscule specks of pink clay and press them onto the cheeks below the eyes to mimic a blush. -
Add legs:
Create small, rounded nubs for feet—pink for the pink bear, white for the white bear—and attach them to the bottom so they peek out slightly.
Make them Mates
Before baking, turn the heads slightly so the figures look like they are interacting or looking at each other for a more dynamic display.
Step 4: Smoothing and Baking
-
Remove fingerprints:
Dip a finger or a soft brush in a tiny bit of baby oil or rubbing alcohol. Gently stroke over the figurines to smooth out any fingerprints or lint before baking. -
Bake the project:
follow the baking instructions on your specific package of polymer clay. Usually, this is around 275°F (135°C) for 15-30 minutes. Let them cool completely before handling.
Now you have a trio of adorable desk companions ready to brighten your workspace
Mini Food Charms for Keychains or Jewelry
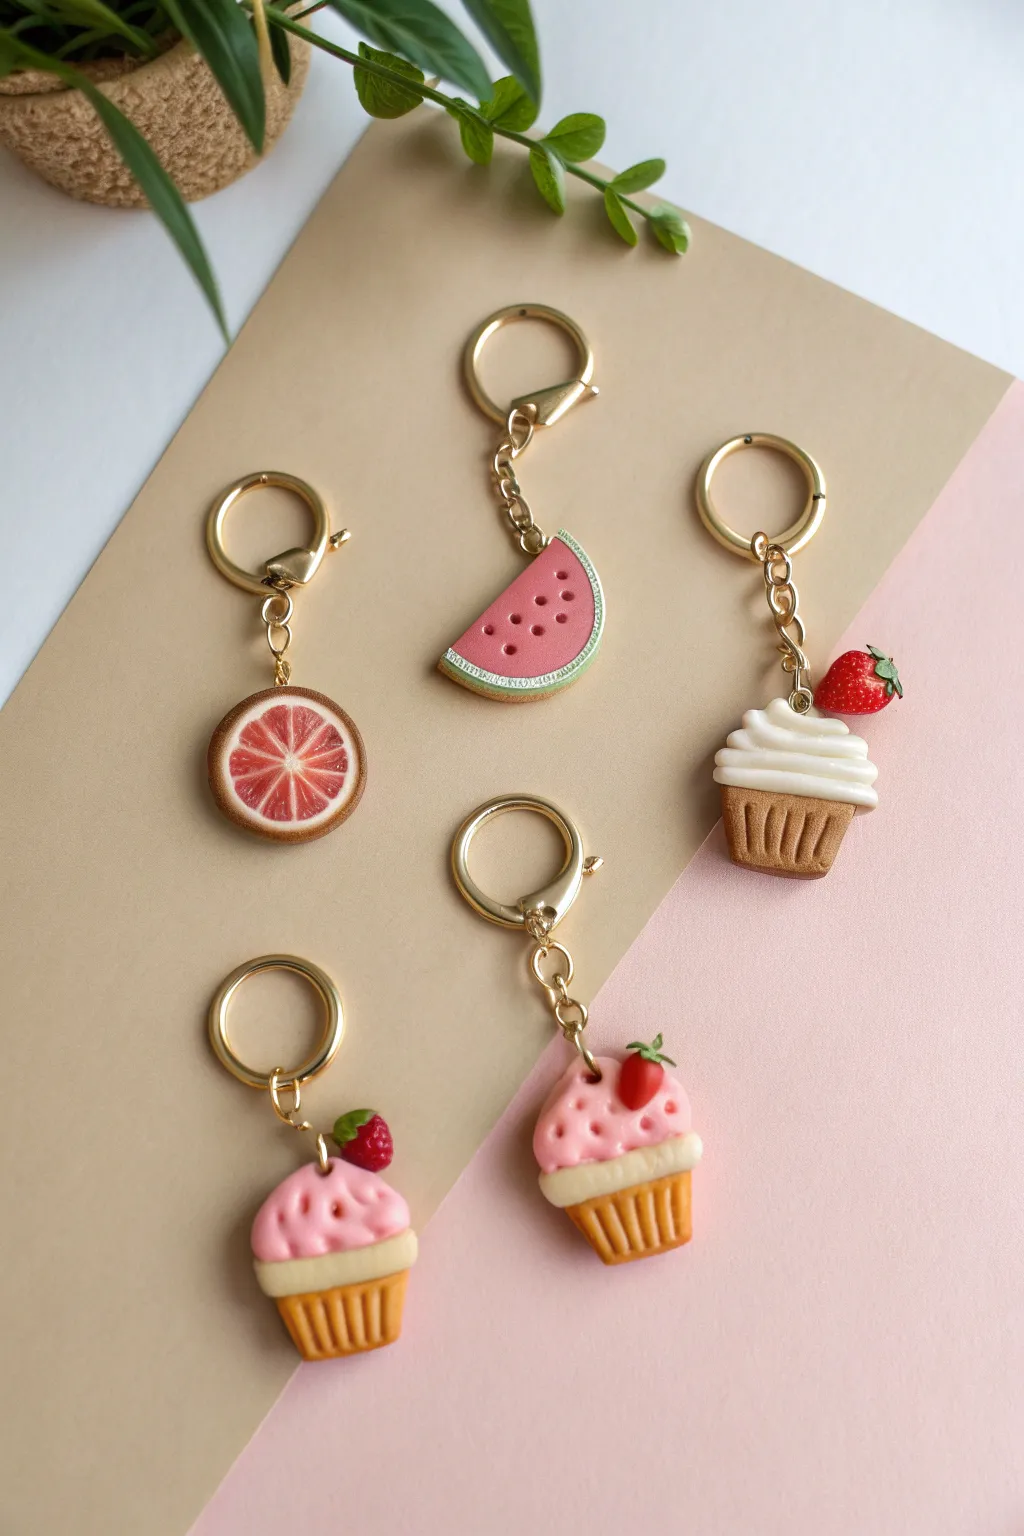
Transform colorful polymer clay into adorable, bite-sized accessories with this collection of fruit and dessert charms. These delightful keychains feature realistic textures like citrus pulp and fluffy frosting, making them perfect gifts or personal trinkets.
How-To Guide
Materials
- Polymer clay (white, translucent, red, pink, orange, green, tan/ochre)
- Liquid polymer clay (white and translucent)
- Small circle cutters (various sizes)
- Needle tool or toothpick
- Dotting tool
- Soft pastel chalks (reds and oranges) and a small brush
- Clean toothbrush or texture tool
- Eye pins
- Gold keychain hardware and jump rings
- Gloss glaze or UV resin
- Blade or X-Acto knife
- Oven for baking
Step 1: Grapefruit Slice
-
Create the Cane:
Start by mixing translucent clay with a touch of red or orange to create a grapefruit flesh color. Roll this into a log. -
Wrap and Reduce:
Roll out a thin sheet of white clay and wrap it around the translucent log. Stretch and roll the log until it becomes a long, thin cane. -
Assemble the Segments:
Cut the cane into equal segments (about 8-10 pieces) and pinch one side of each segment to form a teardrop shape. Arrange these in a circle with the points touching in the center. -
Add the Rind:
Wrap the assembled circle in a layer of white clay, followed by a layer of textured brown or orange-tan clay for the outer skin. Slice a thick disk from your finished cane. -
Texturize:
Use a needle tool to gently scratch lines creating a radiating pulp texture on the translucent parts.
Step 2: Watermelon Slice
-
Form the Base:
Shape a thick disk of red or dark pink clay. Cut it in half so you have a semi-circle. -
Add the Rind Layers:
Roll out thin snakes of white and green clay. Wrap the white along the curved edge first, smoothing it down, followed by the green layer. -
Add Seeds:
Using a small dotting tool, press indentations into the red flesh. Roll tiny teardrops of black or dark brown clay and press them into the holes. -
Surface Texture:
Gently tap the red surface with a clean toothbrush to give it a realistic, grainy watermelon texture.
Fixing Fingerprints
Work light to dark colors to keep white clay clean. If you see fingerprints before baking, lightly brush the clay with a little baby oil or cornstarch to smooth them out.
Step 3: Cupcakes
-
Make the Base:
Press tan clay into a small cupcake mold or shape a tapered cylinder by hand. Use a needle tool to press vertical ridges around the sides for the wrapper effect. -
Shading the Base:
Brush a little brown soft pastel powder onto the ridges to make the ‘baked’ dough look golden and realistic. -
Frosting Swirls:
Roll a snake of white or pink clay. Twist it gently and coil it on top of the base, spiraling upward to a peak. Smooth the bottom of the coil onto the base slightly. -
Tiny Strawberry Toppers:
Shape a tiny red cone for a strawberry. Use a needle to poke seed holes. Add tiny green leaves to the top and place it on your frosting.
Make it Sparkle
Mix fine iridescent glitter into the translucent clay for the grapefruit and watermelon, or dust the cupcake frosting with clear embossing powder for a sugar-coated look.
Step 4: Assembly & Finishing
-
Insert Hardware:
Trim eye pins to size and insert them deeply into the top of each charm. I find adding a dab of liquid clay to the pin helps it bond securely during baking. -
Bake:
Bake all pieces according to your clay manufacturer’s temperature and time instructions. Let them cool completely. -
Glaze:
Apply a coat of gloss glaze or UV resin to the fruit flesh and the strawberry toppers to make them look juicy. Leave crusts and cupcake bases matte. -
Chain Assembly:
Use pliers to open a jump ring, attach your charm to the gold keychain hardware, and close the ring securely.
Now attach your delicious creations to your keys and enjoy a touch of sweetness wherever you go


What Really Happens Inside the Kiln
Learn how time and temperature work together inside the kiln to transform clay into durable ceramic.
Clay Magnets With Happy Faces and Simple Shapes
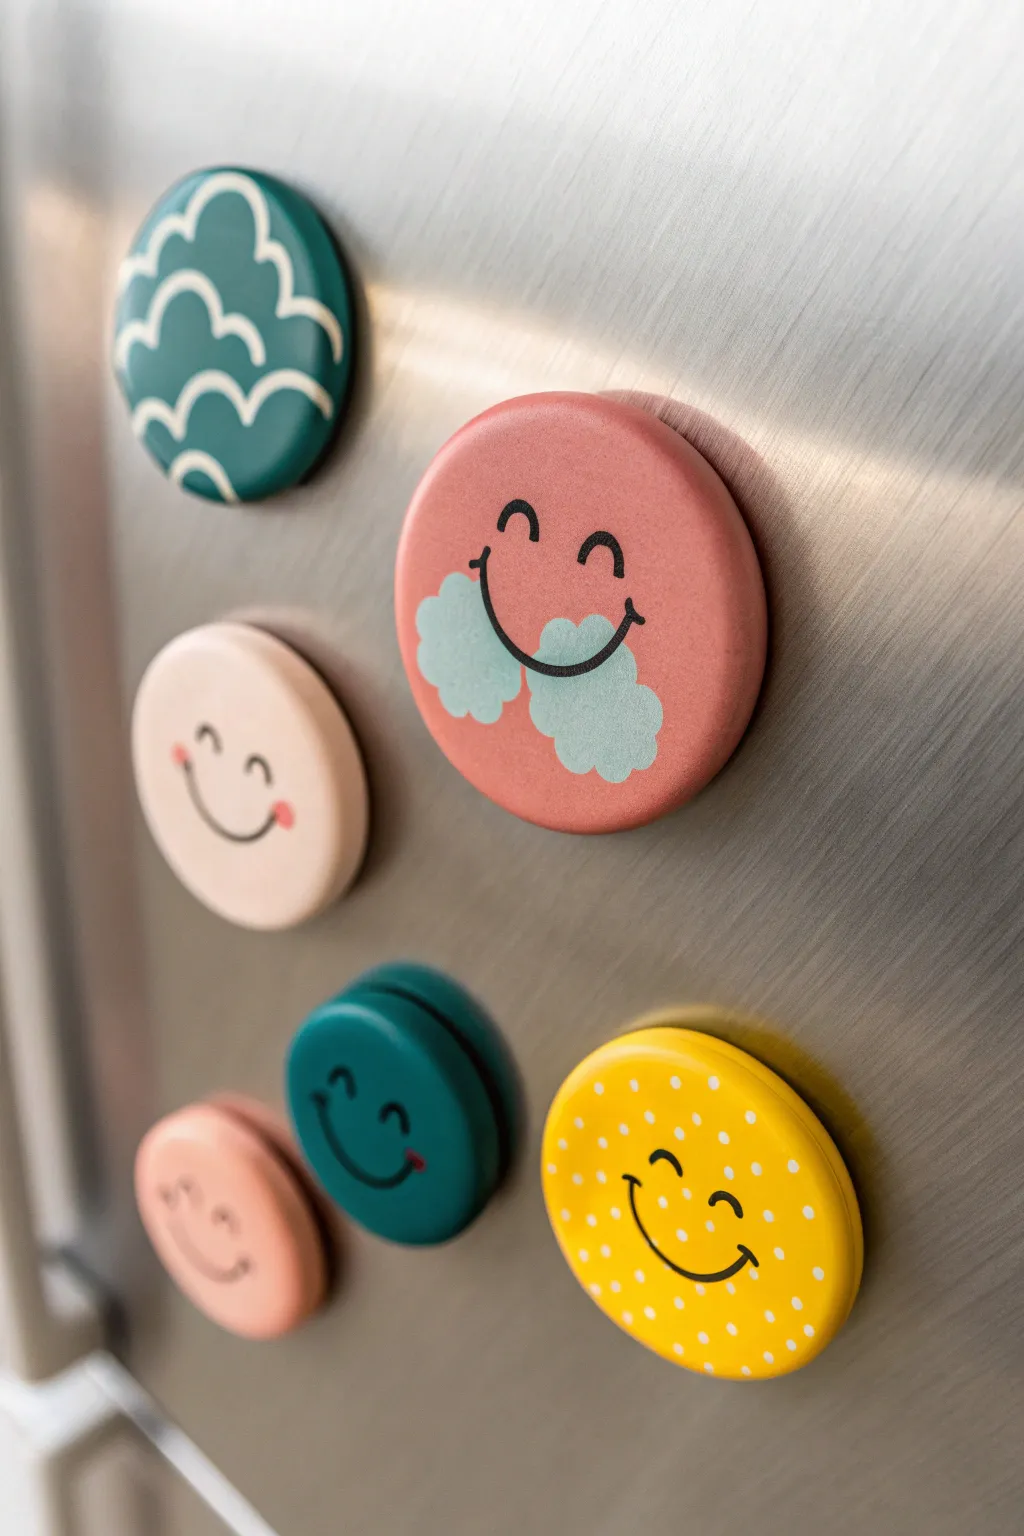
These charming clay magnets bring a cheerful vibe to any kitchen with their smooth, matte finish and simple, kawaii-inspired expressions. The project combines soft pastel colors with bold black line work to create a modern, minimalist set of refrigerator decor.
Step-by-Step Tutorial
Materials
- Polymer clay (white, coral, teal, yellow)
- Acrylic rolling pin
- Round clay cutters (various sizes)
- Parchment paper
- Baking sheet
- Fine-grit sandpaper (400-600 grit)
- Black acrylic paint pen (fine tip)
- White acrylic paint pen (medium tip)
- Small round magnets
- Strong craft glue (e.g., E6000)
- Matte varnish (optional)
Step 1: Shaping the Base
-
Condition the clay:
Start by warming up your polymer clay in your hands. Knead the coral, teal, white, and yellow blocks separately until they are soft, pliable, and free of cracks. -
Roll out slabs:
Place a ball of clay on parchment paper and use your acrylic rolling pin to flatten it. Aim for a thickness of about 1/4 inch (6mm) to ensure the magnets are sturdy but not too heavy. -
Cut the circles:
Use your round cutters to punch out clean circles. Try using different cutter sizes for variety—make a large coral one for the main face and smaller ones for the accent magnets. -
Create the cloud shape:
For the cloud magnet shown in the top left, take a teal circle and use a smaller round cutter to ‘bite’ out semi-circles along the edge, creating a fluffy cloud silhouette. -
Smooth the edges:
Gently run your finger around the cut edges of each shape to soften any sharp corners left by the cutter. This gives them that professional, finished look. -
Bake the clay:
Arrange your shapes on a parchment-lined baking sheet. Bake according to your brand of clay’s instructions (usually 275°F/135°C for 15-30 minutes). -
Cool down:
Let the pieces cool completely on the baking sheet. They will harden fully as they return to room temperature.
Step 2: Decorating & Assembly
-
Sand for smoothness:
Once cool, lightly sand the surface or edges with fine-grit sandpaper if there are any fingerprints or rough spots. Wipe away the dust with a damp cloth. -
Draw the main smile:
On the large coral circle, use the fine-tip black paint pen to draw a wide, U-shaped smile. Keep the lines crisp and steady. -
Add the eyes:
Draw two small upside-down ‘U’ shapes for winking eyes above the smile. Position them fairly wide apart to achieve that cute, characteristic face. -
Paint the cloud cheeks:
Using a light teal or mint paint (or a paint pen), add two fluffy cloud shapes at the corners of the smile. Let this paint dry completely before touching it. -
Detail the yellow magnet:
For the yellow sun-style magnet, draw a similar happy face in the center. Then, use a white paint pen to add small polka dots all around the background. -
Create the cloud pattern:
On the teal cloud-shaped magnet, use a white paint pen to draw scalloped lines that mimic the outer edge, creating a layered cloud effect. -
Add rosy cheeks:
For the smaller beige or pink face magnets, add tiny red or pink dots at the ends of the smile to create rosy cheeks. -
Seal the design:
I like to apply a thin coat of matte varnish over the painted areas to protect the design from chipping, though this is optional if you used high-quality paint pens. -
Attach the magnets:
Flip the clay pieces over. Apply a small dab of strong craft glue to the center of the back and press a round magnet firmly into the glue. -
Final cure:
Allow the glue to cure for at least 24 hours before sticking your new creations onto the fridge to ensure the bond is secure.
Sticky Situation?
If your clay sticks to the table or rolling pin, lightly dust the surface with cornstarch or baby powder before rolling. It brushes off easily after baking.
Make It 3D
Instead of painting the cloud cheeks, cut tiny cloud shapes from thin slabs of teal clay and press them onto the raw coral face before baking for a tactile, layered effect.
Now you have a cheerful set of custom magnets to brighten up your daily routine
Open-Mouth Animal Toothbrush Holder
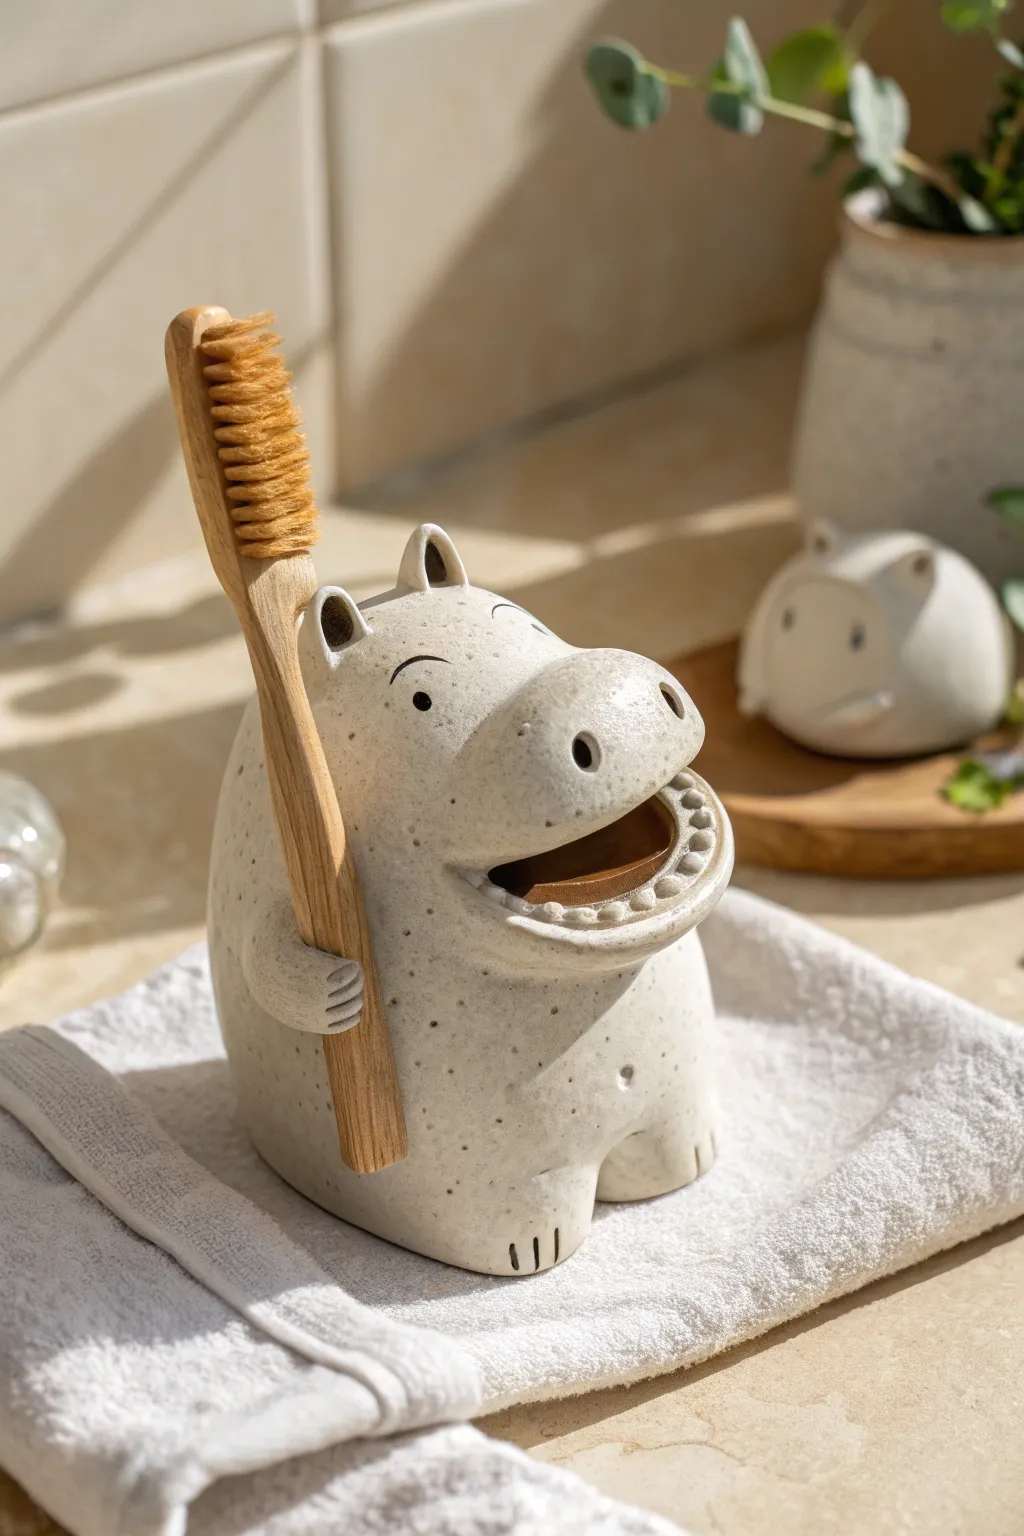
This adorable, speckled ceramic-style hippo isn’t just a cute bathroom accessory; it’s a functional toothbrush holder with a clever open-mouth design. The wide-open mouth acts as a catch-all, while the carefully sculpted arm hugs your brush to keep it upright and ready for use.
How-To Guide
Materials
- Air-dry clay or polymer clay (white or light beige)
- Speckled clay additive (optional) or black pepper/sand
- Sculpting tools (needle tool, ball stylus)
- Water and sponge for smoothing
- Acrylic paints (black, white, brown)
- Fine grit sandpaper
- Clear waterproof sealant or glaze
Step 1: Forming the Base Body
-
Prepare the Clay:
Start by conditioning your clay until it is soft and pliable. If you want that stone-like speckled look shown in the photo, knead in a small pinch of black pepper, specialized clay speckles, or even fine sand before you start shaping. -
Shape the Main Blob:
Roll a large handful of clay into a smooth ball slightly larger than a tennis ball. Gently flatten the bottom against your work surface so it stands upright securely without wobbling. -
Create the Squat Shape:
Mold the ball into a rounded, pear-like shape. The bottom needs to be wider to support the weight, tapering slightly towards the top where the head will be. -
Define the Legs:
At the base of your shape, use a modeling tool or your thumb to create a vertical indentation in the center front. This separates the two front legs. Use a needle tool to press three small vertical lines into each ‘foot’ to represent toes.
Step 2: Sculpting the Head and Mouth
-
Add the Snout:
Roll a separate, smaller oval of clay for the snout. Attach this to the upper front of the body. Blend the seams thoroughly with your fingers or a clay tool so it looks like one continuous piece, not an attachment. -
Open Wide:
Here I like to use a looped sculpting tool to carve out the mouth cavity. Scoop out a deep, wide semi-circle from the snout area. Smooth the inside walls of this cavity with a little water on your finger. -
Form the Teeth:
Roll very tiny balls of clay and flatten them slightly. Arrange these around the lower rim of the mouth opening to create the bottom row of teeth. Press them down gently to secure them. -
Nose and Ears:
Use a large ball stylus or the back of a paintbrush to press two deep nostrils into the top of the snout. For the ears, shape two small triangles, pinch them slightly to curve them, and attach them to the very top of the head.
Stone Effect Secret
Mix dried tea leaves or used (dried) coffee grounds into your clay. It mimics the speckled texture of stoneware pottery perfectly without needing a kiln.
Step 3: The Toothbrush Hug
-
Create the Arm:
Roll a coil of clay to act as the arm. It needs to be long enough to reach from the hippo’s side to its front belly. -
Position the Grip:
Attach one end of the coil to the side of the body, blending the seam. Curve the arm around the front. Before securing the hand, press a toothbrush handle (or a dowel of similar size) against the belly to measure the gap needed. -
Secure the Hand:
Curve the end of the arm (the hand) slightly outward to form a hook or cup shape that will cradle the brush. Use a needle tool to score finger lines into the hand.
Cracking Issues?
If using air-dry clay, minor cracks can appear as it shrinks. Make a ‘slip’ by mixing clay scraps with water into a paste and use it to fill cracks, then sand smooth.
Step 4: Refining and Drying
-
Smooth the Surface:
Take a slightly damp sponge and wipe down the entire sculpture. This removes fingerprints and softens any harsh tool marks, giving it that smooth, ceramic finish. -
Let it Dry:
Allow the piece to dry completely. If using air-dry clay, this may take 24-48 hours. Turn it occasionally to ensure the bottom dries evenly. -
Sanding:
Once fully cured, use fine-grit sandpaper to gently buff away any remaining rough spots, particularly around the toes and ears.
Step 5: Finishing Touches
-
Paint the Details:
Using a fine detail brush and black acrylic paint, add smaller dots for the eyes and thin, curved eyebrows above them to give him an inquisitive expression. -
Color the Mouth:
Paint the inside floor of the mouth cavity with a dark brown or terracotta color to add depth. -
Waterproofing:
This is crucial for a bathroom item. Apply 2-3 coats of a high-quality waterproof varnish or gloss glaze. Pay special attention to the inside of the mouth and the bottom base to prevent water damage.
Place your new friend by the sink and let him keep your toothbrush safe and dry

TRACK YOUR CERAMIC JOURNEY
Capture glaze tests, firing details, and creative progress—all in one simple printable. Make your projects easier to repeat and improve.
Minimal Photo Holder With a Pinched Slot
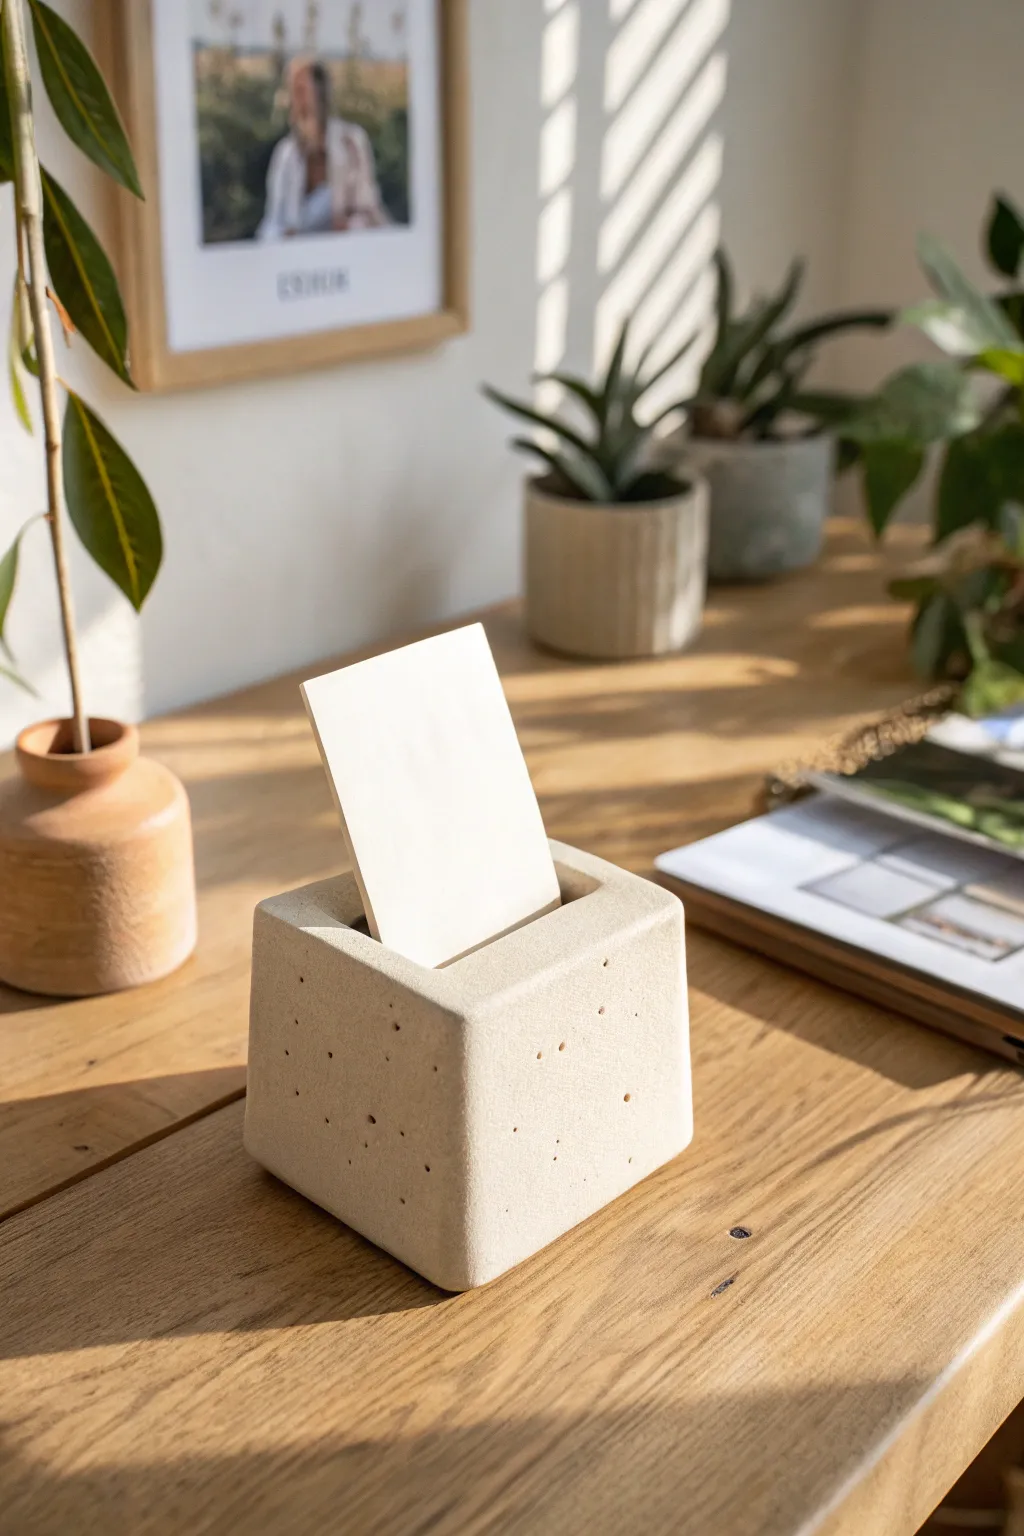
Capture the industrial elegance of cast concrete without the mess of mixing cement by using polymer or air-dry clay. This minimalist cube features a clever pinched slot and a textured, porous finish that perfectly mimics sculpted stone.
Detailed Instructions
Materials
- Stone-effect polymer clay (e.g., granite or limestone color)
- Acrylic rolling pin
- Sharp tissue blade or clay knife
- Piece of thick cardstock (for sizing the slot)
- Needle tool or toothpick
- Old toothbrush
- Fine-grit sandpaper (optional)
- Ruler
- Clear matte varnish (optional)
Step 1: Shaping the Base
-
Condition the clay:
Begin by warming standard polymer clay in your hands, kneading it until soft and pliable. If using a specific stone-effect clay, mix it thoroughly to ensure the flecks are evenly distributed. -
Form a rough block:
Roll your conditioned clay into a large, smooth ball to remove initial air pockets, then press it firmly onto your work surface to flatten the bottom. Use your hands to pat the sides into a rough square shape. -
Refine the cube:
Use your acrylic rolling pin or a flat block of wood to gently tap against all six sides. Rotate the piece frequently, tapping and smoothing until you have a sharp, distinct cube shape. Aim for dimensions around 2 to 3 inches. -
Slice for sharpness:
For ultra-crisp edges, I prefer to take a long, sharp tissue blade and carefully slice off a very thin layer from each side of the cube. This creates that manufactured architectural look. -
Soften the corners:
Gently run your finger along the sharp edges you just cut to slightly bevel them. You don’t want them round, just not razor-sharp.
Step 2: Creating the Slot
-
Mark the center:
Use your ruler to find the exact center of the top face of your cube. Mark a light line where the photo slot will go. -
Insert the spacer:
Take a piece of thick cardstock or a doubled-over business card. Press it firmly into the center line, sinking it about halfway down into the cube. -
Widen the opening:
With the cardstock still inside, gently wiggle it back and forth to widen the slot slightly. You want the opening to be just wide enough to hold a photo without bending it. -
Sculpt the pinched edge:
Using your thumbs, gently press down on the clay immediately surrounding the cardstock slot. This creates the ‘pinched’ depression visible in the photo, guiding the eye toward the picture. -
Remove and refine:
Carefully pull the cardstock out. Use a clay tool to smooth the inner walls of the slot if they look rough.
Slumping Slot?
If the slot closes up during baking, bake the piece with the cardstock still inserted. Just ensure the paper isn’t touching any heating elements.
Step 3: Texturing and Finishing
-
Stipple the surface:
Take an old toothbrush and firmly tap the bristles all over the exterior of the cube. This crucial step removes fingerprints and adds that sandy, stone-like grain. -
Add faux air bubbles:
To mimic the look of cast concrete, use a needle tool to poke random holes into the sides. Create clusters of two or three holes, varying the depth and size for realism. -
Final check:
Look over the piece one last time. If the cube warped while texturing, gently tap it back into square alignment against the table. -
Bake the clay:
Bake the piece according to your clay manufacturer’s instructions. Since this is a thick block, you may need to bake it for a longer duration at a lower temperature to prevent cracking. -
Cool slowly:
Turn off the oven and let the cube cool down inside completely. This gradual cooling helps prevented thermal shock cracks in thick pieces. -
Sand the texture:
Once cool, lightly scuff the surface with fine-grit sandpaper. This enhances the matte, stone effect and whitens the ‘scratches’ slightly. -
Seal (Optional):
If you want to protect the finish, apply a very thin coat of matte varnish. Avoid glossy finishes, as they will ruin the raw concrete illusion.
Color Speckles
Mix black pepper or dried tea leaves into plain white or grey clay before sculpting to create natural-looking granite speckles without buying special clay.
Place your favorite instant photo inside and enjoy your modern desktop accessory
Pinch-and-Coil Succulent Planter for a Tiny Pot
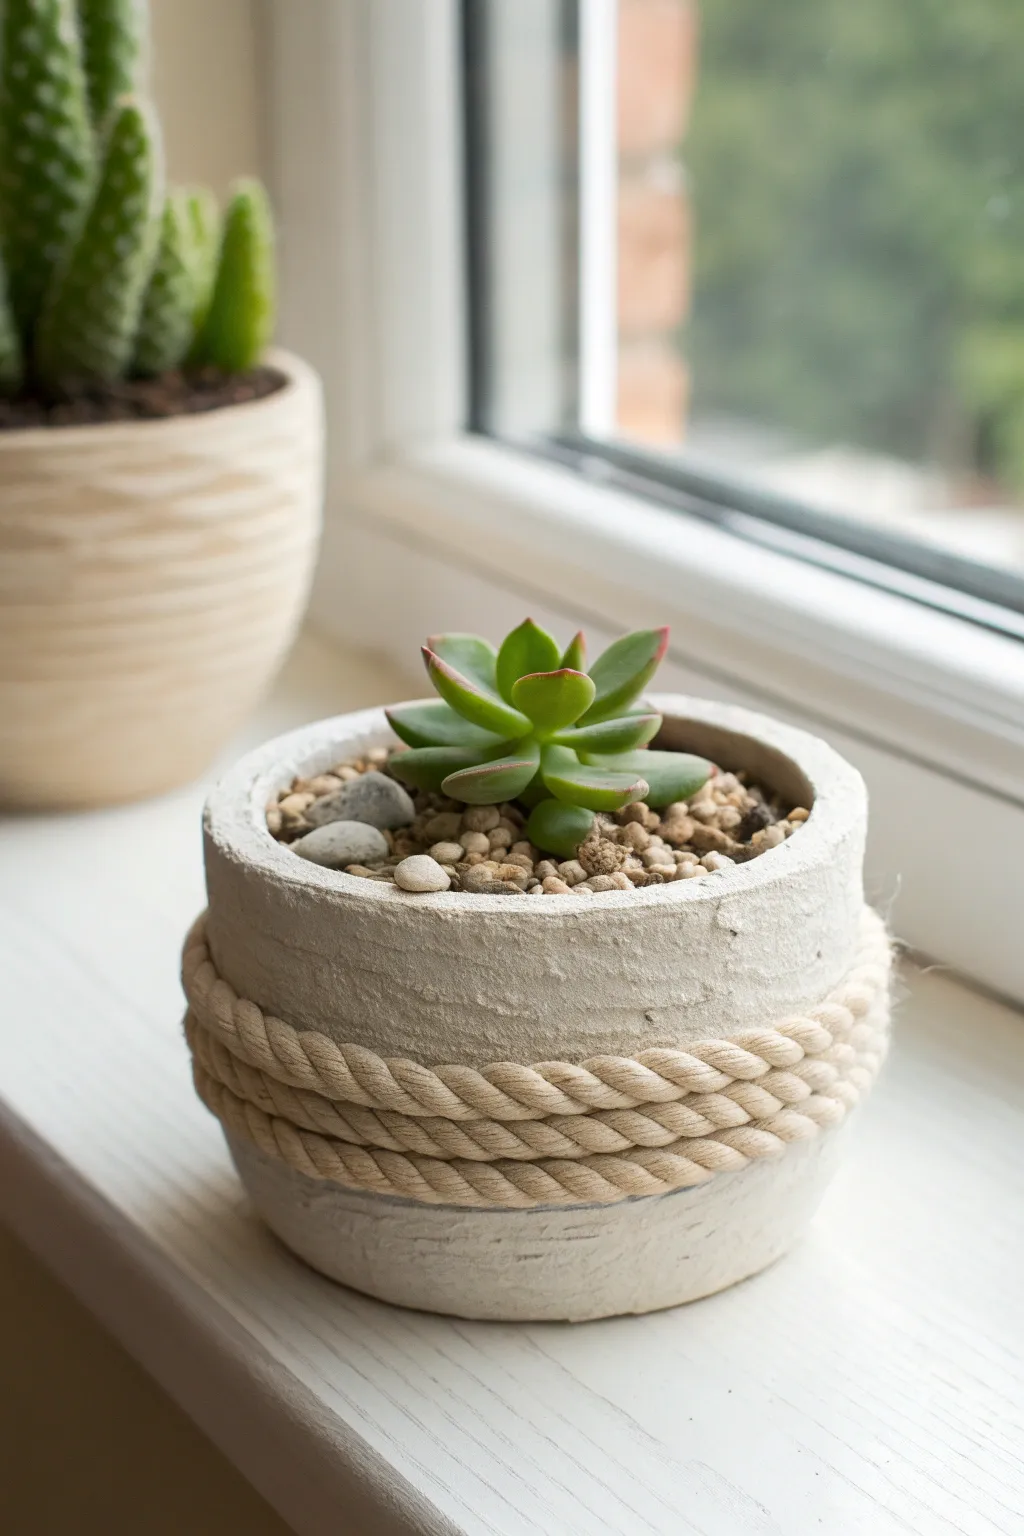
Embrace a charmingly rustic aesthetic with this faux-concrete planter project, perfect for tiny succulents. Using simple air-dry clay and a touch of nautical rope, you’ll craft a textured, cylindrical vessel that brings a calm, seaside vibe to any windowsill.
Step-by-Step
Materials
- White air-dry clay (or concrete modeling paste)
- Rolling pin
- Craft knife or clay cutter
- Small cylindrical mold (like a spice jar wrapped in plastic)
- Texture tool (old toothbrush or crumpled foil)
- Natural twisted rope or jute twine (medium thickness)
- Strong craft glue or hot glue gun
- Acrylic paint (light grey or stone color)
- Matte sealant or varnish
- Sandpaper (fine grit)
Step 1: Forming the Base Vessel
-
Prepare the Clay:
Begin by kneading a fist-sized ball of air-dry clay until it is soft and pliable. If the clay feels too dry, mist it lightly with water, but avoid making it sticky. -
Roll the Base:
Roll out a portion of the clay to about a 1/4 inch thickness. Use your cylindrical mold as a guide to cut a perfect circle for the base of the pot. -
Create the Wall:
Roll out a long, rectangular strip of clay, maintaining that same 1/4 inch thickness. The length should be just enough to wrap around your cylindrical mold with a slight overlap. -
Assemble the Pot:
Wrap the rectangular strip around your mold. Score and slip the edges where they meet to create a strong vertical seam, smoothing it down with your finger so it becomes invisible. -
Attach the Bottom:
Score the edges of the circular base and the bottom of your cylinder wall. Press them together firmly and use a modeling tool or your finger to smooth the clay across the join line, ensuring a watertight seal. -
Refine the Shape:
While the clay is still on the mold, gently roll it on your work surface to ensure the sides are straight. Trim the top rim with a craft knife for a cleaner, flat edge if desired, though a slightly uneven rim adds character. -
Add Texture:
Before the clay dries, take an old toothbrush or a ball of crumpled foil and gently tap it all over the exterior surface. This creates that realistic, stone-like pitted texture seen in the photo. -
Create the Rope Groove:
Using a wide modeling tool or just your thumb, gently press a shallow indent around the middle circumference of the pot. I find this helps the rope sit flush later, though you can skip it if you prefer the rope to sit entirely on top.
Make It Look Ancient
Mix a tiny bit of baking soda into your grey paint. This creates a gritty, chalky finish that mimics aged limestone or concrete.
Step 2: Finishing and Decorating
-
Let it Dry:
Carefully slide the pot off the mold and let it dry completely. This usually takes 24-48 hours depending on humidity. Flip it halfway through to ensure the bottom dries evenly. -
Sand Imperfections:
Once bone dry, use fine-grit sandpaper to smooth out any sharp edges on the rim or the seam, but be careful not to sand away the beautiful texture you created. -
Painting the Stone Look:
If your clay isn’t already the desired color, dilute some light grey or warm beige acrylic paint with water (a wash). Brush this over the pot and wipe it back immediately with a paper towel. The paint will settle into the texture pits, enhancing the stone effect. -
Seal the Inside:
Since air-dry clay dissolves with water, apply two or three coats of a waterproof varnish or sealant to the *inside* of the pot to protect it from moisture. -
Start the Rope Wrap:
Apply a dab of strong glue to the back of the pot, right in the center of where your rope band will go. Press the end of your rope into the glue to anchor it. -
Coil the Rope:
Slowly wrap the rope around the pot, applying small dots of glue every inch or so to keep it secure. Ensure the coils are packed tightly against each other so no clay shows through between the rope strands. -
Finish the coil:
Once you have three or four nice rows of rope, cut the end at an angle. Glue it down firmly on the back side, tucking the raw end flush against the previous coil to hide it. -
Final Seal:
Give the exterior clay (avoiding the rope) a quick coat of matte spray sealant to protect your paint job and texture from handling.
Clay Cracking?
If small cracks appear while drying, don’t panic. Mix a small slurry of fresh clay and water (slip) and fill the cracks, then smooth over.
Now you have a sturdy, textured home ready for your favorite little green friend
Molded Desk Organizer With Little Pocket Sections
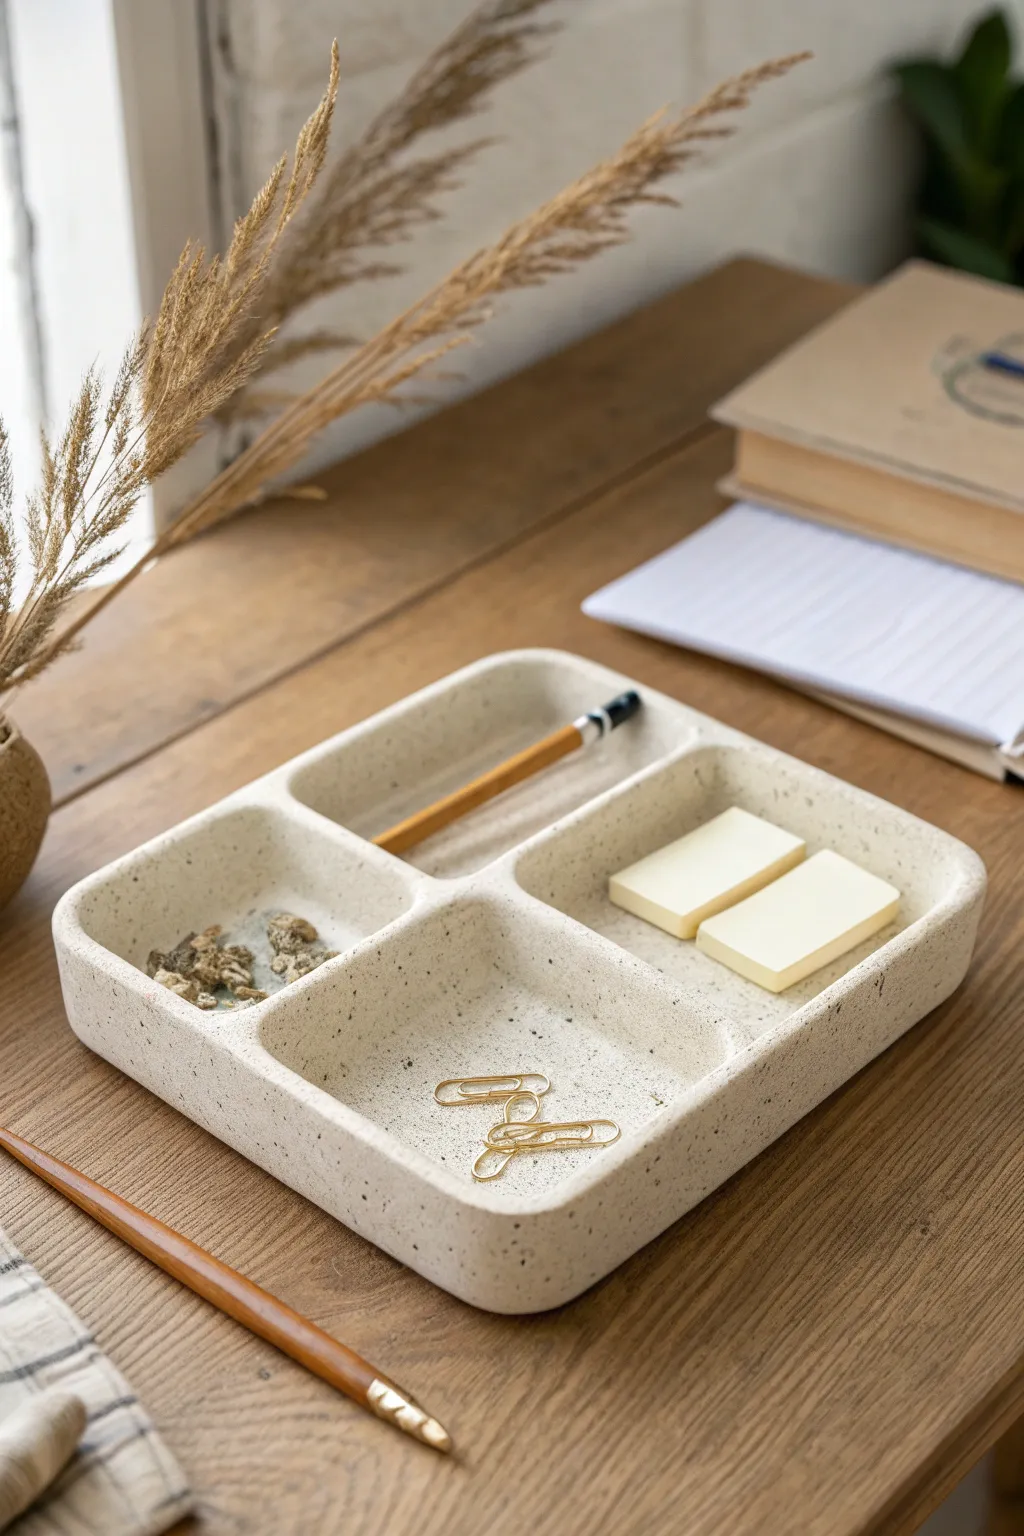
Bring a touch of organic minimalism to your workspace with this segmented desk tray that mimics the look of speckled stoneware. This beginner-friendly project uses air-dry clay to create bespoke compartments perfect for corralling clips, sticky notes, and accessories.
Step-by-Step Guide
Materials
- Air-dry clay (white or cream)
- Black pepper or dried tea leaves (for speckling)
- Rolling pin
- Sharp craft knife
- Ruler
- Small bowl of water
- Sandpaper (medium and fine grit)
- Matte acrylic varnish
- Sponge or soft paintbrush
Step 1: Preparing the Speckled Clay
-
Condition the clay:
Start by taking a large block of white air-dry clay and kneading it thoroughly in your hands until it becomes warm, soft, and pliable. -
Add texture:
To achieve that natural, stony look without painting, sprinkle a generous pinch of coarse black pepper or dried tea leaves onto the clay. -
Mix it in:
Fold the clay over itself repeatedly and continue kneading until the specks are evenly distributed throughout the entire lump.
Cracks happen!
If small hairline cracks appear while drying, mix a tiny bit of fresh clay with water to make a thick paste. Fill the cracks, smooth over, and let dry again.
Step 2: Forming the Base
-
Roll out the slab:
Place the clay on a smooth surface and use a rolling pin to flatten it into an even slab, aiming for a thickness of about 1/4 inch (6mm). -
Cut the rectangle:
Using your ruler as a guide, cut out a large rectangle with your craft knife. This will be the base of your organizer roughly 6×6 inches or your desired size. -
Round the corners:
Gently use your finger or a sculpting tool to round off the sharp corners of the rectangular base for a softer, organic feel.
Pro Tip: Weighted Drying
To keep the base perfectly flat as it dries, place a small piece of parchment paper inside, followed by a light book or a flat board for the first few hours.
Step 3: Building the Walls
-
Create strips:
Roll out the remaining clay to the same thickness and cut long strips that are about 1 inch wide. These will become your outer and inner walls. -
Attach the perimeter:
Score the edges of your base and the bottom of a clay strip with a cross-hatch pattern. Apply a little water to create slip. -
Secure the outer wall:
Press the strip onto the edge of the base, working your way around the perimeter. Trim any excess and join the ends seamlessly. -
Blend the seams:
Using a modeling tool or your finger, smooth the clay where the wall meets the base, both inside and outside, until the seam disappears.
Step 4: Creating Compartments
-
Measure the dividers:
Decide on your layout—a four-section grid works beautifully. Measure the interior width and length to cut your divider strips to size. -
Insert the main divider:
Score and slip the ends and bottom of your long center divider strip. Place it into the tray, pressing it firmly against the base and side walls. -
Add cross-sections:
Cut smaller strips to create the perpendicular dividers. I find it helpful to visually mock up the spacing before committing with slip. -
Smooth connections:
Use a small tool or wet paintbrush to smooth all the interior corners where the dividers meet the walls and floor, ensuring strong bonds. -
Refine the edges:
Once assembled, dip your finger in water and run it along the top rims of all the walls to round them off and remove any sharp ridges.
Step 5: Finishing Touches
-
Let it dry:
Allow the piece to dry slowly in a cool place for 24-48 hours. Rotate it occasionally to prevent warping. -
Sand for smoothness:
Once fully dry and hard, use medium grit sandpaper to level out any bumps, followed by fine grit to make -
Seal the surface:
Apply a coat of matte acrylic varnish with a sponge or soft brush to protect the clay and bring out the contrast of the speckles.
Now your workspace has a custom spot for every little thing to live in style
Chunky Candle Holder With Cutout Windows

This rustic candle holder mimics the charm of old-world architecture with its thick walls and arched cutout windows. The textured terracotta finish gives it a grounded, earthy feel that looks beautiful with a simple pillar candle flickering inside.
Step-by-Step Tutorial
Materials
- Terracotta-colored air-dry clay or polymer clay (approx. 1-2 lbs)
- Large rolling pin
- Sharp craft knife or scalpel
- Ruler or straight edge
- Cardboard tube or glass jar (approx. 4-inch diameter) to use as a mold
- Parchment paper
- Small sponge
- Clay slip (water mixed with clay scraps) or scoring tool
- Sandpaper (medium grit)
- Small arch template (cut from cardstock)
Step 1: Preparing the Slab
-
Measure your mold:
Begin by measuring the circumference and height of the cylindrical object you plan to use as a form. Add about half an inch to the circumference measurement to account for the overlap seam later. -
Roll out the clay:
Roll your terracotta clay out onto parchment paper. You want a substantial thickness here, roughly 1/4 to 1/2 inch thick, to achieve that chunky, rustic look seen in the photo. -
Cut the rectangle:
Using your ruler and craft knife, cut a clean rectangle based on the dimensions you measured earlier. Keep the excess clay handy for the base. -
Create the texture:
Before assembling, add texture to the flat slab. I like to gently press a crumpled ball of aluminum foil or a coarse sponge against the surface to create those natural-looking pits and divots.
Texturing Tip
Mix gritty elements like sand or used coffee grounds directly into your clay body before rolling it out. This creates deep, authentic texture that painting alone can’t achieve.
Step 2: Cutting the Windows
-
Make an arch template:
Cut a small arched window shape out of thick cardstock. The size should be roughly 1.5 inches tall by 1 inch wide, but adjust based on your cylinder’s total height. -
Plan the placement:
Lightly trace the template onto your flat clay slab using a needle tool. Create two rows of windows, ensuring they are evenly spaced. The windows in the top row should align directly above the windows in the bottom row. -
Cut out the shapes:
Carefully cut along your traced lines with the craft knife. Remove the clay pieces. If the edges are too sharp, dampen your finger and gently smooth them, but leave them slightly rough for character. -
Check spacing:
Ensure there is at least a half-inch of solid clay between each window to maintain structural integrity when you stand it up.
Step 3: Assembly
-
Prepare the mold:
Wrap your cardboard tube or jar in parchment paper. This prevents the clay from sticking to the form and makes removal much easier. -
Form the cylinder:
Lift the entire slab (still on its backing paper if needed for support) and wrap it around your form. Bring the two short ends together. -
Join the seam:
Score the edges where they meet by scratching cross-hatch marks, then apply a little water or slip. Press the edges firmly together to seal the cylinder. -
Blend the join:
Smooth over the seam with your fingers or a modeling tool so it disappears into the texture. You may need to re-apply texture to this area using your foil ball. -
Cut the base:
Roll out a separate piece of clay for the base. Place your clay cylinder (still on the form) onto this slab and trace around it, then cut out the circle. -
Attach the base:
Score and slip the bottom edge of the cylinder and the outer edge of the base circle. Press them together firmly. -
Reinforce the bottom:
On the inside of the cylinder, use a small coil of clay to reinforce the seam where the wall meets the floor, smoothing it down for a watertight seal.
Make it Shine
Once dry, rub a tiny amount of white wax or diluted gray paint into the textured crevices and wipe away the excess. This highlights the ‘stone’ texture and gives it depth.
Step 4: Finishing Touches
-
Initial drying:
Let the piece sit on the form for about 1-2 hours until it is leather-hard and can support its own weight without slumping. -
Remove the form:
Carefully slide the cardboard tube or jar out of the clay cylinder. Peel away the parchment paper lining. -
Refine the windows:
Now that the form is gone, check the inside edges of your windows. Smooth any ragged bits of clay that might catch the light. -
Final drying:
Allow the candle holder to dry completely. For air-dry clay, this takes 24-48 hours; for polymer, bake according to package instructions. -
Sanding:
Once fully cured, use sandpaper to rough up the exterior slightly if you want an even more weathered, stone-like appearance.
Place a cream-colored pillar candle inside and enjoy the warm, architectural shadows it casts on your walls
Hanging Clay Suncatchers With Cutouts
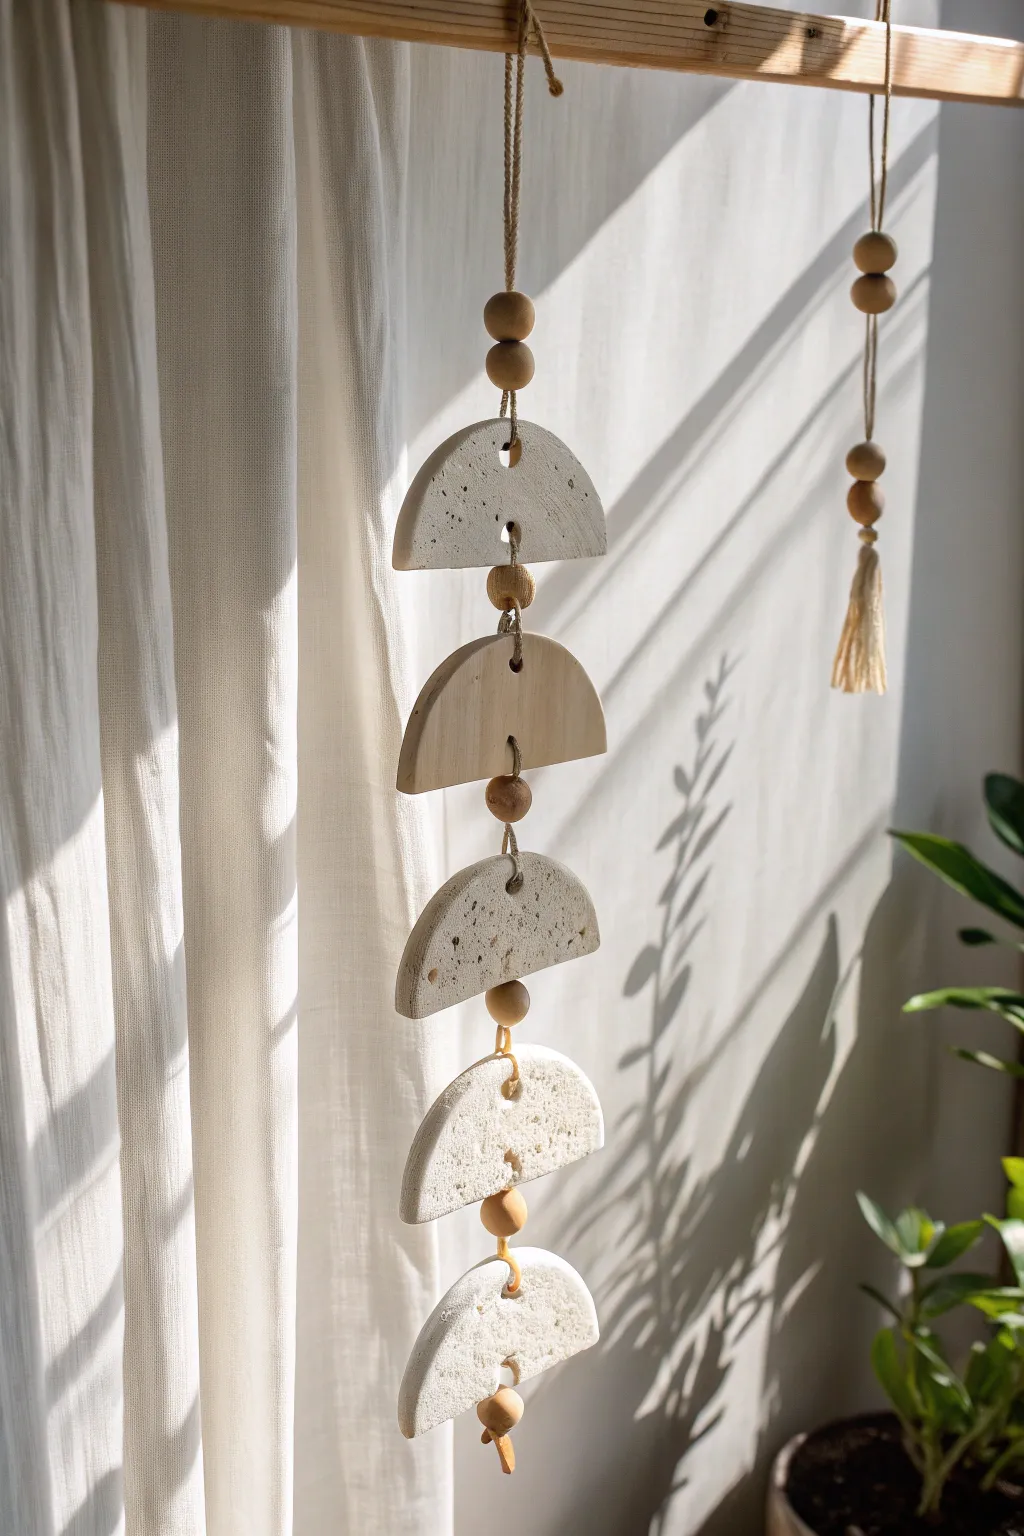
Brighten up any window or blank wall with this textured, geometric mobile that captures the light beautifully. Combining the earthy feel of speckled clay with the warmth of natural wood, this hanging piece adds a serene, modern bohemian touch to your decor.
Step-by-Step Tutorial
Materials
- Air-dry clay (white and optionally a grey/stone effect variety)
- Rolling pin
- Circle cookie cutter (approx. 3-4 inches diameter)
- Fettling knife or bench scraper
- Wooden skewer or toothpick
- Sandpaper (fine grit)
- Natural jute twine or hemp cord
- Wooden beads (assorted sizes, natural finish)
- Wooden dowel or driftwood branch
- Used coffee grounds or black pepper (optional for texture)
- Clear matte sealant spray
Step 1: Shaping the Clay Elements
-
Prepare your clay:
Begin by conditioning your air-dry clay. If you want that speckled, stone-like texture shown in the bottom pieces, knead in a small pinch of used (dried) coffee grounds or cracked black pepper into white clay. Alternatively, you can marble two different colors of clay together. -
Roll it out:
Roll your clay out on a smooth surface to an even thickness of about 1/4 inch. If you want a smooth finish, wipe the surface gently with a damp finger to remove any canvas marks. -
Cut the circles:
Use your large circle cutter to stamp out three perfect circles. This project uses halves, so three full circles will yield six semi-circles, giving you one extra just in case. -
Create the semi-circles:
Use a sharp knife or a bench scraper to cut each circle directly in half. Try to make a swift, clean cut to keep the straight edge crisp. -
Add holes for hanging:
While the clay is still wet, use a wooden skewer to poke holes. You will need one hole centered near the top curve and one hole centered near the flat bottom edge of each semi-circle to connect them. -
Refine the edges:
Dip your finger in a little water and run it along the cut edges to smooth out any roughness or jagged bits from the cutting process. -
Drying time:
Lay your pieces flat on a piece of parchment paper or a wire rack to dry. I find flipping them over halfway through the drying process helps prevent them from curling. Let them cure for 24-48 hours.
Fixing Cracks
If hairline cracks appear while drying, mix a tiny bit of fresh clay with water to make a paste (slip). Fill the crack, smooth it over, and let it dry again before sanding.
Step 2: Sanding and Assembly
-
Sand for smoothness:
Once fully dry, take your fine-grit sandpaper and gently sand the edges and faces of the semi-circles. The goal is a matte, organic finish, so don’t over-polish. -
Seal the distinct pieces:
Spray a light coat of clear matte sealant over the pieces to meaningful protect them from humidity and dust. Let this dry completely before handling. -
Start the stringing:
Cut a long length of jute twine, roughly 3 feet. Tie a secure knot at the very bottom end. You can add a decorative wooden bead here as a stopper if you like. -
Thread the first piece:
Thread the twine through the bottom hole of your first semi-circle (the lowest one in the design) and up through the top hole. The clay shape should rest on your knot or bottom bead. -
Add spacing beads:
Slide one or two wooden beads onto the twine. These act as spacers between your clay tiers. Tie a simple overhand knot right above the bead to keep the next clay piece from sliding down too far. -
Attach the next tier:
Thread the twine through the bottom hole of the second semi-circle. Pull the twine up until the clay rests on the knot you just created, then thread it out through the top hole. -
Repeat and vary:
Continue this pattern: add a wooden bead spacer, tie a supporting knot, and thread a clay semi-circle. Notice how the original piece alternates textures—try alternating your speckled and plain shapes. -
Final attachment:
Once all five pieces are strung, add a few final wooden beads to the top of the twine. -
Mount to the dowel:
Tie the top of the twine securely around the center of your wooden dowel or branch. Trim any excess string. -
Create the hanger:
Cut another piece of twine and tie it to both ends of the wooden dowel to create the main hanging loop for the wall.
Add a Tassel
Make a simple tassel out of the same jute twine or cream cotton yarn. Attach it to the very bottom of the structure for extra movement and length.
Hang your new creation in a sunny spot and enjoy the organic shadows it casts throughout the day
Mini Clay Room Scene Relief Plaque
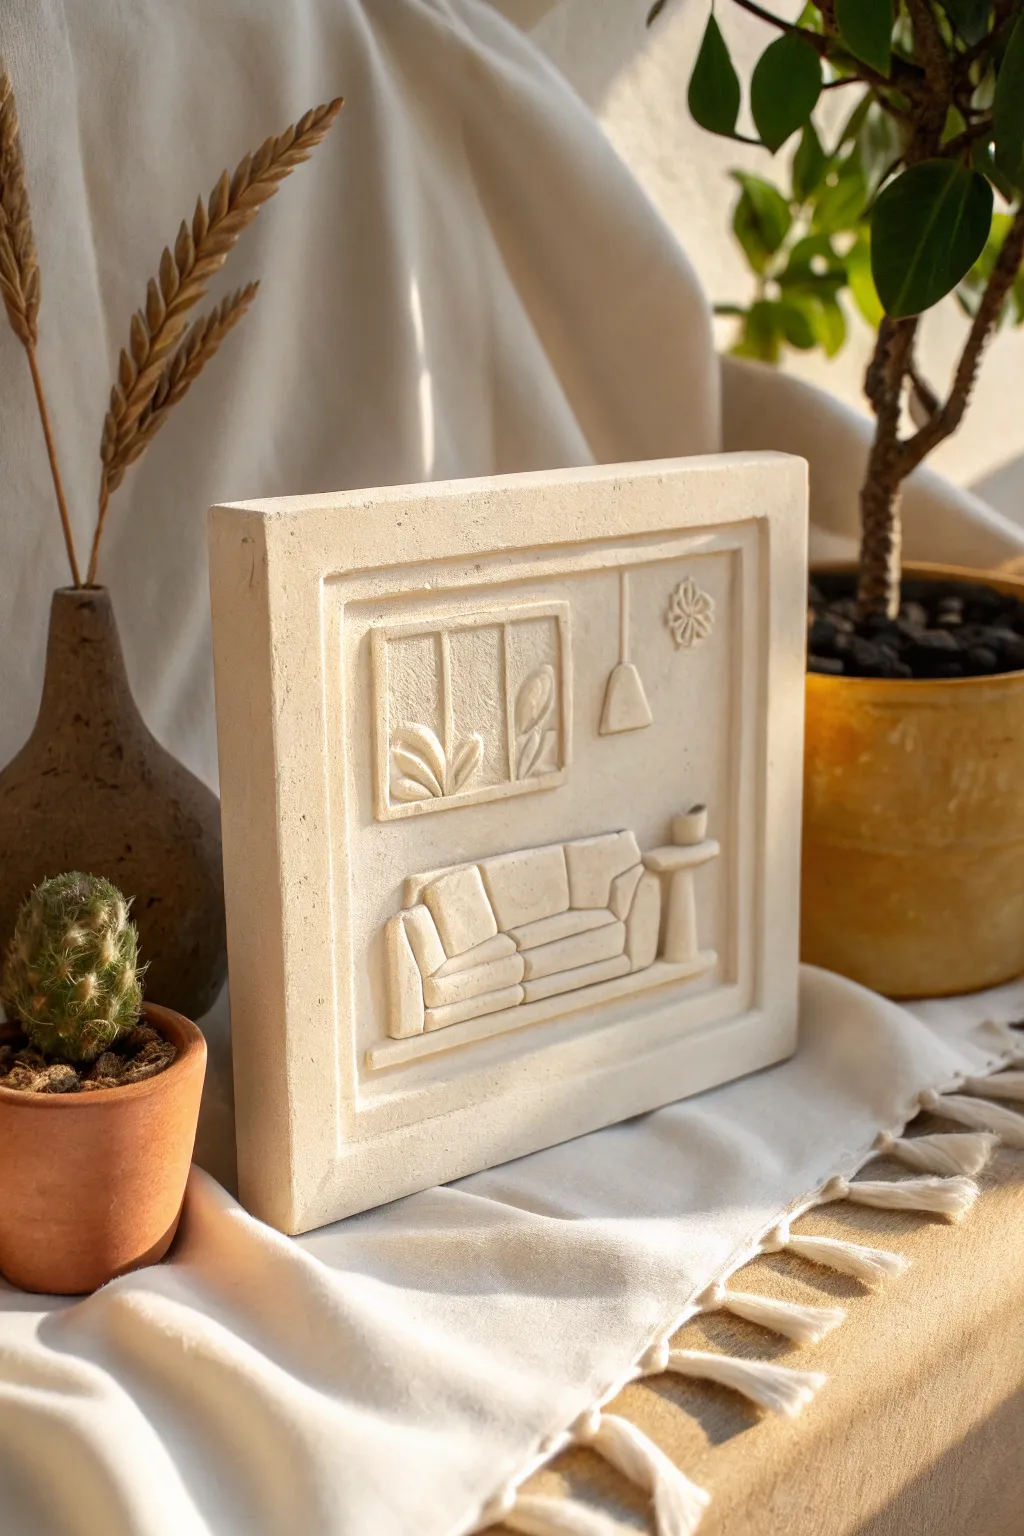
Capture the essence of a peaceful afternoon with this minimalist clay relief sculpture. Using simple layering techniques, you’ll build a charming 3D living room scene that brings a warm, architectural touch to any shelf.
Step-by-Step
Materials
- Air-dry clay (stone, cream, or white)
- Rolling pin
- Square cookie cutter or knife and ruler
- Clay carving tools (needle tool, small spatula)
- Small cup of water (for slipping and scoring)
- Fine-grit sandpaper
- Matte sealant (optional)
Step 1: Base Construction
-
Roll the foundation:
Begin by rolling out a thick slab of clay, approximately 1/2 inch thick. This needs to be sturdy enough to support the relief work without warping. -
Cut the square:
Use a square cutter or a ruler and knife to cut a perfect square shape for your plaque. Smooth the cut edges with a damp finger to remove any sharpness. -
Create the frame:
Roll out a long, thin snake or strip of clay. Flatten it slightly so it looks like molding. -
Attach the border:
Score the outer edges of your square base and apply a tiny bit of water. Lay the flattened clay strips around the perimeter to create a recessed ‘frame’ effect, trimming the corners at 45-degree angles for neat joints.
Step 2: Sculpting the Scene
-
Sketch the layout:
Lightly trace the outline of your scene directly onto the clay base using a needle tool. Mark where the sofa, window, and lamp will go. -
Cut the sofa shape:
Roll a small slab of clay, thinner than your base but thick enough to stand out. Cut a rectangle for the sofa back and a thicker, lower rectangle for the seat. -
Mount the sofa:
Score the back of your sofa pieces and the spot on the base where they will sit. Press them firmly onto the plaque, smoothing the edges downward to blend them slightly. -
Add armrests:
Shape two small, curved blocks of clay and attach them to either side of the seat to form the armrests. -
Detail the cushions:
Press shallow lines into the seat and backrest to suggest separate cushions. Add two small, square ‘throw pillows’ made of thin clay slabs to the corners of the sofa. -
Build the window frame:
Form a small rectangular slab for the window. Attach it to the upper left quadrant. Add extremely thin snakes of clay across it to create the vertical window panes. -
Add foliage:
Roll tiny teardrop shapes and flatten them. Arrange these ‘leaves’ inside the window frame area to look like a houseplant is peeking through from outside. -
Hang the lamp:
Create a small triangle or cone shape for the lampshade. Attach it to the right of the window, then roll a very thin thread of clay to connect the shade to the ceiling line. -
Sculpt the side table:
Place a small cylinder or rectangle to the right of the sofa for a side table. Include a tiny cup on top for a ‘lived-in’ detail. -
Include wall decor:
Add a small floral motif or circular decoration in the top right corner to balance the composition.
Stone Texture Trick
Before drying, gently dab the surface with an old toothbrush or a ball of aluminum foil. This adds a realistic sandstone texture.
Step 3: Fining and Finishing
-
Refine the edges:
Go over every seam with a modeling tool. You want the objects to look crisp and distinct, not melded together like a single lump. -
Final smooth:
Dip a soft brush in water and gently sweep it over the entire piece to remove fingerprints and harsh tool marks. -
Dry slowly:
Place the relief on a wire rack away from direct heat. I find rotating it occasionally helps prevent the corners from curling up as it shrinks. -
Sand for perfection:
Once fully cured (24-48 hours), use fine-grit sandpaper to buff the frame edges and the surface of the sofa for a stone-like finish. -
Seal:
Apply a clear matte sealant or varnish to protect the clay from dust and moisture while keeping that natural look.
Make it a Coaster
Skip the hanging hardware and glue a square of cork to the back. Use waterproof sealant, and you have a unique sculptural coaster.
Display your miniature room on a mantle or bookshelf to add a quiet moment of artistry to your space