I still get a little thrill every time a plain lump of clay turns into something you’ll actually use at home. These molding clay ideas for adults lean modern, functional, and just artsy enough to look like they belong on your shelf—not in a toy box.
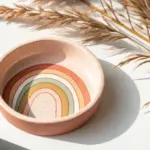
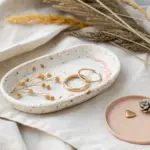
Minimalist Ring Dish With Stamped Texture
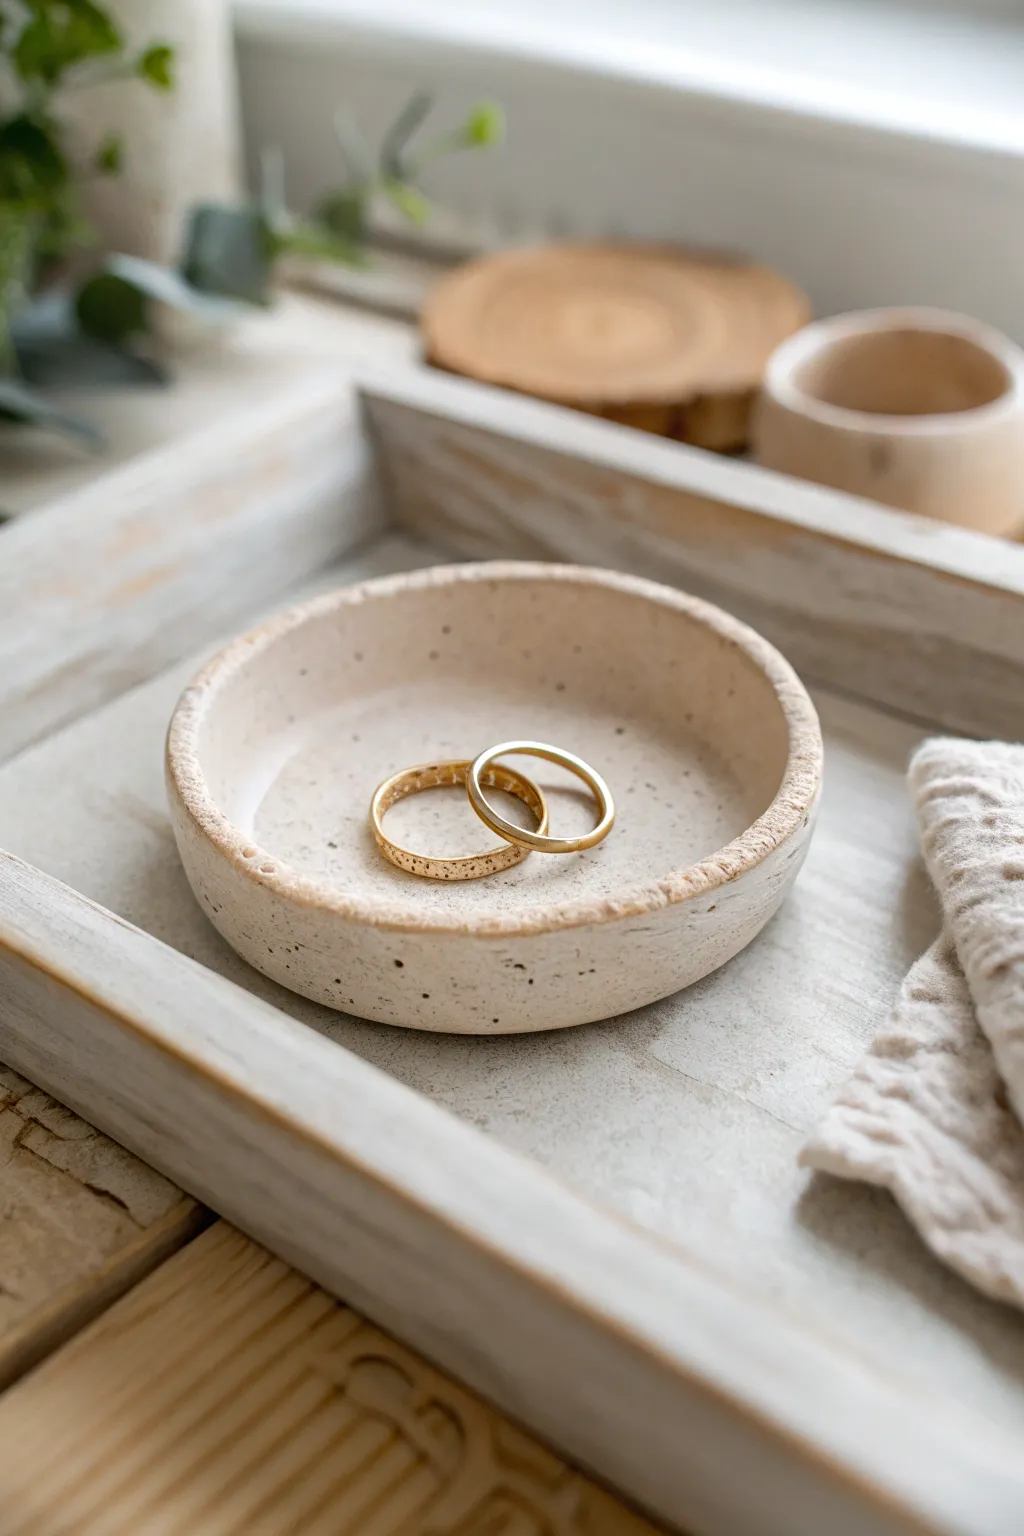
Embrace the beauty of imperfection with this minimalist ring dish that mimics the look of natural speckled stone. Its shallow, organic form and subtle textures create the perfect resting spot for your everyday jewelry.
Step-by-Step Tutorial
Materials
- White or beige air-dry clay (or polymer clay)
- Used coffee grounds or black pepper (for speckling)
- Rolling pin
- Small bowl or round cookie cutter (approx 4-5 inches)
- Small sponge
- Sandpaper (fine grit)
- Matte sealant or varnish
- Water bowl
- Craft knife
Step 1: Preparing the Clay
-
Condition the clay:
Start by taking a handful of your clay and kneading it in your hands until it becomes soft, pliable, and free of cracks. -
Add texture inclusions:
To achieve that beautiful speckled stone look seen in the photo, flatten your clay slightly and sprinkle in a pinch of dried coffee grounds or coarse black pepper. -
Incorporate the speckles:
Fold the clay over the inclusions and knead thoroughly again. Continue folding and kneading until the speckles are evenly distributed throughout the batch. -
Roll it out:
Place the clay on a smooth surface. Use a rolling pin to flatten it into an even slab, aiming for a thickness of about 1/4 inch.
Step 2: Shaping the Form
-
Cut the circle:
Place your bowl or round cutter onto the rolled clay slab. Press down firmly to cut out a perfect circle, or trace around the bowl with a craft knife. -
Softening the edge:
Dip your finger in a little water and run it gently along the cut edge of the circle to smooth out any sharpness or loose bits of clay. -
Creating the rim:
Gently lift the edges of the circle upwards to create a shallow wall. I like to pinch the clay slightly between my thumb and forefinger as I go around to build height. -
Refining the curve:
To get that gentle, shallow curve, place the clay circle inside a slightly larger bowl to help it hold its concave shape, or simply cup it in your palm and press the center down gently.
Clean Edges Trick
Use a slightly damp sponge to smooth the rim immediately after cutting the circle. It saves hours of sanding time later.
Step 3: Texturing and Drying
-
Adding texture to the rim:
The dish in the image has a lovely organic, porous texture on the rim. Use a dry sponge or a crumpled piece of aluminum foil and lightly dab it along the top edge of the rim. -
Smoothing the interior:
Ensure the inside of the dish is smooth so rings won’t catch. If you made marks while shaping, rub them out gently with a slightly damp finger. -
Initial drying:
Let the dish sit undisturbed for about 24 to 48 hours. Keep it away from direct heat sources to prevent cracking. -
Checking dryness:
The clay should turn a lighter color and feel hard to the touch when fully dry. If it feels cool, it likely still contains moisture.
Gilded Edge Upgrade
Once the sealant is dry, paint just the very top uneven rim with gold liquid leaf for a luxe, mixed-metal aesthetic.
Step 4: Finishing Touches
-
Sanding:
Once bone dry, take fine-grit sandpaper and very gently sand any rough spots on the bottom or the interior. Leave the rim texture intact for character. -
Dusting off:
Wipe the dish down with a dry cloth or soft brush to remove any clay dust from sanding. -
Applying sealant:
Apply a coat of matte varnish or sealant. This protects the clay from moisture and gives it a finished, professional look without making it too shiny. -
Final cure:
Allow the sealant to dry completely according to the manufacturer’s instructions before placing any jewelry inside.
Now you have a serene, nature-inspired vessel ready to hold your favorite treasures on your nightstand


Abstract Face Vase for Dried Stems
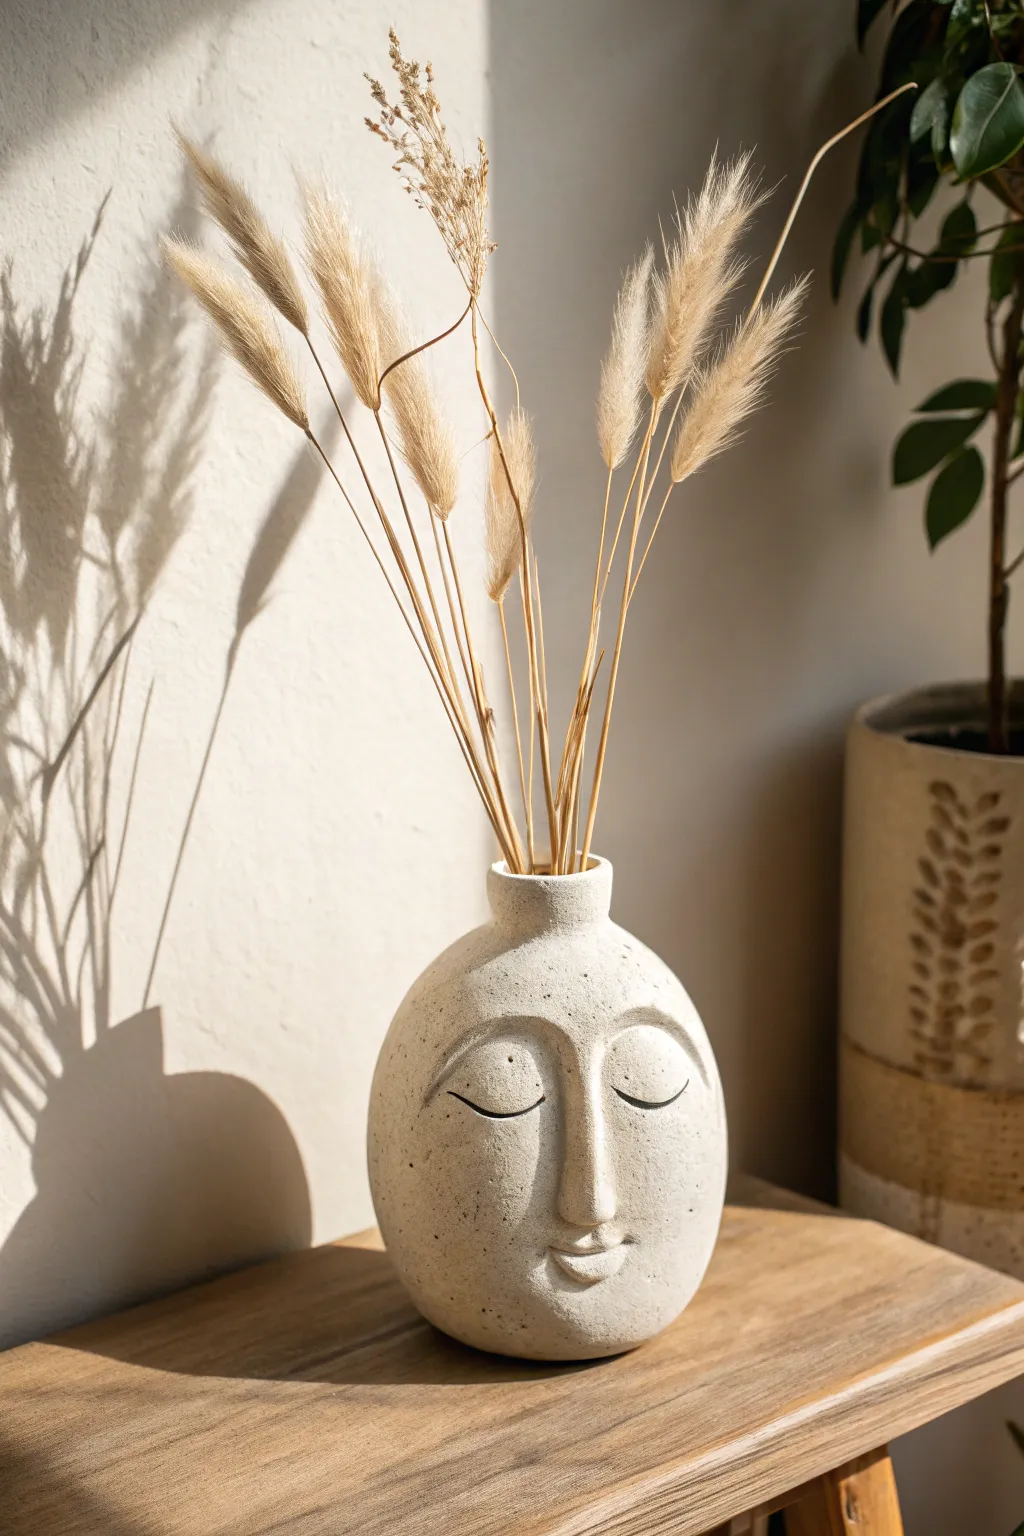
Sculpt a peaceful, monolithic mood into your home decor with this rounded face vase, perfect for displaying dried grasses or bunny tails. The project features a speckled, stone-like finish and calming features that evoke the stillness of ancient statues.
Step-by-Step Guide
Materials
- Air-dry clay (white or cream)
- Pinch pot or pottery tools (specifically a needle tool and a small loop tool)
- Rolling pin
- Small sponge
- Bowl of water
- Fine-grit sandpaper
- Acrylic paint (cream/off-white and charcoal grey)
- Speckle medium or an old toothbrush for splattering
- Matte sealant or varnish
Step 1: Forming the Base
-
Prepare the Clay:
Start with a large ball of air-dry clay, roughly the size of a grapefruit. Knead it well to remove air bubbles and warm it up, ensuring it’s pliable but sturdy. -
Create a Pinch Pot:
Push your thumb into the center of the ball, stopping about an inch from the bottom. Gently pinch and rotate the clay to open up the internal cavity, aiming for an even wall thickness of about half an inch all around. -
Shape the Sphere:
Once the cavity is established, cup your hands around the exterior and gently collaring the rim inward to create a more enclosed, spherical egg shape rather than an open bowl. -
Add the Neck:
Roll a thick coil of clay and attach it to the top opening. Score and slip (scratch the surfaces and add wet clay water) to join the coil securely, then smooth it upwards to form a short, narrow bottle neck. -
Smooth the Canvas:
Use a damp sponge or your fingers to smooth out the entire surface of the vase. You want a seamless transition between the body and the neck before you begin sculpting the face.
Pro Symmetry Tip
Look at your sculpture in a mirror while working. The reflection instantly reveals lopsided features or uneven cheeks that your eyes might miss when looking directly at the clay.
Step 2: Sculpting the Features
-
Map the Face:
Lightly trace a vertical center line with a needle tool to guide symmetry. Mark horizontal lines for where the eyebrows and nose tip will sit. -
The Nose Bridge:
Roll a small carrot-shaped piece of clay for the nose. Score and slip the area along the center line, then press the clay onto the vase. Blend the edges of the nose seamlessly into the forehead and cheeks so it looks like it’s emerging from the form, not just stuck on. -
The Brow Line:
Add small pads of clay above the eyes to build up a subtle brow bone. This adds dimension and creates a natural shadow where the eyes will be drawn later. -
Mouth and Lips:
Add a very small, flattened oval of clay below the nose. Use a sculpting tool or knife to slice a horizontal line for the mouth, gently curving the corners up for a serene smile. Smooth the edges into the surrounding cheek area. -
Refine the Profile:
Turn the vase to the side to check the profile. I often add a little extra clay to the chin area to ensure it protrudes enough to balance the nose.
Fixing Cracks
If small hairline cracks appear while drying, don’t panic. Mix a small amount of clay with vinegar to make a paste, fill the crack, let it dry, and sand it smooth before painting.
Step 3: Finishing and Painting
-
Dry Completely:
Let the vase dry slowly for 24-48 hours. Keep it loosely covered with plastic for the first day to prevent cracking, then uncover it to finish drying. -
Sand for Texture:
Once bone dry, use fine-grit sandpaper to smooth any harsh tool marks, paying special attention to the neck rim and the nose bridge. -
Base Coat:
Paint the entire vase with a cream or off-white acrylic paint. Apply two coats for solid coverage, letting it dry between layers. -
Stone Effect:
To get that speckled pottery look, dip an old toothbrush into slightly watered-down grey or brown paint. Run your thumb over the bristles to flick tiny speckles across the vase surface. -
Detailing the Eyes:
Using a very fine liner brush and black or dark charcoal paint, paint two simple, downward-curving crescents for the closed eyes. Keep the lines thin and elegant. -
Seal the Work:
Because this is for dried stems, a waterproof sealant isn’t strictly necessary, but a matte varnish will protect the paint and give it a professional, finished sheen.
Place your favorite dried bunny tails or wheat stalks inside to complete this tranquil, artful display


Pinch-Pot Tea Light Holders Set
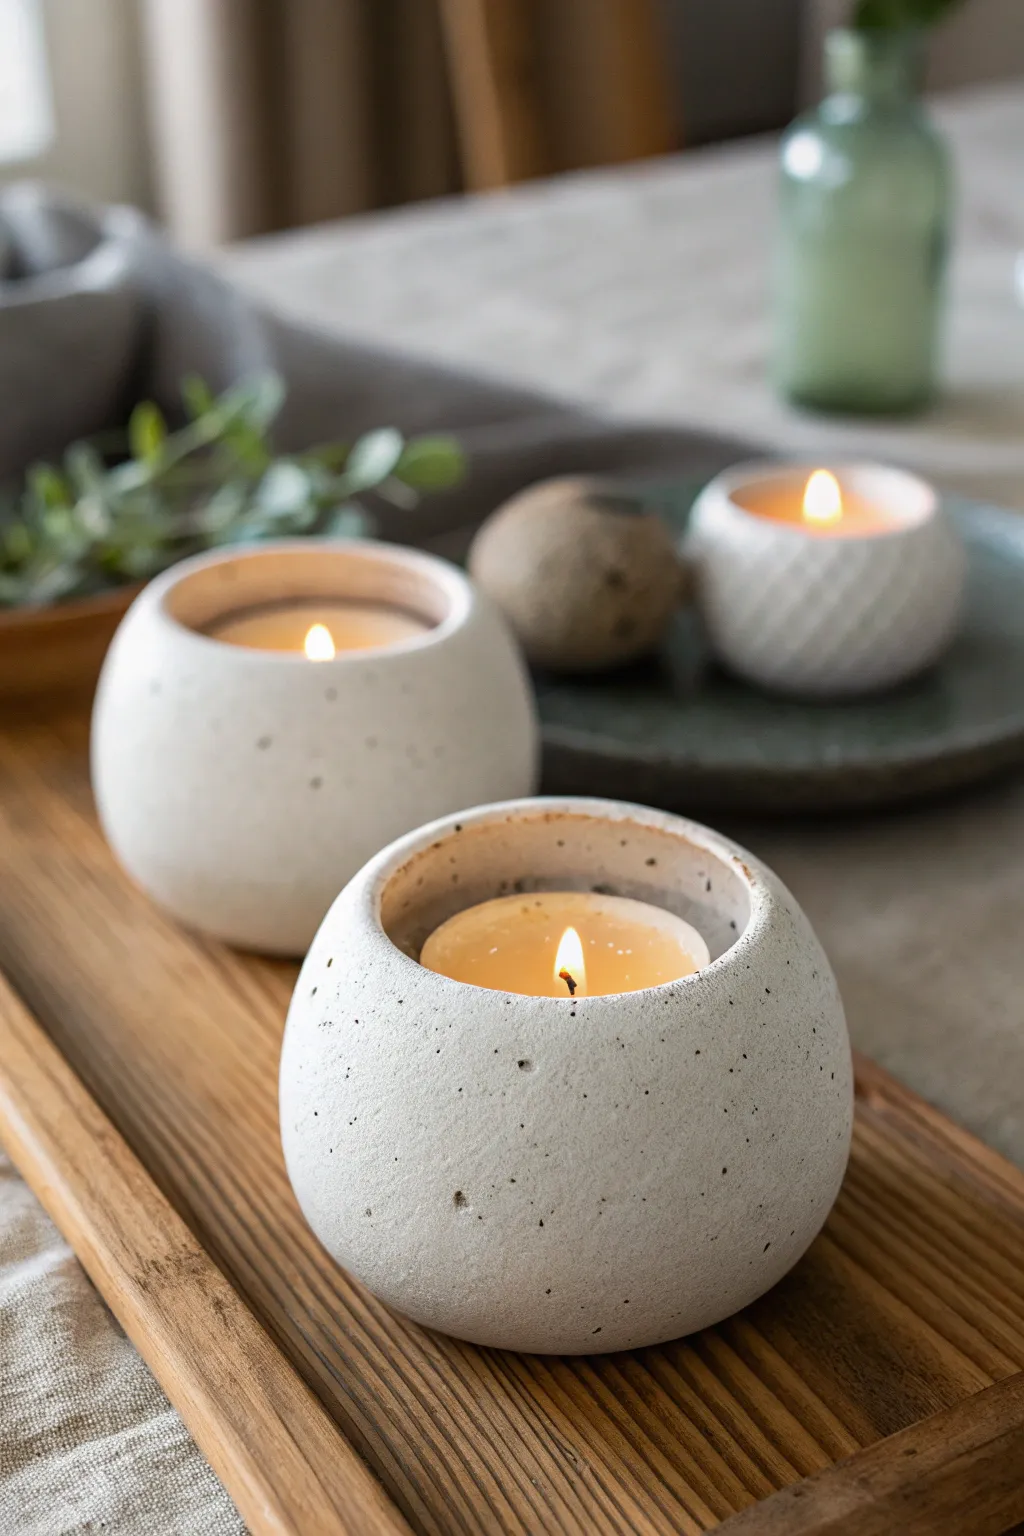
Embrace the beauty of modern simplicity with this set of three rounded tea light holders that mimic the look of speckled stone or concrete. Using simple pinch-pot techniques, these holders create a cozy, serene atmosphere with their organic shapes and soft candlelight.
Step-by-Step
Materials
- White air-dry clay or white polymer clay
- Coarse black pepper or dry used coffee grounds (for speckling)
- Small bowl of water
- Rolling pin
- Tea light candle (for sizing)
- Fine-grit sandpaper (200-400 grit)
- Matte varnish or sealant
- Sponge or soft cloth
- Modeling tool or butter knife
Step 1: Preparation and Mixing
-
Prepare the Clay Body:
Start with a generous block of white clay. To achieve that gorgeous speckled stone look shown in the photo, you will need to add texture directly into the clay body. -
Add the Speckles:
Flatten your clay slightly and sprinkle a small amount of coarse black pepper or dried coffee grounds onto the surface. Fold the clay over and knead thoroughly until the specks are evenly distributed throughout the mass. -
Divide the Clay:
Cut your clay into three equal portions to create a matching set, or vary the sizes slightly if you prefer a graduated look. -
Form Spheres:
Roll each portion of clay between your palms on a flat surface to create a tight, smooth ball. Ensure there are no major cracks or seams before moving on.
Cracks Appearing?
If small hairline cracks appear while drying, mix a tiny bit of fresh clay with water to make a paste (slip) and fill them in, then sand smooth once dry.
Step 2: Shaping the Pinch Pots
-
Begin the Pinch:
Hold one clay sphere in your non-dominant hand. Gently press your thumb into the center of the ball, but don’t push all the way through to the bottom. -
Widen the Opening:
Using a pinching motion with your thumb on the inside and fingers on the outside, slowly rotate the ball while pressing the walls outward. Aim for an even thickness of about 1/4 inch. -
Curve the Shape:
Instead of flaring the walls out like a bowl, gently curve them back inward slightly at the top to create that enclosed, spherical orb shape seen in the image. -
Check the Size:
Insert a tea light candle into the opening to ensure it fits comfortably. There should be a little wiggle room around the candle to allow for shrinkage during drying. -
Create a Flat Base:
Gently tap the bottom of the pot against your work surface. This creates a small flat spot so the holder will sit stable and level on the wooden tray later.
Textured Grip
Before drying, gently roll the outside of one pot over a piece of textured fabric or burlap to add a subtle woven pattern alongside the speckles.
Step 3: Refining and Finishing
-
Smooth the Rim:
Dip your finger in a little water and run it along the top rim of the opening. Use light pressure to smooth out any cracks or sharp edges, creating a soft, rounded lip. -
Refine the Surface:
Use a damp sponge to wipe the exterior of the pot. This smooths fingerprints and helps expose some of the speckled texture buried just under the surface. -
Dry Completely:
Set the pots aside to dry. If using air-dry clay, this may take 24-48 hours. Rotate them occasionally to ensure the bottom dries evenly. -
Sand for Texture:
Once fully dry, take a piece of fine-grit sandpaper and gently sand the exterior. This is crucial for achieving that matte, stone-like finish and will remove any remaining imperfections. -
Seal the Project:
Apply a coat of matte varnish to protect the clay. I usually avoid glossy finishes here because the matte look mimics real concrete much better.
Place your finished trio on a wooden tray and enjoy the warm glow of your handmade stone-look vessels


Modern Planter With Sculpted Feet
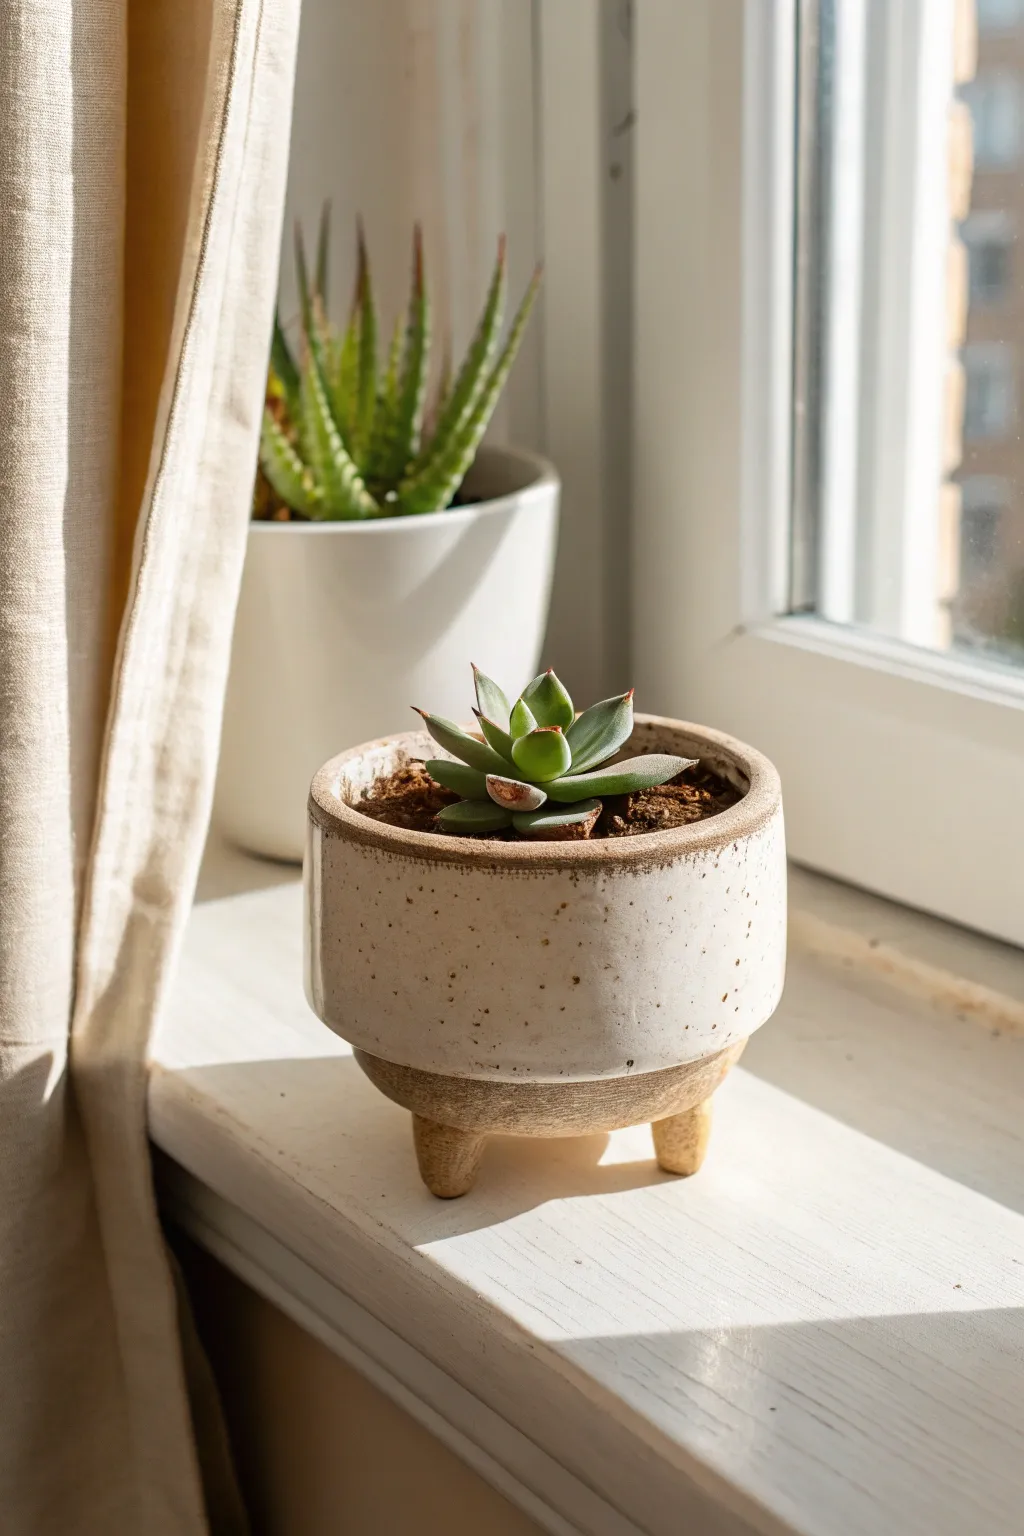
This charming little planter combines a rustic, speckled texture with a modern silhouette, featuring three sturdy feet and a two-toned glaze finish. It’s the perfect beginner-friendly project to elevate your succulent collection with a touch of handmade warmth.
Step-by-Step Guide
Materials
- Speckled buff stoneware clay (or polymer clay with faux speckles)
- Rolling pin
- Circle template or compass
- Fettling knife or clay needle tool
- Canvas mat or slab roller
- Slip and scoring tool (toothbrush works well)
- Wooden modeling tool
- Smoothing sponge
- White gloss glaze
- Clear glaze (optional for the bottom)
- Kiln (if using ceramic clay) or oven (if polymer)
Step 1: Forming the Base Body
-
Roll the slab:
Start by wedging your clay to remove air bubbles, then roll out a consistent slab about 1/4 inch thick. Using guide sticks on either side of your rolling pin helps keep the thickness perfectly even. -
Cut the components:
Using your template, cut out a circle for the base (approx. 4 inches in diameter). Next, cut a long rectangular strip for the walls; calculate the length by multiplying your base diameter by 3.14 (pi) and adding a little extra for overlap. -
Score and slip the base:
Take your scoring tool or a serrated kidney and rough up the outer edge of your circular base. Apply a generous amount of clay slip (liquid clay) to the scored area to act as glue. -
Attach the wall:
Carefully wrap the rectangular strip around the base circle, placing it on top of the scored edge. I like to bevel the short ends of the rectangle at a 45-degree angle where they meet to create a seamless flush joint. -
Seal the seams:
Use a wooden modeling tool to firmly blend the clay from the wall down into the base on both the inside and outside. Smoothing this connection is crucial so your pot doesn’t crack during firing. -
Refine the rim:
Use a damp sponge to smooth the top rim of the pot. You want a slightly rounded, soft edge rather than a sharp, cut one.
Wobbly Pot?
If the pot wobbles after attaching legs, place a piece of sandpaper on a flat surface and gently rub the dry (leather hard) feet in a circular motion to sand them perfectly level.
Step 2: Sculpting and Attaching Feet
-
Shape the feet:
Roll three equal-sized balls of clay, roughly the size of a large grape. Gently embrace each ball against your work surface to tap them into thick, tapered cones or cylinder shapes with flattened tops. -
Check for symmetry:
Line up your three feet next to each other to ensure they are the exact same height. Adjust as needed by tapping them on the table or adding small bits of clay. -
Mark placement:
Turn your pot upside down. Mark three equidistant points on the bottom of the pot where the feet will go. Think of a triangle shape to ensure stability. -
Score and slip feet:
Heavily score both the bottom of the pot at your marks and the flat tops of your clay feet. Add slip to both surfaces. -
Attach and compress:
Press the feet firmly onto the pot. Wiggle them slightly to lock the clay particles together. Use a small tool to blend the clay of the feet up onto the pot base, ensuring no air is trapped. -
Level the pot:
Flip the pot right-side up and gently tap it on the table. This ensures it sits level and doesn’t wobble. If it leans, press down gently on the high side until it corrects. -
Smooth the transition:
Use a damp sponge or finger to smooth out the attachment points of the feet, creating a clean line where the leg meets the body.
Step 3: Finishing and Glazing
-
Dry slowly:
Loosely cover your pot with plastic and let it dry slowly over a few days until it reaches the bone-dry stage. This prevents warping. -
Bisque fire:
Fire the piece in the kiln to cone 04 (or bake according to package directions if using oven-bake clay). Clean off any dust with a wet sponge after firing. -
Apply wax resist:
Paint liquid wax resist on the bottom of the feet and up the lower section of the pot, creating a straight line about 1/2 inch from the bottom. This will keep the raw, speckled clay exposed at the base. -
Glaze the interior:
Pour a white gloss glaze inside the pot, swirl it around to coat the entire interior surface, and pour out the excess. -
Dip the exterior:
Holding the pot by the foot area (or using tongs), dip the top portion into the white glaze, stopping exactly where your wax resist line begins. -
Final clean up:
Use a sponge to wipe away any stray droplets of glaze that might be sitting on top of the wax resist area. The bottom section should be clean clay. -
Glaze fire:
Fire the piece again to the temperature required for your specific clay and glaze body (typically cone 5 or 6 for stoneware).
Pro Tip: Texture
If you don’t have speckled clay, mix coarse black sand or iron oxide filings into plain white clay before rolling your slab to achieve that organic, spotted look naturally.
Once cooled, fill with a gritty soil mix and your favorite succulent to enjoy your handiwork

The Complete Guide to Pottery Troubleshooting
Uncover the most common ceramic mistakes—from cracking clay to failed glazes—and learn how to fix them fast.
Handbuilt Taper Candle Holder Duo
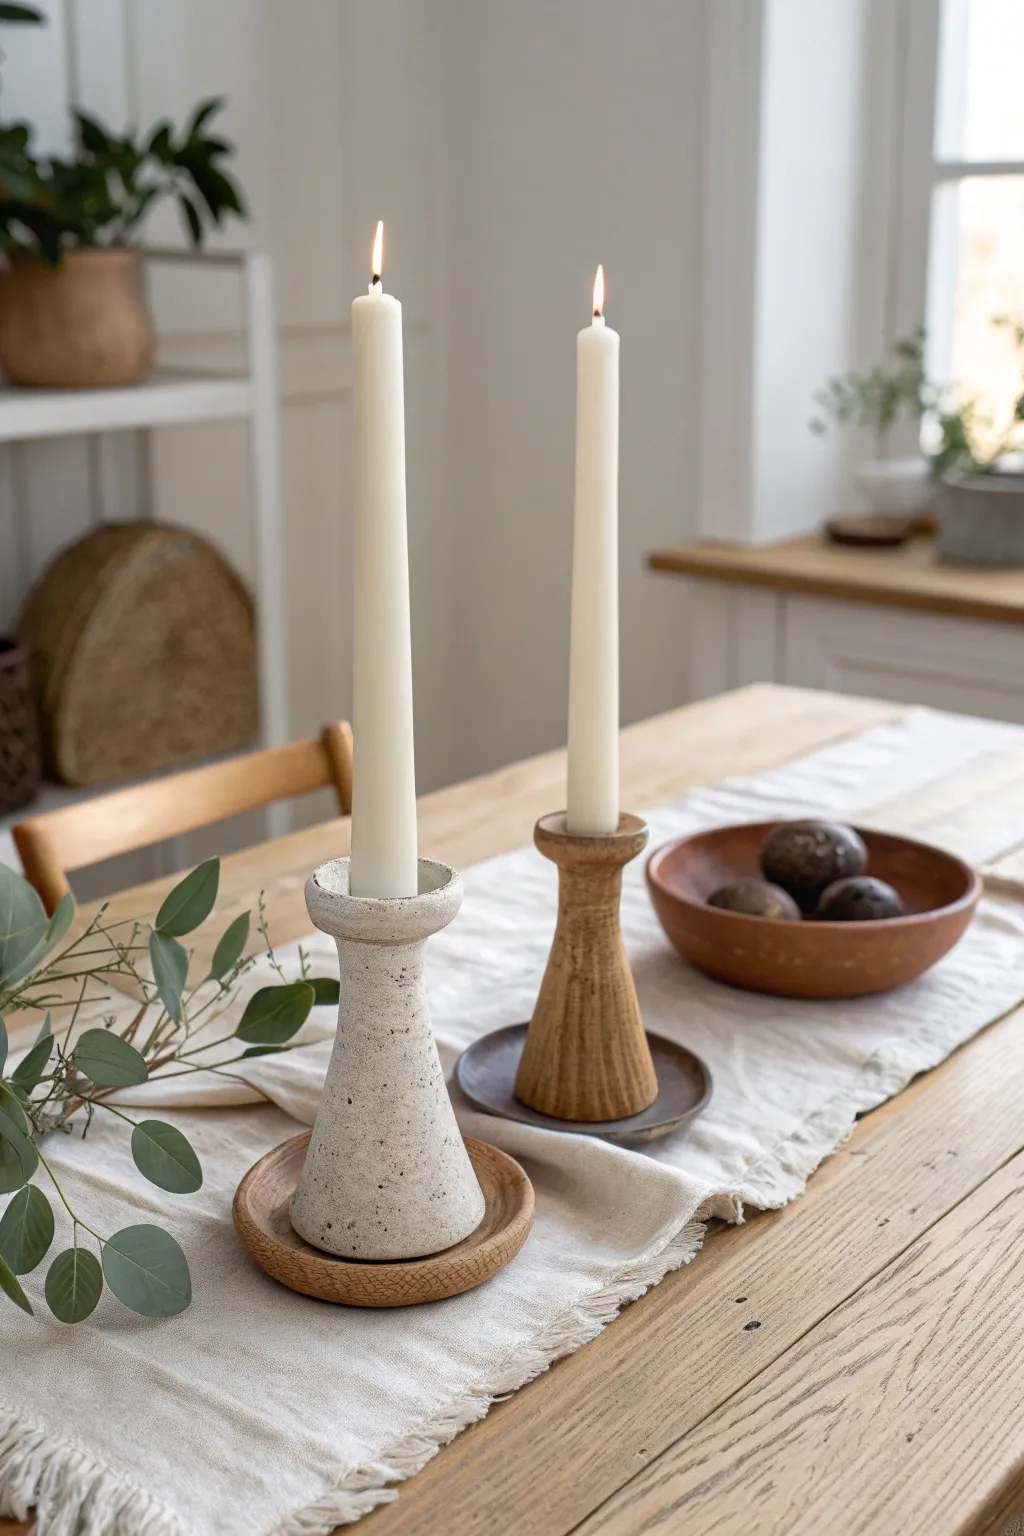
Bring an earthy, handmade touch to your dining table with these textured taper candle holders. This project focuses on simple hand-building techniques to create organic shapes that look like kiln-fired pottery without the wheel.
How-To Guide
Materials
- Air-dry clay (white or light grey)
- Rolling pin
- Canvas mat or parchment paper
- Clay knife or rib tool
- Slip (clay mixed with water)
- Small sponge
- Sandpaper (medium and fine grit)
- Acrylic paints (Cream, Stone Grey, Raw Sienna, Burnt Umber)
- Old toothbrush
- Matte spray varnish
- Taper candle for sizing
Step 1: Creating the Base
-
Roll the slab:
Begin by rolling out a medium-sized ball of clay into a flat slab, approximately 1/4 inch thick. This will ensure your holders feel substantial but aren’t too heavy. -
Cut the circles:
Using a circle cutter or a bowl as a template, cut two circles for the saucers—one slightly smaller than the other to match the visual variation in the photo. -
Form the shallow dishes:
Gently pinch up the edges of these circles to create a shallow lip. Smooth the rim with a damp finger to remove any sharp edges or cracks.
Wobbly Candle?
If the hole shrank too much and the candle won’t fit, gently sand the inside of the opening. If it’s too loose, melt a little wax into the bottom to secure the candle.
Step 2: Building the Stems
-
Roll a cone:
Take a larger lump of clay and roll it into a thick coil that tapers slightly, creating a cone shape. You’ll need two of these. -
Hollow the core:
Carefully push a tool handles or your thumb through the wider bottom of the cone to hollow it out partially, reducing weight and aiding drying time. -
Shape the neck:
Roll the clay on your surface while applying gentle pressure near the top third to create a ‘waist’ or slight curve inward before the top flares out. -
Size the candle opening:
Press a real taper candle gently into the top to create the socket. Wiggle it slightly to make the hole just a hair larger than the candle to account for clay shrinkage. -
Add the drip rim:
Roll a small snake of clay and attach it around the very top opening using scoring and slip. Flatten it slightly to create the distinct collar visible on the taller holder.
Level Up: Texture Play
Mix dried coffee grounds or sand directly into your wet clay before sculpting. This creates authentic internal texture that shows through wonderfully when sanded.
Step 3: Assembly & Texture
-
Attach stem to base:
Score (scratch) the bottom of your conical stem and the center of your shallow dish base. Apply slip to both scored areas and press firmly together. -
Smooth the seam:
Use a small clay tool or your finger to blend the clay where the stem meets the base so they become one seamless unit. -
Add surface texture:
Before the clay dries, gently tap the surface with a coarse sponge or a crumpled ball of foil to remove the ‘perfect’ smooth finish and add that rustic, stone-like character. -
Dry thoroughly:
Let the pieces dry completely for 24-48 hours. I like to rotate them occasionally so the bottom dries evenly. -
Refine the shape:
Once bone dry, use fine-grit sandpaper to soften any sharp ridges on the rims, but leave the body texture rough.
Step 4: Painting & Faux Finish
-
Base coat:
Paint the taller holder with a mixture of Cream and a drop of Stone Grey. Paint the shorter holder with a wash of Raw Sienna mixed with water for a wood-like stain. -
Create the speckles:
Dilute Burnt Umber paint heavily with water. Dip an old toothbrush into it, and flick the bristles with your thumb to spray tiny dark speckles over the white holder. -
Add depth to the brown holder:
Use a dry brush with darker brown paint to casually stroke vertical lines on the shorter holder, mimicking wood grain or vertical throwing lines. -
Seal the work:
Finish both pieces with a matte spray varnish to protect the paint and give it that non-shiny, raw ceramic look.
Place your new sculptural duo on a linen runner and enjoy the warm, cozy atmosphere they create
Textured Coaster Set With Botanical Imprints
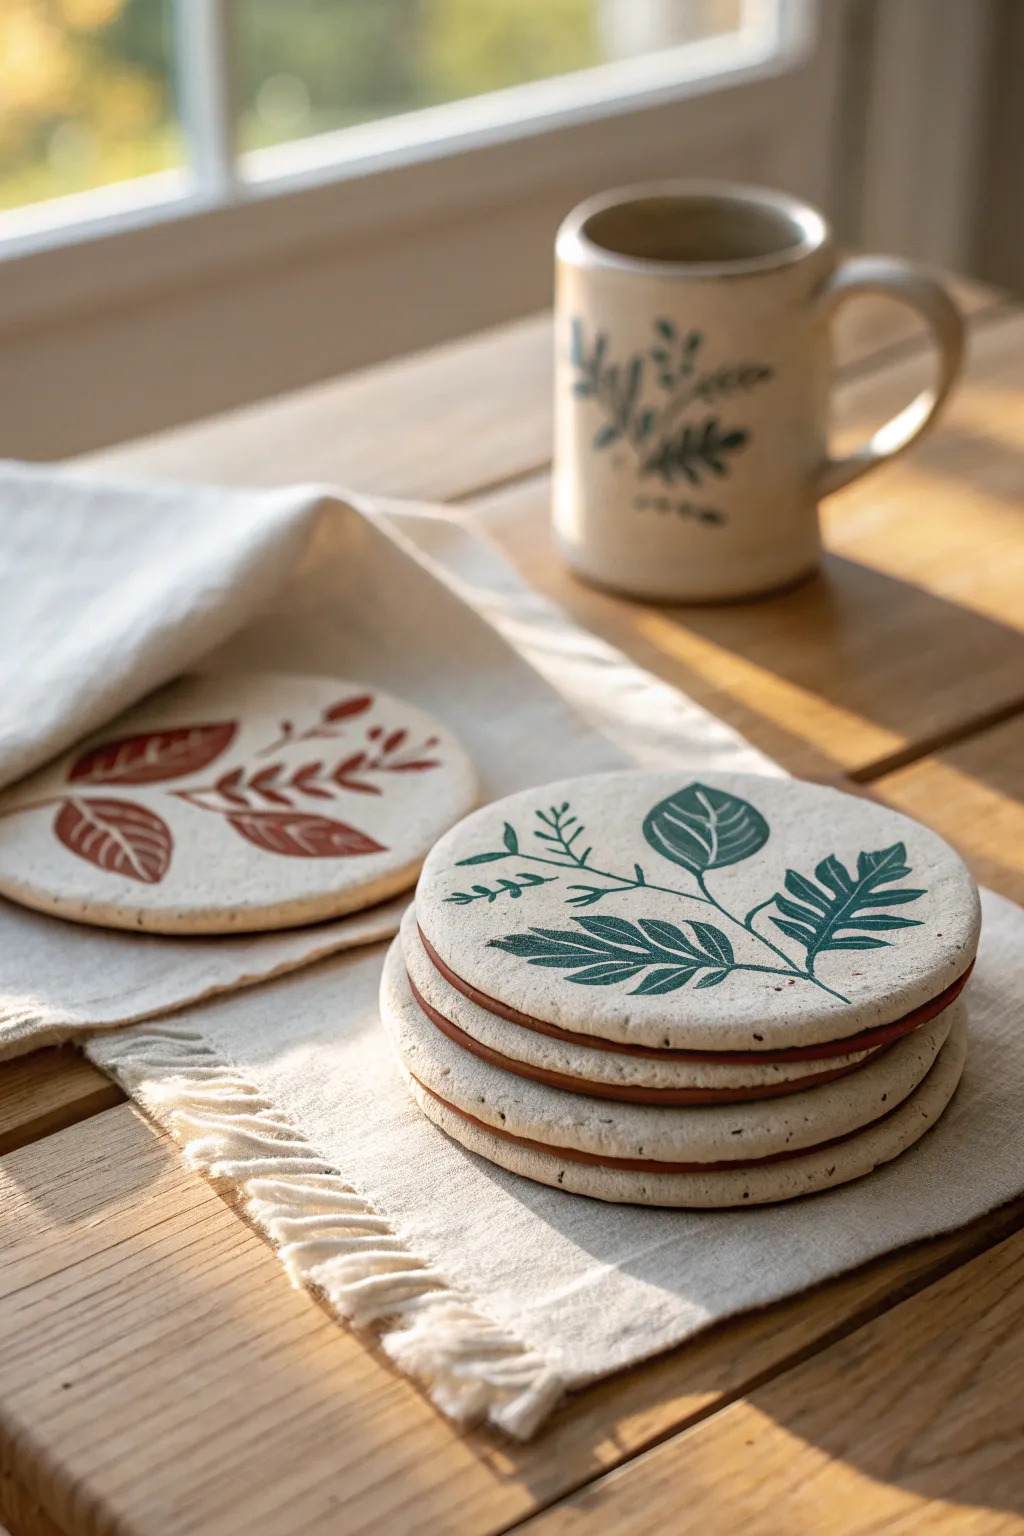
Bring nature indoors with these charming, rustic coasters that feature delicate leaf motifs stamped onto speckled clay. The design combines a creamy, textured surface with deep earth tones for a cozy, handmade feel that beautifully protects your tabletops.
Step-by-Step Tutorial
Materials
- White or cream speckled stoneware clay (or air-dry clay with added speckles)
- Terra cotta colored clay (for backing/layering)
- Rolling pin
- Canvas mat or heavy fabric (to prevent sticking)
- Round cookie cutter (approx. 4 inches) or a bowl and knife
- Carving tools or needle tool
- Underglazes or acrylic paints (deep forest green, rust red/brown)
- Small detail paintbrushes
- Clear matte varnish or sealant (if using air-dry clay)
- Clear glaze (if firing)
- Sponge and water
- Sandpaper
Step 1: Preparing the Base
-
Condition the clay:
Start by taking a chunk of your white speckled clay and kneading it in your hands until it’s warm and pliable. This conditioning step is crucial to prevent cracks later on. -
Roll the top layer:
Place the clay on your canvas mat. Using a rolling pin, roll the clay out to an even thickness of about 1/4 inch. Try to keep the pressure consistent so one side isn’t thicker than the other. -
Prepare the bottom layer:
Repeat the process with the terra cotta colored clay, rolling it out to the same thickness. This will act as a contrasting base layer, giving that lovely rim effect seen on the stacked coasters. -
Combine layers:
Lightly score the surface of both clay sheets with a needle tool and brush on a tiny bit of water or slip. Press the white layer on top of the terra cotta layer and gently roll over them once more to bond them together without thinning them too much. -
Cut the circles:
Using your round cutter or a bowl as a guide, press firmly into the layered clay to cut out your coaster shapes. Create as many circles as you need for a set, usually four or six. -
Smooth the edges:
Dip your finger in a little water and run it along the cut edge of each coaster. This smooths out any harsh lines from the cutter and helps blend the two colored layers visually.
Step 2: Creating the Design
-
Imprint or sketch:
You can now either lightly press real leaves into the soft clay to create an impression guide, or if you feel confident, use a needle tool to faintly sketch your botanical design directly onto the surface. -
Carve the outlines:
Using a carving tool, deepen the lines of the stems and leaf veins. I like to vary the pressure here—press harder for the main stem and lighter for the delicate veins to create organic variation. -
Initial drying:
Allow the coasters to dry until they are ‘leather hard’. They should be firm to the touch but still have some moisture. This is the perfect stage for crisp painting.
Warped while drying?
If coasters curl up at the edges while drying, place a heavy book on top of them (with parchment paper in between) once they are semi-dry to flatten them back out.
Step 3: Painting and Finishing
-
Paint the green foliage:
Dip a fine detail brush into your deep forest green underglaze (or acrylic paint). Carefully fill in the leaf shapes on your first set of coasters, following the carved guides. -
Add red accents:
For the second design style, use a rust-red or brown tone to paint the leaf shapes. The contrast between these two earthy colors creates a cohesive but varied set. -
Refine the lines:
Go back over the painted areas with a very fine brush to sharpen the edges or add tiny vine tendrils extending from the main stems. -
Full dry:
Place the coasters on a flat wire rack to dry completely. If using air-dry clay, flip them occasionally to ensure even drying and prevent warping. -
Sand and prep:
Once bone dry, very gently sand the edges if there represent any rough burrs. Wipe away the dust with a slightly damp sponge. -
Seal the deal:
For kiln-fired clay, apply a clear glaze and fire according to your clay’s instructions. For air-dry clay, apply 2-3 thin coats of matte varnish to make them water-resistant. -
Final check:
Inspect your finished coasters for any missed spots in the sealant, especially around the rim, to ensure they can handle a damp mug.
Tip: Crisp Lines
If you struggle with freehand painting, use a masking fluid pen to block out the leaf shapes before painting, then peel it off to reveal crisp, unpainted borders.
Now you have a stunning set of functional art pieces ready to hold your morning coffee


What Really Happens Inside the Kiln
Learn how time and temperature work together inside the kiln to transform clay into durable ceramic.
Geometric Clay Earrings in a Neutral Palette
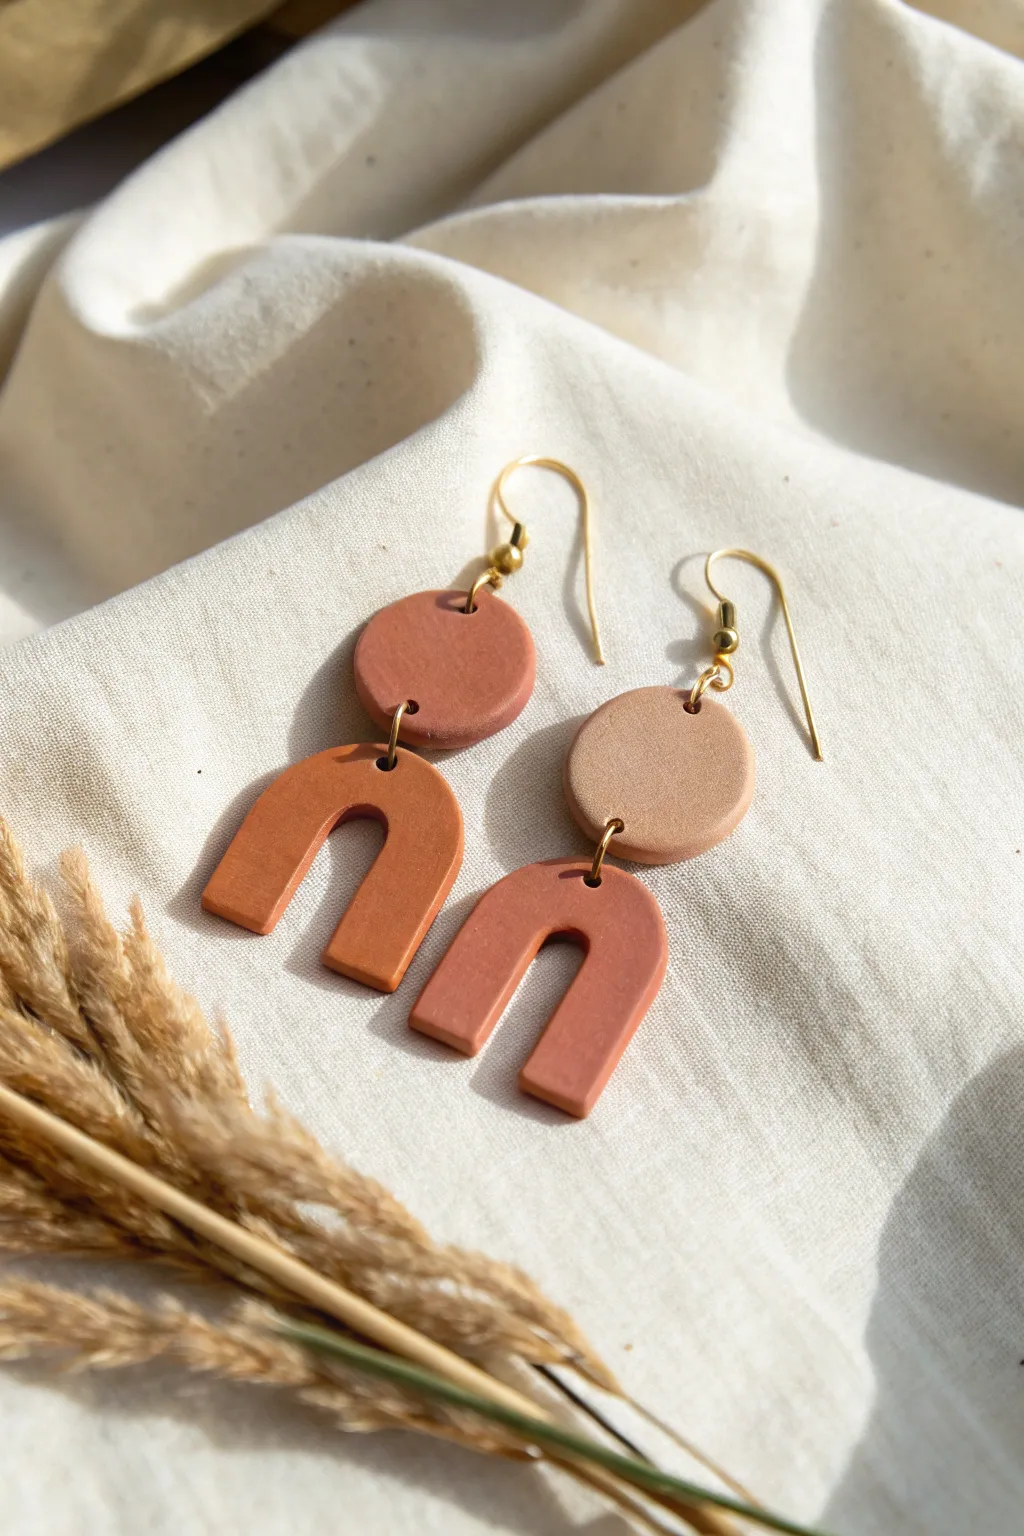
Embrace the warmth of earthy tones with these simple yet striking geometric earrings. The combination of a circular stud and a structured arch creates a balanced silhouette that feels both modern and timeless, while the matte finish mimics the look of natural terracotta.
Step-by-Step
Materials
- Polymer clay in Terra Cotta and Beige/Sand colors
- Acrylic rolling pin or pasta machine
- Circle clay cutter (approx. 12-15mm diameter)
- Arch clay cutter (or U-shape cutter)
- Small jump rings (gold finish)
- French ear wire hooks (gold finish)
- Needle tool or toothpick
- Jewelry pliers (flat nose and round nose)
- Fine-grit sandpaper (optional)
- Ceramic tile or baking sheet
- Parchment paper
Step 1: Preparing the Clay
-
Condition the Clay:
Begin by warming the polymer clay in your hands. Knead the terra cotta color and the beige color separately until they are soft and pliable, which prevents cracking later on. -
Roll Smooth Sheets:
Using an acrylic roller or a pasta machine on a medium setting, roll out both colors into sheets. Aim for a distinct thickness of about 3mm to 4mm so the earrings feel substantial but not heavy. -
Check for Air Bubbles:
Inspect your clay sheets closely. If you see any air bubbles trapped under the surface, gently pierce them with your needle tool and smooth over the area with your finger.
Step 2: Cutting and Shaping
-
Cut the Circles:
Press your circle cutter firmly into the clay sheet to create two rounds. For the asymmetrical look shown in the image, you can cut one circle from the terra cotta clay and one from the beige clay. -
Cut the Arches:
Using your arch cutter, punch out two arch shapes from the terra cotta clay. If you don’t have a specific cutter, you can hand-cut a U-shape using a sharp craft knife and a paper template. -
Pierce Attachment Holes:
Before baking, use your needle tool to carefully poke a small hole at the very bottom of each circle and the very top center of each arch. Ensure the holes are large enough for your jump rings to pass through freely. -
Add Top Holes:
Create a second hole at the very top of each circle. This will connect to the earring hook later. Make sure not to place the hole too close to the edge to avoid breakage. -
Soften the Edges:
I always take a moment here to gently tap the cut edges of the clay with my finger to remove any sharp ridges left by the cutters, giving the piece a more finished, ceramic look.
Uneven Surfaces?
If your clay has fingerprints before baking, lightly brush the surface with a tiny amount of baby oil or cornstarch. This smoothes out ridges without altering the shape.
Step 3: Baking and Assembly
-
Bake the Pieces:
Arrange your clay shapes on a ceramic tile or baking sheet lined with parchment paper. Bake according to the manufacturer’s instructions on your specific package of clay (usually around 275°F for 15-30 minutes). -
Cool Down:
Let the pieces cool completely inside the oven with the door cracked, or remove them and let them sit for at least an hour. Moving them while hot can warp the shape. -
Sand for Perfection:
Once fully cooled, inspect the edges. If there are any rough spots, lightly buff them away with fine-grit sandpaper or a denim scrap for a buttery smooth finish. -
Open the Jump Rings:
Using two pairs of pliers, twist your jump rings open sideways (never pull them apart outward) to preserve their circular shape. -
Connect the Shapes:
Thread an open jump ring through the bottom hole of a circle and the top hole of an arch. Close the ring securely using your pliers. -
Attach the Hooks:
Open the small loop on your French ear wire hook. Thread it through the top hole of the circle component. -
Final Secure:
Close the ear wire loop gently but firmly with your pliers. Repeat these assembly steps for the second earring.
Pro Tip: Color Mixing
To get that perfect custom ‘terracotta’ shade, try mixing a standard orange clay with a pinch of brown and a tiny speck of translucent clay to add depth.
Now you have a stunning pair of handcrafted earrings ready to add a touch of artisan style to any outfit
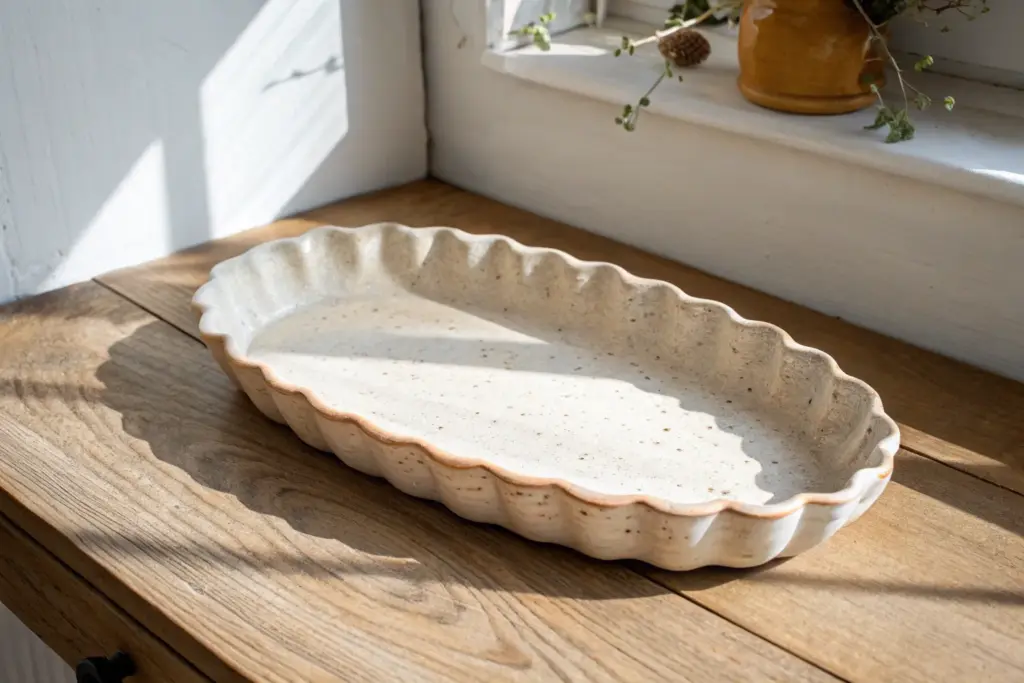
Studio-Chic Brush Rest for Painting Sessions
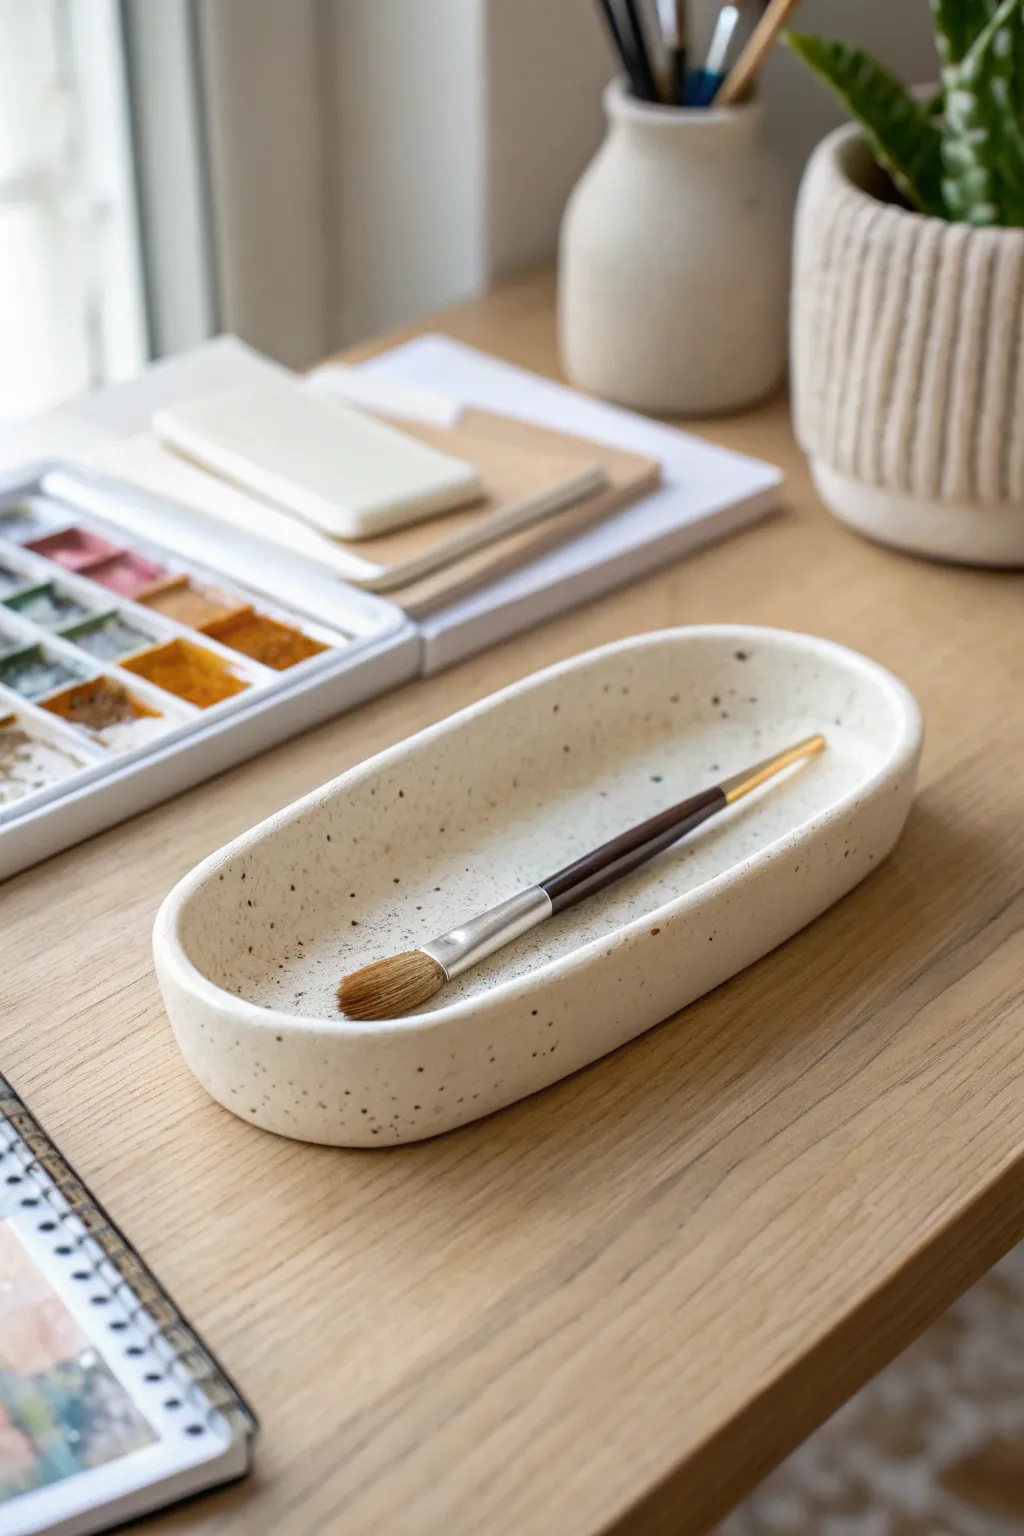
This minimalist, studio-chic brush rest keeps your workspace tidy while adding a touch of artisanal elegance to your art sessions. With its creamy, speckled finish and organic oval shape, it mimics the look of high-end stoneware pottery without needing a kiln.
Step-by-Step Guide
Materials
- Air-dry clay (white)
- Acrylic rolling pin
- Rolling guides (approx. ¼ inch thick)
- Flexible rib tool or old credit card
- Canvas mat or parchment paper
- Fettling knife or clay cutting tool
- Small bowl of water
- Sponge
- Fine-grit sandpaper (220-400 grit)
- Acrylic paint (cream/off-white)
- Acrylic paint (dark brown or black)
- Old toothbrush
- Matte or satin varnish/sealant
- Soft synthetic paintbrush
Step 1: Shaping the Base
-
Condition the Clay:
Begin by taking a baseball-sized chunk of white air-dry clay. Knead it in your hands for a few minutes to warm it up and remove any air bubbles, ensuring the texture is smooth and pliable. -
Set Up Your Workspace:
Lay down your canvas mat or parchment paper to prevent sticking. Place your rolling guides on either side of the clay ball to ensure an even thickness. -
Roll the Slab:
Using your acrylic rolling pin, roll the clay out into a smooth slab. Aim for an oblong shape rather than a perfect circle, as this will become the oval base. -
Compress the Clay:
Run a flexible rib tool or an old credit card gently over the surface of the slab. This ‘compresses’ the clay particles, which helps prevent future cracking and creates a silky smooth finish. -
Cut the Oval:
Freehand a long oval shape onto the clay using a needle tool or the tip of your knife. Once you are happy with the symmetry, cut straight down through the clay to remove the excess.
Step 2: Forming the Walls
-
Create a Coil:
Roll a snake-like coil of clay about the thickness of a pencil. This coil needs to be long enough to wrap around the entire perimeter of your oval base. -
Score and Slip:
Using a needle tool or fork, rough up (score) the outer edge of your base and one side of your coil. Dab a little water (slip) onto the scored areas to act as glue. -
Attach the Coil:
Press the coil firmly onto the edge of the base. Join the two ends of the coil by cutting them at an angle and smushing them together for a seamless loop. -
Blend the Seams:
Use your thumb or a wooden tool to smear the clay from the coil down onto the base, both on the inside and the outside. The seam needs to disappear completely for a solid structure. -
Refine the Rim:
With a slightly damp sponge, smooth the top of the rim to create a gentle curve. I like to pinch the walls slightly upward to give it that organic, handmade pottery height. -
Final Smoothing:
Do a final pass with your damp sponge over the entire piece to remove fingerprints. Let the piece dry completely in a cool spot for 24–48 hours depending on humidity.
Fixing Cracks
If hairline cracks appear while drying, don’t panic. Mix a tiny bit of fresh clay with water to make a paste and fill the gaps, then sand smooth once dry.
Step 3: Finishing the Look
-
Sand for Smoothness:
Once fully dry, the clay will be white and chalky. Use fine-grit sandpaper to gently buff away any sharp edges or uneven spots, paying special attention to the rim. -
Apply Base Color:
Mix a warm cream or off-white acrylic paint. Apply two smooth coats to the entire dish, letting the first coat dry before adding the second. -
Create the Speckles:
Dilute a small amount of dark brown paint with water until it is inky. Dip an old toothbrush into this mixture. -
Splatter Technique:
Hold the toothbrush over the dish and run your thumb across the bristles to flick tiny droplets onto the surface. Practice on a scrap paper first to control the density of your speckles. -
Seal the Tray:
Protect your work with a matte or satin varnish. Apply a thin, even coat to seal the paint and clay, making it durable enough for holding damp brushes.
Make it Functional
Before drying, gently press the handle of a paintbrush into the rim on opposite sides to create custom indentations specifically for resting your tools.
Place this beautiful dish on your desk and enjoy the serene vibe it brings to your creative process

TRACK YOUR CERAMIC JOURNEY
Capture glaze tests, firing details, and creative progress—all in one simple printable. Make your projects easier to repeat and improve.
Sculptural Bookends With Curvy Forms
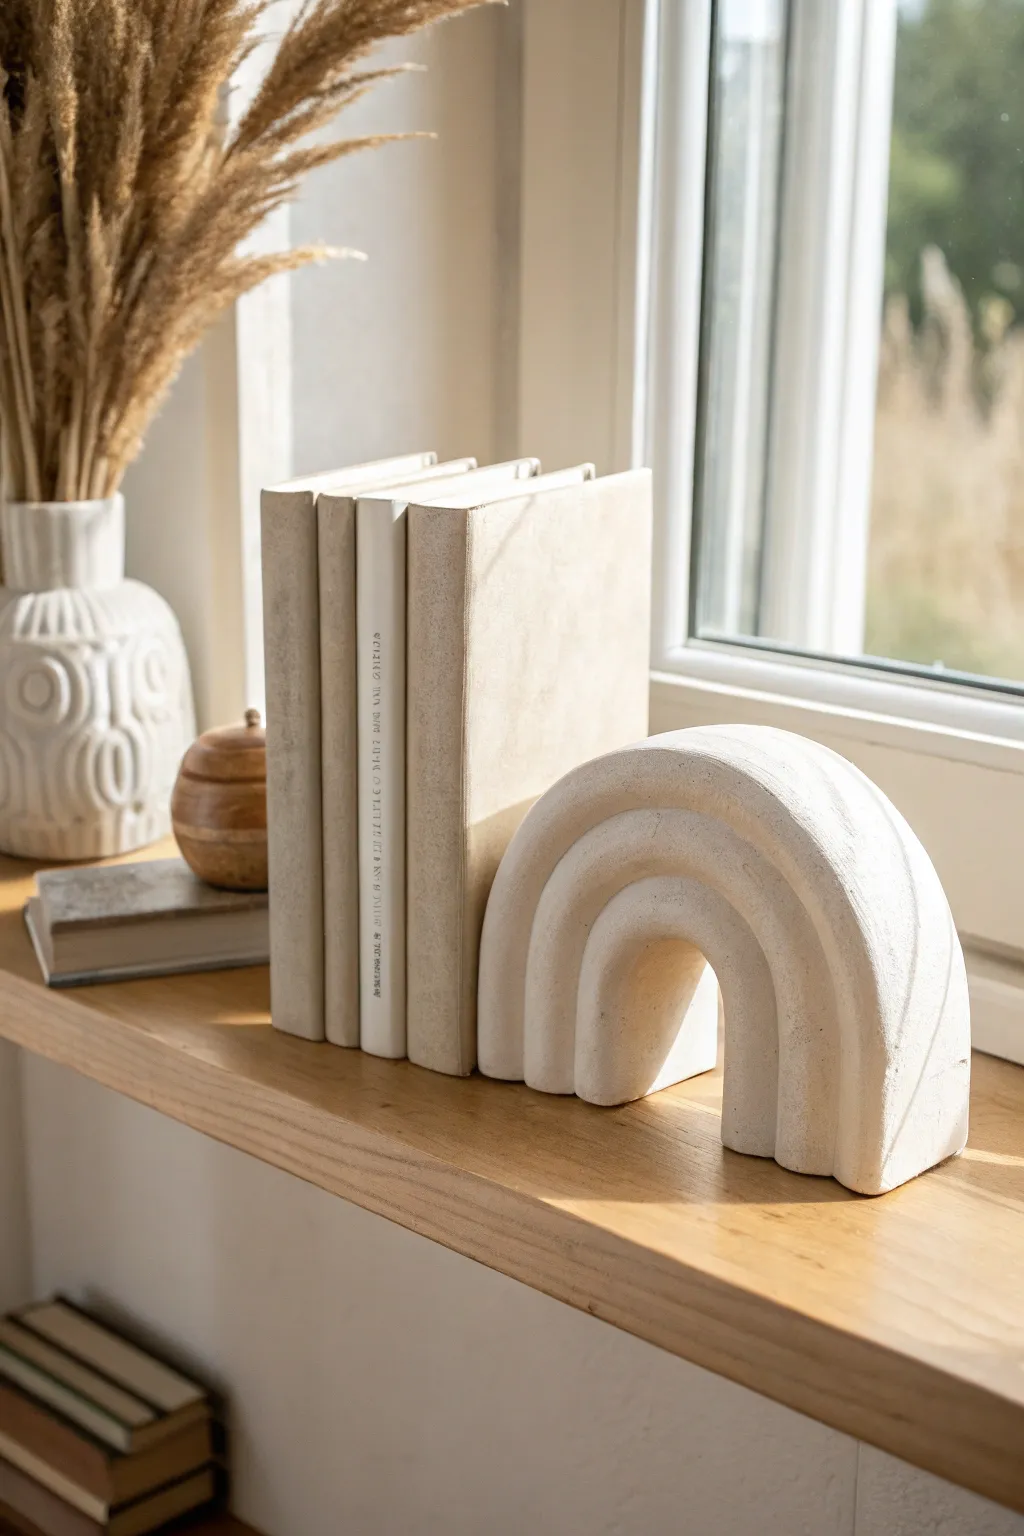
Bring a touch of modern minimalism to your bookshelf with this gorgeous arched rainbow bookend. The textured, sandy finish and soft organic curves make it look like high-end decor, but it’s surprisingly simple to hand-build with air-dry clay.
Step-by-Step Guide
Materials
- Air-dry clay (white or light grey)
- Rolling pin
- Clay knife or craft blade
- Small bowl of water
- Sponge or textured cloth
- Sandpaper (fine and medium grit)
- Rolling guides or two wooden rulers
- Ruler
- Baking soda or textured paint additive (optional)
- Acrylic paint (cream or beige)
- Wide paintbrush
- Heavy rectangular object (like a brick or wood block) to act as a weight/support
- Non-stick work surface or canvas mat
Step 1: Forming the Arches
-
Prepare your workspace:
Set up a clean, non-stick surface. If you have rolling guides (flat strips of wood with even thickness), place them on either side of your work area. This ensures your clay slabs are perfectly uniform. -
Roll out the base slab:
Take a large chunk of air-dry clay and knead it briefly to warm it up. Place it between your guides and roll it out into a long, rectangular slab about 1/2 to 3/4 inch thick. You want it substantial enough to hold weight. -
Cut uniform strips:
Using a ruler and a sharp clay knife, cut three long strips from your slab. The strips should all be the exact same width—aim for about 1.5 inches wide. -
Measure the first arch:
Take your shortest strip. Gently bend it into a tight ‘U’ shape. This will be the innermost arch. Stand it up to check the height; trim the ends so they sit flush against the table. -
Create the support structure:
This is crucial for structural integrity. I like to use a heavy rectangular object, like a weighted box or a wood block wrapped in plastic wrap, to build the clay against. Place your first small arch against this vertical support. -
Form the second arch:
Take the second strip and drape it over the first one. It should hug the curve of the inner arch closely. Trim the bottom ends so they align perfectly with the first arch’s feet. -
Add the final arch:
Repeat the process with the third, longest strip. Drape it over the middle arch, gently pressing them together to ensure contact, and trim the bottoms flush again.
Cracks happen?
Don’t panic if small cracks appear while drying. Dip your finger in a mix of water and fresh clay (slip) and rub it into the crack in a circular motion until filled, then let dry again.
Step 2: Fusing and Refining
-
Score and slip the layers:
Carefully separate the arches for a moment. Use your knife to score cross-hatch marks on the top of the inner arch and the underside of the middle arch where they touch. Apply a little water (slip) and press them back together firmly. -
Connect the outer layer:
Repeat the scoring and slipping process for the connection between the middle and the outermost arch. This bonding prevents the layers from separating as they dry. -
Fill the gaps:
Check the back of the bookend (the flat side that will touch the books). If there are deep grooves between the arches, roll tiny coils of clay, press them into the seams, and smooth them out with your finger to create a solid, flat back surface. -
Define the front grooves:
On the front face, you want those distinct rainbow lines. Use a modeling tool or the back of a knife to gently deepen the groove between the arches if they got smudged during pressing. -
Initial smoothing:
Dip your finger in water and run it over the entire surface to smooth out fingerprints and harsh edges. Pay special attention to the bottom feet to ensure the sculpture stands perfectly straight.
Step 3: Texturing and Finishing
-
Add texture:
To mimic the stone-like look in the photo, take a damp sponge or a crumpled textured cloth and gently dab it all over the wet clay. This removes the ‘plastic’ smoothness. -
Slow drying:
Let the piece dry upright against its support. Cover it loosely with a plastic bag for the first 24 hours to prevent cracking, then uncover and let it dry completely for another 24-48 hours. -
Sand the surface:
Once bone dry, use fine-grit sandpaper to knock off any sharp burrs or uneven spots. Don’t over-sand; you want to keep that organic texture. -
Mix textured paint:
Mix your beige acrylic paint with a teaspoon of baking soda. This creates a fluffy, chalky texture that looks just like limestone or sandstone. -
Apply the finish:
Paint the entire sculpture with your textured mix. Use a dabbing motion rather than long strokes to enhance the stony effect. -
Final coat:
Let the first coat dry, then apply a second layer if needed to ensure solid coverage. Allow it to cure fully before placing it on your shelf.
Make it Heavy
To make this a fully functional heavy-duty bookend, hollow out the bottom of each arch leg slightly while wet and embed fishing weights or heavy washers, then seal with clay.
Place your new sculpture on a shelf and enjoy the sophisticated, architectural vibe it adds to your reading nook
Tiny Salt Cellar and Matching Pinch Spoon
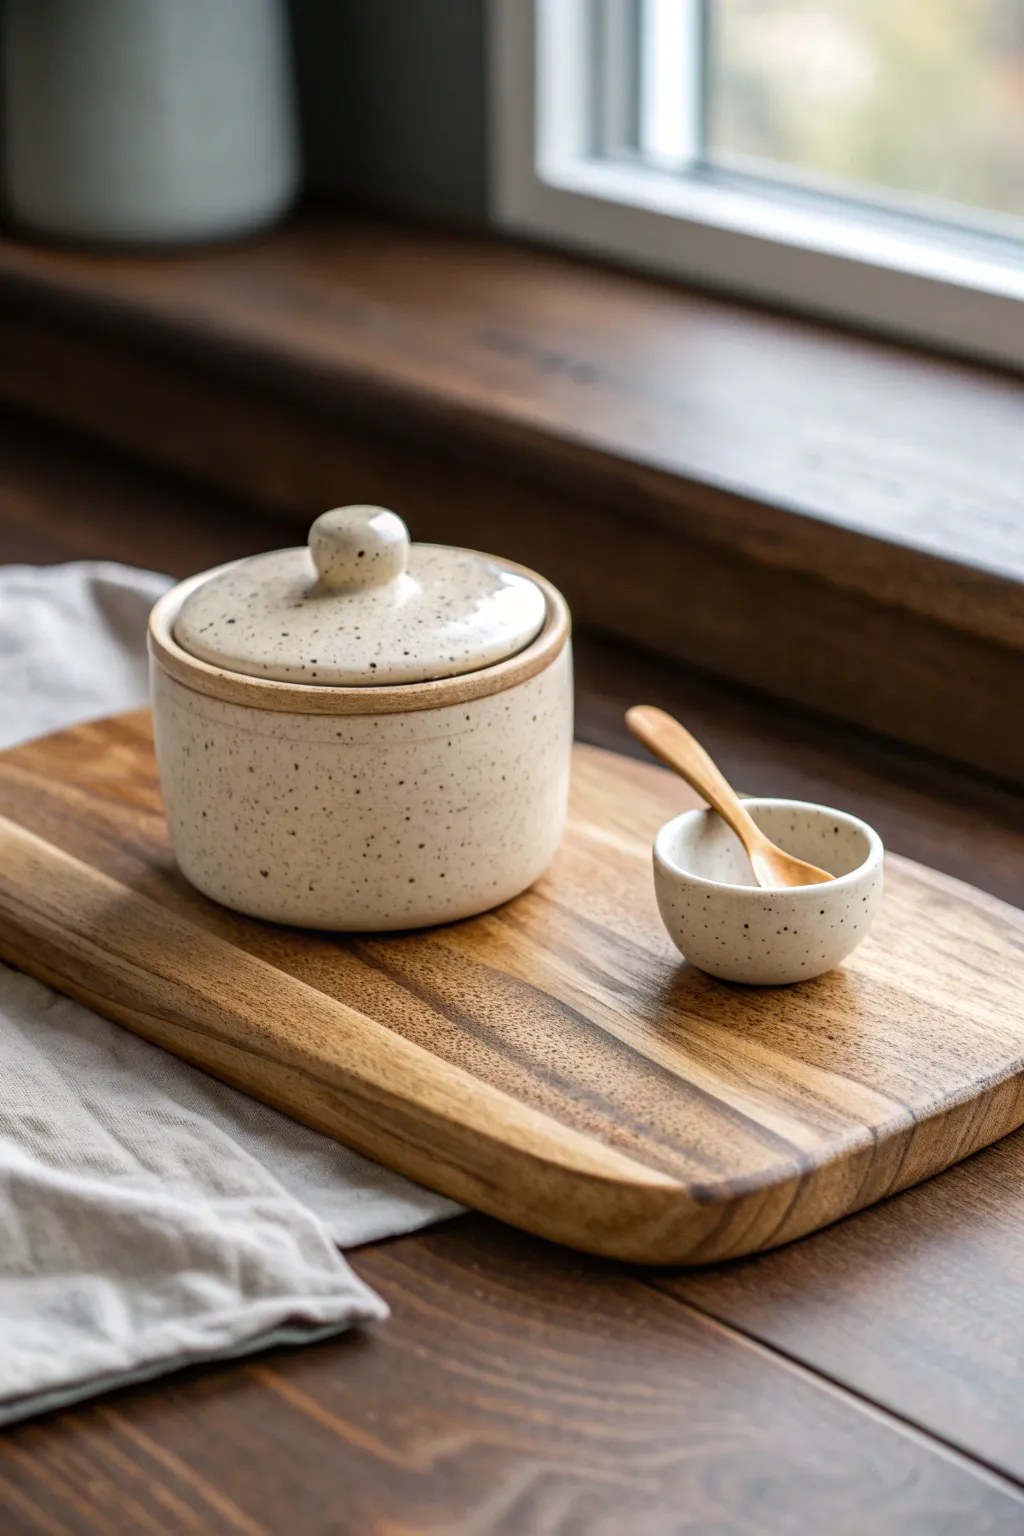
Elevate your kitchen counter with this minimalist duo that mimics the look of high-end speckled stoneware using accessible polymer or air-dry clay. The set features a sturdy, lidded main vessel for your coarse salt and an adorable matching pinch bowl for pepper or spices, both finished with a charming faux-ceramic glaze.
How-To Guide
Materials
- White polymer clay or air-dry clay (approx. 1 lb)
- Speckled clay additive (black pepper or dried coffee grounds work well)
- Rolling pin
- Round cookie cutters (3-inch and 4-inch diameter)
- Clay knife or craft blade
- Small bowl relative to your cutter size (for molding)
- Sandpaper (fine grit)
- Glossy varnish or resin (for the faux-glazed look)
- Small wooden spoon (store-bought or hand-carved)
- Acrylic rolling guides or popsicle sticks
- Sponge and water (if using air-dry clay)
Step 1: Preparing the Clay Body
-
Condition and Speckle:
Begin by conditioning your white clay until it is soft and malleable. To achieve that organic, speckled stoneware look, knead in a small amount of black pepper or dried coffee grounds. Fold the clay repeatedly until the specks are evenly distributed throughout the batch. -
Roll the Base Slab:
Using rolling guides or stacked popsicle sticks to ensure an even thickness of about 1/4 inch, roll out a large slab of your speckled clay. This thickness gives the final piece a substantial, ceramic feel. -
Cut the Bases:
Use your 4-inch round cutter to stamp out a circle for the base of the main cellar. Use a smaller 2-inch cutter (or freehand cut) for the base of the tiny pinch bowl.
Sticky Lid Fix
If the lid fits too tightly after baking or drying, wrap sandpaper around a dowel and gently sand the inner rim of the jar until the lid sits flush and lifts easily.
Step 2: Constructing the Main Cellar
-
Create the Walls:
Cut a long rectangular strip from your rolled slab. The height should be roughly 2.5 to 3 inches, and the length must be enough to wrap around the circumference of your 4-inch base with a little overlap. -
Attach the Wall:
Wrap the strip around the base circle. Score and slip the edges (if using air-dry clay) or press firmly (if using polymer) to join the wall to the floor. Smooth the seam where the wall ends meet, blending it until invisible. -
Refine the Rim:
Trim the top edge of the wall to ensure it is perfectly level. I like to run a damp finger or a minimal amount of clay softener along the rim to round it off slightly so it isn’t sharp. -
Form the Lid:
Roll out a fresh piece of clay slightly thicker than the walls. Cut a circle slightly larger than the cellar’s opening. Gently dome it by pressing it over a curved object or shaping it in your palms. -
Add the Knob:
Roll a small ball of clay for the handle. Attach it to the center of the domed lid. Ensure the connection is seamless by blending the clay downward from the knob onto the lid surface. -
Create the Inner Lip:
To keep the lid from sliding off, roll a small coil of clay. Flip the lid upside down and attach this coil in a circle that fits just *inside* the rim of the main jar.
Two-Tone Effect
Before varnishing, paint a thin strip of tan acrylic paint along the rims or base. This mimics the look of exposed raw clay often seen on wheel-thrown pottery.
Step 3: Making the Pinch Bowl & Finishing
-
Mold the Small Bowl:
Taking your smaller base circle, form a small ball of clay and press your thumb into the center to create a pinch pot, or build it using the slab method like the large cellar for a cylindrical look. Keep the walls thick and consistent. -
Smooth Everything:
Inspect both pieces. Use a damp sponge or baby oil (for polymer) to smooth away any fingerprints or harsh tool marks. The goal is a clean, machine-thrown appearance. -
Bake or Dry:
Follow the instructions for your specific clay. If baking polymer clay, tent it with foil to prevent scorching. If using air-dry clay, allow it to dry slowly over 24-48 hours away from direct heat to prevent cracking. -
Sand for Texture:
Once fully cured or dry, lightly sand the edges and surfaces. This exposes the specks (pepper/coffee) beautifully and creates a soft, matte stone texture. -
Apply the Glaze:
Apply a coat of high-gloss varnish or resin to the exterior and interior to mimic a fired ceramic glaze. For a realistic touch, leave the very bottom rim unvarnished to look like raw, unglazed pottery foot. -
Pair with wood:
While your finish dries, sand a small wooden spoon if you have one unfinished, or simply pair the dried set with a bamboo scoop to complete the aesthetic.
Enjoy displaying your chic, handmade set on your dining table or gifting it to a food-loving friend
Arched Wall Hanging With Carved Lines
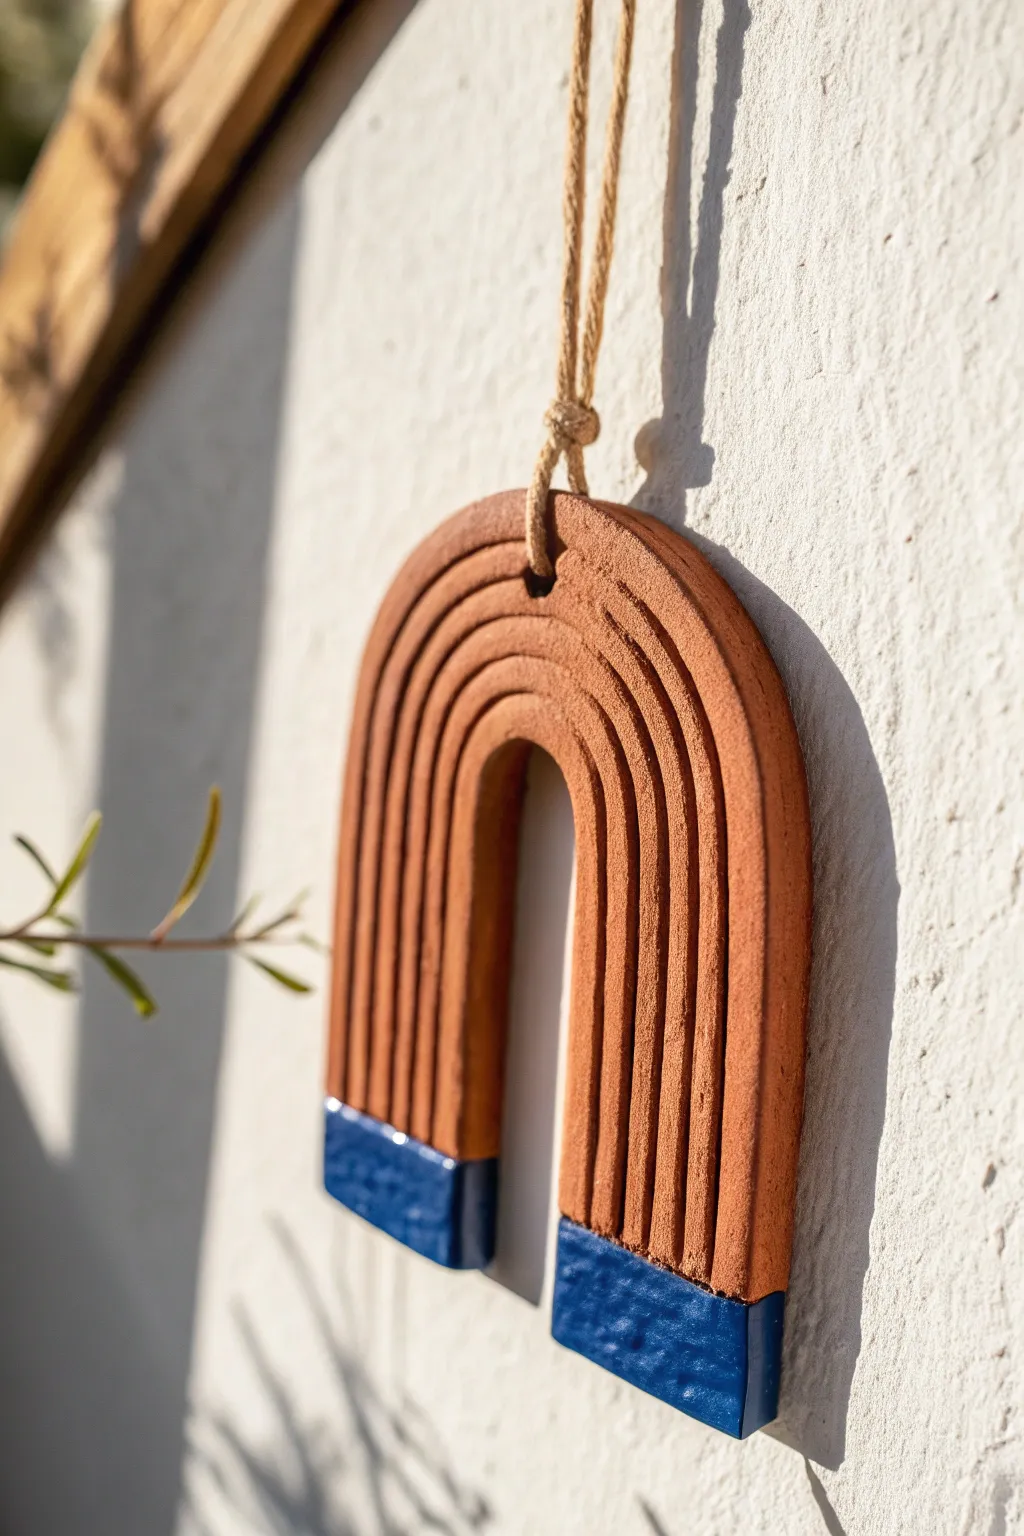
Embrace earthy tones and geometric simplicity with this lovely clay wall hanging. Featuring a distinct terracotta hue, deep carved grooves, and striking cobalt-dipped ends, this piece adds a modern bohemian touch to any wall.
Step-by-Step Tutorial
Materials
- Terracotta-colored air-dry clay (or polymer clay)
- Non-stick rolling pin
- Parchment paper or craft mat
- Sharp craft knife or scalpel
- Needle tool or toothpick
- Modeling tool with a rounded tip (or loop tool)
- Ruler
- Glossy acrylic paint (Cobalt or Navy Blue)
- Flat paintbrush
- Painter’s tape
- Jute twine or hemp cord
- Sandpaper (fine grit)
Step 1: Shaping the Arch
-
Condition the clay:
Start by kneading a generous amount of terracotta clay in your hands until it becomes soft, pliable, and free of cracks. -
Roll the slab:
Place the clay on parchment paper and roll it out to an even thickness of about 1/4 to 1/2 inch. Ensure it is thick enough to withstand handling but not so heavy that it weighs down the hanging cord. -
Draft the shape:
Using a needle tool, lightly sketch a tall U-shape or horseshoe arch onto the clay slab. You want the legs of the arch to be straight and parallel. -
Cut the outline:
Take your sharp craft knife and cut out the outer perimeter of the arch first. -
Remove the center:
Carefully cut out the inner U-shape to create the negative space. Remove the excess clay from the center and smooth the cut edges with a water-dampened finger to remove any sharpness. -
Add the hanging hole:
Locate the exact top center of the arch. Using a straw or a tool with a wider diameter than your twine, puncture a clean hole through the top, about half an inch down from the edge.
Step 2: Carving and Refining
-
Mark the guide lines:
Before carving deep grooves, lightly trace the concentric rainbow lines with your needle tool. Start from the inner edge and work your way out to ensure they are evenly spaced. -
Carve the grooves:
Now, use a loop tool or a rounded modeling tool to deepen these lines. Press firmly and drag the tool along your traced paths to remove or displace small ribbons of clay. -
Clean the texture:
The carving process often pushes up little burrs of clay. Gently smooth these down with your finger or a soft, damp brush so the surface looks refined but still retains the handmade texture. -
Initial sand:
Check the bottom edges of the ‘legs’ to ensure they are squared off and flat. Trim them with your craft knife if necessary. -
Dry completely:
Let the piece dry undisturbed for at least 24-48 hours. If you are using polymer clay, bake according to the package instructions instead. -
Sand for finish:
Once fully cured and hard, gently sand any rough edges, particularly around the hanging hole and the outer rim.
Uneven Grooves?
If your carving tool is dragging or stuttering, your clay might be too dry. Mist it lightly with water, wait a minute, and try carving again for smoother lines.
Step 3: Painting and Assembly
-
Tape the border:
Apply a piece of painter’s tape horizontally across both legs of the arch, about one to two inches up from the bottom. Press the tape firmly into the grooves to prevent paint bleed. -
Apply base color:
Paint the exposed bottom sections with your glossy cobalt blue acrylic paint. You may need two coats for opaque coverage. -
Finish ridges:
Make sure to get the paint deep into the carved grooves on these bottom sections so the color block effect looks solid and deliberate. -
Remove tape:
Peel off the tape while the paint is still slightly tacky to achieve the crispest straight line. -
Seal (Optional):
If you want the whole piece to have a sheen, apply a clear varnish, but leaving the terracotta matte creates a beautiful contrast with the glossy blue tips. -
Attach the cord:
Cut a length of jute twine. Fold it in half, push the loop through the hole from front to back, and pull the tails through the loop to create a lark’s head knot. -
Secure the knot:
Tie a simple overhand knot at the top ends of the twine to finish the hanging loop.
Pro Texture Tip
For that gritty, authentic stone look, mix a pinch of used coffee grounds or sand into your clay before rolling it out. It adds amazing speckled detail.
Now you have a stunning piece of modern decor ready to hang in a sunny spot
Minimal Suncatcher With Cutout Shapes
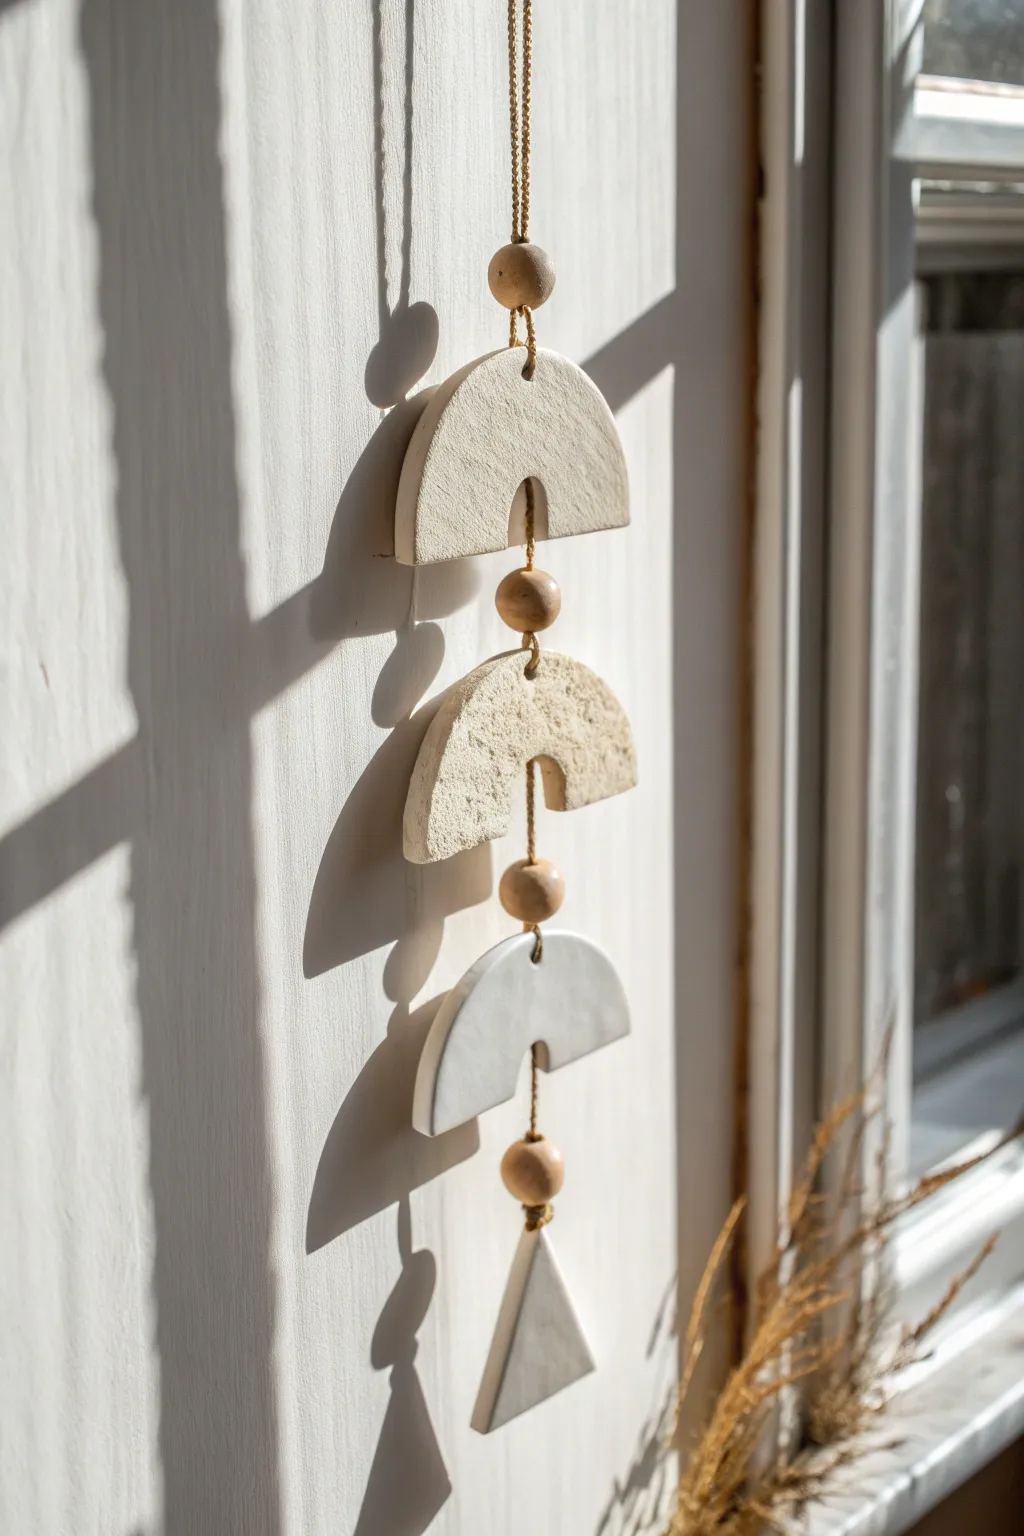
This elegant hanging ornament brings a touch of modern bohemian style to any window or wall. Featuring organic clay arches and geometric dangles paired with raw wooden beads, it perfectly balances smooth and textured surfaces.
Detailed Instructions
Materials
- Air-dry clay (white or off-white)
- Rolling pin
- Parchment paper or canvas mat
- Round cookie cutters (approx. 3-inch diameter)
- Small round cutter (approx. 1-inch diameter or less)
- Craft knife or clay needle tool
- Wooden skewer or toothpick
- Sandpaper (fine grit)
- Twine or hemp cord
- Raw wooden beads (4 round, medium-sized)
- Clear matte sealant spray (optional)
Step 1: Shaping the Clay Arches
-
Prepare your workspace:
Lay down parchment paper or a canvas mat to prevent the clay from sticking. Knead a portion of air-dry clay until it is soft, pliable, and free of cracks. -
Roll the slab:
Using your rolling pin, flatten the clay to an even thickness of about 1/4 inch. Try to keep the thickness consistent so the pieces hang straight later. -
Cut the base circles:
Press your large 3-inch round cutter into the slab to create two perfect circles. Gently remove the excess clay from around them. -
Create the arches:
Cut each circle in half horizontally using your craft knife. You will need three total semi-circles for this design, so you’ll have one extra half to spare or test on. -
Add the inner cutout:
Take your small round cutter and position it at the center of the straight edge of each Semi-circle. -
Remove the notch:
Press down halfway into the semi-circle to remove a small ‘U’ shape from the bottom center, creating the distinct arch silhouette seen in the photo.
Warp-Free Drying
To keep pieces perfectly flat while drying, place a lightweight book or board gently on top of them after they have dried for about an hour to set the shape.
Step 2: Creating Texture and the Triangle
-
Cut the bottom triangle:
Roll out a small scrap of clay and cut a simple isosceles triangle for the bottom weight. It should be roughly 2 inches tall. -
Pierce the hanging holes:
Using a skewer, carefully poke a hole vertically through the top center of each arch and the top of the triangle. Ensure the hole goes all the way through and is wide enough for your twine. -
Apply texture (Optional):
For the middle arch shown in the image, gently press a piece of rough sandpaper or a crumpled ball of foil onto the surface to create a stone-like texture. Leave the top and bottom arches smooth for contrast. -
Smooth the edges:
Dip your finger in a little water and run it along the cut edges of all pieces to smooth out any sharp ridges or burrs.
Step 3: Assembly
-
Dry the pieces:
Place all clay components on a flat surface to dry for 24-48 hours. I recommend flipping them over halfway through so they dry evenly without warping. -
Sand for finish:
Once fully cured, use fine-grit sandpaper to refine the edges and surfaces of the smooth pieces until they feel polished. -
Prepare the cord:
Cut a length of twine or hemp cord, approximately 24 inches long. Tie a secure loop at the top for hanging. -
Add the first bead:
Thread the first wooden bead onto the cord and position it just below your hanging loop. Tie a knot tightly underneath the bead to hold it in place. -
Attach the top arch:
Thread the cord through the hole in the first smooth arch. Tie a knot underneath the arch so it rests securely without sliding down. -
Continue the pattern:
Repeat the process: thread a bead, tie a knot, thread the textured arch, and tie another knot. Leave about an inch of space between components. -
Finish the sequence:
Add the third bead, the final smooth arch, and the fourth bead, knotting underneath each item as you go. -
Attach the triangle:
Thread the final triangle piece onto the bottom of the cord and tie a double knot securely at the very end. Trim any excess string close to the knot.
Hole Troubleshooting
If your holes shrank too much during drying, carefully use a small hand drill or manually twist a drill bit through the existing hole to widen it for the cord.
Step 4: Final Touches
-
Seal the piece:
If you wish to protect the clay from humidity or dust, lightly mist the entire mobile with a clear matte sealant spray.
Now you have a serene piece of décor ready to catch the changing light in your favorite room
Mini House Votive for Cozy Shelf Styling
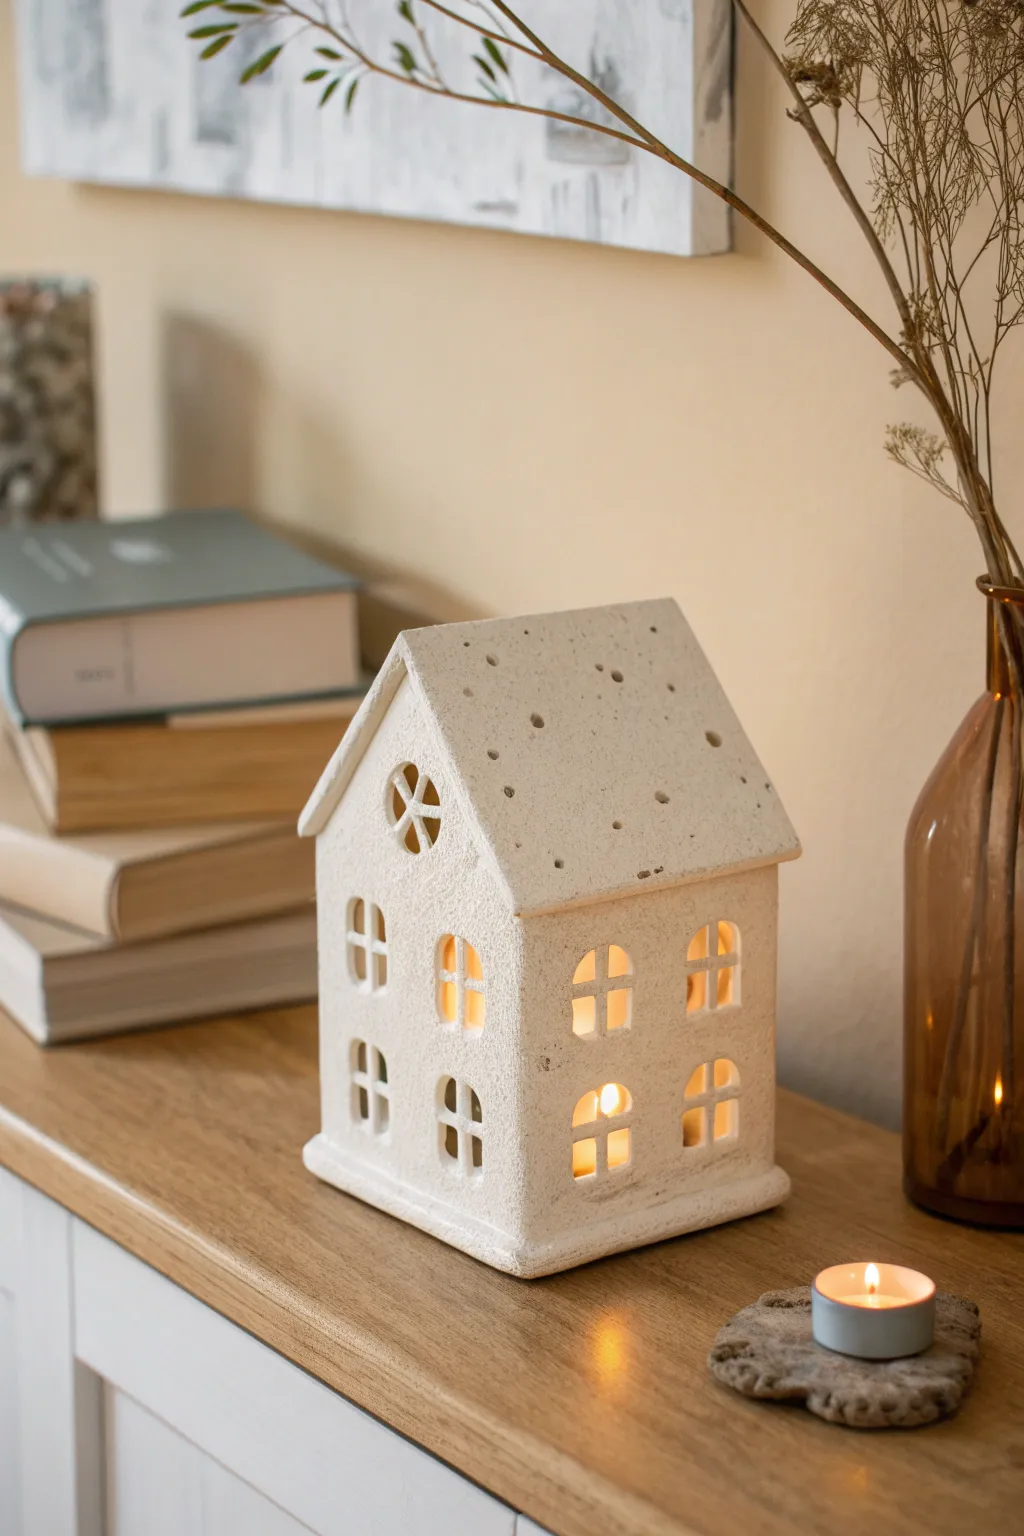
Capture the warmth of home with this charming clay votive house, featuring cutout windows and a speckled roof that casts a starry glow. Its textured white finish simulates the look of weathered stone, making it a perfect cozy addition to any bookshelf or mantel.
Step-by-Step Guide
Materials
- Air-dry clay (white or stone texture)
- Rolling pin
- Sharp craft knife or scalpel
- Ruler
- Cardstock or cardboard (for templates)
- Small round cookie cutters or bottle caps (optional)
- Straw or toothpick
- Texture sponge or stiff bristle brush
- Clay slip (water mixed with clay scraps)
- Sandpaper (fine grit)
- Acrylic paint (creamy white or limestone color)
- Matte sealant spray
Step 1: Drafting and Cutting
-
Create templates:
Begin by sketching your house panels on cardstock. You will need two identical pentagon shapes for the front and back (the pointed top is the roofline), two rectangular side walls, and two rectangular roof panels. Cut these out to use as guides. -
Roll the slab:
Roll out your air-dry clay to an even thickness of about 1/4 inch (6mm). Using guide strips on either side of your roller can help ensure the slab is perfectly uniform. -
Texture the surface:
Before cutting, gently dab the entire surface of the clay with a texture sponge or a stiff brush. This stippling effect creates that lovely aged, stone-like appearance seen in the photo. -
Cut the shapes:
Place your cardstock templates onto the textured clay. Using a ruler and a sharp craft knife, slice cleanly around the borders to create your six structural pieces.
Clean Cuts Hack
If your clay drags while cutting windows, let the slab dry for about 15-20 minutes first. Slightly firmer clay cuts much cleaner than wet, sticky clay.
Step 2: Detaling the Windows
-
Plan window placement:
Lightly trace the window locations on your wall panels with a needle tool. Notice the example has arched windows: four on the front (two levels) and two on the sides. -
Cut the arches:
Carefully cut out the window shapes. For the arched tops, steady your hand and move slowly. Save the clay scraps to make slip later. -
Add window panes:
To create the cross-pane look, you can either cut the window as four separate small sections or cut one large opening and attach thin strips of clay across it with slip. The latter is often easier for beginners. -
Attic detail:
On the front pentagon piece, center a circular cutout near the peak. Add a cross-shaped clay strip inside it to mimic a wagon-wheel window. -
Roof stippling:
Take your two roof panels and use a straw or a toothpick to poke random holes through the clay. These perforations will let the candlelight twinkle through like stars.
Step 3: Assembly and Finish
-
Prepare edges:
Score the edges of all walls where they will connect (cross-hatching with a needle tool) and apply a generous amount of clay slip. -
Erect the walls:
Stand the walls up, pressing the scored edges together. Use a square object, like a small box, inside the house temporarily to keep the corners at 90-degree angles while the clay grabs. -
Reinforce seams:
Roll a very thin snake of clay and press it into the interior corners to reinforce the bond. Smooth this out with a modeling tool or your finger. -
Attach the roof:
Score and slip the top edges of the walls and the undersides of the roof panels. Generally, I find it best to attach one roof panel at a time, letting it rest on the gabled peak of the front and back walls. -
Join the peak:
Ensure the two roof panels meet snugly at the top pinnacle. Blend the clay across the top seam so it looks like one continuous piece, but leave the overhangs distinct. -
Dry slowly:
Let the house dry loosely covered with plastic wrap for the first 24 hours to prevent warping, then uncover to finish drying completely (usually 2-3 days total). -
Sand and soften:
Once bone dry, gently sand any sharp edges or uneven seams. Don’t over-sand the surface texture you created earlier. -
Paint application:
Paint the entire house with a creamy stone or off-white acrylic paint. Use a pouncing motion rather than brushing to preserve the rough, stony texture. -
Protective coat:
Finish with a matte sealant spray both inside and out. This protects the clay from soot or heat, though you should always use battery-operated tea lights for safety.
Wall Collapse?
If walls won’t stand, they are too thin or wet. Prop them up with spice jars or cut cardboard supports to hold the shape while the structure stiffens.
Place an LED tea light inside and enjoy the soft, flickering shadows cast by your handmade architectural gem