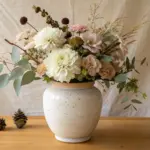
A plain mud vase is basically an invitation to play—those earthy surfaces love paint, texture, and a little personality. Here are my favorite mud vase painting ideas that feel doable on a relaxed afternoon and still look styled on a shelf.
Classic White-On-Terracotta Florals
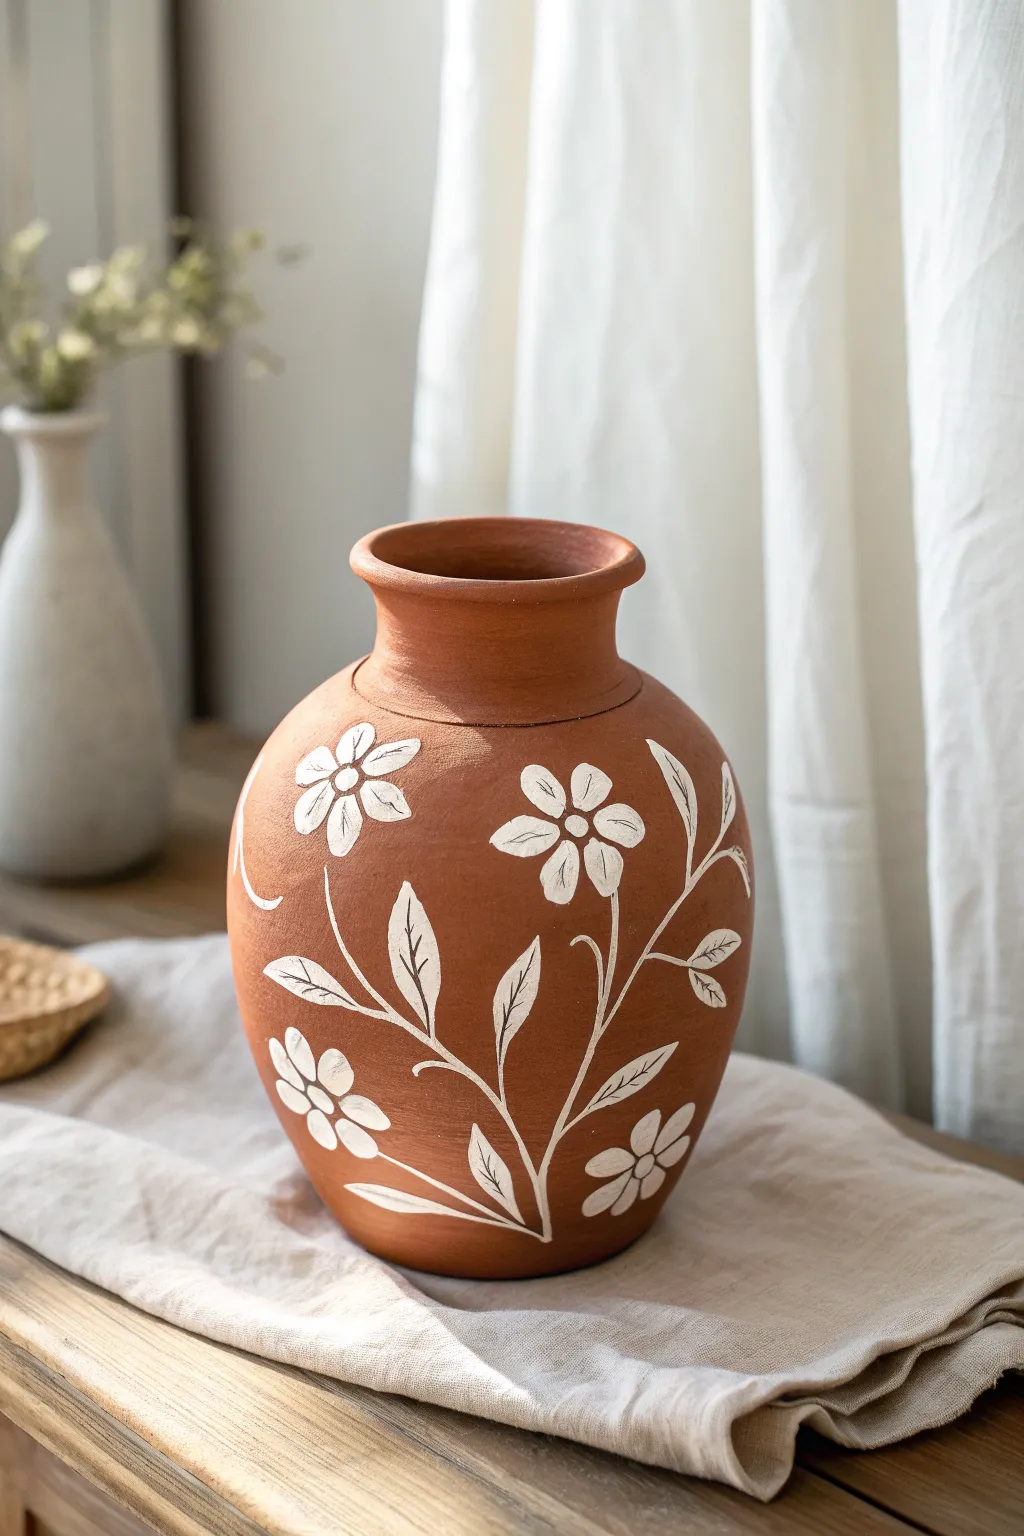
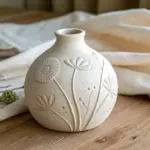
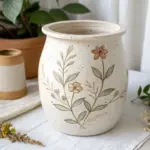
Embrace the earthy warmth of terracotta by adding delicate, hand-painted white florals that pop against the clay background. This beginner-friendly project transforms a plain mud vase into a charming, cottage-core centerpiece with just a single color of paint.
How-To Guide
Materials
- Terracotta vase (clean and dry)
- White acrylic paint (matte or satin finish)
- Fine round paintbrush (size 0 or 1)
- Small flat paintbrush (size 4)
- Pencil (white charcoal pencil preferred, regular HB works)
- Paper plate or palette
- Water cup
- Paper towels
- Clear matte sealant spray (optional)
Step 1: Preparation & Planning
-
Clean the surface:
Ensure your terracotta vase is free of dust and debris. Wipe it down with a slightly damp cloth and let it dry completely before starting, as any moisture in the clay can affect paint adhesion. -
Sketch the main stems:
Using a white charcoal pencil or a light touch with regular graphite, draw gently curving lines starting from the bottom third of the vase. These will act as the backbone for your floral arrangement. -
Outline flower placement:
Lightly mark small circles where you want your main blossoms to sit. Aim for an organic scatter—some high, some low—rather than a perfect grid. -
Add leaf guides:
Draw simple leaf shapes extending from your main stem lines. Don’t worry about details yet; just map out the general direction and size to ensure the design feels balanced.
Smooth Strokes
Add a tiny drop of water to your acrylic paint to improve flow. This helps you achieve long, continuous stem lines without the brush dragging or skipping on the texture.
Step 2: Painting the Florals
-
Load your brush:
Squeeze a small amount of white acrylic paint onto your palette. Dip your fine round brush in water, dab it on a towel, and then load it with paint. You want a creamy consistency—not too thick, but opaque. -
Paint the first petals:
Start with the uppermost flower. Press the brush down gently and lift as you pull toward the center of your sketched circle to create a teardrop petal shape. -
Complete the first flower:
continue painting five or six petals around the center point. Leave a small gap of unpainted terracotta in the very middle to act as the flower’s center. -
Repeat for all blooms:
Move around the vase painting the remaining flowers. Rotating the vase as you work helps prevent smudging your wet paint with your hand. -
Paint the stems:
Reload your brush with a smooth amount of paint. Carefully trace over your sketched stem lines, using long, steady strokes. Varying the pressure slightly will give the stem a more natural, organic thickness. -
Refine the centers:
Once the petals are dry to the touch, use a tiny dot of white paint or a small ring in the unpainted center of each flower to define the pistil.
Step 3: Adding Foliage & Detail
-
Outline the leaves:
Using the fine brush, outline the leaf shapes attached to your stems. The leaves in this style are simple pointed ovals. -
Fill in the leaves:
You can fill the leaves in completely for a solid white look, or leave small slivers of negative space down general center to mimic a vein, which adds lovely dimension. -
Add floating petals:
I like to paint a few stray petals or small buds floating near the detailed stems to fill empty visual space without cluttering the design. -
Check for opacity:
Terracotta is porous and soaks up paint. If your white looks a bit transparent after the first layer dries, go back and carefully add a second coat to the petals for brightening. -
Clean up edges:
If any lines traveled too far, you can gently scrape away excess dry paint with a craft knife or use a damp Q-tip for wet mistakes.
Go 3D
Mix baking soda into your white acrylic paint before applying the petals. This creates a raised, textured effect that looks beautiful and tactile on the rough clay.
Step 4: Finishing Touches
-
Erase guidelines:
Once the paint is thoroughly dry (give it at least an hour), use a clean eraser to gently remove any visible pencil marks from your initial sketch. -
Seal the work:
To protect the design from scratches or moisture, take the vase to a ventilated area and apply a light coat of clear matte sealant spray. -
Final cure:
Let the sealant cure according to the can’s instructions before using the vase for heavy floral arrangements.
This simple yet striking vase is now ready to hold your favorite dried bouquet or stand alone as a piece of decor.


Bold Stripes With Clean Edges
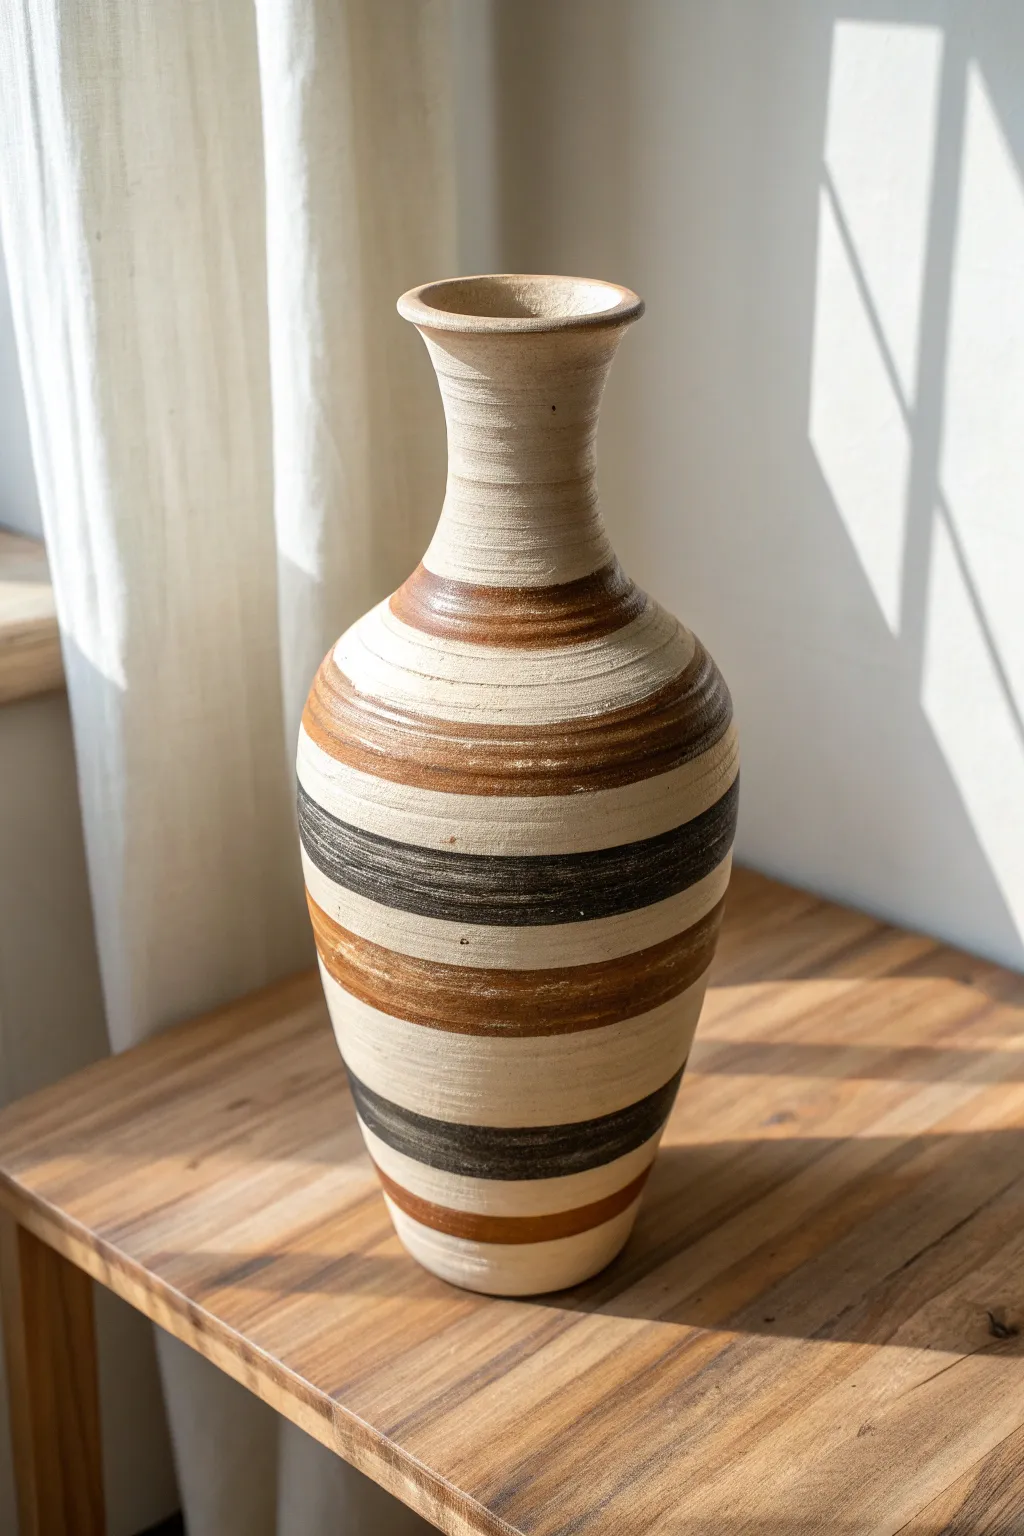
Transform a plain ceramic or clay vase into a sophisticated centerpiece featuring bold, contrasting bands of earth tones. This project emphasizes texture and clean lines, utilizing the natural color of the vase as a backdrop for deep browns and charcoal blacks.
Step-by-Step Guide
Materials
- Tall ceramic or terracotta vase (matte finish preferred)
- Acrylic paints (Burnt Sienna, Raw Umber, Carbon Black, Unbleached Titanium)
- Medium flat brush (3/4 inch)
- Small flat brush (1/4 inch)
- Painter’s tape or washitape (various widths)
- Palette or paper plate
- Cup of water and paper towels
- Matte spray sealant (optional)
Step 1: Preparation and Base
-
Clean surface:
Begin by wiping down your vase with a damp cloth to remove any dust or oils. Let it dry completely. -
Assess the vase color:
Look at your vase’s natural color. Since we want to use negative space as part of the design, we won’t be painting the whole thing. If the original color isn’t quite right, apply a base coat of a creamy beige or Unbleached Titanium mixed with a little water for a wash effect, then let it dry fully.
Step 2: Painting the Textured Bands
-
Mix the brown tone:
Squeeze out some Burnt Sienna and a touch of Raw Umber onto your palette. Are you aiming for warmth? Add a tiny bit more Sienna. -
The neck ring:
Load your small flat brush with the brown mix. Paint a horizontal band right at the base of the neck, where it meets the main body. -
Rotating technique:
To get a straight line around the curve, I find it easiest to hold the brush steady in one spot and slowly rotate the vase itself with my other hand. -
Create the first thick stripe:
Moving down to the widest part of the shoulder, paint a thicker band using the medium flat brush and the same brown mixture. Don’t worry about perfect opacity; the brushstrokes add texture. -
Define the black stripe:
Clean your brush thoroughly. Pick up your Carbon Black paint. Beneath the wide brown shoulder band, leave a gap of the natural vase color, then paint a thick, dark charcoal band around the middle belly of the vase. -
Add texture to the black:
While the black paint is still slightly wet, drag a mostly dry brush horizontally through it to create subtle streaks, simulating a turned pottery look. -
Lower heavy band:
Switch back to the brown mixture. Paint a substantial band below the black one, leaving another negative space gap in between. -
Adding variation:
For this lower brown band, try mixing in a tiny bit of Unbleached Titanium on your brush without fully blending it on the palette to create natural-looking streaks of lighter clay tones. -
The anchor stripe:
Paint a final, thinner black stripe near the bottom third of the vase to balance the visual weight of the design. -
Base stripe:
Finish the bottom sequence with one last thin brown stripe near the foot of the vase.
Spin It Right
Place the vase on a Lazy Susan or turntable while painting. Spinning the table instead of walking around the vase makes creating continuous horizontal lines significantly easier.
Step 3: Refinement and Finish
-
Check the edges:
Inspect your stripes. If any edges look too wobble, use a damp Q-tip to gently wipe away mistakes, or use a small brush with your base color (or unbleached titanium) to touch up the negative space areas. -
Enhance the texture:
The charm of this look is the hand-painted, slightly rustic feel. If a stripe looks too flat, take a dry brush with a very small amount of a lighter version of the color and lightly drag it over the dried paint to highlight horizontal ridges. -
Dry time:
Allow the vase to sit undisturbed for at least 2-3 hours to ensure all layers are fully cured. -
Sealing:
If you plan to use this vase near moisture, take it outside and apply a light coat of matte spray sealant to protect the paint without adding unwanted shine.
Textured Touch
Mix baking soda into your acrylic paint (1:1 ratio) before applying the stripes. This adds a gritty, terracotta-like texture that makes the vase look like authentic handmade pottery.
Now you have a stunning, modern-rustic vessel that looks like an expensive artisan find


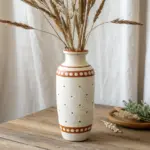
Easy Polka Dots on an Earthy Base
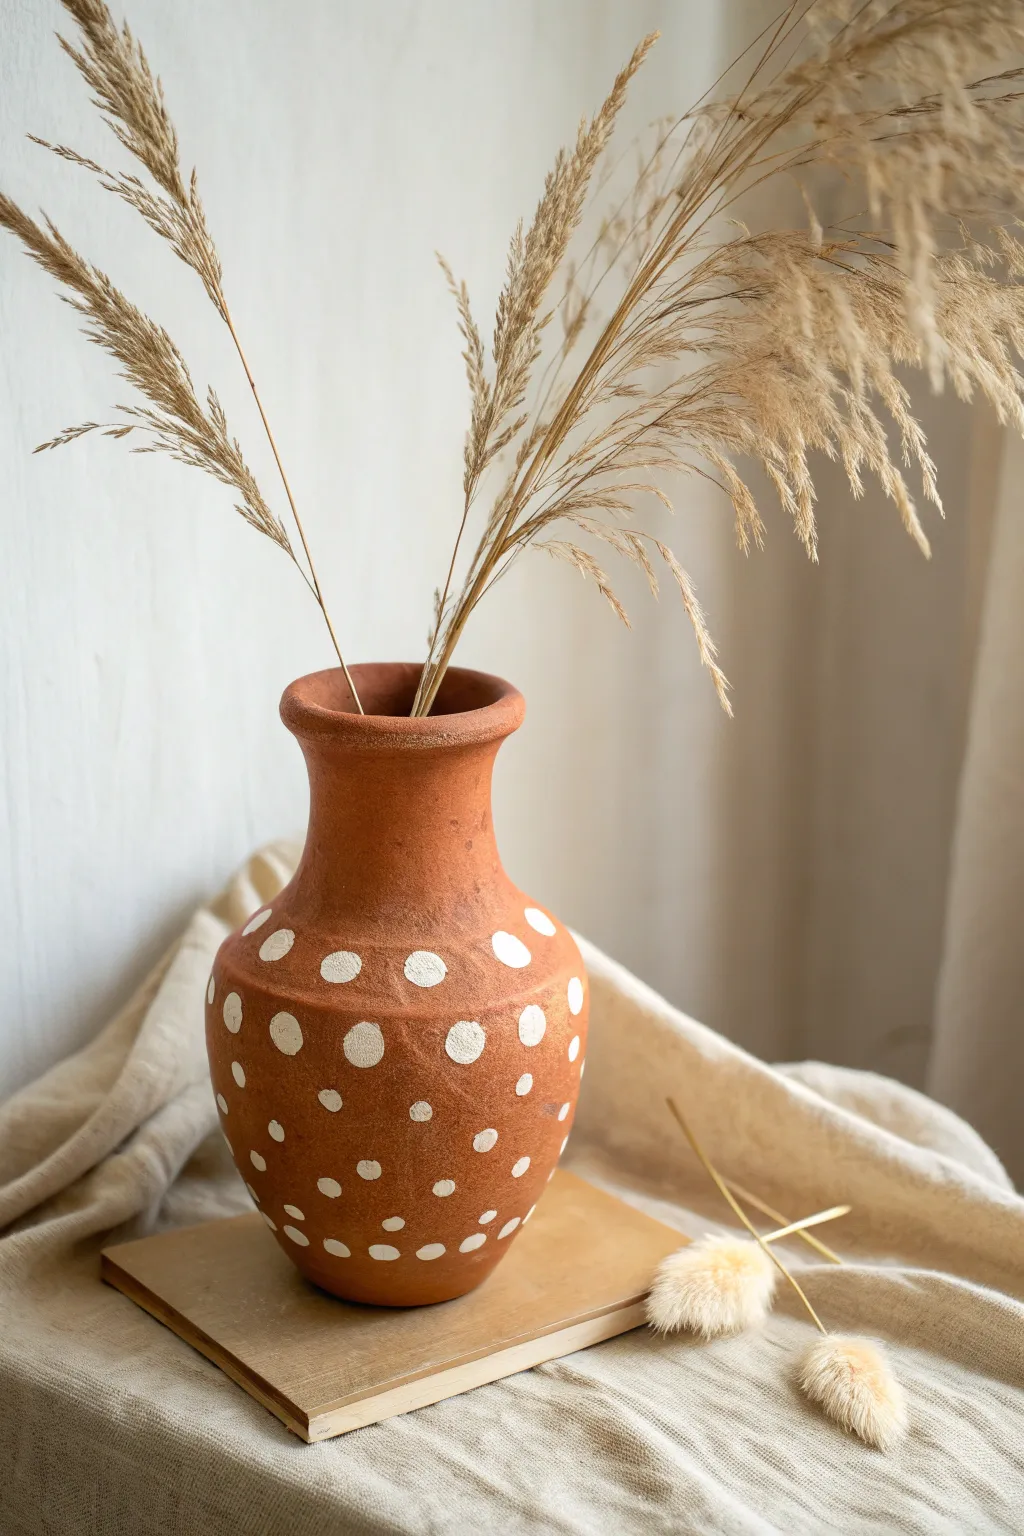
Transform a simple garden pot into a trendy piece of home decor with this wonderfully tactile project. Using an earthy terracotta base and simple white acrylics, you’ll create a charming, rustic vessel perfect for holding dried grasses.
Detailed Instructions
Materials
- Terracotta vase or pot (unglazed)
- White or cream acrylic paint
- Round foam sponge pouncers (small size)
- Small round paintbrush
- Paper plate or palette
- Damp cloth
- Clear matte sealer spray (optional)
Step 1: Preparation
-
Clean surface:
Begin by wiping down your terracotta vase with a damp cloth to remove any dust or manufacturing residue. The clay needs to be completely clean for the paint to adhere properly. -
Dry completely:
Let the vase sit until it is bone dry. Moisture trapped in the clay can cause the paint to bubble later, so patience is key here. -
Prepare paint:
Squeeze a dollop of your white or cream acrylic paint onto a paper plate or palette. You don’t need to water it down; a creamy consistency works best for opaque dots.
Step 2: Painting the Pattern
-
Test spacing:
Before touching the vase, practice making a few dots on a piece of scrap paper to get a feel for how much pressure creates the perfect circle size. -
Start the top row:
Load your round foam pouncer or a small round brush with paint. Start making your first row of dots around the shoulder of the vase, just below the neck. -
Create the staggered effect:
For the second row, place each new dot directly below the empty space between the two dots in the row above it. This brick-lay or staggered pattern helps the design look cohesive. -
Work downwards:
Continue adding rows down the body of the vase. Don’t worry if the spacing isn’t mathematically perfect; the slight irregularities add to the handmade charm. -
Adjust dot size:
As the vase tapers towards the bottom, you might want to use a slightly smaller brush or apply less pressure to make the dots naturally shrink with the form. -
Check consistency:
If some dots look a bit thin or transparent, wait for them to dry to the touch and then carefully dab a second layer of paint directly on top. -
Freehand touch-ups:
I like to use a small detail brush to tidy up any rough edges on the dots if the sponge smudged slightly, making sure they look relatively round.
Clean Circles Pro Tip
Don’t have a sponge pouncer? The flat end of a pencil eraser or a cotton swab makes excellent, uniform dots for smaller patterns.
Step 3: Finishing Touches
-
Let it cure:
Allow the painted vase to dry completely for at least an hour. Terracotta is porous and absorbs paint quickly, but surface drying is important. -
Seal the deal:
If you plan to use this outdoors or in a humid area, spray a light coat of clear matte sealer over the vase to protect your work. -
Add texture (optional):
For an even more rustic look, you can lightly sand the painted dots with fine-grit sandpaper after they dry to distress them slightly.
Level Up: Texture
Mix a teaspoon of baking soda into your white acrylic paint before applying. This creates a grainy, ceramic-like texture that makes the dots feel raised and expensive.
Place your dried pampas grass inside and admire your stylish new centerpiece that brings a touch of nature indoors


Modern Geometric Blocks
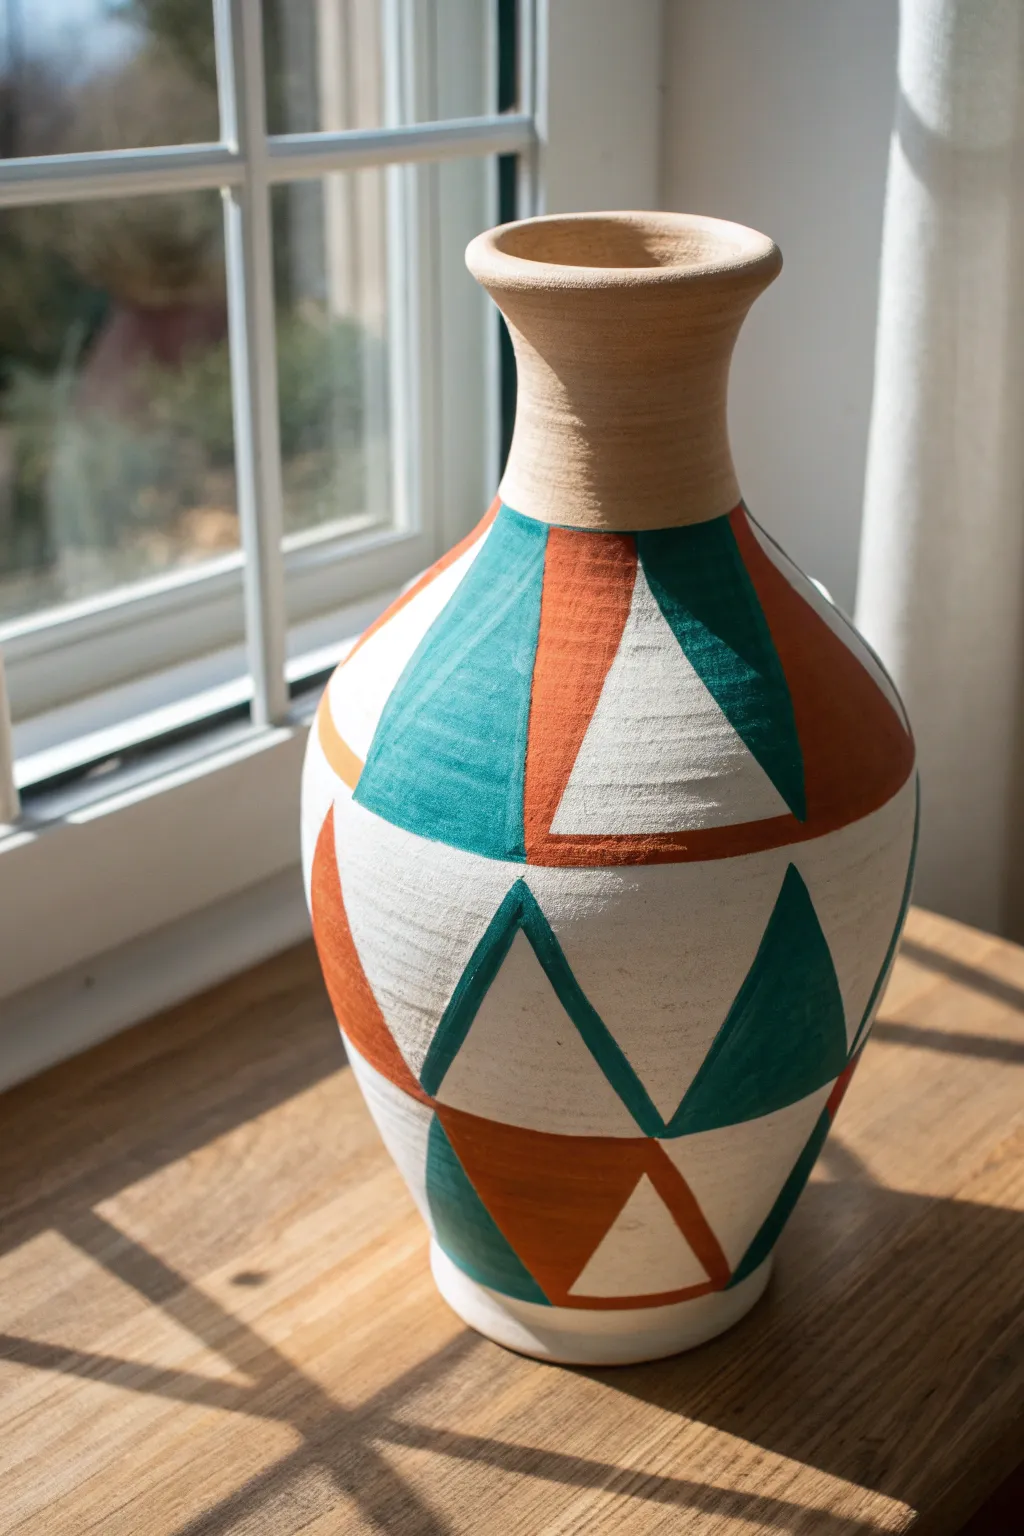
Transform a simple terracotta vase into a statement piece of modern decor with this bold geometric design. Using a striking palette of teal, burnt orange, and cream, you’ll create interlocking triangles that feel both retro and refreshingly contemporary.
Step-by-Step Tutorial
Materials
- Bisque fired vase or plain terracotta vase (medium to large size)
- Acrylic craft paints (Deep Teal, Burnt Orange, Warm Cream/Off-White)
- Painter’s tape or masking tape (1/4 inch width is ideal for curves)
- Flat shader brushes (medium size)
- Small liner brush for touch-ups
- Pencil
- Ruler or flexible measuring tape
- Eraser
- Matte spray sealant (optional)
Step 1: Preparation and Mapping
-
Clean the surface:
Wipe down your vase with a slightly damp cloth to remove any dust or oils from the store shelves. Let it dry completely. -
Establish the unpainted neck:
Decide where you want the natural clay neck to end and the design to begin. Typically, this is right where the neck starts to flare into the body. -
Tape the boundary:
Place a solid ring of painter’s tape around the neck at your chosen line. Press the edge down firmly to ensure a crisp horizon line later. -
Sketch the primary triangles:
Using a pencil, lightly sketch large triangles around the widest part of the vase. I find it helps to mark the top points and bottom points first to keep the spacing somewhat even, though they don’t need to be mathematically perfect. -
Fill the gaps:
Draw inverted triangles in the spaces between your first set. The goal is to puzzle-piece them together so the entire body of the vase is covered in a triangular grid. -
Step back and review:
Look at the vase from a distance. If any triangle looks too warped or disproportionately large, erase and adjust the lines now before paint touches the clay.
Wobbly Lines?
If freehand painting is too hard, use thin automotive detailing tape (1/8 inch) to mask off every triangle grid line before painting for razor-sharp edges.
Step 2: Painting the Design
-
Start with the cream base:
Identify which triangles will be white/cream. Using a flat brush, carefully paint inside these lines. Using the lightest color first prevents harder-to-cover mistakes later. -
Apply a second coat:
Acrylics on terracotta can soak in rapidly. Apply a second layer of cream once the first is dry to get that solid, opaque look. -
Paint the orange sections:
Select your burnt orange triangles. Using a clean flat brush, fill these in, being careful where they border the cream sections. A steady hand is key here. -
Add the teal accents:
Finally, paint the remaining triangles with the deep teal. This cool tone offers a beautiful contrast to the warm orange and neutral clay. -
Refine the edges:
Use your smallest liner brush to sharpen the lines where three colors meet. If the paint surfaces look uneven, adding texturing or brush strokes in the same direction adds a nice handmade feel. -
Let it cure:
Allow the vase to dry undisturbed for at least an hour. The clay holds moisture, so it might feel cool to the touch even when surface-dry.
Step 3: Finishing Touches
-
Remove the neck tape:
Slowly peel off the ring of tape around the neck. Pull it away at a 45-degree angle to keep the paint from chipping. -
Clean up the border:
If any paint seeped under the tape, gently scrape it away with a craft knife or use a small damp brush to wipe it off the raw clay. -
Inspect for coverage:
Check your painted triangles one last time. If the raw clay is showing through the paint too much, dab a little extra color onto those thin spots. -
Seal (Optional):
If you plan to put real flowers in this, spray the entire painted exterior with a matte clear coat to protect your work from water drips.
Pro Tip: Surface Texture
Don’t sand the paint smooth. Leaving visible brushstrokes in alternating directions for each triangle adds a lovely tactile, textile-like quality to the finish.
Now you have a stunning, artisanal vase that looks like it came straight from a high-end pottery studio

The Complete Guide to Pottery Troubleshooting
Uncover the most common ceramic mistakes—from cracking clay to failed glazes—and learn how to fix them fast.
Ombre Fade From Neck to Base
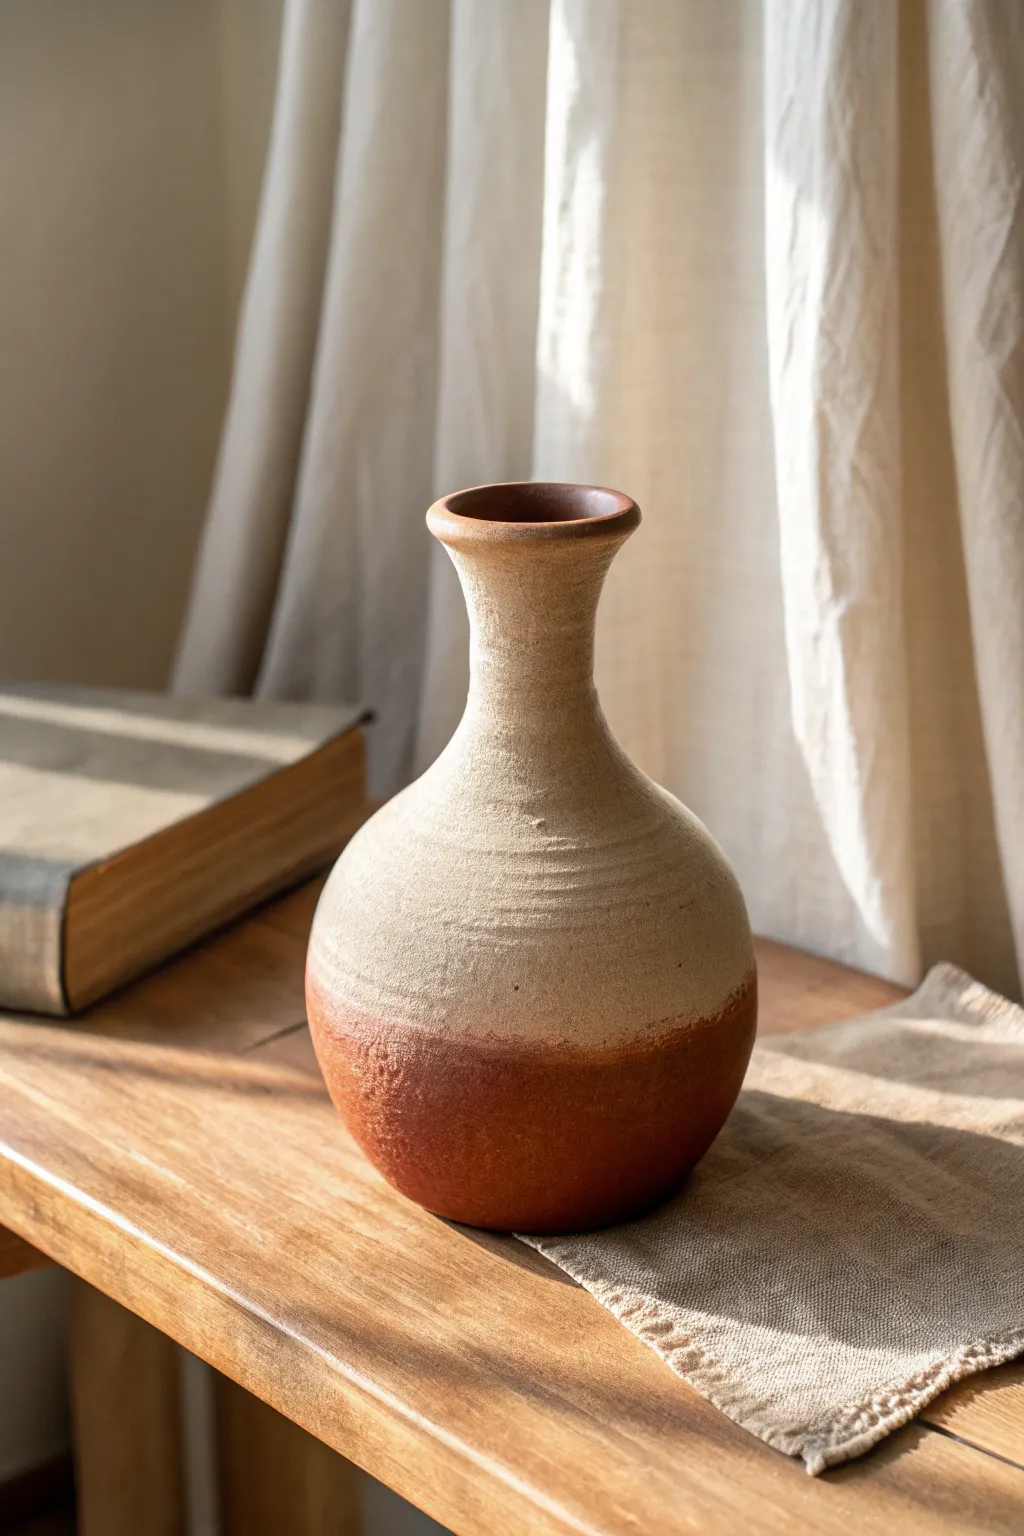
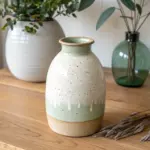
Achieve the look of raw, kiln-fired pottery without ever touching a wheel by using specialized texture techniques. This project transforms a basic glass or ceramic vessel into a rustic décor piece featuring a warm, natural gradient from deeply rooted terracotta to sun-bleached sand.
Step-by-Step
Materials
- Glass or ceramic vase (smooth surface)
- Baking soda
- Terracotta or burnt sienna acrylic paint
- Cream or oatmeal beige acrylic paint
- Medium-sized flat paintbrush
- Chip brush or sponge applicator
- Small cup or palette for mixing
- Matte finish sealant spray
- Paper towels
- Sandpaper (optional for prep)
Step 1: Mixture Preparation
-
Surface Prep:
Begin by thoroughly cleaning your vase with soap and warm water to remove any oils or dust. If the surface is extremely glossy, give it a quick scuff with fine-grit sandpaper to help the paint adhere better. -
Create the Texture Mix:
In your mixing cup, combine the terracotta paint with an equal part of baking soda. This is the secret ingredient that turns standard acrylics into a thick, mud-like paste that mimics clay. -
Check Consistency:
Stir the mixture well until it reaches a consistency similar to fluffy frosting. If it’s too runny, add a pinch more baking soda; if it’s too thick to spread, add a drop of water. -
Prepare the Upper Color:
Repeat the mixing process in a separate section of your palette using the cream or beige paint and baking soda. Aim for the exact same textural consistency as your terracotta mix.
Textural Depth
For a grittier, sand-stone finish, mix used coffee grounds or fine craft sand into the bottom paint layer alongside the baking soda.
Step 2: Applying the Base Layer
-
Start at the Bottom:
Using your flat brush, begin applying the terracotta texture paste to the bottom third of the vase. Don’t worry about being neat; thick, horizontal strokes actually enhance the handmade look. -
Build the Foundation:
Continue working the dark color upward until you cover roughly the bottom 40% of the vase. Ensure the coating is thick enough that the original vase surface doesn’t show through. -
Apply the Top Color:
Switch to a clean brush and apply the cream texture paste to the neck of the vase, working your way down. Leave a gap of about two inches between the cream paint and the terracotta paint.
Distressed Detail
Once fully dry, lightly sand high points of the texture with 220-grit sandpaper to reveal the contrasting color underneath for a weathered, vintage vibe.
Step 3: Creating the Ombre Blend
-
Bridge the Gap:
Bring the cream paint down further so it just barely touches the wet terracotta edge. Do not overlap them heavily yet. -
Initial Blending:
Wipe your brush on a paper towel so it is mostly dry. Gently drag the lighter cream paint down into the darker terracotta area using quick, light feathering motions. -
Upward Strokes:
Clean the brush again or flip it over, and drag a small amount of the terracotta paint upward into the cream section. This creates an organic, uneven transition line. -
Stipple the Textures:
To remove visible brush strokes and unify the texture, take a chip brush or sponge and gently dab (stipple) along the transition line where the two colors meet. -
Refine the Gradient:
I prefer to step back and look at the vase from a distance here. If the line looks too stark, lightly dab a tiny bit more of the mixed intermediate color over the seam until the fade looks natural. -
Add Horizontal Detail:
While the paint is still tacky, lightly drag a dry, stiff-bristled brush horizontally around the neck and body of the vase. This mimics the ‘throwing lines’ found on wheel-turned pottery.
Step 4: Finishing Touches
-
Dry Time:
Allow the vase to dry completely. Because the baking soda mixture is thick, this might take 2-4 hours. It will lighten slightly and turn very matte as it dries. -
Check for Cracks:
Inspect the surface. If the drying process caused large cracks you don’t like, simply mix a tiny batch of plain paint (without baking soda) and dab it into the cracks. -
Dusting Technique:
For a super-aged look, dip a dry brush into a tiny amount of flour or white chalk dust and lightly brush it over the dried terracotta section to highlight the texture. -
Seal the Work:
To protect the baking soda from humidity or flaking, spray the entire vase with a clear matte sealant. Do not use gloss, as it will ruin the raw clay illusion.
Now you have a stunning, stone-like vessel that adds instant warmth to any shelf
Half-Dipped Color Block
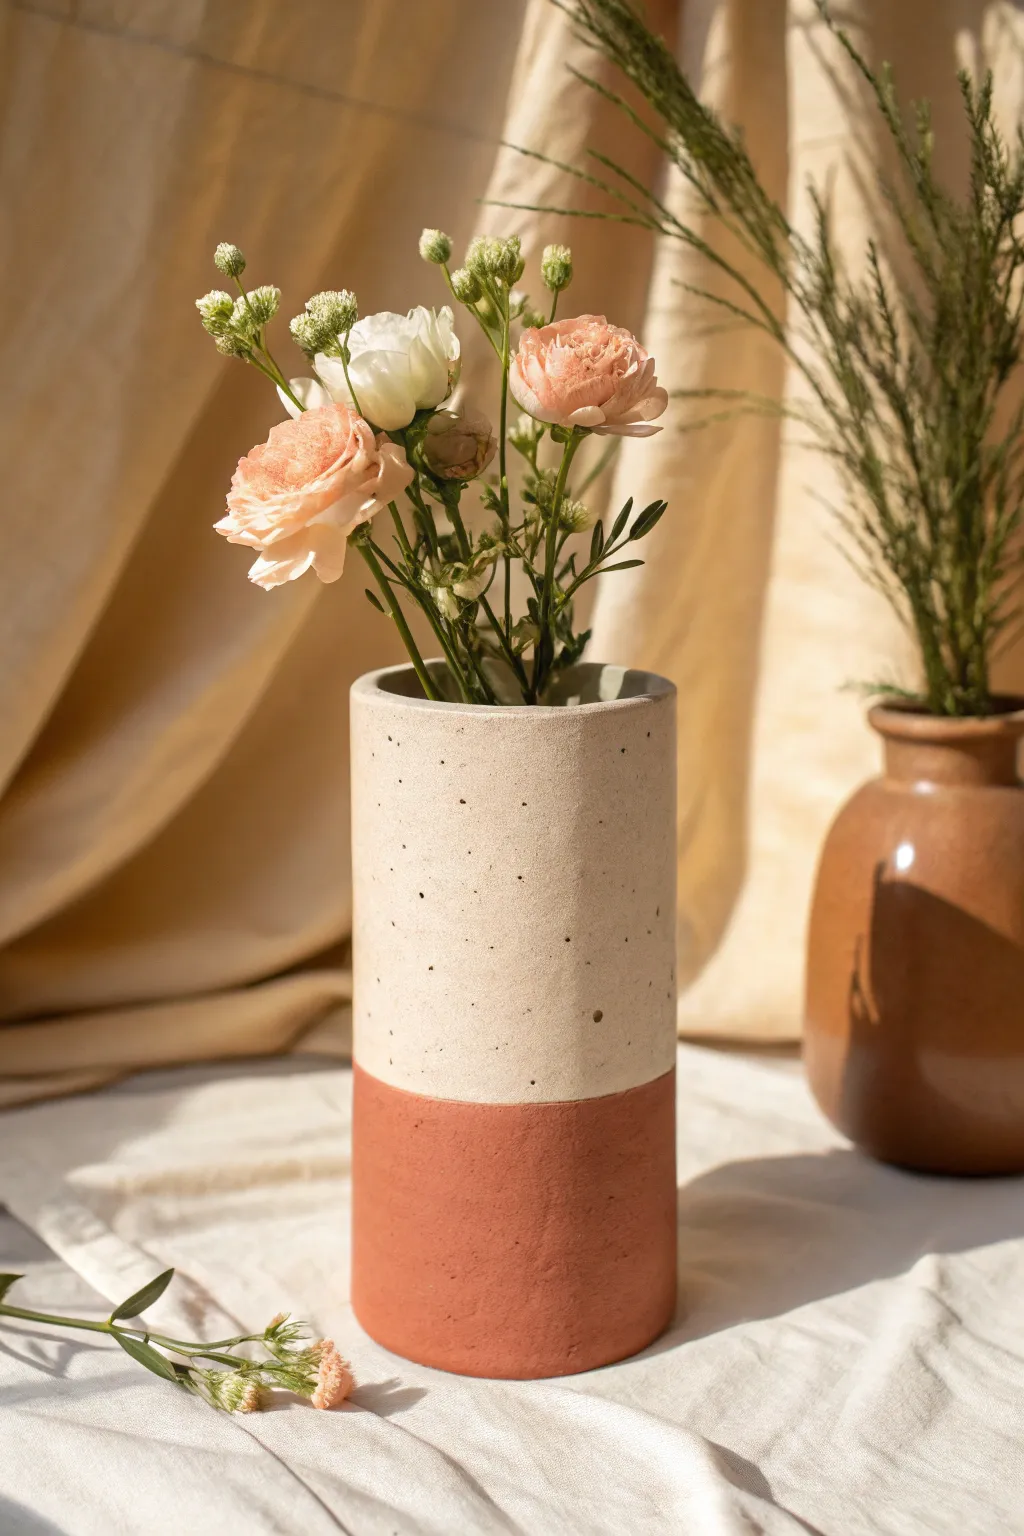
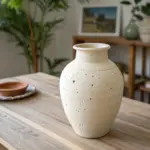
Transform a simple cylindrical vase into a modern statement piece with this half-dipped color block technique. The result is a stunning contrast between raw, earthy terracotta tones and a smooth, speckled cream finish that adds texture and warmth to any room.
Step-by-Step Tutorial
Materials
- Cylindrical ceramic or terracotta vase (bisque or unglazed preferred)
- Acrylic paint (warm cream or off-white)
- Acrylic paint (terracotta or burnt orange)
- Black or brown acrylic paint (for speckles)
- Painter’s tape or washi tape (wide width)
- Wide flat paintbrush
- Old toothbrush
- Matte clear sealant spray
- Paper plate or palette
- Water cup
- Ruler
Step 1: Preparation & Base Coat
-
Clean surface:
Begin by wiping down your vase with a damp cloth to remove any dust or oils. A clean surface ensures the paint adheres properly and lasts longer. -
Measure the line:
Decide where you want your color block transition to be. For the look in the photo, measure approximately one-third of the way up from the bottom of the vase. -
Mark heights:
Use a pencil to make small, faint marks at this height around the circumference of the vase to guide your taping. -
Apply tape:
Carefully run a strip of painter’s tape around the vase connecting your marks. Press the edge down firmly with your fingernail to prevent paint from bleeding under straight lines.
Step 2: Painting the Top Section
-
Mix cream color:
Pour your cream or off-white acrylic paint onto the palette. I like to add a tiny drop of brown to warm it up so it doesn’t look too stark against the terracotta. -
First layer:
Using the wide flat brush, paint the upper section of the vase above the tape line. Use long, vertical strokes for a smooth finish. -
Check coverage:
Let the first coat dry for about 15-20 minutes. If the underlying vase color is showing through, apply a second coat for full opacity. -
Edge care:
Be mindful when painting near the tape edge; brush away from the tape or parallel to it rather than forcing paint under it. -
Dry thoroughly:
Allow these top coats to dry completely to the touch before moving to the next texturing step.
Bleeding Lines?
If paint seeped under the tape, wait for it to dry fully. Then, use a small flat brush with the opposite color to carefully touch up and straighten the edge.
Step 3: Adding Texture & Detail
-
Prepare speckle paint:
Water down a small amount of black or dark brown acrylic paint on your palette. You want an inky consistency, liquid enough to flick easily. -
Test splatter:
Dip an old toothbrush into the thinned paint. Run your thumb across the bristles to test the spray pattern on a scrap piece of paper first. -
Apply speckles:
Gently flick the paint onto the cream section of the vase. Aim for random, sparse distribution to mimic natural ceramic imperfections. -
Protect the bottom:
Before speckling near the tape line, you might want to loosely cover the bottom terracotta section with paper just in case, though the tape usually suffices. -
Remove tape:
Once the speckles are dry, slowly peel off the painter’s tape at a 45-degree angle to reveal your crisp line.
Add Faux Stone Texture
Mix a teaspoon of baking soda into your cream paint before applying. This creates a gritty, stone-like surface that feels more authentic and earthy.
Step 4: Finishing the Base
-
Assess the bottom:
If your vase was already terracotta, you might leave the bottom raw. If not, paint the bottom section now with your terracotta color. -
Edge painting:
Use a smaller brush to carefully cut in the terracotta paint right up to the cream line, keeping your hand steady to maintain that sharp division. -
Create texture:
To mimic the rough texture seen in the photo, dab the wet terracotta paint with a dry sponge or stipple it with a dry brush rather than smoothing it out completely. -
Final drying:
Let the entire vase cure for at least 24 hours to ensure all layers are hardened. -
Sealant application:
Finish with a light coat of matte clear spray sealant. This protects the paint from scratches and moisture without adding unwanted shine.
Fill your new vase with fresh blooms or dried grass to enjoy your handcrafted piece of decor


What Really Happens Inside the Kiln
Learn how time and temperature work together inside the kiln to transform clay into durable ceramic.
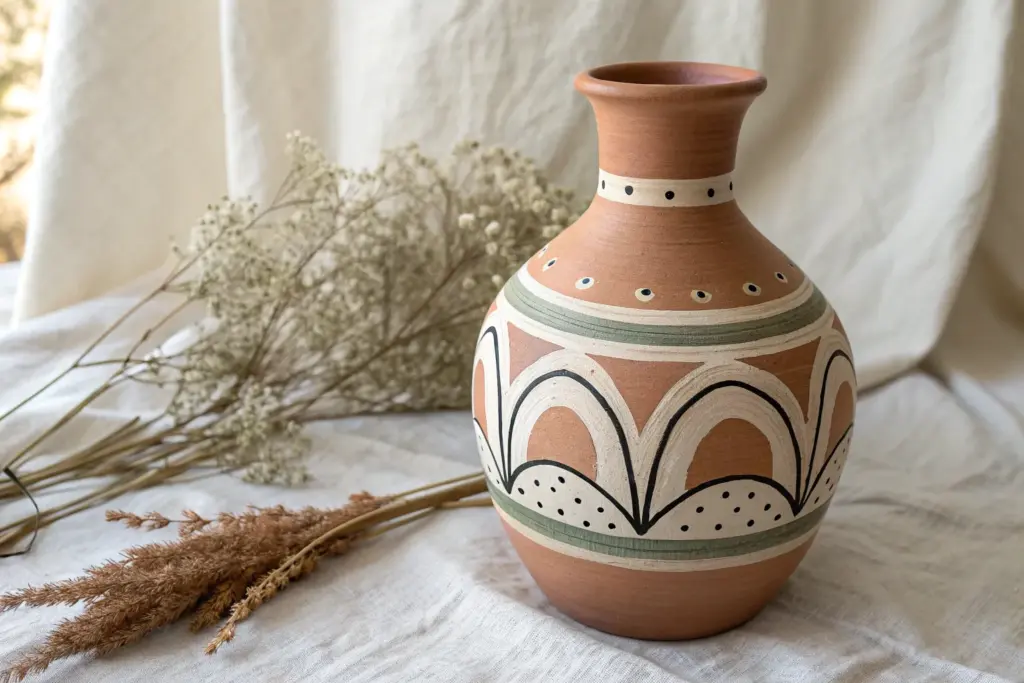
Boho Folk Borders and Bands
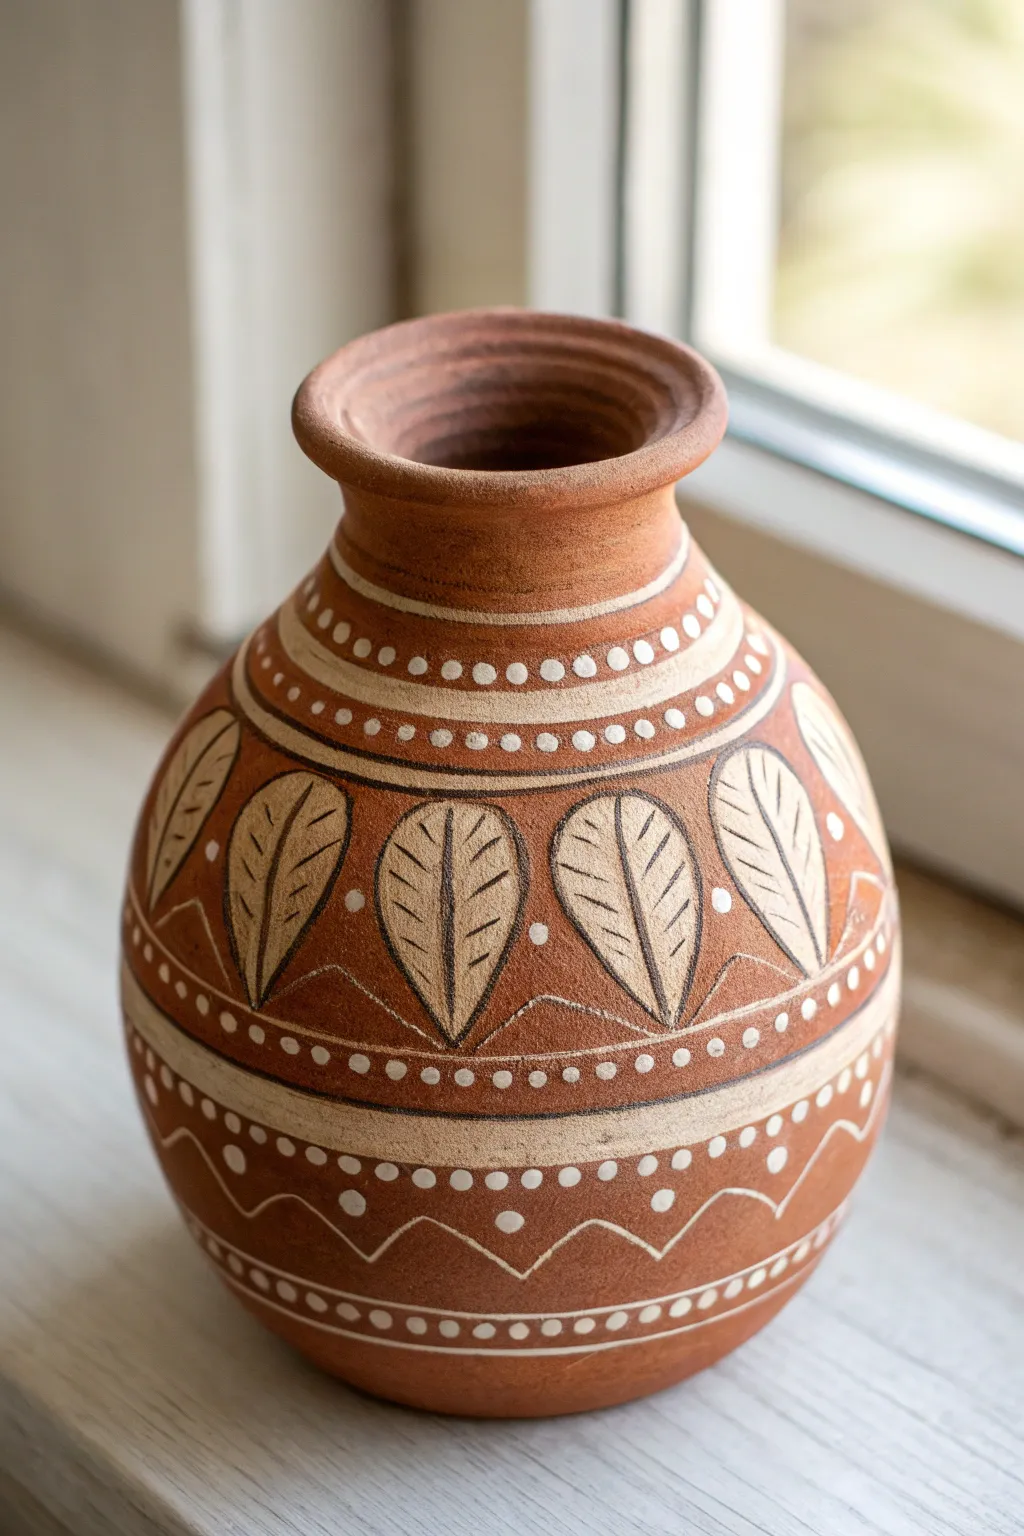
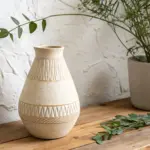
This project transforms a simple terracotta pot into a piece of boho folk art using striking white line work and repeating geometric bands. The central feature creates a mesmerizing rhythm with stylized, veined leaves nestled between borders of delicate dots.
How-To Guide
Materials
- Terracotta or clay vase (smooth surface preferred)
- White acrylic paint (high pigment) or white paint marker
- Fine liner brush (size 0 or 00)
- Small round brush (size 1)
- Dotting tools (various sizes) or ends of brush handles
- Pencil for sketching
- Eraser
- Matte spray varnish
Step 1: Preparation and Base Sketching
-
Clean surface:
Ensure your terracotta vase is clean, dry, and free of dust. If the surface is rough, give it a very light sanding with fine-grit paper to help the paint glide smoothly. -
Mark horizontal guides:
Using a pencil, lightly draw horizontal rings around the vase to create the sections. You will need a narrow band at the neck, a wider decorative band below that, the main large section for the leaves in the middle, and three narrower bands near the bottom. -
Sketch the leaf motif:
In the largest middle section, lightly sketch the outlines of large, oval-shaped leaves spacing them evenly around the circumference. They should be pointed at the top and bottom. -
Plan the zig-zags:
In the lowest main section near the base, sketch a simple zig-zag or chevron line that connects the horizontal bands you marked earlier.
Uneven Lines?
If painting curved lines on a round surface is tricky, try placing the vase on a banding wheel or lazy Susan. Hold your brush steady and rotate the object instead of moving your hand.
Step 2: Painting the Upper Neck
-
Top rim detailing:
Starting at the very top rim, use your fine liner brush or paint marker to draw a solid white line just inside the lip. -
Neck dotted bands:
Just below the neck curve, paint two parallel horizontal rings. Between these rings, add a row of medium-sized dots using a dotting tool. -
Secondary neck band:
Move down about an inch and paint another set of double parallel lines. Fill the space between them with slightly larger dots than the previous row to create visual weight.
Step 3: Creating the Leaf Centerpiece
-
Outline the leaves:
Using your fine brush or marker, carefully go over your pencil sketches to outline the large leaves in white. Keep your hand steady to ensure smooth curves. -
Add the central veins:
Draw a straight vertical line down the center of each leaf, starting from the tip and ending at the base. -
Detail the leaf ribs:
Inside each leaf, paint diagonal ribs extending from the center vein to the outer edge. Space these lines slightly apart to let the terracotta color show through. -
Fill the gaps:
In the negative wedge-shaped spaces between the bottom of the leaves, create a small triangle shape. Some painters like to add a single dot inside this triangle for extra detail.
Add Rustic Texture
Before sealing, lightly sand the dried white paint with fine sandpaper. This distresses the stark white lines, giving the vase an aged, archaeological find aesthetic.
Step 4: Lower Bands and Finishing Touches
-
Leaf border:
Paint two parallel lines immediately below the leaf section to frame it. Add a row of small, tightly spaced dots between these lines. -
The broad band:
Below the leaf border, create a wider band (about half an inch). Instead of filling it solid, use a light wash of white or very thin lines to create a lighter, textured look, then frame it with solid white lines. -
Zig-zag section:
Paint the zig-zag line you sketched near the bottom. In the upper ‘V’ of each zig-zag, place a medium-sized white dot. -
Bottom anchor:
Finish the design near the base with one final set of double parallel lines containing a row of simple dots. -
Clean up:
Once the paint is fully dry, gently erase any visible pencil marks. Check for any patchy lines and apply a second coat of white if needed for opacity. -
Seal the work:
To protect your design from scuffs, finish by applying a coat of matte spray varnish in a well-ventilated area.
Place your finished vase near a window where natural light can highlight the contrast between the earth tones and your crisp white patterns
Leafy Vines That Wrap Around
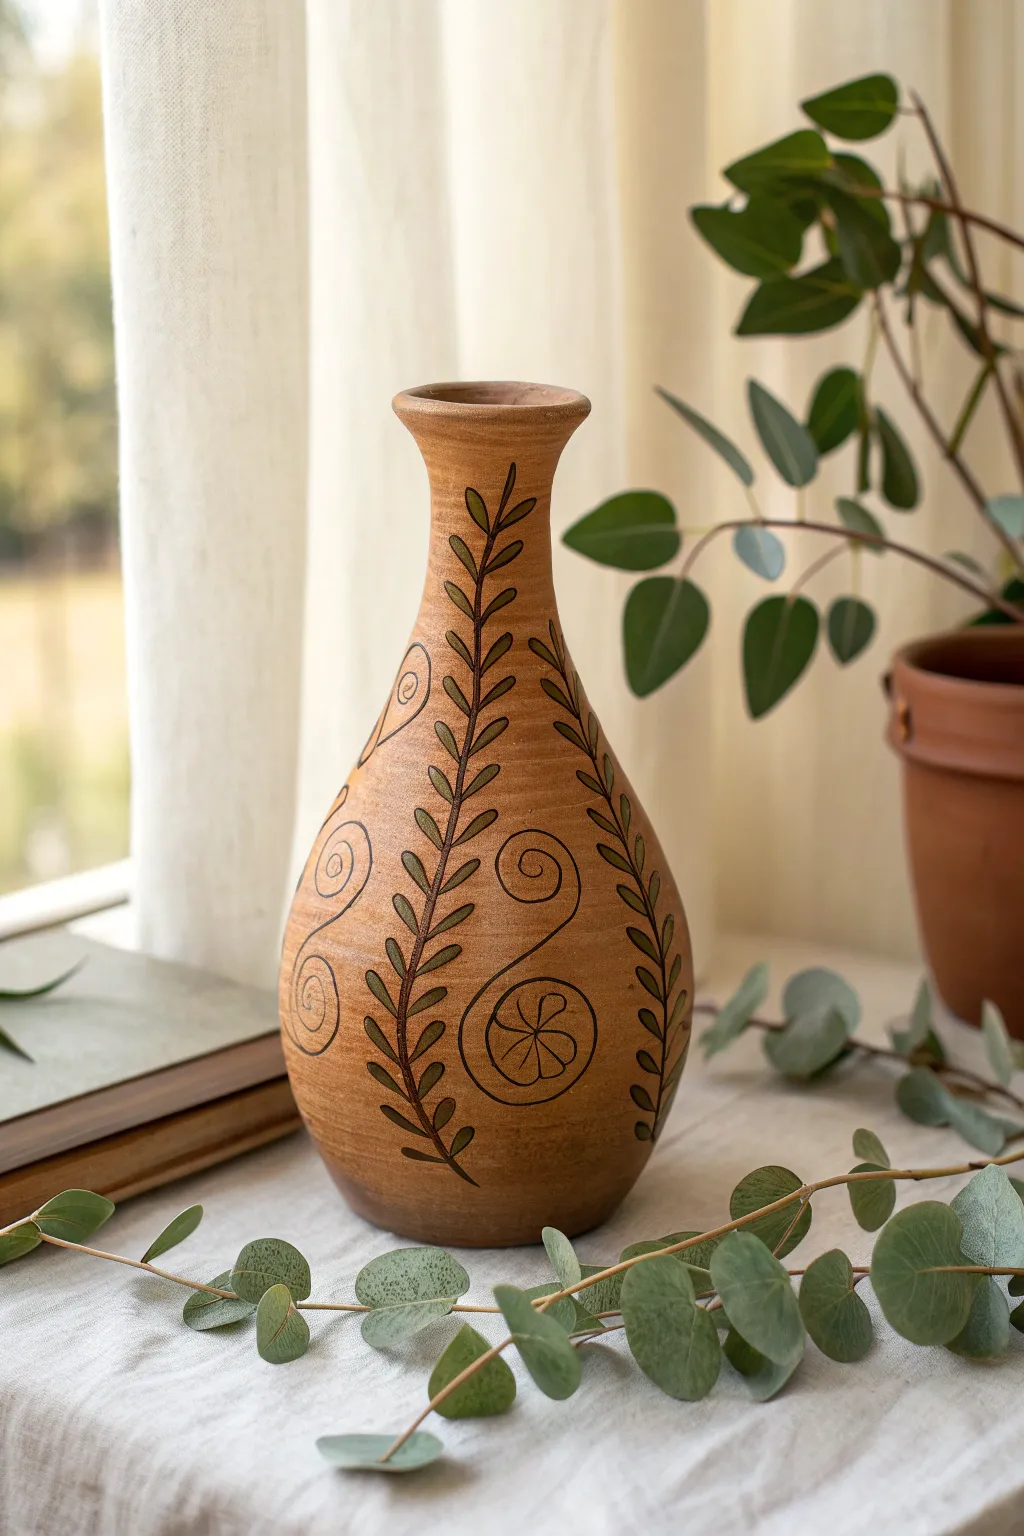
Transform a plain terracotta or ceramic vase into an earthy statement piece with this nature-inspired design. The contrasting dark vines against the warm, clay-toned background create a rustic yet elegant look that brings the outdoors inside.
Step-by-Step Guide
Materials
- Tall, narrow-neck vase (terracotta or ceramic with a matte finish)
- Acrylic paint (Burnt Sienna or Terracotta for the base)
- Acrylic paint (Dark Forest Green or Olive Green)
- Acrylic paint (Black or Dark Brown for outlines)
- Medium flat brush (for base coat)
- Fine liner brush (size 0 or 00)
- Pencil / Chalk
- Matte finish clear sealant spray
- Palette for mixing
Step 1: Preparing the Base
-
Clean surface:
Begin by wiping down your vase with a damp cloth to remove any dust or oils. Let it dry completely. -
Base coat selection:
For this project, we want a warm, earthy foundation. If your vase isn’t already a natural terracotta color, mix Burnt Sienna with a touch of white or yellow oxide to create a clay-like hue. -
Apply base color:
Using a medium flat brush, apply your base color evenly over the entire vase. Work in smooth vertical strokes to minimize brush marks. -
Establish texture:
While the first coat is still slightly tacky, I like to stipple the surface gently with a dry sponge or brush to add a subtle, mud-like texture rather than a perfectly smooth finish. -
Second coat:
Let the first layer dry for about 20 minutes. Apply a second coat if necessary to ensure full opacity, then allow the vase to cure for at least an hour.
Wobbly Lines?
If your hand shakes while painting long stems, rest your pinky finger on the vase surface to stabilize your hand as you pull the brush.
Step 2: Drafting the Design
-
Sketch the spine:
With a pencil or light chalk, draw a vertical S-curve line running from the base of the vase up toward the neck. This will be the main stem of your vine. -
Add secondary stems:
Draw parallel or intertwining vertical lines around the circumference of the vase. Aim for 3-4 main vines depending on the width of your vase. -
Mark leaf placement:
Lightly sketch small tick marks along the stems where your leaves will sprout. Keep them evenly spaced but angled upwards. -
Draft decorative fills:
In the negative spaces between the vines, lightly sketch simple spiral shapes and a central geometric flower motif near the base.
Step 3: Painting the Details
-
Mix the vine color:
Create a deep, organic green by mixing Dark Forest Green with a tiny drop of Brown or Black. You want a color that stands out sharply against the terracotta. -
Line the stems:
Using your fine liner brush, trace over your vertical stem lines. Keep the pressure steady, but allow the line width to vary slightly for a natural look. -
Paint the leaves:
For the leaves, press the belly of a small round brush down at the stem and lift as you pull outward to create a tapered point. Repeat this up the entire length of the vine. -
Drying check:
Allow the green vines to dry to the touch before moving to the outlines. This prevents muddying the crisp lines. -
Outline work:
Load your finest liner brush with thinned Black or Dark Brown paint. Carefully outline the green leaves and stems to give them definition. -
Add the spirals:
Paint the spiral motifs using the same dark outline color. Start from the center of the spiral and carefully unwind your stroke outward. -
Paint the flower motif:
Fill in the circle flower near the base. Keep the petals simple and geometric, echoing the style of ancient pottery designs. -
Final touches:
Look for any gaps in the leaf outlines or areas where the green needs a second pass for vibrancy. Fix these now.
Pro Tip: Rustic Texture
Mix a teaspoon of baking soda into your base coat paint. This creates a grainy, authentic texture that looks and feels just like real terracotta pottery.
Step 4: Sealing and Finishing
-
Full cure:
Let the painted design dry completely, preferably overnight, to ensure the acrylic has hardened. -
Erase guidelines:
Gently erase any visible pencil or chalk lines with a soft eraser. -
Spray sealant:
In a well-ventilated area, apply a coat of matte clear acrylic sealer. This protects the paint from chipping and maintains that non-glossy, clay aesthetic.
Place your newly decorated vase by a window where the light can highlight the organic curves of your vines

TRACK YOUR CERAMIC JOURNEY
Capture glaze tests, firing details, and creative progress—all in one simple printable. Make your projects easier to repeat and improve.
Sunburst Motifs for a Retro Feel
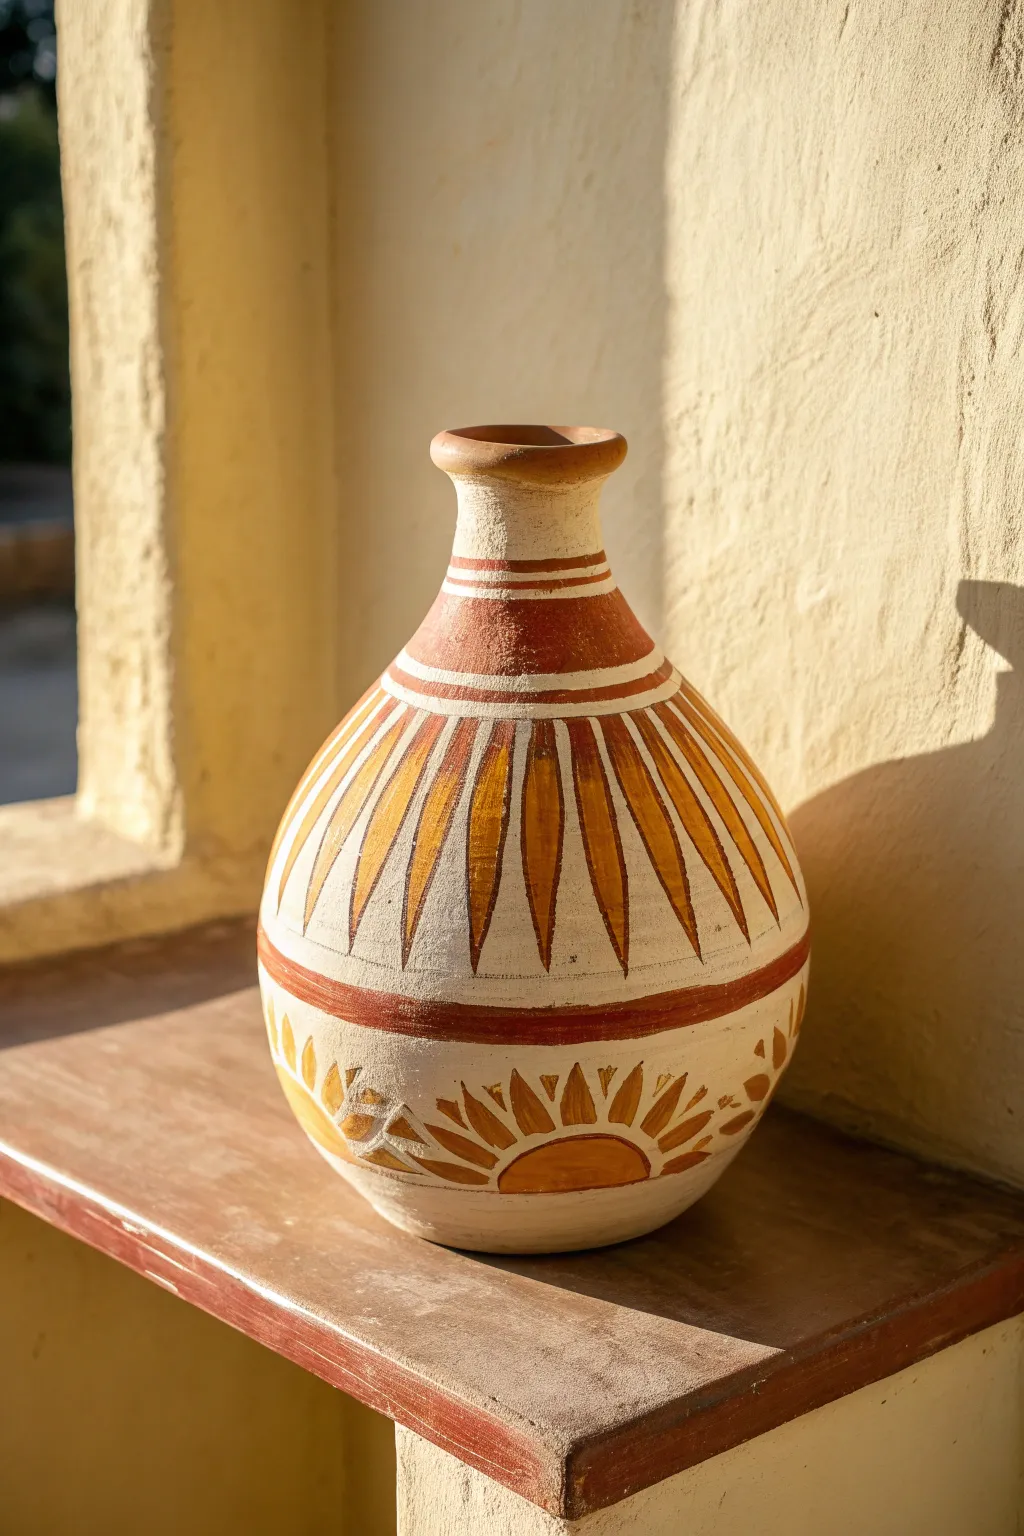
Capture the warmth of golden hour with this retro-inspired sunburst design on a classic clay pot. Using a harmonious palette of white, saffron, and terracotta, this project transforms a simple vessel into a glowing piece of folk art.
Step-by-Step Tutorial
Materials
- Raw terracotta or mud vase (matka style)
- White acrylic paint or chalk paint (matte finish)
- Yellow ochre or deep saffron acrylic paint
- Burnt sienna or terracotta acrylic paint
- Medium flat brush (for bands)
- Small round detail brush (for rays)
- Pencil for sketching
- Measuring tape (flexible)
Step 1: Base Preparation & Initial Bands
-
Prepare the surface:
Ensure your mud vase is clean and dry. If using a raw terracotta pot, wipe away any loose dust with a barely damp cloth and let it dry completely before starting. -
Paint the background:
Apply a coat of white matte acrylic paint over the entire body of the vase. Because the clay is porous, you might need a second coat to get a solid, opaque finish that hides the raw clay color. -
Define the neck bands:
Once the white base is dry, use a medium flat brush loaded with burnt sienna paint to create a solid band around the narrowest part of the neck. -
Add secondary neck stripes:
Paint two thinner stripes above that main neck band. Leave a small gap of white space between them to keep the design crisp. -
Create the shoulder border:
Moving down to where the vase widens into the shoulder, paint a thick, bold band of burnt sienna. This will serve as the top anchor for your main sunburst pattern.
Uneven Lines?
If your horizontal bands are wavy, place the vase on a banding wheel or lazy susan. Hold your brush hand steady against a stack of books and spin the pot instead of moving your hand
Step 2: Painting the Main Sunburst
-
Create the lower border:
Determine how long you want your sunburst rays to be—roughly halfway down the belly of the vase—and paint another horizontal band in burnt sienna to frame the central design area. -
Sketch the rays:
Lightly use a pencil to mark vertical guidelines between the shoulder band and the belly band. Spacing them evenly is key, but slight irregularities add handmade charm. -
Paint the ray outlines:
Using your small round brush and the yellow ochre paint, outline elongated triangle shapes (rays) centered on your pencil marks. The points should face downward. -
Fill the rays:
Fill in these long triangles with the yellow ochre. I find it helpful to dampen the brush slightly to help the paint flow smoothly over the curved surface. -
Add depth with outlining:
Once the yellow is dry, mix a slightly darker shade (yellow ochre mixed with a touch of burnt sienna) or simply use the burnt sienna to carefully outline one side of each ray for a shadowed, dimensional effect. -
Create the spacing stripes:
In the white triangular spaces between your yellow rays, paint very thin vertical lines using the burnt sienna color to emphasize the separation.
Level Up: Texture
Mix a small amount of baking soda into your white base paint before applying it. This creates a gritty, stone-like texture that makes the vase look like an ancient artifact
Step 3: The Lower Hemisphere Details
-
Establish the bottom anchor:
Paint a final, thick horizontal band of burnt sienna around the widest part of the belly, just below the tips of your main sunburst rays. -
Sketch half-suns:
In the lower section of the vase, lightly sketch semi-circles resting on the bottom of the vase (or fading into the unpainted base if you prefer). -
Paint the rising suns:
Fill these semi-circles with solid yellow ochre to represent rising suns. -
Add radiating beams:
Paint short, thick strokes radiating outward from these semi-circles using the same yellow ochre. These should look like traditional flower petals or sunbeams. -
Include decorative accents:
Between the large rising sun motifs, add smaller abstract leafy shapes or simple V-shapes in yellow ochre to fill the negative space without overcrowding it. -
Final outline check:
Go back over any bands or outlines that look a bit faint. A second pass on the burnt sienna bands often makes the whole design pop.
Let your vase dry completely in a sunny spot before displaying it with dried flowers or on its own
Black Base With White Line Art
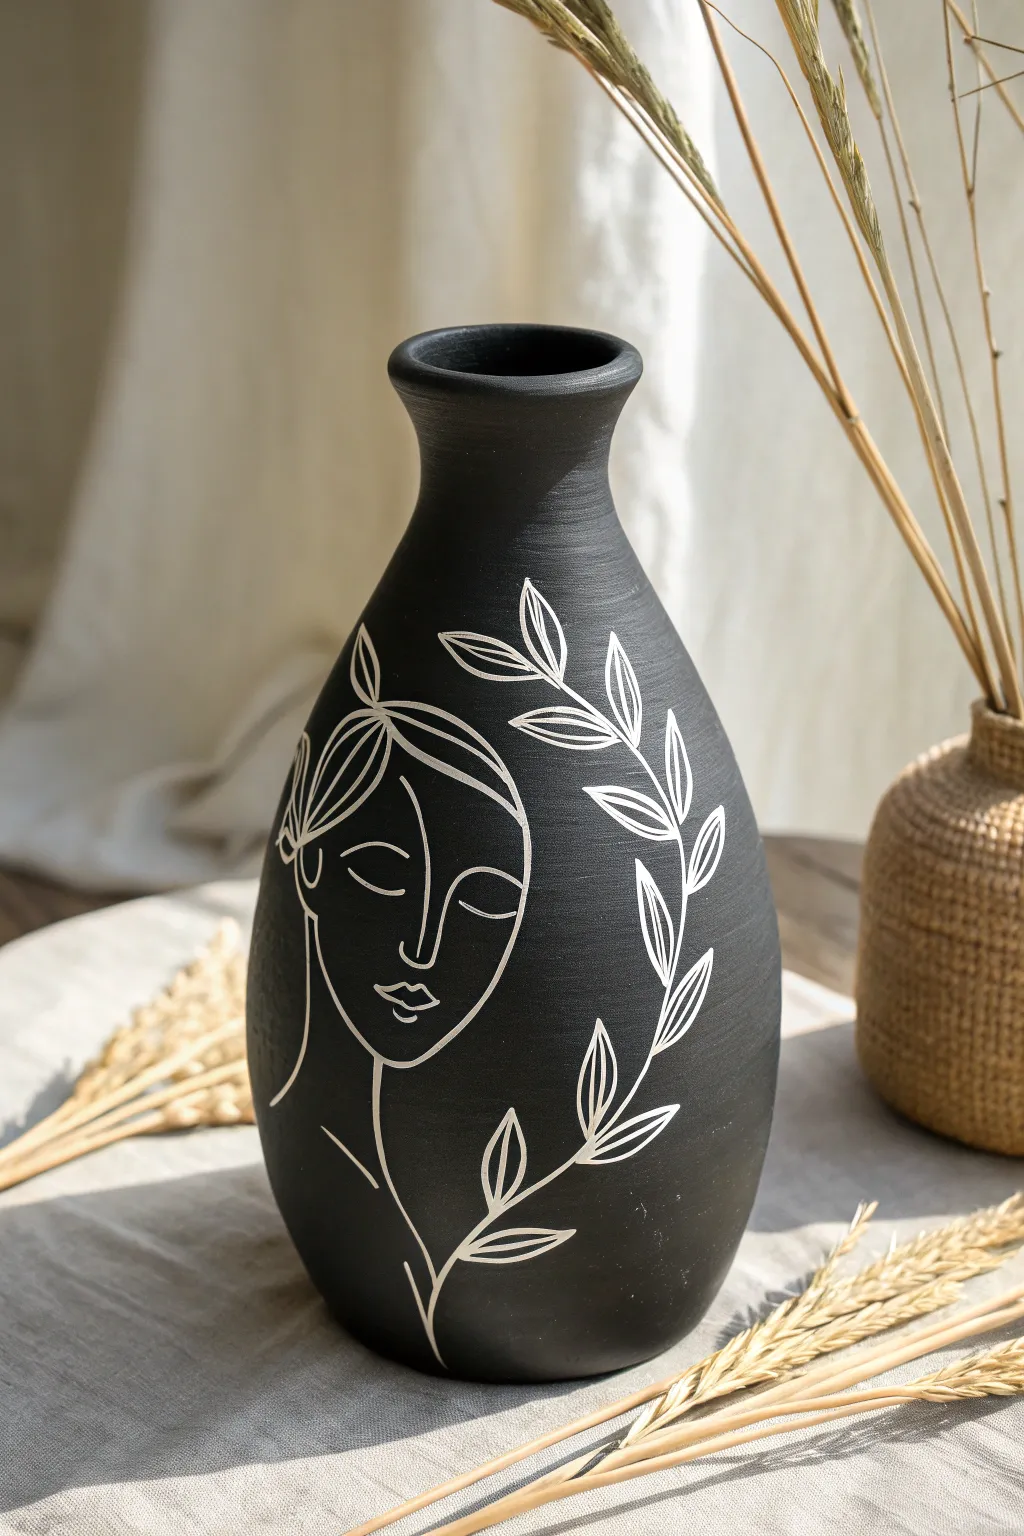
Transform a plain ceramic or clay vase into a stunning piece of modern art with this high-contrast design. The matte black finish provides a dramatic backdrop for fine white line work, creating a sophisticated look that mimics professional pottery studio pieces.
Detailed Instructions
Materials
- Teardrop or bottle-shaped ceramic vase
- Fine grit sandpaper (220-320 grit)
- Black acrylic paint (matte finish)
- White acrylic paint (high flow or ink-like consistency)
- Baking soda (optional, for texture)
- Wide flat paintbrush
- Very fine liner brush (size 0 or 00)
- White chalk or white charcoal pencil
- Spray sealant (matte)
- Paper towels
- Palette or small dish
Step 1: Preparing the Canvas
-
Clean the surface:
Before you begin painting, give your vase a thorough wipe down with a damp cloth to remove any dust or oils. If the vase is glossy, lightly scuff it with fine-grit sandpaper to help the paint adhere better. -
Mix the base coat:
Squeeze your matte black acrylic paint onto a palette. If you want a more authentic ‘mud vase’ texture, mix in a teaspoon of baking soda to thick the paint slightly, though plain matte paint works perfectly for a sleek look. -
Apply the first layer:
Using your wide flat brush, apply the black paint in smooth, vertical strokes. Cover the entire exterior, including just inside the rim of the vase opening. -
Let it dry completely:
Allow the first coat to dry for at least 30 minutes. It should be dry to the touch before you proceed. -
Apply the second layer:
Add a second coat of black paint to ensure full opacity. Look for any streaks or light spots and cover them well. Let this layer dry fully, perhaps for an hour, to ensure a solid foundation.
Step 2: Sketching the Design
-
Draft the concept:
Before drawing on the vase, practice the continuous line face on a piece of scrap paper. Notice how the nose connects to the eyebrow and how the eyelids are simple, curved lines. -
Sketch on the vase:
Using a white chalk pencil or charcoal pencil, lightly sketch your design onto the black surface. Start with the profile of the face on the left side, keeping the lines faint so they are easy to wipe away if needed. -
Add the botanical elements:
Sketch a long, curving branch that arches over the head and down the right side of the vase. Draw simple leaf shapes attached to this main stem. -
Refine the composition:
Step back and look at your vase. Ensure the face and leaves are balanced and fill the space nicely without feeling crowded. The negative space is just as important as the drawing.
Shaky Hands?
If your lines are wobbling, rest your pinky finger against the dry surface of the vase as an anchor while you paint. It stabilizes your hand significantly.
Step 3: Painting the Line Art
-
Prepare your fine brush:
Load your size 0 or 00 liner brush with white paint. If your acrylic is too thick, thin it with a tiny drop of water until it has an ink-like consistency for smooth flow. -
Test the flow:
Test a stroke on paper first. You want a consistent, thin line that doesn’t break. I find rolling the brush tip in the paint creates a sharper point. -
Paint the face outline:
Start painting over your chalk sketch. Use a light hand and try to paint continuous lines where possible. Begin with the forehead and nose bridge line. -
Detail the features:
Carefully paint the closed eye, the lips, and the jawline. Remember to keep the pressure consistent to maintain line width. -
Outline the hair:
Paint the curved lines representing the hair or headwrap at the top of the profile. -
Paint the main stem:
Move to the botanical element. Paint the long central stem first, using a smooth sweeping motion to keep it organic. -
Add the leaves:
Fill in the leaf outlines. For the vein details inside the larger leaves, use the very tip of your brush with barely any pressure. -
Clean up sketch lines:
Once the white paint is completely dry (give it at least 20 minutes), gently wipe away any visible chalk marks with a slightly damp Q-tip or a soft cloth. -
Seal the artwork:
To protect your design, take the vase outside and spray it with a clear matte sealant. Two light coats are better than one heavy coat to prevent dripping.
Paint Pen Alternative
Struggling with the brush? Swap the liner brush for a white oil-based paint marker with a fine tip. It offers much more control for beginners.
Place your finished masterpiece on a sunlit shelf with some dried grasses to complete the serene aesthetic
Minimal Faces on Natural Clay
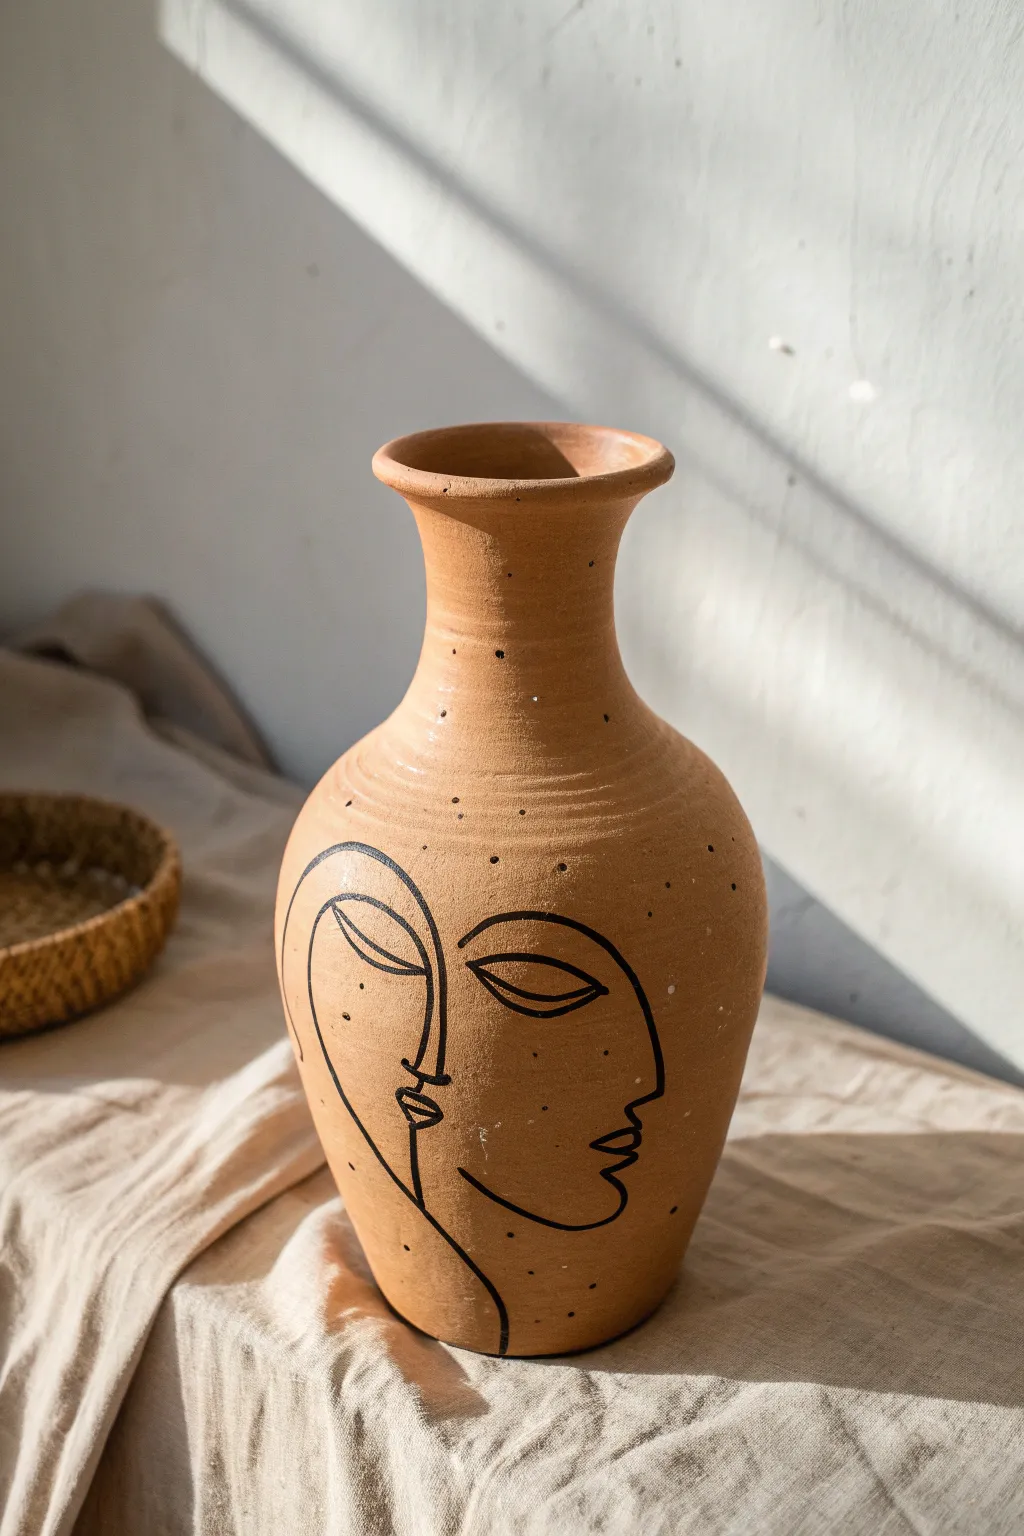
Embrace the raw beauty of natural pottery with this minimalistic face design that plays with negative space and continuous lines. The warm, earthy terracotta provides a stunning canvas for the bold black strokes, creating a piece that feels both modern and primal.
Step-by-Step
Materials
- Unfinished terracotta or ceramic vase (matte finish)
- Black acrylic paint or black paint marker (medium tip)
- Pencil (HB or 2B)
- Clean eraser
- Fine liner brush (if using paint)
- Matte spray sealant (optional)
- Stiff bristle brush (for speckling)
- Water cup and paper towels
Step 1: Preparing the Surface
-
Surface check:
Begin by inspecting your vase. Since we are working with a ‘raw’ look, wipe it down with a slightly damp cloth to remove any dust or kiln residue. Let it dry completely. -
Planning the layout:
Visualize where the main face will sit. The curve of the vase naturally distorts straight lines, so rotate the vase in your hands to find the ‘front’ viewing angle that looks best.
Steady Hands Tip
Rest your painting hand’s pinky finger against the vase surface as you draw. It acts as an anchor to keep your lines smooth on the curved surface.
Step 2: Drafting the Design
-
The central nose line:
With your pencil, lightly sketch a vertical line that will serve as the shared profile. Start near the middle of the vase body and draw the bridge of the nose, dipping in for the eye socket and out for the nose tip. -
Defining the lips:
Below the nose, sketch the profile of the lips. Keep them simple—just a small indentation for the philtrum and the outward curve of the upper and lower lip. -
Drawing the first eye:
To the left of the profile line, draw an almond-shaped eye. This eye faces forward. Add a simple curved line above it for the eyelid. -
Drawing the second eye:
On the right side of the profile line, draw a similar almond eye. This one creates the illusion of a second face or a shift in perspective. -
Adding the jawline:
From underneath the chin area, draw a sweeping line that curves upward toward where an ear would be on the right side. This defines the main face shape. -
Completing the hair line:
Extend a line from the top of the forehead area, curving it down around the left side of the face to frame the composition. -
Review and refine:
Step back and look at your pencil sketch. Does the composition feel balanced? Now is the time to erase and adjust any proportions before committing to ink or paint.
Abstract Twist
For a Picasso-inspired look, paint the two faces in slightly different shades—perhaps keep only the eyes black and use white for the profile line.
Step 3: Painting the Lines
-
Loading the brush or marker:
If using acrylics, thin your black paint slightly with a drop of water to help it glide over the textured clay. If using a paint marker, pump the nib on a scrap paper first. -
Tracing the profile:
Start with the central profile line (nose and lips). Use a confident, steady hand. I find it helps to lock my wrist and move my whole arm to keep the line fluid. -
Inking the eyes:
Carefully trace the almond shapes of the eyes. Make the upper lash line slightly thicker than the bottom line for added depth. -
Connecting the jaw:
Paint the long, sweeping jawline. Try to do this in one continuous stroke if possible to avoid shaky connection points. -
Cleanup:
Once the black lines are dry (give it about 10-15 minutes), gently erase any visible pencil marks that weren’t covered by the paint.
Step 4: Adding Texture and Finish
-
Creating the speckle mix:
Dilute a tiny amount of black paint with water until it’s very runny, almost like ink. -
Applying the splatter:
Dip a stiff bristle brush (or an old toothbrush) into the watery paint. Hold it near the vase and flick the bristles with your thumb to spray tiny dots across the surface. Go sparingly at first. -
Adding manual dots:
For more control, use the tip of your detailed brush or marker to place larger, intentional dots around the eyes and cheeks to enhance the texture. -
Checking the neck:
Add a few random speckles up the neck of the vase so the design doesn’t feel isolated just to the body. -
Sealing the work:
If you plan to use this vase for fresh flowers with water, spray the outside with a matte clear coat to protect the raw clay and your paint work from moisture stains.
Place your new art piece in a sunny spot to see how the natural light catches the raw clay texture
Speckled Stoneware Look on Mud
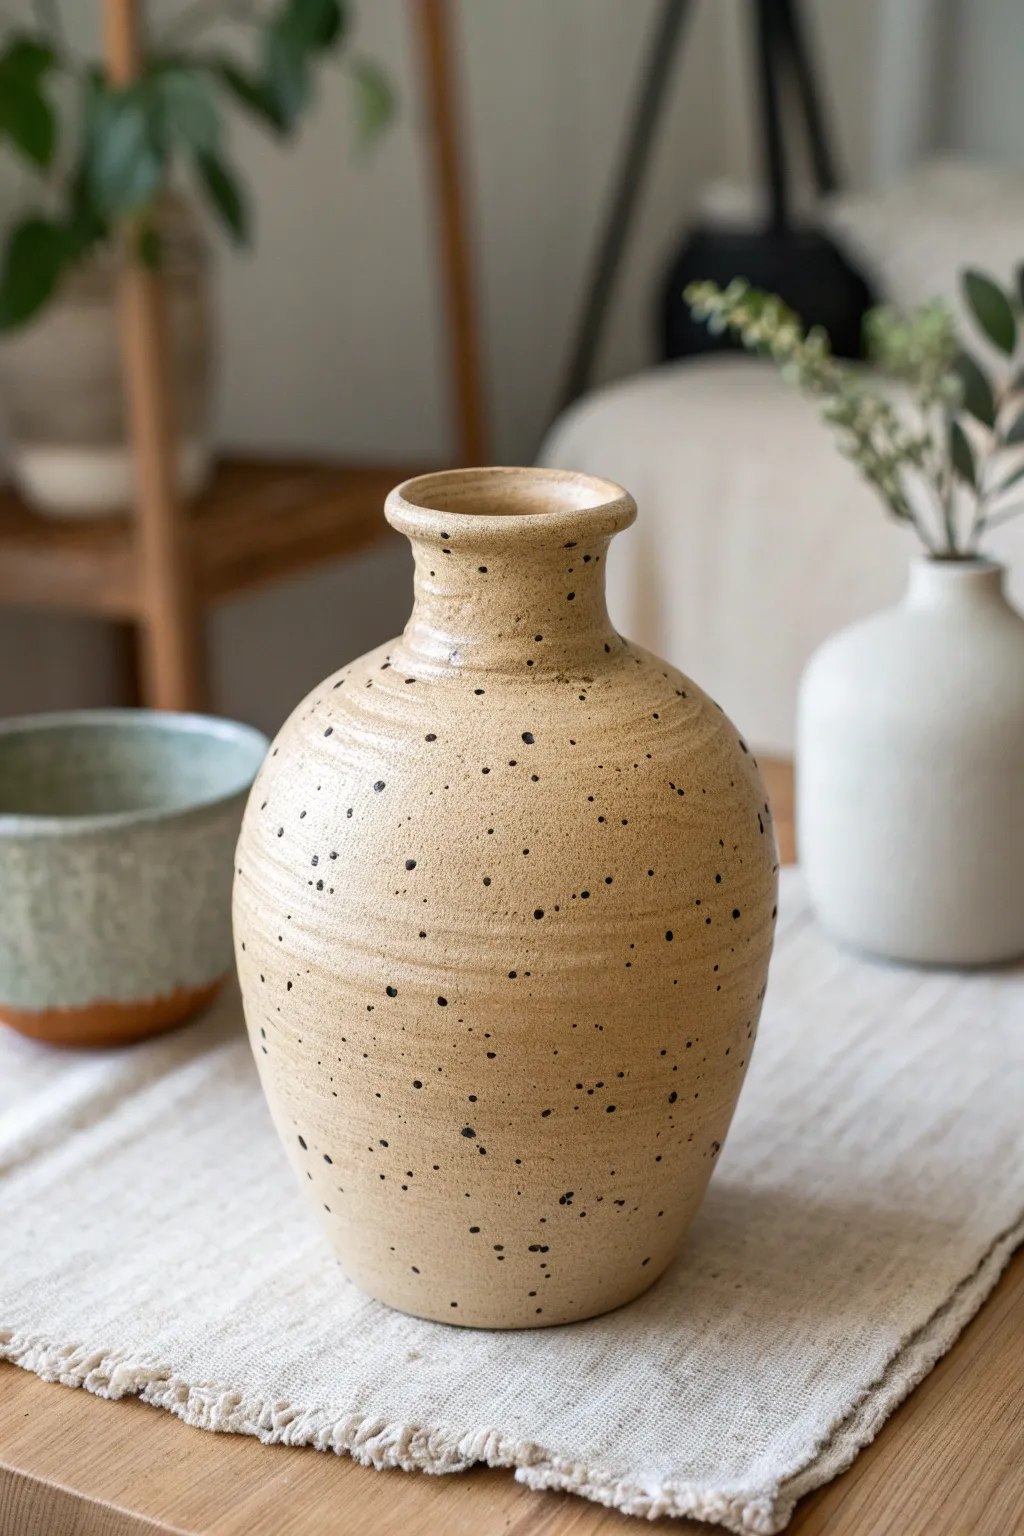
Transform a simple glass or ceramic vessel into a high-end stoneware piece using a clever combination of textured paint and splatter techniques. This approachable finish mimics the organic look of raw, fired clay with charming imperfections and earthy speckles.
Detailed Instructions
Materials
- Glass or ceramic vase (thrifted works great)
- Baking soda or joint compound (for texture)
- Acrylic paint (warm beige/sand color)
- Acrylic paint (black or dark brown)
- Matte finish spray sealant
- Paintbrushes (one wide flat, one old toothbrush)
- Mixing cup or palette
- Disposable gloves
Step 1: Preparation & Base Texture
-
Clean surface:
Begin by thoroughly cleaning your vase to remove any dust or oils. A quick wipe with rubbing alcohol ensures the best adhesion for your paint layers. -
Mix textured paint:
In your mixing cup, combine your warm beige acrylic paint with baking soda. Aim for a ratio of about 1 part baking soda to 2 parts paint. You want a fluffy, mousse-like consistency that holds its shape slightly. -
Apply base coat:
Using a wide flat brush, apply a thick, uneven coat of the baking soda mixture to the vase. Don’t try to be too smooth; the goal is to hide the original sleek surface. -
Create throwing rings:
While the paint is still wet, gently drag the bristles of your brush horizontally around the circumference of the vase. This mimics the ‘throwing rings’ found on wheel-thrown pottery. -
Dry partially:
Let this first coat dry until it is tacky to the touch, usually about 15-20 minutes depending on humidity. -
Second coat:
Apply a second coat of the textured mixture to build opacity. If you want deeper grooves, use the brush to reinforce those horizontal lines again. -
Full dry:
Allow the vase to dry completely. This is crucial—if the base is wet, the speckling step might muddy the colors. I like to leave it overnight to be safe.
Step 2: The Speckle Effect
-
Prepare splatter paint:
Dilute a small amount of black or dark brown acrylic paint with water. You want an inky consistency—runny enough to fly off a brush, but pigmented enough to show up clearly. -
Protect workspace:
Set up a splatter station. Use a large cardboard box or lay down plenty of newspaper, as this next step can get messy. -
Test splatter:
Dip an old toothbrush into the watered-down dark paint. Point the bristles away from you and run your thumb across them to spray fine droplets. Test on a piece of paper first to control the size of the dots. -
Apply fine speckles:
Working in sections, splatter the paint onto the vase. Start with a light dusting. Rotate the vase frequently to ensure even coverage. -
Add larger spots:
For a more organic look, load a regular paintbrush with the watery darkness and tap the handle against a stick or your finger over the vase. This creates larger, accidental blots that look like natural mineral deposits. -
Refine density:
Step back and assess. Add more density near the bottom or neck if you want to create a gradient effect, or keep it uniform for a classic clay look. -
Fix mistakes:
If a splatter is too large or smears, quickly dab it with a damp paper towel or paint over it with a tiny dot of your original beige mixture once dry. -
Dry splatter:
Let the speckles dry completely. Since the paint is thin, this should only take about 30 minutes.
Splatter Control
If your speckles are turning into streaks, your paint is too watery. Add a tiny drop of undiluted acrylic back into the mix to thicken it slightly.
Step 3: Sealing & Finishing
-
Inspect texture:
Run your hand gently over the vase. If the baking soda texture feels too rough or gritty in spots, you can lightly sand it down with high-grit sandpaper, but be careful not to remove the color. -
Apply sealant:
Take the vase to a well-ventilated area. Apply a thin, even coat of clear matte spray sealant. This protects the textured paint from chipping and moisture. -
Final cure:
Let the sealant cure according to the manufacturer’s instructions before using the vase.
Aged Rim Technique
For added realism, sponge a very light wash of brown paint just on the rim and the very bottom edge to mimic the natural discoloration found on vintage stoneware.
Place your newly textured vase on a shelf with some dried botanicals to enjoy that fresh, organic aesthetic every day
Textured “Mud-Dipped” Bottom Edge
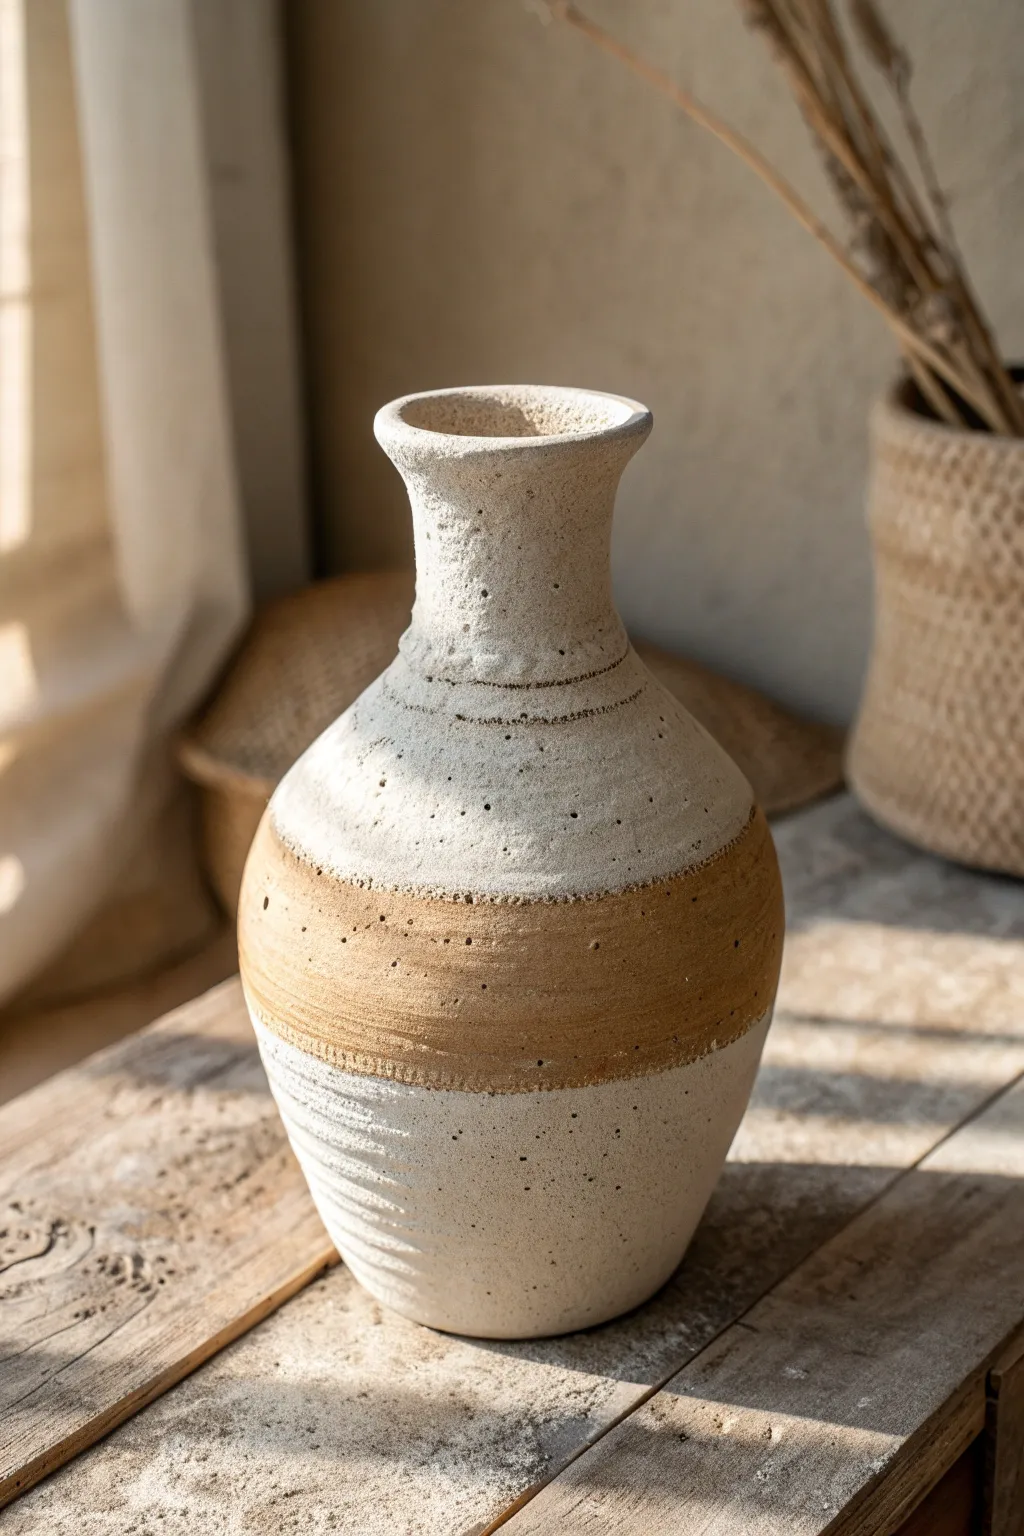
Transform a plain ceramic vase into an artifact that looks centuries old with this specialized texturing and painting technique. The result features a distinct band of earthy clay tones sandwiched between rough, speckled stone textures for a stunningly rustic finish.
Step-by-Step Guide
Materials
- Smooth ceramic or glass vase (bulbous shape preferred)
- Baking soda or plaster of Paris
- Matte acrylic paints (warm white/cream, stone gray, burnt sienna/terracotta, dark brown)
- Black acrylic paint (for speckling)
- Wide flat paintbrush
- Old toothbrush
- Mixing palette or paper plate
- Fine-grit sandpaper
- Painter’s tape or masking tape
- Matte clear sealant spray
Step 1: Creating the Stone Texture
-
Prepare the base mixture:
Start by mixing your base texture paint. Combine roughly one part baking soda (or plaster of Paris) with two parts warm white acrylic paint. You want a consistency similar to fluffy frosting—thick enough to hold peaks but spreadable. -
Apply the first coat:
Using a wide flat brush, apply a generous coat of this textured mixture over the entire vase. Don’t worry about being neat; uneven strokes contribute to the hand-thrown pottery look. -
Build up the surface:
While the paint is still tacky, use the tip of your brush to stipple areas, creating little pits and bumps. This simulates the rough surface of natural stoneware. -
Let it cure:
Allow this base layer to dry completely. Because of the baking soda, this might take an hour or two. It must be bone dry before the next steps. -
Softening the edges:
Once dry, take a piece of fine-grit sandpaper and very lightly scuff the surface. You aren’t trying to remove the texture, just knocking down any overly sharp peaks that feel unpleasant to touch.
Natural Variation
Don’t overmix your clay-colored paints. Leave streaks of darker brown and lighter ochre visible on the brush to mimic the natural marbling found in real dug earth.
Step 2: Painting the Mud Band
-
Define the band area:
Visualise where you want your ‘mud’ stripe to sit. On this vase, it sits just below the widest part of the belly. You can use painter’s tape for a sharp line, or go freehand for a more organic look. -
Mix the clay color:
Create the terracotta color by mixing burnt sienna with a tiny drop of yellow ochre or warm white. It should look like wet, raw clay. I find adding a pinch of baking soda here helps keep the texture consistent. -
Paint the middle section:
Apply this clay-colored paint in a horizontal band around the middle. Allow the edges to be slightly imperfect or feathered where they meet the white sections. -
Add depth to the mud:
While the terracotta paint is still wet, mix a slightly darker brown and streak it horizontally through the band. This creates the variation seen in natural clay strata. -
Dry brush the transitions:
Take a dry brush with a tiny amount of your original white base color and lightly drag it over the very edges of the colored band. This helps blend the two zones so it looks like one cohesive piece.
Step 3: Detailing and Aging
-
Mix a wash:
Create a very watery wash using stone gray or a diluted brown paint. It should be 80% water and 20% paint. -
Apply the wash:
Brush this wash over the white sections of the vase, letting it settle into the deep textures and pits you created earlier. -
Wipe back:
immediately use a paper towel or rag to wipe the wash off the high points. The dark color will remain in the crevices, highlighting the rock-like texture. -
Create the speckles:
Dip an old toothbrush into slightly watered-down black or dark brown paint. Run your thumb across the bristles to flick tiny specks of paint onto the vase. -
Control the spray:
Focus the speckling heavily on the white top section and more sparsely on the bottom. If you get a blob that’s too big, quickly dab it with a paper towel. -
Add linear details:
Use a small detail brush or the edge of your flat brush to paint faint, thin horizontal lines in dark brown around the neck or base, mimicking throwing rings from a potter’s wheel. -
Carve the bottom texture:
If your paint layers are thick enough at the bottom white section, use a toothpick to gently score horizontal lines into the surface to create a ribbed effect. -
Seal the piece:
Once everything is perfectly dry, finish with a coat of matte clear sealant spray to protect the textured finish from chipping.
Too Much Texture?
If the baking soda mixture is clumping too much and looking messy rather than rocky, dip your brush in water and smooth it over the vase surface to melt the clumps down.
Place your new artisan vessel near a window where the light can catch all that beautiful, rugged texture.
Raised Paint Dots for 3D Texture
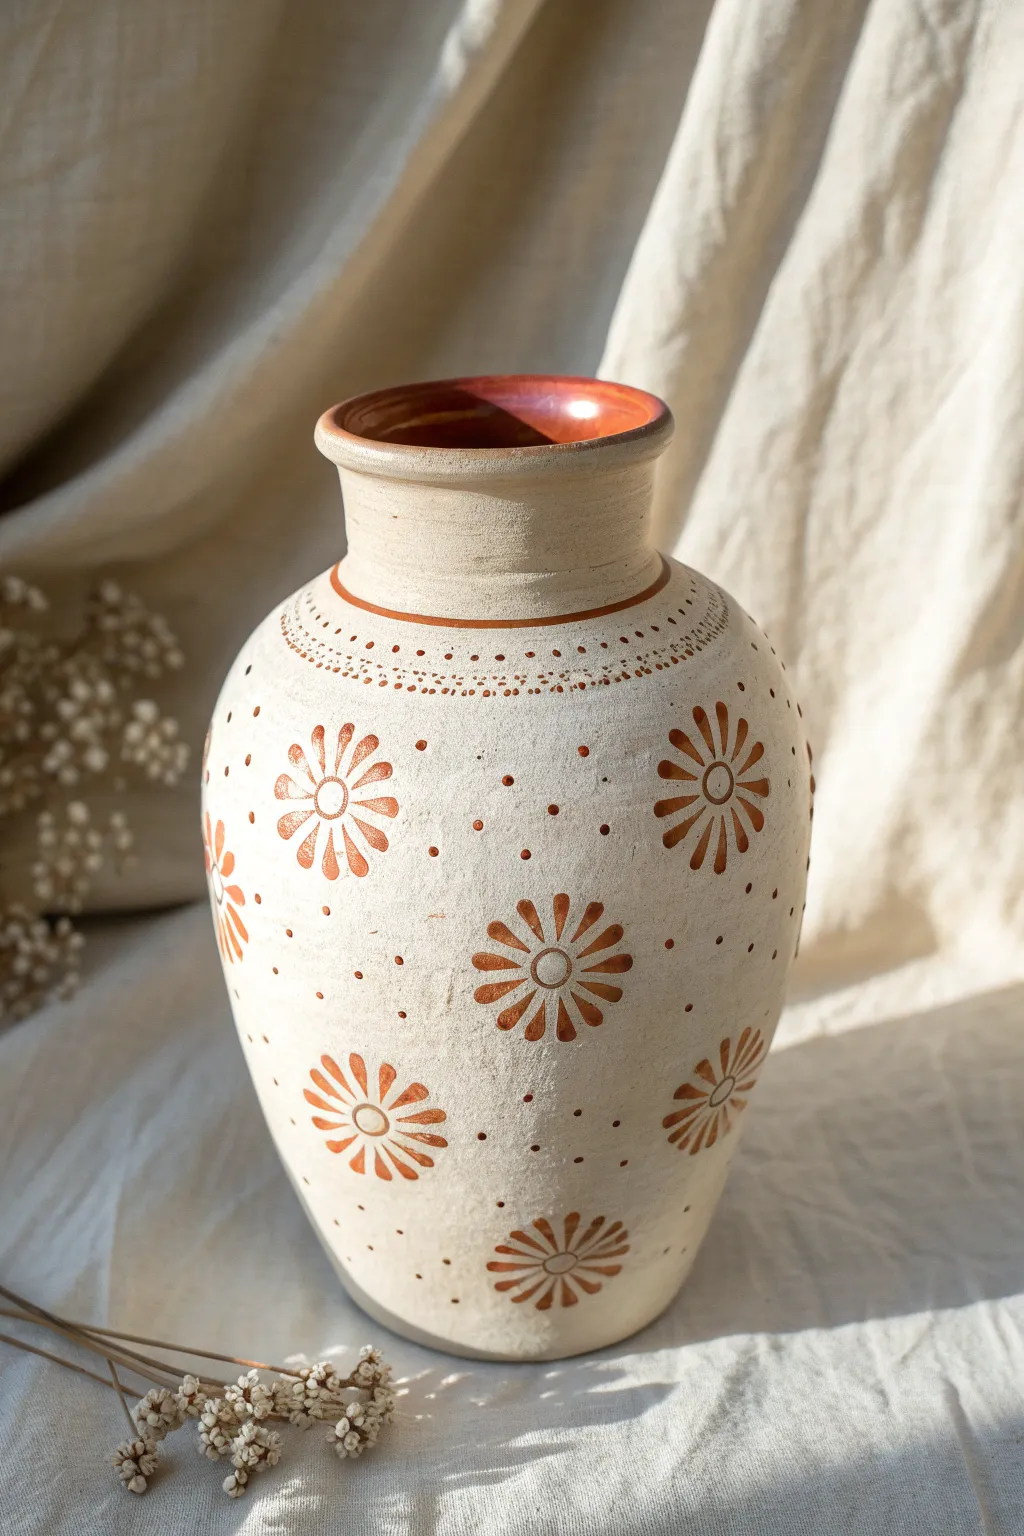
Transform a plain ceramic vessel into a piece of artisanal decor with this mud-inspired painting technique. By combining warm terra cotta tones with raised dot work, you’ll create a beautifully textured surface that feels as good as it looks.
Step-by-Step Tutorial
Materials
- Ceramic vase (biscuit or unglazed preferred)
- Acrylic paint (warm cream/beige)
- Acrylic paint (terra cotta/burnt orange)
- Baking soda or plaster powder (for texture)
- Wide flat brush
- Medium round brush
- Detail brush or dotting tool
- Matte sealant spray
- Palette for mixing
- Pencil (optional)
Step 1: Base Preparation
-
Clean surface:
Begin by wiping down your vase with a damp cloth to remove any dust or oils. Let it dry completely to ensure the paint adheres properly. -
Mix textured paint:
Pour your warm cream acrylic paint onto a palette. Gradually mix in baking soda or plaster powder using a 1:1 ratio until the consistency resembles fluffy mousse. This creates the signature ‘mud’ look. -
Apply base coat:
Using a wide flat brush, apply the textured paint mixture all over the exterior of the vase. Use horizontal strokes around the neck and rim, and vertical or cross-hatch strokes on the body for visual interest. -
Dry and repeat:
Allow the first coat to dry for about 20 minutes. Apply a second thick coat to ensure full opacity and rich texture. Let this layer dry fully for at least an hour.
Uneven Dots?
If your raised dots are peaking too sharply like meringue, tap the bottom of the vase gently against the table immediately after applying. This settles the paint into rounded domes.
Step 2: Floral Design
-
Plan placement:
Visualize a grid of flowers around the belly of the vase. You can lightly sketch the centers of the flowers with a pencil if you need guidance, spacing them evenly. -
Paint flower centers:
Dip your medium round brush into the terra cotta paint (do not mix with baking soda for this step). Paint simple open circles for the flower centers. They don’t need to be perfectly round; a hand-painted look adds charm. -
Add petals:
Using the same brush and color, paint eight to ten petals radiating from each center circle. Press the brush down and pull outward to create a teardrop shape. -
Refine petals:
Go back over any petals that look too thin. The goal is a bold, graphic daisy shape. Ensure the petals are detached from the center ring, leaving a small gap of the cream base showing. -
Paint the rim:
Carefully paint the inside of the rim with the terra cotta paint. Bring the color just slightly over the top lip for a finished look. -
Add neck details:
Paint a thin, solid band of terra cotta around the base of the vase’s neck where it meets the shoulder.
Rustic Aging
After the paint is dry, lightly dry-brush a tiny amount of diluted brown paint over the textured cream areas to highlight the roughness and give it an antique feel.
Step 3: Adding Texture
-
Mix dimensional paint:
Create a new mixture of terra cotta paint and baking soda. You want this slightly thicker than the base coat—think toothpaste consistency—so it holds a peak. -
Shoulder dots:
Dip the handle end of a brush or a dotting tool into the thick mixture. Apply two rows of small dots around the shoulder of the vase, just above the main floral area. -
Scattered accents:
Using a smaller dotting tool, add tiny dimensional dots randomly in the empty spaces between the flowers. This fills the negative space without overwhelming the design. -
Shoulder pattern:
Between the two rows of dots on the shoulder, utilize a very fine brush to paint tiny vertical hash marks or zig-zags to connect the dot rows.
Step 4: Finishing Touches
-
Final drying:
Because the dotted paint is thick, allow the vase to dry undisturbed for several hours or overnight. -
Seal the work:
Once fully cured, spray the entire vase with a matte clear sealant. This protects the textured surface from chipping and locks in the earthy aesthetic.
Place your new textured vase in a sunny spot to let the shadows play across the raised details
White Relief Vines on a Dark Base
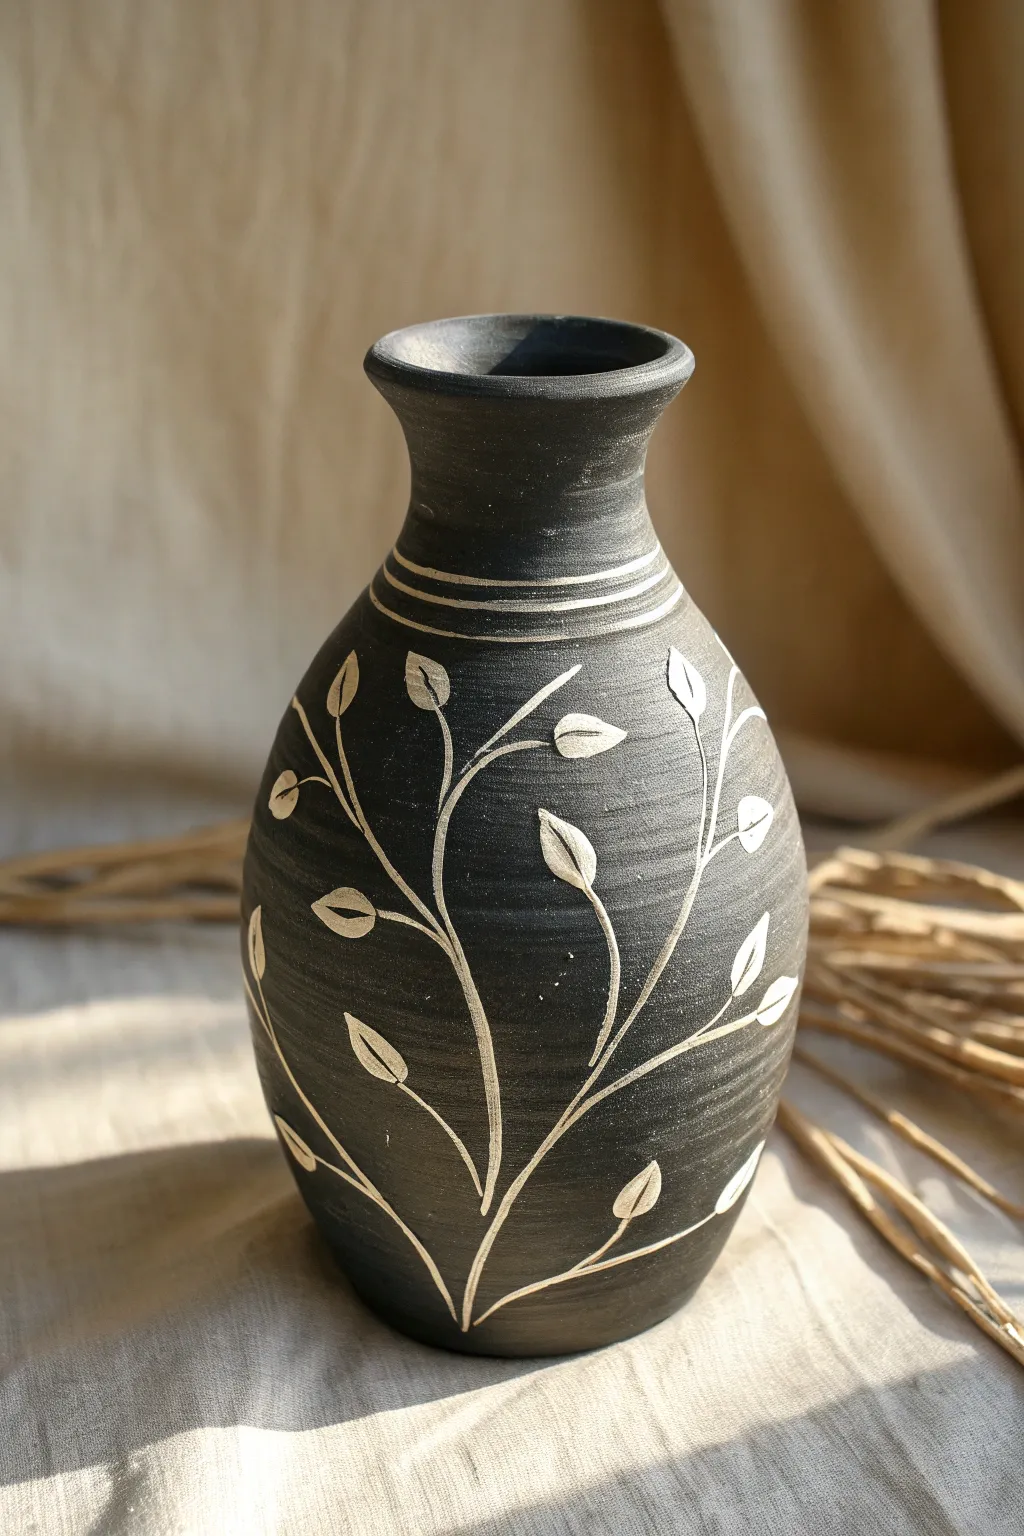
Transform a plain terra cotta or ceramic vase into a sophisticated centerpiece with this monochrome design. By combining matte charcoal paint with delicate, etched-style white vines, you achieve a stunning contrast that mimics high-end artisanal pottery.
Detailed Instructions
Materials
- Old vase (ceramic or terra cotta)
- Matte charcoal or soft black acrylic paint
- Medium flat paintbrush
- White puff paint (3D fabric paint) or pure white acrylic heavy body paint
- Fine liner brush (size 0 or 00)
- White charcoal pencil or chalk
- Matte spray sealant (optional)
- Damp rag
Step 1: Preparing the Dark Base
-
Clean surface:
Begin by thoroughly cleaning your vase with warm soapy water to remove any dust or oils. Dry it completely before starting. -
Apply base coat:
Using the flat paintbrush, apply an even coat of the charcoal or soft black acrylic paint. If you want a more organic, ‘mud’ look, brush in crisscross strokes rather than straight lines. -
Dry and repeat:
Allow the first coat to dry for about 20-30 minutes. If the original color of the vase shows through, apply a second coat for full opacity. -
Create texture (Optional):
For that slightly rough, unglazed pottery feel, you can dab a nearly dry sponge over the wet paint to create a subtle texture before it sets.
Step 2: Drafting the Design
-
Sketch the primary stems:
Once the black base is bone dry, use a white charcoal pencil or a stick of chalk to lightly sketch the main stems of your vines. Start from the bottom and curve upwards. -
Add leaf placement:
Mark small oval shapes where you want your leaves to sit. Keep the spacing random and natural; avoid making the pattern too symmetrical. -
Sketch neck details:
Near the neck of the vase, lightly draw two or three horizontal rings to frame the top of your design.
Pro Tip: Faux-Carved Look
For a carved ‘sgraffito’ look, paint the white layer first, let it dry, paint the black over it, and scratch the design through the wet black paint with a toothpick.
Step 3: Painting the Relief Vines
-
Select your medium:
To get the slightly raised ‘relief’ look shown in the image, heavy body acrylics or 3D puff paint work best. If using puff paint, squeeze a small puddle onto a palette rather than applying directly from the bottle. -
Start the rings:
Dip your fine liner brush into the white paint. Carefully trace the horizontal rings around the neck. I usually steady my hand against the table to keep the lines even. -
Paint the stems:
With a loaded brush, trace your chalk outlines for the stems. Use long, confident strokes. Press slightly harder at the base of a stem and lift off as you reach the tip for a tapered effect. -
Form the leaves:
Paint the leaves by placing the tip of the brush on the stem, pressing down to widen the stroke for the leaf body, and lifting up to create a point. -
Add vein details:
For the specific look in the photo, you can leave the center of larger leaves unpainted (negative space) to create a vein, or paint the leaf solid and paint a thin black line through it later. -
Refine edges:
Go back over your white lines if they look too translucent. The white needs to be opaque to pop against the dark background. -
Clean up:
Once the paint is completely dry (give it at least an hour), use a slightly damp rag to gently wipe away any visible chalk or charcoal sketch lines.
Troubleshooting: Shaky Lines
If your ring lines around the neck are uneven, place the vase on a turntable or Lazy Susan. Hold your brush hand steady and slowly spin the vase instead of moving your hand.
Step 4: Finishing Touches
-
Check for contrast:
Step back and assess your vase. If any white areas look streaky, dab a little more paint on top to ensure a crisp, solid finish. -
Seal (Optional):
To protect your work, lightly mist the entire vase with a matte spray sealant. Avoid glossy sprays, as they will ruin the earthy ‘mud’ aesthetic.
Place your new vase near a window where the natural light can highlight the delicate contrast of the vines
Marbled Swirls in Earthy Colors
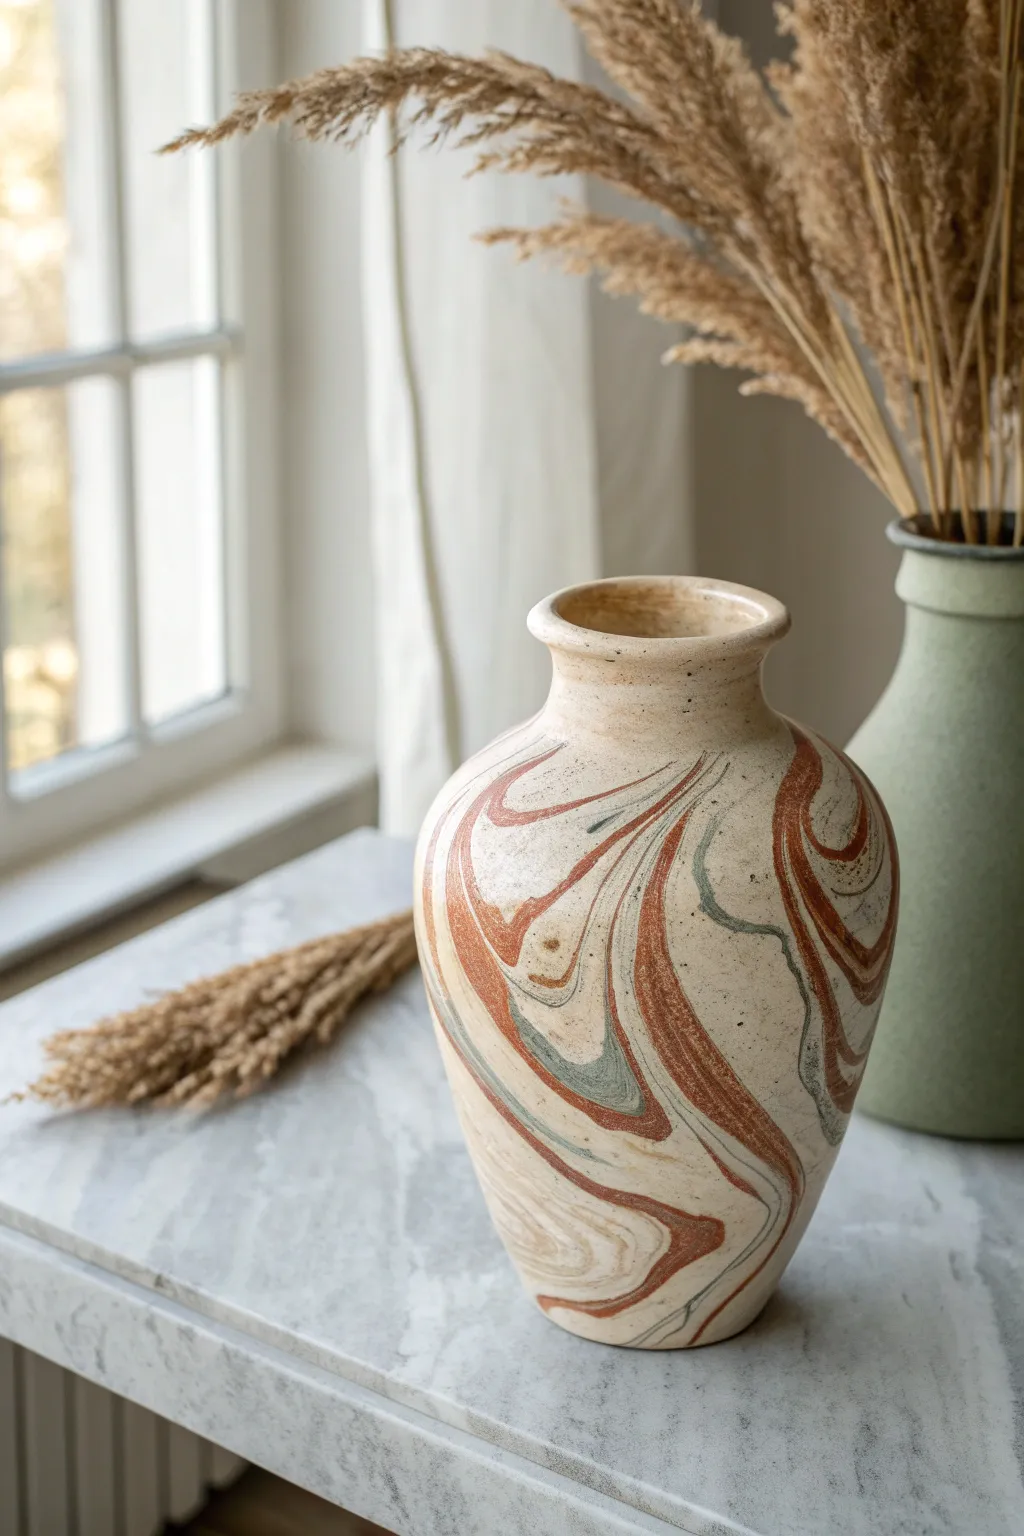
Capture the organic beauty of desert canyons with this sophisticated marbling technique that mimics natural stone strata. The warm terracotta and cool sage swirls create a serene, grounded aesthetic perfect for modern boho interiors.
How-To Guide
Materials
- Bisque fired or matte ceramic vase (beige or cream base)
- Baking soda
- Acrylic paint (Antique White, Terracotta, Sage Green, Dark Brown)
- Medium-sized flat paintbrush
- Fine-tipped liner brush
- Sea sponge or textured sponge
- Small mixing bowls or palette
- Water cup
- Paper towels
- Matte finish spray sealant
Step 1: Creating the Textured Base
-
Clean the surface:
Begin by wiping down your vase with a damp cloth to remove any dust or oils. This ensures your base coat adheres perfectly. Let it dry completely. -
Mix the ‘mud’ base:
In a mixing bowl, combine your Antique White acrylic paint with baking soda. Start with a 1:1 ratio. You want a thick, fluffy consistency that resembles frosting or wet plaster. -
Apply the first coat:
Using your flat paintbrush, apply a thick, even layer of the baking soda mixture all over the vase. Use horizontal strokes to mimic the natural direction of pottery turning. -
Create subtle texture:
While the paint is still wet, gently dab the surface with a dry sea sponge. This knocks down brush strokes and creates that authentic, stone-like pitted texture. -
Let it cure:
Allow this base layer to dry completely. Because of the baking soda, it might take a bit longer than regular paint—usually about an hour or until it feels chalky to the touch.
Step 2: Painting the Marbled Strata
-
Prepare your colors:
Mix a small amount of baking soda into your Terracotta, Sage Green, and Dark Brown paints in separate wells. This keeps the texture consistent with the base. -
Dilute the flow:
Add just a drop or two of water to these colored mixtures. You want them fluid enough to glide but thick enough to hold texture. -
Map the primary swirl:
Using a fine liner brush and the Terracotta paint, lightly sketch a large, wavy S-curve starting from the neck of the vase and flowing down to the base. Keep the line organic and shaky. -
Add secondary curves:
Paint parallel curves next to your first line. Vary the distance between them—sometimes close together, sometimes wider apart—to mimic natural geological layers. -
Introduce the sage tone:
Switch to the Sage Green paint. Add thin, wandering veins of green nestled between the terracotta lines. I find it looks most natural if these lines taper off and fade rather than encircling the whole vase. -
Thicken key areas:
Go back to your Terracotta mixture. Use a slightly larger brush to thicken specific sections of the swirl, creating bold bands of color rather than just thin lines. -
Add depth lines:
Using the Dark Brown paint and your finest brush, add extremely thin, broken lines along the edges of the terracotta bands. This creates a shadow effect and adds dimension.
Uneven Swirls?
If your lines look too shaky or uneven, don’t correct them! Natural stone veining is rarely perfect. Embrace the wobbly aesthetic for a more authentic geological look.
Step 3: Softening and Blending
-
Dry brush technique:
Wipe your medium brush until it’s almost clean and dry. Gently drag it vertically across the painted bands while they are slightly tacky. This softens the hard edges. -
Feather the edges:
Dip a corner of your sponge into the Antique White base mixture. Lightly dab over any areas where the colored bands look too stark or artificial, blending them back into the background. -
Check for balance:
Step back and look at the vase from a distance. If an area looks too empty, add a small, isolated ‘island’ swirl of terracotta or green to fill the negative space. -
Final drying:
Let the marbled design dry fully. This is crucial before sealing, as moisture can get trapped under the clear coat and cause cloudiness. -
Seal the art:
Finish by spraying the entire vase with a matte sealant. This protects the baking soda texture from flaking off over time without adding unnatural shine.
Natural Variation
For more realism, mix a tiny dot of the Sage Green into the Terracotta on your palette. This muted ‘bridge color’ creates a harmonious transition between the two distinct hues.
Now step back and admire how simple paint transformed a plain vessel into a piece of art that looks like it was carved from the earth
Celestial Night-Sky Dots and Moons
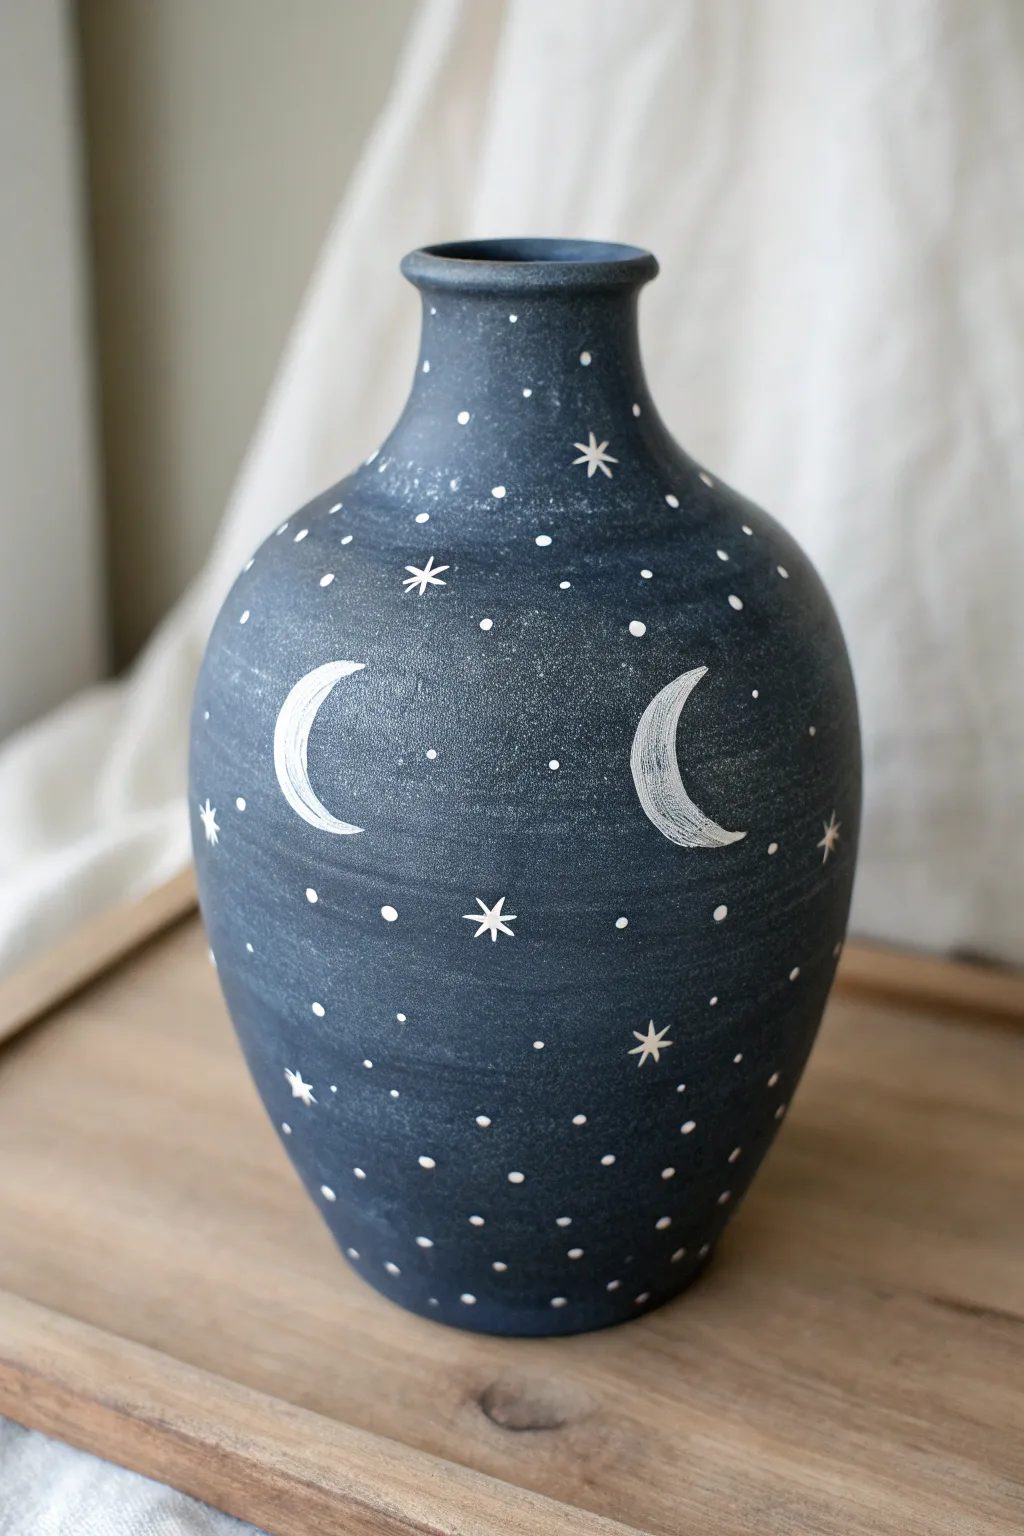
Transform a simple vessel into a piece of midnight magic with this moody, celestial design. Using a matte dark base and delicate white detailing, you’ll create a dreamy night sky that feels both grounded and ethereal.
Step-by-Step
Materials
- Bisque fired ceramic vase or sturdy paper mâché/mud vase
- Matte acrylic paint in dark navy or charcoal blue
- Titanium white acrylic paint
- Wide flat brush for base coating
- Round detail brushes (size 0 and 2/0)
- Dotting tools or toothpicks
- Pencil for sketching
- Water cup and paper towels
- Matte sealant spray or varnish
Step 1: Setting the Midnight Scene
-
Clean the surface:
Before painting, wipe down your vase with a dry cloth or slightly damp sponge to remove any dust or debris. A clean surface ensures your ‘night sky’ attaches perfectly to the vessel. -
Mix the base color:
Squeeze out a generous amount of dark navy acrylic paint. If you want that specific smoky, chalkboard-like hue seen in the image, mix in a tiny drop of black or slate grey to mute the vibrancy. -
Apply the first coat:
Using your wide flat brush, apply the paint in horizontal strokes. Aim for thin, even coverage rather than globbing it on. Let this layer dry completely, usually about 15-20 minutes. -
Add texture and depth:
Instead of a smooth second coat, try dabbing the paint on with a sponge or a stipple brush. This builds up the subtle, stone-like texture visible in the reference photo. -
Finalize the night sky base:
Check for any bald spots or lighter areas. Apply a final touch-up coat where needed to ensure the vase is a solid, opaque dark blue. Allow the vase to dry thoroughly for at least an hour before adding details.
Step 2: Mapping the Cosmos
-
Plan the moons:
Use a pencil to lightly sketch the outlines of your crescent moons. Place two large facing crescents on opposite sides of the vase’s belly for balance. -
Initial moon painting:
Load a size 0 round brush with white acrylic paint. Carefully fill in the crescent shapes. Don’t worry if the coverage is slightly streaky at first; this actually adds to the texture. -
Refine the crescents:
Once the first white layer is dry, go back over the moons. Use short, curved strokes following the shape of the moon to mimic crater textures rather than making it perfectly flat white. -
Sketch the major stars:
Identify 4-5 spots around the moons and near the neck of the vase for your largest ‘hero’ stars. Mark these spots lightly with your pencil.
Chalky Texture Trick
Mix a teaspoon of baking soda into your dark base paint. This creates a grainy, matte finish that feels like authentic pottery.
Step 3: Starlight and Details
-
Paint eight-point stars:
For the largest stars, paint a simple cross (+), then paint a smaller diagonal cross (x) through the center. Keep the lines thin and taper the ends to sharp points. -
Paint six-point stars:
Fill the medium-sized gaps with six-pointed stars. Paint a vertical line, then cross it with a slanted ‘X’ shape. These should be smaller than your hero stars. -
Create four-point twinkles:
Using your smallest detail brush (size 2/0), add tiny four-pointed stars scattered randomly. These are just small crosses with elongated vertical lines. -
Prepare the dotting tool:
Dip a dotting tool, the back end of a paintbrush, or a toothpick into your white paint. Test the dot size on a scrap piece of paper first. -
Add the constellations:
Begin placing dots in clusters around the moons. I like to group them in threes or lines to suggest distant constellations. -
Fill the void:
Work your way from the neck down to the base, filling empty dark spaces with varying sizes of dots. Press harder for larger dots and barely touch the surface for tiny specks. -
Create the atmospheric fade:
Make the dots denser near the bottom third of the vase and slightly sparser near the neck, giving the piece a grounded, heavy feel. -
Dry and seal:
Let the white paint cure fully, ideally overnight. Finish with a matte spray varnish to protect the artwork without adding unwanted gloss, preserving that chalky, mud-vase aesthetic.
Make It Mystical
Add a tiny drop of metallic silver to your white paint for the moons. It won’t be glittery, but will catch the light subtly as you move.
Now you have a stunning piece of celestial decor that brings the quiet beauty of the night sky into your home
Fish and Waves in Folk Style
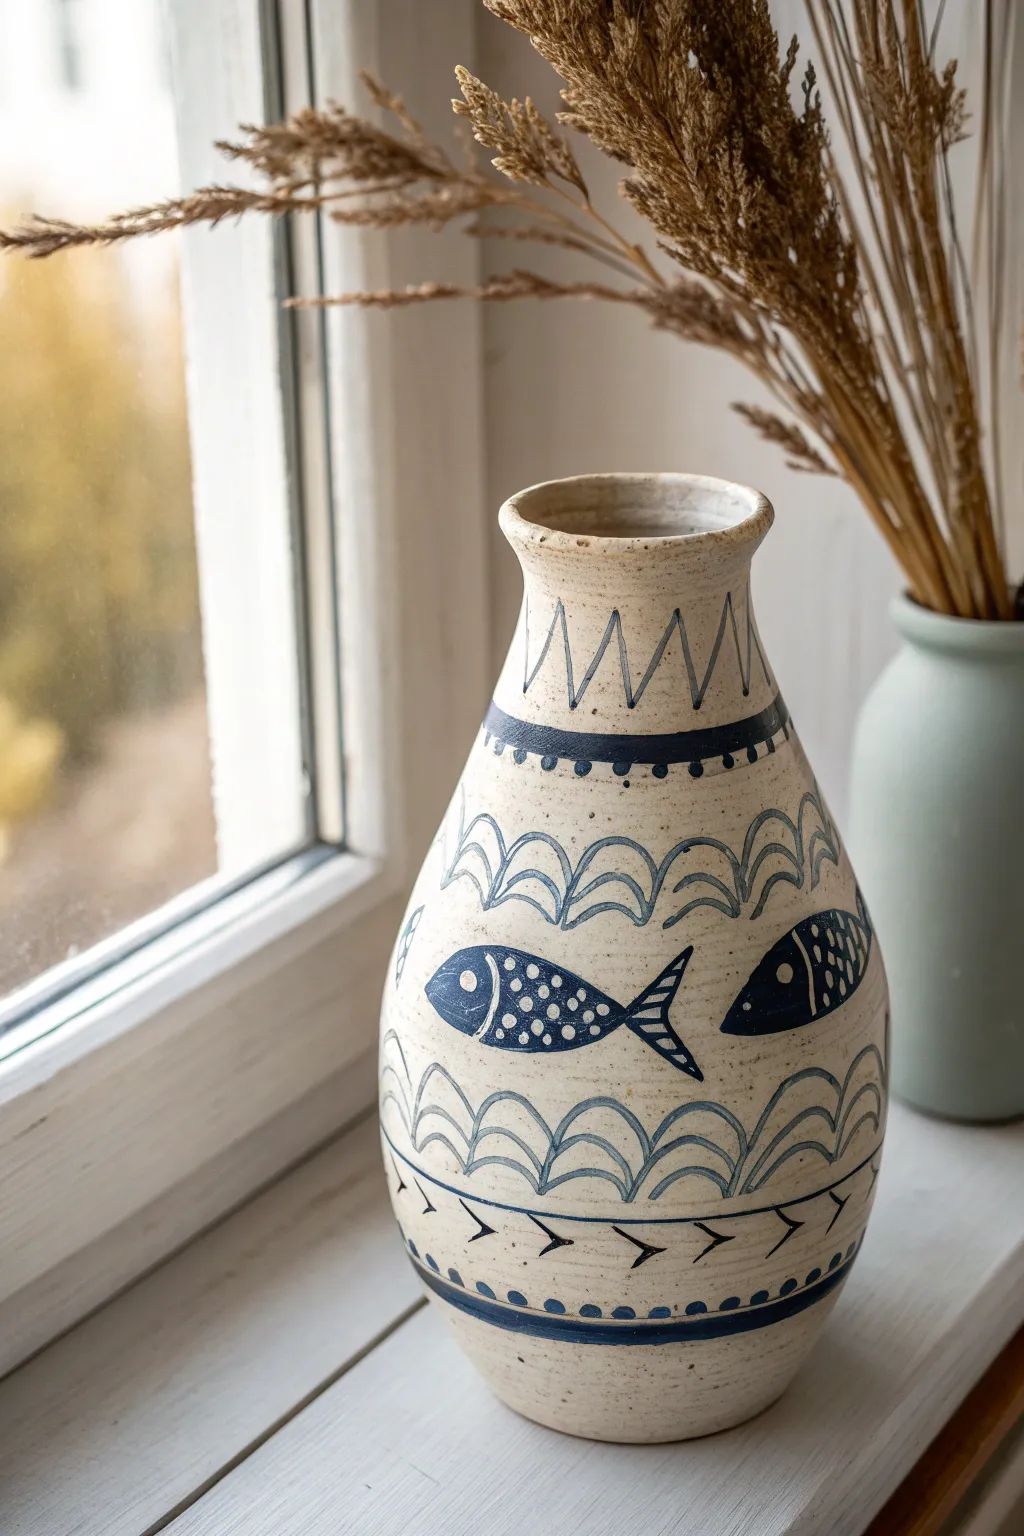
Transform a plain ceramic vase into a charming piece of folk art with this simple yet striking design. Using deep blue pigment against a speckled cream background, you’ll create rhythmic waves and playful fish motifs that evoke a timeless, rustic feel.
Step-by-Step Guide
Materials
- Bisque-fired ceramic vase (bottleneck shape preferred)
- Cream or oatmeal-colored speckled matte glaze
- Deep indigo or navy blue underglaze (or acrylic paint if not firing)
- Fine liner brush (size 0 or 00)
- Medium round brush (size 4 or 6)
- Pencil for sketching
- Clear matte sealant (if using acrylics) or clear glaze (if firing)
Step 1: Base Preparation
-
Clean surface:
Begin by wiping down your bisque ware or vase with a damp sponge to remove any dust or oils that could interfere with adhesion. -
Apply base color:
Coat the entire vase with the speckled cream glaze. Apply 2-3 even coats, allowing each layer to dry until it’s no longer cool to the touch before adding the next. -
Check consistency:
Ensure the base coat is opaque and smooth. A matte finish works best for this rustic look, as it mimics traditional stoneware.
Steady Hand Trick
Rest your painting hand’s pinky finger against the vase surface as a stabilizer. This acts as an anchor while you paint the fine lines and dots.
Step 2: Planning the Pattern
-
Mark banding lines:
Using a pencil, lightly sketch horizontal rings around the vase to divide the design sections. You’ll need rings at the neck base, above the belly, below the belly, and near the foot. -
Sketch neck zig-zags:
In the neck area, lightly draw a continuous zig-zag pattern between the top rim and the first neck ring. -
Outline the fish:
Around the widest part of the vase (the belly), sketch three or four simple fish shapes swimming in the same direction. Keep them primitive: an almond-shaped body and a simple triangle tail.
Step 3: Painting the Details
-
Paint horizontal bands:
Load your medium round brush with the deep blue pigment. Paint steady, thick lines over your horizontal pencil guides. Don’t worry if they aren’t perfectly straight; the wobbly quality adds charm. -
Add neck details:
With the liner brush, trace over the zig-zag pattern on the neck. Below the neck band, add a row of small, evenly spaced dots using the tip of your brush. -
Create the waves:
Above and below the central fish band, paint rows of scalloped arches to represent waves. Draw a second, slightly smaller arch inside each one to create a double-line effect. -
Fill wave band:
I find it helpful to rotate the vase on a turntable or lazy susan while painting these repetitive arches to keep the spacing consistent. -
Paint fish bodies:
Outline the fish bodies and tails with the liner brush. Fill in the head area solid blue, leaving a small negative space circle for the eye. -
Detail the fish:
Fill the body of the fish with rows of small polka dots. Use the very tip of the liner brush to add thin stripes to the tail fins.
Add Dimension
Mix a tiny drop of water into your blue paint for the wave outlines to make them semi-transparent, creating a subtle contrast with the solid, dark fish.
Step 4: Final Touches
-
Bottom border:
Near the base, paint a pattern of small arrows or ‘V’ shapes facing sideways, sandwiched between two thin horizontal lines. -
Clean up:
Check for any smudges. If you are using underglaze on bisque, you can gently scratch off mistakes with a needle tool once the paint is dry. -
Fire or seal:
If using ceramic glazes, fire the piece in a kiln according to manufacturer instructions. If using acrylics on a decorative vase, apply a clear matte sealant spray to protect your work.
Now you have a beautiful vessel ready to hold your favorite dried grasses or wildflowers
Patchwork Shapes Like Painted Fabric
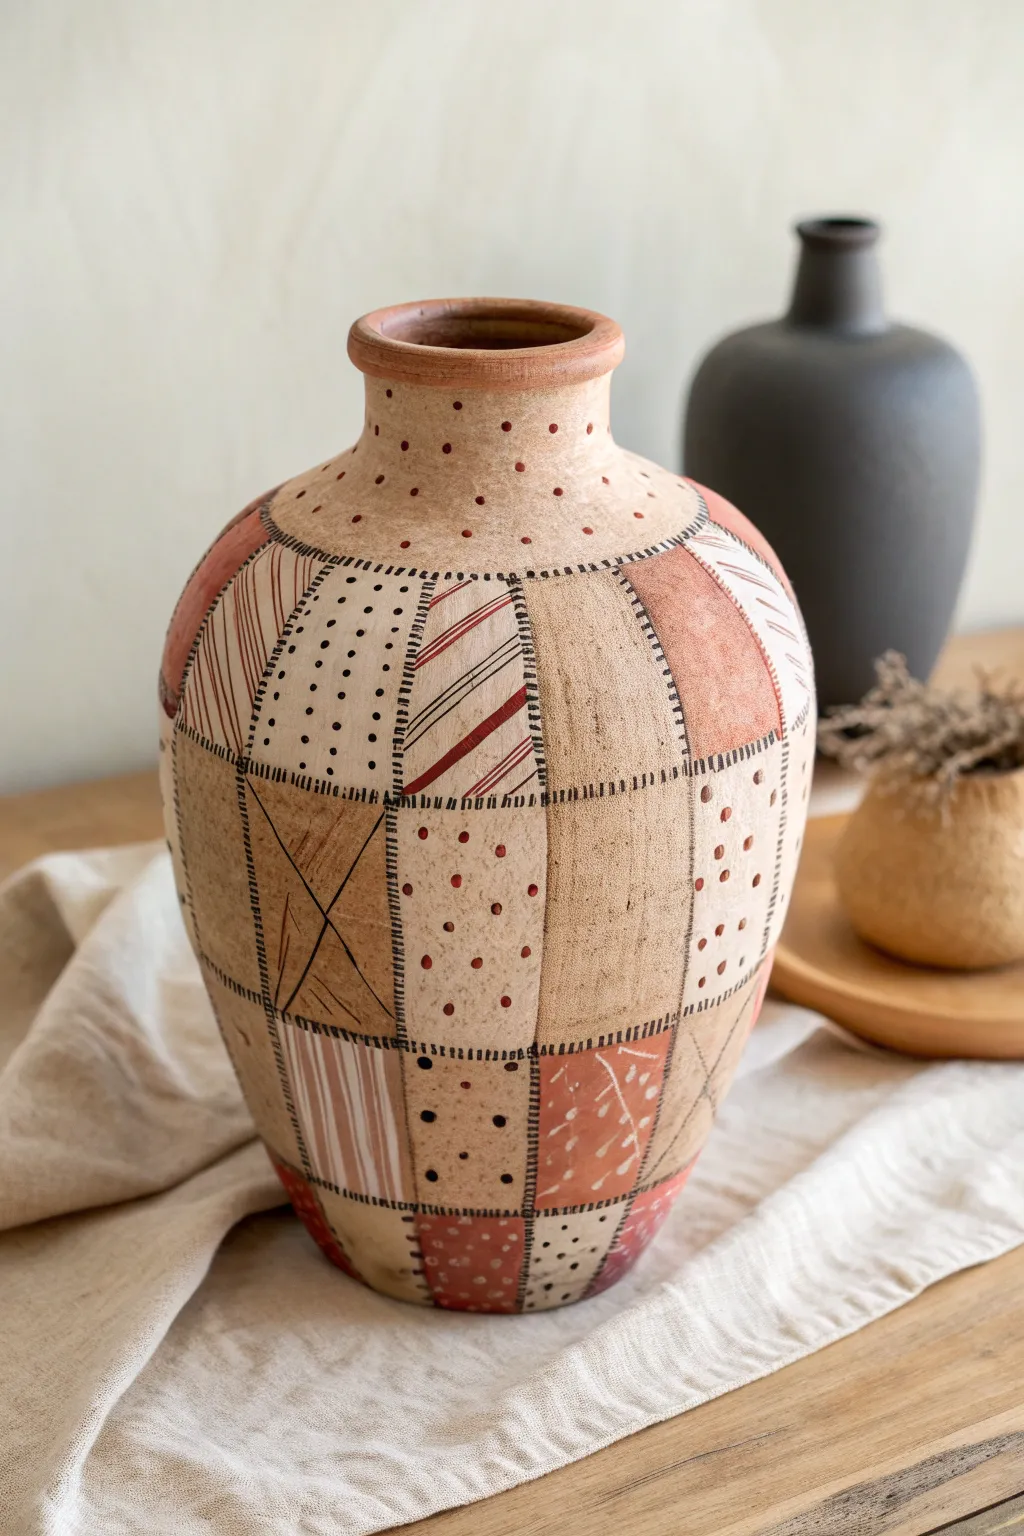
Transform a plain ceramic vessel into a cozy, textured masterpiece that mimics the look of hand-stitched fabric scraps. Using warm earth tones and simple geometric patterns, this project creates a charming rustic centerpiece perfect for any cottage-core or eclectic interior.
Step-by-Step Tutorial
Materials
- Terracotta or ceramic vase (matte finish preferred)
- Acrylic craft paints (creamy beige, terra cotta, rust red, soft brown, black)
- Small flat brush (size 4 or 6)
- Fine liner brush (size 0 or 00)
- Pencil
- Palette or paper plate
- Matte spray sealant (optional)
- Clean water and paper towels
Step 1: Planning and Base Work
-
Clean surface:
Begin by wiping down your vase with a damp cloth to remove any dust or oils. Let it dry completely to ensure the paint adheres properly. -
Sketch the grid:
Using a pencil, lightly hand-draw a grid of irregular rectangles and squares all over the vase. Don’t worry about using a ruler; the slightly wobbly lines add to the organic, fabric-like feel. -
Curve the lines:
As you draw your grid near the top neck or curved bottom, allow your pencil lines to follow the contour of the vessel. This makes the ‘fabric’ look like it’s wrapping around the form.
Texturize It
Mix a teaspoon of baking soda into your base paints before applying. This creates a grainy, gritty texture that makes the surface feel like real unglazed pottery or worn fabric.
Step 2: Blocking in the Patches
-
Mix your palette:
Prepare your acrylic colors. You want a cohesive warm palette, so mix a little brown into your reds and oranges to desaturate them if they feel too bright. -
Paint solid light patches:
Start by filling in random sections of your grid with your lightest creamy beige color. Use a small flat brush for smooth coverage, but leave the pencil lines visible. -
Add warmth:
Fill in other scattered sections with a soft tan or light brown. Think of this as distributing the visual weight, so don’t put all the brown squares in one cluster. -
Inject color:
Paint the remaining squares with your rust red and terra cotta shades. I find it helps to step back occasionally to make sure the color balance feels right across the whole vase. -
Let it dry:
Allow this base layer to dry completely. Acrylics dry fast, but give it about 15-20 minutes so you don’t smudge the colors when adding details.
Make it Aged
Once the painting is dry, lightly dry-brush a mixture of watered-down brown paint over the entire piece, then wipe it back immediately with a rag for an antique look.
Step 3: Adding Patterns and Texture
-
Create dotted fabrics:
Pick a few beige squares and use the back end of your paintbrush dipped in black or dark brown paint to stamp small, regular polka dots. -
Paint striped swatches:
On the reddish patches, use your liner brush to paint tin, diagonal stripes in white or cream. Vary the direction of the stripes for visual interest. -
Add rustic cross-hatching:
On some of the tan squares, use a very dry brush or a fine liner to create rough ‘X’ shapes or loose scratches, mimicking the texture of worn burlap. -
Detail the neck:
Paint small red dots evenly spaced around the neck of the vase, just below the rim, to create a decorative collar.
Step 4: Stitching it Together
-
Mix the stitch color:
Use black paint, perhaps mixed with a tiny drop of brown to soften it, for your stitching lines. -
Paint the seams:
Using your finest liner brush, paint short, perpendicular dashes across all your original pencil grid lines. These represent the thread holding the ‘fabric’ pieces together. -
Cross-stitch details:
For variety, change the stitch pattern on one or two major seam lines to appear like little ‘X’ stitches instead of straight dashes. -
Clean up edges:
If your original pencil lines are still too visible under light paint, you can gently erase them, or simply paint over them with a thin line of the background color before stitching. -
Seal the work:
Once fully dry (give it at least an hour), spray the entire vase with a matte sealant to protect the paint and unify the finish without making it glossy.
Now you have a beautifully unique vessel that brings the warmth of a handmade quilt to your display shelf
Before-and-After Split Display Set
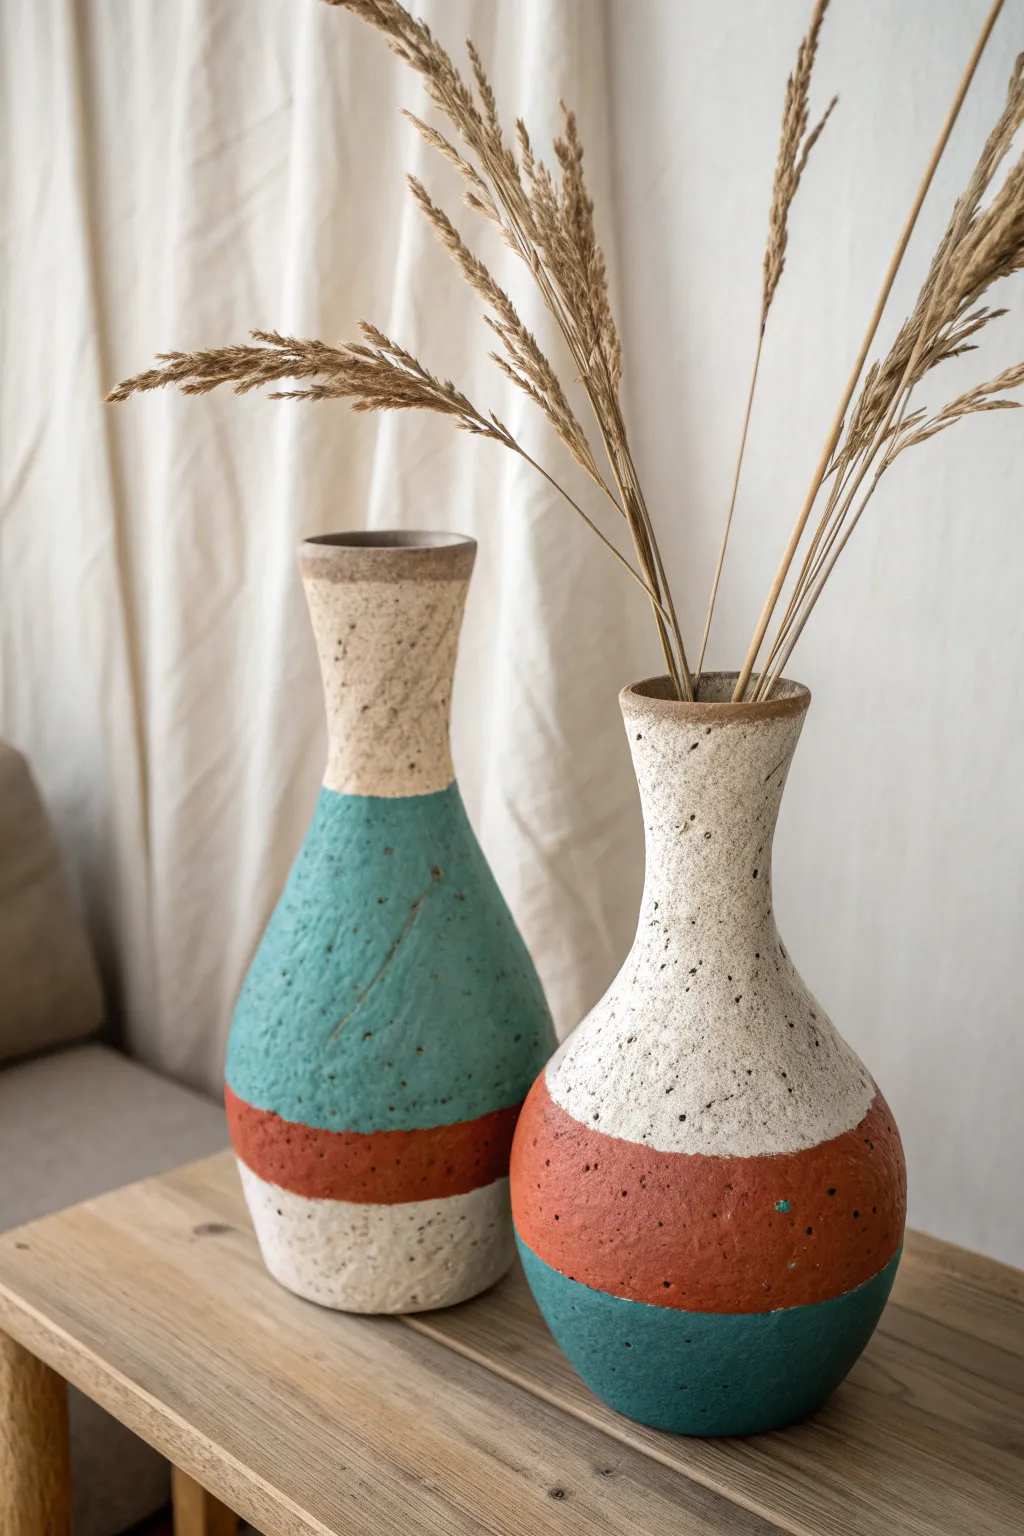
Transform plain glass or ceramic vases into high-end, earthy decor using a clever textural technique. This project couples a rough, sandstone-like finish with a bold geometric color-blocking pattern in creamy white, teal, and terracotta.
Step-by-Step
Materials
- Two vases with similar curved silhouettes (glass or smooth ceramic)
- Baking soda (bicarbonate of soda)
- Matte acrylic paint: Cream/Off-white
- Matte acrylic paint: Teal/Turquoise
- Matte acrylic paint: Terracotta/Clay Orange
- Assorted flat paintbrushes (medium and large)
- Painter’s tape or delicate surface tape
- Plastic mixing palette or paper plates
- Old toothbrush (optional for speckling)
- Matte clear sealer spray (optional)
Step 1: Preparation & Base Texture
-
Clean the surfaces:
Begin by thoroughly washing your vases with soapy water to remove any grease or manufacturer oils. Dry them completely with a lint-free towel. -
Mix the ‘mud’ paint:
Pour a generous amount of your Cream/Off-white acrylic paint onto a palette. Gradually stir in baking soda until the mixture reaches a fluffy, mousse-like consistency. It should hold stiff peaks but still be spreadable. -
Apply the first coat:
Using a flat brush, apply this textured mixture over the entire exterior of both vases. Don’t worry about brushstrokes; the texture is the goal. Use a dabbing motion in areas where you want more roughness. -
Let it cure:
Allow this initial heavy coat to dry completely. This usually takes about 1-2 hours depending on how thick your mixture was. It will feel chalky to the touch when ready. -
Second coat for opacity:
Apply a second layer of the cream baking soda mixture. This ensures full coverage so the original vase material doesn’t peek through the texture.
Step 2: Creating the Color Split
-
Plan the dividing lines:
Visualize where your color blocks will sit. The photo shows one vase with a high teal bottom and narrow terracotta band, and the other inverted with a large cream top and terracotta base. You are creating a complementary ‘split’ look. -
Tape the first vase (The Teal Base):
For the taller-looking design, place a ring of painter’s tape roughly 1/3 down from the top. Press the tape edges firmly into the textured surface to prevent severe bleeding. -
Tape the second vase (The Cream Top):
For the second vase, tape off the bottom quarter. This will be the distinct teal section at the very base. -
Mix textured colors:
Prepare your colored paints. Mix baking soda into both the Teal and Terracotta paints in separate wells. Maintaining texture in the colored sections is crucial for a cohesive look. -
Paint the first vase’s large section:
Paint the bottom two-thirds of the first vase with the textured Teal mix. Cover everything below your tape line. -
Paint the second vase’s accents:
Paint the bottom-most section of the second vase with the Teal mix. Let both vases dry for about 30 minutes. -
Add the terracotta bands:
For the first vase (Teal base), tape off a narrow band at the bottom and paint it Terracotta. For the second vase working upwards, paint the middle ‘belt’ section in Terracotta. I find freehanding the touching edges creates a more organic, artisan feel than excessive taping. -
Refine the edges:
Once the paint is tacky but not fully hard, carefully peel away any painter’s tape. If lines are too jagged, use a small detail brush with the appropriate color mixture to touch up the borders.
Tape Trick
On highly textured surfaces, tape won’t seal perfectly. To fix bleed-through, paint the base color over the tape edge first to seal it, then apply the new color.
Step 3: Finishing Details
-
Add faux stone speckles:
Dip an old toothbrush into slightly watered-down brown or dark grey paint. Run your thumb over the bristles to flick tiny speckles onto the creamy white sections of the vases. This mimics natural pottery clay. -
Soften the texture:
If any baking soda clumps are too sharp, very gently sand them down with your fingertips once completely dry. The goal is rough visual texture, not sharp spikes. -
Seal the work:
To prevent flakes of baking soda from falling off over time, spray the vases with a matte clear sealer. Do this in a well-ventilated area. -
Style and display:
These vases aren’t water-tight on the outside, so use dried stems like wheat, bunny tails, or pampas grass to complete the rustic vibration.
Level Up: Aged Patina
Mix a tiny drop of brown paint into water to make a ‘wash.’ Brush it over the dry vases and wipe it back immediately with a rag for an antique, dirty-clay look.
Now you have a stunning, sculptural set of vases that look like heavy earthenware pottery.