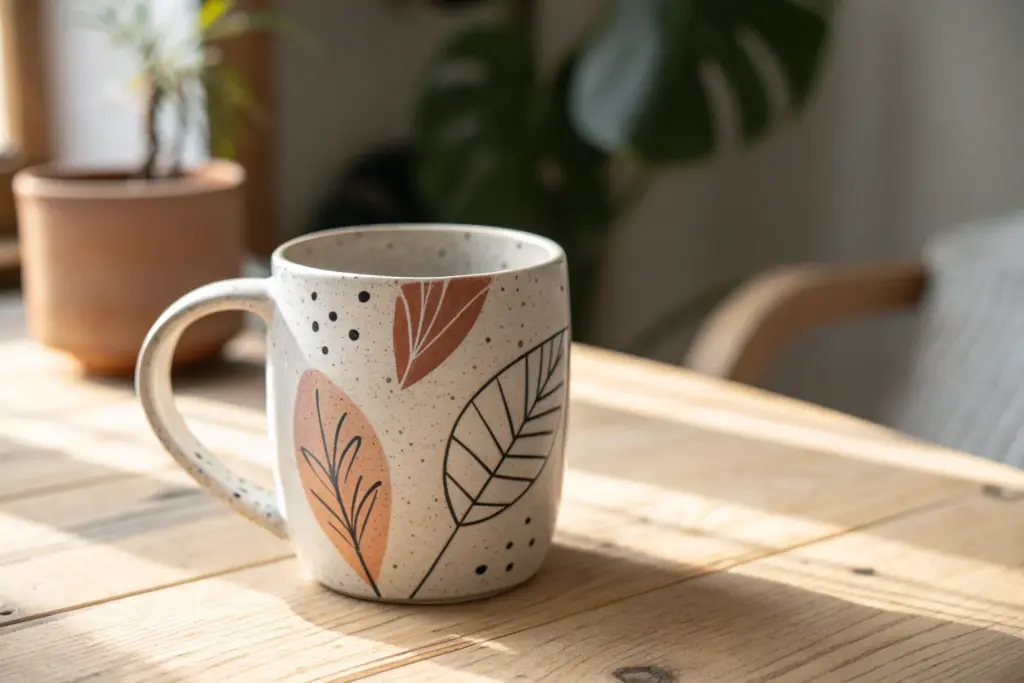
A plain mug is basically a tiny curved canvas, and I love how a few simple touches can turn it into something you’ll reach for every single day. Here are my favorite mug art ideas that feel fun, doable, and totally personal—whether you’re painting store-bought mugs or decorating your own handmade pottery.
Monogram With Dot Halo
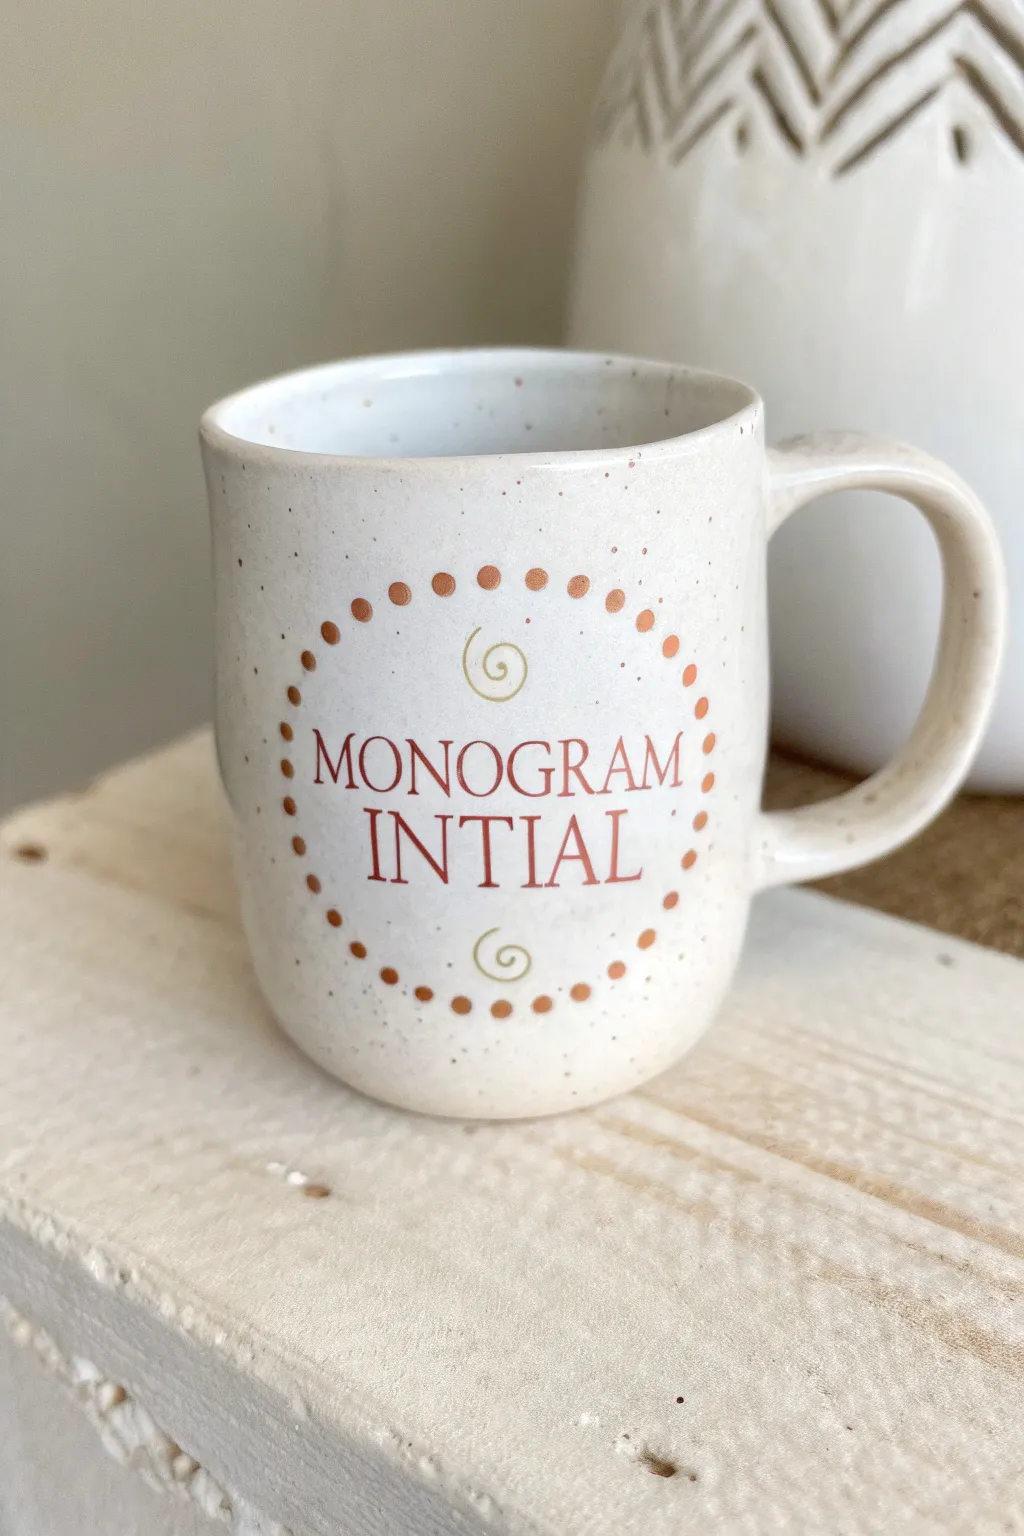
Elevate your morning coffee routine with this elegantly simple personalized mug design. Featuring a warm copper-toned monogram encircled by a delicate halo of dots and spirals, this project mimics the cozy aesthetic of high-end speckled pottery.
Detailed Instructions
Materials
- Blank speckled ceramic mug (cream or off-white)
- Bronze or copper oil-based paint marker (fine tip)
- Rubbing alcohol
- Cotton pads
- Graphite transfer paper (optional)
- Pencil
- Printed text template
- Painter’s tape
- Oven (for baking the design)
Step 1: Preparation
-
Clean surface:
Before you begin, thoroughly clean the mug’s surface with rubbing alcohol and a cotton pad. This removes any oils or residue that might prevent the paint from adhering properly. -
Create template:
Type out your desired monogram or text (like a name or initials) using a serif font on your computer. Print it out sized to fit the side of your mug. -
Transfer method:
If you aren’t comfortable freehanding, cut out your printed text. Place a small piece of graphite transfer paper behind the text and tape both to the mug using painter’s tape. -
Trace design:
Firmly trace the outline of your letters with a pencil. When you peel back the paper, you should have a faint guide to follow.
Clean Edges Pro Tip
Keep a dull toothpick handy while painting. If your paint marker bleeds slightly or a line isn’t sharp, you can gently scrape away the excess paint with the toothpick while it is still wet.
Step 2: Lettering
-
Shake the marker:
Shake your bronze oil-based paint marker vigorously to mix the pigments. Press the nib down on a scrap piece of paper until the ink flows smoothly. -
Outline letters:
Carefully trace the outline of your transferred text on the mug. Keep a steady hand and work slowly to maintain clean edges. -
Fill lettering:
Fill in the letters with the marker. For thinner parts of the serif font, use just the very tip of the marker. If the coverage looks streaky, let it dry for a few minutes and apply a second coat. -
Wait briefly:
Allow the lettering to dry for about 10-15 minutes before moving on to the surrounding design to avoid accidentally smudging your work.
Step 3: Decorative Halo
-
Mark center points:
Visualize a circle surrounding your text. I find it helpful to place four tiny guide dots at the top, bottom, left, and right to establish the circle’s boundaries. -
Draw top spiral:
Directly above the text, inside your imagined circle, draw a small, simple spiral using a fine green or lighter bronze marker. Start from the center and curl outward. -
Draw bottom spiral:
Repeat the spiral design directly below the text, ensuring it mirrors the top one for balance. -
Start the dots:
Switch back to your main bronze marker. Begin placing dots around the perimeter of your circle. Apply gentle pressure to make uniform round marks. -
Space the dots:
Continue dotting around the text, keeping the spacing consistent—roughly 3-4mm apart. Try to keep the dots aligned in a circular path rather than an oval. -
Refine the shape:
Step back and look at the mug from a distance. If the circle looks uneven, you can add a slightly larger dot to fill gaps or extend the shape slightly.
Level Up The Look
Add a second ring of much smaller dots inside the main bronze halo using a metallic gold or silver marker. This creates a layered, jeweled effect that adds depth to the design.
Step 4: Finishing
-
Cleanup:
If you made any mistakes or have stray pencil marks, use a Q-tip dipped in rubbing alcohol to carefully erase them. Do this before baking. -
Air cure:
Let the mug sit undisturbed for at least 24 hours. This allows the paint to cure on the surface before heat setting. -
Load oven:
Place the mug into a *cold* oven. Do not preheat the oven, as the sudden temperature change can crack the ceramic. -
Bake:
Set the oven to 350°F (175°C). Once it reaches temperature, bake for 30 minutes. -
Cool down:
Turn off the oven but leave the mug inside. Let it cool down completely inside the oven before removing it.
Now you have a beautifully personalized vessel ready for your favorite hot beverage


Minimal Line Doodle Faces
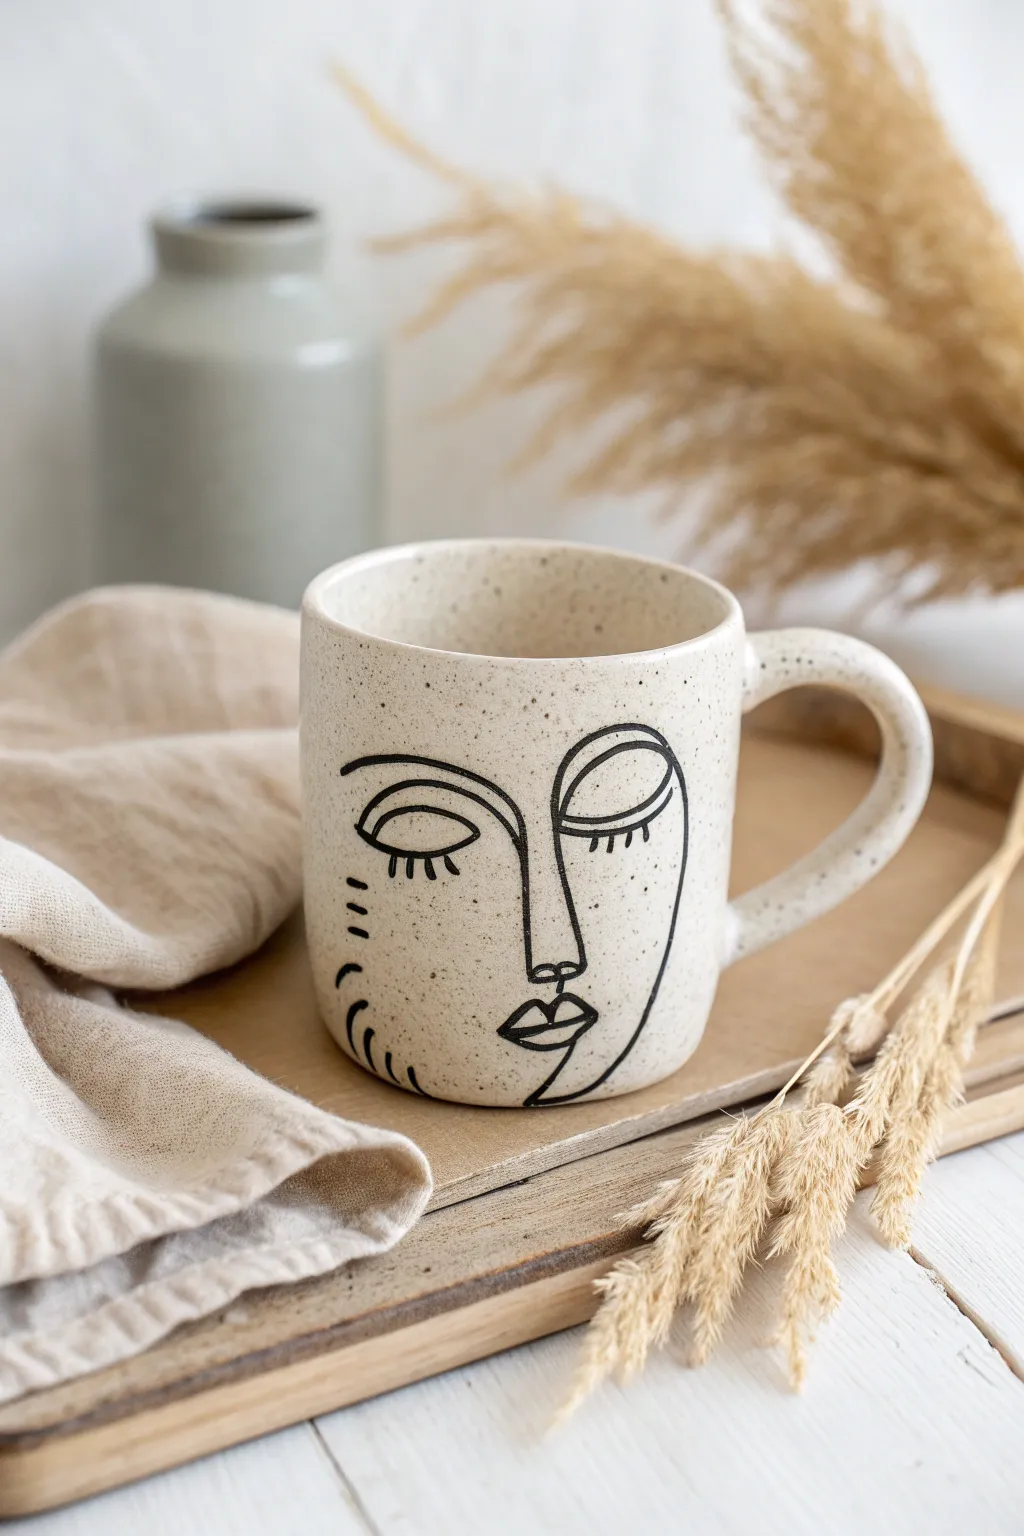
Transform a simple ceramic mug into a modern piece of decor with this minimalist face design. Using stark black lines against a speckled background, this project captures the trendy abstract aesthetic found in high-end boutiques.
Step-by-Step
Materials
- Plain ceramic mug (cream or oatmeal speckled finish preferred)
- Black oil-based paint marker (fine or medium tip)
- Rubbing alcohol
- Cotton pads
- Pencil (optional)
- Oven (for baking the design)
- Paper towel
- Cotton swabs (for cleanup)
Step 1: Preparation & Planning
-
Clean surface:
Before starting, ensure your mug is completely free of oils or fingerprints. Wipe the entire outer surface with rubbing alcohol and a cotton pad. -
Let dry:
Allow the alcohol to evaporate completely for a minute or two to ensure the best possible adhesion for the paint. -
Practice sketch:
Since mug surfaces are curved, sketch your design on a piece of paper first. Try drawing a continuous line face—start with the nose, connect to the eyebrows, and then the outline of the cheek. -
Light pencil guide:
If you are nervous about freehanding, lightly sketch the main anchor points (nose placement, eye level) onto the mug with a pencil. The graphite will wipe off later.
Oops, Smudged It!
Don’t panic if your hand smears wet ink. Quickly wipe the area with an alcohol-dampened Q-tip. If the paint has dried slightly, you may need to apply a bit of pressure to remove it entirely.
Step 2: Drawing the Face
-
Prime the marker:
Shake your oil-based paint marker well and press the tip onto a scrap piece of paper until the black ink flows smoothly and evenly. -
Start with the nose:
Begin your drawing in the center of the mug face. Draw a long, vertical line for the nose bridge, curving slightly at the bottom to form the nostril area. -
Connect the eyebrow:
From the top of the nose bridge, extend a line outward to the left to create a bold, arched eyebrow shape. It creates a nice flow if this connects seamlessly to the nose line. -
Draw the left eye:
Under the left eyebrow, draw a simple semi-circle for the eyelid. Add four or five short, downward strokes for eyelashes. -
Add the right eye:
Move to the right side of the nose. Draw a large, curved shape for the right eye socket/brow bone that mirrors the left but stays distinct. Add the sleepy eyelid and lashes inside this shape. -
Create the lips:
Centered below the nose, draw the lips. A simple ‘M’ shape for the top lip and a curved line for the bottom works well. I like to keep a small gap between the lips for a relaxed expression. -
Outline the face:
Starting near the left eye, draw a sweeping line down the side to form the cheek and jawline. Let this line curve inward near the chin. -
Add abstract details:
On the far left cheek area, add a few decorative marks. Three small dashes or curved lines add texture and balance the composition without cluttering. -
Refine lines:
Look over your work. If any lines look too thin or uneven, carefully go over them a second time to build up the opacity of the black ink.
Add a Pop of Color
For a mid-century modern twist, paint a solid, organic blob of muted color (like terracotta or sage green) behind the face design. Let the color dry completely before drawing the black lines on top.
Step 3: Finishing Touches
-
Clean up errors:
If you made a mistake or a line is wobbly, dip a cotton swab in rubbing alcohol and carefully wipe away the wet paint. Let that spot dry before redrawing. -
Initial drying:
Let the mug sit undisturbed for at least 24 hours. This allows the paint to cure on the surface before you bake it to set it permanently. -
Prepare for baking:
Place the cold mug into a cold oven. Do not preheat the oven, as the sudden temperature change could crack the ceramic. -
Bake the design:
Turn the oven on to 350°F (175°C). Once the oven reaches temperature, set a timer for 30 minutes. -
Cool down:
Turn the oven off after 30 minutes but leave the mug inside. Let it cool down completely inside the oven to prevent thermal shock. -
Final check:
Once cool, remove the mug. The design is now set, though hand washing is generally recommended to preserve the life of the artwork.
Now you have a custom piece of art ready for your morning coffee routine


Wraparound Botanical Vines
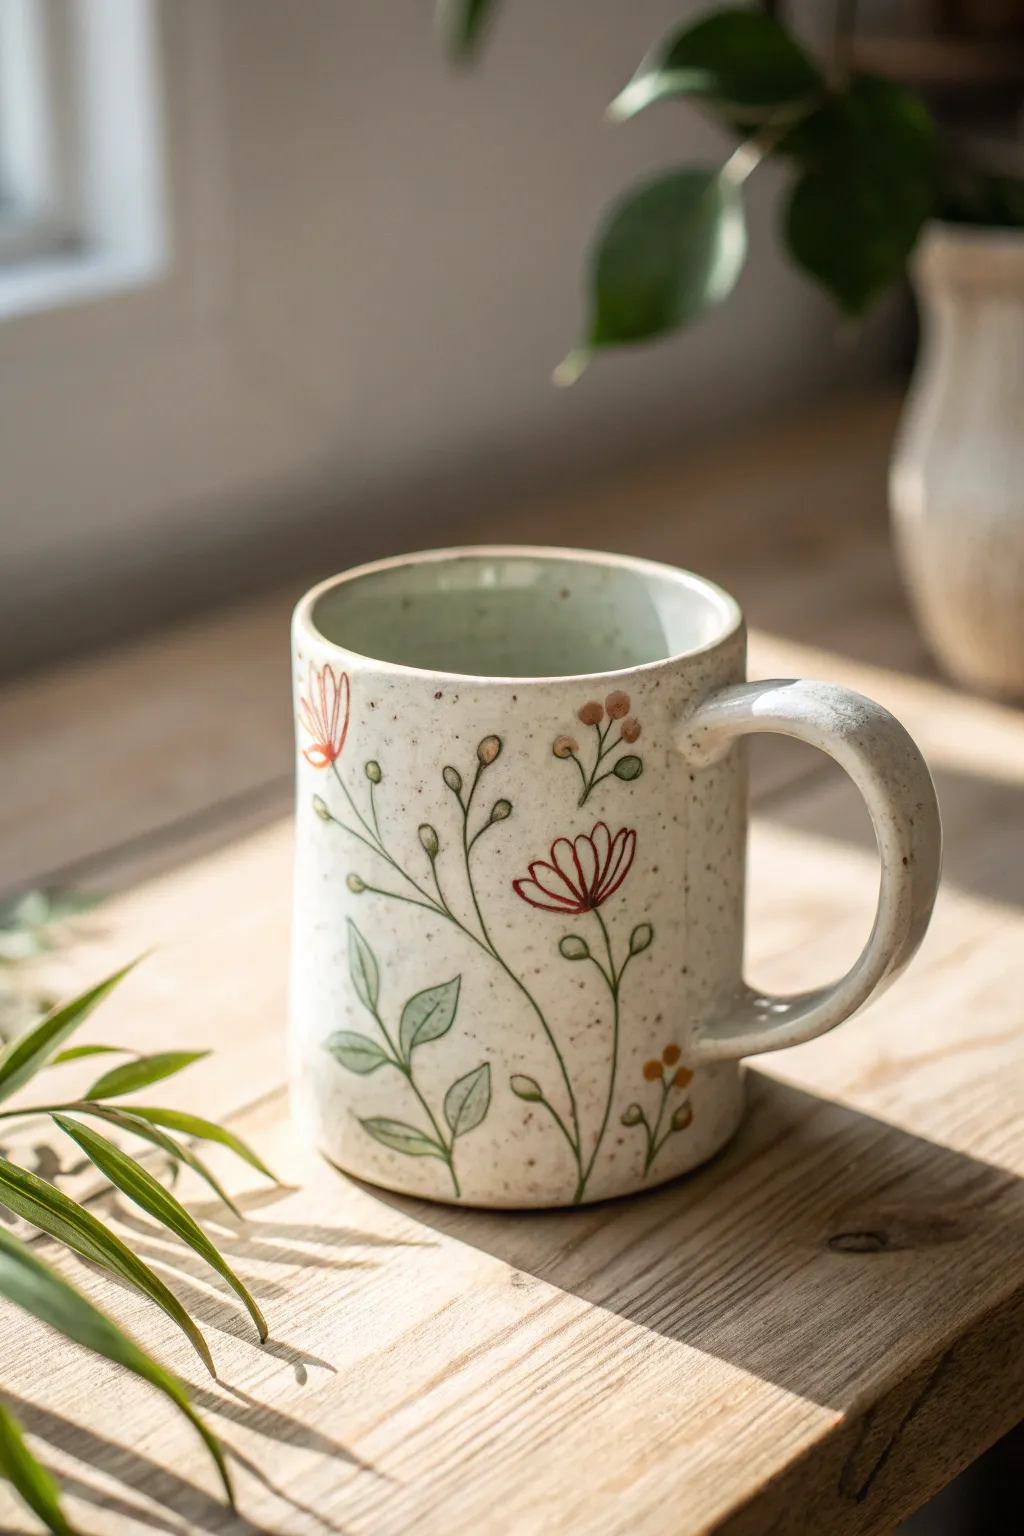
Capture the delicate beauty of a sunlit garden with this wraparound botanical design. Featuring swaying vines, simple red blooms, and soft green leaves on a speckled cream base, this project transforms a plain ceramic mug into a piece of functional art.
Step-by-Step Tutorial
Materials
- Bisque-fired ceramic mug (smooth surface)
- Underglazes: Dark Green, Sage Green, Rust Red, Golden yellow/ochre
- Clear transparent glaze (cone 06 or 06-04)
- Speckled clay body or ‘Speckled’ underglaze additive
- Fine liner brush (size 0 or 00)
- Small round brush (size 2)
- Pencil
- Sponge
- Kiln access
Step 1: Preparation & Base
-
Clean surface:
Begin by wiping down your bisque-fired mug with a damp sponge to remove any kiln dust or oils from your hands, ensuring a clean canvas for painting. -
Speckled effect:
If your clay body isn’t naturally speckled, create the look by diluting a brown or iron oxide wash. Dip a stiff brush (like a toothbrush) into the wash and flick the bristles to spatter tiny dots across the entire exterior. I like to keep this subtle to let the flowers shine. -
Draft the stems:
Using a light pencil, sketch the main flow of your vines directly onto the bisque. Draw three or four main vertical curving lines that meander from the base up towards the rim, allowing them to intersect or lean naturally.
Uneven Lines?
If your vine lines are shaky or too thick, your brush is likely too dry. Add a tiny drop of water to your underglaze on the palette to improve flow for long strokes.
Step 2: Painting the Foliage
-
Line the stems:
Load your fine liner brush with Dark Green underglaze mixed with a tiny drop of water for flow. Carefully trace over your pencil lines, keeping the pressure light to maintain thin, delicate stems. -
Add leaf branches:
Along the main stems, paint short, thin offshoot lines where you want your leaves and flowers to sit. Vary the spacing so it doesn’t look too uniform or manufactured. -
Outline leaves:
Switching to the Sage Green, use your liner brush to draw the outlines of simple, almond-shaped leaves attached to the lower sections of your vines. -
Fill the leaves:
Using the size 2 round brush and watered-down Sage Green, gently wash the color into the leaf outlines. The color doesn’t need to be solid; a slightly translucent, watercolor look adds charm. -
Detailing veins:
Once the leaf fill is dry to the touch, use the Dark Green and the very tip of your liner brush to add a central vein line down the middle of each sage leaf.
Add Texture
For a tactile finish, use a slip trailer to apply the flower centers or buds. This creates raised bumps that you can feel when holding the finished mug.
Step 3: Adding Florals
-
Main blooms:
Identify 2-3 focal points near the top third of the mug. Using Rust Red and the liner brush, paint five to six simple, elongated loops radiating from a single point to form the main flower petals. -
Bud clusters:
For the smaller buds shown in the reference, dip the round end of a paintbrush handle into the Rust Red or Golden Yellow underglaze. Dot these onto the ends of the smaller stems. -
Connect the buds:
Use the liner brush and Dark Green to paint tiny ‘caps’ or stems connecting these dotted buds back to the main vine system. -
Center details:
Add a small line or dot of Dark Green in the center of the open red flowers to ground the petals. -
Cleanup:
Check for any smudges. You can gently scrape away mistakes on bisque ware with an X-Acto knife or a stiff clean brush.
Step 4: Glazing & Firing
-
Drying time:
Allow the underglaze design to dry completely, ideally overnight, to prevent smearing during the glazing process. -
Apply clear glaze:
Dip the mug into a clear transparent glaze, or brush on three even coats if using brushing glaze. Ensure the interior is fully coated as well for food safety. -
Wipe the foot:
Use a damp sponge to meticulously wipe all glaze off the bottom foot ring of the mug so it doesn’t stick to the kiln shelf. -
Final fire:
Fire the mug in the kiln according to the clay and glaze manufacturer’s instructions (typically cone 06 or cone 6 depending on your materials).
Once cooled from the kiln, pour yourself a warm drink and enjoy the garden vibes of your handmade creation


Easy Terrazzo Speckles
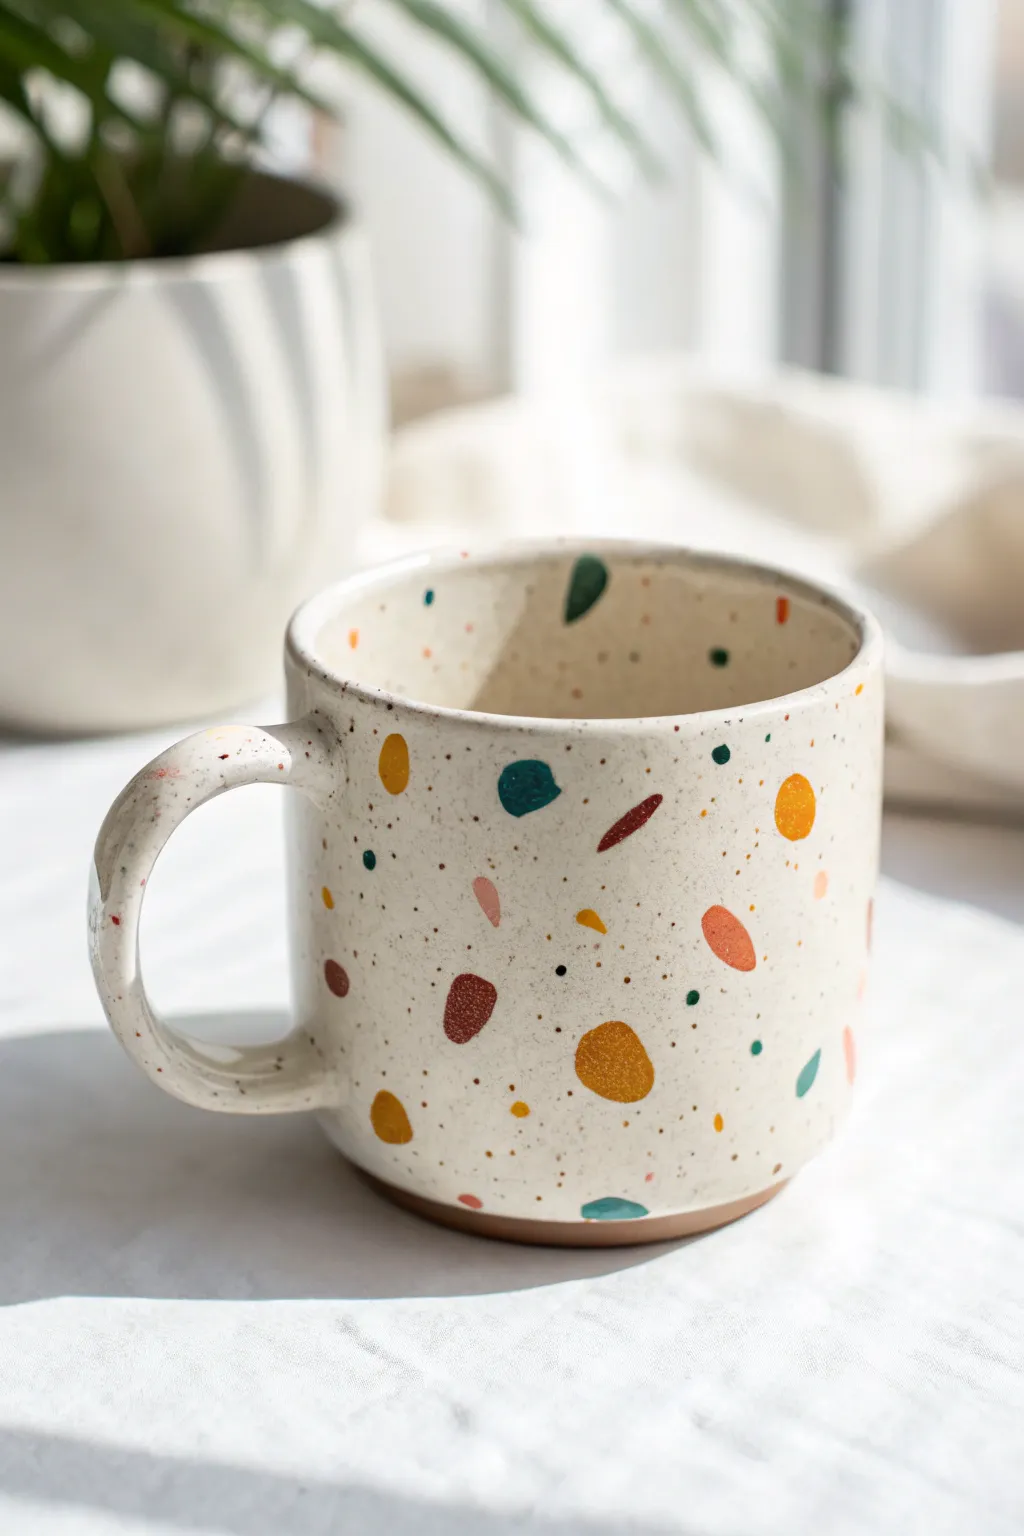
Transform a plain ceramic mug into a piece of modern art with this simple terrazzo technique. The scattered, confetti-like pattern combines organic shapes with earthy tones for a playful yet sophisticated look that mimics real terrazzo stone.
Detailed Instructions
Materials
- Plain white or cream ceramic mug
- Pebeo Porcelaine 150 paints (or similar oven-bake ceramic paint)
- Colors: Mustard yellow, deep teal, rust orange, burnt sienna, and dark brown
- Small round paintbrush (size 0 or 1)
- Small flat shader brush (size 2)
- Toothbrush or stiff bristle brush
- Rubbing alcohol
- Paper towels
- Palette or small plate for mixing
- Domestic oven
Step 1: Preparation and Planning
-
Clean surface:
Begin by thoroughly cleaning your mug with warm soapy water to remove any manufacturing oils or dust. -
Sanitize with alcohol:
Once dry, wipe the entire surface down with rubbing alcohol on a paper towel. This step is crucial because even fingerprints can prevent the paint from adhering properly. -
Check your palette:
Shake your paint bottles well and dispense a pea-sized amount of each earthy tone onto your palette. -
Practice creating shapes:
Before touching the mug, practice painting small, irregular geometric shapes—some rounded, some triangular, some oblong—on a piece of scrap paper to get a feel for the brush.
Step 2: Painting the Terrazzo Shapes
-
Start with dominant colors:
Beginning with the mustard yellow, use your small flat brush to paint random shapes scattered across the surface. Think of kidney beans, small ovals, or soft triangles. -
Rotate and space:
Rotate the mug as you work to ensure even coverage, leaving plenty of negative space between your yellow shapes for the other colors. -
Add secondary tones:
Clean your brush and switch to the deep teal. Paint slightly smaller abstract shapes in the gaps, occasionally placing one near the rim or the handle for continuity. -
Introduce warmth:
Using the rust orange paint, add more varied shapes. I like to make some of these elongated or sliver-like to add visual interest to the composition. -
Deepen the palette:
Add the burnt sienna and dark brown accents. Keep these sparing; they act as anchors for the lighter colors. -
Check the interior:
Don’t forget to paint a few small shapes just inside the rim of the mug. This small detail makes the design feel high-end and intentional. -
Handle details:
Carry the pattern onto the handle, but keep the shapes slightly smaller here to accommodate the curves.
Shape Variety Tip
Real terrazzo is random broken stone. Avoid make circles too perfect. Embrace lopsided ovals and jagged triangles to make the effect look more authentic and organic.
Step 3: Creating the Speckle Effect
-
Prepare the splatter:
Mix a tiny drop of water into your dark brown paint to make it slightly inkier—it should be fluid but not dripping. -
Load the tool:
Dip an old toothbrush or a stiff bristle brush into the thinned brown paint. -
Flick the paint:
Hold the brush near the mug and run your thumb across the bristles to flick tiny speckles onto the surface. This mimics the sandy texture of real terrazzo cement. -
Second splatter layer:
Repeat this splatter process using a tiny bit of the rust orange color for subtle variety in the background texture. -
Clean up errors:
If any splatters are too large or land where you don’t want them, quickly wipe them away with a damp Q-tip before they dry.
Paint Sliding Off?
If paint beads up or slides, the ceramic glaze is too slick or oily. Re-clean thoroughly with alcohol. If it persists, lightly scuff the surface with fine sandpaper.
Step 4: Curing the Design
-
Dry completely:
Let the painted mug sit undisturbed for at least 24 hours. The paint needs to air-cure before heat setting. -
Load the oven:
Place the mug into a cold oven. Do not preheat the oven, as the sudden temperature change could crack the ceramic. -
Bake the design:
Set the oven to 300°F (150°C) and bake for 35 minutes once it reaches temperature. -
Cool down slowly:
Turn the oven off and leave the mug inside until it has cooled completely back to room temperature.
Enjoy your morning coffee in a custom mug that looks like it came straight from a boutique pottery studio

The Complete Guide to Pottery Troubleshooting
Uncover the most common ceramic mistakes—from cracking clay to failed glazes—and learn how to fix them fast.
Modern Color-Block Shapes

Capture the warmth of mid-century aesthetics with this modern color-block mug design featuring bold arches and rectangles. The finish combines a rustic, speckled base with smooth, matte geometric shapes in a grounded palette of terracotta, olive, and ochre.
Step-by-Step Guide
Materials
- Bisque-fired ceramic mug (plain straight-sided shape)
- Speckled cream underglaze or glaze (matte finish)
- Underglazes in: burnt orange, terracotta, olive green, dark chocolate brown
- Soft fan brush
- Small flat shader brush (size 4 or 6)
- Detailed liner brush (size 0 or 1)
- Pencil (HB or lighter)
- Measuring tape (flexible)
- Clear matte dipping glaze
- Masking tape (optional for straight lines)
Step 1: Base Preparation
-
Clean the bisque:
Start by wiping down your bisque-fired mug with a slightly damp sponge. This removes any kiln dust or oils from your hands that might resist the glaze. -
Apply the base coat:
Using a soft fan brush, apply three even coats of the speckled cream underglaze to the entire mug, including the handle and interior. Allow each coat to dry until it’s chalky to the touch before applying the next. -
Dry thoroughly:
Let the base coat dry completely. This is crucial because painting on top of damp underglaze can cause the colors to muddy or life the base layer.
Clean Lines Hack
Use flexible automotive detailing tape (1/8 inch) to mask off the gaps between shapes. Peel it off gently when the paint is semi-dry for perfect negative space lines.
Step 2: Mapping the Design
-
Sketch the grid:
Lightly visualize a grid on your mug. The design relies on balance, so aim to divide the mug’s surface into four roughly equal quadrants visually. -
Draft the arches:
Using a pencil, lightly sketch your arches. Draw a large ‘rainbow’ arch shape on the upper half. Don’t worry about pencil marks; they will burn off in the kiln. -
Add nested shapes:
Inside your main arch, sketch a smaller, solid semi-circle. Leave a consistent gap of about 1/8th inch (3mm) between the outer arch and the inner semi-circle to let the speckled base show through. -
Draw the lower elements:
On the lower half of the mug, sketch the opposing shapes. This design uses a vertical rectangle block and a quarter-circle shape that mirrors the curve of the upper arch.
Step 3: Painting the Motifs
-
Paint the terracotta arch:
Load your flat shader brush with the burnt orange/terracotta underglaze. Carefully fill in the outer band of the top arch. I like to stabilize my hand against the table to get a clean curve. -
Fill the inner semi-circle:
Using a lighter terracotta or peach tone, fill in the small semi-circle nested inside the top arch. Ensure edges are crisp. -
Add the olive rectangle:
Switch to your olive green underglaze. Paint the vertical rectangular block on the bottom section. Use the flat edge of your brush to get sharp corners. -
Paint the quarter-circle:
Using the dark chocolate brown or deep rust color, fill in the quarter-circle shape on the bottom right. This shape should look like part of a rainbow emerging from the bottom edge. -
Second Coats:
Once the designs are dry to the touch, apply a second coat to all colored shapes. Underglazes can be translucent, and a second layer ensures that rich, opaque color seen in the photo. -
Third Coats (if needed):
Check your coverage. If you can still see the cream base through the shapes, apply a third coat for solid opacity.
Streaky Paint?
If your underglaze looks brushy or uneven, you likely didn’t layer enough. Apply coats in alternating directions (horizontal then vertical) to create a smooth, solid finish.
Step 4: Detailing and Glazing
-
Clean up edges:
Dip a liner brush or a toothpick into water and gently scrape away any paint that went outside your lines. The cream base creates negative space lines, so keep them consistent width. -
Dry completely:
Allow the mug to dry overnight. The underglaze needs to be bone dry before the final glazing step. -
Apply clear glaze:
Dip the entire mug into a clear matte glaze. A matte finish is essential here to maintain that earthy, modern tactile feel; a glossy finish will change the vibe significantly. -
Final wipe:
Wipe the foot of the mug (the bottom ring where it sits on the shelf) with a wet sponge to remove all glaze. This prevents it from fusing to the kiln shelf. -
Fire:
Fire the mug in the kiln according to your clay and glaze specifications (usually Cone 5 or 6 for stoneware).
Now you have a stunning, functional piece of modern art ready for your morning coffee
Gradient Polka Dot Fade
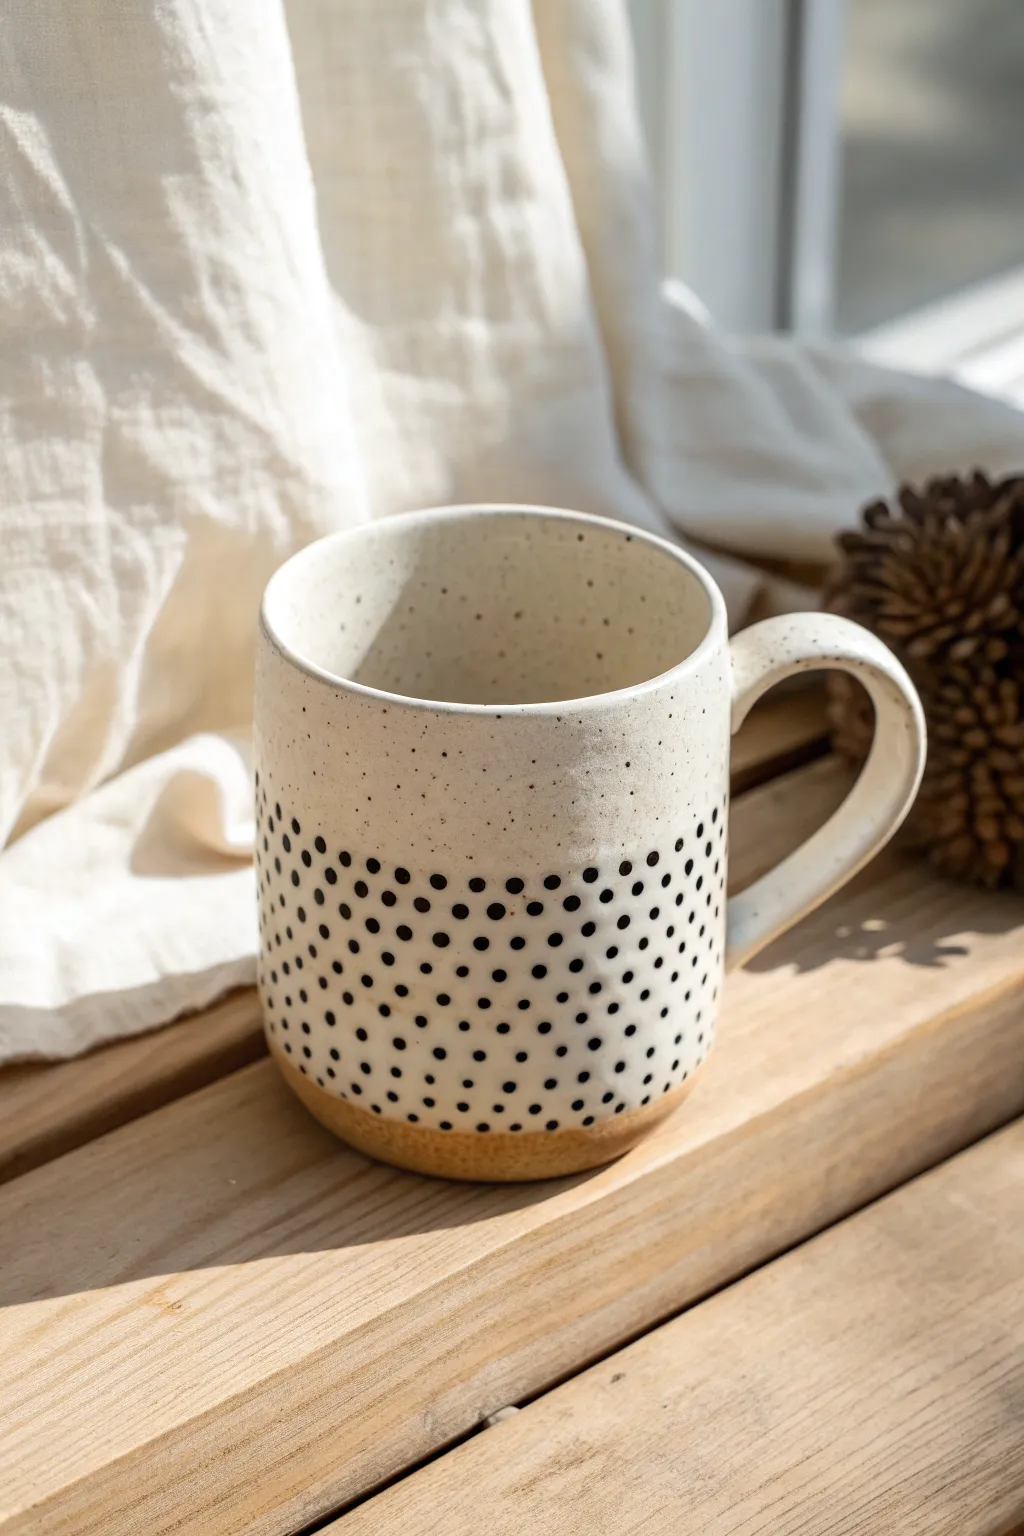
Achieve a modern, high-end pottery look with this deceptively simple dotted design. This project uses a gradient technique where small black dots transition from sparse to dense, creating a beautiful visual texture over a creamy speckled base.
Detailed Instructions
Materials
- Plain ceramic mug (preferably cream or off-white)
- Black ceramic paint or porcelain marker (fine tip)
- Rubbing alcohol
- Cotton pads
- Masking tape or painter’s tape
- Oven (for curing)
- Paper towel
- Small round paintbrush (optional, if using liquid paint)
Step 1: Preparation
-
Clean surface:
Before you begin any detail work, it is crucial to remove invisible oils and dust. Wipe the entire exterior of the mug thoroughly with rubbing alcohol on a cotton pad. -
Define the base:
Decide how much of the raw base you want exposed. Measure about 1/2 to 3/4 inch up from the bottom edge and apply a strip of masking tape horizontally around the circumference. This creates that clean, ‘dipped’ look at the bottom. -
Secure edges:
Press the tape firmly, especially at the overlap and edges, to prevent paint from bleeding underneath. I usually run my fingernail along the tape edge for extra security.
Uneven Dots?
Don’t stress about perfect circles! If a dot looks oddly shaped, simply expand it slightly to round it out, or leave it organic—hand-painted pottery is prized for its imperfections.
Step 2: Creating the Speckled Base
-
Prepare speckle paint:
If your mug isn’t already speckled, you can mimic the effect. Dilute a tiny amount of black ceramic paint with water until it’s very fluid. -
Splatter technique:
Dip a stiffer brush or toothbrush into the diluted paint. Use your thumb to flick the bristles, spraying fine mist and tiny irregular dots over the upper half of the mug. -
Refine speckles:
If any large globs land on the mug, quickly dab them gently with a corner of a paper towel to soften them. Let this base layer dry completely for at least 30 minutes before starting the main pattern.
Step 3: Applying the Gradient Dots
-
Start at the bottom:
Begin painting your primary dots right above the tape line. Using your porcelain marker or fine brush, create a dense row of black dots. Space them very closely together, almost touching. -
Build density:
Work your way up from the tape in horizontal bands. For the first inch, keep the dots tightly packed and uniform in size. The goal is to create a heavy visual weight at the bottom. -
Start spacing out:
As you move upward past the bottom third of the mug, begin increasing the distance between each dot slightly. Instead of 1-2mm apart, move to 3-4mm spacing. -
Vary alignment:
Stop painting in strict horizontal lines. Start placing dots more randomly to break up the grid structure. This organic placement is key to a smooth fade. -
Create the fade:
By the time you reach the middle of the mug, your dots should be sparsely placed. Think of them as floating upward like bubbles. -
Feather the top:
For the top half of the design, place only a few scattered dots here and there. Leave large areas of the creamy background open to let the speckles show through. -
Randomize sizes:
Go back through the middle section and add tiny micro-dots between larger ones if the transition looks too abrupt. Variation in dot size helps blend the gradient beautifully.
Paint Choice Pro-Tip
Use a specialized porcelain paint marker (like Pebeo Porcelaine 150) rather than a regular permanent marker. It withstands dishwashing much better after baking.
Step 4: Finishing
-
Remove tape:
Carefully peel away the masking tape while the paint is still slightly tacky or fully dry, depending on your brand’s instructions. Pull the tape away at a severe angle for the sharpest line. -
Clean up:
Check the unpainted band at the bottom. If paint bled under the tape, use a cotton swab dipped in alcohol or a craft knife to gently scrape it away. -
Dry properly:
Let the mug sit undisturbed for 24 hours. This resting period allows the paint to bond initially with the ceramic surface. -
Bake to cure:
Place the mug in a cold oven. Set the temperature to 300°F (150°C) or follow your paint manufacturer’s specific instructions. Let it bake for 30-35 minutes. -
Cool down:
Turn the oven off and leave the mug inside until it cools completely to room temperature. Removing it while hot can cause thermal shock and cracking.
Enjoy your customized cafe-style mug with your next morning coffee


What Really Happens Inside the Kiln
Learn how time and temperature work together inside the kiln to transform clay into durable ceramic.
Hand-Lettered Quote Band
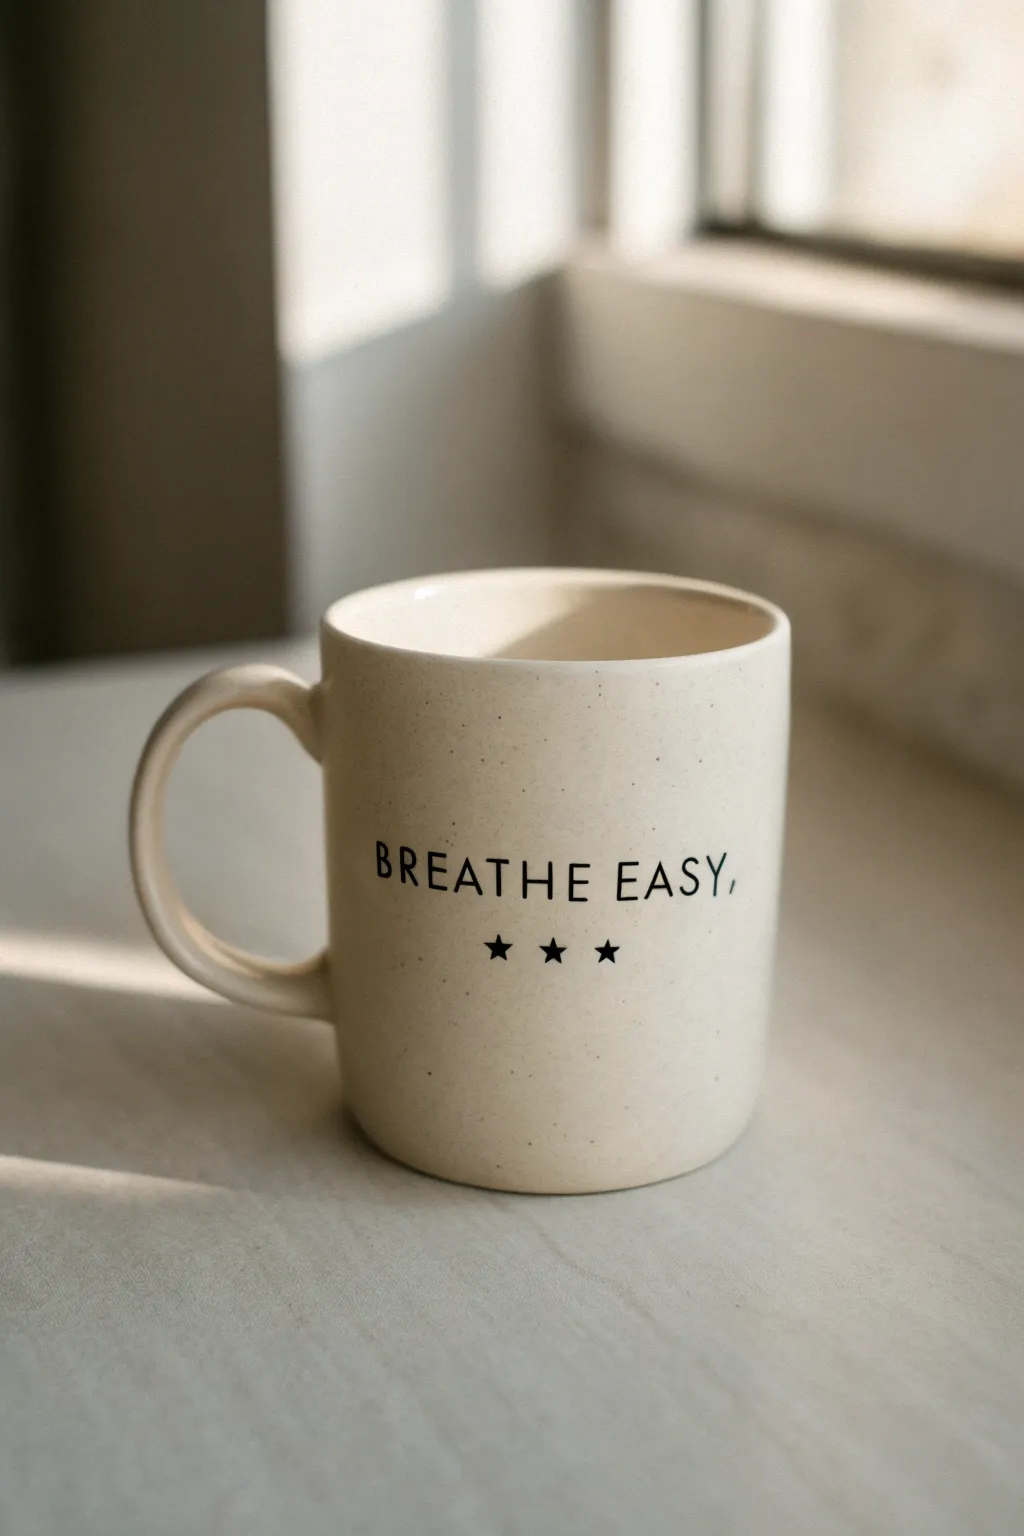
Embrace simplicity with this clean, minimalist hand-lettered mug design that serves as a gentle daily reminder. By using the right ceramic markers and a steady hand, you can transform a plain speckled mug into a modern piece of functional art.
How-To Guide
Materials
- Cream or speckled ceramic mug (clean surface)
- Black oil-based paint pen (fine tip/0.7mm)
- Rubbing alcohol
- Cotton pads or paper towel
- Pencil (HB or softer)
- Painter’s tape or masking tape
- Cotton swabs
- Ruler or measuring tape
- Oven (for curing)
Step 1: Preparation & Layout
-
Clean surface:
Begin by thoroughly washing your mug with soap and water to remove any grease or price tag residue. Dry it completely with a clean towel. -
Degrease with alcohol:
Wipe the area where you intend to write with a cotton pad soaked in rubbing alcohol. This removes invisible oils from your fingers that could prevent the paint from adhering properly. -
Establish a baseline:
Cut a strip of painter’s tape and apply it horizontally around the mug where you want the bottom of your text to sit. Use a ruler to ensure it is level all the way around. -
Sketch the text:
Using a soft pencil, lightly sketch the words ‘BREATHE EASY,’ just above the tape line. Aim for a clean, sans-serif style with wide kerning (spacing between letters). -
Mark the star placement:
Roughly 1/4 inch below your text baseline (on top of the tape for now, or just below where the text sits if you remove the tape early), mark three small dots where the stars will go to center them perfectly under the phrase.
Pro Tip: Pencil Transfer
Can’t freehand? Print the text, rub graphite heavily on the back of the paper, tape it to the mug, and trace the letters hard to transfer a guide.
Step 2: Inking the Design
-
Activate the marker:
Shake your oil-based paint pen well. Press the tip down on a scrap piece of paper until the ink flows smoothly and consistently before touching the mug. -
Letter the first word:
Starting with ‘BREATHE’, trace over your pencil lines. Use slow, deliberate vertical strokes for the uprights of the letters to keep them straight. -
Complete the phrase:
Continue with ‘EASY,’. Pay close attention to the comma at the end; keep it small and subtle. -
Remove the guide:
Once the lettering is dry to the touch (usually 5-10 minutes), carefully peel away the painter’s tape to reveal your clean baseline. -
Draw the stars:
Using the fine tip, draw three small, five-pointed solid stars below the text. Start by drawing the outline of the star shape first, then fill in the center. -
Clean up mistakes:
If a line goes rogue, dip a cotton swab in rubbing alcohol and gently wipe away the error while the paint is still fresh. Let the area dry completely before re-drawing. -
Thicken the lines:
I like to go back over the vertical strokes of each letter one more time to give the text slightly more visual weight and opacity.
Troubleshooting: Paint Flaking
If paint flakes after baking, the mug likely had a glossy glaze or wasn’t degreased enough. Lightly sand the area next time for better grip.
Step 3: Curing & Finishing
-
Air dry first:
Let the mug sit undisturbed for at least 24 hours. This allows the paint solvents to evaporate fully before baking. -
Load the oven:
Place the mug into a cold oven. Do not preheat the oven, as the sudden temperature change can crack the ceramic. -
Bake the design:
Set the oven to 350°F (175°C). Once it reaches temperature, set a timer for 30 minutes. -
Cool down slowly:
Turn the oven off after 30 minutes but leave the door closed. Let the mug cool down completely inside the oven (usually another hour or two). -
Final clean:
Once cool, gently wipe away any remaining visible pencil marks with a damp cloth.
Now you have a serene, custom mug perfect for your morning coffee rituals.
Classic Stripes and Checks
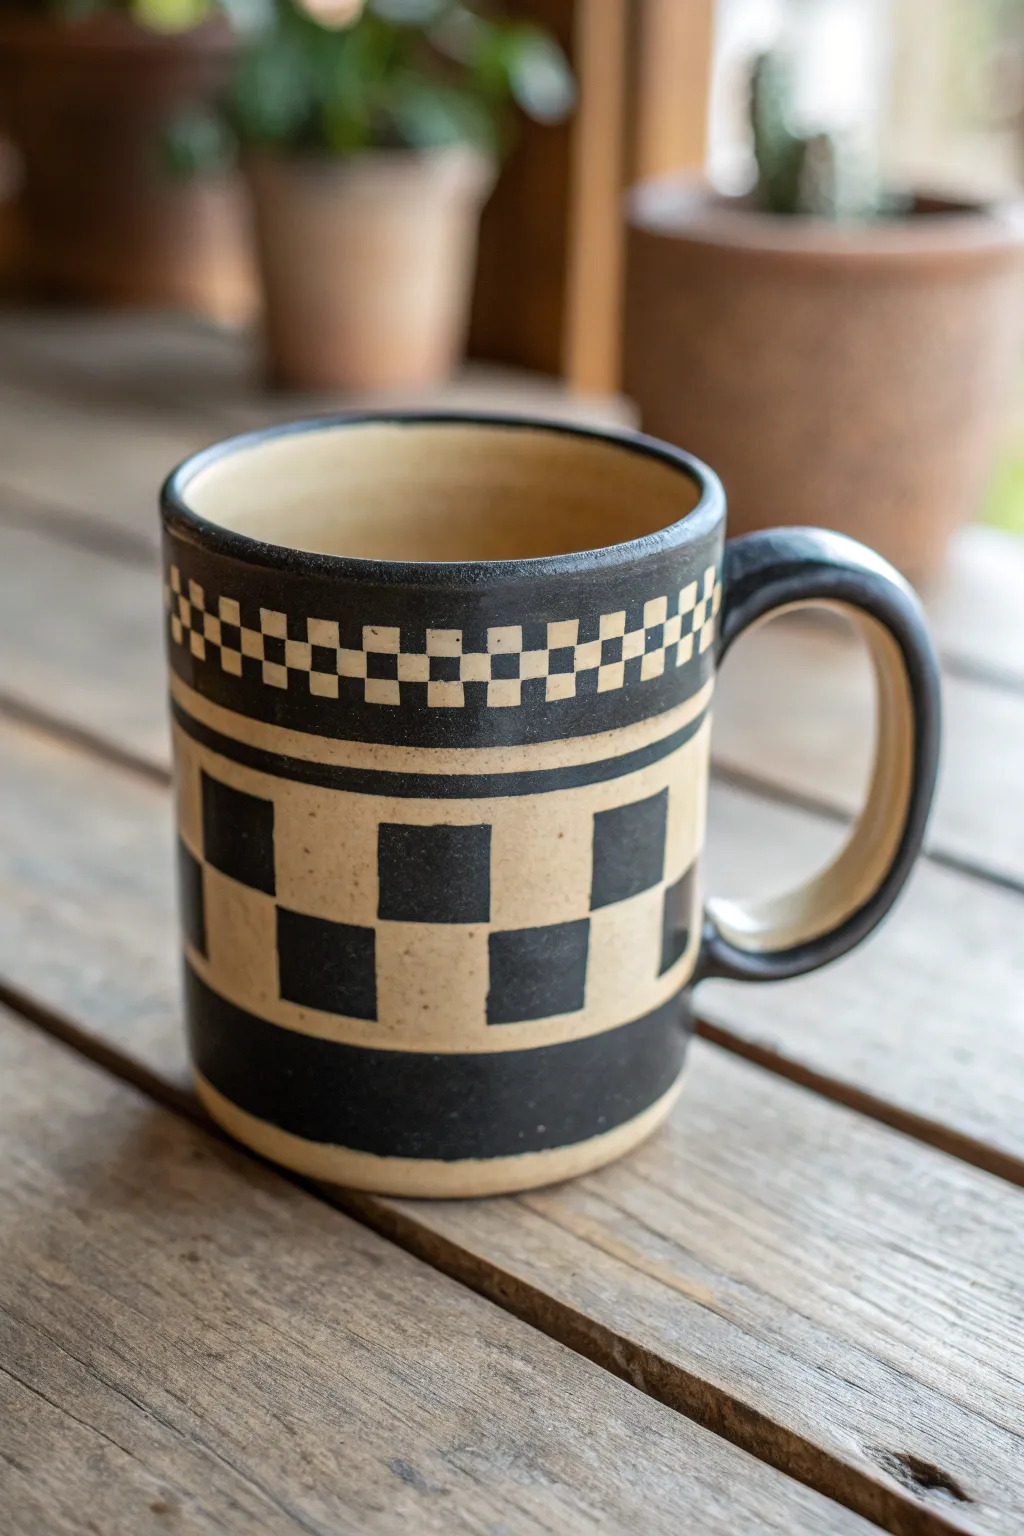
Transform a plain ceramic mug into a piece of modern pottery art with this bold, graphic design. The interplay between the raw clay texture and stark black glaze creates a timeless checkered pattern that feels both rustic and contemporary.
Step-by-Step
Materials
- Bisque-fired ceramic mug (beige/tan clay body)
- Black underglaze (matte finish)
- Clear matte glaze (food safe)
- Pencil
- Ruler or flexible measuring tape
- Painter’s tape or graphic art tape (various widths)
- Small flat shader brush
- Fine liner brush
- Sponge
- Bowl of water
Step 1: Preparation & Mapping
-
Clean the surface:
Begin by wiping down your bisque mug with a slightly damp sponge. This removes any dust that might prevent the underglaze from adhering properly. -
Define the main bands:
Use a flexible measuring tape to find the center point of the mug’s height. Lightly mark this spot with a pencil. -
Draw horizontal guides:
Place your pencil on a steady surface at the height of your mark. Rotate the mug against the pencil to create a perfectly straight horizontal line all the way around. Repeat this process to create lines for the top rim band and bottom base band. -
Grid the checkerboard:
Within the central band where the large checks will go, measure and mark vertical lines evenly spaced around the circumference. Aim for squares approximately 1 inch wide.
Uneven Lines?
If freehand lines are wobble, use thin automotive masking tape (1/8 inch) to block out the grid before painting. Peel it off when the underglaze is leather-hard.
Step 2: Painting the Design
-
Paint the base band:
Load your flat shader brush with black underglaze. Carefully paint the solid band around the very bottom of the mug, following your pencil guide. I find rotating the mug on a banding wheel helps keep this line steady. -
Paint the top band:
Paint a solid black band just below the rim, leaving a small gap of exposed clay at the very lip. -
Create the large checks:
Using the grid you drew earlier, paint alternating squares in the central section. Paint the outline of each square first with the liner brush, then fill it in. -
Add a second coat:
Once the black squares are dry to the touch, apply a second coat of underglaze to ensure the black is opaque and solid.
Level Up: Sgraffito
Paint the entire center band black first. Once dry, use a carving tool to scratch away the clay squares, revealing the beige body underneath for textured checks.
Step 3: Detailing & handle
-
Mark the mini-check band:
Between the top solid band and the large checks, lightly pencil in a narrower band for the small checkerboard pattern. -
Grid the small checks:
Draw a grid for two rows of small squares. These should be significantly smaller than the main body checks, perhaps 1/4 inch. -
Paint the mini-checks:
Switch to your finest distinct liner brush. Carefully dab in the alternating small squares. Patience is key here to keep the corners sharp. -
Outline the sections:
Paint thin horizontal lines separating the different sections (top solid band, mini-checks, large checks, bottom band) to give the design structure. -
Paint the handle:
Paint the exterior curve of the handle black, leaving the interior curve as exposed raw clay for contrast. Connect this black strip to the body design seamlessly. -
Check for smudges:
Inspect the raw clay areas. If any black paint smudged, gently scratch it off with a craft knife or clean it up with a damp brush.
Step 4: Finishing
-
Interior glazing:
Pour clear matte glaze into the inside of the mug, swirl it to coat the entire interior surface, and pour out the excess. -
Exterior glazing:
Dip the exterior of the mug into the clear matte glaze, or brush it on if you prefer. This will seal the raw clay sections while maintaining that earthy, non-glossy look. -
Final wipe:
Wipe the very bottom foot of the mug clean with a sponge so it doesn’t stick to the kiln shelf. -
Fire:
Fire the mug in a kiln according to the clay and glaze manufacturer’s temperature instructions.
Enjoy your morning coffee in this stunning, graphic vessel you brought to life

TRACK YOUR CERAMIC JOURNEY
Capture glaze tests, firing details, and creative progress—all in one simple printable. Make your projects easier to repeat and improve.
Tape-Resist Geometric Lines
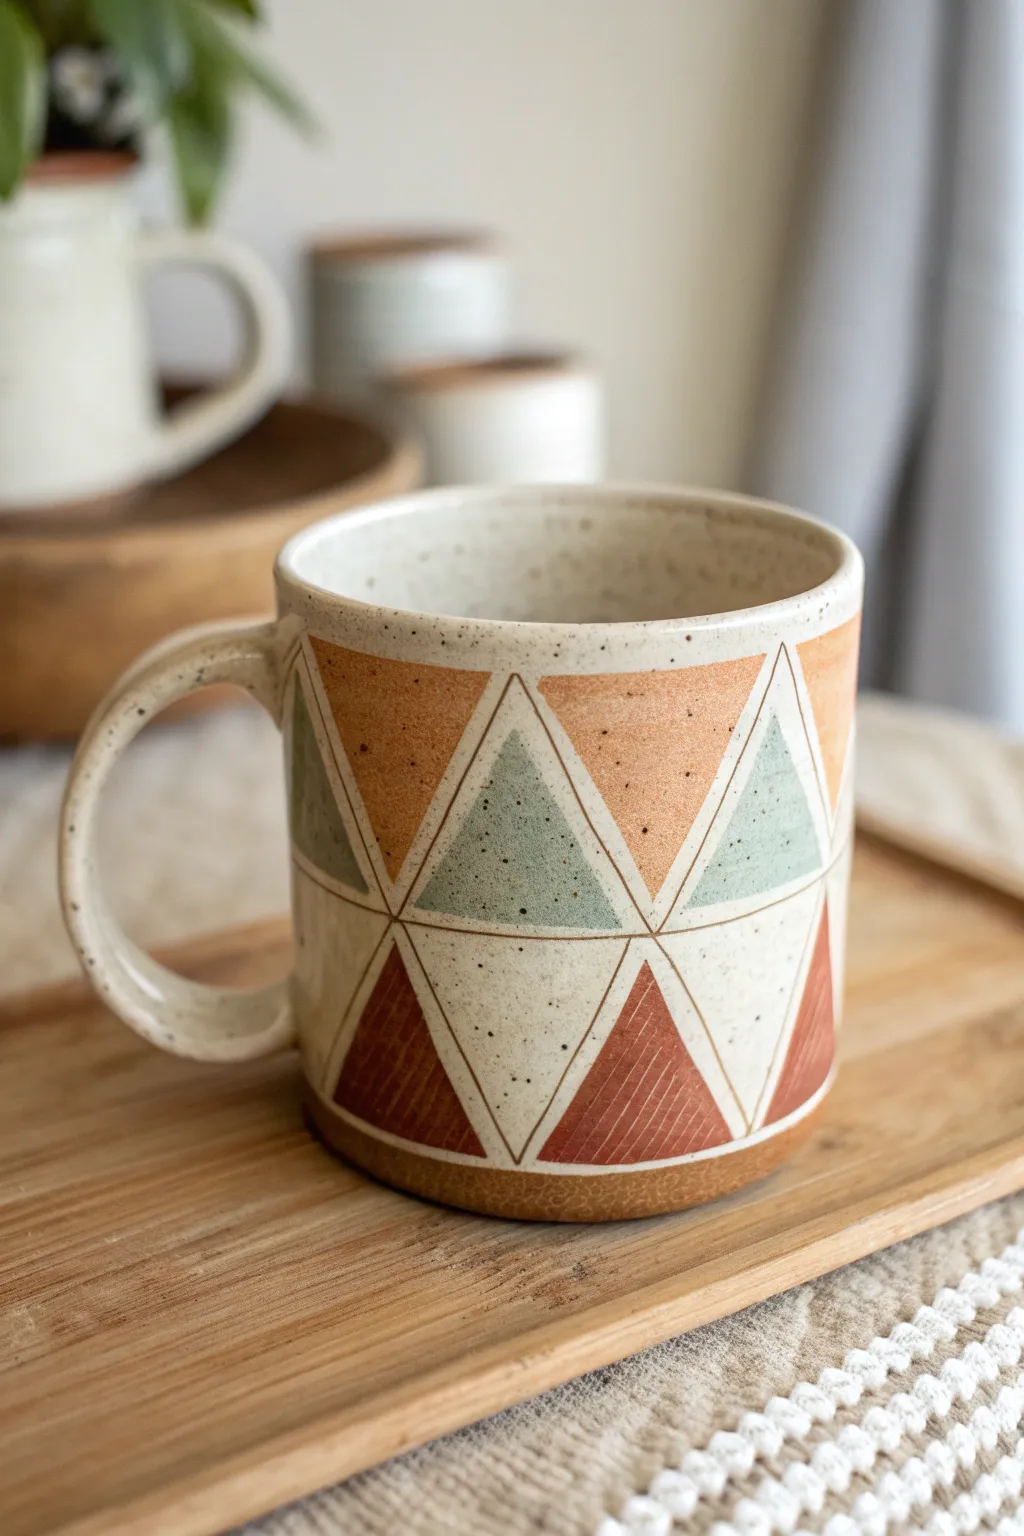
Bring a touch of modern bohemian style to your morning coffee with this tape-resist geometric mug. The crisp lines of raw clay contrasting against earthy glazes create a sophisticated yet handmade feel that looks professionally thrown.
Step-by-Step Guide
Materials
- Bisque-fired ceramic mug (speckled clay body recommended)
- Thin art tape or automotive masking tape (1/8 inch or 3mm width)
- Underglazes or cone 5/6 glazes (Terracotta/Rust, Sage Green, Peach/Muted Orange)
- Speckled cream or white semi-opaque glaze
- Small flat synthetic brushes
- X-acto knife or precision craft blade
- Sponge
- Clear transparent glaze (optional, if using underglazes)
Step 1: Planning and Taping
-
Clean surface:
Begin by wiping your bisque-fired mug with a slightly damp sponge to remove any dust or oils that might prevent the glaze from adhering properly. -
Create the baseline:
Apply a strip of thin tape horizontally around the very bottom edge of the mug, leaving a small band of raw clay exposed near the foot for a grounded look. -
Establish the grid:
Apply a second horizontal tape line around the middle circumference of the mug. Try to keep this as level as possible to ensure your triangles are uniform. -
Form the zig-zags:
Cut several short strips of tape. Create a zig-zag pattern between your bottom tape line and the middle line to form a row of triangles. Press the tape edges down firmly with your fingernail. -
Complete the upper row:
Repeat the process for the top section, creating inverted triangles that nest above the bottom row. The points of the top triangles should align with the valleys of the bottom row. -
Seal the edges:
Go over every piece of tape one last time, burnishing the edges extremely well. This is crucial to prevent the glaze from bleeding underneath and ruining your crisp lines.
Crisp Line Secret
Before painting your colors, paint a thin layer of liquid wax resist or clear glaze over the tape edges. This seals the tape so any bleeding is clear, keeping the colored lines perfect.
Step 2: Glazing the Pattern
-
Select your palette:
Pour small amounts of your rust, sage, and peach glazes onto a palette. Planning your color placement beforehand helps ensure a balanced distribution of tones. -
Apply the first color:
Start with the rust color (bottom row triangles). Paint inside the designated taped triangles carefully. It’s better to do two thin, even coats rather than one thick, gloopy one. -
Paint the second tone:
Move on to the peach color for the alternating upper triangles. Use a fresh brush or clean yours thoroughly to avoid muddying the colors. -
Add the cool tone:
Fill the remaining triangle spaces with sage green. The contrast between this cool tone and the warm peach creates that lovely retro-modern balance. -
Leave some blank:
Notice that some triangles in the design are left as raw speckled clay or painted with the white speckled glaze. Choose a few triangles to fill with your cream glaze for visual breathing room. -
Glaze the interior:
While the exterior shapes dry, pour your speckled cream glaze inside the mug, roll it around to coat the entire interior, and pour out the excess. -
Clean the rim:
Wipe the rim carefully with a sponge to ensure a smooth drinking surface, or apply the cream glaze over the lip if you prefer a finished edge.
Textured Variation
Carve fine vertical lines into the raw clay of the rust-colored triangles before glazing (sgraffito style) to add a tactile, textile-like texture to the finished piece.
Step 3: Finishing Touches
-
Peel the tape:
Wait until the glaze is dry to the touch but not powdery. Gently peel off the tape strips using a precision knife to lift the corners. I find pulling the tape away at a sharp angle gives the cleanest line. -
Clean up lines:
If any glaze bled under the tape, carefully scrape it away with your X-acto knife or a rubber styling tool to reveal the raw clay line underneath. -
Clear coat (if needed):
If you used underglazes for the colors, dip the entire mug into a clear transparent glaze now. If you used colored glazes, skip this step. -
Wipe the foot:
Ensure the very bottom of the mug (the foot ring) is completely free of glaze so it doesn’t fuse to the kiln shelf. -
Fire:
Load the mug into the kiln and fire it to the recommended temperature for your clay and glaze combination (typically Cone 5 or 6 for stoneware).
Once fired, you will have a stunning, geometric mug ready to hold your favorite warm beverage
Alcohol-Blended Tie-Dye Swirls
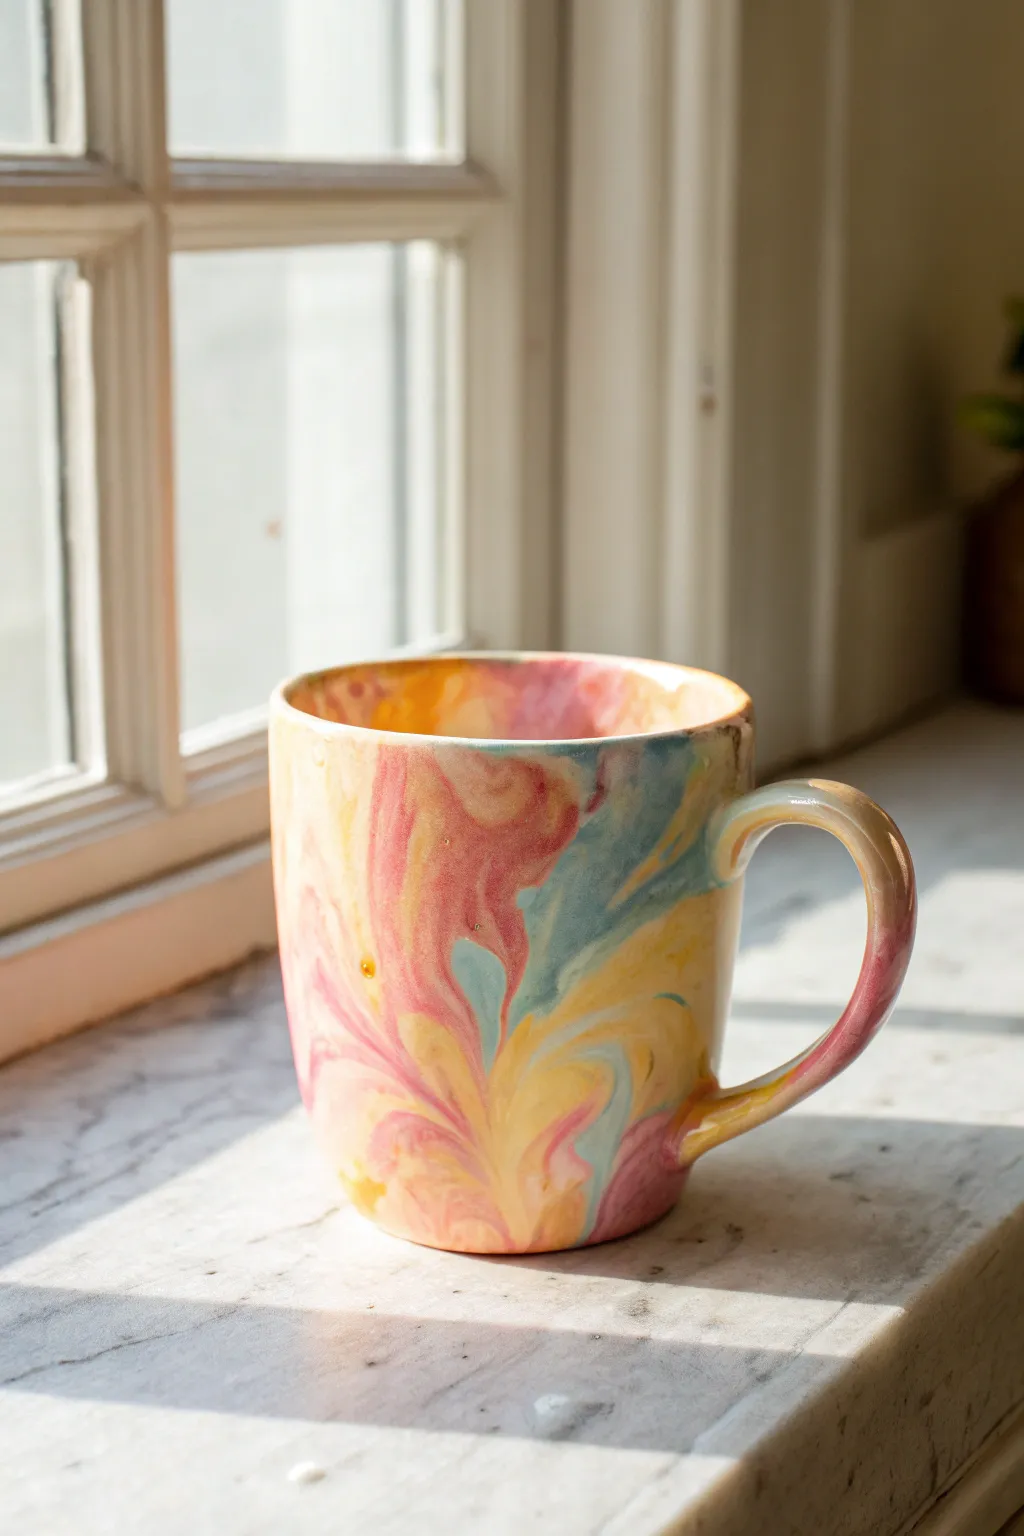
Transform a plain ceramic mug into a piece of functional art with this mesmerizing swirl technique. The result is a dreamy, ethereal blend of pinks, buttery yellows, and soft blues that mimics the look of expensive marbled stoneware.
Detailed Instructions
Materials
- Plain white ceramic mug
- Rubbing alcohol (isopropyl)
- Alcohol inks (Pink, Yellow, Light Blue)
- Small plastic cup or palette
- Small, soft paintbrush
- Clear sealant (dishwasher-safe, such as Mod Podge Dishwasher Safe)
- Protective gloves
- Paper towels
- Masking tape (painter’s tape)
Step 1: Preparation
-
Clean surface:
Before you begin, wipe your mug down thoroughly with rubbing alcohol. This removes any oils from your fingers that might repel the ink, ensuring a clean canvas for your colors. -
Protect the rim:
Since you will be drinking from this mug, use masking tape to cover the top half-inch of the rim. This keeps the area your lips touch free of ink and sealant. -
Prep your workspace:
Lay down some paper towels or a protective sheet. Alcohol inks stain instantly and permanently, so I always double up on surface protection just in case.
Clean Color Tip
To prevent muddy colors, wait for one color layer to dry slightly before adding a contrasting one right on top.
Step 2: Creating the Swirls
-
Apply base alcohol:
Dab a small amount of plain rubbing alcohol onto a section of the mug using your brush or a paper towel. The surface needs to be slightly wet for the inks to flow. -
Drop the pink:
Place a single drop of pink alcohol ink onto the wet section. Watch it bloom outward. Create a few pink focal points around the mug, leaving plenty of white space between them. -
Add yellow accents:
While the pink is still slightly fluid, drop yellow ink near the edges of the pink blooms. Let them touch naturally; the alcohol base will encourage them to bleed into a lovely orange hue where they meet. -
Introduce blue:
Add small drops of light blue ink into the remaining white gaps. Be careful not to let the blue mix too aggressively with the yellow, or you might end up with a muddy green instead of a clean swirl. -
Tilt and turn:
Gently tilt the mug in different directions. Use gravity to guide the wet ink into elongated drips and curves rather than static circles. -
Manipulate with air:
For softer edges, gently blow on the wet ink with a straw or just your breath. This pushes the pigment into those feathery, ethereal shapes seen in the reference photo. -
Create the marble veins:
Dip your small paintbrush into plain rubbing alcohol and lightly drag it through the drying ink. This lifts some color and creates the lighter, vein-like streaks that mimic real marble. -
Handle carefully:
Don’t forget the handle. Apply a drop of yellow and pink at the top curve and let gravity pull the color down the handle so it matches the body of the mug.
Metallic Touch
Add a drop of metallic gold alcohol mixative into the swirls for a luxurious, shimmering vein effect.
Step 3: Sealing the Artwork
-
Dry thoroughly:
Let the mug sit untouched for at least 24 hours. Alcohol inks dry quickly to the touch, but they need time to fully set before sealing. -
First seal coat:
Using a soft brush, apply a thin, even layer of dishwasher-safe sealant over the inked areas. Brush lightly to avoid reactivating and smearing the ink. -
Cure time:
Allow the first coat to dry according to the manufacturer’s instructions, usually about 1-2 hours. -
Second seal coat:
Apply a second layer of sealant for durability. Ensure you cover the handle and the bottom edge where the ink stops. -
Remove tape:
While the final coat is still slightly tacky, carefully peel off the masking tape from the rim to ensure a clean, sharp line. -
Final cure:
Let the mug cure fully before using. Most dishwasher-safe sealants require roughly 28 days to reach full hardness, though you can hand wash gently sooner.
Enjoy your morning coffee in this unique, handmade masterpiece that captures the light beautifully
Starry Sky Constellations
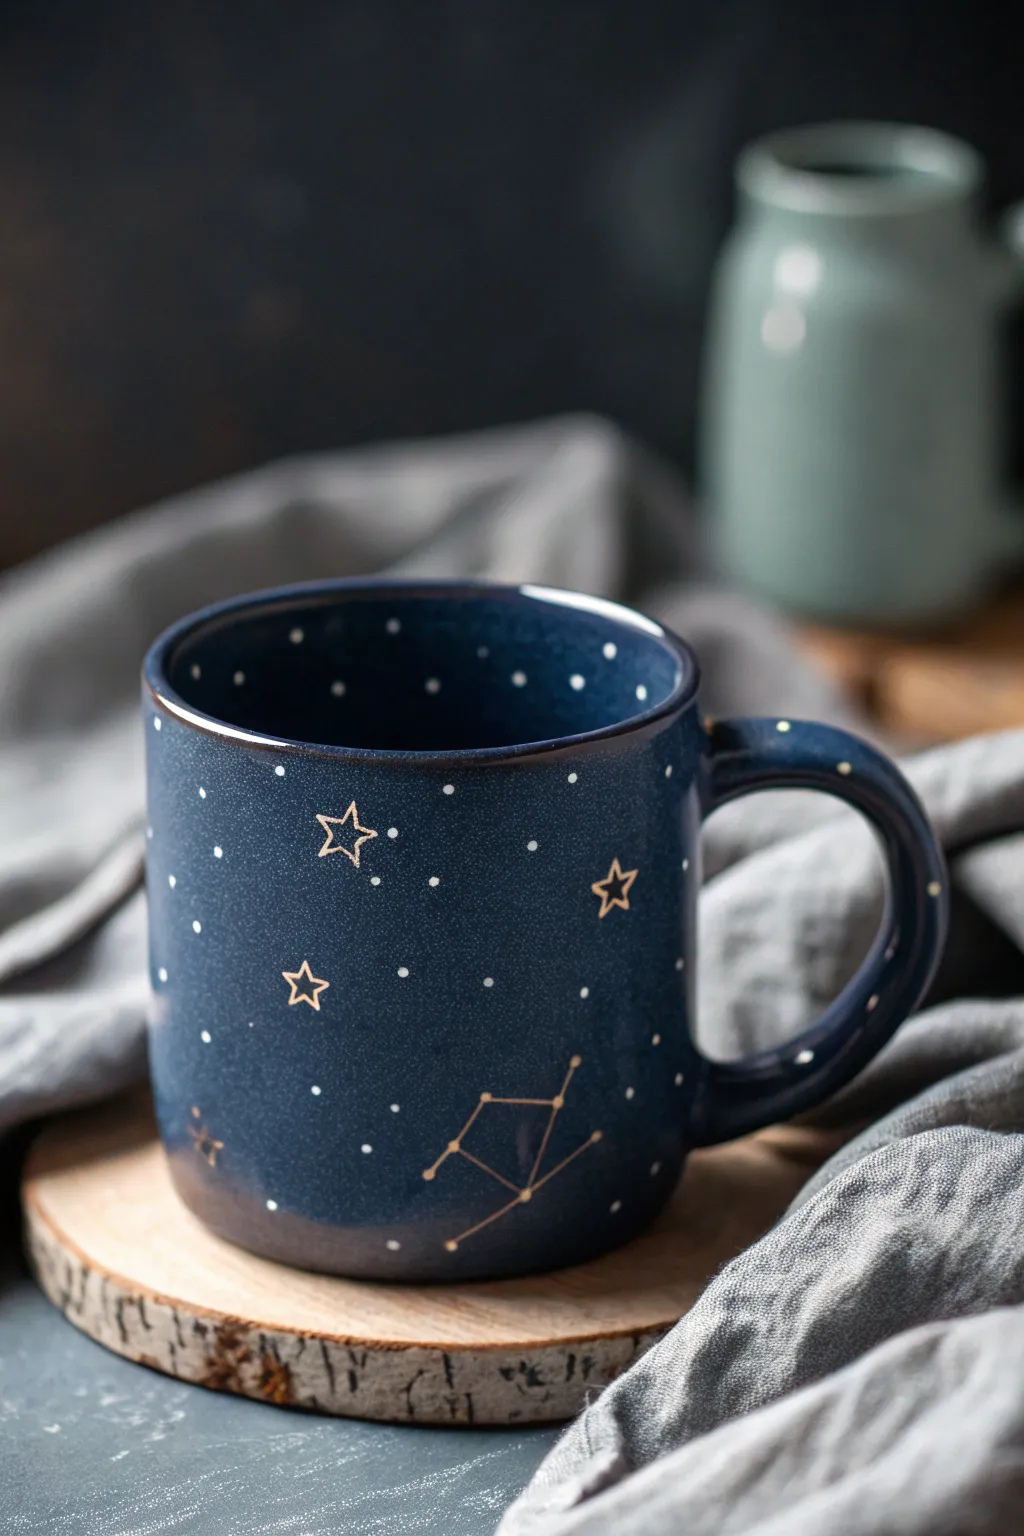
Transform a plain ceramic mug into a piece of the night sky with this elegant celestial design. The deep navy background highlights delicate gold constellations and stars, making your morning coffee feel magical.
Step-by-Step Guide
Materials
- Plain dark blue ceramic mug (matte or satin finish preferred)
- Gold oil-based paint marker (fine point)
- Gold oil-based paint marker (extra-fine point)
- Rubbing alcohol
- Cotton pads
- Pencil (white charcoal pencil works best on dark surfaces)
- Paper towels
- Oven (for curing)
- Ruler or straight edge (optional)
Step 1: Preparation
-
Clean the Surface:
Before starting any painting, it is crucial to remove oils and fingerprints from the mug. Wipe the entire outer surface thoroughly with a cotton pad soaked in rubbing alcohol. -
Plan Your Stars:
Look up simple constellation diagrams online or sketch your own ideas on paper first. It helps to have a visual guide for spacing before you commit to the ceramic surface. -
Draft the Design:
Using a white charcoal pencil, very lightly mark the main points where your major stars will go. Keep these marks faint so they are easy to cover or wipe away later.
Steady Hands
Rest your painting wrist on a folded towel or a stack of books equal to the height of the mug. This provides stability for drawing straight constellation lines.
Step 2: Painting the Constellations
-
Draw Star Points:
Shake your fine-point gold paint marker well to mix the pigment. Press down on a scrap paper to get the flow started, then gently dab dots over your charcoal guide marks to create the ‘stars’ of the constellation. -
Connect the Lines:
Switch to the extra-fine point marker for the delicate connecting lines. Draw straight, thin lines between your star points to form the constellation shape shown in your reference. -
Refine the Lines:
If a line looks too faint, wait a moment for it to dry slightly, then go over it again with a very light touch. I find a second pass often makes the gold pop more against the dark blue. -
Add Decorative Stars:
Scatter a few open, five-pointed stars around the open spaces of the mug using the fine-point marker. Draw them as simple outlines rather than filling them in to match the airy style of the original image. -
Incorporate Tiny Stars:
To create variety, add smaller, solid five-pointed stars or cross-hatches in empty areas. Keep these smaller than your main constellation stars.
Step 3: Adding the Galaxy Detail
-
Create the Starfield:
Using the tip of the extra-fine marker, gently tap dozens of tiny dots across the mug surface. Vary the spacing so some areas look dense like a galaxy and others look sparse. -
Check the Rim:
Pay attention to the top and bottom edges. Adding a few dots near the rim, and even a couple just inside the lip, gives the design a finished, professional look. -
Decorate the Handle:
Don’t forget the handle. Add a sparse trail of dots running down the curve of the handle specifically to tie the whole piece together. -
Clean Up Edges:
Check your work for any charcoal pencil marks that are still visible. Use a slightly damp cotton swab to carefully wipe them away without disturbing the gold paint.
Zodiac Customization
Personalize this gift by painting the specific zodiac constellation of the recipient on the front, with their birth date in tiny numerals near the handle.
Step 4: Curing and Finishing
-
Air Dry First:
Let the mug sit undisturbed for at least 24 hours. This allows the solvents in the paint to evaporate fully before baking. -
Prepare the Oven:
Place the mug into a cold oven. Do not preheat the oven, as the sudden temperature change can crack the ceramic. -
Bake the Design:
Set the oven temperature to 350°F (175°C). Once the oven reaches temperature, timer for 30 minutes. -
Cool Down:
Turn off the oven after 30 minutes but leave the mug inside. Open the door slightly and let the mug cool down completely with the oven to ensure durability.
Now you have a stunning custom mug perfect for sipping tea while stargazing
Tiny Landscape Panorama
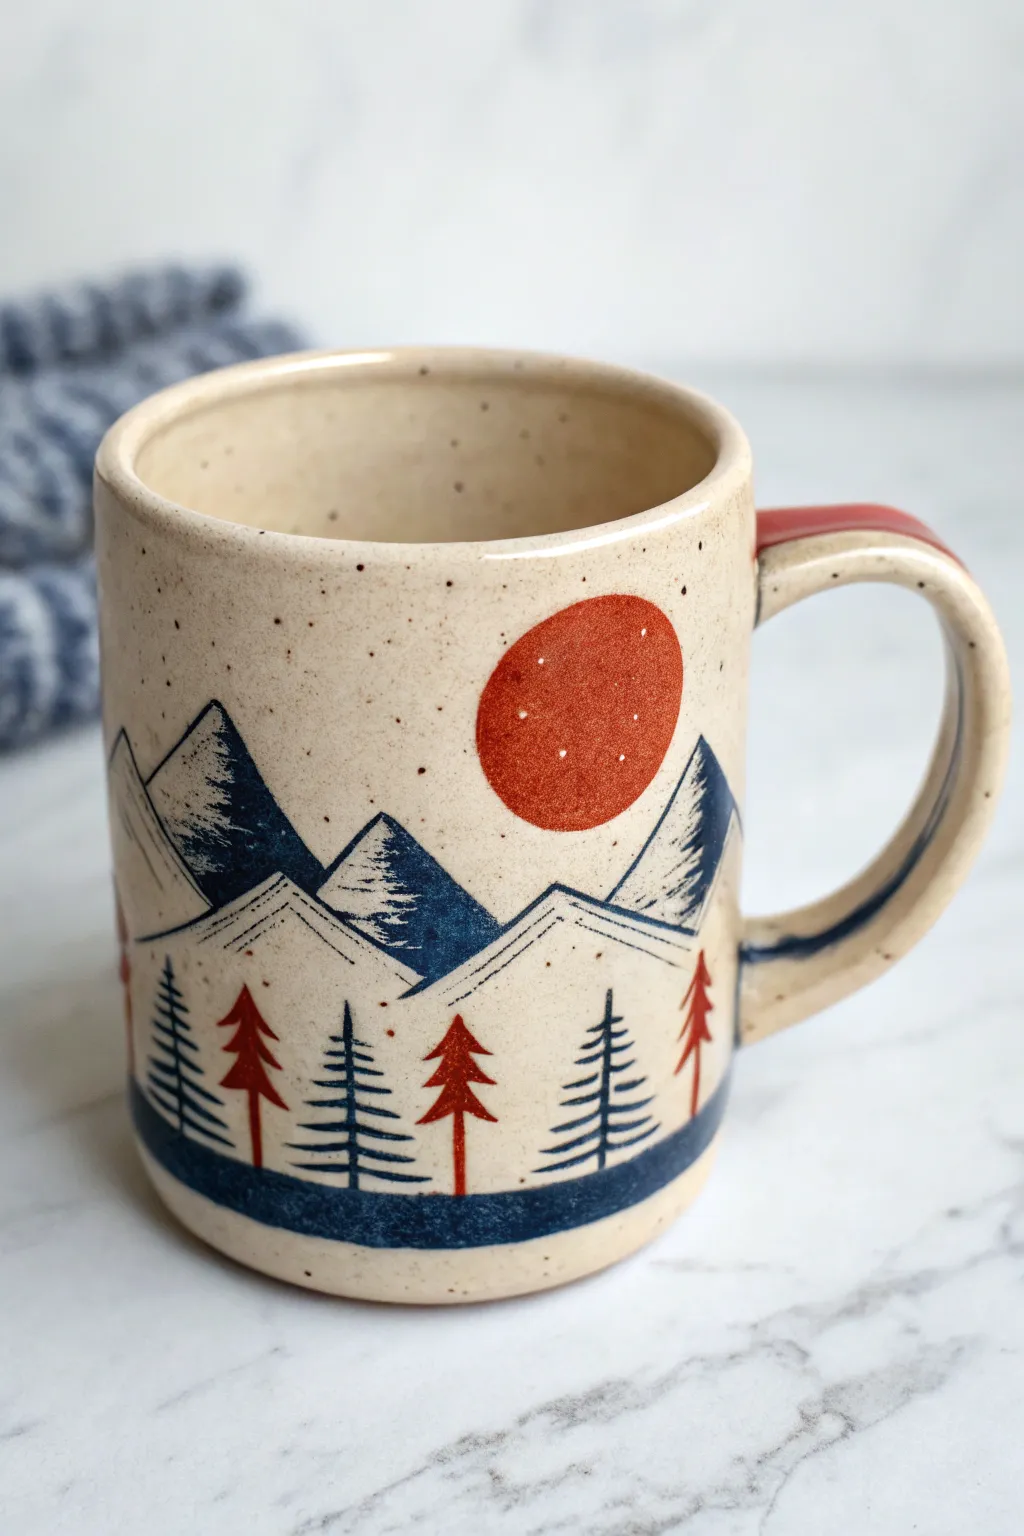
Bring the serenity of the great outdoors to your morning coffee with this hand-painted ceramic mug design. Featuring stylized indigo mountains, a bold terra cotta sun, and a charming forest line, this panorama wraps your cup in a cozy, rustic aesthetic.
How-To Guide
Materials
- Bisque-fired ceramic mug (preferably speckled clay body)
- Underglazes: Indigo/Navy Blue, Terra Cotta/Rust Red, Cream/White (optional)
- Small flat brush (size 4 or 6)
- Fine liner brush (size 0 or 00)
- Pencil for sketching
- Clear dipping glaze
- Old toothbrush (for speckling)
- Wax resist (optional)
Step 1: Planning and Sketching
-
Clean surface:
Begin by wiping down your bisque mug with a damp sponge to remove any dust or oils that might repel the glaze. -
Sketch the horizon:
Using a regular pencil, lightly sketch a horizon line about a quarter of the way up from the bottom rim. This doesn’t need to be perfectly straight; a slight organic wave adds character. -
Outline mountains:
Sketch three to four large triangles for your primary mountain range. Make them overlap slightly and vary their heights for a natural look. -
Mark the sun:
Draw a circle floating mid-sky on the right side of the handle area. You can trace a coin or bottle cap if you want a perfect circle, but a freehand shape fits the rustic style well.
Clean Lines Hack
Smudged a tree? Wait for the underglaze to dry completely, then gently scratch the mistake off with a toothpick or a dull X-Acto blade.
Step 2: Painting the Landscape
-
Fill the sun:
Using your flat brush, fill in the sun circle with your Terra Cotta underglaze. Apply 2-3 coats, letting each dry briefly in between, to ensure opacity. -
Paint the blue peaks:
Switch to the Indigo underglaze. Paint the triangular mountain shapes solid blue. I like to leave the very tips slightly jagged or uneven to suggest rocky summits. -
Create snow caps:
Once the blue is dry, use a clean brush or a scratching tool (sgraffito tool) to create the white peaks. You can either paint white underglaze over the blue tips or scratch lines through the blue to reveal the clay body underneath. -
Define the foothills:
Below the main peaks, sketch faint outlines of smaller foothills. Leave these unpainted or paint them with a very watered-down wash of the cream underglaze to create atmospheric depth. -
Base stripe:
Paint a solid, thick band of Indigo blue along the very bottom edge of your initial landscape area to ground the scene.
Step 3: Adding the Details
-
Sketch tree placements:
With your pencil, make small tick marks along the foreground where you want your trees to stand. Alternate the spacing slightly so it doesn’t look too uniform. -
Paint blue pines:
Using the fine liner brush and Indigo underglaze, paint vertical lines for the tree trunks. Then, add short, downward-sweeping strokes starting from the top of the trunk to create the branches. -
Add accent trees:
Clean your liner brush thoroughly. Dip into the Terra Cotta underglaze and paint a few accent trees interspersed among the blue ones. This pop of red ties the forest to the sun color. -
Add texture to mountains:
Go back to your mountains with the fine liner brush. Add very thin, scratchy horizontal lines in white or cream on the blue slopes to simulate wind-swept snow or rock texture. -
Handle detail:
Paint a simple stripe of Terra Cotta or Indigo along the top curve of the mug handle to connect it visually to the illustration.
Level Up: Hidden details
Paint a tiny matching tree or a miniature sun on the inside bottom of the mug as a surprise for when you finish your coffee.
Step 4: Finishing Touches
-
Speckling (Optional):
If your clay body isn’t naturally speckled, create the look now. Dilute a tiny bit of brown or black underglaze with water. Dip an old toothbrush in it and flick the bristles with your thumb to spray tiny dots over the whole exterior. -
Inspect and clean:
Check the rim and the foot of the mug. Use a damp sponge to wipe away any stray smudges of underglaze that aren’t part of the design. -
Clear glaze application:
Once the underglaze is bone dry, dip the entire mug into a clear transparent glaze. Ensure an even coat. -
Final fire:
Fire the mug in the kiln according to your clay and glaze instructions (typically Cone 5 or 6 for stoneware) to melt the glaze and seal the design.
Unload your kiln to reveal a personalized piece that captures the calm of a mountain morning
Animal Faces Using the Handle
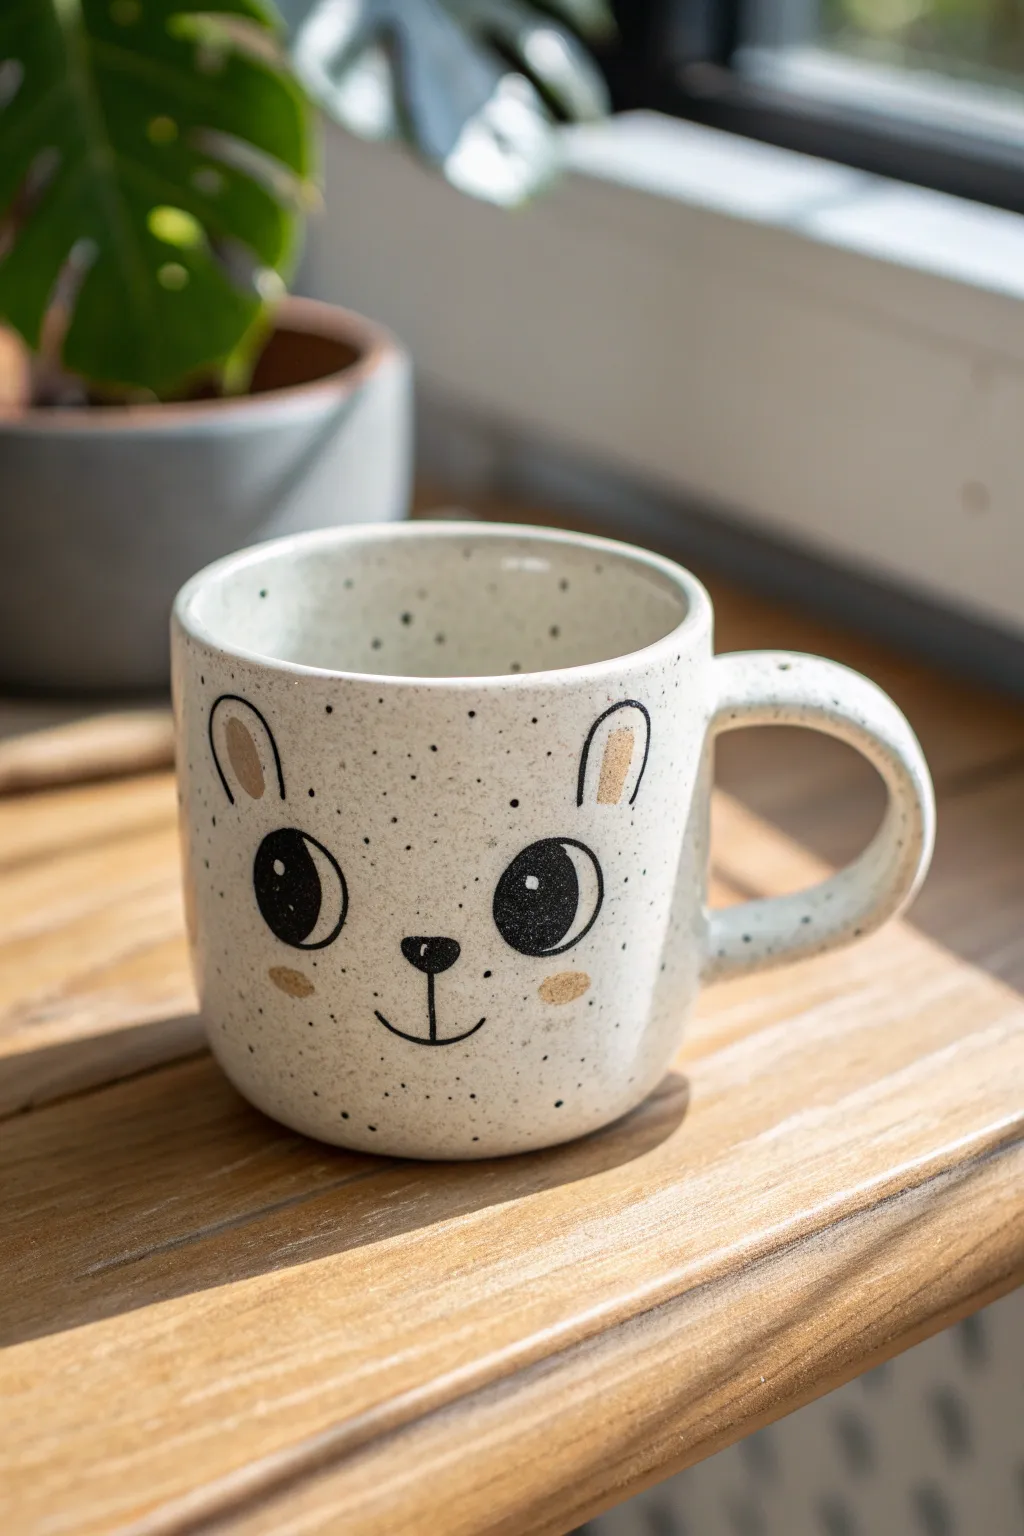
Transform a simple wheel-thrown or hand-built mug into a charming character with this glazing tutorial. The speckled clay body provides a rustic, textured canvas for a sweet bear face featuring bold eyes and golden accents.
Detailed Instructions
Materials
- Bisque-fired ceramic mug (preferably speckle clay)
- Glossy white glaze (transparent or semi-opaque)
- Underglaze pencil or fine brush for sketching
- Black underglaze
- Gold or caramel luster/overglaze
- Small round brushes (size 0 and 2)
- Clear dipping glaze (if using underglazes on bare clay)
- Kiln access
Step 1: Preparation & Base Coat
-
Clean surface:
Begin by wiping down your bisque-fired mug with a slightly damp sponge to remove any kiln dust or oils from handling. -
Dip glazing:
If your mug is made of speckled clay, dip the entire piece into a transparent or semi-opaque white glaze. This will allow the natural speckles of the clay to show through, creating that lovely textured background. -
Clean the foot:
Immediately wipe away any glaze from the bottom foot ring of the mug with a sponge to prevent it from sticking to the kiln shelf. -
Dry thoroughly:
Allow the base glaze to dry completely until it is powdery to the touch. This usually takes about 20-30 minutes.
Glaze Consistency
For the crispest lines, ensure your black underglaze has the consistency of heavy cream. Too watery and it will run; too thick and it may flake off.
Step 2: Designing the Face
-
Locate the face:
Position the mug so the handle is to the right. The face will be centered on the front-facing curve. -
Sketch placement:
Use a graphite pencil to lightly sketch where the eyes, ears, and nose will go. The graphite will burn off in the kiln, so don’t worry about marks. -
Draw eye outlines:
Draw two large ovals for the eyes. They should be spaced widely apart to give a cute, innocent expression. -
Add ear shapes:
Sketch two inverted U-shapes near the rim of the mug for the ears. They don’t need to touch the rim but should sit high on the ‘forehead’.
Step 3: Painting Details
-
Fill the eyes:
Using a size 2 brush and black underglaze (or majolica color), carefully fill in the large oval eyes. You want an opaque, solid black. -
Add eye highlights:
While the black is wet, leave tiny circles unpainted for the ‘catchlights’ in the pupils, or wait for the black to dry and dot white glaze on top. -
Outline the ears:
Switch to a finer size 0 brush. Trace the inverted U-shapes for the ears with a thin, steady black line. -
Nose and mouth:
Paint a small, inverted triangle for the nose. Draw a straight vertical line down from the nose, branching into a gentle smile curve at the bottom. -
Inner ear color:
Using a gold or caramel-colored underglaze, fill the inside of the ear outlines. Leave a small gap between the color and the black outline. -
Rosy cheeks:
Paint two small ovals in the same gold/caramel color just below and outside the eyes to create blushing cheeks.
Handle Accents
Make the mug even more unique by painting small paw prints or a little ‘tail’ design at the base of the handle to continue the animal theme.
Step 4: Final Firing
-
Inspect work:
Check for any smudges or stray glaze drops. Gently scrape them away with an X-Acto knife if necessary. -
Fire the kiln:
Load the mug into the kiln and fire to the temperature recommended for your specific glaze and clay body (typically Cone 5 or 6 for stoneware). -
Cool down:
Let the kiln cool completely before opening. I find rushing this part can necessitate thermal shock cracks, so patience is key. -
Sand the bottom:
Once cool, use a sanding stone or sandpaper to smooth any rough spots on the unglazed foot ring.
Enjoy sipping from your adorable new creation or gift it to a friend who loves handmade charm
Raised Dots and Slip-Trailed Lines
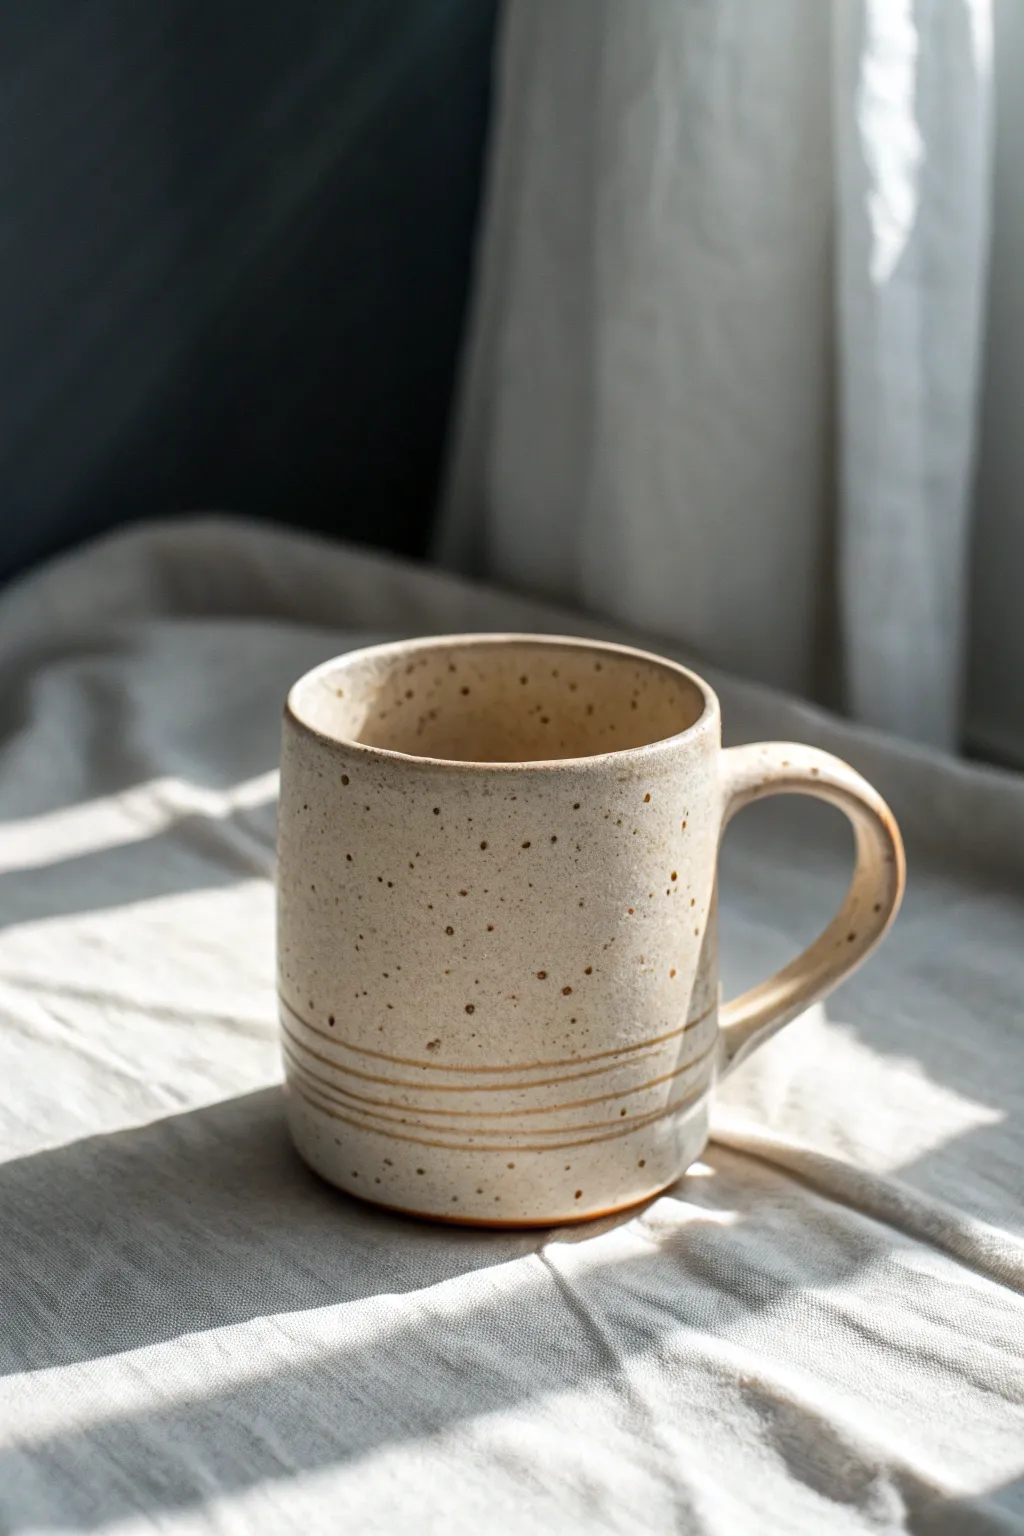
Embrace the beauty of minimalism with this handcrafted ceramic mug featuring a gentle speckled glaze and subtle, raised stripes. The tactile lines add dimension to the smooth surface, creating a cozy vessel perfect for your morning brew.
Step-by-Step Guide
Materials
- Stoneware clay body
- Pottery wheel
- Throwing tools (sponge, rib, wire cutter)
- Needle tool
- Trimming tools
- Underglaze pencil or brush (earthy brown)
- Speckled cream stoneware glaze
- Clear glaze (optional, depending on cream glaze finish)
- Kiln
- Wax resist
Step 1: Throwing and Shaping
-
Center the clay:
Start by wedging your stoneware clay thoroughly to remove air bubbles, then slam it onto your wheel head. Using moistened hands and steady pressure, center the clay into a smooth mound. -
Open the form:
Press your thumbs into the center of the mound to open it, leaving about a half-inch of thickness for the base. Pull the floor out to your desired width. -
Pull the walls:
Bring the clay up into a cylinder shape. Keep your pulls steady and even to ensure uniform wall thickness. Aim for a straight-sided profile with a very slight taper inward near the rim to match the reference photo. -
Refine the shape:
Use a kidney rib tool on the exterior while supporting the interior with your other hand. Smooth the walls to remove throwing rings and create that sleek, modern canvas we need for the decoration. -
Detach and dry:
Wire the mug off the wheel head and set it aside on a ware board. Allow it to dry to a ‘leather-hard’ state, where it’s firm enough to handle without deforming but still holds moisture.
Fixing Wobbly Lines
If your carved lines aren’t straight, hold your tool hand against a steady object (like a brick) while spinning the banding wheel to stabilize your motion.
Step 2: Trimming and Handle
-
Trim the foot:
Once leather-hard, center the mug face-down on the wheel. Trim away excess clay from the bottom to create a neat foot ring, defining the base of the mug. -
Pull the handle:
Using a separate lump of clay and plenty of water, pull a strap of clay to form the handle. Look for a thickness that feels comfortable to hold, tapering slightly. -
Shape the ear:
Curve the pulled strap into a ‘C’ or ear shape. Let it stiffen slightly on a board until it holds its curve. -
Attach the handle:
Score the attachment points on both the mug body and handle ends. Apply slip, press the handle firmly into place, and smooth the seams with a modeling tool or damp sponge. Ensure the handle loop allows enough finger space.
Pro Tip: Spot Control
If your cream glaze doesn’t have enough ‘speckle,’ you can flick iron oxide wash onto the wet glaze with a stiff toothbrush before firing.
Step 3: Detailing and Glazing
-
Carve the lines:
Place the mug back on the wheel or a banding wheel. Hold a needle tool or a fine loop tool steady against the lower third of the mug while spinning it slowly. -
Create depth:
Carve three parallel grooves around the circumference. You can choose to leave them as incised lines or fill them later. For the specific look in the image, we want these lines to feel intentional and slightly textured. -
Bisque fire:
Once the mug is bone dry, load it into the kiln for the bisque firing (usually Cone 04 or 06). This prepares the clay for glazing. -
Accent the lines:
After the bisque fire, wipe down the piece. I like to dilute a small amount of earthy brown underglaze and paint it directly into the carved grooves, wiping away excess from the surface so the color remains only in the recesses. -
Apply wax resist:
Paint a thin layer of wax resist on the very bottom of the foot ring to prevent glaze form sticking to the kiln shelf. -
Glaze application:
Mix your speckled cream glaze thoroughly. Dip the entire mug into the bucket for a few seconds, then remove and shake gently to dri off excess. The glaze should coat the brown lines but, due to the texture, the stripes will subtly show through or break the glaze surface. -
Check the rim:
Inspect the rim for any sharp drips or thick spots and smooth them with a finger if necessary. -
Glaze fire:
Load the glazed mug into the kiln for the final glaze firing (temperature depends on your specific clay and glaze, typically Cone 5 or 6 for stoneware).
Once cooled, your new favorite mug is ready to add a touch of handmade warmth to your kitchen cabinet
Carved Sgraffito Pattern Bands
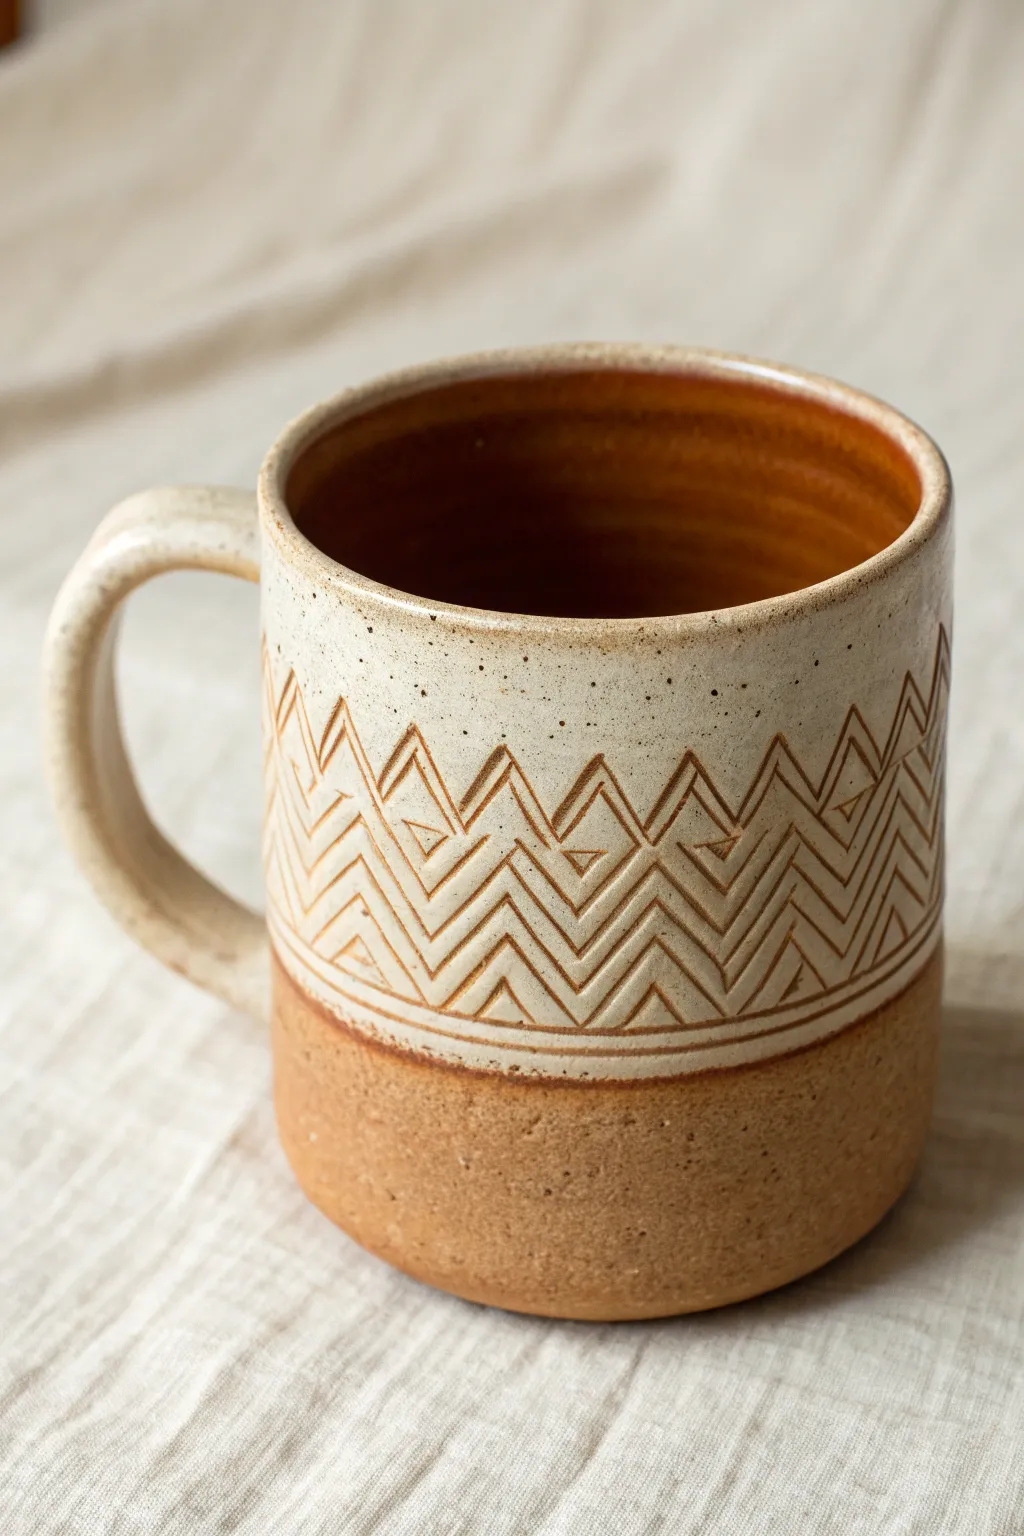
This rustic, earthy mug combines the raw warmth of unglazed stoneware with a creamy, speckled upper section featuring intricate geometric carvings. The deep ridges of the chevron pattern create a tactile experience that feels as good in your hands as it looks on your shelf.
How-To Guide
Materials
- Stoneware clay body (speckled buff or warm brown recommended)
- Pottery wheel (or slab rolling equipment)
- Wire cutter
- Ribs (wooden and metal)
- Small loop tool or sgraffito tool
- Needle tool
- Sponge
- Creamy matte white glaze
- Wax resist
- Kiln
Step 1: Throwing and Shaping
-
Center and open:
Begin with about 1 to 1.5 lbs of wedged clay on your wheel. Center it firmly and open the vessel, pulling up the walls to create a cylinder that is slightly wider at the base than the rim. -
Refine the shape:
Use a straight wooden rib on the exterior to compress the walls and create that distinct vertical profile with a very subtle taper toward the top. Ensure the rim is rounded and comfortable for drinking. -
Trim the foot:
Once the mug is leather-hard, trim the bottom to create a slight undercut or distinct break where the wall meets the table surface. This defines the unglazed section later. -
Pull and attach handle:
Pull a strap handle that is thick and sturdy. Attach it to the side of the mug, ensuring a generous C-curve that allows for a comfortable grip. Blend the attachment points smoothly.
Clean Lines Tip
Carve when the clay is on the stiffer side of leather-hard. If the clay is too wet, the tool will drag and create ragged edges; too dry, and it will chip.
Step 2: Carving the Pattern
-
Mark your bands:
While the pottery is leather-hard, place it on a banding wheel. Use a needle tool to lightly score two horizontal guidelines around the circumference: one marking the bottom of the pattern area (about 1/3 up from the base) and one near the rim. -
Establish the zigzag rhythm:
Lightly sketch the primary large zigzag line between your two guidelines. Try to space the peaks and valleys evenly so they meet up cleanly at the end. -
Carve the primary lines:
Using a small U-shaped loop tool or a specialized carving tool, cut deeply into your sketched lines. You want a distinct groove that will catch the glaze later. -
Add inner details:
Inside each large triangle created by your main zigzag, carve smaller, echoing triangles. Follow the angle of the main lines to keep the geometric pattern cohesive. -
Carve the vertical lines:
Fill the remaining negative spaces with vertical hatching or smaller geometric shapes as seen in the reference, varying the density to create visual interest. -
Clean up burrs:
Once the clay is bone dry, gently rub the surface with a green kitchen scouring pad or use a stiff brush to remove any sharp clay crumbs (burrs) created during carving.
Staining Effect
For higher contrast, apply a dark iron oxide wash to the carved area before glazing, then wipe it back. This makes the geometric lines pop intensely.
Step 3: Glazing and Firing
-
Bisque fire:
Fire the piece to cone 04 (or your clay body’s bisque temperature) to prepare it for glazing. -
Wax the base:
Apply wax resist to the bottom third of the mug, exactly up to the carved line that demarcates the patterned area. This ensures the raw clay aesthetic at the bottom. -
Dip or pour glaze:
Dip the mug into a creamy, matte white glaze. I find a 3-second dip is usually perfect for coverage without obscuring the texture. -
Reveal the pattern:
If the glaze is thick, it might hide your carving. While the glaze is powdery but dry, gently rub the carved areas with a clean, dry finger or a wiping tool to thin the glaze on the high points, accentuating the brown clay beneath. -
Clean the bottom:
Use a damp sponge to wipe away any glaze beads that formed on the waxed bottom section. -
Glaze fire:
Fire the mug to maturity (likely cone 5 or 6 for stoneware). The glaze should break over the carved edges, highlighting the geometric design.
Once cooled, your mug is ready to add a touch of artisanal warmth to your morning coffee routine
3D Clay Charms and Mini Sculptures
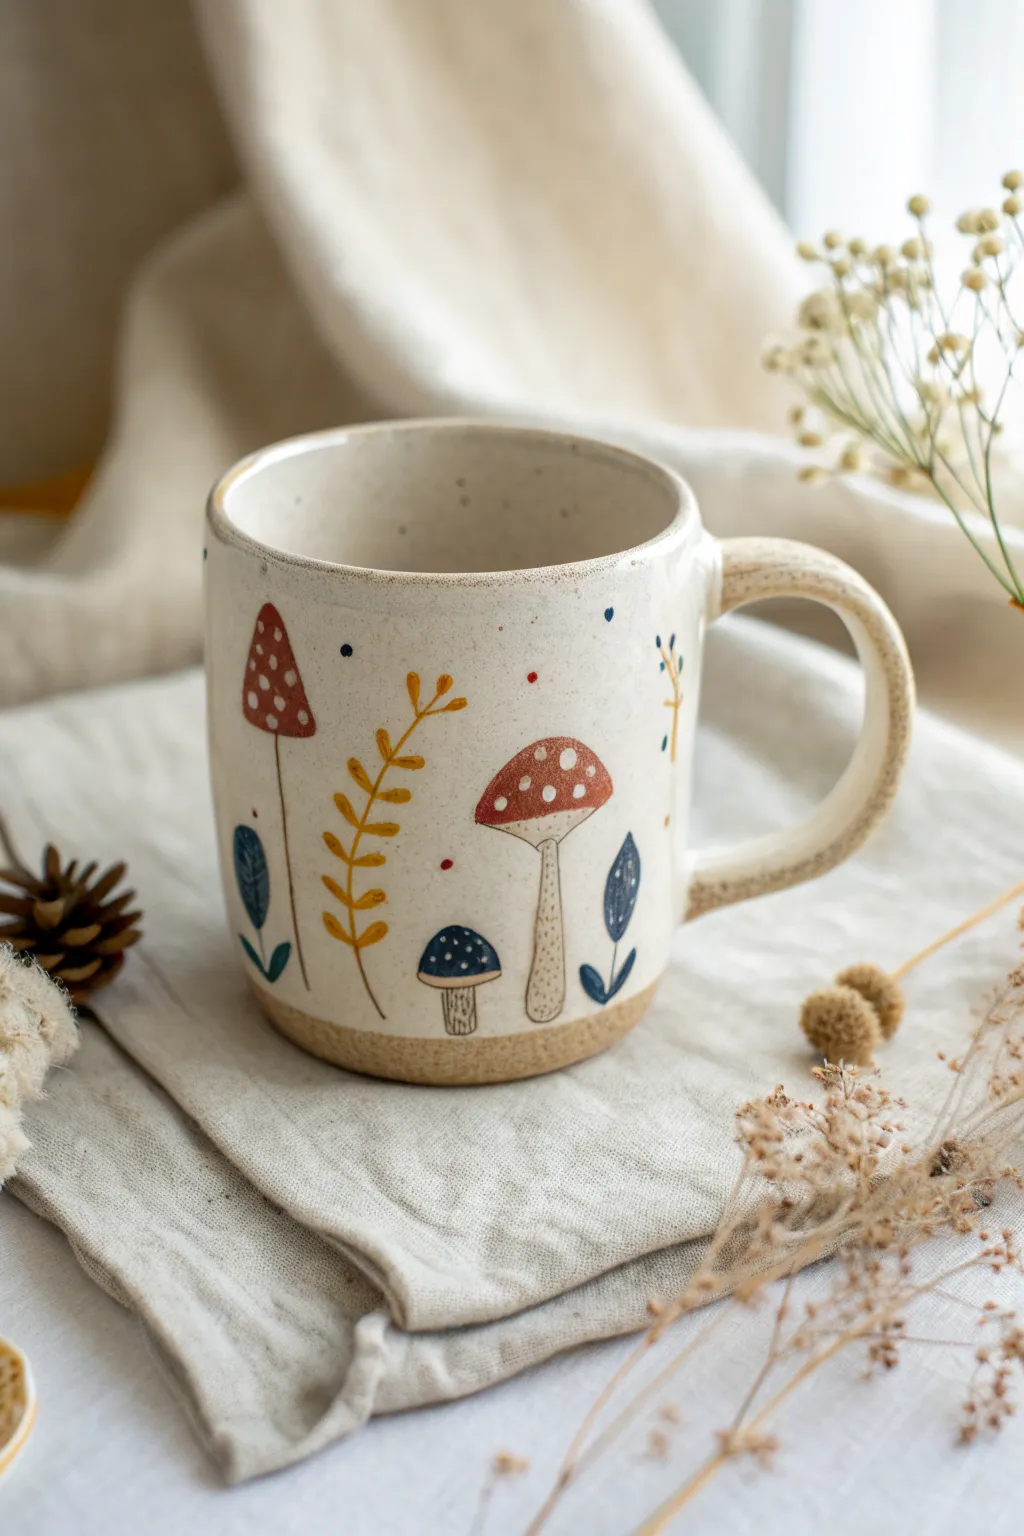
Bring the charm of a forest floor to your morning coffee with this cozy, hand-built mug featuring delicate mushroom illustrations. The speckled clay body and warm, earthy palette create a rustic vessel perfect for slow mornings.
Detailed Instructions
Materials
- Speckled stoneware clay (approx. 1.5 lbs)
- Basic pottery tool kit (needle tool, sponge, rib, wire cutter)
- Rolling pin and guide sticks (about 1/4 inch thick)
- Rectangle template (approx. 12×5 inches)
- Scoring tool or serrated rib
- Slip (liquid clay)
- Underglazes (Red-brown, mustard yellow, dark blue, deep green)
- Fine detail brushes (sizes 0/0 and 1)
- Clear transparent food-safe glaze
- Kiln access
Step 1: Building the Mug Body
-
Roll the slab:
Begin by wedging your speckled clay to remove air bubbles. Roll it out into a smooth, even slab using your rolling pin and guide sticks to ensure uniform thickness. -
Cut the form:
Place your rectangle template over the slab and cut out the main body of the mug using a needle tool. You will also need to cut a circle for the base that matches the circumference of your cylinder. -
Texture the clay:
Smooth both sides of the slab with a damp sponge or a soft rib to compress the particles, which helps prevent warping later. -
Form the cylinder:
Carefully lift the rectangular slab and curve it into a cylinder shape. Be gentle to avoid cracking the clay. -
Join the seam:
Score the edges where the cylinder will overlap. Apply slip generously, press the edges together firmly, and smooth the join inside and out until the seam is invisible. -
Attach the base:
Score and slip the bottom edge of the cylinder and the outer edge of your circular base. Press them together firmly and use a wooden tool to blend the clay from the base up into the wall.
Keep it clean
Wipe your bisque ware with a slightly damp sponge before painting. This removes dust that can cause pinholes in your final glaze.
Step 2: Rounding the Rim and Handle
-
Create a rounded bottom:
I like to leave the bottom half-inch unglazed later, so define this area now by smoothing and rounding the transition from the wall to the base, giving it that soft ‘hug mug’ feel. -
Pull the handle:
Pull a strap of clay for the handle, tapering it slightly. Curve it into a comfortable ear shape and let it stiffen slightly until it can hold its form. -
Attach handle:
Score and slip the attachment points on both the mug and the handle. Press firming to attach, ensuring the top of the handle aligns near the rim and the bottom sweeps inward comfortably.
Step 3: Painting the Forest Scene
-
Bisque fire preparation:
Let the mug dry slowly to the bone-dry stage. Once dry, bisque fire it in the kiln according to your clay’s specifications. -
Sketch the layout:
Using a regular pencil, lightly sketch your mushroom designs onto the bisque. The graphite will burn off in the kiln, so don’t worry about mistakes. -
Paint the red mushroom:
Using the red-brown underglaze and a small brush, paint the cap of the tall mushroom. Leave small negative space circles unpainted for the white dots, rather than painting white over red. -
Add foliage details:
Switch to mustard yellow for the fern-like fronds. Use a fine liner brush to create the central stem and pull outward for the leaves to get tapered ends. -
Paint accent mushrooms:
Add smaller mushrooms in dark blue and deep red. Vary heights and shapes—some tall and skinny, some short and stout—to create visual interest. -
Define the stems:
Dilute a tiny bit of dark underglaze or use a black underglaze pencil to outline the mushroom stems and draw the vertical gills underneath the caps. -
Final leaf accents:
Add small, solitary leaves or buds in deep blue and scattered dots in primary colors to fill empty spaces.
Make it 3D
Before the first firing, attach tiny balls of clay to the mushroom caps instead of painting dots to give extensive tactile texture.
Step 4: Glazing and Final Firing
-
Wax resist:
Apply wax resist to the bottom half-inch of the mug (the raw clay area) and the bottom of the foot to keep them glaze-free. -
Apply clear glaze:
Dip the entire mug into a clear, transparent glaze. Ensure the coat is even but not too thick, so it doesn’t cloud the detailed painting underneath. -
Final fire:
Load the mug into the kiln for the final glaze firing. Once cool, sand the unglazed bottom lightly if it feels rough.
Now you have a charming woodland mug ready to hold your favorite warm beverage