
Glazing mugs is where your simple form suddenly turns into a whole mood—shiny, buttery, earthy, dramatic, or playful. Here are my favorite mug glazing ideas I reach for when I want reliable results first, and then a few weird-but-gorgeous experiments once you’re feeling brave.
Classic Single-Color Dip
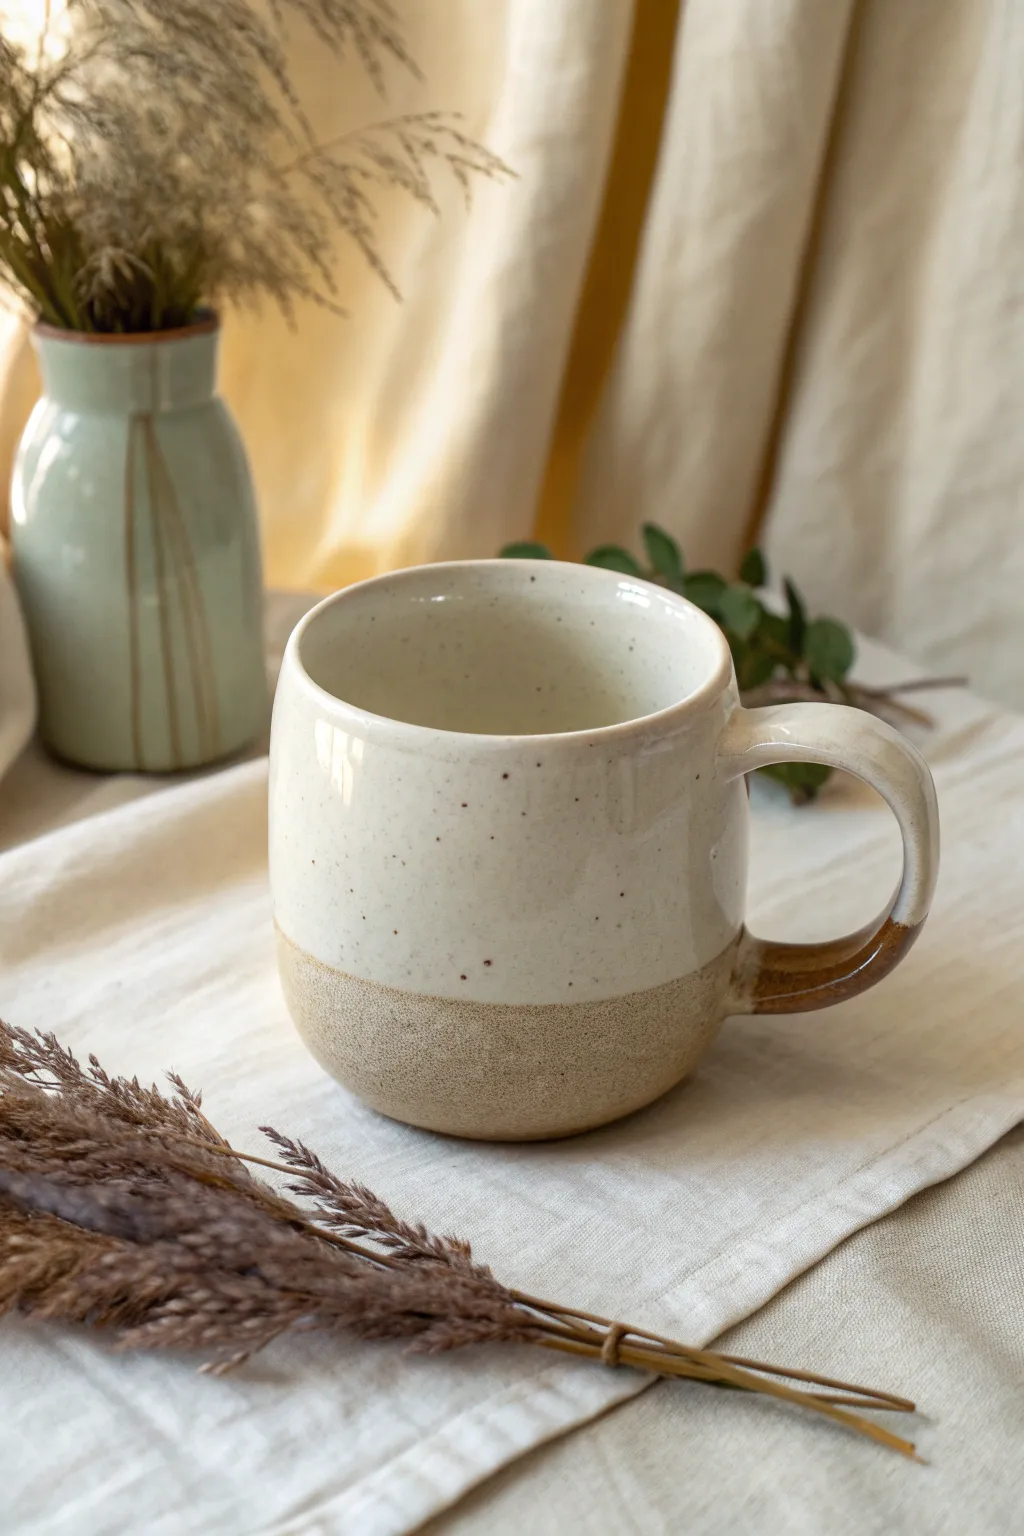
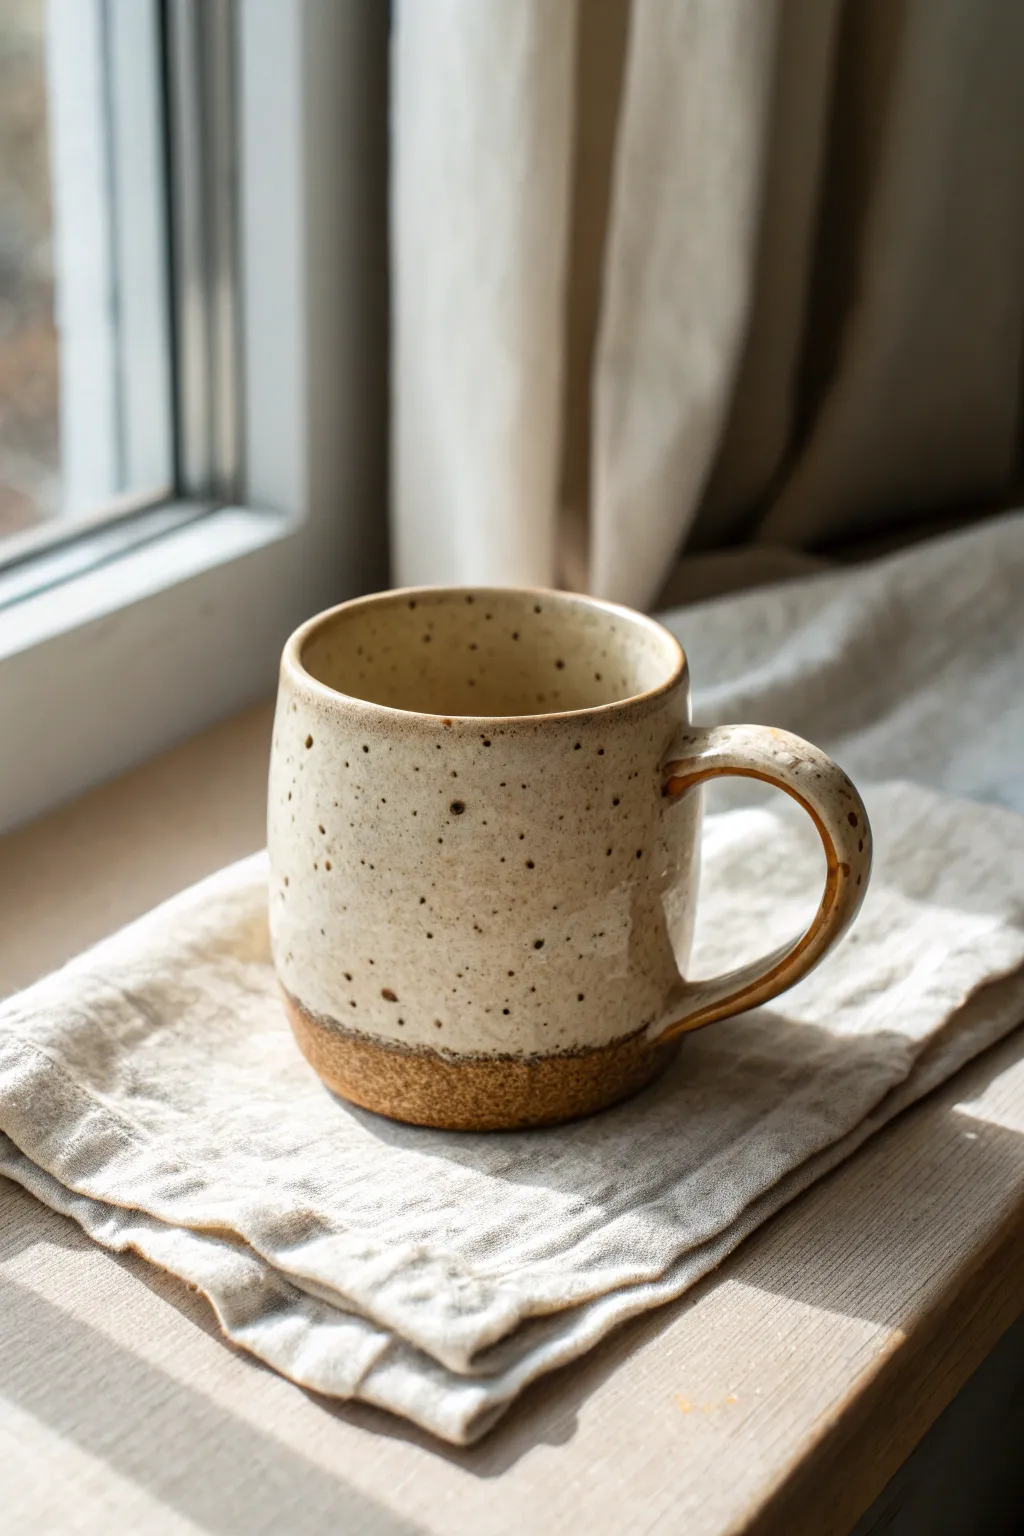
This classic glazing technique celebrates the natural texture of clay by leaving the base exposed, creating a beautiful tactile contrast. The result is a cozy, modern mug with a speckled cream upper body that transitions seamlessly into warm, sandy stoneware.
Step-by-Step Tutorial
Materials
- Bisque-fired stoneware mug
- Speckled cream or ‘Oatmeal’ glaze (cone 5/6)
- Wax resist (liquid emulsion)
- Sponge or brush for wax application
- Large bucket for dipping
- Glaze tongs (optional)
- Damp sponge for cleanup
- Kiln
Step 1: Preparation
-
Surface Check:
Begin with your clean, bisque-fired mug. Wipe it down gently with a barely damp sponge to remove any kiln dust that might interfere with glaze adhesion. -
Determine the Line:
Decide where you want your glaze line to fall. For this look, visualize a line about one-third of the way up from the bottom of the mug. This lower section will remain bare. -
Wax the Bottom:
Dip a brush into your wax resist. Carefully paint the entire bottom of the mug, including the foot ring. This prevents the glaze from sticking to the kiln shelf later. -
Wax the Sidewall:
Continue applying wax resist up the side of the mug to your predetermined one-third mark. Try to keep a relatively straight horizontal edge, though a slightly organic waver adds charm. -
Handle Detail:
For that distinctive partial-handle look, apply wax resist to the bottom attachment point of the handle, blending it into the waxed area on the mug body. -
Dry the Wax:
Let the wax resist dry completely. It should feel firm to the touch and not tacky, usually taking about 15 to 20 minutes.
Step 2: Glazing
-
Mix the Glaze:
Stir your speckled cream glaze thoroughly. You want to ensure all heavy particles are suspended so you get those lovely speckles evenly distributed. -
Check Viscosity:
The glaze should be the consistency of heavy cream. If it’s too thick, the drip line will be bulky; too thin, and the speckles won’t show. Adjust with water if necessary. -
The Interior Pour:
Since we are doing a dip, it’s often easiest to glaze the inside first. Pour glaze inside the mug, roll it around to coat the entire inner surface, and pour the excess back into your bucket. -
Dipping the Exterior:
Hold the mug firmly by the rim or using glaze tongs. In one smooth motion, dip the mug straight down into the glaze bucket until the glaze level covers the rim and overlaps slightly onto your wax line. -
Hold and Count:
Hold the mug submerged for a count of three. This ensures an opaque coat without getting too heavy. -
Lift and Shake:
Pull the mug straight up and out. Give it a gentle shake to encourage excess glaze to drip off the bottom and handle. -
Clean the Line:
As the glaze dries, it will bead up on the waxed areas. Using a clean, damp sponge, gently wipe away any glaze beadlets clinging to the waxed bottom section and the waxed portion of the handle. -
Refine the Rim:
Check the rim for any sharp drips or uneven spots. Smooth them lightly with your fingertip once the glaze is powdery dry to ensure a comfortable drinking edge.
Uneven Drip Line?
If glaze pools thick at the wax line, use a sponge to gently bevel the edge of the glaze upward slightly. This prevents it from running securely down onto the bare clay during the firing
Step 3: Firing
-
Dry Completely:
Allow the mug to dry for at least 24 hours. The clay needs to be bone dry before entering the kiln to prevent cracking. -
Load the Kiln:
Place the mug on the kiln shelf. Because you waxed high up the side, you don’t need a stilt, but ensure it’s not touching other pots. -
Fire to Cone:
Fire the mug to the temperature recommended by your clay and glaze manufacturer (typically Cone 5 or 6 for stoneware). -
Cool Down:
Let the kiln cool naturally until it is safe to unload. The thermal shock of opening too early can cause the glaze to craze.
Add Variation
Before dipping, lightly sprinkle iron oxide or manganese wash on the raw clay section. It creates a darker, toasted effect near the glaze line for extra rustic depth
Once cooled, your mug is ready for a warm beverage, highlighting the beautiful contrast between smoothness and raw earth


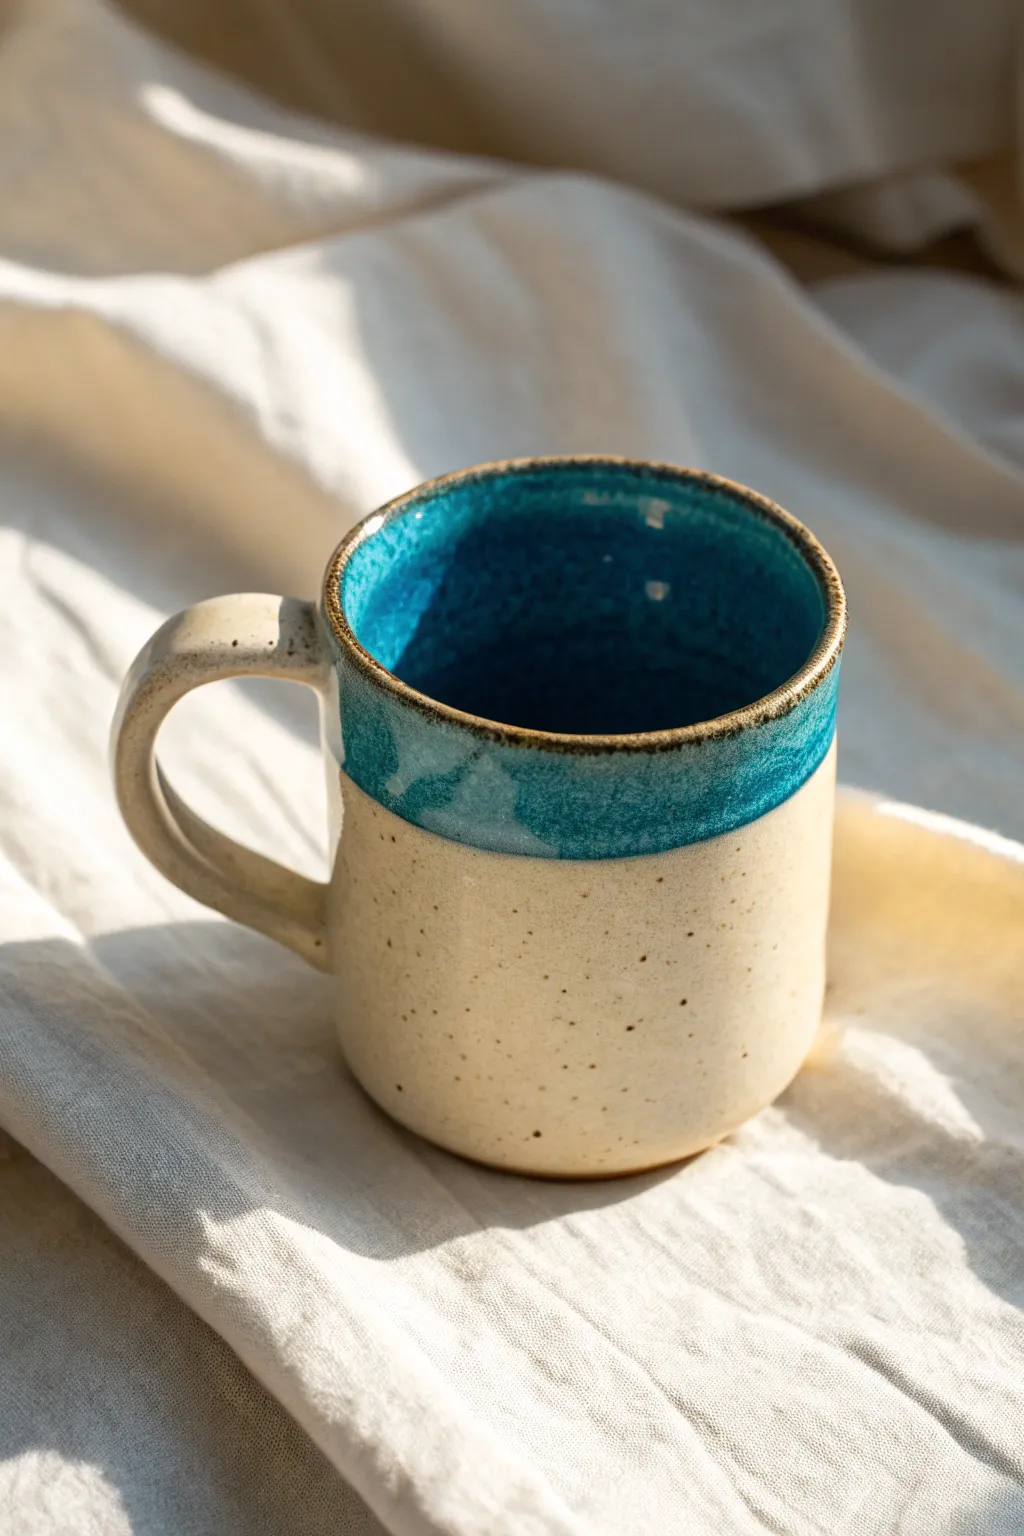
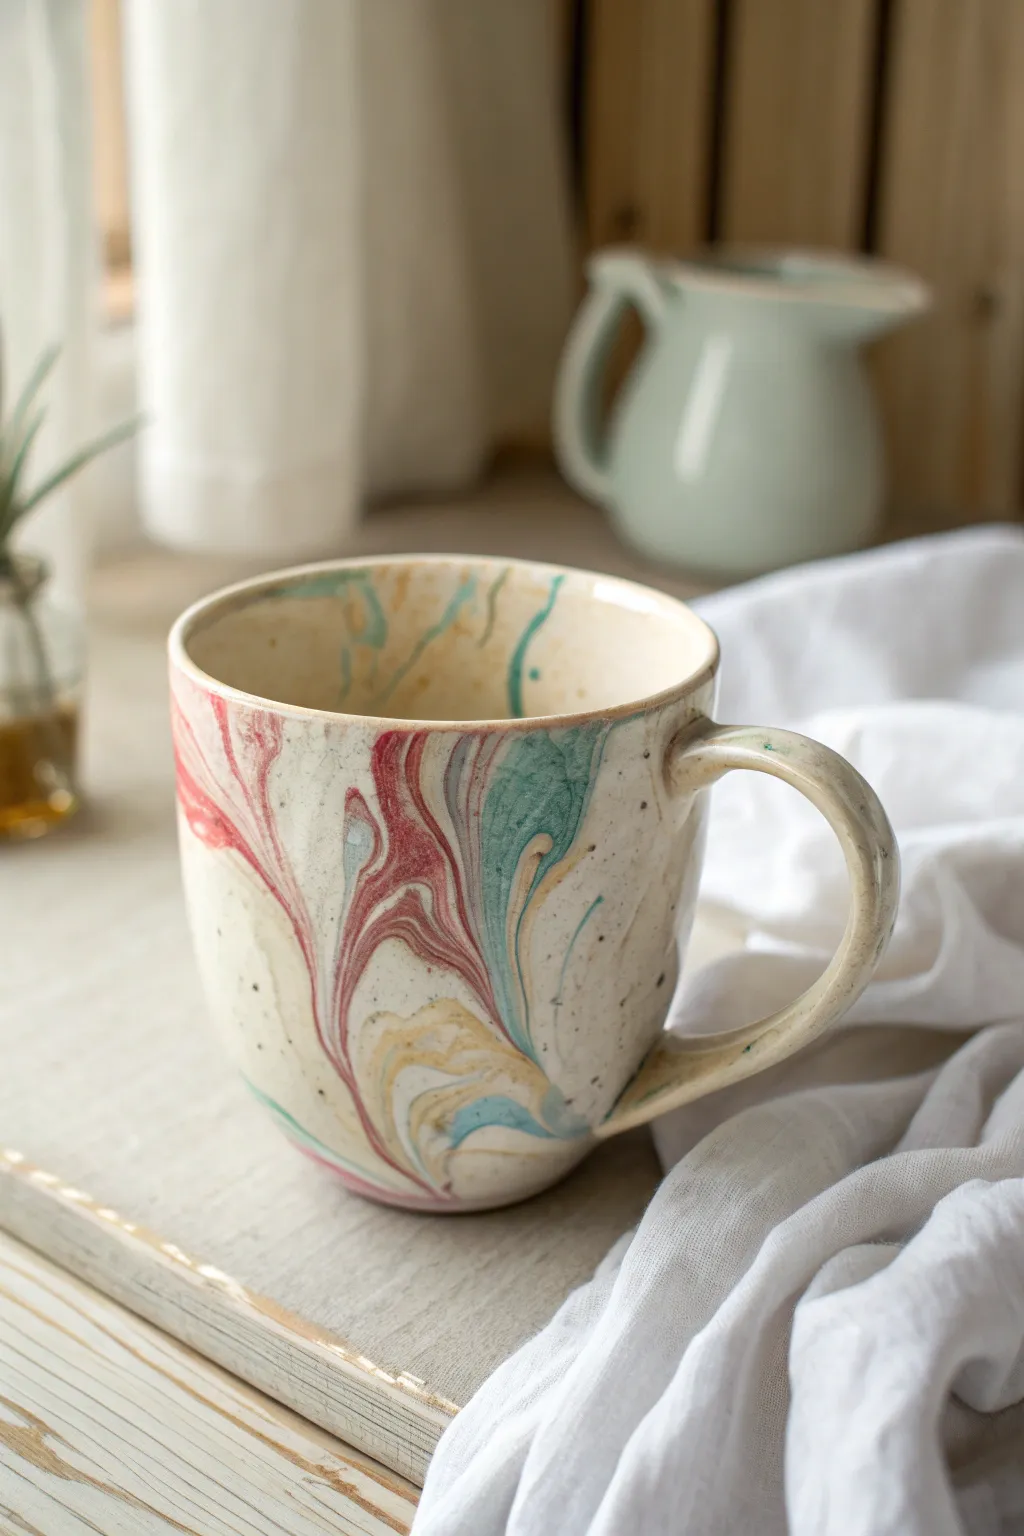
Two-Tone Rim Dip Cascade

This glazing technique achieves a stunning, earthy aesthetic by combining a smooth speckled cream body with a deep forest green rim and handle. The magic happens where the glazes meet, creating a soft, misty transition and delicate vertical dripping effects toward the base.
Step-by-Step Guide
Materials
- Bisque-fired ceramic mug (with handle)
- Speckled cream or oatmeal stoneware glaze
- Deep forest green or teal reactive glaze
- Wax resist emulsion
- Sponge or brush for wax application
- Large dipping container (for the cream glaze)
- Shallower dipping container (for the green glaze)
- Soft fan brush (optional for touch-ups)
- Damp sponge for cleanup
- Kiln
Step 1: Preparation and Base Glazing
-
Clean the bisque:
Start by wiping down your bisque-fired mug with a slightly damp sponge. This removes any dust that could prevent the glaze from adhering properly. -
Apply wax resist bottom:
Paint a layer of wax resist on the very bottom foot of the mug and up the side about 1/4 inch. This is crucial as the cascading effect needs a stopping point so it doesn’t fuse to your kiln shelf. -
Mix the base glaze:
Thoroughly mix your speckled cream or oatmeal glaze. Ensure it is a creamy consistency, similar to heavy cream, to get that smooth, even finish on the body. -
Dip the interior:
Pour the cream glaze inside the mug, roll it around to coat the entire interior surface, and pour the excess back out. Give the rim a quick wipe if any drips formed. -
Dip the exterior body:
Holding the mug by the foot (or using dipping tongs if you prefer), dip the entire mug into the cream glaze right up to the brim. -
Dry the base layer:
Allow this cream base coat to dry until it is powdery to the touch. I usually wait about 20 minutes to ensure the surface is stable enough for the next layer.
Flux for Flow
To guarantee those long, thin drips at the bottom, dab a tiny bit of clear flux or a ‘runny’ glaze additive right at the transition line between the green and cream glazes.
Step 2: Creating the Two-Tone Effect
-
Prepare the green glaze:
Stir your deep forest green glaze well. This glaze needs to be fluid enough to drip slightly but not so thin that it completely runs off. -
Dip the handle:
Carefully dip just the handle into the green glaze. You might need to angle the mug awkwardly to coat the handle without getting too much green on the body yet. -
Clean up the handle connection:
Use a brush or sponge to tidy up where the handle meets the body if the dip was uneven. The goal is solid green coverage on the loop itself. -
Perform the rim dip:
Invert the mug and dip the top 1.5 to 2 inches straight down into the green glaze. Hold it there for just a second or two. -
Control the drip:
As you pull the mug out, give it a subtle shake to encourage excess glaze to move, but then quickly flip it right-side up. This allows gravity to pull the green glaze down over the cream layer. -
Check the overlap:
Look at where the green meets the cream. The interaction between these two chemistries creates the misting effect. If you want more dripping like the photo, apply a tiny extra dab of green glaze at the transition line with a brush. -
Wait for the magic:
Let the glazes dry completely. You will see the green glaze settle into the texture of the cream glaze beneath it.
Step 3: Firing and Finishing
-
Final foot cleaning:
Double-check the wax resist line near the foot. If any glaze has dripped over the wax, wipe it away cleanly with a damp sponge. -
Load the kiln:
Place the mug in the kiln. Because of the potential for dripping, I recommend placing a cookie (a sacrificial clay disc) under the mug just in case the cascade runs further than expected. -
Fire the piece:
Fire to the maturation temperature of your clay and stoneware glazes (typically Cone 5 or 6). A slow cool down can sometimes help enhance the micro-crystalline effects in the green glaze. -
Inspect the result:
Once cool, check the rim. The green glaze should have broken into a golden-brown tone on the sharp edge where it thinned out, adding definition to the form.
Iron Oxide Wash
Before glazing, wipe a thin iron oxide wash over the bare clay texture. This creates a toasted, rustic brightness underneath the sheer parts of the cream glaze.
The end result is a beautifully balanced mug that looks perfect for a morning coffee in a cozy cabin


Half-Dipped Color Block
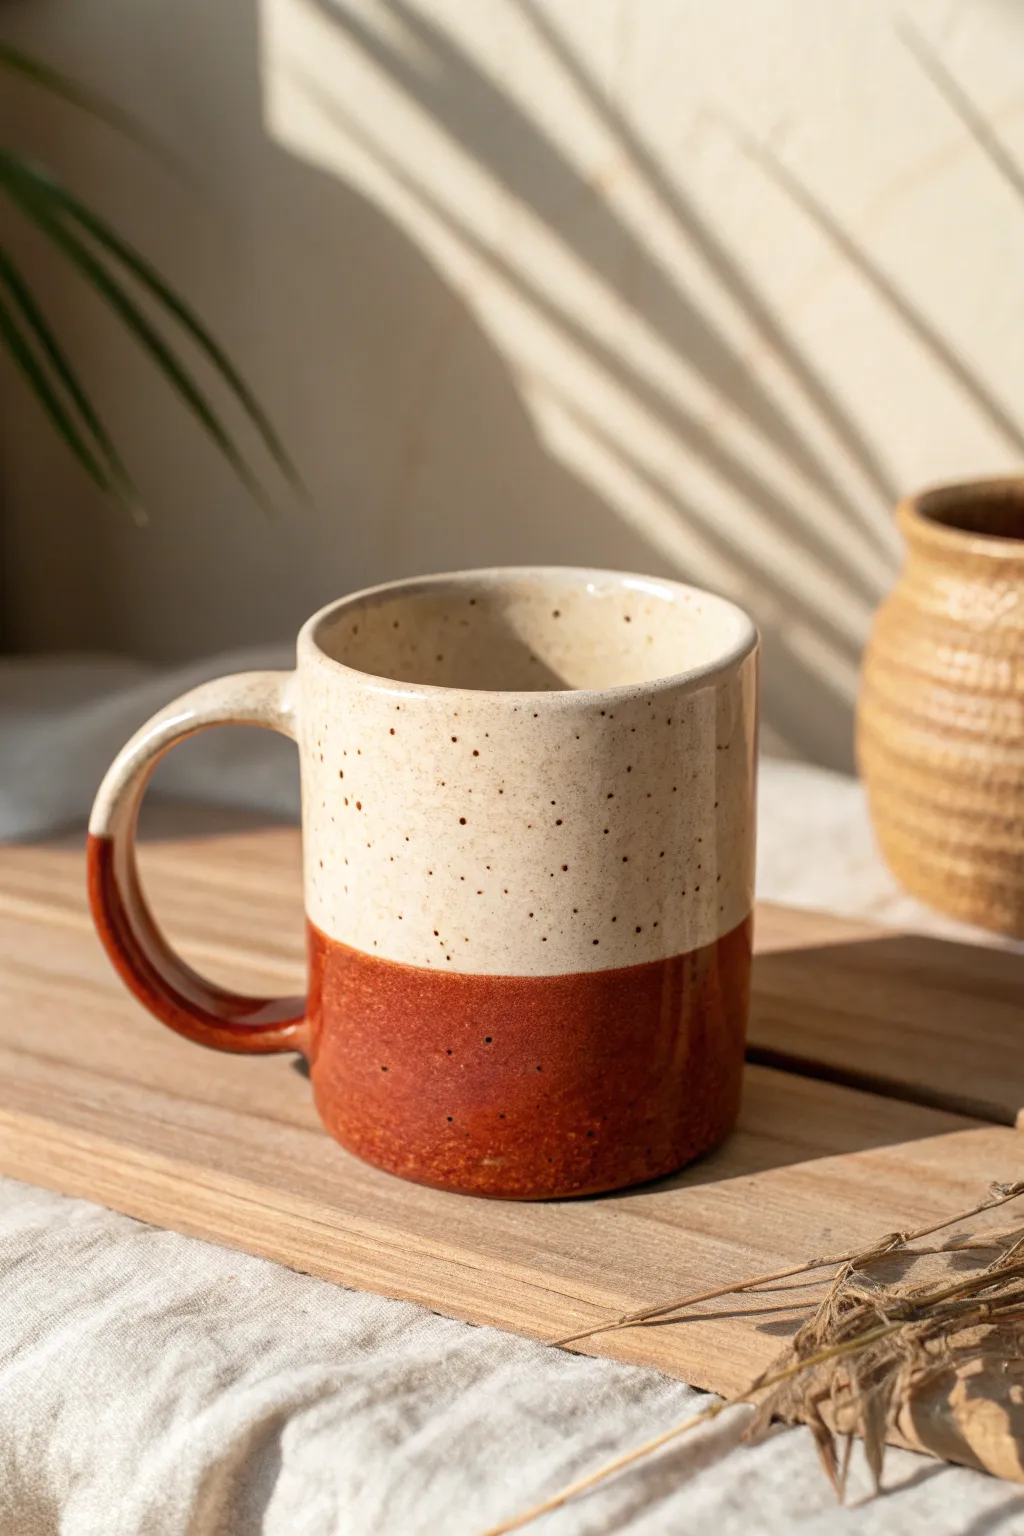
Achieve a charmingly earthy aesthetic with this half-dipped glazing technique that highlights the natural beauty of contrast. By pairing a speckled cream interior with a bold terracotta bottom, you create a timeless piece that feels as warm as the coffee you’ll pour into it.
How-To Guide
Materials
- Bisque-fired ceramic mug
- Speckled cream or oatmeal glaze (stoneware favored)
- Rust red or terracotta glaze
- Wax resist
- Sponge
- Glaze tongs
- Clean bucket of water
- Small paintbrush
- Damp sponge or fettling knife
Step 1: Preparation and Interior Glazing
-
Clean the bisque:
Begin by wiping down your bisque-fired mug with a slightly damp sponge to remove any dust or oils from handling, which can cause glaze defects. -
Mix the base glaze:
Stir your speckled cream glaze thoroughly. You want a consistency similar to heavy cream to ensure even coverage without being too thick. -
Pour the interior:
Pour a generous amount of the cream glaze into the mug. Rotate the mug slowly so the liquid coats the entire inner wall right up to the rim. -
Drain excess:
Pour the remaining glaze back into your bucket while continuing to rotate the mug to prevent drip marks from forming on the inside. -
Clean the distinct rim:
If any cream glaze dripped onto the outside during pouring, wipe it away immediately with a damp sponge.
Overlap Mastery
If overlapping glazes, test a tile first. Some color combinations create a third, muddy color where they meet. A slight gap between dips can look cleaner.
Step 2: Creating the Top Layer
-
Top half dip:
Hold the mug by the foot (bottom). I find it easiest to dip the mug straight down into the cream glaze bucket until the liquid line hits just below the halfway point of the mug body. -
Handle consideration:
Ensure you dip deep enough so the top part of the handle is submerged in the cream glaze, maintaining that continuous line. -
Shake and dry:
Give the mug a gentle shake as you lift it out to remove excess drops, then set it aside to dry until it is no longer tacky to the touch. -
Apply wax resist (Optional):
For a very crisp line between colors, you can paint a band of wax resist right over the edge of the cream glaze. However, for the softer, rustic look in the photo, you can skip this and let the glazes overlap slightly.
Step 3: The Bottom Dip
-
Prep the accent color:
Stir your rust red or terracotta glaze well. This glaze needs to be fluid enough to accommodate a quick dip. -
Grip technique:
Using glaze tongs creates the least surface disturbance, or you can carefully hold the mug by the rim if your hands are steady and clean. -
The second dip:
Lower the bottom half of the mug into the rust glaze. Aim for the glaze line to meet or slightly overlap the cream section you applied earlier. -
Handle dipping:
Tilt the mug slightly if needed to ensure the bottom curve of the handle gets coated in the red glaze, mirroring the design in the photo. -
Hold and lift:
Hold the proper depth for about three seconds to build up color opacity, then lift straight out. -
Clean the foot:
Once the glaze is dry to the touch, flip the mug over and use a damp sponge to wipe the bottom foot ring completely clean so it won’t fuse to the kiln shelf. -
Finger mark touch-ups:
If you held the mug by the rim and left small finger marks in the cream glaze, dab a tiny bit of glaze over those spots with a small paintbrush to smooth them out.
Speckle Effect
Use a clay body with iron pyrite spots (speckled clay) under a transparent white glaze instead of a speckled glaze for a more organic, deep texture.
Fire the mug according to your clay and glaze specifications to reveal the beautiful contrast of your new favorite cup


Raw Clay Foot With Glazed Upper
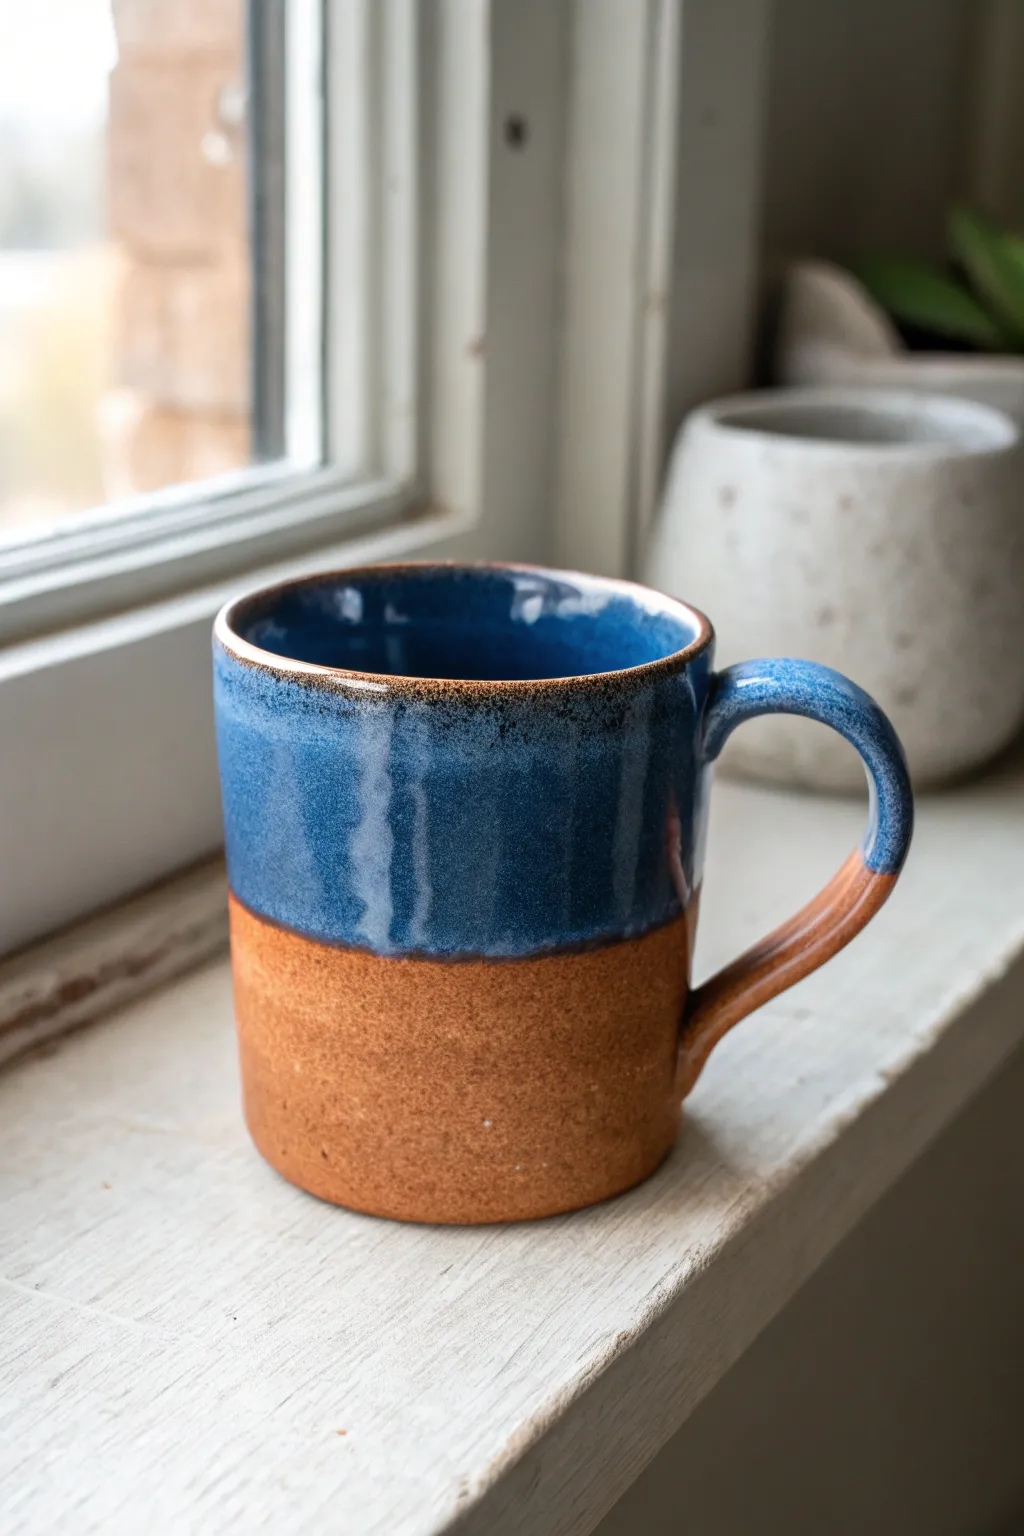
This project celebrates the beautiful contrast between raw, toasted stoneware and a glossy, deep ocean-blue glaze. By leaving the bottom portion unglazed, you create a tactile experience that highlights the natural warmth of the clay body against a cool, smooth finish.
Step-by-Step Tutorial
Materials
- Bisque-fired stoneware mug (speckled or red clay body recommended)
- Deep Blue floating glaze (like Amaco Blue Rutile or similar)
- Wax resist (liquid)
- Sponge
- Small paintbrush
- Glaze tongs (optional)
- Clean bucket for dipping
- Fettling knife or rib tool
Step 1: Preparation & Waxing
-
Clean the bisque:
Start by wiping down your bisque-fired mug with a damp sponge. This removes any kiln dust or oils from your hands that might interfere with glaze adhesion. -
Determine the glaze line:
Visualize where you want the glaze to stop. For this look, the line sits just below the halfway point of the mug body. -
Apply wax resist bottom:
Using a brush dedicated to wax, apply a smooth coat of wax resist to the entire bottom of the mug and up the sides to your desired line. Be careful to keep this edge straight. -
Wax the handle base:
Carefully paint wax on the lower attachment point of the handle and about an inch up the handle itself. This creates that seamless transition where the glaze stops on the handle at the same level as the body. -
Let it dry:
Allow the wax resist to dry completely. It should feel tacky or hard, not wet, before you move on to glazing.
Pro Tip: Masking Tape
Struggling with a steady hand? Use automotive detailing tape to mask off your straight line before waxing. Peel it off once the wax is dry, and you’ll have a razor-sharp edge.
Step 2: Glazing Process
-
Prepare the glaze:
Stir your deep blue glaze thoroughly. Floating glazes like this often settle, so mix until it’s the consistency of heavy cream to ensure the color variegation comes through. -
Pour the interior:
Pour a generous amount of glaze into the mug, swirl it around to coat every inch of the interior, and pour the excess back into your bucket. Rotate the mug as you pour out to coat the rim evenly. -
Clean the exterior drips:
I prefer to quickly wipe any accidental drips on the outside now with a damp sponge before doing the exterior dip. -
The exterior dip:
Hold the mug firmly by the foot (the waxed part) or use glaze tongs. Dip the mug straight down into the glaze bucket, submerging it past the rim but stopping exactly where your wax line begins. -
Hold and count:
Hold the mug in the glaze for about 3-5 seconds. This ensures a thick enough coat for that rich blue but not so thick that it runs excessively. -
Lift and shake:
Pull the mug straight up and give it a gentle shake to remove excess droplets. Turn it right-side up quickly to stop drips from running back down.
Troubleshooting: Running Glaze
If your test tile shows this blue runs significantly, sponge off a 2mm ‘reserve line’ right at the wax edge. This gives the glaze room to move down during firing without ruining the line.
Step 3: Finishing Touches
-
Wipe the wax line:
Even with wax resist, small beads of glaze will stick to the waxed area. Use a damp sponge to wipe the waxed section clean, paying close attention to the sharp line where the glaze meets the raw clay. -
Check the handle:
Ensure the handle connection point is clean. If glaze has pooled where the handle meets the body, dab it away gently to prevent crawling. -
Smooth the pinholes:
Once the glaze is dry to the touch, gently rub the glazed surface with a clean, dry finger to smooth over any tiny pinholes or bubbles. -
Rim check:
Run your finger lightly over the rim to make sure the glaze isn’t too sharp or thick. -
Fire the kiln:
Load the mug into the kiln. Since the bottom is raw clay, you don’t need stilts, but make sure no glaze is touching the shelf. Fire to Cone 5 or 6 (depending on your specific clay and glaze).
Unload your kiln to reveal a stunning contrast of textures that makes your morning coffee feel grounded and artistic

The Complete Guide to Pottery Troubleshooting
Uncover the most common ceramic mistakes—from cracking clay to failed glazes—and learn how to fix them fast.
Speckled Freckle Glaze Look
This rustic, cozy mug design embraces the natural beauty of the clay body while juxtaposing it against a creamy, speckled finish. It features a classic bare clay ‘boot’ at the base and a comforting, rounded handle, perfect for a warm morning brew.
Step-by-Step
Materials
- Bisque-fired stoneware mug (wheel-thrown or hand-built)
- Speckled Cream/Oatmeal stoneware glaze (cone 5/6 compatible)
- Fettling knife
- Clean sponge
- Bucket of water
- Wax resist (liquid emulsion)
- Small paintbrush (for wax)
- Glaze tongs
- Large dipping bucket for glaze
- Kiln (cone 5 or 6 capable)
Step 1: Preparation & Waxing
-
Inspect the bisque:
Begin with your clean, bisque-fired mug. Run your hands over the surface to check for any sharp burrs or rough spots. -
Sand rough patches:
If you find any sharp bits, lightly sand them down. Remember to do this outdoors or while wearing a mask to avoid inhaling silica dust. -
Wipe it down:
Use a damp sponge to wipe the entire mug. This removes any dust from sanding and prevents pinholing in the glaze later. -
Define the base line:
Decide how much bare clay you want exposed. For this look, the bottom 1-1.5 inches should remain unglazed. -
Apply wax resist:
Dip your brush into the liquid wax resist. Carefully paint the bottom of the mug and up the sides to your desired line. I like to rotate the mug on a banding wheel to get a steady, straight line. -
Check the foot:
Ensure the very bottom foot ring is completely covered in wax so the mug won’t fuse to the kiln shelf. -
Let the wax dry:
Allow the wax resist to dry completely, which usually takes about 15–20 minutes. It should feel dry to the touch and not tacky.
Iron Speckle Hack
If your white glaze lacks speckles, mix in a tiny amount of granular ilmenite or coarse iron oxide (about 0.5%) to get those lovely dark freckles.
Step 2: Glazing Process
-
Prepare the glaze:
Stir your speckled cream glaze thoroughly. You want the heavy speckling agents that have settled at the bottom to be evenly distributed throughout the bucket. -
Dip the interior:
Pour glaze inside the mug, roll it around to coat the entire inner surface, and pour the excess back into the bucket. -
Wipe the rim:
Quickly wipe any drips off the rim with your finger or a sponge so the next dip doesn’t create a thick, uneven bead. -
Set up glaze tongs:
Grip the mug securely by the foot using your glaze tongs. Make sure the grip is tight so it doesn’t slip into the bucket. -
The exterior dip:
Submerge the mug into the glaze bucket straight down. Stop just before the glaze line reaches your wax resist line to keep it super crisp, or submerge fully and let the wax do the work. -
Hold and lift:
Hold it submerged for about 3 seconds to build up a nice opacity, then lift it out straight. -
Shake off excess:
Give a gentle shake to remove excess droplets before turning the mug right-side up. -
Clean the wax line:
Even with wax resist, little beads of glaze will stick. Take a damp sponge and firmly wipe the waxed area to reveal the clean, sharp line of bare clay. -
Check the handle:
Inspect the handle specifically. If the glaze is too thin in the crevices, dab a little extra on with a brush.
Step 3: Firing
-
Final drying:
Let the mug dry completely overnight. The moisture from the glaze needs to evaporate before firing to prevent defects. -
Load the kiln:
Place the mug in the kiln. Since the foot is waxed and clean, no stilts are necessary. -
Fire to temperature:
Fire the kiln to Cone 5 or 6 (approx. 2200°F / 1200°C), depending on your specific clay and glaze specifications. -
Cool down:
Allow the kiln to cool naturally before opening. Opening too early can cause thermal shock and crack your beautiful new piece.
Textured Clay Body
Use a heavily grogged or sandy clay body. When the glaze melts, the texture of the clay will interact with the glaze for a more organic, tactile surface.
Now you have a stunning, artisanal mug that highlights the raw beauty of its materials
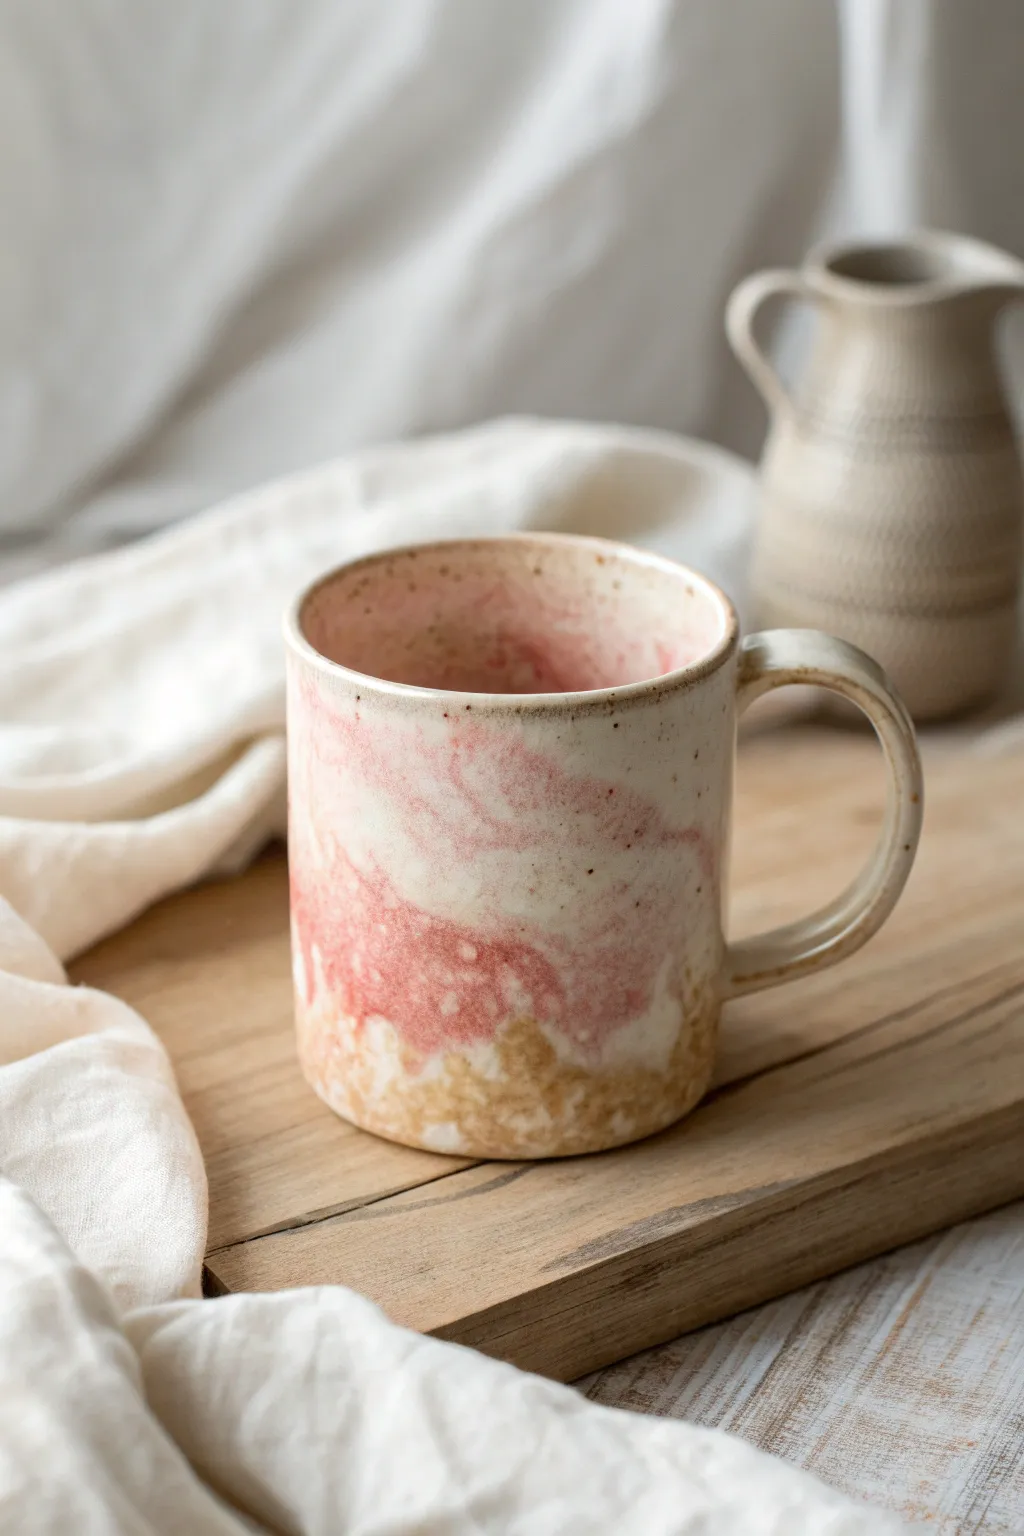
Soft Ombre Fade
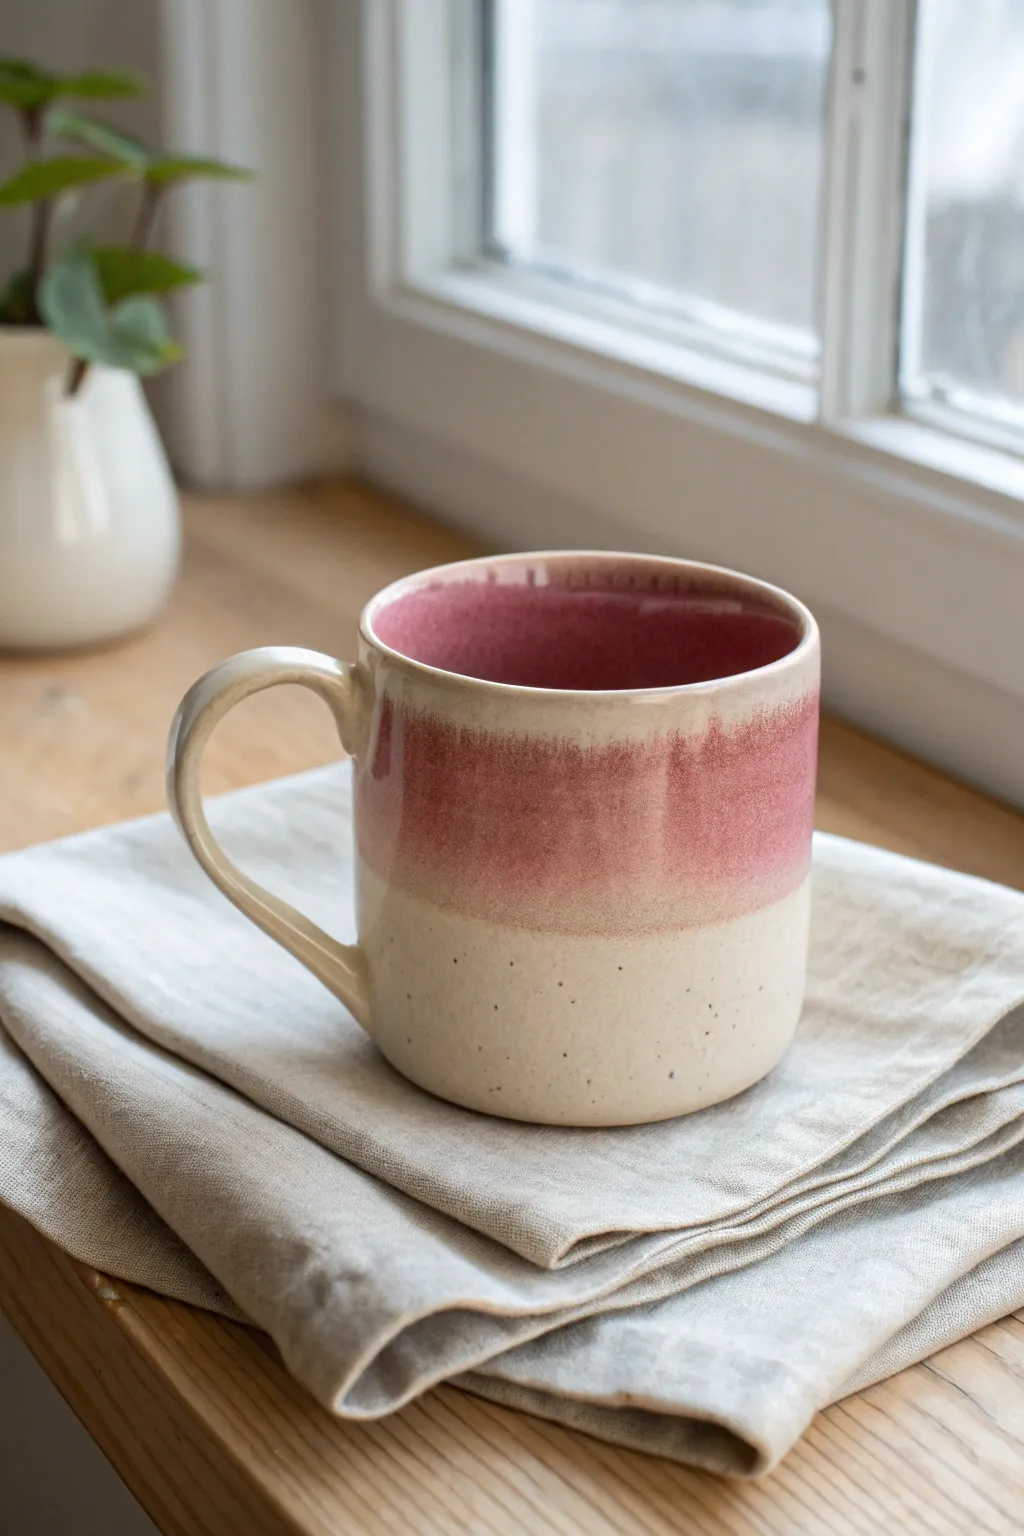
Achieve a gentle, calming transition on your ceramic ware with this dip-glazing technique that marries a rustic, speckled oatmeal base with a soft, romantic dusty rose rim. The result is a piece that feels both organic and elegantly finished, perfect for cozy morning coffees.
Step-by-Step Guide
Materials
- Bisque-fired ceramic mug (stoneware clay body recommended)
- Speckled Cream/Oatmeal glaze (cone 5/6)
- Dusty Rose/Pink glaze (cone 5/6)
- Wax resist
- Sponge
- Wide glazing tongs
- Bucket of warm water
- Clean towel
- Fine grit sandpaper (for bisque smoothing)
Step 1: Preparation
-
Check the surface:
Begin by inspecting your bisque-fired mug for any sharp burrs or rough patches. Gently sand these down with fine-grit sandpaper so the surface feels smooth to the touch. -
Wash away dust:
Wipe the entire mug down with a damp sponge to remove any sanding dust involved in the previous step. Dust can prevent glaze from adhering properly, causing pinholes later. -
Mix your glazes:
Stir both your Speckled Cream and Dusty Rose glazes thoroughly. You want a consistency similar to heavy cream. If using pint jars, shake them vigorously to ensure all sediment at the bottom is integrated. -
Wax the foot:
Apply a coat of wax resist to the very bottom foot ring of the mug. This prevents glaze from sticking to the kiln shelf. Let the wax dry for about 10-15 minutes until it is no longer tacky.
Crawling Glaze?
If the second layer separates or ‘crawls’ during firing, the base layer was likely too dry or dusty. Next time, dip the second color while the first is ‘leather hard’—set but still cool.
Step 2: Base Glazing
-
Prepare the tongs:
Adjust your glazing tongs to fit securely inside the mug. Test the grip over a table first to ensure you won’t drop the piece. -
The first dip:
Using the tongs, submerge the entire mug into the Speckled Cream glaze bucket. Hold it under for a count of three to ensure an even coating. -
Drain and smooth:
Lift the mug out and turn it gently to let excess glaze drip off the bottom edge. Shake it very lightly to break the surface tension of the drips. -
Touch up tong marks:
After the glaze has set for a moment and is dry enough to handle by the foot, release the tongs. Use a fingertip dipped in a tiny bit of glaze to fill in the small marks left by the tong teeth. -
Initial dry time:
Allow this base layer to dry completely. The surface should be powdery and room temperature to the touch, not cool or damp. I find giving it at least an hour ensures the second dip doesn’t pull the first layer off.
Add Texture
For a more tactile finish, leave the bottom third of the mug unglazed, exposing the raw clay body. This creates a beautiful contrast between the smooth pink gloss and the rough stone base.
Step 3: The Pink Ombre
-
Prepare the second glaze:
Give your Dusty Rose glaze another quick stir. For the dipping method, pour enough glaze into a wide, shallow container so you can easily dip the top half of the mug without hitting the bottom. -
Invert the mug:
Hold the mug firmly by the foot. Turn it upside down, ensuring you have a steady grip on the unglazed waxed area or the very lower portion of the base glaze. -
The partial dip:
Lower the inverted mug straight down into the Dusty Rose glaze, stopping just below the handle attachment point—roughly covering the top 50-60% of the mug. -
The hold:
Hold it there for just 1-2 seconds. Since the bisque is already saturated with the first layer, a quick dip prevents the glaze from getting too thick and runny. -
The lift:
Pull the mug straight up and out. Hold it upside down for a few seconds to let droplets form on the rim, then gently shake to level the coating. -
Clean the rim:
Turn the mug right-side up. Check the interior rim; if any rose glaze ran excessively down the inside, you can tidy it up with a distinct line or leave it for a rustic look.
Step 4: Finishing
-
Clean the foot:
Use a damp sponge to wipe any glaze beads off the waxed foot. Although waxed, stray droplets can still sit on top and need to be removed to protect your kiln shelves. -
Final drying:
Let the mug dry for at least 24 hours before firing. The double layer of glaze introduces a lot of water to the clay body, and firing too soon can cause steam issues. -
Check the overlap:
Before loading the kiln, inspect the line where the pink meets the cream. If it looks excessively thick or lumpy, gently rub it with a dry finger to smooth the transition slightly. -
Fire:
Fire the mug to Cone 5 or 6 (approx 2200°F/1200°C), depending on your specific clay and glaze specifications. Allow the kiln to cool naturally before unloading.
Once cooled, your two-tone mug is ready to be filled with your favorite warm beverage


What Really Happens Inside the Kiln
Learn how time and temperature work together inside the kiln to transform clay into durable ceramic.
Bright Interior, Quiet Exterior
This glazing style plays with the element of surprise, featuring a calm, speckled oatmeal exterior that conceals a vibrant pop of glossy turquoise inside. It creates a beautiful contrast between rustic warmth and jewel-toned brightness, perfect for your morning coffee ritual.
How-To Guide
Materials
- Bisque-fired stoneware mug (light or speckled clay body suggested)
- Speckled Oatmeal or Cream matte glaze
- Glossy Turquoise or Teal glaze
- Wax resist (liquid wax or wax stick)
- Glaze brushes (fan brush and detail brush)
- Sponge
- Bucket of clear water
- Pottery tongs (optional)
- Damp clean cloth
Step 1: Preparation & Interior Glazing
-
Clean the bisque:
Start by wiping down your bisque-fired mug with a damp sponge. This removes any dust or oils from handling that might repel the glaze. -
Wax the foot:
Apply wax resist carefully to the bottom foot ring of the mug. I like to bring the wax just a millimeter or two up the side wall to ensure a clean line where the glaze ends. -
Pour the interior:
Prepare your glossy turquoise glaze by stirring it thoroughly. Pour the glaze inside the mug until it is about half full. -
Swirl to coat:
Rotate the mug in your hand, tilting it so the glaze travels up the walls, coating the entire interior surface evenly. -
Pour out excess:
While continuing to rotate the mug, pour the excess glaze back into your bucket. A swift, twisting motion helps break the stream cleanly without leaving a thick drip. -
Rim application:
For that distinctive spilled-over look, dip just the top rim—about a half-inch deep—into the turquoise glaze. Hold it there for just a second. -
Manage drips:
Pull the mug straight up. If a drip forms on the outside rim, you can leave it for a rustic effect or gently sponge it back if you prefer a straighter line. -
Let dry completely:
Set the mug aside until the turquoise glaze is dry to the touch. This prevents smudging when we handle the exterior.
Step 2: Exterior Glazing & Finishing
-
Wax the rim (optional):
If you want a very sharp line between the turquoise rim and the beige body, apply a band of wax resist over the dried turquoise on the exterior rim. However, overlapping creates a nice organic blend. -
Prepare the exterior glaze:
Stir your speckled oatmeal glaze well. Matte glazes often settle quickly, so make sure the sediment is fully incorporated. -
Dip the exterior:
Using pottery tongs or a firm claw-grip on the foot, submerge the mug into the oatmeal glaze. Stop right at the rim line where the turquoise ends. -
Lift and shake:
Lift the mug out and give it a gentle shake to remove excess glaze. Be careful not to let the oatmeal glaze splash inside the turquoise interior. -
Clean the foot:
Use a damp sponge to wipe away any glaze beads that have settled on the waxed foot ring. This saves your kiln shelf from drips. -
Check the overlap:
Inspect the point where the two glazes meet near the rim. If the oatmeal glaze is too thick over the turquoise, gently rub it back with a finger to reveal more of the blue underneath. -
Final dry:
Allow the mug to dry completely, usually overnight. The glazes should be powdery to the touch before firing. -
Fire the kiln:
Load your kiln and fire to the recommended cone temperature for your stoneware clay and glaze choice (commonly Cone 6).
Rim Running?
If the rim glaze runs too much during firing, next time thin the turquoise glaze slightly with water or hold the dip for a shorter duration to apply a thinner layer.
Textured Touch
Use a stiff-bristle brush to purposefully scratch away small bits of the exterior glaze before firing, revealing the raw clay body for added rustic texture.
Unloading the kiln will reveal a stunning contrast piece that feels calm in the hand but exciting to look into
Wax Resist Mountain Line
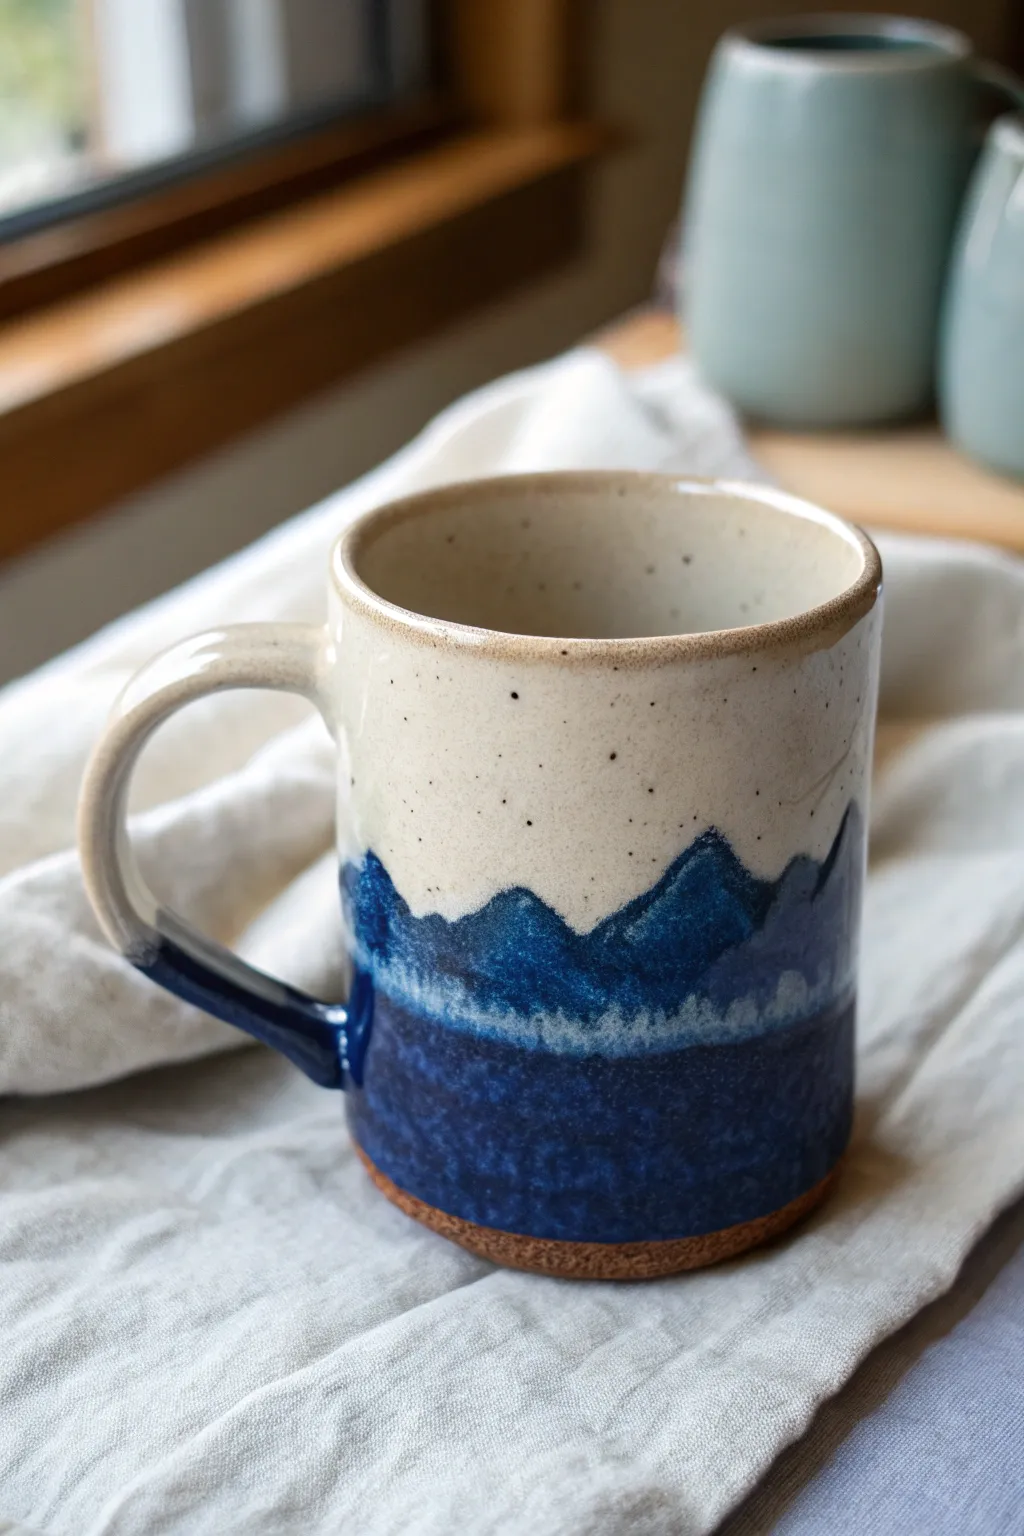
Capture the serenity of an alpine landscape directly on your favorite coffee vessel with this striking wax resist technique. The contrast between the speckled oatmeal glaze and the deep, rich navy creates a dimensional mountain range that feels both rustic and modern.
Step-by-Step Guide
Materials
- Bisque-fired stoneware mug (speckled clay body recommended)
- Speckled cream or oatmeal stoneware glaze (mid-fire)
- Deep glossy navy or cobalt blue stoneware glaze (mid-fire)
- Wax resist (emulsion or liquid wax)
- Small round paintbrush (size 2 or 4)
- Medium soft fan brush
- Sponge
- Fettling knife or cleanup tool
Step 1: Preparation & First Dip
-
Clean the bisque:
Begin by wiping down your bisque-fired mug with a damp sponge. This removes any kiln dust or oils from your hands that might prevent the glaze from adhering properly. -
Wax the foot:
Apply a generous coat of wax resist to the very bottom foot of the mug and about 1/4 inch up the side wall. This ensures the glaze won’t run onto the kiln shelf during firing. Let this dry completely until it’s no longer tacky. -
Prepare the cream glaze:
Thoroughly mix your speckled cream or oatmeal glaze. It should have the consistency of heavy cream. If it’s too thick, the speckles might bunch up; too thin, and you’ll lose the opacity. -
Full interior dip:
Pour the cream glaze inside the mug, roll it around to coat the entire interior surface, and pour the excess back into the bucket. Quickly wipe any drips off the rim with a damp sponge. -
Upper exterior dip:
Holding the mug by the foot (or using dipping tongs if you prefer), dip the mug upside down into the cream glaze. You want to submerge it deeply, covering about two-thirds of the mug’s exterior height. -
Handle coverage:
Ensure the top arch of the handle gets coated during this dip. If the dip didn’t catch it all, use your fan brush to touch up the connection point, but leave the bottom of the handle bare for now. -
Initial drying:
Set the mug aside to dry. The glaze needs to be dry to the touch before you can apply the wax resist design phase. This usually takes about 15-20 minutes.
Peak Performance
Make your mountain line slightly lower than you think you need. Glazes often run downward during firing, so starting higher gives the mountains room to move without hitting the kiln shelf.
Step 2: Creating the Mountains
-
Painting the peaks:
Dip your small round brush into the wax resist. Paint a jagged, undulating line around the middle of the mug, directly over the dried cream glaze. The area *above* this line will remain cream. -
Refining the range:
Vary the height of your peaks. Make some sharp and tall, others rolling and low. Think about a real horizon line. I find that avoiding perfect symmetry makes the mountains look much more natural. -
Fill the sky:
Once your mountain line is established, paint wax over the entire upper portion of the mug (everything above your line), including the rim and the inside. This protects the cream glaze from the upcoming blue dip. -
Wax curing:
Allow the wax resist to dry completely. This is crucial—if the wax is wet, the second glaze will stick to it or smear the design.
Blurred Lines?
If your mountain edges look messy or blurry after firing, your wax layer was likely too thin or hadn’t dried fully. Apply a second thin coat of wax for a sharp, crisp resist line next time.
Step 3: The Deep Blue Coat
-
Prepare the navy glaze:
Stir your deep navy blue glaze well. You want a rich, dark pigment that is fluid enough to overlap slightly without crawling. -
The mountain dip:
Hold the mug by the rim (where the wax is dry) or using tongs. Dip the bottom portion of the mug into the blue glaze, submerging it past your wax line and up to about the middle of the peaks. -
Checking the overlap:
Ensure the blue glaze covers the raw clay section at the bottom and the lower handle connection. The wax you applied earlier effectively blocks the blue from covering the ‘sky,’ but creates a crisp edge where the mountains start. -
Handle finishing:
If the dip was awkward for the handle, use a brush to apply blue glaze to the bottom curve of the handle, blending it into the body of the mug. -
Clean up wax beads:
You will likely see beads of blue glaze sitting on top of the waxed cream areas. Use a slightly damp sponge to gently wipe these droplets away. Be careful not to scrub the unwaxed blue glaze below. -
Foot check:
Double-check the foot ring you waxed in the very first step. If any blue glaze has adhered to the bottom touching surface, wipe it clean with a sponge. -
Final dry:
Let the mug dry completely, usually overnight, to ensure all moisture has evaporated from the clay body before firing. -
Firing:
Fire the mug in your kiln according to the clay and glaze specifications (typically Cone 5 or 6). The heat will melt the glazes, and where the blue meets the cream at the wax line, they may flux slightly to create a beautiful misty boundary.
Once cooled, you’ll have a stunning landscape piece perfect for contemplating your next adventure over a warm cup of coffee

TRACK YOUR CERAMIC JOURNEY
Capture glaze tests, firing details, and creative progress—all in one simple printable. Make your projects easier to repeat and improve.
Crisp Stripe Resist
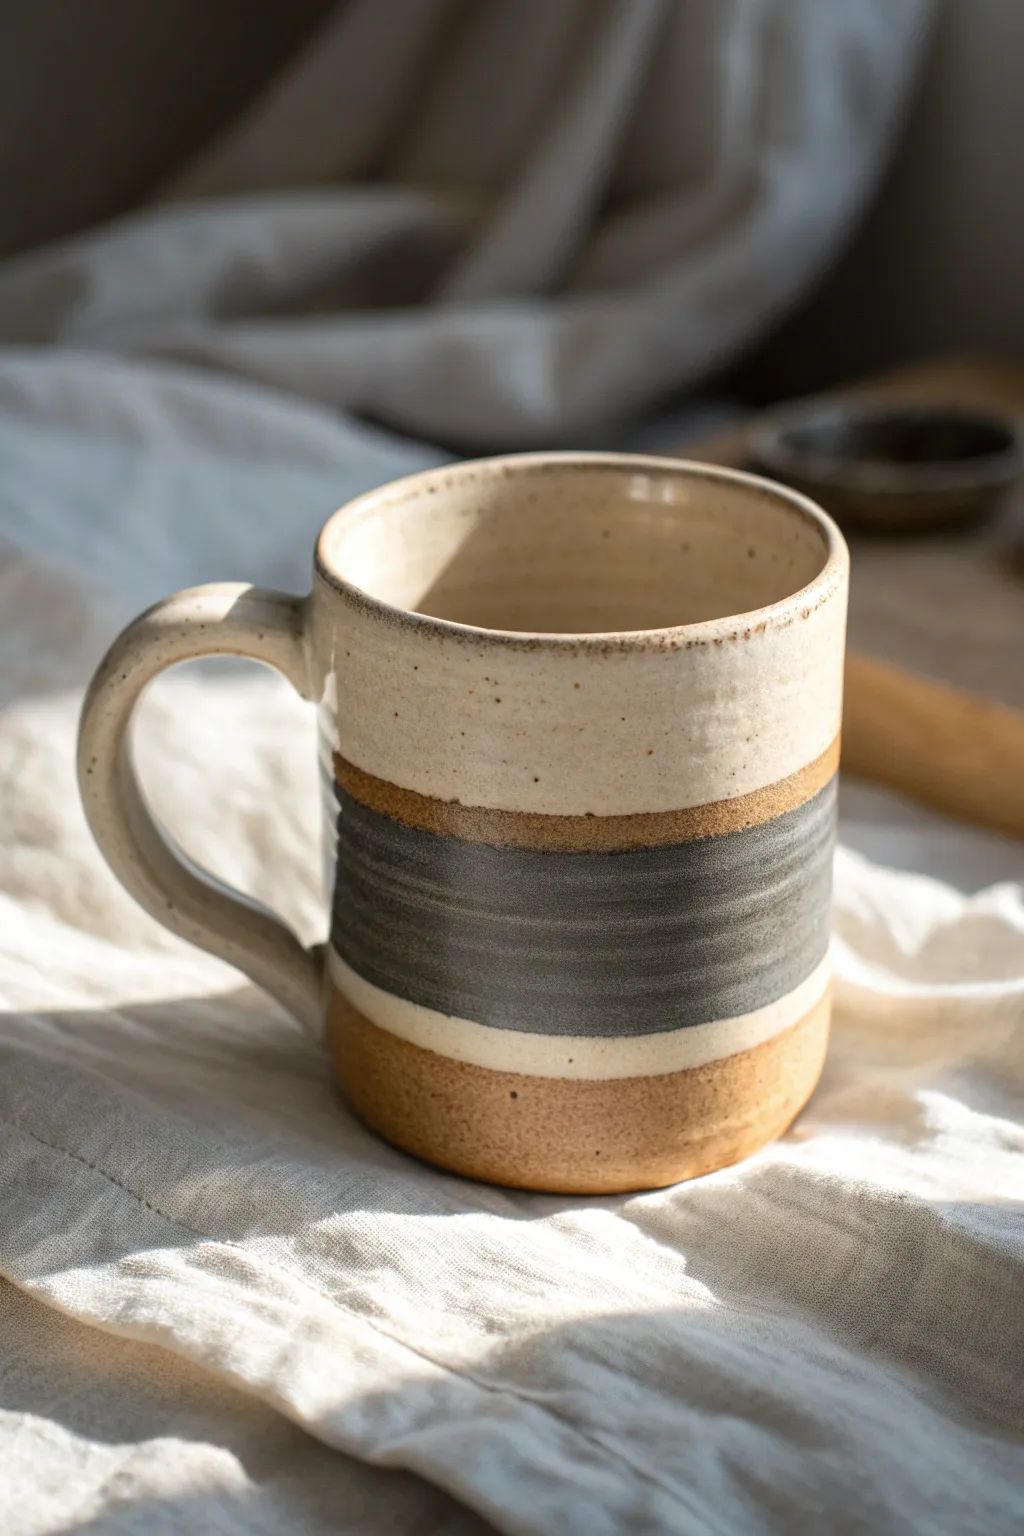
This project achieves a modern, rustic aesthetic by combining exposed clay with distinct bands of glaze. The result is a tactile, speckled mug featuring a prominent charcoal stripe sandwiched between creamy whites and warm, raw earth tones.
Detailed Instructions
Materials
- Bisque-fired ceramic mug (speckled clay body recommended)
- Cream or oatmeal speckled stoneware glaze (Gloss)
- Satin charcoal or matte grey glaze
- Wax resist emulsion
- Soft fan brush
- Decorator’s tape or automotive pin-striping tape (1/4 inch width)
- Sponge
- Bowl of water
- Fettling knife or needle tool
Step 1: Preparation & Masking
-
Clean the bisque:
Begin by wiping down your bisque-fired mug with a damp sponge. This removes any kiln dust or oils from your hands that might interfere with glaze adhesion. -
Mark the base line:
Decide where you want the glaze to stop at the bottom. The image shows about an inch of exposed clay at the base. Mark this line lightly with a pencil while spinning the mug on a banding wheel if you have one. -
Apply wax to the base:
Using your wax resist, carefully paint the bottom inch of the mug (up to your pencil line) and the entire underside foot. Let this dry completely until it’s tacky and firm. -
Create the middle resist line:
To create that thin, crisp line of separation seen above the bottom clay section, apply a strip of decorator’s tape or pin-striping tape around the circumference of the mug, positioning it about half an inch above your wax line. -
Burnish the tape:
Press the edges of the tape down firmly with your fingernail or a rib tool to ensure no glaze can seep underneath.
Bleeding Lines?
If glaze bleeds under your tape, scrape the excess away with a wooden tool before firing. For sharper lines next time, brush a thin layer of wax over the tape edges before glazing.
Step 2: Glazing the Interior & Top
-
Pour the interior:
Pour your cream speckled glaze into the mug, swirl it to coat the entire inside, and pour the excess out. Wipe the rim immediately with a damp sponge if any drips occurred. -
Dip the top section:
Hold the mug by the base (the waxed area) and dip the top half into the cream speckled glaze. You want the glaze to come down just past the handle attachment but stop before it hits your tape line. Alternatively, you can brush this section on. -
Clean up the rim:
Check the rim for any uneven spacing or drips and smooth them out with your finger while the glaze is still damp. -
Let the first coat dry:
Allow the cream glaze to dry until it is powdery to the touch before moving to the darker color. This prevents the colors from bleeding into each other during handling.
Step 3: The Grey Stripe
-
Apply the dark band:
Using a soft fan brush, apply the satin charcoal glaze to the middle section. Paint right over the tape line and meet the bottom edge of the cream glaze. -
Overlap slightly:
I usually brush the grey glaze just slightly over the bottom edge of the cream glaze to create a fused transition, while being careful not to let it run too far up. -
Layering:
Apply 2-3 coats of the charcoal glaze, letting each coat dry in between layers, to ensure a solid, opaque dark grey color. -
Remove the tape:
This is the crucial moment: carefully peel off the tape strip while the grey glaze is still slightly damp. Don’t wait for it to be bone dry, or the glaze might chip. -
Clean the resist line:
If the tape removal left jagged edges, use a damp brush or a needle tool to gently neaten the line, revealing the raw clay body underneath.
Add Texture
Before bisque firing, use a carving tool to incise horizontal grooves in the clay where the dark grey stripe will go. This adds tactile depth when the glaze breaks over the edges.
Step 4: Final Touches
-
Check the wax line:
Inspect the bottom wax resist area. If any grey glaze dripped onto the wax, wipe it away cleanly with a sponge. -
Wipe the foot:
Give the very bottom of the mug one last wipe to ensure no glaze residue is left on the surface that will touch the kiln shelf. -
Dry:
Let the mug dry completely overnight. -
Fire:
Fire the mug to cone 6 (or whatever temperature your clay and glaze specifies) in an oxidation atmosphere.
Once cooled, you will have a stunning piece of functional art ready for your morning coffee
Loose Brushstroke Bands
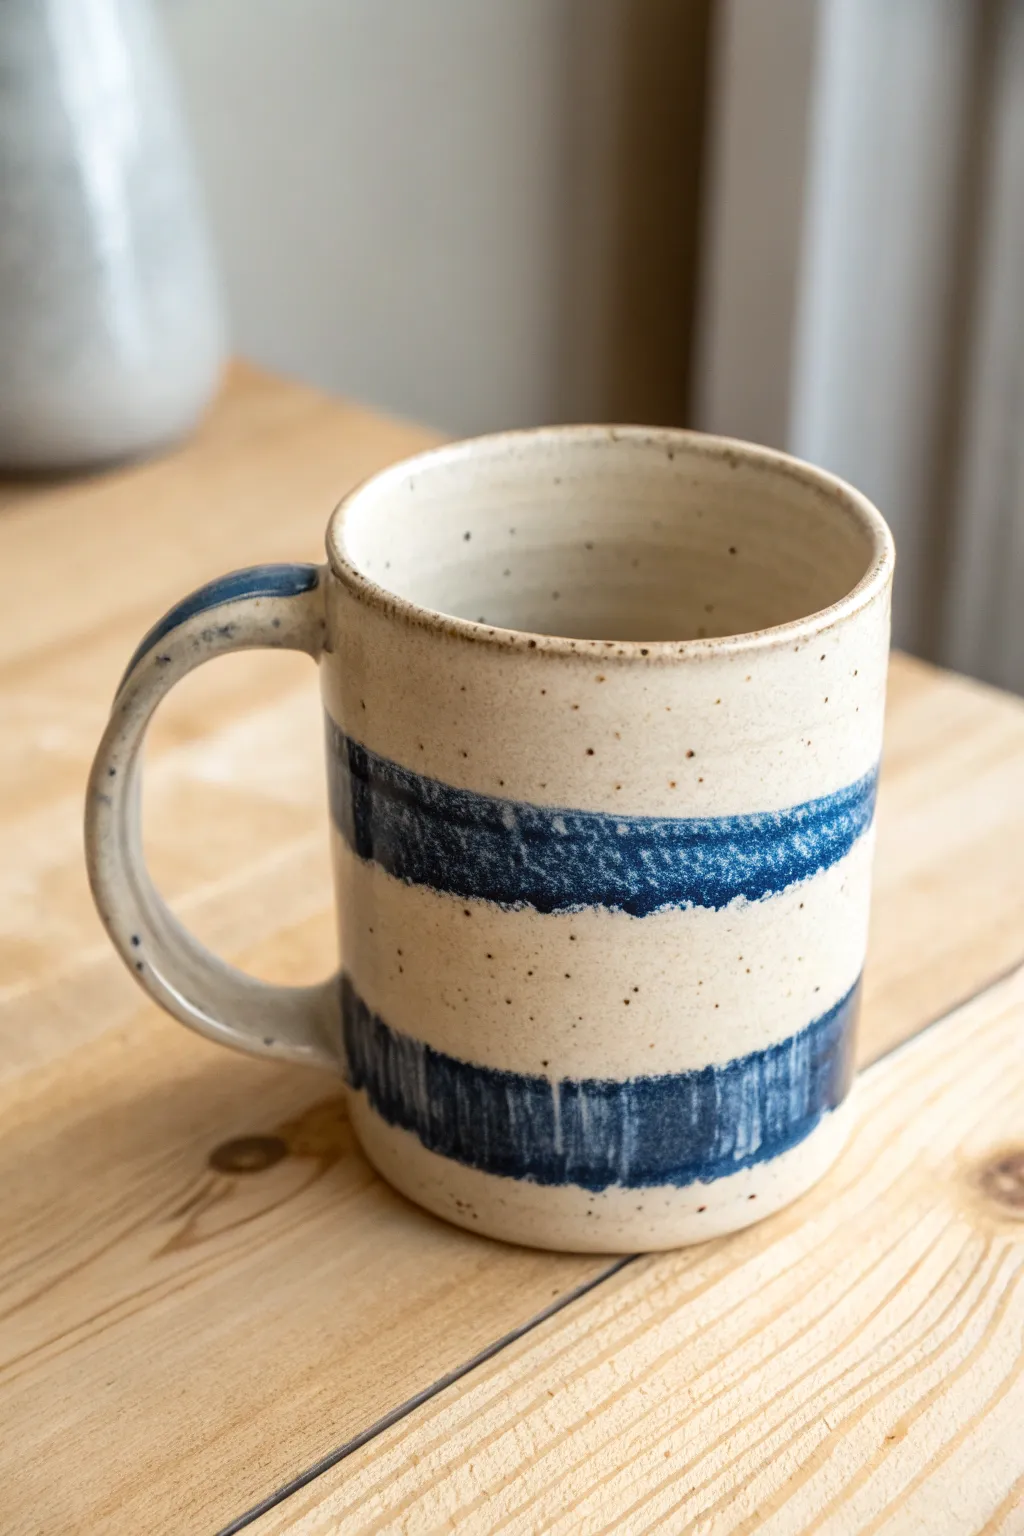
This project captures the relaxed essence of a seaside cottage with loose, painterly cobalt blue bands over a warm, speckled cream base. The beauty lies in the imperfect, streaky application of the blue, which allows the natural clay body and base glaze to interact beautifully.
Step-by-Step Guide
Materials
- Bisque-fired ceramic mug (stoneware clay recommended)
- Speckled Cream or Oatmeal glaze (dipping or brushing)
- Cobalt Carbonate wash (or Cobalt Blue underglaze)
- Medium-width flat oxide brush (hake or bamboo style)
- Wax resist emulsion
- Sponge for wiping
- Bucket of water
Step 1: Preparation & Base Glaze
-
Clean the Bisque:
Start by wiping down your bisque-fired mug with a slightly damp sponge. This removes any kiln dust or oils from handling that might repel the glaze. -
Wax the Foot:
Apply a coat of wax resist to the bottom foot ring of the mug and a few millimeters up the side. This saves you from having to wipe back glaze later and ensures a clean firing line. -
Mix the Base Glaze:
Stir your speckled cream glaze thoroughly. If you are dipping, ensure the consistency is like heavy cream. If brushing, pour a small amount into a separate container. -
Apply Base Coat:
Dip the mug entirely into the speckled cream glaze for a count of three. If brushing, apply 2-3 even coats, allowing each to dry to the touch in between. -
Check the Rim:
Inspect the rim for any drips or uneven spots. Gently smooth these out with your finger while the glaze is still powdery but not fully dry. -
Let it Dry:
Allow the base glaze to dry completely. It should feel room temperature to the touch, not cool or damp, before adding the decoration. I find waiting at least an hour gives the best surface for the next step.
Dry Brushing Tip
For visible brush strokes, don’t re-wet the brush constantly. Let the pigment run out as you drag the brush to create scratchy, textured ‘tails’ on the bands.
Step 2: Painting the Bands
-
Prepare the Cobalt Wash:
Mix a small amount of cobalt carbonate with water to create a wash. It should be relatively thin, similar to watercolor consistency, to allow for the streaky effect. -
Load the Brush:
Dip your flat, medium-width brush into the cobalt wash. Don’t overload it; you want the bristles to separate slightly as you drag them to create texture. -
Position the Mug:
Hold the mug steady by the handle or place it on a banding wheel if you have one. Position creates stability. -
Paint the Top Band:
With a swift, confident motion, sweep the brush horizontally across the middle-upper section of the mug. Don’t worry about making it perfectly straight; the charm is in the wave. -
Create the Texture:
As you pull the brush around, vary your pressure slightly. Pressing harder deposits more blue, while lifting slightly creates those dry-brush streaks seen in the photo. -
Paint the Bottom Band:
Reload your brush slightly—less than before—and paint the lower band near the base. Keep this one slightly darker or more saturated to ground the design. -
The Handle Detail:
With the remaining pigment on your brush, do a single quick swipe along the top curve of the handle. This ties the design together without overcoming the handle’s shape. -
Final Clean Up:
Check the waxed foot again. If any cobalt wash dripped onto the waxed area, wipe it away with a clean, damp sponge to prevent it from fusing to the kiln shelf.
Blue Too Dark?
If your cobalt bands fired nearly black, the wash was too concentrated. Next time, dilute the oxide with more water or mix it with a clear glaze medium.
Step 3: Firing
-
Kiln Loading:
Place the mug in the kiln, ensuring it’s not touching any other ware. The cobalt can sometimes fume slightly, so give it a little breathing room. -
Fire to Cone 6:
Fire the mug to Cone 6 (approx. 2232°F / 1222°C) in an oxidation atmosphere. This temperature matures the stoneware and allows the speckles in the base glaze to pop through. -
Cooling:
Allow the kiln to cool naturally until it hits room temperature before opening. Opening too early can cause the glaze to craze or the pot to crack.
Enjoy your morning coffee with the satisfaction of using a piece that feels both rustic and modern
Sponge-Dab Cloudy Texture
Achieve a soft, ethereal look on your pottery with this sponge-dabbing technique that mimics the gentle drift of pink clouds against a creamy sky. This project uses layering to create depth and a speckled, organic finish that feels wonderful in the hand.
How-To Guide
Materials
- Bisque-fired ceramic mug
- Cream or off-white matte glaze (base)
- Soft pink underglaze or glaze
- Light brown or tan reactive glaze (for mottling)
- Natural sea sponge
- Small synthetic sponge
- Glaze brushes (fan brush and detail brush)
- Bucket of clean water
- Wax resist (optional for foot ring)
- Kiln
Step 1: Preparation and Base Coat
-
Wipe and wax:
Begin by wiping down your bisque-fired mug with a damp sponge to remove any kiln dust. If you prefer a clean foot, apply a layer of wax resist to the bottom ring and let it dry completely. -
Mix the base glaze:
Stir your cream or off-white matte glaze thoroughly. You want a consistency similar to heavy cream to ensure opaque coverage without running. -
Apply the interior:
Pour the cream glaze inside the mug, roll it around to coat the entire inner surface, and pour out the excess. Wipe the rim immediately with a damp finger to keep it smooth. -
Apply the exterior base:
Using a fan brush, apply two even coats of the cream glaze to the exterior of the mug. Allow the first coat to dry to the touch before applying the second to prevent dragging the previous layer.
Too Heavy?
If the sponge leaves thick blobs instead of texture, your sponge is too wet or loaded with too much glaze. Blot it on paper towels before touching the mug.
Step 2: Creating the Cloudy Texture
-
Prepare the pink glaze:
Pour a small amount of your soft pink glaze onto a palette or shallow dish. Dampen your natural sea sponge and wring it out well so it is moist but not dripping. -
Sponge application:
Dip the textured face of the sea sponge into the pink glaze. Dab it lightly onto a scrap surface first to remove excess material. -
Create the clouds:
Gently press the sponge against the mug’s surface in random, drifting patterns. Focus on the middle and upper sections, leaving some of the cream base showing through for that wispy, cloud-like effect. -
Soften the edges:
While the pink glaze is still damp, take a slightly moist, clean synthetic sponge and very lightly pat the edges of your pink shapes. This blurs the transition between the pink and the cream background. -
Layering density:
Go back in with the pink-loaded sponge and add a second, denser layer to the centers of your cloud shapes to build visual depth.
Step 3: Adding Earthy Details
-
Prepare the brown glaze:
Dispense a small amount of the light brown reactive glaze. I find usually a little goes a long way here. -
Lower texture application:
Using a coarser part of your sponge, dab the brown glaze primarily around the bottom third of the mug. Allow it to fade upward into the pink clouds naturally. -
Speckling technique:
Load a stiff-bristled brush or toothbrush with the brown glaze. Hold it near the mug and flick the bristles to create a fine spray of speckles over the pink and cream areas. This mimics iron specks often found in clay bodies. -
Rim definition:
Dip a detail brush into the brown glaze and run it very lightly along the rim of the mug. Don’t make a solid line; let it break and vary in thickness to maintain the rustic aesthetic.
Level Up: Handle Contrast
Leave the handle purely cream or paint it a solid contrasting color like the brown used for speckles to frame the cloudy body of the mug.
Step 4: Finishing and Firing
-
Clean the foot:
Use a damp sponge to firmly wipe back any glaze that may have dripped onto the foot ring or the very bottom edge of the mug. -
Final drying:
Let the mug dry completely for at least 24 hours. The glazes should be powdery and dry to the touch before entering the kiln. -
Firing:
Load the mug into the kiln and fire according to the specific cone requirements of your chosen glazes (typically Cone 5 or 6 for this type of stoneware look). -
Cooling:
Allow the kiln to cool naturally before opening. Removing the piece too early can cause thermal shock and ruin the subtle matte finish.
Once cooled, your mug is ready to hold your morning coffee in its dreamy, cloud-wrapped embrace
Controlled Drip Glaze Moment
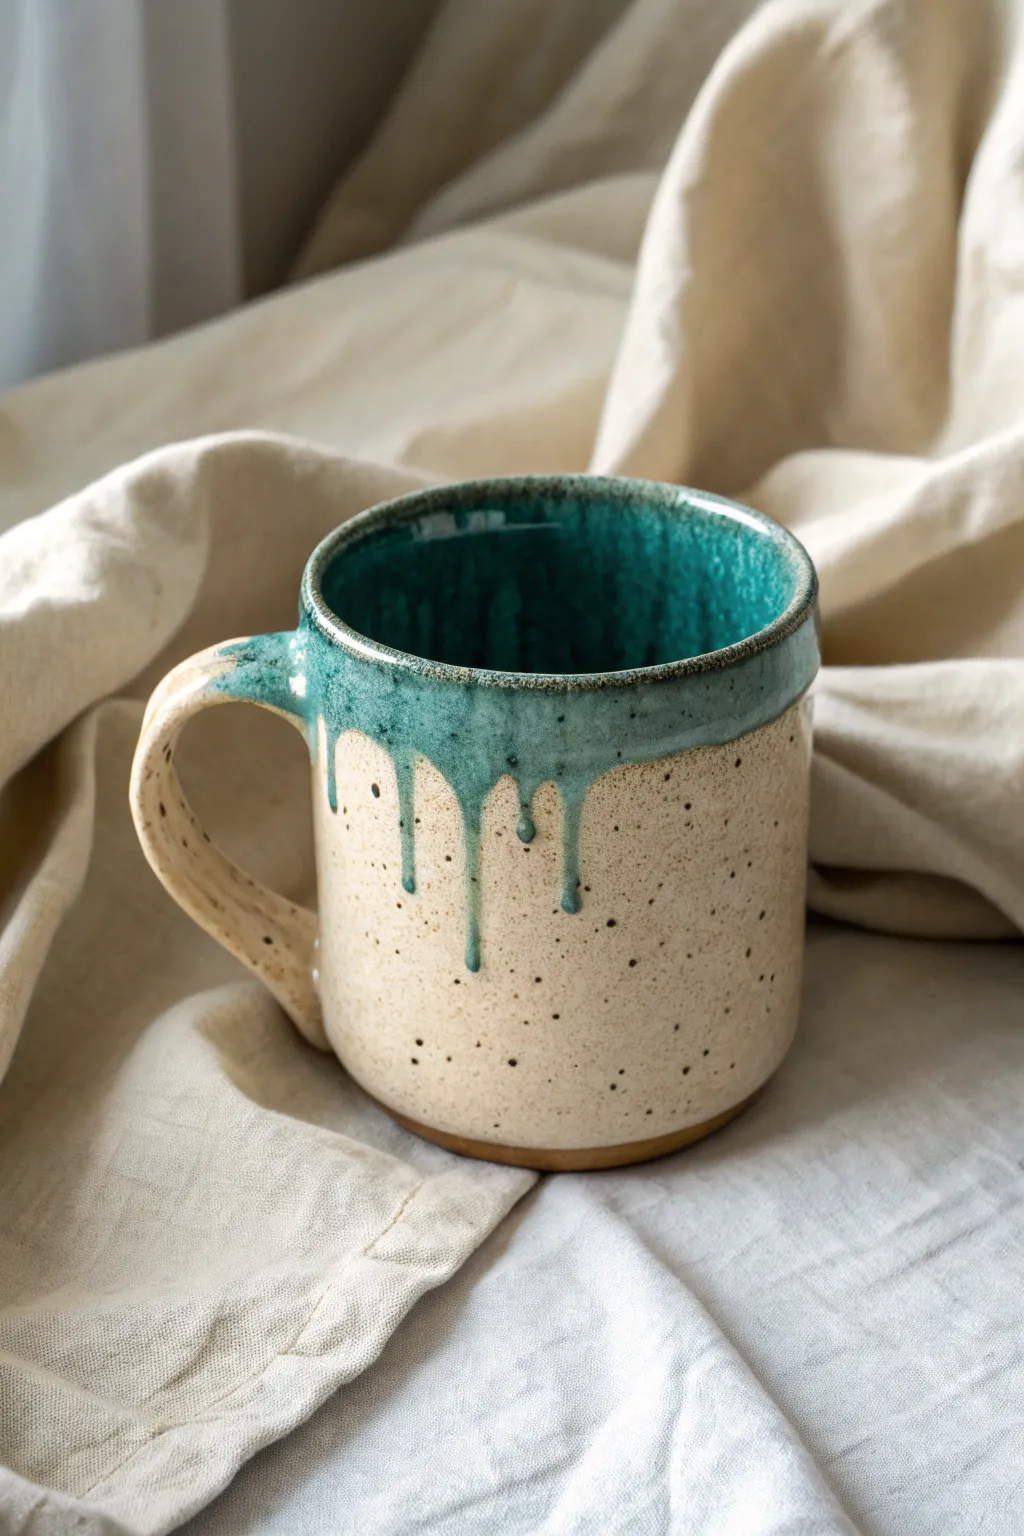
Achieve a stunning contrast between rustic warmth and cool elegance with this dual-glaze technique. The speckled cream base provides a neutral canvas, while the luscious teal drip adds a dynamic, organic touch to the rim.
Step-by-Step Tutorial
Materials
- Stoneware clay body (grogged or speckled clay recommended)
- Pottery wheel
- Throwing tools (sponge, rib, wire cutter)
- Trimming tools
- Bisque firing kiln access
- Glaze kiln access (Cone 5 or 6 depending on glaze)
- Speckled cream or oatmeal matte glaze
- Translucent teal or turquoise gloss glaze
- Wax resist
- Sponge
- Glaze brush (soft bristle)
Step 1: Throwing and Shaping
-
Center the clay:
Start with about 1-1.25 lbs of well-wedged stoneware clay. Center it firmly on the wheel head, ensuring there is no wobble before you begin opening. -
Open and pull:
Open the clay and pull up the walls to form a cylinder. Aim for a straight-sided shape or a very subtle taper inwards at the top, keeping the walls even—about 1/4 inch thick is ideal. -
Refine the rim:
Compass the rim with a chamois or a small strip of plastic to create a smooth, rounded edge. This is crucial for drinking comfort and helps the glaze break beautifully later. -
Undercut and wire off:
Use a wood tool to create a slight undercut at the base of the mug, which creates a visual lift. Run your wire tool underneath to separate the pot from the wheel.
Drips Too Short?
If your drips didn’t run enough, your secondary glaze might be too stiff. Next time, add a tiny amount of water or flux to the teal glaze, or fire with a slight hold at top temperature.
Step 2: Trimming and Handle
-
Trim the foot:
Once leather hard, center the mug upside down on the wheel. Trim a clean foot ring, removing excess weight from the bottom while mirroring the interior curve. -
Pull a handle:
Pull a strap of clay for the handle. For this rustic look, keep the handle slightly thick and substantial. Let it stiffen slightly on a board until it holds an arch. -
Attach the handle:
Score and slip the attachment points on both the mug body and handle. Press firmly to join, smoothing the seams with a damp sponge or modeling tool to ensure a strong bond. -
Slow drying:
Cover the mug loosely with plastic to equalize the moisture content between the handle and body. Let it dry slowly to the bone-dry stage before bisque firing.
Layering Logic
Always test your glaze combination on a test tile first. Some glazes react chemically when layered, resulting in bubbles or crawling rather than a smooth melt.
Step 3: Glazing Process
-
Clean the bisque:
After the bisque fire, wipe the entire mug down with a clean, damp sponge to remove any dust that could repel the glaze or cause pinholing. -
Wax the foot:
Apply a coat of wax resist to the bottom of the foot ring and about 1/4 inch up the side. This ensures a clean line and saves your kiln shelves from drips. -
Apply base glaze:
Dip the entire mug into your speckled cream matte glaze. Hold it under for 3-4 seconds for an even coat. Shake off excess drips gently as you lift it out. -
Clean the rim:
Once the base coat is dry to the touch, very lightly sponge the rim if the glaze is too thick, ensuring the lip is defined. -
Dip the rim:
Now for the teal. Invert the mug and dip just the top 1.5 to 2 inches into the teal gloss glaze. Hold it briefly—about 2 seconds—so the layer isn’t too heavy. -
Encourage the drips:
Immediately after dipping the rim, set the mug upright. I like to give it a gentle tap on the table to help gravity start pulling the wet teal glaze down into drips. -
Touch up drips:
If the drips aren’t forming naturally, use a loaded glaze brush to add a drop of teal glaze to the bottom of the teal band, encouraging it to run further. -
Check the bottom:
Before firing, double-check the foot ring. If any cream glaze has dripped onto the waxed area, wipe it entirely clean with a sponge.
Step 4: Firing
-
Load the kiln:
Place the mug on a kiln shelf. If you think your drips might run long, place a ‘cookie’ or catch-plate under the mug just in case. -
Final Fire:
Fire to the maturation temperature of your clay and glaze combination (typically Cone 5 or 6 for stoneware). Allow the kiln to cool naturally.
Unload your kiln to reveal a beautiful daily-use mug that perfectly balances earthy texture with a splash of vibrant color
Reactive Layering at the Overlap
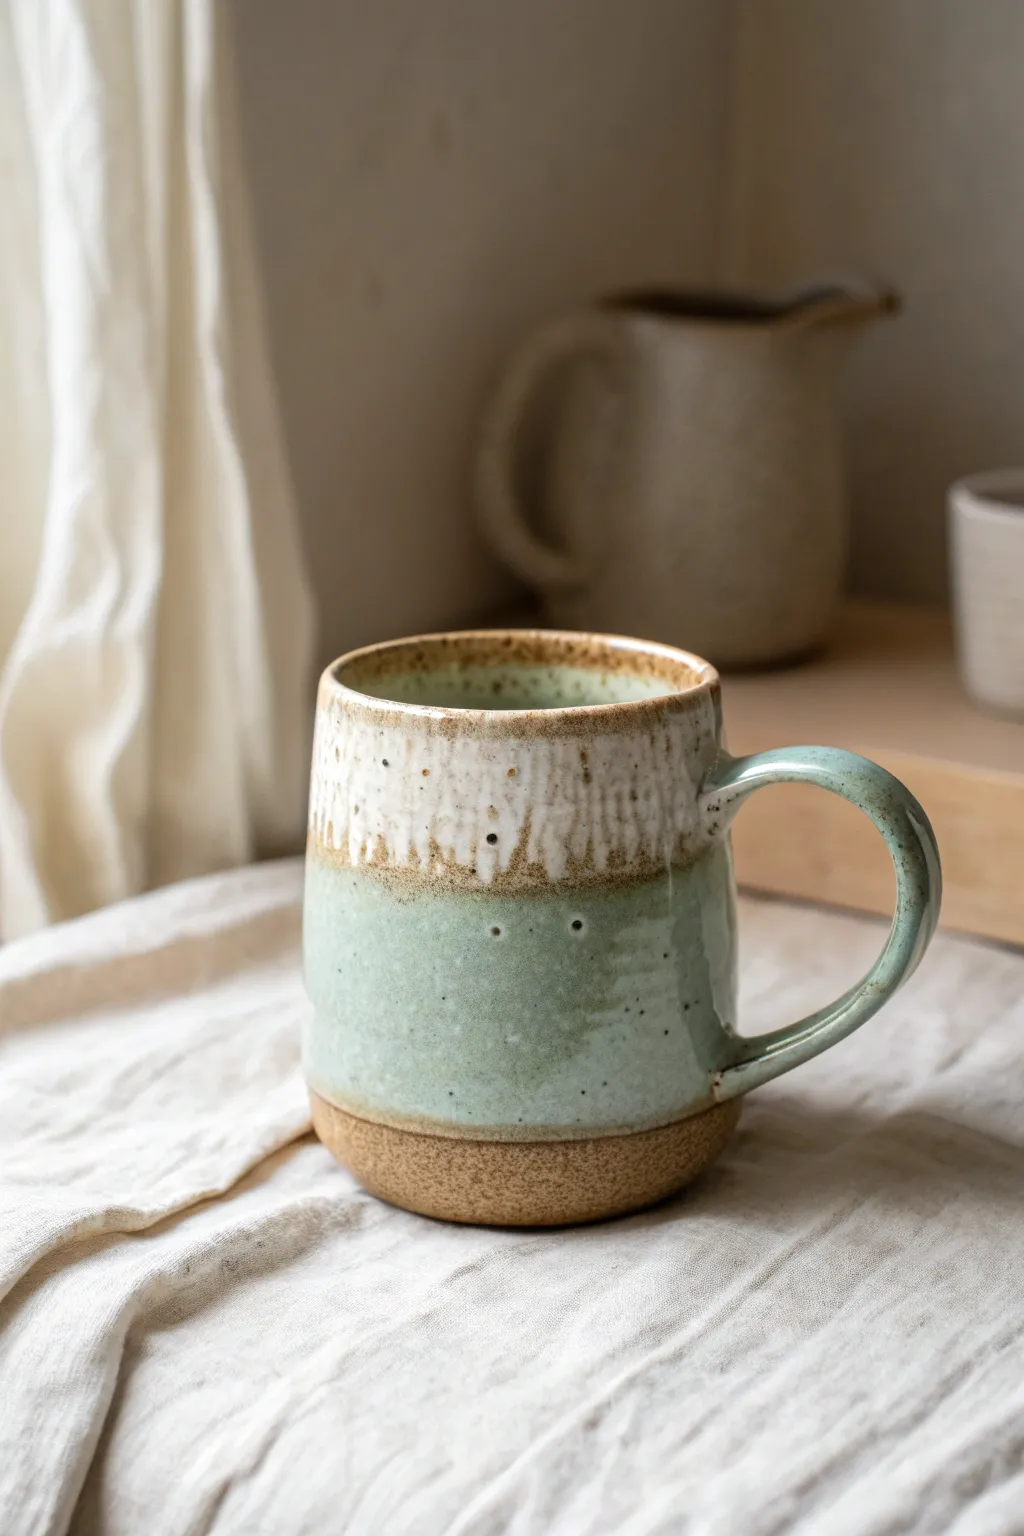
Achieve a stunning, coastal-inspired look by layering reactive glazes to create a unique transition zone. This tutorial guides you through glazing a stoneware mug to get that distinct separation between the raw clay base, the celadon mid-section, and the creamy, flowing rim.
Step-by-Step Guide
Materials
- Bisque-fired stoneware mug
- Wax resist (liquid latex or wax emulsion)
- Sponge or brush for wax application
- Celadon glaze (Mint or light green/blue)
- Rutile-based cream or oatmeal glaze (for the rim)
- Glaze tongs
- Clean bucket of water and sponge
- Kiln (cone 5/6 capability)
Step 1: Preparation & Waxing
-
Clean the bisque:
Start by wiping down your bisque-fired mug with a slightly damp sponge to remove any kiln dust or oils from your hands, ensuring the glaze adheres properly. -
Mark the raw clay line:
Decide how much raw clay you want visible at the bottom. Aim for about 1/2 to 3/4 of an inch from the foot ring up the wall. -
Apply wax resist:
Using a brush or sponge dedicated to wax, carefully apply a smooth band of wax resist to that bottom section and the entire underside of the foot. -
Let the wax cure:
Allow the wax resist to dry completely. It needs to be hard to the touch so it won’t smudge when dipped into the glaze later.
Don’t Run Too Low
Keep the second dip (the rim) shallow. If you dip too far down the mug, the double-thick glaze layer might run all the way off the pot onto the kiln shelf.
Step 2: Base Glaze Application
-
Mix the celadon:
Stir your mint celadon glaze thoroughly. You want a consistency similar to heavy cream for an even coat. -
Dip the interior:
Pour the celadon glaze inside the mug, roll it around to coat every surface, and pour the excess back out efficiently. -
Clean the rim immediately:
While the interior is drying slightly, use a damp sponge to wipe any drips off the rim to keep your dipping line clean. -
The main dip:
Using glaze tongs, dip the exterior of the mug into the celadon glaze. Submerge it until the glaze level hits your wax line. -
Shake and lift:
Hold it submerged for about 3 seconds, then lift and give a gentle shake to remove excess drips. The wax will repel the glaze at the bottom. -
Clean the foot:
Even with wax, beads of glaze might form. Use a damp sponge to wipe the waxed area perfectly clean, revealing the speckles in the clay body.
Boost the Melt
For more dramatic drips, apply a very thin wash of flux or clear glaze right over the seam where the two colors meet before firing.
Step 3: Layering the Rim
-
Prepare the second glaze:
Stir your cream or oatmeal rutile glaze. This type of glaze is crucial because it needs to be slightly fluid to create the drippy effect. -
Wait for dryness:
Ensure the first layer of celadon is dry to the touch—usually about 15-20 minutes—before adding the second layer. -
The overlap dip:
Turn the mug upside down and dip just the top 1.5 to 2 inches into the cream glaze. -
Hold briefly:
Keep it submerged for just 1-2 seconds. A quick dip prevents the glaze setup from becoming too thick. -
Encourage interaction:
Use your finger to gently rub the very edge where the two glazes meet if you want a softer transition, or leave it sharp for a bold break.
Step 4: Firing
-
Check for thickness:
Inspect the rim. If the overlap looks excessively thick, you can gently sand it down a tiny bit once dry to prevent darker crawling. -
Load the kiln:
Place the mug on a kiln shelf. Since the rim glaze is fluid, ensure the foot is perfectly clean so no glaze runs onto the shelf. -
Fire to cone 6:
Run a standard medium-speed firing schedule to cone 6 (approx 2232°F). I usually add a 10-minute hold at the top temperature to encourage that beautiful melting interaction. -
Cool slowly:
Allow the kiln to cool naturally to room temperature before opening to prevent thermal shock.
Unload your kiln to reveal a beautifully textured mug where the glazes have mingled to create a sandy shoreline effect
Glaze Trailed Swirls and Doodles
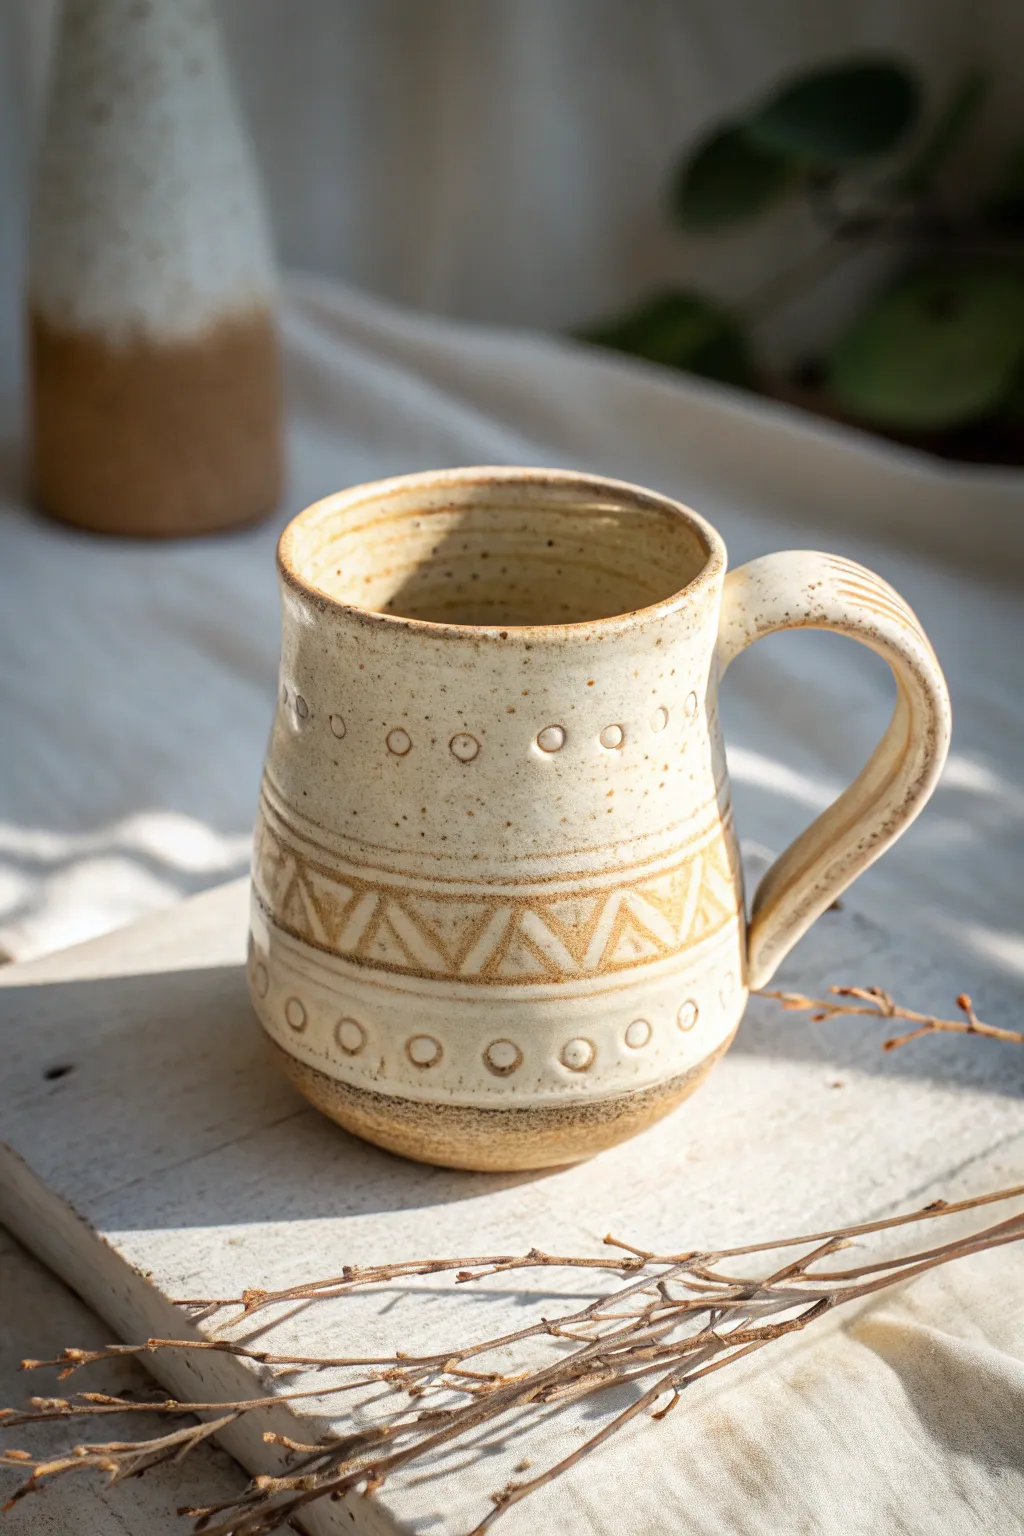
This project highlights the beauty of raw clay texture peeking through creamy glaze, using trailing and resist techniques to create geometric patterns. The result is a cozy, tactile mug with earthy triangles and delicate dots that feel great in the hands.
Detailed Instructions
Materials
- Speckled stoneware clay (e.g., Lagunitas or similar)
- Pottery wheel and throwing tools
- Loop tool for trimming
- Slip trailer or fine-point glazing bottle
- Wax resist (emulsion type)
- Sponge
- Creamy white matte glaze (semi-opaque)
- Kiln (bisque and cone 6 glaze firing capabilities)
Step 1: Forming the Base
-
Center and throw:
Begin by centering about 1 lb of speckled stoneware clay on the wheel. Throw a cylinder that is slightly wider at the bottom, gently bellying it out in the lower third for a comfortable hold. -
Shape the rim:
Refine the rim by compressing it with a chamois or sponge. Create a slight outward flare at the very top lip to make drinking pleasant. -
Trim the foot:
Once the mug is leather hard, center it upside down on the wheel. Use a loop tool to trim a neat foot ring, removing excess weight from the bottom curve while leaving the walls even. -
Attach the handle:
Pull a strap handle from a carrot-shaped nub of clay. Attach it securely to the leather-hard body, blending the connection points thoroughly. I like to add a subtle decorative groove down the spine of the handle for extra visual interest.
Wax Resist Woes
If your wax lines are blobs rather than lines, your resist is likely too thick. Thin it slightly with water or use a smaller gauge tip on your trailer.
Step 2: Creating the Relief Pattern
-
Plan the zones:
Wipe the mug with a damp sponge to smooth any burrs. The design features a central band of triangles flanked by rows of dots. Mentally divide your vertical space, leaving the top rim and bottom foot strictly plain. -
Apply wax resist design:
Pour liquid wax resist into a slip trailer or a bulb syringe with a fine metal tip. You are drawing the *lines* and *dots* that will remain raw clay. -
Trail the top dots:
Start about an inch below the rim. Squeeze the trailer gently to deposit a row of small, evenly spaced circles of wax resist around the circumference. -
Draw the geometric band:
Below the dots, trail two parallel horizontal lines of wax around the mug to define a band. Inside this band, draw a continuous zigzag line to create a series of triangles. -
Detail the triangles:
Inside each triangle created by your zigzag, add a smaller, nested triangle shape with the wax. This creates that ‘double line’ look seen in the photo. -
Add lower details:
Finish the wax work by adding a second row of resist dots near the bottom of the form, mirroring the top row. Let the wax dry completely—it should feel tacky but not wet.
Pro Tip: Depth Control
For deeper relief texture, paint the wax on the greenware, then gently wipe the *unwaxed* areas with a wet sponge to erode the clay slightly before bisque firing.
Step 3: Glazing and Firing
-
Bisque fire:
Load the thoroughly dried greenware into the kiln and bisque fire to Cone 04. The wax will burn off during this stage, leaving the raw clay exposed where you drew. -
Prepare the glaze:
Mix your creamy white matte glaze well. It should be the consistency of heavy cream to ensure it breaks nicely over the texture. -
Wax the foot:
Apply a coat of standard wax resist to the bottom foot ring and the underside of the mug to prevent glaze from running onto the kiln shelf. -
Dip the mug:
Using glazing tongs or your hand, submerge the mug into the glaze bucket for about 3 seconds. Pull it out smoothly and shake it gently to remove excess drips. -
Reveal the pattern:
The glaze will naturally bead up over the areas you waxed before bisque firing (which are now just raw bisque). Use a damp sponge to firmly wipe these waxed areas clean, revealing the speckled clay body underneath the glaze. -
The second reveal:
If the glaze looks too thick over your triangle lines, you may need a second pass with the sponge. You want sharp, clean lines of raw clay contrasting against the white glaze. -
Glaze fire:
Once the glaze is dry, fire the mug to Cone 6 (or the temperature specific to your clay and glaze combination) in an oxidation atmosphere.
Enjoy your morning coffee with the delightful sensory experience of smooth glaze meets gritty clay
Marbled Pour With Flowy Veins
Achieve this mesmerizing, organic look that mimics the natural flow of river currents or delicate silk fabric swirling in water. This marbled pour technique combines soft teal, muted rose, and creamy beige glazes to create distinct, vein-like patterns that wrap beautifully around a curved surface.
Step-by-Step
Materials
- Bisque-fired ceramic mug
- Liquid layering glazes (Cream/Beige, Teal/Light Blue, Rose/Terracotta)
- Small pouring cups or disposable spoons
- Clean bucket or bowl of water
- Wax resist or latex masking fluid
- Sponge
- Catch basin or plastic tray
- Lazy Susan/banding wheel (optional)
- Soft fan brush
Step 1: Preparation & Base Coat
-
Clean surface:
Begin by wiping down your bisque-fired mug with a damp sponge. This removes any kiln dust or oils from handling that might resist the glaze application. -
Protect the foot:
Carefully apply wax resist or latex masking fluid to the bottom foot of the mug and up the side about 1/4 inch. This prevents glaze from fusing your mug to the kiln shelf. -
Mix base glaze:
Stir your base cream or speckled beige glaze thoroughly. You want a consistency similar to heavy cream for the best coverage. -
Pour the inside:
Pour a generous amount of the cream glaze inside the mug. Rotate the mug slowly to coat the entire interior, then pour out the excess. -
Dip the exterior:
Dip the exterior of the mug into the cream base glaze. Hold it there for about 3 seconds to ensure an even coat. -
Initial dry:
Allow this base layer to dry until it is powdery to the touch. It shouldn’t be wet, but it doesn’t need to be bone dry yet.
Glaze Viscosity Tip
Glazes that are too thick won’t marble well. Add water by the teaspoon to your accents until they flow like melted ice cream.
Step 2: Creating the Marble Effect
-
Prepare accent colors:
Pour small amounts of your teal and rose glazes into separate small cups. I like to add a tiny splash of water to these to make them slightly more fluid than the base glaze. -
Set up the pour:
Place your mug upside down on a support stands inside your catch basin. A banding wheel works great here if you have one. -
Load the ladle:
Take a large spoon or small ladle. Fill it mostly with the cream glaze, then carefully drizzle a few drops of teal and rose directly onto the spoon’s surface. Don’t mix them. -
The pour motion:
Starting at the bottom (which is currently facing up), pour the contents of the ladle down the side of the mug. Tilt your hand slightly to let gravity pull the different colors in streaks. -
Repeat around perimeter:
Rotate the mug slightly and repeat the pour process. Vary the amount of teal or rose in your ladle to create interest—some sections can be heavier on color, others more neutral. -
Connect the flows:
As the glaze runs down towards the rim, gentle tilt the mug itself if needed to encourage the streams to merge and marbleize naturally. -
Add detail veins:
For thinner veins, dip a chopstick or thin brush into the colored glaze and let a single drop run down a plain section of cream glaze. -
Address the handle:
Pouring over handles can be tricky. Use a soft fan brush to dab specific marbled areas onto the handle rather than pouring, to prevent huge drips.
Step 3: Finishing & Firing
-
Clean the rim:
Once the drips reach the rim (which is at the bottom), carefully wipe away any excess beads of glaze with a sponge so they don’t run onto the kiln shelf. -
Check the foot ring:
Flip the mug right-side up once it’s safe to touch. Double-check your waxed foot ring and scrape away any rogue glaze drips with a fettling knife. -
Final dry:
Let the mug dry completely overnight. This thick application needs more time to lose moisture than a standard single dip. -
Fire:
Fire the mug to the temperature recommended by your glaze manufacturer (usually Cone 5 or 6 for mid-fire stoneware).
Muddled Colors?
If your colors are turning muddy gray instead of distinct swirls, you are over-mixing in the spoon. Let them sit on top of each other and mix only as they pour.
Now you have a stunning, geology-inspired mug ready for your morning coffee
Bubble Texture Crater Glaze
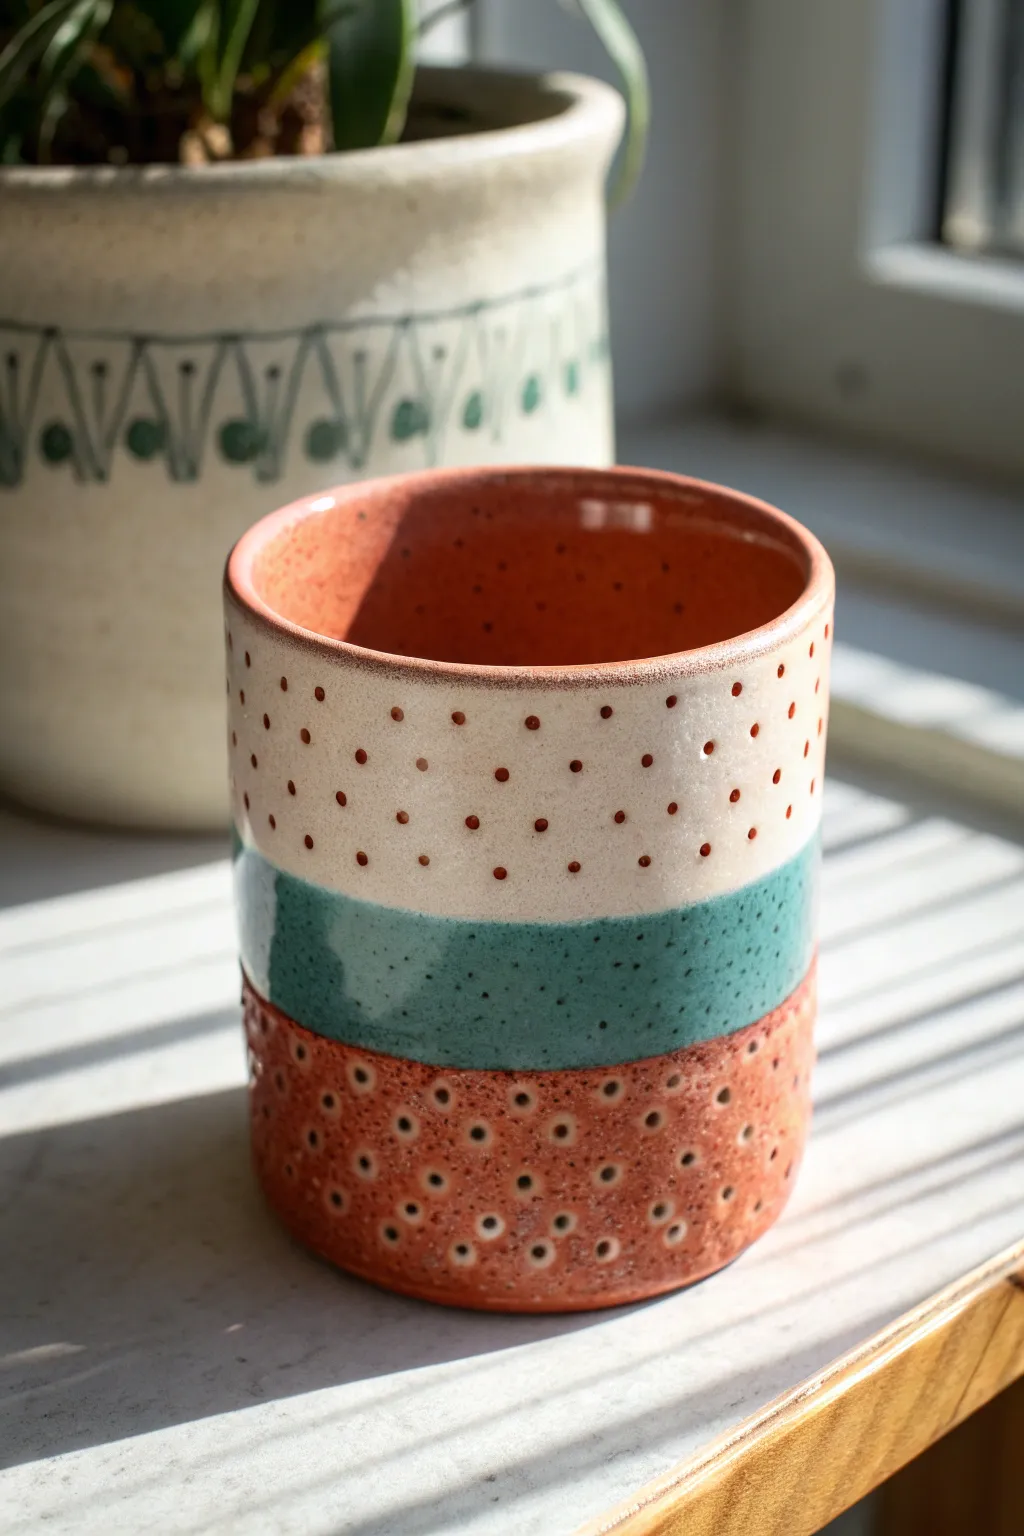
This mug plays with contrasting finishes, combining a smooth teal center with earthy, crater-textured bands on top and bottom. The satisfying tactile quality comes from leaving the raw clay exposed at the base while creating a speckled, pinhole effect on the upper rim.
How-To Guide
Materials
- Bisque-fired ceramic mug (wheel-thrown or hand-built)
- Red stoneware clay body (improves the contrast)
- White matte glaze
- Glossy teal/turquoise celadon glaze
- Glossy reddish-brown liner glaze (food safe)
- Wax resist emulsion
- Sponge or brush for wax application
- Needle tool or stiff bristle brush
- Clean bucket of water
- Soft fan brush
Step 1: Interior Glazing
-
Clean the bisque:
Start by wiping down your bisque-fired mug with a damp sponge. This removes any dust or oils from handling that might interfere with glaze adhesion. -
Pour the liner:
Pour your glossy reddish-brown glaze into the inside of the mug. Fill it about halfway, then rotate the mug as you pour the glaze out to coat the entire interior surface evenly. -
Clean the rim:
Immediately wipe away any drips that may have run over onto the exterior rim. The outside needs to be pristine for the next steps.
Don’t Over-Sponge
When cleaning glaze off the wax resist, use a damp sponge, not a wet one. Too much water can re-wet the surrounding glaze and cause it to crawl or run.
Step 2: Creating the Textured Bands
-
Mark the sections:
Using a pencil, lightly mark the mug’s exterior into three horizontal sections. Don’t worry about the lines; the kiln heat will burn the graphite away later. -
Wax the middle band:
Apply a coat of wax resist to the middle band area. This protects the space reserved for the teal color while we work on the top and bottom textures. -
Apply the white glaze:
Dip the top third of the mug (the rim area) into the white matte glaze. Hold it for just a second or two to ensure an even coat. -
Create the pinholes:
While the white glaze is drying but still damp, use a stiff brush or a needle tool to gently poke or stipple the surface. You want to reveal tiny specks of the dark clay body underneath without scraping large chunks off. -
Texture the base:
For the bottom reddish-brown band, we aren’t glazing it, but we want texture. If your clay wasn’t textured during throwing, use a small tool to press uniform dimples into the bare clay now, or apply a very thin wash of iron oxide and wipe it back to highlight the clay’s natural grit.
Add Oxide Wash
For deeper contrast in the pinholes, brush a black iron oxide wash over the white glaze and sponge it off before firing. It settles in the pits.
Step 3: Applying the Center Color
-
Remove the resist:
Wait for the top glaze to fully dry. If you used a wax resist that needs peeling, remove it now. If it’s a burn-off wax, you might need to clean any stray white glaze off the waxed area with a damp sponge. -
Wax the finished areas:
Apply wax resist carefully over the white top band and the textured raw clay bottom band. This isolates the middle strip. -
Brush on the teal:
Using a soft fan brush, apply the glossy teal glaze to the center band. I find brushing gives more control here than dipping, allowing you to get crisp lines against the textured sections. -
Apply second coat:
Once the first coat of teal loses its sheen, apply a second coat to ensure opacity and depth of color. -
Clean the distinct lines:
Use a damp sponge or a clean brush to tidy up the boundaries between the three bands. The lines should be straight and crisp.
Step 4: Firing and Finishing
-
Dry completely:
Let the mug dry for at least 24 hours. Any moisture trapped in the clay walls can cause issues during the firing. -
Wipe the foot:
Double-check the very bottom of the mug (the foot ring) is free of glaze so it doesn’t fuse to the kiln shelf. -
Fire to temperature:
Load the kiln and fire to the maturation temperature of your specific clay and glaze combination (likely Cone 5 or 6 for stoneware). -
Sand the bottom:
Once fired and cooled, use high-grit sandpaper to smooth the unglazed bottom section if the texture feels too rough against the skin.
Once cooled, fill your new tactile mug with coffee and enjoy the mix of smooth and rough textures
Crackle Glaze With Highlighted Lines
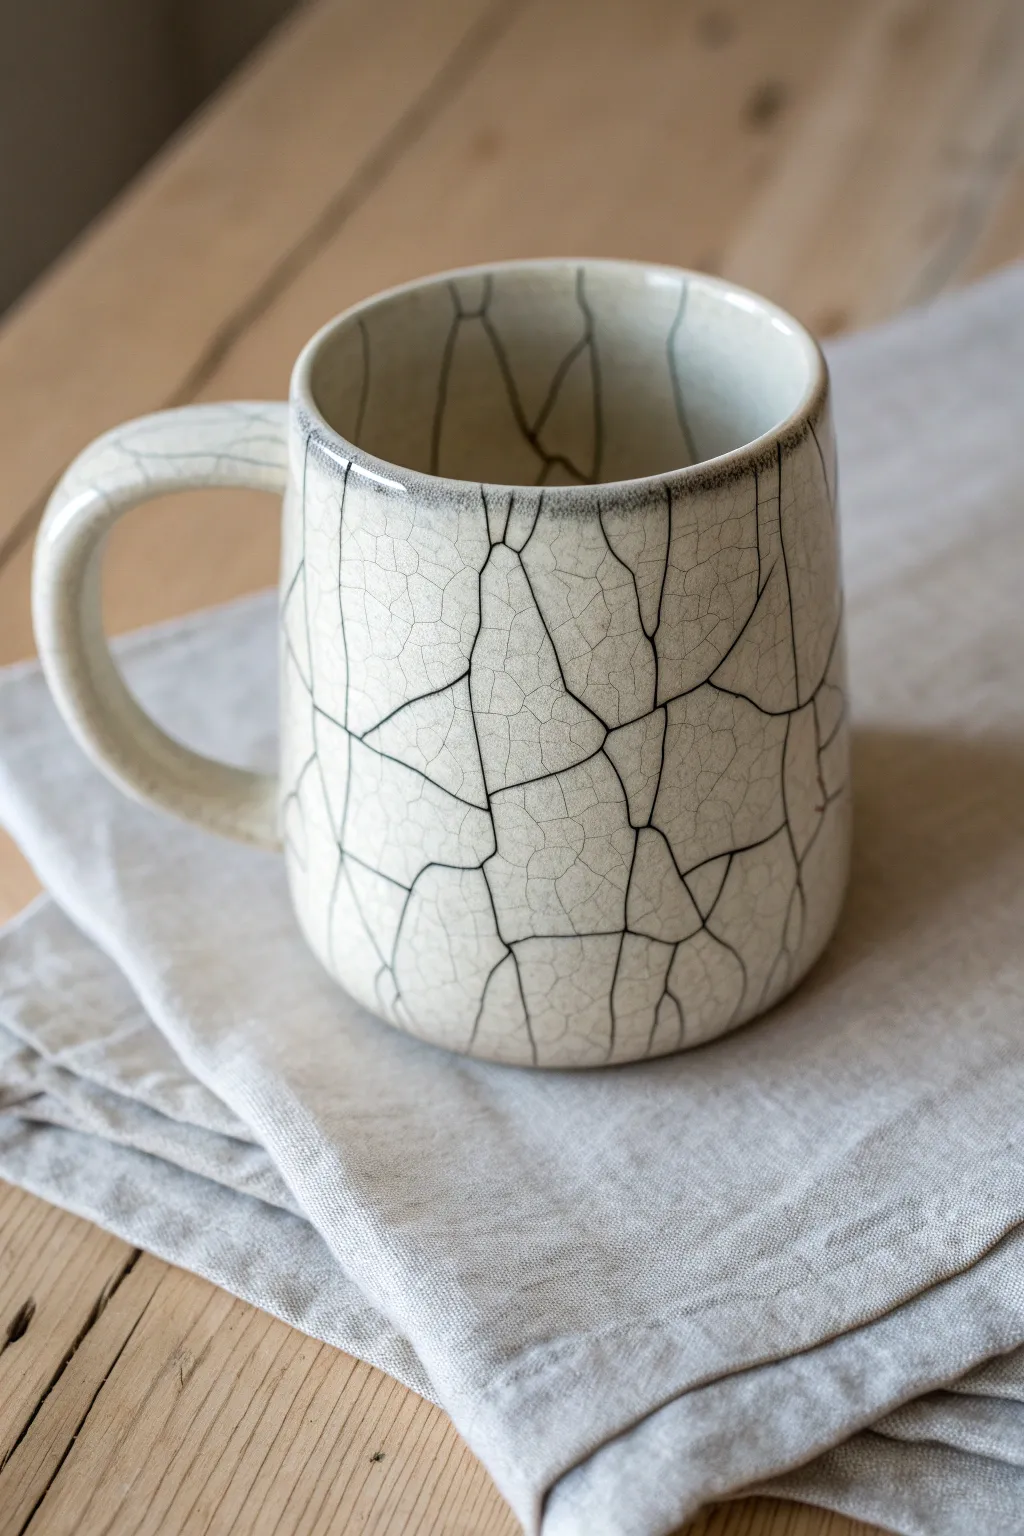
This technique transforms a simple ceramic mug into a stunning piece of art featuring an intricate network of darkened veins. By using a specialized crackle glaze and enhancing the fissures with India ink or a dark stain, you create a dramatic, antique-inspired finish that looks different every time.
Detailed Instructions
Materials
- Bisque-fired ceramic mug
- Commercial crackle glaze (white or clear)
- Glaze brush or dipping tongs
- India ink (black) or black masonry stain
- Latex or nitrile gloves
- Soft cloth or sponge
- Water container
- Kiln
Step 1: Glazing and Firing
-
Prepare your bisque:
Start with a clean, dust-free bisque-fired mug. Use a damp sponge to wipe away any fettling dust or debris that might interfere with the glaze adhesion. -
Mix the glaze thoroughly:
Stir your commercial crackle glaze well. These glazes rely on a specific coefficient of expansion to crack, so ensuring the suspension is uniform is critical for a consistent effect. -
Apply the first coat:
Using a soft fan brush, apply a smooth, even coat of crackle glaze to the inside of the mug. I find it easier to do the interior first to avoid messing up the exterior later. -
Glaze the exterior:
Apply the glaze to the outside and handle. If you are dipping, use tongs to submerge the mug for about 3 seconds, then let the excess drip off completely. -
Apply a second coat:
Once the first layer is dry to the touch, apply a second coat if you are brushing. A slightly thicker application often encourages larger, more distinct cracks during cooling. -
Clean the foot:
Wipe the foot ring of your mug completely clean with a wet sponge. Any glaze left here will fuse your mug to the kiln shelf. -
Fire the mug:
Load the mug into the kiln and fire to the cone temperature recommended by your glaze manufacturer (usually Cone 06 or Cone 6). Let the kiln cool naturally.
Listen for the ‘Ping’
Crackle glazes often ‘ping’ audibly as they cool and crack. Removing the piece from the kiln slightly warm (safely!) can increase thermal shock and create deeper cracking.
Step 2: Inking the Cracks
-
Protect your hands:
Put on a pair of latex or nitrile gloves. India ink is very staining and will settle into the lines of your fingerprints just as easily as the mug’s glaze. -
Apply the ink:
Brush a generous amount of black India ink (or a strong black tea/coffee wash for a subtle look) all over the surface of the fired mug. Ensure it seeps into every crack. -
Work the ink in:
Use your gloved fingers or a sponge to rub the ink into the surface circular motions. I like to really massage it in to ensure deep penetration into the fissure network. -
Wipe away excess:
Immediately take a slightly damp soft cloth and wipe the surface. You want to remove the ink from the smooth glaze tiles while leaving it trapped in the cracks. -
Clean the rim:
Pay attention to the rim area. You can leave a little extra ink accumulated near the top edge for that shadowed, rustic look seen in the photo, or wipe it clean for a sharper finish. -
Repeat if necessary:
If the lines aren’t dark enough for your taste, let the first pass dry and repeat the inking process. Layering can build depth. -
Let it dry completely:
Allow the mug to sit for 24 hours. This gives the ink time to fully dry and set inside the micro-fissures of the glaze. -
Seal (Optional):
While India ink is permanent in the ceramic pores, firing the piece one more time to a low temperature (like a luster firing) can permanently set stains if you used specialized ceramic oxides instead of ink.
Colorful Veins
Don’t limit yourself to black ink. Try using colored acrylic washes or colored India inks (like blue or sepia) to highlight the cracks for a totally different vibe.
Now you have a beautifully textured mug that feels ancient and modern all at once