Painting a mug is one of my favorite quick studio treats because it turns an everyday sip into something that feels totally yours. Here are mug painting ideas that look great on a curved surface, from classic patterns you can nail in one sitting to artsy designs that feel like a little masterpiece.
Classic Polka Dots in a Clean Color Palette
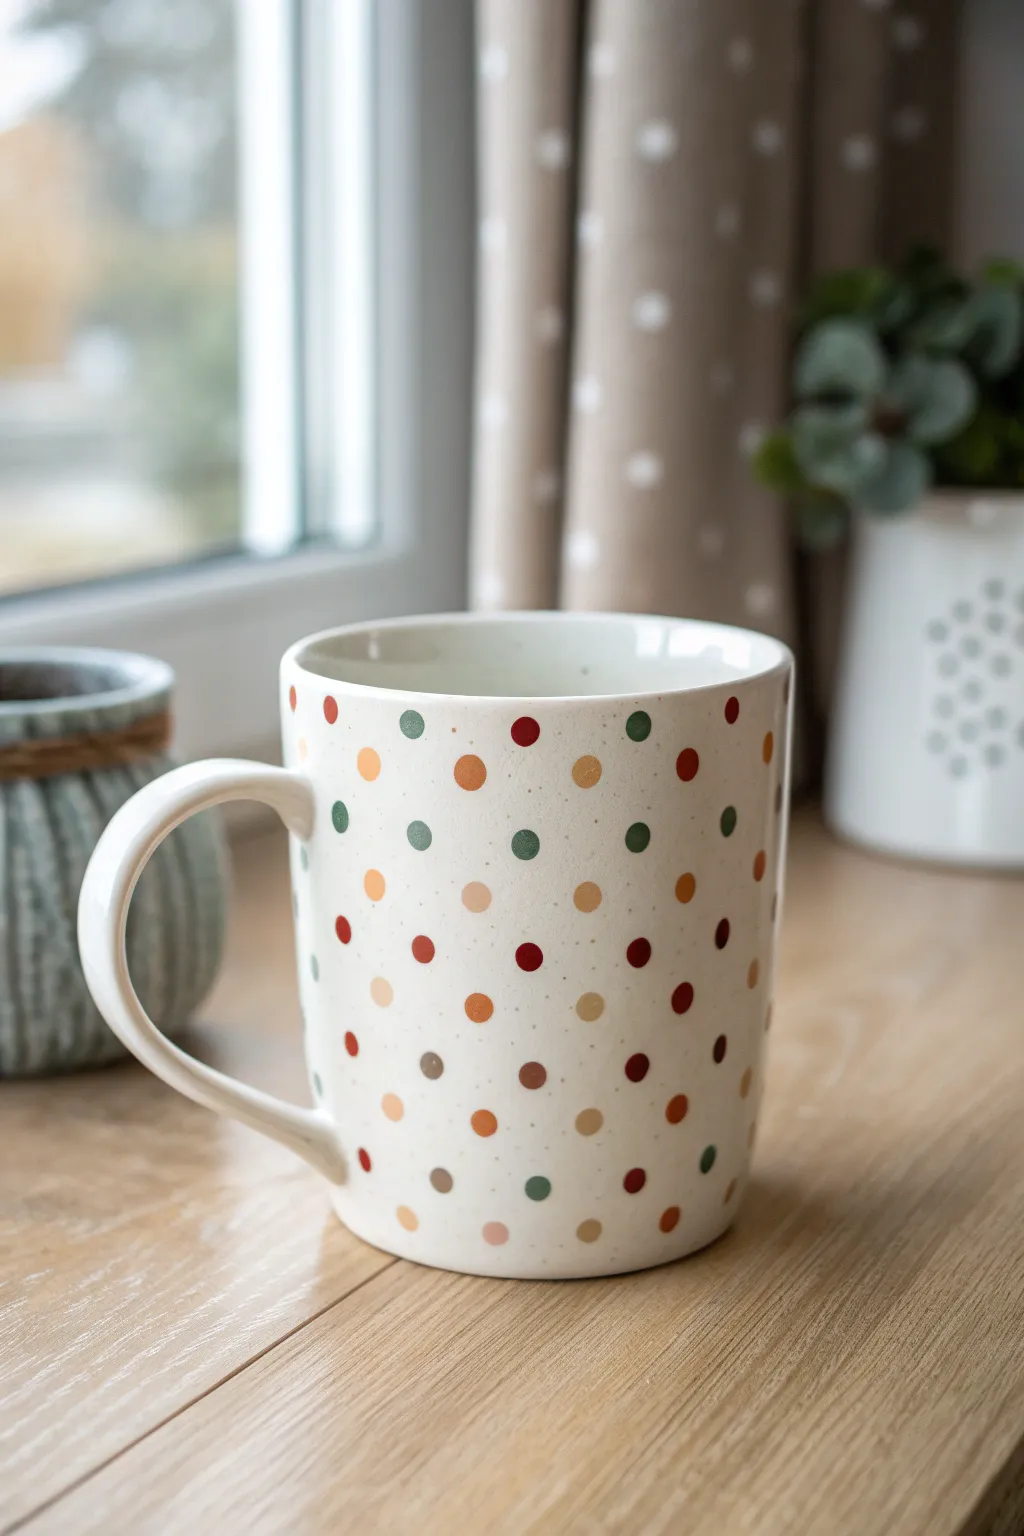
Embrace simplicity with this beautifully speckled mug design featuring a warm, earthy color palette. The clean white ceramic base makes the muted greens, rusty reds, and soft browns pop, creating a cozy vessel perfect for your morning brew.
Step-by-Step
Materials
- Plain white ceramic mug (clean and dry)
- Pebeo Porcelaine 150 paints (or similar ceramic acrylics)
- Colors: Olive green, rust red, mustard yellow, burnt umber, tan/beige
- Cotton swabs (Q-tips) or dotting tools in various sizes
- Rubbing alcohol
- Paper towels
- Small palette or ceramic plate
- Oven (for curing)
Step 1: Preparation & Surface Cleaning
-
Clean the surface:
Before a single drop of paint touches the mug, wipe the entire outer surface down thoroughly with rubbing alcohol and a paper towel. This removes invisible oils from your fingers that can prevent the paint from adhering properly. -
Air dry:
Let the alcohol evaporate completely for a minute or two. Avoid touching the painting surface with your bare hands, as you want to keep it pristine. -
Prepare your palette:
Dispense small, dime-sized amounts of your paint colors onto your palette. You want a mix of earthy tones: deep olive green, a rusty red, a mustardy yellow, dark brown, and a lighter biscuit tan.
Clean Circles
To get perfectly round dots without specialized tools, use the flat end of a drill bit or the eraser of a new pencil. Dip, press, and lift straight up.
Step 2: Applying the Dots
-
Load the tool:
Dip the end of a round dotting tool or a cotton swab straight down into your first color—let’s start with the rust red. Ensure the tip is fully coated but not dripping. -
Create anchors:
Place your first few dots randomly around the mug to act as ‘anchors.’ Press the tool gently onto the ceramic and lift straight up to create a perfect circle. -
Switch colors:
Clean your tool or switch to a fresh cotton swab. I like to move on to the anchor dots for the olive green next, placing them in the large gaps left by the red. -
Add mustard tones:
Introduce the mustard yellow dots. Aim for a staggered pattern—imagine invisible triangles connecting your dots to keep the spacing visually balanced but not rigid. -
Deepen with brown:
Now, add the dark brown dots. These will add contrast and depth to the lighter colors. -
Fill with tan:
Finally, use the light tan or beige color to fill in the remaining larger open spaces. This soft color helps bridge the gap between the white mug and the darker dots. -
Check spacing:
Take a step back and rotate the mug slowly. different. Look for any areas that feel too crowded with one specific color or too empty, and add a dot where necessary. -
Clean edges:
If any dots look smudged or wonky, use a damp cotton swab or a little rubbing alcohol to wipe them away immediately while wet, then re-dot. -
Rim check:
Ensure no paint is directly on the rim where your lips will touch. Keep the pattern about half an inch down from the top edge for comfort and safety.
Layered Texture
Once the first layer of dots is dry, add smaller dots of a lighter shade in the center of the dark dots for a cute, dimensional button effect.
Step 3: Curing and Finishing
-
Initial dry time:
Let the mug sit undisturbed for at least 24 hours. The paint needs to be completely dry to the touch before baking. -
Load the oven:
Place your mug into a cool oven. Do not preheat the oven; placing cool ceramic into a hot oven can cause it to crack. -
Bake the design:
Set the temperature to 300°F (150°C) and bake for 35 minutes (or follow the specific instructions on your paint bottle). -
Cool down:
Turn the oven off and open the door slightly, but leave the mug inside until the oven is completely cool. This gradual temperature change prevents thermal shock. -
Final verify:
Once cool, the paint should be hardened and resistant to scratching. Give it a gentle wash with mild soap to ensure it’s ready for use.
Your custom mug is now ready to add a splash of handmade charm to your morning coffee routine


Simple Stripes That Wrap Around the Mug
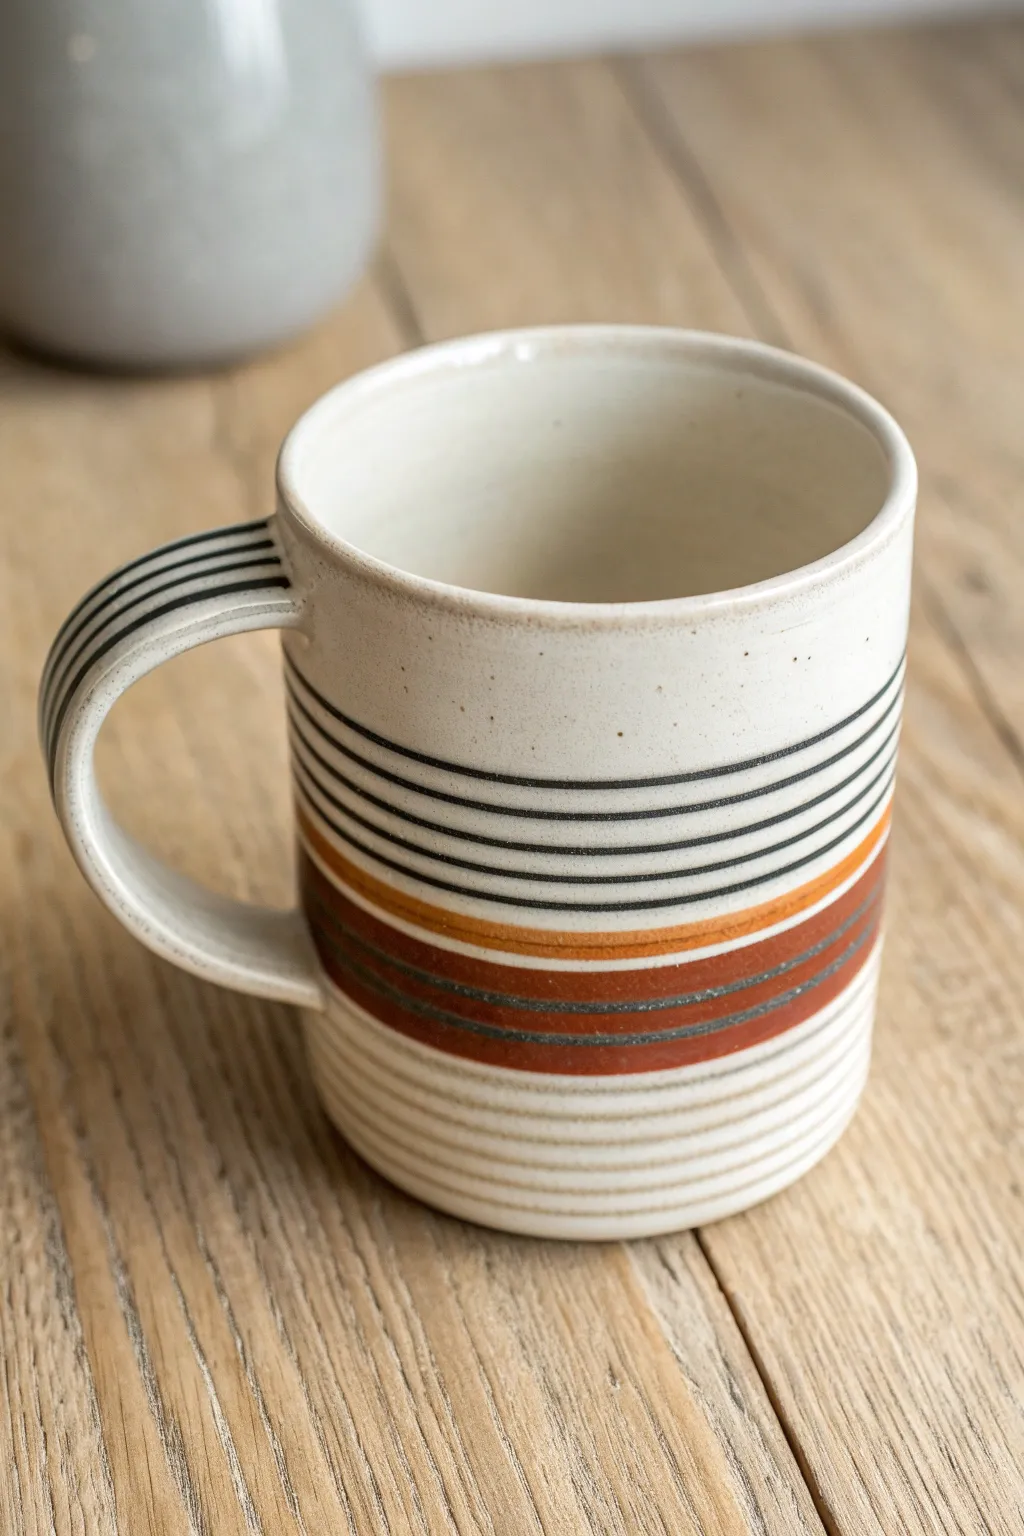
This project captures the warmth of vintage pottery with a modern, minimalist twist using simple horizontal bands. The combination of clean black lines, rust-orange accents, and textured cream glaze creates a cozy, handcrafted feel perfect for your morning coffee.
Detailed Instructions
Materials
- Blank cream or speckled ceramic mug (bisque or pre-glazed)
- Pebeo Porcelaine 150 paints (or similar ceramic paint)
- Colors: Anthracite Black, Rust Orange, Slate Blue/Grey
- Fine liner brush (size 00 or 0)
- Small flat shader brush (size 2 or 4)
- Pottery banding wheel (optional but highly recommended)
- Isopropyl alcohol and paper towels
- Oven for baking (if using heat-set paints)
Step 1: Preparation
-
Clean surface:
Before you begin, wipe the entire mug down with isopropyl alcohol and a paper towel. This removes any oils or fingerprints that could prevent the paint from adhering properly to the ceramic surface. -
Set up your station:
Place your mug in the center of a banding wheel if you have one. If you are working without one, find a lazy susan or simply prepare to turn the mug steadily by hand.
Wobbly Lines?
Steady your painting hand by resting your pinky finger against the mug surface (on a dry spot!) or resting your wrist on a stack of books while the mug spins.
Step 2: Painting the Upper Black Lines
-
Load the brush:
Dip your fine liner brush into the Anthracite Black paint. You want the paint to be fluid but not dripping, so roll the tip on your palette to shape it to a point. -
First line placement:
Start about an inch down from the rim. If using a wheel, spin it slowly while holding your hand steady against a support to create a continuous horizontal line. -
Continue the pattern:
Paint 4-5 thin, parallel black lines below the first one, keeping the spacing roughly equal but allowing for small organic imperfections that give the piece character. -
Handle detail:
Don’t forget the handle. Continue the striping pattern onto the top curve of the handle, ensuring the lines wrap around the sides of the handle for a cohesive look.
Step 3: The Center Color Band
-
Switch brushes:
Change to your small flat shader brush. This will help you lay down thicker bands of color without streaking. -
Apply the rust band:
Below your black lines, paint a medium-thickness band of Rust Orange. I find it helpful to perform one full rotation for the top edge and another for the bottom edge of this band to keep it neat. -
Add the slate accent:
Directly below the orange, paint a slightly wider band of Slate Blue/Grey. Let these colors touch slightly or leave a hairline gap depending on your preference. -
Lower rust band:
Finish the main color block with another band of Rust Orange below the grey, mirroring the top orange stripe. -
Detailing the color block:
Once the color bands are touch-dry (about 10-15 minutes), switch back to your fine liner with black paint. -
Border lines:
Carefully paint very thin black lines separating the orange and grey sections to define the layers sharply. -
Overlay texture:
For that textured pottery look, you can dry-brush a faint, scratchy black line right through the center of the grey band.
Pro Tip: Faux Texture
If using a smooth mug, use a stiff bristle brush for the bottom beige lines. The stiff bristles create tiny streaks that mimic the look of grooved, wheel-thrown clay.
Step 4: Lower Section and Finishing
-
Lower textured lines:
For the bottom third of the mug, you want a softer look. Mix a tiny bit of water or medium into your black paint to create a wash, or use a beige/grey color. -
Create ridges:
Paint a series of closely spaced lines around the base. If your mug has physical ridges in the clay, simply let your brush follow those grooves. -
Clean up:
Inspect your lines. If you made a mistake or a line went wonky, use a damp cotton swab or a toothpick to gently scrape away the wet paint and refine the edges. -
Drying time:
Let the mug sit undisturbed for at least 24 hours to allow the paint to fully cure before baking. -
Baking process:
Place the mug in a cool oven. Set the temperature to 300°F (150°C) or according to your paint manufacturer’s instructions. Bake for 35 minutes. -
Cooling down:
Turn the oven off and leave the mug inside until it is completely cool. Removing it while hot can cause the ceramic to crack.
Enjoy sipping from your new favorite mug that looks like it came straight from a pottery studio


Minimalist Line Art Face for a Modern Look
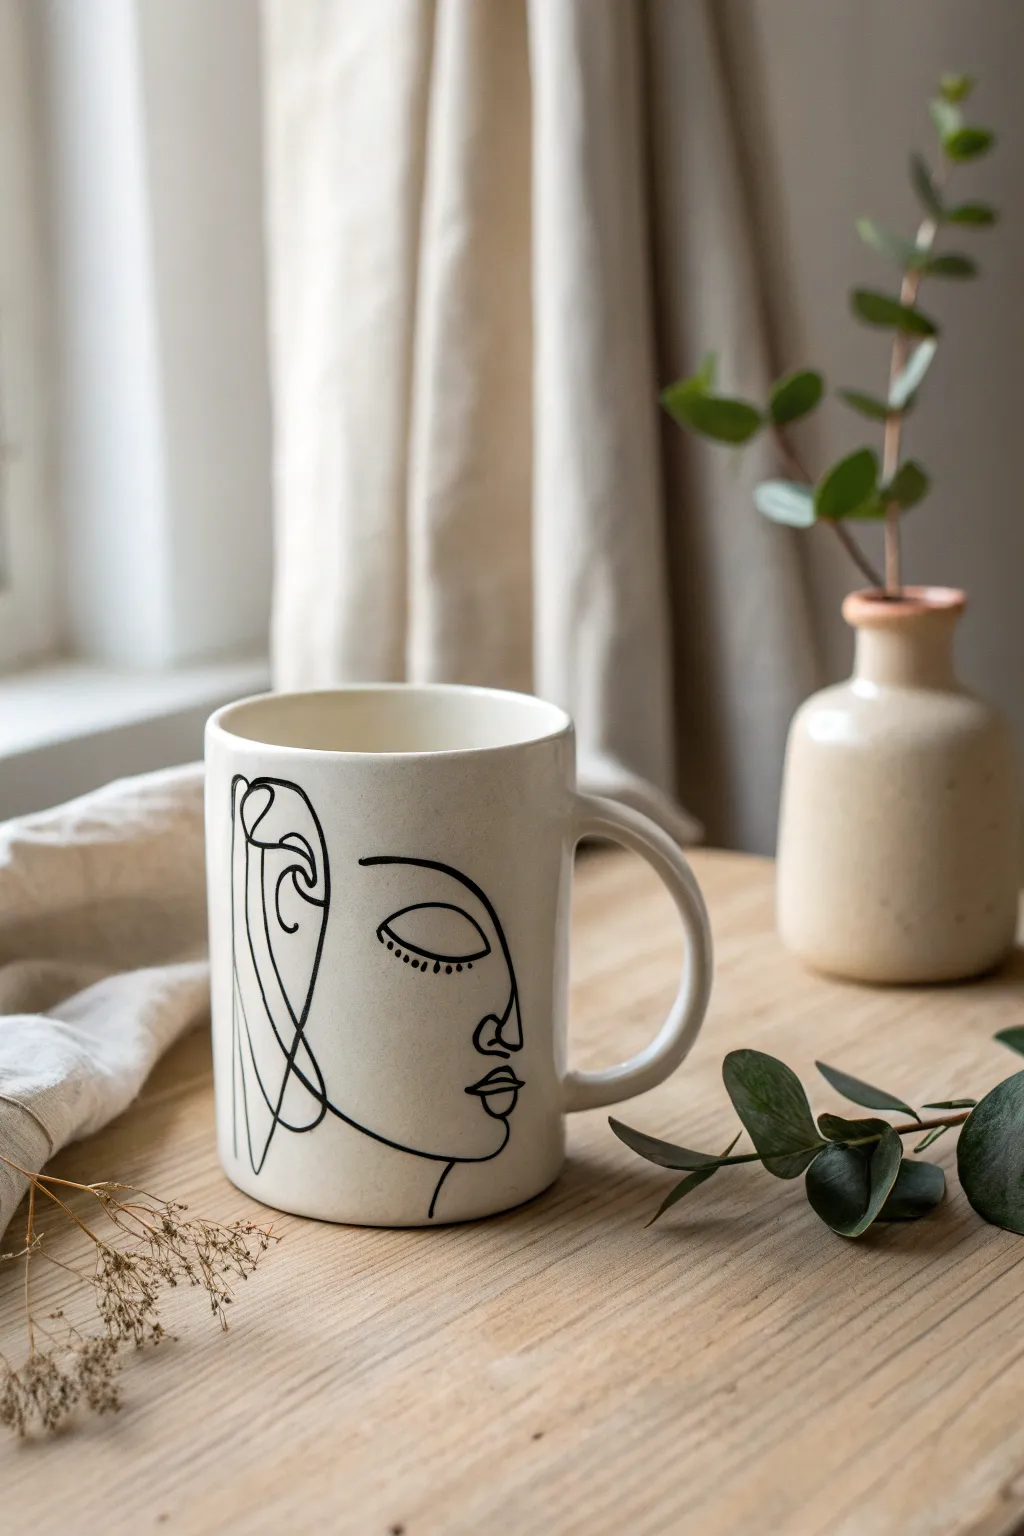
Capture the elegance of modern line art with this sophisticated graphic mug design, featuring a continuous-line style profile face. The stark black-on-creamy-white contrast creates an effortlessly chic piece that looks like it came straight from a boutique studio.
Step-by-Step
Materials
- Plain white or cream ceramic mug (smooth surface)
- Rubbing alcohol
- Cotton pads
- Pencil (HB or softer)
- Paper
- Scissors
- Masking tape
- Black oil-based porcelain paint marker (fine tip)
- Black oil-based porcelain paint marker (medium tip, optional)
- Oven (for baking)
- Cotton swabs (for cleanup)
Step 1: Preparation & Sketching
-
Clean the surface:
Before anything else, thoroughly wipe down the exterior of your mug with rubbing alcohol on a cotton pad. This removes invisible oils or fingerprints that prevent the paint from adhering properly. -
Draft the design on paper:
Measure the height of your mug to gauge the workspace. On a piece of scrap paper, sketch out your minimalist face design to size. Focus on the continuous flow of the line—starting from the forehead, dipping into the nose, curving for the lips, and sweeping down the chin. -
Refine the features:
Simplify the eye into a sleek almond shape with a heavy upper lid line. Add the abstract hair lines on the side. Keep practicing this on paper until you love the flow; this style relies on confidence rather than perfection. -
Transfer or freehand plan:
Cut out your paper sketch and tape it to the mug to check placement. If you aren’t comfortable freehanding directly, you can scribble heavily with pencil on the back of your sketch, tape it to the mug, and trace over the lines firmly to leave a faint graphite guide on the ceramic.
Uneven Ink Flow?
If the marker streaks or skips, press the tip on scrap paper to re-saturate. Don’t press too hard on the mug itself or the tip might split.
Step 2: Painting the Design
-
Activate the marker:
Shake your black porcelain marker well. Press the tip down on a piece of scrap paper several times to get the paint flowing smoothly before touching the mug. -
Start with the main profile:
Begin at the top of the forehead. Using steady, even pressure, draw the line downwards to form the brow bone and the bridge of the nose. Try to keep your hand relaxed to avoid shaky lines. -
Detail the nose and lips:
Continue the line under the nose, creating a small curve for the nostril if desired. Move immediately into the upper lip, a small dip, and the fuller bottom lip. -
Complete the chin line:
Sweep the line downward from the lips to create the chin and jawline. Let this line trail off or curve inward slightly towards the neck area, maintaining that fluid, artistic feel. -
Draw the eye:
Position the eye level with the top of the nose bridge. Draw a bold, arched line for the eyelid. Beneath it, add a thinner curved line for the eye shape. I like to add tiny vertical strokes for lashes on the bottom lid for extra character. -
Add hair elements:
To the left of the face, create the hair using abstract, looping lines. Draw a vertical line down, then create a loop that mimics an ear or a hair tuck, and connect it back to the jawline area. These lines can be looser and more abstract. -
Thicken select lines:
Go back over the main profile line (forehead to chin) and the upper eyelid to add slightly more weight. This variation in line thickness gives the drawing dimension and makes it pop.
Step 3: Finishing Touches
-
Clean up mistakes:
If a line went rogue, dampen a cotton swab with a little rubbing alcohol or water (depending on your marker type) and carefully wipe away the error. Do this while the paint is still wet for best results. -
Dry thoroughly:
Let the mug sit untouched for at least 24 hours. Ideally, leave it for 48 hours to ensure deep layers of the paint marker dry completely before baking. -
Bake to set:
Place the mug in a cold oven. Turn the heat to 320°F (160°C)—or whatever specific temperature your marker brand recommends. Once the oven reaches temperature, bake for 30-45 minutes. -
Cool down gradually:
Turn off the oven but leave the mug inside. Open the door slightly and let the mug cool down completely with the oven. This gradual temperature change prevents the ceramic from cracking.
Design Placement
Keep the design at least 1 inch below the rim so your lips don’t touch the paint while drinking, which extends the design’s lifespan.
Now you have a stunning, gallery-worthy mug ready for your morning coffee routine


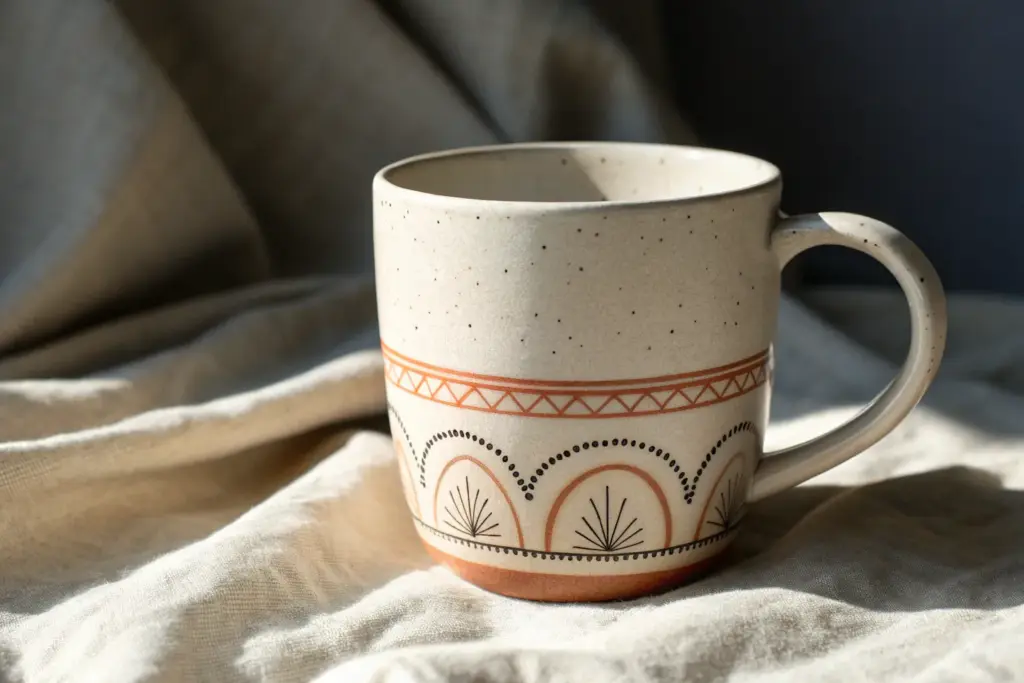
Daisy Chain Florals That Curve Naturally
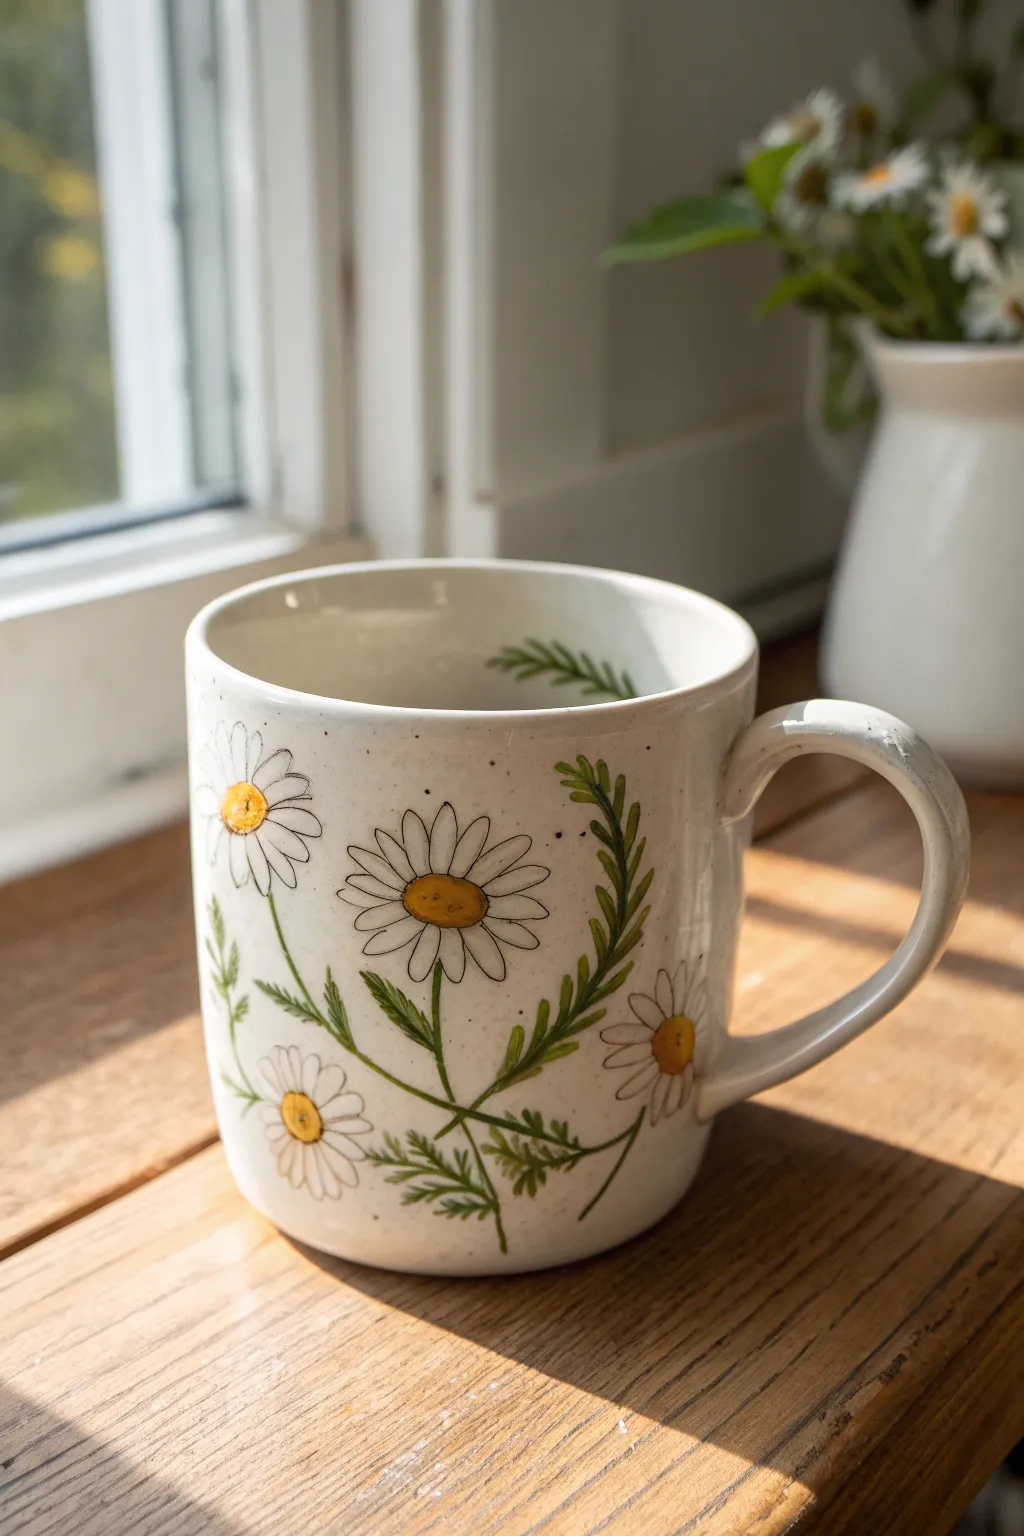
Capture the essence of a sunlit meadow with this charming daisy design that features delicate fern-like greenery climbing up the side of a mug. The uneven, hand-drawn lines give it a lovely rustic feel that perfectly imperfect handmade pottery vibe.
Step-by-Step Guide
Materials
- plain white ceramic or stoneware mug
- enamel paints or ceramic paints (water-based or solvent-based)
- fine tip round brush (size 0 or 1)
- medium detail brush (size 2)
- paint palette or small ceramic dish
- rubbing alcohol and cotton pads
- paper towels
- oven (for curing, if required by your paint)
Step 1: Preparation & Layout
-
Clean the surface:
Before you even touch a paintbrush, wipe the entire exterior of the mug with rubbing alcohol. This removes invisible oils from your fingers that can prevent the paint from adhering properly. -
Plan your composition:
Visualize three main focal points: a large central daisy, a smaller side daisy, and a third peeking near the handle. The key here is asymmetry; we want the flowers to look like they are swaying naturally. -
Sketch the centers:
Using a very pale yellow paint or a washable marker, lightly dot the positions for the yellow centers of your daisies. Place one slightly lower than the center, one higher to the left, and one near the handle.
Uneven Lines?
Don’t panic if your varied line weights look messy close up. Step back two feet. This style relies on ‘perfect imperfection,’ and shaky lines often look charmingly illustrative from a distance.
Step 2: Painting the Blooms
-
Outline the petals:
Load your fine tip brush with diluted black or dark grey paint. I like to use an inky consistency for this to get smooth, thin lines. Draw long, teardrop-shaped petals radiating from your center dots. -
Keep it loose:
Don’t try to make every petal identical. Let some overlap, make some shorter, and allow the lines to be slightly wobbly. This mimics the ‘sketchy’ style of the inspiration piece. -
Fill the centers:
Switch to your size 2 brush and fill the flower centers with a warm, golden yellow. Apply the paint thick enough to be opaque but thin enough to avoid drips. -
Add dimension to the centers:
While the yellow is still slightly tacky, tap a tiny amount of darker ochre or light brown on the lower curve of each yellow circle to create a shadow effect. -
Outline the centers:
Once the yellow is dry, use your fine liner brush and black paint to loosely outline the yellow circles. Add a few tiny dots inside the center for texture.
Step 3: Adding Greenery
-
Draft the stems:
With a thin wash of green paint, draw long, curving stems connecting your flower heads. Let them cross over each other naturally near the base of the mug. -
Create fern fronds:
To make the fern-like leaves, paint a long, central vein curving upwards, separate from the flower stems. This creates variety in the foliage. -
Paint the leaflets:
Using short, quick strokes, flick paint outward from that central vein. Start with shorter strokes at the top and get progressively longer as you move down the stem. -
Vary the greens:
Mix a little brown or yellow into your green paint for different leaves. I find this creates depth so the foliage doesn’t look flat. -
Add tiny leaves:
Go back to your main daisy stems and add small, erratic jagged leaves along them, similar to real daisy foliage.
Level Up: Bee Friends
Add a tiny bumblebee near one of the petals. Use a small yellow oval for the body, thin black stripes, and two translucent white loops for wings to bring the garden scene to life.
Step 4: Finishing Touches
-
Check the interior:
For a delightful surprise, paint a single, tiny fern frond on the inside rim of the mug, just opposite the handle. -
Faux speckling:
Load a toothbrush or stiff brush with watered-down brown paint. Run your thumb across the bristles to flick tiny speckles onto the mug. -
Final outline check:
If any detailed lines got covered by the green leaves, gently re-state them with your finest black liner brush to bring the drawing back to the front. -
Dry:
Allow the mug to dry completely. This usually takes at least 24 hours, but check your specific paint instructions. -
Cure:
Bake the mug according to the paint manufacturer’s instructions (usually around 300°F/150°C for 30 minutes) to make the design dishwasher safe.
Enjoy sipping your morning coffee from your own slice of a permanent summer garden

The Complete Guide to Pottery Troubleshooting
Uncover the most common ceramic mistakes—from cracking clay to failed glazes—and learn how to fix them fast.
Wildflower Meadow Band Around the Base
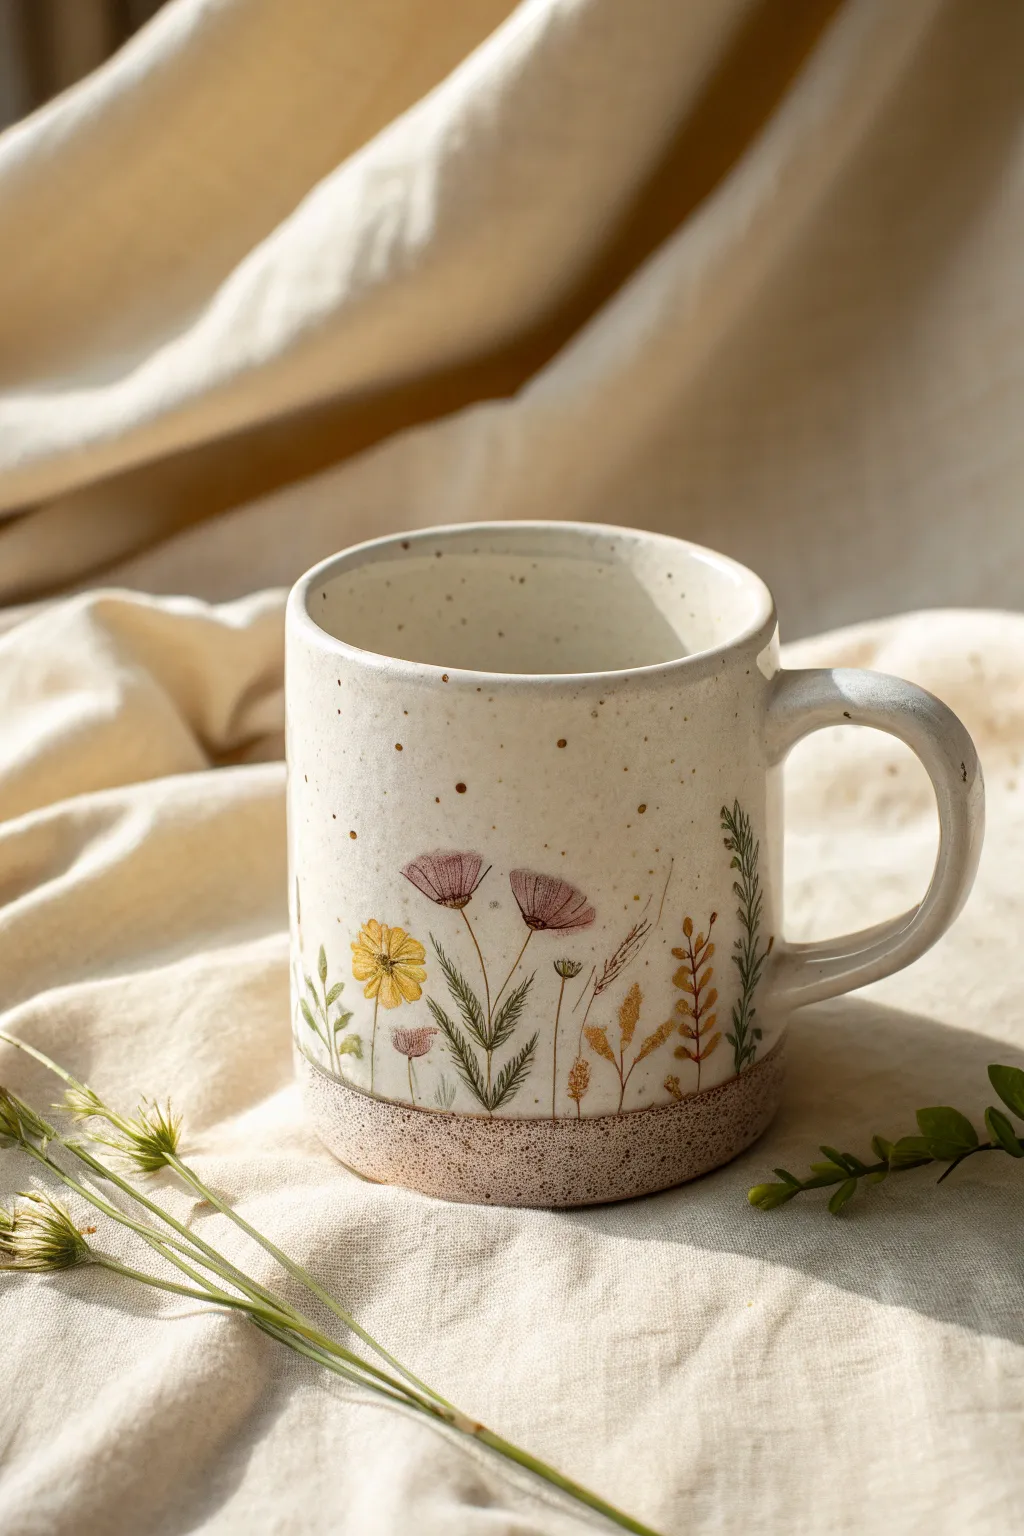
Transform a plain ceramic mug into a botanical keepsake with this delicate wildflower meadow design. The combination of speckled cream glaze, raw textured clay, and hand-painted grasses creates a serene, grounded feel perfect for your morning coffee.
Detailed Instructions
Materials
- Bisque-fired ceramic mug (with a straight-sided shape)
- Speckled cream or ‘oatmeal’ ceramic glaze
- Underglazes in: olive green, dark forest green, mustard yellow, dusty rose/pink, and rusty brown
- Clear transparent glaze (for the painted area only)
- Small round detail brush (size 0 or 00)
- Liner brush (for thin stems)
- Wax resist emulsion
- Sponge
- Flat shader brush
- Kiln access (or use oven-bake porcelain paints for a non-ceramic alternative)
Step 1: Prepping the Base
-
Mask the base:
Before glazing, decide how high you want your raw clay band to be. Apply wax resist to the bottom half-inch or inch of the mug’s exterior. This prevents glaze from sticking and creates that beautiful tactile contrast shown in the photo. -
Apply the main glaze:
Dip or brush your speckled cream glaze onto the entire mug, stopping where the wax resist begins. You want a smooth, even coat. If brushing, apply 2-3 coats, letting each dry to the touch in between. -
Clean the edges:
Once the glaze is dry, use a damp sponge to wipe away any stray drips from the waxed bottom area. The transition between the cream glaze and the raw clay needs to be crisp.
Fixing Smudges
Made a mistake on a flower? Don’t panic. If the base glaze is dry, you can gently scratch the mistake off with a needle tool or stiff brush once the underglaze dries.
Step 2: Painting the Meadow
-
Start with main stems:
Using a liner brush and olive green underglaze, paint thin, vertical lines rising from the raw clay band. Vary the heights slightly to create a natural, organic rhythm. These will be the anchors for your flowers. -
Add the pink blooms:
Mix a dusty rose color. Using a small round brush, paint simple, cup-shaped blooms on two of the taller stems. Start with a semi-circle shape and fill it in with gentle vertical strokes to mimic petals texture. -
Detail the pink flowers:
Once the pink is touch-dry, use a tiny amount of dark brown on the very tip of your liner brush to add thin stamens inside the cup shapes. -
Paint the yellow flower:
Select a medium-height stem. With mustard yellow, dab small dots in a tight circular cluster to form the center of a flower. Then, pull small, short strokes outward to create daisy-like petals. -
Incorporate ferns:
Switch to your dark forest green. On the right side of the composition, paint a vertical line, then add tiny, downward-angled dashes on either side of the stem to create a fern frond. -
Add golden grasses:
Using a rust or golden-brown underglaze, paint fine, feathery grasses. Use a flicking motion with your liner brush to get tapered ends that look like dried wheat or tall grass seed heads. -
Layer foliage:
Fill in the gaps near the ‘ground’ (the raw clay line) with smaller, leafy sprouts in olive green. I find that overlapping a few stems slightly makes the meadow look more dense and realistic. -
Speckle effect (Optional):
If your base glaze doesn’t have speckles, create them now. Dilute a tiny bit of dark brown underglaze with water. Dip a stiff toothbrush in it and run your thumb over the bristles to flick tiny splatters across the mug surface.
Level Up: Texture
For the bottom band, gently press heavy-grit sandpaper or a stiff coarse sponge into the wet clay before the bisque firing to create that extra-rough, sandy stone texture.
Step 3: Finishing Touches
-
Protect the art:
Allow the underglaze illustrations to dry completely—usually at least an hour. Carefully dab a thin layer of clear glaze over just the painted flowers if you want them glossy, or rely on the base glaze if you applied the art over the unfired glaze. -
Double check the rim:
Ensure the rim of the mug is smooth. If you painted stems that go too high, wipe them back slightly so your lips touch smooth glaze, not rough underglaze. -
Final wipe:
Given the raw textured bottom, give the unglazed clay band one last wipe with a clean, damp sponge to ensure no powdery glaze residue is stuck in the texture. -
Fire the piece:
Place the mug in the kiln and fire according to the specifications of your clay and glaze—typically to Cone 5 or 6 for stoneware. If using oven-bake paints, bake according to the manufacturer’s instructions.
Enjoy using your new mug, knowing you have a little piece of a summer meadow held right in your hands
Leafy Vine That Climbs Onto the Handle
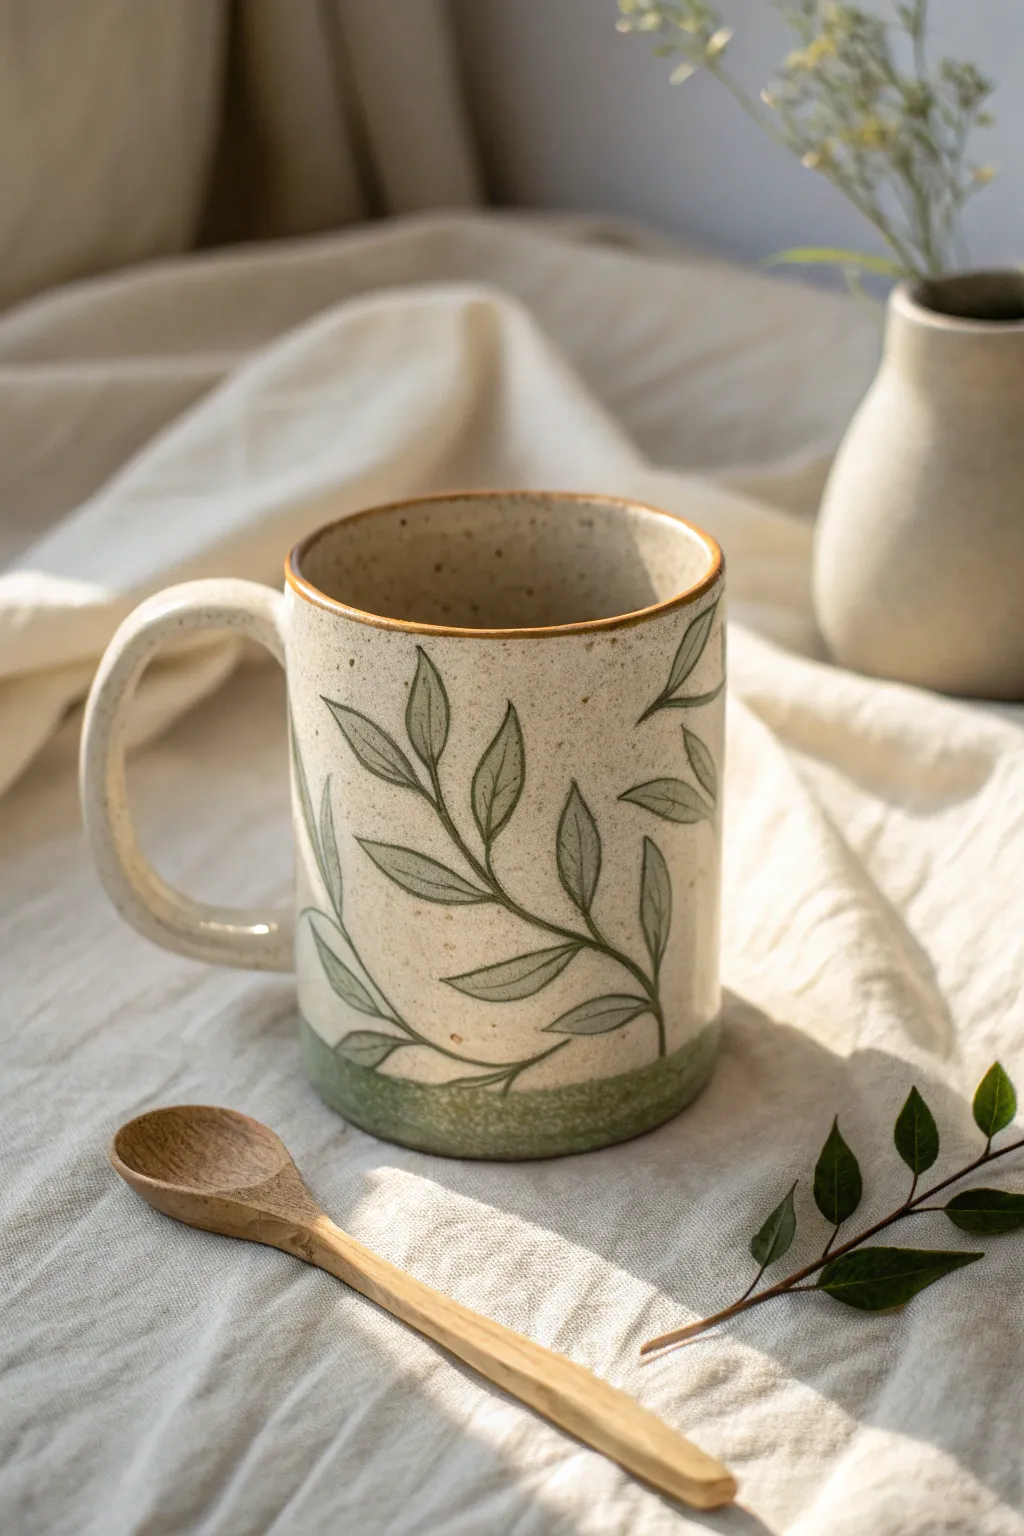
Bring the calming essence of nature to your morning coffee with this hand-painted ceramic design. Featuring delicate climbing vines and a grounding earthy base, this project transforms a simple speckled mug into a woodland-inspired treasure.
Step-by-Step Guide
Materials
- plain speckled cream ceramic mug (or plain cream)
- porcelain or ceramic paints (Sage Green, Forest Green, Burnt Sienna)
- fine liner brush (size 0 or 00)
- small flat brush (size 4 or 6)
- rubbing alcohol
- cotton pads
- palette or small plate
- oven (for curing)
Step 1: Preparation & Base Work
-
Clean surface:
Begin by thoroughly wiping down the entire exterior of the mug with rubbing alcohol on a cotton pad. This removes any invisible oils or fingerprints that could prevent the paint from adhering properly. -
Mix base color:
On your palette, mix a small amount of sage green with just a touch of forest green to create a muted, earthy tone. I like to keep this mixture slightly translucent to let the mug’s speckles show through. -
Paint the bottom band:
Using the small flat brush, paint a band around the absolute bottom edge of the mug, about half an inch high. Don’t worry about making the top line perfectly straight; a slightly uneven, organic edge adds to the rustic charm. -
Add texture:
While the green band is still wet, dab the brush lightly against the ceramic to create a textured, mossy appearance rather than a flat block of color. -
Dry baselayer:
Allow this bottom band to dry for at least 15-20 minutes before moving on to the detailed vine work so you don’t smudge it.
Step 2: Painting the Vines
-
Outline the stems:
Switch to your fine liner brush and load it with a dark forest green paint. Start from the green base band and draw thin, winding lines extending upward toward the rim. -
Create movement:
Allow the lines to curve naturally, crossing over each other slightly. Ensure at least one vine reaches all the way to the top rim to guide the eye explicitly upward. -
Handle detail:
Extend a small vine branch near the handle, or even wrap one slightly onto the handle attachment point if your mug shape allows, to integrate the handle into the design. -
Paint leaf outlines:
Using the very tip of the liner brush, draw simple almond-shaped outlines for the leaves along your main stems. Alternate their placement—left, then right—to mimic natural growth patterns. -
Vary leaf sizes:
Make the leaves near the bottom slightly larger and the ones near the top rim smaller and more delicate.
Fixing Smudges
Made a mistake? Don’t panic. Dip a Q-tip in rubbing alcohol and gently wipe away the wet paint like an eraser. Wait for the spot to dry before repainting.
Step 3: Filling and Finishing
-
Fill the leaves:
Mix a lighter, sheer wash of sage green. Carefully fill in the leaf outlines, but leave a tiny sliver of negative space near the central vein or edges to make them feel airy and Illustrated. -
Add vein details:
Once the leaf fill is semi-dry, go back in with your darkest green and the liner brush to add a single central vein line down the middle of the larger leaves. -
Rim accents:
Clean your brush and pick up the Burnt Sienna paint. Carefully paint a very thin line along the rim of the mug to frame the artwork. -
Final cure:
Let the mug dry for 24 hours. Afterward, place the cold mug into a cold oven, heat to 300°F (150°C), bake for 35 minutes, and let it cool completely inside the oven before removing.
Make It 3D
For a textured effect, mix a tiny bit of baking soda into your green base paint before applying the bottom band. It creates a rough, moss-like feel.
Now you have a serene, nature-inspired vessel ready for your favorite warm beverage


What Really Happens Inside the Kiln
Learn how time and temperature work together inside the kiln to transform clay into durable ceramic.
Cute Hearts Scatter for an Easy Gift Mug
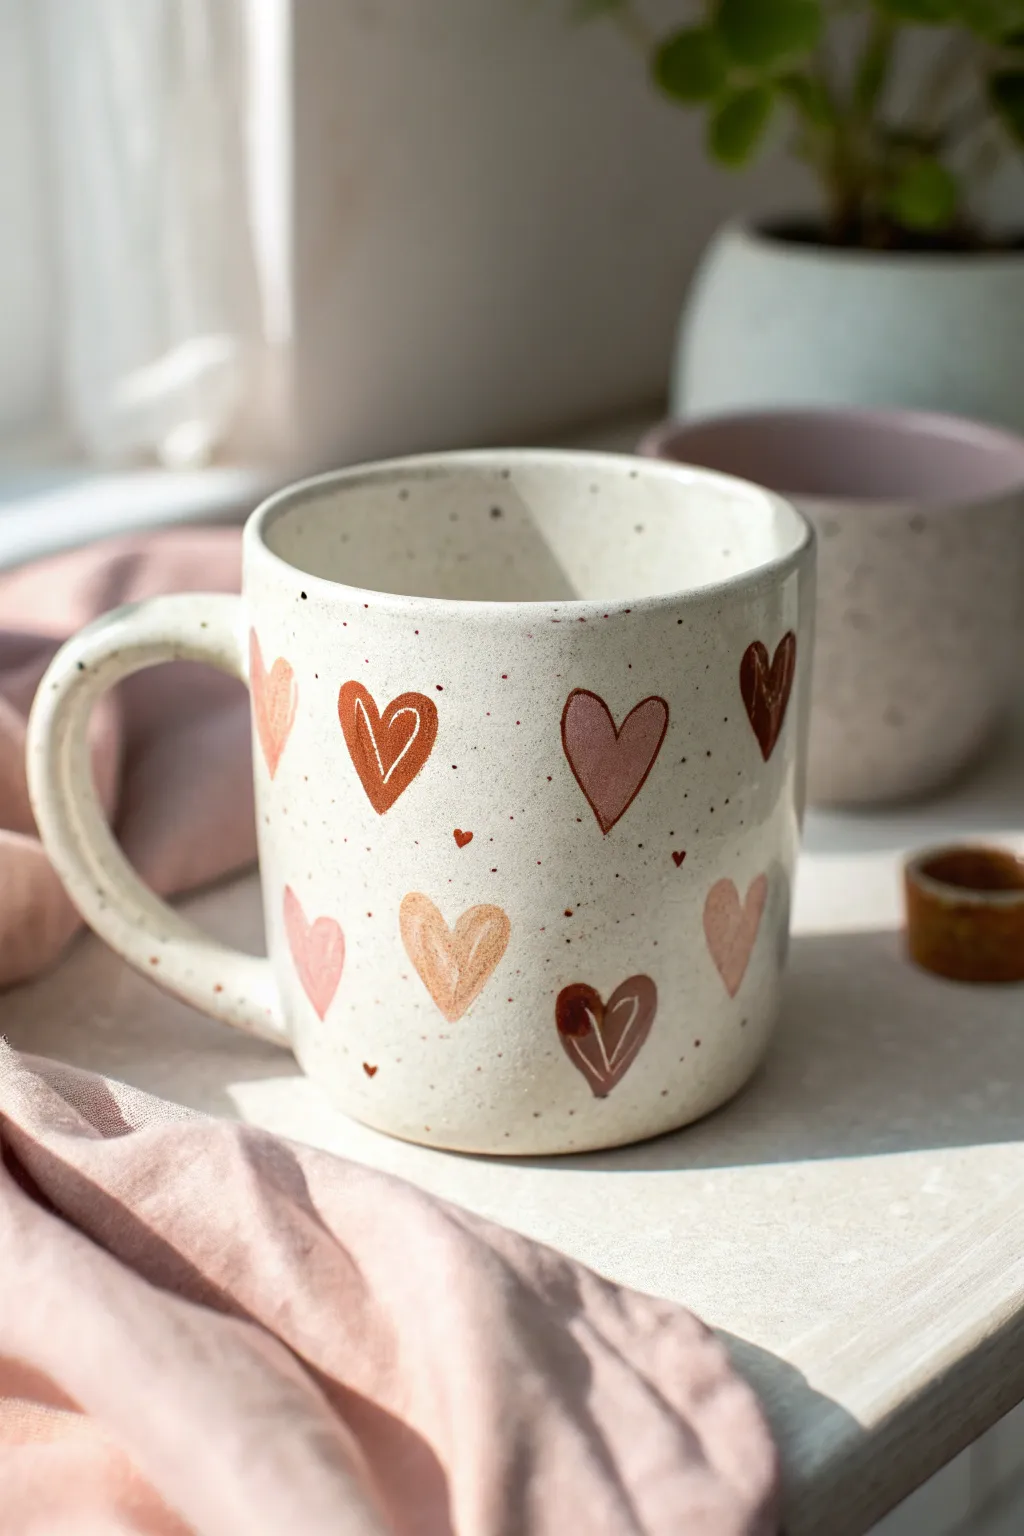
This charming mug features a scattered pattern of hearts in warm, earthy tones like rust, blush, and chocolate brown. The design mimics the look of hand-thrown pottery with faux speckles and organic, fluid brushstrokes perfect for a cozy gift.
Step-by-Step
Materials
- Plain white or cream ceramic mug
- Ceramic paints or porcelain markers (Rust, Blush Pink, Chocolate Brown, White)
- Small round paintbrush (Sz 2 or 4)
- Fine detail brush or liner brush (Sz 0 or 00)
- Old toothbrush (stiff bristles)
- Paint palette or small dish
- Rubbing alcohol and cotton pads
- Oven for baking (if using bake-to-set paints)
Step 1: Preparation
-
Clean the surface:
Before you begin painting, wipe down the entire outer surface of your mug with rubbing alcohol. This removes any oils or fingerprints that could prevent the paint from adhering properly. -
Mix your palette:
Squeeze out small amounts of your rust, blush pink, and chocolate brown paints. If you want more variety, mix a little white into the rust to create a soft terracotta, or mix brown and pink for a dusty rose shade.
Oops! Uneven splatter?
If you get a large blob of paint instead of fine mist, quickly dab it gently with a corner of a paper towel to create a larger, softer spot rather than wiping it, which creates a smear.
Step 2: Painting the Hearts
-
Plan the spacing:
Visualise where your main hearts will go. You want a random, scattered look, so avoid placing them in straight rows. Imagine triangles connecting them to keep the spacing dynamic. -
Paint the rust hearts:
Start with your rust or terracotta color. using the small round brush, paint a few medium-sized hearts. Keep the shape a bit loose and organic rather than perfectly symmetrical. -
Add blush pink hearts:
Rinse your brush well and switch to blush pink. Fill in some empty spaces with these softer hearts. I like to tilt some hearts slightly left or right so they look like they are tumbling. -
Paint the chocolate hearts:
Add the deepest contrast with your chocolate brown paint. Paint fewer of these than the lighter colours to keep the design feeling airy and light. -
Create tiny filler hearts:
Using the very tip of your brush or the fine detail brush, dab tiny little hearts in the gaps between the larger ones. Use a mix of all your colors for these miniature accents. -
Let the base layers dry:
Allow the hearts to dry to the touch, usually about 15-20 minutes depending on your paint brand. This prevents smearing when we add the next details.
Level Up: Handle Pop
Don’t ignore the handle! Paint a single tiny heart at the very top of the curve where your thumb rests for a sweet hidden detail that the user will see every time they take a sip.
Step 3: Adding Details & Speckles
-
Add outlined details:
Take your fine liner brush. On a few of the dry hearts, paint a thin, loose outline in a contrasting color (like white on a rust heart) or a slightly darker shade of the same color. -
Layer inner strokes:
For a playful touch, add simple V-shapes or smaller hearts inside some of the larger solid hearts. This mimics the look of scraffito or layered glaze. -
Prepare the speckle mix:
Mix a small amount of chocolate brown paint with a drop of water to thin it out slightly. It should be fluid but not dripping like ink. -
Test the spatter:
Dip your old toothbrush into the thinned brown paint. Point the bristles away from you over a scrap piece of paper and run your thumb across them to test the spray pattern. -
Apply the faux speckles:
Gently flick the toothbrush bristles to spray fine speckles over the entire mug, including over the painted hearts. This gives it that authentic stoneware pottery vibe. -
Clean up rims:
If any paint or large speckles got onto the rim where your lips will touch, wipe it away cleanly with a damp paper towel or cotton bud.
Step 4: Finishing
-
Dry completely:
Let the mug sit undisturbed for at least 24 hours to allow the paint to fully cure and harden before baking. -
Bake to set:
Place the mug in a cold oven. Turn the heat to 350°F (175°C) or the temperature specified by your paint manufacturer. Bake for 30 minutes. -
Cool down:
Turn the oven off and leave the mug inside until it is completely cool. Removing it while hot can cause the ceramic to crack due to thermal shock.
Now wrap your beautiful new mug in tissue paper for the perfect handmade gift
Abstract Brushstroke Blocks for a Gallery Feel
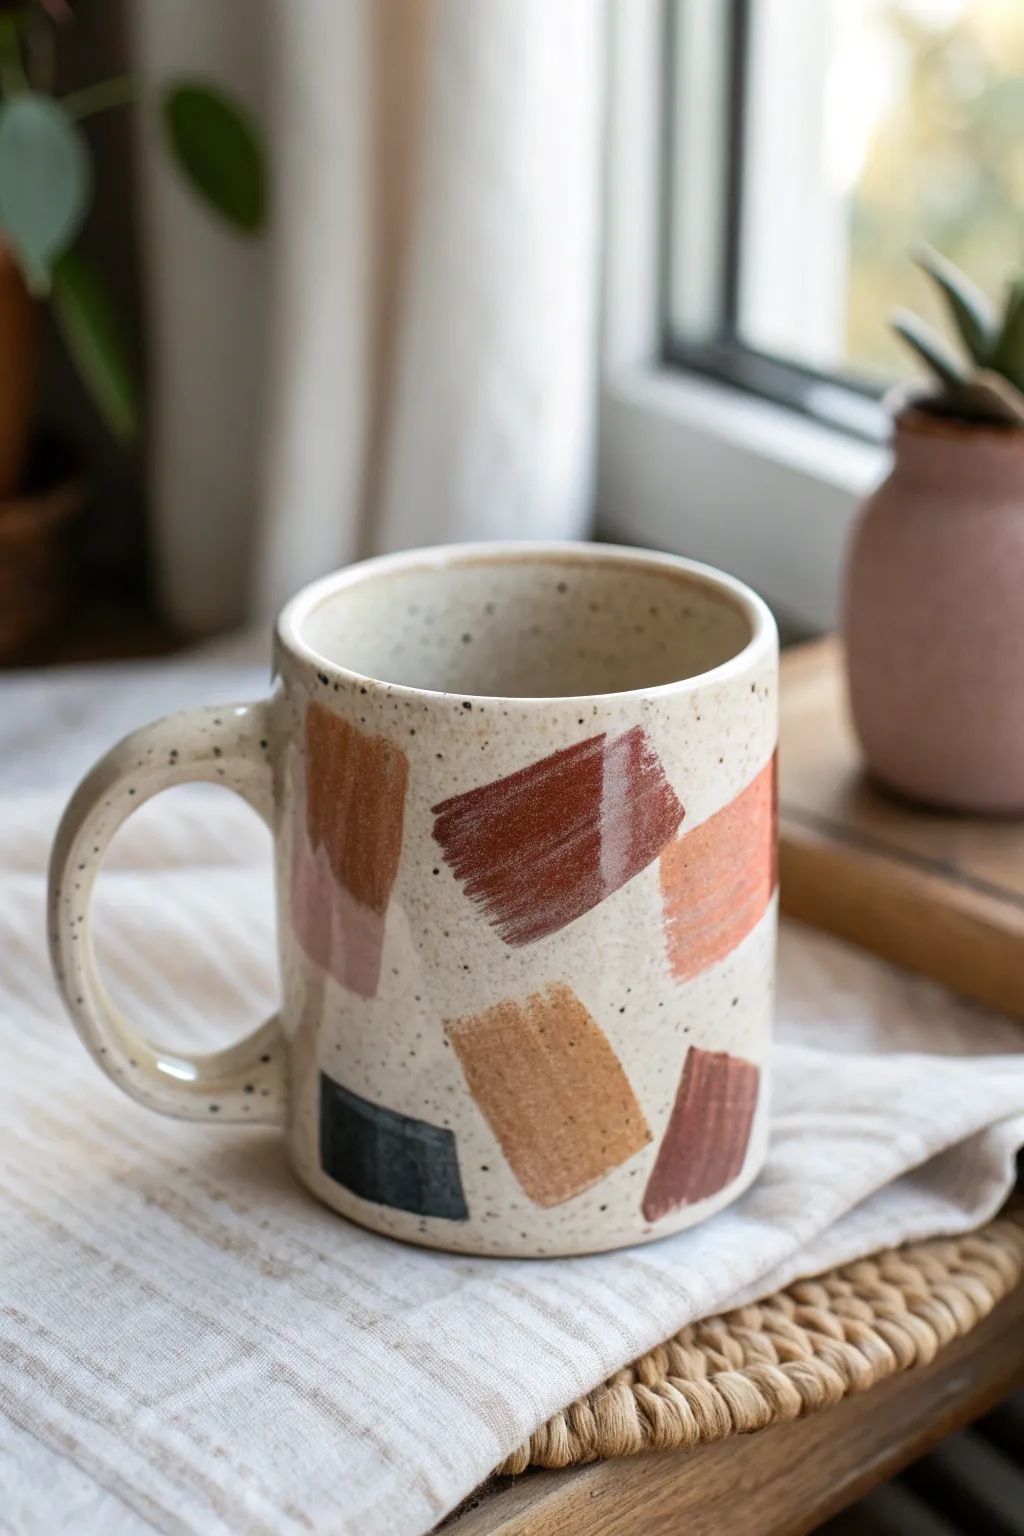
Transform a plain ceramic mug into a modern art piece with this simple yet sophisticated brushstroke design. The scattered block pattern uses a warm, earthy palette to create a painterly look that feels both curated and cozy.
Step-by-Step Guide
Materials
- Plain cream or off-white ceramic mug (preferably speckled)
- Ceramic paints or porcelain markers (e.g., Pebeo Porcelaine 150)
- Flat shader brushes (size 6 or 8)
- Rubbing alcohol
- Cotton rounds
- Paper plate or palette
- Oven (for curing)
Step 1: Preparation
-
Clean surface:
Before you begin painting, it is crucial to remove any oils or fingerprints from the mug. Wipe the entire outer surface thoroughly with a cotton round soaked in rubbing alcohol. -
Dry completely:
Let the alcohol evaporate completely. Avoid touching the painting area with your bare hands after this step to ensure the paint adheres properly. -
Prepare palette:
Dispense small amounts of your ceramic paint onto your palette. You will need a rust red, a terracotta orange, an ochre or tan, and a muted charcoal or dark grey.
Brushstroke Texture Tip
Don’t reload your brush for every single block. Using a brush with less paint on it creates that lovely, scratchy texture at the tail end of the stroke.
Step 2: Painting the Blocks
-
Load the brush:
Start with your darkest color, the deep rust red. Load a flat shader brush with a generous amount of paint, ensuring the bristles are evenly coated but not dripping. -
First stroke:
Place the brush flat against the mug’s surface. In one confident motion, drag the brush diagonally or horizontally for about an inch to create a rectangular block. -
Feather the edge:
Lift the brush slightly at the end of the stroke to create that textured, ‘dry brush’ look where the paint thins out, mimicking the example image. -
Repeat random placement:
Add 2-3 more blocks of this same rust color designated around the mug. Keep them spaced far apart to leave room for other shades. -
Clean brush:
Wash your brush thoroughly and dry it completely. Water can dilute ceramic paint and affect adhesion, so a dry brush is key. -
Apply ochre tones:
Switch to your ochre or tan paint. Load the flat brush again and paint new blocks in empty spaces, varying the angle slightly—some can be slightly tilted compared to the first set. -
Overlap slightly:
Feel free to let one or two ochre blocks slightly touch or graze the corners of the existing rust blocks for a cohesive composition. -
Add charcoal accents:
Using a clean brush, pick up the charcoal or dark grey paint. These should be sparse accents. Add one distinct block near the bottom or handle area to anchor the design. -
Paint terracotta strokes:
Finally, use the terracotta paint to fill in the remaining larger gaps. These softer orange tones balance the dark charcoal and deep rust. -
Review composition:
Step back and look at the mug from all angles. If a spot looks too empty, add a small partial block or a faint wash of color to balance it out.
Step 3: Finishing Touches
-
Create faux texture:
If your mug wasn’t originally speckled, you can flick a stiff toothbrush loaded with watered-down black paint over the design to mimic the ceramic clay spots seen in the photo. -
Clean edges:
If any block looks too messy or has dripped, use a damp cotton swab or a toothpick to gently scrape away unwanted paint before it dries fully. -
Dry time:
Allow the mug to air dry for at least 24 hours. This resting period is essential for the paint to settle before baking. -
Bake to cure:
Place the mug in a cold oven. Set the temperature to the manufacturer’s instructions for your specific paint (usually around 300°F/150°C) and bake for 30-35 minutes. -
Cool down:
Turn off the oven and leave the mug inside until it cools down completely. Removing it while hot can cause thermal shock and cracking.
Add Metallic Flair
Once the initial colors are dry, layer a thin stroke of gold leaf or metallic gold ceramic paint on top of the darkest block for a chic, modern accent.
Your new artful mug is now ready to hold your morning coffee in style

TRACK YOUR CERAMIC JOURNEY
Capture glaze tests, firing details, and creative progress—all in one simple printable. Make your projects easier to repeat and improve.
Color Splash Speckle Mug That Looks Effortless
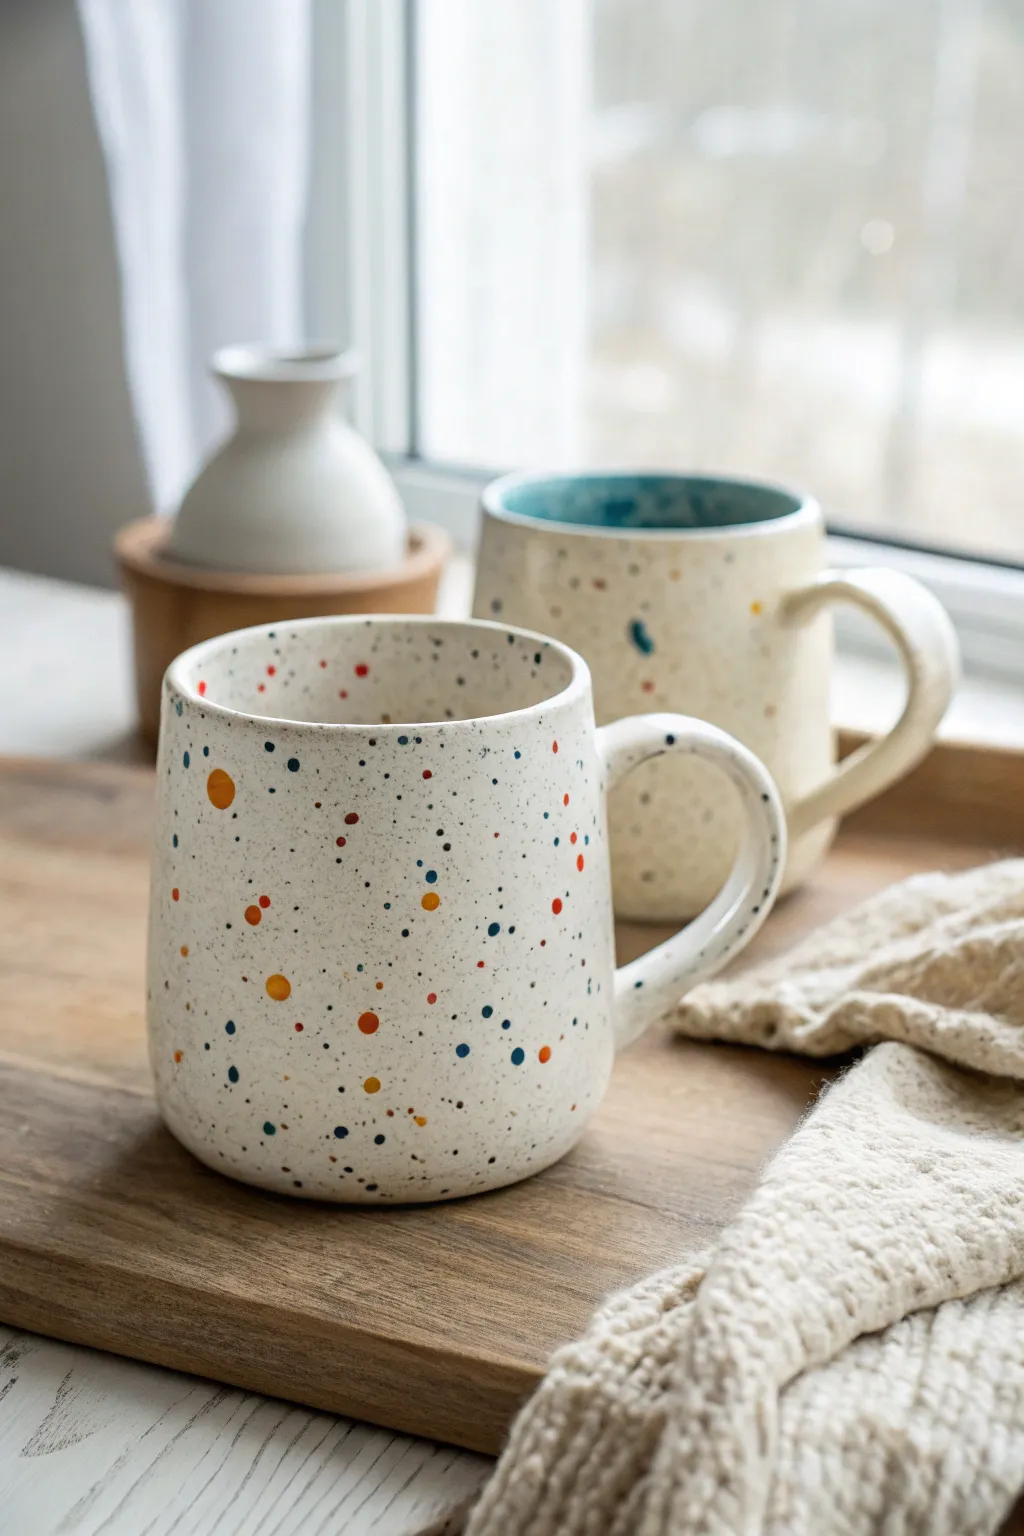
Achieve a high-end pottery studio look without the kiln using this effortless speckling technique. This project transforms a plain white ceramic mug into a playful, confetti-inspired piece that brightens up your morning coffee routine.
How-To Guide
Materials
- Plain white ceramic mug
- Porcelain paints or ceramic markers (orange, teal blue, red, black, mustard yellow)
- Rubbing alcohol
- Cotton rounds
- Stiff bristle toothbrush
- Small round paintbrush (size 0 or 1)
- Paper plate or palette
- Cardboard box or drop cloth (for splatter protection)
- Oven (for curing)
Step 1: Preparation
-
Clean surface:
Before applying any paint, it is crucial to remove oils and fingerprints. Wipe the entire outer surface of the mug thoroughly with rubbing alcohol and a cotton round. -
Let dry:
Allow the alcohol to evaporate completely for a minute or two to ensure a pristine canvas. -
Setup workspace:
Set up a splatter station. Place your mug inside a cardboard box or over a wide drop cloth because the flicking technique can get messy.
Blob Control
If your toothbrush releases big globs instead of mist, the paint is too thick. Dilute it slightly with water and dab excess paint onto a paper towel before flicking.
Step 2: Creating the Fine Base
-
Prepare black paint:
Squeeze a small amount of black porcelain paint onto your palette. If it’s too thick, add a tiny drop of water to thin it slightly—it should be fluid but not runny. -
Load the brush:
Dip your stiff bristle toothbrush into the black paint. You want the tips coated, but don’t overload it to the point of dripping. -
Test the mist:
Practice your flicking motion on a piece of scrap paper first. Run your thumb across the bristles to spray a fine mist of dots. -
Apply base speckles:
Holding the toothbrush about 6 inches from the mug, flick a fine mist of black speckles all around the mug. Rotate the mug as you work for even coverage. -
Clean up:
If you accidentally get a large blob, quickly wipe it away with a damp Q-tip before it dries. -
Dry first layer:
Let this fine black mist dry for about 15-20 minutes so you don’t smudge it during the next steps.
Toothpick Trick
Want perfectly round tiny dots without a brush? Dip the flat end of a toothpick or a bamboo skewer into the paint and stamp it onto the ceramic surface.
Step 3: Adding the Color Pops
-
Plan your palette:
Select your accent colors. For the look in the photo, you’ll want a mix of sunshine orange, deep red, and a cool teal blue. -
Paint larger dots:
Using the small round paintbrush, manually paint larger, organic circles in random spots. I like to start with the brightest color, like the orange, to set the spacing. -
Vary the sizes:
Make some dots the size of a peppercorn and others tiny like a pinhead. This variety mimics natural ceramic glaze inclusions. -
Layering colors:
Rinse your brush and switch to the next color, filling in the empty white spaces. Try not to overlap the wet paints to keep the colors crisp. -
The rim area:
Don’t forget to take the pattern all the way up to the lip of the mug, and even just slightly inside the rim for a professional finish. -
Handle detail:
Continue the pattern onto the handle, painting carefully to ensure the dots wrap around the curve.
Step 4: Finishing Touches
-
Final dense speckle:
Once your manual dots are painted, grab the toothbrush again with a tiny bit of dark blue or another accent color. -
Flick accent color:
Give the mug one final, very light flick of colored mist to tie the manual dots and the background together. -
Full dry:
Allow the mug to dry completely for at least 24 hours. This part requires patience but is vital for durability. -
Bake to cure:
Place the mug in a cold oven. Set the temperature to the manufacturer’s instructions for your specific paint (usually around 300°F/150°C). -
Cool down:
Once the baking time is up (typically 30-40 minutes), turn off the oven and leave the mug inside to cool down gradually with the oven.
Hand wash your new favorite mug gently to preserve those vibrant speckles for years to come
Checkerboard Pattern for Instant Retro Style
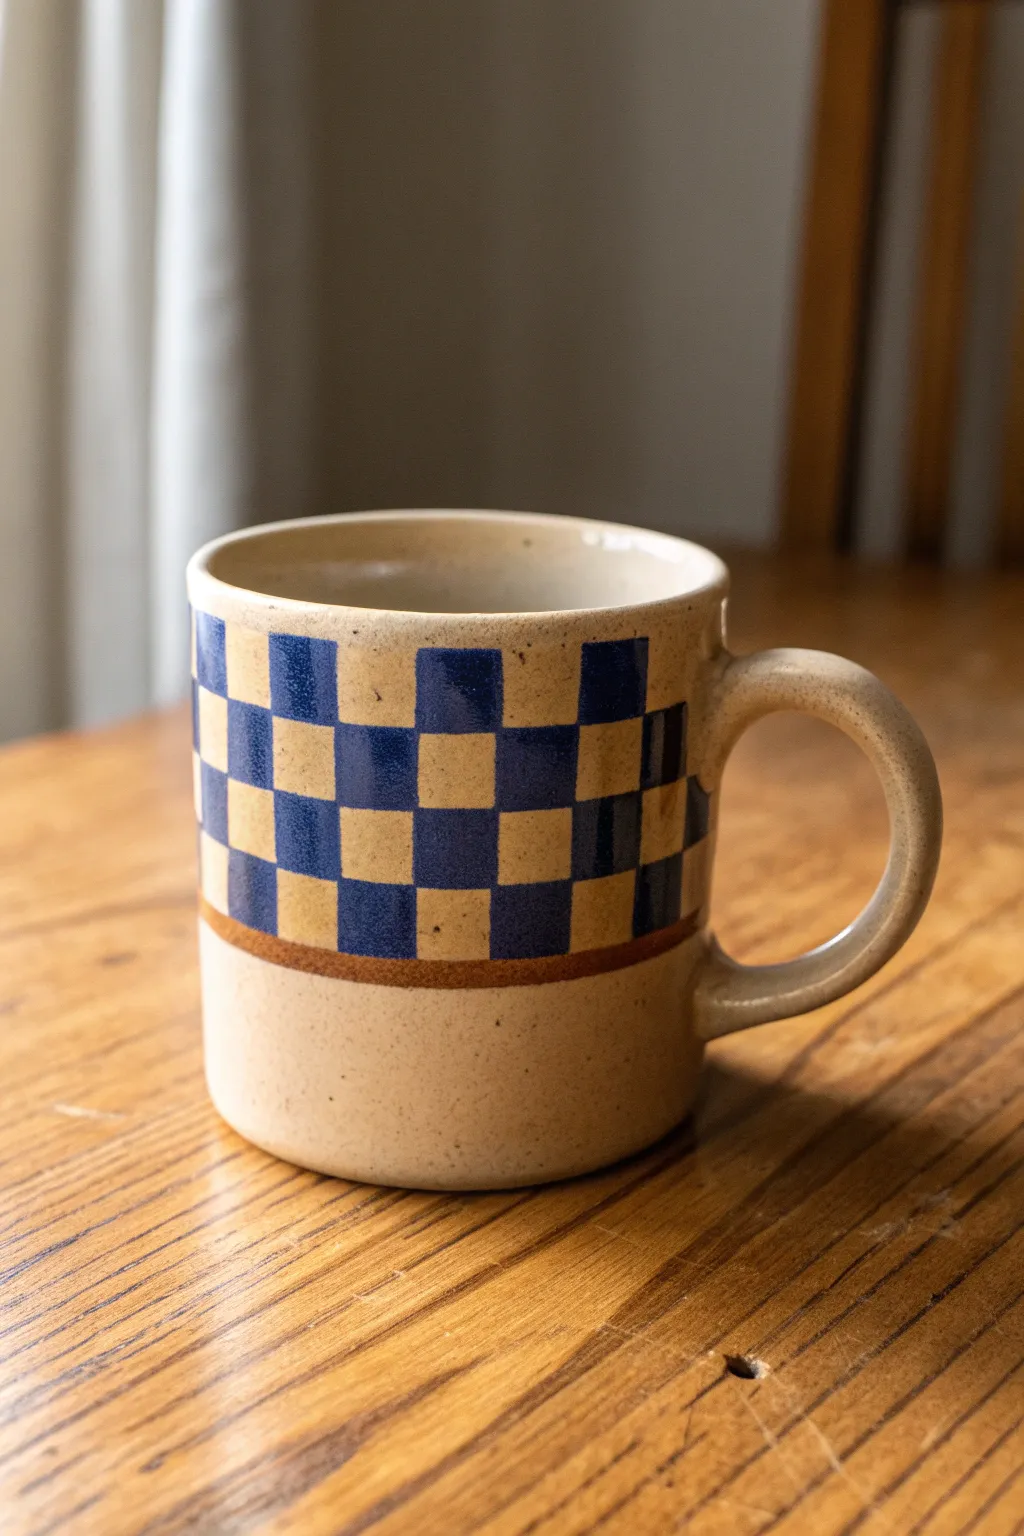
Channel vintage vibes with this classic checkerboard mug project that brings instant nostalgia to your morning coffee. The design features a bold navy grid offset by natural speckled stoneware tones, separated by a thin rust-colored accent line.
Step-by-Step Tutorial
Materials
- Speckled beige or tan ceramic mug (cleaned and dried)
- Pebeo Porcelaine 150 paint (Navy Blue)
- Pebeo Porcelaine 150 paint (Rust or Terracotta)
- Small flat synthetic brush (size 2 or 4)
- Fine liner brush (size 0 or 00)
- Masking tape or painter’s tape (1/4 inch width is ideal)
- Rubbing alcohol
- Cotton pads
- Pencil
- Ruler or measuring tape
Step 1: Preparation and Grid Layout
-
Prepare the surface:
Wipe the entire mug down with rubbing alcohol on a cotton pad. This removes any finger oils or invisible residues that might prevent the paint from adhering properly. -
Define the painted area:
Decide on the height of your painted section. On this mug, the design takes up the top two-thirds. Measure up from the bottom and make small pencil marks around the circumference to guide you. -
Tape the bottom border:
Apply a strip of masking tape strictly horizontally around the mug where your design will end. Ensure the tape is pressed down firmly to prevent paint bleeding underneath. -
Sketch vertical guides:
Using a pencil, lightly draw vertical lines around the mug to create columns. Aim for a width of about 1.5 to 2 centimeters per square, depending on your mug’s size. -
Sketch horizontal guides:
Now, draw your horizontal lines to cross the vertical ones, creating a grid. Try to keep your squares as even as possible, but don’t stress if they are slightly organic; it adds to the handmade charm.
Uneven Grid?
For wobbly lines, use thin washi tape to mask off individual squares before painting. It takes longer but guarantees sharp, perfect corners every time.
Step 2: Painting the Checkerboard
-
Identify the pattern:
Before dipping your brush, mark a tiny ‘x’ inside the squares you intend to paint blue. This simple step saves you from accidentally painting two adjacent squares the same color. -
Outline the first square:
Load your small flat brush with Navy Blue porcelain paint. Carefully paint the outline of your first ‘x’ marked square to establish clean edges. -
Fill in the square:
Fill the center of that square with smooth, even strokes. If the paint looks streaky, I usually wait a few minutes for it to tack up before adding a second coat. -
Continue the pattern:
Move to the next marked square and repeat the process. Work your way around the mug row by row, being mindful not to smudge wet squares with your hand. -
Touch up edges:
Once the blue squares are filled, inspect your edges. Use a slightly damp cotton swab or a clean, stiff brush to tidy up any paint that strayed outside the lines. -
Let the blue dry:
Allow the navy paint to dry for at least one hour. It needs to be dry to the touch before you add the final detail to avoid smearing the design.
Add Texture
Mix a tiny pinch of baking soda into your blue paint for a matte, slightly raised texture that mimics vintage relief pottery.
Step 3: Adding the Accent Line
-
Remove the tape:
Gently peel off the masking tape you applied in the first phase. You should now have a crisp line where the paint stops. -
Paint the stripe:
Using the fine liner brush and Rust/Terracotta paint, carefully draw a thin line directly along the bottom edge of your checkerboard pattern. This separates the grid from the raw ceramic bottom. -
Connect the stripe:
Rotate the mug slowly as you paint the stripe to keep the line consistent. If your hand shakes, rest your pinky finger on the plain bottom section of the mug for stability. -
Clean up the stripe:
If the line gets too thick in places, use a toothpick to gently scrape away excess paint while it is still wet for a sharper finish.
Step 4: Curing
-
Air dry completely:
Let the finished mug sit undisturbed for 24 hours. The paint needs to fully harden before baking. -
Bake to set:
Place the mug in a cool oven, then set the temperature to 300°F (150°C). Once it reaches temperature, bake for 35 minutes. Let it cool completely inside the oven.
Now you have a stylish, retro-inspired mug perfect for sipping your favorite warm drink
Night Sky and Tiny Stars for a Cozy Mood
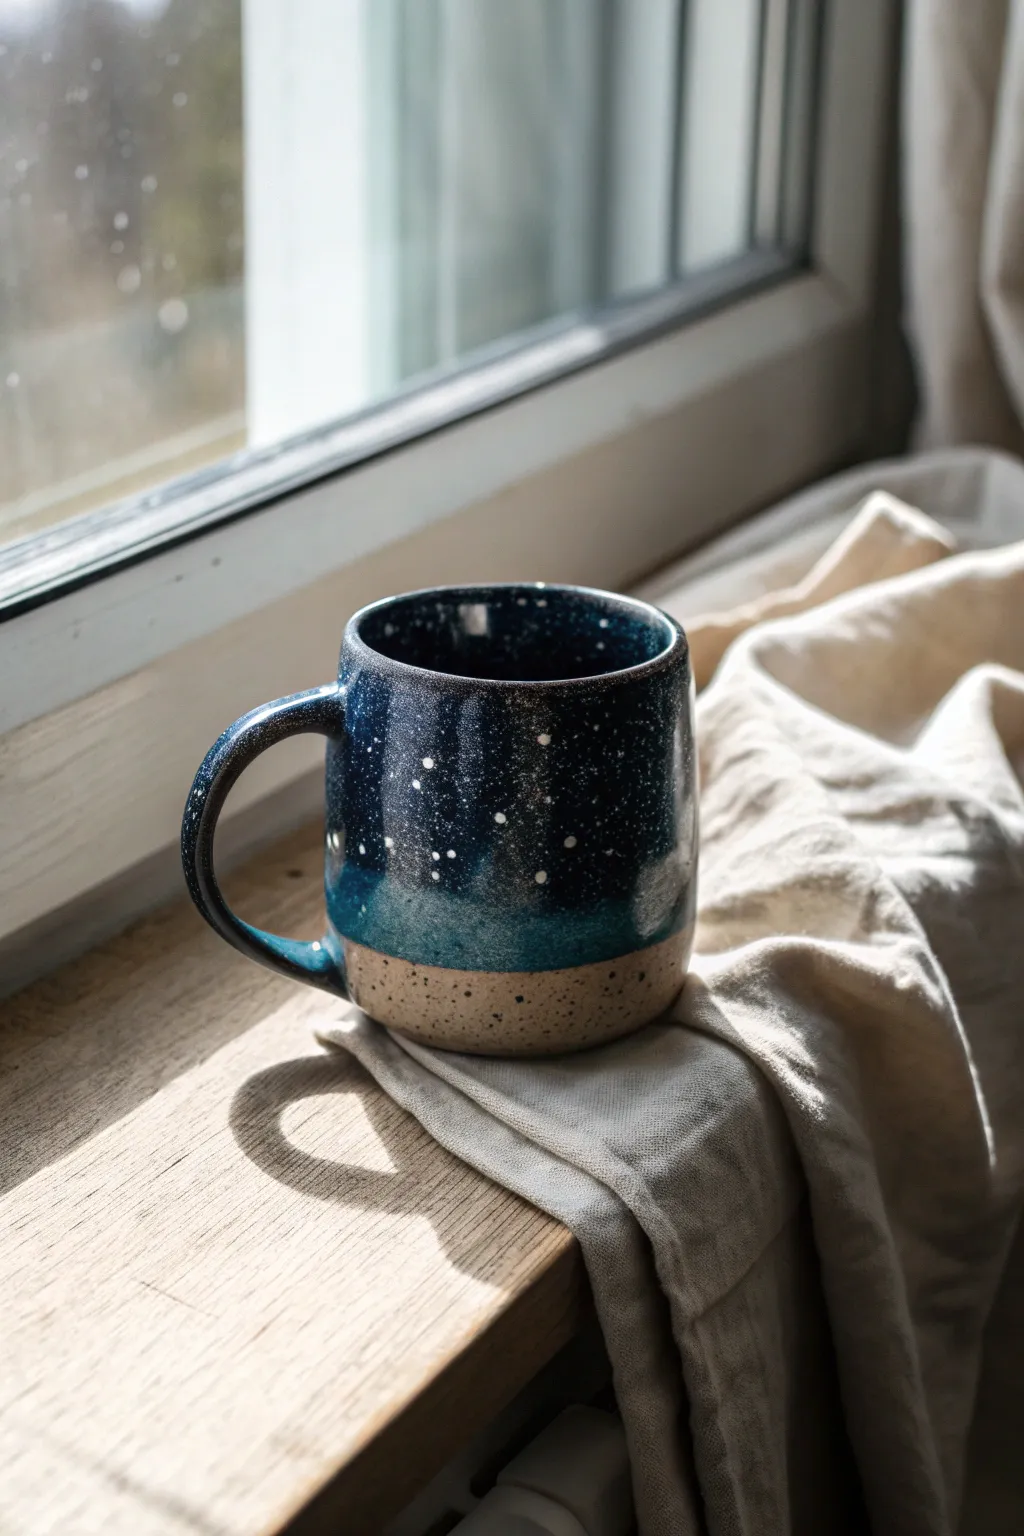
Capture the magic of a clear celestial evening on your favorite drinkware with this starry night mug design. By combining deep midnight blues with a raw, unglazed base, you create a beautiful contrast that feels both rustic and cosmic
Step-by-Step Guide
Materials
- Bisque-fired ceramic mug (with a speckled clay body preferred)
- Deep midnight blue underglaze
- Teal or lighter blue underglaze
- Bright white underglaze
- Clear transparent glaze
- Wide flat brush
- Small soft round brush
- Old toothbrush or stiff bristle brush
- Painter’s tape or masking tape
- Sponge
- Bowl of water
Step 1: Preparation and Masking
-
Clean the surface:
Start by wiping down your bisque mug with a damp sponge. This removes any dust that might prevent the glaze from adhering properly. -
Tape the horizon line:
Decide how much of the raw clay base you want to show. Apply a strip of painters tape around the bottom third of the mug, ensuring it is straight and pressed down firmly to prevent leakage. -
Protect the handle:
If you want the underside of your handle to remain unglazed or cleanly separated, you might want to tape off the attachment point near the bottom.
Uneven Blending?
If your gradient looks streaky, sponge the area lightly with a damp sea sponge while the paint is wet to soften the transition lines.
Step 2: Painting the Gradient
-
Apply the base blue:
Dip your wide flat brush into the deep midnight blue underglaze. Start painting from the rim downwards, covering the top two-thirds of the exposed area. -
Add the lighter tone:
While the dark blue is still slightly damp, take the teal or lighter blue underglaze. Paint a band right above the tape line where the sky creates a horizon. -
Blend the transition:
Use a clean, slightly damp brush to gently feather the wet edge where the dark blue meets the teal. I like to use horizontal strokes here to create a seamless ombre effect. -
Build opacity:
Allow the first layer to dry until it’s chalky to the touch. Apply a second and third coat of the blues, repeating the blending process each time for a rich, solid color. -
detail the handle:
Don’t forget the handle. Paint it with your dark blue, ensuring you get into the crevices, blending it into the main body color.
Step 3: Creating the Stars
-
Prepare the spatter:
Dilute a small amount of bright white underglaze with a few drops of water until it has the consistency of heavy cream. -
Flick the stars:
Dip an old toothbrush into the watered-down white. Hold it near the mug and run your thumb across the bristles to flick tiny specks onto the blue surface. -
Control the density:
Focus more spatters near the top ‘deep space’ area and fewer near the horizon line. Rotate the mug carefully to cover all sides. -
Hand-paint larger stars:
Using your smallest round brush or a needle tool dipped in white, manually place a few slightly larger dots to represent distant planets or bright stars. -
Remove tape:
Once the underglaze is dry, carefully peel away the painter’s tape. If any blue seeped under, gently scrape it away with a craft knife or clean it with a damp sponge.
Milky Way Effect
Sponge a very faint, watered-down cloud of purple or magenta diagonally across the blue before adding stars to create a galaxy nebula look.
Step 4: Glazing and Firing
-
Apply clear glaze:
Once fully dry, dip the mug into a clear transparent glaze, or brush it on if you don’t have a dipping container. This will seal the underglaze and make the mug food safe. -
Wipe the foot:
Ensure the bottom of the mug and the exposed raw clay section (if you want it matte) are wiped clean of clear glaze, or simply glaze the entire thing for a glossy finish. -
Final fire:
Fire the mug in the kiln according to the clay and glaze manufacturer’s instructions, usually to Cone 5 or 6 for stoneware.
Enjoy sipping your warm coffee while gazing into your own personal handmade galaxy
Simple Landscape Silhouette That Wraps Around
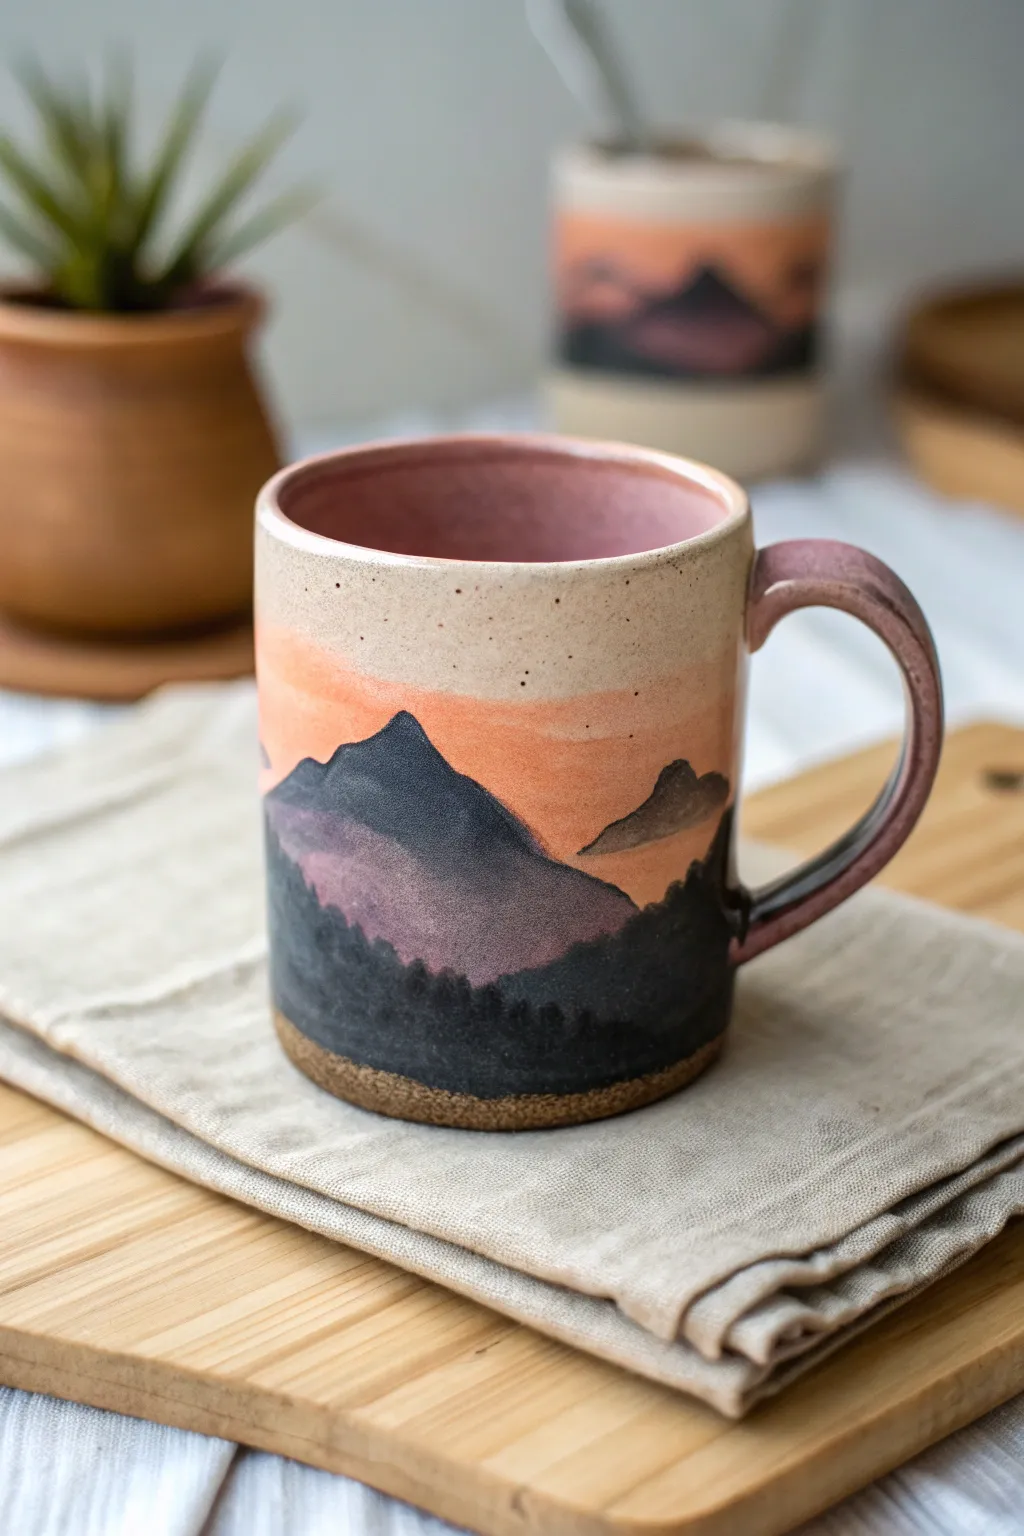
Capture the serene beauty of a mountain dusk on your morning coffee cup with this layered landscape design. With soft gradients of peach and pink set against striking dark peaks, this project transforms a plain ceramic mug into a piece of functional art.
How-To Guide
Materials
- Plain ceramic mug (cream or speckle glazed)
- Ceramic or porcelain paints (Peach, Pink, Dark Purple, Black)
- Small flat paintbrush
- Fine detail paintbrush
- Rubbing alcohol
- Cotton pads
- Oven (for baking/curing, if required by paint type)
- Palette for mixing
- Paper towels
Step 1: Preparation & Sky Layer
-
Clean surface:
Begin by thoroughly wiping down the exterior of your mug with rubbing alcohol on a cotton pad to remove any oils or fingerprints that might repel the paint. -
Mix the sunset base:
On your palette, mix a soft peach color using your ceramic paints. You want this to be slightly translucent to blend with the mug’s natural color. -
Apply the horizon line:
paint a horizontal band about halfway down the mug using the flat brush. Don’t worry about making the bottom edge straight, as the mountains will cover it. -
Create the gradient:
While the paint is still wet, introduce a very small amount of pink to the upper edge of your peach band, blending it upwards to fade softly into the mug’s original color. -
Add texture:
To mimic the speckled stoneware look in the photo, you can lightly flick the bristles of an old toothbrush dipped in diluted brown paint over the sky area, or simply leave the clean ceramic if yours is already speckled. -
First drying phase:
Let this sky layer dry completely according to your paint manufacturer’s instructions. This is crucial so your dark mountains don’t muddy the sunset.
Glazing Trick
Mix a tiny drop of water or glaze medium into your sky paints. This increases transparency, letting the ceramic texture show through like watercolor.
Step 2: Painting the Mountains
-
Outline the peaks:
Mix a dark purple shade. Using your fine detail brush, paint the outline of the mountain range directly over the sunset band. Create one large, dominant peak and smaller rolling hills beside it. -
Fill the mid-ground:
Switch back to the flat brush and fill in the mountain shapes with the dark purple. Keep the paint somewhat thin near the top for a misty effect. -
Darken the base:
While the purple is still workable, mix in some black paint near the bottom of the mountains to give them weight and depth. -
Create the tree line:
Along the very bottom edge where the mountains meet the mug base, switch to the smallest brush. Use a stippling motion (tapping up and down) with pure black paint. -
Refine the silhouette:
Extend these tiny tapped ‘tree’ shapes slightly upward into the purple mountain base to create the illusion of a dense forest in the foreground. -
Wrap it around:
Continue this mountain and treeline pattern around the visible sides of the mug, varying the height of the hills so the landscape feels organic.
Starry Night Option
Once everything is dry, use a toothpick dipped in white paint to dot tiny stars in the upper cream section or add a crescent moon near a peak.
Step 3: Finishing Touches
-
The unpainted base:
Leave a small strip of the raw, unpainted mug exposed at the very bottom (or paint a faux ‘sand’ texture there) to ground the design. -
Handle detail:
I like to tie the whole piece together by painting the handle. Use a wash of the dark purple that fades into the peach tone near the attachment points. -
Final cure:
Allow the mug to dry for 24 hours. Once fully dry, bake the mug in a non-preheated oven according to your ceramic paint instructions to set the design permanently.
Now you have a cozy, custom mug perfectly suited for warm drinks on cool mornings
Cute Food Icons Like Strawberries or Citrus Slices
Adorn your morning coffee vessel with a scattering of juicy, bright strawberries in this farmhouse-style project. The speckled cream background gives it a charming handmade pottery feel, while the simple fruit shapes make this an accessible design for any skill level.
Step-by-Step Tutorial
Materials
- Plain white or cream ceramic mug
- Ceramic paint (Red, Green, White, Black/Dark Brown)
- Small flat brush (size 2 or 4)
- Fine liner brush (size 0 or 00)
- Toothpicks
- Rubbing alcohol
- Cotton pads
- Ceramic paint medium (optional, for translucency)
- Palette or small plate
- Oven (for curing)
Step 1: Preparation & Base
-
Clean the surface:
Before putting any paint down, wipe the entire exterior of the mug with rubbing alcohol and a cotton pad. This removes oils and dust that prevent paint adhesion. -
Mock up the pattern:
If you’re nervous about freehanding, use a washable pencil or marker to lightly dot where you want the center of each strawberry to sit. Aim for a staggered, random pattern rather than perfect rows.
Step 2: Painting the Strawberries
-
Mix the red:
Dispense a small amount of red ceramic paint. If you want a more watercolor look like the photo, mix in a tiny drop of ceramic medium or water (check your paint’s instructions) to slightly thin it out. -
Paint the berry shapes:
Using the small flat brush, paint rounded triangular shapes for the strawberry bodies. Press down at the top (the wide part) and lift as you pull down to create the tapered point. -
Refine the edges:
Go back over your shapes to smooth out the tops. They shouldn’t be perfect triangles; give them slightly rounded shoulders for a natural fruit look. -
Let the red dry:
Allow the red base layer to dry completely. This usually takes about 15-20 minutes, depending on the thickness of your paint. -
Add the leaves:
Load your fine liner brush with green paint. Paint a small ‘starburst’ or three distinct little teardrop shapes sitting directly on top of each red berry. -
Define the stems:
Pull a very tiny, short line upward from the center of the leaves to create the stem attachment point.
Paint sliding off?
If the paint beads up or slides off the glossy glaze, the mug might be too smooth. Try lightly scuffing the surface with fine-grit sandpaper for better grip.
Step 3: Details & Texture
-
Dot the seeds:
Once the red and green paint is dry to the touch, squeeze a tiny bit of white paint onto your palette. Dip the very tip of a clean toothpick into the white. -
Apply the seeds:
Gently tap the toothpick onto the red berries to create the seeds. I usually like to stagger them in diagonal rows, but random placement works too. -
Create the speckled effect:
Dilute a small drop of black or dark brown paint with water until it’s quite fluid. Load an old toothbrush or a stiff bristle brush with this mixture. -
Splatter the mug:
Hold the brush near the mug and flick the bristles with your thumb to spray fine specks across the surface. This mimics the look of speckled clay pottery. -
Add manual specks:
If the splatter feels too unpredictable, use the very tip of your liner brush to manually place tiny black dots in empty spaces between the strawberries.
Try Watercolor Style
Mix a tiny drop of glass medium into your paint to make it semi-transparent. Layering this creates a lovely, soft watercolor effect on the ceramic.
Step 4: Finishing
-
Final dry time:
Let the mug sit undisturbed for at least 24 hours to allow the paint to fully cure on the surface before baking. -
Bake to set:
Place the mug in a cold oven, then set the temperature to 350°F (176°C) or whatever your paint manufacturer specifies. Bake for 30 minutes, then turn the oven off and let the mug cool completely inside.
Now perfectly cured, your new favorite mug is ready for a cozy cup of tea