
When I’m stuck for ideas, I just step outside and let nature-inspired clay do the brainstorming for me. These projects are all about capturing real leaves, flowers, textures, and little outdoor moments in polymer clay or air-dry clay.
Leaf Imprint Tiles
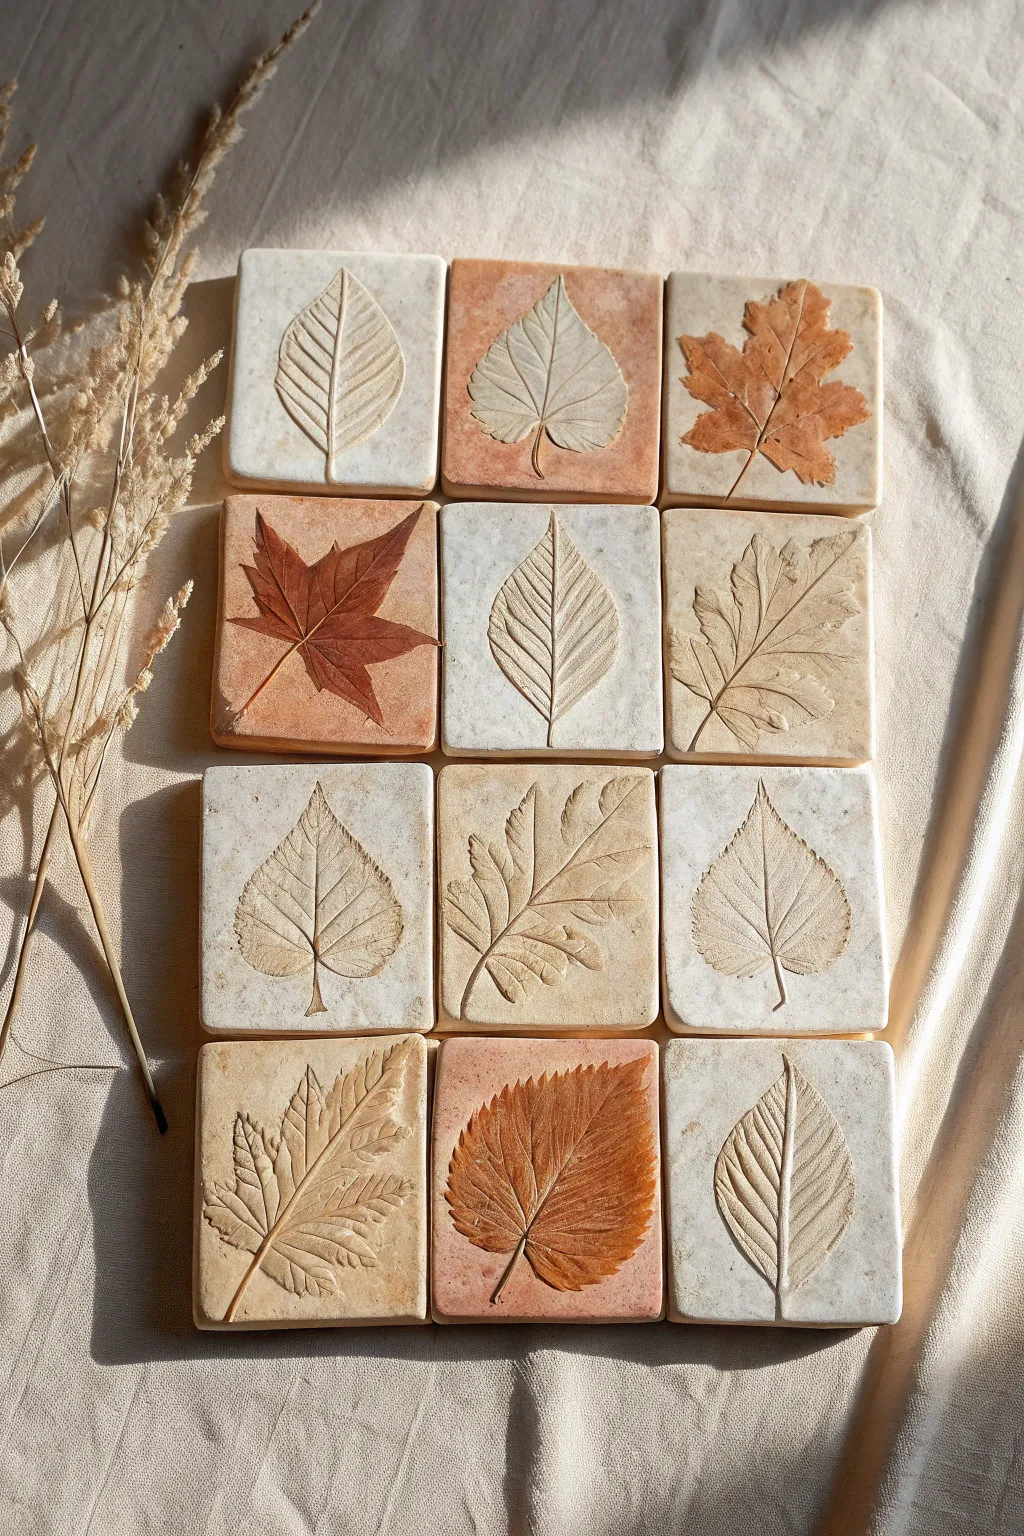
Capture the delicate veins and organic silhouettes of nature forever in these sophisticated clay tiles. With their muted earthy tones and crisp impressions, these squares serve as beautiful coasters or a striking wall installation.
Step-by-Step
Materials
- Air-dry clay (stone effect or terracotta)
- White air-dry clay
- Rolling pin
- Square cookie cutter or knife and ruler
- Various fresh leaves (with prominent veins)
- Sandpaper (fine grit)
- Matte sealant or varnish
- Optional: Acrylic paints (earth tones like burnt sienna, deep brown)
- Sponge or soft cloth
- Parchment paper
Step 1: Preparation & Rolling
-
Clay Selection:
Choose your clay bases. The image features a mix of white clay, terracotta, and a speckled clay to create color variation across the set. -
Knead the Clay:
Take a portion of clay and knead it until it’s pliable and warm. If you want a marbled look like the top-left tile, twist white and beige clays together gently before rolling. -
Rolling Out:
Roll the clay out onto a piece of parchment paper to prevent sticking. Aim for an even thickness of about 1/4 inch (6mm) to ensure durability. -
Smoothening:
I like to run a slightly damp finger over the surface to remove any initial cracks or fingerprints before moving on.
Uneven Impressions?
If the leaf isn’t pressing in evenly, place a piece of paper over the leaf before rolling. This helps the pin glide smoothly without tearing the leaf.
Step 2: Leaf Impressions
-
Leaf Placement:
Select a fresh leaf with strong, raised veins on the back. Place it vein-side down onto your rolled clay slab. -
Embedding:
Gently roll your rolling pin over the leaf. Apply firm, even pressure to push the veins deep into the clay without making the slab too thin. -
Removal:
Carefully lift the leaf stem and peel it away to reveal the detailed impression. Use a tweezer if the stem is too short to grab. -
Cutting the Shape:
Position your square cutter over the impression to center the leaf design. Press down firmly to cut the tile shape. -
Edge Cleanup:
Remove the excess clay from around the square. Use a wet finger to smooth the sharp edges of the cut tile.
Level Up: Felt Backing
Glue a square of cork or felt to the bottom of each finished tile. This prevents them from scratching your table and adds a premium feel.
Step 3: Drying & Refining
-
Drying Phase:
Let the tiles dry on a flat surface for 24-48 hours. Carefully flip them halfway through to ensure the bottom dries evenly and prevents warping. -
Sanding:
Once fully dry and hard, use fine-grit sandpaper to gently smooth the edges and corners for a professional finish. -
Dust Removal:
Wipe away all clay dust with a dry brush or cloth before applying any finishes.
Step 4: Enhancing & Sealing
-
Optional Staining:
To highlight the veins (especially on the lighter tiles), dilute a small amount of brown acrylic paint with water creates a wash. -
Applying the Wash:
Brush the wash over the impression and quickly wipe the surface with a damp sponge. This leaves pigment in the deep crevices while cleaning the high points. -
Sealing:
Apply a coat of matte varnish or sealant to protect the clay from moisture, especially if you plan to use these as drink coasters. -
Final Cure:
Allow the sealant to cure completely according to the manufacturer’s instructions before stacking or using your new tiles.
Enjoy arranging your nature-inspired tiles into a beautiful mosaic for your home


Leaf-Pressed Trinket Dishes
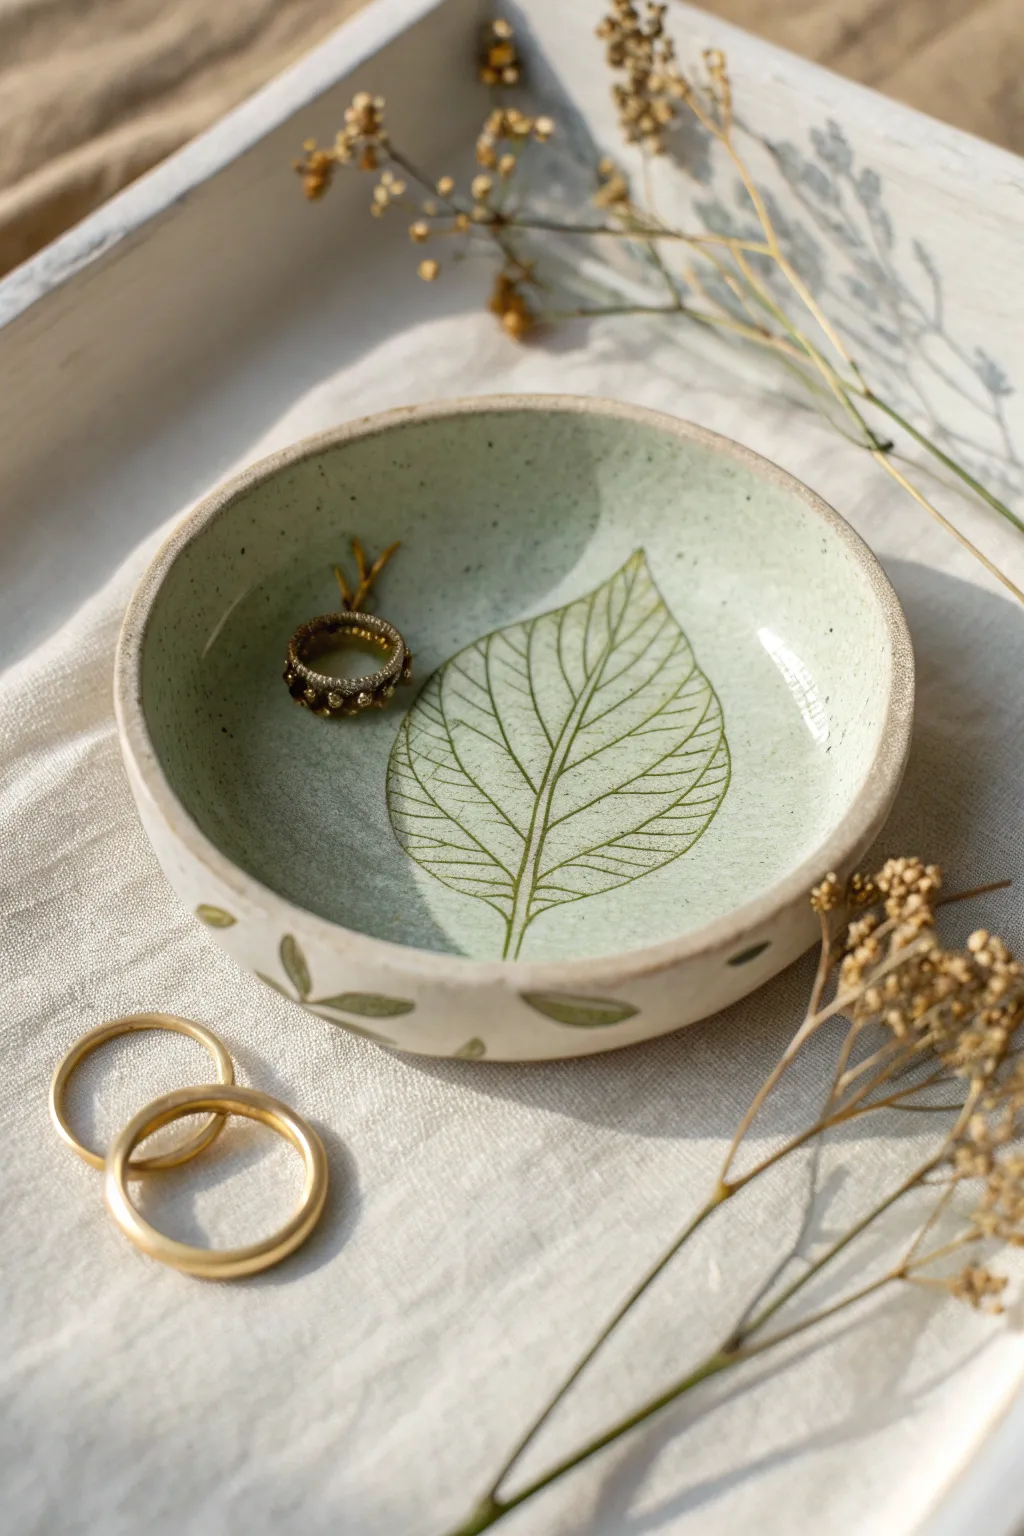
Capture the delicate beauty of fallen foliage with this elegant leaf-pressed clay dish. Featuring a subtle speckled green finish and organic leaf motifs, this project balances rustic charm with a smooth, professional-looking glaze.
Step-by-Step Tutorial
Materials
- White polymer clay or air-dry clay (for a ceramic look)
- Fresh leaf with prominent veins (e.g., hydrangea or beech)
- Rolling pin
- Small bowl (for use as a mold)
- Craft knife or scalpel
- Fine grit sandpaper
- Acrylic paints: sage green, dark olive, brown
- Gloss varnish or resin sealant
- Small round paintbrush
- Old toothbrush (optional for speckling)
- Sponge or paper towel
Step 1: Shaping the Clay Body
-
Condition the clay:
Begin by kneading your white clay thoroughly until it is soft, pliable, and free of air bubbles. If using polymer clay, the warmth of your hands is key here. -
Roll out a slab:
Use your rolling pin to flatten the clay into a smooth sheet, aiming for a consistent thickness of about 1/4 inch. -
Press the leaf texture:
Place your chosen leaf face-down onto the center of the clay slab. The underside of the leaf usually has the most prominent veins. Roll over it firmly with the rolling pin once to embed the texture deeply. -
Shape the perimeter:
Find a circular cutter or a bowl slightly larger than your desired finished size. Place it over the leaf imprint and cut around it with your craft knife to create a perfect circle. -
Remove the leaf:
Carefully lift the leaf away using tweezers or the tip of your knife to reveal the intricate vein pattern stamped into the clay. -
Form the curve:
Gently lift your clay circle and place it inside your shaping bowl to create a curved, dish-like form. Press it gently against the sides ensuring the leaf design remains centered. -
Smooth the edges:
Dip your finger in a little water (for air-dry clay) or baby oil (for polymer) and run it along the rim to smooth out any sharp cutting marks. -
Let it cure:
Allow the clay to dry or bake according to the package instructions. If baking polymer clay, I prefer to leave it in the bowl so it holds its shape perfectly in the oven.
Step 2: Decorating and Glazing
-
Sand for smoothness:
Once fully cured and cool, gently sand the rim and any rough spots on the surface with fine-grit sandpaper. -
Highlight the veins:
Dilute some dark olive green paint with water to create a wash. Brush this over the leaf impression, getting into all the crevices. -
Wipe back the wash:
Immediately use a damp sponge or paper towel to wipe the surface. The dark paint will stay trapped in the deep veins, defining the leaf structure, while the raised areas remain cleaner. -
Apply the base tint:
Mix a very translucent wash of sage green paint. Brush this over the entire inside of the bowl to give it that soft, celadon-pottery look. -
Add speckles:
Dip an old toothbrush into slightly watered-down brown paint. Run your thumb over the bristles to flick tiny speckles across the dish, mimicking stoneware clay. -
Paint the exterior motifs:
On the outside curve of the bowl, paint simple, freehand leaf stems using the olive green paint. Keep the strokes loose and organic. -
Detail the rim:
Use a nearly dry brush with brown paint to gently distress the very top edge of the rim, giving it an earthy, finished border. -
Seal the piece:
Once all paint is completely dry, apply two coats of high-gloss varnish or a thin layer of resin. This not only protects the paint but gives it the shiny, authentic look of fired ceramic glaze.
Leaf not showing up?
If the impression is too faint, your clay might be too firm. Warm the clay and try rolling again, or switch to a leaf with much thicker veins, like a hydrangea.
Level Up: Gold accents
After the varnish dries, use a liquid gold leaf pen to trace only the very outer rim of the bowl. This touch of metallic luster mimics Kintsugi-style pottery.
Now you have a serene little catch-all perfect for holding your favorite rings or earrings


Wildflower and Fern Clay Ornaments

Capture the delicate beauty of a woodland walk with this natural clay ornament featuring intricate fern and wildflower impressions. The soft cream clay provides a perfect canvas for subtle earthy tones, creating a piece that feels both rustic and refined.
Step-by-Step
Materials
- White air-dry clay (or polymer clay)
- Small rolling pin
- Oval cookie cutter (approx. 3-4 inches)
- Fresh fern leaf (small)
- Tiny wild berries or small floral sprigs
- Parchment paper or craft mat
- Drinking straw or small circular cutter
- Brown acrylic paint (Burnt Umber or similar)
- Deep red or burgundy acrylic paint
- Fine detail paintbrush (size 0 or 00)
- Paper towel or soft cloth
- Jute twine
- Fine-grit sandpaper (optional)
- Matte spray varnish/sealant
Step 1: Shaping the Base
-
Condition the clay:
Begin by kneading a small handful of white air-dry clay until it is warm, pliable, and free of cracks. If it feels too dry, you can wet your hands slightly. -
Roll it smooth:
Place the clay on a sheet of parchment paper to prevent sticking. Use your rolling pin to flatten the clay to an even thickness of about 1/4 inch (6mm). -
Cut the shape:
Press your oval cookie cutter firmly into the rolled clay. If you don’t have an oval cutter, you can lightly trace an oval shape with a needle tool and cut it out carefully with a craft knife. -
Smooth the edges:
Dip your finger in a tiny bit of water and gently run it along the cut edges of the oval to smooth away any roughness or clay crumbs. -
Create the hanging hole:
Using a drinking straw or a small circular cutter, punch a hole near the top center of the oval. Make sure it’s not too close to the edge to prevent breaking later.
Step 2: Creating Impressions
-
Arrange the botanicals:
Gently lay your fern leaf in the center of the clay oval. Position small floral sprigs or berry clusters around the fern to create a balanced composition. -
Press designs:
Once arranged, use your rolling pin to gently but firmly roll over the plants once. You want to press them flush into the clay without distorting the oval shape. -
Add detail impressions:
For deeper definition in areas the roller missed, like the separate flower petals on the right, use the end of a paintbrush handle or a modeling tool to manually press those specific elements deeper. -
Remove plants:
Carefully lift the botanicals out of the clay using tweezers or a needle tool. Pull slowly to ensure clean edges on the impression. -
Refine the surface:
If the removal process pulled up any jagged bits of clay, gently tap them down with your finger. -
Dry completely:
Allow the clay to dry fully according to the package instructions. This usually takes 24-48 hours for air-dry clay. Flip it occasionally to ensure even drying.
Clay cracked while drying?
Surface cracks happen if clay dries unevenly. Mix a tiny bit of fresh clay with water to make a paste (‘slip’) and fill cracks. Sand smooth once re-dried.
Step 3: Finishing Touches
-
Sand imperfections:
Once bone dry, check the edges. If they are sharp or rough, lightly sand them with fine-grit sandpaper for a polished look. -
Apply the antiquing wash:
Mix a small amount of brown acrylic paint with water to create a thin wash. The consistency should be ink-like. -
Fill the fern:
Paint the brown wash over the fern impression, making sure the liquid settles into the deep crevices. -
Wipe back excess:
Immediately use a slightly damp paper towel to wipe the surface of the clay. This leaves the brown paint only inside the recessed fern pattern, revealing the design. -
Detail the berries:
Using your very fine brush, dab a tiny amount of undiluted burgundy paint specifically into the small berry impression on the left to make it pop. -
Tint the flowers:
Similarly, use a mostly dry brush to lightly dust a golden-brown or beige tone into the flower imprint on the right for subtle definition. -
Seal the piece:
Protect your work with a light coat of matte spray varnish. This prevents the raw clay from absorbing moisture. -
Add the hanger:
Cut a length of jute twine, thread it through the hole, and tie a loop knot to finish your nature-inspired ornament.
Scented Ornament
Add 2-3 drops of essential oil (like pine, cedarwood, or lavender) to the back of the unsealed clay ornament. The porous clay acts as a natural diffuser.
Hang your creation near a window to let the natural light highlight the beautiful botanical textures you’ve captured


Mini Clay Mushrooms
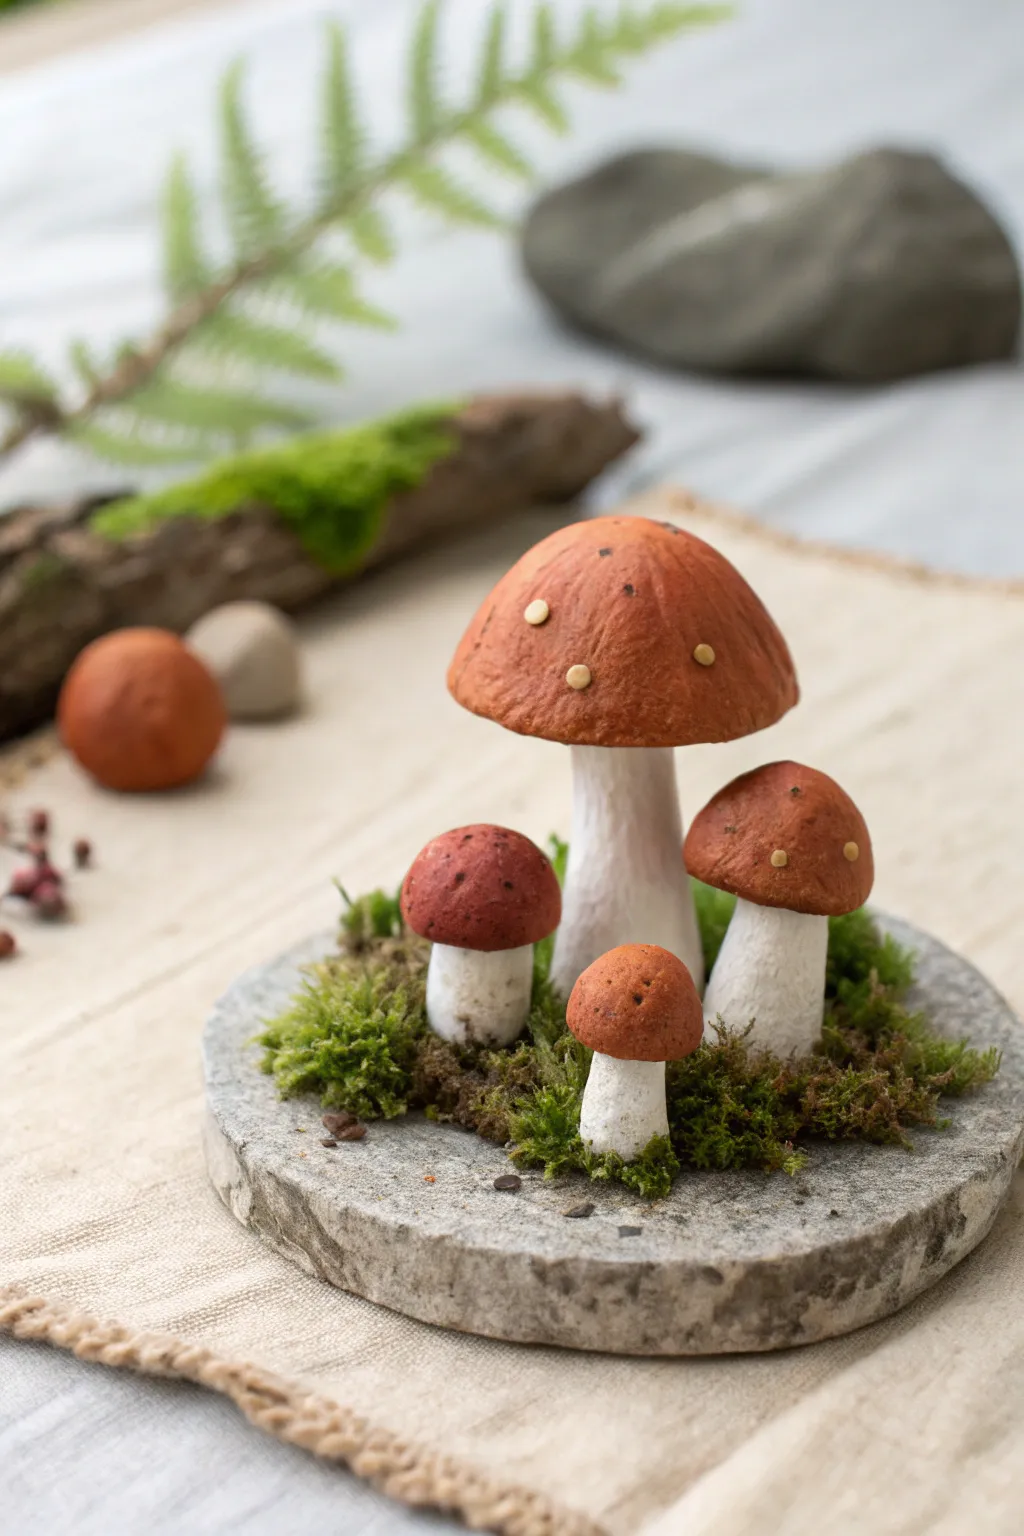
Capture the magic of an autumn woodland with these delightful, realistic miniature mushrooms. Resting on a bed of preserved moss and stone, this sculpture brings a tiny piece of nature right onto your desk.
Step-by-Step Tutorial
Materials
- Air-dry clay or polymer clay (white and terracotta/orange)
- Acrylic paints (brown, ochre, cream, dark grey)
- Fine-grit sandpaper
- Small round stone or slate coaster (approx. 4-inch diameter)
- Preserved craft moss (green and brown varieties)
- Tacky glue or heavy-duty craft adhesive
- Sculpting tools (needle tool and ball stylus)
- Small paintbrush
- matte varnish (optional)
- Toothbrush or texture sponge
Step 1: Sculpting the Mushrooms
-
Form the stems:
Start by pinching off four pieces of white clay in varying sizes. Roll them into thick logs, making the bottoms slightly wider than the tops like a natural mushroom stalk. -
Add stem texture:
Before the clay hardens, take a toothbrush or a stiff bristle brush and gently tap the surface of the stems. This creates a porous, organic texture that mimics real fungi. -
Shape the large cap:
Condition a ball of terracotta-colored clay. Press your thumb into the center and rotate to form a dome shape. The edges should be slightly uneven rather than perfectly round. -
Create smaller caps:
Repeat the dome-shaping process for one medium cap and two small caps. Vary the roundness slightly; maybe one is taller and another is flatter. -
Connect stems and caps:
Score the top of each white stem and the underside of each colored cap with a needle tool. Apply a tiny dab of water (for air-dry clay) or liquid clay (for polymer) and press them firmly together. -
Refine the join:
Use a sculpting tool to smooth the clay where the stem meets the underside of the cap, ensuring a strong bond. I find blending the clay slightly helps them look like one solid organism. -
Add signature spots:
Roll extremely tiny balls of cream-colored clay. Press these randomly onto the tops of the orange caps and flatten them gently so they look like natural markings. -
Dry or bake:
If using air-dry clay, set them aside for 24-48 hours. If using polymer clay, bake according to package instructions (usually 275°F for 15-30 minutes).
Texturing Tip
For ultra-realistic stem texture, roll absolute tin foil into a ball and roll it over the damp white clay stems before baking or drying.
Step 2: Painting and Assembly
-
Wash the caps:
Mix a small amount of brown acrylic paint with water to create a thin wash. Brush this over the orange caps and immediately wipe most of it off with a paper towel to create depth in the crevices. -
Detail the stems:
Using a very dry brush with a tiny amount of grey paint, lightly dust the texture on the white stems. This highlights the porous surface we created earlier. -
Prepare the base:
Clean your chosen stone slab or coaster thoroughly and ensure it is dry. Decide on the arrangement of your mushrooms before gluing. -
Mount the mushrooms:
Apply a generous amount of heavy-duty craft adhesive to the bottom of the largest mushroom stem and press it firmly onto the stone. Hold for a minute to set. -
Complete the cluster:
Glue the remaining three mushrooms around the large one. Clustering them at slightly different angles makes the group look more natural. -
Apply the moss:
Tear small clumps of preserved moss. Dab glue around the base of the mushroom stems and press the moss into the glue, covering the join where the clay meets the stone. -
Fill the gaps:
Continue adding moss outward towards the edge of the stone, mixing green and brown shades to mimic a real forest floor. -
Final touches:
Check for any visible glue spots and cover with tiny bits of moss. You can lightly seal the mushroom caps with a matte varnish for protection if desired.
Make it a Scene
Add a tiny clay snail trailing up a stem or a miniature ladybug on the moss for a charming touch of life.
Enjoy your everlasting piece of the forest floor, perfect for bringing a calm natural vibe to any shelf

The Complete Guide to Pottery Troubleshooting
Uncover the most common ceramic mistakes—from cracking clay to failed glazes—and learn how to fix them fast.
Tiny Succulent and Cactus Pots
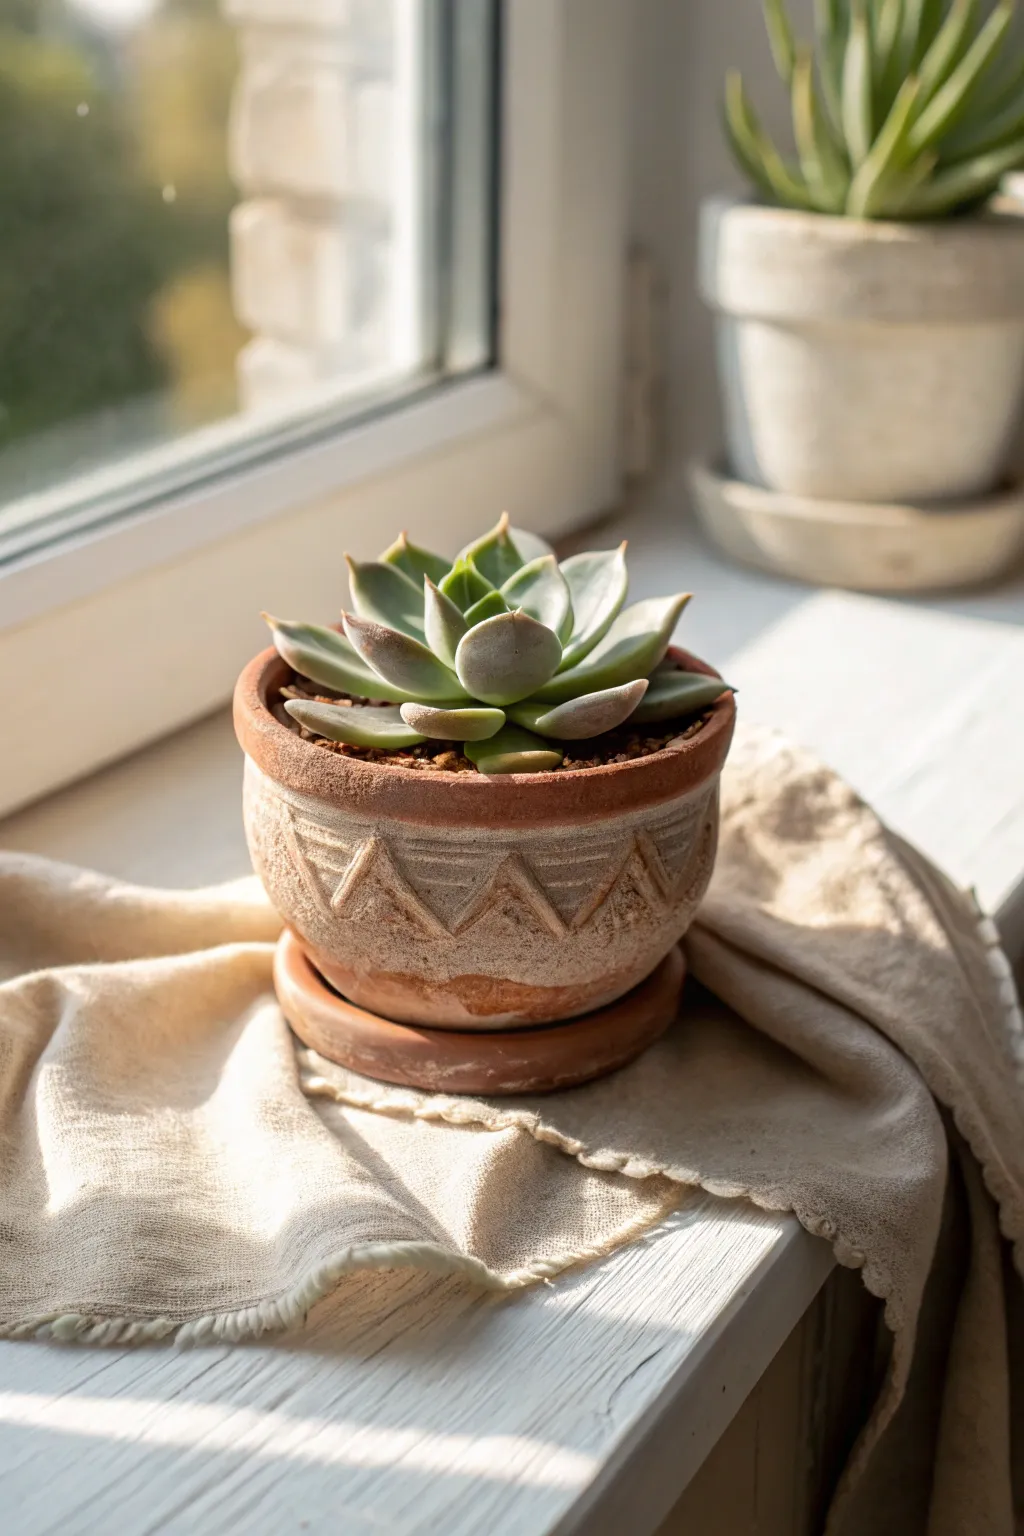
Embrace the natural beauty of earthenware with this petite, textured planter perfect for small succulents like Echeveria. Its incised geometric pattern and dusty terracotta finish give it an authentic, sun-baked charm right out of the kiln.
Step-by-Step
Materials
- Terracotta baking clay (or air-dry clay)
- Small rolling pin
- Circle cutter (or a bowl/glass to trace)
- Fettling knife or craft knife
- Carving tool or wooden stylus
- Small bowl for shaping (mold)
- Sponge and water
- Clear matte sealant (optional for air-dry clay)
- Sandpaper (fine grit)
Step 1: Shaping the Pot Base
-
Roll your slab:
Begin by conditioning your terracotta clay until it’s pliable. Roll it out into a smooth slab about 1/4 inch thick, ensuring even thickness throughout to prevent cracking during drying. -
Cut the base:
Using a circle cutter or by tracing around a small glass, cut out a circle for the base of your pot. This determines the footprint of your planter, so aim for about 3-4 inches in diameter. -
Create the walls:
Roll a long rectangular strip of clay from the remaining slab. The width of the strip will determine the height of your pot, and the length should be enough to wrap around the circumference of your base circle with a little overlap. -
Assemble the cylinder:
Score the edges of the base circle and the bottom edge of your clay strip. Apply a little water or ‘slip’ (clay slurry) to the scored areas. Wrap the strip around the base, pressing firmly to join them. -
Join the seam:
Where the two ends of the wall meet, score and slip the edges, then blend the clay together using your thumb or a modeling tool until the seam disappears. I like to smooth this area particularly well on the inside to ensure it’s watertight. -
Shape the rim:
Add a small coil of clay to the top rim to thicken it slightly. Blend this coil down into the wall, creating a rounded, sturdy lip that gives the pot a finished look. -
Refine the curve:
Gently push the walls outward from the inside to create a slight belly or curve, rather than a straight cylinder. Smooth the exterior with a damp sponge to remove fingerprints.
Clean Lines
Wait until the clay is ‘leather hard’ (stiff but damp) before carving. The tool will cut cleaner lines without dragging.
Step 2: Adding Texture and Pattern
-
Mark your guidelines:
Lightly trace two horizontal parallel lines around the middle of the pot using a needle tool. These will serve as boundaries for your geometric pattern. -
Carve the zig-zag:
Using a carving tool or wooden stylus, draw a continuous zig-zag line between your parallel guides. Press deeply enough to create a distinct groove but careful not to puncture the wall. -
Create the inner triangles:
Inside each large triangle formed by the zig-zag, carve a smaller, parallel triangle. This nested chevron look adds the intricate detail seen in the reference photo. -
Texture the surface:
For that aged, rustic feel, gently tap the smooth areas of the clay with a stiff bristle brush or a crumpled ball of aluminum foil. Avoid the carved lines so they remain crisp. -
Make the simple saucer:
Roll a second, slightly larger circle of clay for the saucer. Curve the edges up just slightly to create a shallow dish shape that will catch excess water.
Step 3: Finishing Touches
-
Dry thoroughly:
Allow your pot and saucer to dry completely. If using air-dry clay, this may take 24-48 hours; for oven-bake clay, follow the package instructions. -
Sand the rough spots:
Once dry (or cured), use fine-grit sandpaper to gently smooth the rim and any sharp edges on the pattern. Blow away the dust. -
Apply a wash (Optional):
To enhance the texture, you can wipe a thinned darker brown acrylic paint over the surface and immediately wipe it off with a rag. The dark color will stay in the carved grooves, making the pattern pop. -
Seal the interior:
If you plan to put a real plant inside and used air-dry clay, apply several coats of a waterproof sealant to the inside of the pot. Terracotta baking clay is naturally porous but can generally handle moisture better.
Cracks Appearing?
If small cracks appear while drying, fill them immediately with a matching clay slip or paste and smooth over with a damp finger.
Now you are ready to nestle your favorite succulent into its new handmade home
Woodland Animal Planters
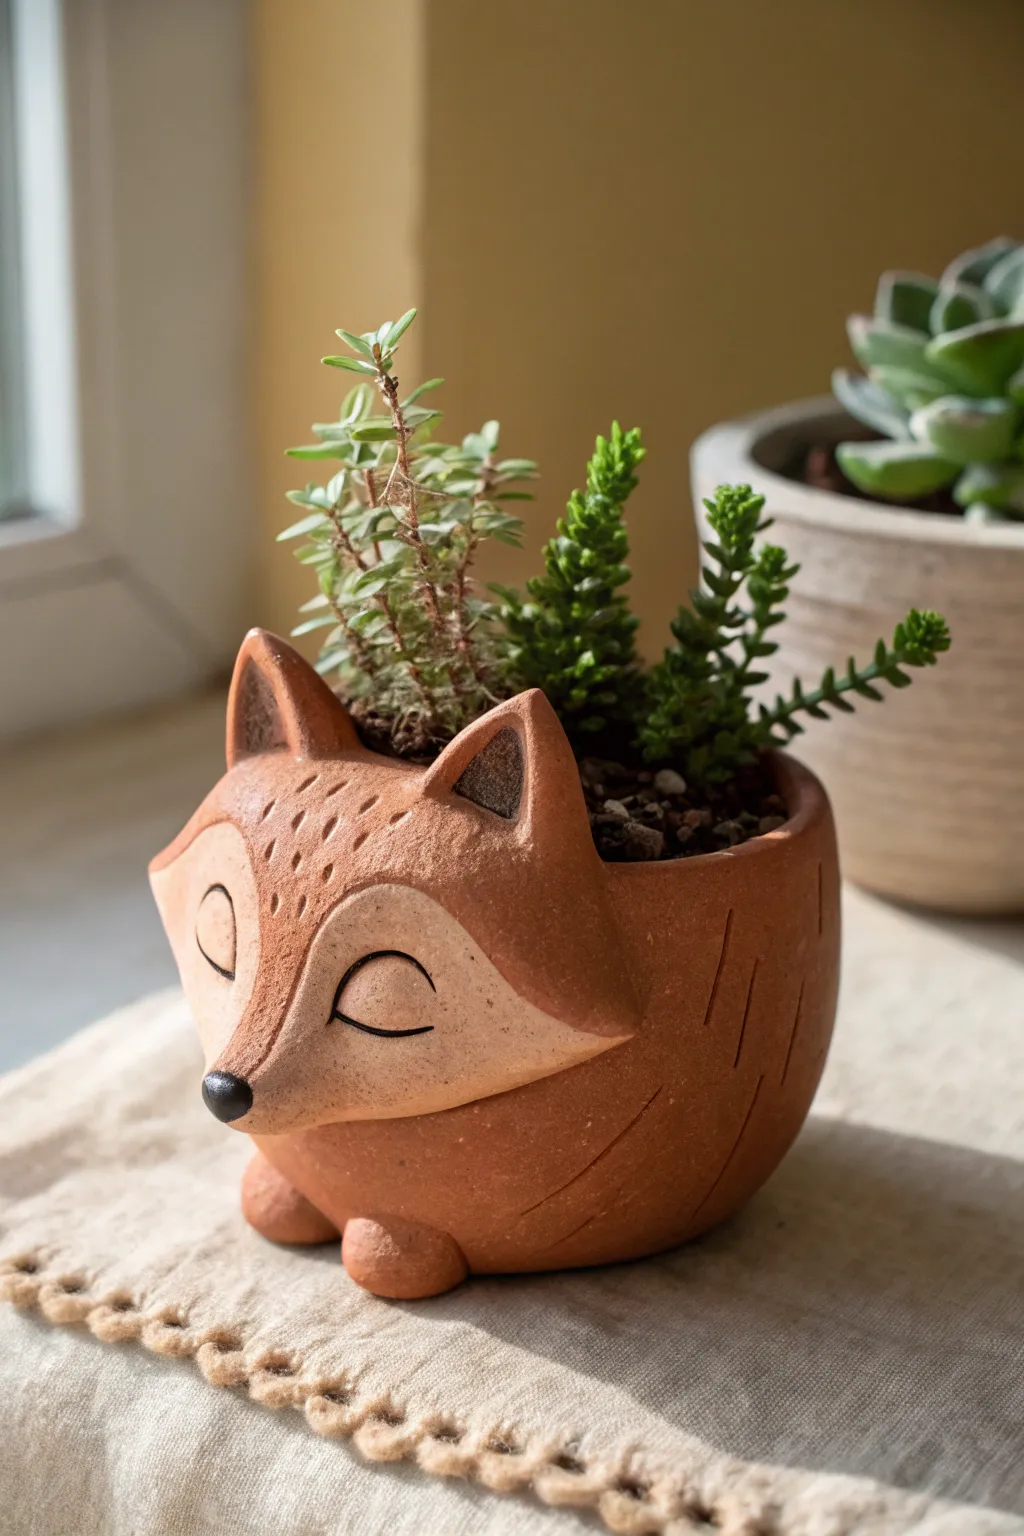
Bring a touch of woodland whimsy to your windowsill with this adorable sleeping fox planter. The warm, earthy tones of the clay perfectly complement the sleepy expression, creating a cozy home for your favorite succulents.
Step-by-Step Tutorial
Materials
- Terracotta-colored air-dry clay or polymer clay
- Basic clay sculpting tools (needle tool, smoothers)
- Small rolling pin
- Circular cookie cutter (approx. 4 inches) or bowl for template
- Water and sponge (for smoothing)
- Black acrylic paint
- White or cream acrylic paint
- Fine detail paintbrush
- Matte sealant or varnish
- Small succulents and potting soil
Step 1: Forming the Base
-
Create the main pinch pot:
Start with a large ball of terracotta clay, roughly the size of a grapefruit. Press your thumb into the center and pinch the walls upwards and outwards to form a deep, rounded bowl shape. Keep the walls about 1/4 inch thick for stability. -
Smooth the exterior:
Using a slightly damp sponge, smooth out any fingerprints or cracks on the outside of your bowl. This rounded form will be the fox’s body, so you want it nice and organic. -
Flatten the bottom:
Gently tap the pot onto your work surface to create a flat base. This ensures your planter won’t roll away once it’s filled with soil.
Cracking Up?
If you see small cracks forming while the clay dries, mix a tiny bit of fresh clay with water to make a paste and fill them in immediately.
Step 2: Sculpting the Fox Features
-
Shape the face plate:
Roll out a separate piece of clay into a flattened heart shape, but keep the bottom rounded rather than pointed. This will be the lighter-colored face mask area. -
Attach the face:
Score the back of your heart shape and the front of the pot. Apply a little water or slip (liquid clay) and press the face piece firmly onto the front of the pot. Smooth the edges so it looks integrated, not just stuck on. -
Form the nose:
Pinch the bottom center of the attached face piece to create a slight protrusion. Add a tiny triangle of clay to the very tip for the nose button. -
Create the ears:
Shape two triangular wedges of clay. Make them fairly thick at the base. Use your thumb to create an indentation in the center of each triangle to give the ears depth. -
Attach the ears:
Score and slip the base of the ears and attach them to the top rim of the pot, just above the face mask. Blend the clay downwards into the body for a seamless connection. -
Add the feet:
Roll two small balls of clay and slightly flatten them. attach these to the bottom front of the pot, just under the chin, to look like tucked-in paws. -
Detail the fur:
Using a needle tool, gently scratch textural lines into the clay on the fox’s forehead and around the sides of the body to mimic the look of fur. -
Refine and dry:
Give the entire piece a final smoothing with a damp finger or sponge. Let the clay dry completely according to the package instructions—usually 24 to 48 hours for air-dry clay.
Tail Time
Sculpt a large, fluffy tail that wraps around one side of the bowl to give the fox even more character and a 360-degree sculptural look.
Step 3: Painting and Finishing
-
Paint the face mask:
Mix a cream color using white paint and a tiny dot of your terracotta clay color (or orange paint). Paint the heart-shaped face area, carefully following the sculpted lines. -
Add facial details:
Using a very fine detail brush and black paint, draw two curved semicircles for the sleeping eyes. I find it helps to practice the curve on paper first to get them symmetrical. -
Paint the nose:
Paint the small clay nose tip solid black. -
Add ear details:
Paint the inner triangles of the ears with a dark brown or dark grey to create depth. -
Add forehead spots:
Dip the tip of a toothpick or small brush into dark brown paint and add a few decorative dots or dashes on the fox’s forehead. -
Seal the planter:
Once the paint is fully dry, coat the entire piece (inside and out) with a matte waterproof sealant. This is crucial to protect the clay from moisture. -
Plant:
Fill with potting soil and add your chosen succulents, arranging taller ones in the back to resemble a tail or woodland foliage.
Place your little sleeping friend in a sunny spot and enjoy the calm vibe it brings to your room


What Really Happens Inside the Kiln
Learn how time and temperature work together inside the kiln to transform clay into durable ceramic.
Pebble Mosaic Nature Faces
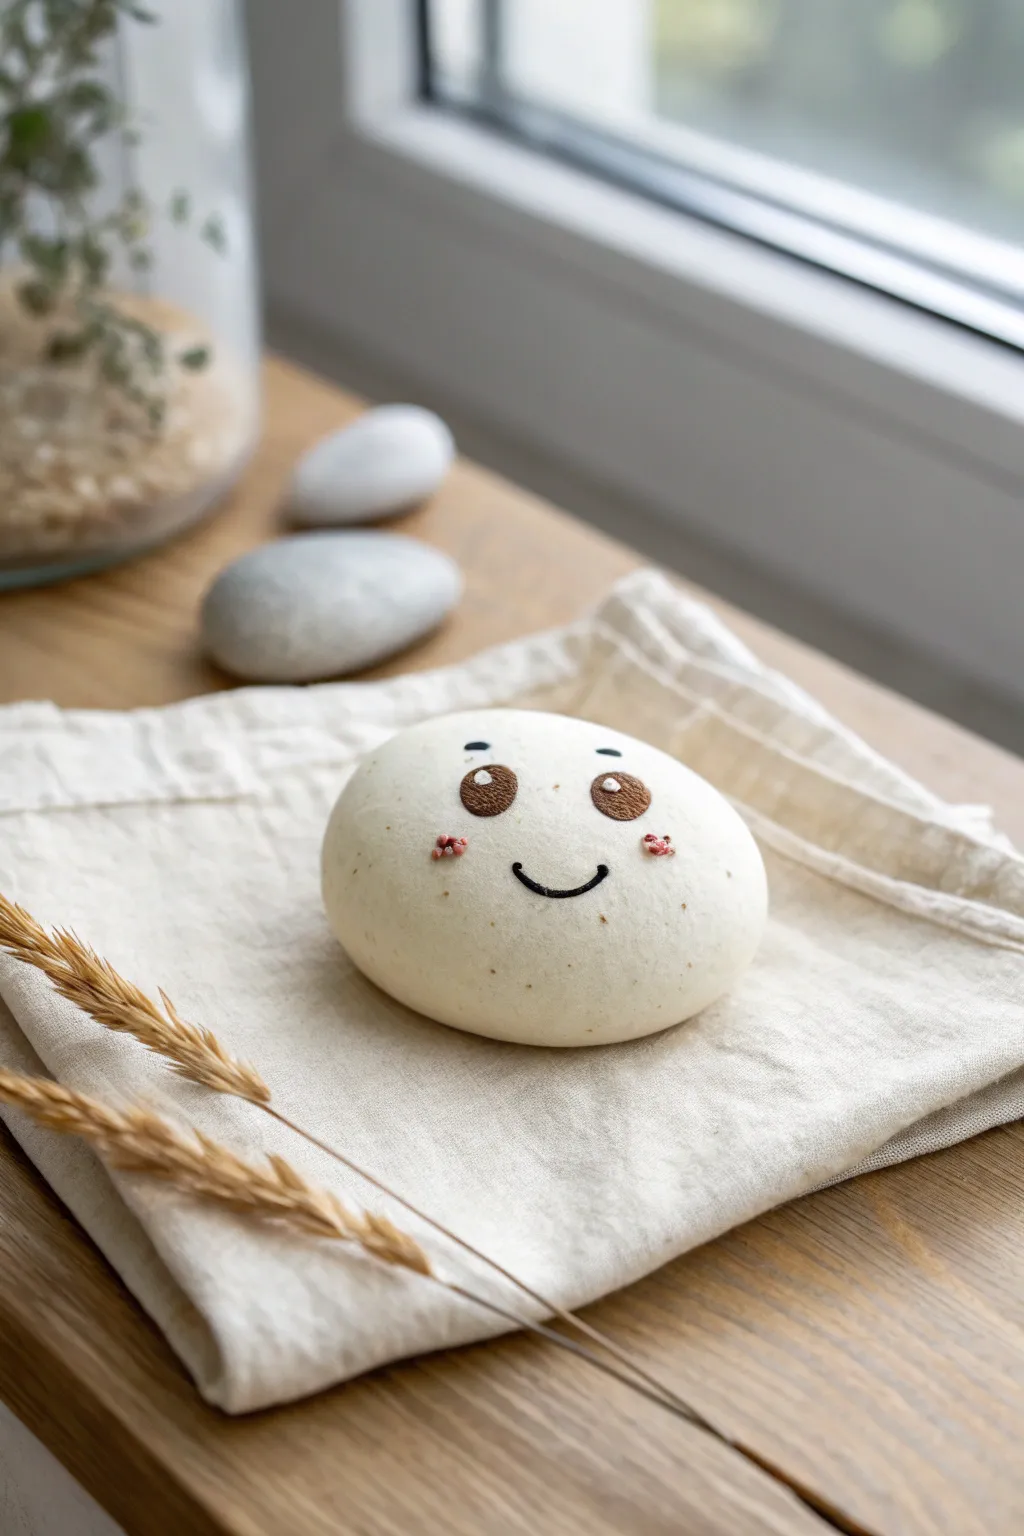
Transform a simple lump of white clay or a smooth river stone into an adorable, smiling friend. This minimalist project focuses on clean lines and gentle expressions to bring a touch of joy to your tabletop or garden.
How-To Guide
Materials
- Air-dry clay (white) or a smooth white river stone
- Fine-grit sandpaper (if using clay)
- Acrylic paints (brown, white, pink)
- Fine-point black permanent marker or liner pen
- Small detail paintbrush (size 0 or 00)
- Matte sealant spray or varnish
- Water cup and paper towels
Step 1: Shaping the Base
-
Form the pebble:
Start by taking a handful of white air-dry clay. Roll it firmly between your palms to create a smooth, seamless ball. Gently flatten it into an oval, bun-like shape, ensuring the top surface is slightly doomed and even. -
Smooth the surface:
Dip your finger in a tiny bit of water and run it over the clay to erase any fingerprints or cracks. The smoother the surface now, the cleaner your painting will look later. -
Let it cure:
Allow the clay to dry completely according to the package instructions—usually 24 to 48 hours. Don’t rush this, as moisture creates painting issues. -
Sand for perfection:
Once bone dry, take a piece of fine-grit sandpaper and gently buff the surface. Focus on the ‘face’ area to create a porcelain-smooth canvas.
Step 2: Creating the Expression
-
Draft the face:
Use a pencil very lightly to mark where the eyes and mouth will go. Aim for wide-set eyes to give the character an innocent, cute look. -
Paint the eye base:
With your smallest brush and brown acrylic paint, carefully fill in two large circular or oval shapes for the eyes. I find it helpful to anchor my hand on the table for stability here. -
Add the smile:
Switch to your fine-point black marker or liner pen. Draw a simple, clean upward curve for the mouth right between the eyes, slightly lower, to form a gentle smile. -
Detail the eyes:
Using the marker or a very fine brush with black paint, outline the brown eye circles thinly to define them. -
Add eyebrows:
Draw two small, floating curved lines above the eyes using the black marker. These simple strokes add a lot of personality.
Ink Bleeding?
If your marker bleeds into the clay, seal the clay with a thin layer of matte varnish or white acrylic paint *before* drawing the face details.
Step 3: Bringing it to Life
-
Add the highlights:
Dip the back end of your paintbrush or a toothpick into white acrylic paint. Dot a large reflection spot in the upper left of each brown eye pupil, then a tiny dot in the lower right. -
Create rosy cheeks:
Mix a tiny dab of pink paint (or diluted red). Using the very tip of your brush, apply three tiny dots in a cluster on each cheek, just below the outer corners of the eyes. -
Simulate texture:
To mimic a natural stone look, you can lightly flick an old toothbrush with diluted brown paint near the edges, or add tiny random specks with a marker, though keeping it clean is also lovely. -
Seal the artwork:
Once all paint and ink are completely dry, spray the entire stone with a matte sealant. This protects the clay from moisture and keeps the face looking fresh. -
Display your friend:
Place your finished character on a small linen cloth or nestle it among some dried botanicals for a cozy vignette.
Add Variety
Make a whole family of pebbles with different expressions—winking, sleeping, or surprised. Vary the sizes to create a stacked totem pole.
Enjoy the calm presence of your new little clay companion on your desk or shelf
Bark and Pine Needle Texture Coasters

Bring a touch of the outdoors to your coffee table with these rustic, nature-inspired coasters. By imprinting clay with real or hand-carved pine motifs and adding a wash of green, you’ll create functional art that looks perfectly imperfect.
Step-by-Step Guide
Materials
- Air-dry clay (terracotta color recommended)
- Rolling pin
- Circle cutter or a round bowl (appx. 4 inches diameter)
- Fresh pine sprigs (for reference or direct impression)
- Needle tool or sharp toothpick
- Acrylic paint (forest green, dark brown)
- Small paintbrush
- Sponge or paper towel
- Matte sealant or varnish
- Sandpaper (fine grit)
Step 1: Shaping the Base
-
Prepare your workspace:
Lay down a piece of canvas or wax paper to prevent sticking. Grab a handful of air-dry clay and knead it until it’s pliable and warm. -
Roll the slab:
Roll the clay out to an even thickness, aiming for about 1/4 inch. If you want them sturdier, go slightly thicker, but remember this will increase drying time. -
Cut the circles:
Use your circle cutter or place a bowl upside down on the clay and trace around it with a knife. Create as many coasters as your slab allows, usually four for a set. -
Smooth the surface:
Dip your finger in a little water and gently run it over the edges and surface of the clay circles to remove any rough burrs or cracks.
Fixing Curled Clay
If your coasters curl while drying, slightly dampen the concave side and place them under a heavy book overnight to flatten them back out.
Step 2: Adding Texture & Design
-
Create the bark edge:
To mimic the side of a tree slice, take your needle tool or a small texturing comb. Gently score vertical lines haphazardly around the entire outer rim of each coaster. -
Draft the pine needles:
You can now lightly press fresh pine sprigs into the clay for a realistic impression, or use your needle tool to sketch the central spine of a pine branch freehand. -
Detail the needles:
If carving by hand, use short, quick strokes radiating from the branch spine to create the needles. Vary the pressure so some lines are deeper than others. -
Refine the imprint:
If you used real sprigs, gently peel them away. I often like to go back over faint impressions with a tool to make sure the paint will have a good groove to settle into later. -
Final drying stage:
Place the coasters on a flat surface or a wire rack to dry. Flip them every few hours to prevent curling. Let them cure for 24-48 hours until fully hard.
Step 3: Color & Finish
-
Sand edges:
Once fully dry, lightly sand the bottom and top edge if there are any sharp points, but leave the ‘bark’ texture on the side rough. -
Apply the green wash:
Water down your forest green acrylic paint slightly. Brush it generously into the pine needle grooves you created. -
Wipe back:
Before the paint dries completely, use a slightly damp sponge or paper towel to wipe the surface. The paint should stay inside the carved lines but clear off the top surface. -
Deepen the contrast:
Mix a tiny bit of dark brown paint with water and wash it over the bark-textured edges, wiping it back quickly to highlight the rim texture. -
Dry the paint:
Allow the paint to set for at least an hour. -
Seal the piece:
Apply a coat of matte varnish or sealant. This is crucial to protect the clay from moisture when used as a drink coaster. -
Add protective backing:
Glue a felt circle or small cork pads to the bottom of each coaster to protect your furniture.
Level Up: Scented Set
Mix a few drops of essential pine oil into the clay while kneading. The scent will be subtle but adds a multisensory element to the gift.
Stack your finished coasters and tie them with twine for a beautiful handmade gift

TRACK YOUR CERAMIC JOURNEY
Capture glaze tests, firing details, and creative progress—all in one simple printable. Make your projects easier to repeat and improve.
Botanical Clay Pendants
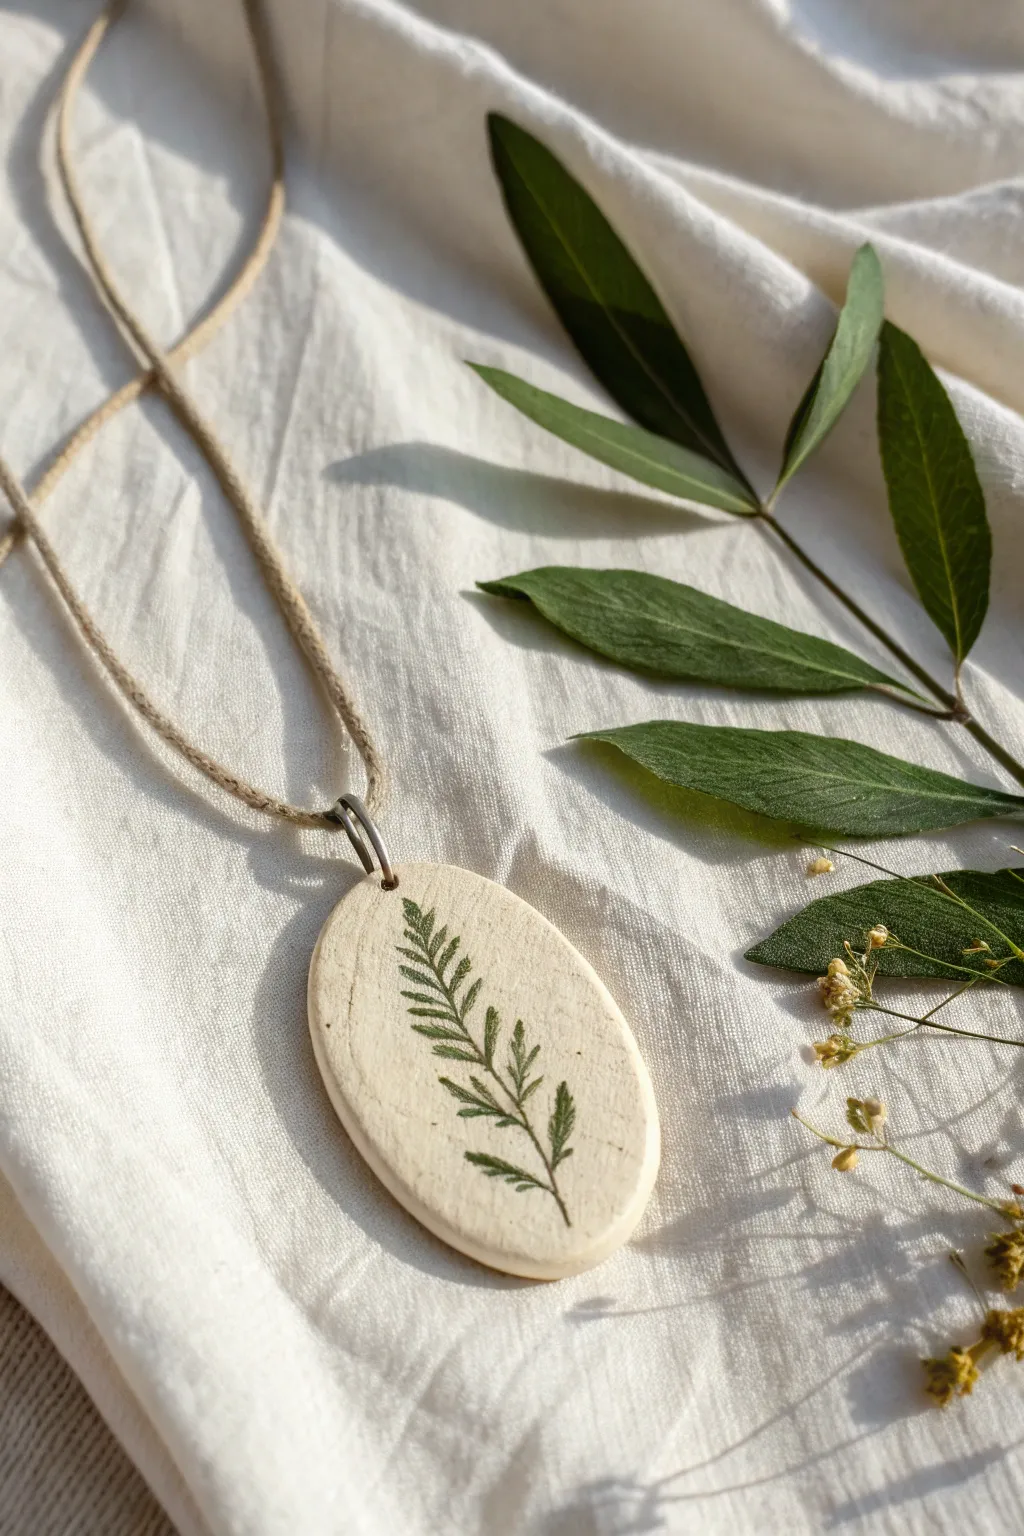
Capture the delicate beauty of the forest floor with this minimalist clay pendant featuring a crisp fern leaf impression. The smooth, matte finish and natural jute cord create an earthy, organic piece of jewelry perfect for everyday wear.
Detailed Instructions
Materials
- Air-dry clay (white or off-white)
- Small fern leaf (fresh or pressed)
- Rolling pin
- Oval clay cutter (approximately 1.5 – 2 inches)
- Sandpaper (fine grit)
- Green acrylic paint (natural forest shade)
- Very fine detailing brush
- Matte varnish or sealant
- Jump ring (silver or bronze tone)
- Jute twine or hemp cord
- Straw or toothpick (for creating the hole)
- Wax paper or craft mat
Step 1: Shaping the Base
-
Prepare the Clay:
Begin by taking a small ball of air-dry clay and kneading it briefly until it is warm and pliable. This conditioning prevents cracks from forming later. -
Roll the Slab:
Place the clay onto a piece of wax paper or a craft mat to prevent sticking. Use your rolling pin to flatten the clay to an even thickness of about 1/4 inch (6mm). -
Cut the Shape:
Position your oval cutter over a smooth section of the rolled clay. Press down firmly and evenly to cut out the pendant shape, then gently pull away the excess clay. -
Smooth the Edges:
Dip your finger in a tiny bit of water and run it along the cut edges of the oval to smooth out any harsh lines or roughness left by the cutter. -
Create the Hanging Hole:
Before the clay hardens, use a straw or a toothpick to poke a hole near the top center of the oval. Make sure the hole is large enough to accommodate your jump ring later. -
Dry Completely:
Set the clay aside on a flat surface to dry. Depending on humidity and clay brand, this usually takes 24 to 48 hours. I recommend flipping it over halfway through to ensure even drying.
Step 2: Adding the Botanical Detail
-
Sand for Smoothness:
Once the clay is bone dry, take your fine-grit sandpaper and gently buff the surface and edges until they are perfectly smooth and soft to the touch. -
Plan the Composition:
Lay your fern leaf onto the white oval to visualize placement. For this design, a slight diagonal orientation looks particularly elegant. -
Paint the Leaf:
Apply a thin, even coat of forest green acrylic paint to the underside of your fern leaf (where the veins are prominent). Don’t let the paint pool, or the print will smudge. -
Press the Design:
Carefully place the painted side of the leaf onto the clay surface. Place a scrap piece of paper over it and rub gently with your finger to transfer the paint. -
Reveal the Print:
Slowly peel the leaf away to reveal the stamped impression. If any areas are too faint, you can use a very fine detailing brush to connect stems or darken leaves. -
Seal the Artwork:
Allow the paint to dry completely. Apply a coat of matte varnish over the entire front of the pendant to protect the paint and give the clay a finished look.
Stamp Sudo-Science
If your stamp looks messy, practice on a scrap piece of paper first. The key is using very little paint on the leaf—think “tacky” rather than “wet.”
Step 3: Final Assembly
-
Attach Hardware:
Open a jump ring using pliers and thread it through the hole you created earlier. Close the ring securely so there is no gap. -
Prepare the Cord:
Cut a length of jute or hemp cord to your desired necklace length. Make sure it’s long enough to slip over your head if you aren’t adding a clasp. -
Thread the Pendant:
Pass the cord through the jump ring. Ensure the pendant hangs freely and the knot will sit at the back of the neck. -
Secure the Necklace:
Tie the ends of the jute cord together with a strong double knot, trim any excess material, and your botanical artwork is ready to wear.
Gilded Edges
For a touch of luxury, use a small brush to paint just the rim of the oval with liquid gold leaf or metallic gold paint after the varnish dries.
Enjoy wearing your piece of evergreen nature regardless of the season
Herb-Imprint Garden Markers
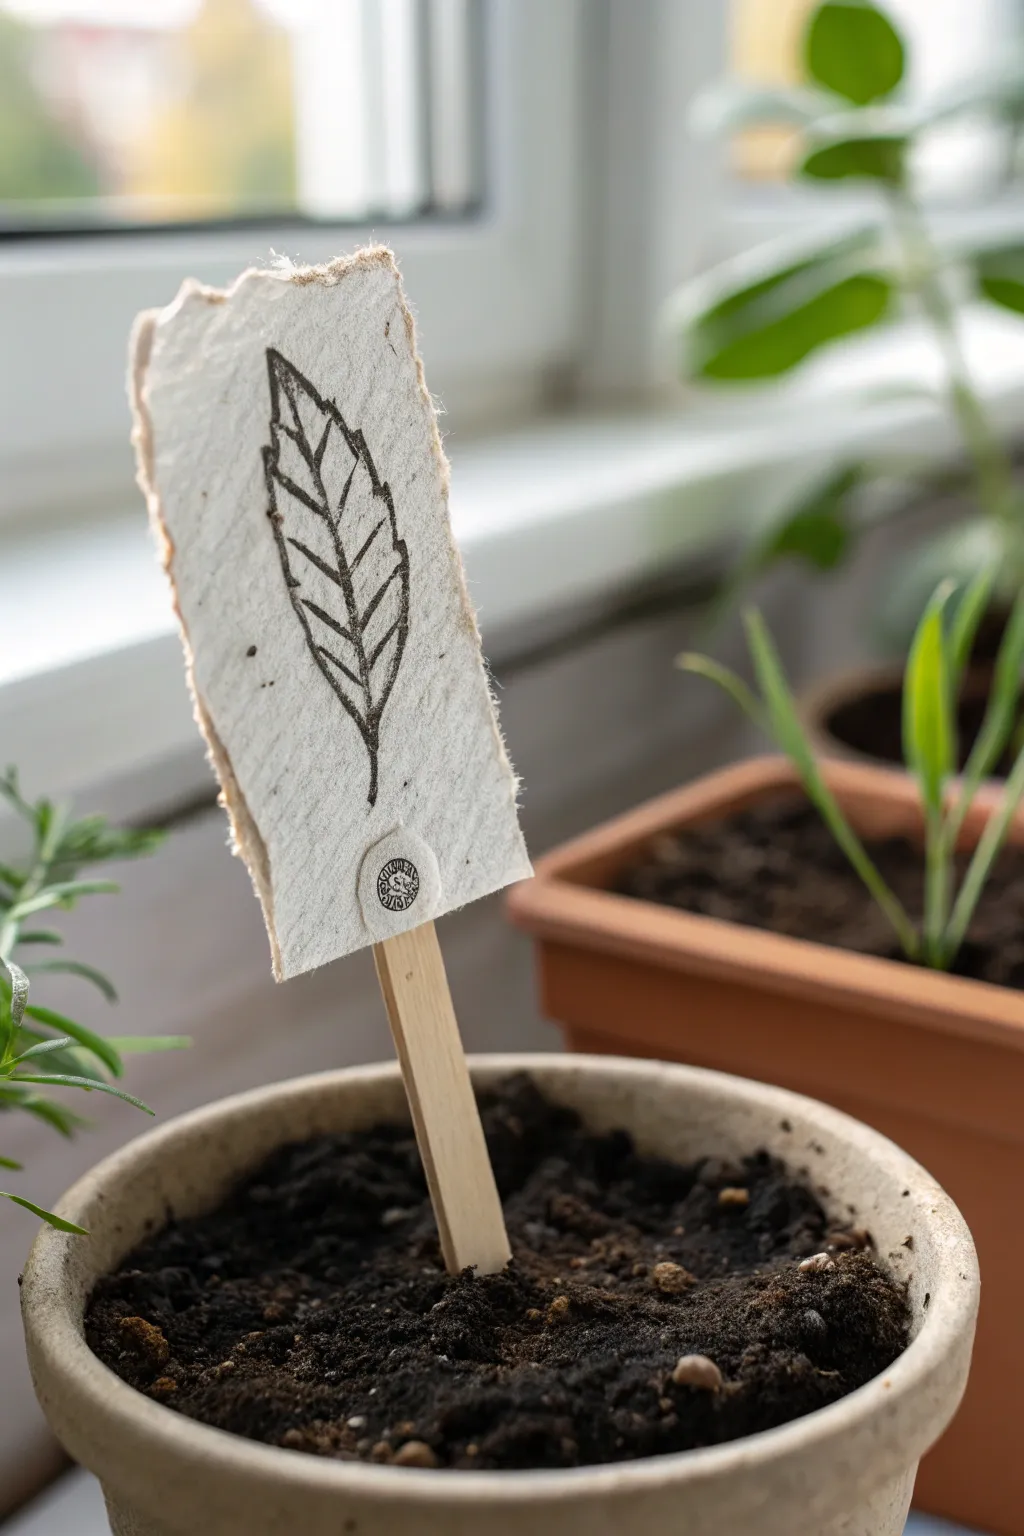
Create a charming, organic label for your indoor garden using air-dry clay and a simple transfer technique. These textured markers mimic the look of handmade paper and feature a delicate, sketched leaf design that adds immediate character to any potted plant.
Step-by-Step Tutorial
Materials
- White or light grey air-dry clay (paper clay works best for this texture)
- Small wooden craft sticks or popsicle sticks
- Rolling pin
- Rough fabric or burlap (for texturing)
- Small leaf stamp or black fine-liner pen
- Black ink pad (if stamping)
- Craft knife or metal ruler
- Small round seal stamp (optional)
- Super glue or strong craft glue
- Water bowl
Step 1: Shaping the Clay Body
-
Prepare the workspace:
Begin by laying down a piece of parchment paper or a silicone mat to prevent the clay from sticking to your table. -
Roll out the clay:
Take a small ball of air-dry clay, about the size of a walnut. Roll it out into a rectangular slab approximately 3-4mm thick. Don’t worry about perfect edges yet. -
Add surface texture:
Place a piece of rough fabric, canvas, or burlap over the clay slab. Roll over it gently with your rolling pin to imprint a textile-like weave into the surface. This gives it that ‘handmade paper’ appearance. -
Create rough edges:
Instead of cutting straight lines with a knife, I prefer to use a metal ruler to tear the clay. Place the ruler firmly on the clay and rip the excess away against the straight edge. This creates the beautiful, organic raw edge seen in the photo. -
Refine the shape:
Repeat the tearing process on all four sides until you have a rectangular piece that is roughly 2 inches by 3 inches. -
Insert the stick mechanism:
Carefully flip the clay piece over. Press the top inch of a wooden craft stick into the back of the clay just enough to create an indentation, then remove it. -
Secure the stick:
Apply a dab of strong glue into that indentation and press the stick back in. Alternatively, you can sandwich the stick between the main piece and a small scrap of clay on the back for extra support.
Tearing Technique
When tearing edges, pull the clay upward and toward you against the ruler. This creates a thinner, more ragged edge that mimics high-quality handmade paper.
Step 2: Adding the Design
-
Dry partially:
Let the clay dry for about an hour. It should be firm to the touch but still have a tiny bit of moisture, which helps it take ink better. -
Sketch the leaf outline:
Using a fine-tip black pen or marker, draw a simple vertical line down the center of the clay rectangle. This acts as the stem. -
Draw the leaf body:
Sketch a jagged, lance-shaped outline around the center stem. Keep your lines loose and slightly sketchy rather than geometric to match the rustic vibe. -
Add veins:
Draw diagonal lines branching from the center stem out to the edges of the leaf. Press lightly to simulate a sketch. -
Add the seal:
If you have a small round stamp or a button with a pattern, press it firmly into the bottom center of the clay, just below the stem tip. You can highlight the impression with a tiny dot of black ink later. -
Final drying:
Allow the completed marker to dry fully for 24-48 hours. The clay will lighten in color as the moisture evaporates. -
Seal the surface:
To protect the drawing from watering mishaps, coat the front of the marker with a thin layer of matte varnish or decoupage glue.
Botanical Infusion
Mix dried tea leaves or lavender buds directly into the clay before rolling it out for a speckled, aromatic texture that hints at what you are growing.
Place your new marker in the soil and enjoy the organized, artistic touch it brings to your windowsill garden
Shell and Seaweed Texture Dishes
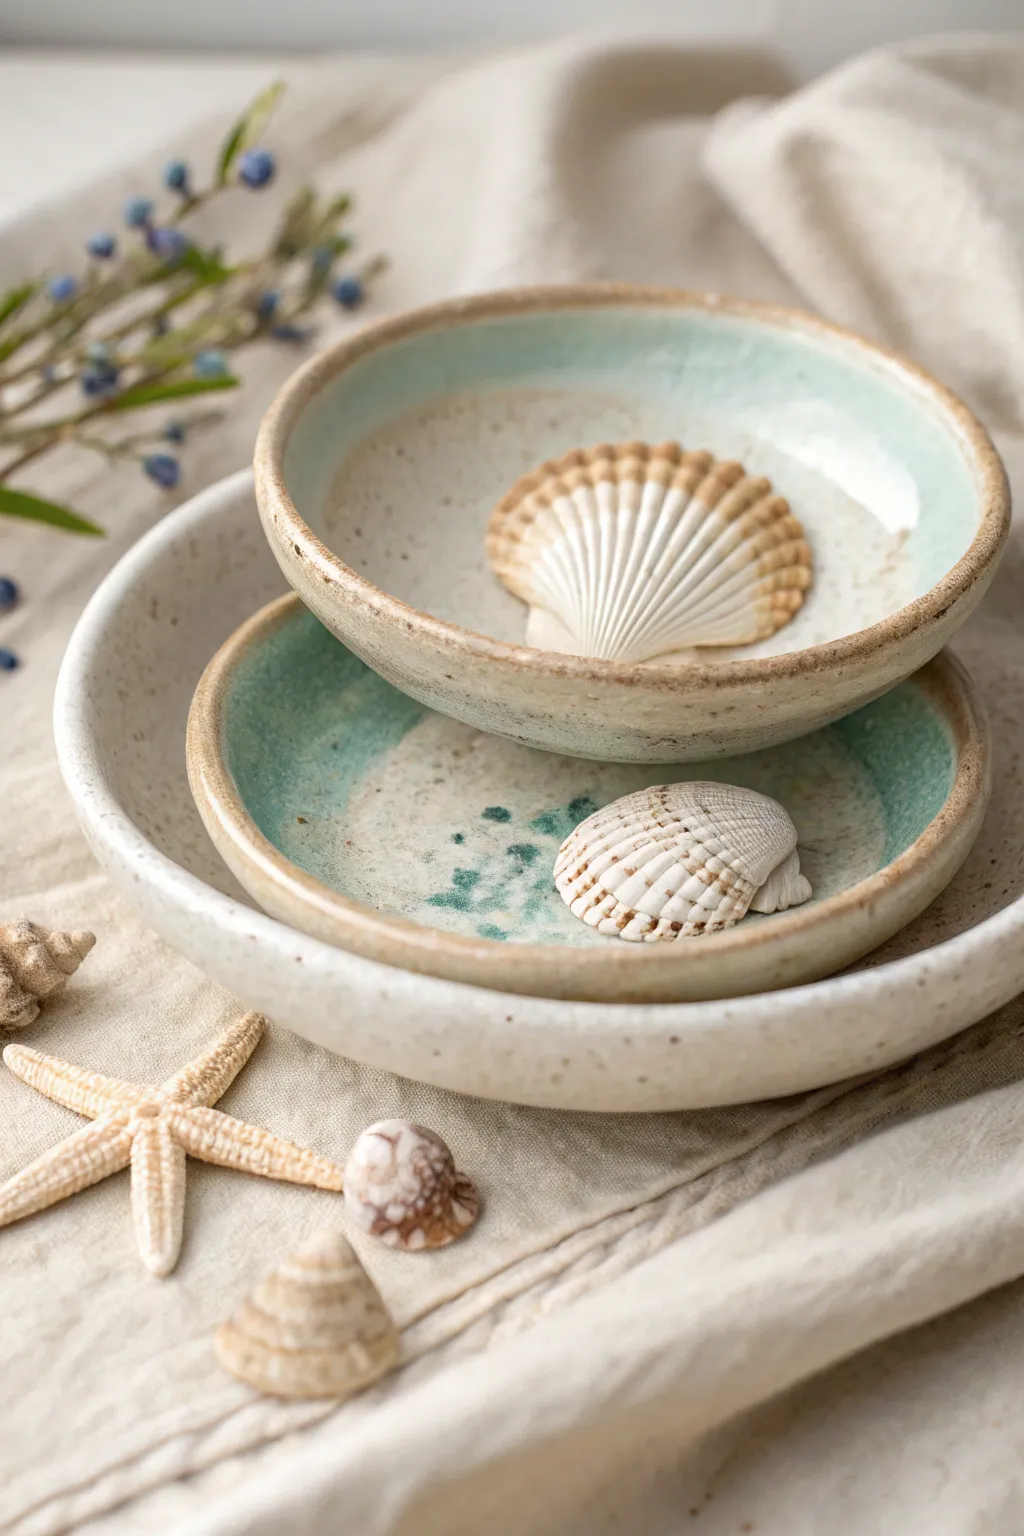
Capture the serenity of the shoreline with these organic, handmade ceramic dishes perfect for holding jewelry or keepsakes. The soft aqua glazes and speckled clay body work together to mimic the textures of sand and sea glass.
Detailed Instructions
Materials
- Speckled stoneware clay (light cream or buff color)
- Small rolling pin
- Canvas mat or slab roller
- Circular templates (paper or bowls in 3 sizes)
- Fettling knife or needle tool
- Small sponge
- Pottery rib (smooth, soft rubber)
- Slump molds or simple foam bowls
- Celadon or translucent turquoise glaze
- Clear matte glaze (optional)
- Kiln (or access to a firing service)
Step 1: Preparing the Slabs
-
Wedges the clay:
Begin by thoroughly wedging a grapefruit-sized ball of speckled stoneware clay. This removes air bubbles and ensures the particles are aligned for strength during firing. -
Roll out the slab:
On a canvas mat, use your rolling pin to flatten the clay. Aim for an even thickness of about 1/4 inch (6mm) to ensure the dishes feel substantial but not heavy. -
Smooth the surface:
Take a soft rib tool and gently compress the clay surface in all directions. This removes the canvas texture and prepares a smooth canvas for the glaze later. -
Cut the shapes:
Place your three different-sized circular templates onto the slab. Using a needle tool or fettling knife, cut straight down around the edges to create three distinct discs.
Step 2: Forming and Refining
-
Soften the edges:
Dip your finger or a small piece of chamois in water and run it along the cut rim of each disc. This rounds off the sharp 90-degree angle, giving it that handmade, weathered look. -
Slump the clay:
Gently lift each clay disc and place it inside your chosen slump molds. If you don’t have professional plaster molds, simple foam bowls lined with plastic wrap work wonderfully. -
Shape the interior:
Use a damp sponge to gently press the clay into the curve of the mold. Don’t press too hard, or you might thin out the bottom; just ensure it hugs the shape. -
Create the rim:
I like to leave the rim slightly uneven or gently push it down in spots with my thumb. This irregularity mimics the natural erosion of sea glass or driftwood. -
Slow drying:
Cover the molds loosely with plastic and let them dry slowly to leather-hard. This usually takes about 24 hours depending on humidity.
Uneven Glaze Line?
If your wiped rim looks messy, let the glaze dry completely, then use a stiff, angled brush dipped in water to clean up the line neatly.
Step 3: Glazing and Firing
-
Bisque fire:
Once bone dry, fire the pieces in the kiln to cone 04 (or your clay’s specific bisque temperature). This hardens the clay and prepares it for liquid glaze. -
Wipe down:
Use a slightly damp sponge to wipe any dust off the bisque-fired pieces. Dust can prevent glaze from adhering properly. -
Glaze the interior:
Pour a glossy, translucent turquoise or celadon glaze into the center of the medium and small bowls. Swirl it around to coat the bottom and sides, then pour out the excess. -
Create the transition line:
Using a damp sponge, carefully wipe the glaze back from the very top rim, exposing about a millimeter of the raw, speckled clay. This creates a beautiful contrast. -
Glaze the large bowl:
For the largest bottom dish, apply a clear matte or very pale cream glaze to the interior to differentiate it from the colorful upper bowls. -
Leave the exterior raw:
To achieve the look in the photo, leave the outside of all bowls unglazed. The speckled clay body will turn a warm, sandy toasty color when fired. -
Final wipe:
Ensure the bottom foot of every bowl is completely free of glaze so they don’t stick to the kiln shelf. -
Glaze fire:
Fire the pieces a second time to cone 5 or 6 (mid-range stoneware temperatures). This melts the glaze and vitrifies the clay body.
Add Sea Texture
Before the clay dries, gently press a real scallop shell into the interior bottom to leave a fossil-like impression under the glaze.
Now you have a serene set of nesting dishes ready to bring a touch of the ocean to your home
Pinecone Stamp Bowls
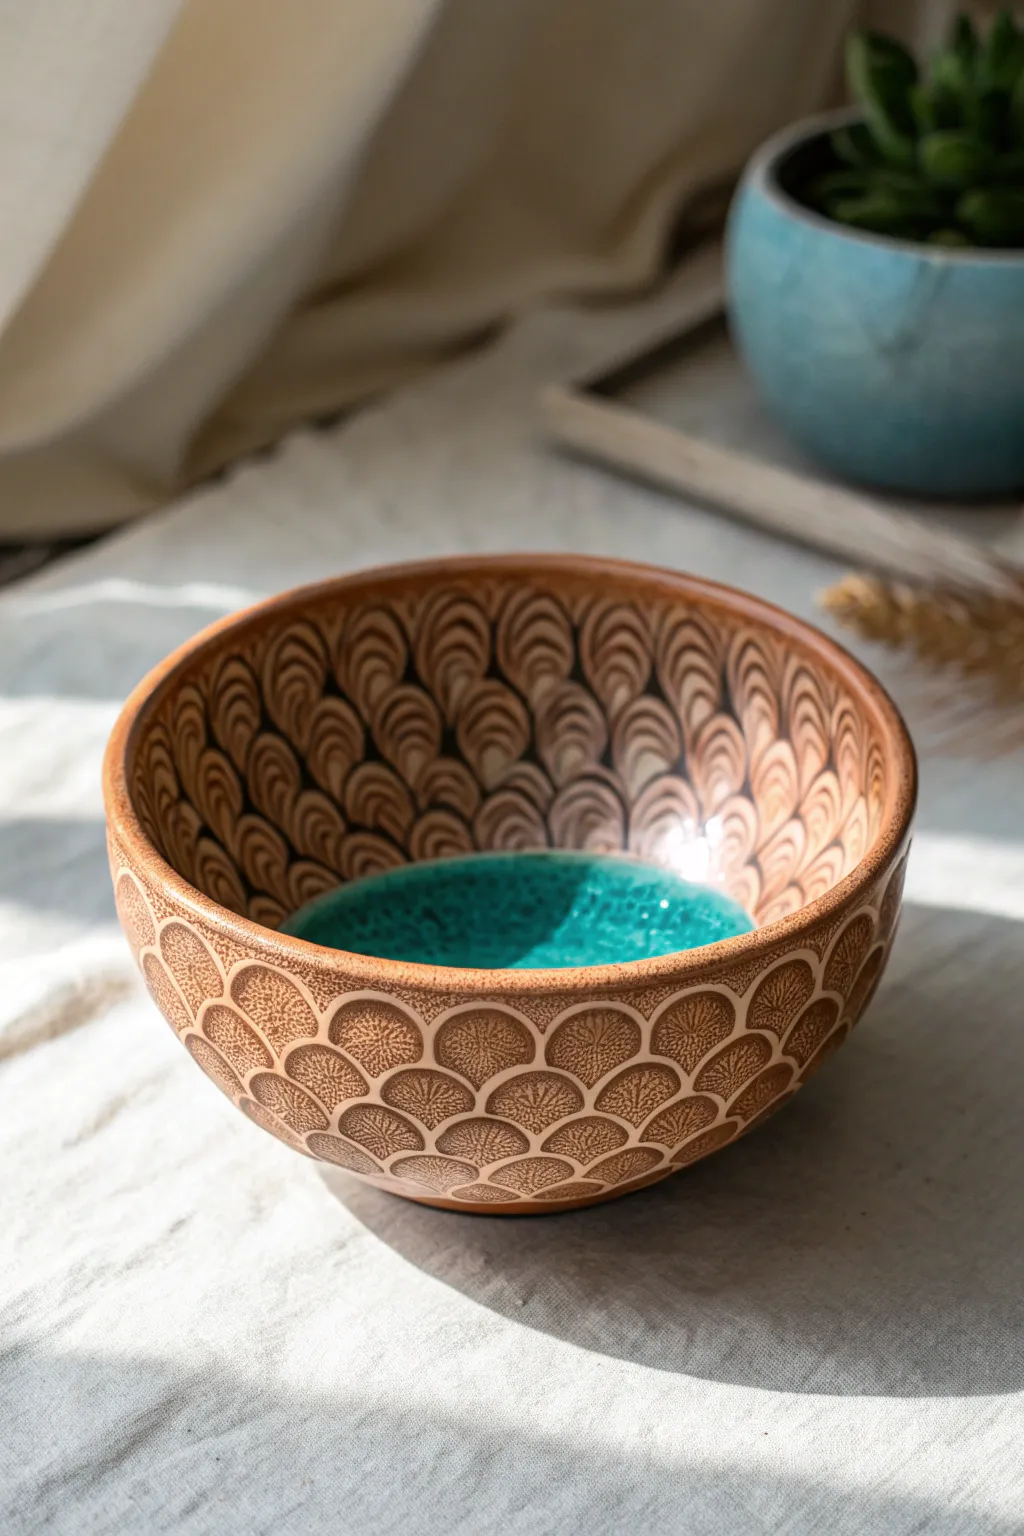
Bring the forest floor to your table with this stunning ceramic bowl, featuring a repetitive scalloped texture that mimics pinecone scales. The contrast between the raw, patterned exterior and the pool of glossy turquoise glaze inside creates a mesmerizing piece that feels both rustic and refined.
How-To Guide
Materials
- Stoneware clay (smooth body recommended)
- Pottery wheel or rolling pin and slump mold
- Pinecone scale carving tool (or a loop tool/U-shaped gouge)
- Sponge
- Water bowl
- Rib tool (kidney)
- Turquoise splash glaze (cone 5/6 compatible)
- Iron oxide wash (or brown underglaze)
- Clear matte glaze (optional)
- Small paintbrush
- Kiln
Step 1: Forming the Base Vessel
-
Prepare the Clay:
Begin by thoroughly wedging about 1.5 to 2 pounds of stoneware clay to remove air bubbles and ensure an even consistency. This is crucial for structural integrity. -
Throw the Bowl:
Center your clay on the wheel and open it up. Pull the walls up to create a simple, hemispherical bowl shape. Aim for a slightly thicker wall than usual (about 1/4 inch) to allow depth for carving later. -
Smooth the Surface:
While the wheel is spinning slowly, use a rib tool on the exterior to compress the clay and create a smooth canvas for your texture. Do the same for the interior to ensure the glaze will pool beautifully. -
Dry to Leather Hard:
Remove the bowl from the wheel and let it dry slowly until it reaches a leather-hard state. The clay should be firm enough to handle without deforming but soft enough to carve easily. -
Trim the Foot:
Place the bowl upside down on the wheel (or use a chuck) and trim a clean foot ring. This creates a professional finish and lifts the bowl slightly.
Step 2: Carving the Texture
-
Plan the Pattern:
Visualize your ‘pinecone’ pattern. You will be working from the bottom (near the foot) upwards toward the rim, overlapping rows like roof shingles. -
Start the Base Row:
Using a U-shaped loop tool or a specialized scale carving tool, press into the clay near the foot and drag slightly upwards to create a semi-circle indentation. Repeat this around the entire circumference. -
Create the Overlap:
Move up to the next row. Position your tool so the center of the new scale falls directly above the gap between two scales below it. This offset pattern is key to the organic pinecone look. -
Texture the Interior Rim:
Continue this specific texture over the lip and down the inside wall about 2 inches. This creates a beautiful transition zone before the glaze pool begins. -
Detail the Scales:
I like to take a fine needle tool or a stiff serrated rib at this point and gently scratch vertical lines inside each individual scale to mimic the fibrous texture of a real pinecone. -
Clean Up Burrs:
Once the carving is complete, let the bowl dry a bit more. Gently brush it with a soft, dry brush or a very slightly damp sponge to remove any sharp clay crumbs or burrs without smoothing out your hard work.
Clean Scale Tip
When carving the scales, clean your loop tool after every 3-4 cuts. Clay buildup in the tool dulls the edges and tears the clay rather than slicing it cleanly.
Step 3: Glazing and Firing
-
Bisque Fire:
Place the bone-dry bowl into the kiln for a bisque firing (usually to cone 04). This prepares the ceramic for glazing. -
Apply Oxide Wash:
Mix iron oxide with water to create a thin wash. Brush this over the entire textured area (exterior and upper interior rim). Wipe it back with a damp sponge so the dark color remains only in the deep crevices of the scales. -
Wipe the Center:
Ensure the center bottom of the bowl interior is clean of oxide wash if you want the turquoise to be pure, or leave it for a darker, moodier effect. -
Glaze the Interior:
Pour a glossy turquoise glaze into the bowl. Swirl it around carefully so it covers the bottom and comes just up to where your interior scale texture ends. Pour out the excess. -
Clean the Rim:
If any glaze splashed onto the textured rim area, wipe it away cleanly. The goal is a sharp contrast between the glossy pool and the matte, textured rim. -
Final Fire:
Load the bowl into the kiln for the glaze firing (matched to your clay and glaze, typically cone 5 or 6). Ensure the foot is wiped clean of any glaze or oxide.
Glassy Bottom Effect
Add a pinch of clear crackle glass to the very bottom of the glaze pool before firing. It melts into a stunning, crystalline depth that looks like actual water.
Now you have a stunning, nature-inspired vessel ready to hold treasures or simply be admired on your shelf
Fairy Garden Clay Accessories
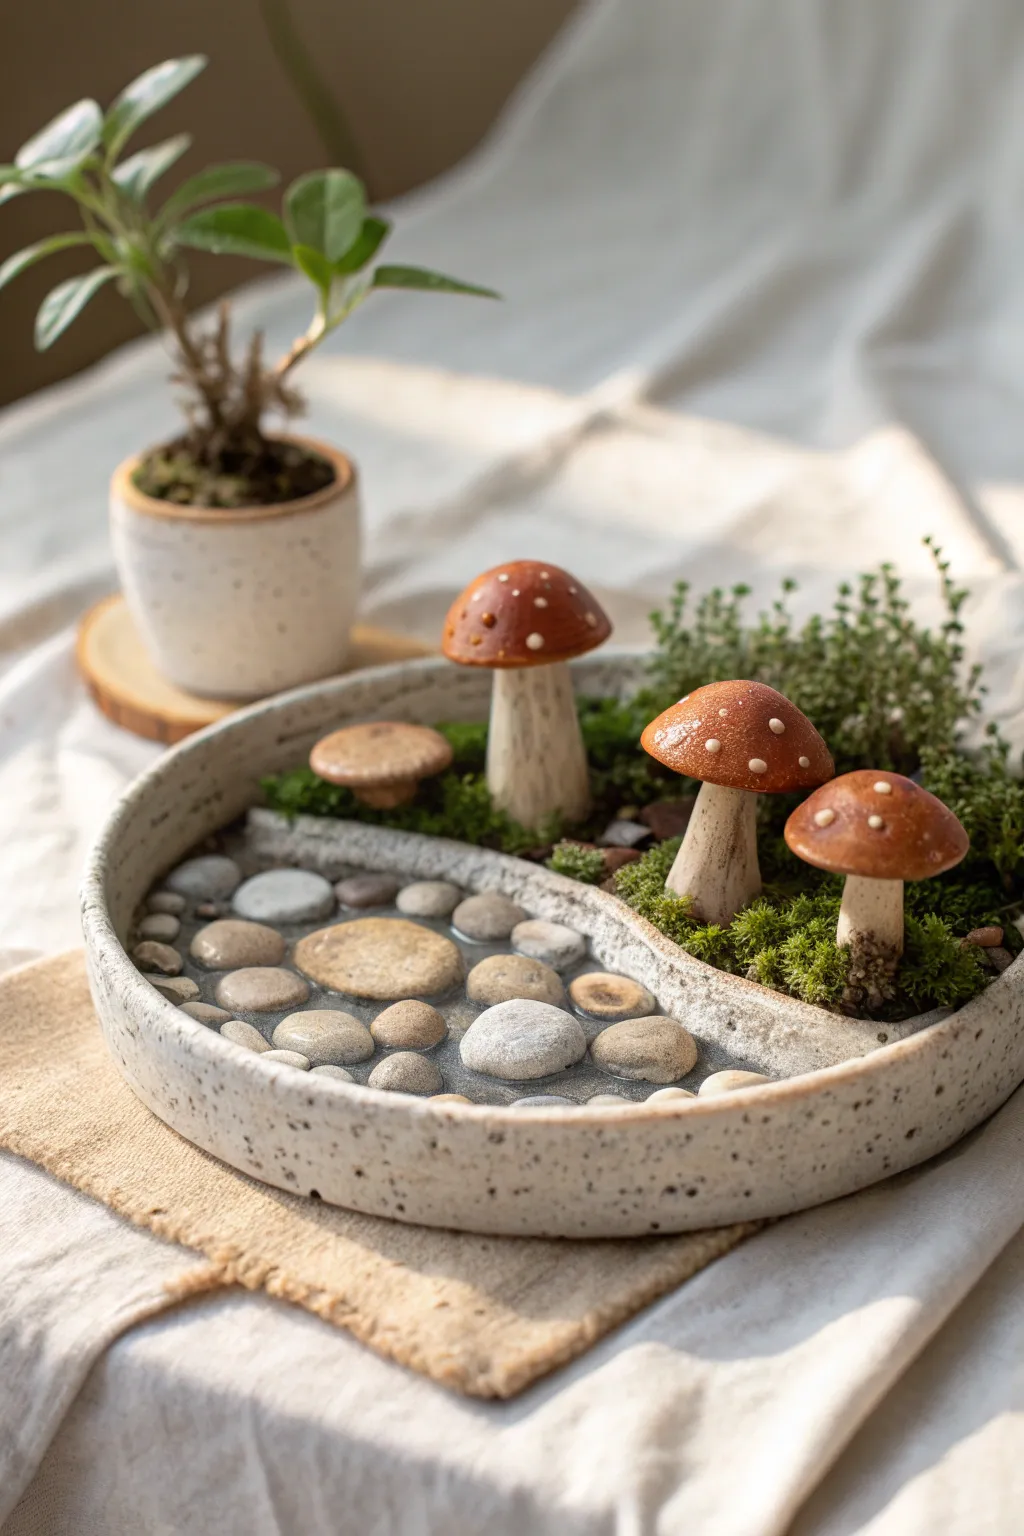
This charming dual-purpose dish combines a serene pebble pond with a lush miniature moss garden, separated by a graceful curved wall. The hand-sculpted clay mushrooms and speckled finish give it an organic, woodland feel perfect for bringing a bit of nature indoors.
Detailed Instructions
Materials
- Speckled stoneware clay or polymer clay with faux speckles
- Rolling pin and guide strips (approx. 1/4 inch)
- Circle clay cutter or template (approx. 6-8 inches)
- Clay sculpting tools (needle tool, modeling tool)
- Slip and scoring tool (if using ceramic clay)
- Acrylic paints (terracotta, white, cream)
- Clear epoxy resin (for the water effect)
- Small smooth river stones
- Dried moss and miniature faux plants
- Gloss varnish (optional)
Step 1: Sculpting the Base Dish
-
Roll the slab:
Begin by wedging your speckled clay to remove air bubbles, then roll it out into an even slab about 1/4 inch thick using guide strips for consistency. -
Cut the circle:
Use your large circle cutter or a paper template and a needle tool to cut out the main base of your dish. -
Form the rim:
Roll a long coil of clay, slightly thicker than a pencil. Score and slip the outer edge of your circular base, then attach the coil to form a vertical rim. Smooth the seam on both the inside and outside so it looks like one solid piece. -
Create the divider:
Roll a second coil to create the internal S-curve divider. Position it across the center of the dish in a flowing ‘yin-yang’ shape. Score, slip, and blend this wall securely to the base and the outer rim. -
Smoothen surfaces:
Use a damp sponge or finger to smooth all rims and walls. I like to spend a little extra time here ensuring the connection points are seamless to prevent leaks later.
Step 2: Crafting the Mushrooms
-
Stem formation:
Roll three or four thick cylinders of clay for the mushroom stems. Taper them slightly towards the top and give the base a bit of a flare for stability. Texture the stems vertically with a needle tool to mimic natural fibers. -
Cap sculpting:
Form dome shapes for the caps. Create variety by making some wider and flatter, and others more rounded. Hollow out the underside of the caps slightly so they sit nicely on the stems. -
Assembly and detailing:
Score and join the caps to the stems. Add tiny clay dots to the tops of the caps for that classic toadstool look, or press small indents if you plan to paint the spots later. -
Firing or drying:
If using ceramic clay, dry the dish and mushrooms slowly before bisque firing and glazing. If using polymer clay, bake according to the manufacturer’s instructions.
Natural Texture
Before baking, gently press a real rock or piece of rough bark against the outside of your clay dish rim to give it an authentic, earthy texture.
Step 3: Painting and Finishing
-
Painting the mushrooms:
Once fired or baked, paint the mushroom caps a warm terracotta or reddish-brown hue. Carefully paint the spots and the stems using a cream or off-white color. -
Attaching the elements:
Glue the mushrooms firmly into the ‘garden’ side of the dish using a strong adhesive or heavy-duty glue. -
Adding the greenery:
Pack dried moss and miniature faux shrubbery around the base of the mushrooms to create a dense forest floor effect. This helps conceal any glue spots and stabilizes the mushrooms.
Glow Up
Mix a tiny amount of glow-in-the-dark powder into the white paint for the mushroom spots to create a magical night-time garden scene.
Step 4: Creating the Pond
-
Arranging the stones:
On the empty side of the dish, arrange your smooth river stones. Place flat ones towards the bottom and layer slightly larger ones for visual interest. -
Mixing the resin:
Mix a small batch of clear epoxy resin according to the package directions. Ensure you mix slowly to avoid introducing too many air bubbles. -
Pouring the water:
Carefully pour the resin over the stones until they are partially submerged, creating the illusion of a shallow, clear pool. Let the resin cure undisturbed for at least 24 hours.
Place your finished dish near a sunny window to let the resin water sparkle and bring your mini ecosystem to life
Mini Nature Island Diorama Tiles
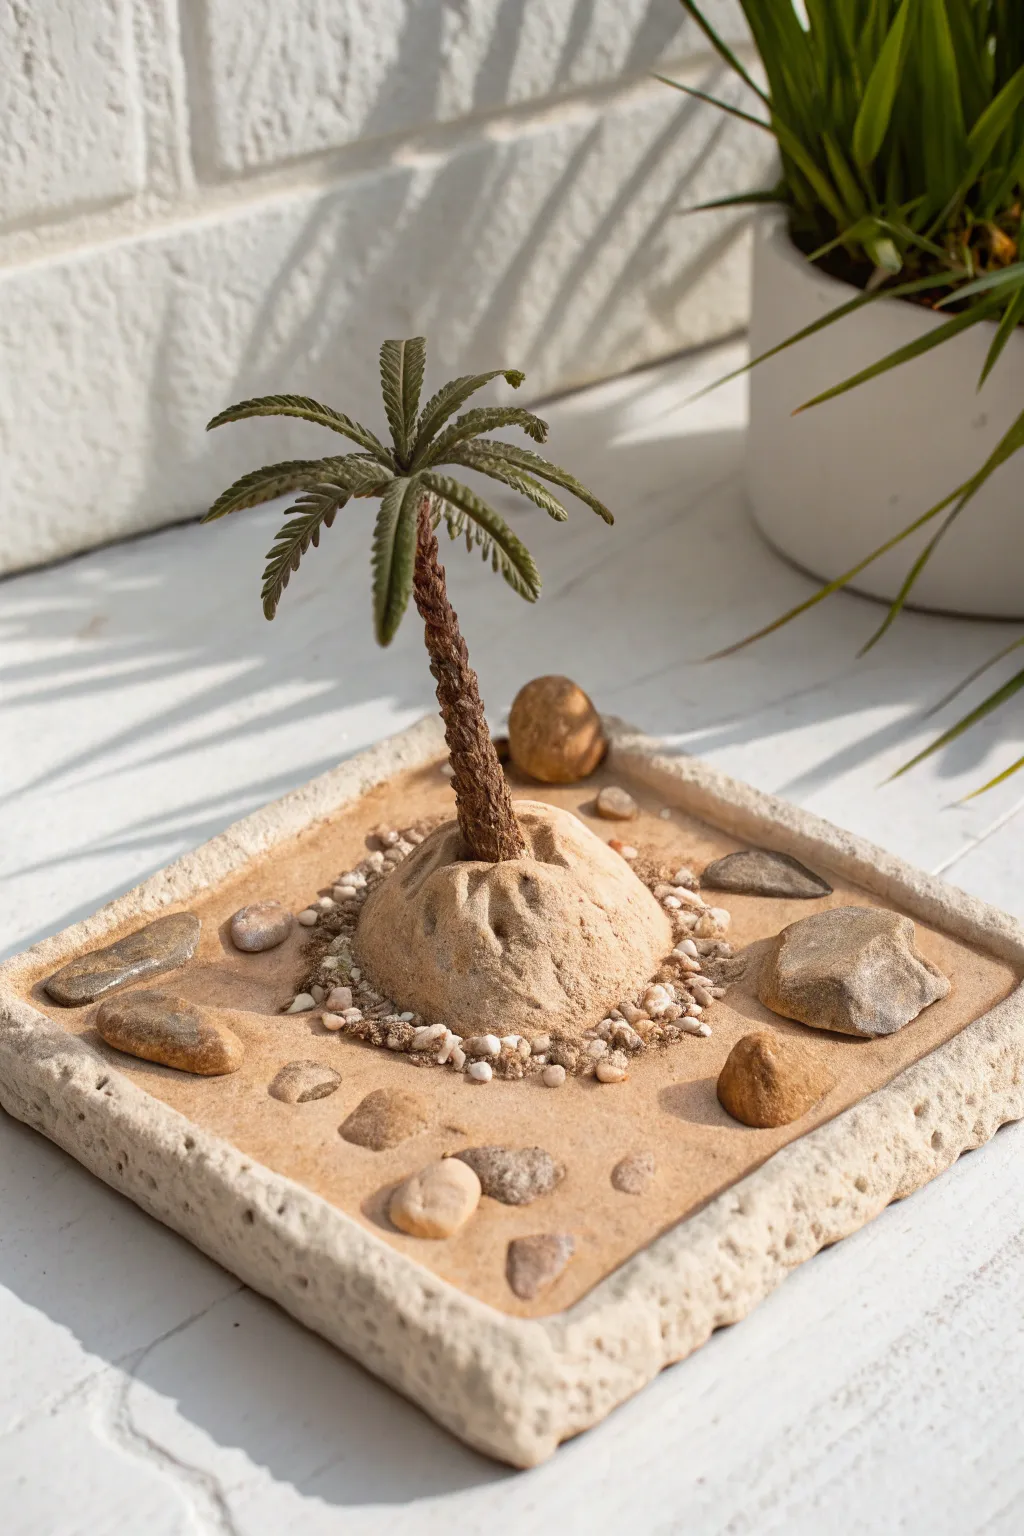
Transport yourself to the tropics with this charming miniature diorama built on a textured clay tile. This project captures the essence of a deserted island, featuring a realistic palm tree rising from a sandy mound surrounded by smooth river stones.
Step-by-Step Guide
Materials
- Air-dry clay (stone or sand colored)
- Square rolling pin or guides (optional)
- Small craft knife or sculpting tool
- Real sand (fine grain)
- PVA glue or craft glue
- Miniature palm tree (plastic or model railroad scenic element)
- Assorted small pebbles and river rocks
- Textured sponge or foil ball
- Small paintbrush
- Matte finish sealant spray
Step 1: Shaping the Base
-
Form the main slab:
Start by rolling out a thick slab of air-dry clay, aiming for a square shape about 4 to 5 inches wide and roughly 0.5 inches thick. I like to keep the edges slightly irregular to mimic natural hewn stone. -
Create the border:
Pinch the outer edges of the square upward to create a raised rim. This will help contain the sand and decorative elements later. -
Texture the stone:
Using a crumpled ball of aluminum foil or a coarse sponge, press gently all over the clay surface—especially the rim—to give it a pitted, weathered rock texture like travertine or limestone. -
Form the central mound:
Take a separate, smaller ball of clay and press it into the center of your tile to form the island base. Shape it into a gentle hill, blending the bottom edges seamlessly into the flat tile surface with your thumb or a smoothing tool. -
Create the planting hole:
While the clay is still soft, use the trunk of your miniature palm tree (or a dowel of similar size) to create a deep hole at the apex of the central mound. Wiggle it slightly to ensure fit, then remove it for now. -
Sculpt mound details:
Use a sculpting tool to carve small vertical grooves or indentations down the sides of the central mound, simulating erosion and root paths.
Clay Cracking?
If hairline cracks appear while drying, don’t panic. Mix a tiny bit of fresh clay with water to make a paste (slip) and smooth it over the cracks with a brush.
Step 2: Embedding and Drying
-
Embed the pebbles:
Select your flattest, most interesting pebbles. Press them firmly into the flat areas of the clay base around the mound and even into the rim itself while the clay is soft, so they look partially buried by time. -
Add the gravel ring:
Take smaller grit or tiny pebbles and press a ring of them into the clay right at the base of the central mound. -
Initial drying phase:
Set the tile aside in a cool, dry place. Allow it to dry until it is leather-hard (usually 24 hours), which prevents warping before the final assembly.
Make it a Set
Make three tiles with different features—one with a palm, one with a mini hammock, and one with a little driftwood pile—to create a full modular beach scene.
Step 3: Assembly and Finishing
-
Plant the tree:
Once the clay is firm but not fully cured, add a drop of strong craft glue into the center hole. Insert your miniature palm tree trunk, ensuring it stands straight. -
Apply the sand base:
Brush a layer of diluted PVA glue over the flat ‘ground’ sections of the tile and the central mound, avoiding the actual stone rim. -
Sprinkle the sand:
Generously pour fine sand over the glued areas. Press it down gently with your fingers to ensure good adhesion, creating that realistic beach texture. -
Shake off excess:
Let the glue set for about 30 minutes, then turn the tile sideways and gently tap it to remove loose sand. -
Highlight the rim:
If your clay dried too uniform in color, use a dry brush with a tiny amount of pale cream paint to lightly dust the raised textures of the stone rim, making the details pop. -
Final cure:
Allow the entire piece to dry completely for another 24-48 hours depending on clay thickness. -
Seal the piece:
Finish with a light mist of matte sealant spray to lock the sand in place and protect the clay from moisture.
Now you have a permanent slice of paradise to brighten up your desk or shelf
Insect and Beetle Relief Medallions
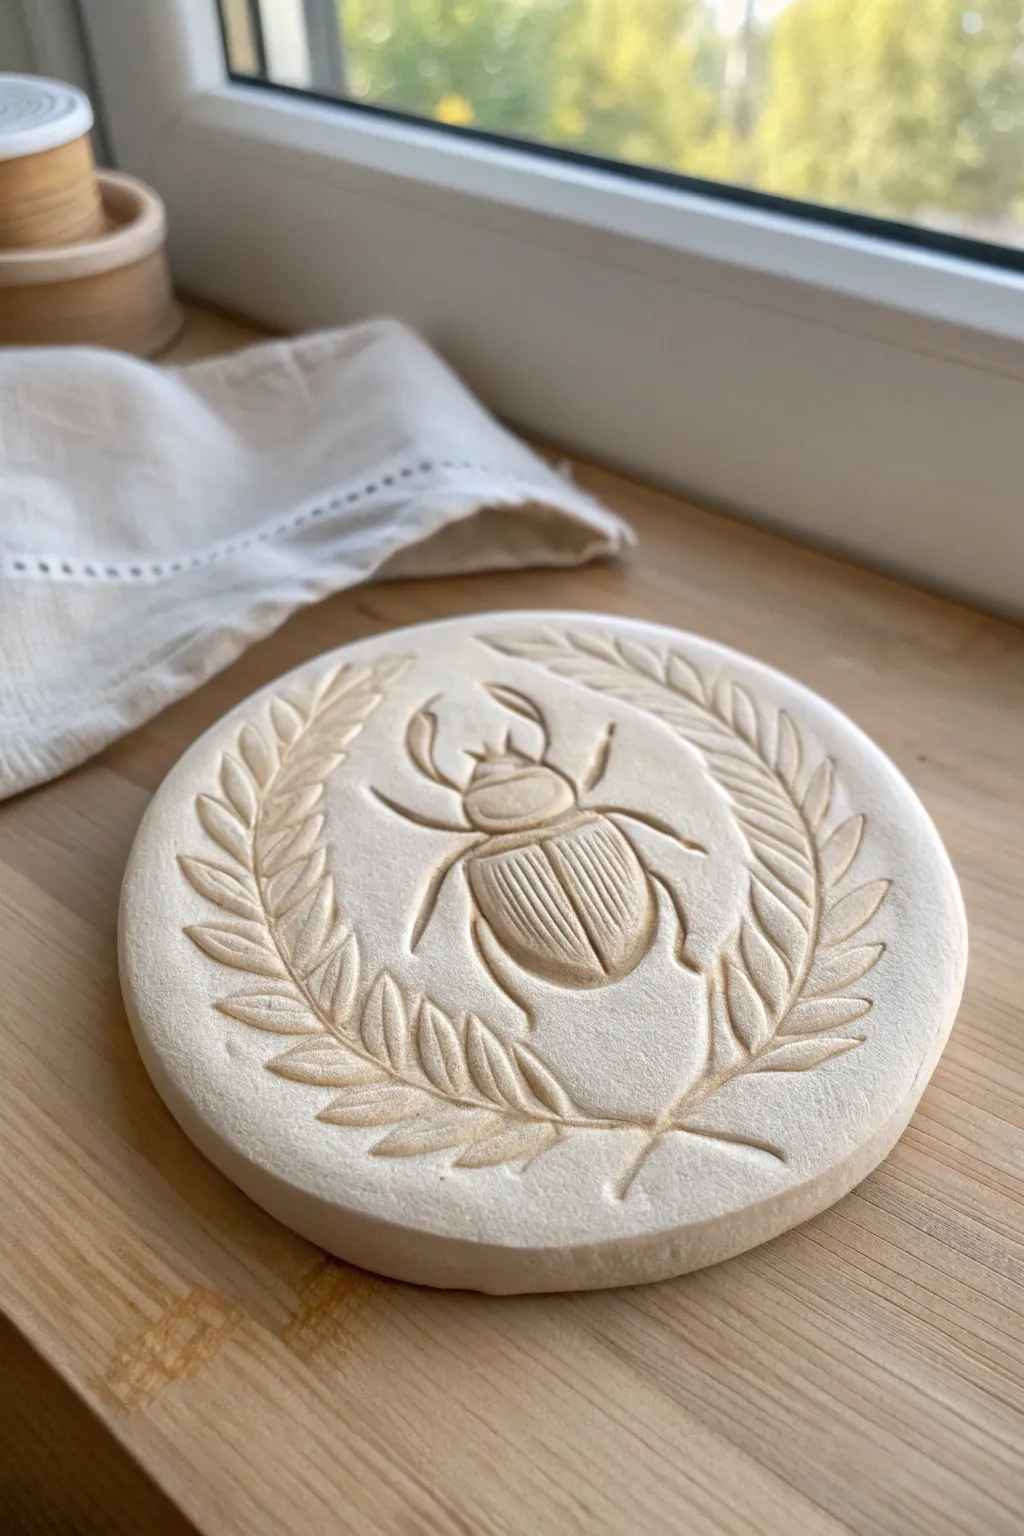
Capture the timeless elegance of natural history with this delicately carved clay medallion. Featuring a stylized beetle framed by laurel branches, this project uses simple relief techniques to create a sophisticated, museum-quality display piece.
Detailed Instructions
Materials
- White aesthetics air-dry clay or polymer clay
- Rolling pin
- Circle cutter (approx. 4-5 inches) or a bowl to trace
- Needle tool or sharp toothpick
- Small loop tool or ribbon tool for carving
- Rubber clay shaper or blending tool
- Fine-grit sandpaper (optional)
- Parchment paper or work mat
- Small sponge and water
Step 1: Base Preparation
-
Condition the Clay:
Begin by kneading a handful of white clay until it is warm, pliable, and free of air bubbles. If the clay feels too stiff, dip your fingers in a tiny bit of water to soften it as you work. -
Roll the Slab:
Place the clay on a sheet of parchment paper. Roll it out evenly to a thickness of approximately 3/8 of an inch (about 1 cm). You want a substantial thickness to allow for deep carving without breaking through. -
Cut the Shape:
Use your large circle cutter or the rim of a bowl to press a perfect circle into the clay. Remove the excess clay from around the edges, but keep the circle on the parchment paper to avoid distortion. -
Smooth the Edges:
Dip your finger in water and gently run it along the cut edge of the circle to round it off slightly, removing any sharp angles or burrs from the cutter.
Clean Lines Tip
Keep a small brush handy to sweep away tiny clay crumbs as you carve. This keeps your workspace clear and prevents debris from getting mashed back into the smooth background.
Step 2: Outlining the Design
-
Mark the Center:
Find the visual center of your disc. Lightly press a tiny dot with your needle tool to guide your placement, ensuring the beetle sits right in the middle. -
Sketch the Beetle Body:
VERY lightly scratch the outline of the beetle into the clay surface. Start with an oval for the abdomen, a smaller semi-circle for the thorax, and the head sections. Don’t dig deep yet; just block out the shapes. -
Add the Legs:
Sketch the six legs extending from the body. Notice how the front legs curve forward, while the middle and back legs angle backward. Keep the lines delicate. -
Draft the Branches:
Draw two curved stems originating from the bottom center, wrapping up around the beetle. Sketch simple leaf shapes along these stems, ensuring the tips point upward.
Step 3: Carving the Relief
-
Define the Beetle Outline:
Using your needle tool or a small knife, re-trace the beetle’s outline, cutting slightly deeper this time (about 1-2mm) to separate the insect from the background. -
Carve the Background:
Take your small loop tool and gently scrape away a thin layer of clay *around* the beetle and inside the leaf shapes. This lowers the background and makes the design elements appear raised. -
Sculpt the Carapace:
Use a rubber shaper or your thumb to gently round the edges of the beetle’s body, giving it a domed, 3D effect. The abdomen should be the highest point. -
Detail the Wings:
Press a vertical line down the center of the abdomen. Then, use the needle tool to draw fine, parallel vertical striations on either side to mimic the texture of wing cases. -
Detail the Leaves:
For the laurel border, use a sharp tool to press a central vein into each leaf. You can carve out tiny slivers of clay between the leaves to separate them distinctively from the stem. -
Refine the Legs:
Carefully carve around the thin legs. I find it safest to press the clay down around them rather than trying to cut, which prevents accidental breakage.
Go Antique
After drying, rub a small amount of diluted brown acrylic paint or brown wax into the crevices and wipe the surface clean. This highlights the carving depth instantly.
Step 4: Finishing Touches
-
Smooth the Surface:
Use a slightly damp sponge or a soft brush with water to gently smooth over any tool marks or rough crumbs of clay. Be careful not to erase your fine wing details. -
Flatten the Rim:
Check the outer rim of the medallion again. If handling has warped it, gently press it back into a perfect circle. -
Drying Process:
Let the piece dry slowly away from direct heat to prevent cracking. If using air-dry clay, flip it over after 24 hours to let the back dry. This usually takes 2-3 days total. -
Sanding (Optional):
Once bone dry, you can very gently rub the surface with fine-grit sandpaper to achieve that ultra-smooth, stone-like finish shown in the photo.
Place your finished relief on a shelf or attach a hanger to the back to bring a calm, natural touch to your walls.
Feather Imprint Wall Hangings
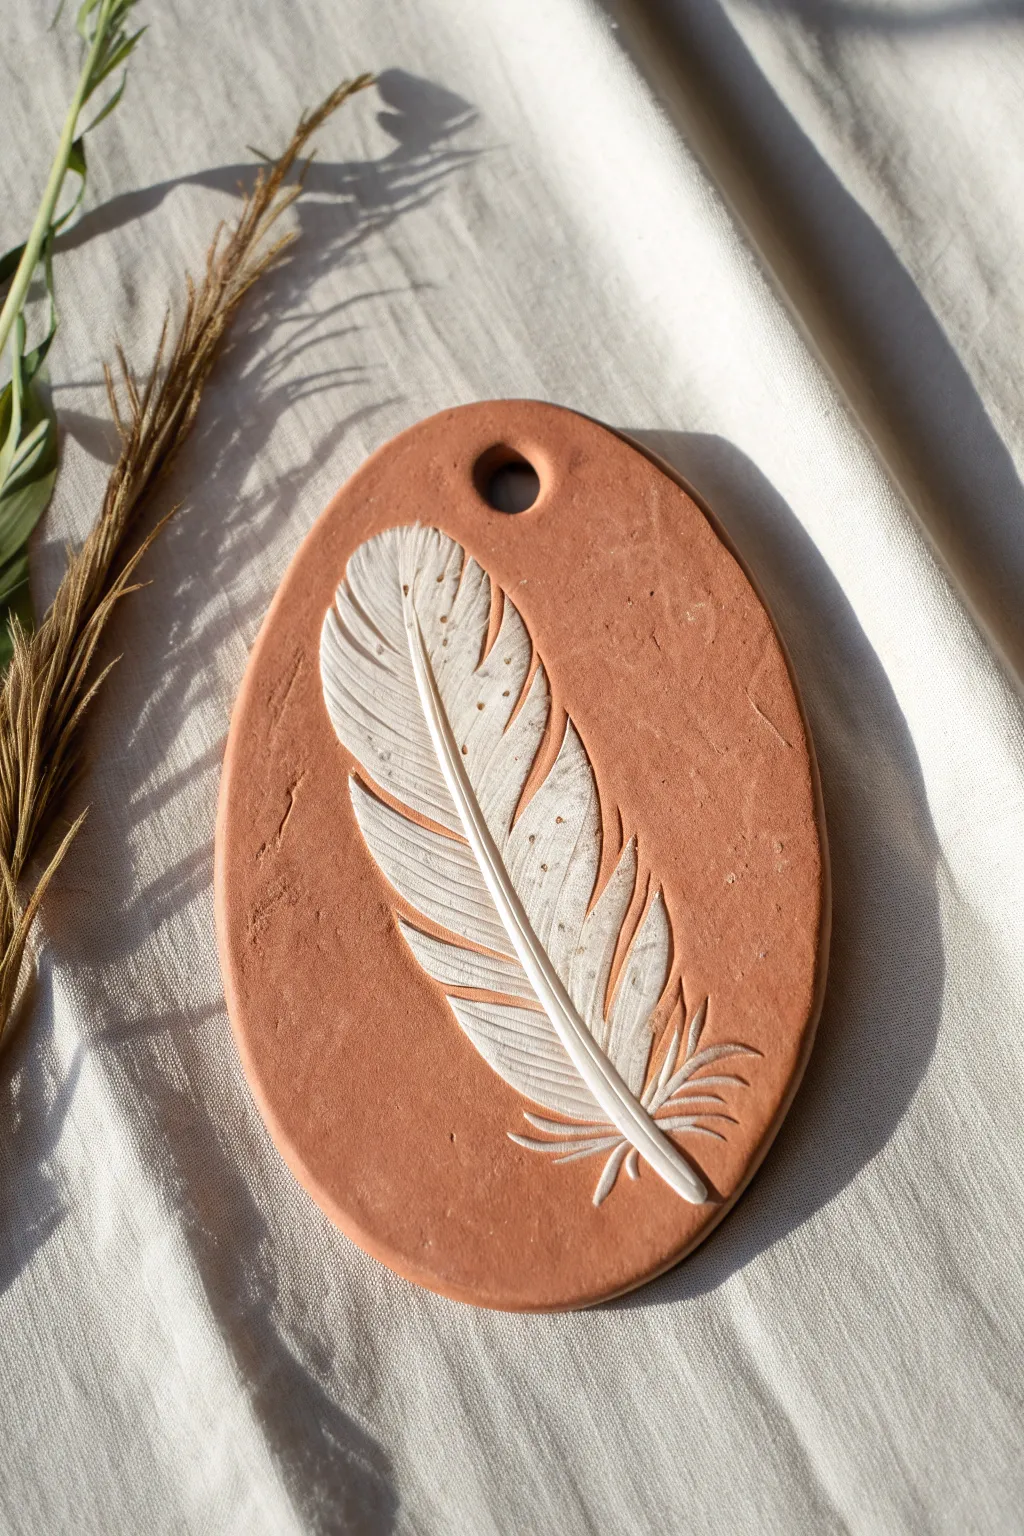
Capture the delicate details of nature with this striking wall hanging which contrasts warm terracotta clay against bright white feather details. This sgraffito-inspired technique creates a beautiful, fossil-like relief that feels both rustic and refined.
How-To Guide
Materials
- Terracotta clay (air-dry or kiln-fire depending on preference)
- White underglaze (for kiln clay) or white acrylic paint (for air-dry)
- White clay slip (optional, for inlay method)
- Rolling pin
- Oval cookie cutter or paper template with knife
- Real or faux feather (sturdy quill helps)
- Needle tool or small carving loop tool
- Fine-grit sandpaper
- Small sponge
- Straw or circular cutter (for the hanging hole)
- Clear matte varnish (if using air-dry clay)
Step 1: Shaping the Base
-
Prepare the Clay:
Begin by wedging your terracotta clay to remove any air bubbles. Roll it out into a smooth slab approximately 1/4 to 1/3 inch thick. You want it substantial enough to not warp, but light enough to hang. -
Cut the Form:
Use a large oval cookie cutter to stamp out your shape. If you don’t have a cutter, simply cut an oval template from cardstock, place it on the clay, and trace around it with a needle tool or fettling knife. -
Smooth the Edges:
Dip your finger in a little water and gently run it along the cut edges of the oval to remove any sharp burrs or roughness from the cutting process. -
Create the Hanging Point:
Take a plastic straw or a small circular clay cutter and punch a clean hole near the top center of the oval. This is where your twine or leather cord will eventually go.
Step 2: Creating the Feather Design
-
Initial Outline:
Using a needle tool, lightly scratch the outline of your feather onto the clay surface. Start with the central quill (rachis) curving gently, then outline the general shape of the vanes. -
Carving the Relief:
Using a small loop tool or carving tool, gently scrape away a shallow layer of the terracotta inside your feather outline. You want to create a slightly recessed area where the white color will eventually sit. -
Applying the White Layer:
If using kiln-fire clay, brush a thick layer of white heavy slip or underglaze into the recessed feather shape. If using air-dry clay, wait until the piece is fully dry to paint this section white, or inlay white soft clay now. -
Refining the Edges:
Clean up the transition between the red clay and white section. Use a damp brush to wipe away any white slip that strayed onto the main terracotta background.
Messy Lines?
If white slip smears onto the terracotta, wait for it to dry completely. It’s much easier to scrape dried slip off with a knife than to wipe wet slip, which just stains.
Step 3: Detailing and Texture
-
Carving the Quill:
Once the white layer has stiffened slightly (leather hard) or dried just a touch, use a needle tool to carve the central quill line deeply down the middle of the white shape. -
Adding Barbs:
Use a sharp needle tool or X-Acto knife to scratch fine, diagonal lines radiating from the quill outward. These represent the individual barbs of the feather. Press firmly enough to create texture. -
Creating Separations:
To make the feather look realistic, create a few ‘gaps’ in the feather vanes. Carve slightly wider V-shapes to show where the feather strands have naturally separated. -
Adding Fluff:
At the very bottom of the feather stem, scratch chaotic, tufted lines to represent the downy, fluffy aftermath that is common at the base of feathers. -
Background Texture:
Inspect the terracotta background. If it looks too perfect, you can gently tap it with a stiff brush or coarse sandpaper to give it that organic, weathered stone look shown in the photo.
Sgraffito Secret
Apply white underglaze over the whole oval, let it dry found leather hard, and carve the terracotta background AWAY, leaving just the white feather raised.
Step 4: Finishing Touches
-
Drying Phase:
Allow the piece to dry slowly. Cover it loosely with plastic for the first day to prevent the edges from curling upward, then uncover to finish drying. -
Sanding:
Once bone dry (or fully cured), use fine-grit sandpaper to gently smooth over the white feather section. This reveals the crisp white lines against the terracotta if you used the inlay method. -
Firing or Sealing:
If using ceramic clay, bisque fire and then glaze fire (matte clear is best). If using air-dry clay, seal the entire piece with a matte varnish to protect the surface and deepen the terracotta color. -
Final Clean:
Wipe away any sanding dust with a slightly damp sponge to let the contrast pop before hanging.
Hang your finished piece in a spot that catches natural light to highlight the beautiful carved textures
Twig Shadow Lanterns With Leaf Cutouts
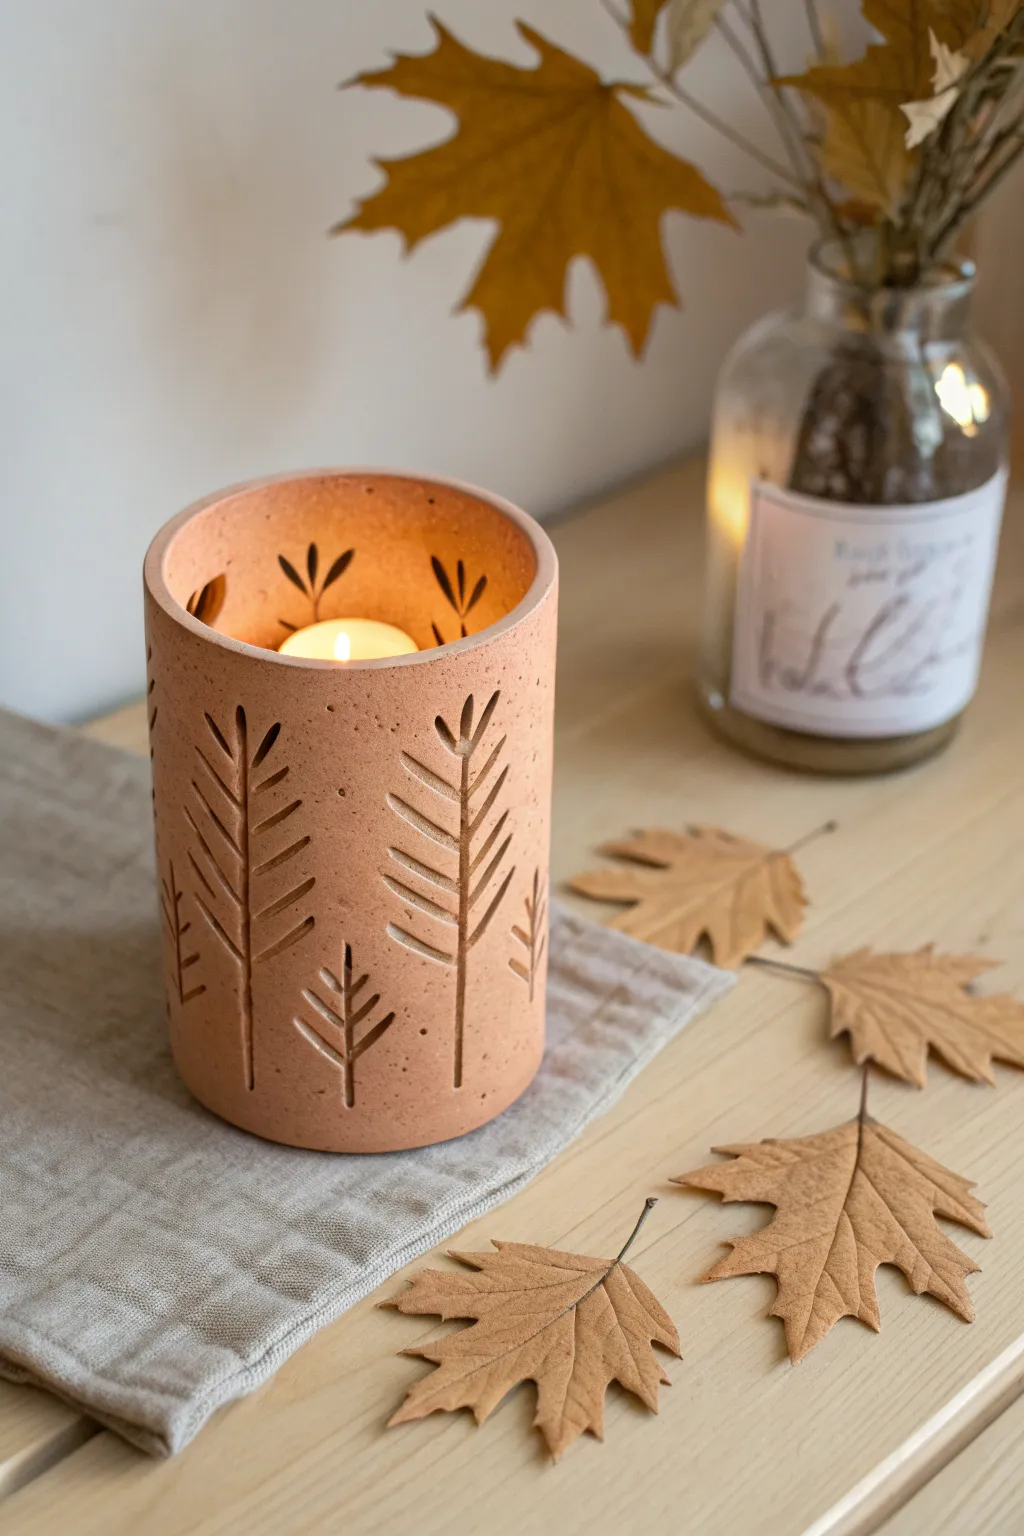
Bring the calming serenity of autumnal forests indoors with this elegant terracotta-toned lantern. Featuring carved fir tree motifs that cast long, dancing shadows, this project uses simple hand-building techniques to create a warm, cylindrical vessel perfect for cozy evenings.
Step-by-Step
Materials
- Terracotta-colored air-dry clay or polymer clay
- Rolling pin
- Parchment paper or canvas mat
- Large cylindrical object (like a glass jar or PVC pipe) for forming
- Clay carving tools (needle tool, small loop tool)
- Small craft knife or scalpel
- Ruler
- Small bowl of water
- Sponge
- Sandpaper (fine grit)
- Tea light candle
Step 1: Preparing the Clay Slab
-
Condition the clays:
Begin by working your terracotta clay in your hands until it is soft, pliable, and free of cracks. If it feels too stiff, add a tiny drop of water or clay softener. -
Roll it out:
Place the clay on a sheet of parchment paper or a canvas mat. Using your rolling pin, roll the clay out into a long rectangular slab. Aim for an even thickness of about 1/4 inch (6mm) to ensure stability. -
Measure the size:
Determine the circumference of your cylindrical form (the jar or pipe). Add about half an inch to this measurement for the overlap seam. -
Trim the edges:
Using a ruler and your craft knife, trim the clay slab into a neat rectangle based on your measurements. A height of about 5-6 inches works well for a standard tea light holder.
Slumping Cylinder?
If your detailed cutouts are causing the clay to sag, let the slab dry flat for 20-30 minutes before wrapping it. The slightly stiffer clay will hold the cylinder shape better.
Step 2: Carving the Design
-
Mark the design:
While the slab is still flat, lightly sketch the vertical lines for your tree trunks using a needle tool. Vary their heights—some tall reaching near the rim, others shorter near the base—to create a varied forest pattern. -
Carve the trunks:
Using a small loop tool or your knife, gently carve out the central vertical lines for the tree trunks. These should be thin grooves, not cut all the way through the clay yet. -
Add the branches:
Carve upward-angled branches extending from the trunks. Create a stylized fir tree look with simple, straight lines angling up. I find it easiest to do one side of the tree first, then the other. -
Cut through for light:
Now, careful cut all the way through the clay along your carved branch lines and trunk lines. This is what allows the candlelight to shine through. Remove the excess clay scraps carefully with the tip of your knife. -
Clean the edges:
Dip your finger in water and gently smooth any rough burrs or jagged bits created by the cutting process. -
Add detail dots:
For extra texture, use your needle tool to poke small, random holes through the clay in the negative space between trees, resembling falling snow or fireflies.
Pro Tip: Hidden Texture
Before cutting your design, gently roll a textured fabric or a real leaf over the clay surface. This adds a subtle, organic stone-like texture that catches the light beautifully.
Step 3: Forming the Cylinder
-
Prepare the form:
Wrap your cylindrical form (jar or pipe) in a single layer of parchment paper. This prevents the clay from sticking to the glass or plastic permanently. -
Lift the slab:
Carefully lift your clay rectangle and wrap it around the paper-covered form. -
Score the seam:
Where the two ends meet, score (scratch) the overlapping edges with your needle tool and dab a little water or slip (liquid clay) on the scored areas. -
Seal the join:
Press the edges together firmly to create the cylinder. Smooth the seam with your fingers or a modeling tool so the join becomes invisible. -
Level the rim:
Check the top rim of your cylinder. If it became distorted during wrapping, gently tap it against a flat surface or trim it slightly to ensure it is level.
Step 4: Finishing Touches
-
Remove the form:
Allow the clay to stiffen slightly on the form for about an hour. Once it holds its shape but isn’t fully dry, carefully slide the interior form out. Remove the parchment paper. -
Full drying:
Let the lantern dry completely. For air-dry clay, this usually takes 24-48 hours. Keep it away from direct heaters to prevent cracking. -
Sanding:
Once bone dry, use fine-grit sandpaper to gently smooth the top rim and any sharp edges around your cutouts. -
Light it up:
Place a tea light candle inside your finished lantern to see the beautiful tree silhouettes come to life.
Enjoy the warm glow as the candlelight flickers through your handcrafted trees