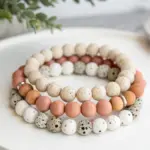
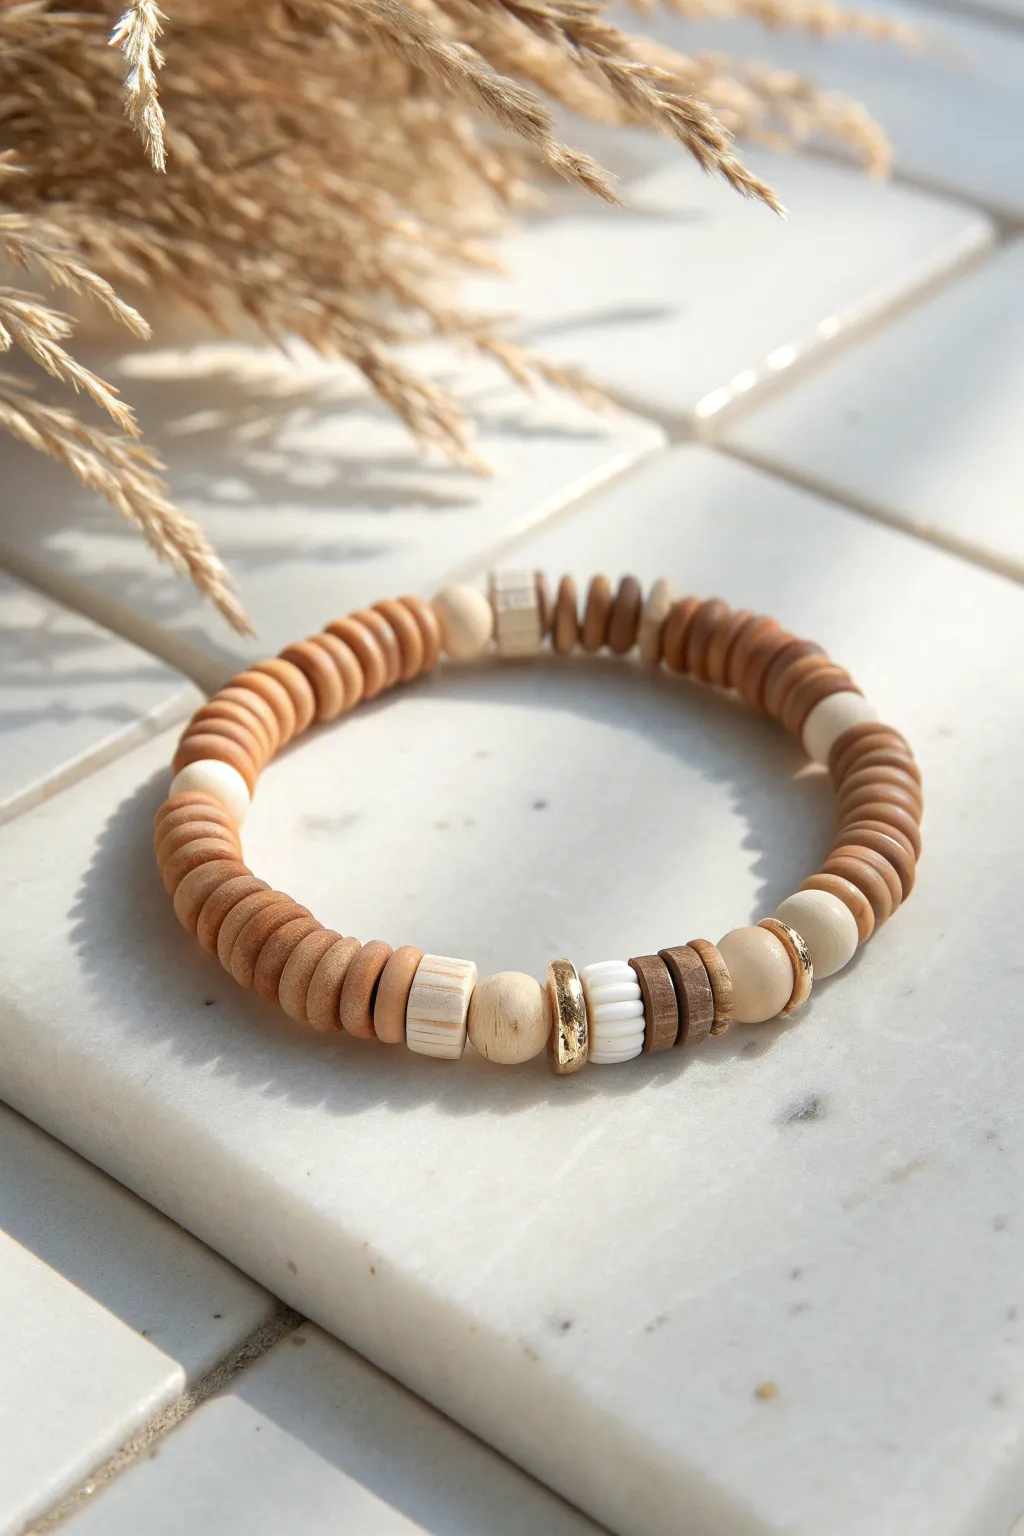
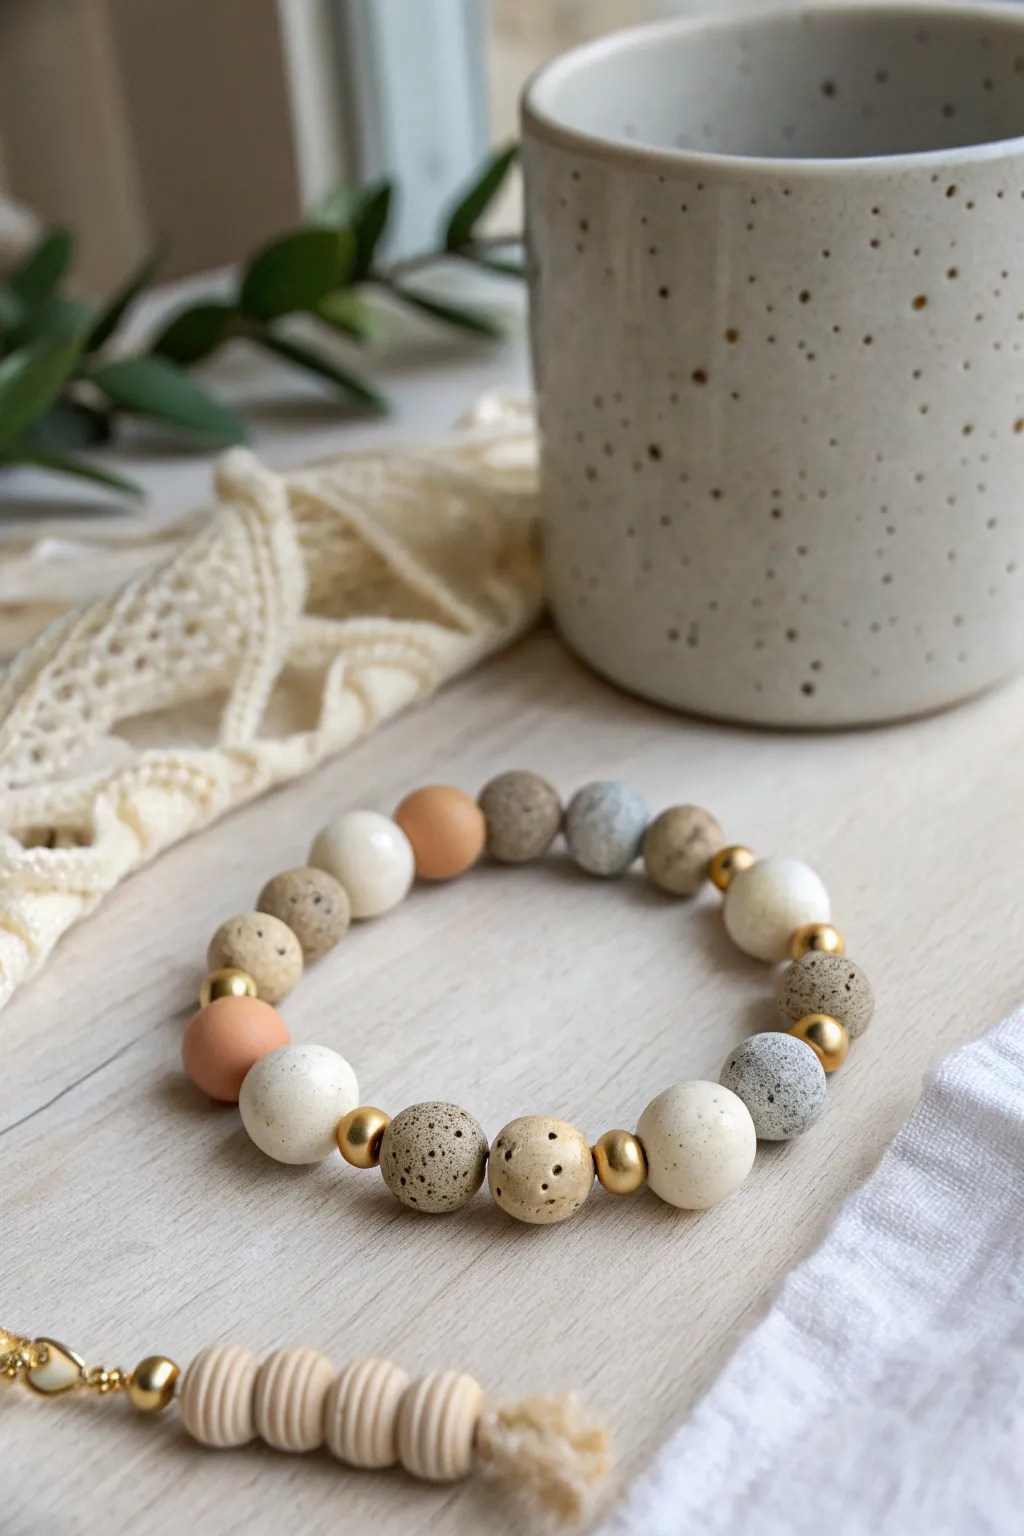
When I’m craving jewelry that goes with literally everything, I always reach for neutral clay bead bracelets because they feel effortless and pulled-together at the same time. Here are my favorite neutral bracelet ideas—starting with the classic staples and ending with a few studio-style twists that still stay beautifully understated.
Classic Beige Heishi Stack
Embrace the effortless elegance of neutrals with this trio of textured heishi bracelets. Combining creamy whites, warm tans, and subtle gold accents creates a harmonious stack that looks just as good with denim as it does with a summer dress.
Step-by-Step
Materials
- Elastic stretch cord (0.8mm or 1mm transparent)
- 6mm cream/white polymer clay heishi beads
- 6mm beige/tan clay heishi beads or light wooden discs
- Small gold seed beads (size 11/0 or 8/0)
- Small gold spacer beads (round or faceted)
- Accent beads: darker brown wood beads, metallic tube beads
- Jewelry glue or clear nail polish
- Scissors
- Beading needle (optional but helpful)
- Masking tape or bead stopper
Step 1: 1. The Creamy Base Layer
-
Prepare the Cord:
Cut a piece of elastic cord about 10-12 inches long. This extra length makes tying the knot easier later. Pre-stretch the cord by pulling it gently a few times to prevent sagging after wear. -
Secure the End:
Place a piece of masking tape or a bead stopper on one end of the cord so your beads don’t slide right off as you work. -
String the Cream Beads:
Begin threading the cream/white polymer clay heishi beads onto the cord. This is the simplest bracelet of the stack, designed to be uniform. -
Check the Fit:
Continue adding beads until the strand measures about 6.5 to 7 inches, or your desired wrist size. Wrap it around your wrist to check the fit; it should be snug but comfortable. -
Tie and Trim:
Tie a sturdy surgeon’s knot (right over left, left over right, and loop through an extra time). Pull it tight, secure with a dab of jewelry glue, let it dry, and trim the excess cord close to the knot.
Knot Security Tip
After tying your knots, pull the elastic tight and wait 30 seconds before trimming. Elastic relaxes slowly, and cutting too soon can cause the knot to slip later.
Step 2: 2. The Warm Beige Middle
-
Start the Second Strand:
Cut and pre-stretch another length of elastic cord. Secure the end as you did before. -
String the Beige Beads:
For this layer, use the beige or light tan heishi beads. If you have slightly textured or wooden disc beads, they add a great organic feel here. -
Add a Focal Point:
To break up the uniformity, slide on a single gold bead or a slightly larger gold focal bead near the center of the strand. This subtle shine elevates the neutral tone. -
Finish the Strand:
Complete the stringing to match the length of your first bracelet. Tie off with a surgeon’s knot, glue, and trim.
Elevate with Charms
Add a small gold seashell or starfish charm to the accent bracelet. It plays up the beachy vibe of the heishi beads without overpowering the neutral palette.
Step 3: 3. The Textured Accent Strand
-
Plan the Pattern:
The third bracelet is the detailed accent piece. Lay out your beads on a board first to visualize the pattern shown in the image: sections of small gold seed beads interrupted by wooden accents. -
Section 1: Gold Seeds:
Start with a long segment (about 2-3 inches) of the tiny gold seed beads. This creates a delicate, metallic shimmer segment. -
Section 2: The Transition:
Add a transition bead—perhaps a small, darker brown wooden sphere or a faceted gold spacer—to end the seed bead section. -
Section 3: Mixed Textures:
String a short pattern of alternating beads: a few cream heishi beads, followed by a darker wood bead, then perhaps a gold tube bead or spacer. -
Section 4: The Heishi Base:
Fill the rest of the bracelet length with the beige heishi beads to tie it visually to the other bracelets in the stack. -
Final Adjustments:
Check the symmetry and length. Often, I like to ensure the gold seed bead section sits visible on top of the wrist. -
Secure the Final Knot:
Tie your final surgeon’s knot very tightly, especially since the seed beads have larger holes relative to the cord. Apply glue liberally to the knot. -
Hide the Knot:
If possible, gently tug the knot inside one of the larger heishi beads or adjacent wooden beads to conceal it for a professional finish.
Slide on your new stack to add an instant touch of warmth and texture to your outfit


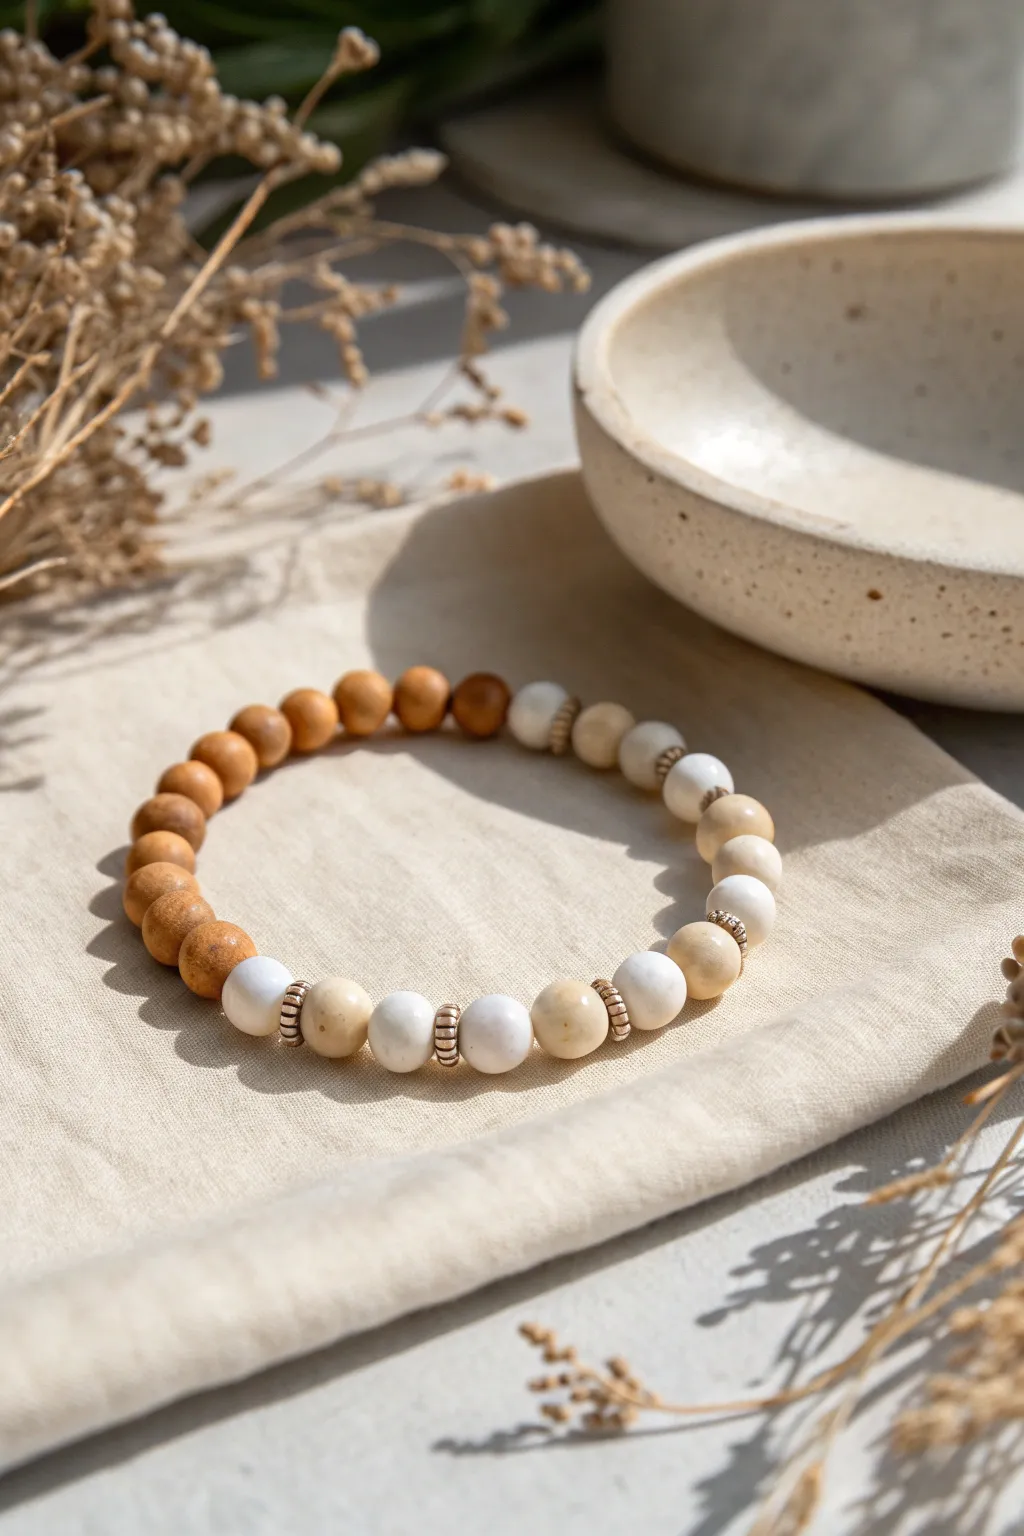
Taupe-to-Cream Ombre Fade
This sophisticated bracelet merges earthy warmth with a touch of luxury, perfect for a subtle everyday statement. The design features a smooth transition from rich brown cocoa tones to a creamy white center, accented by touches of gold.
How-To Guide
Materials
- 6mm flat heishi beads (cocoa brown/wood tone)
- 6mm flat heishi beads (cream/off-white)
- 6mm round beads (matte light beige)
- Gold rhinestone spacers (rondelle shape)
- Gold crimp beads (2)
- Gold crimp covers (2)
- Gold lobster clasp
- Gold extender chain
- Gold jump rings (4mm or 5mm)
- Beading wire (0.38mm or 0.45mm)
- Wire cutters
- Flat nose pliers
- Crimping pliers
Step 1: Preparation & First Side
-
Measure and Cut:
Cut a piece of beading wire approximately 10-12 inches long. This generous length gives you plenty of room to work with the clasps without beads sliding off. -
Secure the End:
Thread a crimp bead onto one end of the wire, followed by a jump ring attached to your lobster clasp. -
Crimp the Wire:
Loop the wire back through the crimp bead to create a small loop holding the clasp. Use your crimping pliers to flatten the crimp bead securely, ensuring the wires don’t cross inside. -
Add a Cover:
Place a gold crimp cover over the flattened crimp bead. Gently squeeze it closed with flat nose pliers until it resembles a round gold bead. -
Begin Beading:
Start threading your cocoa brown heishi beads. You want a substantial length of this dark neutral to form the majority of the bracelet strap. -
Check Length:
Continue adding brown beads until you reach nearly the halfway point of your desired bracelet size, minus about 1.5 inches for the centerpiece. -
Transition Bead:
Add one single cream heishi bead after the brown section to act as a subtle buffer before the centerpiece details begin.
Wire Guard Technique
For extra durability, thread your wire through a tiny U-shaped wire guard before adding the clasp. It prevents friction from wearing down the string over time.
Step 2: Creating the Centerpiece
-
First Accent:
Slide on one matte light beige round bead. This larger shape adds a nice contrast to the flat discs. -
Add Sparkle:
Thread on a gold rhinestone spacer bead. Ensure the rhinestones are facing outward for maximum shine. -
Cream Center:
Add five or six cream flat heishi beads. This creates the bright focal point of the ombre design. -
Second Sparkle:
Mirror the design by adding the second gold rhinestone spacer bead. -
Close the Center:
Finish the focal section with one more matte light beige round bead.
Step 3: Finishing the Loop
-
Resume Brown Beads:
Return to your cocoa brown heishi beads. Thread on the exact same number of beads as you used on the first side to ensure symmetry. -
Double Check Fit:
Wrap the bracelet around your wrist or a sizing cone. Remember the clasp and extender will add a small amount of length. -
Prepare to Close:
Thread a crimp bead onto the end of the wire. -
Attach Extender:
Add the jump ring connected to your gold extender chain. -
Seal the End:
Pass the wire back through the crimp bead and pull it taut, removing slack but keeping the bracelet flexible. Flatten the crimp bead with your pliers. -
Trim and Cover:
Trim the excess wire close to the crimp. Place your second crimp cover over the bead and gently close it with flat nose pliers for a polished finish.
Natural Texture
Swap the brown polymer clay heishi beads for actual coconut wood beads. The natural grain variation adds an incredible organic feel to the piece.
Enjoy styling this versatile piece individually or stacked with gold bangles for a richer look


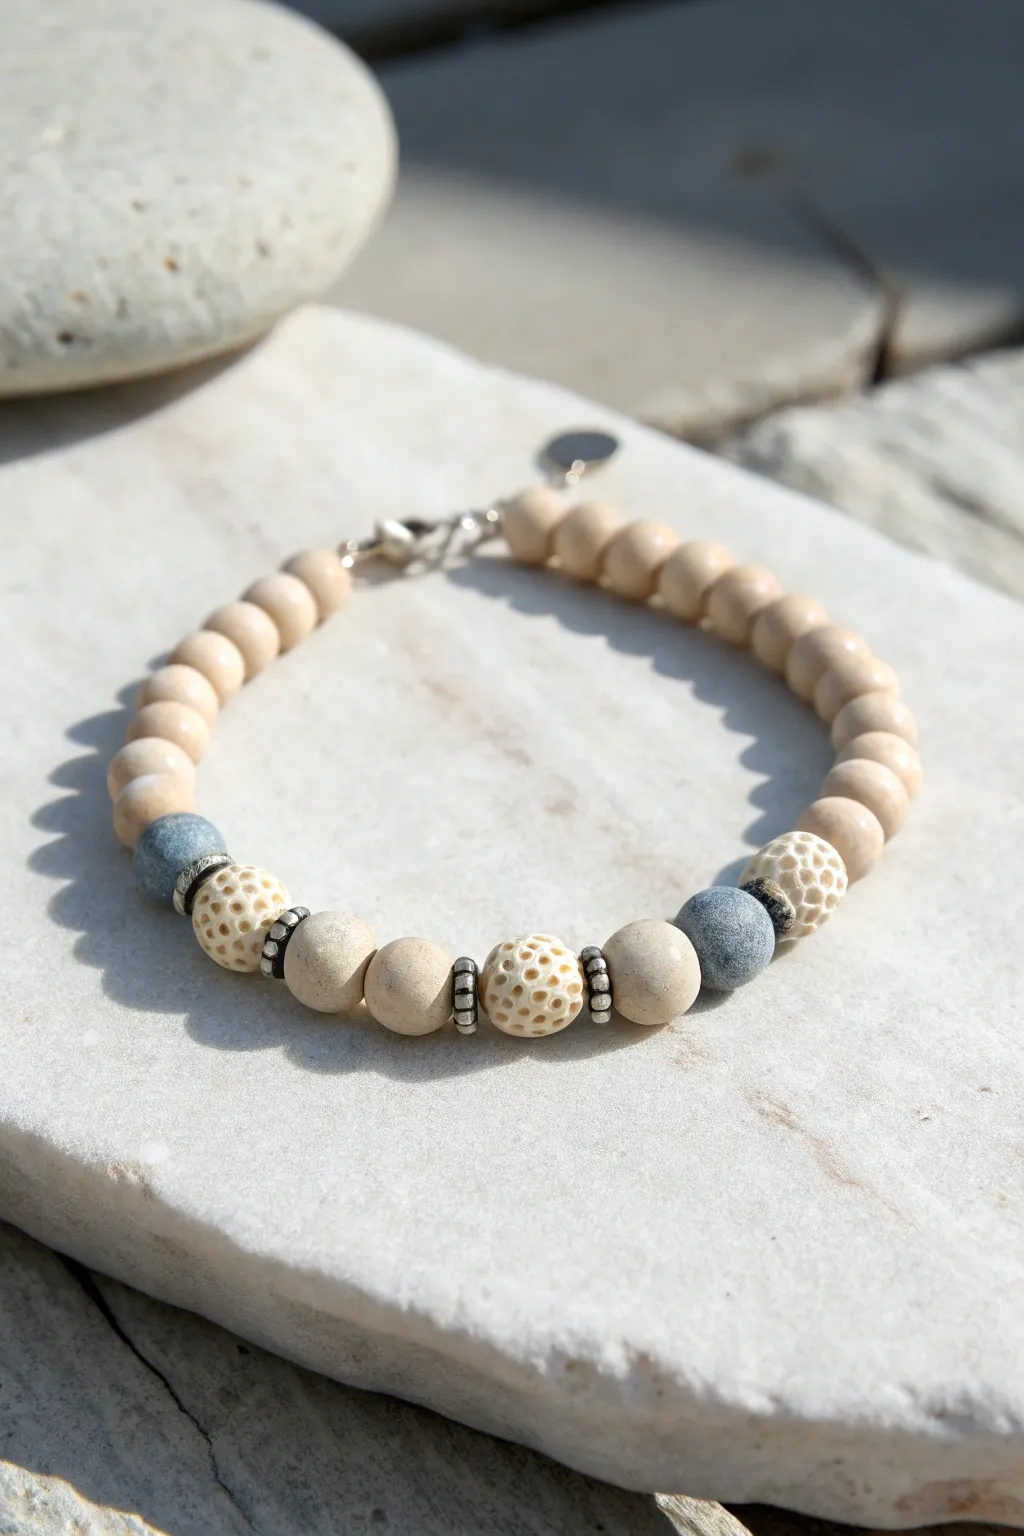
Greyscale With Soft Silver Touches
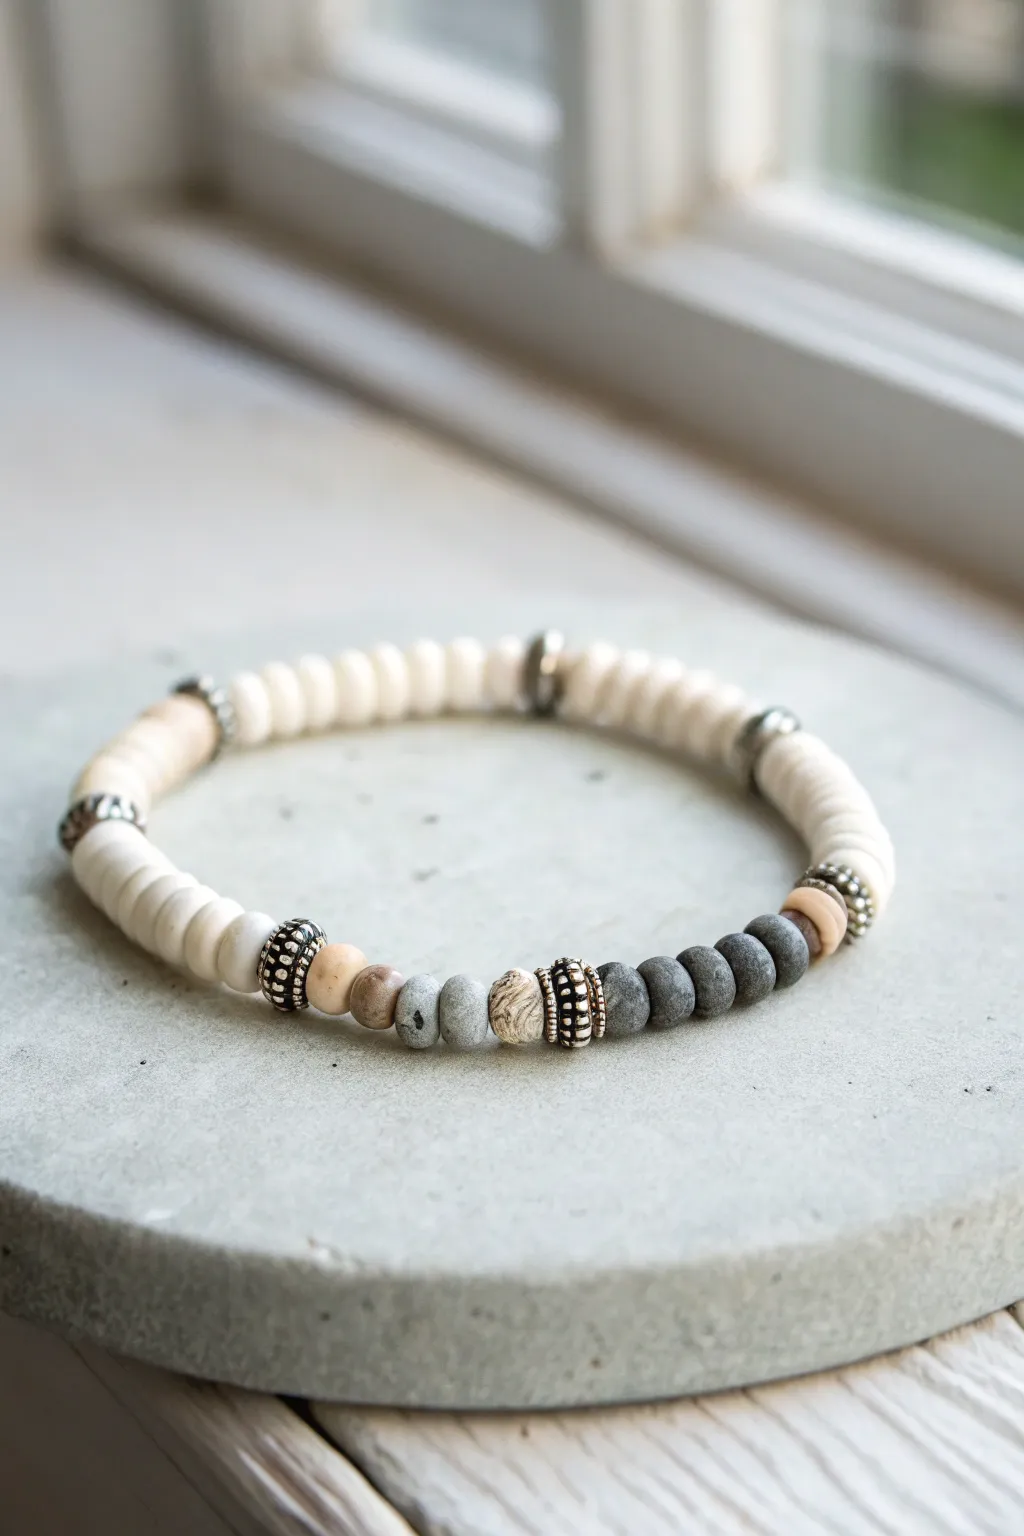
Embrace the understated elegance of monochrome with this textured bracelet that blends the matte smoothness of clay heishi discs with the rugged feel of natural stone. The soft silver spacers add just enough shimmer to break up the neutrals, creating a piece that feels both grounded and sophisticated.
Detailed Instructions
Materials
- Cream or off-white polymer clay heishi beads (approx. 4-6mm)
- Dark grey or slate matte stone beads (6mm round)
- Light grey/speckled matte stone beads (6mm round)
- Beige/tan spacer beads (heishi or thin round)
- Textured antique silver spacer beads (barrel or lantern shape)
- Simple antique silver rondelle spacers
- Strong elastic cord (0.7mm or 0.8mm)
- Jewelry glue or clear nail polish
- Scissors
Step 1: Planning and Layout
-
Measure your wrist:
Wrap a piece of string around your wrist to find your size, then lay it flat against a ruler. Add about 0.5 inches to this measurement to ensure a comfortable fit that isn’t too tight. -
Set the foundation:
Cut a piece of elastic cord about 10-12 inches long. I always cut significantly more than I need—it makes the final knotting process much less frustrating. -
Pre-stretch the cord:
Give your elastic a few gentle tugs. This pre-stretching prevents the bracelet from loosening up and sagging immediately after you wear it for the first time. -
Secure the end:
Place a bead stopper or simply tape one end of the cord to your work surface so your carefully arranged beads don’t slide off.
Knot Security
Hide the knot inside the silver spacer bead if possible. The metal hole is usually larger than the clay beads, offering the perfect hiding spot.
Step 2: Stringing the Pattern
-
Start with the focal section:
This design features an asymmetrical focal point. Begin by threading on a textured silver barrel spacer. -
Build the darker side:
Next to the silver barrel, add about five dark grey matte stone beads. These provide the visual weight for the ‘bottom’ of the bracelet. -
Transition slowly:
After the dark grey stones, adding a single beige or tan heishi bead acts as a subtle buffer before moving to the next section. -
Add a silver accent:
Slide on a smaller silver rondelle spacer here to complete the transition zone. -
Create the cream expanse:
Now, thread on a long section of the cream heishi beads. This should cover roughly half to two-thirds of the bracelet’s circumference, creating that clean, modern look. -
Mirror the accent:
Once the cream section extends about halfway around, insert another simple silver rondelle spacer, followed by a short run of heishi beads. -
Insert the secondary silver elements:
Add a second textured silver barrel bead. This creates a rhythm without being perfectly symmetrical. -
Finish the lighter mixed section:
Thread on your mixed lighter stones—the beige, speckled grey, and light grey rounds—separated by that second chunky silver barrel bead.
Texture Play
Swap the smoothness of the cream beads for faceted quartz or white lava stone to add even more tactile variety to the monochrome palette.
Step 3: Finishing Touches
-
Check the fit:
carefully lift the cord and wrap it around your wrist. If there are gaps, add a few more cream heishi beads; if it’s too loose, remove one of the stone rounds. -
Prepare the knot:
Bring the two ends together, ensuring there is no slack in the bead line but not pulling so tight that the bracelet buckles. -
Tie a surgeon’s knot:
Cross the ends, wrap one side through the loop twice, and pull tight. Repeat this process once more to secure the bind. -
Apply adhesive:
Place a tiny drop of flexible jewelry glue (or clear nail polish in a pinch) directly onto the knot. Let it dry for a few minutes. -
Hide the mechanics:
Once the glue is tacky or dry, trim the excess elastic ends close to the knot. Ideally, gently tug the bracelet so the knot slides inside the large hole of one of the silver barrel beads.
Slip on your new creation and enjoy the sophisticated balance of textures


Black-and-White With Metallic Pops
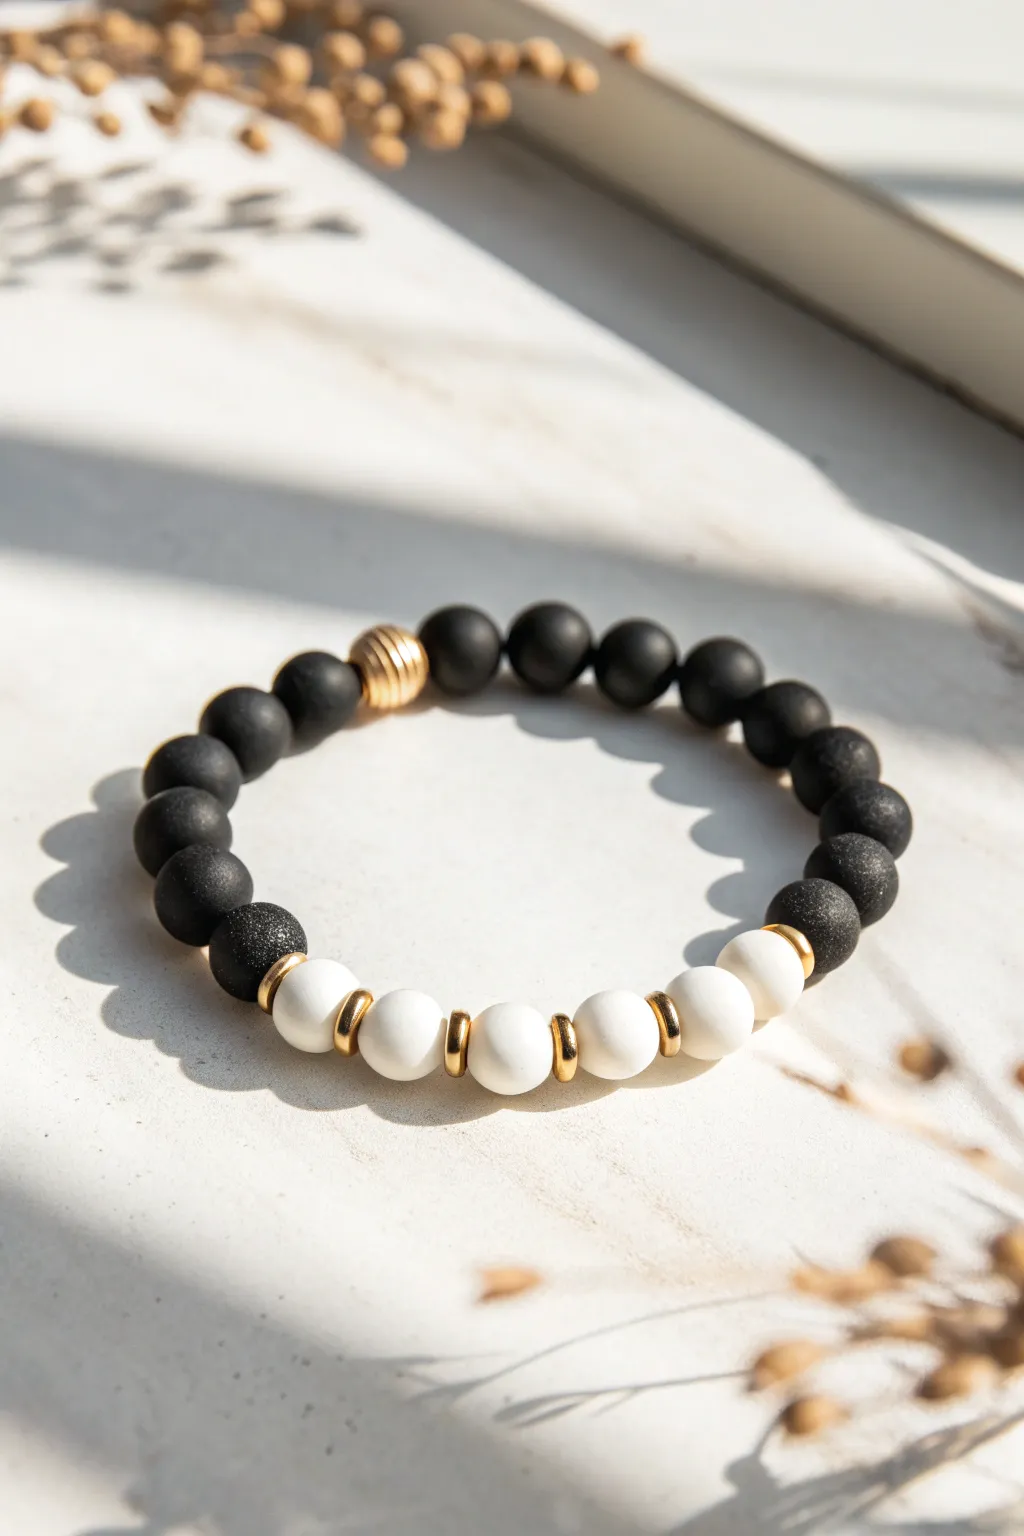
This sophisticated design balances the rustic feel of matte black stone with the clean brightness of white beads, all tied together with elegant gold accents. It’s a perfect neutral accessory that works just as well for a casual lunch as it does for an evening out.
How-To Guide
Materials
- Matte black onyx or agate round beads (8mm)
- White tridacna or howlite round beads (8mm)
- Gold tone metallic spacer rings or rondelles
- One gold textured accent bead (ribbed or corrugated)
- Strong elastic stretch cord (0.8mm or 1mm)
- Jewelry glue or clear nail polish
- Scissors
Step 1: Planning and Measuring
-
Measure your wrist:
Wrap a measuring tape loosely around your wrist to determine the circumference. For a standard fit, add about half an inch to your measurement to determine the final bracelet length. -
Pre-stretch the cord:
Cut a piece of elastic cord about 10-12 inches long. Before you start beading, firmly pull on the cord several times to pre-stretch it; this helps prevent the bracelet from sagging later. -
Secure the end:
Place a piece of tape or a bead stopper clip on one end of your cord so your beads don’t slide right off while you work.
Knot Slipping?
If your surgeon’s knot feels loose, try tensioning the cord before tying. Pull the elastic tight, then let it relax, then tie. This takes the ‘slack’ out.
Step 2: Stringing the Design
-
Start with the black beads:
Begin threading the matte black beads onto the cord. Looking at the reference, you’ll need approximately 13-15 black beads to form the majority of the band, depending on your wrist size. -
Add the gold accent:
After about half of the black beads are strung, slide on your gold ribbed accent bead. This will serve as a subtle focal point on the dark side of the bracelet. -
Finish the black section:
Continue adding the remainder of your matte black beads until you’ve completed the dark section of the loop. -
Transition with gold:
Slide on a flat gold spacer ring. These thin metallic discs act as separators that make the white section pop. -
Begin the white section:
Thread on your first white bead followed immediately by another gold spacer ring. -
Create the white pattern:
Continue this alternating pattern: white bead, gold spacer, white bead, gold spacer. You generally want about 5 white beads total for this specific look. -
Close the pattern:
Ensure there is a gold spacer ring after the final white bead so the transition back to the black beads is symmetrical.
Step 3: Finishing Touches
-
Check the fit:
carefully bring the two ends of the cord together and wrap the circle around your wrist. It should sit comfortably without pinching or slipping too much. Add or remove a black bead if necessary. -
Prepare the knot:
Remove the tape or clip from the end. Cross the two ends of the elastic cord. -
Tie a surgeon’s knot:
Make a regular overhand knot, but loop the end through a second time before pulling it tight. This extra pass creates friction that holds slippery elastic much better. -
Secure the knot:
I always add a tiny drop of jewelry glue or clear nail polish directly onto the knot. Let it dry for a minute to ensure it bonds permanently. -
Hide the knot:
Trim the excess cord tails close to the knot (but not too close!). Gently pull the elastic so the knot slides inside the hole of the nearest black bead, effectively hiding it from view.
Mix Metals
Swap the gold spacers for rose gold or brushed silver to change the vibe. Using hexagonal spacers instead of round rings adds a geometric edge.
Now you have a chic, high-contrast accessory that looks professional and stylish

The Complete Guide to Pottery Troubleshooting
Uncover the most common ceramic mistakes—from cracking clay to failed glazes—and learn how to fix them fast.
Cream and Camel Color Blocks
Embrace the soothing qualities of neutral tones with this handcrafted bracelet that alternates between creamy spheres and warm camel accents. The varying shapes create a delightful rhythm around the wrist, perfect for everyday wear or stacking with other earth-toned jewelry.
Detailed Instructions
Materials
- Polymer clay (cream or ecru)
- Polymer clay (camel or light terra cotta)
- One distinct wooden accent bead (polished deep brown)
- Elastic stretch cord (0.7mm or 0.8mm)
- Bead roller tool (optional, for uniform spheres)
- Bead piercing pin or needle
- Baking sheet with parchment paper
- Jewelry glue (e.g., G-S Hypo Cement)
- Scissors
Step 1: Shaping the Beads
-
Condition the Clay:
Begin by thoroughly kneading your cream polymer clay until it is soft and pliable. Do the same for the camel-colored clay to ensure no cracking during the baking process. -
Portion the Cream Spheres:
Roll the cream clay into a log and slice equal segments. You will need approximately 14 to 16 segments, depending on your wrist size. -
Roll the Spheres:
Roll each cream segment between your palms to create smooth, round spheres. Aim for a diameter of about 10-12mm. -
Refine the Shape:
If I want them perfectly uniform, using a bead roller helps, but hand-rolled beads add a lovely organic touch. -
Create Camel Spacers:
Roll the camel-colored clay into a thinner log and slice off small, disc-like pieces. -
Flatten Spacers:
Gently press these small slices flat with your thumb or a flat tool to create washer-shaped spacers. You’ll need about 6-8 of these.
Fingerprints everywhere?
If you see fingerprints on your raw clay beads, lightly brush them with a little cornstarch or baby powder before baking to smooth the surface without deforming the sphere.
Step 2: Piercing and Baking
-
Pierce the Beads:
Use your bead piercing pin to gently bore a hole through the center of each cream sphere. Rotate the bead as you pierce to keep the shape round. -
Pierce the Spacers:
Poke a hole through the center of your flat camel spacers, ensuring the hole is wide enough for your elastic cord. -
Arrange for Baking:
Place all your clay pieces on a baking sheet lined with parchment paper. Leave a little space between each one. -
Bake:
Bake the clay according to the manufacturer’s instructions (usually 275°F/135°C for 15-30 minutes). Let them cool completely before handling.
Natural Texture Hack
To mimic the stone-like texture seen in the photo, gently roll your raw cream beads over a piece of coarse sandpaper or a textured sponge before baking.
Step 3: Assembly
-
Prepare the Cord:
Cut a length of elastic cord about 10-12 inches long. Give it a gentle pre-stretch to prevent it from loosening later. -
Start Stringing:
Theme your pattern. Begin threading the cream spheres. After every 2 or 3 cream beads, slide on a flat camel spacer. -
Continue the Pattern:
Repeat this pattern (sphere, sphere, sphere, spacer) until you have nearly filled the cord length appropriate for your wrist. -
Add the Focal Point:
Thread on your single dark wooden accent bead at a point where it balances the design, perhaps flanked by camel spacers. -
Check the Fit:
Wrap the unfinished strand around your wrist to ensure it sits comfortably without being too tight. -
Secure the Knot:
Tie a secure surgeon’s knot (looping the cord through twice before pulling tight). Add a tiny dab of jewelry glue to the knot. -
Hide the Knot:
Once the glue is tacky but drying, slide the knot inside the hole of the nearest large cream bead to conceal it. -
Final Trim:
Trim the excess cord tails close to the bead hole, being careful not to cut the main knot.
Now you have a serene, earth-toned accessory ready to complement any outfit
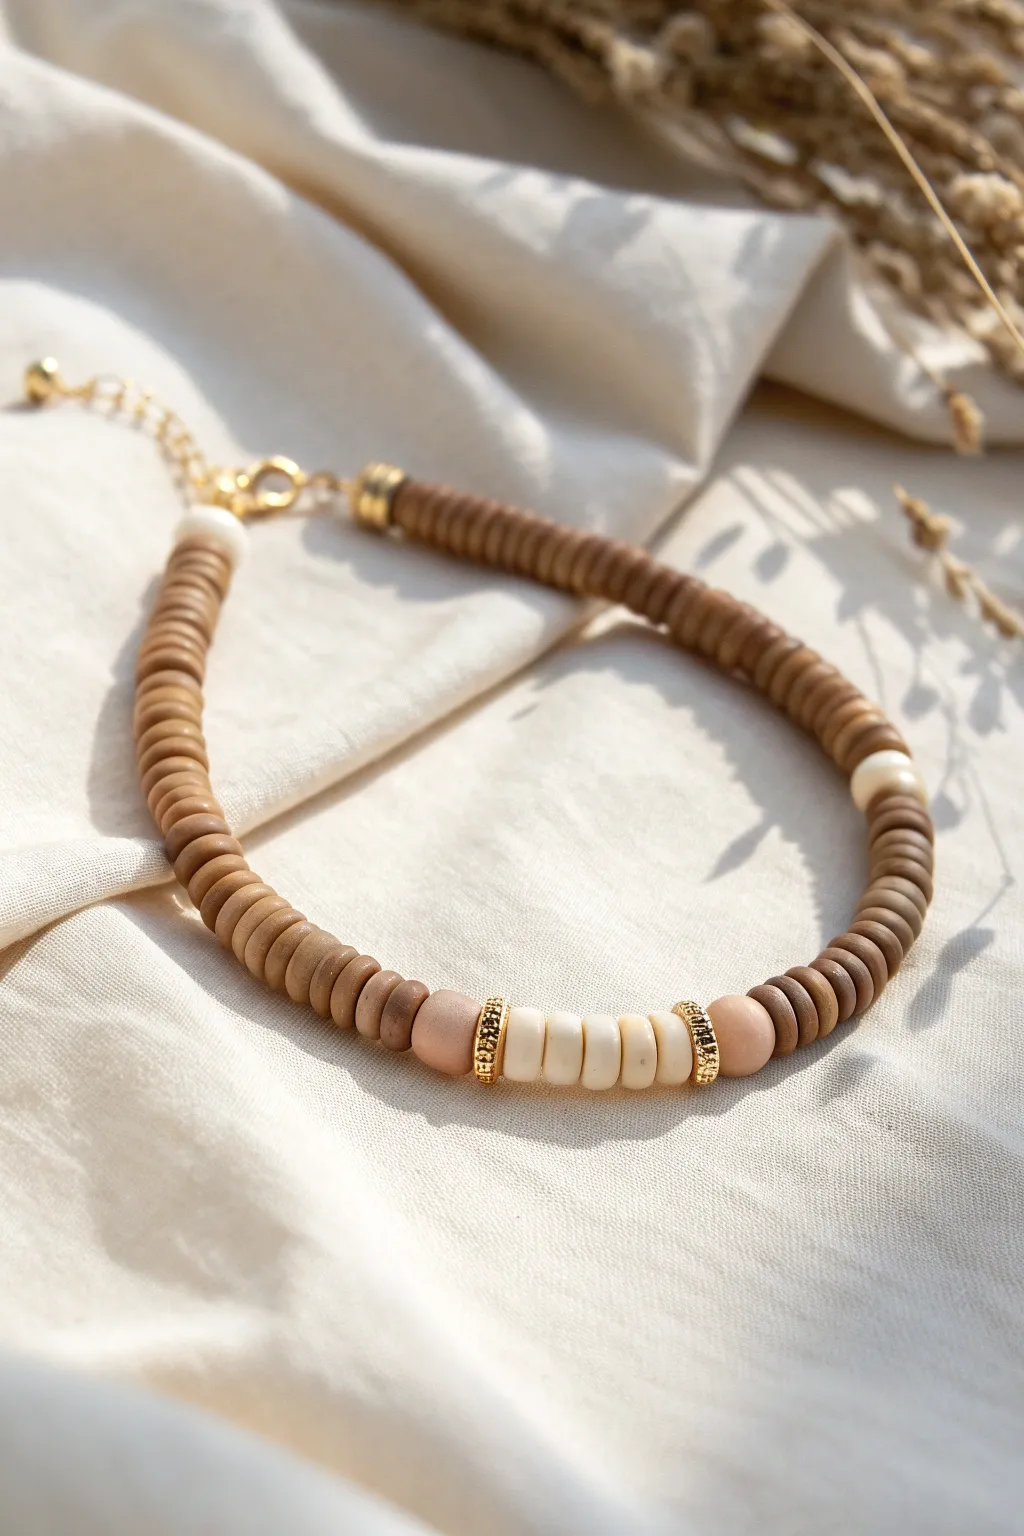
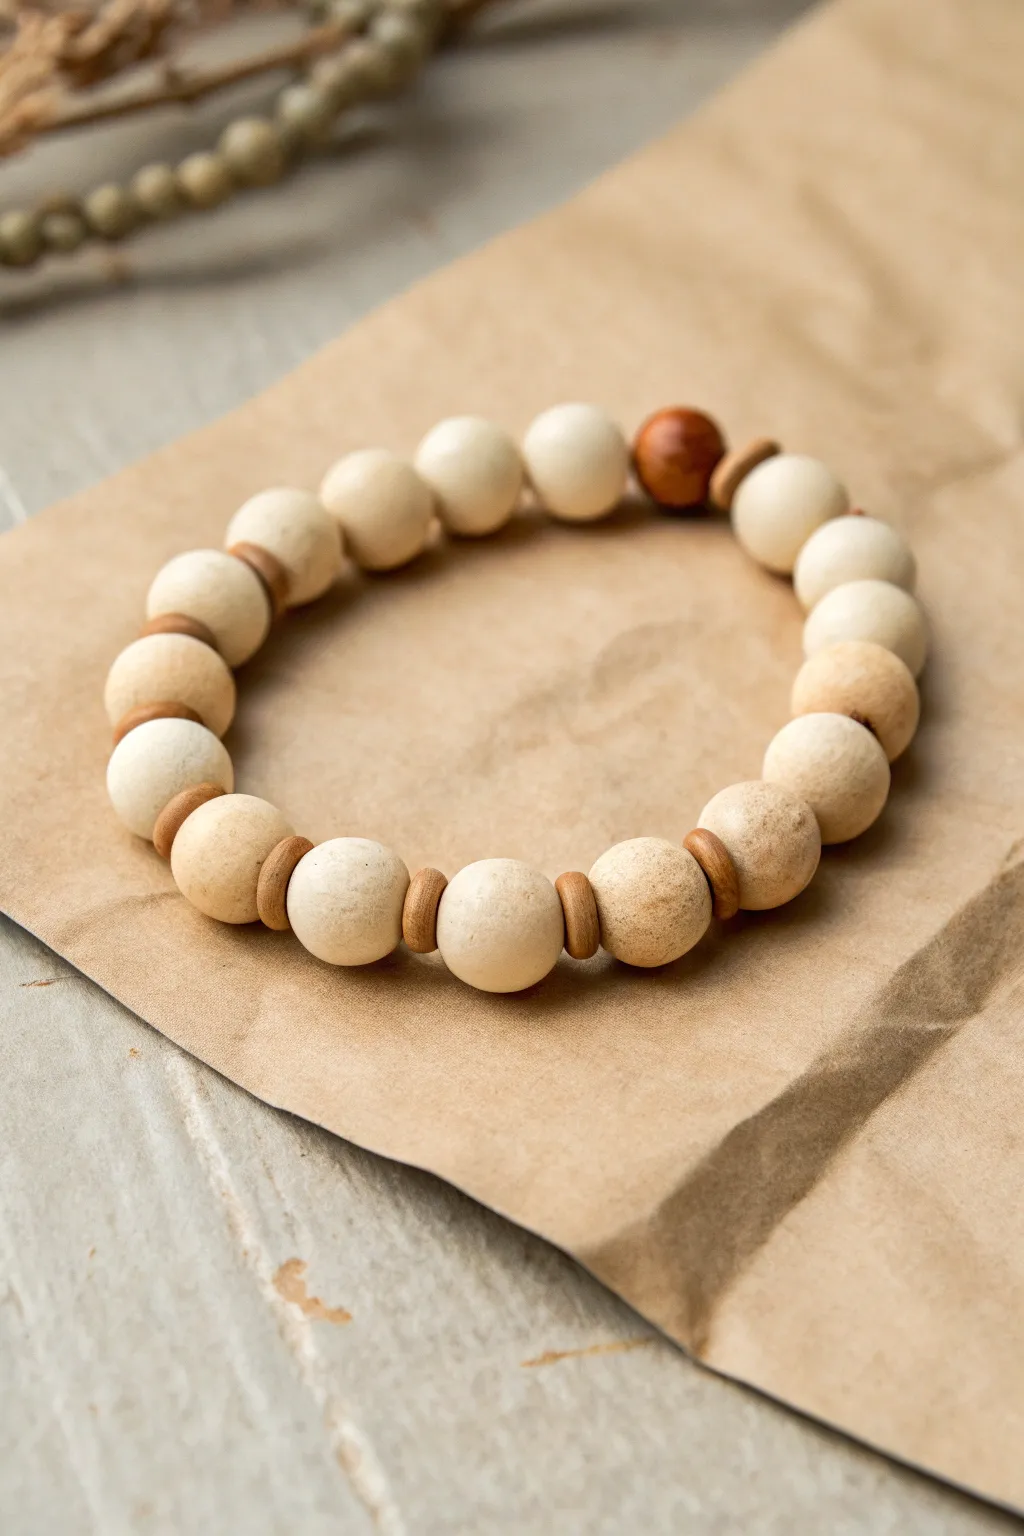
Warm Sand With Milky White Accents
This bracelet balances rustic warmth with clean minimalism by combining matte brown clay beads with milky white rounds and textured metallic accents. The split design creates a versatile accessory that feels earthy yet refined.
Step-by-Step Guide
Materials
- 8mm warm brown wood-look polymer clay beads (approx. 10-12 beads)
- 8mm milky white or ivory polymer clay beads (approx. 12-14 beads)
- Small textured metallic spacers (copper or antiqued gold tone)
- 0.8mm clear elastic stretch cord
- Jewelry glue or clear nail polish
- Scissors
- Beading needle (optional, for easier threading)
- Tape or bead stopper
Step 1: Preparation & Design
-
Measure your wrist:
Before you begin, wrap a piece of string or a measuring tape around your wrist to determine the circumference. Add about 1/2 inch to this measurement to ensure the bracelet fits comfortably without pinching. -
Cut the cord:
Cut a length of elastic cord about 10-12 inches long. This generous length gives you plenty of room to knot the ends securely later without struggling. -
Secure the end:
Pre-stretch your elastic cord by pulling it gently a few times; this prevents it from sagging later. Place a piece of tape or a bead stopper on one end of the cord so your beads don’t slide off while you work. -
Plan the pattern:
Lay out your beads on a flat surface or bead board. The design relies on a ‘half-and-half’ look: group all the brown beads on one side and the white beads on the other to visualize the transition.
Knot Security Tip
Pre-stretching your elastic cord is crucial. Give it 3-4 firm tugs before stringing; this prevents the bracelet from loosening and becoming baggy after you wear it a few times.
Step 2: Stringing the Beads
-
Start with the warm tones:
Begin threading the brown wood-look clay beads onto the elastic. I like to continuously check the length against my wrist as I go. -
Create the first transition:
Once you have strung about 3-4 inches of brown beads, add your first metallic spacer. This marks the shift from the solid earth tones to the lighter section. -
Begin the white section:
Thread on two or three of the milky white clay beads immediately after the spacer. -
Establish the spacer pattern:
Add another metallic spacer, followed by two more white beads. Repeat this specific rhythm (spacer, two white beads, spacer) for the middle portion of the white section. -
Vary the rhythm:
Towards the center of the white section, you can switch to single white beads between spacers if you want a more metallic focus, or stick to the double-bead pattern for consistency. -
Complete the white half:
Finish stringing the remaining white beads until the strand reaches your desired total length. -
Check the fit:
Wrap the unfinished strand around your wrist one last time. The ends should meet comfortably with no gaps, but not be tight enough to leave an impression on your skin.
Step 3: Finishing Touches
-
Prepare for the knot:
Remove the tape or bead stopper carefully while holding both ends of the elastic firmly. -
Tie the knot:
Tie a surgeon’s knot (loop the cord through twice before pulling tight) to secure the bracelet. Pull the elastic taut as you tighten the knot to minimize slack. -
Secure with glue:
Apply a tiny dot of jewelry glue or clear nail polish directly onto the knot. This prevents it from slipping over time. -
Hide the knot:
While the glue is still slightly tacky, gently pull the cord so the knot slides inside the hole of the nearest large bead. This creates a seamless, professional finish. -
Trim the ends:
Once the glue is fully dry, use sharp scissors to trim the excess elastic cord close to the bead hole, being careful not to nick the main knot.
Texture Twist
Swap the smooth white beads for lava stone beads. This adds a pitted texture that contrasts beautifully with the wood tones and allows you to diffuse essential oils.
Wear your new bracelet alone for a subtle statement or stack it with other earth-toned pieces to complete the look


What Really Happens Inside the Kiln
Learn how time and temperature work together inside the kiln to transform clay into durable ceramic.
Stone-Speckled Neutrals for Texture
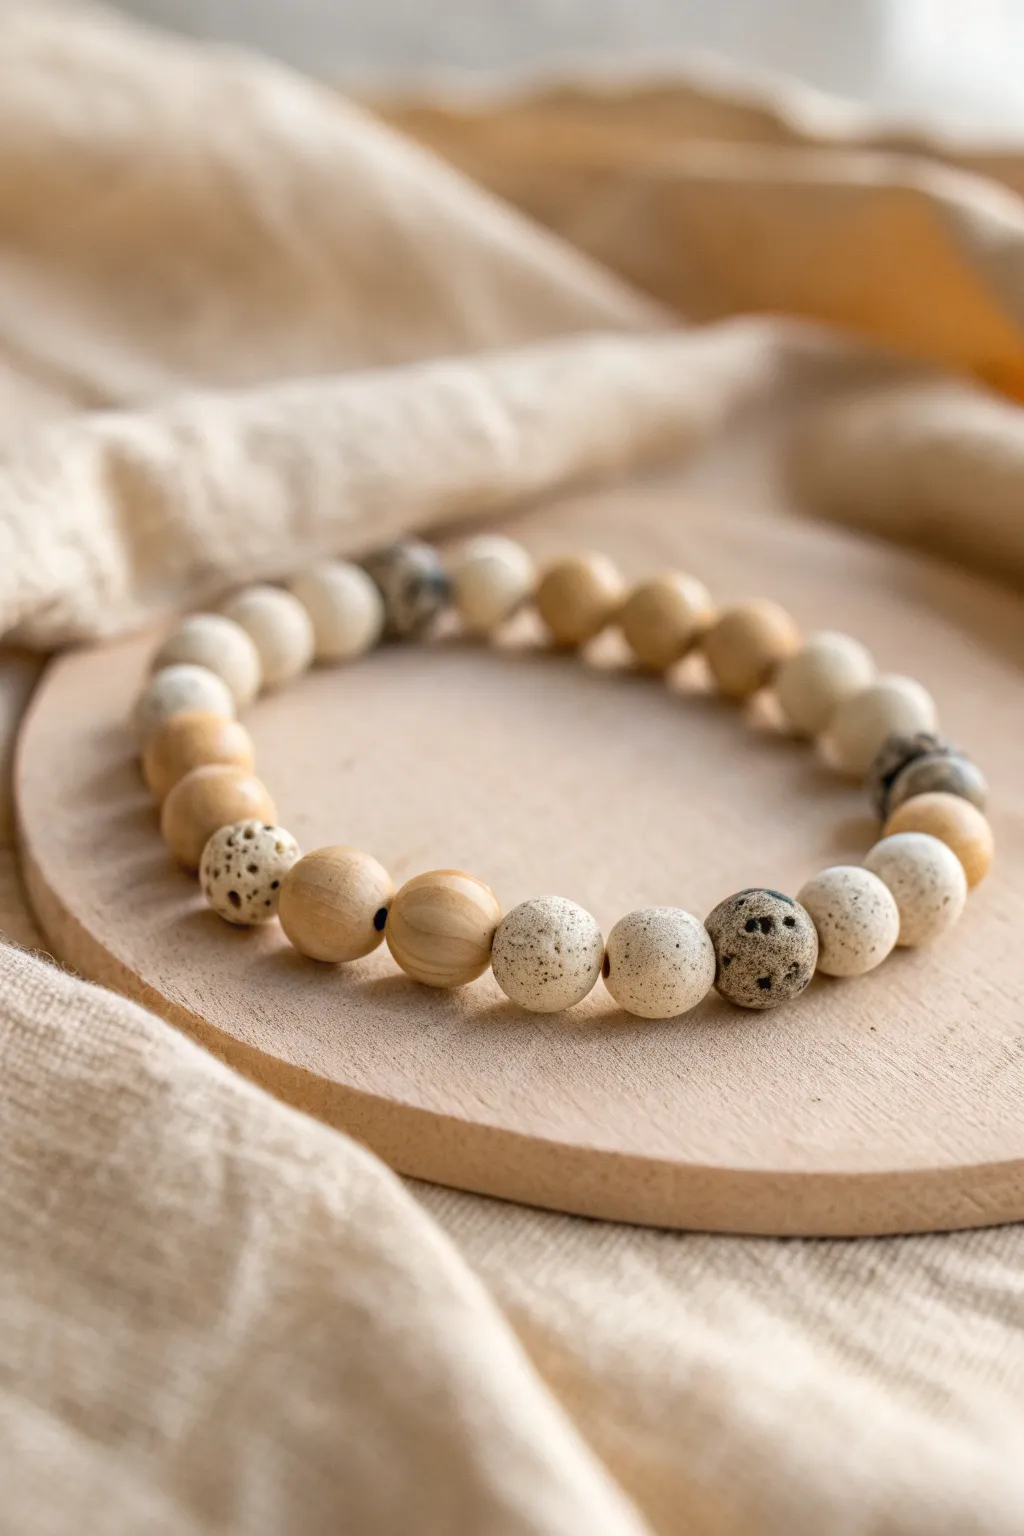
Embrace the soothing palette of the shoreline with this neutral bead bracelet that mixes smooth wood with tactile speckled stones. The combination of creamy off-whites, warm tans, and stone-flecked textures creates a piece that feels both grounded and elegant.
Step-by-Step
Materials
- 8mm smooth maple wood round beads
- 8mm Dalmatian Jasper round beads (grey/black speckled)
- 8mm speckled cream ceramic or polymer clay beads
- 8mm beige/ivory wood or bone beads
- 0.8mm clear elastic stretch cord
- Jewelry adhesive (e.g., G-S Hypo Cement)
- Scissors
- Beading needle (optional, but helpful)
- Bead design board or soft cloth
- Tape or binder clip
Step 1: Planning the Design
-
Set up your workspace:
Lay out your soft cloth or bead design board. This prevents your round beads from rolling away while you work and helps you visualize the pattern before threading. -
Sort your beads:
Separate your beads into piles by type: smooth maple wood, speckled cream ceramic, beige wood, and the darker Dalmatian Jasper beads. Having them organized makes the patterning process much smoother. -
Establish the pattern rhythm:
Examining the inspiration piece, the pattern relies on asymmetry and organic grouping rather than a strict rigid repeat. We want blocks of similar tones broken up by the speckled accents. -
Draft the layout:
Start arranging beads in a circle on your board. Try grouping 2-3 smooth maple beads together, followed by a lighter speckled bead, then a darker stone bead. -
Refine the sequence:
Create visual interest by placing the darker Dalmatian Jasper beads opposite each other or spaced irregularly to draw the eye around the wrist. -
Check the length:
Measure your wrist and arrange enough beads to match that circumference comfortably. For an average 7-inch wrist, you will typically need about 21-22 beads of this 8mm size.
Hiding the Mechanics
Choose a bead with a slightly larger hole size to place next to your knot. This makes it much easier to tuck the finished knot inside for a seamless, professional look.
Step 2: Stringing the Beads
-
Prepare the cord:
Cut a piece of elastic cord about 12 inches long. This generous length gives you plenty of room to tie knots later without struggling. -
Pre-stretch the elastic:
I always take a moment to firmly pull on the elastic cord a few times before threading; this pre-stretching prevents the bracelet from sagging or loosening up immediately after you wear it. -
Secure the end:
Place a piece of tape or a binder clip on one end of the cord to act as a stopper so beads don’t slide off as you work. -
Begin threading:
Thread your finalized design onto the cord one bead at a time. If the bead holes are small, a collapsible eye needle can be a lifesaver here. -
Verify the pattern:
Once all beads are on the cord, lift the ends carefully to let the beads settle together. Check that your texture distribution looks balanced—ensure the ‘speckled’ textures aren’t all clumped in one spot. -
Test the fit:
Wrap the strand around your wrist to check for size. It should sit comfortably without pinching skin or drooping excessively.
Scent Infusion
Use unfinished wood or lava stone beads in the mix. Add a drop of essential oil to these porous beads to turn your jewelry into a subtle, personal aromatherapy diffuser.
Step 3: Finishing Touches
-
Prepare the knot:
Remove the tape or clip. Hold both ends of the elastic and bring the circle together, ensuring there is no slack between the beads. -
Tie the first knot:
Cross the ends and tie a simple overhand knot. Pull it tight enough to bring the beads together but not so tight that the bracelet begins to buckle or curve unnaturally. -
Secure with a surgeon’s knot:
Follow up with a surgeon’s knot—loop the elastic through twice before pulling tight. This extra friction helps hold the stretchy material securely. -
Apply adhesive:
Dab a tiny drop of G-S Hypo Cement or strong jewelry glue directly onto the knot. Avoid getting glue on the beads themselves. -
Let it cure:
Allow the glue to dry completely according to the manufacturer’s instructions. Patience here ensures your bracelet won’t pop open later. -
Hide the knot:
Once dry, trim the excess cord ends close to the knot. Gently pull the elastic to slide the knot inside the hole of the nearest large-hole bead to conceal it.
Slip on your new textured bracelet and enjoy the subtle, earthy elegance it adds to your daily attire
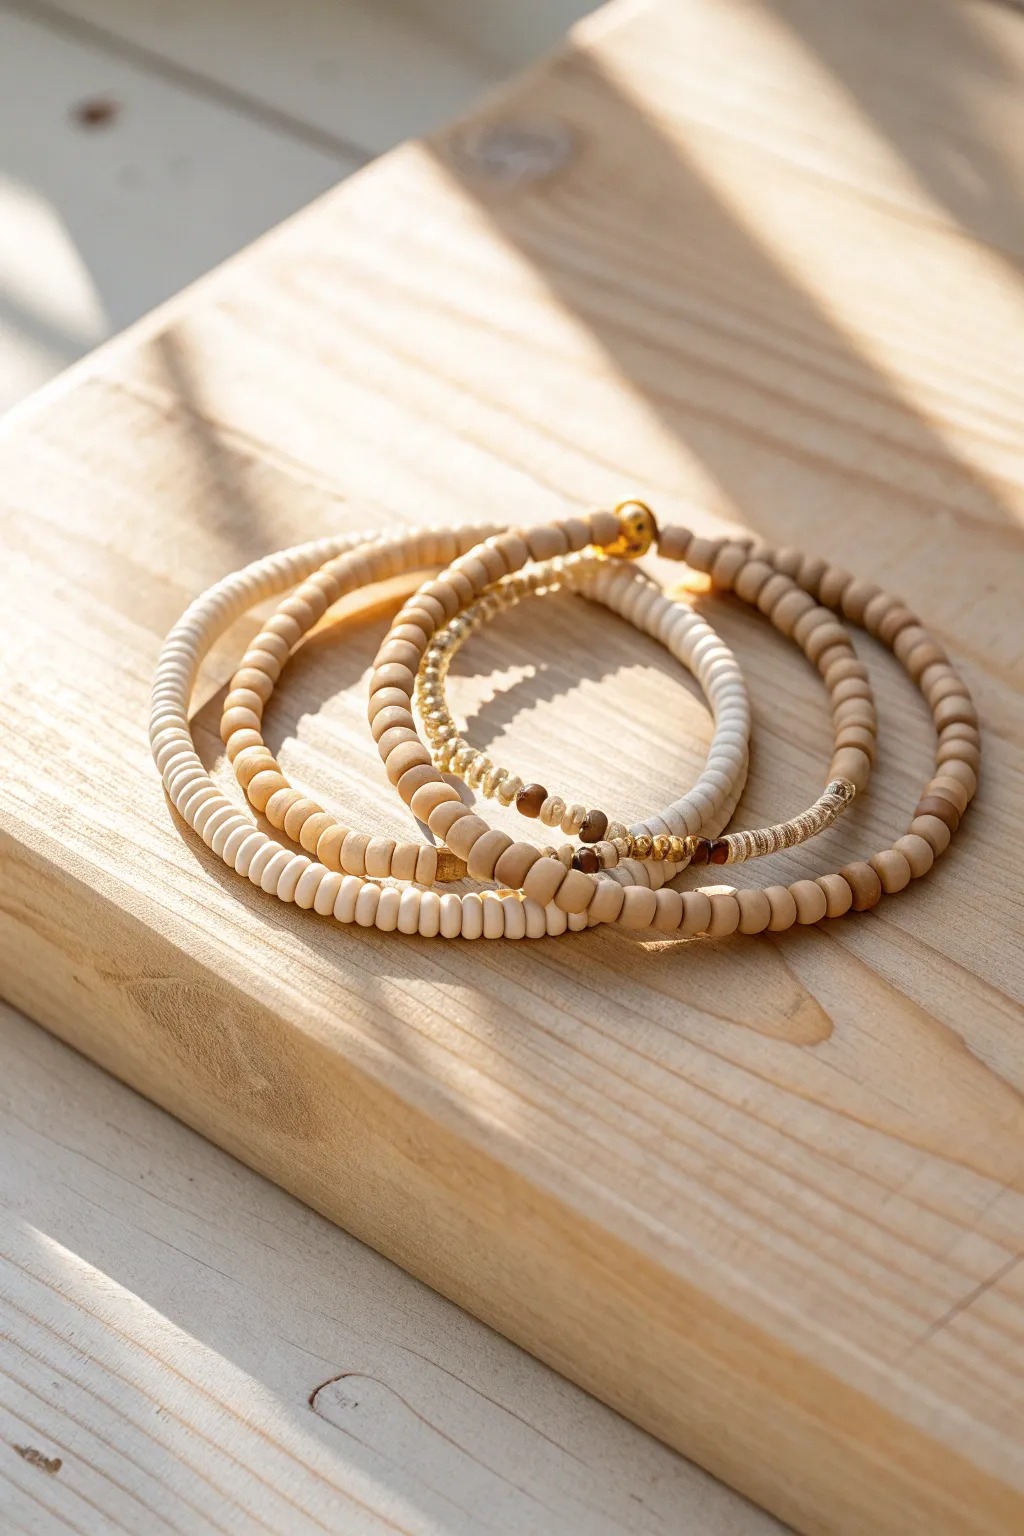
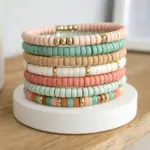
Minimal Spacer Rhythm in Neutrals
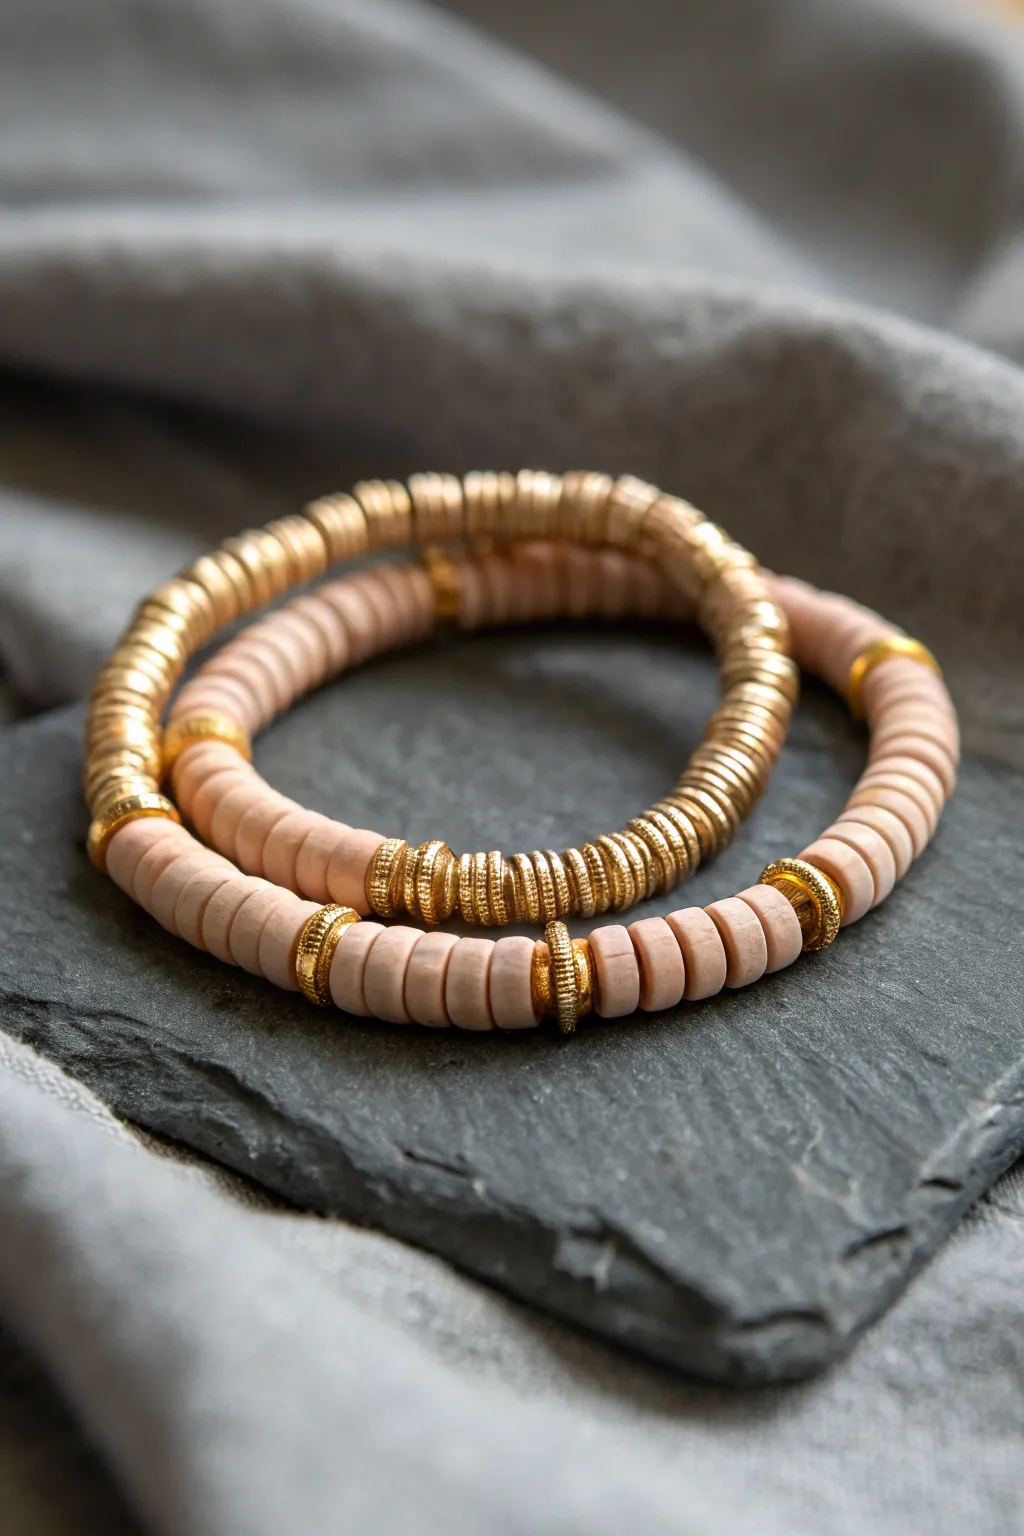
Achieve a look of effortless elegance with this duo of stretch bracelets, combining the matte softness of neutral clay discs with the shimmer of textured gold spacers. The alternating patterns create a sophisticated rhythm, perfect for stacking or wearing solo.
Step-by-Step Tutorial
Materials
- 6mm or 8mm polymer clay heishi beads (pale blush or beige)
- 6mm gold-plated disc spacer beads
- 8mm textured gold nugget or rondelle spacer beads
- 0.8mm clear elastic stretch cord
- Jewelry glue (e.g., G-S Hypo Cement)
- Scissors
Step 1: Planning & Prep
-
Measure your wrist:
Wrap a flexible measuring tape around your wrist, adding about half an inch to the measurement for a comfortable fit. -
Pre-stretch the cord:
Cut two lengths of elastic cord, each about 10-12 inches long. Give each piece a firm tug to pre-stretch it; this prevents the bracelet from loosening immediately after you finish it. -
Secure the end:
Place a piece of tape or a bead stopper on one end of your first cord to keep beads from sliding off while you work.
Knot Hiding Trick
If your bead holes are too small to hide the knot, simply dot the knot with clear nail polish creates a smooth seal that won’t irritate your skin.
Step 2: Creating the Blush Bracelet
-
Start the sequence:
Begin by threading about 10 to 12 of the pale blush clay heishi beads onto the cord. These flat discs nest together beautifully to form a seamless tube. -
Add a gold accent:
Slide on one textured gold rondelle spacer. This larger gold bead acts as a visual break against the matte clay. -
Establish the rhythm:
Continue this pattern: string a section of 10-12 clay beads followed by a single gold spacer. Repeat until you reach your desired length. -
Refine the pattern:
Check the symmetry; I like to ensure the bracelet starts and ends with clay bead sections so the knot can be hidden within the softer clay rather than next to a metal bead. -
Knot the ends:
Remove the tape and bring the ends together. Tie a surgeon’s knot (right over left, left over right, looping the top strand through twice) and pull tight. -
Secure with glue:
Apply a tiny dab of jewelry glue to the knot. Let it dry for a moment before trimming the excess cord close to the knot.
Step 3: Creating the Gold Bracelet
-
Begin the gold sequence:
Secure the end of your second cord. This design is heavier on metal tones. Start by threading a long segment of gold disc spacers, approximately 1.5 inches in length. -
Integrate texture:
Add a visual focal point by stringing three or four larger textured gold rondelle beads together. This creates a chunky, metallic centerpiece. -
Incorporate clay accents:
For a subtle tie-in to the first bracelet, add a very short section of 3-4 blush clay beads on either side of a large gold spacer section if desired, or keep it strictly metallic for high contrast. -
Complete the loop:
Continue stringing the gold disc spacers until the strand matches the length of your first bracelet. -
Tie and finish:
Perform the same surgeon’s knot technique as before. Pull firmly to ensure the gold discs sit flush against each other without gaps. -
Hide the knot:
Once the glue is dry and ends are trimmed, gently tug the bracelet so the knot slides inside the hole of one of the larger textured gold beads to conceal it completely.
Fixing Gaps
If you see cord showing between beads after tying, you didn’t pull the elastic tight enough during the knotting phase. Re-tie tighter for a solid look.
Slip these on together to enjoy the sophisticated mix of textures you just created

TRACK YOUR CERAMIC JOURNEY
Capture glaze tests, firing details, and creative progress—all in one simple printable. Make your projects easier to repeat and improve.
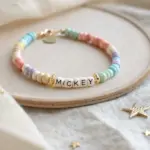
Neutral Words With Letter Beads
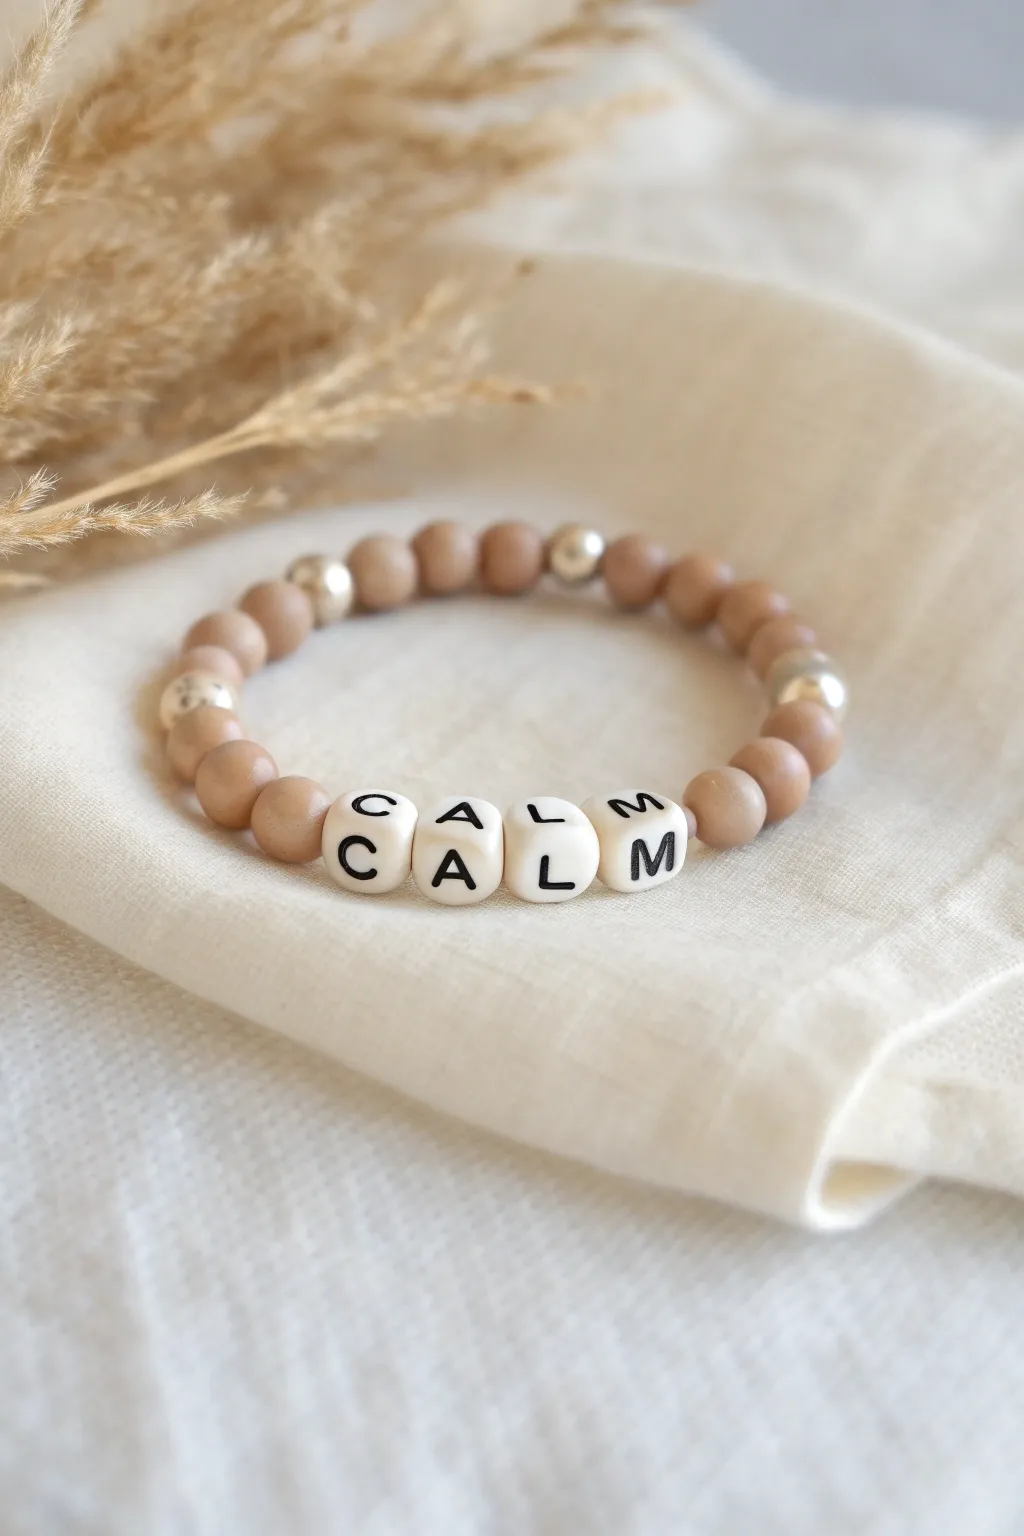
Embrace tranquility with this minimalist beaded bracelet that pairs earthy tones with a gentle reminder. Using smooth matte beige beads and simple letter cubes, this project creates a serene accessory perfect for everyday wear or stacking with other neutrals.
How-To Guide
Materials
- Stretch cord (0.7mm or 0.8mm clear elastic)
- 6mm or 8mm matte light beige/tan round stone or clay beads
- 4 white cube letter beads (spelling C-A-L-M)
- 4-6 silver spacer beads (smooth round metal)
- Scissors
- Hypo cement or clear jewelry glue
- Bead stopper or tape
Step 1: Preparation & Layout
-
Measure your wrist:
Start by measuring your wrist with a flexible measuring tape. Add about half an inch to your measurement to ensure a comfortable fit that isn’t too tight. -
Cut the cord:
Cut a piece of stretch cord about 10-12 inches long. Having this extra length makes tying the final knot significantly easier and less frustrating. -
Pre-stretch the cord:
Gently pull on both ends of the elastic cord a few times. This pre-stretching step helps prevent the bracelet from sagging or expanding permanently after you wear it. -
Secure the end:
Attach a bead stopper to one end of the cord, or simply tape it down to your work surface so beads don’t slide off while you work. -
Arrange the pattern:
Lay out your beads on a bead board or flat surface to visualize the design. Place the ‘CALM’ letter beads in the center, flanked by the tan round beads, and decide where you want the silver accents to sit—I usually space them somewhat symmetrically.
Knot Hiding Trick
If the knot won’t fit inside a stone bead, try sliding it inside one of the silver metal spacers, as metal beads often have slightly larger holes.
Step 2: Stringing the Beads
-
Start stringing:
Begin threading your tan round beads onto the cord. Add about 3-4 beads depending on your total required length before introducing an accent. -
Add first silver accent:
Slide one silver metal spacer bead onto the cord to break up the matte texture of the tan beads. -
String first section:
Continue adding tan beads until you have reached almost half of the bracelet’s length, adding another silver spacer if you like the look. -
Add the word:
Thread the letter beads in order: C, A, L, M. Double-check that they are facing the correct direction and are readable from left to right. -
Mirror the design:
Continue stringing beads on the other side of the word to mirror the first half. Add your tan beads and place silver spacers in corresponding positions to maintain balance. -
Check the size:
Wrap the unfinished strand around your wrist to check the fit. If it feels too loose, remove a couple of tan beads from the ends; if too tight, add one more to each side.
Switch Up The Stones
Swap the beige beads for matte wood or lava stone beads. You can even add a drop of essential oil to lava beads for an aromatherapy bracelet.
Step 3: Finishing Touches
-
Remove the stopper:
Carefully remove the bead stopper or tape while holding both ends of the elastic cord firmly. -
Tie the first knot:
Bring the two ends together and tie a simple overhand knot, pulling it gently but firmly so the beads sit snug against each other without buckling. -
Secure with a surgeon’s knot:
Tie a surgeon’s knot for extra security. Loop one end over the other twice before pulling it tight. This creates a much stronger hold than a standard square knot. -
Apply adhesive:
Dab a tiny drop of GS Hypo Cement or clear jewelry glue directly onto the knot. Be careful not to get glue on the neighboring beads if possible. -
Let it dry:
Allow the glue to dry for at least 30 minutes, keeping the bracelet undisturbed so the knot settles perfectly. -
Hide the knot:
Once dry, trim the excess cord ends close to the knot. Gently tug the bracelet so the knot slides inside the hole of one of the adjacent tan beads, hiding it from view.
Now you have a peaceful, personalized accessory to keep you grounded throughout the day
Single Tiny Charm on a Neutral Base
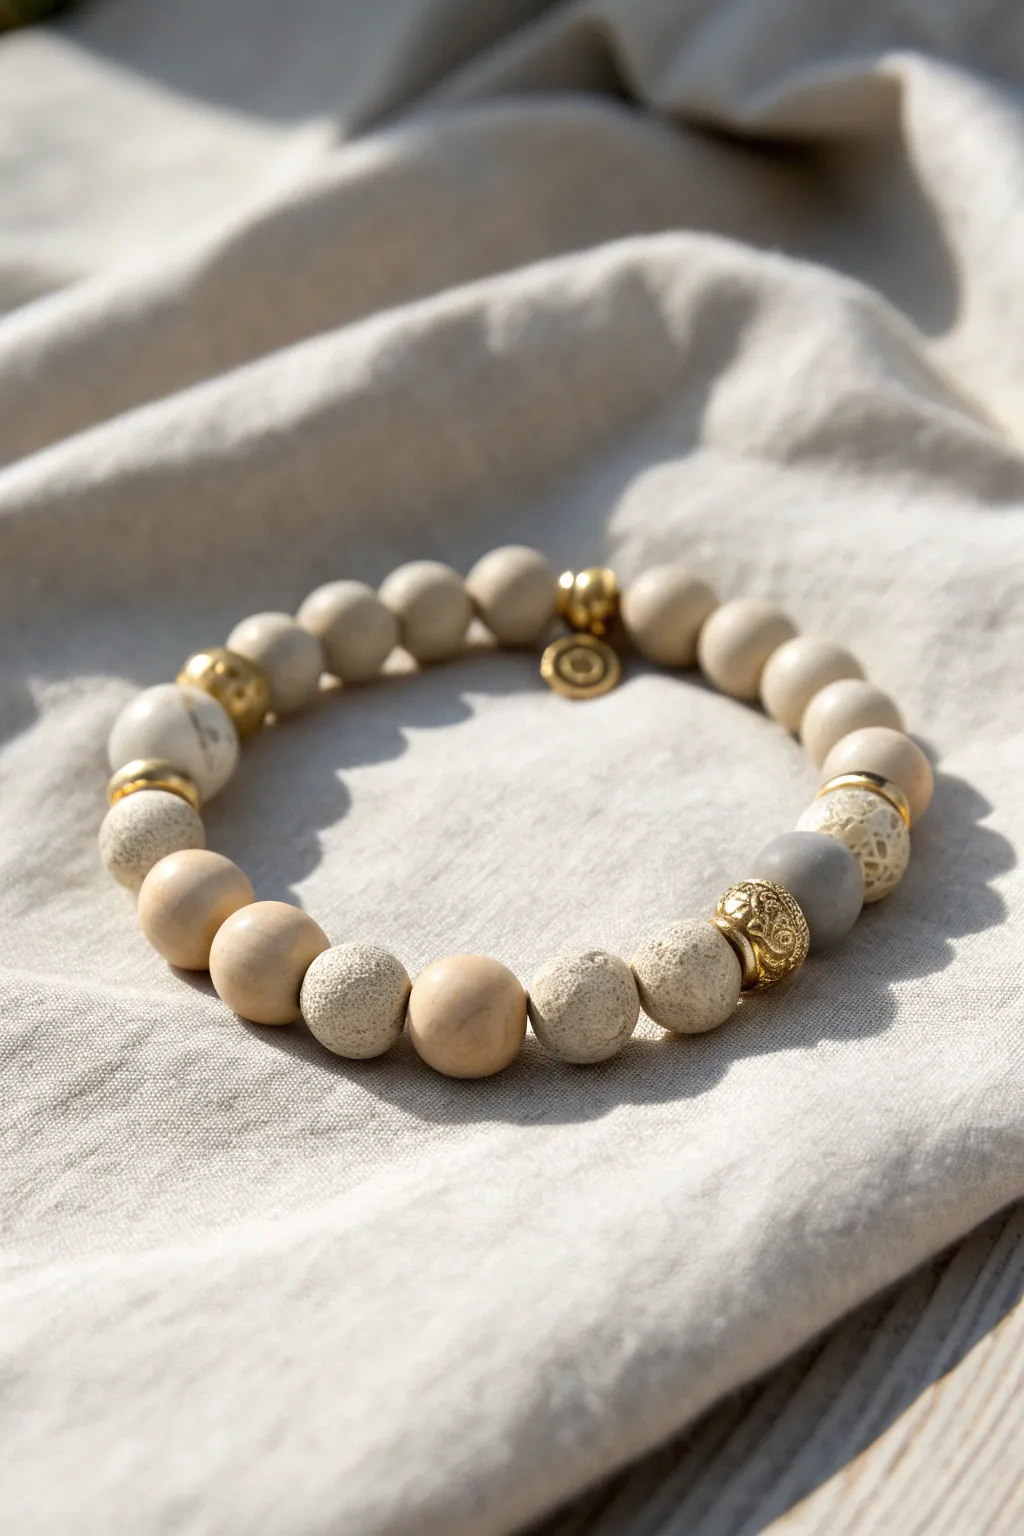
Embrace the soothing tones of nature with this minimalist bracelet design that balances matte textures with subtle gold accents. The combination of smooth clay beads, porous lava stones, and a delicate charm creates a piece that feels both grounded and sophisticated.
Step-by-Step Tutorial
Materials
- 8mm smooth beige clay polymer or matte gemstone beads (approx. 15-20 depending on wrist size)
- 8mm beige lava stone beads (porous texture)
- 8mm grey matte agate or jasper bead (single accent bead)
- Gold spacer beads (small discs and rondelles)
- Ornate gold focal bead (filigree or patterned)
- Small gold charm (circular logo or symbol style)
- Gold jump ring (4mm or 6mm)
- Elastic beading cord (0.7mm or 0.8mm clear)
- Jewelry glue or clear nail polish
- Scissors
Step 1: Planning Your Layout
-
Measure your wrist:
Before stringing, wrap a piece of string around your wrist to find your size, then add about half an inner to ensure a comfortable fit that isn’t too tight. -
Lay out the pattern:
On a bead design board or a soft towel, start arranging your beads. The beauty of this design lies in its asymmetry. I like to group the smooth beige beads for the back section. -
Incorporate texture:
Intersperse the porous lava stone beads among the smooth ones. Notice in the example how three textured beads are grouped near the focal area for contrast. -
Place the gold accents:
Position your gold spacers. Use flat disc spacers between the larger clay beads to break up the color, and place the ornate gold filigree bead near the front section. -
Determine the charm spot:
Select a spot opposite the textures for your charm. This will act as the visual anchor. Place a gold jump ring here in your layout for now.
Knot Slipping?
If the elastic feels slippery, dust the knot area with a tiny bit of cornstarch before pulling tight. This adds friction and helps the knot grip itself better.
Step 2: Stringing the Beads
-
Prepare the cord:
Cut a piece of elastic cord about 10-12 inches long. This extra length makes tying the knot much easier later. -
Pre-stretch the elastic:
Give your cord a few firm tugs. This pre-stretching step encourages the elastic to relax now rather than stretching out later while you are wearing it. -
Start stringing:
Begin threading your beads onto the cord, following the pattern you laid out. Start with the smooth beige beads intended for the back of the wrist to hide the knot more easily. -
Add the charm connector:
When you reach your designated charm spot, slide on the jump ring (or a bead with a loop attached). If using a charm directly, slide the charm’s top loop onto the cord. -
Thread the focal section:
Continue adding the textured lava beads, the single grey accent bead, and the ornate gold bead. Ensure the gold spacers sit flush between their neighboring beads. -
Check the fit:
Once all beads are strung, carefully wrap the strand around your wrist. It should sit comfortably without pinching or leaving large gaps between beads.
Make It A Set
Create a stacked look by making two companion bracelets: one using only the smooth beige beads and one using only the textured lava stones.
Step 3: Finishing Touches
-
Tie the first knot:
Bring the two ends of the elastic together. Tie a simple overhand knot to bring the beads into a circle, pulling tight enough to remove slack but not so tight the bracelet buckles. -
Secure with a surgeon’s knot:
For the main security knot, wrap one end of the cord over and under the other end twice before pulling tight. This extra loop creates a surgeon’s knot which holds much better than a standard knot. -
Apply adhesive:
While holding the knot taut, dab a tiny drop of jewelry glue or clear nail polish directly onto the knot. This prevents it from slipping over time. -
Hide the knot:
Before the glue fully sets (but is tacky), gently pull the elastic so the knot slides inside the hole of the nearest large bead. -
Trim the excess:
Once the glue is dry, use your scissors to trim the excess cord ends as close to the bead hole as possible without nicking the knot itself. -
Attach the charm:
If you didn’t thread the charm directly, use pliers to open your jump ring, slide on your gold logo charm, and close the ring securely around the cord or carrier bead. -
Diffuse essential oils:
Optional: Since you used lava stone beads, you can now add a drop of your favorite essential oil to the porous beads for a wearable aromatherapy experience.
Enjoy the calming weight of natural stones on your wrist as you wear your new custom accessory
Mix Heishi and Chunky Neutral Rondelles
This sophisticated bracelet blends the uniform texture of clay heishi beads with the organic warmth of chunky wooden and bone-style accents. The neutral palette of tans, creams, and soft browns makes it a versatile accessory that pairs effortlessly with any outfit.
How-To Guide
Materials
- Stretch cord (0.8mm or 1mm)
- Brown polymer clay heishi beads (approx. 6mm)
- Light wood or bone rondelle beads (approx. 8mm)
- Cream wooden round beads (8mm-10mm)
- Dark wood washer or spacer beads
- Gold rondelle spacer beads
- White heishi bead stack or disc bead
- Jewelry glue (GS Hypo Cement recommended)
- Scissors
- Bead stopper or tape
Step 1: Preparation & Planning
-
Measure your wrist:
Start by measuring your wrist with a flexible measuring tape. Add about half an inch to this measurement to ensure the bracelet fits comfortably without being too tight. -
Cut the cord:
Cut a piece of stretch cord roughly 10-12 inches long. Having this extra length makes tying the final knot much easier than struggling with short ends. -
Pre-stretch the cord:
Give your cut piece of cord a few gentle tugs. Pre-stretching helps prevent the bracelet from sagging or loosening immediately after you wear it for the first time. -
Secure the end:
Attach a bead stopper to one end of the cord, or simply tape it down to your table. This keeps your beads from sliding off while you design your pattern.
Knot Hiding Trick
Plan your pattern so the knot falls near a large-hole wooden bead. Heishi beads have tiny holes that discourage hiding knots inside.
Step 2: Beading the Pattern
-
Start with the main color:
Begin threading the brown heishi beads onto the cord. You’ll want a substantial section of these, perhaps covering about a third of the bracelet’s length to create a solid base. -
Insert first accent:
Slide on a cream-colored wooden round bead followed by a flat, light-colored rondelle bead (like bone or light wood). This begins the transition away from the solid heishi section. -
Return to heishi:
Add another segment of the brown heishi beads. This section should be slightly shorter than your first one to create asymmetry. -
Add the focal cluster base:
Now, thread on a cream wooden round bead, followed by a gold metallic spacer. The gold adds a touch of polish to the natural textures. -
Create the center detail:
Add the white disc accent beads (or a small stack of white heishi). Follow this immediately with two dark wood washer beads for contrast. -
Finish the focal cluster:
Mirror the start of the cluster by adding another gold spacer, followed by a final cream wooden round bead. -
Check the length:
Wrap the strand around your wrist to check the fit. If it’s too short, add more brown heishi beads to the ends; if too long, remove a few.
Curling Heishi?
If your heishi beads twist or look uneven, your cord might be too thin. Try doubling the string or using a thicker gauge like 1mm for stability.
Step 3: Finishing Touches
-
Prepare to knot:
Remove the bead stopper or tape carefully, holding both ends of the elastic firmly so no beads escape. -
Tie the knot:
Tie a surgeon’s knot—this is like a standard square knot, but you loop the cord through twice on the first pass for extra friction and security. -
Tighten securely:
Pull the cords tight. I like to pull them stretching away from each other, then grasp the knot itself and roll it slightly to ensure it’s fully cinched. -
Apply adhesive:
Dab a tiny drop of jewelry glue directly onto the knot. This prevents it from slipping over time, which is crucial for stretch bracelets. -
Hide the knot:
While the glue is still tacky, gently pull the knot inside one of the larger hole beads (like the wooden rounds) to conceal it seamlessly. -
Trim excess:
Once dry, trim the excess cord ends close to the bead hole. Be careful not to cut the main cord or scratch the bead surface.
Enjoy styling your new neutral bracelet individually or stacked with other textures for a boho-chic vibe
Seed Bead Pinstripes in Beige and Gray
This bracelet combines smooth neutral woods with fascinating textures to create a piece that feels both grounded and sophisticated. The subtle interplay of creamy beige, soft gray, and intricate white patterns makes it a versatile accessory for any outfit.
Step-by-Step Guide
Materials
- Beige matte wooden beads (8mm)
- White fossil coral or patterned ceramic beads (8mm)
- Gray matte river stone or jasper beads (8mm)
- Silver daisy spacers or rondelle beads
- Beading wire (flexible, coated)
- 2 Crimp beads
- 2 Crimp bead covers (silver)
- Lobster claw clasp
- Jump ring (closed)
- Wire cutters
- Crimping pliers
Step 1: Preparation
-
Measure and Cut Wire:
Cut a piece of beading wire about 10-12 inches long. This gives you plenty of extra room to work with the clasp without struggle. -
Secure the First End:
Thread a crimp bead onto one end of the wire, followed by the closed jump ring. Loop the wire back through the crimp bead to create a small loop holding the jump ring. -
Crimp and Cover:
Use your crimping pliers to flatten the crimp bead securely. I like to give it a gentle tug to ensure it holds tight. Place a crimp cover over the flattened bead and gently squeeze it closed to look like a silver bead.
Step 2: Beading the Pattern
-
Start with the Base Beads:
Begin by stringing approximately 8-10 of the plain beige wooden beads. This section will sit at the back of the wrist near the clasp. -
First Accent Transition:
Slide on one gray matte stone bead. This marks the beginning of your focal section. -
Adding Texture:
Follow the gray bead immediately with a silver spacer. -
The Focal Bead Grouping:
Add one textured white bead (the fossil coral style). -
Spacer Detail:
Separate the textured bead with another silver spacer. -
Center Beige Pair:
String two of your plain beige wooden beads. These act as a calm pause in the pattern. -
Center Silver Accent:
Add a silver spacer, followed by a central textured white bead, and another silver spacer. -
Mirror the Pattern:
Add two more plain beige wooden beads to mirror the other side. -
Closing the Focal Section:
Place a silver spacer, followed by the final textured white bead, and one last silver spacer. -
Final Gray Transition:
Finish the main design element by adding the second gray matte stone bead. -
Completing the Loop:
Fill the rest of the wire with the plain beige wooden beads until you reach your desired bracelet length (usually about 6.5 to 7 inches total).
Material Swap
Can’t find fossil coral? Use white lava rock beads for a similar pitted texture that doubles as an essential oil diffuser.
Step 3: Finishing Touches
-
Prepare the Clasp End:
Thread a crimp bead onto the open wire end, followed by the lobster claw clasp. -
Creating the Final Loop:
Feed the wire tail back down through the crimp bead and through the last couple of wooden beads to hide the end. -
Tighten and Check:
Pull the wire snug so there are no gaps between beads, but leave just a tiny bit of slack so the bracelet can bend comfortably around the wrist. -
Secure and Trim:
Flatten the final crimp bead with your pliers. Trim the excess wire flush against the beads with your flush cutters. -
Final Cover:
Place the second crimp cover over the crimp bead and gently close it with pliers for a professional finish.
Level Up: Charm It
Add a small silver leaf or tree charm near the clasp using a jump ring to emphasize the nature-inspired theme.
Enjoy wearing this naturally balanced piece that brings a calm earthiness to your day
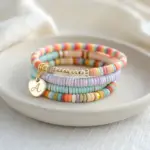
Muted Pastels as New Neutrals
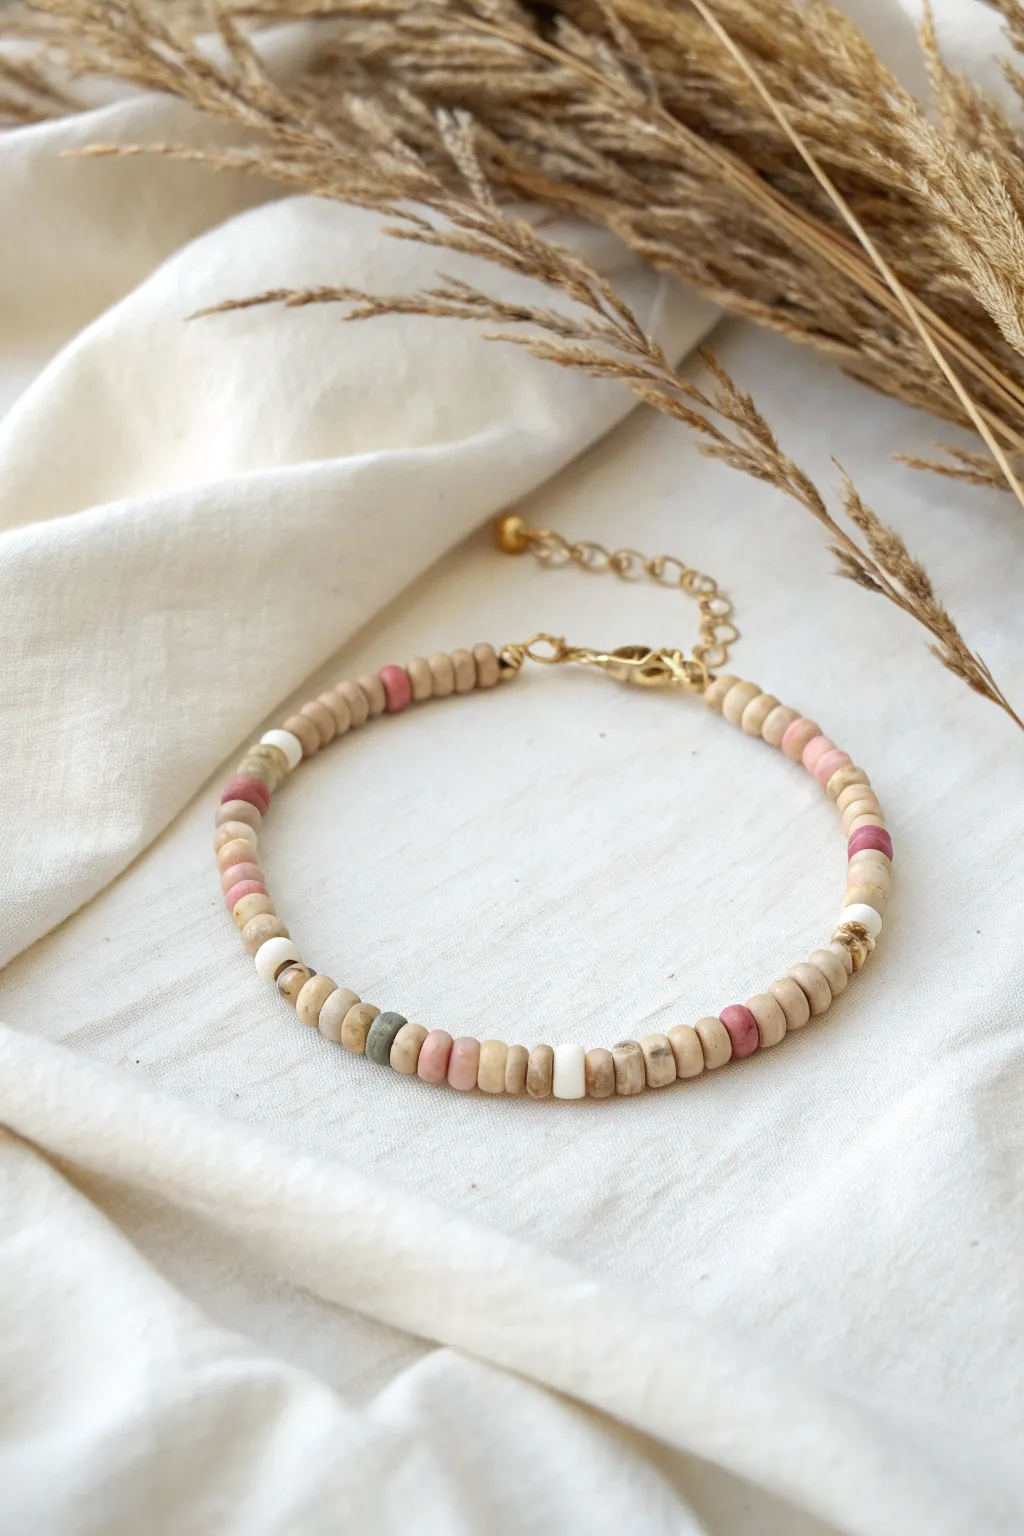
Embrace the understated beauty of muted tones with this delicate bracelet, featuring a mix of sandstone, soft pink, and white heishi beads. The gold-plated hardware adds a touch of elegance, making it a perfect everyday accessory that pairs well with any outfit.
Detailed Instructions
Materials
- 4mm polymer clay heishi beads (sand/beige, muted pink, white, soft grey/green)
- Beading wire (golden or clear nylon-coated, approx. 0.38mm)
- Small gold spacer beads (optional, for subtle sparkle)
- Gold-plated lobster clasp
- Gold-plated extension chain with teardrop charm
- 2 Gold crimp beads (2mm)
- 2 Gold crimp covers (3mm, optional but recommended)
- Wire cutters
- Flat-nose pliers
Step 1: Preparation
-
Measure and cut:
Begin by determining your desired wrist length. Cut a piece of beading wire about 2-3 inches longer than this measurement to allow plenty of room for crimping and handling the ends. -
Sort your palette:
Lay out your bead colors. The charm of this design lies in its random yet balanced pattern. Group your sand-colored beads as the primary filler, then separate small piles of the accent colors: muted pink, white, and that unique soft grey-green.
Randomness Tip
Don’t overthink the pattern! To achieve a truly organic look, grab beads from your pile without looking occasionally.
Step 2: Stringing the Beads
-
Secure the first end:
Thread a crimp bead onto one end of the wire, followed by the jump ring attached to your extension chain. Loop the wire back through the crimp bead. -
Crimp lightly:
Use your flat-nose pliers to flattened the crimp bead securely. I like to give a gentle tug to ensure it holds firm before moving on. -
Cover the crimp:
Place a crimp cover over the flattened crimp bead and gently close it with pliers to make it look like a seamless gold bead. -
Start the pattern:
Begin stringing your beads. Start with a section of the dominant sand/beige color—about 5 to 7 beads—to establish the neutral base. -
Add first accents:
Introduce color by adding a single muted pink bead followed by a beige one. Keep the color insertions spontaneous rather than strictly mathematical. -
Incorporate white:
After a few more neutral beads, slide on a white bead. The high contrast of the white against the tan adds a lovely pop. -
Create a color cluster:
Midway through, try a small cluster: a pink bead, a beige bead, and a grey-green bead close together to create visual interest. -
Maintaining balance:
Continue stringing, aiming for a ‘random’ look. Generally, use 3-8 neutral beads between every colored accent bead. -
Check the length:
Periodically wrap the strand around your wrist. Stop adding beads when the beaded portion is about 0.5 inches shorter than your total desired length.
Step 3: Finishing Touches
-
Prepare final closure:
Thread a crimp bead onto the remaining wire tail. -
Add the clasp:
Slide on the lobster clasp. Loop the wire back through the crimp bead and pull it taut, leaving just a tiny bit of slack so the bracelet remains flexible. -
Secure the end:
Flatten the crimp bead firmly with your pliers. Trim the excess wire tail close to the crimp bead so it doesn’t poke the skin. -
Hide the mechanics:
Install the second crimp cover over this final crimp bead, gently rounding it out with your pliers for a professional finish. -
Connect extension:
Double-check that your extension chain (added in step 3) moves freely and the teardrop charm hangs correctly. -
Final polish:
Wipe the beads gently with a soft cloth to remove any fingerprints from the metal components and ensure everything shines.
Level Up: Texture
Swap a few beige clay beads for round wooden beads or raw brass spacers to add organic texture and earthiness.
Enjoy styling your new bracelet solo or stacked with other gold accessories for a layered look
Negative Space With Bead Gaps
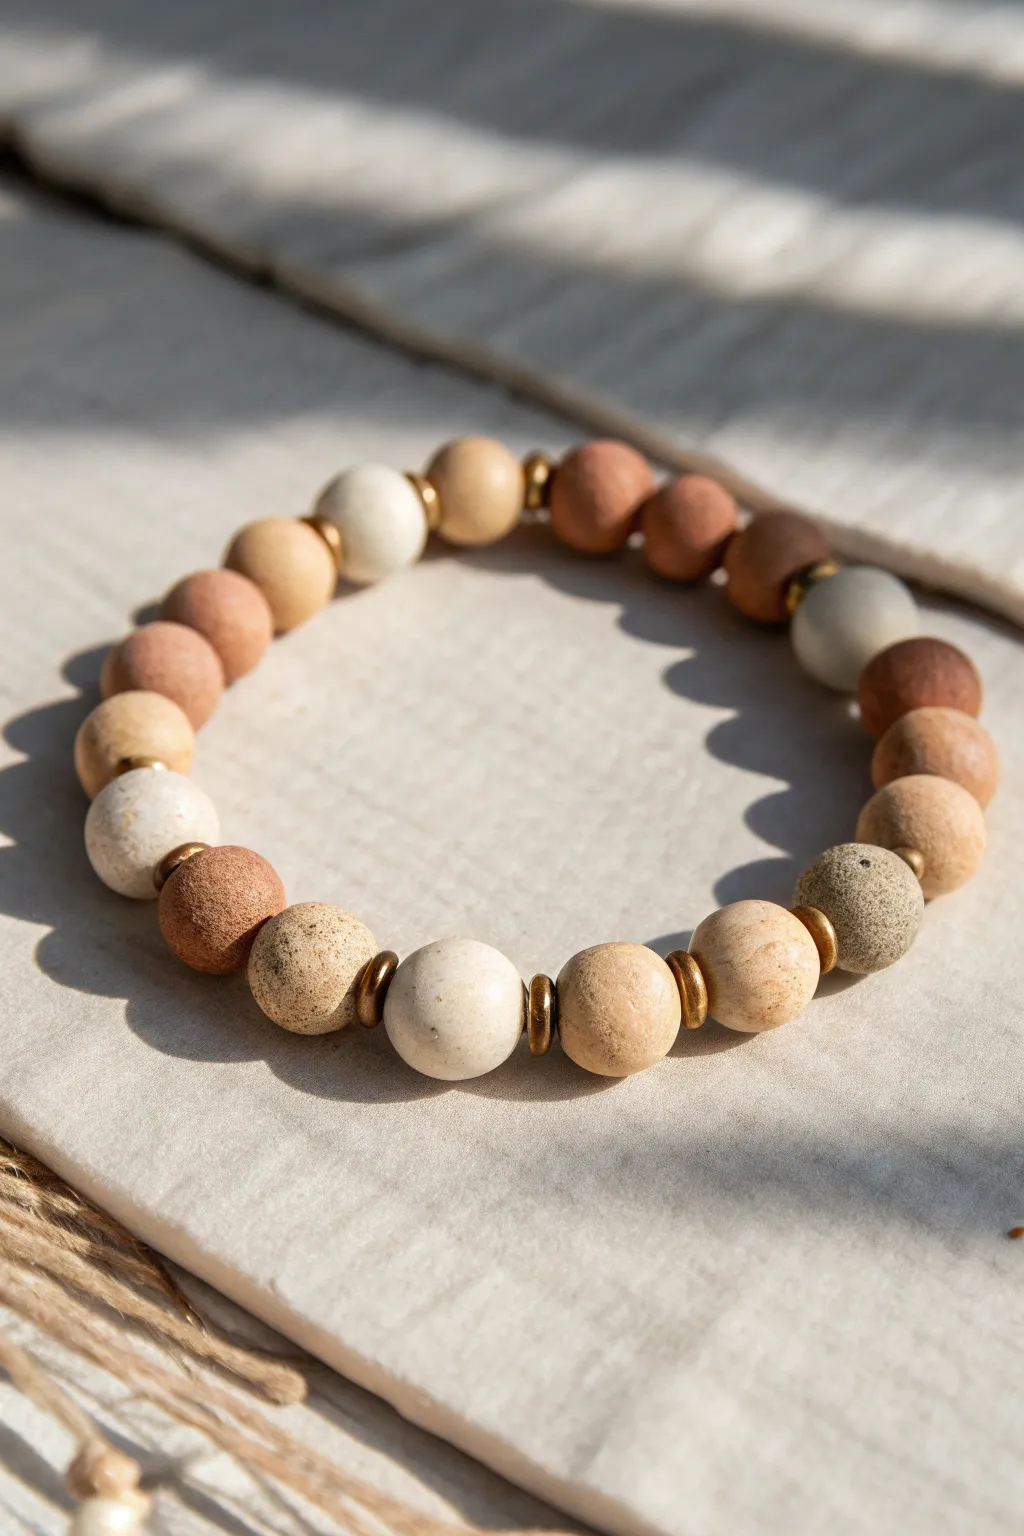
Embrace the warmth of nature with this minimalist beaded bracelet featuring a calming palette of desert neutrals. The matte finish of clay beads combined with metallic spacer accents creates a sophisticated texture that works beautifully on its own or stacked.
How-To Guide
Materials
- Matte round beads (approx. 8mm-10mm) in neutral tones: cream, beige, sienna, terracotta, and soft grey
- Flat warm gold or brass heishi spacer beads (approx. 4-5mm diameter)
- Strong elastic stretch cord (0.8mm or 1mm thickness)
- Beading needle (collapsible eye recommended)
- Scissor or jewelry snips
- Jewelry adhesive (specifically for knots, like G-S Hypo Cement)
- Bead design board or a soft towel
Step 1: Planning and Preparation
-
Measure your wrist:
Wrap a measuring tape comfortably around your wrist to find your size. Add about 0.5 inches to this measurement to ensure the bracelet isn’t too tight once the bulk of the beads is added. -
Cut the cord:
Cut a length of elastic cord about 10-12 inches long. Having this extra length makes tying the final knot much easier than struggling with short ends. -
Pre-stretch the elastic:
Gently pull on the elastic cord several times before you start beading. This pre-stretching step is crucial because it prevents the bracelet from slouching or loosening permanently after the first few times you wear it. -
Plan your palette:
Lay out your beads on a design board or towel. The goal is a random, organic mix of earth tones. Distribute the cream, terracotta, and brown beads so no two identical colors are sitting directly next to each other.
Knot Security
Can’t hide the knot? Enlarge one bead hole slightly with a bead reamer tool so the knot tucks away invisibly.
Step 2: Stringing the Design
-
Start the stringing process:
Thread your elastic through the beading needle. Or, if the cord is stiff enough, you can bead directly without one. Secure one end of the cord with a piece of tape or a bead stopper so your beads don’t slide off. -
Create the first segment:
String approximately 4 to 5 of your matte clay beads onto the cord. Keep the color order random to mimic the natural variation seen in stones or pottery. -
Insert the first metallic accent:
After your first small group of clay beads, slide on one flat gold heishi spacer. This metallic flash breaks up the matte texture beautifully. -
Vary the spacing:
Continue adding clay beads. Unlike a rigid pattern, aim for slight irregularity. String 2 or 3 clay beads, then add another gold spacer. I prefer varying the number of clay beads between the gold spacers to keep the look effortless. -
Continue the pattern:
Repeat this process—grouping 1 to 3 clay beads followed by a gold spacer—until you reach your desired bracelet length. Occasionally string a slightly darker bead, like a mocha or grey tone, to add depth. -
Check the fit:
Wrap the unfinished strand around your wrist to check the sizing. The two ends should meet comfortably without gaps, but without heavily stretching the elastic. -
Adjust if necessary:
Add or remove a bead or two to get the perfect fit. Ensure your final bead is a clay one rather than a thin spacer, as the knot hides better inside the larger hole of a round bead.
Step 3: Finishing Touches
-
Prepare the knot:
Remove the bead stopper or tape. Hold both ends of the elastic firmly to ensure there is no slack in the bead line. -
Tie a surgeon’s knot:
Cross the ends like you are tying your shoes, but loop the end through twice instead of once. Pull tight. Repeat this knotting process two or three times to ensure security. -
Apply adhesive:
Ideally, dab a tiny drop of jewelry glue onto the knot itself. Be careful not to get glue on the visible surface of the beads, as it can ruin the matte finish. -
Le dry and trim:
Allow the glue to dry for at least 15 minutes. Once secure, trim the excess elastic tails close to the knot using sharp scissors. -
Hide the knot:
Gently tug on the beads adjacent to the knot to pull the knot inside the hole of the nearest large clay bead. This gives your project a completely seamless, professional appearance.
Scent Infusion
Since these are unglazed clay beads, add a drop of essential oil to one or two beads to turn this into a diffuser bracelet.
Now you have a versatile accessory that brings a touch of earthy elegance to any outfit
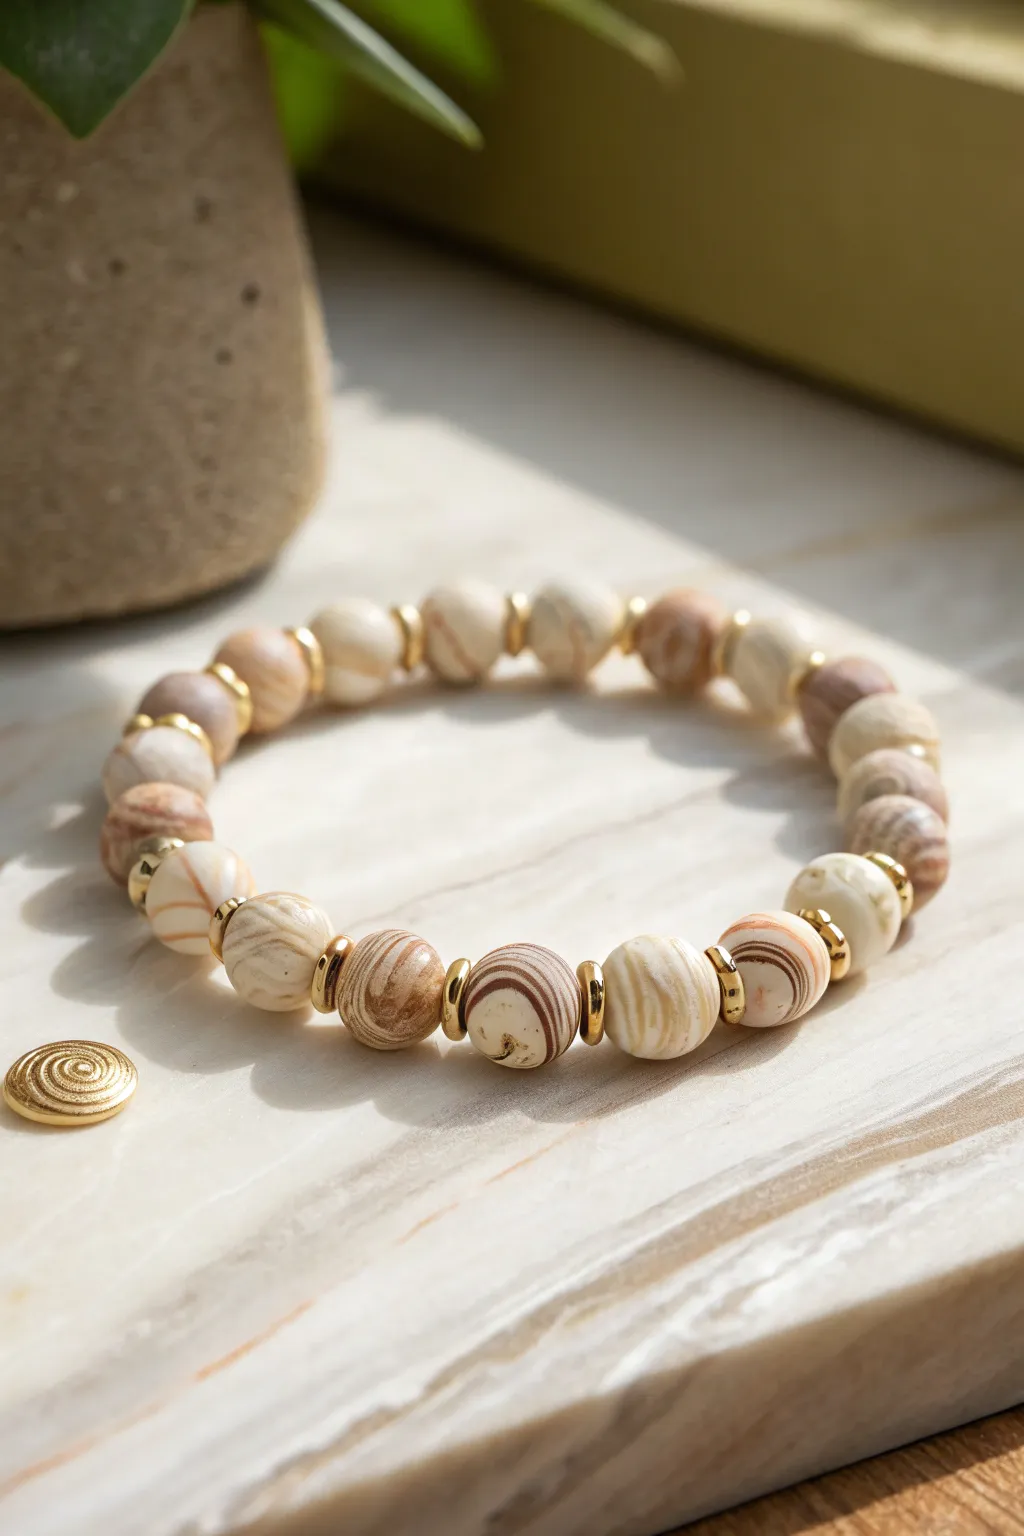
Neutral Terrazzo-Style Focal Beads
This sophisticated bracelet combines the warmth of terracotta and cream with the modern texture of speckled terrazzo-style clay beads. Accented with hints of gold, it captures a perfect balance of organic charm and polished style.
Detailed Instructions
Materials
- Polymer clay (white, translucent, beige, terracotta, granite/grey)
- Black pepper or dried coffee grounds (for speckling)
- Small gold round spacer beads (approx. 4mm)
- Strong elastic stretch cord (0.8mm or 1mm)
- Jewelry glue or clear nail polish
- Bead roller (optional but helpful)
- Needle tool or toothpick
- Oven and baking tray
- Sandpaper (fine grit)
- Measuring tape
Step 1: Crafting the Clay Beads
-
Condition the Clay:
Begin by thoroughly conditioning each color of polymer clay until it is soft and pliable. You’ll need primarily white, a soft beige or ‘ecru’, a terracotta or peach tone, and a granite or grey shade. -
Create the Speckled Mix:
To achieve the terrazzo look seen in the focal beads, take a portion of your beige clay and mix in a very small amount of black pepper or dried coffee grounds. Knead until the speckles are evenly distributed. -
Prepare the Granite Mix:
For the grey textural beads, use pre-mixed granite clay or mix white clay with tiny chopped bits of black and grey clay to create a stony appearance. -
Measure Uniform Portions:
Roll your clay into logs of equal thickness. Slice the logs into equal segments to ensure your finished beads are roughly the same size, aiming for about 12mm in diameter once rolled. -
Roll the Spheres:
Roll each segment between your palms to create smooth spheres. I like to use a clear acrylic block or a bead roller here to get them perfectly round without fingerprints. -
Add Texture (Optional):
For the beige speckled beads, you can use a needle tool to gently poke a few random holes or indentations to mimic the porous texture of lava stone or natural pottery. -
Pierce the Holes:
Gently twist a needle tool or toothpick through the center of each bead to create the stringing hole. Rotate the bead as you pierce to keep the shape from distorting. -
Bake the Beads:
Arrange your raw beads on a baking tray or dedicated bead rack. Bake according to the manufacturer’s instructions for your specific brand of clay (usually around 275°F/135°C for 15-30 minutes). -
Cool and Finish:
Allow the beads to cool completely. If there are any fingerprints or rough edges near the holes, lightly buff them with fine-grit sandpaper.
Smooth Rolling Tip
Refrigerate raw clay spheres for 10 minutes before piercing. The firmer clay resists squishing, keeping your beads perfectly round.
Step 2: Assembly
-
Plan Your Pattern:
Lay out your beads on a bead board or cloth. The pattern shown uses an irregular mix, often alternating between a clay bead and a gold spacer, but occasionally placing clay beads side-by-side. -
Prepare the Cord:
Cut a length of elastic cord about 10-12 inches long. Pre-stretch the cord by pulling on it gently several times; this prevents the bracelet from stretching out later. -
Begin Stringing:
Start threading your beads. A typical sequence shown is: White Bead, Gold Spacer, Speckled Beige Bead, Speckled Grey Bead, Gold Spacer, Terracotta Bead, Gold Spacer. -
Check the Size:
Continue adding beads until the strand wraps comfortably around your wrist. A standard adult bracelet is usually about 7 inches in circumference. -
Tie the Knot:
Once you are happy with the length, bring the ends together. Tie a surgeon’s knot (loop the clear cord through twice on the first pass, then tie a standard overhand knot on top). -
Secure the Ends:
Pull the knot tight. Apply a tiny dot of jewelry glue or clear nail polish to the knot to seal it. -
Hide the Knot:
Trim the excess elastic close to the knot, then gently pull the cord so the knot slides inside one of the larger clay beads to hide it.
Scent Diffuser Upgrade
Make a few beads from unsealed terracotta or wood clay. These porous beads can absorb essential oils, turning your bracelet into a diffuser.
Enjoy wearing this versatile piece that brings a touch of natural artistry to any outfit
Marbled Clay Beads in Cream and Taupe
Achieve a sophisticated, high-end look with these hand-rolled polymer clay beads featuring a delicate marble effect. The combination of creamy white and warm mocha swirls, separated by gleaming gold spacers, creates a neutral accessory that pairs with absolutely everything.
Step-by-Step
Materials
- Polymer clay (white)
- Polymer clay (translucent)
- Polymer clay (light beige or ecru)
- Polymer clay (mocha or taupe brown)
- Acrylic roller or pasta machine
- Tissue blade or clay knife
- Bead piercing pins or toothpicks
- Gold tone heishi spacer beads (approx. 4mm or 5mm)
- Elastic beading cord (0.7mm or 0.8mm)
- Jewelry glue (hypo-cement)
- Ceramic tile or baking sheet
- Parchment paper
- Wet/dry sandpaper (400, 600, 1000 grit)
- Buffing cloth or denim scrap
Step 1: Creating the Marbled Cane
-
Condition the Clay:
Begin by conditioning all your clay colors separately until they are soft and pliable. You want the white and translucent to make up the bulk of the mixture, with smaller amounts of beige and just a hint of the mocha brown. -
Form Snakes:
Roll each conditioned color into a long, snake-like cylinder. The white snake should be the thickest, followed by the translucent, then the beige, and finally a very thin snake of the brown. -
Combine the Colors:
Twist the four snakes together into one large rope. Fold this rope in half and twist it again. Repeat this folding and twisting process 3-4 times, but stop before the colors blend completely; you want distinct striations. -
Refine the Mix:
Roll the twisted rope into a smooth log on your work surface. If the lines look too thick, fold and twist one more time to make the marbling finer. -
Portion the Clay:
Using your tissue blade, slice the log into equal-sized segments. The size of the slice will determine the final size of your bead, so aim for consistency here.
Step 2: Forming and Baking
-
Roll spheres:
Take a clay segment and roll it between your palms to form a smooth ball. I like to use a light touch initially to get the round shape, then firmer pressure to smooth out any seams. -
Pierce the Beads:
Gently twist a bead piercing pin or toothpick through the center of each sphere. Use a twisting motion rather than pushing straight through to avoid flattening the round shape. -
Bake:
Arrange the beads on a parchment-lined ceramic tile or baking sheet. Bake according to your brand’s specific temperature instructions, usually for about 30 to 45 minutes to ensure durability. -
Cool Down:
Allow the beads to cool completely in the oven with the door cracked open. This gradual cooling helps prevent cracks.
Muddy Colors?
If your marble lines look blurry or gray, you over-mixed the clay. Stop twisting as soon as you see distinct stripes. The rolling process will blend them further naturally.
Step 3: Finishing and Assembly
-
Sand for Smoothness:
Once cool, wet sand the beads in a bowl of water. Start with 400 grit to remove fingerprints, then move to 600, and finish with 1000 grit for a silky feel. -
Buff to Shine:
Rub each bead vigorously with a piece of denim or a buffing cloth. This brings out a natural, stone-like sheen without needing glossy varnish. -
Plan the Design:
Lay out your beads on a bead board or towel. Place one marbled clay bead, followed by one gold heishi spacer, repeating the pattern until you reach your desired length (usually 6.5 to 7 inches). -
String the Beads:
Cut a piece of elastic cord about 10 inches long. Pre-stretch the cord by pulling it gently a few times to prevent it from stretching out later. String your pattern onto the cord. -
Knot the Cord:
Tie a surgeon’s knot (right over left loop twice, pull tight; left over right loop once, pull tight). Pull the knot very tight to secure it. -
Secure and Trim:
Apply a tiny drop of jewelry glue exclusively to the knot. Let it dry for a few minutes before trimming the excess cord close to the knot. Ideally, hide the knot inside one of the clay beads.
Pro Tip: Fingerprint Free
Dust your palms lightly with cornstarch before rolling the final bead shapes. It prevents sticking and eliminates pesky fingerprints, reducing sanding time later.
Slip your new marbled bracelet on your wrist and enjoy the touch of handmade elegance you’ve created.
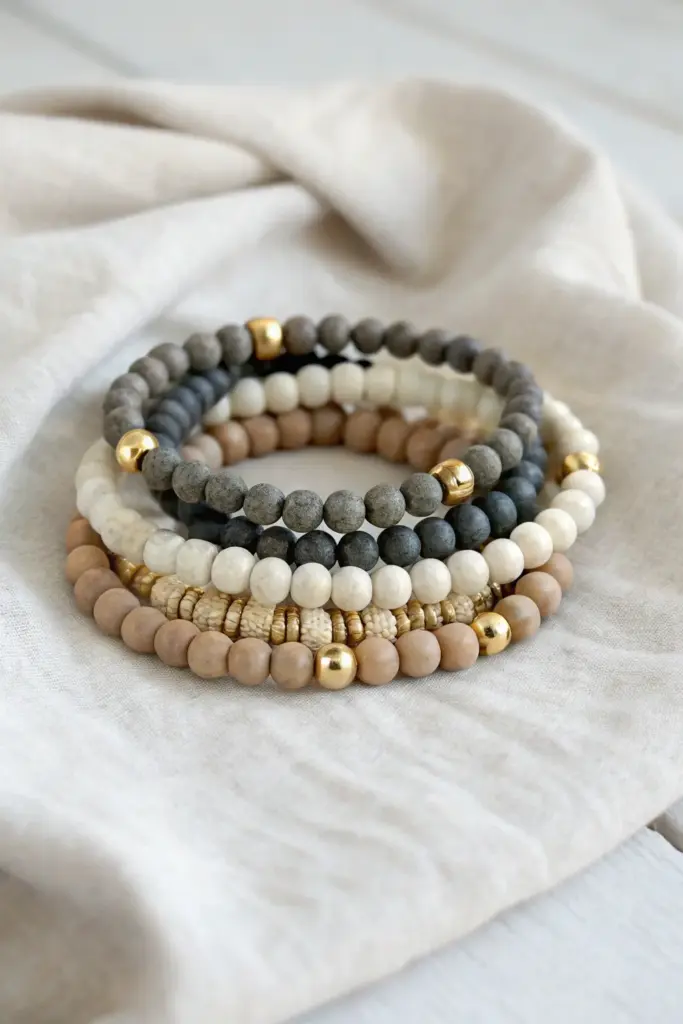
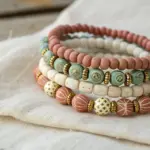
Curated Neutral Stack Set With One “Hero” Bracelet

This tutorial guides you through creating a sophisticated set of neutral bracelets designed to be worn together for a layered, textured look. The combination of matte clay, smooth stone, natural wood, and gold accents creates a versatile stack that transitions perfect from casual to dressy.
Step-by-Step Guide
Materials
- Elastic bead cord (0.8mm or 1mm clear)
- 6mm-8mm grey matte stone beads
- 6mm-8mm cream or white stone/jade beads
- 6mm-8mm tan wood beads
- 6mm gold spacer beads (round)
- Small gold disc spacers or heishi beads (optional)
- Textured ‘Hero’ beads (e.g., carved bone, coconut shell discs, or intricately patterned clay)
- Jewelry glue (e.g., G-S Hypo Cement)
- Scissors
Step 1: Planning & Sizing
-
Measure your wrist:
Before cutting any cord, measure your wrist with a flexible tape measure. Add about half an inch to this measurement for a comfortable fit that isn’t too tight. -
Cut elastic strands:
Cut four separate lengths of elastic cord, each about 10-12 inches long. This generous length gives you plenty of room to tie secure knots without struggling. -
Pre-stretch the cord:
Holding each end of the cord, give it a few firm tugs. I always do this to ‘pre-stretch’ the elastic—this prevents the finished bracelet from sagging or stretching out permanently after the first wear.
Step 2: The Grey Stone Bracelet
-
Start the pattern:
Begin threading your grey matte stone beads onto the first cord. Aim for a simple, uniform look. -
Add gold accents:
Integrate 2-3 gold round spacer beads at random intervals or focused in one section to catch the light. -
Finish length:
Check the length against your wrist measurement, ensuring the ends meet comfortably without gaps.
Knot Security
Hide your knot inside a bead with a large hole! Pull the knot gently into the neighboring bead while the glue is wet for a seamless finish.
Step 3: The Cream & White Bracelet
-
Base layer:
Take your second cord and string predominantly creamy white stone or jade beads. -
Create contrast:
To mirror the darker bracelet, add a few gold spacer beads. Place them symmetrically or clustered together for a focal point.
Texture Play
Swap the ‘hero’ bracelet’s bone beads for lava stones. You can add a drop of essential oil to them for an aromatherapy diffuser bracelet.
Step 4: The Tan Wood Bracelet
-
Thread wood beads:
Using the tan wood beads, thread your third cord. Wood beads are often lighter than stone, which adds a nice balance to the weight of the stack. -
Intersperse gold:
Add 3-4 gold beads evenly spaced throughout this strand to tie it visually to the other bracelets in the set.
Step 5: The ‘Hero’ Texture Bracelet
-
Select textured beads:
This bracelet is the standout piece. Use your textured beads—like carved bone, coconut discs, or patterned clay—as the main component. -
Mix materials:
Start by stringing a section of tan wood beads, then transition into a long section of your textured ‘hero’ beads in the center. -
Add detailed spacers:
Between the textured beads, slip in thin gold disc spacers or tiny heishi beads. This separation highlights the unique texture of the hero beads.
Step 6: Finishing the Stack
-
Tie the knots:
For each bracelet, tie a surgeon’s knot (right over left, left over right) and pull tight. -
Secure with glue:
Dab a tiny drop of jewelry glue directly onto the knot. Let it tack up for a moment, then slide a bead with a larger hole over the knot if possible to hide it. -
Trim excess:
Once the glue is fully dry, use your small scissors to trim the excess cord tails as close to the bead as safely possible.
Slip on your new stack and enjoy the satisfying mix of textures on your wrist