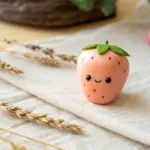
Octopus projects are my go-to when I want something cute, quick, and ridiculously satisfying to sculpt. With a few simple shapes and some playful details, you can turn clay octopus ideas into gifts, desk buddies, jewelry, and tiny decor you’ll actually finish.
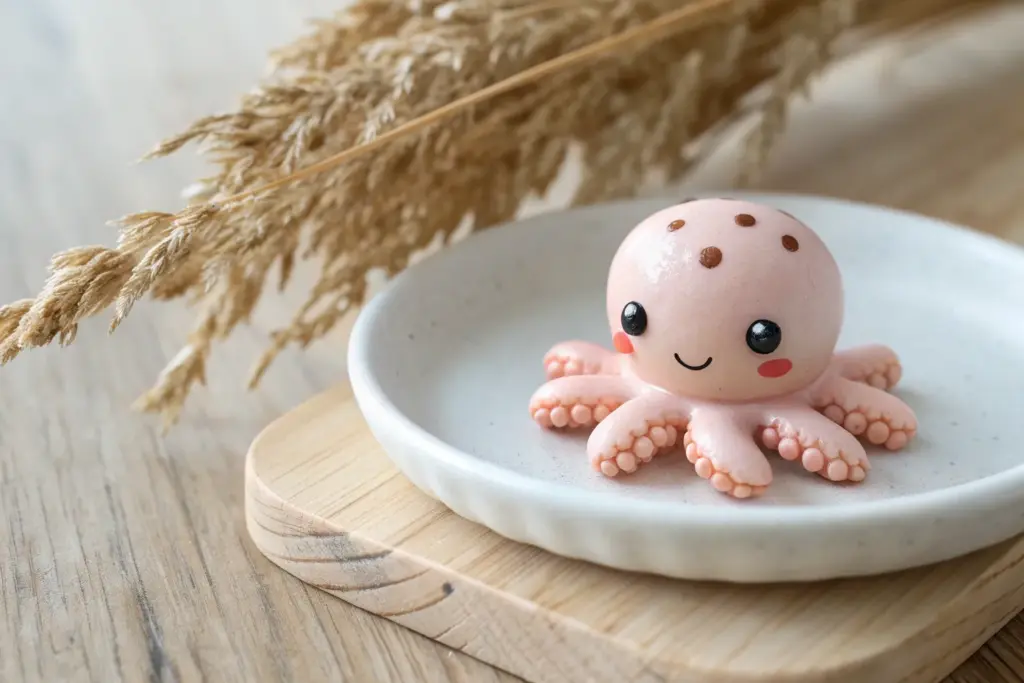
Classic Kawaii Mini Octopus
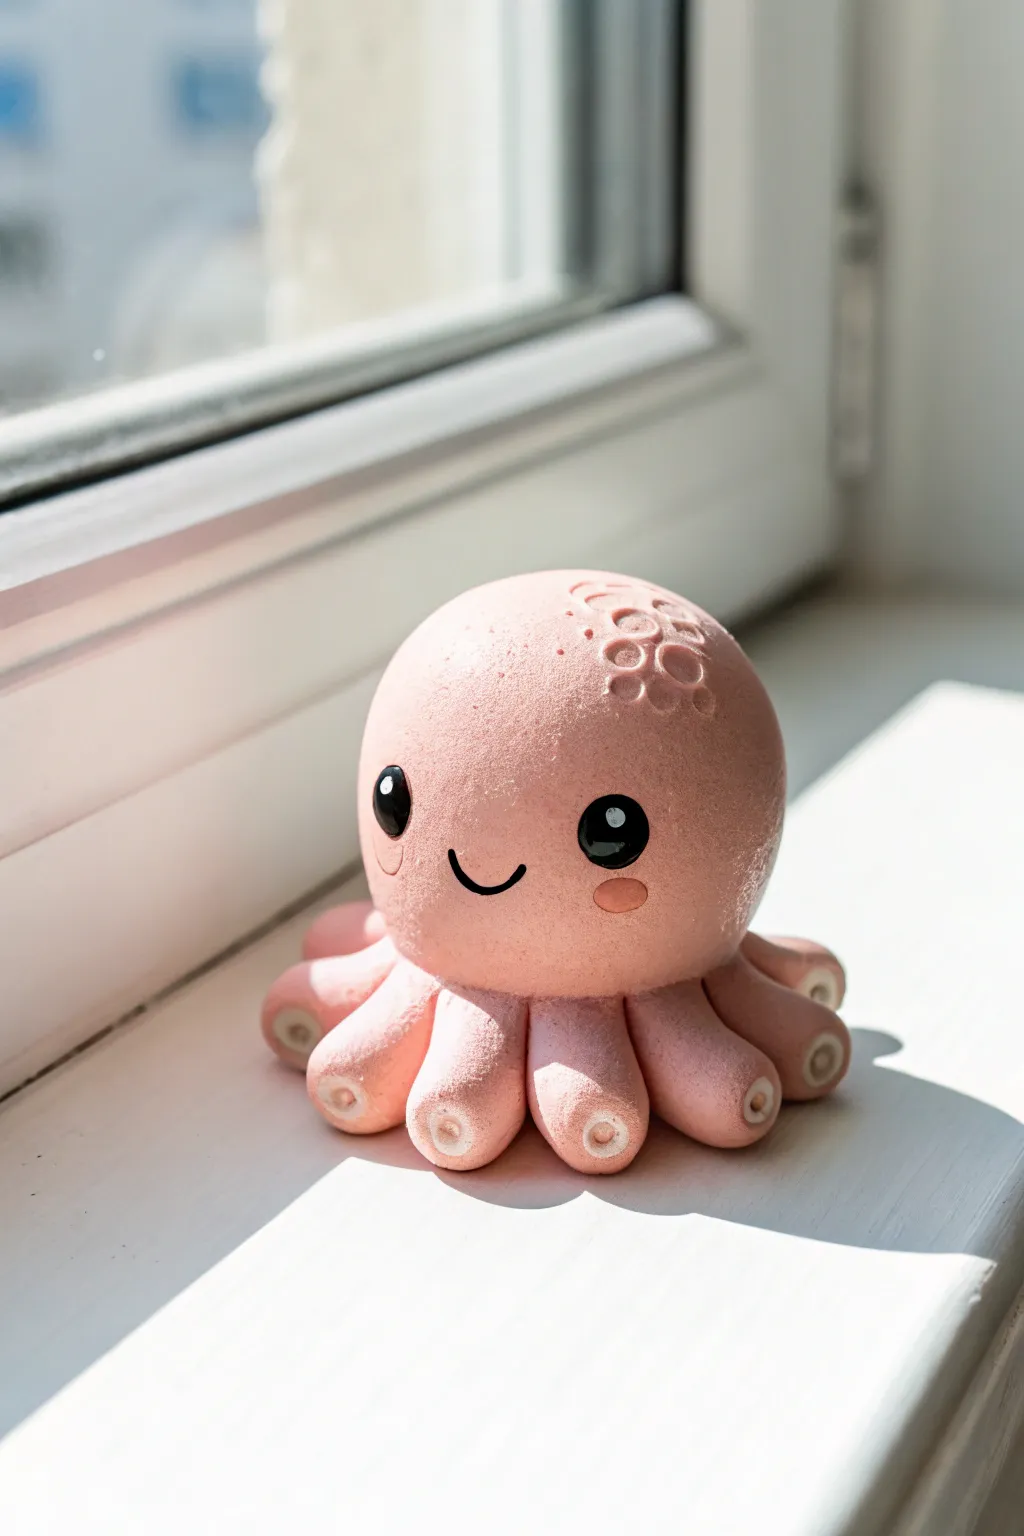
This adorable mini octopus brings a touch of kawaii charm to any windowsill with its soft matte finish and sweet expression. The design features classic rounded tentacles and simple painted details that make it approachable for beginners and satisfying for pros.
Step-by-Step
Materials
- Light pink polymer clay
- Black acrylic paint
- White acrylic paint
- Pink soft pastel chalk (slightly darker than the clay)
- Small dotting tool or toothpick
- Fine detail paintbrush
- Ball stylus tool (medium size)
- Small straw or piping tip (for head texture)
- Matte varnish (optional)
Step 1: Shaping the Base
-
Condition the clay:
Begin by warming the light pink clay in your hands, kneading it thoroughly until it is soft, pliable, and free of cracks. -
Form the head:
Roll a large portion of the clay into a smooth, seamless ball. This will be the main body and head of your octopus. -
Create a slight dome:
Gently press the ball onto your work surface to flatten the bottom slightly, creating a stable dome shape rather than a perfect sphere. -
Divide the tentacles:
Roll a snake of clay roughly the same thickness as you want the tentacles to be, then cut it into eight equal segments. -
Shape the limbs:
Roll each segment into a teardrop shape—rounded at one end and slightly tapered at the other where it will attach to the body.
Texturing Tool Tip
For the circular impressions on the head, try using the empty barrel of a mechanical pencil or a small piping tip. It creates perfect, consistent rings.
Step 2: Assembly and Texture
-
Attach the tentacles:
Arrange the eight tentacles in a wide circle. Place the head dome on top of the tapered ends and gently blend the clay underneath so the connection is seamless. -
Curving the tips:
Gently curl the rounded ends of each tentacle upward just a bit to give the octopus a dynamic, ‘sitting’ posture. -
Adding texture to the head:
Using a small tube, straw, or the end of a paintbrush, press incomplete circles into the upper right side of the head to create a bubbly, textured patch. -
Creating suction cups:
Use a medium ball stylus or a rounded tool to press a deep indentation into the end of each tentacle leg to mimic suction cups. -
Adding white details:
Roll tiny balls of white clay (or use white paint later) and press them into the center of the tentacle indentations for extra detail. -
Smooth it out:
Do a final check for fingerprints. I like to lightly brush the surface with a bit of cornstarch or baby oil to get it perfectly smooth before baking.
Step 3: Details and Finishing
-
Bake the piece:
Bake the octopus according to your polymer clay package instructions. Let it cool completely before painting. -
Outline the eyes:
Using black acrylic paint and a fine brush, paint two large, oval shapes for the eyes. Position them wide apart for maximum cuteness. -
Paint the smile:
Carefully paint a small, U-shaped mouth right between the eyes using the very tip of your detail brush. -
Add eye highlights:
Dip a dotting tool or toothpick into white paint and add a large highlight dot in the upper corner of each eye, followed by a smaller dot below it. -
Apply rosy cheeks:
Scrape a little pink pastel chalk into a powder. Use a soft, dry brush to gently buff this powder onto the clay below the eyes for a soft blush effect. -
Seal the work:
Finish by applying a coat of matte varnish to protect the paint and pastel while maintaining that soft, non-glossy look.
Lint Magnet?
If you see dust or lint on your smooth pink clay before baking, use a cotton swab dipped in rubbing alcohol or nail polish remover to gently wipe it away.
Place your new little friend in a sunny spot to enjoy his cheerful company


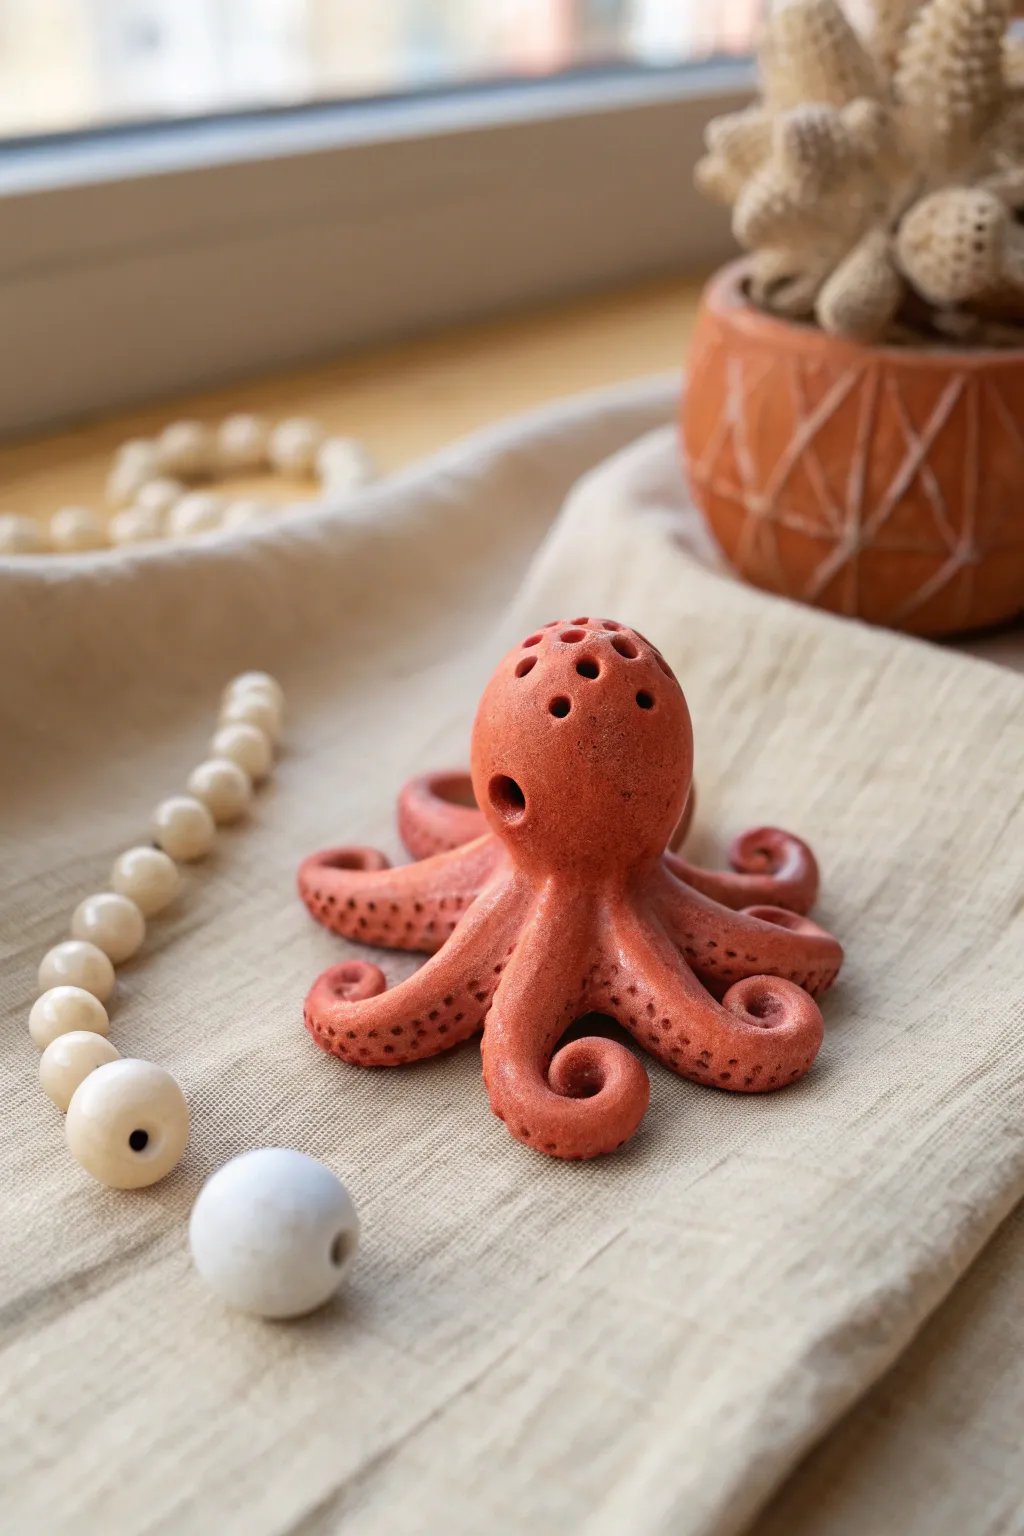
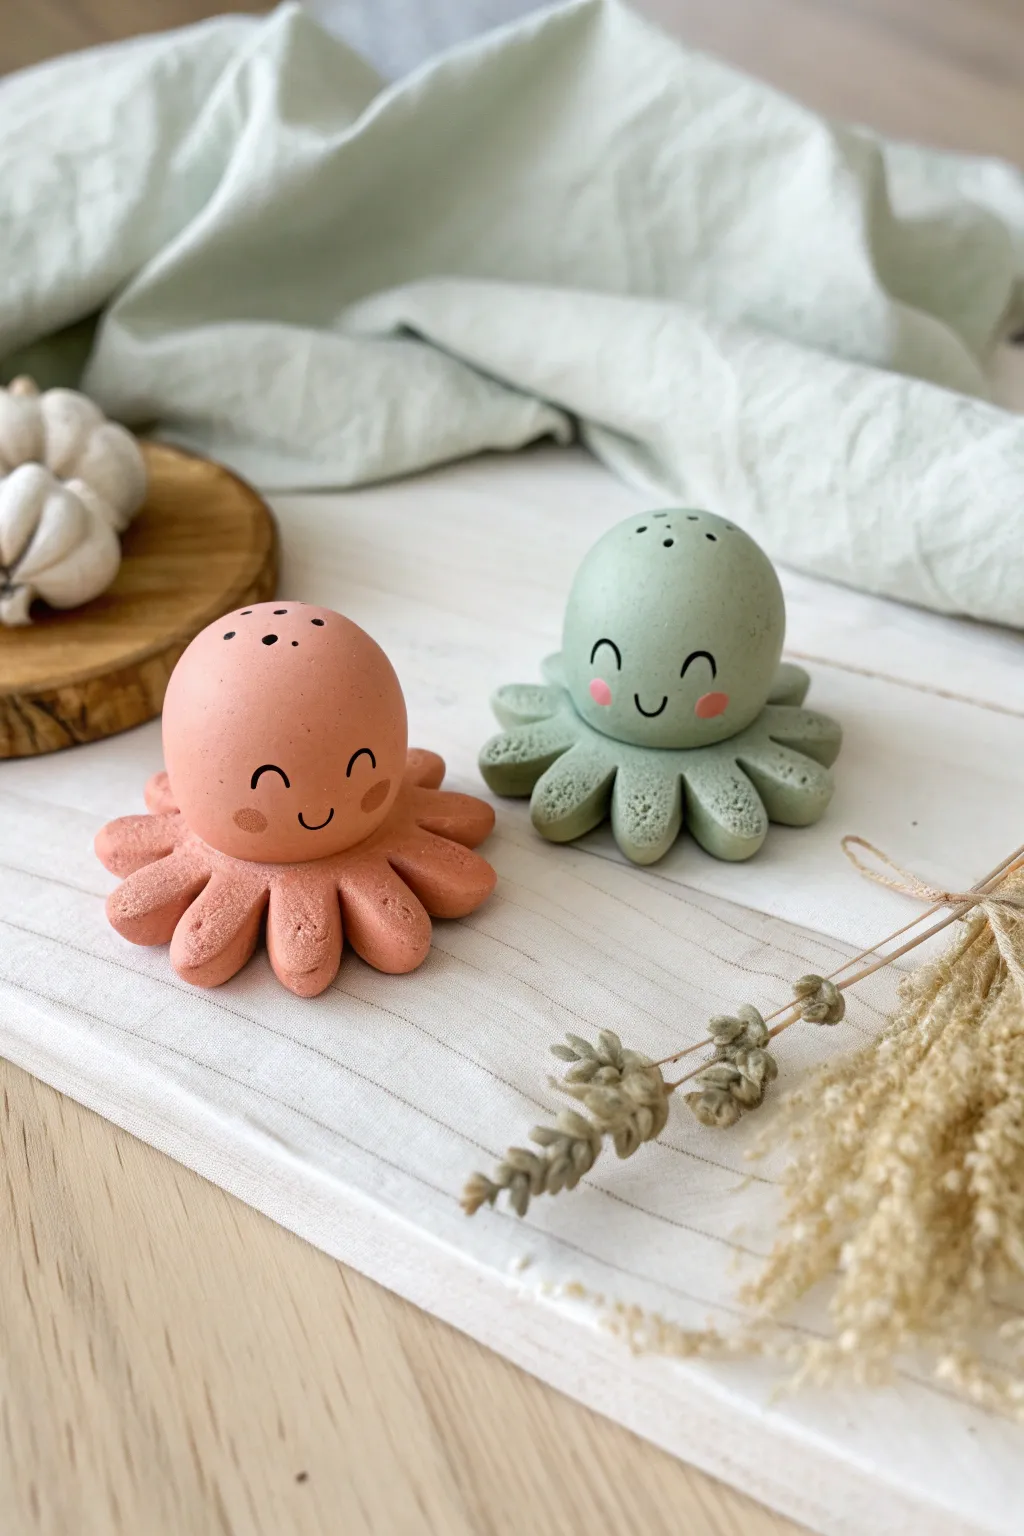
Two-Octopus Couple Set
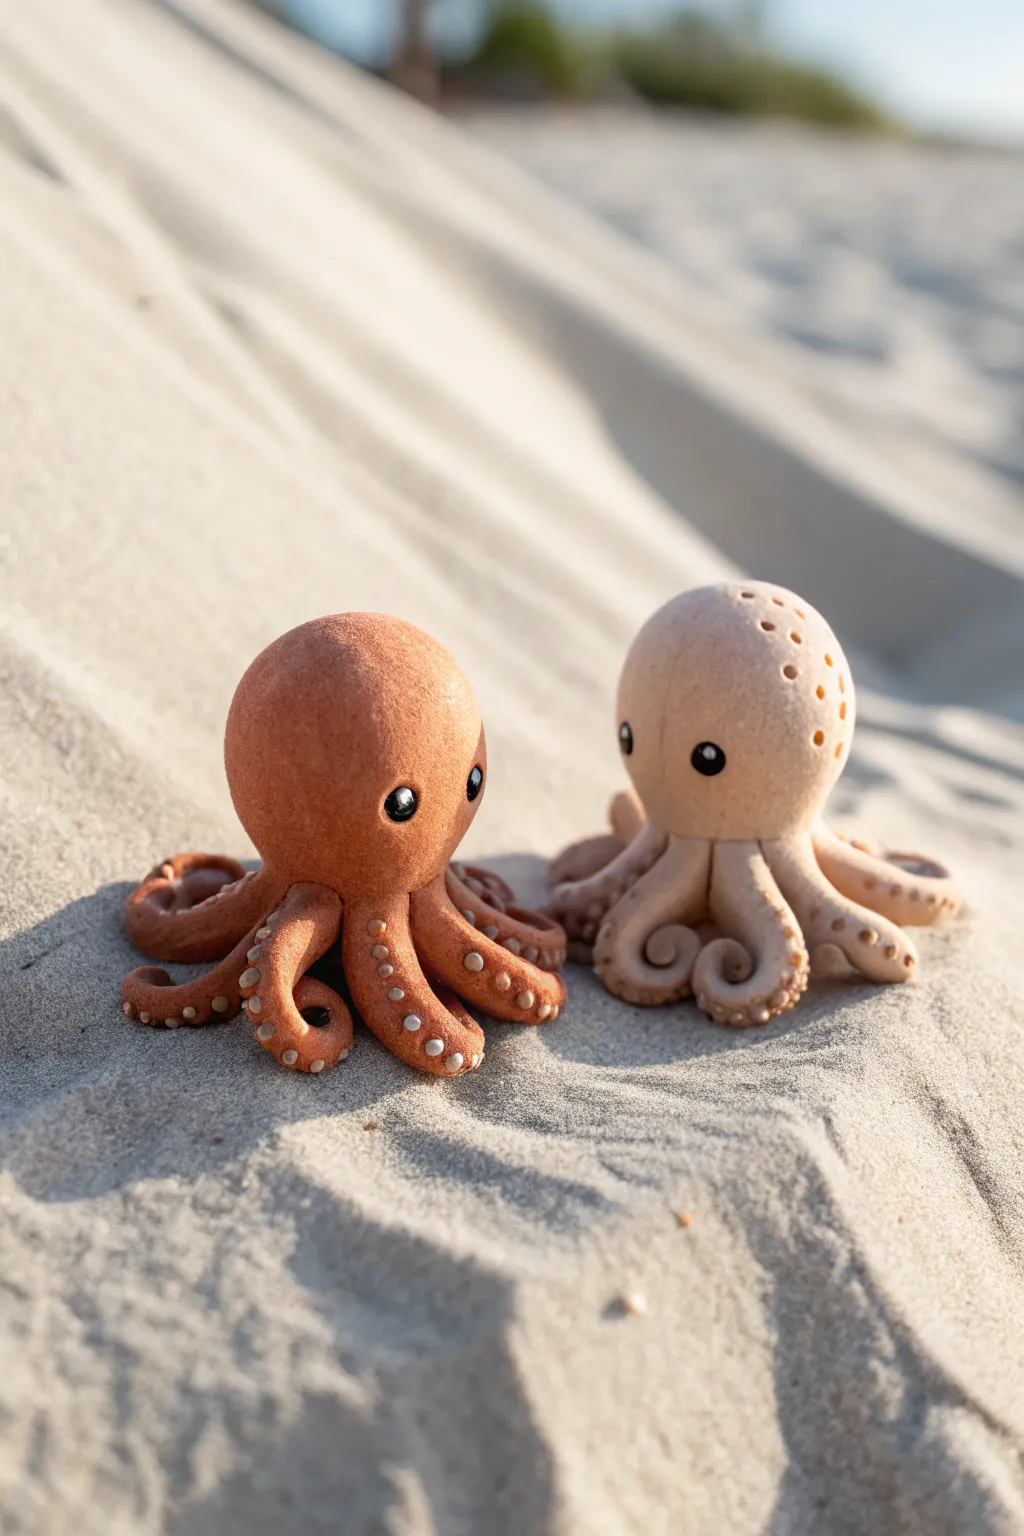
Capture the magic of a seaside romance with this adorable pair of polymer clay octopuses. With their soft, matte finish and tiny, detailed suckers, these pint-sized cephalopods make for a charming desk display or a sweet handmade gift.
Step-by-Step Tutorial
Materials
- Polymer clay (terracotta orange and pale beige/sand)
- Small amount of white and black polymer clay for eyes
- Ball stylus tools (various sizes)
- Needle tool or toothpick
- Soft texture sponge or sandpaper (optional)
- Clean work surface or ceramic tile
- Oven for baking
Step 1: Shaping the Bodies
-
Prepare the Clay:
Begin by conditioning your terracotta and beige clay separately until they are soft and pliable. Ensure your hands are clean between colors to avoid staining the lighter clay. -
Form the Heads:
Roll two smooth balls of clay, one in each color, slightly larger than a bouncy ball. Gently taper the bottom of each ball to create a slight teardrop shape, but keep the top very round and bulbous. -
Create Tentacle Base:
For each octopus, roll out eight smaller logs or tapered snakes of matching clay. These should be thicker at one end and taper to a fine point at the other. -
Attach Tentacles:
Turn the head upside down and press the thick ends of the eight tentacles onto the bottom center. Blend the clay seams smooth so the legs look like they are growing naturally from the head.
Droopy Tentacles?
If the curly tentacles keep falling flat before baking, try chilling the raw sculpture in the fridge for 15 minutes to firm up the clay before putting it in the oven.
Step 2: Adding Texture and Detail
-
Texture the Skin:
Before curling the legs, gently dab the entire surface of both octopuses with a coarse sponge or a crumpled piece of foil. This removes fingerprints and gives them a realistic, organic sandy texture. -
Curl the Legs:
Flip the octopuses right-side up. Gently twist and curl the tips of the tentacles. I like to make a few curl tightly inward like a fiddlehead fern, while others can wave casually outward for a natural look. -
Make the Suckers:
Roll tiny, minuscule balls of clay (lighter beige for the orange octopus, white or pale tan for the beige one). You will need dozens of these very small spheres. -
Apply Suckers:
Press the tiny balls in rows along the underside of the curled tentacles. Use the tip of a small ball stylus to press into the center of each tiny ball, creating a cup shape.
Make It a Keychain
Before baking, screw a threaded eye pin into the top of the head. Once baked, remove it, add a drop of superglue, and screw it back in for a secure permanent hold.
Step 3: Refining the Face
-
Create Eye Sockets:
Use a medium-sized ball tool to press two indentations into the front of the head where you want the eyes to sit. Space them somewhat widely for a cute, innocent expression. -
Insert Eyes:
Roll two small balls of black clay. Press them gently into the sockets you just created. They should protrude slightly but look nestled in the clay. -
Add Highlights:
To bring them to life, take the tiniest speck of white clay and place it on the upper right corner of each black eye. This catchlight is crucial for their personality. -
Final Texture Check:
Look over your figures one last time. If you smoothed out any texture while handling them, re-dab those areas lightly with your texturing tool.
Step 4: Baking and Finishing
-
Preheat Oven:
Set your oven to the temperature recommended on your specific brand of polymer clay packaging (usually around 275°F or 130°C). -
Support the Shapes:
If the tentacles are lifting off the ground, you can prop them up with small bits of polyester fiberfill or crumpled tissue paper during baking so they don’t drooping. -
Bake:
Place the octopuses on a ceramic tile or baking sheet lined with parchment paper. Bake for approximately 30 minutes, or as directed by the manufacturer for the thickness of the head. -
Cool Down:
Turn the oven off and let the figures cool down inside the oven slowly. This helps prevent cracking, especially with thicker pieces.
Once cooled, arrange your little cephalopod couple together on a shelf where they can keep each other company


Octopus Keychain Charm

This adorable polymer clay octopus charm features a warm peach tone with delicate speckled details and a sweet, smiling face. It hangs from a classic gold keychain, making it the perfect whimsical accessory for your keys or bag.
How-To Guide
Materials
- Polymer clay (peach/terracotta color)
- Polymer clay (lighter peach or cream color)
- Polymer clay (black)
- Small dotting tool or toothpick
- Gold screw eye pin
- Gold keychain ring with chain attached
- Needle nose pliers
- Clay blade or craft knife
- Gloss glaze (optional)
Step 1: Shaping the Base
-
Condition the clay:
Begin by thoroughly conditioning your main peach-colored clay. Knead it in your hands until it becomes soft, pliable, and easy to shape without cracking. -
Form the head:
Roll a medium-sized ball of peach clay, roughly the size of a large grape. Gently flatten the bottom slightly so it is somewhat dome-shaped but still nice and round. -
Roll the tentacles:
Create eight small, equal-sized balls from the same peach clay. Roll these into short, tapered logs that are slightly thicker at one end. -
Attach the tentacles:
Arrange the tapered logs in a circle underneath the head shape. Fan them out so they curve slightly upwards at the tips, giving the octopus movement. -
Blend the seams:
Use a sculpting tool or your finger to gently blend the top of the tentacles into the underside of the head, ensuring a secure bond so they don’t break off later.
Sticky Situation?
If fingerprints are ruining your smooth finish, lightly brush the raw clay with a little baby oil or cornstarch before baking to smooth them out.
Step 2: Adding Details
-
Prepare the spots:
Take your lighter peach or cream clay and roll out a very thin snake. Cut tiny little slices from this snake to act as the suckers and head spots. -
Apply head speckles:
Place several of the tiny light clay dots randomly onto the top of the head. Press them down gently so they look integrated but slightly raised. -
Add tentacle suckers:
Apply two rows of the tiny light dots along the visible top surface of each tentacle. I find it helpful to use the tip of a detailing tool to pick these up and place them precisely. -
Texture the dots:
Using a very small dotting tool or a dull needle, press a tiny indentation into the center of each light dot to mimic the texture of suckers. -
Insert eye pin:
Trim a gold screw eye pin if it’s too long. Carefully twist it into the center top of the head before baking to create the attachment point.
Ocean Sparkle
Mix a tiny amount of pearl or translucent clay into your peach base color. It gives the octopus a subtle, aquatic shimmer that mimics wet skin.
Step 3: The Face & Finish
-
Create eye sockets:
Use a medium-sized ball tool to press two indentations into the front of the face where the eyes will go. -
Add the eyes:
Roll two small balls of black clay. Place them into the sockets and gently flatten them just a bit so they look secure. -
Add eye highlights:
Roll extremely tiny specks of white clay (or use white acrylic paint after baking) and place a small dot in the upper corner of each black eye for a ‘sparkle’. -
Carve the smile:
Use a needle tool or a small curved blade to gently press a small, U-shaped mouth right between the eyes. -
Bake the charm:
Bake your creation according to the manufacturer’s instructions for your specific brand of clay. Usually, this is around 275°F (135°C) for 15-30 minutes. -
Cool and assemble:
Let the piece cool completely. Use your needle nose pliers to open the jump ring on the keychain and attach it securely to the eye pin on the octopus head.
Now your little sea creature is ready to tag along on all your daily adventures


Octopus Phone Grip Topper
Transform a plain phone grip into a charming underwater scene with this miniature clay octopus. The textured orange finish and simple dotted base create a playful, tactile accessory that adds character to your device.
Step-by-Step Guide
Materials
- Orange polymer clay
- White polymer clay
- Black polymer clay
- Phone grip blank (e.g., PopSocket)
- Needle tool or toothpick
- Ball stylus tool
- Acrylic paint (coral/orange, grey)
- Small paintbrush
- Gloss glaze or resin (optional)
- Strong adhesive (E6000 or similar)
- Oven for baking
Step 1: Sculpting the Base
-
Prepare the base:
Start by conditioning a flat disc of white polymer clay. Make sure it is slightly larger than the top surface of your phone grip blank. -
Smooth the surface:
Place the white clay disc onto the plastic phone grip top. Use your fingers to smooth the edges downwards, ensuring the clay covers the surface evenly without trapping air bubbles. -
Add the spots:
Take tiny pinches of orange and grey clay, rolling them into microscopic balls. Alternatively, you can paint these later, but embedding clay dots creates a smoother finish. -
Embed the pattern:
Press these tiny colored balls gently into the white base in a random, confetti-like pattern. Roll over the surface lightly to make them flush with the white clay.
Step 2: Forming the Octopus
-
Shape the head:
Roll a medium-sized ball of orange clay for the head. It should be slightly oval-shaped, resembling a rounded egg. -
Create the tentacles:
Roll eight small, tapered snakes of orange clay. These should be thinner at one end and slightly thicker where they will join the body. -
Attach the legs:
Arrange the eight tentacles in a star shape on the center of your prepared base. Press them down gently so they adhere to the white clay. -
Curl the tips:
Using a needle tool or your fingertips, curl the thin ends of the tentacles into varying spiraled shapes for a natural, flowing look. -
Mount the head:
Place the orange head ball onto the center where the tentacles meet. Gently blend the clay from the bottom of the head into the tops of the tentacles so it looks like one solid piece. -
Texture the skin:
Take a needle tool and poke tiny, shallow holes all over the head and upper tentacles. This stippling effect gives the octopus a realistic, spongy texture.
Sticky Situation
If the tentacles aren’t sticking to the base, add a tiny drop of liquid polymer clay or ‘Bake and Bond’ as a glue before pressing them down.
Step 3: Details & Finish
-
Make the eyes:
Flatten two tiny discs of white clay and press them onto the face. Add smaller discs of black clay on top for the pupils. -
Add a highlight:
Place the tiniest speck of white clay onto the black pupil to create a ‘sparkle’ in the eye, bringing the character to life. -
Final baking:
Bake the entire piece according to your polymer clay package instructions. I usually tent foil over it to prevent the white base from scorching. -
Painting the base:
If you chose not to use colored clay for the dots earlier, use a fine tip brush to paint small orange and grey dots onto the white base now. -
Sealing:
Once cool, apply a light coat of matte or gloss varnish to protect the clay and painted details from daily wear and tear. -
Final assembly:
If you baked the clay separate from the plastic grip, glue the finished clay piece onto the phone grip blank using a strong, permanent adhesive.
Pro Tip: Eye Placement
Place the eyes lower on the head, lined up with the top of the tentacles. Wide-set, low eyes instantly make characters look cuter.
Attach this adorable grip to your phone and enjoy your new nautical companion

The Complete Guide to Pottery Troubleshooting
Uncover the most common ceramic mistakes—from cracking clay to failed glazes—and learn how to fix them fast.
Octopus Earrings
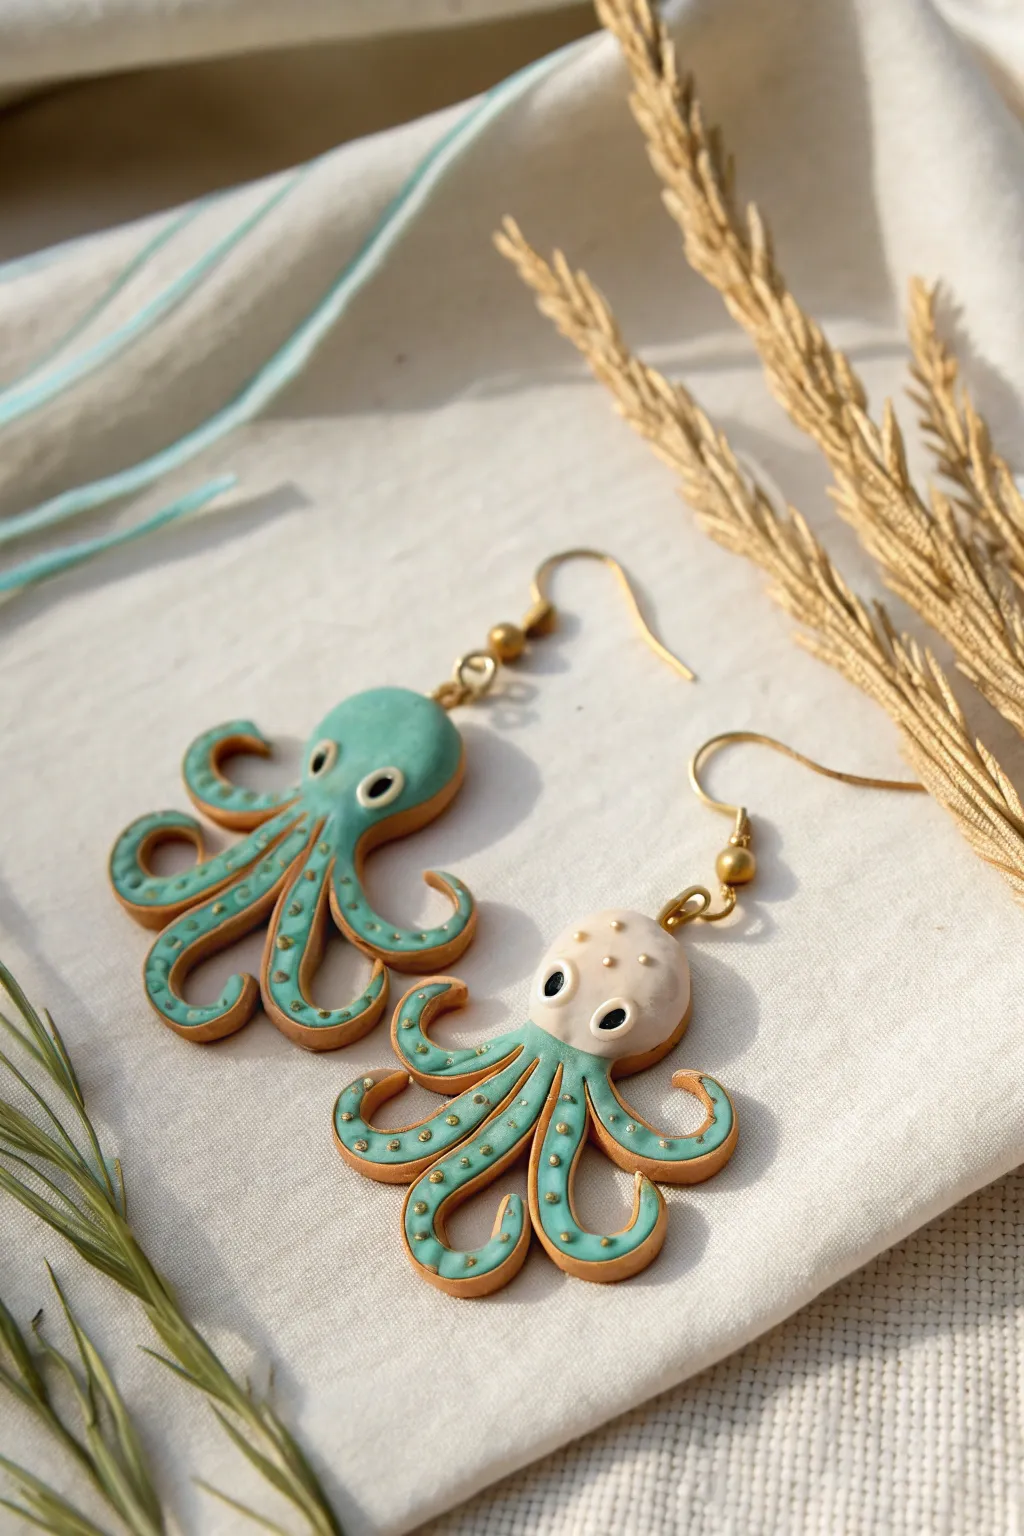
These charming octopus earrings combine soft teal and cream tones with elegant gold accents for a playful yet sophisticated accessory. Their stylized, swirling tentacles and tiny textured suckers make them an eye-catching craft project perfect for ocean lovers.
Step-by-Step
Materials
- Polymer clay (Teal, Beige/Cream, Black, White)
- Gold acrylic paint or metallic gold powder
- High-gloss varnish or glaze
- Clay roller or pasta machine
- Exacto knife or craft blade
- Needle tool or toothpick
- Small dotting tool
- Earring hooks (gold-tone)
- Jump rings (gold-tone)
- Eye pins
- Fine detail paintbrush
- Jewelry pliers
- Oven for baking
Step 1: Sculpting the Base Form
-
Condition the clay:
Begin by kneading your chosen clay colors—teal for one octopus, and separating a mix of beige and teal for the other if you want the two-tone look—until they are soft and pliable. -
Roll the slab:
Roll out a sheet of clay to approximately 3mm thickness. This needs to be sturdy enough for earrings but not too heavy. -
Cut the general shape:
Using a craft knife, freehand cut a bulbous head shape that flows down into a central point where the legs will begin. You can sketch this on paper first to use as a template. -
Form the tentacles:
For each tentacle, roll a small tapered snake of clay. You can also cut curved strips from your flat slab if you prefer a flatter, illustrative look like the photo. -
Attached the tentacles:
Gently press the tentacles onto the underside of the head shape, arranging them in swirling, curling patterns. Ensure they flare out symmetrically but with organic curves. -
Smooth the seams:
Use a silicone tool or your finger to gently blend the clay where the tentacles join the head so it looks like one cohesive piece.
Step 2: Adding Details & Hardware
-
Insert eye pins:
Carefully twist an eye pin into the top center of each octopus head. You may need to trim the pin so it doesn’t poke through the tentacles. -
Define the edges:
I like to take a needle tool and lightly trace around the perimeter of the tentacles to sharpen the edges, preparing them for the gold paint later. -
Create the face:
Roll two tiny balls of black clay for eyes and press them onto the head. Flatten them slightly. Add two minuscule specks of white clay for the light reflection. -
Texture the suckers:
Using a small dotting tool, press rows of small indentations along the center of each tentacle to simulate the suckers. -
Add head details:
For the beige octopus, add tiny dots of texture on the forehead using the needle tool to give it character. -
Bake:
Bake the pieces according to your polymer clay package instructions (usually around 275°F/130°C for 15-30 minutes). Let them cool completely.
Sticky Situation?
If your clay gets too soft and fingerprints are showing, pop the raw sculpted pieces in the fridge for 10 minutes before adding the final textures.
Step 3: Finishing Touches
-
painting the edges:
Dip a fine detail brush into gold acrylic paint. Carefully paint the side edges of the entire octopus to create a gilded outline. -
Highlight the suckers:
Using the very tip of your brush or a toothpick, dab a tiny amount of gold paint into each recessed sucker dot on the tentacles. -
Seal the piece:
Apply a coat of high-gloss varnish or glaze over the entire front of the earring to protect the paint and give it a ceramic-like shine. -
Assemble the jewelry:
Once the varnish is fully dry, use pliers to open a jump ring, slide it onto the eye pin, and attach the earring hook. -
Final check:
Close the jump ring securely and ensure the earring hangs facing forward. Repeat for the second octopus.
Pro Tip: Eye Placement
Place the eyes slightly wider apart and lower on the head than you think necessary. This creates a much cuter, ‘kawaii’ aesthetic instantly.
Now you have a unique pair of sea-inspired earrings ready to wear or gift.
Octopus Pendant Necklace
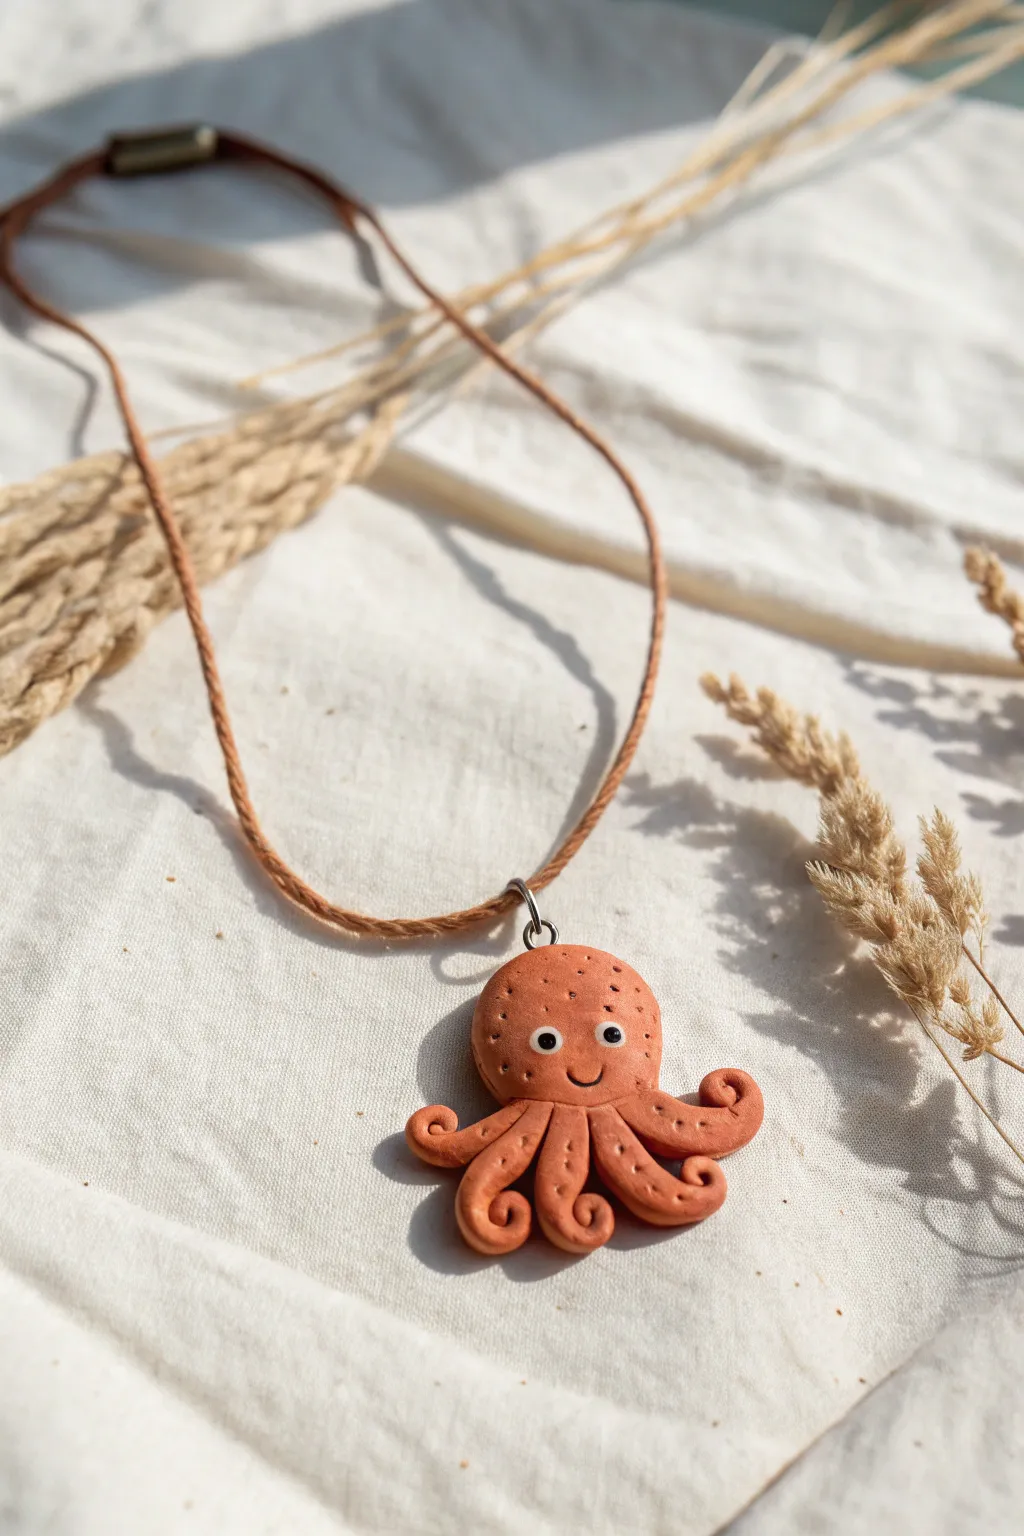
This charming octopus pendant brings a touch of seaside whimsy with its warm terracotta hue and tiny textured details. Simple enough for beginners but full of character, this little sea creature makes a perfect handmade gift or personal accessory.
Step-by-Step Guide
Materials
- Terracotta or orange-brown polymer clay
- White polymer clay
- Black polymer clay
- Pointed detailing tool (or toothpick)
- Small eye pin
- Flexible blade or craft knife
- Jewelry cord (brown or suede)
- Small jewelry pliers
- Baking sheet
- Jewelry clasp (optional, for cord)
Step 1: Sculpting the Body
-
Condition the Clay:
Start by taking a chunk of your terracotta-colored polymer clay. Knead it thoroughly in your hands until it becomes soft, pliable, and free of any cracks. -
Form the Head Shape:
Roll the clay into a smooth ball about the size of a large grape. Gently flatten it slightly so it isn’t perfectly spherical but retains a nice rounded dome shape for the octopus’s head. -
Create the Base:
Flatten the bottom of the sphere against your work surface just slightly to create a base where the tentacles will eventually attach.
Step 2: Creating Tentacles
-
Roll Snakes:
Roll out several small, tapered snakes of the same terracotta clay. You will need 6 to 8 of these, depending on how crowded you want the legs to be. -
Attach the First Tentacles:
Attach the wider end of each snake to the underside of the head shape. Smooth the seam with your finger or a smoothing tool so the clay joins seamlessly. -
Curl the Tips:
Take the tapered end of each tentacle and gently curl it inward or outward to create movement. Vary the direction of the curls to give the octopus a playful, swimming appearance. -
Add Texture:
Use your pointed detailing tool to poke a single row of small dots running down the center of each tentacle. This mimics the look of suction cups without needing to sculpt individual circles.
Fixing Fingerprints
If you notice fingerprints on your smooth clay before baking, lightly brush the surface with a little baby oil or cornstarch to smooth them away without ruining details.
Step 3: Adding Details & Hardware
-
Texture the Head:
Continue using your detailing tool to poke random, shallow dots all over the top of the head. Keep the pressure light to add texture without deforming the shape. -
Make the Eyes:
Roll two tiny balls of white clay and two even tinier balls of black clay. Flatten the white balls onto the face area, then place the black balls on top for pupils. -
Add a Smile:
Use a curved tool or the edge of a straw to gently press a small, U-shaped mouth just below the eyes. -
Insert the Eye Pin:
Trim an eye pin to size if it’s too long. Push the straight end directly into the top center of the octopus head. I sometimes add a tiny dab of liquid clay or bake-and-bond to the pin for extra security.
Glossy Finish
After baking and cooling, apply a coat of satin or gloss water-based varnish to the eyes to make them look wet and shiny, contrasting with the matte body.
Step 4: Baking & Assembly
-
Bake:
Place your octopus on a baking sheet lined with parchment paper. Bake according to your specific polymer clay manufacturer’s instructions (usually around 275°F or 135°C for 15-30 minutes). -
Cool Down:
Allow the piece to cool completely before handling. Polymer clay is slightly fragile while still warm. -
Prepare the Cord:
Cut a length of jewelry cord or faux suede lace to your desired necklace length. -
String the Pendant:
Thread the cord through the eye of the eye pin loop. If the cord is thick, you might need to use a jump ring as an connector. -
Finish the Necklace:
Tie simple knots at the ends of the cord for an adjustable sliding knot style, or attach metal crimp ends and a clasp using your pliers.
Now you have a cute ocean companion ready to wear on your next beach trip


What Really Happens Inside the Kiln
Learn how time and temperature work together inside the kiln to transform clay into durable ceramic.
Octopus Bead For Bracelets
Create a striking centerpiece for your jewelry designs with this earthy, textured octopus bead. Modeled from reddish clay, this little sea creature features whimsical curled tentacles and delicate stippling that mimics natural skin textures.
Step-by-Step Tutorial
Materials
- Terracotta colored polymer clay or air-dry clay
- Small ball tool or dotting tool with a rounded tip
- Needle tool or toothpick
- Smooth work surface (ceramic tile or glass)
- Small bead reamer or skewer (for making the bead hole)
- Soft texture sponge or bristle brush
Step 1: Forming the Body
-
Condition the Clay:
Start by taking a walnut-sized amount of your terracotta clay and kneading it thoroughly until it is soft and pliable. This prevents cracks later on. -
Create the Head Shape:
Roll the clay into a smooth sphere, then gently elongate the top half to form a rounded, bulbous head shape, slightly narrower at the ‘neck’ area. -
Flatten the Base:
Press the bottom of the shape gently onto your work surface to create a flat base where the tentacles will attach. This ensures the bead sits nicely against the wrist. -
Pierce the Bead Hole:
Using your skewer or bead reamer, carefully pierce a horizontal hole through the lower third of the head section. Wiggle the tool slightly to ensure the channel is wide enough for your cord.
Fixing Cracks
If you see tiny cracks forming while curling the tentacles, dampen your finger with a tiny amount of water (clay) or baby oil (polymer) and smooth specifically over the stress point immediately.
Step 2: Sculpting Tentacles
-
Roll Clay Snakes:
Roll out eight small, tapered snakes of clay. They should be thicker at one end and taper to a fine point at the other, roughly 1.5 inches long. -
Attach the First Layer:
Place four tentacles in a cross shape underneath the head. Blend the thick ends seamlessly into the underside of the body using your needle tool or fingertip. -
Add Second Layer:
Place the remaining four tentacles in the gaps between the first layer, blending them in securely so the octopus looks full and balanced. -
Curl the Tips:
Gently lift the end of each tentacle and curl it into a tight spiral. I find it helpful to vary the tightness of the curls slightly to give the creature more organic movement. -
Shape the Legs:
Arrange the legs so they radiate outward before curling back in, creating a stable, star-like footprint.
Antiquing Finish
Once baked and cooled, wash a thin dark brown acrylic paint over the piece and wipe it off quickly. Ideally, paint stays in the tiny pores and suction cups to pop the texture.
Step 3: Adding Texture & Detail
-
Create Suction Cups:
Flip the octopus gently or work from the side. Use a very small ball tool to press a row of indentations along the underside of each tentacle to mimic suction cups. -
Detail the Skin:
Using a needle tool, poke tiny, shallow holes all over the top of the tentacles and the lower part of the head. Keep the spacing random for a natural skin texture. -
Texture the Head:
Continue these tiny pricks up the head, but create larger, circular indentations at the very top of the head using a larger tool to mimic breathing pores or decorative spots. -
Define the Eyes:
Use a medium-sized ball tool to press two deep sockets on either side of the head, just above the tentacle line. -
Refine the Surface:
Lightly tap the sculpture with a texture sponge or coarse brush to remove any fingerprints and mattify the surface, giving it that raw ceramic look. -
Final Inspection:
Check that the bead hole hasn’t been blocked during sculpting. Run your skewer through one last time to clear it. -
Bake or Dry:
If using polymer clay, bake according to package directions (usually 275°F for 15-30 mins). If using air-dry clay, allow it to dry for 24-48 hours until fully hard.
String your new invertebrate friend on a leather cord or macrame bracelet for a truly unique accessory
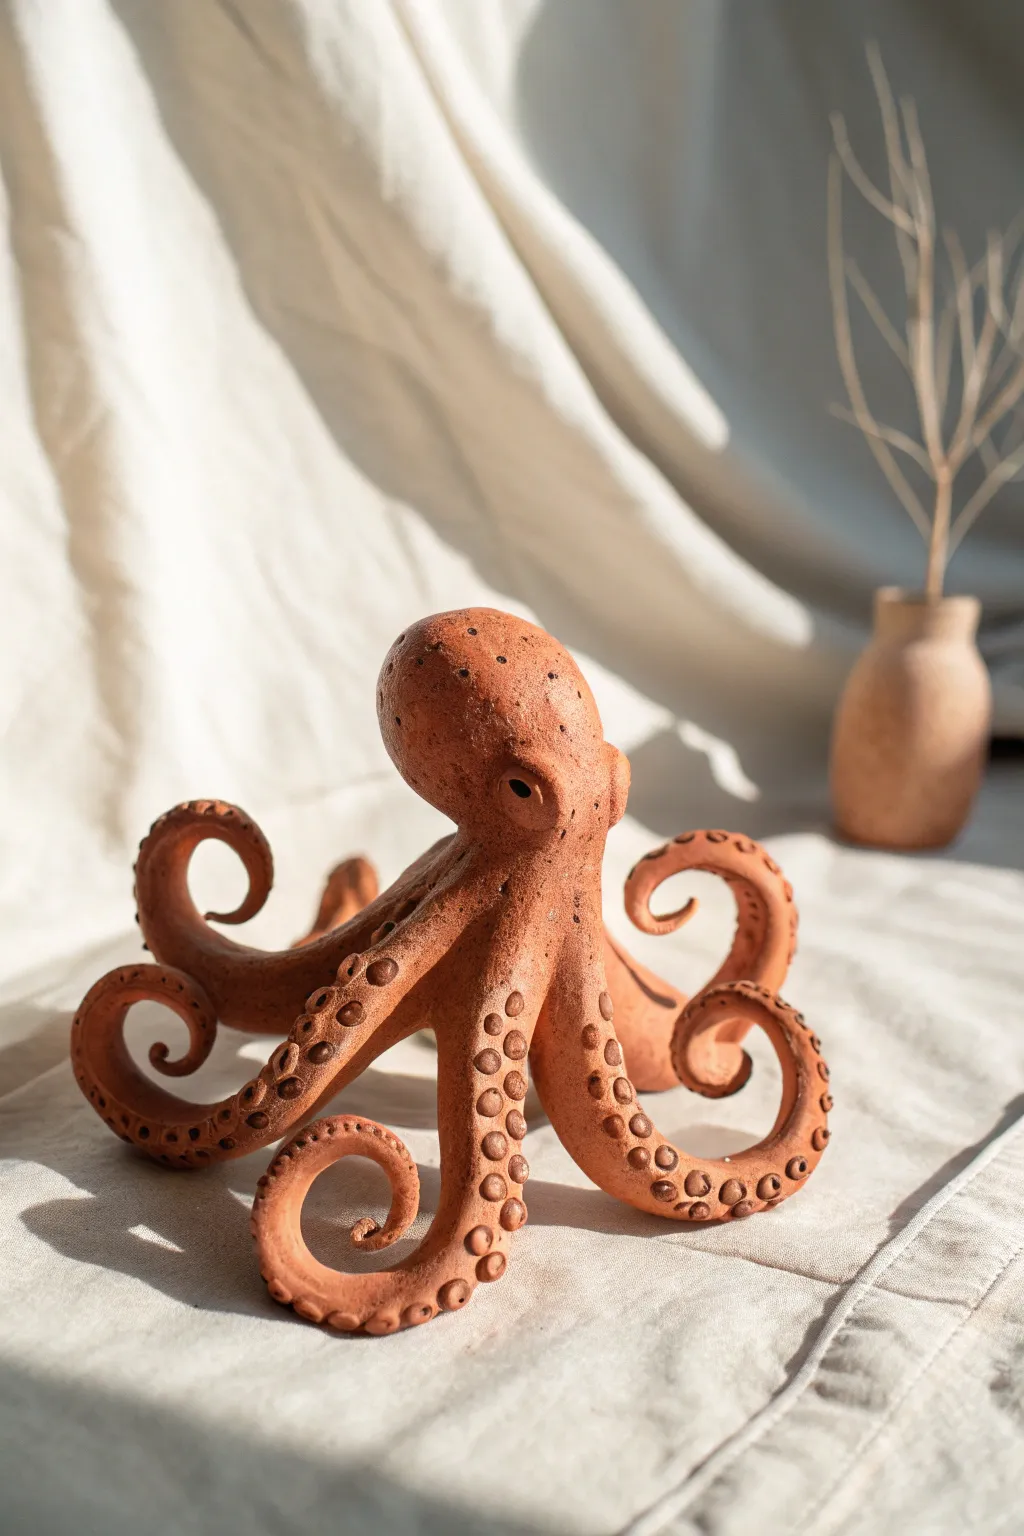
Tiny Octopus Desk Buddy
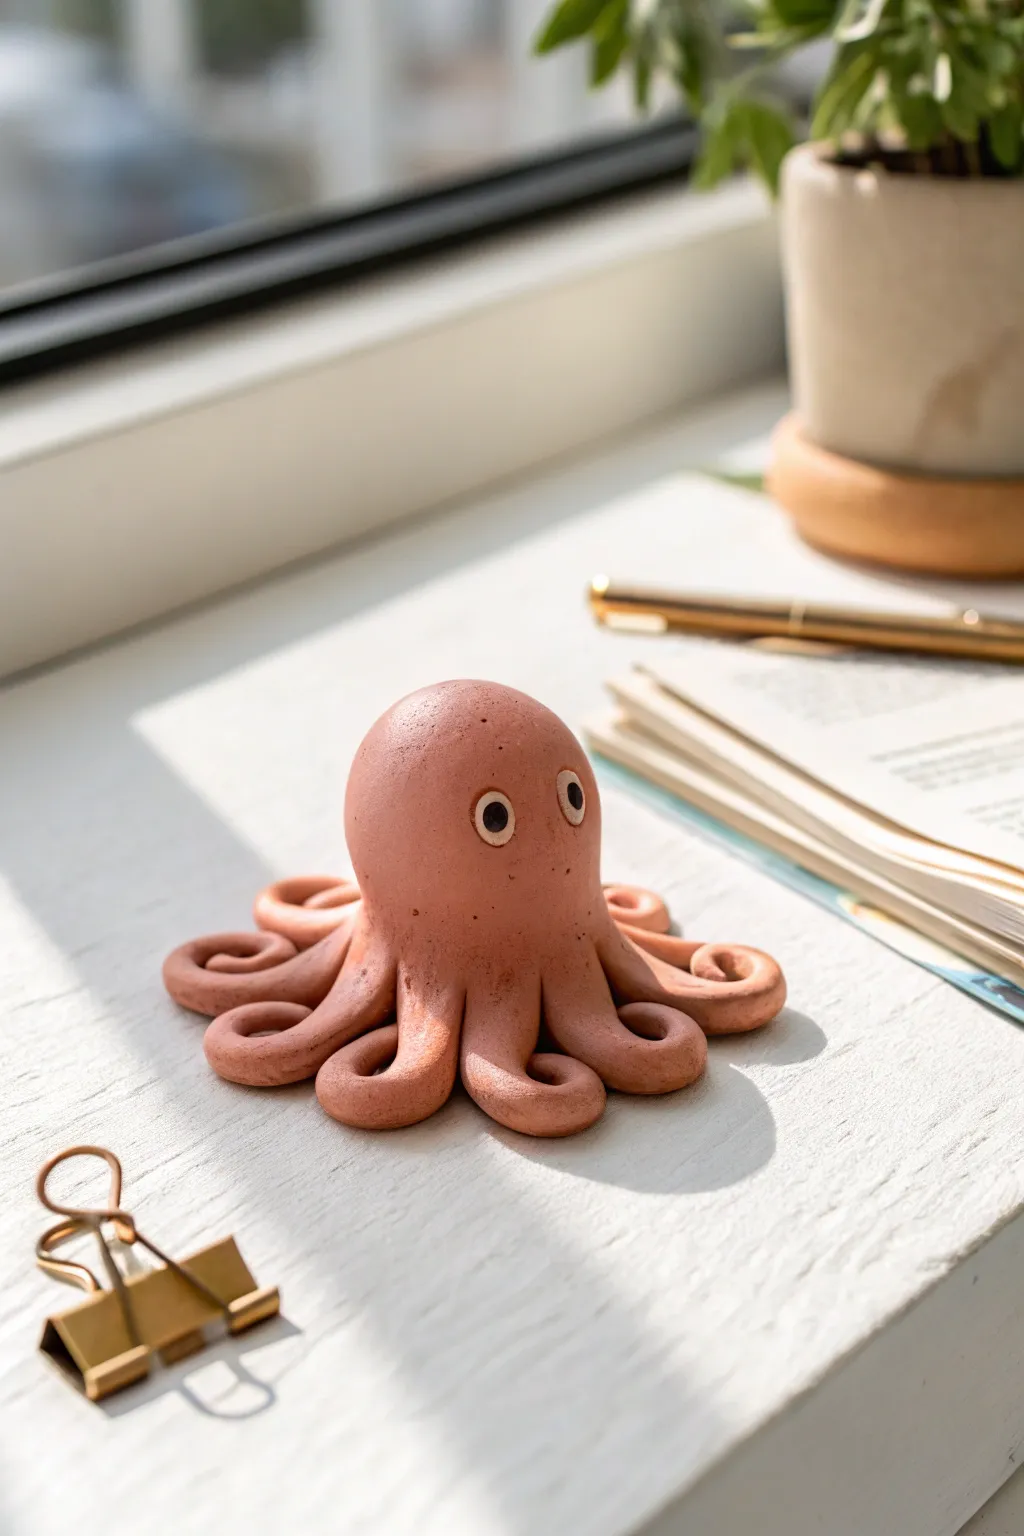
This charming, wide-eyed desk buddy brings a touch of whimsy to your workspace with its earthy, matte finish. Crafted from simple shapes, this project focuses on smooth blending and creating dynamic, curling tentacles that seem to wriggle right across your table.
Step-by-Step
Materials
- Polymer clay (terracotta or dusty pink)
- White polymer clay (tiny amount for eyes)
- Black polymer clay (tiny amount for pupils)
- Flexible clay blade or craft knife
- Ball stylus tool (medium and small)
- Silicone blending tool or rubber shaper
- Needle tool
- Acrylic roller
- Work surface (ceramic tile or glass mat)
Step 1: Forming the Base
-
Prepare the clay:
Begin by conditioning your terracotta-colored clay until it is soft and pliable. If the color is too bright, try mixing in a tiny pinch of brown or beige to achieve that subdued, earthy tone seen in the photo. -
Shape the head:
Roll a large portion of the clay into a smooth, seamless ball about the size of a golf ball. Gently elongate it slightly into a rounded egg shape to form the octopus’s head. -
Portion the tentacles:
Take the remaining clay and roll it into a long, even log about 1/2 inch thick. Using your blade, cut this log into eight equal segments. -
Taper the legs:
Roll each of the eight segments into a tapered cone shape. The thick end should attach to the body, while the other end should taper down to a smooth, rounded point.
Seamless Blending
To make the neck joint disappear completely, drag clay down from the head onto the legs with a tool, then smooth horizontally.
Step 2: Assembly and Shaping
-
Attach the first legs:
Flip the head upside down or hold it carefully. Press the thick end of four tentacles onto the bottom of the head in a cross pattern. Blend the clay seams upward into the head using a silicone tool so they are completely seamless. -
Add remaining legs:
Attach the remaining four tentacles in the gaps between the first four. Again, blend the clay smoothly at the connection points so the octopus looks like one solid unit rather than pieces stuck together. -
Curl the tips:
Place the octopus right-side up on your work surface. Take the tip of one tentacle and curl it inward into a tight spiral. Repeat this for all eight legs, varying the tightness and direction slightly for a natural, organic look. -
Adjust the posture:
I like to gently press down on the head to settle the creature onto its legs. Ensure the curled tips are supporting the body and that the legs splay out symmetrically. -
Smooth the surface:
Check the entire surface for fingerprints. Use a drop of baby oil on your finger or a soft brush to lightly buff away any prints, giving the head that matte, stone-like texture.
Textured Skin
Before baking, gently tap the skin with a toothbrush or coarse sponge to remove the ‘plastic’ shine and mimic real terracotta.
Step 3: The Face & Finishing
-
Mark eye sockets:
Using a medium ball tool, press two shallow indentations into the front of the head where you want the eyes to sit. Space them somewhat wide apart for that cute, vacant expression. -
Create the whites:
Roll two very small balls of white clay. They should be the exact same size. Press them gently into the indentations you just made, flattening them slightly so they aren’t bulging too far out. -
Add the pupils:
Roll two tiny, minuscule specks of black clay. Place these onto the center of the white circles. Press them flat carefully with a clean finger or flat tool. -
Final inspection:
Give your octopus one last look. Ensure the tentacles are curled exactly how you want them, as they will harden in this position. -
Bake:
Bake the figurine according to your polymer clay package instructions (typically 275°F or 135°C for 15-30 minutes). Let it cool completely in the oven to prevent cracking. -
Finishing touch:
Since the look is matte, you don’t need a glossy varnish. However, if the eyes look dull, a tiny dot of gloss glaze just on the black pupils brings them to life.
Now you have a stoic little cephalopod ready to guard your pens and notebooks

TRACK YOUR CERAMIC JOURNEY
Capture glaze tests, firing details, and creative progress—all in one simple printable. Make your projects easier to repeat and improve.
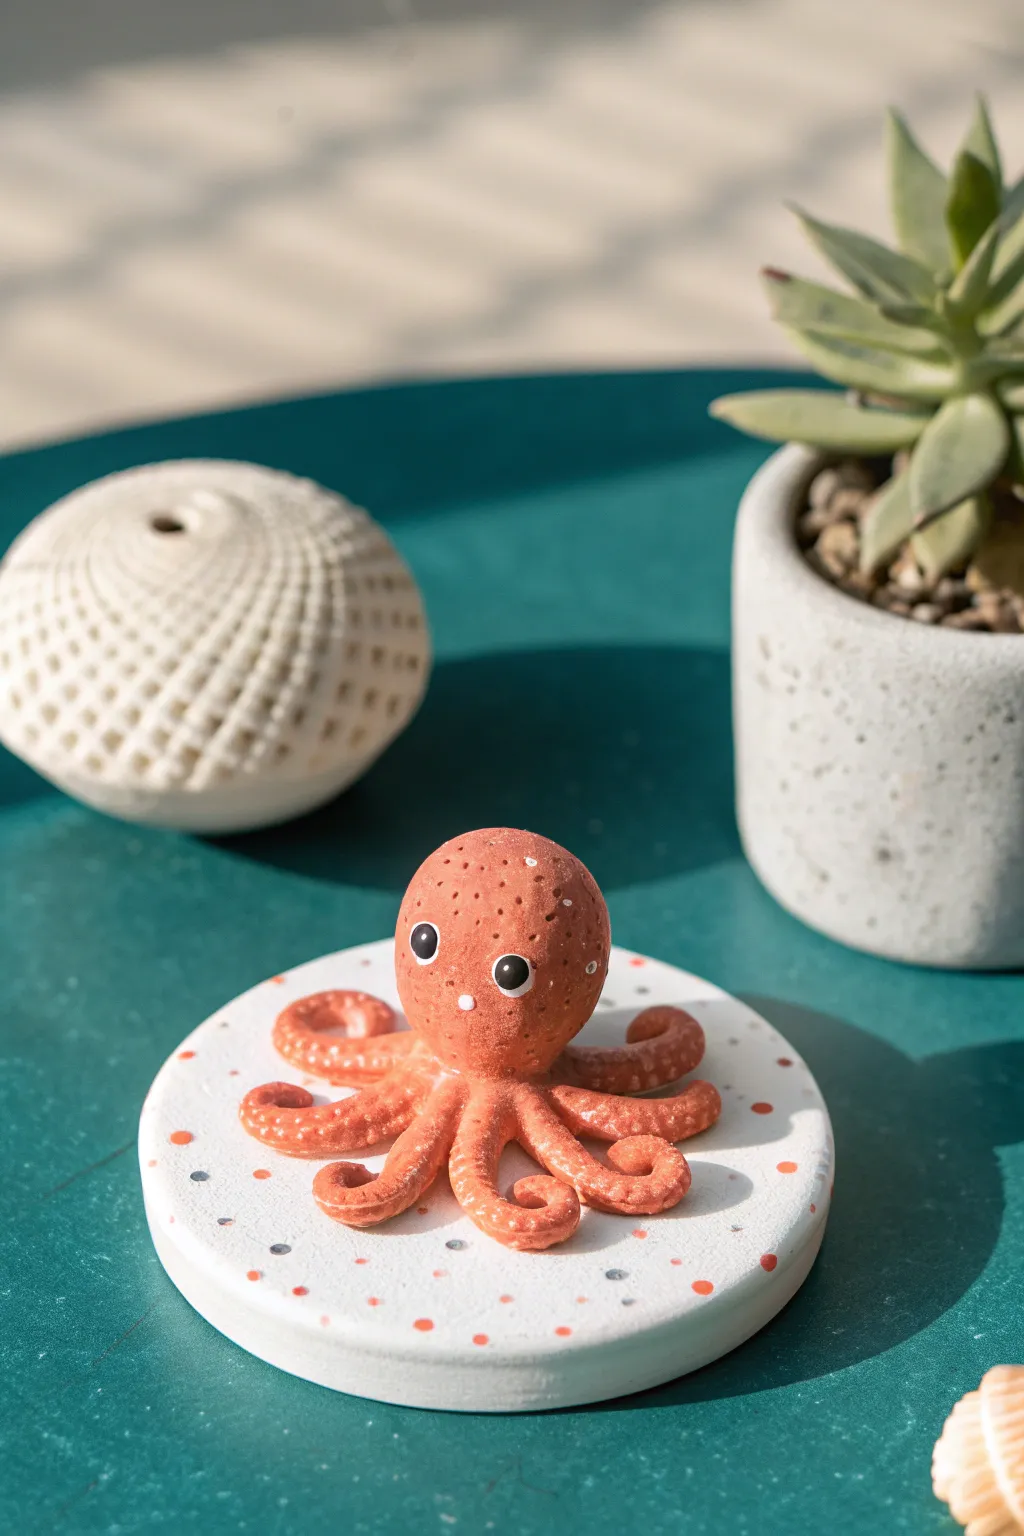
Baby Octopus In a Shell
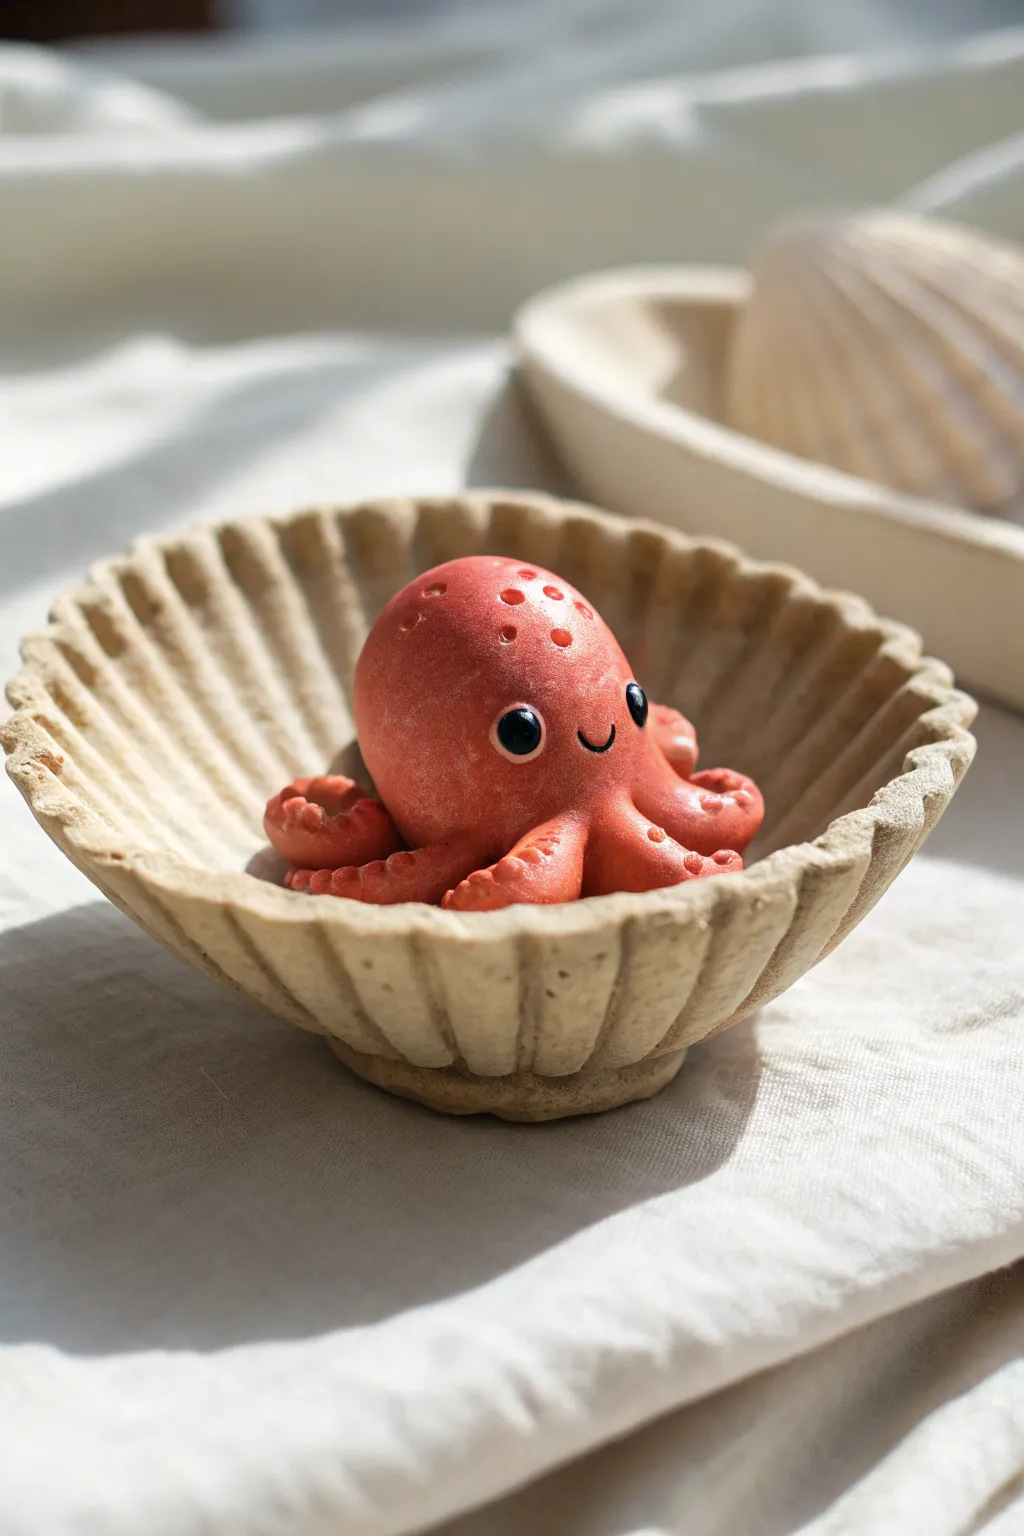
Nestled perfectly inside a handmade fluted dish, this adorable coral-colored octopus makes a charming desk companion or ring holder. Its simple, rounded forms and expressive face make it an ideal project for practicing clean modeling techniques and texture work.
Step-by-Step Guide
Materials
- Polymer clay (Coral red/terracotta color)
- Polymer clay (Beige/sand color)
- Small amounts of black and white polymer clay
- Ball stylus tools (various sizes)
- Needle tool or toothpick
- Small curved sculpting tool or plastic knife
- Acrylic roller
- Small bowl or sphere (to use as a mold for the shell)
- Cornstarch or baby powder (release agent)
Step 1: Sculpting the Seashell Dish
-
Prepare the clay:
Begin by conditioning your beige or sand-colored clay until it is soft and pliable. Roll it into a smooth ball to remove any air bubbles. -
Form the base pancake:
Flatten the ball into a thick disc, about 1/4 inch thick. You can use an acrylic roller for this, but keep the edges slightly organic rather than perfectly circular. -
Creating the flutes:
Pinch the edges of the disc gently between your thumb and forefinger to create a wavy, undulating rim. Go all the way around the circumference. -
Adding texture:
Use the side of a needle tool or a dull knife to press radial lines from the center of the dish out to the peaks of the waved edge. This mimics the striations of a scallop shell. -
Shape the bowl:
Lightly dust your small mold or bowl with cornstarch. Press your clay disc gently into it to curve the shape into a concave bowl form. -
Form the foot:
Roll a small snake of beige clay and form it into a ring. Attach this to the bottom center of your shell bowl to act as a stabilizing foot so it sits flat. -
Surface detailing:
Tap the clay surface lightly with a toothbrush or stiff brush to give it a realistic, porous stone texture before setting it aside.
Clean Clay Tip
Keep wet wipes handy! Red pigment loves to stain fingers. Clean your hands thoroughly before touching the beige shell clay to prevent pink smudges on the sand texture.
Step 2: Creating the Coral Octopus
-
Head and body shape:
Take a walnut-sized amount of the coral-colored clay and roll it into a very smooth tear-drop shape. The wider, rounded end will be the head. -
Forming the tentacles:
Instead of attaching separate legs, I prefer to gently pinch and pull the bottom of the teardrop shape outwards to form the tentacle stumps. -
Refining the legs:
Use a sculpting tool to define the separations between the tentacles, smoothing them into curled, rounded points. Arrange them so they will fit snugly inside your shell base. -
Adding suction cups:
Use a very small ball stylus to press tiny indentations underneath the curled tips of the tentacles for a suction cup effect. -
Spot texture:
Using a medium ball stylus, gently press a few varied-size dimples onto the forehead area of the octopus for added texture. -
Eye sockets:
Press two deep indentations into the face area using a large ball stylus. Spacing them widely apart adds to the ‘cute’ factor. -
Inserting the eyes:
Roll two small balls of black clay and press them firmly into the sockets. They should bulge slightly. -
The sparkle:
Place a teeny-tiny speck of white clay on the upper right side of each black eye to bring the character to life. -
The smile:
Use the edge of a curved tool or a drinking straw cut in half to impress a small, U-shaped mouth right between the eyes. -
Final assembly:
Gently place the raw octopus inside the raw shell bowl. Press down lightly to ensure they bond. Bake the entire assembly according to your clay manufacturer’s instructions.
Level Up: Glossy Finish
After baking and cooling, apply a coat of UV resin or glossy water-based varnish ONLY to the octopus’s eyes and body. Leave the shell matte for a beautiful textual contrast.
Once baked, this little sea creature is ready to hold your favorite rings or simply brighten up your shelf
Reversible Mood Octopus Twin
These charming clay octopus figures are designed with a smooth, whimsical matte finish and sweet facial expressions that bring instant cheer. While styled as twin shakers or purely decorative pieces, their rounded forms and pastel hues make them an approachable project for clay art enthusiasts.
Step-by-Step Tutorial
Materials
- Air-dry clay or polymer clay (white is best for custom painting)
- Acrylic paints (Coral Pink and Sage Green)
- Fine-grit sandpaper
- Small rolling pin
- Sculpting tools (needle tool and ball stylus)
- Fine detail paintbrush (size 0 or 00)
- Black acrylic paint or fine-tip permanent marker
- Matte spray varnish or sealant
- Water for smoothing
- Toothpick or large needle (for shaker holes)
Step 1: Sculpting the Base
-
Prepare the Clay:
Start by conditioning your clay. If using polymer, knead it until soft and pliable; for air-dry, ensure it’s moist but not sticky. Divide the clay into two equal portions, one for each octopus. -
Roll the Head:
Take about two-thirds of one clay portion and roll it into a very smooth ball. Gently flatten the bottom just enough so it sits stable without rolling away, creating a dome shape. -
Form the Tentacles:
With the remaining one-third of the clay, roll eight small, equal-sized balls. These will become the legs. -
Attach the Tentacles:
Arrange the eight small balls in a ring shape where you want the octopus to sit. Place the large dome head on top of the ring, pressing down gently so the head bonds with the legs. -
Blend the Seams:
Using a modeling tool or your finger, gently smudge the clay from the underside of the head onto each leg ball to secure them permanently. I find a little water on my fingertip helps smooth this transition flawlessly. -
Shape the Legs:
Once attached, press the outer edge of each leg ball slightly to flatten it, giving it that rounded, flowing appearance seen in the photo. Use a tool to define the separation between each leg if they squished together. -
Add Shaker Holes:
If you want these to function as shakers (or just mimic the look), use a toothpick or large needle to poke 3-5 holes in a small cluster at the very top of the head. -
Repeat for the Twin:
Repeat the entire sculpting process for the second octopus so you have a matching pair ready for drying or baking.
Step 2: Refining and Painting
-
Dry or Bake:
Follow the manufacturer’s instructions for your specific clay. If baking polymer clay, create a foil tent to prevent scorching. If using air-dry clay, allow 24-48 hours for complete drying. -
Sand for Smoothness:
Once fully cured, inspect your octopuses. Use fine-grit sandpaper to gently buff away any fingerprints or rough textures on the dome surface. Wipe away dust with a slightly damp cloth. -
Base Coat – Coral:
Paint the first octopus entirely in a soft coral pink acrylic paint. Use broad, smooth strokes to avoid brush marks. It may require two or three thin coats for opaque coverage. -
Base Coat – Sage:
Paint the second octopus in a muted sage green. Let the base coats dry completely before moving to details. -
Sketch the Face:
Lightly pencil in the placement of the eyes and mouth to ensure they are centered and symmetrical on both figures. -
Paint the Eyes:
Using your finest detail brush and black paint, create two small inverted ‘U’ shapes for the smiling eyes. On the green octopus, add tiny eyebrows above the eyes. -
Paint the Mouth:
Paint a small, simple ‘U’ shape for the smile centered between the eyes. -
Add Cheeks:
Mix a slightly darker shade of the body color (darker pink for the coral one, rosy pink for the green one). Dip a cotton swab or the back of a paintbrush handle into the paint and stamp round rosy cheeks next to the smile. -
Freckles:
For the coral octopus, use a tiny tool to dot three small dark freckles on each cheek. -
Seal the Work:
Finish by spraying both figures with a matte clear sealant. This protects the paint from chipping and gives them that uniform, professional finish shown in the image.
Cracking Clay?
If you see hairline cracks in air-dry clay while drying, mix a tiny bit of fresh clay with water to make a paste and fill the cracks, then sand smooth once dry.
Texture Twist
Before baking or drying, press a piece of textured fabric or a sponge against the octopus’s skin to give it a stone-like surface instead of a smooth finish.
Place these delightful twins on a shelf or desk where their happy smiles can brighten your day
Gentleman Octopus With Bowtie
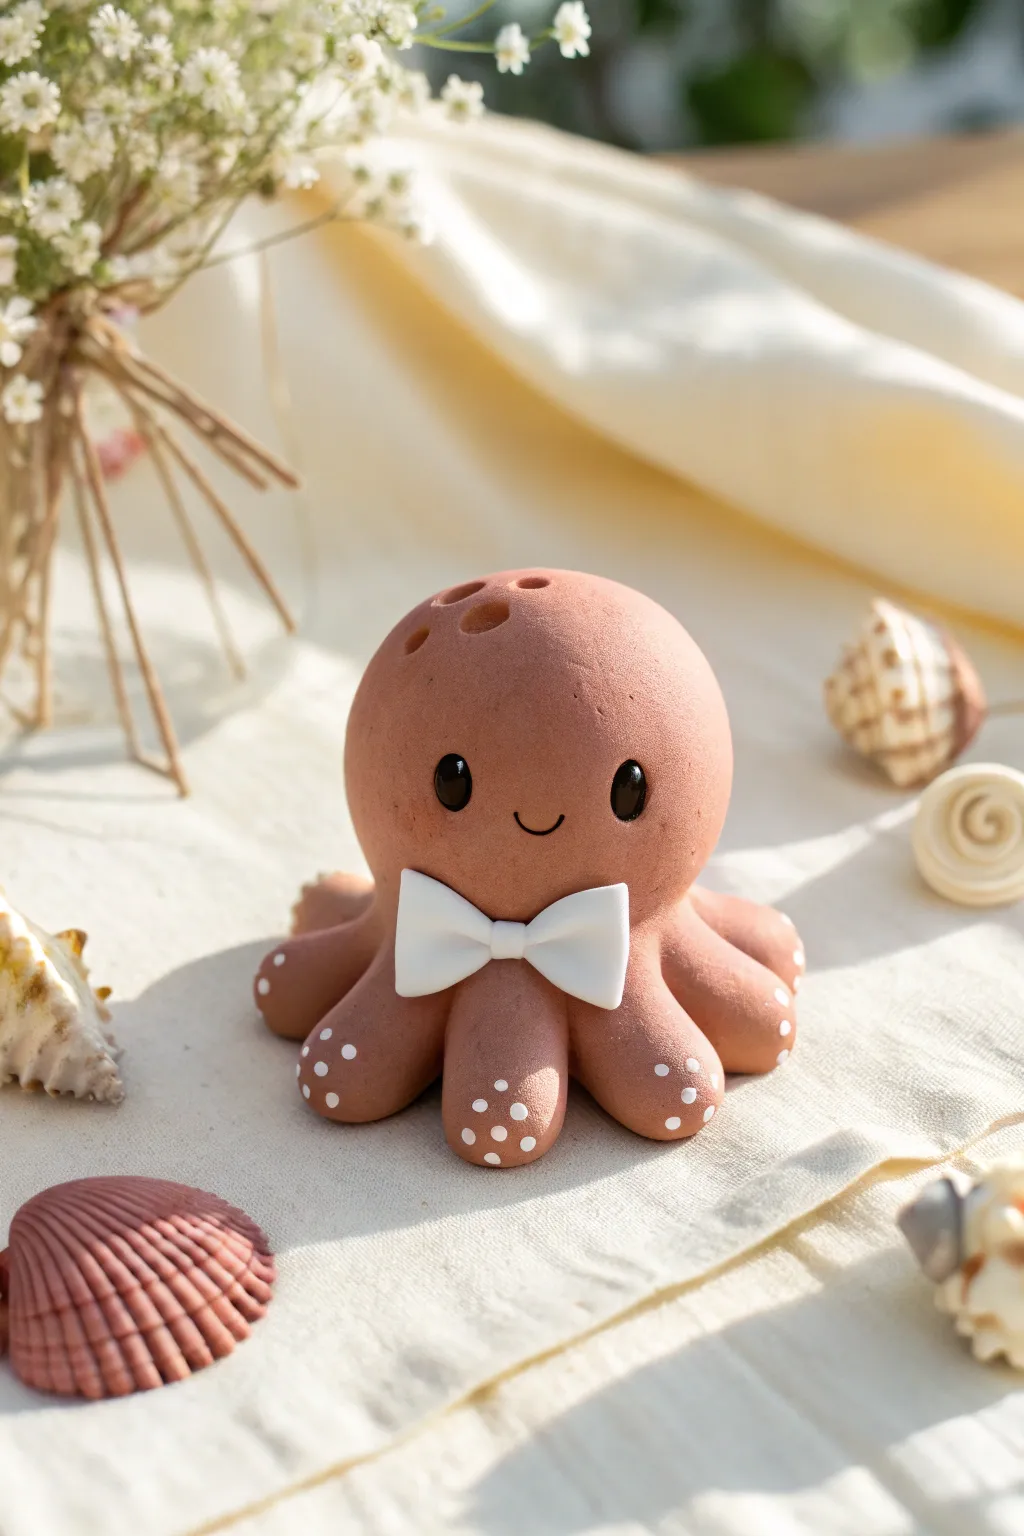
This charming little cephalopod is ready for a formal event with his crisp white bowtie and friendly smile. Sculpted from terracotta-colored clay with delicate white accents, he makes for a perfect desk companion or distinctive gift.
Step-by-Step Guide
Materials
- Terracotta-colored polymer clay (or air-dry clay)
- White polymer clay
- Black polymer clay (or black beads)
- White acrylic paint
- Small dotting tool or toothpick
- Clay sculpting tools (needle tool, smoothing tool)
- Small rolling pin
- Craft knife
- Wet wipes (for cleaning hands between colors)
Step 1: Sculpting the Base Body
-
Condition the Main Clay:
Start by taking a generous amount of terracotta-colored clay. Knead it in your hands until it’s warm, soft, and pliable to prevent cracking later. -
Form the Head:
Roll the clay into a smooth ball about the size of a tangerine. Gently taper just the bottom portion slightly to create a very subtle pear shape, keeping the top nice and round. -
Create Tentacle Portions:
Divide a separate lump of terracotta clay into eight equal-sized small balls. These will become the tentacles. -
Shape the Tentacles:
Roll each small ball into a short, thick log or cone shape. Flatten one end slightly where it will attach to the body. -
Attach Tentacles:
Press the tentacles onto the bottom of the main body piece, arranging them in a circle so they flare outwards. Use a blending tool or your finger to smooth the seams so the clay looks like one continuous piece. -
Smooth the Form:
Go over the entire surface with your finger or a silicone tool to remove any fingerprints. A light brush with a tiny bit of baby oil can help achieve that ultra-smooth matte finish seen in the photo.
Keeping It Clean
White clay stains easily! Always wipe your hands and tools with a baby wipe or alcohol swab before switching from the terracotta clay to the white bowtie clay to keep it pristine.
Step 2: Adding the Dapper Details
-
Indent Eye Sockets:
Use a ball tool to press two small indentations into the face area where you want the eyes to sit. -
Insert the Eyes:
Roll two tiny balls of black clay. Press them firmly into the sockets you just made. Alternatively, you can use small black beads. -
Carve the Smile:
Use a needle tool or a small curved sculpting tool to gently press a small ‘U’ shape between the eyes for a subtle, happy smile. -
Texturing the Head:
Using a larger ball tool, press three shallow, decorative indentations onto the top left of the head to add a bit of organic character. -
Make the Bowtie Wings:
Clean your hands thoroughly. Take a small piece of white clay, flatten it, and cut two small triangles with rounded corners. -
Assemble the Bowtie:
Place the two triangles point-to-point on the octopus’s ‘neck’ area. Roll a tiny rectangle of white clay and place it vertically over the center to create the knot. -
Refine the Bowtie:
Use a tool to create a soft crease in the center of each bowtie wing for a realistic fabric look.
Make Him a Sir
Want to make him even fancier? Sculpt a tiny black top hat and place it slightly askew on his head, or add a monocle using a thin wire ring and a dab of clear gloss.
Step 3: Finishing Touches
-
Bake or Dry:
If using polymer clay, bake according to the package instructions (usually 275°F/135°C for 15-30 minutes). If using air-dry clay, let it sit for 24-48 hours. -
Paint the Spots:
Once cool or dry, dip a small dotting tool into white acrylic paint. Add tiny polka dots to the tips of the tentacles. -
Add Highlights:
Place a minuscule dot of white paint on the upper right corner of each black eye to bring your gentleman to life. -
Protective Coat:
Finish with a layer of matte varnish if you want to protect your work without making it shiny.
Place your sophisticated friend on a shelf to add a touch of class to your decor
Fancy Octopus With Tiny Hat
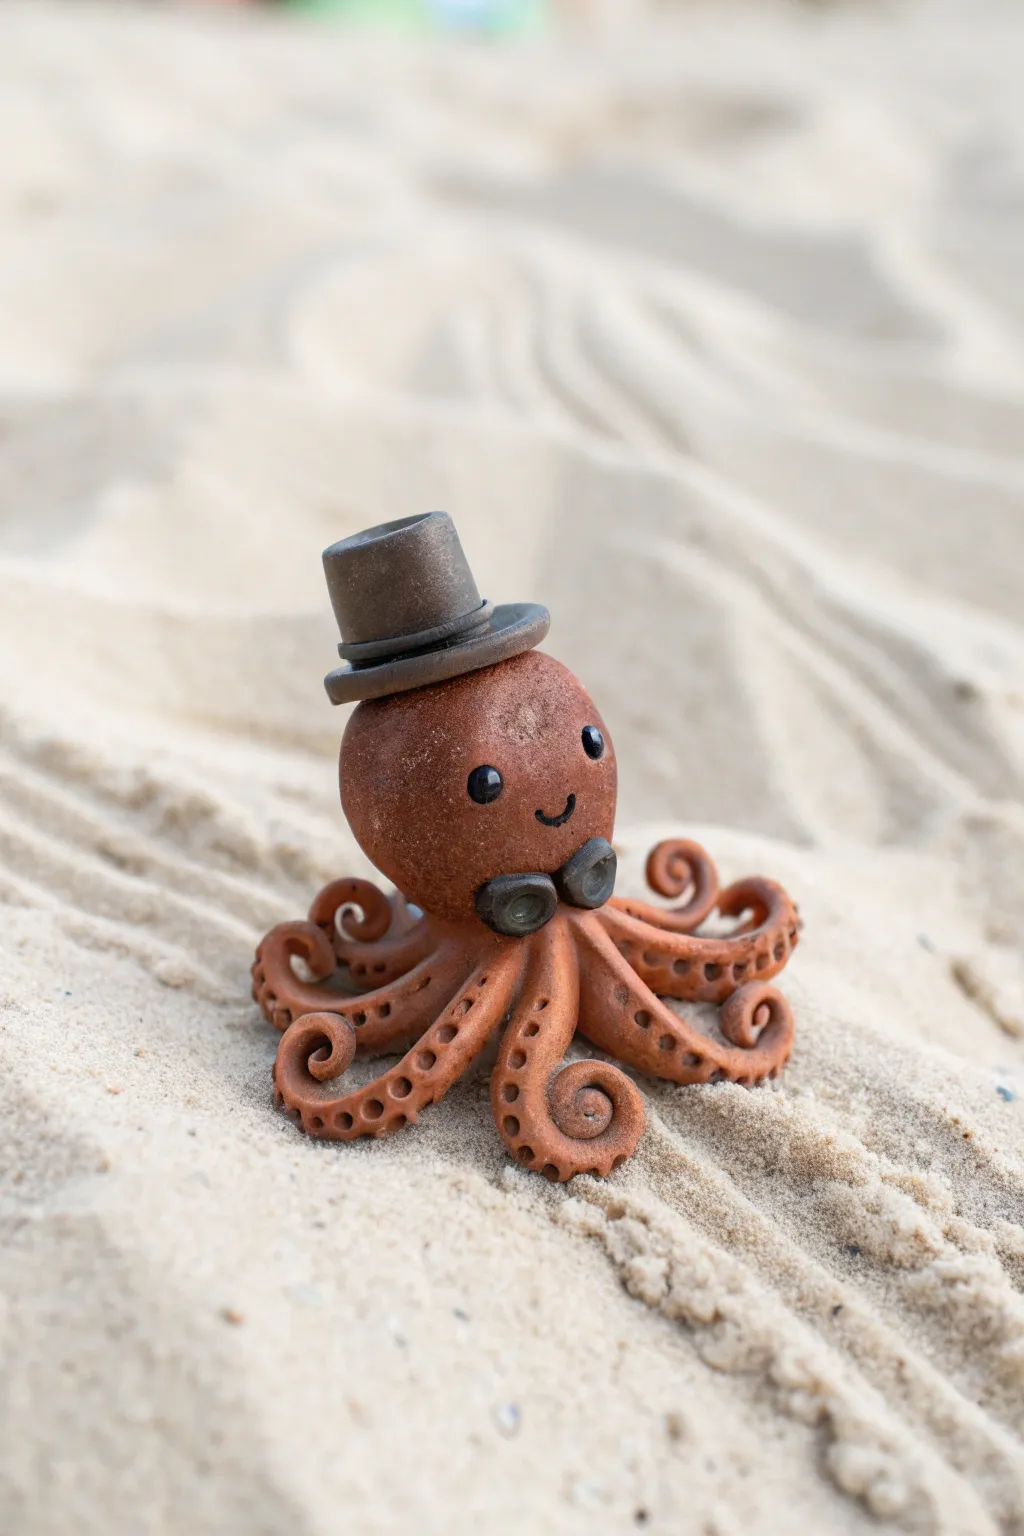
This charming little cephalopod brings a touch of class to the ocean floor with his tiny top hat and sophisticated bow tie. Crafted from reddish-brown clay and finished with careful textures, he looks perfect posed in a sandy scene.
Detailed Instructions
Materials
- Polymer clay (terracotta or rust-brown color)
- Polymer clay (dark grey or black for accessories)
- Black glass beads or small black clay balls (for eyes)
- Dotting tool or small ball stylus
- Pointed sculpting tool or toothpick
- Baking sheet / ceramic tile
- Oven (for baking)
- Acrylic paint (black – optional for mouth)
- Fine liner brush
Step 1: Sculpting the Head and Body
-
Roll the main sphere:
Start by conditioning your terracotta-colored clay until it is soft and pliable. Roll a smooth ball about the size of a large walnut; this will form the main head of the octopus. -
Shape the head:
Gently pinch and smooth the ball so it’s slightly teardrop-shaped but remains quite round at the top. The idea is to have a bulbous head that tapers slightly towards where the legs will attach. -
Create the base for legs:
Flatten the bottom of your shape slightly against your work surface so the octopus will sit upright without rolling away.
Step 2: Forming the Tentacles
-
Prepare clay snakes:
Roll out eight tapered snakes of the same terracotta clay. They should be thicker at one end (to attach to the body) and curl into a fine point at the other. -
Attach the legs:
Press the thicker end of each tentacle under the base of the head you created earlier. Arrange them so they radiate outward like a star. -
Blend the seams:
Use a sculpting tool or your finger to smooth the clay where the legs meet the body, ensuring a seamless transition so they don’t fall off during baking. -
Curl the tips:
Take the tip of each tentacle and curl it tightly inward. Vary the curls slightly—some can be tighter than others—to give the octopus a natural, organic movement. -
Add suction cups:
Using a small dotting tool or the head of a pin, press a row of small indentations along the underside of every tentacle. I like to start with larger dots near the body and make them smaller as I reach the tip.
Clean Clay Tip
Keep wet wipes handy when switching from the dark hat clay back to the lighter body clay. Dark pigment transfers easily and can stain the terracotta color.
Step 3: Adding the Face
-
Insert the eyes:
Press two small black glass beads into the face area. If you are using black clay instead, roll tiny balls and press them flat against the head. -
Add the smile:
Use a fine liner brush with a tiny amount of black acrylic paint to draw a small, U-shaped smile between the eyes. Alternatively, you can etch this line with a needle tool.
Glossy Upgrade
After baking, apply a coat of clear gloss glaze to just the eyes and the suction cups. This makes them look wet and realistic against the matte body.
Step 4: Accessories and Details
-
Make the hat brim:
Condition a small amount of dark grey or black clay. Flatten a small circle to create the rim of the top hat. -
Form the hat crown:
Roll a small cylinder of the same dark clay. Press it onto the center of the brim you just made. -
Add a hat band:
Roll a very thin snake of clay and wrap it around the base of the cylinder where it meets the brim to create a decorative band. -
Attach the hat:
Place the finished hat on the octopus’s head, tilting it slightly to the side for extra personality. Press gently to secure. -
Create the bow tie:
Form two tiny ovals of dark clay and press them together below the smile. Add a tiny dot of clay in the center to complete the bow tie look.
Step 5: Finishing Up
-
Final texture check:
Look over your sculpture for any fingerprints. You can gently buff them out with a tiny drop of baby oil on your fingertip. -
Bake:
Bake the project according to the manufacturer’s instructions for your specific brand of polymer clay (usually around 275°F or 130°C for 15-30 minutes). -
Cool down:
Allow the octopus to cool completely before handling, as the clay is fragile while hot.
Place your dapper creation on a shelf or plant pot to add a whimsical vibe to your decor
Octopus With Heart Tentacles
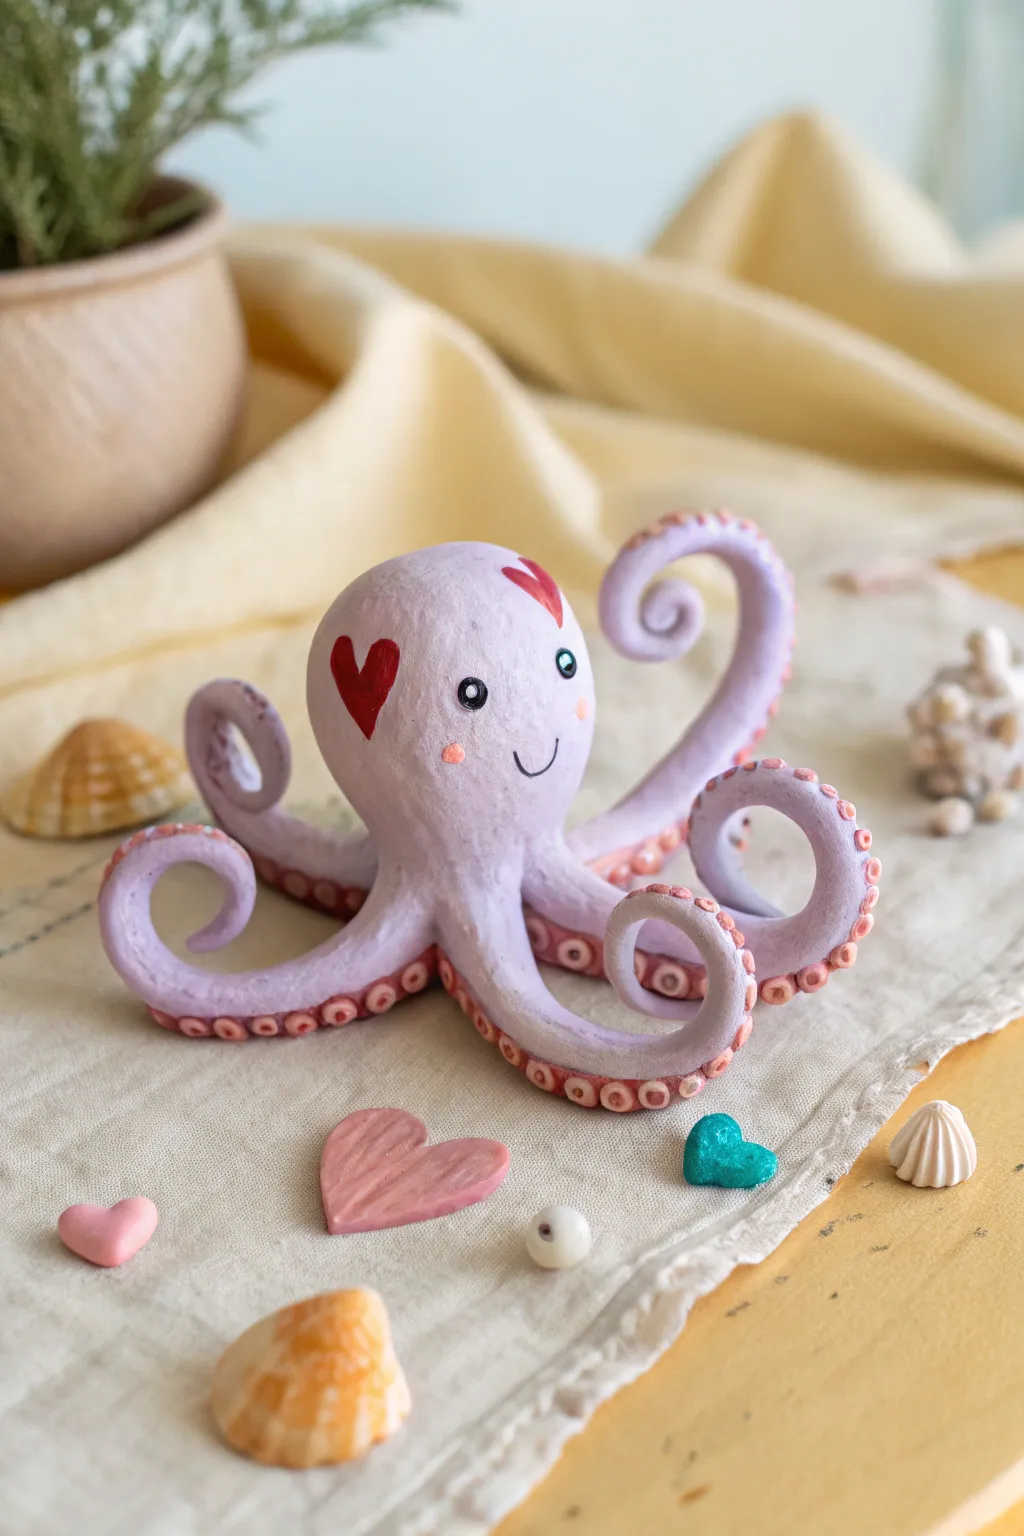
This adorable purple octopus figurine captures hearts with its swirly tentacles and sweet hand-painted details. It features a smooth matte finish with individually sculpted suction cups that add wonderful texture to the whimsical design.
How-To Guide
Materials
- Polymer clay (light purple/lavender)
- Polymer clay (pale coral/pink for suction cups)
- Acrylic paints (red, black, white)
- Fine detail paintbrush
- Dotting tool or small ball stylus
- Clay sculpting tools (needle tool, smoothing tool)
- Aluminum foil (for armature)
- Baking sheet and parchment paper
- Matte varnish (optional)
Step 1: Sculpting the Base Form
-
Create the core:
Start by scrunching a small piece of aluminum foil into a ball about the size of a walnut. This saves clay and keeps the head lightweight while baking. -
Cover the head:
Condition your lavender polymer clay until it’s soft and pliable. Flatten a sheet of clay and wrap it smoothly around the foil ball, rolling it in your palms to remove any seams or fingerprints. -
Shape the body:
Extend the clay downward slightly from the ball to create a thick, short neck area where the tentacles will eventually attach.
Drooping Tentacles?
If raised tentacles fall during sculpting, prop them up with cornstarch or polyester batting. These materials support the weight in the oven but won’t leave flat spots like a baking sheet would.
Step 2: Forming the Tentacles
-
Roll the coils:
Roll out eight long, tapered snake shapes from the same lavender clay. Make them thicker at one end (to attach to the body) and gently pointed at the tips. -
Attach the legs:
Press the thick end of each tentacle onto the underside of the body. Use a silicone smoothing tool or your finger to blend the clay upwards so the legs look like they are growing naturally out of the head. -
Curl the tips:
Arrange the tentacles in dynamic poses. I like to lift a few legs up in the air and curl the very tips into tight spirals for that classic whimsical octopus look. -
Prepare suction cups:
Take your pale coral or pink clay and roll tiny, rice-sized balls. You will need quite a few of these—roughly 10-15 per tentacle.
Step 3: Adding Details and Baking
-
Apply suction cups:
Gently press the small pink balls onto the underside of each tentacle in a single row. -
Indent the centers:
Use a small dotting tool or the rounded end of a paintbrush to press an indentation into the center of each pink ball. This turns them from simple dots into realistic-looking suction cups. -
Final smoothing:
Give the entire piece a once-over with a tiny bit of baby oil on your finger to smooth away any accidental fingerprints before baking. -
Bake the piece:
Place the octopus on a baking sheet lined with parchment paper. If you have legs raised in the air, you may need to prop them up with scrap foil. Bake according to your clay package instructions (usually 275°F/135°C for 15-30 minutes). -
Cool down:
Let the sculpture cool completely before handling. Polymer clay is fragile when hot and hardens fully as it returns to room temperature.
Clean Clay Tip
Lighter colors like lavender show dust easily. wash your hands thoroughly and wipe down your work surface with a baby wipe before starting so no lint gets trapped in your clay.
Step 4: Painting the Personality
-
Paint the eyes:
Using a fine detail brush and black acrylic paint, add two small circles for eyes. Once dry, add a tiny white dot in the upper corner of each eye for a sparkle effect. -
Add the smile:
Paint a very thin, small ‘u’ shape between the eyes for a gentle smile. -
Blush the cheeks:
Mix a tiny amount of red with white paint (or use watered-down red) to dab soft pink spots on the cheeks just below the eyes. -
Add hearts:
Paint two bold red hearts on the forehead area to give the octopus its signature loving expression. -
Seal (optional):
If you want to protect your paint job, apply a coat of matte varnish over the piece, or use gloss varnish just on the eyes to make them shine.
Now you have a charming aquatic friend to display on your desk or gift to someone special
Octopus Holding a Pearl
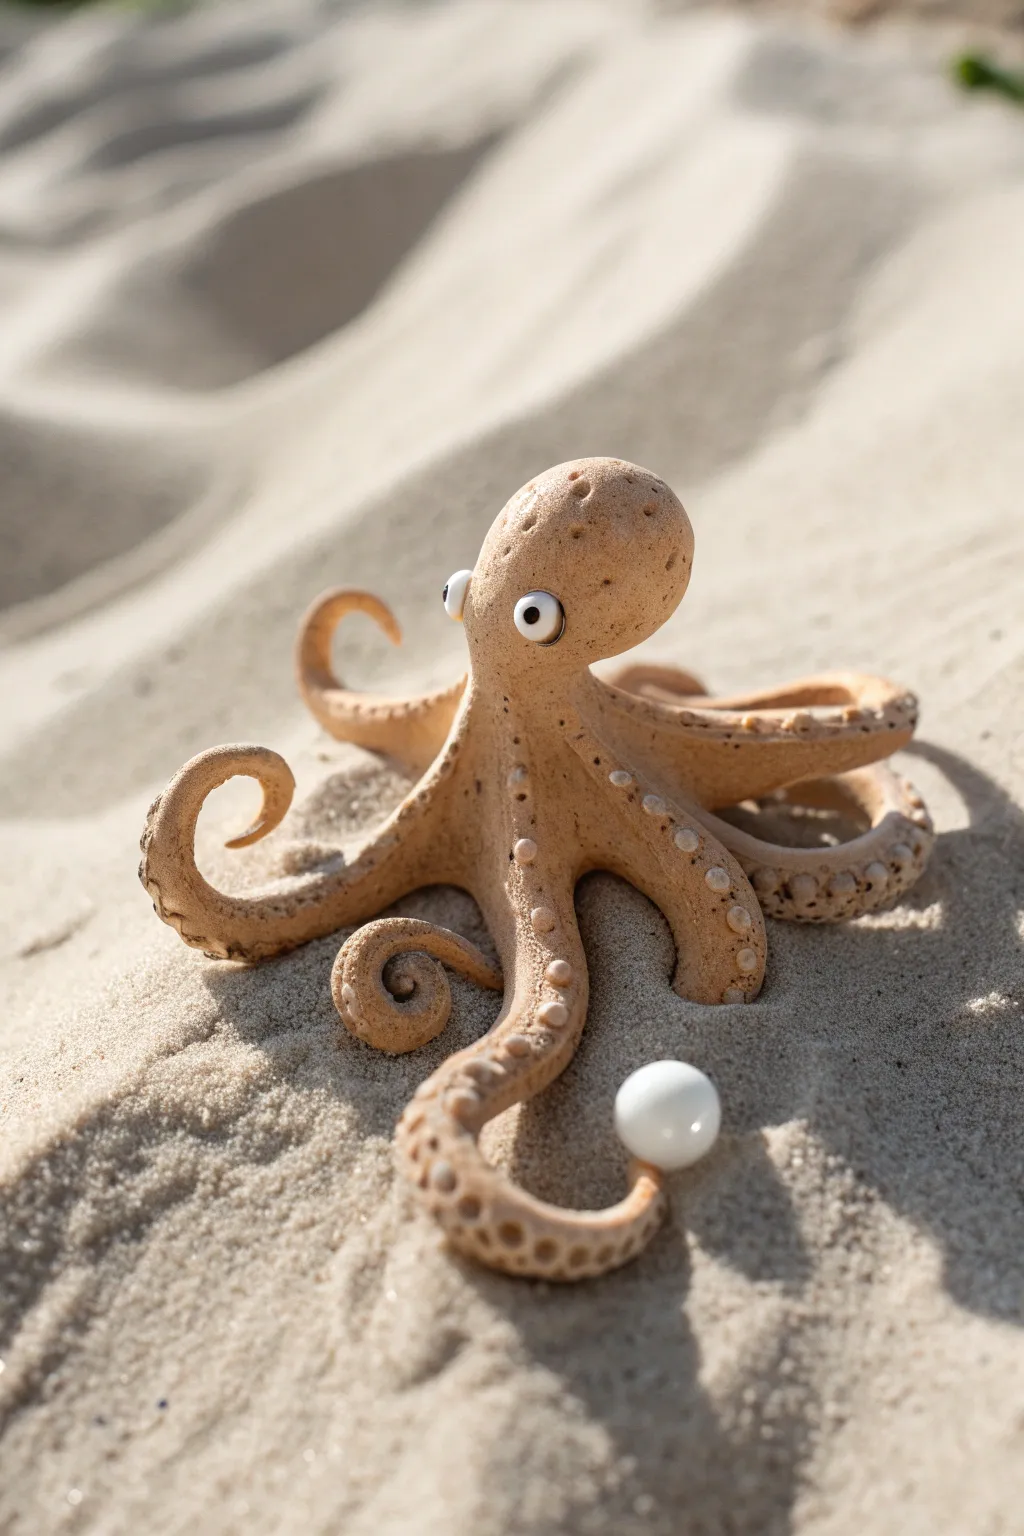
This charming little octopus serves as a guardian for tiny treasures, gripping a pearlescent marble in its curling tentacle. Crafted to mimic the texture of wet sand with a realistic speckled finish, this figurine brings a touch of beachside whimsy to any display.
Detailed Instructions
Materials
- Tan/beige polymer clay (approx. 2 oz)
- White pearl marble or large bead
- Coarse black pepper or brown embossing powder (for speckling)
- White polymer clay (very small amount)
- Black polymer clay or small black beads (for pupils)
- Texturizing tool (stiff toothbrush or sandpaper)
- Needle tool or toothpick
- Small ball stylus tool
- Gloss varnish (optional)
Step 1: Preparing the Clay
-
Create the Sand Texture:
Before sculpting, we need to create that faux-stone, sandy look. Take your tan polymer clay and knead in a small pinch of coarse black pepper or brown embossing powder. Knead thoroughly until the specks are evenly distributed throughout the block. -
Separate Your Portions:
Divide your clay into two uneven parts. You’ll need about one-third for the head and two-thirds for the tentacles. Roll both parts into smooth balls to get them ready.
Droopy Legs?
If the raised tentacles sag before baking, support them with small crumpled bits of paper towel or foil. These props can be removed easily once the clay is baked hard.
Step 2: Forming the Body
-
Shape the Head:
Take the smaller ball and shape it into a rounded, slightly elongated teardrop shape. Flatten the bottom slightly where it will connect to the legs. This will be the mantle of the octopus. -
Divide the Legs:
Flatten the larger ball of clay into a thick disk. Use a knife or cutter to slice this disk into eight equal wedges, like a pizza. Each wedge will become a leg. -
Roll the Tentacles:
Roll each wedge into a long, tapered snake shape. One end should be thicker for the base, tapering down to a fine, curling point. -
Assemble the Base:
Arrange the eight tentacles in a starburst pattern, pressing the thick ends together in the center. Gently blend the seams where they meet using your thumb or a modeling tool so it becomes one solid unit. -
Attach the Head:
Place the head piece onto the center of the leg assembly. Use a blending tool or your finger to smooth the clay from the neck down onto the shoulders of the legs, ensuring a seamless connection.
Beach Glass Upgrade
Instead of a pearl, use a piece of genuine sea glass or a small seashell found on your travels to make this a special memory-keeper souvenir.
Step 3: Adding Details
-
Create the Skin Texture:
This is crucial for the sandy look. Gently tap the entire surface of the octopus with a stiff toothbrush or a crumpled ball of aluminum foil. This removes fingerprints and gives it that stone-like, porous grit. -
Add Suckers:
Use a small ball stylus to press rows of indents along the underside and sides of each tentacle. I like to vary the size, making them larger near the body and tiny near the tips. -
Shape the Pearl Grip:
Select one front tentacle and curl the tip upward into a ‘C’ shape. Place your pearl marble into the curl to test the fit, ensuring the clay hugs it securely, but remove the marble before baking if it’s plastic. -
Pose the Other Legs:
Give the remaining legs movement by curling the tips and arching them slightly. This makes the octopus look like it’s crawling across the sand rather than sitting flat.
Step 4: The Eyes and Finishing
-
Make Eye Sockets:
Press two deep indentations on either side of the head where the eyes will go. Using the ball stylus here helps create a clean socket. -
Form the Whites:
Roll two small balls of white clay and press them firmly into the sockets. They should bulge out slightly, typical of octopus anatomy. -
Add Pupils:
Place tiny flattened disks of black clay or small black beads onto the center of the white eyeballs. Press them in gently to secure them. -
Final Texture Check:
Look over your piece for any smooth spots you might have accidentally created while handling. Re-texture those areas with your toothbrush lightly. -
Bake:
Bake the sculpture according to your polymer clay package instructions (usually 275°F/135°C for 15-30 minutes). If your pearl is glass, you can bake it in place; otherwise, glue it in after cooling.
Place your finished Guardian of the Sands on a shelf or desk where it can keep an eye on its precious cargo
Realistic Octopus Arm Study
Capture the graceful movement of the ocean with this detailed clay octopus sculpture. Using rich terracotta clay, you’ll focus on creating realistic suction cup textures and organic curves that bring this cephalopod to life.
How-To Guide
Materials
- Terracotta air-dry clay or kiln-fire clay (approx. 2 lbs)
- Small rolling pin
- Pointed sculpting tool or needle tool
- Ball stylus tools (various sizes)
- Slip (clay mixed with water)
- Sponge
- Small bowl of water
- Wire cutter
- Aluminum foil (for armature)
Step 1: Forming the Body
-
Prepare the core:
Begin by crumpling aluminum foil into a tight egg shape to act as the internal armature for the head (mantle). This saves clay and reduces drying weight. -
Cover the armature:
Roll out a slab of clay about 1/4 inch thick. Wrap this smoothly around your foil core, blending the seams together until you have a seamless, bulbous head shape. -
Refine the head:
Smooth the surface with a slightly damp sponge to remove fingerprints. Gently pinch the clay where the neck would be to create a slight taper. -
Add the eyes:
Roll two small balls of clay and attach them to the sides of the head using the score-and-slip method. Smooth the edges into the head so they bulge naturally, then use a tool to define the eyelids.
Cracking at joints?
If tentacles start to crack at the connection point while posing, patch immediately with a wet slurry of clay (slip) and support the arm so gravity doesn’t pull it down.
Step 2: Sculpting the Tentacles
-
Pre-roll coils:
Roll out eight long, tapered coils of clay. Make them thick at the base (about finger-width) and tapering down to a fine point at the tips. -
Attach the first arms:
Flip the head body upside down. Score and slip the thick ends of four coils and attach them firmly to the base of the body. Blend the clay upwards into the head for a strong bond. -
Add remaining arms:
Attach the remaining four coils in the gaps between the first four. Ensure all connection points are thoroughly smoothed so no seams are visible. -
Pose the tentacles:
Turn the octopus right-side up. Gently bend and curl each tentacle. I like to twist the ends into spirals to mimic the creature’s fluidity onscreen. Prop up lifted arms with spare bits of sponge or clay while they set.
Step 3: Detailing and Texture
-
Create suction cups base:
Make dozens of tiny clay balls in graduating sizes. You’ll need larger ones for the base of the arms and tiny ones for the tips. -
Attach the suckers:
Slightly dampen the underside of an arm. Press the clay balls onto the tentacle in two rows, placing larger balls near the body and smaller ones toward the tips. -
Shape the suckers:
Use a ball stylus tool to press into the center of each applied clay ball. This flattens the ball slightly and creates the characteristic cup shape simultaneously. -
Add skin texture:
Using a stiff brush or a textured sponge, gently dab the top of the head and the upper side of the tentacles to create a porous, skin-like texture. -
Refine the eyes:
Use a needle tool to deepen the pupil area or shape it into a horizontal slit for realism. -
Adding spots:
With the tip of a small tool, poke tiny shallow holes or indentations randomly across the head and upper arms to mimic natural pigmentation spots.
Make it watertight
If you used kiln-fire clay, glaze the finished piece with a matte clear coat to keep the raw terracotta look while making it safe for aquarium or garden use.
Step 4: Finishing Touches
-
Final smoothing:
Check over your work for any sharp burrs or rough patches. Smooth them down with a finger dipped in water. -
Drying setup:
Let the sculpture dry slowly away from direct heat or sunlight. If using air-dry clay, rotate it occasionally so the bottom dries evenly.
Once fully dry or fired, your octopus will have a timeless, earthy presence perfect for any shelf display
Textured Octopus With Speckles

Capture the charm of the seaside with this adorable speckled octopus sculpture, featuring a natural, sandy palette and expressive eyes. The textured finish and detailed suction cups give this stylized sea creature a sophisticated yet playful character perfect for coastal décor.
Detailed Instructions
Materials
- Polymer clay (cream or off-white)
- Acrylic paints (terracotta orange, black, white, sandy beige)
- Old toothbrush or stiff bristle brush
- Small dotting tool or ball stylus
- Detail paintbrush
- Sculpting tools (needle tool, smoothing tool)
- Aluminum foil (for armature)
- Matte varnish or sealant
- Oven (for baking polymer clay)
Step 1: Forming the Body
-
Prepare the core:
Crumple a small amount of aluminum foil into a tight ball, slightly larger than a golf ball. This will be the armature for the octopus’s head, keeping the sculpture lightweight and reducing baking time. -
Cover the core:
Condition your cream-colored polymer clay until soft. Flatten a large sheet and wrap it completely around the foil ball, smoothing out any seams until you have a perfect, egg-shaped sphere. -
Shape the head:
Gently gently pinch and pull the bottom third of the sphere to create a slightly narrower ‘neck’ area where the tentacles will eventually attach. The top should remain rounded and bulbous.
Texturing Trick
Before baking, lightly pat the entire surface with a piece of coarse sandpaper or a stiff sponge. This micro-texture makes the clay look more like natural stone or unglazed ceramic.
Step 2: Creating Tentacles
-
Roll the coils:
Roll out eight tapered logs of cream clay. They should be thicker at one end (attachment point) and taper down to a fine, curling point. -
Attach the legs:
Press the thick ends of the tentacles onto the underside of the head. Use a blending tool or your thumb to smooth the clay of the tentacles upward into the head so there are no visible seams. -
Pose the octopus:
Arrange the tentacles in a dynamic, radial pattern. Curl the tips upward or sideways to give the octopus a sense of movement, as if it’s resting on the Ocean floor. -
Support the sculpt:
If the head feels too heavy, place a small object or extra crumpled foil underneath the center to support it while you work on the details.
Step 3: Adding Texture & Detail
-
Add suction cups:
Roll many tiny balls of clay. Press them down the length of each tentacle in two rows. Use a small ball stylus to press into the center of each small ball, creating the cup shape. -
Apply speckles:
Dilute a small amount of terracotta and sandy beige paint with water. Dip an old toothbrush into the mixture and flick the bristles with your thumb to spray fine speckles across the top of the head and upper tentacles. -
Create the eyes:
Using a larger ball tool, press two shallow indentations into the face area. Roll two small balls of black clay (or paint them later) and press them into these sockets. Add tiny white dots for catchlights. -
Bake the piece:
Bake the sculpture according to your specific clay manufacturer’s temperature and time instructions. Let it cool completely before painting further.
Make it a Planter
Flatten the top of the head slightly and carve out a deep hollow before baking. Once finished, you can place a tiny air plant or succulent right into the top of your octopus.
Step 4: Painting & Finishing
-
Paint the cups:
Mix a warm terracotta wash (paint diluted with water). carefully paint inside the suction cups and along the underside of the tentacles, wiping away excess from the raised edges to accentuate the texture. -
Highlight the skin:
Dry brush a very light coat of white or pale cream over the top of the head and the textured areas. This catches the raised speckles and gives the ‘skin’ a realistic, matte texture. -
Enhance the speckles:
I like to go back in with a fine detail brush and add a few larger, deliberate orange and brown spots by hand to vary the pattern created by the toothbrush splatter. -
Define the eyes:
If you painted the eyes instead of using clay, paint two solid black circles now. Once dry, add a small white highlight dot to the upper right corner of each eye for a cute expression. -
Seal the work:
Finish the piece with a coat of matte varnish to protect the paint and give it a natural, non-glossy ceramic look. Use a satin varnish on just the eyes to make them shine.
Place your finished octopus on a shelf alongside some seashells or smooth stones for a perfect touch of aquatic whimsy
Octopus Wall Charm Hanging
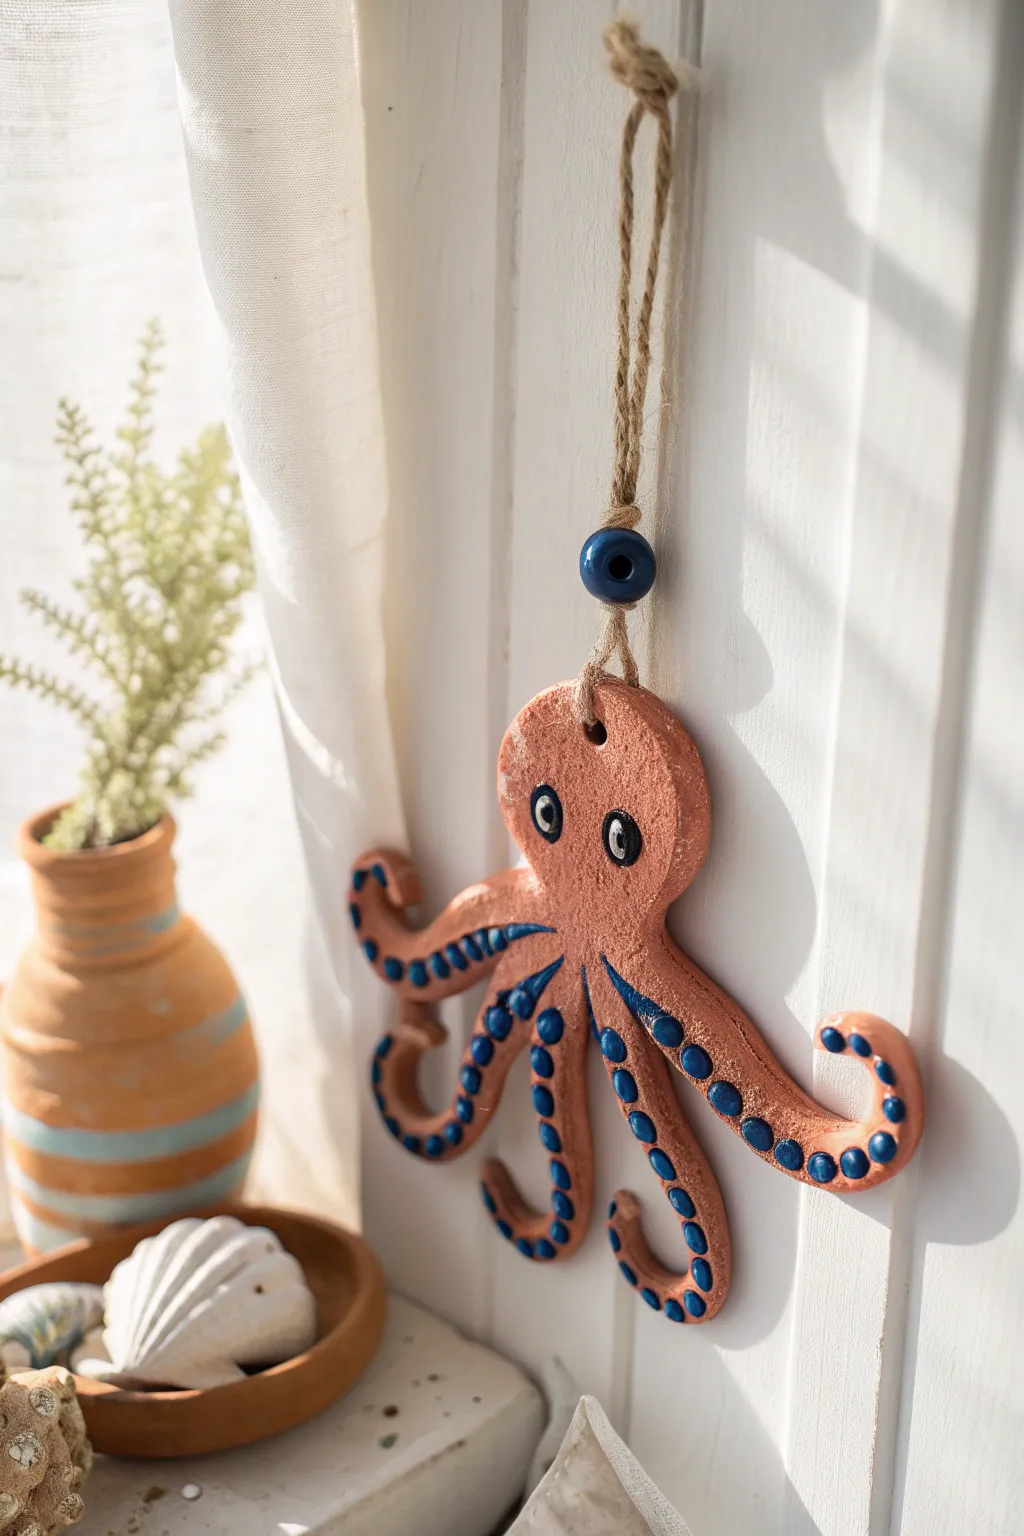
Bring a touch of the seaside to your wall with this charming rustic octopus hanging. Crafted to look like sun-baked terracotta, this friendly cephalopod features distinct blue sucker details and hangs from a simple jute cord.
Step-by-Step Guide
Materials
- Air-dry clay (terracotta color preferred)
- Rolling pin
- Octopus template (optional, drawn on paper)
- Needle tool or X-Acto knife
- Small round clay tool or stylus
- Acrylic paints: Navy blue, black, white
- Fine detail paintbrush
- Jute twine
- Large blue wooden or ceramic bead
- Skewer or straw (for hole punching)
- Sandpaper (fine grit)
- Matte sealant or varnish
Step 1: Shaping the base
-
Roll the slab:
Start by conditioning a ball of terracotta air-dry clay in your hands until it’s pliable. Roll it out on a flat surface to an even thickness of about 1/4 inch. Avoid making it too thin, as the curling tentacles need some structural integrity. -
Cut the outline:
Using a needle tool or knife, carefully cut out your octopus shape. You want a bulbous, oval-shaped head and eight tentacles radiating from the bottom. I find it easiest to lightly sketch the design onto the clay surface first before committing to the cut. -
Refine the edges:
Dip your finger in a little water and smooth down all the cut edges. The clay should look soft and rounded, removing any sharp angles left by your cutting tool. -
Curl the tentacles:
Gently lift and twist the ends of the tentacles. Curve some to the left and others to the right to create a dynamic, swimming motion. You can prop up the curled ends with small wads of foil or paper towels so they dry in that lifted position. -
Create the hanging hole:
Use a skewer or a straw to punch a clean hole at the very top center of the head. Ensure it is large enough for your jute twine to pass through easily.
Smooth Operator
Keep a small bowl of water nearby while sculpting. A damp finger is the best tool for erasing fingerprints and smoothing out the clay join lines.
Step 2: Adding texture and drying
-
Texture the surface:
To mimic the sandy look of the original, you can gently pat the surface with a rough sponge or a crumpled ball of foil. This removes the perfect smoothness and adds that rustic, handmade charm. -
Dry completely:
Place the octopus on a wire rack to allow air circulation underneath. Let it dry for at least 24-48 hours. The terracotta color will lighten slightly as the moisture evaporates. -
Sand imperfections:
Once fully cured, use fine-grit sandpaper to buff away any burrs or rough spots on the edges, paying special attention to the curves of the tentacles.
Textured Tentacles
Before painting the blue dots, press a small round tool into the clay where each sucker will go. This creates relief texture that makes painting easier.
Step 3: Painting and assembly
-
The base wash:
If your clay isn’t already the perfect shade, mix a watered-down acrylic wash of burnt sienna and orange to stain the clay, then wipe it back for a weathered look. If you used colored clay, you can skip this step. -
Paint the suckers:
Using your fine detail brush and navy blue acrylic paint, add rows of small dots along the underside of the tentacles. Start with larger dots near the body and make them progressively smaller as you reach the tips. -
Create the dimension:
To make the suckers pop like the image, add a tiny highlight of a lighter blue or white mixed with blue to the top-right curve of each dot once the base layer is dry. -
Paint the eyes:
Paint two white ovals for the eyes. Once dry, add smaller black ovals inside for pupils, leaving a tiny white speck in the black area for a ‘gleam’ that brings the character to life. -
Seal the piece:
Appy a coat of matte varnish or sealant over the entire piece to protect the paint and give the clay durability. -
Attach the hanger:
Cut a length of jute twine roughly 12 inches long. Fold it in half to create a loop at the top. -
Add the bead:
Thread both cut ends of the twine through your blue bead. Slide the bead up so it sits about 2 inches below the top loop. -
Secure the charm:
Thread the loose ends of the twine through the hole in the octopus head from front to back. Tie a secure double knot on the back side to hold the octopus in place.
Hang your handcrafted sea creature near a window or patio door to enjoy a bit of coastal flair every day