When I want a relaxing, creative win, I reach for oven-bake clay because it bakes up strong and looks surprisingly high-end with just a few smart finishes. These ideas are all about grown-up style—functional decor, modern shapes, and pieces you’ll actually use every day.
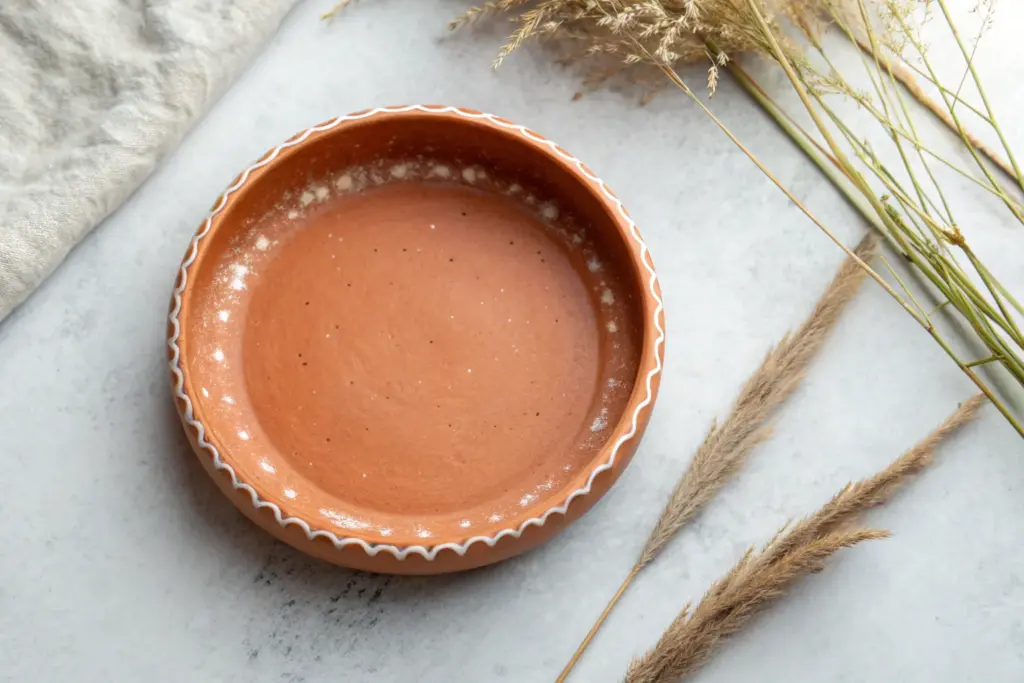
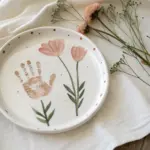
Marbled Trinket Dish
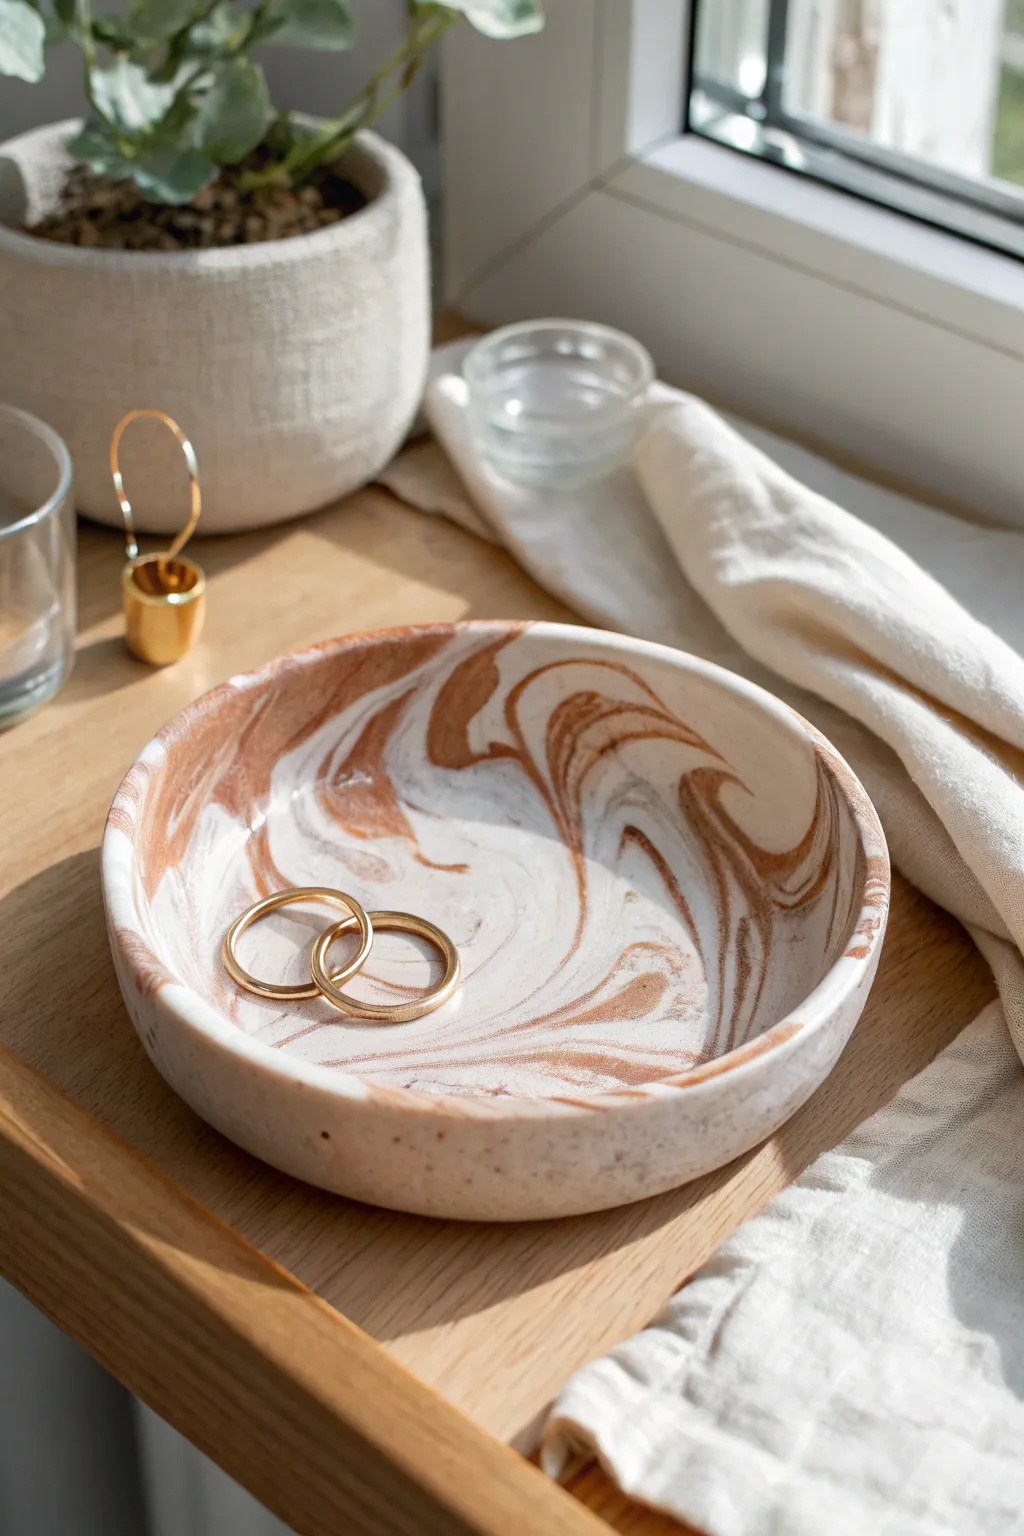
Bring warmth to your dresser with this sophisticated marbled trinket dish, blending crisp white with rich, earthy terracotta tones. The organic swirl pattern ensures no two pieces are ever alike, making it a perfect unique catch-all for your favorite rings.
Step-by-Step
Materials
- White oven-bake polymer clay (2 oz)
- Terracotta or copper-colored oven-bake polymer clay (1 oz)
- Granite or speckled effect clay (optional, small amount)
- Acrylic rolling pin or glass jar
- Circle cutter or a round bowl to use as a template (approx. 4-5 inches)
- Craft knife or clay slicer
- Oven-safe bowl (ceramic or glass) for forming
- Fine-grit sandpaper (400 to 600 grit)
- Gloss or matte polyurethane varnish (optional)
Step 1: Preparing the Marbling
-
Condition the white clay:
Start by taking your block of white clay and kneading it thoroughly in your hands until it becomes soft, pliable, and warm. This is crucial to prevent cracking later. -
Condition the colored clay:
Repeat the conditioning process with your terracotta or copper-colored clay. If you are adding a speckled effect, condition that small amount now as well. -
Create long ropes:
Roll the white clay into a thick log, about 5 inches long. Roll the terracotta clay into a similar, slightly thinner log. -
Twist them together:
Place the two logs side by side and twist them around each other like a candy cane. This begins the mixing process. -
Roll and fold:
Roll the twisted log on your work surface to smooth it into one single snake. Fold this snake in half, and twist it again.
Clean Clay Pro-Tip
Keep baby wipes handy! Wipe your hands and roller between touching the terracotta and handling the white clay to keep the white sections crisp and free of color transfer.
Step 2: Forming the Dish
-
Repeat the fold:
Determine if you like the marbling density. I find that folding and twisting about 3-4 times creates the nice, distinct separation seen in the photo. Don’t overmix, or it will turn pink. -
Ball it up:
Squish your marbled snake into a tight ball, smoothing out any seams with your thumbs. -
Roll out the slab:
Using your acrylic roller, roll the ball flat into a circle. Aim for a consistent thickness of about 1/4 inch. -
Check the pattern:
Look at both sides of your flattened slab. The marbling will look different on each side, so pick the one you find most visually pleasing to be the top. -
Cut the circle:
Place your circle cutter or template bowl face down on the clay. Use your craft knife to trace around it, cutting a clean, perfect circle. -
Soften the edges:
Dip your finger in a tiny bit of water or baby oil and run it gently along the cut edge to smooth out any sharpness or jagged bits. -
Shape the curve:
Take your oven-safe bowl and gently place your clay circle inside it. Press it down lightly so it takes the curved shape of the bowl bottom. Ensure it sits centered.
Level Up: Gold Rim
Use a decadent gold leaf paint pen to trace the very top edge of the rim after baking. This adds a luxury metallic touch that matches gold jewelry perfectly.
Step 3: Baking and Finishing
-
Bake the clay:
Place the bowl (with the clay inside) onto a baking sheet. Bake according to your specific clay brand’s package instructions—usually around 275°F (135°C) for 15-30 minutes. -
Cool down naturally:
Turn off the oven and let the dish cool inside completely before removing it. This helps prevent thermal shock and cracking. -
Pop it out:
Once cool, gently pry the clay dish out of the ceramic bowl. It should release easily. -
Sand the rim:
Take your fine-grit sandpaper and wet it slightly. Gently sand the rim of the dish in a circular motion to achieve a professional, smooth finish. -
Seal (optional):
If you want a glossy look or extra protection for holding keys or coins, apply a thin layer of polyurethane varnish. For jewelry, the raw matte finish works beautifully too.
Now you have a chic, minimalist vessel ready to display your daily treasures on a sunny windowsill


Geometric Statement Earrings
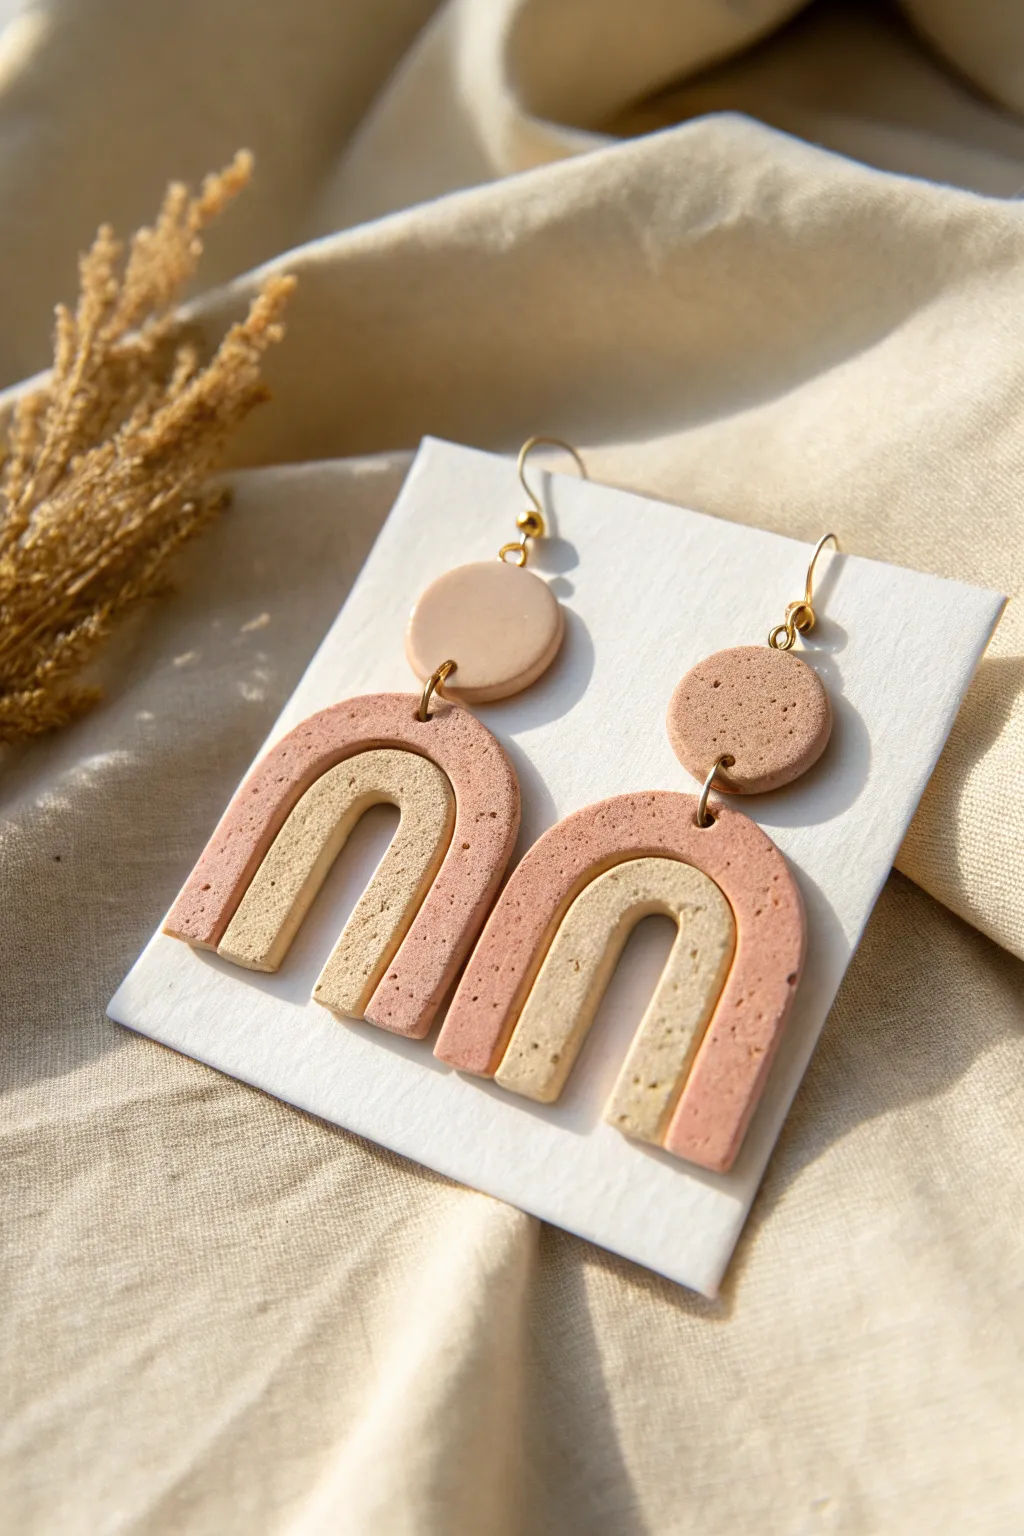
These boho-chic statement earrings feature a sophisticated double-arch design with a lovely speckled texture. The combination of warm terra cotta and creamy beige tones creates a versatile accessory that feels both modern and earthy.
How-To Guide
Materials
- Polymer clay (Terra cotta/Peach color)
- Polymer clay (Beige/Cream color)
- Black pepper or dried coffee grounds (for speckling)
- Acrylic rolling pin or clay machine
- U-shaped clay cutters (two sizes: medium and small)
- Circle clay cutter (small, approx. 1 cm)
- jump rings (approx. 6-8mm, gold finish)
- Earring hooks (gold finish)
- Needle tool or toothpick
- Jewelry pliers (round nose and flat nose)
- Super glue (optional)
- Parchment paper and baking sheet
Step 1: Prepping and Mixing the Clay
-
Condition the clay:
Start by warming up your beige and terra cotta clay in your hands. Knead each color separately until they are soft, pliable, and free of cracks. -
Add texture:
To achieve the organic speckled look seen in the photo, flatten both clay balls slightly. Sprinkle a tiny pinch of ground black pepper or very fine dried coffee grounds onto the clay. -
Mix in the speckles:
Fold the clay over the speckles and knead thoroughly. Continue kneading until the particles are evenly distributed throughout the dough. I prefer to add speckles gradually so I don’t overpower the clay color. -
Roll out slabs:
Using an acrylic rolling pin or a pasta machine, roll out both colors of clay into even slabs. Aim for a thickness of about 3mm—thick enough to be sturdy but thin enough to be lightweight.
Uneven Surfaces?
If your fingerprints are visible on the raw clay, lightly brush the surface with a tiny amount of baby oil or cornstarch before baking to smooth it out.
Step 2: Cutting the Shapes
-
Cut the outer arches:
Take your terra cotta slab and the larger U-shaped cutter. Press firmly to cut out two arches. If you don’t have cutters, you can print a template and trace around it with a craft knife. -
Cut the inner arches:
Using the smaller U-shaped cutter and the beige slab, cut out two smaller arches that will nest inside the larger ones. -
Cut the connector circles:
From either the beige or terra cotta slab (the photo shows a mix, so feel free to choose), cut out two small circles using your circular cutter. These will hold the earring hooks. -
Smooth the edges:
Gently run your finger along the cut edges of all shapes to soften any harsh lines or jagged bits left by the cutters.
Step 3: Assembly and Baking
-
Create holes:
Using a needle tool, carefully poke a hole at the top dead center of the large terra cotta arches. Make another hole at the bottom and top of the circular connector pieces. -
Nest the arches:
Place the small beige arch inside the large terra cotta arch. Ensure the bottom edges are perfectly aligned. Press the inner curve of the large arch gently against the outer curve of the small arch to bond them slightly. -
Bake the clay:
Arrange the pieces on a parchment-lined baking sheet. Bake according to your brand of polymer clay instructions (usually 275°F/135°C for 15-30 minutes). Let them cool completely before handling.
Strength Check
Polymer clay is stronger when baked longer. Don’t fear burning it; if your oven temp is correct, baking for 45-60 mins makes pieces more durable.
Step 4: Final Assembly
-
Reinforce the bond (Optional):
If your arches separated during baking, apply a tiny drop of super glue between the inner and outer arches to secure them permanently. -
Open jump rings:
Using two pairs of pliers, twist a jump ring open sideways (never pull it apart). Slide it through the hole in the top of the main arch piece. -
Attach the connectors:
Slide the bottom hole of the circular clay piece onto that same jump ring, then close the ring securely with your pliers. -
Add earring hooks:
Open the loop on your earring hook. Thread it through the top hole of the circular clay piece. Close the loop carefully. -
Repeat:
Repeat the assembly process for the second earring so you have a complete pair ready to wear.
Now you have a stunning, lightweight pair of geometric earrings to elevate any casual outfit


Terrazzo Coaster Set
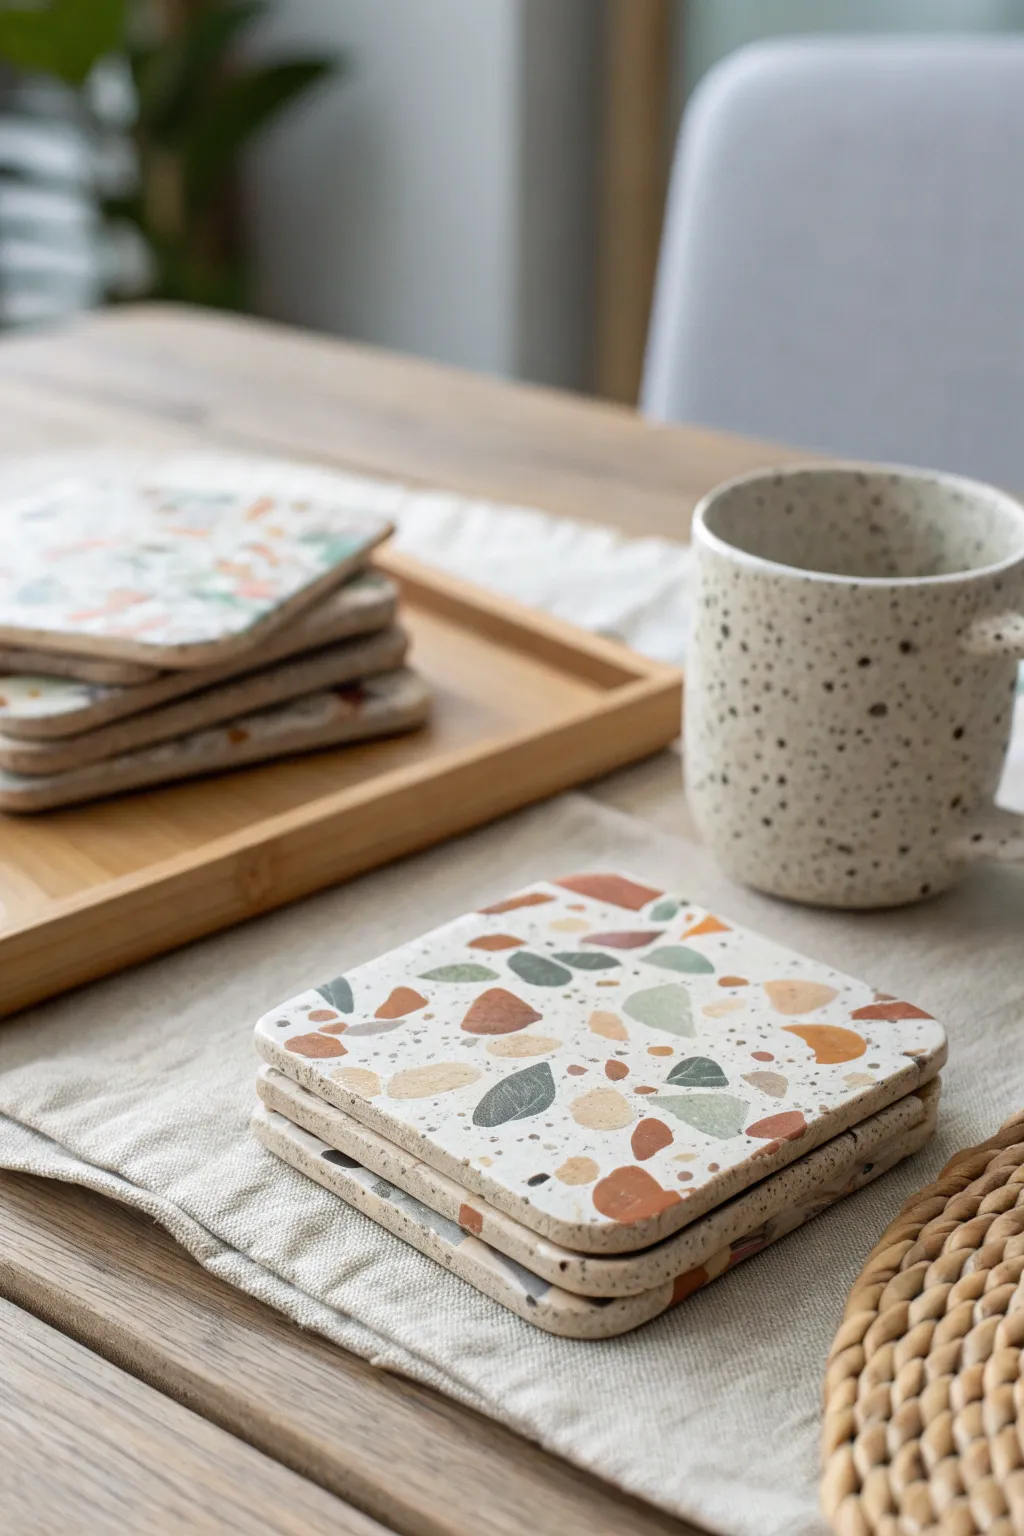
Bring the trendy look of terrazzo into your home without mixing concrete by using polymer clay for this stylish coaster set. These coasters feature a creamy speckled base with irregular chips of rust, sage, and ochre for a warm, natural aesthetic.
Step-by-Step
Materials
- Polymer clay (White or Translucent for base)
- Polymer clay (Rust, Sage Green, Mustard Yellow, Tan, Black/Grey)
- Acrylic roller or rolling pin
- Square cookie cutter (approx. 4×4 inches) or craft knife and ruler
- Parchment paper or baking mat
- Sandpaper (various grits: 400, 600, 800)
- Oven
- Matte or satin sealant (optional)
- Small black pepper or sand for texture (optional)
Step 1: Preparing the Terrazzo Chips
-
Mix your colors:
Start by conditioning your colored clays. We want an earthy palette, so mix a bit of brown into bright reds or yellows for muted rust and mustard tones. -
Flatten the colors:
Roll out each colored piece of clay into a very thin sheet. The thinner these sheets are, the more delicate your final terrazzo pattern will look. -
Bake the sheets:
Place these thin colored sheets on a baking tray lined with parchment paper. Bake them for just 5-10 minutes to harden them slightly; this makes chopping them much easier. -
Create the chips:
Once cool, use your fingers to crumble or a blade to chop the baked sheets into small, irregular shards. Aim for a variety of sizes, from tiny specks to larger triangles.
Step 2: Creating the Base Slab
-
Condition the base clay:
Take a large block of white or cream polymer clay. Condition it thoroughly by kneading until it is soft and pliable. I find warm hands make this step much faster. -
Add speckling:
For that realistic stone look, mix in a tiny pinch of black clay or even ground black pepper into your white base. Knead it until evenly distributed to create a ‘granite’ effect. -
Roll out the slab:
Roll the base clay out on parchment paper to a thickness of about 1/4 inch. Ensure it is even, as this will determine the flatness of your coaster.
Sticky Situation?
If your roller is sticking to the clay and ruining the smooth surface, simply lay a piece of parchment paper between the clay and the roller.
Step 3: Assembling the Pattern
-
Apply the chips:
Scatter your pre-baked colored chips over the surface of the raw white slab. Don’t overthink placement; random scattering usually looks best. -
Embed the design:
Cover the slab with a piece of parchment paper to prevent sticking. Use your acrylic roller to firmly roll over the chips, pressing them into the white base until the surface is smooth and flat. -
Check surface level:
Run your finger over the slab. If you can still feel the edges of the chips, roll it a bit more. You want the chips flushed completely with the base. -
Cut the shapes:
Use your square cutter or a ruler and craft knife to cut out your coaster shapes. Round off the corners slightly with your finger for a softer look similar to the photo.
Metallic Accent
Add gold leaf flakes during the chip scattering phase. Roll them into the clay just like the colored chips for a chic, high-end sparkle.
Step 4: Baking and Finishing
-
Final Bake:
Transfer the cut squares carefully to a baking sheet. Bake according to your clay manufacturer’s instructions, usually around 275°F (130°C) for 30 minutes to ensure durability. -
Cool under weight:
As soon as you take them out of the oven, place a heavy book on top of the coasters while they cool. This helps ensure they dry perfectly flat. -
Sanding start:
Once fully cooled, begin sanding the surface. Start with a lower grit sandpaper (around 400) under running water. This reveals the crisp edges of your terrazzo chips. -
Refine the finish:
Progress to finer grits (600, then 800) to smooth out any scratches. The ‘wet sanding’ technique keeps dust down and polishes the clay beautifully. -
Seal (optional):
If you want extra protection against drink spills, apply a thin layer of matte or satin varnish. Let it dry completely before use.
Enjoy styling your coffee table with these unique, handcrafted pieces tailored to your own color scheme

Sculptural Tealight Holders
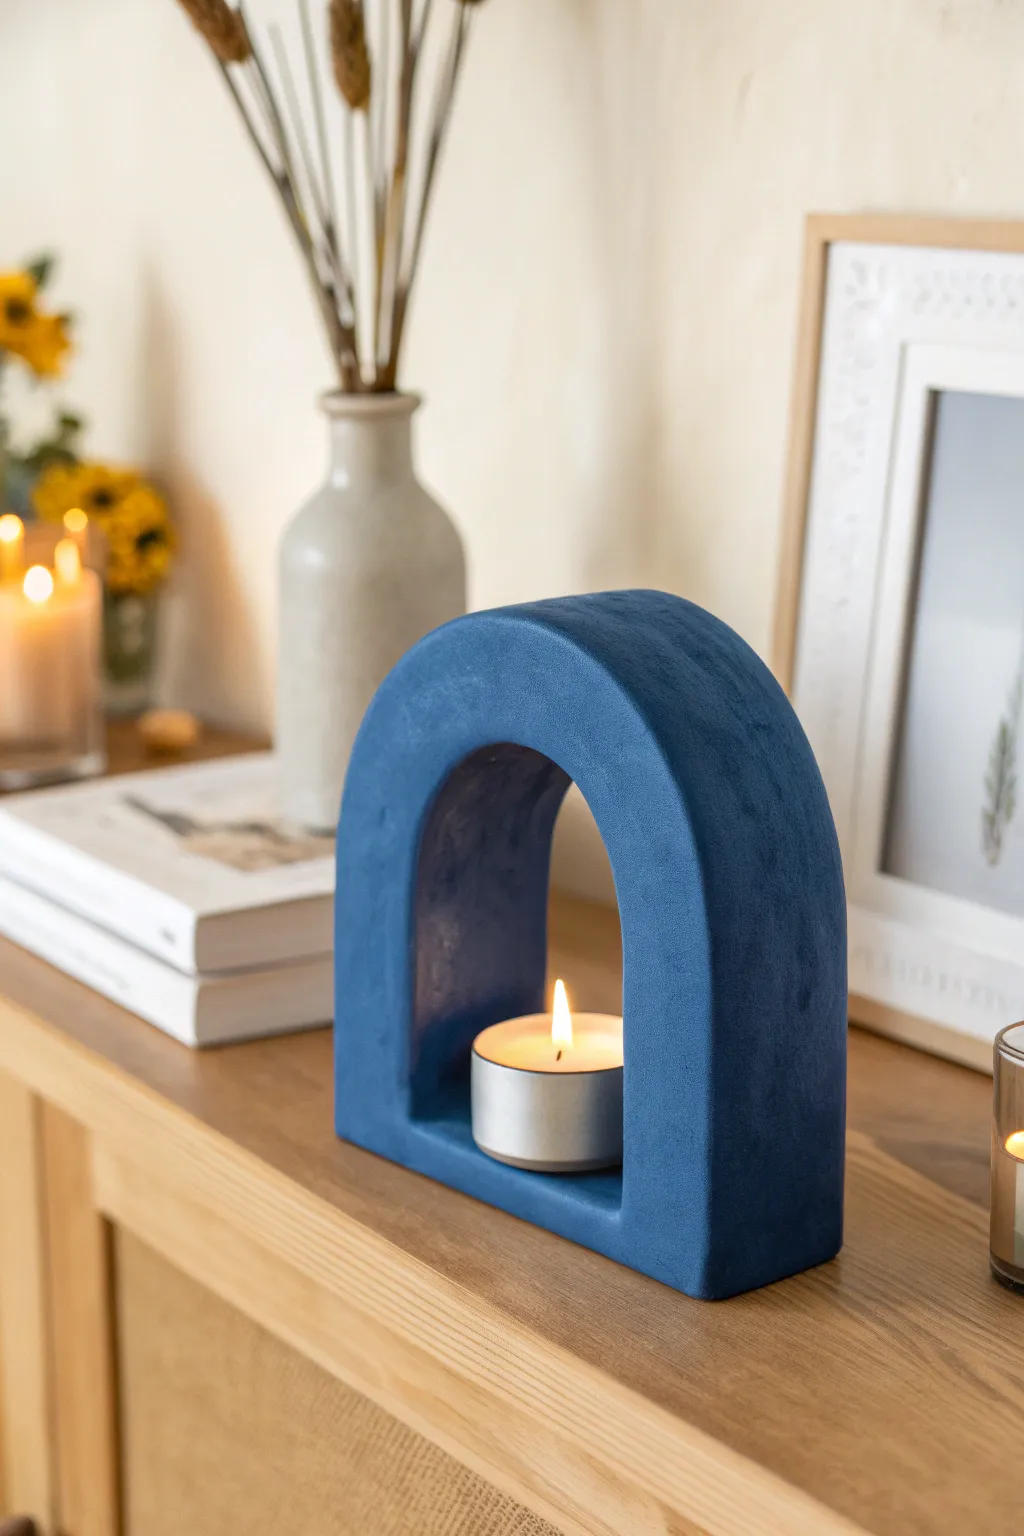
Bring a touch of architectural elegance to your mantle with this bold, arch-shaped tealight holder. Its minimalist form and rich matte blue finish create a stunning focal point, proving that simple shapes can have a major impact.
Step-by-Step Tutorial
Materials
- Oven-bake polymer clay (approx. 450g / 1lb, white or neutral)
- Rolling pin or clay machine
- Sharp clay blade or craft knife
- Ruler
- Paper template (arch shape)
- Rectangle cookie cutter (optional, for the opening)
- Sandpaper (various grits from 400 to 1000)
- Matte dark blue acrylic paint
- Soft synthetic paintbrush
- Baking soda (optional, for texture)
- Tealight candle for sizing
Step 1: Planning and Forming the Arch
-
Create a template:
Sketch an arch on a piece of cardstock. The base needs to be wide enough to comfortably hold a tealight (about 2 inches wide), plus thick walls (about 1 inch each side). The height should be roughly 6 inches. -
Condition the clay:
Warm up your polymer clay by kneading it thoroughly until it is soft and pliable. This prevents cracks later on. -
Roll the slab:
Roll your clay out into a thick, even slab. Aim for a thickness of about 1.5 to 2 inches. You may need to stack and bond several sheets together to get this depth. -
Cut the general shape:
Place your paper template on the slab and use your sharp blade to cut out the arched outline. Keep your blade completely perpendicular to the work surface for straight edges. -
Refine the edges:
Run your finger along the cut edges with a drop of baby oil or clay softener to smooth out any drag marks from the knife.
Uneven Walls?
If your arch walls look lopsided after cutting, don’t restart. Use a rasp/coarse file after baking to grind down the thicker side, then sand smooth before painting.
Step 2: Creating the Window
-
Mark the center:
Using your ruler, lightly mark the center of the arch where the tealight will sit. Ensure the walls on either side are even in width. -
Cut the inner arch:
Carefully cut out the inner arch window. You can use a smaller arch template or a shaped cutter if you have one. Cut straight down. If the slab is very thick, you might need to cut from both sides to meet in the middle. -
Smooth the interior:
Use a modeling tool or your smooth finger to refine the inside of the arch. It needs to look seamless. -
Check sizing:
Gently place your tealight inside the opening to ensure it fits with a little wiggle room. Don’t press it in, just hover it to check scale. -
Bake the piece:
Place the arch on a ceramic tile or baking sheet. Bake according to your clay manufacturer’s instructions (usually 275°F for 30 minutes per 1/4 inch of thickness). Since this is thick, it will need a long bake time.
Velvet Texture
Instead of baking soda paint, achieve the fuzzy, soft look in the image by applying blue flocking powder over wet paint or glue as a final step.
Step 3: Finishing and Painting
-
Cool down:
Let the piece cool completely in the oven with the door open. This prevents thermal shock cracks. -
Sand for perfection:
Start with 400 grit sandpaper to remove any fingerprints or bumps. Work your way up to 1000 grit for a super smooth finish. I prefer to do this wet to keep dust down. -
Prepare the paint:
For that textured, velvety look seen in the photo, mix your blue acrylic paint with a teaspoon of baking soda. This creates a faux-ceramic or plaster effect. -
Apply the first coat:
Brush the paint mixture onto the clay using long, even strokes. Don’t worry if it looks streaky at first. -
Layer up:
Allow the first coat to dry, then apply a second and third coat until you have full, opaque coverage and a rich color depth. -
Final touches:
Inspect the inner corners. Use a smaller brush to get deep into the arch curve if the larger brush missed any spots.
Now you have a striking, modern decor piece that looks high-end and handmade.

The Complete Guide to Pottery Troubleshooting
Uncover the most common ceramic mistakes—from cracking clay to failed glazes—and learn how to fix them fast.
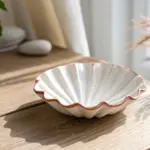
Minimal Incense Holder
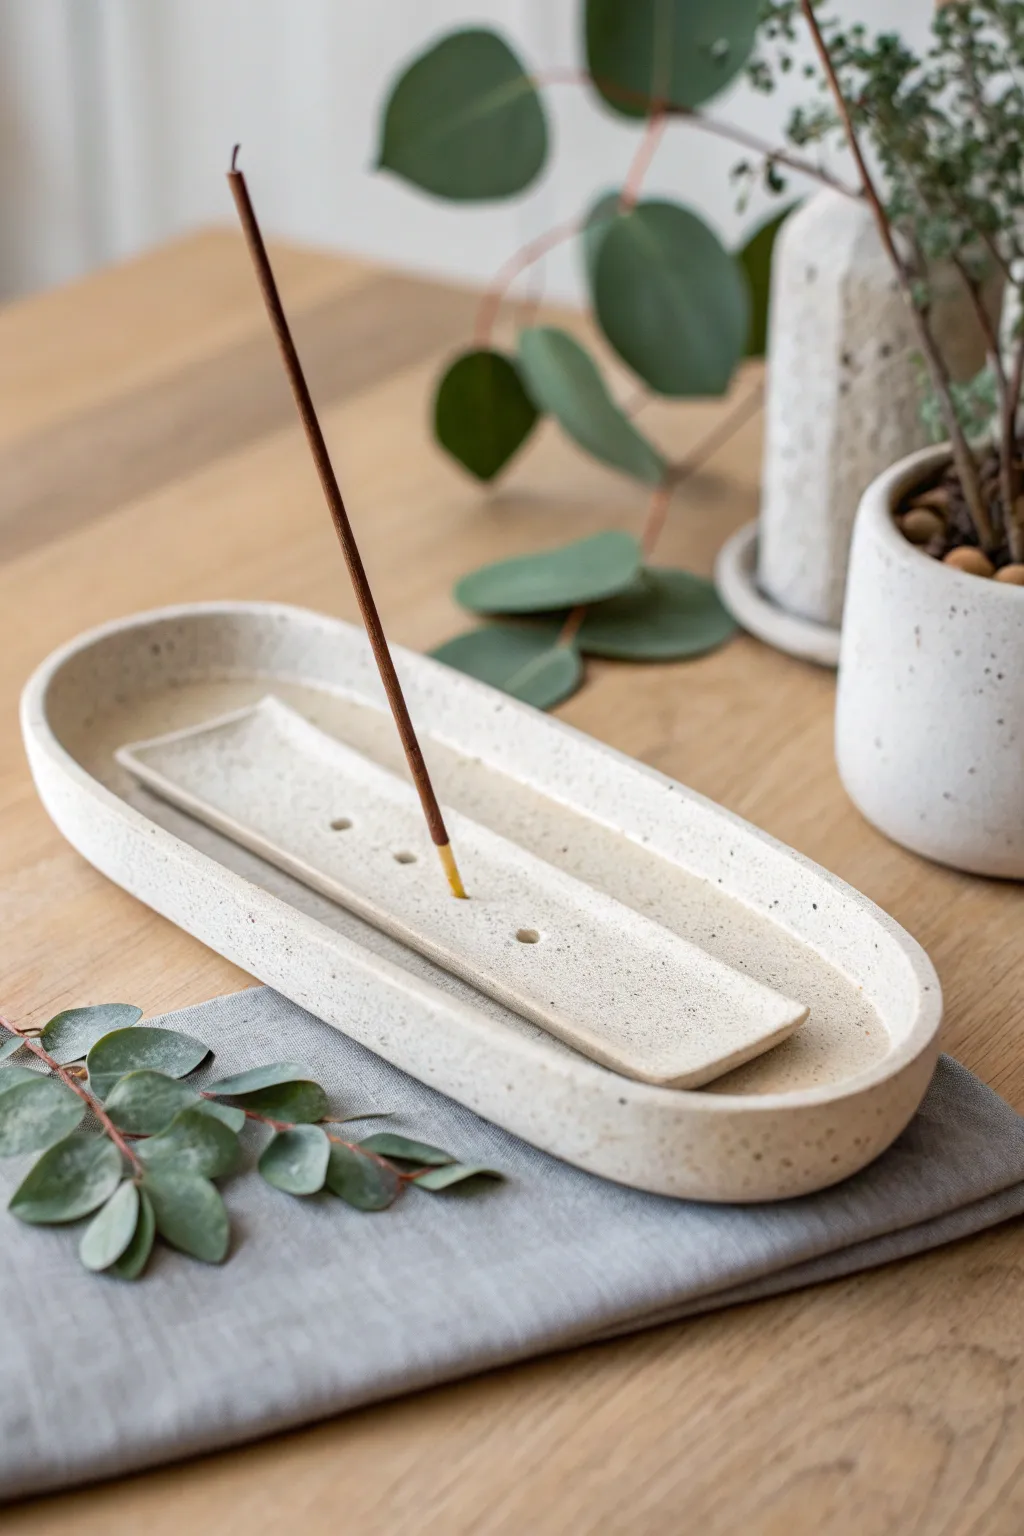
Embrace the beauty of minimalism with this elegant two-piece incense holder, featuring a long, sleek receiving tray and a detachable insert for stick incense. The speckled stone effect gives it a high-end ceramic look without the need for a kiln, making it a perfect addition to any modern tabletop.
Detailed Instructions
Materials
- Polymer clay (white or beige base)
- Black pepper or finely ground dried coffee (for speckles)
- Acrylic rolling pin
- Oval cookie cutter (or paper template and craft knife)
- Rectangular template (approx 1.5 inches wide by 5 inches long)
- Sanding paper (fine grit)
- Needle tool or toothpick
- Baking sheet with parchment paper
- Oven (for curing)
- Matte varnish (optional)
Step 1: Preparing the Speckled Clay
-
Condition the clay:
Start by warming the polymer clay in your hands, kneading it until it becomes soft and pliable. This conditioning step is crucial to prevent cracks later on. -
Add the texture:
To achieve that gorgeous speckled stone look shown in the photo, flatten your clay slightly and sprinkle in a pinch of ground black pepper or dried coffee grounds. -
Mix thoroughly:
Fold the clay over the speckles and knead repeatedly until the particles are evenly distributed throughout the entire block. Add more speckles gradually if you want a denser pattern.
Step 2: Shaping the Base Tray
-
Roll the main slab:
Roll out about two-thirds of your clay on a smooth surface to a thickness of approximately 1/4 inch. Try to keep the thickness consistent for even baking. -
Cut the oval shape:
Use a large oval cutter or place a paper template on the clay and trace around it with a craft knife to create the base. A size of roughly 8-9 inches long works well for catching ash. -
Create the rim:
Roll a long snake of clay, about the thickness of a pencil. This coil will become the raised wall of your tray. -
Attach the coil:
Place the coil along the top edge of your clay oval. Gently press it down so it adheres to the base. -
Blend the expansive seam:
Using your thumb or a blending tool, smudge the clay from the coil down onto the base on the inside, and down the side on the outside, until the seam disappears completely. -
Smooth the surfaces:
I like to use a tiny bit of baby oil on my finger to smooth out any fingerprints or tool marks on the rim and the interior basin.
Stone Effect Trick
Don’t have pepper? You can also use embossing powder, dried tea leaves, or even fine glitter mixed into the clay to achieve different faux-stone textures.
Step 3: Creating the Insert
-
Form the rectangular strip:
Roll out your remaining clay to the same 1/4 inch thickness. Cut a long, narrow rectangle that fits comfortably inside your oval tray with plenty of room around the edges. -
Curve the edges:
Gently lift the edges of the rectangle and curve them upward very slightly to create a shallow concave shape, matching the style of the base. -
Refine the shape:
Use your fingers to round off the harsh corners of the rectangle so it looks soft and organic. -
Add holes:
Use a needle tool or a bamboo skewer to poke 3-4 holes down the center line of the strip. Make sure the holes go all the way through. -
Test the fit:
Wiggle your incense stick into the holes before baking to ensure they are wide enough; clay doesn’t shrink much, but it’s better to be safe.
Fixing Uneven Rims
If your tray’s rim looks lumpy after baking, place a sheet of sandpaper on a flat table and rub the tray upside down in a circular motion to level it.
Step 4: Baking and Finishing
-
Prepare for baking:
Place both pieces on a baking sheet lined with parchment paper. -
Bake the clay:
Bake according to your specific polymer clay package instructions (usually around 275°F or 130°C for 15-30 minutes). -
Cool down:
Let the pieces cool completely in the oven with the door open to prevent thermal shock. -
Sand edges:
Once cool, use fine-grit sandpaper wet with water to smooth any remaining rough edges on the rim or the insert. -
Seal (optional):
If you want extra protection against ash stains, brush on a thin layer of matte polymer clay varnish.
Now you have a serene, custom-made spot to burn your favorite scents and relax
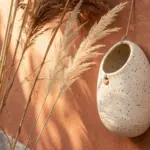
Ring Cone Organizer
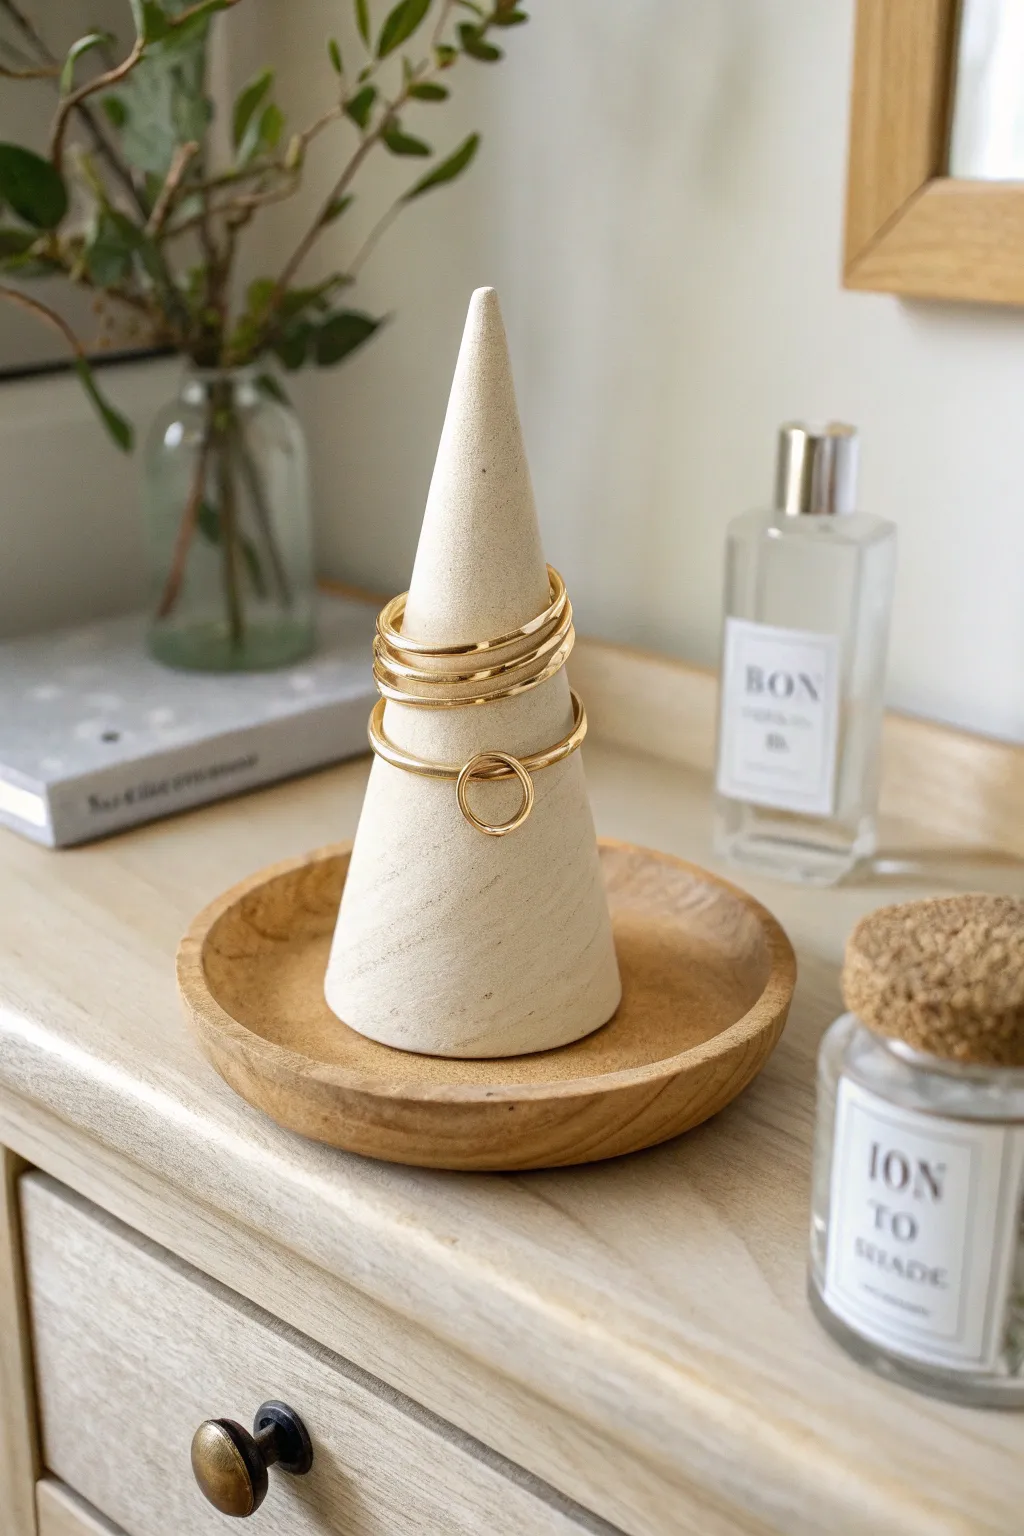
Elevate your vanity with this minimalist ring cone that mimics the look of natural speckled stone. Its simple geometric shape and neutral palette provide a sophisticated way to organize your everyday jewelry while adding a touch of modern decor to your space.
How-To Guide
Materials
- Oven-bake clay (granite or speckled stone effect)
- Acrylic rolling pin
- Flexible clay blade or craft knife
- Parchment paper
- Smooth work surface (ceramic tile or glass)
- Cardstock or heavy paper
- Tape
- Needle tool or toothpick
- Fine-grit sandpaper (400 and 800 grit)
- Matte finish varnish (optional)
Step 1: Planning and Preparation
-
Condition the Clay:
Begin by taking a generous amount of your speckled stone effect clay. Warm it up in your hands, kneading and rolling it until it is soft, pliable, and free of any cracks. -
Create a Paper Template:
Cut a quarter-circle shape out of cardstock. The straight sides should be about 4 inches long. Roll this paper into a cone shape to test the height and width, adjusting the size until you are happy with the proportions, then tape it flat again to use as your cutting guide.
Step 2: Forming the Cone
-
Roll out a Slab:
Use your acrylic roller to flatten the conditioned clay on a piece of parchment paper. Aim for a thickness of about 1/4 inch to ensure the cone is sturdy enough to stand on its own. -
Cut the Shape:
Place your cardstock template onto the rolled clay. Using your flexible blade or craft knife, carefully trace around the template to cut out your cone wedge shape. -
Initial Shaping:
Gently lift the clay wedge and bring the two straight edges together to form a cone. Be careful not to stretch the clay too much as you curve it. -
Seam the Edges:
Press the meeting edges together firmly. Use a modeling tool or your finger to smooth the clay over the seam, blending it until the line disappears completely. -
Reinforce the Inside:
If possible, reach a finger or a smooth tool inside the cone to smooth the seam from the interior as well, ensuring the bond is strong throughout the clay’s thickness.
Seamless Seams
To ruin the seam, use a little liquid clay (Bake & Bond) on the edges before pressing them together. It acts like glue and helps the clay merge perfectly.
Step 3: Refining and Baking
-
Level the Base:
Stand the cone upright on your work surface. Look for any wobbling. If it’s uneven, gently press it down to flatten the bottom rim, or slice a very thin layer off the bottom with your blade to create a perfectly flat base. -
Smooth the Tip:
Gently roll the very tip of the cone between your fingers to ensure it is sharp and defined, rather than blunt or rounded. -
Final Smoothing:
Do a final pass over the entire surface with your finger. Use a tiny bit of baby oil if needed to buff away any fingerprints or lint before baking. -
Bake the Cone:
Place the cone upright on a parchment-lined baking sheet. Bake according to the manufacturer’s instructions for your specific brand of clay—usually around 275°F (130°C) for 15-30 minutes per 1/4 inch of thickness. -
Cool Down:
Once the baking time is up, turn off the oven and let the piece cool completely inside the oven or on a wire rack. Sudden temperature changes can sometimes cause cracking.
Marble Effect
Mix white, translucent, and a tiny bit of black clay. twist them together but stop before they fully blend to create realistic marble veins.
Step 4: Finishing Touches
-
First Sanding Pass:
Once fully cool, use 400-grit sandpaper to wet-sand the surface. Dip the cone in water and sand in circular motions to remove any lumpy areas or remaining fingerprints. -
Refine the Finish:
Switch to 800-grit sandpaper for a polishing pass. This will make the clay feel incredibly smooth and soft to the touch, almost like real polished stone. -
Rinse and Dry:
Wash off any milky residue from sanding with water and dry the cone thoroughly with a lint-free cloth. -
Optional Sealing:
If you prefer a sealed finish, apply a thin coat of matte varnish. However, the raw, sanded clay often mimics the natural stone look best without any glaze. -
Pair and Display:
Place your finished cone on a small wooden coaster or dish as seen in the inspiration photo to complete the natural, earthy aesthetic.
Enjoy your chic new organizer that makes storing your favorite rings a beautiful part of your decor


What Really Happens Inside the Kiln
Learn how time and temperature work together inside the kiln to transform clay into durable ceramic.
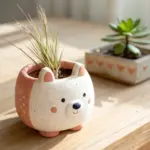
Textured Succulent Planter
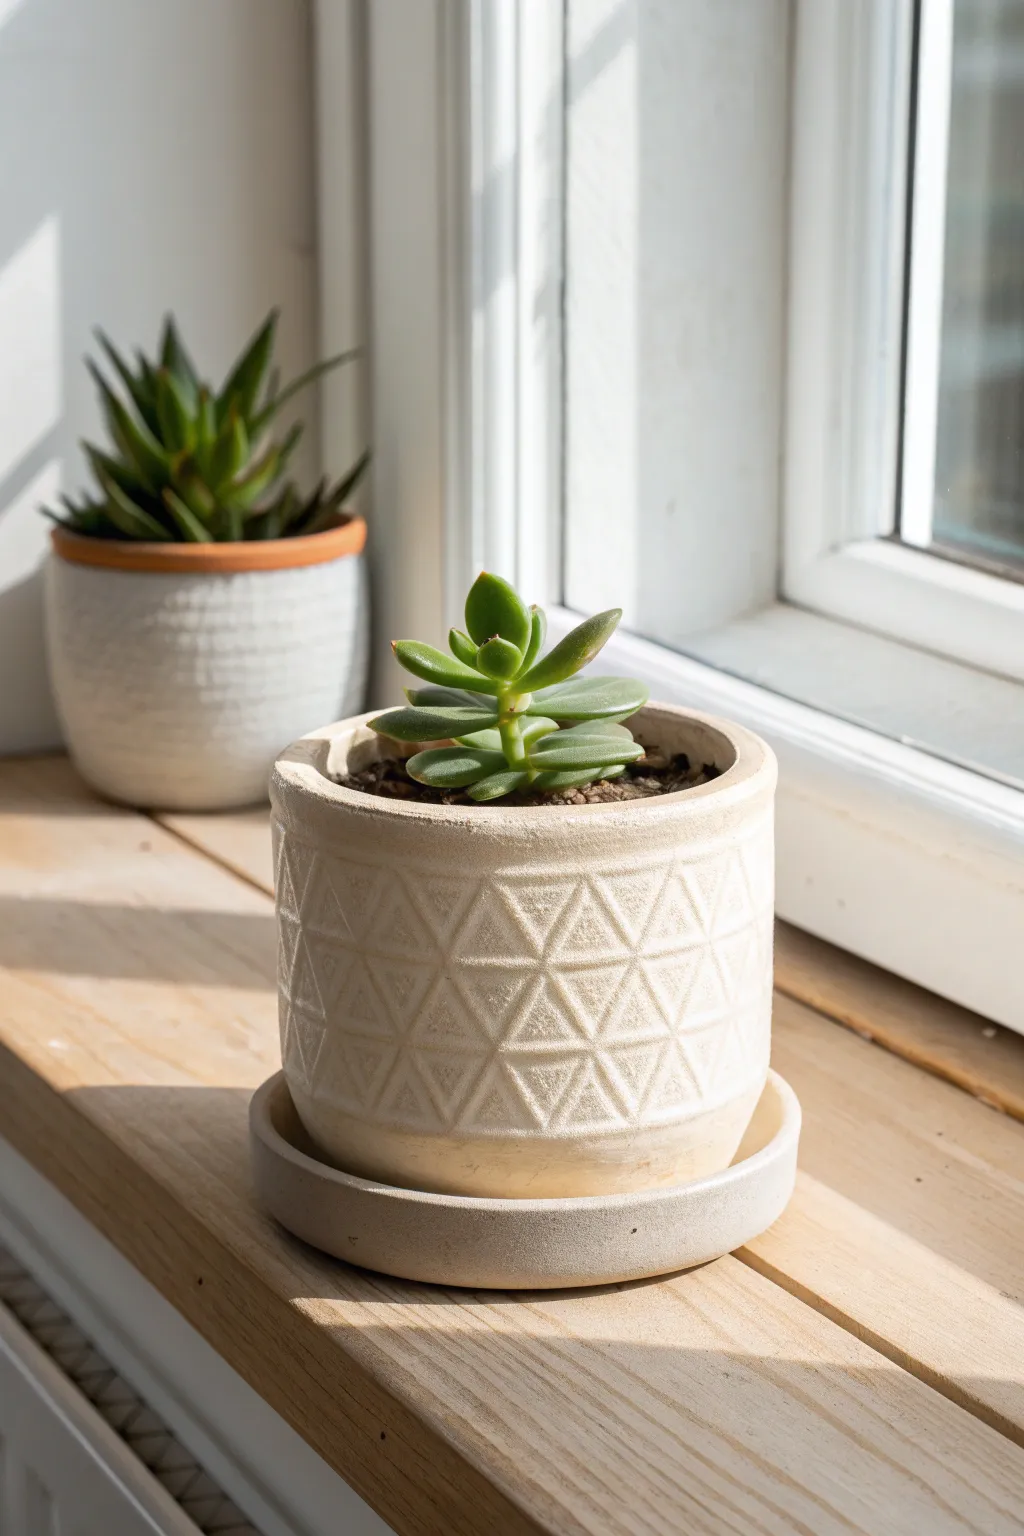
Bring modern, clean lines to your windowsill with this beautifully textured planter featuring a repeating triangle relief pattern. The creamy, matte finish gives it the sophisticated look of hand-thrown pottery without the need for a kiln.
Detailed Instructions
Materials
- White or cream oven-bake polymer clay (approx. 1 lb brick)
- Small glass jar or metal can (to use as an armature/mold)
- Rolling pin or pasta machine
- Clay blade or craft knife
- Small triangular cutter or a firm sculpting tool
- Circle cutter (slightly larger than the jar)
- Ovensafe glass or ceramic tile (for baking)
- Sandpaper (various grits)
- Matte varnish (optional)
Step 1: Creating the Base Form
-
Condition the Clay:
Begin by thoroughly conditioning your polymer clay until it is soft, pliable, and free of air bubbles or cracks. It should feel warm in your hands. -
Roll the Sheet:
Roll out a large sheet of clay to a uniform thickness, aiming for about 1/4 inch (6mm). This thickness ensures the pot is sturdy enough to hold soil later. -
Cut the Base:
Using your circle cutter or by tracing around your jar, cut a round disc for the bottom of the pot. Place this directly onto your baking tile or parchment paper. -
Create the Wall:
Measure the circumference and height of your jar/armature. Cut a rectangular strip of clay that is slightly longer than the circumference and matches your desired height. -
Wrap the Form:
Carefully wrap the clay strip around your glass jar or metal can. If you want to remove the jar later, dust it lightly with cornstarch first. -
Seal the Seam:
Join the two ends of the strip together. Use your fingers or a clay tool to smooth the seam completely so it disappears. I prefer to slice the ends at a diagonal for a cleaner overlap before smoothing. -
Attach to Base:
Place the wrapped cylinder onto the circular base. Gently smudge the clay from the walls down onto the base to create a watertight seal, blending the seam on both the inside and outside.
Sticky Situation?
If the clay sticks to your texturing tool, dip the tool in a little cornstarch or water before pressing it into the clay for a clean release every time.
Step 2: Adding the Texture
-
Mark Guidelines:
Lightly mark horizontal bands around the pot if you need help keeping your pattern straight, or freehand it for a more organic look. -
Impress the Pattern:
Using a small triangle cutter or a V-shaped sculpting tool, press firmly into the clay to create the relief pattern. Don’t cut all the way through; you just want a deep impression. -
Create Rows:
Continue pressing triangles in alternating directions—one clear triangle pointing up, the next pointing down—to create a tessellated geometric band around the center of the pot. -
Refine the Rim:
Smooth the top rim of the pot with your finger or a little bit of water (if using water-based clay) or clay softener to ensure it’s rounded and comfortable to touch. -
Make the Saucer:
Roll a smaller ball of clay and flatten it into a disc slightly wider than your pot. Create a small raised lip around the edge to catch water.
Step 3: Finishing Touches
-
Bake the Pieces:
Bake the pot (still on the jar if it’s oven-safe) and the saucer according to the clay manufacturer’s specific temperature and time instructions. -
Cool and Release:
Allow the clay to cool completely in the oven. Once cool, carefully slide the inner jar out. If it sticks, popping it in the freezer for a few minutes can verify the clay shrinks enough to release. -
Sand for Texture:
For that matte, stone-like finish seen in the image, lightly sand the entire surface with fine-grit sandpaper. This removes fingerprints and imparts a natural ‘tooth’ to the surface. -
Seal (Optional):
If you plan to put a live plant directly inside versus a nursery pot, coat the interior with a waterproof sealant to protect the clay over time.
Faux Stone Look
Mix a small amount of translucent clay and cracked black pepper into your white clay before rolling to create a speckled, faux-granite effect.
Place your favorite succulent inside and enjoy the calm, structured beauty of your new handmade planter
Catchall Entry Tray
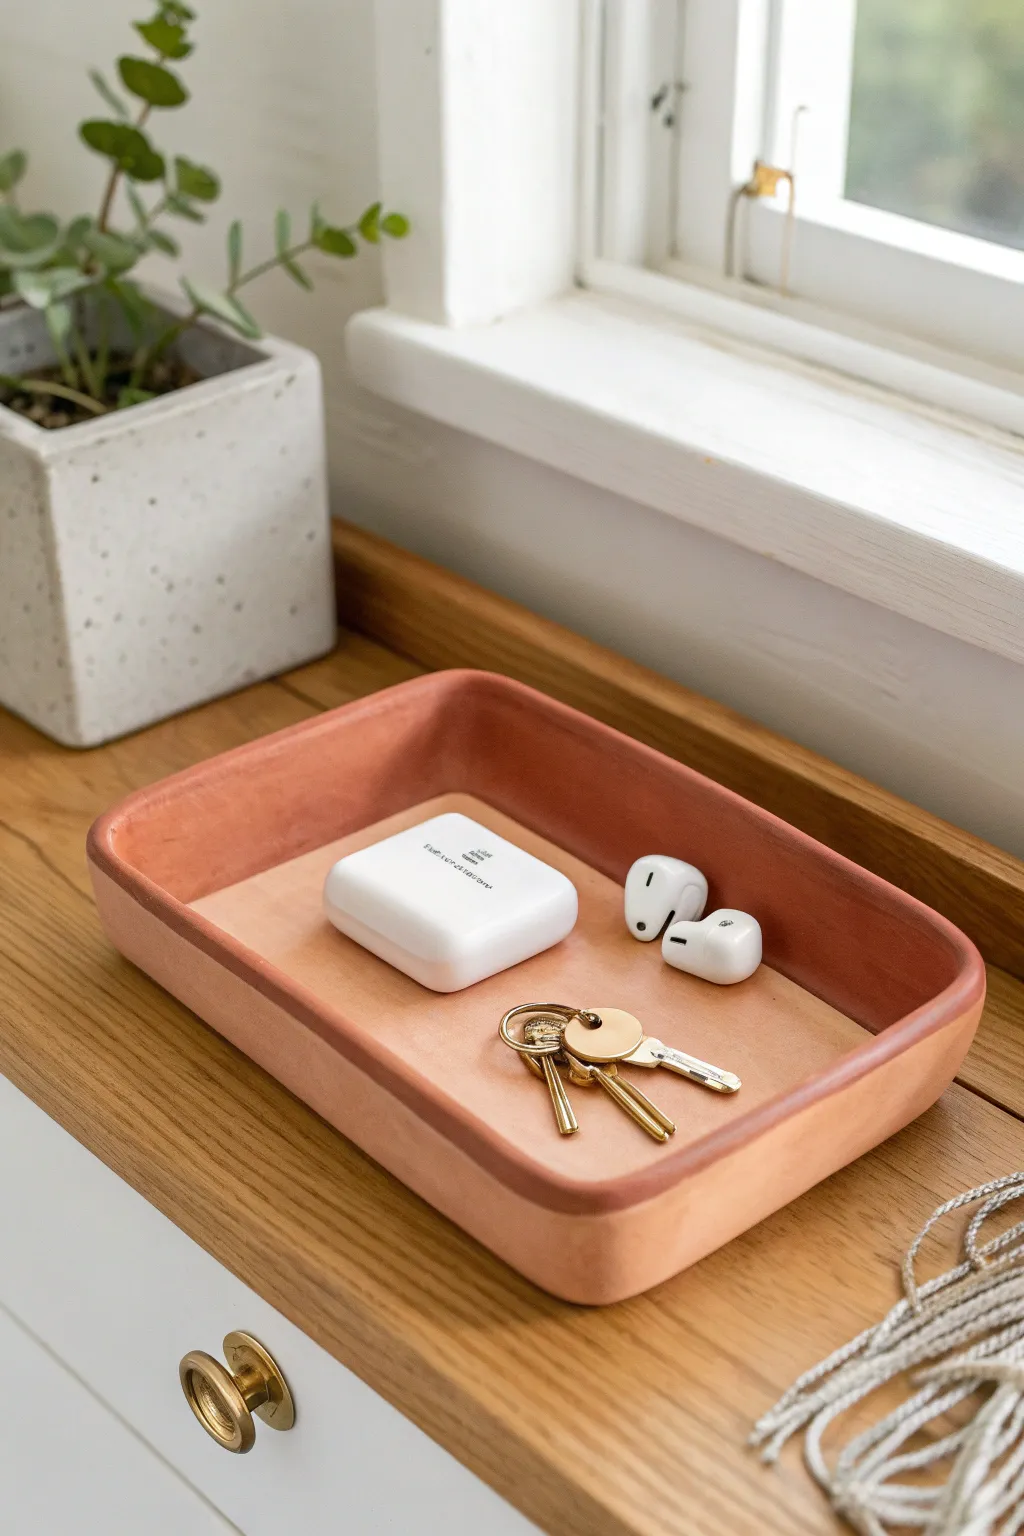
This sophisticated catchall combines the earthy warmth of terracotta-colored polymer clay with the refined texture of natural vegetable-tanned leather. The result is a minimalist, mixed-material tray perfect for corralling keys and earbuds by the front door.
Step-by-Step Tutorial
Materials
- Terracotta colored polymer clay (approx. 1 lb block)
- Vegetable-tanned leather sheet (2-3oz weight)
- Rolling pin or acrylic roller
- Sharp crafting knife or scalpel
- Ruler
- Paper for template making
- Liquid polymer clay or strong craft glue (like E6000)
- Sandpaper (various grits from 400 to 1000)
- Cardboard or cardstock for structural support while baking
- Oven
Step 1: Shaping the Clay Base
-
Condition the Clay:
Begin by thoroughly conditioning your terracotta polymer clay until it is soft and pliable. This prevents cracking and ensures a smooth finish. -
Roll the Slab:
Roll out a large slab of clay to a uniform thickness of about 1/4 inch. For a tray like this, consistency is key, so consider using thickness guides or playing cards stacked on either side of your roller. -
Create a Template:
Cut a rectangle from paper representing the size of your tray’s base (e.g., 5×8 inches). Round the corners of your paper template with scissors to match the soft edges seen in the photo. -
Cut the Base:
Lay the template on your clay slab and carefully cut around it with your craft knife. Set the excess clay aside for the walls. -
Prepare Wall Strips:
Re-roll remaining clay into a long strip for the sides. You want this strip to be the same thickness as the base and tall enough for the rim—about 3/4 inch high. -
Cut the Strip:
Using a ruler, cut a perfectly straight strip of clay long enough to go around the entire perimeter of your base. Depending on the size, you might need two strips joined together.
Clean Cuts Matter
For the crispest leather edges, use a brand new blade on your utility knife and make one decisive pass rather than sawing back and forth.
Step 2: Assembly and Refining
-
Attach the Walls:
Place the clay strip on top of the base’s edge (not against the side). Gently press it down to adhere. I like to cut the ends of the strip at a diagonal angle where they meet to create a stronger, less visible seam. -
Blend the Seams:
Use a modeling tool or your finger to blend the clay from the wall down into the base on both the inside and outside. The seam should completely disappear to make the tray look like a solid unit. -
Round the Rim:
Gently run your finger along the top edge of the wall to round it off, removing any sharp angles from the cutting process. -
Support the Structure:
Since the walls might want to sag, place a piece of cardstock cut to the size of the inner base inside the tray, or use bits of cardboard to prop up the outside walls if needed. -
Bake:
Bake the tray according to your clay manufacturer’s specific instructions. Usually, this is around 275°F (135°C) for 30 minutes per 1/4 inch of thickness. -
Cool and Sand:
Let the tray cool completely. Once cool, wet sand the edges and sides with fine-grit sandpaper to achieve that matte, stone-like finish visible in the example.
Stamped Details
Before gluing, use alphabet stamps to emboss a monogram or word into the damp leather for a personalized, high-end touch.
Step 3: Adding the Leather Insert
-
Measure the Interior:
Accurately measure the interior dimenstions of your fired tray. It may have shrunk slightly during baking. -
Cut the Leather:
Using your measurements, cut a rectangle from the vegetable-tanned leather. Round the corners to match the interior curve of your tray walls. -
Dry Fit:
Place the leather inside to check the fit. It should sit flush against the bottom. Trim tiny slivers off the edges if it’s too tight. -
Prepare the Surface:
Lightly sand the bottom of the leather piece and the inside floor of the clay tray to give the glue some texture to grip onto. -
Glue:
Apply a strong craft adhesive like E6000 or a thin layer of liquid clay (if re-baking is an option, though glue is safer for leather) to the tray floor. Press the leather insert firmly into place. -
Weight it Down:
Place a clean heavy object or books on top of the leather while the glue cures to ensure a perfectly flat bond without air bubbles.
Place your finished tray on an entryway table to keep your daily essentials organized in style

TRACK YOUR CERAMIC JOURNEY
Capture glaze tests, firing details, and creative progress—all in one simple printable. Make your projects easier to repeat and improve.
Modern Clay Bead Necklace
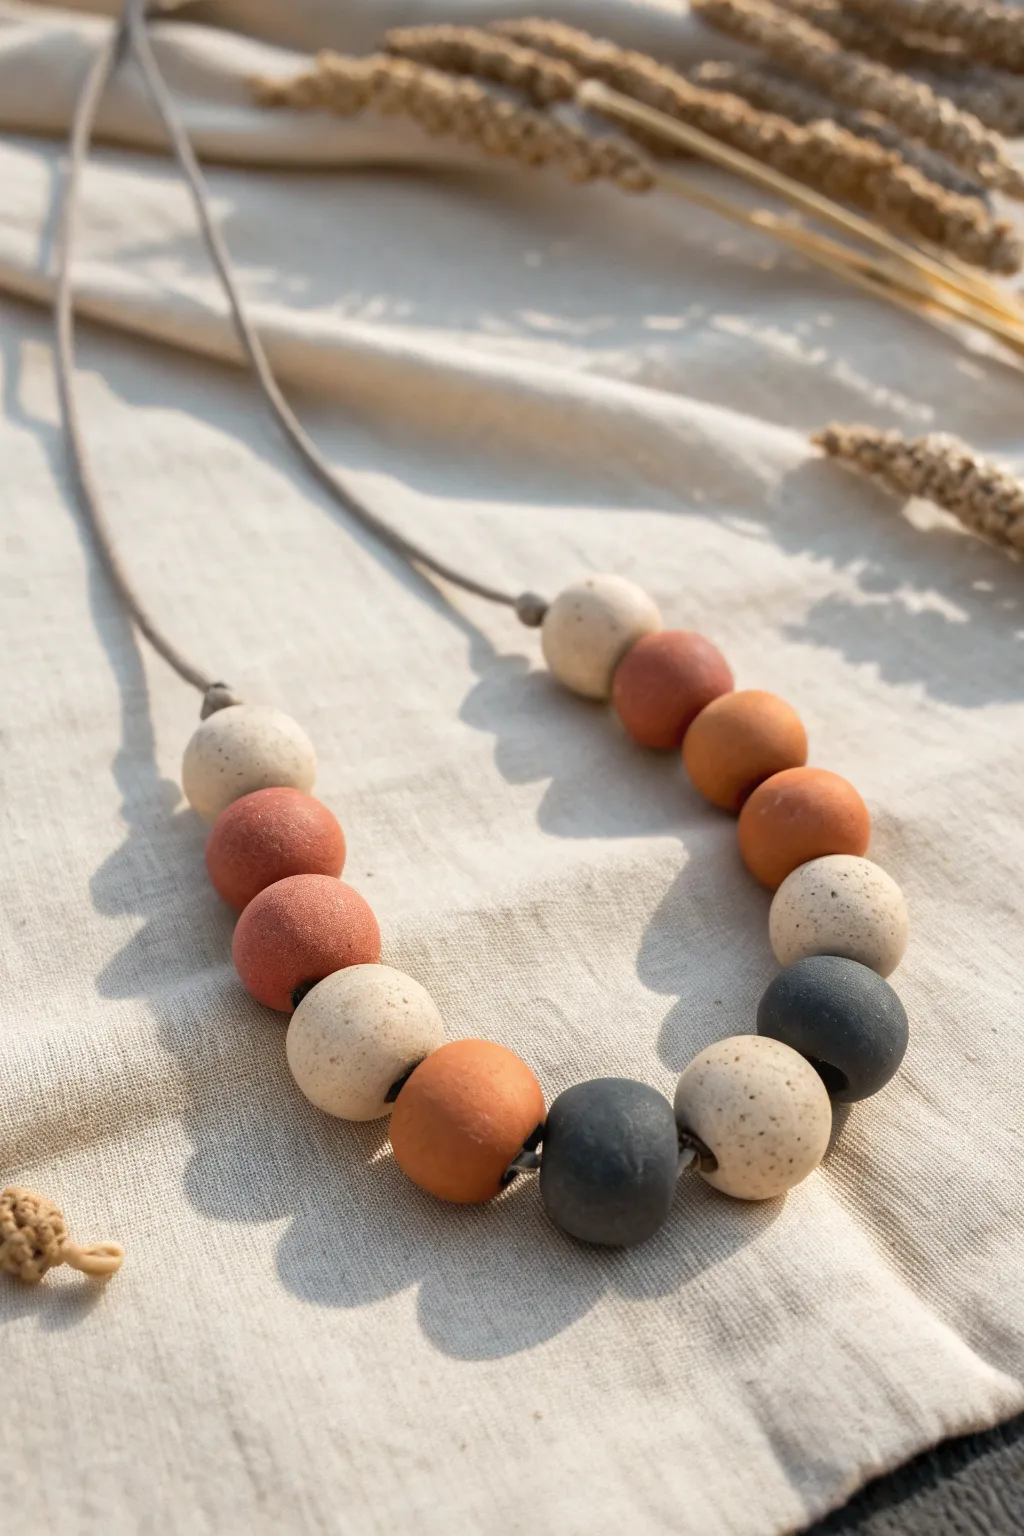
This necklace brings together a stunning palette of terracotta, slate grey, and speckled cream for a rustic yet modern aesthetic. The matte finish and organic imperfections of the beads give it a high-end, handmade feel that pairs beautifully with natural linens and neutral tones.
Step-by-Step
Materials
- Oven-bake polymer clay (colors: white/translucent mix for speckle base, terracotta/rust, slate grey)
- Small amount of ground black pepper or dried coffee grounds (for speckling)
- Thin wooden skewer or large tapestry needle
- Sandpaper (fine grit, 400-600)
- Grey suede or faux suede cord (approx. 30 inches)
- Baking sheet
- Parchment paper
- Ceramic tile or glass work surface
- Sharp clay blade or knife
Step 1: Exploring Color & Texture
-
Condition the clay:
Begin by warming up your clay blocks in your hands. Knead each color separately until it is soft, pliable, and free of cracks. This ensures your beads won’t be brittle after baking. -
Mix the speckled cream:
To create the stone-like cream color, take a chunk of white clay and mix in a tiny pinch of translucent clay. Sprinkle a very small amount of ground black pepper or fine coffee grounds onto the clay and knead it thoroughly until the specks are evenly distributed. -
Prepare the palette:
Ensure you have your three main color groups ready: the custom speckled cream, a warm terracotta or rust orange, and a deep slate grey. You want roughly equal amounts of clay for the size of necklace shown.
Step 2: forming the Beads
-
Portion the clay:
Roll each color into a thick log. Use your clay blade to slice the logs into equal-sized segments. For this design, you will need approximately 13 beads total: 5 speckled cream, 5 terracotta/rust, and 3 slate grey. -
Roll spheres:
Take a segment and roll it between your palms to form a smooth ball. Aim for beads that are about 2-3 cm (approx. 1 inch) in diameter. I find that lightly wetting my palms helps smooth out fingerprints. -
Pierce the holes:
Hold a bead gently between your thumb and forefinger. Using a twisting motion, slowly push your skewer or large needle through the center. Create a hole slightly larger than your cord’s thickness to allow for easy stringing later. -
Refine the shape:
Piercing can sometimes squash the bead slightly. Gently re-roll the bead while it is still on the skewer to restore its round shape, or tap the ends to flatten them slightly if you prefer a more cylindrical look. -
Check symmetry:
Line up your raw beads on your work surface in the intended pattern to check for size consistency. The beads in the image have a lovely, organic slight variation, so don’t stress about mathematical perfection.
Smooth Moves
To prevent flat spots while baking without a rack, create a zigzag ‘bed’ of accordion-folded cardstock or parchment paper and nestle the beads into the folds.
Step 3: Baking & Finishing
-
Preheat the oven:
Preheat your oven according to the specific manufacturer’s instructions on your clay package (usually around 275°F or 130°C). -
Arrangement for baking:
Place the beads onto a baking sheet lined with parchment paper. If you can, balance the skewer on the rim of a baking dish so the beads are suspended; this prevents flat spots from forming on the bottom. -
Bake the beads:
Bake for the directed time, typically 15-30 minutes depending on thickness. Do not rush this step; under-baked clay is weak. -
Cool down:
Turn off the oven and let the beads cool down completely inside or on the counter. The clay hardens fully as it cools. -
Sand for texture:
Once cool, take your fine-grit sandpaper and gently buff the surface of each bead. This removes any fingerprints and, more importantly, gives the clay that matte, unglazed ceramic look seen in the photo. -
Wash and dry:
Quickly rinse the beads in water to remove the sanding dust and pat them completely dry.
Color Pop
Before stringing, paint half of a few select beads with gold leaf or liquid gold paint for a chic, metallic color-blocked accent.
Step 4: Assembly
-
Prepare the cord:
Cut a length of grey suede cord to your desired necklace length, leaving extra room for knots. A length of 30-36 inches works well for a piece that sits on the chest. -
String the pattern:
Thread the beads onto the cord. Following the image, mimic this asymmetrical pattern: Cream, Rust, Rust, Cream, Rust, Slate Grey, Cream, Slate Grey, Cream, Slate Grey, Cream, Rust, Cream. -
Secure the beads:
To keep the beads centered in a curve like the photo, tie a simple overhand knot in the cord immediately before the first bead and immediately after the last bead. Push the knots snug against the clay. -
Create the closure:
Bring the two loose ends of the cord together. You can simply tie them in a strong knot at the desired length, or create an adjustable sliding knot if you want variable lengths. -
Final adjustment:
Hold the necklace up and let the beads settle into their natural curve against the cord.
Wear your new statement piece with pride, knowing you crafted those custom earthy tones yourself
Minimal Hair Clips and Pins
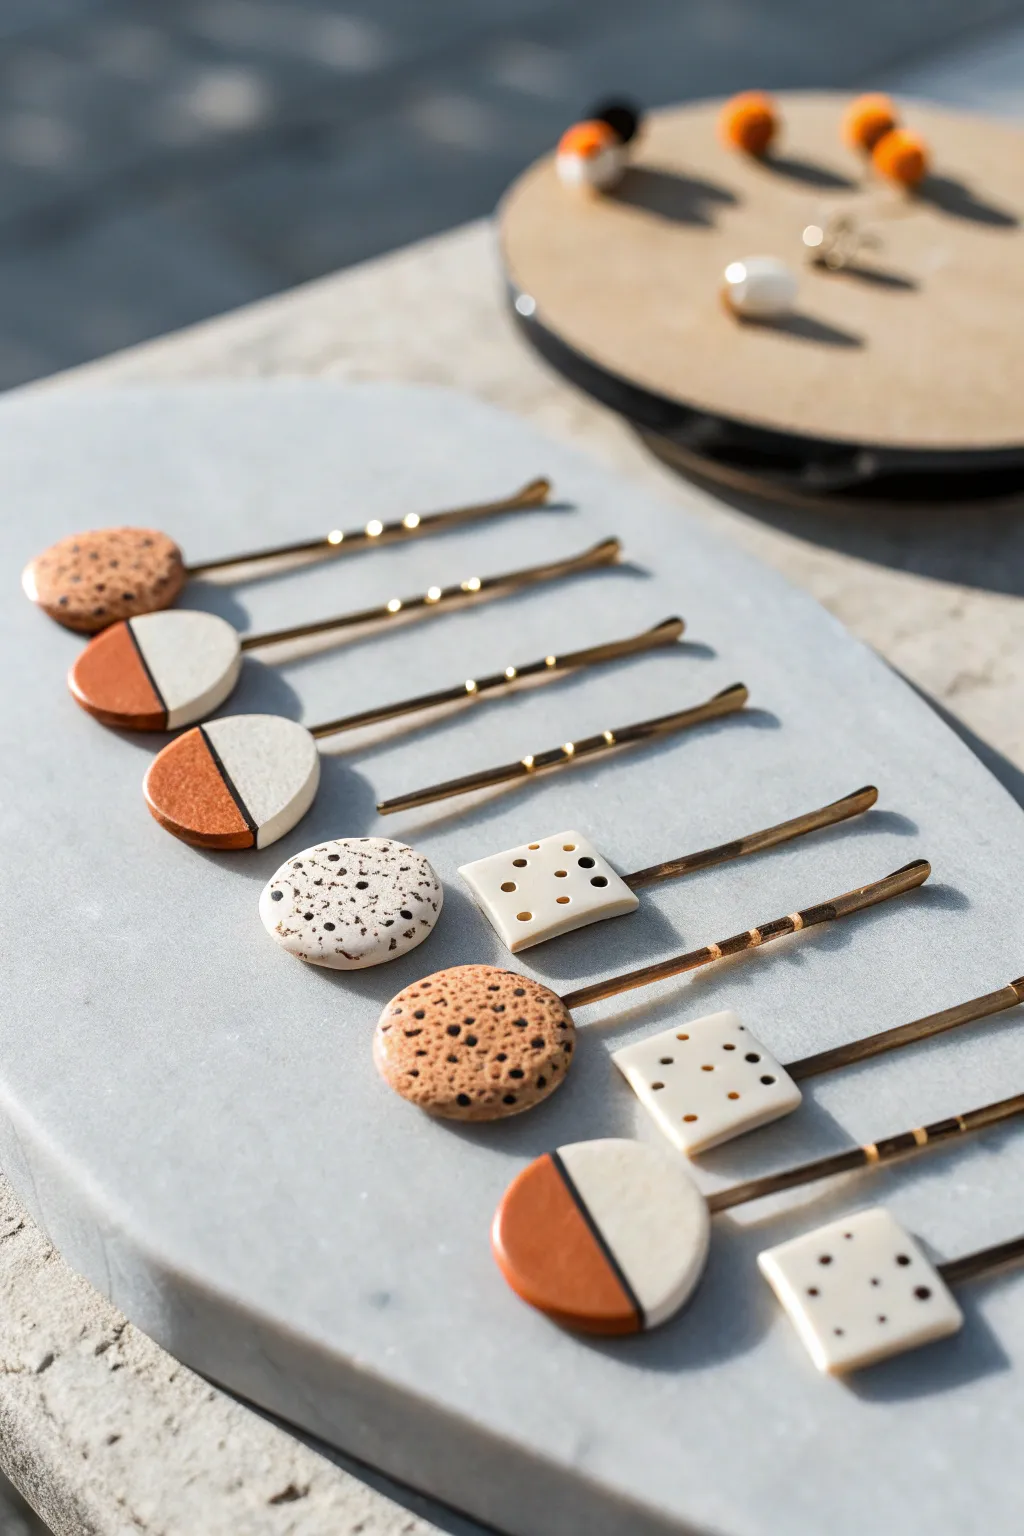
Elevate simple gold bobby pins into modern hair accessories using basic polymer clay techniques. This project combines terracotta tones, creamy neutrals, and playful geometric patterns for a chic, minimalist look.
How-To Guide
Materials
- Polymer clay (terracotta/rust, cream/white, black)
- Black acrylic paint or black liquid clay
- Gold tone flat-pad bobby pins or hair clips
- Strong craft adhesive (E6000 or 2-part epoxy)
- Clay roller or pasta machine
- Small geometric clay cutters (circle, square, semi-circle)
- Needle tool or toothpick
- Small detail paintbrush
- Fine grit sandpaper (optional)
- Parchment paper and baking sheet
- Old toothbrush or stiff brush (for speckling)
Step 1: Prepping the Clay Designs
-
Condition the clay:
Start by warming the cream and terracotta clays in your hands until they are soft and pliable. Roll them out into flat sheets approximately 3mm to 4mm thick using a roller or pasta machine. -
Create the terrazzo slab:
To make the speckled ‘cookie’ design, take a small amount of terracotta and black clay. Finely chop or crumble them into tiny, dust-like bits. -
Embed the speckles:
Sprinkle these tiny crumbs over a sheet of cream clay. Use your roller to gently press the crumbs into the surface, rolling until the clay is smooth again and the speckles are embedded. -
Cut the shapes:
Use your small cutters to punch out your shapes. For the image shown, you’ll need full circles from the speckled clay, semi-circles from the solid terracotta and cream clays, and squares from the cream clay.
Glue Not Holding?
Metal is slick. Before gluing, lightly scratch the flat pad of the bobby pin with sandpaper to create a rough texture for the glue to grip.
Step 2: Adding Details & Texture
-
Assemble the split circles:
For the two-tone circular clips, cut a cream circle and a terracotta circle in half. Gently press the cut edges of one cream half and one terracotta half together to form a full circle. -
Add the dividing line:
Roll a very thin ‘snake’ of black clay. Press this gently over the seam where the two colors meet on your split circles, flattening it slightly so it integrates with the surface. -
Create the dot pattern:
For the square clips, use a needle tool or the blunt end of a paintbrush to gently indent a grid of dots, resembling a domino or die face. Don’t press all the way through. -
Add black paint to dots:
If you want the dots on the squares to be black, you can fill the indentations with a tiny bit of black liquid clay before baking, or wait to paint them after baking. -
Smooth the edges:
Before baking, use your finger or a silicone tool to gently smooth the cut edges of all your clay pieces to remove any sharp corners or drag marks from the cutters.
Step 3: Baking & Assembly
-
Bake the pieces:
Arrange your clay pieces on a parchment-lined baking sheet. Bake according to your specific brand’s package instructions—usually around 275°F (135°C) for 15-30 minutes. -
Cool down:
Remove the tray from the oven and let the clay pieces cool completely. They are fragile when hot, so resist the urge to move them. -
Paint the indents:
If you didn’t use liquid clay earlier, take a fine brush and dab black acrylic paint into the indented dots on the square pieces. Wipe away excess surface paint with a damp paper towel so the paint only remains in the holes. -
Sand for finish:
I prefer to quickly sand the edges and surfaces with fine-grit sandpaper at this stage to give them a truly professional, matte finish. -
Prepare the glue:
In a well-ventilated area, mix a small amount of strong adhesive like two-part epoxy or squeeze out some E6000. -
Attach the clips:
Apply a dab of glue to the flat pad of the bobby pin. Press the baked clay piece firmly onto the pad. -
Cure the bond:
Let the glue cure undisturbed for at least 24 hours to ensure the bond is permanent before wearing.
Pro Tip: Surface Texture
To get that realistic ‘stone’ look on the speckled pieces, gently tap the raw clay surface with an old toothbrush before baking to remove the shine.
Now you have a custom set of geometric hair accessories ready to style or gift
Stamped Gift Tags You Keep

Elevate your gift-giving with these reusable, heirloom-quality tags that look like ancient pottery fragments. Using oven-bake clay in a warm terracotta hue, you’ll create textured geometric designs that add a sophisticated, handmade touch to any package.
Detailed Instructions
Materials
- Terracotta-colored oven-bake polymer clay (e.g., Fimo or Sculpey)
- Acrylic rolling pin
- Parchment paper or ceramic tile (for working surface)
- Rectangular clay cutter or a sharp craft knife/blade
- Detailing stamps (geometric or mandala patterns)
- Small circular cutter or straw (for the hole)
- Jute twine
- Cornstarch or baby powder (as a release agent)
- Fine-grit sandpaper (optional)
- Oven
Step 1: Preparation and Rolling
-
Condition the Clay:
Begin by working the terracotta clay in your hands until it becomes soft, pliable, and warm. This conditioning step is crucial to prevent cracks later on. -
Prepare Your Surface:
Lay down a sheet of parchment paper or work directly on a clean ceramic tile. This prevents the clay from sticking to your table and makes it easier to transfer to the oven. -
Roll Out the Clay:
Using your acrylic rolling pin, roll the clay out to an even thickness of about 1/4 inch (6mm). You want it thick enough to hold the imprint without becoming flimsy. -
Cut the Tag Shape:
Press a rectangular cutter firmly into the clay. If you don’t have a cutter, use a ruler and a craft knife to cut a precise rectangle, approximately 2 inches by 3 inches. -
Create Angled Corners (Optional):
To mimic the classic tag shape shown in the photo, use your craft blade to slice off equal-sized triangles from the top two corners.
Step 2: Stamping the Design
-
Prepare the Stamp:
Lightly dust your geometric stamp with cornstarch or baby powder. I like to tap off the excess on the side so it doesn’t clog the details. -
Position the Stamp:
Align your stamp carefully over the bottom two-thirds of the tag. The design in the image features two vertical panels of geometric triangles and dots. -
Imprint the Clay:
Press the stamp down firmly and evenly. Apply enough pressure to get a deep, crisp impression, but be careful not to distort the outer shape of the rectangle. -
Lift and Reveal:
Gently peel the stamp back. If the clay lifts with it, use a craft knife to gently separate them without ruining the pattern. -
Add the Tie Hole:
Use a small circular cutter or the end of a drinking straw to punch a hole centered near the top edge of the tag. Make sure it’s wide enough for your twine. -
Smooth the Edges:
Dip your finger in a tiny bit of water or baby oil and gently run it along the cut edges of the tag to soften any sharp ridges or burrs.
Stamp Stuck?
If the clay keeps sticking to deep stamp grooves, spray the stamp lightly with water or place a piece of cling film over the clay before stamping for a softer look.
Step 3: Baking and Finishing
-
Bake the Clay:
Transfer the clay (still on its drying tile or parchment) to a baking sheet. Bake according to the manufacturer’s instructions on your clay package mostly likely around 230°F to 275°F for 15-30 minutes. -
Cool Down:
Once baken, turn off the oven and let the tag cool down completely inside with the door slightly ajar. This gradual cooling helps prevent brittleness. -
Sand Imperfections:
If there are any rough spots on the edges after baking, lightly buff them away with fine-grit sandpaper. -
Clean the Residue:
Wipe the tag with a slightly damp cloth to remove any lingering sanding dust or release powder from the stamping process. -
Attach the Twine:
Cut a length of jute twine, fold it in half, push the loop through the tag hole, and pull the loose ends through the loop to secure it with a lark’s head knot.
Antique Finish
After baking, rub a dark brown or black acrylic paint into the grooves and wipe the surface clean immediately. paint stays in the recesses for contrast.
Now you have a stunning, reusable gift tag that serves as a secondary present in itself
Terrazzo Napkin Rings
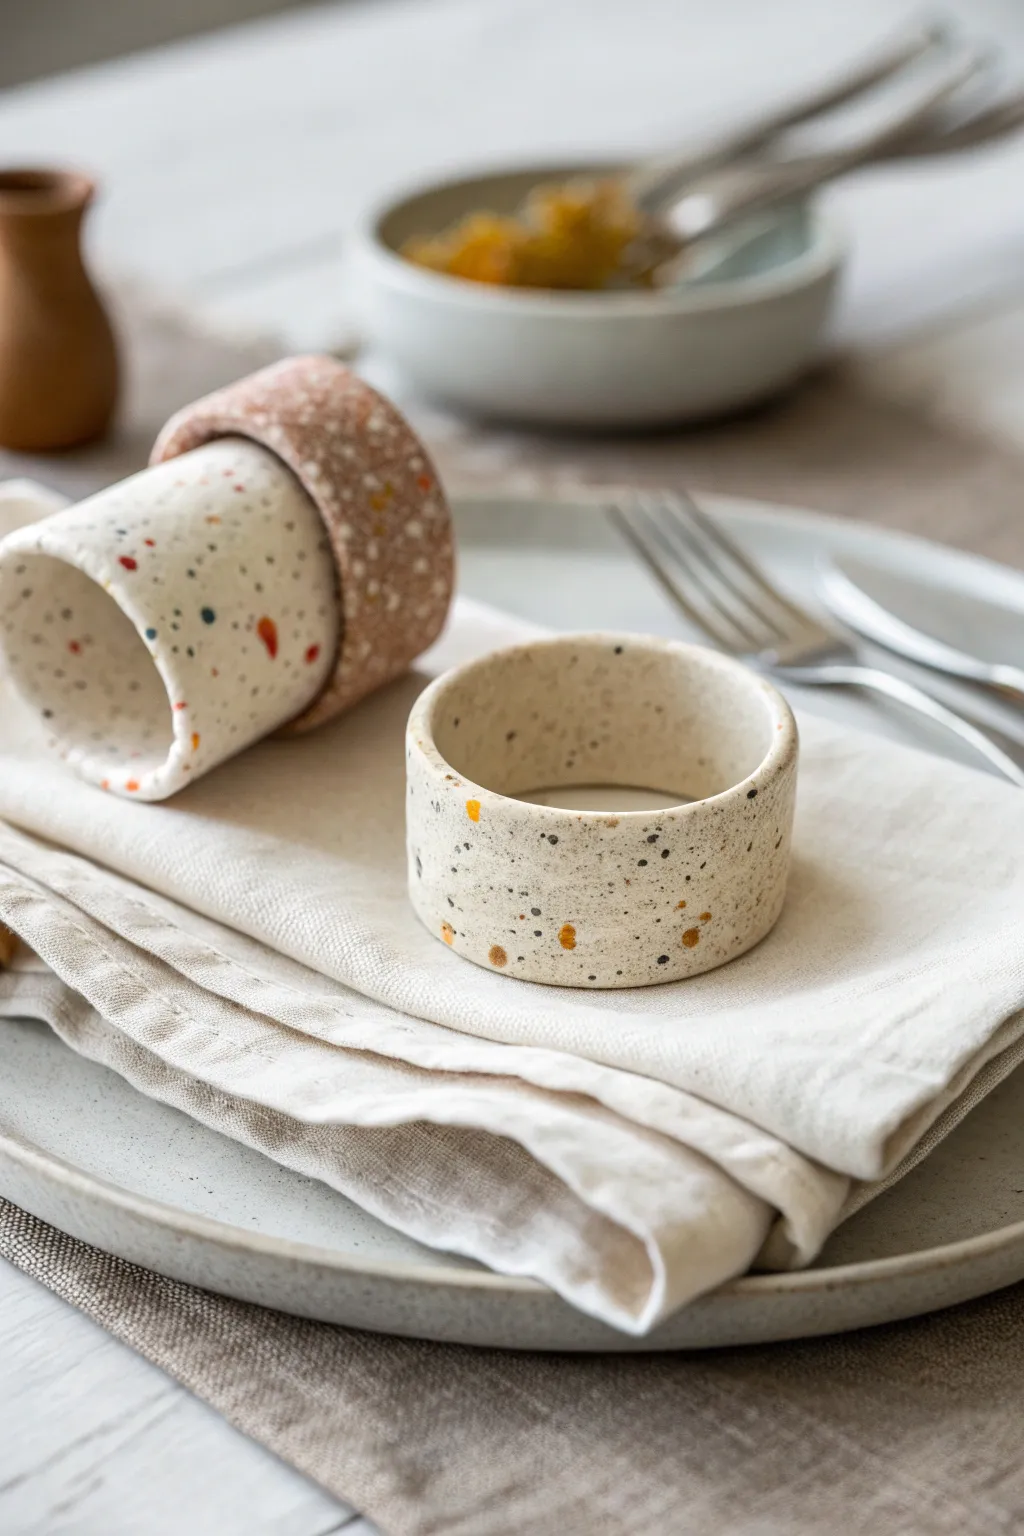
Bring a touch of modern artisan charm to your dining table with these chic napkin rings, featuring a speckled terrazzo finish. The organic, imperfect flecks of color against a neutral base create a sophisticated look that feels both trendy and timeless.
Step-by-Step
Materials
- White or cream polymer clay (base color)
- Small amounts of polymer clay in accent colors (terracotta, mustard, grey, navy)
- Clay roller or rolling pin
- Craft knife or tissue blade
- Cardboard tube (from paper towels or toilet paper)
- Parchment paper
- Sandpaper (fine grit)
- Matte polymer clay glaze (optional)
- Soft brush
Step 1: Preparing the Pattern
-
Condition the Base:
Start by thoroughly conditioning your white or cream clay in your hands until it becomes soft and pliable. Roll it out into a flat sheet about 1/4 inch thick. This will be your canvas. -
Create Colored Flecks:
Take your accent colors—terracotta, mustard yellow, dark grey, and navy—and pinch off very tiny pieces. Based on the photo, you want these shapes to be irregular and jagged rather than perfect circles. -
Chop for Texture:
For an even more authentic terrazzo look, I like to roll the accent colors into thin snakes and then chop them randomly with a craft knife into tiny confetti-sized bits. -
Sprinkle the Confetti:
Randomly scatter these colored bits over your rolled-out neutral sheet. Aim for an uneven distribution to keep it looking organic, letting some areas be denser than others. -
Embed the Colors:
Place a piece of parchment paper over the clay to prevent sticking, then gently roll over the surface again. Apply enough pressure so the colored chips flatten completely and become flush with the base clay.
Step 2: Shaping the Rings
-
Trim the Edges:
Using your craft knife and a straight edge (like a ruler), cut your patterned clay sheet into long, clean strips. These should be about 1.5 to 2 inches wide. -
Prepare the Form:
Take your cardboard tube and wrap a small piece of parchment paper around it. This prevents the clay from bonding to the cardboard during baking. -
Wrap the Clay:
Lift one of your clay strips and wrap it carefully around the parchment-covered tube. Ensure it fits snugly but isn’t stretched too thin. -
Seal the Seam:
Where the ends of the clay strip meet, slice through both layers simultaneously with your blade for a perfect butt joint. Gently press the seam together with your finger or a clay tool to blend it invisible. -
Smooth the Edges:
Run a finger dipped in a tiny bit of water or baby oil along the top and bottom rims of the ring to smooth out any sharp edges created by the cutting process.
Clean Start
Wipe your work surface and rolling pin with alcohol before rolling the white base clay. Dust shows up easily on light clay!
Step 3: Baking and Finishing
-
Bake the Pieces:
Place the cardboard tubes (with clay still attached) onto a baking sheet. Bake according to your specific clay brand’s instructions, usually around 275°F (135°C) for 15-30 minutes. -
Cool Down:
Once the baking time is up, turn off the oven but verify the clay has hardened. Let the pieces cool completely before attempting to remove them from the cardboard tubes. -
Remove from Form:
Slide the clay rings off the cardboard. Peel away the parchment paper from the inside of the ring. -
Sand for Smoothness:
Using fine-grit sandpaper, gently wet-sand the surface and edges of the ring. This step is crucial for achieving that professional, stone-like finish seen in the image. -
Buff or Seal:
The napkin rings in the photo appear to have a natural matte finish. You can simply buff them with a soft cloth, or apply a very thin layer of matte glaze for durability.
Alternative Shapes
Instead of round rings, try forming the clay into a hexagon shape or an open ‘C’ cuff for a more geometric, architectural look.
Set your table with these custom pieces and enjoy the compliments on your handiwork
Arch Photo or Card Holder
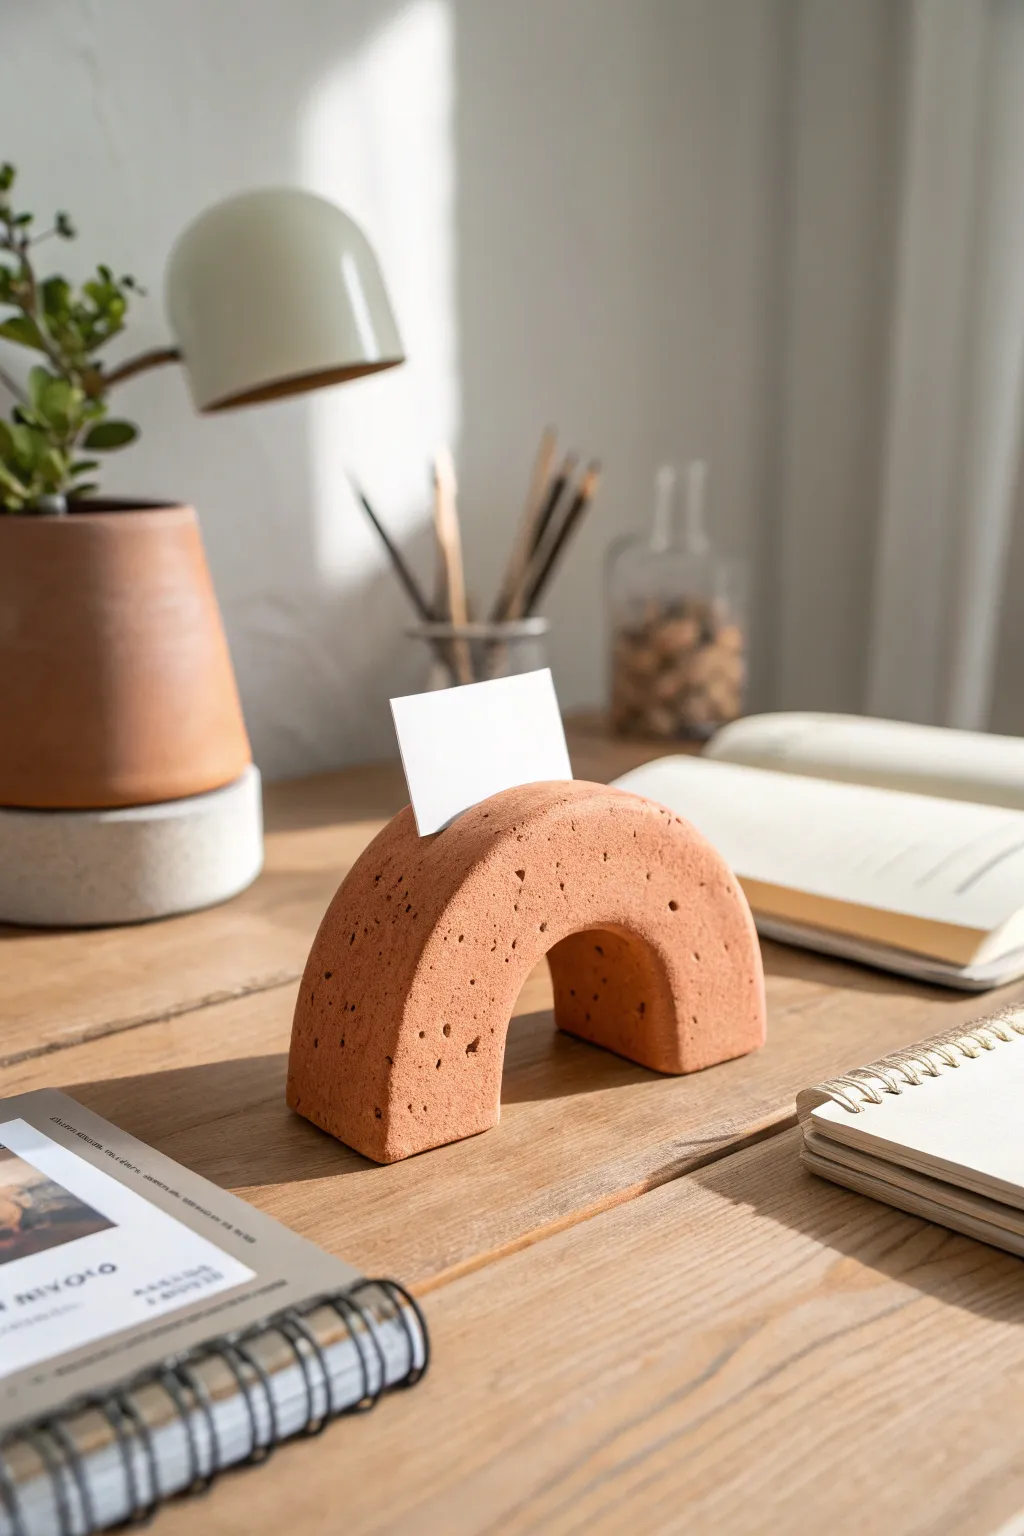
This minimalist card holder combines the warm, earthy tones of terracotta with a rugged styling that mimics rough-hewn stone. It’s perfect for displaying your favorite photo, a business card, or even a table number at an event.
How-To Guide
Materials
- Terracotta-colored polymer clay (approx. 4-6 oz)
- Aluminum foil
- Rolling pin or acrylic roller
- Craft knife or tissue blade
- Clean toothbrush or stiff stippling brush
- Coarse sea salt or sugar (for texturing)
- Needle tool
- Baking sheet and parchment paper
- Sandpaper (medium grit)
Step 1: Forming the Core
-
Condition the clay:
Begin by warming the terracotta polymer clay in your hands. Knead and twist it thoroughly until it becomes soft, pliable, and easy to shape. -
Prepare the foil core:
To save clay and ensure even baking, crumple a piece of aluminum foil into a tight log about 4 inches long. Curve this log into an arch shape that resembles the final project. -
Roll out a clay sheet:
Using your roller, flatten your conditioned clay into a consistent sheet, roughly 1/4 inch thick. Make sure the sheet is large enough to completely wrap around your foil arch. -
Wrap the core:
Drape the clay sheet over the foil arch. Press it gently to adhere, smoothing the seams together on the underside where they won’t be visible.
Natural Speckling
Mix a tiny pinch of black pepper or dried coffee grounds into the clay before shaping. This adds permanent, realistic speckles that mimics real stone.
Step 2: Shaping and Refining
-
Define the shape:
Stand the arch up on your work surface. Press down firmly to create a flat base so the holder sits level without wobbling. Use your fingers to square off the sides slightly if you prefer a blockier look. -
Trim the edges:
Use your craft knife to trim away any excess clay at the base, ensuring a clean line where the arch meets the table. -
Smooth the surface:
Rub your finger or a little bit of baby oil over the clay to remove any obvious fingerprints or seam lines. It doesn’t need to be perfect since we are adding texture later. -
Cut the display slot:
Using your blade or craft knife, cut a straight, vertical slit into the very top center of the arch. Gently wiggle the blade side-to-side to widen it just enough to hold a thick card.
Uneven Texture?
If the salt doesn’t stick, lightly mist the raw clay with water before pressing the granules in. This helps them embed firmly before baking.
Step 3: Texturing and Finishing
-
Rough texturing:
Take your clean toothbrush or a stiff stippling brush and firmly tap it all over the surface of the arch. This creates a base layer of fine, concrete-like pores. -
Add deep pitting:
For that weathered stone look, take your needle tool and randomly poke deeper holes. I find grouping a few holes together looks more natural than spacing them perfectly evenly. -
Salt texture method:
Sprinkle coarse sea salt or sugar onto your work surface and roll the sides of the arch into it, or press the granules into the clay by hand. This creates uneven, organic divots. -
Refine the slot:
Check the card slot again. The texturing process can sometimes push it closed, so re-insert your blade to ensure the opening remains clear and straight. -
Bake the piece:
Place your arch on a parchment-lined baking sheet. Bake according to the manufacturer’s instructions for your specific brand of clay—usually around 275°F (135°C) for 30 minutes per 1/4 inch of thickness. -
Cool and wash:
Allow the piece to cool completely in the oven. Once cool, run the piece under warm water and scrub gently to dissolve and wash away the salt or sugar granules, revealing the pitted texture. -
Final sand (optional):
If the bottom feels uneven, lightly sand the base against a piece of sandpaper placed flat on the table until it sits perfectly flush.
Place your favorite photo in the slot and enjoy the earthy charm this piece brings to your desk
Moon Phase Wall Mobile

Bring the calming energy of the night sky indoors with this elegant hanging mobile. Featuring two strands of clay moon phases with a beautiful marbled stone finish, it serves as a sophisticated piece of modern bohemian decor.
Step-by-Step Guide
Materials
- White or translucent polymer clay (approx. 8 oz)
- Beige or granite-effect polymer clay (approx. 4 oz)
- Gold alcohol ink or metallic gold acrylic paint
- Rolling pin or pasta machine
- Circle cookie cutters (approx. 2.5 to 3 inches diameter)
- Sharp craft knife or clay blade
- Wooden dowel (12-14 inches long)
- Natural jute twine or hemp cord
- Small eye screws (optional, for dowel hanging)
- Small needle or toothpick (for piercing holes)
- Sandpaper (high grit)
- Oven and baking sheet
Step 1: Marbling and Cutting
-
Condition the Clay:
Begin by warming up your white and beige polymer clay in your hands until they are soft and pliable. This prevents cracking later on. -
Create the Marbling:
Twist the white and beige clay ropes together, fold them, and roll them out again. Repeat this twisting and folding process just enough to create streaks, but stop before the colors blend completely into a solid new shade. -
Roll Out the Slab:
Use your rolling pin to flatten the marbled clay into a sheet about 1/4 inch thick. Aim for a consistent thickness so pieces hang evenly. -
Cut the Circles:
Using your circle cutter, punch out roughly 8 to 10 full circles from the slab. These circles will become your various moon phases. -
Shape the Phases:
Leave several circles whole for the full moons. For the crescent and half moons, use the same circle cutter to slice into the existing circles, removing arcs of clay to create the desired curved shapes. -
Add Texture (Optional):
Lightly dap a crumpled piece of aluminum foil or a stiff paintbrush onto the surface of the clay to mimic the cratered texture of the moon. -
Pierce Hanging Holes:
Using a needle or toothpick, poke a small hole at the very top and very bottom of every piece that will be in the middle of a strand. The bottom-most pieces only need a top hole.
Clean Cuts
If your clay sticks to the cutter, dip the cutter in cornstarch or water before pressing down. This helps the clay release instantly without distorting the moon shape.
Step 2: Baking and Finishing
-
Bake the Pieces:
Arrange your shapes on a parchment-lined baking sheet and bake according to your specific clay package’s instructions (usually 275°F for 15-30 minutes). -
Cool and Sand:
Allow the pieces to cool completely. Once hard, use fine-grit sandpaper to gently smooth any rough edges left by the cutter. -
Apply Gold Accents:
Dip a brush into gold alcohol ink or metallic paint and lightly distress the edges and surface texture. I like to blot most of the paint off onto a paper towel first for a dry-brush effect that looks aged rather than painted.
Baking Bubbles?
If you notice air bubbles forming on the surface during baking, gently prick them with a pin and smooth the air out while the clay is still warm, then bake for a few more minutes.
Step 3: Assembly
-
Prepare the Strings:
Cut two long lengths of jute twine. Tie a secure knot at the end of the first string. -
Thread the First Strand:
Thread the string through the top hole of your bottom-most moon piece. Tie a knot a few inches above it to create spacing, then thread the bottom hole of the next moon piece. -
Connect the Phases:
Continue threading the string through the back of the clay piece and out the top hole. Repeat the knotting and threading process until your first column is complete. -
Create the Second Strand:
Repeat the threading process for the second vertical strand of moons, trying to keep the spacing consistent with the first strand. -
Attach to Dowel:
Wrap the excess string at the top of each strand around the wooden dowel several times and secure heavily with knots. You can add a dab of super glue here for extra hold. -
Create the Hanger:
Tie a final piece of twine to both ends of the wooden dowel to create the triangular hanger for the wall.
Hang your lunar creation near a window to catch the shifting light and enjoy the serene atmosphere it adds to your room
Abstract Knot Paperweight
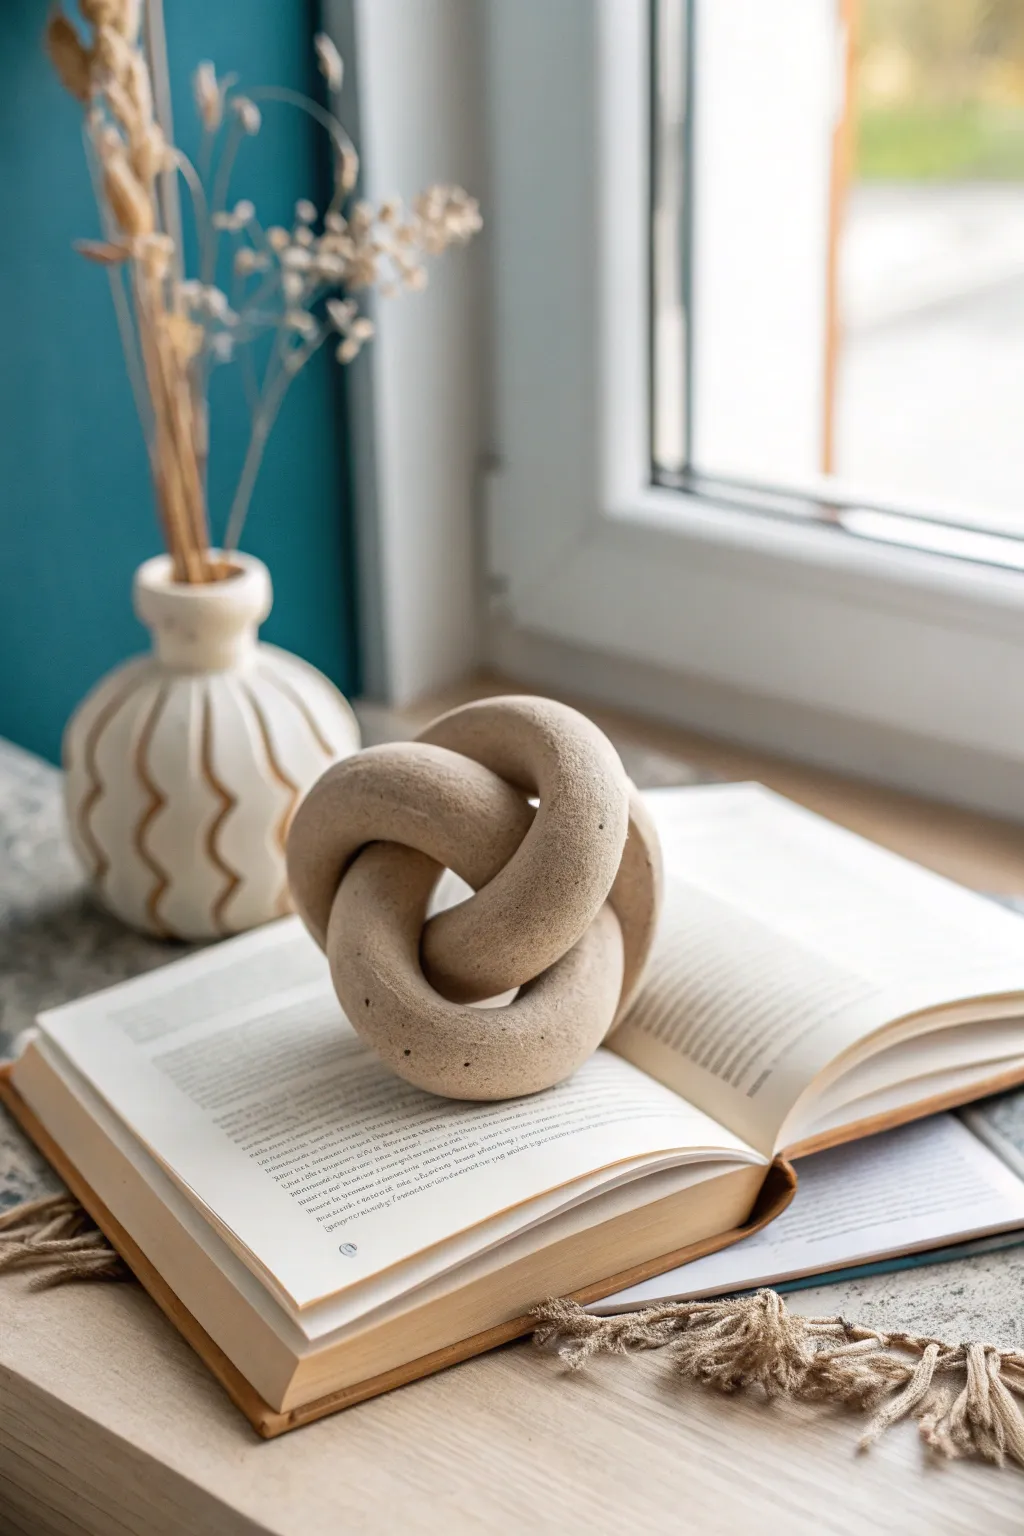
This elegant, sculptural knot brings a touch of modern minimalism to any shelf or desk. With its textured, speckled finish, it mimics the look of raw sandstone while being surprisingly lightweight and easy to create with polymer clay.
Detailed Instructions
Materials
- Beige or tan oven-bake polymer clay (approx. 8 oz)
- Coarse black pepper or dried coffee grounds
- Rolling pin or acrylic roller
- Aluminum foil
- Pottery sponge or texture sponge
- Clay cutting blade
- Oven and baking sheet
- Parchment paper
- Sandpaper (fine grit)
Step 1: Preparing the Clay
-
Condition the clay:
Start by warming the polymer clay in your hands, kneading it thoroughly until it becomes soft and pliable. If the clay is old or crumbly, you can add a drop of clay softener or baby oil. -
Add texture inclusions:
To achieve that realistic stone look, flattening your clay slightly and sprinkle in a pinch of coarse black pepper or dried coffee grounds. Fold the clay over and knead it until the specks are evenly distributed throughout. -
Create the core snake:
Roll the clay into a long, even cylinder or ‘snake’ shape. You want this to be quite thick, roughly 1 inch in diameter and about 12-14 inches long. -
Smooth the surface:
As you roll, watch for air bubbles or seams. Gently smooth these out with your thumb to ensure the surface is uniform before you begin forming the knot.
Fixing Cracks
If small cracks appear after baking, mix a tiny bit of raw clay with liquid clay (Bake & Bond) to make a paste. Fill the crack, re-texture, and bake again for 15 mins.
Step 2: Forming the Knot
-
Create the initial loop:
Take your long clay snake and create a simple open loop in the center. Picture it like tying a shoelace, but keep everything very loose and open. -
Weave the first end:
Take one end of the snake and thread it through the loop you just made. Don’t pull it tight; the goal is a voluminous, chubby knot structure. -
Weave the second end:
Take the other loose end and weave it over and under the existing curves to complete a basic overhand knot or pretzel shape. Adjust the loops so they look balanced. -
Hide the seams:
Where the two ends of your snake meet (usually tucked underneath or inside the knot), gently press them together. Use a modeling tool or your finger to blend the clay so the strand looks continuous. -
Refine the shape:
Gently push and pull the loops to ensure the knot sits flat on your work surface but maintains a nice rounded height.
Level Up: Color Wash
Dilute brown or grey acrylic paint with water. Brush it over the cooled knot and immediately wipe it off with a rag. The pigment stays in the crevices for depth.
Step 3: Texturing and Baking
-
Apply stone texture:
Take a rough pottery sponge or even a crumpled ball of aluminum foil. Gently press it all over the surface of the clay to remove fingerprints and create a pitted, stone-like texture. -
Prepare the baking surface:
Line a baking sheet with parchment paper. To help the knot hold its rounded shape, you can create small pillows of crumpled foil to support any loops that might sag. -
Bake the project:
Place your knot in a preheated oven according to your clay package’s instructions (usually 275°F or 130°C). Bake for about 30-45 minutes depending on the thickness. -
Cool down:
Turn off the oven and open the door slightly, letting the piece cool down slowly inside. This helps prevent cracking. -
Post-bake sanding:
Once fully cool, inspect the piece for any sharp edges or overly rough spots. I like to lightly sand these areas to give it a weathered, tumbled stone feel. -
Final wipe:
Wipe the sculpture down with a slightly damp cloth to remove any sanding dust and reveal the speckled texture pattern.
Place your new faux-stone sculpture atop a stack of books or a coffee table for an instant style upgrade