When I’m crafting with kids, oven-bake clay is my favorite because you can take your time shaping, then bake it into something sturdy and satisfying. These ideas are all about cute, simple wins—tiny projects that turn a little polymer clay into big smiles.
Mini Food Charms
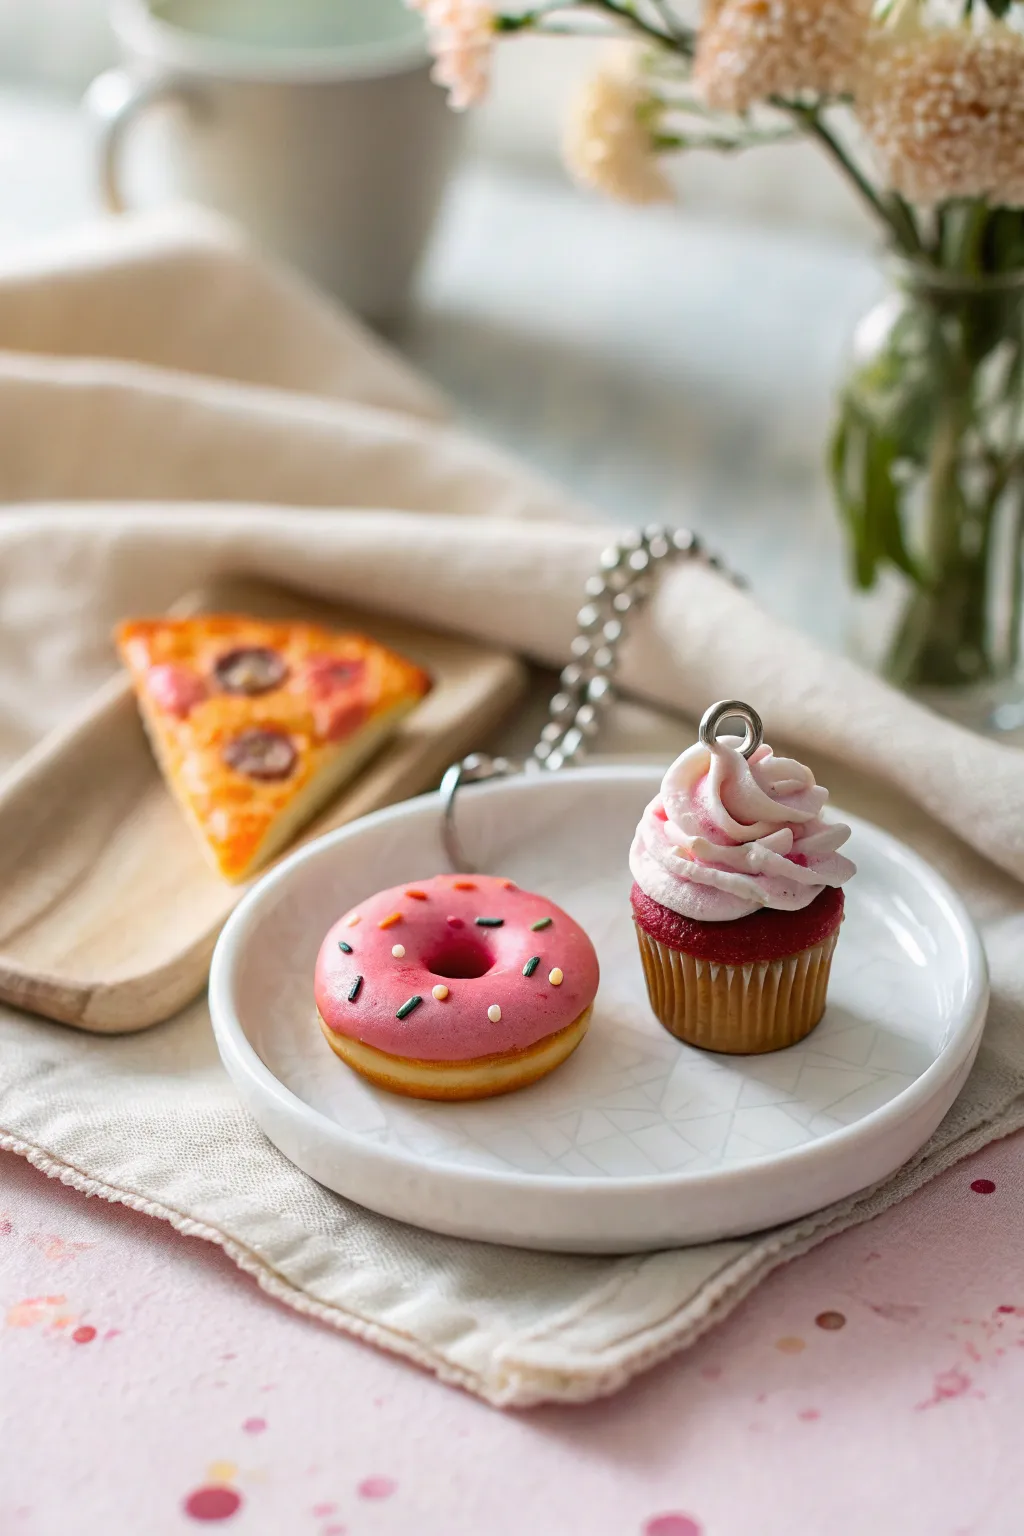
Transform simple polymer clay into an adorable trio of miniature snacks perfect for jewelry or keychains. This project features a classic pepperoni pizza slice, a sprinkle-covered donut, and a swirled red velvet cupcake charm.
Step-by-Step Guide
Materials
- Polymer clay (tan/beige, yellow, red, pink, white, green)
- Liquid polymer clay (translucent or white)
- Clay roller or pasta machine
- Small circle cutter (approx. 1 inch)
- Needle tool or toothpick
- Exacto knife or clay blade
- Soft pastel chalks (oranges and browns)
- Small paintbrush
- Metal eye screws or headpins
- Gloss glaze (optional)
- Star piping tip (very small) or DIY clay piping bag
Step 1: Crafting the Donut
-
Base shape:
Start by conditioning a small ball of tan or beige clay. Roll it into a smooth sphere, then gently flatten it into a thick disc shape. Use your finger to round the edges so it looks like a risen dough. -
Create the hole:
Take a needle tool or the end of a paintbrush and press directly into the center to create the donut hole. Wiggle it slightly to widen the opening, smoothing the inner edges with your finger. -
Adding texture:
Use a toothbrush or a ball of crinkled foil to gently texture the tan surface, giving it a realistic fried dough appearance instead of perfect smoothness. -
Pink icing:
Roll out a thin sheet of pink clay. Use a small cutter (slightly smaller than your donut diameter) or cut a wavy circle freehand. Place this on top of the donut and smooth the edges down so it looks like dripping glaze. Poke the center hole through the pink layer. -
Sprinkles:
For the sprinkles, roll tiny snakes of green, yellow, and white clay. They should be thread-thin. Cut tiny segments and gently press them onto the pink icing.
Frosting Pro-Tip
If you don’t have liquid clay for the frosting, roll a long, thin snake of white clay. Twist two strands together first, then coil it upward into a swirl.
Step 2: Making the Cupcake
-
Cupcake base:
Form a cylinder of tan clay that is slightly narrower at the bottom than the top. -
Liner texture:
Use a needle tool or a dull knife to press vertical lines all around the side of the cylinder to mimic the ridges of a paper cupcake liner. -
Cake layer:
Form a small, flattened dome of dark red clay. Press this onto the top of your tan base. Texture the surface by poking it repeatedly with a needle tool or toothbrush to create a crumb effect. -
Frosting swirl:
Mix a small amount of white clay with liquid clay until it’s a soft, pipeable consistency (like toothpaste). Put this into a tiny piping bag or a plastic bag with the corner snipped. Pipe a swirl on top of the red cake, finishing with a peak. -
Pink dusting:
Scrape a tiny bit of pink or red chalk pastel into a powder. Use a soft brush to lightly dust the edges of the white frosting for a sweet, rosy tint.
Step 3: Sculpting the Pizza
-
Crust formation:
Roll a ball of beige clay into a triangle shape. Pinch the wider end to form a raised crust rim, leaving the middle section flat and slightly thinner. -
Sauce and cheese:
Mix liquid clay with red chalk pastel for sauce, or use a thin layer of red clay. Top this with a textured layer of yellow-orange clay for the cheese. Texture the cheese by pricking it lightly. -
Pepperoni toppings:
Roll a tiny snake of dark red clay. Cut very thin slices and press them into the cheese layer. I like to texture these slightly so they look like cooked meat. -
Baking effect:
Use orange and brown chalk pastels to shade the crust rim and parts of the cheese. This adds that crucial golden-brown, oven-baked look.
Hardware Help
If the eye screw feels loose after baking, unscrew it, add a tiny drop of superglue to the threads, and screw it back into the hole for a secure hold.
Step 4: Finishing Touches
-
Adding hardware:
Before baking, carefully screw a metal eye pin into the top of each charm. For the cupcake, go through the frosting into the base; for the pizza, go into the thick crust. -
Baking:
Bake the charms according to your clay manufacturer’s instructions (usually 275°F/135°C for 15-30 minutes). Let them cool completely before handling. -
Glazing:
Once cool, apply a coat of gloss glaze to the pepperoni, the donut icing, and the frosting to make them look moist and appetizing.
Now you can attach your delicious-looking charms to a keychain or necklace chain and show them off


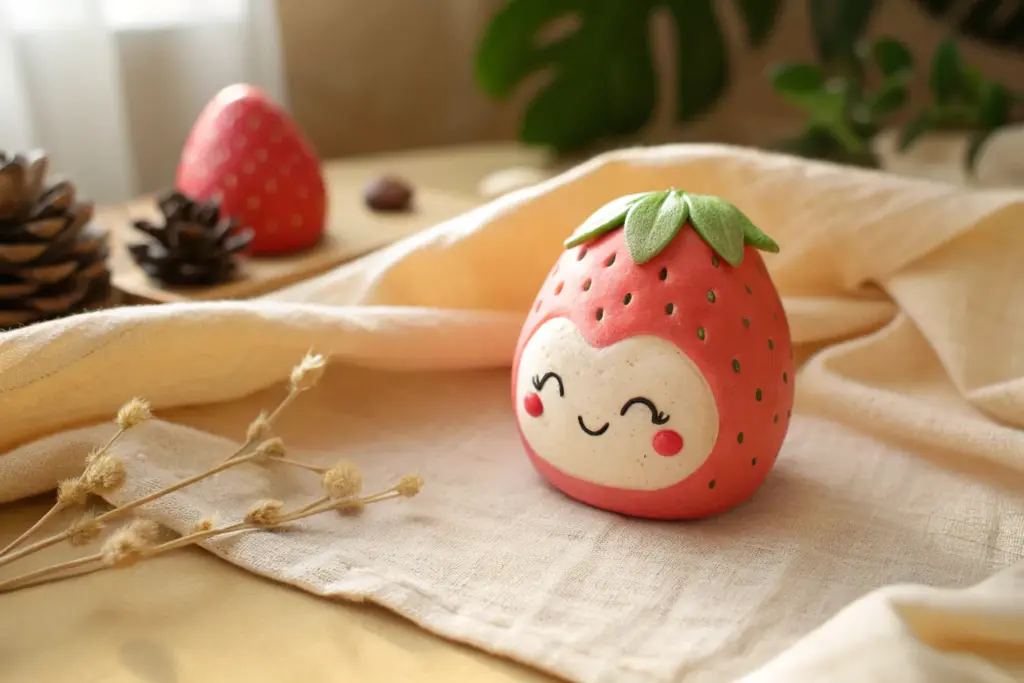
Fruit Faces That Always Smile
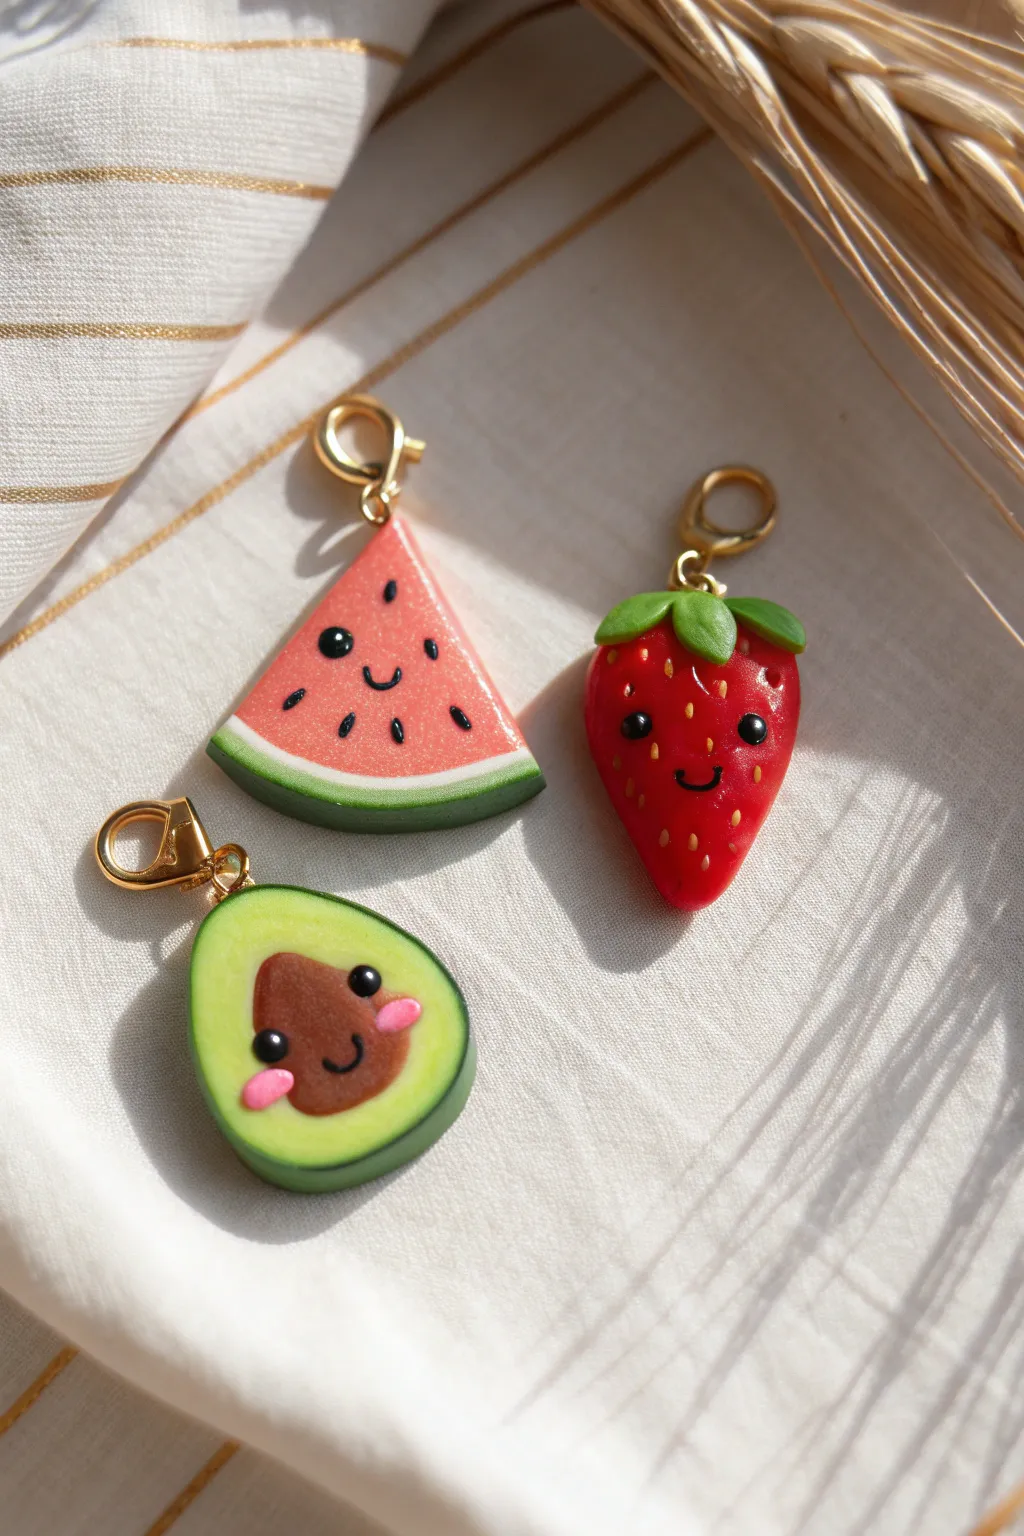
These adorable fruit slice charms are full of personality and make perfect zipper pulls or necklace pendants. With their tiny smiles and rosy cheeks, this trio of watermelon, strawberry, and avocado is a sweet introduction to sculpting with clay.
Step-by-Step Tutorial
Materials
- Polymer clay (red, pink, dark green, light green, brown, black, white)
- Clay rolling pin or acrylic roller
- Precision craft knife or clay blade
- Needle tool or toothpick
- Small dotting tool
- Gold tone lobster clasps with jump rings
- Gloss glaze or UV resin (optional)
- Small paintbrush
Step 1: Sculpting the Shapes
-
Mix Custom Colors:
Start by conditioning your clay. You may want to mix a bright pinkish-red for the watermelon and a deep red for the strawberry. For the avocado, mix a soft lime green for the flesh and a darker forest green for the skin. -
Create the Watermelon Slice:
Roll a thick triangle of pinkish-red clay. Roll out a thin sheet of white clay and a slightly thicker sheet of dark green clay. Wrap the white around the curved bottom edge of the triangle, followed by the green, to create the rind layers. -
Form the Strawberry:
Shape a ball of red clay into a rounded mood-drop or heart shape, slightly flattened. For the leaves, create three or four small teardrops of green clay, flatten them, and press them onto the top of the berry. -
Shape the Avocado:
Form the lime green clay into a pear shape and flatten it into a thick slab. Wrap a thin strip of dark green clay around the entire outer edge for the skin. Press a small ball of brown clay into the lower center to make the pit.
Fingerprint Fix
Work getting smudgey? Lightly brush your raw clay shapes with a little baby oil or cornstarch before baking to smooth out fingerprints.
Step 2: Adding the Faces
-
Make Eye Indentations:
Using a dotting tool, gently press two small divots where you want the eyes to go on each fruit. This helps the tiny clay balls sit securely. -
Insert the Eyes:
Roll infinitesimally small balls of black clay. Carefully place them into the indentations you made. Press them down gently so they don’t protrude too much. -
Create the Smiles:
Roll a very thin ‘snake’ of black clay. Cut tiny curved segments for the mouths. Using a needle tool, carefully press these curves onto the faces below the eyes. -
Add Rosy Cheeks:
For the avocado, roll two tiny ovals of bright pink clay and press them next to the smile on the brown pit. This gives it that extra kawaii look. -
Detail the Seeds:
For the strawberry, press small indentations all over the red surface with a needle tool to mimic seeds. You can fill these with tiny bits of yellow clay, or paint them gold later. For the watermelon, press small teardrops of black clay onto the pink surface.
Sparkle Up!
Mix a tiny pinch of fine glitter into the red watermelon clay or the strawberry glaze for a sugary, candy-coated effect.
Step 3: Finishing Touches
-
Add Hardware:
Before baking, screw a small metal eye pin into the top of each fruit. I find adding a drop of liquid clay or bake-and-bond on the screw threads helps it stay put permanently. -
Bake the Clay:
Place your charms on a parchment-lined baking sheet. Bake according to your brand of clay’s instructions—usually around 275°F (135°C) for 15-20 minutes. -
Cool Down:
Let the pieces cool completely before handling. They are fragile when warm. -
Glaze and Highlight:
Once cool, paint tiny white highlights on the black eyes with acrylic paint to bring them to life. Coat the charms with a gloss glaze or UV resin for a shiny, durable finish. -
Attach Clasps:
Using pliers, open the jump ring on your lobster clasp and thread it through the eye pin loop on the charm. Close the ring securely.
Now you have a set of cheerful fruit friends ready to brighten up any backpack or keychain


Simple Animal Keychain Buddies
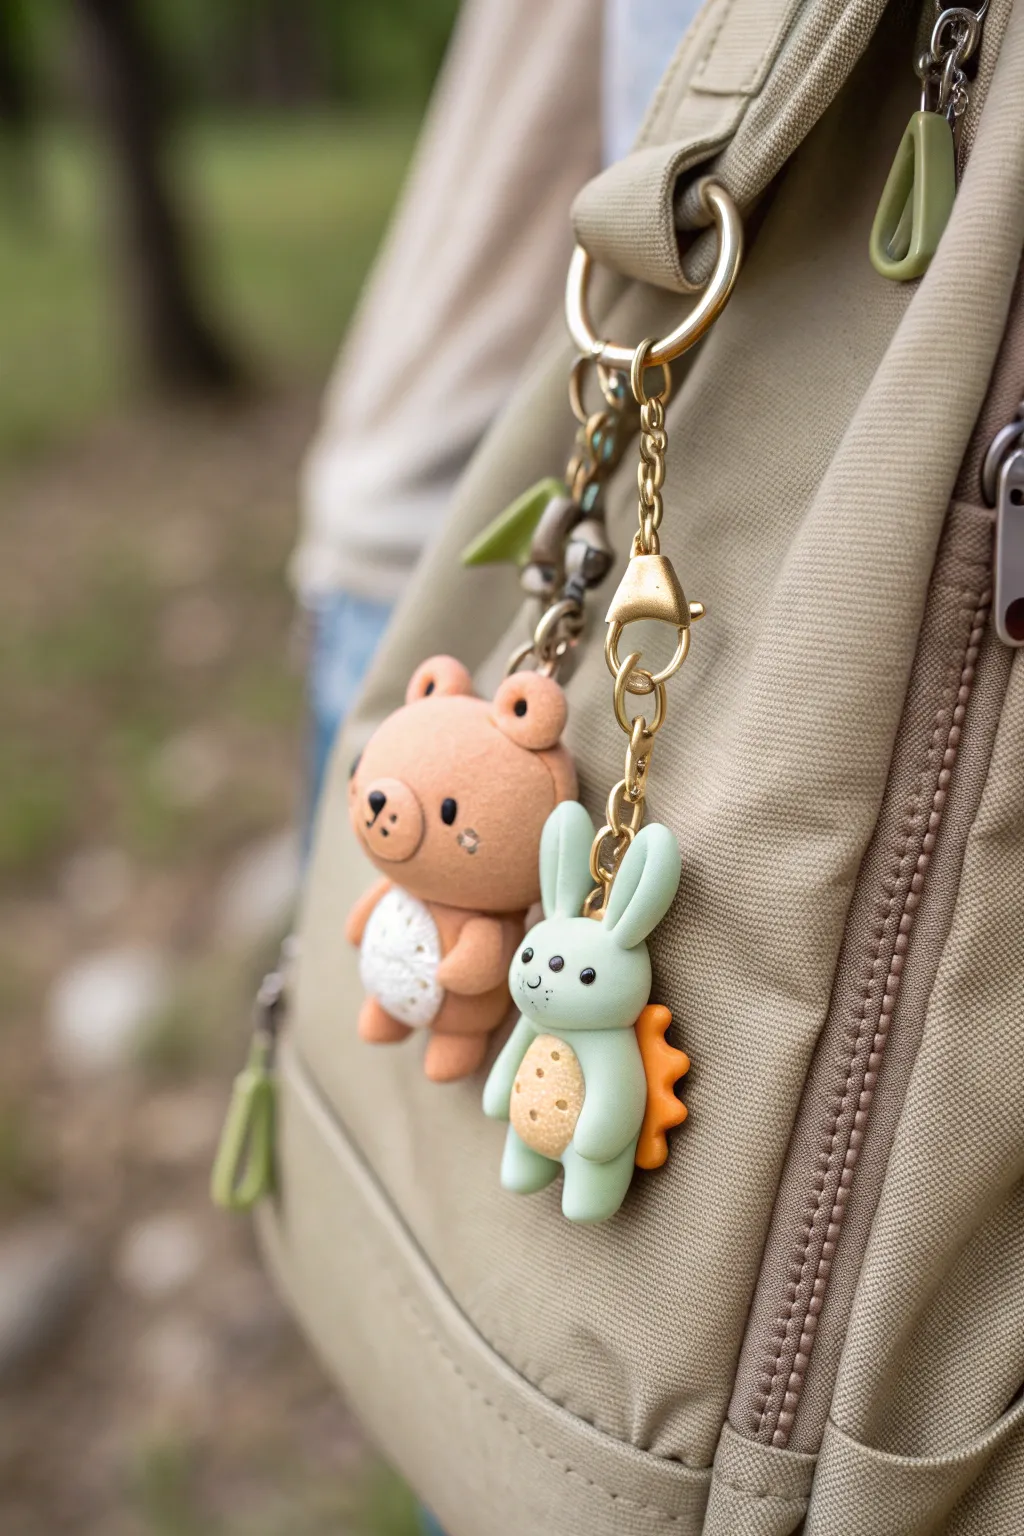
These adorable polymer clay charms—a cozy brown bear and a gentle mint-green bunny—make perfect companions for any adventure. With their matte finish and textured belly details, they add a sweet, handmade touch to zippers and loops.
Step-by-Step Guide
Materials
- Polymer clay (light brown, mint green, white, cream/beige, orange)
- Black acrylic paint or fine-tip permanent marker
- Ball stylus tool or toothpick
- Needle tool
- Gold screw eye pins (2 small)
- Small gold lobster clasps and jump rings
- Gold chain links
- Cleanup tools (wet wipes)
- Oven and baking sheet
- Gloss glaze (optional for eyes)
Step 1: Sculpting the Bear
-
Base Shape:
Start by conditioning the light brown clay until it’s soft and pliable. Roll a medium-sized ball for the head and a slightly smaller oval shape for the body. -
Joining Parts:
Gently press the head onto the top of the body oval. Push them together firmly enough to adhere, or use a tiny piece of wire or toothpick inside for extra stability. -
Ears and Limbs:
Roll two small balls of brown clay and flatten them slightly for the ears; attach these to the top of the head. Create four small sausage shapes for the arms and legs, attaching them to the body so the bear looks like it’s standing or sitting comfortably. -
Textured Belly:
Flatten a small disc of white clay and press it onto the bear’s tummy. Use a needle tool or toothpick to poke tiny, shallow holes all over the white patch to create a fluffy, dotted texture. -
Hardware Prep:
Insert a screw eye pin into the very top of the bear’s head. You may want to add a drop of liquid clay or bake-and-bond to the threads ensuring it stays secure after baking.
Loose Eye Pins?
If the screw eye feels loose after baking, unscrew it gently, add a drop of super glue to the threads, and screw it back into the hole.
Step 2: Sculpting the Mint Bunny
-
Body Form:
Take your mint green clay and roll a unified shape that looks a bit like a pear—narrower at the top for the head and wider at the bottom. -
Long Ears:
Roll two elongated teardrop shapes from mint clay. Flatten them gently and attach them to the top of the head. -
Adding Dimension:
Using a ball tool, press a gentle indentation into the inner part of each ear for depth. I like to smooth the seams where the ears meet the head so they don’t look fragile. -
Spiky Detail:
Create three or four small triangles from orange clay. Attach these in a row down the bunny’s back to give it a playful, monster-like spine detail. -
Belly Patch:
Similar to the bear, press a cream-colored oval onto the stomach. Instead of poking holes, use a small ball tool to make larger, crater-like divots for a different texture. -
Hardware:
Insert your second screw eye pin securely into the space between the bunny’s ears.
Step 3: Baking and Assembly
-
Bake:
Place both figures on a baking sheet or ceramic tile. Bake according to your clay package instructions (usually 275°F/135°C for about 15-20 minutes depending on thickness). -
Cool Down:
Allow the clay to cool completely before handling. The clay hardens as it cools, so patience here prevents breakage. -
Face Details:
Using a fine ball tool dipped in black paint (or a marker), add two small dots for eyes on each character. Add a tiny nose and mouth. For the bear, you can add three freckle dots on the cheeks. -
Highlighting:
Add the tiniest speck of white paint to the eyes to make them look alive. -
Attaching the Chain:
Open a jump ring with pliers and loop it through the eye pin on the figurine’s head. Connect a length of gold chain and the lobster clasp. -
Final Secure:
Close the jump ring tightly so there is no gap for the chain to slip through. Your buddies are now ready to hang.
Make it Sparkle
Brush a little pearlescent mica powder over the belly patches before baking to give your charms a magical, shimmer effect.
Clip these gentle creatures onto your daily bag to carry a little whimsy with you everywhere you go


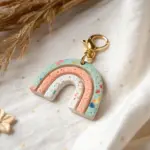
Rainbow and Cloud Pendants
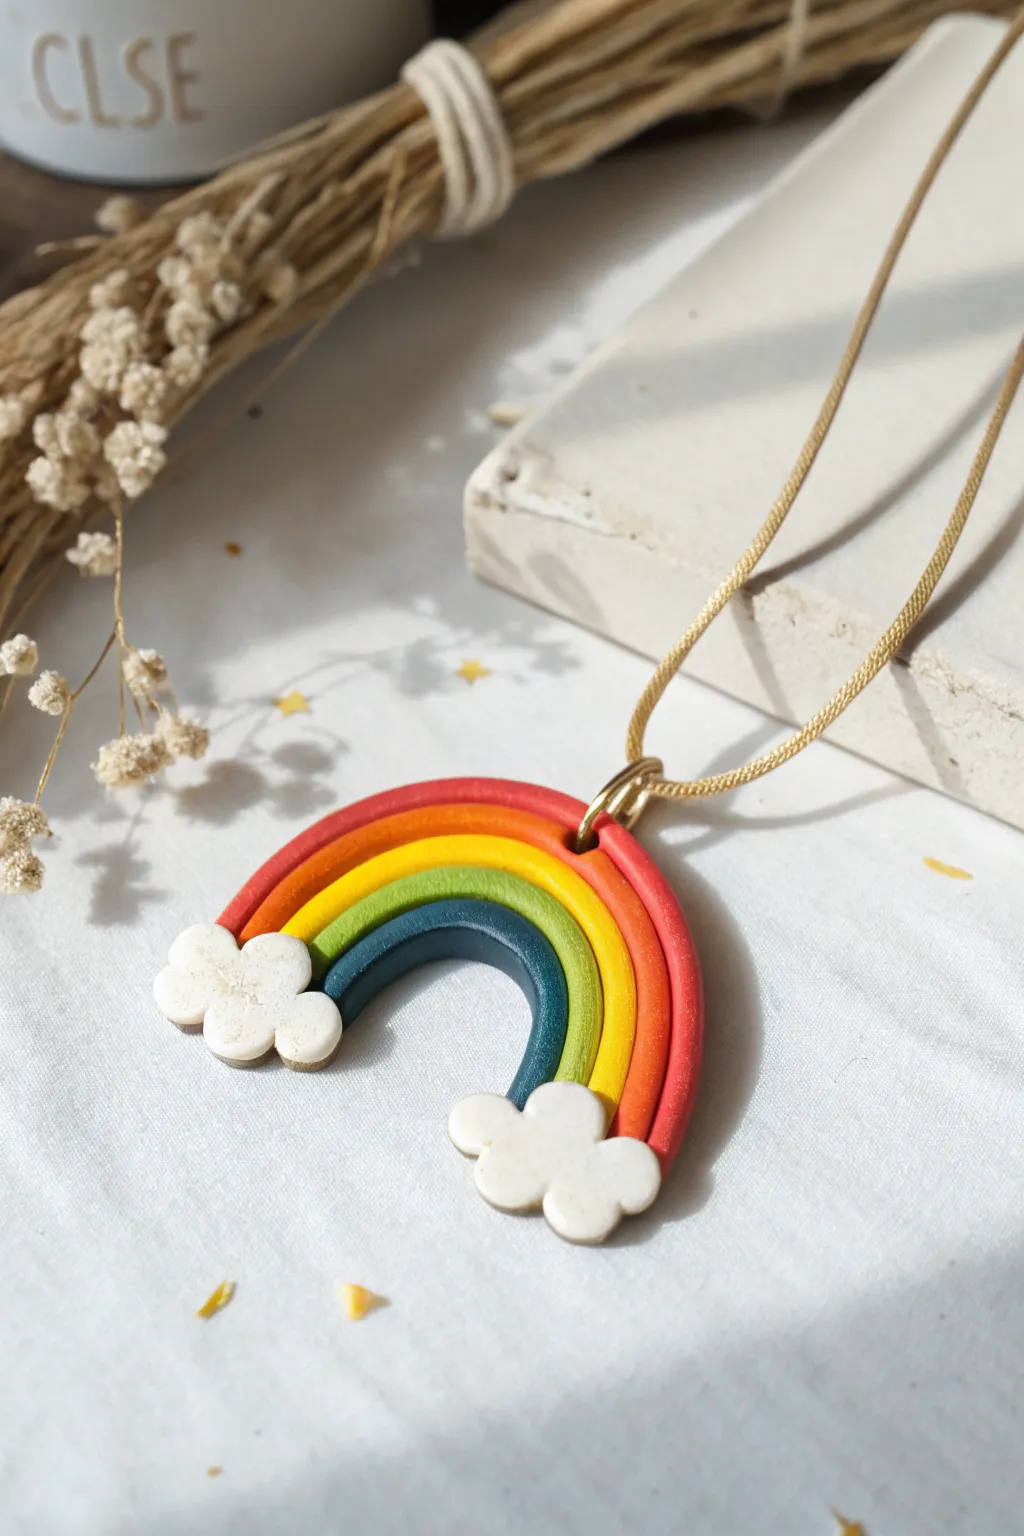
Brighten any outfit with this charming polymer clay necklace featuring a classic five-color rainbow nestled between two fluffy white clouds. The matte finish and simple shapes make this a perfect beginner project that looks professionally crafted.
Detailed Instructions
Materials
- Polymer clay (red, orange, yellow, green, dark blue, white)
- Clay roller or acrylic rolling pin
- Clay knife or craft blade
- Small cloud-shaped cutter (optional) or needle tool
- Gold jewelry bail or strong jump ring
- Gold cord or chain
- Liquid polymer clay or Bake and Bond (optional)
- Ceramic tile or baking sheet
- Oven
Step 1: Preparing the Arches
-
Condition the clay:
Start by warming up your red, orange, yellow, green, and dark blue clay. Knead each color separately in your hands until soft and pliable to prevent cracking later. -
Roll the snakes:
Roll each colored ball of clay on your work surface into a long, even snake. Aim for a thickness of about 3-4mm for each strand. Try to keep the pressure consistent so they are uniform. -
Form the first arch:
Take the dark blue snake (the innermost color) and gently bend it into a tight U-shape on your ceramic tile. This will set the size for the rest of the rainbow. -
Build the rainbow:
Take the green snake and press it snugly against the outer edge of the blue arch. Repeat this process with the yellow, orange, and finally, the red snake. -
Secure the strands:
I like to gently press the arches together from the sides to ensure they adhere well without flattening the rounded tops of the snakes. Use a little liquid clay between strands if your clay is dry. -
Trim the ends:
Once all five colors are assembled, take your sharp blade and slice straight across the bottom of the rainbow legs so they are perfectly flush and even.
Step 2: Adding Clouds & Hardware
-
Create cloud fondant:
Roll out a small slab of white clay to about 3mm thickness. If you have a tiny cloud cutter, punch out two shapes. Otherwise, freehand cut two small, bumps shapes. -
Refine the clouds:
Soften the cut edges of your clouds with your fingertip. You can use a needle tool to gently impress curves to make them look puffier and more stylized. -
Attach the clouds:
Place a cloud at the bottom of each side of the rainbow, covering the cut ends of the colored strands. Press firmly but gently to bond them. -
Prepare the bail placement:
Before baking, carefully poke a hole through the top red arch if using a jump ring, or gently press a jewelry bail into the back of the top arch depending on your hardware type. -
Final check:
Smooth out any fingerprints with a drop of baby oil or by lightly buffing the raw clay. Ensure the overall shape is symmetrical.
Fixing Gaps
If the arches separate after baking, apply a tiny amount of super glue liquid gel between the colors. Press together for 30 seconds to bond them invisibly.
Step 3: Baking & Assembly
-
Bake the piece:
Place your tile with the rainbow into the oven. Bake according to your specific clay manufacturer’s instructions (usually 275°F/130°C for 15-30 minutes). -
Cool down:
Let the rainbow cool completely in the oven with the door slightly ajar. This gradual cooling makes the clay stronger. -
Add the hardware:
Once cool, attach your large jump ring through the hole you made, or glue a bail to the back if you didn’t pierce the clay. Use strong jewelry glue for glued bails. -
Thread the cord:
Thread your gold cord through the jump ring or bail. Tie a secure knot at the ends or add clasp findings to finish the necklace.
Smoother Snakes
Use an acrylic block to roll your snakes. Instead of your hands, move the clear block back and forth over the clay for perfectly even, fingerprint-free ropes.
Wear your colorful creation with pride or gift it to a friend who needs a little sunshine

The Complete Guide to Pottery Troubleshooting
Uncover the most common ceramic mistakes—from cracking clay to failed glazes—and learn how to fix them fast.
Letter Beads for Name Bracelets
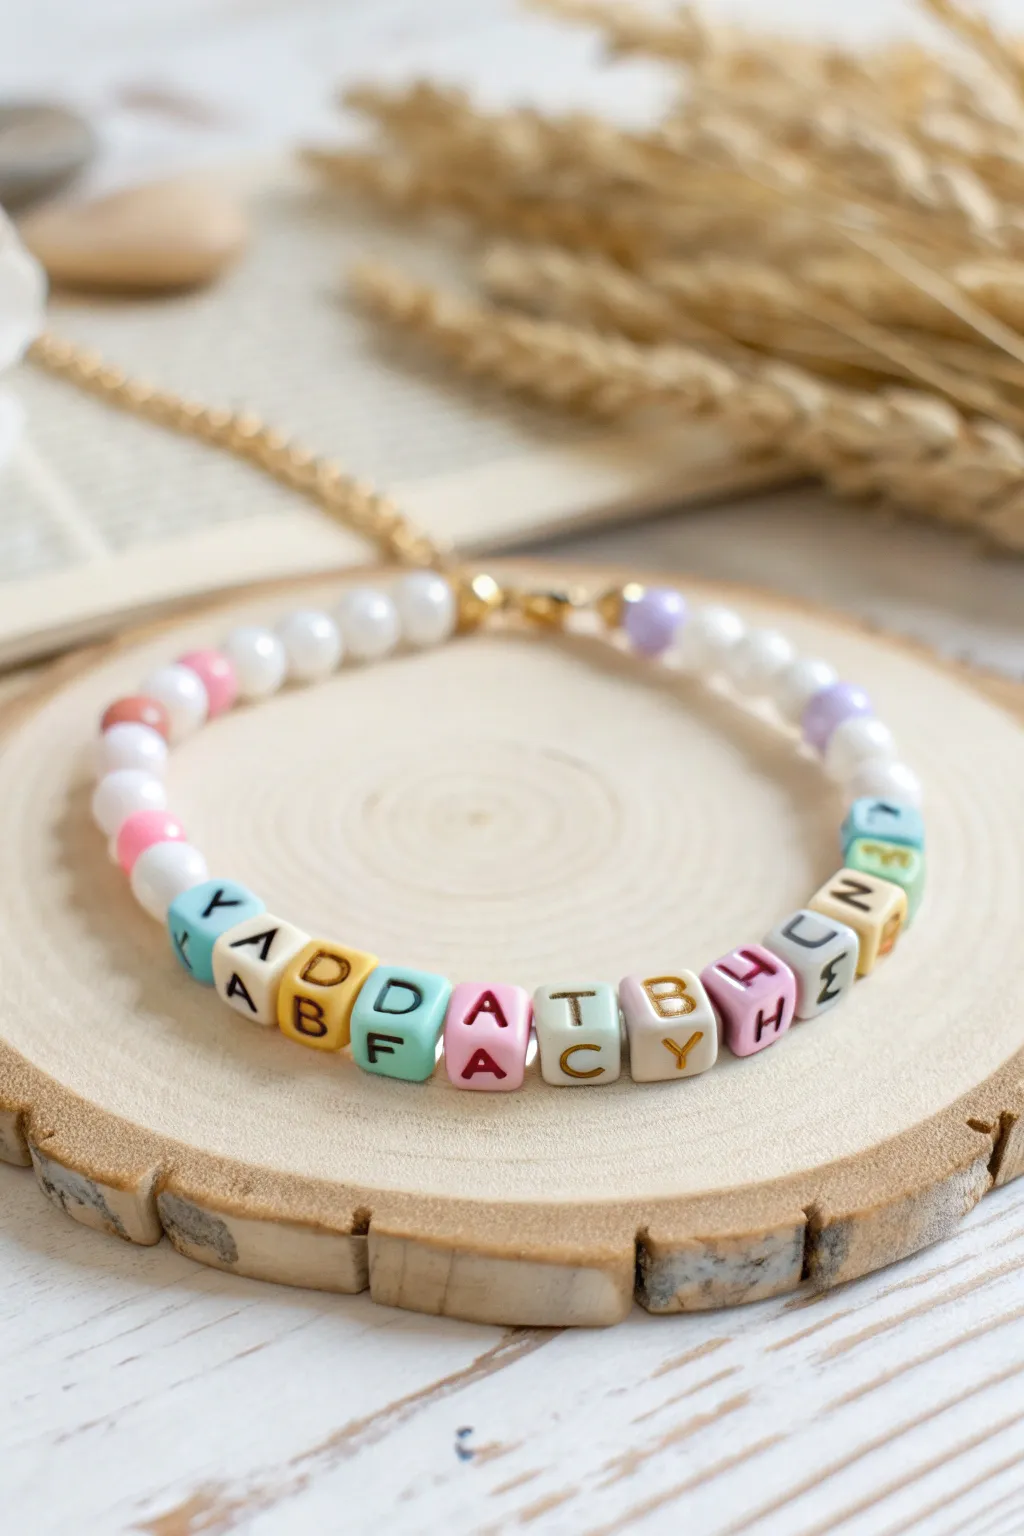
Create a truly personalized accessory by sculpting your own square letter beads from oven-bake clay instead of using store-bought ones. This sweet pastel bracelet combines these custom message beads with classic faux pearls for a custom piece that looks charmingly boutique-made.
Step-by-Step Guide
Materials
- White polymer clay (oven-bake)
- Acrylic paints (pastel pink, blue, yellow, mint green, lavender)
- Gold or brown acrylic paint (for lettering)
- High-gloss glaze or polyurethane varnish
- Fine detail paintbrush (size 00 or 000)
- Clay blade or craft knife
- Toothpick or bead piercing pin
- Ruler
- Parchment paper-lined baking sheet
- 6mm or 8mm white faux pearl beads
- Pastel round accent beads (pink, lilac)
- Beading elastic cord (0.8mm)
- Jewelry glue (optional)
- Gold crimp beads (optional)
- Two pairs of jewelry pliers (if using crimps)
Step 1: Sculpting the Letter Beads
-
Condition the clay:
Begin by warming a block of white polymer clay in your hands, kneading it until it is soft, pliable, and free of cracks. -
Form a log:
Roll the conditioned clay into a smooth, even log shape on your work surface. Aim for a diameter of about 6-7mm, which will be the size of your bead faces. -
Shape the square profile:
Gently press the log down on your work surface to flatten the bottom. Rotate it 90 degrees and press again. Repeat this until the log has a distinct square cross-section rather than a round one. -
Slice the beads:
Using a sharp clay blade, slice the square log into individual cubes. Try to make them as perfectly cubic as possible; keep your cuts straight and evenly spaced. -
Refine the shape:
Pick up each cube and gently tap the sides with your finger to soften any sharp edges created by the blade, ensuring they stay cube-shaped but look finished. -
Pierce the holes:
Carefully insert a toothpick or piercing pin through the center of each cube to create the stringing hole. Gently rotate the tool as you push through to avoid squishing the cube’s shape. -
Bake the beads:
Arrange your blank clay cubes on a parchment-lined baking sheet. Bake them according to the specific temperature and time instructions on your package of clay, then let them cool completely.
Smudged Paint?
If you make a mistake while painting the letter, quickly wipe it away with a damp cotton swab or wait for it to dry and paint over it with the base pastel color.
Step 2: Decorating the Beads
-
Paint the base colors:
Select your pastel acrylic paints. Paint the entire surface of each cooled cube in a single color—mix and match pink, blue, yellow, mint, and cream. You may need two thin coats for full coverage. -
Dry thoroughly:
Allow the base color to dry completely before attempting any lettering. I find sticking the beads onto toothpicks stuck in foam makes drying easier. -
Add the letters:
Using a very fine detail brush and gold or brown paint, carefully hand-paint a single capital letter onto the face of each bead. -
Seal the beads:
Once the lettering is bone dry, coat each bead with a high-gloss glaze. This protects the paint and gives them that polished, ceramic-like finish seen in the photo.
Pro Tip: Uniform Holes
To avoid distorting your cubes, pierce the hole halfway through one side, then stop and pierce directly from the opposite side until the channels meet in the middle.
Step 3: Assembling the Bracelet
-
Plan your design:
Lay out your specific letter beads in order on a bead board or soft cloth. Determine exactly where your accent pearls and colored round beads will go. -
Cut the elastic:
Cut a piece of elastic cord about 10-12 inches long. Stretching it pre-assembly helps prevent the bracelet from loosening later. -
String the beads:
Thread your beads onto the elastic. Start with the back section of pearls and pastel rounds, then add your custom letter beads in the center, and finish with the remaining pearls. -
Check the fit:
Wrap the strung beads around your wrist to check the size. Add or remove pearl beads at the ends if necessary to get the perfect fit. -
Secure the knot:
Tie a strong surgeon’s knot (right over left, left over right) to secure the bracelet. Pull it tight. -
Glue and trim:
Dab a tiny drop of jewelry glue on the knot to lock it in place. Once dry, trim the excess elastic tails close to the knot, or hide the knot inside a neighboring pearl bead.
Now you have a completely custom, handmade bracelet ready to wear or gift.
Best-Friends Matching Charm Sets

Celebrate friendship with these celestial-themed sun and moon charms that fit together perfectly in spirit. Using simple clay techniques and stamps, you will create a warm terracotta sun and a burnt orange moon with delicate facial features, finished with elegant gold hardware.
How-To Guide
Materials
- Polymer clay (terracotta or dusty pink, burnt orange/bronze)
- Round clay cutter (approx. 1 inch diameter)
- Acrylic roller or pasta machine
- Detailed sun face stamp or tool
- Detailed moon/crescent face stamp or tool
- Small jump rings (gold)
- Lobster clasp keychains (gold)
- Needle tool or toothpick
- Parchment paper
- Ceramic tile or baking sheet
- Needle-nose pliers
Step 1: Preparing the Clay Base
-
Condition the clay:
Start by warming the polymer clay in your hands. Knead both the terracotta (pinkish) and burnt orange colors separately until they are soft, pliable, and free of cracks. -
Roll it out:
Using your acrylic roller or pasta machine, roll the conditioned clay into a smooth, even sheet. Aim for a thickness of about 3mm to 4mm—thick enough to hold an impression but thin enough to be lightweight. -
Cut the circles:
Place your clay on parchment paper or a smooth tile. Firmly press your round cutter into each color of clay to create two perfect circles. Gently remove the excess clay from around the cut shapes.
Stamp Getting Stuck?
If your stamp sticks to the raw clay, lightly dust the clay surface with cornstarch or brush a tiny amount of water on the stamp before pressing down.
Step 2: Creating the Celestial Designs
-
Position the stamps:
Take your sun face stamp and center it over the lighter terracotta circle. For the darker orange circle, align your crescent moon stamp carefully so the face profile is upright. -
Press for details:
Apply firm, even pressure to the stamps to emboss the design. You want the impression deep enough to catch shadows, highlighting the sun’s rays and the moon’s profile. -
Refine the edges:
If the stamping process distorted the round shape slightly, gently use your fingers or the cutter to reshape the edges back into a perfect circle. -
Add texture manually (Optional):
If you don’t have specific stamps, use a needle tool to carefully carve the crescent shape, stars, and facial features. Press shallow lines for rays and use the tip for tiny dots. -
Create the hole:
Use a needle tool or a small straw to punch a hole near the top edge of each charm. Ensure the hole is large enough for your jump rings but not so close to the edge that the clay might tear.
Add Antique Depth
After baking, rub brown acrylic paint into the grooves of the faces and wipe the surface clean with a damp cloth to make the details pop.
Step 3: Baking and Finishing
-
Bake the charms:
Transfer the clay pieces on their baking surface to the oven. Bake according to the manufacturer’s instructions on your specific package of clay (usually around 275°F for 15-30 minutes). -
Cool down:
Once baked, turn off the oven and let the charms cool completely inside or on a cooling rack. Do not handle them while hot, as polymer clay is slightly fragile until fully cooled and cured. -
Inspect the finish:
Check the edges for any sharp bits. I like to lightly sand the rim with very fine-grit sandpaper if there are any rough spots. -
Prepare hardware:
Using two pairs of pliers (or pliers and your fingers), twist a gold jump ring open sideways—never pull it apart outward, as this weakens the metal. -
Attach the clasp:
Slide the open jump ring through the hole in the clay charm. Before closing it, loop the gold lobster clasp onto the ring as well. -
Secure the closure:
Twist the jump ring back into a closed position so the ends meet perfectly flush. Repeat this process for the second charm.
Clip these onto matching backpacks or zipper pulls to share a little celestial magic with your best friend


What Really Happens Inside the Kiln
Learn how time and temperature work together inside the kiln to transform clay into durable ceramic.
Fridge Magnets Kids Actually Use
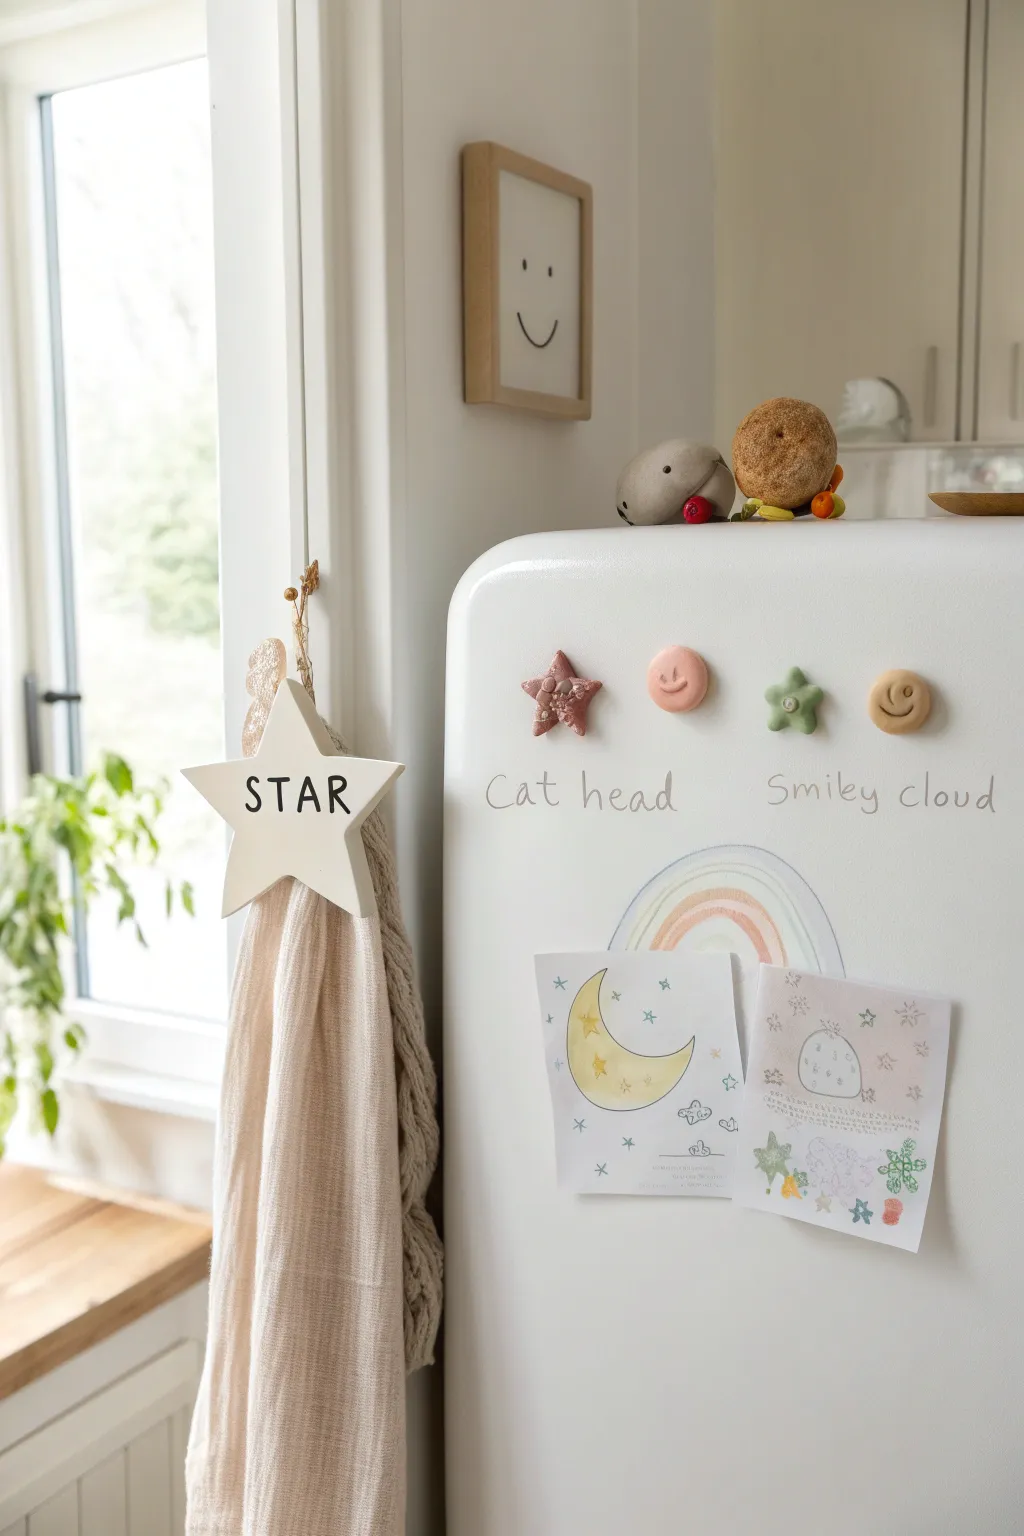
Brighten up your appliance with these adorable, pastel-colored clay magnets featuring stars and smiley faces. They are tactile, easy to shape, and perfect for holding up your little one’s latest masterpieces.
Step-by-Step
Materials
- Oven-bake polymer clay (reddish-brown, pastel pink, sage green, mustard yellow)
- Small round magnets (neodymium or ceramic)
- Super glue or E6000 adhesive
- Small star-shaped cookie cutters (optional)
- Sculpting tools or a toothpick
- A clean, flat working surface (ceramic tile or acrylic sheet)
- Parchment paper
- Baking sheet
- Gloss glaze (optional)
Step 1: Prepping the Clay
-
Condition the clay:
Start by taking a small chunk of each clay color. Warm and knead the clay in your hands for several minutes until it becomes soft, pliable, and free of cracks. -
Roll spheres:
Divide your conditioned clay into marble-sized portions. Roll each portion into a smooth, seamless ball between your palms.
Strong Grip Tip
Embed the magnet slightly into the raw clay back before baking for a flush fit, then pop it out, add glue, and replace it after baking.
Step 2: Shaping the Smileys
-
Flatten the rounds:
Take a pink ball and a yellow ball. Gently press them down onto your work surface with your thumb or a flat object to create thick, coin-like discs. Keep the edges rounded for a soft look. -
Carve the expression:
Using a curved sculpting tool or the end of a straw cut in half, press a simple smile into the lower half of each circle. -
Add the eyes:
Use a small dotting tool or a toothpick to poke two little eye indentations above the smile. Keep it simple and sweet.
Step 3: Creating the Stars
-
Cut or mold the stars:
Flatten your reddish-brown and green clay slightly. You can use a small star cutter for precise shapes, or hand-mold five points by pinching and pulling the clay outwards from the center. -
Soften the edges:
Gently tap the points of your stars with your finger to round them off slightly; you don’t want sharp edges on a kid-friendly magnet. -
Add texture (optional):
For the reddish star, lightly press a textured sponge or crumpled foil against the surface to give it a stone-like or glittery appearance before baking. -
Face details on the green star:
Press a tiny indentation into the center of the green star or add a tiny clay dot to create a whimsical character feel.
Make it Sparkle
Mix a pinch of fine glitter into translucent clay before shaping to create a galaxy star effect or a shimmering smiley face.
Step 4: Baking & Assembly
-
Prepare for baking:
Place your finished shapes onto a parchment-lined baking sheet. Ensure they aren’t touching each other. -
Bake:
Bake the clay according to the manufacturer’s instructions on the package (usually around 275°F or 135°C for 15-30 minutes). I find baking slightly longer at a lower temp helps prevent scorching. -
Cool down:
Let the clay shapes cool completely on the baking sheet. They will harden fully as they return to room temperature. -
Attach magnets:
Flip the cooled shapes over. Place a small drop of super glue or strong adhesive on the back center of each piece. -
Secure and dry:
Press a magnet firmly into the glue. Let them dry undisturbed for at least 24 hours to ensure a permanent bond before sticking them to the fridge.
Now your fridge is ready to showcase artwork with these charming handmade helpers
Pocket Pet Mini Figurines
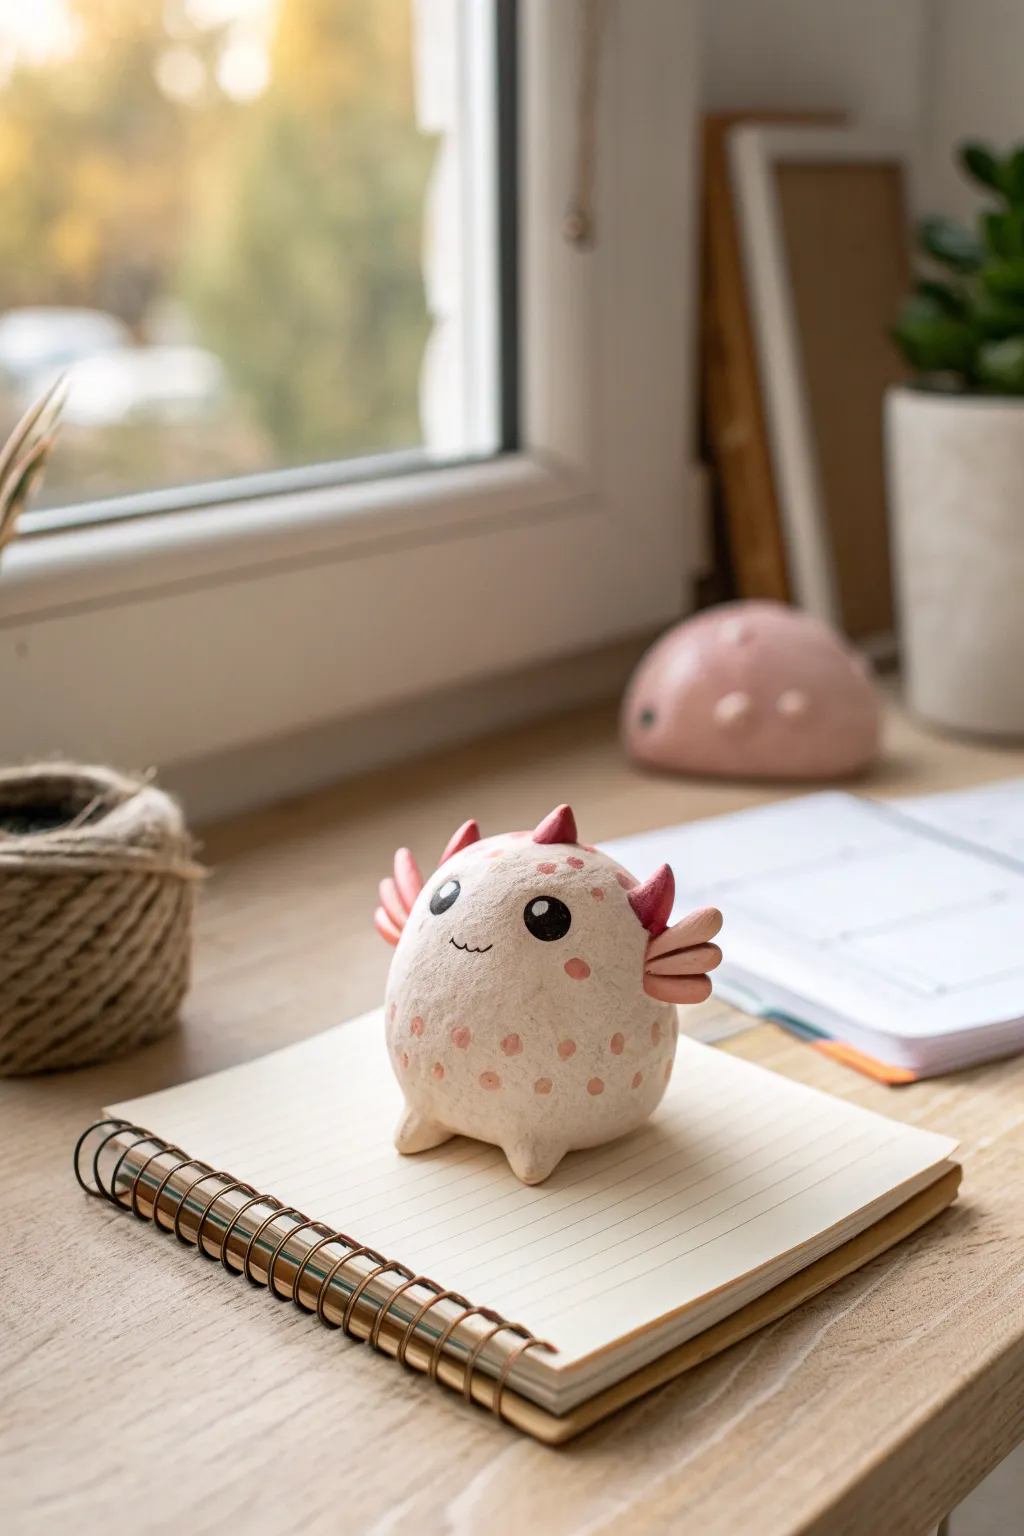
This adorable fantasy creature sits somewhere between a chubby dragon and a sweet axolotl, making it the perfect pocket-sized companion. With its soft beige body and playful pink accents, this beginner-friendly project is great for practicing basic clay shaping techniques.
Detailed Instructions
Materials
- Light beige or cream polymer clay (primary color)
- Soft pink or coral polymer clay (accent color)
- Black polymer clay (for eyes)
- White polymer clay (tiny amount for eye highlights)
- Needle tool or toothpick
- Ball stylus tool (small)
- Clean work surface or ceramic tile
- Oven for baking
Step 1: Shaping the Base Body
-
Create the core shape:
Start with a chunk of beige clay about the size of a golf ball or ping pong ball, depending on how large you want your pet. Roll it between your palms until it is perfectly smooth and free of cracks. -
Refine the form:
Gently tap the ball on your work surface to flatten the bottom slightly so it sits upright without rolling away. The top should curve like an egg. -
Add the feet:
Pinch off two tiny, pea-sized balls of beige clay. Roll them into small cones and attach them to the bottom front of the body, blending the seams upward with your thumb or a smoothing tool so they look like little nubby legs.
Step 2: Adding Character Details
-
Form the wing-gills:
Take your pink clay and roll six small teardrop shapes. Flatten them gently. You will need three for each side of the head. -
Attach the wing-gills:
Press the three pink teardrops together in a fan shape. Attach one fan to the left side of the body and one to the right, just below where the ‘head’ area would be. Blend the attachment point into the beige body carefully. -
Detail the wings:
Use a needle tool or toothpick to press horizontal indentations across the pink wing-gills to give them texture. -
Add head spikes:
Create three small cones from pink clay. Place one in the center of the forehead and the other two slightly behind it, creating a little mohawk row of soft spikes. -
Give it spots:
Roll very tiny balls of pink clay. Press these randomly all over the beige body to create a speckled pattern. Flatten them flush against the surface so they look like natural markings.
Clean Clay Tip
Keep hand wipes nearby! Red and pink clays can stain your hands and transfer color to the light beige clay. Wipe your fingers thoroughly before switching back to the beige body.
Step 3: Face and Finishing
-
Position eye sockets:
Use a medium ball stylus or the back of a paintbrush to press two shallow indentations into the face where you want the eyes to go. Spacing them wide apart adds cuteness. -
Insert the eyes:
Roll two small balls of black clay. Press them firmly into the sockets you just created. Flatten them slightly so they aren’t bulging out too far. -
Add the sparkle:
I always find this step brings the character to life: take the tiniest speck of white clay and place it on the upper right side of each black eye pupil for a ‘shine’ effect. -
Carve the smile:
Using your needle tool, carefully draw a small, wobbly ‘w’ shape between the eyes for the mouth. Keep the lines thin and delicate. -
Smooth fingerprints:
Check your figurine for any accidental fingerprints. Put a drop of baby oil or clay softener on your finger and gently rub them away before baking. -
Bake carefully:
Place your figurine on a baking sheet or foil. Bake according to your specific clay package’s instructions (usually 275°F/135°C for about 15-20 minutes per 1/4 inch of thickness). -
Cool down:
Once baking is complete, turn off the oven and let the clay cool down completely inside before removing it. This helps prevent cracking.
Make it a Charm
Before baking, screw a metal eye pin into the top of the head between the spikes. After baking, secure it with a dab of superglue to turn your pet into a keychain.
Now you have a mythical little friend to guard your desk while you work on your next masterpiece

TRACK YOUR CERAMIC JOURNEY
Capture glaze tests, firing details, and creative progress—all in one simple printable. Make your projects easier to repeat and improve.
Tiny Treasure Boxes
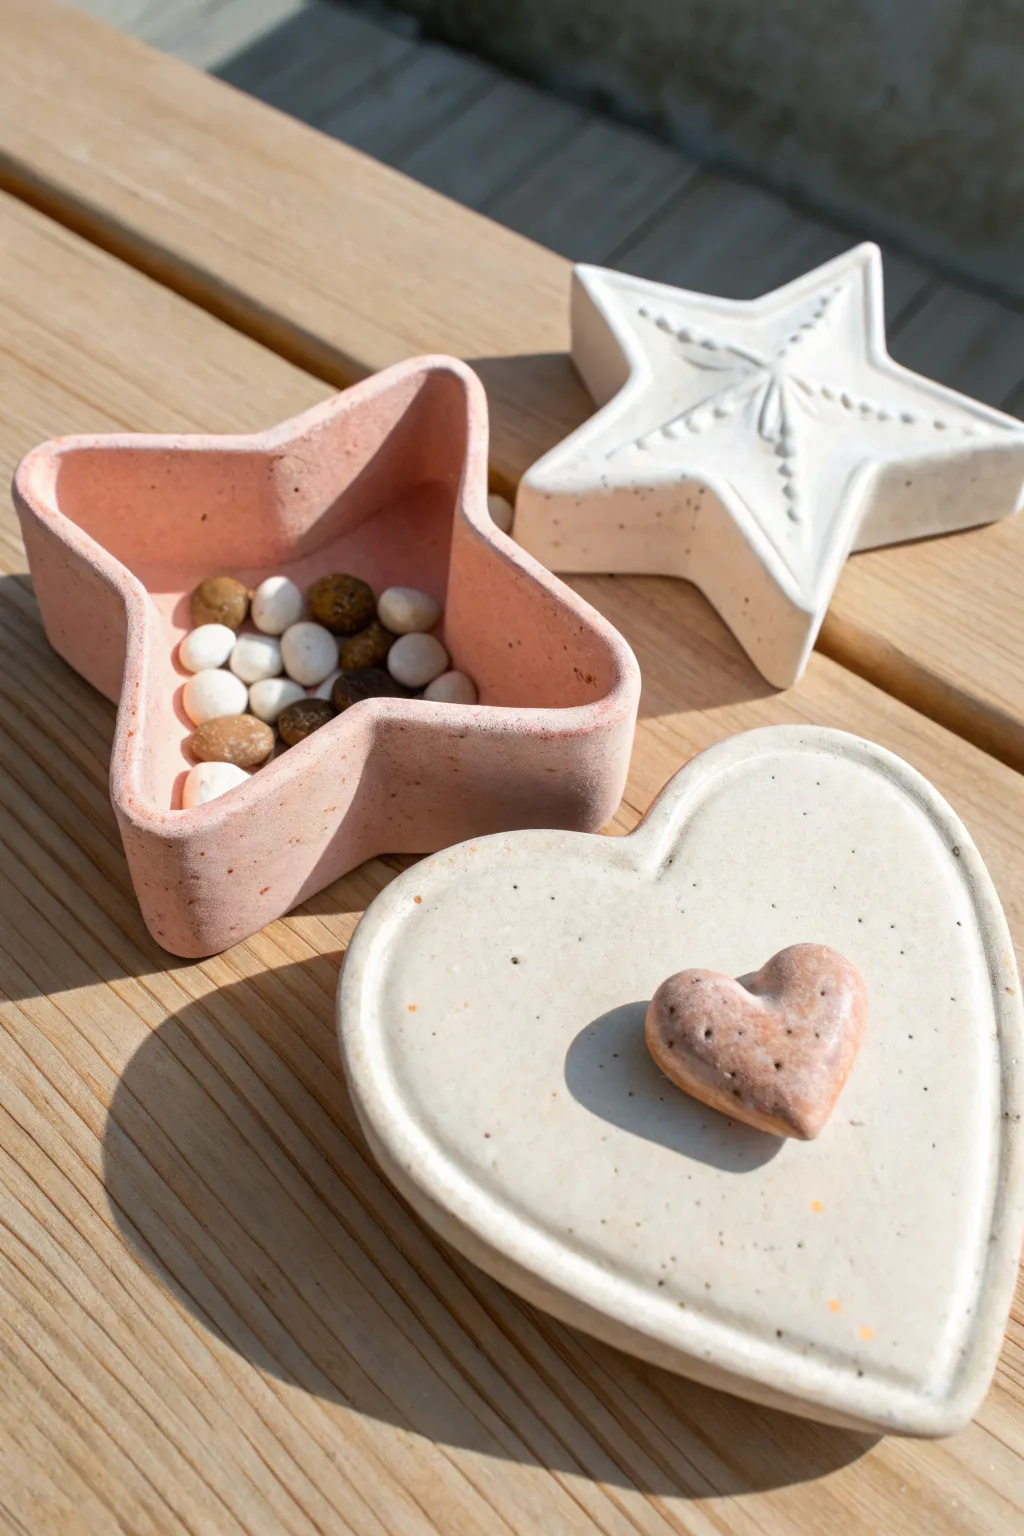
These adorable speckled trinket boxes are the perfect hiding spot for tiny treasures. With their soft matte finish and playful shapes, they look like high-end ceramic pieces but are easily made right at home.
Step-by-Step Tutorial
Materials
- Polymer clay (white, pale pink, and a speckle effect clay like ‘granite’)
- Star and heart-shaped cookie cutters (various sizes)
- Clay roller or rolling pin
- Cornstarch or baby powder (as a release agent)
- Small craft knife or clay blade
- Smoothing tool or your finger
- Fine-grit sandpaper (optional)
- Oven and baking sheet
Step 1: Preparing the Clay
-
Conditioning:
Start by warming up your polymer clay in your hands. Knead it thoroughly until it’s soft and pliable. This prevents cracks later on. -
Mixing the Speckles:
To achieve that natural, stony look, mix a small amount of granite-effect clay (or mix in actual dried spices like black pepper or coarse sand) into your plain white and pink clay. Knead until the speckles are evenly distributed but not completely blended into a solid color. -
Rolling Out:
Roll your mixed clay into a slab about 1/4 inch thick. I find using guides or spacers helps keep the thickness uniform so the box walls are sturdy.
Sticky Cutter?
If the clay sticks inside your cookie cutters, dip the cutter into a bowl of cornstarch or flour before pressing it into the clay. It will pop right out.
Step 2: Creating the Star Box Base
-
Cutting the Base:
Use your large star cookie cutter to cut the bottom shape for your box from the pink speckled clay. -
Preparing the Walls:
Cut a long, rectangular strip from the same pink clay slab. The width of the strip determines the height of your box walls—about 1 inch is usually good. -
Attaching the Walls:
Carefully wrap this strip around the edge of your star base. You will need to gently bend the clay to follow the star’s points and indentations. -
Seaming the Edges:
Where the strip ends meet, cut them at an angle for a clean join. Use a smoothing tool to blend the seam on both the inside and outside so it becomes invisible. -
Bonding the Bottom:
Use your tool to smudge the clay from the bottom edge of the wall onto the base to fuse them together. Smooth out the connection point so it looks like one solid piece.
Pro Tip: Hidden Seams
When connecting the wall strip ends, try to locate the seam in one of the inner corners of the star. It makes blending much easier and less noticeable.
Step 3: Making the Lids
-
Cutting the Star Lid:
Roll out white speckled clay slightly thicker than before. Use the same large star cutter to create the lid shape so it matches the box perfectly. -
Adding Details:
If you want a raised design like the white star in the background, use a smaller cutter or tool to impress a pattern, or gently carve lines radiating from the center. -
Forming the Heart Lid:
Use a large heart cutter on your white clay slab. Gently soften the edges with your finger to give it a rounded, pillow-like appearance. -
The Tiny Heart Handle:
Hand-form a very small heart from a scrap of pink clay. This will act as the handle for the lid. -
Attaching the Handle:
Place the small pink heart in the center of the white heart lid. Press it down gently to bond the raw clay pieces together. -
Refining Edges:
Check all your pieces for fingerprints or sharp edges. rubbing a tiny bit of cornstarch over the surface can help you smooth imperfections without sticky drag.
Step 4: Baking and Finishing
-
The Inner Rim :
To keep the lids from sliding off, you can add a smaller outline of clay on the underside of each lid, sized to fit just inside the box walls. Alternatively, bake them flat for a simple resting lid. -
Baking:
Place all pieces on a parchment-lined baking sheet. Bake according to your clay package instructions (usually around 275°F or 130°C for 15-30 minutes per 1/4 inch of thickness). -
Cooling:
Let the pieces cool completely in the oven with the door slightly ajar. This gradual cooling makes the clay stronger. -
Sanding:
Once cool, use fine-grit sandpaper wet with a little water to smooth any rough bottom edges or seams for a professional matte finish.
Fill your new creations with collected pebbles or special trinkets to complete the look
Tic-Tac-Toe Travel Game
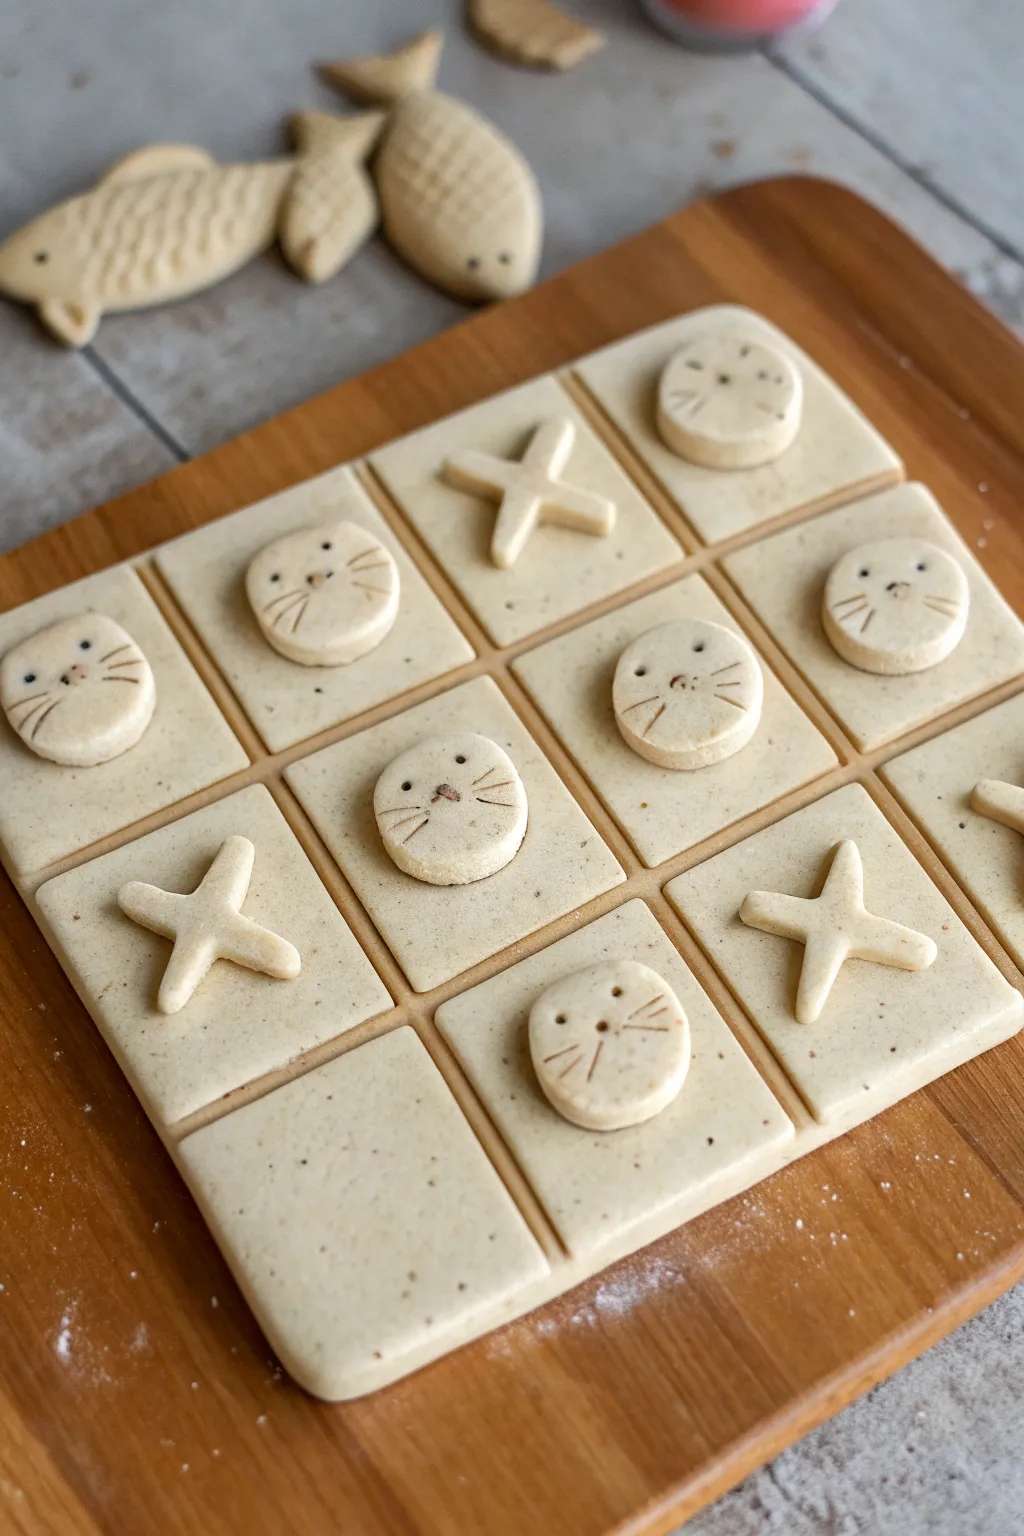
This charming, travel-sized game transforms a classic pastime into something special with adorable cat faces and simple X markers made from clay. It features a textured board that doubles as a carrying base and includes fish-shaped game pieces for an extra touch of whimsy.
Step-by-Step Guide
Materials
- Oven-bake clay (beige or sand color)
- Rolling pin or smooth glass jar
- Square cookie cutter (approx. 2-3 inches)
- Small round cookie cutter (approx. 1 inch)
- Knife or clay cutting tool
- Chopstick or round tool for eye indentations
- Needle tool or toothpick for whiskers
- Ruler
- Parchment paper
- Baking sheet
Step 1: Creating the Game Board
-
Prepare the Clay:
Start by conditioning your beige clay until it is soft and pliable. Roll it out into a large, even slab about 1/4 inch thick. I find turning the slab over once or twice while rolling helps prevent sticking. -
Cut the Base:
Using a ruler and a knife, cut a large square from your clay slab. This will serve as the game board, so ensure it is large enough to hold nine grid spaces comfortably. -
Score the Grid:
Take your knife or a dedicated clay tool and gently press lines into the square base to create a 3×3 grid. Press deep enough to create distinct grooves but be careful not to cut all the way through the base layer. -
Add Texture:
To give the clay a natural, stone-like look, you can gently tap the surface with a stiff-bristled toothbrush or a crumpled ball of aluminum foil. This speckling adds character to the plain beige color.
Smooth Operator
dip your finger in a tiny bit of baby oil or cornstarch before smoothing clay seams. This eliminates fingerprints and ensures a professional, polished finish on the cat faces.
Step 2: Sculpting the Cat & X Pieces
-
Cut Circle Bases:
Roll out a fresh slab of clay to the same thickness as your board. Use your small round cookie cutter to punch out five circles. These will become the cat faces. -
Add Cat Ears:
Pinch two small triangles of clay and gently attach them to the top of each circle to form ears. Use a smoothing tool or your finger to blend the seams so they don’t pop off during baking. -
Detail the Faces:
Using a small round tool or the end of a chopstick, press two little dots for eyes. Then, use a needle tool to scratch three whiskers on each cheek and a tiny triangle for the nose. -
Create the X Pieces:
Roll thin snakes of clay. Cut them into short segments of equal length. Cross two segments over each other and press the center gently to bond them, creating five ‘X’ shapes. -
Make the Fish (Optional):
If you have extra clay, freehand cut simple fish shapes. Texture them by pressing curved lines for scales with your needle tool and adding a small dot for an eye.
Make It Magnetic
Glue small round magnets to the back of each piece and embed a flexible magnetic sheet under the board grid. Now you have a travel game that won’t slide around in the car
Step 3: Baking & Finishing
-
Arrange for Baking:
Place the large board, the cat faces, the X pieces, and any fish onto a parchment-lined baking sheet. Make sure none of the pieces are touching so they bake evenly. -
Bake the Clay:
Bake the project according to the specific temperature and time instructions on your package of clay. Typically, this is around 275°F (135°C) for 15-30 minutes depending on thickness. -
Cool Down:
Let everything cool completely on the baking sheet before handling. The clay is fragile when hot but hardens significantly as it cools. -
Highlight the Details:
Once cool, you can take a very fine-point brown marker or a tiny bit of brown acrylic paint to darken the eyes, whiskers, and nose indentations to make the faces pop.
Pack your new handmade game into a small cloth bag and you are ready for on-the-go fun
DIY Game Tokens for Family Night
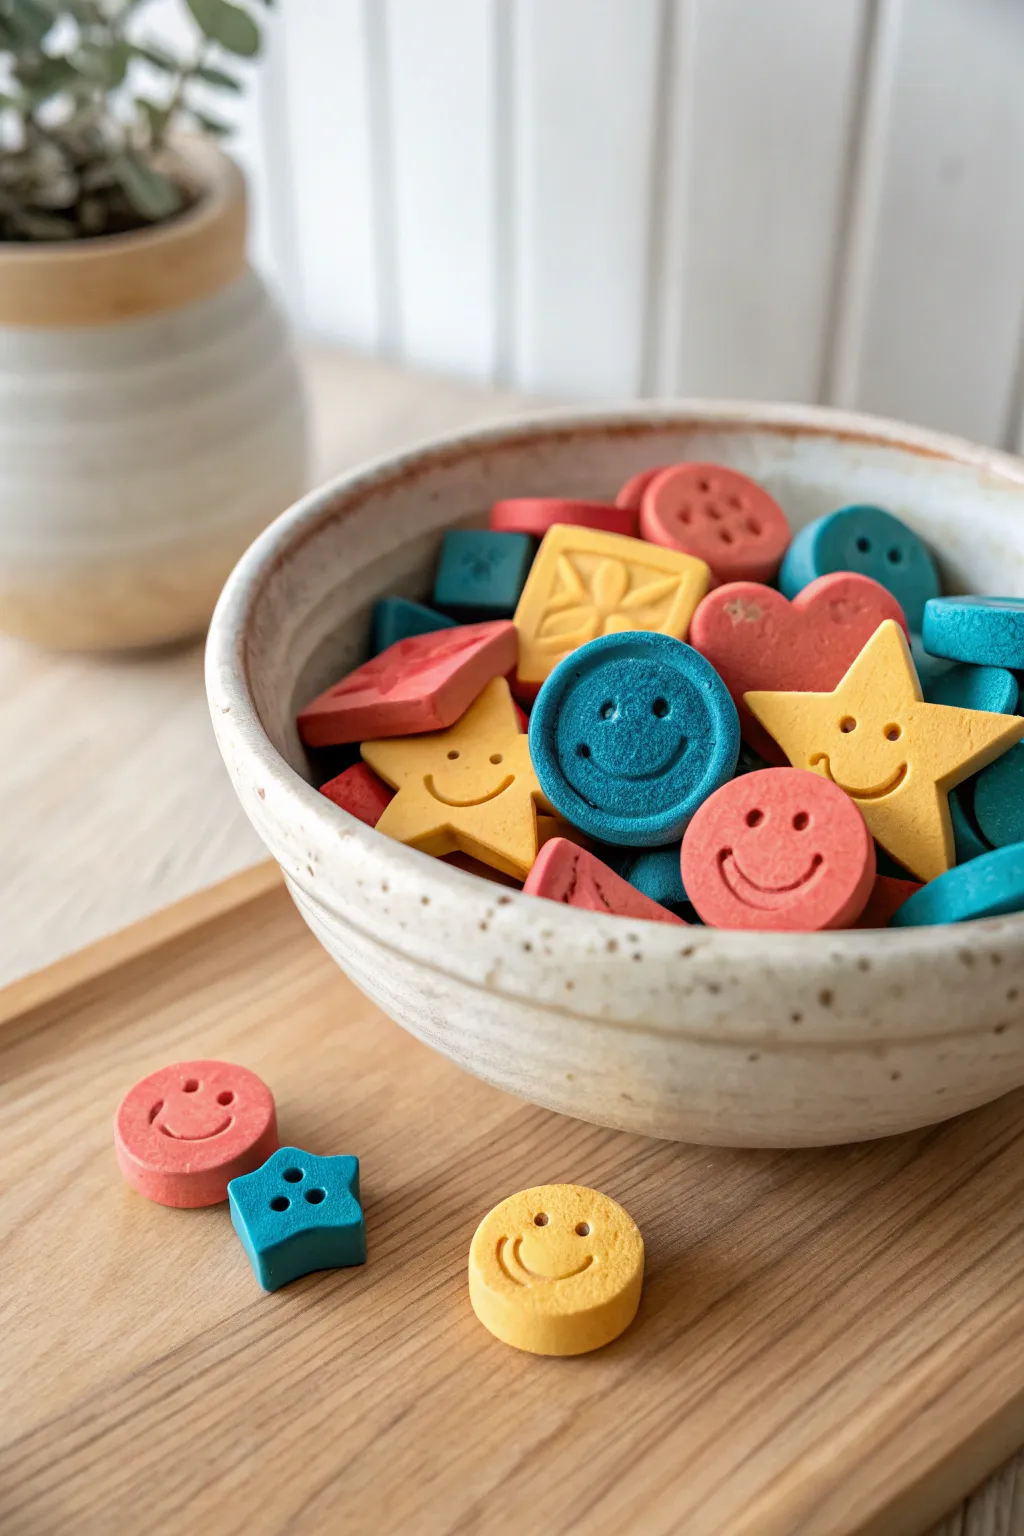
These charming, chunky game tokens are perfect for breathing new life into old board games or creating an entirely new family tradition. With their smooth, matte finish and playful smiley faces, they feel wonderful in the hand and look even better in a bowl.
How-To Guide
Materials
- Polymer clay (red, blue, yellow, and orange)
- Rolling pin or acrylic roller
- Small cookie cutters (circle, star, square, heart)
- Parchment paper
- Baking sheet
- Stylus tool or ball tool (small and medium sizes)
- Plastic knife or clay blade
- Optional: Texture stamps or buttons
Step 1: Preparation & Shapes
-
Condition the Clay:
Start by warming up your polymer clay in your hands. Knead each color separately until it is soft and pliable, which prevents cracking later on. -
Roll it Out:
Place a ball of clay on parchment paper and roll it flat. Aim for a thickness of about 1/4 inch (6mm)—you want these tokens to feel substantial and chunky, not flimsy. -
Cut the Base Shapes:
Using your small cutters, punch out a variety of shapes. Mix and match colors and shapes, creating a pile of blue circles, yellow stars, and red hearts. -
Smooth the Edges:
Gently run your finger around the cut edge of each piece to soften any sharp corners left by the cutter. This gives the finished token a more polished, professional look.
Crumbly Edges?
If the clay crumbles when you cut shapes, it isn’t conditioned enough. Add a drop of clay softener or baby oil and knead longer to restore elasticity.
Step 2: Adding Personality
-
Create the Eyes:
For the smiley face tokens, take your small ball tool or stylus. Press two firm dots into the upper half of the clay shape to create deep, distinct eye sockets. -
Carve the Smile:
Use a slightly larger tool or the edge of a small spoon to press a curved smile below the eyes. Rock the tool gently side-to-side to widen the smile without tearing the clay. -
Make Button Tokens:
For a different texture, create ‘button’ tokens. Take a circle or square shape and use a tiny stylus or toothpick to poke four symmetrical holes in the center. -
Add Decorative Details:
On the square tokens, try pressing a pattern. You can use a texture stamp, or simply press the edge of a ruler into the clay diagonally to make an ‘X’ or starburst pattern. -
Create Rim Details:
On the circular smiley faces, create a border like a coin. Use a small tool to press a ring just inside the outer edge, framing the face.
Glow Up
Mix glow-in-the-dark powder into your yellow clay before rolling. Your star tokens will actually glow during lights-out rounds of gaming.
Step 3: Baking & Finishing
-
Arrange for Baking:
Transfer all your finished tokens onto a parchment-lined baking sheet. Ensure they aren’t touching each other so they bake evenly. -
Bake the Clay:
Bake according to your polymer clay package instructions. Usually, this is around 275°F (135°C) for 15-30 minutes, depending on the brand and thickness. -
Cool Down:
Remove the tray from the oven and let the tokens cool completely before handling. Polymer clay is slightly soft when hot and hardens as it cools. -
Sand for Smoothness:
If there are any rough fingerprints or sharp edges, lightly sand the cooled tokens with fine-grit sandpaper for a buttery soft finish. -
Wash and Dry:
Quickly rinse the tokens in cool water to remove any sanding dust and dry them thoroughly with a soft cloth.
Now you have a custom set of durable, cheerful tokens ready for your next game night
Story Icons for Make-Believe Tales
Transform storytelling into a tactile adventure with these charming clay tokens, perfect for sparking imagination during playtime. Featuring classic motifs like castles, dragons, sailboats, and weather symbols, these smooth, pastel-colored discs look lovely enough to display when the story ends.
Step-by-Step Tutorial
Materials
- Polymer clay (white, beige, muted pink, sage green, light blue, terracotta)
- Acrylic rolling pin or glass jar
- Circle cookie cutter (approx. 1.5 – 2 inches)
- Small clay sculpting tools or toothpicks
- Parchment paper
- Baking sheet
- Gloss or matte varnish (optional)
- Sandpaper (fine grit)
Step 1: Preparing the Base
-
Condition the clay:
Start by warming up your polymer clay in your hands. Knead colors like white, beige, sage green, and muted pink separately until they are soft and pliable to prevent cracking later. -
Mix custom shades:
To achieve the soft, earthy pastel look seen in the photo, mix a tiny amount of brown or beige into your bright primary colors. This desaturates them for that modern nursery aesthetic. -
Roll out the slab:
Place a ball of clay on parchment paper and use your acrylic roller to flatten it. Aim for a consistent thickness of about 1/4 inch so the tokens feel substantial and durable. -
Cut the circles:
Press your circle cutter firmly into the rolled clay. Twist slightly to separate the shape, then lift away the excess clay. Smooth the edges of each circle with your finger to remove any sharp cut lines.
Clean Lines Hack
Wipe your tools and hands with a baby wipe between colors. This prevents transferring darker lint or pigments onto your pristine white or pastel clay pieces.
Step 2: Designing the Icons
-
Plan your symbols:
Decide which icons you want to create. Simple shapes work best: a sailboat, a castle tower, a lighthouse, a dragon, a rainbow, or weather elements like a sun or cloud. -
Create the raised cloud:
For the cloud token, roll a very thin snake of white clay. Shape it into a fluffy cloud outline directly on a white base disc. Press it down gently so it bonds without losing its rounded definition. -
Sculpt the sun:
On a light blue disc, place a small flattened ball of yellow clay in the center. Use a dull knife tool to impress radiating lines around it for the sun’s rays. -
Detail the rainbow:
Roll extremely thin threads of terracotta or beige clay. Arch them on a white disc to form a rainbow. Use a needle tool to poke tiny dots underneath the arches for rain or texture. -
Build the sailboat:
Form a small triangle and a crescent shape from white or brown clay. Press these onto a pink or beige base to look like sails and a hull. I find using a flat smoothing tool helps merge the edges slightly for a seamless look. -
Carve the castle and lighthouse:
For the green tokens, you can use an impressing technique. Gently press a stamp or sketch the design lightly with a needle tool first. Then, layer thin strips of clay on top to build the structure in 3D relief. -
Add intricate dragon details:
The dragon or sewing-style motifs require patience. Roll the thinnest possible snake of clay (like a thread). carefully lay it onto the base to ‘draw’ the dragon shape, using a needle tool to nudge curves into place. -
Smooth the seams:
Once your designs are placed, gently tap them with your finger to ensure they are adhered well to the base disc. Be careful not to squash your detailed work.
Step 3: Baking and Finishing
-
Prepare for baking:
Arrange all your finished tokens on a baking sheet lined with clean parchment paper. Ensure they aren’t touching each other. -
Bake the clay:
Bake according to your specific clay package’s instructions (usually around 275°F or 135°C for 15-30 minutes). Do not overbake, as colors may darken. -
Cool down completely:
Let the tokens cool on the baking sheet until they are room temperature. They are fragile while hot and harden as they cool. -
Sand the edges:
If there are any rough spots on the rims of your circles, gently buff them with fine-grit sandpaper for a professional, smooth finish. -
Seal the surface (Optional):
For extra durability during play, verify the clay is clean and apply a thin layer of matte or satin varnish over the top.
Clay Too Soft?
If your clay gets too warm and sticky to hold detail, pop it in the fridge for 10 minutes. The chilled clay will be firmer and easier to sculpt into precise tiny shapes.
Bag these lovely tokens up in a small pouch and get ready for endless imaginative stories
Mini Succulent Pots That Never Die

Bring a touch of the desert to your windowsill with this adorable layered planter that combines smooth finishes with organic textures. This project mimics the look of high-end ceramic glazing using simple oven-bake clay, making it a perfect home for your favorite little succulent.
Step-by-Step Guide
Materials
- Oven-bake polymer clay (White, Pastel Pink, Terracotta/Brown)
- Rolling pin or clay roller
- Clay knife or craft blade
- Small circular cookie cutter (approx. 2-3 inches)
- Glass jar or metal can (to use as a mold)
- Old toothbrush or stiff-bristle brush
- Parchment paper
- Aluminum foil
- Small succulents and potting soil
Step 1: Creating the Base
-
Prepare the Mold:
Begin by selecting a glass jar or metal can that is oven-safe to serve as your form. Wrap the bottom and sides tightly with parchment paper or aluminum foil so the clay won’t stick to it later. -
Roll the Base:
Take a chunk of the terracotta-colored clay and knead it until soft. Roll it out into a flat sheet about 1/4 inch thick. -
Cut the Bottom:
Use your circular cookie cutter to punch out a perfect circle from the terracotta sheet. This will become the base of your pot. -
Position the Base:
Place this clay circle onto the bottom of your wrapped jar mold, pressing gently to ensure it sits flat. Set the jar upside down on your workspace.
Stone Effect
Mix a tiny pinch of black pepper or sand into the white clay before rolling. This adds speckles that make the “stone” texture look incredibly realistic.
Step 2: Building the Layers
-
Create the Terracotta Strip:
Roll out more terracotta clay into a long strip. You want it to be enough to wrap around the jar and about 1 inch wide. -
Attach the Bottom Band:
Wrap this strip around the very bottom edge of the jar (which is currently facing up), connecting it to the circle base. Smooth the seam where the strip ends meet with your finger. -
Create the Pink Strip:
Clean your roller, then roll out the pastel pink clay. Cut a strip similar in length to the first one, but perhaps slightly narrower, about 3/4 inch wide. -
Attach the Middle Band:
Wrap the pink strip directly above the terracotta one. Gently press the edges together so they bond without distorting the straight line too much. -
Create the White Strip:
Finally, roll out the white clay. Treat this layer differently; leave it slightly thicker, maybe 1/3 inch, to create that chunky rim look. -
Attach the Top Band:
Wrap the white strip at the top (closest to the table surface). Press it firmly onto the pink layer to ensure a solid connection.
Sagging Clay?
If the clay strips are slipping down the jar, pop the whole assembly in the fridge for 10 minutes to firm up before adding the next color layer.
Step 3: Adding Texture & Finishing
-
Smooth the Seams:
Use your finger or a clay tool to gently blend the horizontal seams on the inside of the pot (against the jar) to strengthen the structure. Leave the outside seams distinct. -
Texture the Top:
This is the fun part. Take an old toothbrush or a ball of crumpled foil and press it repeatedly into the white clay band. I like to really work the surface here to mimic rough stone. -
Refine the Rim:
Ensure the top rim is slightly uneven and textured rather than perfectly smooth, as this adds to the rustic charm shown in the photo. -
Check the Bottom:
Before baking, give the bottom edge (where the terracotta meets the pink) a gentle smooth-over with your thumb to ensure a soft transition. -
Bake:
follow the temperature instructions on your specific package of clay. Bake the pot while it is still on the jar mold to hold its shape. -
Cool and Release:
Let the piece cool completely in the oven before removing it. Once cool, carefully slide the clay pot off the parchment-covered jar. -
Plant:
Add a small amount of soil and carefully nestle your succulent inside its new forever home.
Enjoy your beautifully layered creation sitting pretty on the shelf
Texture-Stamped Tile Coasters (Kid Size)
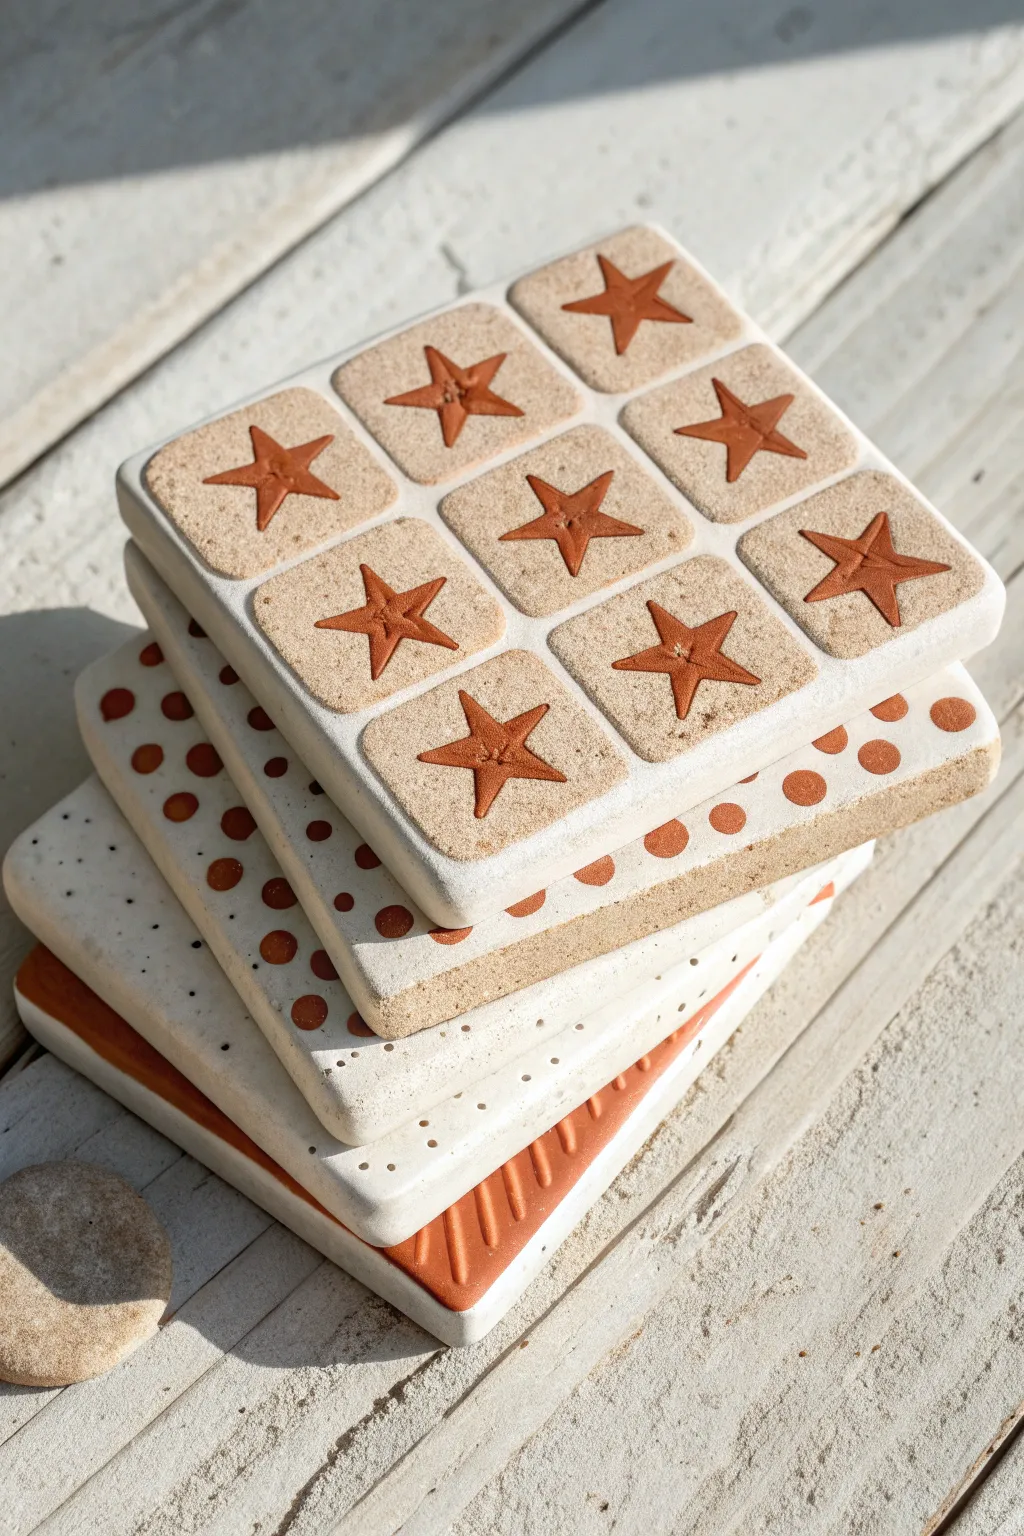
These charming coasters combine natural textures with geometric simplicity, making them a satisfying project for little hands. By using clay stamps and warm earth tones, you’ll create a stacked set that looks as good as it feels.
Detailed Instructions
Materials
- White or cream oven-bake polymer clay (approx. 200g per coaster)
- Square clay cutter (4-inch) or ruler and craft knife
- Rolling pin
- Parchment paper
- Terracotta or warm brown acrylic paint
- Small fine-point paintbrush
- Medium flat paintbrush
- Star-shaped stamp (or similar small geometric stamp)
- Toothpick or small dotting tool
- Textured fabric or rough sandpaper (optional, for surface texture)
- Glaze or sealant (satin finish)
Step 1: Shaping the Base
-
Condition the Clay:
Begin by warming up a large chunk of white polymer clay in your hands. Knead it thoroughly until it is soft, pliable, and free of cracks. -
Roll it Out:
Place the clay between two sheets of parchment paper to prevent sticking. Roll it out into an even slab, aiming for a thickness of about 1/4 inch so the coasters feel substantial. -
Cut the Squares:
Use a 4-inch square cutter to punch out your coaster shapes. If you don’t have a cutter, measure a 4×4 inch square with a ruler and carefully slice it out using a craft knife. -
Smooth the Edges:
Dip your finger in a little bit of water (or baby oil if the clay is oil-based) and gently run it along the cut edges to round them off slightly. This prevents sharp corners after baking.
Clean Edges Trick
If your stamp distorts the square shape when you press down, simply re-align your square cutter over the clay and press again to trim the edges back to perfect straight lines.
Step 2: Adding Texture & Design
-
Create the Grid:
For the star coaster, lightly score a 3×3 grid onto the surface using a ruler. Don’t cut through the clay; just make faint guide lines so you know where to position your stamps. -
Add Surface Texture:
Before stamping the deep shapes, gently press a piece of rough sandpaper or textured fabric over the clay surface. This adds that lovely sandy, stone-like finish seen in the background of the squares. -
Stamping the Stars:
Press a small star stamp firmly into the center of each grid square. You want a depression deep enough to hold paint later, but not so deep it warps the coaster. -
Alternative Designs: Dots:
For the dotted coaster, use the flat end of a paintbrush handle or a large dotting tool to press rows of circles into the clay. I find alternating rows creates a fun, dynamic pattern. -
Alternative Designs: Edging:
For the variation with small holes, use a toothpick to poke tiny indentations along the perimeter, spacing them evenly.
Step 3: Baking & Finishing
-
Bake the Clay:
Transfer your clay squares (still on the parchment paper) to a baking sheet. Bake according to the manufacturer’s instructions, usually around 275°F (135°C) for 15-30 minutes depending on thickness. -
Cool Completely:
Remove the coasters from the oven and let them cool completely on a flat surface. Do not attempt to paint them while they are warm. -
Painting the Impressions:
Using a fine-point brush, fill the stamped stars or dots with warm terracotta acrylic paint. Don’t worry if you get paint outside the lines for now. -
Wipe Back Excess:
While the paint is still damp, take a slightly moist paper towel and gently wipe across the surface of the coaster. This removes the paint from the high points but leaves it trapped nicely inside the stamped grooves. -
Painting the Sides (Optional):
For a bold look like the bottom coaster in the stack, paint the entire side edge of the square with the terracotta color to create a sandwich effect. -
Seal the Work:
Once the paint is fully dry, apply a thin coat of satin sealant or glaze to protect the surface from moisture and wear.
Faux Stone Look
Mix a pinch of ground black pepper or dried used coffee grounds into your white clay before rolling. This creates realistic speckles that mimic natural stone or ceramic.
Stack your finished coasters to admire the variety of textures and enjoy your handmade home decor
Swirly Marble Beads and Pendants
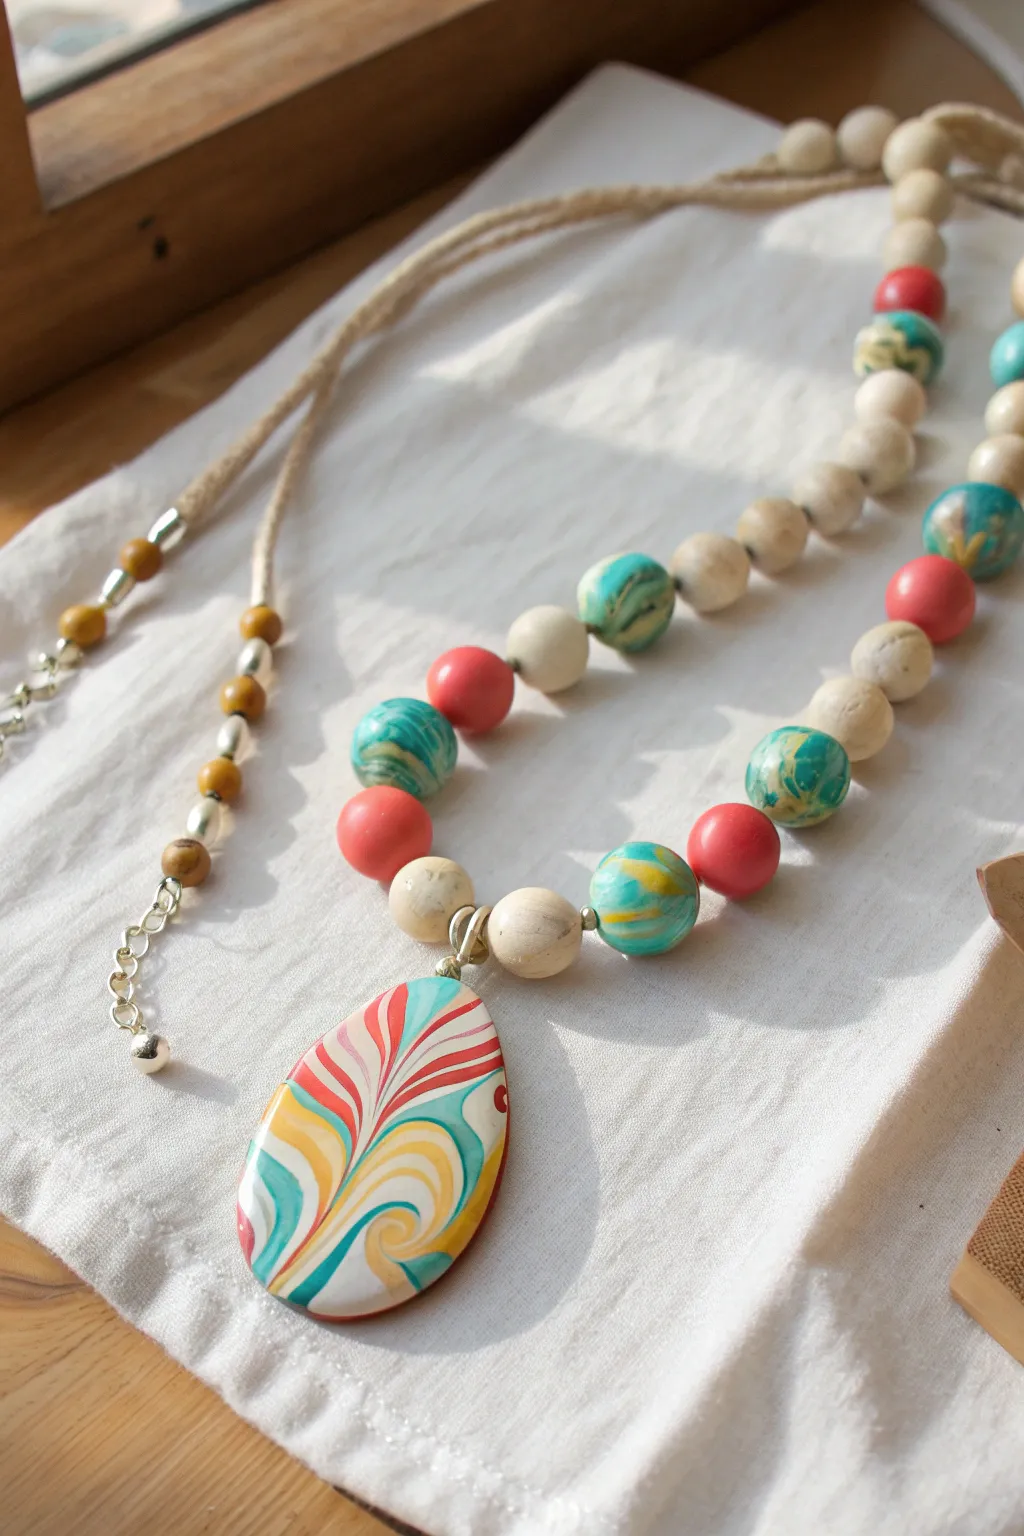
Transform simple polymer clay into a stunning, wearable art piece that mimics the look of high-end ceramic or jasper. By twisting and swirling colorful clay ropes together, you’ll create a mesmerizing, one-of-a-kind pendant and matching beads perfect for a boho-chic necklace.
Step-by-Step
Materials
- Polymer clay (white, turquoise/teal, coral red, yellow, and beige)
- Clay roller or acrylic rolling pin
- Clay slicing blade or craft knife
- Baking sheet
- Parchment paper
- Toothpick or bead piercing tool
- Jewelry cord (hemp or waxed cotton, beige)
- Silver jump ring (large)
- Silver crimp beads and clasp (optional)
- Small pliers
- Oven (for baking)
Step 1: Creating the Marbled Slab
-
Condition the Clay:
Begin by warming up chunks of each clay color in your hands until they are soft and pliable. You’ll need about twice as much white clay as the other colors to achieve the bright, airy look seen in the pendant. -
Roll Snakes:
Roll each color into long, thin snakes or ropes. Aim for varying thicknesses; keep the white ropes slightly thicker than the colored ones to create distinct separations in the pattern. -
Twist and Combine:
Gather your colorful snakes into a bundle and twist them together tightly like a candy cane. Then, fold the twisted rope in half and twist it again. Repeat this twist-and-fold process about 3-4 times. Don’t overdo it, or the colors will turn muddy. -
Form a Ball:
Roll the twisted clay rope into a smooth ball. You should already see beautiful swirls appearing on the surface. -
Flatten the Slab:
Using your acrylic roller, flatten the ball into a slab about 1/4 inch thick. This will be the base for your pendant.
Muddy Colors?
If your colors look brown or grey, you twisted the clay too many times. Stop twisting as soon as you see distinct stripes, then roll it out.
Step 2: Shaping the Beads and Pendant
-
Cut the Pendant Shape:
Look at your marbled slab and choose the area with the most interesting pattern. Use a teardrop cutter or freehand cut a large teardrop shape with your craft knife. -
Smooth the Edges:
Gently run your finger along the cut edge of the pendant to smooth out any sharpness or irregularities. -
Make the Top Loop:
Use a small metal jump ring and press it partially into the top of the pendant, or simply use a tool to poke a hole near the top, large enough for your jump ring to fit through later. -
Form Colored Marbled Beads:
Use the leftover scraps from your marbled slab to roll round beads. I like to vary the sizes slightly, making some about the size of a marble and others smaller like peas. -
Create Solid Color Beads:
Roll solid balls of Coral, Beige, and Teal clay to complement the marbled ones. The image features a mix of solid colors and marbled textures for visual balance. -
Pierce the Beads:
Carefully poke a hole through the center of each bead using a toothpick or piercing tool. twist the tool gently as you push through to avoid squishing the bead’s shape.
Step 3: Baking and Assembly
-
Prepare for Baking:
Place your pendant and all your beads on a baking sheet lined with parchment paper. -
Bake:
Bake the clay according to the manufacturer’s instructions on the package (usually around 275°F or 135°C for 15-30 minutes). Let them cool completely before handling. -
Attach the Jump Ring:
Open a large silver jump ring using your pliers. Thread it through the hole in your cooled pendant and close it securely. -
Start Stringing:
Cut a long length of beige hemp or cotton cord. Fold it in half to find the center, then thread the pendant onto the cord so it sits in the middle. -
Add the Beads:
String your beads onto the cord on either side of the pendant. Follow the pattern in the photos: alternate between marbled beads, solid beige beads, and pops of coral or teal. -
Knot Between Beads (Optional):
For a more rustic, defined look, you can tie a small overhand knot in the cord between each bead to keep them separated and secure. -
Finish the Ends:
Once you are happy with the length, you can simply tie the ends of the cord together in a secure knot, or attach a metal clasp using crimp beads.
Glossy Finish
Coat the baked, cooled beads with a layer of water-based gloss glaze or Mod Podge for a shiny, ceramic-like look.
You now have a beautiful, vibrant set of jewelry that looks incredibly professional for a simple afternoon craft
Candy-Stripe Cane Slice Charms

Create a sweet, non-edible treat that looks good enough to eat with this classic candy-stripe charm. Using a simple polymer clay cane technique, you’ll spiral bright pink and white together into a glossy, professional-looking accessory.
Step-by-Step Tutorial
Materials
- Bright pink polymer clay
- White polymer clay
- Clay roller or acrylic rolling pin
- Tissue blade or sharp craft knife
- Small eye pin
- Gold lobster clasp keychain finding
- Jump ring
- Glossy polymer clay glaze
- Small paintbrush
- Needle nose pliers (for assembly)
- Oven (for baking)
Step 1: Creating the Clay Cane
-
Condition the Clay:
Start by warming up both your pink and white clay in your hands until they are soft and pliable. This prevents cracking later. -
Form the Base Colors:
Roll a portion of the white clay into a thick log. Then, flatten a sheet of pink clay until it is roughly the same length as your white log. -
Wrap the Log:
Carefully wrap the pink sheet around the white log, trimming any excess so the seams meet neatly without overlapping too much. Roll it gently on your work surface to smooth the seam. -
Create the Stripes:
Slice this wrapped log into four equal lengths. Stack them in a 2×2 grid formation to create a thicker, multi-colored block. -
Reduce to Snakes:
Gently squeeze and roll this block to lengthen it out into a long, thin snake. I find that pulling gently from the ends while rolling helps keep the pattern consistent. -
Twist the Pattern:
Hold one end of the snake steady and twist the other end to create the spiral candy-cane effect. Keep twisting until the stripes look diagonal and tight.
Step 2: Shaping the Swirl
-
Roll the Coil:
Take your twisted snake and lay it flat on your work surface. Start coiling it tightly around itself, like a cinnamon roll, keeping the spiral flat. -
Smooth the Edges:
Continue coiling until the charm reaches your desired size—about 1.5 inches is good for a keychain. Slice off the excess tail at an angle and tuck it smoothly into the side of the circle. -
Flatten and Perfect:
Place a piece of parchment paper over the swirl and gently roll over it with your acrylic roller to flatten the top surface slightly, ensuring all the coils adhere to each other.
Fix Smudged Colors
If pink smears onto the white while rolling, use a cotton swab dipped in rubbing alcohol or nail polish remover to gently wipe the surface clean before baking.
Step 3: Assembly and Baking
-
Insert Hardware:
Take your metal eye pin and carefully push it into the top edge of the candy swirl. Make sure it goes in straight and deep enough to be secure. -
Bake the Charm:
Place the charm on a baking sheet or tile. Bake according to your specific clay brand’s package instructions (usually around 275°F or 135°C for 15-30 minutes). -
Cool Completely:
Allow the clay to cool completely before handling. It will still be slightly soft when hot but hardens as it cools. -
Glaze for Shine:
Once cool, apply a coat of glossy polymer clay glaze using a soft brush. This step is crucial for achieving that hard-candy look shown in the photo. -
Attach the Clasp:
After the glaze is fully dry, use pliers to open a jump ring. Loop it through the eye pin on your charm and the bottom of the lobster clasp, then close the ring securely.
Make it Sparkle
For a ‘sugared’ look, brush liquid clay or glaze on the unbaked charm and sprinkle it with ultra-fine white glitter or clear embossing powder before baking.
Clip this delightful swirl onto a backpack or use it as a zipper pull for a pop of sweet style
Faux Stained-Glass Suncatchers
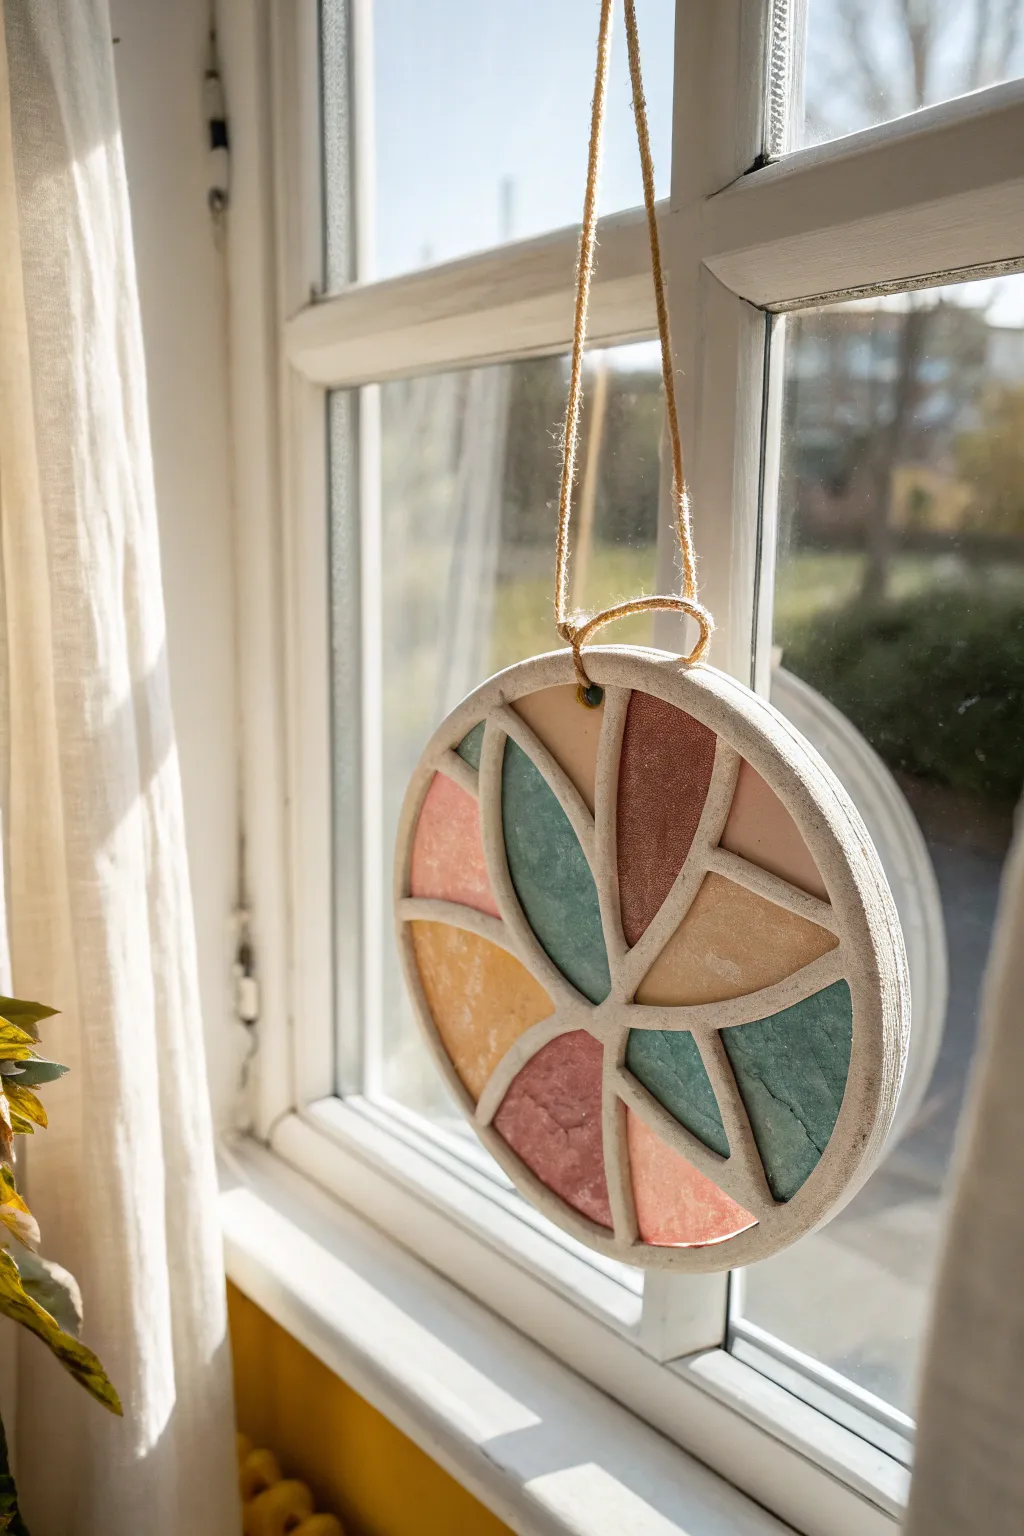
This charming suncatcher combines the structure of oven-bake clay with the translucence of melted wax or resin to mimic the look of stained glass. The sturdy white frame contrasts beautifully with the soft, muted pastels of the inner sections, making it perfect for catching afternoon sunlight.
Step-by-Step
Materials
- White oven-bake polymer clay (e.g., Sculpey or Fimo)
- Rolling pin or pasta machine
- Round cookie cutter (approx. 4-5 inches diameter)
- Craft knife or clay blade
- Parchment paper
- Baking sheet
- Liquid polymer clay (translucent)
- Alcohol inks or grated crayons (muted earth tones: peach, teal, sage, rust)
- Toothpick or needle tool
- Jute twine or string
- Small metal jump ring (optional)
- Gloss glaze (optional)
Step 1: Creating the Clay Frame
-
Condition the clay:
Start by warming a block of white polymer clay in your hands until it is soft and pliable. This conditioning step is crucial to prevent cracks later on. -
Roll it out:
Roll the clay into a flat sheet about 1/4 inch thick. You want it substantial enough to hold the ‘glass’ panes without breaking. -
Cut the outer circle:
Place your large round cutter onto the clay and press down firmly to create the main outer shape. Remove the excess clay from the outside. -
Mark the center:
Find the approximate center of your circle and make a tiny indentation with a toothpick to guide your design. -
Carve the inner design:
Using a craft knife, carefully cut out teardrop or petal shapes radiating from the center. Leave a border of white clay about 1/4 inch wide between each cutout and around the rim. The goal is to create empty windows. -
Smooth the edges:
Gently run your finger dipped in a little cornstarch or water along the cut edges to smooth out any jagged cuts from the knife. -
Add a hanging hole:
Poke a hole through the top of the outer rim using a straw or a larger needle tool. Make sure it’s wide enough for your twine to pass through later.
Leak Prevention
If liquid clay seeps under the frame, press the raw clay frame firmly onto a glass tile or ceramic tile before filling. Bake on the tile directly.
Step 2: Adding the ‘Glass’ & Baking
-
Prepare the baking surface:
Transfer your clay frame onto a baking sheet lined with clean parchment paper. Ensure the clay is lying perfectly flat and pressing firmly against the paper to create a seal. -
Mix your colors:
In small cups, mix liquid translucent polymer clay with a tiny drop of alcohol ink. Aim for soft, muted colors like sage green, terracotta, and pale yellow. Alternatively, you can use finely grated crayon shavings, but liquid clay is more durable. -
Fill the windows:
Carefully pour or spoon the colored liquid mixture into the open cutout spaces. Fill them just enough to touch the edges of the white clay frame without overflowing. Pop any air bubbles with a toothpick. -
First bake:
Bake the project according to the package instructions for your white clay (usually 275°F/135°C for 15-30 minutes). I often tent foil over the top to prevent the white clay from browning. -
Cool down completely:
Remove from the oven and let it cool completely on the baking sheet. Do not try to lift it while warm, or the centers might warp. -
Back filling (optional):
If the colored sections look too thin or sunken after baking, add a second thin layer of the colored heavy liquid clay and bake again for a seamless look.
Textured Glass Effect
Before baking, lightly drag a needle tool through the liquid filling to create swirls, or sprinkle a pinch of clear glitter for a sparkling finish.
Step 3: Finishing Touches
-
Sand edges:
Once fully cured and cooled, use a fine-grit sandpaper to gently smooth the outer rim of the white clay if there are any rough spots. -
Seal (optional):
For extra shine, brush a thin layer of gloss glaze over the colored sections, or even the white frame if you prefer a ceramic look. -
Add the hanger:
Thread a length of natural jute twine through the hole you made earlier at the top. -
Secure the loop:
Tie a secure knot at the base near the clay, and then tie the loose ends together at your desired length to create a hanging loop.
Hang your new creation in a sunny window and enjoy the beautiful wash of color it brings to the room
Secret Message Locket Charms
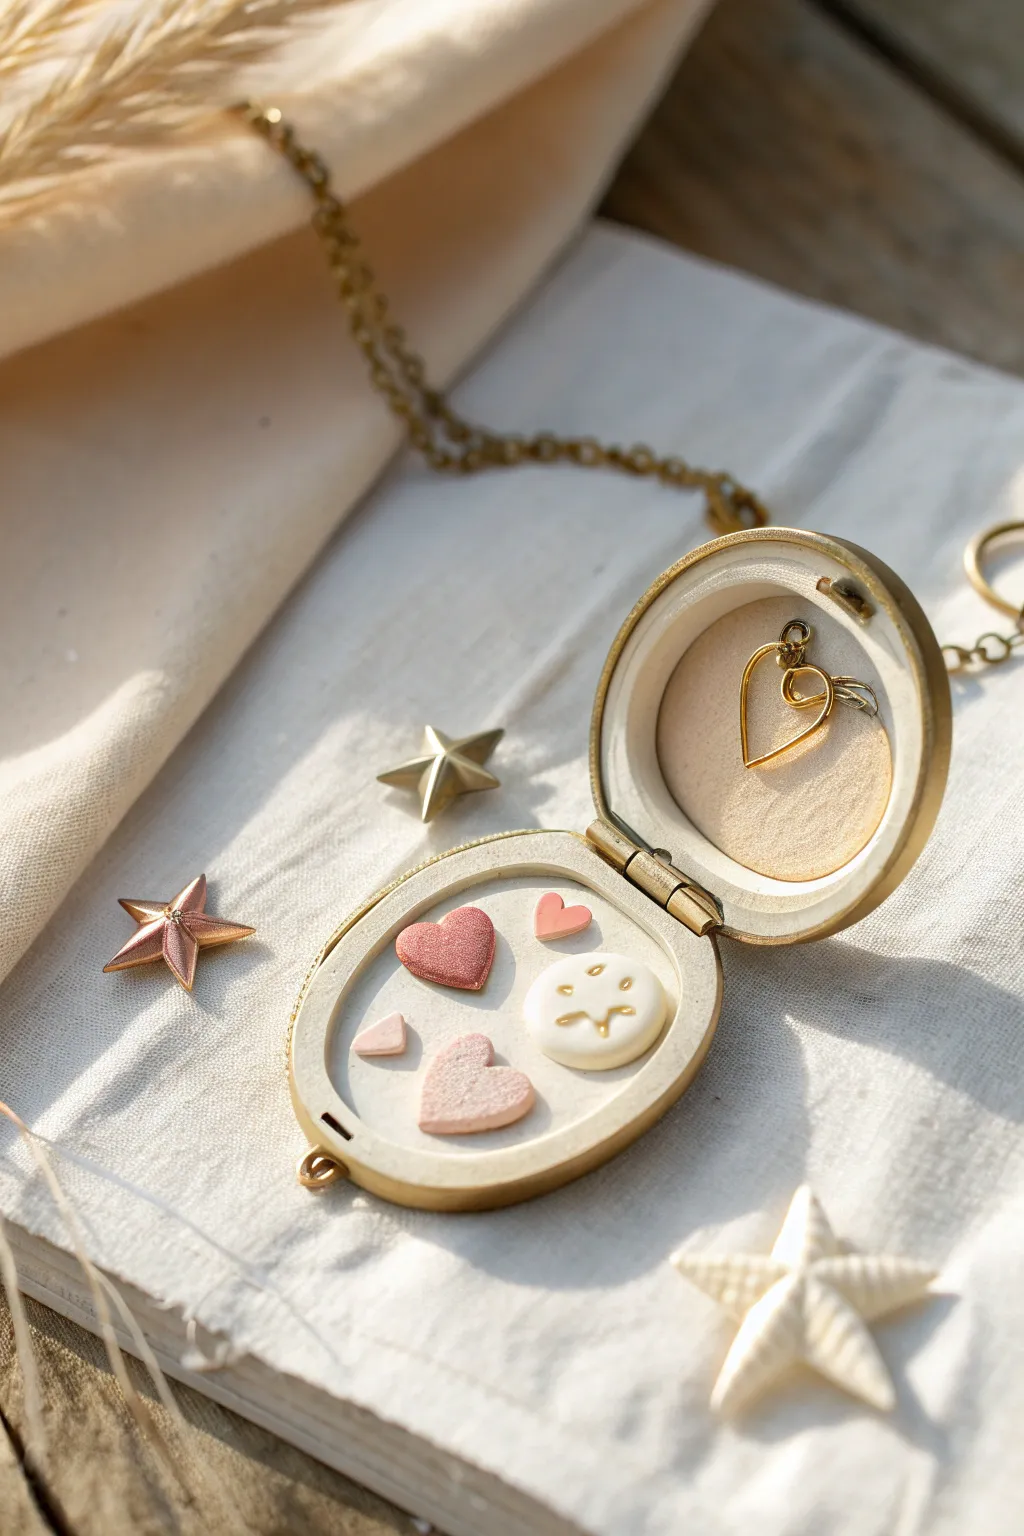
Transform a vintage-style locket into a tiny treasure chest featuring custom, miniature clay charms inside. These delicate heart and star shapes are perfect for hiding little tokens of affection or secret reminders to keep close to your heart.
How-To Guide
Materials
- Golden brass locket (vintage style, with hinge)
- White or translucent polymer clay
- Pink polymer clay
- Mica powder (pearl white and gold)
- Small soft paintbrush
- Tiny heart-shaped cutters (various sizes)
- Needle tool or toothpick
- Gold jewelry wire (thin gauge)
- Round nose pliers
- Gold chain
- Liquid polymer clay (optional, for adhering)
- Gloss glaze (optional)
Step 1: Prepping the Base
-
Measure the locket:
Open your locket and press a small ball of scrap clay into one side to create a template of the interior size. Remove it carefully; this will help you gauge how small your charms need to be. -
Create the background:
Roll out a thin sheet of white or translucent clay. Using your scraper or a circle cutter that matches the locket’s interior, cut out a circle to line the bottom of the locket. -
Texture the background:
Press this clay circle gently into the locket. You can leave it smooth or lightly texture it with a piece of fabric or sandpaper for a soft, matte look.
Heat Safety First
Double-check that your locket has no plastic components or gems before baking. If unsure, bake the clay insert separately and glue it in later.
Step 2: Sculpting the Charms
-
Condition the pink clay:
Take a very small amount of pink clay and warm it in your hands until it is soft and pliable. Roll it into a thin sheet, about 2-3mm thick. -
Cut the hearts:
Using your smallest cutters, punch out several tiny heart shapes. If you don’t have cutters this small, I find using the tip of a craft knife to hand-cut triangles and notch the top works well. -
Add shimmer:
Dip a soft brush into pearl white or gold mica powder and gently dust the tops of your pink hearts to give them a metallic, satiny sheen. -
Make the star token:
Roll a small ball of white clay and flatten it slightly into a disc or rounded shape. Keep it small enough to fit alongside the hearts. -
Detail the star:
Use a needle tool or toothpick to gently press a star pattern into the center of the white disc. Do not poke all the way through. -
Gild the star:
Brush a tiny amount of gold mica powder specifically into the indented star shape to make the design pop against the white clay.
Step 3: Creating the Wire Heart
-
Shape the wire:
Cut a short piece of gold wire (about 2 inches). Using round nose pliers, bend the wire in the center to form the bottom point of a heart. -
Form the lobes:
Curve both ends of the wire upwards and inwards to create the top arches of the heart. -
Create a loop:
Twist one end of the wire around the other to close the shape, leaving a tiny loop if you want it to dangle, or trim it flush if you want it to lay flat.
Magnetic Magic
Embed a tiny magnet behind the clay background and glue small magnets to the charms so kids can rearrange the scene inside endlessly.
Step 4: Assembly and Baking
-
Arrangement:
Place your clay hearts, the star token, and the wire heart onto the clay background inside the locket. Use a tiny drop of liquid clay to secure them if you want them permanently fixed. -
Check fit:
Gently try to close the locket to ensure none of the charms are too thick. If it won’t snap shut, flatten the charms slightly. -
Baking setup:
Most metal lockets can go safely into the oven at low temperatures. Place the open locket on a baking tile or parchment-lined tray. -
Bake:
Bake according to your clay package instructions (usually 275°F or 130°C) for about 15-20 minutes. Keep an eye on the temperature to protect the metal finish. -
Cool down:
allow the locket to cool completely before touching it, as the metal will potentially stay hot longer than the clay. -
Final touches:
Once cool, check that all pieces are secure. If any loose pieces shifted, use a dab of super glue to fix them in place.
Wear your finished locket on a long chain to keep your miniature collection close wherever you go