If you’ve got a little oven-bake clay and a handful of magnets, you’re only one baking session away from the cutest fridge makeover. These polymer clay magnet ideas are small, beginner-friendly, and built around that super-important flat back so everything sits nice and flush.
Geometric Color-Block Magnets
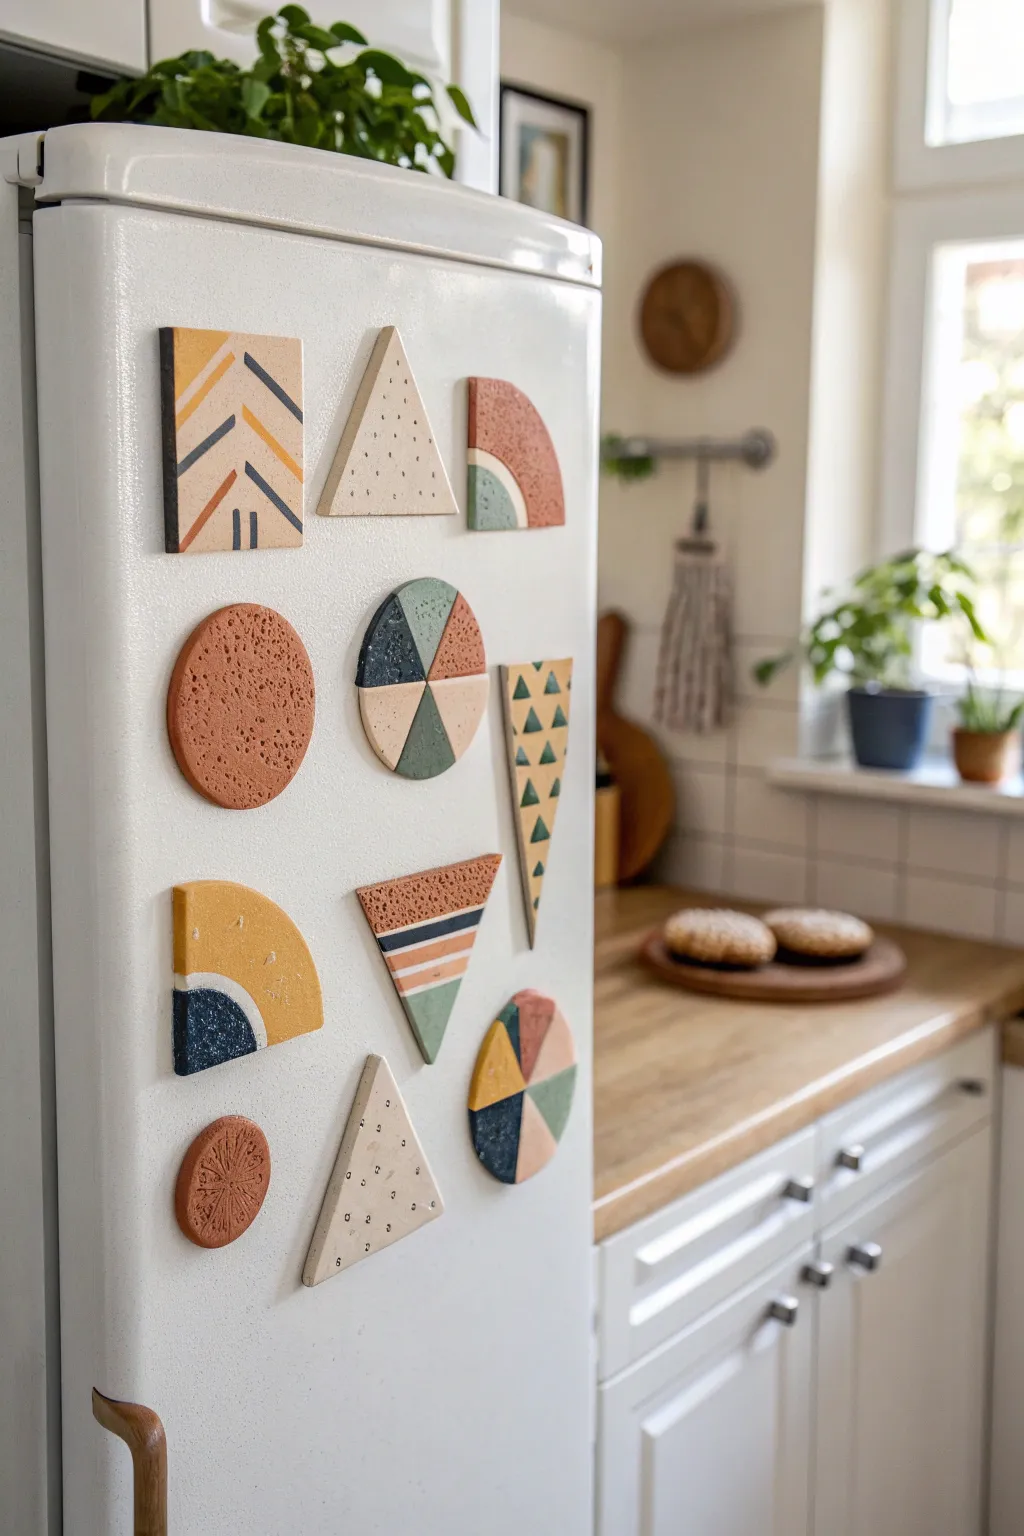
These modern, geometric magnets are an artistic way to showcase photos or artwork on your fridge. By combining simple shapes including triangles, circles, and semi-circles with an earthy color palette and terrazzo-style speckling, you can create a cohesive set that functions as mobile kitchen art.
Step-by-Step Tutorial
Materials
- Oven-bake polymer clay (white, terracotta, ochre, forest green, navy blue)
- Acrylic rolling pin
- Geometric clay cutters (square, circle, triangle)
- X-acto knife or clay blade
- Texture tools (coarse sandpaper, toothbrush, or crumpled foil)
- Small round piping tip (for indentation)
- Black and white acrylic paint
- Fine detail paintbrush
- Strong craft glue (E6000 or strong super glue)
- Round ceramic or neodymium magnets
- Parchment paper and baking sheet
- Matte finish glaze (optional)
Step 1: Preparing the Clay Base
-
Condition the Clay:
Begin by kneading each color of clay individually until it becomes warm, soft, and pliable. This prevents cracking later on. -
Roll Out Slabs:
Use your acrylic rolling pin to roll out slabs of each color. Aim for a consistent thickness of about 1/4 inch (6mm) so the magnets feel substantial but aren’t too heavy. -
Add Speckled Texture:
To achieve the stone-like effect seen on the terracotta pieces, gently press a coarse texture tool like crumpled foil or coarse sandpaper into the rolled slab before cutting. -
Stamp Patterns:
For the circular terracotta magnet, use an old toothbrush or a stippling sponge to create a porous, cratered texture across the entire surface.
Smooth Cut Trick
Place a piece of plastic wrap over the clay before using your cutters. This creates a beautifully rounded, beveled edge rather than a sharp, flat cut.
Step 2: Cutting and Designing
-
Cut Basic Shapes:
Use your geometric cutters to punch out your main base shapes. You’ll need several triangles, circles, and squares. -
Create the Semi-Circles:
To make the semi-circle shapes, cut a full circle first, then use your clay blade to slice it perfectly in half. -
Assemble the Pie Chart:
For the segmented circle magnet, cut a circle from four different clay colors. Slice each circle into pizza-style wedges, then reassemble them into a single multi-colored circle, gently pressing the seams together. -
Create Striped Motifs:
For the striped triangle, cut thin strips of colored clay using your blade and press them onto a base triangle. Gently roll over the surface once with the rolling pin to fuse the layers. -
Add Inlaid Details:
For the color-blocked semi-circles, trace a smaller arc on your base shape with a needle tool, cut it out, and replace it with a contrasting color of clay, smoothing the join with your finger.
Step 3: Baking and Finishing
-
Pre-Bake Preparation:
Place all your cutout shapes onto a parchment-lined baking sheet. Double-check that all edges are smooth and no fingerprints adhere to the surface. -
Bake the Clay:
Bake according to your polymer clay package instructions. This is usually around 275°F (135°C) for 15-30 minutes, depending on thickness. -
Paint the Details:
Once fully cooled, use a fine detail brush and acrylic paint to add the graphic elements. Paint the navy chevrons on the square magnet and the small pine tree triangles on the long wedge. -
Add Speckles:
For the white triangle, dilute a tiny bit of black paint with water. Dip a stiff brush in it and flick the bristles to splatter tiny dots for a terrazzo look. -
Seal the Surface:
If you want extra durability, apply a thin coat of matte glaze over the painted areas to protect the design from kitchen grease or scratches. -
Attach the Magnets:
Flip the clay shapes over. Apply a dab of strong adhesive to the back center of each shape and press a magnet firmly into place. -
Final Cure:
Let the glue cure completely (usually 24 hours for maximum strength) before placing them on your refrigerator.
Gold Accents
For a luxe upgrade, paint the thin dividing lines or the edges of the shapes with liquid gold leaf after baking to make the colors pop.
Now you have a stunning, cohesive set of magnets that turns your appliance into a gallery wall


Smiley Face Icon Magnets
Brighten up your fridge or office board with these cheerful, nostalgic smiley face icon magnets. The smooth, glazed finish and slightly speckled yellow clay give them a high-quality, ceramic-like feel without needing a kiln.
Step-by-Step Guide
Materials
- Polymer clay (mustard yellow or sunshine yellow)
- Black acrylic paint
- Glossy polyurethane varnish or glaze
- Rolling pin or clay roller
- Square clay cutter with rounded corners (approx. 1.5 inches)
- Small round clay cutter (for eyes) (optional)
- Fine-grit sandpaper (400-600 grit)
- Strong craft magnets (neodymium)
- E6000 glue or strong superglue
- Very fine detail paintbrush
- Needle tool or toothpick
- Parchment paper or ceramic tile
Step 1: Prepping and Shaping the Base
-
Condition the clay:
Start by warming up your yellow polymer clay in your hands. Knead it thoroughly until it is soft, pliable, and free of any air bubbles. -
Create a speckle effect (Optional):
If you want that natural, speckled look seen in the photo, mix in a tiny pinch of cracked black pepper or brown clay shavings into your yellow clay while conditioning. -
Roll it out:
Roll the clay into a flat slab. You want this to be fairly thick—about 1/4 inch—to give the magnet a nice, chunky dimensional feel like the one pictured. -
Cut the shape:
Use your square cutter with rounded corners to punch out the main shape. Wiggle the cutter slightly before lifting to ensure a clean separation from the workspace. -
Soften the edges:
Take the raw clay square and gently rub your finger along the sharp top edges. Press them inward slightly to create that pillowy, rounded contour rather than a sharp 90-degree angle.
Step 2: Creating the Face
-
Mark the eye placement:
Before committing to the deep indentations, lightly mark two dots where the eyes will go to ensure they are level and centered on the upper half of the square. -
Indent the eyes:
Using a small sculpting tool or the rounded end of a paintbrush, press firmly into the clay to create oval-shaped depressions for the eyes. Don’t go all the way through, just deep enough to hold paint. -
Scribe the smile:
Use a needle tool or toothpick to carve the smile line. Keep the pressure even and confident; a shaky hand creates a jagged line. Add small ticks at the ends of the smile for extra charm. -
Add the nose:
Center a small, vertical oval indentation between the eyes and the smile for the nose. This tiny details adds a lot of character. -
Bake the clay:
Place your pieces on parchment paper or a ceramic tile. Bake according to your specific clay package’s instructions (usually 275°F for 15-30 minutes depending on thickness). -
Cool down:
Let the clay cool completely before moving on. I prefer to leave them in the oven with the door open so they cool gradually, which prevents cracking.
Fixing Smudges
If the black paint stains the yellow clay too much during wipe-off, use a tiny bit of rubbing alcohol on a cotton swab or very fine sandpaper to gently buff the stain away.
Step 3: Painting and Finishing
-
Paint the details:
Dip a fine detail brush into black acrylic paint. Carefully fill in the indented eyes, nose, and smile line. Don’t worry if you get paint outside the lines; we will fix that next. -
Clean up the lines:
Once the paint is dry to the touch, take a damp q-tip or a baby wipe and gently swipe across the surface. This removes excess paint from the high points of the yellow clay, leaving black only in the recessed grooves. -
Apply the glaze:
Brush on a coat of glossy polyurethane varnish or clay glaze. This is crucial for achieving that wet, shiny look in the photo and protecting the paint. -
Let the glaze cure:
Allow the glaze to dry fully according to the bottle instructions. Ensure it is in a dust-free area so no specks get stuck in the finish. -
Attach the magnet:
Flip the smiley face over. Apply a dot of E6000 glue to the center of the back and press your neodymium magnet firmly into it. -
Final dry:
Let the glue set for at least 24 hours to ensure a super strong bond before sticking it to your fridge.
Make it Matte
Prefer a modern matte finish instead of glossy? Skip the glaze and instead buff the baked clay with denim or a microfiber cloth for a soft, natural sheen.
Once dry, these cheerful little faces are ready to hold your important notes and photos with a smile


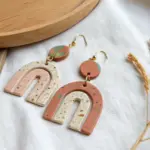
Rainbow Arch Magnets
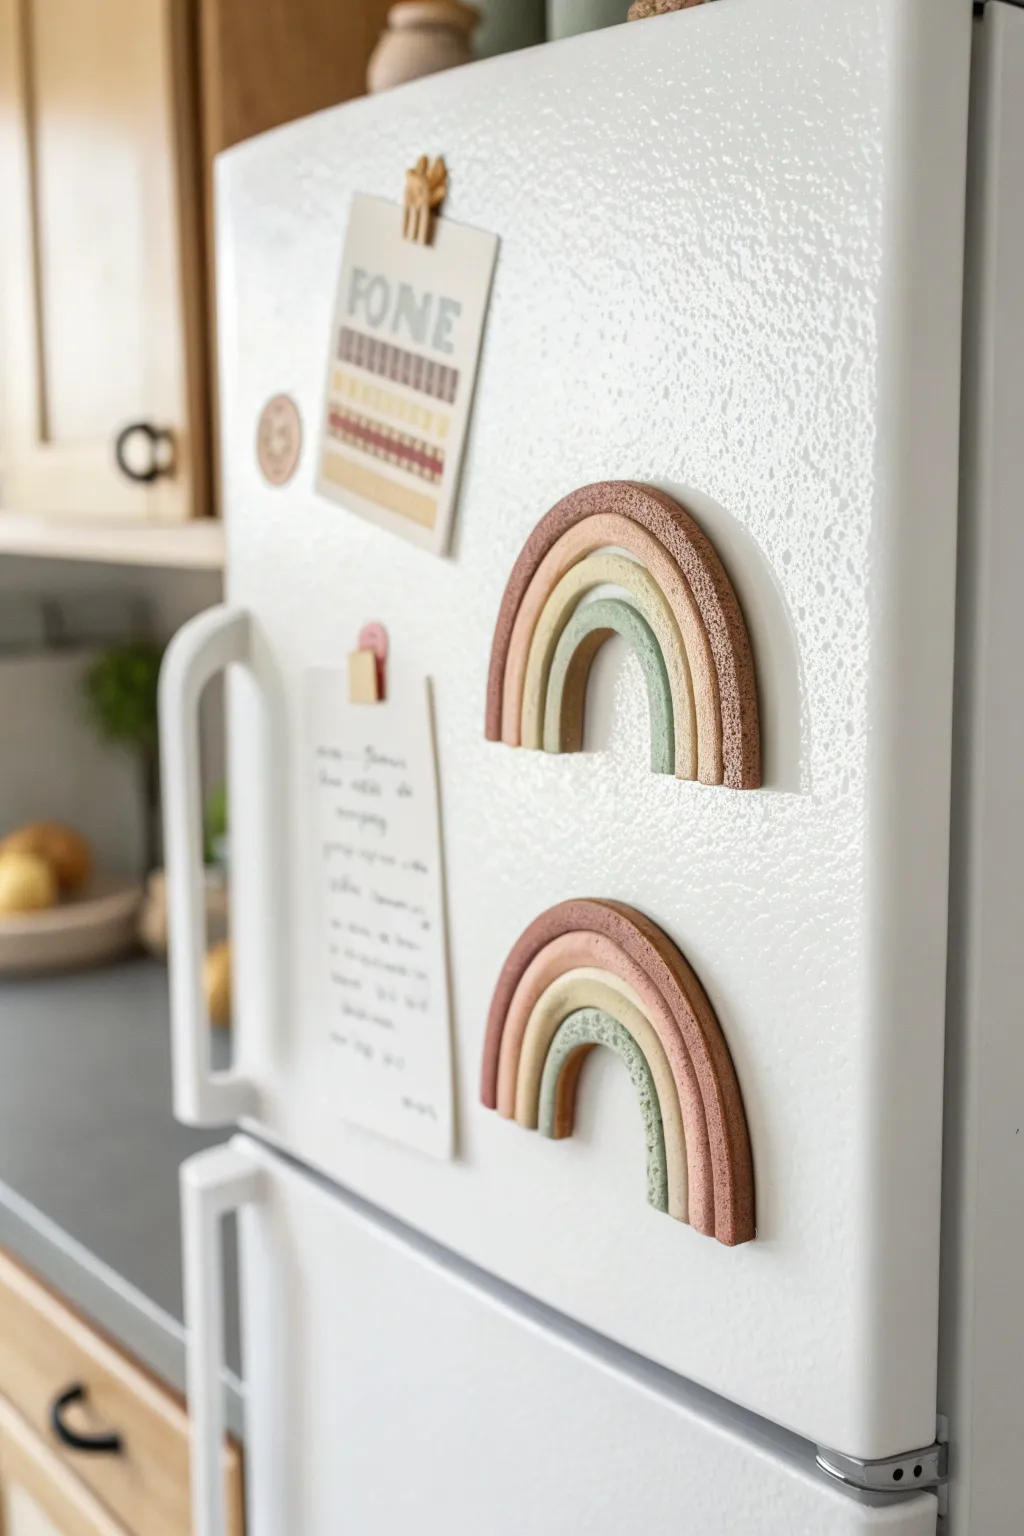
Bring a touch of boho charm to your kitchen with these muted, textured rainbow magnets. Using earthy tones like terracotta, sage, and sand, these arches add a subtle pop of warmth to any magnetic surface.
How-To Guide
Materials
- Oven-bake polymer clay (colors: rust/terracotta, dusty pink, beige/cream, sage green)
- Black pepper or dried coffee grounds (for texture)
- Acrylic rolling pin or clay roller
- Clay knife or craft blade
- Circle cutters (various nesting sizes) OR a printed template
- Liquid polymer clay or Bake & Bond
- Strong round craft magnets
- Super glue or E6000
- Baking sheet
- Parchment paper
- Sandpaper (optional)
Step 1: Preparing the Clay
-
Condition the clay:
Start by manipulating each block of clay in your hands until it becomes soft and pliable. You want a nice, smooth consistency that won’t crack when bent. -
Mix tailored colors:
If your package colors are too bright, tone them down. Mix a tiny bit of green or brown into bright orange to get that rust color, or add white to green for a soft sage look. -
Add that speckled texture:
To achieve the stone-like finish seen in the photo, sprinkle a pinch of ground black pepper or used (dried) coffee grounds onto your conditioned clay. -
Fold and roll:
Fold the clay over the speckles and roll it repeatedly until the particles are evenly distributed throughout the color block. -
Create uniform ropes:
Roll each color into a long snake or rope. Aim for an even thickness of about 1/4 inch for all strands so your rainbow lies flat.
Clean Cuts Pro Tip
Chill your assembled clay rainbow in the fridge for 15 minutes before cutting the bottom edge. Firm clay slices much cleaner and resists smushing.
Step 2: Assembling the Arches
-
Form the smallest arch:
Take your sage green rope (or whichever color you want on the inside) and curve it into a tight U-shape on your workspace. -
Add the next layer:
Apply a very thin line of liquid clay along the outer edge of the green arch to act as glue. Press the beige/cream rope snugly against it. -
Continue layering:
Repeat the process with the dusty pink rope, ensuring it hugs the curve of the beige layer without gaps. -
Finish the outer arch:
Finally, add the rust/terracotta rope as the outermost layer. Gently press all four ropes together from the sides to ensure they bond well. -
Check the shape:
Use your fingers to gently refine the arch shape if it got distorted during pressing. Keep the top rounded and smooth.
Level Up: Texture
Before baking, gently roll a piece of rough sandpaper or a clean toothbrush over the clay surface to give it an even more realistic stone finish.
Step 3: Refining and Baking
-
Trim the bottom edge:
Take your long clay craft blade and make a swift, straight cut across the bottom of the rainbow legs. This creates that clean, flat base. -
Smooth the cut:
Gently tap the freshly cut ends with your fingertip to soften any sharp edges or clay drag marks resulting from the slice. -
Transfer to the baking sheet:
Carefully lift your rainbows using the blade to slide under them, placing them onto a parchment-lined baking sheet. -
Bake the batch:
Bake according to your clay manufacturer’s instructions—usually around 275°F (135°C) for 15-30 minutes depending on thickness. I like to tent foil over them to prevent scorching. -
Cool down completely:
Let the rainbows cool fully on the baking sheet. The clay hardens as it cools, so don’t test their strength while they are hot.
Step 4: Final Assembly
-
Sand for perfection:
If the back looks uneven, lightly sand it flat so the magnet will adhere properly. -
Attach the magnet:
Apply a dab of strong adhesive like E6000 or super glue to the back of the rainbow, positioning it centered near the top curve. -
Secure and dry:
Press a strong round magnet into the glue. Let the adhesive cure for the recommended time (often 24 hours for maximum strength) before sticking it to your fridge.
Once dry, these charming arches are ready to hold up your grocery lists and favorite photos with style


Sweet Heart Message Magnets
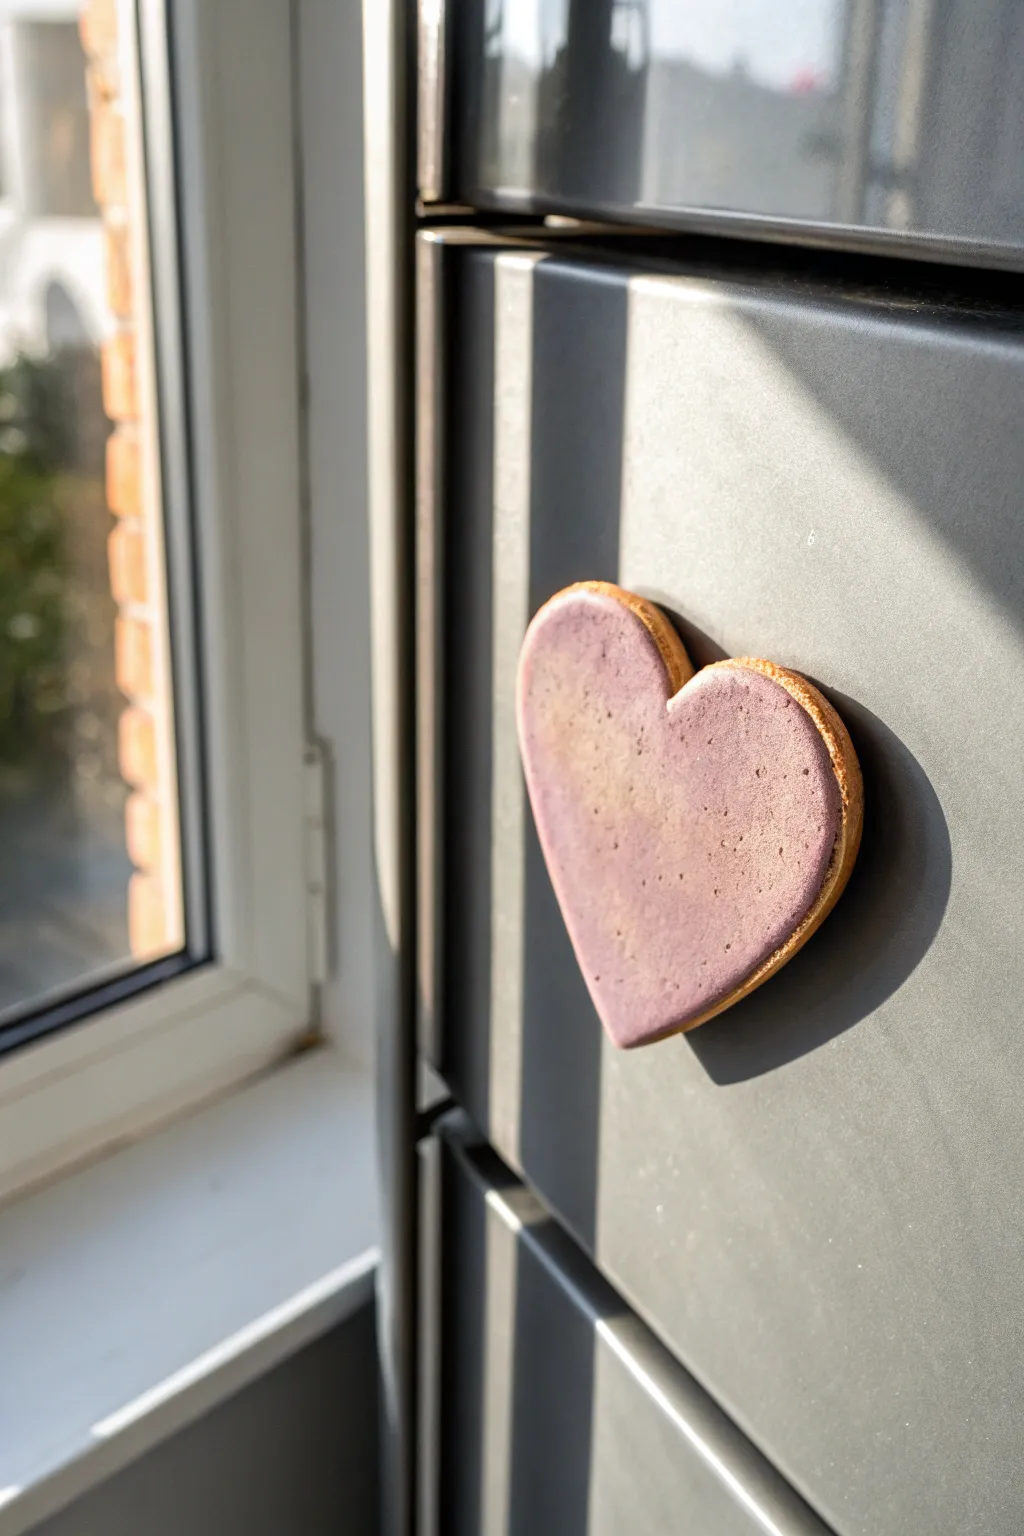
This charming magnet mimics the cozy look of a sugar cookie topped with smooth royal icing, but it’s made entirely from durable polymer clay. Its dusty violet hue and subtle golden edges give it a rustic, handcrafted bakery feel that looks sweet enough to eat.
Detailed Instructions
Materials
- Light tan or beige polymer clay (cookie dough base)
- White polymer clay
- Purple polymer clay (violet or plum shade)
- Heart-shaped cookie cutter (medium size)
- Rolling pin or clay machine
- Soft pastel chalks in golden-brown or burnt umber
- Soft paintbrush
- Liquid polymer clay (Translucent or Bake & Bond)
- Needle tool or toothpick
- Strong round craft magnet
- Super glue (cyanoacrylate)
- Gloss or satin varnish (optional based on preference)
- Oven for baking
Step 1: Creating the Cookie Base
-
Condition the dough:
Start by conditioning your light tan polymer clay until it is soft and pliable. If you don’t have a pre-mixed tan color, a tiny bit of brown and yellow mixed into white works perfectly. -
Roll the slab:
Roll the tan clay out into a slab that is approximately 1/4 inch thick. You want it thick enough to resemble a real sugar cookie. -
Texture the surface:
Lightly press a piece of sandpaper or a clean toothbrush over the surface of the clay slab. This tiny detail creates a realistic baked texture rather than a perfectly smooth plastic look. -
Cut the shape:
Use your heart-shaped cookie cutter to cut out the base. Gently push the clay out of the cutter if it sticks. -
Soften the edges:
Use your finger to very gently tap and round the sharp edges created by the cutter. Real cookies puff up slightly and rarely have sharp 90-degree angles. -
Shade the edges:
Scrape a little bit of golden-brown soft pastel chalk into a powder. Using a soft, dry paintbrush, dust the edges of the heart to simulate a golden-baked crust.
Step 2: Adding the Icing Layer
-
Mix the icing color:
Condition white polymer clay and mix in a very small amount of purple clay. Keep adding purple slowly until you achieve a soft, dusty violet shade. -
Roll the icing:
Roll this violet clay much thinner than your base, about 1/16 to 1/8 inch thick. -
Cut the icing shape:
Cut a heart from the violet clay using the same cutter you used for the base. -
Resize the icing:
I like to gently press in the edges of the violet heart with my fingers to make it slightly smaller than the base. This ensures the ‘cookie’ edge remains visible underneath. -
Attach layers:
Apply a thin layer of liquid polymer clay or Bake & Bond to the top of the tan cookie base. -
Place the icing:
Center the violet heart on top of the tan base and press down gently to secure it without squishing the texture. -
Add surface texture:
Using a needle tool, create very tiny, sparse pinpricks on the surface of the violet clay. This mimics the tiny air bubbles found in dried royal icing. -
Dust the top (Optional):
For an aged or matte look like the photo, you can lightly dust the center of the violet heart with a tiny bit of white or lighter pastel powder.
Sticky Cutters?
If your clay keeps getting stuck inside the cookie cutter, dip the cutter into a little cornstarch or water before pressing it into the clay. This acts as a release agent.
Step 3: Baking and Assembly
-
Preheat the oven:
Preheat your oven according to the specific temperature directions on your brand of polymer clay package (usually around 275°F/135°C). -
Bake:
Place the heart on a ceramic tile or baking sheet lined with parchment paper. Bake for approximately 25-30 minutes to ensure it is fully cured. -
Cool down:
Allow the clay to cool completely inside the oven or on a wire rack before handling. -
Attach the magnet:
Flip the heart over. Place a drop of super glue on the back and press your round magnet firmly into place. -
Final cure:
Let the glue dry completely for at least an hour before placing your new magnet on the fridge.
Realistic Pitting
Make the tiny holes on the icing surface different depths. A few deeper pinpricks mixed with very shallow surface marks look more natural than uniform dots.
Now your kitchen has a sweet little touch of permanent bakery charm that keeps your notes secure

The Complete Guide to Pottery Troubleshooting
Uncover the most common ceramic mistakes—from cracking clay to failed glazes—and learn how to fix them fast.
Donut With Sprinkles Magnets
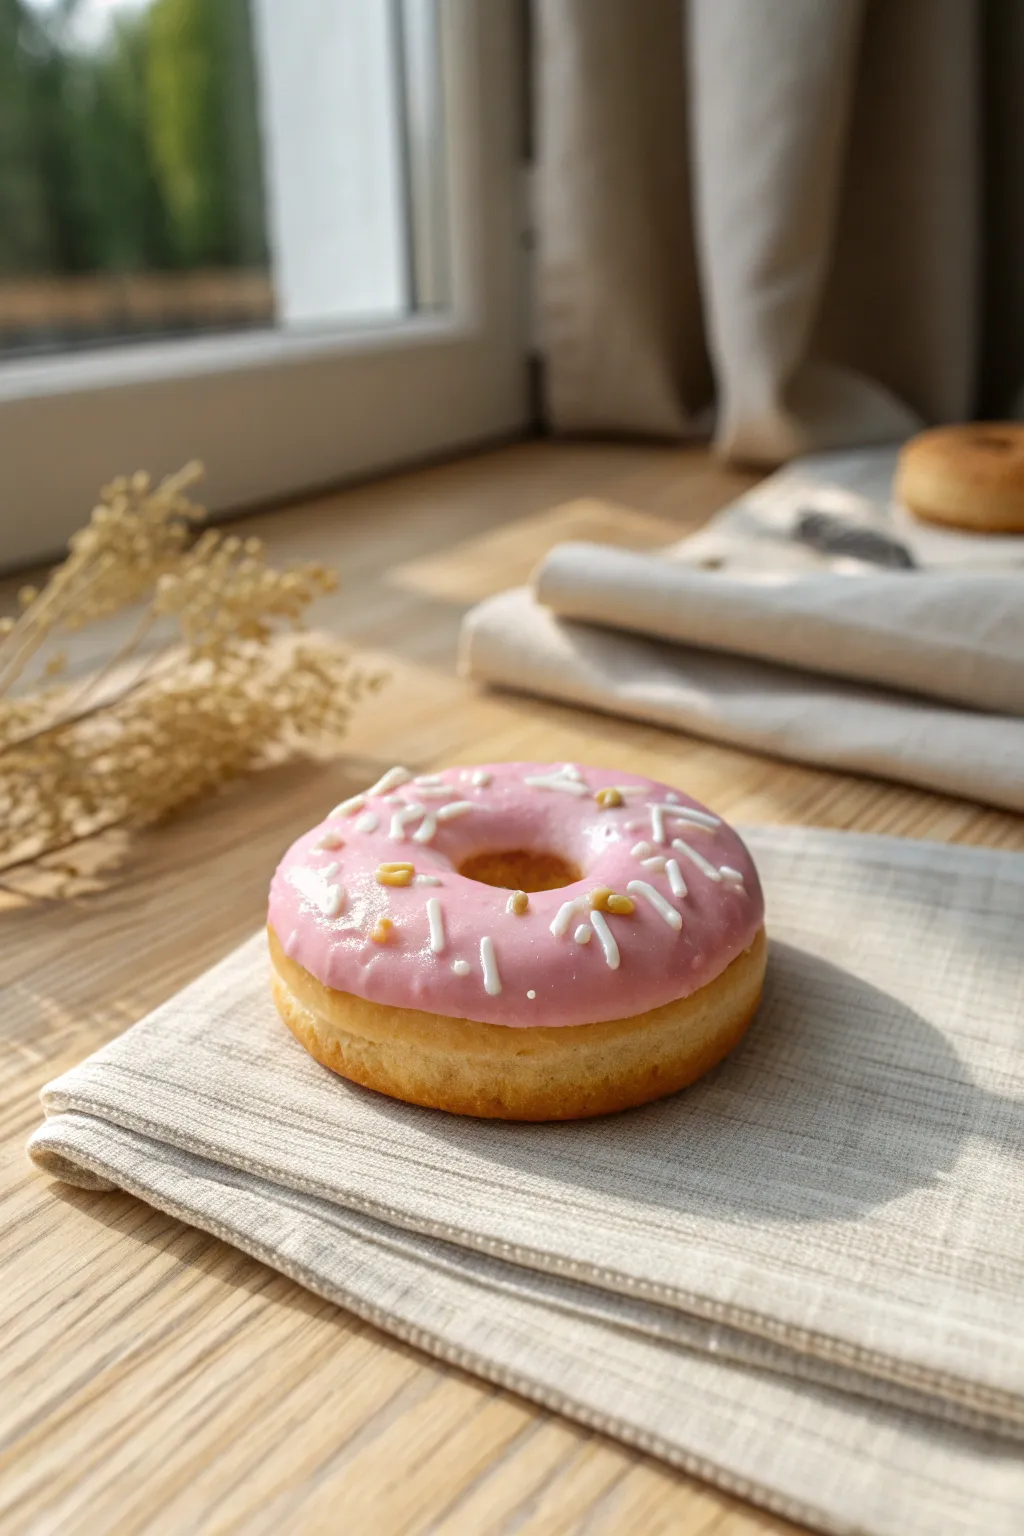
Capture the sweetness of a bakery treat without the calories by sculpting this hyper-realistic donut magnet. With its glossy pink frosting and delicate sprinkles, it adds a charming pop of color to any fridge or locker.
Step-by-Step
Materials
- Polymer clay (dough color: mix of translucent, white, and tiny bit of yellow/ochre)
- Polymer clay (frosting color: baby pink)
- Polymer clay (sprinkles: white and gold/yellow)
- Liquid polymer clay (translucent or white)
- Soft pastels or chalks (golden brown, orange, dark brown)
- Detailed paintbrush
- Round cookie cutters (one medium, one small for the hole)
- Texture tool (toothbrush or stiff bristle brush)
- Needle tool or toothpick
- Gloss glaze or UV resin
- Strong craft magnet
- Superglue
Step 1: Sculpting the Base
-
Mix the dough color:
Begin by conditioning your clay. To get that perfect baked-dough shade, mix a large amount of white with translucent clay, then add a very small pinch of yellow ochre or beige. The translucent clay helps mimic the airy texture of real bread. -
Shape the donut:
Roll the clay into a smooth ball, then flatten it slightly into a thick disk. Use your medium cookie cutter to ensure a perfect circle if you want it uniform, or shape it by hand for a rustic look. -
Create the center hole:
Use the small cutter to remove the center. Gently soften the sharp edges created by the cutter with your fingertip so the donut looks risen and fluffy rather than sharp-edged. -
Add bread texture:
Take a clean toothbrush or a stiff-bristled brush and tap it all over the surface of the clay. Focus especially on the rounded sides and the bottom, creating a realistic porous bread texture. -
Create the ‘fry line’:
Use your finger or a smooth tool to lightly smooth out a thin strip right around the middle equator of the donut. Real donuts usually have a lighter, smoother line here where they floated in the oil. -
Pre-shade the dough:
Shave some golden brown and orange chalk pastels into a powder. With a dry soft brush, dust this powder over the textured areas, avoiding the ‘fry line’ to keep it pale. I like to add a tiny bit of darker brown just on the very bottom edge for a well-baked look.
Step 2: Frosting and Decorating
-
Prepare the frosting:
Mix your pink polymer clay with liquid polymer clay in a small cup or on a tile. Stir until you achieve a consistency similar to heavy cream or thick icing—it should flow but hold its shape. -
Apply the glaze:
Carefully drizzle or spread the pink mixture onto the top of your donut. Let it drip naturally down the sides in a few spots, but don’t cover the entire sides; you want that golden dough to peek through. -
Create the sprinkles:
Roll out very thin ‘snakes’ of white and golden-yellow clay. Bake these snake strands separately for just 5-10 minutes to harden them, then chop them into tiny bits with a blade to make realistic jimmies. -
Sprinkle placement:
Using tweezers or a needle tool, press the pre-baked sprinkles into the wet liquid clay frosting. Scatter white long sprinkles and smaller golden uneven chunks randomly. -
Bake the magnet:
Place your finished donut on a tile and bake according to your polymer clay manufacturer’s instructions (usually 275°F/130°C for 15-30 minutes).
Frosting Too Runny?
If your liquid clay mix is dripping too fast, let it sit on a piece of paper for 10 minutes. The paper will leech out some plasticizer, thickening the ‘icing’ instantly.
Step 3: Finishing Touches
-
Glaze the frosting:
Once cool, apply a coat of gloss glaze or UV resin specifically to the pink frosting area. This replicates the wet, sugary shine of real donut glaze. -
Seal the dough:
For the dough part, use a matte varnish or leave it natural, as bread shouldn’t be shiny. -
Attach the magnet:
Flip the donut over. Apply a drop of strong superglue to the center of a round magnet and press it firmly against the back of the clay. -
Final cure:
Let the glue and glaze dry completely before testing it on your fridge.
Scented Clay
Mix a tiny drop of vanilla or sweet baking fragrance oil into the clay dough before baking. Your magnet will smell just as delicious as it looks.
Enjoy seeing this sweet, calorie-free treat every time you open the refrigerator
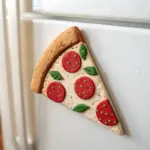
Mini Pizza Slice Magnets
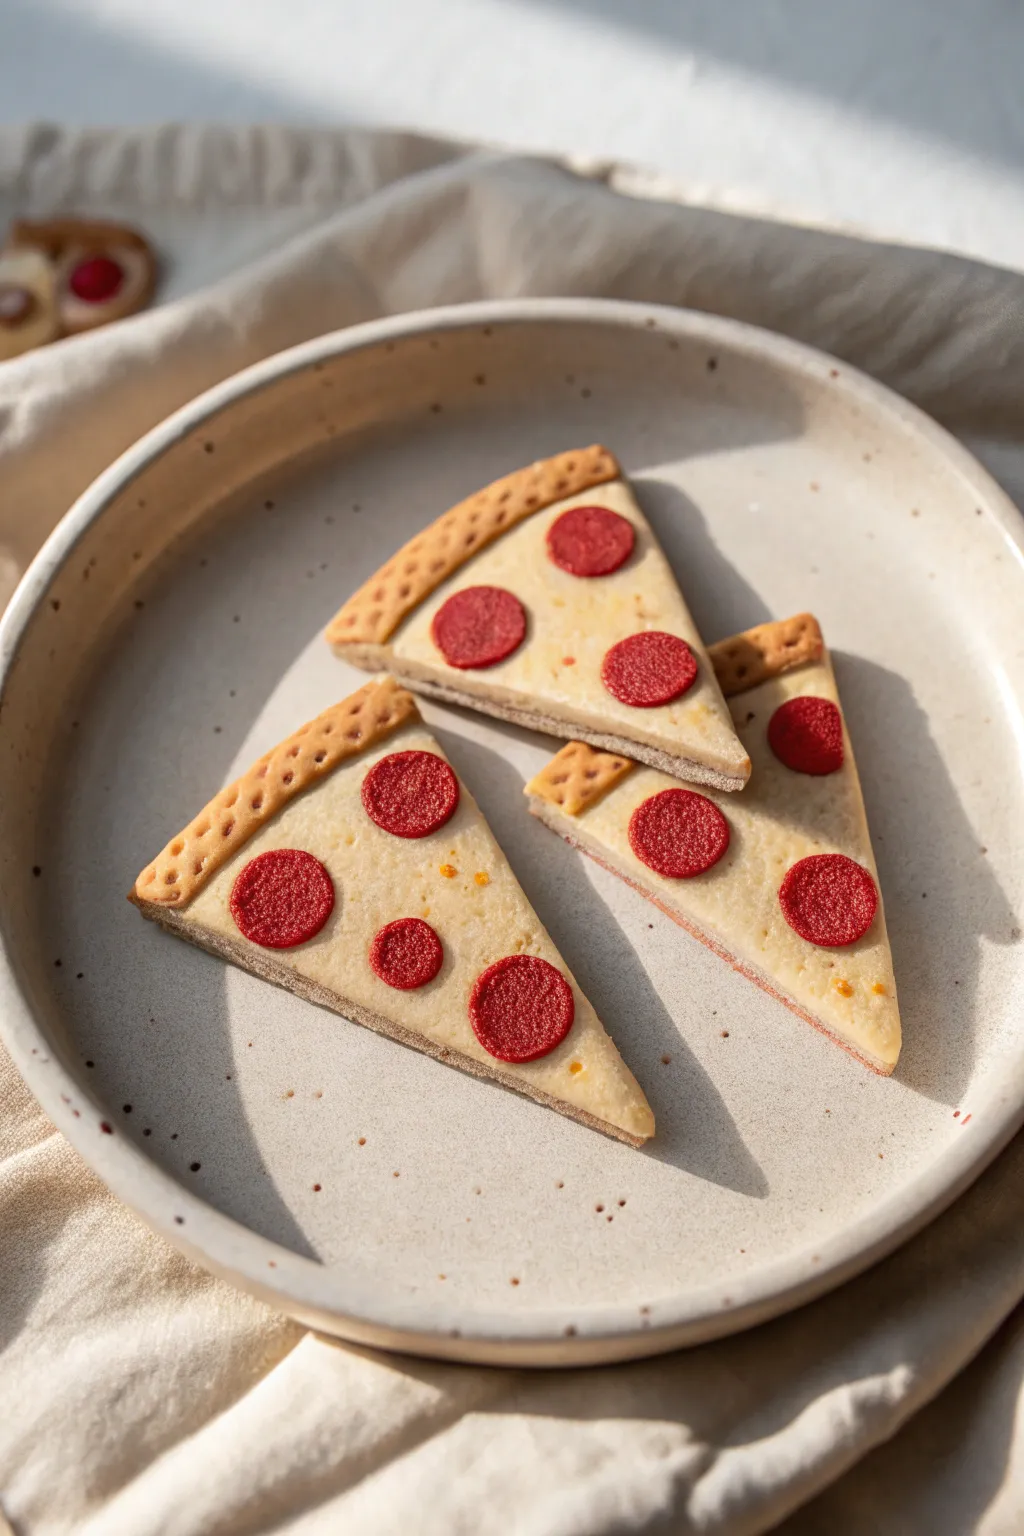
Transform polymer clay into delectable little slices of pepperoni pizza that look good enough to eat but are designed to hold up your grocery list. These realistic magnets feature textured crusts, melty cheese details, and tiny pepperoni rounds, adding a fun, savory touch to your fridge decor.
Step-by-Step Guide
Materials
- Polymer clay (beige/tan, ecru or translucent, red for pepperoni)
- Pastel chalks (yellow ochre, burnt sienna/brown)
- Liquid polymer clay (translucent or whitish)
- Rolling pin or pasta machine
- sharp craft blade or tissue blade
- Needle tool or toothpick
- Ball stylus tool
- Toothbrush or crumpled foil (for texture)
- Small round cutter or straw (for pepperoni)
- Soft paintbrush
- Strong round magnets
- Super glue or E6000
Step 1: Creating the Base Crust
-
Mix the dough color:
Start by conditioning your beige or tan polymer clay until it’s soft and pliable. If the color is too dark, mix in a little white to achieve a realistic baked dough shade. -
Roll the sheet:
Roll the clay out into a thick, even sheet, approximately 1/4 inch thick. This needs to be sturdy enough to hold the magnet later. -
Cut the triangular shape:
Using your sharp craft blade, cut out an isosceles triangle shape. It should look like a classic New York slice—long and pointy. -
Form the crust rim:
Roll a separate snake of the same dough-colored clay. Attach this along the short, top edge of your triangle to form the rising crust. -
Blend the seams:
Use a modeling tool or your finger to gently smooth the underside of the attached crust snake into the main triangle so it looks like one cohesive piece of dough. -
Texturize the crust:
Take a toothbrush or a ball of crumpled aluminum foil and gently tap it all over the raised crust rim to simulate a bread-like texture. -
Add crust dimples:
Use a medium ball stylus to press indentations into the top of the crust rim. I like to space these unevenly to make it look more handmade and rustic.
Step 2: Adding Cheese & Toppings
-
Mix the cheese color:
Mix ecru clay with a small amount of translucent clay. This helps the ‘cheese’ look slightly melty and distinct from the dough. -
Apply the cheese layer:
Roll the cheese mixture very thin. Cut a triangle slightly smaller than your dough base and press it onto the flat part of the slice, leaving the textured crust exposed. -
Create texture paste:
Mix a tiny bit of liquid polymer clay with your solid cheese-colored clay to create a sticky paste. Smear this lightly over the cheese layer to help toppings stick and add realism. -
Create pepperoni slices:
Roll out a very thin sheet of dark red clay. Use a small round cutter (a drinking straw works perfectly for this scale) to punch out several circles. -
Texture the meat:
Before placing them, lightly dab the red circles with your toothbrush/foil tool to give them a meaty texture rather than a smooth plastic look. -
Place the toppings:
Arrange the pepperoni slices on your pizza. Press them down firmly into the cheese layer. -
Add spice details:
Grate a tiny amount of orange or red baked clay into dust and sprinkle it sparingly over the cheese to simulate oregano or red pepper flakes.
Pro Tip: Realistic Cheese
For ultra-realistic cheese, mix liquid clay with yellow and white chalk pastels, then drizzle it over the pepperoni edges before baking.
Step 3: Shading & Baking
-
Shade for baked effect:
Scrape some yellow ochre and burnt sienna artist chalk into fine powder. Use a soft brush to gently apply the ochre to the center cheese and crust. -
Darken the edges:
Apply the darker burnt sienna powder specifically to the raised crust rim and the very edges of the pepperoni to mimic charring from a hot oven. -
Bake the clay:
Place your slices on a baking sheet lined with parchment paper. Bake according to your specific clay brand’s instructions (usually 275°F for 15-30 minutes). -
Cool completely:
Let the pizza slices cool down completely before handling. The clay is fragile while hot. -
Attach the magnet:
Flip the slice over. Apply a drop of strong super glue or E6000 to the back and press your round magnet firmly into place.
Troubleshooting: Lint
If you see dust or lint on your light-colored dough, use a q-tip dipped in rubbing alcohol or baby oil to gently wipe it away before baking.
Once the glue sets, stick these savory slices on your fridge and enjoy a slice of art every day


What Really Happens Inside the Kiln
Learn how time and temperature work together inside the kiln to transform clay into durable ceramic.
Citrus Slice Magnets
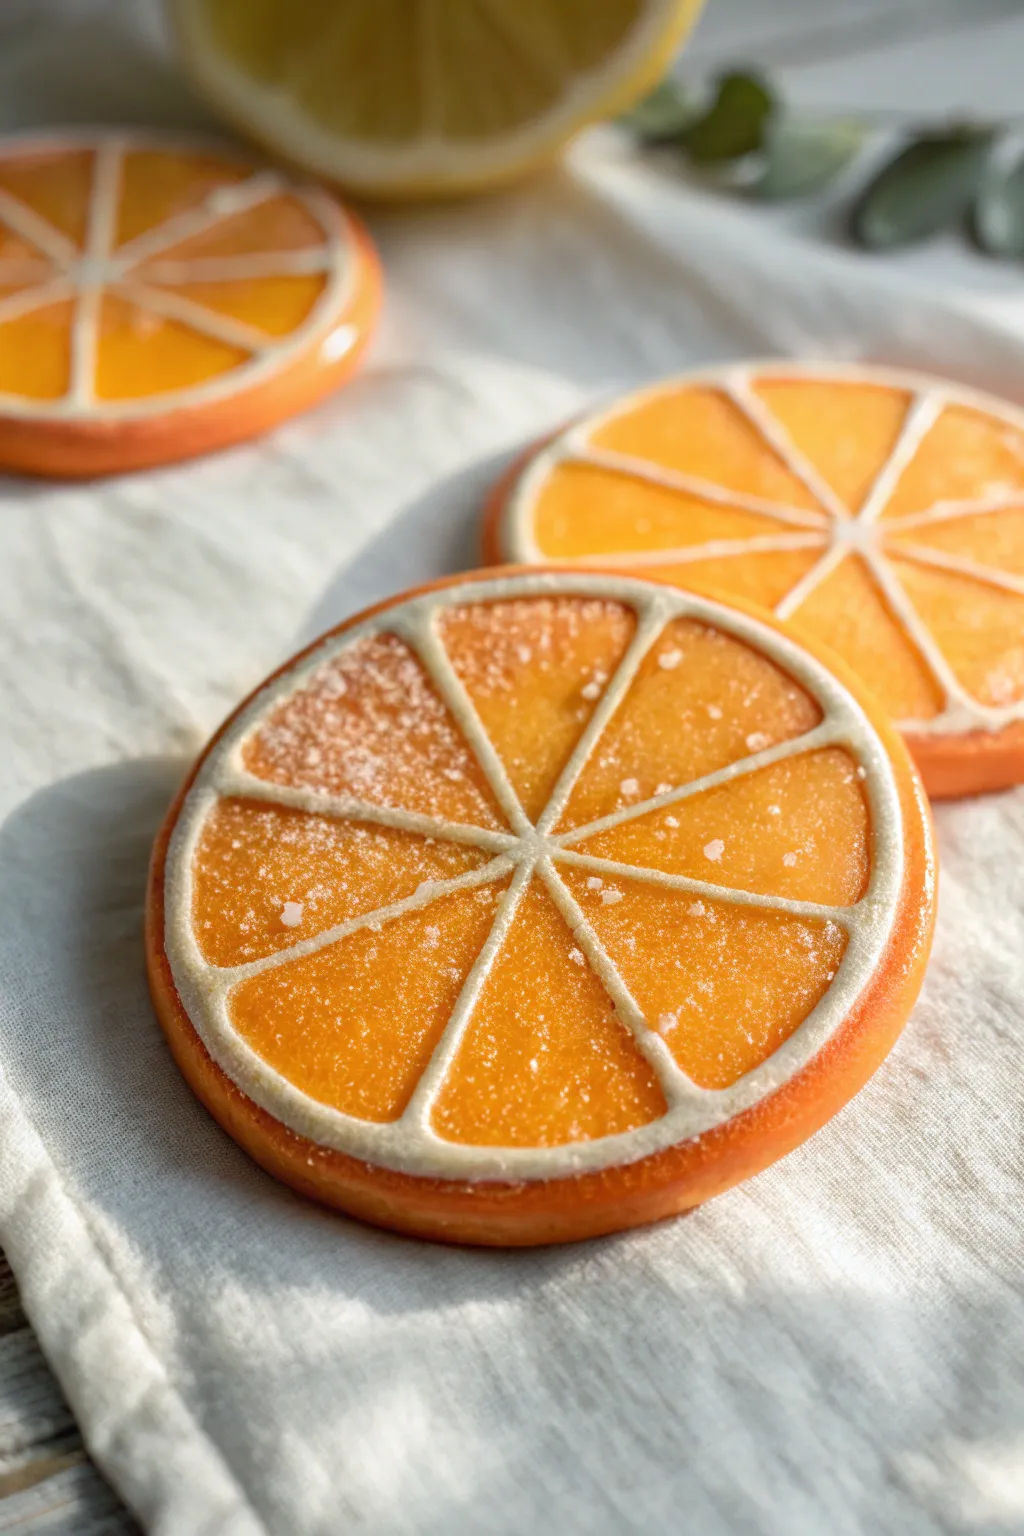
Capture the zest of summer with these hyper-realistic citrus magnets that look good enough to eat. With their translucent juicy segments and a dusting of faux sugar, they add a bright pop of color to any fridge or magnetic board.
Step-by-Step Tutorial
Materials
- Translucent orange polymer clay
- Opaque white polymer clay
- Opaque orange polymer clay (for the rind)
- Liquid polymer clay (translucent)
- Clear micro-beads or fine clear embossing powder
- Rolling pin or pasta machine
- Round cookie cutter (approx. 2-3 inches)
- Sharp craft knife or tissue blade
- Needle tool or toothpick
- Strong round magnets
- Superglue or E6000
- Gloss varnish (optional)
Step 1: Creating the Citrus Cane
-
Prepare the orange center:
Begin by conditioning your translucent orange clay until it is soft and pliable. Roll it into a thick log, about 1 inch in diameter. -
Create the pith layer:
Roll out a thin sheet of opaque white clay. Wrap this sheet completely around your translucent orange log, trimming the excess overlapping clay to create a clean seam. -
Reduce to a triangle:
Gently squeeze and roll the log to lengthen it, then pinch one side to form a long teardrop or triangular prism shape. This represents a single juicy segment of the fruit. -
Cut the segments:
Cut this long triangular log into 8 equal lengths. These will become the wedges of your orange slice. -
Reassemble the fruit:
Arrange the 8 triangular wedges in a circle, with the pointy ends meeting in the center. Gently press them together so they adhere to one another. -
Add the outer rim:
Roll out another thin sheet of opaque white clay and wrap it around the entire circle of segments to form the inner pith. -
Apply the rind:
Finally, roll out a slightly thicker sheet of opaque orange clay. Wrap this around the outside of the white pith to create the textured skin of the orange.
Step 2: Slicing and Texturing
-
Slice the cane:
Using a very sharp tissue blade, verify the cane is cool and firm. Slice distinct rounds from the log, aiming for about 1/4 inch thickness for durability. -
Refine the shape:
If the slicing compressed your circle, gently pat the edges back into a perfect round shape. I sometimes use a round cutter to trim the very outer edge for perfect uniformity. -
Texture the rind:
Take a needle tool or an old toothbrush and gently stipple the outer orange rind to mimic the porous texture of citrus skin. -
Juicy texture base:
Mix a small amount of liquid translucent clay with a tiny bit of orange clay to create a thick, sticky paste. -
Apply liquid clay:
Carefully paint this mixture onto the translucent orange segments of your slice, avoiding the white pith lines. -
Add the sugary finish:
While the liquid clay is wet, sprinkle clear micro-beads or fine embossing powder generously over the orange segments. This creates that glistening, crystalline juice-cell look. -
Bake carefully:
Place your slices on a parchment-lined baking sheet. Bake according to your clay manufacturer’s instructions, usually at 275°F (130°C) for 15-30 minutes.
Smudged Pith Lines?
If your white lines look messy after slicing, your clay was too soft. Chill the cane in the fridge for 20 minutes before cutting for crisp, clean definition.
Step 3: Assembly
-
Cool down:
Allow the clay slices to cool completely inside the oven or on a wire rack before handling to prevent cracking. -
Attach the magnet:
Flip the slice over. Apply a dab of strong adhesive like E6000 to the back center. -
Secure the backing:
Press your round ceramic magnet firmly into the glue. Let it cure fully (usually 24 hours) for the strongest hold.
Realistic Rind Tip
Before baking, roll the finished cane over a piece of sandpaper or a textured sponge. This creates an instant, uniform skin texture without needing to stipple by hand.
Now you have a refreshing set of citrus slices ready to brighten up your kitchen organization
Cute Avocado Half Magnets
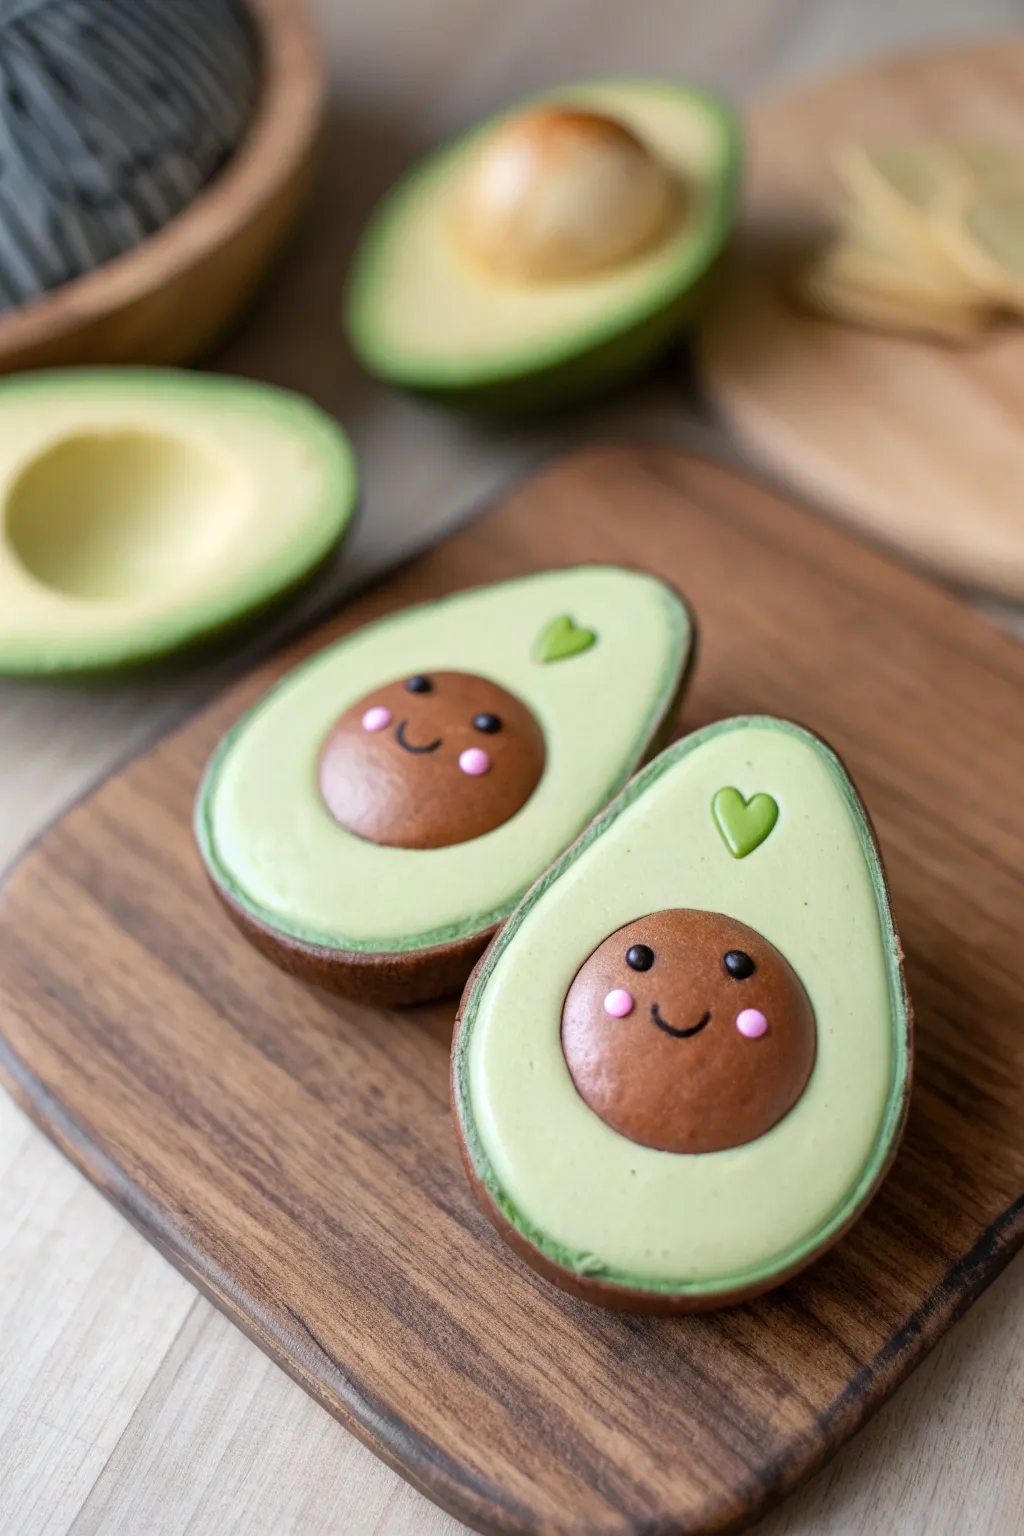
These adorable avocado halves feature smiling pit faces and little green hearts, adding a dash of cheer to any magnetic surface. With a smooth, creamy finish and realistic outer skin texture, they look almost good enough to eat.
Detailed Instructions
Materials
- Polymer clay (dark brown, light green, dark green, black, pink)
- Small round clay cutter (approx. 1 inch)
- Sculpting tools (needle tool, ball stylus)
- X-Acto knife or clay blade
- Texture sponge or toothbrush
- Liquid polymer clay (translucent or clear)
- Strong round magnets
- Superglue or E6000 adhesive
- Gloss glaze (optional)
Step 1: Shaping the Avocado Body
-
Mix the perfect green:
Start by conditioning your light green clay. If it feels too vivid, mix in a tiny pinch of yellow or white to achieve that creamy, ripe avocado flesh tone. -
Form the base shape:
Roll a ping-pong ball-sized amount of light green clay into a smooth sphere, then gently flatten it into a thick teardrop shape to mimic an avocado half. -
Create the pit hollow:
Press your thumb or a large ball tool gently into the lower center of the teardrop to create a shallow depression where the pit will sit. Don’t go too deep; just enough to nestle the seed. -
Make the skin layer:
Roll out a thin sheet of dark green clay. Place your light green avocado shape on top of it and carefully wrap the dark green up around the sides to create the skin. -
Trim and blend:
Trim away any excess dark green clay flush with the top surface of the light green clay. Smooth the seam with your finger so the skin looks like a natural border. -
Texture the skin:
Using a texture sponge or an old toothbrush, gently tap the dark green exterior skin to give it that bumpy, realistic avocado peel texture. Avoid texturing the smooth light green face.
Step 2: Creating the Character Pit
-
Form the pit:
Roll a ball of dark brown clay that fits perfectly into the depression you made earlier. Press it down so it is slightly domed but flush with the avocado surface. -
Add the eyes:
Roll two tiny specks of black clay into balls. Press them onto the brown pit using a small ball tool or needle to create the eyes. Place them wide apart for a cuter look. -
Draw the smile:
Roll an incredibly thin snake of black clay. Cut a tiny u-shape segment and press it gently between the eyes with a needle tool to form the mouth. -
Apply rosy cheeks:
Take two minuscule balls of pink clay and flatten them slightly. I like to place these just under the eyes to give the face a sweet, blushing expression. -
Secure the pit:
Apply a tiny drop of liquid polymer clay into the depression on the avocado body, then press your finished character pit firmly into place.
Clean Lines
Before baking, wipe the light green surface with a Q-tip dipped in rubbing alcohol. This removes lint and creates an ultra-smooth, creamy avocado finish.
Step 3: Finishing Touches and Assembly
-
Add the heart accent:
Create a tiny heart using a brighter green clay. Carefully place this on the upper part of the avocado flesh, acting as a cute garnish or sticker. -
Smooth fingerprints:
Lightly brush the light green surface with a little baby oil on your finger to remove any stray prints and ensure the ‘creamy’ look is perfect. -
Bake carefully:
Place your avocados on a tile or parchment-lined baking sheet. Bake according to your clay package instructions (usually 275°F/135°C for 15-30 minutes per 1/4 inch thickness). -
Cool down:
Allow the clay pieces to cool completely in the oven before removing them. This helps prevent cracking and ensures the clay cures fully. -
Attach the magnet:
Once cool, flip the avocado over. Apply a dab of strong glue (like E6000) to the center of the back and press your magnet firmly into it. -
Glaze (Optional):
For a fresh-cut look, apply a thin layer of satin or gloss glaze only to the pit or the green heart to make them pop against the matte flesh.
Avocado Toast
Create a small, textured triangle of tan clay to look like toast. Glue your finished avocado magnet on top of it for a trendy brunch-themed decoration.
Now your fridge has a healthy dose of cuteness to greet you every morning

TRACK YOUR CERAMIC JOURNEY
Capture glaze tests, firing details, and creative progress—all in one simple printable. Make your projects easier to repeat and improve.
Fried Egg Toast Magnets
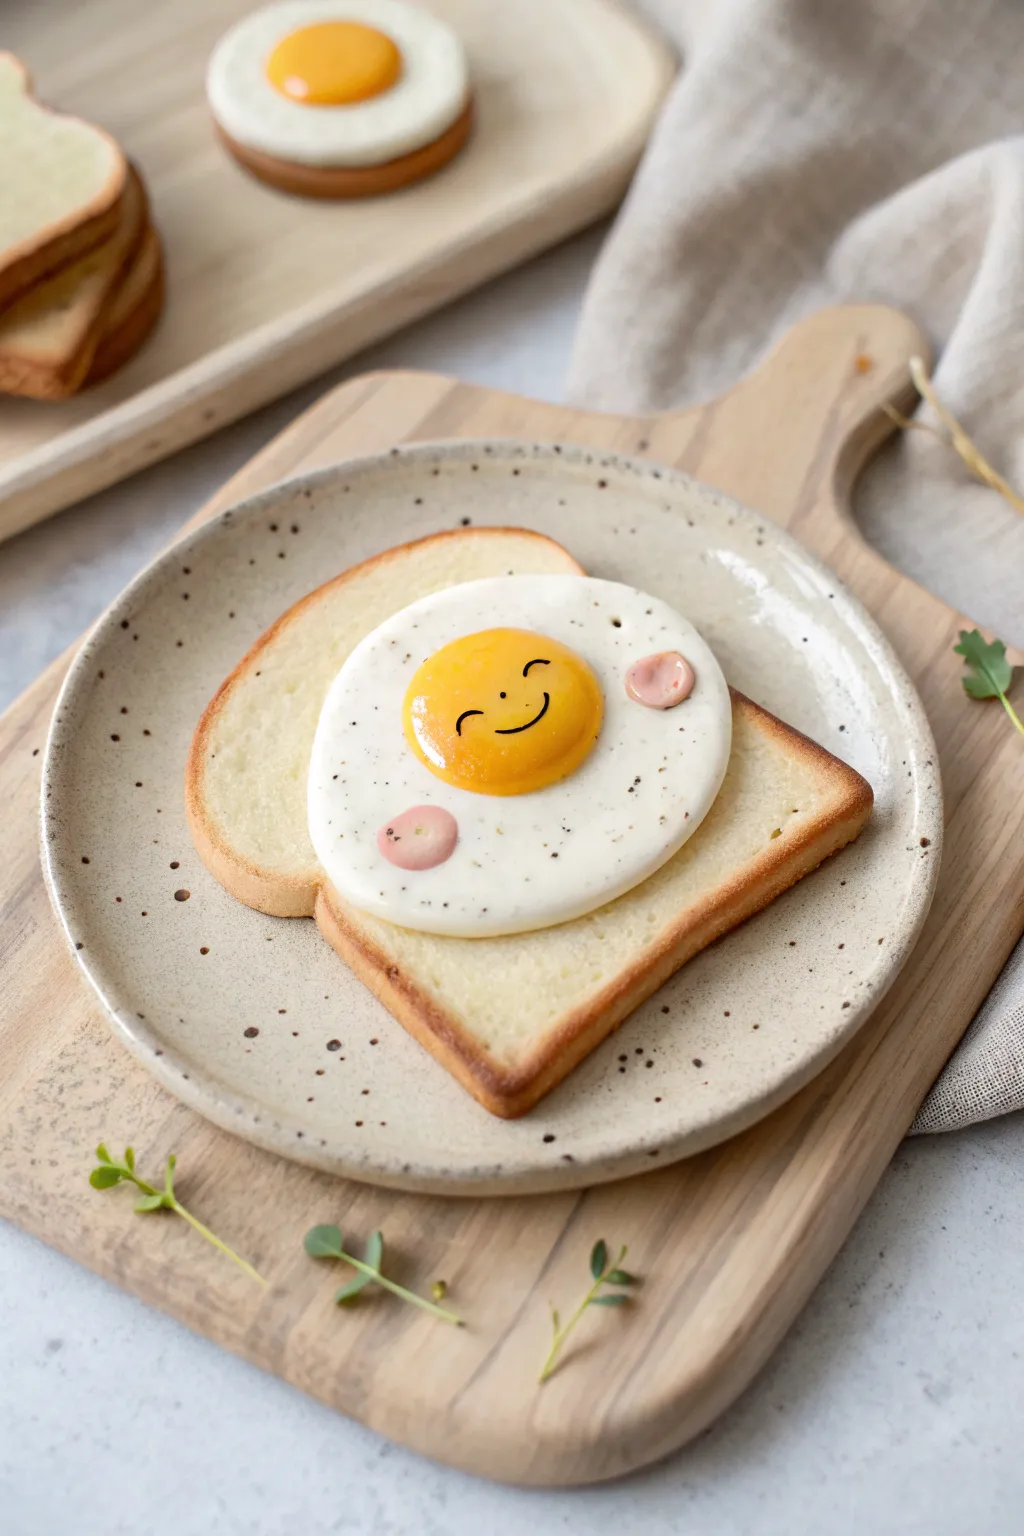
Brighten up your fridge with this adorable breakfast-themed magnet that looks good enough to eat. This project focuses on realistic textures for the bread and a smooth, glossy finish for that perfectly cooked egg.
Step-by-Step Guide
Materials
- White polymer clay
- Translucent polymer clay
- Yellow ochre polymer clay
- Ecru or beige polymer clay
- Soft pastels (browns, oranges, yellows)
- Liquid polymer clay (optional)
- Black acrylic paint
- Pink acrylic paint or clay
- Fine detail brush
- Toothbrush or texturing tool
- Needle tool
- Gloss glaze (polyurethane or UV resin)
- Strong craft magnet
- E6000 glue or similar strong adhesive
Step 1: Sculpting the Toast Base
-
Mix the Dough Color:
Start by mixing white clay with a small amount of ecru and translucent clay. You want a very pale, bread-dough color that isn’t stark white. -
Shape the Slice:
Roll the clay into a ball and then flatten it into a thick square sheet, about 1/4 inch thick. Use your fingers to gently indent the top to create the classic ‘M’ shape of a slice of bread leading into the crust. -
Texture the Bread:
This is the most crucial step for realism. Take an old toothbrush or a stiff bristle brush and aggressively tap it all over the surface of the clay. Don’t be shy; bread is full of air pockets. -
Refine the Crust:
Smooth out the very edges of the slice with your finger to remove the harsh texture marks, creating a distinct ‘crust’ area. -
Shade the Toast:
Scrape some brown and orange soft pastels into a powder. Using a dry brush, dust the powder heavily along the crust edges to simulate baking. Lightly dust the center surface for a toasted look.
Texturing Trick
For ultra-realistic bread texture, press a piece of actual coarse sandpaper or a ball of aluminum foil onto the clay surface before shading with pastels.
Step 2: Creating the Fried Egg
-
Form the Egg White:
Clean your hands thoroughly. Take pure white clay and flatten it into an irregular, organic oval shape. It should be thinner at the edges and slightly thicker towards the center. -
Attach to Toast:
Place the white clay shape onto the center of your textured toast. Gently press the edges down so it looks like the egg has cooked onto the bread surface. -
Make the Yolk:
Mix yellow clay with a tiny bit of orange or translucent clay for depth. I prefer adding a touch of translucent so it doesn’t look like plastic. Roll a small ball and flatten the bottom slightly. -
Place the Yolk:
Position the yellow ball in the center of the egg white. Press it down gently to bond the clays, ensuring it stays domed. -
Add Cheeks:
Roll two tiny, flattened discs of pink clay (or use pink paint later) and place them on the egg white, one on each side of where the mouth will go. -
Speckle the Egg:
To mimic pepper or imperfections, lightly flick a stiff brush with watered-down brown paint or use crushed black peppercorn-sized bits of clay. Keep this very sparse.
Dirty Clay Fix
If dust gets on your white egg clay, use a cotton swab dipped in rubbing alcohol or acetone to gently wipe the visible debris off before baking.
Step 3: Baking and Finishing
-
Bake the Piece:
Bake the clay according to the manufacturer’s instructions (usually 275°F for 15-30 minutes). Let it cool completely before handling. -
Paint the Face:
Using a very fine detail brush or a needle tool dipped in black acrylic paint, carefully draw a simple ‘U’ shape for the smile and two tiny arches for closed, happy eyes on the yolk. -
Glaze the Yolk:
Apply a coat of gloss glaze or UV resin specifically to the yellow yolk. This gives it that wet, runny egg look while leaving the toast matte. -
Seal the Whites (Optional):
You can add a satin glaze to the egg white if you want it to look slightly cooked but less wet than the yolk. -
Attach the Magnet:
Flip the toast over. Apply a dab of strong adhesive like E6000 to the back and press your magnet firmly into place. Let the glue cure fully for 24 hours.
Now your fridge has a cheerful breakfast companion that will make you smile every time you reach for the milk
Peas in a Pod Magnets
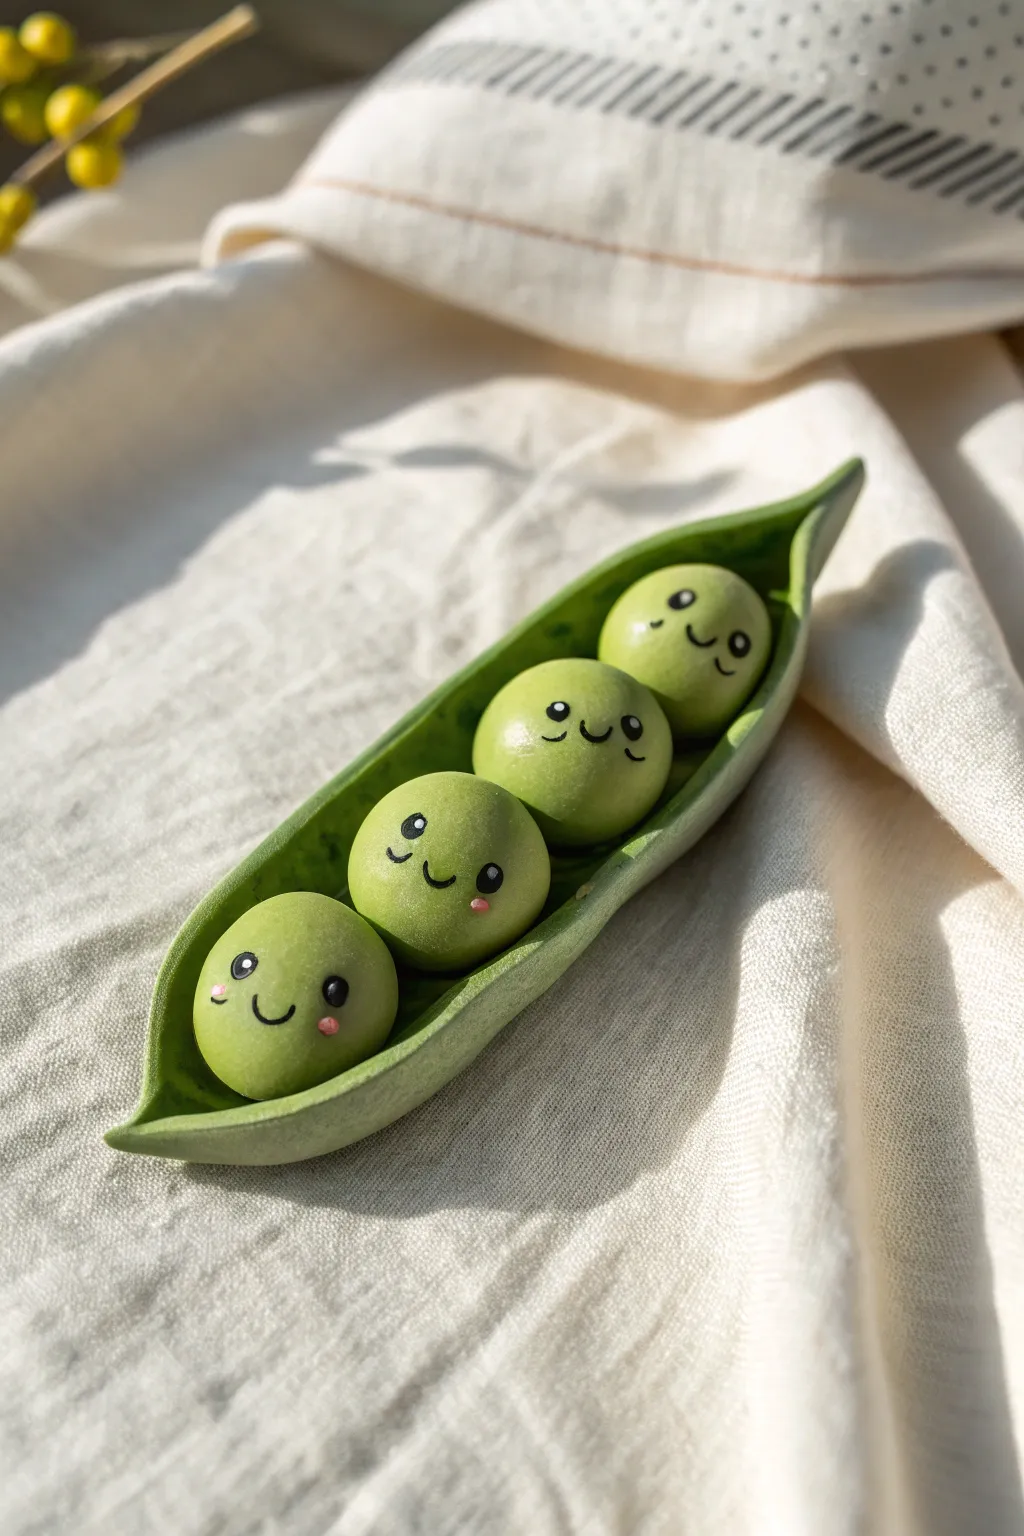
These adorable peas in a pod make for a charming kitchen magnet that’s bound to bring a smile to your face. The smooth, matte finish and tiny hand-painted expressions give these little friends plenty of personality.
Step-by-Step
Materials
- Green polymer clay (light and medium shades)
- Black acrylic paint
- Pink acrylic paint or blush
- Fine detail paintbrush (size 000)
- Dotting tool or toothpick
- Clay sculpting tools (specifically a ball tool)
- Circular magnets (strong neodymium recommended)
- E-6000 adhesive or strong super glue
- Matte varnish (optional)
Step 1: Sculpting the Pod
-
Shape the Base:
Start with a medium green clay. Roll a log about 3 inches long, making it slightly thicker in the middle and tapering off to sharp points at both ends to create the classic pod silhouette. -
Hollow the Center:
Use your thumb or a large ball tool to gently press an indentation down the length of the pod. You aren’t cutting it open, but rather creating a canoe-like trough where the peas will sit. -
Refine the Edges:
Pinch the sides of the pod upwards to create thin, delicate walls. Smooth out any fingerprints by lightly gliding your finger over the clay. -
Add Texture Details:
Using a needle tool or a craft knife, lightly score a very subtle line down the outer spine of the pod for a realistic touch. You can also pinch the very tips to give them a slight upward curve.
Keep it Clean
Light green clay shows dust easily! Wipe your hands and work surface with a wet wipe or baby wipe before starting the peas to avoid dark lint specks.
Step 2: Creating the Peas
-
Roll the Spheres:
Take your lighter green clay and roll four equal-sized balls. Test fit them inside your pod to ensure they sit snugly but aren’t squished; resize if necessary. -
Secure the Peas:
Apply a tiny bit of liquid clay (sculpey bake and bond) or scratch the surface of the pod trough slightly to help adhesion. Press the four peas gently into the pod in a row. -
Smooth the Connections:
Make sure the peas are touching each other and the sides of the pod. I usually check from the side profile to ensure they aren’t sticking up too high. -
Bake the Clay:
Bake the entire piece according to your clay manufacturer’s instructions (usually around 275°F/135°C for 15-30 minutes). Let it cool completely before painting.
Uneven Peas?
If your peas aren’t the same size, roll a long snake of clay and cut it into four equal-length segments before rolling them into balls.
Step 3: Painting and Finishing
-
Paint the Eyes:
Using a dotting tool dipped in black acrylic paint, place two small dots for eyes on each pea. Position them slightly wide apart for a cuter look. -
Add Eye Shine:
Once the black is dry, use a sewing needle or a very sharp toothpick to add a microscopic white dot to the upper corner of each eye. This spark of life is crucial. -
Draw the Mouths:
With your finest paintbrush and slightly watered-down black paint, carefully draw a small smile between the eyes. Vary the expressions slightly—perhaps one has a smirk while another has a wide grin. -
Add Rosy Cheeks:
Dip a toothpick into pink paint or use a dry brush with pink pastel chalk dust. Dab tiny rosy spots just under the outer corners of the eyes. -
Seal the Project:
If you want to protect the paint, apply a thin coat of matte varnish over the piece. Avoid glossy finishes to maintain the soft look shown in our example. -
Attach Magnets:
Flip the pod over. Adhere two small, strong neodymium magnets to the back using E-6000 glue—one near the top and one near the bottom for stability.
Pop these onto your fridge door and enjoy their cheerful company every time you grab a snack
Sushi Buddy Magnets
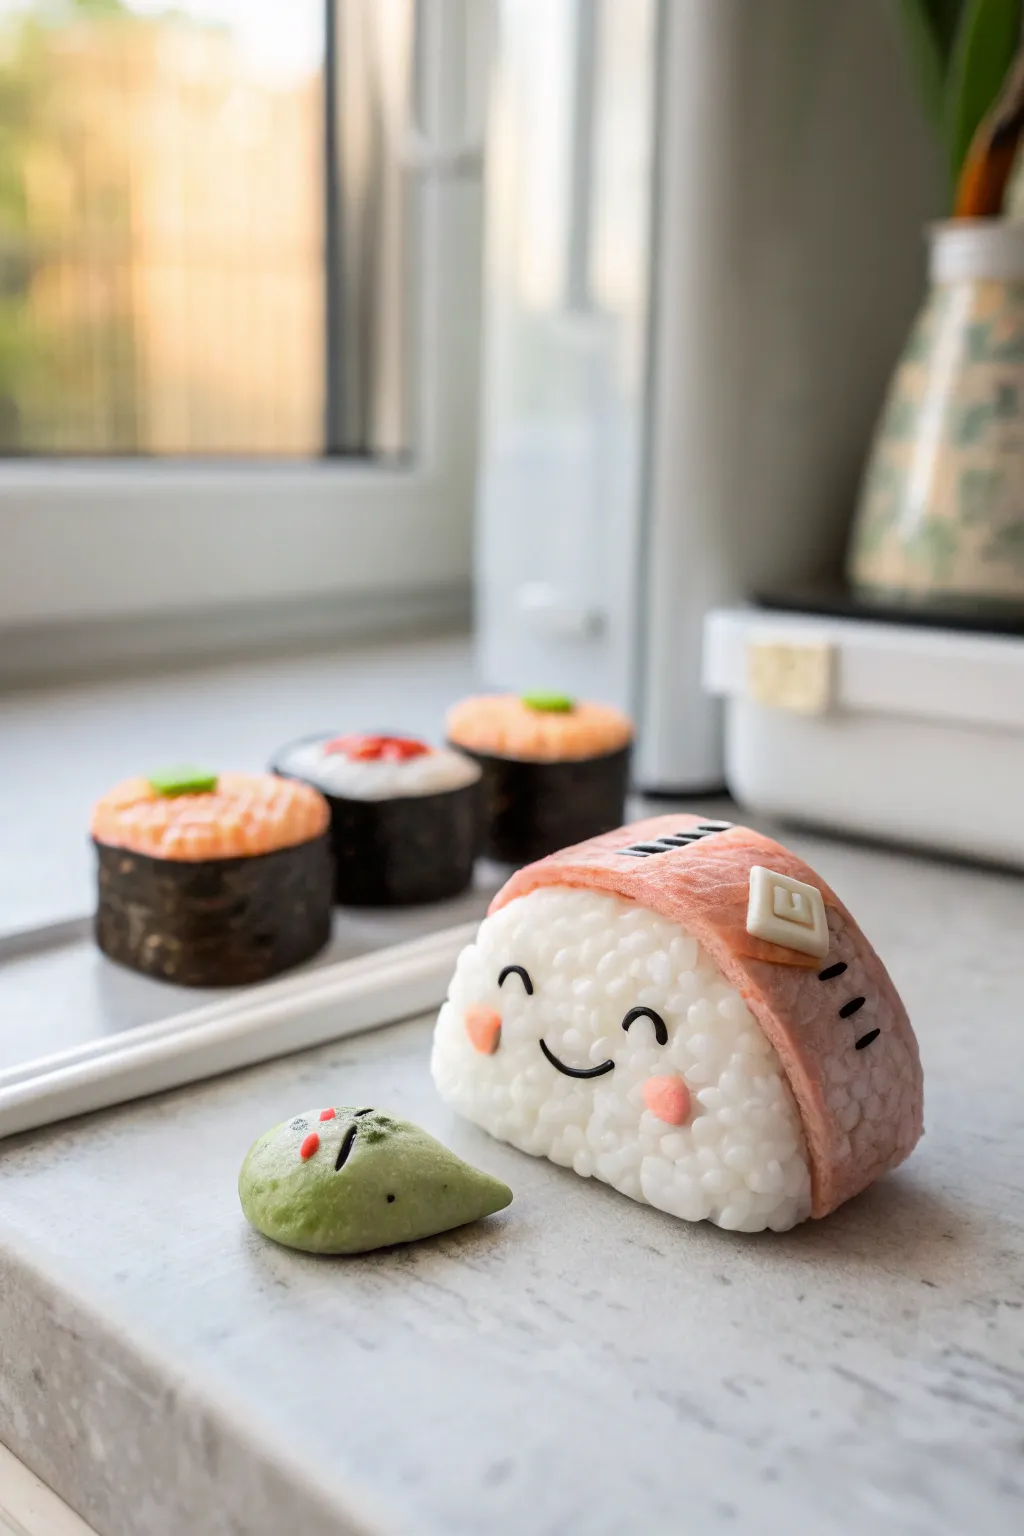
Bring a little kawai flavor to your fridge with this adorable anthropomorphic sushi magnet. Featuring realistic rice textures and a sweet, smiling face, this sushi buddy is accompanied by a tiny wasabi friend for the perfect pairing.
Detailed Instructions
Materials
- White polymer clay (for rice)
- Salmon pink/orange polymer clay (for fish)
- Black polymer clay (for eyes and details)
- Light green polymer clay (for wasabi)
- Translucent liquid clay or bake-and-bond
- Small needle tool or toothpick
- Ball stylus tool
- Soft pink chalk pastel (for blush)
- Small magnets
- Gloss glaze (optional)
Step 1: Rice preparation
-
Prepare the base:
Condition a chunk of white polymer clay until soft. Form it into a rounded rectangular block, slightly taller on one side to mimic the shape of hand-pressed nigiri rice. -
Create texture pellets:
This is the most time-consuming but rewarding part. Roll hundreds of tiny, rice-sized ovals from the remaining white clay. They don’t need to be identical, as variation adds realism. -
Attach the grains:
Brush a thin layer of liquid clay over your base shape. Gently press the tiny rice grains all over the surface, covering it completely except for the very bottom where the magnet will go. Ensure they are packed tightly but retain their individual shape.
Sticky Rice Troubles
If your tiny rice grains keep falling off while you work, your base clay might be too dry. Use a slightly thicker layer of liquid clay or bake-and-bond to act as a stronger adhesive before attaching grains.
Step 2: Adding the Fish Topping
-
Shape the fish:
Roll out a thick sheet of salmon-pink clay. Cut a rectangular strip that is wide enough to cover the top of your rice ball and drape down the sides. -
Texture the fish:
Using a needle tool, lightly score diagonal lines across the pink surface to mimic the muscle fibers found in sashimi. Be careful not to cut all the way through. -
Drape and secure:
Place the fish strip over the top of the textured rice base. Gently curve it down the back and sides, letting it hug the form naturally. I like to press it just slightly so it looks integrated with the rice. -
Add detail elements:
Create a tiny square of white clay and place it near the top edge of the fish like a garnish. Add two small black stripes near the bottom edge using tiny snakes of black clay.
Step 3: Face and Wasabi Companion
-
Scult the face:
Roll extremely thin snakes of black clay. Form two small U-shapes for the closed happy eyes and a wider U-shape for the smile. Press these gently onto the front of the rice section. -
Apply blush:
Scrape some powder from a pink chalk pastel. Using your finger or a small brush, dab two rosy cheeks just below the eyes on the rice bumps. -
Shape the wasabi:
Take a small ball of light green clay and pinch it into a teardrop shape. Flatten the bottom so it sits flush. -
Wasabi face:
Give the wasabi a tiny face using black clay specks for eyes and a darker green bit for a mouth or nose. Add tiny red dots for cheeks.
Make it a Platter
Don’t stop at nigiri. Create a whole set by making square tamago (egg) sushi buddies or cylinder-shaped maki rolls with cucumber centers to create a complete bento family on your fridge.
Step 4: Assembly and Baking
-
Embed Magnets:
Press a small magnet into the back of the sushi piece and the wasabi piece. If your magnet is not bake-safe, make an indentation now and glue the magnet in after baking. -
Bake:
Bake the pieces according to your clay manufacturer’s instructions, typically at 275°F (135°C) for 15-30 minutes depending on thickness. -
Finish:
Once cool, you can optionally glaze the fish portion (not the rice) to make it look fresh and shiny.
Your little sushi chef is now ready to hold up your grocery lists and photos
Sunflower Round Magnets
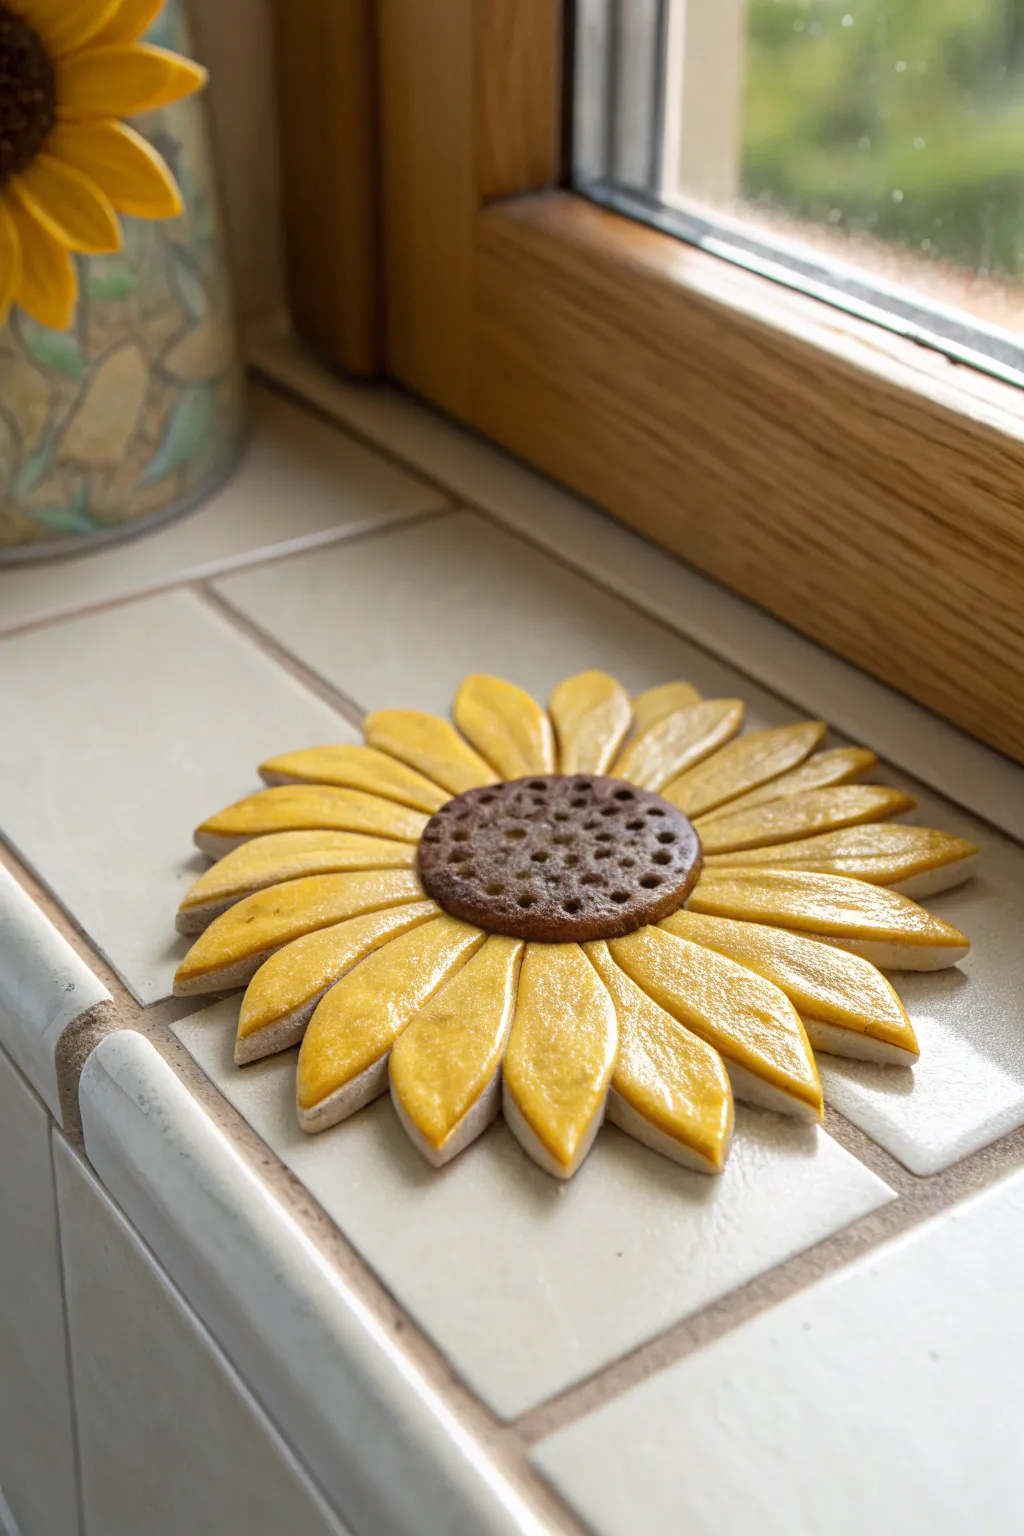
Brighten up your fridge or magnetic board with this cheerful sunflower that mimics the look of glazed ceramic tiles. This project involves shaping individual petals to create a stylized, dimensional focal point that captures the warmth of a summer garden.
Step-by-Step Tutorial
Materials
- White or translucent oven-bake polymer clay
- Yellow alcohol ink or polymer clay dye
- Brown polymer clay (or dark brown acrylic paint)
- Glossy polyurethane varnish or UV resin
- Rolling pin or pasta machine
- Leaf-shaped cutter (small) or craft knife
- Circle cutter (approx. 1.5 inch)
- Dotting tool or toothpick
- Texture sponge or sandpaper
- Strong craft glue (E6000 recommended)
- Round ceramic or neodymium magnet
- Fine grit sandpaper
Step 1: Preparing the Center
-
Mix the brown clay:
Start by conditioning your brown polymer clay until it is soft and pliable. If you don’t have brown clay, you can mix red, yellow, and blue into white clay until you achieve a deep earth tone. -
Cut the center circle:
Roll the brown clay out to a thickness of about 1/4 inch. Use your circle cutter to punch out a perfect round disk for the sunflower’s face. -
Texture the seeds:
Using a dotting tool or the blunt end of a toothpick, press small indentations all over the surface of the brown disk. Vary the depth slightly to create a natural, seed-like texture. -
Soften the edges:
Gently tap the edges of the circle with your finger to round them off slightly, removing the sharp cut look.
Step 2: Creating the Petals
-
Condition white clay:
Condition a block of white polymer clay. Although you can use pre-colored yellow clay, using white clay and painting or glazing it later gives that authentic hand-painted ceramic effect shown in the image. -
Roll and cut:
Roll the white clay out to the same thickness as your center. Use a small leaf-shaped cutter to create approximately 16-20 petals. If you don’t have a cutter, cut a teardrop template from paper and trace it with a craft knife. -
Shape the petals:
Take each petal and gently pinch the wider end to give it a slight curve. Smooth the cut edges with your fingertip so they look soft and rounded. -
Create a base:
Roll a very thin, larger circle of scrap clay to act as a baseplate. This won’t be visible in the end but helps hold everything clearer. Place your brown center on this base. -
Attach the first layer:
Arrange the first layer of petals around the brown center, pressing the pointed ends slightly under the edge of the brown disk. Use a touch of liquid clay or bond if needed. -
Add dimension:
If you want a fuller look, gently lift the tips of the petals or curve them slightly to simulate movement. -
Trim the base:
Once the petals are arranged, carefully trim away any excess clay from the baseplate that sticks out beyond the petals.
Glazing Pro Tip
For a richer ceramic look, brush a tiny amount of diluted orange paint near the base of the petals before applying the yellow glaze.
Step 3: Baking and Coloring
-
Bake the piece:
Transfer your sunflower to a ceramic tile or baking sheet. Bake according to your clay package instructions (usually 275°F/135°C for 15-30 minutes). -
Cool and sand:
Allow the piece to cool completely. If there are any rough fingerprints, lightly sand them away with fine-grit sandpaper. -
Apply yellow glaze:
Mix a few drops of yellow alcohol ink into your glossy varnish. Brush this translucent yellow mixture over the white petals. The glaze will naturally pool in lower spots, creating a beautiful depth of color similar to fired ceramic. -
Seal the center:
Apply a clear matte or satin varnish to the brown center to protect it without making it too shiny, contrasting nicely with the glossy petals. -
Dry properly:
Let the varnish or resin cure completely in a dust-free area.
Clay Too Soft?
If your petals are drooping or losing shape while you work, pop the clay in the fridge for 10 minutes to firm it up before cutting.
Step 4: Final Assembly
-
Prepare the magnet:
Rough up the back of the sunflower and the surface of your magnet with sandpaper to ensure a strong bond. -
Glue firmly:
Apply a dab of E6000 or strong super glue to the magnet and press it firmly onto the center back of the flower. -
Dry time:
Leave the magnet face down for at least 24 hours to ensure the glue cures fully before placing it on a vertical surface.
Now you have a permanent piece of sunshine to hold your most important notes
Panda Face Magnets
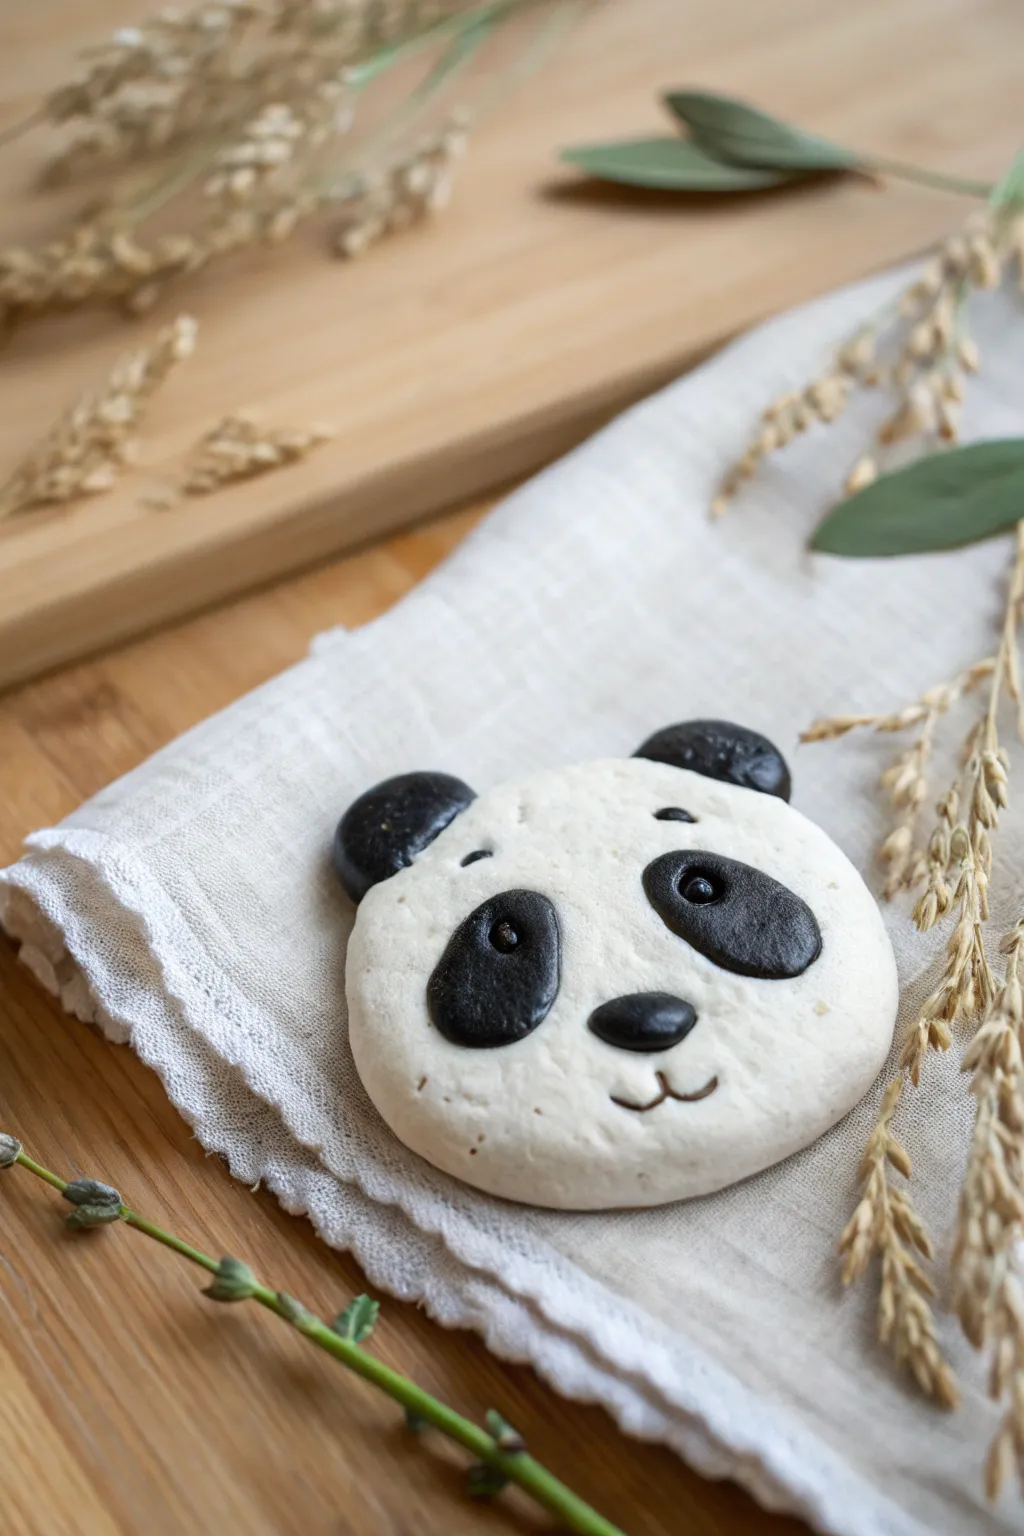
This adorable panda face magnet features a smooth, matte white base with classic black markings and a sweet, gentle expression. It’s a perfect beginner project for learning how to embed features seamlessly into polymer clay without bulky layering.
Step-by-Step
Materials
- White polymer clay (oven-bake)
- Black polymer clay
- Rolling pin or pasta machine
- Circle cutter (approx. 2-3 inches)
- Small ball stylus or dotting tool
- Needle tool or clay knife
- Ceramic tile or baking sheet
- Strong craft magnet
- Super glue (cyanoacrylate) or E6000
- Baking parchment
Step 1: Creating the Base
-
Condition the white clay:
Start by kneading a generous amount of white polymer clay until it is soft, pliable, and free of cracks. Warm clay is much easier to smooth later. -
Roll out the slab:
Roll your conditioned white clay into a sheet that is approximately 1/4 inch (6mm) thick. You want it substantial enough to hold the magnet but not too heavy. -
Cut the shape:
Use your circle cutter to punch out a clean round disc. If you want a slightly softer, more organic look like the photo, gently press the edges inward with your fingers to make it slightly oval. -
Smooth the edges:
Run your finger lightly around the circumference of the disc to soften the sharp cut edge, creating a nice rounded finish.
Clean Clay Tip
Keep baby wipes nearby! Always clean your hands and tools thoroughly when switching from black clay back to white to keep the panda’s face pristine.
Step 2: Adding the Features
-
Prepare the black clay:
Clean your hands thoroughly to avoid transferring white clay, then condition a small amount of black clay. -
Make the eye patches:
Roll two small balls of black clay and flatten them into teardrop shapes. These should be fairly thin. -
Position the eyes:
Place the black teardrops onto the white face, angling them slightly inward. Press them down firmly so they adhere well. -
Embed the patches:
Use your finger or a rolling tool to gently flatten the black patches until they are almost flush with the white surface. This creates that seamless look. -
Create the ears:
Roll two equal-sized balls of black clay. Flatten each slightly into a thick disc. -
Attach the ears:
Press one black disc firmly onto the top left edge and the other onto the top right edge of the white face. Blend the seam on the back side only for extra stability. -
Shape the nose:
Form a small oval from black clay. Press it into the center of the face, slightly lower than the eyes. -
Detail the eyes:
Use a ball stylus to make a small indentation in the center of each black eye patch. Roll tiny balls of back clay and press them into these indents for the eyeballs. -
Add the highlight:
For a spark of life, take a minuscule speck of white clay (or use white acrylic paint after baking) and place it on the top right of the black eyeball. -
Carve the eyebrows:
Using a needle tool, gently impress two small, curved lines slightly above the eye patches to give the panda increased expression. -
Carve the mouth:
Use the needle tool again to etch a simple ‘w’ shape directly below the nose for the mouth. Keep the lines thin and delicate.
Level Up: Texture
Before baking, gently tap a clean toothbrush over the white areas of the face. This creates a subtle fur-like texture instead of a completely smooth finish.
Step 3: Baking and Finishing
-
Check for lint:
Before baking, inspect the white clay for any dust or lint. You can gently wipe it with a little rubbing alcohol on a brush or fingertip to clean it up. -
Bake the clay:
Place the panda on parchment paper and bake according to your specific clay manufacturer’s instructions (usually 275°F/135°C for 15-30 minutes). -
Cool down:
Allow the piece to cool completely in the oven or on a wire rack before handling. It creates a stronger bond. -
Attach the magnet:
Flip the panda over. Apply a drop of strong adhesive to the back and press your magnet firmly into place. -
Final cure:
Let the glue dry fully according to the package directions, usually 24 hours for maximum strength.
Now your fridge has a charming new guardian ready to hold up your grocery lists
Mushroom Cluster Magnets
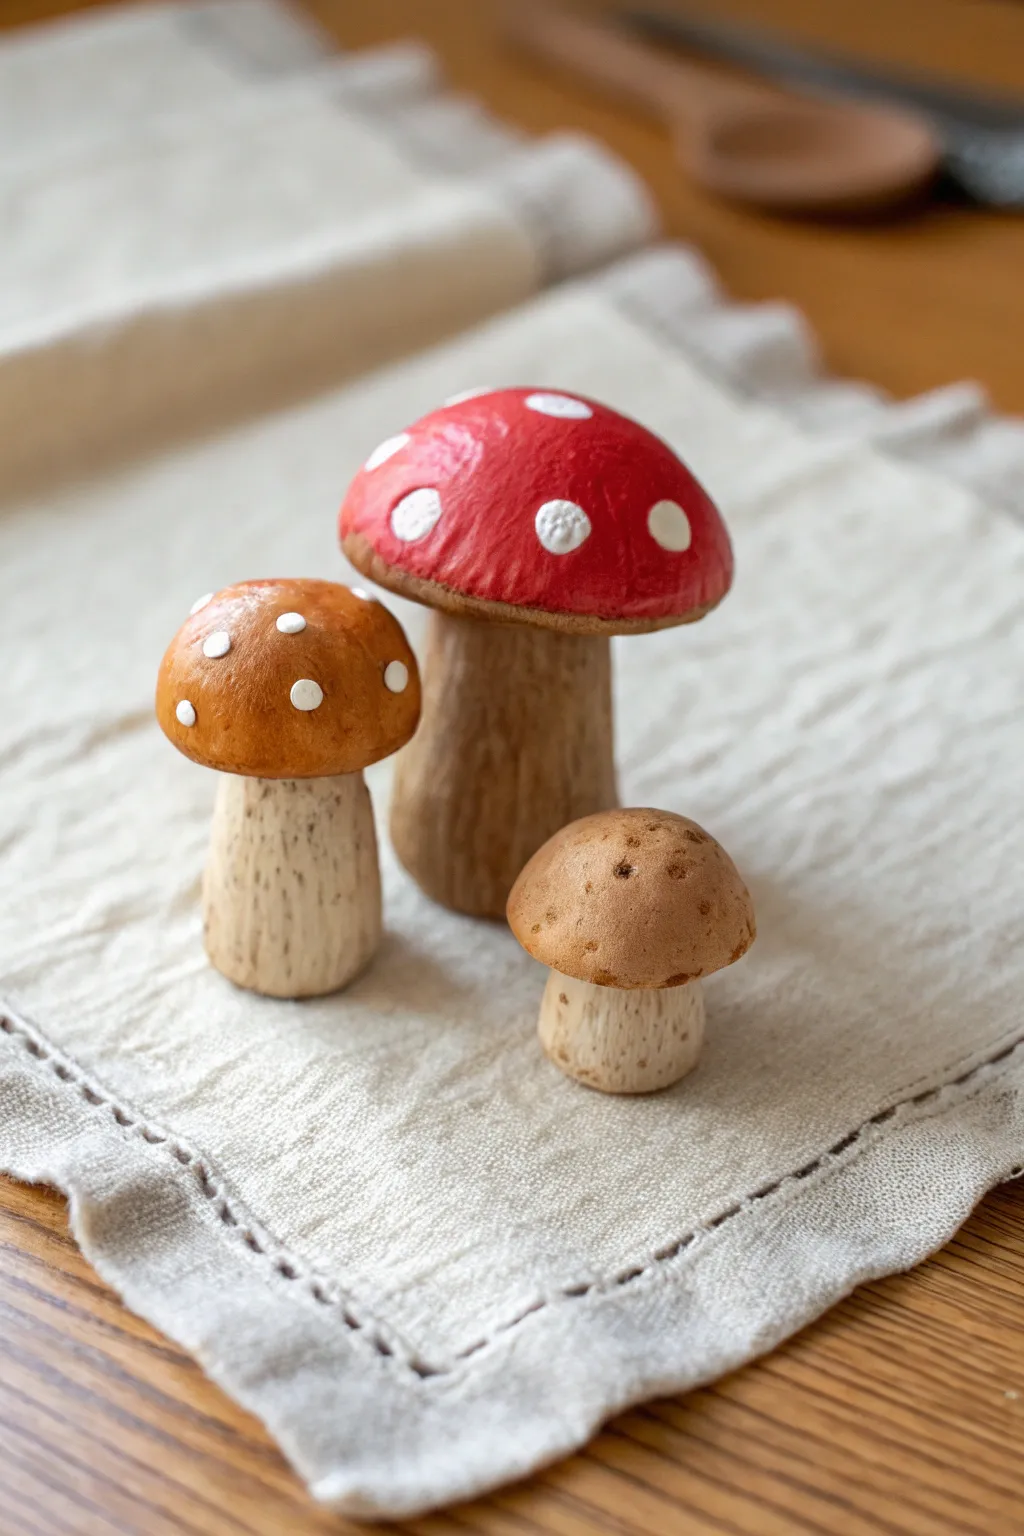
Bring a touch of the forest floor into your kitchen with these delightful clay mushroom magnets. This project features three distinct fungi styles, from the classic red-capped toadstool to earthy brown varieties, all with charmingly textured stems and hand-painted details.
Detailed Instructions
Materials
- Polymer clay (white or beige base color)
- Acrylic paints (red, burnt orange, brown, warm beige, white, black)
- Small round strong magnets
- Super glue or E6000
- Sculpting tools (needle tool, small ball stylus)
- Texture tool (old toothbrush or stiff bristle brush)
- Fine detail paintbrush
- Matte varnish or sealant
- Aluminum foil (for creating armatures)
- Rolling pin or acrylic roller
Step 1: Shaping the Mushrooms
-
Prepare the foil cores:
Start by crumpling small pieces of aluminum foil into tight shapes. Make three different sizes: a larger, wide cap for the red mushroom, a medium rounded cap, and a tiny button shape to save on clay and reduce baking time. -
Condition the clay:
Take your polymer clay (white or beige works best as a base for painting later) and knead it until it’s soft and pliable. Use a rolling pin to flatten it into a sheet about 1/8 inch thick. -
Cover the caps:
Wrap the clay sheet over your foil armatures, smoothing the seams carefully with your thumb. Ensure the surface is even and rounded. For the red mushroom, aim for a flatter, wider dome; keep the others more bulbous. -
Form the stems:
Roll three thick logs of clay for the stems. The largest stem should flare out slightly at the bottom (bulbous base), while the medium and small ones can be straighter cylinders. Press the top of each stem against a flat surface to create a connection point. -
Connect caps to stems:
Gently press the caps onto their corresponding stems. If the clay is fresh, it should stick, but you can use a drop of liquid clay or score the surfaces for a stronger bond. Blend the clay slightly at the seam, or leave a distinct overhang for a realistic look. -
Embed the magnets:
Turn each mushroom over. firmly press a magnet into the back of the cap or the stem (depending on balance) to create an indentation. Remove the magnet before baking; we will glue it in later.
Texturing Tip
Use an old toothbrush to gently tap the surface of the stems before baking. This adds a microscopic pore texture that looks incredible once the dark paint wash settles into it.
Step 2: Texturing and Baking
-
Texture the stems:
Using a needle tool, scratch vertical lines up and down the stems to mimic fibrous mushroom stalks. Vary the depth and length of your scratches for an organic feel. -
Add cap details:
For the smallest mushroom, use a ball tool or the needle to poke tiny indents or pores on the cap surface. Leave the other two caps smooth for now. -
Underside texture:
Don’t forget the gills! Underneath the caps (where they meet the stem), use your needle tool to draw fine lines radiating from the stem to the edge of the cap. -
Bake the clay:
Place your mushrooms on a baking sheet or ceramic tile. Bake according to the manufacturer’s instructions on your specific package of clay (usually 275°F/135°C for 15-30 minutes). Let them cool completely before painting.
Uneven Standing
If your mushrooms tip over, the cap is too heavy. Before baking, slightly flatten the back of the cap where the magnet goes, or slice a thin layer off the back to create a flat contact plane.
Step 3: Painting and Finishing
-
Base coat the stems:
Mix a watery wash of brown and beige acrylic paint. Brush this over the stems, letting the darker color settle into the textured grooves you carved. Wipe away excess paint on the raised areas with a paper towel to highlight the texture. -
Paint the red cap:
Paint the largest cap a vibrant woodland red. You may need two coats for full opacity. While the paint is wet, you can dab a tiny bit of darker red near the edges for shading. -
Paint the orange cap:
For the medium mushroom, apply a coat of burnt orange or warm ochre. I like to sponge this on lightly to give it a slightly mottled, natural appearance rather than a flat plastic look. -
Paint the brown cap:
Color the smallest cap with a soft light brown. Add tiny darker brown speckles using the tip of your smallest brush to mimic natural imperfections. -
Add the spots:
Once the base colors are dry, use a small dotting tool or the back of a paintbrush to apply white dots to the red and orange caps. Make them irregular in size/shape, and slightly textured, so they look like organic scales rather than perfect polka dots. -
Seal the work:
Protect your paint job with a layer of matte varnish. Avoid glossy finishes unless you want them to look wet; matte looks more realistic for fungi. -
Attach the magnets:
Place a dab of strong super glue or E6000 into the indentation you made earlier and press the magnet in. Let it cure fully before sticking it to your fridge.
Arrange your charming fungal cluster on the fridge to hold your most important notes in forest style
Frog Head Magnets
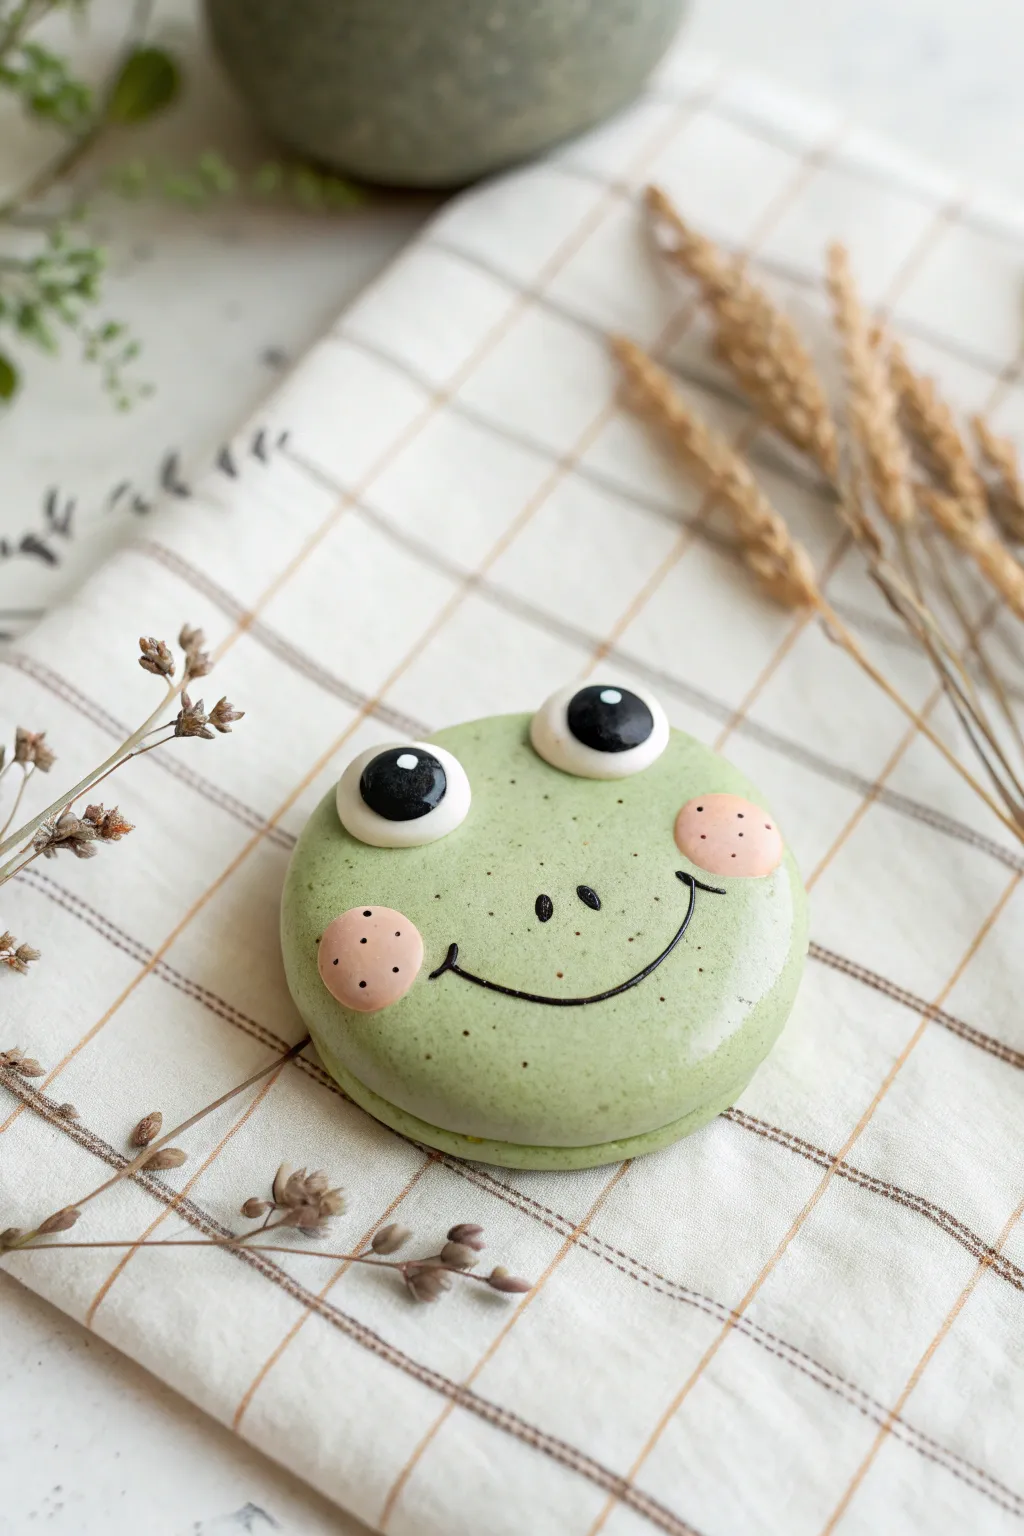
These adorable frog faces mimic the soft, puffed look of a macaron cookie with none of the baking fuss. The speckled green clay and wide-set eyes give this magnet a sweet, charming personality perfect for your fridge.
Step-by-Step Guide
Materials
- Polymer clay: Green (speckled or plain), white, black, faint pink
- Coarse black pepper or dried herbs (if using plain green clay)
- Round clay cutter (approx. 2 inches)
- Ball tool or dotting tool
- Rolling pin
- Needle tool
- Black acrylic paint or fine-tip permanent marker
- Gloss glaze (UV resin or water-based varnish)
- Strong round magnet
- Superglue or E6000 adhesive
Step 1: The Base Shape
-
Prepare the Clay:
Start by conditioning your green polymer clay until it is soft and pliable. If you don’t have pre-speckled clay, mix in a tiny pinch of coarse black pepper or dried basil to achieve that textured, organic look seen in the photo. -
Roll It Out:
Roll the green clay into a thick sheet, about 1/4 inch to 1/3 inch thick. You want it substantial enough to look like a plump cookie. -
Cut the Circle:
Use your round cutter to punch out a perfect circle. Gently smooth the sharp top edge with your finger to give it a slightly domed, baked appearance. -
Create the Filling Layer:
Roll a second, slightly thinner sheet of green clay (or a slightly lighter shade) and cut another circle of the same size. -
Stack the Rounds:
Place the thick domed circle on top of the thinner circle. Gently press them together around the edges, but leave a distinct seam visible so it resembles a sandwich cookie or macaron.
Step 2: Adding Features
-
Shape the Eyes:
Take two small balls of white clay and flatten them slightly into thick discs. These should be fairly large relative to the face to get that cute, buggy-eyed look. -
Attach the Eyes:
Press the white discs onto the upper part of the green face. I like to space them slightly apart rather than touching, creating a wider, friendly expression. -
Add Pupils:
Roll two smaller balls of black clay. Flatten them and press them onto the white discs. -
The Sparkle:
For the catchlights, add extremely tiny dots of white clay to the upper right corner of each black pupil. -
Rosy Cheeks:
Roll two small balls of pale pink clay and flatten them into thin circles. Press these onto the lower sides of the face. -
Texture the Cheeks:
Using a needle tool, gently poke three or four tiny indentations into each pink cheek to mimic freckles or pores.
Uneven Surface?
If fingerprints are visible on the smooth green dome, lightly brush the unbaked clay with a little baby oil or cornstarch and rub gently to smooth them out.
Step 3: Finishing Touches
-
Draw the Mouth:
Take a very thin snake of black clay and curve it into a wide U-shape. Press it gently between the cheeks. -
Refine the Smile:
Add tiny perpendicular ticks at the ends of the smile using scrap bits of black clay, or use a needle tool to indent the corners. -
Add Nostrils:
Use your needle tool or a small dotting tool to impress two small vertical ovals near the center for the nose. -
Bake:
Bake the piece according to your polymer clay manufacturer’s instructions (usually 275°F for 15-30 minutes). -
Cool and Glaze (Optional):
Once fully cooled, you can apply a gloss glaze solely to the eyes to make them look wet and shiny, leaving the green face matte. -
Attach Magnet:
Apply a drop of strong adhesive to the back of the frog head and press your round magnet firmly into place. Let it cure completely.
Level Up: Cookie Feet
Make two tiny green balls, flatter them slightly, and attach them to the bottom edge of the circle before baking to give your frog tiny ‘macaron feet’ for extra cuteness.
Now you have a sweet little amphibian friend ready to hold up your grocery list.
Pumpkin and Jack-o’-Lantern Magnets
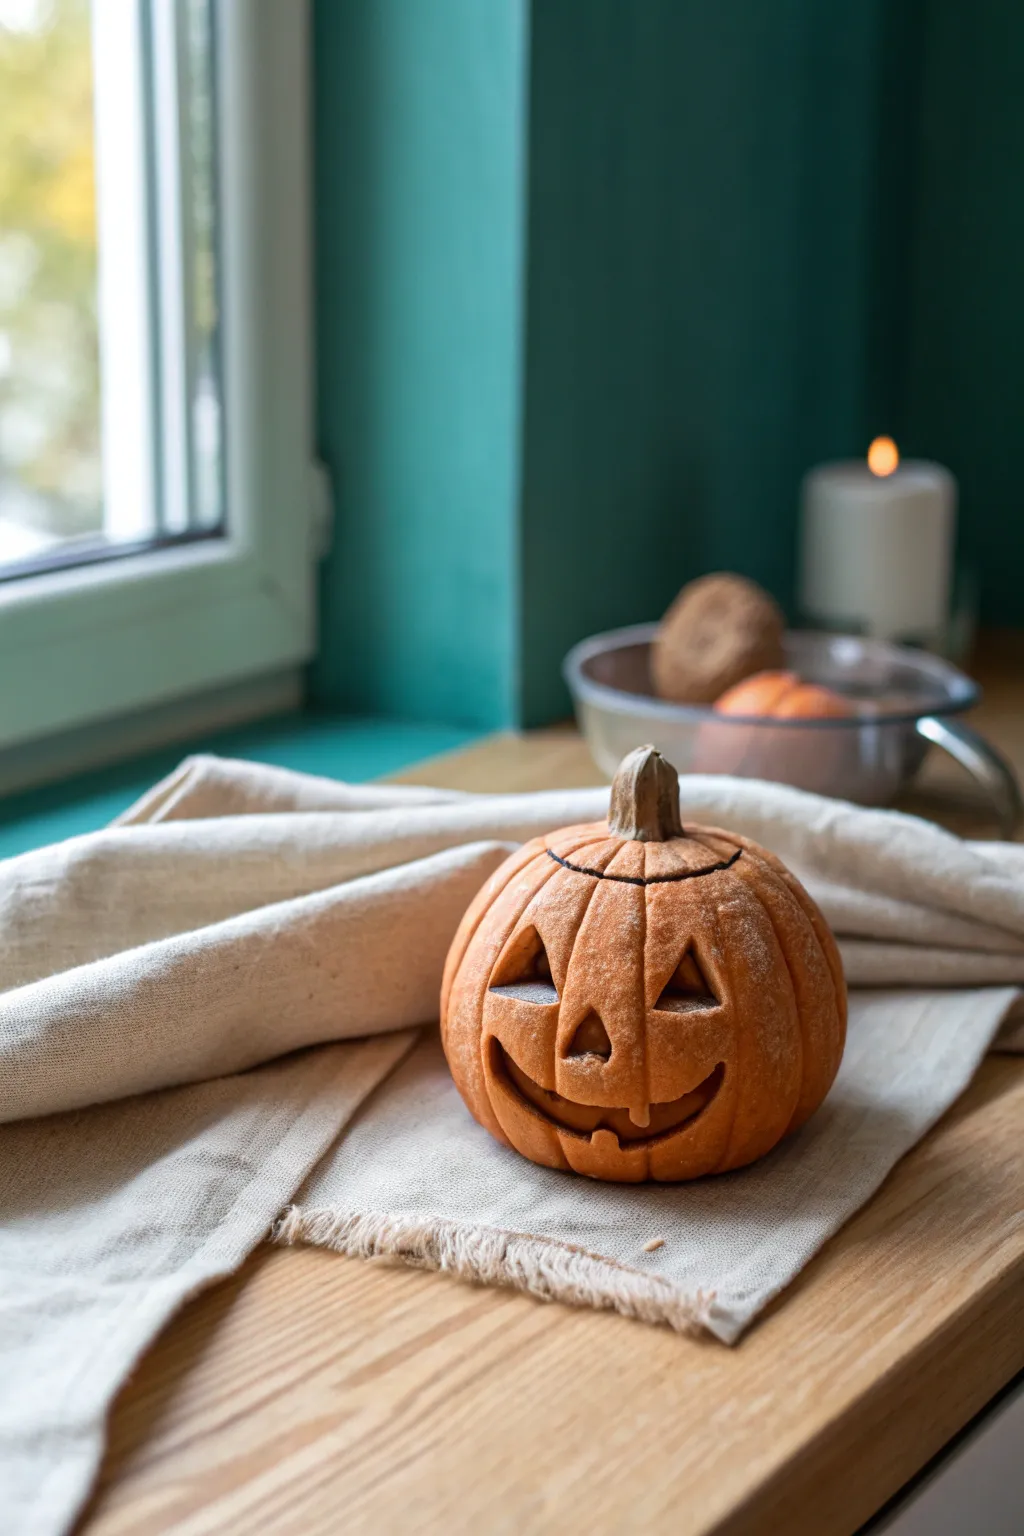
Capture the essence of autumn with this remarkably realistic little jack-o’-lantern made from oven-bake clay. With its textured skin and deep-set features, this magnet adds a cozy, handmade touch to your fridge or magnetic board.
Step-by-Step Tutorial
Materials
- Orange oven-bake clay (polymer clay)
- Brown oven-bake clay
- Sculpting tools (needle tool, small ball stylus)
- Small craft knife or clay blade
- Soft pastel chalks (dark orange, brown, black)
- Paintbrush (soft bristle)
- Texture sponge or toothbrush
- Strong round magnet
- Super glue or E6000
- Oven and baking sheet
Step 1: Forming the Base
-
Condition the clay:
Begin by kneading a walnut-sized amount of orange polymer clay in your hands until it becomes soft and pliable. This conditioning step prevents cracking later on. -
Shape the pumpkin body:
Roll the clay into a smooth ball. Slowly press it down slightly onto your work surface to flatten the bottom so it sits stable, creating a squat, pumpkin shape. -
Create the segments:
Using a needle tool or the back of a craft knife, press vertical indentations from the top center down to the bottom edge. Space these lines evenly around the sphere to create the pumpkin’s distinctive segments or ribs. -
Soften the lines:
Gently rub your finger over the indented lines you just made. You want to smooth out any sharp edges so the segments look organic and puffed, rather than sharply sliced.
Fixing Fingerprints
If you notice fingerprints on the clay before baking, lightly brush the surface with a tiny amount of baby oil or cornstarch to smooth them away without ruining the detail.
Step 2: Carving the Face
-
Outline the features:
Use a needle tool to very lightly sketch the placement of the eyes, nose, and mouth directly onto the clay surface. This acts as your guide before committing to deeper cuts. -
Carve the eyes:
Carefully cut out two triangles for the eyes using a small craft knife. Instead of slicing straight down, angle your blade slightly inward to create depth and remove the small clay wedges. -
Add the nose:
Cut a smaller triangle in the center for the nose. I find it helpful to use the very tip of the blade to lift the tiny piece of clay out without damaging the surrounding area. -
Sculpt the mouth:
Carve a wide, crescent grin. You can leave small rectangular tabs of clay along the upper or lower lip to resemble teeth, giving it a playful or spooky character. -
Detail the lid:
Use your needle tool to scribe a circle around the top crown of the pumpkin where a lid would naturally be carved.
Glow Effect
For a spooky twist, paint the inside of the carved eyes and mouth with yellow or glow-in-the-dark acrylic paint after baking to make it look like there is a candle inside.
Step 3: Texturing and Stem
-
Add skin texture:
Gently press a texture sponge, a piece of sandpaper, or an old toothbrush over the orange surface. This roughs up the smooth clay to mimic real pumpkin skin. -
Form the stem:
Take a small pea-sized piece of brown clay and roll it into a cone. Twist it slightly to make it look dried and gnarly. -
Attach the stem:
Press the brown stem firmly into the center of the ‘lid’ area at the top. You can use a dab of liquid clay or bake-and-bond if you have it to ensure a secure hold. -
Apply shading:
Shave some brown and black soft pastel chalk into a fine powder. Using a dry, soft brush, dust this powder into the vertical creases (ribs) and inside the carved eye and mouth sockets for realistic shadows.
Step 4: Finishing
-
Bake the project:
Place your pumpkin on a baking sheet lined with parchment paper. Bake according to the specific temperature and time instructions on your package of clay. -
Cool down:
Let the pumpkin cool completely in the oven with the door slightly ajar. Sudden temperature changes can sometimes cause clay to crack. -
Attach the magnet:
Flip the cooled pumpkin over. Apply a drop of strong adhesive like E6000 to the center of the flat back. -
Secure the magnet:
Press your round magnet firmly into the glue. Allow the adhesive to cure fully (usually 24 hours) before sticking it to your fridge.
Now your fridge is ready for the autumn season with a charming little pumpkin face
Tiny Ghost Sheet Magnets
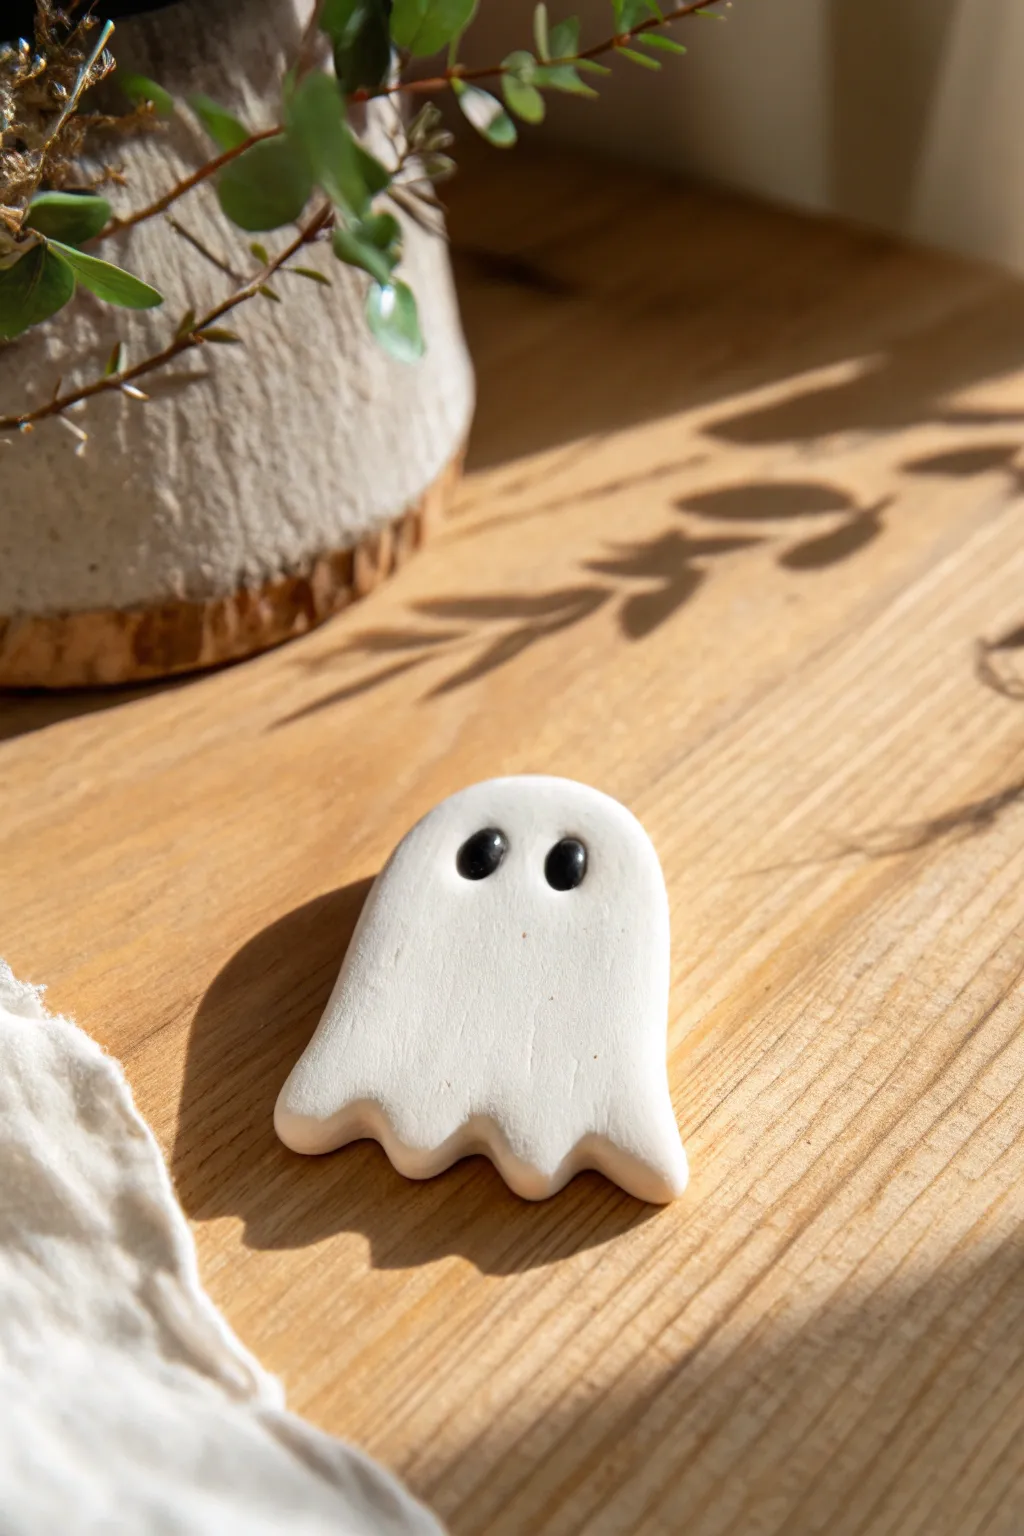
This adorable little phantom captures the classic look of a bedsheet ghost with soft, draping folds and beady black eyes. It’s a minimalist, beginner-friendly sculpting project that adds a touch of playful haunting to your fridge or locker.
Step-by-Step Guide
Materials
- White oven-bake polymer clay (e.g., Sculpey or Fimo)
- Small black glass seed beads (2 per ghost)
- Flat, smooth work surface (ceramic tile or glass mat)
- Clay roller or acrylic rolling pin
- Small round clay cutter (approx. 1.5 – 2 inches) or a bottle cap
- Ball stylus tool or a toothpick
- Flexible clay blade or craft knife
- Strong craft glue (E6000 or super glue gel)
- Small round magnets
Step 1: Forming the Base Shape
-
Condition the white clay:
Start by taking a small chunk of white polymer clay. Knead it thoroughly in your hands until it becomes warm, soft, and pliable. This conditioning step is crucial to prevent cracks later on. -
Roll out a sheet:
Using your acrylic roller, flatten the conditioned clay into a sheet. You want it to be roughly 1/8th of an inch thick—thick enough to be sturdy, but thin enough to drape naturally. -
Cut the primary shape:
Use your round cutter or a clean bottle cap to punch out a circle from your rolled clay. This circle will become the body of your ghost. -
Create the upper body:
Gently pull lightly on one side of the circle to elongate it slightly into a rounded oval. This creates the ‘head’ and body area while leaving plenty of clay at the bottom for the skirt. -
Smooth the edges:
Run your finger gently around the cut edge of the clay to round it off. This removes the sharp ‘cookie cutter’ look and makes the ghost look more like soft fabric.
Lint-Free Zone
White clay attracts dust like a magnet! Keep a piece of scotch tape handy while working toward the end. Tap the sticky side lightly on the raw clay to lift off dust specs before baking.
Step 2: Sculpting the Details
-
Create the wavy hem:
Focusing on the bottom edge of your oval, use your fingertip or a modeling tool to gently push the clay upward in three or four spots. This creates the scalloped, wavy bottom of the ghost’s sheet. -
Refine the folds:
Using a toothpick or a smooth modeling tool, create subtle indentations running vertically from the wavy scallops up toward the center of the body. I find this creates the illusion of fabric folds. -
Check the thickness:
Ensure the center of the ghost remains fairly flat so the magnet can adhere properly later. If you pushed too hard while making folds, gently flatten the back against your work surface again. -
Position the eye sockets:
Decide where you want the face. Use a small ball stylus or the blunt end of a paintbrush to make two small indents side-by-side near the top of the shape. -
Insert the eyes:
Take two black seed beads. Press one into each indentation firmly. Make sure they are embedded deep enough that they won’t pop out after baking, but still protrude slightly. -
Clean up fingerprints:
Before baking, look closely for any stray fingerprints or lint. You can gently brush the surface with a tiny bit of baby oil or cornstarch to smooth these imperfections away.
Step 3: Baking and Assembly
-
Prepare for the oven:
Place your finished ghost on a ceramic tile or a parchment-lined baking sheet. -
Bake the clay:
Bake the piece according to the manufacturer’s instructions on your specific package of clay. Usually, this is around 275°F (135°C) for 15-20 minutes. -
Cool completely:
Remove the tray from the oven and let the clay cool down fully. It is still fragile when hot, so resist the urge to touch it until it’s room temperature. -
Prepare the adhesion point:
Once cool, flip the ghost over. If the back isn’t perfectly flat, you can lightly sand it with fine-grit sandpaper to create a better surface for the glue. -
Apply the magnet:
Place a dab of strong craft glue (like E6000) on the back of the ghost. -
Secure the magnet:
Press the round magnet firmly into the glue. Let it cure undisturbed for the time recommended on your glue bottle—usually 24 hours for maximum strength.
Eyes Falling Out?
If the beads won’t stick, bake the clay first without them. After cooling, glue the beads into the sockets. Alternatively, use a tiny drop of liquid bakeable clay in the socket before inserting the bead.
Now you have a charming little spirit ready to hold up your notes and photos
Mini Charcuterie Board Magnets
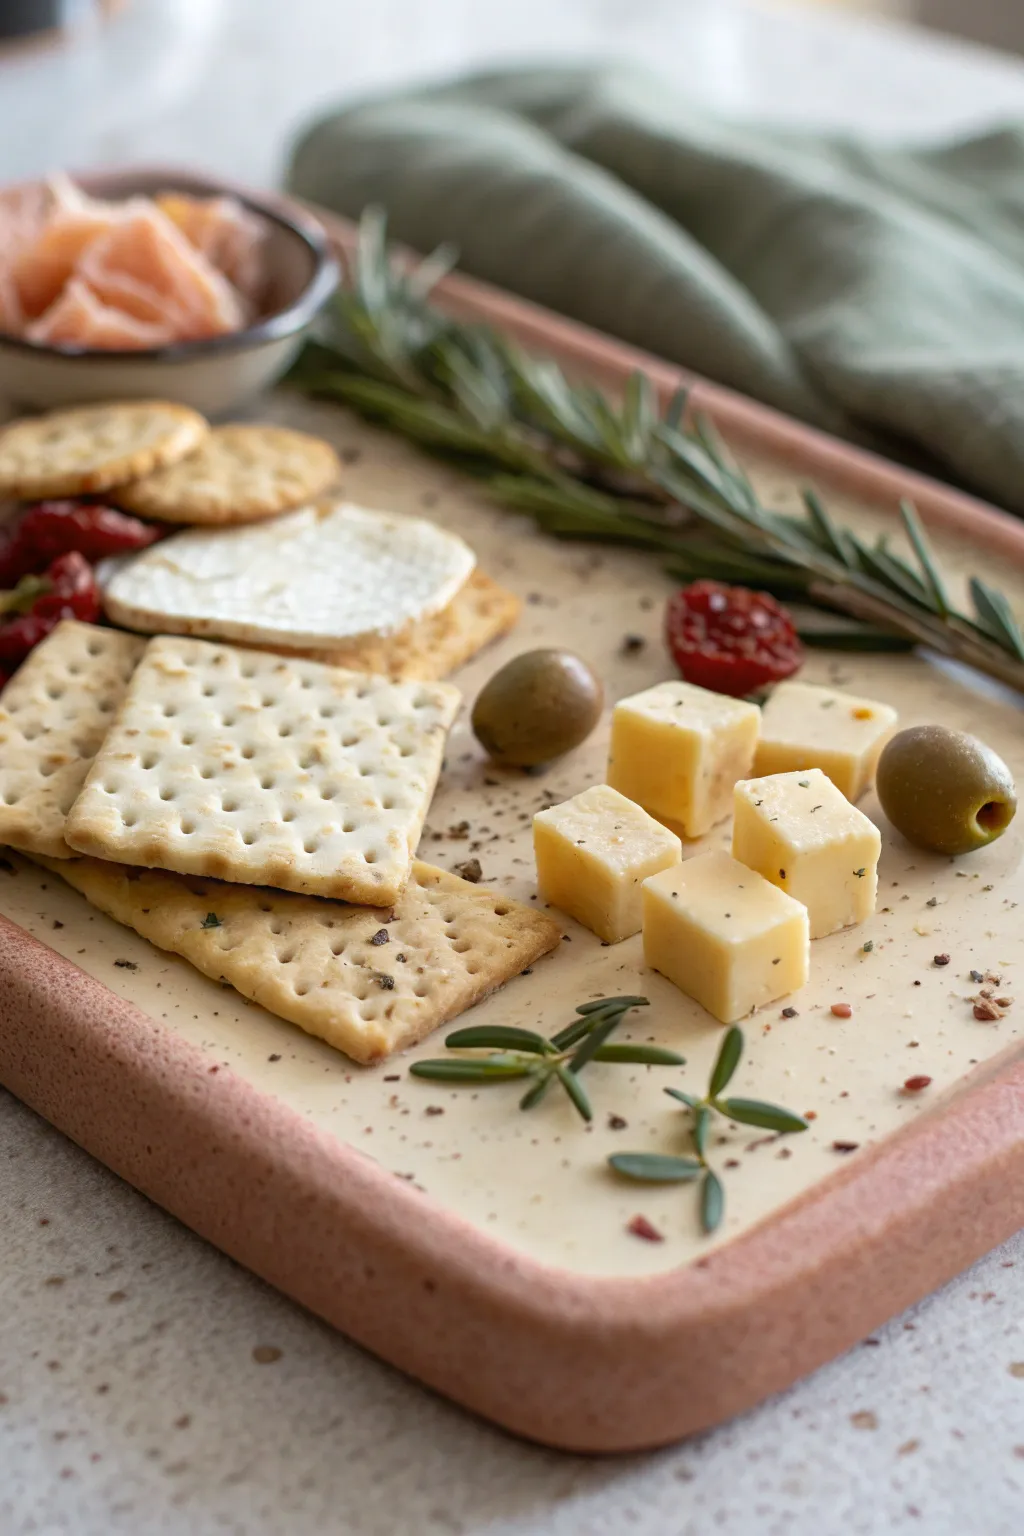
Create a deliciously detailed miniature charcuterie board that looks good enough to eat but lives on your fridge. This project uses polymer clay to sculpt realistic tiny cheeses, crackers, and garnishes on a faux ceramic platter.
Step-by-Step
Materials
- Polymer clay (beige, white, translucent, yellow, terracotta/rose, green, brown)
- Liquid polymer clay (translucent)
- Soft pastels (browns, oranges, reds)
- Texture tools (sandpaper, toothbrush, needle tool)
- Small round piping nozzle or straw
- Blade or X-Acto knife
- Rolling pin or pasta machine
- Strong magnets
- Super glue or E6000
- Gloss varnish (optional)
Step 1: Sculpting the Board
-
Mix the Board Color:
Blend a large amount of white clay with a tiny touch of beige and a speck of black to create a creamy ceramic color. Mix a separate portion of terracotta or rose clay with some translucent clay for the textured rim. -
Form the Base:
Roll the creamy clay into a thick slab, approximately 1/4 inch thick. Cut it into a rectangle with rounded corners to serve as your serving platter. -
Add the Textured Rim:
Roll your terracotta/rose mixture into a long, thin snake. Flatten it slightly and press it around the perimeter of the base. Gently texture this rim by dabbing it with a stiff toothbrush or crumpled foil for a stone-like effect. -
Pre-Bake:
Bake the empty board according to your clay package instructions for about 15 minutes. This provides a solid base so you don’t squash it while adding toppings later.
Realistic Textures
Use a real cracker to imprint texture onto your clay! Pressing gently with actual food creates the most believable surface for your miniature snacks.
Step 2: Creating the Crackers
-
Mix Cracker Dough:
Combine beige clay with a little white and translucent. -
Texture the Dough:
Before cutting shapes, press a piece of coarse sandpaper or a texture sheet onto the clay slab to simulate the rough surface of a cracker. -
Cut Shapes:
Use a small square cutter or your blade to cut square crackers. For the round ones, use a small circle cutter. Poke rows of holes using a needle tool or the tip of a mechanical pencil. -
Shading:
Shave some brown and orange soft pastels into a powder. Dust the edges and tops of the crackers with a soft brush to make them look baked and crispy.
Step 3: Cheeses and Accompaniments
-
Brie Wheel:
Form a flattened circle of white clay. Wrap a very thin sheet of white mixed with translucent clay around it for the rind. Cut a wedge out to show the inside texture. -
Cheddar Cubes:
Mix yellow, white, and a tiny bit of orange clay. Form a block and slice it into sharp little cubes using your blade. Texture the cut sides slightly with a toothbrush. -
Herb Cheese Cubes:
Create pale yellow cubes similar to the cheddar. Mix tiny specs of chopped green clay or dried herbs into the clay body before cutting to mimic herbs de provence. -
Olives:
Roll tiny ovals of olive-green clay. Use a large ball tool or the end of a paintbrush to indent one end where the pit would have been removed. -
Prosciutto Roses:
Roll incredibly thin, translucent pink strips of clay. Roughly fold and scrunch them together to resemble thin slices of cured meat, and arrange them in a small ‘bowl’ made of clay. -
Rosemary Garnish:
Roll a very thin green snake for the stem. Attach tiny, flattened teardrop shapes along the stem to look like rosemary needles.
Sticky Situations
If your tiny cheese cubes are getting squished while cutting, pop the clay in the fridge for 10 minutes. Cold clay slices much cleaner and sharper.
Step 4: Assembly and Finishing
-
Arrange the Board:
Apply a thin layer of liquid polymer clay (Bake & Bond) to the pre-baked board. Arrange your crackers, cheeses, olives, and garnishes artfully. I like to overlap items slightly to make the board look bountiful. -
Adding Spices:
For a final touch of realism, sprinkle actual ground black pepper or grated brown pastel ‘spices’ over the cheese and empty spaces on the board. -
Final Bake:
Bake the entire assembled piece again for the full duration recommended by your clay manufacturer. -
Finishing Touches:
Once cool, glaze the olives and meat with gloss varnish to make them look moist and oily. Keep the crackers and cheese matte. -
Attach Magnets:
Glue strong magnets to the back of the board using E6000 or super glue. Use two magnets if the piece is heavy to prevent sliding.
Arrange your mini charcuterie board on the fridge and enjoy a perpetual snack time without the calories
Terrazzo Speckle Tile Magnets
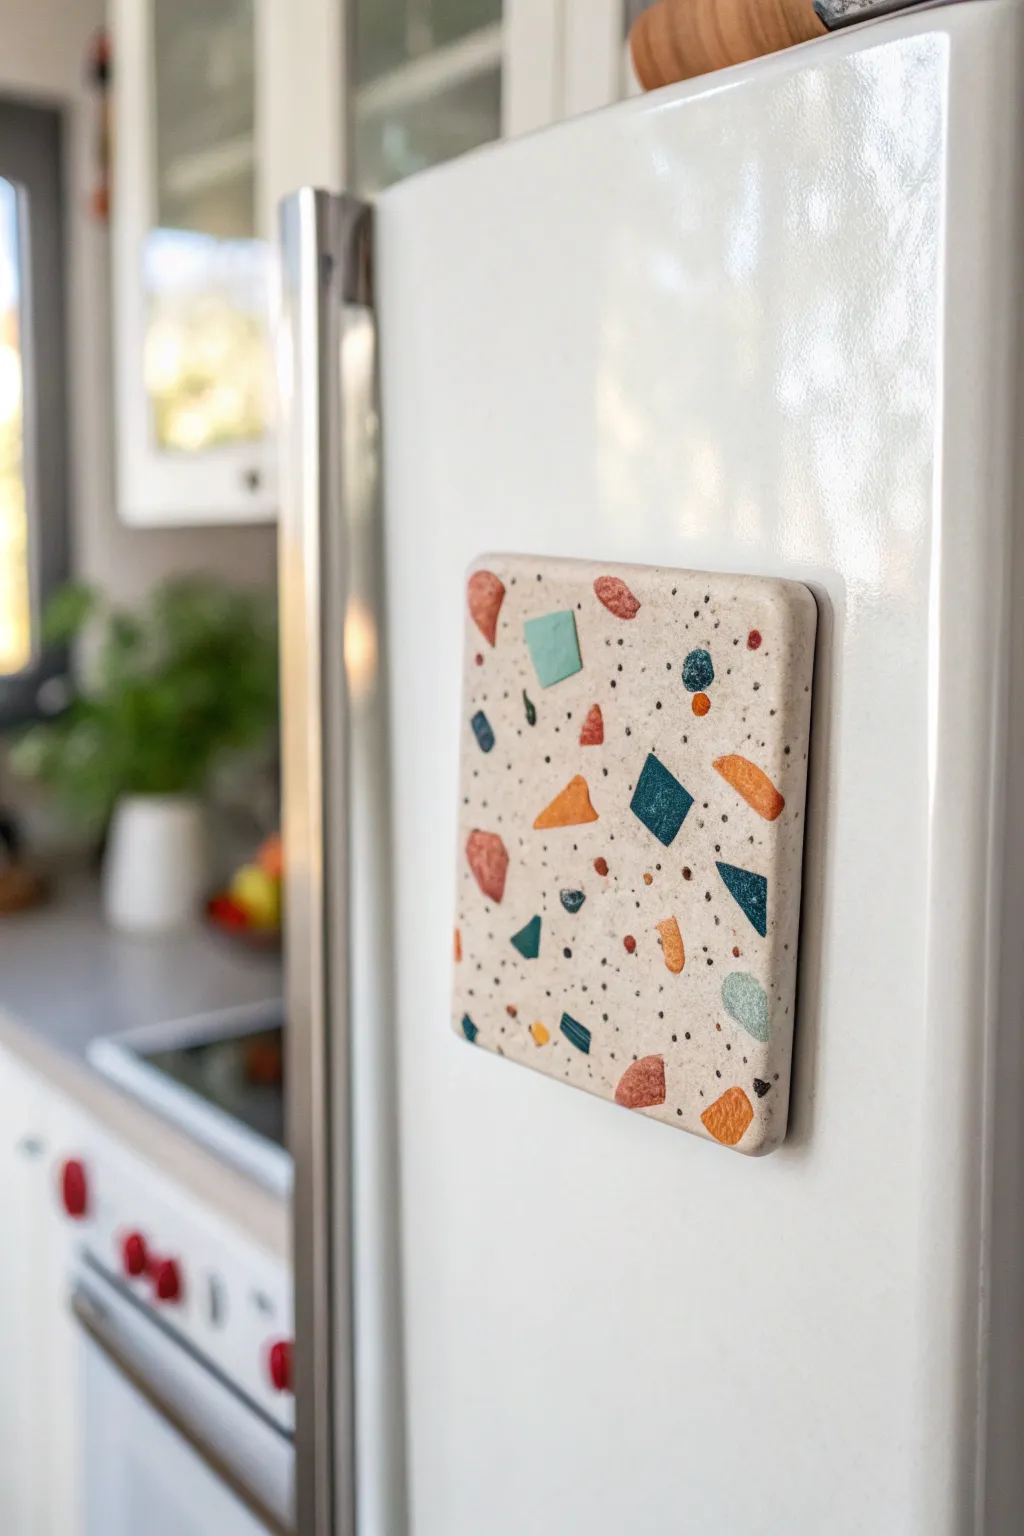
Bring a trendy touch to your fridge with these realistic faux terrazzo magnets. By mixing a speckled base with vibrant geometric chips, you can mimic the high-end look of polished stone using simple oven-bake clay.
Detailed Instructions
Materials
- Oven-bake polymer clay (Beige/Ecru, Burnt Orange, Teal, Navy Blue, Red oxide)
- Black pepper or black embossing powder (for speckles)
- Acrylic rolling pin or pasta machine
- Square cookie cutter (approx. 2.5 – 3 inches)
- Craft knife or tissue blade
- Fine grit sandpaper (400 to 1000 grit)
- Strong craft glue (e.g., E6000)
- Heavy-duty ceramic or neodymium magnets
- Parchment paper
- Baking sheet
Step 1: Preparing the Components
-
Condition the colors:
Start by thoroughly conditioning each color of clay separately until pliably soft. You’ll need a larger amount of beige for the base and very small amounts of the colored clays for the chips. -
Create the terrazzo chips:
Roll out your colored clays (orange, teal, navy, red) into very thin sheets, about 1-2mm thick. Use a rolling pin or the thinnest setting on a pasta machine. -
Cut the shapes:
Using a sharp craft knife, cut these thin sheets into random, jagged geometric shapes. Aim for triangles, uneven quadrilaterals, and trapezoids of varying sizes—some tiny, some slightly larger. -
Pre-bake the chips (optional):
To keep sharp edges, I sometimes like to bake these chips for just 5-10 minutes at the recommended temperature. However, for a smoother, more integrated look, leave them raw.
Step 2: Creating the Base Slab
-
Prepare the base mixture:
Take your beige or ecru clay and flatten it slightly. Sprinkle a generous amount of coarse black pepper or black embossing powder onto it to create the subtle ‘granite’ speckling. -
Incorporate the speckles:
Fold the clay over the pepper and knead it thoroughly. Repeat the folding and rolling process until the black specs are evenly distributed throughout the white clay. -
Roll out the slab:
Roll this speckled beige clay into a thick slab, approximately 1/4 inch (6mm) thick. This thickness gives the magnet a nice, sturdy tile feel.
Clean Cuts
Chill your clay slab in the fridge for 10 minutes before using the square cutter. Firm clay distorts less when cut, giving you perfect geometric edges.
Step 3: Assembling the Pattern
-
Arrange the chips:
Gently place your colored clay chips onto the surface of the beige slab. Be intentional with spacing; avoid clustering similar colors together and leave plenty of beige space visible. -
Add detail:
Place tiny flecks of extra clay or press a few larger grains of black pepper into the gaps between the colored shapes for added realism. -
Embed the pattern:
Place a sheet of parchment paper over the design. Use your acrylic roller to firmly roll over the slab. You want to press the chips *into* the base so they become flush with the surface, not just sitting on top. -
Check for smoothness:
Peel back the parchment. If the chips aren’t fully flush yet, roll again. The surface should feel relatively smooth to the touch. -
Cut the tile:
Position your square cutter over the best section of your pattern. Press down firmly to cut the clean tile shape. If the clay sticks to the cutter, gently push it out from the edges. -
Smooth the edges:
Use your finger to gently soften the sharp cut edges of the square so they don’t look too severe or jagged.
Smudged Chips?
If colors smear during rolling, your clay was too warm or soft. Sanding after baking is the best fix—it scrapes away the top smear to reveal crisp colors underneath.
Step 4: Finishing
-
Bake:
Place the tile on a parchment-lined baking sheet. Bake according to your clay package instructions (usually 275°F/135°C for 15-30 minutes depending on thickness). -
Cool down:
Allow the tile to cool completely before handling. It will be slightly soft when hot but hardens as it cools. -
Sand for stone effect:
Once cool, wet sand the surface with fine-grit sandpaper. This removes fingerprints and exposes the crisp edges of your colored chips, making it look like real polished stone. -
Attach the magnet:
Flip the tile over. Apply a dab of strong craft glue (like E6000) to the center and press your magnet firmly into place. -
Dry:
Let the glue cure fully (usually 24 hours) before placing your new art on the fridge.
Enjoy arranging your miniature terrazzo art piece on the fridge