
When I want a project that feels satisfying fast, I reach for oven-bake clay—it’s sturdy, detailed, and you can cure it right in a home oven. Here are my favorite oven dry clay ideas that you can totally pull off in an afternoon, whether you’re into functional decor or tiny cute collectibles.
Simple Clay Earrings in Bold Shapes
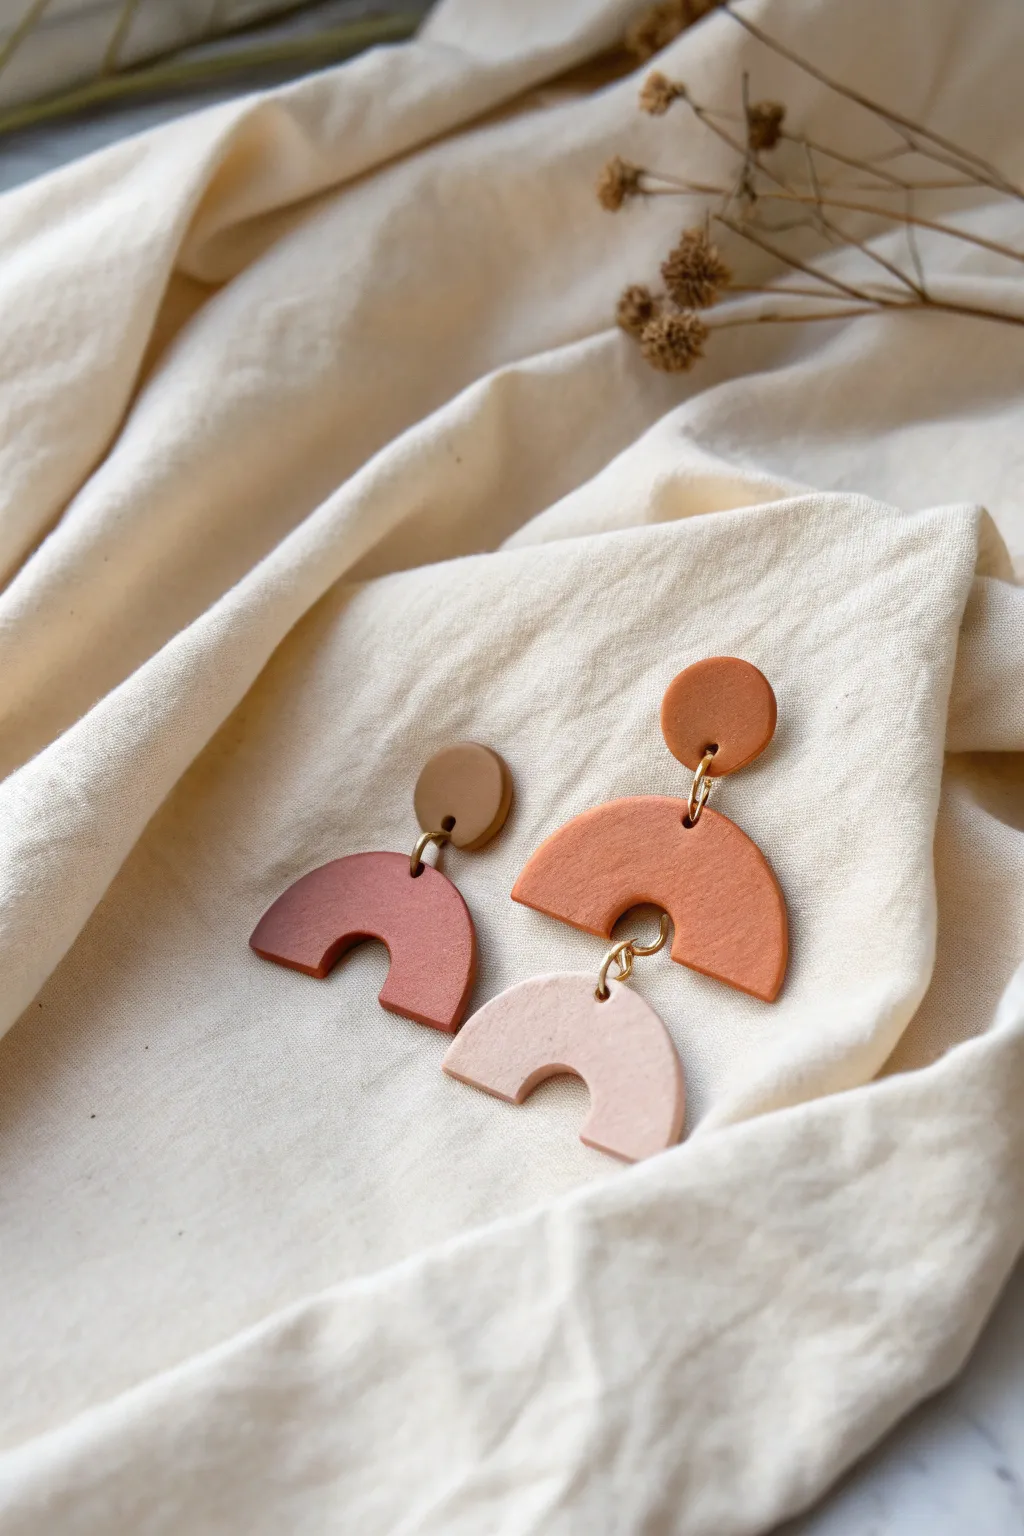
These earthy, terracotta-toned earrings combine modern geometric shapes with a soft, matte finish for a sophisticated look. Using simple arch cutters and varying shades of warm polymer clay, you can assemble these statement pieces that are surprisingly lightweight to wear.
Step-by-Step Guide
Materials
- Polymer clay (terracotta, burnt orange, beige, and brown)
- Acrylic rolling pin
- U-shaped or arch clay cutters (small and medium sizes)
- Small circular clay cutter (approx. 10mm)
- Sharp tissue blade
- Hand drill or pin vibe
- Jump rings (gold finish, 6mm or 7mm)
- Earring posts and backs
- Super glue or jewelry glue
- Parchment paper or ceramic tile
Step 1: Clay Preparation
-
Condition the clay:
Begin by warming the clay in your hands and kneading each color separately until it is soft and pliable. This conditioning step is crucial to prevent cracking later. -
Mix custom shades:
To achieve the organic palette shown, you may need to mix your base colors. Try mixing a little white into terracotta to soften it, or a touch of brown into orange for that burnt sienna look. -
Roll out the slab:
Place your conditioned clay on a flat surface or tile. use your acrylic rolling pin to roll it out to an even thickness, aiming for about 3mm or 1/8 inch. -
Smooth the surface:
Gently wipe the surface of the clay with a finger or a baby wipe to remove any fingerprints or lint before cutting.
Clean Cuts Pro Tip
Before pressing your cutters into the clay, dip them into a small bowl of cornstarch or water. This acts as a release agent and prevents the clay from sticking inside the cutter.
Step 2: Cutting Shapes
-
Cut the studs:
Use your small circular cutter to punch out two circles from your chosen top color (like the dark brown or burnt orange shown). -
Cut the arches:
Use your arch cutters to create the hanging components. For the longer earring, you’ll need two arches in graduating sizes and different colors. For the simpler earring, just one medium arch. -
Clean the edges:
If your cutters leave rough edges, gently smooth them with your finger while the clay is still raw. -
Create holes:
Using a toothpick or a small tool, poke holes where the jump rings will go. Make sure the hole isn’t too close to the edge. For the middle pieces, you need a hole at the top and bottom center.
Step 3: Baking and Finishing
-
Bake the pieces:
Arrange your shapes on a ceramic tile or parchment-lined baking sheet. Bake according to your brand of clay’s instructions—usually around 275°F (130°C) for 15-30 minutes. -
Cool and sand:
Let the pieces cool completely. If there are any rough spots, use fine-grit sandpaper to buff the edges for a professional finish. -
Attach the posts:
Apply a small dab of strong jewelry glue to the back of the circular stud pieces and press the earring post firmly onto them. Let this cure fully.
Texture Twist
Before baking, gently press a piece of coarse sandpaper or a stiff bristled toothbrush onto the raw clay surface to give it a stone-like texture.
Step 4: Assembly
-
Open jump rings:
Use two pairs of pliers to twist your jump rings open. Never pull them apart; always twist sideways to maintain the circle shape. -
Connect the stud:
Loop a jump ring through the hole in your top arch and the hole you drilled into the circle stud (if you drilled it) or simply connect the arches together if you are gluing the post directly to the top circle. -
Connect the tiers:
I find it easiest to work from bottom to top. Connect the bottom beige arch to the middle orange arch using a gold jump ring. -
Final check:
Ensure all jump rings are closed tightly so there are no gaps for the clay pieces to slip through.
Wear your new geometric creations with pride, knowing you made them yourself


Mini Food Charms for Keychains
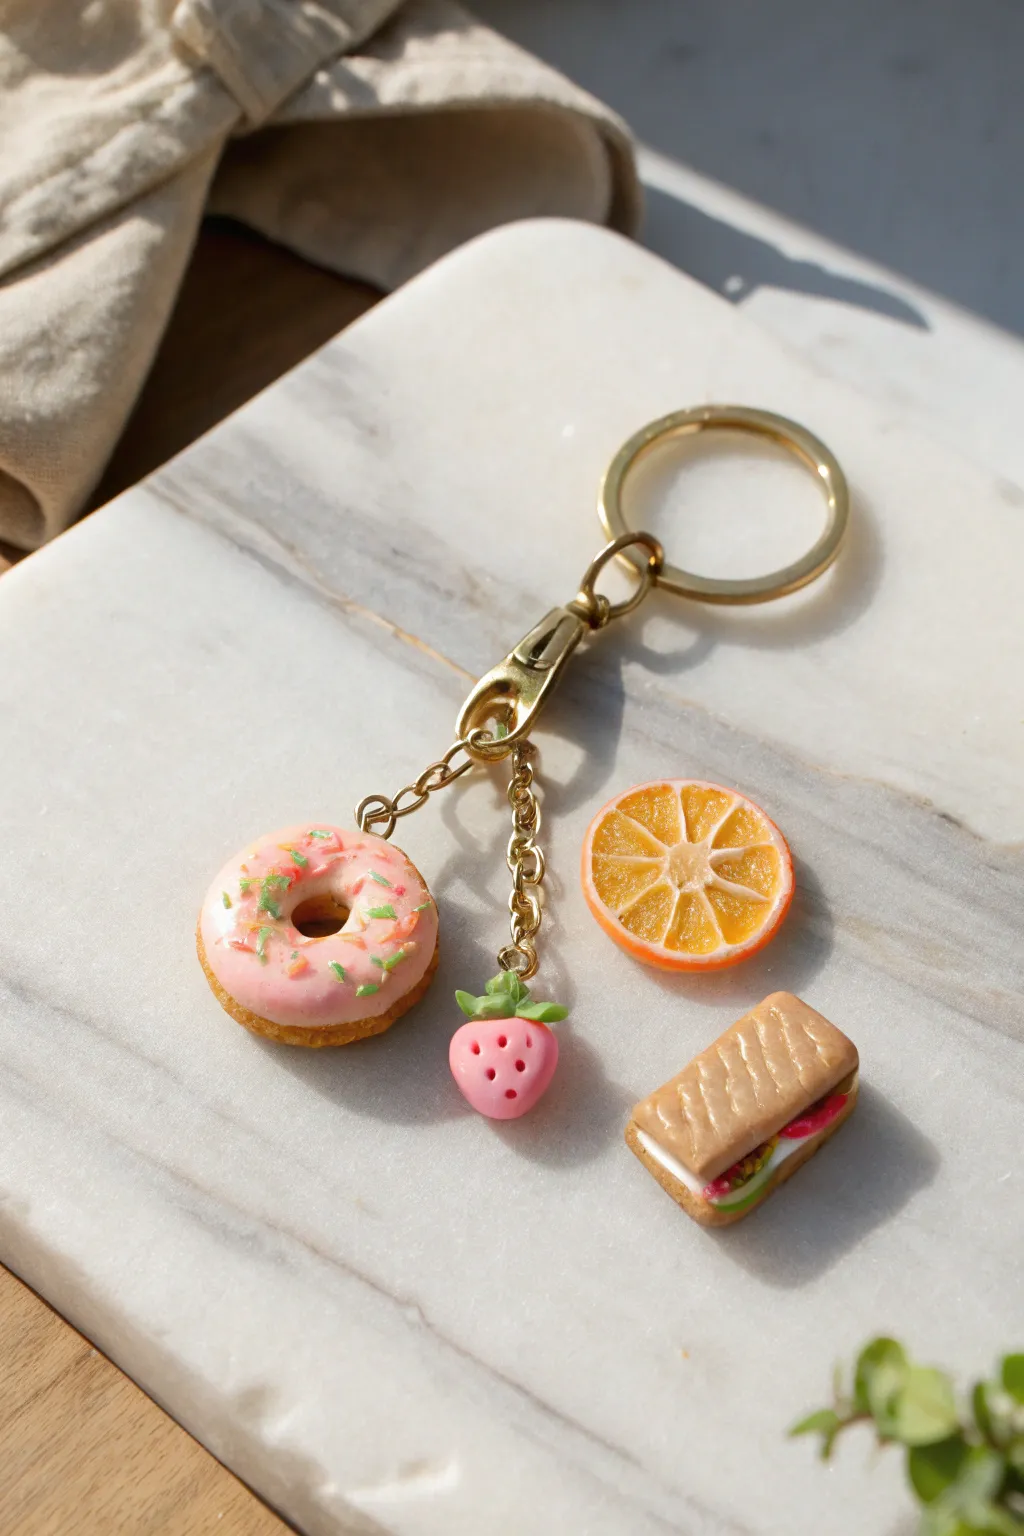
These delightful miniature food charms turn your keychain into a tiny, wearable picnic. Featuring a glazed donut, a ripe strawberry, a juicy orange slice, and a savory sandwich, these polymer clay creations are as fun to make as they represent a charming level of detail.
Step-by-Step Tutorial
Materials
- Polymer clay (white, translucent, tan/beige, pink, green, orange)
- Liquid polymer clay (translucent and white)
- Chalk pastels (orange, brown, yellow) for shading
- High-gloss glaze or UV resin
- Sculpting tools (needle tool, ball tool, craft knife)
- Gold eye pins
- Gold keychain hardware (split ring, lobster clasp, chain links)
- Super glue (optional)
- Oven and baking sheet
Step 1: Sculpting the Donut
-
Shape the Base:
Mix tan clay with a tiny bit of yellow and white to create a dough color. Roll a small ball (about 1.5 cm) and flatten it slightly into a thick disc. -
Create the Hole:
Use a ball tool or the end of a paintbrush handle to press completely through the center of the disc to form the donut shape. Smooth the edges of the hole with your fingers to make it look baked and puffy. -
Texture the Dough:
Take a clean toothbrush or a ball of aluminum foil and gently tap it all over the donut surface to mimic a bread-like texture. Use a soft brush to dust orange chalk pastel around the edges for a ‘baked’ look. -
Add the Glaze:
Mix pink clay with a drop of liquid clay to create a frosting consistency, or simply flatten a thin, irregular sheet of pink clay. drape this over the top of the donut, letting the edges wave naturally. -
Sprinkle Time:
Roll tiny, hair-thin snakes of green and orange clay. Chop them into minuscule bits with your craft blade and press them gently onto the pink glaze. -
Pin It:
Insert a gold eye pin into the top of the donut. You may want to bend the hidden end slightly to secure it inside the clay.
Step 2: Crafting the Berry & Fruit
-
Form the Strawberry:
Roll a small ball of pink clay into a teardrop shape. Using a needle tool, poke small indentations all over the surface to create the seed texture. -
Add the Leaves:
Flatten a tiny bit of green clay and cut a star shape or small teardrops. Attach these to the wide top of the berry, curling the tips slightly upward. -
Strawberry Hardware:
Carefully insert a small eye pin through the center of the green leaves into the berry body. -
Orange Slice Base:
Roll a cane of translucent orange clay wrapped in thin white clay (for the rind segments). Wrap the entire cylinder in a thicker layer of rough-textured orange clay for the skin. -
Texture the Citrus:
Slice the cane into a disc. Use a needle tool to drag lines from the center outward and poke the translucent sections to simulate juicy pulp texture.
Sticky Situation
Work with lighter colors (like the white cheese or tan dough) first. Red and green clays can leave pigment on your fingers that will stain the lighter clay.
Step 3: Building the Sandwich
-
Bread Texture:
Create two small rectangular slabs of tan clay. Score the tops diagonally with a knife to mimic a grilled panini or baguette texture. -
Filling the Layers:
Sandwich thin layers of green (lettuce), red (tomato or meat), and white (cheese) clay between the bread slabs. Texture the edges of the filling with a needle tool to make them look crinkly and realistic.
Scented Charms
Mix a tiny drop of essential oil (like vanilla or strawberry) into the clay before baking for scratch-and-sniff charms that smell as good as they look.
Step 4: Finishing Up
-
Bake:
Place all pieces on a baking sheet or ceramic tile. Bake according to your brand of clay’s instructions (usually around 275°F/130°C for 15-20 minutes). -
Glaze:
Once cool, coat the donut frosting and the fruit pulp of the orange slice with a high-gloss glaze or UV resin to make them look wet and sweet. -
Assembly:
Use jump rings to attach your donut and strawberry charms to the chain links of the gold keychain hardware. Secure the eye pins with a drop of super glue if they feel loose.
Now you have an adorable set of miniature snacks ready to sweeten up your keys or zipper pulls


Cute Icon Fridge Magnets Set
Brighten up your kitchen with this delightful set of handmade fridge magnets featuring charming icons like smiling suns, cats, and fruits. These flat, cookie-style clay pieces are painted with soft pastel tones and simple line work for a cohesive and friendly aesthetic.
Step-by-Step Guide
Materials
- White oven-dry polymer clay (or air-dry clay)
- Acrylic rolling pin
- Parchment paper
- X-acto knife or craft blade
- Cookie cutters (circle, heart, teardrop) – optional but helpful
- Acrylic paints (pastel yellow, peach, mint green, soft pink, earthy red, black, white)
- Fine detail paintbrushes (size 0 and 00)
- Strong round craft magnets
- Super glue or E6000 adhesive
- Matte or satin varnish (optional)
Step 1: Shaping the Clay Base
-
Condition the clay:
Begin by warming the polymer clay in your hands until it is soft and malleable. This prevents cracking later on. -
Roll out the slab:
Place the clay between two sheets of parchment paper and use the acrylic roller to flatten it into an even slab, approximately 1/4 inch thick. You want them sturdy but not too heavy. -
Cut the basic circle shapes:
For the sun, smiley face, blue face, and pink face, use a round cookie cutter or trace a lid to cut perfect circles. Smooth the edges with your finger. -
Create the specialty shapes:
For the strawberry and watermelon, cut teardrop or triangle shapes. For the cat, cut a slightly flattened circle and gently mold triangular ears at the top. For the rainbow, cut a semicircle. -
Add dimension to the sun:
For the sun icon, cut small triangles from your scrap clay and gently press them around the perimeter of one of your yellow circles to create the rays. -
Mold the strawberry stem:
Hand-shape small leafy greens for the top of the strawberry and press them firmly onto the top of the fruit base. -
Bake the clay:
Arrange all your shapes on a parchment-lined baking sheet. Bake according to your specific clay package instructions (usually 275°F for 15-30 minutes). Let them cool completely before painting.
Smooth Surface Secret
Before baking, dip your finger in a tiny bit of rubbing alcohol or baby oil and lightly rub the clay surface to remove any fingerprints or dust.
Step 2: painting and Detailing
-
Apply base coats:
Paint each shape with its primary color. Use pastel yellow for the sun and smiley, peach for the cat, light teal for the blue face, and muted red for the strawberry and watermelon. You may need two coats for opaque coverage. -
Paint the rainbow and hearts:
For the rainbow magnet, carefully paint the arches in peach, green, yellow, and terracotta. Paint your heart shapes with solid red or pink bases. -
Add facial features:
Using your finest brush and black paint, carefully add the “U” shaped smiles, winking eyes, and noses. I find it helpful to practice the stroke on paper first to steady my hand. -
Detail the fruit:
Add small black teardrops for watermelon seeds and tiny vertical dashes on the strawberry for texture. -
Add rosy cheeks:
Mix a tiny bit of pink or red paint with water to make a glaze, or use a dry brush technique to dab sweet rosy cheeks onto the sun, smiling circles, and cat. -
Create decorative patterns:
On the orange cat face, add white radiating lines for texture. Add polka dots or small hearts to the red heart magnets for extra flair. -
Seal the artwork:
Once the paint is fully dry, apply a thin layer of matte varnish to protect the paint from chipping without making it too glossy. -
Attach the magnets:
Flip the dried clay pieces over. Apply a dab of super glue or strong adhesive to the back of a round magnet and press it firmly onto the center of the clay shape.
Make It 3D
Instead of painting the seeds or eyes, try using tiny balls of black clay pressed into the raw clay before baking for a tactile, embossed effect.
Arrange your cheerful new collection on the fridge to hold up your favorite photos and notes


Geometric Wall Hanging Tiles
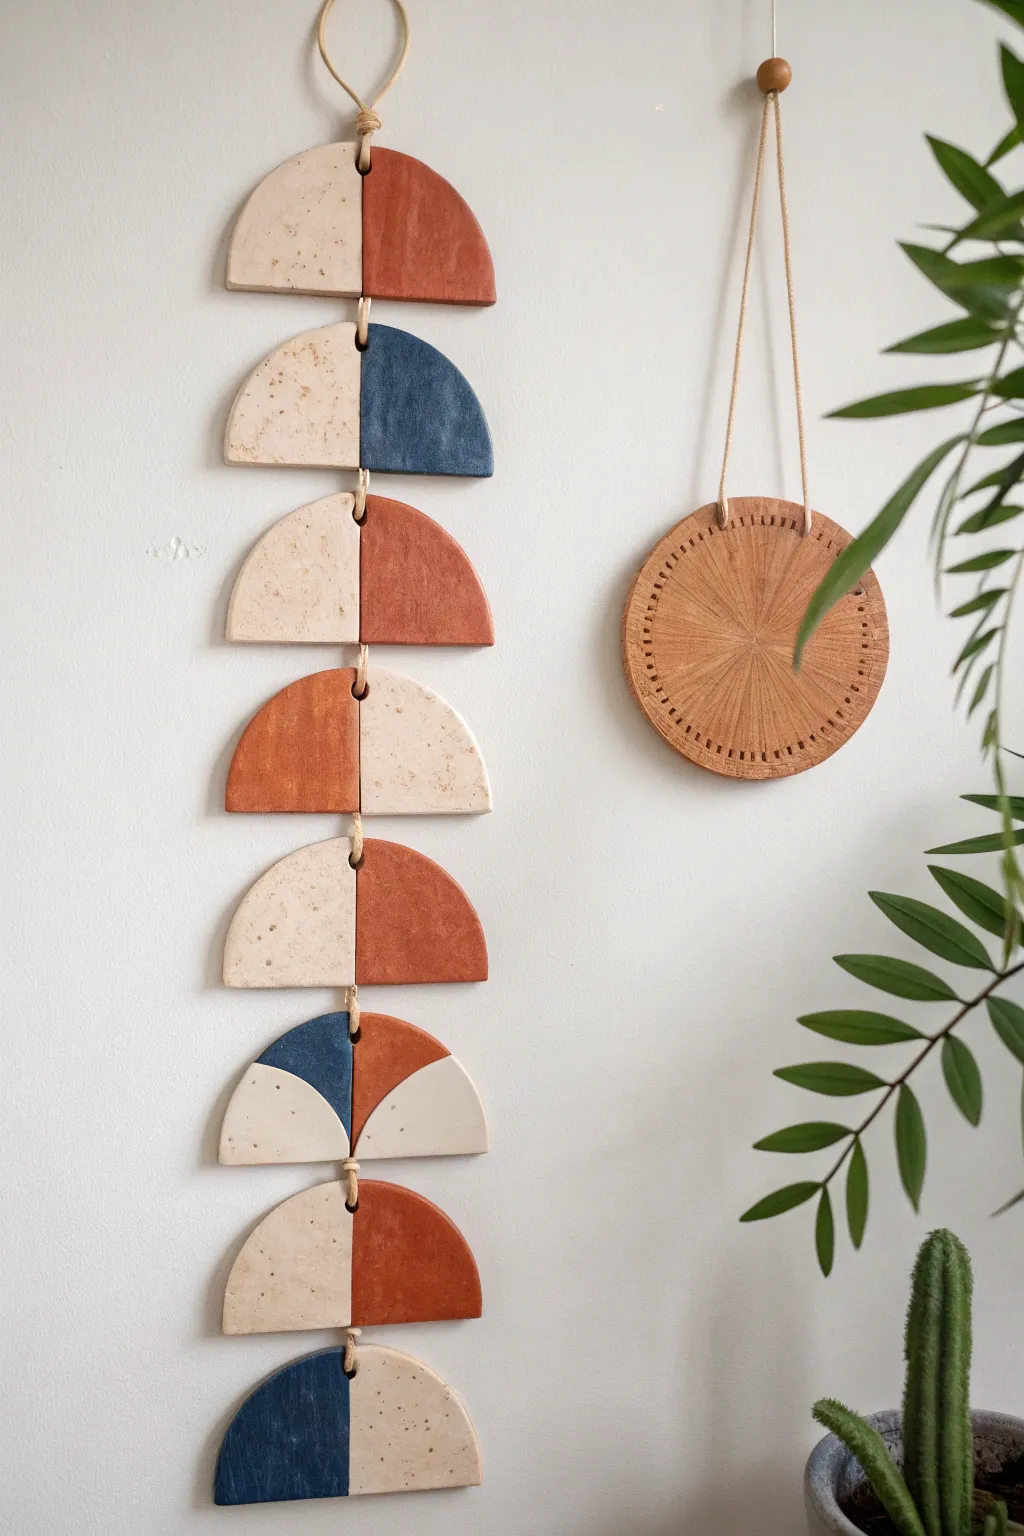
Bring earthy warmth to your walls with this vertical hanging made from mesmerizing semi-circle tiles. The combination of terracotta, deep indigo, and speckled cream tones creates a modern rhythmic pattern that fits perfectly in any contemporary space.
Detailed Instructions
Materials
- Oven-bake polymer clay (terracotta, white/beige, and navy blue)
- Speckled clay or cracked pepper inclusions
- Rolling pin or pasta machine
- Large circular cookie cutter (approx. 3-4 inches diameter)
- Craft knife or clay blade
- Twine, hemp cord, or leather cording
- Wooden dowel, straw, or small punch tool (for holes)
- Ruler
- Parchment paper and baking sheet
- Varnish (optional matte finish)
Step 1: Preparing the Clay Slabs
-
Condition and mix:
Begin by conditioning your clay blocks until they are soft and pliable. For the speckled cream look, mix a plain white or beige geometric clay with a ‘granite’ effect clay, or knead in a tiny pinch of cracked black pepper or dried coffee grounds for texture. -
Roll out the sheets:
Roll out your terracotta, navy, and speckled cream clays separately. Aim for a consistent thickness of about 1/4 inch (6mm) to ensure the tiles are sturdy enough to hang without cracking. -
Cut the circles:
Using your large circular cutter, press firmly into the clay sheets. You will need enough full circles to create eight split semi-circles. Cut a few extras just in case of mishaps during the split phase.
Step 2: Creating the Geometric Shapes
-
Slice in half:
Take your clay rounds and use a long, sharp blade to slice them perfectly in half. I find using a ruler as a guide helps keep this line completely straight. -
Create the split tone effect:
To mimic the look in the photo, you aren’t painting the clay; you are joining two colors. Take a semi-circle of terracotta and cut a straight vertical line to remove one half. Do the same with a speckled cream semi-circle. -
Join the seams:
Press the cut edge of the terracotta piece against the cut edge of the cream piece to form a single multi-colored semi-circle. Gently smooth the seam with your finger or a clay tool on the back side so they bond together. -
Repeat for all tiles:
Create the pattern shown: mostly half-split tiles (terracotta/cream), one solid deep blue split with cream, and one special tile that uses quarters (blue, terracotta, and cream). Refer closely to the image for the specific color rhythm. -
Pierce hanging holes:
Before baking, you must add holes for the cord. Use a straw or small punching tool to create a hole at the very top center and bottom center of each semi-circle. Ensure the hole is wide enough for your chosen twine.
Uneven Seams?
If your two clay colors aren’t sticking together, verify the edges are clean. Apply a tiny dab of liquid clay (Bake & Bond) to the edges before pressing them together for a permanent fuse.
Step 3: Baking and Assembly
-
Bake carefully:
Arrange your finished tiles on a parchment-lined baking sheet. Bake according to your specific clay package instructions, usually around 275°F (130°C) for 15-30 minutes. Do not stick them in the oven and forget them; over-baking darkens the colors. -
Cool and finish:
Let the tiles cool completely on a flat surface. If desired, apply a thin coat of matte varnish to seal the clay and deepen the colors without adding unnatural shine. -
Start the knotting:
Cut a long length of twine (approx. 4 feet to be safe). Fold it in half to create a loop at the top for hanging on the wall. Tie a secure knot just below the loop. -
Thread the first tile:
Feed the two loose ends of the twine through the top hole of your first (top) tile. Tie a knot on the back or front, depending on the look you want, though the image shows hidden connections. Alternatively, run the cord continuously behind the tile. -
Connect the series:
Thread the cord down to the bottom hole of the first tile and tie a knot. Leave a small gap (about 0.5 inch), then tie a knot to support the top hole of the second tile. Thread through the second tile. -
Continue downwards:
Repeat this knot-and-thread process for all eight tiles, maintaining consistent spacing between each semi-circle. The weight of the tiles will help the cord hang straight. -
Final trim:
Once the last blue/speckled tile is secured, tie a final sturdy knot underneath it and trim any excess twine for a clean finish.
Go Big
Scale this up for a statement piece using a small bowl as your circle template. You can also mix in metallic gold leaf flakes into the white clay for an elegant terrazzo effect.
Now you have a stunning, architectural piece of art ready to hang in your entryway or living room

The Complete Guide to Pottery Troubleshooting
Uncover the most common ceramic mistakes—from cracking clay to failed glazes—and learn how to fix them fast.
Sculptural Knot Paperweight

This elegant, looping sculpture brings a touch of modern sophistication to any desk or shelf. Despite its complex appearance, this decorative knot is surprisingly simple to form using a single long coil of smooth, air-dry or oven-bake clay.
How-To Guide
Materials
- White oven-bake clay (polymer) or air-dry clay (approx. 8 oz)
- Acrylic roller or smooth rolling pin
- Clean, flat work surface (glass or ceramic tile work well)
- Clay cutting blade or knife
- Fine-grit sandpaper (400-600 grit)
- Small bowl of water (for smoothing)
- Matte varnish or sealant (optional)
Step 1: Conditioning and Rolling
-
Prepare the clay:
Start by taking a generous amount of clay—about the size of two tennis balls. Knead it thoroughly in your hands to warm it up and condition it until it’s pliable and free of cracks. -
Begin the coil:
Roll the clay into a thick log shape between your palms first to get the basic form started. -
Roll it out:
Place the log on your flat work surface. Using both hands, roll the clay back and forth, moving from the center outwards to extend the length. -
Maintain evenness:
Aim for a very consistent thickness of about 3/4 inch to 1 inch throughout the entire snake. If one spot gets too thin, gently push the clay back together from the ends. -
Check the length:
You will need a surprisingly long coil to achieve this knot. I usually aim for at least 18-20 inches to ensure I have enough slack to weave comfortably. -
Smooth the surface:
Once rolled, inspect the coil for any small fissures or fingerprints. Dip your finger in a tiny bit of water and gently glide it over the surface to polish it smooth.
Seamless Joints
To merge tucked ends perfectly, score the clay lightly with a needle tool, add a drop of water or liquid clay, and blend the seam with a silicone sculpting tool.
Step 2: Forming the Knot
-
Create the first loop:
Take one end of your clay snake and create a loose, open loop, crossing the working end over the stationary end. -
Weave through:
Take the long working end and pass it under the loop you just made, pulling it through gently. Think of this like tying a very loose pretzel knot. -
Form the second pass:
Continue guiding the end of the clay so it follows the path of the existing curve, doubling the thickness of the knot structure. -
Tuck the ends:
When you are happy with the intricate shape, trim the excess clay off the ends using your blade. -
Conceal the joints:
Tuck the cut ends underneath the curves of the knot so they are hidden from view. You want the piece to look like one continuous, infinite loop. -
Adjust the shape:
Gently nudge the loops closer together to create a compact, spherical shape rather than a flat, sprawling knot.
Step 3: Refining and Finishing
-
Final smoothing:
Before drying or baking, do one last pass with a damp finger to erase any marks made while tying the knot. -
Curing process:
If using oven-bake clay, bake according to the package instructions (usually 275°F for 15-30 minutes per 1/4 inch thickness). If using air-dry clay, let it sit undisturbed for 24-48 hours. -
Cool down:
Allow the piece to cool completely in the oven with the door cracked, or wait until the air-dry clay is fully hardened and room temperature. -
Sand imperfections:
Take your fine-grit sandpaper and very gently buff away any remaining fingerprints or rough patches. Be careful not to flatten the rounded profile of the coils. -
Dust off:
Wipe the sculpture down with a slightly damp cloth to remove any sanding dust. -
Seal (Optional):
For a finished look that protects against dust, apply a thin layer of matte varnish. This keeps the natural, stone-like appearance while making it easier to clean later.
Speckled Stone Effect
Knead a small pinch of black pepper or dried used coffee grounds into your white clay before rolling. This creates a trendy ‘faux ceramic’ speckled finish.
Place your finished knot atop a stack of journals or beside a candle for an instant style upgrade
Tiny Creature Collectible Set

Create your own lineup of adorable, pocket-sized friends using oven-bake clay in a palette of warm, earthy tones. These tiny collectibles feature simple, rounded shapes with charming details like spotted bellies and gentle smiles that make them perfect for brightening up a bookshelf.
Detailed Instructions
Materials
- Oven-bake polymer clay (terracotta, burnt orange, pastel pink, soft teal, dusty rose, mustard yellow)
- Black polymer clay or black acrylic paint
- Sculpting tools (needle tool, ball stylus)
- Aluminum foil (optional, for armature)
- Rolling pin or pasta machine
- Parchment paper-lined baking sheet
- Oven
- Soft paintbrush (if using acrylics)
- Wet wipes (for cleaning hands between colors)
Step 1: Base Shaping
-
Condition the clay:
Start by warming a small amount of clay in your hands, kneading it until it becomes soft and pliable. I personally like to start with the terracotta color to set the warmth of the palette. -
Form the main body:
Roll the clay into a smooth ball about the size of a golf ball or slightly smaller. If you want to save clay, you can wrap a small ball of aluminum foil in the center. -
Create the signature shape:
Gently shape the ball into a rounded capsule or gumdrop shape, slightly narrower at the top and flatter at the bottom so it stands securely on its own. -
Repeat for the squad:
Make five more base shapes using your other colors—burnt orange, pink, teal, rose, and mustard—keeping them roughly the same height but varying the widths slightly for character.
Fixing Fingerprints
Smudges ruin the smooth look! Before baking, lightly brush your creatures with a little baby oil or cornstarch to smooth out any rogue fingerprints.
Step 2: Adding Limbs & Features
-
Attach the feet:
For each creature, roll two tiny balls of matching clay. Press these firmly onto the bottom front of the body to create nubby little feet, smoothing the seams with your finger or a tool. -
Add simple arms:
Roll thin, small snake shapes for arms. Attach them vertically to the sides of the body so they look like they are resting by the creature’s side, blending the top of the arm into the shoulder area. -
Sculpt the ears:
Pinch two small triangles or nubs of clay and attach them to the top of the head. Varies these shapes; make some pointy like a cat and others round like a bear.
Give Them Personality
Try varying the eye placement! placing eyes wide apart makes them look innocent, while close-set eyes can look goofy. Add tiny clay accessories like hats or scarves.
Step 3: Detailing & Texturing
-
Indent the face:
Decide where the face will go—usually slightly higher than center looks cutest. Use a thumb lighter to smooth this area if needed. -
Create the smile:
Use a needle tool or a small curved tool to press a gentle, wide smile into the clay. Keep the lines clean and simple. -
Add spotted patterns:
For the pink and yellow creatures, roll extremely tiny balls of a contrasting dark clay (or black). Press them flat onto the belly area to create polka dots. Alternatively, you can indent these spots now and fill them with paint later. -
Texturizing the teal friend:
For the teal creature, use a needle tool to scratch a scribbled, furry texture onto the belly patch, leaving the rest of the body smooth. -
Add tails (optional):
For the yellow creature on the end, add a slightly longer, curved tail sweeping around its side.
Step 4: Baking & Finishing
-
Prepare for the oven:
Place all your creatures on a parchment-lined baking sheet. Double-check that they are standing straight and aren’t touching each other. -
Bake carefully:
Bake according to your specific clay brand’s instructions (usually around 275°F or 130°C for 15-30 minutes per 1/4 inch of thickness). -
Cool down:
Let the figures cool completely on the baking sheet before handling them, as warm clay can be fragile. -
Paint the eyes:
Since tiny clay balls can be hard to handle for eyes, use a small dotting tool dipped in black acrylic paint to add the eyes after baking. This ensures they stay perfectly round. -
Final touches:
If you opted to paint the spots instead of using clay, add those details now with a fine brush. Let the paint dry completely.
Now arrange your colorful little troop on a shelf to watch over your room