I’m obsessed with how paper clay can go from rustic and textured to crisp and detailed with just a little patience. If you’re craving projects that feel relaxed, forgiving, and super satisfying once they dry, these paper clay art ideas will keep your studio table busy.
Paper Clay Trinket Dish With Soft Pinch Edge
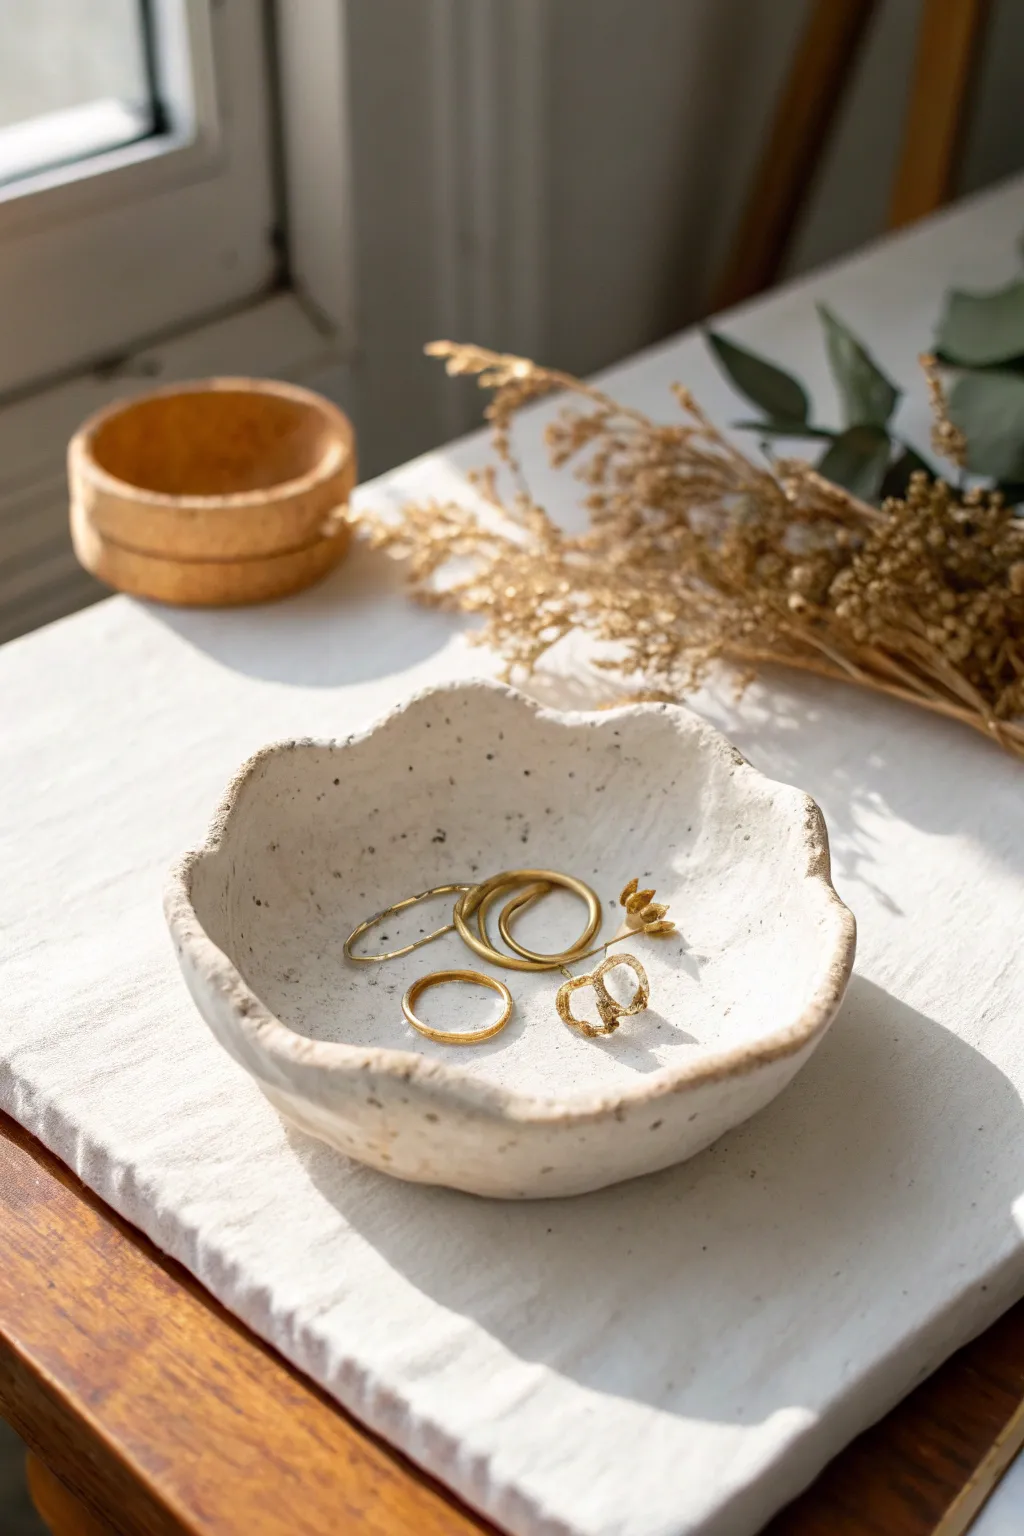
Capture the raw, natural beauty of handcrafted ceramics with this simple paper clay project. This trinket dish features a gentle, organic shape with soft pinched edges and a speckled, matte finish that mimics high-end stoneware.
Step-by-Step Guide
Materials
- Air-dry paper clay (white)
- Rolling pin or smooth glass jar
- Small bowl (to use as a mold)
- Plastic wrap or cling film
- Cup of water
- Sponge
- Fine-grit sandpaper (220 grit)
- Acrylic paints (creamy white, burnt umber)
- Small stiff-bristled brush or toothbrush
- Matte varnish or sealant
Step 1: Forming the Dish
-
Prepare your clay:
Start with a ball of paper clay about the size of a tennis ball. Knead it warmly in your hands for a minute to ensure it is pliable and free of air bubbles. -
Roll out the slab:
On a clean, flat surface, flatten the ball slightly with your palm. Use your rolling pin to roll it out into an even circle, aiming for a thickness of about 1/4 inch. -
Create the rough shape:
Don’t worry about cutting perfect circle. Instead, gently tear or cut the edges to create a rough, slightly irregular circular shape. -
Prepare the mold:
Take your small bowl and cover the inside with plastic wrap. This prevents sticking and makes removal much easier later. -
Shape the dish:
Lift your clay slab and gently drape it inside the bowl. Press it down lightly into the center so it takes on the curved form. -
Sculpt the rim:
Using your thumb and forefinger, pinch the rim of the clay gently. Create undulations and waves by pushing some sections slightly inward and pulling others outward. -
Smooth the edges:
Dip your finger in a little water and run it along the rim to soften any sharp tears or cracks. The goal is a ‘soft pinch’ look, smooth but organic. -
Refine the interior:
Smooth the inside surface with a slightly damp sponge to remove fingerprints or heavy textures, leaving a clean base for your jewelry. -
Initial drying:
Let the clay sit in the mold for about 24 hours until it holds its shape firmly but isn’t bone dry. -
Remove and dry:
Carefully lift the clay dish out of the bowl using the plastic wrap. Remove the plastic and place the dish upside down on a drying rack to let the bottom dry completely.
Cracking Up?
If small cracks appear while drying, don’t panic. Mix a tiny bit of fresh clay with water to make a paste (slip) and fill the cracks, then smooth over.
Step 2: Finishing and Decorating
-
Sand for smoothness:
Once bone dry, use fine-grit sandpaper to gently buff the rim and any rough spots on the body. Wipe away dust with a slightly damp cloth. -
Base coat application:
Paint the entire dish with a creamy white acrylic paint. You might need two thin coats for opaque coverage. Let it dry fully. -
Creating the speckled effect:
Dilute a small amount of burnt umber or dark brown paint with water until it’s inky. Dip a stiff brush or toothbrush into this mixture. -
Apply the speckles:
Hold the brush over the dish and flick the bristles with your thumb to spray fine droplets onto the surface. Practice on paper first to control the splatter size. -
Highlight the rim:
Using a dry brush technique with a tiny bit of brown paint, very lightly graze the very top edge of the rim to define the wavy shape. -
Seal the piece:
Once the paint is completely dry, apply a coat of matte varnish. This protects the clay and gives it that finished ceramic feel.
Natural Texture
For a stone-like texture, mix a teaspoon of dried coffee grounds or fine sand directly into your white clay before rolling it out.
Now you have a serene spot to keep your favorite rings and earrings safe.


Paper Clay Pinch Pot Minis
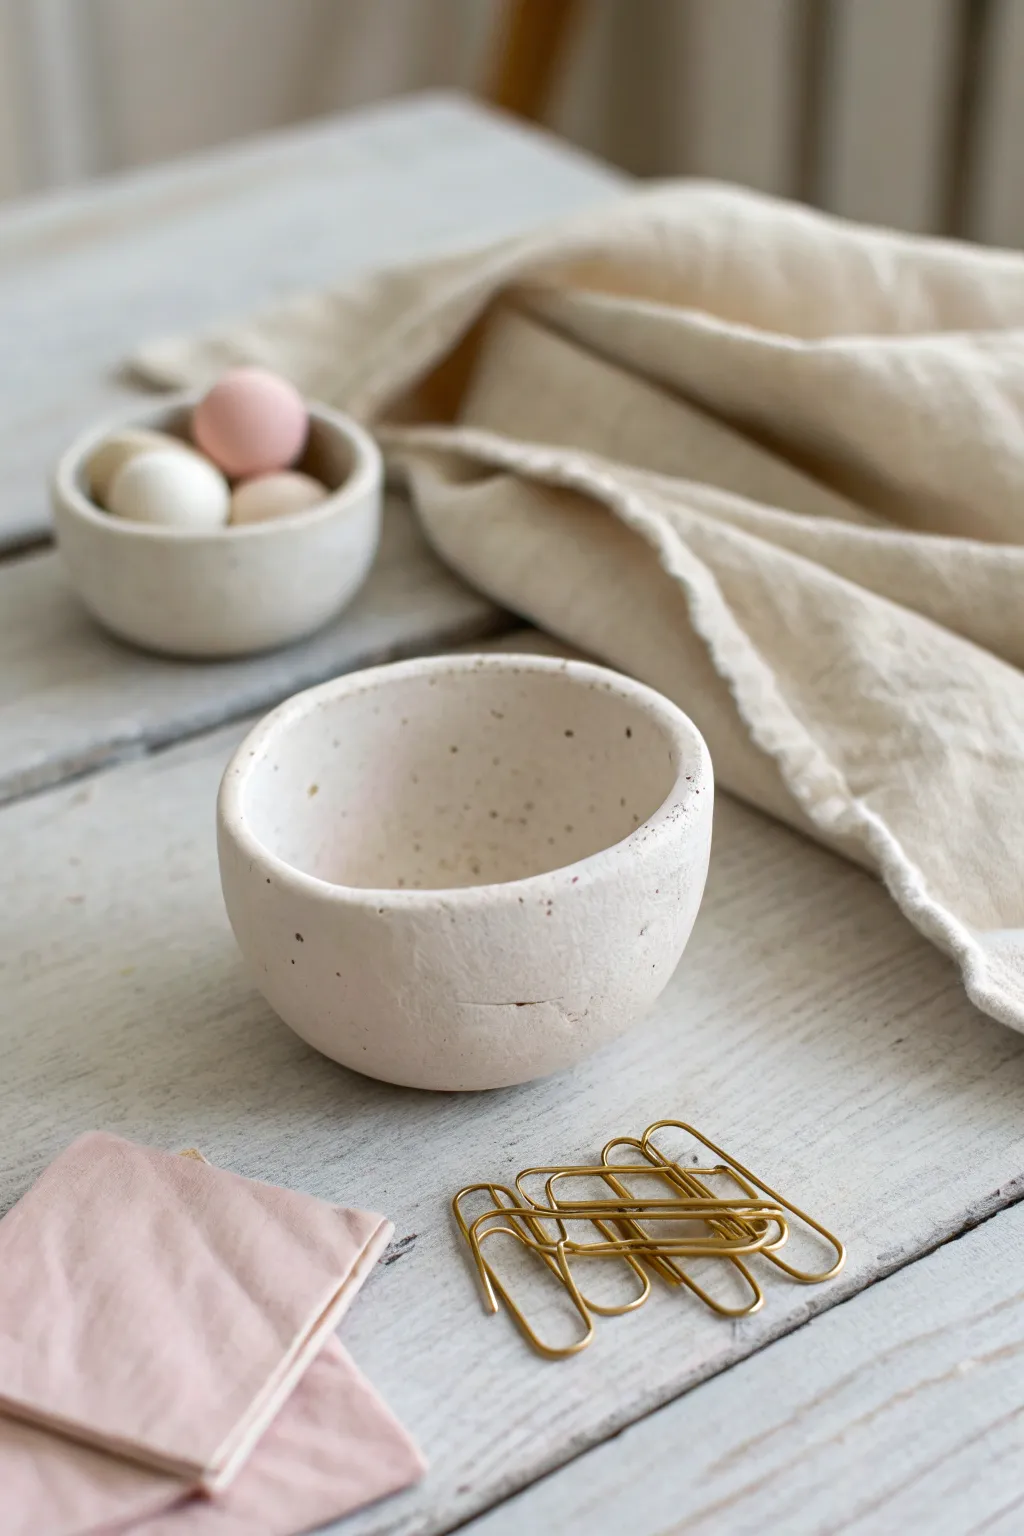
These charming miniature pinch pots feature a delightfully rustic texture and a speckled finish that mimics stoneware pottery. Perfect for holding paperclips, jewelry, or simply as decorative accents, they bring an earthy, handmade touch to any desk.
Step-by-Step Tutorial
Materials
- Paper clay or air-dry clay (white)
- Small bowl of water
- Fine-grit sandpaper
- Used coffee grounds or black pepper (for speckles)
- Acrylic paint (cream or off-white)
- Acrylic paint (matte varnish or sealer)
- Paintbrushes
- Rolling pin (optional)
- Clean work surface or mat
Step 1: Preparing the Clay Body
-
Condition the Clay:
Start by taking a chunk of paper clay about the size of a golf ball. Knead it in your hands to warm it up and make it pliable. -
Add Texture:
To achieve that organic, speckled look right from the start, sprinkle a small pinch of dried coffee grounds or coarse black pepper onto the clay. -
Mix Thoroughly:
Fold the clay over the grounds and knead thoroughly until the speckles are evenly distributed throughout the ball. -
Form a Sphere:
Roll the prepared clay between your palms to create a smooth, tight sphere. Ensure there are no major cracks on the surface.
Cracks happen!
If deep cracks appear while drying, mix a tiny bit of fresh clay with water to make a paste (slip) and fill them in, then smooth over.
Step 2: Shaping the Pinch Pot
-
Start the Pinch:
Hold the clay sphere in one hand. Gently press your thumb into the center of the ball, stopping before you push all the way through to the bottom. -
Open the Walls:
Using your thumb and forefingers, gently pinch the clay walls, rotating the ball as you go to ensure an even thickness all around. -
Refine the Shape:
Continue pinching lightly to thin the walls and widen the opening. Aim for a slightly organic, imperfect rim rather than a machine-perfect circle. -
Flatten the Base:
Once the bowl shape is formed, tap the bottom gently against your work surface to create a flat, stable base so it won’t wobble. -
Smooth the Edges:
Dip your finger in a tiny bit of water and run it over the rim and walls to smooth out rough cracks, though leaving a few small fissures adds to the rustic charm.
Step 3: Drying and Finishing
-
Let it Dry:
Place your pot in a safe spot to air dry completely. Depending on humidity and thickness, this usually takes 24-48 hours. I like to flip it gently halfway through to help the bottom dry evenly. -
Sand Imperfections:
Once bone dry, use fine-grit sandpaper to gently smooth any sharp edges on the rim or rough spots on the exterior. -
Base Coat:
Mix a cream or warm off-white acrylic paint. Apply a thin, even coat over the entire bowl, inside and out. -
Enhance Speckles:
If the paint covered your texture too much, you can gently flick a toothbrush loaded with watered-down brown paint over the surface for extra speckles. -
Seal the piece:
Finish with a coat of matte varnish or sealer to protect the paper clay from moisture and give it that finished ceramic feel.
Color Pop
Paint the inside a solid pastel color like blush pink or sage green while keeping the outside natural for a modern two-tone look.
Place your new mini bowls on your desk to organize small treasures or display them empty as sculptural art


Paper Clay Leaf-Imprint Bowls
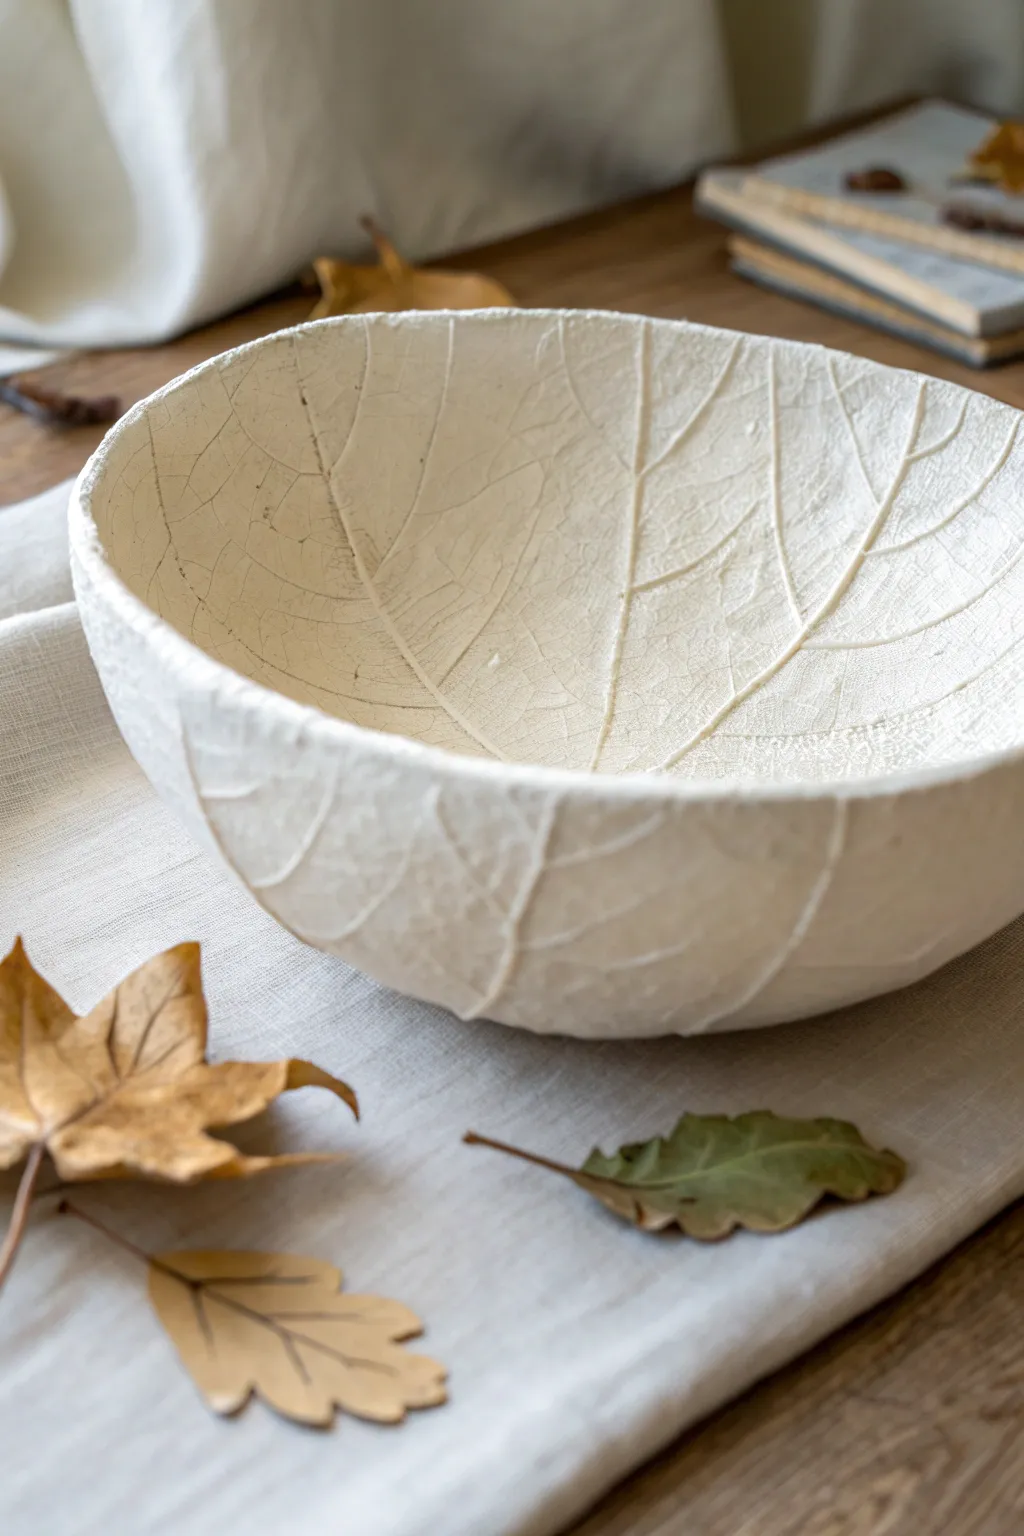
Capture the delicate details of nature with this elegant, textured bowl project. Using paper clay allows you to create a lightweight yet durable vessel that showcases distinct leaf vein patterns on both the interior and exterior.
Detailed Instructions
Materials
- White paper clay (store-bought or homemade)
- Large, deeply veined leaf (e.g., Savoy cabbage, large Hosta, or Rhubarb)
- Rolling pin
- Parchment paper or canvas mat
- Bowl for a mold (plastic or ceramic)
- Plastic wrap
- Craft knife or pottery needle tool
- Sponge and water
- Fine-grit sandpaper (220 grit)
- Matte sealant or acrylic varnish
Step 1: Preparation and Rolling
-
Prepare your workspace:
Lay down your canvas mat or a large sheet of parchment paper to prevent sticking. Ensure the leaf you’ve chosen is clean and dry, as moisture can affect the clay. -
Condition the clay:
Take a generous amount of paper clay and knead it briefly until it is pliable and smooth. If it feels too dry, mist it lightly with water, but avoid making it sticky. -
Roll out the slab:
Use your rolling pin to flatten the clay into a large, even slab. Aim for a thickness of about 1/4 inch (approx. 6mm). Lift and flip the clay occasionally to ensure it isn’t sticking to your surface.
Fixing Cracks
Paper clay shrinks as it dries. If minor cracks appear, make a slip (paste) of wet clay and fill them in with a finger, then smooth over.
Step 2: Creating the Texture
-
Position the leaf:
Place your chosen leaf vein-side down onto the clay slab. The underside of the leaf usually has the most prominent veins, which creates the best impression. -
Imprint the pattern:
Roll firmly over the leaf with your rolling pin. Don’t be afraid to apply pressure; you want the veins to embed deeply into the clay surface. I like to roll from the center outward to avoid air pockets. -
Reveal the detail:
Carefully peel the leaf away from the clay. Do this slowly to ensure the clay doesn’t tear and to admire the beautiful network of veins left behind. -
Cut the shape:
Using the impression as a guide, cut out a large circle or organic shape around the leaf pattern with your craft knife. You can follow the natural edge of the leaf or cut a perfect circle depending on your desired look.
Step 3: Shaping the Bowl
-
Prepare the mold:
Take your plastic or ceramic bowl and cover the exterior tightly with plastic wrap. This step is crucial so your clay doesn’t fuse to the mold as it dries. -
Drape the clay:
Gently lift your textured clay slab and drape it over the upside-down bowl mold. Position it so the textured side is facing outward (away from the bowl). -
Form the shape:
Press the clay gently against the mold to shape it. Smooth out any large folds, or embrace the natural pleats and waves that occur, pressing them down to secure the form. -
Refine the edges:
Check the rim of your bowl. You can leave it raw and organic or smooth it slightly with a damp sponge for a cleaner finish.
Design Twist
For a rustic look, rub a diluted brown acrylic wash over the texture and wipe it back immediately, leaving darkness only in the deep veins.
Step 4: Drying and Finishing
-
Initial drying phase:
Let the bowl dry on the mold for at least 24 hours in a cool, dry place. Avoid direct sunlight or heat, which can cause cracking. -
Remove the mold:
Once the clay feels stiff and leathery, carefully lift it off the mold and peel away the plastic wrap. The interior might still be damp. -
Complete drying:
Flip the bowl right-side up and allow it to dry completely for another 24-48 hours until it is bone dry and chalky white. -
Sand limitations:
Using fine-grit sandpaper, gently smooth any rough spots on the rim. Be extremely careful not to sand over the leaf texture, or you will lose the fine details. -
Seal the work:
Apply a thin coat of matte sealant or acrylic varnish to protect the surface and make it easier to dust later. This preserves the natural, stone-like appearance shown in the image.
Display your new bowl on a linen table runner for a naturally sophisticated centerpiece


Paper Clay Hanging Ornaments
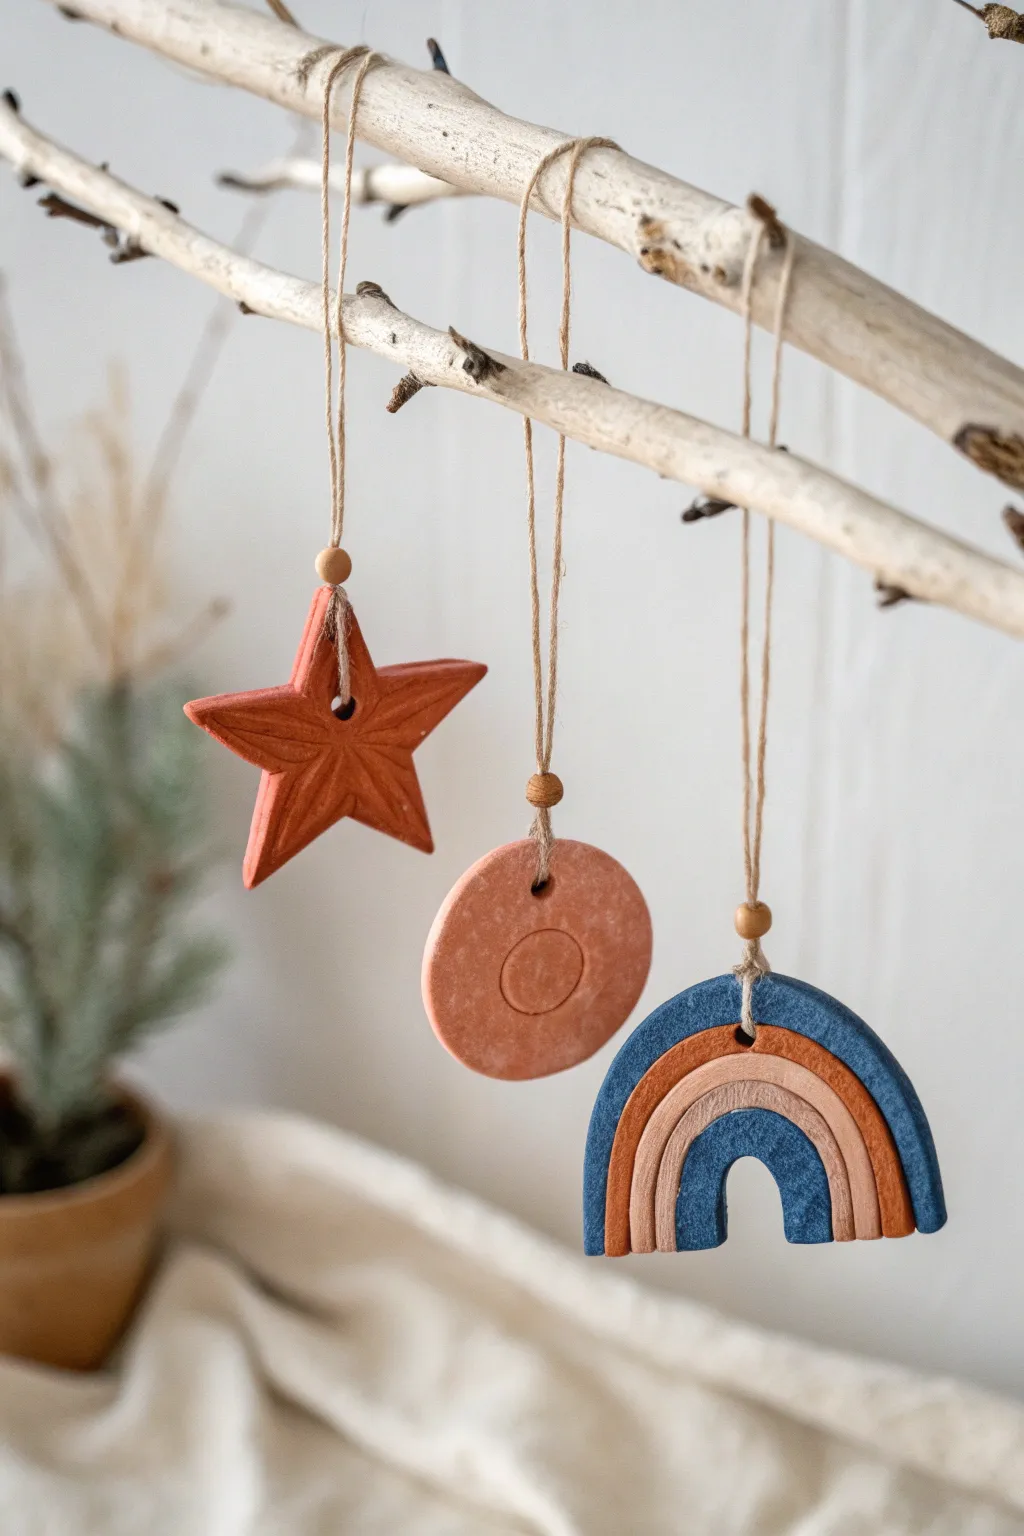
These charming, earthy ornaments combine the warmth of terracotta tones with the lightweight versatility of paper clay. Perfect for a minimalist holiday tree or year-round wall decor, this trio features a classic star, a simple medallion, and a modern arch rainbow.
How-To Guide
Materials
- White paper clay (air-dry)
- Acrylic paint (Terracotta/burnt orange, dark blue, beige, light peach)
- Small rolling pin
- Rolling guides or wooden slats (approx. 1/4 inch thick)
- Cookie cutters (Star, Circle)
- Sharp craft knife
- Small wooden beads
- Jute twine
- Toothpick or skewer
- Fine-grit sandpaper
- Small flat paintbrush
- Modeling tool or dull butter knife
- Bowl of water
Step 1: Preparation & Shaping
-
Prepare the Clay:
Pull a baseball-sized chunk of paper clay from your package. Knead it in your hands for a minute until it is pliable and smooth, removing any air bubbles. -
Roll it Out:
Place the clay between two wooden slats or rolling guides to ensure an even thickness. Roll the clay out until it is perfectly flat and about 1/4 inch thick. This thickness is crucial for durability. -
Cut the Star:
Press your star cookie cutter firmly into the clay. Before lifting the cutter, give it a tiny wiggle to ensure separation. Gently pop the star out. -
Add Star Details:
Using a modeling tool or the back of a dull knife, gently score lines from the center of the star out to the points and the inner crevices to create a 3D faceted look. Use the toothpick to poke a hole near the top point for hanging. -
Cut the Circle:
Use your circle cutter to stamp out a round shape. For the inner detail shown in the photo, lightly press a smaller circular object (like a bottle cap) into the center without cutting all the way through. -
Pierce the Circle:
Make a hole near the top edge of the circle using your toothpick. Ensure the hole is wide enough for your twine to pass through later. -
Creating the Rainbow Base:
For the rainbow, cut a fresh arch shape using a large circle cutter, then cut straight across the bottom. Use a smaller cutter to remove the inner semi-circle to create the arch. -
Sculpting Rainbow Texture:
Instead of gluing separate coils, carve grooves into the flat arch shape to mimic the look of stacked layers. Run your carving tool parallel to the curve to define four distinct bands. -
Finalize Rainbow Structure:
Ensure the top of the rainbow has a hole for hanging. Pierce it directly in the center of the top arch.
Uneven Drying?
If your ornaments curl while drying, place a light book on top of them once they are semi-dry but not tacky. This gently weights them down to ensure they stay perfectly flat.
Step 2: Drying & Refining
-
Let it Dry:
Place all shapes on a wire rack or parchment paper. Allow them to dry for at least 24-48 hours. I like to flip them halfway through so the bottom gets air exposure too. -
Sand the Edges:
Once fully hard and white, use fine-grit sandpaper to gently smooth any rough edges or burrs left by the cutting process. Wipe away the dust with a barely damp cloth.
Step 3: Painting & Assembly
-
Paint the Star and Circle:
Mix a terracotta red with a touch of brown acrylic paint. Paint the entire star and the circle ornament with this mixture. You may need two coats for full opacity. -
Paint the Rainbow:
Paint the outermost and innermost bands of the rainbow in a deep matte blue. Paint the second band in burnt orange/terracotta, and the third band in a soft beige light peach. -
Seal (Optional):
If you want extra protection, apply a clear matte varnish over the paint once dry. This helps keep the earthy, matte look seen in the photo. -
Add the Hanging Loop:
Cut a 10-inch length of jute twine for each ornament. Fold the twine in half and thread the looped end through the hole in the clay. -
Secure with bead:
Pass the two loose ends of the twine through the loop you just pushed through to create a lark’s head knot directly on the ornament. Then, thread both loose ends through a small wooden bead and slide it down to rest on top of the clay. -
Tie it Off:
Tie a simple overhand knot at the very end of the twine to create the hanging loop.
Textured Effect
To get that stone-like texture, mix a pinch of baking soda specifically into your paint before applying it. It creates a subtle, gritty surface that mimics real terracotta.
Hang your creations on a driftwood branch or your holiday tree to enjoy their handmade charm

The Complete Guide to Pottery Troubleshooting
Uncover the most common ceramic mistakes—from cracking clay to failed glazes—and learn how to fix them fast.
Paper Clay Cute Animal Buddies
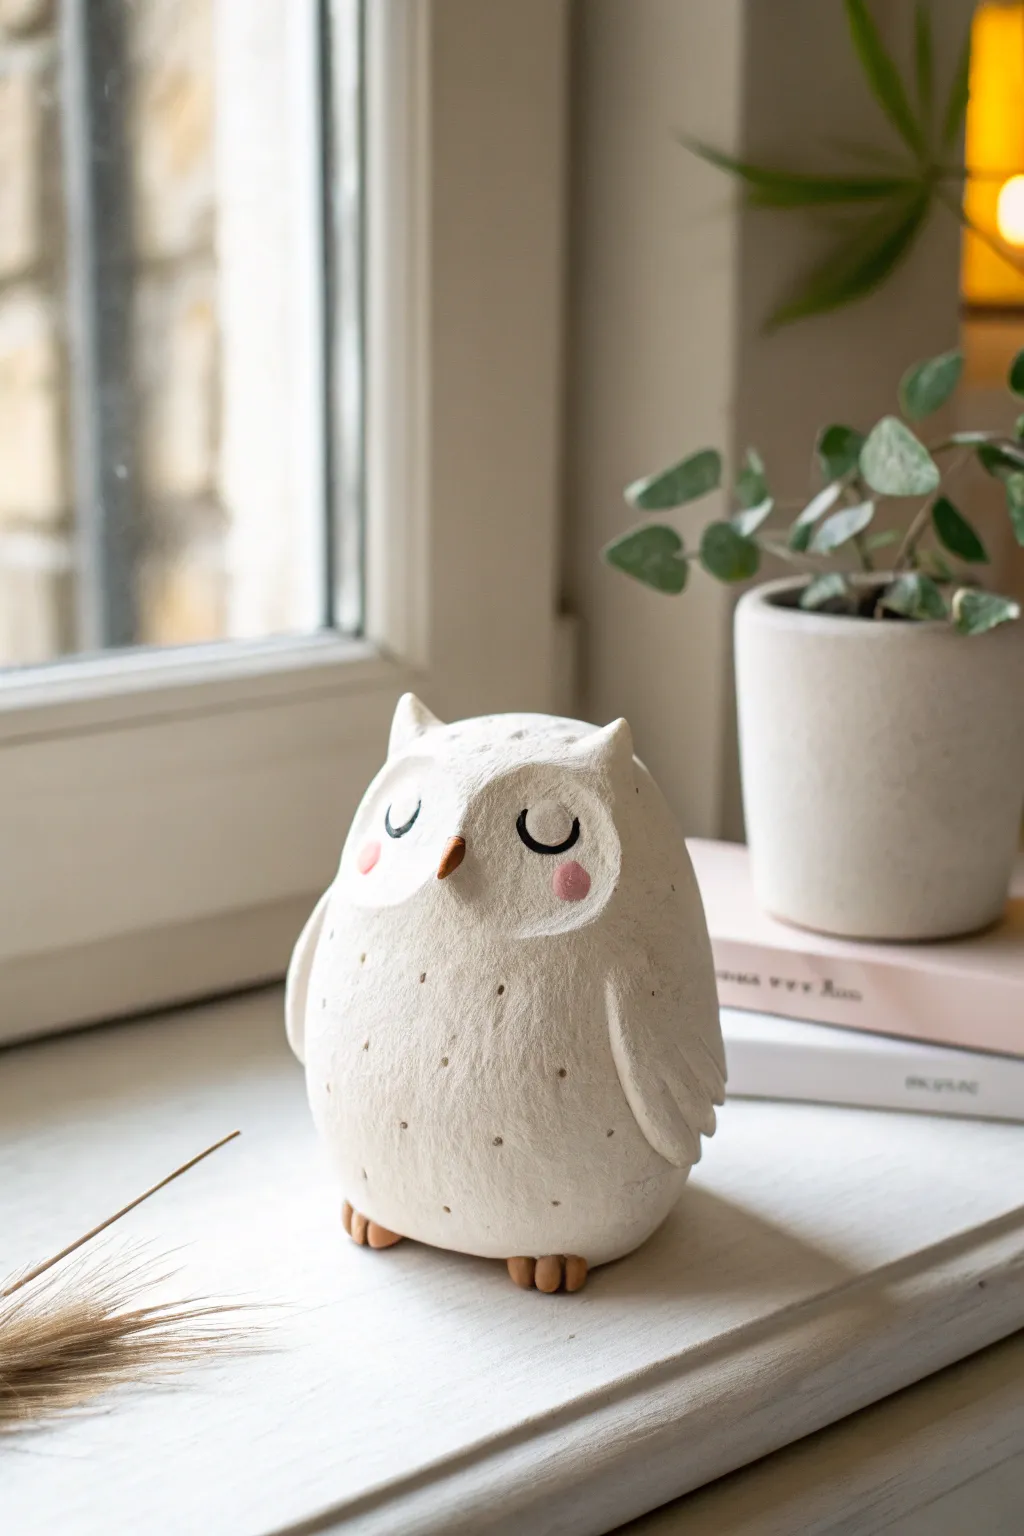
Craft a serene sleeping owl that brings a touch of calm to any shelf or windowsill. This project uses the unique, slightly fibrous texture of paper clay to imitate soft feathers on a minimalist, rounded form.
Detailed Instructions
Materials
- Air-dry paper clay (white)
- Small cup of water
- Aluminum foil (for armature)
- Modelling tools (or a toothpick and a dull knife)
- Fine-grit sandpaper
- Acrylic paints: Black, Soft Pink, Terracotta/Brown
- Fine detail paintbrush
- Matte varnish or sealant
Step 1: Shaping the Base
-
Form the core:
Crumple a piece of aluminum foil into a tight, egg-shaped ball. This saves clay and keeps the figurine lightweight while helping it dry faster from the inside out. -
Cover the core:
Flatten a generous chunk of paper clay into a pancake and wrap it completely around your foil egg. Smooth the seams together with a little water until the surface is uniform. -
Refine the shape:
Roll the clay egg gently between your palms to smooth it. Press the bottom against your work surface to create a flat base so the owl stands securely on its own.
Needle Tool Trick
For the subtle tummy texture, try using the eye of a needle rather than the sharp point. It creates perfect little semi-circle impressions that look like downy feathers.
Step 2: Sculpting Features
-
Create the ears:
Pinch the top two corners of the ‘head’ area gently to form small, pointed tufts for the ears. Keep them subtle and integrated into the main shape rather than attaching separate pieces. -
Define the face:
Using your thumbs, press a very shallow, heart-shaped indentation into the face area. This slight depression defines the facial disc where the eyes will eventually go. -
Add the beak:
Roll a tiny, grain-sized cone of clay. Score the center of the face slightly with a needle tool, add a dot of water/slip, and press the beak into place, smoothing the edges just a bit so it stays put. -
Attach the wings:
Form two flat, teardrop shapes from fresh clay. Attach one to each side of the body using water to blend the top edge into the shoulder, leaving the bottom tips slightly raised for dimension. -
Texture the feathers:
Take a needle tool or toothpick and press small indentations into the tips of the wings to intimate flight feathers. You can also lightly poke tiny, sparse holes across the tummy area for texture. -
Make the feet:
Roll six tiny sausages of clay. Group them in threes to form two clawed feet. Attach these to the very bottom front edge of the owl so they peek out from under the belly.
Cracking Issues?
Paper clay shrinks as it dries. If cracks appear, mix a tiny bit of fresh clay with water to make a paste and fill the cracks, then sand smooth once dry.
Step 3: Finishing Touches
-
Let it dry:
Allow the owl to dry completely. Paper clay can take 24-48 hours depending on thickness. Flip it occasionally to ensure the bottom dries too. -
Sand for softness:
Once bone dry, take fine-grit sandpaper and gently sand the surface. You don’t want it perfectly smooth like porcelain; keep some of that paper texture to mimic fluff. -
Paint the beak and feet:
Using a small brush, carefully paint the beak and the little feet with a warm terracotta or brown acrylic paint. -
Add the rosy cheeks:
Mix a very watery wash of soft pink paint. Dab two circle shapes onto the cheeks. The porous clay will absorb the wash, creating a soft, stained effect rather than a harsh paint layer. -
Paint the eyes:
With your finest brush and black paint, draw two downward-curving crescents for the sleeping eyes. Add little eyelashes if you like, but keep lines thin. -
Seal the piece:
Finish with a coat of matte varnish. This protects the paint and clay but keeps the natural, non-shiny look suitable for a woodland creature.
Place your little owl near a window or plant to enjoy its peaceful presence
Paper Clay Heart and Star Gift Tags
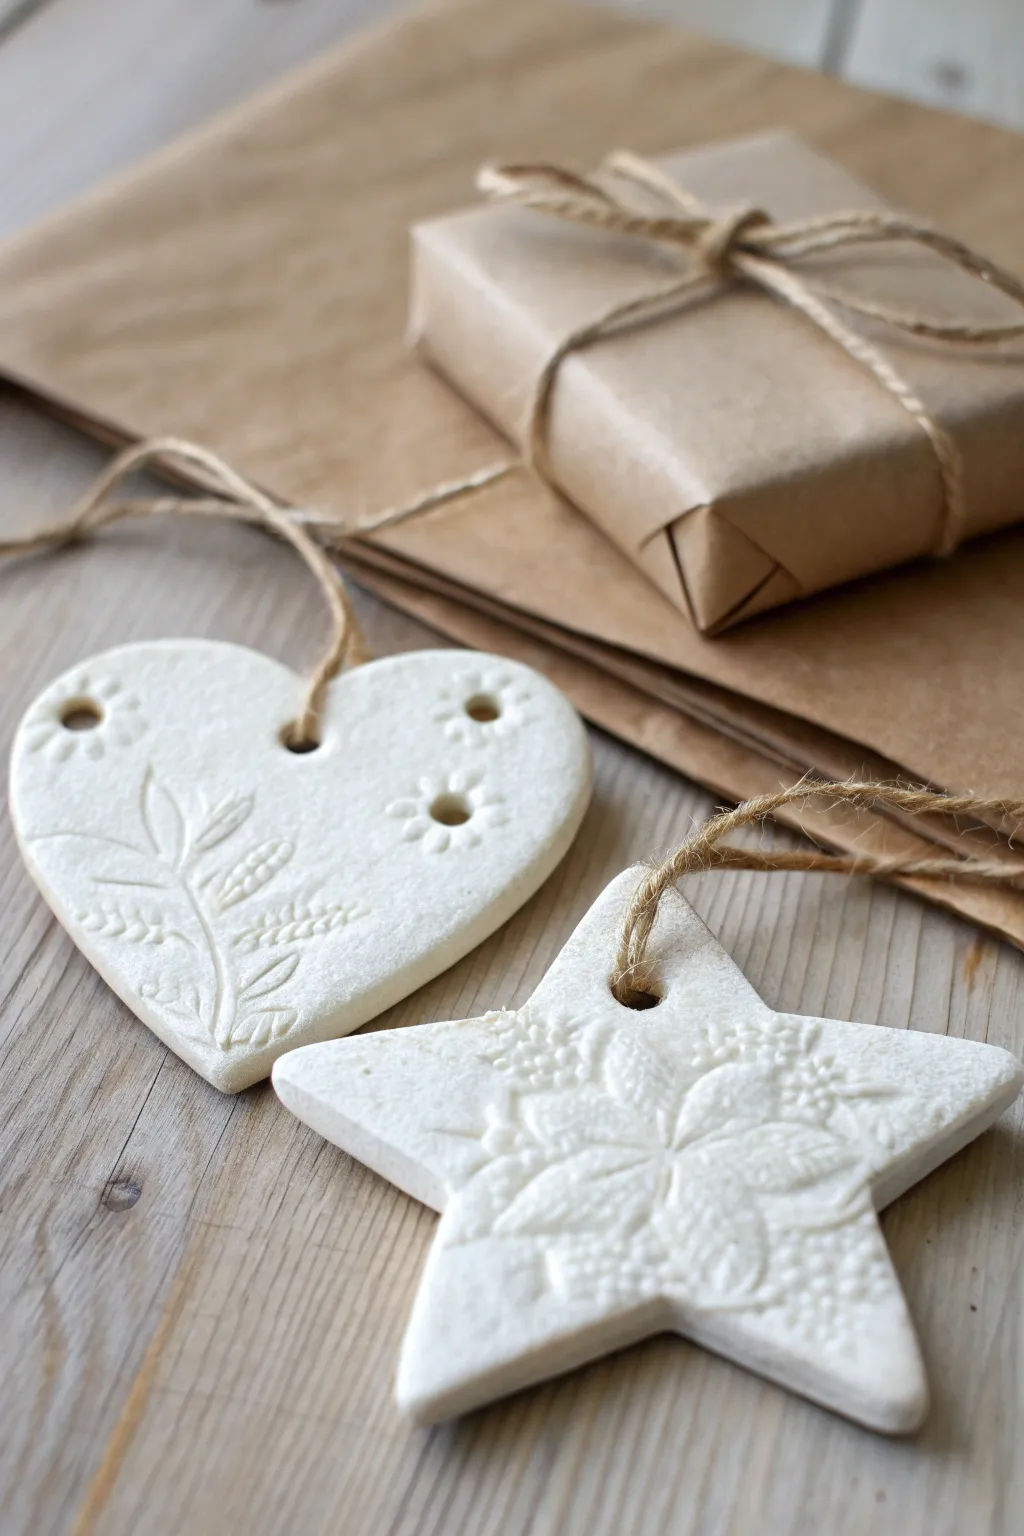
Create these charmingly rustic gift tags that double as keepsake ornaments, featuring delicate embossed botanical designs. The soft white finish of the paper clay pairs beautifully with unbleached jute twine for a natural, timeless aesthetic.
How-To Guide
Materials
- White air-dry paper clay (or homemade paper clay)
- Small heart-shaped cookie cutter
- Small star-shaped cookie cutter
- Rolling pin
- Wax paper or parchment paper (for working surface)
- Rubber stamps with floral or botanical motifs
- Fresh herbs or greenery (optional alternative to stamps)
- Small straw or circular tool (for creating the hole)
- Fine-grit sandpaper
- Natural jute twine
- Scissors
Step 1: Preparation and Rolling
-
Prepare your surface:
Lay down a sheet of wax paper or parchment paper on a flat, stable table. This prevents the clay from sticking and keeps your tags clean. -
Condition the clay:
Take a handful of your white paper clay and knead it gently in your hands until it feels pliable and smooth. The warmth of your hands helps remove any initial stiffness. -
Roll out the slab:
Place the clay on your work surface and use the rolling pin to flatten it. Aim for an even thickness of about 1/4 inch (approx. 5-6mm). -
Check consistency:
Ensure the clay isn’t too thin, as it might crack when drying, or too thick, which can make the tags heavy. A uniform slab is key for professional-looking results.
Stamp Release Trick
If your stamp sticks to the moist clay, lightly dust the stamp surface with cornstarch or baby powder before pressing it down. This ensures a crisp, clean release every time.
Step 2: Embossing and Cutting
-
Apply the texture:
Before cutting the shapes, press your botanical rubber stamps gently but firmly into the rolled clay. Alternatively, lay a sprig of fresh herbs on the clay and roll over it once lightly to transfer the impression. -
Consider placement:
Look at where your design landed on the clay. Position your cookie cutters so the embossed pattern sits nicely within the frame—perhaps centered for the star or off-center for the heart. -
Cut the shapes:
Press the heart and star cutters straight down into the clay. Give them a tiny wiggle to ensure a clean cut, then lift them away. -
Remove excess clay:
Peel away the scrap clay from around your cut shapes. Save this excess; you can ball it up and store it in an airtight bag for later use. -
Add decorative holes:
For the heart tag, use a small tool or straw end to press tiny decorative divots around the floral design if you wish to mimic the look in the photo. -
Create the hanging hole:
Use a drinking straw to punch a clean hole near the top of each shape. Make sure it’s not too close to the edge to prevent the clay from breaking later.
Step 3: Drying and Finishing
-
Initial drying:
Leave the tags on the parchment paper to air dry. Since paper clay shrinks slightly, keeping them on a flat surface helps reduce curling. -
Flip for evenness:
After about 12 hours, or once the top feels dry to the touch, gently flip the tags over. This allows the backside to dry evenly and prevents warping. -
Check for total dryness:
Wait another 12-24 hours. The clay should turn a stark, chalky white and feel lightweight and hard when fully cured. -
Smooth the edges:
Take a piece of fine-grit sandpaper and very gently sand the outer edges of the heart and star to remove any rough burrs or sharp points. -
Add the twine:
Cut a length of natural jute twine, approximately 8-10 inches long. Fold it in half to create a loop. -
Secure the loop:
Thread the folded end through the hole in the tag, then pass the loose ends through that loop (a lark’s head knot) and pull tight. -
Final touch:
Your tags are now ready to be tied onto a gift wrapped in brown paper for that perfect rustic finish.
Fixing Curled Edges
If your tags curl while drying, slightly dampen the concave side with a wet sponge and place them under a heavy book (with parchment paper in between) overnight to flatten.
These handcrafted tags add such a personal touch to your gift-giving and can easily be reused as holiday ornaments for years to come


What Really Happens Inside the Kiln
Learn how time and temperature work together inside the kiln to transform clay into durable ceramic.
Paper Clay Relief Art Discs
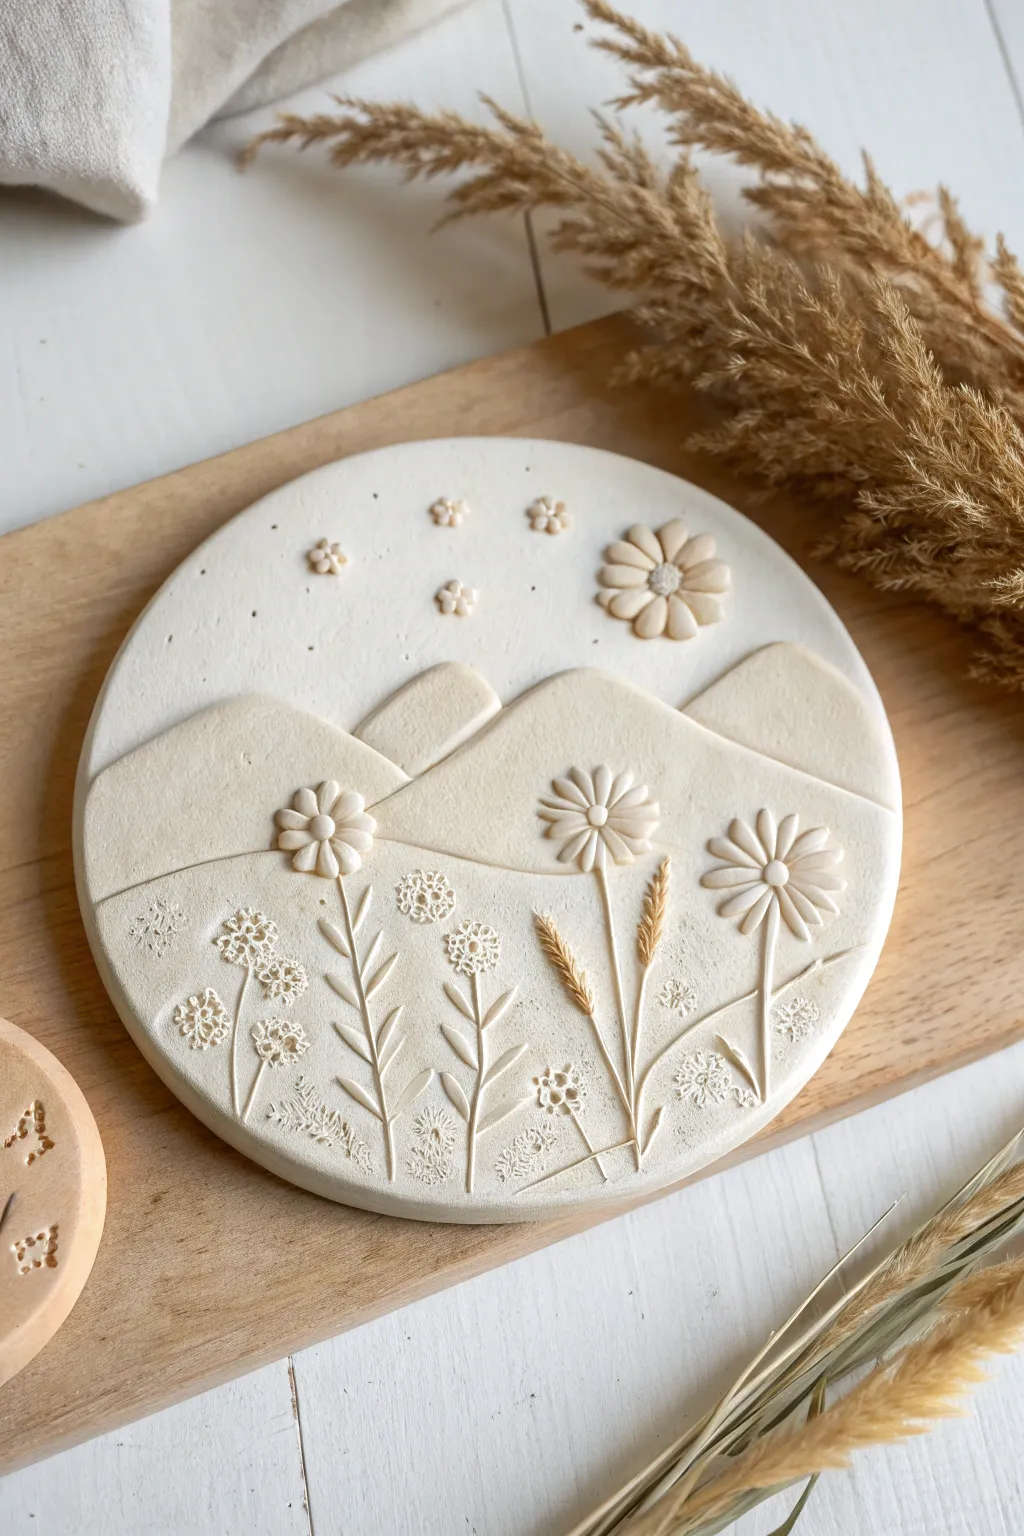
Capture the serene beauty of a wildflower meadow with this charming relief art project. Using simple layering techniques, you’ll build a dimensional landscape featuring rolling hills and delicate blooms on a smooth paper clay disc.
Step-by-Step Guide
Materials
- Paper clay or premium air-dry clay (white)
- Rolling pin
- Circle cutter or bowl (approx. 6-8 inches)
- Clay sculpting tools (needle tool, small ball stylus)
- Small floral stamps or texture tools
- Water in a small cup
- Sandpaper (fine grit)
- Parchment paper or non-stick mat
- Acrylic sealer (matte, optional)
Step 1: Base Preparation
-
Condition the clay:
Begin by kneading a large handful of paper clay until it is warm, pliable, and free of cracks. This conditioning step is crucial for a smooth finish later on. -
Roll the slab:
Place the clay on a sheet of parchment paper. Roll it out into an even slab, aiming for a consistent thickness of about 1/4 inch to ensure durability. -
Cut the disc:
Use a large circle cutter or trace around a bowl with a needle tool to cut out your main disc shape. Remove the excess clay and smooth the edges with a wet finger.
Step 2: Sculpting the Landscape
-
Outline the horizon:
Lightly sketch a wavy line across the middle of the disc with your needle tool to mark where your mountain range will sit. -
Create the mountain layers:
Roll out a thinner piece of fresh clay. Cut organic, wave-like shapes to mimic rolling hills. I like to make three distinct sections—two larger side hills and a smaller central peak. -
Attach the background:
Score the back of your mountain pieces and the corresponding area on the disc. Dab a little water on the scored areas and gently press the clay down to bond them. -
Blend the seams:
Use a modeling tool to smooth the bottom edges of the mountains into the base clay, but keep the top ridges distinct to create that lovely 3D relief effect. -
Adding texture to the ground:
For the foreground meadow area, gently press a rough sponge or texture tool into the clay to give it an earthy, grassy texture, distinct from the smooth sky.
Fixing Cracks
Prepare a ‘slip’ by mixing a small chunk of clay with water until it’s paste-like. Use this to fill any small cracks that appear during drying, then sand smooth.
Step 3: Botanical Details
-
Form the main petals:
Roll tiny teardrop shapes for the large flower petals. Arrange them in a radial pattern on the right hill to form a daisy-like bloom. -
Add flower centers:
Place a small flattened ball of clay in the center of your petals. Use a needle tool to poke tiny dots into the center for texture. -
Sculpt the stems:
Roll extremely thin snakes of clay for the flower stems. Attach them vertically leading up to your flowers, pressing them gently onto the base. -
Create wheat accents:
For the wheat stalks, attach a small stem and then use your needle tool to make angled indentations along the top, mimicking the grain texture. -
Stamp tiny wildflowers:
If you have small floral stamps or lace, press them into the lower left foreground to create a field of intricate, tiny blooms without needing to sculpt individual petals. -
Sky embellishments:
Add a few tiny molded flowers or stars in the upper sky area. Grouping them in threes often creates a pleasing visual balance. -
Final smoothing:
Do one last check for fingerprints. A damp paintbrush is perfect for smoothing out tiny imperfections without ruining your detailed sculpting.
Add Natural Color
For a subtle, antique look, wipe a diluted wash of brown or beige acrylic paint over the dried relief, then immediately wipe off the surface with a damp cloth.
Step 4: Finishing
-
Slow drying:
Place the disc on a wire rack to air dry. To prevent curling, you can place a light book on top once the surface is dry to the touch, usually after 24 hours. -
Sanding edges:
Once fully cured (2-3 days), use fine-grit sandpaper to gently smooth the outer rim of the disc for a professional, clean look. -
Preservation:
Apply a thin coat of matte acrylic sealer to protect the clay from moisture and dust while keeping that natural, matte stone appearance.
Hang your relief art on a wall or display it on a shelf to bring a touch of calmness to your space
Paper Clay Ring Cones
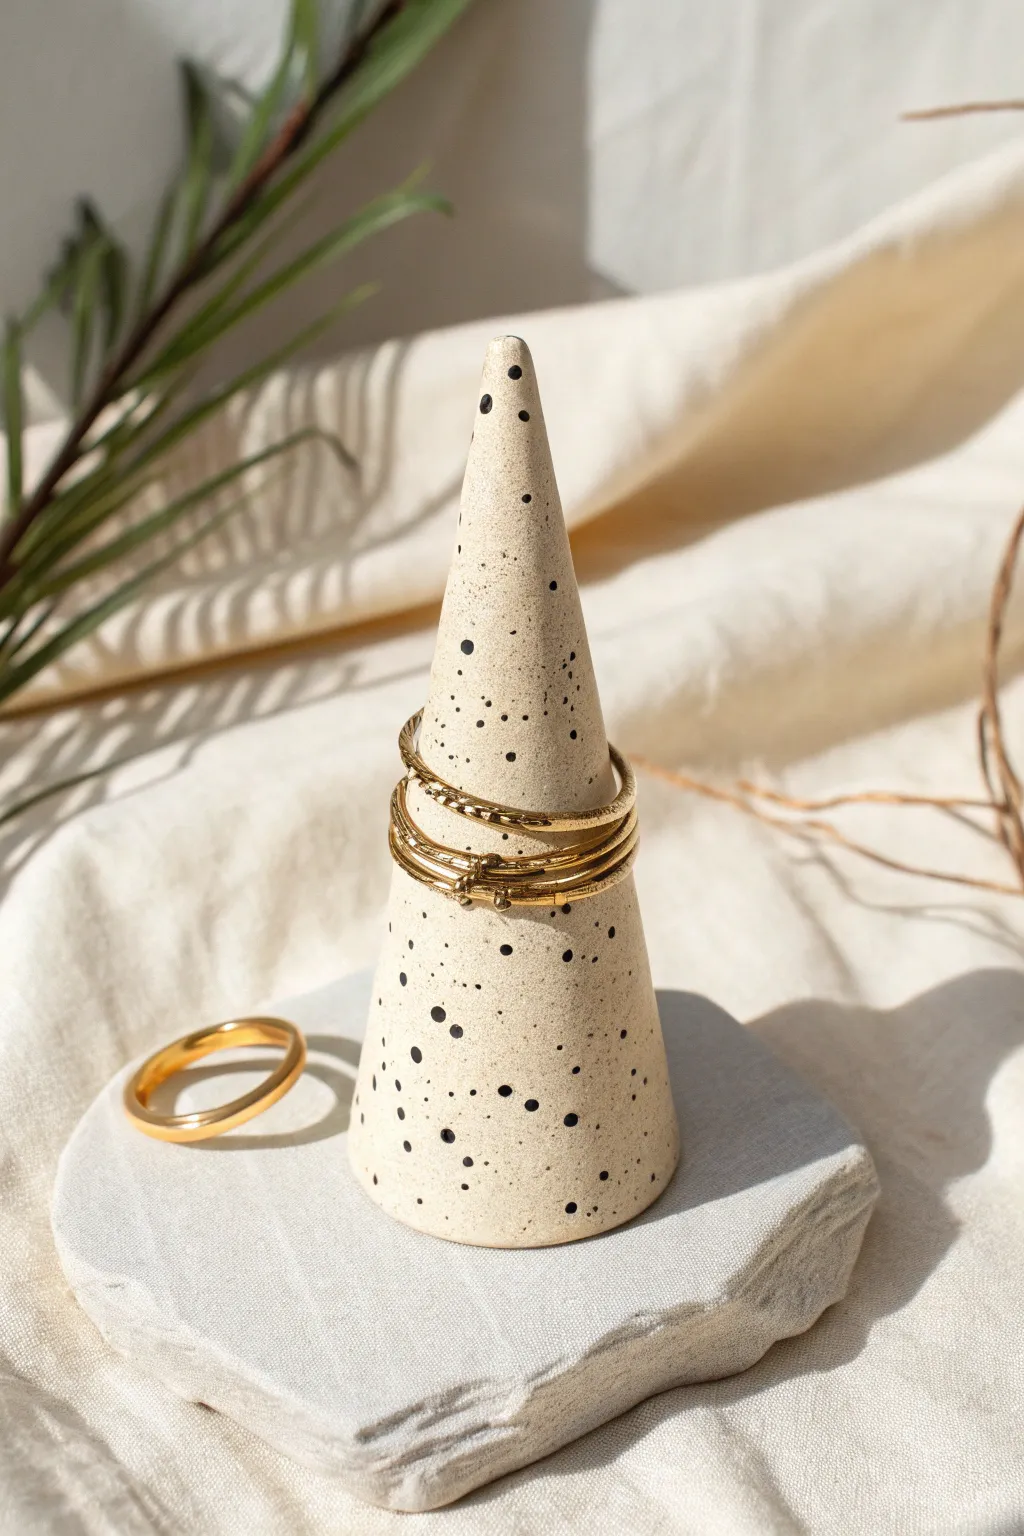
Embrace the organic beauty of ceramic pottery without the need for a kiln with this elegant paper clay ring cone. This project features a minimalist speckled cone set atop a textured, raw-edge stone base, creating a stunning display for your favorite gold bands.
Step-by-Step
Materials
- Paper clay (air dry clay, white)
- Black acrylic paint (liquid or fluid body)
- Rough stone tile or slate coaster (for the base)
- Rolling pin
- Sharp craft knife
- Cardstock or thin cardboard (for template)
- Clear matte varnish or sealant
- Sandpaper (fine grit)
- Old toothbrush
- Small bowl of water
- Strong adhesive (E6000 or strong craft glue)
Step 1: Shaping the Cone
-
Prepare the template:
Cut a quarter-circle wedge shape out of your cardstock. A radius of about 3 to 4 inches works well for a standard ring cone height. -
Roll out the clay:
Take a handful of paper clay and roll it out into a flat slab, approximately 1/4 inch thick. Aim for an even thickness to ensure the cone stands straight later. -
Cut the clay shape:
Place your cardstock template onto the rolled clay slab. Use your sharp craft knife to trace around the template and cut out the wedge shape. -
Form the cone:
Gently lift the clay wedge. Bring the two straight edges together to form a cone shape. Overlap the edges slightly or butt them together, depending on your preference, but ensure they touch completely. -
Blend the seam:
Dip your finger in a little water and smooth the seam where the edges join. I like to work the clay gently back and forth until the line disappears completely, making the cone look solid. -
Level the bottom:
Stand the cone upright on a flat surface. If it wobbles or leans, trim the bottom edge carefully with your knife until it sits perfectly flush and vertical. -
Refine the point:
Using moistened fingertips, gently smooth and round off the very tip of the cone so it isn’t dangerously sharp, giving it that soft pottery look. -
Let it dry:
Set the cone aside to dry completely. This usually takes 24 to 48 hours depending on humidity. Rotate it occasionally so all sides dry evenly.
Step 2: Finishing and Assembly
-
Sand for smoothness:
Once bone dry, use fine-grit sandpaper to buff out any bumps, fingerprints, or lingering seam lines. Wipe away the dust with a slightly damp cloth. -
Prepare the speckle paint:
Dilute a small drop of black acrylic paint with water. You want a very thin, inky consistency that flicks easily off a brush bristles. -
Apply the splatter:
Dip an old toothbrush into the diluted black paint. Hold it near the cone and run your thumb across the bristles to flick tiny specks onto the surface. Rotate the cone to get full coverage. -
Control the pattern:
Vary your distance to create different speckle sizes. Do a test run on a scrap piece of paper first to ensure you aren’t getting large blobs. -
Seal the cone:
Allow the paint specks to dry fully. Apply a coat of clear matte varnish to protect the clay from moisture and give it a finished, ceramic feel. -
Prepare the base:
Take your rough stone tile or slate piece. Ensure the center is clean and dry. The contrast between the smooth cone and the rough stone is key to this look. -
Attach the cone:
Apply a generous dab of strong adhesive to the bottom of your finished cone. Press it firmly onto the center of the stone base. -
Final cure:
Let the glue cure according to the manufacturer’s instructions before placing any jewelry on it.
Uneven Seams?
If the seam cracks while drying, fill the crack with a wet ‘slip’ (mushy clay and water mix), smooth it over, and let it dry again before sanding.
Solid Stone Look
Mix a tiny amount of grey or beige paint directly into the white clay before rolling it out to make the cone look like unglazed stoneware.
Now you have a chic, modern display piece that keeps your rings safe and looks beautiful on your vanity

TRACK YOUR CERAMIC JOURNEY
Capture glaze tests, firing details, and creative progress—all in one simple printable. Make your projects easier to repeat and improve.
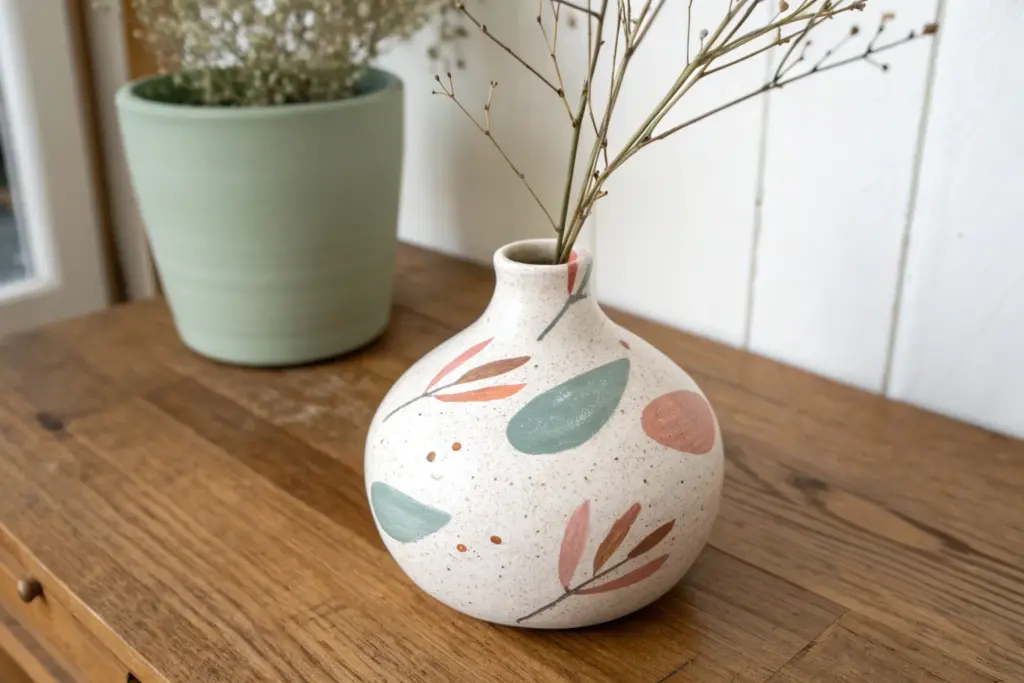
Paper Clay Bud Vases for Dried Stems
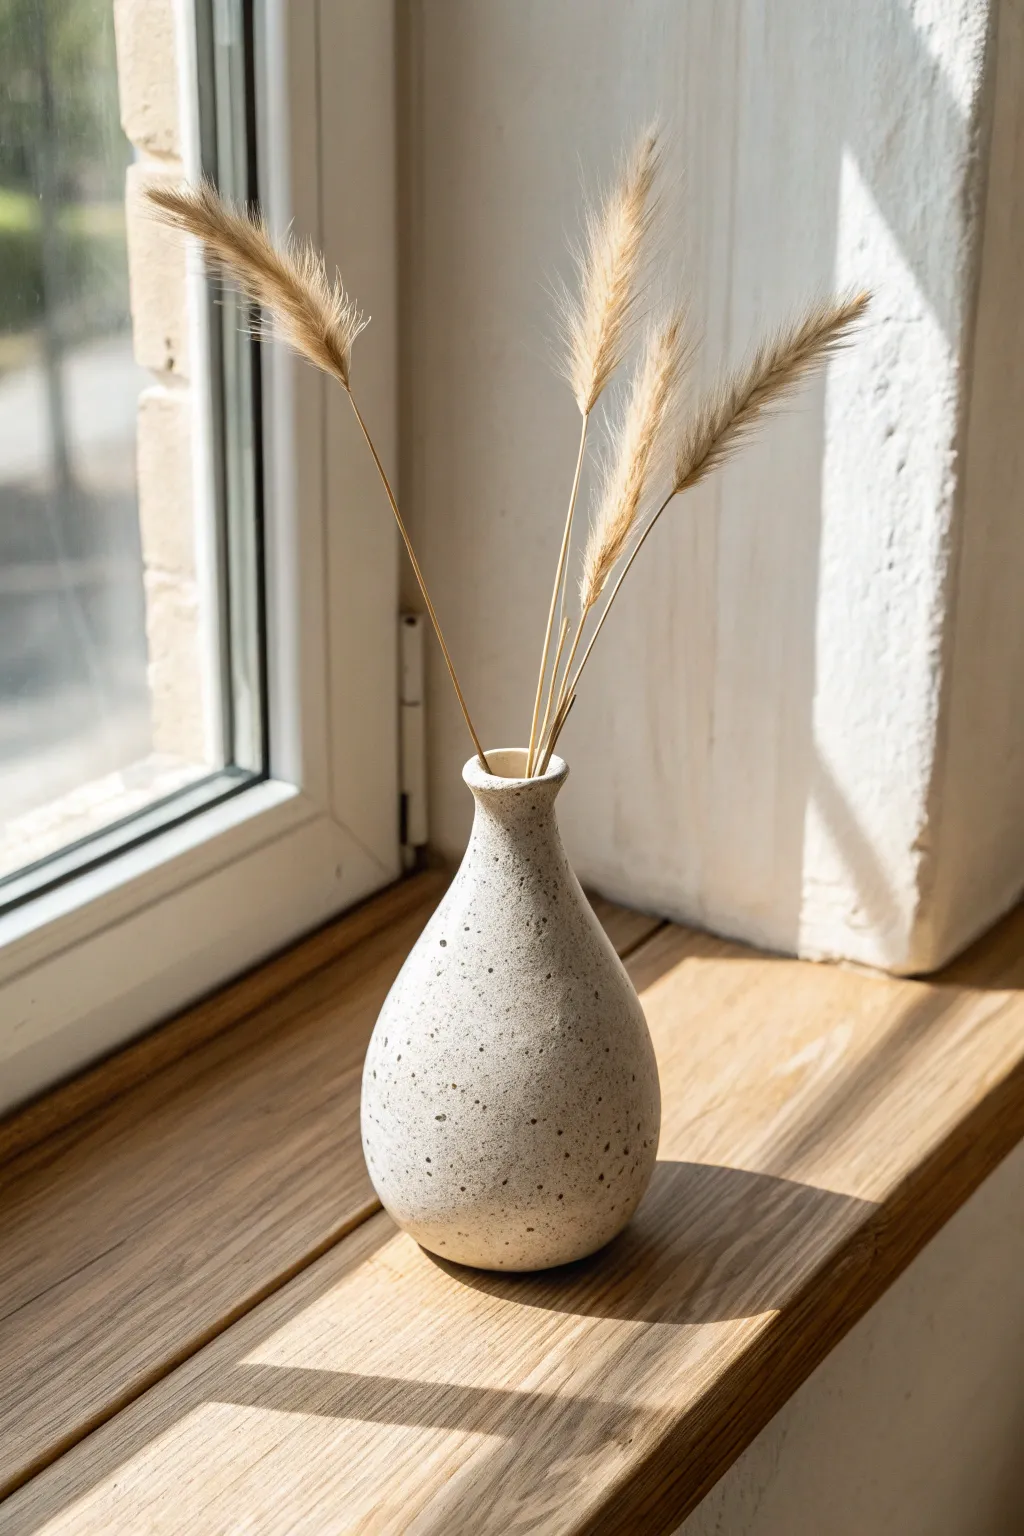
Bring a touch of organic minimalism to your windowsill with this faux-stone bud vase crafted from air-dry paper clay. Its gentle bulbous shape and speckled finish perfectly mimic heavy ceramic, making it an ideal vessel for delicate dried bunny tails or wheat stems.
Detailed Instructions
Materials
- Air-dry paper clay (white)
- Small glass bottle or jar (for armature)
- Acrylic paints (cream/off-white, black, brown)
- Old toothbrush
- Fine-grit sandpaper
- Water in a small bowl
- Sculpting tools or a butter knife
- Matte varnish or sealant
- Rolling pin
Step 1: Building the Form
-
Prepare the armature:
Since paper clay isn’t waterproof, find a small glass bottle or jar to serve as the watertight core. A small juice shot bottle or spice jar works perfectly for this bulbous shape. -
Roll out the clay:
Knead a generous chunk of paper clay until it’s pliable. Roll it out into a flat slab about 1/4 inch thick. You want it thick enough to hide the jar’s shape but thin enough to dry evenly. -
Wrap the base:
Wrap the slab around your glass bottle, pressing the seams together firmly. Use a little water on your finger to smooth the join line until it completely disappears. -
Build the volume:
To create that teardrop, bulbous bottom, add extra ropes of clay around the lower half of the bottle. Blend the clay upwards and downwards with your thumbs to integrate it seamlessly into the base layer. -
Shape the neck:
Taper the clay gently as you move up towards the bottle opening. If your armature has a threaded neck, ensure you cover the threads completely with a smooth layer of clay. -
Refine the lip:
At the very top, fashion a slightly flared, rounded rim. I find that wetting your thumb and index finger helps to smooth this edge into a perfect circle without cracking.
Fixing Cracks
If cracks appear during drying, mix a slurry of fresh clay and water (called slip) and fill the gaps. Smooth over and let dry again.
Step 2: Refining and Sealing
-
Smooth the surface:
Dip your fingers in water and run them over the entire vase to remove fingerprints and bumps. The goal is a smooth, organic finish, not absolute perfection. -
Let it dry:
Allow the vase to dry completely. This usually takes 24-48 hours depending on humidity. Flip it occasionally so the bottom dries too. -
Sand for perfection:
Once bone dry, use fine-grit sandpaper to gently buff away any remaining lumps or rough patches. Wipe away the dust with a slightly damp cloth.
Step 3: Faux Stone Finish
-
Base coat:
Mix a warm cream or off-white acrylic paint. Apply two generous coats to the entire vase, letting the first coat dry before applying the second. -
Prepare the speckle mix:
Dilute a small amount of black or dark brown acrylic paint with water until it has an ink-like consistency. -
Apply the speckles:
Dip an old toothbrush into the diluted paint. Hold it near the vase and run your thumb across the bristles to flick tiny droplets onto the surface. -
Vary density:
Rotate the vase as you splatter. Create some areas with denser speckles and others that are more sparse to mimic the natural randomness of stone. -
Seal the work:
Once the paint is fully dry, apply a matte varnish. This protects the finish and gives it that soft, non-shiny ceramic look. -
Add dried stems:
Finish by arranging a few stalks of dried bunny tails or ornamental grass inside your new vessel.
Two-Tone Effect
Mix coffee grounds directly into the wet clay before sculpting. This adds actual texture and creates a natural, earthy speckled look from within.
Place your finished vase in a sunny spot to highlight its beautiful stone-like texture
Paper Clay Coasters With Stamped Texture
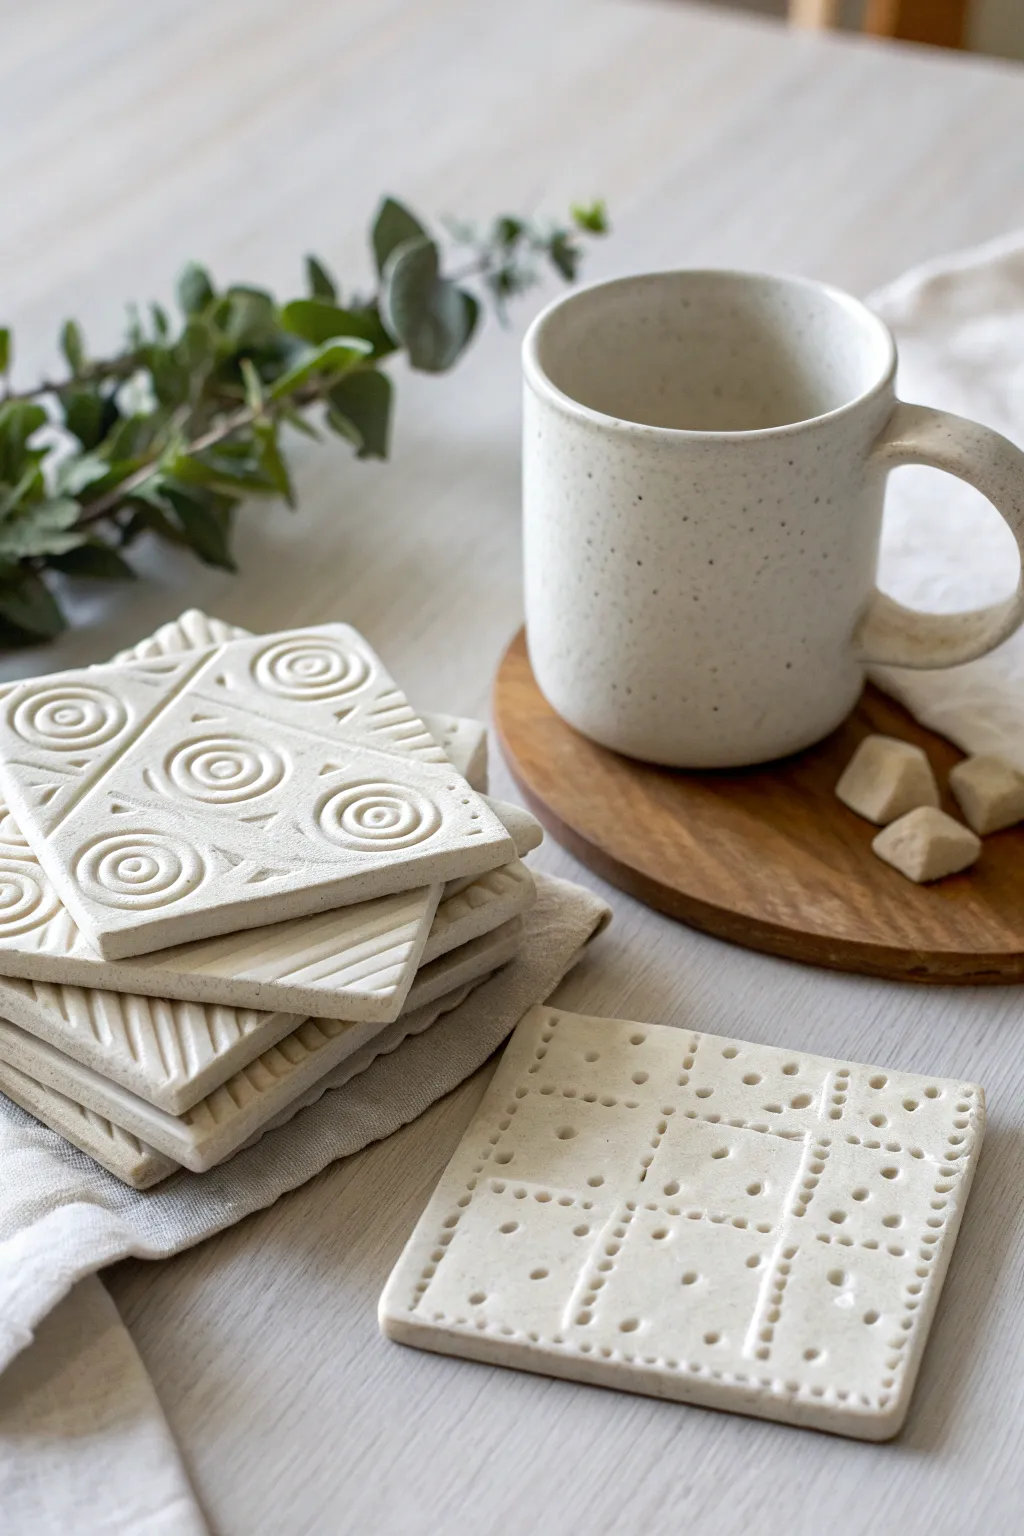
Elevate your coffee table with these charming, minimalist coasters that look like high-end boutique ceramics. Using air-dry paper clay and simple stamping tools, you can create durable, functional art with stunning raised geometric patterns.
Step-by-Step
Materials
- Air-dry paper clay (white)
- Rolling pin
- Two wood slats or rulers (approx. 1/4 inch thick) for depth guides
- Square cookie cutter (approx. 4×4 inches) or craft knife/template
- Texture stamps (spiral, concentric circles, lines)
- Household items for stamping (forks, pen caps, lollipop sticks)
- Sponge and water bowl
- Fine-grit sandpaper (220 grit)
- Matte acrylic varnish or waterproof sealer
- Flat paintbrush
- Parchment paper or canvas mat
Step 1: Preparing the Slab
-
Knead the clay:
Begin by taking a generous handful of paper clay. Knead it in your hands for a minute or two to warm it up and ensure it’s pliable and free of air bubbles. -
Set up your guides:
Place your parchment paper or canvas mat on a flat work surface. Lay your two wooden support slats or rulers parallel to each other, slightly wider apart than your desired coaster size. -
Roll out the slab:
Place the ball of clay between the guides. Using the rolling pin, roll the clay out until the pin rides along the slats, ensuring a perfectly even thickness across the entire slab. -
Smooth the surface:
Dip your finger or a slightly damp sponge into water and gently smooth across the top of the clay to remove any rolling marks or minor cracks.
Uneven Drying?
If coasters start curling while drying, place a lightweight board or book on top of them (sandwiching them between parchment paper) to weigh them down flat.
Step 2: Cutting and Stamping
-
Cut the shape:
Press your square cookie cutter firmly into the clay slab. If using a knife and template, trace around your square template carefully. Don’t remove the surrounding clay just yet; it helps support the edges while stamping. -
Plan your design:
Visualize your pattern. For the spiral coaster seen in the stack, you’ll need a circular spiral stamp. For the flat coaster shown, you’ll be creating a grid using dots. -
Stamp the spiral pattern:
For the geometric design, press your spiral stamp firmly into the clay. I usually start in the corners or the center to establish symmetry, then fill in the gaps with triangular or linear stamps. -
Create the dotted grid:
For the dot-patterned coaster, use the flat end of a lollipop stick or a small dowel. Ideally, use a ruler to lightly mark a grid, then press dots along these lines to create raised squares. -
Add deep accents:
To mimic the look of the project image, ensure some impressions are deeper than others. Use a smaller tool to add tiny dots inside established shapes for extra detail. -
Clean the edges:
Carefully lift away the excess clay from around your square. Dip your finger in water and gently run it along the cut edges of the coaster to round them off slightly and remove any sharpness.
Kitchen Tool Stamps
Don’t buy expensive stamps! A meat tenderizer makes a grid, pen caps make circles, and a fork creates perfect parallel lines for geometric texture.
Step 3: Drying and Finishing
-
Initial drying:
Transfer the coasters onto a clean sheet of parchment paper. Let them dry flat for about 24 hours. Keep them away from direct heat sources to prevent warping. -
Flip and continue drying:
Once the top feels dry to the touch and has lightened in color, flip the coasters over to allow the bottom to dry evenly. This usually takes another 24 hours depending on humidity. -
Sand for smoothness:
When completely bone dry, take your fine-grit sandpaper and gently sand the edges and the flat surfaces. Be careful not to sand away your beautiful texture. -
Dust off:
Wipe the coasters with a dry cloth or a soft brush to remove all ceramic dust before sealing. -
Apply the first coat of sealer:
Using a flat paintbrush, apply a thin, even layer of matte acrylic varnish. Ensure you get the varnish into all the stamped crevices. -
Seal the bottom:
Once the top is dry, flip the coaster and seal the bottom and sides. This step is crucial for paper clay, as it makes the coaster water-resistant against condensation. -
Final coat:
Apply a second coat of varnish to the top surface for extra durability against hot mugs.
Stack your set on the coffee table and enjoy the satisfaction of using your own handmade decor
Paper Clay Beads for a Garland
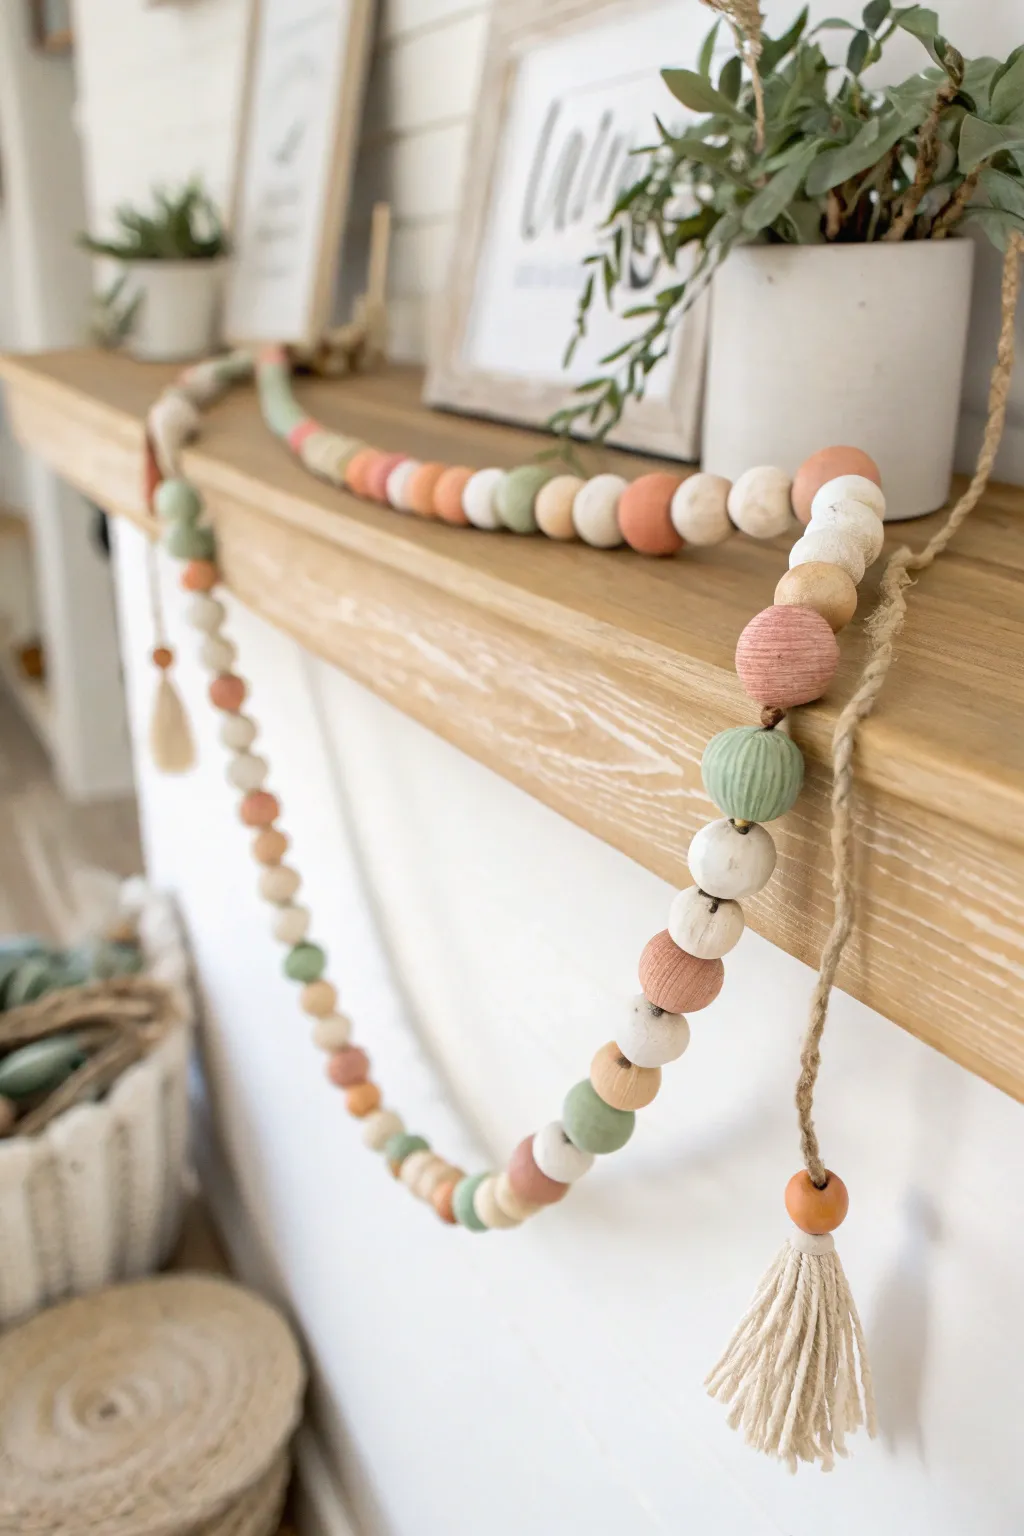
Add a touch of rustic charm to your mantel with this beautiful, earthy garland made from custom paper clay beads. The soft, muted tones of sage, terra cotta, and cream create a cozy, organic aesthetic perfect for farmhouse or boho decor.
Detailed Instructions
Materials
- Paper clay (air-dry)
- Wooden skewers or toothpicks
- Fine-grit sandpaper (220 grit)
- Acrylic paints (Sage Green, Terra Cotta, Cream/Off-White)
- Paintbrushes (small flat and detail)
- Jute twine or heavy string
- Scissors
- Cardboard box or floral foam block (for drying)
- Clear matte sealant spray (optional)
- Wooden beads (optional, to mix with clay beads)
Step 1: Shaping the Beads
-
Condition the clay:
Begin by taking a chunk of paper clay and kneading it in your hands until it becomes soft, pliable, and free of cracks. If it feels too dry, mist it lightly with water. -
Portion the clay:
Pinch off small pieces of clay, roughly the size of a large gum ball or a walnut. Aim for slight variations in size to give the garland an organic feel. -
Roll spheres:
Roll each piece between your palms to form a smooth sphere. Don’t worry about perfection; slight irregularities add to the handmade character. -
Create the holes:
While the bead is still soft, gently push a wooden skewer through the center creating a hole. Rotate the skewer as you push to prevent flattening the bead. -
Check the hole size:
Wiggle the skewer slightly to widen the hole, ensuring it will be large enough for your jute twine to pass through later. -
Smooth the edges:
Dip your finger in a little water and smooth out the area where the skewer entered and exited the clay to clean up any rough edges.
Cracked Clay?
Paper clay shrinks as it dries. If larger cracks appear, fill them with a fresh dab of wet clay or spackle, let dry, and sand smooth before painting.
Step 2: Drying and Refining
-
Let them dry:
Thread your skewered beads onto a drying rack or stick the skewers into a cardboard box or foam block. Allow them to air dry completely, usually for 24-48 hours depending on humidity. -
Sand for finish:
Once fully dry, gently sand each bead with fine-grit sandpaper. Focus on removing any major bumps, but remember the texture of paper clay is part of the charm. -
Dust off:
Wipe each bead with a dry cloth or a soft brush to remove any clay dust before painting.
Add Texture
Before the clay dries, gently press a textured fabric or a stamp into a few beads to add intricate surface details that catch the paint beautifully.
Step 3: Painting and Assembly
-
Select your palette:
Pour your sage green, terra cotta, and cream paints onto a palette. Leave some beads unpainted if you want a crisp white look, or mix in plain wooden beads for contrast. -
Paint the beads:
Place a bead back on a toothpick for stability and paint the entire surface. I like to do two thin coats rather than one thick one for uneven coverage. -
Dry the paint:
Return the painted beads to your drying setup. Let the paint cure fully for at least an hour. -
Prepare the tassels:
Wrap jute twine around your hand or a piece of cardboard about 20 times. Cut the loop at one end and tie a piece of twine tightly around the top to create the tassel head. -
Start stringing:
Cut a long length of jute twine. Tie one end securely to your first tassel to act as the stopper. -
Pattern your beads:
thread your beads onto the twine. Alternate colors—perhaps doing a pattern like sage, white, wooden, terra cotta—to keep the visual rhythm interesting. -
Secure the end:
Once you reach your desired length, tie the remaining end of the twine to your second tassel, knotting it tightly close to the last bead so there are no large gaps. -
Trim and finish:
Trim any excess twine from your knots and fluff the ends of your tassels to complete the look.
Now you are ready to drape your custom creation over a mantel or shelf for an instant style upgrade
Paper Clay Wall Rainbow Panels
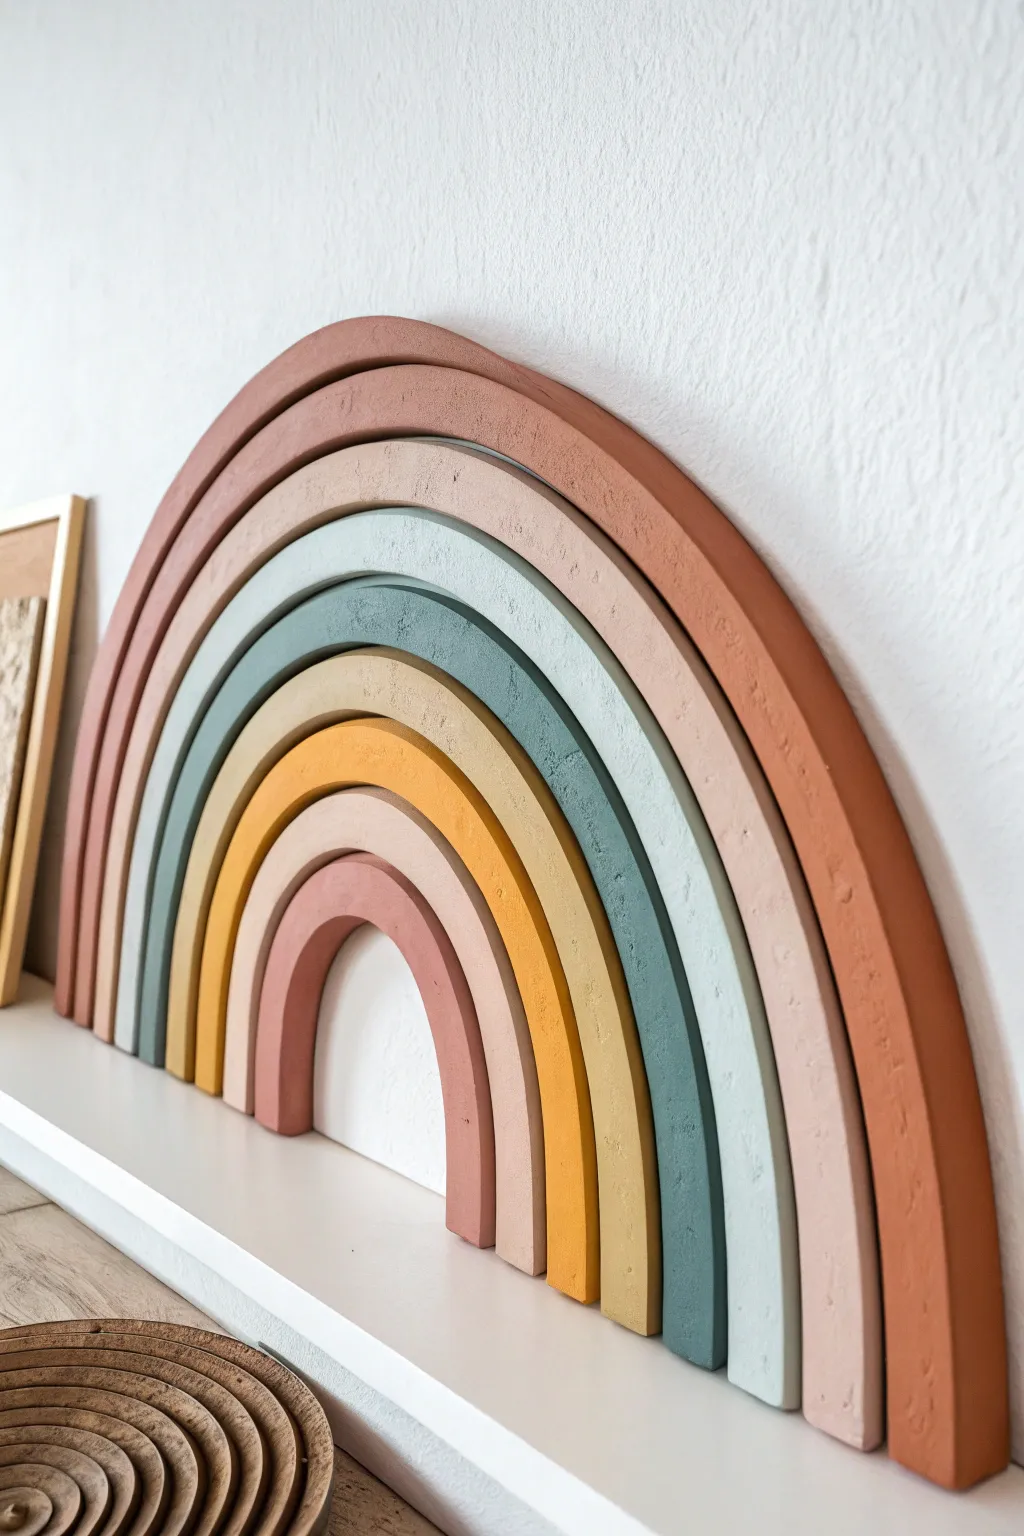
Create a stunning, earthy focal point for any nursery or living space with this sculptural rainbow wall art. Made from simple paper clay, this project features thick, textured bands in a muted, warm color palette that brings a cozy, handmade feel to your decor.
Step-by-Step Guide
Materials
- Paper clay (air-dry clay)
- Rolling pin
- Sharp crafting knife or clay cutter
- Ruler
- Large sheet of parchment paper or baking mat
- Compass (or several round bowls in graduating sizes)
- Fine-grit sandpaper (220 grit)
- Acrylic paints (terracotta, beige, teal, mustard, pink)
- Foam brushes or soft bristle brushes
- Strong craft glue (E6000 or heavy-duty wood glue)
- Backing board (cardboard or thin plywood/MDF)
- Small cup of water
- Matte sealant spray (optional)
Step 1: Planning and Shaping the Arches
-
Prepare your template:
Before touching the clay, draw your rainbow design on a large piece of paper or cardboard. You need 7 concentric arches. Use a compass or trace around bowls of different sizes to ensure the curves are perfectly parallel and evenly spaced. -
Condition the clay:
Take a large chunk of paper clay and knead it in your hands for a few minutes. This warms it up, removes air bubbles, and makes it pliable enough to roll without cracking. -
Roll out the slab:
Roll your clay out onto parchment paper to a consistent thickness of about 1/2 inch (1.2 cm). Using guide sticks on either side of your roller is a great trick to keep the slab perfectly level. -
Cut the arches:
Place your paper template gently over the clay slab. Using a sharp craft knife, carefully cut along the curved lines of each arch. Hold the knife vertical to get clean, straight edges rather than beveled ones. -
Refine the edges:
Once cut, separate the arches slightly. Dip your finger in a little water and run it along the cut edges to smooth out any roughness or loose clay bits. -
Dry the components:
Let the arches dry flat on a wire rack or mesh screen if possible to allow airflow underneath. This process can take 24-48 hours. I like to flip them over gently halfway through to prevent warping.
Keep it Flat
Paper clay shrinks as it dries, which can cause curling. Place a light book or board over the arches as they dry (sandwiching them with parchment paper) to ensure they stay perfectly flat.
Step 2: Sanding and Painting
-
Sand for smoothness:
Once fully dry and hard, use fine-grit sandpaper to gently buff the surface and edges. You don’t need it glass-smooth—a little texture adds to the organic look—but remove any sharp burrs. -
Mix your palette:
Prepare your acrylic colors. For this specific look, you’ll need a muted terracotta (outermost), a dusty rose, a soft sage/teal, a muted gold/mustard, a lighter beige, and a mauve tone. -
Paint the first coat:
Apply the first layer of paint to the front and visible sides of each arch. Use long, smooth strokes. Don’t worry about full opacity yet; this layer seals the porous clay. -
Apply the second coat:
After the first coat is dry to the touch, apply a second layer for rich, solid color coverage. Let this dry completely. -
Seal the pieces (optional):
If you want extra protection or a specific finish, spray a light coat of matte sealant over the painted pieces.
Step 3: Assembly and Mounting
-
Prepare the backing:
Cut a piece of sturdy cardboard or thin MDF into a rainbow shape that is slightly smaller than your clay assembly. This will be the hidden support structure. -
Arrange the final layout:
Lay your painted arches face down (on a clean, soft surface) in their correct order. Ensure the spacing is tight and the bottom edges are aligned perfectly straight. -
Glue the backing:
Apply a generous amount of strong craft glue to your backing board. Press the board onto the back of the arranged arches. Place heavy books on top to weigh it down while the glue cures. -
Install hanging hardware:
Once the glue is fully set, attach a sawtooth hanger or a d-ring to the back of the support board. Ensure it is centered so the rainbow hangs level.
Fixing Cracks
If hairline cracks appear during drying, mix a small amount of fresh clay with water to make a paste (slip). Fill the cracks, smooth with a wet finger, and let dry before sanding.
Hang your beautiful handmade rainbow on a floating shelf or main wall to add a touch of warmth and joy to your room
Paper Clay Fridge Magnets With Raised Icons
Bring a touch of modern art to your kitchen with these tactile, dimensional paper clay magnets. Featuring raised floral motifs and contrasting earthy tones, these durable little squares look like miniature ceramic tiles but are surprisingly lightweight.
How-To Guide
Materials
- Paper clay (air dry)
- Square cookie cutter (approx. 2-3 inches)
- Small rolling pin
- Precision craft knife or clay sculpting tool
- Fine-grit sandpaper (400 grit)
- Acrylic paints (terracotta/dusty rose, bright white, chocolate brown)
- Small flat paintbrushes
- Fine-point detail brush
- Strong round craft magnets
- Strong craft glue (E6000 or heavy-duty super glue)
- Varnish or matte sealant spray
- Parchment paper or non-stick mat
Step 1: Shaping the Base Tiles
-
Prepare the Clay:
Start by taking a handful of paper clay and kneading it briefly until it is pliable and smooth. If it feels too dry, you can dampen your fingertips slightly, but avoid making the clay sticky. -
Roll the Slabs:
Place your clay on parchment paper and roll it out to a uniform thickness, aiming for about 1/4 inch. For a truly professional look, use guide sticks or stacks of playing cards on either side of your roller to ensure the slab is level. -
Cut the Squares:
Press your square cookie cutter firmly into the rolled clay. Gently wiggle it to separate the shape before lifting. Cut as many squares as you want for your set. -
Refine the Edges:
Dip your finger in a little water and smooth out any rough edges or stray clay hanging off the sides of your squares. You want these to look like clean-cut tiles.
Smooth Operator
To get perfectly flat tiles without warping, place a light book on top of the squares (sandwiched between parchment paper) once they are semi-dry but still cool to the touch.
Step 2: Creating the Raised Icons
-
Roll Thin Sheets:
For the raised icons (the daisy and the tulip), roll out a smaller piece of clay, but make this layer much thinner than your base—about 1/8 inch thick. -
Cut Petal Shapes:
Using a craft knife, carefully hand-cut your shapes. For the daisy, cut simple elongated teardrops. For the tulip, cut a ‘U’ shape for the flower head, a thin stem, and two leaf shapes. -
Arrange the Design:
Without using glue yet, lay your cut pieces onto the wet clay squares to check the spacing. Arrange the daisy petals in a radial pattern and center the tulip vertically. -
Score and Slip:
To attach the pieces permanently, lightly scratch the back of your icon pieces and the spot on the base tile where they will sit. Dab a tiny amount of water (slip) on the scratches. -
Attach the Icons:
Press the shapes gently onto the base. Use a rounded tool or your finger to smooth the edges very slightly so they adhere fully, but keep that distinct raised definition. -
Dry Completely:
Move your tiles to a flat, safe surface. Paper clay can warp, so I like to gently flip them over halfway through the drying process. Let them dry for at least 24-48 hours until they are hard and chalky white.
Glossy Pop
Instead of a matte finish all over, use a high-gloss varnish or UV resin ONLY on the raised flower icons. This creates a beautiful contrast against the matte background tile.
Step 3: Painting and Finishing
-
Surface Sanding:
Once fully dry, take your fine-grit sandpaper and create a pristine finish. Sand the edges of the square and the tops of the raised icons to remove any fingerprints or burrs. -
Base Color: Daisy Magnet:
For the daisy magnet, paint the entire square background in a dusty rose or terracotta shade, carefully painting around the raised petals. Use a small flat brush for clean lines near the icon. -
Base Color: Tulip Magnet:
For the tulip design shown, tape off or freehand a horizontal line across the middle. Paint the bottom half in a warm terracotta/brown and leave the top half unpainted (or paint it white). -
Paint the Icons:
Use a bright white paint for the daisy petals. For the tulip, paint the flower head dusty rose and the stem/leaves a chocolate brown. A fine-point brush is essential here to keep the edges crisp. -
Outline for Definition:
To mimic the enameling look in the photo, take your finest brush with white paint and create a thin outline around the brown tulip stem and the colorful flower head. -
Seal the Artwork:
Apply a coat of matte varnish or sealant spray. This protects the porous paper clay from kitchen moisture and grease while maintaining that stony, matte aesthetic. -
Add the Magnet:
Flip the dry tile over. Apply a generous dab of heavy-duty craft glue to the back of your magnet and press it firmly into the center of the tile. Let the glue cure completely according to package instructions.
Pop these onto your fridge for an instant gallery wall effect in your kitchen
Paper Clay Faux Fossil Plaques
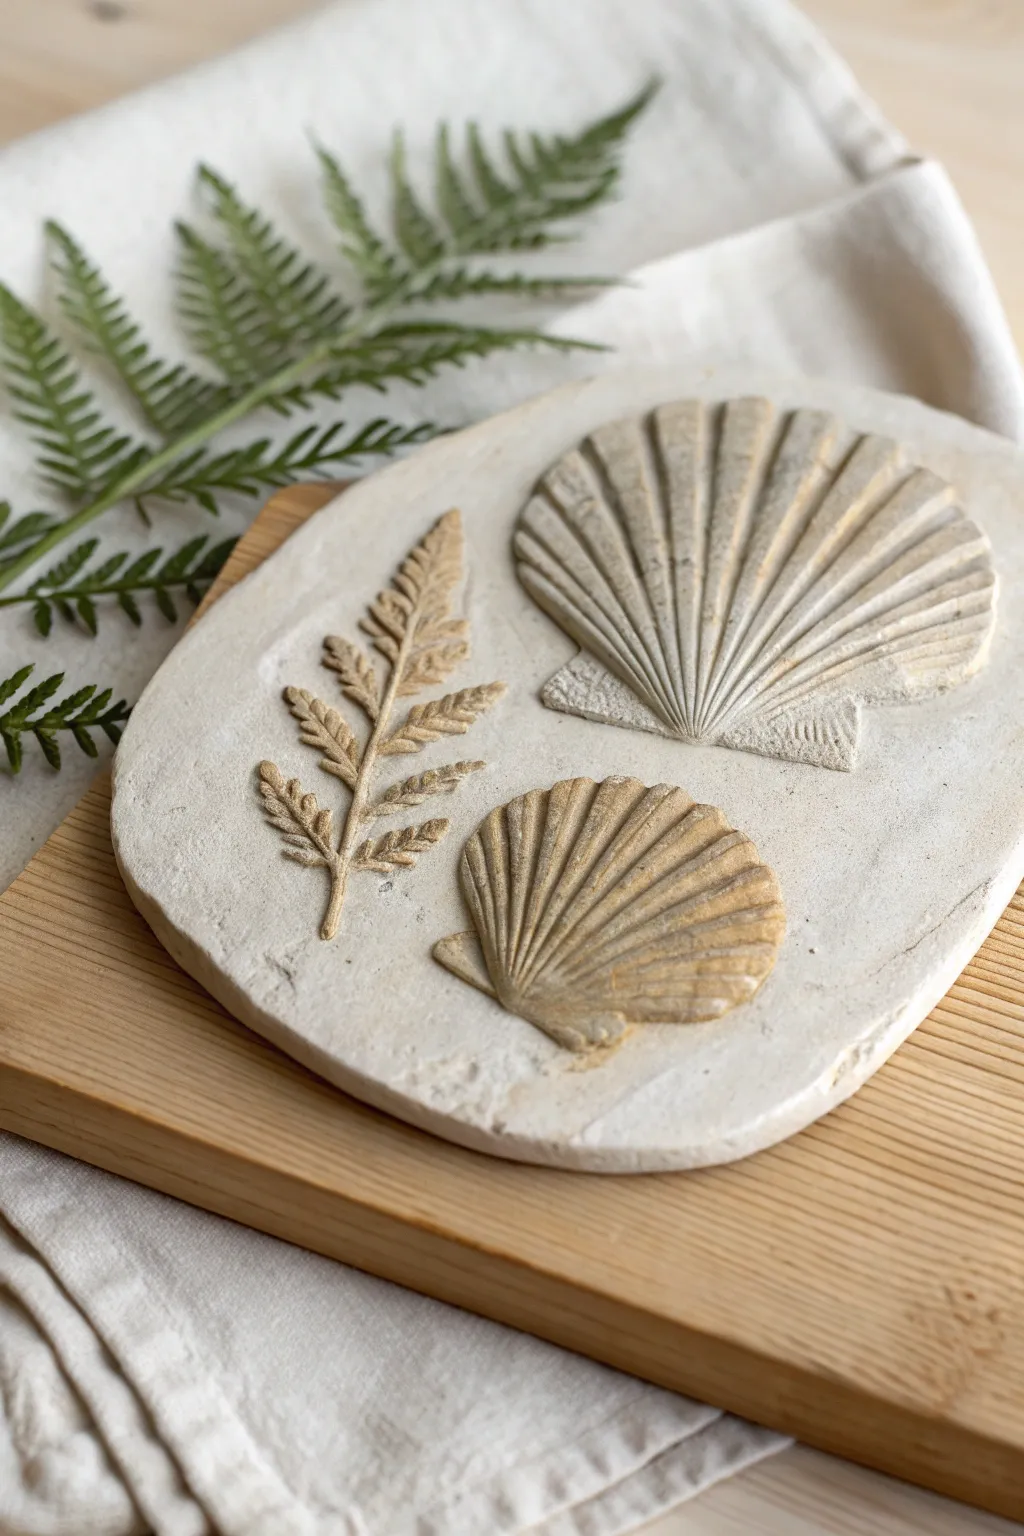
Capture the delicate details of nature with this sophisticated faux fossil project. Using paper clay, you can preserve the intricate textures of shells and leaves in a durable, stone-like plaque that adds an organic touch to any shelf.
Step-by-Step Tutorial
Materials
- Air-dry paper clay (white or cream)
- Small wooden rolling pin or acrylic roller
- Wooden cutting board or smooth work surface
- Parchment paper or plastic wrap
- Fresh fern frond (sturdy variety)
- Two scallop shells (one large, one medium) with deep ridges
- Craft knife or spatula
- Fine-grit sandpaper (220 grit)
- Acrylic paints: Burnt Umber, Raw Sienna, White
- Small mixing cup and water
- Soft cloth or paper towel
- Matte spray varnish (optional)
Step 1: Preparation & Rolling
-
Prepare the surface:
Set up a clean, flat workspace on your wooden board. Tape down a sheet of parchment paper if you’re worried about sticking, though working directly on wood can add a nice subtle texture to the back. -
Condition the clay:
Take a handful of paper clay—roughly the size of a large orange—and knead it in your hands to warm it up. This conditioning phase prevents cracks later on. -
Form the base:
Roll the clay into a smooth ball, then flatten it slightly with your palm to create a thick disc. -
Roll out the slab:
Use your rolling pin to flatten the clay into an organic oval shape. Aim for a thickness of about 1/4 to 1/2 inch. Keep the edges naturally uneven for that excavated fossil look. -
Smooth the surface:
Dip your finger in a tiny bit of water and gently smooth across the top of the clay slab to remove any fingerprints or rolling marks.
Step 2: Creating the Impressions
-
Position the elements:
Arrange your fern leaf and two shells gently on top of the wet clay to check spacing. I usually like to place the fern on the left and the shells on the right to balance the composition. -
Press the fern:
Remove the shells, leaving the fern. Use the rolling pin to gently roll *over* the fern leaf, embedding it into the clay. Press firmly enough to capture the vein details but not so deep you cut through. -
Embed the large shell:
Lift the fern carefully. Now, position the larger scallop shell near the top right. Press it straight down firmly, rocking it slightly side-to-side to ensure the deep ridges imprint clearly. -
Embed the small shell:
Place the smaller shell below the first one. Press it into the clay at a slightly different angle to create visual interest. Remove both shells carefully by lifting straight up. -
Clean edges:
If the pressure distorted the outer shape of your plaque too much, gently nudge the edges back inward with your palms. -
Initial Drying:
Let the plaque dry completely. This is crucial—paper clay can take 24-48 hours depending on thickness. Flip it over halfway through to prevent curling.
Cracked Clay Fix
If hairline cracks appear while drying, don’t panic. Mix a tiny bit of fresh clay with water to make a paste (slip) and adhere it into the crack with a brush.
Step 3: Refining & Antiquing
-
Sand the surface:
Once bone dry, use the fine-grit sandpaper to smooth any sharp ridges on the clay edges or surface imperfections, but avoid sanding the actual imprinted details. -
Dust off debris:
Wipe the entire piece with a dry soft cloth to remove all sanding dust. -
Mix the wash:
Create a watery wash by mixing a pea-sized amount of Burnt Umber and Raw Sienna acrylic paint with about two tablespoons of water. It should look like tea. -
Apply the wash:
Generously brush this brown wash over the entire plaque, ensuring the liquid pools into the deep crevices of the shell and leaf impressions. -
Wipe back:
Immediately use a damp cloth to wipe the paint off the raised surface areas. The dark paint will stay trapped in the recesses, highlighting the texture. -
Dry brush highlights:
If the surface looks too dark, put a tiny amount of white paint on a dry brush, wipe most of it off on a paper towel, and lightly graze the tops of the ridges to bring back brightness. -
Seal (Optional):
To protect your fossil, apply a light coat of matte spray varnish once the paint is fully dry.
Botanical Stains
For an even more realistic look, press fresh flowers into the clay. The plant juices can naturally stain the clay slightly yellow/green during drying for an authentic effect.
Your finished plaque now holds a permanent memory of nature textures, ready to be displayed on a mantel or used as a unique coaster
Paper Clay Sculpted Letters and Name Plates
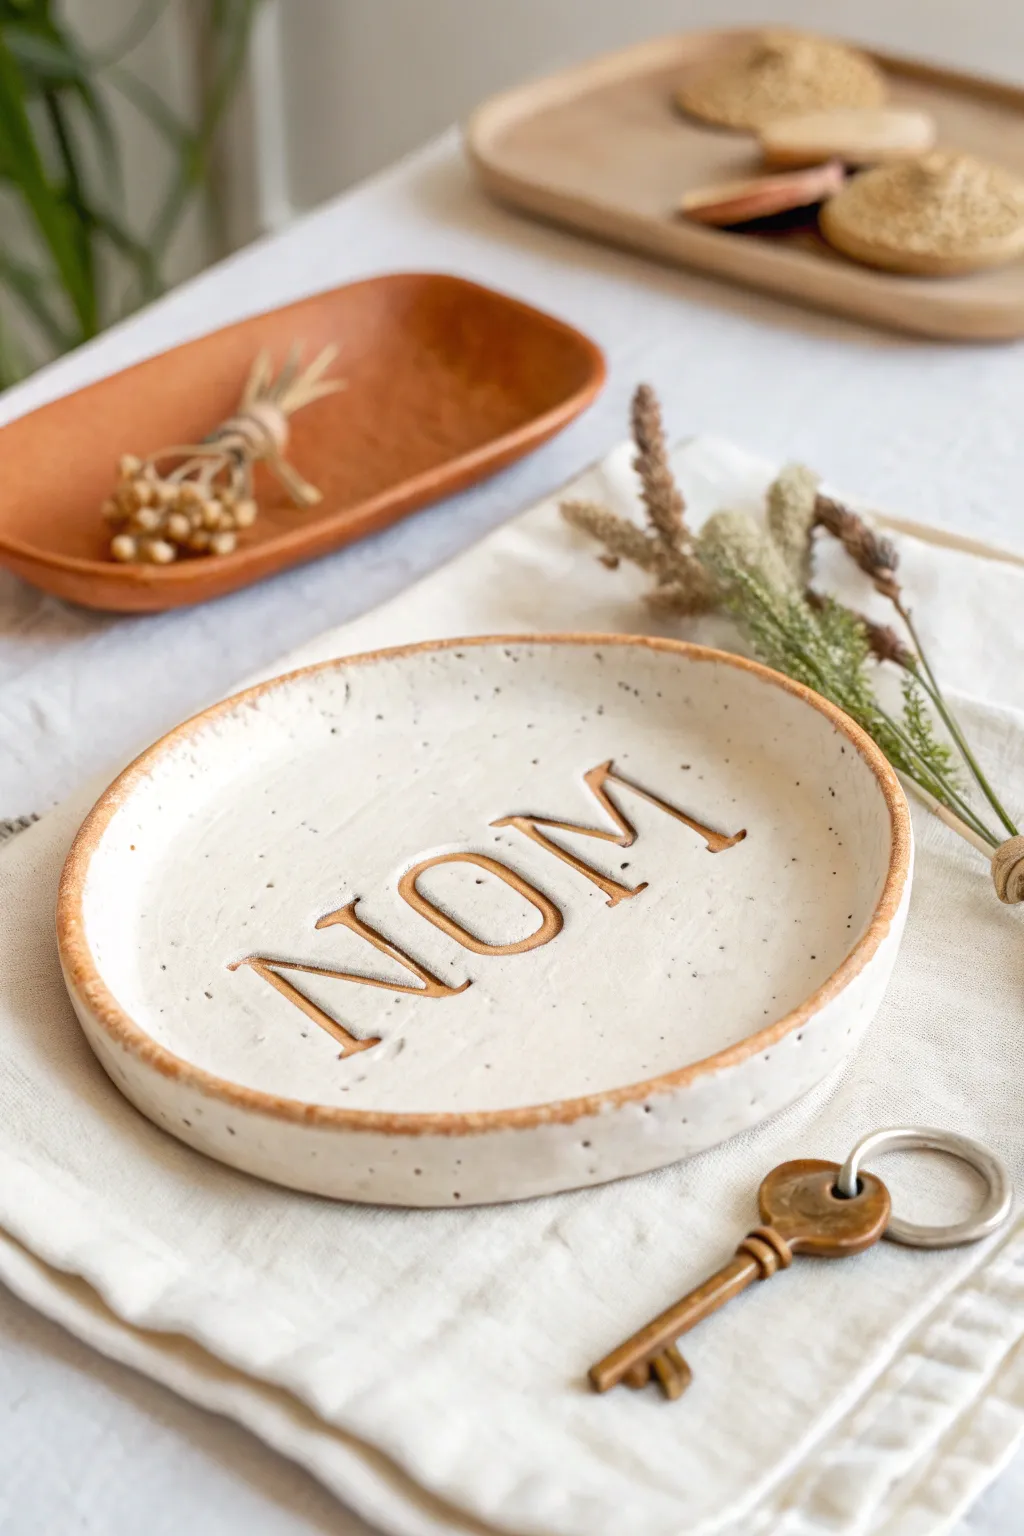
This rustic, handmade trinket dish features charmingly sunken lettering and a lovely speckled finish that mimics high-fire ceramics. It’s the perfect stylish catch-all for keys or jewelry, blending a modern aesthetic with the tactile warmth of paper clay.
How-To Guide
Materials
- White paper clay (air-dry)
- Small rolling pin
- Rolling guides or wooden slats (approx. 1/4 inch thick)
- Round cookie cutter or bowl (approx. 5-6 inches diameter)
- Alphabet stamps (serif font)
- Parchment paper or canvas mat
- Small bowl of water
- Sponge
- Fine-grit sandpaper (220 grit)
- Acrylic paint (warm terracotta or cognac brown)
- Acrylic paint (black or dark grey)
- Old toothbrush
- Matte or satin varnish/sealer
- Small paintbrush
Step 1: Shaping and Stamping
-
Prepare your clay:
Take a handful of white paper clay and knead it briefly in your hands to ensure it is pliable and free of air pockets. Place it onto your parchment paper or canvas work surface. -
Roll the slab:
Position your rolling guides on either side of the clay ball. Use the rolling pin to flatten the clay into an even slab, rolling until the pin rests on the guides to ensure a consistent 1/4 inch thickness. -
Cut the circle:
Place your round cookie cutter or an overturned bowl onto the clay slab. -
Refine the cut:
Press down firmly to cut the circle shape. If using a bowl, trace around the edge carefully with a craft knife or needle tool. -
Lift the edge:
Gently lift the cut circle. Using your fingertips, slightly curl the outer edges upward to create a shallow lip or rim around the entire circumference. -
Smooth the clay:
Dip your finger or a small sponge into water and run it along the rim and the surface to smooth out any cracks or rough textures associated with paper clay. -
Position the stamps:
Before pressing, hover your alphabet stamps over the clay to gauge the spacing for the word ‘NOM’. Aim for the center, leaving equal space on the left and right. -
Impress the letters:
Press each letter stamp firmly and evenly into the wet clay. Rock them very slightly to ensure the deep serif edges catch, then lift straight up to avoid dragging the clay.
Step 2: Finishing and Coloring
-
Dry the piece:
Allow the sculpted dish to dry completely in a warm, dry spot. I usually recommend at least 24-48 hours regardless of thickness; paper clay must be bone dry before painting. -
Sand imperfections:
Once fully dry, take the fine-grit sandpaper and gently buff the rim and surface. Pay attention to the edges of the dish to ensure they feel rounded and smooth. -
Paint the letters:
Dilute a small amount of terracotta or cognac brown acrylic paint with a drop of water. Use a fine brush to paint inside the impressed letters. If you go outside the lines, quickly wipe the surface with a damp cloth. -
Highlight the rim:
Using the same terracotta color (undiluted this time), lightly brush or sponge the very top edge of the rim to create that warm, contrasting border seen in the original piece. -
Create the speckles:
Mix a tiny amount of black paint with water until it’s very fluid. Dip an old toothbrush into this mixture. -
Splatter the dish:
Hold the toothbrush over the dish and run your thumb across the bristles to flick tiny specks of paint onto the white surface. Test on a scrap paper first to control the spray. -
Seal the artwork:
After the paint is fully dry, apply two thin coats of matte or satin varnish to protect the surface from moisture and scratches.
Clean Impressions
If your clay is too sticky, lightly dust your letter stamps with cornstarch before pressing them into the slab. This ensures the stamps release cleanly.
Functional Upgrade
Use a clear, high-gloss resin instead of varnish for the final coat. It creates a glass-like finish that makes the tray water-resistant and more durable.
Now you have a custom, minimal accent piece ready to hold your daily essentials with style
Paper Clay Armature Fantasy Houses

This charming fantasy house features a sturdy cylindrical body topped with a vibrant teal and rust-red shingled roof. Its textured white walls and sculpted architectural details give it a delightful, hand-built character perfect for any shelf display.
Step-by-Step
Materials
- Paper clay (air dry)
- Cardboard or poster board
- Empty oatmeal container or similar cylinder (for armature)
- Masking tape
- Rolling pin
- Craft knife and scissors
- Sculpting tools (needle tool, modeling tool)
- Acrylic paints (White, Teal/Turquoise, Rust/Terracotta, Brown, Metallic Gold)
- Paintbrushes (flat broad brush, small detail brush)
- Water cup and texture sponge
- Strong craft glue or PVA glue
Step 1: Building the Armature
-
Prep the cylinder:
Begin with your cylindrical base, such as an empty oatmeal container or a sturdy cardboard tube. Cut it to your desired height for the house walls. -
Form the roof cone:
Cut a large circle from poster board or cardstock. Remove a wedge-shaped slice from the circle and pull the cut edges together to form a cone that is slightly wider than your cylinder. Secure the seam with masking tape. -
Join the structures:
Place the cone on top of the cylinder. Use generous amounts of masking tape to secure the roof to the base, ensuring there are no large gaps. -
Add a base:
Glue the bottom of the cylinder onto a slightly larger circle of cardboard to create a stable foundation and a small ‘porch’ area around the structure.
Smoother Seams Tip
When attaching sculpted details like windows or doors, score both surfaces (cross-hatch scratches) and add water to ensure they bond permanently without cracking.
Step 2: Sculpting the House
-
Cover the walls:
Roll out a slab of paper clay to about 1/4 inch thickness. Wrap this around the cylindrical base, pressing firmly so it adheres. Don’t worry about smoothing it perfectly; a little texture adds character. -
Texture the surface:
Take a damp texture sponge or a crumpled ball of foil and press it gently all over the wet clay walls to create a stucco-like stone effect. -
Create the roof shingles:
Roll out thin sheets of clay and use a small round cutter or a knife to create U-shaped shingles. Start at the bottom reinforced edge of the roof and overlap them row by row, working your way up to the peak. -
Finish the peak:
For the very top section of the roof, switch to a slightly different shingle shape or size to create the contrasting cap seen in the example. -
Sculpt the door:
Form a small arch shape from clay for the door. Use a needle tool to score horizontal lines for wooden planks and add a tiny clay ball for the doorknob. Attach this to the main body using a little water as ‘slip’.
Add a Glow
Cut a hole in the bottom of your armature before sculpting. Once finished, place an LED tea light underneath to make the windows glow from the inside.
Step 3: Refining Details
-
Add windows:
Roll thin snakes of clay to form the window frames. Shape them into arches or circles and press them onto the walls. Add cross-pieces inside the frames to create window panes. -
Add final textures:
Use a needle tool or toothpick to poke tiny holes randomly around the siding, giving the appearance of weathered stone or wormholes in wood. -
Dry thoroughly:
Allow the sculpture to dry completely. This is crucial—I like to let this dry for at least 24 to 48 hours depending on humidity, until the clay is hard and room temperature to the touch.
Step 4: Painting and Finishing
-
Base coat the walls:
Paint the entire wall section with a creamy white acrylic paint. You may need two coats to fully cover the grey of the clay. -
Paint the lower roof:
Paint the main section of shingles with a deep teal or turquoise. Work the paint into the crevices between shingles to create depth. -
Paint the roof peak:
Use a rust or terracotta red for the top cluster of shingles. -
Detail the woodwork:
Paint the window frames and door trims with a warm medium brown. For the door itself, use a teal shade that matches or coordinates with the roof. -
Highlighting:
Once dry, use a very dry brush with a lighter teal to lightly dust the raised edges of the roof shingles, making the texture pop. Dot the doorknob with metallic gold. -
Window interiors:
Paint the ‘glass’ areas inside the window frames with a soft grey or a pearlescent white to suggest reflection.
Place your finished fantasy tower on a bookshelf or mantle to add a touch of storybook magic to your room