When I need a quick, satisfying project, I grab pinch clay because you can turn a simple ball into something cute and useful in no time. These pinch pot ideas start with the classics and then wander into the fun, quirky stuff I love making in my studio.
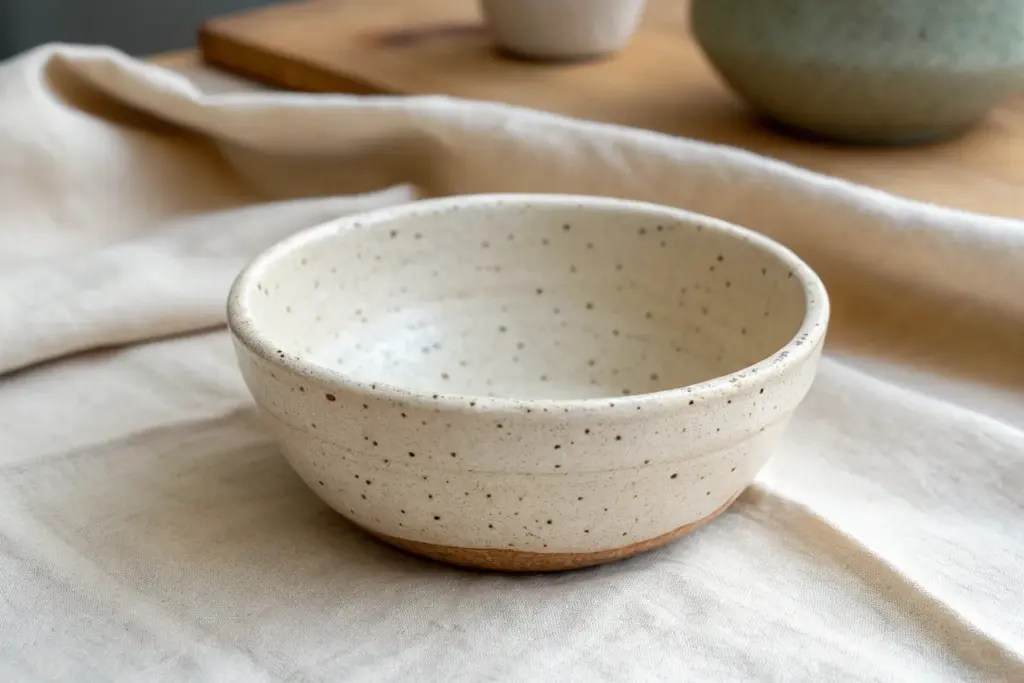
Classic Pinch Pot Bowl

This project transforms a simple ball of clay into a functional, artful vessel with a rustic modern aesthetic. By leaving the base unglazed, you highlight the natural warmth of the clay body against a creamy interior glaze.
Step-by-Step
Materials
- Stoneware clay (buff or speckled brown)
- Small bowl of water
- Rib tool (metal or rubber)
- Sponge
- Needle tool
- Loop tool (for trimming)
- Cream/White dipping glaze
- Wax resist (liquid)
- Paintbrush for wax
- Kiln access (bisque and glaze firing)
Step 1: Forming the Bowl
-
Prepare the clay:
Start with a ball of clay roughly the size of a large orange or grapefruit. Wedging it well beforehand ensures there are no air bubbles trapped inside. -
Opening the center:
Hold the ball in your non-dominant hand. Press your thumb firmly into the center of the ball, stopping about half an inch from the bottom to leave enough thickness for the foot. -
The first pinch:
With your thumb still inside and fingers on the outside, gently squeeze the clay. Rotate the ball slightly and squeeze again. Keep the pressure even to maintain a circular shape. -
Expand the walls:
Continue pinching and rotating, working your way from the thick base up to the rim. Aim for a consistent wall thickness of about 1/4 inch throughout the vessel. -
Shape the curve:
As the bowl opens up, use your outer fingers to gently push the clay upward and slightly outward to create that classic wide, open bowl silhouette shown in the photo. -
Smooth the interior:
The inside of a pinch pot can get lumpy. I like to take a damp sponge or a rubber rib tool and compress the interior walls, smoothing out those finger indentations. -
Refine the rim:
Run a damp chamois or your finger along the rim to round it off. A sharp or jagged rim is uncomfortable to drink or eat from later. -
Dry to leather hard:
Set the bowl aside until it reaches a leather-hard state. It should be firm enough to handle without warping but still cool to the touch.
Cracking Issues?
If the rim cracks while pinching, your clay is too dry. Dip your fingers in water (don’t soak the clay) or score and slip the crack immediately to seal it.
Step 2: Trimming and Finishing
-
Refine the exterior:
Once leather hard, use a metal rib to scrape the outside walls smooth. This removes fingerprints and creates the clean contour seen in the reference image. -
Trim the foot:
Turn the bowl upside down. If you have a pottery wheel or banding wheel, use a loop tool to trim away excess weight from the bottom and define a small foot ring. -
Smooth the transition:
Use a slightly damp sponge to wipe down the exterior again, particularly where you trimmed, to bring the rough clay grain back to the surface. -
Bisque fire:
Let the bowl bone dry completely (this may take several days). Fire it in the kiln to bisque temperature (usually cone 04 or 06).
Step 3: Glazing
-
Clean the bisque:
Wipe the fired bowl with a damp sponge to remove any kiln dust. This prevents glaze crawling. -
Apply wax resist:
Paint liquid wax resist onto the bottom third of the bowl’s exterior and the entire foot. This creates that sharp line between the glazed and unglazed sections. -
Check the line:
Ensure your wax line is straight and even as you rotate the pot. Let the wax dry completely. -
Dip the glaze:
Hold the bowl by the foot and dip it rim-first into your cream or white glaze. Submerge it fully, then lift it out promptly to avoid a coat that is too thick. -
Clean up drips:
The glaze will bead up on the waxed area. Use a damp sponge to wipe away these beads instantly so the raw clay bottom is perfectly clean. -
Glaze fire:
Fire the bowl again to the maturation temperature of your specific clay and glaze (often cone 6 or cone 10).
Add Texture
Before the clay dries, gently press a piece of coarse linen or burlap against the exterior wall to create a subtle fabric texture that glaze breaks beautifully over.
Enjoy using your handmade bowl for morning cereal or simply displaying it as a study in simplicity


Pinch Pot Trinket Dish

Create a serene resting place for your favorite jewelry with this handmade pinched trinket dish. The speckled clay body and soft matte finish give it an organic, timeless appeal that looks beautiful on any bedside table.
Step-by-Step Guide
Materials
- Speckled Stoneware Clay (or white clay with speckle additive)
- Small bowl of water
- Sponge
- Wooden rib or smoothing tool
- Basic clay sculpting tools (needle tool)
- Matte clear glaze or matte white glaze
- Kiln access (or oven if using polymer clay – adjust instructions accordingly)
Step 1: Forming the Base
-
Prepare the clay:
Start with a ball of speckled clay roughly the size of a golf ball or a small lime. Ensure it is wedged well to remove any air bubbles. -
Open the center:
Hold the ball in your non-dominant hand. Gently press your thumb into the center of the ball, stopping about a quarter-inch from the bottom to leave enough thickness for the base. -
Begin pinching:
Using your thumb on the inside and fingers on the outside, start pinching the clay walls. Rotate the bowl slightly with each pinch to ensure even thickness. -
Widen the form:
Focus on pinching from the bottom upward, gently encouraging the walls to flare out slightly rather than going straight up. You want a shallow, open bowl shape that makes it easy to retrieve small items. -
Check thickness:
Aim for a consistent wall thickness of about 1/4 inch throughout. Run your fingers delicately over the walls to feel for any thick or thin spots and adjust as needed.
Step 2: Refining and Drying
-
Level the rim:
Set the pot on a flat surface. Look at it from eye level to see if the rim is uneven. You can gently tap the rim upside down on the table to level it, or trim excess clay with a needle tool. -
Smooth the interior:
Dampen your sponge slightly and wipe the inside of the bowl to remove fingerprints. I like to use a small circular motion here to really compress the clay floor. -
Smooth the exterior:
Use a wooden rib or your damp fingers to smooth the outside. For this specific look, don’t over-smooth; leaving a few subtle hand-marks adds to the organic aesthetic. -
Refine the lip:
Run a damp finger or a piece of chamois leather over the rim to round it off. A sharp rim is prone to chipping, so a soft curve looks and functions better. -
Initial drying:
Let the dish dry slowly to the leather-hard stage. This usually takes about a day depending on humidity. Cover it loosely with plastic if you need to slow the process. -
Clean up the foot:
Once leather hard, flip the pot over. If the bottom is rough, smooth it with a rib or sponge. You can carve a small recessed foot ring if desired, but a flat bottom works perfectly for trinket dishes.
Cracking Up?
If you see cracks forming on the rim while pinching, your clay is too dry. Dip your fingers in water (sparingly!) or smooth the cracks immediately with a damp sponge to heal them.
Step 3: Firing and Glazing
-
Bone dry:
Allow the piece to dry completely until it is bone dry. The clay will become lighter in color and room temperature to the touch. -
Bisque fire:
Fire the piece in a kiln to cone 04 (or your clay’s specific bisque temperature). This hardens the clay and prepares it for glazing. -
Wipe down:
After the kiln cools, wipe the bisque-fired dish with a damp sponge to remove any kiln dust that might interfere with glaze adhesion. -
Glaze application:
Pour a matte clear or matte creamy-white glaze inside the bowl. Swirl it around to coat the interior, then pour the excess back out. This allows the natural speckles of the clay to show through. -
Clean the bottom:
Ensure the bottom and the bottom 1/8th inch of the exterior wall are completely free of glaze. Use a wax resist on the bottom beforehand or wipe it clean with a sponge. -
Glaze fire:
Fire the piece again to the maturation temperature of your specific clay and glaze (typically cone 5 or 6 for stoneware). Follow the manufacturer’s firing schedule carefully.
Make it Yours
Try leaving the outside unglazed! The contrast between a smooth, glazed interior and the raw, textured exterior clay creates a stunning tactile experience.
Once cooled, your dish is ready to hold your most precious rings and daily treasures on your dresser


Mini Pinch Cup for Desk Storage
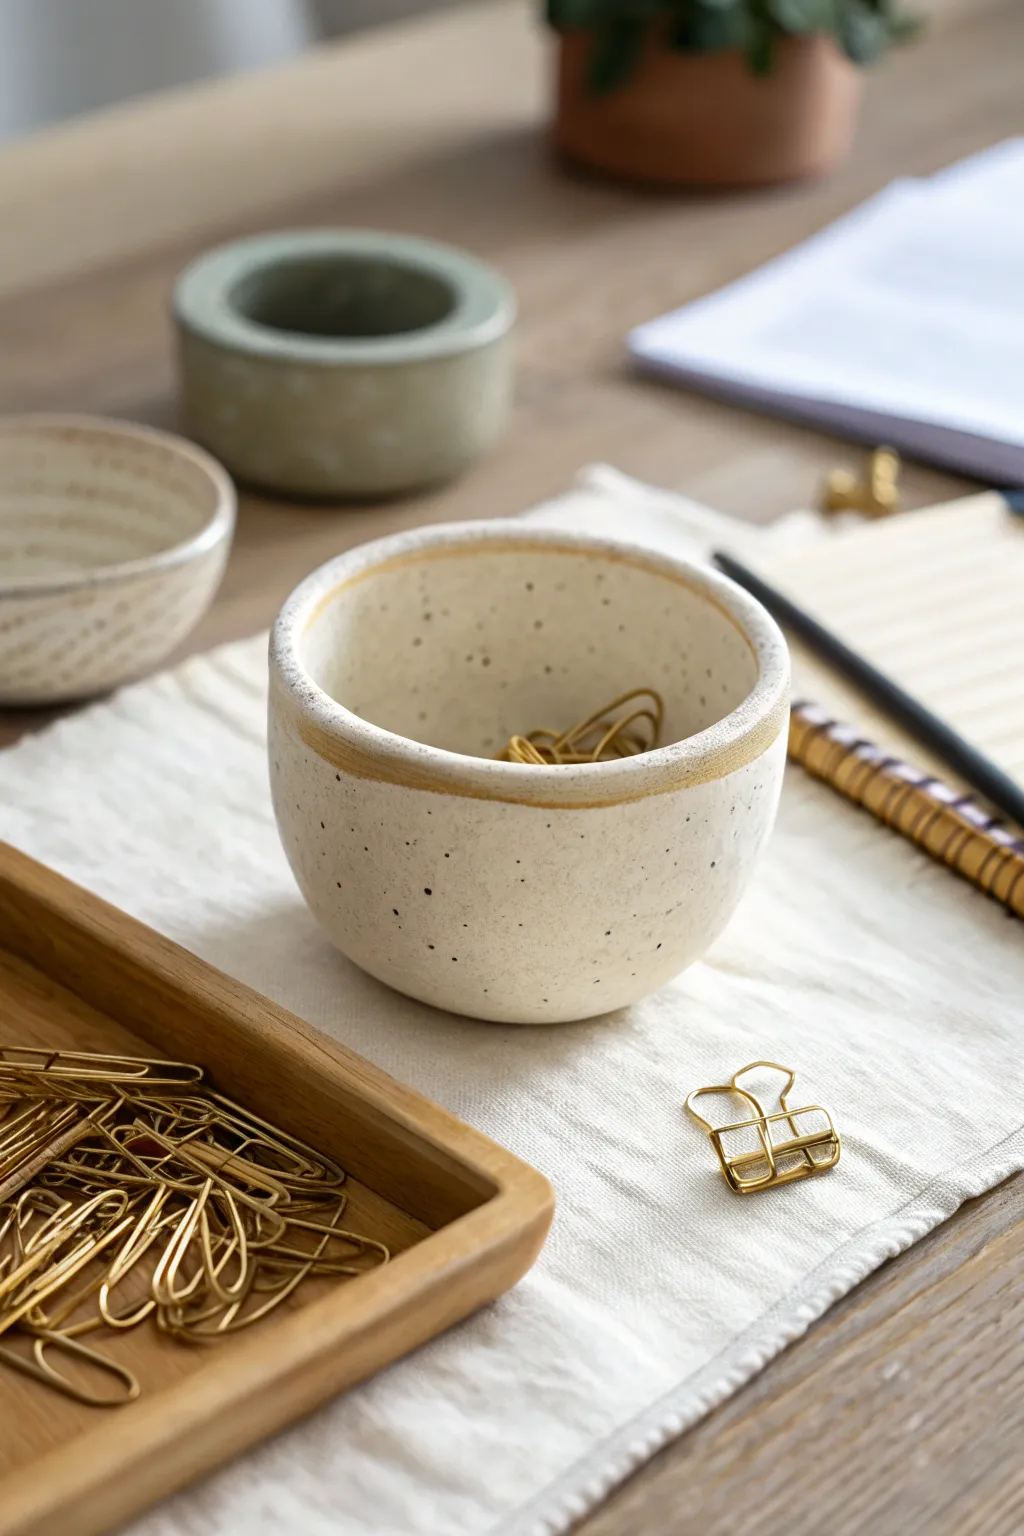
This charming little desk organizer starts as a simple ball of clay and transforms into a chic vessel perfect for holding paperclips or small trinkets. The finished piece features a lovely speckled finish and a delicate gold-stained rim that adds a touch of understated luxury to your workspace.
Step-by-Step
Materials
- White stoneware clay (speckled variety, or plain white)
- Black iron oxide or black underglaze (if creating speckles manually)
- Pottery sponge
- Rib tool (kidney)
- Needle tool
- Small bowl of water
- Loop tool (optional for trimming)
- Transparent glaze (glossy or satin)
- Gold luster or metallic gold acrylic paint (for the rim)
- Small soft paintbrush
- Kiln (or kitchen oven if using polymer clay alternative)
Step 1: Forming the Pinch Pot Base
-
Prepare the Clay:
Start with a ball of clay roughly the size of a tangerine. Pat it firmly between your palms to ensure it is round and compact, knocking out any visible air pockets. -
Open the Form:
Hold the clay ball in your non-dominant hand. Gently press your thumb into the center, stopping about a half-inch from the bottom—you don’t want to push all the way through. -
Begin Pinching:
With your thumb still inside, begin pinching the clay wall between your thumb and fingers. Rotate the ball slightly after each pinch, working in an even spiral from the bottom upward. -
Even Out the Walls:
Continue pinching lightly and rapidly to thin the walls. Aim for a consistent thickness of roughly 1/4 inch throughout the entire cup, paying special attention to the transition from the floor to the walls. -
Shape the Profile:
As you pinch upward, gently cup the outside with your palm to encourage a vertical, slightly rounded shape rather than a wide bowl. We want a cup profile like the image, so keep the opening slightly narrower. -
Refine the Bottom:
Gently tap the pot on your work surface to create a flat, stable bottom. You want it to sit flush without rocking.
Cracking Up?
If you see tiny cracks forming on the rim while pinching, your clay is likely too dry. Dip your fingers in water (sparingly!) or use a damp sponge to rehydrate the edge and compress it immediately.
Step 2: Refining and Smoothing
-
Smooth the Rim:
The rim in the photo is slightly thick and rounded. Run a damp sponge or a piece of chamois leather over the lip to compress the clay and remove any sharp edges or cracks. -
Address Exterior Texture:
Use a rib tool (a flexible kidney shape) to scrape and smooth the exterior walls. This removes fingerprints and creates that clean, minimalist surface seen in the reference. -
Create Speckles (If Needed):
If your clay isn’t naturally speckled, flick a stiff toothbrush dipped in iron oxide or diluted black underglaze over the pot. I prefer to do this while the clay is leather hard for crisp dots. -
Slow Drying:
Cover the pot loosely with plastic and let it dry slowly to the leather-hard stage. This prevents warping, especially around the rim.
Step 3: Bisqueing and Glazing
-
Bisque Fire:
Once fully bone dry, fire the piece in a kiln to cone 04 (or according to your clay’s instructions) to harden it into bisque ware. -
Apply Clear Glaze:
Dip the bisqued pot into a transparent glaze (glossy or satin works best). Make sure to wipe the foot (bottom) clean with a sponge so it doesn’t stick to the kiln shelf. -
Glaze Fire:
Fire the piece a second time to the maturation temperature of your glaze (typically cone 5 or 6 for stoneware).
Make It a Set
Create a nesting set by making two additional bowls—one slightly larger and one smaller. Vary the rim colors using copper or silver luster for a mixed-metal desk collection.
Step 4: The Golden Touch
-
Prepare the Rim Decoration:
For a true ceramic finish, apply gold luster (overglaze) to the top 1/2 inch of the rim using a dedicated brush. If you aren’t using a kiln, paint the rim with high-quality metallic gold acrylic. -
Create the Band:
Paint a confident, slightly organic band. Don’t worry about using tape; a slightly wavering hand-painted line adds to the handmade charm shown in the photo. -
Final Fire or Seal:
If using gold luster, fire the piece a third time at a very low temperature (usually cone 018). If using acrylic paint, seal the painted rim with a varnish once dry.
Place your new speckled cup on your desk and enjoy the satisfaction of organizing your space with your own handmade art


Pinch Pot Tealight Holder
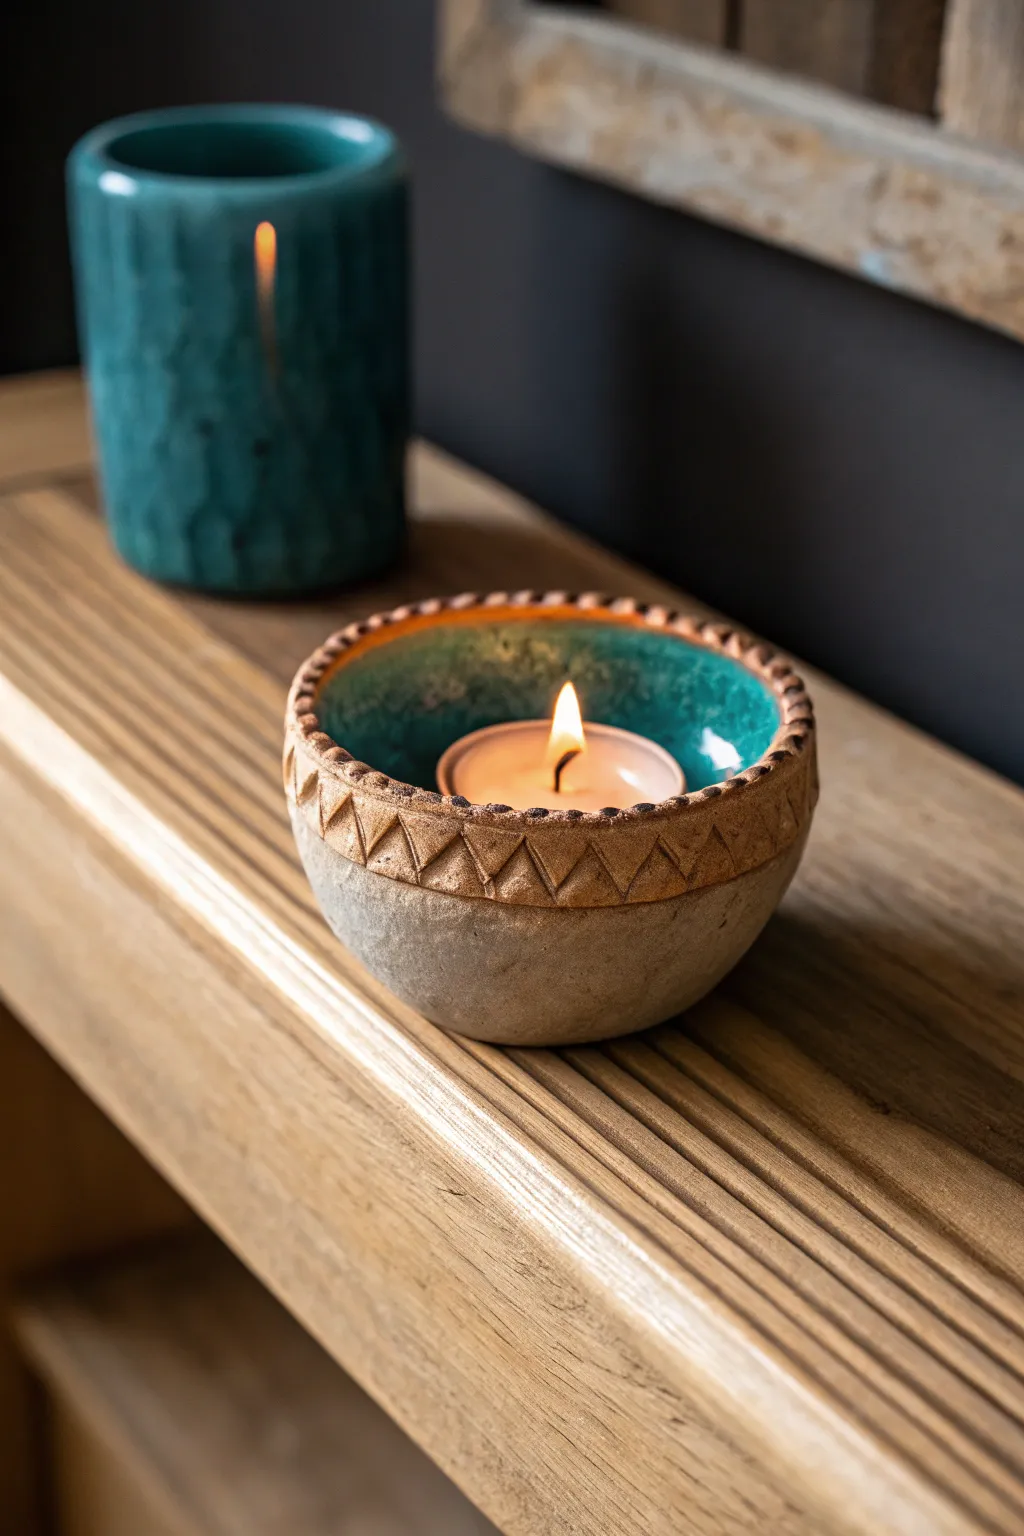
Create a cozy atmosphere with this dual-textured pinch pot that combines rustic stonework with vibrant color. The interior features a glossy turquoise glaze that reflects the candlelight, while the rim showcases a carved tribal pattern.
How-To Guide
Materials
- Stoneware clay (groggy/speckled is best)
- Small bowl of water
- Carving tool or needle tool
- Rib tool (wood or rubber)
- Turquoise gloss glaze
- Iron oxide wash or brown underglaze
- Sponge
- Fine grit sandpaper (optional)
- Tealight candle for sizing
Step 1: Forming the Basin
-
Prepare the clay:
Start with a ball of clay roughly the size of a tangerine. Wedge it well to remove air bubbles, then roll it into a smooth sphere in your palms. -
Open the pot:
Hold the sphere in one hand and press your thumb into the center, stopping about a half-inch from the bottom to ensure a sturdy base. -
Pinch the walls:
Rotate the ball while gently pinching between your thumb and fingers. Aim for a wide, shallow bowl shape rather than a tall cup. The walls should be about a quarter-inch thick. -
Size for the candle:
Place your unlit tea light inside to check the fit. You want plenty of room around the candle since the clay will shrink during drying and firing. -
Flatten the rim:
Once you are happy with the shape, gently tap the rim against your work surface to create a flat, horizontal surface for your carving. -
Refine the exterior:
Use a rib tool or your thumb to smooth the exterior walls, but don’t over-polish; the slightly rough, stone-like texture adds character to the bottom half.
Cracking Issues?
If the rim cracks while drying, you likely opened it too fast. Compress the rim by running a shammy cloth over it after shaping to strengthen the clay particles.
Step 2: Carving and Detailing
-
Define the border:
Use a needle tool or carving tool to score a horizontal line around the exterior, about half an inch down from the rim. This marks the area for your pattern. -
Carve the zigzags:
Carve a continuous zigzag line between the rim and your scored line. I find it easiest to make all the diagonal strokes in one direction first, then go back to complete the triangles. -
Add texture:
Inside the lower triangles of your zigzag pattern, press small vertical lines or hatch marks to create deeper texture that will catch the glaze later. -
Smooth the lip:
Run a slightly damp sponge over the very top edge of the rim to remove sharp burrs from carving, but be careful not to wash away your crisp lines. -
Dry slowly:
Cover the piece loosely with plastic and let it dry slowly to the bone-dry stage. Once dry, bisque fire the piece according to your clay’s instructions.
Go Bigger
Scale this up using a grapefruit-sized ball of clay to create a matching 3-wick candle holder. The larger surface allows for more intricate rim carvings.
Step 3: Glazing and Finishing
-
Apply oxide to rim:
Brush an iron oxide wash or brown underglaze over the carved zigzag rim. Make sure it gets into all the recessed textures. -
Wipe back:
Using a damp sponge, wipe away the excess oxide from the high points of the carving. The dark color should remain only in the deepest cuts, highlighting the geometry. -
Wax the rim (optional):
If you want a very clean separation, carefully apply wax resist over your oxide-stained rim so the interior glaze doesn’t overlap it. -
Glaze the interior:
Pour a glossy turquoise glaze into the center of the pot, swirl it to coat the entire interior surface up to the rim, and pour out the excess. -
Clean the exterior:
Ensure the bottom exterior of the pot remains completely unglazed to maintain that raw gritty stone look shown in the reference. -
Final fire:
Fire the piece a second time to the temperature required by your specific glaze and clay body.
Light your candle and enjoy the warm glow reflecting off the beautiful turquoise interior

The Complete Guide to Pottery Troubleshooting
Uncover the most common ceramic mistakes—from cracking clay to failed glazes—and learn how to fix them fast.
Pinch Pot Soap Dish With Finger-Groove Ridges
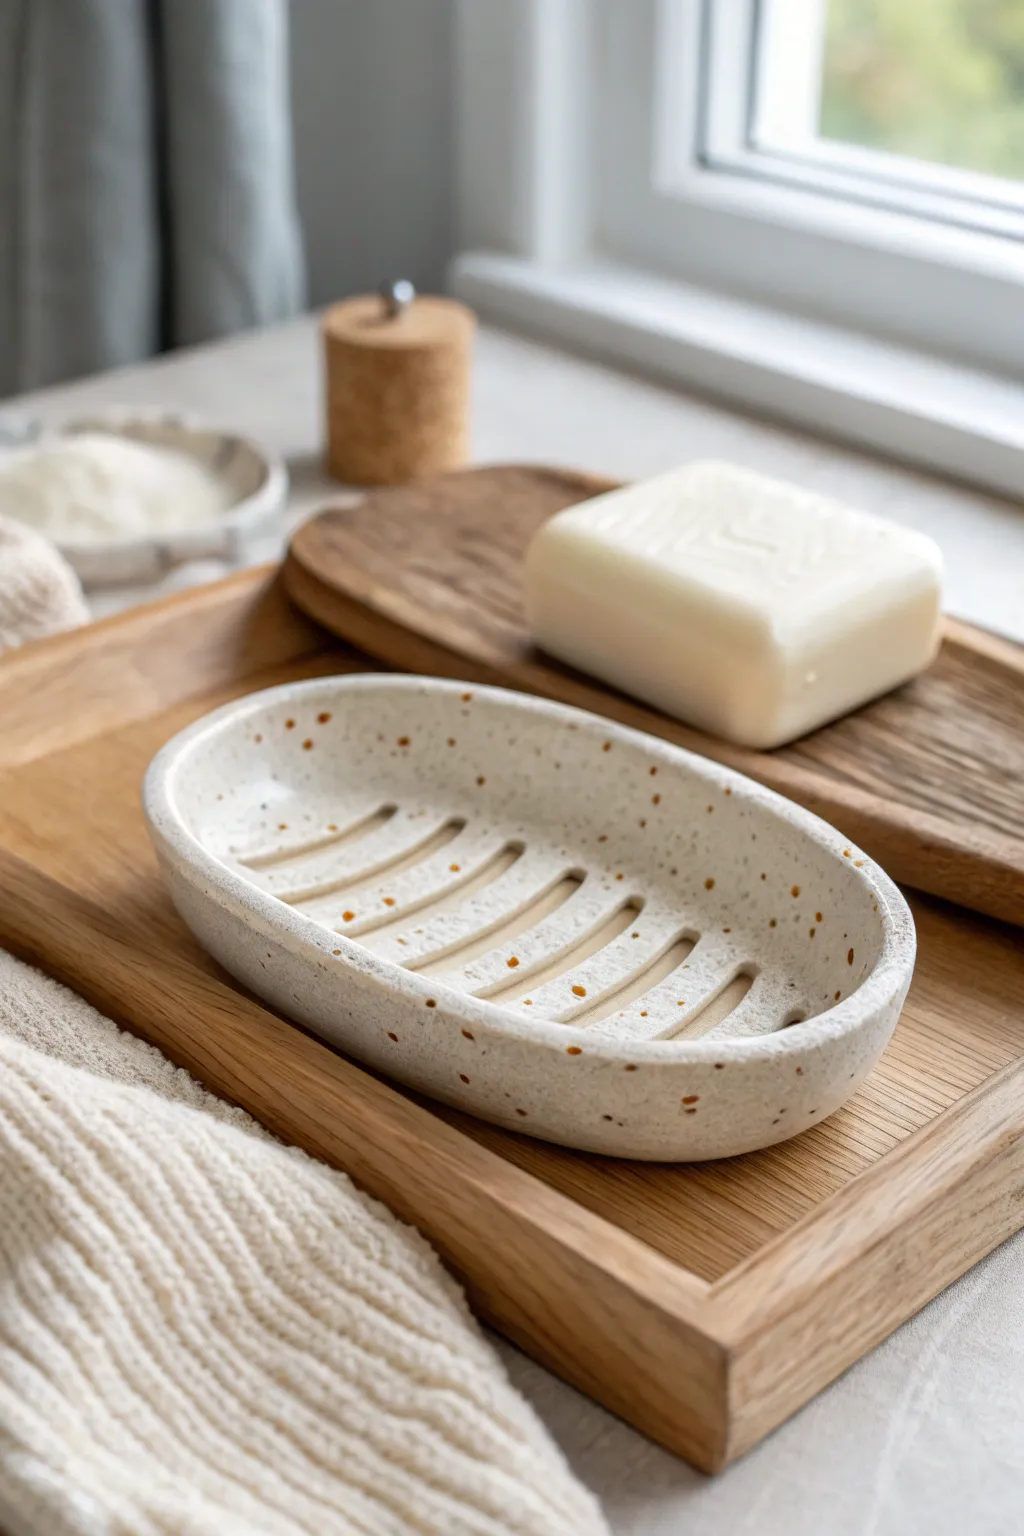
Elevate your bathroom sink with this elegant, functional soap dish that combines the organic feel of hand-built ceramics with practical design. The elongated oval shape features distinct raised ridges created directly with your fingers, allowing water to drain away and keeping your soap dry.
Step-by-Step Guide
Materials
- Speckled stoneware clay (white or buff)
- Small bowl of water
- Sponge
- Rubber rib tool (soft)
- Wooden modeling tool or old credit card
- Fettling knife or needle tool
- Rolling pin (optional)
- Clear matte or satin glaze
- Kiln access
Step 1: Forming the Base
-
Prepare your clay:
Start with a ball of speckled clay roughly the size of a large lemon or a tennis ball. Wedge it thoroughly to remove air bubbles and ensure an even consistency. -
Shape the oval:
Begin gently rolling the ball between your palms to elongate it into a thick sausage or log shape. It should be about 4-5 inches long. -
Open the pot:
Hold the clay log in one hand and press your thumb into the center to open it up, creating a deep trough. Instead of a circular pinch pot, we are aiming for a canoe-like opening. -
Pinch the walls:
Using your thumb on the inside and fingers on the outside, gently pinch the walls upwards and outwards. Rotate the piece frequently to keep the thickness even, aiming for walls about 1/4 inch thick. -
Flatten the bottom:
Tap the bottom of your pinch pot gently against your work surface to create a flat, stable base. This ensures it won’t rock when sitting on your counter.
Use a Damp Chamois
For an ultra-smooth rim and ridge top, drag a damp strip of chamois leather over the edges while the clay is leather hard. It compresses the clay better than a sponge.
Step 2: Creating the Interior Ridges
-
Mark the ridge lines:
Before sculpting, lightly sketch five or six parallel curved lines along the inside bottom of the dish using a needle tool to map out where your drainage ridges will go. -
Add coils for height:
Roll out very thin, worm-sized coils of fresh clay. Score the lines you just marked and slip them, then gently press these tiny coils onto the lines. This adds necessary volume for the ridges. -
Sculpt the grooves:
I like to use a rounded wooden tool or just my pinky finger to press down between the coils, effectively pushing the added clay up into sharper reliefs while smoothing the valleys. -
Refine the ridges:
Use a damp sponge or your finger to smooth the tops of the ridges. They should be distinct enough to hold soap up, but smooth enough not to scratch. -
Shape the rim:
Check the rim of your dish. If it has become uneven during pinching, trimming slightly with a needle tool can help, or simply compress it with a sponge for a soft, rounded lip.
Step 3: Finishing Touches
-
Smooth the exterior:
Take a flexible rubber rib and run it over the exterior walls to compress the clay and remove fingerprint marks, giving it that professional, sleek look. -
Refine the shape:
Look at the dish from above. Gently squeeze or push the sides to ensure a symmetrical oval shape. -
Let it dry slowly:
Cover the piece loosely with plastic for the first day to let the moisture even out, then uncover to let it dry to bone dry status. -
Bisque fire:
Fire the piece in a kiln to cone 04 (or according to your clay body’s instructions) for the bisque firing. -
Apply glaze:
Dip or brush on a clear matte or satin glaze. The clear glaze is crucial because it allows the natural speckles of the clay body to be the star visual element. -
Wipe the bottom:
Use a damp sponge to meticulously wipe any glaze off the flat bottom of the dish so it doesn’t fuse to the kiln shelf. -
Glaze fire:
Fire the piece a final time to the maturity temperature of your clay (commonly Cone 5 or 6 for stoneware).
Ridges Too Sharp?
If your drainage ridges feel jagged after sculpting, wait until the clay is stiff (leather hard) and burnish them with the back of a spoon to round and polish them.
Once fired, place your favorite soap bar on top and enjoy the functional art you’ve created for your home
Pinch Pot Spoon Rest With a Thumb Dip

This elegant, speckled ceramic spoon rest combines the organic charm of hand-built pottery with practical kitchen utility. Its elongated oval shape and gentle curve create the perfect cradle for your cooking utensils, keeping your counters clean in style.
Detailed Instructions
Materials
- Speckled stoneware clay (mid-fire)
- Wooden spoon (for sizing)
- Small bowl of water
- Potter’s needle tool
- Rib tool (flexible metal or rubber)
- Sponge
- Canvas working mat or wooden board
- Clear or transparent gloss glaze
Step 1: Shaping the Base
-
Prepare the Clay:
Begin by wedging a softball-sized amount of speckled stoneware clay to remove air bubbles. This ensures your spoon rest won’t crack during firing. -
Form the Initial Ball:
Roll the wedged clay into a smooth, tight sphere in your hands. Pat it gently to ensure it is symmetrical. -
Elongate the Form:
Instead of a traditional round pinch pot, gently roll the sphere into a thick, sausage-like oval shape. This sets the foundation for the elongated spoon rest. -
Start the Pinch:
Hold the clay oval in your non-dominant hand. Press your thumb deep into the center of the clay, creating a well, while keeping the walls thick. -
Open the Walls:
Using a rhythmic pinching motion with your thumb on the inside and fingers on the outside, gentle squeeze and rotate the clay. Focus on extending the shape outwards lengthwise rather than just upwards. -
Refine the Thickness:
Continue pinching from the bottom up to the rim. Aim for an even thickness of about 1/4 inch throughout the piece. I find checking the thickness by feel often works better than measuring.
Step 2: Refining and Smoothing
-
Shape the Curve:
Place the piece on your work surface. Gently press the bottom down to flatten it slightly so it sits stable, while pulling the sides up to create a shallow bowl form. -
Check the Fit:
Lay your wooden spoon inside the dish to check the length. Stretch the clay gently at both ends if you need more room for the spoon bowl or handle. -
Smooth the Interior:
Take a damp sponge and wipe the inside of the bowl to remove any fingerprints or deep pinch marks. You want a smooth surface for easy cleaning later. -
Create the Rest:
On one shorter end of the oval, use your thumb to gently press the rim downward slightly. This creates a subtle dip where the handle of a spoon can rest securely. -
Clean the Rim:
Use a damp sponge or a piece of felt to compress and smooth the rim. A rounded, smooth rim is durable and less likely to chip. -
Refine the Exterior:
Use a flexible rib tool to scrape and smooth the outside walls. This defines the shape and gives it that professional, finished look shown in the photo.
Wobbly Base?
If your spoon rest rocks on the table, wait until it’s leather-hard. Flip it over and gently tap the center of the base with a wooden paddle to flatten it perfectly.
Step 3: Drying and Finishing
-
Dry Slowly:
Let the piece dry slowly under plastic for the first day to equalize moisture, then uncover it to dry completely to the bone-dry stage. -
Bisque Fire:
Once bone dry, fire the piece in a kiln to cone 04 (or your clay’s specific bisque temperature). This turns the fragile clay into durable ceramic. -
Glaze Application:
After the bisque fire, wipe the piece with a damp sponge to remove dust. Dip the entire piece into a clear or transparent gloss glaze to show off the natural speckles of the clay. -
Wipe the Foot:
Carefully wipe any glaze off the very bottom of the piece where it will touch the kiln shelf. This prevents it from fusing to the shelf during firing. -
Final Fire:
Fire the piece a second time to the maturation temperature of your clay (typically cone 5 or 6 for stoneware). Let the kiln cool completely before unloading.
Add a Notch
For extra functionality, carve a distinct U-shaped notch into the rim instead of just pressing it down. This holds round-handled ladles more securely.
Now you have a beautifully simple, handmade spot to rest your favorite cooking spoon that brings an artisanal touch to your daily routine


What Really Happens Inside the Kiln
Learn how time and temperature work together inside the kiln to transform clay into durable ceramic.
Pinch Pot Mug With a Simple Handle
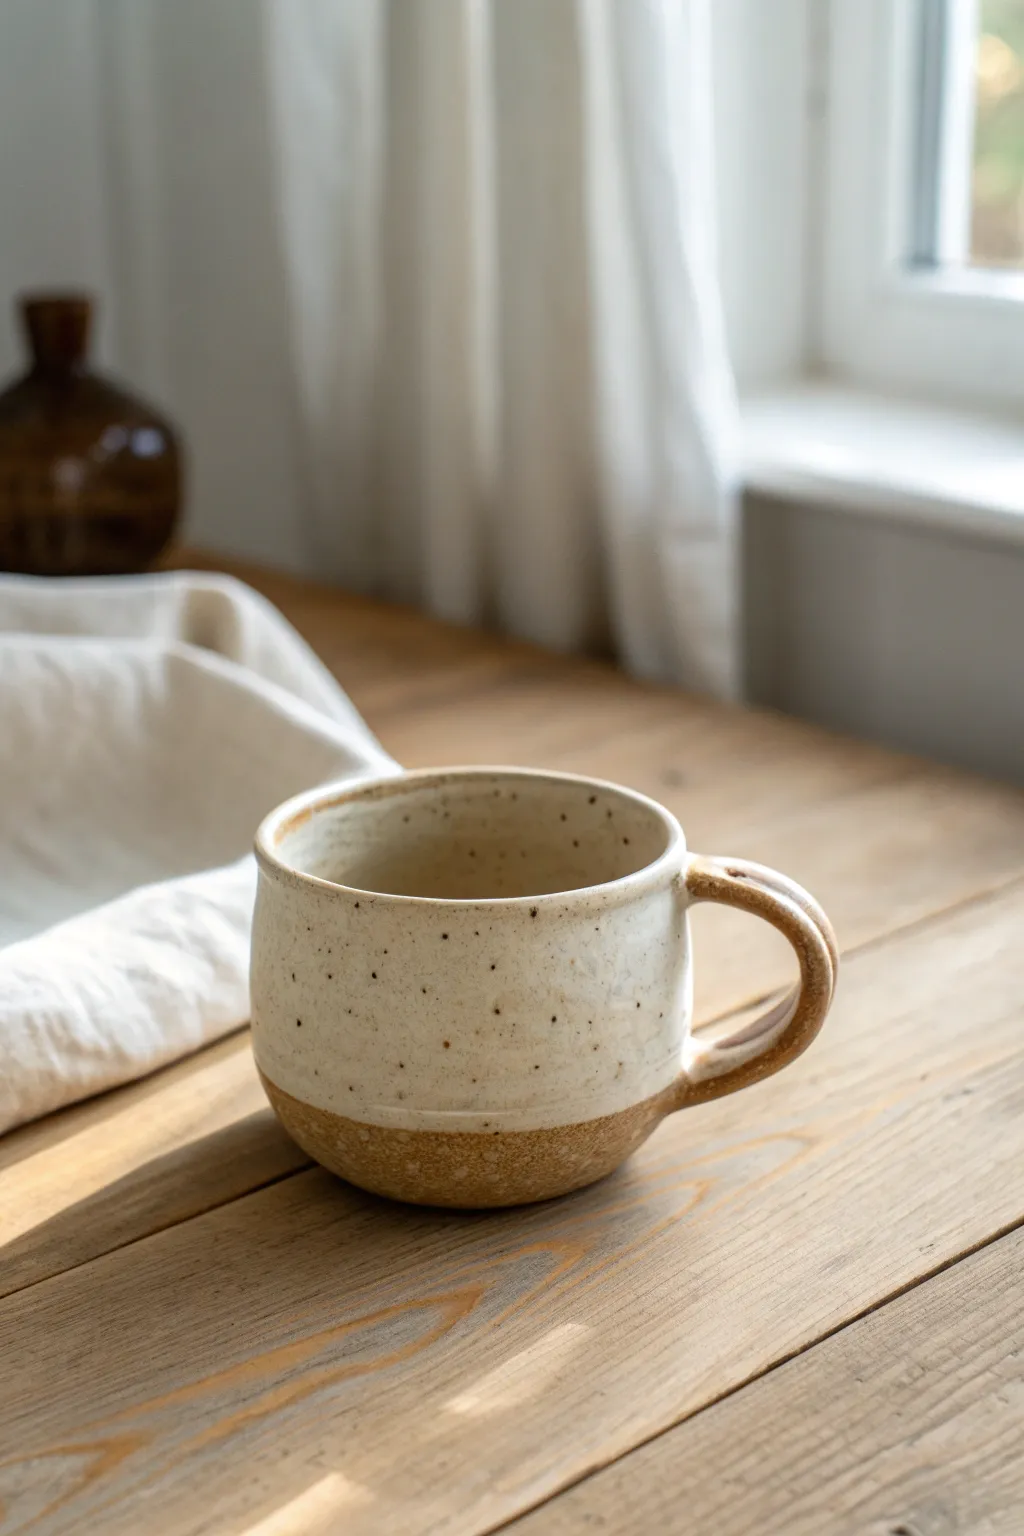
This cozy, handmade mug starts with a humble ball of clay and transforms into a functional piece of art featuring earthy, raw texture at the base and a creamy, speckled glaze. The classic pinch pot method creates organic, slightly imperfect walls that feel wonderful to hold.
Step-by-Step Tutorial
Materials
- Speckled stoneware clay (mid-fire)
- Pottery wire cutter
- Sponge
- Water container
- Serrated rib tool
- Rubber kidney rib
- Pin tool or needle tool
- Scoring tool (or fork)
- Cream or matte white glaze
- Wax resist (optional)
Step 1: Forming the Pinch Pot Base
-
Prepare the clay:
Cut a piece of speckled stoneware clay roughly the size of a tennis ball. Pat and roll it into a smooth sphere, ensuring there are no trapped air bubbles or deep creases. -
Start the opening:
Hold the clay ball in your non-dominant hand. Press your thumb gently but firmly into the center of the ball, stopping about a half-inch from the bottom to leave enough thickness for the base. -
Pinch the walls:
Begin pinching the clay between your thumb (inside) and fingers (outside). Rotate the ball slightly with each pinch to ensure even thickness all around, working from the bottom up toward the rim. -
Shape the cylinder:
As you pinch upward, gently guide the clay into a cylindrical shape rather than a wide bowl. Aim for a wall thickness of about a quarter-inch throughout the vessel. -
Flat bottom:
Tap the pot gently on your work surface to flatten the base. This ensures your mug will sit stably without wobbling. -
Refine the surface:
Use a damp sponge or a rubber kidney rib to smooth out deep fingerprints and refine the outer shape. The goal isn’t total perfection, as the hand-built texture adds charm.
Cracking Handles?
If the handle cracks at the join during drying, wrap the handle in wet paper towel while leaving the body exposed. This helps equalize moisture levels.
Step 2: Adding the Handle
-
Roll a coil:
Take a smaller piece of clay and roll it into a thick coil, about the width of your index finger. Taper the ends slightly by rolling them with a bit more pressure. -
Shape the handle:
Curve the coil into a ‘C’ shape or ear-like loop. Hold it up to your mug body to check the proportions—it should fit two or three fingers comfortably. -
Mark attachment points:
Hold the handle against the mug and lightly mark where the top and bottom meet the body with a needle tool. -
Score and slip:
Rough up the attachment areas on both the mug and the handle ends using a scoring tool or fork. Apply a dab of water or clay slip to the scored areas to act as glue. -
Attach the handle:
Press the handle firmly onto the mug body. Use your thumb to smudge the clay from the handle onto the mug wall to create a seamless, strong bond. -
Reinforce the seam:
Roll a tiny, thin coil of clay and place it around the connection points if needed, blending it in with a wooden tool or your finger to ensure no cracks form during drying. -
Check alignment:
Look at the mug from directly above and straight on to ensure the handle is vertically straight and centered.
Step 3: Drying and Glazing
-
Slow drying:
Loosely cover the mug with plastic to let it dry slowly to the leather-hard stage, then uncover it to dry completely to bone dry. This prevents the handle from pulling away as the clay shrinks. -
Bisque fire:
Fire the mug in a kiln to the bisque temperature appropriate for your specific clay body (usually Cone 06 or 04). -
Wax the bottom:
Apply wax resist to the bottom inch of the mug’s exterior and the foot. This creates the distinct unglazed line seen in the image. -
Apply glaze:
Dip the mug into a cream or matte white glaze, holding it by the foot or using tongs. The glaze will bead off the waxed area, leaving that raw clay texture exposed. -
Clean up:
Use a damp sponge to wipe away any stray droplets of glaze that might have stuck to the waxed bottom area. -
Glaze fire:
Fire the mug again to the glaze temperature (likely Cone 5 or 6 for stoneware). The heat will melt the glaze and bring out the iron speckles in the clay body.
Pro Tip: Lip Comfort
Before drying, use a small piece of chamois leather or a very smooth plastic bag to compress the rim. A rounded, compressed rim feels much better on the lips.
Once cooled, your new favorite mug is ready for a warm brew and a quiet moment
Lidded Pinch Pot Jar
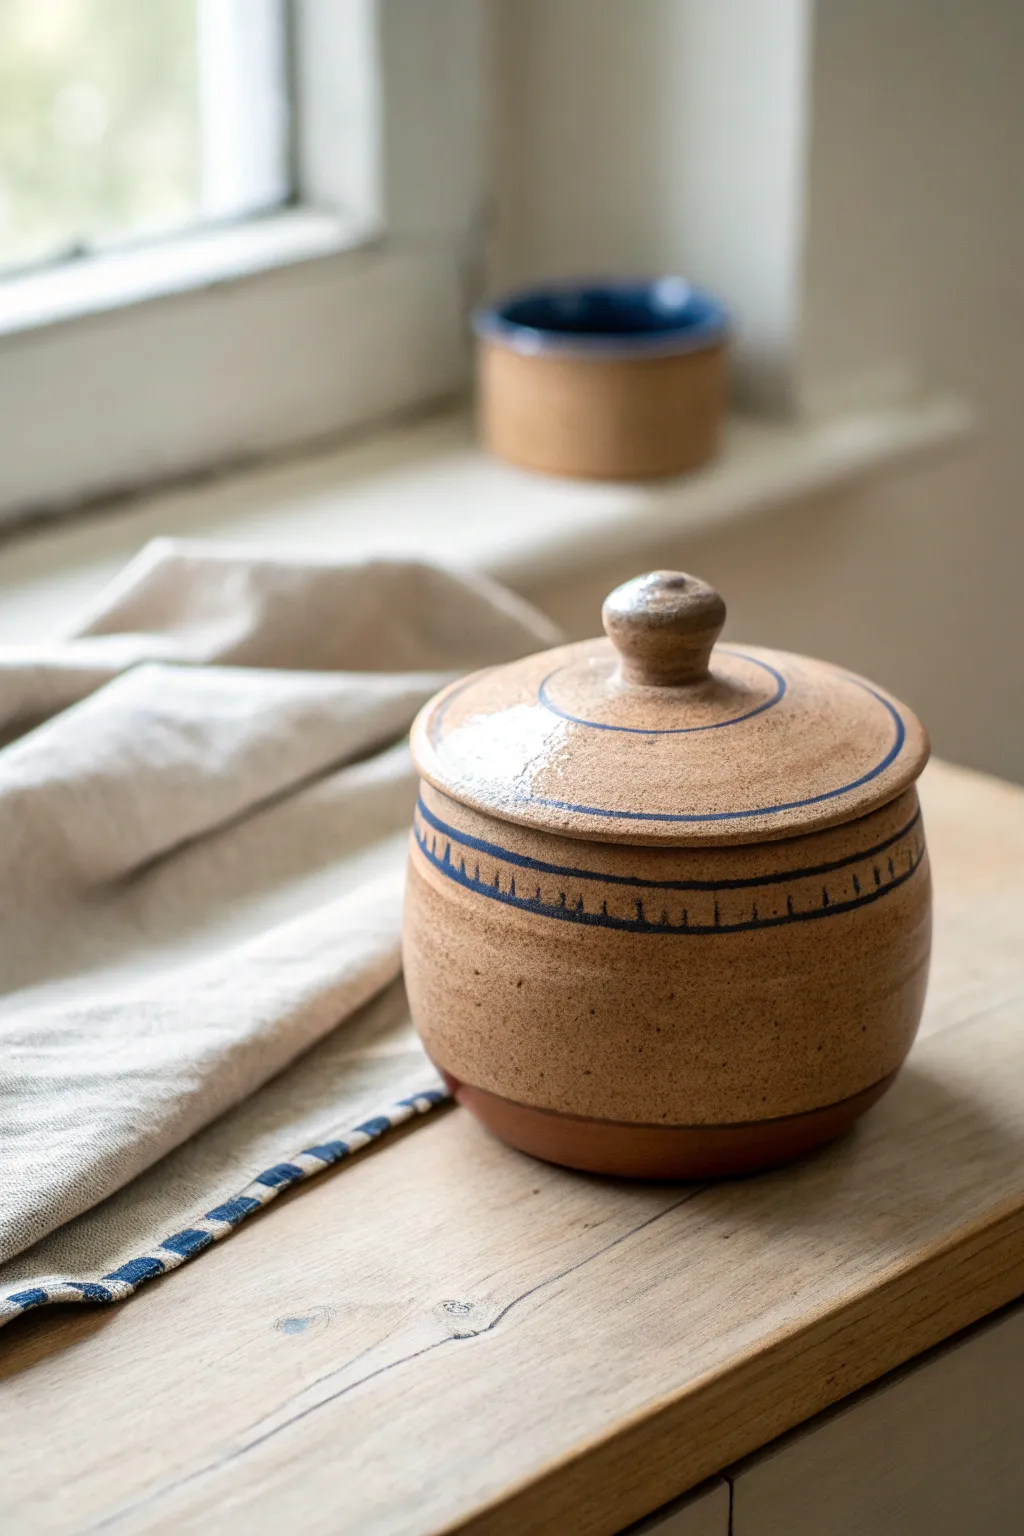
Create a charming, functional storage jar using simple hand-building techniques that highlight the natural beauty of speckled clay. This project features a snug-fitting lid with a classic knob handle and is finished with minimalist cobalt blue brushwork.
Detailed Instructions
Materials
- Speckled stoneware clay (mid-fire)
- Blue underglaze or cobalt oxide wash
- Clear glossy glaze
- Clay cutting wire
- Decorating wheel (banding wheel)
- Small sponge
- Needle tool
- Wooden modeling tool
- Serrated rib or scoring tool
- Small round paintbrush
- Slip (clay slurry)
Step 1: Forming the Base
-
Prepare the Clay:
Start with a ball of well-wedged speckled clay about the size of a large orange. Pat it into a smooth sphere to ensure even walls later. -
Open the Pinch Pot:
Hold the clay ball in one hand and push your thumb into the center, stopping about a half-inch from the bottom. Slowly pinch and rotate the clay to open up a bowl shape, keeping the walls even. -
Refine the Cylinder:
Once the basic opening is established, gently stroke the clay upwards to create vertical walls rather than a wide bowl. You want a squat cylinder shape with a slightly rounded bottom. -
Level the Rim:
Set the pot on your table. If the rim is uneven, use a needle tool to trim the top edge level while slowly spinning the pot. Smooth the cut edge with a damp sponge. -
Create the Gallery:
This is crucial for the lid. Gently press the rim slightly inwards or use a wooden tool to carve a small ledge (gallery) on the inside of the rim where the lid will eventually sit.
Step 2: Making the Lid & Knob
-
Measure the Opening:
Use calipers or a ruler to measure the exact diameter of the gallery ledge you just created. You want your lid to fit inside this measurement. -
Form the Lid Slab:
Flatten a smaller piece of clay into a thick disk. You can pinch it into shape or roll it out. It should be slightly domed to match the pot’s aesthetic. -
Refine the Fit:
Trim the disk to match your measurements. Test the fit on the base pot frequently; it should sit flat on the gallery ledge without falling in or hanging over too much. -
Make the Knob:
Roll a small ball of clay for the handle. Pinch it gently to form a mushroom or knob shape. -
Attach the Knob:
Score the center of the lid and the bottom of the knob. Apply slip to both areas, press the knob firmly onto the lid, and smooth the seam with a modeling tool so it looks like one piece.
Spin It to Win It
For super crisp horizontal lines, rest your elbow on the table to stabilize your hand while spinning the banding wheel, letting the rotation do the painting.
Step 3: Decoration & Glazing
-
Leather Hard Stage:
Let both pieces dry until leather hard. This is the perfect time to clean up any rough marks with a sponge, but leave some texture for character. -
Trimming the Foot:
Turn the pot over. I like to carve away a small ring of clay at the bottom to create a defined foot, leaving the raw clay exposed. -
Apply Blue Lines:
Place the pot on a banding wheel. While spinning it slowly, hold a paintbrush loaded with blue underglaze against the upper section to create steady horizontal rings. -
Add Pattern Details:
Between the blue rings, paint small vertical dashes or hash marks to create the geometric band pattern seen in the image. -
Decoration on Lid:
Repeat the banding wheel technique on the lid, adding concentric blue circles radiating from the knob. -
Bisque Fire:
Fire the pieces in a kiln to bisque temperature (usually cone 04 or 06). This prepares the clay for the final glaze. -
Wax Resist:
Apply wax resist to the bottom foot ring and the gallery ledge where the lid touches the jar to prevent them from fusing together. -
Clear Glaze Application:
Dip the jar and lid into a clear glossy glaze. The clear coat will make the speckles in the clay pop and seal the blue underglaze. -
Final Firing:
Fire the kiln again to the final temperature for your clay body (likely cone 5 or 6). Once cool, test the lid fit one last time.
Lid Stuck?
If the lid rattles or feels loose after firing, you can apply a tiny dot of silicone or glue to the underside rim to create a soft, non-slip buffer.
Your beautiful new jar is now ready to hold tea, sugar, or trinkets on your windowsill

TRACK YOUR CERAMIC JOURNEY
Capture glaze tests, firing details, and creative progress—all in one simple printable. Make your projects easier to repeat and improve.
Tripod Footed Pinch Bowl
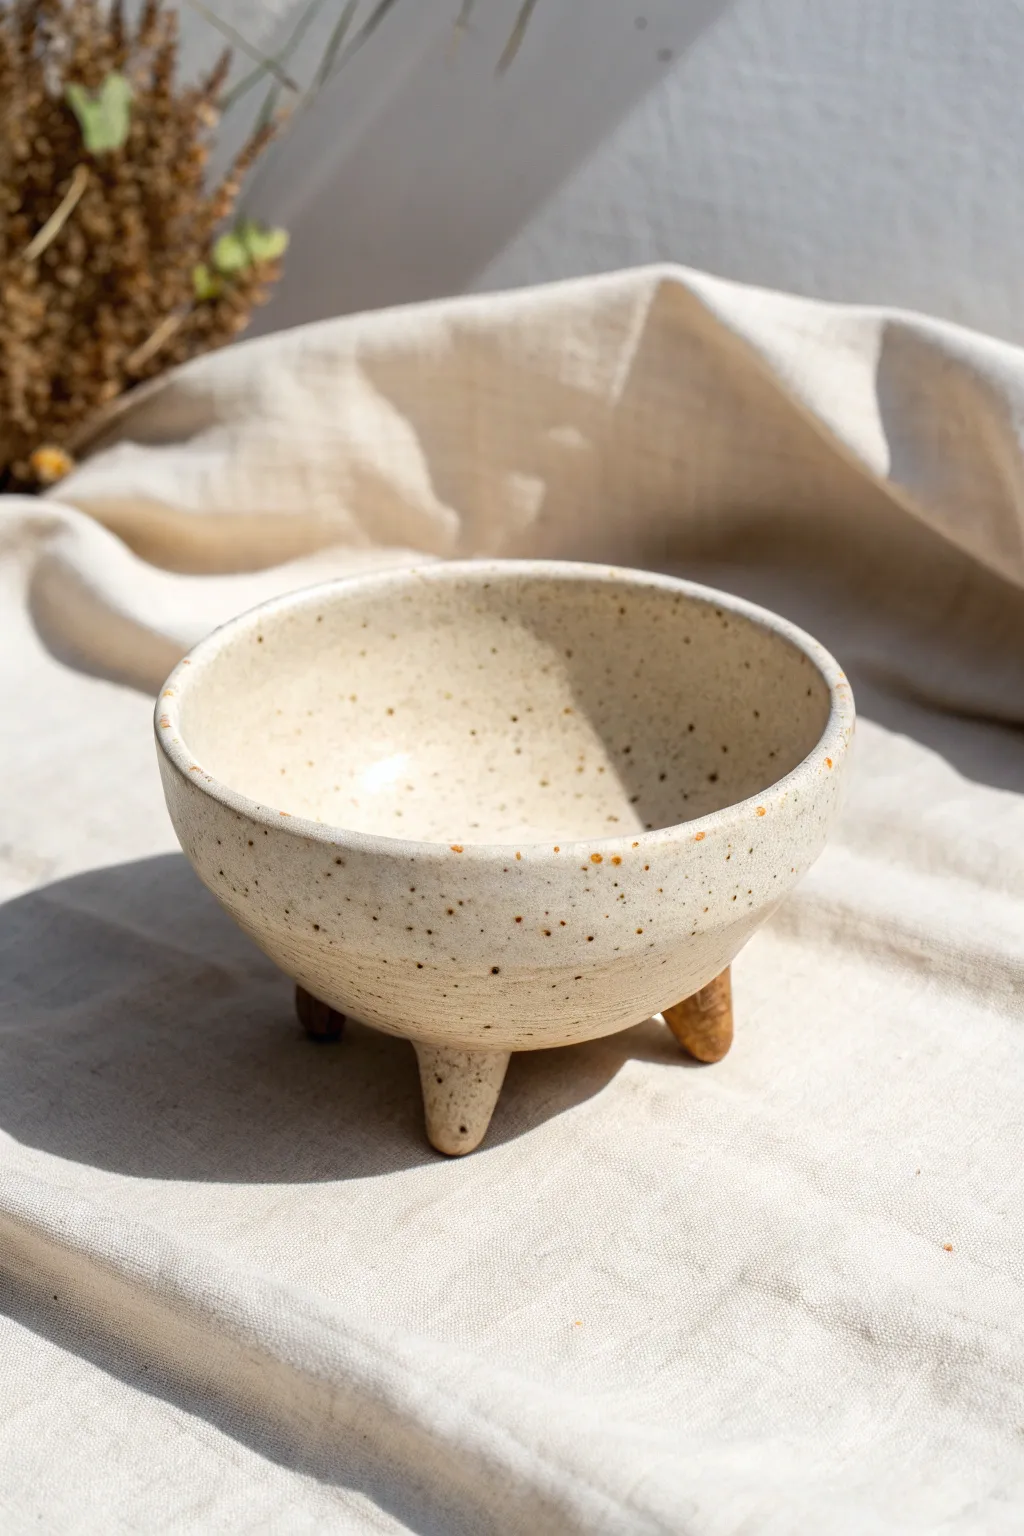
This charming, three-legged pinch bowl combines a modern silhouette with an earthy, hand-formed aesthetic. The creamy glaze over speckled clay creates a lovely warmth, making it perfect for holding trinkets, salt, or small succulents.
Step-by-Step
Materials
- Speckled stoneware clay (mid-fire or high-fire)
- Small bowl of water
- Serrated rib tool or scoring tool
- Smooth wooden rib or rubber kidney
- Sponge
- Needle tool
- Bat or wooden board for drying
- Kiln (or access to a firing service)
- Creamy matte white glaze
Step 1: Forming the Main Body
-
Prepare the clay:
Start with a ball of clay roughly the size of a tennis ball. Pat it back and forth between your hands to ensure it is round and compact. -
Open the form:
Hold the clay in your non-dominant hand. Press your thumb into the center, stopping about a half-inch from the bottom to leave enough thickness for the base. -
Pinch the walls:
Gently pinch the clay between your thumb and fingers, rotating the ball as you go. Work from the bottom center upwards towards the rim. -
Even out the thickness:
Continue pinching rhythmically until the walls are an even thickness, roughly 1/4 inch throughout. Try to keep the rim slightly thicker for structural integrity during drying. -
Refine the curve:
Use a flexible rubber kidney rib on the inside of the bowl to smooth out fingerprints and define that nice, open curve. Support the outside with your hand as you smooth. -
Level the rim:
If the rim has become uneven, you can slice off the very top with a needle tool while rotating the bowl, or gently paddle it flat with a wooden spoon.
Clean the Rim
Before the clay fully dries, run a damp chamois leather strip over the rim. This compresses the clay particles and makes the edge incredibly smooth for handling.
Step 2: Adding the Tripod Feet
-
Roll coils for feet:
Taking a small amount of fresh clay, roll out a thick coil or ‘snake’ about the thickness of your thumb. -
Cut the feet:
Cut three equal segments from the coil, each about 3/4 inch long. Tap the cut ends on the table to flatten them slightly. -
Tape and shape:
I like to gently taper one end of each segment so the feet are slightly narrower at the bottom than where they attach to the bowl. -
Mark placement:
Flip your bowl upside down. Mark three equidistant spots on the bottom curve where the feet will go. They should be just inside the curve, not right on the edge. -
Score the surfaces:
Use your serrated tool to roughen up (score) both the marked spots on the bowl and the top of each clay foot. -
Add slip and attach:
Dab a little water or clay slip onto the scored areas. Press each foot firmly onto the bowl. Wiggle them slightly to lock the clay particles together. -
Blend the seams:
Use a modeling tool or your finger to smooth the clay from the foot onto the bowl body, eliminating any visible seam. This bond needs to be strong. -
Level the bowl:
Flip the bowl right-side up and gently tap it on the table to ensure all three feet touch the surface evenly and the bowl sits level.
Add Texture
While the clay is leather-hard, gently press a piece of coarse linen or canvas against the exterior before firing to enhance that organic, tactile feel.
Step 3: Finishing and Firing
-
Dry slowly:
Loosely cover the bowl with plastic for the first day to let the moisture equalize, then uncover it to dry completely to the bone-dry stage. -
Bisque fire:
Fire the piece in a kiln to cone 04 (or your clay’s specific bisque temperature) to prepare it for glazing. -
Glaze application:
Pour a creamy matte white glaze inside the bowl and swirl to coat, then pour out the excess. Dip the outside, stopping just above the feet to leave them raw. -
Clean the feet:
Wipe the bottoms of the feet with a damp sponge to ensure absolutely no glaze touches the kiln shelf. -
Final firing:
Fire the bowl to the maturity temperature of your clay and glaze (likely cone 5 or 6). This will bring out the lovely speckles through the creamy glaze.
Once cooled, your tripod bowl is ready to bring a touch of handcrafted warmth to any corner of your home
Wavy Rim Pinch Pot Bowl
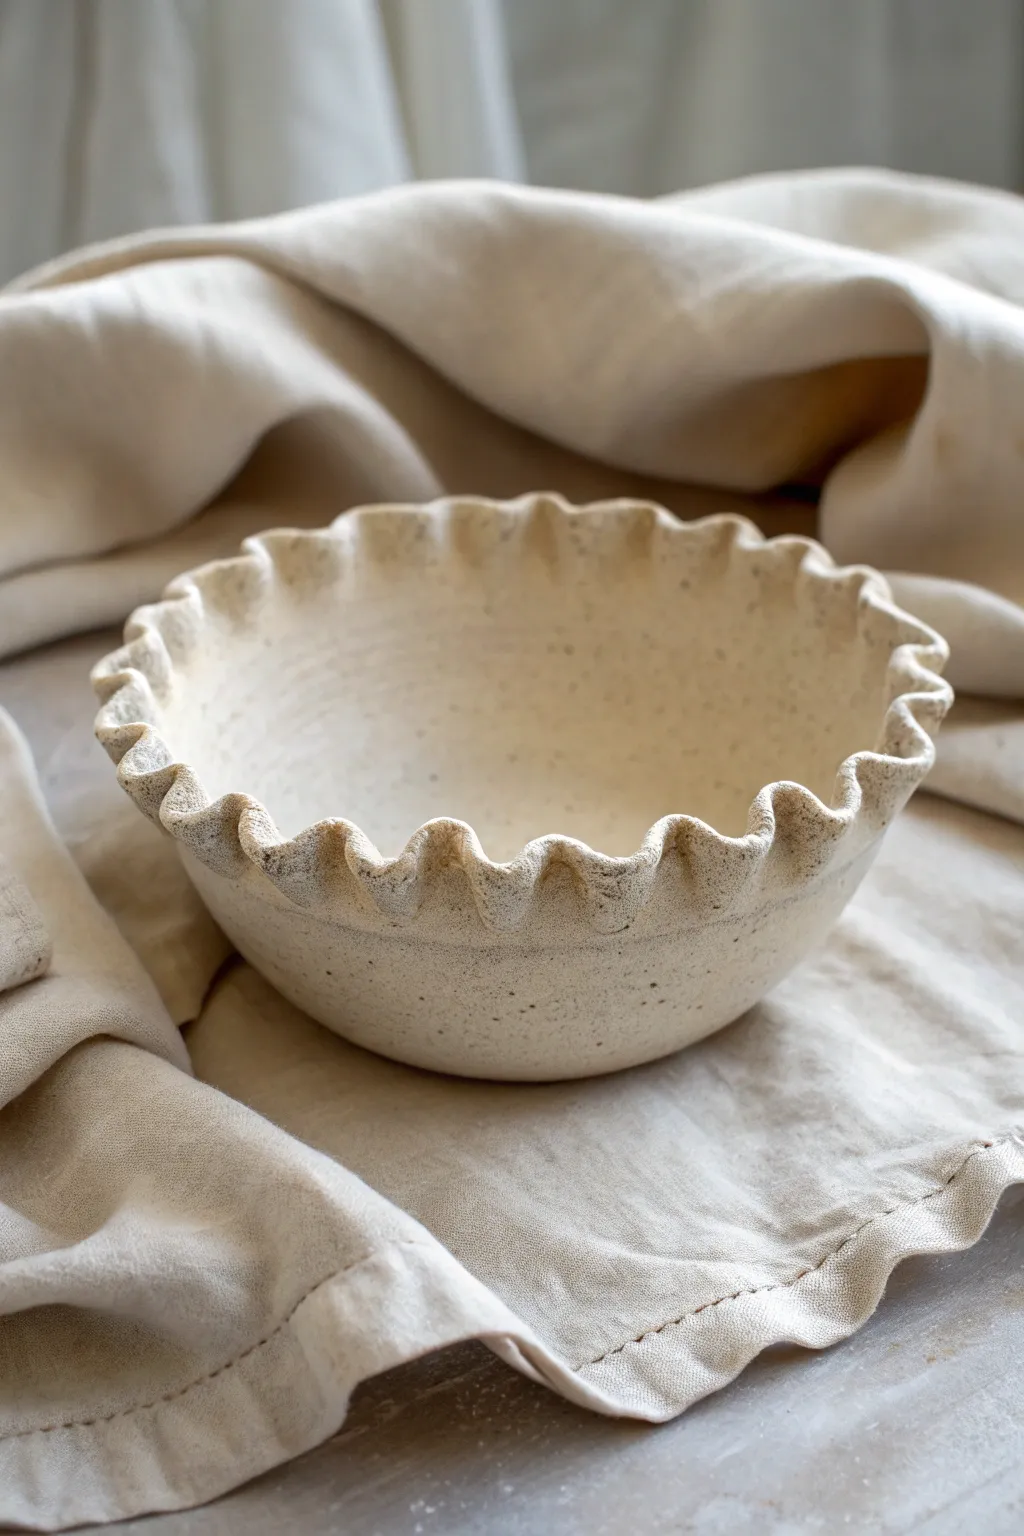
Elevate a simple pinch pot by transforming the rim into a delicate, wavy statement piece. This speckled cream bowl features soft, undulating curves that mimic the gentle folds of fabric, creating a functional vessel with organic charm.
Detailed Instructions
Materials
- Speckled buff stoneware clay (or white clay with added grog)
- Needle tool
- Wooden modeling tool or rib
- Synthetic sponge
- Bowl of water
- Rolling pin (optional, for flattening the bottom)
- Clear matte or satin glaze
- Kiln (or access to a firing service)
Step 1: Forming the Base
-
Prepare the clay:
Start with a ball of clay roughly the size of a large orange. Wedge it well to remove air bubbles and ensure the speckles are evenly distributed throughout the body. -
Open the center:
Hold the clay ball in your non-dominant hand. Press your thumb firmly into the center, leaving about half an inch of thickness at the bottom for the base. -
Pinch the walls:
Begin pinching the clay between your thumb (inside) and fingers (outside). Rotate the ball rhythmically as you pinch, working your way from the bottom up to the rim. -
Even out thickness:
Aim for a consistent wall thickness of about 1/4 inch. If you find thick spots near the base, gently push more clay upward. I find it helpful to close my eyes occasionally to feel the uneven spots rather than seeing them. -
Shape the curve:
Instead of building straight walls, gently push the belly of the pot outward from the inside to create a rounded, open bowl shape. -
Flatten the bottom:
Tap the pot gently on your work surface to create a stable flat bottom, or use a small rolling pin to compress the interior floor.
Cracking Rims?
If the rim cracks while bending, your clay is too dry. Mist it lightly and wrap in plastic for 20 minutes to rehydrate before trying again. Smooth cracks with a damp sponge.
Step 2: Creating the Ruffles
-
Thin the rim:
Before ruffling, pinch just the very top edge of the rim slightly thinner than the rest of the body. This delicate edge is crucial for the fabric-like appearance. -
Smooth the edge:
Run a damp sponge or a chamois cloth over the rim to ensure it is perfectly smooth and rounded. Any cracks here will worsen when we bend the clay. -
Mark your spacing:
Visually divide the rim. You don’t need distinct marks, but plan to have roughly 15-20 ripples for a bowl of this size to get that tight, wavy look. -
Form the first wave:
Place your index finger from your left hand inside the rim. Place your index finger and thumb from your right hand on either side of that finger on the outside. -
Establish the rhythm:
Gently push outward with the inside finger while tucking inward with the outside fingers. Move over one finger-width and reverse the motion or repeat the pattern seamlessly around the circle. -
Deepen the folds:
Go around a second time to exaggerate the curves. The clay has ‘memory,’ so push the waves slightly further than you want them to finish, as they may relax back slightly. -
Clean up surfaces:
Use a flexible rib (metal or rubber) to smooth the interior and exterior walls below the rim, removing finger marks while leaving the rim’s texture intact.
Step 3: Finishing and Firing
-
Slow drying:
Because the rim is thinner than the base, cover the rim loosely with plastic while leaving the bottom exposed for a few hours to equalize moisture. -
Bisque fire:
Once bone dry, fire the piece to cone 04 (or your clay’s specific bisque temperature). -
Glaze application:
Pour a clear matte or satin glaze inside the bowl, swirl it to coat, and pour it out. Dip the rim swiftly or brush the exterior to coat the rest. -
Wipe the foot:
Ensure the bottom of the bowl is completely free of glaze before the final firing. -
Final firing:
Fire to cone 5/6 (or your clay’s maturity temperature). The heat will interact with the iron speckles in the clay, popping them through the mild milky glaze.
Deepen the Texture
For a more rustic, antiqued look, wipe a layer of dark iron oxide wash over the finished bisque, then wipe it back with a sponge before applying the clear glaze.
Once fired, this bowl becomes a perfect vessel for fruit or simply a beautiful object to display on your table
Leaf-Imprint Pinch Dish
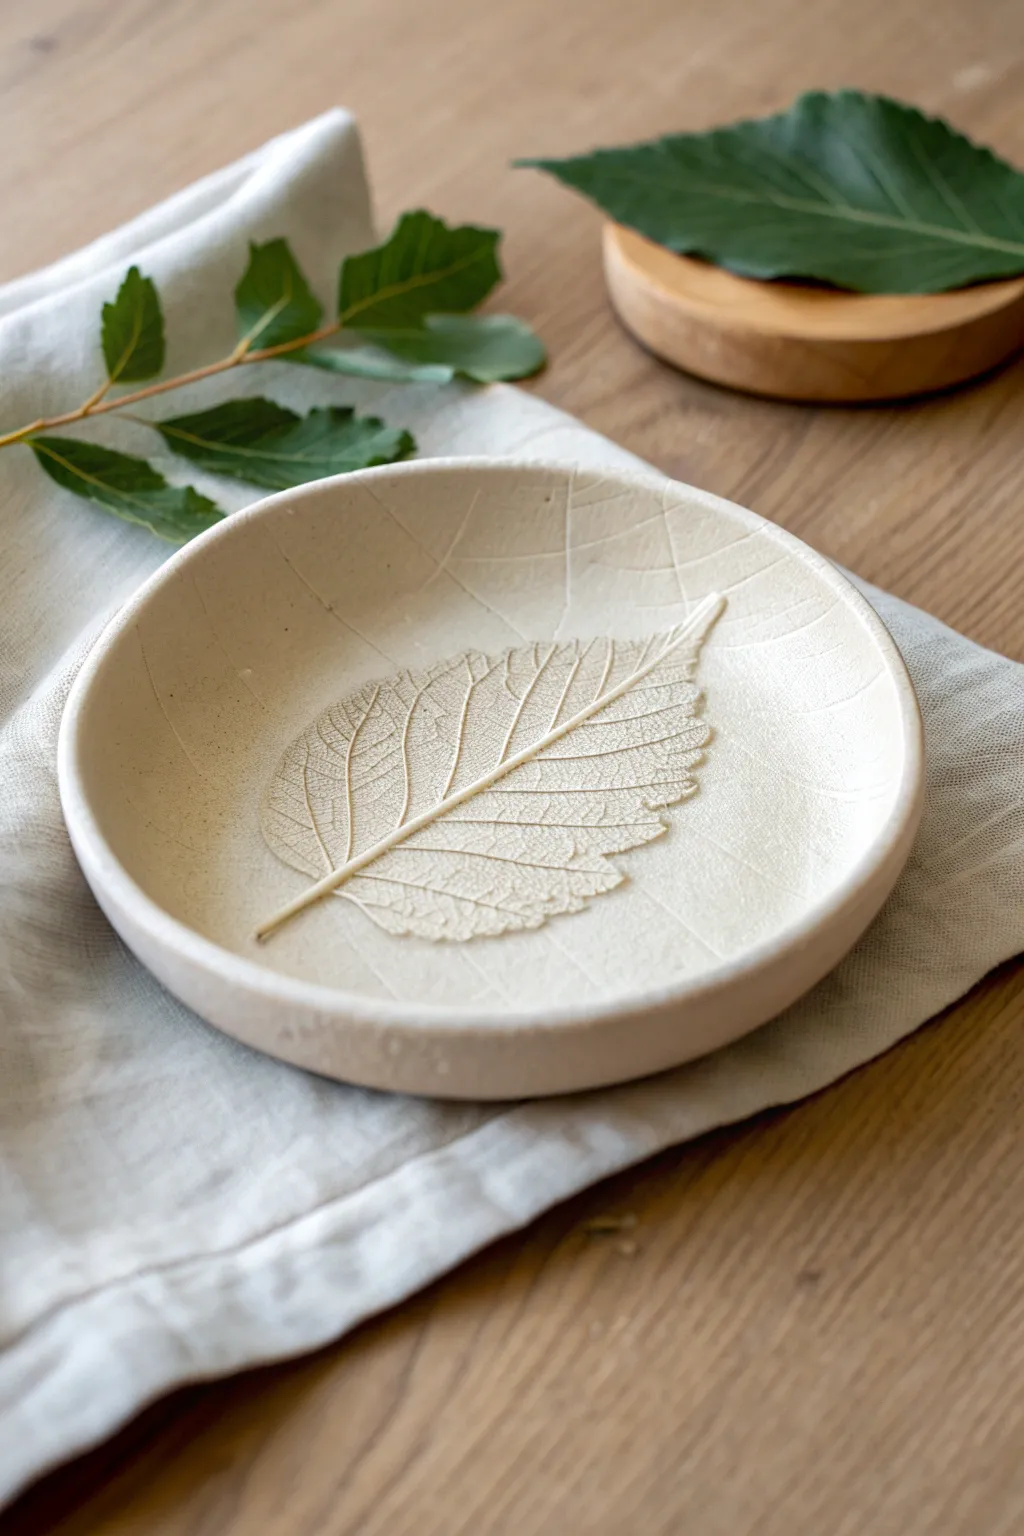
Capture the delicate veins of a leaf forever with this elegant, minimalist pinch dish. The soft, creamy finish and organic impression create a stunning, tactile piece perfect for holding jewelry or small keepsakes.
How-To Guide
Materials
- White or cream-colored air-dry clay (or polymer clay)
- Small, deeply-veined leaf (like elm, mint, or hydrangea)
- Rolling pin (acrylic or wooden)
- Craft knife or needle tool
- Small bowl relative to dish size (optional, for shaping)
- Fine-grit sandpaper
- Clear matte varnish or sealant
- Soft brush for sealing
- Water (for smoothing)
Step 1: Forming the Base
-
Prepare the Clay:
Begin with a ball of clay roughly the size of a tangerine. Knead it in your hands until it is warm, pliable, and free of any air bubbles. -
Pinch the Shape:
Push your thumb into the center of the ball, but not all the way through. Slowly pinch and rotate the clay between your thumb and fingers to open up the bowl shape. -
Flatten the Bottom:
Gently press the base of your pinched bowl onto your work surface to create a flat, stable bottom so the dish won’t rock. -
Refine the Walls:
Continue pinching and smoothing the walls until you have a uniform thickness of about 1/4 inch. I like to keep the rim slightly rounded for a softer look. -
Smooth the Inner Surface:
Dip your finger in a tiny bit of water and run it over the interior of the bowl to make it perfectly smooth before imprinting.
Faint Impression?
If the veins aren’t showing up, your clay might be too dry. Mist the clay surface lightly with water, let it sit for a minute to soften, and try pressing the leaf again with firmer pressure.
Step 2: Creating the Impression
-
Select Leaf Placement:
Place your chosen leaf vein-side down into the center of the bowl. The vein side down is crucial for getting that detailed, raised texture. -
Initial Press:
Use your fingers to gently press the leaf onto the clay surface, starting from the center stem and working your way out to the edges. -
Deepen the Impression:
Use a small rolling pin or the rounded handle of a tool to roll over the leaf firmly. Ensure you press the edges of the leaf into the curved sides of the bowl. -
Remove the Leaf:
Find the stem of the leaf and very carefully peel it back to reveal the imprint. Do this slowly to avoid tearing the leaf or distorting the clay.
Add a Wash
To make the veins pop, apply a watered-down brown acrylic paint wash over the texture. Wait ten seconds, then wipe the surface with a damp sponge, leaving darker color only in the deep crevices.
Step 3: Finishing and Sealing
-
Clean Up Edges:
If the leaf imprint created any unwanted rough ridges around the outline, gently smooth them down with a damp finger or a rubber shaping tool. -
Drying Phase:
Let the dish dry completely. Air-dry clay usually takes 24-48 hours. Turn it over halfway through the drying time to ensure the bottom dries evenly. -
Sanding:
Once bone dry, use fine-grit sandpaper to smooth out any fingerprints or rough spots on the rim and exterior. Be careful not to sand over the delicate leaf veins. -
Dusting:
Wipe the dish down with a slightly damp cloth or a dry brush to remove all ceramic dust before sealing. -
Sealing the Dish:
Apply a thin coat of clear matte varnish. This mimics the natural look in the photo while protecting the clay from moisture and dirt. -
Final Cure:
Allow the varnish to cure fully according to the manufacturer’s instructions before placing any items inside.
Enjoy your beautiful, nature-inspired vessel as a serene addition to your home decor
All-Over Stamped Pinch Pot Pattern
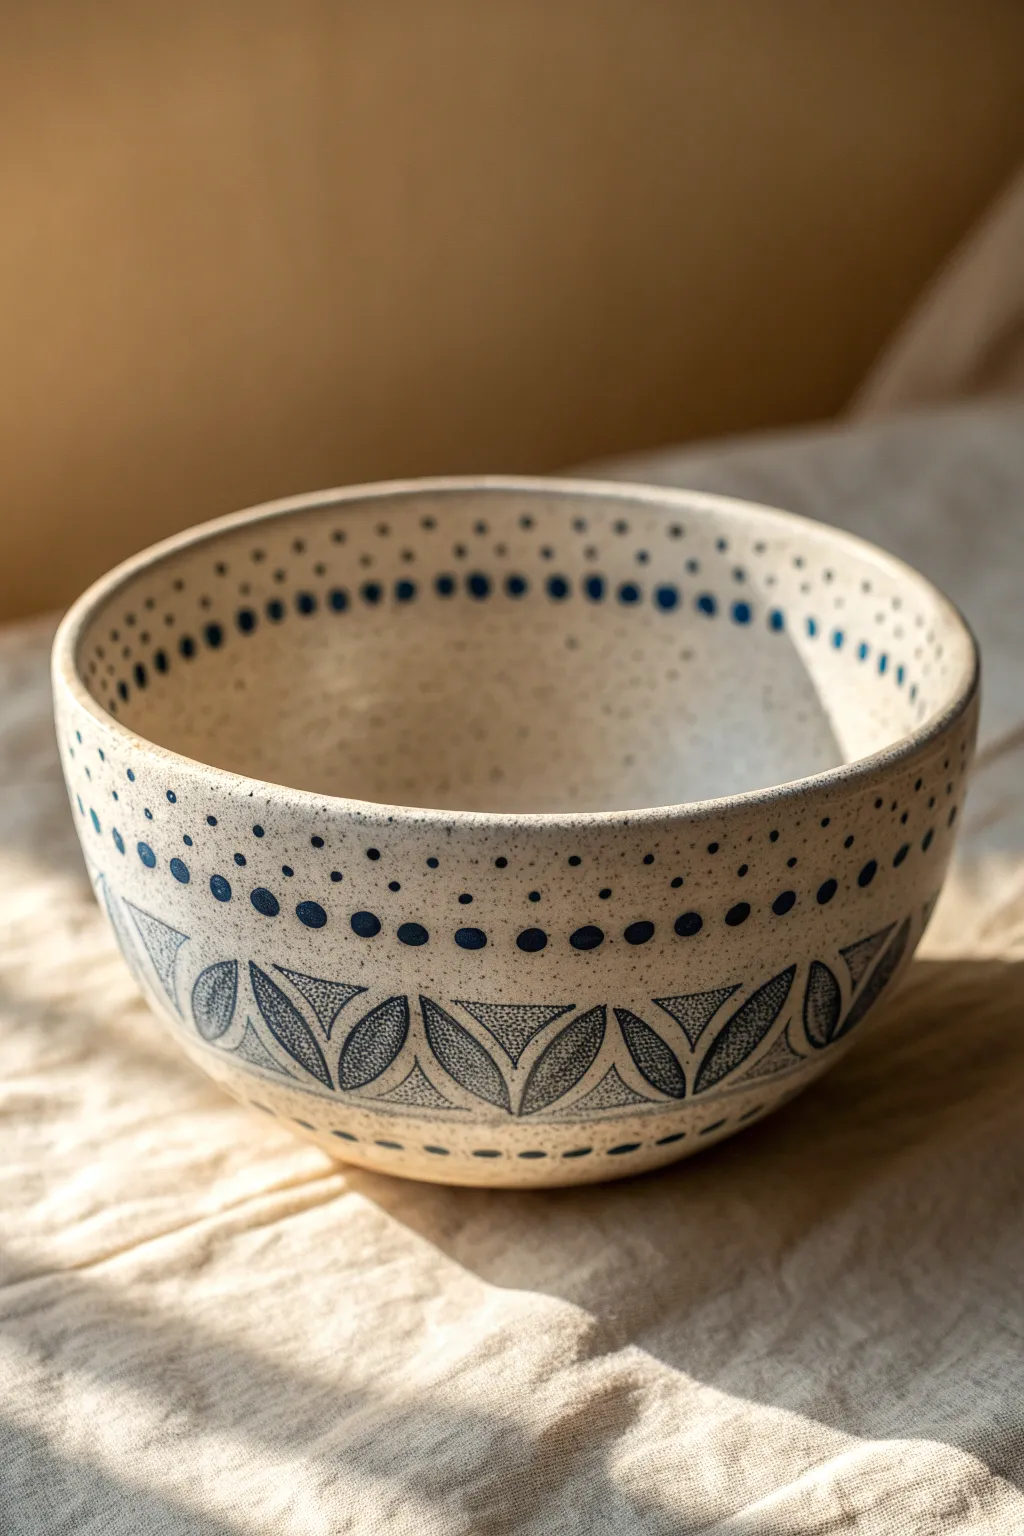
This elegant pinch pot combines simple hand-building techniques with precise surface decoration to create a piece that feels both modern and timeless. The speckled clay body provides a warm, rustic canvas for the deep indigo geometric patterns and delicate dot work.
Detailed Instructions
Materials
- Speckled cream stoneware clay (mid-fire)
- Blue underglaze (cobalt or navy)
- Small fine-point paintbrush
- Porous sponge
- Wooden rib tool
- Needle tool
- Metal kidney scraper
- Clear transparent glaze
- Small round stamp or dowel end (optional)
- Water bowl
Step 1: Forming the Bowl
-
Start the pinch:
Begin with a ball of speckled clay roughly the size of a large orange. Insert your thumb into the center, stopping about a half-inch from the bottom, and begin pinching the walls evenly while rotating the ball in your hand. -
Open the form:
Continue pinching upward and outward to widen the bowl. Aim for walls that are consistent in thickness—about 1/4 inch is ideal—to ensure even drying and firing. -
Refine the shape:
Once you have the basic bowl shape, set it on a flat surface. Use a wooden rib on the inside and a metal scraper on the outside to compress the clay, smooth out finger marks, and refine the curve. -
Define the rim:
Pay special attention to the rim. Use a damp sponge or a chamois cloth to smooth it over, ensuring it is level and pleasant to the touch. -
Leather hard stage:
Allow the bowl to dry to a leather-hard state. It should be firm enough to handle without deforming but still cool to the touch. This is the perfect canvas for decoration.
Step 2: Applying Decoration
-
Plan your spacing:
Visualizing the bands of decoration is crucial. You can lightly score horizontal guide lines with a needle tool while spinning the pot on a banding wheel if you have one, or just eyeball it for a more organic feel. -
Paint the main dots:
Using a fine brush or the flat end of a small dowel dipped in underglaze, create the central band of large blue dots. Space them evenly around the circumference, about an inch below the rim. -
Add secondary dots:
Above and below the main dot band, add rows of tinier dots. I find using the handle end of a paintbrush works perfectly for these uniform micro-dots. -
Outline the leaf motifs:
For the lower band near the foot, sketch out repeating leaf or petal shapes using a very thin brush loaded with underglaze. These shapes should resemble curved triangles or pointed arches. -
Fill with texture:
Inside each leaf outline, paint delicate cross-hatching or stippling. This texture mimics the look of a stamp and adds depth to the design without needing solid block color. -
Detail the rim:
Return to the interior rim. Paint a matching series of small dots or dashes just inside the lip of the bowl to connect the interior and exterior designs. -
Clean up:
If you smudge any underglaze, wait for it to dry completely and then gently scrape it off with a needle tool or an X-Acto knife.
Smudged Underglaze?
Don’t wipe wet underglaze! It will stain the clay pore structure. Wait until it is bone dry, then gently scratch the mistake away with a pin tool.
Step 3: Glazing and Firing
-
Bisque fire:
Once the bowl is bone dry, fire it to bisque temperature (usually cone 04 or 06). This hardens the clay and sets the underglaze. -
Wax the foot:
Apply wax resist to the bottom foot of the bowl to prevent glaze from adhering to the kiln shelf. -
Apply clear glaze:
Dip the entire bowl into a clear, transparent glaze. A clear glaze is essential here to let the speckles of the clay and the blue underglaze show through vividly. -
Glaze fire:
Fire the piece again to the maturation temperature of your specific clay body (likely cone 5 or 6 for stoneware). Allow the kiln to cool completely before opening.
Try Sgraffito
Paint a solid band of blue underglaze, let it dry directly on the leather-hard clay, then carve the leaf patterns through it to reveal the white clay.
Your finished bowl will be a durable, functional piece of art perfect for morning cereal or serving sides
Carved Linework Pinch Pot (Easy Sgraffito Look)
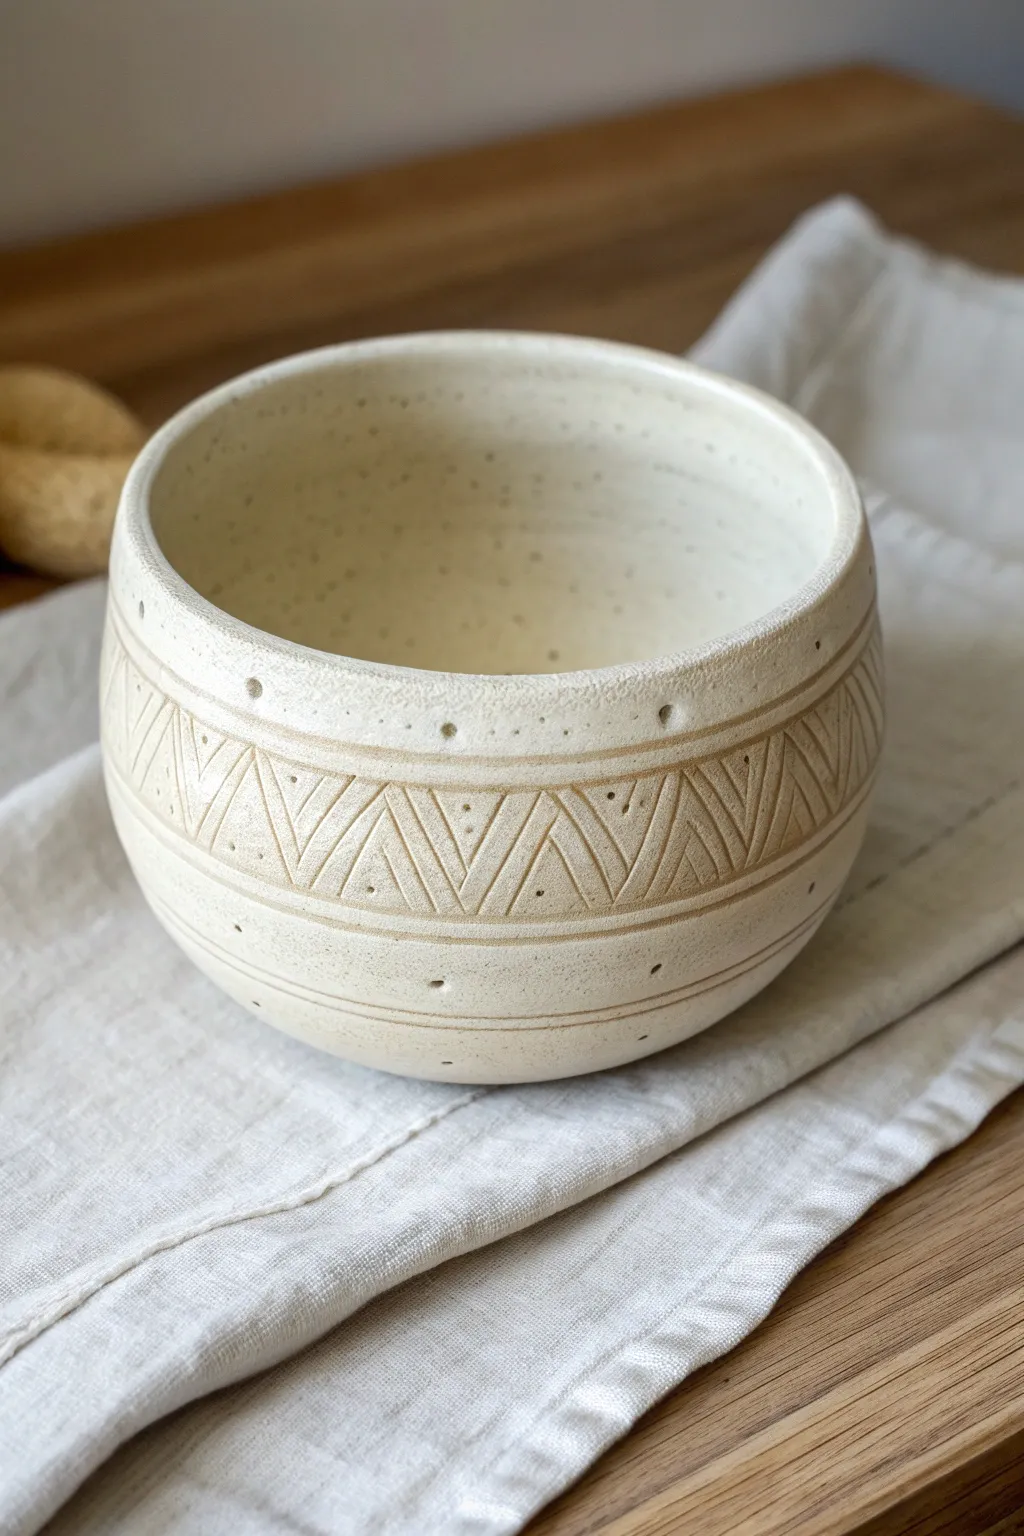
This charming little pinch pot combines a rustic, hand-built shape with precise geometric carving to create visible texture. The creamy white glaze showcases the warm, raw clay body underneath, giving it a delightful etched or ‘sgraffito’ appearance without needing colored slips.
Step-by-Step Tutorial
Materials
- Speckled buff stoneware clay (or any groggy clay body)
- Small bowl of water
- Pin tool or needle tool
- Rib tool (metal or rubber)
- Carving tool (V-tip or small loop tool)
- Sponge
- Satin matte white glaze (translucent or breaking)
- Plastic bag for slow drying
Step 1: Forming the Pinch Pot
-
Prepare the clay ball:
Start with a ball of wedged speckled buff clay roughly the size of a large orange. Pat it into a smooth, round sphere in your hands. -
Open the form:
Hold the clay in one hand and press your thumb into the center, stopping about a half-inch from the bottom. Don’t push all the way through. -
Pinch the walls:
Gently rotate the ball while pinching the clay between your thumb and fingers. Work your way from the bottom up to the rim in a spiral motion to thin the walls evenly. -
Shape the profile:
Aim for a rounded, hemispherical shape. If the rim gets uneven, tap the pot gently upside down on your table to level it. -
Refine the surface:
Once you are happy with the shape, use a flexible rubber rib to scrape the exterior walls smooth. This compresses the clay and removes finger marks, creating a clean canvas for your carving. -
Firm up slightly:
Let the pot sit until it reaches a soft leather-hard state. It needs to be firm enough to hold its shape while handling, but soft enough to carve easily.
Clean Lines Pro Tip
Don’t flick away clay crumbs while carving wet clay! Leave the burrs alone until the pot is bone dry, then they will brush right off without ruining your sharp edges.
Step 2: Carving the Design
-
Mark horizontal guides:
You can carefully drag a needle tool around the circumference to create light guide lines while the pot spins on a banding wheel, or simply eyeball it for a more organic look. You’ll need two parallel lines near the middle. -
Carve the main bands:
Using a V-tip carving tool or a pin tool, deepen those horizontal lines. Create one band running near the upper third and another near the lower third of the bowl. -
Create the zig-zags:
Inside the band created by your horizontal lines, carve a continuous zig-zag or triangle pattern all the way around the pot. -
Add inner details:
Within each large triangle you just carved, add smaller nested triangles. I like to carve these lightly first, then go back over them to deepen the groove. -
Dot the details:
Using the blunt end of a small drill bit or a needle tool, press small divots or dots into the negative spaces of the triangles and around the rim. -
Add lower stripes:
Carve two or three simple horizontal rings around the base of the pot to ground the design. -
Clean up burrs:
Wait until the clay is bone dry, then gently rub the surface with a scrubbing pad or stiff brush to knock off the little clay crumbs (burrs) without smearing the lines.
Step 3: Glazing and Finishing
-
Bisque fire:
Fire the piece to cone 04 (or your clay’s specific bisque temperature). -
Wite down the pot:
Use a damp sponge to remove any kiln dust from the bisque ware before glazing. -
Apply the glaze:
Dip the pot into a satin matte white glaze. A glaze that ‘breaks’ over edges is ideal here, as it will naturally pool in your carved lines and thin out on the ridges. -
Wipe back (Optional):
If your glaze is very opaque, gently wipe the raised surfaces with a damp sponge, leaving more glaze in the carved recesses to highlight the pattern. -
Final fire:
Glaze fire to cone 5/6 (or your clay’s maturity temperature). The heat will interact with the iron speckles in the clay, making them bleed through the white glaze for that lovely spotted effect.
Try Mishima
Before glazing, paint black underglaze into the carved lines and wipe the surface clean with a sponge. This creates a high-contrast ‘inlaid’ look under a clear glaze.
Once fired, fill your new textured bowl with trinkets or snacks and enjoy the tactile feel of your hand-carved design
Two-Pinch Pot Bud Vase (Joined Forms)
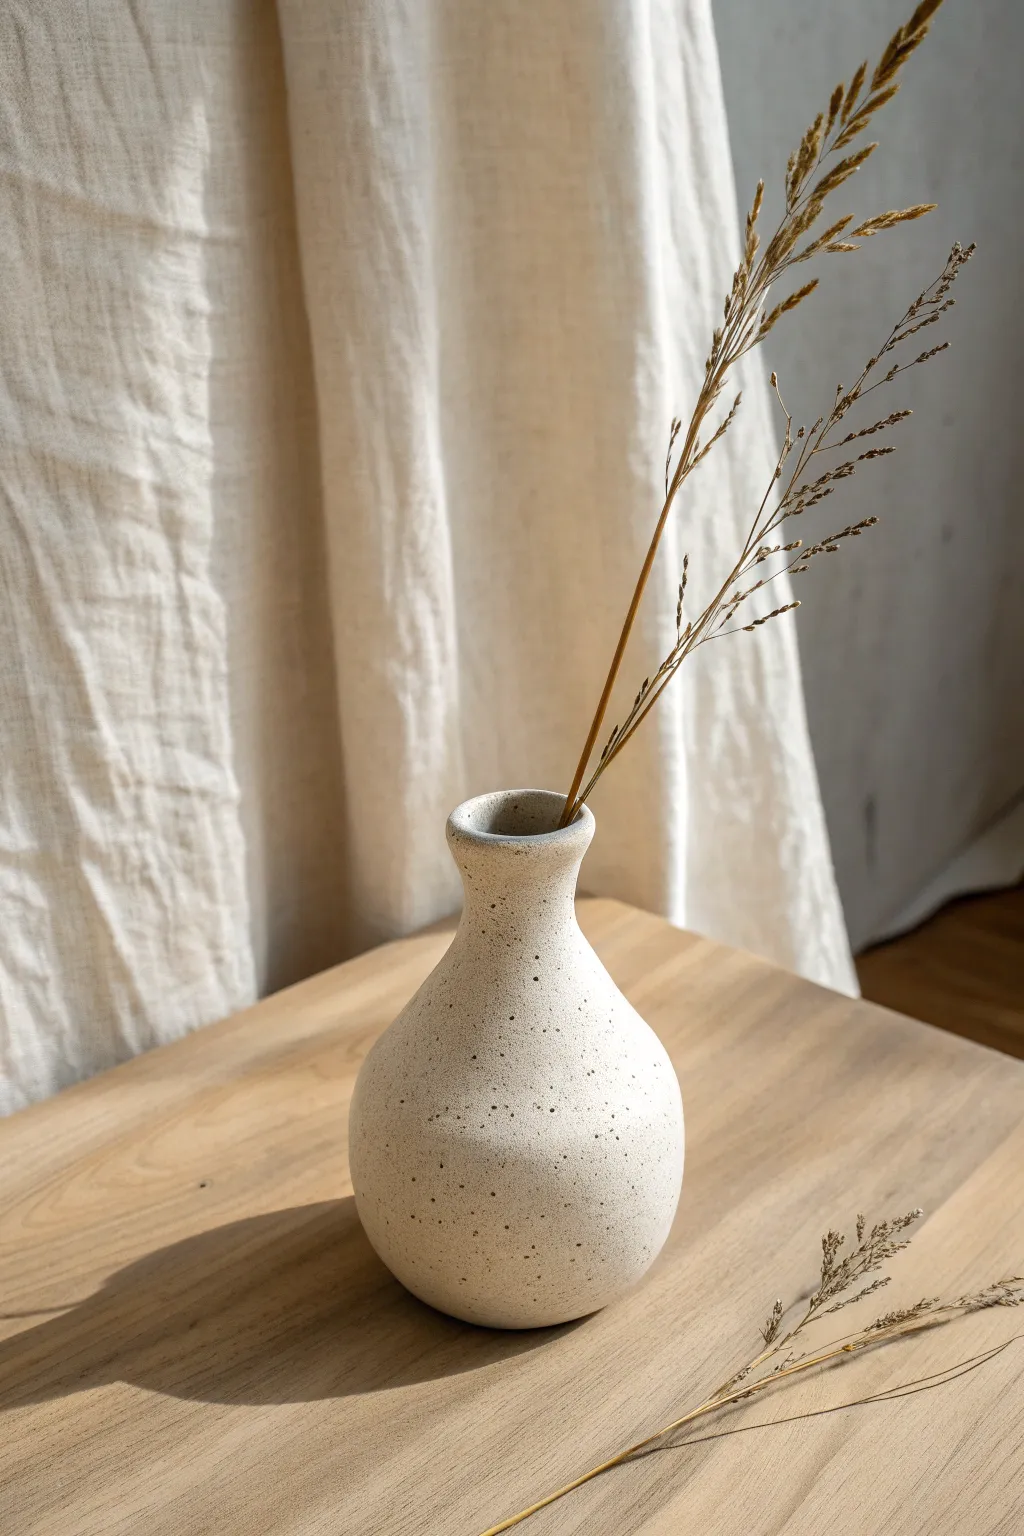
Create a stunningly simple bud vase that looks wheel-thrown but is actually hand-built using a clever double-pinch pot technique. This project highlights the natural beauty of speckled clay with a minimal, organic silhouette perfect for holding dried stems.
Step-by-Step
Materials
- Speckled stoneware clay (mid-fire)
- Scoring tool or serrated rib
- Slip (clay and water mixture)
- Wooden modeling tool
- Rubber kidney rib
- Sponge
- Fettling knife
- Matte white or clear glaze (transparent to show speckles)
Step 1: Forming the Base
-
Prepare the Clay:
Start by wedging your clay to remove air bubbles. Separate two pieces: a larger ball (about the size of a tennis ball) for the body and a smaller ball (golf ball size) for the neck. -
Open the First Pot:
take the larger ball and press your thumb into the center without breaking through the bottom. Gently pinch the clay between your thumb and fingers, rotating it in your palm. -
Refine the Walls:
Continue pinching evenly from the bottom up to create a rounded, bowl-like shape. Aim for walls that are about a quarter-inch thick throughout. -
Close the Rim:
As you pinch near the top rim, gently angle your fingers inward to encourage the opening to narrow slightly. This creates the shoulder of the vase.
Seamless Seams
To ensure the neck doesn’t pop off during drying, I always add a tiny coil of soft clay exactly over the seam before smoothing. It acts as extra reinforcement.
Step 2: Creating the Neck
-
Form the Top Section:
Take the smaller ball of clay and create a second, much smaller pinch pot. This one should be taller and narrower, resembling a small cup or funnel. -
Trim the Bottom:
Normally a pinch pot has a closed bottom, but for the neck, use your fettling knife to slice off the bottom curve of this smaller pot, creating a hollow tube. -
Score the connection points:
Score (scratch up) the top rim of your large base pot and the bottom rim of your new neck piece using your scoring tool. -
Apply Slip:
Dab a generous amount of slip onto the scored areas. This acts as the glue that bonds the two clay bodies together.
Textured Finishes
Before the clay dries, gently tap the exterior with a flat wooden paddle. This creates subtle facets that catch the glaze beautifully.
Step 3: Joining and Refining
-
Attach the Components:
Place the neck piece onto the base, aligning the openings. Press down firmly but gently to ensure good contact between the slipped surfaces. -
Blend the Clay Downward:
Using your thumb or a wooden tool, drag clay from the neck piece down onto the body of the vase to cover the seam completely. -
Blend the Clay Upward:
Repeat the process on the inside if your finger fits, or simply smooth the exterior seam thoroughly until the joining line is invisible. -
Shape the Neck:
With the pieces joined, use your fingers to gently flare the top rim outward slightly, giving it that soft, organic trumpet shape seen in the photo. -
Smooth the Surface:
This is crucial for the finished look. Use a flexible rubber rib to compress the clay and smooth out any fingerprints or lumps. -
Final Sponge Wipe:
Wipe the entire piece with a slightly damp sponge to remove any grog or rough texture brought to the surface during smoothing.
Step 4: Firing and Glazing
-
Dry Slowly:
Cover the vase loosely with plastic for a day, then uncover to let it dry completely to the bone-dry stage. This prevents cracking at the seam. -
Bisque Fire:
Fire the piece in a kiln to cone 04 (or your clay’s specific bisque temperature). -
Glaze Application:
Pour a matte white or semi-transparent glaze inside the vase and swirl to coat. Dip the exterior or brush on the glaze evenly. -
Glaze Firing:
Fire again to the maturity temperature of your clay (likely Cone 5 or 6). The heat will interact with the clay’s impurities to create those beautiful iron speckles.
Once fired, fill your new vase with dried grass or wildflowers to complete the rustic, minimalist aesthetic
Pinch Pot Animal Critter Bowl
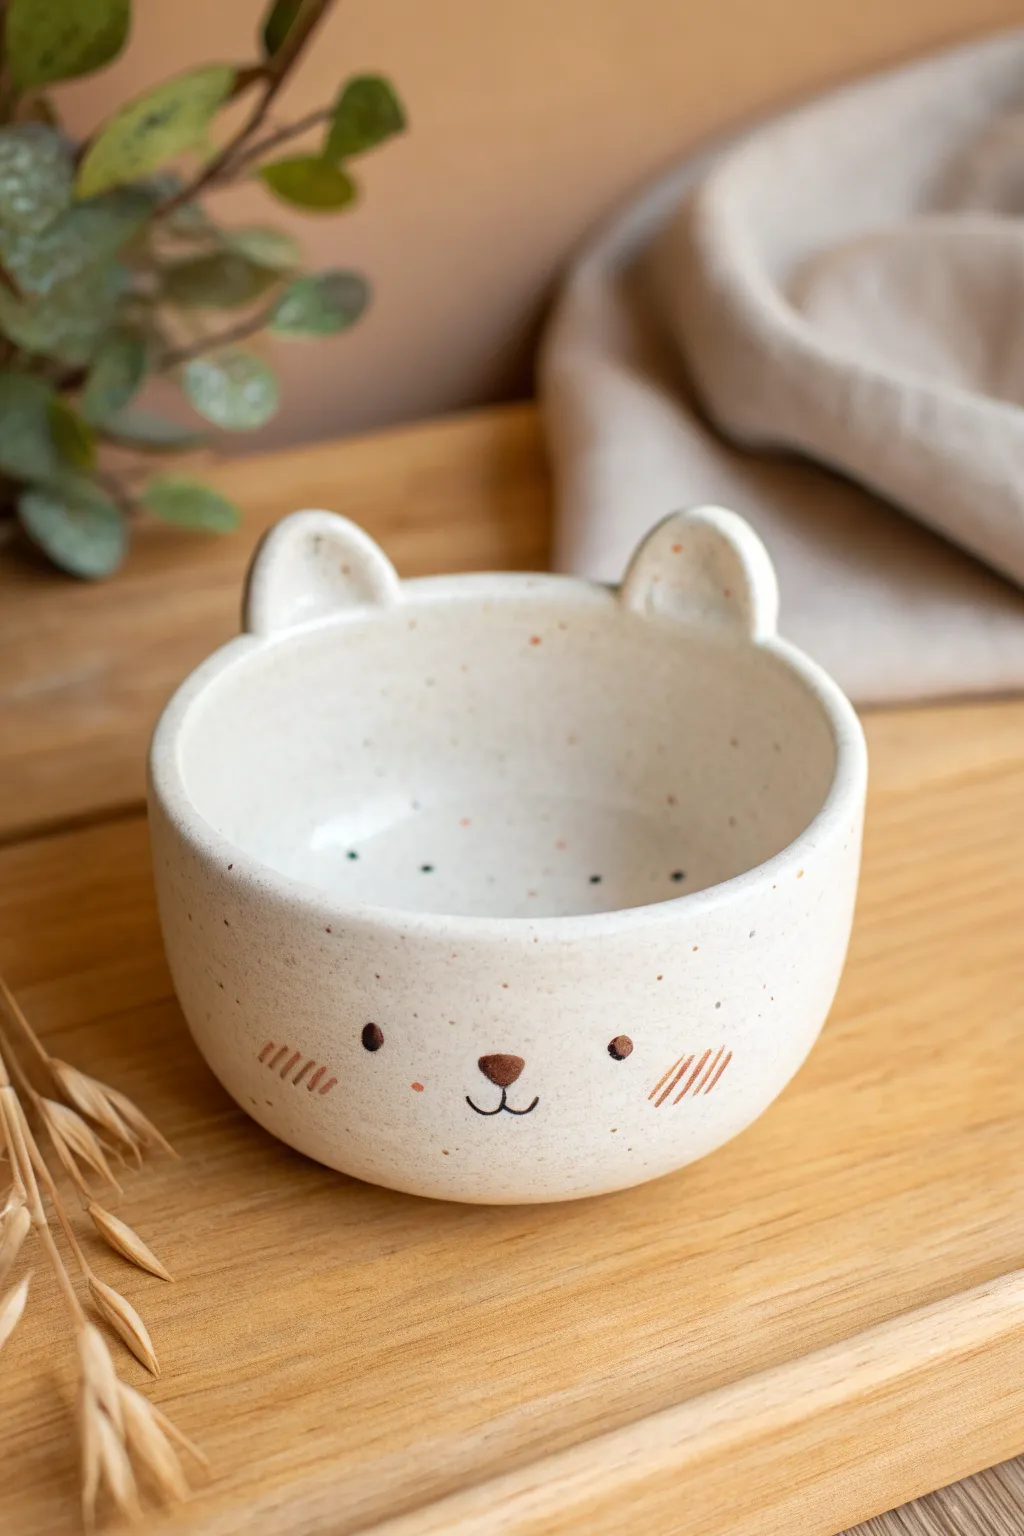
This adorable ceramic bowl transforms a simple pinch pot into a sweet-faced bear cub, perfect for trinkets or snacks. The speckled clay body and minimal painted features give it a warm, modern handmade aesthetic.
How-To Guide
Materials
- Speckled stoneware clay (white or light cream firing)
- Small sponge
- Pin tool or needle tool
- Scoring tool (or serrated kidney)
- Clay slip or vinegar
- Wooden modeling tool
- Clear transparent glaze (food safe)
- Underglaze (dark brown and terracotta/pink)
- Small fine-point liner brush
- Rolling pin (optional)
- Kiln access
Step 1: Forming the Base
-
Prepare the Clay:
Begin with a ball of plastic speckled stoneware clay, roughly the size of a tennis ball or slightly larger. Pat it firmly between your palms until it is a smooth, round sphere without any cracks. -
Open the Pot:
Hold the ball in one hand and press your thumb into the center, going down about three-quarters of the way to the bottom. Don’t push all the way through. -
Pinch the Walls:
Rotate the ball slowly in your hand while rhythmically pinching the clay between your thumb (inside) and fingers (outside). Start from the bottom and work your way up to the rim. -
Even Out Thickness:
Continue pinching until the walls are an even thickness, aiming for roughly 1/4 inch all around. I find it helpful to close my eyes briefly here to feel for thick spots rather than looking for them. -
Refine the Shape:
Gently tap the bottom of the pot against your table to create a flat, stable base. Use your fingers to smooth the interior curve and ensure the rim acts as a straight vertical cylinder rather than flaring out too much.
Rim Smoothing Secret
Use a strip of soft plastic (cut from a grocery bag) over the rim. Run your damp finger over the plastic to compress and round the rim perfectly without drag marks.
Step 2: Adding Details
-
Shape the Ears:
Take two small balls of leftover clay, each about the size of a marble. Flatten them slightly and pinch them into rounded triangular shapes to resemble bear ears. -
Score and Slip:
Use your needle tool to scratch up (score) the bottom of the ears and the two spots on the rim where you want them to sit. Apply a dab of clay slip or vinegar to the scored areas. -
Attach the Ears:
Press the ears firmly onto the rim. Use a wooden modeling tool to drag clay from the base of the ear down onto the bowl to blend the seam completely avoiding any cracks later. -
Smooth the Surface:
Use a slightly damp sponge to wipe down the entire piece. This removes fingerprints and smoothes out the transition where the ears meet the rim. -
Dry to Leather Hard:
Let the pot sit until it reaches the leather-hard stage—firm enough to hold its shape perfectly but still cool to the touch. This usually takes a few hours or overnight under loose plastic.
Step 3: Decorating & Glazing
-
Sketch the Face:
Lightly trace the facial features with a pencil. Don’t press hard; you just want a guide. The pencil graphite will burn off in the kiln, so mistakes are okay. -
Paint the Nose and Eyes:
Using the fine-point liner brush and dark brown underglaze, carefully paint the small oval nose and the two circular eyes. Keep the paint opaque but not goopy. -
Add the Mouth:
Draw the simple ‘anchor’ shape for the mouth using the very tip of your brush. A steady hand is key here. -
Blush the Cheeks:
Dip your brush into the terracotta or pink underglaze. Paint three small diagonal hash marks on each cheek area to give the bear a sweet, blushing expression. -
Bisque Fire:
Allow the piece to dry completely (bone dry) before loading it into the kiln for a bisque firing (usually Cone 04 or 06). -
Apply Clear Glaze:
Once bisque fired, wipe the pot with a damp sponge to remove dust. Dip the entire piece into a clear transparent glaze, or brush on three even coats. Avoid smearing the underglaze details. -
Final Firing:
Fire the piece again to the temperature required by your clay and glaze (likely Cone 5 or 6 for stoneware). This will seal the clay and make the speckles pop.
Try a Texture
Instead of a smooth finish, press a piece of lace or burlap into the outer wall before the clay dries for a cozy, sweater-like texture on your bear.
Once cooled, your little speckled bear bowl is ready to hold your morning cereal or favorite jewelry pieces
Pinch Pot Monster Cup With a Big Mouth Rim
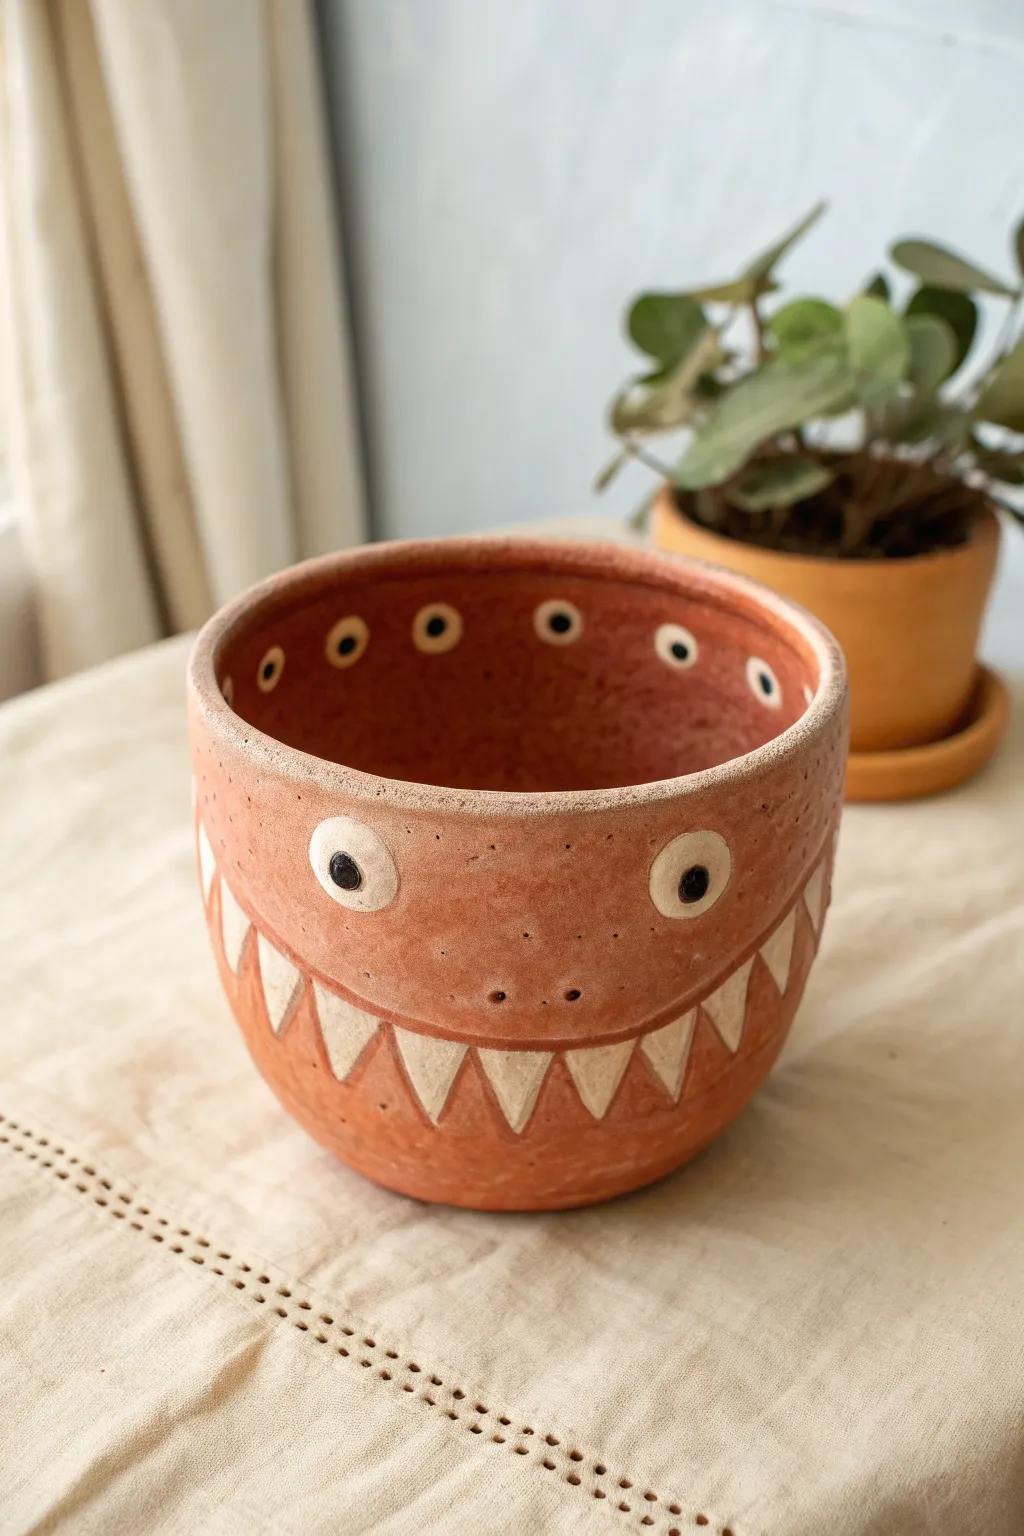
This whimsical terracotta pot features a grinning monster design that essentially swallows your houseplant whole. With its sharp triangular teeth and a surprising row of eyes peeking from the inside rim, it brings a playful edge to your indoor garden.
Step-by-Step Tutorial
Materials
- Terracotta-colored air-dry clay or earthenware clay
- Pottery sponge
- Needle tool or toothpick
- Loop tool (optional)
- White underglaze (for kiln fire) or white acrylic paint
- Black underglaze (for kiln fire) or black acrylic paint
- Small round paintbrush
- Fine detail paintbrush
- Water cup
- Clear matte varnish (if using air-dry clay)
Step 1: Forming the Pot
-
Create the base:
Start with a ball of clay roughly the size of a large orange. Cup it in your palm and press your thumb firmly into the center, stopping about a half-inch from the bottom. -
Pinch the walls:
Gently pinch the clay between your thumb and fingers, rotating the ball as you work. Aim to pull the walls upward and outward to create an even cup shape. -
Smooth the shape:
Continue pinching until the walls are about 1/4 inch thick. I like to stroke the exterior with a damp sponge or wet finger to remove any deep fingerprints, ensuring a smooth canvas for the face. -
Flatten the bottom:
Tap the pot gently on your work surface to create a flat, stable base so it won’t wobble. -
Refine the rim:
Use a damp sponge to smooth the top rim. It doesn’t need to be perfectly level—a slight organic wave adds character—but it should be rounded and comfortable to touch.
Clean Lines
If your hand shakes while painting pupils, use the handle end of a paintbrush. Dip it in paint and stamp it for a perfect dot.
Step 2: Adding the Face Details
-
Outline the mouth:
Using a needle tool, very lightly scratch a curved line across the lower half of the pot. This defines the monster’s large, smiling jawline. -
Sketch the teeth:
Lightly etch a row of zigzag triangles below the mouth line you just drew. These will guide your painting later. -
Add nostrils:
Poke two small holes near the center of the face, just above the mouth line, to create nostrils. -
Sculpt the eyes (optional):
You can either paint the eyes flat later or add small flat discs of clay now for a 3D effect. If adding clay, score and slip the back of the discs before pressing them onto the face. -
Dry the piece:
Let the clay dry completely to the ‘bone dry’ stage if firing, or simply dry fully if using air-dry clay. This usually takes 24-48 hours depending on humidity.
Step 3: Painting the Monster
-
Paint the teeth:
Using a small round brush and white paint (or underglaze), carefully fill in the triangular teeth shapes. You may need two coats for opaque coverage against the terracotta background. -
Paint the main eyes:
Paint two large white circles for the eyes on the exterior. Make sure they are spaced widely apart for that goofy monster look. -
Add the inner rim eyes:
Paint a ring of small white circles all along the *inside* upper rim of the pot. This is the secret detail that makes this project special. -
Add pupils:
Once the white paint is dry, use a fine detail brush and black paint to add pupils. Place them in the center of the main exterior eyes. -
Detail the inner rim:
Add smaller black dots to the center of every white circle on the inside rim. -
Final touches:
If you used air-dry clay, seal the entire pot (inside and out) with a matte varnish to protect the paint. If using ceramic clay, clear glaze and fire according to your clay’s instructions.
Cracking Issues?
If small cracks appear while drying, smooth them immediately with a tiny bit of vinegar on your finger (for earth clay) or a slurry paste.
Your toothy friend is now ready to hold your favorite succulents or small plants