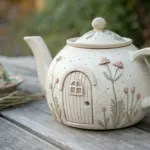
A pinch pot jar is basically the coziest little container you can make—simple, hand-formed, and totally customizable. Here are my favorite ideas for turning that classic pinch pot into a lidded jar you’ll actually want to keep out on the counter.
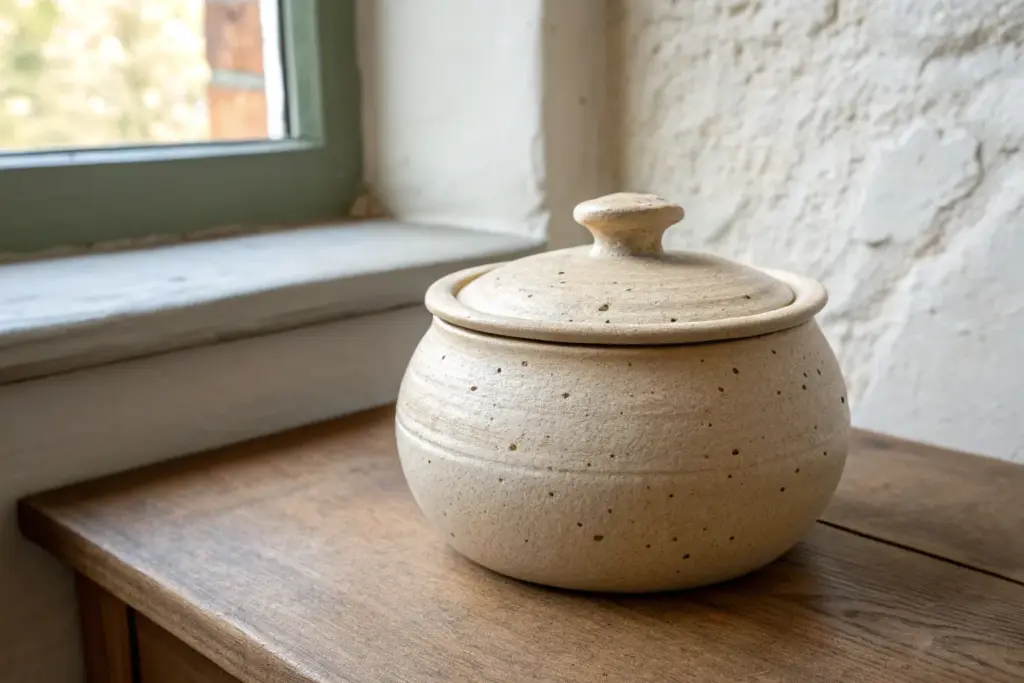
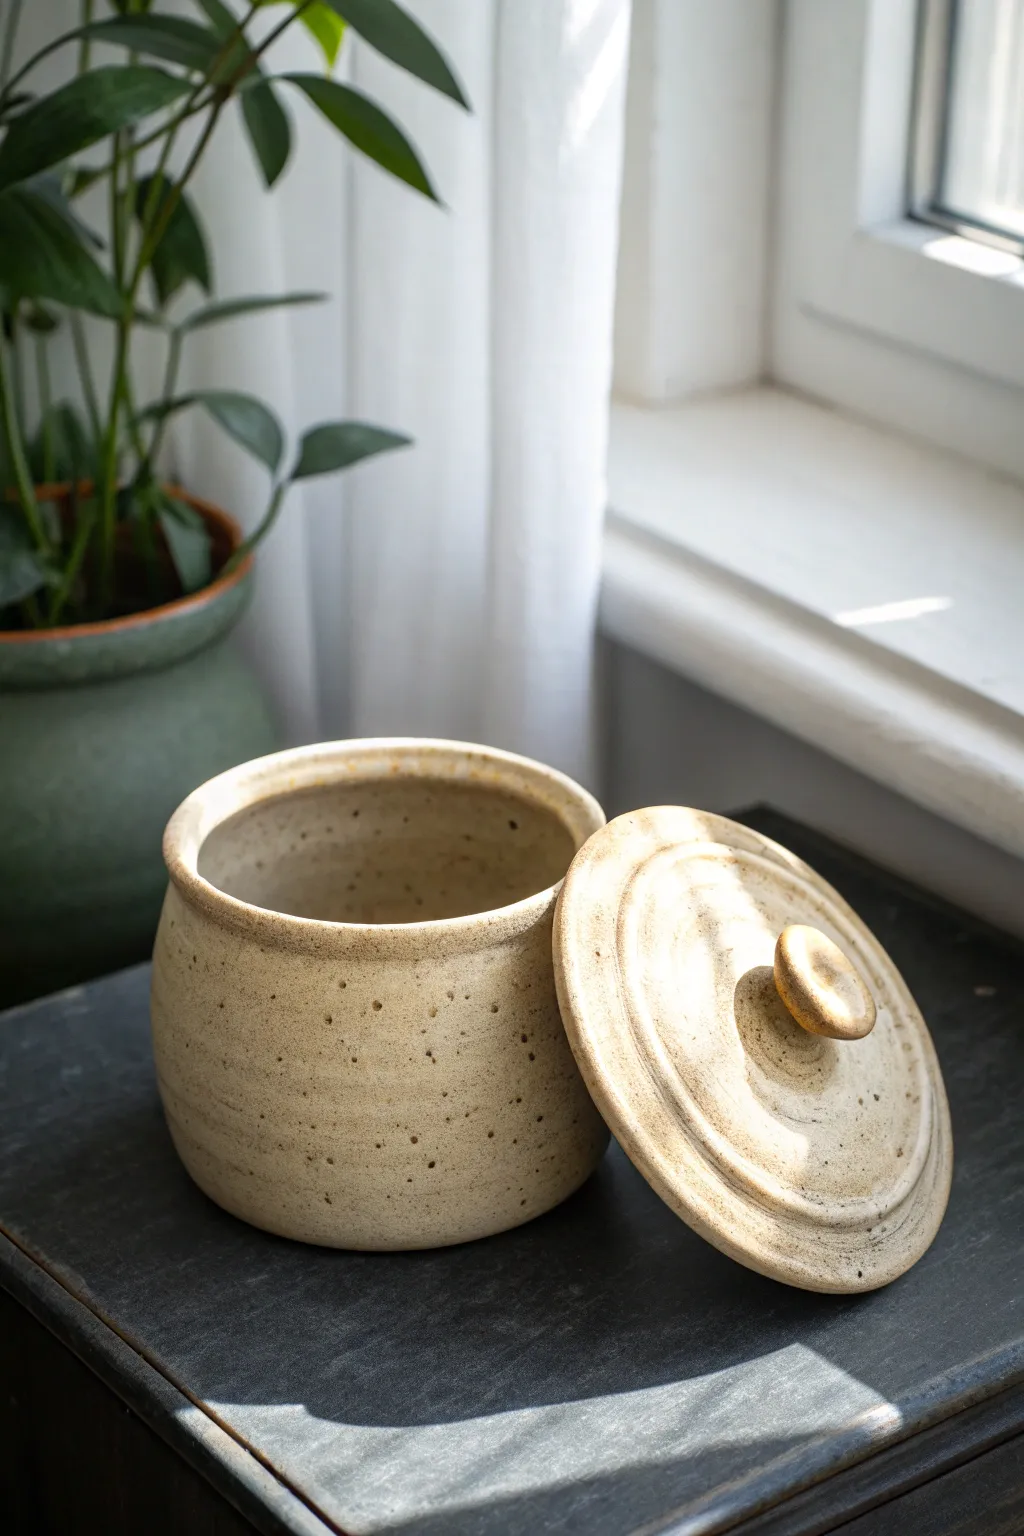
Classic Round Pinch Pot Jar With Fitted Lid
This project transforms two simple spheres of clay into a functional lidded vessel with a warm, speckled finish. The clean lines and snug-fitting lid create a professional look that hides the hand-molded origins, making it perfect for storing tea, sugar, or trinkets.
How-To Guide
Materials
- Speckled stoneware clay (approx. 2 lbs)
- Pottery wheel (optional, but hand-building tools used here)
- Needle tool
- Wooden rib tool
- Metal rib scraper
- Serrated kidney tool or scoring tool
- Slip (clay and water mixture)
- Sponge
- Rolling pin
- Canvas mat
- Matte cream glaze
- Satin honey/tan glaze
- Paintbrush for glazing
Step 1: Forming the Base
-
Divide and conquer:
Start by separating your clay into two balls. One should be slightly larger than the other—about 60% of the clay for the base and 40% for the lid. -
Open the base:
Take the larger ball and cradle it in one hand. Press your thumb into the center, stopping about a half-inch from the bottom to create the floor of your jar. -
Pinch the walls:
Rotate the clay slowly while gently pinching between your thumb and fingers. Work your way from the bottom up to the rim an even thickness of about 1/4 inch. -
Shape the cylinder:
While pinching, encourage the walls to go straight up rather than flaring out. Use a flat wooden paddle to gently tap the outside if it gets too wide. -
Refine the surface:
Once you have the height you want, use a flexible metal rib to scrape and smooth the exterior walls, removing deep finger marks and compressing the clay. -
Level the rim:
If the top edge is uneven, trimming it with a needle tool while rotating the pot (or placing it on a banding wheel) will give you a clean, flat surface.
Step 2: Creating the Gallery & Lid
-
Add a coil gallery:
Roll a thin coil of clay. Score and slip the inside of the jar’s rim, about 1/4 inch down. Attach the coil firmly to create a shelf (gallery) for the lid to sit on. -
Smooth the gallery:
Blend the bottom edge of this coil into the interior wall so it creates a seamless ledge. This step is crucial for a tight-fitting lid. -
Pinch the lid:
Take your second, smaller ball of clay. Flatten it into a thick disc, then pinch the edges slightly downwards to create a shallow, inverted saucer shape. -
Measure and trim:
Test the fit of the lid against the jar’s gallery. It should be slightly larger initially. Trim the edge gradually until it sits comfortably on the internal ledge without falling in.
Wobbly Rim Fix
Can’t get the rim level? Flip the leather-hard pot upside down on a flat board and gently rotate it. This naturally evens out the top edge without cutting.
Step 3: Detailing and Handle
-
Make the knob:
Roll a tiny ball of clay for the handle. Flatten the bottom and pinch the top slightly to create a mushroom or button shape. -
Attach the knob:
Score the center of the lid and the bottom of the knob. Apply slip and press them together firmly. I like to twist it slightly as I press to ensure a solid bond. -
Clean up:
Use a damp sponge to smooth any rough edges on the knob, lid rim, and base. Ensure the lid still fits perfectly after handling. -
Dry slowly:
Place the lid on the jar with a piece of paper towel in between to prevent sticking. Let them dry slowly under loose plastic to prevent warping. -
Bisque fire:
Once bone dry, fire the piece in a kiln to bisque temperature (usually Cone 04).
Pro Tip: Paper Resist
Place a circle of wax paper between the lid and jar during the slow drying phase. This lets them dry together for a perfect fit without sticking.
Step 4: Glazing
-
Apply base glaze:
Dip or brush the entire exterior and the top of the lid with a speckled matte cream glaze. Wipe the bottom of the jar clean to prevent it sticking to the kiln shelf. -
Layer the accent:
Brush a band of satin honey or tan glaze around the rim of the lid and the very top of the jar body. This creates that lovely toasted contrast seen in the image. -
Inside finish:
Pour the cream glaze inside the jar, swirl it to coat, and pour out the excess. This ensures the interior is food-safe and easy to clean. -
Final fire:
Fire the jar to the glaze’s recommended temperature (typically Cone 5 or 6 for stoneware) to melt the glazes into a durable finish.
Once cooled, your handcrafted jar is ready to bring a touch of earthy charm to your kitchen counter or vanity


Flange Lid That Locks In Place
Create a charming, rustic storage vessel with a satisfyingly secure flange lid. This project combines classic pinch pot techniques with precise shaping to craft a speckled, organic jar that looks beautiful on any windowsill.
Step-by-Step Guide
Materials
- Speckled buff stoneware clay (or similar mid-fire clay)
- Potter’s needle tool
- Serrated rib tool or scoring tool
- Wooden modeling tool
- Sponge
- Ruler or calipers
- Clear matte glaze
- Kiln access
- Plastic bag for slow drying
Step 1: Forming the Base
-
Prepare the Clay Ball:
Start with a ball of clay roughly the size of a large orange. Pat it into a smooth sphere to ensure there are no trapped air bubbles. -
Open the Pot:
Hold the clay in one hand and press your thumb into the center, leaving about a half-inch of thickness at the bottom for the base. -
Pinch the Walls:
Gently pinch the clay between your thumb and fingers, rotating the ball as you go. Work from the bottom up to thin the walls evenly, aiming for a consistent thickness of about 1/4 inch. -
Define the Cylinder:
Once the walls are thinned, place the pot on a flat surface. Gently paddle the outside with a wooden spatula or your hand to straighten the walls into a vertical cylinder shape rather than a bowl. -
Smooth the Rim:
Use a damp sponge to compress and smooth the rim. Keep it flat and even, as this is crucial for the lid fit later.
Step 2: Creating the Flanged Lid
-
Measure the Opening:
Use calipers or a ruler to measure the exact inner diameter of your jar’s opening. Write this measurement down. -
Form a Slab:
Roll out a small slab of clay, slightly thicker than your jar walls. Use a round cutter or needle tool to cut a circle that is about 1 inch wider than the jar opening. -
Create the Flange Coil:
Roll a thin coil of clay. Create a ring with this coil that matches your measured inner diameter exactly. This distinctive flange is what will lock the lid in place. -
Score and Slip:
Score the underside of your flat lid circle and the coil ring. Apply slip to both surfaces and press the ring firmly onto the center of the lid underside. -
Test the Fit:
Here I always do a quick test fit while the clay is still plastic. Gently place the lid on the jar to ensure the flange sits inside the rim comfortably without binding. -
Clean the Seams:
Use a modeling tool to smooth the seam where the coil meets the lid, ensuring a strong bond.
Warped Lid Woes?
If your lid wobbles after firing, apply a dab of grinding paste to the rim and rotate the lid back and forth against the jar to grind them into a perfect match.
Step 3: Adding the Knob
-
Shape the Handle:
Roll a small ball of clay and flatten it slightly into a thick button shape for the knob. -
Attach the Knob:
Score and slip the center top of the lid and the bottom of your knob. Press them together firmly. -
Refine the Connection:
Use a small brush or tool to smooth the connection point, creating a seamless transition from lid to knob.
Pro Tip: Sharp Definition
Use a damp chamois strip on the rim of the jar and the edge of the lid while the clay is leather hard. This compresses the particles for a smoother, chip-resistant edge.
Step 4: Finishing and Firing
-
Dry Slowly:
Place the lid on the jar (with a small piece of paper between them to prevent sticking) and wrap loosely in plastic. Let it dry slowly over several days to bone dry. -
Bisque Fire:
Fire the piece to bisque temperature (usually cone 04) according to your clay’s specific instructions. -
Apply Glaze:
Dip or brush a clear matte glaze over the entire piece. Wipe the bottom of the jar and the contact points where the lid touches the jar rim with a damp sponge to prevent them fusing together. -
Final Firing:
Glaze fire the piece to maturity (often cone 5 or 6 for stoneware). The heat will draw out the natural iron speckles in the clay body.
Fill your new handmade jar with tea, spices, or trinkets and enjoy the satisfying clink of a perfectly fitted ceramic lid.


Easy Drop-In Lid With Soft Dome Top

This charming jar combines the organic, hand-formed feel of a pinch pot with a clean, functional drop-in lid. The soft domed top and speckled matte cream glaze give it a cozy, rustic elegance perfect for storing small treasures or spices.
Detailed Instructions
Materials
- Speckled stoneware clay (approx. 1 lb)
- Potter’s ribs (wooden and soft rubber)
- Needle tool
- Loop trimming tool
- Scoring tool (or serrated rib)
- Slip
- Sponge
- Calipers (optional but helpful)
- Paddle (wooden)
- Matte cream or white glaze
Step 1: Forming the Body
-
Pinch the base:
Start with a ball of clay roughly the size of a large orange. Insert your thumb into the center and begin pinching rhythmically while rotating the ball in your other hand. Aim for an even wall thickness of about 1/4 inch. -
Refine the shape:
Once the walls are raised, use a wooden paddle to gently tap the outside of the pot while supporting the inside. This helps round out any lumpy areas and creates that pleasing, spherical volume seen in the photo. -
Level the rim:
Set the pot on a flat surface to flatten the bottom slightly. Use a needle tool to cut the rim level if it’s uneven, or simply compress and smooth edge with a damp sponge. -
Create the gallery:
For a drop-in lid, we need a seat. Gently push the rim outward slightly, then use your thumb or a modeling tool to press a recessed ledge (gallery) just inside the rim. Smooth this ledge carefully so the lid will sit flat.
Lid Rocking?
If the fired lid rattles, apply a small dab of grinding paste (valve grinding compound) to the gallery and twist the lid back and forth to sand it into a perfect, silent fit.
Step 2: Making the Lid & Knob
-
Measure the opening:
Use calipers to measure the diameter of your gallery ledge. You want the lid to fit inside this measurement with a tiny bit of wiggle room to account for glaze thickness later. -
Form the lid slab:
Shape a smaller ball of clay into a thick disk. You can pinch this out just like a tiny bowl, but keep it shallow. Invert it so the convex side faces up—this creates the soft dome shape. -
Refine the lid fit:
Place the lid onto the pot’s gallery to check the fit. Trim the edges of the lid with a knife or fettling tool until it drops in comfortably. I find it helpful to refine the edge with a damp sponge to ensure it slides smoothly. -
Make the knob:
Roll a very small ball of clay (about the size of a marble or large pea) for the knob. Keep it simple and round to match the pot’s aesthetic. -
Attach the knob:
Score the center of the domed lid and the bottom of the knob. Apply a dab of slip and press the knob firmly into place. Smooth the attachment point with a small tool so it looks seamless.
Add Texture
Before drying, gently press a coarse fabric or linen cloth into the soft clay surface to add a subtle tactile quality that glaze will break over nicely.
Step 3: Finishing Touches
-
Dry slowly:
Place the lid on the pot (with a piece of paper towel in between to prevent sticking) and wrap the whole piece loosely in plastic. Let it dry slowly to the leather-hard stage. -
Trim the foot (optional):
If the bottom feels heavy, flip the leather-hard pot over and use a loop tool to trim a small foot ring. This elevates the form and gives it a professional shadow line. -
Smooth the surface:
Use a soft rubber rib to burnish or smooth the exterior walls. You want to remove heavy fingerprints while keeping the organic hand-built character. -
Bisque fire:
Allow the piece to dry completely until it is bone dry, then bisque fire it to your clay body’s recommended temperature (usually Cone 04 or 06).
Step 4: Glazing
-
Wax the contact points:
Apply wax resist carefully to the gallery ledge on the pot and the underside rim of the lid where they will touch. This prevents the lid from fusing to the pot during firing. -
Apply the glaze:
Pour a matte cream glaze inside the pot, swirl, and pour out. Then dip the exterior of the pot and the top of the lid. The speckles in the clay will bleed through a translucent or semi-opaque cream glaze beautifully. -
Check the fit:
Before firing, double-check that no glaze is on the contact surfaces. Wipe any stray drips with a sponge. -
Final firing:
Glaze fire to maturity (likely around Cone 5 or 6 for stoneware). Let the kiln cool naturally to avoid thermal shock.
Once cooled, your jar is ready to hold loose tea, jewelry, or simply sit on a shelf looking lovely


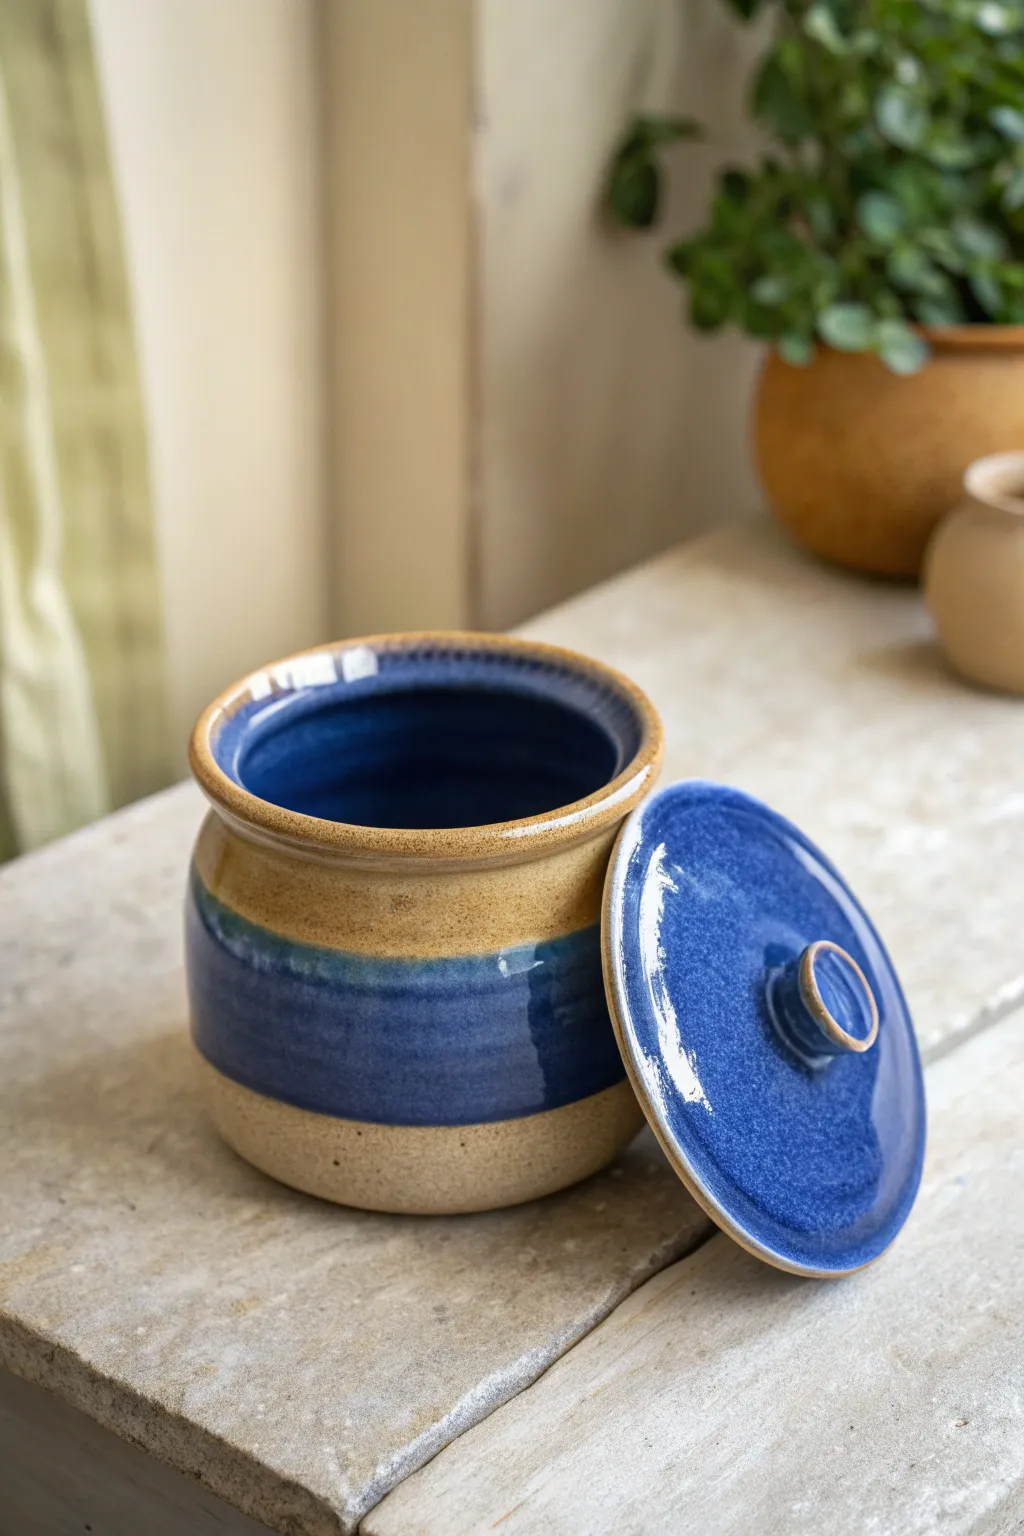
Ball Knob Lid for Beginner-Friendly Grip
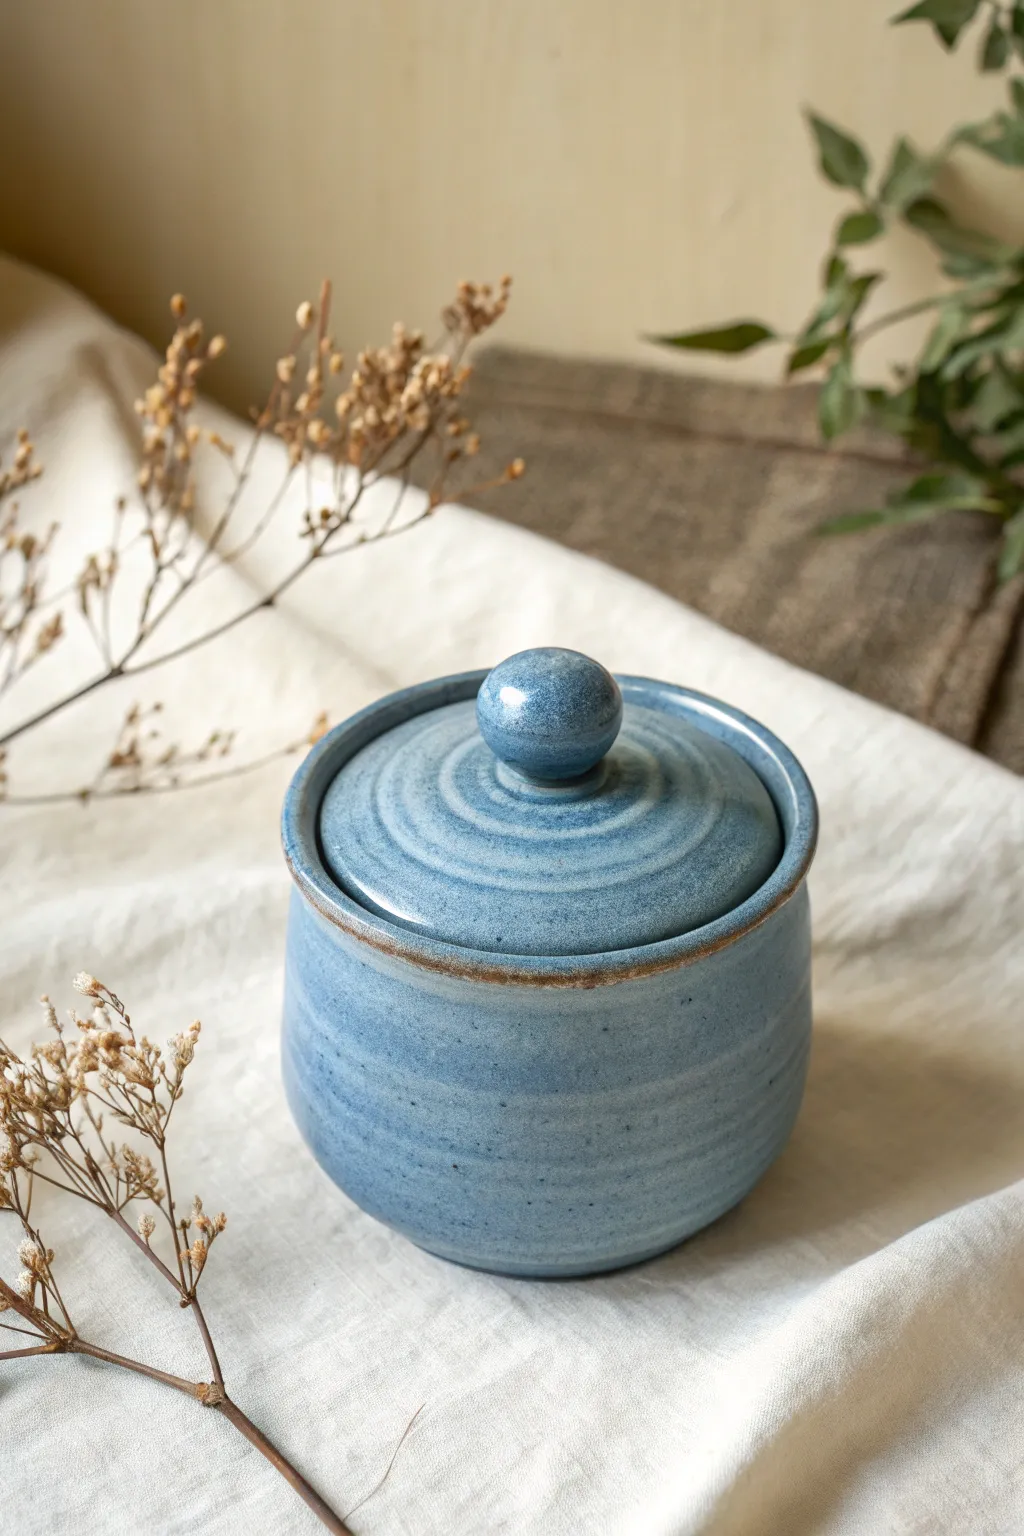
This charming, wheel-thrown jar features a serene blue glaze with subtle spiral throwing lines that add texture and character. The perfectly shaped ball knob provides both a classic silhouette and an easy grip, making this a delightful project for everyday use.
Step-by-Step Guide
Materials
- Stoneware clay body
- Pottery wheel
- Throwing sponge
- Wire cutter
- Loop tool for trimming
- Rib tool (wooden or metal)
- Pin tool
- Calipers
- Speckled blue stoneware glaze
- Kiln
Step 1: Throwing the Body
-
Center and Open:
Start with a ball of wedged clay on the wheel head. Center it firmly, then open the clay to create the floor, leaving it slightly thicker than the walls to allow for later trimming. -
Pull the Walls:
Begin pulling the walls upward into a cylinder shape. Keep your pulls steady and even to create uniform thickness. -
Shape the Belly:
Apply gentle pressure from the inside to belly out the form slightly, creating a rounded, inviting curve for the jar body. I like to leave slight finger ridges visible for texture. -
Create the Gallery:
At the rim, use a rib or your finger to split the clay slightly or push it inward to create a small shelf (gallery) where the lid will sit. Ensure this ledge is flat and smooth. -
Measure with Calipers:
Use your calipers to measure the exact inner diameter of the gallery seating area. Lock the calipers in place so you can use this measurement for the lid. -
Cut and Dry:
Wire the pot off the wheel bat but leave it on the bat to firm up until it’s leather hard.
Don’t Ignore the Gallery
Make your gallery ledge slightly deeper than you think is necessary. Glaze adds thickness, and a shallow gallery can cause the lid to slide off easily.
Step 2: Creating the Lid
-
Throw the Lid Mound:
Center a smaller amount of clay on the wheel. You will throw the lid upside down, starting with the outer rim. -
Shape and Measure:
Flatten the mound into a disk and refine the edge. Frequently check the diameter against your locked calipers to ensure a perfect fit with the jar’s gallery. -
Trim the Knob:
Unlike a pulled handle, this knob is created by leaving a thick excess of clay in the center. Once the rim is established, shape this central mass into a rough knob shape. -
Refine the Knob:
Using your fingers and a wet sponge, smooth the central mass into a perfect sphere. Create a slight undercut at the base of the sphere to give it a defined ‘neck’ where it meets the lid curve. -
Add Texture:
While the wheel is spinning slowly, press your sponge or finger gently into the lid’s surface to create concentric spiral rings radiating from the knob, matching the texture of the body.
Lid Too Loose?
If you trim your lid too small for the gallery, don’t panic. You can throw a small coil of wet clay onto the lid’s rim and re-throw just that edge to widen it.
Step 3: Finishing and Glazing
-
Trimming the Foot:
Once both pieces are leather hard, flip the jar body over on the wheel. Use a loop tool to trim away excess weight from the bottom and carve a clean foot ring. -
Test Fit:
Place the lid onto the jar. It should sit comfortably without wobbling. If it’s tight, sand it gently continuously checking the fit. -
Bisque Fire:
Fire the pieces in the kiln to a bisque temperature (usually Cone 04 or 06) to prepare them for glazing. -
Wax the Contact Points:
Apply wax resist to the foot ring of the jar, the gallery ledge, and the underside rim of the lid where it will touch the jar. This prevents the lid from fusing shut during firing. -
Apply Glaze:
Dip the jar and lid into a speckled blue stoneware glaze. Shake off excess drips immediately. If you want the rim detail seen in the image, wipe the glaze slightly thinner at the edges. -
Final Fire:
Load the kiln carefully and glaze fire to the maturation temperature of your clay and glaze (typically Cone 5 or 6 for stoneware).
Once cooled, your jar is ready to hold tea, spices, or trinkets with a beautifully handcrafted touch

What Really Happens Inside the Kiln
Learn how time and temperature work together inside the kiln to transform clay into durable ceramic.
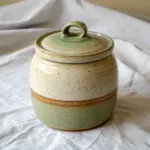
Coil Bumper Ring Under the Lid
This charming, speckled ceramic jar features a cleverly hidden coil “bumper” that keeps the lid perfectly secure and snug. Its organic texture and earthy, glossy finish make it a beautiful addition to any kitchen or vanity.
How-To Guide
Materials
- Stoneware clay (speckled or white)
- Pottery wheel (optional, can be hand-built)
- Needle tool
- Rib tool (wooden or silicone)
- Scoring tool or fork
- Slip (clay and water mixture)
- Sponge
- Cutting wire
- Glossy white glaze
- Kiln
Step 1: Forming the Base
-
Prepare your clay:
Start with a ball of well-wedged clay, about the size of a large grapefruit. Ensure there are no air bubbles. -
Establish the base:
If throwing on the wheel, center your clay and open it up to a medium width. If hand-building, create two deep pinch pots and join them, or coil build a cylinder. -
Pull the walls:
Pull the walls up to create a squat, cylindrical shape. Aim for a slightly rounded bottom that tapers just barely toward the top. I like to keep the walls slightly thicker than a standard mug to give it a sturdy, rustic feel. -
Refine the rim:
Using a shammy or a sponge, smooth the rim of the cylinder. It needs to be leveled but doesn’t have to be perfect, as we are adding to it.
Wax Resist Method
Apply wax resist to the bumper ring gallery and the underside of the lid rim before glazing. This ensures a clean contact point and prevents the lid from fusing to the jar in the kiln.
Step 2: Creating the Bumper Ring
-
Roll a coil:
Roll out a consistent coil of clay, roughly the thickness of your pinky finger. -
Score and slip:
Score the interior wall of your jar, about half an inch down from the top rim. Apply a generous amount of slip to the scored area. -
Attach the coil:
Place the coil inside the jar on the scored line. This coil acts as the “bumper” or shelf for your lid to sit on. -
Blend the coil:
Blend the bottom edge of the coil downward into the interior wall of the jar so it becomes seamless. Leave the top edge of the coil defined—this is the shelf. -
Refine the gallery:
Smooth the top surface of the coil shelf so it is flat and level. This creates the “gallery” for the lid.
Make it Match
Create a matching tall bottle to go with your jar. Use a coarser, darker clay for the bottom half of the bottle to mimic the woven texture seen in the background of the photo.
Step 3: Making the Lid
-
Measure the opening:
Use calipers to measure the diameter of the interior opening (from the inner edge of your new bumper ring). -
Form the lid slab:
Roll out a slab of clay or throw a flat disk that is slightly wider than the opening you just measured so it sits on top of the rim, not inside it. -
Add a flange:
Flip the lid over. Score and slip a small ring of clay on the underside that will fit comfortably *inside* the bumper ring to prevent the lid from sliding off. -
Create the handle:
Form a small knob or button shape from a scrap of clay. Score and slip the center of the top of the lid and attach the knob securely. -
Texture the surface:
Before the clay dries, use a trimming tool or rib to create subtle concentric circles on the lid’s surface for visual interest.
Step 4: Finishing and Glazing
-
Dry slowly:
Loosely cover the jar with the lid in place with plastic. Let it dry slowly to the leather-hard stage to prevent warping. -
Bisque fire:
Once bone dry, fire the piece in the kiln to cone 04 (or your clay body’s bisque temperature). -
Apply glaze:
Dip or brush a glossy white glaze over the entire piece. If you used speckled clay, the specks will burn through the white glaze nicely during firing. -
Clean the connection points:
Wipe away any glaze from the gallery (the bumper ring shelf) and the underside of the lid where they touch. If these fuse during firing, the lid will be stuck forever. -
Final firing:
Fire the piece to glaze temperature (typically cone 5 or 6 for stoneware).
Once cooled, your custom jar is ready to hold tea, spices, or small treasures on your counter
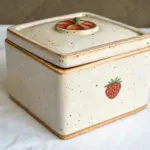
Two Pinch Pots Joined Into a Plump Jar
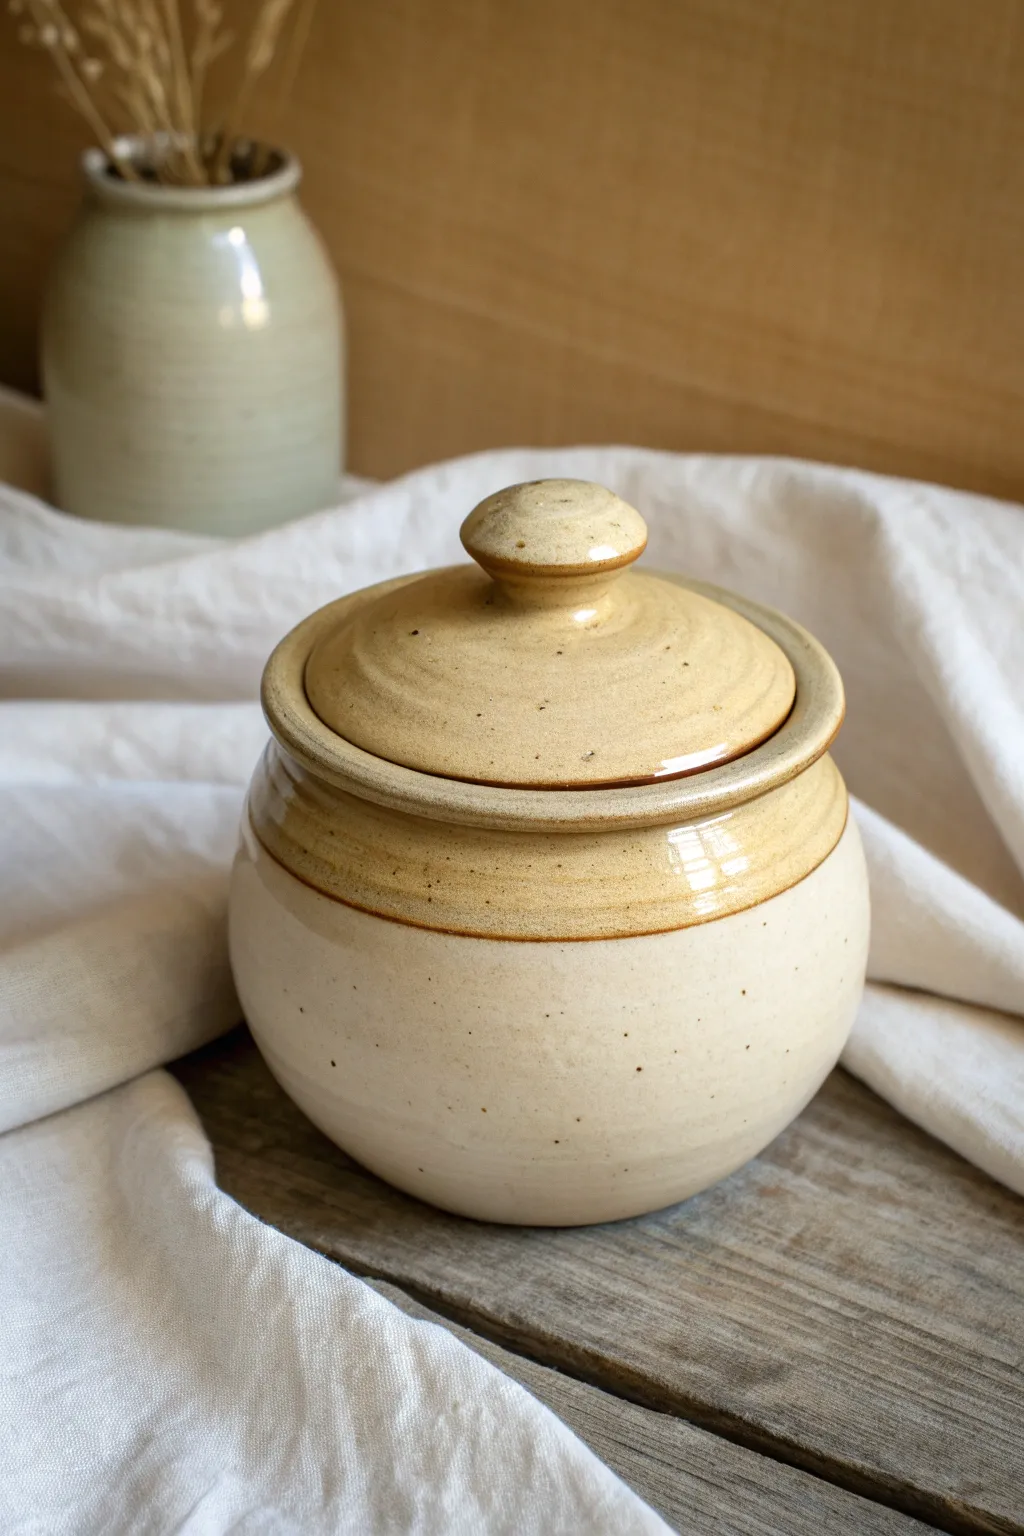
This charming, round-bellied jar features a classic speckled cream glaze with toasted accents on the rim and lid for a warm, rustic feel. By joining two simple pinch pots together, you can create volume and form without needing a pottery wheel.
Step-by-Step Guide
Materials
- Stoneware clay (preferably speckled)
- Pottery wheel (optional, for trimming)
- Serrated rib or fork
- Slip (clay and water slurry)
- Wooden paddle
- Loop tool for trimming
- Sponge
- Cream/White speckled glaze
- Honey/Tan dipping glaze
- Needle tool
- Kiln
Step 1: Forming the Body
-
Roll two balls:
Start with two balls of clay of equal size, roughly the size of a large orange. Roll them smooth in your hands to minimize cracks later. -
Pinch the pots:
Insert your thumb into the center of the first ball and pinch the clay between your thumb and fingers, rotating as you go. Aim for an even wall thickness of about a quarter-inch. -
Check the match:
Repeat the process for the second ball. Create a slightly wider rim on this one if possible, but mostly ensure the diameters of both pot openings match perfectly. -
Score and slip:
Use a serrated rib or needle tool to scratch up the rims of both pinch pots aggressively. Apply a generous amount of slip to the roughed-up areas. -
Join the halves:
Press the two rims together firmly to form a sealed hollow sphere. Wiggle them slightly to lock the clay particles together. -
Smooth the seam:
Using your thumb or a wooden tool, drag clay across the seam line in both directions to knit the halves together, then smooth over the join until the seam is invisible.
Air Pressure Trick
Don’t cut the opening immediately after joining the pots. The trapped air acts like a balloon, supporting the walls while you paddle and shape the body.
Step 2: Shaping and Refining
-
Paddle the form:
To get that nice round shape and compress the join, gently slap the outside of the sphere with a wooden paddle while rotating it in your hand. This strengthens the structure. -
Create the opening:
Decide which side will be the top. Use a needle tool to slice off a horizontal cap from the top of the sphere. Save this slice; it can sometimes be repurposed. -
Refine the rim:
Smooth the cut edge with a damp chamois or sponge. I like to add a small coil of clay to the rim to thicken it slightly, giving it that defined lip seen in the photo. -
Add a gallery (optional):
If you want the lid to sit flush, you can carve a small ledge inside the rim, but for this style, a simple flat rim works if the lid has an inner flange.
Step 3: The Lid and Finishing
-
Measure for the lid:
Measure the opening of your jar. Roll a slab of clay or make a small shallow pinch pot that is slightly wider than the opening. -
Form the flange:
On the underside of your lid slab, add a ring of clay (a coil) that fits *inside* the jar opening to keep the lid from sliding off. -
Throw or sculpt a knob:
Attach a small ball of clay to the center of the lid. Shape it into a mushroom-style knob, ensuring it’s easy to grip. -
Dry and Bisque Fire:
Allow the jar and lid to dry slowly under plastic to prevent warping. Once bone dry, bisque fire them to cone 04 (or your clay’s specification).
Wax Resist Magic
Apply wax resist to the gallery or rim where the lid touches the jar. This ensures you don’t accidentally glaze the contact points, which would fuse the lid shut.
Step 4: Glazing
-
Apply base glaze:
Dip the entire jar and lid into a creamy white speckled glaze. If you used speckled clay, a semi-opaque white works best to let the clay’s character show through. -
Dip the accents:
Once the base coat is dry to the touch, carefully dip just the top rim of the jar and the entire lid into a honey or light tan glaze. This creates that warm, toasted contrast. -
Clean the foot:
Wipe all glaze off the bottom of the jar and the contact points of the lid to prevent them from fusing to the kiln shelf. -
Glaze fire:
Fire the piece to maturity (likely Cone 5 or 6 for stoneware). The heat will melt the two glazes slightly where they overlap, creating a beautiful transition.
Once cooled, your new jar is ready to hold tea leaves, sugar, or small treasures on your shelf


The Complete Guide to Pottery Troubleshooting
Uncover the most common ceramic mistakes—from cracking clay to failed glazes—and learn how to fix them fast.
Mini Pinch Pot Jar Trio for Tiny Treasures
Create a charming set of three miniature ceramic jars using simple hand-building techniques to store your tiniest treasures. These speckled, earth-toned pinch pots feature perfectly fitted lids and a cozy, organic aesthetic that looks beautiful on any windowsill.
Step-by-Step Tutorial
Materials
- Stoneware clay (speckled or buff)
- Pottery tools (rib, needle tool, sponge)
- Small bowl of water
- Rolling pin
- Canvas or cloth mat
- Loop tool for trimming
- Underglazes or dipping glazes (terracotta brown, creamy oatmeal, sage green)
- Small kiln (or access to firing services)
- Clear transparent glaze (optional if using underglazes)
Step 1: Forming the Pot Bases
-
Prepare your clay:
Start by wedging your clay to remove air bubbles. Divide a portion into three equal balls, roughly the size of a large tangerine, to ensure your trio will be consistent in size. -
Open the pinch pot:
Take the first ball and press your thumb gently into the center, leaving about a half-inch of thickness at the bottom. Start pinching the clay between your thumb and fingers, rotating the ball as you go to widen the opening. -
Shape the walls:
Continue pinching upwards to thin the walls evenly. Aim for a slightly bulbous, rounded belly shape rather than a straight cylinder. Keep the rim slightly thicker than the walls for strength. -
Smooth the exterior:
Use a flexible rib tool or a slightly damp sponge to smooth out deep fingerprints on the outside, but leave a bit of texture for that handmade rustic character. -
Refine the rim:
Gently tap the rim of the pot upside down on your table to level it. Then, use your fingers or a chamois cloth to round the lip so it’s smooth to the touch. -
Repeat for the set:
Repeat this process for the other two balls of clay, checking them against each other to maintain a similar scale while allowing for slight organic variations.
Step 2: Creating the Fitting Lids
-
Measure the opening:
Measure the interior diameter of your finished pots. You want to create lids that have a flange (a ridge) that sits securely inside this opening. -
Make the lid slab:
Roll out a small slab of clay to about 1/4 inch thickness. Use a needle tool to cut three circles that are slightly larger than the *outer* diameter of your pots. -
Add the gallery:
Score and slip a smaller ring or snake of clay onto the underside of each lid. This ring should fit just inside the pot’s rim to keep the lid from sliding off. -
Dome the tops:
Place the lid (right side up) in your palm and gently press from the center to create a slight dome shape, giving it a pleasing visual curve. -
Attach the knobs:
Roll three tiny balls of clay for the knobs. Score and slip the center of each lid, then attach the balls firmly. Smooth the connection point so it looks seamless.
Don’t Rush the Fit
Make the lids while the pots are leather hard, not bone dry. Clay shrinks as it dries; making them at the same moisture stage ensures they shrink together perfectly.
Step 3: Finishing and Firing
-
Dry slowly:
Place the lids on their respective pots and cover the trio loosely with plastic. Let them dry very slowly over a few days to prevent warping, which is crucial for a fitting lid. -
Bisque fire:
Once bone dry, fire the pieces to bisque temperature (usually cone 04) to prepare them for glazing. -
Apply wax resist:
Paint wax resist on the bottom of each pot and the flange of the lid (where clay touches clay) to prevent the lid from sticking to the pot during the glaze firing. -
Glaze the trio:
Dip or paint your pots in three distinct earthy tones. For the look in the photo, use a glossy amber-brown for one, a matte speckled oatmeal for the middle, and a semi-opaque sage green for the third. -
Wipe the rims:
I like to wipe the glaze slightly back from the rim of the lid and the pot mouth using a damp sponge, exposing a thin line of raw clay for visually defining the separation. -
Final firing:
Fire the pots again to the maturity temperature of your clay and glaze (typically cone 5 or 6 for stoneware). Open the kiln to reveal your beautiful, durable jar trio.
Texture Time
Before the clay dries, gently press a piece of coarse linen or burlap against the belly of the pots to add a subtle woven texture that the glaze will break over later.
Set your finished trio on a sunny shelf to catch the light and enjoy their earthy warmth
Fluted Walls for a Modern Pinch Pot Jar
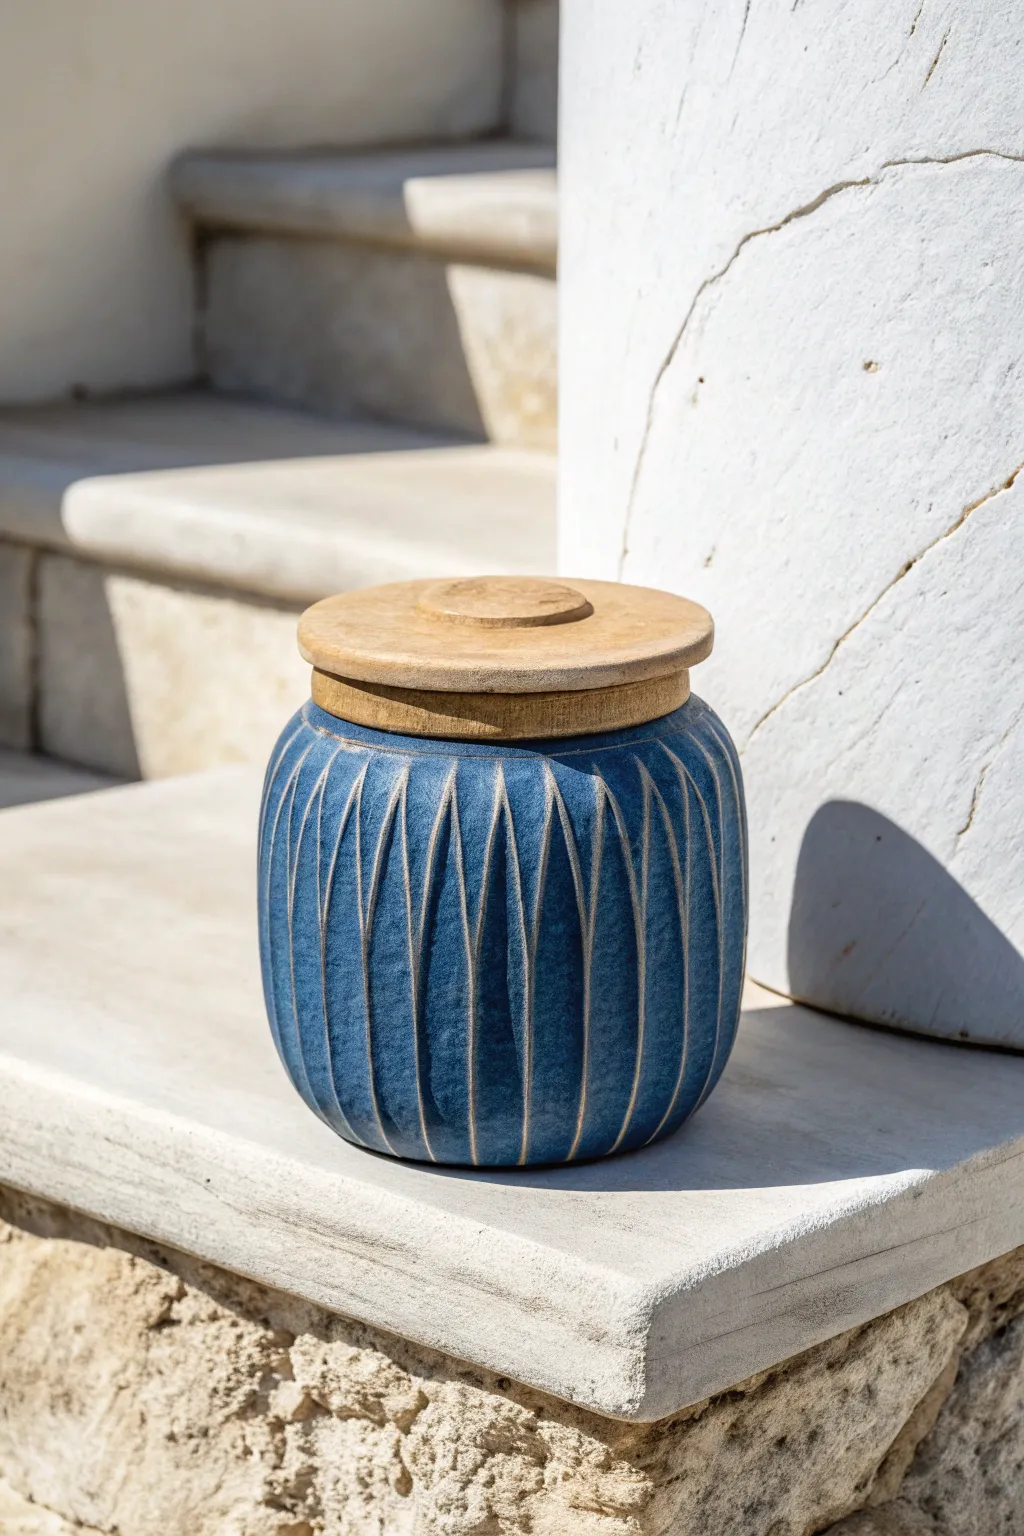
This striking ceramic jar combines deep navy blue glaze with the exposed, raw clay of its vertical fluting for a modern, textural contrast. This project centers on building a sturdy, rounded pinch pot base and carefully carving precise channels to create a rhythmic pattern.
Detailed Instructions
Materials
- Stoneware clay (buff or white)
- Pottery wheel (optional, or hand-building tools)
- Wooden throwing ribs or metal kidney tool
- Wire carving tool or loop tool (small)
- Sponge
- Wooden lid (pre-bought or lathe-turned)
- Navy blue stoneware glaze
- Callipers
- Paintbrush (fan or hake)
- Clear wax resist
Step 1: Forming the Base Vessel
-
Prepare the Clay:
Begin by wedging roughly 2-3 pounds of stoneware clay to remove air bubbles. Form it into a smooth, even ball. -
Start the Pinch Pot:
If hand-building, push your thumb into the center of the ball and gently pinch the walls upward and outward while rotating the clay in your palm. Aim for walls about 1/4 inch thick. -
Refine the Shape:
Using a wooden paddle or a rib tool, smooth the exterior while supporting the interior wall. You want a rounded, barrel-like shape that curves slightly inward at the top rim. -
Flatten the Rim:
Use a damp sponge or your fingers to create a flat, horizontal rim. This flat surface is crucial because it needs to support the wooden lid later. -
Measure for the Lid:
Use callipers to measure the inner diameter of your rim. If you already have your wooden lid, ensure the opening matches the lid’s flange precisely, allowing for shrinkage (clay shrinks about 10-12% when fired). -
Dry to Leather Hard:
Set the pot aside until it reaches a leather-hard state. The clay should be firm enough to handle without deforming but soft enough to carve into easily.
Clean Lines
Wait until the clay is a firm leather-hard before carving. Check firmness by trying to make a thumbprint; if it resists denting but you can scratch it with a fingernail, it’s perfect.
Step 2: Carving the Flutes
-
Mark Vertical Guides:
Using a needle tool, lightly scratch vertical lines around the jar to divide the surface evenly. These will serve as guides for your carving tool to ensure your flutes stay straight. -
Select the Carving Tool:
Choose a U-shaped or V-shaped wire loop tool. The width of the loop will determine the width of your flutes, so test it on a scrap piece of leather-hard clay first. -
Carve the Initial Stroke:
Start your cut just below the rim and drag the tool downward in a confident, continuous motion toward the base. Apply consistent pressure to keep the depth uniform. -
Clean the Flute End:
As you reach the bottom curve of the pot, lift the tool gently to taper the cut so it fades out naturally right before the foot. -
Repeat Around the Vessel:
Continue carving adjacent channels all the way around the pot. Leave a thin ridge of uncarved surface between each flute to create the defining vertical lines. -
Smooth the Edges:
Once all flutes are carved, use a slightly damp sponge or a soft brush to gently smooth any sharp burrs or crumbs of clay along the carved edges without erasing the texture. -
Slow Drying:
Loosely cover the pot with plastic to let it dry slowly and evenly to bone dry. This prevents the rim from warping out of round.
Uneven Fluting?
If your hand slips while carving, don’t try to fill it back in with fresh clay—it usually cracks. Instead, smooth the mistake with a wet finger and make that area a slightly wider flute.
Step 3: Glazing and Finishing
-
Bisque Fire:
Fire the piece in the kiln to a bisque temperature (usually cone 04 or 06). After firing, wipe the pot down with a damp sponge to remove dust. -
Apply Wax Resist:
I like to carefully paint liquid wax resist into the deep carved grooves of the fluting. This step is optional but creates the two-tone look seen in the image where the raw clay shows through the texture. -
Glaze Application:
Dip the pot or brush on your navy blue stoneware glaze. If you waxed the grooves, wipe the surface with a sponge immediately after dipping; the glaze will wipe off the waxed concave areas but stick to the raised ridges. -
Clean the Foot and Rim:
Wipe all glaze off the bottom foot and the very top flat rim using a sponge to prevent sticking to the kiln shelf or the lid later. -
Glaze Fire:
Fire the pot to the maturity temperature of your clay and glaze (likely cone 5 or 6). Allow the kiln to cool completely before opening. -
Pair with the Lid:
Sand the bottom of the pot if necessary to ensure it sits flat. Place the wooden lid on top to complete the mixed-material aesthetic.
Place your finished jar on a shelf where the light can catch the texture of the fluting and enjoy the modern elegance you have created

TRACK YOUR CERAMIC JOURNEY
Capture glaze tests, firing details, and creative progress—all in one simple printable. Make your projects easier to repeat and improve.
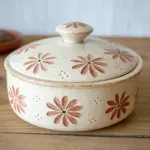
Stamped Texture Jar With Matching Lid Pattern
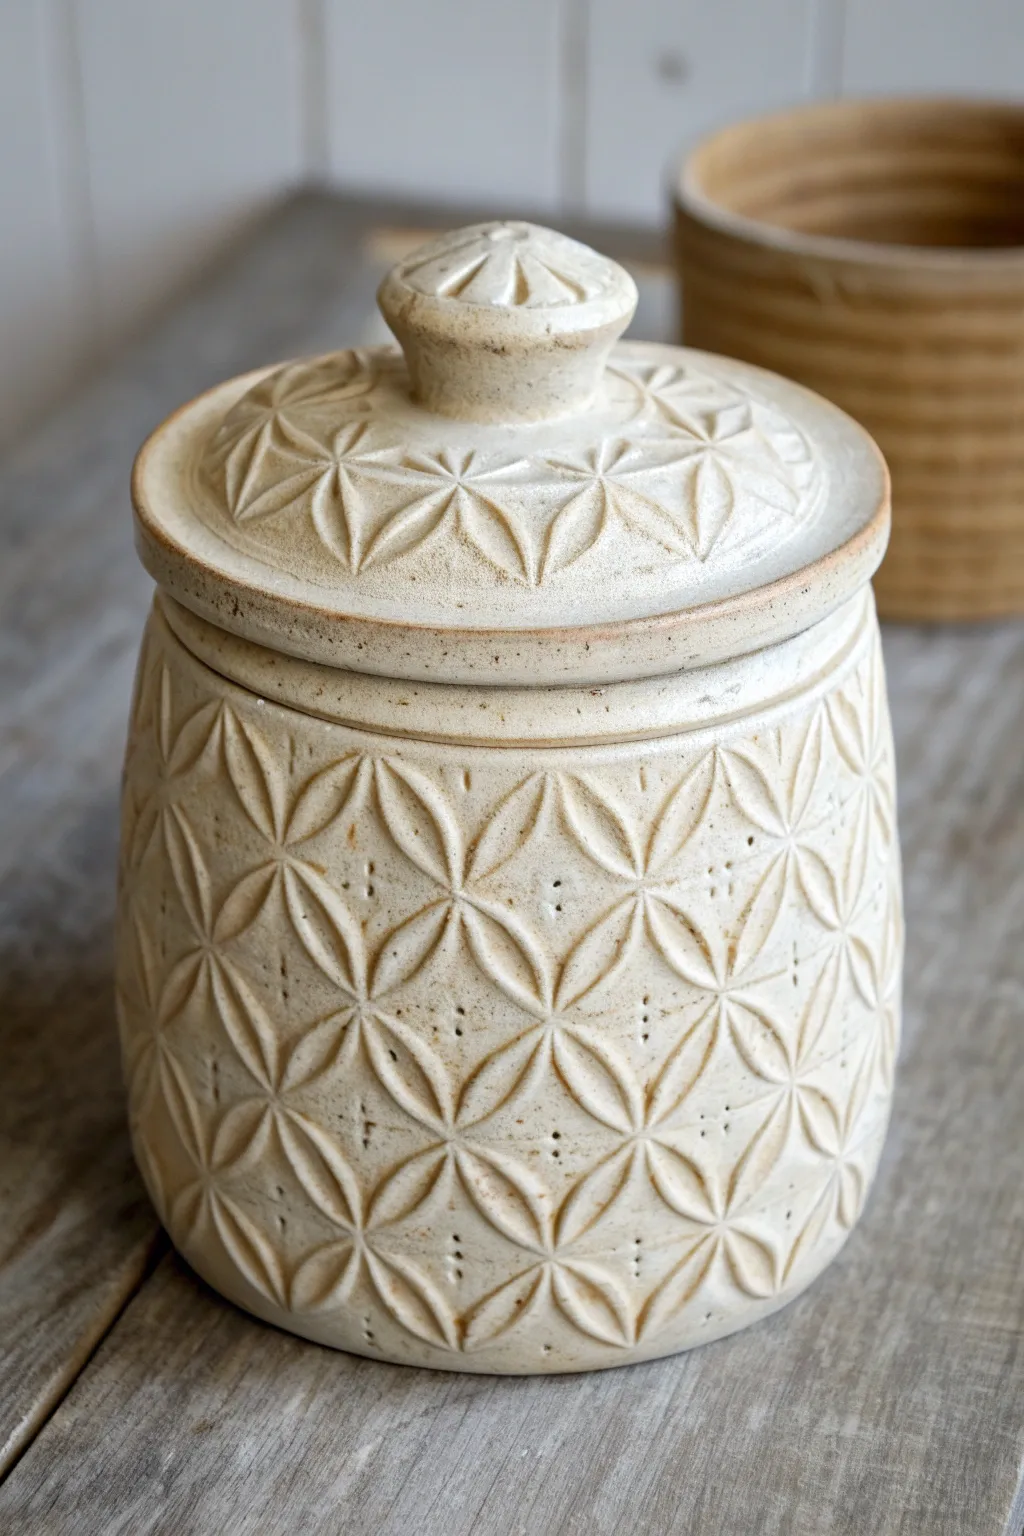
This charming lidded jar combines primitive pinch pot techniques with precise surface decoration for a result that feels both rustic and refined. The repeating starburst pattern creates a mesmerizing texture that is highlighted beautifully by a speckled, creamy glaze.
How-To Guide
Materials
- Stoneware clay (speckled or buff)
- Wooden or bisque rolling pin
- Patterned stamp (floral or geometric starburst)
- Fettling knife
- Needle tool
- Scoring tool (serrated rib)
- Slip (clay mixed with water)
- Pattern paddle or flat board
- Sponge
- Cream matte glaze with iron speckles
Step 1: Forming the Vessel Body
-
Start the pinch pot:
Begin with a ball of well-wedged clay about the size of a large grapefruit. Insert your thumb into the center and gently pinch the walls while rotating the ball to open up the form. -
Refine the shape:
Continue pinching upward to create a cylinder. Aim for vertical walls rather a bowl shape, keeping the thickness consistent—about 1/4 inch thick is ideal. -
Flatten the rim:
Once you have your desired height, gently tap the rim upside down on a flat surface to level it. Use a damp sponge to smooth any cracks that have formed. -
Add volume:
From the inside, gently push the belly of the jar outward with your fingers or a rib tool to give it a slightly rounded, barrel-like profile.
Clean Impressions
Dust your clay stamp lightly with cornstarch before pressing it into the clay. This acts as a release agent, preventing the stamp from sticking and ensuring crisp, sharp lines.
Step 2: Creating the Lid and Gallery
-
Measure the opening:
Using a pair of calipers or a ruler, measure the exact inner diameter of your jar’s rim. -
Form the lid slab:
Roll out a slab of clay to roughly 1/4 inch thickness. Use a round cutter or needle tool to cut a circle that is slightly larger than your jar’s outer rim. -
Create the gallery flange:
Roll a small coil of clay. Score and slip the underside of your lid slab in a circle that matches the *inner* measurement of your jar. -
Attach the flange:
Attach the coil to the scored area and smooth it down. This ring will sit inside the jar neck to keep the lid secure. Test the fit on the jar now while the clay is still workable. -
Shape the lid profile:
Place the lid on a banding wheel or simple support. Gently curve the top of the lid upwards to create a slight dome shape.
Step 3: Stamping and Decorating
-
Establish the grid:
Lightly mark vertical and horizontal guidelines on the jar’s exterior with a needle tool to keep your pattern straight, or trust your eye for a more organic look. -
Apply the texture:
Press your geometric starburst stamp firmly into the clay. Support the wall from the inside with your other hand to prevent the jar from deforming under pressure. -
Repeat the pattern:
Line up the edges of the stamp with the previous impression to create a seamless, tessellating design. I find it easiest to work in rows from the bottom up. -
Texture the lid:
Apply the same stamped pattern to the domed surface of the lid, radiating from the center outward. -
Add the knob:
Form a small knob of clay. Texture it to match, then score and slip it securely onto the center of the lid.
Add Subtle Detail
Use a needle tool or small drill bit to add tiny prick marks in the negative space between stamp impressions. This adds extra visual interest and mimics the look of vintage lace.
Step 4: Finishing and Glazing
-
Dry slowly:
Loosely cover the jar with the lid in place with plastic. Let it dry slowly to the leather-hard stage, then uncover to reach bone dry. -
Bisque fire:
Fire the piece to cone 04 (or your clay body’s bisque temperature). -
Clean and glaze:
Wipe the bisque surface with a damp sponge to remove dust. A dip application works best here to get glaze into all the deep textures without brush marks. -
Wipe back (optional):
If the glaze is thick, gently wipe the raised areas with a sponge to highlight the texture, letting the glaze pool in the stamped recesses. -
Glaze fire:
Fire to the maturation temperature of your glaze and clay (typically cone 5 or 6 for stoneware).
Once fired, you’ll have a beautifully tactile storage vessel perfect for holding everything from sugar to trinkets.
Waffle-Grid Cap Jar Inspired by Nature
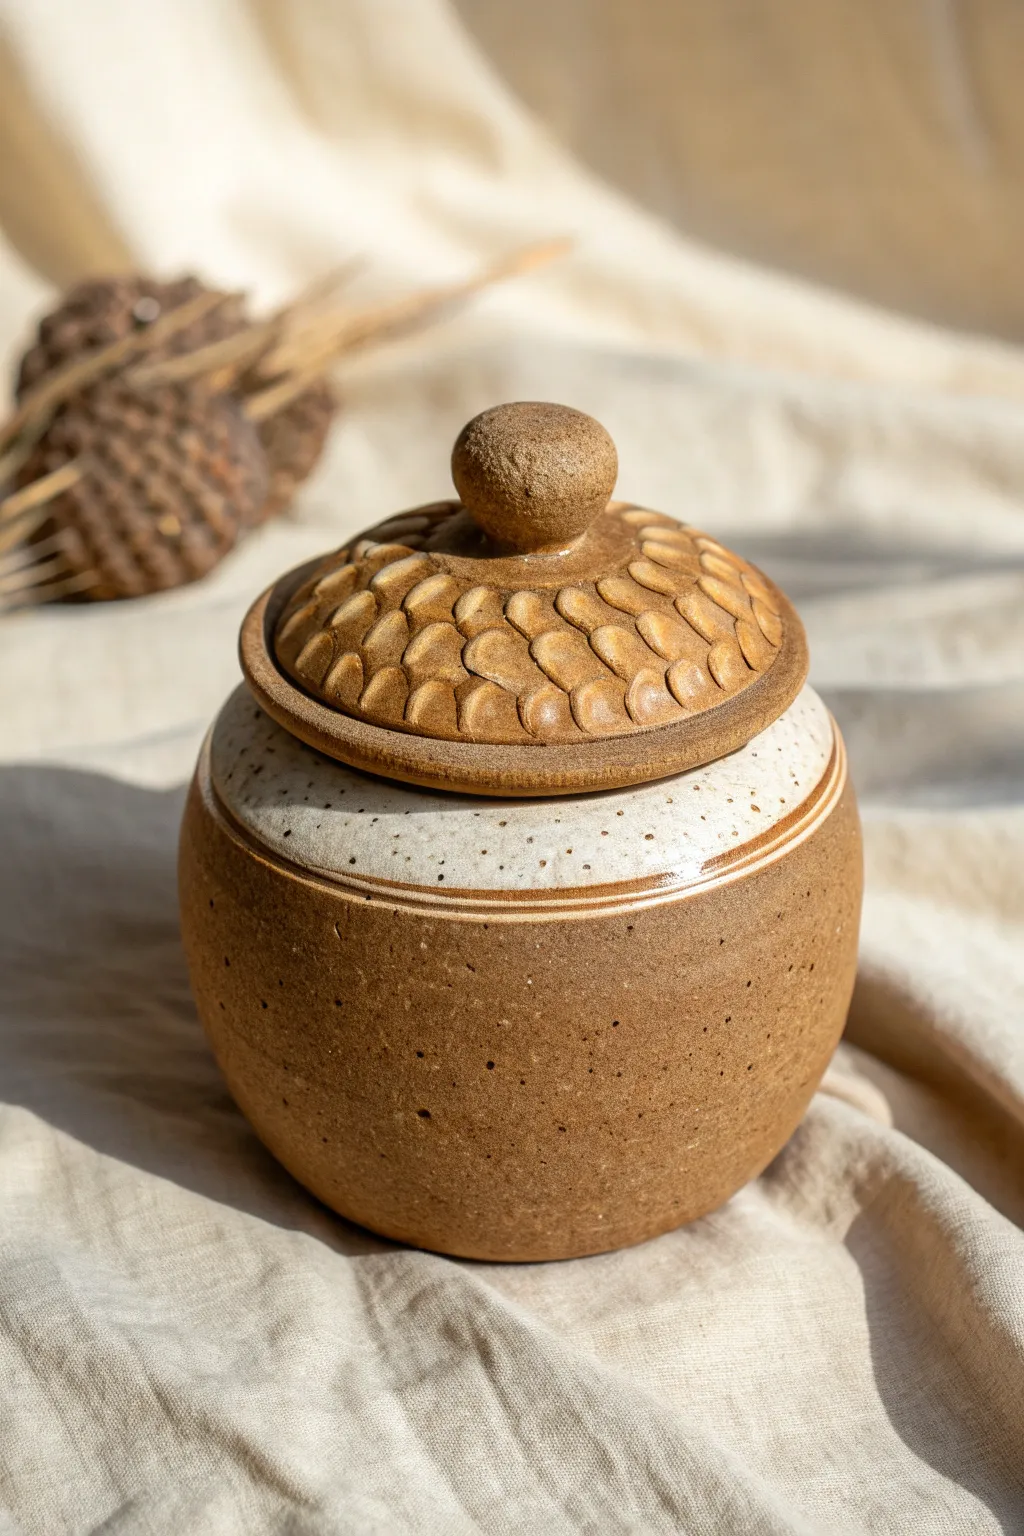
This charming ceramic jar features a rounded, earthy base topped with a textured lid that echoes the organic patterns found on acorns or pinecones. The contrasting glazes create a beautiful separation between the smooth, speckled body and the tactile, carved lid.
Step-by-Step
Materials
- Stoneware clay (speckled or buff)
- Small loop tool or carving tool
- Pin tool or needle tool
- Rib tool (metal or rubber)
- Sponge
- Slip (clay mixed with water)
- Scoring tool or serrated rib
- Glossy white glaze
- Clear matte glaze (optional)
- Kiln access
Step 1: Forming the Base
-
Prepare the Clay:
Start with a ball of clay roughly the size of a large orange. Wedge it thoroughly to remove any air bubbles, ensuring the clay is uniform in consistency. -
Open the Pinch Pot:
Hold the clay ball in one hand and push your thumb into the center, stopping about a half-inch from the bottom. Begin pinching the clay walls between your thumb and fingers, rotating the ball as you go to create an even thickness. -
Shape the Walls:
Continue pinching upward, aiming for a rounded, bulbous shape rather than a straight cylinder. Gently curve the walls inward slightly at the top to create a narrowed shoulder for the lid to sit on. -
Smoothing the Form:
Use a rib tool to smooth the exterior, compressing the clay and refining the curve. A paddle works well here to tap the bottom flat so the jar sits stable. -
Refining the Rim:
Use a damp sponge or your fingers to compress and smooth the top rim. It needs to be level for the lid to fit securely.
Clean Carving Tip
Wait until the lid is ‘leather hard’ before carving the scales. If the clay is too wet, the tool will drag and tear; too dry, and it will chip.
Step 2: Sculpting the Textured Lid
-
Measure the Opening:
Measure the interior diameter of your jar’s rim using calipers or by lightly marking a slab of clay. -
Form the Lid Base:
Roll a small slab of clay or flatten a ball just slightly larger than your opening measurement. Shape it into a gentle dome—it shouldn’t be flat, but rather slightly convex like a mushroom cap. -
Add a Flange:
Create a small coil of clay. Score and slip the underside of the lid, then attach the coil in a circle that fits perfectly *inside* the jar’s opening. This flange keeps the lid from sliding off. -
Throw or Roll a Knob:
Form a small ball of clay into a simple, rounded knob. Score the center of the lid top and the bottom of the knob, applying slip before pressing them firmly together. -
Map the Grid:
Using a needle tool, lightly sketch a series of concentric circles radiating from the knob. Then, sketch radial lines to create a faint grid, or simply eyeball the spacing if you prefer a more organic look. -
Carve the Texture:
Using a small U-shaped loop tool, carve out scoops of clay. I find it easiest to start from the outer edge and work inward toward the knob. Press the tool in and flick upward to create those scale-like indentations. -
Clean Up Edges:
Once the carving is complete, smooth any sharp burrs of clay with a soft brush or your finger, but leave the texture crisp.
Step 3: Glazing and Finishing
-
Bisque Fire:
Allow both pieces to dry slowly and completely. Bisque fire them in the kiln to prepare the creative surface for glazing. -
Wax the Lid:
Apply wax resist to the bottom of the lid and the flange so glaze doesn’t fuse the lid to the jar during firing. -
Glaze the Interior:
Pour a liner glaze inside the jar, swirl it around to coat strictly the interior, and pour out the excess. -
Dip the Shoulder:
Dip just the top shoulder of the jar into a glossy white glaze. Let it drip slightly down the sides for a natural transition, or keep a clean line. -
Leave Raw Clay:
Leave the bottom two-thirds of the jar unglazed. This highlights the natural speckle of the stoneware clay body, giving it that warm, toasted appearance. -
Stain or Wash the Lid (Optional):
To enhance the carving, you can apply an iron oxide wash to the lid and wipe it back with a sponge. This leaves dark color in the crevices while highlighting the high points. -
Final Fire:
Fire the jar and lid separately in the kiln to the maturity temperature of your clay body (likely Cone 5 or 6 for stoneware).
Lid Fit Troubleshooting
If the lid wobbles after firing, apply a dab of grinding paste (valve grinding compound) to the rim and spin the lid back and forth to sand it into a perfect fit.
Place your finished jar on a shelf where the light can catch the texture of the lid and enjoy the earthy warmth it brings to the room
Leaf-Impressed Pinch Pot Jar With Gentle Rim
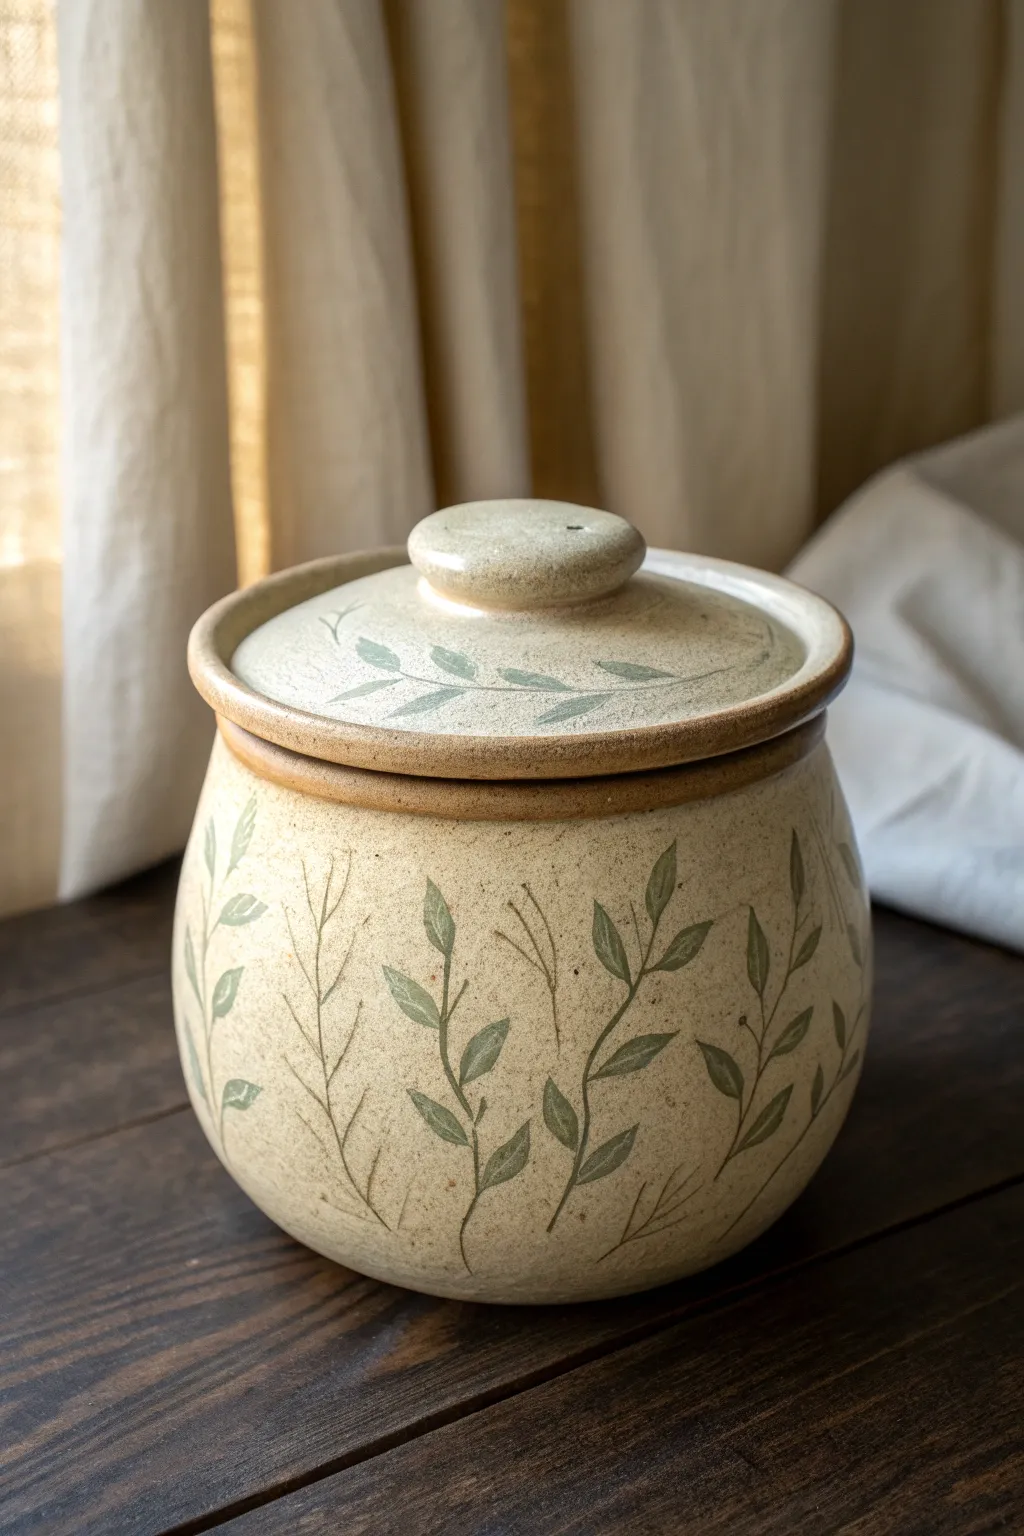
This charming, rustic jar features delicate vine motifs painted onto a warm, speckled clay body. The gentle rim and snug-fitting lid make it perfect for storing trinkets, tea, or salt.
Step-by-Step Tutorial
Materials
- Stoneware clay (speckled or buff)
- Pottery tools (rib, needle tool, sponge)
- Slip and scoring tool
- Rolling pin and guide strips
- Underglaze (Sage Green or similar)
- Fine liner brush
- Clear or transparent matte glaze
- Kiln access
Step 1: Forming the Jar Base
-
Prepare the clay:
Start with a ball of clay roughly the size of a large orange. Pat it into a smooth sphere, ensuring there are no trapped air bubbles. -
Open the pot:
Hold the clay in one hand and press your thumb into the center, stopping about a half-inch from the bottom to create the floor. -
Pinch the walls:
Rotate the ball while gently pinching the clay between your thumb and fingers. Work from the bottom up, aiming for an even wall thickness of about 1/4 inch. -
Shape the belly:
As you pinch upward, gently push the walls outward from the inside to create a rounded, bulbous shape for the jar’s body before bringing the rim back in slightly. -
Refine the surface:
Once the shape is established, use a flexible rib tool to smooth the exterior and interior, removing your fingerprints and compressing the clay particles. -
Define the rim:
Tap the rim gently on a table to flatten it slightly, then use a damp sponge to smooth it into a uniform, rounded lip.
Rim Definition
To get that slightly darker rim seen in the photo, wipe away a thin line of glaze right at the edge, exposing the raw clay body slightly or applying a thinned oxide wash.
Step 2: Creating the Lid and Gallery
-
Measure the opening:
Before making the lid, measure the inner diameter of your jar’s rim using calipers or a ruler. -
Roll a slab:
For the lid, roll out a small slab of clay, slightly thicker than the jar walls. You can cut a circle slightly larger than the jar opening. -
Form the flange:
Create a small coil of clay. Score and slip the underside of the lid slab, then attach the coil in a circle that matches the *inner* measurement of your jar. This flange keeps the lid from sliding off. -
Check the fit:
Gently test the fit on the jar. The flange should sit comfortably inside the rim. Trim or smooth the coil if it’s too tight. -
Add the knob:
Form a small, rounded button of clay. Score and slip the center of the lid’s top surface and attach the knob securely, smoothing the connection point so it looks seamless.
Step 3: Decoration and Glazing
-
First firing:
Allow both pieces to dry slowly to the leather-hard stage, then let them bone dry completely before bisque firing them. -
Painting the vines:
Using a fine liner brush and Sage Green underglaze, paint delicate, flowing vertical vines around the belly of the jar. Keep your wrist loose to mimic natural growth curves. -
Adding leaves:
Paint small, almond-shaped leaves branching off the vines. Don’t worry about perfect symmetry; variation adds to the organic look. -
Decorating the lid:
Paint a similar vine motif swirling gently across the top surface of the lid, framing the central knob. -
Apply clear glaze:
Once the underglaze is dry, dip or brush the entire piece (except the bottom foot and the contact points between lid and jar) in a clear or transparent matte glaze. -
Final firing:
Fire the piece to the temperature recommended for your specific clay and glaze (usually Cone 5 or 6 for stoneware) to finish.
Level Up: Texture
Before painting, lightly scratch the vine patterns into the leather-hard clay with a needle tool. The underglaze will settle into these grooves for added depth.
Your finished jar is now ready to hold loose-leaf tea or simply sit beautifully on a shelf
Contrasting Glaze: Glossy Inside, Matte Outside Jar
This rustic yet elegant jar features a beautiful interplay between bare, sandy clay and a deep, glossy cobalt blue glaze. The wide form is perfect for holding kitchen staples or trinkets, while the contrasting textures make it a tactile delight.
Step-by-Step
Materials
- Stoneware clay (speckled or buff)
- Pottery wheel or rolling pin/slab roller (for optional base)
- Rib tool
- Loop tool for trimming
- Pointed pottery knife
- Scoring tool (serrated rib or needle tool)
- Slip (clay and water mixture)
- Cobalt blue high-gloss glaze
- Wax resist (optional)
- Sponge
- Kiln
Step 1: Forming the Jar Body
-
Prepare the clay:
Start with a ball of clay roughly the size of a large grapefruit. Wedge it thoroughly to remove air bubbles and ensure even consistency. -
Open the form:
Push your thumb into the center of the ball, leaving about half an inch of thickness at the bottom. Begin pinching the walls upwards, rotating the clay in your hand to keep the thickness even. -
Refine the shape:
Work the walls until they are cylindrical but slightly barrel-shaped. Aim for a height suitable for a storage jar, keeping the rim slightly thicker for stability. -
Create the gallery:
Using your thumb and forefinger, carefully press the rim outwards and then smooth the inner edge to create a small shelf or ‘gallery’ where the lid will sit. -
Smooth the exterior:
Use a rib tool to smooth the outside walls, removing your fingerprints. I like to leave just a hint of hand-texture to maintain the organic feel, but the surface should be clean.
Step 2: Creating the Lid
-
Measure the opening:
Before making the lid, measure the diameter of your jar’s gallery (the inner shelf) using calipers or a ruler. -
Form the lid slab:
Flatten a smaller ball of clay into a thick disk. Pinch the edges gently to curve it slightly upwards, creating a shallow dome shape. -
Trim to size:
Cut the disk to fit perfectly inside the gallery of your jar. It needs to sit flat without falling through. -
Add a handle:
Roll a small coil of clay. Form it into a loop or ring and attach it to the center of the lid using scoring and slip. -
Dry slowly:
Place the lid on the jar (with a piece of paper towel in between to prevent sticking) and let them dry slowly to leather hard. This ensures they shrink at the same rate and fit perfectly.
Clean Lines
For a super crisp line between the glazed and unglazed sections, use making tape instead of wax resist. Remove the tape immediately after dipping while the glaze is still wet.
Step 3: Glazing and Finishing
-
Bisque fire:
Once bone dry, fire the piece to bisque temperature (usually Cone 04 or 06) to prepare it for glazing. -
Wax the exterior:
Apply wax resist to the bottom third of the jar’s exterior and the very bottom base. This will keep the raw clay look at the bottom. -
Glaze the interior:
Pour your deep cobalt blue glaze inside the jar, swirl it around to coat every surface, and pour out the excess. Wipe the rim clean with a damp sponge. -
Dip the exterior:
Hold the jar by the base and dip the top two-thirds into the blue glaze. The wax resist should stop the glaze at your defined line, but use a sponge to clean up any drips. -
Glaze the lid:
Dip the entire top of the lid into the blue glaze. Be very careful to wipe the underside (where it touches the jar) completely clean so it doesn’t fuse shut during firing. -
Final fire:
Load the kiln and glaze fire to the temperature specific to your clay and glaze (likely Cone 5 or 6 for stoneware).
Textured Grip
Before the clay dries, roll the unglazed bottom section over a textured fabric or carved wood block to add a subtle pattern to the raw clay area.
Once cooled, your jar is ready to bring a touch of artisan charm to your countertop
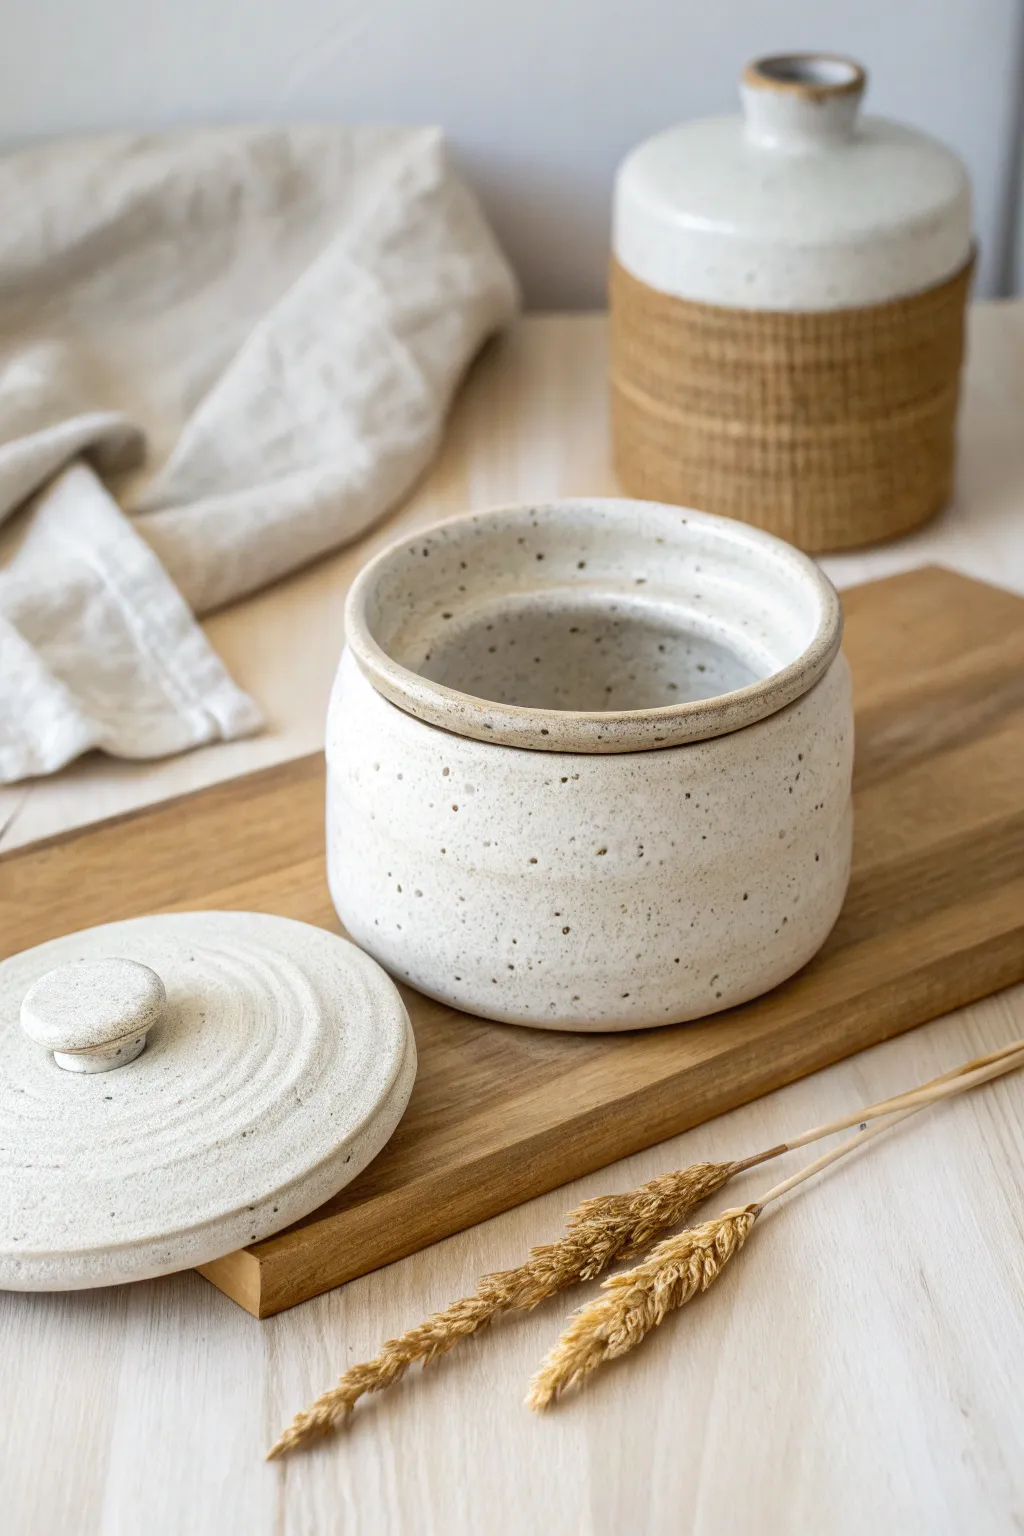
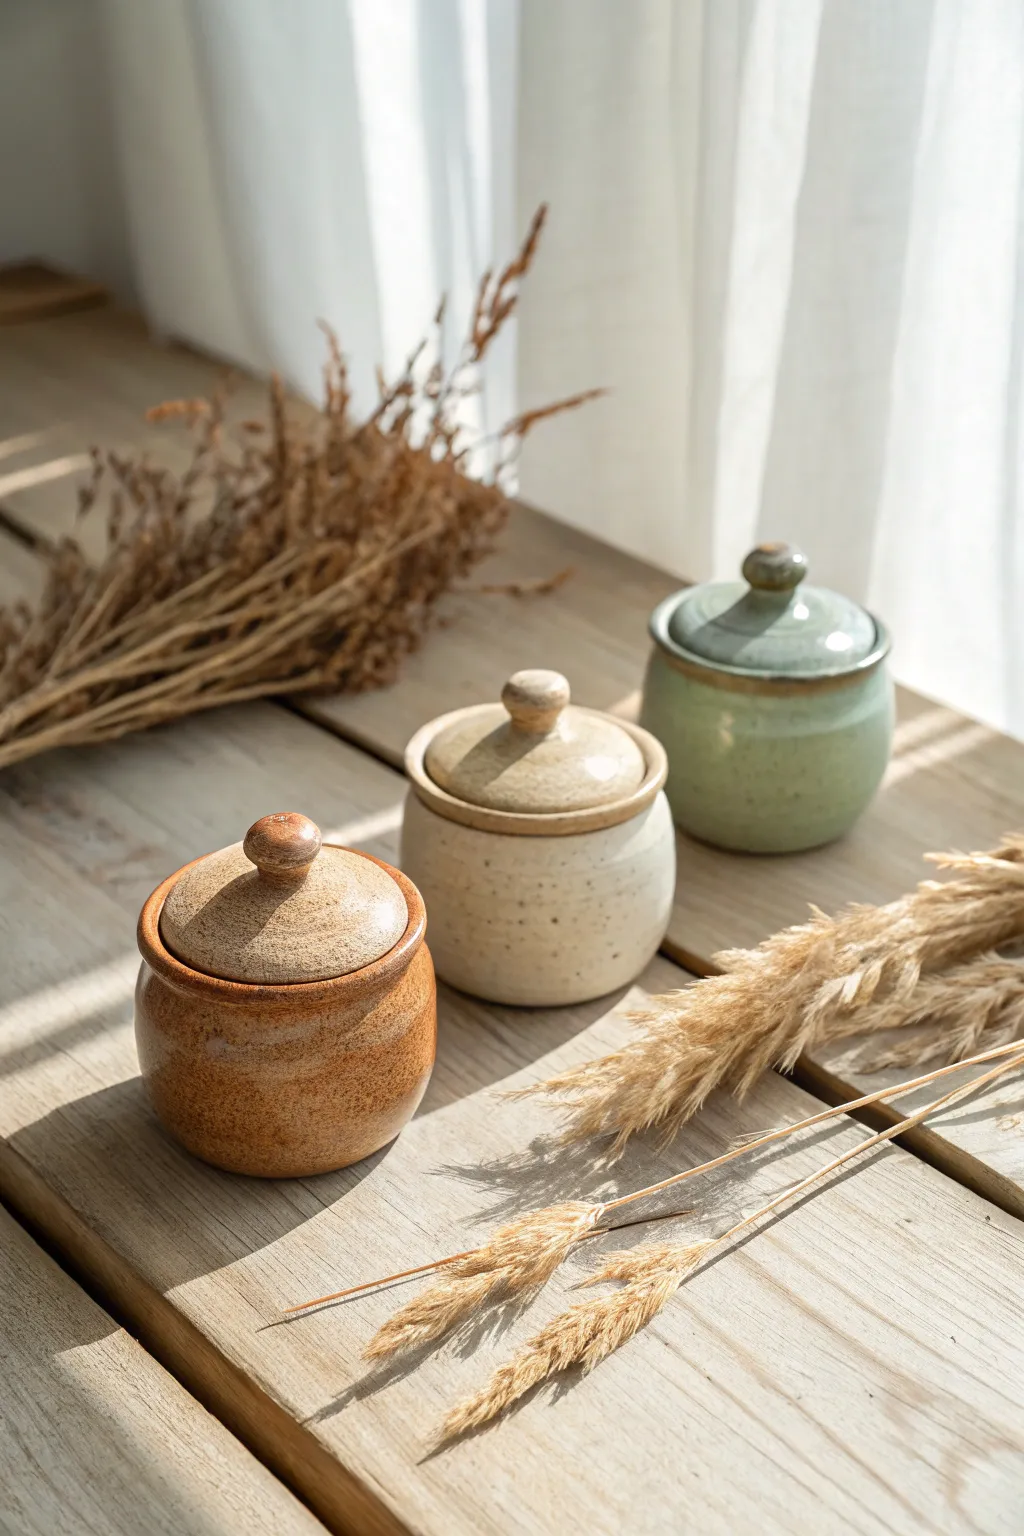
Speckled Clay Jar With Clean Minimal Lid
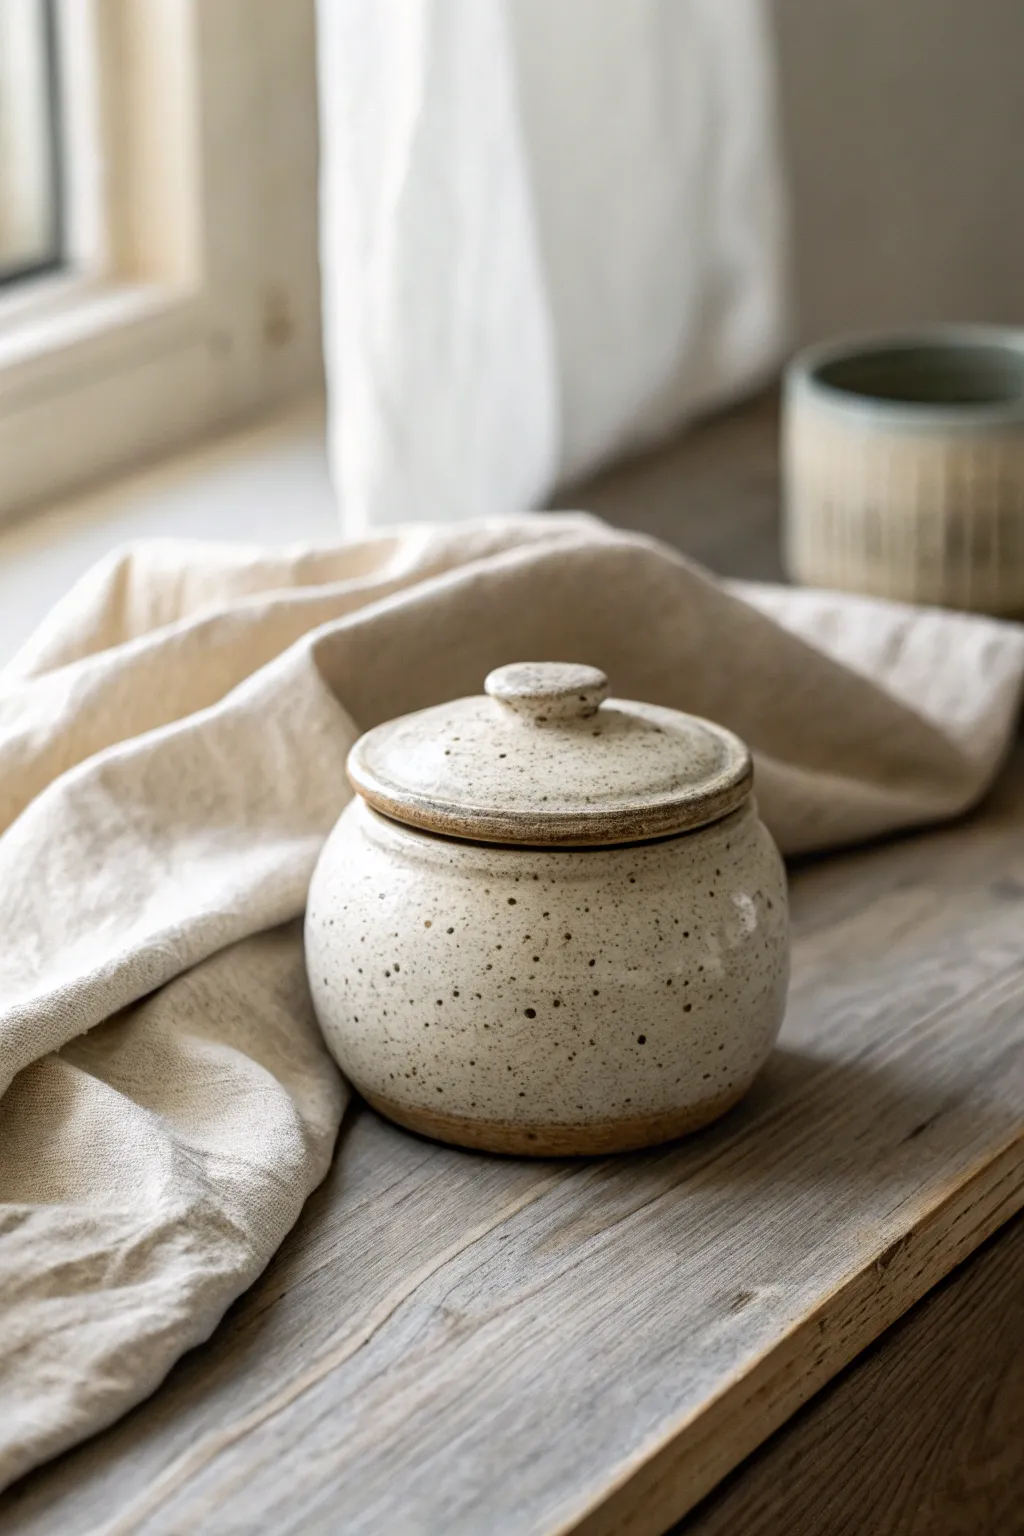
This charming jar elevates the humble pinch pot technique into something refined and functional. Featuring a creamy speckled clay body and a perfectly fitted lid, its minimalist aesthetic makes it a beautiful container for anything from sugar to trinkets.
Step-by-Step Guide
Materials
- Speckled Stoneware Clay (e.g., Laguna Speckled Buff)
- Pottery sponge
- Pin tool or needle tool
- Wooden rib tool
- Serrated metal rib or scoring tool
- Clear or sheer white glossy glaze
- Wooden paddle (optional)
- Slip (clay and water mixture)
- Canvas work surface
Step 1: Forming the Base
-
Prepare the Clay:
Start with a ball of well-wedged speckled clay about the size of a large orange. Pat it into a smooth sphere to ensure the walls will be even. -
Open the Pot:
Hold the clay ball in one hand and press your thumb into the center, stopping about a half-inch from the bottom. This thickness is crucial for trimming or creating a foot later. -
Pinch the Walls:
Gently pinch the clay between your thumb and fingers, rotating the ball as you go. Work from the bottom upward, aiming for a consistent wall thickness of about a quarter-inch. -
Shape the Belly:
As you pinch upward, gently push the walls outward from the inside to create a rounded, bulbous belly shape. Avoid flaring the rim too wide; keep it slightly gathered inward. -
Refine the Surface:
Once the shape is established, use a wooden paddle or a rib tool on the outside while supporting the inside wall. This compresses the clay and smooths out deep fingerprint marks for a cleaner look. -
Define the Rim:
Tap the rim gently with a flat wooden tool to level it. Then, use your fingers or a chamois cloth to smooth and round the edge, ensuring it is thick enough to support a lid.
Step 2: Creating the Fitted Lid
-
Measure the Opening:
Measure the interior diameter of your jar’s rim using calipers or by marking a strip of paper. This measurement will dictate the size of the lid’s flange. -
Form the Lid Slab:
Flatten a smaller ball of clay into a thick disk, slightly wider than the jar’s outer rim. You can pinch this into shape or roll it out, keeping it slightly domed in the center. -
Add the Flange:
Roll a small coil of clay. Score and slip a circle on the underside of your lid disk that matches your interior measurement. Attach the coil here to act as a stopper so the lid doesn’t slide off. -
Test the Fit:
Once the flange is attached but still soft, gently place the lid on the pot. If it’s too tight, smooth the flange inward; if too loose, nudge it outward. I like to do this while the clay is leather hard for better precision. -
Make the Knob:
Roll a tiny ball of clay and flatten it slightly into a button shape. Score and slip the center of the lid’s top surface and attach the knob securely. -
Final Smoothing:
Use a damp sponge to wipe away any rough joining marks or slip residue. Pay special attention to the rim where the lid meets the jar to ensure a visual separation.
Rim Distinction
To get that distinct brownish line at the rim and base, wipe the glaze back about 1/8th of an inch with a damp sponge. The exposed clay will darken naturally in the kiln.
Step 3: Finishing and Glazing
-
Dry Slowly:
Place the lid on the jar with a piece of paper towel between them to prevent sticking. loosely cover with plastic to dry slowly, which prevents warping. -
Bisque Fire:
Fire the piece to cone 04 (or your clay’s specific bisque temperature). This hardens the clay and prepares it for glazing. -
Wax Resist:
Apply wax resist to the bottom of the jar and the underside of the lid flange. Also, carefully wax the rim of the jar and the outer rim of the lid where they touch, leaving the exposed clay aesthetic seen in the photo. -
Apply Glaze:
Dip or brush a clear or semi-opaque white glaze over the jar. The glaze should be thin enough to let the dark speckles of the clay body show through. -
Clean Up:
Sponge off any glaze that dripped onto the waxed areas. The defined line of unglazed clay at the rim and base is key to this design. -
Glaze Fire:
Fire the jar to the maturity temperature of your clay and glaze (typically Cone 5 or 6 for stoneware). Allow the kiln to cool completely before removing your finished piece.
Warped Lids?
If your lid wobbles after firing, apply a dab of grinding paste (water and silicon carbide grit) to the rim and rotate the lid back and forth to grind them into a perfect fit.
Your beautiful speckled jar is now ready to hold your favorite loose-leaf tea or small treasures
Mosaic-Look Lid With Pressed-In Bits
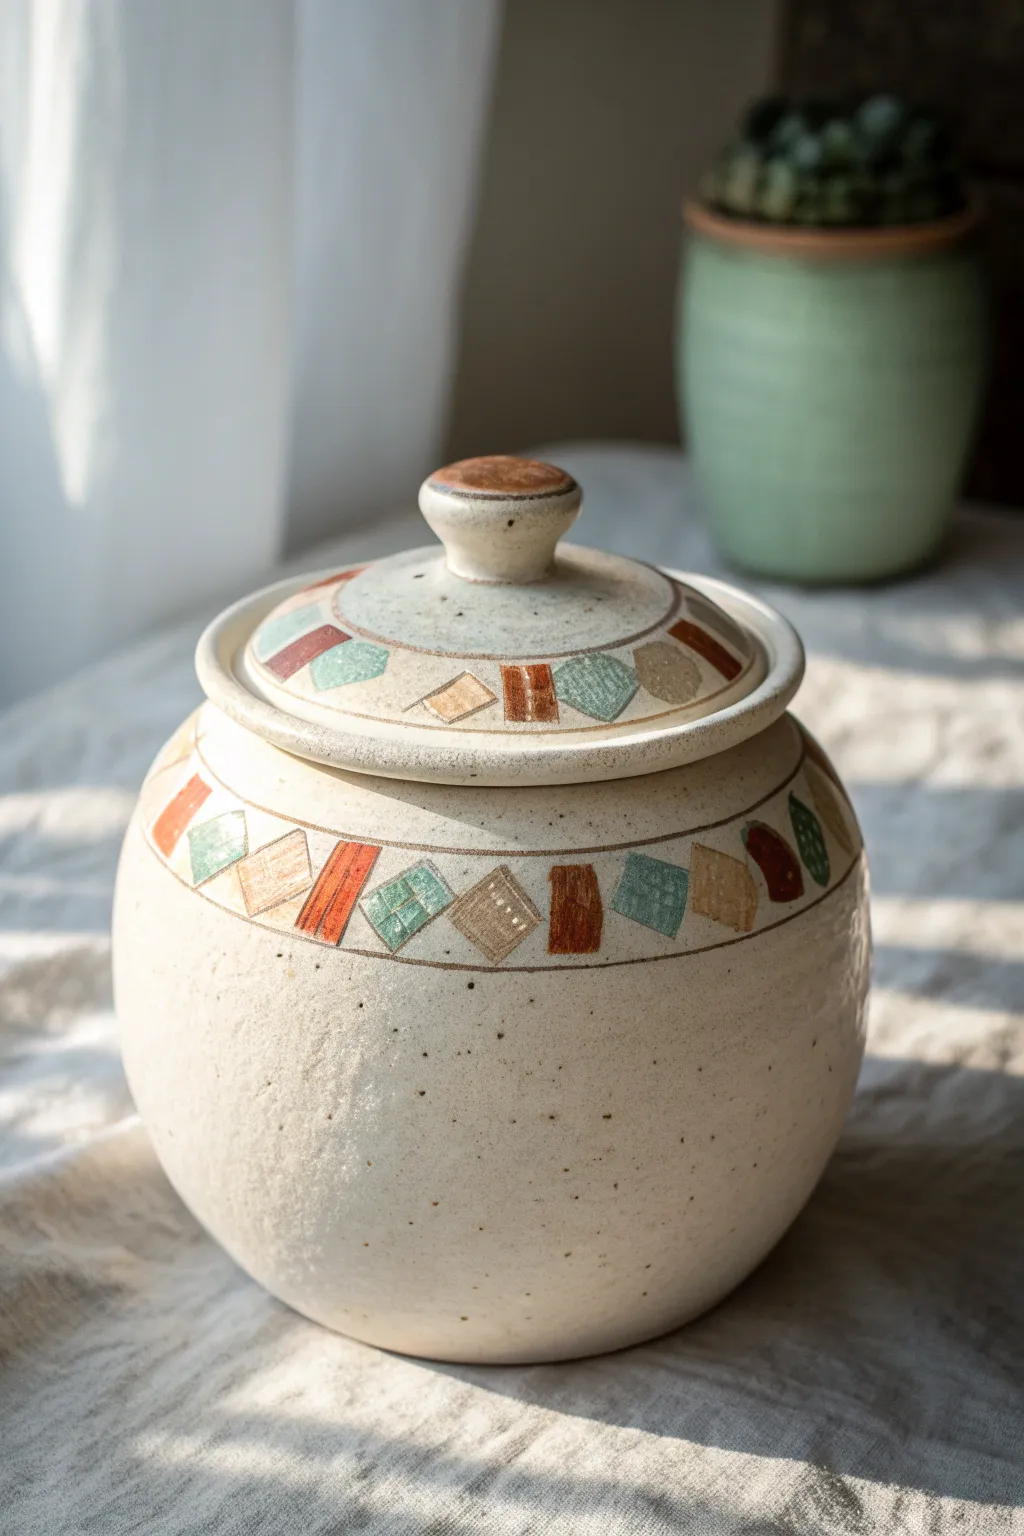
This charming jar combines the organic feel of a pinch pot with the structured beauty of a mosaic. By pressing bits of colored clay or using a precise inlay technique, you can achieve a textured, geometric band that wraps beautifully around the rim and lid.
How-To Guide
Materials
- Speckled stoneware clay (buff or cream)
- Small amounts of colored clay or underglaze
- Pin tool or needle tool
- Wooden modeling tool
- Rib tool
- Sponge
- Small rolling pin
- Clear matte glaze
- Scoring tool or fork
- Slip (clay glue)
- Fine paintbrush
Step 1: Forming the Base Jar
-
Start the pinch pot:
Begin with a ball of speckled clay about the size of a large grapefruit. Push your thumb into the center, stopping about half an inch from the bottom, and start pinching the walls upwards while rotating the clay in your hand. -
Shape the belly:
As you pinch, gently push the walls outward from the inside to create a rounded, bulbous belly shape. Aim for even wall thickness throughout, about 1/4 to 3/8 of an inch. -
Refine the rim:
Bring the opening in slightly at the top to create a shoulder. Flatten the very top edge with a wooden paddle or flat tool to create a gallery or a flat seat for the lid. -
Smooth the surface:
Once the shape is established, use a damp sponge and a rib tool to smooth the exterior. You want a clean canvas for your decoration, though leaving the natural speckles visible adds character.
Step 2: Creating the Lid
-
Measure the opening:
Measure the inner diameter of your jar’s opening. You’ll need this measurement to ensure the lid fits snugly. -
Form the lid slab:
Roll out a slab of clay slightly thicker than your jar walls. Cut a circle that is slightly larger than the jar’s opening so it overhangs just a bit. -
Add the flange:
Roll a small coil of clay. Score and slip this coil onto the underside of the lid slab, positioning it so it will sit just inside the jar’s rim to prevent the lid from sliding off. -
Make the knob:
Fashion a simple, rounded knob from a small ball of clay. Attach it securely to the center of the lid using scoring and slip, smoothing the transition so it looks seamless.
Uneven Lid Fit?
If the lid wobbles after the bisque fire, use a bit of grinding paste or coarse sandpaper. Rotate the lid back and forth against the jar rim to sand them into a perfect match before glazing.
Step 3: Applying the Mosaic Design
-
Outline the bands:
Use a needle tool to lightly scribe two parallel lines around the shoulder of the jar and around the top surface of the lid. This creates the ‘track’ for your mosaic pattern. -
Create the tesserae:
Roll out thin bits of clay. If you are using colored clays, cut small geometric shapes—diamonds, squares, and rectangles—that fit within your scribed bands. -
Inlay technique (Option A):
If using colored clay pieces, score the area on the jar and press the colored shapes firmly into the surface. Use a rolling pin or pony roller to press them flush with the jar wall. -
Carve and paint (Option B):
Alternatively, carve the geometric shapes shallowly into the clay band. After the piece is bisque fired, you can fill these depressions with colorful underglazes for a similar effect. -
Define the borders:
Once your shapes are placed or carved, use a dull pencil or modeling tool to incite a deeper line outlining the top and bottom of the decorative band to frame the mosaic. -
Add texture:
For extra detail, use a needle tool to gently scratch cross-hatching or dots into specific shapes within your pattern, like the beige diamonds shown in the example.
Crisp Mosaic Lines
To keep your geometric shapes looking sharp, let the clay firm up to ‘leather hard’ before pressing or carving your design. Soft clay tends to smoosh and blur the edges.
Step 4: Finishing and Firing
-
Dry slowly:
Loosely cover the jar with the lid on (place a piece of paper between them to prevent sticking) and let it dry slowly to the bone-dry stage. This prevents warping. -
Bisque fire:
Fire the piece to cone 04 (or your clay’s bisque temperature). -
Paint the details:
If you chose the carving method, now is the time to carefully paint your geometric shapes with underglazes—try earthy reds, muted teals, and warm ochres. -
Apply clear glaze:
Dip the entire jar and lid into a clear matte glaze. Wipe the bottom of the jar and the contact points where the lid touches the jar to prevent them fusing together. -
Final firing:
Glaze fire the piece to the maturity temperature of your clay body, usually cone 5 or 6 for stoneware.
Now you have a beautifully textured vessel perfect for storing tea or simply admiring on a shelf
Face Pinch Pot Jar With Nose Knob Lid
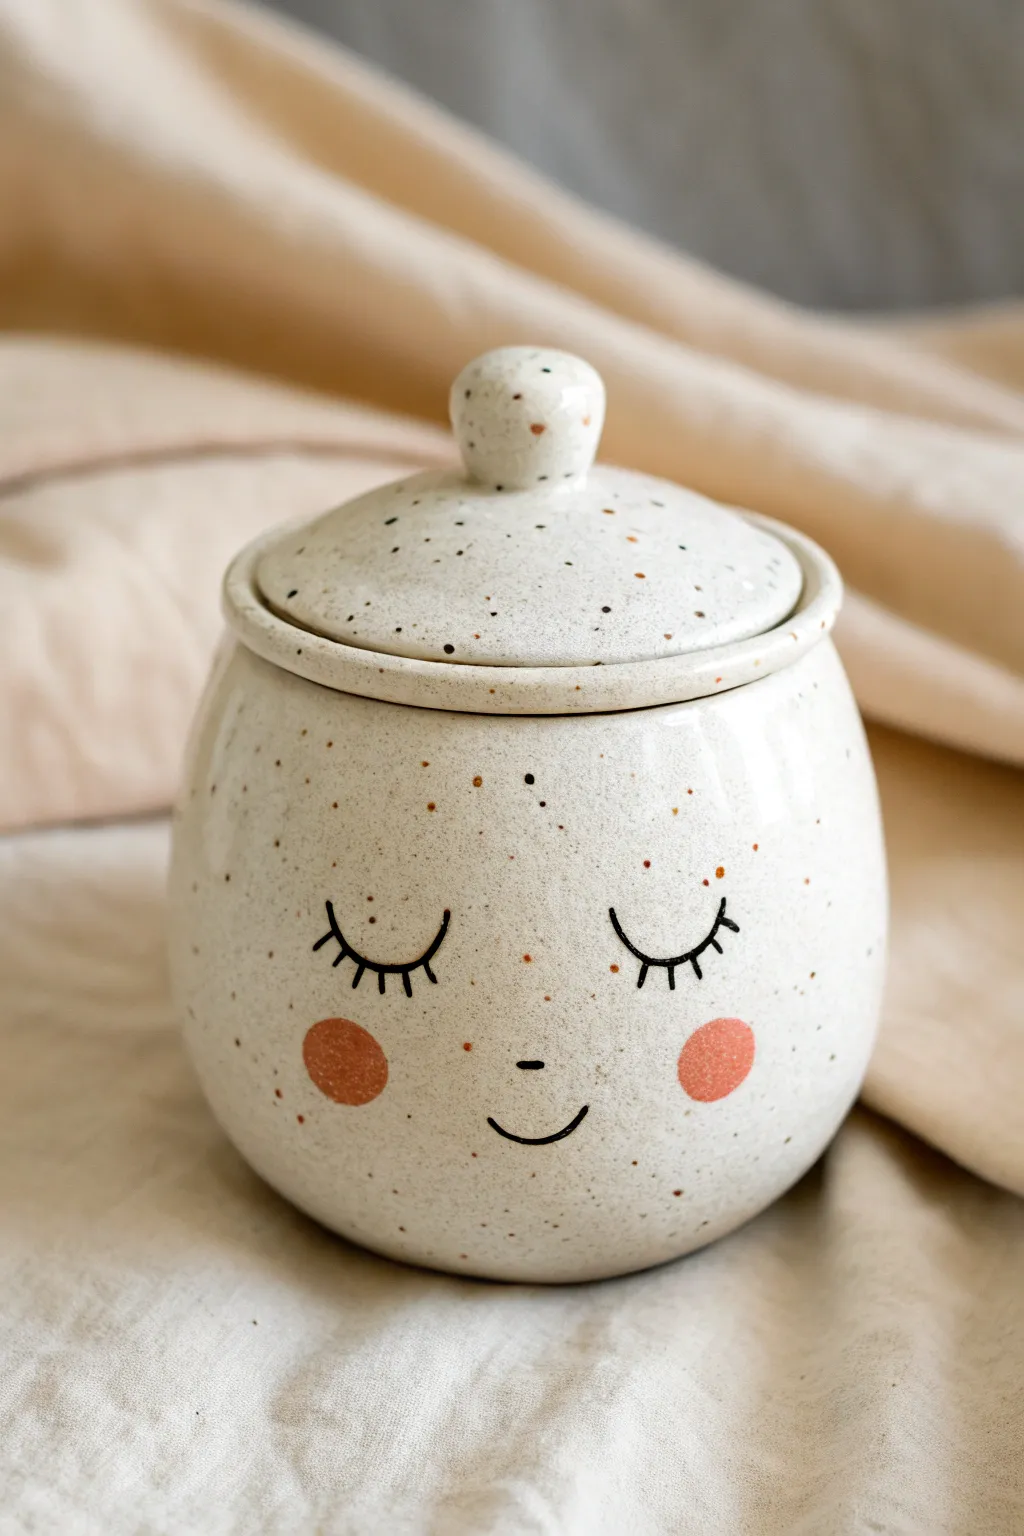
This charming, speckled jar features a serene sleepy face and a snug-fitting lid topped with a simple round knob. The creamy glaze and delicate facial details give it a sweet, whimsical character perfect for storing small treasures or sugar.
Step-by-Step Tutorial
Materials
- Speckled stoneware clay
- Pottery tools (needle tool, rib tool, scoring tool)
- Slip (clay mixed with water)
- Underglaze (black and coral/pink)
- Clear or transparent cream glaze
- Fine detail brush
- Small sponge
- Kiln access
Step 1: Forming the Base
-
Start the Pinch Pot:
Take a ball of speckled stoneware clay roughly the size of a large orange. Press your thumb into the center, stopping about a half-inch from the bottom to create the initial opening. -
Pinch the Walls:
Gently pinch the clay between your thumb and fingers, rotating the ball as you go. Aim for an even thickness of about 1/4 inch throughout the walls, working from the bottom up. -
Shape the Belly:
As you pinch upward, gently push the walls outward from the inside to create a rounded, bulbous belly shape. The rim should be slightly narrower than the widest part of the pot. -
Smooth the Surface:
Use a flexible rib tool to smooth the exterior walls, erasing your fingerprints and refining the round curve. I find that compressing the clay here helps prevent cracks later. -
Flatten the Base:
Gently tap the bottom of the pot against your work surface to create a flat, stable foot so the jar won’t wobble.
Step 2: Creating the Lid
-
Measure the Opening:
Measure the diameter of your pot’s rim. Roll out a slab of clay or flatten a second ball to create a disc slightly larger than this opening. -
Domed Shape:
Place the clay disc over a humped mold or gently curve it by hand to create a slight dome shape that mirrors the curve of the pot. -
Add a Flange:
Roll a small coil of clay. Score and slip the underside of the lid, then attach the coil in a circle that will fit *inside* the pot’s rim. This flange keeps the lid from sliding off. -
Make the Knob:
Roll a small ball of clay for the handle. Score the center of the lid and the bottom of the ball, apply slip, and press firmly to attach. Smooth the connection point so it looks seamless. -
Dry check:
Place the lid on the pot to ensure a good fit. Let both pieces dry slowly to leather-hard consistency.
Lid Won’t Fit?
Clay shrinks as it dries. If the lid no longer fits the pot before firing, re-wet the smaller piece slightly and gently reshape it, or sand the dry clay carefully.
Step 3: Decorating and Glazing
-
Pencil Sketch:
Once leather hard, lightly sketch the face onto the pot using a soft pencil. The graphite will burn off in the kiln, so don’t worry about mistakes. -
Paint the Face:
Using a fine detail brush and black underglaze, carefully paint the curved eyelids, eyelashes, and the small U-shaped smile. -
Add Cheeks:
Dip a small round brush or a sponge dabber into coral or pink underglaze. Apply two perfect circles for the rosy cheeks on either side of the smile. -
Bisque Fire:
Allow the clay to bone dry completely, then bisque fire it in the kiln according to your clay body’s specifications (usually Cone 04 or 06). -
Apply Glaze:
Dip the bisque-fired pot and lid into a clear or semi-transparent cream glaze. This will seal the piece while letting the speckles and underglaze painting show through. -
Wipe the Foot and Flange:
Clean off any glaze from the very bottom of the pot and the rim where the lid sits to prevent the pieces from fusing together during firing. -
Final Fire:
Glaze fire the piece to the temperature required by your clay and glaze (typically Cone 5 or 6 for stoneware).
Pro Tip: Clean Lines
For the sharpest eyelashes, use an underglaze pencil or a needle-tip applicator bottle instead of a brush. It offers much more control than bristles.
Once cooled, your adorable jar is ready to bring a touch of calmness to your shelf
Cactus Pinch Pot Jar With Flower Knob
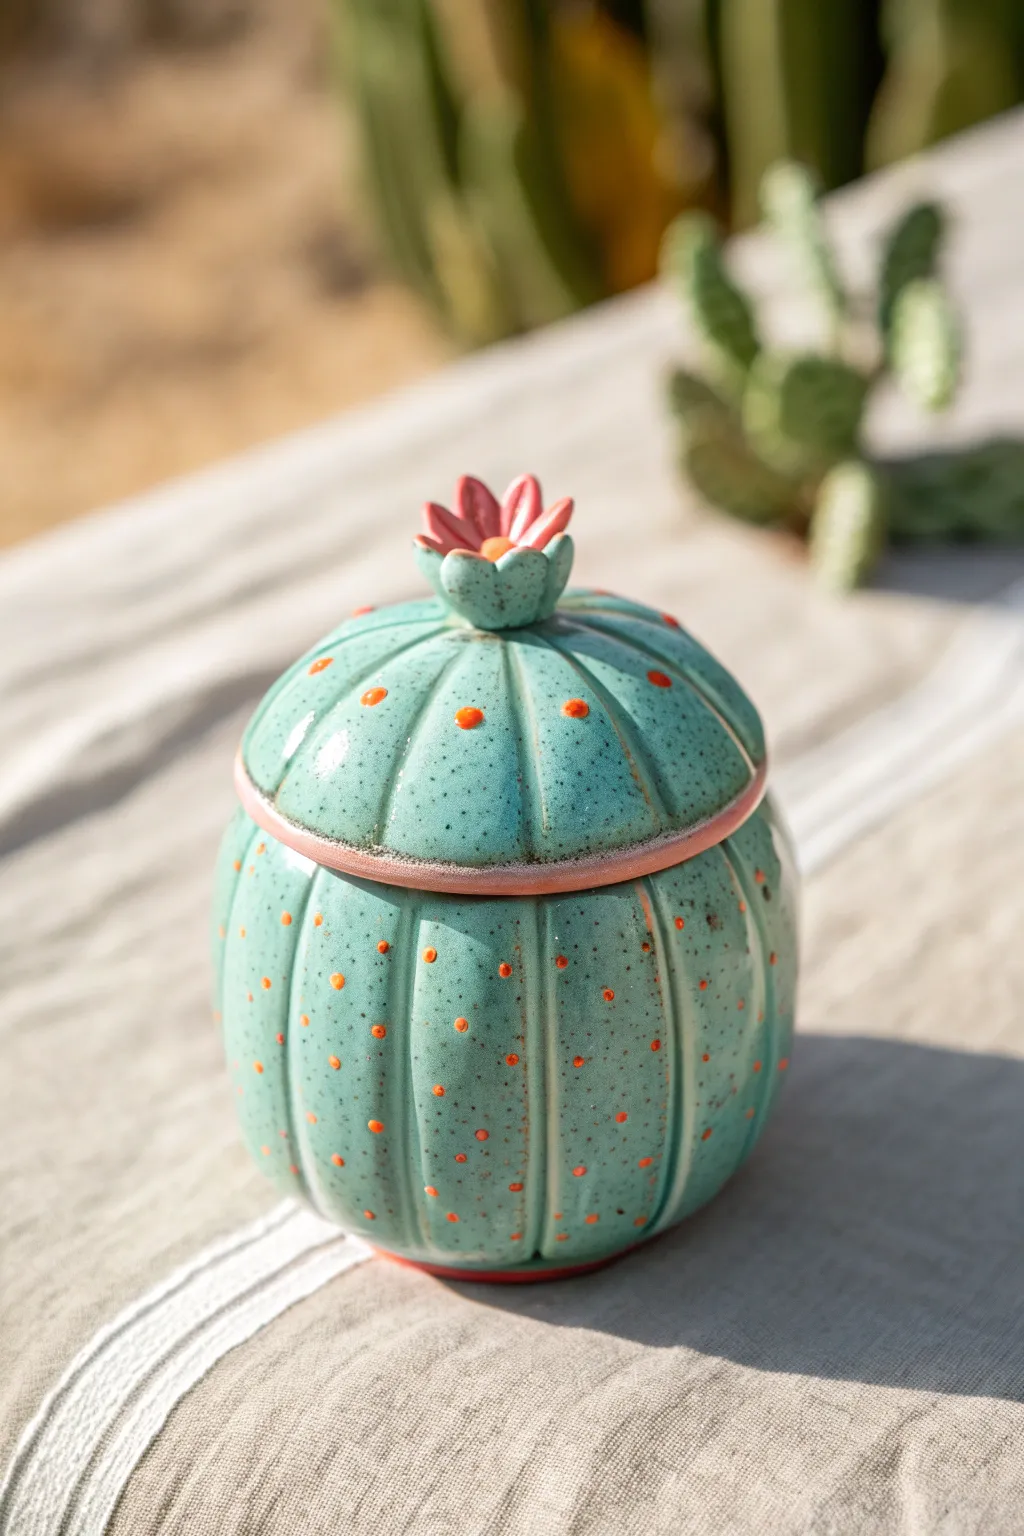
This charming ceramic jar captures the whimsical spirit of the desert with its segmented body and dainty flower knob. Using basic pinch pot techniques, you’ll create a functional piece perfect for storing small trinkets or kitchen spices.
Step-by-Step Guide
Materials
- White or light-colored stoneware clay
- Turquoise/Teal ceramic glaze (speckled or glossy)
- Small amount of pink/coral glaze (underglaze or glaze)
- Orange glaze or underglaze for dots
- Needle tool
- Scoring tool (or fork)
- Small loop tool or carving tool
- Slip (clay and water mixture)
- Small detail paintbrush
- Fan brush or glaze brush
- Sponge
Step 1: Forming the Body
-
Prepare the Clay:
Start with two balls of clay roughly the size of a large orange. Wedge them well to remove air bubbles, as this ensures your pots won’t crack during firing. -
Create the First Pinch Pot:
Take one ball and press your thumb into the center, stopping about a half-inch from the bottom. Gently pinch and rotate the clay between your thumb and fingers to open up the bowl shape. -
Shape the Base:
Continue pinching until you have a deep, rounded bowl. Tap the bottom gently on your table to create a small, flat foot so the jar sits securely without wobbling. -
Form the Lid:
Repeat the pinch pot process with a slightly smaller ball of clay to create the lid. This time, create a slightly shallower curve that mimics the dome shape of the cactus top seen in the photo. -
Refine the Rims:
Check that the diameter of your lid matches the diameter of your base jar. Smooth the rims of both pieces with a damp sponge so they fit together relatively flush. -
Add a Gallery (Optional):
To keep the lid secure, attach a small coil of clay to the inside rim of the lid (or the base) to create a flange that prevents sliding. Smooth this coil completely into the existing wall.
Uneven Lid?
If the lid wobbles on the base after forming, place a piece of plastic wrap between them and gently paddle the outside while they are stacked. This shapes them to match each other.
Step 2: Sculpting the Details
-
Mark the Vertical Ribs:
With the lid placed on the jar, use a needle tool to very lightly sketch vertical lines running from the top center of the lid down to the bottom of the base. This aligns the pattern. -
Carve the Segments:
Use a modeling tool or your finger to press into the clay between the lines you just drew. This creates the ‘puffy’ segmented look of the cactus barrel. Smooth the depressions with water. -
Sculpt the Flower Knob:
Roll a tiny ball of clay and flatten it slightly. creating 5-6 small petals using a needle tool or by attaching tiny distinct petal shapes. I find attaching individual petals gives it more dimension. -
Attach the Flower:
Score the center top of the lid and the bottom of your flower. Apply slip to both areas and press the flower firmly onto the lid, blending the clay at the attachment point slightly so it doesn’t pop off. -
Add Texture:
Using a needle tool, poke tiny, shallow holes all over the surface of the greenware to mimic the texture of a cactus skin before smoothing it over lightly with a sponge. -
Bisque Fire:
Allow the piece to dry slowly and completely (bone dry) before firing it in the kiln to cone 04 (or according to your clay’s instructions).
Make It Sparkle
For a more magical look, use a clear glaze with speckles over a plain teal underglaze. The speckles will break through during firing, looking like natural sand or texture.
Step 3: Glazing Process
-
Apply the Base Color:
Using a fan brush, apply 2-3 coats of turquoise glaze to the entire exterior and interior of the jar. Avoid the rim where the lid touches the base to prevent them from fusing together. -
Wipe the Rims:
Carefully wipe any glaze off the contact points (the rim of the jar and the rim of the lid) using a clean, damp sponge. -
Paint the Flower:
Using a small detail brush, carefully paint the petals of the flower knob with the pink/coral glaze. Add a dot of orange or yellow to the very center of the flower. -
Add the Prickly Dots:
Dip the handle end of a paintbrush into the orange glaze. Dot the glaze onto the raised vertical ribs of the cactus. Space them evenly to mimic spines. -
Final Fire:
Place the jar and lid separately on the kiln shelf (do not fire with the lid ON unless you have meticulously waxed the rims). Fire to the maturity temperature of your glaze.
Once cooled, your prickly little pot is ready to hold your favorite treasures.
Acorn Pinch Pot Jar With Textured Cap Lid
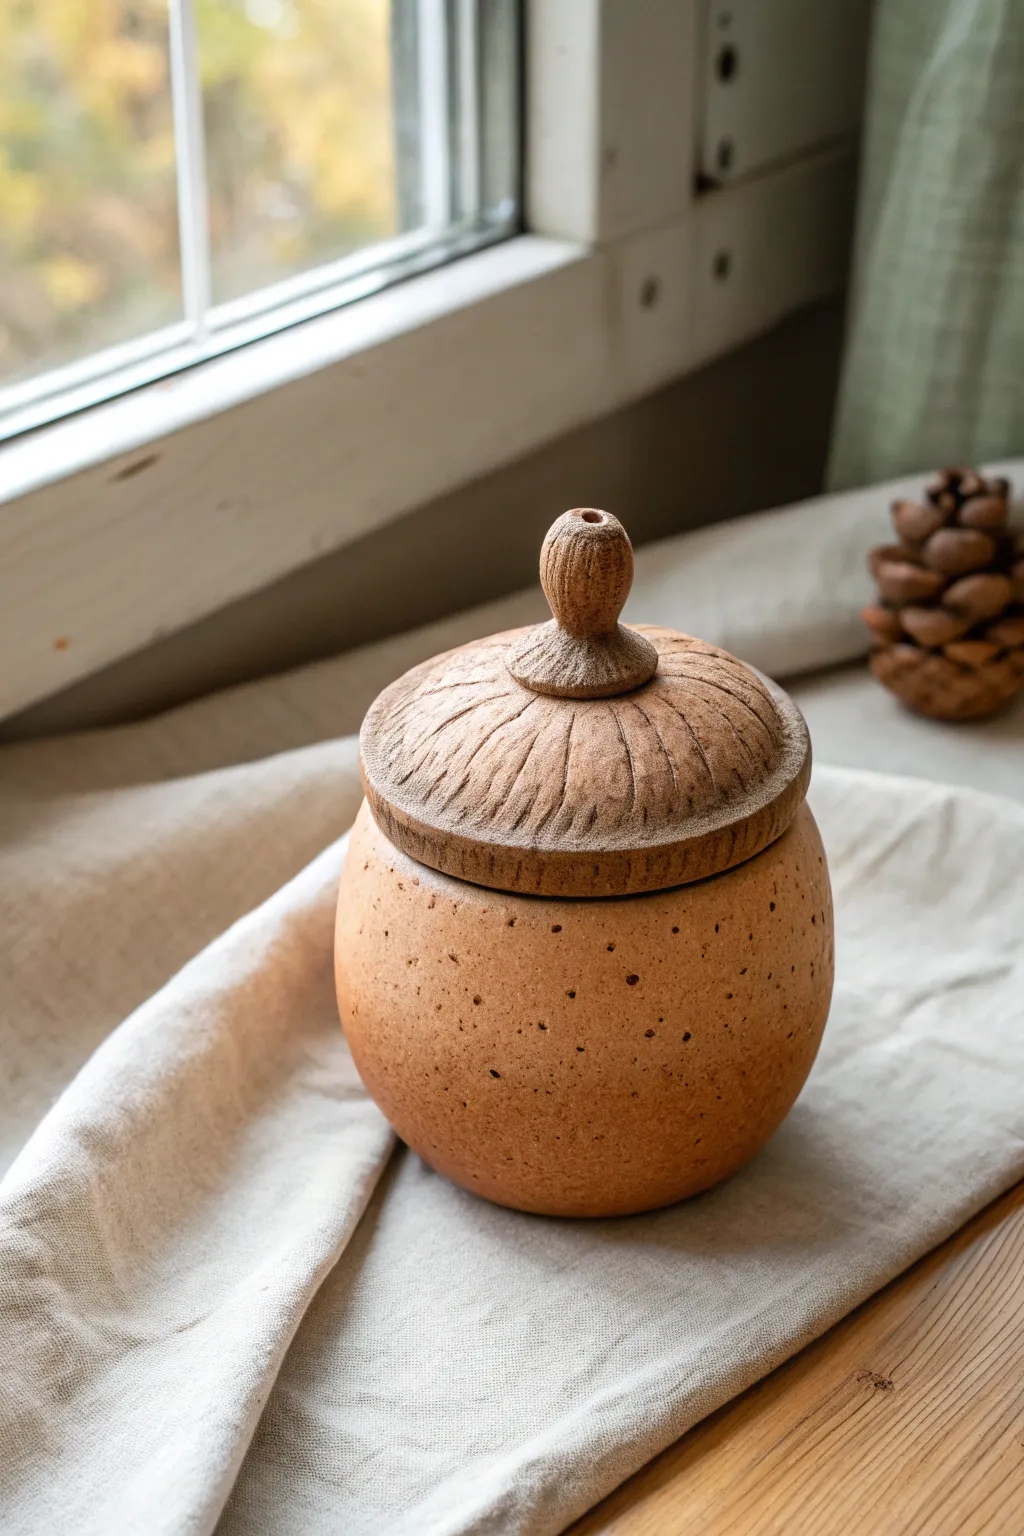
Embrace the cozy vibes of autumn with this delightful acorn-shaped pinch pot jar, perfect for storing little trinkets or dried spices. This project combines a simple, rounded vessel with a wonderfully textured lid that mimics the rustic charm of a real acorn cap.
Detailed Instructions
Materials
- Stoneware clay (speckled or terracotta works best)
- Potter’s needle tool
- Modeling tool (round ended)
- Serrated rib tool or fork
- Small sponge
- Slip (clay mixed with water)
- Clear matte glaze
- Kiln (or access to firing services)
Step 1: Creating the Jar Body
-
Wedging the Clay:
Begin with a ball of clay roughly the size of a large orange. Wedge it thoroughly to remove any air bubbles, ensuring the consistency is uniform, which is crucial for preventing cracks during firing. -
Forming the Pinch Pot:
Push your thumb into the center of the ball, stopping about a half-inch from the bottom. Gently pinch and rotate the clay between your thumb and fingers to open up the shape. -
Refining the Shape:
Continue pinching upwards to thin the walls evenly. Aim for a rounded, bulbous shape that curves slightly inward at the rim, just like the nut of an acorn. I find smoothing the inside with a damp sponge helps maintain the curve. -
Smoothing the Exterior:
Use a flexible rib or your thumb to smooth the exterior surface. You want the body to be mostly smooth, but the natural speckles of the clay body will do the heavy lifting for texture later. -
Adding Speckled Texture:
To enhance the natural look seen in the photo, you can lightly poke random, shallow holes using a needle tool, concentrating slightly more density near the middle and top. Smooth over them lightly so they aren’t sharp.
Step 2: Sculpting the Textured Lid
-
Measuring the Lid:
Roll a second ball of clay, slightly smaller than the first. Flatten it into a thick disc that is just wide enough to overhang the rim of your jar body by a few millimeters. -
Creating the Flange:
underneath the disc, score and slip a small coil of clay that fits *inside* the jar’s opening. This ‘flange’ keeps the lid from sliding off. Smooth it onto the lid securely. -
Checking the Fit:
Place the lid on the jar to ensure the fit is snug but not tight (remember clay shrinks). Adjust the curve of the lid so it domes upward slightly. -
Adding the Knob:
Roll a small, small sphere of clay for the stem. Score and slip the center of the lid, then attach the sphere. Pinch the top slightly to create a concave, button-like depression on the very tip. -
Carving the Radial Lines:
Using a needle tool or a dull knife, carve lines radiating from the base of the knob down to the edge of the lid. Make these lines slightly irregular and organic rather than perfectly straight. -
Deepening the Texture:
Go back over your radial lines with a modeling tool to widen them. I like to twist the tool slightly to create a rough, bark-like texture between the ridges. -
Refining the Rim:
Press the edge of the lid gently to create a distinct, slightly overhang rim, mimicking where an acorn cap separates from the nut.
Lid Won’t Fit?
If the lid warps during drying and rocks on the jar, use a flat surface and sandpaper to gently grind down the high spots on the rim of the jar until they sit flush.
Step 3: Finishing and Firing
-
Drying:
Place the lid on the jar (with a small piece of paper between them to prevent sticking) and let them dry slowly under loose plastic. This ensures they warp together if they warp at all. -
Bisque Firing:
Once bone dry, bisque fire the piece to the appropriate cone for your specific clay body (usually Cone 04 or 06). -
Glazing:
For the bottom jar, apply a transparent matte glaze to show off the clay’s natural color and speckles. For the lid, you can wash on a thin layer of iron oxide and wipe it back to highlight the carved crevices before glazing clear. -
Final Firing:
Glaze fire the piece according to your clay’s maturation temperature (e.g., Cone 5/6 for stoneware). Ensure no glaze is on the contact points where the lid touches the jar.
Realistic Color Depth
Use a darker clay body or a red iron oxide wash on the lid specifically. This extra contrast makes the ‘cap’ look distinct from the ‘nut’ body.
Once cooled, your ceramic acorn is ready to bring a touch of woodland magic to your windowsill or shelves