A simple pinch pot is basically a monster-in-disguise just waiting for a personality. Give it a mouth, a few goofy features, and suddenly you’ve got a pinch pot monster that looks like it crawled right out of your imagination.
Classic Open-Mouth Pinch Pot Monster
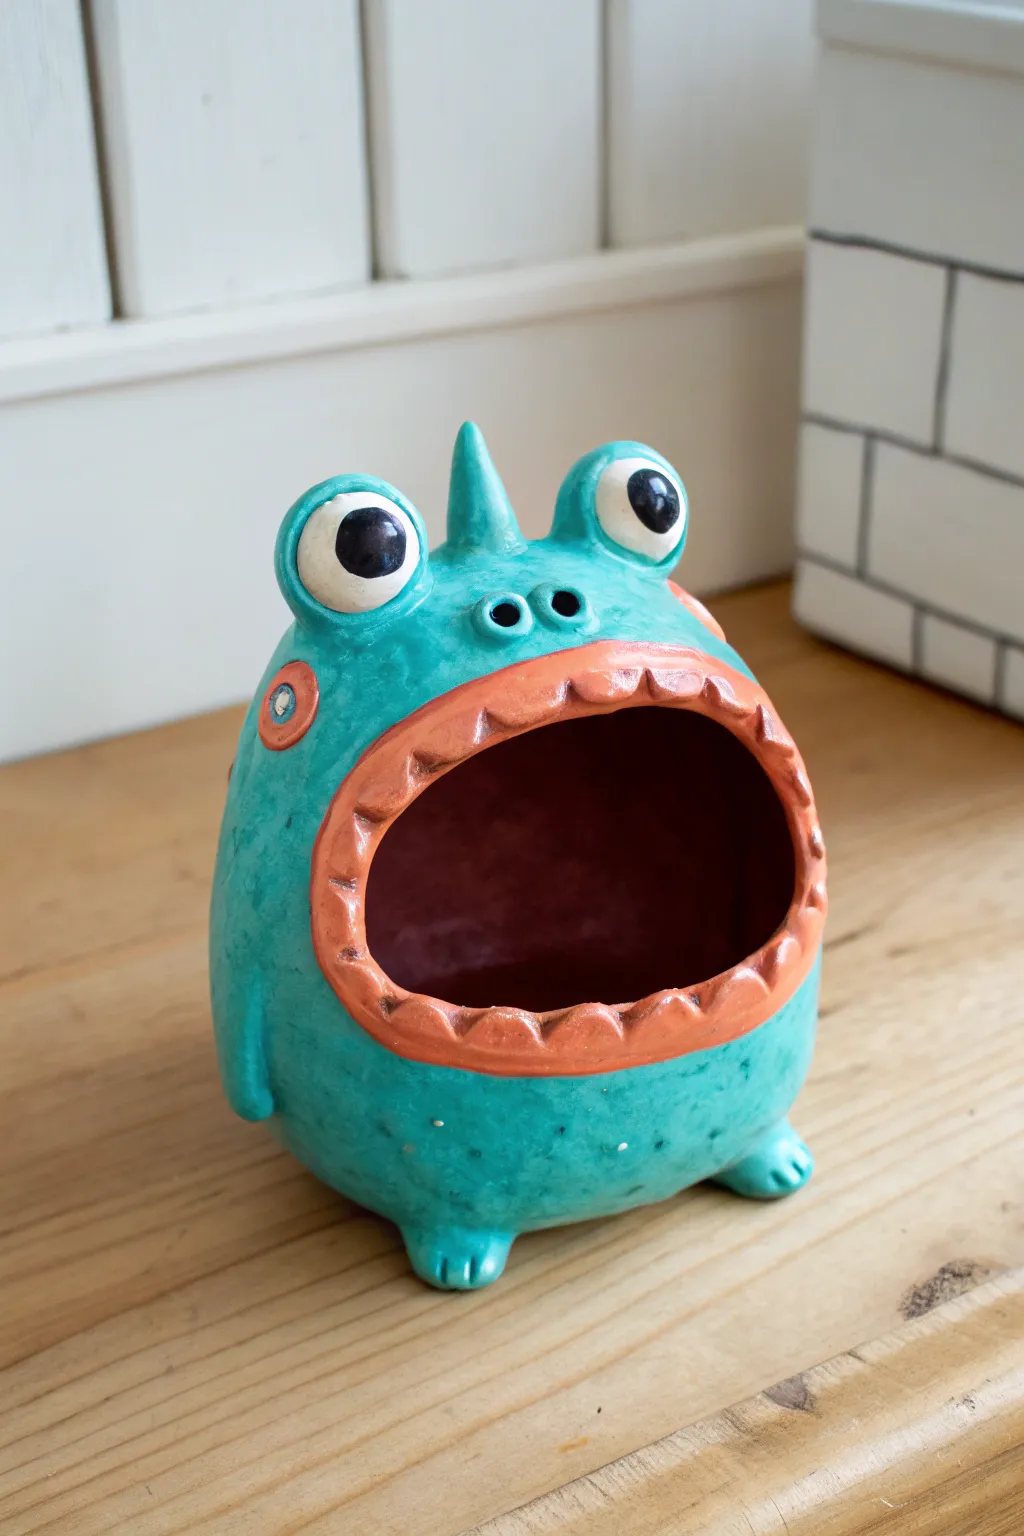
This whimsical monster features a wide, toothy maw perfect for holding trinkets, candy, or even a small plant. Its bright teal glaze, chunky orange lips, and surprised expression make it a charming addition to any shelf.
Step-by-Step Guide
Materials
- Stoneware or earthenware clay (white firing recommended)
- Needle tool
- Loop tool (small)
- Sponge
- Bowl of water
- Slip (clay mixed with water)
- Scoring tool or old fork
- Underglazes: Teal/Turquoise, Bright Orange, White, Black
- Clear glaze (if using non-glossy underglaze)
- Paintbrushes (various sizes)
Step 1: Forming the Base Body
-
Start with a sphere:
Begin with a lump of clay about the size of a large orange. Roll it between your palms until you have a smooth, round ball. -
Pinch the pot:
Push your thumb into the center of the ball, stopping before you break through the bottom. Rotate the ball in one hand while pinching the walls with the other to open up a deep bowl shape. -
Shape the enclosure:
Instead of leaving the top wide open like a bowl, gently collar the rim inwards. You want a teardrop or egg-like shape that is mostly closed but hollow inside. -
Create the mouth:
Decide which side is the ‘front.’ Use your needle tool to slice a large, wide horizontal oval out of the belly of the pot. Remove this clay piece—you can save it for making features later. -
Smooth the edges:
Use a damp sponge to soften the cut edges of the mouth opening so they are rounded, not sharp.
Step 2: Adding Features and Personality
-
Make the eyes:
Roll two small balls of clay for the eyes. Score the top of the monster’s head and the bottom of the eyeballs, add a dab of slip, and press them firmly into place. -
Sculpt the eyelids:
Roll two small coils of clay. Flatten them slightly and drape them over the tops of the eyeballs to create heavy, sleepy, or surprised eyelids. Blend the back edge of the coil into the head using a modeling tool. -
Add the spike:
Form a small cone shape for the central horn. Score and slip the area between the eyes and attach the horn securely. -
Construct the lips:
Roll a long, even coil of clay. Score the perimeter of the open mouth. Attach the coil around the opening, blending the outer edge into the body so it looks seamless, but leaving the inner edge distinct to define the lips. -
Indent the teeth:
Instead of adding individual teeth, use the handle of a paintbrush or a modeling tool to press indentations into the lip coil. This creates a scalloped ‘gummy’ look that implies teeth without sharp edges. -
Add nostrils and details:
Press a small tool into the space between the eyes and mouth to create two nose holes. Add a small ‘button’ of clay to the side of the body for a decorative spot or wart. -
Refine the surface:
Add tiny feet by flattening small balls of clay and attaching them to the bottom so the monster sits stable and slightly tilted back. Smooth everything with a slightly damp sponge to remove fingerprints.
Air Escape Safety
Make sure your monster body is hollow and has an opening (the mouth). If you make thick solid parts over 1/2 inch, poke a vent hole to prevent explosions in the kiln.
Step 3: Glazing and Finishing
-
Bisque fire:
Let your monster dry completely (bone dry) before firing it in a kiln to bisque temperature. -
Apply base color:
Paint three coats of teal or turquoise underglaze over the entire body, avoiding the lips, eyes, and inside of the mouth. -
Paint the mouth:
Carefully paint the lips with a bright orange underglaze. I like to use a dark reddish-brown or black for the inside of the mouth to create depth. -
Detail the eyes:
Paint the eyeballs white. Once dry, add large black pupils. Leave a tiny speck of white unpainted (or add a dot of white on top) for the ‘catchlight’ reflection. -
Final clear coat:
If your underglazes aren’t glossy, apply a coat of clear transparent glaze over the entire piece to make the colors pop and seal the clay. -
Final firing:
Fire the piece again to your glaze temperature.
Texture Play
Before the clay hardens, gently press a piece of coarse burlap or a textured sponge against the skin areas to give the monster a rough, reptile-like scale texture.
Now your grinning monster is ready to guard your desk treasures with its wide-open appetite.


Three-Eyed Goofy Pinch Pot Monster
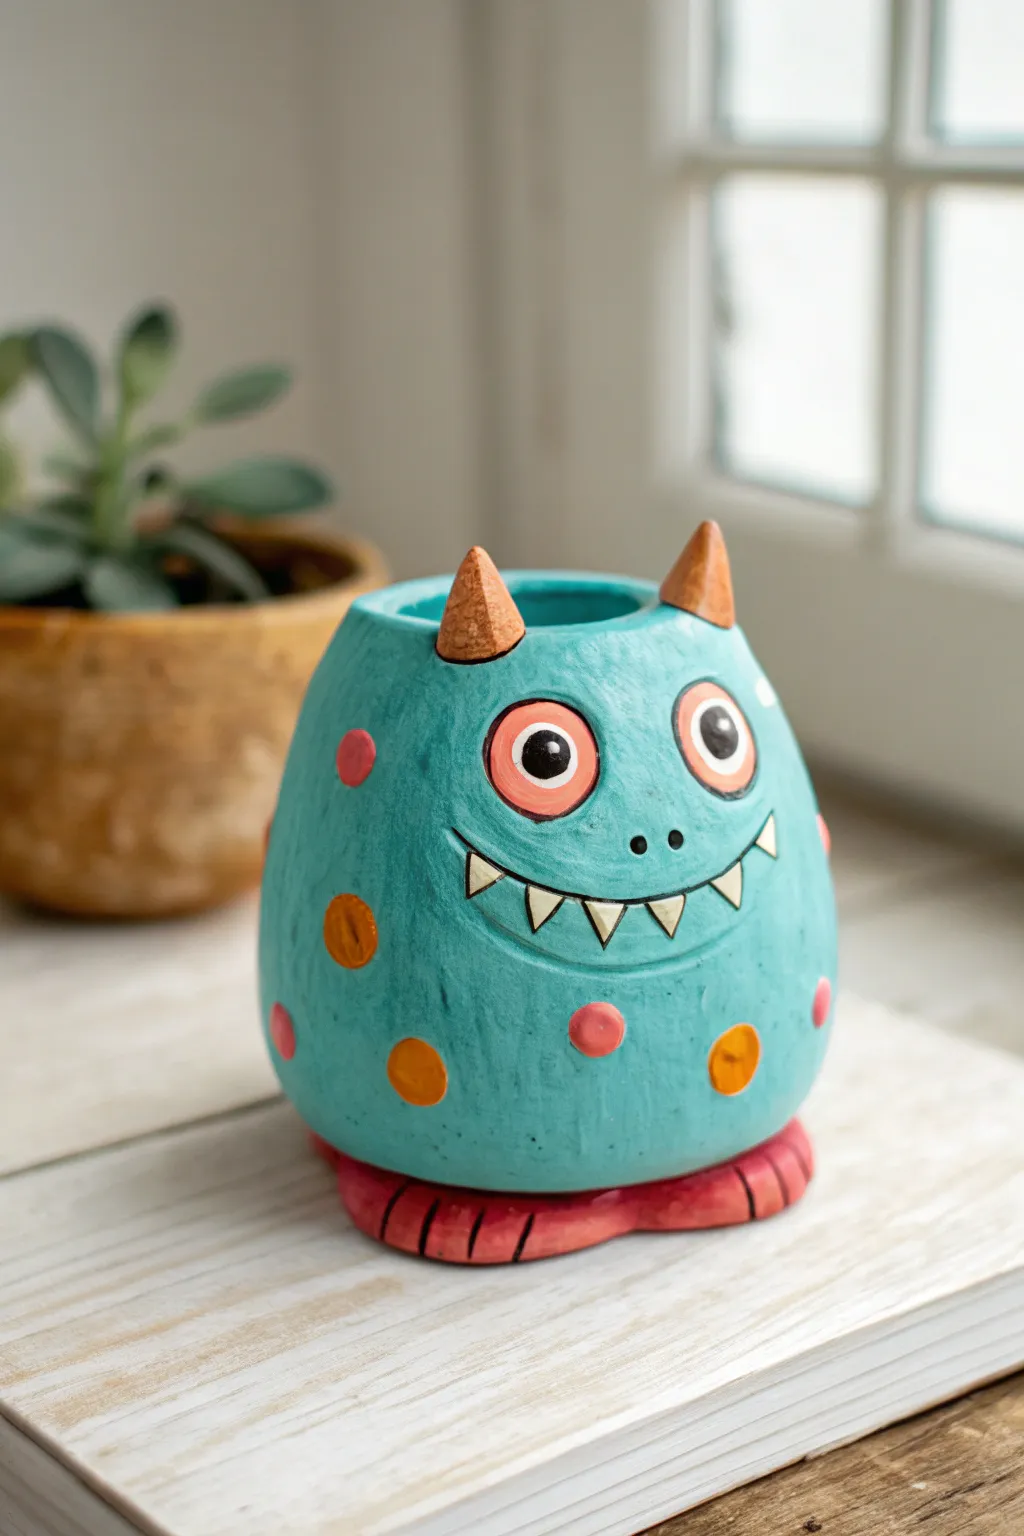
This charming, egg-shaped monster combines cartoonish whimsy with classic pottery techniques. With its bright teal body, playful polka dots, and sturdy red feet, it makes a perfect planter for small succulents or a goofy desk organizer.
Step-by-Step Tutorial
Materials
- Air-dry clay or polymer clay (white)
- Acrylic paints (teal/turquoise, orange, pinkish-red, white, black)
- Small paintbrush set (fine liner and medium flat)
- Clay sculpting tools (needle tool, small spatula)
- Water cup (for smoothing)
- Rolling pin
- Clear matte varnish (optional)
Step 1: Shaping the Base
-
Form the pinch pot:
Start with a ball of clay about the size of a large orange. Push your thumb into the center and pinch the walls while rotating the ball to create a deep, hollow cup shape. -
Close the form:
Gently taper the top opening inward to create an egg-like silhouette, rather than a wide bowl. The top hole should be about 2 inches wide. -
Create the feet:
Roll two thick, flattened logs of clay and attach them to the bottom of your pot. Use a sculpting tool or knife to press vertical lines into the front of each foot to define the toes. -
Smooth the surface:
Dip your finger in a little water and smooth out any fingerprints or cracks on the exterior walls until the surface looks polished.
Step 2: Adding Character
-
Add horns:
Roll two small cones for the horns. Score (scratch) the bottom of the cones and the attachment points on top of the head, add a dab of water or slip, and press them firmly into place. -
Sculpt the eyes:
Create two flat circles of clay and attach them to the upper face area. These should protrude slightly to give that buggy-eyed look. -
Carve the mouth:
Using a needle tool, lightly scratch a wide, curved smile into the clay. Don’t cut all the way through; just define the outline. -
Add teeth:
Inside the smile outline, impress small triangles pointing up and down to form sharp teeth. You can carve away a tiny bit of clay around the teeth to make them pop out. -
Create nose holes:
Poke two small holes between the eyes and mouth with your needle tool for nostrils. -
Dry the sculpture:
Let your monster dry completely. For air-dry clay, I usually wait 24-48 hours until it’s room temperature to the touch.
Smooth Operator
Use a damp sponge instead of just fingers to smooth the clay surface before drying. This erases fingerprints instantly and creates a professional finish.
Step 3: Painting the Monster
-
Base coat:
Paint the entire body with a vibrant turquoise or teal acrylic paint, avoiding the horns, eyes, and feet if possible, though you can paint over mistakes later. -
Paint the feet:
Use a reddish-pink shade to paint the feet, carefully following the line where the feet meet the body. -
Detail the eyes:
Paint the outer rim of the eyes orange. Fill the center with white, then add large black pupils with a tiny white reflection dot in each for ‘life’. -
Fill the horns:
Paint the horns a solid orange that matches the eye rims and body spots. -
Highlight the smile:
Use a very fine brush to fill in the teeth with white paint. Outline the mouth curve and the teeth with a thin black line to make the expression readable. -
Add spots:
Dot the body with alternating orange and pink circles. Vary the sizes slightly for a more organic, playful texture. -
Add texture marks:
Mix a tiny bit of black into your teal paint to make a darker shade, and paint very faint, short vertical strokes on the body to simulate a textured ‘fur’ or skin effect. -
Seal (Optional):
Once fully dry, apply a coat of matte varnish to protect the paint, especially if you plan to put a plant inside.
Accessorize
Before the clay dries, poke a hole in one hand or add a clay ‘pocket’ to hold a tiny fake flower or a written note.
Your goofy new friend is ready to guard your desk or hold your favorite succulent


Snaggletooth Rim Monster With Crooked Teeth
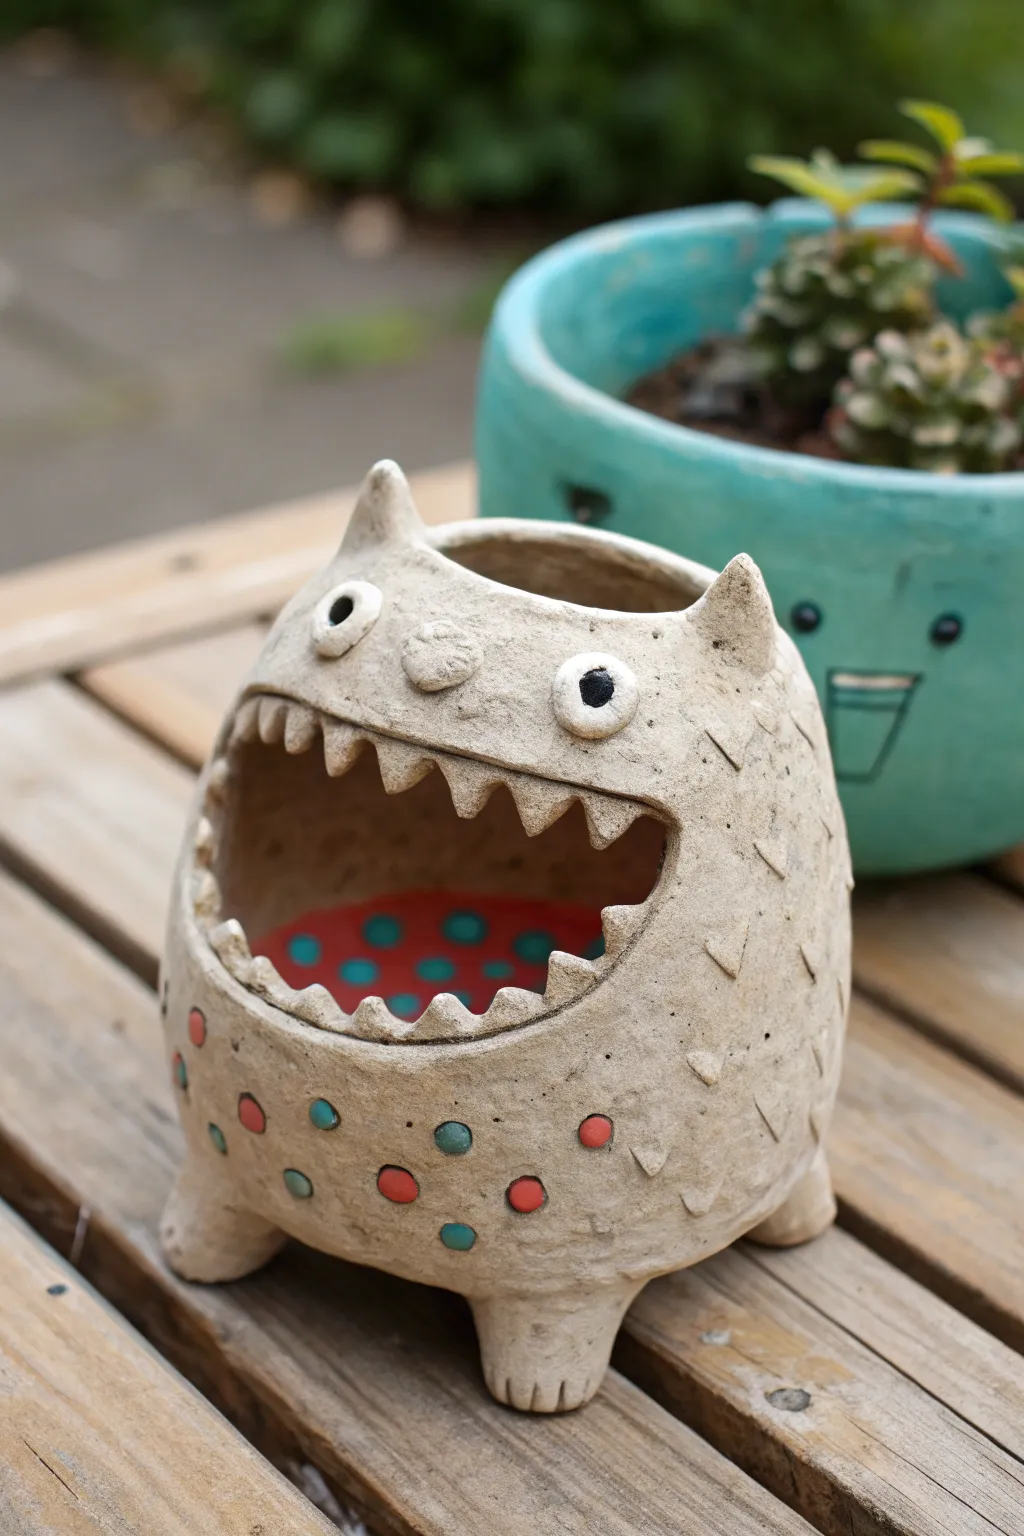
This whimsical monster pot transforms a simple ball of clay into a charming creature with a voracious appetite for keys, candy, or small succulents. Featuring a wide, toothy mouth carved directly into the rim and playful polka dots, its textured skin and quirky expression make it an irresistible addition to any shelf.
Step-by-Step
Materials
- Stoneware clay (smooth or slightly grogged)
- Pottery tools (needle tool, rib tool, loop tool)
- Fettling knife
- Slip (clay slurry)
- Underglazes (Red, Teal, Black, White)
- Clear matte glaze
- Sponge
- Small paintbrushes
Step 1: Forming the Body
-
Create the base pinch pot:
Start with a ball of clay about the size of a large orange. Insert your thumb into the center and gently pinch the walls while rotating the ball. Aim for an even thickness of about 1/4 inch throughout, keeping the shape round and enclosed rather than flaring it like a bowl. -
Drying/stiffening pause:
Once pinched, let the form sit for about 30 minutes until it stiffens slightly; this ensures it won’t collapse when we cut the mouth. -
Add the feet:
Roll four small balls of clay. Score and slip the bottom of your pot and attach these balls as feet. Gently tap the pot on the table to flatten the feet bottoms so the monster stands stably. -
Shape the ears:
With your fingers, gently pinch and pull up two triangular sections on the very top of the pot to form cat-like ears.
Slumping Mouth?
If the clay is too soft, the top lip might sag. Stuff the mouth cavity with crumpled newspaper or paper towels while working to support the shape until the clay is leather-hard.
Step 2: Sculpting the Features
-
Sketch the mouth:
Using a needle tool, lightly draw a wide, oval-shaped mouth opening on the front of the pot. Make sure it dips low enough to give the monster a big grin. -
Cut the jagged teeth:
Instead of cutting a smooth oval, carefully cut a zigzag line along the top and bottom of your sketched mouth shape. Remove the central clay chunk. You should be left with triangular teeth pointing inward from both rims. -
Refine the bite:
Use a damp sponge or your finger to smooth the sharp edges of the teeth so they don’t chip later, but keep their points defined. -
Create the eyes:
Roll two small spheres of clay. Score the forehead area and the back of the eyes, add slip, and press them firmly onto the face. -
Add the nose:
Roll a tiny oval for the nose. Attach it between the eyes, pressing a small indentation into it for character. -
Texture the skin:
Using a small V-tip carving tool or the edge of a fettling knife, press small ‘V’ shapes randomly all over the upper body and sides to simulate fur or scales.
Step 3: Surface Decoration & Glazing
-
Add recessed dots:
On the lower belly of the monster, use the rounded end of a paintbrush handle to press shallow circular indentations into the clay. -
Create the tongue:
Form a flat, oval pad of clay to serve as the tongue inside the mouth. Score the bottom of the pot’s interior and press this slab inside. -
Bisque fire:
Allow your monster to dry slowly and completely before bisque firing it to cone 04. -
Paint the tongue:
Paint the interior ‘tongue’ slab with bright red underglaze. Once dry, add teal polka dots on top of the red. -
Detail the body dots:
Fill the recessed belly dots with the same teal underglaze, wiping away any excess that spills onto the main body so the color sits neatly inside the depressions. -
Finish body color:
Apply a wash of diluted black underglaze over the textured skin areas, then sponge it back. I find this technique really makes the ‘V’ textures pop by leaving dark pigment in the crevices. -
Paint the eyes:
Use white underglaze for the eyeballs and dot the centers with black for pupils. -
Final glaze firing:
Coat the entire piece in a clear matte glaze to seal the clay without making it too shiny, then fire to the final temperature compatible with your clay body.
Make it a Planter
If using this for succulents, don’t forget to poke a drainage hole in the bottom center before creating the tongue insert (cut a hole in the tongue too!).
Once fired, your jagged-toothed creation is ready to guard your treasures with a smile


Two-Pinch-Pot Round Belly Monster
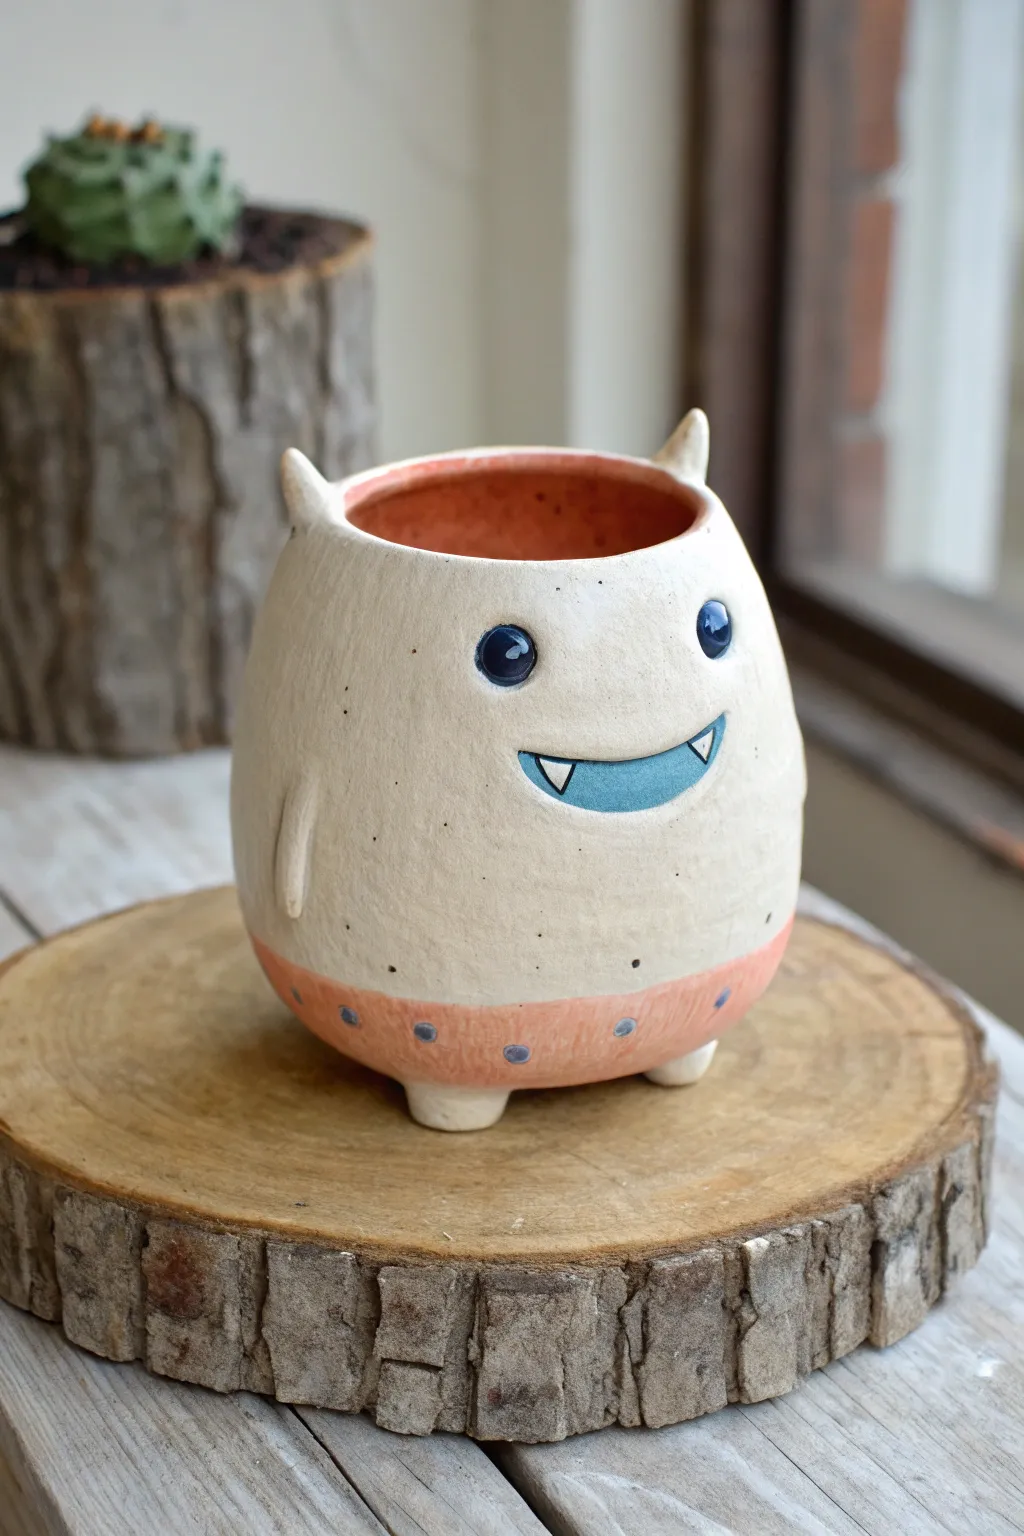
This adorable ceramic monster features a textured, creamy body with a cheeky grin and distinct pink “pants” at the bottom. It’s built using a double pinch pot method to create that perfectly round, belly-like shape that sits sweetly on any shelf.
Step-by-Step Tutorial
Materials
- Light-colored stoneware or earthenware clay
- Underglazes: Salmon pink, bright blue, white, black/navy
- Small loop tool or needle tool
- Serrated rib tool (metal or wood)
- Slip (clay mixed with water)
- Small paintbrush
- Clear glaze (optional for shiny finish on eyes/mouth)
- Sponge
Step 1: Forming the Body
-
Shape two pinch pots:
Start with two equal balls of clay, roughly the size of a tennis ball. Press your thumb into the center of each and pinch the walls while rotating to create two bowl shapes. -
Join the pots:
Score the rims of both bowls with your needle tool or serrated rib and apply slip. Press the rims together firmly to create a hollow sphere, trapping air inside to help it hold its shape. -
Smooth the seam:
Using a wooden tool or your thumb, drag clay across the join line to seal it completely. Smooth the entire surface until the seam is invisible. -
Shape the oval:
Gently paddle or roll the sphere on your table to elongate it slightly into a tall oval shape. Tap the bottom gently against the table to create a slightly flat base. -
Open the top:
Decide where the top rim will be. Slice off a horizontal section or cut a circular hole. Smooth the rim with a damp sponge.
Air Pressure Safety
When joining two pinch pots, trap air inside to keep the shape rigid. But remember: cut your opening hole BEFORE the clay dries out or shrinks, otherwise trapped air can cause cracks.
Step 2: Adding Features
-
Attach the horns:
Roll two tiny cones of clay. Score and slip the placement spots near the rim, then attach curve them slightly outward for character. -
Add little arms:
Create two small noodle-like coils for arms. Attach them vertically to the sides of the body, blending the top edge so they look like they are emerging from the skin. -
Create the feet:
Form two small, stubby cones for feet. Score the bottom of the pot and attach them so the monster leans slightly backward or stands level, depending on your preference. -
Refine the surface:
Before adding facial details, I like to gently sponge the whole piece to remove fingerprints, leaving a slightly organic, matte texture.
Step 3: Decorating & Glazing
-
Carve the mouth:
Use a needle tool to lightly outline a wide, U-shaped mouth. Gently press or carve slightly into the clay to create depth for the paint later. -
Bisque fire:
Allow the piece to dry completely (bone dry) and fire it in the kiln to bisque temperature. -
Paint the pants:
Using salmon pink underglaze, paint the bottom third of the pot. Ensure a crisp, straight line where the ‘pants’ meet the belly. -
Paint the face:
Fill the mouth area with bright blue underglaze. Paint two small circles for eyes using dark navy or black. -
Add highlights and details:
Once the base colors are dry, use a fine brush to add white triangles for teeth and small white reflection dots in the eyes. -
Detail the pants:
Add small blue polka dots around the pink section to mimic fabric options. -
Clear glaze and final fire:
Apply a clear glaze only to the inside to make it waterproof, or brush clear glaze over the eyes and mouth for a glossy ‘wet’ look, leaving the skin matte. Fire to the final glaze temperature.
Crisp Glaze Lines
To get that perfect straight line for the monster’s pants, use a rubber band around the pot as a guide, or lightly mark the line with a pencil while spinning the pot on a banding wheel.
Now you have a charming little monster ready to hold a succulent or keep your pencils safe

The Complete Guide to Pottery Troubleshooting
Uncover the most common ceramic mistakes—from cracking clay to failed glazes—and learn how to fix them fast.
Fuzzy “Fur” Texture Pinch Pot Monster

This adorable little creature combines the simplicity of a pinch pot with a delightful carved texture that mimics soft fur. With its wide-set orange eyes and tiny smile, this matte white planter adds a whimsical touch to any windowsill display.
Detailed Instructions
Materials
- White stoneware or polymer clay
- Carving tool or needle tool
- Small loop tool
- Orange underglaze or acrylic paint (if using polymer)
- Black underglaze or fine-tip black marker
- Small round paintbrush
- Clear matte glaze (optional)
- Sponge and water
- Scoring tool (or fork)
Step 1: Forming the Base Body
-
Prepare the Clay:
Start with a ball of white clay roughly the size of a large orange. Wedge it well to remove air bubbles if using ceramic clay, or condition it until pliable if using polymer. -
Pinch the Primary Shape:
Insert your thumb into the center of the ball, stopping about half an inch from the bottom. Gently rotate the ball in one hand while pinching the walls with the other to open up the form. -
Refine the Walls:
Continue pinching upward, aiming for an even wall thickness of about 1/4 inch. Gently collaring the rim inward will create that slightly tapered, egg-like silhouette shown in the photo. -
Smooth the Surface:
Once you are happy with the rounded shape, use a slightly damp sponge or your finger to smooth out any fingerprints or cracks on the exterior surface. A smooth canvas is essential before adding texture.
Step 2: Adding Feet and Features
-
Create the Feet:
Roll two small balls of clay, roughly the size of marbles. Flatten them slightly to create stable little feet for your monster to stand on. -
Attach the Feet:
Score the bottom of the pot and the top of the feet (scratch up the surfaces). Apply a dab of water or slip, then press the feet firmly onto the base. Smooth the seams with a modeling tool or your finger so they look integrated, not just stuck on. -
Shape the Eyes:
Roll two very small, flat discs of clay for the eyes. Position them wide apart on the upper half of the pot to give it that vacant, cute expression. -
Secure the Eyes:
Score and slip these discs onto the body. I like to press around the edges gently to ensure they are fully adhered so they don’t pop off during drying.
Clean Fur Lines
Wait until the clay is ‘leather hard’ (firm but cool) before carving. Too wet, and the clay drags; too dry, and it chips. Leather hard yields clean shavings.
Step 3: Creating the Texture
-
Map the Face:
Before texturing, lightly outline the area around the eyes and mouth where you want the face to remain smooth. This negative space helps the features stand out. -
Carve the Fur:
Using a small loop tool or a carving tool, make short, vertical gouges into the clay. Start from the top rim and work your way down. -
Vary the Strokes:
Keep the strokes somewhat random in length but generally following a downward direction. Leave small gaps between the marks—you are removing slivers of clay to create raised ‘tufts’ between the gouges. -
Clean Up Burrs:
As you carve, little crumbs of clay (burrs) will form. Wait until the clay stiffens slightly, then brush them away with a soft, dry brush to keep the fur looking crisp. -
Detail the Toes:
Use a needle tool to press two or three small indents onto the front of each foot to suggest toes or claws.
Expression Trick
Change the monster’s personality by moving the pupils! Placing them looking upward makes it look innocent; crossing them slightly makes it look goofy.
Step 4: Finishing and Color
-
Dry Completely:
Allow your piece to dry slowly. If using ceramic clay, fire it to bisque temperature. If using polymer, bake according to package instructions. -
Paint the Eyes:
Apply a bright orange underglaze or acrylic paint to the raised eye discs. You may need two coats for solid opacity. -
Add the Pupils:
Using a very fine brush or a black paint marker, add small black dots to the center of the orange eyes. -
Paint the Mouth:
carefully paint a tiny, thin curved line for the smile in the smooth space between the eyes. -
Highlight the Feet:
Add tiny dashes of the orange paint to the toe indentations to tie the color scheme together. -
Final Coat:
Leave the raw clay body unglazed for a matte, stone-like texture, or apply a clear matte protective coat if using polymer clay.
Pop a small air plant or succulent inside your new friend and find it a happy spot on your shelf
Scaly Reptile Skin Pinch Pot Monster
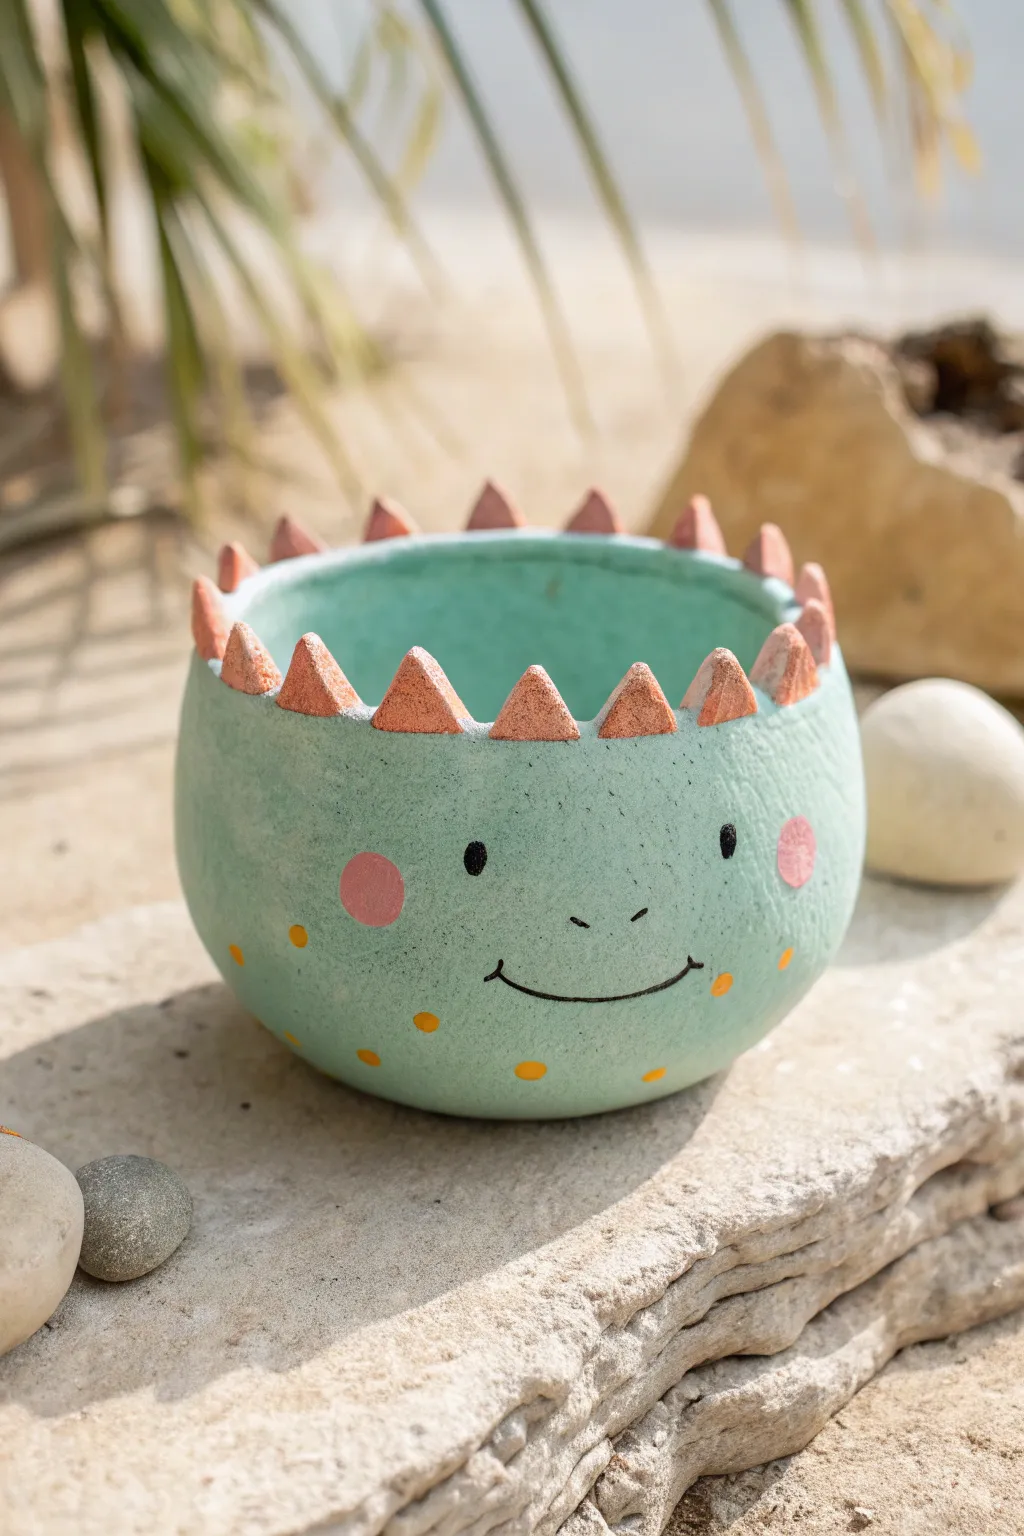
Transform a simple ball of clay into a charming, scaly companion with this reptilian-inspired pinch pot. Featuring a soft mint green glaze, playful orange spikes along the rim, and a cheerful hand-painted face, it makes the perfect home for a small succulent or desk treasures.
Step-by-Step
Materials
- Air-dry clay or polymer clay (white)
- Clay sculpting tools (soft rib or sponge)
- Acrylic paints (Mint Green, Terracotta Orange, Black, Pink, White)
- Paintbrushes (medium flat brush, small detail brush)
- Small cup of water
- Rolling pin (optional)
- Clear matte varnish or sealant
- Sandpaper (fine grit)
Step 1: Sculpting the Base
-
Form the ball:
Start with a handful of clay and roll it between your palms until you have a smooth, firm sphere about the size of a tennis ball. -
Open the pinch pot:
Gently press your thumb into the center of the ball, stopping before you break through the bottom. Begin pinching the clay walls between your thumb and fingers, rotating as you go to create an even bowl shape. -
Smooth the walls:
Use a damp sponge or a soft rib tool to smooth out any fingerprints or cracks on the exterior. I find that smoothing the surface now saves a lot of sanding time later. -
Create the flat bottom:
Tap the pot gently on your work surface to create a flat, stable base so it won’t wobble.
Smooth Seams Secret
Use a slightly damp paintbrush to smooth the clay seams where the spikes attach. It acts like an eraser for join lines without denting the clay like a finger might.
Step 2: Adding the Spikes
-
Make the spike cones:
Roll out a small snake of clay and cut it into roughly 12-15 equal, pea-sized pieces. Shape each piece into a small triangular cone. -
Attach the spikes:
Score the top rim of your pot and the bottom of each cone, adding a tiny dab of water or slip. Press the triangular spikes firmly onto the rim, spacing them evenly all the way around. -
Blend the seams:
Use a modeling tool or your finger to gently smooth the clay where the spikes meet the rim, ensuring they are securely attached and won’t pop off during drying. -
Refine the shape:
Once attached, gently pinch each spike again to sharpen the points and ensure they look uniform. Let the pot dry completely according to your clay manufacturer’s instructions, usually 24-48 hours. -
Sand for smoothness:
Once bone dry, lightly rub the exterior with fine-grit sandpaper to remove any remaining bumps or rough textures.
Texture Twist
Before the clay dries, gently press a piece of lace or burlap into the body of the pot to give your reptile friend a scaly, textured skin effect before painting.
Step 3: Painting the Monster
-
Apply the base coat:
Paint the entire exterior and interior of the pot with a soft mint green acrylic paint. You may need two coats for full, opaque coverage. -
Paint the spikes:
Using a smaller brush, carefully paint just the triangular spikes along the rim with a terracotta or muted orange color. -
Add the cheeks:
Dip a round brush or a foam spouncer into pink paint and dab two gentle circles onto the front of the pot to create rosy cheeks. -
Detail the face:
Switch to your finest detail brush and black paint. Draw two small oval eyes above the cheeks, two tiny nostril dashes, and a wide, curved smile connecting the features. -
Add decorative dots:
Using the handle end of a paintbrush dipped in the orange paint, stamp small polka dots randomly around the lower half of the pot for texture. -
Seal the artwork:
Once all paint is completely dry, apply a coat of clear matte varnish to protect your monster and give it a finished, professional look.
Now your adorable monster pot is ready to guard your favorite trinkets or plants without even needing to roar


What Really Happens Inside the Kiln
Learn how time and temperature work together inside the kiln to transform clay into durable ceramic.
Tentacle-Foot Pinch Pot Monster
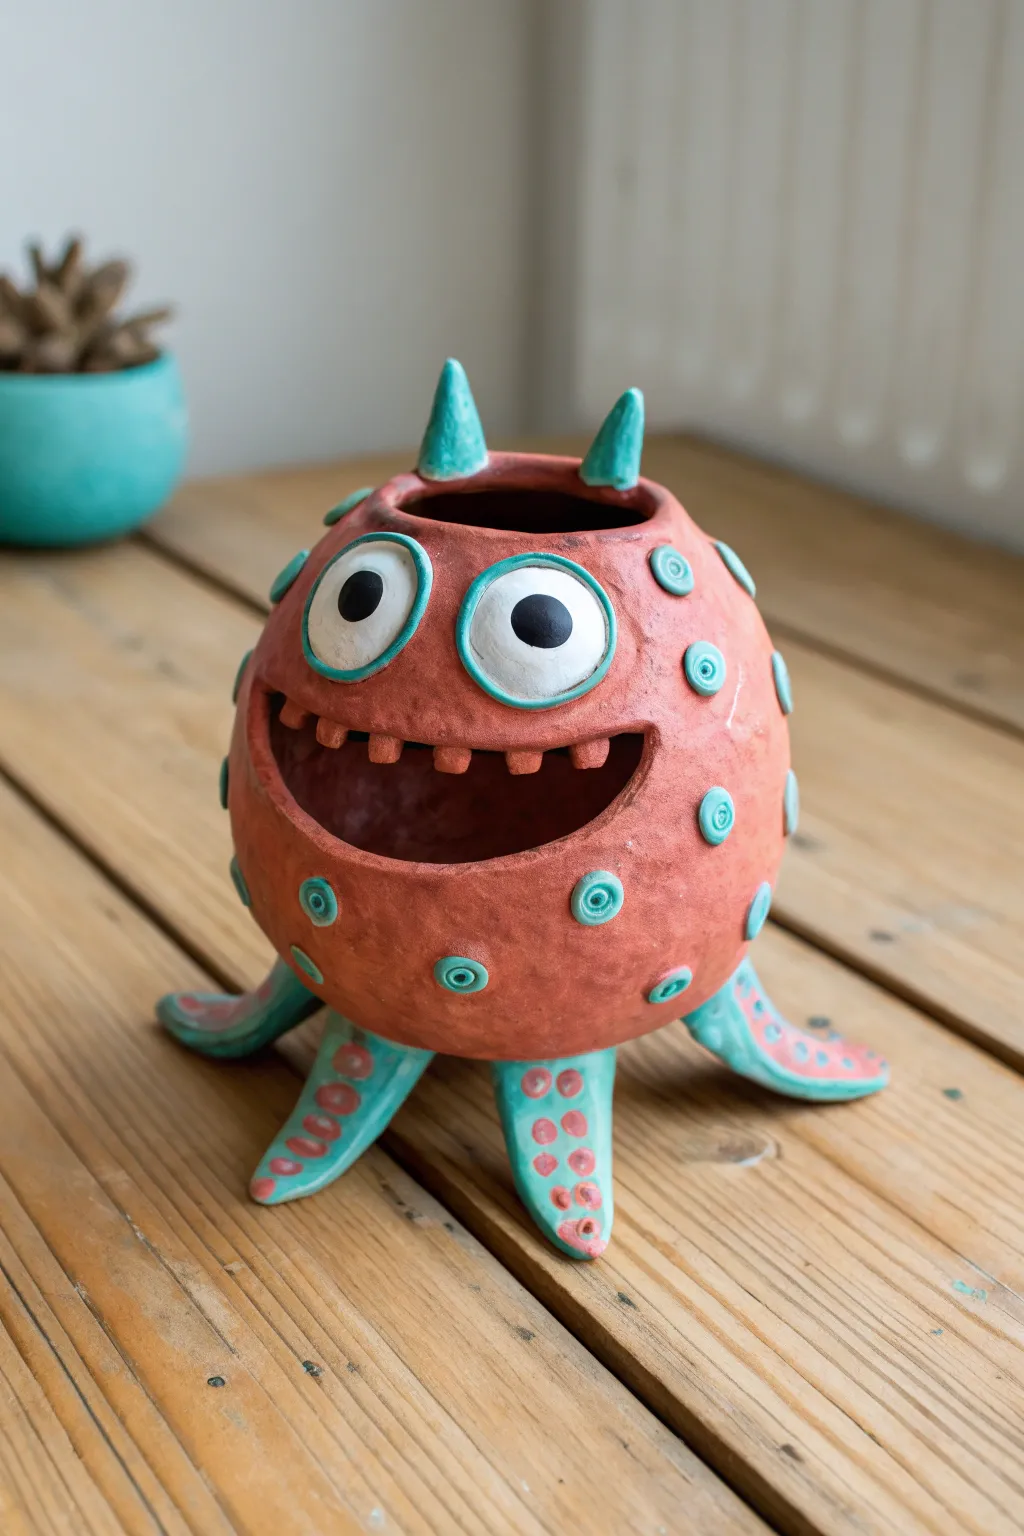
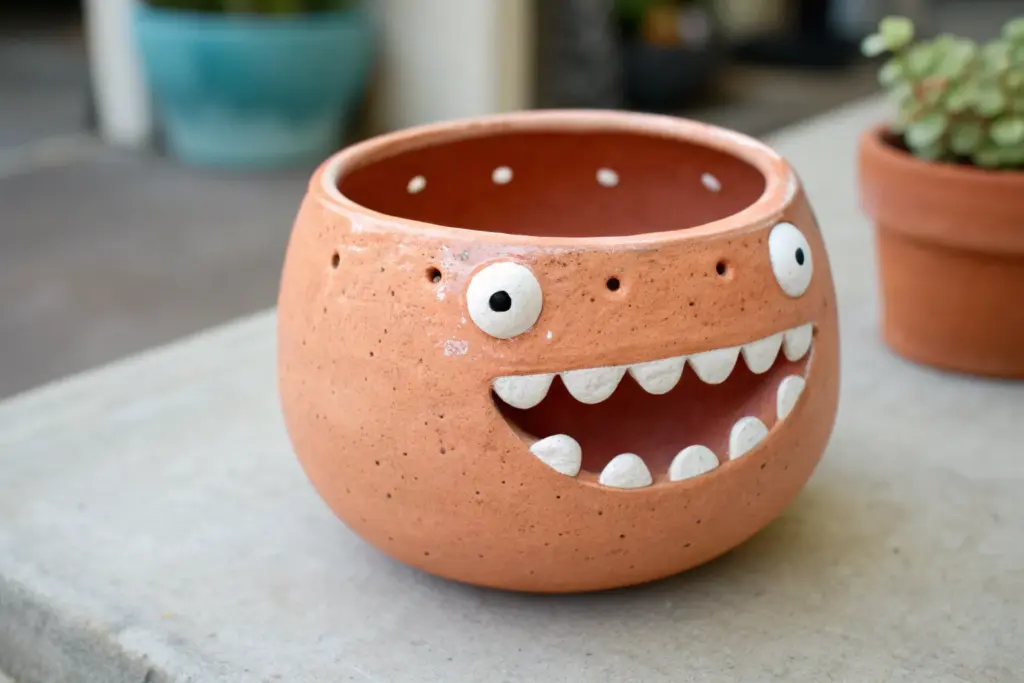
This whimsical creature features a classic pinch pot body transformed by sea-inspired tentacles and a cheerfully wide grin. With its terracotta red skin, bright teal accents, and bulging eyes, this functional planter or candy dish adds a splash of personality to any shelf.
Detailed Instructions
Materials
- Terra cotta clay (or air-dry clay)
- Small bowl of water
- Pointed wooden modeling tool
- Needle tool
- Sponge
- Rolling pin
- Acrylic paints (terracotta orange, teal/turquoise, white, black, pink)
- Small round brushes
- Fine-grit sandpaper
- Gloss varnish (optional)
Step 1: Forming the Body and Legs
-
Wedging the clay:
Start by wedging a baseball-sized amount of clay to remove air bubbles, then roll it into a smooth, tight sphere. -
Creating the pinch pot:
Push your thumb into the center of the sphere, stopping about half an inch from the bottom. Gently pinch the walls while rotating the ball to open up the pot, aiming for even wall thickness throughout. -
Shaping the rim:
Since this monster has a narrower opening at the top, curve the walls slightly inward as you reach the rim, rather than flaring them out. Smooth the lip with a damp sponge. -
Making the tentacles:
Roll four thick coils of clay, tapering one end of each to a point to create cone shapes. These will become the tentacle legs. -
Attaching the legs:
Score the bottom of the pot and the thick ends of the tentacles. Apply a little water or slip, then press the tentacles firmly onto the base, splaying them outward for stability. -
Smoothing the joins:
Use a modeling tool or your finger to blend the clay from the tentacles onto the body so no seam is visible. This is crucial for structural integrity.
Hollow or Solid?
Make sure your tentacle legs aren’t too thick! If they are thicker than your thumb, hollow them out slightly from the attachment point to prevent explosions in the kiln.
Step 2: Sculpting the Face
-
Carving the mouth:
Decide where the front is, then use a needle tool to cut out a wide, crescent-shaped mouth opening in the belly of the pot. Smooth the cut edges with a damp finger. -
Adding teeth:
Roll very small rectangular nuggets of clay. Score the upper lip of the mouth opening and attach these teeth, blending the top edge of each tooth into the lip so they hang down securely. -
Forming the eyes:
Roll two medium-sized balls of clay and flatten them slightly. Score and slip the area above the mouth, then attach the eyes firmly. They should bulge out significantly. -
Eye details:
Roll thin coils of clay to wrap around the base of each eyeball, creating eyelids or rims. Smooth them onto the main body. -
Adding horns and texture:
Form two small cones for horns and attach them to the top of the head near the rim. For the body texture, add small flattened discs of clay randomly all over the skin to creating raised spots.
Go wild with texture
Instead of adding clay discs for spots, try using the capped end of a marker or a straw to stamp ring-shaped indentations into the soft clay for a reversed texture effect.
Step 3: Finishing and Painting
-
Drying and firing:
Allow the piece to dry slowly and completely. If using kiln clay, bisque fire it now. If using air-dry clay, wait until it is bone dry. -
Sanding:
Once dry or fired, lightly sand any rough patches, particularly around the mouth opening and the tips of the tentacles. -
Base coat:
Paint the entire body and the upper recessed rim with a warm terracotta or reddish-orange color. It may take two coats for full coverage. -
Painting the details:
Use a bright teal or turquoise paint for the eye rims, the horns, the raised body spots, and the tentacles. Use a steady hand to keep lines crisp. -
Tentacle suckers:
I prefer to use the handle end of a paintbrush dipped in pink paint to stamp little ‘sucker’ dots onto the teal tentacles. -
Eyes and shading:
Paint the eyeballs bright white. Once dry, add large black pupils in the center. To make them pop, add a tiny white reflection dot in each black pupil. -
Sealing the work:
Finish by applying a coat of gloss varnish to give the monster a shiny, ceramic-glaze look, especially on the eyes.
Now your cheerful tentacled friend is ready to hold a small plant or store your trinkets
Bat-Wing Pinch Pot Monster With Tiny Wings
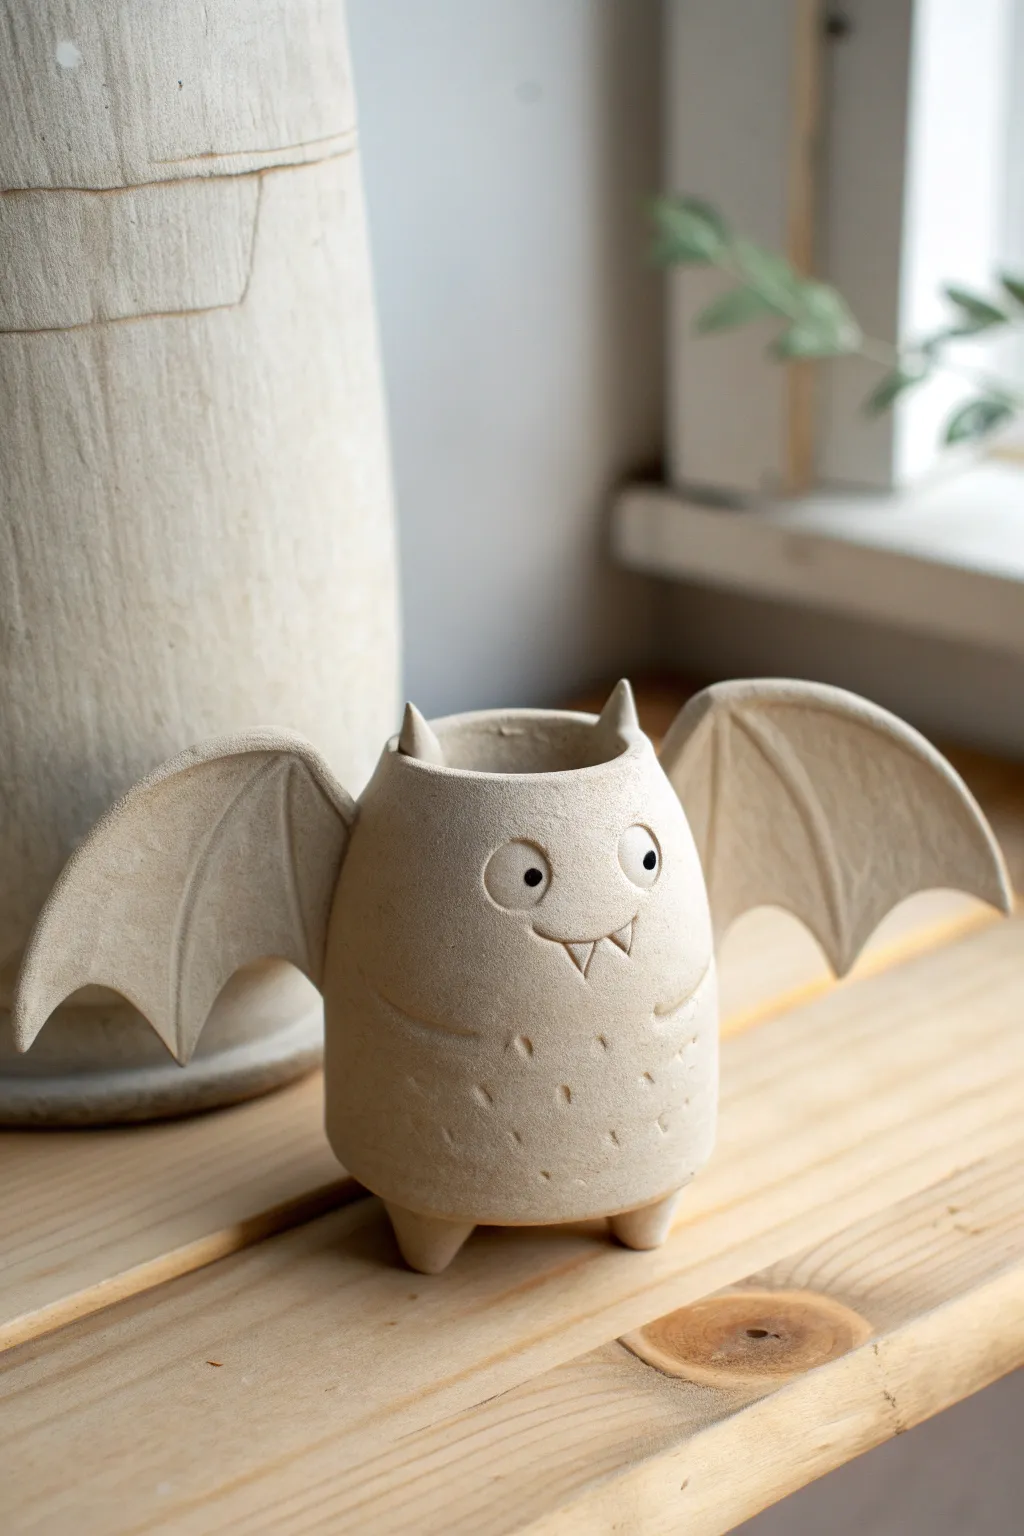
This adorable beige ceramic monster combines the simplicity of a pinch pot with the charm of spooky, fluttering wings. With a gentle, smiling face and distinctive textures, it makes for a perfect Halloween decoration or a sweet year-round desk companion.
Step-by-Step Guide
Materials
- Stoneware clay (buff or speckled)
- Needle tool
- Scoring rib or serrated kidney tool
- Small sponge
- Rolling pin
- Slip (clay mixed with water)
- Modeling tool (rounded end)
- Fettling knife
Step 1: Forming the Body
-
Roll the Base Ball:
Begin with a fist-sized lump of clay. Roll it firmly between your palms or on a table until you have a smooth, uniform sphere without cracks. -
Open the Pot:
Push your thumb into the center of the ball, stopping about half an inch from the bottom. Gently pinch the clay between your thumb and fingers, rotating as you go, to create an even cup shape. -
Shape the Cylinder:
Unlike a bowl, we want a taller, slightly cylindrical shape. Gently collar the rim inward by encircling it with your hands and squeezing lightly. Flatten the bottom slightly by tapping it on your work surface so it stands upright. -
Smooth the Surface:
Use a slightly damp sponge to smooth out any finger marks on the exterior. The finish should be matte and stony, not overly slick.
Step 2: Adding Appendages
-
Create the Feet:
Roll two small marble-sized balls of clay. Tap them into slight cones. Score the bottom of your pot and the flat side of the feet, apply slip, and press them firmly onto the base to give the monster a slight lift. -
Roll a Slab for Wings:
Roll out a small slab of clay to about 1/4 inch thickness. Use a needle tool to cut out two majestic bat-wing shapes. They should curve upward and have scalloped bottom edges. -
Detail the Wings:
Before attaching, use a modeling tool to press lines radiating from the ‘shoulder’ of the wing down to the points of the scallops, mimicking wing bones. -
Attach the Wings:
Score the sides of the body where the wings will sit—about halfway up the form. Score the attachment edge of the wings. Add slip and press the wings into place, blending the clay onto the body for a strong bond. -
Form the Ears:
Shape two small triangular cones for ears. Attach them to the rim of the pot using the score-and-slip method, placing them fairly close to the front.
Wing Stability
If the wings droop while wet, prop them up with crumpled paper towels or foam blocks until the clay stiffens enough to hold its own weight.
Step 3: Sculpting the Face
-
Make the Eyes:
Roll two tiny spheres of clay and flatten them into discs. Attach these to the upper front of the pot. Use the back of a small drill bit or tool to impress a pupil into each eye. -
Carve the Smile:
Use a needle tool to gently scribe a curved smile line. I find it helpful to draw it lightly first before committing to the deeper cut. -
Add Tiny Fangs:
Create two minuscule triangles of clay. Score tiny spots on the lip of the smile and attach these fangs pointing downward. -
Create Belly Texture:
Using a needle tool or small gouge, make small vertical dashes across the lower belly area to suggest fur or rough skin texture. -
Refine and Dry:
Check all seams to ensure they are smooth. Let the piece dry slowly under plastic for a day before uncovering it to reach the bone-dry stage.
Glaze Approach
Skip the glaze! Fire to cone 6 bare, or use a matte clear glaze. To darken the eyes, use a black underglaze pencil before the bisque firing.
Once fired, this little creature is ready to hold pencils, succulents, or simply smile from a shelf

TRACK YOUR CERAMIC JOURNEY
Capture glaze tests, firing details, and creative progress—all in one simple printable. Make your projects easier to repeat and improve.
Underbite Pinch Pot Monster With One Big Tooth
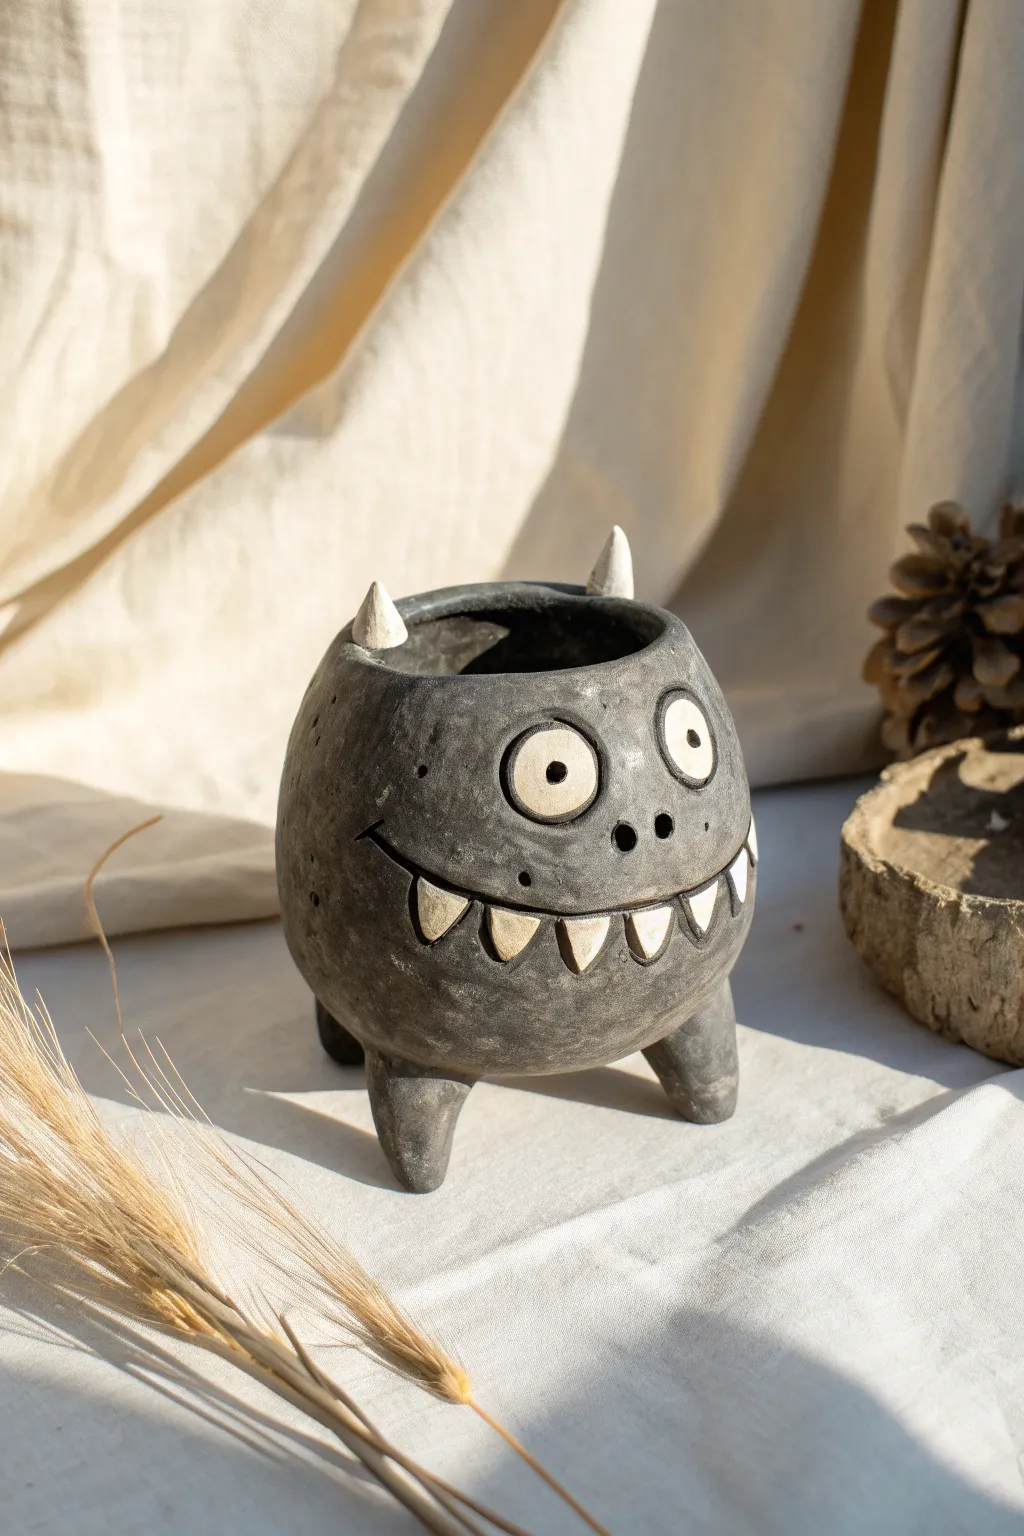
This quirky pinch pot monster features a delightful spherical body, three stubby legs, and a wide, toothy grin that adds instant personality to any shelf. The dark, matte charcoal finish contrasts beautifully with the stark white details of the eyes, horns, and teeth.
Detailed Instructions
Materials
- Air-dry clay or kiln-fire clay (grey or white)
- Black acrylic paint or black ceramic underglaze
- White acrylic paint or white ceramic underglaze
- Mod Podge or matte varnish (for air-dry clay)
- Sponge or textured foam piece
- Needle tool or toothpick
- Small paintbrush
- Water and a small bowl
- Scoring tool (or an old toothbrush)
Step 1: Forming the Body and Legs
-
Create the base pinch pot:
Start with a ball of clay roughly the size of a large orange. Insert your thumb into the center and gently pinch the walls while rotating the ball to create a hollow sphere with an opening at the top. -
Close the form slightly:
Guide the upper rim inward so the opening isn’t too wide; you want a distinct round shape rather than a wide bowl shape. -
Shape the legs:
Roll three small balls of clay, about the size of large marbles. Slightly flatten the tops and taper the bottoms to create stubby, cone-like legs. -
Attach the legs:
Score (scratch) the bottom of the pot and the top of each leg leg. Add a dab of water or slip, then press the legs firmly onto the base in a tripod arrangement. -
Smooth the seams:
Use your thumb or a modeling tool to blend the clay from the legs up onto the body so they look seamless and pulled from the same piece. -
Check balance:
Set the pot down on a flat surface and gently tap it to ensure it stands stable on its three legs.
Sponge Tactics
Use a natural sea sponge rather than a synthetic kitchen sponge. The irregular holes create a much more convincing stone-like texture on the monster’s skin.
Step 2: Sculpting the Face
-
Add horns:
Roll two very small cones of clay for the horns. Score and slip the spots where you want them, then attach them near the back rim of the opening. -
Create the eyes:
Make two flat discs of clay for the eyes. Score the back of each and press them firmly onto the upper front of the pot. -
Detail the pupils:
Take tiny pinched bits of clay to make the pupils and press them into the center of the eye discs to give them dimension. -
Carve the mouth line:
Use a needle tool or toothpick to carve a wide, curved line for the smile across the belly of the pot. -
Add teeth:
Roll several small triangles for the teeth. Score the area just below the mouth line and attach the teeth pointing downward, spacing them out slightly. -
Add nostrils and texture:
Poke two small holes for nostrils between the eyes and mouth. Gently dab the entire surface of the pot (avoiding the eyes and teeth) with a sponge to give it a rough, stony texture.
Make It Glossy
For extra character, apply a high-gloss glaze or varnish ONLY to the eyes and teeth. This makes the monster look wet and alive while keeping the skin stony matte.
Step 3: Painting and Finishing
-
Dry the clay:
Let your monster dry completely according to your clay type (24-48 hours for air-dry clay). -
Apply the dark base coat:
Paint the entire body, legs, and eyelids with matte black paint. I find distinct brushstrokes add to the rustic charm, so don’t worry about it being perfectly opaque. -
Paint the details:
Carefully paint the eyeballs, horns, and teeth in a creamy off-white color. You may need two coats to cover the dark clay or base coat. -
Refine the eyes:
Use a very fine brush or a toothpick to paint the pupils black again if you accidentally got white paint on them. -
Create texture wash:
If the black looks too flat, create a ‘wash’ with watered-down grey paint and lightly sponge it over the body to highlight the sponge textures you made earlier. -
Seal (Optional):
If using air-dry clay, apply a matte varnish to protect your work without making it too shiny.
Fill your new friend with a small succulent or dried grasses to complete the wild look
Pinch Pot Monster Pencil Cup With a Hungry Mouth
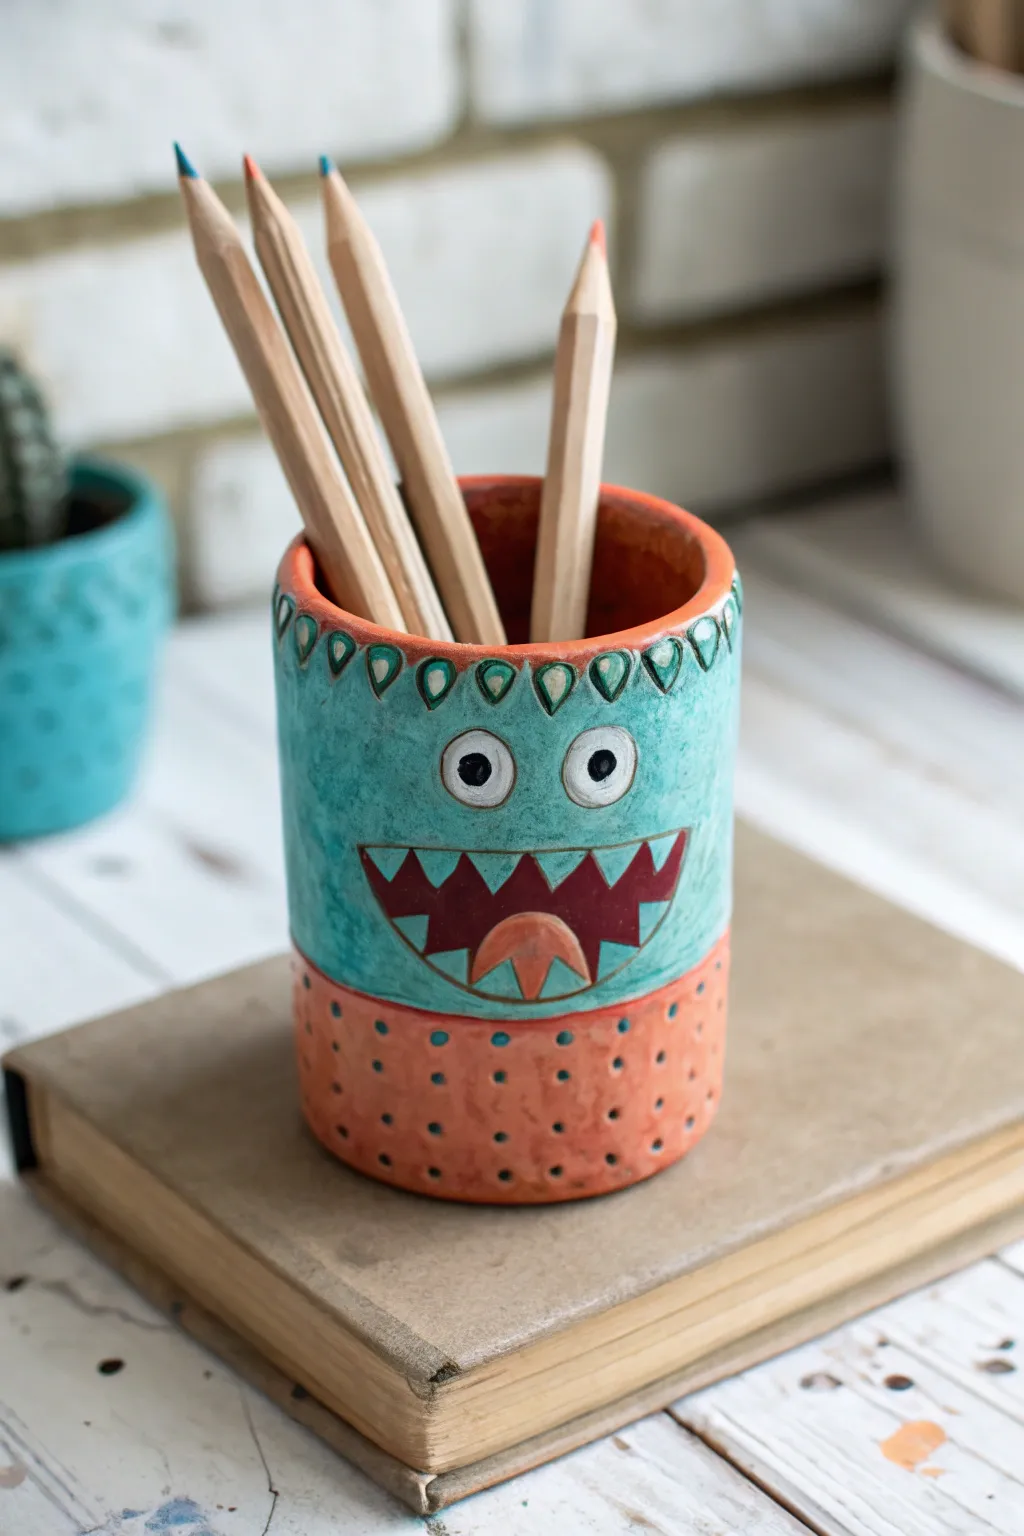
This whimsical pencil cup features a wide, toothy grin and a two-toned color scheme that adds character to any desk. The textured base and decorative rim give it a professional ceramic look, even if you are crafting it at home with air-dry clay.
Step-by-Step
Materials
- Air-dry clay (white or terra cotta)
- Clay rolling pin
- Clay knife or fettling knife
- Small cup or cylinder form (optional, for structure)
- Needle tool or toothpick
- Sponge
- Water cup
- Acrylic paints (teal, orange, dark red, white, black)
- Fine-grit sandpaper
- Clear varnish or sealant (glossy)
Step 1: Forming the Cup Base
-
Prepare the clay:
Start with a ball of clay about the size of a large orange. Wedge it well to remove air bubbles, then roll it into a thick cylinder shape on your work surface. -
Create the pinch pot:
Push your thumb deep into the center of the cylinder, stopping before you break through the bottom. Gently pinch and pull the walls upwards, rotating the piece constantly to keep the thickness even. -
Refine the cylinder:
Once you have the basic cup shape, roll the outside against your table to smooth the walls. If you want perfectly straight sides, I find it helpful to gently press the clay around a cardboard tube or glass jar lined with plastic wrap. -
Smooth the surfaces:
Dip a sponge in a little water and wipe down the exterior and interior walls to remove fingerprints and cracks. Ensure the rim is flat and level.
Fixing Cracks
If hairline cracks appear while drying, mix a tiny bit of clay with water to make a paste (slip) and fill the crack. Smooth it over and let it dry again
Step 2: Sculpting the Details
-
Carve the mouth:
Use a needle tool to sketch a wide semi-circle for the mouth on the side of the cup. Carefully carve out the interior of the mouth slightly to create depth, but don’t cut all the way through. -
Add the teeth:
Score the inside edge of the mouth area. Roll tiny triangular cones of clay for the sharp teeth and press them firmly into the mouth cavity, smoothing the seams so they don’t fall off. -
Attach the eyes:
Roll two small balls of clay and flatten them into discs. Score and slip the back of these discs, then press them onto the cup above the mouth. Add a tiny snake of clay around them for an eyelid if desired. -
Texture the rim:
Using the loop end of a small carving tool or the tip of a spoon handle, press teardrop indentations all around the very top edge of the cup to create a scalloped border pattern. -
Create the base texture:
Define a horizontal line separating the bottom third of the cup. Below this line, use a toothpick or small stylus to poke a grid of small holes all around the base for texture. -
Dry the piece:
Let the pencil cup dry completely for 24-48 hours. Keep it away from direct heat to prevent cracking.
Go 3D
Instead of painting the dots on the base, try rolling tiny balls of clay and attaching them for a raised, bumpy texture before painting
Step 3: Painting and Finishing
-
Sand imperfections:
Once fully dry, gently sand any rough spots, especially around the rim and the teeth. -
Paint the top section:
Paint the upper two-thirds of the cup (including the rim) with a bright teal or turquoise acrylic paint. You may need two coats for opaque coverage. -
Paint the bottom section:
Use a warm orange or muted coral color for the textured bottom third. Let the paint settle into the little poked holes. -
Detail the mouth:
Fill the inside of the mouth shape with a dark red or maroon color. Carefully paint the teeth white, cleaning up any edges where the red might have smudged. -
Detail the eyes and texture:
Paint the eye discs white with black pupils. For the dots on the orange base, you can dab a tiny bit of teal or dark blue into each indentation to make them pop. -
Highlight the rim:
Use a fine brush to outline the teardrop shapes on the rim with a darker teal or black to emphasize the carving. -
Seal the project:
Finish with a coat of glossy varnish to protect the paint and give it that fired ceramic shine.
Now you have a sturdy little monster ready to guard your favorite drawing tools
Toothbrush-Holder Pinch Pot Monster With Bitey Rim Teeth
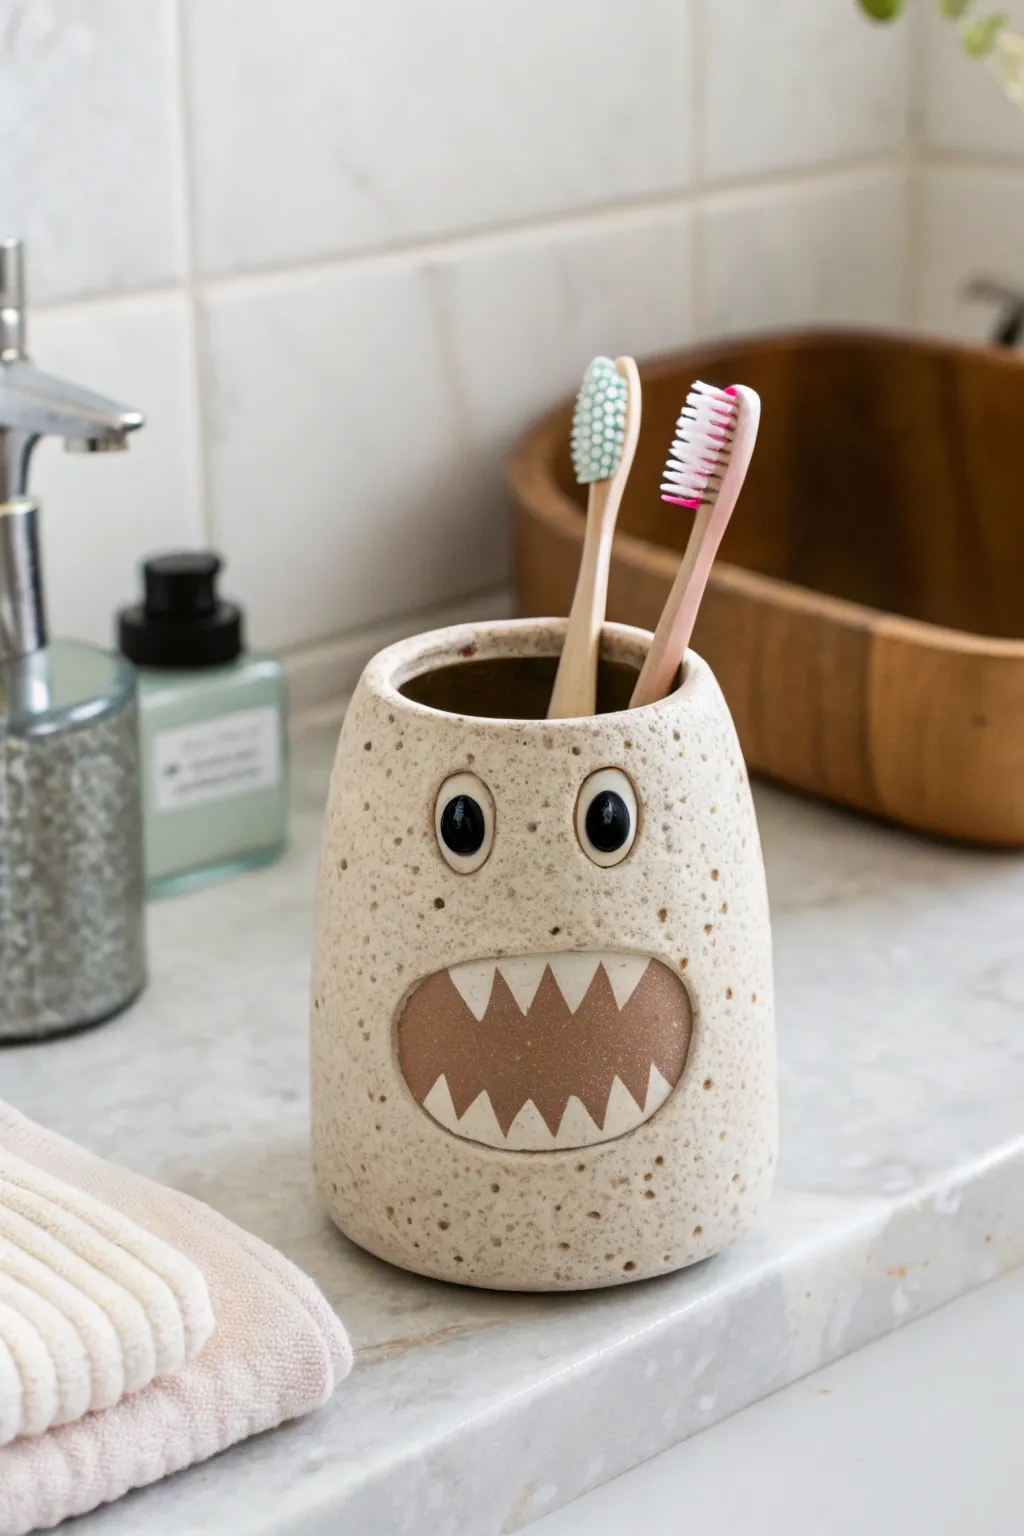
Transform your bathroom countertop with this charmingly ferocious toothbrush holder. Sculpted from speckled stoneware clay, this pinch pot monster features wide, watchful eyes and a toothy grin that makes brushing fun for everyone.
Detailed Instructions
Materials
- Speckled buff stoneware clay
- Pottery needle tool or fettling knife
- Loop tool (for carving)
- Ribs (metal and rubber)
- Slip and scoring tool (or serrated rib)
- Sponge
- Rolling pin
- Small paintbrush
- Glaze: Clear or transparent matte (for the body)
- Underglaze: Black (for pupils), White (for eyes/teeth)
- Kiln access
Step 1: Forming the Base
-
Prepare the Clay:
Start by wedging a ball of speckled stoneware clay about the size of a large orange. This ensures there are no air bubbles. -
Open the Pinch Pot:
Hold the clay ball in one hand and push your thumb into the center, stopping about a half-inch from the bottom. -
Pinch the Walls:
Gently pinch the clay between your thumb and fingers, rotating the ball as you go. Work your way from the bottom up to create a tall, cylindrical shape. -
Refine the Shape:
Aim for a slightly tapered cylinder—wider at the bottom for stability and slightly narrower at the top rim. I find that tapping the base on the table helps create a flat, steady bottom. -
Smooth the Surface:
Use a metal or rubber rib to compress and smooth the outside walls, removing your finger marks and evening out the thickness.
Keep it Clean
When carving the mouth recess, smooth the interior clay with a wet finger or brush immediately. It is much harder to sand this small area smooth once the clay is dry.
Step 2: Sculpting the Monster Face
-
Outline the Mouth:
Using your needle tool, lightly sketch a large, wide oval shape lower down on the cylinder where the mouth will go. -
Carve the Cavity:
Take your loop tool and gently carve away the clay inside your sketched oval. You want to create a recessed area, but be careful not to poke through to the inside of the holder. -
Add the Teeth:
Roll out a small, thin slab of clay. Cut out a zig-zag strip of triangles to act as the teeth. -
Attach the Teeth:
Score the top and bottom edges of the recessed mouth area and slip the back of your zig-zag strip. Press the teeth firmly into the recess so they sit flush with the outer wall. -
Make the Eyes:
Roll two small balls of clay for the eyes. Flatten them slightly so they aren’t perfect spheres. -
Attach the Eyes:
Score the area above the mouth and the back of the eye discs. Apply slip and press them firmly onto the body. Use a small tool to blend the edges if you want a seamless look, or leave them distinct as shown here. -
Smooth Everything:
Run a damp sponge over all attachments to remove sharp edges or burrs.
Step 3: Glazing and Finishing
-
Bisque Fire:
Allow the piece to dry slowly and completely before bisque firing it in the kiln to cone 04 (or your clay’s specification). -
Underglaze the details:
Using a small brush, paint the round part of the eyes and the zig-zag teeth with white underglaze. Paint a small black dot in the center of each eye for pupils. -
Wax Resist:
Apply wax resist over the painted eyes, the teeth, and the raw clay inside the mouth recess if you want it to remain unglazed and textured. -
Glaze the Body:
Dip the entire cup into a clear or transparent matte glaze. The wax will prevent the glaze from adhering to your details. -
Final Fire:
Wipe the bottom clean of any glaze and fire the piece again to the maturation temperature of your clay (likely cone 5 or 6).
Color Pop
Instead of raw clay for the mouth interior, paint the recess with a bright pink or red underglaze before adding the teeth for a more cartoonish, vibrant look.
Now you have a whimsical, durable ceramic friend ready to guard your dental hygiene tools