
Pink clay has this magical way of making everything feel sweeter, softer, and just a little more playful. Here are my favorite pink clay ideas—from classic cute minis to more unexpected statement pieces—so you can pick what fits your vibe today.
Blush Heart Keychain Charms
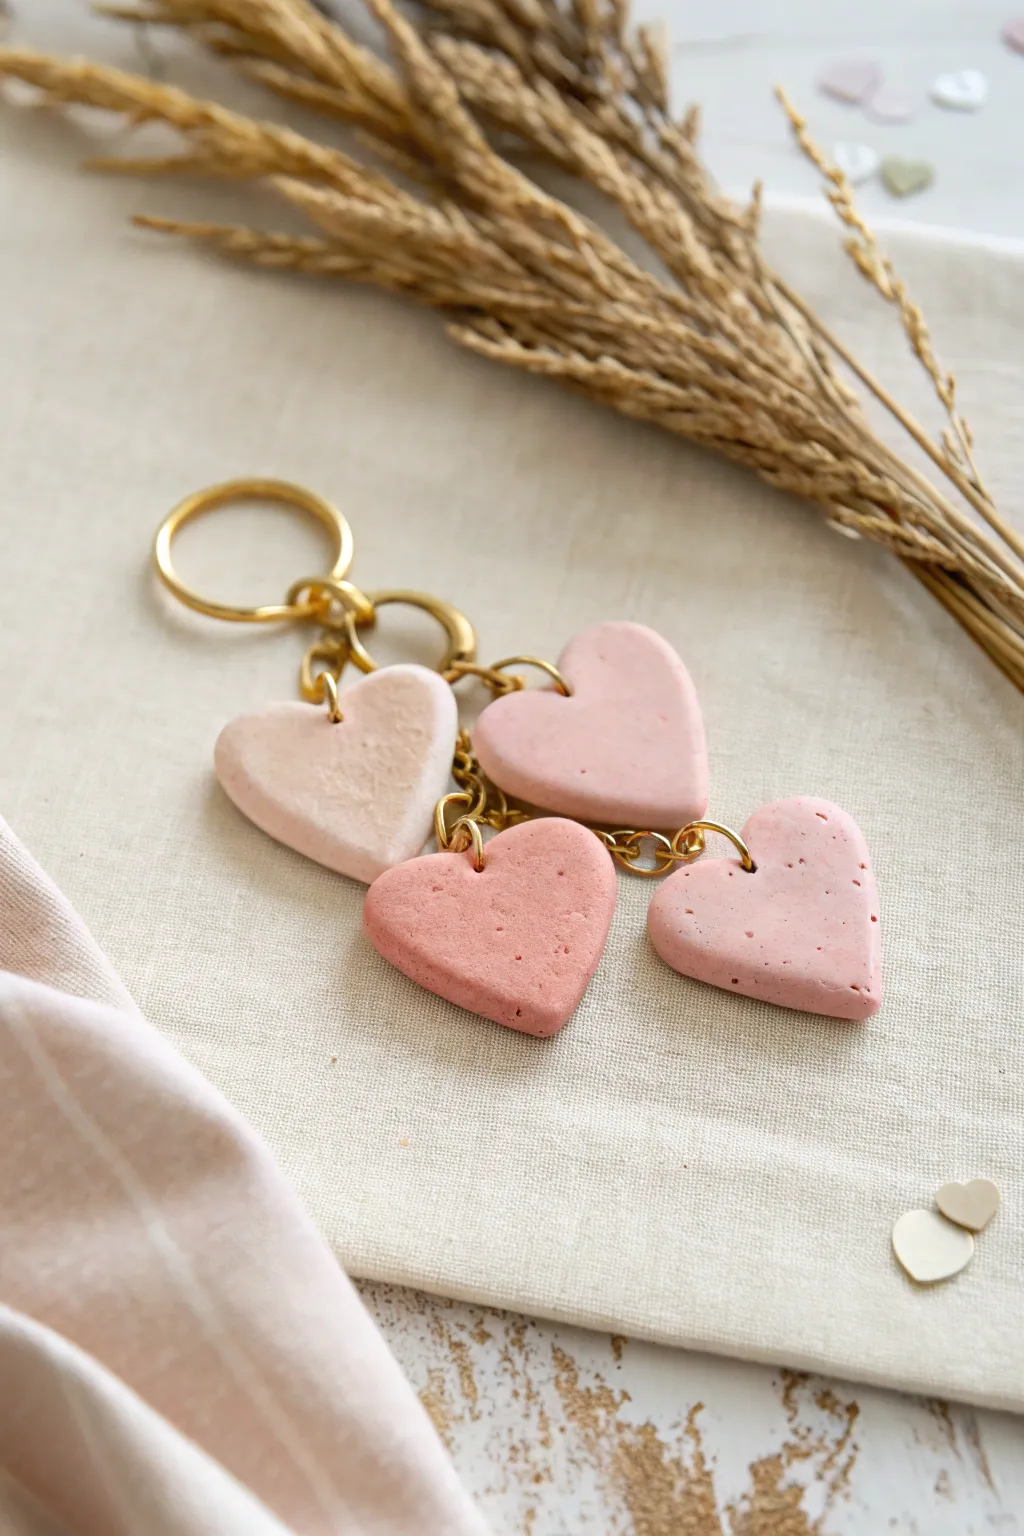
These sweet, minimalist keychain charms feature four clay hearts in varying shades of soft pink and blush. Their matte, slightly speckled finish gives them a lovely natural stone look that pairs perfectly with the gold hardware.
Step-by-Step Tutorial
Materials
- Polymer clay (white, beige, and pink or red)
- Black pepper or dried coffee grounds (for speckling)
- Heart-shaped clay cutters (small size)
- Acrylic rolling pin or pasta machine
- Parchment paper or ceramic tile
- Needle tool or toothpick
- Gold tone keychain ring with chain links
- Gold jump rings (6mm or 8mm)
- Jewelry pliers (flat nose and round nose)
- Fine-grit sandpaper (optional)
- Gloss or matte varnish (optional)
Step 1: Preparing the Clay
-
Condition the clay:
Start by warming up your white clay in your hands until it is soft and malleable. Do the same with small amounts of beige and pink clay separately. -
Mix your base shade:
To achieve that soft blush tone, mix a large amount of white with a tiny pinch of pink and a slightly larger pinch of beige. Knead them together thoroughly until the color is uniform. -
Create color variations:
Divide your clay into four equal balls. Add a tiny bit more pink to two of them and a bit more beige or white to the others to create subtle gradients between the hearts. -
Add texture:
Sprinkle a very small pinch of black pepper or fine dried coffee grounds onto each ball of clay. Fold the clay over the speckles and knead gently to distribute them for that faux-stone effect.
Step 2: Shaping and Baking
-
Roll it out:
Using your acrylic roller or pasta machine, roll the clay out to a thickness of about 4mm to 5mm. You want them thick enough to be durable as a keychain. -
Cut the shapes:
Press your heart-shaped cutter firmly into the clay. Give it a tiny wiggle to ensure a clean cut before lifting. Create one heart from each of your four slightly different color batches. -
Smooth the edges:
Dip your finger in a little bit of water or cornstarch and gently smooth the sharp edges of the cutouts to give them a softer, pillowy look. -
Pierce the holes:
Using a needle tool, poke a hole near the top center of each heart (or slightly to the side on the lobe). Make sure the hole is large enough to fit your jump rings, and wiggle the tool slightly to ensure the opening is clean on both sides. -
Bake:
Place your hearts on a ceramic tile or parchment-lined baking sheet. Bake according to your polymer clay package instructions—usually around 275°F (135°C) for 30 minutes. -
Cool down:
Let the hearts cool completely in the oven with the door slightly ajar. This helps prevent cracking from sudden temperature changes.
Fixing Fingerprints
If you notice fingerprints on your raw clay hearts, lightly brush them with a little baby oil or cornstarch before baking to smooth the surface perfectly.
Step 3: Assembly
-
Sand imperfections:
If there are any rough spots on the edges after baking, lightly buff them away with fine-grit sandpaper for a professional finish. -
Open the jump rings:
Take a gold jump ring and use two pairs of pliers to twist it open. Remember to twist the ends away from each other (front to back) rather than pulling them apart, to maintain the circle shape. -
Attach the hearts:
Slide one open jump ring through the hole in a clay heart. Before closing it, hook it onto the chain links of your main keyring hardware. -
Vary the heights:
Attach the hearts at slightly different points on the chain links so they cascade naturally rather than bunching all at the same level. -
Secure the rings:
Use your pliers to twist the jump rings back into a closed position, ensuring the ends meet perfectly flush so the hearts don’t slip off. -
Final check:
Give the keychain a little shake to make sure all components are secure and the hearts hang freely without getting tangled.
Pro Tip: Liquid Clay
For extra strength around the hole, add a tiny dot of liquid clay or bake-and-bond inside the pierced hole before baking. It acts as a seamless reinforcement.
Now you have a charming, handmade accessory ready to organize your keys or gift to a friend


Mini Pink Bunny Figurines
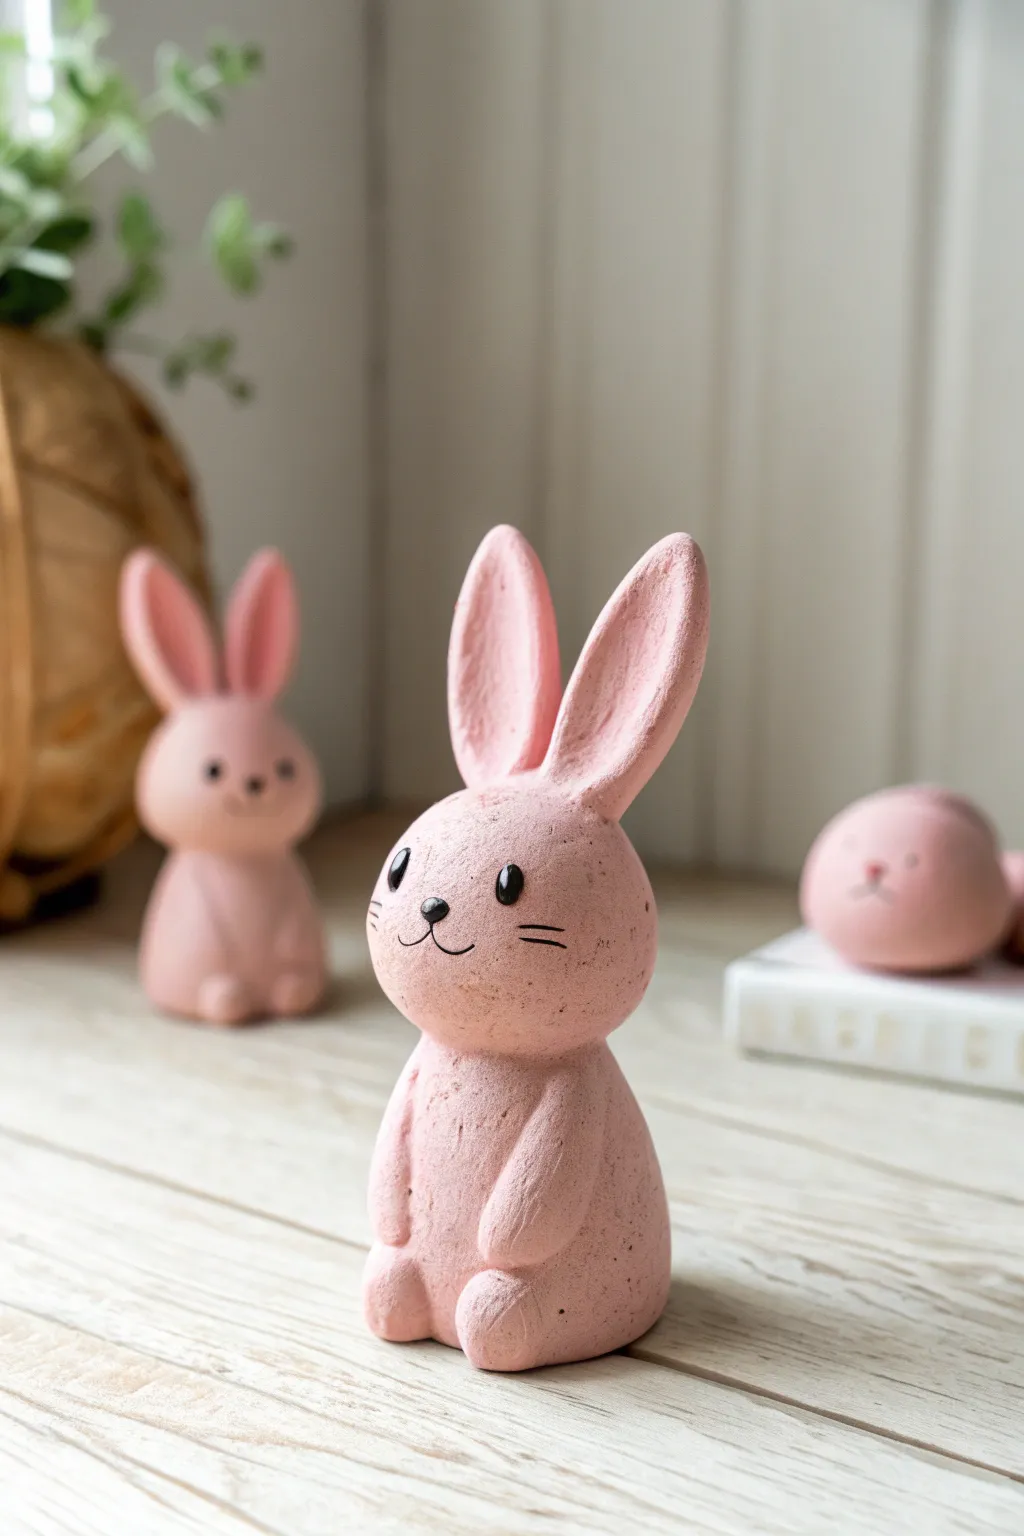
Capture the charm of springtime with these delightful, slightly textured clay bunny figurines. Their soft pink hue and minimalist faces give them a sweet, modern rustic look that’s perfect for shelf decor or Easter centerpieces.
Step-by-Step Guide
Materials
- Pink polymer clay (or air-dry clay tinted with acrylic)
- Black acrylic paint (fine tip tube or small brush)
- Matte sealant or varnish
- Medium-grit sandpaper or a stiff toothbrush (for texturing)
- Clay sculpting tools (needle tool, ball stylus)
- Aluminum foil (for armature core, optional)
- Rolling pin
- Clean work surface
Step 1: Shaping the Body
-
Condition the Clay:
Warm up your pink clay by kneading it thoroughly until it becomes soft and pliable. If you want that specific speckled, stone-like look directly in the clay, you can mix in a tiny pinch of black pepper or fine sand during this stage. -
Form the Base Torso:
Roll a medium-sized ball of clay into a smooth egg shape. This will serve as the bunny’s body. Gently flatten the bottom against your work surface so the figurine stands upright without wobbling. -
Create the Head:
Roll a second, slightly smaller ball for the head. It should be roughly 2/3 the size of the body to keep those cute proportions. -
Attach Head to Body:
Press the head firmly onto the narrower top of the body egg. I like to blend the clay slightly at the connection point with a smoothing tool to ensure it doesn’t pop off later. -
Add Texture:
Before adding limbs, gently tap the entire surface with a stiff toothbrush or a crumpled ball of aluminum foil. This creates the porous, stone-like texture seen in the reference image.
Tip: Stone Effect
To get that speckled, grainy look without special clay, lightly flick diluted brown paint onto the hardened figure using an old toothbrush before sealing.
Step 2: Adding Details & Personality
-
Sculpt the Ears:
Create two long, flattened teardrop shapes for the ears. Make them quite tall relative to the head. -
Attach the Ears:
Press the wider ends of the ears onto the top of the head. Use a blending tool to seamless merge the clay at the base. Gently curve one ear slightly for a more organic, animated look. -
Indent the Inner Ear:
Use a modeling tool or the handle of a small paintbrush to press a shallow groove down the center of each ear, giving them depth. -
Form the Paws:
Roll two small sausage shapes for the front paws. Attach them vertically to the front of the body, blending the top edge so they look like they are resting against the tummy. -
Add Feet:
Create two small ovals for the back feet. Press these onto the bottom front of the body, just slightly protruding so the bunny looks like it’s sitting comfortably. -
Refine the Texture:
Go back over the seams where you attached the ears and limbs with your texturing tool to hide any smooth join lines.
Step 3: Finishing and Painting
-
Bake or Dry:
Follow the manufacturer’s instructions for your specific clay. If using polymer, bake firmly on a tray. If using air-dry, let them sit undisturbed for 24-48 hours. -
Sand for Effects:
Once fully cured, lightly scuff the surface with sandpaper. This emphasizes the texture and mimics the look of carved stone. -
Paint the Eyes:
Using a very fine detail brush or a toothpick dip-in black acrylic paint, add two simple oval eyes. Place them wide apart for a sweeter expression. -
Add Facial Details:
Paint a tiny rounded nose between the eyes and draw thin, delicate whiskers on the cheeks. A small inverted ‘Y’ shape works perfectly for the mouth. -
White Highlights:
Add a microscopic dot of white paint to the top corner of each black eye. This ‘catchlight’ brings the character to life. -
Seal the Project:
Apply a coat of matte varnish to protect the paint and clay. Avoid glossy finishes if you want to maintain that natural, matte stone aesthetic.
Level Up: Trio Display
Make two more bunnies in different poses—one lying completely prone (sleeping) and one sitting on its haunches—to recreate the full family scene.
Now you have a charming little clay companion ready to brighten up your desk or shelf


Kawaii Peach With a Face
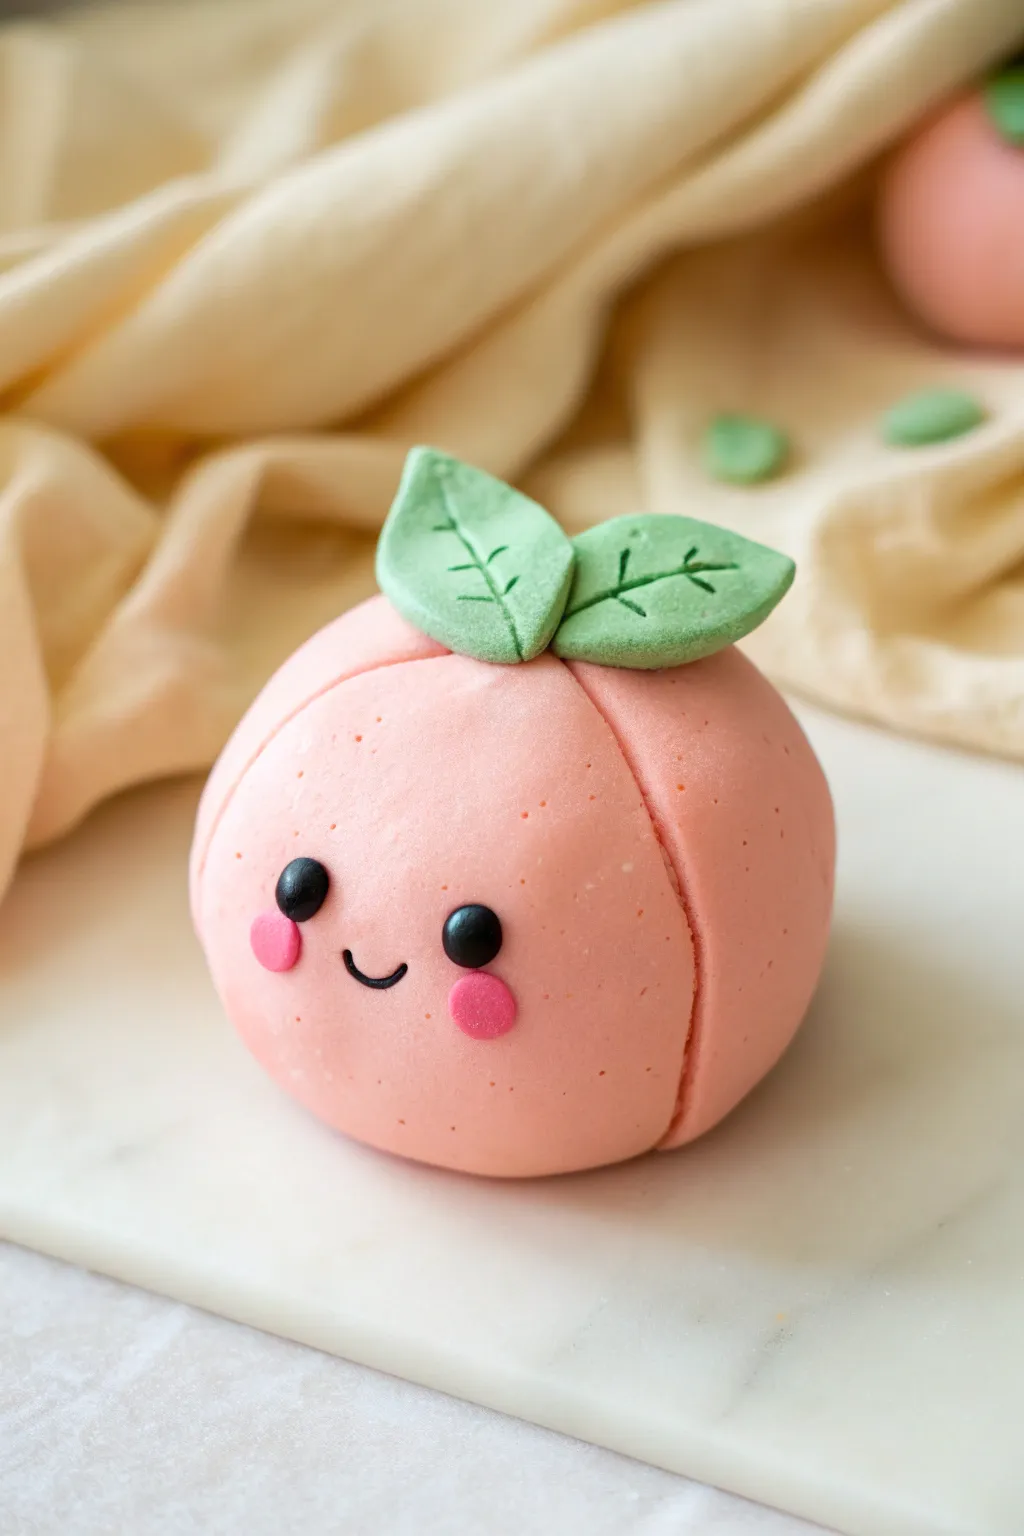
Brighten up your desk or shelf with this adorable, blushing peach character that looks good enough to eat. With its soft pastel pink hue, happy little smile, and textured leaves, this simple clay project captures the essence of kawaii charm.
How-To Guide
Materials
- Polymer clay (Soft pink, Light green, Black, Dark pink)
- Clay sculpting tools (needle tool or toothpick, ball tool)
- Clean work surface or ceramic tile
- Aluminum foil (optional, for core)
- Oven for baking
- Gloss glaze (optional)
Step 1: Shaping the Fruit Base
-
Condition the Peach Clay:
Start by taking a generous amount of soft pink polymer clay. Knead it thoroughly in your hands until it becomes warm, pliable, and free of any cracks. -
Form the Sphere:
Roll the pink clay between your palms to create a smooth, perfect sphere. If you want to save clay or make a larger figure, you can use a tightly crumpled ball of aluminum foil as a core and wrap the clay around it. -
Create the Peach Cleft:
Gently press the side of a needle tool or a knitting needle vertically down one side of the sphere. Rock it back and forth slightly to create the distinctive deep groove of a peach, ensuring it’s soft and rounded, not sharp. -
Slight Flattening:
Tap the bottom of the peach gently against your work surface. This creates a small flat spot so your character will sit upright without rolling away. -
Texture the Skin:
To mimic the velvety texture shown in the photo, you can gently tap the surface with a clean toothbrush or a coarse sponge. This step is subtle but adds a nice matte finish.
Clean Hands Trick
Use a baby wipe or hand sanitizer between colors! Switching from black clay back to light pink can easily smudge your peach base.
Step 2: Adding the Happy Face
-
Position the Eyes:
Take two tiny pieces of black clay and roll them into small balls. Flatten them slightly into discs and press them onto the front of the peach, spacing them widely apart for maximum cuteness. -
Form the Mouth:
Roll an incredibly thin snake of black clay. Cut a tiny U-shaped segment and carefully place it centered between the eyes using your needle tool to guide it into a smile. -
Add Rosy Cheeks:
Condition a small amount of dark pink or magenta clay. Roll two small balls, slightly smaller than the eyes, and flatten them. -
Place the Cheeks:
Press these pink discs just below and slightly outside the eyes. I find this placement gives the face that classic shy, sweet expression.
Make it a Charm
Insert a metal eye pin into the top center of the peach (between the leaves) before baking to turn this into a keychain or necklace pendant.
Step 3: Crafting the Leaves
-
Prepare Green Clay:
Condition your light green clay. Divide a small portion into two equal pieces for the leaves. -
Shape the Teardrops:
Roll each green piece into a ball, then pinch one end to form a teardrop shape. Flatten them gently with your thumb. -
Detail the Veins:
Using your needle tool or a craft knife, score a central line down each leaf. Then, press small diagonal lines branching off the center to create realistic leaf veins. -
Attach the Leaves:
Place the two leaves at the very top of the peach, right where the cleft starts. Angle them slightly outward so they look perky. -
Secure the Connection:
Gently press the base of the leaves into the peach body. You can use a dab of liquid clay or bake-and-bond if you’re worried about them falling off later.
Step 4: Baking and Finishing
-
Final Inspection:
Check your peach for any fingerprints or dust specks. Smooth them out gently with your finger or a little baby oil. -
Bake the Project:
Place your peach on a baking sheet or ceramic tile. Bake according to your specific polymer clay’s package instructions (usually around 275°F/135°C for 15-30 minutes depending on thickness). -
Cool Down:
Let the peach cool completely in the oven with the door slightly ajar. Sudden temperature changes can sometimes cause cracks. -
Optional Glaze:
If you want a shiny look for the eyes to make them look wet and alive, apply a tiny drop of gloss glaze to just the black eye parts after cooling.
Now you have a sweet little fruit friend ready to brighten up any corner of your room


Pink Piggy Mini Sculptures
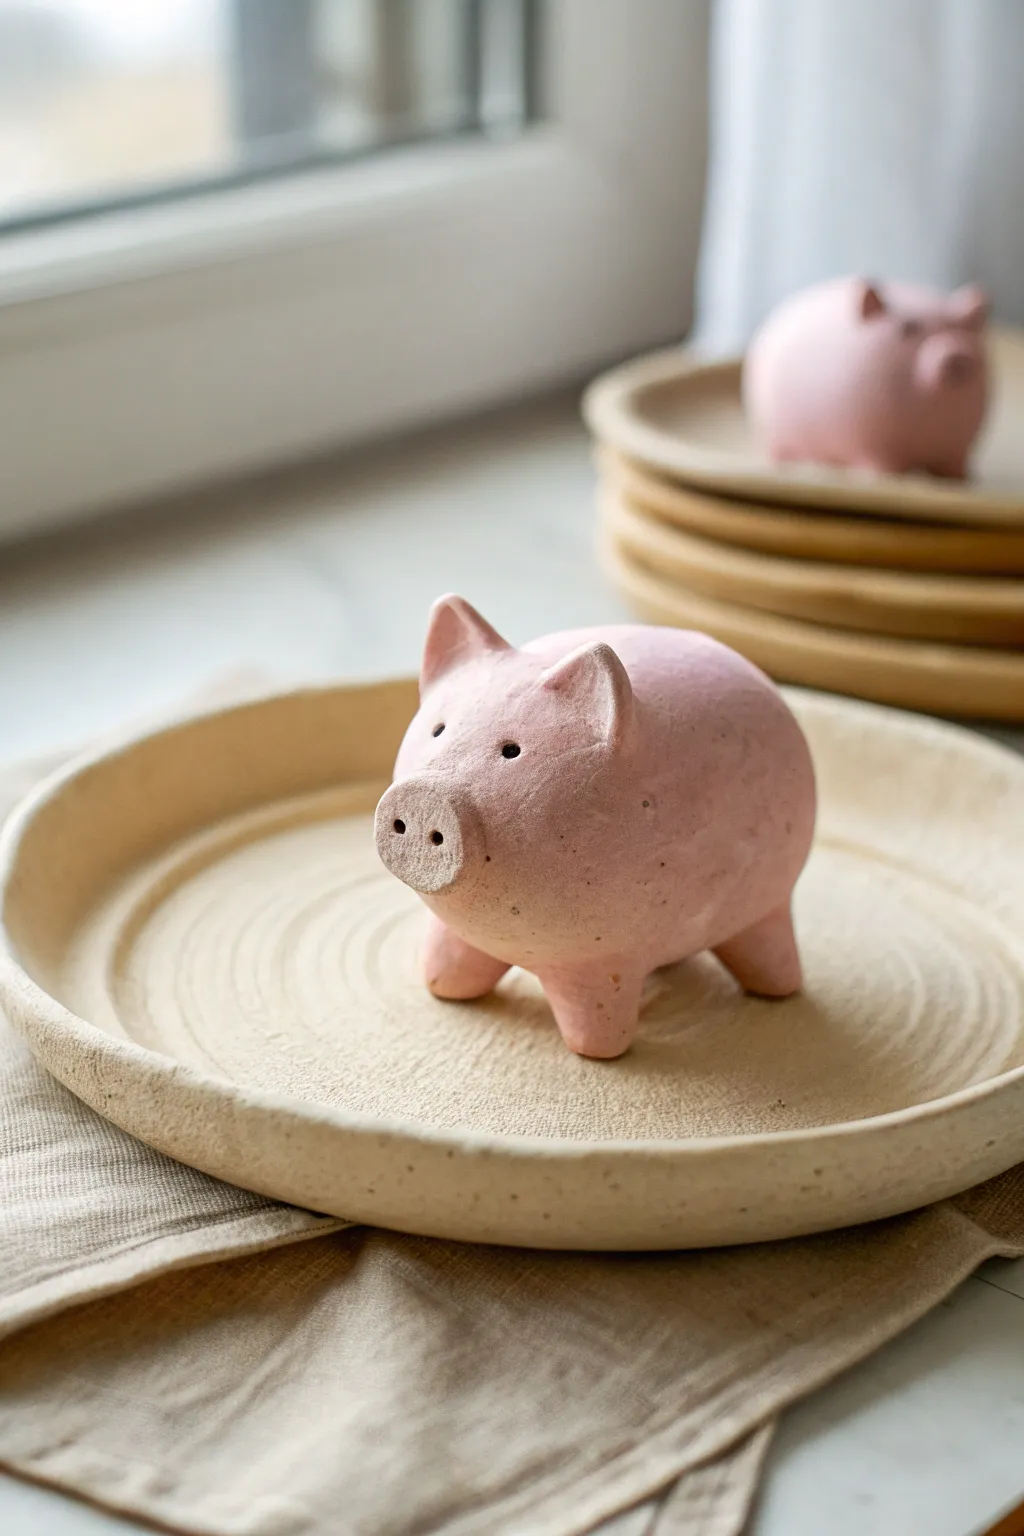
Create adorable, minimalistic pig figurines that add a touch of whimsy to any shelf or table. With their textured, matte finish and simple shapes, these little sculptures strike the perfect balance between cute and artisanal.
Step-by-Step Tutorial
Materials
- Pink air-dry clay (or polymer clay in a dusty rose shade)
- Black acrylic paint
- Small dotting tool or toothpick
- Modeling tools (or a simple knife)
- Water (for smoothing)
- Fine-grit sandpaper
- Matte varnish (optional)
Step 1: Shaping the Base Body
-
Prepare the Clay:
Start by conditioning your clay. Knead a palm-sized amount until it is warm and pliable to prevent cracks later on. -
Form the Torso:
Roll the clay into a smooth ball, then gently elongate it into a pill or potato shape. This will be the main body of your pig. -
Smooth the Surface:
Run your finger dipped in a tiny bit of water over the surface to erase any fingerprints or deep creases.
Cracks while drying?
Mix a tiny bit of fresh clay with water to create a thick slip. Paint this paste into any cracks, smooth it over, and let it dry again.
Step 2: Sculpting the Features
-
Create the Snout:
Roll a small, flat disk of clay about the size of a dime. Press this firmly onto the front center of the body. -
Detail the Nose:
Using the back of a small paintbrush or a dedicated smoothing tool, blend the edges of the snout onto the face just slightly so it doesn’t look like it’s falling off. Keep the front flat. -
Nostrils:
Take a tool with a blunt, round point and press two distinct holes into the flat snout disk to create the nostrils. -
Shape the Ears:
Form two small triangles of clay. Pinch them slightly at the base to create a curve. -
Attach the Ears:
Score the top of the head lightly where the ears will go. Press the ears on, pointing them slightly forward. Smooth the seam at the back of the ear into the head. -
Add Legs:
Roll four equal-sized, stubby cylinders for the legs. They should be quite short to keep the pig stable. -
Secure the Stance:
Press the legs onto the bottom of the body. I find it helpful to gently tap the whole sculpture onto the table to flatten the bottom of the feet, ensuring it stands level.
Step 3: Finishing Touches
-
Refine the Texture:
For that rustic, handmade look seen in the photo, take an old toothbrush or a stiff bristle brush and gently tap it all over the pig’s skin to create a subtle pitted texture. -
Create Eye Sockets:
With a small dotting tool, press two tiny indentations where the eyes will sit, positioned slightly wider than the snout. -
Drying Time:
Allow the clay to dry completely according to the package instructions. For air-dry clay, this usually takes 24-48 hours. Turn it over halfway through to let the belly dry. -
Sanding:
Once bone dry, lightly scuff any sharp edges or rough seams with fine-grit sandpaper. -
Painting the Eyes:
Dip a toothpick into black acrylic paint and carefully dab it into the eye sockets you created earlier. You want tiny, beady eyes. -
Final Seal:
To preserve the matte look, leave the clay raw or apply a very thin coat of ultra-matte varnish. Avoid glossy finishes.
Clay Tip
If using polymer clay, wipe the unbaked surface with baby oil before baking. It removes fingerprints and dust like magic for a cleaner finish.
Now you have a charming little pig to bring a smile to your face every time you walk by

The Complete Guide to Pottery Troubleshooting
Uncover the most common ceramic mistakes—from cracking clay to failed glazes—and learn how to fix them fast.
Pink Marble Slab Earrings
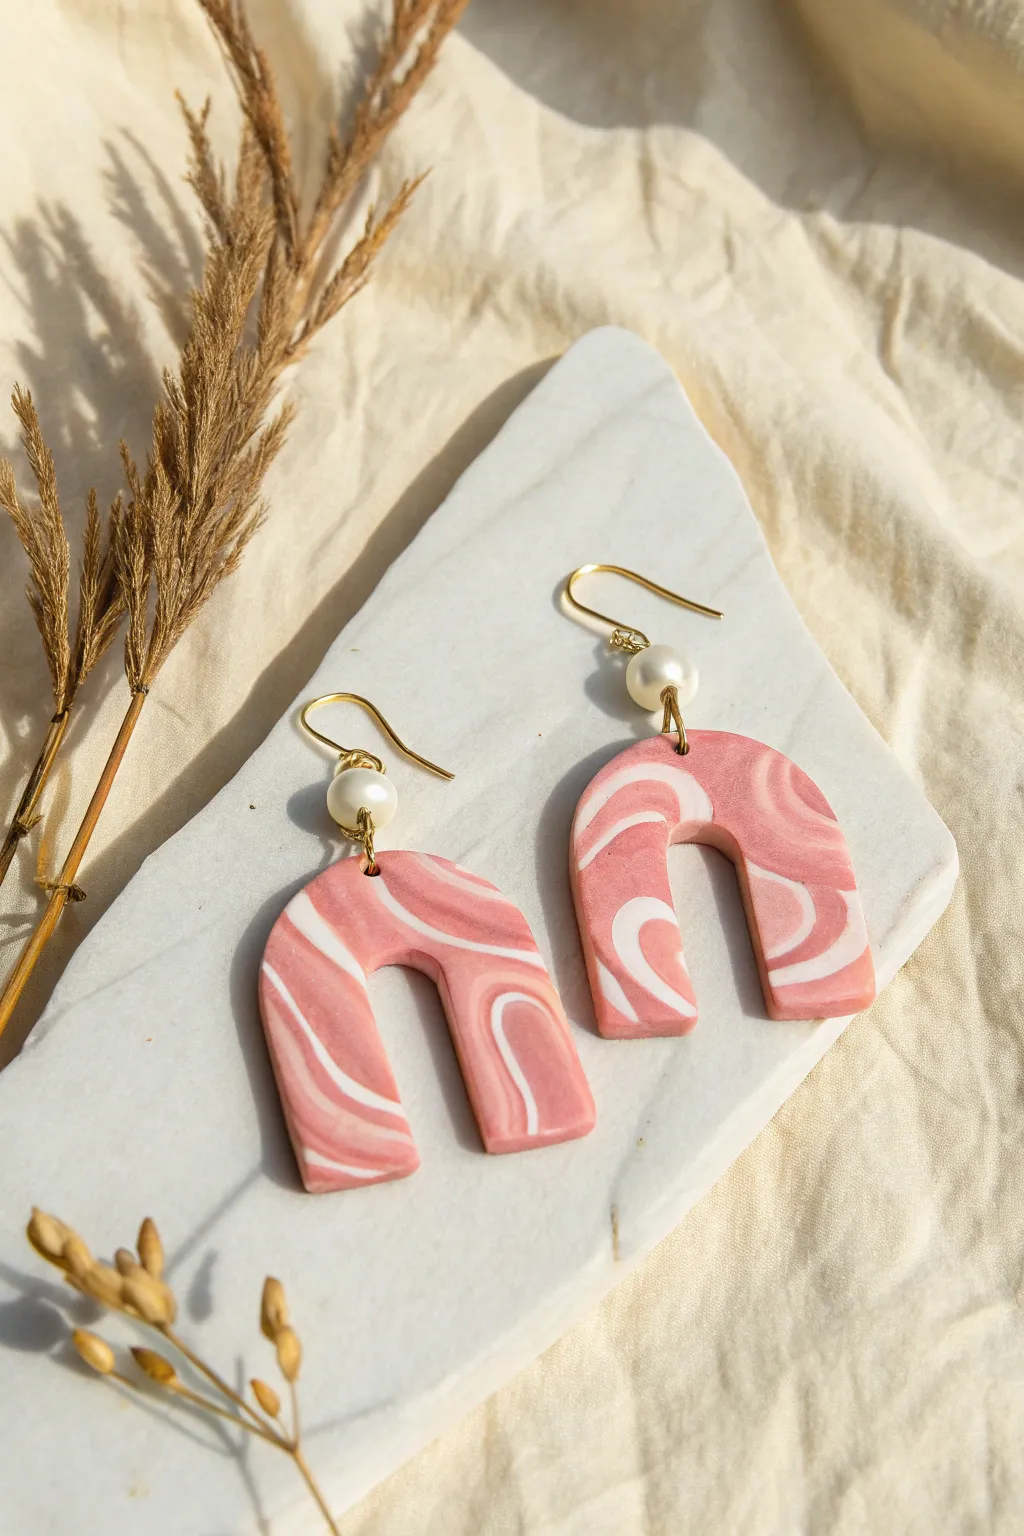
Create a stunning pair of statement earrings featuring a dreamy pink and white marble pattern. These elegant arch-shaped dangles are accented with a delicate pearl bead, adding a sophisticated touch to the playful clay design.
Detailed Instructions
Materials
- Pink polymer clay (dusty rose shade)
- White polymer clay
- Translucent polymer clay (optional, for depth)
- Acrylic rolling pin or pasta machine
- U-shaped or arch clay cutter
- Small circle cutter (for jump ring holes) or needle tool
- Two pearl beads with holes
- Two gold eye pins
- Two gold French hook ear wires
- Gold jump rings (sturdy gauge)
- Jewelry pliers (round nose and flat nose)
- Ceramic tile or baking sheet
- Parchment paper
- Fine grit sandpaper (400-1000 grit)
- Clay varnish or resin (optional)
Step 1: Preparing the Marble Slab
-
Condition the clay:
Start by kneading your pink and white polymer clay separately until they are soft and pliable. If you want to add depth, condition a small amount of translucent clay as well. -
Create logs:
Roll the pink clay into a thick log and the white clay into a slightly thinner log. If using translucent, make a very thin snake of it. -
Combine colors:
Twist the white log around the pink log like a candy cane. Add the translucent snake effectively wrapping it into the mix. -
Twist and fold:
Roll the combined log into a smooth snake, then fold it in half and twist it again. Repeat this twist-and-fold process about 3-4 times. Be careful not to over-mix; you want distinct streaks, not a solid light pink color. -
Form the ball:
Once you like the variegation in your snake, roll it into a tight ball. This helps randomize the pattern further. -
Flatten the slab:
Using your acrylic roller or pasta machine, flatten the ball into a slab approximately 3mm thick. I like to roll in different directions to stretch the pattern organically.
Keep it Clean
White clay picks up dust instantly. Wipe your work surface, hands, and tools with a baby wipe or alcohol before handling the white clay to keep the marble bright.
Step 2: Cutting and Baking
-
Select your cutting area:
Look at your marble slab and identify the areas with the most beautiful swirls. Place your arch cutter over these sweet spots. -
Cut the shapes:
Press the cutter firmly down into the clay. Give it a tiny wiggle to ensure it cuts all the way through, then lift it. Gently push the clay shape out if it sticks. -
Smooth the edges:
Before baking, run your finger lightly along the cut edges to smooth out any roughness or loose bits of clay. This saves sanding time later. -
Pierce holes:
Use a needle tool or a very small circle cutter to make a hole at the top center of each arch. Ensure the hole is large enough for your jump ring but not too close to the edge. -
Bake carefully:
Place the cut shapes on a ceramic tile or parchment-lined baking sheet. Bake according to your brand of clay’s instructions (usually around 275°F or 130°C) for 30–45 minutes. Tent with foil to prevent scorching.
Step 3: Assembly and Finish
-
Cool and sand:
Let the pieces cool completely. If there are still rough edges, wet sand them gently with fine-grit sandpaper under running water. -
Buff or varnish:
You can buff the clay with a soft cloth for a natural sheen or apply a thin coat of matte varnish for protection. -
Prepare the pearl accent:
Slide a pearl bead onto a gold eye pin. Trim the excess wire to about 1cm, then use round nose pliers to create a loop at the top, closing the bead in. -
Attach the bead:
Open a jump ring using two pairs of pliers (twist sideways, don’t pull apart). Thread it through the hole in the clay arch and the bottom loop of your pearl connector. Close the ring securely. -
Add ear wires:
Finally, open the loop on your French hook ear wire and attach it to the top loop of the pearl connector. Close the loop, ensuring everything faces forward.
Bubbled Surface?
If you see air bubbles after rolling your slab, gently pierce them with a needle tool and smooth the air out with your finger before cutting your shapes.
Wear your new swirled creations with pride or gift them to a friend who loves unique accessories
Strawberry Milk Carton Charms
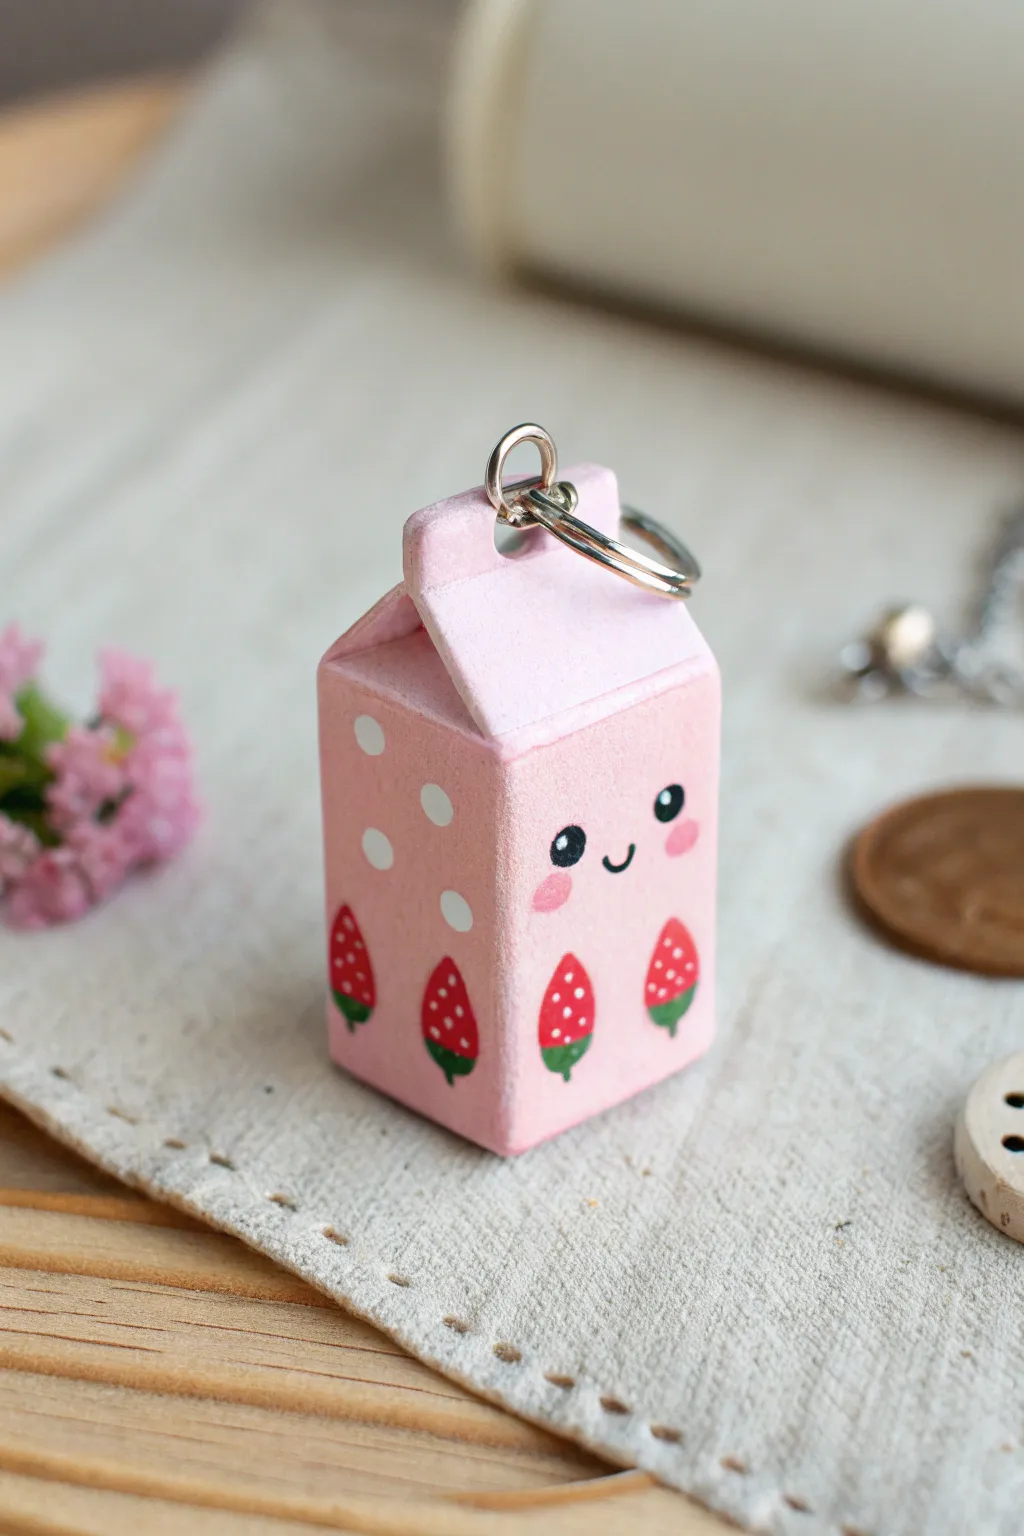
This adorable polymer clay charm captures the sweet nostalgia of strawberry milk in miniature form. With its soft pink finish, Kawaii face, and tiny strawberry details, it makes for a perfect necklace pendant or keychain accessory.
Step-by-Step
Materials
- Polymer clay (light pink, white, red, green, black)
- Blade or X-Acto knife
- Rolling pin or pasta machine
- Needle tool or toothpick
- Metal eye screw
- Jump rings and keychain hardware
- Gloss glaze or matte varnish (optional)
- Oven for baking
Step 1: Basic Shape Construction
-
Condition the clay:
Start by conditioning your light pink polymer clay until it is soft and pliable. If the shade isn’t quite right, mix a tiny bit of white clay with translucent red until you get that milky pastel hue. -
Form the block base:
Shape a substantial amount of the pink clay into a rectangular prism. This will be the main body of the milk carton. Ensure the bottom is flat so it stands upright. -
Create the top slope:
Using your blade, carefully slice the top of the rectangle at an angle to create the gable shape typical of milk cartons. If you slice too much, simply add a bit of clay back and re-smooth. -
Form the carton ridge:
Roll out a thin sheet of pink clay. Cut a rectangular strip that is slightly wider than the top of your carton. Fold this strip lengthwise but don’t crease it sharply; let it have a rounded top. -
Attach the top ridge:
Place the folded strip along the top ridge of your carton base. Gently blend the seams where the strip meets the angled sides using your finger or a smoothing tool, leaving the very top edge defined.
Fingerprint Troubles?
If you see fingerprints on your raw clay, lightly brush the surface with a little baby oil or cornstarch before baking to smooth them out completely.
Step 2: Adding Details & Face
-
Pre-bake hole:
Before adding delicate details, carefully screw the metal eye screw into the top center of the carton ridge. Remove it carefully; you’ll glue it in later, but the threaded hole needs to be there now. -
Create the eyes:
Roll two extremely tiny balls of black clay. Flatten them gently onto the upper third of the wide side of the carton to create the eyes. -
Add eye shine:
Using a needle tool or toothpick, pick up the tiniest speck of white clay and place it on the upper corner of each black eye for a ‘sparkle’ effect. -
Make the mouth:
For the smile, you can either roll a microscopic snake of black clay and shape it into a ‘U’, or carefully paint it on after baking. In this project, I find using a tiny bit of clay gives it better dimension. -
Add rosy cheeks:
Mix a slightly darker pink clay. Roll two small, flattened ovals and place them just below and outside the eyes.
Pro Tip: Clean Cuts
Pop your clay in the fridge for 10 minutes before cutting the carton angles. Cool clay is firmer and slices cleanly without squishing the shape.
Step 3: Strawberry Patterns
-
Form the strawberries:
Roll tiny teardrop shapes from red clay. Flatten them against the bottom section of the carton’s sides. You’ll want about two or three per side depending on the size. -
Add leaves:
Using green clay, create minuscule triangles or diamonds. Place two at the top of each red strawberry to simulate leaves. -
Seed details:
Take your needle tool and gently prick the surface of the red strawberries to create texture, or use the tiniest dots of white clay to mimic seeds. -
Polka dot accents:
Roll small balls of white clay and flatten them randomly on the sides and back of the carton to break up the pink space.
Step 4: Finishing
-
Bake the charm:
Bake the piece according to your polymer clay manufacturer’s instructions (usually 275°F/135°C for 15-30 minutes). Use an oven thermometer to ensure accuracy. -
Cool and assemble:
Allow the charm to cool completely. Add a dab of superglue to your eye screw and twist it back into the pre-made hole. -
Seal (Optional):
If desired, apply a matte varnish for a natural look or a gloss glaze to make it look shiny and wet. Let it dry fully before attaching the jump ring and keychain hardware.
Now you have a sweet little charm ready to accompany you on your keys or bag


What Really Happens Inside the Kiln
Learn how time and temperature work together inside the kiln to transform clay into durable ceramic.
Pink Cat Head Phone Charm
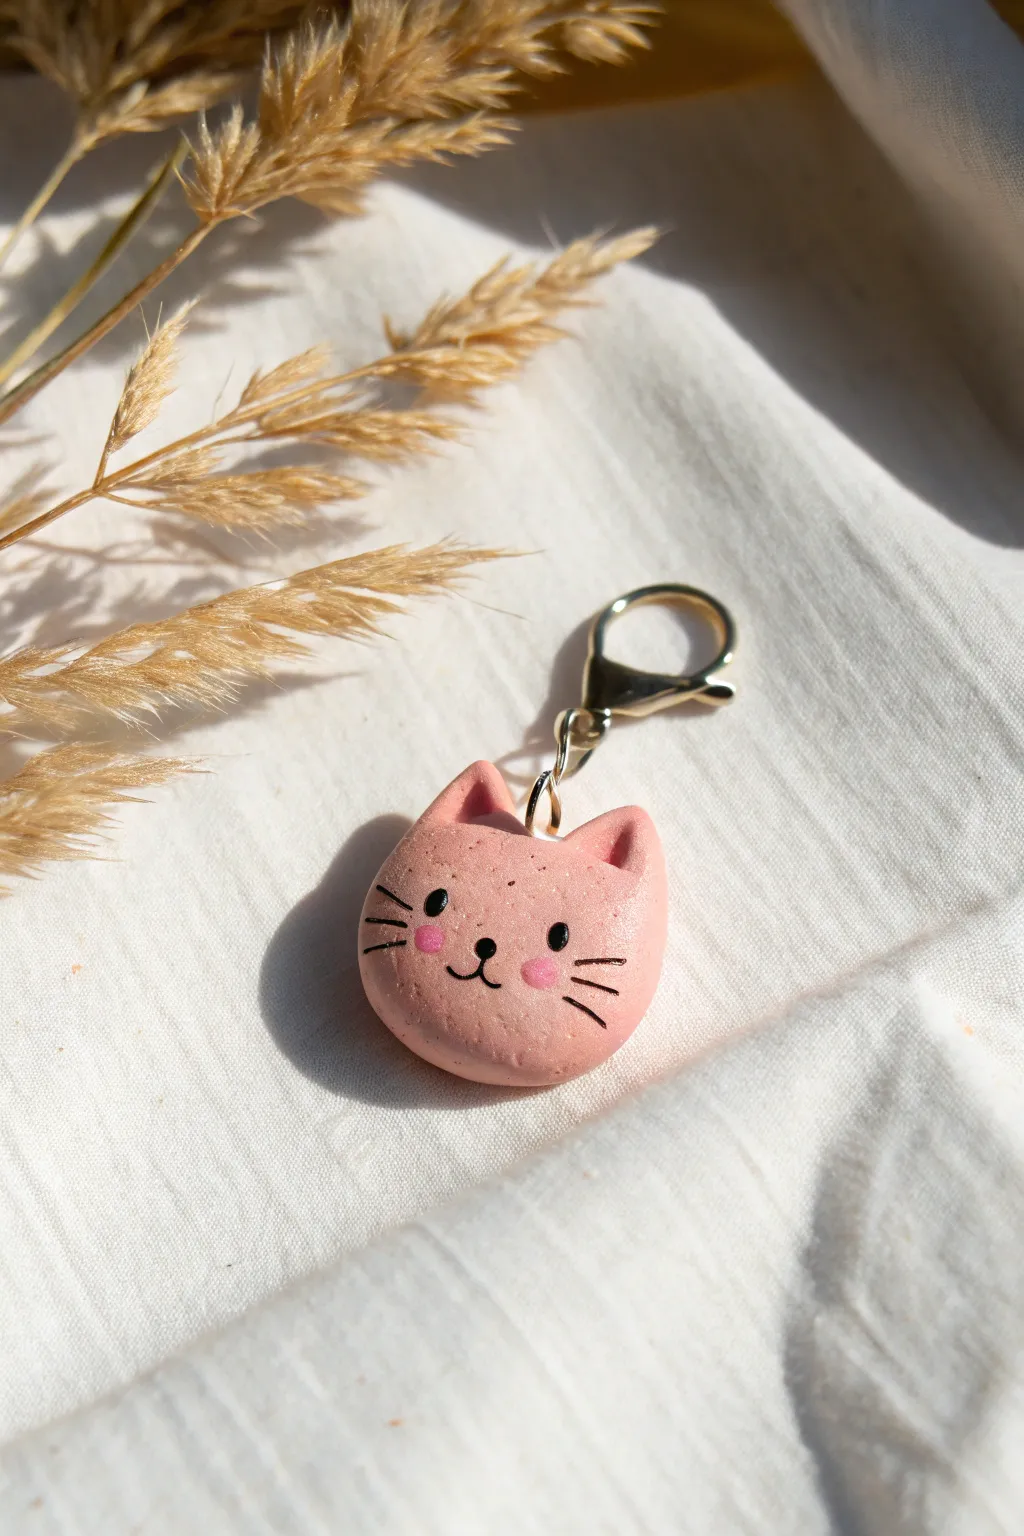
This adorable little feline charm captures a sweet expression in soft, speckled pink clay. It’s a quick and gratifying project perfect for beginners, resulting in a durable accessory for your phone, zipper, or keychain.
Detailed Instructions
Materials
- Pink polymer clay (a speckled or granite effect adds nice texture)
- Black acrylic paint
- Soft pink acrylic paint or pink pastel chalk
- Fine detail paintbrush
- Dotting tool or toothpick
- Small metal jump ring
- Gold lobster clasp
- Headpin or eye pin
- Clay sculpting tools (needle tool)
- Gloss glaze (optional)
Step 1: Sculpting the Base
-
Condition the Clay:
Start by kneading a small amount of pink polymer clay until it is soft and pliable. If you want the speckled look shown in the photo but only have solid pink, try mixing in a tiny pinch of black pepper or granite-effect clay. -
Shape the Head:
Roll the clay into a smooth ball, roughly the size of a large marble or a grape so it isn’t too heavy. -
Flatten Slightly:
Gently press the ball down onto your work surface with your palm to create a thick, rounded disc shape. It should be puffed, not flat like a coin. -
Refine the Outline:
Use your fingers to gently smooth the edges, rounding out any sharp angles so the head looks soft and organic.
Step 2: Adding Ears & Hardware
-
Form the Ears:
Pinch off two very small, equal-sized pieces of the same pink clay. Roll them into tiny balls and then pinch one side to create a triangle shape. -
Attach the Ears:
Place the triangular ears on top of the head. Use a blending tool or your finger to smooth the seam where the ear meets the head so they bond securely. -
Indent the Ears:
With a small ball tool or the rounded end of a paintbrush, gently press into the center of each ear to create a concave inner ear shape. -
Insert the Pin:
Carefully push an eye pin into the center top of the head, right between the ears. I find it helps to add a tiny dab of liquid clay or bake-and-bond to the pin shaft to ensure it stays put after baking.
Make it Sparkle
Before baking, lightly brush the unbaked clay with white mica powder. This gives the cat a subtle, pearlescent shimmer without needing glitter.
Step 3: Baking & Painting
-
Bake:
Bake the piece according to your clay manufacturer’s instructions, typically around 275°F (130°C) for 15-30 minutes depending on thickness. -
Cool Down:
Let the charm cool completely before painting. Painting on warm clay can ruin your brushes and make the paint dry clumpily. -
Paint the Eyes:
Dip a small dotting tool into black acrylic paint and gently dab two small dots for the eyes. Space them fairly wide apart for a cute look. -
Draw the Nose and Mouth:
Using your finest detail brush, paint a tiny inverted triangle or oval for the nose between the eyes. Draw a small anchor shape extending down from the nose to form the mouth. -
Add Whiskers:
With the very tip of your fine brush, lightly flick three short lines on each cheek. Keep your hand steady and use very little pressure for thin lines. -
Blush the Cheeks:
Mix a slightly darker pink paint or use pink pastel chalk dust. Dab it gently onto the cheeks right under the eyes for a rosy glow. -
Seal (Optional):
If you want extra durability, apply a thin coat of matte or gloss varnish over the facial features once the paint is fully dry.
Shaky Hands?
If you struggle painting fine whiskers with a brush, use a fine-tip permanent marker or archival ink pen after the clay is baked and cooled.
Step 4: Assembly
-
Open the Jump Ring:
Use two pairs of pliers to twist open your small metal jump ring. Never pull rings apart; always twist sideways. -
Connect the Clasp:
Slide the open jump ring through the loop of the eye pin you baked into the cat’s head. Add the gold lobster clasp onto the ring as well. -
Close the Ring:
Twist the jump ring back into a closed position, ensuring the ends meet perfectly flush so the clasp doesn’t slip off.
Now you have a charming little friend to dangle from your keys or phone case
Cubed Pink Animal Friends
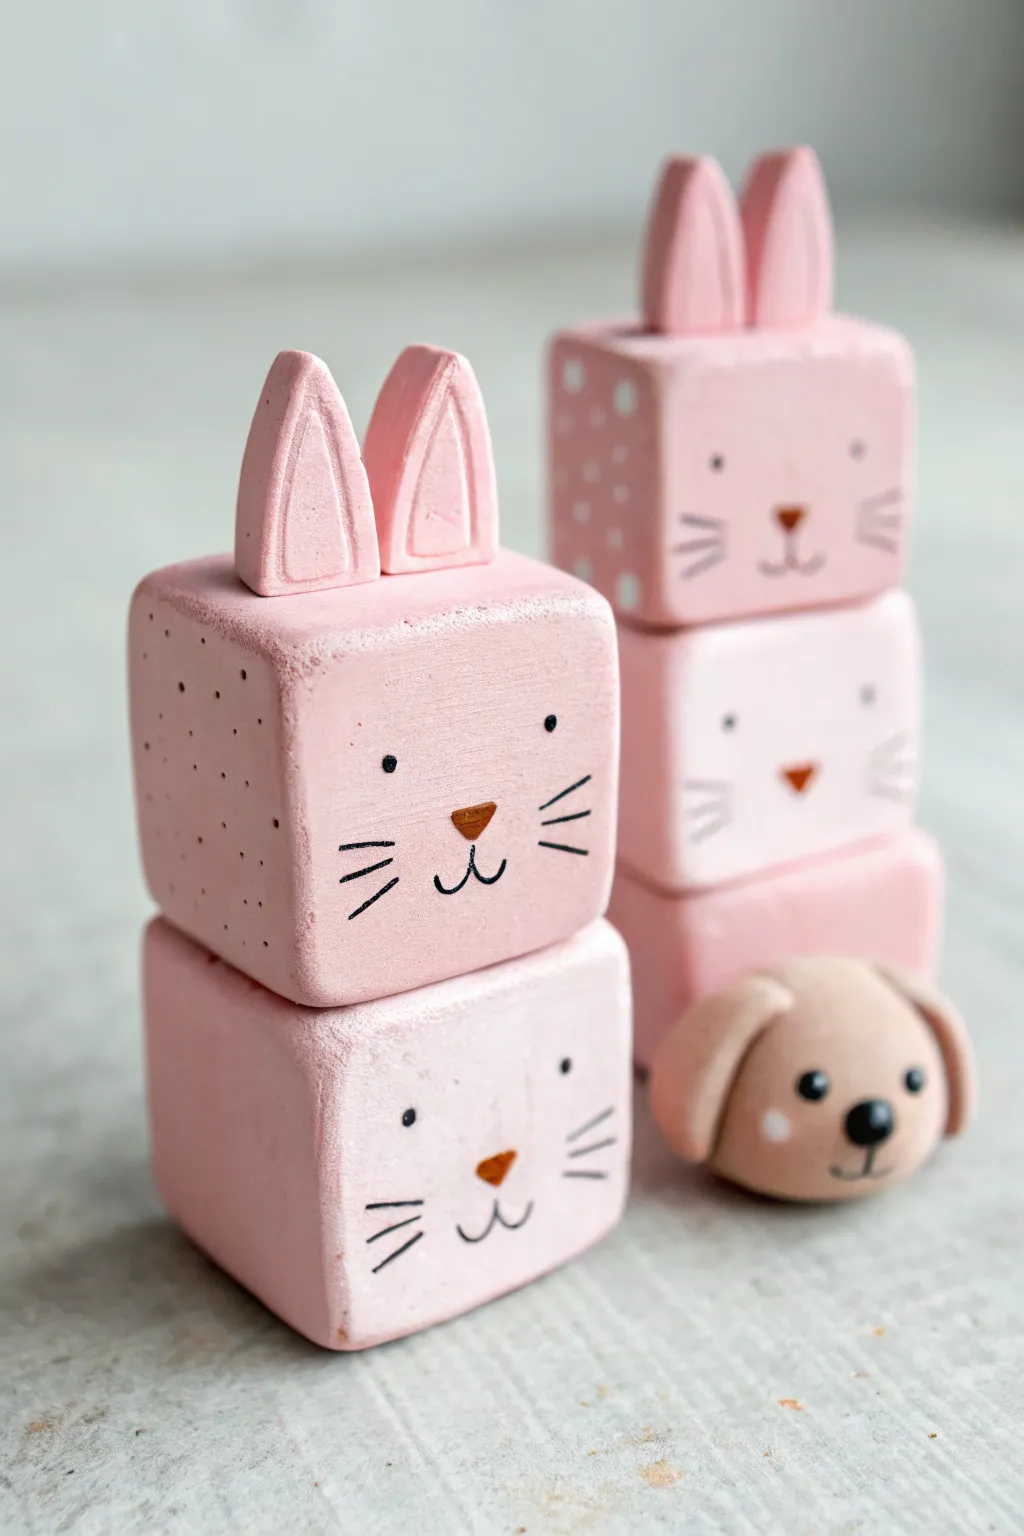
Transform simple geometric blocks into adorable woodland creatures with this charming clay project. These pink bunny stacks combine minimalist design with sweet, hand-painted details for a delightful nursery decoration or desk companion.
How-To Guide
Materials
- Pink polymer clay or air-dry clay
- Rolling pin or clay roller
- Sharp clay blade or craft knife
- Fine-grit sandpaper
- Acrylic paints (black, white, burnt orange)
- Small beige wooden bead or ball (for the puppy companion sidekick)
- Fine detail paintbrush (size 00 or 000)
- Strong craft glue or liquid clay
- Matte varnish or sealant
- Ruler
Step 1: Forming the Base Blocks
-
Condition the Clay:
Begin by thoroughly kneading your pink clay until it is soft and pliable. If you are using air-dry clay, keep your hands slightly moist to prevent cracking. -
Shape the Cubes:
Roll the clay into a thick log or block shape. Using your clay blade and ruler, cut four equal-sized cubes, approximately 1.5 to 2 inches on each side. -
Refine the Edges:
Gently tap each side of the cubes against a flat work surface to flatten the faces. Use your fingers to smooth out sharp corners just slightly for a softer, organic look. -
Create Texture (Optional):
For the top left block, use a needle tool to gently poke small, random holes on the side surfaces to add a bit of speckled texture.
Keep it clean
Keep baby wipes nearby while working with pink clay. Dust and lint show up easily on light colors, so clean your hands and tools frequently.
Step 2: Crafting the Details
-
Sculpt the Ears:
Roll out a small slab of the remaining pink clay to about 1/4 inch thickness. Cut out four elongated triangles with rounded tips for the bunny ears. -
Detail the Ears:
Use a modeling tool to press a smaller, indented triangle shape into the center of each ear. This creates depth and mimics the inner ear structure. -
Attach the Ears:
Score the bottom of the ears and the top of two of your cubes. Apply a drop of liquid clay or water (if using air-dry) and press the ears firmly onto the top blocks. -
Make the Puppy Companion:
Take a separate ball of beige clay (or a wooden bead). Add two small, drooping teardrop shapes on the sides for ears to create the small dog head shown in the foreground. -
Smooth and Inspect:
Check all seams where clay pieces join. Smooth them out with a silicone tool or your finger to ensure they are secure.
Step 3: Baking and Finishing
-
Bake or Dry:
Follow the manufacturer’s instructions for your specific clay. If baking polymer clay, place the pieces on a ceramic tile or parchment paper. If air-drying, let them sit for at least 24-48 hours. -
Sand for Smoothness:
Once fully cured or dry, use fine-grit sandpaper to gently buff away any fingerprints or rough edges on the cube faces. -
Draft the Faces:
Before painting, I find it helpful to lightly sketch the facial features with a pencil to ensure the eyes and nose are centered. -
Paint the Snouts:
Using a tiny brush and burnt orange paint, carefully paint a small inverted triangle for the nose on each block face. -
Add the Eyes:
Use the handle end of a paintbrush dipped in black paint to dot on the eyes. Make sure they are spaced wide apart for a cute, kawaii look. -
Draw Whiskers and Mouth:
Switch to your finest detail brush. Paint three thin whiskers on each cheek and a small ‘anchor’ shape (a line down with a curved u-shape) for the mouth. -
Highlight the Cheeks:
Add tiny white dots near the eyes or cheeks for a sparkling highlight. -
Assemble the Stacks:
Use strong craft glue to adhere the bunny-head blocks on top of the plain face blocks. -
Seal the Project:
Finish by applying a coat of matte varnish to protect the paint and give the clay a professional finish.
Make it a puzzle
Instead of gluing the blocks together, drill a vertical hole through the center of each cube and stack them on a wooden dowel for an interactive stacking toy.
Enjoy arranging your cubed critters on a shelf to bring a soft pop of color to the room

TRACK YOUR CERAMIC JOURNEY
Capture glaze tests, firing details, and creative progress—all in one simple printable. Make your projects easier to repeat and improve.
Pink Daisy Magnets
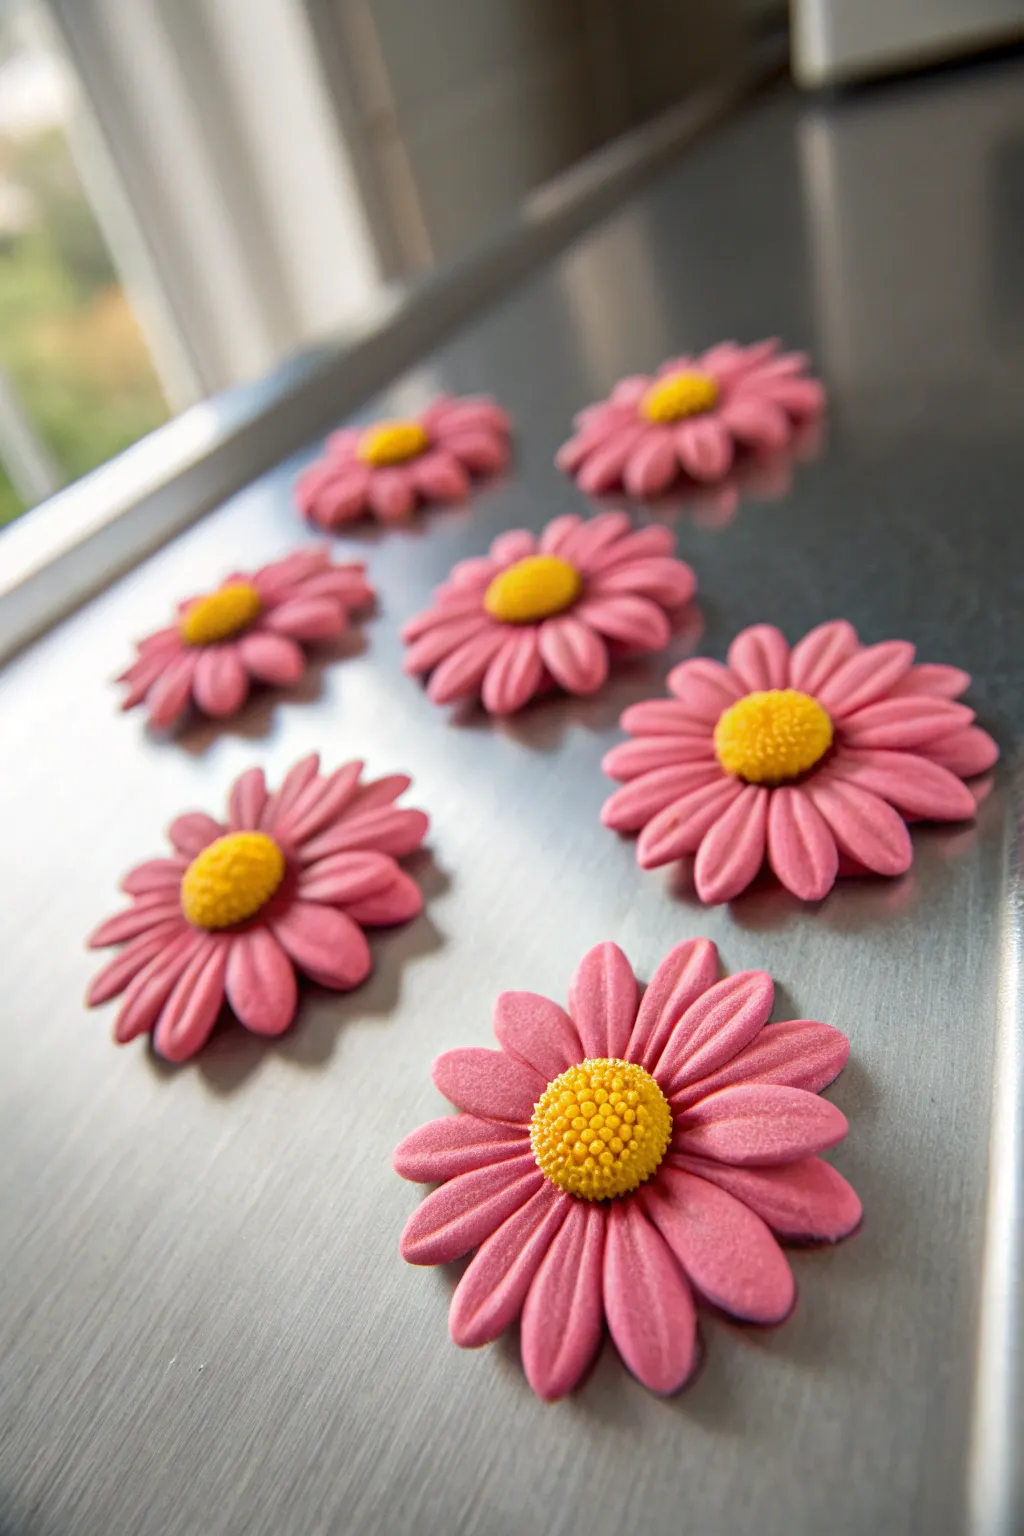
Bring the freshness of spring into your kitchen with these charming pink daisy magnets. Modeled with simple clay techniques, their textured yellow centers and soft petals provide a lovely pop of color for any magnetic surface.
Step-by-Step
Materials
- Polymer clay (Bright Pink and Golden Yellow)
- Small round magnets
- Strong craft glue (E6000 or similar)
- Clay sculpting tool or toothpick
- Small circle cutter (optional)
- Soft paintbrush (for shading)
- Pink chalk pastel (optional, for shading)
- Roller or pasta machine
- Baking sheet and parchment paper
- Oven
Step 1: Creating the Petals
-
Condition the clay:
Start by kneading your pink polymer clay until it is soft, pliable, and free of air bubbles. -
Roll teardrop shapes:
Pinch off small pieces of pink clay, about the size of a pea. Roll each one into a ball, then gently roll one end between your fingers to form a teardrop shape. -
Flatten the petals:
Gently press each teardrop flat with your finger. Make sure the rounded end remains wider while the tapered end stays distinct. -
Add petal definition:
Using a dull knife tool or a toothpick, press a single indentation down the center length of each pink petal to give it a realistic floral vein. -
Arrange the base:
Take a small, flattened disk of scrap clay to use as a base. Begin arranging your pink petals directly onto this base, pressing the pointed ends into the center. -
Layering:
Ensure the petals touch or slightly overlap near the center so there are no gaps. You typically need about 10-12 petals per flower.
Sticky Petals?
If the clay gets too soft and sticky while you are shaping the petals, pop it in the fridge for 10 minutes. This firms it up and stops fingerprints from ruining the smooth surface.
Step 2: Forming the Center
-
Make the yellow core:
Condition a small amount of yellow clay and roll it into a sphere that fits proportionately into the center of your petals. -
Flatten slightly:
Press the yellow ball gently into the very center of the flower where all the petal points meet. Don’t flatten it completely; you want it to look like a raised dome. -
Texture the center:
Use a needle tool or the tip of a toothpick to prick the surface of the yellow dome repeatedly. Create small dots all over to mimic the pollen texture of a real daisy. -
Optional shading:
I like to scrape a little pink chalk pastel onto a brush and lightly dust the inner edges of the petals near the yellow center for added depth.
Step 3: Finishing Up
-
Prepare for baking:
Carefully transfer your assembled daisies onto a baking sheet lined with parchment paper. -
Bake the clay:
Bake the flowers according to the temperature and time instructions on your specific brand of polymer clay packaging. -
Cool down:
Allow the clay flowers to cool completely on the tray before handling them to prevent breakage. -
Prepare the magnets:
Flip the cooled flowers over. Apply a small dab of strong craft glue to the back of each flower center. -
Attach magnets:
Press a small round magnet firmly into the glue. Let the adhesive cure fully (usually 24 hours) before placing them on your fridge.
Go Glitter
Before baking, lightly brush the petals with white mica powder or extra-fine edible glitter. This gives the magnets a subtle, iridescent shimmer that catches the light beautifully.
Once the magnets are securely attached, you can display your blooming art on the fridge for a cheerful touch
Pink Trinket Dish With Scalloped Edge
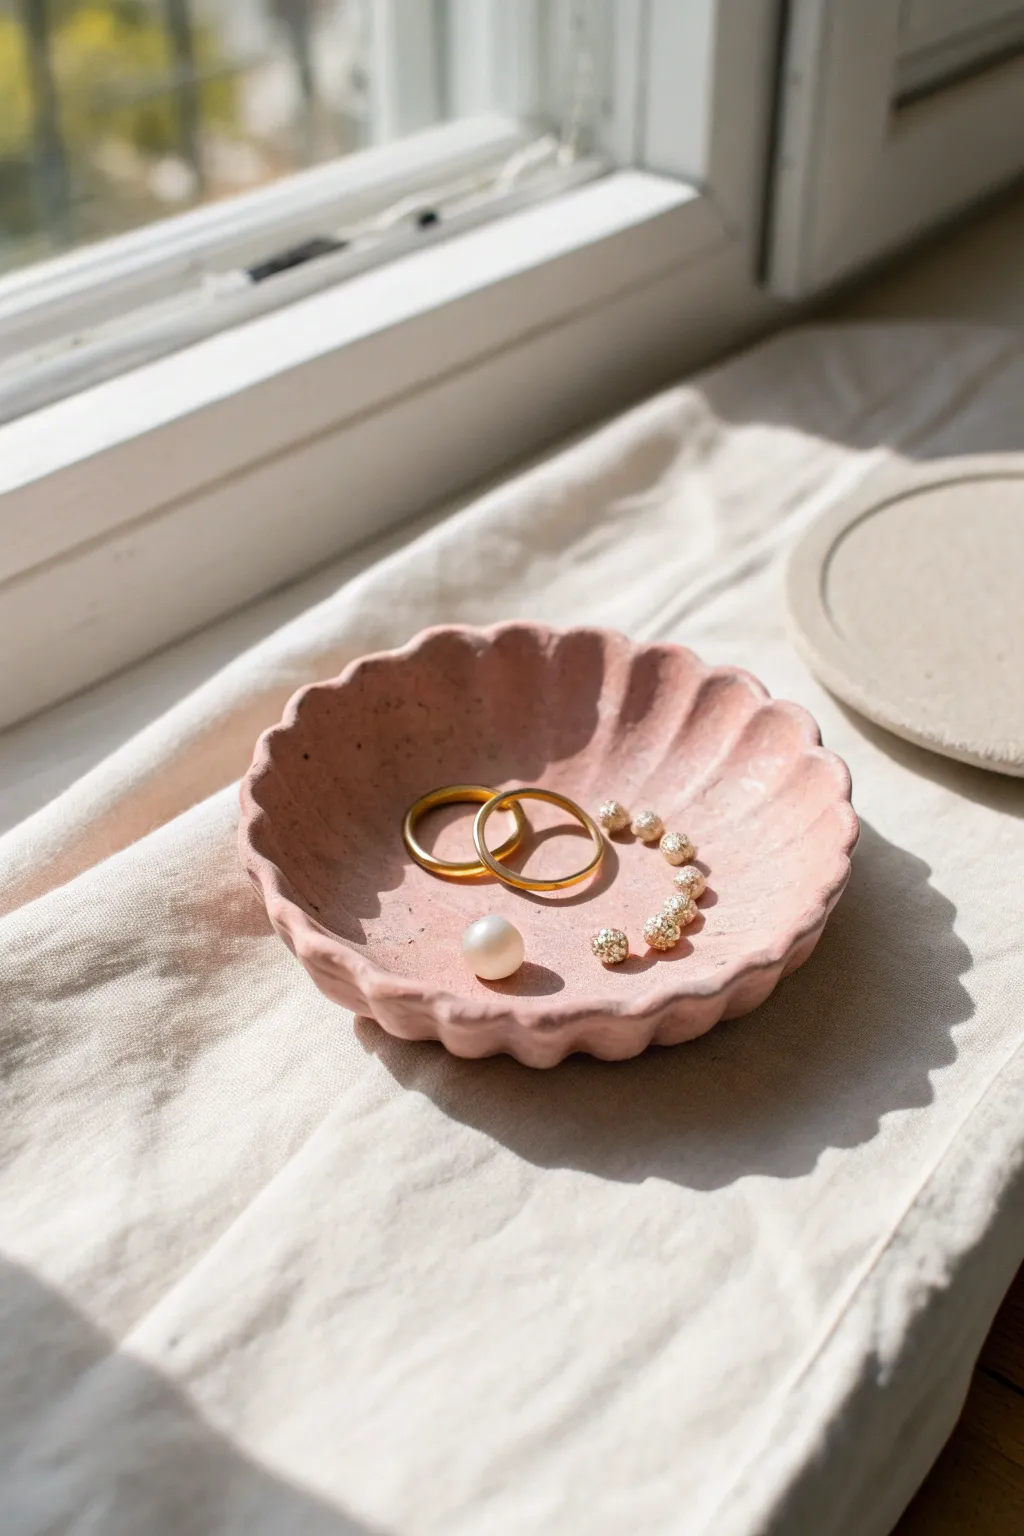
Capture the delicate beauty of a seashell in a modern, functional form with this dusty pink scalloped trinket dish. Its matte, textured finish and gentle curves make it the perfect resting place for your favorite rings and pearls.
Step-by-Step Tutorial
Materials
- Air-dry clay (pink terra cotta or white)
- Acrylic paint (dusty rose or blush pink, if using white clay)
- Rolling pin
- Rolling guides or two wooden rulers (optional)
- Small round bowl or cutter (approx. 4-5 inches)
- Scalpel or clay knife
- Small bowl for shaping (to act as a mold)
- Sandpaper (fine grit)
- Matte sealant or varnish
- Sponge or soft brush
- Water
Step 1: Preparation & Shaping
-
Prepare the Clay:
Begin by kneading a fist-sized ball of air-dry clay until it is warm and pliable. If the clay feels too dry, add a drop or two of water to your hands while working it to prevent cracks later. -
Roll it Out:
Place the clay on a smooth surface or canvas mat. Use your rolling pin to flatten it into an even slab, aiming for a thickness of about 1/4 inch (6mm). Using guides or rulers on either side can help ensure the thickness is consistent. -
Cut the Circle:
Place your round cutter or a small bowl upside down onto the clay slab to serve as a template. Use your clay knife to cut a clean circle around the edge, removing the excess clay. -
Create the Scallops:
To form the scalloped edge, use your thumb or the back of a paintbrush handle. Gently press into the edge of the circle at regular intervals, pushing the clay slightly inward to create indents. -
Refine the Petals:
Between each indent, use your fingers to pinch and round out the protruding sections, shaping them into soft, petal-like curves. They don’t need to be mathematically perfect; a little irregularity adds organic charm. -
Smooth the Edges:
Dip your finger in a tiny bit of water and run it along the rim of the dish to smooth out any sharp cuts or rough textures left by the tools.
Step 2: Forming & Finishing
-
Shape the Dish:
To give the dish its concave form, drape your clay circle inside a small bowl. Gently press the center down so it takes the shape of the bowl’s interior. -
Adjust the Sides:
Ensure the scalloped edges are flaring slightly outward rather than collapsing inward. You might need to gently manipulate the petals so they sit nicely against the bowl’s curve. -
Dry Completely:
Leave the clay in the mold for at least 24 hours. Once the top feels dry, carefully remove it from the bowl and flip it over to let the bottom dry for another 12-24 hours. -
Sand for Texture:
I like to use a fine-grit sandpaper at this stage to gently buff the edges and surface. This removes fingerprints and enhances that stone-like, matte texture seen in the photo. -
Color Application (Optional):
If you started with white clay, mix a dusty rose acrylic paint. Apply it with a sponge using a dabbing motion rather than brushing; this dabbing technique creates a more natural, stone-effect finish. -
Seal the Dish:
Apply a thin layer of matte varnish or sealant to protect the clay from moisture and oils from your jewelry. A matte finish is key to keeping that raw, earthy aesthetic.
Stone Effect
Mix a small amount of baking soda or used coffee grounds into your paint before applying. This adds a gritty, realistic stone texture to the final piece.
Speckled Finish
Dilute dark brown paint with water and flick it onto the dish with an old toothbrush for a speckled, ceramic-glaze look.
Now your vanity has a calm, coastal touch ready to hold your treasures safe
Gradient Pink Ombré Beads
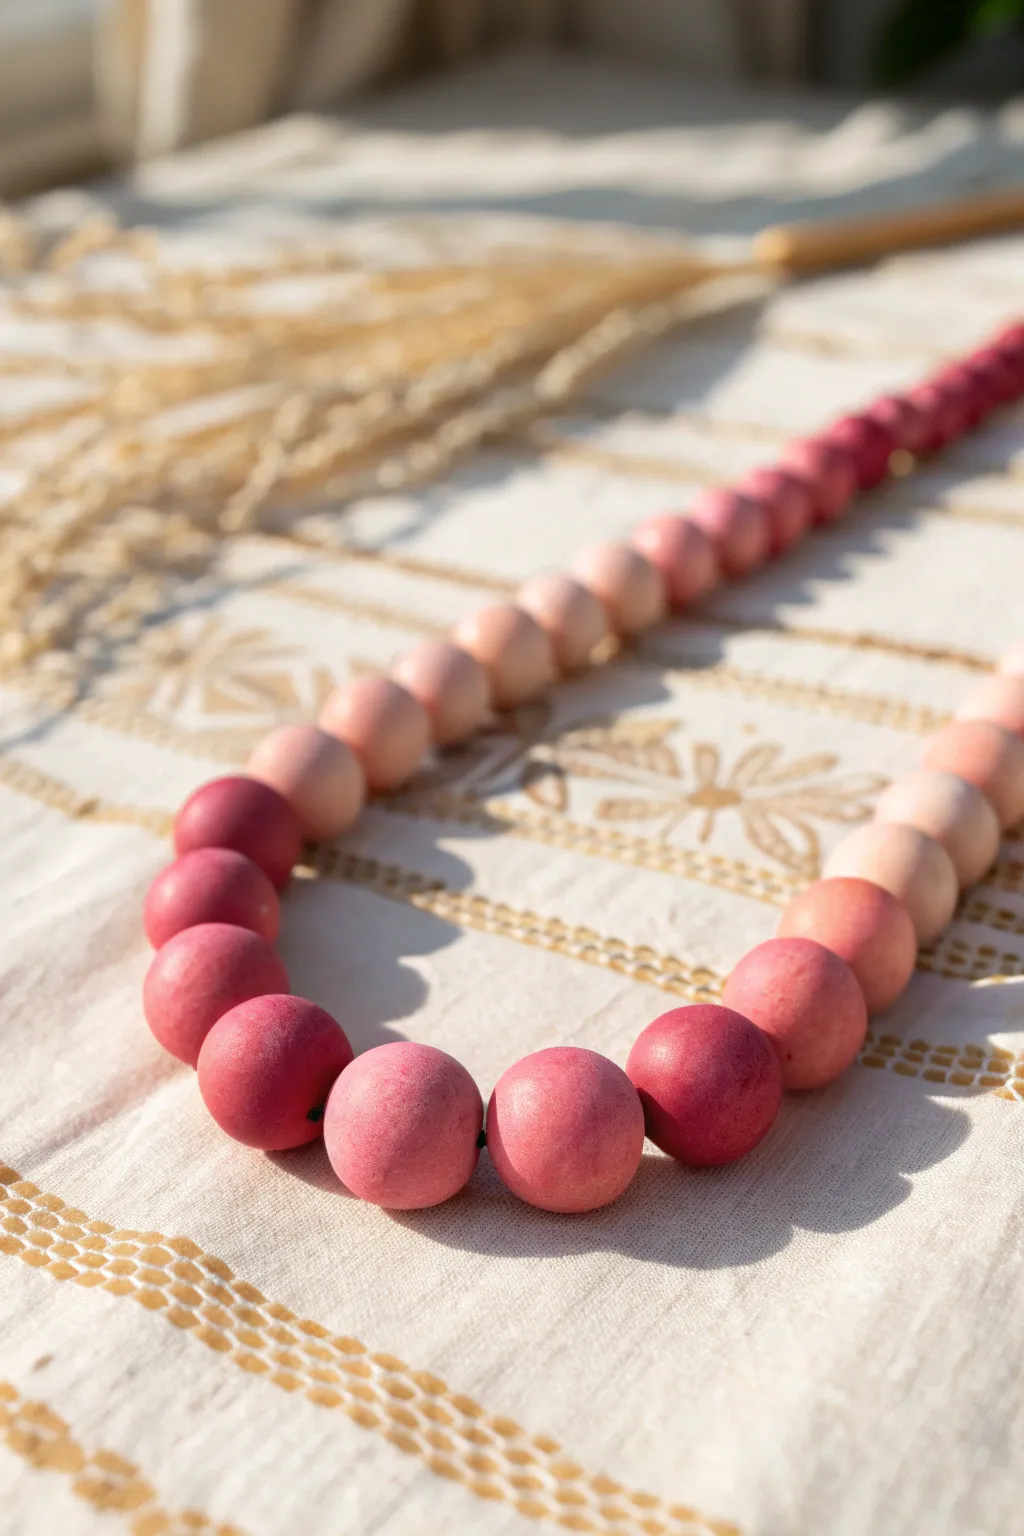
Create a stunning statement piece with this monochromatic beaded necklace that transitions from deep berry to soft blush. The matte, hand-rolled finish gives each bead an organic, artisanal quality that looks beautifully high-end.
Detailed Instructions
Materials
- Polymer clay (White, and a deep magenta or berry color)
- Acrylic roller or pasta machine (clay conditioner)
- Bead piercing pins or toothpicks
- Baking sheet with parchment paper
- Wet/dry sandpaper (400 and 600 grit)
- Strong beading cord or waxed cotton thread
- Needle nose pliers (for cord finishing)
- Jewelry clasps or adjustable slip knot materials
- Ruler
- Blade or clay slicer
Step 1: Mixing the Gradient
-
Condition the Clay:
Begin by kneading your white clay and your deep berry-colored clay separately until they are soft and pliable. Warm clay is much easier to mix without crumbling. -
Portion the Base Colors:
Roll both colors into logs of equal thickness. This ensures you’re working with consistent volumes when measuring out your ratios. -
Create the Darkest Shade:
Cut a segment of pure berry clay. This will be your starting point—the darkest bead in the gradient. -
Mix Step 2:
Take a slightly larger portion of berry clay and mix in a pea-sized amount of white. Knead thoroughly until the color is uniform. -
Mix Step 3:
For the next shade, use a 3:1 ratio of berry to white. You want a subtle shift, so don’t add too much white too quickly. -
Continue the Progression:
Continue mixing new balls of clay, gradually increasing the amount of white clay in each mixture. I like to line them up on my work surface as I go to check the transition. -
Create the Lightest Shade:
Your final mixture should be mostly white with just a tiny pinch of the berry color, creating a very pale, dusty blush. -
Check Consistency:
Ensure you have enough clay for at least 2-3 beads of each shade to create a long, flowing gradient.
Step 2: Forming and Baking
-
Measure the Beads:
Pinch off equal amounts of clay from your color mixtures. Roll them into rough balls to check that they are all approximately the same size before refining them. -
Roll Smooth Sphinx:
Roll each piece of clay between your palms using a circular motion. Apply gentle pressure to eliminate seams and create perfect spheres. -
Pierce the Holes:
Hold a bead gently between your thumb and forefinger. Using a bead pin or toothpick, slowly drill a hole through the center with a twisting motion to avoid distorting the shape. -
Check the Exit:
When the pin starts to poke through the other side, stop pushing. Remove the pin and insert it from the opposite side to ensure a clean, neat hole. -
Texturize (Optional):
For that matte, stone-like look seen in the photo, you can gently roll the raw beads on a piece of sandpaper or canvas before baking. -
Bake:
Arrange the beads on a parchment-lined baking sheet. Bake according to your polymer clay package instructions (usually 275°F/135°C for 15-30 minutes). -
Cool Down:
Let the beads cool completely in the oven with the door slightly ajar. This helps prevent cracking from thermal shock.
Smooth Operator
To remove fingerprints from raw clay without sanding later, lightly brush the unbaked beads with a tiny amount of baby oil or cornstarch before baking.
Step 3: Assembly
-
Sand for Finish:
Once cool, use wet sandpaper to buff out any fingerprints or imperfections. This creates that ultra-smooth, professional matte finish. -
Layout the Design:
Lay your beads out in the correct order, starting with the darkest shades in the center and fading out to the lightest blush at the ends. -
String the Beads:
Cut a length of cord about 6 inches longer than your desired necklace length. Thread the beads onto the cord following your gradient layout. -
Knot Between Beads (Optional):
If you want extra security and separation, tie a small overhand knot between each bead, pushing the knot close to the bead hole. -
Finish the Ends:
Secure the ends with a clasp using crimp beads, or tie a sliding knot closure for an adjustable length style.
Level Up: Speckled Effect
Mix in a pinch of grounded black pepper or dried used coffee grounds into your clay before rolling. This creates a faux-stone, granite effect.
Enjoy wearing your custom gradient necklace, a versatile accessory that adds a pop of sophisticated color to any outfit
Strawberry Turtle Hybrid Figurine
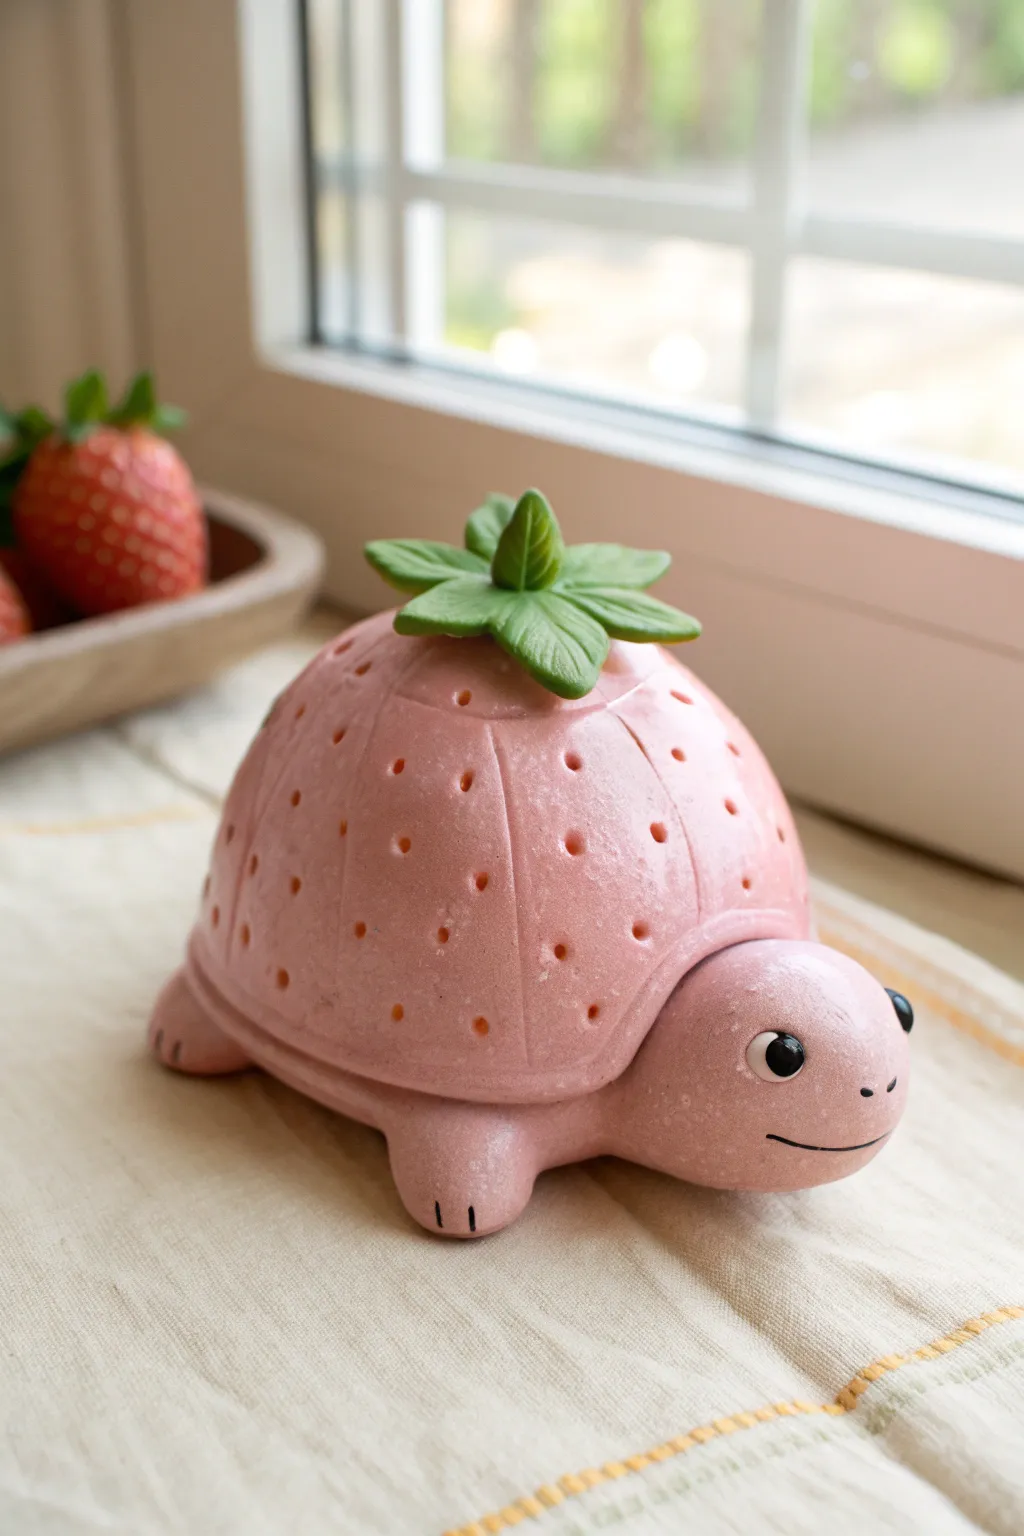
This adorable fusion of garden whimsy and dessert aesthetics turns a simple lump of pink clay into a charming strawberry turtle. With its textured seed-dotted shell and leafy green topper, this figurine makes for a delightful desk companion or a unique handmade gift.
How-To Guide
Materials
- Pink polymer clay (strawberry shade)
- Green polymer clay (leaf shade)
- Black polymer clay or black acrylic paint
- White polymer clay or white acrylic paint
- Sculpting tools (needle tool, ball tool)
- Aluminum foil (for armature)
- Acrylic rolling pin
- Clay glossy glaze or varnish
- Small paintbrush
- Baking sheet and oven
Step 1: Forming the Body Base
-
Create the core:
Crumple a piece of aluminum foil into a distinct dome shape to serve as the lightweight core of the turtle’s shell. This saves clay and prevents cracking during baking. -
Prepare the pink clay:
Condition your pink clay until it is soft and pliable. Roll it out into a sheet about 1/4 inch thick using your acrylic roller. -
Cover the shell:
Drape the pink clay sheet over your foil dome, smoothing it down the sides. Trim away the excess clay at the bottom, folding the edges under to create a neat, flat base. -
Shape the head:
Roll a smooth ball of pink clay for the head. It should be proportional to the shell, roughly the size of a large grape. Slightly flatten the back where it will attach to the body. -
Attach the head:
Press the head firmly onto the front of the shell base. You can use a sculpting tool to blend the clay at the underside of the neck for a seamless connection. -
Make the flippers:
Shape four small, thick logs of pink clay. Round off one end of each log to create the feet. -
Attach the limbs:
Position the four legs under the shell’s edge—two near the front and two at the back. Press them securely into place so they support the turtle’s weight evenly.
Fixing Cracks
If you see tiny cracks before baking, smooth them out with a drop of baby oil on your finger. If cracks appear after baking, fill them with a mix of clay and liquid clay, then rebake briefly.
Step 2: Adding Strawberry Details
-
Define the shell limit:
Use a needle tool or a clay shapers to gently score a line where the ‘rim’ of the shell meets the turtle’s body, creating a slight overhang effect typical of a turtle shell. -
Texture the shell:
Using a modeling tool or the back of a butter knife, press vertical indentation lines running from the top center of the shell down to the rim, dividing the strawberry into segments. -
Add the seeds:
Take a small needle tool or a toothpick and press small, evenly spaced holes all over the shell segments to mimic strawberry seeds. Keep them somewhat random but balanced. -
Create the leaves:
Condition the green clay and flatten it. Cut out five small teardrop shapes. Use a needle tool to impress a central vein down the middle of each leaf. -
Assemble the stem:
Arrange the five leaves in a star pattern on the very top of the shell. Roll a tiny cone of green clay and place it in the center of the leaves to form the stem. -
Add the toes:
Use a sharp blade or needle tool to make two small vertical indentations on the front of each flipper to represent toes.
Seed Variety
Make the seeds pop by painting yellow or gold acrylic paint into the seed indentations after baking, then wiping the surface clean so the color stays only in the holes.
Step 3: Face and Finishing
-
Sculpt the eyes:
Use a ball tool to make two sockets for the eyes. Insert small balls of white clay, then smaller flattened circles of black clay for the pupils. Add a tiny speck of white for a highlight. -
Carve the smile:
Use a curved tool or the edge of a straw to impress a gentle, curved smile line onto the turtle’s face. -
Bake the figurine:
Place your turtle on a baking sheet and bake according to your polymer clay package instructions. Let the piece cool completely before handling. -
Glaze the shell:
I like to apply a coat of glossy glaze specifically to the pink strawberry shell area. This makes it look juicy and highlights the texture while leaving the skin matte.
Once the glaze is dry, your strawberry turtle is ready to bring a touch of sweetness to your shelf
Pink Gloss-Over-Matte Texture Play
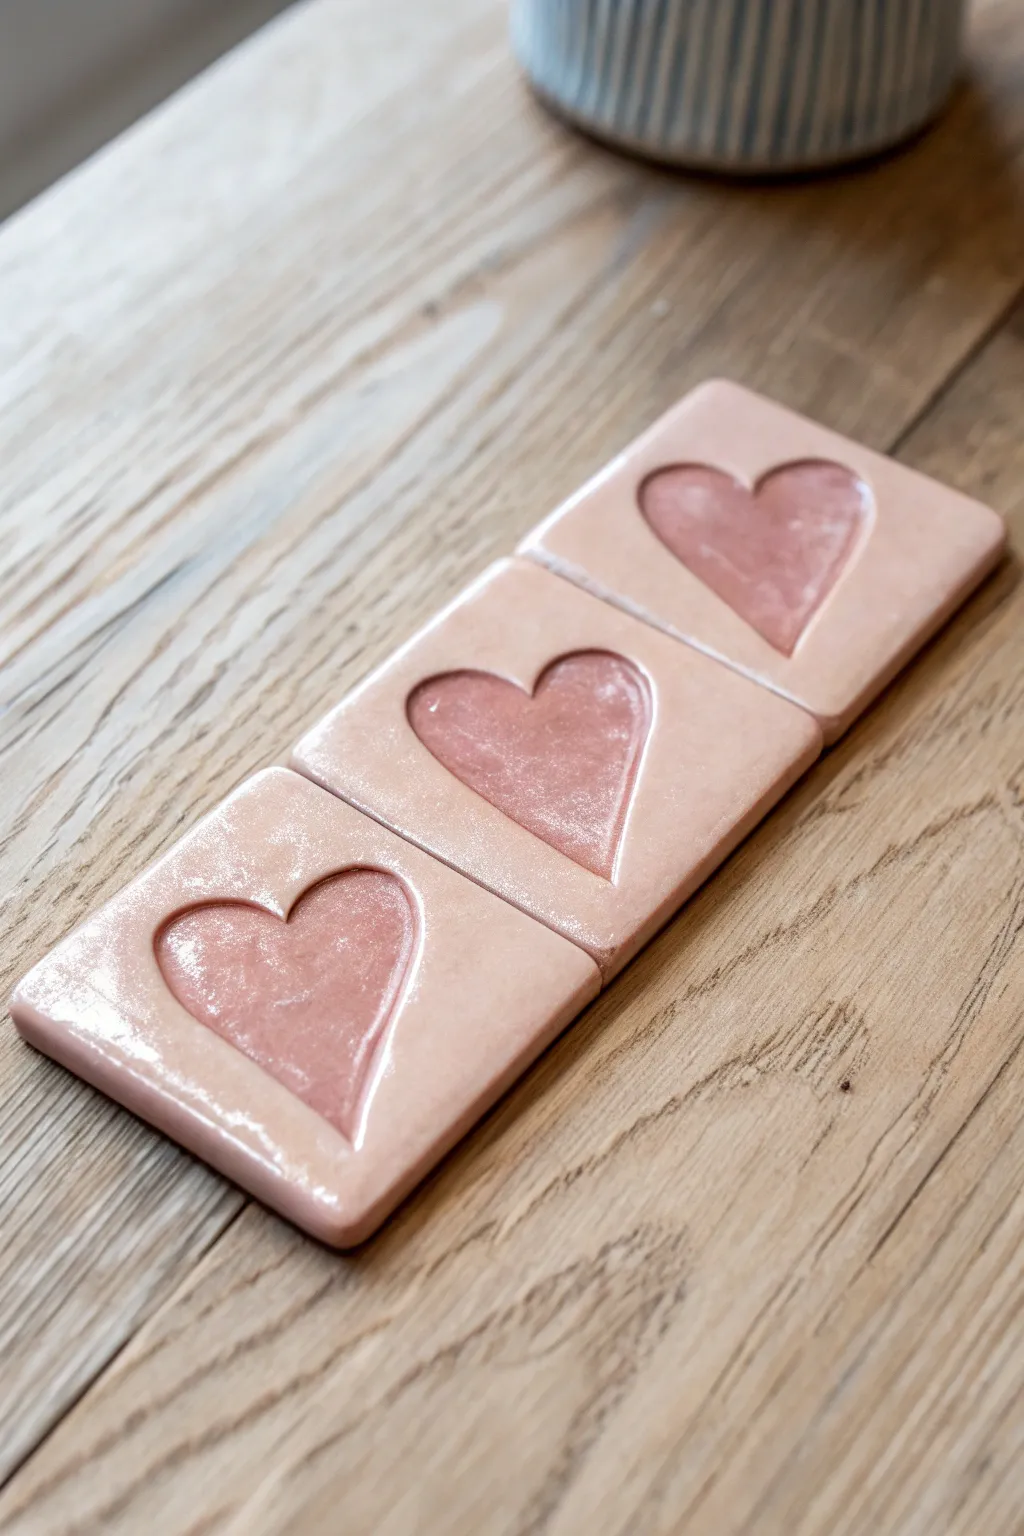
Create a stunning tactile experience with this trio of handmade ceramic tiles featuring indented hearts. The magic lies in the subtle contrast between the smooth, matte clay body and the pooling, glassy glaze inside the heart impressions.
Step-by-Step
Materials
- Light pink or white earthenware clay body
- Rolling pin
- Two wooden guide strips (approx. 1/4 inch thick)
- Square cookie cutter or template (approx. 3-4 inches)
- Heart-shaped stamp or cookie cutter (smaller than the square)
- Fettling knife or needle tool
- Smoother rib tool (rubber or metal)
- Sponge
- Clear or transparent pink glossy glaze
- Glaze brush
- Kiln access
Step 1: Shaping the Clay Base
-
Prepare the slab:
Begin by wedging your clay to remove air bubbles. Place the clay between two wooden guide strips on a canvas or cloth surface. Roll the clay out until the rolling pin rests on the strips, ensuring an even thickness across the entire slab. -
Cut the squares:
Using your square cutter or a template, cut out three identical squares. If using a knife and template, keep the blade perpendicular to the surface for straight edges. -
Smooth the surface:
Take a rubber rib tool and gently compress the surface of the clay squares. This aligns the clay particles and creates that super-smooth base we need for the matte finish. -
Create the heart impression:
Center your heart stamp or cutter over the first square. Press down firmly and evenly to create a distinct indentation. Be careful not to push all the way through the clay. -
Repeat the design:
Repeat the impression process for the remaining two tiles. Try to apply the same amount of pressure so the depth of the hearts matches across the set. -
Clean the edges:
Once the clay has stiffened slightly to a leather-hard state, use a slightly damp sponge to soften the sharp cut edges of the squares and the rim of the heart indentation.
Warped Tiles?
If corners curl up during drying, flip the tiles over daily & weigh them down gently with a wooden board. Even drying is key to keeping them flat.
Step 2: Bisque Firing and Glazing
-
Slow drying:
Allow the tiles to dry slowly between two pieces of drywall or under loose plastic to prevent warping. They must be bone dry before firing. -
Bisque fire:
Fire the tiles in a kiln to cone 04 (or the temperature recommended for your specific clay body). This permanently hardens the clay. -
Clean the bisque:
Wipe the fired tiles with a damp sponge to remove any kiln dust. This ensures the glaze will adhere properly without crawling. -
Glaze application:
Dip your brush into the glossy glaze. Carefully paint the inside of the heart impression only. I like to let the glaze pool slightly at the bottom for extra depth. -
Apply a second coat:
Once the first coat is dry to the touch, apply a second layer within the heart to ensure a rich, glassy finish after firing. -
Clean the overflow:
If any glaze dripped onto the flat square surface, wipe it away cleanly with a damp sponge. The beauty of this project relies on keeping the square border unglazed and matte. -
Final smooth:
Double-check the edges of the glaze application. You want a crisp line where the gloss meets the matte clay. -
Glaze fire:
Load the tiles into the kiln for the glaze firing, following the temperature guidelines for your specific glaze (likely cone 05 or 06). Ensure the tiles are level so the pooled glaze settles evenly.
Pro Tip: Tinted Clay
If you don’t have pink clay, wedge a small amount of red mason stain into white clay before rolling. Wear gloves to avoid staining your hands.
Now you have a charming set of decorative tiles ready to display on a shelf or use as chic coasters