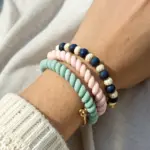
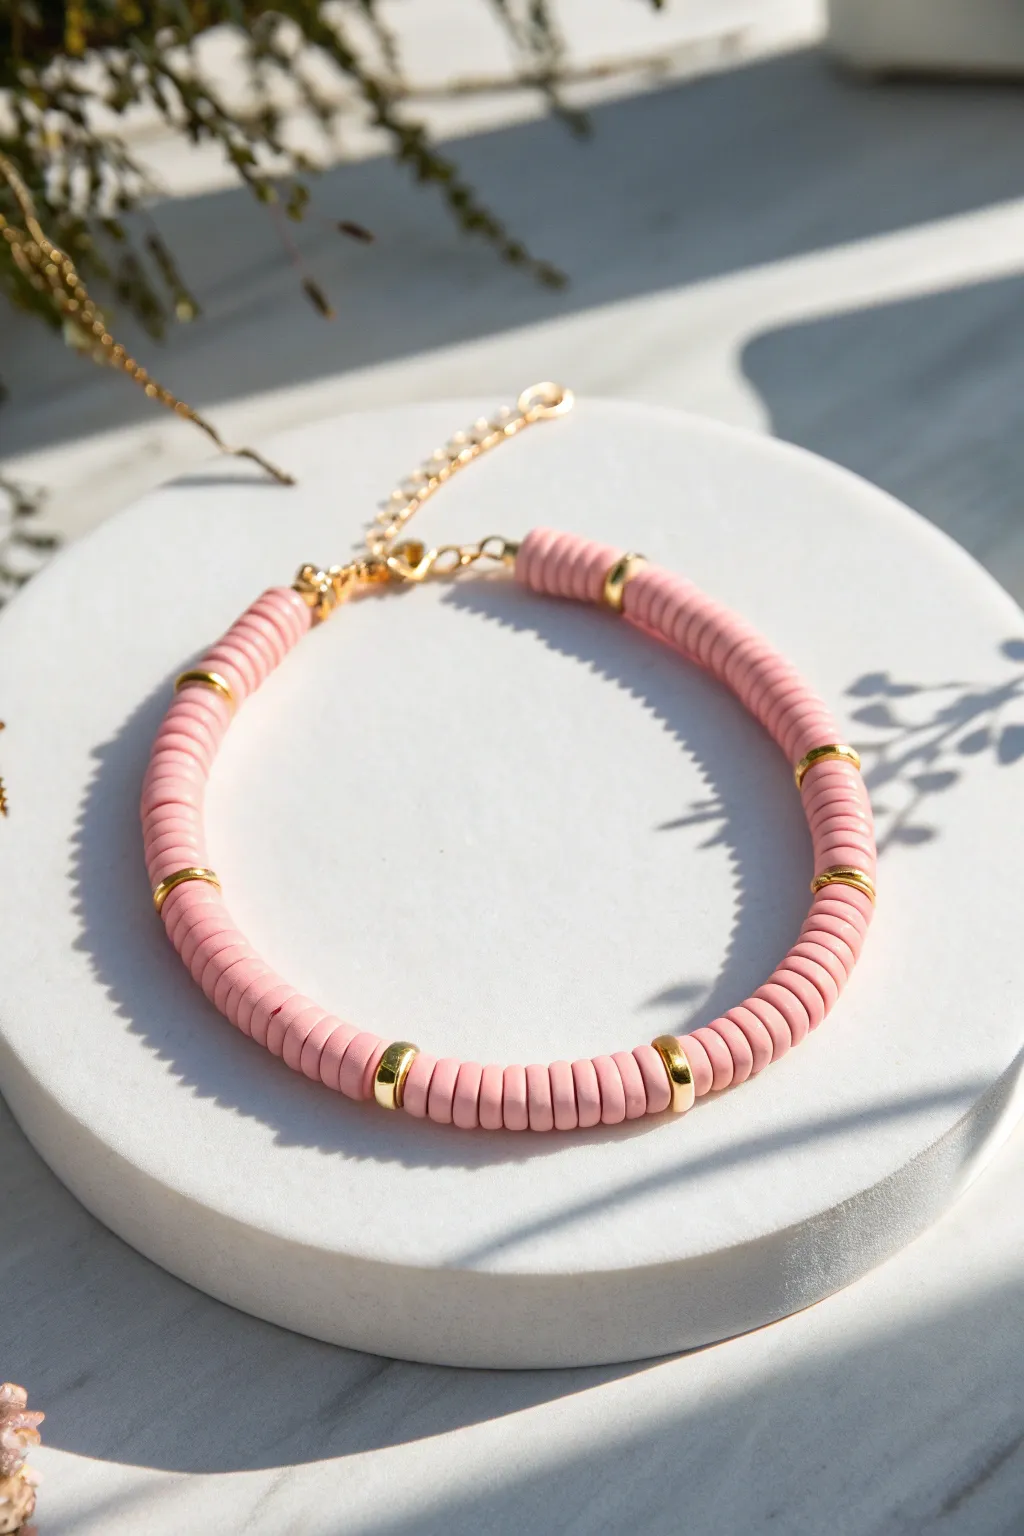
If you’re craving that pink pink preppy vibe, clay heishi beads are basically the quickest way to get there. Here are my go-to clay bead bracelet ideas that feel polished, playful, and made for stacking.
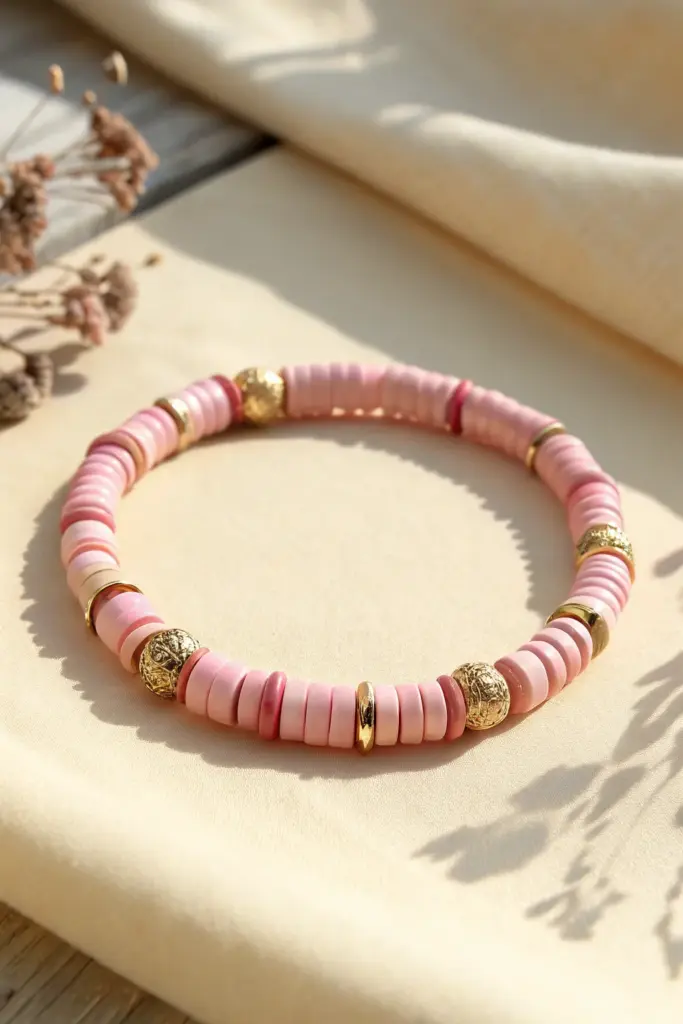
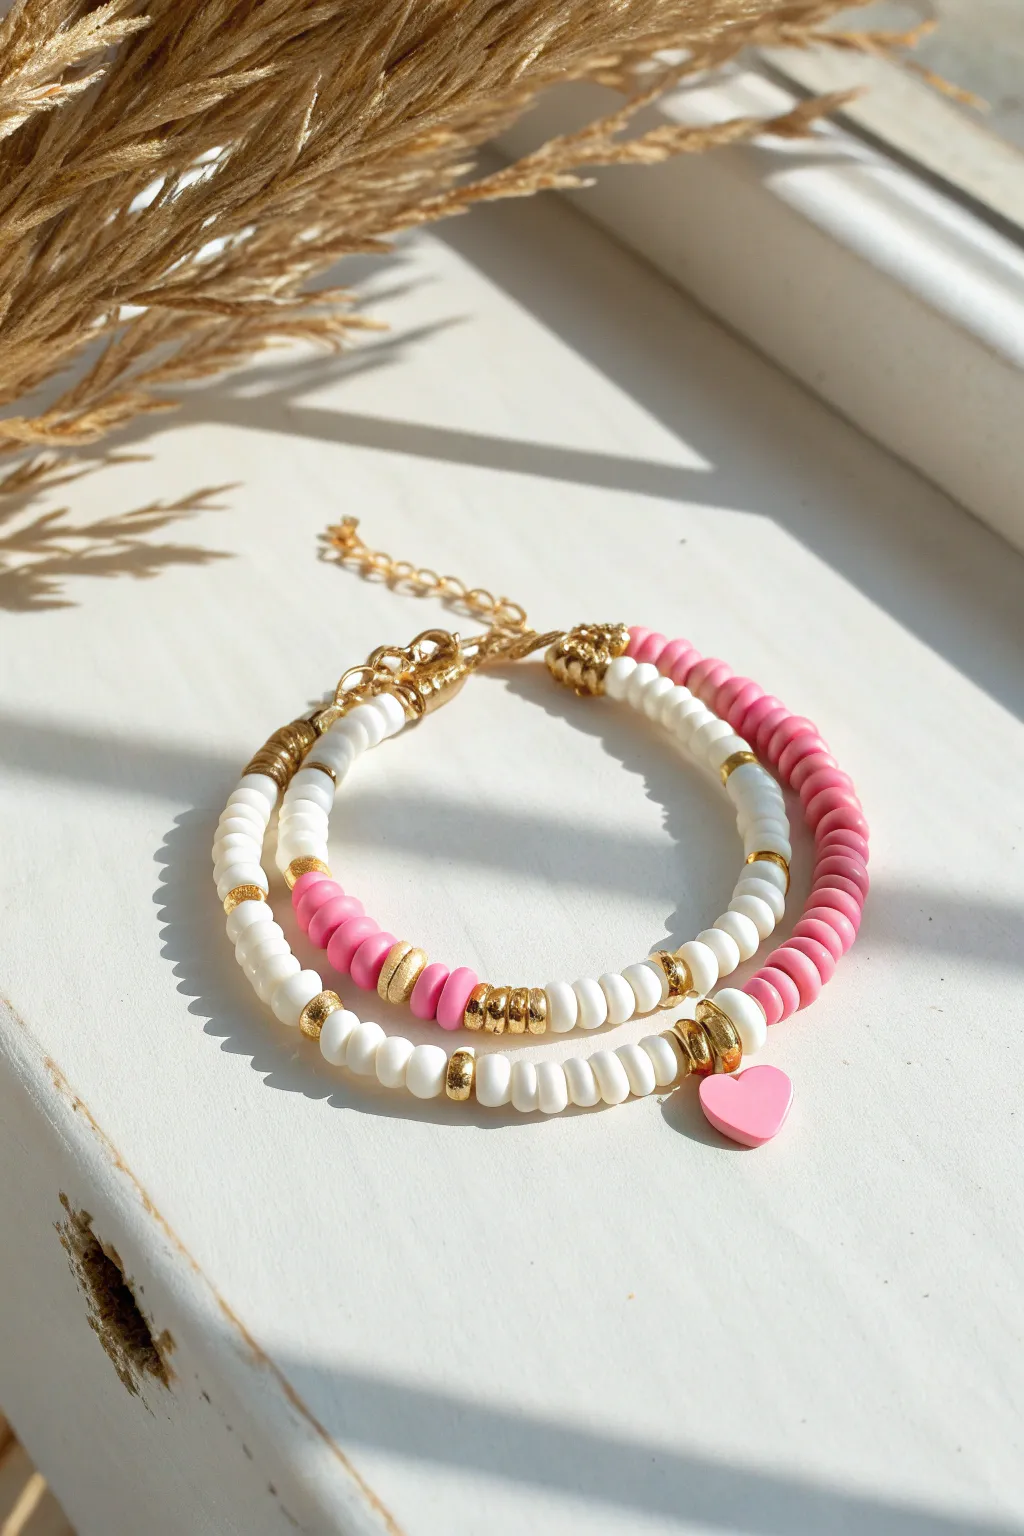
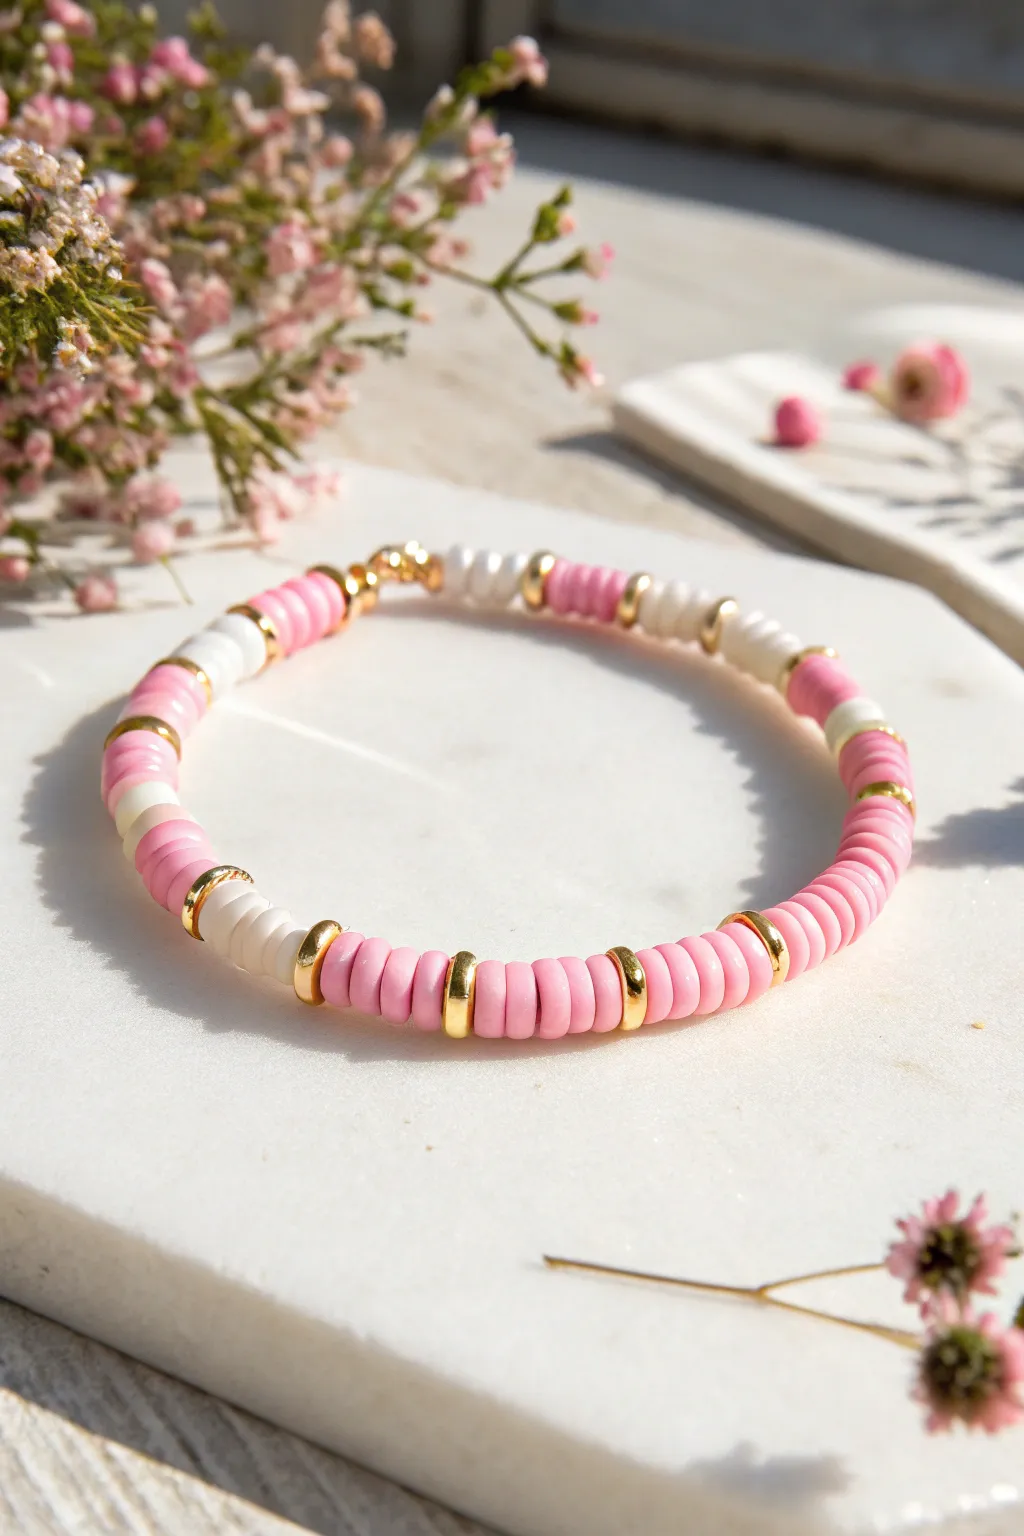
Classic Pink Ombré Heishi Bracelet
Embrace the effortless preppy aesthetic with this duo of pink clay bead bracelets. Featuring a classic chunky solid-color strand and a delicate multi-tone design with gold accents, this set is perfect for stacking or sharing.
Step-by-Step Guide
Materials
- 6mm pink polymer clay heishi beads (hot pink)
- 6mm light pink polymer clay heishi beads
- 4mm polymer clay heishi beads (hot pink, light pink, and white)
- Small gold spacer beads (round or nugget style)
- Elastic cord (0.8mm for durability)
- Super glue or jewelry cement
- Scissors
Step 1: Creating the Chunky Solid Bracelet
-
Measure and Cut:
Start by measuring your wrist with a piece of string or a soft tape measure. You’ll want to cut a piece of elastic cord about 3-4 inches longer than your wrist size to allow plenty of room for tying the knot later. -
Pre-stretch:
Before you begin stringing, give your elastic cord a few gentle tugs. This pre-stretching technique helps prevent the bracelet from loosening up after you wear it a few times. -
Plan Your Pattern:
For the first bracelet, we are aiming for a mostly solid look. You can create a subtle gradient by grouping about an inch of slightly lighter pink beads together, followed by the darker hot pink beads for the rest of the strand. -
String the Beads:
Begin threading the 6mm heishi beads onto the elastic. I find it easiest to work directly from the strand if possible, but picking them up one by one works too. -
Check the Fit:
Once you have strung enough beads to go around your wrist, wrap it around to check the size. It should sit comfortably without digging into your skin. -
Secure the Ends:
Tie a square knot to secure the bracelet. To do this, cross left over right and pull, then right over left and pull tight. -
Reinforce:
Add a tiny drop of super glue or jewelry cement directly onto the knot. Let it dry completely before trimming the excess string close to the knot.
Knot Security
When tying off elastic, pull the cord t-i-g-h-t. The clay beads are flexible and will compress slightly, ensuring no gaps appear later.
Step 2: Creating the Dainty Accent Bracelet
-
Prepare the Cord:
Cut a second piece of elastic cord, similar in length to the first one. Pre-stretch it gently. -
Design the Pattern:
This bracelet uses a thinner 4mm bead profile. The pattern shown alternates sections of pink beads with small sections of white beads, separated by gold spacers. -
Start Stringing:
Thread on a section of pink beads, roughly 1.5 inches long. -
Add Gold Accents:
Slide on one gold spacer bead. This adds that metallic ‘pop’ that defines the preppy style. -
White Contrast Section:
Add a short section of white or very pale pink beads—about 10 to 12 beads is perfect. -
Close the Pattern:
Finish this focal section with another gold spacer bead. -
Complete the Strand:
Fill the rest of the elastic with your main pink color until the bracelet reaches the desired length. -
Tie and Glue:
Just like the first bracelet, tie a tight square knot. Apply a dot of glue to the knot. -
Hide the Knot:
If hole size permits, try to slide the knot inside one of the gold spacer beads or a clay bead for a seamless, professional finish before trimming the ends.
Mix Your Metals
Try swapping the gold spacer beads for silver or rose gold to match your other jewelry. You can also mix bead sizes for a textured stack.
Slip on your new custom bracelet stack and enjoy the splash of color on your wrist


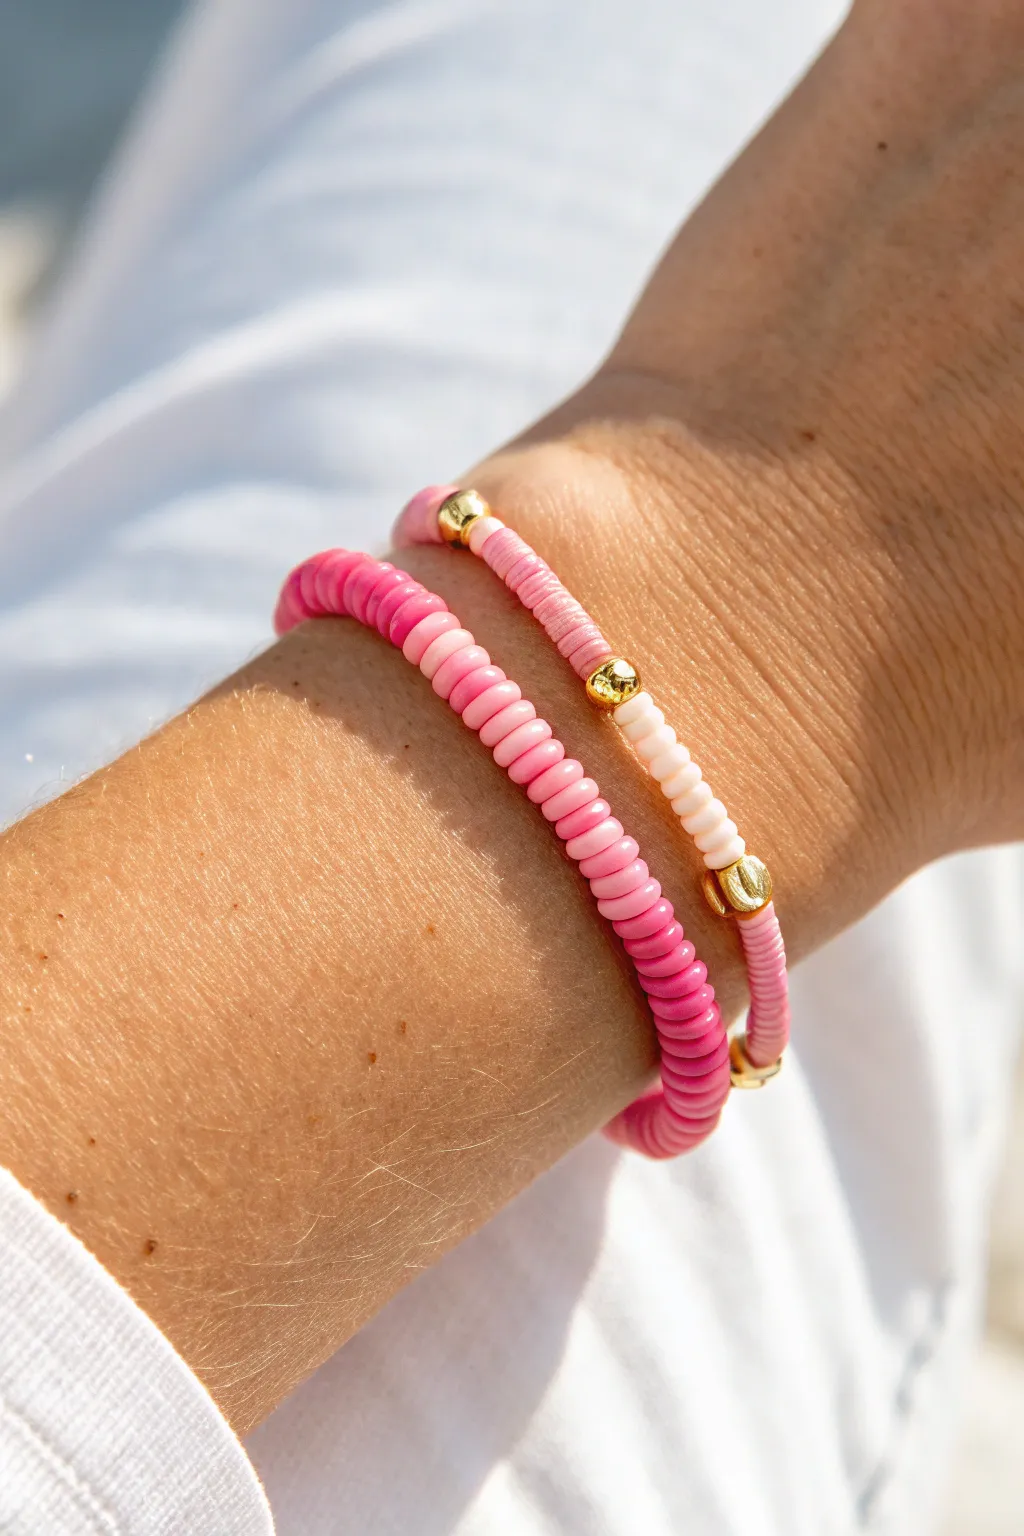
Pink-and-White Preppy Stripes With Gold
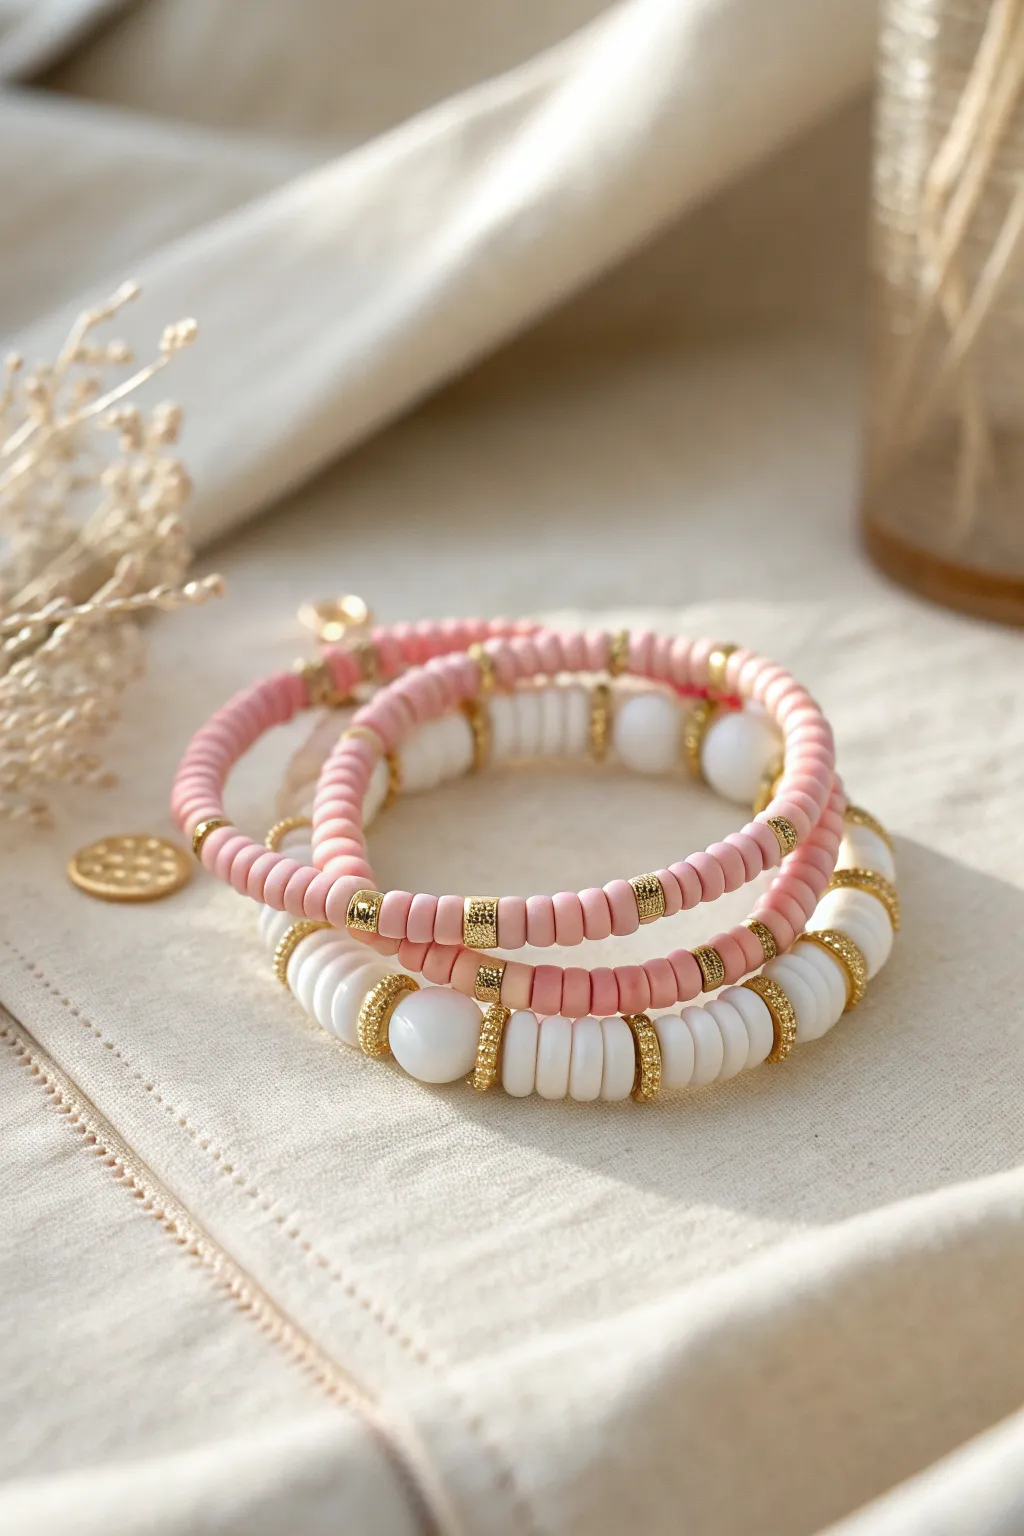
This charming bracelet stack combines soft blush pinks with crisp white texture and elegant gold accents for a classic preppy aesthetic. The set features three distinct strands—two solid pink and one patterned white—that look perfectly curated when worn together.
Step-by-Step Tutorial
Materials
- Flat polymer clay heishi beads (blush pink)
- Flat polymer clay heishi beads (bright white)
- Round white acrylic or ceramic accent beads (approx. 8mm)
- Gold rhinestone rondelle spacer beads (6mm or similar)
- Small gold disc spacer beads (heishi style)
- Strong elastic stretch cord (0.8mm recommended)
- Jewelry glue or clear nail polish
- Scissors
Step 1: Planning and Setup
-
Measure your wrist:
Cut three lengths of elastic cord, each about 10-12 inches long. This gives you plenty of slack for tying knots later without losing beads. -
Pre-stretch the cord:
Gently give each piece of elastic a few tugs. Pre-stretching helps prevent the bracelets from loosening up immediately after you finish making them.
Knot Slipping?
If your elastic is slippery, try rubbing the ends with a little beeswax or roughing them slightly with sandpaper before tying. This creates friction and helps the knot grip.
Step 2: Strand 1: The Pink & Gold Minimalist
-
Start the base pattern:
Thread approximately 10 to 12 pink heishi beads onto your first cord. This creates a solid block of color. -
Add first gold accent:
Slide on one gold rhinestone spacer bead. This adds that key ‘preppy’ sparkle contrasting with the matte clay. -
Continue the pattern:
Repeat the sequence: about 10-12 pink beads followed by one gold spacer. Continue until you reach your desired wrist size. -
Check the fit:
Wrap the strand around your wrist. It should sit comfortably without digging in, but remember the knot will take up a tiny bit of space.
Step 3: Strand 2: The Textured White Statement
-
Create white segments:
On your second cord, thread a stack of about 6 white clay heishi beads. -
Insert gold spacers:
Place a gold rhinestone spacer after the stack of white clay beads. -
Add the focal bead:
Instead of just repeating, swap in a round white acrylic bead every other segment. The pattern should be: clay stack, spacer, round bead, spacer, clay stack. -
Fill the length:
Continue this alternating texture pattern until the bracelet matches the length of your first pink one.
Design Pro Tip
When making stacks, vary the width of your bead segments slightly between bracelets. It creates a more dynamic, ‘curated’ look rather than a uniform factory-made set.
Step 4: Strand 3: The Pink & Disc Variation
-
Begin with pink:
Thread a slightly longer segment of pink clay beads onto the third cord—aim for about 15 beads. -
Switch up the gold:
Use the simpler, flat gold disc spacers for this strand instead of the rhinestone ones. Add two or three gold discs together for a banded metallic look. -
Complete the strand:
Repeat this simpler pattern around the bracelet. This subtle variation keeps the stack from looking too busy.
Step 5: Finishing Touches
-
Tie the first knot:
Take the ends of your first bracelet and tie a simple overhand knot, pulling tight. -
Secure with a surgeon’s knot:
Follow up with a surgeon’s knot (looping the elastic through twice instead of once) for extra security. Pull gently but firmly on all four strands of the cord to tighten. -
Apply adhesive:
Place a tiny drop of jewelry glue or clear nail polish directly onto the knot. This is the secret to longevity. -
Hide and trim:
Once the glue is tacky but not dry, slide a nearby bead over the knot to hide it. Let it dry completely, then snip the excess cord close to the bead. -
Repeat for all strands:
Finish the remaining two bracelets using the same tying and gluing method.
Now layer them up on your wrist for an effortless pop of color that looks store-bought


Pink Initial Centerpiece Bracelet
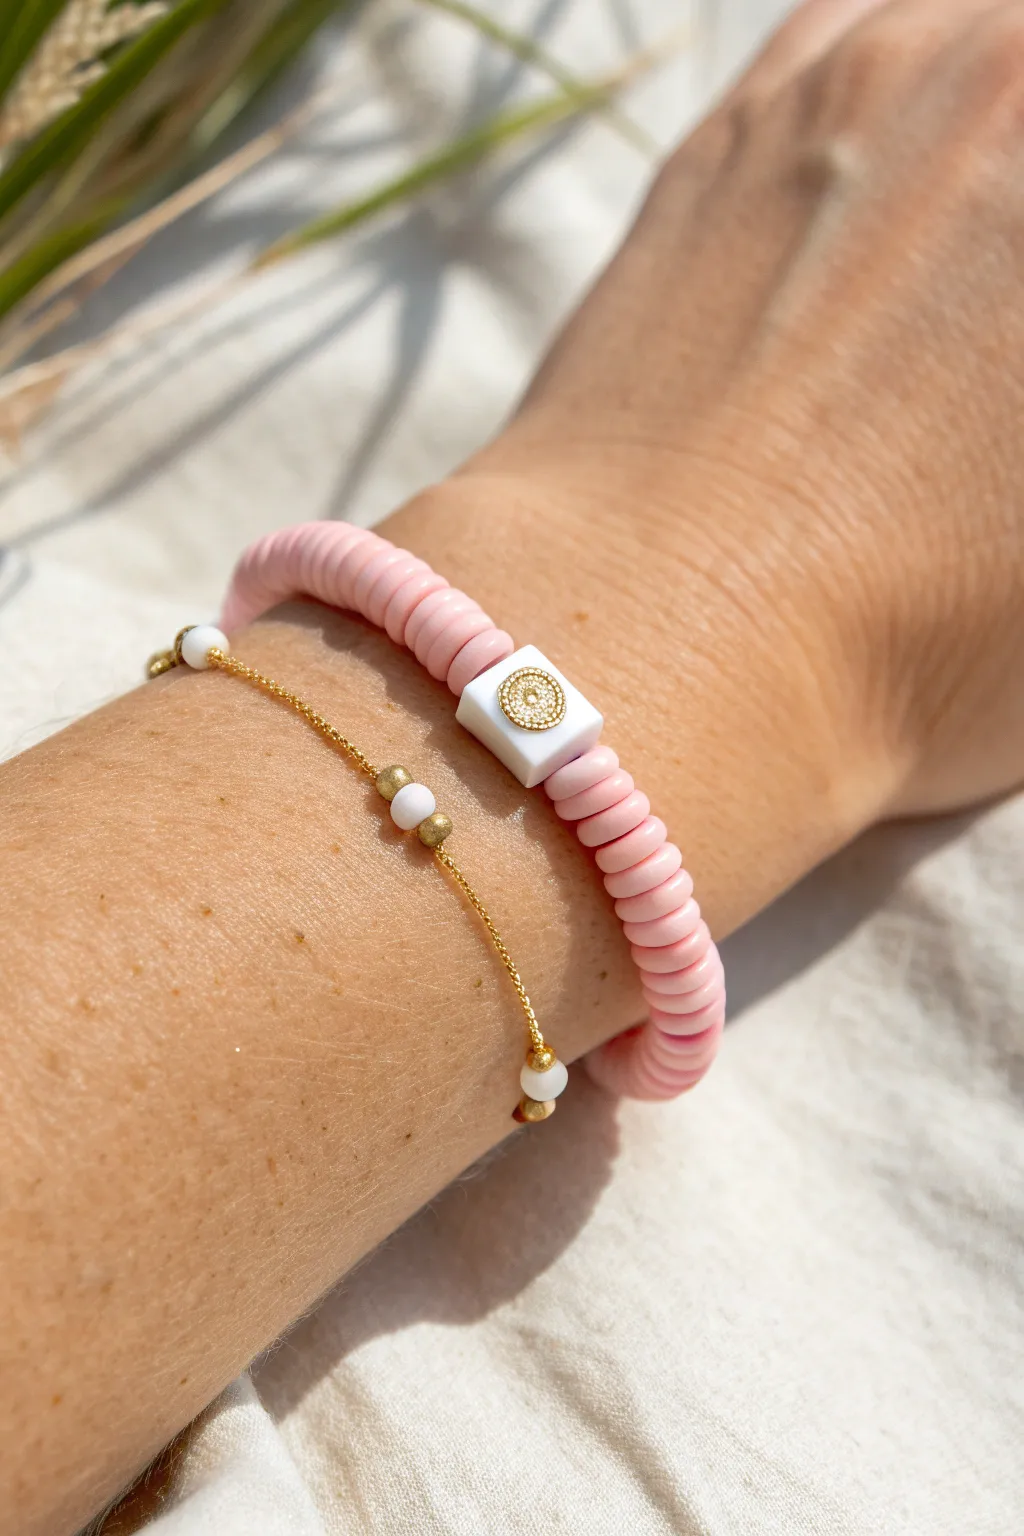
Achieve a chic, preppy aesthetic with this effortless combination of soft pink clay beads and delicate gold accents. This tutorial guides you through crafting the main statement strand and its accompanying dainty chain for a perfectly curated stack.
How-To Guide
Materials
- Pink heishi polymer clay beads (6mm or 8mm)
- White square alphabet or icon bead with gold emblem
- Strong elastic stretch cord (0.7mm or 0.8mm)
- Delicate gold jewelry chain
- Small white seed beads
- Gold spherical spacer beads (2-3mm)
- Crimp beads or knots covers
- Gold jump rings and a lobster clasp
- Super glue or jewelry adhesive
- Jewelry pliers
- Scissors
Step 1: Crafting the Pink Heishi Bracelet
-
Measure and Cut Elastic:
Begin by wrapping the elastic cord around your wrist to find the comfortable length. Cut a piece that is about 3-4 inches longer than your wrist measurement to allow plenty of room for tying the finishing knot. -
Pre-stretch the Cord:
Before adding any beads, firmly pull on both ends of the elastic cord several times. This pre-stretching step prevents the bracelet from drooping or becoming loose immediately after you wear it. -
Begin Beading:
Thread your pink heishi beads onto the elastic cord one by one. I like to start with just a few inches of beads to establish the base color block. -
Add the Centerpiece:
Once you have beaded approximately half of your desired length, slide on the white square bead with the gold emblem. Position it so the emblem faces outward. -
Complete the Circle:
Continue threading the remaining pink heishi beads onto the cord until the bracelet fits comfortably around your wrist. Double-check the size by wrapping it around your arm before tying. -
Secure with Knots:
Tie a standard square knot (right over left, left over right) to bring the ends together. Pull the elastic tight so the beads sit flush against each other without gaps. -
Reinforce the Knot:
Add a drop of super glue or jewelry adhesive directly onto the knot. Let it dry completely for a minute or two to ensure the bond is permanent. -
Trim Excess:
Carefully snip off the excess elastic tails, leaving about 1-2mm. If possible, tuck the knot inside the hole of the nearest heishi bead to hide it.
Sticky Situation
Use a toothpick to apply the super glue to the knot. This prevents glue from flooding the surrounding beads and freezing them together.
Step 2: Creating the Delicate Gold Chain Companion
-
Measure the Chain:
Take your delicate gold chain and wrap it around your wrist. Cut the chain to your exact wrist size, keeping in mind that the clasp will add a tiny bit of length. -
Plan the Bead Placement:
Decide where you want your small accents to sit. The look in the photo uses three small decorative sections spaced evenly along the top of the wrist. -
Thread Accents:
Since fine chain can’t be threaded easily, you will likely need to cut the chain into segments or thread the beads onto a headpin and attach them as links. For a simpler method shown here, use a slightly larger link chain and thread a gold spacer, a white seed bead, and another gold spacer directly onto the chain if it fits. -
Alternative Wire Wrap Method:
If your chain is too fine for threading, cut the chain where you want an accent. Use a small piece of gold wire to create a link: loop one end to the chain, thread your gold-white-gold bead trio, then loop the other end to the next chain segment. -
Attach Findings:
Using your jewelry pliers, open a small jump ring and attach it to one end of the finished chain. Add a lobster clasp to this ring before closing it. -
Finish with a Ring:
Attach a simple closed jump ring to the opposite end of the chain to act as the catch for the clasp. -
Final Polish:
Check all connections on the chain to ensure they are fully closed and secure. Wear both bracelets together for that layered, preppy vibe.
Make It Personal
Swap the generic gold emblem bead for an initial cube to make a monogrammed version, or spell out a short word like ‘LOVE’ using letter beads.
Now you have a stylish, custom stack ready to enhance any everyday outfit


Pink Hearts With Gold Accents
Radiating soft elegance, this stacked set combines creamy white heishi beads with pops of bubblegum pink and luxe gold spacers. The dainty heart charm adds a romantic focal point that ties the two complementary designs together beautifully.
Step-by-Step
Materials
- White polymer clay heishi beads (approx. 6mm disc)
- Bubblegum pink polymer clay heishi beads (approx. 6mm disc)
- Gold tone metal spacer beads (thin geometric discs)
- Larger gold faceted or round spacer beads (approx. 4mm)
- Small pink heart charm (enamel or polymer clay)
- Strong elastic stretch cord (0.8mm recommended)
- Gold jump ring (4mm or 5mm)
- Jewelry glue or clear nail polish
- Scissors
Step 1: Bracelet One: The Charm Strand
-
Measure and Cut:
Cut a length of elastic cord about 10-12 inches long. This gives you plenty of extra room for tying secure knots without struggling to hold the ends. -
Pre-stretch:
Give your elastic cord a gentle pull several times. This ‘pre-stretching’ technique helps prevent the bracelet from loosening up immediately after you wear it. -
Start the Pattern:
String on about 10-12 white heishi beads to begin the base of the bracelet. -
Add Gold Accents:
Slide on one gold disc spacer, followed by a larger round gold bead, and another gold disc spacer. This creates a textured metallic section. -
Continue the White Base:
Add another long section of white heishi beads, roughly equal to the first section you created. -
Attach the Charm:
Using your fingers or small pliers, open a gold jump ring and attach it to your pink heart charm. Slide the jump ring onto the elastic cord so it sits between two gold spacer discs. -
Finish the Sequence:
continue adding white beads until the strand reaches your desired wrist size, typically around 6.5 to 7 inches for an average fit. -
Check the Fit:
Wrap the unfinished strand around your wrist to ensure it sits comfortably without gaps. -
Tie Off:
Tie a secure surgeon’s knot (right over left, left over right, and loop through again). Pull tight. -
Secure and Trim:
Dab a tiny drop of jewelry glue on the knot. Let it dry completely before trimming the excess elastic, leaving tiny tails that can be tucked inside adjacent beads.
Knot Slipping?
If your elastic knot feels insecure, try a ‘surgeon’s knot’—loop the elastic through twice on the first tie before pulling tight. It holds much better than a standard square knot.
Step 2: Bracelet Two: The Pink & White Mix
-
Prepare the Cord:
Cut another 10-12 inch piece of elastic and pre-stretch it just like the first one. -
Create the First Half:
String a solid section of white heishi beads, covering about half of the bracelet’s total length. -
Transition with Gold:
Add a gold disc spacer, a round gold bead, and another disc spacer to mirror the style of the first bracelet. -
The Pink Section:
Begin adding your pink heishi beads. create a small block of 5-6 pink beads. -
Mixed Accent:
Slide on a single round gold bead. -
Solid Pink Finish:
Finish the strand by filling the rest of the length with solid pink heishi beads until it matches the size of your first bracelet. -
Final Knotting:
Repeat the surgeon’s knot technique, ensuring the tension is tight enough that no elastic shows between the beads. -
Finalizing:
Apply your glue to the knot, let it dry, trim the ends, and hide the knot inside a neighboring bead for a seamless professional look.
Add a Clasp
For a more high-end finish, crimp beads and a gold lobster clasp can replace the elastic knotting method. This allows for an adjustable extender chain like the one partially visible here.
Enjoy wearing your charming new bracelet stack or gift it to someone special

The Complete Guide to Pottery Troubleshooting
Uncover the most common ceramic mistakes—from cracking clay to failed glazes—and learn how to fix them fast.
Pink Stars and Shine Spacers
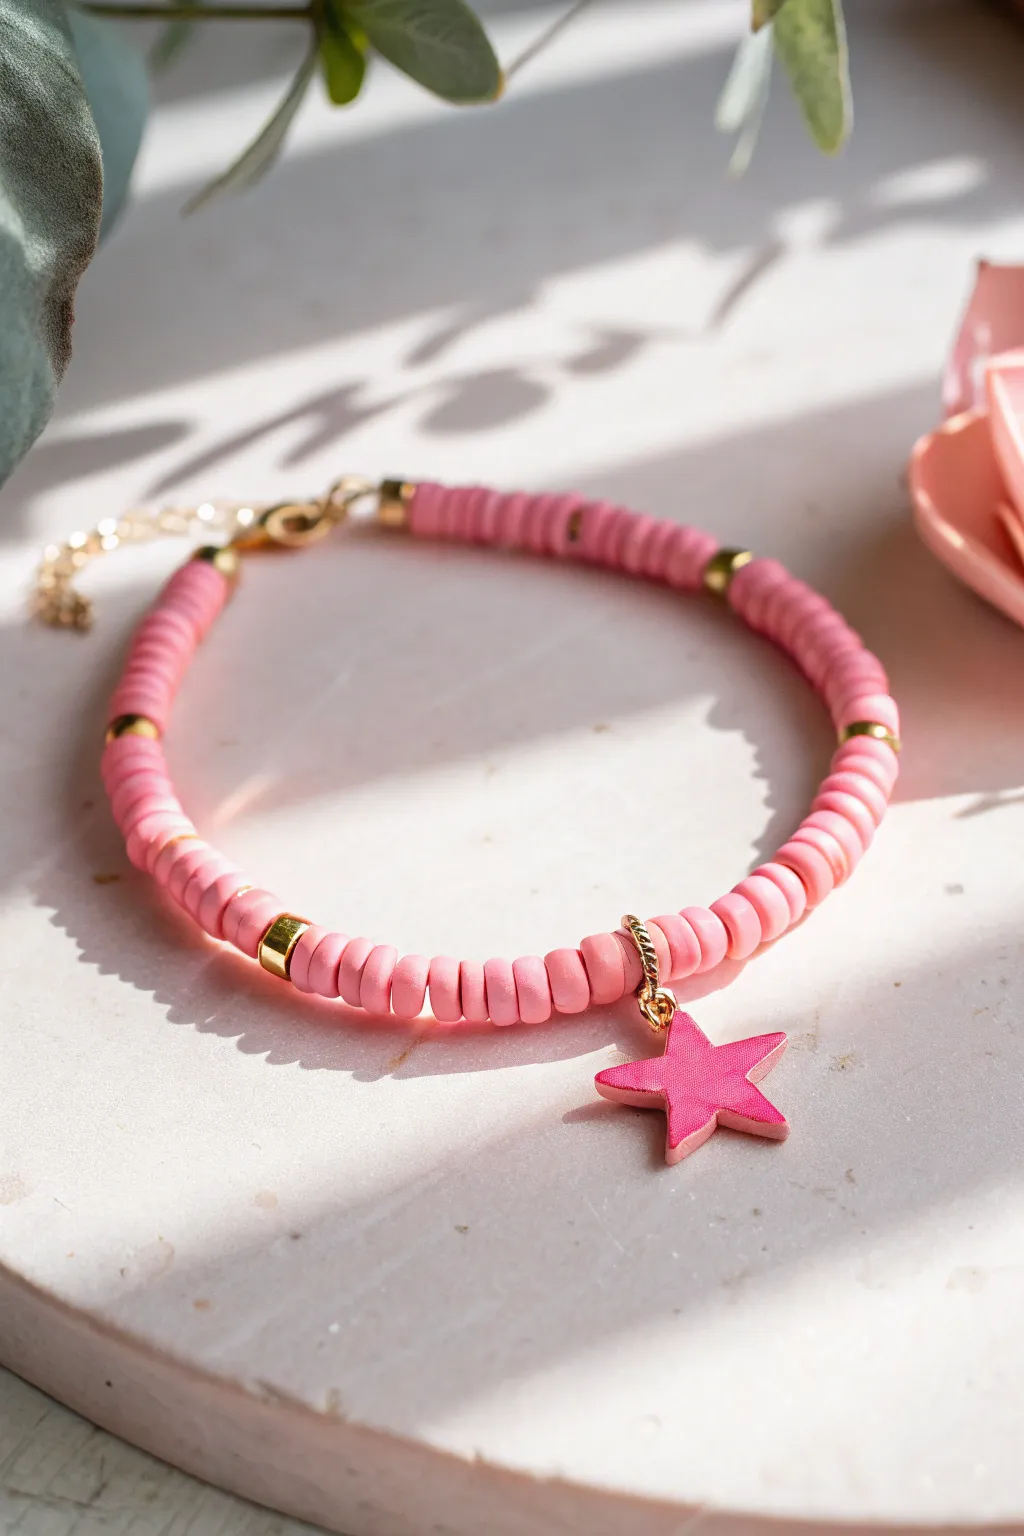
This blush-toned beauty combines the trendy look of heishi clay beads with bright gold accents for a perfect pop of shimmer. The focal point is a charming pink star that adds a playful, preppy touch to your wrist stack.
Step-by-Step Tutorial
Materials
- Pink polymer clay heishi beads (approx. 6mm)
- Gold flat round spacer beads (approx. 6mm)
- Pink enamel star charm with gold jump ring
- Elastic beading cord (0.8mm recommended)
- Gold tone crimp beads or knot covers (optional)
- Small gold lobster clasp
- Gold tone extender chain
- Jewelry pliers (chain nose)
- Scissors
Step 1: Planning and Stringing
-
Measure your wrist:
Before cutting any cord, wrap the elastic around your wrist loosely to gauge size. Add about 3-4 inches of extra length to allow plenty of room for knotting and finishing. -
Secure the end:
Place a piece of tape or a bead stopper on one end of your cut elastic cord. This simple step prevents your beads from sliding off while you design your pattern. -
Begin the bead pattern:
Start by threading on a section of the pink clay heishi beads. Aim for a segment about 1.5 inches long to create a solid base color. -
Add a gold spacer:
Slide on one gold flat round spacer bead. This will act as a bright divider in your pattern. -
Continue the rhythm:
Repeat the previous pattern: string another 1.5 inches of pink beads followed by a gold spacer. Do this until you reach the center point of your bracelet length. -
Attach the charm:
At the halfway mark, slide on a gold jump ring carrying your pink star charm. Ensure the charm faces outward correctly. -
Complete the beading:
Continue the pattern on the other side of the charm—1.5 inches of pink beads followed by a gold spacer—until the bracelet reaches your desired length.
Step 2: Finishing Touches
-
Check the fit:
Wrap the beaded strand around your wrist one last time to ensure it sits comfortably. Add or remove a few pink discs if adjustments are needed. -
Prepare for closure:
On one end of the elastic, thread on a gold crimp bead followed by the jump ring of your lobster clasp. -
Loop back:
Take the end of the elastic and thread it back through the crimp bead to create a secure loop holding the clasp. -
Secure the first side:
Use your chain nose pliers to flatten the crimp bead tightly. I find that pressing firmly ensures the elastic won’t slip out over time. -
Attach the extender:
On the opposite end of the bracelet, repeat the crimping process. Thread on a crimp bead and the jump ring of your extender chain. -
Loop and crimp:
Pass the elastic back through this second crimp bead, pull it snug against the clay beads, and use your pliers to flatten the crimp securely. -
Trim excess cord:
Carefully trim away the leftover elastic tails close to the crimp beads. Be cautious not to snip the main cord holding the bracelet together.
Loose Charm?
If your star charm faces the wrong way, use two pliers to gently twist the jump ring 90 degrees before attaching it to the cord.
Level Up The Look
Create a matching stack by making two more bracelets: one entirely of gold spacers and another using a darker shade of pink clay beads.
Now you have a shimmering star bracelet ready to shine in your collection
Pink Heishi and Classic Pearl Mix
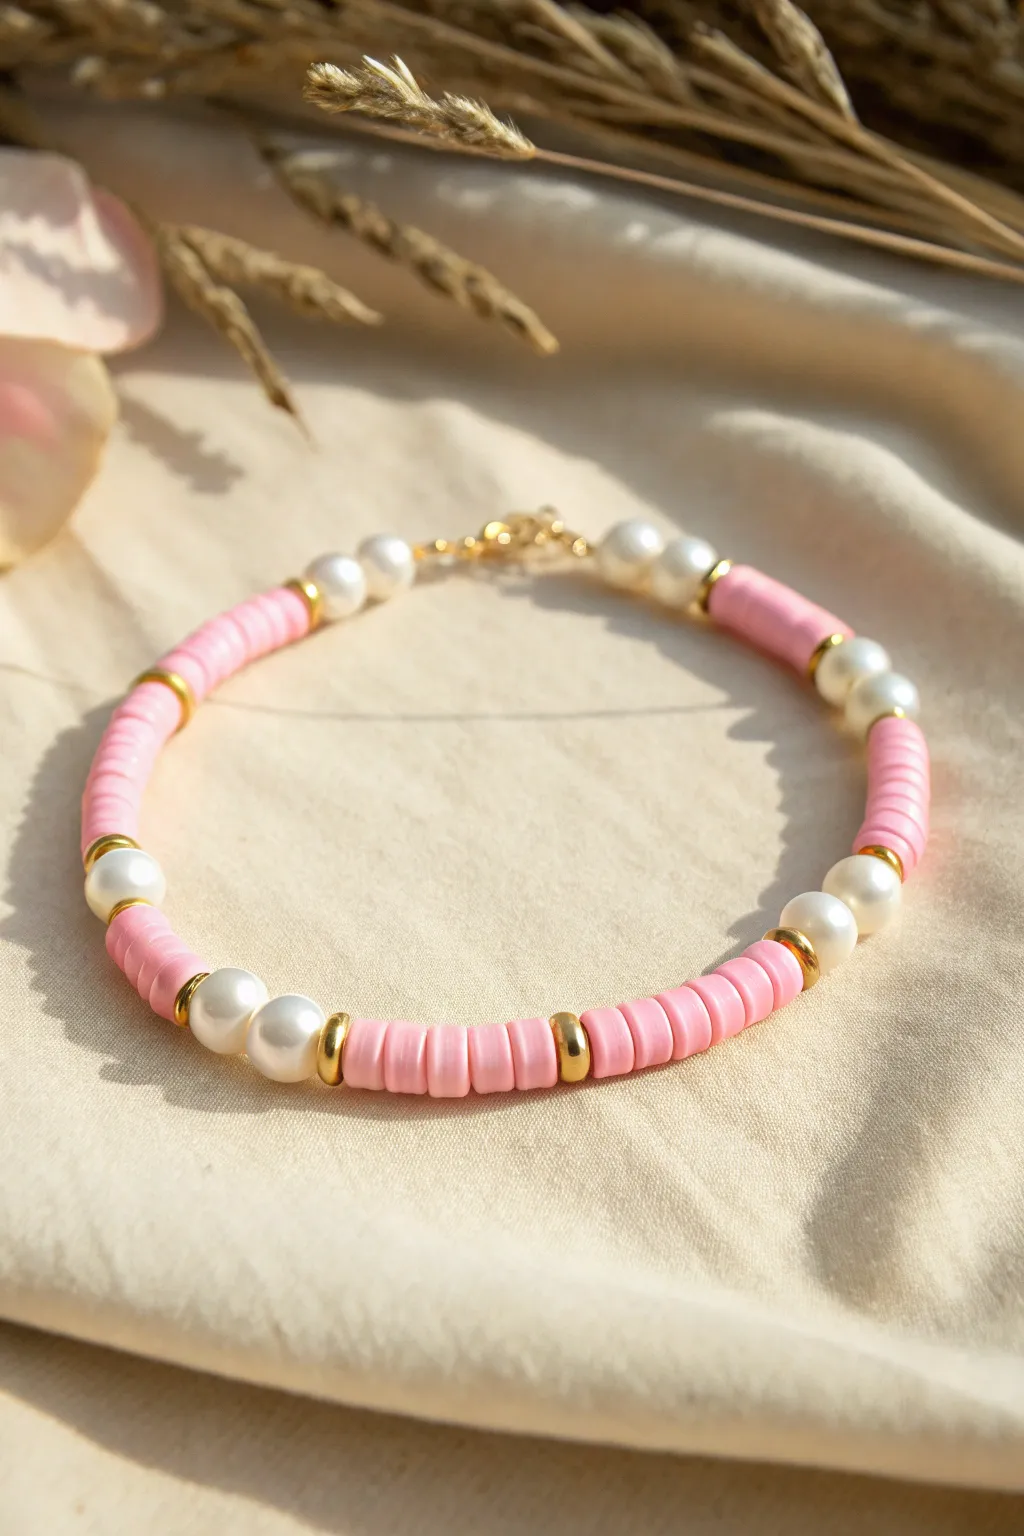
This delicate bracelet blends the playful, modern vibe of pink clay heishi beads with the timeless sophistication of white pearls. Separated by glimmering gold accents, the alternating pattern creates a chic accessory perfect for stacking or wearing solo.
Step-by-Step Guide
Materials
- Pink polymer clay heishi disc beads (approx. 4-6mm)
- White or ivory round pearl beads (approx. 6mm)
- Small gold spacer beads (smooth disc or rondelle shape)
- Lobster claw clasp and jump ring
- Crimp beads and crimp covers (if using wire)
- Beading wire (e.g., Beadalon) or strong clear elastic cord
- Wire cutters
- Chain nose pliers
- Bead stopper or tape
Step 1: Preparation & First Section
-
Measure and cut:
Begin by measuring your wrist to determine the needed length. Cut a piece of beading wire or elastic cord about 3-4 inches longer than your wrist measurement to allow plenty of room for tying knots or attaching clasps. -
Secure the end:
If you are using beading wire, attach one half of your clasp now. Thread a crimp bead onto the wire, loop it through a jump ring (or the clasp loop), and thread the wire back through the crimp bead. Flatten the crimp bead with pliers to secure it. If using elastic, simply place a bead stopper or a piece of tape on one end. -
Start the pattern:
Thread on two round pearl beads to begin. This acts as a classic anchor for the design near the clasp. -
Add gold accent:
Slide on a single gold spacer bead. This will act as the separator between your pearl sections and the pink clay sections. -
Thread the first pink block:
Add approximately 8 to 10 pink heishi beads. I like to check the length of this block visually—it should be roughly double the length of the two-pearl segment. -
Close the pink section:
Finish this block by adding another single gold spacer bead.
Spacer Strategy
Use flat disc spacers rather than round balls. They sit flush against the flat clay beads, creating a seamless transition line.
Step 2: Building the Pattern
-
Add first full pearl segment:
Thread on two pearl beads. Make sure they sit snugly against that last gold spacer. -
Repeat the gold spacer:
Add another gold spacer bead. -
Second pink block:
String on another set of 8-10 pink heishi beads. Try to keep the count consistent with your first block so the bracelet looks symmetrical. -
Spacer transition:
Slide on a gold spacer bead to cap off the pink section. -
Continue alternating:
Repeat this pattern: two pearls, one gold spacer, a block of pink heishi beads, one gold spacer. Continue until you are within an inch of your desired finished length. -
Check the symmetry:
Lay the bracelet down in a circle to check your pattern. Ideally, you want to end with a mirror of how you started—likely with a pearl section or just before one.
Step 3: Finishing Touches
-
Secure the final end:
If using wire: Thread a crimp bead onto the end, followed by the lobster clasp. Loop the wire back through the crimp bead and pull tight, but leave enough slack so the bracelet can move fluidly. -
Crimp and trim:
Use your pliers to flatten the crimp bead securely. Trim the excess wire tail with your wire cutters as close to the bead as possible without snipping the main wire. -
Elastic alternative:
If you used elastic cord, remove the tape/stopper, tie a sturdy surgeon’s knot (looping the elastic through twice), pull tight, and add a dot of jewelry glue to the knot before trimming the ends. -
Optional crimp covers:
For a polished professional look, you can place a gold crimp cover over your flattened crimp beads. Gently close the cover with pliers until it looks like a round gold bead.
Personalize It
Swap the two pearls for a single letter bead in the center section to add initials or a short word without breaking rhythm.
Slip on your new bracelet and enjoy the stylish contrast of classic pearls and colorful clay


What Really Happens Inside the Kiln
Learn how time and temperature work together inside the kiln to transform clay into durable ceramic.
Pink Beach-Prep Shell Accent Bracelet
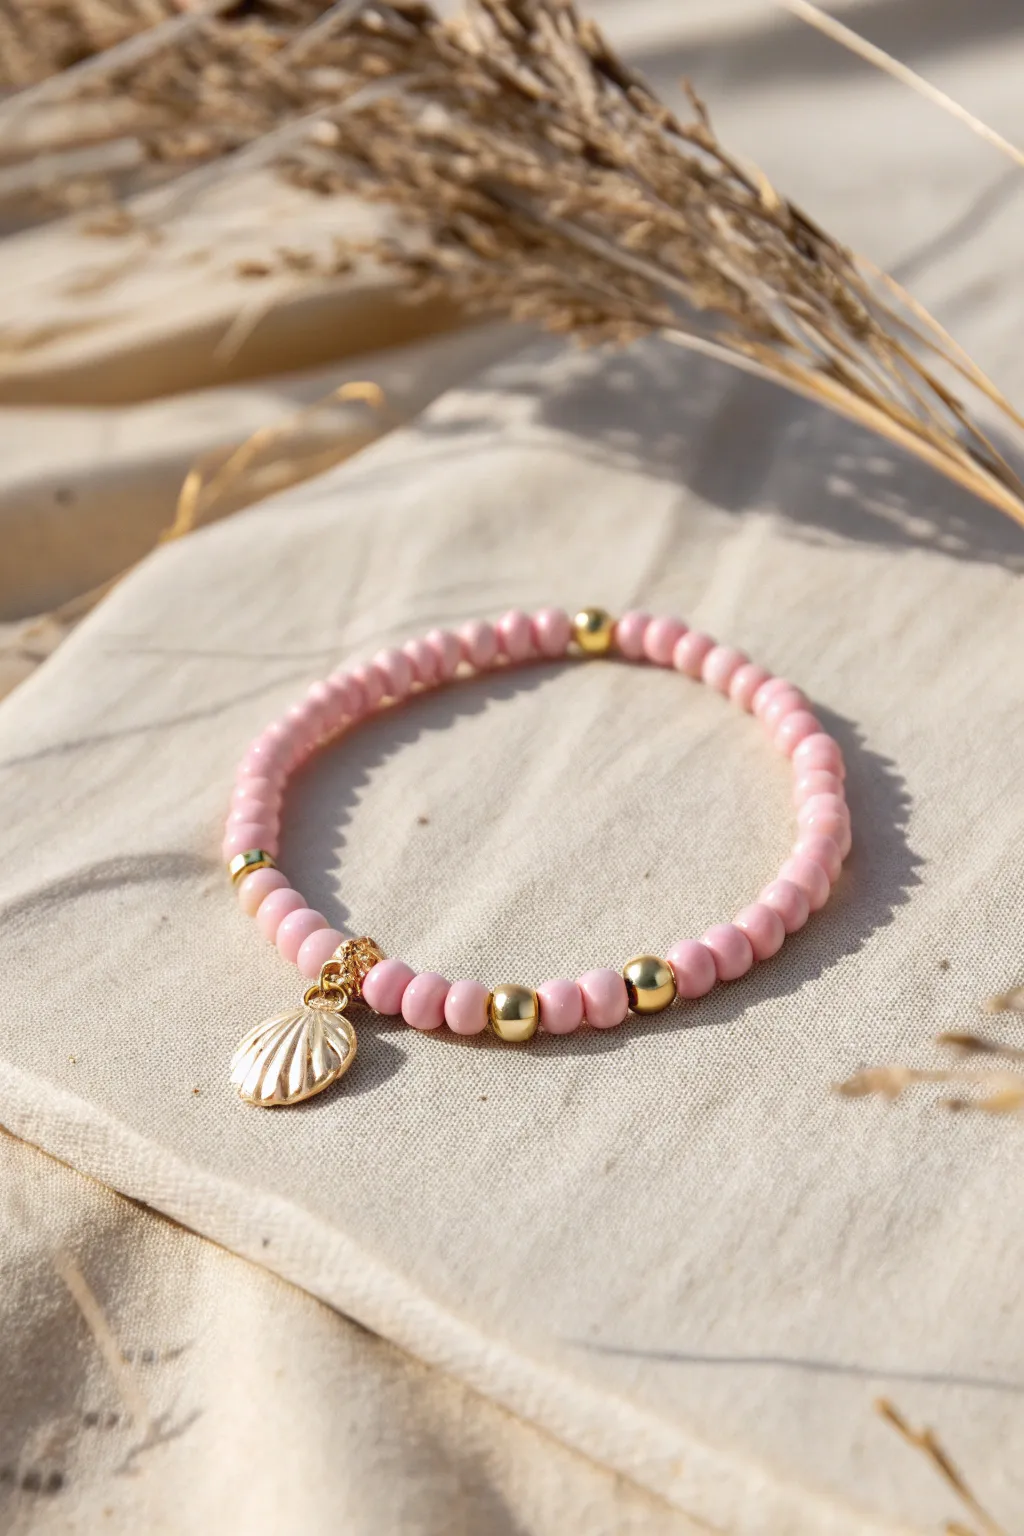
Capture the essence of a serene beach sunset with this delicate beaded bracelet featuring soft pink tones and warm golden accents. The centerpiece is a charming gold scallop shell charm that adds just the right amount of nautical flair to your wrist stack.
How-To Guide
Materials
- 4mm round opaque pink glass beads (or round polymer clay beads)
- 3mm gold-plated round spacer beads
- Gold-plated scallop shell charm with jump ring
- 0.8mm clear elastic cord
- Jewelry glue or clear nail polish
- Scissors
- Bead stopper or tape
- Clean towel or bead mat
Step 1: Preparation & Stringing
-
Measure your cord:
Cut a piece of elastic cord about 10-12 inches long. This generous length makes tying the final knot much easier than struggling with short ends. -
Secure the end:
Attach a bead stopper to one end of the cord, or simply tape it down to your work surface so beads don’t slip off while you work. -
Start the pattern:
Begin by threading on approximately 15 to 20 pink beads. This section will sit on the side of your wrist. -
Add first accent:
Slide on one 3mm gold round spacer bead followed by three pink beads. -
Add second accent:
Add a second gold spacer bead, followed by another three pink beads. -
Center focus:
Place a third gold spacer bead onto the cord. This will act as a frame for the charm area. -
Attach the charm:
Thread the cord through the jump ring attached to your gold scallop shell charm. Ensure the shell faces outward. -
Complete the center:
Immediately follow the charm with a fourth gold spacer bead to lock the charm visually in place. -
Mirror the pattern:
Add three pink beads, followed by your final gold spacer bead.
Step 2: Finishing Touches
-
Finish the strand:
Fill the rest of the cord with pink beads until the bracelet reaches your desired length. A standard wrist size is usually around 6.5 to 7 inches. -
Check the fit:
Wrap the unfinished strand around your wrist to check the size. It should be snug but comfortable, not tight. -
Pre-stretch the cord:
Gently pull tightly on both ends of the elastic cord a few times. I find this crucial step prevents the bracelet from sagging later on. -
Tie the knot:
Remove the bead stopper and tie a surgeon’s knot (loop left over right twice, then right over left once) to secure the circle. -
Secure the knot:
Apply a tiny dab of jewelry glue or clear nail polish directly onto the knot. Let it dry for a minute. -
Hide the mechanics:
If hole sizes allow, gently tug the elastic so the knot slides inside one of the adjacent beads to hide it. -
Trim the excess:
Using your scissors, carefully trim the remaining tails of the elastic cord close to the knot without cutting the knot itself.
Knot Slipping?
If your elastic knot feels insecure, try pulling all four strands (the two loops and two tail ends) simultaneously to tighten it before gluing.
Make it a Stack
Create two companion bracelets using only the pink beads and a single gold bead to wear alongside this charm bracelet for a layered look.
Now you have a breezy, elegant accessory ready for your next coastal adventure or casual day out
Pink Gingham Checkerboard Pattern

Embrace the preppy aesthetic with this cheerful bracelet featuring alternating blocks of bright and soft pink polymer clay beads. The design is elevated by crisp white spacer beads and elegant gold disc accents, creating a polished look perfect for stacking.
Detailed Instructions
Materials
- Polymer clay Heishi beads (disc beads) in hot pink
- Polymer clay Heishi beads (disc beads) in light baby pink
- Round white beads (approx. 4-6mm, likely acrylic or glass)
- Gold flat disc spacer beads (heishi style)
- Elastic stretch cord (0.8mm recommended)
- Super glue or jewelry cement
- Scissors
- Tape or a bead stopper clip
- Gold jump ring and clasp (optional, if not doing a simple stretch tie)
- Gold extension chain (optional)
Step 1: Preparation
-
Measure and Cut:
Cut a piece of elastic cord about 10-12 inches long. This gives you plenty of extra room for tying the knots later. -
Secure the End:
Attach a piece of tape to one end of the cord or use a bead stopper clip to prevent your beads from sliding off while you work. -
Sort Your Beads:
Lay out your beads on a tray or workspace. Separate your hot pink discs, light pink discs, gold spacers, and white round beads to make the stringing process faster.
Step 2: Creating the Pattern
-
Start with Light Pink:
Begin by threading approximately 10 to 12 light baby pink Heishi beads onto the elastic cord. -
Add the Spacer Combo:
Slide on one gold flat disc spacer, followed by one round white bead, and then another gold flat disc spacer. This trio acts as the divider between color blocks. -
Switch to Hot Pink:
Thread on a section of hot pink Heishi beads. Try to use the same number (10-12 beads) as your first section to keep the blocks symmetrical. -
Repeat the Divider:
Add another divider sequence: gold disc, white round bead, gold disc. -
Continue the Pattern:
Repeat the process, alternating between blocks of light pink and hot pink beads, always separating them with the gold/white/gold divider combo. -
Check the Length:
Periodically wrap the strand around your wrist to check the size. I usually aim for about 6.5 to 7 inches for an average adult wrist. -
Final Adjustments:
Ensure your pattern ends in a way that will look seamless when joined. For example, if you started with a pink block, end with a divider section so the pattern flows correctly.
Keep It Uniform
Count your beads exactly for each color block section (e.g., exactly 12 discs each time). Uneven sections are very noticeable in this geometric style.
Step 3: Finishing Touches
-
Prepare to Tie:
Remove the tape or bead stopper. If you are adding a metal clasp and chain like the photo, thread the jump ring onto one end and the clasp onto the other before knotting. -
Tie the Knot:
If making a simple stretch bracelet, cross the two ends of the elastic and tie a simple overhand knot. Pull it tight. -
Secure with Surgeon’s Knot:
Tie a second knot, but loop the elastic through twice (a surgeon’s knot) for extra security. Pull firmly on all four strands (the two tails and the bracelet loop) to tighten. -
Glue the Knot:
Apply a tiny dab of super glue or jewelry cement directly onto the knot. This prevents it from slipping over time. -
Hide the Knot:
Wait for the glue to dry slightly, then trim the excess cord ends. If possible, gently tug the knot inside one of the adjacent beads to hide it.
Knot Slipping?
If your elastic knot keeps coming undone before you can glue it, try pre-stretching the clear cord before you start stringing. This reduces its slickness.
Now you have a vibrant accessory ready to add a pop of pink to any outfit

TRACK YOUR CERAMIC JOURNEY
Capture glaze tests, firing details, and creative progress—all in one simple printable. Make your projects easier to repeat and improve.
Pink “Country Club” Clean-Line Bracelet
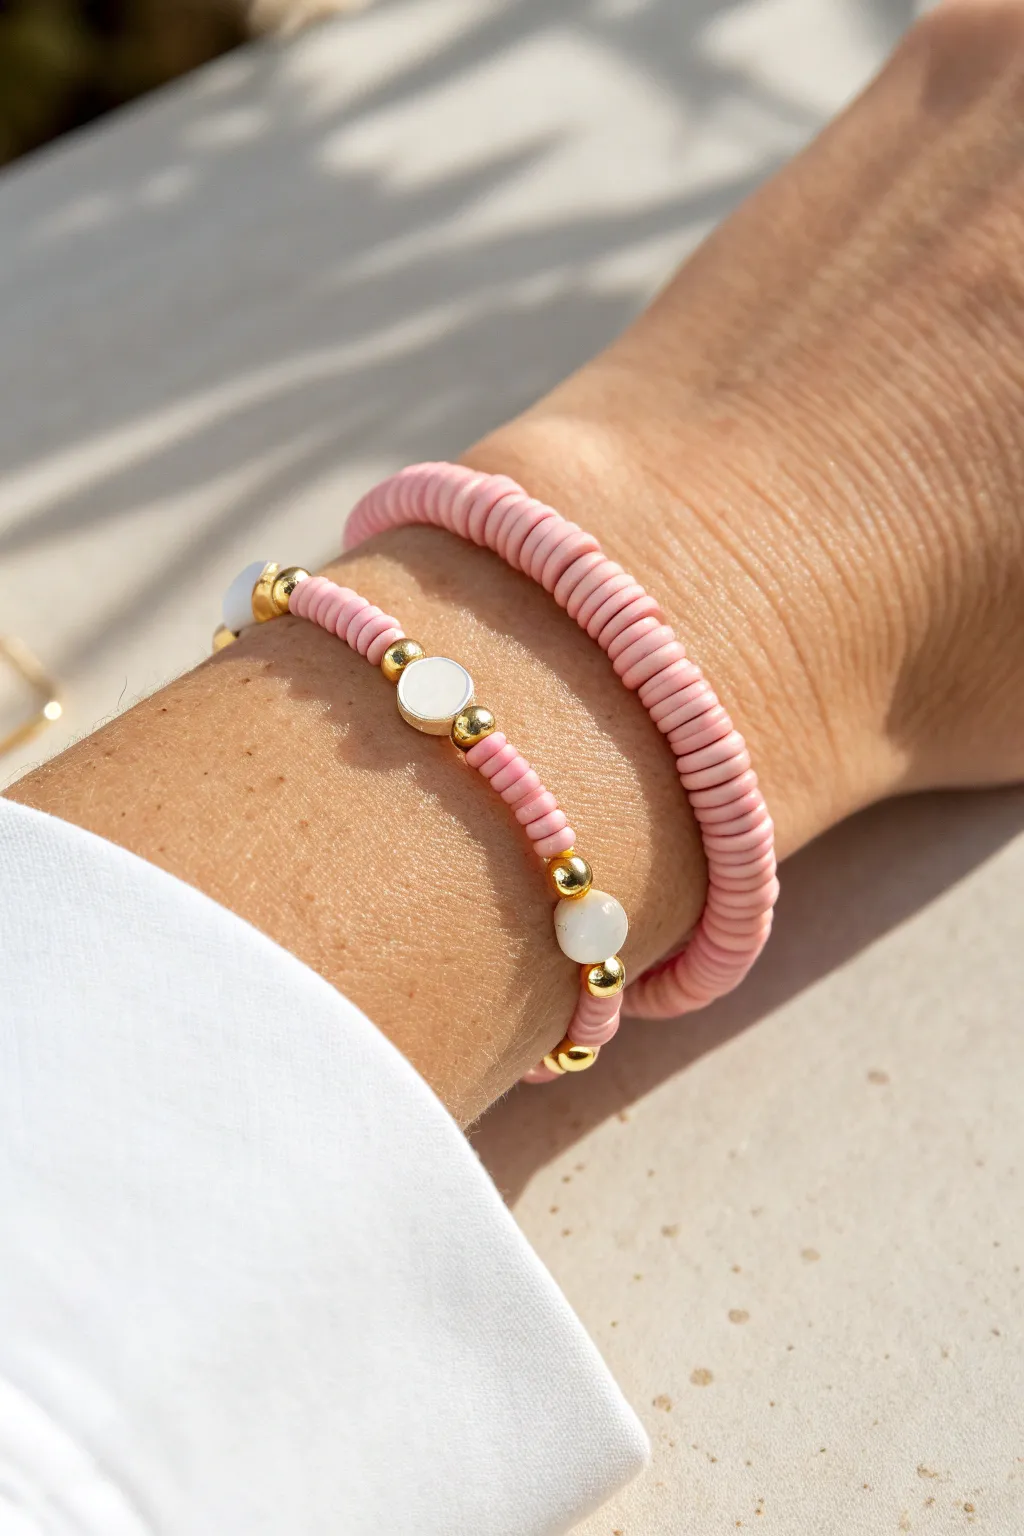
Achieve that classic, preppy aesthetic with this effortless duo of stretchy bracelets. Combining soft rose-pink clay beads with crisp white accents and flashes of gold creates a clean, polished look perfect for everyday wear.
How-To Guide
Materials
- 6mm polymer clay disc beads (heishi beads) in matte rose pink
- 4mm gold-plated round spacer beads
- 8mm flat round shell or white polymer clay beads
- 0.8mm clear elastic stretch cord
- Jewelry glue or clear nail polish
- Scissors
- Bead stopper or tape
- Ruler or measuring tape
Step 1: Planning & Setup
-
Measure your wrist:
Wrap a measuring tape comfortably around your wrist to determine your size. Add about 1/2 inch to this measurement to ensure the bracelets aren’t too tight. -
Cut the cord:
Cut two pieces of elastic cord, each about 10-12 inches long. Having extra length makes tying the final knots much easier than struggling with short ends. -
Secure the ends:
Attach a bead stopper to one end of each cord. If you don’t have a stopper, a piece of masking tape folded over the end works perfectly to keep beads from sliding off.
Knot Slipping?
If the elastic feels too slippery to hold a knot, try sanding the very ends of the cord slightly with a nail file or sandpaper to give it some grip before tying.
Step 2: The Solid Pink Strand
-
Start beading:
Begin threading the matte rose pink clay discs onto your first cord. This bracelet relies on uniformity, so simply load one bead after another. -
Check the fit:
Occasionally wrap the strand around your wrist to check the length. Keep adding beads until you reach your desired length, aiming for a consistent, seamless look. -
Pre-stretch the cord:
Here I like to give the cord a gentle tug before tying. This pre-stretching helps prevent the bracelet from loosening up significantly after the first few wears.
Gold That Lasts
To keep your spacer beads shiny longer, apply a thin coat of clear nail polish to them before stringing. This helps protect the plating from wear and sweat.
Step 3: The Patterned Strand
-
Create the segments:
For the second bracelet, start by threading about 10 to 12 pink clay beads to form the base pink section. -
Add first gold accent:
Slide on one 4mm gold spacer bead. This acts as a metallic frame for the focal bead coming next. -
Place the focal bead:
Thread on one large white flat round bead. This pop of white is the signature detail of this ‘country club’ style. -
Finish the motif:
Add another gold spacer bead immediately after the white bead to close the metallic frame. -
Repeat the pattern:
Return to the pink clay beads. Add another set of 10-12 pink beads, then repeat the gold-white-gold sequence. Continue this pattern until you reach the same length as your first bracelet.
Step 4: Finishing Touches
-
Prepare to knot:
Remove the bead stopper or tape carefully from both ends of the first bracelet, holding the ends tight so beads don’t escape. -
Tie the surgeon’s knot:
Cross the ends, wrap one side around twice, and pull tight. This classic jewelry knot is secure and unobtrusive. -
Secure with glue:
Apply a tiny dot of jewelry glue directly onto the knot. Let it dry completely before trimming; this ensures your hard work doesn’t unravel. -
Hide the knot:
Once the glue is dry, trim the excess tail close to the knot. Gently tug the bracelet so the knot slides inside the hole of a neighboring bead to hide it. -
Repeat for the second strand:
Follow the same tying and gluing process for your second, patterned bracelet to complete the set.
Slip on your stacked set and enjoy the polished, breezy vibe they add to your outfit
Pink Bow Focal Bead Bracelet
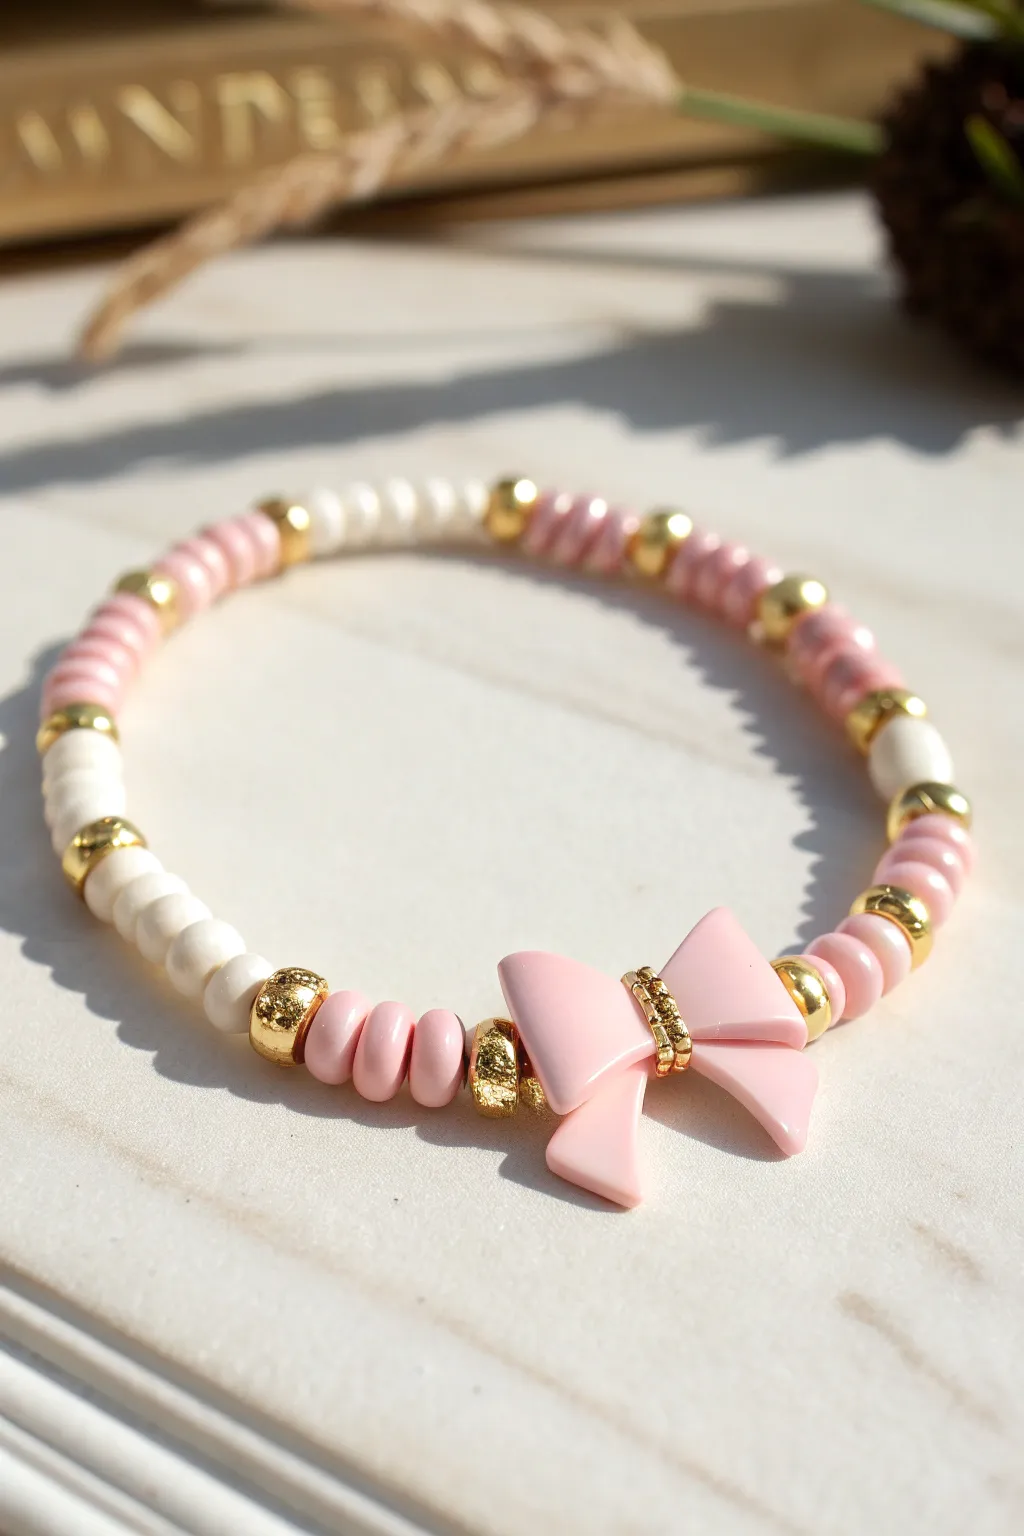
Embrace the coquette aesthetic with this darling pink and gold bracelet featuring a statement bow charm. This design mixes classic clay disc beads with elegant gold spacers for a look that is both playful and polished.
Step-by-Step Guide
Materials
- Elastic jewelry cord (0.7mm or 0.8mm)
- Pink polymer clay disc beads (Heishi beads, ~6mm)
- White round beads (6mm or 8mm, ceramic or tridacna shell)
- Gold round spacer beads (4mm)
- Gold textured rondelle spacer beads (6mm)
- Large pink acrylic bow bead/charm (with horizontal hole)
- Jewelry glue or clear nail polish
- Scissors
Step 1: Preparation
-
Measure your wrist:
Wrap a piece of string around your wrist to find your size, then add about 1/2 inch for a comfortable fit. -
Cut the cord:
Cut a piece of elastic cord roughly 10-12 inches long. Having extra length makes tying the final knot much easier without losing beads. -
Pre-stretch the elastic:
Gently pull tightly on the cord a few times. This pre-stretching prevents the bracelet from sagging or loosening after you start wearing it. -
Secure the end:
Place a piece of tape over one end of the cord or attach a bead stopper clip to prevent your beads from sliding off while you work.
Knot Slipping?
If your elastic knot feels loose, try a surgeon’s knot instead. Loop the cord through twice on the first pass before pulling tight for extra grip.
Step 2: Stringing the Pattern
-
Start the pattern:
Begin stringing with three pink clay disc beads to create a soft color base near where the knot will eventually be hidden. -
Add gold accents:
Slide on one small gold round spacer bead, followed closely by five more pink clay disc beads. -
Introduce the white section:
Add a gold textured rondelle bead, then string three white round beads. Cap this section with another gold textured rondelle. -
Repeat the pink segment:
Return to the pink color by adding five pink clay disc beads, one small gold round spacer, and another five pink clay disc beads. -
Create symmetry:
Continue this alternating pattern—combining the white bead segments with the pink clay segments—until you have filled about half of your desired bracelet length. -
Check the fit:
Wrap the unfinished strand around your wrist. You want the focal point to sit on top, so ensure you have enough length on both sides to balance it.
Step 3: Adding the Focal Point
-
Prepare the centerpiece:
Before adding the bow, frame it by stringing one gold textured rondelle bead onto the cord. -
Thread the bow:
Slide your pink bow charm onto the cord. If the hole is tight, twisting the cord slightly as you push can help it glide through. -
Secure the other side:
Immediately add another gold textured rondelle bead after the bow. This frames the charm perfectly and adds a touch of shine. -
Finish the strand:
Continue the pattern on the other side of the bow, mirroring what you did in the first half until the bracelet reaches your measured length.
Add Sparkle
Replace the plain gold center of the bow with a loop of tiny gold seed beads or stick a small rhinestone in the middle for a customized glam look.
Step 4: Finishing Touches
-
Check symmetry:
Lay the bracelet in a circle to ensure the pattern looks balanced on both sides of the bow before tying. -
Tie the knot:
Remove the tape or clip. Tie a standard square knot: right over left, then left over right. Pull it tight. -
Secure with glue:
Dab a tiny drop of jewelry glue onto the knot. I usually let this dry for a few minutes to ensure it’s completely secure. -
Hide the knot:
Trim the excess cord ends close to the knot, then gently pull the cord to slide the knot inside the hole of the nearest large bead if possible.
Slip on your new bracelet and enjoy the sweet, preppy charm it adds to your outfit
Pink Stack Set With Three Coordinated Patterns
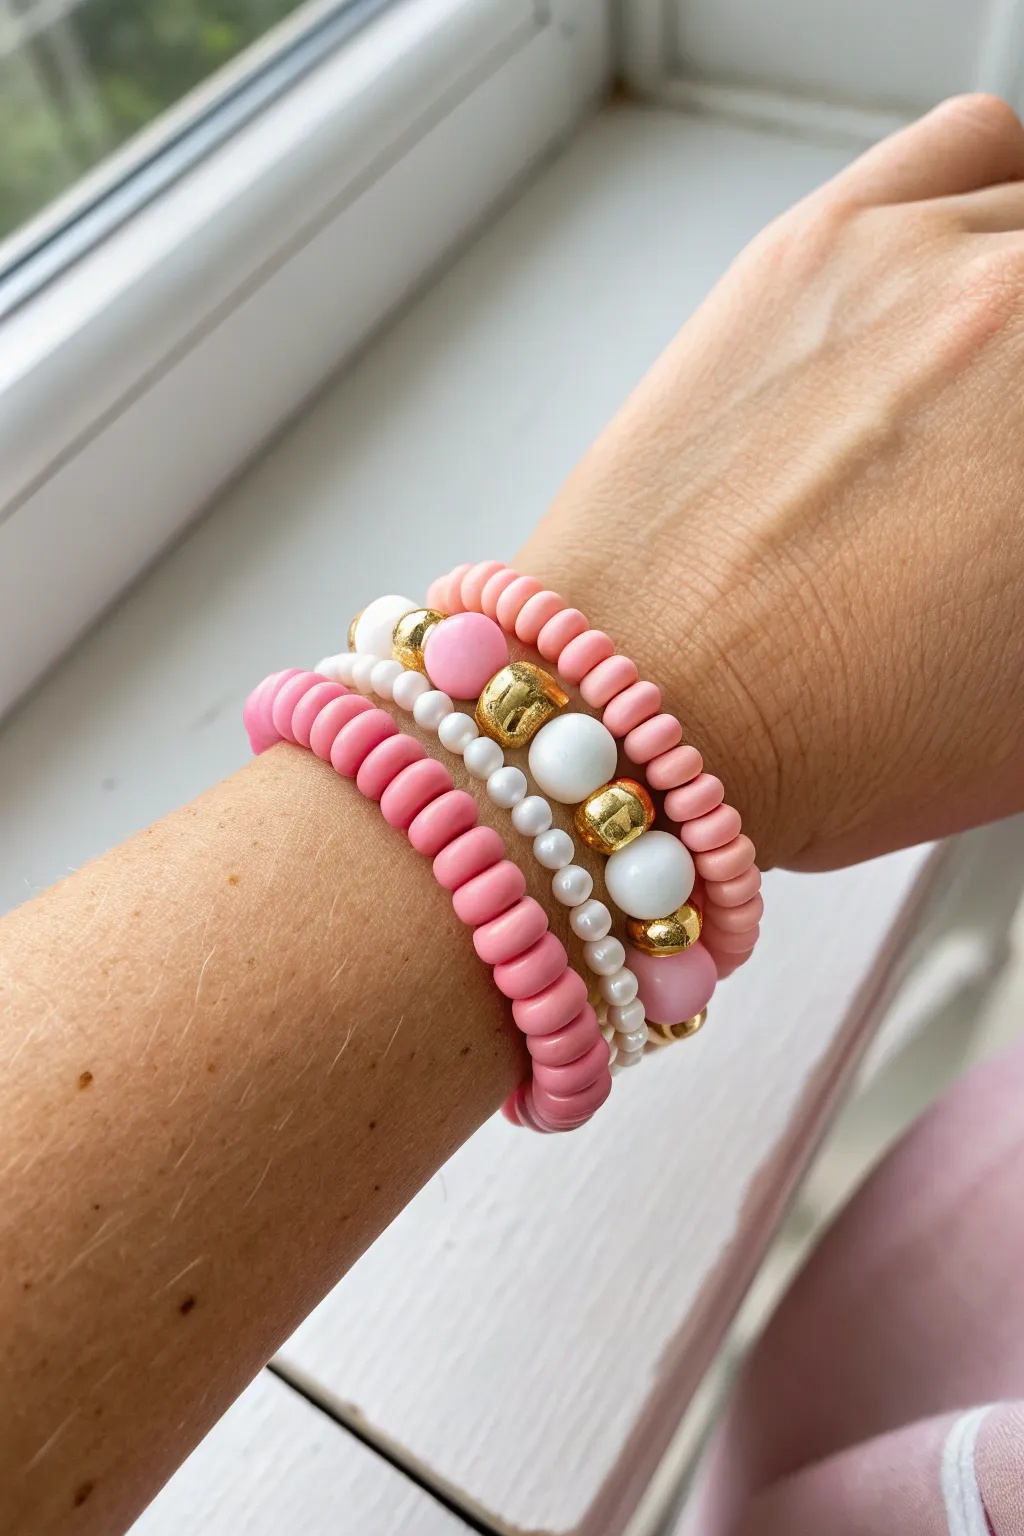
This charming bracelet set combines classic elements for a look that is both playful and polished. By mixing soft pink Heishi beads with elegant pearls and striking gold accents, you create a cohesive trio that looks professionally designed.
How-To Guide
Materials
- Pink polymer clay (Heishi) disc beads (hot pink or bubblegum pink)
- Small white seed beads (approx. 4mm or 6/0 size)
- Large faux pearl beads (approx. 8-10mm)
- Medium pink acrylic round beads (approx. 8-10mm)
- Gold tone metallic spacer beads (round or faceted, approx. 6mm)
- Elastic stretch cord (0.8mm or 1.0mm recommended)
- Scissors or jewelry snips
- Jewelry glue or clear nail polish
- Bead stopper or tape
Step 1: Preparation
-
Measure your wrist:
Wrap a piece of string around your wrist to find your comfortable size, then add about an inch to that measurement. -
Cut the cord:
Cut three lengths of elastic cord, making sure each is at least 3-4 inches longer than your final measurement to allow plenty of room for tying knots. -
Secure the ends:
Attach a bead stopper or simply place a piece of tape on one end of each cord so your beads don’t slide right off while you work.
Knot Hiding Trick
If using beads with larger holes, try to pull the knot inside the bead immediately after applying glue. It creates a cleaner finish.
Step 2: Creating the Solid Pink Heishi Bracelet
-
Start stringing:
Begin threading the pink polymer clay disc beads onto your first cord. -
Check the fit:
Continue adding beads until the strand reaches your desired wrist length. Wrap it around your wrist occasionally to ensure it hits that sweet spot of not too tight, not too loose. -
Finish strand one:
Once filled, set this strand aside carefully or proceed to knotting if you prefer to finish one at a time.
Step 3: Creating the Pearl & Gold Accent Bracelet
-
Start the pattern:
For the middle bracelet, begin by stringing a sequence of the small white seed beads. -
Create the focal point:
Once you have about 2-3 inches of seed beads, thread on one large gold spacer bead followed by a large white pearl bead. -
Continue the center pattern:
Add another gold spacer, then a large round pink bead, and then repeat the gold spacer. -
Complete the sequence:
Add a second large white pearl, followed by a final gold spacer bead to balance the design. -
Finish with seed beads:
Fill the rest of the cord with white seed beads until it matches the length of your first bracelet.
Loose Elastic?
If your bracelet feels saggy quickly, you likely didn’t pre-stretch the cord. Give the elastic a few firm tugs before you ever start beading to relax the fibers.
Step 4: Creating the Mixed Textured Bracelet
-
Begin the final strand:
This third bracelet mirrors the first but adds a small accent section. Ideally, use the same pink Heishi beads for the main body. -
String the foundation:
Thread pink Heishi beads until the strand is about half full. -
Add the mini accent:
Slide on one gold spacer bead, followed by one large round pink bead, and finish the accent with another gold spacer. -
Complete the strand:
Finish stringing the rest of the pink Heishi beads until the length matches the other two bracelets.
Step 5: Final Assembly
-
Pre-stretch the cords:
Before tying, give each bracelet a gentle tug to pre-stretch the elastic; this helps prevent the bracelet from loosening up after you wear it. -
Tie the knots:
Remove your bead stoppers or tape. Tie a sturdy surgeon’s knot (right over left, left over right) for each bracelet, pulling tight. -
Secure with glue:
Dab a tiny drop of jewelry glue on each knot to ensure it stays permanent. -
Hide the knots:
Once the glue is dry, trim the excess cord and verify if you can gently tuck the knot inside a neighboring large bead for a seamless look. -
Stack them up:
Put all three bracelets on together to complete the coordinated set.
Enjoy mixing and matching your new custom stack with different outfits for a splash of color
Pink Confetti Sprinkle Heishi Bracelet
Capture the sweetness of spring with this delightful beaded bracelet featuring a playful mix of bubblegum pink and creamy white clay discs. The addition of shiny gold spacer beads adds a touch of sophistication, making it perfect for stacking or wearing solo.
Step-by-Step Guide
Materials
- Polymer clay Heishi beads (bubblegum pink)
- Polymer clay Heishi beads (cream/white)
- Gold tone disc spacer beads (approx. 4mm)
- Strong elastic beading cord (0.8mm recommended)
- Jewelry glue or clear nail polish
- Scissors
- Tape or bead stopper
- Bead board or measuring tape
Step 1: Preparation
-
Measure your wrist:
Wrap a measuring tape loosely around your wrist to find your size. Add about half an inch to this measurement to ensure the bracelet fits comfortably without being too tight. -
Cut the cord:
Cut a piece of elastic cord roughly 10-12 inches long. Having this extra length makes it much easier to tie the final knot securely without fumbling. -
Secure the end:
Place a piece of tape over one end of the cord or attach a bead stopper. This prevents your beads from sliding off while you design your pattern. -
Pre-stretch the cord:
I like to give the elastic a few gentle tugs before starting. This pre-stretching helps prevent the bracelet from loosening up significantly after the first wear.
Knot Slipping?
If your elastic knot feels slippery, try coating the knot area with a bit of beeswax before tying. It adds grip and helps hold the tension while you apply glue.
Step 2: Creating the Pattern
-
Start the sequence:
Begin by threading on four bubblegum pink heishi beads. Ensure they sit flush against each other. -
Add the gold accent:
Slide on one gold spacer bead next to the pink cluster. These gold accents act like sprinkles, breaking up the color blocks. -
Continue the pattern:
Add another set of four pink beads, followed by another single gold spacer. -
Introduce the white section:
Now switch colors to create the ‘confetti’ look. Thread on three or four cream/white heishi beads. -
Create variation:
Follow use the white section with a gold spacer, then return to a pink section. -
Build the rhythm:
The key to this specific design is irregularity. Instead of a strict pattern, alternate between longer sections of pink (4-5 beads) and shorter sections of white (2-3 beads), always separated by gold spacers.
Add a Charm
Elevate the preppy vibe by attaching a gold initial charm or a small pearl dangle to one of the gold spacer sections for a personalized touch.
Step 3: Finishing Touches
-
Check the length:
Periodically wrap the beaded cord around your wrist. Continue adding beads until the two ends meet comfortably with a little room to spare. -
Prepare for the knot:
Once you are happy with the length, remove the tape or bead stopper carefully, holding both ends of the cord firmly. -
Tie the surgeon’s knot:
Cross the ends, wrap one side over the other twice, and pull tight. Repeat this process to create a very secure surgeon’s knot. -
Secure with glue:
Dab a tiny drop of jewelry glue or clear nail polish directly onto the knot. This seals the elastic and prevents it from unraveling over time. -
Hide the knot:
If the hole of one of your beads is large enough, gently tug the elastic so the knot slides inside a bead, hiding it from view. -
Trim the excess:
Wait for the glue to dry completely, then use your scissors to trim the excess cord ends as close to the knot as possible without snipping the knot itself.
Slip on your new confetti bracelet and enjoy the pop of happy color on your wrist
Pink Heishi Bracelet With a Simple Chain Accent
Embrace the “preppy” aesthetic with this clean and cheerful design featuring matte pink polymer clay discs punctuated by shining gold accents. It’s an effortlessly chic accessory that stacks beautifully with watches or other bangles.
Detailed Instructions
Materials
- Pink polymer clay heishi beads (approx. 6mm)
- Gold flat spacer beads (rondelle or disc shape)
- Gold beading wire or strong elastic cord
- 2 Gold crimp beads
- 2 Gold crimp covers
- 2 Gold wire guardians (optional but recommended)
- Gold lobster clasp
- Gold extension chain
- 2 Gold jump rings (4mm or 5mm)
- Jewelry pliers (flat nose and cutting pliers)
- Bead stopper or tape
Step 1: Planning and Stringing
-
Measure your materials:
Cut a length of beading wire approximately 9-10 inches long. This gives you plenty of slack to work with, even though the finished beaded section will only be about 6-6.5 inches. -
Secure the end:
Attach a bead stopper or a piece of masking tape to one end of your wire to prevent your hard work from sliding off as you string. -
Establish the pattern:
The charm of this bracelet is the rhythm. Plan your sequence: we will use a block of pink beads followed by a single gold spacer. -
String the first segment:
Thread on approximately 12 to 14 pink heishi beads. You want this block to be about 3/4 of an inch long. -
Add the accent:
Slide on one gold flat spacer bead. Ensure it sits flush against the pink clay beads for a seamless look. -
Repeat the pattern:
Continue stringing: 12-14 pink beads, then 1 gold spacer. Repeat this pattern until you have reached your desired length, usually creating about 6 or 7 segments total. -
Check the fit:
Wrap the unfinished strand around your wrist. Remember the clasp and extension chain will add another inch or so, so the beads shouldn’t touch end-to-end completely.
Uneven Segments?
Clay beads vary slightly in thickness. Count by length (e.g., 2cm sections) rather than bead number to keep your gold spacers perfectly spaced visually.
Step 2: Finishing the Hardware
-
Prepare the crimp:
Remove the bead stopper. Slide a crimp bead onto the wire end, followed by a wire guardian. -
Thread the clasp:
Loop the wire through the guardian (or just through a jump ring attached to the lobster clasp if skipping the guardian) and thread it back down through the crimp bead and the first few pink beads. -
Secure the crimp:
Pull the wire taut so there is no gap, but not so tight the bracelet becomes stiff. Use your flat nose pliers to squash the crimp bead firmly flat. -
Conceal construction:
I prefer to place a gold crimp cover over the flattened crimp bead. Gently squeeze it closed with pliers until it looks like a regular round gold bead. -
Trim excess wire:
Use your flush cutters to snip the excess wire tail as close to the beads as possible so it doesn’t poke your wrist. -
Repeat on the other side:
On the opposite end, repeat the crimping process. Slide on a crimp bead, loop through a wire guardian attached to the extension chain, and pass back through the crimp. -
Final tightening:
Pull the wire very snug before flattening this final crimp bead to ensure there are no gaps in your bead line. -
Final cover and trim:
Add the final crimp cover, close it carefully, and trim the remaining wire tail. -
Finish assembly:
If you didn’t attach the clasp or chain directly during crimping, use your pliers to open the jump rings and attach the hardware to the loops created by the wire guardians.
Add a Charm
Attach a small gold seashell or pearl charm to the extension chain tail for a cute, dangling detail that adds movement.
Now you have a professional-looking accessory ready to wear or gift.
Pink Monochrome With Texture Mixing

This project elevates the standard preppy clay bead bracelet by mixing monochrome pinks with luxurious gold accents. The combination of smooth polymer clay discs, textured gold focal beads, and sleek spacers creates a sophisticated yet playful accessory.
Step-by-Step
Materials
- Polymer clay heishi beads (6mm or 8mm) in 2-3 shades of pink (light blush, medium rose, dark mauve)
- Gold tone textured round beads (approx 6-8mm)
- Gold tone flat disc spacer beads
- Elastic stretch cord (0.8mm recommended)
- Super glue or jewelry cement
- Scissors
- Bead stopper or decorative clip
- Measuring tape
Step 1: Preparation
-
Measure the cord:
Cut a piece of elastic cord about 10-12 inches long. This generous length gives you plenty of room to tie the knot comfortably without losing beads. -
Pre-stretch the elastic:
Give the cord a few gentle tugs. Pre-stretching helps prevent the bracelet from sagging or expanding permanently after you wear it a few times. -
Secure the end:
Attach a bead stopper or a piece of tape to one end of the cord so your beads don’t slide off while you are working.
Knot Hiding Trick
If your gold spacer beads have larger holes than the clay discs, try to end your pattern near one. It’s much easier to hide a bulky knot inside a metal bead.
Step 2: Pattern Design
-
Sort your shades:
Separate your pink clay beads into piles by shade. You’ll want to mix them slightly randomly for organic texture, rather than a strict ombre pattern. -
Create the main segments:
Start by threading about 10-12 pink heishi beads onto the cord. feel free to mix a darker mauve disc in occasionally to break up the solid color. -
Add the first gold accent:
Slide on a flat gold spacer bead. This creates a clean transition before the main focal point. -
Insert the textured gold bead:
Add one of the larger, textured gold round beads. This ‘filigree’ style bead adds the critical texture contrast to the smooth clay. -
Cap the focal section:
Place another flat gold spacer bead immediately after the round gold bead to frame it symmetrically.
Step 3: Building the Wrap
-
Repeat the pattern:
Return to your pink clay beads. Thread another segment of 10-12 pink discs. I like to vary the count slightly (maybe 11 or 13) so it doesn’t look machine-made. -
Add a simple gold spacer:
For variety, don’t use the large round bead every time. Between some pink segments, just use a single flat gold spacer or a pair of them to add a flash of metallic shine without the bulk. -
Continue beading:
Repeat your pattern—alternating between the large textured gold bead sections and the simpler flat spacer sections—until the bracelet reaches your desired length. -
Check the fit:
Wrap the strand around your wrist. The ends should meet comfortably without stretching the elastic visible gaps between the beads. Aim for about 6.5 to 7 inches for an average wrist.
Stack It Up
Make two more bracelets: one entirely of pink clay beads, and one using mostly gold beads with pink accents, to create a cohesive ‘arm candy’ stack.
Step 4: Finishing Touches
-
Prepare to knot:
Remove the bead stopper carefully, holding both ends of the elastic firmly. -
The first crossover:
Cross the left end over the right and pull tight, just like the first step of tying a shoelace. -
Tie a surgeon’s knot:
Make another loop, but pass the elastic tail through the loop twice instead of once. This friction helps hold the knot in place. -
Tighten securely:
Pull all four strands (the two tails and the two loop sides) firmly to tighten the knot down into the beads. -
Apply adhesive:
Dab a tiny drop of super glue or jewelry cement directly onto the knot. Let it dry for about 30 seconds. -
Hide the mechanism:
Trim the excess cord close to the knot, leaving about 1mm. Gently pull the bracelet so the knot slides inside the hole of the nearest large bead to hide it.
Slip on your new bracelet and enjoy the satisfying clink of gold against the soft feel of polymer clay