When I want a quick creative win at my clay table, I reach for polymer clay because it’s beginner-friendly and bakes up crisp, colorful, and photo-ready. Here are my go-to oven-bake clay ideas that feel totally doable in an afternoon while still looking like something you’d proudly show off or gift.
Color-Blocked Slab Earrings
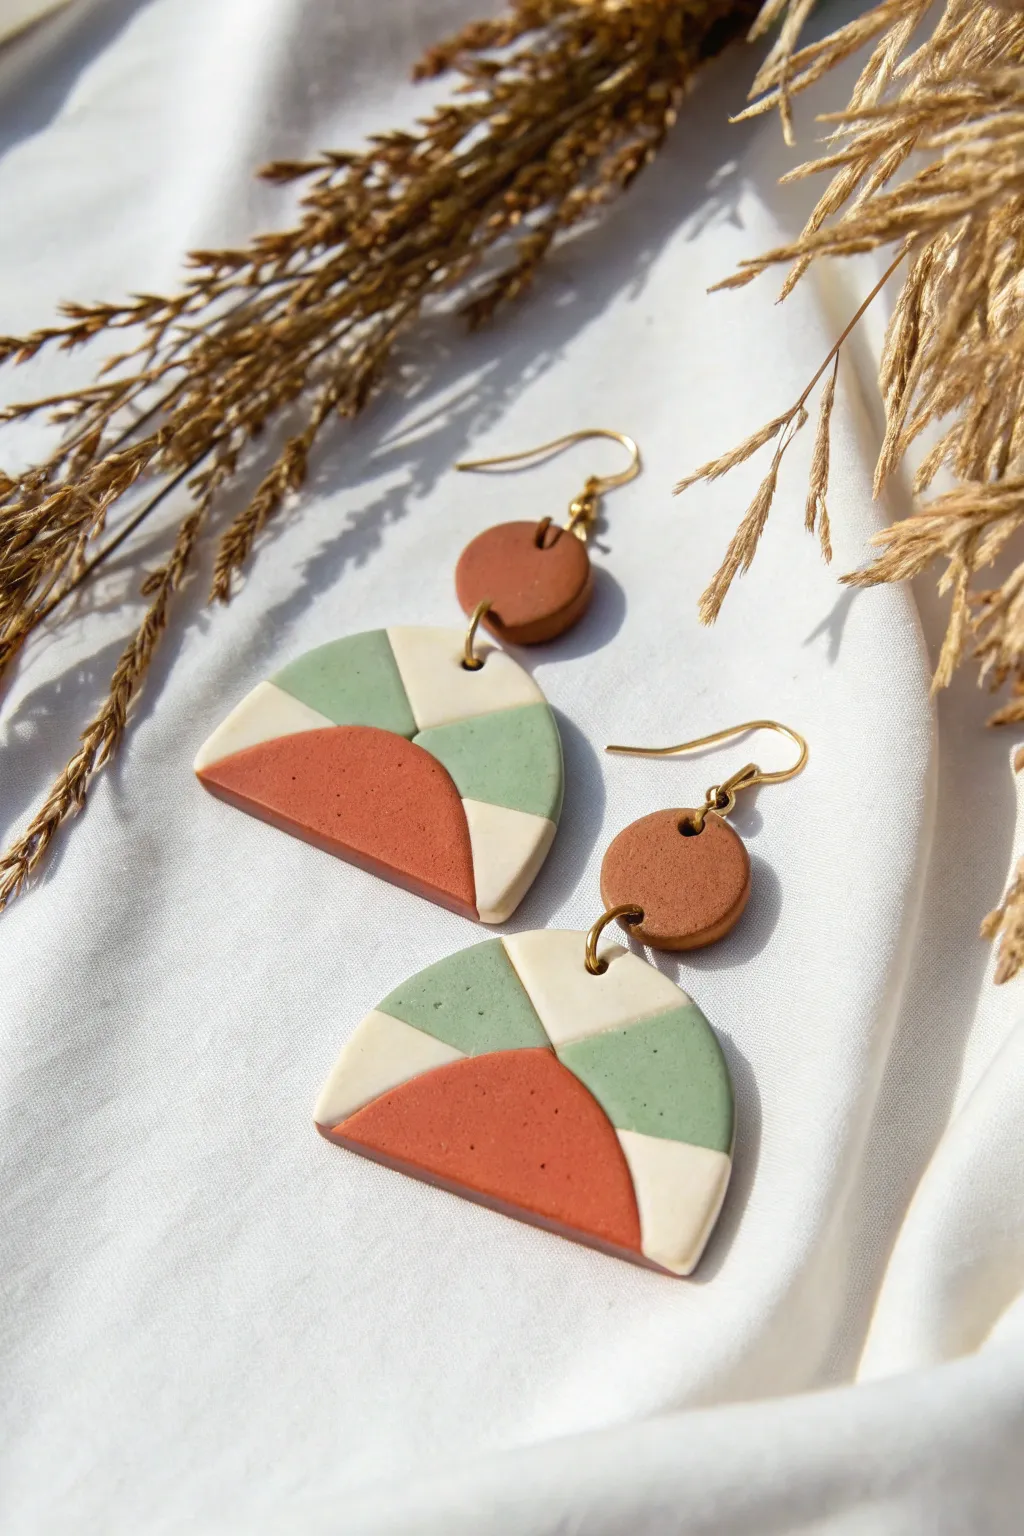
Embrace earthy tones with these stunning geometric earrings featuring a modern color-block pattern. The combination of terracotta, sage green, and cream clay creates a sophisticated slab design that looks intricate but is surprisingly simple to assemble.
Step-by-Step Guide
Materials
- Polymer clay in terracotta (burnt orange), sage green, and cream/off-white
- Acrylic rolling pin or pasta machine
- Tissue blade or flexible craft blade
- Small round clay cutter (approx. 10-12mm)
- Arch/Semi-circle clay cutter (or a large circle cutter to cut in half)
- Ceramic tile or glass work surface
- Parchment paper
- Oven thermometer
- Hand drill or pin vibe
- 4 Jump rings (gold)
- 2 Earring hooks (fish hook style, gold)
- Jewelry pliers (round nose and flat nose)
- Fine grit sandpaper (optional)
Step 1: Creating the Slab
-
Condition the clay:
Start by conditioning each color of clay separately. Knead them warm in your hands until they are soft and pliable, ensuring there are no air bubbles trapped inside. -
Roll out sheets:
Roll each color out into a sheet of equal thickness, roughly 2-3mm thick. I prefer using a pasta machine on a medium setting for perfect consistency, but an acrylic roller works too. -
Cut geometric shapes:
Using your blade, cut the colored sheets into various triangles and trapezoids. They don’t need to be identical; the beauty lies in the varied geometric assembly. -
Assemble the puzzle:
On a fresh sheet of rolled-out cream clay (acting as a base), begin placing your cut shapes. Fit them together like a puzzle, pressing the edges gently against each other so there are no gaps. -
Roll the slab seamless:
Once your design is laid out, cover it with a piece of parchment paper. Gently roll over the top with your acrylic roller to fuse the seams together and create a smooth, unified surface.
Uneven Seams?
If gaps appear between your geometric shapes after rolling, gently push the clay together from the sides to close the gap, then roll over it again with parchment paper.
Step 2: Cutting and Baking
-
Cut the main shapes:
Position your arch or semi-circle cutter over the most pleasing parts of your pattern. Cut out two identical shapes for the bottom pendants. -
Cut the top connectors:
Using a plain terracotta sheet (or a leftover section of the slab if you prefer), cut out two small circles for the top component of the earrings. -
Smooth the edges:
Before baking, gently run your finger along the cut edges of the clay to smooth out any ragged bits or cutter marks. -
Poke holes:
Use a toothpick or needle tool to create a hole at the top of the arch and the bottom of the circle. Alternatively, you can drill these after baking for cleaner lines. -
Bake:
Place your pieces on a ceramic tile or baking sheet lined with paper. Bake according to your specific clay brand’s package directions—usually around 275°F (130°C) for 30 minutes. Use an oven thermometer to ensure accuracy.
Texture Twist
Before cutting your final shapes, gently press a piece of coarse sandpaper or a texture mat into the clay slab to give the surface a stone-like, matte finish.
Step 3: Assembly
-
Cool and sand:
Let the pieces cool completely in the oven. Once cool, if the edges feel rough, you can lightly sand them with fine-grit sandpaper or buff them with a piece of denim. -
Drill holes (if needed):
If you didn’t poke holes earlier, use a hand drill or pin vise to carefully drill a hole at the top center of the arch and the top/bottom of the circle. -
Connect the pieces:
Open a jump ring by twisting it sideways with your pliers. Thread it through the top of the arch and the bottom of the terracotta circle, then close the ring securely. -
Attach the hook:
Open the loop on your earring hook (or use a second small jump ring) and attach it to the top hole of the terracotta circle. -
Final check:
Ensure all jump rings are closed tightly so the pieces don’t slip out. Give the clay a quick wipe with a damp cloth to remove any sanding dust or fingerprints.
Now you have a chic pair of handmade earrings ready to wear or gift


Marbled Swirl Dangle Earrings
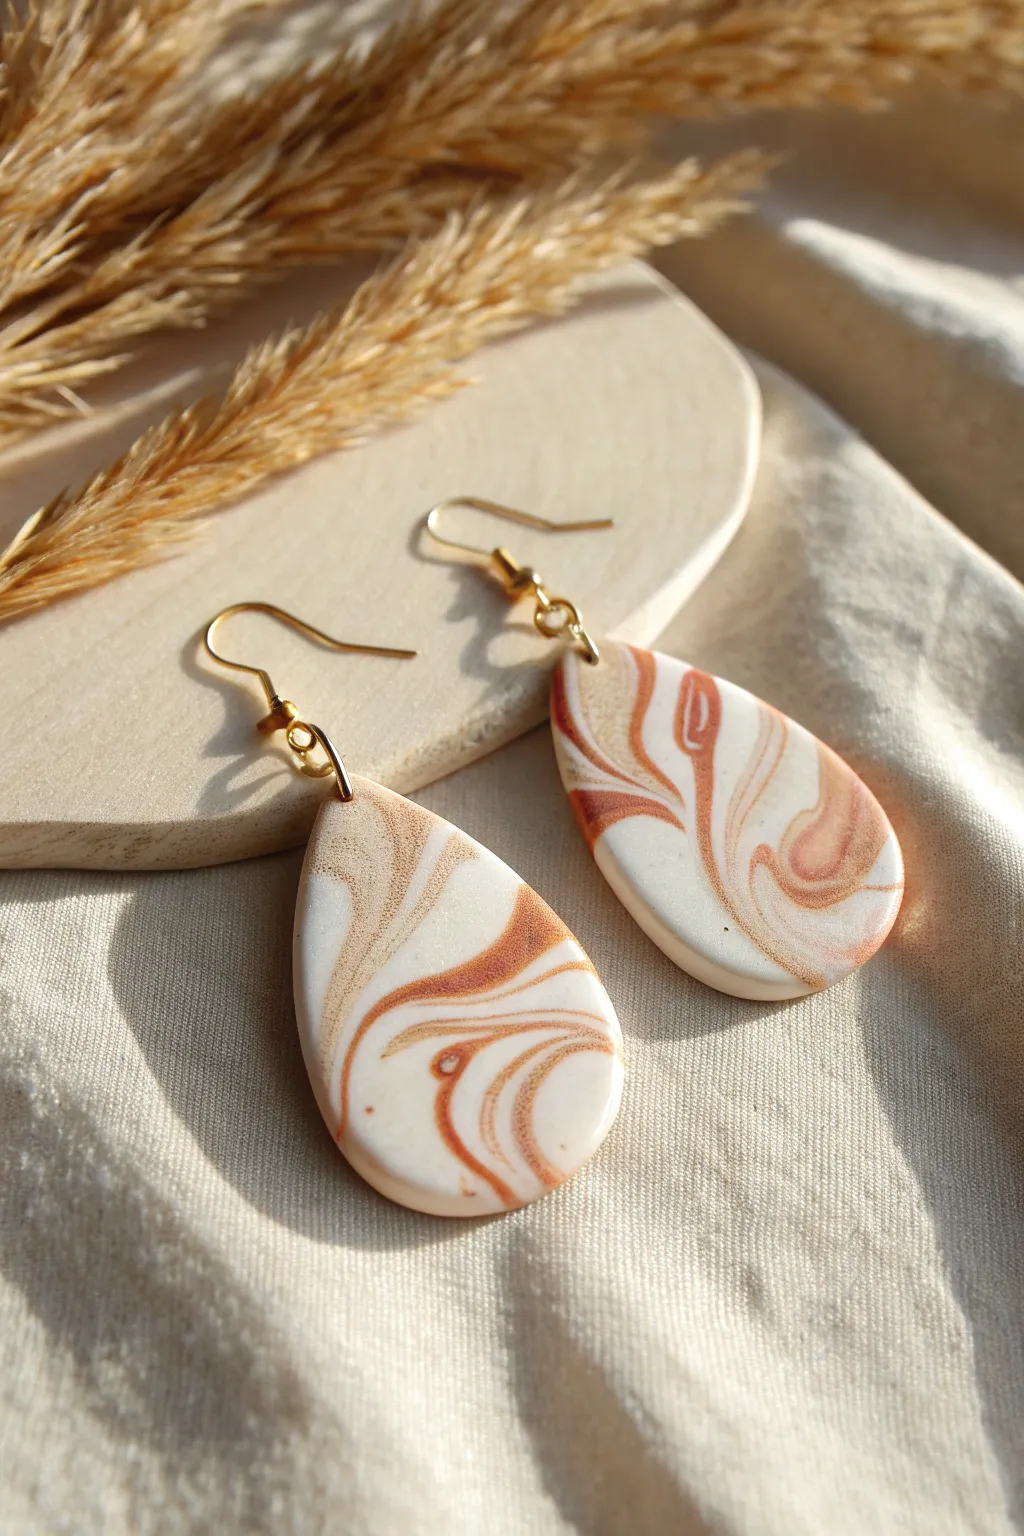
Achieve an elegant, earthy vibe with these teardrop earrings featuring a fluid marbled pattern of burnt orange, cream, and shimmering gold. The organic swirls ensure that no two pieces are exactly alike, giving you a truly one-of-a-kind accessory.
Detailed Instructions
Materials
- Polymer clay in White or Cream
- Polymer clay in Burnt Orange or Terracotta
- Polymer clay in Metallic Gold or Bronze
- Polymer clay in Translucent (optional, for depth)
- Clay roller or pasta machine
- Teardrop-shaped clay cutters
- Tissue blade or sharp craft knife
- Small hand drill or piercing tool
- Sandpaper (various grits from 400 to 1000)
- Gold jump rings (4mm or 6mm)
- Gold French hook ear wires
- Jewelry pliers (round nose and flat nose)
- Oven for baking
Step 1: Creating the Marbled Slab
-
Condition the clay:
Begin by thoroughly conditioning each color of clay separately. Roll them in your hands until they are soft, pliable, and warm to the touch. -
Create color snakes:
Roll each color into long, thin snakes. You’ll want slightly more white/cream than the darker colors to maintain that light, airy background seen in the photo. -
Combine the ropes:
Gather your snakes together and twist them into one large rope. Fold this rope in half and twist again. Repeat this twist-and-fold process about 3-4 times. -
Ball and roll:
Once twisted, roll the clay into a smooth ball. I prefer to roll it quite tightly to ensure no air bubbles are trapped inside the swirls. -
Flatten the slab:
Using an acrylic roller or pasta machine, flatten the ball into a sheet approximately 3mm thick. This is where the magic happens as the unique pattern reveals itself. -
Check the pattern:
Examine your slab. If the lines are too thick or chunky, you can fold the sheet and run it through the pasta machine one more time to elongate the swirls.
Clean Cut Tip
Place a piece of plastic wrap over your clay slab before pressing down your cutter. This creates naturally rounded, ‘domed’ edges that require much less sanding later.
Step 2: Cutting and Baking
-
Select your shapes:
Use your teardrop cutter to frame the most interesting parts of the pattern. Look for areas with a nice balance of the white space and the copper-colored veins. -
Clean the edges:
Carefully lift away the excess clay. Before lifting the teardrops, gently smooth the cut edges with your fingertip to round them off slightly. -
Pierce the holes:
Use a needle tool to create a hole at the very top point of the teardrop. Ensure the hole is large enough for your jump rings. -
Bake carefully:
Place the pieces on a ceramic tile or baking sheet lined with parchment paper. Bake according to your clay manufacturer’s specific instructions (usually 275°F/130°C for 30 minutes). -
Cool down:
Allow the pieces to cool completely inside the oven or on a cooling rack before handling them, as warm clay is fragile.
Level Up: Resin Gloss
Apply a thin layer of UV resin to the front and cure it under a lamp. This adds a glass-like finish that makes the metallic gold swirls pop.
Step 3: Finishing and Assembly
-
Sand the surfaces:
Wet sand the edges and faces of the earrings, starting with 400 grit and working up to 1000 grit for a silky smooth finish. -
Buff (optional):
Vigorously rub the clay with a piece of denim or a soft cotton cloth to bring out a natural, subtle sheen. -
Open the jump rings:
Using two pairs of pliers, twist a gold jump ring open sideways (never pull it apart). -
Attach the hardware:
Slide the open jump ring through the hole in the clay teardrop, then add the loop of the French hook ear wire. -
Close and secure:
Twist the jump ring closed again, ensuring the ends meet perfectly flush so the wire doesn’t slip out.
Wear these sophisticated swirls with a simple linen outfit to let the organic patterns take center stage


Cute Mini Food Charms
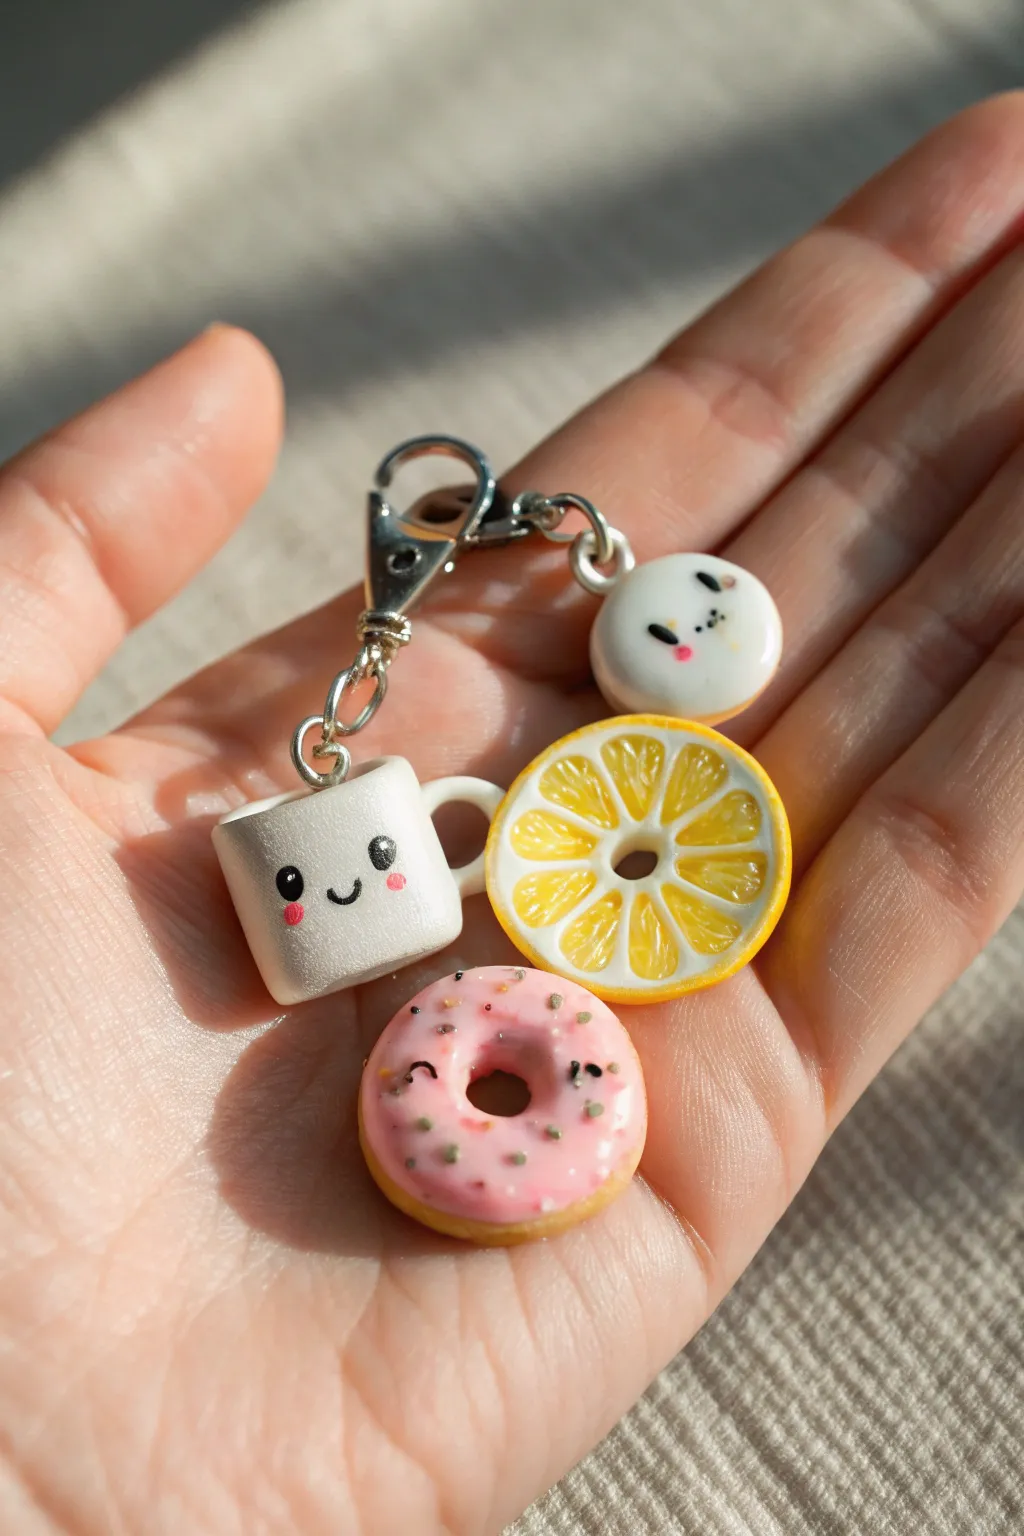
Brighten up your keychain with this adorable mini ensemble featuring a happy mug, a sweet donut, a fresh lemon slice, and a curious little bun. These polymer clay charms combine intricate textures with cute expressions for a perfect morning-themed accessory.
Step-by-Step
Materials
- Polymer clay: white, translucent white, yellow, pink, tan/beige, black
- Liquid polymer clay (translucent)
- Eye pins (silver)
- Lobster clasp keychain with jump rings
- Needle tool or toothpick
- Dotting tool (small)
- Pastel chalks (pink for cheeks)
- Glaze (glossy and matte)
- Exacto knife or clay blade
- Small paintbrush
Step 1: The Happy Mug
-
Shape the Base:
Roll a small ball of white clay and flatten the bottom and top slightly to create a cylinder. This forms the body of the mug. -
Hollow it Out:
Gently press a rounded tool or the back of a paintbrush into the top to create the indentation for the liquid, smoothing the edges as you go. -
Add the Handle:
Roll a tiny snake of white clay, curve it into a ‘C’ shape, and attach it firmly to the side of the mug, blending the seams with a silicone tool or your finger to ensure it doesn’t snap off later. -
Create the Face:
Use a small dotting tool dipped in black paint (or tiny bits of black clay) to add two oval eyes and a small U-shaped smile. Add tiny white dots to the eyes for a sparkle effect. -
Blush Details:
I like to scrape a little pink pastel chalk into dust and apply it with a dry brush to create soft, rosy cheeks right under the eyes.
Clean Clay Tip
White clay picks up lint easily. Keep wet wipes nearby and clean your hands and tools thoroughly before handling the white mug or the bun charm.
Step 2: The Lemon Slice
-
Make the Segments:
Form a cane by wrapping a teardrop shaped log of translucent yellow clay with a thin sheet of opaque white clay. Repeat until you have 8-10 segments. -
Assemble the Wheel:
Arrange these teardrop logs in a circle with the points facing inward. Wrap the entire circle in a thicker sheet of yellow clay (the rind) and then a very thin layer of white clay between the segments and the rind. -
Texture:
Slice a thick piece off your cane. Use a needle tool to gently scratch texture into the translucent yellow pulp areas to make it look juicy. -
Shape the Center:
Poke a hole completely through the center to mimic a donut shape or a seedless center, keeping the edges neat.
Customize It
Try making a chocolate donut instead, or turn the lemon into an orange slice by using translucent orange clay. You can even add a tea bag tag to the mug.
Step 3: The Pink Donut
-
Base Dough:
Mix tan and yellow clay for a dough color. Roll a ball, flatten it slightly, and poke a hole through the center, smoothing the edges to look like a fried donut. -
Add Frosting:
Roll out a thin sheet of pink clay. Cut a wavy, uneven circle shape and drape it over the donut base, pressing gently. -
Texture the Cake:
Use a toothbrush or stiff brush to texture the exposed tan dough along the bottom edge for a realistic baked look. -
Sprinkle Time:
Roll incredibly thin snakes of various clay colors or use glitter bits to act as sprinkles. Press them into the pink frosting. -
Donut Face:
Paint or add tiny clay squinting eyes and a mouth to give this sweet treat some personality.
Step 4: Finishing Touches
-
Add Hardware:
Insert a silver eye pin deeply into the top of each charm. To make it extra secure, bend the end of the wire into a hook shape before inserting. -
Bake:
Bake all pieces according to your clay package instructions (usually 275°F/135°C for 15-30 minutes). Let them cool completely. -
Seal:
Apply a glossy glaze to the lemon slice (for juiciness) and the donut frosting. Use a matte finish for the bun and mug if preferred. -
Assemble:
Using pliers, open the jump rings on your keychain clasp and attach each charm securely.
Enjoy your refreshingly cute new accessory set


Chunky Sculpted Statement Rings
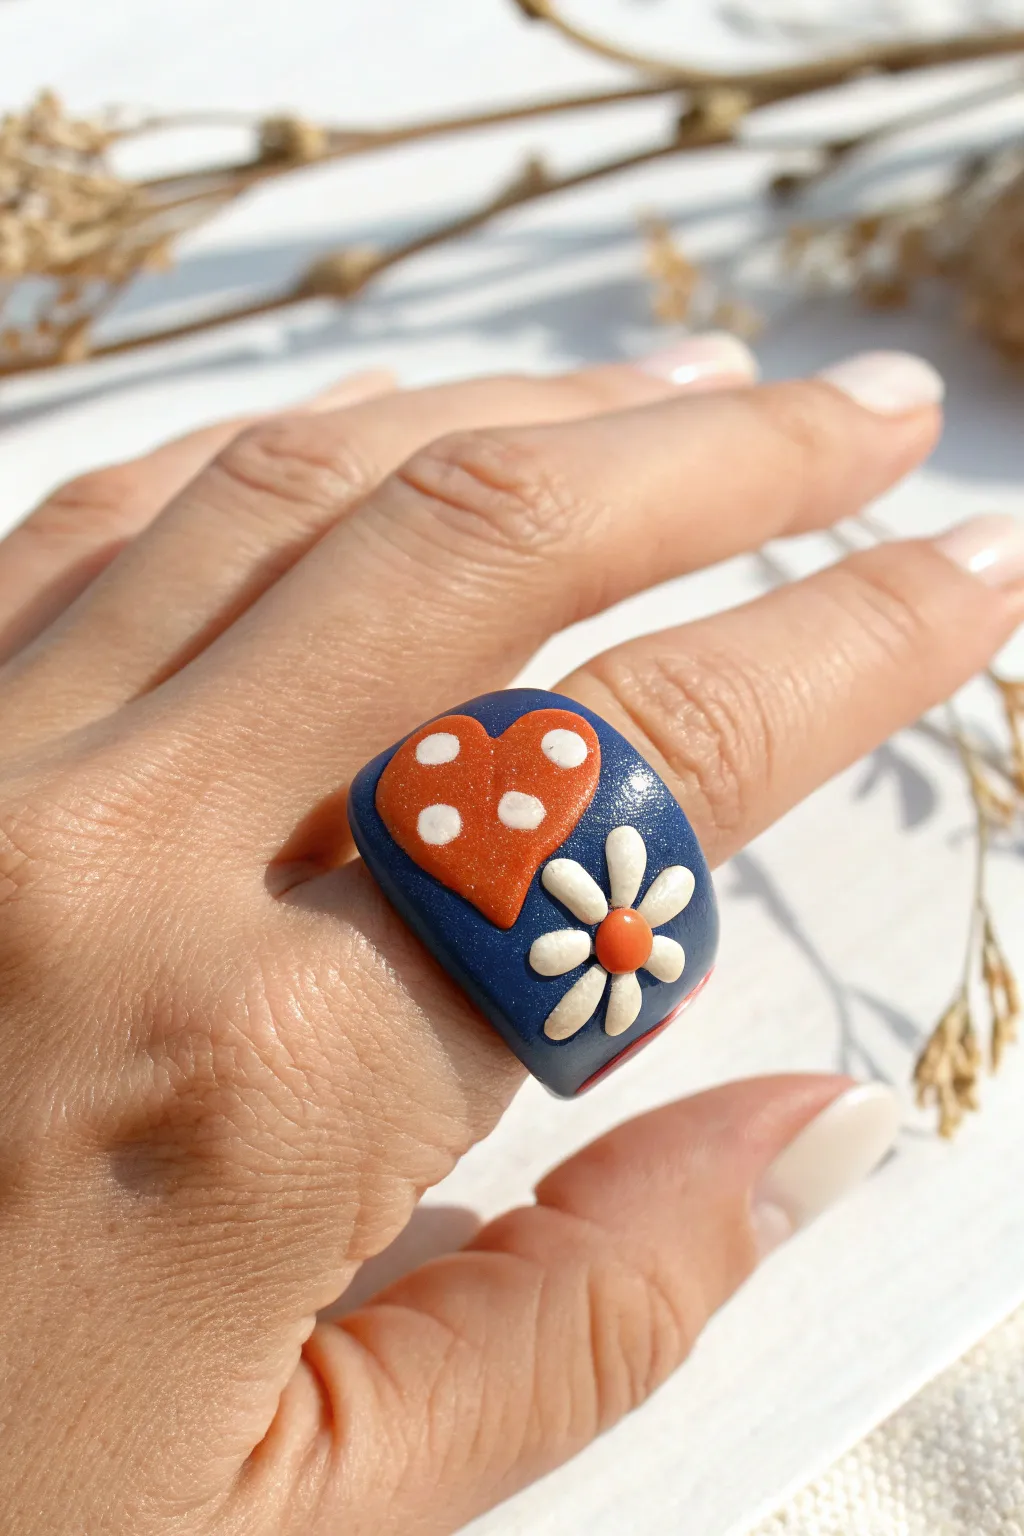
Capture the playful spirit of the 90s with this bold, chunky statement ring featuring a classic heart and daisy motif. The deep denim-blue base makes the vibrant red heart and crisp white petals pop, creating a wearable piece of art that feels both retro and modern.
Step-by-Step Guide
Materials
- Polymer clay in deep navy/denim blue
- Polymer clay in bright red or terra cotta
- Polymer clay in white
- Polymer clay in orange
- Polymer clay roller or pasta machine
- Ring sizing mandrel (mostly for shaping)
- Small dotting tools or toothpicks
- Flexible tissue blade/slicing blade
- Cornstarch or baby powder (as release agent)
- Wet/dry sandpaper (400 to 1000 grit)
- Matte or satin polymer clay varnish (optional)
Step 1: Creating the Ring Base
-
Condition the base clay:
Start by warming up a significant chunk of your navy blue clay in your hands. Knead and roll it until it is completely soft and pliable, ensuring there are no air bubbles trapped inside. -
Form the initial log:
Roll the blue clay into a thick, smooth log. The thickness depends on how chunky you want your ring, but a diameter of about 1 inch is a good starting point for a statement piece. -
Flatten the band:
Gently press the log down against your work surface to create a flattened rectangular strip. You want it thick and sturdy, roughly 4-5mm thick. -
Size the ring:
Wrap your strip around a ring mandrel or a cylinder of the correct finger size. Cut the excess clay where the ends meet and blend the seam thoroughly with your finger or a smoothing tool until it disappears. -
Refine the shape:
While on the mandrel, gently pat the top surface to create a slightly flattened ‘signet’ style face where the design will sit. Smooth the edges so they are rounded and comfortable.
Sticky Situation?
If clay sticks to your surface or fingers, dust your tools lightly with cornstarch. It acts as a release agent and washes off easily after baking without affecting color.
Step 2: Sculpting the Design Elements
-
Make the heart shape:
Take a small ball of red clay and flatten it into a pancake. Use a small cutter or cut freehand with your blade to create a heart shape that will fit nicely on the flattened ring face. -
Create the polka dots:
Roll extremely tiny balls of white clay. Press these gently onto the red heart to create polka dots. Roll over the heart gently with an acrylic roller to embed the dots flush with the red surface. -
Attach the heart:
Place the decorated heart onto the left side of the blue ring face. Press it down firmly but carefully to bond the clay without distorting the ring’s shape. -
Form flower petals:
Roll a thin snake of white clay and cut equal-sized tiny segments. Roll these into small teardrop shapes. -
Assemble the daisy:
Arrange the white teardrops in a circle on the right side of the ring face, next to the heart. Use a needle tool to gently press the pointy ends towards the center. -
Add the flower center:
Roll a small ball of orange clay. Press this into the center of your white petals to complete the daisy.
Step 3: Baking and Finishing
-
Texture check:
Before baking, give the whole piece a scan for fingerprints. You can dip your finger in a little cornstarch and lightly buff them away, or use a baby wipe for smoothing. -
Prepare for baking:
Slide the ring off the mandrel carefully. I find it helpful to bake the ring on a bed of cornstarch or polyester batting to prevent flat spots from forming on the bottom. -
Baking:
Bake according to your specific clay brand’s instructions—usually 275°F (135°C) for about 30-45 minutes. A longer bake ensures durability for rings. -
Cooling:
Allow the ring to cool completely in the oven with the door cracked. This gradual cooling makes the clay tougher. -
Sanding edges:
Once cool, use wet/dry sandpaper under running water to smooth out any sharp edges on the inside or bottom of the band for comfort. -
Seal (Optional):
If you want a slight sheen like the photo, apply a thin layer of satin varnish or liquid clay (baked again briefly) to protect the surface.
Seamless Seams
For a truly invisible seam on the band, cut both ends at a 45-degree angle before joining. The increased surface area creates a stronger bond that is easier to blend smoothly.
Slip on your chunky ring and enjoy the retro flair it adds to your hand

What Really Happens Inside the Kiln
Learn how time and temperature work together inside the kiln to transform clay into durable ceramic.
Daisy and Leaf Stud Earrings
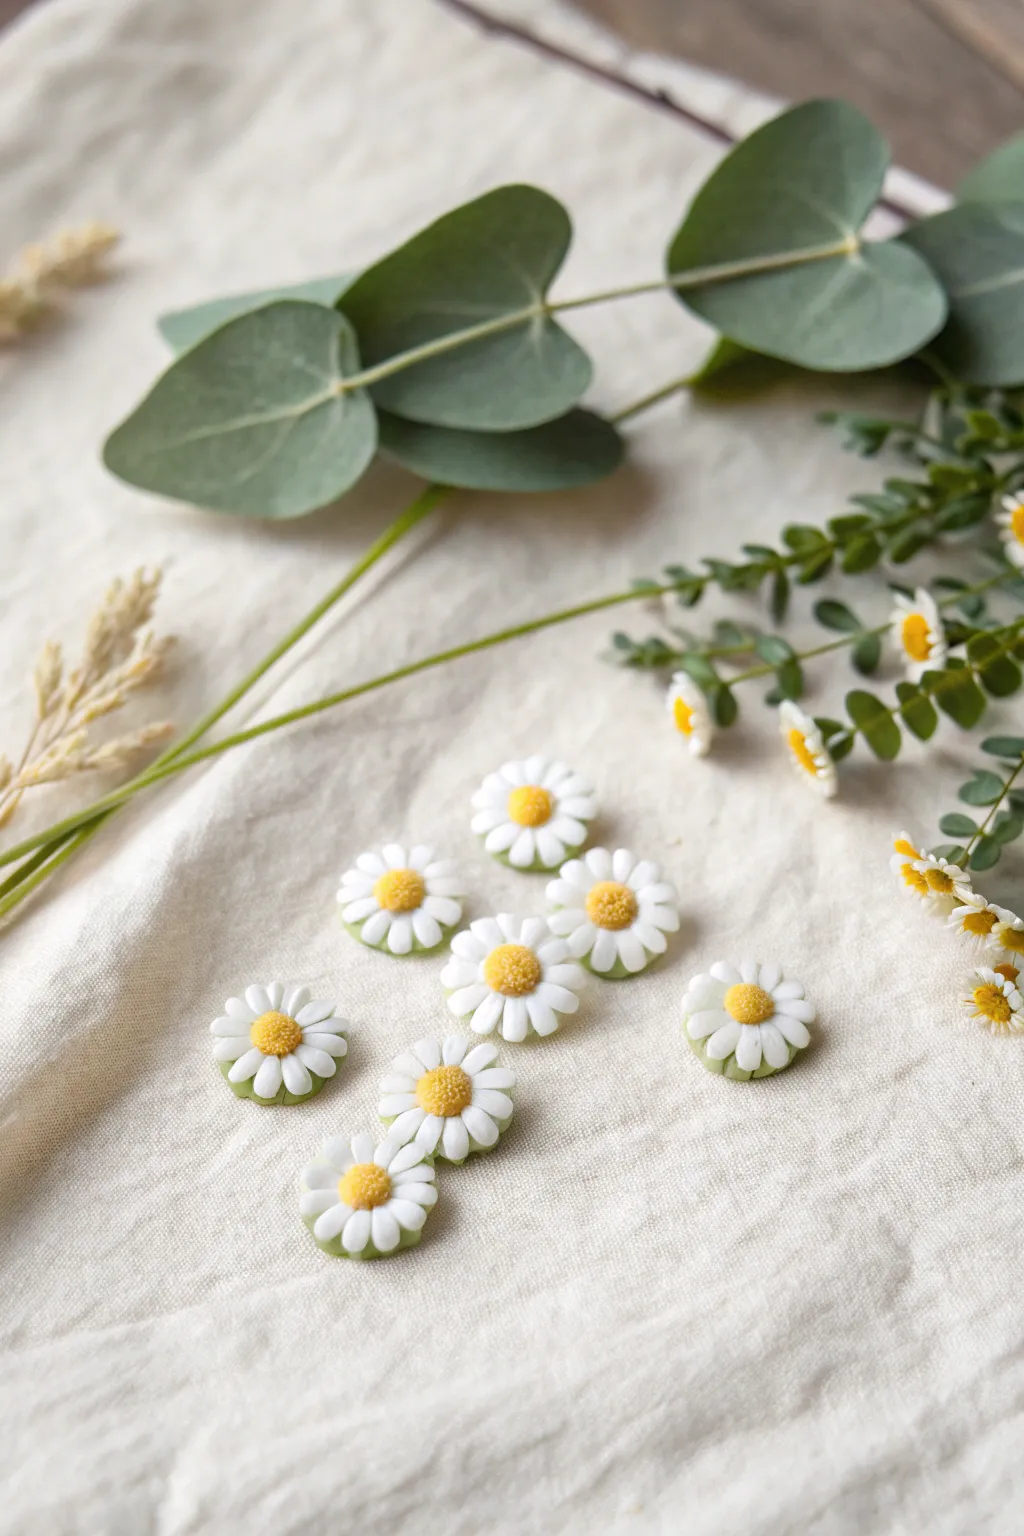
These charming little daisies capture the delicate beauty of a spring meadow with their textured yellow centers and smooth white petals. Made from polymer clay, they are perfect for mounting onto earring posts for a fresh, botanical accessory.
Step-by-Step
Materials
- White polymer clay (e.g., Fimo Soft or Premo)
- Yellow polymer clay (a warm, sunny shade)
- Translucent or pale green polymer clay (optional, for backing)
- Needle tool or toothpick
- Ball stylus tool (small)
- Soft pastel chalks in orange/brown (optional for shading)
- Small paintbrush
- Earring posts and backs
- Strong jewelry glue (e.g., E6000)
- Ceramic tile or baking surface
- Oven
Step 1: Preparing the Base
-
Condition the clay:
Start by kneading your white and yellow clay separately until they are soft and pliable. This prevents cracks and makes shaping much easier. -
Create the base:
Roll a very small amount of white or pale green clay into a flat disc, about 5-6mm in diameter. This will serve as the backing to hold your petals together.
Sticky Situation?
If the clay gets too sticky and warm while handling tiny petals, pop it in the fridge for 10 minutes. This firms it up and makes detail work much cleaner.
Step 2: Forming the Petals
-
Make the petal cane:
Roll a small sausage of white clay. Pinch one side of the cylinder along its length to create a teardrop cross-section. -
Slice the petals:
Use a sharp blade to slice thin, equal-sized pieces from your teardrop cane. These will become your individual petals. -
Shape individual petals:
Take one slice and round the wide edges slightly with your finger to soften the look, ensuring they look organic rather than geometric. -
Assemble the flower:
Place the petals onto your base disc, arranging them in a circle with the pointed ends meeting in the center. I like to gently press them down as I go to ensure they adhere. -
Add a second layer:
For a fuller look, you can add a few extra petals on top of the gaps between the first layer, though a single layer works well for a simpler stud. -
Refine the shape:
Use the side of a needle tool to press lightly into the center of each petal, creating a subtle vein or groove for added realism.
Go Botanical
Create a matching set by sculpting tiny green eucalyptus leaves using the same technique but with sage green clay and a central vein indentation.
Step 3: The Textured Center
-
Create the center ball:
Roll a tiny ball of yellow clay and place it firmly into the center of your petal ring, covering the points where the petals meet. -
Flatten deeply:
Gently press the yellow ball down so it looks like a dome rather than a sphere. -
Texture with a needle:
Using your needle tool or a very small ball stylus, stipple the yellow center repeatedly. Poke tiny holes all over the surface to mimic the pollen texture of a real daisy. -
Add depth (optional):
Scrape a little bit of orange or brown soft pastel chalk into a powder. Dry brush a tiny amount onto the very edges of the yellow center to add visual depth. -
Smooth the edges:
Do a final check to ensure there are no fingerprints on the white petals. If there are, smooth them gently with a drop of baby oil on your finger.
Step 4: Baking and Assembly
-
Bake carefully:
Place your tile in the oven and bake according to your clay manufacturer’s instructions (usually around 230°F/110°C for 30 minutes). Watch closely to prevent the white clay from scorching. -
Cool down:
Let the daisies cool completely in the oven with the door slightly ajar to prevent thermal shock. -
Attach posts:
Once cool, turn the daisies over. Apply a small dot of jewelry glue to the flat pad of an earring post. -
Secure firmly:
Press the post onto the back of the baked clay flower. Let the glue cure for at least 24 hours before wearing them.
Wear these sweet floral studs to bring a touch of nature to your daily outfit
Tiny Sea Creature Keychains
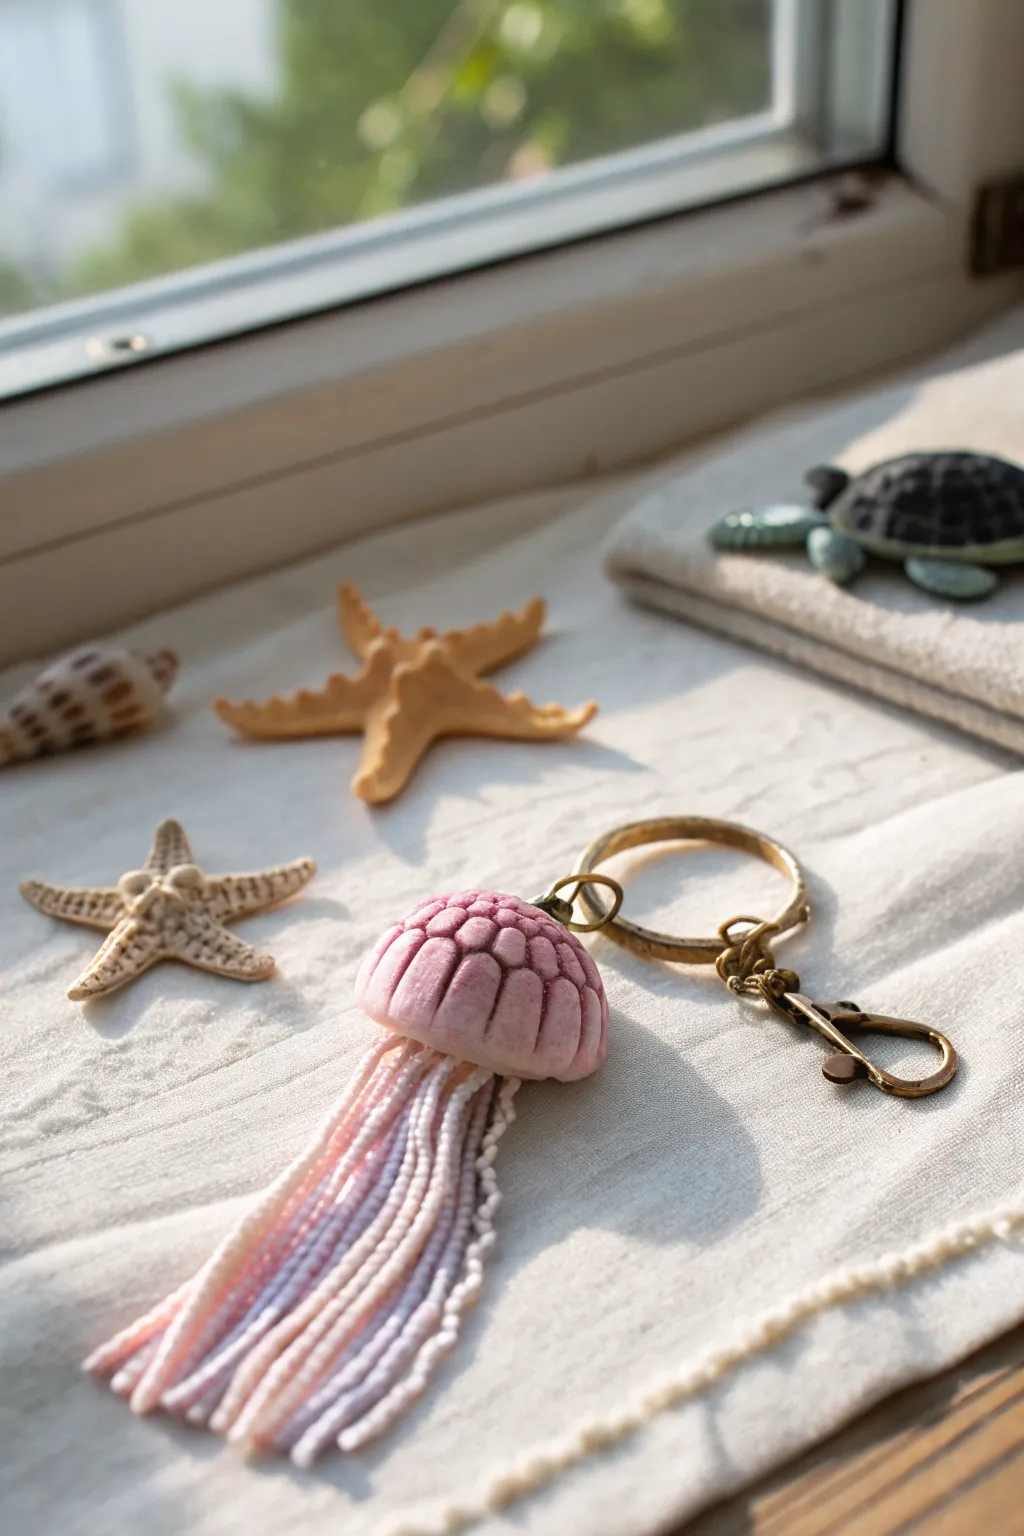
Capture the ethereal beauty of sea life with this mixed-media keychain project. By combining sculpted polymer clay with delicate seed bead tentacles, you’ll create a tactile, swaying jellyfish that looks lovely attached to any bag.
Step-by-Step Guide
Materials
- Pink polymer clay (translucent and opaque mix ideal)
- Sculpting tools (ball styluses, needle tool)
- Eyepin
- Strong craft glue (E6000 or similar)
- Pink and lilac seed beads (size 11/0 or similar tiny beads)
- Strong beading thread
- Beading needle
- Gold tone keychain hardware (split ring and lobster clasp)
- Gold tone jump rings
- Small pliers
- Oven for baking
Step 1: Sculpting the Bell
-
Condition the Clay:
Begin by thoroughly conditioning your pink polymer clay until it is soft and pliable. For a more realistic look, I like to mix a bit of translucent clay with the pink to give it that jelly-like appearance. -
Form the Dome:
Roll the clay into a smooth ball approximately 1 inch in diameter, then flatten the bottom slightly against your work surface to create a dome shape. -
Texture the Surface:
Using a blunt tool or the side of a needle tool, gently press vertical indentations all around the dome. These should run from the top center down to the rim, creating puffy segments. -
Detail the Segments:
Go back over your segments and add horizontal lines or small cross-hatching marks within the vertical grooves to enhance the textured, organic look of the jellyfish bell. -
Insert the Eyepin:
Trim an eyepin to about half the height of your dome. Insert it into the very top center of the jellyfish. You may want to add a tiny dab of liquid clay or bake-and-bond to the pin before inserting for extra security. -
Hollow the Underside:
Gently pick up the dome and use a large ball tool to hollow out the underside slightly. This reduces weight and creates a sheltered area to attach the tentacles later. -
Bake the Clay:
Bake the piece according to the manufacturer’s instructions for your specific brand of clay. Let it cool completely before moving to the next phase.
Dry Brush for Depth
Before baking, lightly brush white or pale pink pastel powder over the raised segments of the dome to highlight the texture.
Step 2: Creating the Tentacles
-
Prepare Your Thread:
Cut several lengths of beading thread, each about 6-8 inches long. You will need enough lengths to create a full cluster of tentacles. -
String the Beads:
Thread your needle and begin stringing the seed beads. Alternate between the pink and lilac shades to create a soft gradient or a speckled effect. -
Secure the Strands:
Once a strand reaches your desired length (roughly 2-3 inches), tie a secure knot at the bottom end. Add a tiny drop of glue to the knot to prevent it from slipping, then trim the excess thread close to the bead. -
Bundle the Tentacles:
Repeat the beading process until you have 10-15 individual strands. Gather all the top ends of the threads together into a single bundle. -
Tie the Bundle:
Knot the top of the bundle securely together, creating a singular anchor point for all your beaded strands.
Step 3: Assembly
-
Glue the Tentacles:
Apply a generous amount of strong craft glue (like E6000) into the hollowed underside of your baked clay bell. -
Insert the Bundle:
Press the knotted top of your bead bundle firmly into the glue inside the dome. Hold it there for a minute to ensure it grabs, then set it upside down (bell resting on its top) to cure fully. -
Dry Completely:
Allow the glue to cure for at least 24 hours. This is crucial so your tentacles don’t pull out during use. -
Attach Hardware:
Using your pliers, open a jump ring and loop it through the eyepin at the top of the jellyfish. -
Connect to Keychain:
Attach the other side of the jump ring to your gold keychain assembly (split ring and lobster clasp). Close the jump ring securely ensuring there is no gap.
Glow in the Dark
Mix glow-in-the-dark polymer clay into your pink base or use glow-in-the-dark seed beads for a bioluminescent effect.
Now you have a charming ocean companion to brighten up your keys or backpack


The Complete Guide to Pottery Troubleshooting
Uncover the most common ceramic mistakes—from cracking clay to failed glazes—and learn how to fix them fast.
Fridge Magnet Mini Sets
Transform your refrigerator door into a colorful gallery of miniature treats with these charming polymer clay magnets. This set features playful food icons like citrus slices, mushrooms, pineapples, and cookies, all crafted with simple shapes and delightful textures.
Step-by-Step
Materials
- Polymer clay (white, red, yellow, orange, brown, tan, green, black)
- Clean ceramic tile or glass work surface
- Rolling pin or acrylic roller
- Circle cutters (various small sizes)
- X-Acto knife or clay blade
- Needle tool or toothpick
- Ball stylus tool
- Small round magnets
- Super glue (E6000 or strong adhesive)
- Gloss glaze (optional)
Step 1: Citrus Slices (Orange & Grapefruit)
-
Base layer:
Roll out a thin sheet of white clay and a sheet of your rind color (orange or red-orange). Cut a circle from the rind color, then cut a slightly smaller circle from the white clay and place it on top. -
Fruit segments:
Roll a small ball of the fruit flesh color (lighter orange or pink) and flatten it onto the white circle, leaving a thin white rim visible. Use your knife to gently score dividing lines like pizza slices. -
Detailing:
Use a needle tool to gently texture the fruit segments for a juicy look. For the half-slices, simply cut the finished circle in half before baking.
Texturing Tip
Use coarse sandpaper or a scrunched-up ball of aluminum foil to gently press texture onto the cookie surfaces before baking for a realistic crumb.
Step 2: Mushrooms & Strawberries
-
Mushroom caps:
Shape a dome from red or brown clay. Flatten the back against your work surface. Add tiny flattened dots of white clay to the red cap for spots. -
Mushroom stems:
Roll a thick cylinder of white clay. Press it gently to the bottom of the cap, smoothing the seam on the back so it’s one solid unit. -
Strawberry shape:
Form a red teardrop shape and flatten the back. Use a needle tool to poke tiny indentations all over the surface for seeds. -
Strawberry leaves:
Create tiny teardrops of green clay, flatten them, and arrange three or four at the top of the strawberry.
Step 3: Pineapples & Cookies
-
Pineapple body:
Shape an oval from yellow-orange clay. Use your knife to score a cross-hatch diamond pattern across the entire body. -
Pineapple crown:
Cut small, pointed leaves from green clay and layer them at the top of the pineapple. -
Cookie base:
Roll a ball of tan clay and flatten it into a rough circle. Tap the edges to make them slightly uneven for a baked look. -
Chocolate chips:
Roll tiny distinct balls of black or dark brown clay and press them firmly into the cookie surface.
Variation Idea
Make ‘bitten’ versions of the cookies or chocolate-dipped strawberries by using a scalloped cutter to remove a chunk or dipping clay in brown paint.
Step 4: Assembly
-
Baking:
Arranged all your pieces on a baking sheet lined with parchment paper. Bake according to your clay package instructions (usually 275°F for 15-30 minutes depending on thickness). -
Cooling:
Let the pieces cool completely before handling. I usually leave them on the baking tray for an hour to ensure they harden fully. -
Finishing touches:
If desired, apply a coat of gloss glaze to the fruit segments to make them look juicy, or keep the cookies matte. -
Attaching magnets:
Apply a small dot of strong glue to the back of each clay piece and press a magnet firmly into place. Let dry overnight.
Your fridge is now dressed up with a delightful assortment of handmade miniatures that look good enough to eat
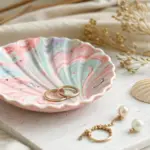
Terrazzo Speckle Trinket Dish
Achieve a chic, high-end ceramic look using polymer clay with this lovely terrazzo-style dish. The design features a creamy, speckled base scattered with organic chips of deep emerald, terracotta, and mustard yellow for a modern, artistic finish.
How-To Guide
Materials
- White polymer clay (large block)
- Black pepper or black embossing powder (for speckles)
- Small amounts of red, green, yellow, and blue polymer clay
- Acrylic rolling pin
- Round cookie cutter (approx. 4-5 inches)
- Oven-safe bowl (to use as a mold)
- Sharp crafting blade or X-Acto knife
- Fine-grit sandpaper (400 to 1000 grit)
- Gloss or matte varnish (optional)
Step 1: Faux Ceramic Base
-
Condition the Clay:
Begin by thoroughly conditioning a large block of white polymer clay. Knead it in your hands until it becomes soft, warm, and pliable to prevent cracking later. -
Create the Speckles:
Flatten the white clay slightly and sprinkle common ground black pepper or black embossing powder onto the surface. Use just a pinch to simulate a natural stoneware look. -
Incorporate the Texture:
Fold the clay over to trap the speckles inside and knead it again until the black flecks are evenly distributed throughout the white dough. -
Roll the Sheet:
Using your acrylic rolling pin, roll the speckled clay out into a smooth, even sheet. Aim for a thickness of about 1/4 inch (6mm) to ensure the dish feels sturdy.
Smudged Colors?
Work with the lightest colors first. If colors smear during rolling, wipe your roller with baby wipes or rubbing alcohol between swipes to keep the white background crisp.
Step 2: Terrazzo Patterning
-
Prepare Color Palette:
Take tiny amounts of your colored clays—terracotta red, deep green, mustard yellow, and a muted teal. Condition each color separately. -
Make the Chips:
Roll these colored clays into extremely thin sheets, almost paper-thin. Use your blade to chop them into irregular, jagged shapes of distinct sizes. -
Place the Chips:
Gently pick up the colored chips and scatter them onto your rolled white base. I prefer to place larger pieces first, then fill the gaps with smaller shards for balance. -
Embed the Design:
Once you are happy with the arrangement, gently roll over the clay sheet again with the acrylic roller to press the colored chips flat and flush with the surface.
Step 3: Shaping and Baking
-
Cut the Circle:
Press your round cookie cutter firming into the clay sheet to create a perfect circle. If you don’t have a cutter, trace a bowl with your knife. -
Smooth the Edges:
Peel away the excess clay. Run your fingertip gently along the rim of the circle to soften the sharp cut edge, giving it a more hand-thrown pottery vibe. -
Form the Curve:
Lift the clay circle and gently place it inside your oven-safe bowl. Press it down lightly so it takes the curved shape of the bowl bottom. -
Bake:
Place the bowl with the clay inside into the oven. Bake according to your clay manufacturer’s instructions, typically around 275°F (130°C) for 30 minutes.
Gold Rim Upgrade
Paint the very edge of the baked dish with liquid gold leaf or metallic acrylic paint. This adds a luxurious contrast to the rustic terrazzo pattern.
Step 4: Finishing Touches
-
Cool Down:
Remove the bowl from the oven and let the clay cool completely before popping it out. It helps the shape set properly. -
Sand the Surface:
Dip your finished dish and a piece of sandpaper in water. Wet-sand the surface and edges to remove fingerprints and make the terrazzo pattern pop distinctively. -
Clean Up:
Rinse off the milky residue from sanding and dry the dish thoroughly with a soft cloth. -
Seal (Optional):
If you want a glossy ceramic look like the photo, apply a thin coat of polymer clay gloss varnish. For a matte stone feel, leave it as is.
Now you have a stylish spot to keep your favorite rings safe

TRACK YOUR CERAMIC JOURNEY
Capture glaze tests, firing details, and creative progress—all in one simple printable. Make your projects easier to repeat and improve.
Ring Cones and Jewelry Holders
Bring a touch of desert warmth to your vanity with this charming ring cone inspired by traditional terracotta pottery. The minimalist cactus engravings add subtle character, making it the perfect little perch for your favorite stacking rings.
Step-by-Step Tutorial
Materials
- Terracotta-colored polymer clay (or mix orange, brown, and a touch of white)
- Acrylic rolling pin or clay machine
- Ceramic tile or glass work surface
- sharp craft blade or flexible tissue blade
- Needle tool or toothpick
- Fine-grit sandpaper (optional)
- Oven (for baking)
- Baking sheet with parchment paper
Step 1: Shaping the Cone
-
Condition the clay:
Begin by kneading your terracotta polymer clay in your hands until it becomes soft, pliable, and warm. This conditioning step prevents cracks later on. -
Form a ball:
Roll the conditioned clay into a smooth, crack-free sphere roughly the size of a golf ball or slightly smaller, depending on your desired cone height. -
Roll into a cone shape:
Place the ball on your work surface. Using the palm of your hand, apply pressure to one side of the ball while rolling back and forth to elongate it into a teardrop or cone shape. -
Refine the tapered point:
Continue rolling, focusing pressure near the top to create a gentle, elongated taper. I like to make the top quite narrow so it can hold smaller midi-rings easily. -
Flatten the base:
Once you are happy with the height, stand the cone up and firmly press it down onto your work surface to create a flat, stable bottom. -
Smooth the surface:
Pick up the cone and gently smooth out any fingerprints with a light gliding motion of your thumb. You want the surface to look like matte pottery.
Uneven Base?
If your cone wobbles after baking, adhere a piece of coarse sandpaper to a table and rub the bottom of the cone against it in a circular motion until perfectly flat.
Step 2: Adding the Cactus Details
-
Plan your design:
Visualize where you want your cactus motifs. The example features a tall saguaro style near the base and a simple long oval near the top. -
Sketch the outline:
Using a needle tool with a very light touch, faintly scratch the outline of your first cactus into the clay surface. This acts as a guide before you commit to deeper lines. -
Carve the main body:
Press the needle tool slightly deeper now to define the vertical line of the cactus trunk. Create a groove rather than just a scratch. -
Add the arms:
Carve the curved arms of the cactus. For the saguaro look, carve a ‘U’ shape attached to the side of the main trunk. -
Clean up the edges:
If the carving tool pushed up small ridges of clay, gently pat them down with your finger or carefully slice them off with your craft blade for a clean, incised look. -
Add texture dots:
To mimic the prickliness of a cactus and the texture of raw ceramic, use the very tip of your needle tool to poke random, shallow dots scattered around the background of the cone. -
Create the top detail:
Near the tip of the cone, carve a simple elongated oval or a single cactus arm shape to balance the design.
Step 3: Baking and Finishing
-
Bake the cone:
Place your finished cone on a baking sheet lined with parchment paper. Bake according to your specific clay brand’s package directions (usually 275°F/135°C for 15-30 minutes). -
Cool down:
Allow the cone to cool completely inside the oven or on a wire rack. Polymer clay strengthens as it cools. -
Optional sanding:
If you want an ultra-smooth, stone-like finish, lightly buff the un-carved areas with fine-grit wet sandpaper under running water. -
Final inspection:
Wipe away any sanding dust with a damp cloth and let it dry before placing your jewelry on it.
Make it Speckled
For a true stoneware look, mix black pepper or dried coffee grounds into your clay before shaping. This adds organic specks that look great after baking.
Now your rings have a stylish and sturdy home that looks just like expensive pottery
Big Bead Necklace Strands
Embrace organic textures and a soothing palette with this statement necklace featuring chunky, hand-rolled polymer clay beads. The speckled finishes and matte earth tones give it a sophisticated, artisanal look perfect for layering or wearing solo.
Detailed Instructions
Materials
- Polymer clay in various colors: white, terracotta, beige, translucent, tan, dull pink, and grey
- Coarse black pepper or dried coffee grounds (for speckling)
- Acrylic rolling pin
- Bead piercing pins or toothpicks
- Baking sheet and parchment paper
- Wet/dry sandpaper (400 and 800 grit)
- Suede or faux suede cord (tan or light brown)
- Oven thermometer
Step 1: Mixing Strategy
-
Condition the Clay:
Begin by thoroughly kneading each block of polymer clay in your hands until it becomes soft and pliable. This prevents cracking later. -
Create Custom Earth Tones:
Mix your clays to achieve varied shades. Blend terracotta with a little beige for a muted rust, and mix white with a tiny dot of brown for a creamy bone color. -
Simulate Stone Texture:
For the speckled ‘granite’ beads, take a portion of grey or beige clay and knead in a pinch of coarse black pepper or dried coffee grounds. The particles add realistic stone-like flecks. -
Marbling Technique:
To create subtle swirls like the light grey bead, partially mix white and a tiny bit of grey clay. Stop before the colors are fully blended to leave faint striations.
Distorted Beads?
If your beads squash while piercing holes, let the raw clay sit in the fridge for 15 minutes to firm up before drilling.
Step 2: Forming the Beads
-
Portion Control:
To keep the sizing consistent, roll each color into a thick log of even diameter. Slice off equal segments for your beads. -
Rolling Spheres:
Take a slice and roll it firmly between your palms. Use a circular motion, gradually lightening your pressure until you have a perfectly smooth sphere. -
Refining the Shape:
I like to inspect each bead closely for fingerprints; if you see any, gently buff them out with your finger or roll the bead lightly on your work surface. -
Creating the Hole:
While the bead is still raw, gently twist a bead pin or toothpick through the center. Aim carefully to exit directly opposite the entry point. -
Enlarging for the Cord:
Since suede cord is thick, ensure your bead holes are wide enough. Wiggle the tool slightly to widen the channel without distorting the sphere.
Step 3: Baking and Finishing
-
Prepare for the Oven:
Arrange your beads on a parchment-lined baking sheet. For perfectly round beads, you can nestle them in a bed of cornstarch or baking soda to prevent flat spots. -
Baking:
Bake according to your clay manufacturer’s instructions (usually 275°F/130°C for 30–60 minutes). Use an oven thermometer to ensure the temperature is accurate. -
Cooling Down:
Allow the beads to cool completely inside the oven with the door cracked, or remove them and let them sit for at least an hour before handling. -
Sanding for Texture:
To achieve that beautiful matte finish seen in the photo, wet-sand each bead under running water. Start with 400 grit to remove blemishes and finish with 800 grit for a velvet touch. -
Washing:
Rinse the beads thoroughly to remove sanding dust and dry them with a soft towel. They will look chalky until they are fully dry.
Pro Tip: Buffing
After sanding, buff the dry beads vigorously with a piece of denim or heavy canvas to give them a slight, natural sheen without using glaze.
Step 4: Assembly
-
Planning the Layout:
Lay out your suede cord and arrange the beads in your desired order on the table first. Alternating colors and textures creates the best visual rhythm. -
Stringing:
Feed the cord through each bead. If the tip of the cord frays, wrap a small piece of tape around it to form a stiff ‘needle’. -
Securing the Ends:
Once all beads are strung, tie a simple overhand knot at the back of the cord to close the necklace, adjusting the length to suit your preference.
This earthy accessory adds a beautifully grounded touch to any outfit you choose to wear it with
Cane-Slice Tiles for Pendants
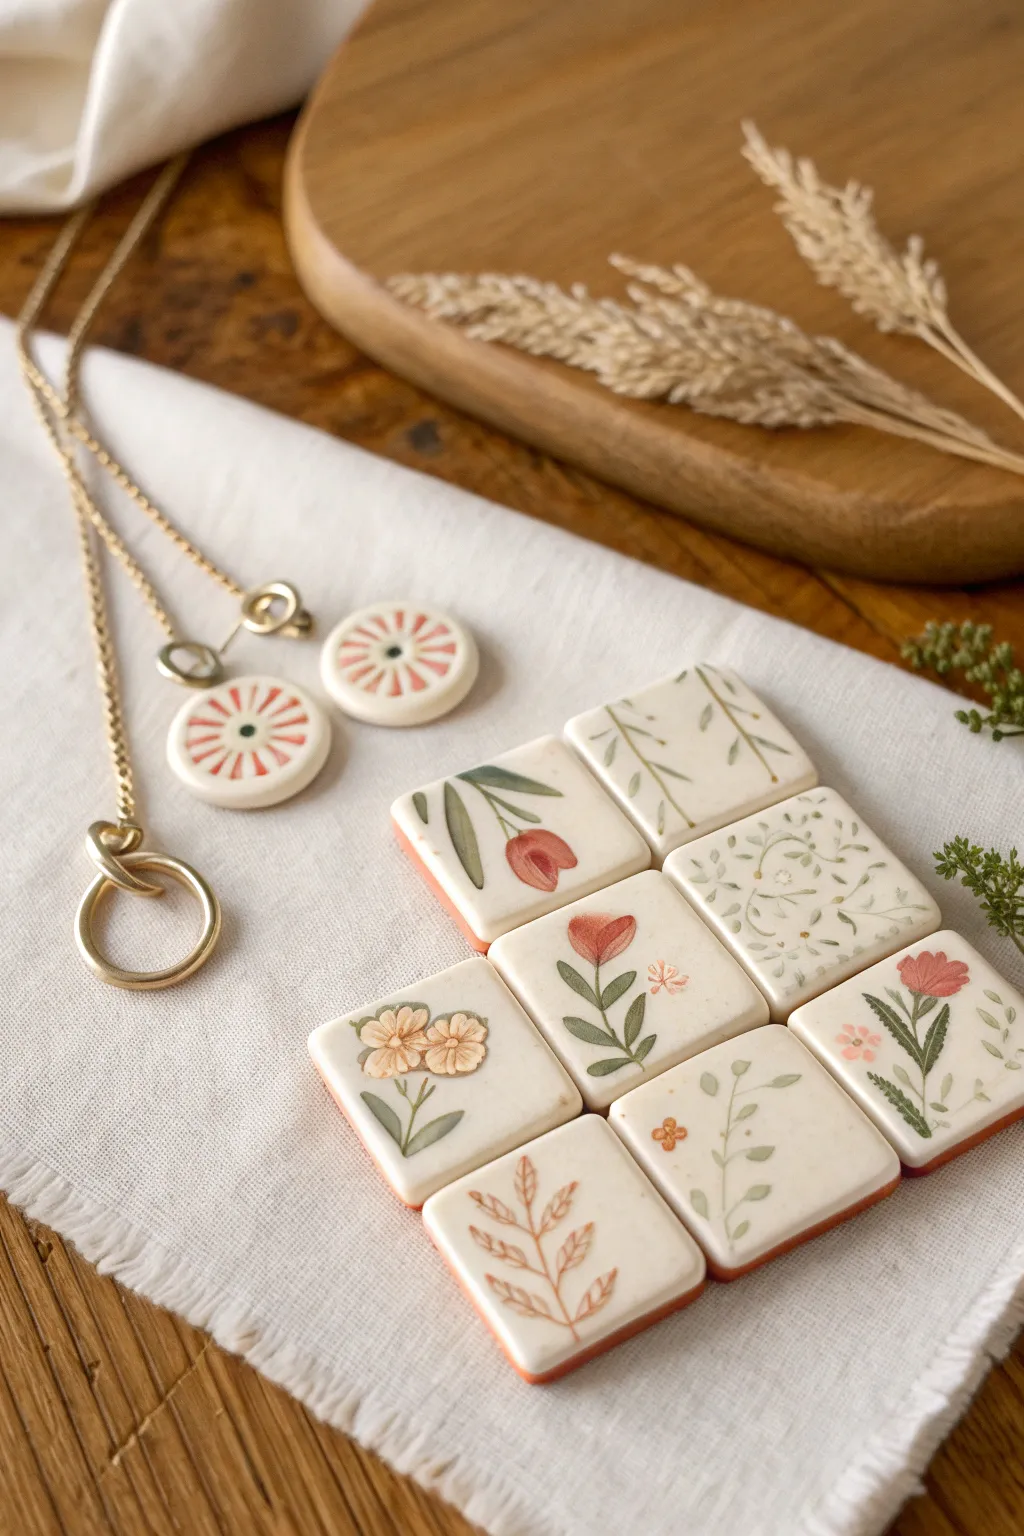
Capture the delicate beauty of a cottage garden with these exquisite polymer clay floral tiles. Featuring soft floral motifs on a creamy base, these rectangular components can be strung together for a statement piece or finished individually as elegant charms.
How-To Guide
Materials
- White or cream polymer clay (for the base)
- Various colored polymer clays (greens, pinks, terracotta, yellows)
- Tissue blade or clay slicer
- Small acrylic roller
- Ceramic tile or glass work surface
- Sandpaper (various grits from 400 to 1200)
- Needle tool or dotting tool
- Oven thermometer
Step 1: Creating the Floral Canes
-
Prepare your palette:
Begin by conditioning all your clay colors until they are soft and pliable. You’ll need distinct shades for leaves (sage and olive green) and flowers (dusty rose, peach, and burnt orange) to match the muted, earthy aesthetic. -
Construct the leaf canes:
Create a simple ‘skinner blend’ or gradient plug of green clay, darker in the center and lighter on the outside. Pinch one side into a teardrop shape to form a basic leaf vein profile. -
Elongate the leaves:
Gently stretch and roll this teardrop cane until it is long and thin. Cut it into multiple sections. You now have a basic leaf component that can be used singly or stacked. -
Form the flower centers:
For the daisy-like flowers, roll small logs of yellow clay. Wrap these in a very thin sheet of white or lighter yellow clay to create definition between the center and the petals. -
Build the petals:
Shape cylinders of pink or peach clay into teardrop logs similar to the leaves. Arrange 5-6 of these petal canes around your center log to form a complete flower shape. -
Pack the background:
This is crucial: fill the gaps between your flower petals with snakes of translucent or cream clay (whichever matches your intended base). This keeps the flower shape circular when you reduce the cane size. -
Reduce the canes:
Gently squeeze and pull your flower and leaf canes to make them smaller and tighter. The goal is to have long canes with the design running through the center, sized appropriately for small tiles.
Smudged Pattern?
If your cane slices distort when cutting, your blade isn’t sharp enough or the clay is too warm. Pop the cane in the freezer for 10 minutes and wipe your blade with alcohol.
Step 2: Assembling the Tile Slab
-
Prepare the base slab:
Roll out a sheet of cream or white clay on the thickest setting of your pasta machine or to about 3-4mm thickness by hand. This will be the canvas for your tiles. -
Slice the canes:
Using your sharpest tissue blade, cut very thin, translucent slices from your various flower and leaf canes. I find that chilling the canes in the fridge for 15 minutes first helps get a cleaner slice without smushing the design. -
Arrange the composition:
Place the cane slices onto the raw cream sheet. Create distinct groupings—perhaps a tulip on one section, a leafy branch on another, and a cluster of daisies on a third. Leave a little space between groupings to serve as cutting guides. -
Embed the design:
Place a sheet of parchment paper or plastic wrap over the clay. Gently burnish (rub) the surface with an acrylic roller or your finger to smooth the cane slices flush into the base clay so it becomes one seamless surface. -
Cut the tiles:
Use a square cutter or a ruler and blade to cut precise square or rectangular tiles around your floral arrangements. Round the corners slightly with your fingertip for a softer, organic look. -
Refine the edges:
If you want the terracotta-colored backing visible in the inspiration photo, press your cream tiles onto a slightly larger, thin sheet of terracotta clay before baking, or dust the edges with terracotta pastel chalk.
Matte Finish Pro Tip
Skip the glossy varnish! A high-grit sanding followed by a buff with denim creates a velvety, organic sheen that looks much more expensive and stone-like.
Step 3: Finishing Touches
-
Bake the batch:
Place your tiles on a ceramic tile or baking sheet lined with cardstock. Bake according to your brand of clay’s instructions (usually 275°F/135°C for 30-45 minutes). Using an oven thermometer is key to prevent scorching lighter colors. -
Sand for smoothness:
Once cool, wet-sand the surface starting with 400 grit and working up to 1000 or 1200 grit. This reveals the clarity of the pattern and gives the clay a professional, stone-like feel. -
Buff and shine:
Buff the tiles vigorously with a soft denim or cotton cloth.
Now you have a collection of botanical tiles ready to become a unique necklace or charm bracelet
Faux Stone and Crystal Pendants
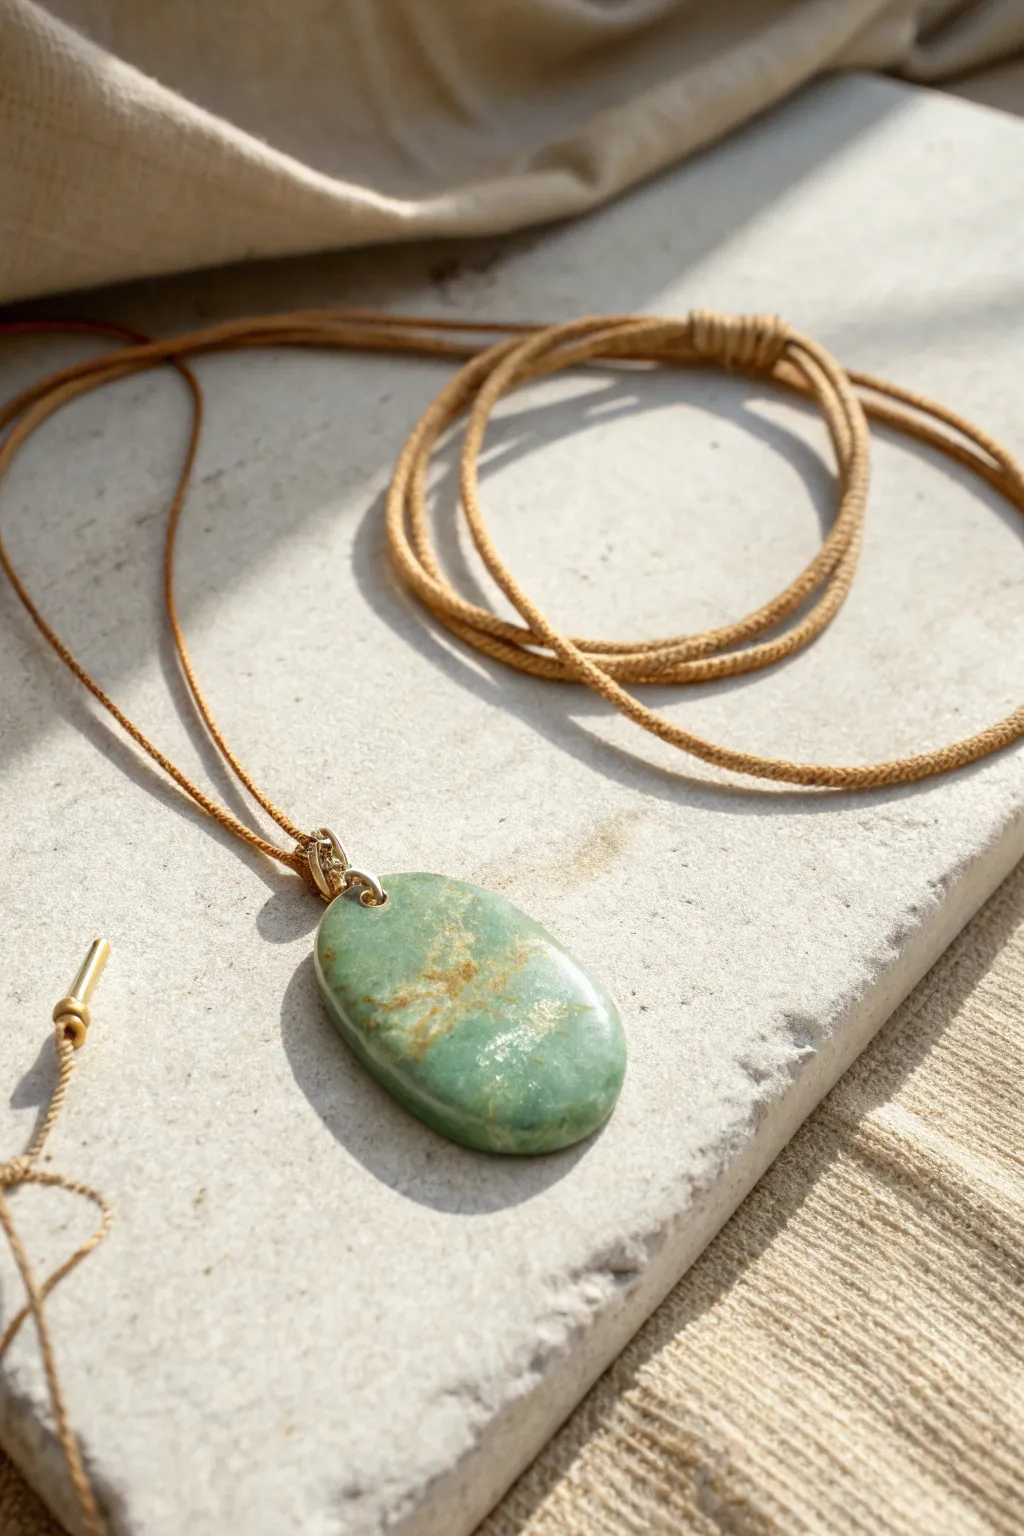
Capture the organic elegance of natural stone with this remarkably realistic faux jade pendant. Using polymer clay techniques, you’ll create a smooth, translucent green cabochon with stunning gold veining that mimics high-end jewelry.
Detailed Instructions
Materials
- Translucent polymer clay
- Green alcohol ink (emerald or leaf green)
- Yellow alcohol ink
- Gold leaf or gold metal flakes
- Gold acrylic paint
- Clay roller or pasta machine
- Oval clay cutter (medium to large size)
- Fine grit wet/dry sandpaper (400 to 2000 grit)
- UV resin or polyurethane gloss varnish
- Hand drill or needle tool
- Gold jump ring
- Tan waxed cotton or suede cord
Step 1: Creating the Faux Stone Block
-
Tinting:
Begin with a golf-ball-sized amount of translucent polymer clay. Add 2 drops of green alcohol ink and 1 tiny drop of yellow ink. Mix until the color is incorporated but slightly streaky for a natural look; it shouldn’t be completely uniform. -
Chopping:
Chop your conditioned green clay into various small, jagged chunks using a tissue blade. Include some very tiny crumbs and some larger chunks. -
Adding Veins:
Mix small flecks of gold leaf or metal flakes into the pile of chopped clay. Don’t overmix; you just want the gold trapped between the clay pieces. -
Reforming:
Squeeze the chopped pile of clay back together into a tight log. Compress it firmly to remove air pockets, but try not to knead it, or you will lose the jagged ‘stone’ internal structure. -
Painting Veins:
Slice the log in half lengthwise. Paint a thin, erratic line of gold acrylic paint on the cut surface, then press the halves back together. This creates a distinct primary vein.
Ice Water Shock
Plunge the baked piece into ice water immediately after removing it from the oven to increase the clarity of translucent clay.
Step 2: Shaping and Curing
-
Sheet Creation:
Roll your re-assembled log into a thick slab, about 5mm to 6mm thick. You want a substantial feel for this pendant. -
Cutting:
Select the most interesting area of your slab where the gold flecks and paint veins are visible. Use your oval cutter to punch out the pendant shape. -
Smoothing:
Gently gently rub the edges of the raw clay with your finger or a bit of cornstarch to round off the sharp cut marks. A stone should look tumbled, not stamped. -
Drilling:
Pierce a hole near the top of the oval using a needle tool. Ensure the hole is wide enough for your jump ring. -
Baking:
Bake the piece according to your clay package instructions. I usually tent foil over translucent clay to prevent scorching while allowing the color to deepen.
Luxury Twist
Drill a hole through the side top instead of front-to-back, and use a gold bail pinch-clasp for a more jewelry-store aesthetic.
Step 3: Finishing and Assembly
-
Cooling:
Allow the piece to cool completely. The translucency often improves significantly once the clay is fully cold. -
Sanding:
Wet sand the piece under running water, starting with 400 grit to smooth huge bumps, then moving through 600, 1000, and finally 2000 grit for a glass-smooth finish. -
Buffing:
Rub the sanded pendant vigorously on a piece of denim or a buffing wheel to bring out a natural, soft sheen. -
Glazing:
For a ‘wet stone’ look, apply a thin layer of UV resin or gloss varnish. Cure or dry as directed to seal in the depth. -
Hardware:
Open a sturdy gold jump ring using pliers and loop it through the hole you drilled earlier. Close it securely. -
Cord Prep:
Take a length of tan cord (approximately 24 inches or chosen length). String the pendant onto the center. -
Knotting:
Tie a secure sliding knot or a simple overhand knot at the ends to finish the necklace.
Now you have a serene, nature-inspired accessory that adds an earthy touch to any outfit
Textured Knit Pattern Charms
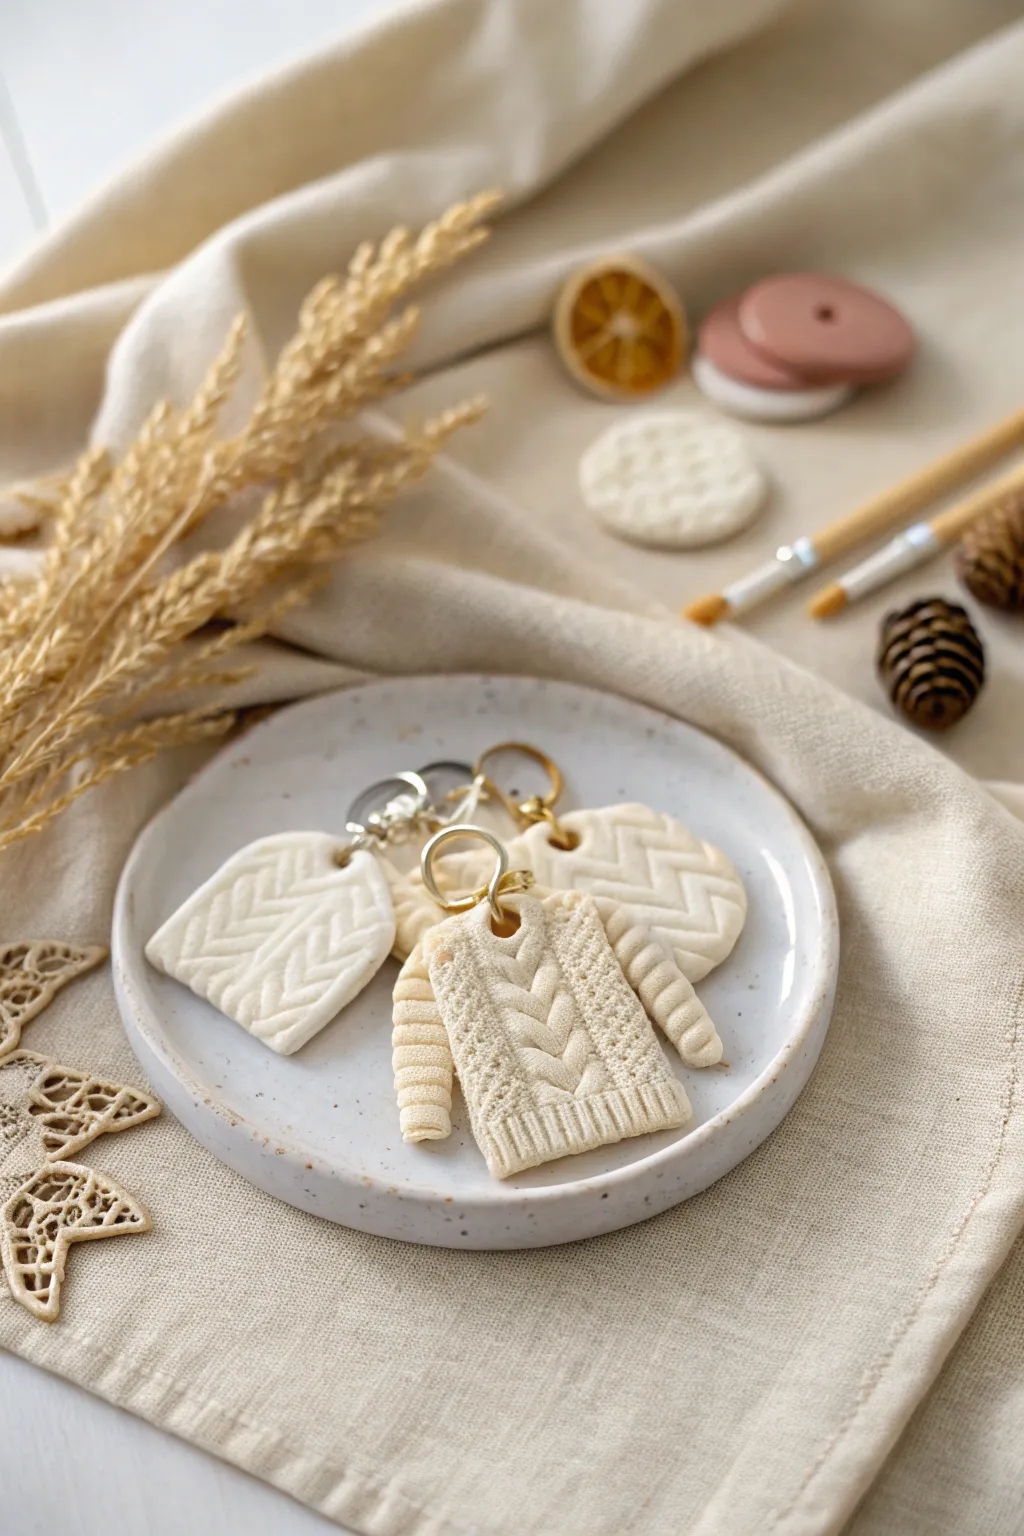
Capture the warmth of winter wool in miniature form with these delightful polymer clay sweater charms. Their intricate cable-knit textures and realistic ribbed cuffs make them perfect for seasonal keychains or unique jewelry gifts.
Step-by-Step
Materials
- White or cream polymer clay
- Rolling pin or pasta machine
- Needle tool or toothpick
- Metal jump rings (gold or silver)
- Small clay cutters (sweater shape and square/rectangle)
- Extruder tool (optional but helpful)
- Flexible clay blade
- Sandpaper (fine grit)
- Small pliers
- Oven for baking
Step 1: Prepping the ‘Wool’
-
Condition the clay:
Start by thoroughly conditioning your white polymer clay until it is soft and pliable. Warm clay is essential for getting those fine knit details without cracking. -
Create the base:
Roll out a smooth sheet of clay about 3-4mm thick. This will serve as the backing for your sweater design to ensure it’s sturdy enough for a keychain.
Sticky Clay Problems?
If clay is too soft and sticking to tools, pop it in the fridge for 10 minutes or dust your texture tools lightly with cornstarch before pressing.
Step 2: Creating the Knit Texture
-
Make clay snakes:
Roll out very thin snakes or strands of clay. Using an extruder with a small round disc is the easiest way to get uniform strands, but hand-rolling works too if you are patient. -
Form the twist:
To create the classic cable look, take two thin strands of clay and twist them together tightly. Make several of these twisted ropes. -
Assemble the cable pattern:
Lay two twisted ropes side-by-side on your work surface. Ensure one twist goes clockwise and the other counter-clockwise so that when placed together, they form a ‘V’ or braided pattern down the center. -
Texture the background:
For the non-cabled areas, you can texture a flat sheet of clay by gently pressing a piece of real fabric or a texture mat into it, or simply use a needle tool to scratch tiny ‘V’ shapes to mimic stockinette stitching. -
Add ribbing:
Create the ribbed bottom and cuffs by taking a small strip of clay and using a dull blade to press vertical parallel lines into it. Attach this strip to the bottom of your textured sheet.
Realistic Texture Tip
For an ultra-realistic fuzzy look, gently dab the unbaked clay surface with a stiff toothbrush or a dedicated texturing brush to stipple the surface.
Step 3: Shaping and Refining
-
Place the pattern on the base:
Gently lift your textured elements (the cables, the background texture, and ribbing) and press them onto the base sheet you prepared earlier. Smooth them down lightly so they adhere without squashing the detail. -
Cut the shapes:
Use your sweater-shaped cutter to punch out the main charm. If making the swatch charms, use a square or tag-shaped cutter. Alternatively, you can hand-cut the sweater shape with a craft knife using a paper template. -
Refine the edges:
After cutting, the edges might be a bit sharp. Use your finger or a silicone tool to gently smooth the sides of the charm. -
Add sleeves:
If your cutter didn’t include sleeves or you want them 3D, roll two small sausages of clay. Add texture to them using a needle tool, pressing lines to mimic the arm knitting, and attach them to the sides of the sweater body. -
Insert hardware holes:
Before baking, use a needle tool or a small straw to create a hole at the top of the sweater neck or the corner of the swatch. Make sure it’s large enough for your jump ring.
Step 4: Baking and Assembly
-
Bake the charms:
Place your charms on a ceramic tile or baking sheet lined with parchment paper. Bake according to your brand of clay’s instructions—usually around 275°F (135°C) for 30 minutes. -
Cool down:
Let the pieces cool completely inside the oven or on the counter. The clay is fragile while hot but hardens as it cools. -
Sand and buff:
If there are any rough spots on the back or edges, lightly sand them with fine-grit sandpaper under running water. -
Attach the hardware:
Using two pairs of pliers, twist open a jump ring (don’t pull it apart). Loop it through the hole you made and attach your keychain ring or clasp. -
Close the ring:
Twist the jump ring back into a closed position, ensuring the ends meet perfectly flush so the charm doesn’t slip off.
Now you have a set of adorable, texturally rich charms ready to accessorize your bags or gift to a knitting enthusiast
Gradient Sunset Earrings with Cutouts

Capture the magic of twilight with these stunning gradient earrings featuring a seamless transition from warm peach to dusty lavender. The modern arch shape with a negative space cutout creates a trendy, sophisticated silhouette that looks professionally made but is surprisingly achievable.
How-To Guide
Materials
- Polymer clay in peach/terracotta
- Polymer clay in dusty lavender
- Polymer clay in white (for mixing custom shades)
- Acrylic rolling pin or pasta machine
- Tissue blade or flexible clay slicer
- Small circle clay cutter (approx. 10-12mm)
- Arch shaped cutter (or paper template and knife)
- Hand drill or needle tool
- Jump rings (gold)
- Earring hooks (gold)
- Jewelry pliers
- Fine grit sandpaper (400-1000 grit)
- Ceramic tile or baking sheet
Step 1: Creating the Gradient Slab
-
Condition the clay:
Begin by thoroughly conditioning your peach and lavender clays until they are soft and pliable. If the colors feel too dark, mix in a small amount of white clay to achieve the soft, pastel sunset tones seen in the photo. -
Prepare the teardrops:
Form a teardrop shape with a piece of the peach clay and another with the lavender clay. Ensure they are roughly the same size and thickness. -
Join the colors:
Align the two teardrops so the pointed ends are facing opposite directions and the flat sides are touching, creating a rectangular block half-peach and half-lavender. -
Roll and fold:
Using your acrylic roller or pasta machine on a thick setting, roll the clay out lengthwise (in the direction of the colors). Fold the slab in half, bottom to top, matching peach to peach and lavender to lavender. -
Repeat the Skinner Blend:
Feed the folded clay back into the machine fold-first. Repeat this rolling and folding process 15-20 times. You will see the center line blur and eventually become a smooth, seamless gradient. -
Final sheet thickness:
Once the blend is perfect, roll the slab out to your final desired thickness, usually about 3mm for earrings so they are sturdy but lightweight.
Fixing Bubbles
Tiny bubbles on the surface? Gently slice them off with your tissue blade before baking, then smooth with a finger. If baked, sand them down until smooth.
Step 2: Cutting and Baking
-
Cut the circles:
Using your small circle cutter, punch out two circles from the peach section of your gradient slab. These will act as the top connectors. -
Cut the arches:
Position your arch cutter over the gradient so the color transition flows vertically from orange at the top to purple at the bottom. Cut out two identical arch shapes. -
Create the cutout:
If you don’t have a specific cutter for the inner ‘U’ shape, carefully use a smaller oval cutter or your craft knife to remove the center section, creating the leggy arch silhouette. -
Smooth the edges:
Before baking, gently run your finger dipped in a little cornstarch or water along the cut edges to soften any sharp corners or drag marks from the blade. -
Add holes:
Use a needle tool to poke a hole at the top center of the arch and the top and bottom of the circle pieces. Ensure the holes are large enough for your jump rings. -
Bake:
Place the pieces on a ceramic tile or baking sheet lined with paper. Bake according to your specific clay brand’s packaging instructions (typically 275°F/135°C for 30-45 minutes).
Step 3: Finishing and Assembly
-
Cool and sand:
Allow the pieces to cool completely. Dip your sandpaper in water and gently sand the edges to achieve that professional, matte finish shown in the image. -
Open jump rings:
Using two pairs of pliers, twist (don’t pull) a gold jump ring open. This technique maintains the ring’s circular shape. -
Connect the pieces:
Thread the open jump ring through the top of the arch and the bottom of the circle stud. Close the ring securely. -
Attach the hook:
Open the loop on your earring hook slightly. Thread it through the top hole of the circle piece and close it. -
Final check:
Double-check that all metal connections are tight and the earrings hang straight forward when held up.
Texture Twist
Before cutting shapes, press a piece of sandpaper or a textured sponge into the raw clay slab to give it a stone-like, organic surface finish.
Now you have a stunning pair of sunset-inspired earrings ready to wear or gift
Mini Desk Buddy Sculptures
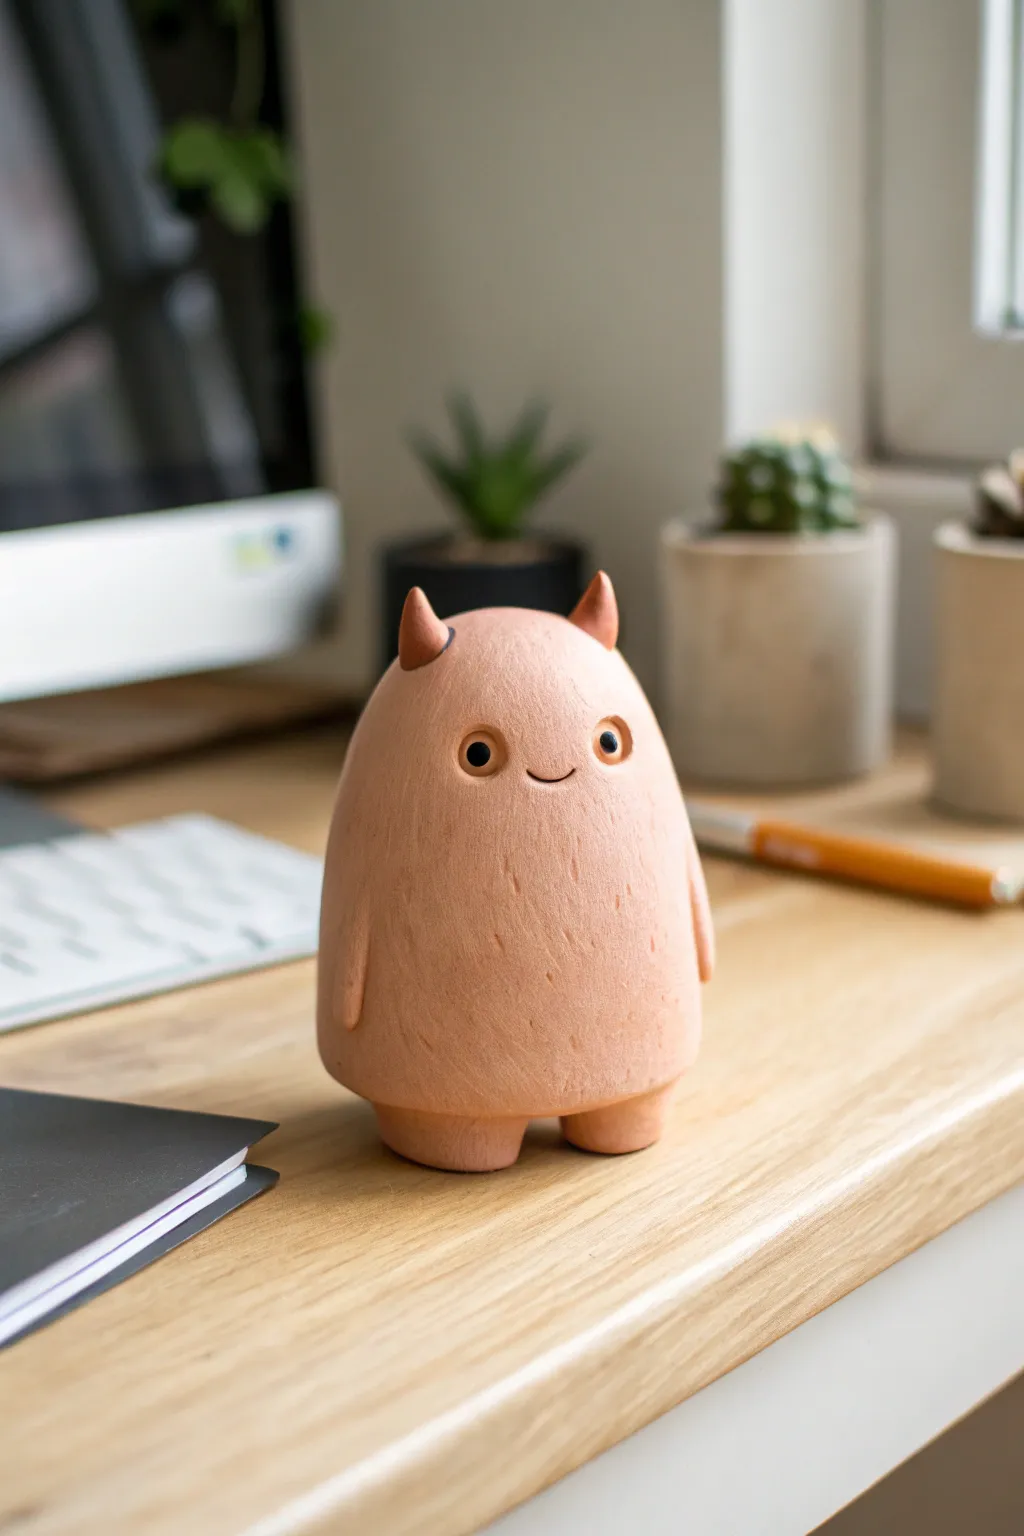
Sculpt your own quietly cheerful monster friend to keep you company while you work. This minimalist polymer clay figure features a soft peach finish, stubby little horns, and a sweet, simple expression that adds character to any workspace.
Detailed Instructions
Materials
- Polymer clay (Peach or Terracotta color)
- Polymer clay (Black for eyes)
- Polymer clay (Darker terracotta for horns)
- Sculpting tool with a needle point
- Ball stylus tool
- Aluminum foil (for armature core)
- Small craft knife
- Soft paintbrush (optional for smoothing)
- Baking sheet and parchment paper
- Oven
Step 1: Forming the Body
-
Create the core:
Start by scrunching a small piece of aluminum foil into an egg shape about 2 inches tall. This saves clay and keeps the figure lightweight. -
Condition the clay:
Take your main peach or terracotta colored clay and knead it thoroughly in your hands until it is warm and pliable. -
Sheet the clay:
Flatten the conditioned clay into a sheet about 1/4 inch thick. You can use an acrylic roller or a pasta machine if you have one. -
Wrap the core:
Wrap the clay sheet around your foil egg, pressing the seams together and smoothing them out until the foil is completely hidden and the surface is uniform. -
Shape the silhouette:
Gently roll the clay egg on your work surface to smooth it further. Taper it slightly at the top so looking at it from the front gives you a rounded ‘gumdrop’ shape.
Step 2: Adding Limbs & Features
-
Make the legs:
Roll two small balls of the same peach clay, roughly the size of marbles. Flatten the tops and bottoms slightly to make squat cylinders. -
Attach the legs:
Press the cylinders onto the bottom of the body. Blend the seams using your finger or a smoothing tool so the legs transition seamlessly into the torso. -
Create the arms:
Roll two very small, thin teardrop shapes for the arms. They should be quite subtle, almost flush with the body. -
Attach the arms:
Place the arms on the sides of the body, curving them slightly downward. Blend the upper edges into the body clay, leaving the bottom tips distinct. -
Form the horns:
Using the slightly darker terracotta clay, roll two tiny cones. Attach these to the top of the head, blending the base so they look like they grow naturally from the skull.
Texturing Tip
Vary the direction of your needle scratches slightly. If they are too uniform, it looks mechanical. Random angles make him look fuzzy and organic.
Step 3: Detailing & Texture
-
Mark the eye sockets:
Use a medium-sized ball stylus to press two indentations into the face area where you want the eyes to sit. -
Insert the eyes:
Roll two tiny spheres of black clay. Place them into the sockets you just made, pressing gently so they don’t bulge out too much. -
Carve the smile:
Use a needle tool or a very fine blade to carve a tiny, curved line for the mouth. Keep it simple and small for that cute minimalist look. -
Add texture:
Take your needle tool and make very short, shallow scratch marks all over the body. This mimics a fur-like texture or faint ceramic crazing. -
Final smooth:
Check the figure for any unwanted fingerprints. I like to brush a little cornstarch or baby oil over the surface right before baking to get it perfectly smooth. -
Bake:
Place your monster on a parchment-lined baking sheet and bake according to your specific clay brand’s instructions (usually 275°F for 15-30 minutes). -
Cool down:
Let the figure cool completely in the oven with the door cracked open to prevent cracking from thermal shock.
Make it Matte
After baking, avoid glossy varnishes. This project looks best with a matte finish. If your clay is shiny, buff it gently with denim or use a matte varnish.
Set your new little friend on your desk to bring a smile to your daily routine
Custom Initial Tags for Bags and Zippers
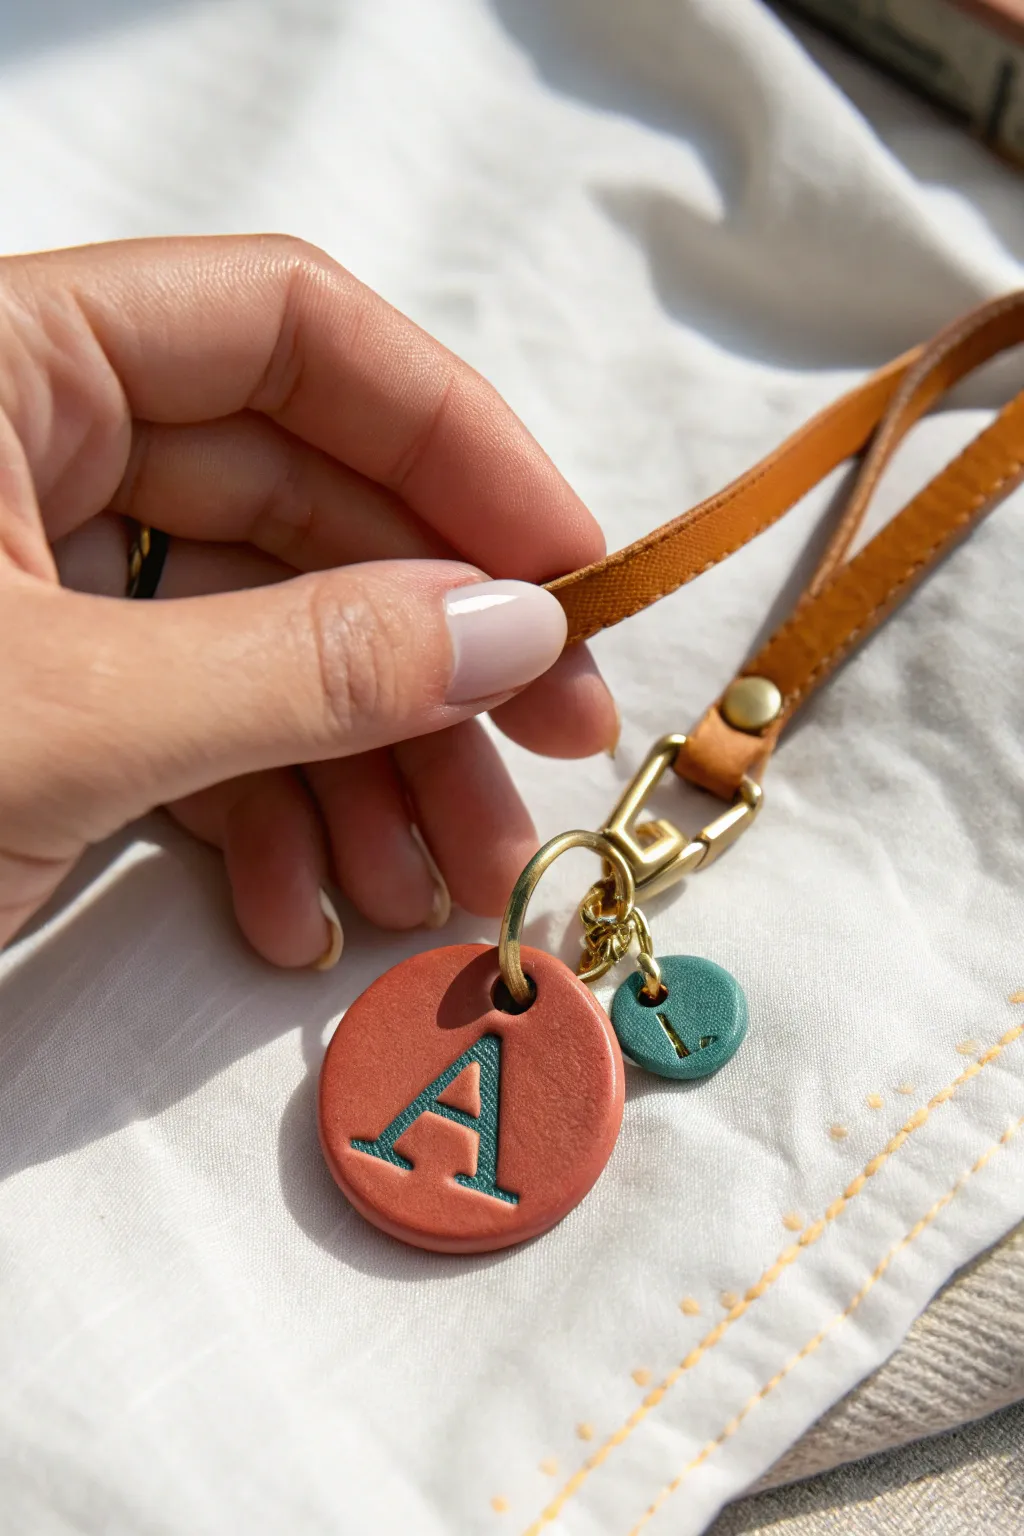
Elevate your handbag or keychain with these sophisticated, personalized initial tags that look just like stamped leather but are actually made from durable polymer clay. The contrasting teal and terracotta colors create a trendy, earthy aesthetic perfect for everyday wear.
Step-by-Step
Materials
- Polymer clay in terracotta/brick red and teal/turquoise
- Rolling pin or pasta machine
- Circle cutters (approx. 1.5 inch and 0.75 inch)
- Small letter stamps (for impressions)
- Acrylic paint (teal and dark blue/black)
- Fine detail paintbrush
- Small jump rings (gold finish)
- Large jump ring or keyring hardware
- Leather cord or strap with clasp hardware
- Needle tool or toothpick
- Wet wipes or rubbing alcohol
- Gloss or matte varnish (optional)
- Oven for baking
Step 1: Prepping and Shaping the Clay
-
Condition the clay:
Begin by warming the terracotta clay in your hands, kneading it thoroughly until it is soft and pliable. Do the same for a smaller amount of teal clay. -
Roll out the slab:
Roll the terracotta clay out to a medium thickness, about 1/4 inch (6mm). You want it substantial enough to look like a thick leather tag, not a thin wafer. -
Cut the main circle:
Using your larger circle cutter, press firmly into the terracotta slab to create the base for your main initial tag. -
Create the accent tag:
Roll out the teal clay to the same thickness and use the smaller circle cutter to make the secondary charm. -
Smooth the edges:
Gently run your finger along the cut edges of both circles to soften any sharp ridges from the cutter, giving it that worn, tumbled leather look. -
Punch the unexpected hole:
Use a straw or a small circle cutter to punch a hole near the top edge of each charm for the hardware. Make sure the hole isn’t too close to the edge to prevent tearing.
Pro Tip: Leather Texture
Before baking, gently roll a ball of aluminum foil over the surface of the clay. This creates a subtle, grainy texture that mimics real leather.
Step 2: Stamping and Detailing
-
Position your stamp:
Align your large letter stamp (e.g., ‘A’) in the center of the terracotta circle. Take your time to ensure it is perfectly vertical. -
Impress the letter:
Press the stamp down firmly and evenly. You want a deep impression that will hold paint later, but be careful not to push all the way through the clay. -
Stamp the smaller tag:
Repeat the process with a smaller letter stamp on the teal circle. I find a light dusting of cornstarch on the stamp helps prevent it from sticking to the fresh clay. -
Clean up imperfections:
If the stamping caused any distortion to the circle shape, gently nudge the edges back into round. Wipe away any fingerprints with a little rubbing alcohol. -
Bake the pieces:
Place your clay pieces on a ceramic tile or baking sheet lined with parchment paper. Bake according to your specific clay brand’s instructions (usually 275°F/135°C for 15-30 minutes). -
Cool down:
Allow the pieces to cool completely in the oven or on a wire rack. They will be slightly flexible when hot but harden as they cool.
Step 3: Painting and Assembly
-
Paint the inlay:
Using a fine brush, fill the impressed letter on the terracotta tag with teal acrylic paint. Don’t worry about being perfectly neat; messy is okay for this step. -
Wipe the surface:
Before the paint dries completely, take a slightly damp paper towel or wet wipe and gently drag it across the surface of the clay. This removes paint from the top but leaves it trapped in the sunken letter grooves. -
Paint the small tag:
Repeat the painting process for the teal tag, using a darker color like navy or black to make the initial pop. -
Let it cure:
Allow the paint to dry fully. If you want extra durability, you can apply a thin coat of matte varnish now, though raw clay mimics leather better. -
Attach jump rings:
Twist open a gold jump ring (use two pairs of pliers for better leverage) and loop it through the hole of the large terracotta charm. Close it securely. -
Cluster the charms:
Add a jump ring to the small teal charm. Then, thread both charms onto a larger main ring or directly onto the clasp of your leather strap. -
Final check:
Ensure all metal rings are closed flush so your charms don’t slip off, and clip your new accessory onto your favorite bag.
Troubleshooting: Paint Smears
If you smear paint where you don’t want it, let it dry first. Then, gently scratch it off with a craft knife or sand it lightly with buffing paper.
Enjoy the personalized touch this project adds to your accessories, combining handmade charm with a professional finish
Mixed-Media Wall Grid with Mini Clay Icons
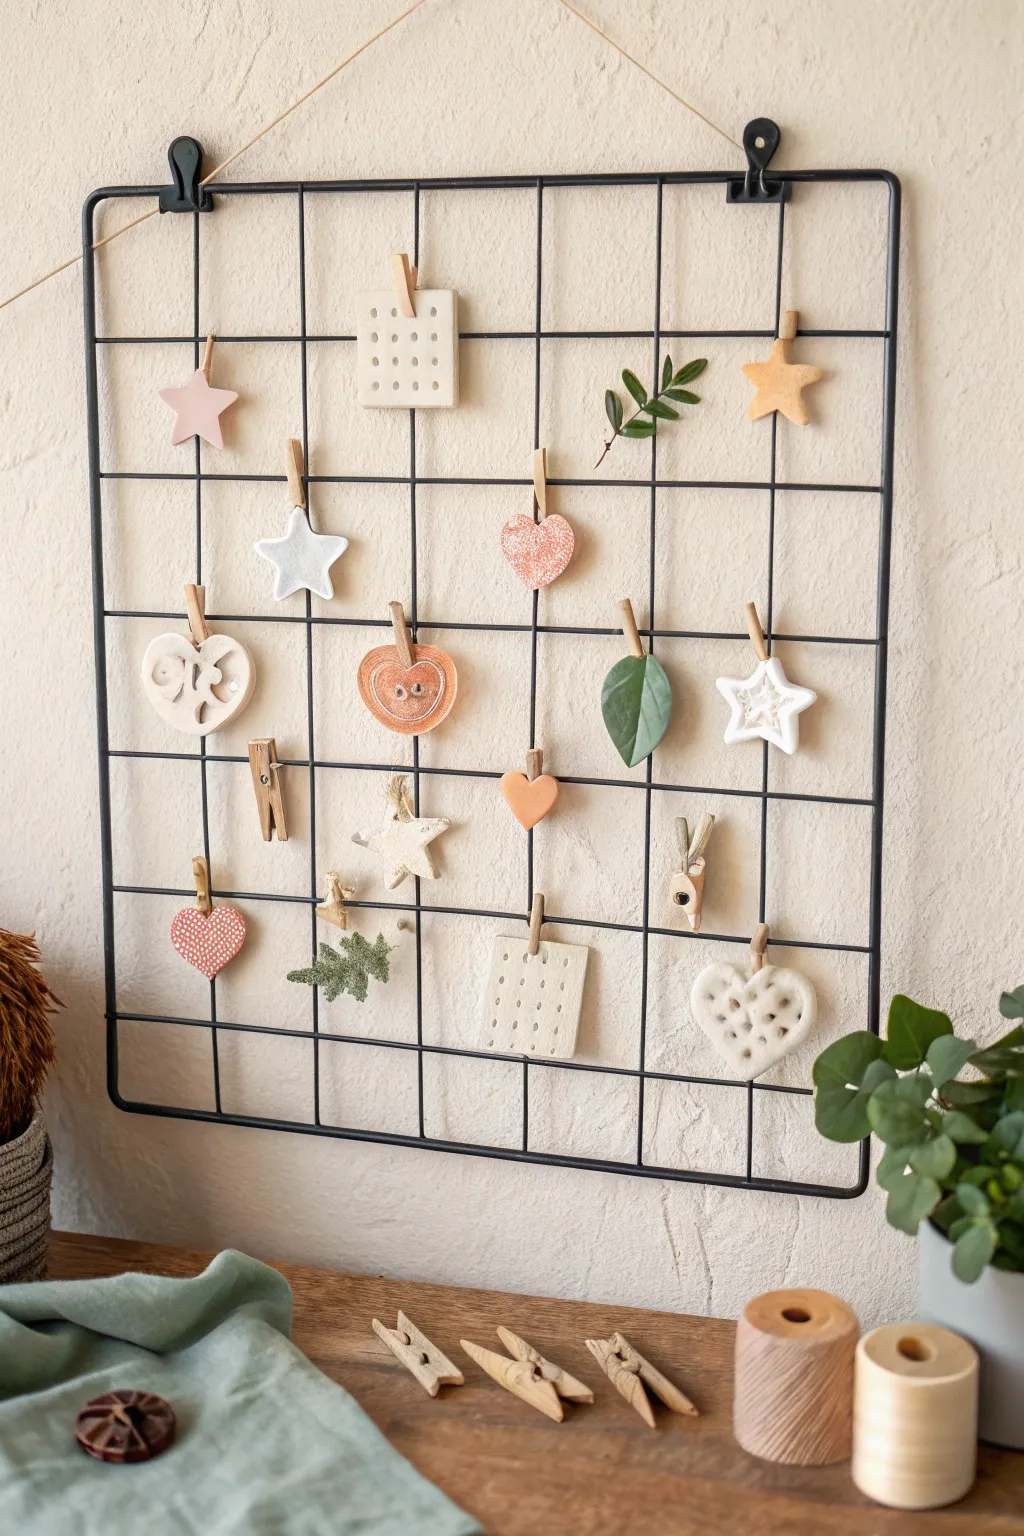
Transform a simple wire organizer into a charming gallery of miniature art pieces using polymer clay and natural textures. This mixed-media project combines the sleekness of industrial wire grid with the warmth of handmade clay hearts, stars, and botanical accents for a sweet, personalized wall display.
How-To Guide
Materials
- Black wire wall grid (approx. 18×24 inches)
- Polymer clay (white, peach/terracotta, speckled beige)
- Mini wooden clothespins (approx. 1-1.5 inches)
- Clay roller or pasta machine
- Various cookie cutters (stars, hearts)
- Texture tools (toothpicks, lace, burlap, button molds)
- Real or faux greenery sprigs (eucalyptus works well)
- Acrylic paint (moss green, terracotta – optional for tinting)
- Matte spray varnish
- Jute twine for hanging
- Two black metal clips for the top
Step 1: Creating the Clay Icons
-
Condition the Clay:
Begin by kneading your polymer clay until it’s soft and pliable. I find mixing a small amount of translucent clay into the white gives a nicer, porcelain-like finish. Create balls of white, peach, and speckled beige clay. -
Roll and Cut:
Roll your clay out to a uniform thickness, about 1/4 inch. Use your cookie cutters to punch out several stars and hearts in different sizes. Keep the edges clean by smoothing them with your finger. -
Add Texture:
Before baking, use household items to press patterns into some of the shapes. Press the tines of a fork or a toothpick into a white clay square to create a ‘cracker’ look, or gently press lace into a heart for a vintage textile texture. -
Create the Button Shapes:
Form a few rounded shapes and press a large button into them to create a mold impression, or simply use a toothpick to poke two ‘buttonholes’ in the center of a circular or heart-shaped piece. -
Sculpt Organic Shapes:
Hand-mold a few unique pieces, like the small rabbit head or rough-surfaced stars. For the ‘greenery’ clay piece, cut a leaf shape from textured clay (use a real leaf to impress veins) or tint white clay with a tiny drop of green paint before baking. -
Bake the Pieces:
Arrange all your clay creations on a parchment-lined baking sheet. Bake exactly according to your brand’s package instructions (usually 275°F for 15-30 minutes); over-baking can darken the white clay. -
Cool and Finish:
Let the pieces cool completely inside the oven to prevent cracking. Once cool, apply a light coat of matte spray varnish to protect them from dust without adding unnatural shine.
Sticky Clothespins?
If clothespins won’t bond to the clay, rough up the back of the baked clay with sandpaper first. This creates ‘tooth’ for the glue to grab onto.
Step 2: Assembling the Grid
-
Prepare the Grid:
Clean your black wire grid to ensure it’s free of dust. Determine the top edge and use the two large black metal bulldogs clips to attach the hanging mechanism (a simple loop of jute twine) to the top corners. -
Prepare Botanical Accents:
Snip small sprigs of faux or dried eucalyptus and olive leaves. You want these to be roughly the same scale as your clay pieces, about 2-3 inches long. -
Layout Design:
Lay the grid flat on a table. Place your clay pieces, greenery, and empty clothespins onto the grid squares to test the arrangement. Aim for a balanced mix of shapes and colors—don’t cluster all the stars or all the peach items in one spot. -
Attach the Clay:
Once happy with the layout, glue the mini wooden clothespins to the backs of your clay pieces using strong superglue or E6000. Let them cure fully before clipping them onto the grid. -
Final Assembly:
Clip your new clay icons onto the horizontal wires of the grid. Intersperse them with the loose botanical sprigs (simply clipped in place) and a few rogue wooden clothespins for a rustic, ‘in-progress’ studio aesthetic.
Scented Decor
Mix a drop of essential oil into the unbaked clay (porous terracotta style works best) to make the grid act as a subtle room diffuser.
Hang your assembled grid in a well-lit spot to cast playful shadows behind your miniature sculptures