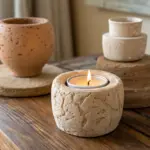
If you’ve got a plain plate and a little pottery paint (or underglaze), you’ve basically got the coziest canvas in the studio. These plate pottery painting ideas are all about designs that look amazing on a round surface without needing fancy drawing skills.
Classic Polka Dots Around the Rim
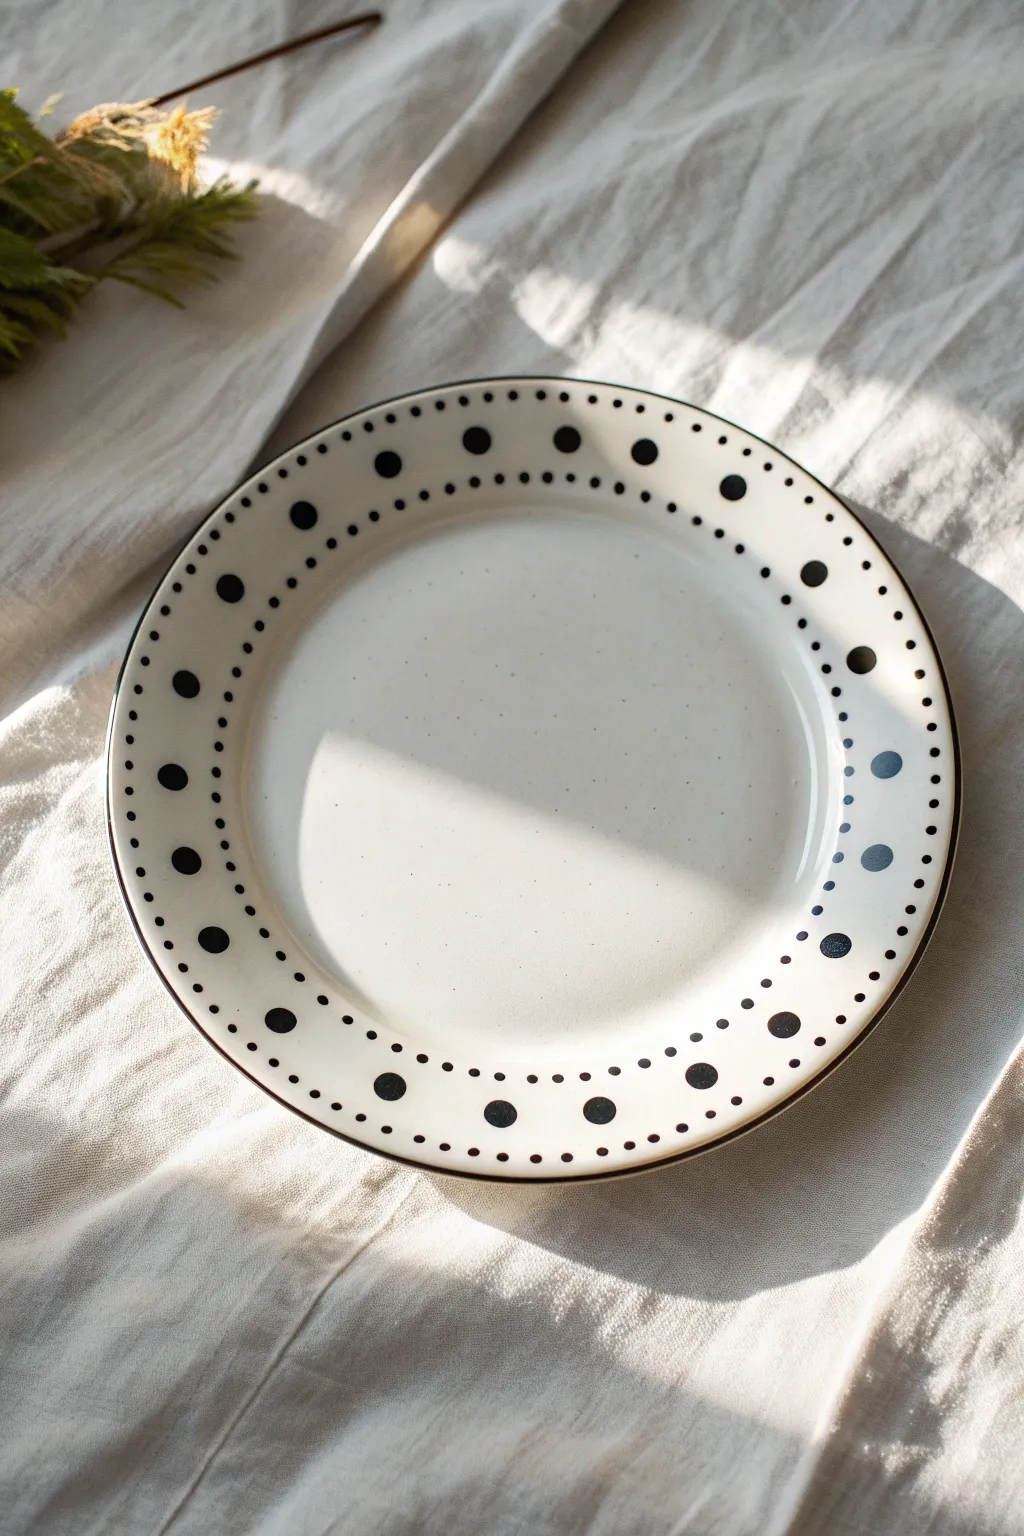
Achieve a look of understated elegance with this cream-colored plate featuring a rhythmic pattern of black polka dots. This design combines large statement dots with delicate smaller points to frame your culinary creations beautifully.
How-To Guide
Materials
- Bisque ceramic plate with a wide rim
- Cream or off-white glossy glaze (background)
- Black underglaze (for dots)
- Medium soft fan brush
- Round sponge blotter (approx. 1/2 inch or 1.5cm)
- Small detail paintbrush (size 0 or 1)
- Pencil (for light sketching)
- Paper towel
- Ruler or measuring tape
- Clear dipping glaze (optional, if underglaze requires it)
- Kiln access
Step 1: Base Preparation
-
Wipe the bisque:
Start by gently wiping down your bisque plate with a slightly damp sponge to remove any dust or ceramic particles that could interfere with the glaze application. -
Apply background color:
Using your fan brush, apply a smooth coat of cream or off-white glaze to the entire surface of the plate. Ensure your strokes are long and even to prevent ridges. -
Layer the background:
Allow the first coat to dry until it’s chalky to the touch, then apply a second and third coat. This ensures a rich, opaque finish that looks professional. -
Dry completely:
Let the background glaze dry fully before attempting any detail work. This usually takes about 20-30 minutes.
Step 2: Planning the Pattern
-
Find the center point:
Visualize the rim as a clock face to help with spacing. -
Mark major anchors:
Using a pencil, lightly mark four points at the 12, 3, 6, and 9 o’clock positions on the rim. The pencil lead will burn off in the kiln, so don’t worry about marks staying forever. -
Subdivide sections:
Between each of your four anchor points, mark the halfway point. You now have 8 evenly spaced locations. -
Add final large dot divisions:
Depending on the size of your plate, add one or two marks evenly between those 8 locations. Aim for about 1.5 to 2 inches of space between these main marks.
Uneven Spacing?
Don’t panic! Wiping off glaze is easy. Use a damp sponge to erase a section and re-measure your marks before painting again.
Step 3: Painting the Design
-
Prepare the black glaze:
Shake your black underglaze well and pour a small amount onto a palette or tile. -
Stamp the large dots:
Dip your round sponge blotter into the black glaze. Dab it once on a scrap paper to remove excess, then press firmly onto your pencil marks to create the large central dots. -
Check consistency:
I like to reload the sponge every 2-3 dots to ensure the black remains opaque and consistent around the entire rim. -
Clean up edges:
If any sponge prints look fuzzy, use a damp brush to gently tidy the edges while the paint is still wet. -
Start the inner ring:
Switch to your small detail brush (size 0 or 1). Create a ring of tiny dots along the inner edge of the rim. -
Spacing the inner dots:
Place three tiny dots in the space corresponding to one large dot. This creates a neat ratio. -
Start the outer ring:
Just like the inner ring, paint a matching series of tiny dots along the very outer edge of the rim. -
Align the dots:
Try to keep the outer small dots radially aligned with the inner small dots for a clean, symmetrical look. -
Inspect the work:
Look over the plate for any smudges or uneven coverage on the black dots. Touch up with a second coat on the large dots if the black looks thin.
Crisp Circles
Twist your sponge blotter slightly as you lift it off the plate. This breaks the suction and leaves a cleaner, rounder edge.
Step 4: Finishing Touches
-
Dry thoroughly:
Allow the black decorative dots to dry completely. -
Glaze dip:
If using underglazes that require a clear coat, dip the entire plate into a clear dipping glaze. If your cream base was a gloss glaze, you can skip this step. -
Fire firmly:
Fire the piece in the kiln according to the manufacturer’s instructions for your specific clay and glaze type.
Once fired, you will have a sophisticated serving piece perfect for any table setting


Crisp Striped Bands for a Modern Look
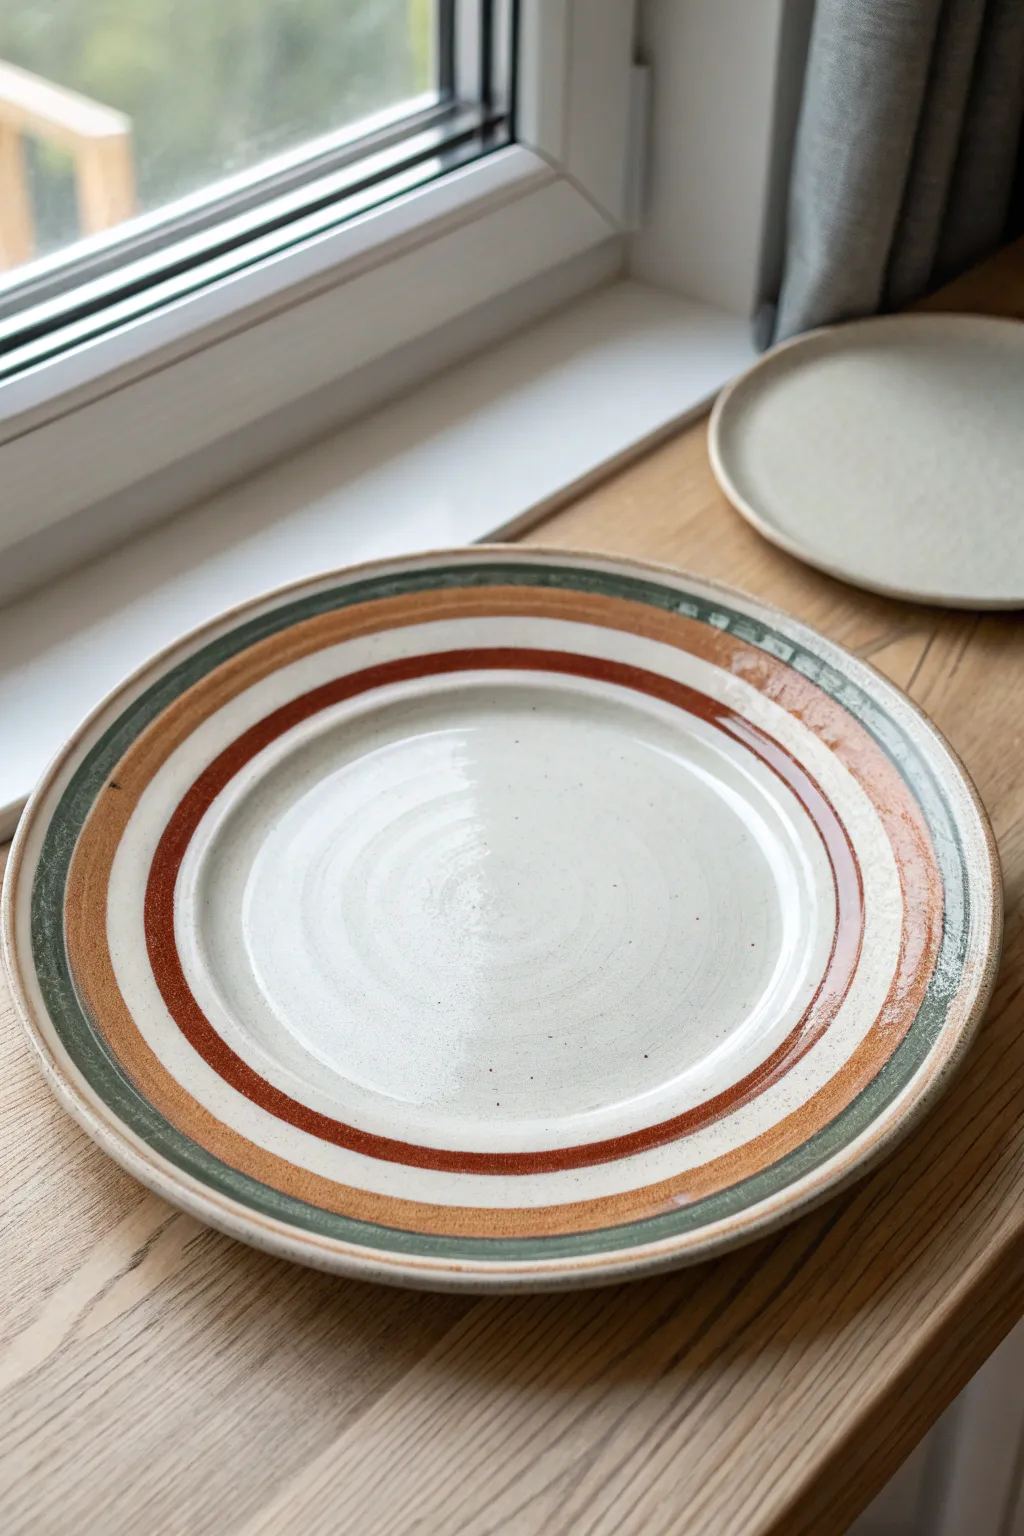
These clean, concentric circles evoke a classic mid-century studio pottery feel, combining warm terracotta tones with muted greens. The beauty of this design lies in its precision and the lovely interplay between the glazed stripes and the creamy speckled clay body.
Step-by-Step Tutorial
Materials
- Bisque-fired ceramic dinner plate (stoneware clay body preferred)
- Pottery wheel or a heavy banding wheel
- Underglazes in: Deep Rust/Terracotta, Sage Green/Olive, Mocha Brown
- Clear transparent glaze (cone 5/6 recommended)
- Soft fan brush (for clear glaze)
- Small to medium square-tipped shader brushes
- Sponge
- Bowl of water
- Centering tool (optional)
Step 1: Preparation
-
Clean the bisque:
Before you begin, wipe down your entire bisque plate with a slightly damp sponge. This removes any kiln dust or oils from handling that might resist the glaze. -
Center the plate:
Place your plate on the pottery wheel or banding wheel. This is the most critical step—spin the wheel and tap the plate gently until it is perfectly centered. If it wobbles, your stripes won’t be even. -
Secure the piece:
Once centered, use three small lugs of clay to secure the plate to the wheel head so it doesn’t shift while you are painting.
Step 2: Painting the Bands
-
Load the brush:
Start with your Sage Green underglaze. Generously load a medium square-tipped brush so the fluid flows smoothly without skipping. -
Apply the outer rim:
With the wheel spinning at a slow, steady pace, touch your brush to the outer rim of the plate. Hold your hand steady against a support or your leg, allowing the wheel’s rotation to create the perfect circle. -
Second coat:
Let the first rotation dry for a few seconds until the shine disappears, then apply a second coat to ensure opacity. -
The wide terracotta band:
Switch to your Deep Rust color. Load a slightly wider brush. Position this band about an inch inward from the green rim. Apply pressure to widen the bristles slightly, creating a thicker stripe. -
Refining the edge:
If the terracotta band looks too thin, carefully bring your brush back to the edge of the existing wet stripe while the wheel spins to widen it just a fraction. -
The inner accent line:
Using the Deep Rust color again, paint a thinner, sharper line closer to the center well of the plate. This defines the eating surface area. -
Adding depth:
Clean your brush and switch to the Mocha Brown. I like to add a very thin, subtle wash over the outer edge of the green rim to give it that slightly aged, rustic look visible in the photo. -
Check for consistency:
Spin the wheel slowly and inspect your lines. If any areas look translucent, dab a little extra underglaze on them, but try to maintain the brushstroke texture.
Wobbly Lines?
If your hand shakes, rest your painting arm on a stack of bricks or a steady jar next to the wheel. Stability is key for crisp circles.
Step 3: Glazing and Firing
-
Dry thoroughly:
Allow the underglaze bands to dry completely. They should feel powdery to the touch and room temperature. -
Apply clear glaze:
Dip a soft fan brush into your clear glaze. Apply it over the entire plate surface, ensuring you don’t drag the brush too hard, which could smear the underglaze lines. -
Second glaze coat:
Once the first coat is dry, apply a second coat of clear glaze in a cross-hatch direction to ensure full coverage without streaks. -
Wipe the foot:
Turn the plate over and use a wet sponge to wipe the foot ring completely clean of glaze so it doesn’t stick to the kiln shelf. -
Final Fire:
Fire the plate in the kiln according to the clay and glaze specifications (typically Cone 5 or 6 for durable stoneware dinnerware).
Vintage Speckle
To mimic the speckled clay look on plain white bisque, flick a toothbrush loaded with diluted brown iron oxide over the plate before glazing.
Once fired, you will have a durable, restaurant-quality piece that highlights the simple elegance of hand-painted geometry


Geometric Color Blocking in Triangles

Bring a touch of mid-century modern flair to your table with this geometric stoneware plate featuring a satisfying radial design. The muted palette of sage green, terracotta, and soft white creates a harmonious balance that looks sophisticated yet approachable.
How-To Guide
Materials
- Bisque-fired ceramic plate (speckled clay body recommended)
- Underglazes: Sage Green, Terracotta/Coral, Creamy White
- Clear matte dipping or brushing glaze
- Pencil
- Ruler
- Protractor (optional)
- Medium soft flat brush
- Small detail brush
- Painter’s tape or graphic chart tape (optional)
- Damp sponge
Step 1: Planning and Preparation
-
Clean the Bisqueware:
Start by wiping down your bisque plate with a damp sponge. This removes any dust that could prevent the glaze from adhering properly to the surface. -
Find the Center:
Using your ruler, lightly mark the exact center of the plate with a pencil. Don’t worry about the graphite marks; they will burn off completely in the kiln. -
Grid the Design:
Draw a straight line through the center point, dividing the plate in half. Then, draw a perpendicular line to divide it into quarters. -
Create the Wedges:
Divide each of your four quarters in half again to create eight equal pie-shaped wedges. A protractor set to 45 degrees can help with precision, but eyeballing works for a more organic feel.
Bleeding Lines?
If underglaze bleeds under your tape, let it dry completely. Then, use an X-acto knife to gently scrape the excess paint away for a crisp edge again.
Step 2: Applying Color
-
Tape Off Sections (Optional):
For razor-sharp lines, apply thin graphic artist’s tape or painter’s tape along the pencil lines of the wedges you plan to paint. Alternatively, you can paint freehand for a softer look. -
Mix the Sage Green:
Shake your sage green underglaze well. Pour a small amount onto a palette. If it feels too thick, thin it with a drop of water for smoother application. -
Paint Opposite Green Wedges:
Select two wedges opposite each other (like 12 o’clock and 6 o’clock) and one additional wedge to create the asymmetrical pattern seen in the reference. Apply the first coat of sage green with a flat brush. -
Add Green Layers:
Once the first coat is dry to the touch, apply a second and third coat of green. Underglaze often requires three coats to achieve solid, opaque coverage. -
Paint the Terracotta Sections:
Identify the two wedges that will be terracotta. Notice in the design that these are not directly opposite but flank a single green wedge. Apply your first coat of terracotta underglaze. -
Layer the Terracotta:
Continue adding layers to the terracotta sections, allowing brief drying time between each coat. I like to alternate brush, stroke directions on each layer for a more even finish. -
Fill the White Sections:
If your clay body isn’t naturally white, paint the remaining empty wedges with a creamy white underglaze. If you are using a speckled white clay, you can leave these sections bare to let the clay’s character shine.
Step 3: Finishing Touches
-
Remove Tape:
If you used tape, peel it away gently before the paint is fully bone dry to prevent chipping the edges. Pull the tape at a 45-degree angle away from the painted area. -
Clean Up Lines:
Use a damp, stiff angled brush or a detail tool to gently scratch or wipe away any underglaze that bled outside your intended lines. Sharp intersections make the geometric effect pop. -
Clear Glaze Application:
Once the underglaze is completely dry, apply a clear matte glaze over the entire plate. You can dip the plate or brush on 2-3 coats, depending on the manufacturer’s instructions. -
Fire the Piece:
Load the plate into the kiln. Fire it to the temperature appropriate for your specific clay and glaze combination (usually cone 5 or 6 for stoneware).
Wax Resist Method
Apply wax resist over your pencil lines before painting. The glaze will bead off the wax, leaving distinct, raw clay lines between your bold colors.
Enjoy using your beautifully patterned plate for your next meal or display it as a piece of modern art.
Simple Line-Art Doodles in the Center

Embrace the beauty of minimalism with this elegant line art project. Using deep cobalt blue on a speckled cream background, you’ll draw a serene profile surrounded by flowing organic leaves.
Detailed Instructions
Materials
- Bisque fired ceramic plate (rimmed or coupe style)
- Speckled cream or white underglaze (for the base)
- Cobalt blue underglaze (or underglaze pencil)
- Wide hake brush or fan brush
- Fine liner brush (size 0 or 00)
- Pencil (standard #2)
- Clear dipping glaze
- Sponge and water bucket
Step 1: Preparation and Base Coat
-
Clean the Bisque:
Begin by wiping down your bisque plate with a slightly damp sponge. This removes any kiln dust or oils from your hands that might resist the glaze. -
Mix the Base Color:
Stir your speckled cream underglaze thoroughly. To get that natural, stone-like look, ensure the specks are well-distributed within the liquid. -
Apply the First Base Layer:
Using a wide hake or fan brush, apply a smooth, even coat of the cream underglaze over the entire front surface of the plate. Long, sweeping strokes work best to minimize brush marks. -
Wait and Repeat:
Allow the first coat to dry until it’s chalky and cool to the touch. Apply a second coat, painting in a perpendicular direction to the first, and then a third coat once that is dry for full opacity.
Use a Steady Hand
Rest your pinky finger on a dry part of the plate while painting. This anchors your hand and gives you much better control for smooth, long lines.
Step 2: Sketching the Design
-
Light Sketching:
Once your base coat is completely dry, take a standard graphite pencil and very lightly sketch the profile. Start with the curve of the forehead, moving down to the nose and chin. -
Adding Nature Elements:
Draw the large, oak-like leaf first on the left side, letting it curve naturally along the rim. I find it helps to draw the central vein first, then add the wavy lobes. -
Positioning the Eye and Mouth:
Carefully place the stylized eye and lips. The eye is a simple almond shape with a heavy lid line, while the lips are just two curved shapes. -
Floating Leaves:
Sketch three simple, teardrop-shaped leaves floating above the head towards the upper right rim. -
Refining Lines:
Step back and look at your composition. The pencil lines will burn off in the kiln, so if you make a mistake, just sketch over it or gently smudge it out with a finger.
Try Sgraffito Style
Paint the whole plate blue, let it dry, then scratch through the blue layer to reveal the white clay body underneath for a reverse-color effect.
Step 3: Painting the Line Art
-
Prepare the Blue:
Pour a small amount of cobalt blue underglaze onto a palette. Thin it slightly with a drop of water until it has an ink-like consistency for smoother flow. -
Start the Forehead Line:
Load your fine liner brush. Starting at the top of the forehead, paint a single, confident stroke down the nose. Don’t worry if the line thickness varies slightly; it adds character. -
Outline the Face:
Continue the line under the nose, forming the lips, chin, and sweeping down into the neck. Keep your wrist loose. -
Create the Eye:
Paint the heavy upper eyelid first, then the lower shape. Add the pupil and three small, delicate vertical lines for lower lashes. -
Paint the Large Leaf:
For the left leaf, outline the wavy shape first. Then, add the central stem line, extending it down past the leaf base. Finally, add small tick marks for the veins. -
Finish with Top Leaves:
Outline the three floating leaves at the top. Draw the central vein in each, and create the striped texture by painting curved lines from the center vein to the outer edges.
Step 4: Finishing Touches
-
Clean Up:
If you have any smudges or drips of blue, carefully scrape them away with a clean craft knife or wipe them with a barely damp brush corner. -
Dry Completely:
Let the underglaze design dry completely. It should look matte and powdery. -
Clear Glaze Application:
Dip the entire plate into clear glaze using tongs, or brush on three coats of clear brushing glaze. This will seal your design and make the plate food-safe. -
Final Fire:
Fire the piece in the kiln according to the clay and glaze specifications (usually cone 5 or 6 for stoneware).
Once fired, you’ll have a stunning, modern art piece ready for display or daily use

The Complete Guide to Pottery Troubleshooting
Uncover the most common ceramic mistakes—from cracking clay to failed glazes—and learn how to fix them fast.
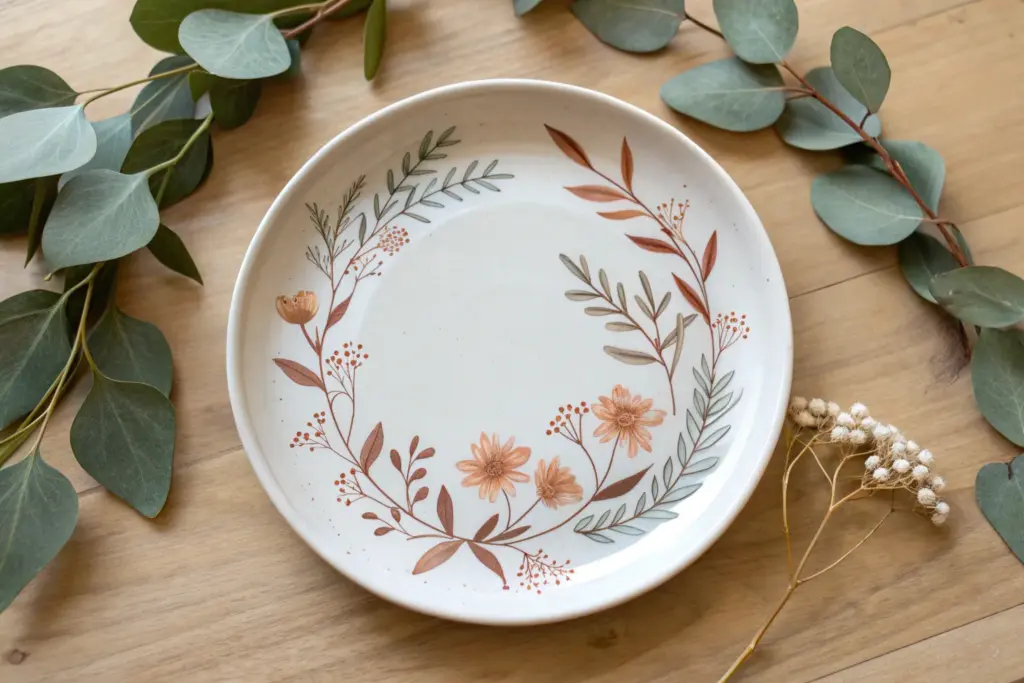
Botanical Wreath Border with Leaves and Stems
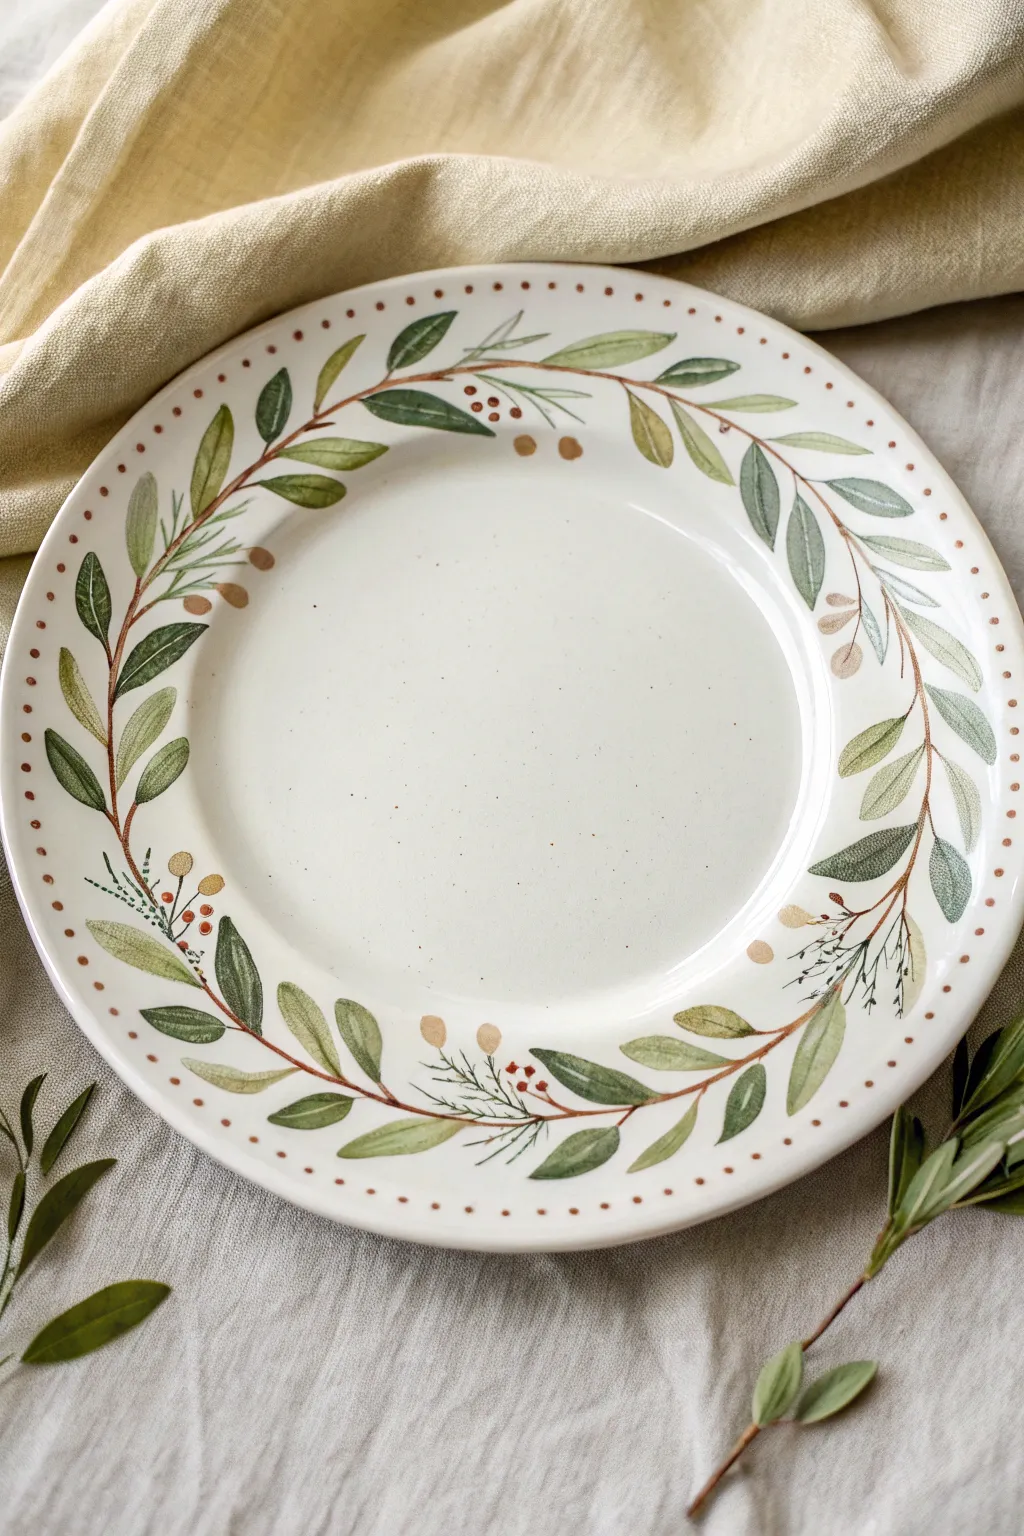
Bring the effortless charm of the Mediterranean to your table with this hand-painted ceramic plate featuring loose, watercolor-style olive branches. The organic flow of the leaves and delicate red berries creates a soft, rustic frame that looks beautiful on any dinnerware.
Step-by-Step Tutorial
Materials
- Bisque ceramic dinner plate
- Underglaze paints (Forest Green, Sage/Light Green, Dark Brown, Rust/Red)
- Round watercolor brush (size 4 or 6)
- Fine liner brush (size 0 or 1)
- Ceramic pencil or HB pencil
- Palette for mixing
- Water cup
- Sponge
- Clear dipping glaze
Step 1: Preparation & Planning
-
Clean the bisque:
Begin by wiping down your bisque plate with a barely damp sponge. This removes any dust that might prevent the glaze from adhering properly. -
Mark the stems:
Using a pencil, lightly sketch a loose, wavy line circling the rim of the plate. Don’t try to make a perfect circle; an organic, undulating vine looks more natural. -
Plan leaf clusters:
Lightly mark small ‘V’ shapes along your vine line where you intend to place the main leaf clusters. This acts as a roadmap so your wreath stays balanced.
Water Control is Key
For that watercolor look, the underglaze should be the consistency of skim milk. If it’s too thick, the leaves will look opaque and stiff.
Step 2: Painting the Foliage
-
Mix your greens:
Squeeze out your Forest Green and Sage underglazes on the palette. I like to dilute them slightly with a drop of water to achieve that translucent, watercolor effect seen in the photo. -
Paint the dark leaves first:
Load your round brush with the darker Forest Green. Using a ‘press and lift’ motion, paint almond-shaped leaves along the vine. Press down for the belly of the leaf and lift up to create a sharp point. -
Add lighter leaves:
Rinse your brush and switch to the lighter Sage green. Paint overlapping leaves next to the dark ones, filling in the gaps. Vary the size and direction to keep the movement dynamic. -
Create variation:
For a few select leaves, mix the two greens on your brush to create a mid-tone olive shade, adding depth to the foliage.
Step 3: Stems & Details
-
Connect with stems:
Switch to your fine liner brush and thin down the Dark Brown underglaze heavily with water until it flows like ink. -
Trace the vine:
With a shaky, delicate hand, trace over your original pencil vine line. Allow the line to break and disappear behind leaves rather than drawing a thick continuous heavy line. -
Add leaf vein stems:
Paint very thin, short lines connecting the base of your floating leaves back to the main brown vine. -
Incorporate pine accents:
Using the very tip of the liner brush and dark green paint, add tiny sprigs that look like pine needles or rosemary between the larger leaves for textural contrast.
Mix Up the Seasons
Change the palette for different seasons! Swap the red berries for tiny blue flowers in spring, or use orange and yellow leaves for autumn.
Step 4: Accents & Finishing
-
Paint berries:
Dip the back end of a brush handle or a dotting tool into Rust or Red underglaze. Dot clusters of 2-3 small berries near the stem junctions. -
Add gold/tan buds:
Mix a watered-down tan or golden brown shade. Paint small, oval buds at the very tips of some vines to suggest new growth. -
Create the speckled rim:
Dip the back of your fine brush into the Rust/Red color again. Carefully place single, evenly spaced dots all the way around the outermost edge of the plate rim. -
Add speckling (optional):
If you want the speckled pottery look, load a toothbrush with watered-down brown glaze and lightly flick it over the plate for a fine mist of specks. -
Final wipe:
Check the underside of the plate for any stray paint smudges and wipe them clean. -
Glaze and fire:
Once the underglaze is bone dry, dip the entire plate in clear glaze and fire it according to the clay and glaze specifications.
Now you have a stunning, nature-inspired piece ready for your next dinner gathering
Loose Wildflowers Scattered Like Confetti
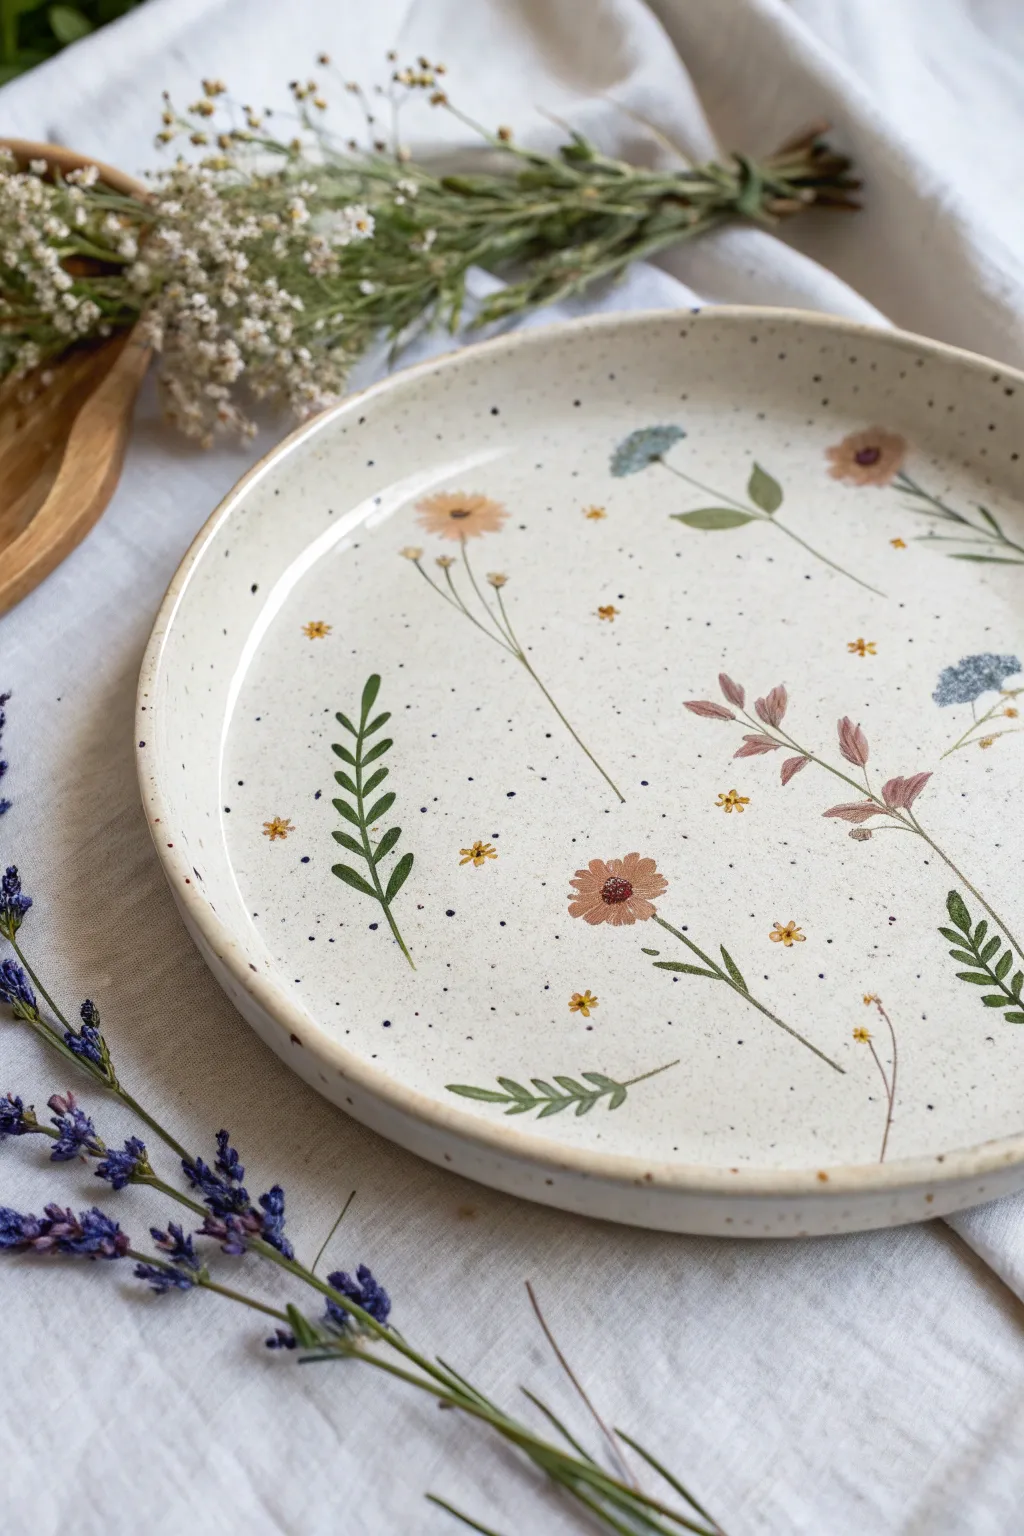
Capture the airy beauty of a summer meadow with this delicate ceramic painting project. By scattering loose botanicals across a speckled surface, you create a piece that feels organic, whimsical, and effortlessly elegant.
Step-by-Step Guide
Materials
- Bisque-fired ceramic plate (white or cream clay body)
- Underglaze paints (sage green, forest green, muted pink, terracotta, cornflower blue, mustard yellow)
- Speckled underglaze or thinned black underglaze for splatter
- Fine liner brushes (size 00 or 000)
- Small round brush (size 2)
- Palette for mixing
- Clear dipping glaze
- Old toothbrush (for splattering)
- Pencil (optional for sketching)
Step 1: Preparation & Base
-
Clean the bisque:
Begin by wiping down your bisque plate with a slightly damp sponge to remove any dust or oils from handling. This ensures the underglaze adheres perfectly. -
Create the speckled effect:
Before painting flowers, establish the background texture. Dilute a tiny amount of black or dark brown underglaze with water until it’s very runny. -
Splatter texture:
Dip an old toothbrush into the diluted dark mix. Hold it over the plate and run your thumb across the bristles to flick tiny specks onto the surface. Aim for uneven distribution to keep it looking natural. Let this dry completely.
Step 2: Painting the Ferns & Stems
-
Plan the flow:
Visualize a scattered pattern where no two stems touch. You can lightly mark placement with a pencil if you wish; the graphite will burn off in the kiln. -
Paint long stems:
Using your finest liner brush and sage green underglaze, paint thin, wispy stems. Vary the angles so they look like they are floating or falling gently. -
Add leafy fronds:
Load a size 0 brush with forest green. Paint small fern-like leaves by pressing the brush gently and lifting up to create a tapered point. Place these closer to the rim for framing. -
Paint grassy blades:
Switch back to the sage green and add a few standalone blades of grass or wheat-like stalks. Keep your wrist loose to ensure the lines aren’t stiff.
Natural Variation
Mix a tiny drop of brown into your greens for some stems and yellow into others. Monochromatic greens look artificial; variety makes it alive.
Step 3: Adding Blooms
-
Paint terracotta daisies:
Using a small round brush and muted terracotta or pink, paint simple five-petal flowers. I find that starting from the center and pulling the brush outward creates the most natural petal shape. -
Add blue accents:
With cornflower blue, dab small clusters of dots at the end of some stems to mimic forget-me-nots or hydrangeas. -
Detail the larger blooms:
Once the terracotta petals are dry to the touch, use a contrasting darker rust color to add tiny lines near the center of each petal for depth. -
Add flower centers:
Dip the very tip of a brush handle or a dotting tool into dark brown or maroon underglaze and place a dot in the center of the open flowers. -
Scattering tiny filler flowers:
Fill empty negative spaces with tiny mustard yellow stars or micro-flowers. These should be very small—just little ‘x’ shapes or clusters of three dots.
Go 3D
Use a slip trailer to pipe the flower centers or berries. This adds subtle texture you can feel when the plate is fired and finished.
Step 4: Finishing Touches
-
Review the composition:
Step back and look at the plate. Does it need another leaf here or a tiny yellow dot there? The goal is a balanced ‘confetti’ look, so don’t be afraid to leave open space. -
Rim detail:
For a finished look, you can run a damp sponge along the very edge of the rim to expose the raw clay, or paint a very thin, organic line of brown oxide. -
Glazing:
Once the underglaze is bone dry, carefully dip the plate into a clear transparent glaze. Ensure the coat is even and shake off excess drips gently. -
Firing:
Fire the plate in the kiln according to your clay and glaze specifications (usually Cone 5 or 6 for stoneware).
Enjoy using your new botanical plate for a light lunch or displaying it as a piece of functional art


What Really Happens Inside the Kiln
Learn how time and temperature work together inside the kiln to transform clay into durable ceramic.
Citrus Slice Pattern That Fits the Circle
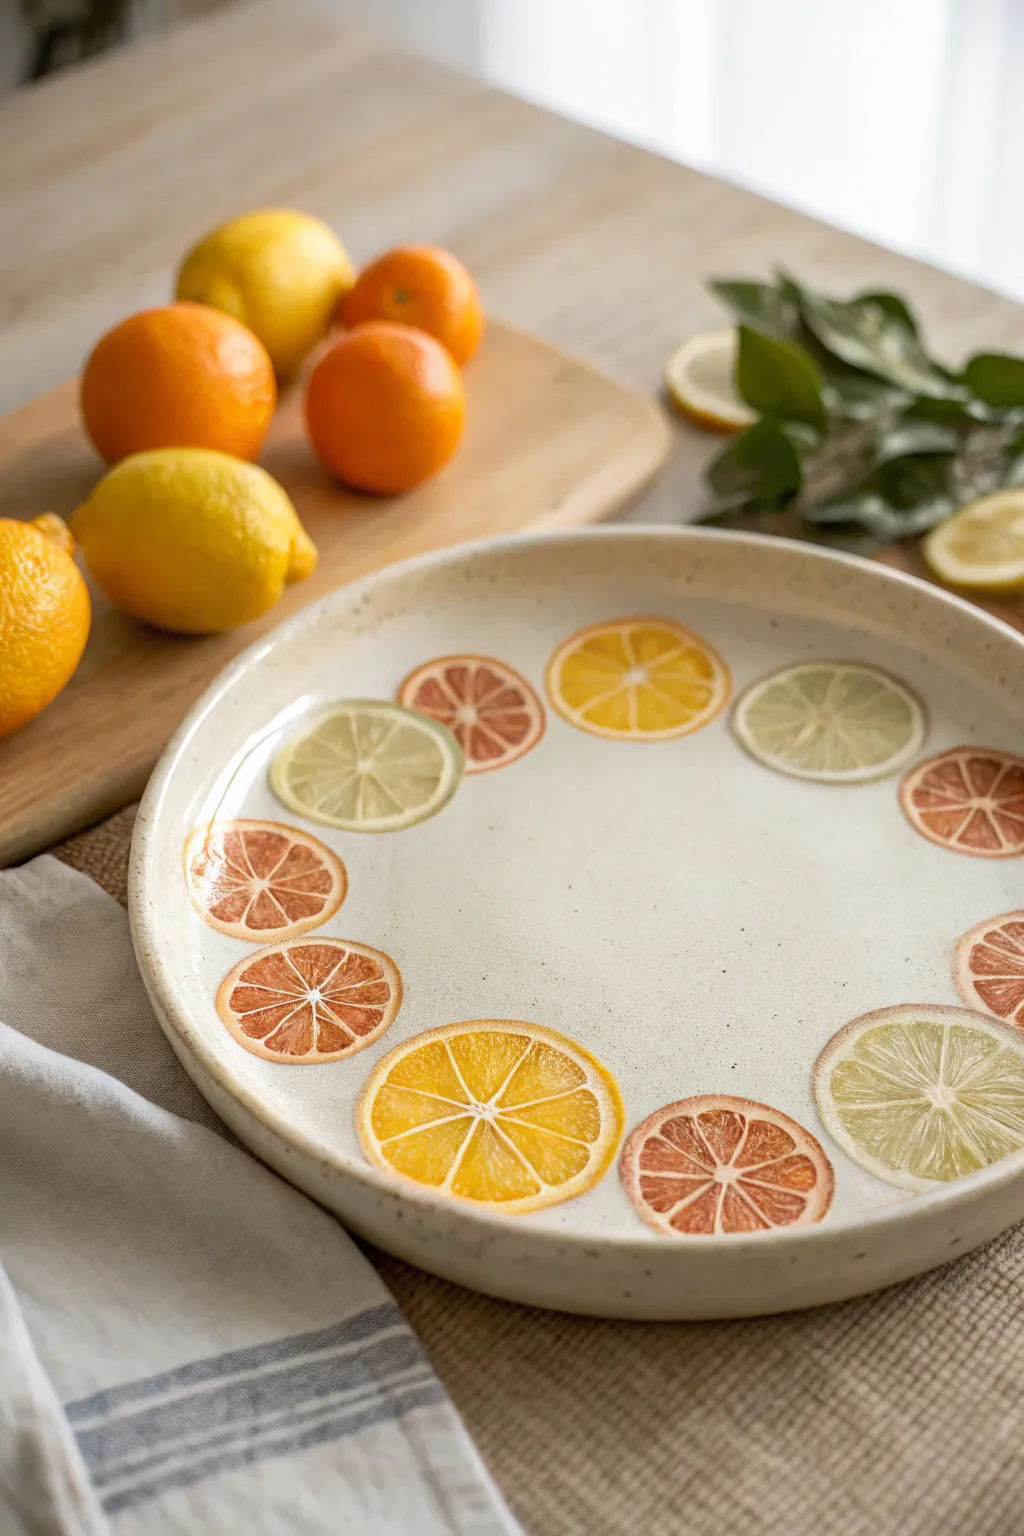
Brighten up your table setting with this cheerful ceramic design featuring a ring of realistic citrus slices. The pattern combines vibrant lemons, oranges, and grapefruit in a semi-wreath that feels fresh, summery, and perfectly framed by the rim of the plate.
Step-by-Step Tutorial
Materials
- Bisque-fired ceramic dinner plate with a slightly raised rim
- Underglazes: Lemon Yellow, Bright Orange, Deep Red-Orange, Lime Green, White
- Pencil for sketching
- Round synthetic brushes (sizes 2, 4, and 6)
- Fine liner brush (size 0 or 00)
- Small sponge (optional for texture)
- Palette or small dishes for mixing
- Clear dipping glaze
- Kiln access
Step 1: Planning the Layout
-
Clean the bisque:
Start by wiping down your bisque plate with a damp sponge to remove any dust that could prevent the glaze from adhering properly. -
Mark the positions:
Using a pencil, lightly draw a circle about an inch inward from the rim to serve as your guide. This doesn’t have to be perfect, as the pencil marks will burn off in the kiln. -
Sketch the slices:
Sketch circles of varying sizes along your guide line. Alternate the sizes slightly to mimic different fruits like lemons, limes, and grapefruits. -
Detail the segments:
Inside each circle, draw the ‘spokes’ or segments of the fruit. Aim for 8-10 triangular segments per slice, leaving a small gap for the rind and the pith (the white part).
Step 2: Painting the Fruit Flesh
-
Mix your citrus shades:
Prepare your palette with distinct citrus colors. Keep pure yellow for lemons, a mix of yellow and orange for oranges, and a pale pinkish-red (diluted red-orange) for the grapefruit slices. -
Base coat the lemons:
Load a size 4 round brush with Lemon Yellow underglaze. Paint the triangular segments of your lemon slices, being careful to leave the lines between segments unpainted (bisque white). -
Paint the oranges:
Switch to your Bright Orange. Fill in the segments for the orange slices. You can vary the intensity by adding a touch of yellow to some slices for a tangerine look. -
Fill in the grapefruit:
For the grapefruit slices, use the Deep Red-Orange. If the color is too strong, I like to water it down slightly for a more translucent, juicy appearance. -
Add the lime accents:
If you want lime slices, mix a very pale, watery green using Lime Green and a touch of White. Paint the segments of the remaining circles. -
Layering for opacity:
Let the first coat dry until it loses its sheen. Apply a second coat to all the fruit segments to ensure the color is vibrant after firing.
Juicy Texture Trick
Use a thicker application of underglaze in the center of the fruit segments and thin it out near the edges. This creates a natural gradient that mimics juicy, plump fruit.
Step 3: Adding Rinds and Details
-
Paint the outer rinds:
Using the size 2 brush, paint a thin ring around the outside edge of each fruit slice. Match the color to the fruit interior—yellow for lemon, orange for orange, etc. -
Create the pith:
The space between the colorful segments and the outer rind represents the pith. You can leave this as raw bisque, or for a cleaner look, use a fine liner brush to paint very thin lines of White underglaze between the segments. -
Add texture detail:
Take your fine liner brush and dip it into a slightly darker shade of your fruit color. Make tiny radial lines or stippling dots inside the segments to mimic the texture of juice vesicles. -
Speckle the background:
To add an organic feel to the plain ceramic, load a stiff brush with watered-down brown or grey underglaze. Run your thumb over the bristles to flick tiny speckles across the entire plate.
Go Tropical
Swap the traditional citrus palette for kiwi (green with black seeds), blood orange (deep purple-red), or dragon fruit (white with black speckles and pink rind) for an exotic twist.
Step 4: Finishing and Firing
-
Check for smudges:
Look over the white areas of the plate. If you find any stray paint marks, gently scratch them off with a toothpick or a clean, damp brush. -
Dry completely:
Allow the underglaze to dry completely, preferably overnight, to ensure no moisture is trapped before glazing. -
Clear glaze application:
Dip the entire plate into clear dipping glaze. Shake off excess gently and let it dry. -
Stilt and fire:
Place the plate on stilts in the kiln to prevent the glaze from adhering to the shelf. Fire according to your clay and glaze specifications (typically cone 06 or cone 6 depending on your materials).
Once fired, your plate will be a durable, dishwasher-safe piece of art ready to serve your favorite summer salads
Single Bee or Butterfly as a Center Focal Point
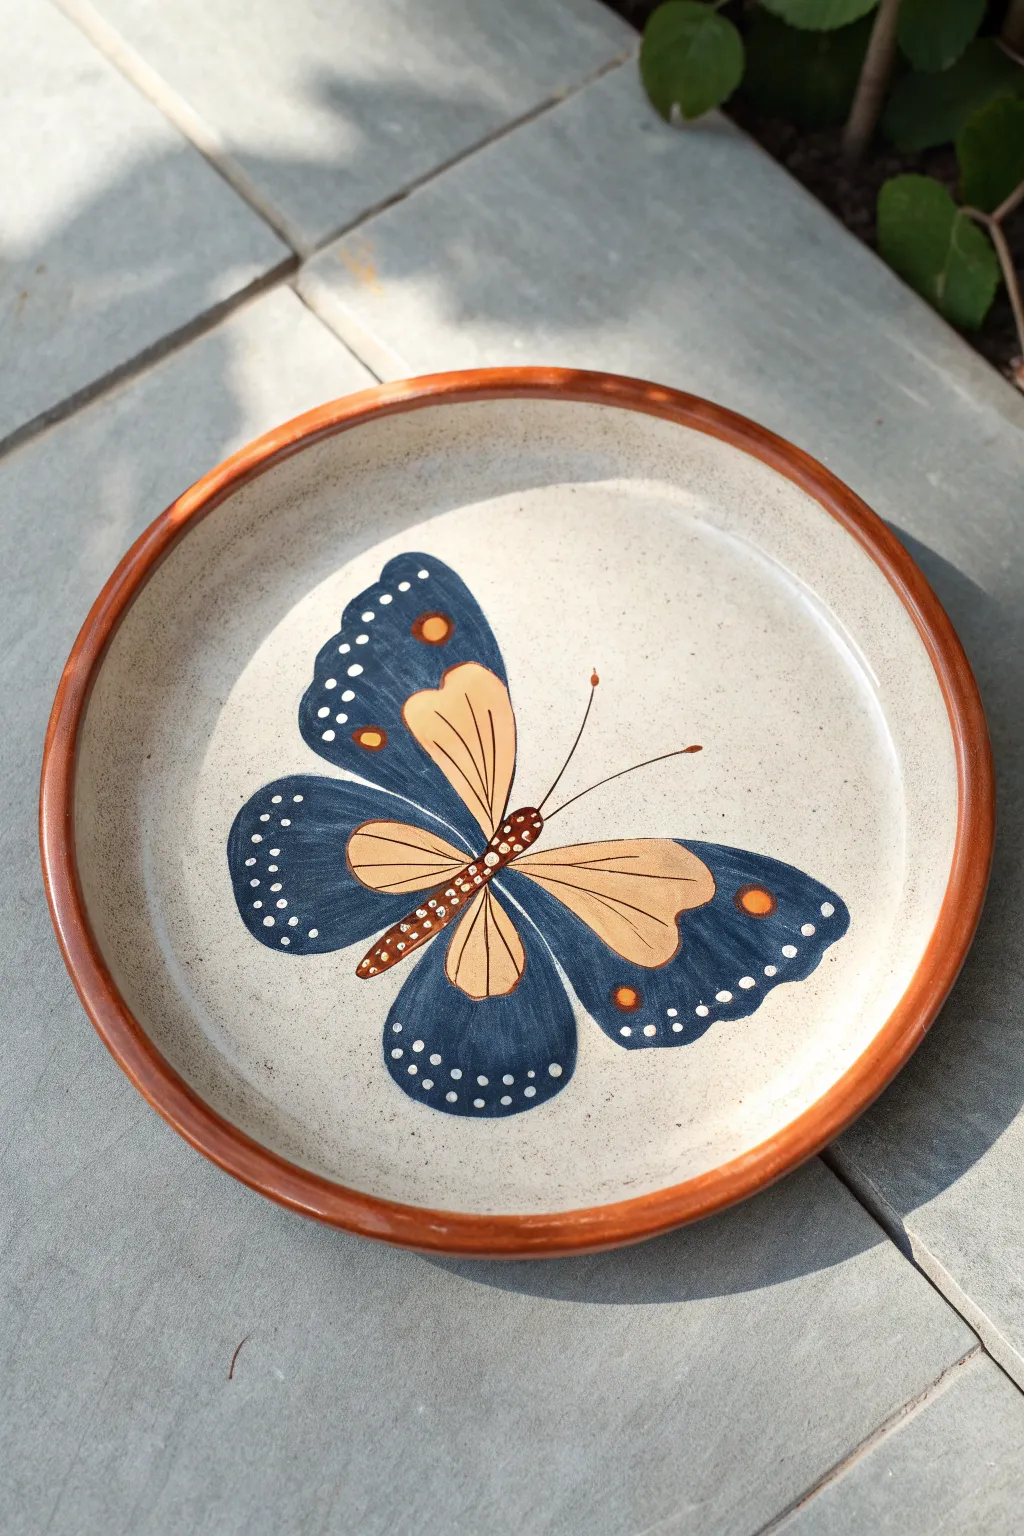
This project features a charming, folk-art inspired butterfly with bold navy wings and warm honey accents painted on a speckled stoneware plate. The design uses simple symmetry and clean lines to create a striking centerpiece that feels both rustic and modern.
Step-by-Step
Materials
- Bisque-fired ceramic plate (cream or speckled stoneware)
- Underglazes: Navy Blue, Honey/Mustard Yellow, Deep Orange, White, Darkest Brown
- Pencils (standard no. 2)
- Small round brush (size 2 or 4)
- Fine liner brush (size 0 or 00)
- Clear dipping glaze
- Sponge and water bowl
- Paper towels
Step 1: Preparation & Sketching
-
Clean the bisque:
Before you begin, wipe your bisque plate firmly with a damp sponge. This removes any kiln dust or oils from handling that might repel the glaze. -
Mark the center:
Lightly mark the absolute center of the plate with your pencil to anchor your design. -
Sketch the body:
Draw the butterfly’s body first. Sketch a long, thin oval shape on a diagonal slant, slightly below and to the left of the center point. -
Outline the wings:
Lightly sketch the four main wing shapes. Start with the large upper wings, swooping them upward and out. Then, draw the two smaller, rounded lower wings. Keep the lines loose; pencil burns off in the kiln. -
Refine the inner shapes:
Inside the navy wing outlines, sketch the teardrop shapes that will become the yellow sections. I like to double-check symmetry here before committing to paint.
Step 2: Painting the Base Colors
-
Fill the inner wings:
Using a small round brush, fill the inner teardrop shapes with your Honey/Mustard Yellow underglaze. Apply 2-3 coats for solid opacity, letting each coat dry until it’s chalky to the touch. -
Paint the outer wings:
Carefully paint the surrounding wing areas with Navy Blue. Use the tip of your brush to cut in cleanly around the yellow sections you just painted. Apply 3 coats for a deep, rich blue. -
Add orange accents:
Once the blue is dry, paint small circles of Deep Orange: one on each upper wing and one on the lower right wing. Add a small accent of orange to the body if desired. -
Paint the body:
Fill in the main body shape with Darkest Brown. Use a steady hand to keep the edges crisp. -
Detail the wing veins:
Switch to your fine liner brush. Using the Darkest Brown, paint thin, delicate lines inside the yellow sections to represent wing veins.
Smudged the blue?
If dark paint strays into the yellow area, don’t wipe it! Let it dry completely, then gently scrape the mistake away with a wooden skewer or exacto knife before retouching.
Step 3: Fine Details & Finishing
-
Dot the perimeter:
Dip the handle end of a paintbrush into White underglaze. Stamp a trail of small white dots along the outer edges of the navy wings. Vary the size slightly for a natural look. -
Add body details:
Using the very tip of your fine liner brush and White underglaze, add tiny dots down the center of the brown body for texture. -
Paint the antennae:
With the liner brush and thinned Darkest Brown underglaze, specific swift strokes to create the two antennae extending from the head. -
Rim the plate:
For the finishing frame, paint the raised edge or rim of the plate with the Deep Orange or a reddish-brown tone. Go all the way around for a cohesive look. -
Glaze and fire:
Once all underglaze is completely dry, dip the entire plate in clear glaze and fire according to your clay body’s instructions.
Add dimensional texture
Use a slip trailer to apply the white dots on the wings. This will leave raised bumps that you can feel on the finished plate surface after firing.
Now you have a beautiful, nature-inspired plate ready for your next garden lunch

TRACK YOUR CERAMIC JOURNEY
Capture glaze tests, firing details, and creative progress—all in one simple printable. Make your projects easier to repeat and improve.
Pet Paw Prints with a Personalized Name
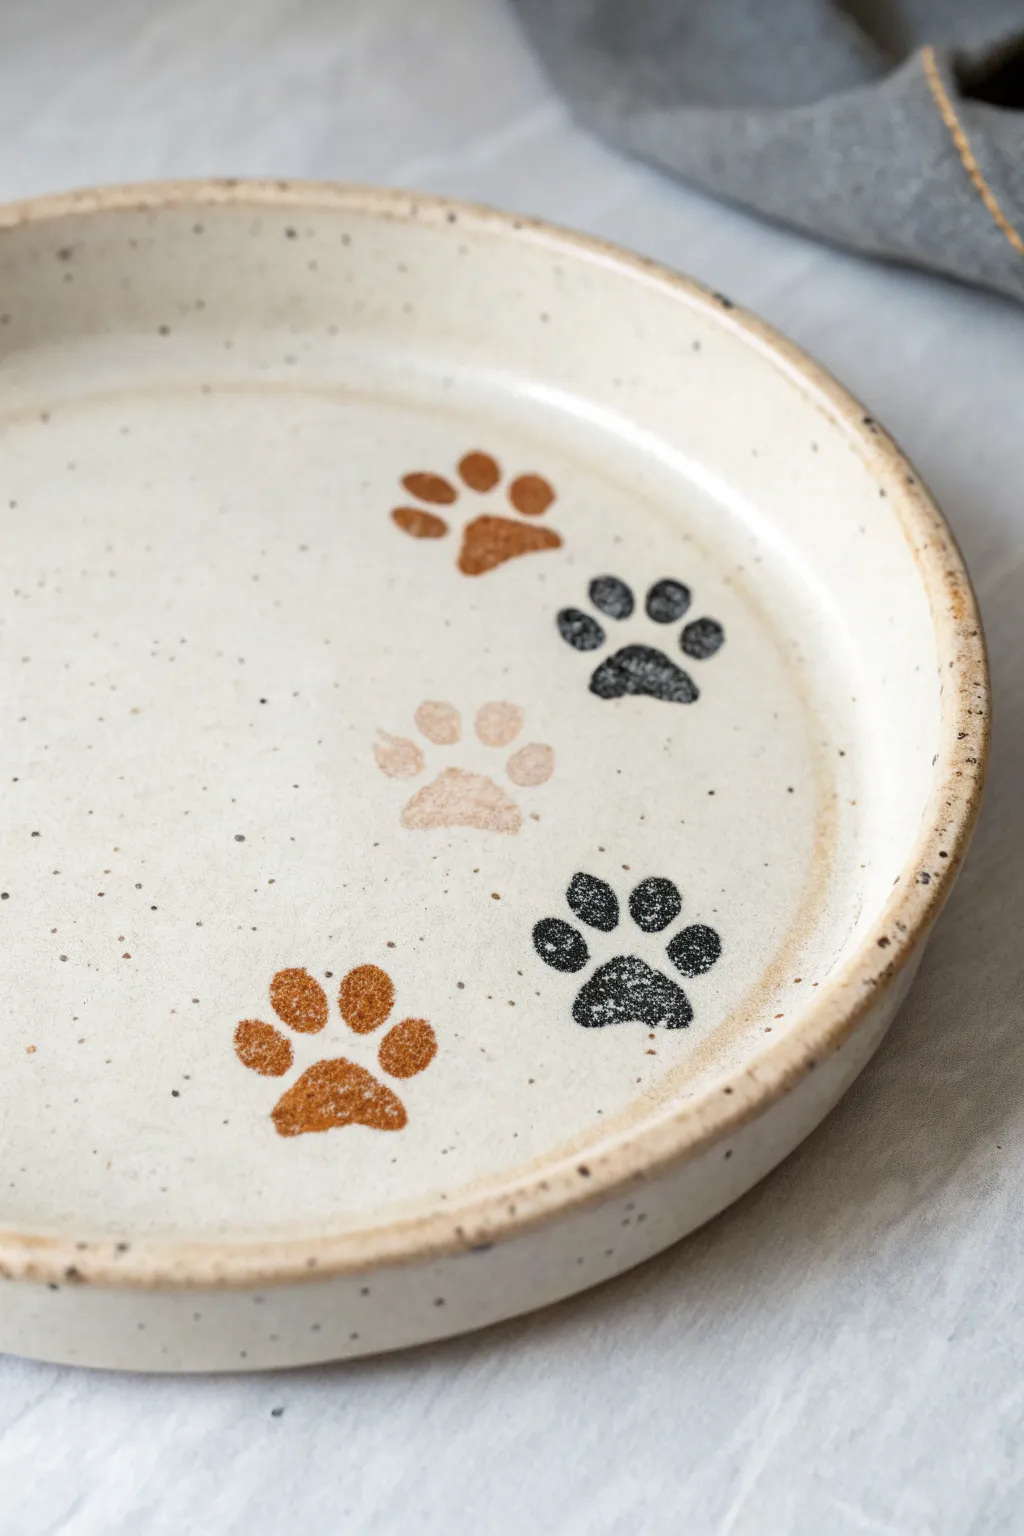
This charming ceramic project captures the simple joy of our furry friends with a series of rustic, alternating paw prints. The finished piece features a warm, speckled cream glaze base that gives it a cozy, handmade feel, perfect for serving treats or displaying as decor.
Step-by-Step Tutorial
Materials
- Bisque ceramic plate (shallow rim, approx. 6-8 inches)
- Speckled cream or ‘oatmeal’ ceramic glaze (opaque)
- Underglaze colors: Burnt Sienna, Jet Black, Light Sand/Tan
- Small round sponge stamp (approx. 1/2 inch) or round sponge dobber
- Small detail paintbrush (size 0 or 1 round)
- Fan brush (for base coat)
- Pencil (optional for marking spacing)
- Clear dipping glaze (if using a matte base glaze that needs sealing)
- Kiln access (for firing)
Step 1: Base Glazing
-
Clean the bisque:
Start by wiping down your bisque plate with a slightly damp sponge to remove any kiln dust. This ensures the glaze adheres properly to the surface. -
Mix the base glaze:
Stir your speckled cream glaze thoroughly. The speckles tend to settle at the bottom, so you want to ensure they are evenly distributed before applying. -
Apply the first coat:
Using a wide fan brush, apply a smooth, even coat of the cream glaze over the entire face of the plate. Extend this over the rim. -
Wait for drying:
Allow the first coat to dry until it loses its sheen and feels dry to the touch. This usually takes about 5 to 10 minutes depending on humidity. -
Build opaque coverage:
Apply a second and third coat of the cream base, alternating the direction of your brushstrokes (horizontal, then vertical) to prevent visible streaks. Let each layer dry completely.
Uneven is Better
Don’t try to make every paw print identical. Varying the pressure and slight rotation makes them look like real tracks walking across mud.
Step 2: Stamping the Paws
-
Plan the layout:
Visualize a gentle curve on the right side of the plate. You can lightly mark the center point of each paw with a pencil if you’re worried about spacing; the graphite will burn off in the kiln. -
Prepare the brown paw:
Dip your round sponge dobber or stamp into the Burnt Sienna underglaze. Dab it on a palette first to remove excess paint so it doesn’t gloop. -
Stamp the main pad:
Press the sponge firmly onto the plate toward the bottom left of your curve to create the large main pad of the first paw print. Lift straight up to keep the edges clean. -
Paint the toes:
Using the small detail brush dipped in Burnt Sienna, paint three or four small oval shapes above the main pad to create the toes. Keep them slightly irregular for a natural look. -
Switch to black:
Clean your brush and sponge thoroughly (or use a fresh set). Load the tools with Jet Black underglaze. -
Create the second paw:
Moving up the curve to the right, stamp the main pad and paint the toes in black. I like to rotate the angle slightly so the paws look like they are walking. -
Add the center highlight:
For the middle paw, switch to your Light Sand or Tan underglaze. Repeat the stamping and painting process. This lighter color might need a second coat to stand out against the cream background. -
Complete the curve:
Continue the pattern by adding another black paw print, and finally, finish the top of the curve with a second Burnt Sienna brown paw print.
Glaze Crawling?
If the underglaze pulls away from the cream base during drying, you likely applied it too thickly. Gently sand down thick spots before firing.
Step 3: Rim Detail & Finishing
-
Sponge the rim:
Dip a damp pottery sponge lightly into the Burnt Sienna underglaze. Gently run the sponge along the very edge of the plate’s rim to create a rustic, distressed brown border. -
Check for mistakes:
Look closely at your prints. if any glaze smudged, you can carefully scratch it off with a toothpick once it’s dry. -
Final drying:
Let the entire piece dry completely, usually overnight, to ensure all moisture has evaporated from the bisque before firing. -
Fire the piece:
Place the plate in the kiln for a glaze firing according to the specifications of your clay and glaze (typically Cone 5 or 6 for stoneware).
Once cooled, your plate will be a durable, adorable tribute to pet love ready for everyday use
Blue-and-White Inspired Border Patterns
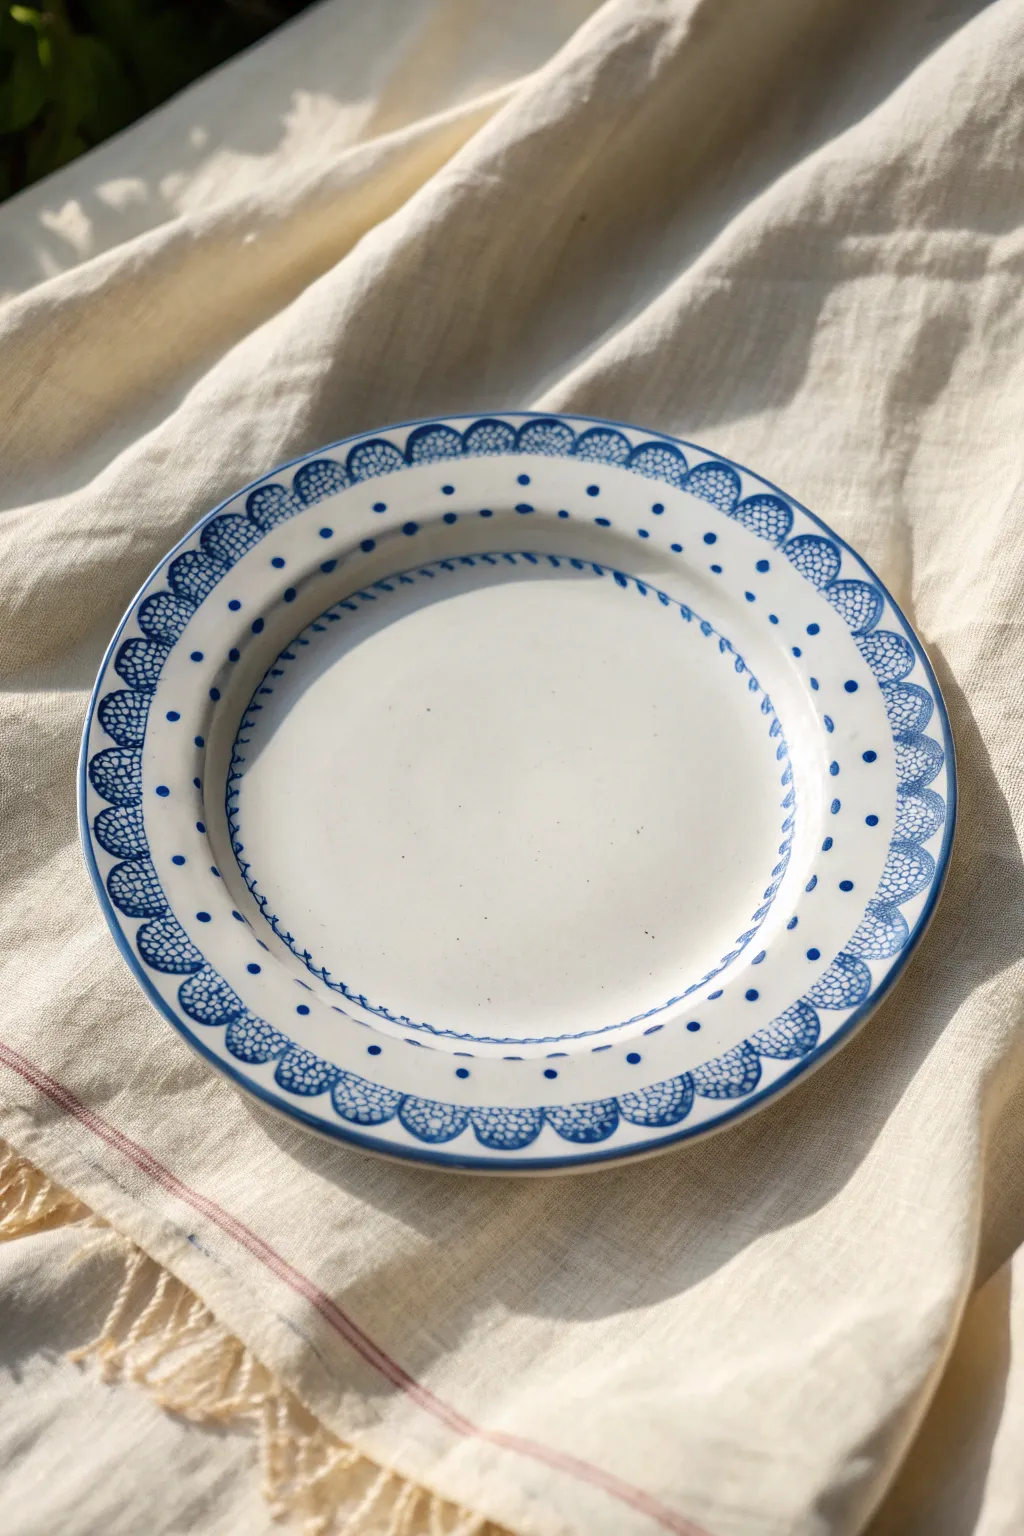
This classic blue-and-white design brings a touch of vintage elegance to any table setting. By combining simple scalloped edges with delicate grid work and whimsical dots, you can transform a plain bisque plate into a timeless heirloom piece.
Step-by-Step
Materials
- Bisque ceramic plate (salad or dinner size)
- Underglaze (Cobalt or Navy Blue)
- Small round brush (size 2 or 4)
- Fine liner brush (size 0 or 00)
- Pencil (for sketching)
- Grid paper or ruler (optional)
- Sponge and water
- Clear dipping glaze (for post-painting firing)
- Lazy Susan/banding wheel (optional but helpful)
Step 1: Preparation & Layout
-
Clean the Surface:
Wipe down your bisque plate with a damp sponge to remove any dust or oils that might repel the underglaze. Let it dry completely for a few minutes. -
Mark the Outer Rim:
Using a pencil, lightly mark the outer edge of the plate where you want the scalloped border to sit. If you want perfect symmetry, divide the plate into quadrants first, then subdivide those sections. -
Sketch the Scallops:
Draw a continuous series of semi-circles (scallops) all the way around the rim with your pencil. The pencil marks will burn off in the kiln, so don’t worry about being messy. -
Define the Inner Circle:
Lightly sketch a circle in the center well of the plate where the flat bottom meets the rising rim. This will serve as the guide for your inner border.
Step 2: Painting the Outer Border
-
Outline the Scallops:
Load your small round brush with blue underglaze. Carefully paint over your pencil scallops, creating a solid, medium-thickness blue line. Keep your hand steady and reload often for inconsistent opacity. -
Fill the Scallop Spandrels:
At the point where two scallops meet, paint a small, solid triangle shape pointing inward toward the center of the plate. This anchors the design. -
Paint the Grid Lines:
Switch to your fine liner brush. Inside each scallop semi-circle, paint delicate crisscross lines to create a net or lace effect. I find it easiest to do all diagonal lines in one direction first, then cross back over them. -
Add the Outer Dots:
Using the tip of a brush handle or a very small round brush, place a single blue dot in the center of the negative space between the scallops, slightly further inward on the plate.
Oops, Smudged It?
If you smear blue underglaze, don’t wipe it with a big sponge! Let it dry completely, then gently scratch the mistake off with a toothpick or crafting knife.
Step 3: Detailing the Inner Rim
-
Create the Dot Border:
Moving inward from the scallops, paint a ring of evenly spaced blue dots. Try to align these roughly with the center of each scallop for visual harmony. -
Paint the Inner Ring:
Go to the pencil line you drew in the center well. Using the liner brush, paint a very thin, slightly broken or organic line. It shouldn’t be a perfect geometric circle; a little variation adds charm. -
Add Vine Details:
Along that inner ring, paint tiny, short dashes or ‘flick’ marks angling off the line, resembling a simplified vine or rope pattern. -
Check Consistency:
Step back and look at your blue shades. If any lines look too thin or watery, carefully go over them with a second coat of underglaze.
Mix & Match
Try alternating the grid pattern inside the scallops with solid blue fills or floral motifs for a more eclectic, Pennsylvania Dutch style look.
Step 4: Finishing Touches
-
Clean Up Edges:
If you smudged any blue paint, use a clean, stiff brush dipped in water to gently scrub the mistake away, acting like an eraser. -
Final Inspection:
Ensure all pencil marks are covered or ignore them (they disappear in the kiln). Check that your grid lines are distinct and haven’t bled together. -
Glazing:
Once the underglaze is bone dry, the piece is ready for clear glazing and firing according to your studio’s specific temperature guidelines.
Once fired, the deep cobalt blue will pop against the white background, giving you a stunning piece of functional art used for years to come
Dot Mandala Medallion for a Calm, Balanced Design
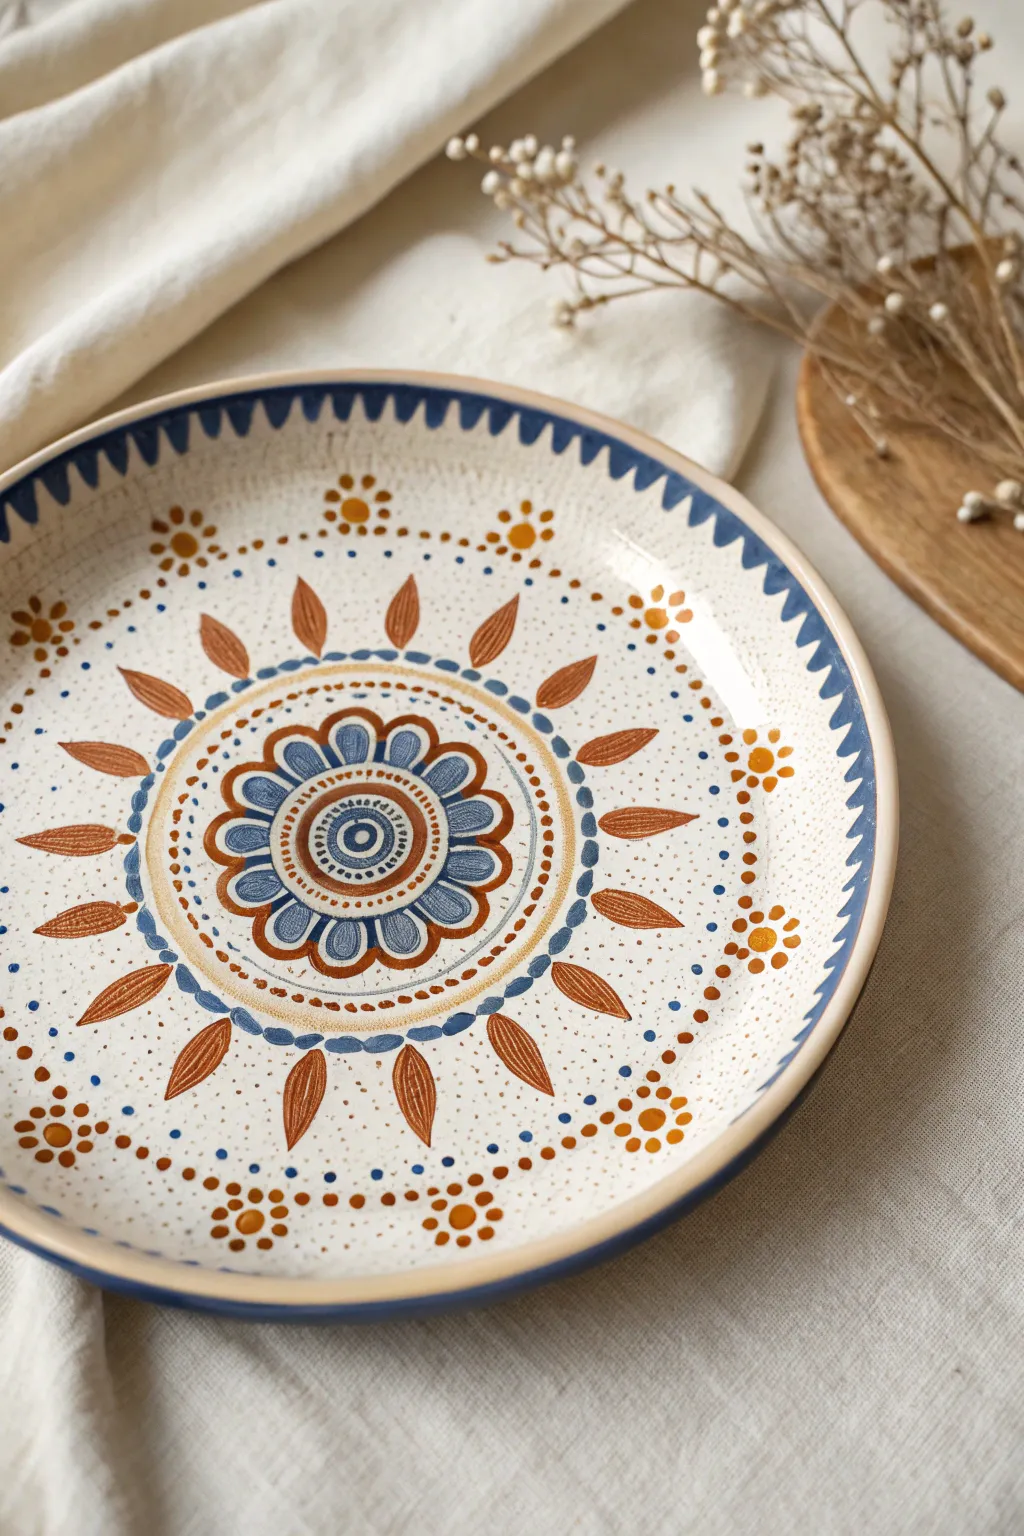
This project transforms a simple ceramic blank into a warm, bohemian centerpiece using a combination of dotting and brushwork. The design features a radiant sunburst motif in rustic terracotta and deep blue, perfect for adding a touch of handmade charm to your table.
Detailed Instructions
Materials
- Bisque-fired ceramic plate (approx 8-10 inches)
- Underglazes: Deep Blue, Rust/Terracotta, Cream/White, Mustard Yellow
- Fine liner brush (size 0 or 00)
- Round brush (size 2)
- Dotting tools (various sizes)
- Pencil for sketching
- Lazy leasing (banding wheel) – optional but helpful
- Clear transparent glaze
- Damp sponge
Step 1: Base Preparation & Center
-
Clean surface:
Begin by wiping your bisque plate with a damp sponge to remove any dust, which can repel the glaze. -
Center point:
Find the exact center of the plate and mark it lightly with a pencil. This will be the anchor for your entire radial design. -
Central spiral:
Using a fine liner brush and deep blue underglaze, paint a small, tight spiral or concentric circle about the size of a dime in the very center. -
Inner ring:
Switch to rust/terracotta color. Paint a solid ring around your blue center, leaving a tiny gap between the two colors. -
First petal layer:
With the liner brush and deep blue, carefully paint a ring of small, rounded petals surrounding the terracotta circle. Fill them in solid blue.
Stealing Support
Use your pinky finger as a bridge to steady your hand against the plate while painting fine details. This prevents smears and shaky lines.
Step 2: Building the Medallion
-
Scalloped outline:
Using the rust color, outline the blue petals with a scalloped line, creating a unified flower shape. -
Decorative dots:
Dip a small dotting tool into cream or white underglaze. Place a single, crisp dot inside each blue petal. -
Double ring border:
Around the main flower, paint two thin concentric circles using the rust color. Leave about 1/4 inch of space between the flower and these rings. -
Dotted accent ring:
In the space between the double rings, use a medium dotting tool to place a row of mustard yellow dots all the way around. -
Outer blue chain:
Paint a chain of small blue ovals or dashes just outside the double ring border, creating a dashed line effect.
Correction Needed?
If you smudge a dot or line, wait for it to dry completely. Then, gently scratch the mistake off with a toothpick before reapplying.
Step 3: Radiating Patterns
-
Sunburst rays:
Using a size 2 round brush loaded with rust underglaze, paint large, teardrop-shaped rays extending outward. Space them evenly around the central medallion. -
Inner details:
Once the rust rays are dry to the touch, use a fine liner brush with cream underglaze to paint a thin line down the center of each ray. -
Connecting blue dots:
Between each rust ray, closer to the center, place a medium-sized blue dot to balance the composition. -
Floral clusters:
Moving further out towards the rim, paint small clusters of mustard yellow dots. Arrange them in a diamond shape (one center dot surrounded by four or five outer dots). -
Micro-dot texture:
I find this step really transforms the piece: use your smallest tool to sprinkle tiny rust-colored dots randomly in the negative space between the main rays, adding texture.
Step 4: Rim and Finish
-
Sawtooth border:
Along the very edge of the plate, paint a sawtooth of triangular pattern using deep blue. The points of the triangles should face inward toward the center. -
Rim line:
Finish the edge by painting a solid blue line along the very lip of the plate to frame the sawtooth pattern. -
Glazing:
Allow all underglaze to dry completely (usually 24 hours). Dip or brush on a coat of clear transparent glaze. -
Firing:
Fire the plate in a kiln according to the clay and glaze manufacturer’s specifications (typically cone 06 or cone 6).
Your finished plate will have a timeless, artisan feel that looks beautiful on display or serving dinner
Ombre Sunset Gradient Across the Whole Plate
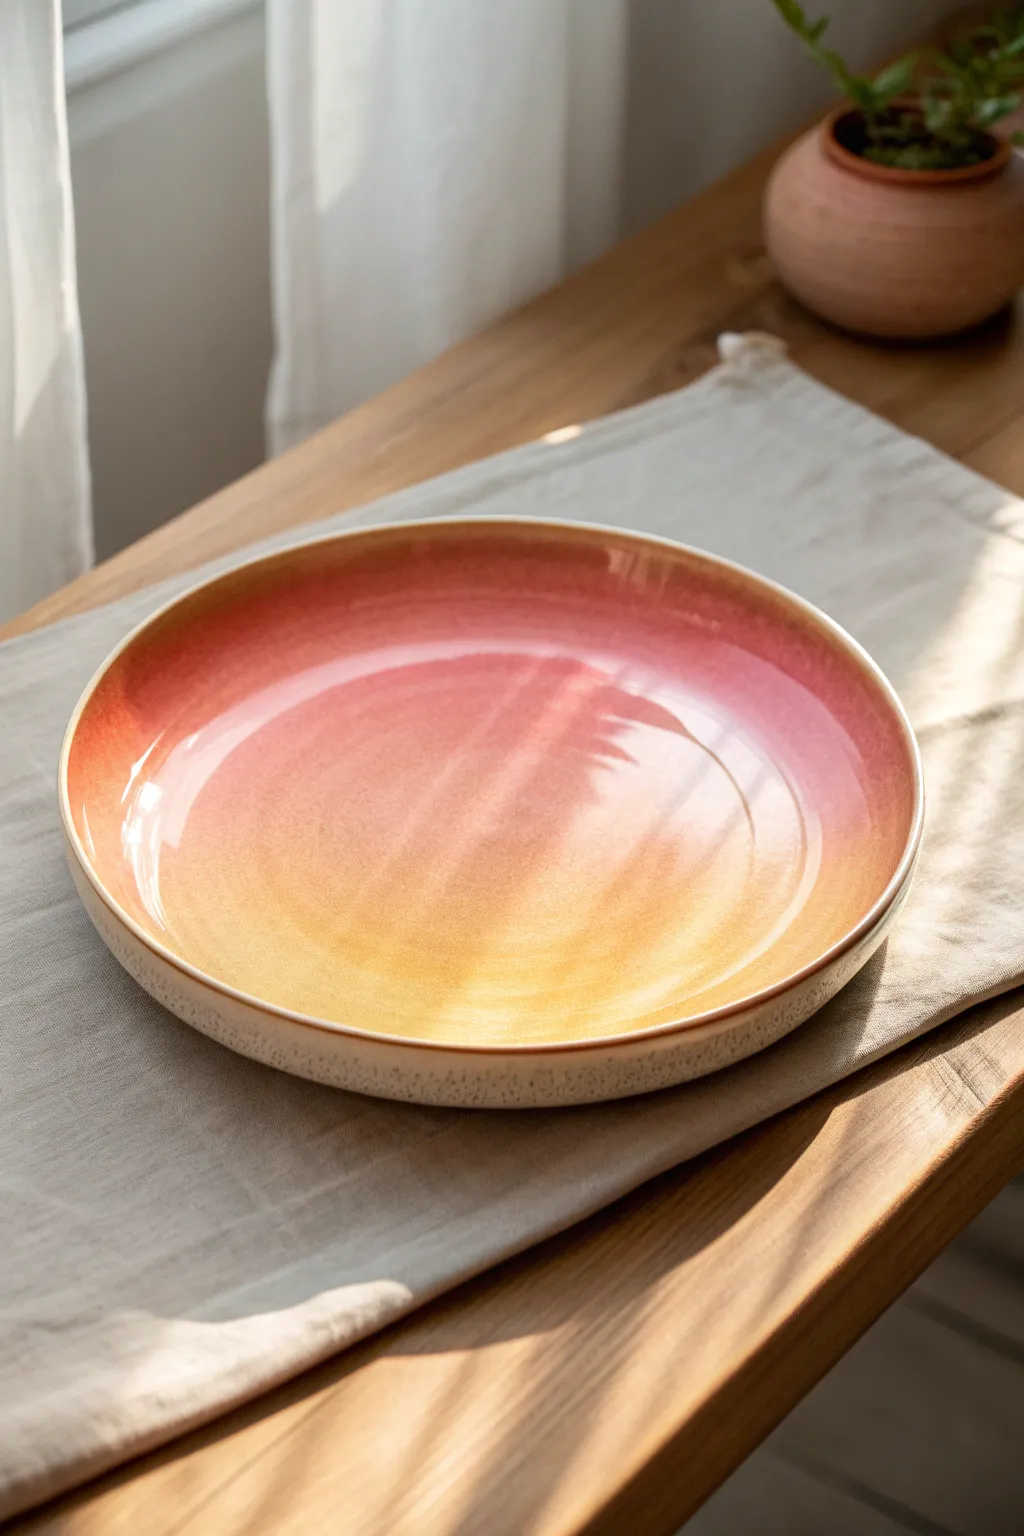
Capture the warmth of golden hour with this stunning gradient technique that fades from a rich terracotta rim to a soft honey center. This seamless ombre effect creates a luminous, sun-kissed finish that elevates even the simplest dinnerware.
How-To Guide
Materials
- Bisque-fired ceramic dinner plate (rimmed or coupe style)
- Underglazes: Deep terracotta/burnt orange, coral pink, warm honey yellow, pale cream
- Large, soft fan brush (synthetic bristles recommended)
- Wide hake brush or mop brush for blending
- Palette or tile for mixing
- Clean water container
- Sponge
- Clear dipping glaze or brushing glaze
- Potter’s wheel or banding wheel (essential for even bands)
Step 1: Preparation & Base Coat
-
Clean the bisque:
Begin by wiping down your bisque plate with a damp sponge. This removes any dust that might resist the glaze and ensures a smooth application surface. -
Center the plate:
Place your plate carefully on your banding wheel. Give it a gentle spin to ensure it is perfectly centered; this is crucial for creating smooth, concentric rings of color. -
Mix the center shade:
On your palette, mix a small amount of the honey yellow with the pale cream. You want a very soft, barely-there yellow for the innermost highlight. -
Apply the center:
While slowly spinning the banding wheel, load your fan brush with the pale yellow mix. Apply it to the very center of the plate, spiraling outward about two inches.
Step 2: Creating the Ombre Rings
-
Apply the honey yellow:
Clean your brush slightly, then load it with pure honey yellow. Apply this in a band adjacent to the pale center, overlapping the edges slightly while the wheel spins. -
Transition to coral:
Next, move to the coral pink underglaze. Paint a band starting where the plate begins to curve upward toward the rim. The spinning motion will help apply a consistent width. -
Paint the rim:
Finally, load your brush with the deep terracotta or burnt orange. Apply this to the outermost rim of the plate, letting the color wrap just slightly over the lip. -
Check the spacing:
Stop the wheel and evaluate your bands. They should look like distinct rings at this stage; don’t worry about the hard lines yet, as we will address those next.
Smooth Moves
Keep your brush hand anchored on a steady surface or armrest while the wheel spins. This stability is the secret to getting perfect resizing concentric circles without wobbling.
Step 3: Blending the Gradient
-
Prepare the blending brush:
Take your wide hake or mop brush and dampen it very slightly with clean water. It shouldn’t be wet, just barely humid to the touch. -
Blend center outward:
Spin the banding wheel at a steady, moderate pace. Gently touch the mop brush to the transition line between the pale center and the honey yellow ring to soften the edge. -
Blend the middle tones:
Rinse and dry your brush, then move to the transition between yellow and coral. Using the same gentle touch while spinning, blur the line until the colors merge. -
Blend the rim:
Repeat the process for the final transition between coral and the terracotta rim. I find that using a very light hand here prevents muddiness. -
Refine the gradient:
If any lines look too harsh, you can add a tiny bit of the lighter color to your blending brush and work it into the darker area while spinning. -
Clean the foot:
Since the inspiration image shows a raw, speckled clay exterior, use a damp sponge to wipe away any glaze that dripped onto the underside or foot ring.
Speckle Upgrade
To mimic the exterior texture in the photo, choose a clay body with grog or manganese speckles. Leave the underside unglazed to highlight the beautiful raw clay contrast.
Step 4: Finishing Touches
-
Allow to dry:
Let the underglaze layers dry completely. They should look chalky and matte before you proceed. -
Apply clear glaze:
Apply two to three coats of clear brushing glaze over the interior of the plate, or dip the entire piece in clear glaze if you want the exterior sealed as well. -
Final wipe:
Ensure the foot of the plate is completely free of glaze so it doesn’t stick to the kiln shelf. -
Fire:
Fire the plate in the kiln according to the instructions for your specific clay and glaze, typically to cone 5 or 6 for stoneware.
Once fired, your plate will glow with the warmth of a setting sun, ready to brighten your table setting.
Swirled Marbling That Looks Like Stone

Achieve the sophisticated look of nerikomi or agateware without needing complex clay-mixing techniques. This project uses swirled glazes to mimic the organic bands of natural stone, resulting in a dreamy, speckled finish that feels both modern and timeless.
Detailed Instructions
Materials
- Bisque-fired ceramic plate (preferably with a slight rim)
- White underglaze or glaze (opaque)
- Dusty rose or mauve underglaze
- Soft grey underglaze (optional, for depth)
- Clear transparent dipping or brushing glaze
- Speckled clay body (if starting from scratch) OR speckled effect topcoat
- Two squeeze bottles or slip-trailing bulbs
- Toothpick or needle tool
- Soft fan brush
- Sponge
- Bowl of water
Step 1: Base Preparation
-
Clean the bisque:
Before you begin, wipe down your bisque-fired plate with a damp sponge. This removes any kiln dust or oils from your hands that might resist the glaze. -
Prepare your mixtures:
Pour your white underglaze and your dusty rose underglaze into separate squeeze bottles. If the consistency is too thick—like toothpaste—thin it slightly with water until it flows more like heavy cream. -
Test the flow:
Squeeze a small amount of each color onto a piece of paper. You want them to be fluid enough to merge together but not so watery that they run uncontrollably.
Pro Tip: Surface Tension
Don’t over-manipulate the glaze. The more you stir with the tool, the muddier the colors get. Stop while the distinct bands of color are still visible.
Step 2: Creating the Marble Swirl
-
Apply the white base:
Squirt a generous spiral of the white underglaze onto the center of the plate, working your way outward. You don’t need full coverage yet, just a good amount of material. -
Add the color accents:
Immediately follow with the dusty rose color, squeezing lines of color in between the white spirals. The goal is to have wet glazes sitting next to each other. -
Optional depth layer:
If you want a more complex stone look, add just a few tiny drops or thin lines of the soft grey glaze in random areas near the pink. -
Tilt and flow:
Pick up the plate and gently tilt it in a circular motion. Encourage the wet glazes to slide into one another. This organic movement creates the most natural results. -
Marbling tool technique:
Take your needle tool or toothpick and lightly drag it through the thick layers of wet glaze. I find that moving in a curvy, ‘S’ shape creates the most realistic stone veins. -
Feathering the edges:
Where the colors meet, use the tip of the tool to feather them slightly if the lines look too sharp. Real stone has soft transitions. -
Rim detailing:
Ensure the glaze reaches the very edge of the rim. Use a brush to smooth out any drips on the vertical edge, giving it a finished, professional look.
Level Up: Exposed Clay
Leave parts of the raw stoneware clay exposed. Instead of covering the whole plate, marble only the center well and leave the rim raw for a beautiful textural contrast.
Step 3: Finishing Touches
-
Let it dry completely:
Because the glaze layer is thick from the pouring and swirling, this will take longer to dry than a painted piece. Leave it overnight to ensure all moisture has evaporated. -
Add the texture (optional):
If your bisque wasn’t made of speckled clay, take an old toothbrush with a tiny bit of brown iron oxide wash or brown underglaze found. Flick the bristles to spray fine speckles over the dried marble pattern. -
Clear glaze application:
Once the marbling design is bone dry, apply a coat of clear transparent glaze over the entire face of the plate using a soft fan brush. Apply broadly to avoid smearing the design. -
Rim accent:
To mimic the raw clay edge seen in the photo, wipe back the clear glaze from the very lip of the rim with a damp sponge, or paint a thin line of iron oxide on the rim for a rustic border. -
Final inspection:
Check the underside of the plate. Wipe away any glaze drips that might have traveled during the tilting process so the piece doesn’t stick to the kiln shelf. -
Fire the piece:
Load the plate into the kiln and fire to the temperature recommended for your specific glaze manufacturer (usually Cone 06 or Cone 6).
Now you have a stunning, stone-like serving piece that is ready to elevate your next dinner party
Scalloped Border Illusion with Tiny Repeating Arches
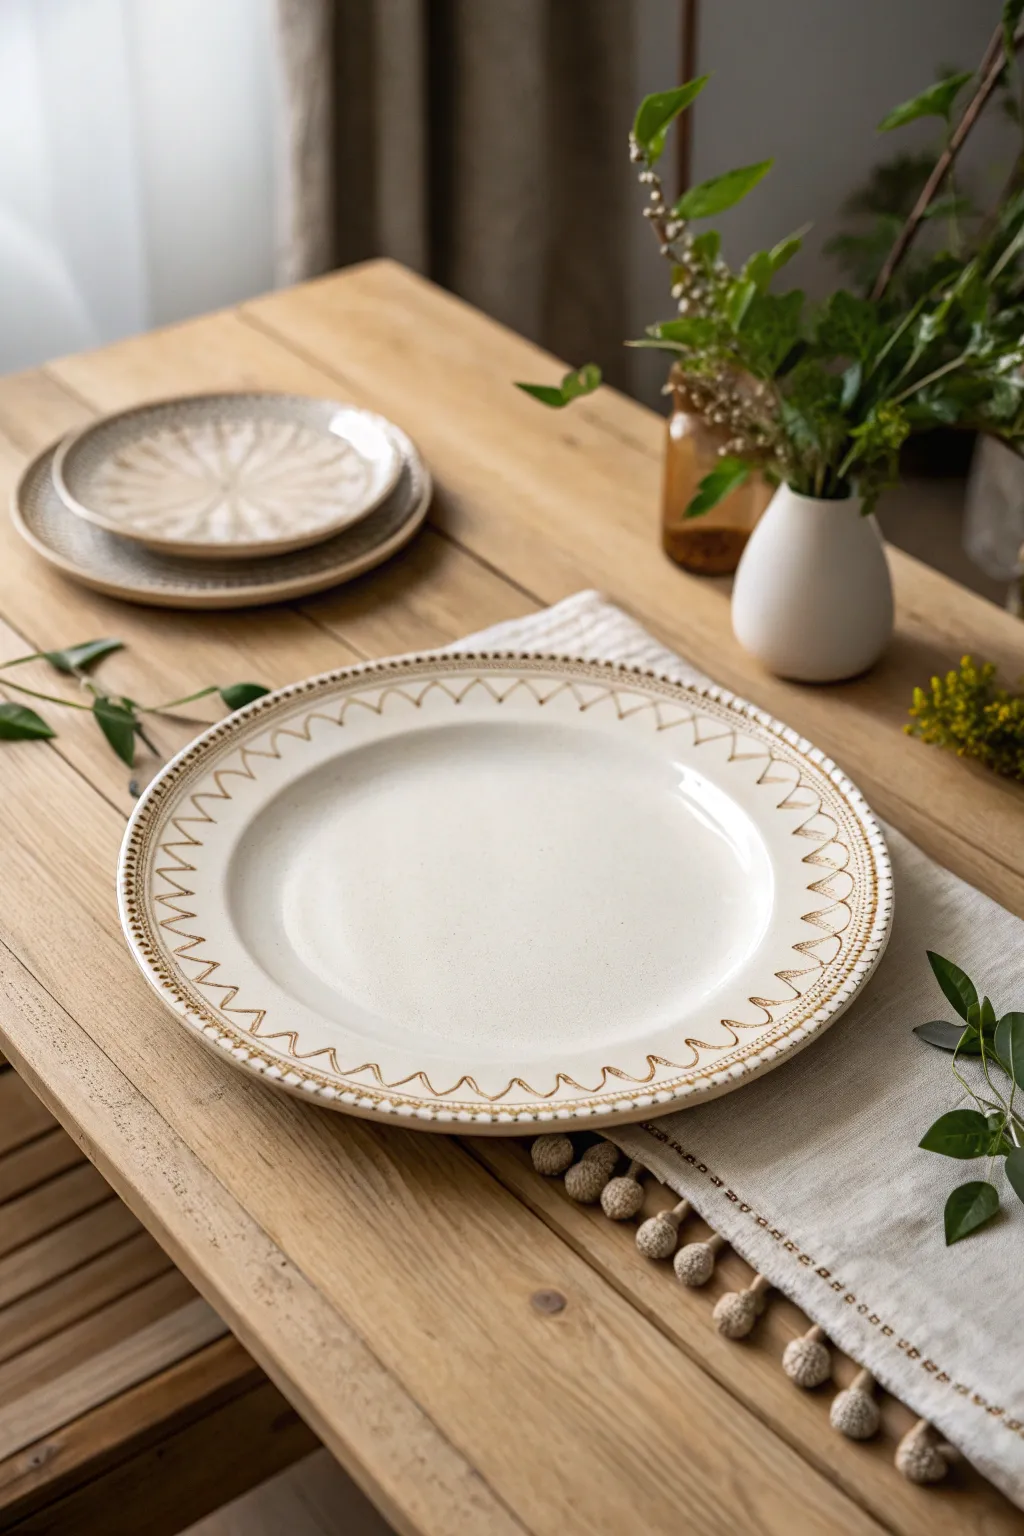
Transform a plain bisque plate into a piece of modern rustic decor with this deceptively simple pattern. The design combines earthen tones with geometric repetition to create a faux-stitched rim that frames any meal perfectly.
How-To Guide
Materials
- White or cream bisque dinner plate (flat rim preferred)
- Glaze underglaze pencil (dark brown or bronze)
- Fine liner brush (size 0 or 00)
- Dark brown or oxide-colored underglaze
- Clean damp sponge
- Clear dipping or brushing glaze
- Lazy Susan or banding wheel (optional but helpful)
Step 1: Preparation & Base Layout
-
Clean surface:
Begin by wiping down your bisque plate with a clean, damp sponge to remove any dust or oils from handling, which can prevent glaze adhesion. -
Center the plate:
Place your plate on a banding wheel or lazy Susan. If you don’t have one, placing the plate on a folded towel allows you to rotate it easily while working. -
Mark spacing:
Using a very light pencil touch (graphite burns off in the kiln), gently mark small dots around the inner circle of the rim about 1 inch apart to guide your zigzag points.
Step 2: Painting the Zigzag Pattern
-
Load the brush:
Load your fine liner brush with the dark brown underglaze. You want an inky consistency—add a drop of water if the glaze feels too thick or draggy. -
Start the zigzag:
Paint a continuous zigzag line. Start at the outer edge of the rim, pull the brush inward toward one of your pencil guide dots, and then stroke back out to the edge. -
Maintain pressure:
Keep your brush pressure consistent. The charm of this design lies in the slight hand-painted variation, so don’t worry if lines aren’t laser-straight. -
Complete the circle:
Continue the zigzag pattern all the way around the rim. I find it easier to rotate the plate rather than moving my hand around it. -
Review connections:
Check where your starting point meets your ending point. If there is an awkward gap, slightly widen or narrow the last few zigzags to close the loop seamlessly.
Steady Hands
Rest your pinky finger on the dry center of the plate while painting the rim. This acts as an anchor, giving you much better control for fine lines.
Step 3: Adding the ‘Stitched’ Details
-
Outer rim definition:
Dip the liner brush again. Along the very outer edge of the plate, paint a thin, broken line or series of dashes that connects the outer points of your zigzags. -
Inner stitching:
Create a second, fainter dashed line just inside the main zigzag pattern. This adds depth and reinforces the textile inspiration of the design. -
Double-check density:
Look at the pattern from a distance. If some areas look too sparse, add tiny dots between the zigzag peaks to balance the visual weight. -
Clean up:
If you made any smudges, use a stiff, damp brush or a specialized cleanup tool to gently scrape or wipe away the mistake before the underglaze sets fully.
Uneven Spacing?
If your zigzags start getting too wide or narrow, stop. Wipe the last few inches with a damp sponge and redraw your pencil guide dots to correct the rhythm.
Step 4: Glazing & Firing
-
Drying time:
Allow the underglaze design to dry completely. It should look chalky and matte when fully dry. -
Sponge application:
If you are brushing on your clear glaze, dab the first coat over the design gently with a sponge rather than dragging a brush, which might smear the fine lines. -
Full coverage:
Apply two to three coats of clear glaze over the entire plate (according to manufacturer instructions), letting each coat dry in between. -
Stilt and fire:
Wipe the foot of the plate clean of any glaze. Fire the piece in a kiln to the cone temperature specified by your clay and glaze supplier.
Once fired, you will have a beautiful, artisan-style plate ready for serving your favorite meals
Negative Space Silhouettes with a Bold Background
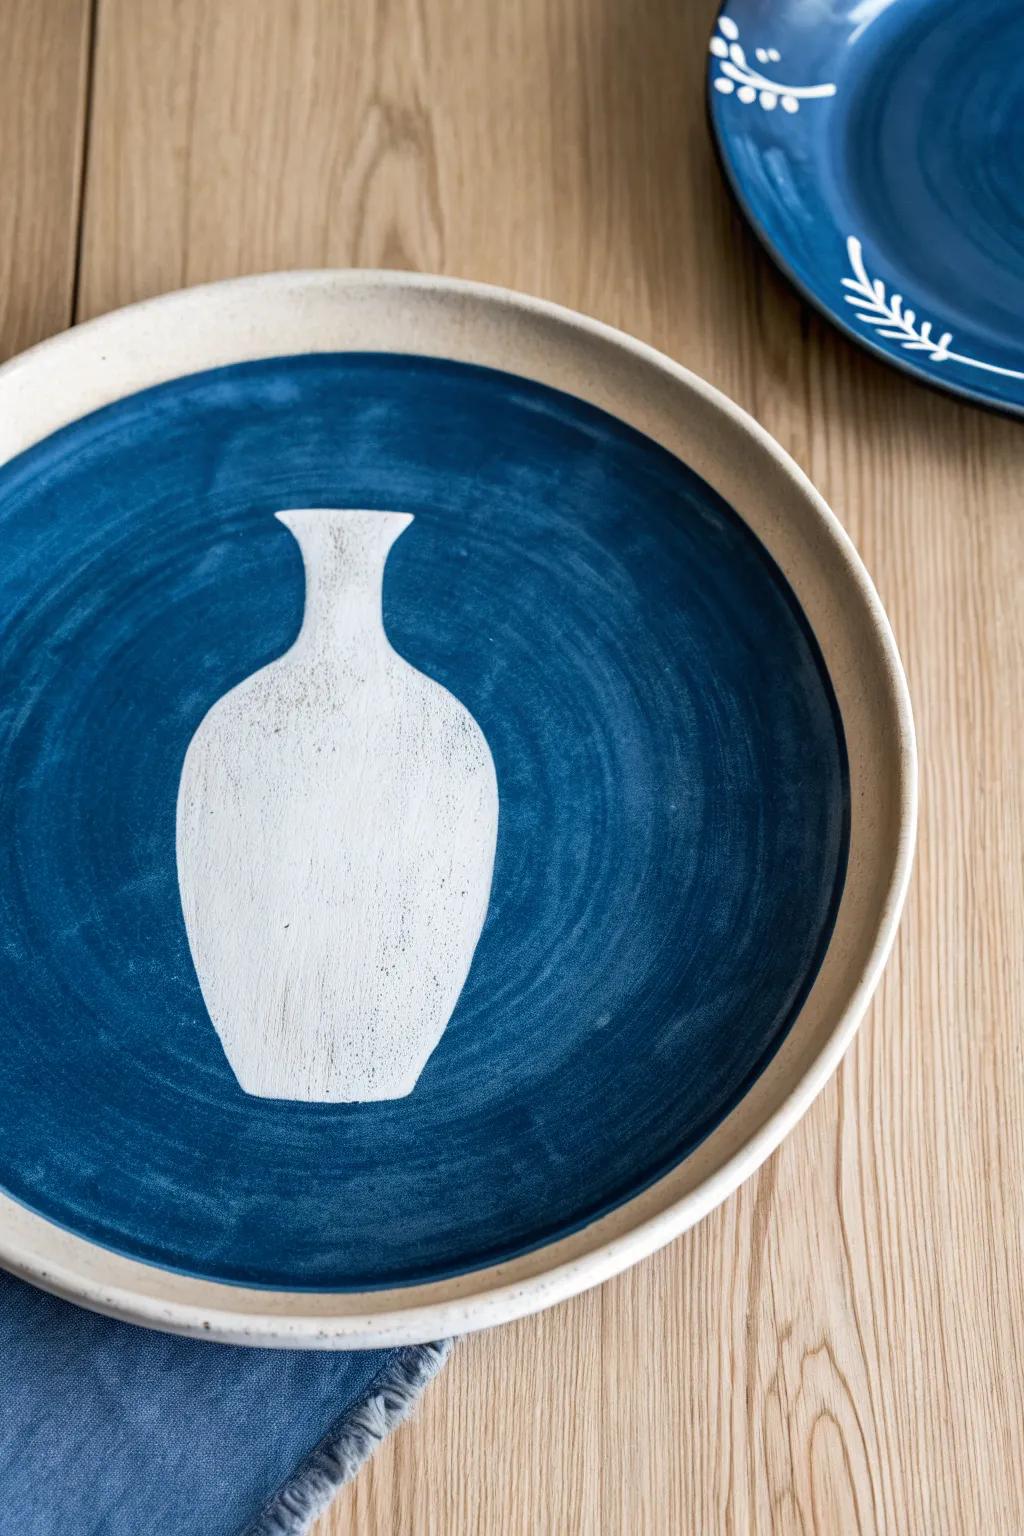
Embrace the power of negative space with this serene plate design featuring a crisp white vase against a deep, textured blue background. It is a perfect beginner project that looks sophisticated and modern, using simple masking techniques to achieve clean lines.
Step-by-Step
Materials
- Bisque ceramic plate (dinner or salad size)
- Adhesive shelf liner or contact paper
- Pencil and scissors
- Deep cobalt blue underglaze
- Wide, flat paintbrush (1-inch)
- Small round sponge (optional)
- Clear dipping glaze
- Pottery kiln access
Step 1: Preparing the Stencil
-
Clean surface:
Begin by wiping down your bisque plate with a damp sponge to remove any dust or oils, ensuring a clean surface for adhesion. -
Sketch the shape:
On the backing of your contact paper or adhesive shelf liner, draw simple vase shape. Aim for a classic silhouette—a narrow neck curving out into a rounded body. -
Refine the cut:
Cut out your vase shape carefully with scissors. Make sure the edges are smooth, as any jagged cuts will show up in the final unpainted area. -
Positioning:
Peel the backing off your contact paper stencil and place it directly in the center of the plate. -
Seal edges:
Press down firmly, paying special attention to the edges of the sticker. I like to run a fingernail or a burnishing tool along the perimeter to ensure no paint can seep underneath.
Bleeding Lines?
If paint seeped under your stencil, wait for it to dry fully. Then, gently scratch the excess paint away with a toothpick or needle tool to restore the sharp edge.
Step 2: Painting the Background
-
Select your brush:
Load a wide, flat brush generously with deep cobalt blue underglaze. The goal is visible brushstrokes, so don’t be afraid to use plenty of paint. -
Apply first stroke:
Start painting in a circular motion, following the curve of the plate rim. Work from the outside edge inward toward the sticker. -
Cross over edges:
Paint directly over the edge of your stencil. Brush away from the center of the sticker outward to minimize the risk of forcing paint under the adhesive. -
Create texture:
Keep your brushstrokes visible and swirly. The charm of this piece lies in the hand-painted texture rather than a perfectly flat color block. -
Rim detail:
Leave the very outer rim (the lip) of the plate unpainted to frame the blue background and match the white vase silhouette. -
Check consistency:
Ensure the blue coverage is relatively opaque but still shows movement. If it looks too thin, let it dry briefly and add a second coat, maintaining the same circular direction.
Step 3: Reveal and Finish
-
Dry to the touch:
Allow the underglaze to dry until it is chalky and no longer shiny. It doesn’t need to be bone dry, but it shouldn’t be wet. -
Peel carefully:
Use a needle tool or the tip of a craft knife to gently lift one edge of the stencil, then peel it away slowly to reveal the clean white bisque below. -
Clean up edges:
If any blue glaze bled under the sticker, use a stiffer, slightly damp brush or a craft knife to gently scrape or wipe it away for a crisp line. -
Glaze application:
Once the underglaze is completely dry, dip the entire plate into a clear dipping glaze. This will seal the raw bisque and make the blue pop vividly. -
Fire:
Fire the plate in the kiln according to the clay and glaze specifications to complete the process.
Add Dimension
Before removing the stencil, lightly splatter a darker blue or black speckle over the background using a toothbrush for a modern, speckled stone effect.
The contrast between the organic brushstrokes and the stark white silhouette creates a truly timeless piece for your table
Wax-Resist Constellation Night Sky
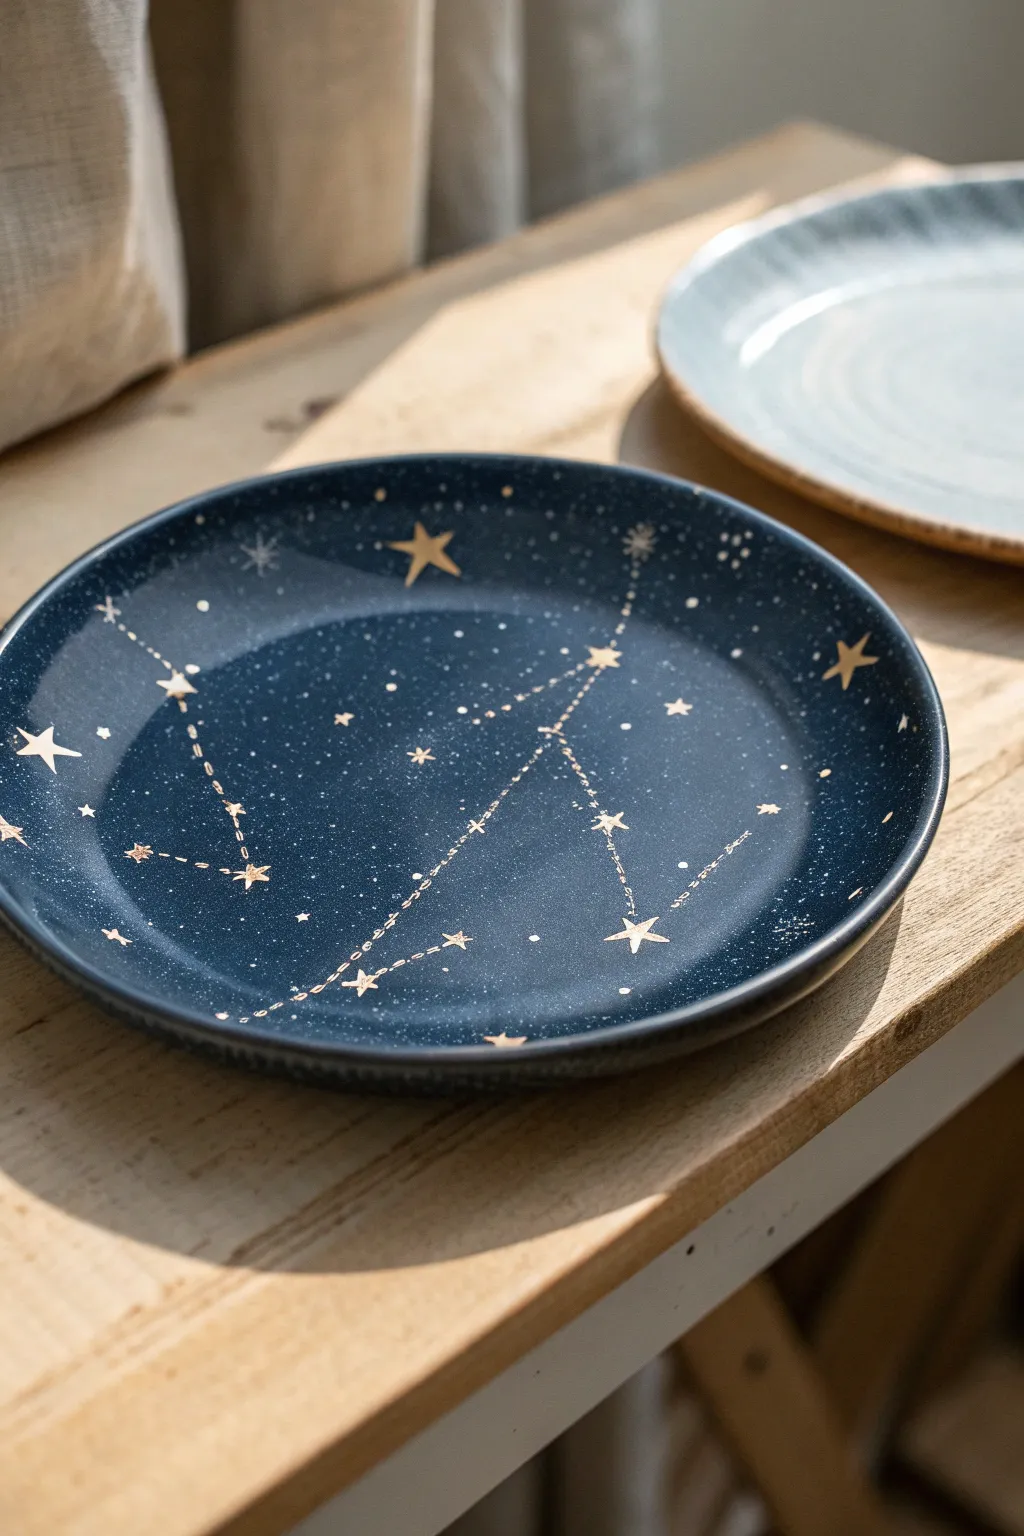
Capture the magic of the cosmos on a ceramic plate with this stunning technique that pairs deep midnight hues with crisp, unglazed stars. The wax-resist method is deceptively simple and allows your celestial patterns to shine through a dark galaxy background.
Step-by-Step Guide
Materials
- Bisque-fired ceramic plate (white clay body recommended)
- Liquid wax resist
- Fine liner brush (size 0 or 00)
- Pencil
- Dark blue speckled glaze (ie. ‘Midnight Sky’ or similar)
- Fan brush or large soft glazing brush
- Sponge
- Gold overglaze or luster (optional)
- Kiln
Step 1: Planning and Sketching
-
Clean the bisque:
Before starting, wipe your bisque plate down with a damp sponge. This removes any dust that might prevent the wax or glaze from adhering properly. -
Lightly sketch the design:
Using a regular pencil, lightly map out your constellation lines and star placements directly onto the plate. Don’t worry about marks; the graphite will burn off completely in the kiln. -
Establish focal points:
Decide where your largest stars will go. In the image, there are prominent 5-point stars acting as anchors for the constellations, so mark those spots clearly.
Fixing Wax Smears
If you accidentally drip wax where you don’t want it, don’t just wipe it! Scrape it off gently or re-fire the bisque to burn it off before glazing.
Step 2: Applying Wax Resist
-
Load the liner brush:
Dip your fine liner brush into the liquid wax resist. I find it helpful to pour a small amount into a bottle cap first so I don’t contaminate the main jar. -
Paint the major stars:
Carefully paint the larger star shapes with the wax. Ensure the wax is applied somewhat thickly; you need a solid barrier against the dark glaze coming later. -
Create constellation lines:
Connect your star points with dashed or dotted lines using the wax. Use a light touch to keep these lines delicate and precise. -
Add background stars:
Dot tiny specks of wax randomly across the rest of the plate to simulate distant stars and create a sense of depth in your galaxy. -
Dry completely:
Let the wax dry fully. This is crucial—if the wax is still tacky, it might smear when you apply the glaze. It usually takes about 15-20 minutes.
Milky Way Effect
Sponge a layer of lighter blue or purple glaze in the center before the dark topcoat to create a cloudy, nebulous glow behind the stars.
Step 3: Glazing and Finishing
-
Prepare the glaze:
Mix your dark blue speckled glaze thoroughly. You want the speckles evenly distributed to enhance the starry night effect. -
Apply the first coat:
Using a fan brush, apply a smooth, even coat of the dark blue glaze over the entire face of the plate, going right over your wax designs. The wax will repel the liquid. -
Wipe the resist:
While the glaze is still damp, take a clean, slightly damp sponge or rag and very gently wipe the top of the waxed areas. This removes any glaze droplets clinging to the wax surface. -
Apply second and third coats:
Once the first layer is touch-dry, apply two more coats of glaze for a rich, opaque finish. Remember to wipe the wax spots gently after each application. -
Check the rim:
Use a damp sponge to clean up the rim or foot of the plate if any glaze dripped where it shouldn’t be. -
Fire the piece:
Place the plate in the kiln and fire according to the glaze manufacturer’s instructions (usually Cone 5 or 6 for stoneware). -
Optional gold accent:
If you want the stars to shimmer like real gold (as seen in some variations), apply a gold luster to the unglazed star silhouettes after the initial firing and fire again at a much lower temperature (around Cone 018).
Now you have a piece of functional art that brings the beauty of the night sky to your dining table
Faux Mosaic Tiles Painted in Small Color Squares
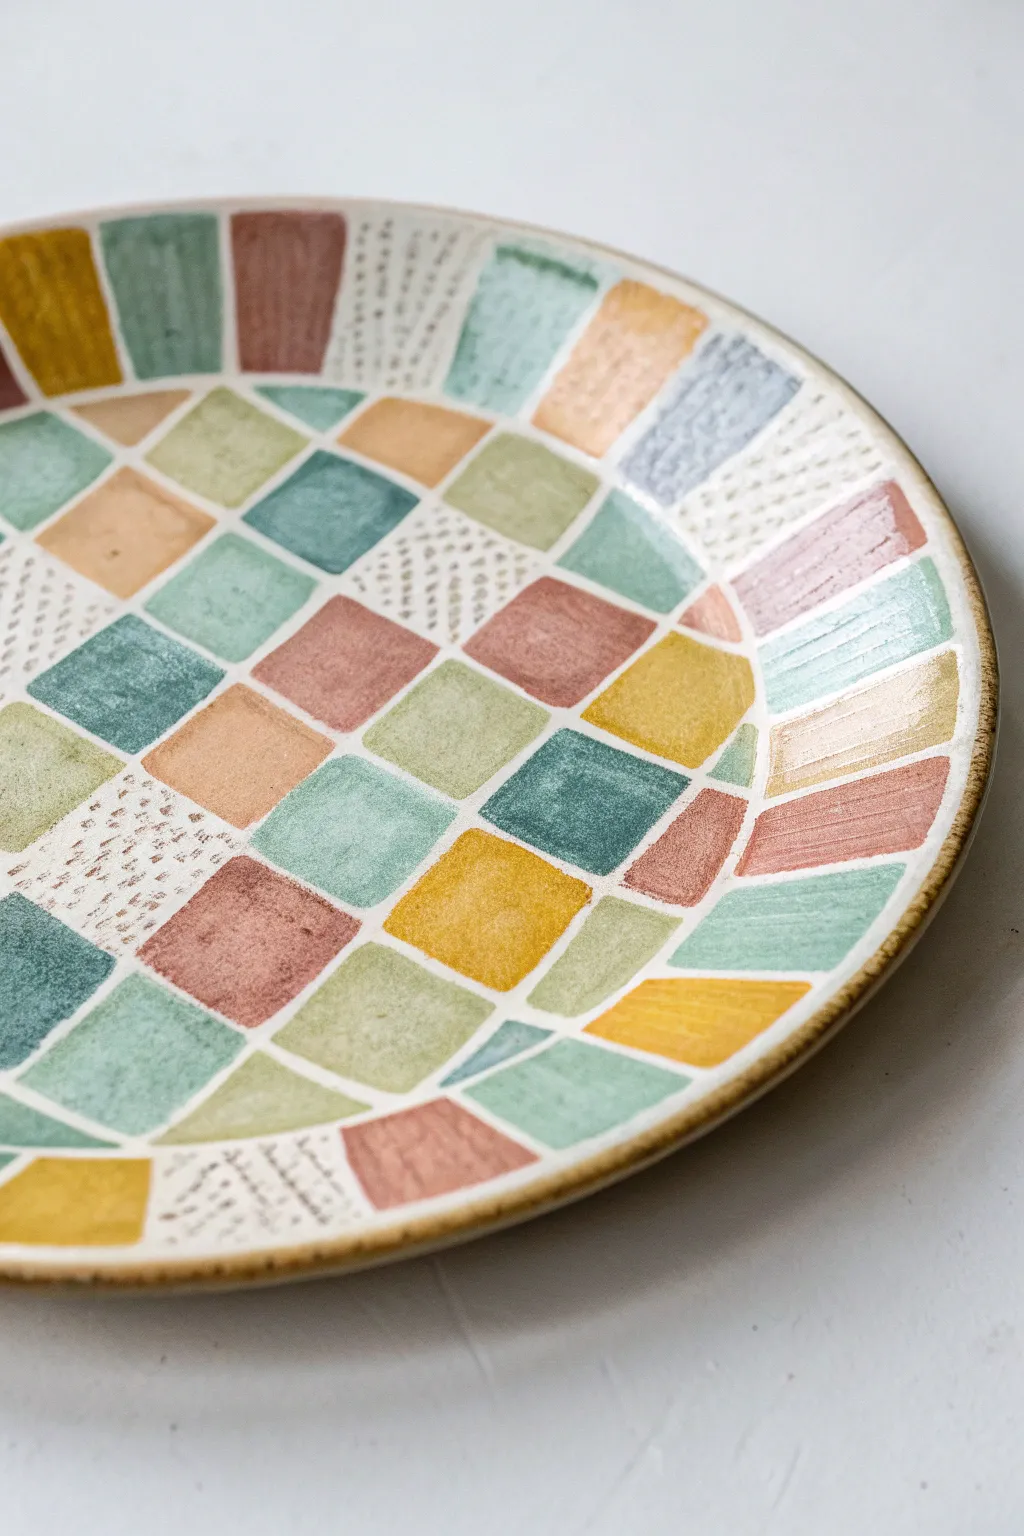
Transform a plain white ceramic plate into a stunning faux mosaic masterpiece using simple geometric painting techniques. This project captures the charm of weathered Mediterranean tiles with a soft, sun-baked color palette and subtle textural details.
How-To Guide
Materials
- Plain white ceramic plate (bisque or glazed, depending on paint choice)
- Ceramic paints or porcelain markers (colors: terracotta, sage green, mustard yellow, teal blue, pale pink)
- Fine-grit sandpaper (optional, for prepping glazed surfaces)
- Pencil
- Ruler or flexible tape measure
- Flat shader paintbrush (size 4 or 6)
- Fine liner brush (size 0 or 1)
- Masking tape or painter’s tape
- Cotton swabs and rubbing alcohol (for cleanup)
- Oven (if baking is required for paint setting)
Step 1: Preparation & Mapping
-
Surface Prep:
Clean your plate thoroughly with rubbing alcohol to remove any oils or fingerprints. If you are using a glossy glazed plate, lightly sanding the surface can help the paint adhere better. -
Find the Center:
Using a flexible tape measure, locate the exact center of the plate and mark it lightly with a pencil. -
Draft the Grid:
Lightly sketch a grid of curved lines radiating from the center to the rim. Don’t worry about making them perfectly straight; a slight hand-drawn wobble adds to the organic mosaic feel. -
Create the Tiles:
Cross those radial lines with concentric circles (or rounded squares) to create individual tile shapes. Aim for tiles that are roughly 1 inch in size, but allow the shapes near the rim to elongate slightly. -
Refine the Grout Lines:
Go back over your pencil grid and thicken the lines slightly to represent the ‘grout’ space. This ensures you leave enough white space between your painted blocks later.
Brushstroke Trick
Don’t aim for solid, opaque coverage. Let the brush bristles leave slight streaks in the paint to mimic the natural grain found in stone mosaics.
Step 2: Adding Color
-
Plan Your Palette:
Pour out small amounts of your terracotta, sage, mustard, teal, and pale pink paints. Mixing a tiny drop of white into each color can give them that soft, chalky ceramic look. -
Paint the Primary Blocks:
Using the flat shader brush, fill in scattered tiles with your darkest color (teal or terracotta). Distribute them randomly across the surface so no two same-colored tiles touch. -
Fill the Mosaic:
Continue filling in tiles with the remaining solid colors. Keep your brushstrokes somewhat visible and unidirectional to mimic the texture of stone or glazed ceramic tiles. -
Leave Breathing Room:
Remember to stop your paint neatly at the pencil edges, leaving that crucial white ‘grout’ line visible between every single colored shape. -
Create Patterned Tiles:
Reserve about 15-20% of the tile spaces for texture. Leave these white for now or paint them a very pale cream base.
Step 3: Detailing & Finishing
-
Add Speckled Texture:
On the reserved light-colored tiles, use your fine liner brush to dab tiny, irregular dots or dashes. I find that grouping the dots slightly denser on one side creates a nice shading effect. -
Paint the Rim:
Carefully paint a thin, solid line around the very edge of the plate using a brownish-gold tone to frame the artwork. -
Clean Up Edges:
If any paint bled into your white grout lines, use a damp cotton swab or a craft knife (if dry) to scratch it away and sharpen the separation. -
Let it Cure:
Allow the paint to dry completely according to the manufacturer’s instructions. This usually takes at least 24 hours. -
Bake to Set:
If your specific ceramic paint requires heat setting, place the plate in a cool oven, heat to the specified temperature (often 300°F/150°C), bake for 30-40 minutes, and let it cool down inside the oven.
Rustic Variation
Mix a tiny amount of fine sand or baking soda into your paint for select tiles. This adds physical grit and texture, making the faux stone effect look incredibly real.
Now you have a charming, hand-painted piece that brings a touch of Mediterranean warmth to your table setting
Optical Illusion Waves Using Wavy Grids
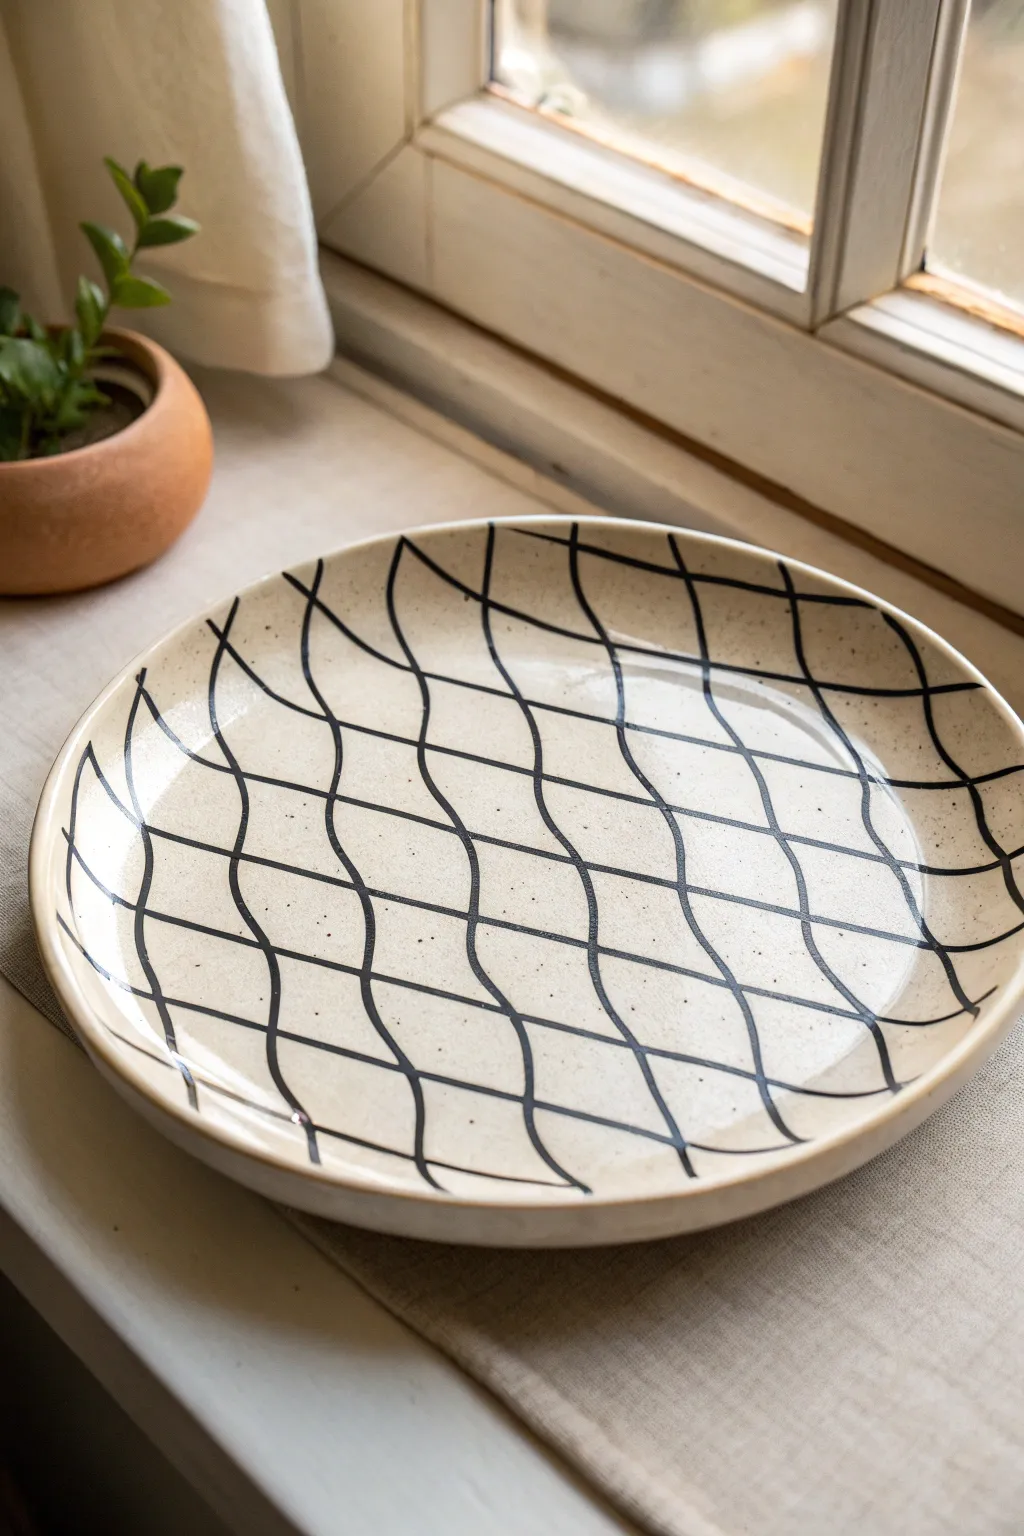
Transform a simple ceramic plate into a mesmerizing piece of functional art using nothing but wavy lines. This optical illusion design creates a sense of movement and depth, turning a standard grid pattern into something fluid and organic.
Step-by-Step Guide
Materials
- Bisque-fired ceramic plate (flat or shallow bowl shape)
- Cream or speckled off-white underglaze
- Black underglaze (high viscosity designed for detail)
- Small round liner brush (size 0 or 1)
- Medium flat brush (for base coat)
- Pencil (No. 2 or lighter)
- Ruler
- Clear transparent glaze
- Damp sponge
Step 1: Base Preparation
-
Clean the bisque:
Begin by wiping down your bisque plate with a barely damp sponge. This removes any kiln dust or oils from your hands that might resist the glaze. -
Apply the base coat:
Using your medium flat brush, apply a smooth layer of the cream or speckled off-white underglaze. Work in long, even strokes across the surface. -
Layering the base:
Let the first coat dry until it’s chalky to the touch, then apply a second coat. I usually alternate the direction of my brush strokes on the second layer to ensure solid, opaque coverage without streaks. -
Check consistency:
Inspect the surface. If you see thin spots, add a third coat. The goal is a uniform, creamy canvas for your line work. Let this dry completely before moving on.
Jittery lines?
If your hand is shaking, try exhaling slowly as you pull the brush for each line. Faster strokes are often smoother than slow, hesitant ones.
Step 2: Drafting the Grid
-
Mark spacing intervals:
Using a ruler and a light pencil, make small tick marks along the outer rim of the plate. Space them about 1.5 to 2 inches apart. Do the same on the opposite side to guide your lines. -
Sketch the vertical waves:
Lightly sketch wavy lines connecting the top marks to the bottom ones. Don’t worry about them being identical; varied curves actually enhance the optical effect. -
Sketch the horizontal waves:
Now, sketch the perpendicular wavy lines crossing over the first set. Aim to have the crests and troughs of your waves intersect in a way that distorts square grid spaces into interesting, organic diamond-like shapes. -
Review the flow:
Step back and look at your pencil sketch. The intersections should feel fluid. Erase gently and redraw any lines that look too stiff or straight.
Design Tip: Varying Thickness
For a more dramatic 3D effect, slightly thicken the lines at the ‘crests’ of the waves and thin them out in the ‘valleys’ to mimic volume.
Step 3: Painting the Lines
-
Load your liner brush:
Dip your fine liner brush into the black underglaze. You want the consistency to be like ink—add a tiny drop of water if it feels too thick to flow smoothly. -
Anchor your hand:
Rest your pinky finger on a dry part of the plate or the table surface to stabilize your hand. This helps keep the long lines steady. -
Trace the vertical lines:
Starting from one edge, trace over your vertical pencil sketches. Use consistent pressure to keep the line width uniform. -
Trace the horizontal lines:
Wait a moment for the vertical lines to lose their wet sheen so you don’t smudge them. Then, carefully paint the horizontal wavy lines. -
Refine intersections:
Go back to where the lines cross. If there are gaps or thin spots, carefully touch them up to ensure the grid looks continuous and woven. -
Clean up edges:
If the lines trail off messily at the rim, wipe the rim clean with a damp sponge or paint a solid border to frame the design.
Step 4: Finishing
-
Burn off pencil marks:
Don’t stress about erasing visible pencil marks. The graphite will burn away completely in the kiln, leaving only your painted design. -
Apply clear glaze:
Once the underglaze is bone dry, carefully dip or brush on a clear transparent glaze. Be gentle so you don’t smear the black lines. -
Final wipe:
Wipe the ‘foot’ (bottom ring) of the plate entirely clean of glaze to prevent it from sticking to the kiln shelf. -
Fire the piece:
Fire the plate according to your clay and glaze specifications (usually cone 5 or 6 for stoneware) to seal the design and make it food safe.
Now you have a stunning, modern plate that plays tricks on the eye every time you use it