When I’m craving a fun, low-pressure craft session, polymer clay is my favorite way to make something adorable fast. These polmer clay ideas lean cute, miniature, and beginner-friendly—exactly the kind of projects that keep my studio table happily cluttered.
Simple Cutout Dangle Earrings
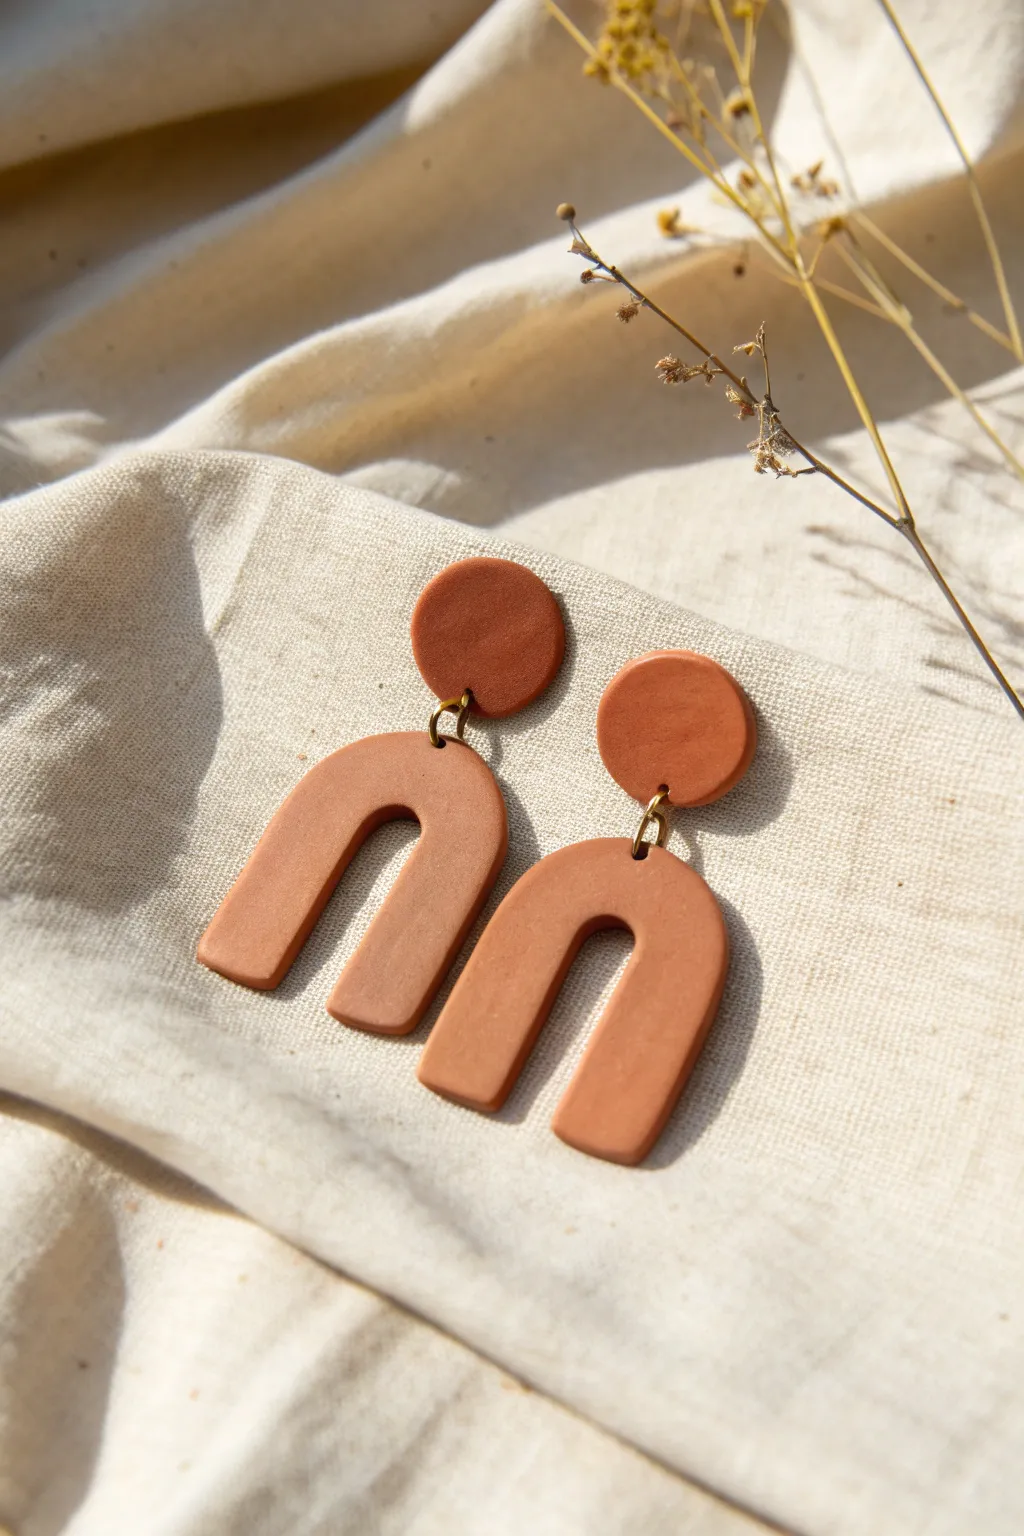
Embrace the warmth of nature with these minimalist clay earrings featuring a rich, sun-baked terracotta hue. Their simple geometric design—a classic stud paired with a modern U-shaped drop—makes them an effortlessly chic accessory for everyday wear.
Step-by-Step Tutorial
Materials
- Terracotta or burnt orange polymer clay
- Acrylic rolling pin
- Circle clay cutter (approx. 10-12mm)
- U-shape or arch clay cutter (approx. 30mm height)
- Tile or glass work surface
- Small hand drill or needle tool
- 4mm or 5mm gold jump rings
- Two flat-pad earring posts and backs
- Jewelry pliers (flat nose and round nose)
- Fine grit sandpaper (optional)
- Instant jewelry glue
Step 1: Preparation & Cutting
-
Condition the Clay:
Begin by warming the terracotta polymer clay in your hands. Knead and fold it repeatedly until it becomes soft, pliable, and free of any air bubbles. -
Roll It Out:
Place the conditioned clay on your glass or tile surface. Use the acrylic rolling pin to roll it into an even slab, approximately 3mm thick. Consistent thickness is key for professional-looking jewelry. -
Cut the Studs:
Take your small circle cutter and firmly press it into the clay slab to create two identical circles. These will be the top studs. Lift the cutter straight up to avoid distorting the shape. -
Cut the Arches:
Using your U-shaped cutter, press firmly into the remaining slab to cut two identical arches. Ensure you have enough space between cuts so the edges remain clean. -
Smooth the Edges:
Before baking, gently run your fingertip along the edges of the cut shapes to soften any sharp ridges left by the cutters. A tiny bit of cornstarch on your finger can help smooth it without leaving prints. -
Create Connection Holes:
Using a needle tool, carefully poke a hole at the very bottom center of each circle stud and the top center of each arch. Ensure the hole is large enough for your jump rings but not too close to the edge to prevent tearing.
Uneven Roll?
If your clay thickness varies, use playing cards as depth guides. Place a stack of equal height on either side of your clay while rolling for a perfectly level slab.
Step 2: Baking & Assembly
-
Bake the Pieces:
Arrange your clay pieces on a baking sheet lined with parchment paper or plain cardstock. Bake according to the manufacturer’s instructions for your specific brand of clay—usually around 275°F (135°C) for 30 minutes. -
Cool Down:
Once the baking time is up, remove the tray from the oven and let the pieces cool completely to room temperature. Clay is fragile when hot, so patience here prevents breakage. -
Sand for Perfection:
If you notice any rough spots or fingerprints after cooling, lightly sand the edges or surface with fine-grit sandpaper or a buffing block under running water. -
Clean surface:
Wipe the back of the circular studs with a little rubbing alcohol to remove any oils or dust. This ensures the best possible bond for the glue. -
Attach Earring Posts:
Apply a small dot of instant jewelry glue to the flat pad of your earring post. Press it firmly onto the back of the circular clay stud, near the top edge (opposite the hole). Hold it for a few seconds to set. -
Wait for Glue to Cure:
Let the glue dry completely before handling again. I usually leave them for at least an hour just to be safe. -
Open Jump Rings:
Using two pairs of pliers, twist a gold jump ring open laterally—think of pushing one side away and pulling the other toward you, rather than pulling them apart. -
Connect the Shapes:
Thread the open jump ring through the hole in the bottom of the stud and the top of the U-shaped arch. -
Close the Ring:
Using your pliers, twist the jump ring back into a closed position until the ends meet perfectly flush. Repeat for the second earring.
Textured Touch
Before cutting shapes, gently press a piece of sandpaper or coarse fabric onto the raw clay slab. This transfers a subtle, stone-like texture for an organic feel.
Wear your new terracotta dangles proudly or gift them to a friend who loves earthy tones


Tiny Stud Earrings in Mini Shapes
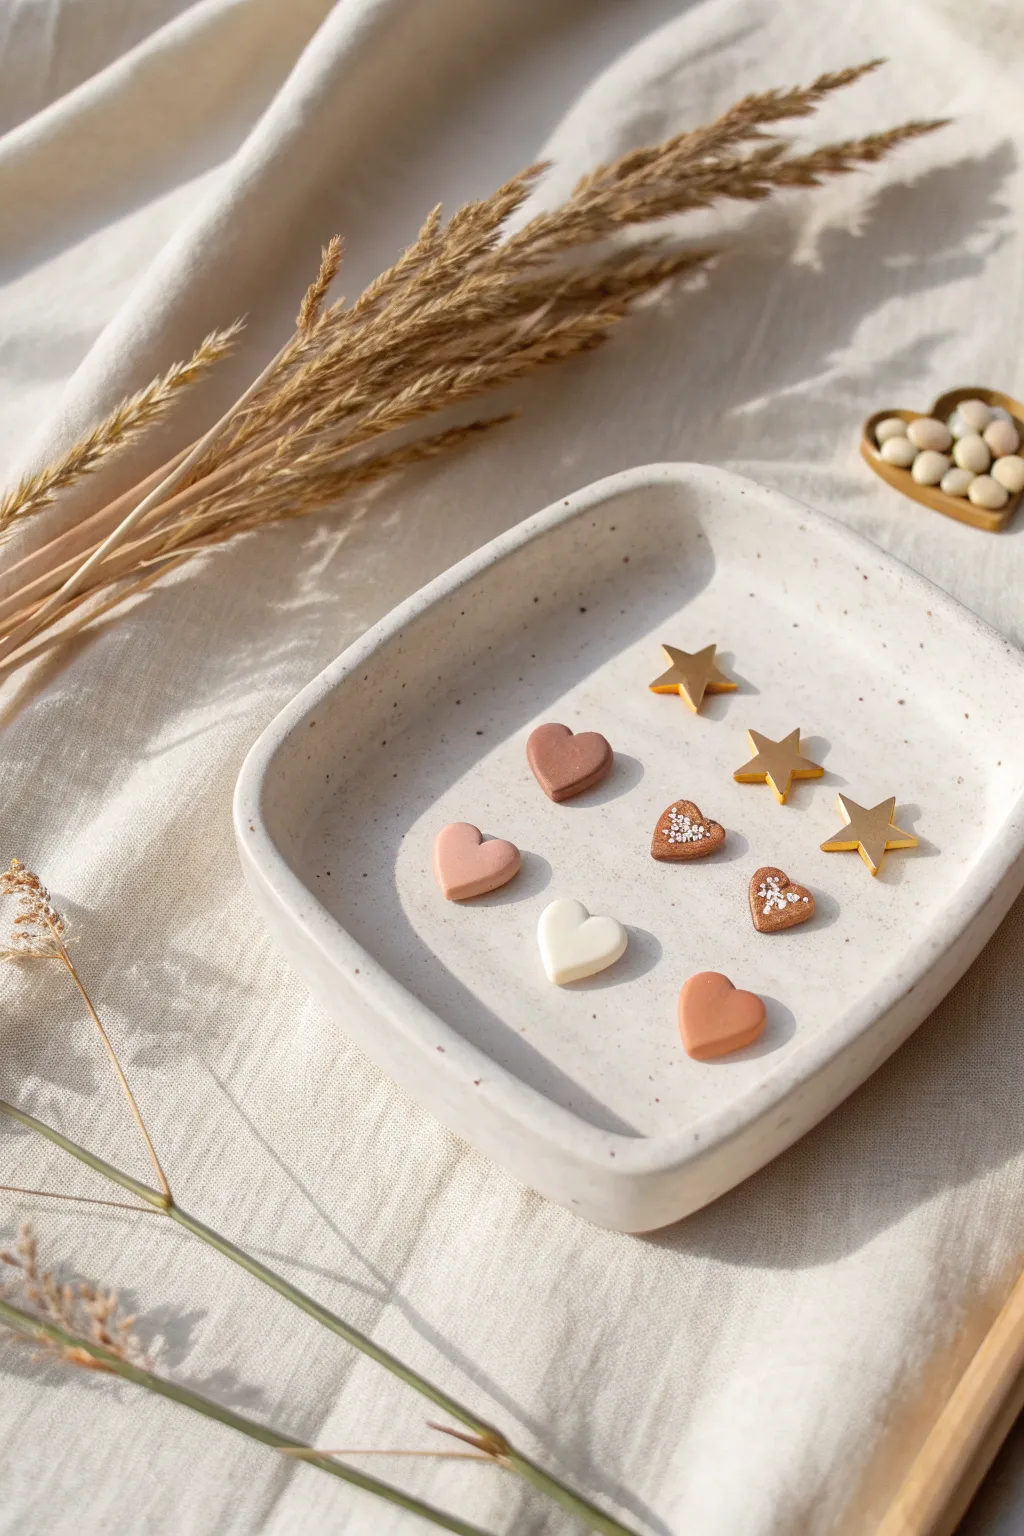
Create a charming collection of miniature stud earrings featuring classic heart and star motifs in a soft, romantic palette. These dainty pieces combine matte pastels, metallic gold, and subtle glitter accents for a versatile set perfect for everyday wear.
Step-by-Step Guide
Materials
- Polymer clay in beige/pale pink, terracotta, white, and translucent
- Gold polymer clay (or metallic gold mica powder)
- Miniature shape cutters (heart and star, approx. 5-7mm)
- White glitter or fine salt/sugar for texture (optional)
- Flat stud earring posts (surgical steel or gold-plated)
- Jewelry glue (E6000 or similar)
- Acrylic roller or pasta machine
- Glossy glaze or resin (optional for sealing)
- Ceramic tile or parchment paper for baking
- Exacto knife or flexible blade
- Sandpaper or buffing tool (optional)
Step 1: Color Mixing & Conditioning
-
Prepare the base colors:
Start by conditioning your clay blocks until they are soft and pliable. You will need a distinct palette: a creamy white, a soft beige-pink, a deep terracotta, and either a pre-mixed gold clay or a mix of translucent clay with gold mica powder. -
Roll out the slabs:
Using your acrylic roller or pasta machine on a thick setting (about 2-3mm), roll out each color into a small, even slab. Ensure the thickness is uniform so your earrings sit flat against the earlobe. -
Add texture (optional):
For the glittery terracotta hearts seen in the image, mix a tiny pinch of white glitter or faux sugar granules directly into a small portion of the terracotta clay before rolling it out again.
Sticky Cutter Fix
Does clay keep getting stuck inside your tiny cutters? Dip the cutter into cornstarch or water before pressing it into the clay. This acts as a release agent for clean cuts.
Step 2: Cutting the Shapes
-
Cut the stars:
Using your gold clay slab, press your miniature star cutter firmly into the clay. Give it a tiny wiggle to ensure a clean cut before lifting. Cut at least three stars to match the set. -
Refine the edges:
If the clay sticks to the cutter, gently poke it out from the back with a dull tool. Use your finger to smooth any rough edges on the star points immediately, as this is harder to do after baking. -
Cut the plain hearts:
Move to your beige-pink, white, and plain terracotta slabs. Cut out several hearts from each color. I find it helpful to cut a few extras just in case one gets smushed during transfer. -
Cut the textured hearts:
Finally, use your mini heart cutter on the glitter-mixed terracotta slab. These will add a lovely tactile contrast to the smooth matte hearts. -
Create the sugar effect:
Alternatively, if you didn’t mix glitter in, you can take a plain terracotta heart and gently press the top surface into fine white glitter or salt before baking to mimic a sugar-coated cookie look.
Step 3: Baking & Assembly
-
Prepare for the oven:
Arrange all your tiny shapes on a ceramic tile or a baking sheet lined with parchment paper. Leave a little space between each one to ensure even heat distribution. -
Bake the batch:
Bake the clay according to the manufacturer’s instructions—usually around 275°F (130°C) for 15-30 minutes depending on the brand. Since these are tiny, check them at the lower end of the time range to prevent scorching. -
Cool down completely:
Allow the clay pieces to cool fully on the tray. Moving them while they are still warm can cause these delicate shapes to warp. -
Sand the backs:
Once cool, lightly sand the back of each piece against a flat piece of sandpaper. This creates a slightly rough surface that helps the glue adhere better. -
Attach the posts:
Place a tiny drop of strong jewelry glue onto the pad of a stud earring post. Press the post firmly onto the center of the back of a clay shape. -
Cure the glue:
Repeat for all shapes. Let the glue cure undisturbed for at least 24 hours to ensure a secure bond that won’t snap off with wear. -
Optional finish:
If you want extra shine on the gold stars, brush on a very thin layer of gloss glaze or UV resin. Leave the pastel hearts matte for that modern, soft aesthetic shown in the photo.
Pro Tip: Embedding Posts
For ultimate durability, try ’embedding’ the post. Use liquid clay to bake the metal post directly into the back of raw clay, or add a thin layer of clay over the glued pad.
Enjoy mixing and matching these tiny treasures for a delightful, personalized ear stack


Marbled Pendant Necklaces
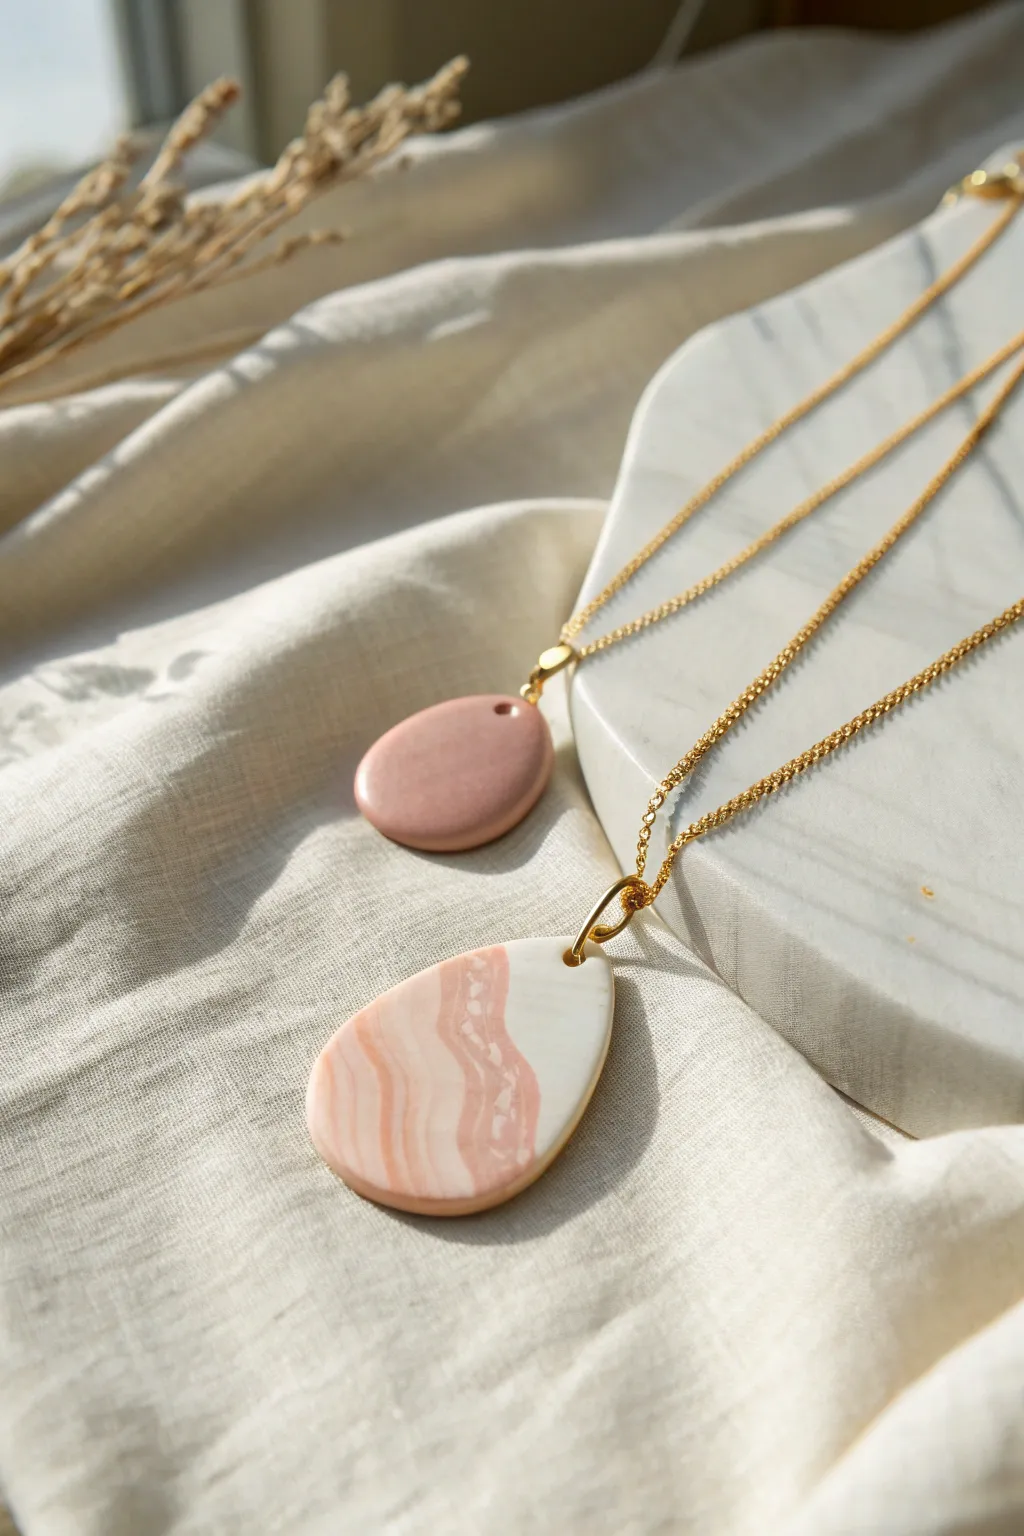
These elegant polymer clay pendants feature soft swirls of white and blush pink that mimic the look of rose quartz or agate. Their organic, tear-drop shape and gold hardware give them a modern, gallery-ready finish that pairs beautifully with minimalist outfits.
Step-by-Step Tutorial
Materials
- Polymer clay (White, translucent, and mauve/terracotta)
- Gold tone necklace chains
- Gold plated jump rings (6mm or 8mm)
- Acrylic rolling pin
- Teardrop and oval shaped clay cutters
- Parchment paper or ceramic tile
- Small hand drill or toothpick
- 2 pairs of flat-nose jewelry pliers
- Wet/dry sandpaper (400 to 1000 grit)
- Gloss or matte varnish (optional)
Step 1: Prepping the Clay
-
Condition the Clay:
Begin by thoroughly conditioning each color of clay separately. Knead the white, translucent, and mauve blocks until they are soft, pliable, and free of any cracks. -
Create Individual Ropes:
Roll each color into a long, thin cylinder or ‘snake,’ about 3-4 inches long. You will need roughly equal parts white and color for a balanced marble, perhaps using slightly less of the darker mauve to keep it subtle.
Step 2: Creating the Marble Pattern
-
Twist the Colors:
Gather your clay ropes and twist them together into one large rope. Fold the twisted rope in half and twist it again. Repeat this twist-and-fold process about 3-4 times. -
Don’t Over-mix:
Be careful not to over-twist, or the colors will blend into a single muddy shade rather than distinct streaks. You want to see clear definition between the white and mauve. -
Form a Ball:
Once you like the variegation in your twisted rope, roll it gently into a smooth ball. This helps compact the layers. -
Flatten and Roll:
Place the ball on your work surface or parchment paper. Use the acrylic roller to flatten it into a slab approximately 3mm to 4mm thick. Roll in different directions to stretch the marble pattern organically.
Air Pocket Troubleshooting
If you see tiny bubbles after baking within the translucent areas, try slicing very thin layers off with a craft knife or sanding aggressively, then buffing to transparency.
Step 3: Cutting and Baking
-
Cut the Shapes:
Choose the section of the slab with the most beautiful swirling. Press your teardrop cutter firmly into the clay. If you are making the smaller, solid-colored pendant shown, simply roll out a sheet of solid mauve clay and cut an oval. -
Smooth the Edges:
Gently lift the cut shapes. Use your finger, dipped lightly in water or cornstarch, to smooth the raw edges so they are rounded rather than sharp. -
Create the Holes:
Before baking, use a toothpick or a small straw to poke a hole near the top of the pendant for the jump ring. Ensure the hole is large enough for your hardware but leaves enough ‘meat’ of clay at the top edge to be sturdy. -
Bake the Pieces:
Place the pendants on a ceramic tile or baking sheet lined with paper. Bake according to the manufacturer’s instructions for your specific brand of clay—usually 275°F (135°C) for 30 minutes works well for this thickness. -
Cooling Down:
Allow the pieces to cool completely in the oven or on a wire rack before handling them further. Warm clay is still fragile.
Pro Tip: Translucency
For a realistic quartz effect, mix a tiny speck of color into translucent clay rather than using opaque colors alone. It adds depth to the marble.
Step 4: Finishing Touches
-
Sand for Perfection:
Once cool, submerge the piece in a small bowl of water and use wet/dry sandpaper to smooth any remaining imperfections on the edges or surface. I prefer starting with 400 grit and finishing with 1000 for a satin touch. -
Open the Jump Ring:
Use your two pairs of pliers to grip the jump ring on either side of the split. Twist one hand forward and one backward to open the ring sideways (never pull it apart). -
Assemble the Necklace:
Slide the open jump ring through the hole in your clay pendant. Before closing it, slip the gold necklace chain into the ring as well. -
Close the Ring:
Using the same twisting motion with your pliers, bring the ends of the jump ring back together until they are perfectly flush and closed tight. -
Optional Varnish:
If you prefer a high-shine look like polished stone, apply a thin coat of polymer clay gloss varnish. For a natural matte ceramic look, you can leave it bare.
Wear your new stone-effect jewelry with pride or wrap it up for a thoughtful handmade gift


Chunky Polymer Clay Bead Bracelets
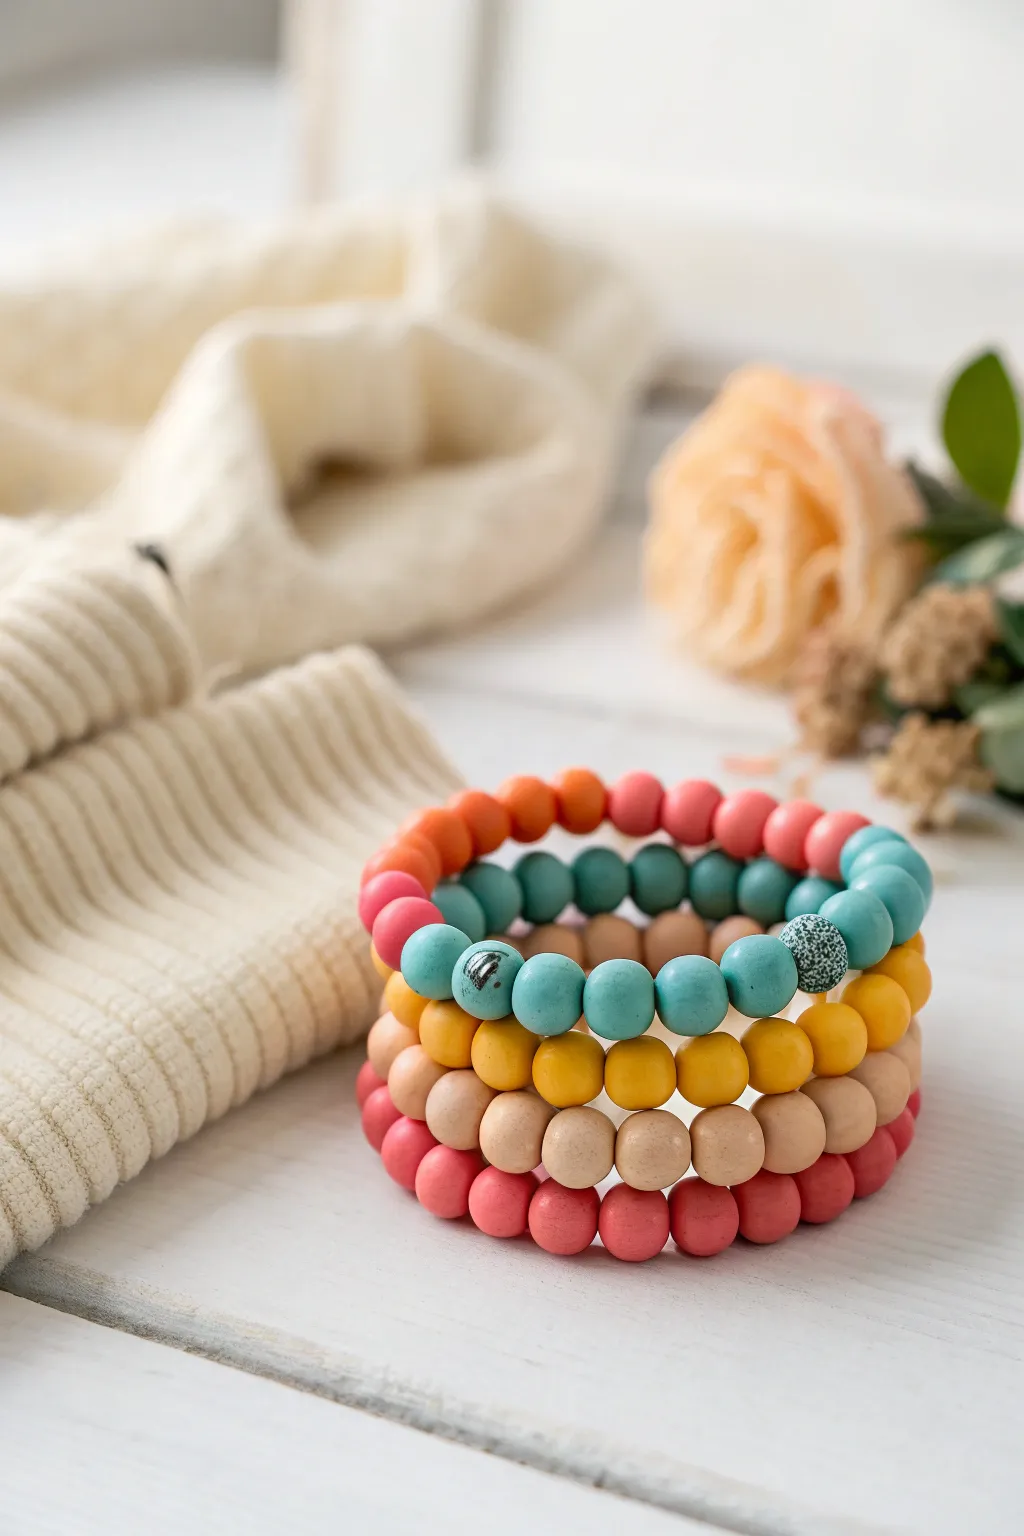
Create a colorful statement with these bold, chunky beaded bracelets that mimic the look of matte ceramic or organic stone. This project allows you to custom-mix your own palette of earthy tones, resulting in a cohesive stack that feels smooth and substantial on the wrist.
How-To Guide
Materials
- Polymer clay (coral, pink, teal, mustard, beige, and white for mixing)
- Acrylic rolling pin or clay machine
- Small round circle cutter (approx. 1/2 inch) or bead roller
- Thick beading needle or toothpick
- Beading elastic cord (0.8mm or 1mm)
- Superglue or jewelry glue
- Oven and baking tray
- Parchment paper or cardstock
- Fine-grit sandpaper (optional)
- Medium-grit sandpaper for texturing (optional)
- Black acrylic paint (for speckling)
Step 1: Color Mixing and Prep
-
Condition the clay:
Start by warming the polymer clay in your hands, kneading each color separately until it is soft and pliable to prevent cracking during rolling. -
Create custom shades:
Mix your primary colors with small amounts of beige or white to achieve the muted, earthy pastel tones seen in the photo. For the gradient effect, mix three shades of pink/coral ranging from light to dark. -
Roll out sheets:
Using your acrylic roller or pasta machine on a thick setting, roll out your conditioned clay into even slabs about 1/4 inch thick.
Baking Tip for Roundness
Bake your beads on a bed of cornstarch or baking soda. The powder cradles the bead, preventing the ugly flat spot that happens when round clay sits on a hard metal tray.
Step 2: Forming the Beads
-
Measure equal portions:
Use a small circle cutter to punch out shapes from your clay slabs. This ensures every bead starts with the exact same amount of clay for a uniform size. -
Roll into spheres:
Take each punched circle and roll it vigorously between your palms. Apply firm pressure at first to work out air bubbles, then lighten your touch to perfect the round shape. -
Add texture (optional):
For the specific speckled bead seen in the teal bracelet, gently roll a few raw beads over coarse sandpaper to create a pitted surface texture. -
Create the holes:
While the clay is still soft, gently pierce each bead with a thick needle or toothpick. Rotate the bead as you pierce to keep the hole centered and prevent the exit side from bulging. -
Refine the shape:
After piercing, the bead might get slightly squashed. Give it a gentle roll between your fingers again to restore its spherical shape, being careful not to close the hole.
Step 3: Baking and Finishing
-
Arrange for baking:
Place your beads on a baking sheet lined with parchment paper. I like to fold the paper into little accordion pleats to keep the beads from rolling around in the oven. -
Bake the beads:
Bake according to your clay manufacturer’s instructions—usually around 275°F (130°C) for 30-45 minutes. Longer baking makes the beads stronger. -
Cool and sand:
Let the beads cool completely. If you have any fingerprints, buff them away lightly with fine-grit sandpaper under running water. -
Add speckled details:
For the speckled look, dilute a tiny drop of black acrylic paint with water. Dip a stiff brush (or toothbrush) into it and flick tiny droplets onto a few select beads, then let dry.
Faux Stone Effect
Mix black pepper or dried used tea leaves into your clay before rolling. This creates organic inclusions inside the bead that look like real granite when baked.
Step 4: Assembly
-
Cut the elastic:
Cut a piece of elastic cord about 10 inches long. Pre-stretch the elastic by pulling it firmly a few times; this prevents the bracelet from stretching out later. -
String the beads:
Thread your beads onto the elastic. You can mix colors or stick to solid color blocks as shown in the image. Check the size against your wrist as you go. -
Tie the knot:
Tie a secure surgeon’s knot (right over left, left over right). Pull the knot very tight. -
Secure and hide:
Add a tiny drop of superglue to the knot. Once dry, trim the excess cord and gently tug the knot inside one of the bead holes to hide it.
Enjoy mixing and matching your new stack of custom-colored chunky bracelets

What Really Happens Inside the Kiln
Learn how time and temperature work together inside the kiln to transform clay into durable ceramic.
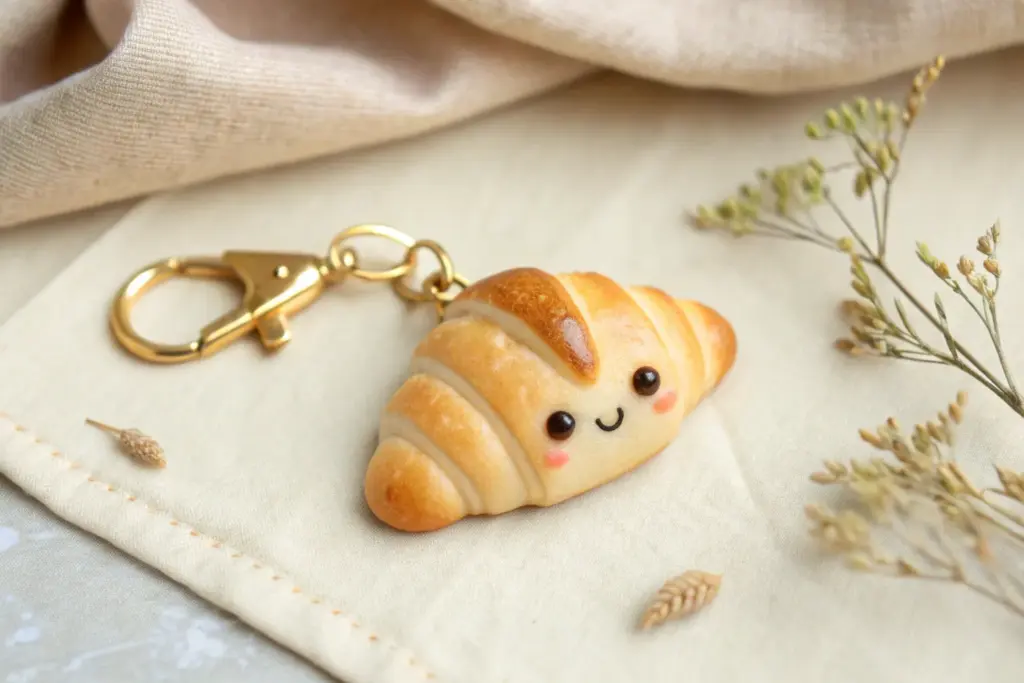
Kawaii Food Charms With Little Faces
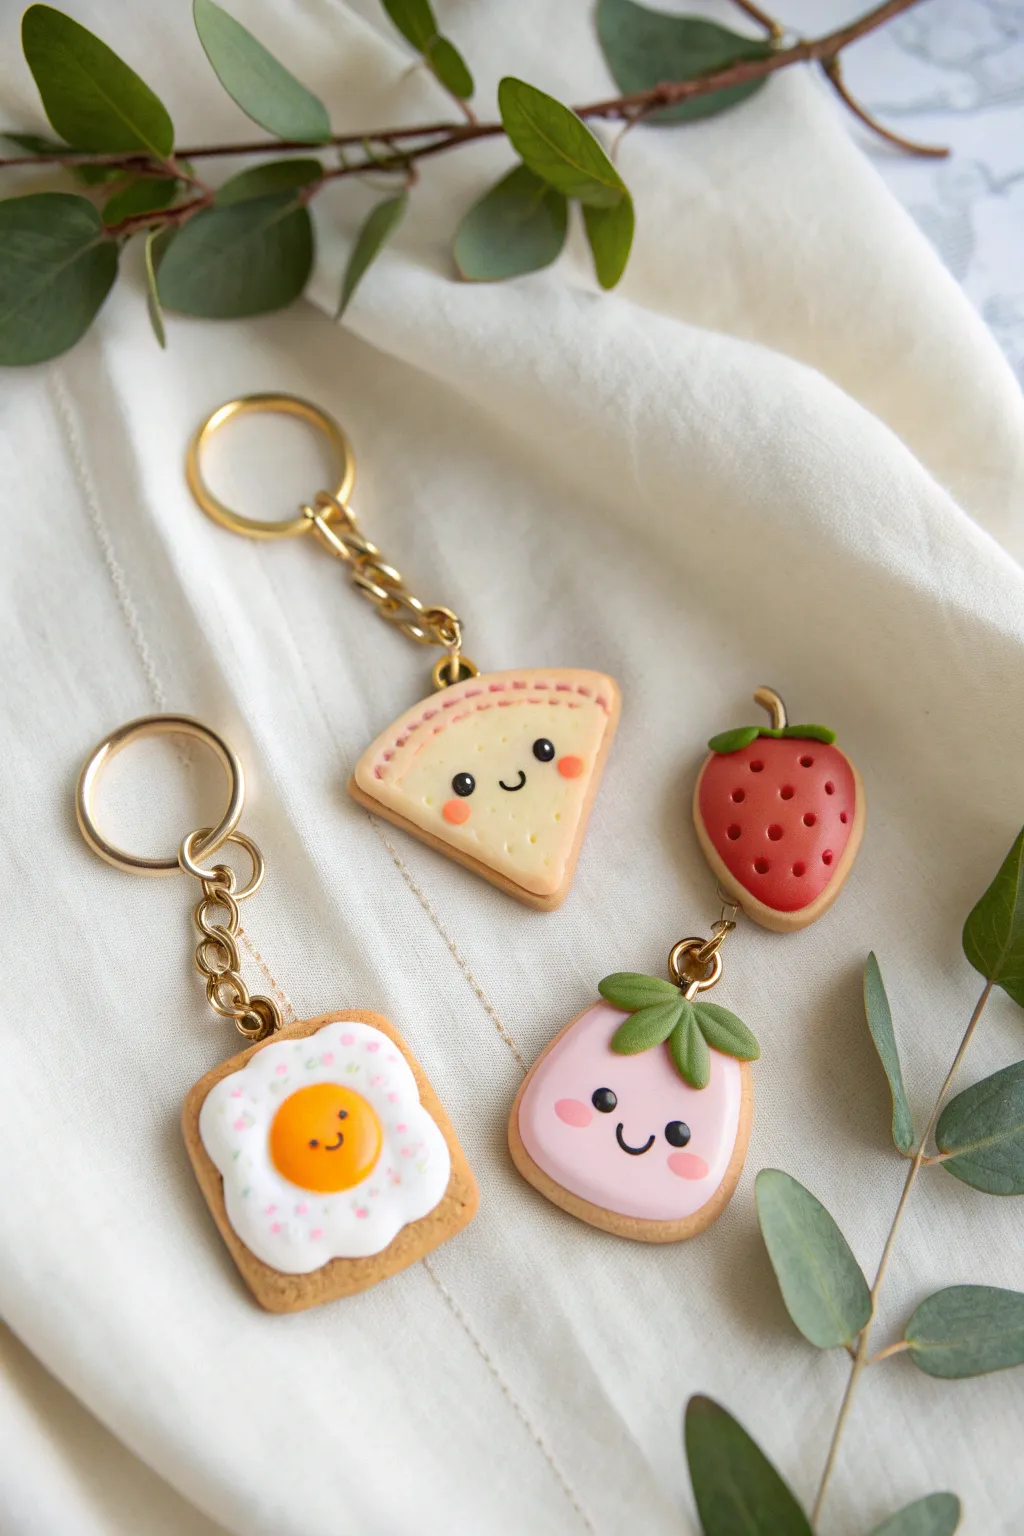
Bring a dose of sweetness to your daily routine with these adorable polymer clay food charms featuring tiny, happy faces. This tutorial guides you through sculpting a cheerful egg-on-toast, a happy pie slice, and a delightful two-tiered strawberry dangle.
Step-by-Step
Materials
- Polymer clay (beige, white, yellow, pink, red, green, black)
- Liquid polymer clay (white and red)
- Pastel chalks (browns, oranges, pinks) for shading
- Gold keychain findings and jump rings
- Metal eye pins
- Gloss and matte glaze
- Sculpting tools (needle tool, ball tool, exacto knife)
- Soft paintbrush for shading
- Dotting tool or toothpick
- Cookie cutter (square and circle, optional)
- Texture tool (toothbrush or sandpaper)
Step 1: Sunny-Side Up Toast
-
Base Shaping:
Start by conditioning beige clay and rolling it into a thick sheet. Cut out a soft square shape with rounded corners to mimic a slice of bread. -
Texture:
Use a toothbrush or a crumpled ball of aluminum foil to texturize the surface of the bread, giving it a realistic baked look. -
Shading the Crust:
Brush brown pastel chalk powder along the edges of the bread to create a toasted crust effect. I like to blend a little orange in for warmth. -
Adding the Egg White:
Flatten a small piece of white clay into an irregular, wavy shape and press it gently onto the center of the toast. -
The Yolk:
Roll a small ball of yellow clay, flatten the bottom slightly, and press it onto the center of the white clay. -
Face Details:
Using a needle tool or very small ball tool, make two indentations for eyes on the yolk. Insert tiny specks of black clay for eyes and a microscopic thread of clay for the smile.
Clean Clay Hacks
White clay picks up dust easily! Keep baby wipes nearby to clean your hands and tools often. Use a piece of scotch tape to lift lint off raw clay before baking.
Step 2: Happy Cheese Pie
-
Pie Wedge Form:
Cut a triangle shape from a thick sheet of pale beige or light yellow clay. Soften the sharp points slightly. -
Crust Rim:
Roll a thin snake of slightly darker beige clay. Wrap it along the back edge of the triangle to form the crust rim. -
Crimping:
Use a needle tool or the dull side of a knife to make small, even indentations along the crust snake to mimic crimping. -
Adding Personality:
Indent the face area in the center of the slice. Add small black clay balls for eyes and draw a smile with a needle tool. Dust pink chalk on the ‘cheeks’ for a blush effect. -
Swiss Cheese Holes:
Use a small ball tool to impress random dimples into the surface, resembling distinctive Swiss cheese holes.
Level Up: Scented Squad
Mix a tiny drop of essential oil or specialized clay fragrance into the clay before sculpting. Try vanilla for the toast or strawberry scent for the berries!
Step 3: Double Strawberry Dangle
-
Shaping the Fruits:
Mold two tear-drop shapes: one in light pink (for the bottom charm) and a slightly smaller one in red (for the top charm). Slightly flatten them so they aren’t fully 3D spheres. -
Leafy Tops:
Create small green stars or teardrops and press them onto the top of each fruit to form the calyx (leaves). Add a tiny stem to the red one. -
Pink Berry Face:
On the pink berry, add wide-set eyes using black clay and a curved mouth. Add pink blush cheeks using pastel chalk or tiny flattened clay circles. -
Red Berry Seeds:
For the top red berry, use a needle tool to poke small seed indentations all over the surface. -
Hardware Prep:
Insert a metal eye pin deeply into the top of each charm. For the pink berry, ensure the loop is vertical; for the red heavy, you might need a loop at the bottom too if chaining them directly.
Step 4: Finishing Touches
-
Baking:
Bake all pieces according to your polymer clay package instructions (usually 275°F/135°C for 15-30 minutes). Let them cool completely. -
Glazing:
For extra shine on the egg yolk and the red strawberry, apply a coat of gloss glaze. Keep the bread and pie crust matte for realism. -
Assembly:
Open your jump rings with pliers. Attach the charms to the keychain hardware. For the strawberry set, link the red berry to the chain, then hang the pink berry beneath it using a jump ring.
Attach your new friends to your keys or backpack and enjoy their cheerful company all day long
Fast-Food Best-Friend Charm Sets
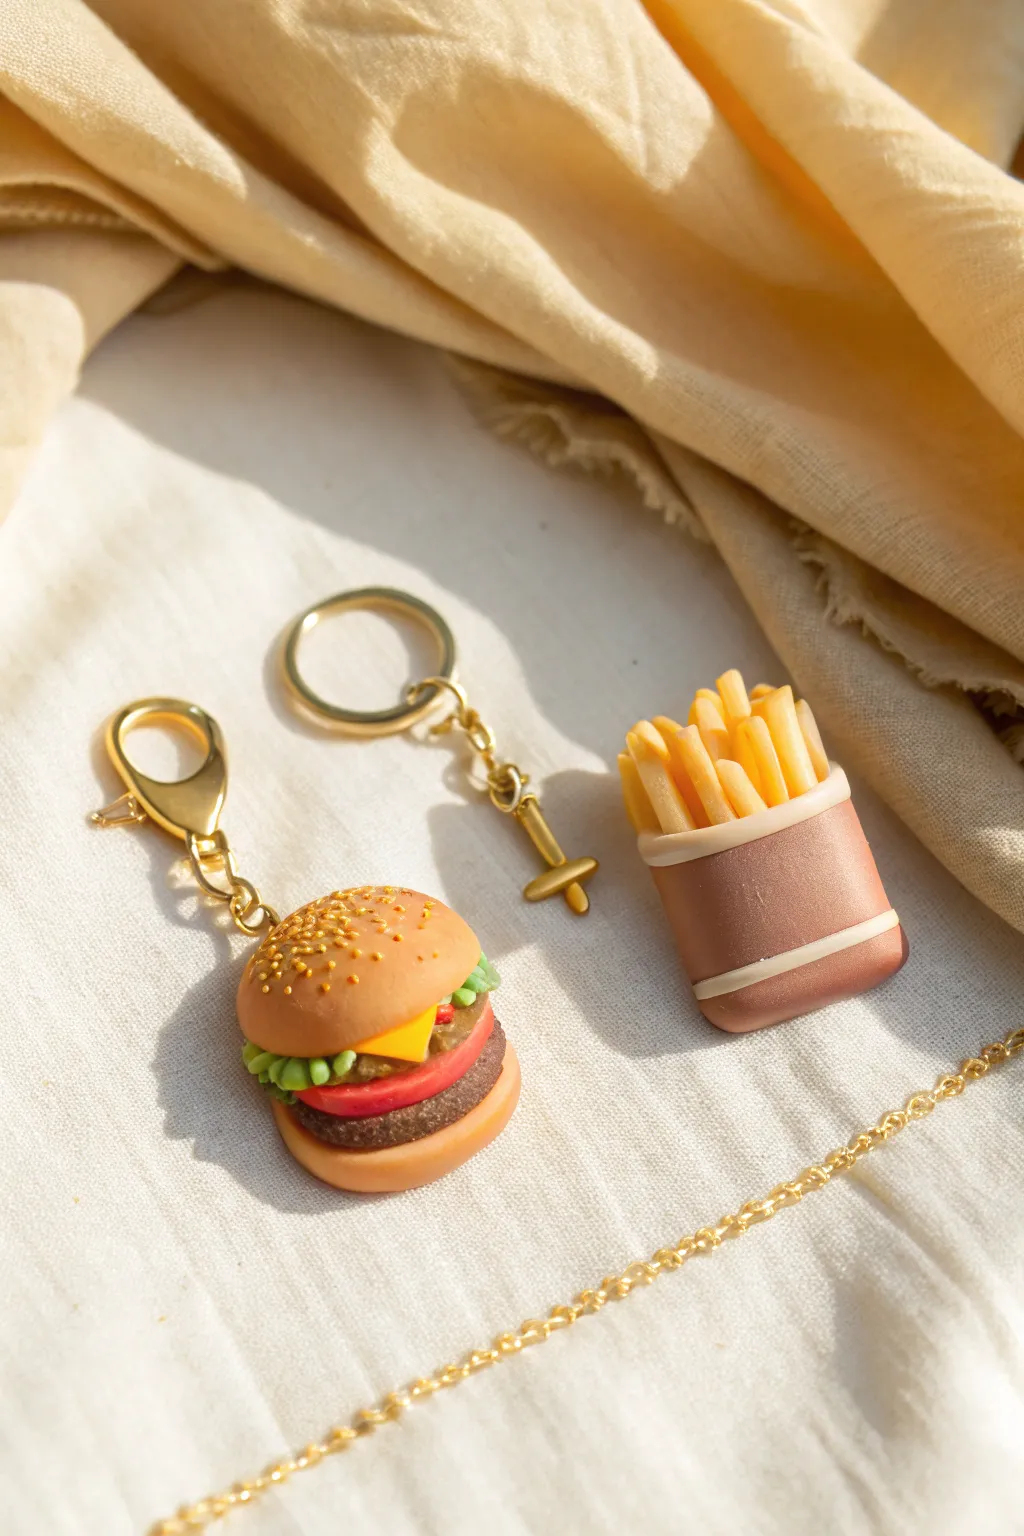
These miniature fast-food charms make an adorable matching set for you and a friend to share. Sculpted from polymer clay with realistic textures like sesame seeds and crispy fry edges, they are the perfect bite-sized accessories.
Detailed Instructions
Materials
- Polymer clay (tan/ochre, dark brown, red, green, yellow, translucent white)
- Liquid polymer clay (translucent)
- Pastel chalks (brown, orange, yellow) for shading
- Soft paintbrush for pastels
- Needle tool or toothpick
- Dotting tool or ball stylus
- X-acto knife or clay blade
- Gold eye pins (2)
- Gold keychains with lobster clasps
- Gloss glaze (optional)
- oven
Step 1: The Hamburger
-
Shape the Buns:
Mix tan clay with a tiny bit of white to get a bread color. create two balls, flattening the bottom one slightly to form the base bun. For the top bun, create a dome shape and smooth the edges so it looks puffy. -
Texture the Bread:
Using a needle tool or an old toothbrush, gently tap the surface of both bun pieces to create a realistic baked bread texture. Don’t smooth it out; the roughness is key. -
Color the Buns:
Shave some brown and orange pastel chalk into a powder. Using a soft brush, gently dust the top and sides of the buns to give them a golden-baked look. Focus the darker brown on the very top center. -
Form the Patty:
Roll a ball of dark brown clay and flatten it into a thick disc the same diameter as your buns. Use a coarse needle tool to stipple the sides, mimicking the texture of ground meat. -
Create the Lettuce:
Flatten a small piece of green clay until it is very thin. Tear the edges irregularly to look organic, then fold and ruffle the clay slightly. Place this on top of the bottom bun. -
Add Tomato and Cheese:
Slice a thin round of red clay for the tomato. For the cheese, cut a small square of yellow clay. Stack the patty, tomato, and cheese on top of the lettuce layer. -
Assemble and Seed:
Place the top bun on your stack. Gently press down to secure the layers without squishing the details. Roll teeny-tiny specks of tan clay for sesame seeds and press them onto the top bun, or use liquid clay to help them stick.
Step 2: The French Fries
-
Make the Fries:
Mix yellow clay with a touch of translucent clay. Roll it into a thin log and cut it into small rectangular strips of varying lengths. I like to pinch the ends slightly to make them look crispy. -
Shade the Potatoes:
Dust the tips of your clay fries with a little yellow-orange pastel powder to make them look perfectly fried and seasoned. -
Create the Fry Box:
Form a block of reddish-brown or metallic bronze clay into a rectangular prism that is wider at the top than the bottom. Gently hollow out the top opening with a tool to make room for the fries. -
Detail the Container:
Roll a very thin snake of light tan clay. Wrap it around the fry box horizontally, about a third of the way up from the bottom, to create the stripe visible in the photo. -
Fill the Box:
Insert your prepared fries into the top of the box. Arrange them so they look plentiful and stick out at different angles. You can trim the hidden bottoms of the fries if they are too long.
Pro Tip: Texturing
For the most realistic meat texture, use a crumpled ball of aluminum foil to press into the side of the patty rather than just poking holes individually.
Step 3: Finishing Touches
-
Add Hardware:
Insert a gold eye pin into the center of the burger bun and another into the center of the fry cluster. Ensure the loop sits flush with the clay. -
Bake:
Bake the pieces according to your polymer clay package instructions (usually around 275°F or 130°C for 15-30 minutes). Let them cool completely. -
Secure and Glaze:
If the eye pins feel loose after baking, pull them out, add a dab of superglue, and reinsert. Apply a gloss glaze to the tomato and cheese for a wet look, or keep the buns matte. -
Attach Chains:
Use pliers to open the jump ring on your keychain and attach it to the eye pin loop of your finished charms.
Troubleshooting: Fingerprints
If you see fingerprints on your smooth bun or fry box, lightly brush the raw clay with a little baby oil or cornstarch to smooth them away before baking.
Now snap a photo of your tiny meal and gift the matching half to your favorite food buddy


The Complete Guide to Pottery Troubleshooting
Uncover the most common ceramic mistakes—from cracking clay to failed glazes—and learn how to fix them fast.
Fruit Slice Cane Charms
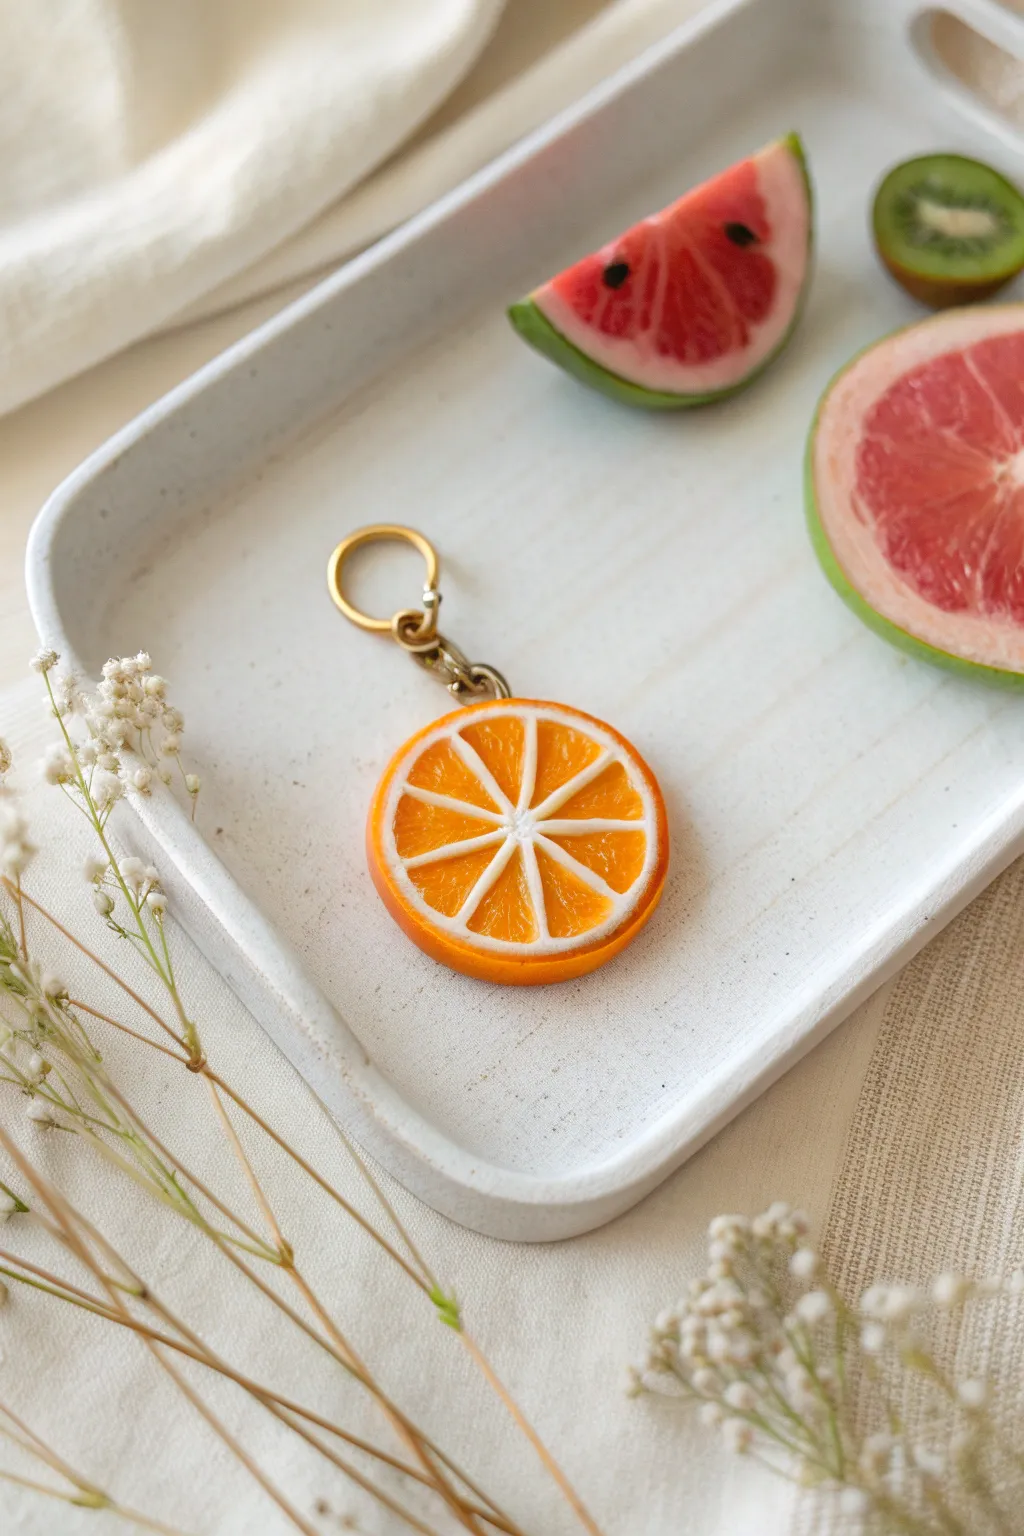
Capture the zest of summer with this incredibly realistic orange slice charm made from polymer clay. The translucent segments and perfect rinds make this a juicy addition to your keys or bag.
Step-by-Step Tutorial
Materials
- Translucent orange polymer clay
- Opaque white polymer clay
- Orange polymer clay (opaque)
- Liquid polymer clay (translucent)
- Blade or tissue slicer
- Toaster oven or clay oven
- Gloss glaze (UV resin or water-based polyurethane)
- Small paintbrush
- Needle tool
- Screw eye pin
- Keyring hardware and jump rings
- Pliers
Step 1: Creating the Cane
-
Form the segments:
Start by conditioning your translucent orange clay until soft. Roll it into a thick log, about 1 inch in diameter. This will become the juicy interior of the fruit. -
Shape the teardrop:
Pinch one side of the cylinder along its entire length to create a teardrop cross-section shape. This mimics the shape of a single orange segment. -
Wrap in pith:
Roll out a thin sheet of opaque white clay. Wrap this sheet around your teardrop-shaped orange log, trimming the excess so the seams meet neatly without overlapping. -
Stretch the cane:
Gently squeeze and pull the wrapped log to elongate it, reducing its diameter. You want to stretch it until it’s quite thin, maybe 1/4 inch thick, while maintaining that teardrop shape. -
Cut the segments:
Once stretched, cut the long cane into 8 equal lengths. These will be the individual segments of your orange slice. -
Assemble the center:
Roll a very thin snake of white clay to act as the central pith. Arrange the 8 segments around this center snake, pointing the narrow ‘teardrop’ tips inward. -
Fill the gaps (optional):
If there are significant gaps between the outer rounded edges of the segments, you can insert tiny triangular wedges of translucent clay, but usually, the next compression step handles this.
Step 2: Final Assembly & Baking
-
Wrap the outer pith:
Roll a medium-thickness sheet of white clay. Wrap this around your assembled bundle of segments to create the main white pith layer found under the skin. -
Add the rind:
Roll a sheet of opaque orange clay, slightly textured if you like, and wrap it around the white layer. This forms the outer skin. -
Compress and reduce:
Gently squeeze the entire large cane from the center outwards to ensure all layers adhere. Roll it on your work surface to smooth it and reduce it to your desired final diameter (about 1.5 to 2 inches). -
Slice the charm:
Let the cane rest until cool—I find placing it in the fridge for 20 minutes makes slicing much cleaner. Use a sharp tissue blade to cut a slice about 4-5mm thick. -
Texture the fruit:
With a needle tool, gently scratch radiating lines and tiny divots into the translucent orange segments to mimic pulp texture. -
Attach hardware:
Insert a screw eye pin into the top of the rind (the opaque orange edge). You can add a dab of liquid clay to the threads for a stronger hold. -
Bake:
Bake the piece according to your clay manufacturer’s instructions, usually around 275°F (135°C) for 15-20 minutes.
Smudged Colors?
If your orange color is bleeding into the white pith while slicing, your cane is too warm. Pop it in the freezer for 10-15 minutes to firm it up before trying another slice.
Step 3: Finishing Touches
-
Cool and inspect:
Allow the charm to cool completely. If there are any fingerprints on the white pith, you can lightly sand them away with fine-grit sandpaper. -
Glaze for juice:
Apply a coat of gloss glaze or UV resin. Focus strictly on the translucent orange segments to make them look wet and juicy, leaving the white pith and rind matte for contrast. -
Assemble keychain:
Once the glaze is cured or dry, use pliers to open a jump ring, attach your keyring hardware to the eye pin, and close the ring securely.
Level Up: Seeds!
Before baking, press tiny, teardrop-shaped bits of dark brown or black clay into the segments near the center to create realistic seeds like the watermelon slice in the photo.
Now you have a refreshing citrus accessory ready to brighten up your daily routine
Round Plush-Inspired Animal Minis
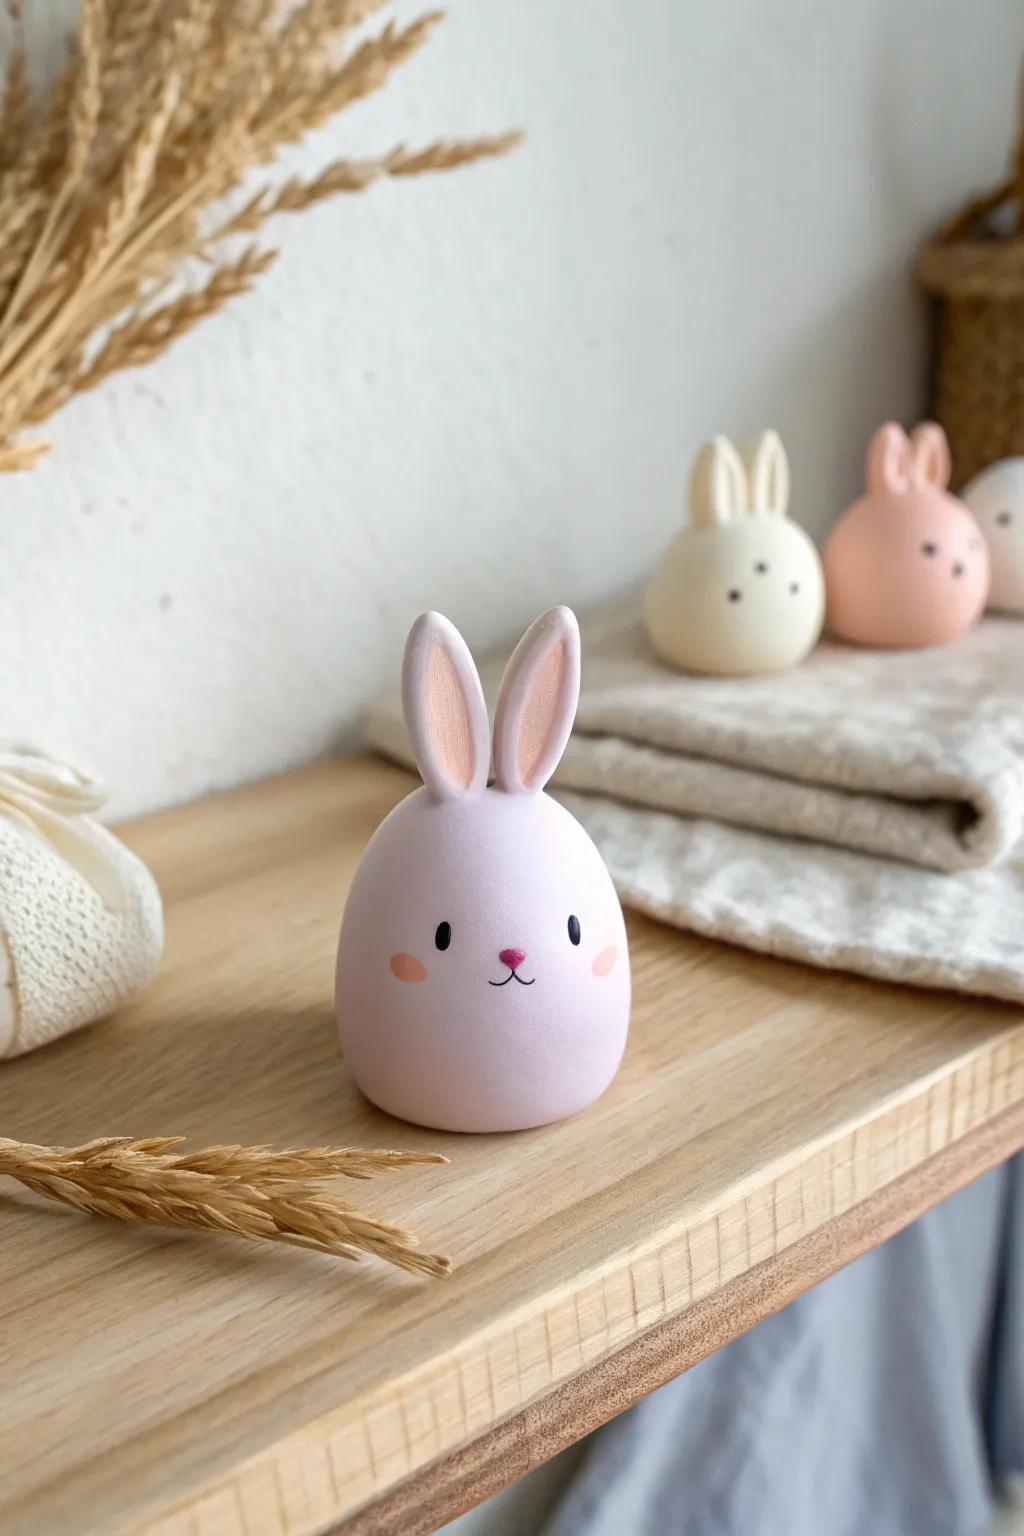
Capture the softness of a stuffed animal in a durable, adorable polymer clay figurine. These egg-shaped bunny minis feature a matte finish and simple, kawaii-style details that make them irresistible desk companions.
Step-by-Step Guide
Materials
- Light lavender or pastel pink polymer clay (main body)
- White polymer clay (inner ears)
- Black polymer clay (eyes)
- Dark pink polymer clay (nose)
- Soft pink chalk pastel or blush (cheeks)
- Basic sculpting tools
- Small paintbrush
- Needle tool
- Oven
- Baking sheet/tile
Step 1: Sculpting the Base
-
Condition the clay:
Start by thoroughly conditioning your main body color clay. Knead it in your hands until it is pliable and warm to prevent any cracks from forming later. -
Form the body:
Roll the clay into a smooth ball about the size of a large egg. Using your palms, gently taper the top half slightly so it resembles an egg shape—wider at the bottom and slightly narrower at the top. -
Flatten the base:
Tap the bottom of your egg shape gently on your work surface. You want to create a flat area so the bunny stands up securely on its own. -
Smooth the surface:
Check for any fingerprints. Gently rub them away with your thumb or a little baby oil to ensure that plush-toy-smooth finish.
Step 2: Creating the Ears
-
Shape the outer ears:
Take two smaller balls of the same body color clay. Roll them into logs and taper both ends to create long teardrop or rice grain shapes. -
Flatten the ears:
Gently flatten these teardrop shapes with your finger. They should look like stretched ovals. -
Add inner ear detail:
Take a tiny amount of white clay and roll two very thin snakes. Press these into the center of your flattened ear shapes, blending the edges slightly so they look inlaid. -
Attach the ears:
Place the ears on top of the head. I like to position them slightly close together for a cuter look. Use a sculpting tool to blend the clay from the base of the ears onto the head so the seam disappears.
Clean Clay Tip
White and pastel clays pick up dust easily. Keep a scrap piece of white clay nearby to roll in your hands periodically—it acts as a magnet, pulling dust off your fingers before you touch your project.
Step 3: Adding the Face
-
Position the eyes:
Roll two minuscule balls of black clay. Press them gently onto the face, spacing them somewhat wide apart to achieve that ‘kawaii’ proportion. -
Create the nose:
Take a microscopic speck of dark pink clay. Roll it into a tiny triangle or oval and place it centrally below and between the eyes. -
Draw the mouth:
Using a very sharp needle tool or a clay shaper, gently impress a small vertical line coming down from the nose, curving into a tiny ‘w’ shape for the mouth. Keep the pressure light. -
Apply blush:
Scrape a little bit of pink chalk pastel into a powder. Use a small, soft dry brush to dab this powder onto the clay cheeks for a soft blushing effect before baking.
Make it a Texture
To simulate real plush fabric, gently tap the unbaked surface with a stiff toothbrush or a ball of aluminum foil. This creates a subtle stippled texture that looks just like soft fur.
Step 4: Baking and Finishing
-
Preheat the oven:
Set your oven to the temperature recommended on your specific brand of polymer clay packaging. An oven thermometer is helpful here to prevent scorching. -
Bake the bunny:
Place your figurine on a baking tile or parchment-lined tray. Bake for the recommended time, usually 15-30 minutes per 1/4 inch of thickness. -
Cool down:
Let the bunny cool completely inside the oven with the door cracked, or remove it and let it rest undisturbed until cold. -
Optional texture:
To mimic the matte texture of the photo, avoid glossy varnishes. If your clay is naturally shiny, you can lightly buff it with a high-grit sanding sponge.
Arrange your finished bunny on a shelf and enjoy the cozy charm it adds to the room

TRACK YOUR CERAMIC JOURNEY
Capture glaze tests, firing details, and creative progress—all in one simple printable. Make your projects easier to repeat and improve.
Sea Creature Charms That Are Easy to Sculpt
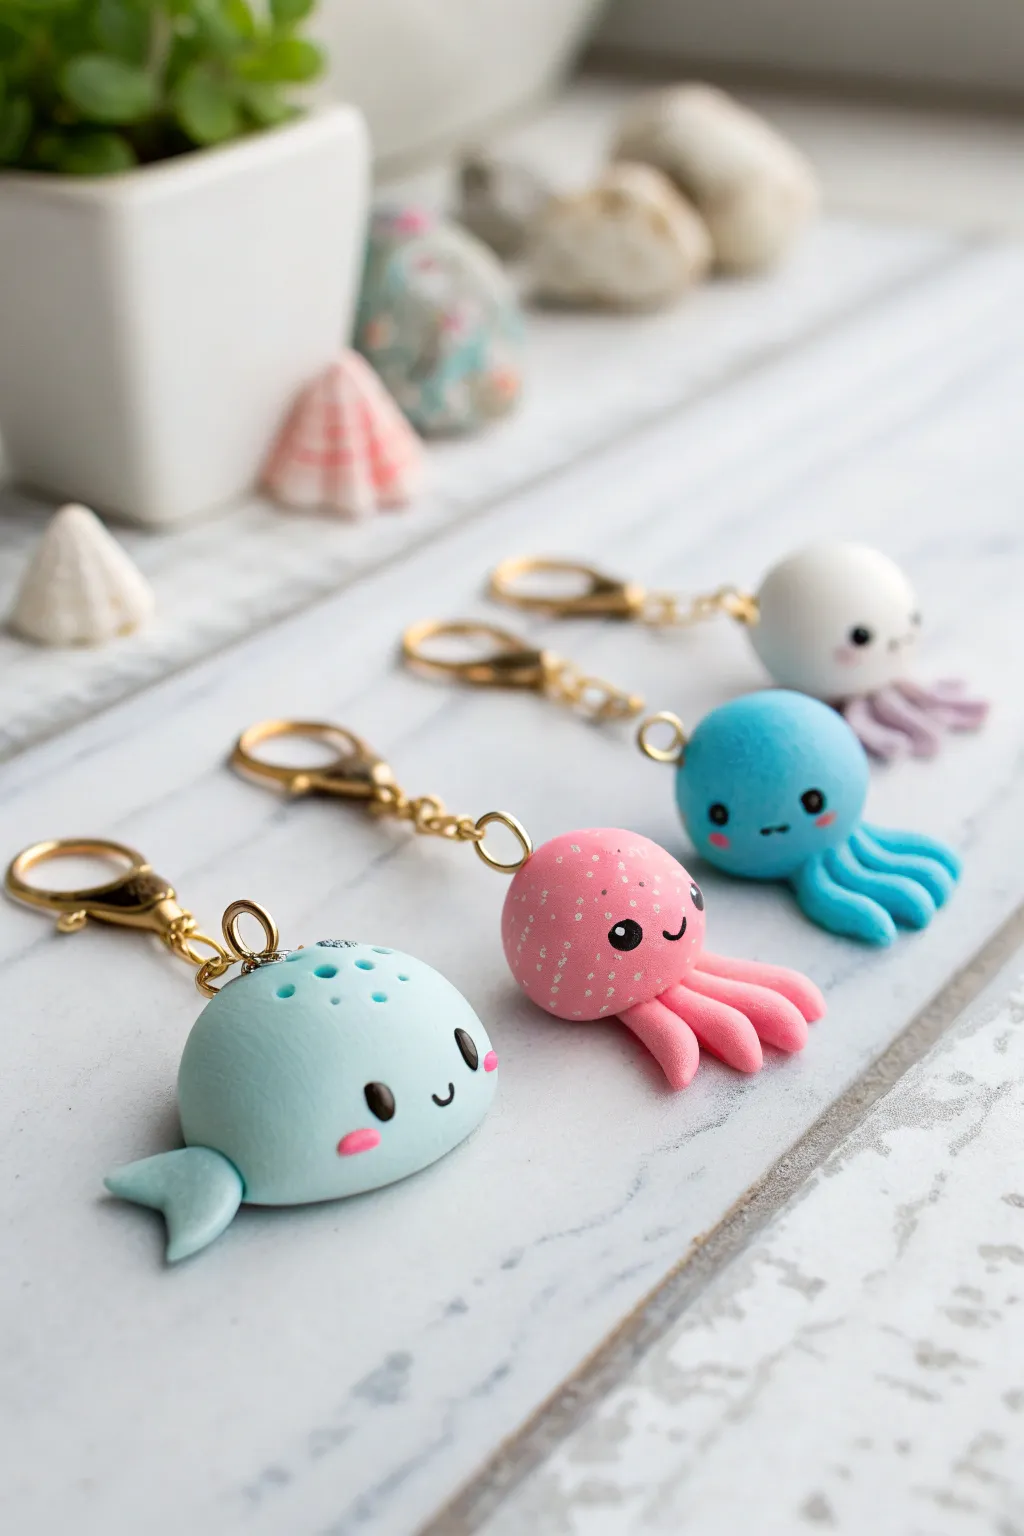
Dive into crafting with these incredibly cute polymer clay sea creature charms. With their rounded bodies, rosy cheeks, and simple shapes, these keychains make perfect gifts or adorable accessories for your own bag.
Step-by-Step Tutorial
Materials
- Polymer clay in light blue, pink, turquoise, and white
- Black polymer clay (tiny amount for eyes)
- Eyepins (silver or gold tone)
- Lobster clasp keychains attached to jump rings
- Ball stylus tool (small and large)
- Needle tool or toothpick
- Gloss glaze (water-based polyurethane)
- Soft artist pastels (pink for cheeks)
- Small paintbrush
- Liquid polymer clay or bake-and-bond
- Oven and baking tray
Step 1: Shaping the Bodies
-
Prepare the Clay:
Begin by conditioning your colored clay until it is soft and pliable. For each charm, roll a ball of clay about the size of a large grape or small walnut until it is perfectly smooth and free of cracks. -
Form the Whale:
Takes the light blue sphere and gently flatten the bottom against your work surface so it sits stability. Keep the top rounded like a dome. -
Form the Octopuses:
For the pink and blue octopuses, keep the spheres mostly round but slightly flatten the bottom so you have a distinct head shape. You want them to look ‘chubby’ and full.
Clean Clay Trick
Lighter colors like the blue whale pick up dust easily. Keep baby wipes nearby to clean your hands and tools often, or wear latex finger cots when handling the white and light blue clay.
Step 2: Adding Details & Features
-
Create the Whale Tail:
Form a small triangle of light blue clay. Use your needle tool to make a notch in the wide end to create two flukes, then curve the tips upward slightly. -
Attach the Tail:
Press the narrow end of the tail onto the back lower side of the whale body. Use a silicone tool or your finger to smooth the seam so it looks like one continuous piece. -
Whale Spout:
Using a needle tool, poke three or four tiny holes in a cluster on the very top of the whale’s head to mimic a blowhole. -
Make Octopus Tentacles:
Roll four to six small logs of clay for each octopus. These should be short and slightly tapered at one end. -
Attach Tentacles:
Attach the wider ends of the tentacles to the underside or bottom edge of the octopus head. Use a small ball tool to blend the seams underneath so they are secure. -
Curl the Tentacles:
I like to gently curl the tips of the tentacles upward or to the side to give the creatures a sense of movement and personality. -
Creating the Faces:
Use a medium ball stylus to create two small indentations for eye sockets on the front of each creature. This helps the eyes sit flush. -
Adding Eyes:
Roll tiny balls of black clay and press them into the sockets. For the whale, flatten them slightly into ovals; for the octopuses, keep them round. -
Mouth Details:
Roll an impossibly thin snake of black clay. Cut tiny segments and curve them into a ‘U’ shape, then gently press onto the face between the eyes for a smile. -
Rosy Cheeks:
Scrape a little pink chalk pastel into powder. Use a dry paintbrush to gently dust small circles of pink right under the eyes for a blushing effect. -
Tentacle Spots:
For the pink octopus, roll tiny specks of white or lighter pink clay and press them randomly onto the head and tentacles for texture.
Loose Eye Pins?
If the eye pin feels loose after baking, gently pull it out, add a drop of super glue (cyanoacrylate) to the shaft, and slide it back into the hole. It will bond instantly.
Step 3: Hardware & Baking
-
Insert Eye Pins:
Trim your eye pins if they are too long. Dip the end in a tiny bit of liquid clay or super glue gel and push it straight down into the top center of each charm. -
Baking:
Place your charms on a baking sheet lined with parchment paper. Bake according to your clay manufacturer’s instructions (usually 275°F/135°C for 15-30 minutes). -
Cooling:
Allow the pieces to cool completely in the oven with the door cracked open. This prevents thermal shock and cracking. -
Glazing (Optional):
Once cool, brush a coat of gloss glaze over the eyes to make them shine, or glaze the entire piece for a ceramic look. -
Assembly:
Use pliers to open the jump ring on your lobster clasp keychain, loop it through the eye pin, and close it securely.
Clip these adorable sea friends onto your keys or backpack and enjoy your handmade ocean crew
Mini Succulent Pots That Never Die
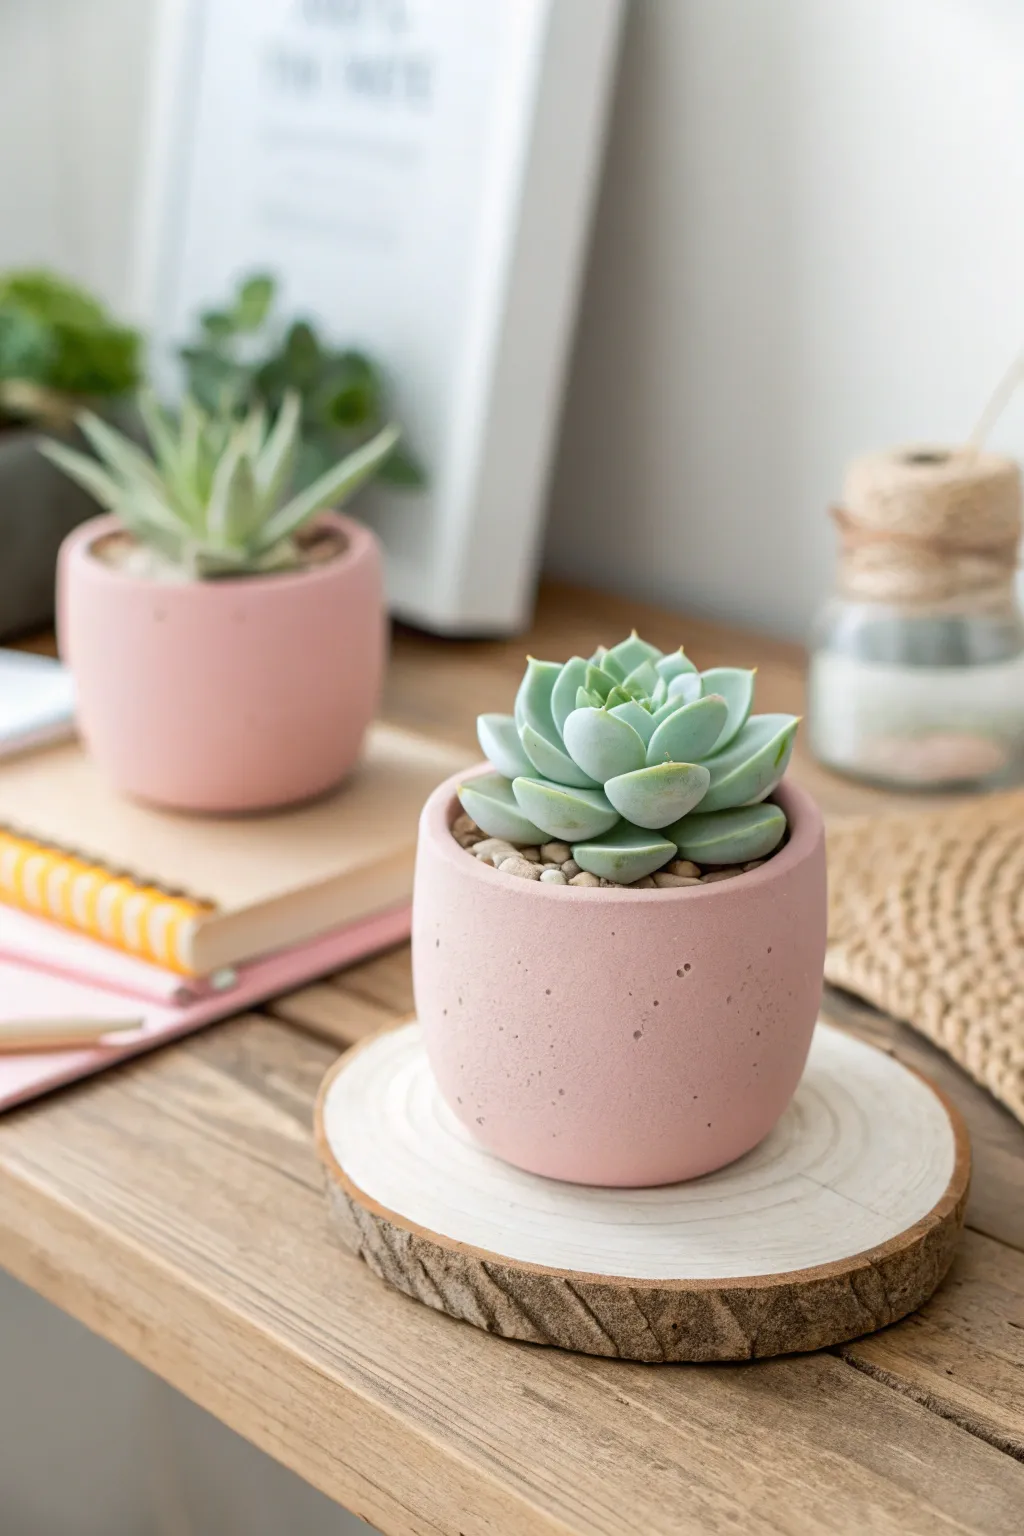
These charming, dusty-pink succulent pots look like they are made from heavy concrete, but they are actually lightweight polymer clay. Their soft matte finish and speckled texture provide the perfect home for real or faux succulents.
Step-by-Step
Materials
- Pink polymer clay (pastel or blush shade)
- Black pepper or dried coffee grounds
- Translucent polymer clay
- Small glass jar or metal tin (as a form)
- Rolling pin or pasta machine
- Blade or craft knife
- Coarse sandpaper or sanding sponge
- Liquid polymer clay (optional)
- Foil or masking tape
- Oven
Step 1: Preparing the Faux-Stone Clay
-
Condition the base clay:
Start by thoroughly conditioning your pink polymer clay until it is soft and pliable. The color should be a muted blush pink to match the reference. -
Add translucency:
Mix in a small amount of translucent clay (about 1 part translucent to 4 parts pink). This adds a slight depth to the clay that makes it look less like plastic and more like stone. -
Create the grit:
Sprinkle a pinch of ground black pepper or dried coffee grounds onto your flattened clay sheet. I like using pepper because the specks vary in size, mimicking real concrete aggregate. -
Incorporate the inclusions:
Fold the clay over the inclusions and run it through the pasta machine or roll it out by hand several times. Repeat until the specks are evenly distributed throughout the entire batch.
Pepper vs. Sand
Use ground black pepper for specks that stay dark. If you use real sand, baking won’t change it, but it creates a gritty texture that might make slicing the clay difficult.
Step 2: Forming the Pot
-
Prepare the form:
Wrap your glass jar or metal tin form in a layer of aluminum foil or masking tape. This crucial step prevents the clay from vacuum-sealing to the glass during baking. -
Roll out the slab:
Roll your speckled clay into a thick, even sheet, approximately 1/4 inch thick. You want it substantial enough to hold its shape. -
Cut the base:
Place your wrapped form onto the clay slab and cut a circle around the base using your craft knife. -
Cut the wall:
Measure the circumference and desired height of your pot, then cut a long rectangular strip from the remaining clay slab. -
Attach the wall:
Wrap the rectangular strip around the form. Ensure the bottom edge meets the base circle flushly. -
Seal the seams:
Gently press the vertical seam where the wall ends meet. Use your finger or a smoothing tool to blend the clay until the line disappears. Do the same for the bottom seam where the wall meets the base. -
Refine the shape:
Roll the form gently on your work surface to ensure the sides are perfectly round and smooth. -
Texture the surface:
Before baking, lightly tap the surface with coarse sandpaper or a toothbrush to remove fingerprints and add a porous stone texture.
Step 3: Baking and Finishing
-
Bake the pot:
Bake the clay—still on the form—according to the manufacturer’s instructions for the specific brand you used. Usually, this means around 275°F (135°C). -
Cool down:
Allow the piece to cool completely inside the oven. Removing it too early can cause thermal shock and cracking. -
Remove the form:
Gently slide the clay pot off the form. If you used foil, peel it out from the inside carefully. -
Sand the rim:
Place a sheet of sandpaper on a flat surface and rub the top rim of the pot against it in a circular motion to get that perfectly flat, architectural edge seen in the photo. -
Add character:
For extra realism, create a few tiny ‘pockmarks’ on the exterior using a needle tool to simulate air bubbles found in poured concrete. -
Final planting:
Fill with small pebbles and nestle your succulent (real or polymer clay) inside to complete the look.
Sticky Situation?
If the clay sticks to your work surface or roller, dust everything lightly with cornstarch or baby powder. This washes off easily after baking and doesn’t affect the finish.
Now you have a durable, stylish vessel that brings a soft pop of color to your workspace
Cute Animal Ring Dishes
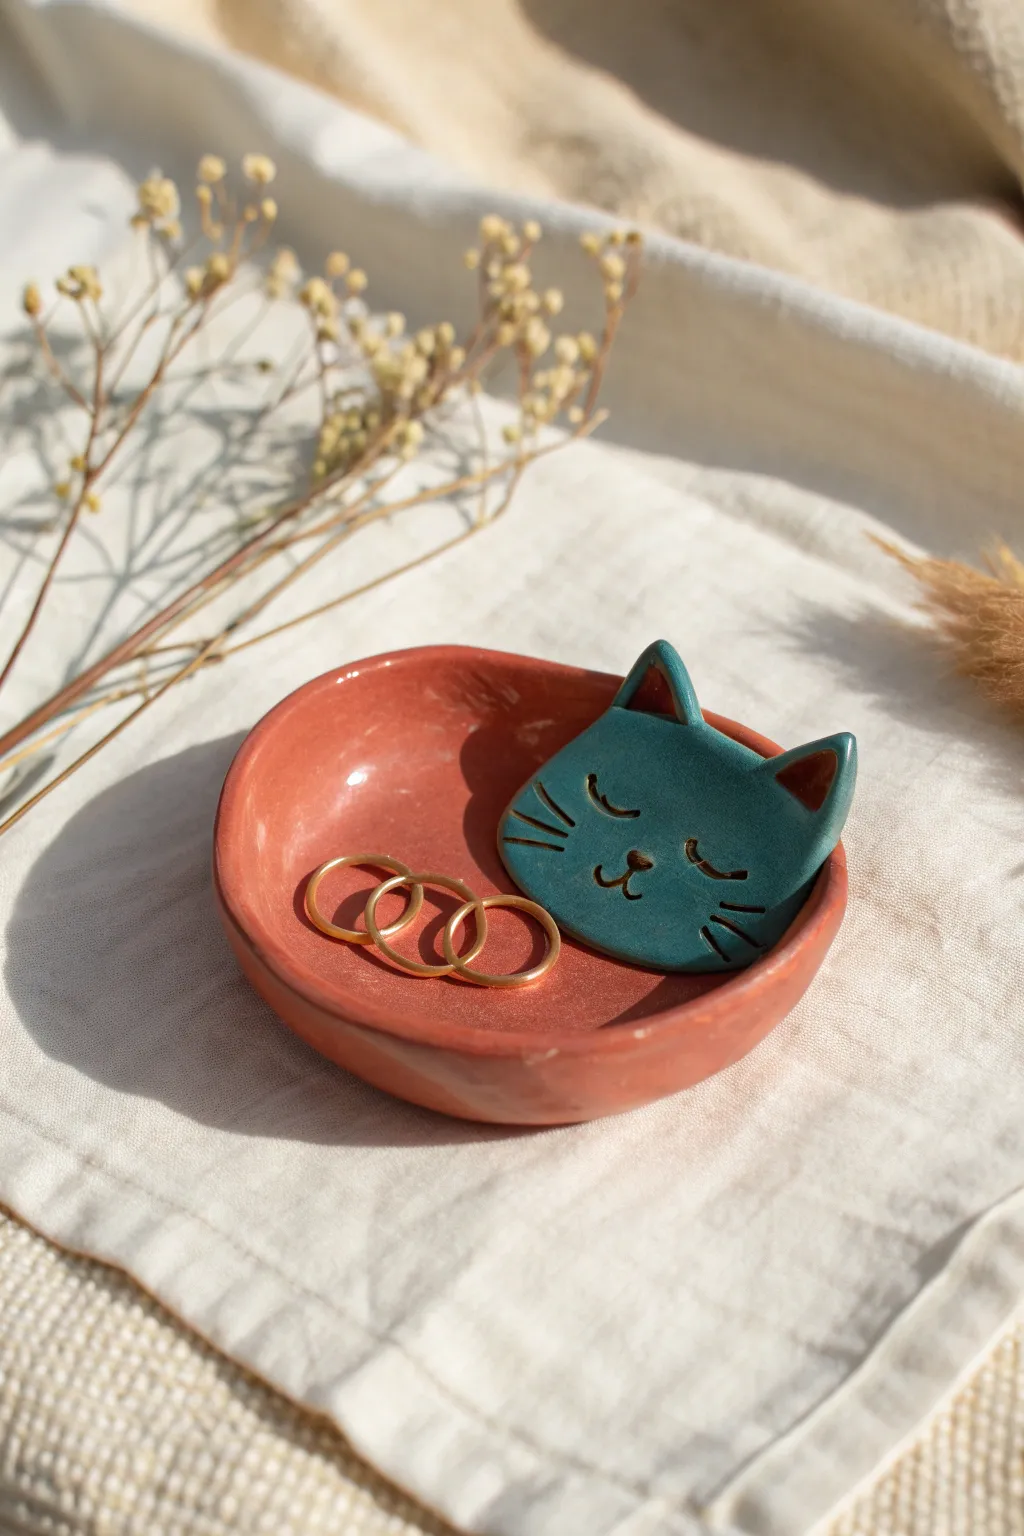
This charming ring dish combines a warm terracotta base with a cool teal cat accent for a look that mimics glazed ceramic pottery. It’s the perfect size for keeping your favorite rings safe while giving your vanity a touch of handmade whimsy.
How-To Guide
Materials
- Terracotta colored polymer clay
- Teal or Slate Blue polymer clay
- Acrylic rolling pin
- Small bowl or round cookie cutter (approx 3-4 inches)
- X-acto knife or craft blade
- Needle tool or toothpick
- Small ball tool
- Liquid polymer clay (Bake and Bond)
- Gloss glaze or UV resin
- Oven-safe small bowl (for creating the curve)
- Dark brown acrylic paint (optional, for antique effect)
Step 1: Creating the Base Dish
-
Condition the clay:
Start by warming up your terracotta-colored clay in your hands. Knead it thoroughly until it is soft, pliable, and free of any air bubbles. -
Roll it out:
Using your acrylic roller, flatten the clay into an even sheet. Aim for a thickness of about 1/4 inch so the dish feels substantial and not flimsy. -
Cut the circle:
Place your round cookie cutter or a small bowl upside down on the clay sheet and cut out a perfect circle. Remove the excess clay. -
Smooth the edges:
Dip your finger in a tiny bit of water or cornstarch and gently run it around the cut edge of the circle. This softens the sharp cut lines for a more organic, pottery-like finish. -
Form the curve:
Take your circle and gently press it into the bottom of a small, oven-safe bowl. Alternatively, you can use your fingers to pinch up the edges slightly to create a shallow rim.
Ceramic Look Pro-Tip
To mimic the uneven nature of hand-thrown pottery, don’t make your edges too perfect. A slightly wobbly rim adds authentic handmade charm.
Step 2: Sculpting the Cat
-
Shape the cat face:
Condition a smaller piece of teal clay. Roll it into a ball, then flatten it slightly into an oval shape. -
Form the ears:
Pinch the top two corners of your oval gently to pull out two triangular ear shapes. Smooth the transition so the head looks like one cohesive piece. -
Add ear details:
Using a small ball tool or the rounded end of a paintbrush, make indentations in the center of each ear triangle to give them depth. You can fill these with a tiny speck of terracotta clay if you like, though the glaze will pool here later nicely. -
Carve the features:
With your needle tool, very carefully crave two curved lines for sleepy eyes. -
Add nose and mouth:
Carve a small vertical line for the mouth anchor, and two curves for the smile. I prefer to press a tiny ball of brown or terracotta clay right at the junction for a cute nose. -
Add whiskers:
Gently press three short lines on each cheek using the side of your needle tool to create the whiskers. -
Attach the cat:
Inspect the placement of the cat head on the dish. Once happy, apply a thin layer of liquid polymer clay to the back of the cat head and press it firmly onto the terracotta base.
Step 3: Baking and Finishing
-
Pre-bake check:
Before putting it in the oven, give the piece a final once-over. Smooth out any accidental fingerprints with a drop of baby oil. -
Bake:
Bake the dish (still inside its forming bowl if necessary) according to your clay package instructions. Usually, this is around 275°F (135°C) for 30 minutes. -
Cool down:
Let the piece cool completely before removing it from the shaping bowl. Rushing this can cause cracks. -
Enhance the details:
Dilute a small amount of dark brown acrylic paint with water. Brush it over the carved cat face, then immediately wipe the surface with a paper towel. The dark paint will remain in the grooves, making the face pop. -
Glaze:
Apply a thick coat of gloss glaze or UV resin over the entire piece. This is crucial for achieving that shiny, ‘wet’ ceramic look seen in the photo. -
Final cure:
Let the glaze air dry or cure the resin under a UV lamp until hard and non-tacky.
Level Up: Gold Accents
After baking but before glazing, paint the rim of the dish or the tips of the cat’s ears with liquid gold leaf for a luxurious finish.
Now you have a sweet little spot to rest your jewelry at the end of the day
Mini Scene Trinket Dishes
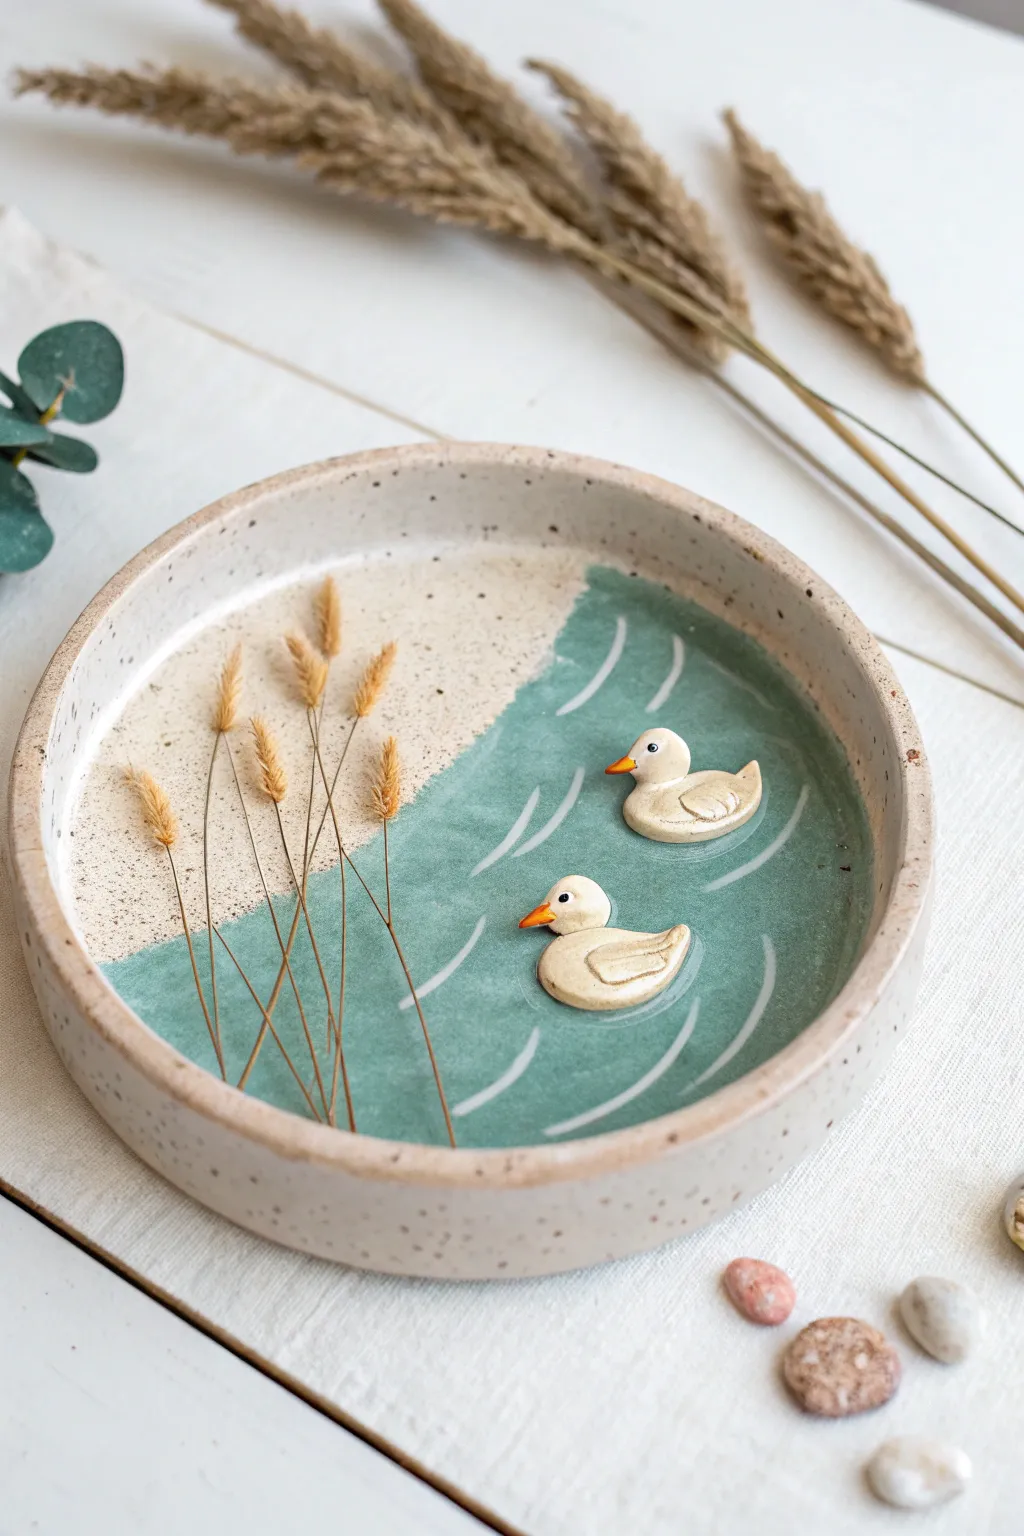
This charming trinket dish captures a serene lakeside moment with tiny ducks gliding across teal waters. With its speckled pottery finish and real dried grass accents, it makes for a delightful and functional piece of art.
Step-by-Step Guide
Materials
- White polymer clay
- Speckled tan/granite polymer clay (or mix play sand/pepper into beige clay)
- Acrylic paints: Teal/Aqua, Cream/Beige, White, Orange, Black
- Gloss varnish or clear resin
- Rolling pin
- Round cookie cutter or bowl template (approx 4-5 inches)
- Small craft knife or scalpel
- Assorted dried grass stems or wheat stalks
- Fine detail paintbrushes
- Oven-safe bowl (for shaping)
Step 1: Shaping the Base
-
Prepare the Clay:
Condition your speckled clay until it is soft and pliable. If you don’t have pre-speckled clay, knead fine black pepper or actual sand into beige clay to achieve that organic, pottery-like texture. -
Roll the Slab:
Roll the clay out into a smooth, even slab about 1/4 inch thick. Aim for a consistent thickness to ensure even baking later. -
Cut the Circle:
Using your large round cutter or a bowl as a guide, cut out a perfect circle. Smoothing the edges now with your finger will save sanding time later. -
Build the Wall:
Roll a long snake of clay and flatten it slightly to create a strip. Attach this strip to the perimeter of your circle base to form the rim, blending the seam on the inside and outside so it looks like one solid piece. -
Add Texture:
To mimic the sandy shore shown in the background, gently press a textured sponge or sandpaper into one half of the dish’s floor.
Burnt Grass Blues
Real dried plants can ignite or scorch in the oven. To be safe, poke holes for the stems before baking, but glue the actual dried grass in with superglue AFTER the baking and cooling is done.
Step 2: Sculpting the Details
-
Sculpt the Ducks:
Using tiny amounts of white clay, shape two small, flat-bottomed ovals for the bodies. Add smaller spheres for heads and form tiny triangles for tails. -
Attach Wings and Beaks:
Press small teardrop shapes onto the sides for wings. Use a minuscule bit of clay to form their beaks, blending them gently onto the faces. Position the ducks where you want them on the ‘water’ side of the dish. -
Embed the Reeds:
Take your dried grass stalks and gently press the bottom stems into the ‘sand’ side of the clay. You want them deep enough to hold, but be careful not to poke through the bottom. If the stalks are too brittle, make tiny holes now and glue them in after baking. -
Bake the Dish:
Place the project on a ceramic tile or inside an oven-safe bowl if you want a curved bottom. Bake according to your clay manufacturer’s instructions, usually around 275°F (135°C) for 30 minutes.
Use Resin for Water
Instead of just painting the water teal, pour a thin layer of tinted UV resin into the water side. It creates genuine depth and a glass-like surface that makes the ducks look like they are truly floating.
Step 3: Painting and Finishing
-
Cool and Clean:
Allow the piece to cool completely. If any edges feel rough, lightly sand them with fine-grit sandpaper. -
Paint the Water:
Paint the smooth half of the dish floor with a watery teal acrylic. I like to use a slightly diluted paint here so the speckles of the clay show through, enhancing the pottery effect. -
Paint the Sand:
Apply a cream or light beige paint to the textured side to highlight the ‘beach’ area, blending softly where it meets the water. -
Detail the Ducks:
Paint the ducks cream or soft white. Use a tiny detail brush to paint the beaks bright orange and add two black dots for eyes. -
Add Water Currents:
Using thin white paint and your finest brush, paint curved ‘parenthesis’ lines around the ducks and across the water to simulate ripples and movement. -
Seal the Piece:
Finish by applying a gloss varnish heavily over the water area to make it look wet. Use a matte varnish for the rim and sand area for contrast.
Now you have a serene little desk companion to hold your rings or coins
Decorative Magnets With Mini Characters
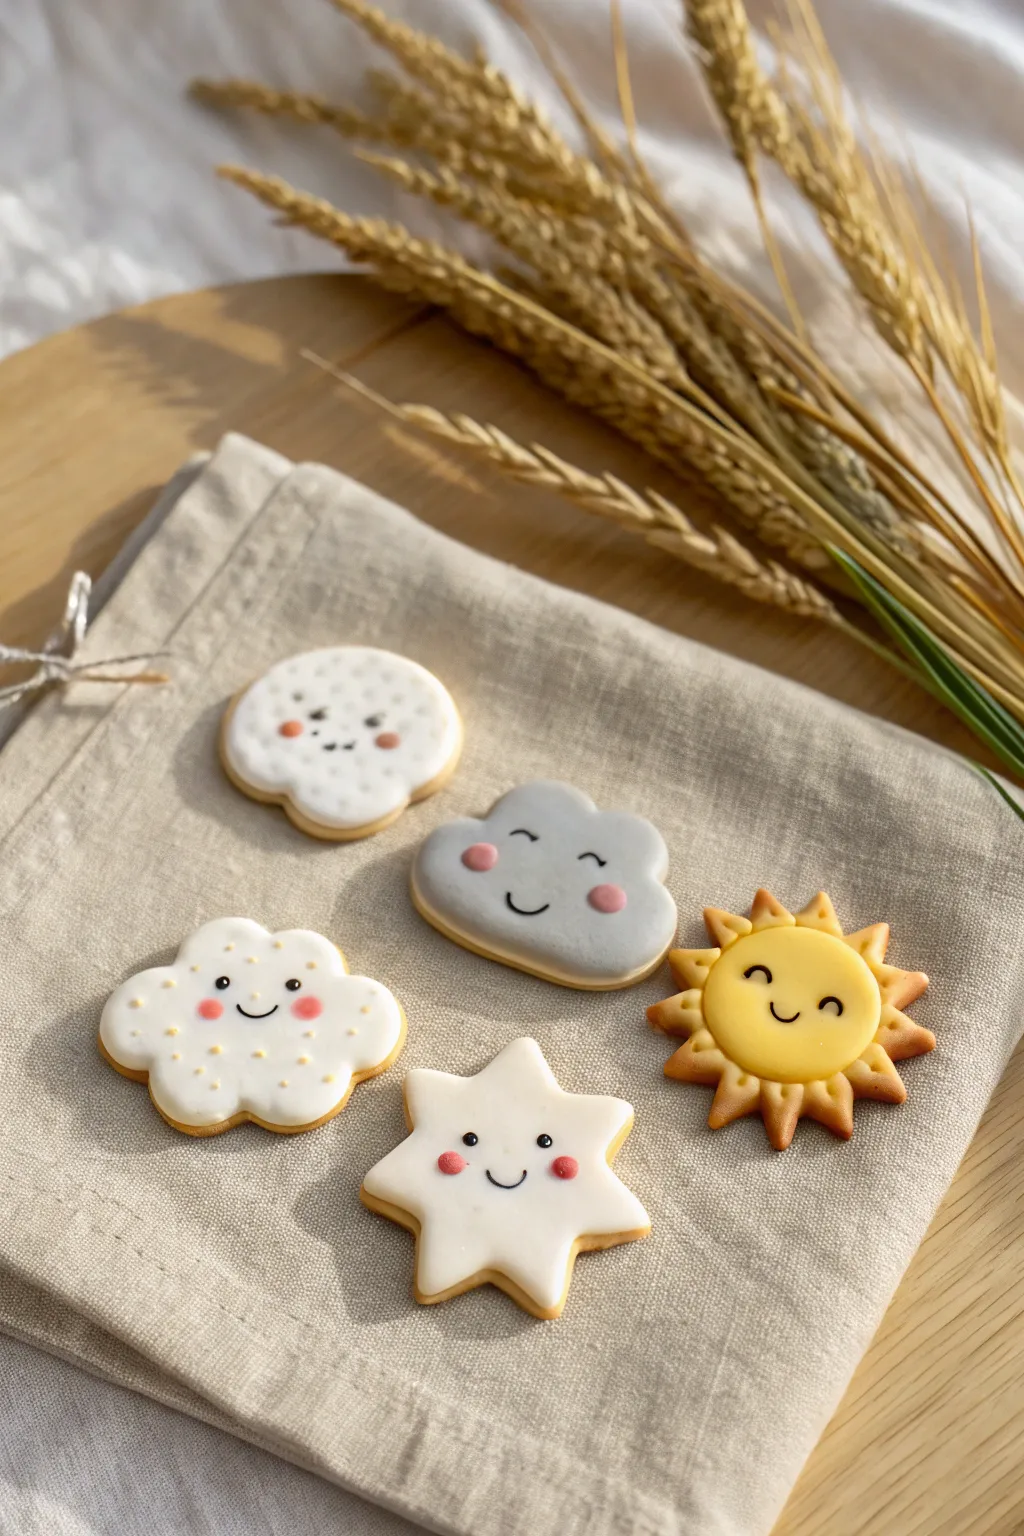
Bring a little sunshine to your fridge with these adorable polymer clay magnets designed to look like freshly frosted sugar cookies. With their charming kawaii faces and soft, matte finish, they capture the cozy essence of baking without any of the calories.
Detailed Instructions
Materials
- Polymer clay in white, pale yellow, light grey, and golden brown
- Liquid polymer clay (white and yellow)
- Pastel chalk pastels (soft pink for cheeks)
- Black acrylic paint or extra-fine tip black permanent marker
- Gloss glaze (optional, for ‘icing’ shine)
- Cookie cutters (small cloud, star, sun shaping tools)
- Needle tool or toothpick
- Texturing tool (toothbrush or sandpaper)
- Small round magnets
- Strong craft glue (E6000)
- Rolling pin
- Baking sheet and parchment paper
- Oven
Step 1: Baking the Bases
-
Mix the Dough Color:
Start by creating your ‘cookie dough’ color. Mix a large amount of white clay with a very small amount of golden brown or beige. You want a warm, baked-biscuit hue, not a dark chocolate shade. -
Roll and Texture:
Roll out the dough-colored clay to about 1/4 inch thickness. Before cutting, gently press a clean toothbrush or piece of sandpaper onto the surface to give it a realistic, baked cookie texture. -
Cut the Shapes:
Use your cutters to punch out your shapes. You’ll need two clouds, one star, and one sun base. Alternatively, you can hand-cut these shapes using a template and a craft knife. -
Enhance the Sun:
For the sun cookie, gently pinch the outer rays to make them distinct. If you want a toasted effect, very lightly dust the edges of all shapes with golden brown chalk pastel using a soft brush. -
First Bake:
Place your ‘bare’ cookies on a parchment-lined baking sheet and bake according to your clay manufacturer’s instructions for about 15 minutes to set the shape.
Sticky Situation?
If your ‘icing’ layer has air bubbles underneath, use your needle tool to prick the bubble gently and smooth the air out with your finger before baking.
Step 2: Icing & Decorating
-
Prepare the ‘Icing’:
While the bases cool, condition your icing colors. Roll out white clay very thinly for the clouds and star, light grey for the storm cloud, and pale yellow for the sun. -
Cut the Icing Layers:
Use the same cutters to create thin colored layers. However, this time, trim the edges slightly with a craft knife or smooth them inward with a finger so the ‘dough’ base will peek out around the edges. -
Apply the Base Icing:
Place the thin colored layers onto the cooled baked bases. Gently press them down, smoothing the edges to make it look like flooded royal icing. -
Shade the Storm Cloud:
For the grey cloud, add dimension by softening the edges. I find that rubbing a tiny bit of darker grey pastel around the bottom gives it that perfect rain-cloud weight. -
Add Cheeks:
Scrape a bit of soft pink chalk pastel into a powder. Use a small, dry brush or a cotton swab to dab rosy circular cheeks onto each character. -
Draw the Faces:
Using a very fine needle tool, gently indent where the eyes and smiles will go. Fill these indentations with black acrylic paint using a fine detail brush, or use a tiny bit of black clay rolled into snakes for the smiles and balls for the eyes. -
Sun Details:
For the sun, ensure the yellow icing doesn’t cover the rays completely; let the warmth of the cookie base shine through. The face should sit comfortably in the round center. -
Decorate the White Cloud:
For the happy white cloud, use a dotting tool to add tiny yellow dots—mimicking sprinkles or sunlight—around the face. -
Final Bake:
Return the decorated cookies to the oven. Bake for another 15-20 minutes to fully cure the icing layers and set the paint.
Make It Sweet
Mix liquid polymer clay with chalk pastels to create a drizzly ‘glaze’ consistency. You can pipe this on for 3D raised details.
Step 3: Finishing Touches
-
Cool Down:
Allow the pieces to cool completely. Polymer clay is strongest once it has returned to room temperature. -
Optional Glaze:
If you want a sugary sheen, brush a thin layer of gloss glaze strictly over the colored ‘icing’ parts, leaving the ‘cookie’ borders matte. -
Attach Magnets:
Flip the cookies over. Apply a dab of strong adhesive (like E6000) to the center of the back and press your magnet firmly into it. -
Dry Time:
Let the glue cure for at least 24 hours before sticking these sweet creations onto your refrigerator.
Enjoy your delightful set of weather magnets that look good enough to eat.
Terrazzo-Style Coasters and Tiles
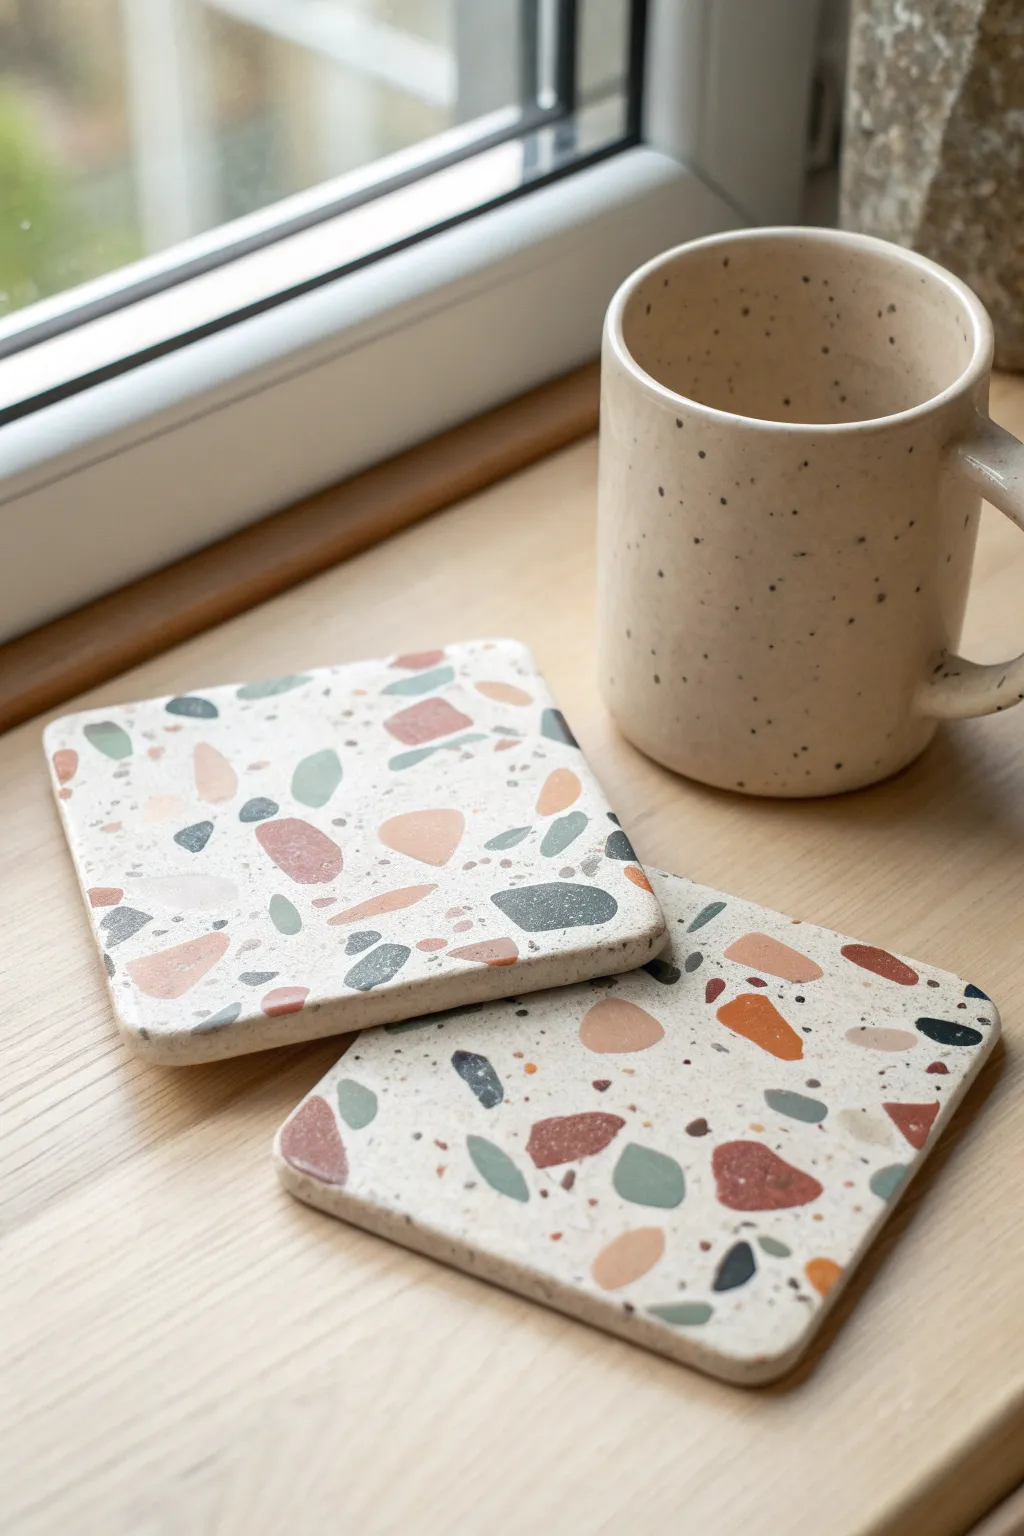
These stylish coasters mimic the classic Italian terrazzo look using colorful fragments of polymer clay embedded in a neutral base. The result is a smooth, durable, and sophisticated home accessory that looks like real stone but is surprisingly easy to make.
Step-by-Step
Materials
- Polymer clay (White or Ecru for base)
- Polymer clay (Various colors for chips: Terracotta, Sage Green, Slate Blue, Mustard)
- Acrylic rolling pin or clay machine
- Square cookie cutter (approx. 4 inches) or craft knife and ruler
- Parchment paper or ceramic tile
- Fine grit sandpaper (400, 600, 1000 grit)
- Optional: Water-based polyurethane varnish or resin
- Soft cloth for buffing
Step 1: Preparing the Terrazzo Chips
-
Condition your colors:
Start by conditioning your colored clays until they are soft and pliable. You’ll need small amounts of terracotta, sage green, slate blue, and mustard yellow to match the photo’s palette. -
Roll thin sheets:
Roll each colored clay piece out as thinly as possible. A thickness setting of roughly 1-2mm is ideal because you want the chips to be delicate, not chunky blocks. -
Create the fragments:
Rip the thin sheets of clay into rough, irregular pieces. Don’t overthink the shapes; natural variation is key to the terrazzo effect. -
Chop finely:
Using your craft knife, chop these larger ripped pieces into much smaller, confetti-like shards. Aim for a mix of sizes—some tiny specks and some larger geometric chunks. -
Separate the colors:
Keep your chopped piles of color separate for now so you can control the distribution later.
Stone Texture Trick
Add semi-translucent clay chips alongside opaque ones. When baked and sanded, they add depth that mimics real quartz or marble inclusions.
Step 2: Creating the Coaster Base
-
Prepare the base clay:
Taking a large block of your white or ecru clay, condition it thoroughly. You might want to mix in a tiny speck of black or brown granite-effect clay if you want a speckled stone background, though plain white works beautifully too. -
Roll the slab:
Roll the base clay out into a thick slab, approximately 5mm to 6mm thick. It needs to be substantial enough to act as a sturdy coaster. -
Sprinkle the chips:
Begin scattering your colored clay chips onto the white slab. Start with the larger pieces, placing them randomly, and then fill in the gaps with the smaller confetti bits. -
Press gently:
Once you are happy with the coverage, lay a piece of parchment paper over the slab. Use your rolling pin to gently press the chips into the base clay without distorting the shape too much. -
Roll flush:
Continue rolling carefully until the surface is completely flat and the colored chips are embedded flush with the white clay. The slab will naturally expand and thin out slightly during this process.
Level Up: Cork Backing
Glue a sheet of thin cork or felt to the bottom of your finished coaster. It adds a professional touch and protects your wooden table surfaces.
Step 3: Shaping and Finishing
-
Cut the squares:
Use your square cutter or a ruler and craft knife to cut out your coaster shapes. Ensure the corners are neat; you can round them slightly with your finger if you prefer a softer look. -
Smooth the edges:
Run your finger along the cut edges to smooth down any roughness or sharpness created by the cutting tool. -
Bake carefully:
Place your coasters on a ceramic tile or parchment-lined baking sheet. Bake according to your specific clay brand’s instructions (usually 275°F/130°C for 30 minutes). I prefer to tent foil over them to prevent any white areas from scorching. -
Cool down:
Allow the coasters to cool completely before handling. They will be slightly flexible when warm but harden as they cool. -
Sand for stone effect:
Once cool, wet sand the surface. Start with 400 grit to reveal the crisp edges of the chips, then move to 600 and 1000 grit for a super smooth finish. This step is crucial for removing the top film of clay and making the terrazzo pattern pop. -
Buff and seal:
Wash off any sanding residue and dry thoroughly. For a matte look, just buff vigorously with a soft cloth (denim works great). If you want extra protection against coffee stains, apply a thin layer of water-based polyurethane varnish.
Now you have a stunning set of custom coasters ready for your morning coffee or to give as a thoughtful handmade gift
Translucent Faux Stained Glass Suncatchers
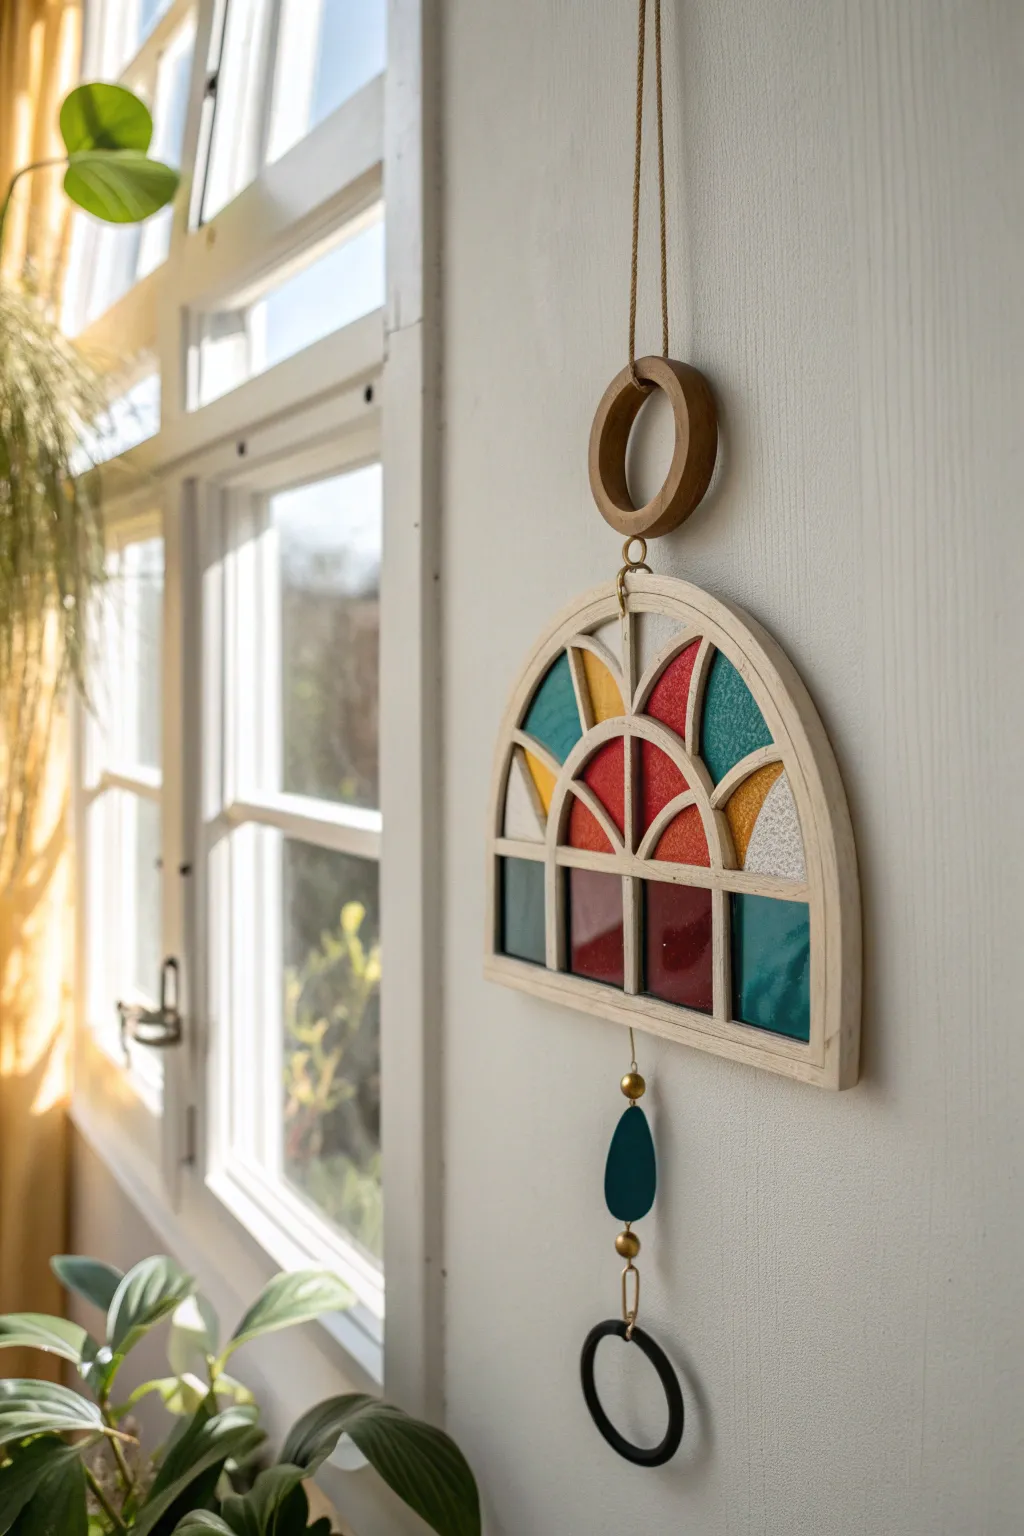
Capture the magic of cathedral windows with this lightweight, translucent polymer clay wall hanging. By combining liquid clay with wood-effect framing, you create a sophisticated piece of decor that glows beautifully when the light hits it.
Detailed Instructions
Materials
- Translucent liquid polymer clay
- Alcohol inks (teal, red, yellow/amber)
- Beige or tan polymer clay (for the frame)
- Brown acrylic paint or antique gel
- Texture sponge or sandpaper
- Craft knife or clay blade
- Rolling pin or pasta machine
- Glass tile or ceramic tile (as a work surface)
- Oven-safe round cutters (various sizes)
- Gold jump rings
- Jewelry pliers
- Jute twine or cord
- Gold beads
- Black polymer clay (for the bottom ring)
- Teal polymer clay (for the teardrop)
- UV resin (optional, for extra shine)
Step 1: Creating the Faux Wood Frame
-
Roll the clay:
Condition your beige or tan polymer clay until soft, then roll it out into a sheet approximately 1/4 inch thick. You want it sturdy enough to hold the liquid clay later. -
Texture the surface:
Press a texture sponge or coarse sandpaper onto the clay sheet to simulate wood grain. I prefer to drag the sandpaper slightly in one direction to create realistic linear grain marks. -
Cut the arch shape:
Using a large arched cutter or a paper template and a craft knife, cut out the main arch outline. Make it roughly 4-5 inches wide at the base. -
Carve the window panes:
Carefully cut out the inner sections to create the window pane design. Leave a grid of ‘wood’ strips about 1/4 inch wide. You need two quarter-circles at the top corners, a central semi-circle fan, and rectangular sections at the bottom. -
Create the top ring:
Form a thick ring from the same beige clay using two sizes of circle cutters. Texture it to match the main frame. -
Add hanging holes:
Poke a hole at the very top center of the arch and the bottom center of the wooden ring using a needle tool or toothpick. Ensure they are large enough for your jump rings. -
Pre-bake the frame:
Bake the frame and the wooden ring on your ceramic tile according to the clay package instructions (usually 275°F for 15-30 minutes). This hardens the ‘dam’ for the liquid clay.
Leaking Liquid Clay?
If liquid clay seeps under the frame, don’t panic. Bake it anyway, then use a craft knife to carefully scrape the thin overflow layer off the back of the glass tile once cool.
Step 2: Pouring the ‘Glass’
-
Prepare the colors:
In small disposable cups, mix translucent liquid polymer clay with a tiny drop of alcohol ink. You’ll need a teal, a deep red, and an amber yellow. Leave some liquid clay clear or mix with white glitter for the textured panes. -
Seal the back:
Ensure your baked frame is pressing flat against the glass tile. If there are gaps, the liquid will leak. You can use a tiny bit of raw clay on the outside edge to seal it down temporarily if needed. -
Fill the sections:
Carefully squeeze or drip the colored liquid clay into the open spaces of your baked frame. Fill the top corners with teal, the center fan sections with alternating red and yellow, and the bottom rectangles with teal and red. -
Create texture:
For the clear/white sections (like the right-middle section in the example), dab the wet liquid clay slightly with a toothpick to create a ‘seeded glass’ look. -
Bake the glass:
Bake the entire piece again on the tile. To maximize transparency, bake at a slightly higher temperature (usually 300°F) for about 15-20 minutes, keeping a close eye to prevent burning. Let it cool completely before popping it off the tile.
Step 3: Assembly and Finishing
-
Antique the wood:
Brush brown acrylic paint over the baked beige frame. Quickly wipe it off with a damp paper towel or baby wipe, leaving the dark paint only in the textured crevices to mimic wood grain. -
Make the charms:
Create a flat teardrop shape from teal clay and a black ring from black clay. Bake these separately and drill holes in them once cooled. -
Connect the top:
Use a large gold jump ring to connect the wooden top ring to the main arch. It should swing freely. -
Assemble the drop:
Thread a gold bead onto a headpin or wire, attach it to the teal teardrop, and connect that to the bottom of the arch. Chain customized links or jump rings below it to hold the black ring at the very bottom. -
Add the cord:
Loop a piece of natural jute twine through the top wooden ring for hanging.
Crystal Clear Finish
For a glassier finish, quench the piece in ice water immediately after baking the liquid clay. This shocks the polymer and can increase translucency significantly.
Hang your new creation in a sunny window and enjoy the warm, colorful glow it casts across your room