Whenever I need a quick creative win, I reach for polymer clay because it’s made for tiny, adorable projects you can finish in an afternoon. Here are my go-to poly clay ideas—from classic beginner favorites to more “how did you make that?” little charms and minis.
Simple Arch Polymer Clay Earrings
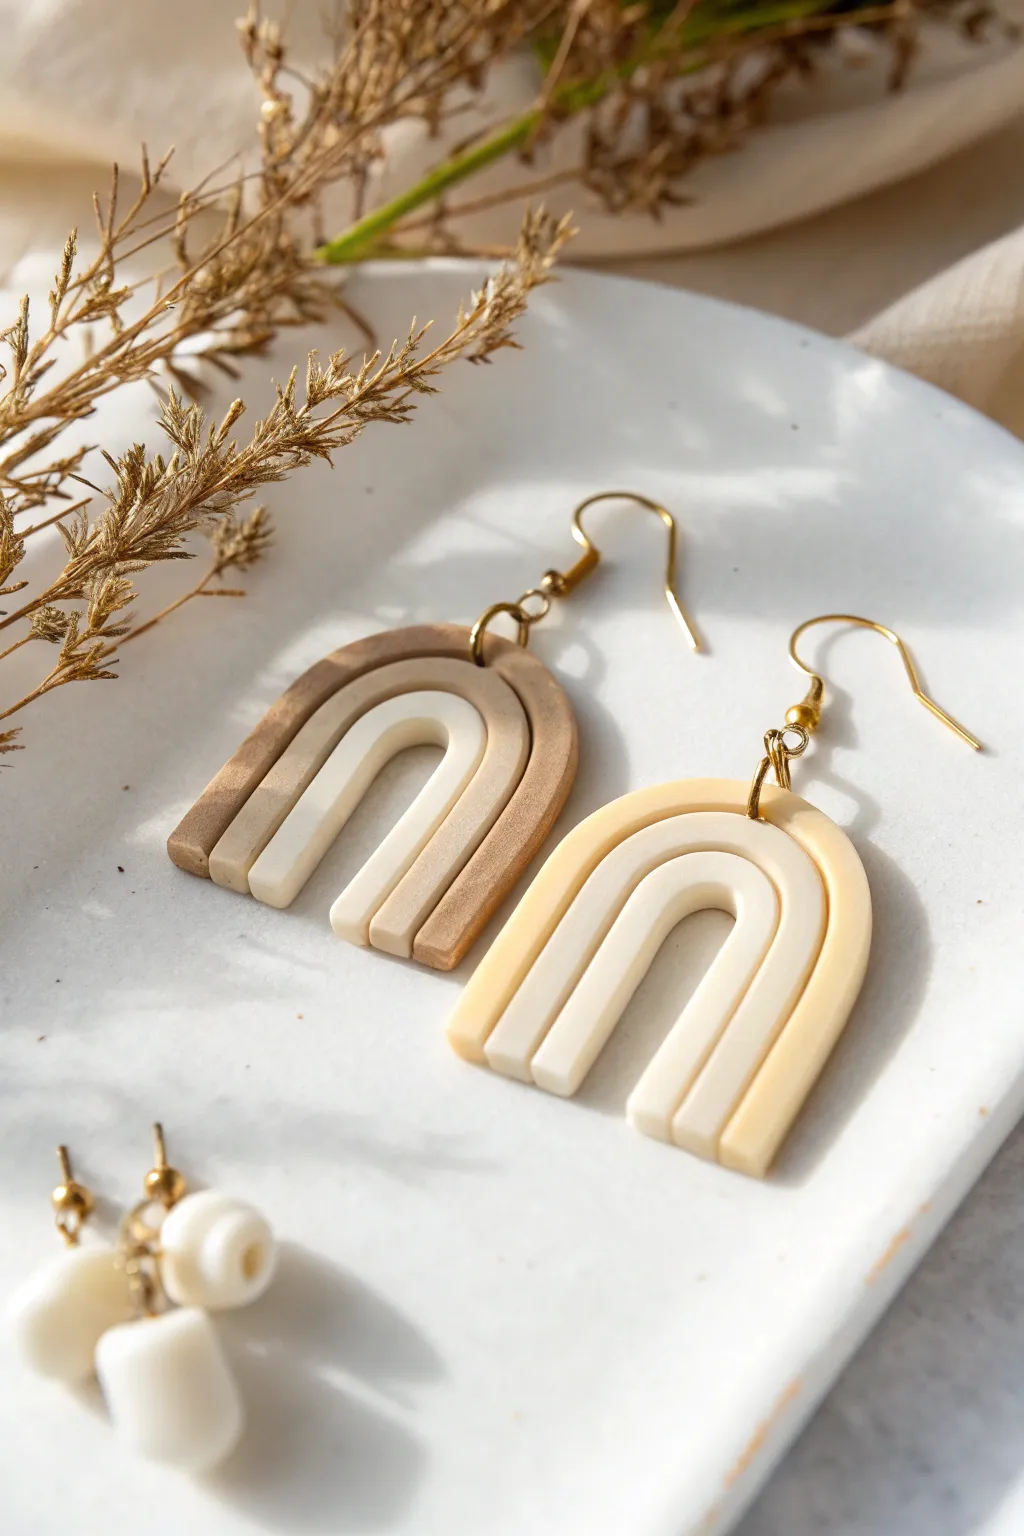
These minimalist polymer clay earrings feature an elegant, nested arch design in soothing neutral tones. With a mix of matte creams and subtle metallic textures, they are the perfect understated accessory for everyday wear.
Step-by-Step Tutorial
Materials
- Polymer clay in white, translucent, beige, and metallic bronze/gold
- Clay roller or pasta machine
- Flexible tissue blade
- Arch shaped clay cutters (set of 3 graduated sizes) OR a scalpel knife and template
- Smooth work surface (ceramic tile or glass)
- Jump rings (gold finish)
- Fish hook earring wires (gold finish)
- Jewelry pliers
- Hand drill or pin vibe
- Oven for baking
Step 1: Preparing the Clay
-
Condition the white clay:
Begin by taking your white polymer clay and kneading it in your hands until it becomes soft and pliable. This conditioning step is crucial to prevent cracks later. -
Mix your custom cream shade:
To achieve the soft inner arch color, mix a small amount of translucent clay into your white clay. This gives it a less stark, more porcelain-like finish. -
Create the beige tone:
Condition the beige clay. If your beige is too dark, blend in some white to soften it until it matches the middle arch tone shown in the image. -
Prepare the metallic shade:
Condition the metallic bronze or gold clay. Roll this into a ball and set it aside; the metallic particles often look best when the clay is manipulated less vigorously than solid colors. -
Roll out sheets:
Using your roller or pasta machine, roll each of your three colors into sheets of even thickness. Aim for about 3mm thick so the earrings feel sturdy but not heavy.
Clean Cuts Pro Tip
To prevent the clay from sticking to your cutters, dip the cutting edge into a small pile of cornstarch or baby powder before pressing it into the clay.
Step 2: Cutting and Shaping
-
Cut the outer arches:
Using your largest arch cutter, cut two shapes from the metallic bronze sheet for the left pair design, or the beige sheet if making the right pair. -
Cut the middle arches:
Switch to your medium-sized cutter. Cut two arches from the beige clay sheet. These will nest snugly inside the larger arch. -
Cut the inner arches:
Finally, use the smallest cutter on your cream/white sheet to create the innermost section of the design. -
Assemble the arch shape:
Gently place the three arches together on your baking tile. Start with the smallest arch, fit the middle one around it, and then the largest one on the outside. Press the edges together very gently so they bond without distorting the shape. -
Smooth the seams:
Use your finger or a rubber clay shaper to lightly smooth the back of the earrings where the arches meet. This strengthens the bond between the separate pieces. -
Trim the bottom edge:
Take your long flexible blade and make one clean, straight cut across the bottom of all three arches. This ensures all the legs are perfectly even and flush. -
Add texture (optional):
For the metallic arch shown on the left, you can lightly distress the surface using coarse sandpaper or a toothbrush before baking to enhance the metallic shimmer.
Level It Up
Try mixing black pepper or dried tea leaves into the white clay for a speckled ‘stone’ effect that adds organic texture to the inner arch.
Step 3: Baking and Assembly
-
Drill holes:
Before baking, use a toothpick or small tool to poke a hole at the top center of the largest arch. Make sure the hole is big enough for your jump rings. -
Bake the pieces:
Place your tile with the clay pieces into the oven. Follow your specific clay manufacturer’s instructions for temperature and time, usually around 275°F (130°C) for 30 minutes. Using an oven thermometer is something I always recommend to ensure accuracy. -
Cool down:
Once baked, turn the oven off and let the pieces cool partially inside. This gradual cooling helps prevent brittleness. -
Sand the edges:
If there are any rough spots on the edges, use fine-grit sandpaper to gently smooth them out under running water. This keeps clay dust out of the air. -
Attach jump rings:
Using two pairs of jewelry pliers, twist a gold jump ring open sideways. Loop it through the hole you created at the top of the arch. -
Add the hook:
Before closing the jump ring, slide on the loop of your fish hook earring wire. Twist the jump ring back ensuring it closes tightly with no gap.
Enjoy styling these versatile earrings that bring a touch of handcrafted elegance to your wardrobe


Terrazzo Speckle Statement Studs
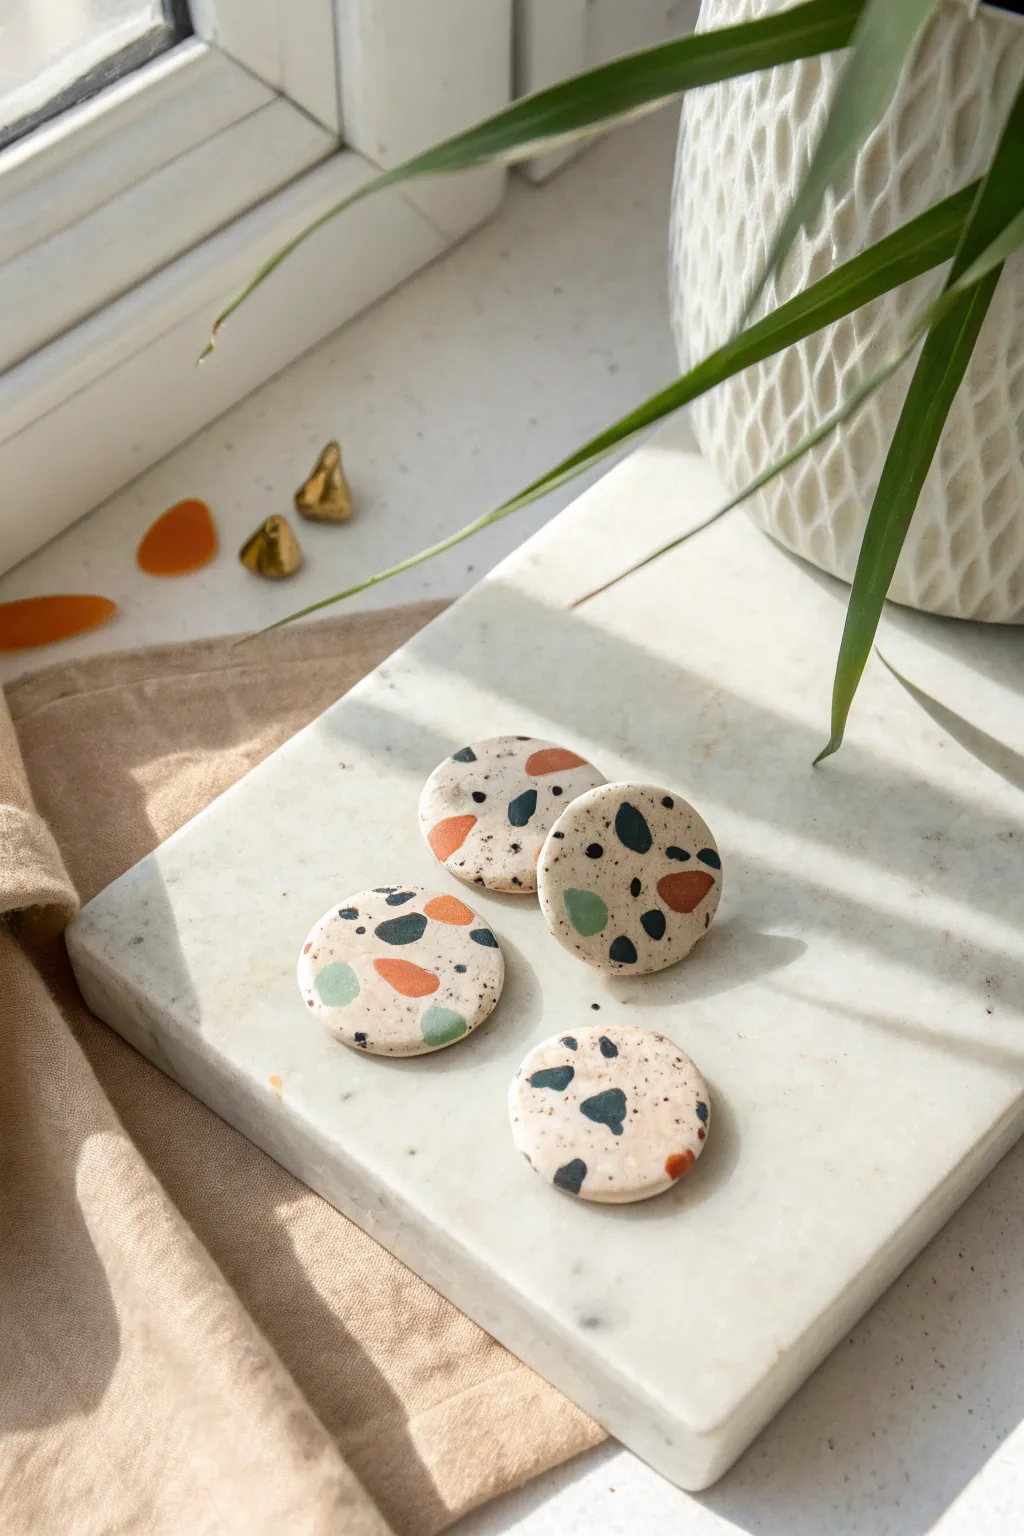
Capture the trendy, modern aesthetic of terrazzo flooring in miniature form with these chic polymer clay earrings. The organic speckling of black, terra-cotta, and sage green against a creamy base creates a sophisticated, earthy look perfect for everyday wear.
How-To Guide
Materials
- Polymer clay in white or cream/ecru
- Polymer clay in black, terra-cotta orange, and sage green
- Rolling pin or acrylic roller
- Circular clay cutter (approx. 20-25mm)
- Tissue blade or sharp craft knife
- Parchment paper or baking tile
- Course and fine grit wet/dry sandpaper (400 to 1000 grit)
- Earring posts and backs
- Strong jewelry glue (like E6000) or UV resin
- Gloss or matte varnish (optional)
Step 1: Preparing the Base
-
Condition the base clay:
Start by thoroughly kneading your white or cream-colored clay until it is soft and pliable. This warmth helps prevent cracking later on. -
Roll the sheet:
Using your acrylic roller or a pasta machine, roll the conditioned base clay into a smooth, even sheet. Aim for a thickness of about 3mm to 4mm, which gives the studs a nice substantial feel without being too heavy. -
Prepare the speckles:
Take tiny amounts of the black, terra-cotta, and sage green clay. Roll them into very thin snakes or flat sheets. -
Chop the colors:
Using your tissue blade, chop these colored pieces into irregular, tiny fragments. Keep the black pieces particularly small—like ground pepper—while the colored chunks can be slightly larger and more variably shaped.
Smudged Colors?
If your colored speckles are smearing during the rolling process, your clay might be too warm or soft. Pop the unrolled slab in the fridge for 10 minutes to firm up before chopping and rolling.
Step 2: Creating the Terrazzo Pattern
-
Scatter the fragments:
Randomly sprinkle your chopped colored clay pieces over the rolled-out base sheet. Don’t overthink the placement; organic randomness is key to the terrazzo look. -
Embed the design:
This is where I like to place a piece of parchment paper over the clay to prevent sticking. Gently roll over the sheet again with your roller to press the colored chips flat into the base clay until the surface is completely smooth. -
Check the surface:
Lift the parchment and inspect your slab. If you see gaps that look too empty, add a few more speckles and roll again until you are happy with the density of the pattern. -
Add texture (optional):
For a more stone-like effect, you can gently sprinkle a tiny bit of real black pepper or ground cinnamon onto the surface and roll it in, though the clay speckles alone work beautifully.
Level Up: UV Resin Topcoat
For a glassy, high-end finish that mimics polished stone, apply a layer of UV resin to the top of your baked/sanded studs and cure under a UV lamp for a durable, glossy shine.
Step 3: Cutting and Baking
-
Cut the shapes:
Press your circular cutter firmly into the clay slab to cut out your stud shapes. Twist slightly before lifting to ensure a clean cut. -
Refine the edges:
Before baking, gently smooth the edges of each circle with your fingertip to remove any loose bits or sharpness from the cutter. -
Bake the pieces:
Place your clay circles on a ceramic tile or baking sheet lined with parchment. Bake according to your specific brand of clay’s instructions (usually around 275°F/130°C for 15-30 minutes). -
Cool down:
Allow the pieces to cool completely before handling them. Polymer clay is fragile when hot and reaches its full strength only after cooling.
Step 4: Finishing Touches
-
Sand the surface:
Once cool, dip your sandpaper in water and sand the surface and edges of each stud. Start with a lower grit (400) to flatten any bumps, and move to a higher grit (1000) for a silky smooth finish. -
Buff and clean:
Wipe away any sanding dust with a damp cloth and buff the surface with a piece of denim or a soft cloth to bring out the depth of the colors. -
Attach the posts:
Apply a small dot of strong jewelry glue to the flat pad of an earring post and press it firmly onto the center back of the clay circle. -
Secure the hardware:
Let the glue cure fully (usually 24 hours). For extra security, you can place a tiny piece of clay over the glued post pad and bake the piece again briefly, or cover the pad with a thin layer of UV resin.
Once the glue is fully set, your stylish terrazzo studs are ready to add a modern pop of pattern to any outfit


Tiny Fruit Slice Charm Set
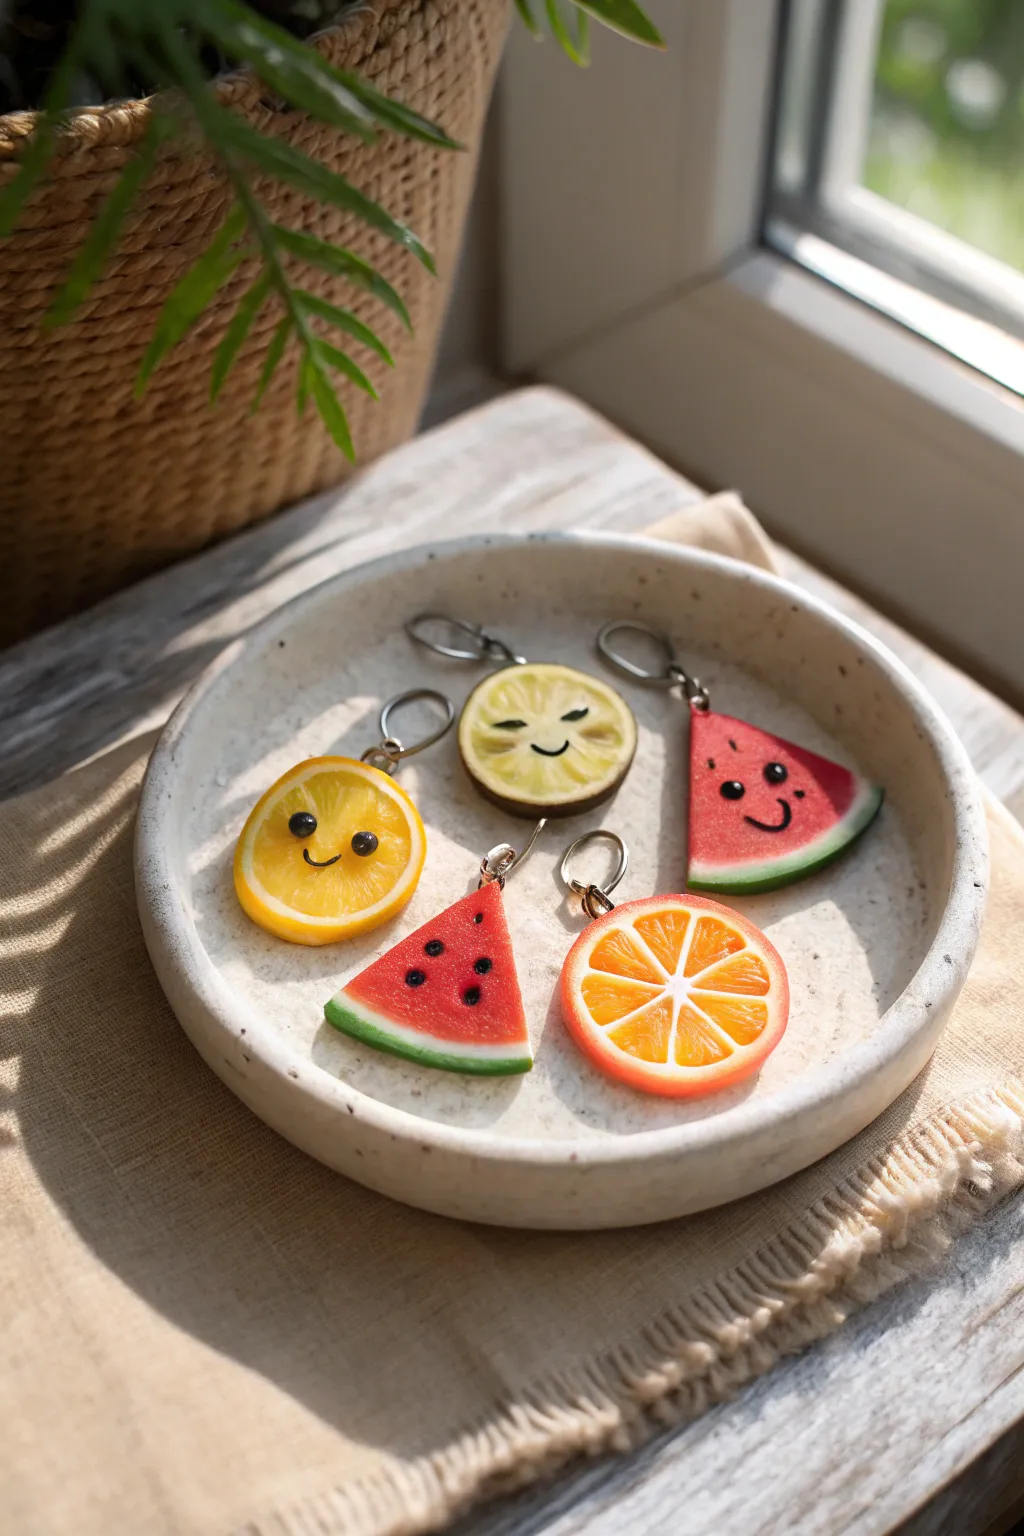
Brighten up your keyring with this adorable collection of polymer clay fruit slices, featuring sweet smiley faces and translucent citrus details. This project combines simple cane-making techniques with character sculpting to create a cheerful set that looks good enough to eat.
How-To Guide
Materials
- Polymer clay (translucent, white, red, yellow, orange, green, black)
- Liquid polymer clay (translucent)
- Clay roller or pasta machine
- Tissue blade or sharp craft knife
- Needle tool
- Small circle cutter
- Jump rings and keychain hardware
- Gloss glaze or UV resin
- Oven for baking
Step 1: Prepping the Citrus Canes
-
Mix your colors:
Start by mixing translucent clay with small amounts of yellow and orange to create juicy, semi-transparent fruit flesh colors. Keep a portion of plain white clay for the pith. -
Form the segments:
Roll the translucent colored clay into a thick log. Roll a thin sheet of white clay and wrap it around the log. Gently squeeze and stretch this log until it is thinner, then cut it into 8 equal lengths. -
Shape the wedges:
Pinch each small log into a teardrop or wedge shape. These will become the individual segments of your orange or lemon slices. -
Assemble the core:
Arrange the 8 wedges in a circle with the pointy ends meeting in the center. Imagine reassembling a sliced orange. I find placing a tiny snake of white clay in the very center helps them stick together neatly. -
Add the rind:
Roll a sheet of white clay and wrap it around the assembled circle. Then, wrap a final layer of colored clay (yellow for lemon, orange for orange) around the white to create the outer skin. -
Reduce the cane:
Gently squeeze and roll the large cylinder to reduce its diameter, working from the center out to avoid trapping air. Once it’s the size of a coin, slice it into disks to reveal your fruit pattern.
Step 2: Creating the Watermelon Slices
-
Build the watermelon log:
Roll a thick log of red clay. Wrap it in a thin sheet of white clay, followed by a slightly thicker sheet of green clay for the rind. -
Shape and slice:
Reduce this cane just like the citrus one, then slice it into disks. Cut each disk in half to create semi-circle watermelon wedges. -
Paint the seeds:
Using a tiny dotting tool or the tip of a needle, add small indentations for seeds. You can fill these with tiny bits of black clay or paint them on later with acrylics.
Distorted Slices?
If your fruit pattern smushes when cutting, chill the raw clay cane in the fridge for 20 minutes. A firmer cane slices cleanly without distortion.
Step 3: Adding Faces & Finishing
-
Sculpt the eyes:
For the kawaii characters, roll tiny balls of black clay and press them onto the fruit slices. Place them wide apart for a cuter look. -
Create the smiles:
Roll an incredibly thin snake of black clay. Cut tiny segments and curve them into a ‘U’ shape, pressing them gently onto the clay between the eyes. -
Add the hardware:
Insert a screw eye pin into the top of each fruit slice (through the rind). Ensure it goes deep enough to be secure. -
Texture the classic orange:
For the realistic orange slice without a face, use a needle tool to gently scratch radial lines into the translucent segments to mimic pulp texture. -
Bake carefully:
Bake according to your clay manufacturer’s instructions, usually around 275°F (130°C) for 15-20 minutes. Watch closely to ensure the white parts don’t yellow. -
Gloss and assembly:
Once cool, coat the fruit flesh areas with gloss glaze or UV resin to make them look wet and juicy. Finally, attach your jump rings and keychain clips.
Semi-Translucent Tip
Mix 1 part colored clay to 3 parts translucent clay. This ratio gives that perfect realistic ‘jelly’ look to the fruit flesh after baking.
Now you have a refreshing set of fruit charms ready to sweeten up your accessory game.


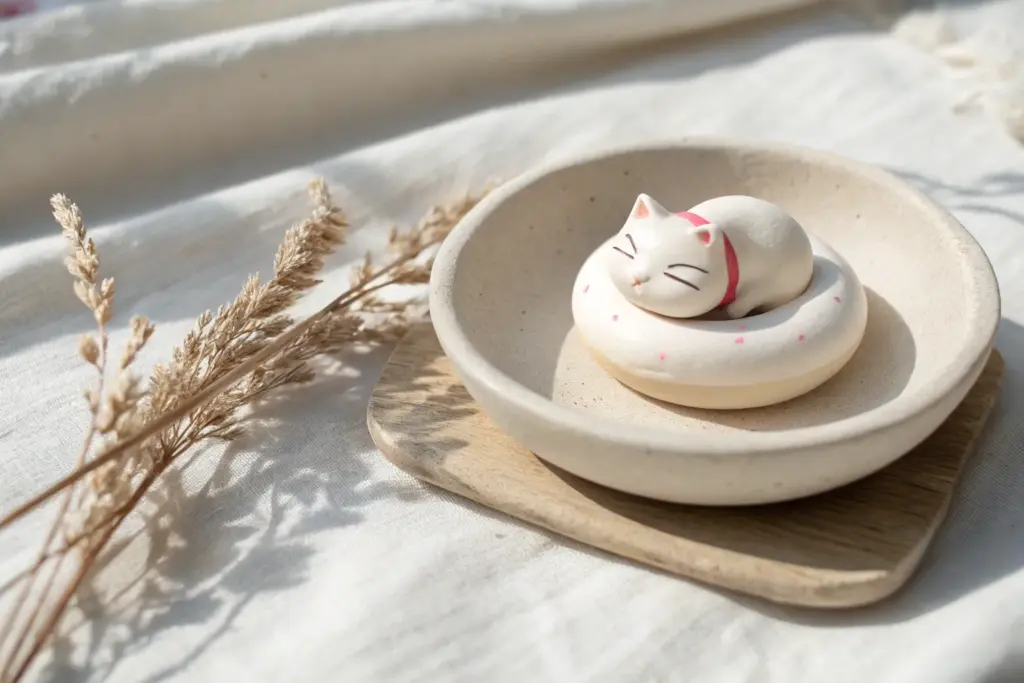
Chibi Animal Head Charms
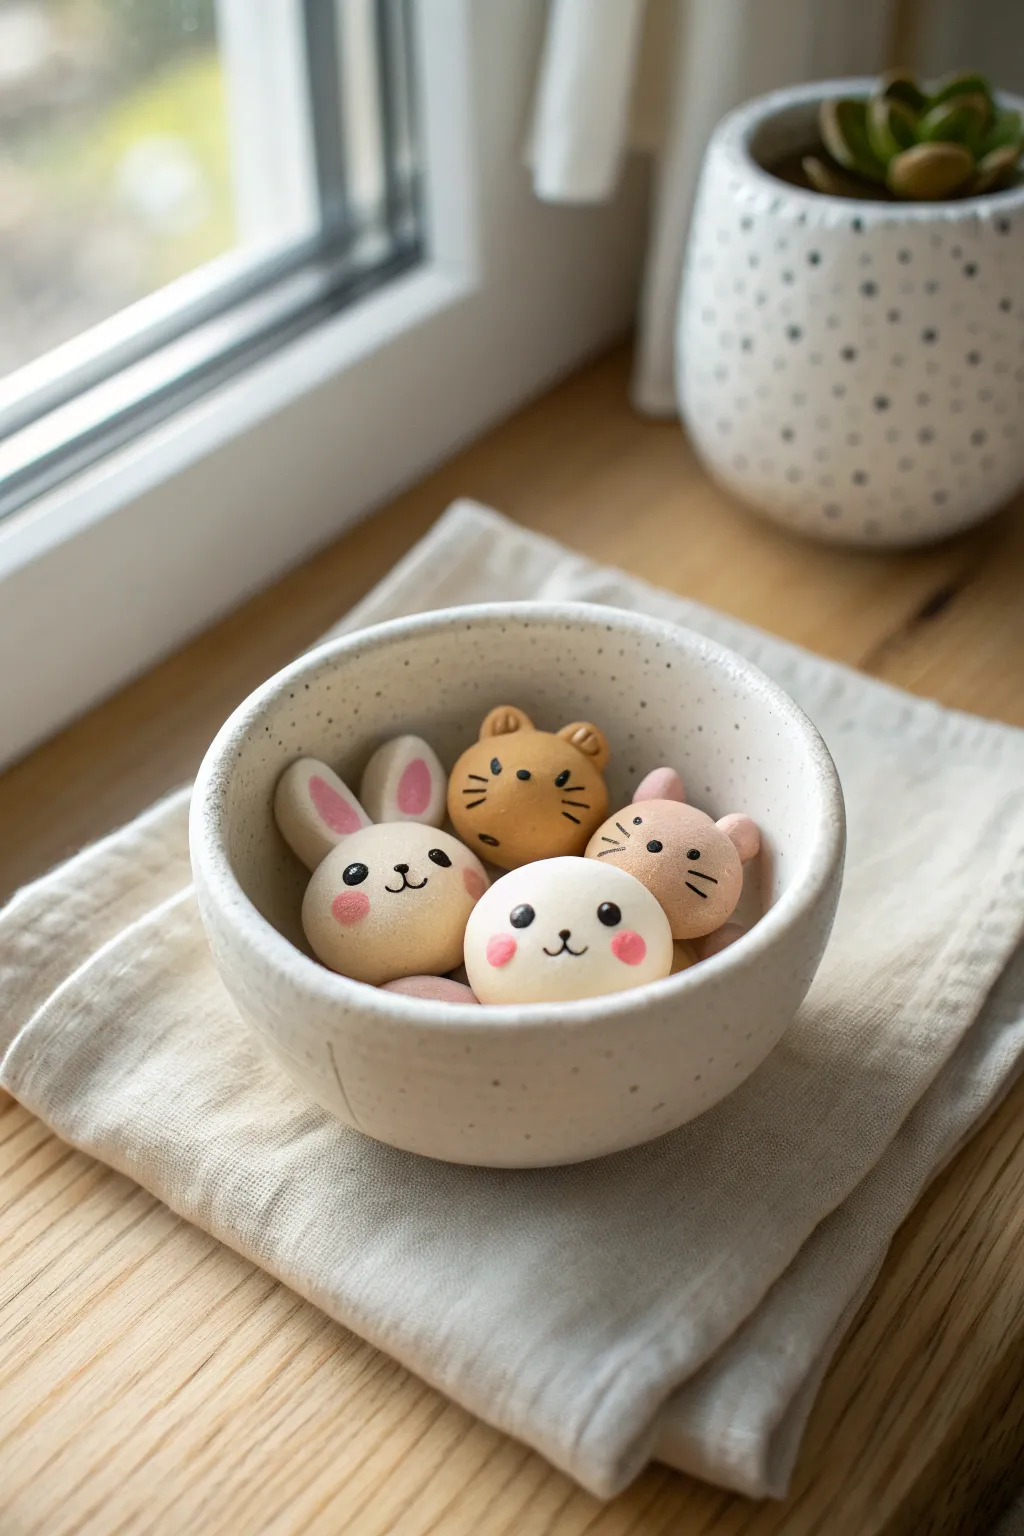
Create a charming collection of miniature animal friends to brighten up any corner of your home. These smooth, matte-finish polymer clay charms feature simple yet expressive faces that evoke a sense of pure sweetness.
Step-by-Step Tutorial
Materials
- Polymer clay (white, beige, soft pink, caramel brown)
- Black acrylic paint or fine detail pen
- Pink soft pastel chalks (for cheeks)
- Small paintbrush (for pastels)
- Fine detail brush or dotting tool
- Clay sculpting tools (needle tool, ball tool)
- Parchment paper-lined baking sheet
- Oven (for curing)
- Matte varnish (optional)
Step 1: Shaping the Base Forms
-
Conditioning the Clay:
Begin by thoroughly kneading your white, beige, and brown clays separately until they are warm, soft, and pliable. This prevents cracking later on. -
Rolling Spheres:
Roll small portions of clay into smooth, seamless balls about the size of a walnut. Aim for a slightly flattened sphere shape, similar to a mochi or bun. -
Smoothing Imperfections:
Inspect each sphere for fingerprints. I like to gently rub the surface with a tiny bit of baby oil or cornstarch on my finger to buff it perfectly smooth.
Clean Clay Only
White clay picks up everything. Wash hands thoroughly between colors and wipe your work surface with a wet wipe to prevent lint contamination.
Step 2: Creating the Bunny
-
Forming Ears:
Take two small pieces of white clay and roll them into elongated teardrops. Flatten them slightly to create the ear shape. -
Adding Inner Ear Detail:
Take minuscule pieces of pink clay, roll into smaller teardrops, flatten them, and press them into the center of the white ears. -
Attaching to Head:
Position the ears on top of a white clay sphere. Use a silicone blending tool or your finger to smooth the seam where the ear meets the head so it looks like one solid piece.
Make Them Functional
Before baking, insert an eye screw pin into the top of the head. Once baked, you can attach these to keychains, phone straps, or necklaces.
Step 3: Creating the Bear and Cats
-
Bear Ears:
For the brown bear, create two tiny balls of brown clay. Press them gently onto the top corners of the brown sphere. -
Indenting the Ears:
Use a small ball tool to press an indentation into the center of each bear ear to give it dimension. -
Cat Variations:
For the pink and white cats, pinch small triangles of clay for ears. Attach them similarly to the bear, smoothing the seams carefully at the base.
Step 4: Detailed Expression
-
Baking Preparation:
Place all your formed animals on a parchment-lined baking sheet. Double-check for any lint or dust and remove it with a piece of tape. -
Curing:
Bake the clay according to the manufacturer’s instructions for your specific brand. Let them cool completely before handling. -
Painting Eyes:
Using a fine detail tool or the very tip of a brush dipped in black acrylic paint, create two small, widely spaced dots for the eyes. Keep them low on the face for that ‘chibi’ look. -
Adding Tiny Noses:
Paint a tiny rounded triangle or oval between the eyes for the nose. -
Drawing Advice:
For the mouths, paint a small ‘w’ shape or an inverted ‘v’. Add whiskers to the cats and bear using extremely light, short strokes. -
Creating the Blush:
Scrape a little pink pastel chalk into a powder. Use a dry, soft brush to pick up the powder and gently dust rosy circles onto the cheeks of each animal. -
Sealing the Charm:
Protect your paint job by applying a thin coat of matte varnish. Avoid glossy finishes to maintain the soft, marshmallow-like aesthetic shown in the photo.
Display your adorable new friends in a small bowl or scatter them on a shelf for a daily dose of cuteness

What Really Happens Inside the Kiln
Learn how time and temperature work together inside the kiln to transform clay into durable ceramic.
Mini Sea Creature Bag Charms
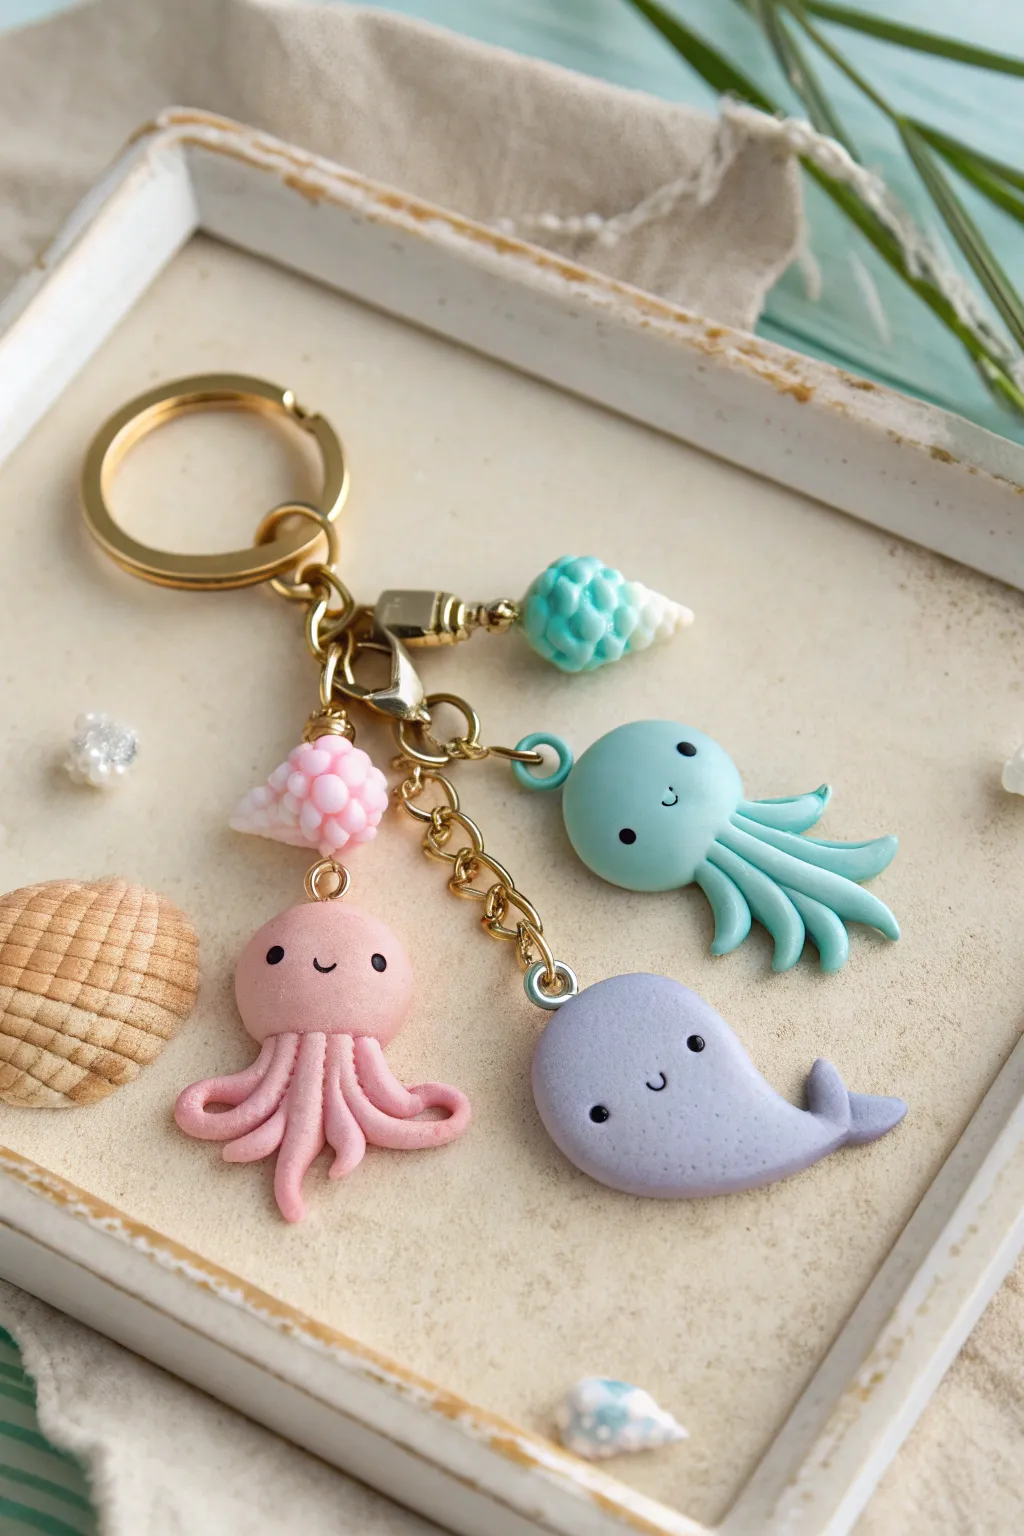
Dive into creativity with this adorable assortment of pastel sea creature charms made from polymer clay. Featuring a happy whale, a cute jellyfish, and a tiny pink octopus, this keychain adds a splash of ocean fun to any bag or set of keys.
Step-by-Step
Materials
- Polymer clay (pale pink, lavender, teal/mint, white)
- Black polymer clay or black acrylic paint (for eyes)
- Gold-tone keychain hardware (ring, chains, lobster clasps)
- Eye pins (gold-tone)
- Jump rings (gold-tone)
- Ball stylus tool
- Needle tool or toothpick
- Clay blade
- Jewelry pliers (round nose and flat nose)
- Gloss glaze (optional)
- Oven for baking
Step 1: Sculpting the Happy Whale
-
Shape the Body:
Condition a small ball of lavender clay until soft. Roll it into a smooth teardrop shape, flattening it slightly to create the whale’s main body. The wide end will be the head. -
Form the Tail:
Pinch the narrow end of the teardrop and flatten it further. Use your needle tool to make a small cut in the center of the flattened end, then gently separate and round the edges to form the flukes of the tail. -
Add the Fin:
Roll a tiny triangle of lavender clay. Press this onto the side of the whale’s body near the tail to create a dorsal fin, blending the seam with your finger or a smoothing tool. -
Create the Face:
Use a small ball stylus to make two shallow indentations for the eyes. Roll tiny specks of black clay and press them into these sockets. Use a needle tool to scratch a tiny ‘u’ shape between the eyes for a smile.
Step 2: Creating the Jellyfish & Octopus
-
Shape the Octopus Head:
Roll a ball of pale pink clay for the octopus head. Create a slightly flattened dome shape. -
Make Tentacles:
Roll out six to eight thin logs of pink clay. Attach them to the bottom of the head, curling the ends upward slightly for a playful look. -
Shape the Jellyfish:
Repeat the head process with teal or mint clay. For the tentacles, create slightly thicker, longer logs that wave and flow downwards, clustering them under the dome. -
Add Faces:
Just like the whale, add tiny black clay eyes and a small smiling mouth to both the octopus and the jellyfish. -
Shell Accents:
Roll small balls of leftover pink and teal clay. Texture them with a needle tool to look like bumpy shells or berries, spiraling the texture around the sphere.
Loose Eye Pins?
If an eye pin pulls out after baking, don’t panic. Put a drop of superglue on the metal shaft and slide it back into the hole for an instant fix.
Step 3: Assembly and Baking
-
Insert Eye Pins:
Before baking, trim gold eye pins to about 1cm long. Insert one into the top of each creature and shell charm. I find adding a tiny drop of liquid clay or bake-and-bond on the pin helps secure it permanently. -
Bake:
Bake all pieces according to your polymer clay manufacturer’s instructions (usually 275°F/130°C for 15-30 minutes). Let them cool completely. -
Glazing:
For a wet look, apply a thin coat of gloss glaze to the eyes or the entire charm. -
Chain Assembly:
Use jump rings to attach the whale, jellyfish, and octopus to varying lengths of gold chain. -
Attach Shells:
Thread the shell beads onto headpins if you made them as beads, or attach their eye pins directly to the chain links above the main creatures. -
Final Connection:
Attach all the chains to the main gold keyring using a large jump ring or a swivel clasp.
Glittery Ocean
Mix smooth pearl mica powder or fine iridescent glitter into your clay before sculpting to give your sea creatures a magical, shimmering skin.
Enjoy carrying your own tiny aquarium wherever you go
Rainbow Cloud Fridge Magnets
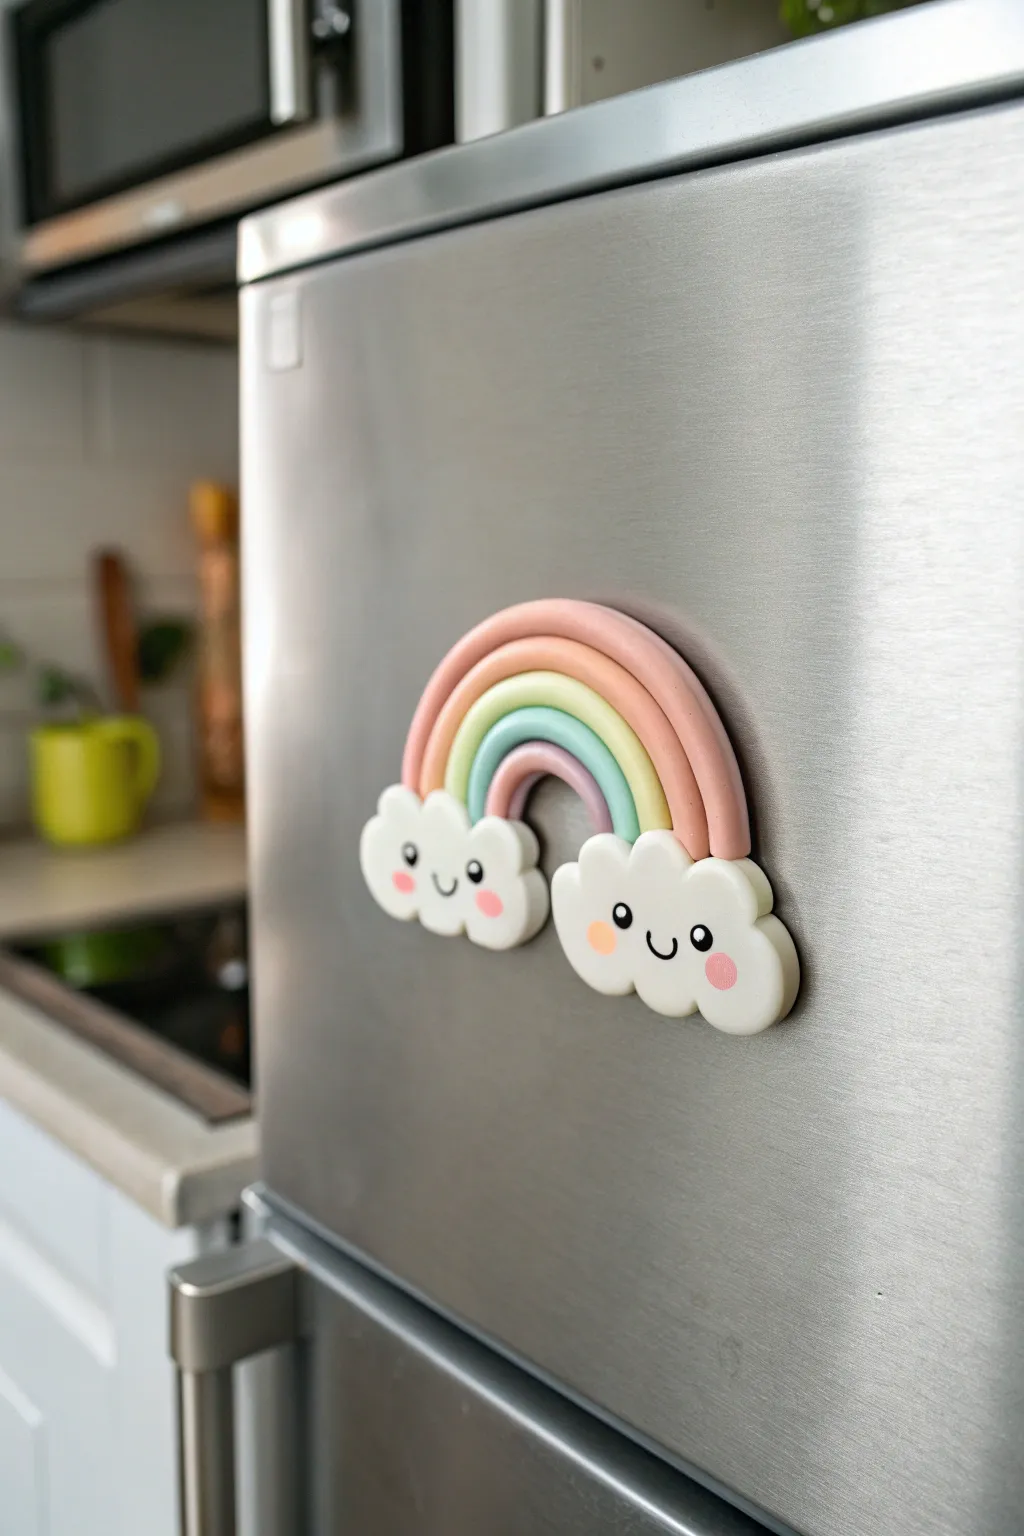
Bring a spot of cheer to your kitchen with this adorable pastel rainbow magnet featuring sweet, smiling clouds. Using simple snake-rolling techniques and soft polymer clay colors, this project is perfect for beginners looking to add a touch of whimsy to their home decor.
Step-by-Step Tutorial
Materials
- Polymer clay in pastel pink, peach, light yellow, mint green, and light blue
- White polymer clay
- Black acrylic paint or fine-tip permanent marker
- Pink acrylic paint (for cheeks)
- Gloss glaze (optional)
- Rolling pin or pasta machine
- Clay blade or craft knife
- Small dotting tool or toothpick
- Liquid polymer clay or strong craft glue
- Two round ceramic magnets
Step 1: Forming the Rainbow Arches
-
Condition the Clay:
Begin by conditioning each of your pastel clay colors—pink, peach, yellow, mint, and blue—until they are soft and pliable. Use your hands or a pasta machine to ensure there are no air bubbles. -
Roll Snakes:
Roll each color into a long, even snake about 1/4 inch thick. Try to keep the thickness consistent across all five colors so the rainbow arches fit together neatly. -
Align the Arches:
Curve the pink snake into an arch shape on your work surface. Take the peach snake and curve it snugly against the inner edge of the pink one, pressing gently so they adhere without distorting the round shape. -
Finish the Spectrum:
Continue adding the yellow, mint, and blue snakes to the inner curve, in that order, until you have a complete five-color rainbow stack. -
Trim the Ends:
Once your arches are assembled, use your clay blade to cut straight across the bottom of the rainbow legs, ensuring both sides are even and flat where the clouds will attach.
Step 2: Sculpting the Clouds
-
Base Shapes:
Take your white clay and form two flattened oval shapes. These should be slightly wider than the base of the rainbow legs to provide a good foundation. -
Creating Fluffiness:
Roll several small balls of white clay in varying sizes. Attach these balls to the top and sides of your flattened ovals to create the bumpy, fluffy cloud texture. -
Blending Seams:
Gently smooth the seams where the small balls attach to the base oval using a blending tool or your finger, but leave the top curves distinct to maintain the bubbly cloud look. -
Attaching to Rainbow:
Apply a tiny drop of liquid polymer clay to the bottom cut edges of your rainbow arches. Press the clouds firmly onto the ends of the rainbow, ensuring a strong bond.
Clean Clay Pro-Tip
White clay picks up lint easily. Wipe your hands and work surface with a baby wipe before shaping the clouds to keep them bright white.
Step 3: Adding Faces and Finishing
-
Prep the Surface:
Before baking, give your piece a final smoothing with baby oil or a touch of cornstarch to remove any fingerprints. -
Baking:
Bake the project according to your clay manufacturer’s instructions (usually 275°F/135°C for 15-30 minutes). I suggest tenting foil over the piece to prevent the white clouds from scorching. -
Cooling:
Let the rainbow cool completely before moving on to decoration. Painting on warm clay can affect the finish. -
Painting Eyes:
Using a fine detail brush and black acrylic paint, or a fine-tip marker, draw two small, wide-set circular eyes on each cloud. Add a tiny white reflection dot inside the black circles for extra cuteness. -
Adding Smiles:
Paint a tiny ‘u’ shape between the eyes for a smiling mouth. -
Rosy Cheeks:
Dip a dotting tool or the end of a paintbrush into pink paint and dab two rosy cheeks onto each cloud, just below the eyes. -
Glazing (Optional):
If you want a shiny finish like the photo, apply a coat of gloss glaze over the rainbow and clouds once the paint is fully dry. -
Attaching Magnets:
Flip the finished piece over. Use strong craft glue (E6000 works well) to attach a round magnet to the back of each cloud.
Sparkle Level Up
Before baking, dust the white clouds with pearl mica powder or press in some iridescent glitter to make them shimmer in the light.
Now your fridge has a cheerful guardian to brighten up even the rainiest days


The Complete Guide to Pottery Troubleshooting
Uncover the most common ceramic mistakes—from cracking clay to failed glazes—and learn how to fix them fast.
Easy Pattern Cane Slice Beads
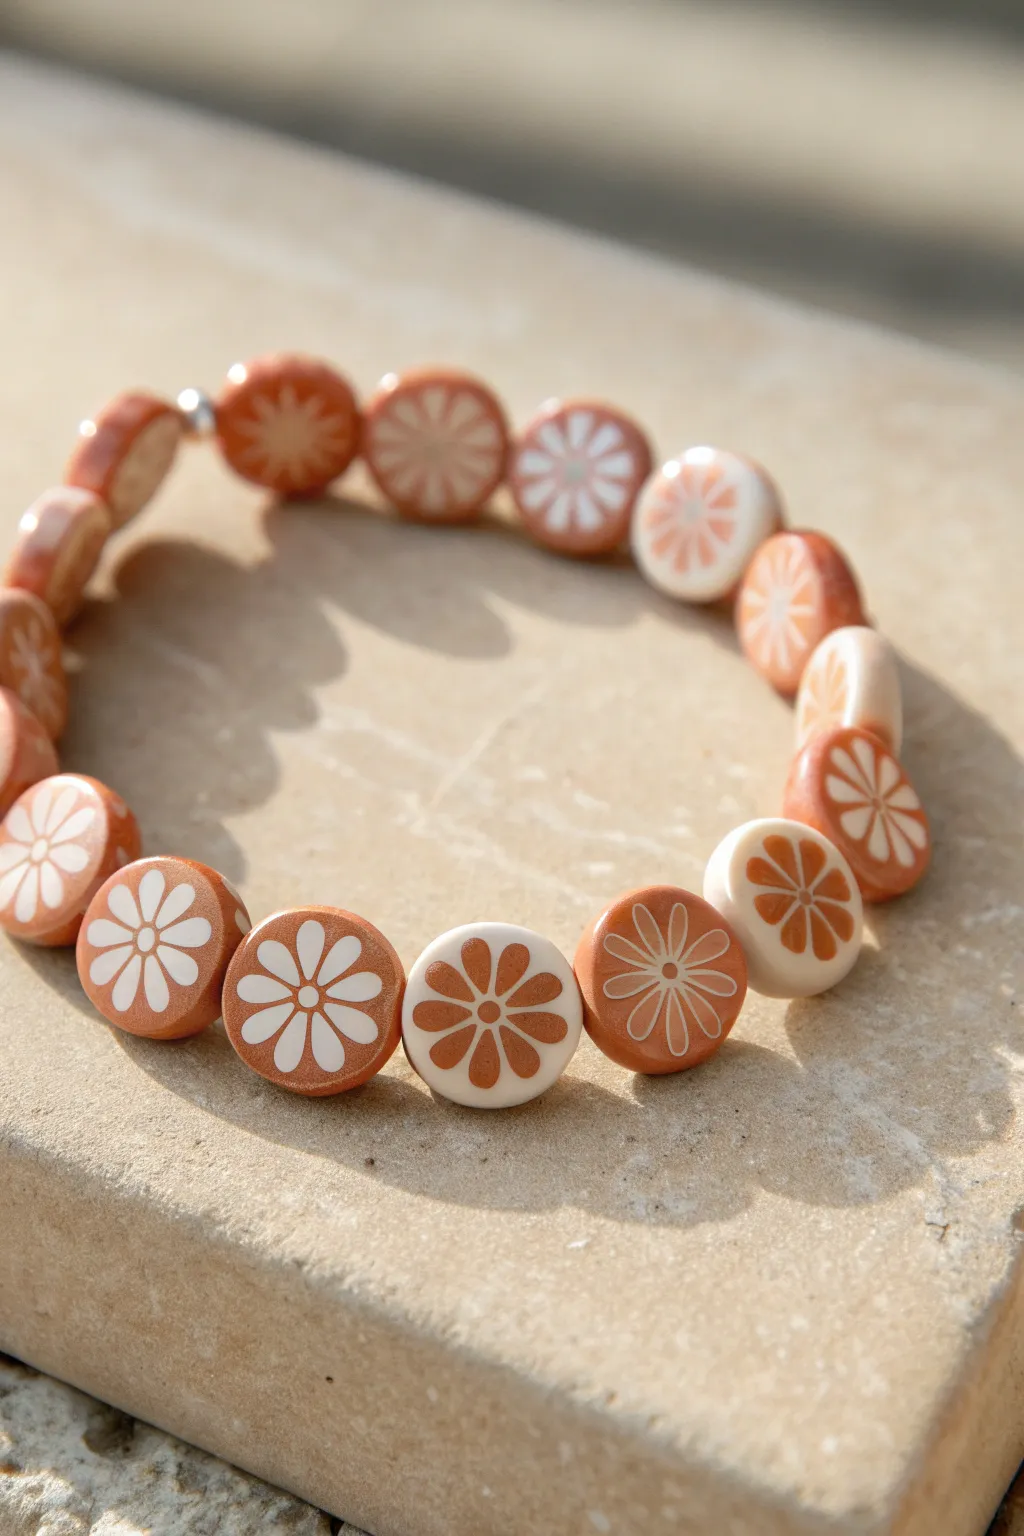
Create a warm, bohemian accessory with these flat disc beads featuring stylized daisy motifs. This project combines simple cane-making techniques with a classic rustic color palette to produce a bracelet that feels both modern and timeless.
Step-by-Step Tutorial
Materials
- Polymer clay in terracotta/rust
- Polymer clay in white or cream
- Pasta machine or rolling pin
- Needle tool or piercing pin
- Tissue blade (flexible and rigid)
- Circle cutter (small, roughly 1/2 inch or 1.5cm)
- Beading elastic cord (0.8mm)
- Strong jewelry glue
- Ceramic tile or glass work surface
- Oven for baking
Step 1: Creating the Flower Canes
-
Conditioning the clay:
Begin by thoroughly conditioning your terracotta and white clay separately. Roll them through your pasta machine until they are soft, pliable, and free of air bubbles. -
Forming the centers:
Roll a snake of terracotta clay and a snake of white clay, both about the thickness of a pencil. These will form the centers of your flowers. -
Making the petals:
Roll thicker logs of both colors (about 1 inch diameter). Use your fingers to pinch along the length of each log, turning them into teardrop shapes rather than round cylinders. -
Slicing and arranging petals:
Slice the teardrop logs into 2-inch segments. Arrange roughly 6-8 white teardrops around the terracotta center snake to form the first flower, and do the reverse (rust petals around white center) for the second. -
Detailed packing:
To ensure the flowers stay round, pack small triangles of the background color clay (white for the white flower, rust for the rust flower) into the crevices between the outer petal edges. -
Wrapping the canes:
Roll a thin sheet of the background clay for each cane. Wrap the white flower cane in a thin sheet of rust clay, and the rust flower cane in a thin sheet of white clay (optional, but creates a nice border). -
Reducing the canes:
Gently squeeze and pull the canes from the center out to elongate them. Reduce them until they are the diameter you want your beads to be, roughly 1/2 inch thick.
Clean Cuts Only
Chill your finished canes in the refrigerator for 15-20 minutes before slicing. Cold clay resists squishing, giving you crisp, undistorted flower patterns.
Step 2: Forming and Baking the Beads
-
Slicing the beads:
Let the canes rest for about 20 minutes to firm up. Using your sharpest tissue blade, slice thin, even discs from the cane. Aim, for about 3-4mm thickness. -
Backing the slices (optional):
If your slices deform, you can slice them thinner and layer them onto a scrap sheet of clay, then use a circle cutter to punch out perfect rounds. This ensures uniformity. -
Smoothing edges:
Gently rub the edges of each raw bead with your finger to round them off slightly so they aren’t sharp against the skin. -
Piercing the holes:
I prefer to use a needle tool to pierce a hole directly through the center of the flower. Twist the tool gently as you push through to avoid squashing the pattern. -
Second piercing:
Turn the bead over and pierce again from the back side to clean up the exit hole. -
Baking:
Arrangement the beads on your ceramic tile. Bake according to your clay manufacturer’s instructions, usually 275°F (135°C) for 30-45 minutes. -
Cooling and Buffing:
Allow the beads to cool completely. For a matte finish like the image, lightly buff them with a piece of denim or a soft cloth, avoiding glazes or varnishes.
Go Geometric
Instead of round beads, use a square cutter to punch out your cane slices. The geometric shape combined with the organic flower creates a cool modern look.
Step 3: Assembly
-
Stringing the design:
Cut a length of elastic cord. String your beads, alternating between the rust-background beads and white-background beads to create the pattern seen in the main image. -
Tying the knot:
Tie a surgeon’s knot (looping the elastic twice on the first pass) and pull it tight. Add a drop of jewelry glue to the knot for security. -
Hiding the knot:
If hole size permits, gently tug the elastic to pull the knot inside one of the beads before the glue fully sets.
Wear your stack of custom beads with pride or gift a set to a friend who loves earthy tones
Translucent Candy Swirl Lollipops

Capture the sweetness of childhood with this delightful polymer clay lollipop charm, featuring soft pastel swirls and a subtle shimmer. This realistic candy replica makes for an adorable pendant or a playful addition to a keychain.
Step-by-Step Tutorial
Materials
- Polymer clay in pastel peach, mint green, and lavender
- Translucent polymer clay
- White liquid polymer clay (optional)
- Small metal eye screw / bail
- Lollipop stick (paper or plastic)
- Craft knife or tissue blade
- Glossy water-based polyurethane varnish or UV resin
- Fine iridescent glitter or mica powder
- Acrylic roller or pasta machine
- Needle tool
Step 1: Preparing the Clay Mixes
-
Condition the base colors:
Begin by thoroughly conditioning your peach, mint green, and lavender polymer clays until they are soft and pliable. If your clay feels too stiff, add a drop of clay softener or baby oil. -
Create the translucent blends:
To achieve that authentic hard-candy look, mix each of your pastel colors with an equal amount of translucent clay. Knead them together until the color is uniform but has a slight depth to it. -
Add the sparkle:
Knead a very small amount of fine iridescent glitter or mica powder into each color batch. You want a subtle internal shimmer, not a heavy glitter coat.
Sticky Situation?
If the clay sticks to your work surface while coiling, work on a piece of ceramic tile or parchment paper. You can bake it directly on this surface later without moving it.
Step 2: Forming the Swirl
-
Roll the snakes:
Roll each color into a long, even snake (log). Aim for a thickness of about 5-6mm. Ensure all three snakes are roughly the same length. -
Combine the strands:
Lay the three snakes side-by-side and gently press them together so they adhere without mashing the shape. Twist the entire group of snakes together firmly to create a single, thick, twisted rope. -
Check the twist tightness:
Continue twisting until you have a tight, consistent spiral pattern. I like to roll this twisted rope gently on the work surface to smooth out the ridges slightly, making it look more like fused candy. -
Begin the coil:
Take one end of your twisted rope and pinch it slightly to taper it. Begin coiling this end tightly around itself to form the center of the lollipop. -
Wrap the spiral:
Continue wrapping the rope around the center coil, keeping the strands tight against the previous layer. Ensure the lollipop remains flat against your work surface as you coil. -
Finish the edge:
Stop when the lollipop reaches your desired diameter (about 1.5 to 2 inches). Cut the excess rope at an angle where two colors meet to disguise the seam. -
Smooth the seam:
Gently press the cut end into the side of the lollipop, blending it with a sculpting tool or your finger so the round shape remains unbroken.
Step 3: Assembly and Curing
-
Insert the stick:
carefully insert the lollipop stick into the bottom of the swirl. If needed, add a tiny dab of liquid clay or translucent liquid sculpey to the stick first to act as a glue. -
Secure the top hardware:
Screw the metal eye pin into the top center of the lollipop. Remove it, dip the threads in a little liquid clay, and screw it back in for a permanent hold after baking. -
Clean up debris:
Before baking, inspect the surface for dust or fingerprints. Wipe lightly with a bit of rubbing alcohol or baby oil to smooth imperfections. -
Bake the piece:
Bake according to your clay manufacturer’s instructions (usually 275°F or 130°C for 15-30 minutes). I recommend tenting foil over the piece to prevent the delicate pastels from darkening or scorching. -
Cool and inspect:
Allow the piece to cool completely before handling. The translucent clay will look clearer once it has cooled.
Sugary Sweet Texture
Before baking, brush the unbaked clay with liquid polymer clay and sprinkle on clear, extra-fine glass glitter or sand for a ‘sour sugar’ coated finish.
Step 4: Finishing Touches
-
Apply the glaze:
Paint a thin layer of glossy polyurethane varnish or UV resin over the entire surface of the ‘candy’ part. This brings out the translucency and gives it that wet, sugary shine. -
Final cure or dry:
Let the varnish dry fully or cure the UV resin under a UV lamp until hard and tack-free.
Now you have a charming, swirly treat that looks good enough to eat—hang it on a necklace or bag.

TRACK YOUR CERAMIC JOURNEY
Capture glaze tests, firing details, and creative progress—all in one simple printable. Make your projects easier to repeat and improve.
Mushroom Buddy Mini Figurines
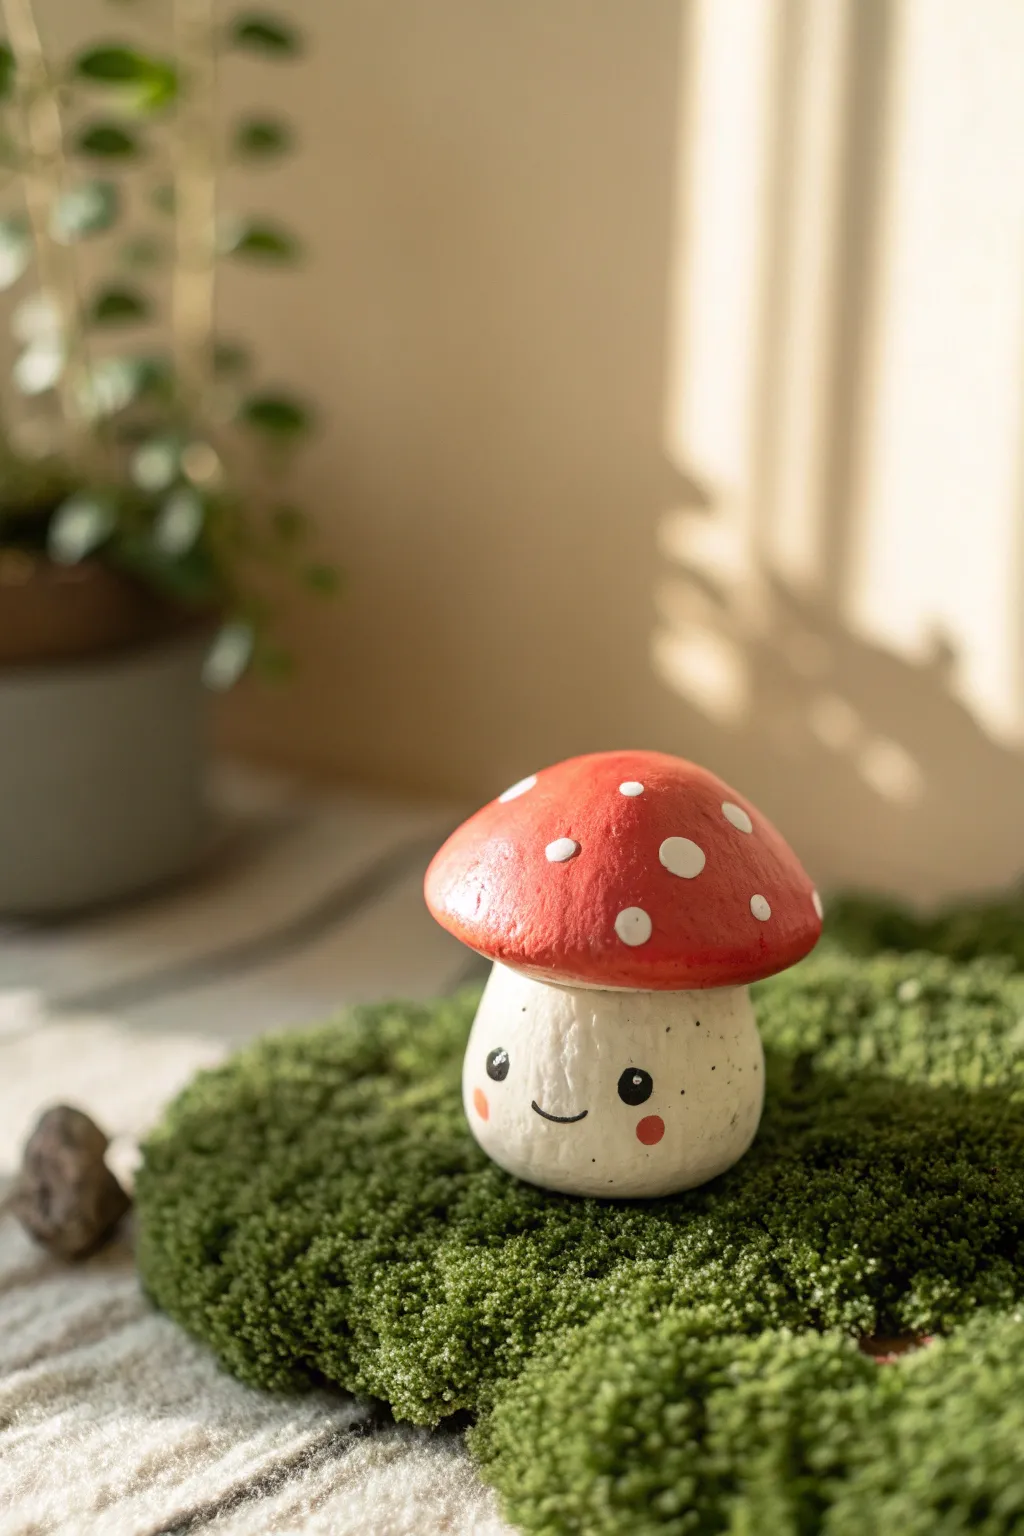
Bring a touch of woodland whimsy to your desk with this adorable red-capped mushroom figurine. With its cheerful painted face and speckled details, this little buddy is the perfect companion for a mini terrarium or shelf display.
How-To Guide
Materials
- White polymer clay
- Red polymer clay
- Acrylic paints (black, white, pink)
- Fine detail paintbrush
- Dotting tool or toothpick
- Aluminum foil
- Clay sculpting tools
- Liquid clay or Bake and Bond (optional)
- Gloss glaze (optional)
Step 1: Sculpting the Base
-
Condition the white clay:
Start by kneading a chunk of white polymer clay in your hands until it becomes soft and pliable. This conditioning step is crucial to prevent cracks later on. -
Form the stem core:
Roll the white clay into a smooth ball about the size of a walnut. Gently flatten the bottom on your work surface so it stands upright on its own without wobbling. -
Shape the chubby stem:
Using your thumb and forefinger, slightly taper the top of the ball to create a squat, pear-like shape. Keep the bottom wide and rounded to give the mushroom its cute, chubby appearance. -
Add texture:
Take a stiff brush or a textured sponge and gently press it against the entire surface of the white stem. I find this creates a lovely, organic stone-like texture rather than leaving it perfectly smooth.
Step 2: Creating the Cap
-
Prepare the foil core:
Crumple a small piece of aluminum foil into a domed semi-circle shape. This saves clay and keeps the figurine lightweight. -
Sheet the red clay:
Condition your red clay and roll it out into a medium-thick sheet, roughly 1/8th of an inch thick. -
Cover the foil:
Drape the red clay sheet over your foil dome. Gently smooth it down properly, trimming away excess clay at the bottom rim. -
Smooth and shape:
Roll the cap gently in your palm to smooth out any fingerprints. The edges should be rounded and soft, not sharp. -
Texture the cap:
Just like the stem, lightly tap a textured sponge over the red surface to give it a porous, natural look. -
Connect the parts:
Place the red cap onto the white stem. If you have liquid clay, add a tiny drop between the pieces for a stronger bond; otherwise, press them firmly together to ensure they stick.
Fingerprint Woes?
If you can’t smooth out a stubborn fingerprint, brush a tiny amount of baby oil or clay softener over the area before baking to melt it away.
Step 3: Baking & Painting
-
Bake the mushroom:
Place your figurine on a baking sheet or ceramic tile. Bake according to your brand of clay’s specific instructions (usually roughly 275°F/135°C for 15-30 minutes per 1/4 inch of thickness). -
Cool completely:
Let the mushroom cool down fully before painting. Painting on hot clay can make the acrylics dry too fast and become clumpy. -
Paint the cap spots:
Dip a dotting tool or the back of a paintbrush into white acrylic paint. Add varied sizes of polka dots all over the red cap. -
Paint the eyes:
Using black paint and your finest brush, paint two small circles on the stem for eyes. Add a tiny white highlight dot in each black circle to bring them to life. -
Add the smile:
Carefully paint a thin, small ‘u’ shape between the eyes using black paint. -
Blush the cheeks:
Mix a tiny bit of pink paint (or mix red and white). Apply two soft, round rosy cheeks just below the eyes. -
Add speckles:
Dilute a bit of black or grey paint with water until it’s very runny. Dip an old toothbrush in it and flick minute speckles onto the white stem for a realistic earthy effect. -
Seal (Optional):
If you want a shiny finish, apply a coat of polymer clay gloss glaze to the red cap, leaving the stem matte for contrast.
Make it a Trio
Create a whole family by making two smaller mushrooms with different cap shapes—one tall and skinny, and one tiny button mushroom.
Place your new friend on a bit of faux moss and enjoy the instant cottagecore vibe
Halloween Ghost and Pumpkin Charms
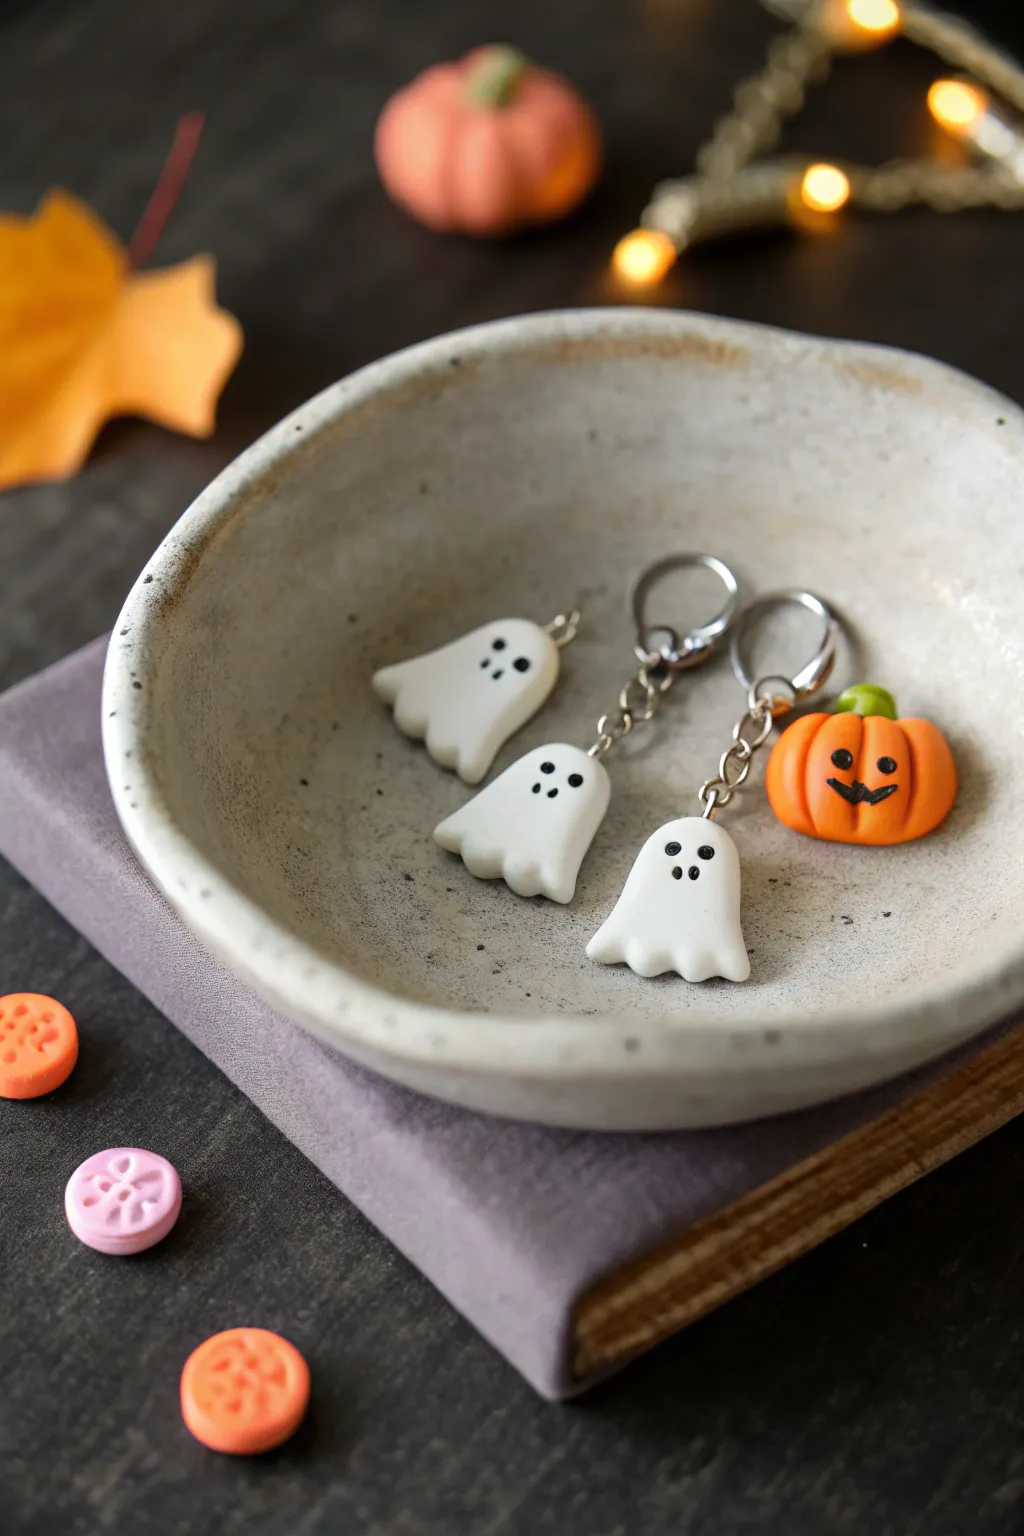
Create a hauntingly adorable set of Halloween accessories with these minimalist ghost and pumpkin charms. Featuring simple shapes and sweet faces, this project is perfect for beginners looking to make custom keychains or stitch markers to celebrate the spooky season.
Step-by-Step
Materials
- White polymer clay
- Orange polymer clay
- Green polymer clay
- Black liquid clay or black acrylic paint
- Fine detail brush or dotting tool
- Jewelry eye pins
- Split rings and keychain hardware
- Needle tool or toothpick
- Round cutters (optional)
- Gloss glaze (optional)
Step 1: Shaping the Little Ghosts
-
Condition the white clay:
Start by warming a small amount of white polymer clay in your hands until it is soft and pliable, ensuring there are no cracks when you flatten it. -
Form the basic shape:
Roll the clay into a smooth ball, then gently roll one end against your work surface to create a teardrop or cone shape. -
Flatten the ghost:
Gently press the teardrop flat with your thumb. It should be about 3-4mm thick—sturdy enough for a keychain but thin enough to look delicate. -
Create the ruffled bottom:
Using your thumb or a rounded tool, gently push up into the bottom edge of the wider part of the teardrop to create a wavy, scalloped hemline, giving the ghost its classic floating appearance. -
Smooth the edges:
Run your finger along the edges to soften them so the ghost looks like soft fabric rather than rigid plastic. -
Insert hardware:
Take a metal eye pin and carefully insert the straight end into the top center of the ghost’s head. Push it down deep enough so it feels secure.
Clean Clay Trick
White clay picks up dust easily. Keep a pack of baby wipes or rubbing alcohol nearby to clean your hands and tools before touching the white clay.
Step 2: Crafting the Pumpkin Buddy
-
Form the orange base:
Roll a piece of orange clay into a slightly flattened sphere, making it roughly the same size as the ghost heads for a cohesive set. -
Add ribs:
Use a needle tool or the back of a knife to gently press vertical indentations around the sides of the sphere, mimicking the ribs of a pumpkin. -
Make the stem:
Roll a tiny sausage of light green clay. Press it onto the top center of the pumpkin, flattening it slightly so it bonds well. -
Add the pumpkin hardware:
Just like with the ghosts, insert an eye pin through the green stem and down into the orange body of the pumpkin.
Step 3: Baking & Facial Details
-
Bake the clay:
Place your charms on a ceramic tile or baking sheet lined with parchment paper. Bake according to your specific clay brand’s instructions (usually around 275°F or 135°C for 15-30 minutes). -
Cool completely:
Allow the charms to cool fully before handling. The clay is fragile when hot and hardens as it cools. -
Paint the ghost faces:
Using a dotting tool or the tip of a toothpick dipped in black paint (or liquid clay), place two small dots for eyes and a slightly larger oval for a surprised mouth. -
Paint the jack-o’-lantern face:
For the pumpkin, carefully paint two small oval eyes and a jagged or curved smile. I like to keep the expression simple to match the cute ghosts. -
Secure the pin (optional):
If the eye pin feels loose after baking, pull it out, add a dab of superglue, and slide it back in for a permanent hold. -
Attach the keychain:
Use pliers to open a jump ring or split ring, thread it through the eye pin loop, and attach your keychain hardware or lobster clasp.
Uneven Eyes?
If you mess up the painted face, quickly wipe it away with a damp Q-tip or alcohol wipe before the paint dries, then try again.
Now your spooky squad is ready to dangle from a backpack or organize your keys
Mini Diorama Desk Scene Toppers
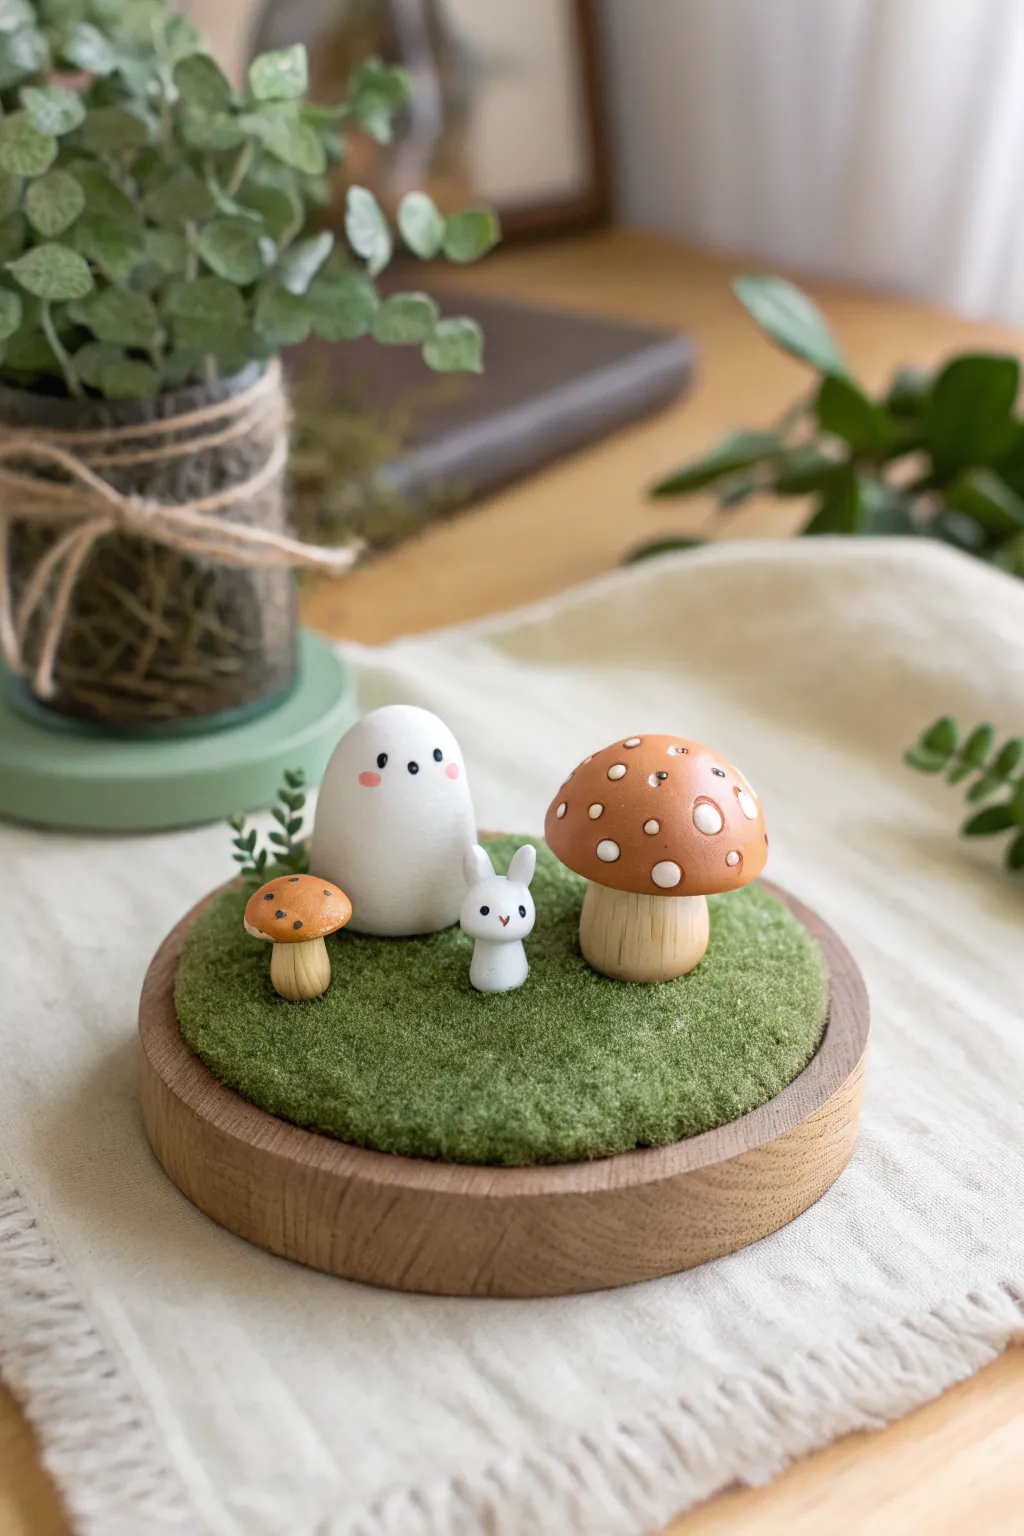
Create a peaceful little world for your desk with this charming miniature diorama featuring a friendly ghost, a tiny bunny, and rustic mushrooms. This project combines polymer clay modeling with simple assembly techniques to bring a touch of woodland magic to any small space.
Step-by-Step Tutorial
Materials
- White, beige, and terracotta/brown polymer clay
- Small round wooden base (coaster or lid)
- Faux moss sheet or flocking powder
- Craft glue or strong adhesive
- Black acrylic paint
- Pink chalk pastel or blush
- Fine detail paintbrush or dotting tool
- Sculpting tools (needle tool, ball tool)
- Aluminum foil (optional for core)
- Glaze or varnish (satin or matte)
- Tiny artificial greenery sprig
Step 1: Sculpting the Characters
-
Form the Ghost Body:
Start with a ball of white polymer clay about the size of a walnut. Gentle roll it into a smooth, rounded cone shape with a flat bottom so it stands securely. -
Add Ghost Details:
Use a ball tool or your thumb to make slight indentations where the eyes will go later. Smooth out any fingerprints with a drop of baby oil. -
Create the Bunny:
Take a much smaller piece of white clay for the bunny. Roll a small ball for the head and a slightly larger oval for the body, blending the seams together. -
Bunny Ears:
Roll two tiny teardrop shapes and attach them to the top of the bunny’s head. Press them down gently to ensure they adhere well.
Keep it Clean
White clay attracts dust like a magnet. Keep baby wipes nearby to clean your hands and tools often, or roll a scrap piece of white clay in your palms first to pick up lint.
Step 2: Making the Mushrooms
-
Shape the Stems:
Using beige clay, roll a thick cylinder for the large mushroom stem and a thinner one for the small mushroom. Slightly flare the base of the large stem for stability. -
Texture the Stems:
Take a needle tool and drag vertical lines up the sides of the beige stems to mimic natural mushroom textures. -
Form the Caps:
Roll two balls of terracotta or brown clay—one large, one small. Flatten them into domes and hollow out the undersides slightly so they fit snugly onto the stems. -
Add Polka Dots:
Press tiny, flattened discs of white clay onto the large terracotta cap. Use different sizes for a natural, organic look, then gently roll over the cap to embed them smoothly. -
Final Clay Assembly:
Attach the caps to their respective stems. For the small mushroom, add a few tiny black dots with paint later instead of clay spots. -
Bake the Clay:
Place all your clay pieces on a baking sheet or tile. Bake according to your brand’s specific package instructions (usually 275°F/135°C for 15-30 minutes) and let them cool completely.
Glow Up
Use glow-in-the-dark polymer clay for the ghost figure. It will look identical in daylight but add a magical surprise to your desk when the lights go out at night!
Step 3: Painting and Assembly
-
Paint Facial Features:
Using a fine detail brush or a toothpick, dip into black acrylic paint to add small eyes to the ghost and bunny. Add a tiny V-shape for the bunny’s nose. -
Add Rosy Cheeks:
Scrape a little pink chalk pastel into powder. Use a soft brush or Q-tip to dust blushing cheeks onto the ghost and the bunny. -
Finish the Small Mushroom:
add three tiny black dots to the cap of the smaller brown mushroom using your painting tool. -
Prepare the Base:
Take your wooden round base. If it’s unfinished, you might want to seal it first. I prefer finding pre-finished wooden coasters for a polished look. -
Apply the Grass:
Cut a circle of faux moss sheet to fit the top of your wooden base exactly. Glue it down firmly to create the grassy meadow. -
Arrange the Scene:
Do a dry run of your arrangement to find the best composition. Place the ghost and large mushroom towards the back, with the bunny and small mushroom in front. -
Glue Components:
Apply a dab of strong glue to the bottom of each clay figure and press them firmly into the moss. Hold them for a few seconds to ensure the glue grabs the fibers. -
Add Greenery:
Finish the scene by gluing a tiny sprig of artificial plastic plant behind the small mushroom for added depth and realism.
Enjoy your adorable new desk companion that brings a little forest peacefulness to your day