Whenever I want a project to look extra polished (and survive real-life wear), I reach for polymer clay and resin together. That combo lets you sculpt all the cute details in clay, then lock it in with that satisfying glassy shine.
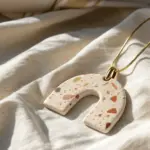
Resin-Domed Statement Earrings
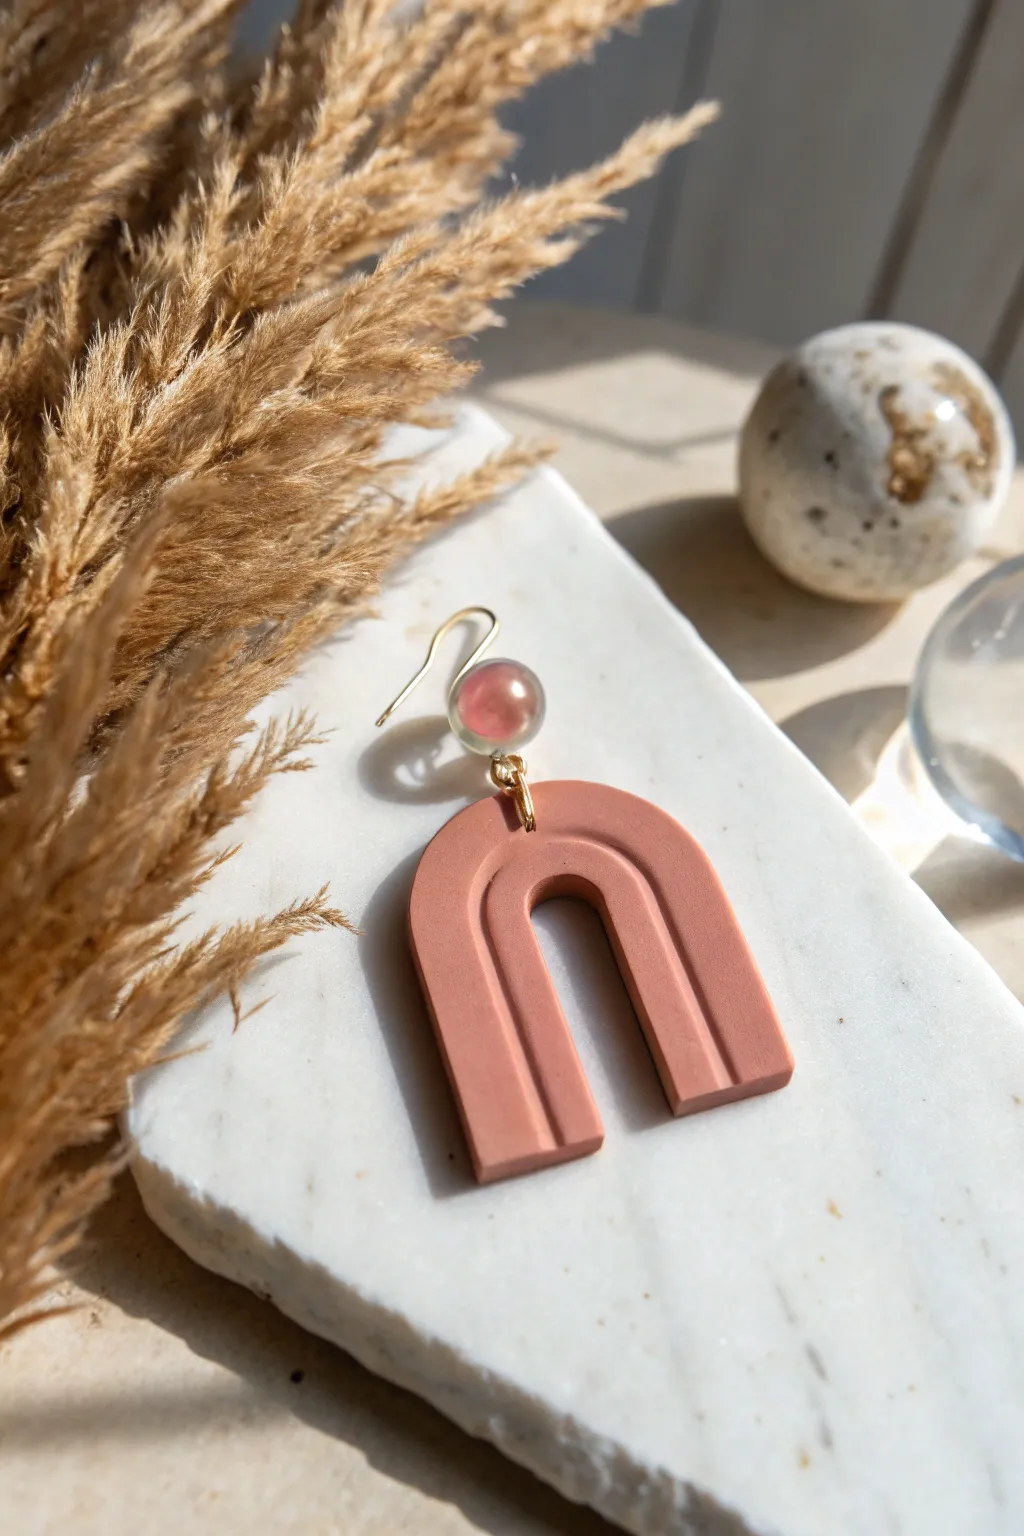
Combine the matte texture of terracotta polymer clay with the glossy shine of resin in these elegant statement earrings. The architectural arch shape paired with a delicate, translucent resin charm creates a sophisticated balance of materials perfect for modern styling.
Step-by-Step Tutorial
Materials
- Terracotta or dusty rose polymer clay
- UV resin or 2-part epoxy resin
- Pink translucent alcohol ink
- Small round silicone mold (for the bead)
- Small eye pins and jump rings (gold)
- Earring hooks (gold)
- Clay texture roller or U-shaped cutter set
- Exacto knife or clay blade
- Hand drill or Dremel with small bit
- Pliers
- Oven for baking clay
Step 1: Creating the Clay Arch
-
Condition the Clay:
Begin by warming the terracotta polymer clay in your hands. Knead and roll it until it is pliable and smooth, ensuring there are no air bubbles trapped inside. -
Roll Out the Base:
Using a clay roller or pasta machine, flatten the clay to a uniform thickness of about 3-4mm. This sturdiness is important for the earring’s durability. -
Cut the Arch Shape:
Use a U-shaped cutter to stamp out your main form. If you don’t have a cutter, print a template on paper, place it over the clay, and carefully trace around it with a clay knife. -
Add Texture Lines:
To achieve the grooved look, carefully press a smaller U-shaped cutter halfway into the clay without cutting through, or freehand the lines using a dull needle tool to create concentric arches. -
Smooth the Edges:
Dip your finger in a little bit of water or cornstarch and gently rub the edges of the cut clay to remove any jagged bits or fingerprints. -
Bake:
Place the clay arch on a ceramic tile or baking sheet. Bake according to the manufacturer’s instructions (usually 275°F/130°C for 15-30 minutes). -
Drill Holes:
Once the clay has fully cooled and hardened, use a hand drill to create a small hole at the top center of the arch for the jump ring.
Step 2: Casting the Resin Element
-
Prepare the Resin:
Mix a small amount of resin. Since we are making a tiny bead, I prefer using UV resin for speed, but epoxy works great too. -
Tint the Resin:
Add a localized drop of pink alcohol ink to your resin mixture. Stir gently to create a soft, translucent jelly look rather than an opaque color. -
Pour and Set Pin:
Pour the mixture into your small round silicone mold. Insert a gold eye pin into the liquid resin, holding it place if necessary. -
Cure:
Cure the resin under a UV lamp for a few minutes (or let epoxy set for 24 hours) until completely hard and glossy. -
Demold:
Pop the resin bead out of the mold. It should look like a small, shiny droplet with the metal loop sticking out of the top.
Clean Lines
To get super clean indentation lines on the U-shape, wipe your tool with a baby wipe or dip it in cornstarch before pressing it into the raw clay.
Step 3: Assembly
-
Link Components:
Open a gold jump ring using two pairs of pliers. Thread it through the hole in the clay arch and the bottom loop of your resin bead connector. -
Secure the Connection:
Close the jump ring tightly, ensuring the gap is completely flush so the resin piece doesn’t slip off. -
Attach Earring Hook:
Open the small loop on your gold earring hook. Slide it onto the top loop of the eye pin embedded in your resin bead. -
Final Polish:
Inspect your work. If the clay looks dull, you can buff it with a soft cloth or add a very matte varnish, though raw clay provides that lovely texture shown in the photo.
Add Sparkle
Mix a tiny pinch of gold leaf flakes or rose gold glitter into the translucent resin bead before curing to catch the light and add extra dimension.
Enjoy styling these versatile earrings that bridge the gap between earthy textures and polished shine


Glossy Cane-Slice Pendants
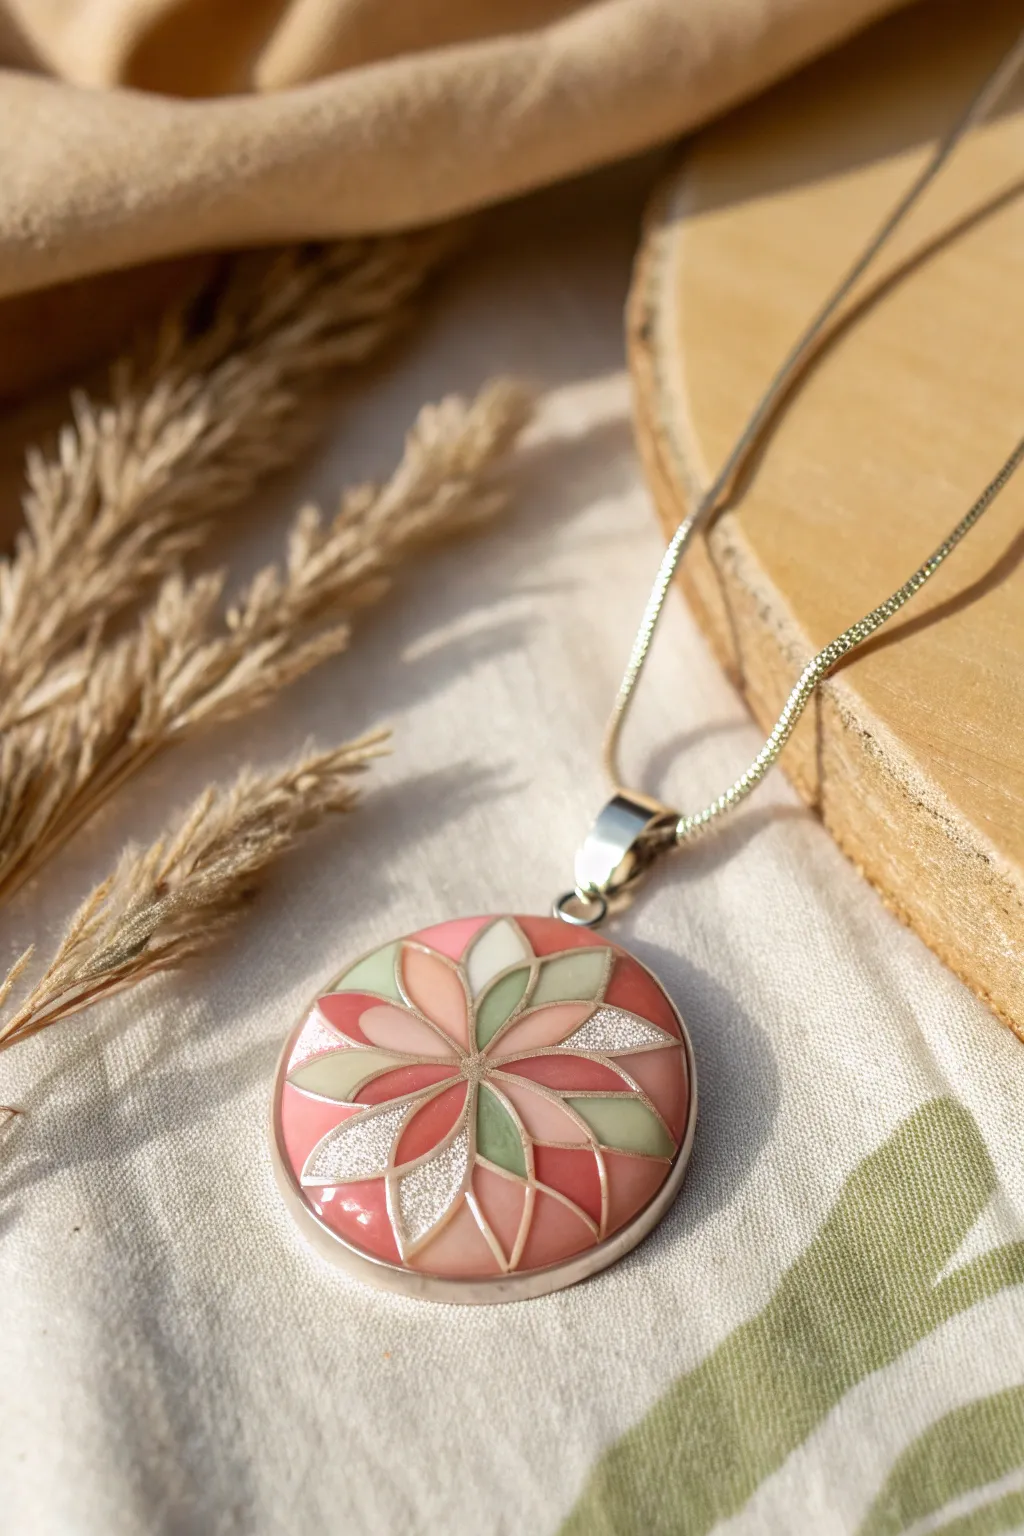
Capture the delicate beauty of stained glass in a wearable format with this intricate polymer clay and resin pendant. The geometric floral design features soft pastels and metallic accents, all sealed under a high-gloss finish for a professional, glass-like shine.
Step-by-Step
Materials
- Polymer clay (shades: soft pink, coral, sage green, pearl white/translucent)
- Silver polymer clay or silver wire (for outlining)
- Round metal bezel setting (silver tone)
- UV resin or 2-part epoxy resin
- UV lamp (if using UV resin)
- Clay roller or pasta machine
- Precision craft knife (X-Acto)
- Small geometric cutters (petal or diamond shapes)
- Needle tool
- Silver mica powder or silver glitter
- Glossy varnish (optional base coat)
- Fine sandpaper (400-1000 grit)
Step 1: Creating the Clay Canes
-
Condition the Clay:
Start by conditioning your polymer clay blocks until they are soft and pliable. Use the roller to create even sheets of the pink, coral, sage green, and white clays at a medium thickness. -
Create Skinner Blends (Optional):
For a softer look, you can create subtle gradients by mixing small amounts of white into your colors, though solid block colors work perfectly for a graphic geometric style. -
Form the Petal Shapes:
Shape your colored clays into long logs. Pinch the tops and bottoms of these logs to create a marquise or ‘eye’ shape cross-section, which creates the petal look. -
Add Glitter Accents:
Mix a small amount of translucent clay with fine silver glitter or mica powder. Form this into a similar petal-shaped log to serve as the sparkly accent segments seen in the design. -
Outline with Silver:
Roll out a very thin sheet of silver polymer clay. Wrap each colored log in this thin silver sheet. This step is crucial as it mimics the metal framework of cloisonné.
Step 2: Assembling the Pattern
-
Reduce the Canes:
Gently roll and stretch your wrapped logs to reduce their diameter. You need them small enough that multiple pieces fit inside your bezel. -
Cut Slices:
Use a sharp blade to cut consistent, thin slices from your canes. Aim for a thickness of about 2-3mm. -
Prepare the Bezel:
Place a thin layer of liquid polymer clay or a base sheet of scrap clay into the bottom of your metal bezel to act as an adhesive foundation. -
Arrange the Center:
Start placing your slices in the center of the bezel. Use a needle tool to gently nudge the pointed ends together to form a central starburst. -
Fill the Outer Ring:
Continue placing slices in a ring around the center. I like to alternate colors—pink, glitter, green—to keep the design balanced. -
Trim to Fit:
If your slices overhang the edge of the bezel, use your craft knife to carefully trim the excess clay flush against the metal rim. -
Smooth the Surface:
Place a piece of parchment paper over the vibrant clay design and gently rub with your finger or roll over it to ensure the clay is flat and distinct segments adhere to each other.
Cloudy Resin?
If your resin looks cloudy after curing, it might be due to moisture on the clay or under-curing. Always ensure the baked clay is 100% dry and wipe with alcohol before pouring resin.
Step 3: Curing and Finishing
-
Bake the Piece:
Bake the pendant in an oven according to your clay manufacturer’s instructions (usually around 275°F/130°C for 15-30 minutes). Let it cool completely inside the bezel. -
Light Sanding:
If the surface feels uneven, very lightly sand the top with fine-grit sandpaper, but be careful not to sand away the silver outlines. -
Clean the Surface:
Wipe the surface with a damp cloth or a little rubbing alcohol to remove any dust or sanding residue. -
Apply Resin:
Pour a small amount of clear UV or epoxy resin onto the center of the piece. Use a toothpick to guide the resin to the edges, creating a domed effect. -
Remove Bubbles:
Check closely for air bubbles. Pass a lighter quickly over the surface or pop stubborn bubbles with a needle tool. -
Final Cure:
Cure the resin under a UV lamp for 2-4 minutes (or let epoxy set for 24 hours) until the surface is hard, glassy, and tack-free.
Add Real Metal
For a truly authentic cloisonné look, replace the silver clay outlines with actual flat craft wire bent into petal shapes, then fill the voids with liquid clay.
String your gleaming new pendant onto a delicate silver chain to complete the elegant aesthetic


Wide Rings With a Resin Topcoat
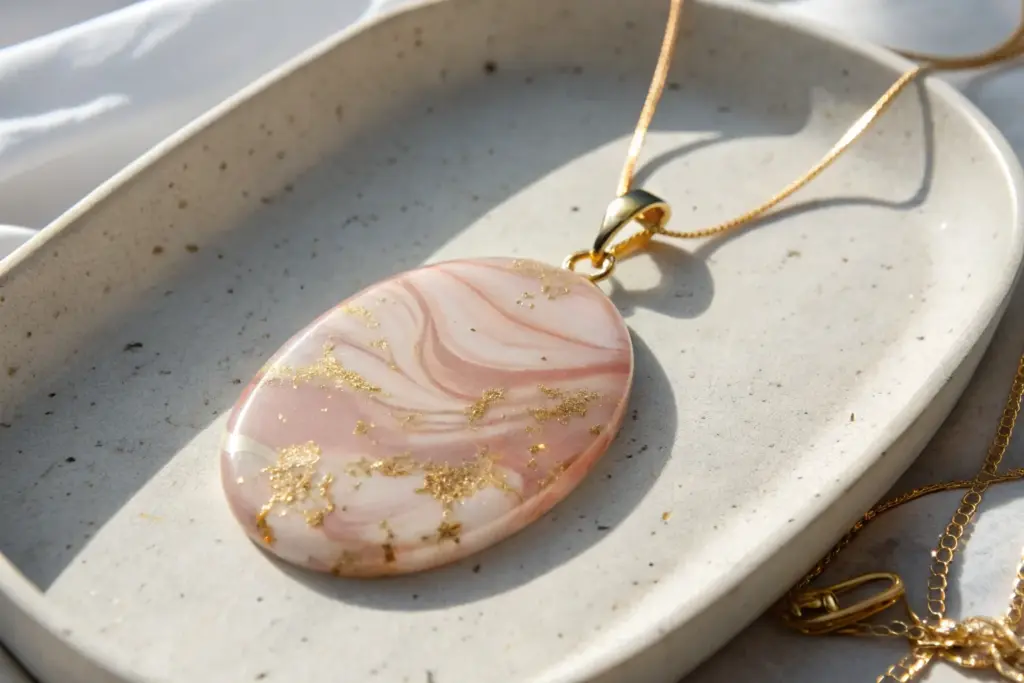
Capture the organic beauty of natural stone with this wide, translucent polymer clay ring. The swirling mix of earthy translucent, rust, and white clays creates a convincing agate effect that is perfectly sealed under a glassy layer of UV resin.
How-To Guide
Materials
- Translucent polymer clay (white or uncolored)
- Opaque polymer clay (white, dark brown, rust/terracotta)
- Alcohol inks (brown, amber) – optional
- Liquid polymer clay (translucent)
- Ring mandrel or metal tube
- Tissue blade
- Acrylic rolling pin
- Pasta machine (optional but helpful)
- Wet/dry sandpaper (400 to 1000 grit)
- UV resin
- UV lamp
- Small paintbrush or silicone applicator
- Latex or nitrile gloves
Step 1: Creating the Faux Stone Veneer
-
Prepare the translucent base:
Condition a large block of translucent polymer clay until it is soft and pliable. If you want a warmer tone, mix in a tiny drop of amber alcohol ink, but keep it mostly clear. -
Mix colored accents:
Create thin sheets of your opaque clays: white, rust, and dark brown. You want very little opaque clay compared to the translucent amount to maintain that gem-like quality. -
Chop and combine:
Roughly chop the translucent clay and the colored sheets into small, irregular chunks. Mix them together into a loose pile. -
Form a log:
Squeeze the chopped pieces together to form a rough log. Twist the log firmly to start stretching the colors into streaks. -
Fold and roll:
Flatten the log, fold it over, and roll it out again. Repeat this process 2-3 times, rolling in different directions to create natural-looking veining rather than uniform stripes. -
Create the sheet:
Roll the final mixture into a medium-thick strip (about 2-3mm). This will be the body of your ring.
Step 2: Forming and Baking
-
Size the ring:
Check your ring size against the mandrel. Remember that the clay will go *around* the mandrel, so you need to account for the thickness. -
Cut the strip:
Use your tissue blade to cut a clean, straight strip from your patterned clay sheet at your desired width (the ring in the image is quite wide, about 10-12mm). -
Wrap the mandrel:
Wrap the strip around your metal ring mandrel. Cut through both overlapping ends simultaneously with a sharp blade to create a perfect butt joint. -
Seal the seam:
Apply a tiny amount of translucent liquid polymer clay to the raw edges of the seam and press them gently together. Smooth the seam with your finger so it disappears into the pattern. -
Initial bake:
Bake the ring while still on the mandrel according to your clay manufacturer’s instructions (usually 275°F/130°C for 30 minutes). Let it cool completely before removing.
Sticky After Curing?
If your resin feels tacky after curing, wipe it with isopropyl alcohol or place it in direct sunlight for 10 minutes to finish the chemical reaction completely.
Step 3: Finishing and Resin Coat
-
Sand the edges:
Remove the ring from the mandrel. Use wet sandpaper (start at 400 grit) to smooth the top and bottom rims, ensuring they are flat and comfortable. -
Sand the surface:
Lightly wet sand the exterior and interior to remove any fingerprints or texture. Rinse and dry the ring thoroughly. -
Prepare for resin:
Place the ring on a protected work surface or a dedicated resin stand. Make sure your workspace is free of dust. -
Apply UV resin:
Squeeze a small amount of UV resin onto the outer surface. I like to use a silicone brush to drag the resin to the very edges without letting it drip over. -
Pop bubbles:
Pass a lighter quickly over the surface or use a toothpick to pop any tiny air bubbles trapped in the resin. -
Cure the resin:
Cure under the UV lamp for 2-3 minutes until hard and tack-free. If coating the inside, repeat the application and curing process for the interior.
Pro Tip: Depth Perception
Add tiny flecks of gold leaf or copper foil into your initial clay chopping mix. The transparent layers make the metal flakes look suspended deep inside stone.
Enjoy wearing your sophisticated, stone-effect statement piece


Charm Keychains With Clear Resin Sealing
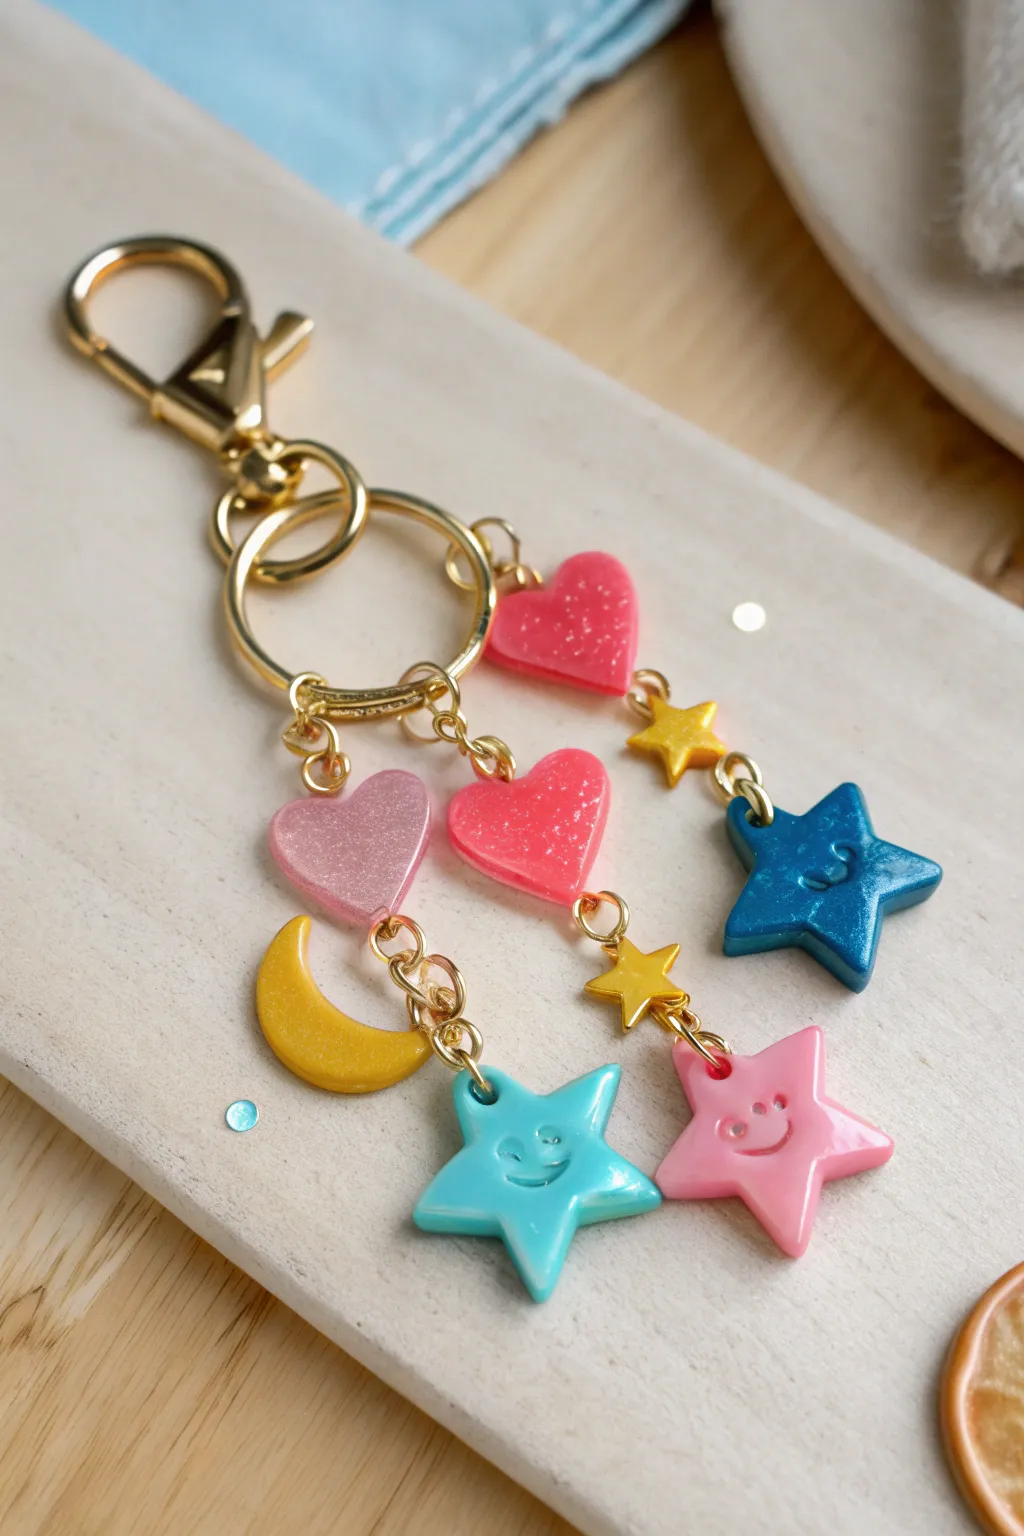
Capture the magic of the night sky with this cheerful, glittering keychain featuring smiling stars and glossy hearts. This project combines pastel polymer clay charms with a durable, high-shine resin finish for a professional-quality accessory.
Step-by-Step Guide
Materials
- Polymer clay (pink, blue, yellow, aqua)
- Small star and heart clay cutters
- Small circle cutter or smiley face modeling tool
- Gold open jump rings (various sizes)
- Gold chain links
- Gold lobster clasp keychain hardware
- UV resin or 2-part epoxy resin
- UV lamp (if using UV resin)
- Small paintbrush or silicone tool
- Hand drill or pin vibe
- Glitter (fine iridescent)
- Jewelry pliers (round nose and flat nose)
- Baking sheet and parchment paper
- Oven
Step 1: Crafting the Clay Charms
-
Condition the clay:
Start by warming the polymer clay in your hands to condition it. You will need separate small balls of pink, darker pink, blue, aqua, and yellow. -
Add sparkle:
Knead a generous pinch of fine iridescent glitter directly into the pink and darker pink clay until it is evenly distributed for a subtle shimmer effect. -
Roll out slabs:
Roll each color out onto a clean work surface to an even thickness of about 3-4mm. Ensure the surface is smooth and free of lint. -
Cut out shapes:
Use your cutters to punch out the shapes: three large stars (blue, pink, aqua), two medium hearts (pink, dark pink), one thicker yellow moon, and small yellow stars. -
Soften the edges:
Gently tap the edges of the cut shapes with your finger to round them off slightly, removing the sharp ‘cookie cutter’ look. -
Add smiley faces:
For the three large stars, press a smile shape into the clay using a modeling tool. Use a small dotting tool to indent the eyes for a cute, animated expression. -
Pierce holes:
Before baking, use a needle tool or toothpick to carefully pierce a hole at the top of each charm for the jump rings. Make sure the hole is big enough for your rings. -
Bake the pieces:
Arrange the charms on a parchment-lined baking sheet and bake according to your polymer clay manufacturer’s instructions (usually 275°F/135°C for 15-30 minutes).
Clear Finish Secrets
Warm your resin bottle slightly in a bowl of warm water before applying. This reduces viscosity and helps bubbles rise to the surface faster.
Step 2: Resin Sealing
-
Clean surface:
Once the baked pieces are completely cool, wipe them down with a little rubbing alcohol to ensure they are oil-free. -
Apply resin coating:
Place the charms on a silicone mat. Apply a thin, even layer of UV resin (or mixed epoxy) to the front surface of each charm using a brush or silicone tool. -
Pop bubbles:
Pass a lighter quickly over the surface or use a toothpick to pop any tiny air bubbles trapped in the resin for a glass-like finish. -
Cure the resin:
Cure the pieces under a UV lamp for 2-3 minutes (or let epoxy sit for 24 hours). I like to do a second thin coat if the first one soaked in too much. -
Clear hoop holes:
If resin has dripped into your pre-drilled holes, use a small hand drill or pin vibe to clear them out again.
Make It Personal
Swap the smiley faces for stamped initial letters to create personalized gift keychains for friends.
Step 3: Assembly
-
Prepare jump rings:
Use your two pairs of pliers to twist open several gold jump rings. Remember to twist sideways, not pull them apart. -
Attach chains:
Attach short lengths of gold chain to the main keychain hardware loop. Create three staggered lengths for a cascading look. -
Connect top charms:
Attach the pink and dark pink hearts to the upper parts of the chains using small jump rings. -
Add connector stars:
Use jump rings to attach the small yellow stars as connectors between chain links, adding visual interest to the middle of the strands. -
Attach main pendants:
Fix the large smiley stars and the moon to the very bottom of each chain strand using slightly larger, sturdy jump rings. -
Final check:
Hold the keychain up to check the balance. Ensure all jump rings are closed tightly so no charms slip off.
Clip your radiant celestial creation onto a bag or keys and enjoy the handmade sparkle every day

What Really Happens Inside the Kiln
Learn how time and temperature work together inside the kiln to transform clay into durable ceramic.
Terrazzo Coasters With Resin Flood Coat
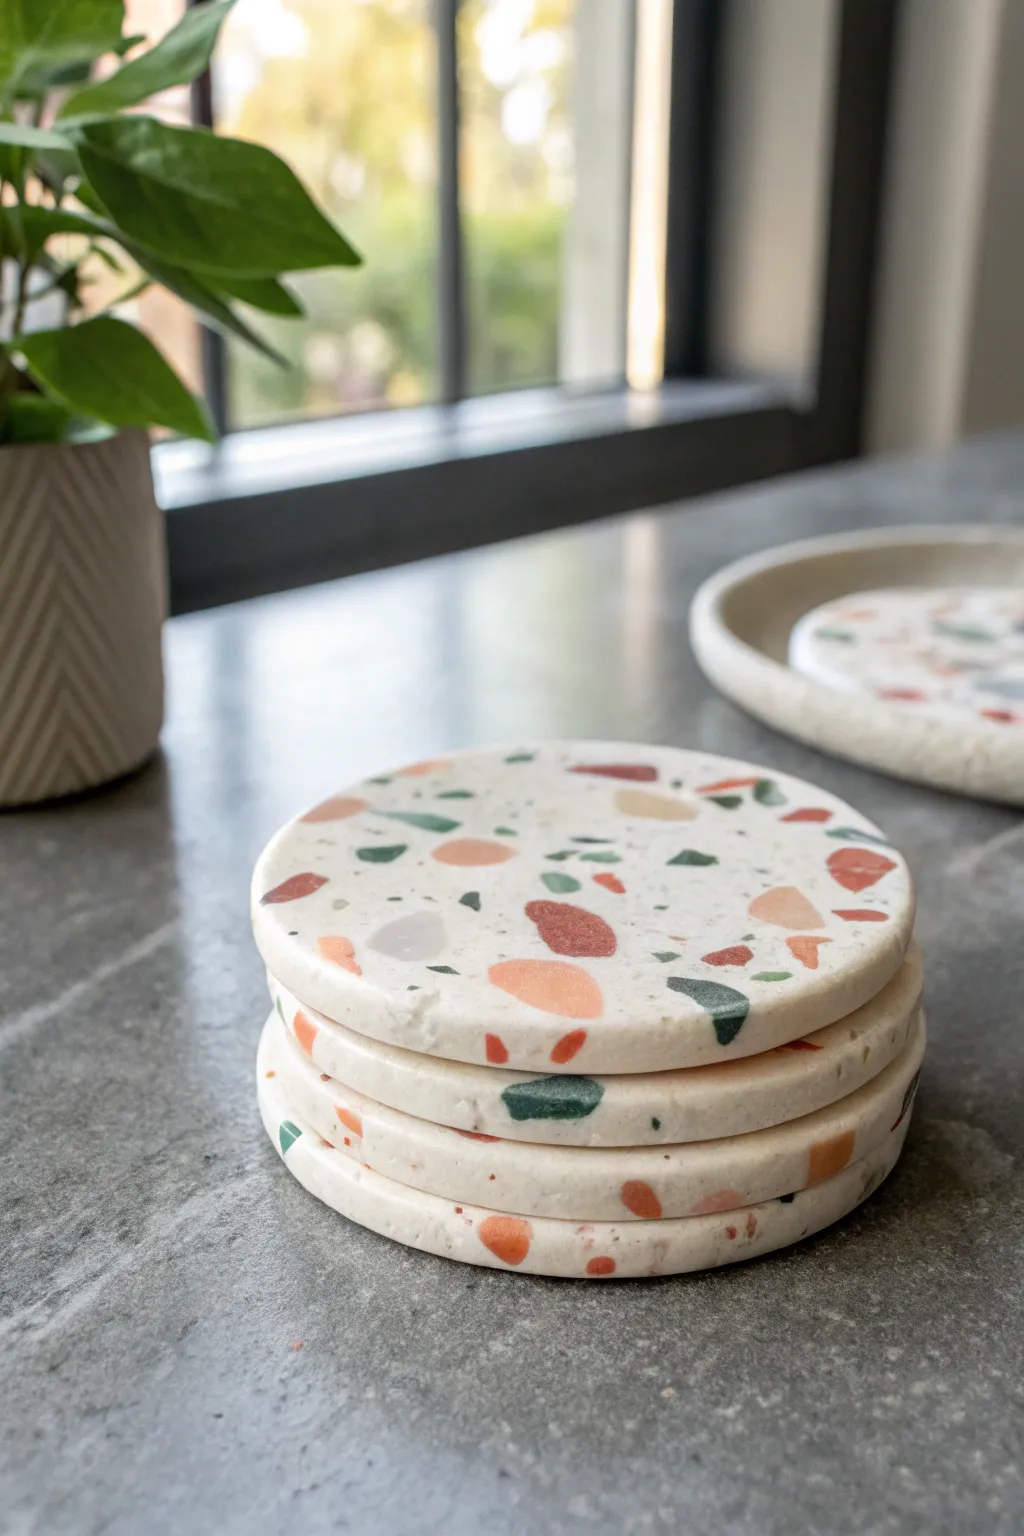
Bring a trendy, modern touch to your coffee table with these stunning terrazzo-style coasters. By combining polymer clay chips with a glossy resin finish, you can achieve that high-end stone look right in your home studio.
Detailed Instructions
Materials
- White or cream polymer clay (base)
- Small amounts of colored polymer clay (terracotta, forest green, light grey, warm brown)
- Two-part casting resin (clear)
- Round silicone coaster mold (approx. 4 inches)
- Rolling pin or pasta machine
- Sharp craft blade or tissue knife
- Parchment paper
- Resin mixing cups and stir sticks
- Heat gun or torch for bubbles
- Fine-grit wet/dry sandpaper (up to 2000 grit)
- Resin release spray (optional)
Step 1: Creating the Terrazzo Chips
-
Roll out colors:
Condition your colored clays (terracotta, green, grey, brown) until soft. Roll each color out into a thin sheet, about 2mm thick. -
Bake the sheets:
Place these flat sheets on parchment paper and bake them according to the package instructions. Do not bake the white base clay yet. -
Cool and crumble:
Once baked and fully cooled, break the colored sheets into irregular fragments. I find using a craft knife to chop them into angular, differing sizes creates the most authentic stone look. -
Sort chips:
Separate your chips into piles. You’ll want a variety of sizes ranging from tiny specks to larger, feature chunks.
Chip Density
Don’t be shy with your chips! Cover about 70-80% of the white clay surface before rolling. The chips spread out significantly as you roll the slab thinner.
Step 2: Forming the Base
-
Prepare the base:
Condition a large block of white or cream polymer clay. Roll it into a thick slab, roughly the thickness you want your final coasters to be (around 1/4 inch). -
Embed the chips:
Scatter your baked chips generously over the top of the raw white clay slab. Press them firmly into the surface with your fingers. -
Roll flat:
Use your rolling pin to flatten the chips into the clay so the surface becomes level again. Roll in different directions to ensure the chips are fully integrated. -
Cut the shapes:
Place your round cutter or use a template to cut circles from the slab. Ensure they fit inside your silicone molds with a tiny bit of wiggle room. -
Final Bake:
Bake the round coaster bases according to your clay’s instructions. Let them cool completely under a heavy book to keep them perfectly flat.
Step 3: Resin Coating
-
Sand the surface:
Using wet sandpaper (starting at 400 grit and working up), sand the top of the baked coasters to expose the sharp edges of the colored chips and create a smooth surface. -
Clean thoroughly:
Wash the coasters to remove all sanding dust and let them dry completely. Any moisture left will cloud the resin. -
Place in molds:
Place your baked and sanded clay discs into the silicone molds. They should sit flat on the bottom. -
Mix resin:
Measure and mix your two-part resin according to the manufacturer’s specific ratio. Stir slowly to minimize bubbles. -
Pour the flood coat:
Pour a thin layer of resin over the top of the coaster. You want just enough to flood the surface and create a glass-like finish, self-leveling to the edges of the mold. -
Pop bubbles:
Wait about 5-10 minutes for bubbles to rise, then quickly pass a heat gun or torch over the surface to pop them. -
Cure:
Cover the molds with a dust cover (like a cardboard box) and allow the resin to cure fully, usually 24-48 hours depending on your brand. -
Demold and finish:
Pop the finished coasters out of the silicone molds. If there are any sharp resin edges on the bottom, lightly sand them away.
Cloudy Resin?
Cloudiness usually comes from moisture or unmixed resin. Ensure your clay is 100% dry after sanding, and always scrape the sides of your mixing cup thoroughly.
Stack your new coasters on the counter and enjoy using your functional art piece
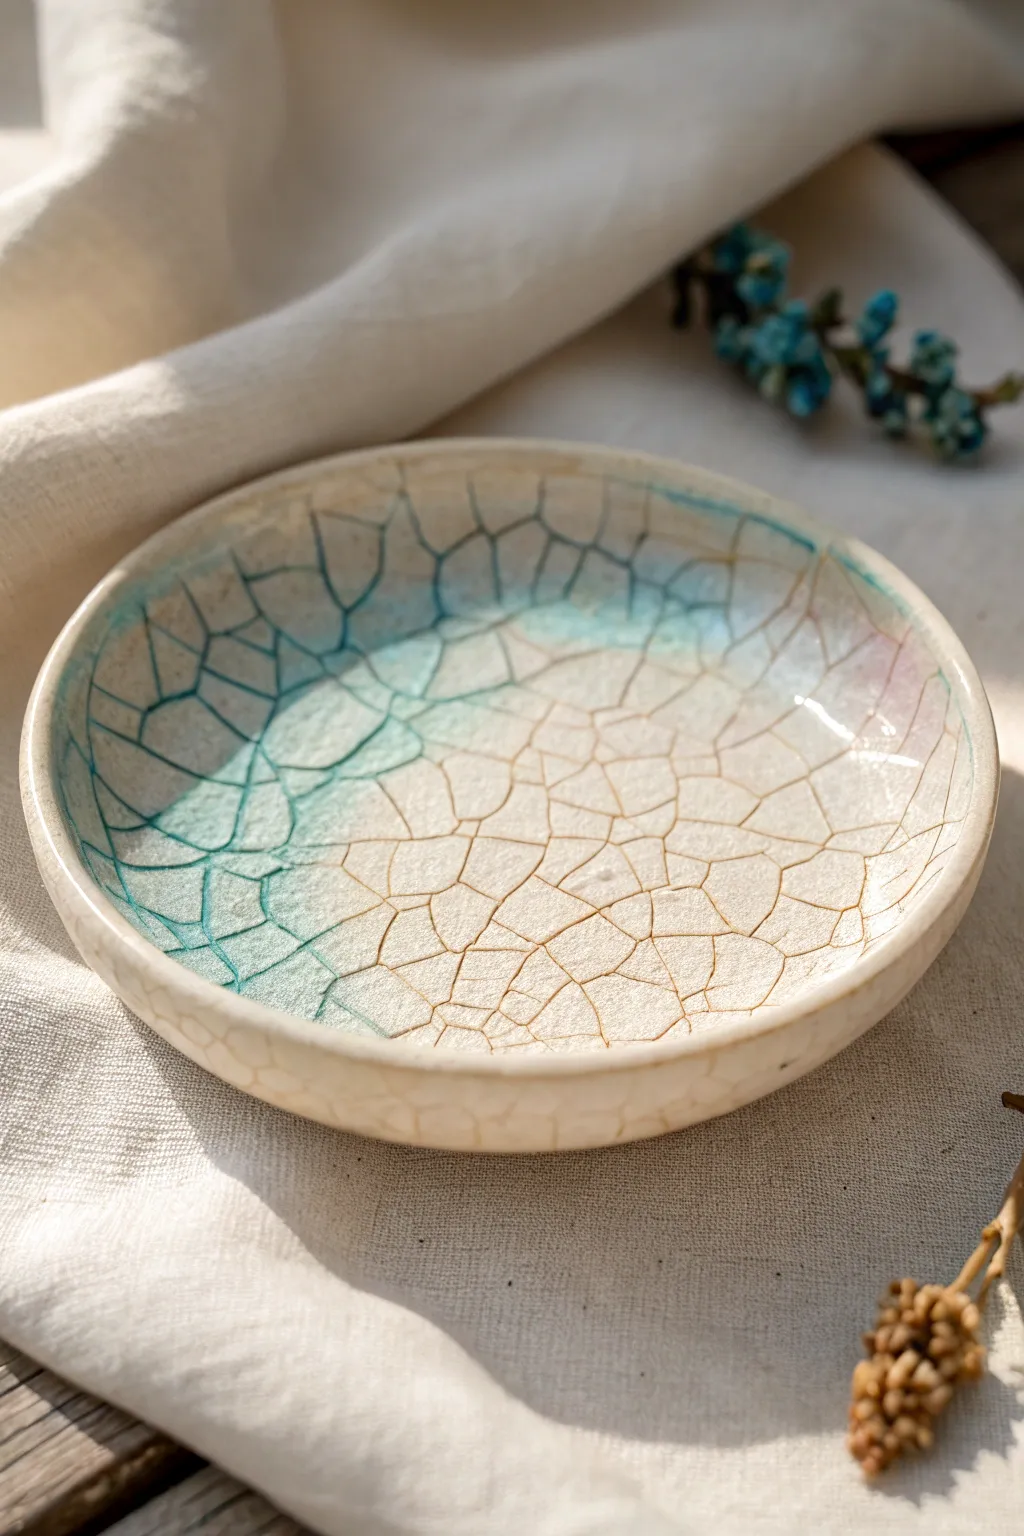
Trinket Dishes With Resin Pools
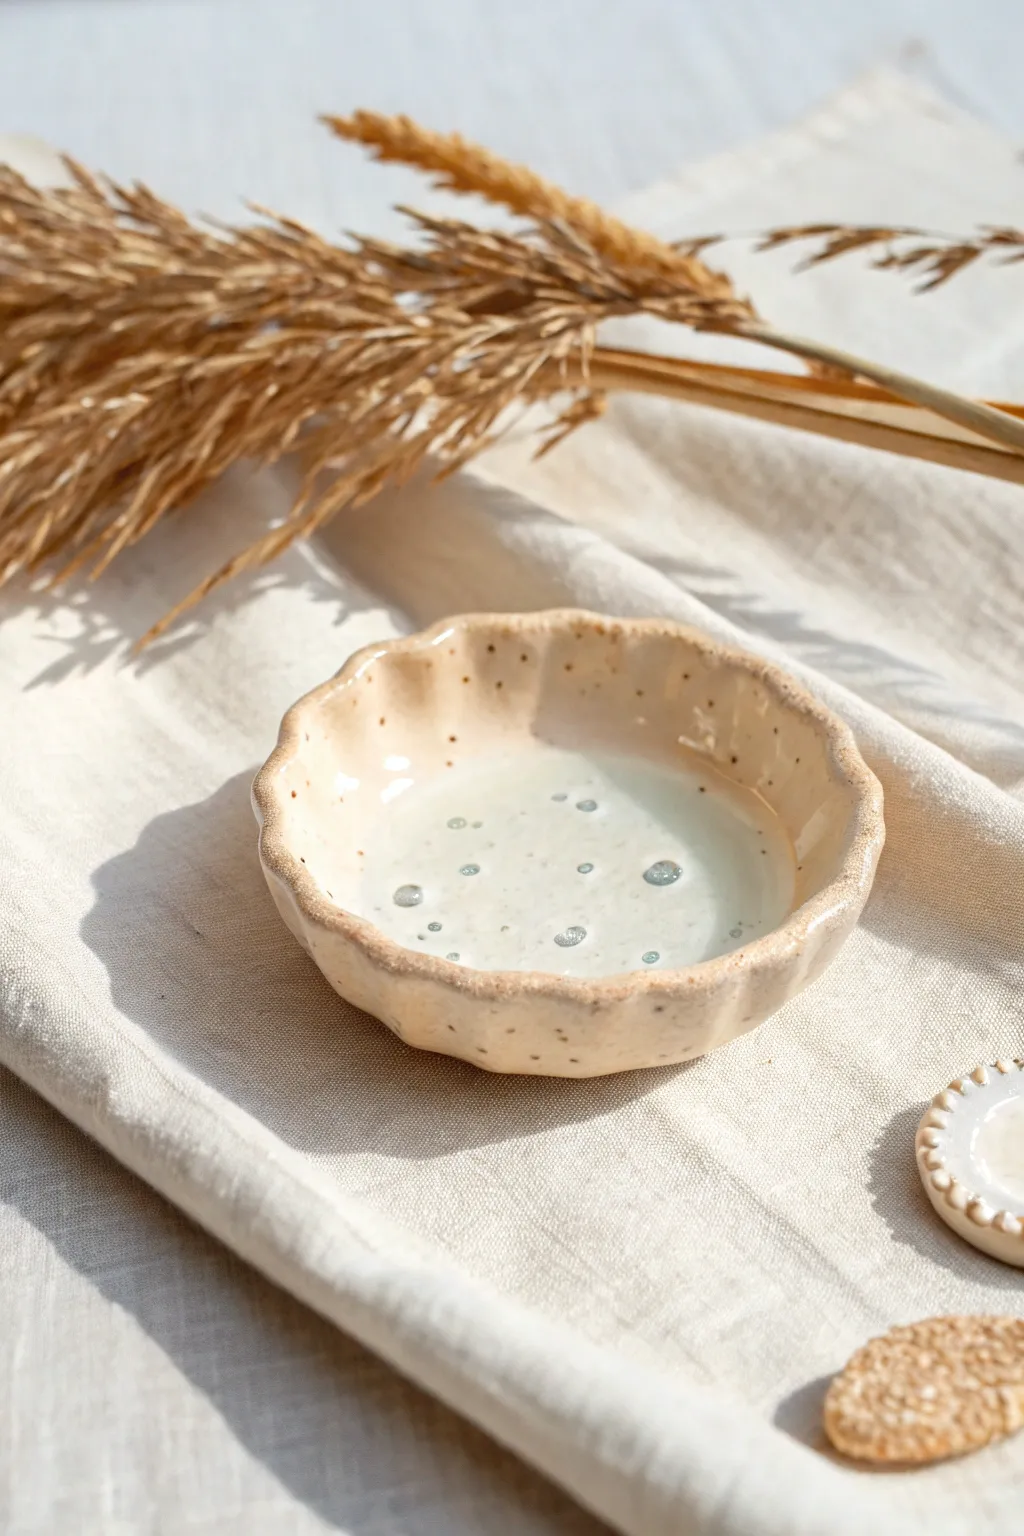
Capture the serenity of a quiet tide pool with this charming trinket dish project. The sandy-textured polymer clay forms a natural, organic vessel, while a layer of clear resin nestled inside creates a permanent, glossy pool of water.
How-To Guide
Materials
- Beige or sand-colored polymer clay
- Coarse black pepper or brown embossing powder (for speckling)
- Small rolling pin
- Circle cutter or small bowl (appx. 3-4 inches diameter)
- Sponge or foam pad
- UV resin or 2-part epoxy resin
- UV lamp (if using UV resin)
- Wooden stir stick
- Small heat gun or lighter
- Gloss glaze (optional for clay rim)
Step 1: Sculpting the Clay Base
-
Prepare the clay:
Begin by conditioning your beige polymer clay until it is soft and malleable. To achieve the speckled, stoneware effect seen in the photo, knead in a small pinch of coarse black pepper or brown embossing powder until it is evenly distributed throughout the block. -
Roll out the slab:
Roll the clay out into an even slab, aiming for a thickness of about 1/4 inch. It needs to be thick enough to hold the pool of resin later without cracking. -
Cut the shape:
Using a circle cutter or by tracing around a small bowl with a craft knife, cut out a perfect circle from your speckled clay slab. -
Form the rim:
Place your clay circle onto a sponge or foam pad. Gently press your thumb into the center and work your way outward, pushing the clay edges up to form a shallow bowl shape. -
Create the texture:
With the clay still soft, use your fingertips to gently pinch and undulate the rim. This creates that natural, organic ‘shell’ or ‘flower’ waved edge rather than a perfectly manufactured look. -
Refine the interior:
Smooth out the interior bottom of the dish with your finger. It’s crucial that the bottom is relatively flat so the resin can pool evenly later. -
Bake the clay:
Place your shaped dish on a baking sheet lined with parchment paper. Bake according to the manufacturer’s instructions for your specific brand of clay—usually around 275°F (130°C) for 15-30 minutes. -
Cool down:
Once baked, turn off the oven and let the dish cool down completely before moving on to the resin phase. Adding resin to hot clay can cause rapid curing or bubbles.
Sticky Situation?
If your resin remains sticky after curing, you may have measured the 2-part mixture incorrectly or your UV light isn’t strong enough. Coat with a thin layer of fresh resin or clear nail polish to seal it.
Step 2: Pouring the Resin Pool
-
Prepare the resin:
If using 2-part epoxy, mix equal parts A and B slowly in a small cup, stirring for at least 3 minutes. If using UV resin, you can pour directly from the bottle. -
Pour the first layer:
Carefully pour a small amount of clear resin into the center of the cooled dish. You want enough to coat the bottom but not so much that it creeps up the sides yet. I find it helpful to tilt the dish slightly to help it spread. -
Pop bubbles:
Use a lighter or a small heat gun held a few inches away to quickly pass over the surface of the resin. This pops any micro-bubbles and ensures a glass-like finish. -
Add detail (optional):
If you want the subtle bubbles suspended in the resin as seen in the photo, you can actually skip the heat gun step, or intentionally stir quickly to introduce air into the mixture before pouring. -
Cure the resin:
If using UV resin, place the dish under a UV lamp for 2-4 minutes until rock hard. If using epoxy, cover the dish with a dust cover (like an upside-down box) and let it cure for 24 hours. -
Second pour:
To get that deep water look, add a second thin layer of resin on top of the first. This creates depth and ensures a perfectly flat surface. -
Rim gloss (optional):
For extra contrast between the matte clay and the shiny ‘water,’ you can carefully paint a thin line of resin or gloss varnish just along the very top edge of the wavy rim. -
Final cure:
Cure the final layer (under the lamp or over 24 hours). Ensure the resin is completely non-tacky before handling.
Make It Magical
Add a drop of translucent blue alcohol ink to your resin for a tropical water look, or embed tiny real crushed seashells into the resin layer before curing for a hidden beach treasure effect.
Now you have a tranquil little piece of the shore perfect for holding your favorite rings or earrings


The Complete Guide to Pottery Troubleshooting
Uncover the most common ceramic mistakes—from cracking clay to failed glazes—and learn how to fix them fast.
Open-Bezel Ocean Creature Jewelry
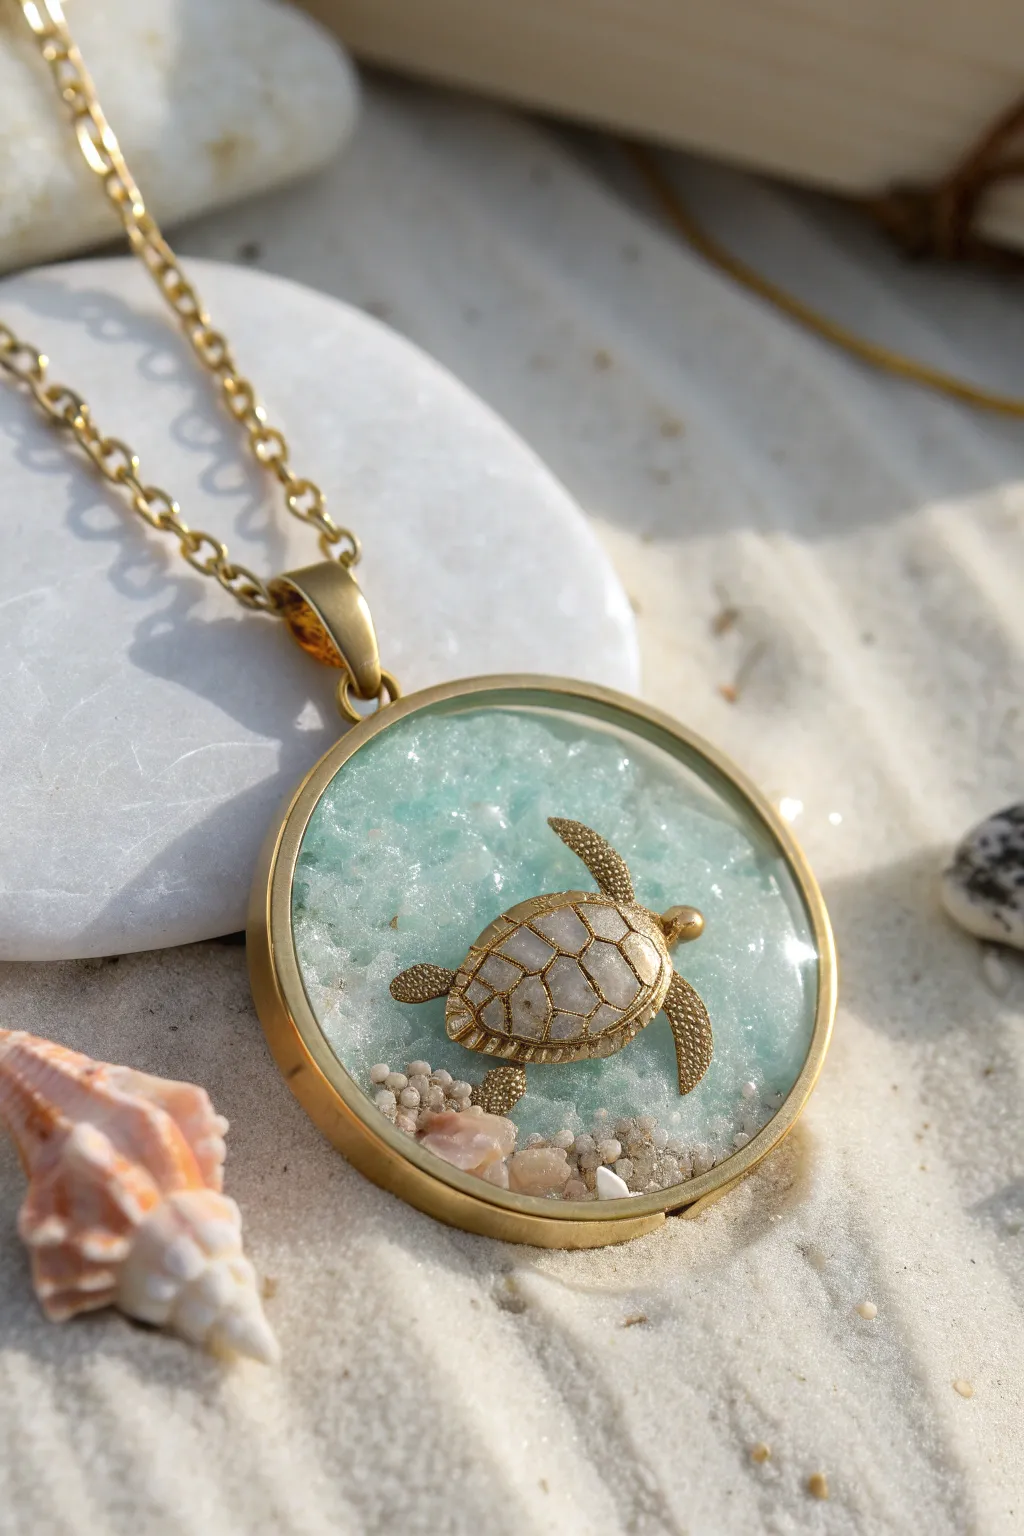
Capture the serenity of shallow tropical waters in this elegant open-bezel pendant. By combining crushed glass texture with crystal clear resin, you will create a sparkling underwater scene for a delicate golden turtle charm.
Step-by-Step
Materials
- Round gold open bezel pendant (approx. 30-40mm)
- UV resin (clear)
- UV lamp
- Packing tape or specialized resin tape
- Crushed glass glitter (turquoise/aqua) or coarse glitter
- Small gold sea turtle charm (flat back preferred)
- Miniature white pebbles or coarse white sand
- Tiny seashells (real or nail art charms)
- Toothpicks or silicone dotting tool
- Gold chain and jump rings
- Tweezers
Step 1: Preparing the Base
-
Tape the Bezel:
Cut a piece of packing tape or resin tape slightly larger than your bezel. Press the bezel firmly onto the sticky side of the tape, ensuring a tight seal around the entire rim to prevent leaks. -
Check the Seal:
Flip the bezel over and run your fingernail or a burnishing tool along the inner edge where the metal meets the tape. This is crucial for a clean finish. -
Base Layer:
Pour a very thin layer of clear UV resin into the bottom of the bezel. You want just enough to coat the tape sticky surface. -
Initial Cure:
Place the bezel under your UV lamp for about 60 seconds to harden this initial base layer.
Seal the Leak
If you notice resin seeping under the tape, flash cure immediately to stop the flow. You can file away the excess leaked resin later with an emery board.
Step 2: Creating the Ocean Floor
-
Apply Resin Glue:
Add another thin layer of liquid UV resin over the cured base, but do not cure it yet. This will act as the adhesive for your textures. -
Add Water Texture:
Sprinkle the turquoise crushed glass or coarse glitter into the upper two-thirds of the bezel. Use a toothpick to spread it out, leaving the bottom area clear for the sand. -
Create the Sandy Bottom:
carefuly place miniature white pebbles or coarse sand into the bottom third of the wet resin, creating a slight slope where it meets the ‘water’ section. -
Secure the Scene:
Once you are happy with the arrangement of the glass and stones, cure under the UV lamp for 2-3 minutes to lock everything in place.
Make it Shine
Mix a tiny amount of iridescent white mica powder into the clear resin for the final top coat. It mimics the look of sun rays hitting the ocean surface.
Step 3: Adding the Inhabitants
-
Position the Turtle:
Place a drop of UV resin on the back of your gold turtle charm. Position it in the center of the crushed glass area, angled slightly upward as if swimming to the surface. -
Add Shell Details:
Using tweezers, dip tiny seashells into a bit of resin and tuck them amongst the white pebbles at the bottom for added realism. -
Flash Cure:
Use your UV light for 30-60 seconds just to fix the turtle and shells in position so they don’t drift during the final pour.
Step 4: Encapsulating and Finishing
-
The Dome Pour:
Slowly pour clear UV resin over the entire piece, starting from the center and letting it flow to the edges. You aim to create a slight dome effect due to surface tension. -
Pop Bubbles:
Let the resin sit for a moment so bubbles rise. Pass a lighter flame quickly over the surface or use a toothpick to pop any stubborn air pockets near the turtle’s legs. -
Final Cure:
Cure under the UV lamp for a full 3-5 minutes. I like to let it cool completely before touching it to avoid fingerprints. -
Back Finishing:
Peel off the tape from the back. If the back feels tacky or has a rough texture from the tape, brush on a thin layer of resin and cure it one last time facing up. -
Assembly:
Attach a large gold jump ring to the pendant loop, thread your gold chain through, and your ocean keepsake is ready to wear.
Enjoy wearing this little piece of the ocean that captures the tranquil beauty of sea life
Faux Opal Clay With Sparkly Resin
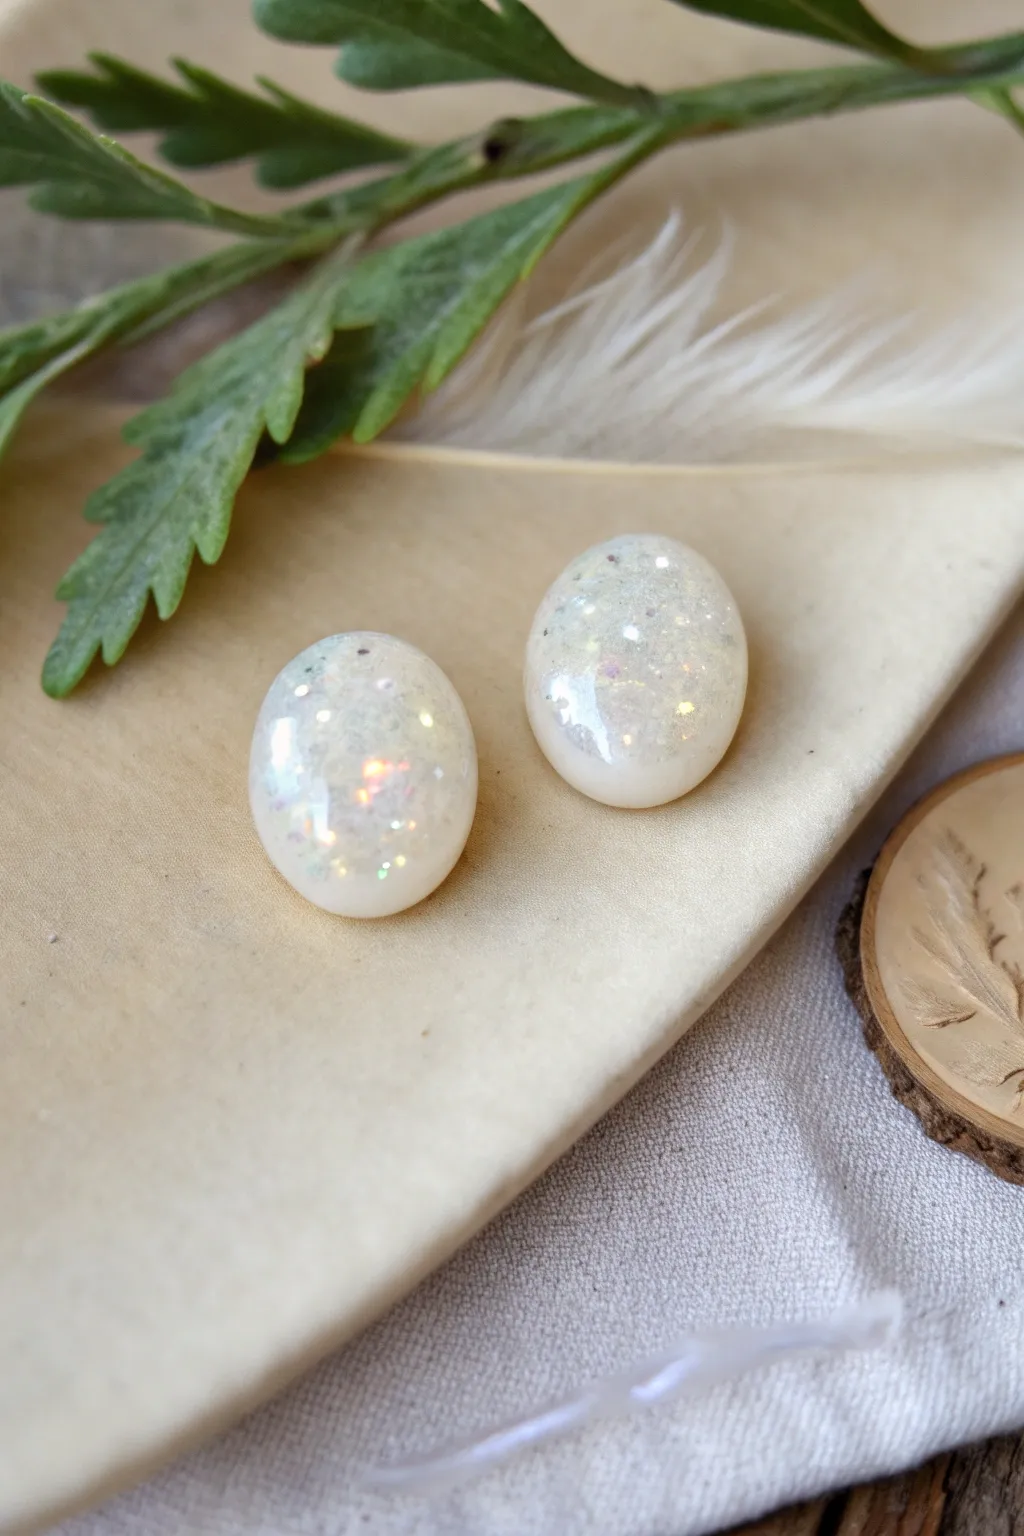
Capture the ethereal beauty of precious gemstones with these luminous faux opal cabochons. By layering translucent clay with iridescent flakes and a high-gloss resin finish, you create depth and sparkle that mimics the real thing beautifully.
Step-by-Step Tutorial
Materials
- Translucent polymer clay (white or frosty)
- Iridescent flakies or mylar flakes (opal shifting colors)
- Ultra-fine glitter (holographic or iridescent)
- UV resin or 2-part epoxy resin
- Oval cabochon silicone mold (approx. 15mm-20mm)
- UV lamp (if using UV resin)
- Mixing stick or toothpick
- Oven for baking clay
- Sandpaper (fine grit, wet/dry)
- Polishing compound or buffing wheel (optional)
Step 1: Preparing the Opal Base
-
Condition the clay:
Start by thoroughly conditioning your translucent polymer clay until it is soft and malleable. Warm hands help this process significantly, ensuring the clay isn’t brittle. -
Mix the inclusions:
Flatten the clay into a sheet. Sprinkle a generous amount of iridescent flakies and a tiny pinch of ultra-fine holographic glitter onto the surface. Don’t overdo the glitter; you want the flakes to be the star. -
Incorporate the sparkle:
Fold the clay over the inclusions and roll it out again. Repeat this folding and rolling process several times to distribute the flakes throughout the clay body, creating layers of depth. -
Form the cabochon shape:
Pinch off a small amount of the clay mixture. Press it firmly into your oval silicone mold. I find it helpful to start in the center and push outwards to avoid trapping air bubbles in the corners. -
Smooth the back:
Use your finger or a flat tool to smooth the back of the clay flush with the mold. Ensure the edges are clean and not overflowing. -
Bake the clay:
Place the mold (if oven-safe) or carefully removed clay pieces onto a baking tile. Bake according to the manufacturer’s instructions for your specific brand of clay, usually around 275°F (135°C) for 30 minutes. Let them cool completely.
Cloudy Results?
If your translucent clay looks milky after baking, you likely didn’t quench it. Plunge the hot baked pieces directly into ice water to maximize translucency immediately after the oven.
Step 2: Adding the Resin finish
-
Clean the surface:
Once cool, wipe the surface of the clay cabochons with a little rubbing alcohol to remove any oils or dust. -
Prepare the resin:
If using 2-part resin, mix it precisely according to package directions and let it rest for 5 minutes to release bubbles. If using UV resin, have your bottle ready. -
Enhance with extra sparkle:
For maximum impact, mix a tiny amount of extra loose iridescent flakes directly into a small amount of resin before applying. -
Apply the dome:
Carefully pour or drip the resin onto the center of the baked clay cabochon. Use a toothpick to guide the resin to the very edges without letting it spill over the sides. -
Pop bubbles:
Pass a lighter quickly over the surface or use a toothpick to pop any stubborn air bubbles that rise to the top. -
Cure the resin:
Place the pieces under a UV lamp for 2-3 minutes (for UV resin) or cover them with a dome to prevent dust and let cure for 24 hours (for epoxy). -
Check the edges:
Inspect the edges once cured. If the resin pulled back during curing, you may need a second thin coat to ensure a perfect dome. -
Sand the back:
If the back of your cabochon is rough or uneven, place a sheet of wet/dry sandpaper on a flat surface and rub the back of the piece in a circular motion until smooth.
Level Up: Fire Opal
Mix a tiny drop of orange alcohol ink into the resin layer. This creates a stunning ‘fire opal’ effect, tinting the depth while keeping the iridescent flakes visible.
Now you have a set of custom gems ready to be glued onto earring posts or set into necklace bezels

TRACK YOUR CERAMIC JOURNEY
Capture glaze tests, firing details, and creative progress—all in one simple printable. Make your projects easier to repeat and improve.
Marbled Tiles With Resin Inlay Lines
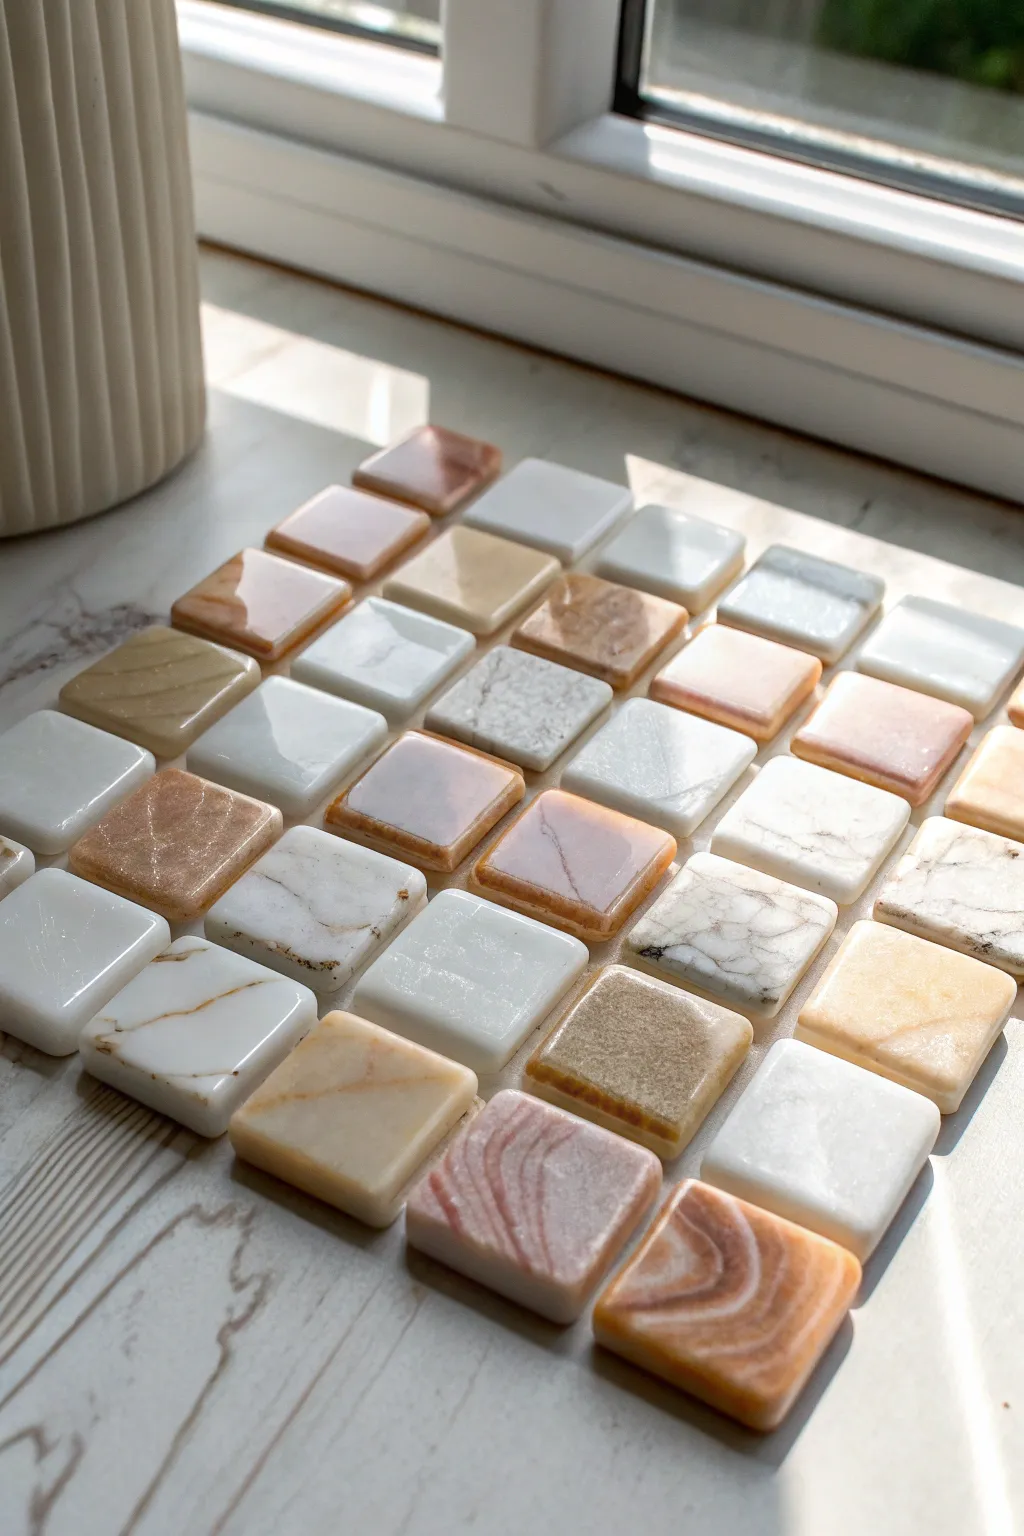
Create a sophisticated set of faux stone tiles that capture the elegance of polished marble and agate using polymer clay and resin. These miniature tiles feature stunning organic swirls and a high-gloss finish perfect for mosaics, jewelry, or dollhouse flooring.
Detailed Instructions
Materials
- Polymer clay (white, translucent, beige, brown, and pink)
- UV resin or two-part casting resin
- Square clay cutter (approx. 1 inch)
- Acrylic roller or pasta machine
- Gold acrylic paint or gold leaf flakes
- Fine-grit sandpaper (400 to 1000 grit)
- Ceramic tile or glass sheet for baking
- UV lamp (if using UV resin)
- Small paintbrush
- Protective gloves
Step 1: Creating the Marble Patterns
-
Condition the Clay:
Start by thoroughly conditioning your polymer clay blocks until they are soft and pliable. You will need a large amount of white and translucent clay, with smaller amounts of the colored clays for veining. -
Create Base Mixtures:
Mix different amounts of translucent clay into your colored clays. This adds depth to the final stone look; a 1:1 ratio of color to translucent works well for a semi-precious stone effect. -
Form Logs:
Roll each color into thin snakes or logs. Combine a few colors together—like white, beige, and a touch of brown—and twist them into a single, thicker rope. -
Marble the Clay:
Fold the twisted rope in half and twist it again. Repeat this fold-and-twist motion several times, but be careful not to over-mix, or the colors will turn muddy instead of distinct veins. -
Sheet the Clay:
Roll your marbled clay into a ball and then flatten it. Run it through your pasta machine or use an acrylic roller to create a sheet about 3mm thick. The pattern will stretch and reveal beautiful organic lines. -
Add Inlay Details:
For the ‘inlay’ look, gently press small flakes of gold leaf onto random areas of the clay sheet, or carve shallow, irregular cracks with a needle tool that we will paint later.
Depth Trick
Add a tiny drop of alcohol ink to your resin before doming. A hint of translucent white in the resin layer simulates the depth of real quartz or polished marble.
Step 2: Cutting and Baking
-
Cut the Tiles:
Place a piece of plastic wrap over the clay sheet before cutting if you want rounded edges, or cut directly for sharp edges. Use your square cutter to punch out uniform tile shapes. -
Refine the Shapes:
Carefully transfer the raw clay squares to your baking tile. Use your finger to gently smooth any rough edges or fingerprints without distorting the square shape. -
Bake:
Bake the tiles according to the manufacturer’s instructions for your specific brand of clay. Usually, this is around 275°F (135°C) for 30 minutes. Let them cool completely. -
Highlighting Veins:
If you carved cracks earlier, dilute a small amount of gold acrylic paint and wash it over the baked tile. Wipe away the excess surface paint with a damp paper towel, leaving gold only in the crevices.
Step 3: Resin Application
-
Clean the Surface:
Wipe each tile with a little rubbing alcohol to remove oils or dust. This ensures the resin bonds perfectly to the clay. -
Prepare the Resin:
Mix your two-part resin slowly to avoid bubbles, or prepare your UV resin bottle. I prefer letting two-part resin sit for 5 minutes after mixing to let bubbles rise and pop. -
Domed Effect:
Pour a small pool of resin into the center of a tile. Use a toothpick or small tool to guide the liquid to the very edges. Surface tension should stop it from spilling over the sides, creating a ‘domed’ look. -
Remove Bubbles:
Pass a lighter quickly over the surface of the wet resin or use a heat gun on low to pop any remaining micro-bubbles. -
Cure:
If using UV resin, cure under a UV lamp for 2-3 minutes. If using two-part resin, place the tiles in a dust-free box or cover them and let them cure for 24 hours. -
Finishing Touches:
Once fully cured, inspect the edges. If any resin dripped over, sand it away gently with fine-grit sandpaper for a flawless finish.
Make it Functional
Glue strong magnets to the backs to create a chic refrigerator set, or arrange them on a coaster base and grout them for a realistic mini-mosaic accent piece.
Enjoy arranging your beautiful, shiny new tiles into patterns or using them for your next architectural miniature.
Color-Block Bangles With Resin Segments
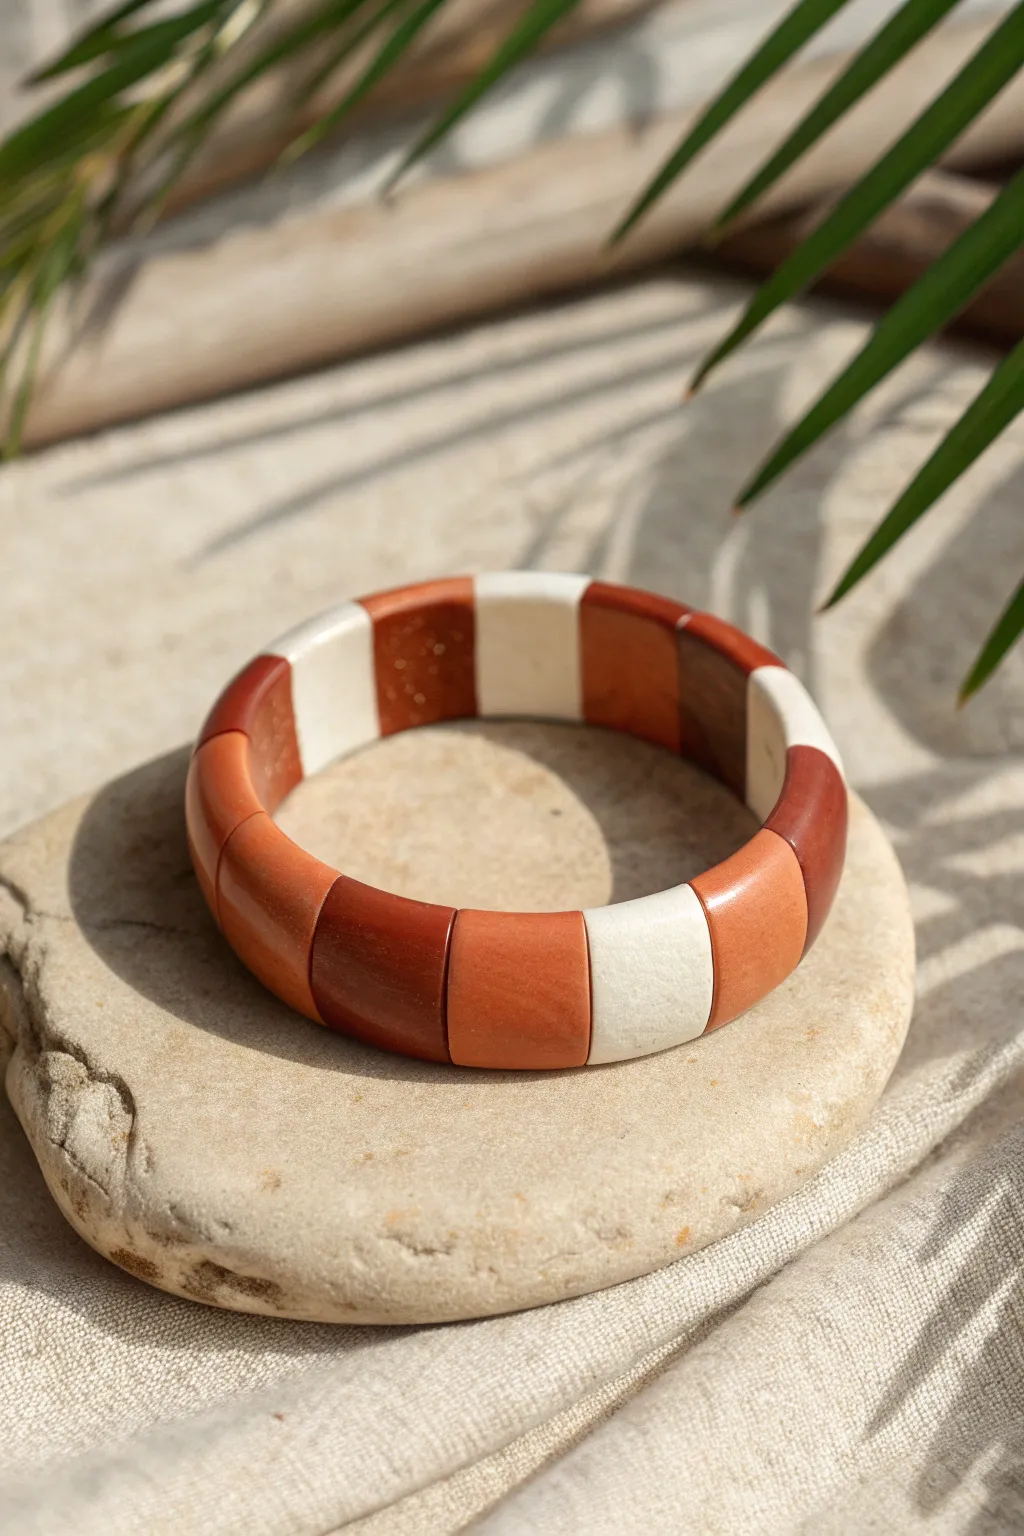
Embrace earthy warmth with this striking bangle featuring alternating segments of burnt orange, deep brown, and cream. By combining polymer clay segments with resin finishing techniques, you can achieve a sophisticated, polished stone look that pairs perfectly with linen and natural textures.
Step-by-Step Tutorial
Materials
- Polymer clay (Burnt Sienna/Terracotta)
- Polymer clay (Dark Chocolate Brown)
- Polymer clay (Cream/Ecru)
- Polymer clay (Translucent – optional for depth)
- UV Resin or 2-part Epoxy Resin
- UV light (if using UV resin)
- Flat, rectangular bead cutter or long blade
- Hand drill or pin vibe with 1mm bit
- Strong elastic cord (0.8mm or 1mm)
- Acrylic rolling pin
- Bead baking rack or pins
- Wet/dry sandpaper (400-1000 grit)
- Super glue (cyanoacrylate) for knots
Step 1: Shaping the Segments
-
Conditioning the Clay:
Begin by thoroughly conditioning your three colors of polymer clay: terracotta, dark brown, and cream. Warm the clay in your hands until it becomes pliable and crack-free. -
Rolling the Slab:
Roll each color into a thick log. I personally like to fashion these into square logs first to make shaping easier. Press them onto your work surface to form rectangular prism shapes. -
Refining the Shape:
Ensure the logs are approximately uniform in height and width, roughly 1/2 inch to 3/4 inch high. Use your blade to slice off the rounded ends so you have clean, flat faces. -
Slicing Segments:
Using a sharp tissue blade, slice uniform segments from your logs. You’ll need about 5-6 segments of each color, depending on your wrist size. Aim for slices about 1cm thick. -
Rounding the Edges:
Gently smooth the sharp corners of each rectangular bead with your fingertips. You want a slightly cushioned look, not a harsh geometric cube, to mimic polished stones. -
Curving the Beads:
This is crucial for a comfortable fit: gently press the inner face of each bead against a curved surface (like a rolling pin or small bottle) to give it a slight concave curve. This helps them sit flush against the wrist.
Step 2: Piercing and Baking
-
Creating the Channels:
You will need two parallel holes in each bead to keep them stable and flat. Use a needle tool to pierce two holes horizontally through the side of each segment. -
Alignment Check:
Stack a few beads on your needle tool to ensure the holes align nicely. If they are crooked, the bangle will twist. -
Mounting for Baking:
To prevent flat spots, suspend the beads on a bead rack using pins. If you don’t have a rack, you can accordion-fold cardstock and rest the beads in the valleys. -
Baking:
Bake the beads according to the manufacturer’s instructions for your specific brand of clay (usually 275°F/130°C for 30-45 minutes). -
Cooling Down:
Allow the beads to cool completely inside the oven before removing them handling them to prevent cracking.
Uneven Hanging?
If the bangle twists on your wrist, your elastic might be too loose or you only used one strand. Always use two parallel strands for wide, flat beads to keep them stable.
Step 3: Finishing and Assembly
-
Sanding:
Once cool, use wet/dry sandpaper under water to smooth away any fingerprints or sharp edges. Start with 400 grit and move up to 1000 grit for a silky feel. -
Resin Application:
For that high-gloss, ceramic look shown in the image, coat the outer face of each bead with a thin layer of resin. Cure with UV light or let epoxy set for 24 hours. -
Drilling Out Holes:
Resin or sanding dust may have clogged the holes. Use a small hand drill to carefully clear the double channels in each bead. -
Stringing:
Cut two lengths of elastic cord. Thread the top hole of every bead, alternating colors in a repeating pattern (e.g., Orange, Brown, Orange, White). -
Completing the Loop:
Thread the second piece of elastic through the bottom set of holes. This double-stringing technique keeps the rectangular segments completely upright. -
Tying Off:
Pull the elastic tight enough that the beads touch firmly but don’t buckle. Tie a surgeon’s knot in both strands. -
Securing the Knots:
Dab a tiny drop of super glue on the knots. Once dry, trim the excess elastic and gently pull the knot inside one of the bead holes to hide it.
Stone Effect
Mix inclusions like black pepper, dried tea leaves, or sand into the cream clay before baking. This adds speckling that mimics real granite or ceramic stoneware.
Slip these on your wrist in stacks of three for a truly organic statement look
Mini Food With Resin Syrup Drips
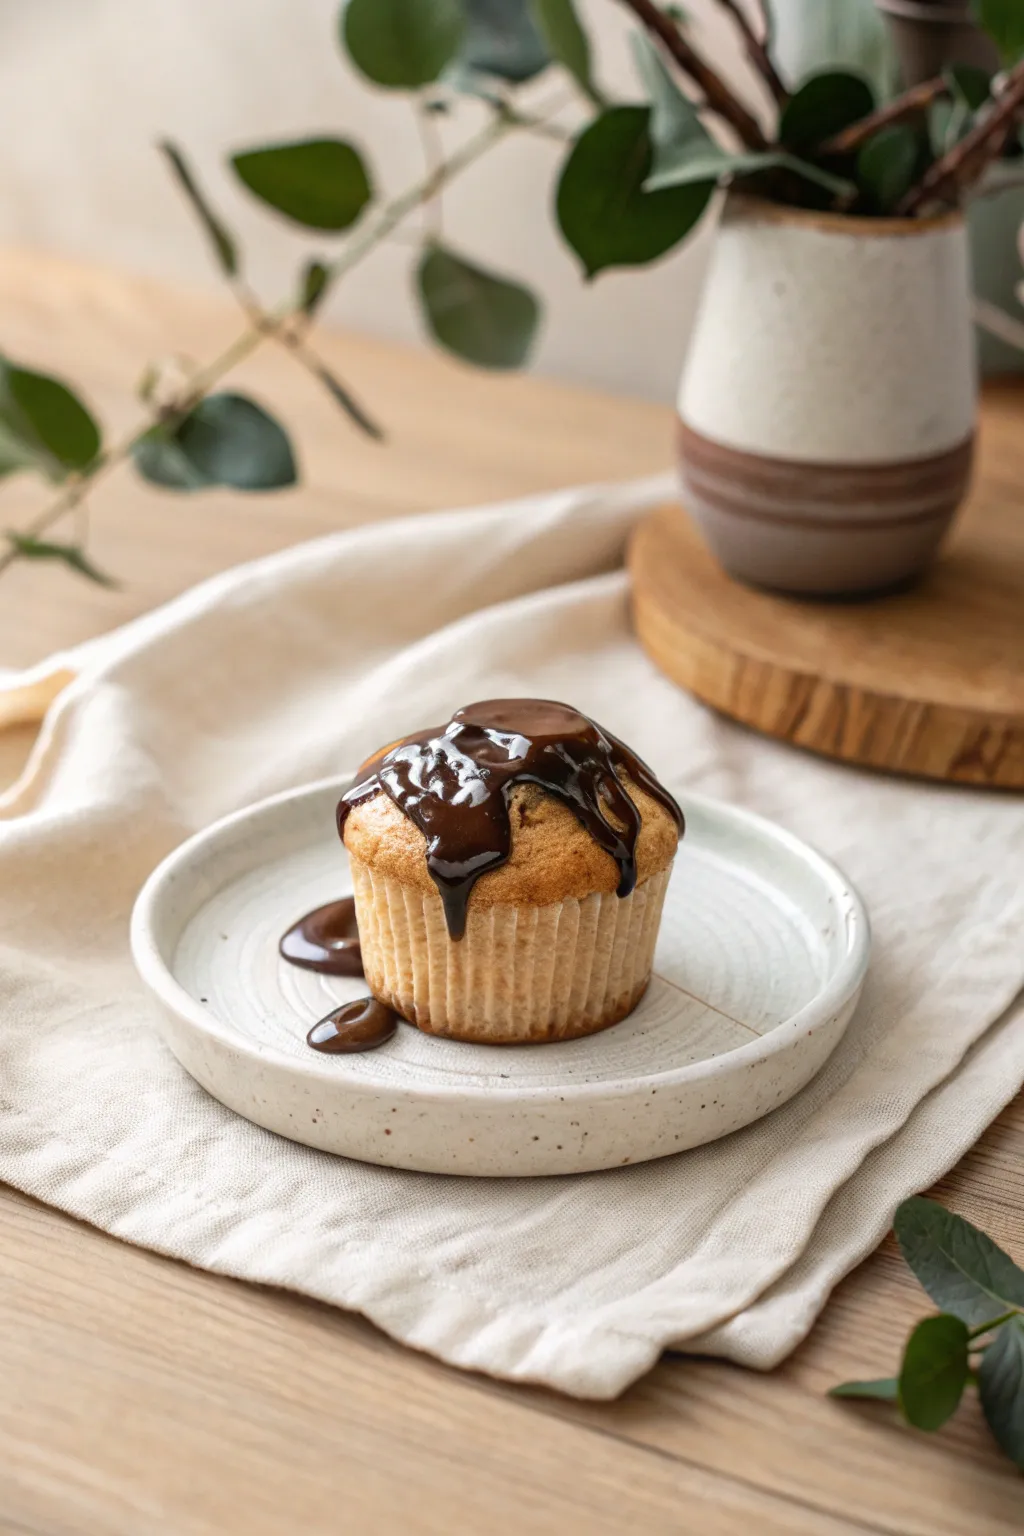
Master the art of faux baking with this remarkably realistic muffin tutorial, featuring a golden-brown crumb texture and a wet-look chocolate drizzle. By combining texturing techniques with UV resin, you’ll create a mouthwatering miniature or life-sized display piece that looks good enough to eat but will last forever.
Step-by-Step
Materials
- Polymer clay (colors: translucent, white, yellow ochre, ecru/beige)
- Soft pastels (yellow ochre, burnt sienna, dark brown)
- Texture tools (toothbrush, needle tool, crumpled aluminum foil, sandpaper)
- Liquid polymer clay (translucent)
- UV resin (clear)
- Dark brown alcohol ink or resin pigment
- UV lamp
- Small mixing cup and toothpick
- Disposable gloves
- Muffin liner (paper or silicone mold)
- Craft knife or scalpel
Step 1: Creating the Muffin Base
-
Mix the dough color:
Begin by conditioning your polymer clay. Mix equal parts white and translucent clay, then add a small amount of yellow ochre and ecru to achieve a realistic, unbaked dough color. It should look pale and creamy. -
Form the base shape:
Roll the clay into a ball that fits snugly inside your chosen muffin liner. Press it down gently to fill the bottom, then create a domed top that rises above the rim, mimicking the ‘muffin top’ overhang. -
Texture the surface:
Using a stiff toothbrush, enthusiastically tap texturing all over the top dome of the clay. Don’t be afraid to be rough; real muffins aren’t perfectly smooth. -
Deepen the texture:
For larger craters and a more baked appearance, use a needle tool to pick at the clay surface gently, pulling up tiny bits of clay. Press a ball of crumpled aluminum foil over the surface to unify the textures. -
Pre-shade the raw clay:
Before baking, scrape some yellow ochre pastel dust onto a piece of paper. Use a soft brush to dust this lightly over the textured top to add depth to the crevices. -
First bake:
Bake the clay inside the paper liner according to your manufacturer’s instructions (usually 275°F/130°C for 15-30 minutes). Let it cool completely before moving to the next step.
Step 2: Browning and Finishing the Crumb
-
Apply the baked look:
Once cool, create a gradient of ‘baked’ colors using your pastels. Start with yellow ochre, moving to burnt sienna on the higher points, and finally a touch of dark brown on the very edges where a muffin would naturally crisp up. -
Seal the shading:
I like to dab a very thin layer of translucent liquid clay over the pastel shading with a sponge. This seals the powder and adds a slight moistness to the look of the ‘cake’ without making it glossy. -
Optional: Add paper texture:
If you want to remove the paper liner for a naked look later, peel it off carefully now. The clay will have taken on the ribbed texture of the paper.
Natural Drip Tip
Don’t force the resin too much. Let gravity do the work for a few seconds before curing. If it moves too fast, flash cure with a handheld UV light for 3 seconds to freeze it.
Step 3: The Chocolate Drip
-
Prepare the chocolate sauce:
In a small mixing cup, pour a small amount of clear UV resin. Add drops of dark brown alcohol ink or resin pigment until perfectly opaque. You want a rich, dark chocolate color. -
Thicken the mixture:
If your resin is too runny, mix in a tiny bit of translucent liquid clay or cornstarch. This helps the ‘chocolate’ hold its shape and not run off the muffin too quickly. -
Apply the main pool:
Using a toothpick or a small silicone tool, place a generous dollop of the resin mixture onto the center of the muffin top. Let it spread naturally for a moment. -
Guide the drips:
Gently drag the resin from the center pool towards the edges using your toothpick. Encourage gravity to pull it down the sides in specific spots to create those realistic, uneven drips. -
Create the plate puddle:
Place the muffin on your display plate (or a piece of acetate). Deposit small drops of resin near the base that touch the muffin, making it look like the glaze has dripped all the way down. -
Separate drops:
Add one or two isolated drops of resin on the plate near the muffin for an artistic, messy touch. This sells the illusion of a fresh pour. -
Cure the resin:
Immediately place the project under a UV lamp. Cure for 2-4 minutes until the resin is hard and tack-free. This freezes the drips in motion permanently.
Level Up: Crumb Topping
Before adding the resin glaze, chop up tiny bits of baked tan clay. Mix them with liquid clay and dab onto the muffin top to create a realistic streusel crumble texture.
Now you have a hyper-realistic treat that captures the perfect moment of a chocolate pour
Resin Pond Bowl With Clay Fish
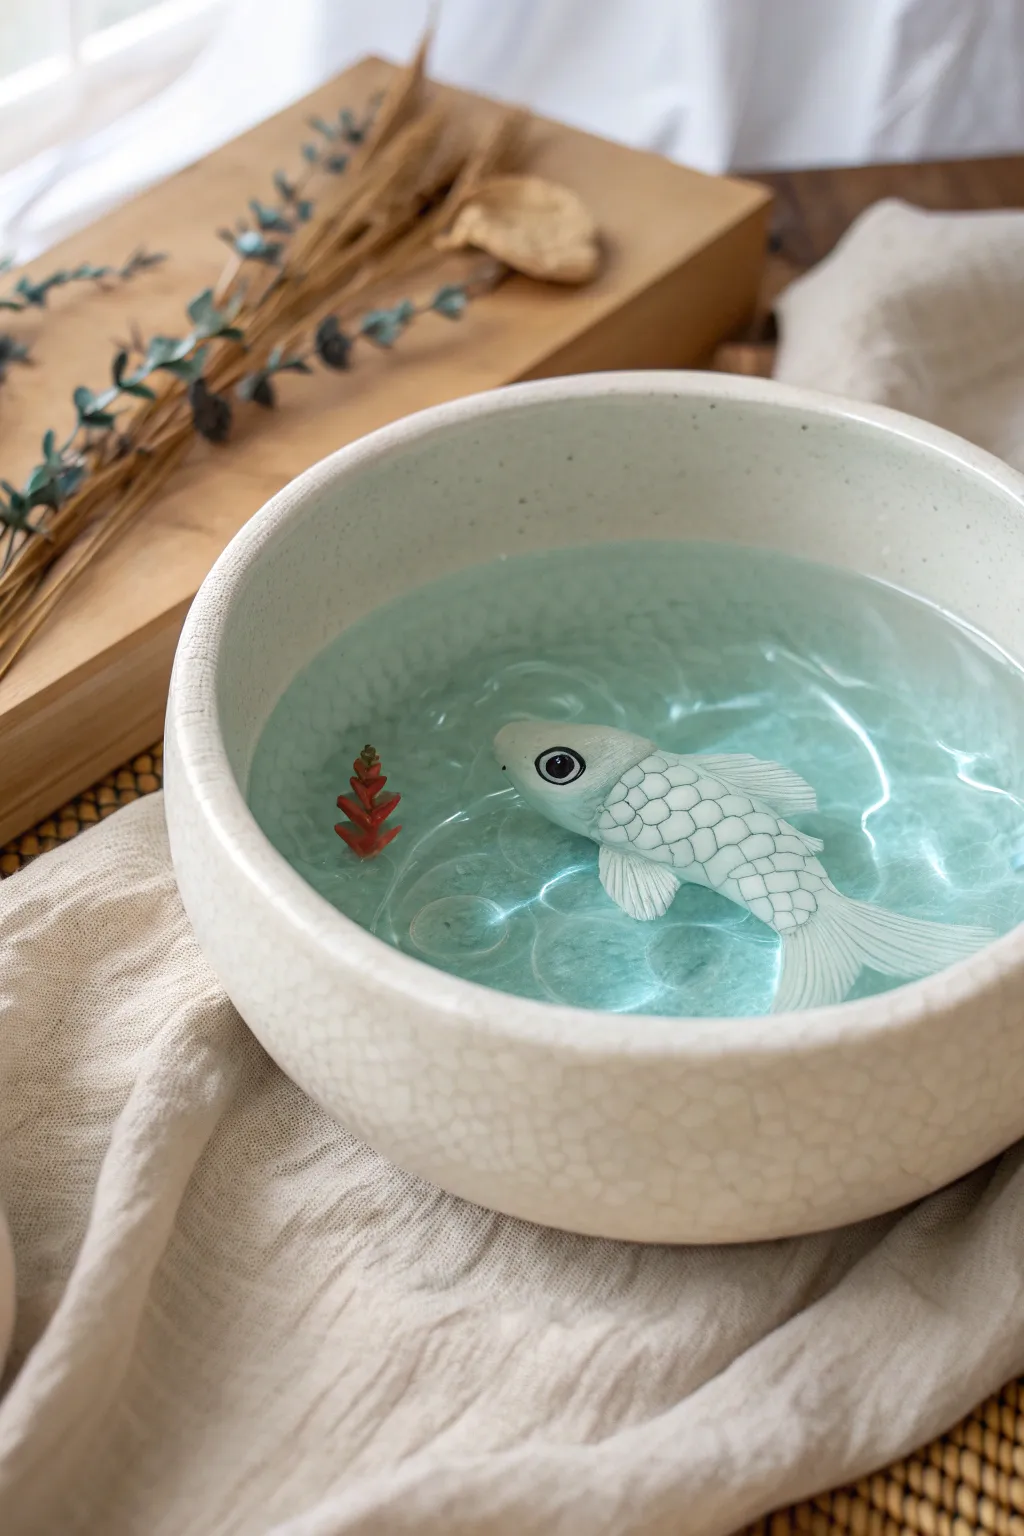
Capture the tranquility of a garden pond in a simple bowl with this mixed media project. You will sculpt a delicate koi fish from polymer clay and suspend it in layers of crystal-clear resin to create a permanent, peaceful water scene.
How-To Guide
Materials
- White or light speckled ceramic bowl (shallow)
- White polymer clay
- Sculpting tools (needle tool, small ball stylus)
- Black acrylic paint
- Fine detail paintbrush (size 00 or 000)
- Clear two-part epoxy resin
- Blue alcohol ink or resin dye (transparent)
- Small amount of red or orange polymer clay (for the plant)
- Mixing cups and stir sticks
- Heat gun or lighter
- Gloss varnish or UV resin (optional for fish coating)
- Sandpaper (fine grit)
Step 1: Sculpting the Koi
-
Shape the body:
Start with a piece of white polymer clay about the size of your thumb. Roll it into a smooth teardrop shape, tapering one end for the tail and keeping the other rounded for the head. -
Form the fins:
Flatten small pieces of clay into fan shapes. Attach two pectoral fins near the head and a dorsal fin along the back. Use a sculpting tool to blend the seams perfectly smooth. -
Detail the tail:
Flatten the tapered tail end and use a needle tool to gently score fine lines, mimicking the delicate rays of a fish’s tail fin. -
Create the scale texture:
Using a very small loop tool or the end of a small straw cut in half, press gentle ‘U’ shapes into the clay starting from the tail and moving toward the head. Leave the head smooth. -
Add the eyes:
Press a small ball stylus into the sides of the head to create sockets. Insert tiny balls of clay for the eyes, or leave the indentation to paint later. -
Sculpt the aquatic plant:
Take a tiny bit of red clay and stack small, jagged triangle shapes on top of each other to form a small underwater plant sprig. Keep it small relative to the fish. -
Bake the clay:
Place your fish and plant on a ceramic tile or baking sheet. Bake according to your clay manufacturer’s instructions (usually 275°F/130°C for 15-30 minutes). Let them cool completely.
Floating Fish?
If your fish tries to float when you add the second layer of resin, hold it down with a toothpick for a few minutes or glue it to the cured base layer with a dot of superglue first.
Step 2: Painting and Prep
-
Define the scales:
Once cool, water down some black acrylic paint into a wash. Brush it over the scaled area of the fish, then immediately wipe the surface with a damp paper towel. The dark paint will remain in the recesses, highlighting the scale pattern. -
Paint the eyes:
Using your finest brush and undiluted black paint, carefully paint the pupils of the eyes. Add a tiny white dot for a reflection highlight if you have a steady hand. -
Seal the sculpture:
I like to brush a thin coat of gloss varnish or UV resin over the fish. This seals the paint and prevents air bubbles from clinging to the matte clay surface when you pour the resin.
Step 3: Pouring the Water
-
Mix the first layer:
Mix a small batch of two-part epoxy resin according to package directions. Add the tiniest drop of blue alcohol ink—you want a very faint, watery tint, not a dark blue. -
Pour the base:
Pour a shallow layer of resin into your ceramic bowl, filling it about one-third of the way. Use a heat gun to pop any bubbles. -
Place the elements:
Let the resin cure until it reaches a ‘gel’ stage (sticky but solid enough to hold weight). Gently place your fish and the red plant onto this layer. The sticky resin will hold them in place so they don’t float away. -
Pour the second layer:
Once the items are secured, mix a second batch of lightly tinted resin. Pour this slowly over the fish until it is submerged or floating just at the surface level you desire. -
Create surface ripples:
Wait until the resin is thick like honey (usually 45-60 minutes after mixing). Using a toothpick or probe, gently drag concentric circles on the surface directly above the fish to create permanent ripples. -
Final cure:
Cover the bowl with a box to prevent dust from landing in the sticky resin. Allow the project to cure fully for 24-48 hours in a warm, dry area.
Making Waves
To enhance the ripple effect, wait until the resin is almost hard, then add a few drops of clear resin on top and swirl them. This adds physical height to the ‘water’ ripples.
Place your finished pond bowl near a window where natural light can shine through the water and illuminate your swimming fish
Resin Window Lockets With Clay Minis
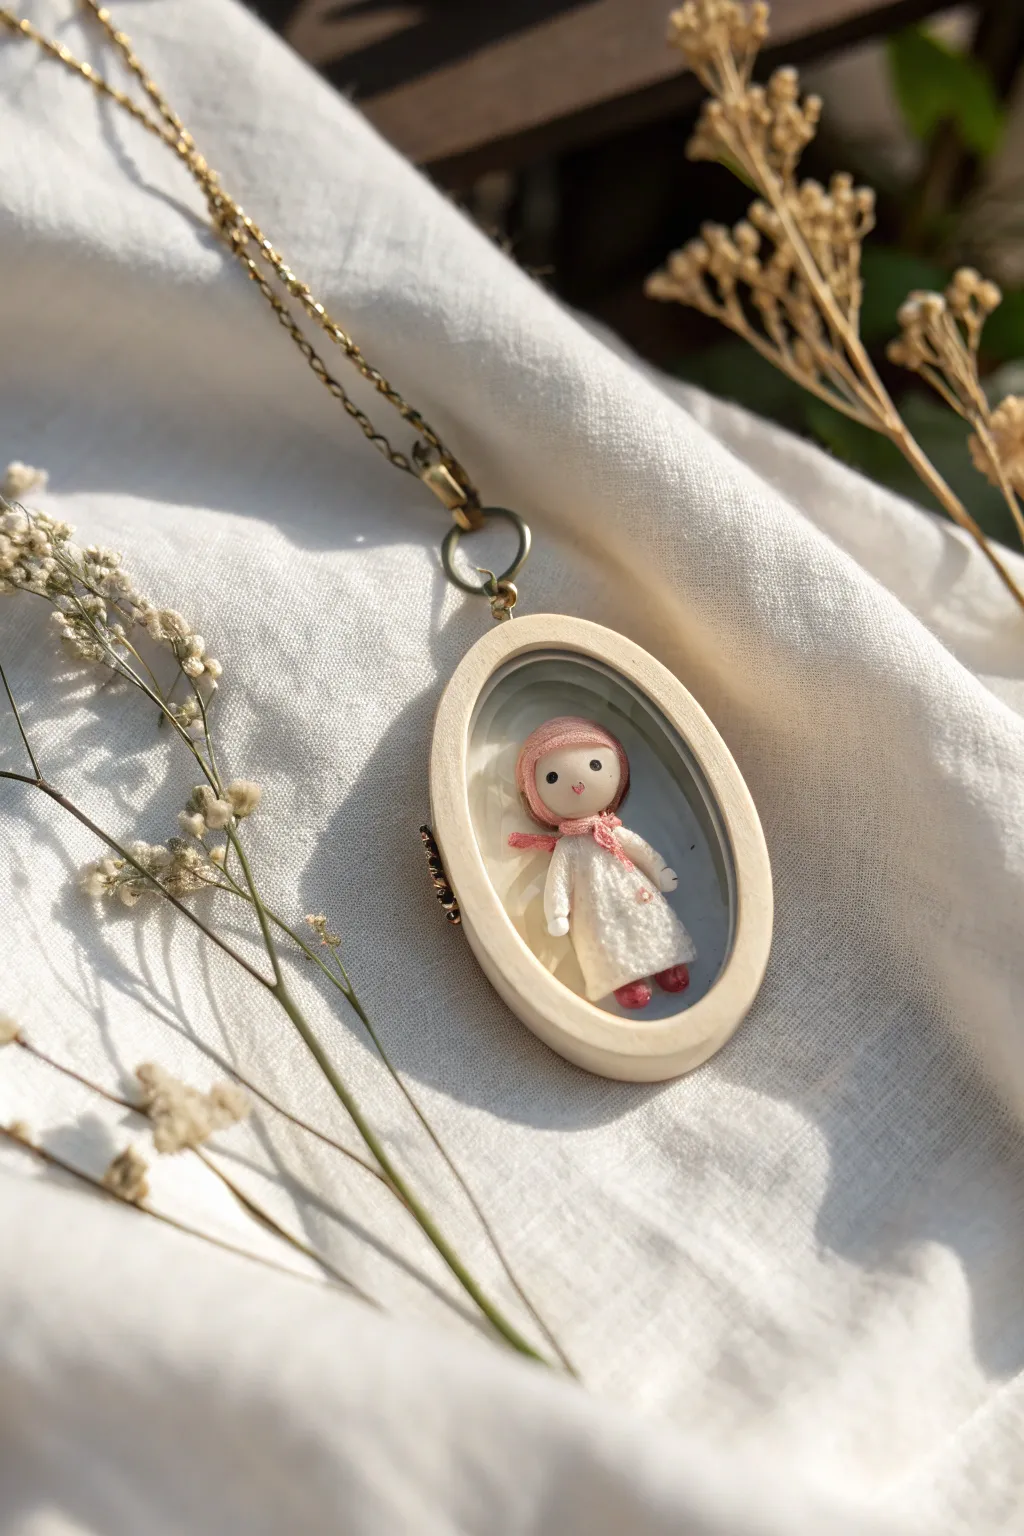
Capture the charm of childhood stories with this enchanting resin window locket featuring a hand-sculpted miniature doll. Suspended in crystal-clear resin within an oval wooden bezel, this piece combines polymer clay artistry with jewelry making for a wearable keepsake that feels like a tiny, frozen moment in time.
Step-by-Step
Materials
- Oval open-backed wooden bezel pendant
- Polymer clay (white, skin tone, pink, red)
- UV resin (clear)
- UV lamp
- Packing tape or jewelry resin tape
- Needle tool or toothpick
- Tiny ball stylus tool
- Black acrylic paint or fine-tip marker
- Headpin or tiny wire loop
- Jewelry chain and jump rings
- Matte varnish (optional)
Step 1: Sculpting the Miniature Doll
-
Form the head:
Start with a tiny ball of skin-tone clay, approximately 4-5mm in diameter. Roll it until it is perfectly smooth and round. -
Add the headscarf:
Flatten a small piece of pink clay into a thin disc. Gently drape this over the top and back of the clay head, smoothing the edges down to frame the face like a hood or bonnet. -
Shape the body:
Create a teardrop shape from white clay for the dress. This should be slightly larger than the head. Flatten the bottom slightly so it can stand, though it will eventually be suspended. -
Texture the dress:
Using a needle tool, gently stipple the surface of the white dress to give it a fabric-like, woolen texture. I find a light dabbing motion works best to avoid squashing the shape. -
Attach limbs:
Roll two tiny white sausages for arms and attach them to the sides of the dress. Add small balls of white clay at the ends for hands. -
Create the scarf detail:
Roll a very thin snake of pink clay. Wrap it around the neck area where the head meets the body, crossing the ends over the chest to look like a tied scarf. -
Add the shoes:
Form two minuscule balls of red clay and press them onto the bottom of the dress to serve as shoes. -
Bake the clay:
Bake your miniature doll according to the manufacturer’s instructions for the specific brand of clay you are using. Since it is tiny, watch the time closely to prevent burning. -
Paint facial features:
Once cool, use a needle tip dipped in black paint (or a micro-pen) to dot two eyes. Add a tiny pink blush to the cheeks with diluted paint or chalk pastel dust.
Floating Effect
To make the doll look truly suspended in air, pour a thicker base layer of resin (about 2mm) and cure it before placing the doll. This keeps the figure centered in the bezel depth.
Step 2: Encasing in Resin
-
Prepare the bezel:
Place your oval wooden bezel tightly onto a strip of packing tape or specific jewelry resin tape. Ensure the seal is tight to prevent leaks. -
Pour the base layer:
Pour a thin layer of UV resin into the bezel, just enough to coat the bottom (the sticky side of the tape). Cure this under your UV lamp for 60 seconds. -
Position the doll:
Place a small drop of wet resin in the center of the cured layer. Carefully set your baked clay doll into this drop to secure it in place. -
Secure the figure:
Flash cure for 10-20 seconds just to lock the doll’s position so it doesn’t float or tilt during the main pour. -
Fill the bezel:
Slowly fill the rest of the bezel with UV resin, working carefully around the doll to avoid trapping air bubbles. Fill until slightly domed. -
Remove bubbles:
Pass a lighter quickly over the surface or use a toothpick to snag any rising air bubbles near the wood edges. -
Final cure:
Cure under the UV lamp for 2-4 minutes until the resin is hard and tack-free. Turn the bezel over, remove the tape, and cure the back side for another minute.
Tape Residue Fix
If the back of your resin looks cloudy or sticky after removing the tape, wipe it with rubbing alcohol or apply a thin topcoat of resin and cure again for glass-like clarity.
Step 3: Assembly
-
Attach hardware:
Open a large jump ring with pliers and thread it through the loop at the top of the wooden bezel. -
Thread the chain:
Pass your prepared chain through the jump ring and close the ring securely.
Wear your miniature story proudly or gift it as a charming handmade treasure
Crackle Texture Filled With Tinted Resin
Achieve the sophisticated look of cracked ceramic glaze without a kiln using polymer clay and tinted resin. This project creates a shallow decorative dish featuring a mesmerizing network of fissures filled with a dreamy, semi-translucent teal gradient.
Detailed Instructions
Materials
- White or translucent polymer clay (approx. 4-6 oz)
- Heat gun or crafting oven
- Gold or metallic acrylic paint (optional for rim)
- UV resin or 2-part epoxy resin
- Teal and blue alcohol inks
- Crackle medium (two-step system) or metallic foiling sheets for texture
- Rolling pin or pasta machine
- Oven-safe glass bowl (to use as a mold)
- Cornstarch or baby powder (release agent)
- Fine-grit sandpaper
- Small paintbrush
- UV lamp (if using UV resin)
- Mixing cups and stir sticks
Step 1: Forming the Base
-
Condition the Clay:
Begin by conditioning your white polymer clay until it is soft and pliable. If the clay is too stiff, add a tiny drop of clay softener or baby oil to help smooth it out. -
Roll out a Sheet:
Roll the clay into a sheet approximately 1/4 inch thick. You want it substantial enough to hold the bowl shape but thin enough to look delicate. -
Apply Release Agent:
Dust the exterior bottom of your oven-safe glass bowl lightly with cornstarch. This ensures your clay won’t stick permanently to the form during baking. -
Shape the Bowl:
Gently drape your clay sheet over the dusted bowl form. Using your fingers, smooth the clay down the sides, ensuring there are no air bubbles trapped underneath. -
Create the Crackle Texture:
Before baking, you need to create the fissures. Take a heat gun and gently heat the raw clay surface while simultaneously stretching it slightly with your fingers or a rounded tool. Alternatively, roll a crumpled ball of aluminum foil over the surface firmly to create deep, random indentations that mimic cracks. -
Refine the Rim:
Use a craft knife to trim the excess clay around the base of your mold to create an even, circular rim for your dish. Smooth the cut edge with your fingertip. -
Bake the Form:
Bake the clay according to the manufacturer’s instructions while it is still on the glass mold. Let it cool completely before popping the clay bowl off the glass form.
Deep Crackle Hack
For deeper cracks, partially bake the clay sheet flat for 5 minutes, remove it, then force it onto the curved bowl mold. The semi-hardened clay will naturally fracture.
Step 2: Adding the Resin Effect
-
Prepare Resin Mix:
Pour a small amount of resin into a mixing cup. Add a single drop of teal alcohol ink. You want a very translucent tint, so go easy on the pigment initially. -
Fill the Fissures:
Using a fine-tip brush or a toothpick, carefully drip the tinted resin into the textured cracks you created. Focus the color on one side of the bowl to create the gradient effect seen in the photo. -
Adding Depth:
Mix a second small batch of resin with a slightly darker blue ink. Apply this sparingly to the deeper cracks or towards the edge where the color is most saturated. -
Clear Resin Coat:
For the areas that should remain white but still look glossy, apply a very thin layer of clear, un-tinted resin. This seals the clay and gives it that ceramic shine. -
Cure the Resin:
If using UV resin, place the bowl under a UV lamp for 2-3 minutes. If using epoxy, ensure the bowl is level and cover it with a dust dome to cure for 24 hours.
Glow Up
Mix phosphorescent pigment powder into the clear resin before filling the cracks. Your bowl will look elegant by day and emit a ghostly glow at night.
Step 3: Finishing Touches
-
Sand Rough Edges:
Once everything is fully cured, check the rim. If it feels sharp or uneven, gently sand it with fine-grit sandpaper under running water. -
Optional Rim Detail:
I like to finish the edge by dry-brushing a tiny amount of metallic paint along the rim, though leaving it plain keeps the minimalist aesthetic. -
Final Buff:
Wipe the entire piece down with a soft microfiber cloth to remove any fingerprints or dust, revealing the high-gloss faux ceramic finish.
Place your finished bowl on a sunny windowsill where the light can catch the translucent resin veins
Raised Clay Relief With Resin Color Wash
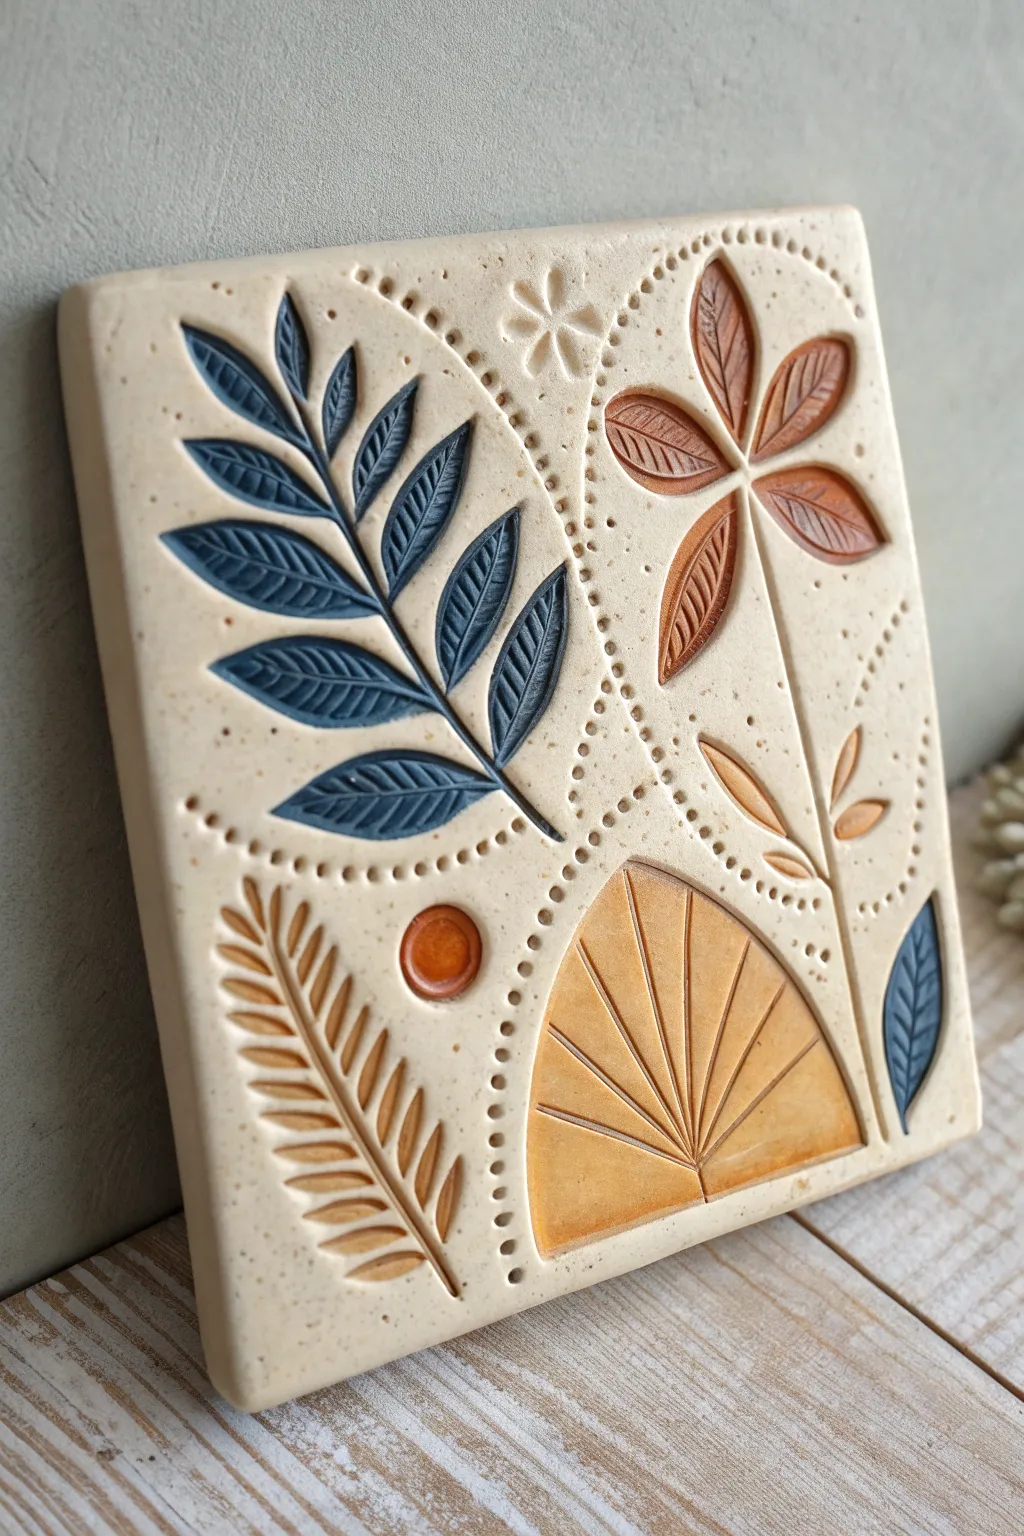
Capture the earthy elegance of traditional pottery without a kiln using polymer clay and resin. This project creates a stunning botanical tile featuring deep relief textures and a glossy, glazed appearance that mimics high-end ceramic art.
Step-by-Step
Materials
- White or beige polymer clay (approx. 2-3 blocks)
- Speckled clay or spices (like pepper or cinnamon) for texture
- Rolling pin or pasta machine
- Square clay cutter (4×4 or 5×5 inch)
- Linoleum carving tools or needle tools
- Small ball stylus tool
- UV resin or two-part epoxy resin
- Alcohol inks (Midnight Blue, Terracotta, Golden Yellow)
- Small fine-point paintbrushes
- Rubbing alcohol
- Ceramic tile or glass work surface
- Oven for baking
Step 1: Preparing the Base
-
Condition the Clay:
Begin by thoroughly conditioning your white or beige polymer clay until it is soft and pliable. If you want that authentic stoneware look shown in the photo, mix in a very small pinch of black pepper or dried used coffee grounds to create natural speckles. -
Sheet and Cut:
Roll your clay out onto a ceramic tile or glass surface to a thickness of about 1/4 inch (6mm). Using a square cutter or a sharp blade and ruler, cut a precise square shape. Don’t lift it off the surface; we will work directly on the tile to prevent warping. -
Smooth the Edges:
Gently run your finger dipped in a little cornstarch or baby oil along the cut edges to soften them, giving the piece a hand-molded pottery feel rather than a sharp, machine-cut look.
Clean Lines
Work from the center outward when carving. This prevents your hand from accidentally resting on and smashing the finished textures you just created.
Step 2: Carving the Relief
-
Draft the Design:
Lightly trace your botanical composition onto the raw clay using a needle tool. Map out four quadrants: a large fern leaf on the left, a flower on the top right, a sunburst arch on the bottom right, and a wheat stalk on the bottom left. -
Carve the Outlines:
Using a V-gouge tool or a sharp needle, carve somewhat deep outlines for your main shapes. You want distinct channels that will hold the color later. -
Sculpt the Fern:
For the large blue leaf, press the clay down inside each leaf segment to create a concave depression. Use a needle tool to score fine veins inside each depression for added texture. -
Detail the Flower:
Sculpt the flower petals similarly, scooping out the center of each petal slightly. Add a small ‘asterisk’ star shape stamped or carved near the top center for a whimsical detail. -
Create the Sunburst:
For the bottom right arch, carve straight radiating lines. Keep the surface inside these lines relatively flat compared to the scooped leaves. -
Add Dotted Accents:
Using a small ball stylus, press a series of decorative dots into the clay to separate the different botanical zones. These dotted lines act as a frame, guiding the eye between the elements.
Step 3: Baking and Coloring
-
First Bake:
Bake the tile according to your clay package instructions (usually 275°F/135°C for 30 minutes). Let it cool completely before moving to the coloring phase. -
Prepare Color Washes:
Mix a few drops of alcohol ink with a small amount of resin. You want a translucent, fluid consistency. Prepare a midnight blue, a warm terracotta, and a golden ochre. -
Fill the Fern:
Carefully paint the blue resin mixture into the recesses of the large fern leaf. The sunken areas we carved earlier will act as reservoirs, naturally pooling the color for a darker look in the deepest parts. -
Paint the Warm Tones:
Use the terracotta mix for the flower petals and the small circle dot. Use the golden ochre for the sunburst arch and the wheat stalk. I find that applying less pigment at first allows you to build up depth gradually. -
Clean the Borders:
If any colored resin spills onto the raised framing areas, quickly wipe it away with a Q-tip dipped in rubbing alcohol to keep the ‘unglazed’ ceramic look clean.
Go Functional
Before baking, attach a strong magnet to the back or poke two holes at the top for twine to transform this art tile into a functional wall hanging or fridge magnet.
Step 4: Finishing Touches
-
Cure the Color:
If using UV resin, cure under a UV lamp for 2-3 minutes until hard. If using epoxy, cover the piece to protect from dust and let it cure for 24 hours. -
Matte Wash (Optional):
To enhance the antique look, you can dilute a tiny bit of brown acrylic paint with water and wash it over the entire piece, then immediately wipe it off with a paper towel. This will leave dark pigment in the dotted textures and carved veins. -
Final Seal:
Depending on your preference, leave the background matte to contrast with the glossy resin, or apply a very thin layer of matte varnish over the bare clay areas to seal them against dirt.
Display your new faux-ceramic tile on a small easel or mounted on the wall to add a touch of handcrafted warmth to any room