Polymer clay is my favorite little playground because you can turn the simplest shapes into something adorable and totally giftable. Here are my go-to polymer clay art ideas that stay beginner-friendly while still giving you that “I made this!” glow.
Cute Polymer Clay Charm Collection
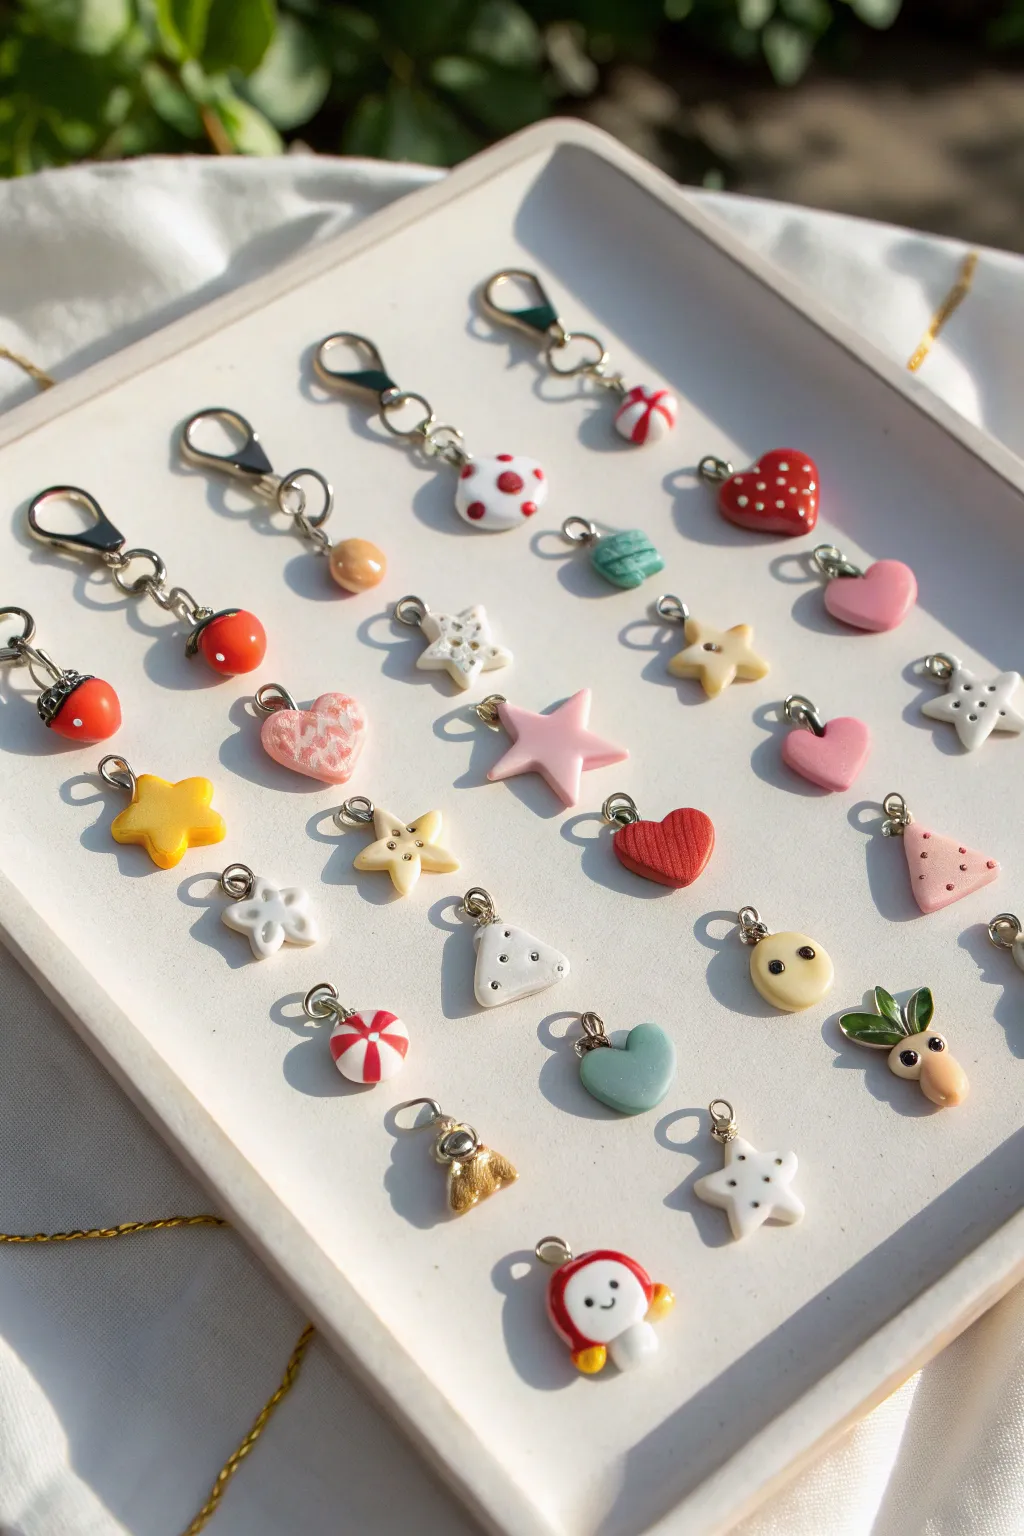
Gather your favorite polymer clay colors to create this delightful assortment of miniature charms, ranging from sweet hearts to tiny food items. These durable little trinkets are perfect for use as knitting stitch markers, jewelry pendants, or zipper pulls.
Step-by-Step
Materials
- Polymer clay in various colors (red, pink, white, yellow, green, tan, blue)
- Liquid polymer clay (optional, for connecting pieces)
- Small metal jump rings (4mm – 6mm)
- Eye pins or head pins (silver or gold tone)
- Lobster clasps (optional)
- Needle tool or toothpick
- Small star and heart clay cutters (micro size)
- Gloss glaze or UV resin
- Jewelry pliers (round nose and flat nose)
- Baking tile or sheet
- Oven
Step 1: Shaping the Basics
-
Conditioning the clay:
Begin by warming small amounts of clay in your hands, kneading until soft and pliable. This prevents cracking later. -
Creating starry shapes:
Roll out yellow, pink, and white clay to about 3mm thickness. Use micro star cutters to punch out shapes, or hand-mold them by pinching five points from a small ball of clay. -
Making simple hearts:
Repeat the process for the hearts using pink, red, and blue clay. For a textured look like the pink heart in the image, gently press a piece of lace or coarse fabric onto the clay surface before cutting. -
Preparing the attachment points:
Insert a small metal eye pin into the top of each shape. I recommend adding a tiny dot of liquid clay to the pin’s shaft before insertion to act as a glue during baking.
Clean Cuts Pro Tip
Before cutting shapes, place a piece of plastic wrap over the clay. Press the cutter down through the plastic for instantly rounded, pillowy edges with no sanding needed.
Step 2: Crafting Detail Charms
-
Sculpting the peppermint:
Roll a small ball of white clay and flatten slightly. Press thin strips of red clay in a starburst pattern over the top, then gently roll the ball again to smoothen the stripes into the surface before flattening into a disc. -
Forming the strawberry:
Shape a small teardrop of red clay. Press tiny indentations all over with a needle tool for seeds. Add a small green clay cap with tiny leaves on the wider end. -
Making the spotted mushroom:
Create a white stem and a red cap. Join them together securely. Use a small ball tool or toothpick to press tiny white dots of clay onto the red cap for the classic toadstool look. -
Assembling the radishes:
Roll a beige/blush teardrop for the veggie body. Attach two small green leaves to the top and use a needle tool to poke two eyes for a cute face if desired. -
Creating the button and biscuit:
For the button shape, flatten a circle of clay and poke four symmetrical holes in the center. For the biscuit, make a triangle and texture the edges, adding tiny ‘chocolate chips’ or sprinkles. -
Final pin check:
Ensure all charms have their eye pins inserted securely at the top center. Smooth any clay distortion caused by the insertion.
Step 3: Baking and Assembly
-
Baking process:
Arranged your charms on a baking tile. Bake according to your specific polymer clay brand’s instructions (usually 275°F/135°C for 15-30 minutes). Let them cool completely. -
Applying the finish:
Once cool, brush a coat of gloss glaze or apply a thin layer of UV resin to each charm for protection and shine. Cure or dry as required. -
Adding jump rings:
Using two pairs of pliers, twist open a jump ring sideways (never pull apart). Slide it through the loop of an eye pin. -
Attaching clasps:
Before closing the jump ring, slide on a lobster clasp if you are making stitch markers or zipper pulls. Twist the jump ring closed securely until the ends meet perfectly.
Pins Keep Falling Out?
If an eye pin pulls out after baking, pull it all the way out, put a drop of superglue on the metal shaft, and slide it quickly back into the existing hole.
Now you have a whole collection of adorable miniatures ready to brighten up your crafting projects


Simple Polymer Clay Earrings in Pairs
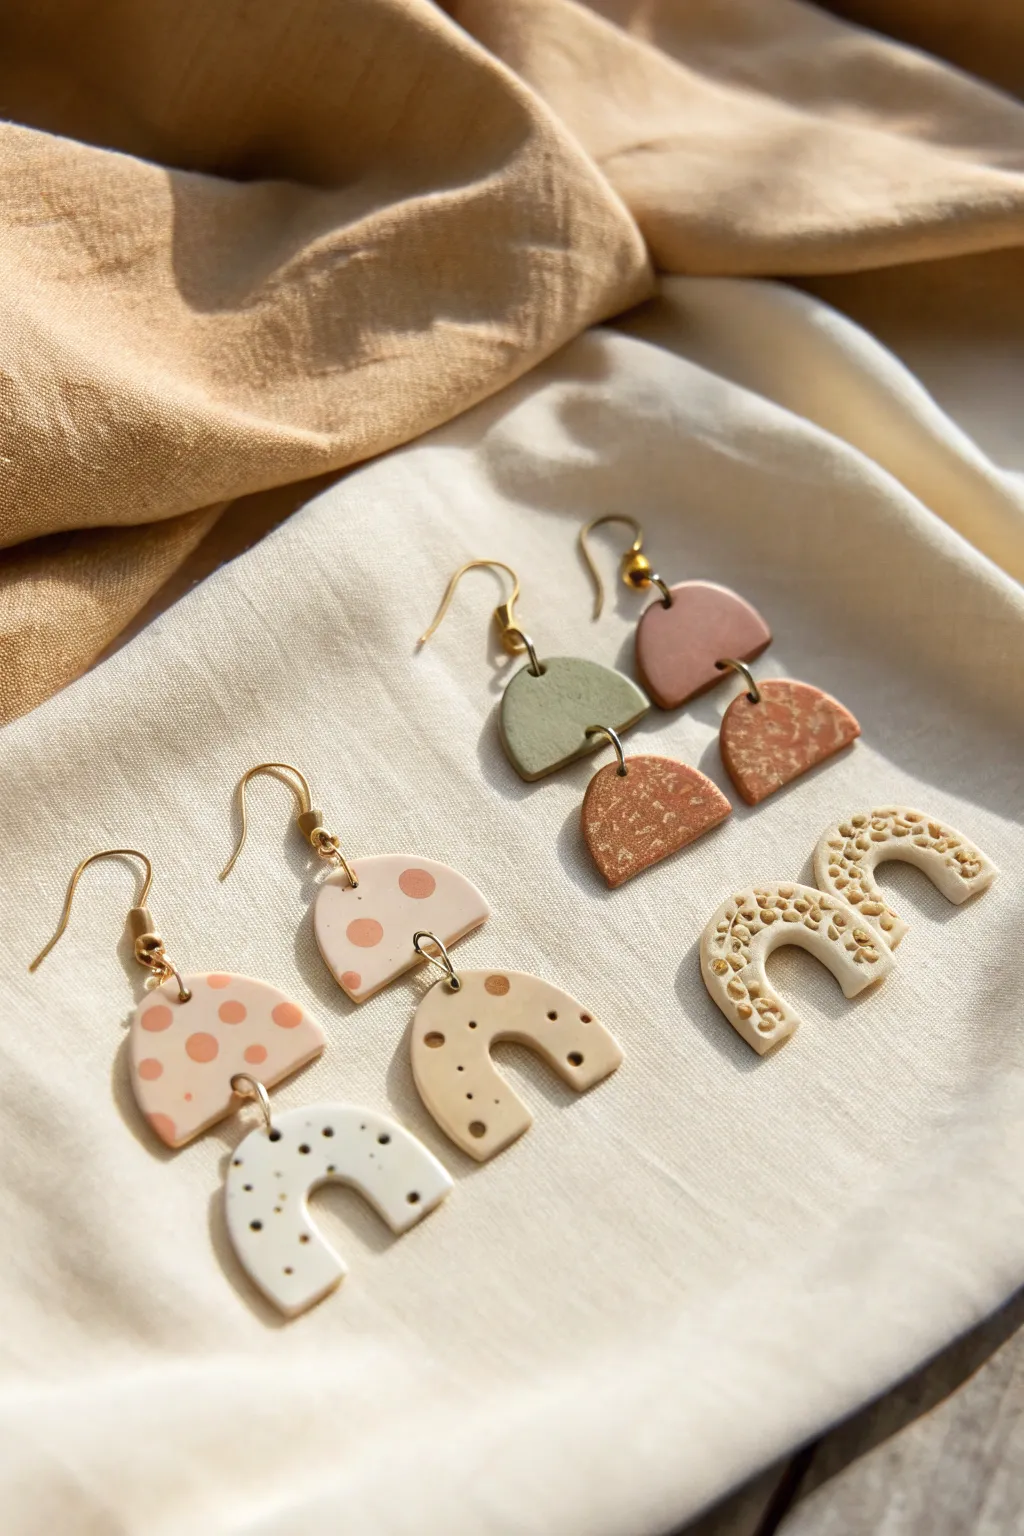
Create three distinct styles of modern, bohemian earrings using simple geometric shapes like semi-circles and arches. This project explores fun techniques like terrazzo speckling, texturing, and simple assembly to make lightweight, wearable art.
Detailed Instructions
Materials
- Polymer clay (white, beige, sage green, mauve, terracotta/copper/metallic, black)
- Acrylic rolling pin
- Clay cutters (small semi-circle, arch shapes)
- Needle tool or toothpick
- Jump rings (gold or brass)
- Earring hooks (gold or brass)
- Jewelry pliers (flat nose and round nose)
- Texture sponge or sandpaper
- Oven and baking tray
- Gloss glaze (optional)
Step 1: Prepping the Clay Styles
-
Condition the clay:
Start by warming up your clay blocks in your hands until they are soft and malleable. You will need base colors for three different designs: a light beige, a white, a sage green, a mauve, and a terracotta or metallic copper. -
Create the polka dot slab:
For the first pair, roll out a small slab of light beige clay to about 3mm thickness. Roll tiny balls of a slightly darker pink or peach clay and press them gently onto the surface to create a polka dot pattern. -
Create the speckled slab:
Roll out a slab of white clay. To get that terrazzo effect, shave tiny flecks of black or dark brown clay (and perhaps some gold leaf if you feel fancy) and sprinkle them over the white clay. Roll over it with your acrylic roller to embed the specks flat. -
Create solid and textured slabs:
Roll out slabs for your sage green, mauve, and terracotta clays. For the terracotta clay, gently press a coarse sponge or a piece of sandpaper onto the surface to give it a stone-like texture. -
Create the detailed texture slab:
For the third pair (the standalone arches), take a beige or cream slab and use a needle tool to create small indentations or patterns, mimicking the look of hammered metal or porous coral.
Uneven Surfaces?
If your baked pieces aren’t perfectly flat or have fingerprints, wet sand them gently with fine-grit sandpaper (400-1000 grit) under running water.
Step 2: Cutting and Baking
-
Cut the shapes:
Using your cutters, press firmly into the clay. For the polka-dot pair, cut two semi-circles from the beige slab and two arches from the speckled white slab. -
Cut the solid pair:
Cut two small semi-circles from the green and mauve slabs (one of each color for an asymmetrical look, or match them if you prefer). Cut two slightly larger semi-circles from the textured terracotta slab. -
Cut the textured arches:
Finally, cut two simple arch shapes from your highly textured beige slab. I find it helpful to wiggle the cutter slightly to release the clay cleanly. -
Add holes for assembly:
Before baking, use a needle tool or a small straw to punch holes where the jump rings will go. Make sure the holes are not too close to the edge to prevent breakage. The dangle pairs need holes connecting the top and bottom pieces, plus a hole at the very top for the hook. -
Smooth the edges:
Gently run your finger dipped in a little cornstarch or water along the cut edges of your shapes to smooth out any rough bits or fingerprints. -
Bake the pieces:
Arrange the pieces on a baking tray lined with parchment paper. Bake according to your brand of polymer clay instructions (usually 275°F/135°C for 15-30 minutes). Let them cool completely before handling.
Go for Gold
After baking, paint the textured indentations with gold acrylic paint and wipe the surface quickly with a wet wipe. The gold stays in the cracks for an antique look.
Step 3: Assembly
-
Open the jump rings:
Use two pairs of pliers to twist your jump rings open sideways (never pull them apart). This maintains their circular shape when you close them later. -
Connect the speckled pair:
Thread a jump ring through the bottom hole of the beige polka-dot semi-circle and the top hole of the white speckled arch. Close the ring securely. -
Connect the textured pair:
Attach the green or mauve top semi-circles to the textured terracotta bottom semi-circles using jump rings. -
Add earring hooks:
Open the small loop on your earring hooks (or use a small jump ring) and attach them to the top holes of all your earring components. For the standalone textured arches, simply attach the hook directly to the top center hole. -
Final check:
Double-check that all jump rings are closed tight so your pieces don’t fall apart while wearing them.
Now you have a stunning collection of handmade earrings ready to gift or wear along with your favorite outfit


Mini Polymer Clay Food Charms
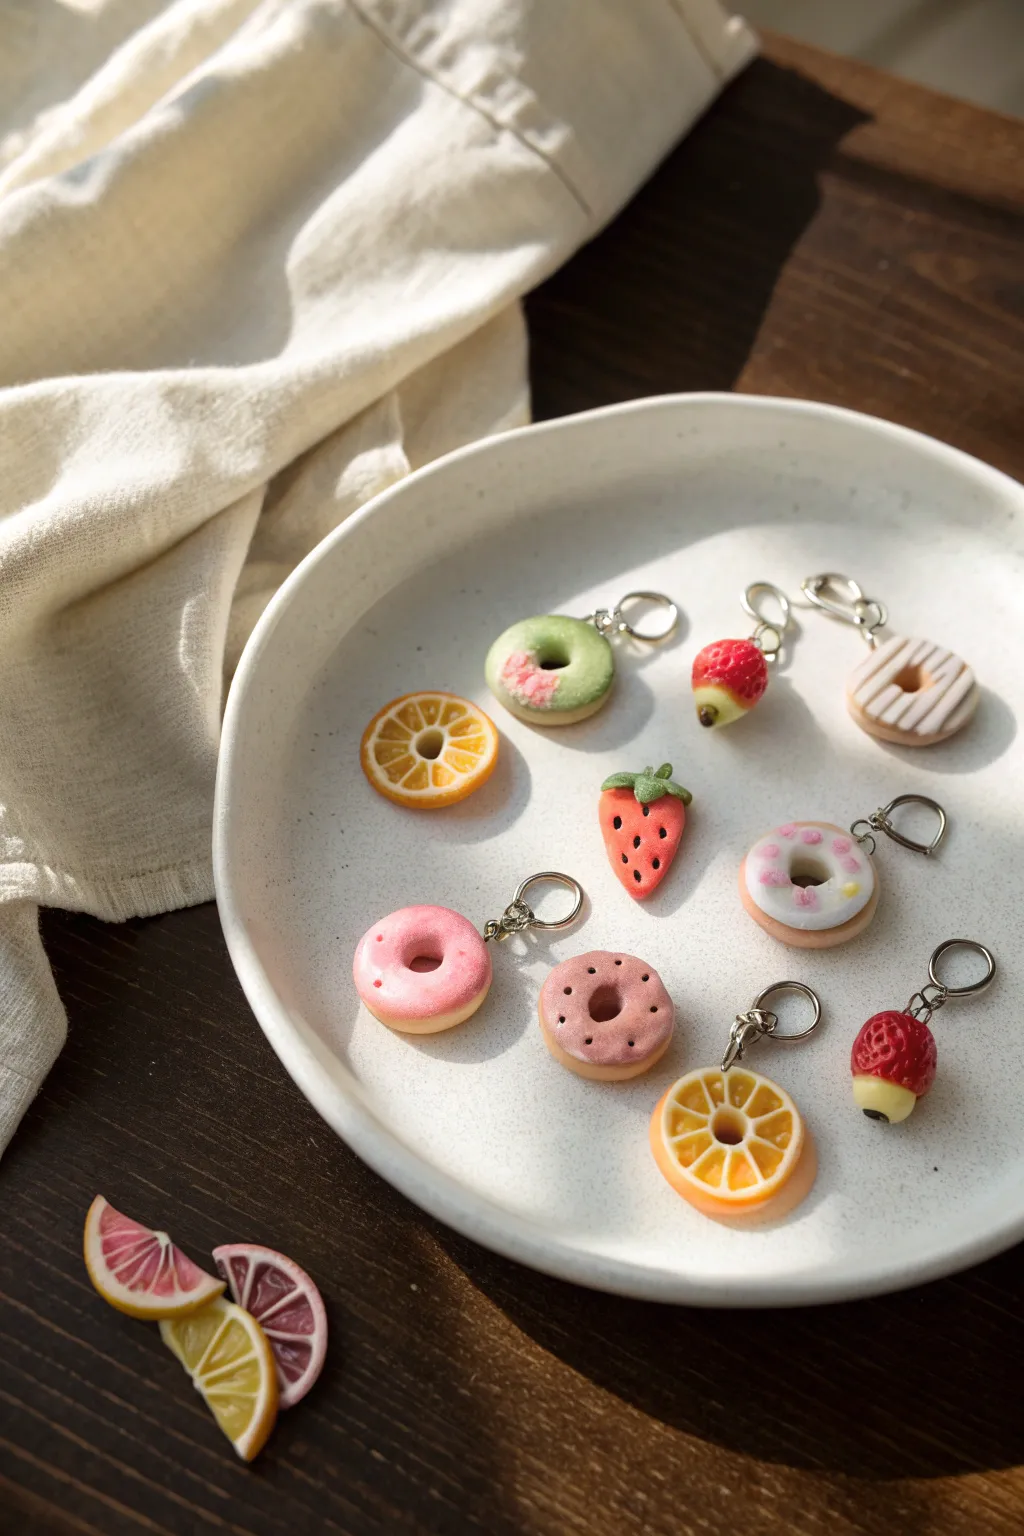
Transform simple balls of clay into a delightful assortment of bakery sweets and fresh fruit slices. This project features tiny donuts with realistic frosting and bright citrus wheels, perfect for creating custom jewelry or zipper pulls.
How-To Guide
Materials
- Polymer clay (tan/beige, pink, red, white, orange, green)
- Liquid polymer clay (Translucent and White)
- Chalk pastels (brown, orange, red)
- Dotting tool or small ball stylus
- Razor blade or craft knife
- Eye pins or jump rings
- Gloss glaze (polyurethane or resin)
- Small paintbrush
- Needle tool
- Cookie cutter (small circle) or straw
Step 1: Crafting the Classic Donuts
-
Shape the base:
Start by conditioning a small amount of tan or beige clay until it is soft and pliable. Roll it into a smooth ball about the size of a marble, then gently flatten it into a thick disc. -
Create the hole:
Use a dotting tool or a small straw to pierce the center of the disc. Gently wiggle the tool in a circular motion to widen the hole, smoothing the inner edges with your finger to remove any sharp lines. -
Texture the dough:
To give the donut a realistic baked look, take an old toothbrush or a crumpled ball of aluminum foil and tap it gently all over the surface of the clay. Focusing on the ‘waist’ line of the donut helps it look fluffy. -
Add shading:
Scrape some brown and orange chalk pastel into a fine dust. Use a soft brush to lightly dust the edges and bottom of the donut, giving it a golden-brown, baked appearance. -
Apply the frosting:
Mix a small amount of liquid polymer clay with pink or white solid clay (or acrylic paint) to create a thick, icing-like consistency. Carefully drizzle or spread this over the top of your donut using a needle tool, letting it drip slightly down the sides. -
Decorate:
While the liquid clay is still wet, add tiny sprinkles by cutting minuscule snake-like strips of colored clay, or use the needle tool to swirl in a second color of frosting.
Sticky Situation?
If your citrus cane slices look smudged, pop the cane in the fridge for 15 minutes before cutting. Cold clay holds its shape significantly better against the blade pressure.
Step 2: Slicing the Citrus Wheels
-
Make the cane center:
Roll a log of translucent orange clay. Wrap this log in a thin sheet of white clay. This forms the basic segment of your fruit. -
Form the segments:
Stretch and reduce this log until it is quite thin, then cut it into eight equal lengths. Pinch one side of each length to create a teardrop or wedge shape. -
Assemble the wheel:
Arrange the eight wedges in a circle with the white points meeting in the center. I find it helpful to place a tiny snake of white clay in the very center to help them adhere. -
Wrap the fruit:
Wrap the entire circle of wedges in a thin layer of white clay, followed by a slightly thicker layer of orange clay to simulate the rind. -
Slice and texture:
Gently compress and roll the cane to fuse the layers, then slice it into discs using a very sharp blade to avoid distortion. Use a needle tool to scratch tiny radiating lines into the fruit pulp for texture.
Make it Sparkle
Dip the unbaked fruit slices into ultra-fine white glitter or clear embossing powder before baking to mimic a crystallized sugar coating, perfect for ‘candied’ fruit charms.
Step 3: Finishing Touches
-
Create strawberries:
Shape red clay into a rounded triangle. Press a small star-shaped piece of green clay onto the top for leaves. Use a needle tool to press tiny indentations all over the surface for seeds. -
Insert hardware:
Trim eye pins to the correct length and insert them into the top of each charm. Adding a tiny dab of liquid clay to the pin’s shaft before insertion acts as a glue during baking. -
Bake:
Arrange all charms on a tile or parchment-lined baking sheet. Bake according to your brand of clay’s instructions (usually 275°F/135°C for 15-30 minutes). -
Seal:
Once cooled completely, coat the fruit slices and the ‘jam’ or ‘frosting’ parts of the donuts with a gloss glaze to make them shine like real sugar.
Attach your new charms to a bracelet chain or keyring and enjoy your miniature bakery collection


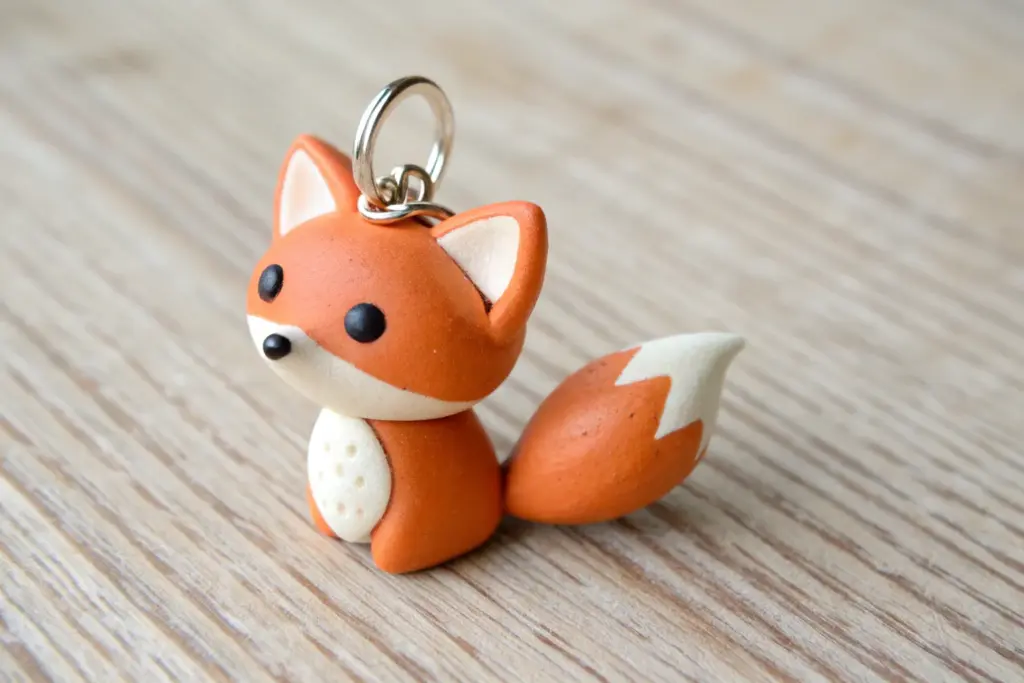
Kawaii Animal Polymer Clay Mini Figures
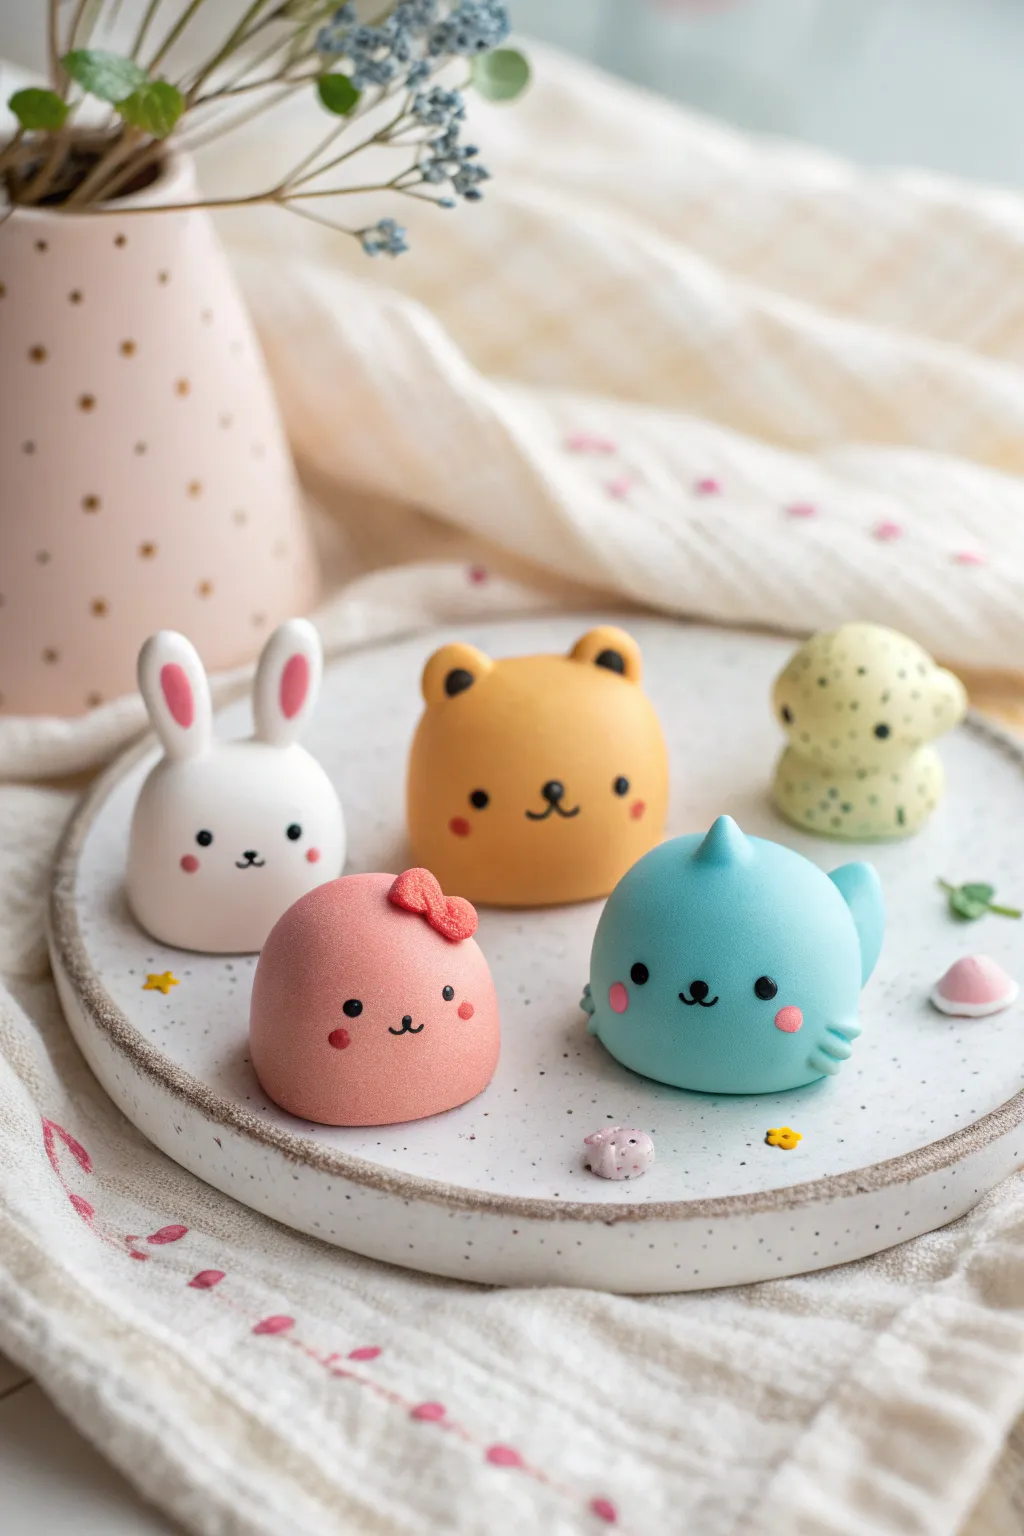
Create your own set of adorable, soft-matte companions with this simple polymer clay project. These palm-sized figurines feature a distinctive smooth, rounded shape and sweet minimalist faces that capture the essence of kawaii style.
Step-by-Step Guide
Materials
- Polymer clay (White, Pastel Pink, Light Orange, Baby Blue, Pale Yellow)
- Black liquid clay or black acrylic paint
- Fine-point dotting tool or toothpick
- Small blending tool or silicone shaper
- Soft pastel chalks (Pink and Red) for blushing
- Soft paintbrush
- Baking tile or parchment paper
- Oven
Step 1: Shaping the Base Bodies
-
Conditioning the Clay:
Begin by thoroughly kneading your clay colors until they are soft and pliable. This is crucial for achieving that seamless, smooth surface seen in the photo. -
Forming the Pink Character:
Roll a ping-pong ball sized amount of pink clay into a smooth sphere. Gently press it onto your work surface to flatten the bottom so it sits like a gumdrop—slightly wider at the base than the top. -
Adding the Bow:
Take a tiny amount of darker pink or red clay. Create two small teardrop shapes and join them at their points. Press a tiny flattened circle in the center, then attach this bow to the upper right side of the head. -
Shaping the Blue Cat:
Form a blue sphere and slightly flatten the bottom. For the ears, pinch tiny bits of clay from the top of the head upward, or attach two small triangles and blend the seams until invisible. Add a small tail to the back if desired. -
Creating the Orange Bear:
Roll an orange ball of clay into a similar gumdrop shape. Roll two small balls of orange clay for ears. Place them on top of the head, pressing them down gently. To mimic the photo, press a small black or dark brown dot into the center of each ear. -
Sculpting the White Bunny:
Create a white gumdrop shape. Roll two elongated teardrop shapes for ears. Press a tool into the center of each ear to create an indentation, fill it with a tiny snake of pink clay, and attach the ears to the top of the head. -
Making the Mushroom Friend:
Form a mushroom cap shape using pale yellow clay. You can mix in tiny specks of dried green clay or herbs for texture, or paint them solely after baking. Create a slightly wider stalk and attach the cap on top.
Lint Attack?
White clay loves dust! Keep a piece of scotch tape handy while working. Before baking, dab the tape lightly over the raw clay surface to lift off any stray dust particles or lint.
Step 2: Detailing and Finishing
-
Smoothing:
Before adding faces, use a drop of baby oil or clay softener on your finger to gently rub away any fingerprints. The finish should be matte and flawless. -
Pre-Baking Blush:
Scrape a little pink pastel chalk into a fine powder. Using a soft dry brush, gently dust rosy cheeks onto the characters. I find applying this before baking helps the pigment bond better to the clay. -
Baking:
Place all figures on your baking tile. Bake according to your clay manufacturer’s instructions (usually 275°F/130°C for 15-30 minutes). Let them cool completely in the oven to prevent cracking. -
Painting the Eyes:
Once cool, use a very fine dotting tool dipped in black acrylic paint or liquid clay to create wide-set eyes. Place them low on the face for maximum cuteness. -
Painting Mouths and Noses:
Using the finest tip of a toothpick or a 0000 brush, draw tiny ‘w’ shapes for mouths or simple dots for noses. The bear gets a classic snout line, while the cat gets whiskers on the cheeks. -
Finishing Touches:
For the mushroom, add small dark dots for eyes. If you used liquid clay for the face details, you may need a second short bake to set it; otherwise, let the acrylic paint dry fully.
Matte Magic
To get the soft, suede-like texture shown in the photo, lightly dust the raw clay with cornstarch before smoothing it out. Brush off the excess before baking for a velvet finish.
Arranging your little clay family on a desk or shelf brings an instant dose of cheer to any space

What Really Happens Inside the Kiln
Learn how time and temperature work together inside the kiln to transform clay into durable ceramic.
Marbled Polymer Clay Jewelry Pieces
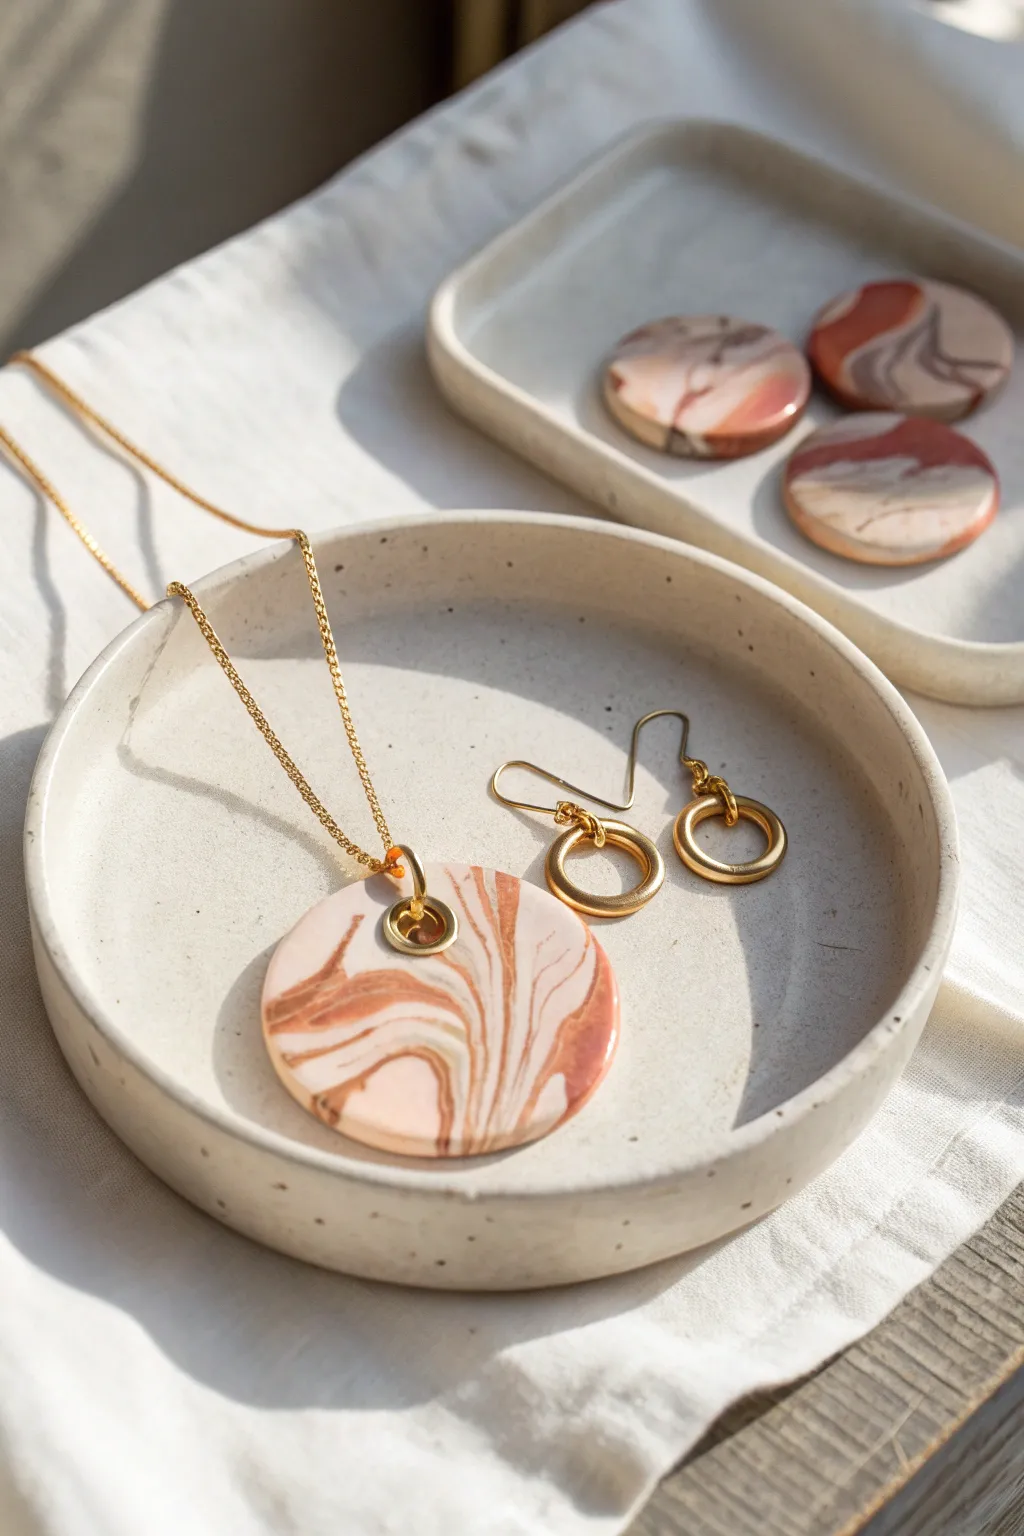
Capture the organic elegance of natural stone with this marbled polymer clay jewelry set, featuring warm swirls of terracotta, cream, and beige. The result is a sophisticated pendant and earring collection that looks like polished agate but feels lightweight and comfortable to wear.
Step-by-Step
Materials
- Polymer clay (white, beige, terracotta/burnt orange, translucent)
- Acrylic rolling pin or pasta machine
- Circle clay cutters (approximately 1.5 inch for pendant, 0.75 inch for earring accents)
- Blade or craft knife
- Small jump rings (gold or brass tone)
- Large jump ring (heavy gauge for pendant)
- Earring hooks (kidney wire style)
- Round nose pliers
- Chain nose pliers
- Ceramic tile or glass sheet (for baking)
- Fine grit sandpaper (400, 600, 800 grits)
- Hand drill or pin vibe with small drill bit
Step 1: Preparing the Marble Slab
-
Condition the clay:
Begin by conditioning each color of polymer clay separately. Knead the white, beige, terracotta, and a small amount of translucent clay until they are soft and pliable. This prevents cracks and makes mixing smoother. -
Create logs:
Roll each color into a distinct log or snake. The white snake should be slightly thicker than the others to serve as the base color, while the terracotta and beige logs should be thinner for accent veins. -
Twist the colors:
Bundle the logs together and twist them into a single, large rope. Fold the rope in half and twist it again. Repeat this twist-and-fold process about 3-4 times. Be careful not to over-mix, or the colors will turn muddy instead of distinct. -
Create the slab:
Roll the twisted rope into a ball, compressing it tightly to remove air bubbles. Using your acrylic roller or pasta machine, flatten the ball into a slab about 3-4mm thick. You should see beautiful, organic swirls appearing.
Muddy Colors?
If you over-mixed the clay and the distinct veins disappeared, don’t scrap it! Roll it into a thin snake and add fresh white clay around it, then twist again to re-introduce contrast.
Step 2: Cutting and Refining
-
Select the pattern:
Inspect your clay slab and identify the areas with the most interesting marbling. Look for spots where the terracotta veins contrast sharply with the cream. -
Cut the pendant shape:
Place your larger circle cutter over the chosen area for the pendant. Press down firmly and give a slight wiggle before lifting to ensure a clean cut. -
Cut additional pieces:
Use the same method to cut other shapes if desired. The image shows extra circular discs, which can be made into studs or future projects. -
Smooth the edges:
Gently lift the cut shapes. Dip your finger in a tiny bit of water or cornstarch and run it lightly around the rim of the circles to smooth out any rough edges or cutter drag marks before baking. -
Create the hole:
Using a toothpick or a small straw, pierce a hole near the top edge of the pendant circle. Make sure the hole is large enough for your heavy-gauge jump ring but not so close to the edge that the clay becomes fragile.
Go for Gloss
While the matte look mimics raw stone, adding a coat of UV resin or polyurethane gloss varnish can make the colors pop and resemble polished agate or ceramic.
Step 3: Baking and Finishing
-
Bake carefully:
Place your clay pieces on a ceramic tile. Bake according to the manufacturer’s instructions for your specific brand of clay—usually around 275°F (135°C) for 30-45 minutes. Tent with foil to prevent scorching the white areas. -
Cool and sand:
Let the pieces cool completely. Once hard, wet-sand the edges and surface starting with 400 grit sandpaper and moving up to 800 grit. This reveals the truest pattern and creates a smooth, stone-like matte finish. -
Buff the surface:
Rub the surface briskly with a piece of denim or a soft cloth to give it a natural sheen without using a glossy varnish.
Step 4: Assembly
-
Attach the pendant ring:
Open the large, heavy-gauge jump ring using two pairs of pliers. Thread it through the pre-made hole in the pendant and close it securely so the gap is invisible. -
Add the chain:
Slide your gold chain through the large jump ring. -
Assemble the earrings:
For the earrings shown, small metal rings are attached directly to kidney-wire hooks. If you made clay components for earrings, drill small holes at the top of two matching small circles. -
Connect earring hardware:
Use small jump rings to connect your clay circles to the earring hooks. Ensure the ‘front’ of the marble pattern faces forward when worn.
Now you have a stunning, nature-inspired set ready for everyday wear.
Polymer Clay Fridge Magnets With Faces
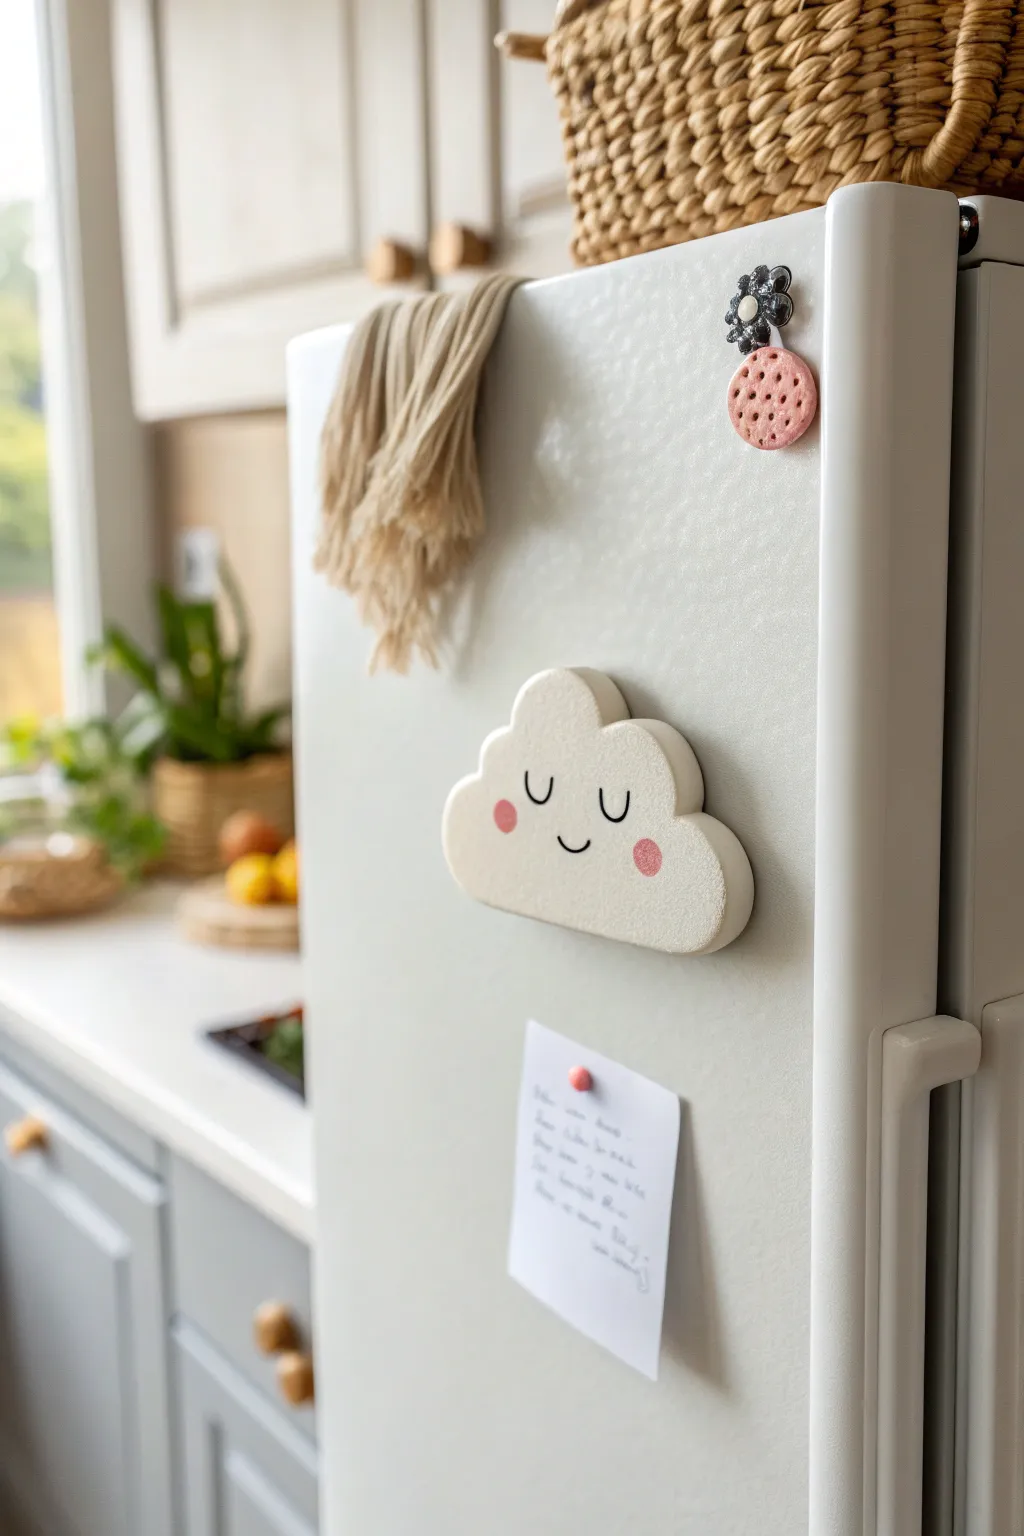
Bring a touch of sweetness to your kitchen with this serene, sleeping cloud magnet. Its minimalist white design and cute expression make it a charming, functional piece for holding your favorite photos or grocery lists.
Step-by-Step
Materials
- White polymer clay (approx. 2oz block)
- Black acrylic paint or black Posca marker
- Pink acrylic paint or soft pastel chalks
- Rolling pin or pasta machine
- Cloud-shaped cookie cutter (or paper template and craft knife)
- Fine-grit sandpaper
- Strong neodymium magnets (2-3 small ones)
- Super glue or E6000 adhesive
- Small detail paintbrush
- Dotting tool or toothpick
- Matte varnish (optional)
Step 1: Shaping the Base
-
Condition the Clay:
Begin by warming the white polymer clay in your hands. Knead and fold it repeatedly until it becomes soft, pliable, and free of any cracks or air bubbles. -
Roll Out the Slab:
Using your rolling pin or a pasta machine on a thick setting, roll the clay out into an even slab. Aim for a thickness of about 1/4 inch (6mm) to ensure the magnet is sturdy and has a nice, chunky look. -
Cut the Cloud Shape:
Press your cloud-shaped cookie cutter firmly into the clay. If you don’t have a cutter, I like to lightly sketch the shape onto the clay using a needle tool first, or trace a paper template, then carefully cut it out with a sharp craft knife. -
Smooth the Edges:
Gently run your finger dipped in a tiny bit of water or baby oil along the cut edges. This softens the harsh lines and gives the cloud that puffy, rounded appearance. -
Inspect the Surface:
Check the front of your cloud for any lint or dust specs. You can carefully lift these off with a piece of tape or smooth them out with your finger.
Dirty Clay?
White clay picks up everything! Keep baby wipes nearby to clean your hands often, and roll the clay on a clean piece of parchment paper to avoid dust.
Step 2: Baking and Sanding
-
Bake the Piece:
Place your cloud on a tile or parchment-lined baking sheet. Bake according to your clay manufacturer’s instructions—usually around 275°F (130°C) for 15-30 minutes depending on brand and thickness. -
Cool Down:
Allow the clay to cool completely inside the oven or on a cooling rack. Do not try to handle it while hot, as the clay is still slightly soft. -
Sand for Perfection:
Once fully cooled, dampen your fine-grit sandpaper and gently buff the surface and edges. This removes any fingerprints or slight irregularities, giving it a professional, matte ceramic look. -
Clean the Surface:
Wipe the cloud with a damp cloth or rinse quickly under water to remove sanding dust. Art sure it is completely dry before moving to the next step.
Step 3: Adding the Face & Magnet
-
paint the Cheeks:
Dip a dotting tool or the end of a paintbrush into pink acrylic paint. Gently stamp two round circles onto the lower sides of the cloud for the cheeks. Alternatively, you can brush on scraped pink pastel dust for a softer, airbrushed look. -
Draw the Eyes:
Using a very fine detail brush with black paint, or a fine-tip Posca marker, draw two downward-curving semicircles between the cheeks. These ‘U’ shapes create the sleeping eyelids. -
Add Lashes (Optional):
If you want extra detail, add tiny vertical lines to the bottom of the eyelids for eyelashes, though the simple look in the photo works beautifully without them. -
Draw the Smile:
In the center, slightly below the eyes, draw a small, gentle upward curve for the smile. -
Seal the Design:
Once the paint is totally dry, apply a thin coat of matte varnish. This protects the white surface from kitchen grease and keeps the painted face from chipping. -
Attach the Magnets:
Flip the cloud over. Apply a strong adhesive like E6000 or super glue to the back and press your neodymium magnets firmly into place. Using two magnets spaced apart helps prevent the cloud from spinning on the fridge. -
Final Cure Time:
Let the glue cure fully (usually 24 hours for strong adhesives) before placing your new art on the refrigerator.
Make it Sparkle
Before baking, lightly brush pearl ex powder or white glitter over the clay surface. This gives the cloud a magical, shimmering finish.
Enjoy seeing this peaceful little face greeting you every time you open the fridge


The Complete Guide to Pottery Troubleshooting
Uncover the most common ceramic mistakes—from cracking clay to failed glazes—and learn how to fix them fast.
Polymer Clay Keychains With Layered Details
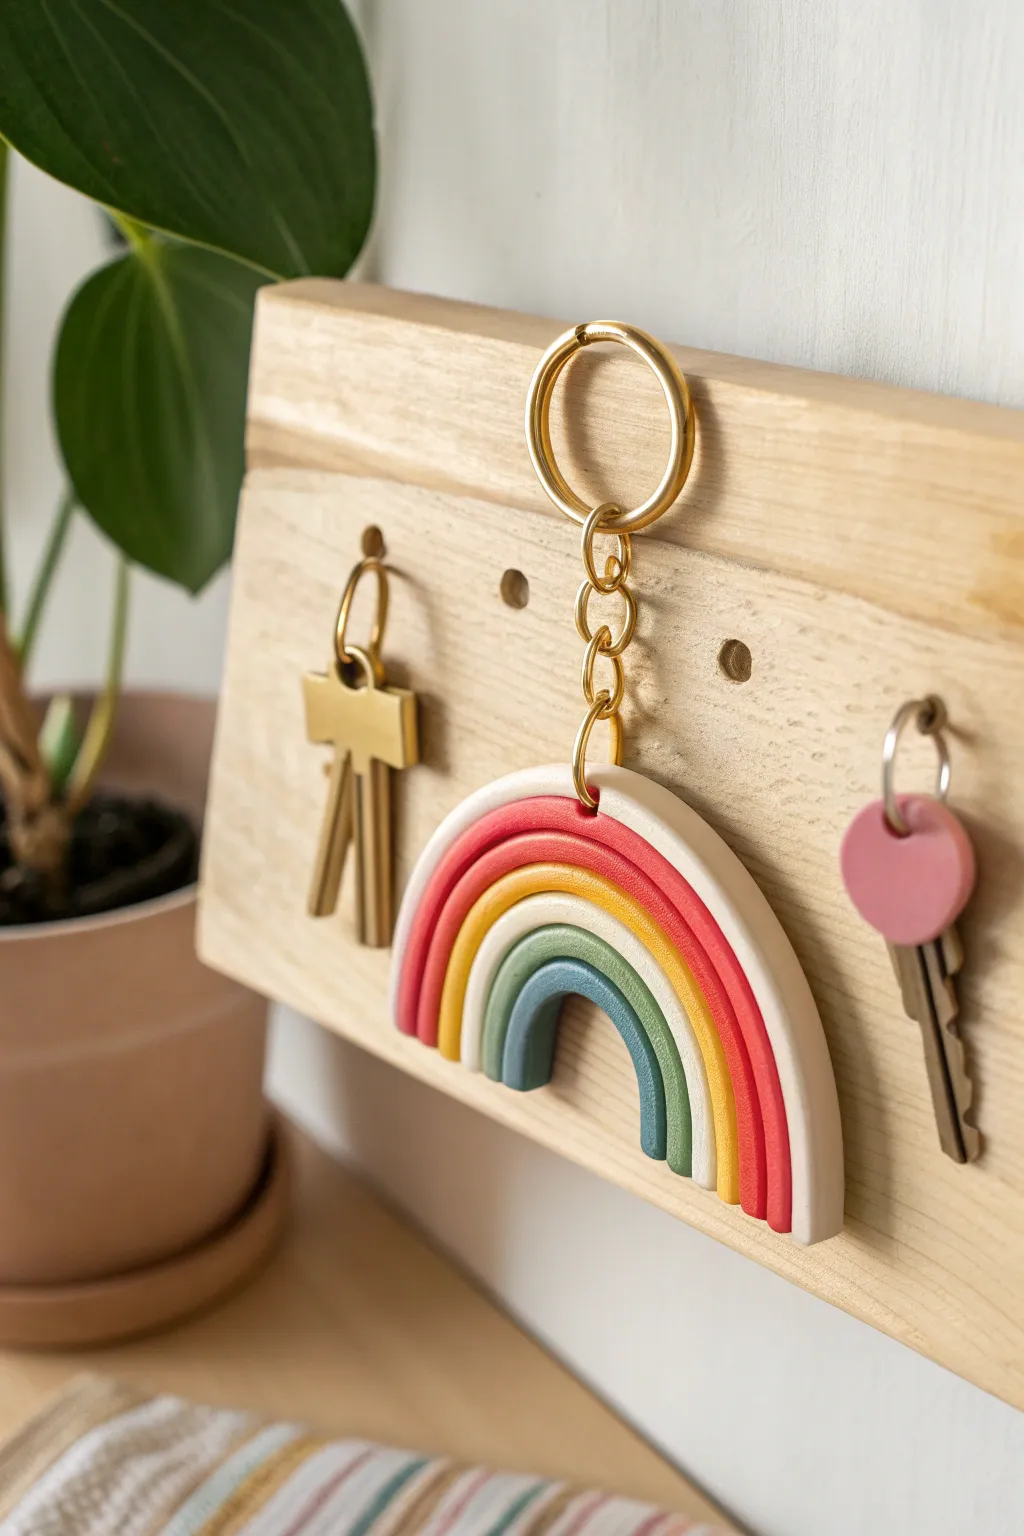
Brighten up your keyring with this charming, architectural rainbow made from polymer clay. The design features clean, distinct arches in a muted, earthy color palette that gives it a sophisticated yet handmade feel.
Step-by-Step Tutorial
Materials
- Polymer clay in five colors: white/cream, terracotta red, mustard yellow, sage green, and slate blue
- Rolling pin or acrylic roller
- Clay extruder (optional but helpful for uniform snakes)
- Circle cutters in graduated sizes (or a single large round cutter)
- Craft knife or tissue blade
- Gold jump rings (1 large, several small)
- Gold keychain ring with chain
- Hand drill or needle tool
- Baking sheet and parchment paper
- Gloss glaze (optional)
- Pliers (flat nose and round nose)
Step 1: Prepping the Clay
-
Condition the clay:
Begin by thoroughly conditioning each color of polymer clay until it is soft and pliable. This prevents cracks and makes rolling easier. -
Roll the base slab:
Take your cream or white clay and roll it out into a flat, even slab about 3-4mm thick. This will serve as the backing plate that holds all the rainbow arches together. -
Cut the backing shape:
Use your largest circle cutter to punch out a round disc from the white slab. Use a craft knife to cut the circle in half, creating a semi-circle.
Use Liquid Clay
Apply a thin layer of liquid polymer clay (like Bake & Bond) between the colored arches and the white backing slab to ensure a permanent, unbreakable bond after baking.
Step 2: Creating the Arches
-
Roll out color snakes:
Roll snakes for each color of your rainbow: terracotta, mustard, white, sage green, and slate blue. Aim for a consistent thickness of about 4-5mm. -
Form the smallest arch:
Start with the innermost color, which is the slate blue. Shape the snake into a small U-shape that fits snugly near the center of your white backing piece. -
Add the next layers:
Wrap the sage green snake tightly around the blue arch. Gently press them together so they adhere without distorting the rounded shape. -
Continue building outward:
Add the white snake next, followed by the mustard yellow, and finally the terracotta red on the very outside. Ensure the coils are touching side-by-side. -
Flatten and secure:
Once all arches are positioned, place a piece of parchment paper over the rainbow and gently roll over it with your acrylic roller just enough to flatten the top slightly and bond the coils together. -
Attach to backing:
I usually lift the rainbow assemblage carefully and place it onto the white semi-circle backing we made earlier. The backing adds the necessary structural strength for a keychain.
Uneven Arches?
If your hand-rolled snakes vary in thickness, use a clay extruder. It forces clay through a distinct disc shape, guaranteeing perfectly uniform ropes every time.
Step 3: Refining and Baking
-
Trim the bottom:
Using your tissue blade or a sharp craft knife, make a clean, straight cut across the bottom of the rainbow to ensure all color strands and the backing are perfectly flush. -
Refine the outer edge:
Check the outer red arch to ensure it matches the curve of the backing clay. You can use your craft knife to trim away any excess white backing visible around the edges. -
Create the hole:
Use a needle tool or a small straw to punch a hole at the very top center of the rainbow, going through both the red arch and the white backing. Make sure the hole is big enough for your jump ring. -
Smooth fingerprints:
Dip your finger in a little bit of baby oil or cornstarch and gently rub out any fingerprints on the clay surface. -
Bake the piece:
Place your rainbow on a parchment-lined baking sheet. Bake according to your brand of clay’s instructions—usually around 275°F (130°C) for 30 minutes. -
Cool down:
Allow the piece to cool completely before handling. It will be slightly soft when hot but hardens as it cools.
Step 4: Assembly
-
Drill if needed:
If your hole closed up slightly during baking, use a small hand drill to carefully reopen it. -
Open the jump ring:
Use two pairs of pliers to twist open a gold jump ring. Never pull it apart; always twist side-to-side to preserve the circle shape. -
Attach the hardware:
Slide the jump ring through the hole in the rainbow and attach it to the chain of your key ring. -
Close the ring:
Twist the jump ring back into a closed position, ensuring the ends meet perfectly so the keychain doesn’t slip off.
Now you have a sturdy, stylish accessory ready to organize your keys
Polymer Clay Beads for Chunky Bracelets

Embrace bold textures and earthy tones with this statement bracelet featuring satisfyingly chunky disc beads. The mix of stone-like speckling, deep navy, and warm terracotta creates a rustic yet modern accessory perfect for everyday wear.
How-To Guide
Materials
- Polymer clay in deep navy blue, terracotta orange, mustard yellow, and beige/cream
- Coarse black pepper or dried coffee grounds (for speckling)
- Acrylic roller or pasta machine
- Small round circle cutter (approx. 1 inch)
- Bead piercing pins or toothpicks
- Thin flexible blade
- Navy blue acrylic paint and fine liner brush
- Matte varnish
- Strong elastic cord or beading wire with clasp
- Two small gold spacer beads
Step 1: Preparing the Clay Stocks
-
Conditioning the clay:
Start by thoroughly conditioning each color of clay—navy, terracotta, mustard, and beige—until they are soft and pliable. This prevents cracking later. -
Creating the faux stone effect:
Take your beige clay and flatten it slightly. Sprinkle a pinch of coarse black pepper or dried coffee grounds onto it. -
Mixing the inclusions:
Fold the clay over the inclusions and roll it repeatedly until the specks are evenly distributed throughout the batch to mimic a natural stone look. -
Rolling the logs:
Roll each color into a thick, even log or snake, aiming for a diameter of about 3/4 of an inch. Ensure all logs have roughly the same thickness for uniform beads.
Clean Piercing
To prevent fingerprints while piercing, let the shaped beads sit in the freezer or fridge for 10 minutes to firm up before inserting your pins.
Step 2: Forming the Beads
-
Slicing segments:
Using your flexible blade, slice even segments from your clay logs. You will need roughly 4-5 blue, 4-5 terracotta, 2-3 mustard, and 4-5 speckled beige pieces. -
Rolling spheres:
Roll each slice between your palms to create smooth, perfect spheres. Any seams or cracks should be smoothed out now. -
Flattening into discs:
Gently press each sphere between two flat surfaces (like acrylic blocks) or just use your finger to slightly flattened them into thick, rounded discs rather than balls. -
Piercing the holes:
Using a bead pin, carefully pierce a hole through the center of each disc. Rotate the pin as you push through to avoid distorting the shape. -
Refining the holes:
Once the pin exits the other side, remove it and re-insert it from the exit hole to ensure a clean, sharp opening on both sides.
Step 3: Adding Details & Baking
-
Texturing the solid colors:
For the solid blue and mustard beads, take a toothbrush or a stiff bristle brush and gently tap the surface to give them a subtle, porous stone texture similar to the speckled beads. -
Creating the striped pattern:
On two or three of the terracotta beads, use a needle tool to gently scribe vertical lines where you want stripes to be painted later, or leave them smooth. -
Baking:
Arrange your beads on a baking sheet lined with parchment paper or cardstock. Bake according to your clay manufacturer’s instructions (usually 275°F/135°C for 30-45 minutes). -
Cooling:
Allow the beads to cool completely in the oven before handling them to ensure maximum durability.
Go Geometric
Instead of rounded discs, slice the edges of your beads with a blade just before baking to create chunky, faceted geometric shapes.
Step 4: Finishing Touches
-
Painting stripes:
Using a fine liner brush and navy blue acrylic paint, carefully paint thin vertical stripes onto the selected terracotta beads. I prefer to rest my hand on the table for steadier lines. -
Sealing:
Once the paint is dry, coat all beads with a thin layer of matte varnish to protect the surface and the painted details without making them look glossy and plastic. -
Stringing the design:
Thread your elastic cord or wire. Arrange the beads in a random but balanced pattern, mixing the colors and textures. -
Adding gold accents:
Place the two small gold spacer beads at the back of the design (near where the knot will be) to add a professional finish. -
Securing the bracelet:
Tie a strong surgeon’s knot if using elastic, adding a dab of super glue to the knot before tucking it inside a bead hole.
Wear your chunky new creation with pride or stack it with other bangles for a boho look

TRACK YOUR CERAMIC JOURNEY
Capture glaze tests, firing details, and creative progress—all in one simple printable. Make your projects easier to repeat and improve.
Mini Polymer Clay Trading Buddy Creatures
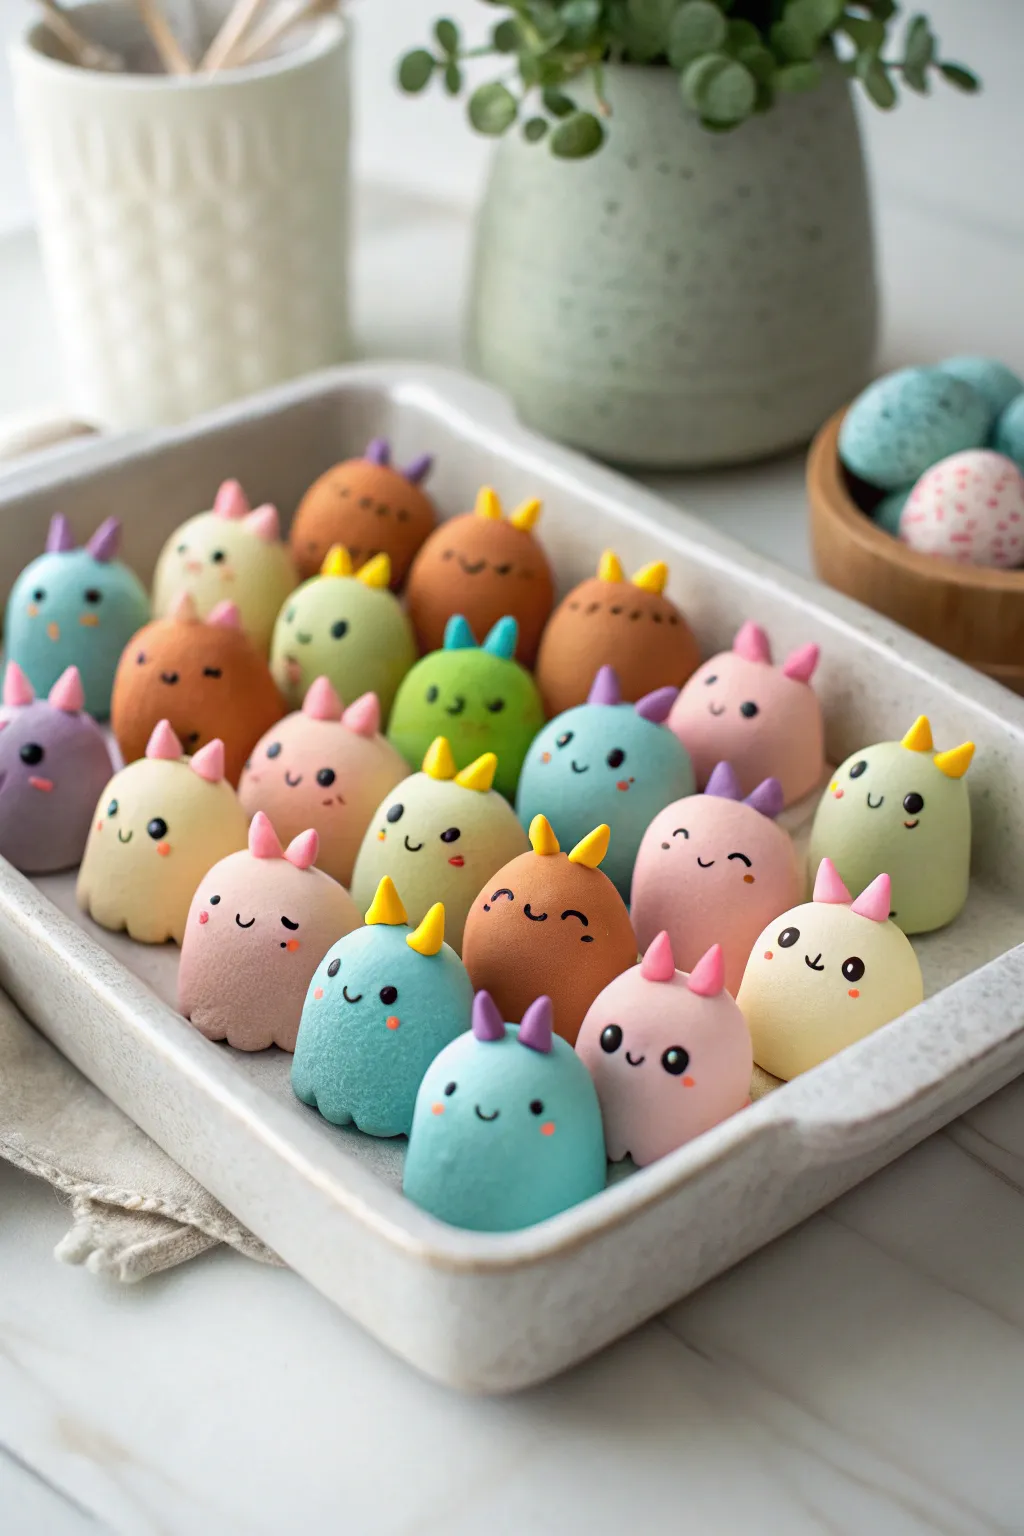
Create an army of adorable trading buddies with these smooth, rounded creatures that fit perfectly in your palm. Their simple, expressive faces and candy-colored horns make them irresistibly cute and easy for beginners to mass-produce.
Step-by-Step Tutorial
Materials
- Polymer clay in pastel shades (baby blue, soft pink, mint green, cream, tan)
- Black polymer clay (tiny amount) or black acrylic paint
- Ball stylus tools (various sizes)
- Needle tool or toothpick
- Clay blending tool or silicone smoother
- Ceramic tile or glass baking surface
- Oven for baking
Step 1: Base Shaping
-
Prepare the clay:
Start by conditioning your chosen pastel clay colors until they are soft and pliable. Since these creatures rely on a smooth finish, ensure there are no air bubbles or cracks in the raw clay. -
Form the body:
Roll a piece of clay into a smooth ball approximately 1 inch in diameter. This size is easy to handle and great for trading. -
Create the shape:
Gently gently roll the ball into a slightly taller, dome-like shape. Flatten the bottom against your work surface so the creature stands upright on its own without wobbling. -
Refine the surface:
Check the dome for fingerprints. I like to lightly buff the surface with my finger or a smoothing tool to ensure it looks flawless before adding details.
Clean Clay Tip
Keep baby wipes handy! Clean your hands thoroughly when switching from dark colors (like the black eyes) back to pastel colors to avoid smudging the light clay.
Step 2: Adding Horns & Ears
-
Choose contrasting colors:
Select a clay color for the horns that contrasts nicely with the body color. For example, pink horns on a blue body or yellow horns on a green body. -
Shape the horns:
Roll two tiny, rice-grain-sized pieces of the accent clay. Pinch one end of each piece to form a subtle point. -
Attach the horns:
Place the horns on the top of the creature’s head, spaced slightly apart. Press them down gently to adhere them. -
Blend the seams:
Use a small ball stylus or silicone tool to gently blend the base of the horns into the head. This ensures they won’t pop off after baking.
Dust Destroyer
If you see lint or dust on your unbaked clay, dip a cotton swab in a tiny bit of rubbing alcohol or baby oil and gently wipe it away before baking.
Step 3: Face Details
-
Mark the eye placement:
Before adding clay, use a needle tool to make two tiny guide holes where the eyes will go. Keep them wide-set for maximum cuteness. -
Add the eyes:
Roll extremely tiny balls of black clay. Use your smallest ball tool to press these into the guide holes so they sit flush with the surface, not bulging out. -
Create the mouth:
Roll a microscopic ‘snake’ of black clay for the mouth. Curve it into a ‘U’ shape for a smile or a tiny line for a neutral expression. -
Apply the mouth:
Carefully transfer the mouth using a needle tool, placing it centered between and slightly below the eyes. Press lightly to secure. -
Add blush:
For the rosy cheeks, roll two minuscule balls of pink or orange clay (depending on the body color). Flatten them into discs and press them onto the cheeks, just below the outer corners of the eyes.
Step 4: Finishing
-
Final inspection:
Check your creature from all angles. Smooth out any accidental fingernail marks or dust specks with a touch of baby oil on your finger. -
Bake:
Place your creatures on a ceramic tile or baking sheet. Bake according to your brand of clay’s instructions (usually 275°F/135°C for 15-30 minutes per 1/4 inch thickness). -
Cool down:
Allow the creatures to cool completely in the oven with the door open. This gradual cooling helps prevent cracking. -
Optional glaze:
If you want a shiny finish, apply a thin coat of polyurethane varnish, but the matte look shown in the image is often preferred for that soft, marshmallow aesthetic.
Start your collection and line them up on a shelf for an instant boost of cheer