Whenever I’m craving a quick, satisfying project, I reach for polymer clay charms—they’re tiny, cute, and you can finish a whole handful in one creative session. Here are my favorite polymer clay charm ideas (from classic mini foods to a few quirky surprises) you can turn into earrings, bracelets, and keychain charms.
Kawaii Mini Donut Charms
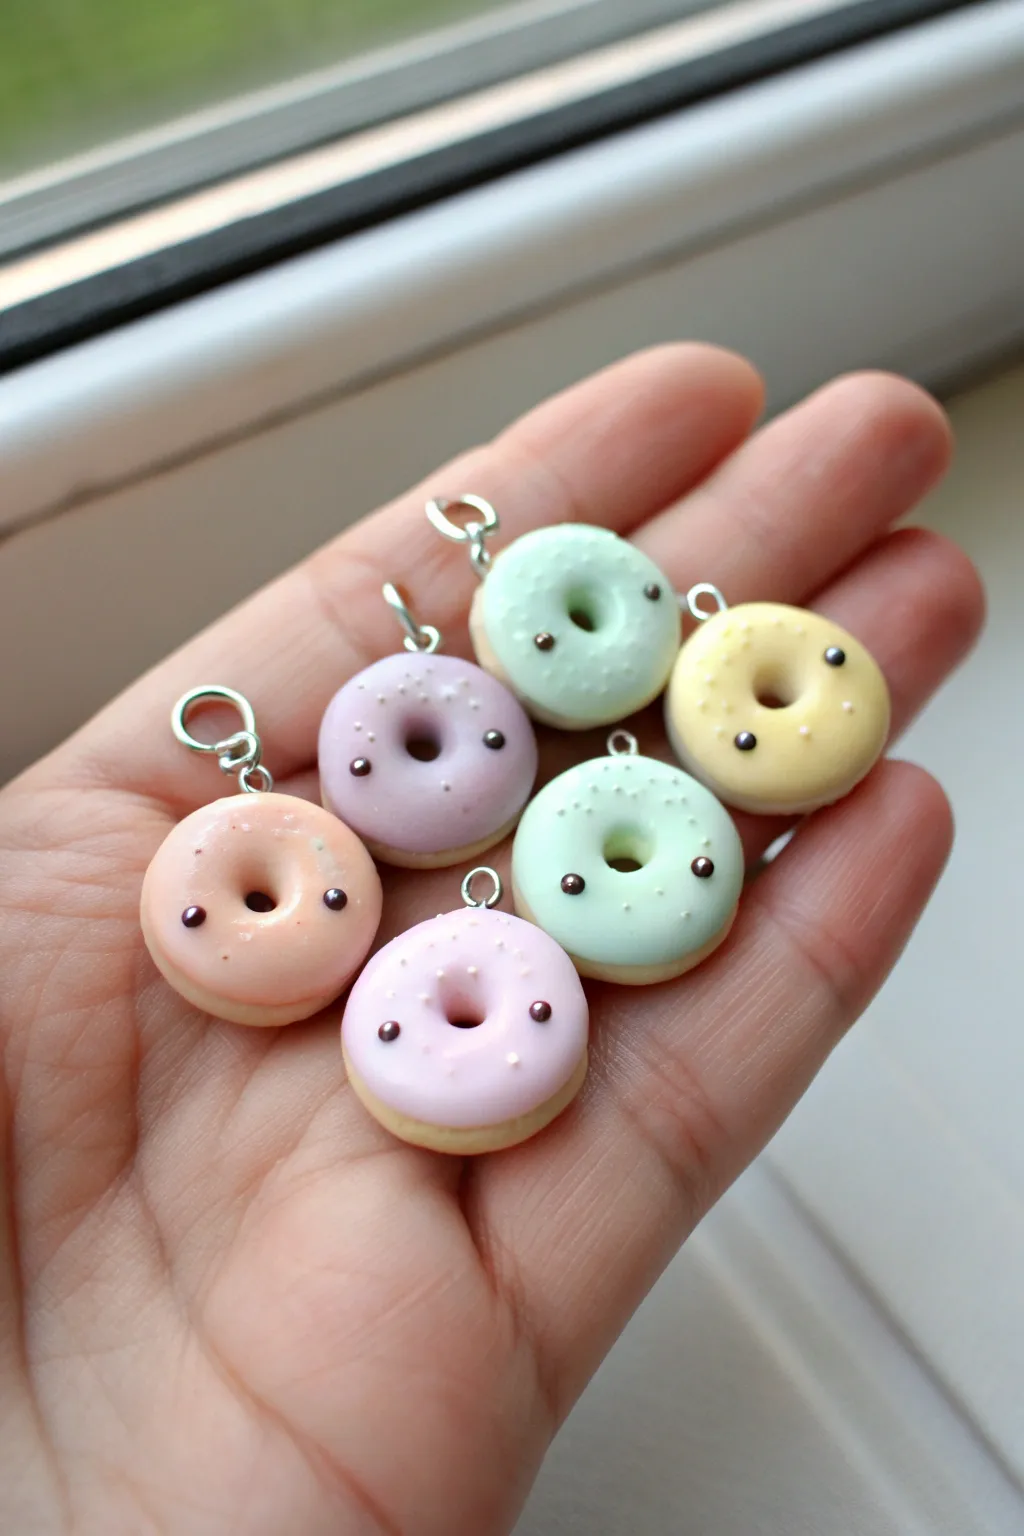
These miniature donut charms are the perfect blend of sweet and whimsical, featuring a soft pastel palette and adorable tiny faces. They make delightful zipper pulls, bracelet charms, or gifts for friends who love anything cute.
Detailed Instructions
Materials
- Polymer clay (beige for the dough base)
- Polymer clay (pastel pink, mint green, lavender, pale yellow for icing)
- Black polymer clay or black acrylic paint (for eyes)
- White acrylic paint (for sprinkle dots)
- Dotting tool or toothpick
- Eyepins (silver)
- Jump rings
- Gloss glaze or UV resin (optional)
- Exacto knife or clay blade
- Small circle cutter (optional)
Step 1: Creating the Dough Base
-
Condition the base clay:
Start by thoroughly conditioning your beige or ‘ecru’ colored polymer clay until it is soft and pliable. This ensures the finished donuts won’t have cracks. -
Portion the dough:
Roll the beige clay into a snake and cut equal segments to ensure all your donuts are the same size. Roll each segment into a smooth, crack-free ball about the size of a large pea or small marble. -
Flatten into a disk:
Gently press down on each ball with your finger or a flat acrylic block to create a thick disk shape. You want the edges to remain rounded, just like a real donut. -
Create the center hole:
Use a medium-sized dotting tool or the back of a paintbrush to press a hole through the center of the disk. Wiggle the tool slightly to widen the hole, smoothing out the clay inside.
Step 2: Adding the Icing
-
Prepare pastel colors:
Mix your icing colors if needed. I like to mix white clay with tiny amounts of pigment to get those super soft pastel shades seen in the photo. -
Roll out the icing:
Take a small ball of your chosen icing color and flatten it very thinly. It should be slightly smaller in diameter than your beige donut base. -
Shape the edges:
Using your fingers or a flexible blade, gently pinch or cut the edges of the icing disk to make them wavy and irregular, mimicking drizzled glaze. -
Apply the icing:
Place the wavy icing disk on top of the beige base. Gently press it down, smoothing the edges so they hug the curves of the donut without flattening the texture. -
Re-pierce the hole:
Locate the hole in the base through the icing layer and use your tool to poke through again, blending the icing clay down into the hole for a seamless look.
Pro Tip: Clean Clays
Pastel clay picks up dust easily. Keep a pack of baby wipes nearby to clean your hands and tools between switching colors to keep your pastels bright.
Step 3: Detailing and Assembly
-
Add the eyes:
Roll two profoundly tiny specks of black clay into balls. Place them wide apart on the donut icing to create that ‘kawaii’ wide-set look. Press them gently into the clay so they don’t fall off. -
Texture the icing (optional):
For a sugary look like on the pink and mint donuts, use a toothbrush or stiff brush to gently tap the surface of the icing, avoiding the eyes. -
Add sprinkle dots:
You can add tiny white specks of clay now for sprinkles, or wait until after baking to paint them on. The image features tiny white dots scattered around the eyes. -
Insert eye pins:
Trim your metal eye pins if they are too long. Insert the straight end into the top of the donut. You can add a dab of liquid clay or ‘Bake & Bond’ to the pin for extra security. -
Bake carefully:
Bake your charms according to the clay manufacturer’s instructions. Usually, this is around 275°F (135°C) for 15-20 minutes. Tent them with foil to prevent the pale colors from scorching.
Troubleshooting: Scorching
If your white icing turns yellow, your oven is too hot. Use an oven thermometer to verify the temp and always cover your tray with an aluminum foil tent.
Step 4: Finishing Touches
-
Paint details:
Once cool, use a fine detail brush or a toothpick dipped in white acrylic paint to add tiny dots or ‘sugar sprinkles’ if you didn’t add them as clay earlier. -
Seal the charm:
Coat the icing area with a satin or glossy polyurethane varnish. This protects the paint and gives the icing a realistic, wet glaze appearance. -
Attach hardware:
Once the glaze is fully dry, use pliers to open a jump ring and attach it to the eye pin loop. Your charm is now ready for a necklace or zipper.
Enjoy mixing and matching different pastel shades to create a complete bakery set of these sweet little accessories


Cute Avocado Half Charms
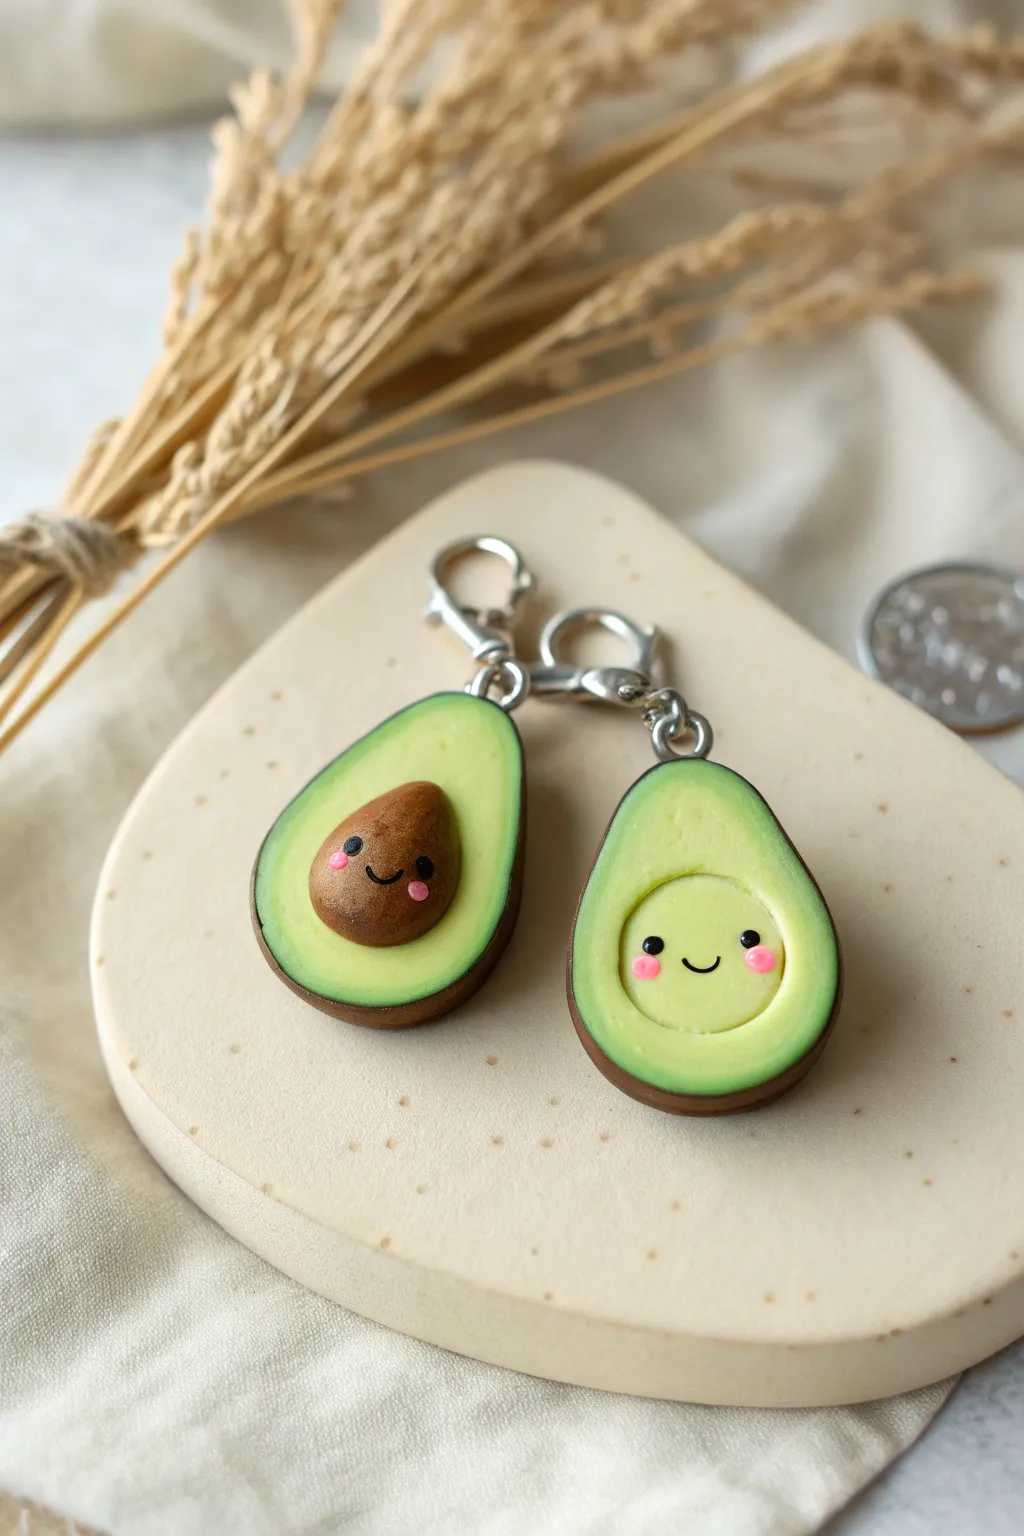
These adorable interlocking charms celebrate friendship with a clever twist on the classic avocado cut. One half holds the pit while the other showcases a perfect heart-shaped indentation, both brought to life with sweet kawaii expressions.
Step-by-Step
Materials
- Polymer clay: Dark Brown (skin), Light Green (inner flesh), Darker Yellow-Green (outer flesh), Medium Brown (pit)
- Black and pink polymer clay (tiny amounts) or acrylic paint
- Liquid polymer clay (Translucent)
- Gloss glaze or UV resin
- Rolling pin or pasta machine
- Teardrop-shaped cutter (approx. 1 inch)
- Circle cutter (small, sized for the pit)
- Needle tool or toothpick
- Dotting tool or ball stylus
- Eye pins and lobster clasp keychains
Step 1: Creating the Avocado Base
-
Mix the Flesh Tone:
Start by conditioning your light green clay. To get that realistic creamy avocado look, mixing a bit of translucent clay into a pale yellow-green works wonders. -
Form the Gradient:
Roll out a thick sheet of the light green clay (about 4-5mm). Then, roll a very thin snake of darker green clay and wrap it around the perimeter of the light green sheet to create the outer flesh ring. -
Cut the Shapes:
Using your teardrop cutter, punch out two identical shapes from the clay slab. Smooth the edges with your finger to blend the dark green rim slightly into the lighter green center. -
Add the Skin:
Roll out a thin sheet of dark brown clay. Place your teardrops onto this sheet and gently cut around them, leaving enough excess to wrap up the sides. Smooth the brown clay up the sides to form the textured skin.
Texturing Tip
For realistic skin texture, gently roll the dark brown exterior on a piece of rough sandpaper before attaching it to the green flesh.
Step 2: Sculpting the Pit Features
-
Create the Pit Indentation:
Choose which half will be the ’empty’ side. Press your small circle cutter gently into the center of the widest part to mark the spot, then use a ball tool to scoop and smooth out a concave hollow. -
Form the Seed:
Roll a ball of medium brown clay that fits perfectly into the indentation you just made. Press it onto the *other* avocado half, flattening the bottom slightly so it adheres well. -
Texture the Skin:
Using an old toothbrush or a stiff brush, tap the dark brown exterior skin to give it that bumpy, realistic avocado texture without distorting the shape.
Step 3: Bringing Them to Life
-
Add the Faces:
For the kawaii look shown, we need happy faces. On the pit (for one half) and inside the hollow (for the other), press two tiny divots for eye sockets using a needle tool. -
Insert Eyes:
Roll extremely tiny balls of black clay and press them into the sockets. Alternatively, you can paint these on after baking, but I find clay gives a better dimension. -
Create the Smile:
Use a needle tool to gently imprint a small ‘U’ shape for the mouth between the eyes. Keep the stroke shallow and clean. -
Add Blushing Cheeks:
Roll two minuscule balls of pink clay for each face. Press them flat just below and to the outside of the eyes for that rosy-cheek effect. -
Hardware:
Insert a metal eye pin into the top center of each avocado half. Use a dab of liquid clay on the pin’s shaft before inserting for extra security.
Level Up: Heart Pit
Make these specifically for Valentine’s Day by shaping the pit and the corresponding indentation into a heart shape instead of a circle.
Step 4: Finishing Touches
-
Baking:
Bake the pieces according to your polymer clay manufacturer’s instructions, typically at 275°F (130°C) for about 30 minutes. Let them cool completely. -
Highlight the Eyes:
Once cool, use a toothpick to add a tiny dot of white acrylic paint to the black clay eyes for a sparkle. -
Glazing:
Apply a coat of gloss glaze or UV resin specifically to the pit and the light green flesh area to make it look moist. Leave the dark brown skin matte for textural contrast. -
Assembly:
Attach your jump rings and lobster clasps to the eye pins using pliers, ensuring the loops are closed tightly so you don’t lose your charms.
Now you have a charming set of avocados meant to be shared with your favorite person


Pizza Slice Charm Trio
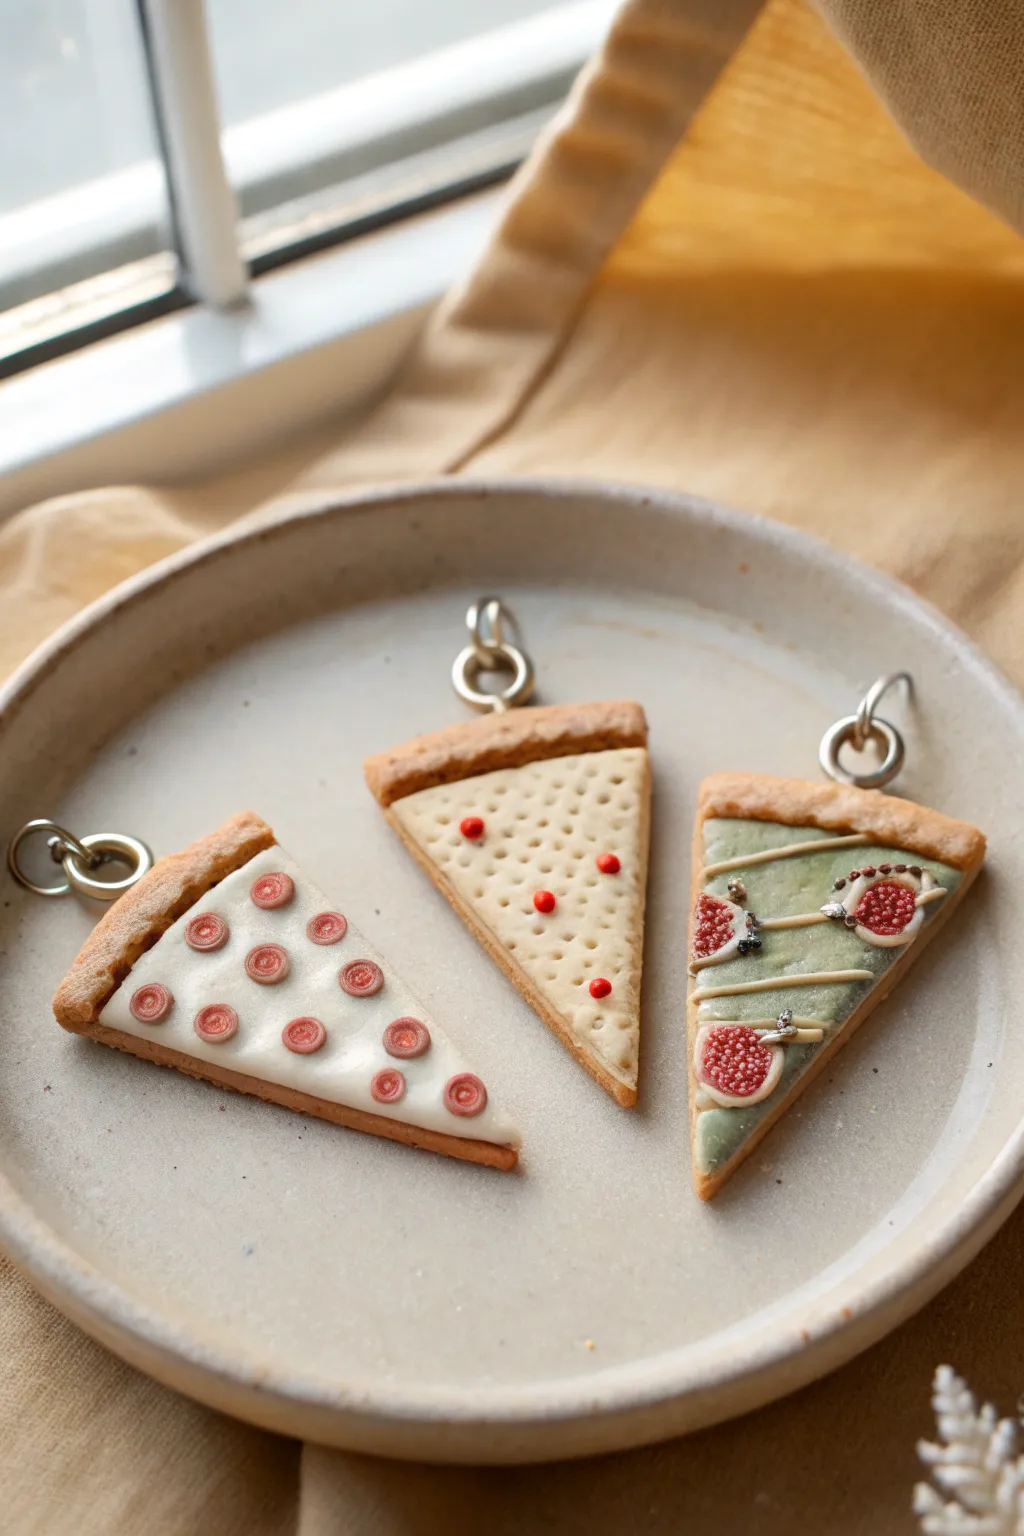
These delightful polymer clay charms mimic artisanal pizza slices with impressive realism and charm. Featuring three distinct topping styles—pepperoni, classic cheese, and a fancy fig and pesto—this project is perfect for creating unique jewelry or keychains.
How-To Guide
Materials
- Polymer clay (beige/tan, white, translucent, red, green, dark purple)
- Liquid polymer clay (translucent or white)
- Chalk pastels (brown, orange, yellow ochre)
- Craft knife or scalpel
- Needle tool or toothpick
- Small dotting tool
- Texture sponge or toothbrush
- Metal screw eye pins
- Gloss glaze or UV resin (optional)
- Baking tile or parchment paper
Step 1: Creating the Crust Base
-
Mix the Dough Color:
Start by mixing beige clay with a tiny amount of translucent and white to create a realistic dough color. It shouldn’t be too opaque. -
Shape the Slices:
Roll the clay into a thick sheet (about 4-5mm) and cut out three identical triangles. These will serve as the base for each slice. -
Form the Crust Edge:
Roll a small snake of the same dough-colored clay. Attach it along the top (widest) edge of each triangle, blending the seam onto the back so it looks like a raised crust rim. -
Texture the Dough:
Using a toothbrush or texture sponge, gently tap the crust rim and the sides of the slice to give it a baked bread texture. Smooth out the flat triangular surface where the toppings will sit. -
Pre-shade the Crust:
Shave some brown and orange chalk pastel into a powder. With a dry brush, gently dust the raised crust rim to give it a ‘baked’ appearance. I find adding a little extra on the corners makes it look crispier.
Sticky Situation?
If your liquid clay ‘cheese’ is too runny and flowing off the slice, let it sit on a piece of paper for 10 minutes to leach out excess plasticizer before applying.
Step 2: Pepperoni Slice (Left)
-
Apply the Sauce and Cheese:
Mix liquid clay with white clay to make a thick ‘cheese’ paste. Spread this over the flat part of the triangle, bringing it just up to the crust rim. -
Make the Pepperoni Cane:
Take red clay and mix in a tiny bit of translucent. Roll a thin log. Wrap a very thin sheet of slightly lighter red around it for the casing illusion, then slice very thin rounds. -
Place Toppings:
Press the pepperoni slices into the soft liquid clay mixture. Use a small ball tool to indent the center of each pepperoni slightly, making them look cupped and cooked.
Chef’s Kiss
For ultra-realism, lightly dust the finished pepperoni with a tiny bit of red-orange pastel powder after baking to simulate grease release.
Step 3: Classic Cheese Slice (Center)
-
Create the Cheese Layer:
Roll out a thin sheet of pale cream or white clay. Cut it to fit the triangle shape and press it onto the base, texturing it slightly with a sponge. -
Add Cheese texture:
Use a medium-sized dotting tool to press random indentations across the surface, simulating bubbling cheese or swiss-style holes. -
Spice it Up:
Roll incredibly tiny balls of bright red clay and place them randomly across the slice to mimic chili flakes or pimento bits.
Step 4: Fig & Pesto Slice (Right)
-
Spread the Pesto:
Mix green clay with translucent clay and a touch of liquid clay to create a pesto paste. Spread this unevenly over the slice base. -
Create Fig Slices:
Make a small cane with a dark purple outer layer and a textured red/pink center (stipple the center with a needle tool). Slice two thin pieces and place them on the green base. -
Drizzle Finish:
Roll very thin threads of beige clay to mimic a balsamic glaze or creamy drizzle and lay them diagonally across the slice in a zigzag pattern.
Step 5: Assembly and Baking
-
Insert Hardware:
Carefully trim the stems of your screw eye pins if they are too long. Screw them gently into the center of the crust on each slice. -
Final Texturing:
Do a final check to smooth out any fingerprints. Re-texture the crust near the eye pin if it got smashed during insertion. -
Bake:
Bake according to your polymer clay package instructions (typically 275°F/130°C for 15-30 minutes). Let them cool completely before handling.
Attach these savory miniatures to a keychain or necklace chain to show off your favorite food in style


Mini Animal Face Charms
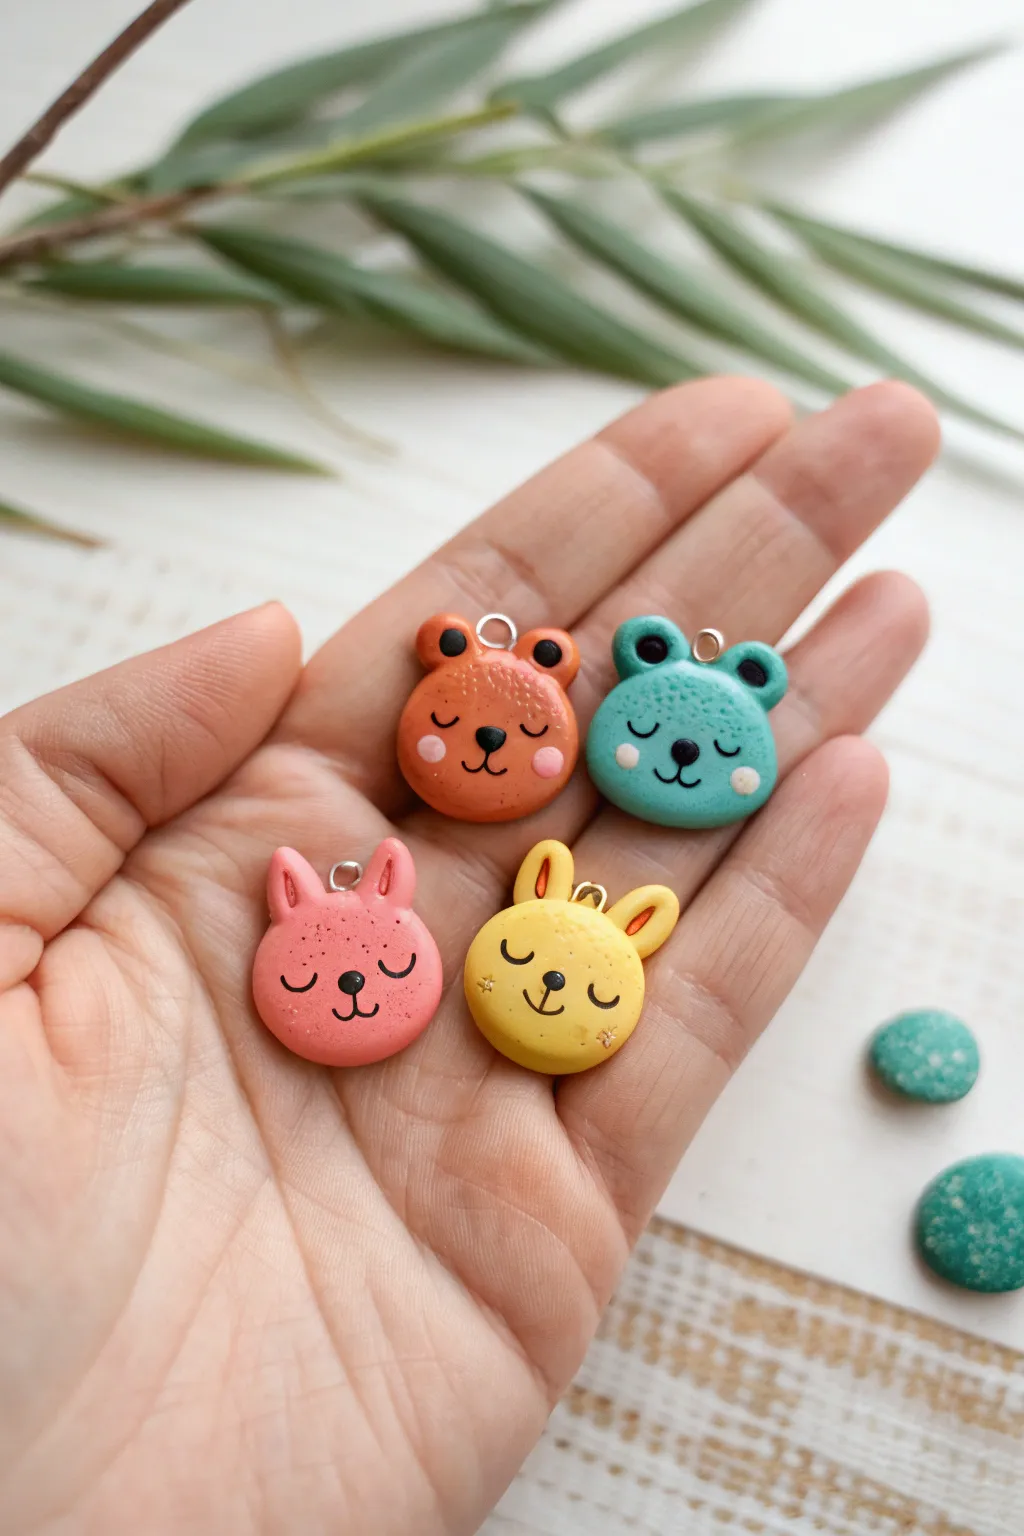
These adorable mini animal face charms are perfect for beginners, featuring a delightful speckled texture and sweet sleepy expressions. Crafted from polymer clay in a soft, cheerful palette, they make charming additions to necklaces, bracelets, or stitch markers.
Step-by-Step Guide
Materials
- Polymer clay (pink, warm yellow, burnt orange, teal)
- Black polymer clay (tiny amount for details)
- Acrylic paint (black and pink)
- Fine-grit sandpaper or an old toothbrush (for texturing)
- Coarse glitter, sand, or black pepper (optional for speckling)
- Small circle cutter (approx. 2cm)
- Dotting tool or toothpick
- Eye pins or silver jump rings
- Gloss or matte glaze (optional)
- Fine detail paintbrush
- Baking sheet and parchment paper
Step 1: Prepping and Shaping the Base
-
Condition the clay:
Start by kneading your colored clay until it is soft and pliable. If you want to achieve the speckled look shown in the photo, kneading in a tiny pinch of black pepper or coarse glitter during this stage works wonders. -
Roll out the slab:
Roll your conditioned clay out to a thickness of about 4-5mm. You want them chunky enough to be durable but light enough for jewelry. -
Cut the circles:
Use your small circle cutter to punch out four rounds. These will be the main heads for your animals. Smooth out any harsh edges from the cutter with your fingertip. -
Add texture:
Take an old toothbrush or a piece of crumpled aluminum foil and gently tap it over the surface of the clay circles. This mimics the organic, slightly pitted texture seen in the reference.
Sticky Situation?
If clay sticks to your cutter or tools, dip them in a little bit of cornstarch or water before cutting. This acts as a release agent and prevents distortion.
Step 2: Forming the Ears
-
Sculpt bear ears:
For the orange bear, roll two tiny balls of clay. Press them gently onto the top of the head and use a modeling tool to blend the seam slightly at the back so they stay attached. -
Indent the bear ears:
Use a medium-sized ball tool to press a small indentation into the center of each bear ear for depth. -
Sculpt rabbit ears:
For the pink and yellow rabbits, roll small logs of clay tapered at one end. Press the wider ends onto the top of the heads. I like to shape them slightly differently—maybe one bent ear—to give them personality. -
Sculpt frog ears:
For the teal frog, add two semi-circles to the top of the head, similar to the bear but positioned slightly wider apart. -
Add dark centers:
Take tiny, flattened discs of black clay and press them into the concave center of the frog and bear ears (if desired, though painting them later is easier).
Level Up: Texture Pop
Mix ‘granitex’ or stone-effect clay with your solid colors. This creates realistic specks throughout the charm without needing manual texturing.
Step 3: Hardware and Baking
-
Insert eye pins:
Trim your eye pins to an appropriate length. Push the pin down through the center top of the head. Since the ears might block the center, place the pin carefully between them. -
Secure the pin:
If you don’t use eye pins, you can carefully pierce a hole near the top using a needle tool or toothpick, ensuring it’s wide enough for a jump ring later. -
Bake:
Place your charms on parchment paper and bake according to your polymer clay package instructions (usually 275°F/130°C for 15-30 minutes). Let them cool completely before handling.
Step 4: Painting the Faces
-
Paint the nose:
Using a fine detail brush or a toothpick dipped in black acrylic paint, draw a small oval or triangle nose in the lower center of the face. -
Draw the mouth:
Paint a simple anchor shape or a small ‘w’ shape connected to the nose to create the mouth. -
Add sleeping eyes:
Paint two small ‘U’ shapes for the closed eyelids. Adding tiny eyelashes on the outer corners makes them look extra peaceful. -
Add rosy cheeks:
Dip a larger dotting tool into pale pink paint (or mix red with white). Gently stamp round cheeks onto the bear and frog faces. -
Detail the ears:
If you didn’t use black clay for the ear centers earlier, paint the insides of the frog ears black or pink now. -
Seal:
Once the paint is fully dry, apply a thin coat of glaze to protect the face details. A matte varnish keeps the natural look, while gloss makes them pop.
String these little sleepyheads onto a necklace chain or attach them to a zipper pull for an instant dose of cuteness.

The Complete Guide to Pottery Troubleshooting
Uncover the most common ceramic mistakes—from cracking clay to failed glazes—and learn how to fix them fast.
Chubby Dino Charm Minis
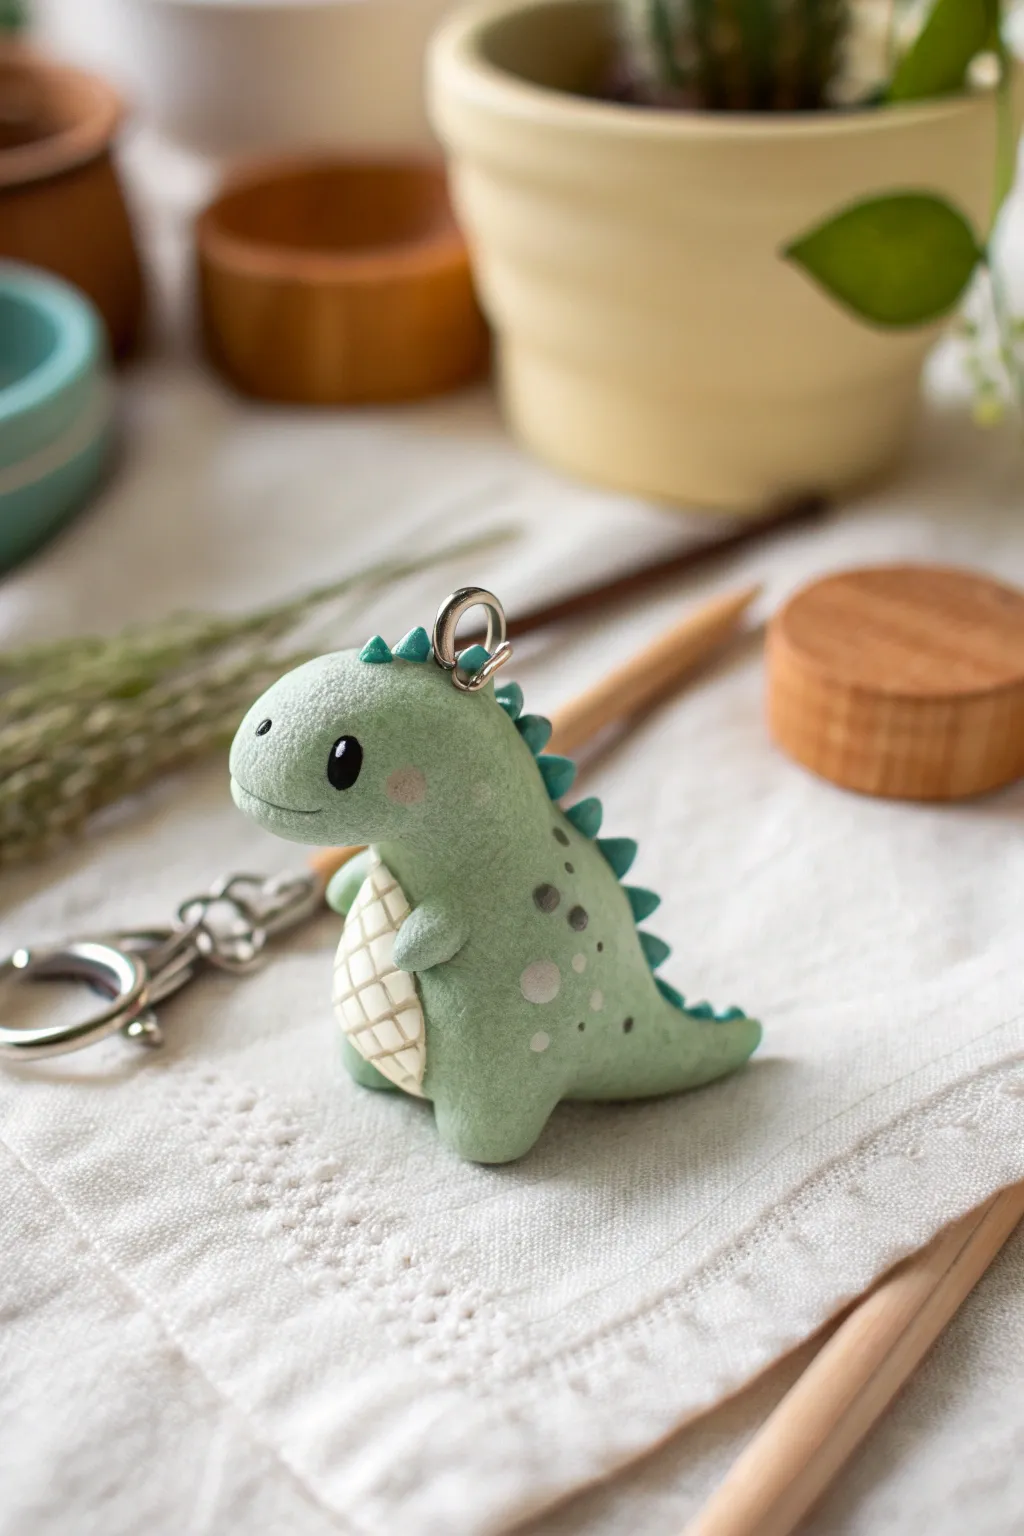
This adorable dinosaur charm boasts a unique, flocked-style texture that makes it irresistible to touch, setting it apart from standard glossy clay creatures. With its chubby silhouette, tiny scales, and gentle expression, this mint-green prehistoric pal is perfect for clipping onto backpacks or keychains.
How-To Guide
Materials
- Mint green polymer clay
- Dark teal polymer clay
- Cream or off-white polymer clay
- Black polymer clay
- Blush pink chalk pastel or eyeshadow
- White acrylic paint
- Old toothbrush or stiff stipple brush
- Needle tool
- Dotting tools
- Eye pin or screw eye
- Liquid clay (TLS) or Bake & Bond
- Clay roller
- Oven
- Gloss glaze (optional, for eyes only)
Step 1: Shaping the Base Body
-
Mix and condition:
Start by conditioning your mint green clay until it is soft and pliable. If the color feels too bright, you can tone it down with a tiny speck of beige or translucent clay. -
Form the main shape:
Roll a large ball of the green clay and gently shape it into a chubby teardrop. The wider bottom will be the body, and the tapered top will become the head. It should feel bottom-heavy and cute. -
Define the head:
Gently gently pinch and press the narrower top section to define a distinct snout area, bending it slightly forward so the dino looks straight ahead. -
Create the legs:
For the legs, pinch the bottom corners of the teardrop to pull out two short, stubby legs. Alternatively, roll two small balls of mint clay and blend them seamlessly onto the bottom of the body using a sculpting tool. -
Add the tail:
Roll a cone of mint clay and attach the wider end to the back of the body. Smooth the clay seams completely so the tail looks like a natural extension of the spine. -
Texture the skin:
This is the secret to the ‘fuzzy’ look: take an old toothbrush or a stiff stipple brush and tap it repeatedly all over the green clay. Cover every surface except where the belly will go.
Keeping the Texture
Work gently when adding the belly and spikes. If you accidentally smash the texture you made with the toothbrush, just re-tap those areas lightly before baking.
Step 2: Adding Details and Personality
-
Make the belly patch:
Roll out a thin sheet of cream-colored clay. Cut an oval shape and press it onto the dinosaur’s tummy. Gently texture this cream patch with your brush as well to match the matte finish. -
Score the belly grid:
Using a needle tool or the back of a craft knife, carefully press diagonal lines across the cream belly in both directions to create a quilted diamond pattern. -
Attach the arms:
Form two tiny teardrops of mint clay for the arms. Press them onto the sides of the body, just above the belly, blending the top shoulder seam into the body while leaving the hands free. -
Add the spikes:
Roll many tiny balls of dark teal clay. Flatten them slightly into triangles and arrange them in a row running from the top of the head down to the tip of the tail. -
Decorate the back:
Take small amounts of grey or lighter green clay and flatten them into random spots on the dinosaur’s flank for added pattern interest. -
Insert the hardware:
Dip the end of an eye pin into a little liquid clay for extra security and push it deep into the top of the dino’s back, right behind the head.
Level Up: Glitter Scales
Mix a tiny pinch of fine iridescent glitter into the dark teal clay before making the spikes. It adds a magical shimmer that contrasts beautifully with the matte body.
Step 3: Face and Finishing
-
Create the eyes:
Use a medium ball tool to make two indents on the face. Roll two small balls of black clay, place them in the sockets, and flatten them slightly. -
Add the smile:
Use a needle tool or a small curved sculpting tool to impress a simple, happy smile line onto the snout. -
Apply blush:
Scrape a little pink chalk pastel into powder. Use a soft brush to gently apply a rosy cheek spot right underneath the eye. -
Bake carefully:
Bake the charm according to your clay package instructions. I usually tent my pieces with foil to prevent the pale green from scorching or darkening. -
Highlight the eyes:
Once cool, use a toothpick to add a tiny dot of white acrylic paint to each eye for a ‘sparkle.’ Ensure the white paint is fully dry. -
Seal:
Because of the texture, avoids varnishing the whole body. Instead, just add a drop of gloss glaze to the black eyes to make them look alive and shiny.
Now you have a wonderfully textured little dino friend ready for grand adventures
Simple Flower Charm Blossoms
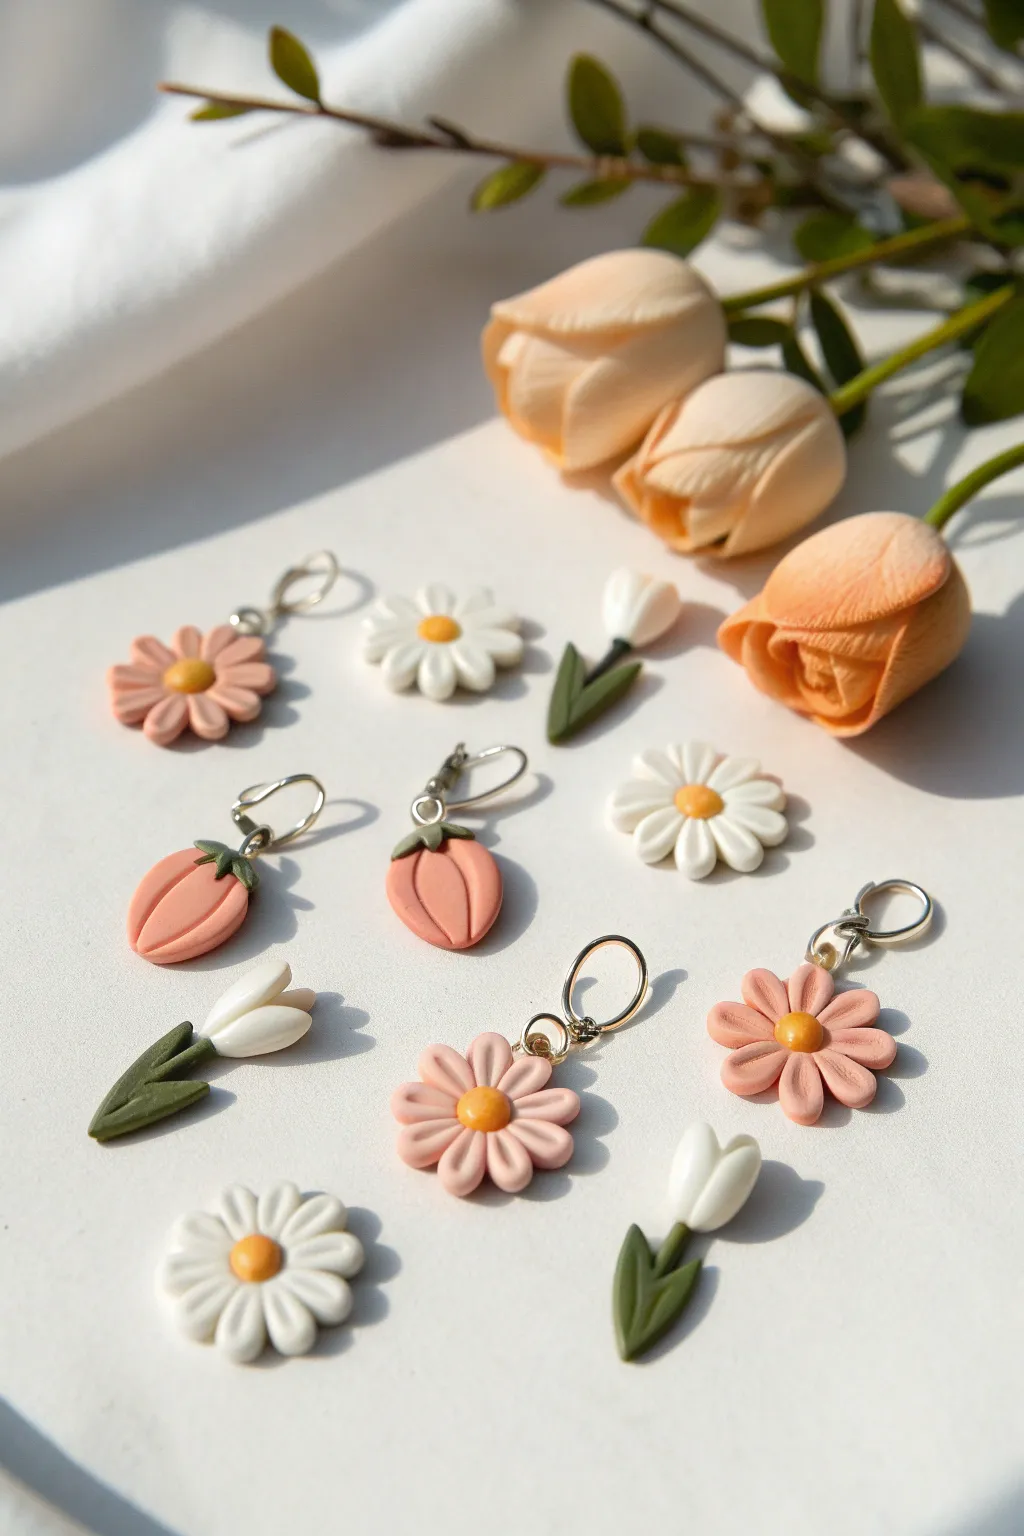
Capture the essence of spring with this delightful assortment of polymer clay flower charms. This project guides you through creating delicate daisies and budding tulips in soft pastel hues, perfect for earrings, stitch markers, or sweet little pendants.
Step-by-Step Tutorial
Materials
- Polymer clay (soft pink, white, warm yellow, olive green)
- Small jump rings (silver or gold tone)
- Needle tool or toothpick
- Ball tool (small)
- Clay blade or craft knife
- Headpins or eye pins
- Wire cutters
- Pliers (round nose and chain nose)
- Oven for baking
Step 1: Prepping the Tulip Buds
-
Base for Closed Buds:
Start with a pea-sized ball of pink clay for the closed tulip buds. Roll it smooth and gently taper one end to create a teardrop shape. -
Adding Texture:
Using a needle tool, gently press vertical indentations around the bulbous part of the teardrop to mimic tightly closed petals. Don’t cut through; just create definition. -
Creating the Calyx:
Take a tiny pinch of olive green clay and flatten it into a small star shape or three tiny triangles. Press this onto the top (the pointy end of the teardrop) where the stem would attach. -
Attaching Hardware:
Trim an eye pin so about 1cm remains. Dip the end in liquid clay or bake-and-bond (optional for strength) and insert it straight through the center of the green calyx into the pink bud.
Fingerprints everywhere?
To smooth out fingerprints before baking, lightly brush the raw clay with a tiny amount of baby oil or cornstarch. It creates a flawless finish.
Step 2: Sculpting the Open White Tulips
-
Shaping the Flower:
Roll a small ball of white clay and pinch it into a larger teardrop shape than the buds. Use a ball tool to verify the top is rounded. -
Cutting Petals:
Use a sharp blade to make two crisscross cuts halfway down from the wide top of the teardrop, creating four distinct petal sections. -
Adding Stems:
Roll a thin log of green clay for the stem. Attach it to the tapered bottom of the flower head. Add simple leaf shapes by flattening small green teardrops and pressing them against the stem.
Step 3: Crafting the Dainty Daisies
-
Prepare Petal Clay:
Condition your pink or white clay and roll it into a thin sheet or log. Cut 8 to 10 equal-sized tiny pieces for each flower. -
Forming Petals:
Roll each tiny piece into a ball, then flatten slightly into an oval. Pinch one end of the oval to create a teardrop shape. -
Assembling the Flower:
Arrange the petals in a circle with the pointy ends touching in the center. Press them gently together so they adhere. -
Adding Center details:
Roll a small ball of warm yellow clay. Flatten it slightly and press it firmly into the center of the petal arrangement. -
Petal Texture:
With the dull side of a knife or a needle tool, press a single indentation down the center of each petal for a classic daisy look. -
Hardware Insertion:
Carefully insert a jump ring directly into one of the petals near the edge before baking. Alternatively, insert a small eye pin into the top of a petal if you prefer a dangle style.
Pro Tip: Stronger Stems
For the stemmed tulips, hide a small piece of wire inside the green clay stem. This reinforcement prevents snaps during daily wear.
Step 4: Finishing Touches
-
Baking:
Arrange all your pieces on a tile or parchment-lined tray. Bake according to your brand of clay’s instructions (usually 275°F/130°C for 15-30 minutes). -
Cooling:
Allow the charms to cool completely in the oven or on the tray. Moving them while hot can cause warping or cracking. -
Final Assembly:
If you used closed jump rings during the sculpting phase, you are done. If you used eye pins, use your pliers to attach jump rings now so they can be hung on chains or wires.
Enjoy styling these little blooms on a bracelet or gifting them to a gardening friend


What Really Happens Inside the Kiln
Learn how time and temperature work together inside the kiln to transform clay into durable ceramic.
Mushroom and Toadstool Charms
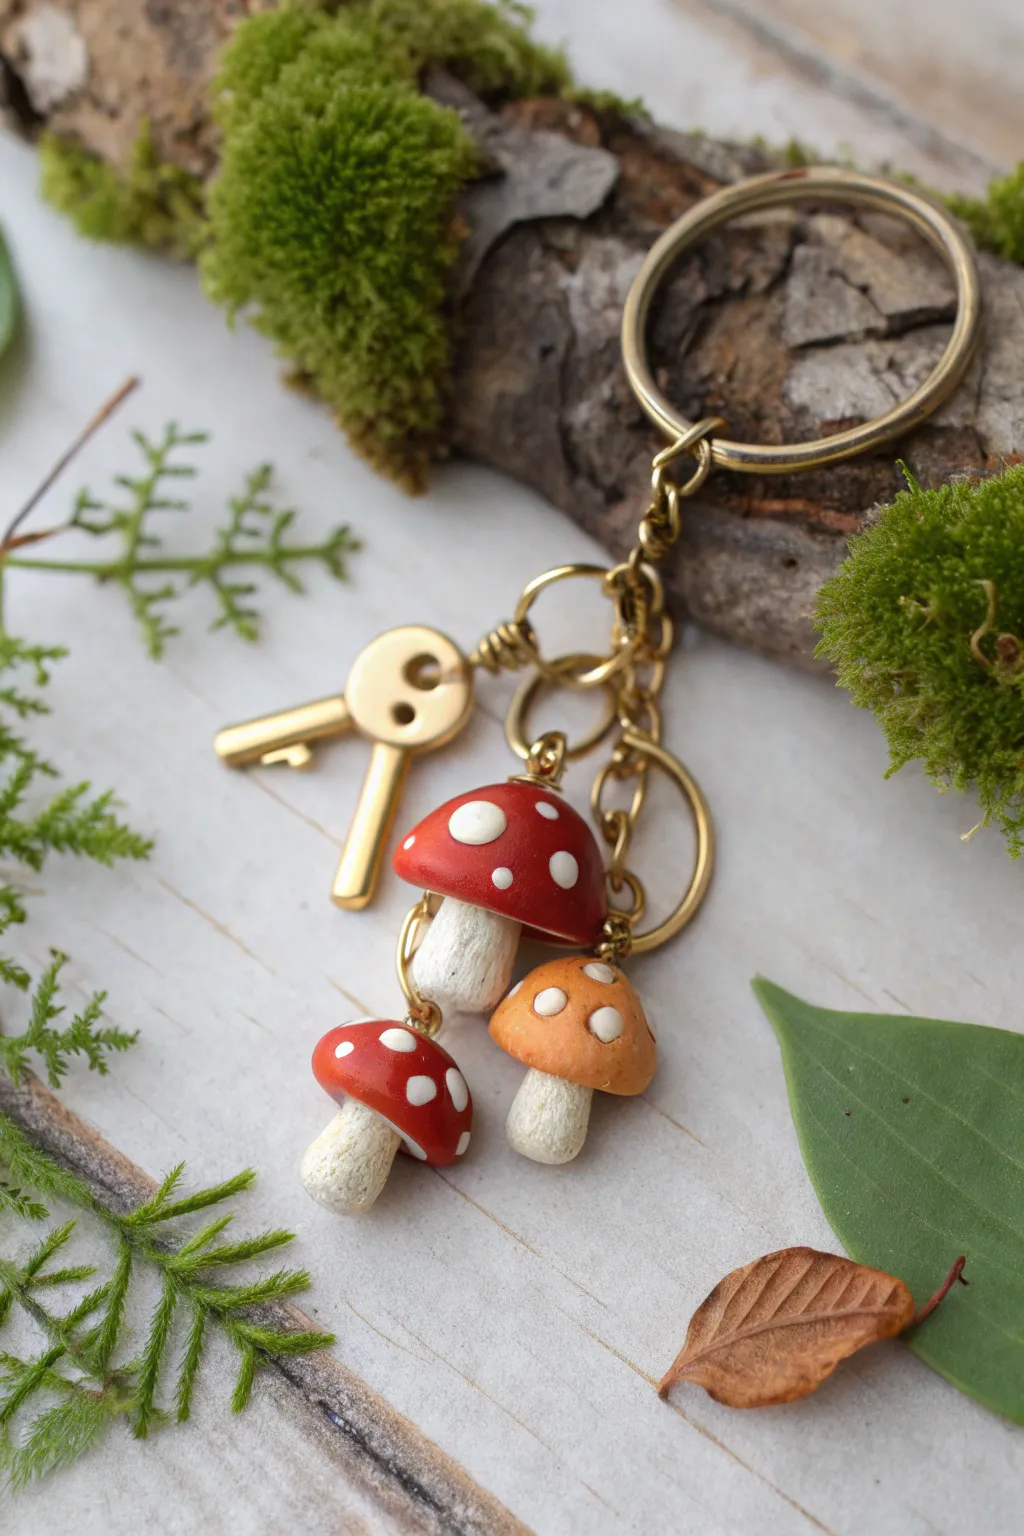
Bring a touch of woodland magic to your keys with this charming cluster of polymer clay mushrooms. Featuring textured stems and classic spotted caps in red and orange, this project combines sculpture with simple jewelry assembly for a functional piece of art.
Detailed Instructions
Materials
- Polymer clay (Red, Orange, White, Translucent)
- Eye pins (gold tone)
- Gold finish keychain ring with chain extender
- Jump rings (gold tone, assorted sizes)
- Small gold skeleton key charm
- Detailing tool or needle tool
- Toothbrush or stiff bristle brush
- Liquid polymer clay (translucent or white)
- Gloss glaze or polyurethane varnish (optional)
- Round nose pliers
- Wire cutters
- Oven
Step 1: Sculpting the Stems
-
Mix the clay:
Start by conditioning your white polymer clay. For a more organic, natural look, I like to mix in a tiny amount of translucent clay and the smallest speck of brown or beige to break the stark whiteness. -
Form the base shapes:
Roll three small cylinders of the white clay mixture. Two should be roughly equal in size, and one slightly smaller for variety. -
Shape the stems:
Gently pinch the top of each cylinder to create a slightly narrower neck where the cap will sit. Tap the bottom against your work surface to flatten it slightly so the stem creates a bulbous, grounded shape. -
Add texture:
Take a stiff toothbrush or a texturing tool and gently stipple the surface of the stems. Don’t smooth it out; you want that fibrous, earthy mushroom texture. -
Insert eye pins:
Trim three eye pins to match the length of your stems. insert them straight down through the center of each stem until the loop touches the top of the clay neck.
Step 2: Creating the Caps
-
Shape the red caps:
Roll two balls of red clay. Press your thumb gently into the center of one to create a dome shape, smoothing the edges downward. -
Create the orange cap:
Repeat the previous step using orange clay to make the third mushroom cap, perhaps making this one slightly flatter or wider for variety. -
Make the dots:
Roll out a very thin snake of white clay. Slice off tiny, uneven pieces and roll them into miniature balls of varying sizes. -
Apply the dots:
Press the tiny white balls onto the red and orange caps. flatten them flush against the surface so they look like part of the mushroom skin rather than bumps sitting on top. -
Attach caps to stems:
Apply a small drop of liquid polymer clay onto the neck of each stem (around the eye pin loop). Thread the caps onto the eye pins, pressing them firmly onto the textured stems. -
Secure the top:
Ensure the loop of the eye pin protrudes cleanly from the top of the cap. If the pin is too short, carefully press the clay down around it or use round nose pliers to twist a new loop if using a long headpin.
Texturing Tip
Use a needle tool to drag tiny vertical lines up the stem just under the cap skirt. This mimics the delicate gills of a real mushroom.
Step 3: Baking and Assembly
-
Bake:
Preheat your oven according to the clay manufacturer’s instructions (usually 230°F to 275°F). Bake your mushrooms for about 30 minutes to ensure durability. -
Cool and glaze:
Allow the pieces to cool completely. If you want a dewy look, apply a coat of gloss glaze strictly to the colored caps, leaving the stems matte and natural. -
Prepare the chain:
Take your main keychain ring. If it has a long chain, decide where you want your charms to hang. -
Attach the mushrooms:
Using small jump rings and pliers, attach the mushrooms at different heights along the chain. Grouping them closely creates a cute ‘cluster’ effect. -
Add the key charm:
Attach the small brass skeleton key charm near the top of the chain cluster using a jump ring. This adds a lovely metallic contrast to the soft clay.
Glow in the Dark
Swap the white clay used for the spots with glow-in-the-dark polymer clay. Your keychain will look magical during the day and luminescent at night.
Enjoy carrying this little piece of the forest with you wherever you go
Rainbow and Cloud Charm Pair
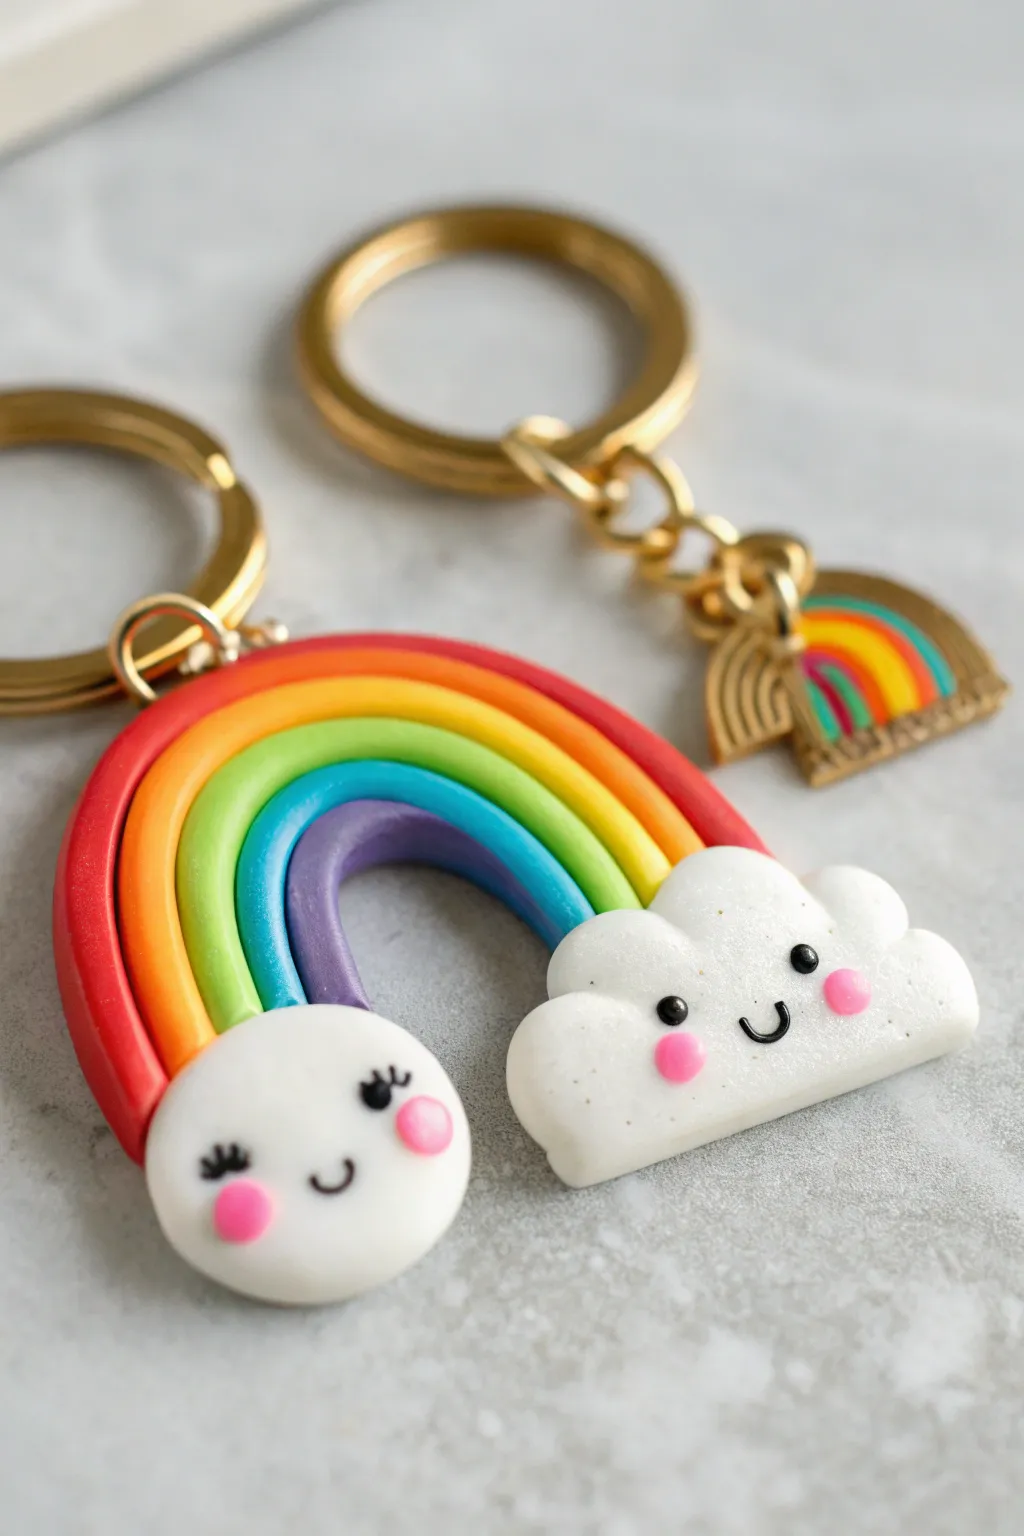
Bring a little sunshine to your day with this adorable polymer clay charm featuring a vibrant rainbow arch ending in two marshmallow-soft clouds. The glossy finish and sweet kawaii faces make this the perfect accessory for keys or backpacks.
Step-by-Step Guide
Materials
- Polymer clay in red, orange, yellow, green, blue, purple, and white
- Liquid polymer clay (translucent or white)
- Black acrylic paint or very fine black clay detailing pen
- Pink soft pastel chalk or pink clay
- Clay extruder (optional but helpful)
- Clean ceramic tile or glass work surface
- X-Acto knife or clay blade
- Needle tool or ball stylus
- Eye pin or screw eye
- Gold keychain hardware and jump rings
- Glossy polyurethane varnish or UV resin
- Small paintbrush
Step 1: Creating the Rainbow Arch
-
Condition the clay:
Begin by thoroughly conditioning each color of your rainbow clay (red through purple) until it is soft and pliable. This prevents cracks later on. -
Roll the coils:
Roll each color into a long, thin snake. Ideally, use a clay extruder to get perfectly even thickness for every strand, but careful hand-rolling works too. -
Form the stack:
Lay the purple snake on your work surface and shape it into a tight U-shape. Place the blue snake directly against the outer edge of the purple one, pressing them gently together so they adhere. -
Complete the rainbow:
Continue adding colors in order—green, yellow, orange, then red—until your full rainbow arch is formed. Ensure there are no gaps between the strands. -
Trim the ends:
Once the arch is complete, use your blade to make a clean, straight cut across the bottom of both sides so the legs of the rainbow are even.
Dirty Clouds?
White clay attracts dust like a magnet! Keep a pack of baby wipes nearby and constantly clean your hands and work surface before touching the white clay to keep it pristine.
Step 2: Forming the Clouds
-
Shape the clouds:
Condition the white clay and form two flattened, slightly irregular bubbly shapes. One should be slightly larger and more oblong than the other for a cute asymmetrical look. -
Add texture (optional):
If you want a glittery effect like the photo, mix a tiny pinch of white glitter into your white clay before shaping, or brush on a little mica powder. -
Attach to the rainbow:
Apply a tiny dab of liquid clay to the raw ends of your rainbow arch. Press one cloud firmly onto each side of the arch, covering the cut ends completely. -
Secure the bond:
Turn the piece over and gently smudge the clay across the seams on the back where the rainbow meets the cloud to ensure a strong structural bond.
Pro Tip: Stronger Hardware
Pull the eye pin out after baking, add a drop of super glue to the hole, and reinsert the pin. This creates a permanent bond that won’t pull out when used as a keychain.
Step 3: Adding the Kawaii Faces
-
Make the cheeks:
Roll four extremely tiny balls of pink clay for the cheeks. Alternatively, you can shave a bit of pink pastel chalk and brush the powder onto the raw clay for a softer blush effect. -
Apply cheeks:
Press the pink balls onto the clouds where you want the cheeks to sit, flattening them gently. -
Draw the details:
I prefer to bake the piece first before painting the eyes to avoid smudging, but if using black clay, roll tiny strands for the smile an dots for eyes and apply them now. -
Insert hardware:
Insert an eye pin into the top center of the red arch. You may need to trim the pin so it doesn’t poke through the other colors.
Step 4: Baking and Finishing
-
Bake:
Bake according to your clay manufacturer’s instructions (usually 275°F/135°C for 15-30 mins). Tent with foil to prevent whites from yellowing. -
Paint facial features:
Once cooled, if you didn’t use black clay earlier, use a fine detail brush or a toothpick with black acrylic paint to add the smiling mouths and eyes. Add tiny eyelashes to one side for character. -
Seal:
Apply a coat of UV resin or glossy varnish to the entire front of the charm. This gives it that professional shine and protects the paint. -
Assembly:
Once the finish is dry or cured, open a jump ring with pliers and attach your rainbow charm to the gold keychain, adding a small metal charm extras if desired.
Now you have a cheerful charm to keep your keys organized or to gift to a friend who needs a smile

TRACK YOUR CERAMIC JOURNEY
Capture glaze tests, firing details, and creative progress—all in one simple printable. Make your projects easier to repeat and improve.
Moon and Star Celestial Charms

Capture the magic of the night sky with this adorable celestial charm set, featuring a sleepy crescent moon and dangling star companions. The blend of creamy speckled clay and metallic gold accents creates a dreamy, sophisticated look perfect for keychains or bag charms.
Step-by-Step Tutorial
Materials
- Polymer clay in speckle white (or white mixed with grounded pepper)
- Polymer clay in beige/tan (speckled effect optional)
- Small circle cutter (approx. 2-3 inches)
- Star-shaped cookie cutter (approx. 1 inch)
- Black acrylic paint
- Fine detail paintbrush or needle tool
- Gold star charms (metal)
- Gold jump rings (various sizes)
- Eye pins (screw-in or standard)
- Gold keychain clasp
- Rolling pin or pasta machine
- Jewelry pliers (round nose and flat nose)
- Gloss glaze (optional)
Step 1: Sculpting the Moon
-
Condition the Clay:
Start by conditioning your speckled white clay until it is soft and malleable. If you don’t have pre-speckled clay, knead a very small amount of black pepper or craft sand into plain white clay for that textured stone look. -
Roll and Cut:
Roll the clay out to a thickness of about 1/4 inch (6mm). Use your large circle cutter to punch out a round shape. -
Shape the Crescent:
Take the same circle cutter and offset it on the clay circle you just cut, slicing away a portion to leave a perfect crescent moon shape. Smooth the sharp edges gently with your fingertip. -
Add the Eye Pin:
Insert a short eye pin or screw-eye into the top center of the moon. Then, insert five eye pins along the bottom curve, spacing them evenly for the hanging stars. -
Detail the Face:
Using a needle tool, gently impress a small, U-shaped curve into the center of the moon for a sleeping eye. Add a tiny curved mouth below it and three small dots on the cheek for freckles.
Clean Lines Pro-Tip
Wipe your tools and clay with a baby wipe before starting the white clay. Dust or lint shows up instantly on white polymer! Use acetone on a Q-tip to clean lint off raw clay.
Step 2: Creating the star Companions
-
Cut Out Stars:
Roll out more of the speckled white clay and a small amount of beige clay to the same thickness as the moon. Use your star cutter to create four white stars and one beige star. -
Soften Edges:
Gently pat the points of the stars with your finger to round them slightly. This gives them a softer, ‘puffy’ aesthetic similar to a cookie. -
Add Expressions:
Use a small dotting tool or the blunt end of a paintbrush to press two vertically oval indentations into each star for eyes. I like to place them slightly wide apart for a cuter look. -
Insert Hardware:
Carefully insert a screw-eye or trimmed eye pin into the top point of each star. Ensure it’s centered so the clay doesn’t bulge. -
Bake:
Place all clay pieces on a tile or parchment-lined baking sheet. Bake according to your clay package instructions (usually 275°F/135°C for 15-30 minutes). Let them cool completely.
Eye Pin Security
If an eye pin feels loose after baking, pull it out, add a tiny drop of super glue or E6000 directly to the metal stem, and slide it back into the hole for a permanent bond.
Step 3: Finishing and Assembly
-
Paint Details:
Once cool, use a tiny brush with a dot of black acrylic paint to fill in the moon’s sleeping eye and mouth. You can leave the star eyes unpainted as indentations, or darken them slightly for contrast. -
Prepare Jump Rings:
Open several gold jump rings using your pliers. Twist them sideways to open, never pull them apart, to maintain their strength. -
Link the Charms:
Attach a gold metal star charm to the top of each clay star using a jump ring. -
Connect to Moon:
Use another jump ring to connect the top of each metal star to the eye pins you placed at the bottom of the moon. This creates the double-link declination effect. -
Final Assembly:
Attach a large jump ring to the top loop of the moon, and connect it to your main gold keychain clasp.
Attach this charming celestial family to your favorite bag and enjoy the gentle jingle of stars wherever you go
Tiny Cactus Pot Charms
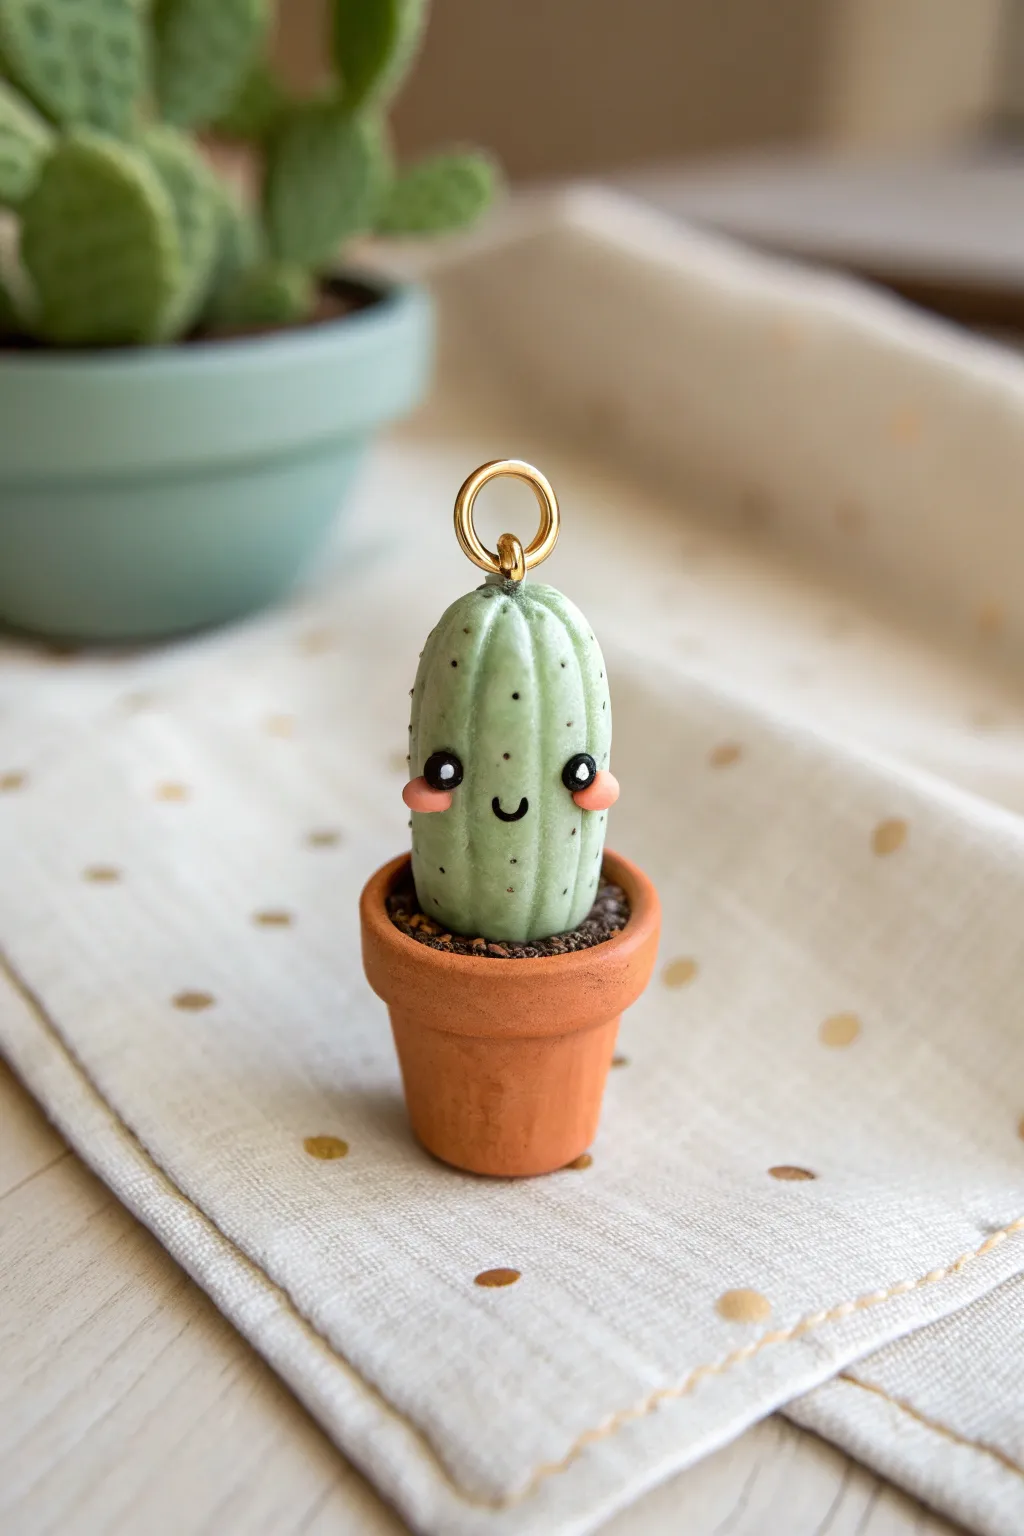
This adorable miniature cactus charm features a friendly kawaii face and sits snugly in its own tiny terracotta pot. It is the perfect beginner-friendly project that combines simple shapes with cute details to create a durable, wearable accessory.
How-To Guide
Materials
- Polymer clay (terracotta/rust, sage green, dark brown, pale pink)
- Black acrylic paint
- Fine detail paintbrush or dotting tool
- Needle tool or toothpick
- Gold screw eye pin
- Gold jump ring
- Liquid polymer clay (optional)
- Gloss glaze (optional)
Step 1: Sculpting the Pot
-
Form the base:
Start with a small ball of terracotta-colored clay, roughly the size of a marble. Roll it until smooth and free of cracks. -
Shape the pot body:
Gently taper the ball into a cylinder that is slightly narrower at the bottom than the top to mimic a flower pot shape. -
Create the rim:
Roll a thin snake of the same terracotta clay. Flatten it slightly with your finger or a roller. -
Attach the rim:
Wrap the flattened strip around the top edge of your cylinder. Cut off the excess and smooth the seam with your finger so it looks like a continuous band. -
Add the soil:
Take a small pinch of dark brown clay and flatten it into a disk. Press this firmly into the top of the pot to create the dirt surface. You can texture it by stippling with a needle tool or an old toothbrush.
Step 2: Creating the Cactus
-
Shape the plant:
Condition a piece of sage green clay and roll it into a thick, elongated oval or pill shape. It should be slightly taller than the pot. -
Mount the cactus:
Place the green oval onto the center of the brown soil. If needed, add a drop of liquid polymer clay for a stronger bond. -
Add texture lines:
Using the side of a needle tool or a dull knife, gently press vertical indentations running from the top center down to the base of the cactus to create ribs. -
Add the blush:
Roll two impossibly tiny balls of pale pink clay. Press them gently onto the cactus ‘cheeks’ halfway down the body. -
Hardware installation:
Screw the gold eye pin into the very top center of the cactus. Twisting it in provides a better grip than just pushing it straight down.
Clean Clay Tip
Use baby wipes or hand sanitizer between colors! Terracotta clay residue can easily dirty the pale green cactus if you don’t clean your hands thoroughly first.
Step 3: Finishing Touches
-
Bake carefully:
Bake the charm according to your clay package directions, usually around 275°F (130°C) for 15-30 minutes. Let it cool completely. -
Paint the eyes:
Dip a dotting tool into black acrylic paint and place two dots just above and between the pink cheeks. -
Add the smile:
With a very fine brush, paint a tiny ‘U’ shape between the eyes for the mouth. -
Highlight the eyes:
Once the black paint is dry, add a microscopic dot of white paint to the top right of each eye for a reflective sparkle. -
Create the spines:
Using a diluted black or dark green paint and a fine brush, add tiny specks or dashes along the vertical ribs of the cactus to simulate spines. -
Glaze and assemble:
If you want a shiny finish, apply a coat of gloss glaze to the cactus body. Finally, open a jump ring with pliers and attach it to the eye pin loop.
Droopy Cactus?
If your cactus leans over while sculpting, insert a cut piece of toothpick or wire into the pot as an internal armature before sliding the green clay on top.
This charming little plant needs no water and is ready to hang from a necklace or bracelet
Mini Book and Journal Charms
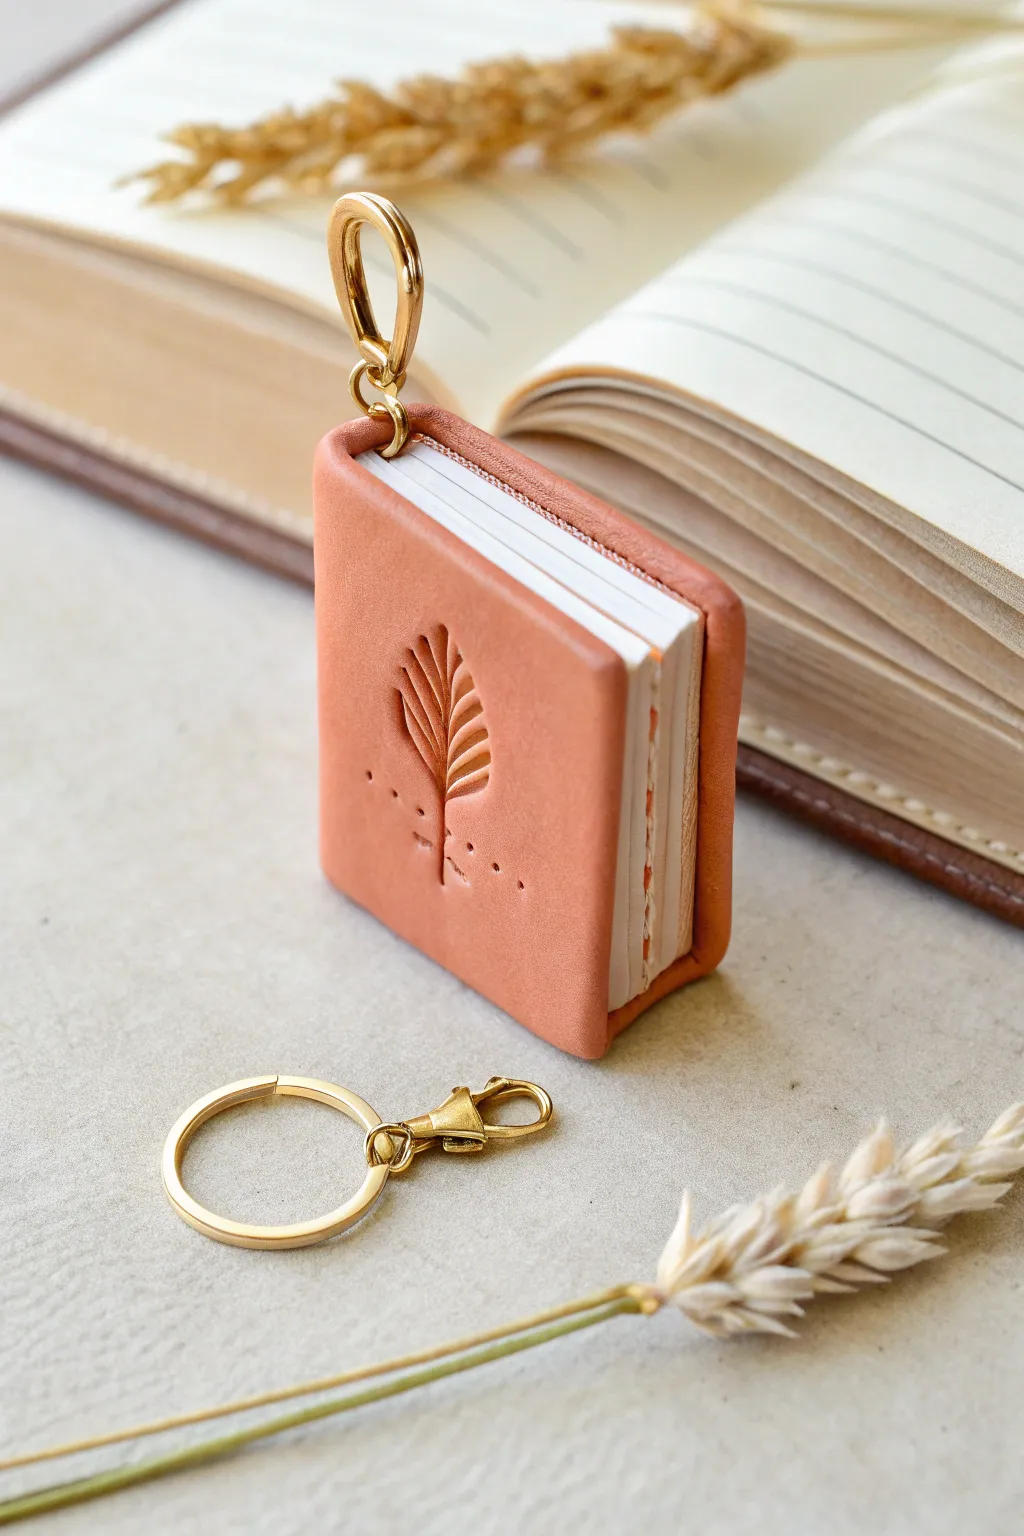
Capture the charm of an old-world journal in miniature form with this delightful polymer clay project. This tiny book features a realistic faux leather texture, a stamped botanical motif, and actual paper pages, making it the perfect accessory for book lovers.
Step-by-Step
Materials
- Terracotta or saddle brown polymer clay
- White or cream paper (printer paper or thin sketchbook paper)
- Liquid polymer clay (translucent or matching color)
- Leaf rubber stamp or embossing tool
- Texture sponge or crumpled aluminum foil
- Paper cutter or sharp craft knife
- Ruler
- Ball stylus tool
- Awl or needle tool
- Jump rings (gold finish)
- Lobster clasp keychain (gold finish)
- Strong craft glue (PVA or heavy gel medium)
- Miniature binder clips (optional)
Step 1: Creating the Cover
-
Condition and Flatten:
Begin by thoroughly conditioning your terracotta or saddle brown polymer clay until it is soft and pliable. Roll it out into a flat sheet, approximately 2-3mm thick. Aim for a uniform thickness to ensure the book cover folds evenly. -
Cut the Rectangle:
Measure and cut a rectangle that is about 3.5cm tall by 5.5cm wide. This will form the full wrap-around cover of your mini journal. -
Texturize the Surface:
To achieve that realistic leather look, gently press a texture sponge or a ball of crumpled aluminum foil over the entire surface of the clay rectangle. Use light tapping motions rather than dragging to avoid distorted lines. -
Stamp the Design:
Locate the center of the right half of your rectangle (this will be the front cover). Press your leaf stamp firmly into the clay. If you don’t have a stamp, you can hand-draw the leaf veins using a needle tool or small ball stylus. -
Add Decorative Details:
Using a small needle tool, prick tiny holes around the base of the leaf stem to create a decorative dotted accent. Smooth any rough edges of the rectangle with your finger to soften the ‘leather’ look. -
Pre-Bake Shaping:
Gently fold the clay rectangle in half to create the spine shape, but don’t crease it sharply—you want a rounded spine. I like to slip a piece of folded parchment paper inside to keep the sides from sticking together. -
Insert Hardware:
Use an awl to poke a hole through the top of the spine for the jump ring. Alternatively, you can embed a small metal eyepin into the spine with a dab of liquid clay for extra security. -
Bake the Cover:
Bake the clay cover according to the manufacturer’s instructions (usually 275°F/135°C for 15-30 minutes). Support the sides with scrap clay or folded cardstock so it maintains its book shape while baking.
Step 2: Binding the Pages
-
Prepare the Paper:
While the cover cools, cut your white paper into long strips that possess the same height as your clay cover (approx. 3.2cm). -
Accordion Fold:
Fold the paper strip back and forth like an accordion. The width of each fold should be slightly smaller than the width of one side of your clay cover. -
Create the Text Block:
Cut the accordion strip into joined sections or stack individual folded sheets to create a text block thickness that fits snugly inside your cover. You want enough pages to look full but not so many that the book won’t close. -
Glue the Spine:
Clamp the stack of paper pages together tightly using binder clips. Apply a generous layer of PVA glue or heavy gel medium along the spine edge of the paper stack. Let this dry completely until the pages form a solid block.
Pages Falling Out?
If the paper block feels loose, glue a strip of fabric or gauze over the paper spine before gluing it into the cover. This reinforces the binding significantly.
Step 3: Assembly
-
Attach Block to Cover:
Once the paper block is dry and the clay cover is cool, apply a strip of strong craft glue or a thin layer of liquid clay to the inside spine of the clay cover. -
Secure the Pages:
Press the glued spine of the paper block firmly into the spine of the clay cover. Hold it in place for a few minutes or use a gentle clamp to ensure a strong bond. -
Add the Hardware:
Open a large gold jump ring using two pairs of pliers (twist side-to-side, don’t pull apart). Thread it through the hole you created in the spine or through the eyepin loop. -
Attach the Clasp:
Before closing the jump ring, slide on the lobster clasp keychain mechanism. Close the jump ring securely so the gap is flush. -
Final Polish:
Inspect the book for any loose glue strands or rough clay edges. If desired, you can brush a very thin layer of matte varnish over the clay cover to protect the texture, though raw clay often looks more like natural leather.
Antique Look
After baking, rub a small amount of dark brown acrylic paint into the stamped crevices and wipe away the excess. This highlights the texture and ages the ‘leather’.
Now you have a tiny repository for your smallest secrets ready to hang on your bag or keys.
Milk Tea Cup Charms With Pearls
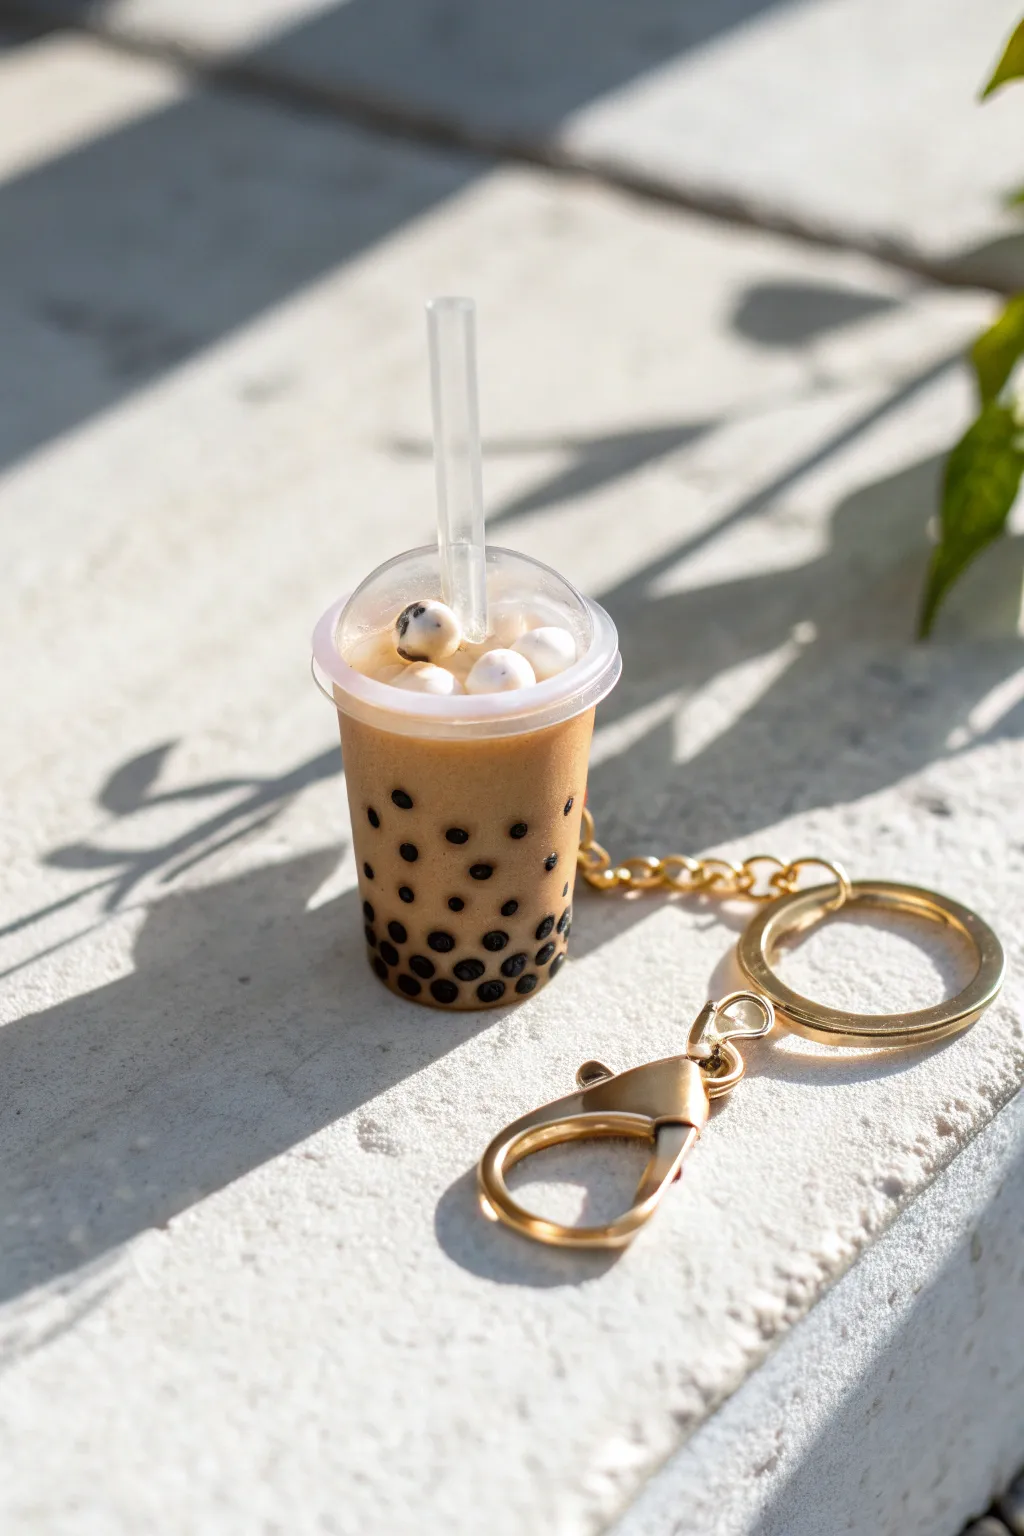
Looking sweet enough to sip, this adorable keychain replicates the classic milk tea look complete with boba pearls and fluffy foam. The clear resin body creates a realistic liquid effect that makes the black tapioca pearls truly pop.
Detailed Instructions
Materials
- UV Resin (Hard type, Clear)
- UV Lamp
- Pre-made miniature plastic bubble tea cup with dome lid (commonly found in nail art or miniaturist supply shops)
- Beige/oystershell acrylic paint or resin pigment (for tea color)
- Black polymer clay
- White polymer clay
- Translucent liquid clay (TLS) or heavy gel medium
- Small section of clear plastic tubing or a cut miniature straw
- Gold screw eye pin
- Gold keychain hardware with clasp and chain
- Needle tool or toothpick
- Silicone mat
Step 1: Preparing the Pearls
-
Roll tiny boba:
Begin by conditioning a very small amount of black polymer clay. Pinch off microscopic pieces and roll them between your fingers into tiny spheres. -
Paint the spots:
Instead of free-floating pearls, the pearls shown here are actually painted on the inside of the cup for a ‘stuck to the glass’ look. Using a fine dotting tool or toothpick, dab black acrylic paint dots randomly around the lower half of the inside of your clear plastic cup. -
Bake the loose pearls:
If you want floating pearls too, bake your tiny black clay spheres now according to package directions (usually 275°F/135°C for 10-15 minutes). The painted dots need to dry completely before the resin step.
Sticky Resin?
If your resin feels tacky after curing, wipe the surface with 91% Isopropyl alcohol or place the charm in direct sunlight for 30 minutes to finish the hardening process.
Step 2: Mixing the Milk Tea
-
Tint the resin:
Pour a small amount of clear UV resin onto your silicone mat or into a mixing cup. Add a tiny drop of beige acrylic paint or liquid resin pigment. Mix thoroughly until you have only a semi-opaque milk tea color; you want light to still pass through it. -
First pour:
Pour a small layer of your tea-colored resin into the bottom of the cup, filling it about one-third of the way. -
Add dimension:
If you baked loose clay pearls earlier, drop a few into this wet resin layer now so they settle at the bottom. -
Cure layer one:
Place the cup under your UV lamp for 60-90 seconds until the layer is hard. This prevents all your ‘ingredients’ from sinking to the bottom. -
Fill the cup:
Pour the remaining tea-colored resin into the cup, stopping just about 2mm below the rim. Do not cure this layer yet.
Step 3: Top and Assembly
-
Insert the straw:
Cut your clear plastic tubing to size so it sticks out about 1.5cm above where the lid will sit. Place it into the center of the wet resin, ensuring it stands upright. -
Final cure:
Cure the full cup under the UV lamp for 3-4 minutes. If the resin is opaque, rotate the cup to ensure light hits all angles. -
Create the foam:
Mix a small amount of white polymer clay with translucent liquid clay (or use white fluffy clay) to create a thick, whipped texture. Spread this ‘foam’ layer directly on top of the cured resin. -
Add toppings:
Roll slightly larger balls of white and black polymer clay to mimic marshmallows or large boba toppings. Press these gently into the uncured white foam mixture. -
Seal tightly:
Snap the clear plastic dome lid onto the cup. If it’s loose, I like to use a tiny dab of clear UV resin around the rim to glue it permanently shut. -
Add hardware:
Drill a small hole into the side of the plastic cup near the rim. Screw in your gold eye pin securely. Attach the gold chain and clasp using jump rings.
Pro Tip: Bubble Control
Use a lighter or heat gun quickly over the uncured resin surface before hardening. This pops trapped air bubbles for a crystal-clear tea look.
Step 4: Final Touches
-
Double check:
Inspect the charm for any sticky residue. If found, place it back under the UV light or wipe with rubbing alcohol. -
Polish (Optional):
If you got any resin on the outside of the cup, use a fine grit sanding stick to remove it, then buff it back to a shine.
Clip this refreshing charm onto your bag and enjoy your zero-calorie treat