
Polymer clay and Christmas just belong together—there’s something so satisfying about making tiny, colorful holiday pieces you can hang, gift, and reuse year after year. Here are my favorite polymer clay Christmas ideas that feel totally doable, even if you’re brand-new to clay.
Classic Cookie-Cutter Ornaments
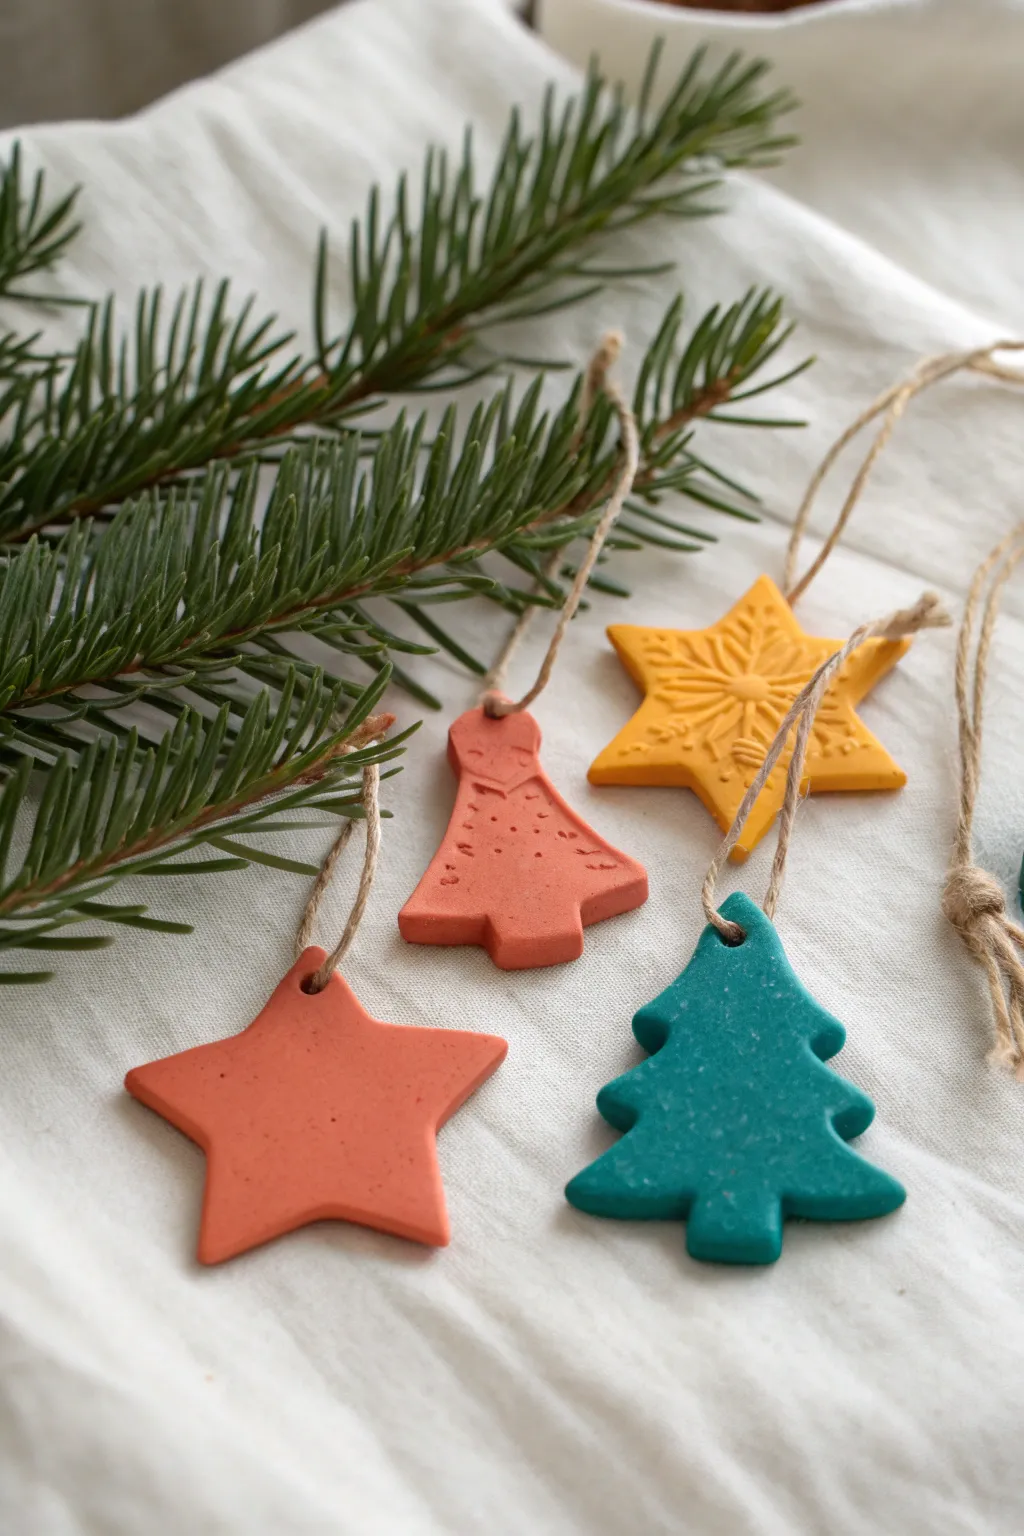
These charming, matte-finish ornaments bring a gentle, rustic warmth to your holiday decor with their muted tones of coral, mustard, and teal. Using simple cookie cutters and textured stamps, you can create a sophisticated set that looks lovely hanging alongside fresh pine boughs.
Step-by-Step Guide
Materials
- Polymer clay (coral/terracotta, teal green, mustard yellow)
- Small rolling pin
- Christmas cookie cutters (star, pine tree, bell/angel)
- Parchment paper or baking mat
- Textured stamp or lace (snowflake or floral pattern)
- Small round piping tip or drinking straw (for holes)
- Natural jute twine
- Fine-grit sandpaper (optional)
- Oven
Step 1: Preparation and Rolling
-
Condition the Clay:
Begin by taking your chosen colors of polymer clay—coral, teal, or yellow—and kneading them thoroughly in your hands. You want the clay to be warm and pliable so it won’t crack when flattened. -
Prepare Your Surface:
Lay down a sheet of parchment paper or a silicone baking mat. This ensures the clay won’t stick to your table and makes transferring them to the baking tray much easier. -
Roll the Sheets:
Using your rolling pin, roll the clay out to an even thickness. Aim for about 1/4 inch (6mm) thick. It needs to be sturdy enough to hang, but not so heavy that it weighs down a branch.
Uneven Surfaces?
If your clay surface looks bumpy or has fingerprints, place a sheet of parchment paper over the clay and lightly roll over it again before cutting.
Step 2: Cutting and Texturing
-
Cut the Shapes:
Press your cookie cutters firmly into the rolled clay. For the project shown, use a traditional five-point star, a pine tree, and a bell or angel shape. -
Clean the edges:
Lift the cutters straight up. If any rough bits of clay stick to the edges of your shapes, I gently smooth them with my fingertip before baking. -
Add Texture (Optional):
For the yellow star ornament, press a textured rubber stamp or a piece of heavy lace into the surface before cutting the shape out. Apply even pressure to get a crisp imprint of the snowflake or floral design. -
Create Hanging Holes:
Using a small straw or the end of a small piping tip, punch a clean hole at the top of each ornament. Make sure the hole is wide enough for your jute twine to pass through later. -
Transfer to Baking Sheet:
Carefully move your parchment paper with the clay shapes onto a baking sheet. Ensure they lay completely flat to prevent warping.
Step 3: Baking and Assembly
-
Bake the Ornaments:
Bake the clay according to the manufacturer’s instructions on your specific package. Usually, this is around 275°F (135°C) for 15-30 minutes, but check your wrapper to be safe. -
Cool Completely:
Once baked, remove the tray from the oven and let the ornaments cool completely on the tray. They settle and harden as they cool. -
Sand the Edges (Optional):
If there are any sharp burrs left after baking, lightly run a piece of fine-grit sandpaper along the edges to soften them. -
Cut the Twine:
Cut lengths of natural jute twine, approximately 8-10 inches long for each ornament. -
Thread the Loop:
Thread one end of the twine through the hole in the ornament. -
Tie the Knot:
Bring the two ends of the twine together and tie a simple overhand knot near the ends to create a loop for hanging. -
Final Trim:
Trim any excess fraying from the knot tails for a neat, rustic appearance.
Speckled Stone Effect
Mix black pepper or dried herbs into the clay while conditioning to create a faux granite or stone speckle like the teal tree shown.
Hang these beauties on your tree to enjoy a handcrafted touch this holiday season


Gingerbread-Inspired Faux Cookies
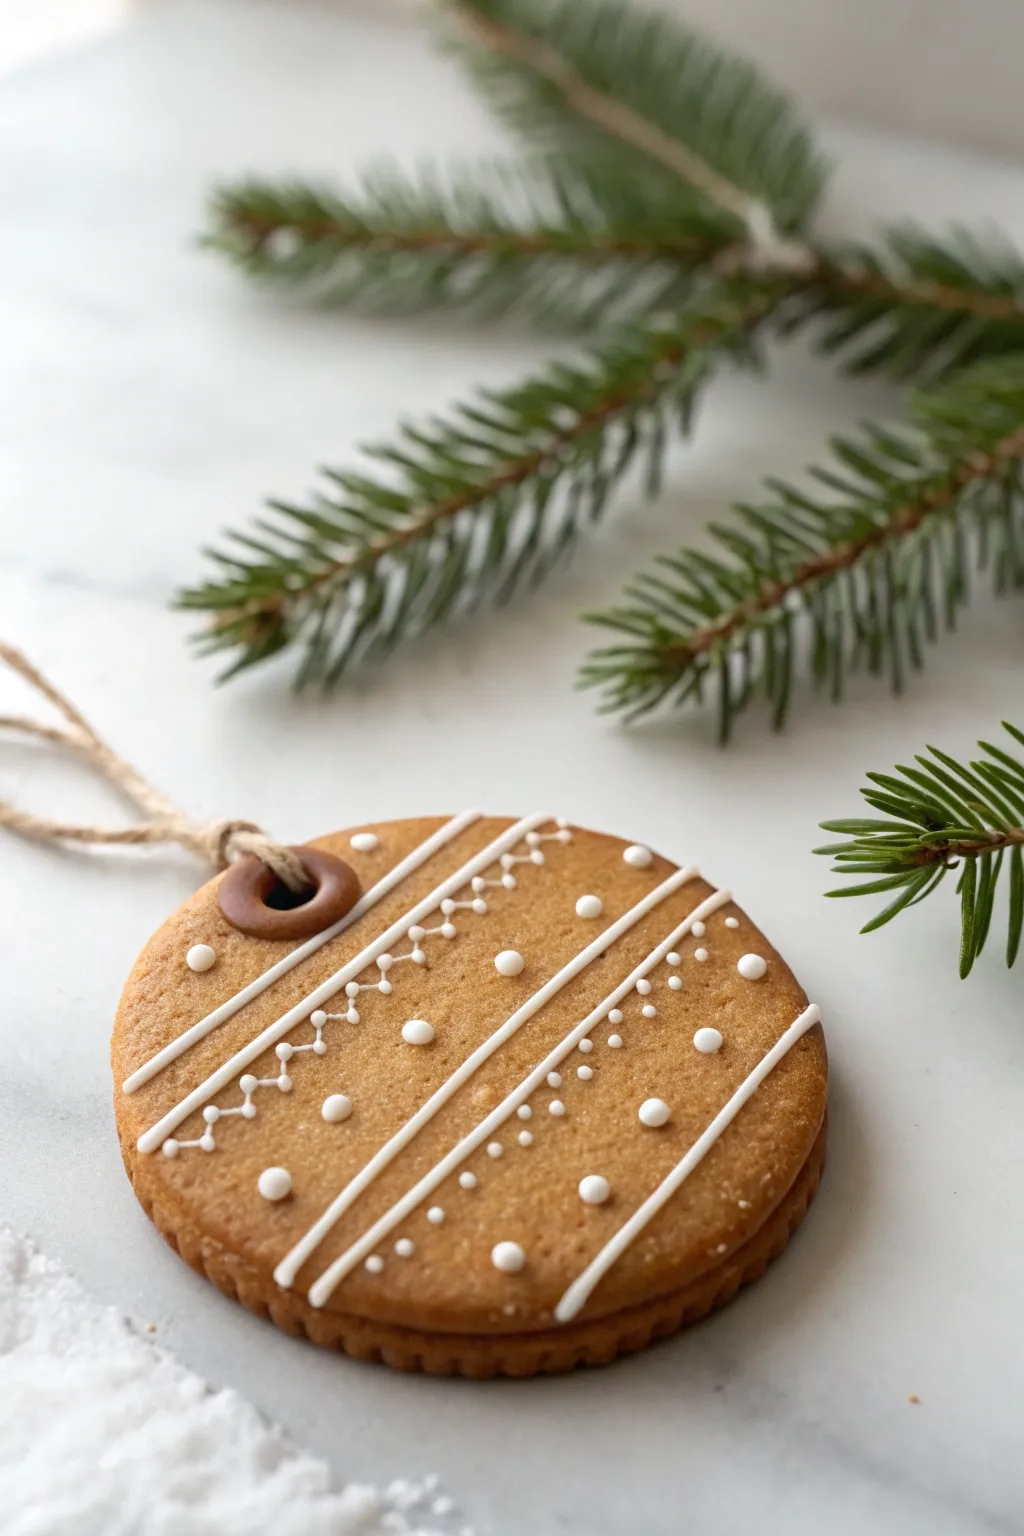
Capture the warmth of holiday baking without turning on the oven by crafting these realistic gingerbread sandwich cookie ornaments entirely from polymer clay. With their textured crumb finish and delicate royal icing details, they look good enough to eat but will last for seasons to come.
Detailed Instructions
Materials
- Polymer clay (gingerbread/tan color, white, and dark chocolate brown)
- Liquid polymer clay (translucent or white mixed with clay)
- Round cookie cutter (approx. 3 inches)
- Texturing tool (toothbrush or sandpaper)
- Needle tool or toothpick
- Small straw or metal piping tip (for the hanging hole)
- Rolling pin or pasta machine
- Pastry chalks or soft pastels (browns and oranges)
- Soft brush
- Jute twine for hanging
Step 1: Creating the Cookie Base
-
Mix the perfect dough color:
Start by mixing a gingerbread shade of polymer clay. If you don’t have a pre-mixed color, blend tan with a small amount of translucent and a tiny dot of brown to get that baked-good warmth. -
Roll out the slab:
Condition your clay well and roll it out to a medium thickness, roughly 1/4 inch thick. You need enough heft to mimic a substantial sandwich cookie. -
Texture the surface:
Before cutting, firmly press a clean toothbrush or coarse sandpaper over the entire surface of the clay slab. This creates the realistic ‘baked crumb’ texture. -
Cut the shapes:
Using your round cutter, punch out two identical circles. One will be the top and one the bottom of your sandwich. -
Create the crimped edge:
With the dull side of a needle tool or a specialized sculpting tool, gently press vertical indentations all around the side edges of both circles to mimic a factory-made biscuit crimp. -
Shade for realism:
Scrape some brown and orange pastel chalk into a fine powder. Use a soft brush to dust the edges and the textured top surface lightly, giving it a ‘toasted’ appearance.
Pro Texture Tip
For ultra-realism, texture your clay *after* rolling but *before* cutting. This prevents the circle from warping while you press down with the toothbrush.
Step 2: Assembly and Baking
-
Add the filling:
Roll a thin sheet of white clay for the cream filling. Cut a circle slightly smaller than your cookie pieces. -
Sandwich the layers:
Stack the bottom cookie (textured side down), the white filling, and the top cookie (textured side up). Press gently to adhere them without squishing the texture. -
Punch the hanging hole:
Use a small straw or the back of a piping tip to punch a clean hole near the top edge for the string. Go through all layers. -
Add the reinforcement ring:
Roll a tiny snake of dark chocolate brown clay. Wrap it around the inside of the punched hole to finish the edge cleanly. -
Initial bake:
Bake the assembled cookie according to your clay package instructions (usually 275°F/130°C for 15-30 minutes). Let it cool completely.
Troubleshooting: Slumping Icing
If your liquid clay lines are spreading out and losing definition, the mix is too thin. Add more solid white clay to thicken the paste before piping again.
Step 3: Icing Decoration
-
Prepare the faux icing:
Mix liquid polymer clay with white solid clay until you have a piping consistency similar to toothpaste—not too runny, not too stiff. -
Load your piping tool:
Transfer the mixture into a fine-tip squeeze bottle or a small plastic bag with the tiniest corner snipped off. -
Pipe the lines:
Drawing three diagonal parallel lines across the face of the cookie. I find it helps to anchor my elbow on the table for steady lines. -
Add zigzag details:
Carefully pipe a zigzag pattern along one of the lines, or add rows of small dots between the stripes for variety. -
Add floating dots:
Place random white dots of varying sizes in the open spaces around the stripes to balance the design. -
Final cure:
Return the decorated cookie to the oven for a final bake (about 15 minutes) to set the liquid clay icing. -
String it up:
Once cool, thread a piece of rustic jute twine through the loop and tie it off.
Hang this delightful faux treat on your tree and enjoy the cozy atmosphere it brings to your holiday decor
Mini Santa Face Charms
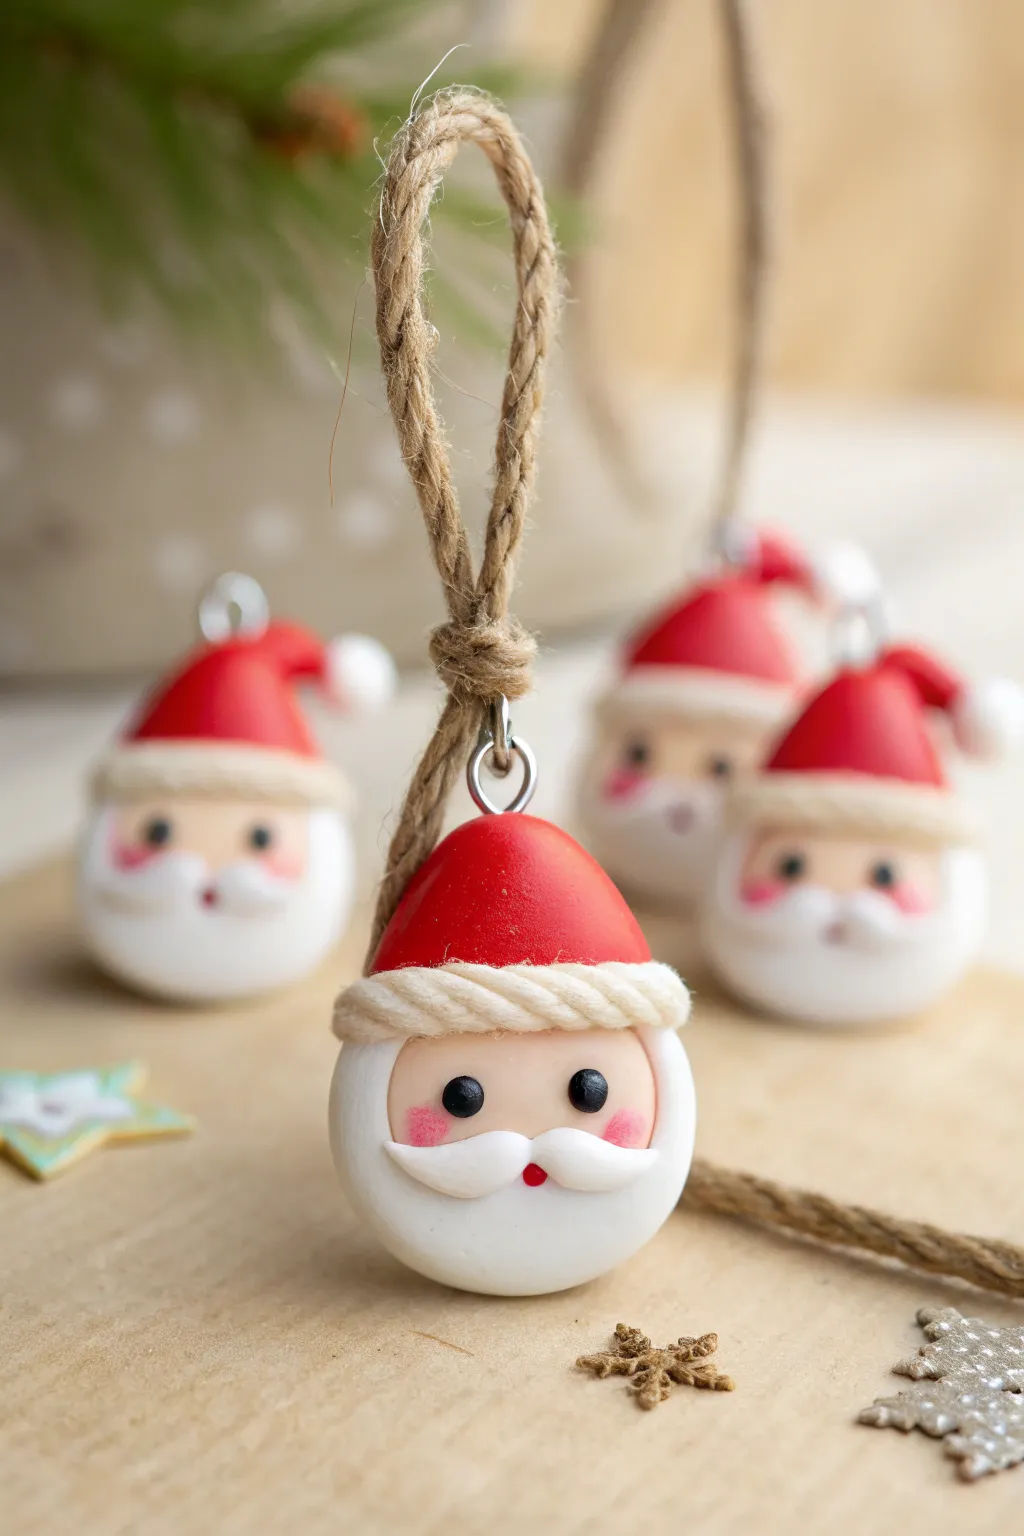
These adorable Santa face charms are simple, festive, and perfect for adding a handmade touch to your tree or gift wrapping. With their rosy cheeks and rustic twine hangers, they bring a classic, cozy holiday feel to your decor.
Step-by-Step Tutorial
Materials
- Polymer clay (Red, White, Peach/Flesh tone, Black)
- Eye pin or small metal screw eye
- Jute twine or rustic string
- Sculpting tools (needle tool, ball stylus)
- Pastel chalk (pink or red) for blushing
- Soft paintbrush
- Work surface (tile or glass mat)
- Oven for baking
Step 1: Forming the Base
-
Create the head shape:
Start by conditioning a chunk of white polymer clay until it is soft and pliable. Roll it into a smooth, even ball about the size of a large marble or a walnut, depending on how big you want your ornament. -
Flatten the back:
Gently press the ball onto your work surface to flatten the back side slightly. This prevents the Santa head from rolling around while you work on the face details. -
Add the face area:
Condition a smaller piece of peach or flesh-tone clay. Flatten it into a thin oval or rounded rectangle and press it onto the upper-middle section of your white ball. Smooth the edges so it merges seamlessly with the white clay.
Fingerprint Fix
Before baking, lightly brush the clay with a drop of baby oil or cornstarch to smooth out any accidental fingerprints left on the smooth surfaces.
Step 2: Adding the Hat
-
Shape the red hat:
Take a portion of red clay and roll it into a cone shape. The base of the cone should be the same width as the top of the Santa head. -
Attach the hat:
Press the red cone onto the top of the head, covering the upper edge of the peach face area. Gently curve the tip of the hat down slightly if you want a slouchy look, or keep it rounded like a beanie. -
Make the hat brim:
Roll a thin snake natural white clay. Take two strands of this thin snake and twist them together tightly to create a rope effect. -
Apply the brim:
Wrap this twisted rope around the base of the red hat, right where it meets the face. Press it down gently to secure it, trimming any excess at the back.
Step 3: Facial Details
-
Create the mustache:
Roll two very tiny teardrop shapes from white clay. Place them point-to-point in the center of the lower face area to form a classic handlebar mustache. Simply press them on; no need for glue. -
Add the nose:
Roll a minuscule ball of red clay and place it right in the center top of the mustache divot. This little cherry nose really brings the character to life. -
Place the eyes:
Roll two small balls of black clay. Position them evenly above the mustache on the peach face area. Press them down slightly so they don’t look like they are bulging out. -
Apply rosy cheeks:
Scrape a little pink or red pastel chalk into a powder. Dip a dry, soft brush into the powder and gently dab it onto the cheeks, just below the eyes, for a soft, flushed winter glow.
Sparkle Upgrade
Mix white glitter into the translucent or white clay for the beard area before sculpting to give Santa a magical, snowy shimmer.
Step 4: Finishing Touches
-
Insert the hardware:
Take a metal eye pin or screw eye. Trim the shaft if it’s too long, and push it vertically into the top center of the red hat. -
Bake the clay:
Bake the charms according to your specific polymer clay package instructions. I usually tent a piece of foil over them to prevent the white clay from yellowing. -
Cool and string:
Allow the clay to cool completely before handling. Once hard, thread a piece of jute twine through the metal eye loop. -
Knot the hanger:
Tie a secure knot in the twine to create a rustic loop for hanging. Trim any excess string for a neat finish.
Hang your finished Santa charms on the tree and enjoy the cheerful holiday spirit they bring to your home


Sweet Little Snowman Ornaments
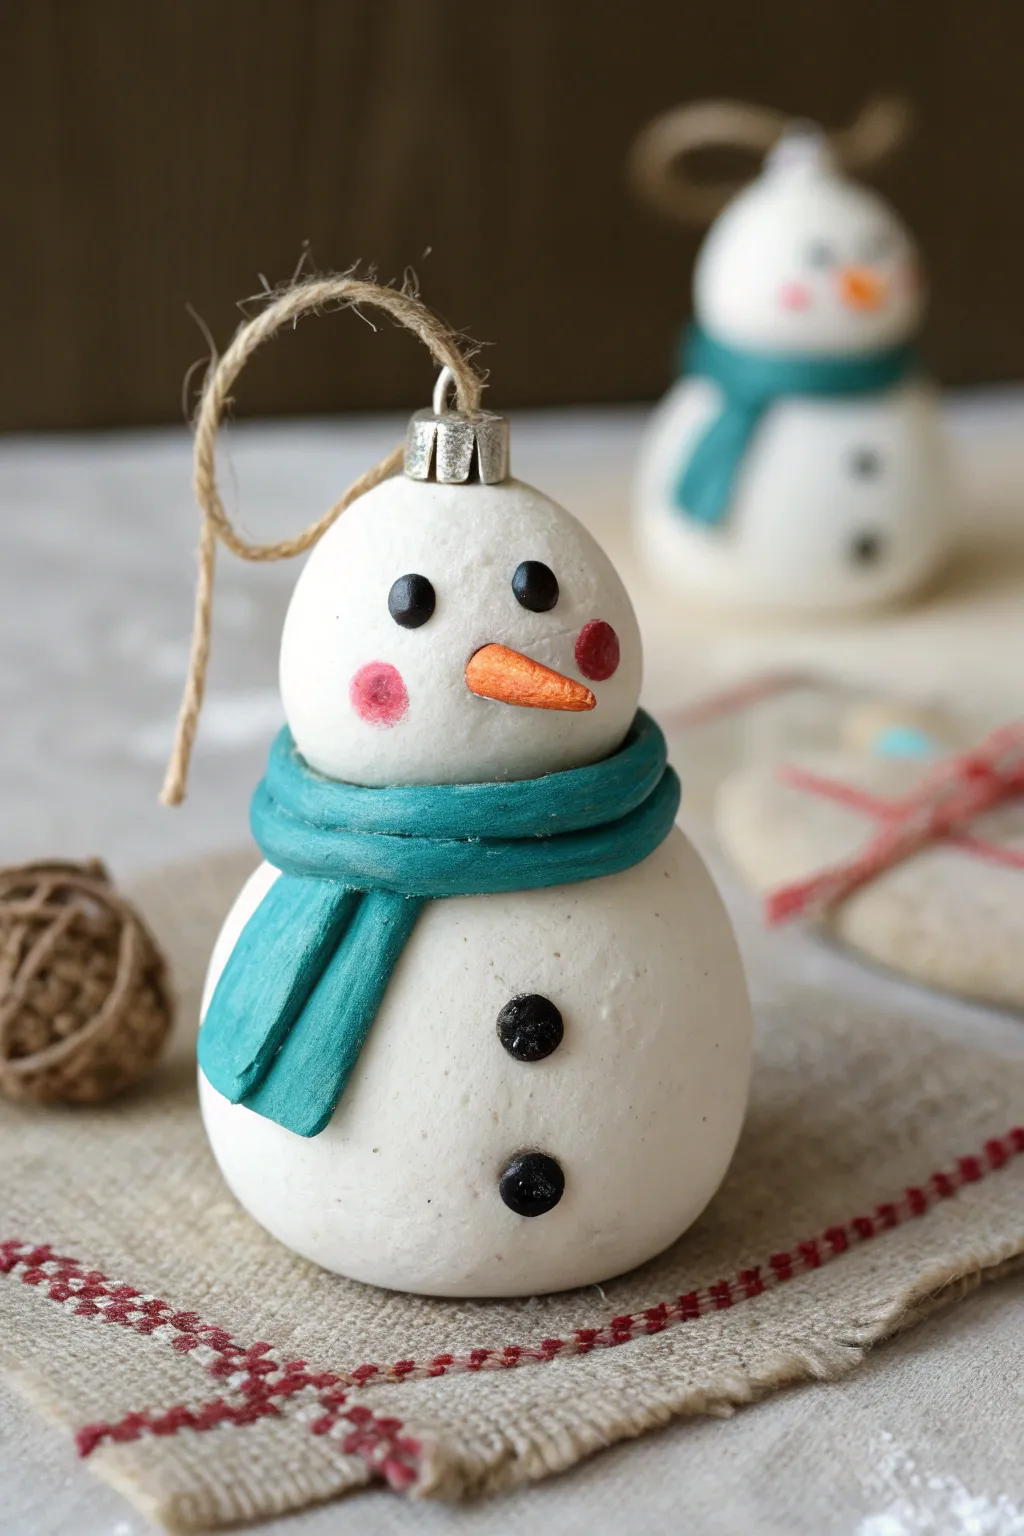
Brighten your tree with this adorable, chunky little snowman character featuring a cozy teal scarf and rosy cheeks. The textured finish gives him a rustic, handmade charm that stands out beautifully against evergreen branches.
Step-by-Step Guide
Materials
- White polymer clay
- Teal or turquoise polymer clay
- Orange polymer clay
- Black polymer clay
- Small metal eye pin or wire loop
- Jute twine
- Translucent liquid clay (optional adhesive)
- Pink soft pastel chalk (for cheeks)
- Small paintbrush
- Toothpick or clay needle tool
- Texturing tool (stiff brush or toothbrush)
- Gloss glaze (optional)
Step 1: Forming the Body
-
Prepare the base:
Condition your white clay by kneading it until it is soft and pliable. Roll a large ball for the body, about the size of a golf ball or slightly smaller. -
Shape the head:
Roll a second ball of white clay, slightly smaller than the first, to serve as the head. Gently press it slightly flat on the bottom so it sits securely. -
Connect the parts:
Press the head firmly onto the body. For extra security, I like to insert a small piece of toothpick or wire between the two balls to act as an internal spine. -
Add texture:
Using a stiff toothbrush or a texturing sponge, gently tap over the entire surface of the white clay to create a stony, snow-like texture instead of leaving it perfectly smooth.
Clean Hands Trick
Work with the white clay first, then orange/teal, and black last. Dark pigments stain hands easily and will smudge your pristine white snow body.
Step 2: Adding the Features
-
Create the eyes:
Roll two tiny spheres of black clay. Press them gently into the upper half of the face, spacing them evenly apart. -
Sculpt the nose:
Shape a small piece of orange clay into a cone. Texture slightly with a needle tool to mimic carrot lines, then attach it centrally below the eyes using a dot of liquid clay. -
Add the buttons:
Roll two slightly larger black spheres for the buttons. Press these vertically down the center of the snowman’s lower body. -
Apply the blush:
Scrape a little pink pigment from your pastel chalk. Use a dry, soft brush to gently dust rosy circles onto the cheeks, right next to the nose. -
Add the hanger:
Insert your metal eye pin or wire loop into the very top of the head. Ensure it goes deep enough to be secure once baked.
Winter Sparkle
Before baking, lightly brush the white body with white mica powder or extra-fine iridescent glitter to give the snowman a frosty, glittering snow effect.
Step 3: Dressing Him Up
-
Roll the scarf:
Condition the teal clay and roll it into a long, thin snake or rope. Flatten it gently with your finger or a roller so it looks like a fabric strip. -
Wrap the neck:
Drape the flattened strip around the snowman’s neck where the head meets the body. Cross the ends over each other at the front, slightly off-center. -
Detail the scarf:
Use your needle tool to indent horizontal lines into the scarf, mimicking the folds of wrapped wool. -
Add the tails:
Trim the ends of the scarf to your desired length. Use a craft knife or needle tool to cut fringe lines into the very tips of the scarf tails.
Step 4: Finishing Touches
-
Bake the project:
Place your snowman on a baking sheet or tile. Bake according to your polymer clay manufacturer’s instructions (usually around 275°F or 130°C for 15-30 minutes). -
Cool down:
Let the ornament cool completely before handling. Polymer clay is still slightly soft when hot and hardens as it cools. -
Add the twine:
Cut a length of jute twine, thread it through the metal eye loop, and tie a knot to create the hanger. -
Optional glaze:
If you want the eyes and nose to shine, apply a tiny drop of gloss glaze to just those specific areas.
Hang this cheerful little guy prominently on your tree where his bright scarf will catch the light

The Complete Guide to Pottery Troubleshooting
Uncover the most common ceramic mistakes—from cracking clay to failed glazes—and learn how to fix them fast.
Reindeer With Red Nose Details
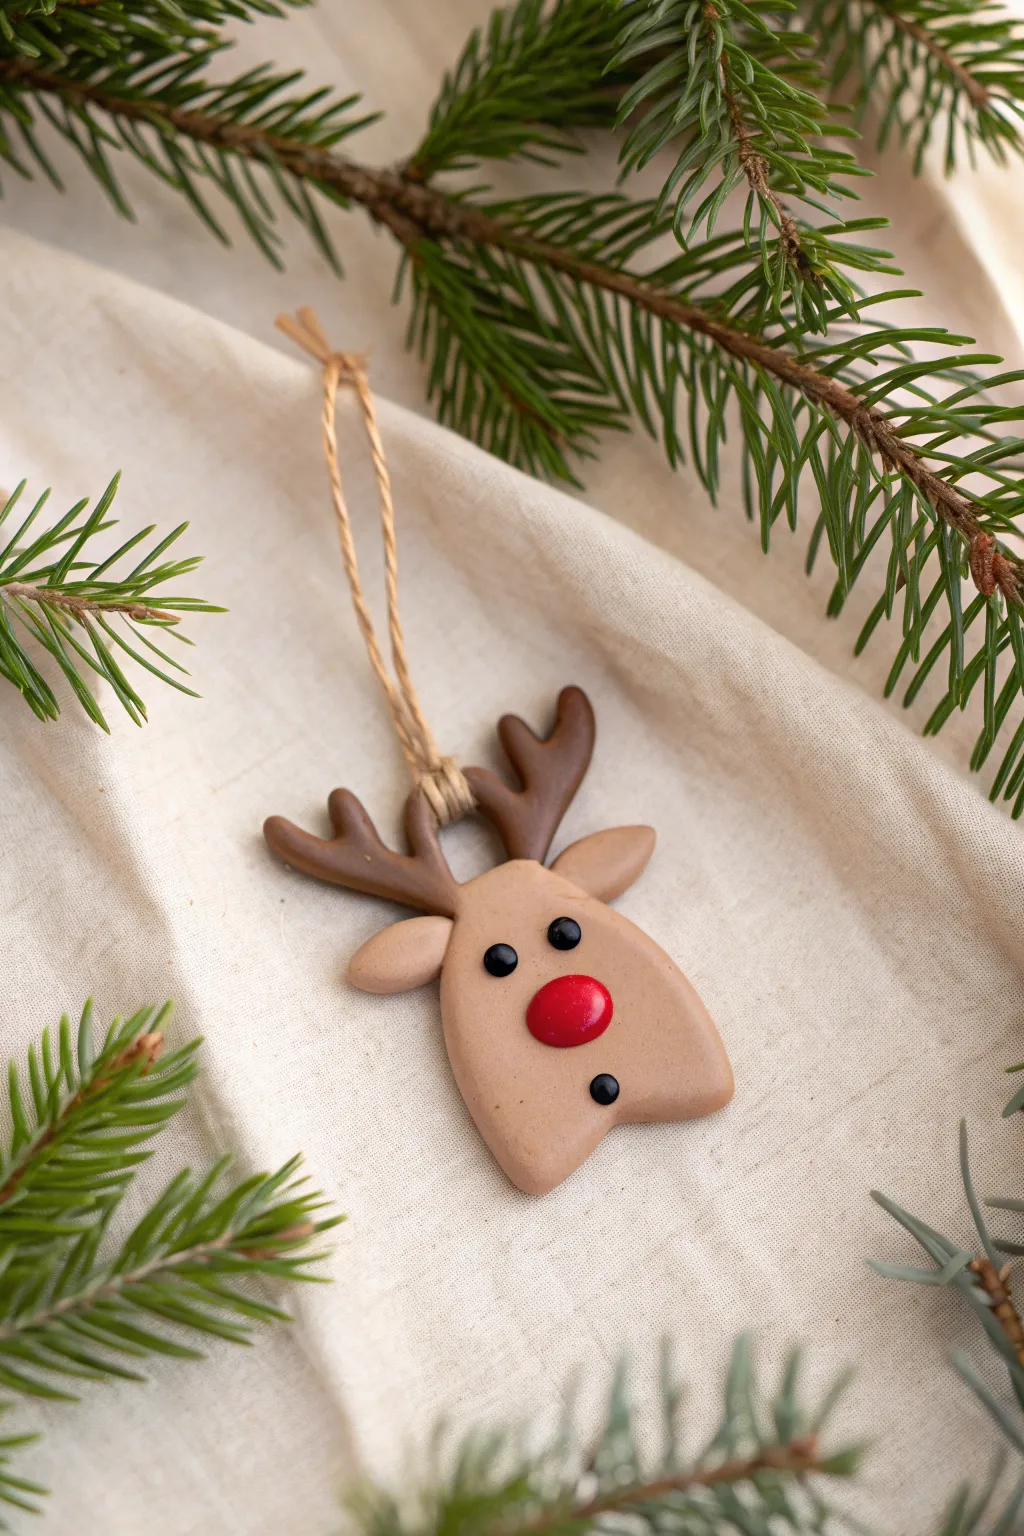
This adorable reindeer ornament captures the holiday spirit with simple shapes and a charming, bright red nose. Its smooth, matte finish and minimalist features give it a modern handmade look perfect for hanging on the tree.
Detailed Instructions
Materials
- Polymer clay in light brown (tan/beige)
- Polymer clay in dark brown
- Polymer clay in bright red
- Polymer clay in black
- Jute twine or rustic cord
- Rolling pin or pasta machine
- Clay cutting blade or craft knife
- Small dotting tool or toothpick
- Needle tool
- Parchment paper or baking tile
- Oven (for curing)
Step 1: Shaping the Head
-
Condition the clay:
Start by warming up a chunk of the light brown clay in your hands. Knead it thoroughly until it is soft, pliable, and free of cracks. -
Form the base shape:
Roll the light brown clay into a smooth ball about the size of a walnut to ensure there are no air bubbles trapped inside. -
Flatten and taper:
Gently press the ball flat onto your work surface until it’s about 1/4 inch thick. Use your fingers to shape it into a rounded rectangle that is slightly wider at the bottom than the top, creating a soft trapezoid shape for the face. -
Create legs:
Using a blade or your finger, press a small indentation into the bottom center of the shape to suggest two front legs or hooves, softening the edges so they look organic.
Step 2: Adding Antlers and Ears
-
Roll the antlers:
Take the dark brown clay and roll two small logs. These should be slightly thicker at the base and taper gently toward the top. -
Branch out:
Form small identifying branches on the logs by pinching and pulling the clay or attaching tiny secondary logs. Curve them slightly outward for a natural look. -
Attach the antlers:
Press the antlers firmly onto the top corners of the reindeer’s head. You can use a tiny drop of liquid clay or just firm pressure to blend the seam slightly at the back. -
Make the ears:
Using the light brown clay again, form two small teardrop shapes. Flatten them gently. -
Position the ears:
Attach one ear just below each antler on the side of the head. Press them on securely, perhaps angling them slightly downward for a cute, relaxed expression.
Clean Prints
Before baking, gently wipe the light clay with a baby wipe or a q-tip dipped in rubbing alcohol to remove any dust, lint, or fingerprints.
Step 3: Facial Details
-
Add the nose:
Roll a small ball of bright red clay. Flatten it slightly into a disc and press it firmly into the center of the face, slightly lower than the midline. -
Create the eyes:
Roll two tiny specks of black clay into balls. Press these onto the face above the nose, spacing them out a bit to create a wide, friendly gaze. -
Add the button detail:
Roll a third tiny black ball, slightly smaller than the nose but larger than the eyes. Press this onto the ‘chest’ area, just below the nose, to look like a button or a mouth detail. -
Pierce the hanging hole:
Use a needle tool or a skewer to carefully poke a hole through the top of the head, centered between the antlers. Wiggle it slightly to ensure the hole is wide enough for your twine.
Shiny Nose
Make Rudolph glow by applying a coat of gloss water-based varnish or UV resin specifically to the red nose after the piece has been baked and cooled.
Step 4: Finishing Up
-
Bake:
Place your reindeer on a baking sheet lined with parchment paper. Bake according to your customized clay package instructions (usually around 275°F or 135°C for 15-30 minutes). -
Cool down:
Allow the ornament to cool completely inside the oven or on a wire rack before handling, as the clay is still fragile while hot. -
String it up:
Cut a length of jute twine. Thread it through the hole you made earlier. -
Secure the loop:
Bring the ends of the twine together and tie a secure knot close to the clay to form a hanging loop. Trim any excess twine if necessary.
Now you have a charming reindeer friend ready to join your holiday decor
Candy Cane Twist Earrings or Charms
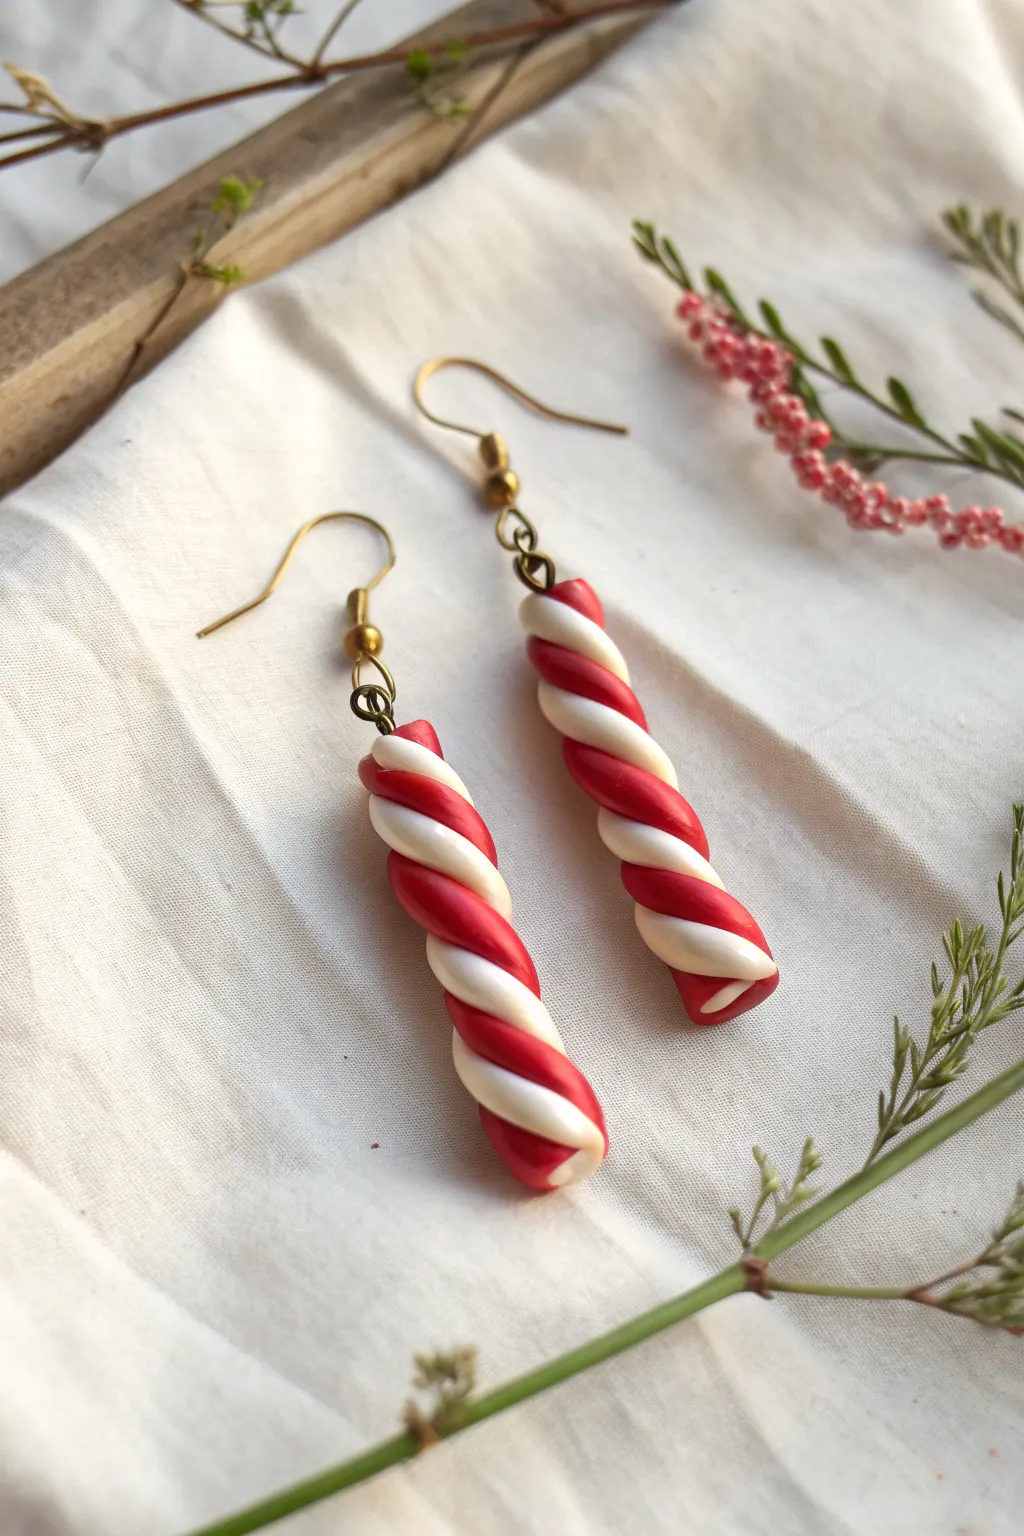
Capture the sweetness of the season with these delightful candy cane twist earrings. Using simple polymer clay techniques, you’ll create elegant red and white spirals that look good enough to eat but are light enough to wear all day.
Step-by-Step
Materials
- Red polymer clay (oven-bake)
- White polymer clay (oven-bake)
- Acrylic roller
- Tissue blade or sharp craft knife
- 2 Gold-tone eye pins
- 2 Gold-tone French earring hooks
- Round nose pliers
- Wire cutters
- Ceramic tile or glass work surface
- Oven for baking
Step 1: Prepping the Clay
-
Conditioning:
Start by thoroughly conditioning your red and white clay separately. Knead each color in your hands until it is soft, pliable, and free of any cracks. -
Rolling snakes:
Take a small portion of the white clay and roll it on your work surface to create a long, even snake about 4-5mm thick. Aim for a consistent thickness from end to end. -
Repeat for red:
Repeat the rolling process with the red clay, ensuring the red snake is the exact same thickness as the white one. -
Cutting to length:
Cut two segments of the white snake and two segments of the red snake. Each piece should be roughly 2 inches long, giving you four pieces in total to make a pair of earrings.
Clean Hands, Clean Clay
Red clay can stain white clay easily! Wipe your hands and work surface with a baby wipe or alcohol swab after handling red clay before touching the white.
Step 2: Creating the Twist
-
Pairing up:
Take one red segment and one white segment. Lay them side-by-side on your work surface so they are touching along their length. -
Initial twist:
Gently pick up the pair. Holding one end of the pair in your left hand and the other in your right, slowly twist your hands in opposite directions. -
Tightening the spiral:
Continue twisting until you have a tight, consistent spiral pattern similar to the photo. Be careful not to pull or stretch the clay too much, or the rope will become too thin. -
Smoothing the seam:
Place the twisted rope back on your work surface and gently roll it back and forth just once or twice. This helps fuse the two colors together so they don’t separate later. -
Repeat:
Repeat this twisting process with the remaining red and white segments to create the second earring component.
Clay Too Soft?
If your clay gets too soft and sticky to twist neatly, pop the rolled snakes in the fridge for 10 minutes. The firmer clay will hold the twist shape much better.
Step 3: Finishing and Assembly
-
Trimming ends:
Use your tissue blade to trim the ragged ends off both twisted ropes. Cut straight down to create a clean, flat surface at the top and bottom. Ensure both pieces are the same final length. -
Rounding lightly:
I like to gently tap the cut ends with my finger to soften the sharp edge slightly, giving it a more finished, candy-like appearance. -
Inserting hardware:
Take an eye pin and gently push the straight wire end down into the center of the top of the clay twist. Push it down about halfway into the length of the earring for stability. -
Baking:
Place your clay pieces on a ceramic tile or baking sheet. Bake according to your customized clay manufacturer’s instructions (usually around 275°F/130°C for 15-30 minutes). -
Cooling:
Allow the pieces to cool completely before handling. The clay is fragile when hot but hardens as it cools. -
Creating the loop:
If your eye pin is too long sticking out the top, trim it with wire cutters leaving about 1cm. Use round-nose pliers to create a loop if you used straight wire, or just ensure the existing eye pin loop is facing the right way. -
Attaching hooks:
Open the loop on your earring hook using pliers (twist it sideways, don’t pull it open). Slide on the clay charm’s loop, and twist the hook’s loop closed again.
Pair these festive twists with a cozy sweater for the perfect holiday accessory


What Really Happens Inside the Kiln
Learn how time and temperature work together inside the kiln to transform clay into durable ceramic.
Holly Leaf and Berry Gift Tags
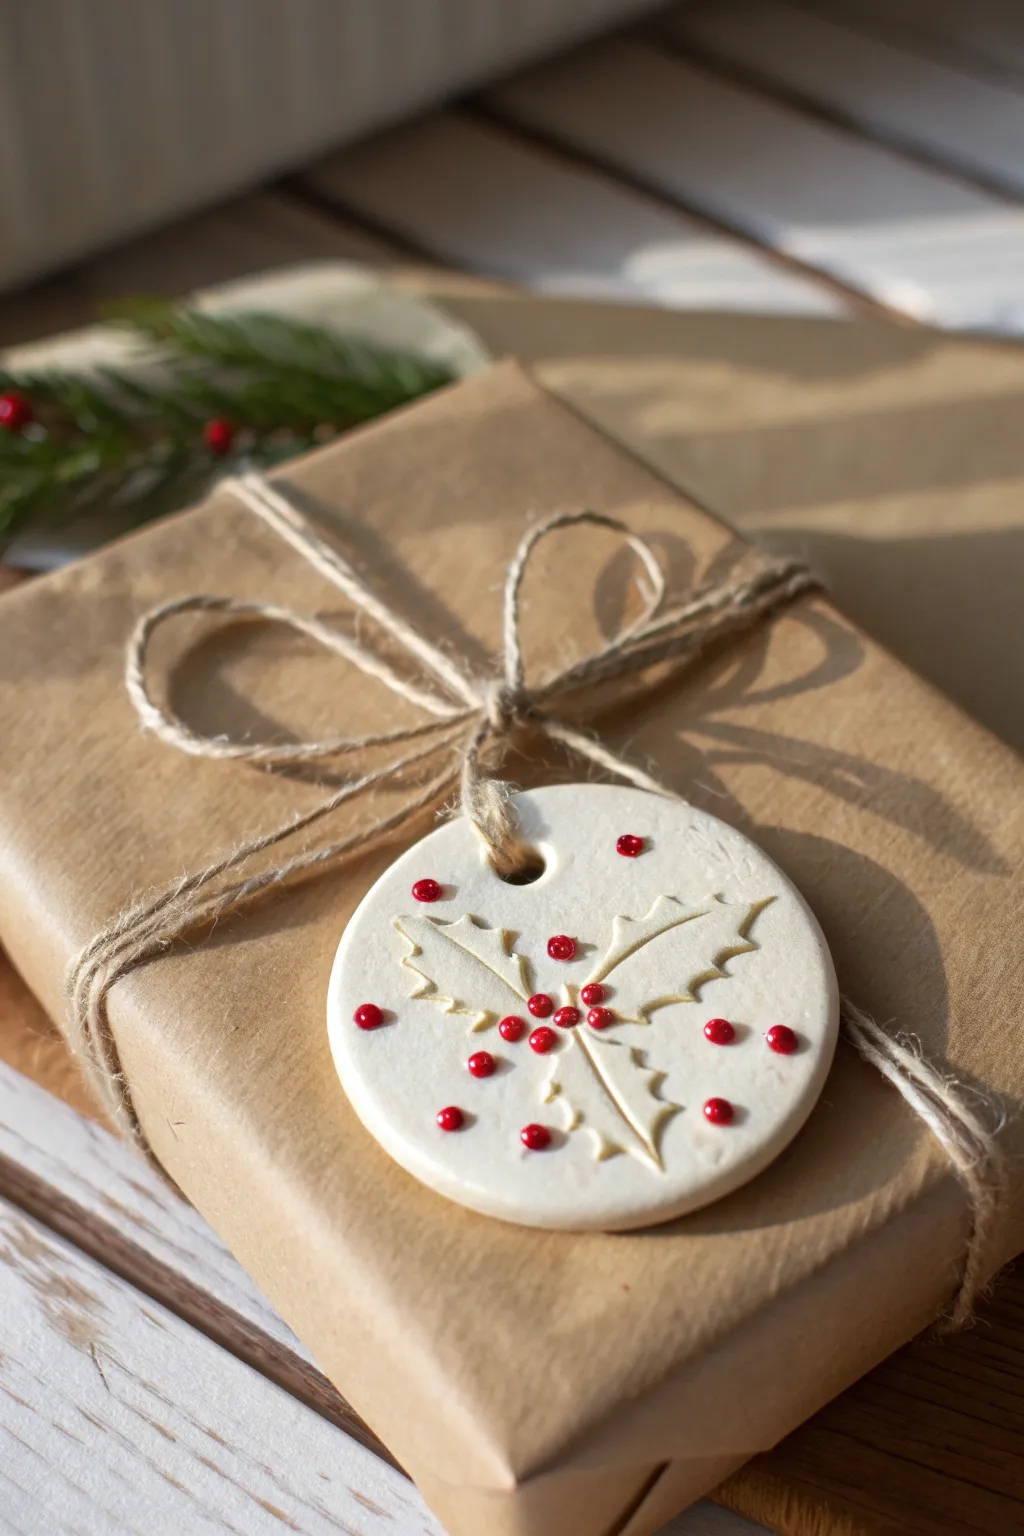
Add a handmade touch to your holiday wrapping with these charming white clay gift tags featuring an imprinted holly motif. The minimalist design, accented with vibrant red berries, brings a classic festive feel to simple kraft paper packages.
How-To Guide
Materials
- White polymer clay (oven-bake)
- Holly leaf stamp or small holly leaf cutter
- Rolling pin (acrylic roller)
- Circle cookie cutter (approx. 2-3 inches)
- Small straw or cocktail stick (for the hole)
- Red acrylic paint
- Small dotting tool or toothpick
- Fine grit sandpaper
- Gloss varnish (optional)
- Baking sheet and parchment paper
- Jute twine
Step 1: Shaping the Clay Base
-
Condition the Clay:
Begin by kneading your white polymer clay in your hands until it becomes soft, pliable, and free of any cracks. -
Roll it Out:
using an acrylic roller, flatten the clay on a clean, smooth surface until it is about 1/4 inch thick. Aim for an even thickness so the tag sits flat. -
Cut the Circle:
Press your circle cookie cutter firmly into the clay to create the round tag shape. Lift away the excess clay. -
Smooth the Edges:
Gently run your finger around the cut edge of the circle to soften any sharp ridges left by the cutter. -
Create the Hanger Hole:
Use a small straw or a cocktail stick to punch a hole near the top edge of the circle. Make sure it’s large enough for your twine to pass through later.
Clean Impressions
Dust your stamp or cutter with a tiny bit of cornstarch before pressing it into the clay. This prevents sticking and ensures your leaf details come out sharp and clean.
Step 2: Embossing the Design
-
Imprint the Holly Leaves:
Take your holly leaf stamp or press a clean holly leaf cutter gently into the surface of the clay. Do not cut all the way through; you just want to create a deep impression of the leaf outline and veins. -
Arrange the Leaves:
Overlap three leaf impressions slightly in the center usually creates the most pleasing composition, radiating outward from a central point. -
Clean Up Details:
If the impression lifted slightly, gently pat the clay back down with your finger to ensure the surface is mostly flat, aside from the imprinted lines.
Texture Twist
Before cutting the circle, gently roll a piece of linen or canvas over the clay slab. This transfers a subtle fabric texture to the background for a more rustic look.
Step 3: Baking and Finishing
-
Bake the Clay:
Place your tag on a parchment-lined baking sheet and bake according to the manufacturer’s instructions on your clay package. This usually involves baking at 275°F (130°C) for 15-30 minutes. -
Cool Down:
Allow the clay to cool completely on the baking sheet before handling it, as it is fragile while warm. -
Sand the Edges:
Once cool, I like to take a piece of fine-grit sandpaper and lightly buff the edges to make them perfectly smooth and professional-looking. -
Paint the Berries:
Dip a dotting tool or the end of a toothpick into bright red acrylic paint. Carefully dab small dots into the center where the leaves meet. -
Add Decorative Dots:
Add smaller red dots scattered randomly around the remaining white space of the tag to fill the empty areas and balance the design. -
Dry and Varnish:
Let the paint dry completely. If you want the ‘berries’ to look juicy and shiny, apply a tiny drop of gloss varnish or dimensional glaze onto each red dot. -
Attach to Gift:
Thread a length of rustic jute twine through the hole and tie the tag securely to your gift wrapping.
These simple yet elegant tags are sturdy enough to be kept as keepsakes or reused as tree ornaments for years to come
Stamped Year Keepsake Ornaments
Capture the year with this rustic yet elegant stamped ornament, which mimics the warm, earthy look of traditional fired terracotta. With delicate botanical impressions and clean typography, it makes for a sophisticated addition to your holiday decor or a thoughtful New Year’s gift.
Step-by-Step Guide
Materials
- Terracotta-colored polymer clay (e.g., Fimo Soft Terracotta or Sculpey Premo Burnt Orange)
- Acrylic rolling pin or clay machine
- Round circle cutter (approx. 3 inches)
- Small number stamps (serif font)
- Botanical rubber stamps or texture mat (pine branch and wildflowers)
- Star-shaped leatherworking tool or small star stamp
- Drinking straw or small circular cutter (for the hanging hole)
- Parchment paper or ceramic tile (for baking)
- Gold satin ribbon (1/4 inch wide)
- Fine-grit sandpaper (optional)
- Matte or satin water-based varnish (optional)
Step 1: Preparing the Base
-
Condition the clay:
Start by warming the terracotta polymer clay in your hands, kneading it thoroughly until it becomes soft, pliable, and free of cracks. This ensures a smooth surface for stamping. -
Roll out the slab:
Using your acrylic roller or pasta machine on a thick setting, roll the clay out to a uniform thickness of about 1/4 inch (6mm). You want it substantial enough to hold the impressions without warping. -
Cut the shape:
Place your circle cutter onto the clay slab and press down firmly to create a clean, round disc. Lift the cutter carefully; if the clay sticks, gently push it out from the top edges. -
Smooth the edges:
Dip your finger in a little water or baby oil and run it gently around the rim of the circle to smooth out any sharp edges left by the cutter. -
Create the hanging hole:
Use a drinking straw or a tiny circle tool to punch a hole near the top of the ornament. Ensure it’s centered and has enough clay above it (at least 5mm) to support the weight of the ornament.
Release Agent Trick
Dust your stamps lightly with arrowroot powder or cornstarch before pressing them into the clay. This stops the clay from sticking to intricate stamp details.
Step 2: Design & Stamping
-
Center the date:
Arrange your number stamps to read ‘2025’. Press them firmly into the center of the clay disc, ensuring even pressure so the depth is consistent. I find it helpful to look straight down from above to keep the alignment level. -
Imprint the large botanical:
Take your pine branch or fern stamp and press it into the lower-left quadrant, curving slightly upwards beneath the numbers. -
Add delicate floral details:
Using a smaller wildflower or berry stamp, add an impression in the lower right quadrant, slightly overlapping the stem of the previous botanical imprint for a cohesive look. -
Add star accents:
Using a star-shaped tool or stamp, press scattered stars into the negative space around the date. Place larger stars near the perimeter and smaller dots or tiny stars closer to the text. -
Refine the surface:
Check for any unwanted fingerprints. You can gently buff them away with a damp intense wipe or a piece of plastic wrap lightly dragged over the surface.
Gilded Impressions
Before baking, lightly brush gold mica powder into the stamped grooves of the numbers and stars. After baking, wipe the surface clean to reveal shimmering text.
Step 3: Finishing Touches
-
Bake the ornament:
Transfer the clay to a ceramic tile or parchment-lined baking sheet. Bake according to your brand’s specific instructions (usually 275°F/130°C for 15-30 minutes). -
Cool down:
Allow the darker clay to cool completely in the oven with the door slightly ajar to prevent thermal shock and ensure durability. -
Sand edges (optional):
If there are any rough spots on the rim after baking, lightly sand them with fine-grit sandpaper under running water. -
Seal the piece:
While the raw terracotta look is beautiful, you can apply a thin coat of matte varnish to protect the surface from dust and scratches without adding too much shine. -
String the ribbon:
Cut a length of gold satin ribbon. Fold it in half, push the loop through the hole from front to back, and pull the tails through the loop to create a lark’s head knot, or simply tie a bow at the top.
Hang your timeless creation on the tree and enjoy the handcrafted warmth it brings to the season

TRACK YOUR CERAMIC JOURNEY
Capture glaze tests, firing details, and creative progress—all in one simple printable. Make your projects easier to repeat and improve.
Mini Wreath Ornaments With Bows
Capture the essence of winter foliage with these delicate polymer clay wreath ornaments. Featuring sculpted leaves and tiny red berries, this soft sage green wreath is tied together with a simple cream bow for a timeless holiday look.
Detailed Instructions
Materials
- Polymer clay (Sage Green and Red)
- Rolling pin or clay machine
- Circle cutters (2 sizes: approx 2.5 inch and 1 inch)
- Leaf silicone mold or manual sculpting tools
- Cream satin ribbon (1/4 inch width)
- Needle tool or toothpick
- Liquid polymer clay (optional)
- Baking sheet
- Parchment paper
- Oven
Step 1: Forming the Base
-
Condition the clay:
Start by kneading your sage green clay until it is soft, pliable, and free of air bubbles. This ensures a smooth finish without cracks. -
Roll the slab:
Roll out the green clay to a thickness of about 1/4 inch (6mm). You want it sturdy enough to hang but not too heavy. -
Cut the donut shape:
Use your larger circle cutter to stamp the outer edge of the wreath. Without moving the clay, center your smaller circle cutter inside and remove the middle to create a donut ring. -
Smooth the edges:
Gently run your finger around the cut edges of the ring to soften any sharp lines left by the cutters.
Fixing Fingerprints
Before baking, lightly brush the clay with a tiny amount of baby oil or cornstarch to smooth out any accidental fingerprints.
Step 2: Adding Foliage Details
-
Create the leaves:
If using a silicone mold, press small bits of the remaining green clay into a small leaf cavity. If sculpting by hand, form tiny teardrops of clay. -
Shape manually (alternative):
For hand-sculpted leaves, flatten the teardrops slightly and use a needle tool to impress a central vein and small side veins for texture. -
Apply the leaves:
Begin placing the clay leaves onto the wreath ring. Arrange them in overlapping pairs or small clusters, following the curve of the circle. -
Check adhesion:
Press the leaves gently onto the base so they bond. I prefer using a tiny dab of liquid polymer clay here to ensure they don’t pop off after baking. -
Fill the surface:
Continue adding leaves until the front surface of the wreath has a nice, organic texture, leaving a small space at the top clear for the ribbon hole. -
Review the texture:
Look closely at your leaves. If any lost their vein details during handling, gently re-etch the lines with your needle tool.
Winter Sparkle
Before baking, lightly dust the leaves with white mica powder or clear micro-glitter to simulate a dusting of fresh frost.
Step 3: Finishing Touches & Assembly
-
Add the berries:
Roll tiny spheres of red polymer clay. Place them in clusters of two or three on top of certain leaf groupings for a pop of color. -
Create the hanging hole:
Use a straw or a larger needle tool to pierce a hole at the very top of the wreath, ensuring it’s wide enough for your ribbon. -
Bake:
Place the wreath on a baking sheet lined with parchment paper. Bake according to your clay package instructions (usually 275°F/135°C for 15-30 minutes). -
Cool down:
Allow the ornament to cool completely on the tray. Polymer clay is fragile when hot and hardens as it cools. -
Thread the loop:
Cut a length of cream satin ribbon. Thread it through the hole you created and tie a knot at the ends to form the hanging loop. -
Tie the bow:
Cut a second, shorter piece of ribbon. Tie a small, neat bow directly around the base of the hanging loop, right where it meets the clay wreath. -
Trim the ends:
Trim the tails of the bow at an angle to prevent fraying and give it a polished finish.
Now you have a charming, handmade piece of greenery that will last permanently on your tree
Marbled “Glass” Look Christmas Baubles
These stunning ornaments mimic the depth and elegance of blown glass or polished malachite using swirling techniques. The mesmerizing blend of emerald, navy, and pearl creates a luxurious finish that catches the holiday lights beautifully.
How-To Guide
Materials
- Polymer clay (emerald green, translucent, pearl white, navy blue)
- Glass or ceramic clear ornament balls (heat-safe)
- Basic pasta machine or acrylic roller
- Sharp craft blade
- Fine glitter (silver or iridescent)
- Glossy polyurethane varnish or UV resin
- Soft synthetic brush
- Oven for baking
- Gold ornament caps and hanging wire
Step 1: Preparing the Pattern
-
Condition the clay:
Start by warming up your polymer clay blocks in your hands. Knead the emerald green, navy blue, and pearl white separately until they are soft and pliable. -
Mix for depth:
Take a portion of the emerald green and mix it with an equal part of translucent clay. This secret step adds that ‘glass-like’ depth we’re aiming for rather than a flat, opaque look. -
Create logs:
Roll each color into a long, thin log or snake about 5 inches long. You should have one log of pearl, one of navy, one of solid emerald, and one of your translucent emerald mix. -
Twist and combine:
Hold all four logs together in a bundle. Twist them together tightly like a candy cane until the colors start to merge and spiral around each other. -
Fold and roll:
Fold the twisted log in half and roll it out smooth again. Repeat this twist-fold-roll process about 3-4 times. Be careful not to over-mix, or the colors will turn muddy; you want distinct striations. -
Add shimmer:
Flatten the log slightly and sprinkle a tiny pinch of fine silver glitter over the surface. Fold the clay over to trap the glitter inside, then roll it back into a log shape.
Keep it Clean
Wear latex gloves or frequently clean your hands with baby wipes while working. White clay picks up lint and dust easily, which will mar the polished look.
Step 2: Covering the Bauble
-
Create slices:
Use your sharp craft blade to cut thin slices from your marbled log. Each slice should reveal a unique swirling pattern of the mixed colors. -
Apply to base:
If you are using a glass ornament blank, remove the metal cap. Gently press the clay slices onto the glass surface, starting from the middle and working outward. -
Blend the seams:
Butt the edges of the slices up against each other. Use your thumb to gently smudge and smooth the seams where the slices meet, creating a continuous, seamless surface. -
Smooth the surface:
Once covered, gently roll the bauble between your palms. The goal is to smooth out any fingerprints and ensure the clay is consistently adhered to the glass base.
Glitzy Gold Veins
Before rolling your final ball, apply bits of gold leaf to the clay slices. The leaf will crackle during smoothing, creating stunning metallic veins.
Step 3: Finishing and Baking
-
Final inspection:
Check for any trapped air bubbles under the clay. If you find one, prick it carefully with a needle and smooth the clay down to release the air. -
Bake the ornaments:
Place your covered baubles on a baking sheet lined with cardstock or a bed of baking soda to prevent flat spots. Bake according to your clay manufacturer’s instructions (usually 275°F for 30 minutes). -
Cool completely:
Allow the ornaments to cool completely inside the oven with the door slightly ajar. This gradual cooling helps prevent cracks in the glass or clay. -
Sand for smoothness:
Wet sand the cooled bauble using high-grit sandpaper (400 up to 1000 grit) under running water to remove any tiny bumps and create a silky surface. -
Apply gloss finish:
To get that high-shine glass look, brush on two thin coats of glossy polyurethane varnish or apply a layer of UV resin and cure it under a UV lamp. -
Reattach hardware:
Once the finish is dry and hard, place the gold ornament cap back onto the neck of the bauble. Squeeze the wire clips gently to secure it in place. -
Add the hanger:
Thread a piece of rustic twine or gold string through the loop for a fancy final touch.
Hang your new creations near lights to let that glossy finish truly shine
Cozy Sweater Pattern Tree Ornaments
Bring a touch of cozy hygge to your holiday decor with this charming miniature sweater ornament. Crafted from polymer clay with delicate tree motifs, it captures the warmth of a favorite winter knit in a timeless keepsake.
Step-by-Step
Materials
- White or ecru polymer clay
- Rolling pin or clay machine
- X-acto knife or clay blade
- Needle tool or toothpick
- Sweater-shaped cookie cutter (optional)
- Small round cutter (for the loop)
- Brown and reddish-brown acrylic paint
- Fine detail paintbrush (size 0 or 00)
- Jute twine
- Parchment paper
Step 1: Shaping the Sweater Base
-
Condition the Clay:
Start by warming the white polymer clay in your hands, kneading it until it becomes soft and pliable. This conditioning step is crucial to prevent cracks later on. -
Roll the Slab:
Roll the conditioned clay out on a piece of parchment paper to an even thickness of about 1/4 inch (6mm). You want it substantial enough to be sturdy but not too heavy for a branch. -
Cut the Shape:
If you have a sweater-shaped cookie cutter, press it firmly into the clay. If not, lightly sketch a sweater outline onto the clay with a needle tool—think a simple T-shape with rounded shoulders—and carefully cut it out using your X-acto knife. Smooth any rough edges with your finger. -
Create the Hanger Loop:
At the top center of the neckline, you’ll need a way to hang the ornament. Cut a small circle of clay using a small round cutter, punch a hole in its center, and press it firmly onto the back of the neckline so the loop peeks out the top. Blend the clay at the seam on the back to secure it.
Fixing Smudges
Make a paint mistake? Don’t panic. Since the clay is baked and non-porous, you can quickly wipe away wet acrylic paint with a damp Q-tip or scratch off dried paint gently with a toothpick.
Step 2: Adding Texture & Details
-
Rib the Collar:
To mimic a knit collar, take a small strip of clay and curve it along the neckline. Use your needle tool or the back of a knife to press vertical lines into this strip, creating a ribbed texture. -
Add Cuffs and Hem:
Repeat the ribbing process for the sleeves and the bottom hem. Attach small rectangular strips of clay to the sleeve ends and the bottom of the sweater, then press in vertical lines to create that classic elasticated knit look. -
Refine the Edges:
Go over the joins between the main body and the ribbed sections. Gently smooth them so they look like one continuous piece of fabric rather than separate chunks of clay. -
Bake the Clay:
Transfer the parchment paper with your ornament onto a baking sheet. Bake according to your brand of polymer clay’s instructions—usually around 275°F (135°C) for 15-30 minutes. Let it cool completely before painting.
Level Up: Texture
Before baking, gently press a piece of real fabric or linen onto the flat parts of the raw clay. This imitates a woven texture, making the sweater look even more realistic and fabric-like.
Step 3: Painting the Design
-
Mix Your Colors:
Prepare your palette with a warm brown and a muted reddish-brown acrylic paint. I like to water the brown down just slightly to make it behave more like an ink or stain. -
Paint the Tree Trunks:
Using your finest brush and the brown paint, draw three simple vertical lines across the center chest of the sweater. These will be the trunks for your pine trees. -
Add Pine Boughs:
paint downward-slanting lines branching off the trunks to create the minimalist tree shape. Keep the lines thin and slightly imperfect to maintain a hand-stitched folk art aesthetic. -
Create the Yoke Pattern:
Dip the handle end of a paintbrush or a dotting tool into the reddish-brown paint. Dot a curved row of small dots across the upper chest area, following the curve of the neckline. -
Add Lower Details:
Paint a thin horizontal reddish line just above the bottom ribbed hem and near the cuffs. Add another row of small dots above the bottom line to mirror the yoke pattern. -
Seal (Optional):
Once the paint is fully dry, you can leave it matte for a natural ceramic look or apply a thin coat of matte varnish for extra protection. -
String It Up:
Cut a length of jute twine, thread it through the loop at the top, and tie a secure knot. Your sweater is now ready to hang.
Now you have a quaint, handmade ornament perfect for gifting or keeping for your own tree
Tiny Christmas Tree Studs and Pins
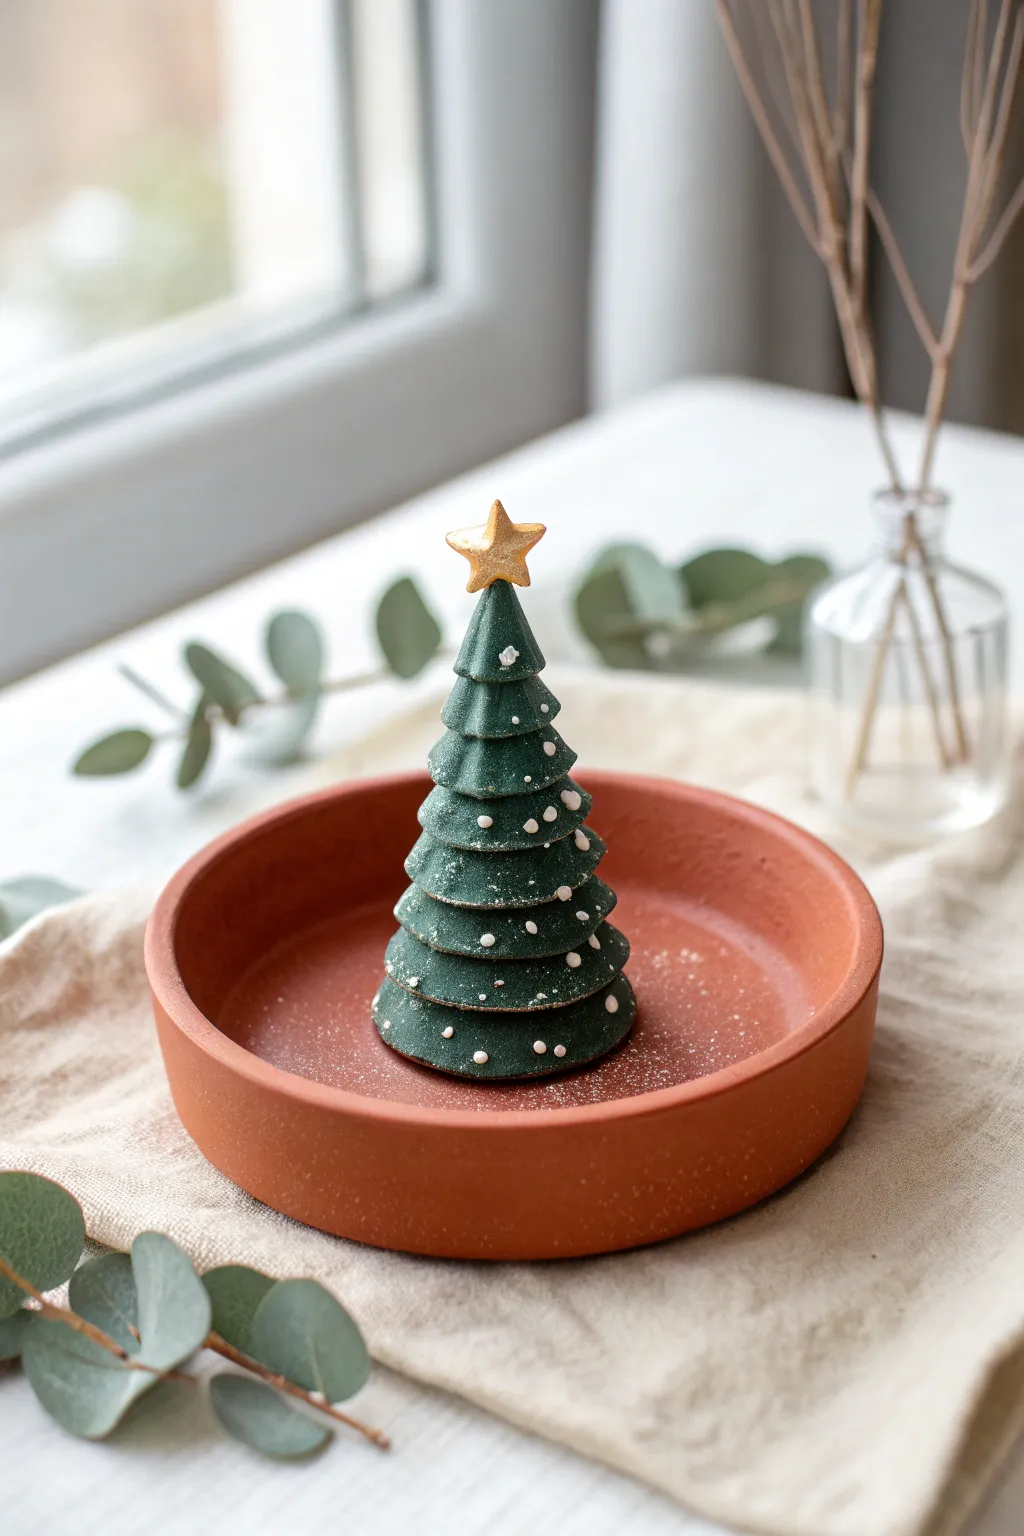
Capture the stillness of a winter forest with this elegant, minimal Christmas tree sculpture. Featuring deep green tiered branches dusting with faux snow and a crowning gold star, this piece makes a stunning addition to any holiday vignette or mantel display.
Step-by-Step Guide
Materials
- Dark forest green polymer clay
- Gold polymer clay (or gold acrylic paint)
- White acrylic paint
- Liquid polymer clay (optional)
- Circle cutters in graduated sizes (approx. 5-7 sizes)
- Needle tool or toothpick
- Old toothbrush or stiff bristle brush
- Smoothing tool or your finger
- Sharp craft blade
- Acrylic roller
- Oven and baking tray
Step 1: Forming the Base Structure
-
Condition the Green Clay:
Start by thoroughly conditioning your dark forest green clay until it is pliable and warm. If the green isn’t dark enough, I like to mix in a tiny pinch of black to get that deep evergreen tone. -
Create the Core Cone:
Roll a portion of the green clay into a solid cone shape. This will serve as the support structure for your tree tiers. Is should be slightly thinner than the final width of the tree. -
Roll Out the Sheet:
Roll out the remaining green clay into a sheet of medium thickness (about 2-3mm). Ensure it’s even, as this will form your branches. -
Cut the Circles:
Using your graduated circle cutters, punch out one circle of each size. You will need about 6-8 circles ranging from large to small to create the full height of the tree.
Step 2: Assembling the Tiers
-
Texture the Edges:
Before stacking, gently run your finger along the edge of each circle to soften the sharp cut line. You want the ‘boughs’ to look organic, not mechanically stamped. -
Begin at the Bottom:
Take the largest clay circle and place it over your cone base. Gently press the edges down so it drapes like a skirt. -
Layering Up:
Repeat this process with the next smallest circle, placing it on top of the first. Smooth the clay gently onto the cone underneath so it adheres, but leave the very edges flared out. -
Stacking to the Top:
Continue stacking your circles from largest to smallest. As you reach the top, the circles will become quite tiny, forming the pointed tip of the fir tree. -
Refine the Silhouette:
Once stacked, gently press the layers together to ensure a solid bond. You can use a smoothing tool to nudge any uneven layers into a symmetrical cone shape.
Texturing Tip
Before assembling the layers, lightly press a piece of coarse sandpaper or a stiff brush against the clay circles to give the ‘branches’ a realistic needle-like texture.
Step 3: Adding Details & Baking
-
Create the Star:
Roll a small piece of gold polymer clay flat. Use a tiny star cutter or carefully cut a five-pointed star shape with your craft blade. -
Attach the Star:
Place the gold star vertically on the very tip of your tree. You can use a drop of liquid clay or bake-and-bond to ensure it stays secure during baking. -
Baking:
Place your tree on a baking tile or parchment-lined tray. Bake according to your clay manufacturer’s instructions (usually 275°F/130°C for 15-30 minutes depending on thickness). -
Cooling:
Allow the tree to cool completely in the oven or on a wire rack. Do not handle it while hot, as the clay is still fragile.
Make it an Ornament
Insert a small metal eye pin into the top of the tree (behind the star) before baking. Once cool, thread a ribbon through it to hang your creation on a real tree.
Step 4: The Snowy Finish
-
Prepare the Splatter:
Dilute a small amount of white acrylic paint with a drop of water. The consistency should be fluid but opaque. -
Splatter Technique:
Dip an old toothbrush into the white paint. Hold it near the tree and run your thumb across the bristles to flick tiny speckles onto the green branches. -
Manual Dots:
For larger snowflakes, dip the tip of a toothpick or a small dotting tool into undiluted white paint and place specific dots on the edges of the tiers. -
Final Dusting:
If desired, a very light dusting of white pastel powder (shaved from a chalk stick) can be brushed over the surface for a frosty, matte finish.
Now you have a serene little evergreen to bring a touch of nature to your holiday decor
Hot Cocoa Mug Mini Ornaments
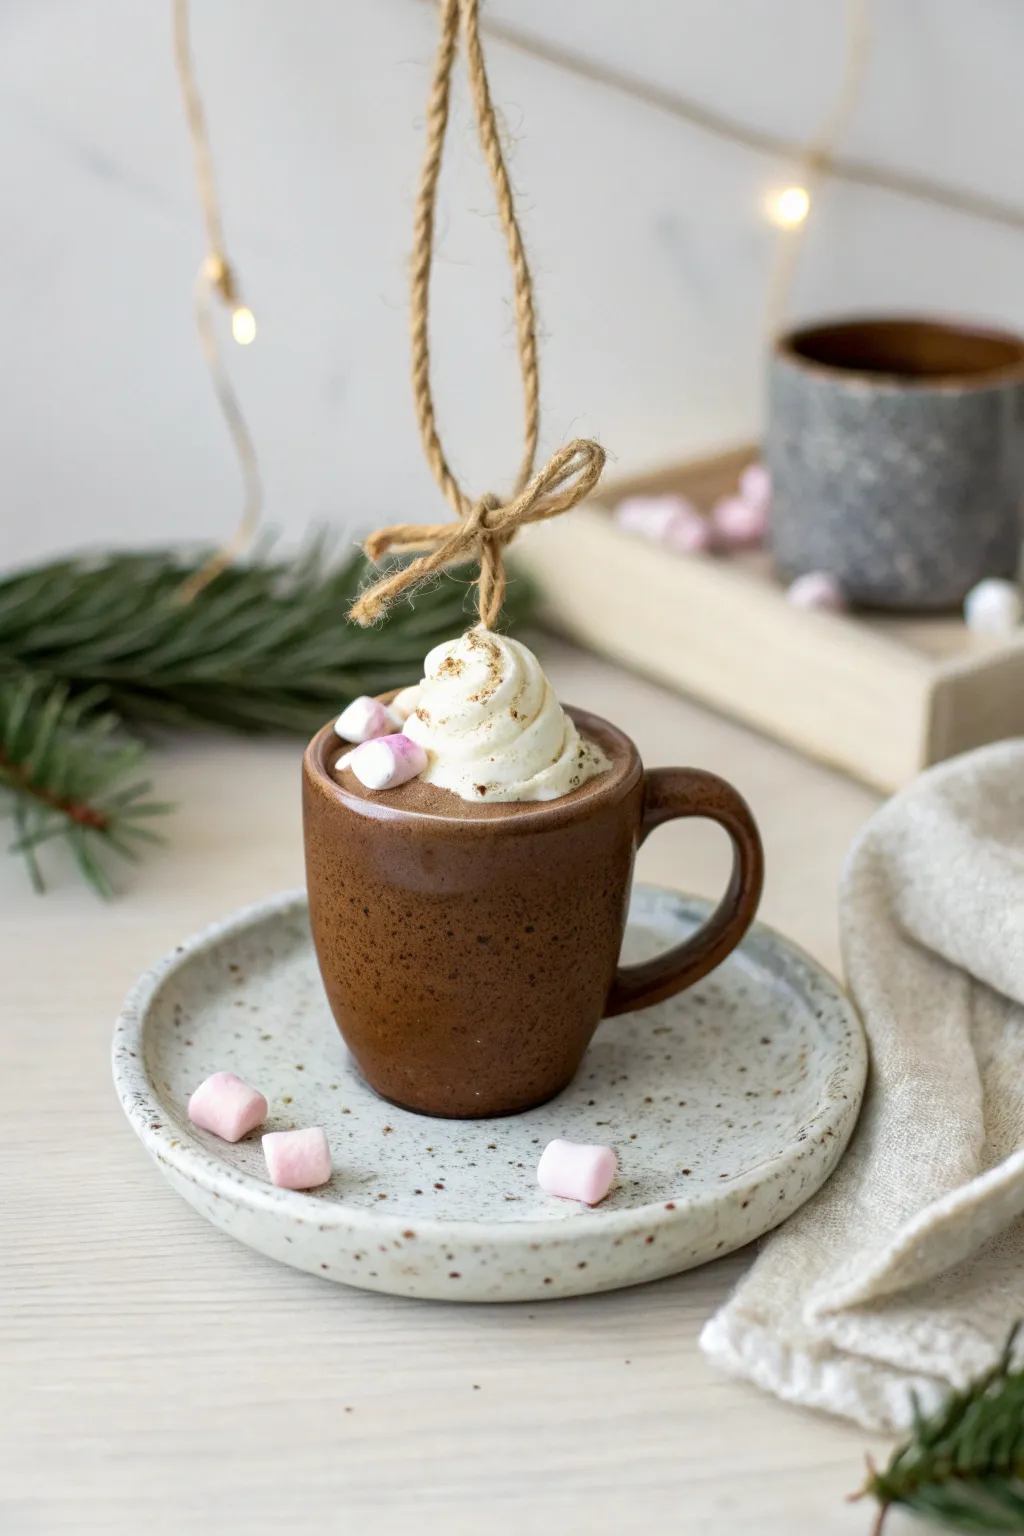
Capture the cozy essence of winter with these adorable miniature hot cocoa mug ornaments, complete with whipped cream and spilled marshmallows. Crafted from polymer clay, the speckled stoneware finish gives them a beautifully rustic and realistic charm.
How-To Guide
Materials
- Polymer clay (Brown, Translucent/White mix, and White)
- Ground black pepper or finely ground dried coffee
- Liquid polymer clay (Translucent or White)
- Pastel chalks (Dark brown, reddish-brown)
- Ball stylus tool
- Ceramic tile or oven-safe work surface
- Needle tool or toothpick
- Jute twine or rustic string
- Eye pin (optional, if not embedding twine directly)
- Gloss glaze (optional)
Step 1: Sculpting the Ceramic Mug
-
Mix the clay:
Begin by conditioning a medium-brown polymer clay. To achieve the speckled pottery look shown in the photo, knead in a generous pinch of ground black pepper or very finely ground dried coffee until evenly distributed. -
Form the base:
Roll the clay into a smooth cylinder, approximately 1 inch tall and slightly wider at the top than the bottom to mimic a classic coffee mug shape. -
Hollow the cup:
Using a large ball stylus or the back of a paintbrush, gently press into the center of the cylinder to create the hollow inside of the mug. Don’t go too deep; you only need enough space for the ‘liquid’ filing. -
Create the handle:
Roll a small snake of the same speckled brown clay. Curve it into a ‘C’ shape and blend the ends onto the side of the mug using a rubber sculpting tool or your fingertip to ensure a seamless bond. -
Make the saucer:
Flatten a larger ball of speckled clay into a thick disk. Press the center gently with a slightly larger flat object to create a rimmed plate effect for the saucer. -
Attach mug to saucer:
Press the mug firmly onto the center of the saucer. If you want them permanently attached as one ornament, use a dab of liquid clay between them for a strong bond. -
Add texture:
Gently tap the surface of the mug and saucer with a toothbrush or crumpled foil to remove fingerprints and enhance that rustic stoneware texture.
Step 2: Adding the Cocoa and Toppings
-
Fill with cocoa:
Mix a small amount of liquid polymer clay with brown pastel chalk shavings to create a thick ‘sauce.’ Pour this into the hollow of your mug, filling it almost to the brim. -
Create whipped cream:
Take white polymer clay and roll it into a long, thin tapered snake. Twist this snake upwards into a spiral cone shape to mimic a dollop of whipped cream. -
Texture the cream:
Use a needle tool to gently drag lines down the sides of the white spiral, making it look fluffy and serrated like it came from a piping bag. -
Place the cream:
Set the whipped cream dollop right into the wet liquid clay ‘cocoa’ in the mug. The liquid clay will act as glue. -
Make mini marshmallows:
Roll a tiny snake of white clay and a tiny snake of pale pink clay. Cut very small segments—about 2-3mm long—to create miniature marshmallows. -
Decorate:
Press a few marshmallows into the liquid cocoa around the whipped cream. Scatter a few loose ones onto the saucer rim for a ‘spilled’ look. -
Dusting details:
Scrape a tiny bit of brown pastel chalk over the whipped cream to look like a dusting of cinnamon or cocoa powder.
Secret Spice Mix
Using real ground pepper adds perfect specks, but don’t over-knead! Stop when the specs are visible but distinct. Too much mixing makes the clay look muddy gray instead of speckled stoneware.
Step 3: Finishing Touches
-
Prepare the hanger:
Cut a length of jute twine and tie a knot at the loose ends to form a loop. Tie a small bow near the knot if desired. -
Embed the hanger:
Push the knotted end of the twine deep into the center of the whipped cream dollop. Close the clay around the twine slightly to secure it. -
Bake:
Bake the ornament according to your polymer clay manufacturer’s instructions (usually 275°F/135°C for 15-30 minutes). I recommend tenting it with foil to prevent the white cream from scorching. -
Cool and glaze:
Let the piece cool completely. For extra realism, you can add a coat of gloss glaze only to the ‘liquid’ cocoa parts, keeping the mug matte for that stoneware feel.
Scented Ornament Hack
Mix a single drop of chocolate or vanilla fragrance oil into the liquid clay ‘cocoa’ mixture before baking. The scent will linger subtly on the tree for weeks!
Your tiny, rustic mug is now ready to add a warm and homemade touch to your holiday tree
Christmas Light Bulb Garland Charms

Bring a touch of vintage charm to your holiday decor with this delightful faux light bulb garland. Crafted from polymer clay and strung on rustic twine, these colorful non-electric lights capture the nostalgia of Christmas past without the tangle of cords.
Detailed Instructions
Materials
- White or translucent polymer clay
- Acrylic paints (cherry red, forest green, turquoise, sunny yellow, metallic gold/bronze)
- Small eye screws (silver or gold)
- Jute twine or hemp cord
- Paintbrushes (fine tip and flat)
- Clay sculpting tools or a craft knife
- Sandpaper (fine grit)
- Matte or satin varnish (optional)
- Oven for baking
Step 1: Sculpting the Bulbs
-
Condition the CLay:
Start by warming a block of white polymer clay in your hands, kneading it until it becomes soft and pliable. This prevents cracks during baking. -
Portion the Pieces:
Roll the clay into a long log and cut equal segments about the size of a large grape. You’ll need roughly 15-20 pieces depending on your desired garland length. -
Form the Bulb Shape:
Roll each segment into a smooth ball first, then gently pinch and roll one end between your thumb and forefinger to create a teardrop or classic C9 bulb shape. I usually try to keep them slightly varied for an organic look. -
Create the Socket Base:
Take a smaller pinch of clay and roll it into a tiny cylinder. Flatten the ends slightly. -
Assemble the Bulb:
Press the cylinder onto the wider, rounded end of your teardrop shape. Blend the seam slightly with a smoothing tool so the two pieces adhere well. -
Add Texture:
Use a craft knife or a needle tool to gently score two or three horizontal rings around the cylinder base to mimic the screw threads of real light bulbs. -
Insert Hardware:
Create a small starter hole in the very top of the socket base. Screw a small eye screw securely into the clay. These can sometimes loosen after baking, so ensure a snug fit now. -
Bake:
Arrange your bulbs on a baking sheet lined with parchment paper. Bake according to your brand of clay’s specific instructions (usually 275°F for 15-30 minutes). Let them cool completely before handling.
Hardware Pro-Tip
Can’t find eye screws? Bend simple crafting wire into a ‘U’ shape and insert the ends into the raw clay base before baking for an instant DIY loop.
Step 2: Painting and Assembly
-
Base Color:
Select your vintage palette—red, green, blue, and yellow work best. Paint the glass portion of each bulb, leaving the threaded base unpainted for now. -
Second Coat:
Apply a second coat of acrylic paint to ensure opaque coverage. Let the paint dry fully between layers to avoid streaking. -
Paint the Sockets:
Using a fine brush and metallic gold or bronze paint, carefully color the threaded base and the eye screw. This metallic touch gives it that realistic electric feel. -
Distress (Optional):
For a rustic finish like the reference photo, lightly scuff the painted bulb with fine-grit sandpaper once dry, or dry-brush a tiny amount of brown paint over the threads. -
Seal the Clay:
Apply a thin layer of matte or satin varnish over the entire piece to protect the paint and give the ‘glass’ a slight sheen. -
Secure the Hooks:
If any eye screws feel loose after baking and cooling, unscrew them, add a tiny drop of super glue to the hole, and screw them back in. -
Measure the Twine:
Cut a length of jute twine as long as your window or mantle, leaving an extra 12 inches on each end for tying. -
Stringing:
Thread the bulbs onto the jute twine. To match the image, don’t tie knots; simply let the friction of the rough twine hold the light bulbs in place, or tie a simple overhand knot around each eye loop if they slide too much. -
Spacing:
Adjust the spacing so the bulbs are about 4-6 inches apart, ensuring they hang naturally.
Level Up: Glitter Frosted
Before the colored paint dries, sprinkle ultra-fine white or translucent glitter over the bulbs to mimic the look of ‘sugared’ or frosted vintage Christmas lights.
Now you have a charming, durable decoration read to brighten up your winter window scene
Photo Frame Keepsake Ornaments
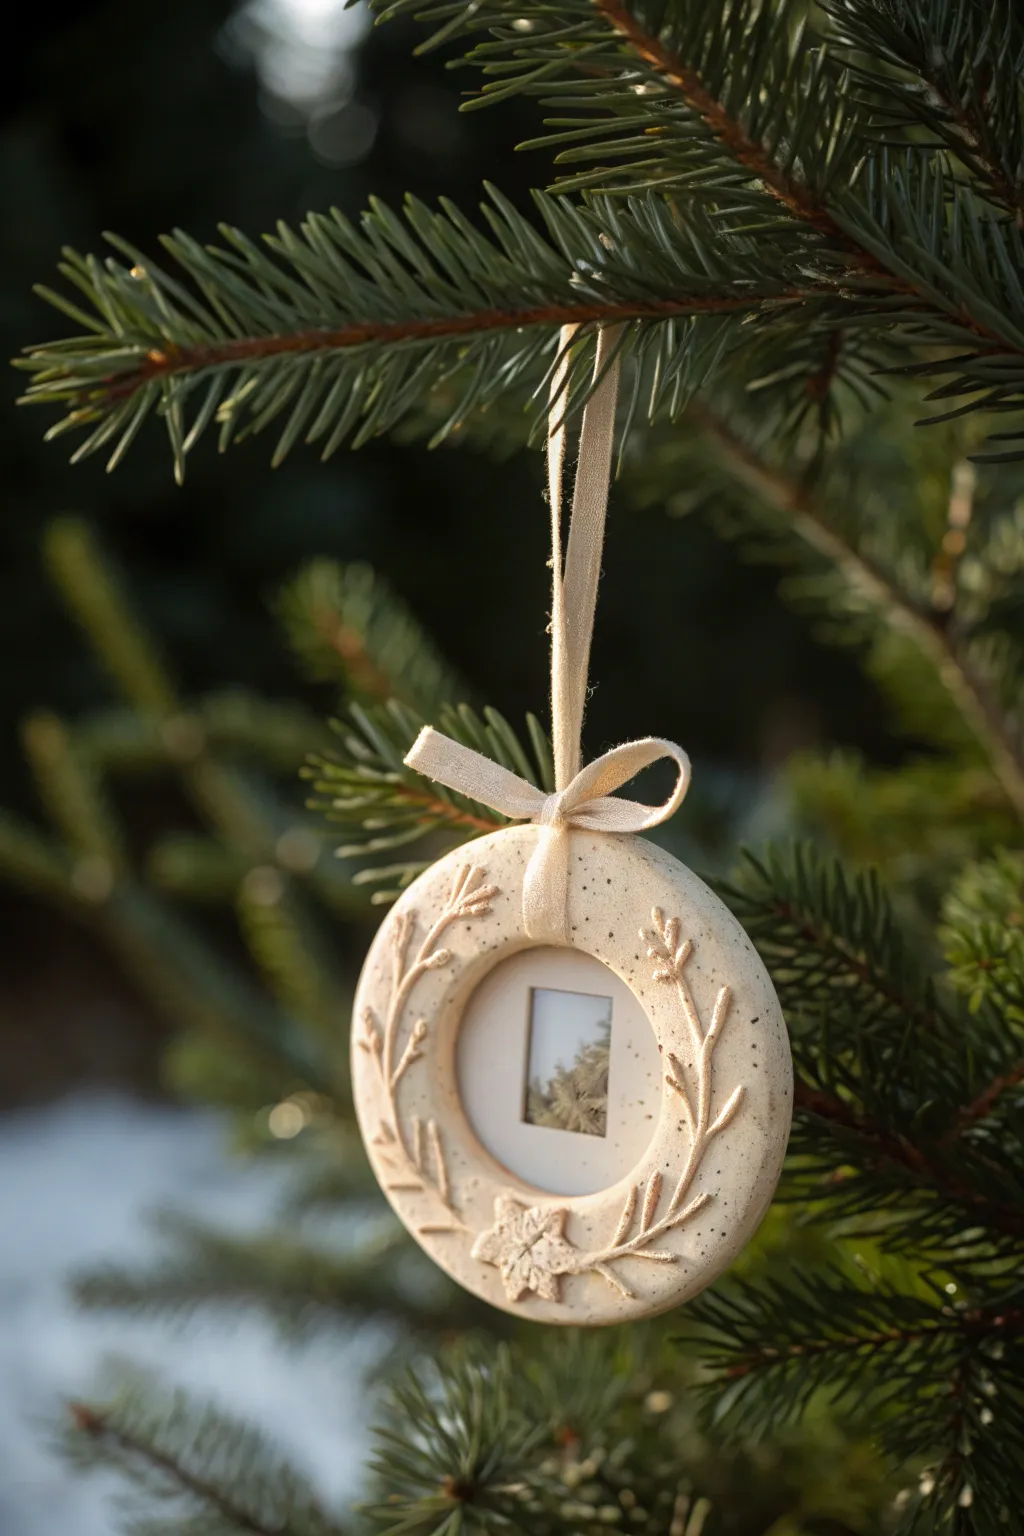
Immortalize your favorite memories with this charming, rustic photo frame ornament. Featuring a delicate botanical relief and a speckled cream finish, it captures the warmth of winter while showcasing a tiny, beloved snapshot.
Step-by-Step Guide
Materials
- White or cream polymer clay
- Faux granite or speckled polymer clay (or black pepper/dried herbs)
- Round cookie cutter (approx. 3-inch diameter)
- Smaller round cutter (approx. 1.5-inch diameter)
- X-Acto knife or sharp craft blade
- Needle modeling tool
- Small star cutter or star mold
- Ball stylus tool
- Cream or beige ribbon (1/4 inch wide)
- Rolling pin or pasta machine
- Super glue or heavy-duty craft glue
- Printed photo scaled to size
- Cardstock for backing
- Clear varnish (optional)
Step 1: Creating the Base
-
Prepare the Clay:
Begin by conditioning your white or cream polymer clay until it is soft and pliable. To achieve the speckled stone look shown in the image, mix in a small amount of granite-effect clay. Alternatively, I like to knead in a pinch of coarse black pepper or dried ground sage for an organic, natural speckle. -
Roll and Cut:
Roll the clay out to a consistent thickness of about 1/4 inch. Use your larger round cookie cutter to stamp out the main circle shape. -
Create the Aperture:
Center the smaller round cutter inside the clay circle and press down to remove the middle section, creating a doughnut or wreath shape. This open space will frame your photo later. -
Add a Hole:
Using a straw or a small round tool, punch a hole at the very top of the wreath shape for the ribbon to pass through. Ensure it is not too close to the edge to prevent tearing.
Needle Tool Trick
When adding tiny leaves, use the tip of your needle tool to pick them up and place them. It’s much more precise than using your fingers.
Step 2: Sculpting the Details
-
Make Thin Coils:
Roll extremely thin snakes or threads of the same clay mixture to serve as the stems. These should be delicate, almost like thread. -
Map the Design:
Gently press these thin clay threads onto the wreath surface, creating two curved branches that start near the bottom and curve upwards along the sides of the circle. -
Form the Leaves:
Roll tiny balls of clay, then flatten them into elongated teardrop shapes to make small leaves. Attach these along the stems you just placed. -
Refine the Leaves:
Use a needle tool to gently press a central vein into each tiny leaf, which also helps bond the clay to the base. -
Add the Star:
Use a small star cutter or mold to create a star shape. Place this at the bottom center of the wreath where the two branch stems meet. -
Texture the Star:
Using a needle tool, stipple the surface of the star to give it a rough, textured finish that contrasts with the smooth leaves.
Step 3: Finishing and Assembly
-
Bake:
Preheat your oven according to the clay manufacturer’s instructions (usually around 275°F or 130°C). Bake the ornament on a ceramic tile or parchment-lined tray for 15-20 minutes. -
Cool Down:
Allow the piece to cool completely in the oven with the door slightly ajar to prevent cracking. -
Prepare the Photo:
Print your chosen photo small enough to fit behind the window. Cut it into a shape slightly larger than the opening. -
Attach the Backing:
Glue the photo to a piece of cardstock for stability. Then, apply a small rim of glue to the back of the clay frame and press the photo unit securely into place. -
String it Up:
Thread a length of cream ribbon through the top hole. Tie the ends into a loop for hanging. -
The Final Bow:
Cut a separate piece of ribbon and tie a small, neat bow. Glue this bow securely to the base of the hanging loop, right against the top of the ornament, to complete the look.
Sticky Clay?
If your clay gets too warm and sticky to handle, pop it in the fridge for 10 minutes. This firms it up, making detailed sculpting much easier.
Hang this beautiful keepsake on a prominent branch where the lights can highlight the delicate textures.
Mini Nutcracker-Inspired Faces
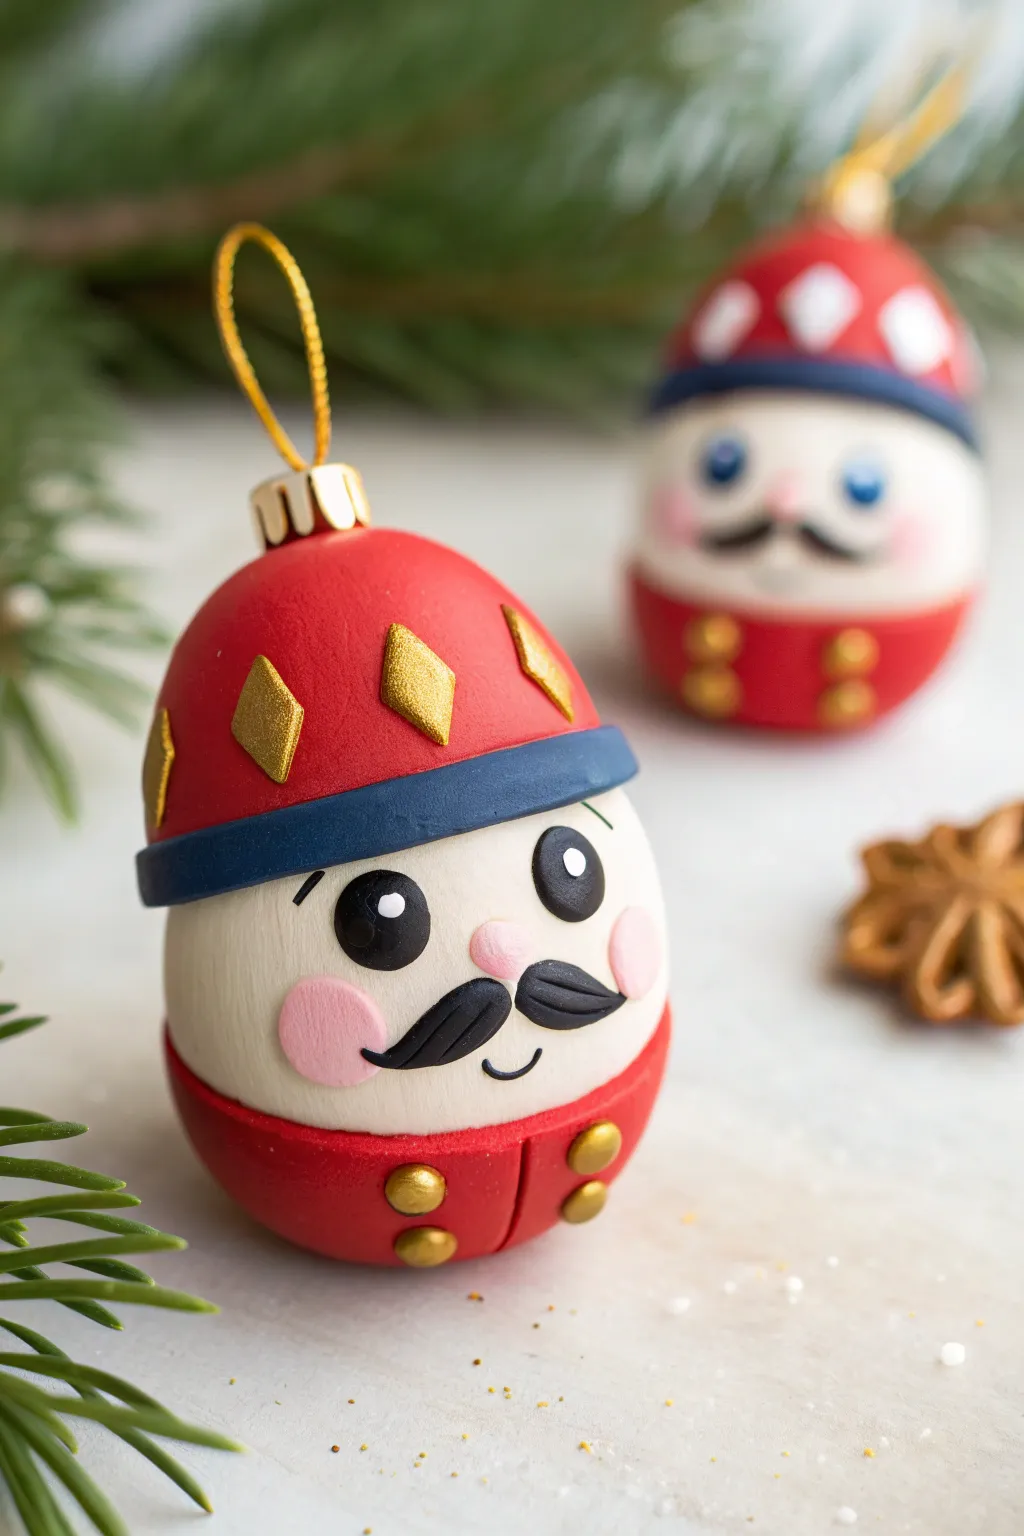
These adorable ornaments twist the classic holiday nutcracker into a charming, rounded egg shape perfect for the tree or a festive display. With their rosy cheeks, golden accents, and stylized uniforms, they bring a whimsical touch of nostalgia to your holiday decor.
Detailed Instructions
Materials
- White or skin-tone polymer clay
- Red polymer clay
- Navy blue polymer clay
- Black polymer clay
- Pink polymer clay (or soft pastel chalk)
- Gold polymer clay or Gold mica powder
- Gold acrylic paint (optional)
- Small eye screw or wire loop
- Basic sculpting tools (blade, ball tool)
- Gloss varnish or glaze
Step 1: Forming the Base
-
Shape the core:
Start by conditioning a large ball of white or skin-tone clay. Roll it between your palms until it is smooth, then gently taper one end to create a classic egg shape. This will be the head and body combined. -
Create the uniform bottom:
Roll out a sheet of red clay to about 2mm thickness. Cut a strip that is wide enough to cover the bottom third of your egg shape. -
Attach the trousers:
Wrap the red strip around the wide base of the egg, smoothing the seam at the back. Gently curve the clay under the bottom to cover it completely. -
Add definition:
Using a knife tool or a thin blade, press a vertical line into the center front of the red clay to simulate the separation of the pant legs or jacket flaps. -
Add gold buttons:
Roll four tiny balls of gold clay. Flatten them slightly and press two onto each side of the vertical line on the red base to recreate brass buttons.
Step 2: Sculpting the Hat
-
Form the hat base:
Take a ball of red clay slightly smaller than your base egg. Flatten it into a hollow dome shape that fits snugly over the top, tapered end of your white egg. -
Create the brim:
Roll a snake of navy blue clay and flatten it into a ribbon. Wrap this ribbon around the base of the red hat dome where it meets the white face, creating a distinct brim. -
Decorate the crown:
Cut small diamond shapes from gold clay (or use red clay painted gold later) and press them onto the red hat dome in a repeating pattern for a regal look. -
Insert the hanger:
Carefully screw a small eye pin or insert a looped wire into the very top center of the hat. I like to add a drop of liquid clay or bake-and-bond on the threads for extra security.
Keep it Clean
White clay attracts dust like a magnet. Keep a pack of wet wipes nearby and clean your hands and tools thoroughly before handling the white clay face parts.
Step 3: Creating the Face
-
Position the eyes:
Roll two small balls of black clay. Flatten them into ovals and press them onto the upper half of the white face area. -
Add the eye sparkle:
Place a teeny-tiny dot of white clay in the upper right corner of each black eye to give him a lively, shiny expression. -
Sculpt the nose:
Roll a very small ball of pink or skin-tone clay and press it right in the center of the face, just below the eyes. -
Add rosy cheeks:
Create two flat circles of pink clay and place them on either side of the face. Alternatively, you can brush on pink pastel dust before baking for a softer, airbrushed look. -
Add the mustache:
Roll a small snake of black clay that tapers at both ends. Cut it in half, curl the tapered ends upward, and join the thicker ends in the middle under the nose to form a handlebar mustache. -
Form the smile:
Roll an extremely thin thread of black clay and shape it into a small ‘U’. Place this gently under the mustache for a subtle, friendly smile. -
Add eyebrows:
For the final expression, add two tiny arched threads of black clay just above the eyes.
Make it a Set
Vary the hat colors (try green or purple) and change the mustache shapes to create a whole squad of unique characters for your tree.
Step 4: Finishing Touches
-
Final smooth:
Check the entire piece for fingerprints. You can use a brush with a little baby oil or clay softener to smooth them away gently. -
Bake:
Bake the ornament according to your clay manufacturer’s instructions, usually around 275°F (130°C) for 30 minutes depending on thickness. -
Glaze:
Once completely cool, apply a coat of gloss varnish to the eyes and the gold buttons to make them pop. -
String it up:
Thread a gold ribbon or cord through the eye pin to finish your ornament.
These little characters look wonderful hanging on pine branches, adding a handcrafted warmth to your season
Glow-Style Snowy Night Ornaments

Capture the magic of a silent winter night with this deep blue, galaxy-inspired ornament. Using polymer clay as a base, you’ll create a stunningly glossy bauble that features delicate golden starbursts and white snowy details.
Step-by-Step Guide
Materials
- Dark blue polymer clay (navy or midnight blue)
- Aluminum foil (for the core)
- Gold acrylic paint or gold paint pen (fine tip)
- White acrylic paint
- Fine detail paintbrushes (size 00 or 000)
- Dotting tool or toothpick
- Glossy polyurethane varnish or UV resin
- Eye pin or wire loop
- Jute twine for hanging
- Gold metal ornament cap (optional, can be salvaged or sculpted from gold clay)
Step 1: Forming the Base
-
Create the core:
Start by scrunching a piece of aluminum foil into a tight ball. This saves clay and keeps the ornament lightweight. Aim for a sphere about 2 inches in diameter. -
Condition the clay:
Take your dark blue polymer clay and condition it thoroughly until it’s soft and pliable. I find that warming it in my hands first helps prevent cracking later. -
Roll a sheet:
Roll the blue clay into a smooth, even sheet, approximately 1/8 inch thick. Ensure there are no air bubbles trapped in the sheet. -
Cover the core:
Wrap the clay sheet around your foil ball. Carefully pinch the seams together and smooth them out with your fingers until they disappear completely. Roll the ball gently between your palms to perfect the spherical shape. -
Add the hardware:
Insert a metal eye pin into the top of the clay ball. If you are adding a decorative metal cap later, ensure the eye pin sticks out far enough to accommodate it. -
Bake:
Bake the ornament according to the manufacturer’s instructions for your specific brand of clay. Usually, this is around 275°F (135°C) for 30 minutes. Let it cool completely before painting.
Step 2: Painting the Night Sky
-
Paint the starbursts:
Using a fine detail brush and gold acrylic paint (or a gold pen), draw several eight-pointed stars scattered around the sphere. Start with a simple cross, then add smaller diagonal lines in between. -
Add major white stars:
Select a few spots for prominent white stars. Draw modest five-pointed shapes using white acrylic paint. Keep them smaller than the gold starbursts to create depth. -
Create the snow:
Dip a dotting tool or a toothpick into white paint. Gently dot the surface randomly to create falling snow. Vary the pressure to make some dots tiny and others slightly larger. -
Let it dry:
Allow the paint to dry completely. Acrylics dry fast, but give it at least 20 minutes to ensure you don’t smudge your hard work during the glazing step.
Uneven Surface?
If your clay ball has fingerprints after rolling, dip your finger in a tiny bit of baby oil (or water for water-based clays) and gently buff the surface smooth before baking.
Step 3: Finishing Touches
-
Apply the glaze:
To achieve that glass-like shine seen in the photo, brush on a thick, even coat of high-gloss polyurethane varnish. Alternatively, coat with UV resin and cure under a lamp for an ultra-durable finish. -
Attach the cap:
Once the glaze is dry, slide a gold ornament cap over the eye pin if you are using one. If you sculpted a cap from gold clay, glue it in place now. -
Secure the hanger:
Thread a piece of rustic jute twine through the eye loop. Tie it securely with a simple knot to create the hanging loop. -
Final inspection:
Check for any uneven spots in the glaze or loose paint. Your starry night bauble is now ready to hang.
Cosmic Depth
Before adding stars, sponge on faint patches of black or lighter blue metallic paint creates a nebula effect, making the background look like deep, dimensional space.
Enjoy seeing your handmade galaxy sparkle among the lights on your tree