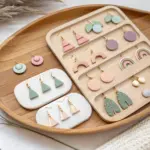
Whenever I need a creative spark, I reach for polymer clay because it’s basically a tiny playground for color, texture, and shape. Here are my favorite polymer clay design ideas—starting with the classics you’ll actually wear and gift, then drifting into the delightfully weird stuff that makes you say, “Okay, I have to try that.”
Geometric Arch Statement Earrings
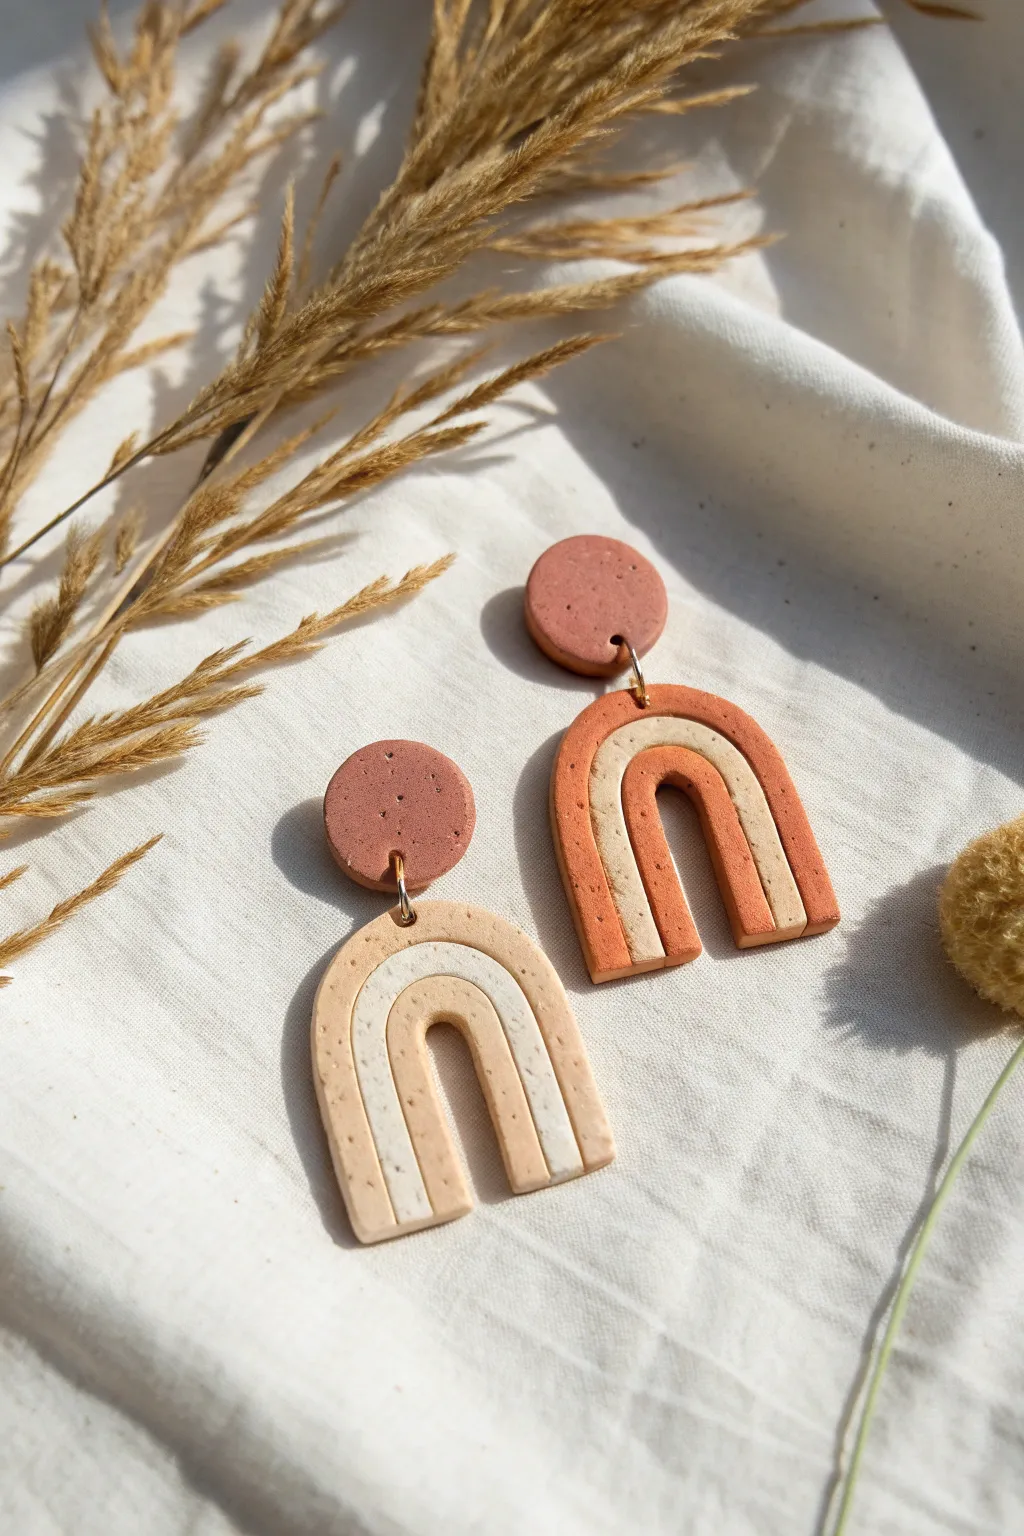
These trendy geometric earrings feature a classic arch shape with a subtle, speckled stone effect. With their muted terracotta and cream palette, they are the perfect lightweight statement piece to add an earthy touch to any outfit.
How-To Guide
Materials
- Polymer clay in terracotta, peach/beige, cream, and white
- Speckled granite polymer clay (or black pepper for DIY speckles)
- Acrylic rolling pin or pasta machine
- Arch-shaped clay cutters (two sizes or a nested set)
- Small circle clay cutter (approx. 10mm)
- Tissue blade or X-Acto knife
- Needle tool or toothpick
- Jump rings (gold or brass, 6-8mm)
- Earring posts and backs
- Jewelry pliers (flat nose and round nose)
- Super glue or UV resin
- Parchment paper or ceramic tile for baking
- Fine-grit sandpaper (optional)
Step 1: Preparing the Clay Colors
-
Condition the base clays:
Start by warming up your terracotta, peach/beige, and cream clays in your hands. Knead each color separately until soft and pliable. If the clay feels too stiff, adding a drop of clay softener or baby oil can help. -
Mix the speckled effect:
To achieve the stone-like texture seen in the photo, mix a very small amount of speckled granite clay into each of your solid colors. Knead thoroughly until the speckles are evenly distributed, but the base color remains distinct. -
Color matching:
For the lighter earring, you might want to mix white with a tiny bit of beige to get that perfect off-white cream tone shown in the geometric arch. -
Roll out slabs:
Using your acrylic roller or pasta machine on a medium setting (approx. 3mm thick), roll out slabs of each speckled color. Ensure the thickness is uniform across all slabs so the earring components fit together seamlessly.
Fixing Distortion
If your arch warps while lifting it off the surface, chill the raw clay in the fridge for 10 minutes before cutting. This stiffens it slightly for cleaner cuts.
Step 2: Cutting and Assembling the Arches
-
Cut the arch strips:
Use your tissue blade to cut straight, narrow strips from your rolled slabs. You will need strips in varying widths—some wider for the outer arch and thinner ones for the inner details. -
Form the U-shape:
Take a terracotta strip and gently bend it into a tall ‘U’ shape on your work surface. If the clay resists, warm it slightly in your palm first. -
Layering the colors:
Take a contrasting cream or peach strip and nest it tightly inside the first one. Gently press the edges together so they bond without distorting the shape. -
Cutting the final shape:
Once your strips are nested and pressed together, use your arch-shaped cutter to stamp out the clean, final shape. This technique ensures the stripes follow the curve perfectly. Alternatively, cut the arch shape from a solid slab first, then use smaller cutters to remove the center, but the strip method often yields cleaner lines. -
Create the stud tops:
Use the small circle cutter to punch out two circles from the terracotta or darker peach slab. These will serve as the top stud component. -
Piercing holes:
Using a needle tool, carefully pierce a hole at the very top center of each arch and the bottom center of each circle stud. Make sure the hole is large enough for your jump rings but not too close to the edge. -
Smooth the edges:
Before baking, I always run a finger dipped in a little cornstarch or water along the cut edges to smooth out any roughness or fingerprints.
Step 3: Baking and Assembly
-
Bake the pieces:
Place your clay pieces on a ceramic tile or a baking sheet lined with parchment paper. Bake according to the manufacturer’s instructions for your specific brand of clay (usually 275°F/135°C for 30 minutes). -
Cooling down:
Let the pieces cool completely in the oven with the door slightly ajar. This helps prevent cracking from thermal shock. -
Sanding (Optional):
If there are any sharp edges after baking, gently sand them with wet/dry fine-grit sandpaper under running water. -
Attaching the posts:
Apply a small dot of strong super glue or UV resin to the back of the circle studs and press the flat pad of the earring post onto it. Let it dry or cure completely. -
Connecting the components:
Using two pairs of pliers, twist a jump ring open sideways (never pull it apart). Thread the jump ring through the hole in the arch and the hole in the stud. -
Closing the rings:
Twist the jump ring back into place until the ends meet perfectly flush. Repeat for the second earring.
Texture Play
Before cutting your shapes, lightly press coarse sandpaper or a toothbrush onto the raw clay slab to enhance the stone effect with actual physical texture.
Now you have a stunning pair of geometric earrings ready to wear or gift.


Marble-Swirl Slab Earrings
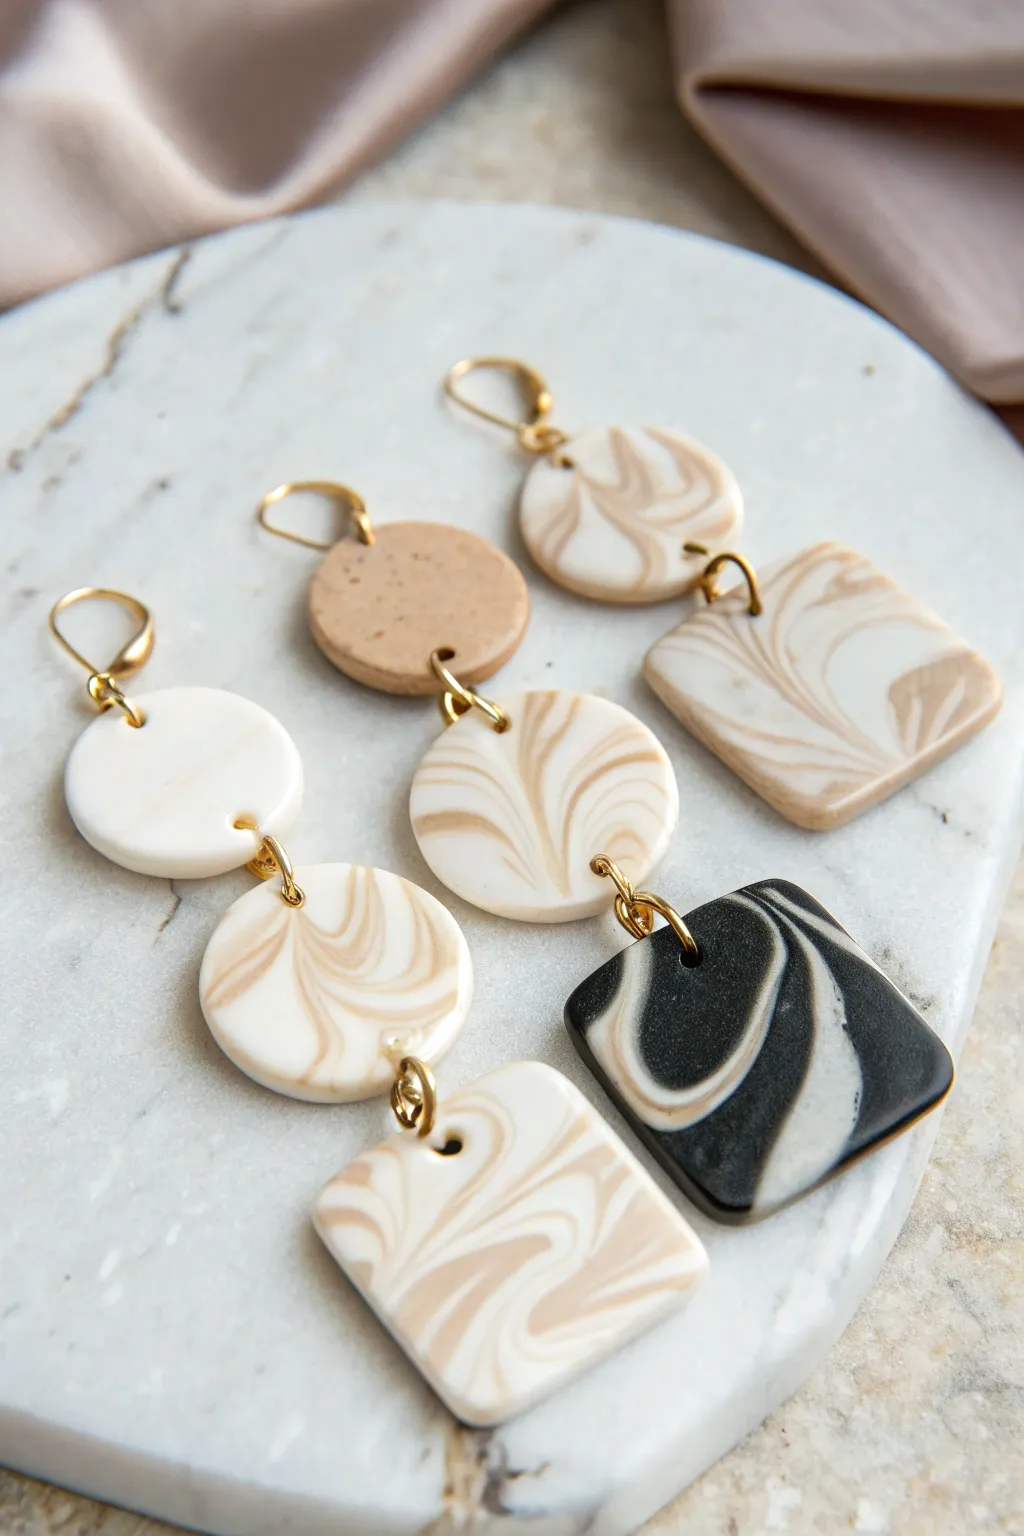
Achieve a high-end boutique look with these sophisticated polymer clay earrings featuring a mesmerizing marble swirl effect. The combination of geometric shapes and organic stone-like patterns creates a modern, lightweight accessory perfect for any occasion.
Step-by-Step Tutorial
Materials
- Polymer clay (white, beige/tan, black)
- Acrylic rolling pin
- Tissue blade or clay slicer
- Shape cutters (small and medium circles, medium squares/rounded squares)
- Hand drill or pin vibe
- Jump rings (gold)
- Earring hooks (gold, kidney wire style)
- Jewelry pliers (flat nose and round nose)
- Baking sheet and parchment paper
- Sandpaper or buffing tool (optional)
Step 1: Creating the Marble Slabs
-
Condition the Clay:
Start by thoroughly conditioning your white, beige, and black clay separately until they are soft and pliable. This prevents cracking and ensures smooth blending. -
Form the Base Logs:
Roll each color into several long, thin snakes. For the beige/white marble, you’ll want a ratio of about 60% white to 40% beige. For the black/white contrast piece, use roughly equal parts. -
Twist and Combine:
Group your chosen color logs together and twist them into a single larger candy-cane rope. Fold this rope in half and twist again. Repeat this twisting and folding process 3-4 times, but be careful not to over-mix, or the colors will turn muddy instead of distinct swirls. -
Compress into a Ball:
Roll the twisted rope into a tight ball. This helps mesh the seams together before flattening. -
Roll the Slab:
Using your acrylic roller, flatten the ball onto your work surface. Roll it out to an even thickness, approximately 3mm to 4mm. I find that rotating the clay as I roll helps keep the swirl pattern organic and multi-directional. -
The Speckled Variation:
For the solid beige top pieces seen in the middle pair, simply condition the beige clay and mix in a tiny pinch of black pepper or craft sand for a subtle speckled texture before rolling it out.
Muddy Colors?
If your swirl looks grey or muddy, you over-mixed the clay. Stop twisting as soon as you see distinct lines. You want ‘streaks’ not a blend.
Step 2: Cutting and Baking
-
Plan Your Cuts:
Look at your marble slab and identify the areas with the most interesting swirl patterns. Position your cutters over these ‘hero’ spots for the best visual impact. -
Cut the Shapes:
Press your cutters firmly into the clay. For the design shown, you will need a mix of medium circles, small connector circles, and rounded squares. wiggle the cutter slightly before lifting to ensure a clean release. -
Smooth the Edges:
Before baking, gently run your finger along the cut edges of each piece to smooth down any rough clay burrs. This saves significant sanding time later. -
Pierce the Holes:
Use a needle tool or toothpick to poke holes where the jump rings will go. Make sure the hole is close enough to the edge for the ring to fit, but not so close that the clay tears. Alternatively, you can drill these after baking for more precision. -
Bake:
Arrange the pieces on a parchment-lined baking sheet. Bake according to your specific clay brand’s instructions (usually 275°F/130°C) for about 30-45 minutes. Cover with a foil tent to prevent white clay from scorching.
Step 3: Assembly
-
Cool and Finish:
Allow the pieces to cool completely. If any rough edges remain, lightly sand them with fine-grit wet/dry sandpaper or buff with a denim cloth. -
Drill (If needed):
If you didn’t pierce holes before baking, use a small hand drill or pin vise to create your connection points now. -
Open Jump Rings:
Use two pairs of pliers to twist your jump rings open sideways (never pull them apart). This maintains the circle’s tension. -
Connect the Tier:
Link your shapes together. For the 3-tier style, connect the top circle to the middle circle, and the middle to the bottom square using the gold jump rings. -
Attach Earring Hooks:
Finally, attach the kidney-style earring hook to the topmost clay piece. -
Final Adjustments:
Double-check that all jump rings are closed tightly and aligned properly so the earrings hang straight and forward-facing.
Gloss It Up
For a true polished stone look, coat the baked pieces in UV resin or a polyurethane gloss varnish to make the marble pattern pop and shine.
Enjoy styling these versatile, artistic earrings that look like real formed stone


Terrazzo Confetti Drop Earrings
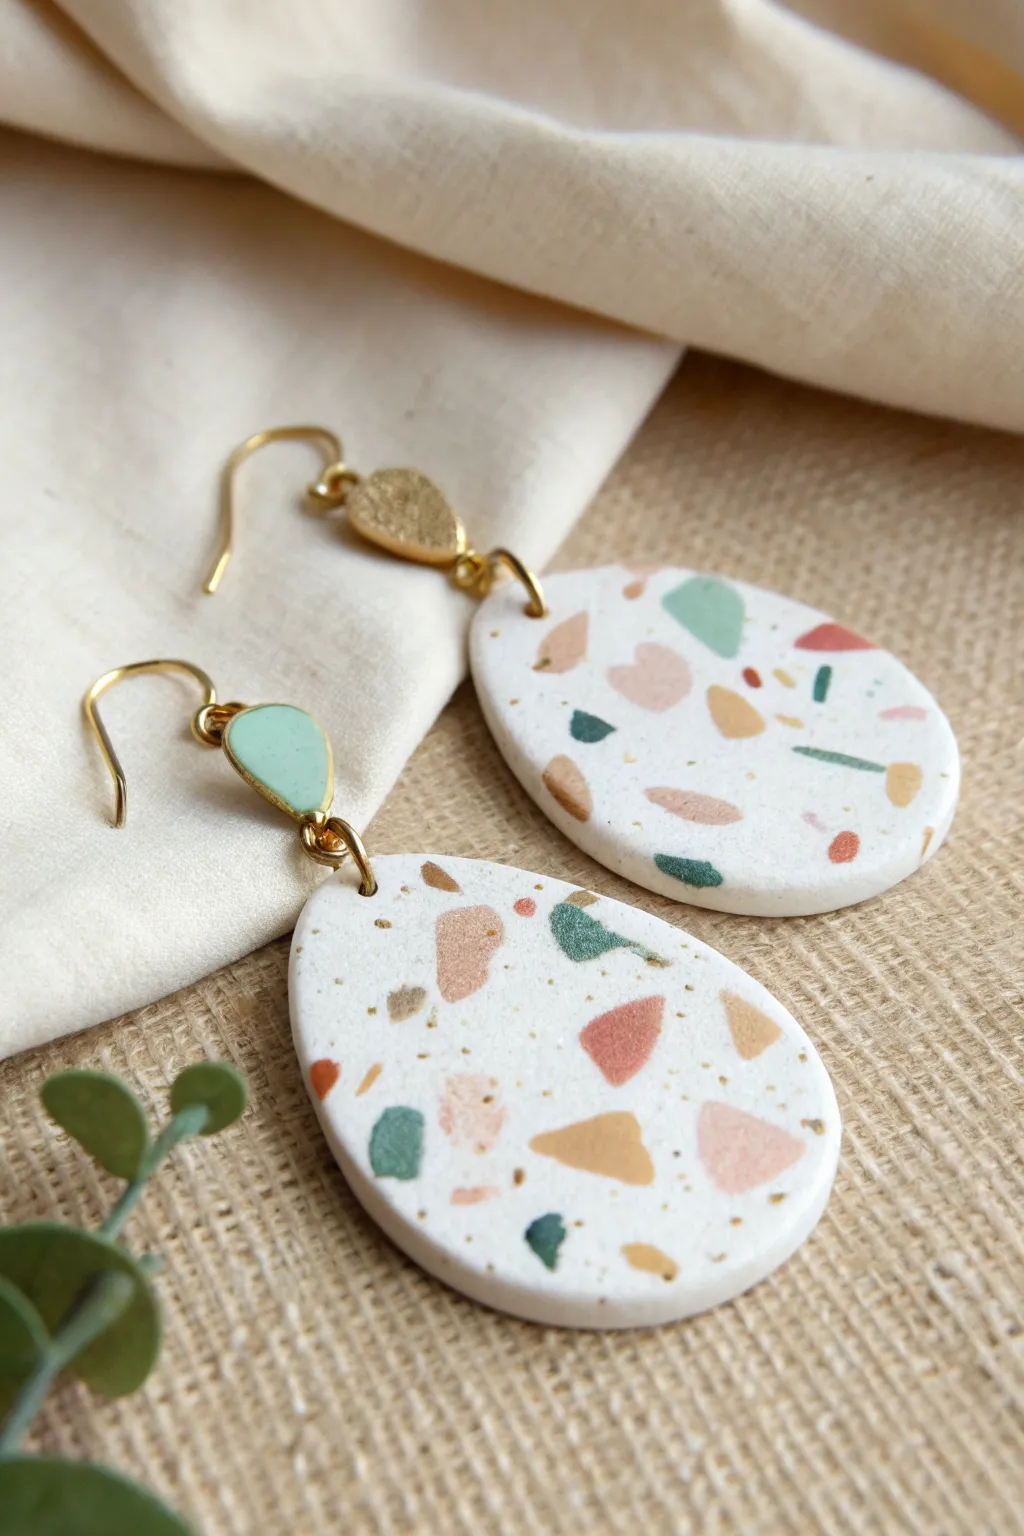
Achieve a chic, handcrafted look with these oversized teardrop earrings featuring a classic terrazzo pattern. The interplay of soft pastels against a crisp white background makes them a versatile statement piece for any season.
How-To Guide
Materials
- Polymer clay (White, Pastel Pink, Mustard Yellow, Teal, Sage Green, Terracotta)
- Acrylic rolling pin or pasta machine
- Tissue blade or X-Acto knife
- Teardrop clay cutters (large and small)
- Parchment paper or ceramic tile
- Hand drill or pin vise with small bit
- 400-1000 grit wet/dry sandpaper
- Gold jump rings (6mm)
- Gold fishhook ear wires
- Gold leaf or teardrop connector charms (optional)
- Jewelry pliers (round nose and flat nose)
- Oven
Step 1: Preparing the Terrazzo Chips
-
Condition the colors:
Start by thoroughly conditioning your colored clays (pink, mustard, teal, sage, terracotta). Roll each color into a thin sheet, about 1mm thick or the thinnest setting on your pasta machine. -
Bake the thin sheets:
Place these thin colored sheets on a tile and bake them for just 10-15 minutes at the temperature recommended on your clay package. Use a lower time since they are thin; we want them firm but not fully cured to brittle perfection yet. -
Chop the confetti:
Once cooled, take your tissue blade and chop the baked sheets into tiny, irregular shards. Aim for varied sizes—some tiny specks and some larger geometric chunks—to create a realistic terrazzo effect.
Clean Cuts Pro Tip
Is your clay sticking to the cutter? Dip your cutter into cornstarch or water before pressing it into the slab. The clay will release instantly without distorting your teardrop shape.
Step 2: Creating the Slab
-
Prepare the base:
Condition a large block of white clay. Roll it out into a thick slab, approximately 3-4mm thick. This will be the canvas for your chips. -
Scatter the chips:
Generously sprinkle your chopped chromatic chips over the white slab. Don’t overthink the placement; randomness is key to the aesthetic. -
Embed the pattern:
Place a sheet of parchment paper over the slab to prevent sticking. Use your acrylic roller to firmly press the chips down into the white base until the surface is flush and smooth. -
Check for gaps:
Peel back the paper. If you see large empty white spaces, add a few more chips and roll again until you have an even distribution of color.
Step 3: Cutting and Curing
-
Cut the shapes:
Use your large teardrop cutter to punch out two shapes from the most visually interesting parts of your slab. If you are making the matching clay connectors shown in the left earring, cut two small teardrops as well. -
Smooth the edges:
Before baking, gently run your finger distinctively along the cut edges to soften them and remove any ragged bits of clay. -
Full bake:
Bake the cut pieces on a ceramic tile or parchment-lined tray for the full duration recommended by the manufacturer (usually 30 minutes per 1/4 inch of thickness) to ensure durability.
Level Up: Texture
Before baking the final shapes, gently press a piece of coarse sandpaper or a toothbrush onto the white background areas to add a stone-like texture that contrasts with the smooth colored chips.
Step 4: Finishing and Assembly
-
Sanding:
Once fully cooled, submerge the pieces in a shallow bowl of water. Sand the surface and edges using wet/dry sandpaper, starting with 400 grit and moving to 1000 grit. This reveals the sharp edges of the chips and makes the white clay buttery smooth. -
Buffing:
Dry the pieces thoroughly and buff them with a soft denim cloth or a microfiber tower to create a soft, matte sheen. -
Drilling holes:
Mark a spot at the top center of each large teardrop. Using a hand drill, carefully bore a hole for the jump ring. Repeat for the small connector pieces if you made them. -
Prepare hardware:
Use two pairs of pliers to twist open your jump rings. Never pull them apart; twist one side toward you and one away to maintain the circle’s integrity. -
Connect the pieces:
Thread a jump ring through the large teardrop hole. Attach it to your chosen connector—either the small clay piece or a gold charm. -
Attach the hooks:
Attach the connector piece to the ear wire loop. Close all jump rings securely with your pliers.
Wear your new modern art earrings with pride or gift them to a friend who loves unique accessories


Botanical Texture Imprint Earrings
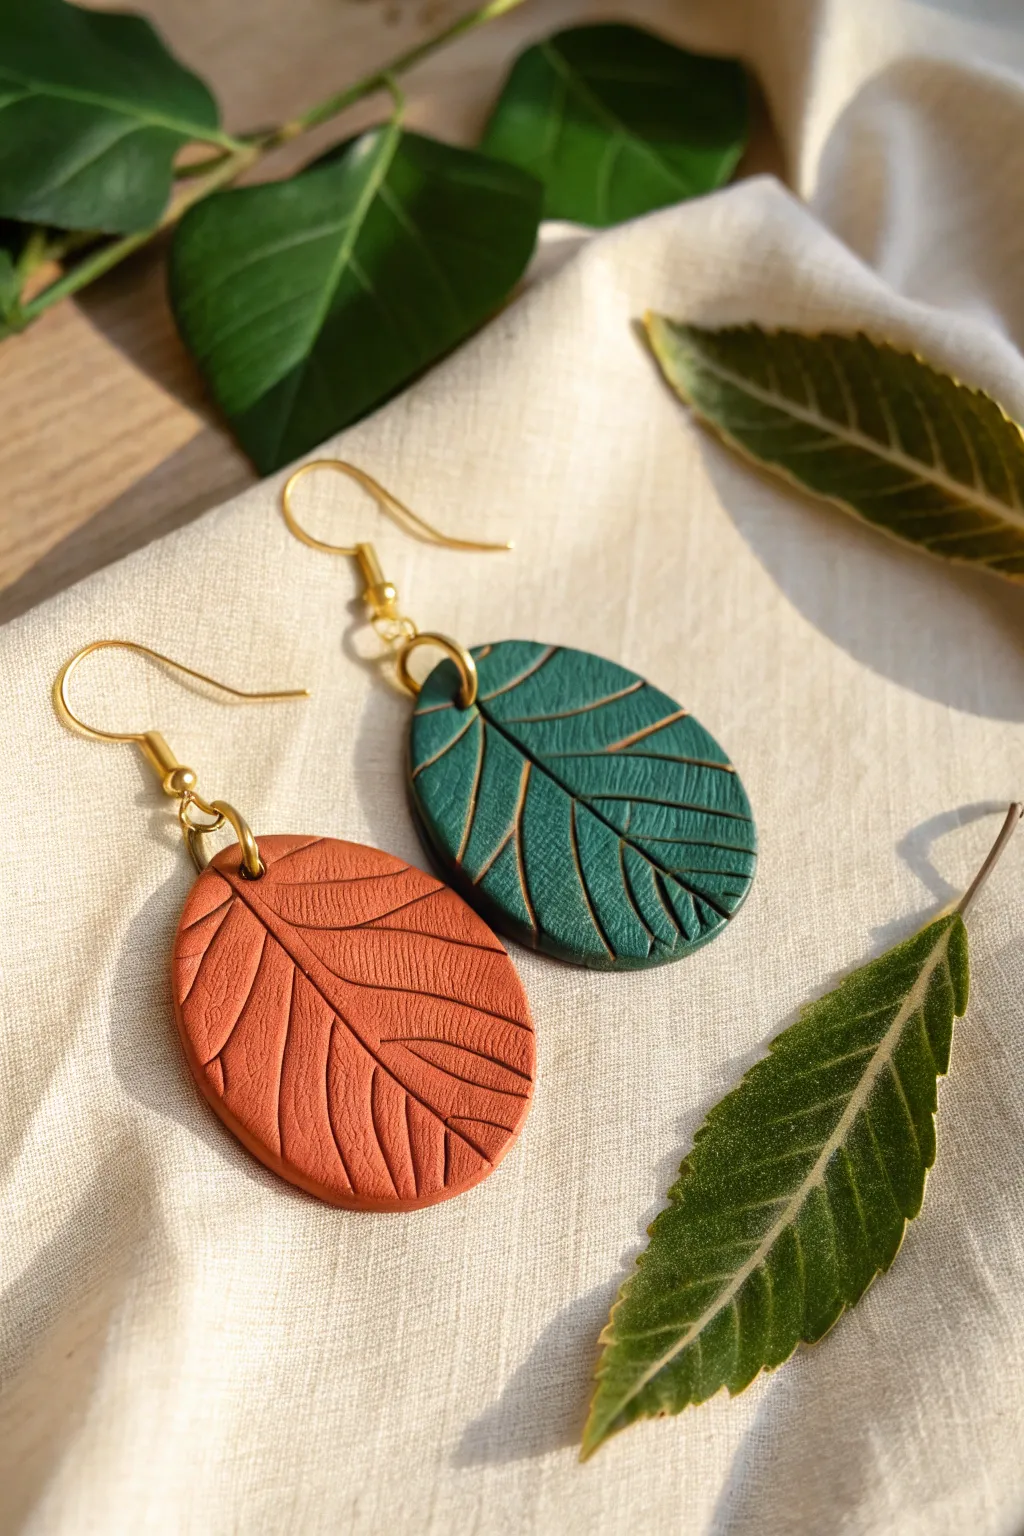
Capture the delicate beauty of nature with these textured oval earrings featuring lifelike leaf vein imprints. The contrast between the deep terracotta and forest green clay highlights the organic details, making them perfect for earthy, bohemian styles.
Detailed Instructions
Materials
- Polymer clay (terracotta orange and forest green)
- Fresh, deeply veined leaves (high relief like sage or mint works best)
- Oval clay cutter (approx. 1.5 – 2 inches)
- Acrylic rolling pin or pasta machine
- Ceramic tile or work surface
- Blade or craft knife
- Small round cutter or piercing tool (for jump ring holes)
- Gold acrylic paint
- Small paintbrush or soft cloth
- Paper towel or baby wipe
- 2 Gold earring hooks (French hook style)
- 4 Gold jump rings (6mm or 7mm)
- 2 Gold crimp ends or pinch bails (optional, but image suggests simple jump ring attachment)
- Jewelry pliers (flat nose and round nose)
- Fine-grit sandpaper (optional)
- Oven
Step 1: Preparing the Clay Canvas
-
Condition the Clay:
Begin by warming the terracotta and forest green polymer clay in your hands separately. Knead each color until it is soft, pliable, and free of any air bubbles. -
Roll Out Slabs:
Using your acrylic roller or pasta machine on a medium setting (approx. 3mm thick), roll out a sheet of each color. Place them on your ceramic tile or work surface. -
Select Your Botanicals:
Choose fresh leaves that aren’t too dry or brittle. Look for leaves with prominent, raised veins on the underside, as these will create the deepest and most detailed impressions.
Sticky Clay Problems?
If the clay sticks to the leaf, dust the leaf lightly with cornstarch or baby powder before rolling. Use a soft brush to remove excess powder after peeling.
Step 2: Texturing and Cutting
-
Imprint the Texture:
Place a leaf face down onto the clay slab, with the veined underside touching the clay. Use your roller to firmly—but gently—roll over the leaf once. Avoid rolling back and forth to prevent ghost images. -
Reveal the Design:
Carefully peel the leaf away from the clay to reveal the intricate vein pattern stamped into the surface. -
Cut the Shapes:
Position your oval cutter over the most interesting part of the textured area. Press down firmly to cut the shape. Repeat for the second color. -
Smooth the Edges:
Gently lift the cut shapes. Use your finger to lightly smooth the raw edges of the clay to remove any cutting burrs or sharpness. -
Create Attachment Holes:
Using a small piercing tool or a tiny round cutter, make a hole near the top center of each oval. Ensure the hole is large enough for your jump rings to pass through easily.
Step 3: Baking and Finishing
-
Bake the Pieces:
Place your clay pieces on a baking sheet or tile. Bake according to your brand of polymer clay instructions (usually around 275°F/135°C for 30 minutes). I like to tent foil over them to prevent scorching. -
Cool Down:
Once baked, turn off the oven and let the pieces cool partially inside before removing them to cool completely on a flat surface. -
Highlighting with Gold:
Dip your brush into a small amount of gold acrylic paint. Brush it into the deep crevices of the leaf veins. -
Wipe Back Excess:
Immediately use a slightly damp paper towel to wipe across the surface. This removes paint from the raised areas while leaving the gold shimmering inside the detailed veins. -
Dry the Paint:
Allow the paint to dry completely. If you prefer a matte look, you can leave it as is, or add a thin coat of varnish for protection.
Pro Tip: Depth Control
For sharper details, refrigerate the clay sheet for 10 minutes before stamping. Firmer clay holds fine impressions better than warm, soft clay.
Step 4: Assembly
-
Open Jump Rings:
Using two pairs of pliers, twist your gold jump rings open laterally (front-to-back motion, never pull them apart). -
Attach Components:
Thread an open jump ring through the hole in the clay oval. If you are using pinch bails, attach those first. -
Add Earring Hooks:
Slide the loop of the earring hook onto the jump ring before closing it. -
Secure the Ring:
Use your pliers to twist the jump ring back into a closed circle, ensuring the two ends meet perfectly so the hook doesn’t slip out. -
Final Check:
Give your new earrings a gentle shake to ensure all connections are secure and the dangle movement is fluid.
Enjoy wearing your unique botanical art pieces that carry a permanent touch of the outdoors

What Really Happens Inside the Kiln
Learn how time and temperature work together inside the kiln to transform clay into durable ceramic.
Layered Petal Flower Studs
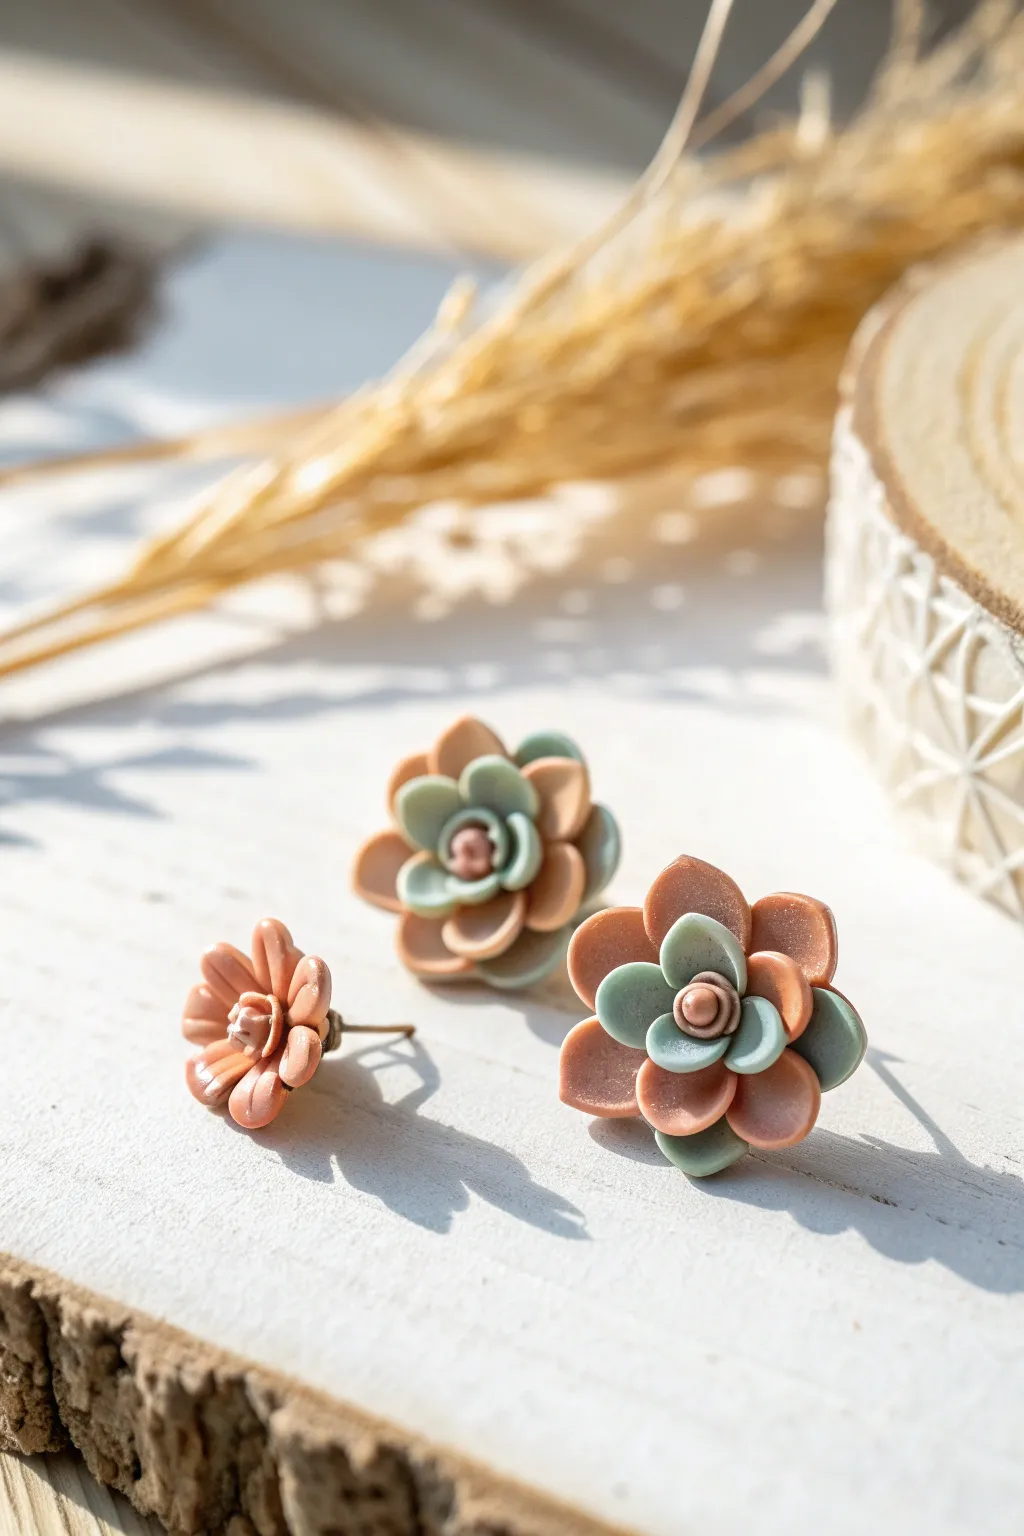
Embrace a soft, natural aesthetic with these delightful layered flower earrings, featuring alternating tiers of muted peach and sage green. The succulent-inspired design adds a touch of botanical charm to any outfit, while the compact stud style keeps them perfect for everyday wear.
Step-by-Step Tutorial
Materials
- Polymer clay in muted peach/terracotta
- Polymer clay in soft sage green
- Small circle cutters (approx. 5mm, 8mm, 10mm)
- Needle tool or toothpick
- Small ball tool
- Flat earring posts with clutch backs
- Strong craft glue (e.g., E6000) or liquid clay
- Clay roller or pasta machine
- Ceramic tile or baking sheet
- Oven
Step 1: Preparing the Clay
-
Conditioning:
Start by warming the polymer clay in your hands to condition it. Knead the peach and sage green blocks separately until they are soft, pliable, and free of cracks. -
Rolling:
Roll each color out into a sheet approximately 1.5mm to 2mm thick. You can use an acrylic roller or a pasta machine on a medium setting for consistent thickness.
Clean Edges
Before baking, lightly brush the clay with a little baby oil or cornstarch on your finger to smooth out any fingerprints or rough edges on the petals.
Step 2: Creating the Petals
-
Cutting shapes for large flowers:
For the two larger succulent-style studs, use your cutters to punch out small circles. For each flower, you’ll need about 5-6 peach circles (large), 4-5 sage green circles (medium), and 3-4 peach circles (small). -
Shaping petals:
Take a single clay circle and place it in your palm. Gently press one side of the circle into a slight point to create a teardrop shape. -
Flattening:
Use your thumb or a ball tool to flatten the rounded end of the teardrop, thinning the edge slightly to make it look like a delicate petal. Repeat this for all your cut circles.
Step 3: Assembling the Succulent Studs
-
Base layer:
On your ceramic tile, arrange five of the large peach petals in a circle, points meeting in the center. Gently press them together at the center point so they adhere. -
Middle layer:
Place four or five of the sage green petals on top of the peach layer. Position them in the gaps between the bottom petals for a natural, staggered look. -
Top layer:
Add the final layer using the smallest peach petals. Arrange three or four of them in the center, cupping them slightly upwards. -
Center detail:
Roll a tiny ball of peach clay and place it in the very center of the flower. Use a needle tool to poke a small indentation in its middle, imitating the flower’s stigma.
Pastel Powder
Brush soft pastel chalk powder onto the petal tips before baking. A darker terracotta on the peach tips adds a lovely sun-baked gradient effect.
Step 4: Creating the Small Accent Stud
-
Cutting shapes:
For the smaller, single-color stud shown, cut about 6 small circles from the peach clay. -
Forming the flower:
Shape them into teardrops as before. Arrange them in a single circular layer, pressing the points together firmly in the center. -
Texturing:
Use your needle tool to press a gentle groove down the center of each petal for added dimension. Add a tiny center ball of clay, detailed with your needle tool.
Step 5: Baking and Finishing
-
Baking:
Preheat your oven according to the clay manufacturer’s instructions (usually around 230°F to 265°F). Bake the clay pieces on the tile for about 30 minutes to ensure durability. -
Cooling:
Allow the flowers to cool completely inside the oven or on the counter before moving them. They will harden fully as they cool. -
Attaching posts:
Apply a small dab of strong craft glue to the flat pad of an earring post. Press it firmly onto the back of a baked flower. -
Securing with clay (optional):
I prefer to add extra security here by placing a small, thin disk of raw clay over the glued post back and baking the earrings again for 15 minutes. If just gluing, let the adhesive cure for 24 hours.
Once the glue is fully set, these charming floral studs are ready to add a subtle pop of color to your style
Minimal Pendant With Inlaid Shapes
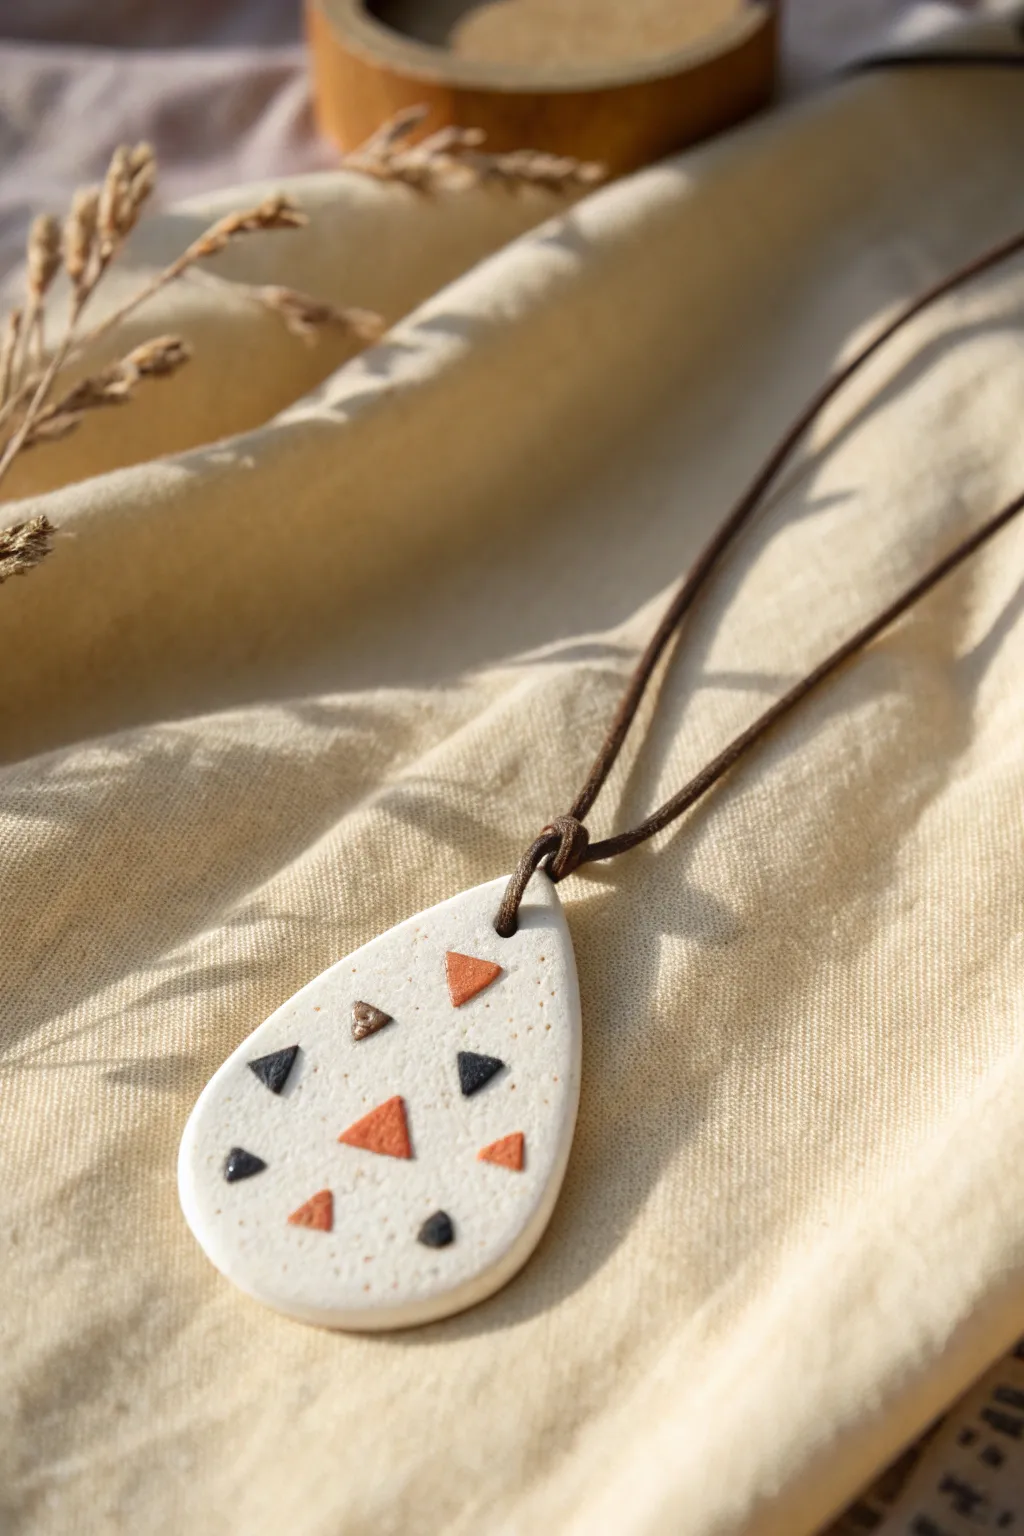
This elegant teardrop pendant combines a minimal aesthetic with a playful terrazzo effect using geometric inlays. The speckled stone-effect base adds a natural, earthy feel that contrasts beautifully with the sharp triangles of orange, black, and bronze.
Detailed Instructions
Materials
- Polymer clay in ‘Granite’ or speckled white stone effect
- Polymer clay scraps in terracotta orange, black, and metallic bronze
- Teardrop-shaped cutter (approx. 2 inches)
- Acrylic roller or pasta machine
- X-Acto knife or sharp blade
- Needle tool or small drill bit
- Fine grit sandpaper (400-800 grit)
- Brown waxed cotton cord or leather cord
- Parchment paper or ceramic tile for baking
- Gloss glaze (optional)
Step 1: Preparing the Base
-
Condition the base clay:
Begin by thoroughly conditioning your granite or speckled white polymer clay. Knead it in your hands until it is pliable and warm to prevent cracking later. -
Roll the sheet:
Roll out the conditioned clay into an even sheet. You want a substantial thickness for a pendant, roughly 4mm to 5mm thick. Ensure the surface is smooth and free of fingerprints. -
Cut the shape:
Place your teardrop cutter onto the clay sheet and press down firmly. If you don’t have a cutter, you can print a teardrop template, place it on the clay, and carefully trace around it with your X-Acto knife. -
Smooth the edges:
Gently lift the pendant shape. Use your finger to softly rub the edges, smoothing out any rough spots or drag marks left by the cutter.
Step 2: Creating the Inlays
-
Prepare the colored clays:
Condition small amounts of your accent colors: terracotta orange, black, and metallic bronze. You only need tiny amounts for this detail work. -
Roll thin sheets:
Roll these accent colors very thinly, much thinner than your base pendant. Aim for about 1mm thickness. -
Cut triangles:
Using your sharp blade, cut various sizes of small triangles from the colored sheets. They don’t need to be uniform; a mix of scalene and equilateral triangles adds visual interest. -
Plan the arrangement:
Before pressing them down, lay the triangles gently onto the clay pendant to test your composition. Aim for a balanced but random scattering, leaving plenty of negative space. -
Embed the shapes:
Once happy with the placement, gently press each triangle into the base clay. To make them flush, cover the pendant with a piece of parchment paper and roll over it gently with your acrylic roller until the surface feels unified.
Clean Cuts Matter
For the crispest triangles, put your rolled accent clay sheets in the fridge for 10 minutes before cutting. Cold clay resists dragging and keeps sharp points.
Step 3: Finishing Touches
-
Create the hole:
Use a needle tool or a straw to pierce a hole near the top point of the teardrop. Make sure it’s wide enough to accommodate your chosen cord. -
Final smooth:
Do a final check for lint or fingerprints. I like to use a tiny bit of baby oil on my finger to smooth away any last imperfections before baking. -
Bake:
Place the pendant on a ceramic tile or parchment-lined baking sheet. Bake according to your specific clay brand’s instructions (usually 275°F/130°C for 30 minutes per 1/4 inch of thickness). -
Cool and sand:
Let the piece cool completely. Use fine-grit sandpaper under running water to gently sand the edges and surface for a professional, matte smoothness. -
Assemble necklace:
Cut a length of brown cord. Thread it through the pendant hole and tie a simple loop knot just above the pendant to secure it, as seen in the photo. -
Tie the closure:
Finish the necklace by tying adjustable sliding knots on the ends of the cord, or attach a clasp if preferred.
Add Subtle Texture
Before baking, gently dab the surface with a coarse sponge or toothbrush. This enhances the ‘stone’ look and hides any accidental fingerprints.
Now you have a stunning, modern piece of jewelry that looks like real stone but carries comfortably light.


The Complete Guide to Pottery Troubleshooting
Uncover the most common ceramic mistakes—from cracking clay to failed glazes—and learn how to fix them fast.
Mini Charm Keychains and Bag Tags
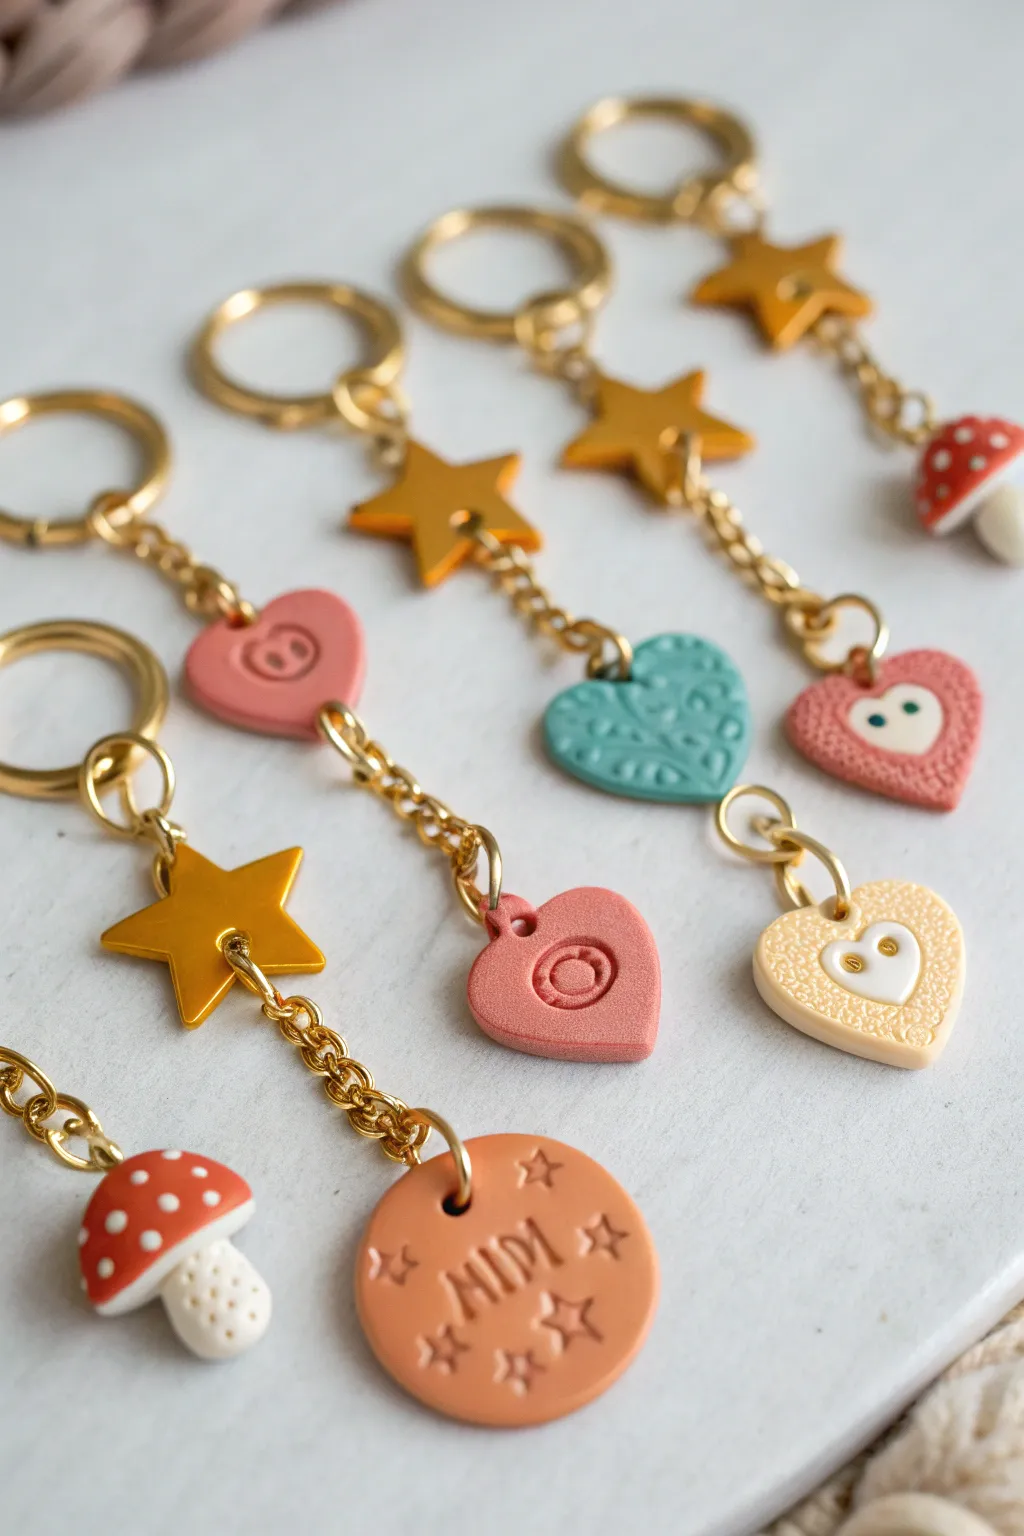
Create a delightful collection of dangling accessories that combine playful shapes like mushrooms, hearts, and stars with elegant gold hardware. These customized polymer clay keychains are perfect for adding a pop of personality to your keys or gifting to friends.
Step-by-Step Tutorial
Materials
- Polymer clay in assorted colors (terracotta, cream, teal, red, mustard yellow)
- Small clay cutters (star, heart, circle shapes)
- Texture sheets or stamps (lace, floral patterns)
- Letter stamps (optional for personalization)
- Dotting tool or small ball stylus
- Gloss glaze or polyurethane varnish (optional)
- Gold-tone keyrings with lobster claps
- Gold-tone jump rings (6mm and 8mm)
- Gold-tone chain segments (approx. 1-2 inches each)
- Jewelry pliers (flat nose and chain nose)
- Needle tool or toothpick
- Rolling pin or pasta machine
Step 1: Shaping the Charms
-
Conditioning the clay:
Start by warming the clay in your hands and kneading it until it is soft and pliable. Roll each color out into slabs approximately 3-4mm thick using a rolling pin or pasta machine for evenness. -
Cutting basic shapes:
Using your small cutters, punch out your desired shapes. For the design shown, you will need several stars in mustard yellow, hearts in pink, teal, and cream, and circles for name tags. -
Creating the mushrooms:
To make the 3D mushrooms, roll a small ball of white clay into a thick stem shape. Mold a red cap by shaping a flattened hemisphere and pressing it gently onto the stem. Use a dotting tool to create indentation ‘spots’ on the white stem for texture. -
Adding mushroom details:
For the mushroom cap spots, roll tiny specks of white clay and press them flat onto the red cap. Smooth them down gently so they adhere but remain slightly raised.
Step 2: Texturing and Detailing
-
Imprinting patterns:
Take your texture sheet or a patterned stamp and press it firmly into the teal and cream heart cutouts before baking. This adds that intricate, lace-like surface interest seen in the photos. -
Adding face details:
For certain hearts, press a smaller heart cutter gently into the center to create an outline without cutting through. Alternatively, add small clay eyes or use a tiny circular cutter to emboss simple smiley faces or button details. -
Personalizing the tag:
If making the round tag, use letter stamps to press a name like ‘MIMI’ into the center. Use a small star tool to stamp decorative stars around the name for a whimsical touch. -
Piercing holes:
Before the clay hardens, use a needle tool or toothpick to create a hole at the top of each charm. Ensure the hole is large enough for your jump rings to pass through, and wiggle the tool slightly to widen it.
Jump Ring Rescue
If jump rings keep falling off the clay, your hole might be too close to the edge. Drill a new hole slightly lower using a small hand drill on the baked clay.
Step 3: Baking and Assembly
-
Baking the pieces:
Arrange all your clay pieces on a standard baking sheet lined with parchment paper. Bake according to your specific brand of polymer clay’s instructions (usually around 275°F/135°C for 15-30 minutes). Let them cool completely. -
Finishing touch:
Once cool, you can choose to apply a thin layer of gloss glaze to the mushrooms or the stars if you want them to have a shiny finish, though a matte look works beautifully for the textured hearts. -
Preparing the chains:
Using your jewelry pliers, cut small lengths of gold chain. I find that varying lengths adds nice movement, so cut some shorter for the top charms and slightly longer for the bottom pendants. -
Connecting the top charm:
Open a jump ring using your two pairs of pliers (twist sideways, don’t pull apart). Thread it through the top charm (like a star or heart) and attach it to the key ring base. Close the ring securely. -
Attaching the chain:
Attach one end of your chain segment to the bottom of the first charm using another jump ring. If your first charm doesn’t have a bottom hole, attach the chain directly to the same top jump ring so it dangles behind or beside the top charm. -
Adding the focal pendant:
Attach the main pendant (the mushroom, large heart, or name tag) to the bottom of the chain using a final sturdy jump ring. Ensure all rings are closed tightly so pieces don’t slip off.
Add Some sparkle
Brush a tiny amount of gold mica powder onto the textured parts of the clay (like the star stamps or lace patterns) before baking to highlight the relief.
Clip your new handmade charms onto your tote bag or keys to enjoy a bit of handcrafted joy every day
Kawaii Animal Blob Figurines
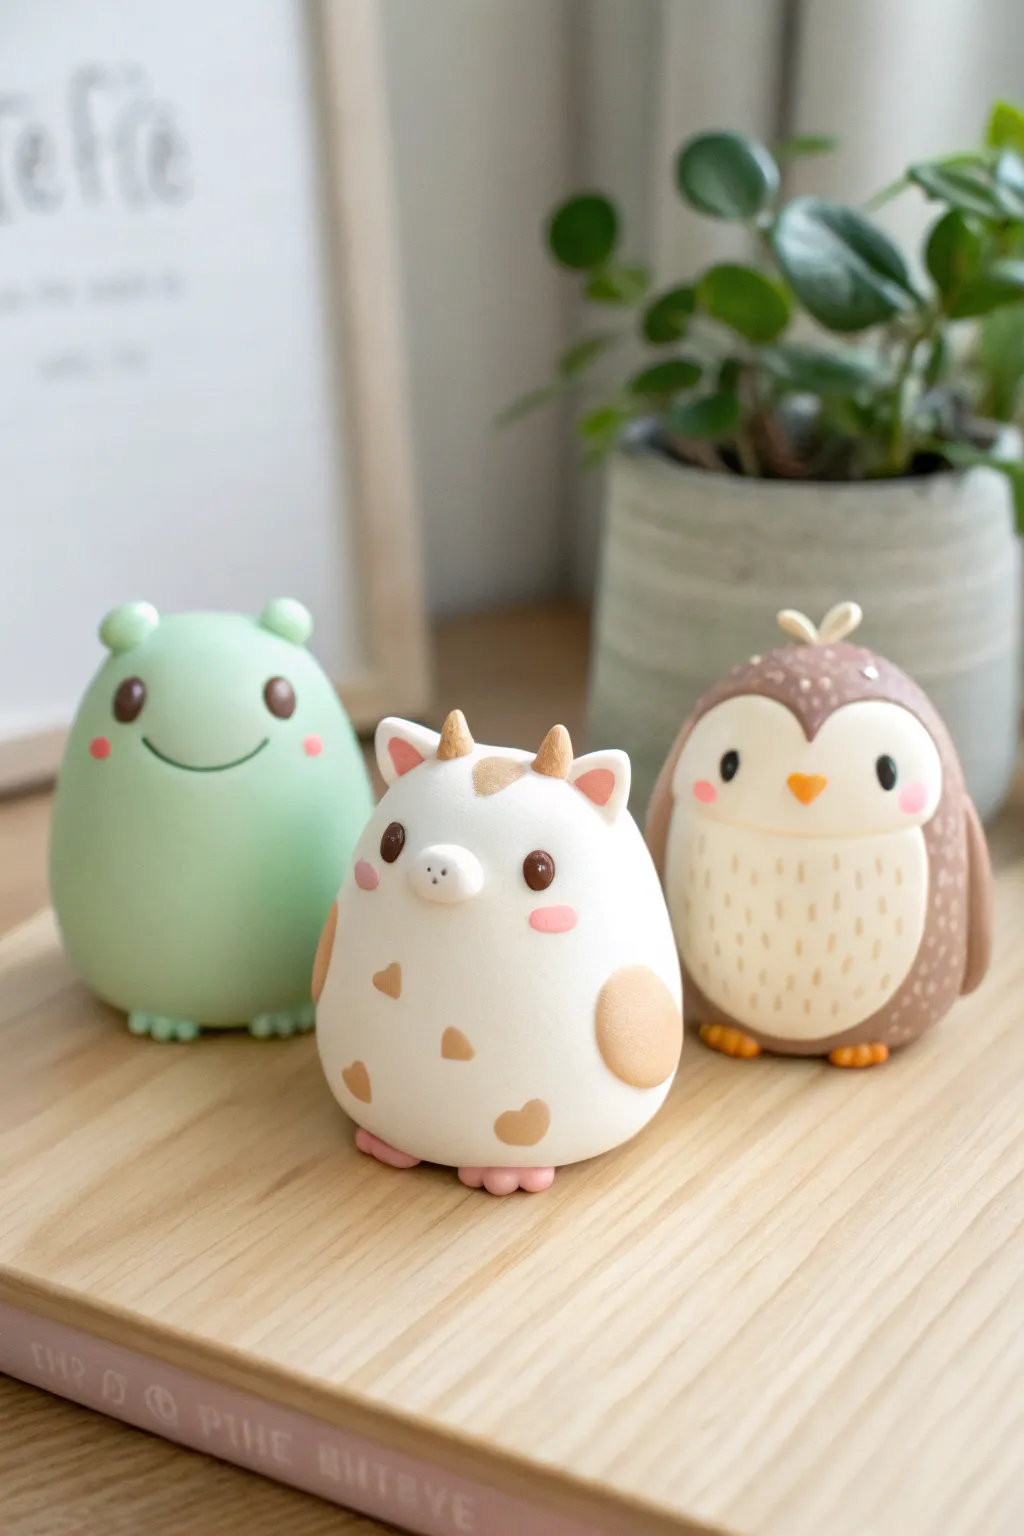
These delightfully chubby figurines—a frog, a cow, and an owl—transform simple egg-shaped lumps of clay into charming desk companions. With their smooth matte finish and minimalist features, they are perfect for beginners looking to master basic shaping and expression.
Step-by-Step Guide
Materials
- Polymer clay in pastel green, white, light brown/tan, dark brown, and pink
- Basic sculpting tools (dotting tool, needle tool)
- Acrylic roller or pasta machine
- Soft pastel chalks (for blushing cheeks)
- Small soft brush
- Baking sheet and parchment paper
- Oven (per clay manufacturer instructions)
- Matte varnish (optional)
Step 1: Base Shaping
-
Condition the Clay:
Begin by thoroughly kneading your green, white, and light brown clay separately until they are warm and pliable. This prevents cracks during baking. -
Form the Body Blobs:
Roll three balls of clay—one green (frog), one white (cow), and one light brown (owl). Each should be roughly the size of a golf ball or slightly larger. -
Refine the Shape:
Gently taper the top of each ball while flattening the bottom against your work surface. You want a stable, egg-like shape that is slightly wider at the base than at the top.
Sticky Fingerprints?
If you notice fingerprints on your smooth blobs, lightly brush the raw clay with a little baby oil or cornstarch before baking to smooth them out completely.
Step 2: Sculpting the Frog
-
Add Eyes and Cheeks:
Roll two tiny balls of dark brown clay for eyes and press them flat onto the face. Add two smaller pink distinct circles for cheeks just below the eye line. -
Create the Smile:
Use a needle tool or a flexible blade to gently impress a wide, U-shaped smile between the cheeks. -
Froggy Features:
Roll two small balls of green clay and attach them to the very top of the head for eye bumps. For feet, flatten two small green balls at the base and use a knife tool to mark three little toes on each.
Step 3: Sculpting the Cow
-
Spotted Details:
Take tiny pinched pieces of light tan clay and flatten them randomly onto the white body to create spots. Gently roll the body in your hands again to smooth these spots flush with the surface. -
Facial Features:
Add dark brown eyes and pink cheeks similar to the frog. For the snout, flatten a small oval of white clay, press it onto the face, and use a needle tool to poke two nostril holes. -
Ears and Horns:
Form two small white triangles for ears and attach them to the sides of the head. Add pink centers if desired. Roll two tiny cones of tan clay and place them between the ears for horns. -
Hooves:
Create four tiny pink flattened ovals for the feet. Attach two peeking out from the front bottom edge and two at the back for stability.
Make Them Functional
Before baking, slice a deep horizontal slit across the very top (or back) of the figures to turn these cute statues into functional photo or card holders.
Step 4: Sculpting the Owl
-
Face Plate:
Roll a disk of cream or very light beige clay. Press it onto the front of the brown body, shaping the top edge into a heart-like curve (the widow’s peak). -
Feather Texture:
Using a needle tool, create short, vertical dashed lines across the cream belly area to mimic chest feathers. -
Wings and Feet:
Flatten two teardrop shapes of brown clay and attach them to the sides of the body as wings. Add two small orange clay feet at the base, marking toes with a knife tool. -
Beak and Tuft:
Place a tiny orange triangle between the eyes for the beak. Add a small tuft of cream clay on top of the head, shaped like two little leaves.
Step 5: Finishing Touches
-
Blushing:
Before baking, scrape a little pink pastel chalk into a powder. Use a soft brush to gently dust rosy cheeks onto the figures for a softer look than clay circles provide. -
Bake:
Place your trio on parchment paper and bake according to your clay package’s directions (usually 230-275°F for 15-30 minutes). -
Cool and Varnish:
Let them cool completely in the oven. If you want durability minus the shine, apply a thin layer of matte varnish to protect your work.
Now you have a trio of adorable friends ready to brighten up any shelf or workspace

TRACK YOUR CERAMIC JOURNEY
Capture glaze tests, firing details, and creative progress—all in one simple printable. Make your projects easier to repeat and improve.
Kawaii Food Miniatures
This adorable kawaii donut features soft pink icing, a happy little face, and a sprinkling of colorful fun. It makes for a sweet keychain or zipper pull that adds a touch of whimsy to your everyday accessories.
Step-by-Step Tutorial
Materials
- Tan or beige polymer clay (dough color)
- Light pink liquid polymer clay (or pink clay mixed with liquid clay softener)
- Black polymer clay (tiny amount)
- Assorted polymer clay sprinkles (pre-baked bits of colored clay)
- Round clay cutter (approx. 1-1.5 inches)
- Small round cutter or straw (for the donut hole)
- Dotting tool or ball stylus
- Needle tool
- Eye pin or screw eye
- Gloss glaze (polyurethane or resin)
- Keychain loop and jump ring
- Baking tile or parchment paper
- Oven
Step 1: Shaping the Dough Base
-
Condition the Clay:
Begin by thoroughly conditioning your tan or beige clay until it is soft and pliable. Roll it into a smooth ball, ensuring there are no cracks or seams visible on the surface. -
Flatten the Form:
Gently press the ball down onto your work surface using your palm or an acrylic roller until it forms a thick, rounded disc. You want it to look puffy, like a raised yeast donut, not flat like a cookie. -
smooth the Edges:
Use your fingers to gently round off the edges of the disc. The goal is to create a soft, organic shape that mimics real fried dough. -
Create the Donut Hole:
Take your smallest round cutter or a sturdy straw and press it directly into the center of the disc to remove the core. If the shape distorts slightly, gently nudging it back into a circle with your fingertips works perfectly. -
Refine the Inner Edge:
Use a ball tool or your little finger to smooth the sharp edges created by the hole cutter, blending them inward so the donut looks realistic. -
Add Texture (Optional):
For added realism, you can gently tap a toothbrush over the tan surface to mimic the texture of fried dough, avoiding the area where the icing will go.
Fixing Runny Icing
If your liquid clay is too runny and dripping too much, let it sit on a piece of paper for 10 minutes to leach out some plasticizer, or mix in a tiny bit of cornstarch to thicken it up.
Step 2: Icing and Decorating
-
Prepare the Glaze:
If you are using solid pink clay, mix it with liquid clay or clay softener until it reaches a sticky, frosting-like consistency. If using premade liquid clay, stir it well. -
Apply the Frosting:
Carefully spread the pink liquid clay over the top of your donut using a needle tool or toothpick. I like to let it drip slightly unevenly down the sides for a natural glazed look. -
Add the Sprinkles:
While the pink layer is still wet, carefully place your tiny polymer clay sprinkles onto the surface. Using tweezers helps with precise placement so you don’t smudge the icing. -
Insert the Hardware:
Insert an eye pin or screw eye into the top edge of the donut. Ensure it goes deep enough into the tan dough for a secure hold.
Step 3: Bringing It to Life
-
Create Eye Sockets:
Using a small ball tool, make two very shallow indentations in the pink icing where you want the eyes to sit. This helps keep the black clay in place. -
Add the Eyes:
Roll two impossibly tiny balls of black clay. Press them gently into the indentations you just made. Position them slightly wide apart for that classic kawaii aesthetic. -
Form the Smile:
Roll an extremely thin snake of black clay. Cut a tiny segment and curve it into a ‘U’ shape using a needle tool, then press it gently between the eyes. -
Initial Bake:
Place the donut on a tile or parchment paper and bake according to your clay manufacturer’s instructions (usually 275°F/135°C for 15-30 minutes). Let it cool completely. -
Glazing:
Once cool, apply a coat of gloss glaze over the pink icing area and the eyes. Avoid glazing the tan dough if you want to keep the matte texture of the bread. -
Assembly:
After the glaze is fully dry, attach your jump ring and keychain loop to the eye pin using jewelry pliers.
Pro Tip: Eye Sparkle
For extra cuteness, use a needle tip to add a microscopic dot of white acrylic paint to the upper corner of each black eye after baking. It brings the character to life instantly.
Now you have a sweet little companion to brighten up your keys or backpack
Mini Succulent Pots and Plant Minis
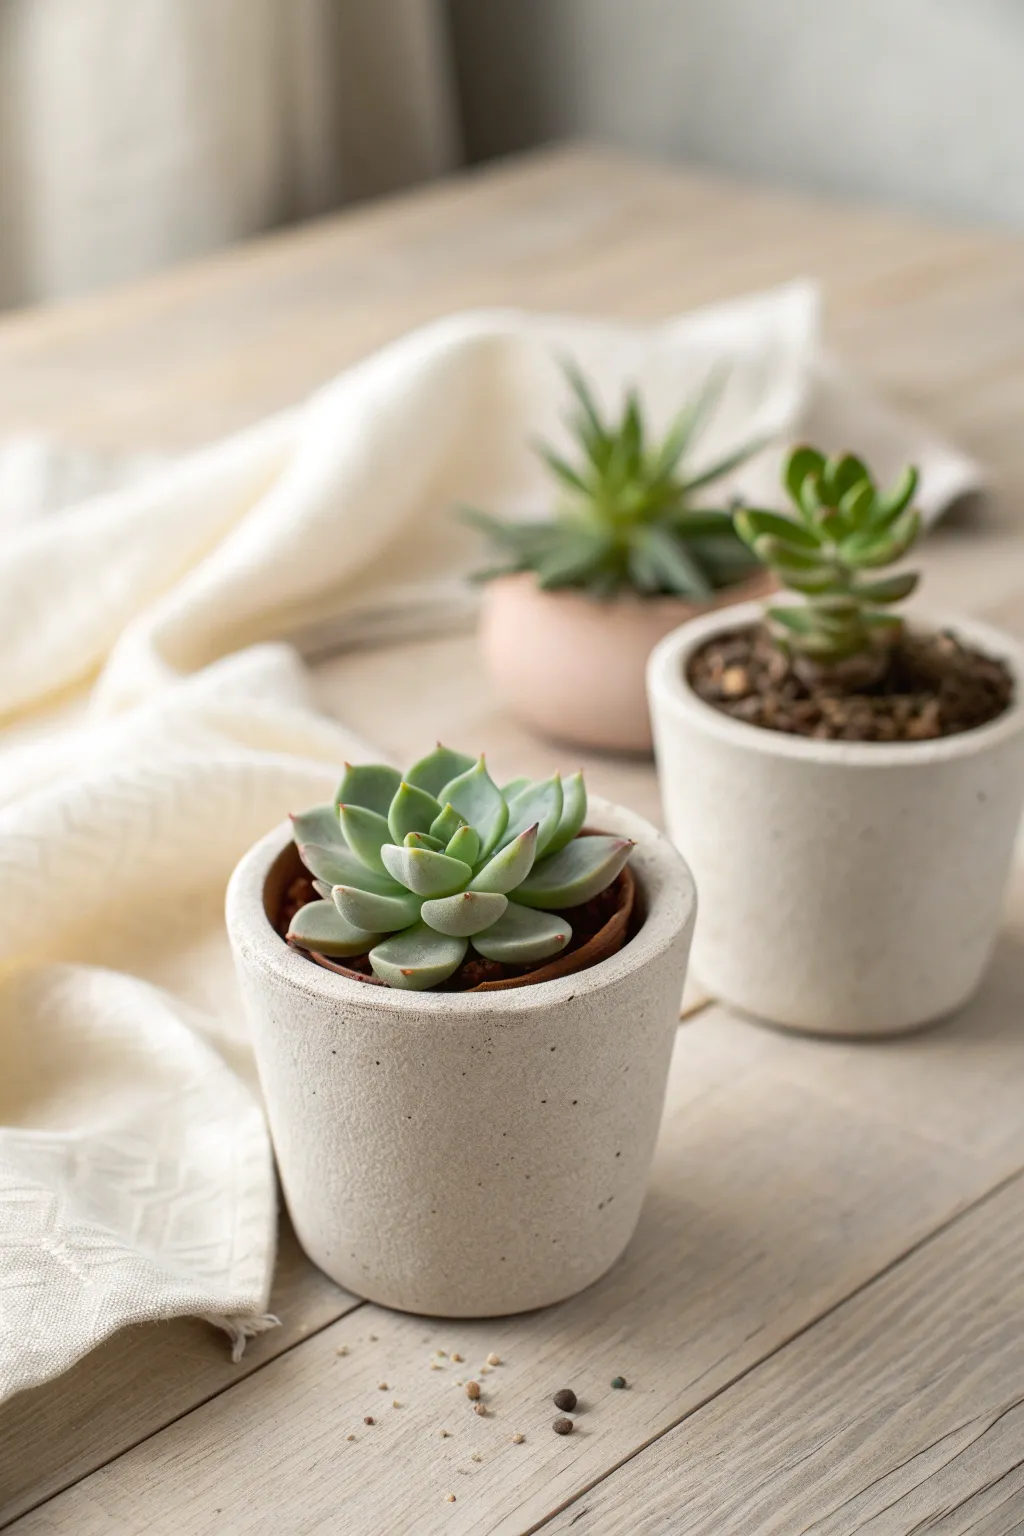
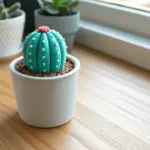
Bring a touch of greenery to your desk without the need for water or sunlight using these realistic polymer clay succulents. This project focuses on creating a convincing faux-concrete pot texture paired with a delicate, life-like echeveria rosette.
Step-by-Step Guide
Materials
- Polymer clay (white, translucent, granite/speckled grey effect)
- Polymer clay (various greens: moss, sage, mint)
- Red pastel chalk or acrylic paint (for blushing tips)
- Coarse sandpaper or a stiff toothbrush
- Liquid polymer clay (Fimo Liquid or Sculpey Bake & Bond)
- Small round cutter or bottle cap
- Detailing tools (needle tool, ball stylus)
- Dried coffee grounds or brown clay crumbs (for soil)
- Oven for baking
Step 1: Crafting the Concrete Pot
-
Mix the stone base:
Start by mixing white clay with a small amount of granite-effect or speckled grey clay. You want a very pale, off-white grey that mimics limestone or concrete. -
Form the pot shape:
Roll a ball of your stone mixture, roughly the size of a walnut. Flatten the bottom against your work surface to create a stable base. -
Hollow the vessel:
Use a ball tool or the handle of a paintbrush to press into the center of the ball, creating the inner cavity. Widen it gently by pinching the walls, aiming for a thick, sturdy rim rather than a delicate one. -
Texturizing the surface:
To get that gritty concrete look, tap a stiff toothbrush or a piece of crumpled aluminum foil all over the exterior. Don’t smooth it out; the imperfections are key. -
Pre-bake the pot:
Bake the pot alone according to your clay package instructions (usually 15 minutes is enough for this stage) to harden it before adding the delicate plant.
Realistic Soil Trick
Mix dried used coffee grounds with a bit of liquid polymer clay ‘syrup’. Apply this paste around the base of your plant before baking for perfect, gritty dirt texture.
Step 2: Sculpting the Echeveria
-
Creating the custom green:
Mix sage green clay with a significant amount of translucent clay. This gives the succulent leaves that slightly waxy, light-filtering quality real plants have. -
Forming the leaves:
Roll tiny teardrop shapes in varying sizes. You will need about 6 small ones for the center, 6 medium for the middle ring, and 8 larger ones for the outer ring. -
Flatten and shape:
Gently press each teardrop flat between your fingers. Pinch the pointed end slightly to create a sharp tip, which makes the rosette look crisp. -
Blushing the tips:
I like to scrape a little red pastel chalk into a powder. Dip a soft brush into the powder and lightly dust just the very tips of your leaves for a sun-stressed look. -
Prepare the pot base:
Take your cooled pot and fill it halfway with scrap clay. Top that with a layer of dark brown clay textured to look like soil, or mix liquid clay with dried coffee grounds for ultra-realism. -
Assembling the rosette:
Start from the outside. Press the largest leaves into the ‘soil’ in a circle, slightly overlapping them. -
Building the layers:
Add the medium ring of leaves inside the first, offsetting them so the tips sit in the gaps of the previous layer. -
Finishing the center:
Cluster the smallest teardrops tightly in the very center, pointing upwards to mimic new growth unfurling.
Level Up: Painted Patterns
After baking, use diluted white acrylic paint to splatter speckles on the pot, or hand-paint tiny geometric triangles around the rim for a boho-chic ceramic style.
Step 3: Final Touches and Baking
-
Adding stray soil:
Sprinkle a few tiny crumbs of baked brown clay or real sand around the base of the succulent to simulate loose potting mix. -
Final texture check:
Ensure no fingerprints have smoothed out your pot texture. If needed, re-tap the rim with your toothbrush. -
Final bake:
Bake the entire assembled piece again for the full recommended duration (usually 30 minutes per 1/4 inch of thickness) to cure the plant. -
Sealing (Optional):
Once cool, you can apply a matte varnish to the pot if you want extra protection, but leaving it raw keeps the stone texture more authentic.
Place your drought-proof miniature garden on a windowsill and enjoy the greenery that truly lasts forever
Moon Phase Tile Garland
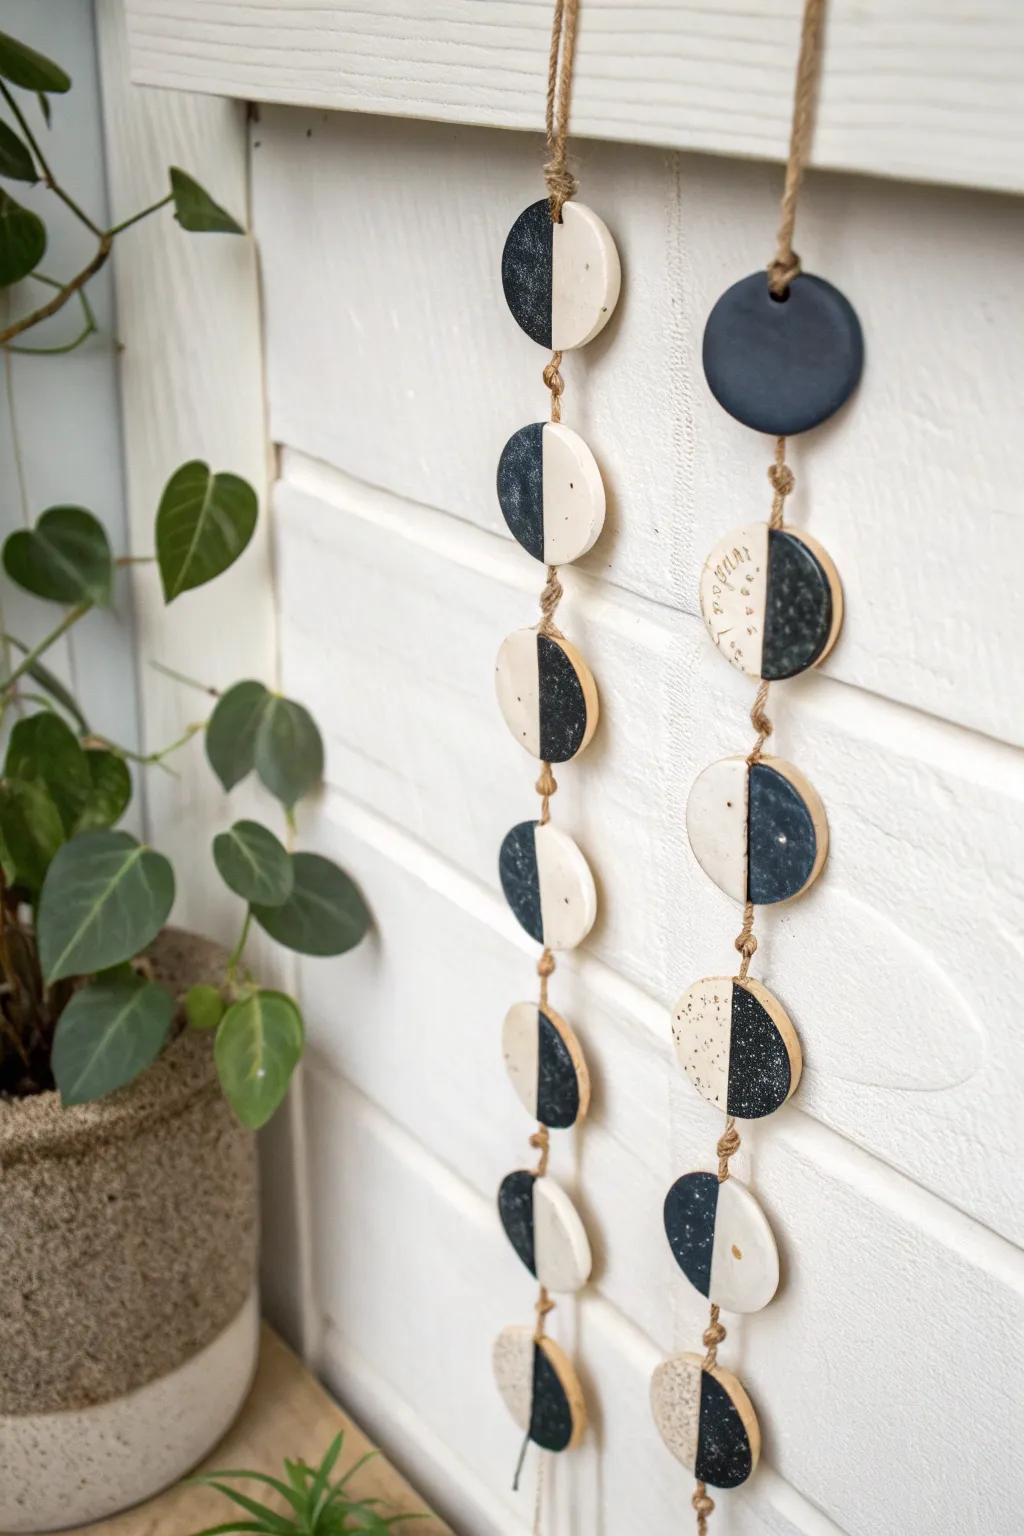
Bring the calming rhythm of the lunar cycle into your home with these minimalist moon phase garlands. Using simple polymer clay techniques and twine, you’ll create a striking vertical wall hanging that balances modern design with celestial charm.
How-To Guide
Materials
- Black polymer clay (granite or speckled effect works well)
- White or cream polymer clay
- Rolling pin or pasta machine
- Circular clay cutter (approx. 1.5 – 2 inches diameter)
- Sharp craft blade or tissue blade
- Needle tool or toothpick
- Twine or jute cord (thin)
- Parchment paper or baking tile
- Oven
- Sandpaper (optional)
- Acrylic paint (black and brown) – optional for speckling
- Old toothbrush – optional for speckling
Step 1: Preparing the Clay
-
Condition the clay:
Begin by kneading your black and white polymer clay separately until they are soft and pliable. This conditioning step is crucial to prevent cracks later. -
Roll out slabs:
Roll each color out into a flat sheet, aiming for a consistent thickness of about 1/8 to 1/4 inch. A pasta machine is perfect for uniformity, but a rolling pin with guide rings works just as well. -
Cut the circles:
Use your circular cutter to punch out an equal number of circles from both the black and white clay slabs. For the full garland shown, you might want 7-8 circles per strand.
Uneven Seams?
If the joined halves don’t stick well, apply a tiny drop of liquid polymer clay or ‘Bake and Bond’ to the cut edges before pressing them together.
Step 2: Creating the Phases
-
Plan your phases:
Lay out your circles on a work surface. Decide which will be full moons (solid color), new moons (solid black), and which will be split phases. -
Slice the circles:
For the split phases, take a black circle and a white circle. Use your sharp blade to cut them in half vertically perfect straight lines. -
Swap and join:
Take one black half and match it with a white half to form a complete circle. Gently press the cut edges together. You can lightly smooth the seam with your finger or a rubber clay shaper to bond them. -
Vary the ratios:
To create crescent or gibbous shapes instead of perfect half-moons, cut your circles off-center. Swap the larger black piece with a smaller white piece, or vice versa, ensuring the curves match up perfectly by using the same cutter as a template if needed.
Step 3: Adding Texture and Details
-
Add speckles (optional):
If your clay isn’t pre-speckled, I like to create a stone effect now. Dip an old toothbrush into slightly watered-down black or brown acrylic paint and flick the bristles over the white clay sections for a natural, pottery-like finish. -
Pierce holes:
Using a needle tool, poke a hole at the very top and very bottom of each circle. Ensure the hole is large enough for your twine to pass through easily. Wiggle the tool slightly to widen it. -
Bake carefully:
Transfer your moon discs onto a baking sheet lined with parchment paper. Bake according to your clay package’s specific temperature and time instructions. Let them cool completely before handling.
Golden Touch
After baking, paint the seam lines or the edges of the discs with gold leaf paint or a metallic marker for a luxurious, celestial finish.
Step 4: Assembly
-
Cut the twine:
Measure a length of jute twine roughly 1.5 times the desired length of your finished garland. It’s better to have extra length than to run short. -
Start at the bottom:
Tie a knot at the end of your twine. Thread the bottom-most moon disc onto the twine, passing the string through the holes. You can tie a knot below the disc to secure it, or just let it rest if threading through the back. -
Knotting technique:
Determine the spacing you want between discs (about 1-2 inches looks balanced). Tie a simple overhand knot in the twine where the bottom hole of the next disc will sit. -
Thread the next disc:
Thread the twine through the bottom hole of the next disc, up along the back of the disc, and out through the top hole. The disc should rest on the knot you just tied. -
Secure the top:
Tie another knot immediately above the top hole of the disc to keep it securely in place and prevent it from sliding up or down. -
Repeat the process:
Continue measuring, knotting, and threading subsequent discs until your full lunar cycle is assembled. -
Create a hanging loop:
Once the top disc is secured, tie a loop at the very end of the twine for easy hanging on a nail or hook.
Hang your moon phase garland in a sunny spot to enjoy the beautiful contrast of light and dark throughout the day
Marbled Trinket Dish
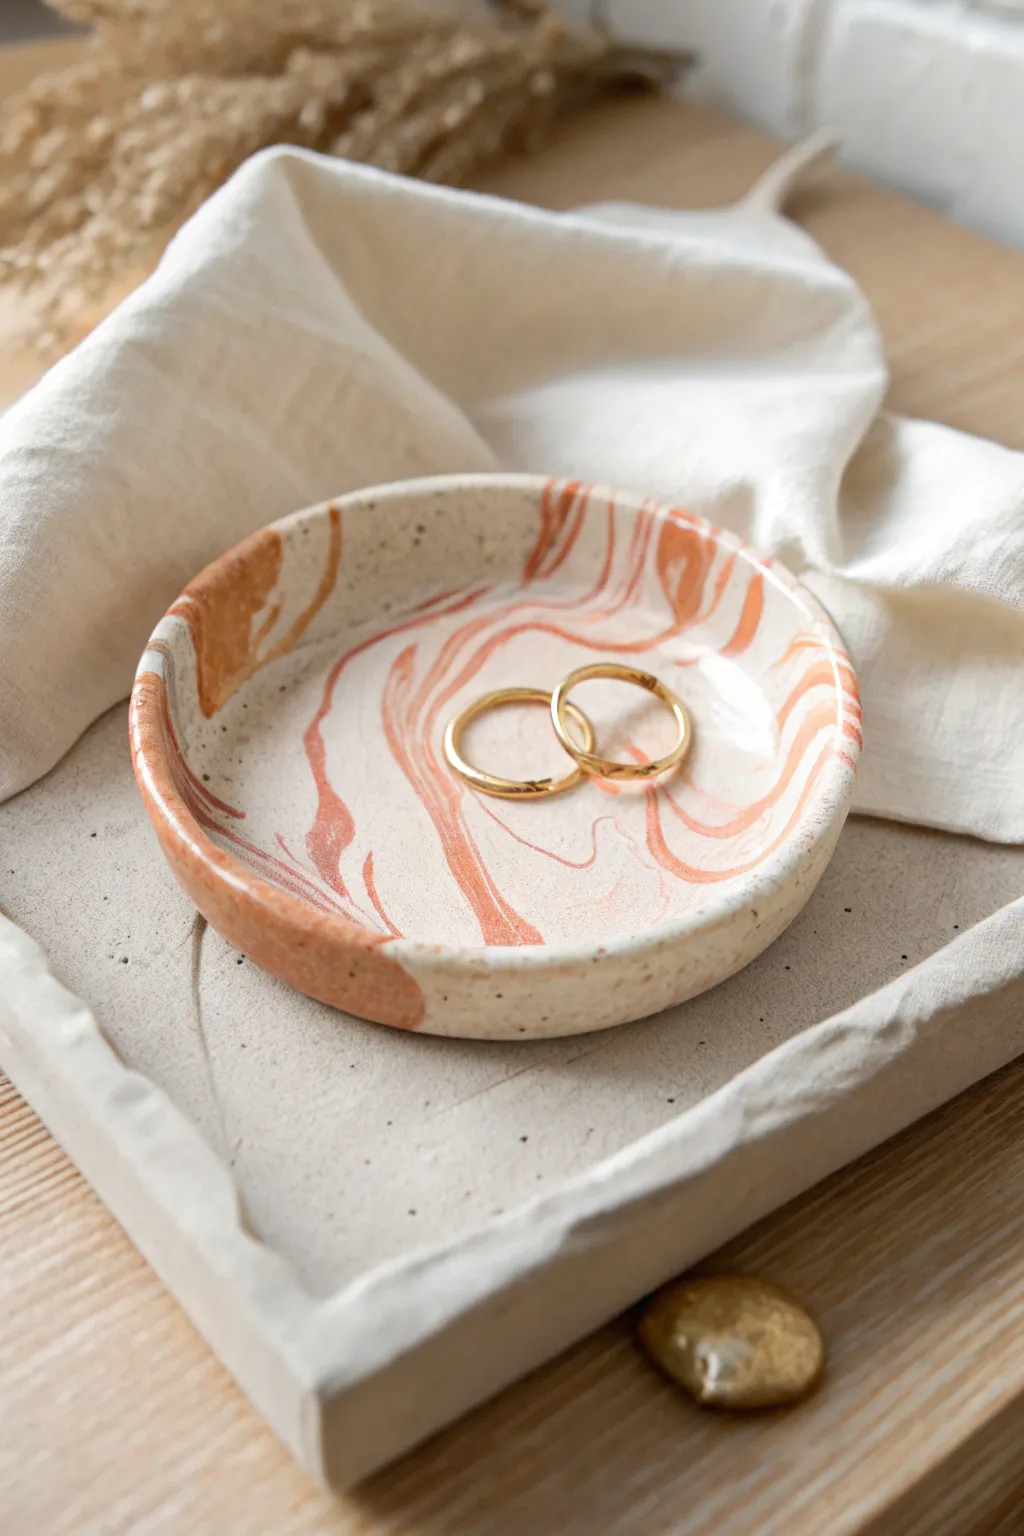
Create a sophisticated, minimalist home for your favorite rings with this marble-effect trinket dish. The warm terracotta veins swirling through speckled cream clay offer an organic, stone-like finish that looks professional yet is surprisingly simple to achieve.
Step-by-Step Tutorial
Materials
- Polymer clay (Speckled cream or granite)
- Polymer clay (Terracotta orange)
- Polymer clay (White – optional for lightening)
- Acryllic roller or pasta machine
- Circle cutter (approx. 4 inches) or a bowl to trace
- Craft knife
- Oven-safe bowl (for shaping)
- Fine-grit sandpaper (400-800 grit)
- Matte varnish or glaze (optional)
Step 1: Preparing the Clay
-
Condition the clay:
Begin by thoroughly kneading your speckled cream clay until it is soft and pliable. This base color will make up the majority of your dish, so prepare a larger amount of this compared to the accent color. -
Prepare the accent color:
Condition a smaller amount of terracotta clay. If the color feels too dark, mix in a tiny pinch of white to soften it, though the rich contrast works beautifully as is. -
Create ropes:
Roll the cream clay into a thick log, about 1 inch in diameter. Roll the terracotta clay into several much thinner snakes.
Step 2: Creating the Marble Pattern
-
Combine the colors:
Place the thin terracotta snakes lengthwise along the thick cream log. You can twist them slightly as you lay them down to encourage varied lines. -
Twist and fold:
Twist the entire log together like a candy cane until the colors start to merge. Then, fold the log in half and twist it again. Repeat this process 2-3 times. -
Form a ball:
Roll the twisted log into a smooth ball. Check the surface to ensure no air bubbles are trapped inside. -
Check the pattern:
I like to slice the ball in half with a tissue blade to reveal the cross-section pattern—this is often where the best marbling hides—and press the halves back together with the cut sides facing out.
Don’t Over-mix!
Stop twisting and collecting your clay sooner than you think. If you mix too much, the distinctive terracotta veins will muddy into a single solid peach color.
Step 3: Shaping the Dish
-
Roll out the slab:
Using your acrylic roller, flatten the ball into a smooth slab about 1/4 inch thick. Roll in different directions to keep the shape relatively circular and distribute the pattern evenly. -
Cut the circle:
Place your circle cutter or a small bowl onto the clay slab to determine your composition. Look for an area with a nice balance of swirls and negative space, then cut or trace your circle. -
Smooth the edges:
Gently run your finger along the cut edge of the circle to soften the sharp angle left by the cutter. This gives the finished piece a more refined, ceramic look. -
Form the curve:
Gently lift your clay circle and place it inside a shallow, oven-safe bowl. Press it down lightly so it takes on the curved shape of the bowl bottom.
Add Gold Accents
After baking, paint the very rim of the dish with liquid gold leaf or metallic acrylic paint for an elegant, high-end gilded edge.
Step 4: Baking and Finishing
-
Bake:
Place the bowl with the clay inside into your oven. Bake according to your polymer clay manufacturer’s instructions (usually around 275°F/130°C for 15-30 minutes). -
Cool down:
Let the dish cool completely inside the bowl before removing it. Removing it while warm can warp the shape. -
Sand the rim:
Once cool, use fine-grit sandpaper to smooth out any remaining roughness on the rim. Wet sanding (dipping the paper in water) prevents dust and gives a smoother finish. -
Seal (optional):
If you want to protect the surface or change the sheen, apply a thin layer of matte varnish. The piece in the image has a natural matte look, so you can skip this if you prefer the raw stone texture.
Your new trinket dish is now ready to hold your jewelry with style.
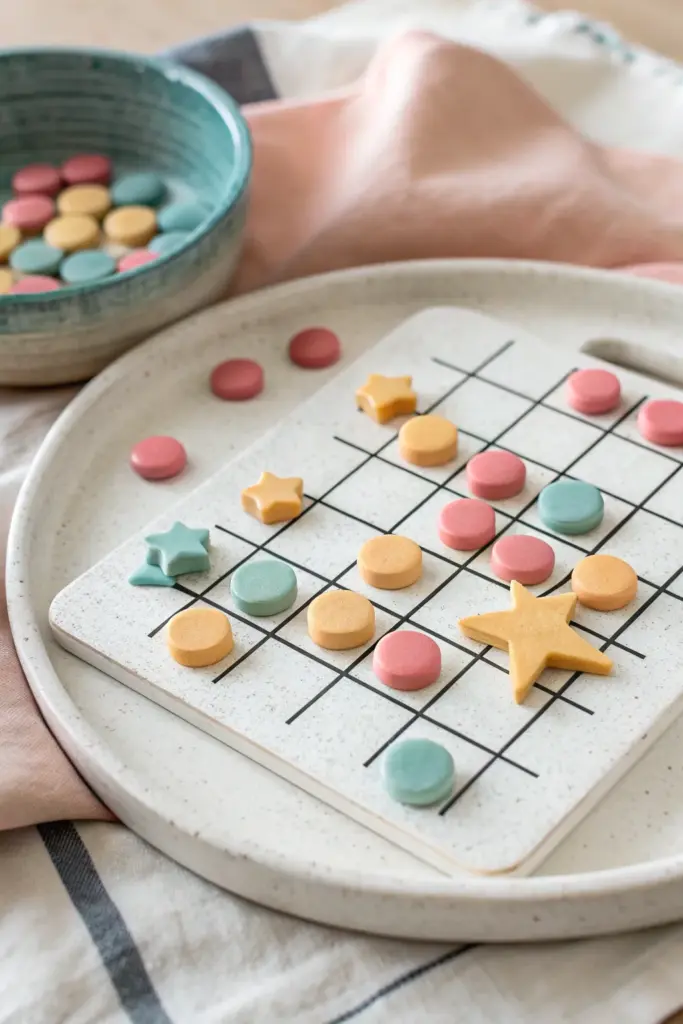
Cute Tabletop Game Pieces

Elevate your game night with a handmade tabletop set that doubles as chic decor. This project features a minimalist grid board crafted from speckled clay, paired with charming pastel dots and star-shaped game pieces for a playful, modern aesthetic.
Detailed Instructions
Materials
- Polymer clay (Speckled white/granite, pastel pink, mustard yellow, light teal)
- Acrylic roller or rolling pin
- Square clay cutter (approx. 4-5 inches) or craft knife
- Small circle cutter (approx. 0.5 inch)
- Small star cutter (approx. 0.5 – 1 inch)
- Black acrylic paint
- Fine liner brush
- Ruler
- Gloss or matte varnish (optional)
- Baking sheet and parchment paper
- Oven
Step 1: Creating the Game Board
-
Condition the base clay:
Start by thoroughly conditioning your speckled white or granite effect polymer clay. Knead it in your hands until it is soft, pliable, and free of any air bubbles. -
Roll out the slab:
Using an acrylic roller, roll the clay out into a flat, even sheet. Aim for a thickness of about 1/4 inch (6mm) to ensure the board is sturdy enough for play. -
Cut the square:
Place your square cutter onto the rolled slab and press down firmly to cut the shape. If you don’t have a large enough cutter, use a ruler and a craft knife to measure and cut a perfect square, approximately 5×5 inches. -
Smooth the edges:
Gently run your finger along the cut edges of the square to soften any sharpness or irregularities. This gives the finished piece a more polished, professional ceramic look. -
Initial bake:
Transfer the square board to a parchment-lined baking sheet. Bake according to your clay manufacturer’s instructions (usually around 275°F/135°C for 30 minutes) and let it cool completely.
Wobbly Lines?
If painting straight lines is tricky, use thin masking tape or painter’s tape to mark off the grid lines. Press edges down firmly to prevent bleed.
Step 2: Crafting the Game Pieces
-
Prepare pastel colors:
While the board cools, condition your colored clays. You’ll need pink, mustard yellow, and teal. If the colors are too bright, mix in a tiny bit of white clay to achieve the soft pastel tones shown in the photo. -
Roll color sheets:
Roll out each color of clay to a uniform thickness, slightly thinner than the board—about 1/8 inch (3-4mm) works well. -
Cut the circles:
Use the small circle cutter to punch out multiple game pieces from each color. Aim for at least 5-6 circles per player color if you are making a standard tic-tac-toe set, or more for larger grid games. -
Cut the stars:
Using the star cutter, create a few special pieces in yellow and teal. These can act as ‘king’ pieces or simply alternative markers. -
Refine the pieces:
Gently pat the tops of the cut shapes to remove fingerprints. Using a finger dipped in a little cornstarch can help smooth them without distorting the shape. -
Bake the pieces:
Arrange all the small circles and stars on the baking sheet. Bake them for the recommended time (usually shorter for smaller pieces, around 15-20 minutes) and allow them to cool.
Go Magnetic
Make it a travel set! Embed small magnets into the clay pieces before baking, and glue a magnetic sheet to the back of the finished board.
Step 3: Designing the Grid
-
Measure the grid:
Once the board is completely cool, use a ruler and a very light pencil to mark out your grid. For a classic game, you might want a 3×3 or 4×4 layout. Ensure the spacing is even. -
Prepare the paint:
Squeeze a small amount of black acrylic paint onto a palette. Add a minuscule drop of water to improve the flow, making it easier to pull long, straight lines. -
Paint vertical lines:
Using a fine liner brush, carefully paint over your pencil marks. I prefer to anchor my pinky finger on the table to keep my hand steady while pulling the brush towards me. -
Paint horizontal lines:
Rotate the board 90 degrees and paint the perpendicular lines to complete the grid pattern. Let the paint dry fully. -
Seal the set (Optional):
To protect your grid lines and give the pieces a nice sheen, apply a thin coat of matte or satin varnish to the board and game pieces. Let everything cure for 24 hours before your first game.
Now you have a charming, custom-made game set ready for display on your coffee table