If you’re brand new to polymer clay earrings, you don’t need fancy tools to make pieces that look crisp, cute, and totally wearable. These beginner-friendly ideas stick to simple shapes and easy surface techniques so you can build confidence fast (and have a lot of fun doing it).
Classic Circle Studs
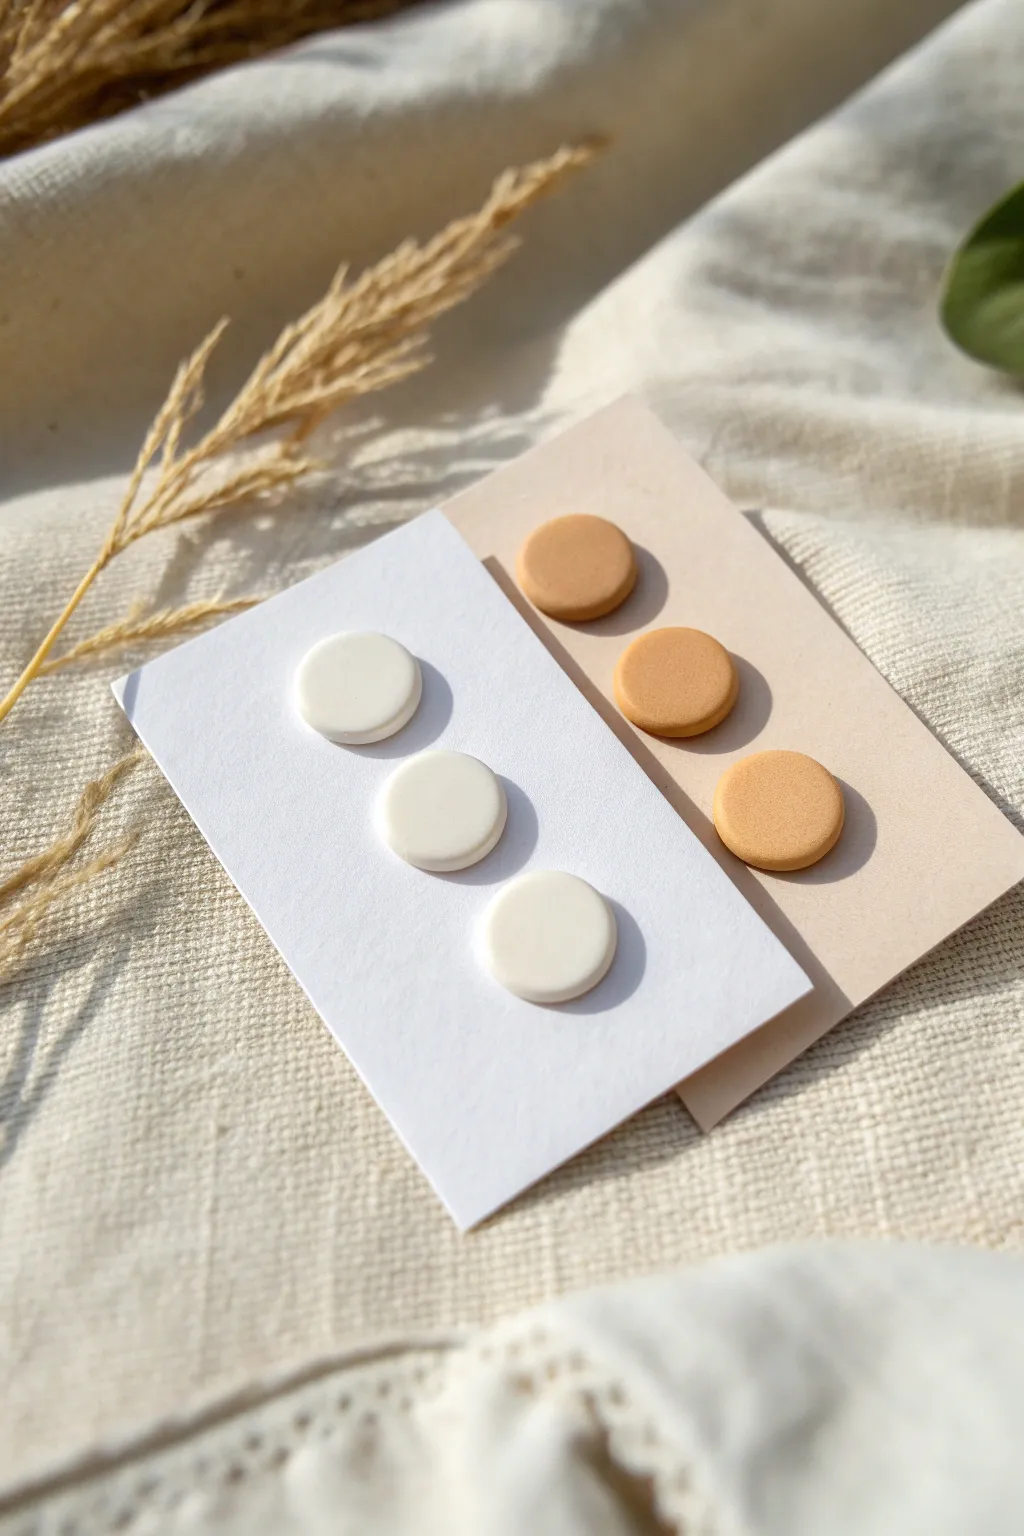
These understated earrings prove that sometimes simplicity makes the biggest statement. You will create two sets of essential studs: a crisp, clean white trio and a warm, caramel-toned set, both finished with a smooth matte texture that looks incredibly modern.
Step-by-Step
Materials
- White polymer clay
- Beige or caramel-colored polymer clay
- Acrylic rolling pin or clay machine
- Small circle cutter (approx. 8-10mm diameter)
- Parchment paper or ceramic tile (for baking)
- Saran wrap (cling film)
- Earring posts (surgical steel or sterling silver)
- Super glue (gel type recommended) or UV resin
- Fine grit sandpaper (optional)
- Cornstarch or baby powder (for conditioning)
Step 1: Preparation & Conditioning
-
Clean your workspace:
Before even touching the clay, wipe down your work surface and wash your hands thoroughly. White clay is notorious for picking up tiny pieces of dust or lint, so I always give everything a quick wipe with a baby wipe or rubbing alcohol first. -
Condition the white clay:
Take a portion of white polymer clay and begin kneading it in your hands until it is soft and malleable. This prevents cracks during baking. -
Condition the caramel clay:
Repeat the conditioning process with your beige or caramel clay. Ensure you wash your hands between colors to avoid transferring pigment to the white clay.
Clean Clay Secret
Keep a piece of scrap translucent or white clay nearby. Before rolling your good clay, roll the scrap clay in your hands to pick up any lint or dust from your skin first.
Step 2: Rolling & Cutting
-
Roll out the slab:
Using your acrylic rolling pin or a pasta machine on a medium/thick setting (about 3mm thick), roll out your white clay on a smooth surface. -
Apply the saran wrap trick:
Place a small piece of saran wrap (cling film) gently over the top of your rolled clay. Smoothing this over the surface creates a softly rounded edge when you cut, rather than a sharp, harsh edge. -
Cut the white circles:
Press your small circle cutter firmly through the saran wrap and into the clay. Cut at least three circles for one card set, though it’s always smart to cut a few extras. -
Repeat for the caramel clay:
Clean your cutter, roll out the caramel clay to the same thickness, apply the saran wrap, and cut your three matching circles. -
Smooth the edges:
Gently lift the cut circles. If there are any tiny jagged bits on the bottom edge, lightly tap them smooth with your fingertip. The top should be perfectly doomed thanks to the plastic wrap trick.
Go Terrazzo Style
Slice tiny shavings of the contrasting color and roll them into your slab before cutting to create a subtle, modern terrazzo stone effect.
Step 3: Baking & Assembly
-
Prepare for baking:
Place your clay circles on a ceramic tile or a baking sheet lined with parchment paper. -
Bake the pieces:
Bake according to your specific clay brand’s instructions (usually around 275°F or 130°C). For pieces this size, 30 minutes is typically sufficient to ensure durability. -
Cool down:
Let the pieces cool completely inside the oven or on the counter. Do not try to attach posts while the clay is still warm. -
Sand for perfection (Optional):
If you want an ultra-smooth matte finish, you can lightly buff the surface with very fine-grit sandpaper, but be gentle. -
Attach the posts:
Apply a tiny dot of gel super glue to the flat pad of an earring post. Press it firmly onto the back of a clay circle. -
Secure the bond:
For extra durability, you can add a tiny snakeskin-thin layer of liquid clay over the post pad (avoiding the stick part) and re-bake for 10 minutes, or simply rely on high-quality jewelry glue. -
Arrange for display:
Once fully cured and dried, push the posts through a cardstock display card for that professional finished look shown in the inspiration photo.
You now have a versatile set of studs perfect for everyday wear or gifting to a friend who loves minimalist design


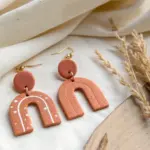
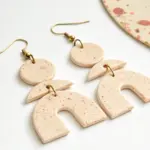
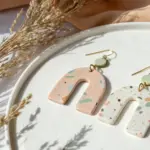
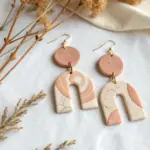
Easy Arch Dangles
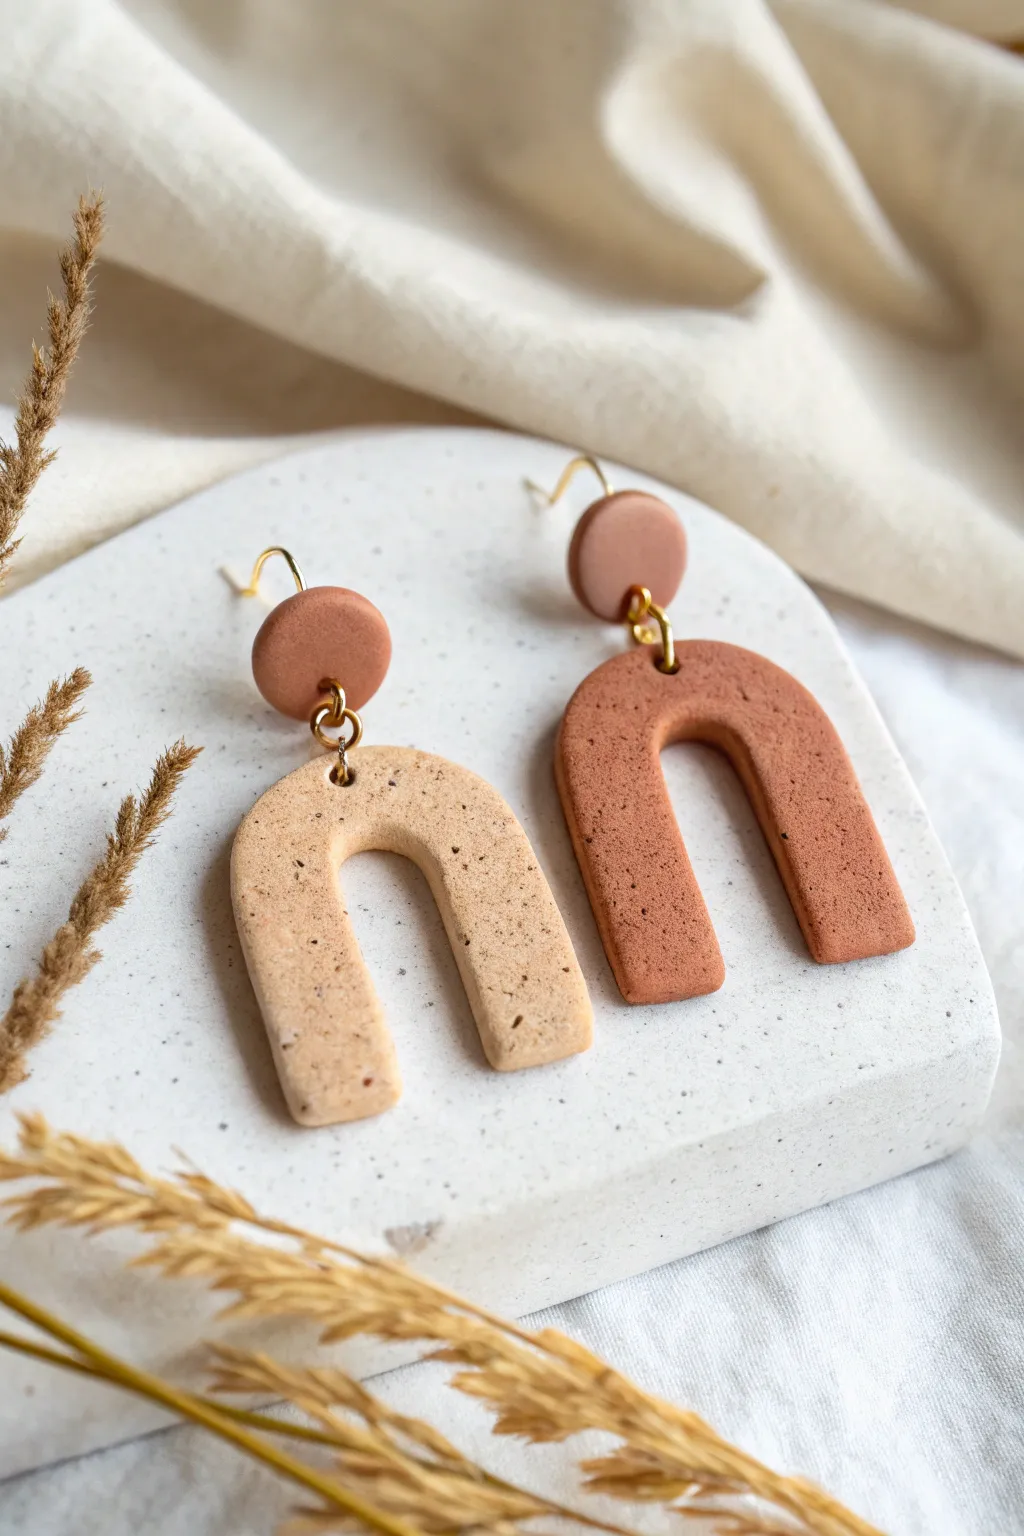
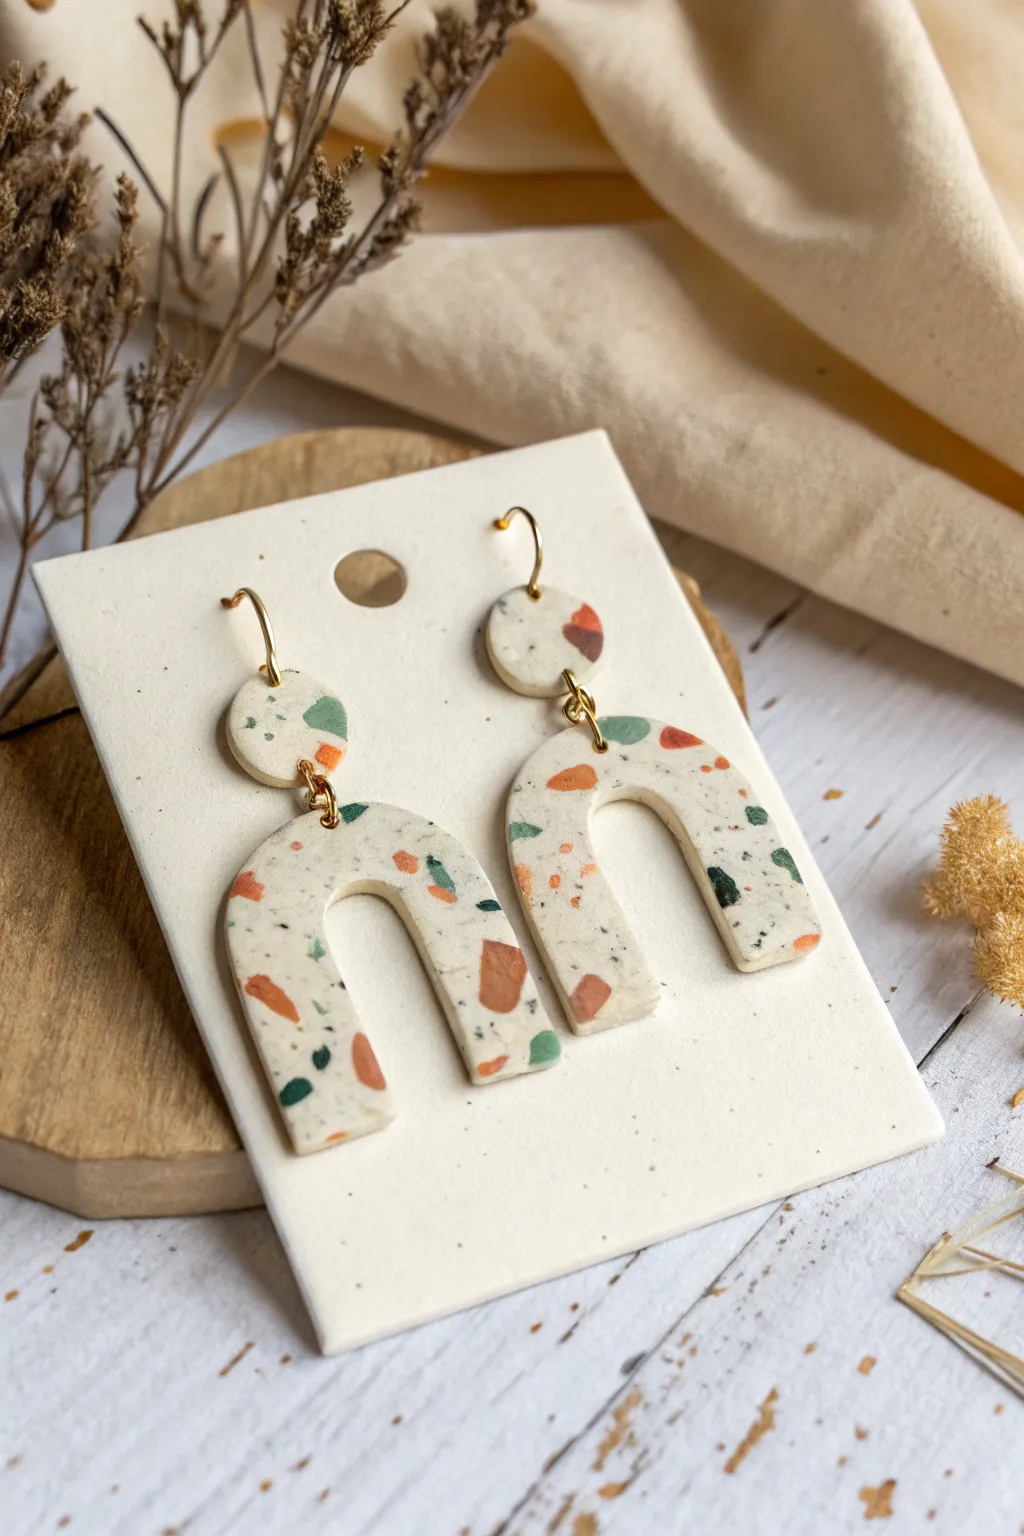
Embrace organic textures with these chic, minimalist arch earrings that mimic the look of natural pottery. The neutral tan and warm terracotta tones, paired with a subtle speckled finish, make these dangles a versatile accessory for any outfit.
Detailed Instructions
Materials
- Polymer clay (Tan/Beige and Terracotta/Rust colors)
- Black pepper or dried coffee grounds (for speckling)
- Acrylic rolling pin or pasta machine
- U-shape clay cutter (approx. 1.5 inch)
- Small circle clay cutter (approx. 0.4 inch)
- Clay slicer blade
- Hand drill or pin vibe
- 4 Gold jump rings (6mm or 7mm)
- 2 Earring studs (posts) and flat backs
- Super glue or jewelry resin
- Jewelry pliers
- Parchment paper or ceramic tile
Step 1: Preparing the Faux Stone Clay
-
Condition the clay:
Start by thoroughly kneading your tan clay until it is soft and pliable. Do the same for the terracotta clay in a separate pile to avoid color contamination. -
Add texture:
Flatten each clay ball slightly. Sprinkle a small pinch of ground black pepper or very fine dried coffee grounds onto the center of each piece. -
Mix the inclusions:
Fold the clay over the speckles and knead well. Continue folding and rolling until the black flecks are evenly distributed throughout the clay, creating a natural stone effect. -
Roll out slabs:
Roll your clay out into an even slab, approximately 3mm thick. I prefer using depth guides or playing cards on either side of my roller to ensure the thickness remains perfectly consistent.
Fixing Bubbles
If you see air bubbles after baking, sand the surface lightly. For deep bubbles, fill with a bit of matching liquid clay and re-bake briefly.
Step 2: Cutting and Shaping
-
Cut the arches:
Press your U-shaped cutter firmly into the slab. Cut one arch from the tan clay and one from the terracotta clay for a mismatched look, or make matching pairs if you prefer. -
Cut the studs:
Focusing on a clean section of your slab, use the small circle cutter to punch out two circles. These will be the top studs that sit on the earlobe. -
Refine edges:
Gently lift the shapes off your work surface. Use your finger or a soft silicone tool to smooth out any sharp edges or little bits of clay left by the cutter. -
Create connection holes:
Using a needle tool or a small cocktail stick, carefully pierce a hole at the very top center of each arch. -
Pierce the studs:
Piercing the stud needs precision; adding a hole at the bottom edge (closest to where the arch will hang). Ensure there is enough clay below the hole so it won’t break later.
Level Up: Texture
Before cutting your shapes, press a piece of coarse sandpaper or a stiff toothbrush onto the raw clay slab to create a realistic pitted stone texture.
Step 3: Baking and Assembly
-
Bake the pieces:
Arrange your clay shapes on a ceramic tile or parchment-lined baking sheet. Bake according to your brand’s specific instructions (usually 275°F/135°C for 30 minutes for Premo/Souffle brands). -
Cool down:
Allow the pieces to cool completely inside the oven or on a cooling rack. Do not try to bend them while they are still warm. -
Sand edges (Optional):
If there are any rough spots remaining after baking, you can lightly sand the edges with fine-grit sandpaper or a buffing block. -
Open jump rings:
Using two pairs of jewelry pliers, grip a gold jump ring and twist it open (motion is front-to-back, never pull apart sideways). -
Connect the shapes:
Thread the open jump ring through the hole in the terracotta arch and the corresponding hole in the terracotta circle stud. -
Close the rings:
Use your pliers to twist the jump ring back into a closed circle, ensuring the cut ends meet perfectly so the clay doesn’t slip out. -
Repeat assembly:
Repeat the connection process for the tan arch and its matching stud. -
Attach earring posts:
Flip the assembled earrings over so the backs are facing up. Apply a small dot of strong super glue (or UV resin) to the back of the circle studs. -
Secure posts:
Press the flat pad of the earring post into the glue. Let it dry completely according to the glue manufacturer’s time, usually overnight for maximum bond.
Wear your new earthy creations with pride and enjoy the organic touch they add to your style

Minimal Half-Moon Drops
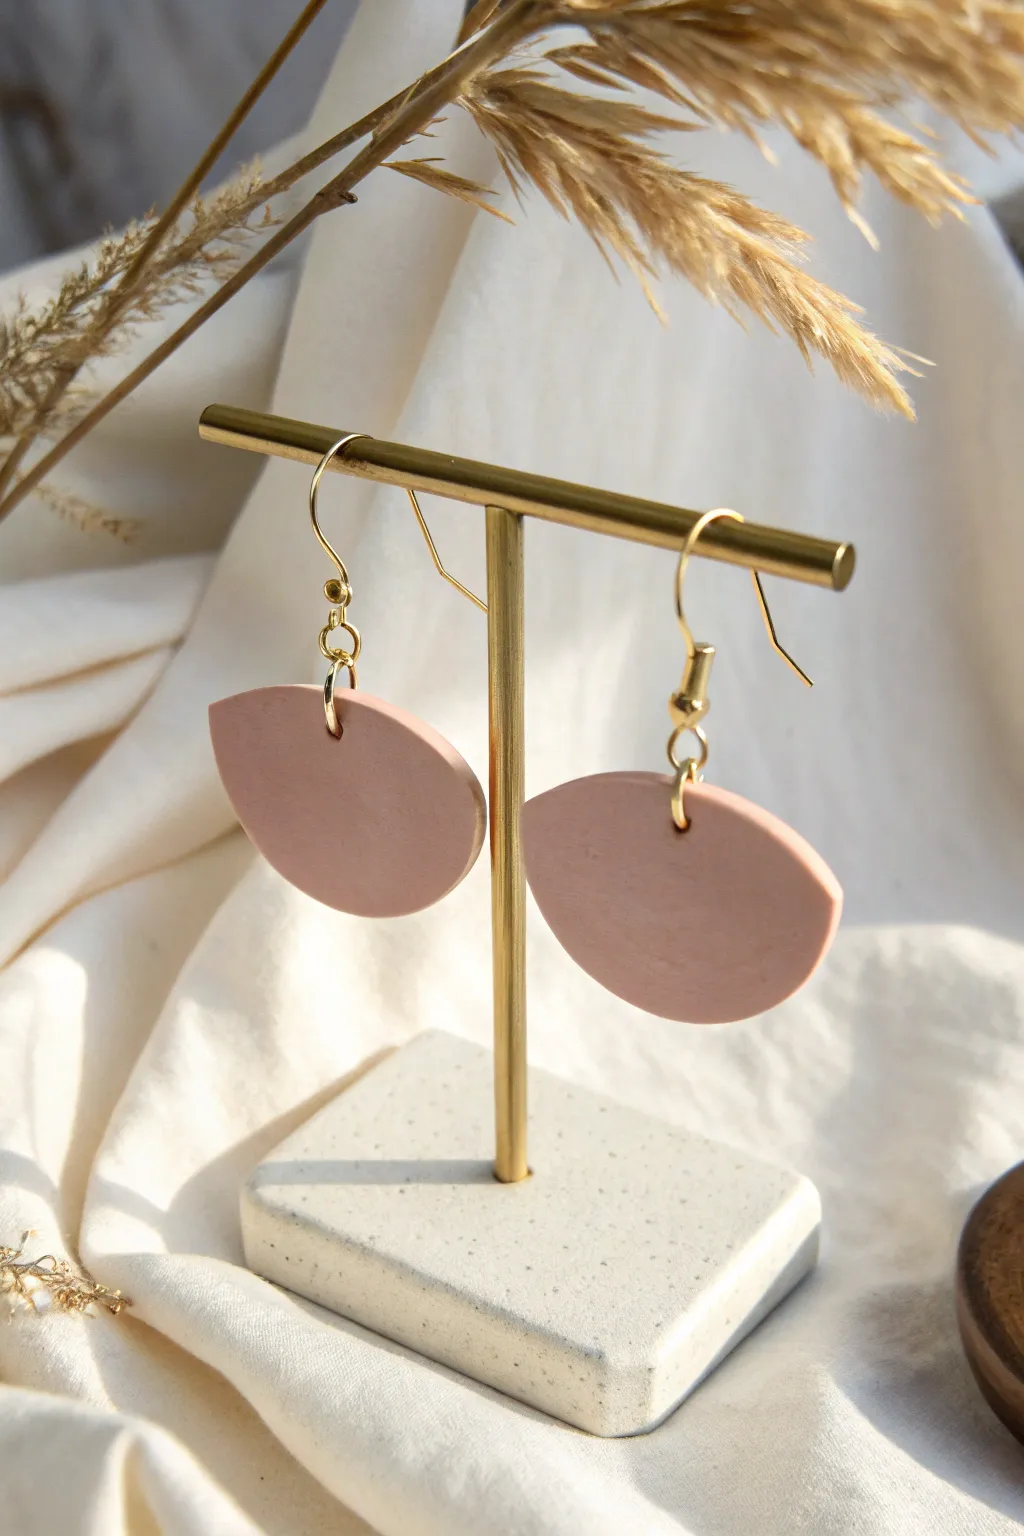
These understated earrings embrace the beauty of simplicity with their soft, dusky pink hue and organic half-circle shape. They are the perfect entry point for clay crafting, offering a modern, matte finish that pairs effortlessly with everyday outfits.
Step-by-Step
Materials
- Polymer clay in a ‘blush’ or ‘dusty rose’ shade
- Rolling pin or acrylic rollercoaster
- Tissue blade or X-Acto knife
- Round cookie cutter (approx. 1.5 inch diameter)
- Small round cutter or toothpick (for holes)
- 2 Gold jump rings (6mm or 8mm)
- 2 Gold fishhook ear wires
- Jewelry pliers (flat nose and round nose)
- Parchment paper or ceramic tile
- Fine-grit sandpaper (optional)
- Oven
Step 1: Shaping the Clay
-
Condition the clay:
Begin by warming the polymer clay in your hands. Knead and twist it repeatedly until it feels soft and pliable, which prevents cracking later. -
Roll it out:
Place the clay on a smooth surface like a ceramic tile or parchment paper. roll it out evenly until it’s about 3mm thick. -
Cut the primary circles:
Using your medium-sized round cutter, press firmly into the clay to cut out two perfect circles. -
Create the half-moon shape:
Take your tissue blade and slice off the top third of each circle. You want a shape that looks like a very rounded letter ‘D’ or a stylized petal. -
Smooth the edges:
Gently run your finger along the cut edge to soften the sharp corner created by the blade. This gives the piece a more finished, professional look. -
Punch the holes:
Use a very small circle cutter or a toothpick to poke a hole near the center of the flat cut edge. Ensure the hole is big enough for your jump ring to slide through freely.
Clean Cuts Pro-Tip
Before cutting your shapes, cover the rolled-out clay with a sheet of plastic wrap. Press your cutter down through the plastic for soft, domed edges that require less sanding.
Step 2: Baking and Finishing
-
Bake the pieces:
Transfer your clay pieces to a baking sheet lined with parchment paper. Bake according to your specific brand’s package instructions—usually around 275°F (130°C) for 15-30 minutes. -
Cool down:
Once baked, turn the oven off and let the pieces cool completely before handling them. They are fragile while hot. -
Sand for perfection:
If there are any rough spots or fingerprints, lightly wet-sand the edges and surface with fine-grit sandpaper for that ultra-smooth matte texture. -
Open the jump rings:
Take your pliers and twist a jump ring open sideways—never pull it apart outwards, as this weakens the metal. -
Attach the hardware:
Slide the open jump ring through the hole in your clay piece. Before closing it, slip the loop of the fishhook ear wire onto the ring as well. -
Close the ring:
Use your pliers to twist the jump ring back into place, ensuring the two ends meet perfectly flush so the wire doesn’t slip out. -
Final check:
Repeat the assembly process for the second earring. Give them a gentle shake to make sure all connections are secure.
Removing Fingerprints
If you notice fingerprints on your unbaked clay, lightly brush the surface with a tiny amount of baby oil or cornstarch before putting them in the oven.
Now you have a chic, handmade accessory ready to wear or gift to a friend

Simple Triangle Dangles
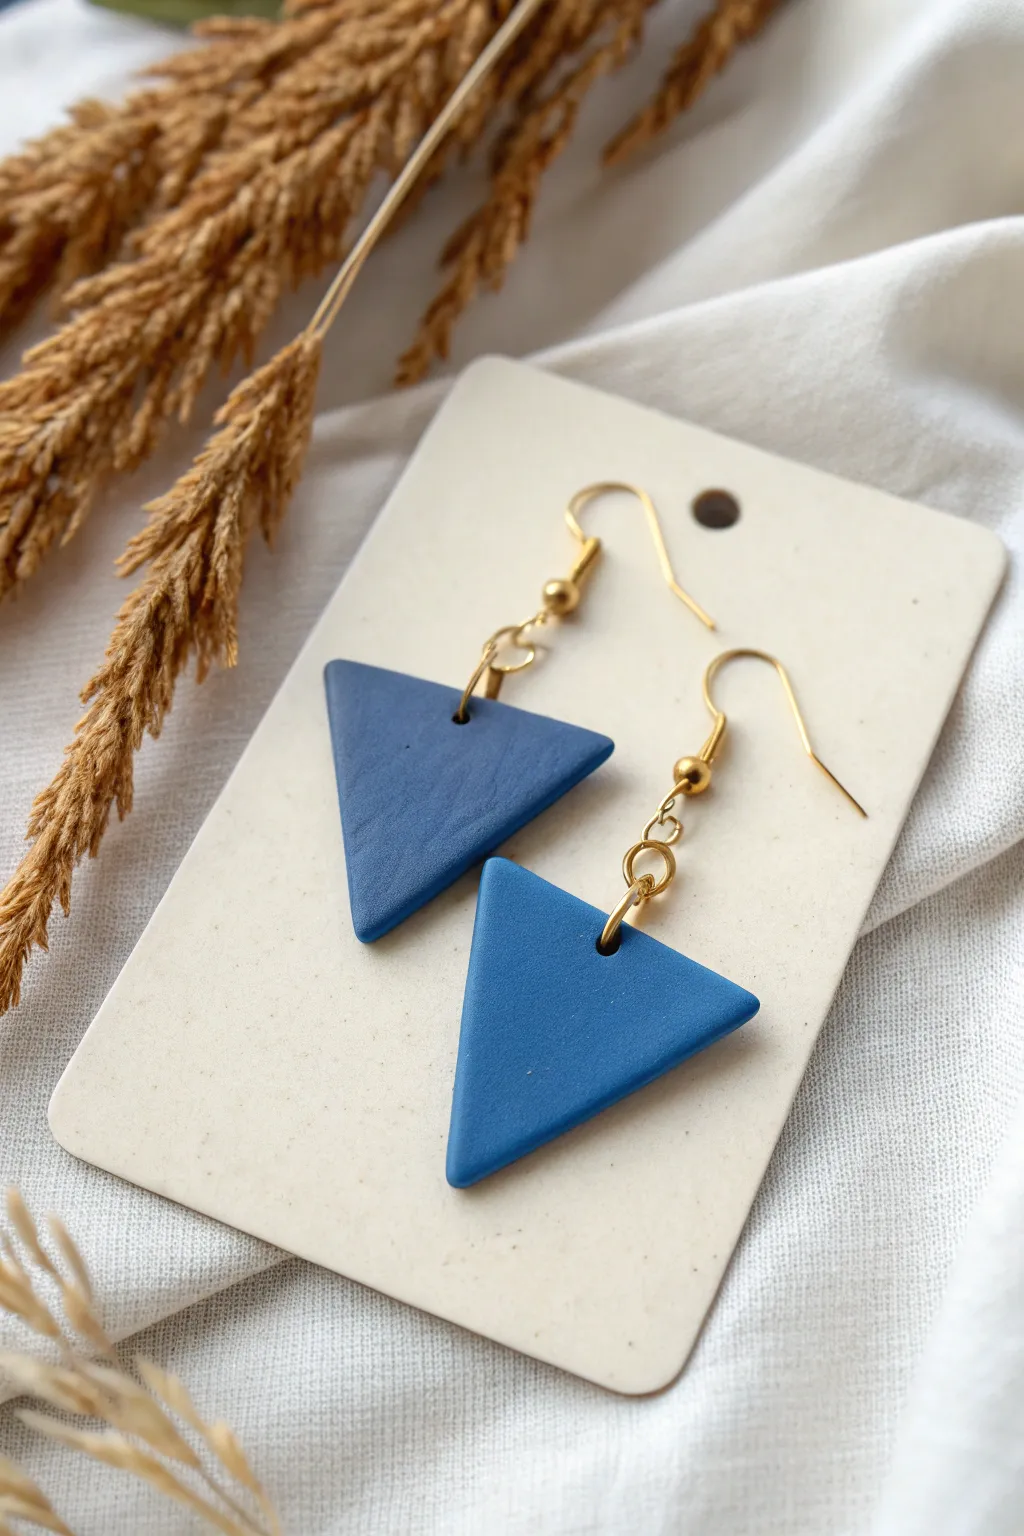
These sleek, geometric dangles prove that simplicity often makes the boldest statement. Featuring a cool denim-blue hue and a soft matte finish, these lightweight earrings are a perfect first project for getting comfortable with shaping and finishing polymer clay.
Step-by-Step Tutorial
Materials
- Polymer clay (denim or matte blue)
- Acrylic rolling pin or pasta machine
- Tissue blade or rigid craft knife
- Cardstock or paper template (optional)
- Ruler
- Fine-grit wet/dry sandpaper (400-800 grit)
- Mini hand drill or needle tool
- 2 Gold earring hooks (fishhook style)
- 4 Gold jump rings (roughly 6-8mm)
- Jewelry pliers (flat nose and round nose)
- Parchment paper and baking tray
Step 1: Preparation & Cutting
-
Condition the clay:
Begin by thoroughly conditioning your blue clay. Knead it in your hands until it is pliable and warm. This prevents cracks and ensures a smooth finish later on. -
Roll out the slab:
Using your acrylic roller or pasta machine, roll the clay into an even sheet. Aim for a thickness of about 3mm (roughly 1/8 inch)—thick enough to be sturdy but light enough for comfortable wear. -
Prepare your template:
Sketch a perfect isosceles triangle onto cardstock, measuring about 1 inch wide at the top. Cut this out to use as your guide, ensuring both earrings will be identical. -
Cut the shapes:
Place your template gently onto the clay slab. Using a sharp tissue blade, slice cleanly around the edges. I find lifting the blade straight up rather than dragging it prevents drag marks. -
Smooth the edges:
Before baking, gently run your finger along the cut edges of the clay triangles to soften the sharp corners slightly. This reduces the amount of sanding you’ll need to do later. -
Create holes for hardware:
Use a needle tool or toothpick to poke a hole in the center of the top edge of each triangle. Ensure the hole is roughly 2-3mm from the edge to provide strength.
Fixing Smooth Surfaces
To fix fingerprints or lint stuck in raw clay, dip a Q-tip in a tiny bit of rubbing alcohol or acetone and gently brush it over the surface before baking.
Step 2: Baking & Finishing
-
Bake the pieces:
Place your clay triangles on a parchment-lined baking sheet. Bake according to your brand’s specific package instructions (usually 275°F/135°C for 30 minutes). Let them cool completely before handling. -
Sand for a matte look:
Once cool, dip your fine-grit sandpaper in water and gently buff the surface and edges of the triangles. This removes fingerprints and creates that velvety, stone-like texture shown in the photo. -
Wash and dry:
Rinse the sanding residue off with water and dry the pieces thoroughly with a soft cloth to reveal the clean, matte blue finish. -
Final drill check:
If your holes closed up slightly during baking or sanding, use a small hand drill to carefully widen them just enough for your jump rings.
Step 3: Assembly
-
Open the jump rings:
Using two pairs of pliers, twist your golden jump rings open. Remember to twist the ends away from each other (side-to-side), never pull them apart, to maintain their circle shape. -
Attach the first ring:
Slide one open jump ring through the hole in the clay triangle. Close it securely using your pliers. -
Add the connector ring:
Take a second jump ring and loop it through the first one you just closed. This double-ring technique allows the triangle to dangle freely and face forward when worn. -
Attach the hook:
Before closing that second ring, slide the loop of your gold earring hook onto it. Close the jump ring securely. -
Repeat for the second earring:
Follow the same assembly steps for the matching triangle to complete your pair.
Add Subtle Texture
Before cutting your triangles, press a piece of coarse fabric or sandpaper gently onto the raw clay slab to give it a stone-like surface texture.
Wear your new matte blue triangles with pride or box them up as a thoughtful handmade gift

The Complete Guide to Pottery Troubleshooting
Uncover the most common ceramic mistakes—from cracking clay to failed glazes—and learn how to fix them fast.
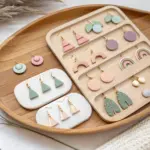
Slab Cutout Earring Sets
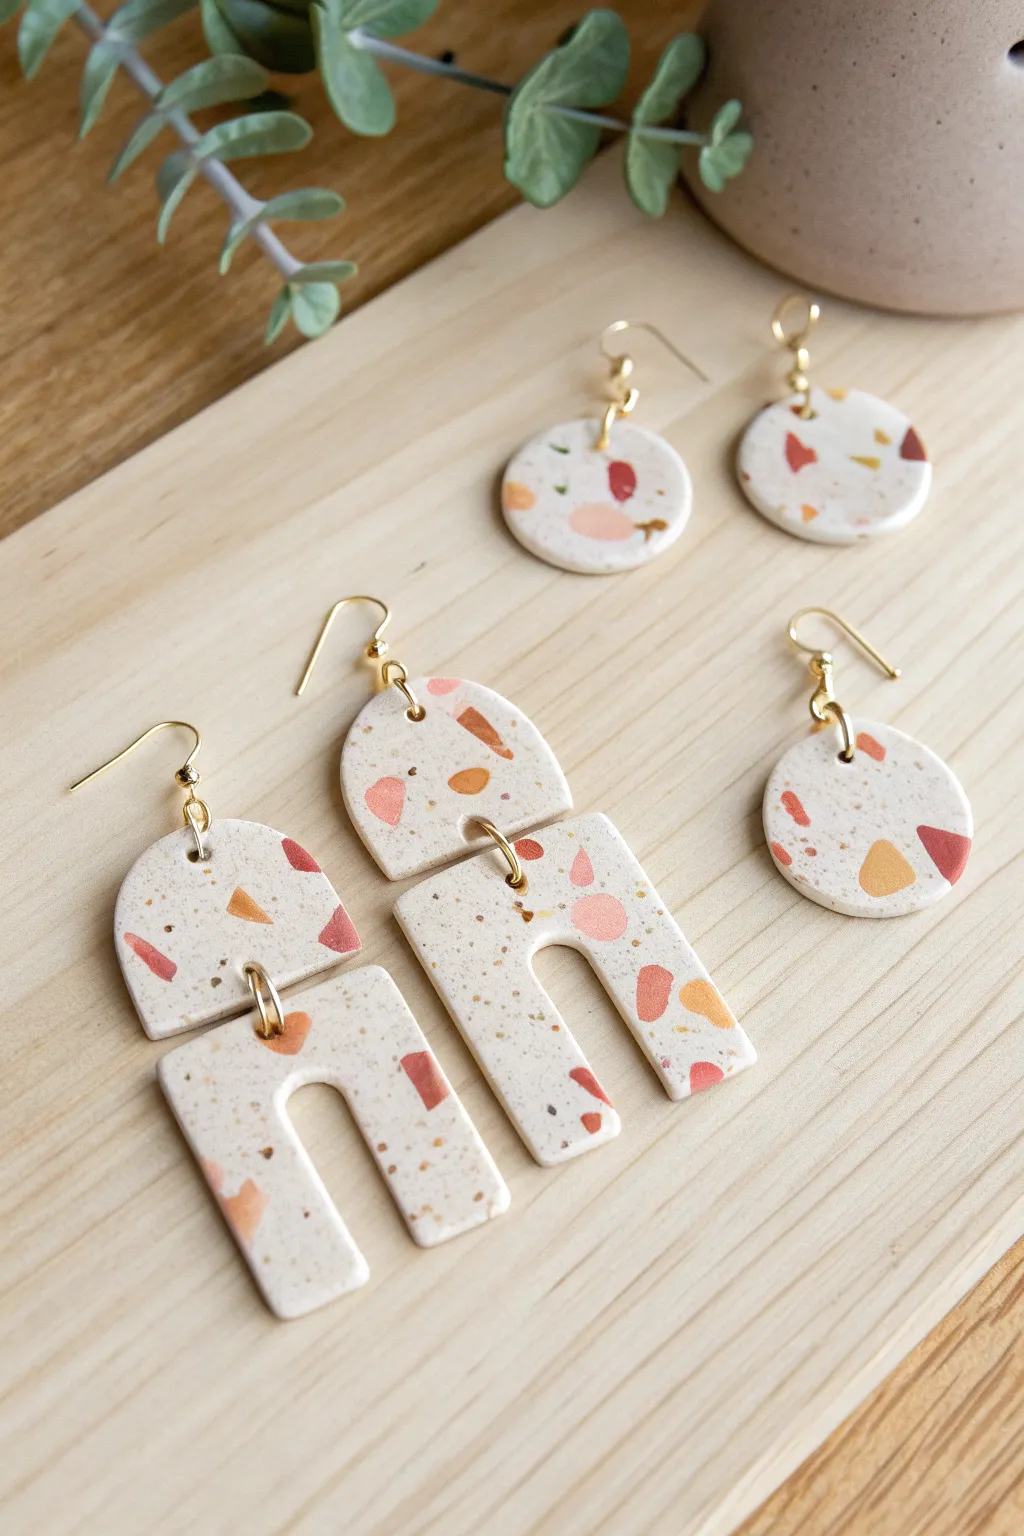
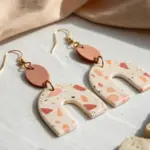
Master the art of the clay slab with these chic terrazzo-style earrings. This beginner-friendly project uses neutral tones and simple geometric cutters to create a sophisticated, speckled finish that looks effortlessly professional.
How-To Guide
Materials
- Polymer clay (colors: speckled beige, terracotta, mustard yellow, light pink, deep red)
- Acrylic roller or pasta machine
- Tissue blade or craft knife
- Circle clay cutters (20mm and 25mm)
- Arch or U-shape clay cutters
- Parchment paper or ceramic tile
- Hand drill or pin vibe
- Jump rings (gold, 6mm and 8mm)
- Earring hooks (gold)
- Jewelry pliers (flat nose and round nose)
- Oven
Step 1: Preparing the Terrazzo Slab
-
Base Conditioning:
Begin by conditioning the speckled beige clay until it’s soft and pliable. Roll it out into a flat sheet about 3mm thick. This will be your canvas. -
Chopping Colors:
Condition your accent colors (terracotta, mustard, pink, red) separately. Roll them into thin snakes or sheets. -
Creating the Chips:
Use your tissue blade to chop these accent colors into tiny, irregular angular pieces. Aim for variety in size, but keep them generally small for a delicate terrazzo look. -
Applying the Pattern:
Scatter the chopped colored pieces randomly over your beige base slab. Don’t overthink placement; random scattering creates the most organic result. -
Embedding the Chips:
Place a sheet of parchment paper over the slab to prevent sticking. Gently roll over the surface with your acrylic roller to press the colored chips flat into the base clay. -
Smoothing the Surface:
Continue rolling until the surface is completely smooth and uniform in thickness. I find rolling in different directions helps prevent the pattern from distorting too much.
Step 2: Cutting and Baking
-
Cutting the Circles:
Press your round circle cutters into the slab to create the simple stud shapes. Try to capture pleasing sections of your terrazzo pattern. -
Cutting the Dangles:
Use your arch cutter and a coordinating top shape (like a half-circle or smaller arch) to cut out the components for the dangle earrings. -
Refining Edges:
Before baking, gently smooth the cut edges with your finger or a silicone tool to remove any sharp bits or drag marks. -
Drilling Holes:
You can carefully poke holes now with a needle tool or wait until after baking to drill. If doing it now, ensure the hole is large enough for your jump rings. -
Baking:
Transfer your pieces to a ceramic tile or baking sheet lined with parchment. Bake according to your clay package instructions (usually around 275°F/135°C for 30 minutes). -
Cooling:
Let the pieces cool completely in the oven or on the tray. This ensures the clay cures correctly and reaches maximum strength.
Clean Edges Trick
Place a piece of cling wrap over your clay slab before pressing down your cutters. This creates a beautifully rounded, domed edge that requires zero sanding.
Step 3: Finishing and Assembly
-
Drilling (If needed):
If you didn’t poke holes earlier, use a hand drill or pin vise to create holes at the top of the dangle bases and the bottom of the connector pieces. -
Opening Rings:
Use two pairs of pliers to twist your jump rings open. Remember to twist sideways (like opening a door), never pull them apart, to maintain their strength. -
Connecting Dangles:
Loop a jump ring through the bottom U-shape and the top connector piece of the arch earrings. Close the jump ring securely. -
Attaching Hooks:
Add jump rings to the top holes of all earring pieces (including the simple circles). Slide the earring hook onto the jump ring and close it tight. -
Final Check:
Give everything a gentle wipe with a soft cloth to remove fingerprints and ensure all metal findings are securely closed.
Level Up: Texture
Before cutting your shapes, gently press a piece of coarse sandpaper or a texture mat into the slab to give the background a stone-like, matte finish.
Now you have a stunning set of custom terrazzo earrings ready to wear or gift
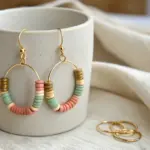
Two-Color Marbled Studs
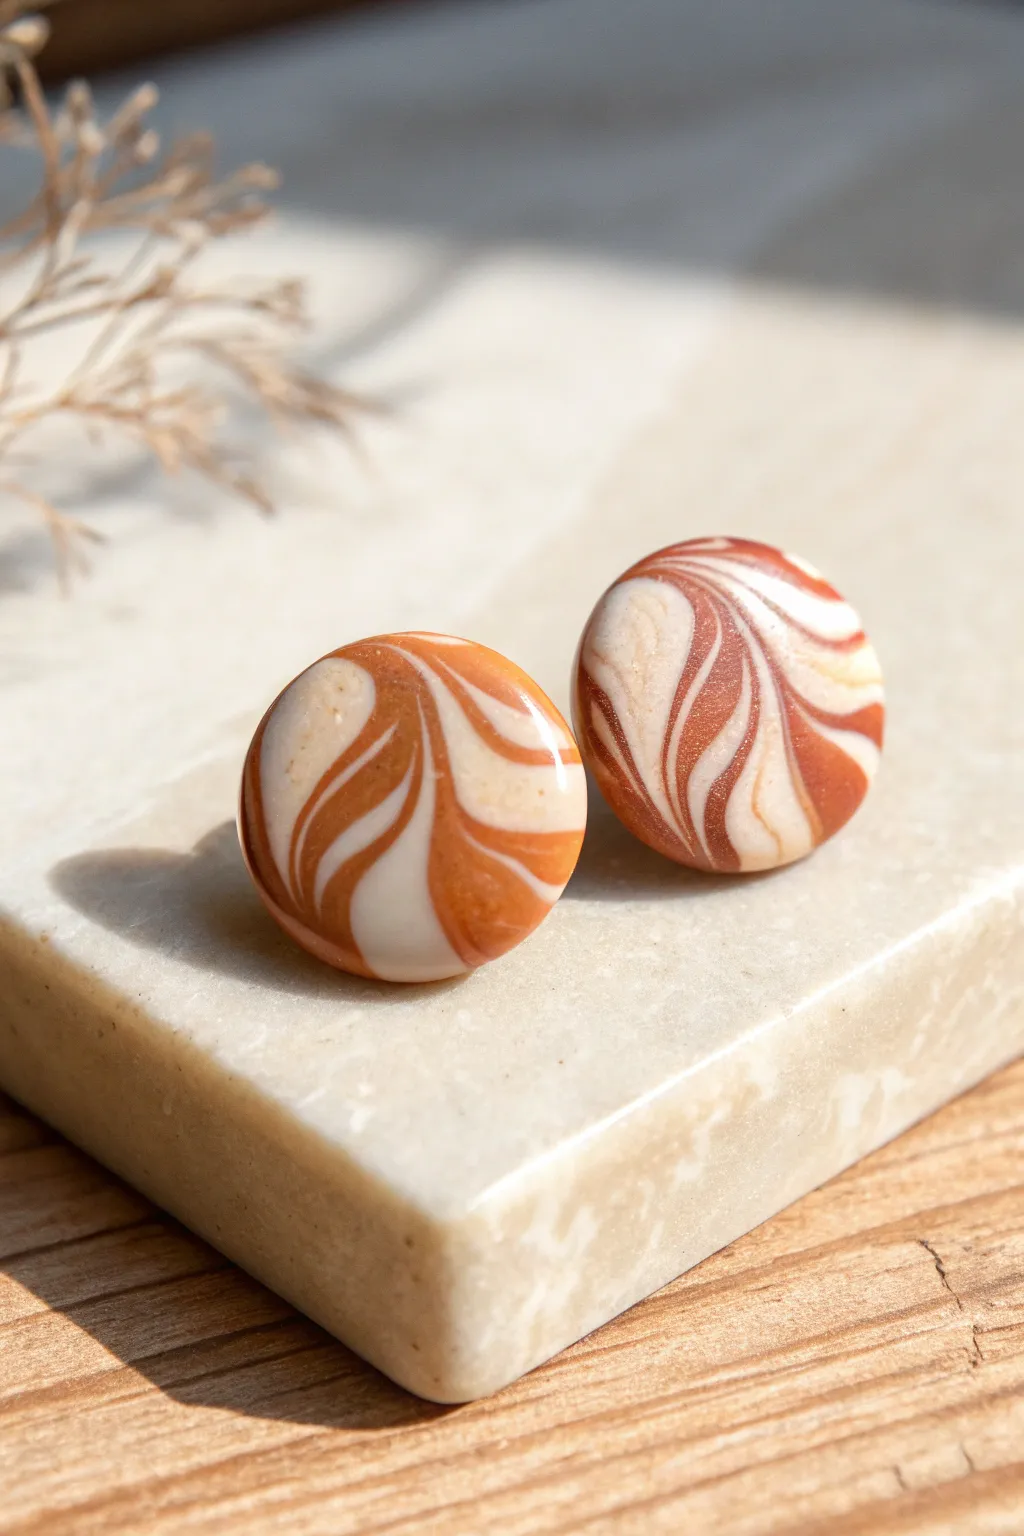
These elegant stud earrings feature a mesmerizing swirl pattern that looks complex but is surprisingly simple to achieve. By combining warm burnt orange and creamy white polymer clay, you’ll create organic lines that mimic polished agate stones.
Detailed Instructions
Materials
- Polymer clay in burnt orange (or terracotta)
- Polymer clay in translucent white or cream
- Acrylic rolling pin
- Small circle cutter (approx. 10-12mm)
- Tissue blade or X-Acto knife
- Ceramic tile or baking sheet
- Parchment paper
- Earring posts and backs
- Strong jewelry glue (e.g., E6000 or Loctite Gel)
- Wet sandpaper (400 to 1000 grit)
- UV resin or glossy polyurethane varnish (optional)
- Small paintbrush (if varnishing)
Step 1: Prepping the Clay
-
Condition the orange clay:
Begin by taking a chunk of your burnt orange clay. Knead it in your hands until it is soft, warm, and pliable. This conditioning step prevents cracks later on. -
Condition the light clay:
Repeat the conditioning process with your cream or translucent white clay. Ensure your hands are clean before switching colors to avoid staining the lighter clay. -
Roll into logs:
Roll each conditioned color into a smooth snake or log shape, roughly equal in length and thickness—about 3 inches long and 0.5 inches thick works well. -
Twist the logs:
Place the two logs side-by-side and twist them together tightly, like a candy cane. The more twists you create, the more intricate your final lines will be.
Stop the Mud!
Don’t over-mix your clay logs. Stop mixing as soon as you see thin, defined striations. If you knead too long, the orange and white will blend into a single peach color.
Step 2: Marbling and Shaping
-
Fold and roll:
Fold the twisted log in half and roll it into a ball. Then, roll it back out into a thick log shape. This begins the mixing process without blending the colors completely. -
Repeat the twist:
Twist this new log again. Repeat the fold-and-roll process one or two more times until you see fine streaks of color, but stop before it turns into a solid, muddy orange. -
Form the main ball:
Roll the marbled clay into a smooth, tight ball. Check the surface to identify the area with the most attractive swirling pattern. -
Flatten deeply:
Place the ball on your work surface or ceramic tile. Use your acrylic roller or finish with a flat object to press it down into a thick slab, roughly 3-4mm thick. -
Cut the shapes:
Inspect your slab for the best patterns. Using your small circle cutter, press firmly into the clay to cut out two circles. I try to choose spots where the white lines curve dramatically against the orange. -
Smooth the edges:
Gently lift the cut circles. Use your finger to lightly smooth the sharp edges created by the cutter, giving the earrings a slightly domed, organic feel.
Add Sparkle
Mix a tiny pinch of gold leaf flakes or translucent glitter into the translucent white clay before twisting. This adds depth and a subtle shimmer to the swirls.
Step 3: Baking and Finishing
-
Bake the pieces:
Place your clay circles on a parchment-lined baking sheet or ceramic tile. Bake according to your specific clay brand’s instructions (usually around 275°F/135°C for 15-30 minutes). -
Cool down:
Allow the clay pieces to cool completely in the oven or on the counter. Do not attempt to sand or glue while they are still warm. -
Sand for smoothness:
Dip your customized studs into a bowl of water and sand the edges and surface with wet sandpaper (starting at 400 grit and moving to 1000). This removes fingerprints and creates a professional curve. -
Buff clean:
Dry the pieces thoroughly with a soft cloth. Buff them briskly against jeans or a denim scrap to bring out a natural sheen. -
Apply gloss (Optional):
If you want the high-shine, glass-like finish seen in the photo, apply a thin layer of UV resin or gloss varnish. Cure or dry according to the product instructions. -
Attach the posts:
Apply a tiny dot of strong jewelry glue to the flat back of the earring post. Press it firmly onto the center of the earring back. -
Final cure:
Let the glue cure for at least 24 hours to ensure maximum durability before wearing your new creations.
Wear your new swirled studs with a cozy sweater to highlight those warm, earthy tones


What Really Happens Inside the Kiln
Learn how time and temperature work together inside the kiln to transform clay into durable ceramic.
Beginner Terrazzo Confetti
These trendy arch earrings feature a classic terrazzo look with earthy tones of rust, sage, and deep green set against a speckled cream background. The confetti style is perfect for beginners because irregular shapes are part of the charm, making it a forgiving and fun technique to master.
Step-by-Step Tutorial
Materials
- Polymer clay (Speckled cream or granite, rust orange, sage green, dark green)
- Acrylic rolling pin
- Tissue blade or X-Acto knife
- U-shape or arch clay cutter (approx. 1.5 inches)
- Small circle cutter (approx. 0.4 inches)
- Parchment paper or ceramic tile
- Hand drill or pin vibe
- 4 Jump rings (gold, 6-8mm)
- 2 Earring hooks (gold)
- Jewelry pliers (round nose and flat nose)
- Fine grit sandpaper (optional)
Step 1: Prepping the Terrazzo Chips
-
Condition the colors:
Start by conditioning your colored clays—the rust orange, sage green, and dark green. Roll each color out into a very thin sheet, roughly 1mm thick. -
Create the chips:
Tear tiny, irregular pieces from these thin colored sheets. You can also use your blade to chop them into small angular bits. Aim for variety in size, but keep them generally small, like confetti. -
Set aside:
Keep your piles of colored chips separate or mix them slightly if you prefer a random grab-bag approach later. Set them aside on a piece of parchment paper.
Step 2: Creating the Base Slab
-
Roll the base:
Condition your speckled cream or white granite clay thoroughly. Roll it out into a slab that is about 3-4mm thick. This will be the canvas for your design. -
Apply the confetti:
Gently place your torn colored chips onto the base slab. Scatter them randomly, ensuring you leave some negative space between them so the speckled background shows through. -
Embed the chips:
Once you are happy with the arrangement, cover the slab with a piece of parchment paper. Use your acrylic roller to gently roll over the slab. This presses the chips into the base clay so they varying become flush with the surface. -
Roll to finish thickness:
Remove the paper and inspect the surface. If it’s uneven, roll slightly more to smooth it out. Aim for a final even thickness of about 3mm.
Clean Cuts Pro Tip
Before pressing your cutter into the clay, dip the cutting edge into cornstarch or water. This acts as a release agent, preventing the clay from sticking inside the cutter and keeping edges sharp.
Step 3: Cutting and Baking
-
Cut the shapes:
Position your U-shaped cutter on the most interesting parts of the slab and press down firmly to cut two arches. Do the same with your small circle cutter to create the two top pieces. -
Check the edges:
Gently lift the shapes. If the edges are rough, smooth them lightly with your fingertip. I like to dip my finger in a tiny bit of cornstarch to prevent fingerprints. -
Pierce holes:
Using a needle tool or toothpick, carefully poke a hole at the top dead-center of each arch and at the bottom and top of each circle. Ensure the hole is large enough for your jump rings. -
Bake:
Transfer the pieces to a ceramic tile or baking sheet lined with parchment paper. Bake according to your clay manufacturer’s instructions, typically at 275°F (130°C) for about 30 minutes. -
Cool down:
Let the pieces cool completely before handling. They are fragile when warm.
Smudged Chips?
If your colored chips smear during rolling, your clay might be too warm or soft. Pop the slab in the fridge for 10 minutes to firm up before slicing or rerolling.
Step 4: Assembly
-
Sand edges:
If there are any sharp edges after baking, gently sand them with fine-grit sandpaper for a professional finish. -
Attach jump rings:
Using two pairs of pliers, twist open a jump ring. Thread it through the top hole of the arch and the bottom hole of the circle piece to connect them. -
Close the ring:
Twist the jump ring closed securely, ensuring the gap is completely shut so the pieces don’t slip out. -
Add earring hooks:
Twist open the loop on your earring hook. Thread it through the top hole of the circle piece. -
Final check:
Close the earring hook loop securely. Repeat the assembly steps for the second earring so you have a matching pair.
Now you have a stunning pair of modern terrazzo earrings ready to wear or gift
Clean Color-Blocked Bars
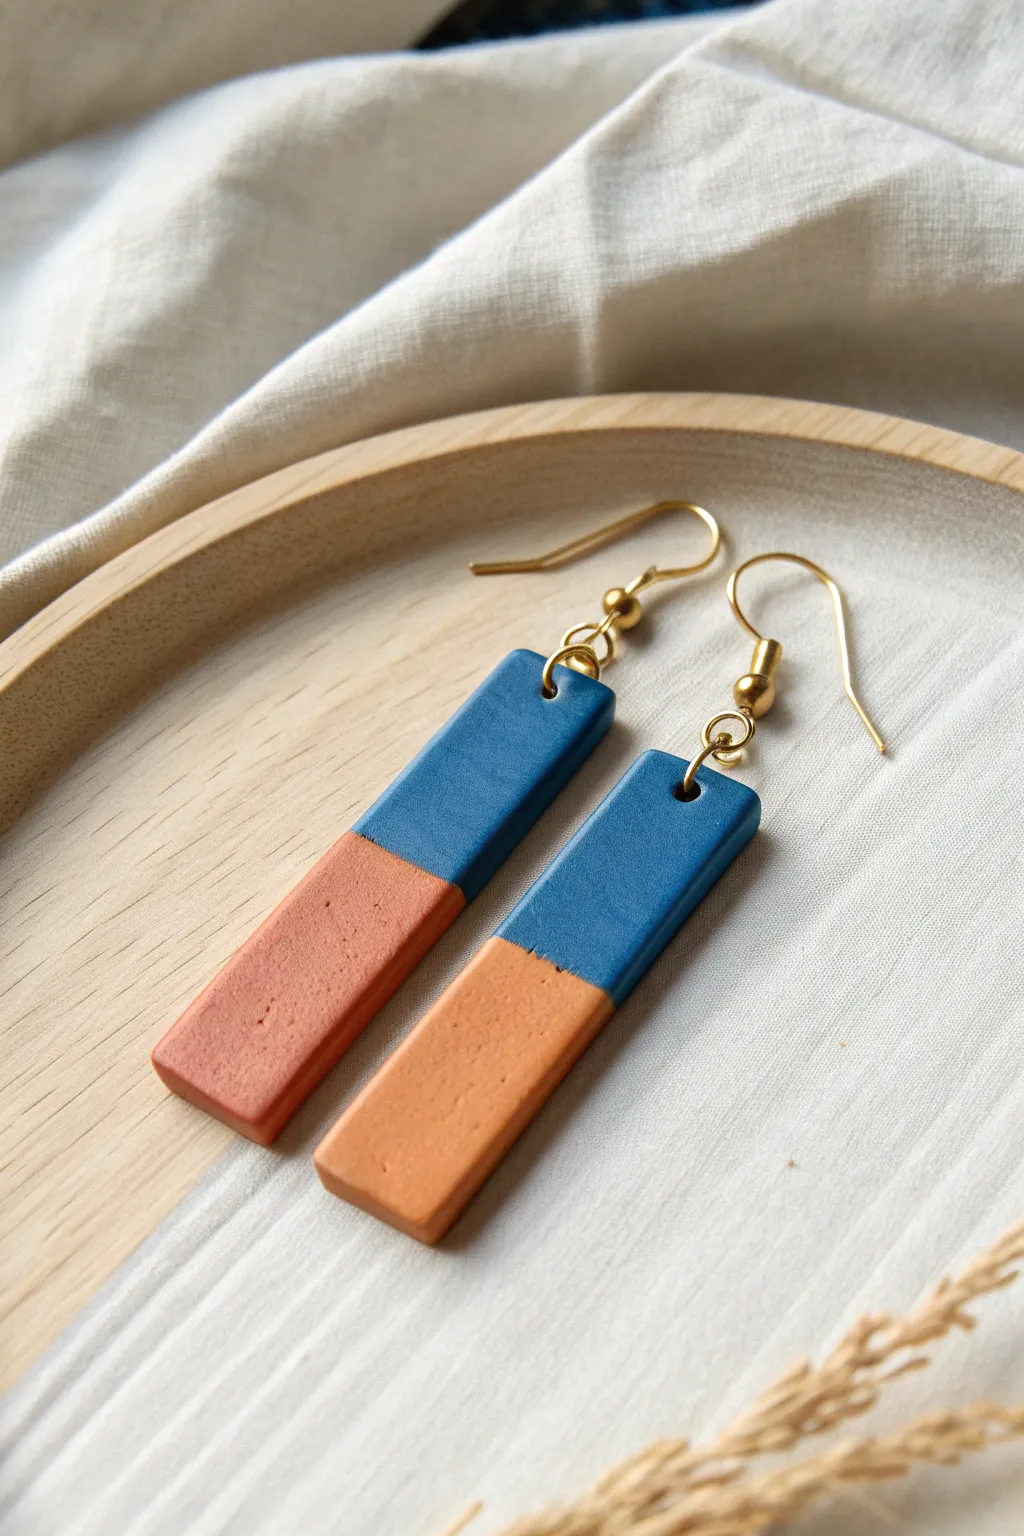
Embrace the beauty of simplicity with these elegant dual-tone bar earrings. The contrasting deep teal and warm terracotta clay create a striking modern look that proves beginners don’t need complex patterns to make a statement.
How-To Guide
Materials
- Polymer clay in deep teal (or navy blue)
- Polymer clay in terracotta (or burnt orange)
- Acrylic rolling pin or pasta machine
- Tissue blade or sharp craft knife
- Ruler
- Small circle cutter or needle tool used for piercing
- Parchment paper or ceramic tile for baking
- Fine-grit sandpaper (400-1000 grit)
- 2 Gold jump rings (6mm or 7mm)
- 2 Gold French hook ear wires
- Jewelry pliers (flat nose and round nose)
Step 1: Prepping and Conditioning
-
Condition the clay:
Start by warming the terracotta clay in your hands, kneading it until it is soft and pliable. Repeat this process separately with the teal clay to prevent color transfer on your hands. -
Roll the sheets:
Using an acrylic roller or a pasta machine on a medium setting (approx. 3mm thick), roll out both colors into flat, even sheets. Ensure they are roughly the same thickness for a seamless join. -
Cut straight edges:
Take your tissue blade and cut a perfectly straight edge along one side of the teal sheet and one side of the terracotta sheet. This will be where your two colors meet.
Clean Seam Secret
To get that perfectly crisp line between colors, wipe your tissue blade with a baby wipe or a tiny bit of rubbing alcohol before every single cut you make.
Step 2: Creating the Slab
-
Join the colors:
Place the two straight edges against each other on a piece of parchment paper. Push them together gently so they touch completely without overlapping. -
Smooth the seam:
Place a piece of parchment paper over the seam. Gently roll over the join with your roller to bond the clays together. Flip the slab over and repeat on the back to ensure a secure bond. -
Check the thickness:
Run your roller over the entire slab one last time to ensure the whole piece is a uniform thickness, which makes the final bar shape look professional.
Step 3: Cutting and Shaping
-
Measure the bars:
Using a ruler, lightly mark out two rectangles. You’ll want the seam to be roughly in the middle, or slightly off-center like in the example photo (about 60% teal, 40% terracotta looks great). -
Cut the shapes:
Use your tissue blade to cut out the two long rectangular bars. Try to press straight down rather than dragging the blade to keep the edges crisp. -
Smooth the edges:
Gently tap the sides of the cut rectangles with your finger to soften any sharp ridges left by the blade. This reduces sanding time later. -
Pierce the holes:
Use a needle tool or a very small circle cutter to poke a hole at the top center of the teal section. Make sure the hole is big enough for your jump ring.
Uneven Seams?
If the seam pulls apart on the back while handling, flip it over and rub a tiny amount of liquid polymer clay (Bake & Bond) into the crack, then smooth before baking.
Step 4: Baking and Finishing
-
Bake the pieces:
Place your clay bars on a ceramic tile or baking sheet lined with parchment paper. Bake according to your specific clay brand’s instructions (usually 275°F/135°C for 15-30 minutes). -
Cool down:
Let the pieces cool completely inside the oven or on a cooling rack. Do not try to flex them while they are still warm. -
Sand for perfection:
Once cool, dip the earrings in a little water and use fine-grit wet/dry sandpaper to smooth the edges and corners. I find sanding in a circular motion works best to remove imperfections. -
Clean up:
Wash the sanded pieces with mild soap and water to remove any clay dust. Dry them thoroughly with a lint-free cloth or paper towel. -
Open the jump ring:
Using two pairs of pliers, twist a gold jump ring open sideways (never pull it apart outwards). -
Assemble the earring:
Thread the jump ring through the clay hole, then add the French hook ear wire. Close the jump ring by twisting it back into place until the ends meet perfectly. -
Repeat for the second side:
Repeat the assembly process for the second earring, ensuring the hooks are facing the correct way so the front of the earring faces forward.
You now have a stunning pair of geometric earrings that look chic enough for the office and cool enough for a night out

TRACK YOUR CERAMIC JOURNEY
Capture glaze tests, firing details, and creative progress—all in one simple printable. Make your projects easier to repeat and improve.
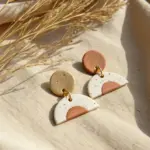
Subtle Texture Imprint Studs
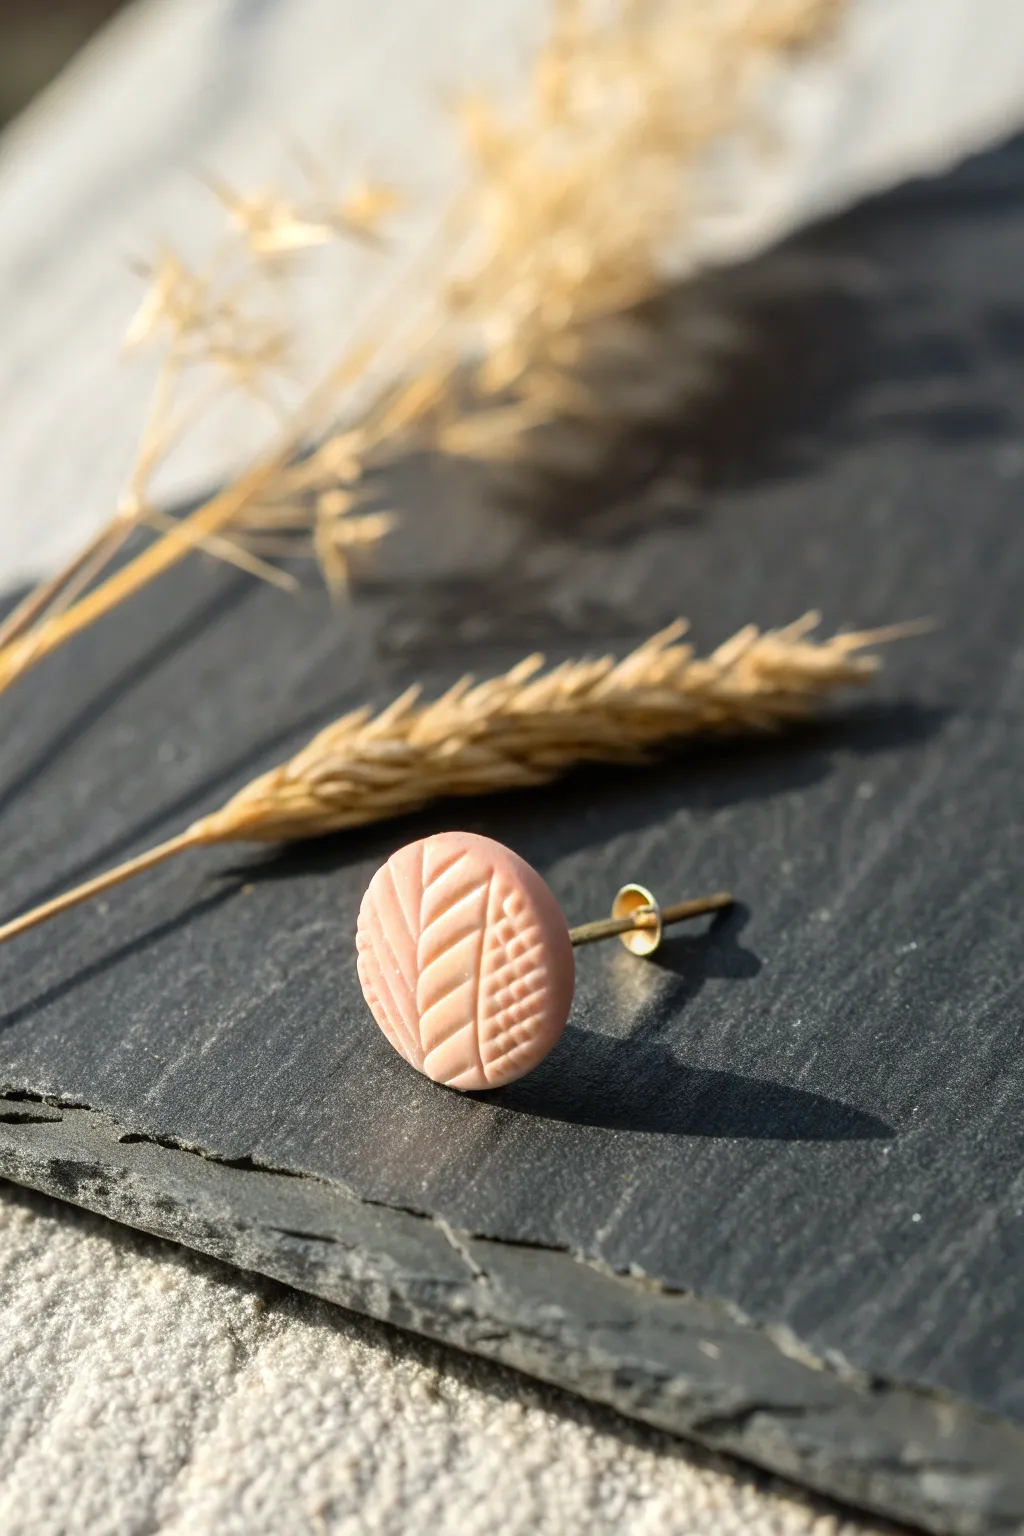
These delicate stud earrings capture the rustic beauty of natural fibers with subtle, embossed patterns. The soft peach tone paired with intricate micro-textures creates a sophisticated look that is deceptively simple to achieve.
Detailed Instructions
Materials
- Polymer clay (pale peach or blush pink)
- Small circular cutter (approx. 10-12mm)
- Texture tools (needle tool, craft knife, or specialized clay texture stamps)
- Acrylic rolling pin
- Ceramic tile or glass work surface
- Flat earring posts (gold or silver)
- Super glue or jewelry adhesive (E6000)
- Clay oven or toaster oven
- Cornstarch or baby powder (optional release agent)
- Fine grit sandpaper (optional)
Step 1: Preparation & Base Creation
-
Condition the clay:
Begin by thoroughly conditioning your peach polymer clay. Knead it in your hands until it is warm, soft, and pliable. This prevents cracking later. -
Roll a sheet:
Use your acrylic roller to flatten the clay into an even sheet. Aim for a thickness of about 3mm (1/8 inch) so the studs feel substantial but not heavy. -
Create a smooth surface:
Check the clay surface for any fingerprints or dust. Gently smooth over it with your finger or a little cornstarch if needed. -
Cut the shapes:
Press your small circular cutter firmly into the clay sheet to cut out two identical circles. Leave the circles on your tile; moving them now might distort their perfect round shape.
Sticky Situation?
If clay sticks to your texturing tool, dip the needle tip into a bit of cornstarch or water before pressing it into the clay. This acts as a release agent for crisp lines.
Step 2: Texturing the Design
-
Mark the sections:
Using the very light touch of a needle tool or the back of a craft knife, faintly score two vertical curved lines to divide the circle into three sections. -
Create the braid:
Focus on the center section first. Use a needle tool to press short, diagonal indentations that meet in the middle, creating a ‘chevron’ or braided wheat look. -
Detail the left section:
On the left carved section, press simple, angled lines that flow downward and outward, resembling the veins of a leaf. -
Cross-hatch the right:
For the right section, create a grid pattern. Press small parallel lines horizontally, then cross them vertically to create a tiny waffle texture. -
Refine the edges:
Gently smooth the outer rim of the circle with your fingertip to remove any sharp edges created by the cutter.
Step 3: Baking & Assembly
-
Bake the pieces:
Place your tile with the clay pieces directly into a preheated oven. Bake according to your specific clay brand’s instructions (usually 275°F/135°C for 15-30 minutes). -
Cool down completely:
Allow the clay to cool fully inside the oven or on a heat-safe surface. Do not attempt to glue whilst the clay is warm. -
Sand backing (optional):
If the back of your stud feels uneven, lightly rub it against fine-grit sandpaper on a flat surface to create a perfectly flush base. -
Apply adhesive:
Place a tiny dot of strong jewelry glue or E6000 onto the flat pad of your earring post. -
Attach the post:
Press the glued post firmly onto the center of the back of the clay circle. Using a slight twisting motion helps the glue bond better. -
Cure the glue:
Let the earrings sit undisturbed for at least 24 hours to ensure the bond is completely secure before wearing.
Natural Finish
After baking, lightly brush a tiny amount of diluted white or tan acrylic paint into the grooves and wipe the surface clean. It makes the texture pop instantly.
Enjoy wearing your handcrafted, nature-inspired accessories or gift them to a friend who loves subtle details
Leaf-Shaped Nature Dangles
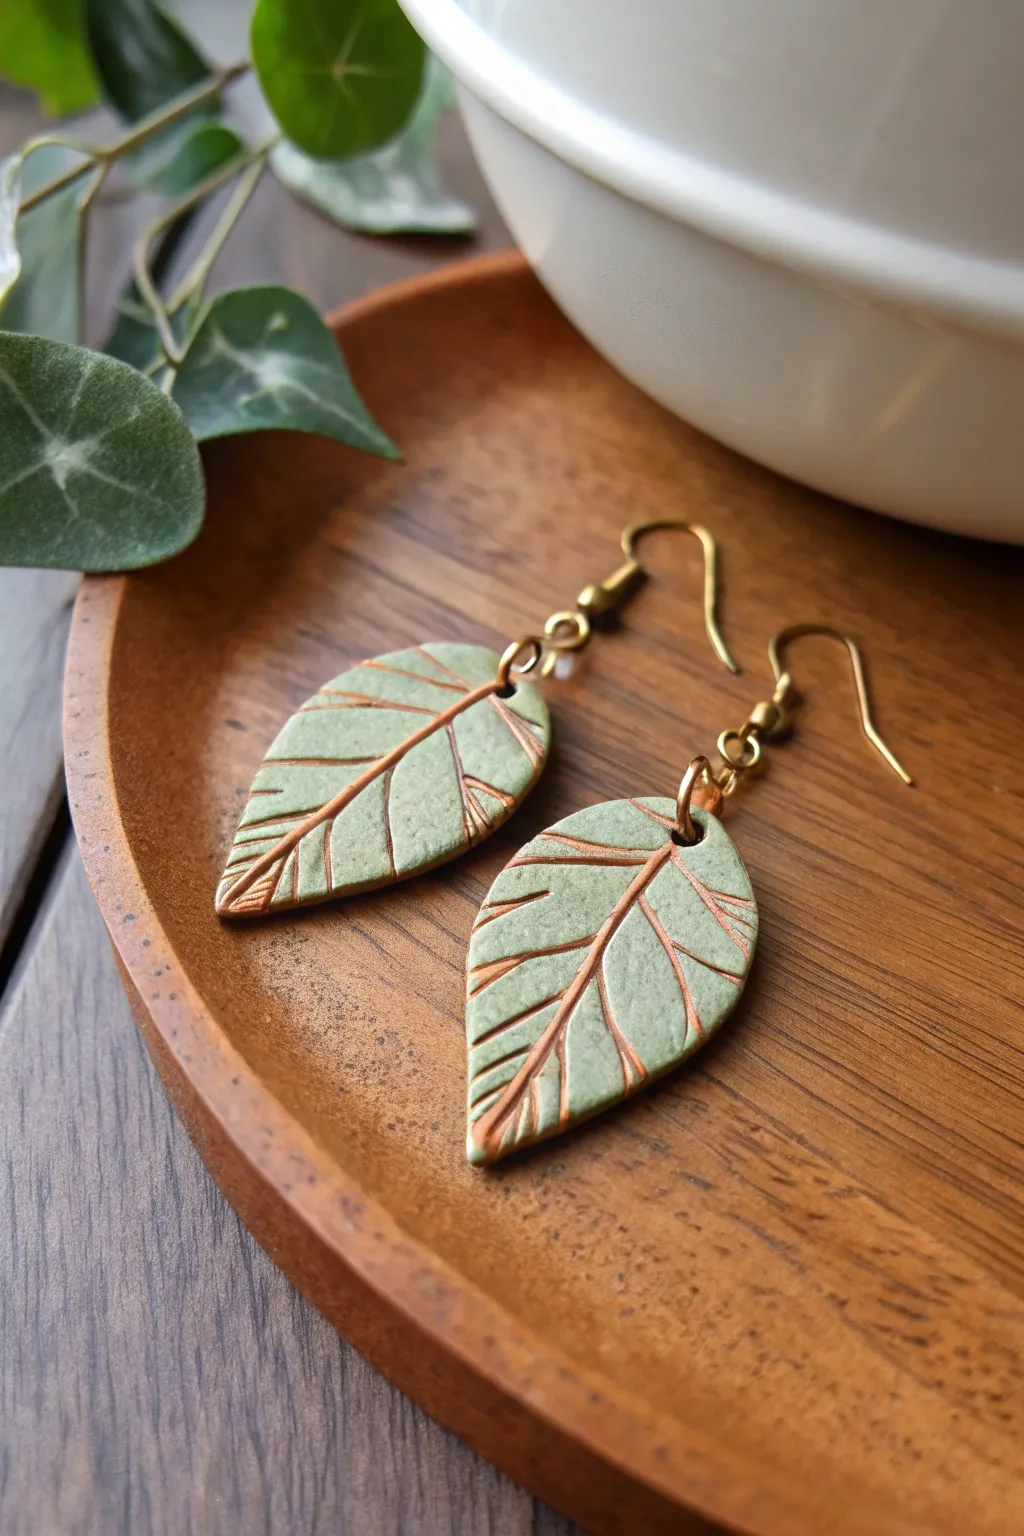
Capture the serenity of nature with these elegant polymer clay earrings featuring a soft sage green base and intricate copper detailing. The process uses a simple impression technique to create realistic leaf veins that shimmer beautifully when filled with metallic paint.
How-To Guide
Materials
- Sage or light olive green polymer clay
- Ceramic tile or glass work surface
- Acrylic rolling pin
- Needle tool or toothpick
- Leaf-shaped cutter (approx. 1.5 – 2 inches)
- Copper or gold acrylic paint
- Small paintbrush
- Baby wipes or paper towel (damp)
- Small jump rings (gold or bronze tone)
- Fishhook earring wires
- Jewelry pliers
- Hand drill or small clay punch
- Oven (for baking)
- Gloss or matte varnish (optional)
Step 1: Preparing the Clay Body
-
Condition the Clay:
Start by warming a block of sage green or light olive polymer clay in your hands. Knead and roll it until it becomes soft, pliable, and free of any air pockets. -
Roll out a Slab:
Place the conditioned clay on your ceramic tile. Using your acrylic rolling pin, flatten the clay into an even slab about 3mm thick. If you have a pasta machine, a medium setting works perfectly here. -
Check for Imperfections:
Inspect the surface. If you see any air bubbles, pop them gently with a needle tool and smooth the area with your finger. -
Cut the Leaf Shapes:
Take your leaf-shaped cutter and press firmly into the clay slab. Create two identical leaf shapes. If the clay sticks to the cutter, dip the cutter in a little cornstarch first. -
Smooth the Edges:
Gently lift the cut shapes. Use your finger to softly round off any sharp or ragged edges left by the cutter, giving the leaves a more organic, natural look.
Clean Edges Trick
Before baking, lightly dip your finger in baby oil and run it along the cut edges of the clay. It smooths away fingerprints and rough spots instantly without distorting the shape.
Step 2: Texturing and Detailing
-
Draw the Central Vein:
Using a needle tool or a sharp toothpick, gently drag a line down the center of each leaf, starting from the top but stopping just before the bottom tip. Press deep enough to create a groove, but don’t cut all the way through. -
Add Side Veins:
Create diagonal lines branching off the central vein on both sides. I like to vary the spacing slightly so they don’t look too uniform or mechanical. -
Add Texture (Optional):
For a subtle stone-like texture, you can gently dab the surface of the clay with a clean toothbrush or piece of sandpaper, being careful not to ruin your vein lines. -
Pierce the Holes:
Use a small circular cutter or a needle tool to create a hole at the very top of the leaf for the jump ring. Make sure the hole is big enough for your jewelry findings but not too close to the edge. -
Bake the Clay:
Place the tile with your clay pieces directly into a preheated oven. Bake according to your specific brand’s package instructions (usually around 275°F/130°C for 15-30 minutes). Let them cool completely before handling.
Step 3: Painting and Assembly
-
Apply Metallic Paint:
Squeeze a small amount of copper or gold acrylic paint onto a palette. Using a brush, generously cover the entire surface of the cooled clay leaves, ensuring the paint gets deep into the carved vein lines. -
Wipe the Surface:
Before the paint dries completely, take a damp baby wipe or paper towel and gently wipe across the surface of the clay. This removes the paint from the raised areas but leaves the metallic pigment trapped inside the grooves. -
Fine-Tune the Look:
If you wipe away too much paint, simply dab a little more into the groove and wipe again. You want a clean contrast between the green clay and the metallic veins. -
Seal (Optional):
If desired, apply a thin coat of water-based varnish to protect the paint and give the earrings a finished sheen. Let this dry fully. -
Attach Jump Rings:
Using two pairs of jewelry pliers, twist open a jump ring (twist sideways, don’t pull apart). Thread it through the hole at the top of the leaf. -
Add Earring Hooks:
While the jump ring is still open, slide on the loop of your fishhook earring wire. Close the jump ring securely by twisting it back into place. -
Final Check:
Repeat for the second earring and ensure all different metal components are securely closed and facing the correct direction.
Level Up: Ombré Effect
Mix a tiny bit of white clay into your sage green for the top half of the leaf to create a soft color gradient before cutting your shapes.
Enjoy styling these sophisticated botanical earrings with your favorite casual or dressy outfits
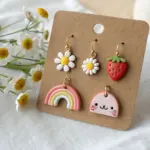
Tiny Flower Stud Pairs
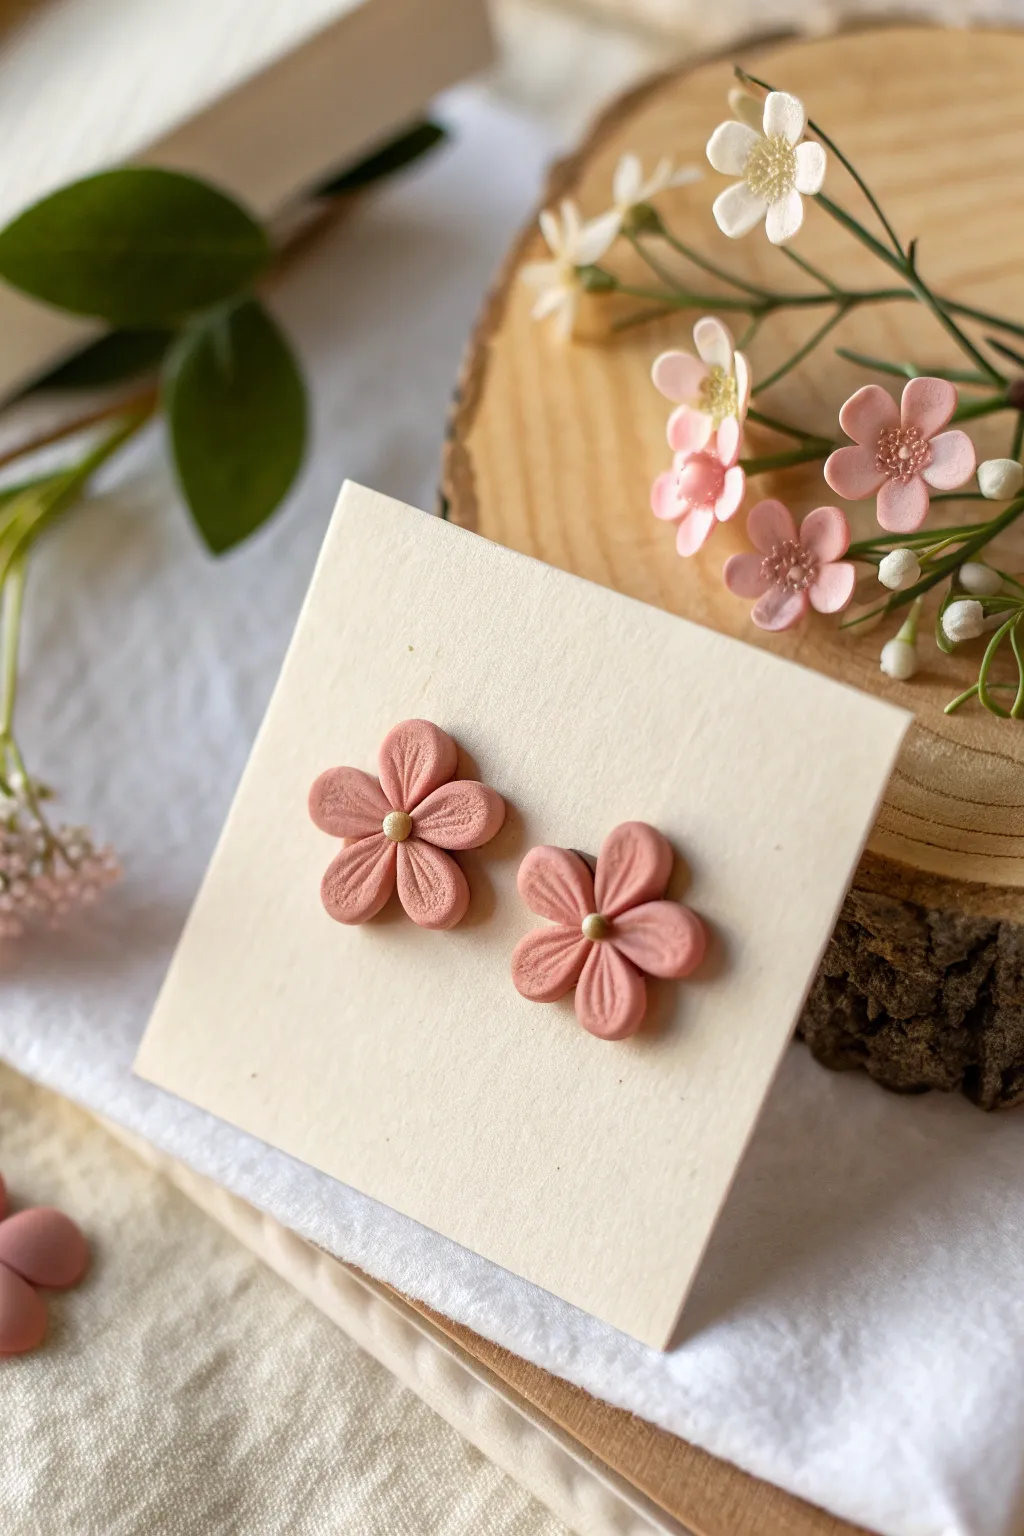
These delicate, dusty rose flower studs capture the simple beauty of spring in miniature form. Their textured petals and tiny centers add a touch of realism to an otherwise charmingly minimal design perfect for everyday wear.
Step-by-Step Tutorial
Materials
- Polymer clay in ‘Dusty Rose’ or light mauve
- Polymer clay in pale yellow (tiny amount for centers)
- Small flower plunger cutter (5-petal shape) or a sharp craft knife
- Ball stylus tool (small)
- Needle tool or toothpick
- Sandpaper or a texture sponge (fine grit)
- Stainless steel earring posts
- Super glue or liquid polymer clay (for attaching posts)
- Oven for baking
Step 1: Prepping the Petals
-
Condition the Clay:
Begin by thoroughly kneading your dusty rose polymer clay until it is soft and pliable. This conditioning step is crucial to prevent cracks during baking. -
Roll Out a Sheet:
Roll the clay flat using a pasta machine or acrylic roller to a thickness of about 2-3mm. You want it sturdy enough to hold its shape but delicate enough to look flowery. -
Cut the Base Shape:
Use your 5-petal flower cutter to punch out two identical shapes. If you don’t have a cutter, you can freehand cut five small teardrop shapes and join them at the points. -
Soften the Edges:
Gently tap around the edges of each petal with your fingertip to remove any sharp cut lines from the tool, giving the flower a softer, more organic look.
Step 2: Adding Texture and Detail
-
Indent the Center:
Take your ball styling tool and press gently into the very center of the flower. This helps lift the petals slightly and creates a nesting spot for the yellow center later. -
Create Petal Veins:
Using a needle tool or the back of a craft knife, carefully press a single line down the center of each petal, starting from the center and stopping just before the tip. -
Apply Surface Texture:
Gently press a piece of fine-grit sandpaper or a texture sponge onto the surface of the petals. This mimics the velvety texture of real flower petals rather than leaving them shiny and smooth. -
Shape the Curve:
I like to gently pinch the tip of each petal just a tiny bit to give them a slight cupped shape, making the flower look like it’s blooming rather than lying flat.
Clean Prints
Before baking, use a cotton swab dipped in rubbing alcohol to gently wipe the clay surface. This removes unwanted fingerprints or lint without damaging the texture.
Step 3: The Center & Assembly
-
Make the Stamen:
Roll a very tiny amount of pale yellow clay into two small spheres. These should be proportionate to your flowers—small enough not to overwhelm the petals. -
Attach the Center:
Place a yellow sphere into the central indentation you made earlier. Press down gently to secure it without squashing it completely flat. -
Texture the Center:
Use a needle tool to poke tiny dots all over the yellow center, giving it a pollen-like texture. -
Bake the Pieces:
Place your flowers on a ceramic tile or baking sheet lined with parchment paper. Bake according to your brand of clay’s instructions (usually 275°F/135°C for 15-30 minutes). -
Cool Down:
Allow the flowers to cool completely before handling them. Polymer clay is fragile when hot and hardens fully as it cools. -
Prepare Posts:
Sand the flat pad of your earring posts lightly to give the glue more grip. -
Attach Hardware:
Apply a dot of strong super glue or Loctite gel to the back of each flower and press the earring post firmly in place. Let it cure fully before wearing.
Metallic Accent
For a glamorous twist, swap the yellow clay center for a gold-leaf flake or paint the cured center with metallic gold acrylic paint.
You now have a lovely set of botanical studs ready to gift or keep for yourself
Speckled Stone Pebble Studs
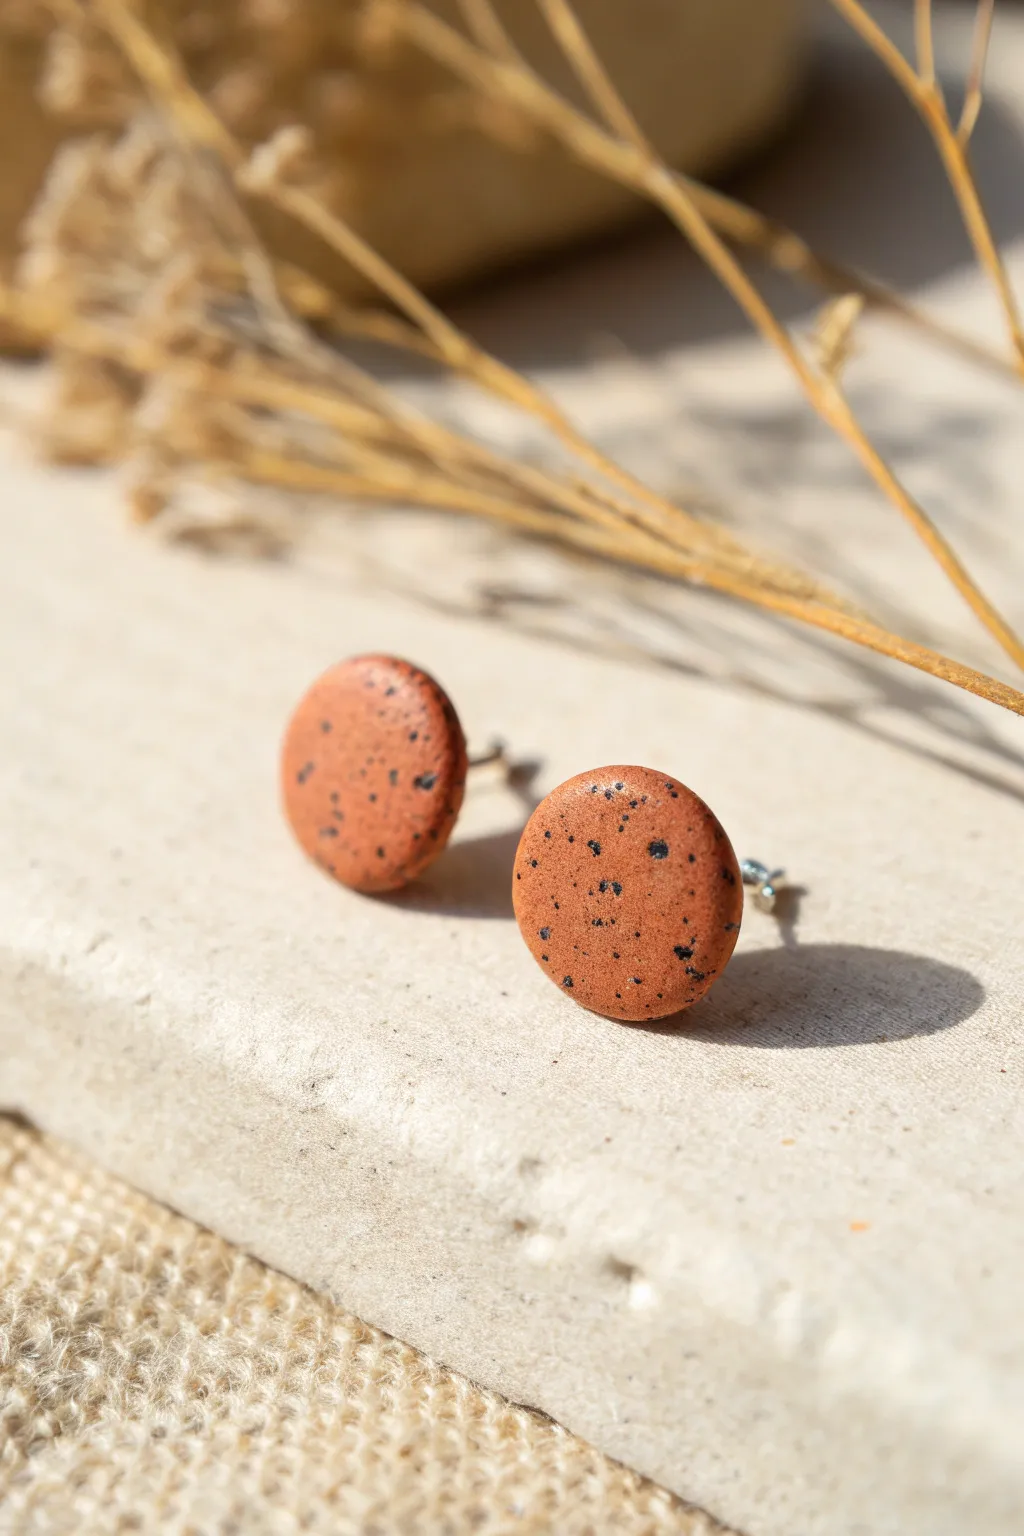
Achieve a gorgeous, earthy aesthetic with these simple speckle-effect studs that mimic the look of natural terracotta stone. This project relies on a surprising household ingredient to create organic texture and visual interest without needing expensive specialty clay.
Step-by-Step Guide
Materials
- Terracotta or rust-colored polymer clay (e.g., Fimo or Sculpey)
- Black acrylic paint
- Coarse black pepper or dried coffee grounds (optional for texture)
- Small round clay cutter (approx. 1cm diameter)
- Acrylic rolling pin or pasta machine
- Ceramic tile or glass work surface
- Stainless steel earring posts
- Strong jewelry glue (e.g., E6000 or Loctite Gel)
- Toothbrush or stiff bristle brush
- Sandpaper (400 and 800 grit)
- Oven for curing
Step 1: Preparing the Clay Body
-
Conditioning:
Begin by warming up a small block of your terracotta or rust-colored polymer clay in your hands. Knead it thoroughly until it is soft, pliable, and free of cracks. -
Adding the Speckles:
Flatten the clay into a pancake shape. Take a pinch of coarse black pepper (or dried used coffee grounds) and sprinkle it onto the clay surface. -
Mixing In:
Fold the clay over to trap the speckles inside and knead it again. Repeat this folding and rolling process until the particles are evenly distributed throughout the block. -
Creating Contrast (Paint Method):
For the distinct black spots seen in the reference, put a tiny drop of black acrylic paint on your work surface. Dip an old toothbrush into the paint and flick the bristles to spray fine droplets onto your flattened clay sheet. -
Incorporating the Paint:
Once the paint flecks are dry to the touch, fold the clay and run it through your pasta machine or roll it out again. This stretches the paint dots into organic-looking mineral streaks.
Uneven Speckles?
If your black specks are clumped together, cut your clay block into tiny pieces and re-combine them randomly before rolling. This breaks up clusters effectively.
Step 2: Shaping and Curing
-
Rolling the Sheet:
Roll your conditioned, speckled clay out into a slab. For stud earrings, I aim for a thickness of about 3mm to 4mm—substantially thick enough to hold the post but light enough to wear. -
Cutting the Shapes:
Place a piece of cling film (plastic wrap) lightly over the clay surface. Press your small round cutter firmly onto the plastic and through the clay. The plastic softens the edges, creating a gentle ‘pebble’ dome rather than a harsh cylinder. -
Releasing and Refining:
Lift the plastic and carefully remove your clay circles. If the edges aren’t perfectly smooth, gently tap them with your fingertip to round them off further. -
Surface Texturing:
To enhance the stone effect, lightly tap the surface of each stud with a piece of coarse sandpaper or a stiff brush. This removes the plastic shine and adds a matte, earthy finish. -
Baking:
Place your studs on a ceramic tile or a baking sheet lined with parchment paper. Bake according to your specific clay brand’s instructions (usually around 230°F – 275°F for 15-30 minutes). -
Cooling Down:
Allow the pieces to cool completely inside the oven if possible, or take them out and let them rest undisturbed until they reach room temperature.
Step 3: Assembly and Finishing
-
Sanding the Backs:
Once cool, take your 400 grit sandpaper and lay it flat on the table. Rub the back of each stud against the paper in a circular motion to create a perfectly flat, slightly roughened surface for better adhesion. -
Cleaning:
Wipe the dust off the studs with a damp cloth or a baby wipe to ensure the surface is clean. -
Preparing Posts:
Lightly scratch the flat pad of your stainless steel earring posts with sandpaper. This texture helps the glue grip the metal. -
Gluing:
Apply a small dot of strong jewelry glue to the earring post pad. Press it firmly onto the center of the back of your clay stud. Excessive glue might squish out, so use just enough. -
Setting Time:
Leave the earrings upside down to cure for at least 24 hours. Don’t rush this step, as full bond strength takes time.
Domed Perfection
Use the ‘Saran wrap method’ (plastic wrap) over your clay before cutting. It naturally bevels the edges for that soft, tumbled stone look without sanding.
You now have a durable, nature-inspired accessory perfect for everyday wear
Simple Checkerboard Tiles
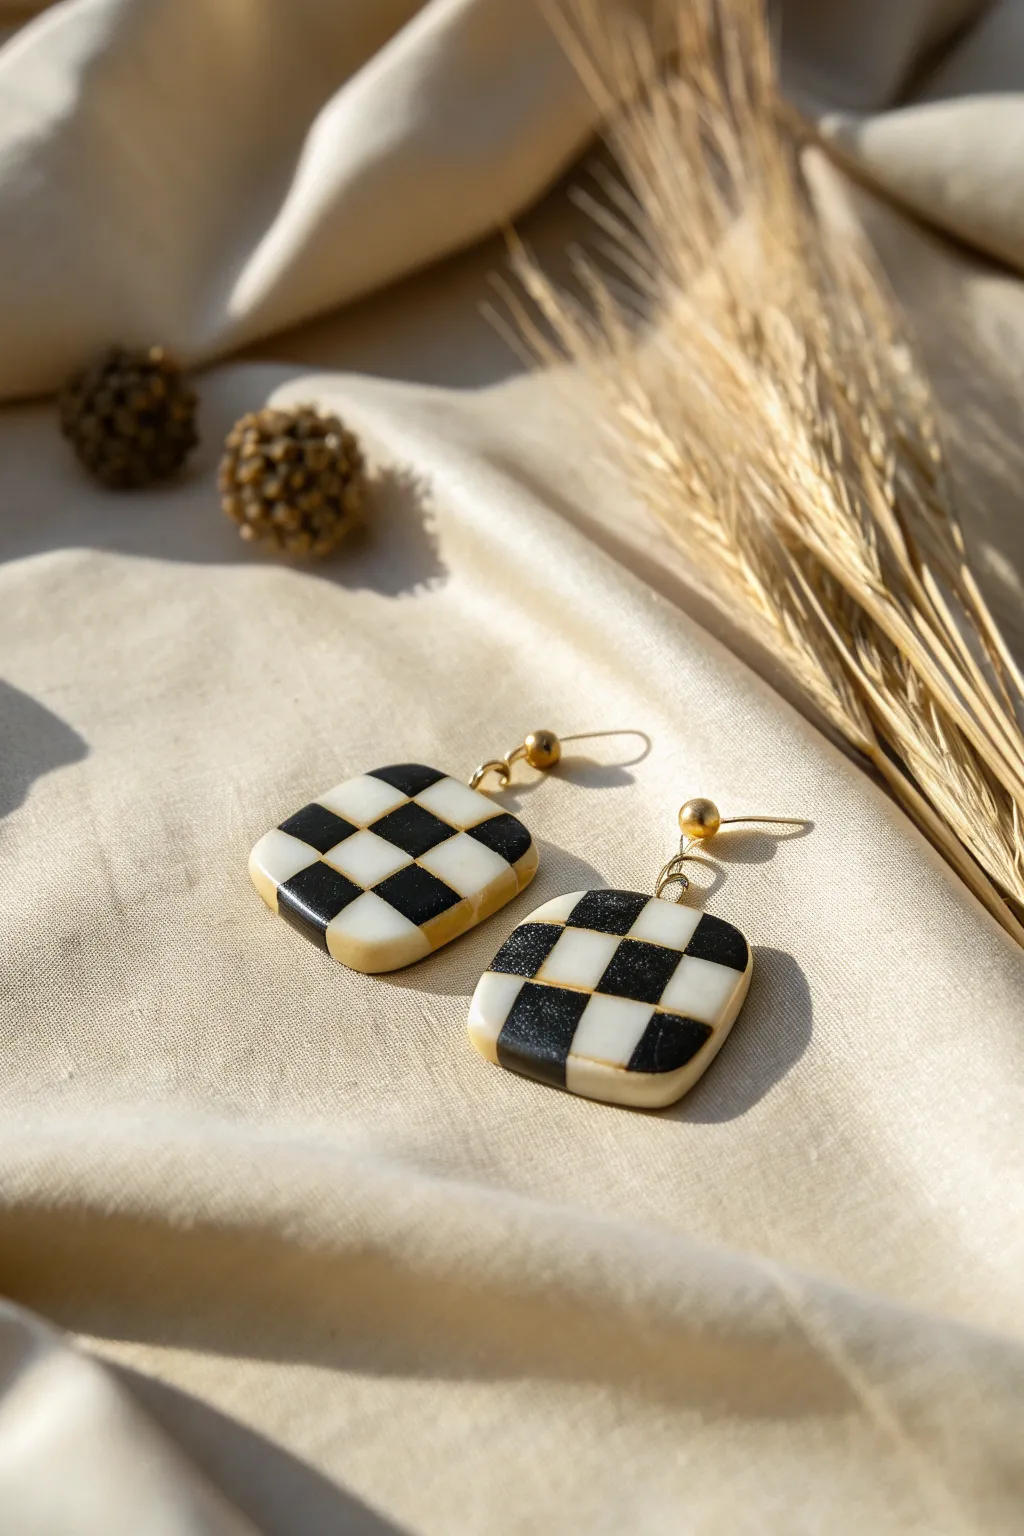
These striking checkerboard earrings combine a classic pattern with a soft, rounded square shape for a modern, wearable look. The crisp black and white contrast makes them versatile enough for daily wear, while the gold hardware adds a touch of elegance.
Detailed Instructions
Materials
- White polymer clay
- Black polymer clay
- Acrylic rolling pin
- Clay slicer blade (rigid)
- Small square clay clutter (approx. 1 inch)
- Ruler
- Gloss or satin polyurethane varnish
- Soft paintbrush
- Hand drill or pin vibe
- 2 Gold jump rings (6mm)
- 2 Gold ball stud earring posts with loops
- Jewelry pliers
- Wet/dry sandpaper (400-1000 grit)
- Smooth ceramic tile or glass work surface
Step 1: Creating the Checkerboard Core
-
Condition the Clay:
Begin by thoroughly kneading both your black and white polymer clay separately until they are soft and pliable. This step is crucial to prevent cracking later. -
Roll Out Slabs:
Use your acrylic roller or pasta machine to roll out a slab of white clay and a slab of black clay. Aim for an equal thickness of about 3mm (usually the thickest setting on a pasta machine). -
Cut Strips:
Using your rigid blade and a ruler, cut long, straight strips from both clay colors. Ensure every strip is exactly the same width (around 5mm works well for this scale). -
Assemble Striped Slab:
Lay the strips side-by-side on your work surface, alternating colors: black, white, black, white. Press them gently together on the sides so they adhere to form a single striped sheet. -
Slice Across:
Turn your striped sheet 90 degrees. Cut across the stripes to create new strips that are composed of alternating black and white squares. Keep the width identical to your original strip width. -
Offset and Reassemble:
Take your new multi-colored strips and lay them next to each other. Shift every other strip so the black squares align with white squares, creating the checkerboard pattern. Press the edges together firmly to bond them.
Step 2: Shaping and Baking
-
Smooth the Surface:
Gently roll over your new checkerboard slab with the acrylic roller. I like to use a piece of parchment paper on top to prevent dragging. This evens out the seams and ensures a flat surface. -
Cut the Shapes:
Position your square cutter over the pattern. Try to center it so the checks look symmetrical, or go off-center for a funky vibe. Press down firmly to cut out two squares. -
Soften the Edges:
Because the earrings in the photo have a lovely cushion-like look, gently tap the sharp cut edges with your fingertip to round them over slightly. This softens the geometry. -
Pierce Holes:
Use a needle tool or toothpick to poke a hole near the top corner of each square for the hardware. Make sure the hole is big enough for your jump rings. -
Bake:
Place the pieces on a ceramic tile and bake according to your clay manufacturer’s instructions (usually 275°F/135°C for 30 minutes). Let them cool completely in the oven to increase durability.
Clean Lines Only
Smudged white squares? Use a baby wipe or cotton swab with rubbing alcohol to gently clean the white clay surface before baking.
Step 3: Finishing Touches
-
Sand for Perfection:
Once cool, use wet/dry sandpaper under running water to smooth out any fingerprints or rough edges. Start with 400 grit and move to 1000 for a silky finish. -
varnish (Optional):
For that subtle sheen seen in the image, apply a very thin coat of gloss or satin varnish. Let it dry completely. -
Attach Jump Rings:
Open a jump ring by twisting it sideways with pliers. Thread it through the hole in the clay square. -
Add Post:
Before closing the jump ring, slide on the loop of your gold ball stud post. Ensure the front of the stud faces the same way as the front of your earring. -
Close and Complete:
Twist the jump ring closed securely so there is no gap. Repeat for the second earring.
Warp Speed
Warm up the design by gently curving the squares over a lightbulb or rounded metal tin before baking for a 3D, puffed effect.
Enjoy styling these geometric gems with your favorite neutral outfit.
Stacked Shapes With Links
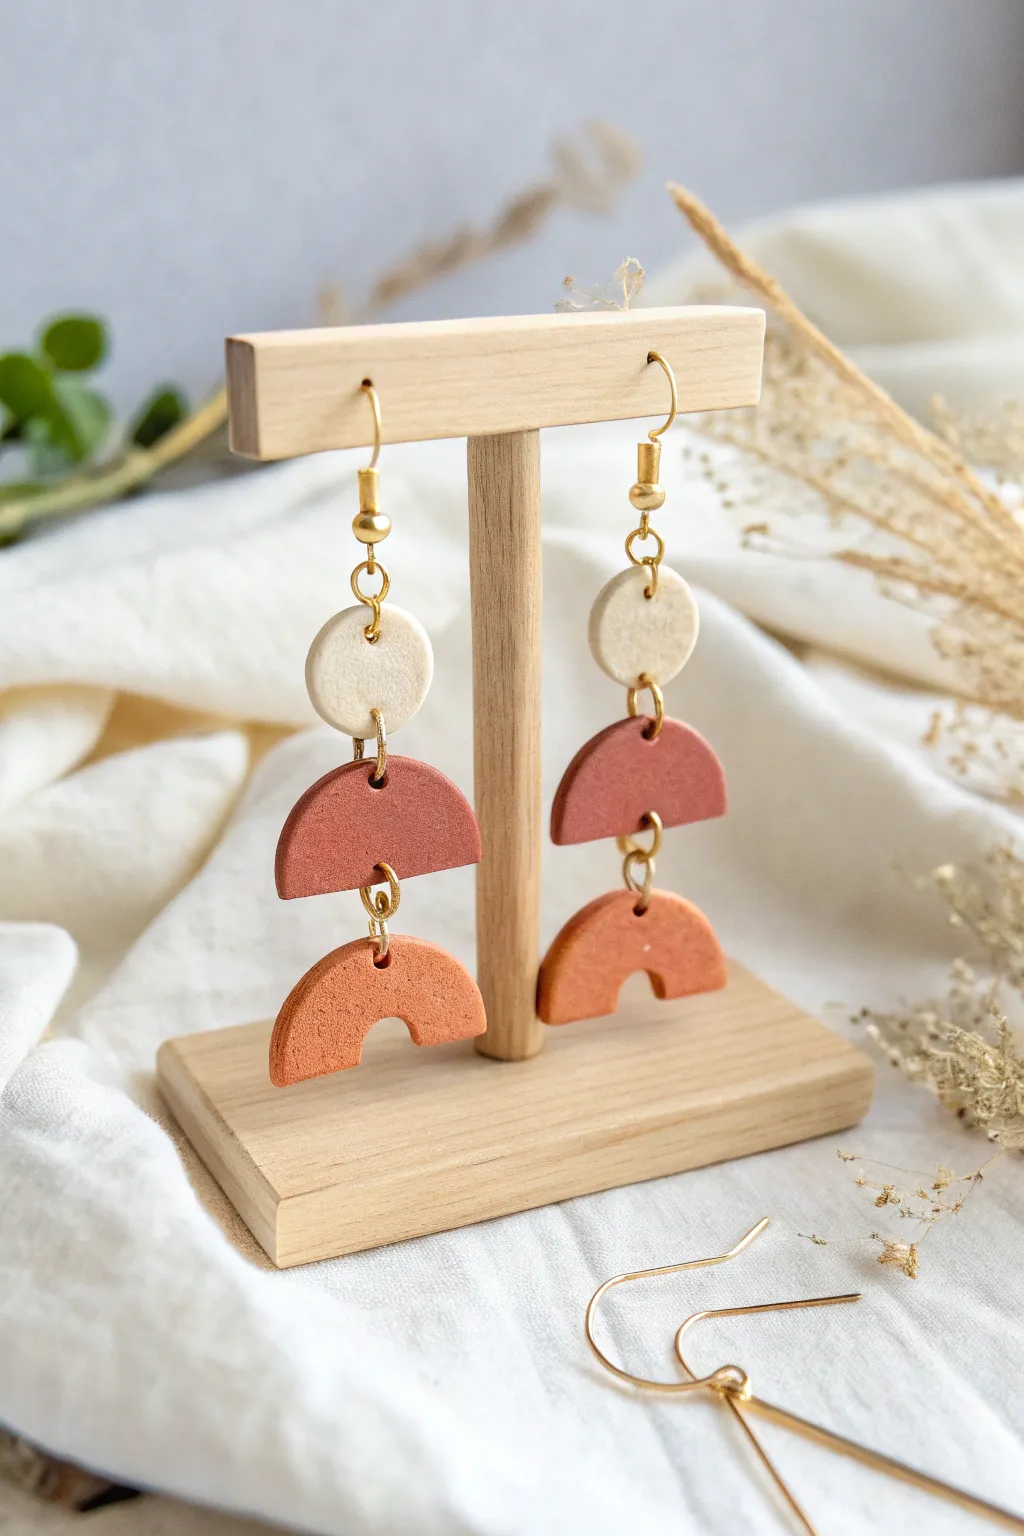
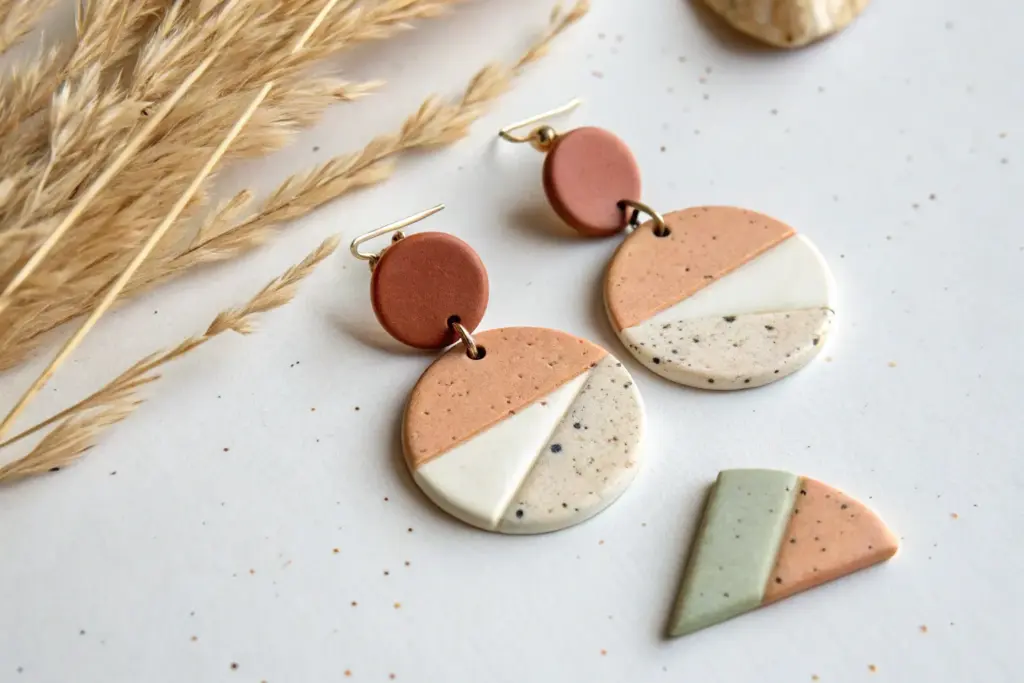
These stunning warm-toned earrings combine creamy stone textures with rich earthy hues in a classic stacked design. By linking simple geometric shapes—circles, semicircles, and arches—you create movement and visual interest perfect for any casual outfit.
Step-by-Step Guide
Materials
- Polymer clay in cream/beige, reddish-brown (brick), and terra-cotta orange
- Rolling pin or pasta machine
- Circle cutters (approx. 0.5 inch diameter)
- Circle cutter (approx. 1 inch diameter)
- Small round cutter or straw (for inner arch)
- Craft blade or clay slicer
- Needle tool or small drill bit
- Sandpaper (fine grit)
- 6-8 gold jump rings (6mm or similar)
- 2 gold fishhook ear wires
- Jewelry pliers (round and flat nose)
- Baking sheet with parchment paper
- Oven
Step 1: Shaping the Clay Components
-
Condition the cream clay:
Start by warming up your cream or beige clay in your hands until it’s soft and pliable. If you want that speckled stone look shown in the photo, mix in a pinch of black pepper or craft sand. -
Roll the sheet:
Roll the cream clay out to an even thickness, roughly 3mm thick. I prefer using a pasta machine for consistency, but a rolling pin with guide rings works perfectly well. -
Cut the top circles:
Use your smallest circle cutter to punch out two identical circles. These will be the top tier of your earrings. -
Prepare the middle tier:
Condition and roll out your reddish-brown (brick) clay to the same thickness. Use your medium-sized circle cutter to punch out one circle, then slice it perfectly in half with your blade to create two semi-circles. -
Create the bottom arches:
Condition and roll the terra-cotta orange clay. Punch out two medium circles using the same cutter as the previous step. -
Refine the arch shape:
To turn those orange circles into arches, use a smaller circle cutter (or even a straw) to remove a semi-circle from the bottom center of each piece. Then, trim the bottom legs flat with your blade to match the photo’s silhouette. -
Smooth the edges:
Gently tap the edges of all your clay pieces with your finger to soften any sharp cutting lines. This gives the finished piece a more polished, professional look.
Uneven Surfaces?
If your clay creates dome-like bumps when you pierce the holes, pierce gently from the front, flip the piece over, and pierce again from the back to ensure a clean channel.
Step 2: Assembly and Finishing
-
Pierce holes:
Using a needle tool, carefully poke holes for your hardware. The cream circles need a hole at the very top and very bottom. The brick semi-circles need holes at the top center and bottom center. The orange arches only need one hole at the top center. -
Bake the pieces:
Arrange your pieces on a parchment-lined baking sheet. Bake according to your clay manufacturer’s instructions (usually around 275°F/135°C depending of brand). Let them cool completely before handling. -
Sand for texture:
Once cool, lightly sand the surfaces and edges if desired. The earrings in the photo have a lovely matte, slightly textured finish that feels very organic. -
Open the jump rings:
Use two pairs of pliers to twist your gold jump rings open. Remember to twist side-to-side rather than pulling them apart, which weakens the metal. -
Connect the tiers:
Thread an open jump ring through the top of the orange arch and the bottom of the brick semi-circle. Close the ring securely. -
Link to the top:
Add another jump ring to connect the top of the brick semi-circle to the bottom of the cream circle. -
Attach the ear wire:
Finally, open the loop on your fishhook ear wire (or use a small jump ring if needed) and thread it through the top hole of the cream circle. Close it tight. -
Repeat for the second earring:
Follow the same assembly steps for the matching earring, ensuring all pieces are facing the correct way so the textures match.
Add Some Shine
For a different vibe, coat just the middle semi-circle with a gloss glaze or UV resin after baking. The contrast between matte and glossy tiers adds significant visual depth.
Wear your new geometric dangles with pride or gift them to a friend who loves earth tones
Twisted Knot Studs
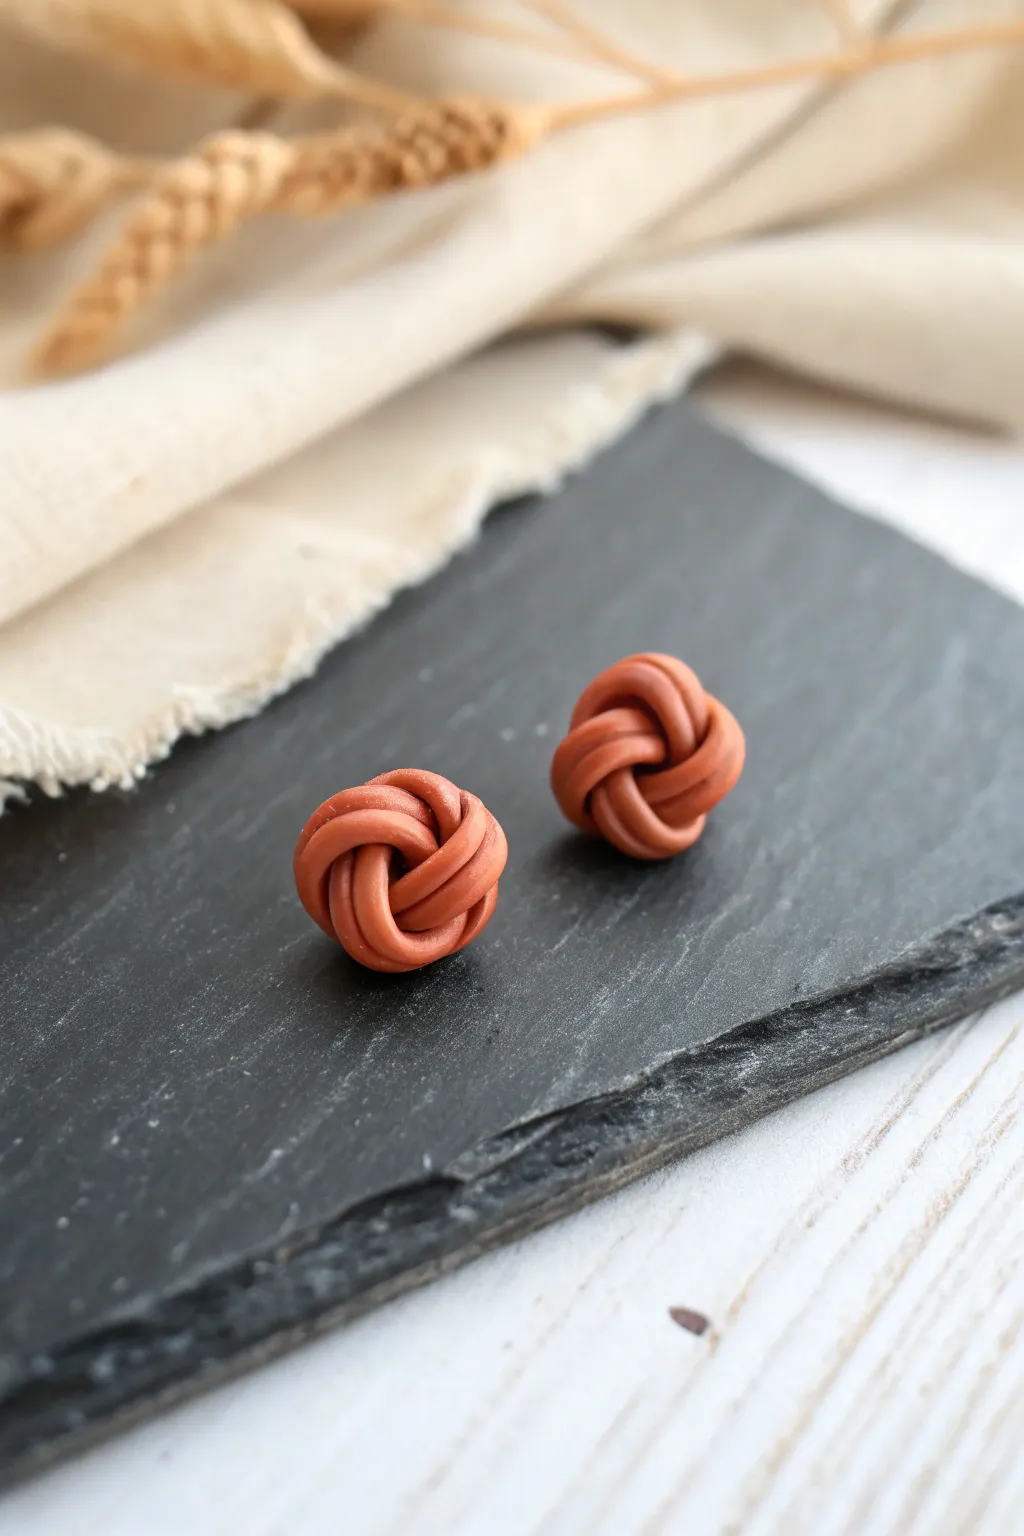
These elegant knot studs mimic the look of classic woven leather or fabric but are crafted entirely from durable polymer clay. Their warm terracotta hue and intricate dimensional texture make them a versatile accessory for everyday wear or special occasions.
Step-by-Step Tutorial
Materials
- Terracotta or reddish-brown polymer clay
- Ceramic tile or glass work surface
- Acrylic rolling pin or pasta machine
- Extruder with a small round disc (optional but recommended)
- Clay blade or craft knife
- Two earring posts with flat backs
- Strong jewelry glue (e.g., E6000) or liquid polymer clay
- Oven for baking
Step 1: Prepping the Clay Strands
-
Condition the clay:
Begin by thoroughly conditioning your terracotta polymer clay. Warm it in your hands and knead it until it is soft, pliable, and free of any cracks or air bubbles. -
Create uniform snakes:
If you have an extruder, use a small round disc to push out long, even strands of clay. This ensures perfect uniformity. -
Roll by hand (alternative):
If rolling by hand, create a snake on your work surface and roll it back and forth with a flat acrylic block until you achieve a thin, even strand about 2-3mm in diameter. -
Cut to length:
You will need two strands per earring, each approximately 3 to 4 inches long. It’s better to have them a little too long than too short.
Loose loops?
If gaps appear between your strands, don’t pull the ends! Instead, gently push the clay together from the outside in using a rubber-tipped shaping tool.
Step 2: Forming the Knot
-
Start the loop:
Take one clay strand and form a simple U-shape on your work surface. -
Create the crossover:
Cross the right end over the left end to create a loop, leaving tails on both sides. -
Weave the second loop:
Take the tail that is now on top and loop it under the bottom of the loop, then back over the top side. You are essentially tying a loose overhand knot but don’t pull it tight yet. -
Double the strands:
Take your second strand of clay and lay it directly next to the first one within the knot structure. Follow the path of the original knot exactly so the strands lie side-by-side like a double lane road. -
Shape into a ball:
Gently manipulate the flat knot into a 3D ball shape by curving the loops upward. I adjust the tension slowly here, nudging loops closer together until a tight sphere forms. -
Hide the ends:
Once the knot is tight and spherical, trim any excess length from the ends of the strands. Tuck the cut ends underneath the curves of the knot so they are hidden on the bottom side. -
Smooth the shape:
Very gently roll the finished knot in your palm to round it out, being careful not to smash the beautiful woven texture. -
Repeat the process:
Follow the same steps to create the second earring, ensuring the size matches the first one.
Step 3: Baking and Assembly
-
Prepare for baking:
Place the two knots on your ceramic tile or backing sheet. Double-check that the bottoms are slightly flattened so the earring post will sit flush later. -
Bake the clay:
Bake according to your specific clay manufacturer’s instructions (usually around 275°F or 130°C for 30 minutes). Let them cool completely before handling. -
Attach the posts:
Apply a small dot of strong jewelry glue to the flat pad of your earring post. -
Secure the backing:
Press the glued post firmly onto the flat spot on the back of the clay knot. Hold it in place for a few seconds. -
Reinforce (optional):
For extra durability, you can cover the earring post pad with a small smear of liquid clay and bake again for 10 minutes, or simply let the jewelry glue cure fully for 24 hours.
Gloss it up
After baking, lightly brush the high points of the knot with a water-based satin glaze. This mimics the sheen of real leather cord.
Enjoy wearing your new handcrafted knots that look intricate but are surprisingly simple to make
Scalloped Fan Earrings
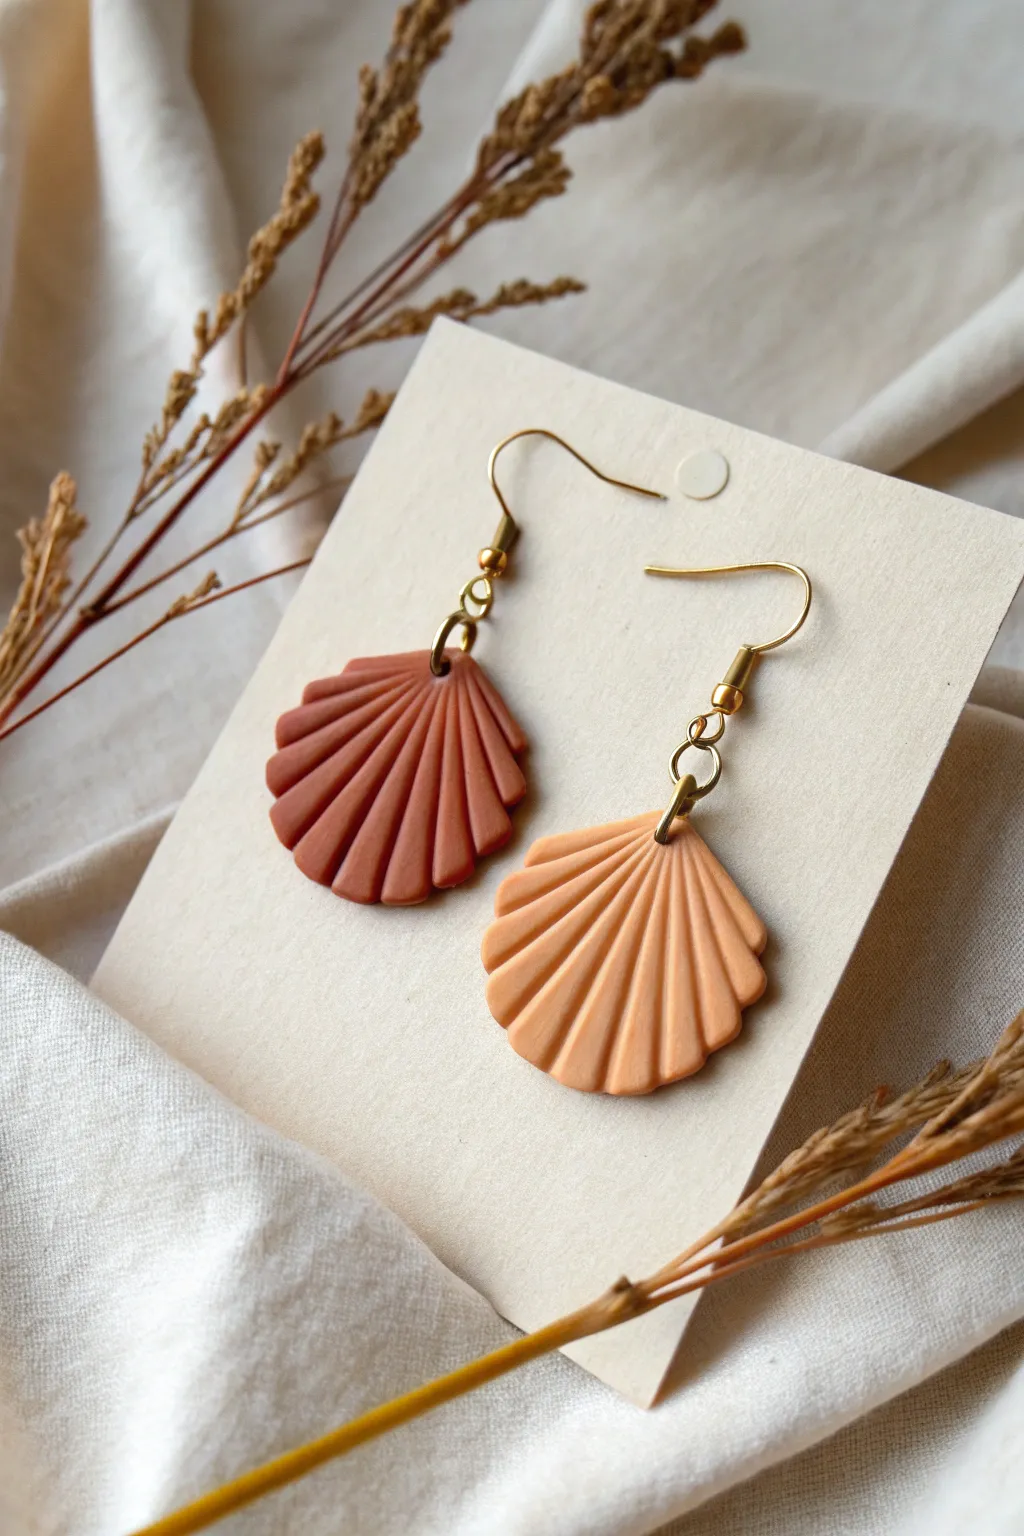
These elegant earrings capture the organic beauty of seashells with a simple, fan-like silhouette. Using terra cotta and peach tones, you’ll create a textured, ridged surface that brings depth and sophistication to a beginner-friendly project.
Step-by-Step
Materials
- Polymer clay in terracotta and peach colors
- Acrylic rolling pin or pasta machine
- Detailed clay needle tool or blunted toothpick
- Round scalloped cutter (approx. 1.5 inch diameter)
- Straight blade tissue slicer
- Small jump rings (gold finish)
- French hook ear wires (gold finish)
- Jewelry pliers (flat nose and round nose)
- Ceramic tile or parchment paper for baking
- Hand drill or pin vibe with small bit
Step 1: Preparing the Clay Base
-
Condition the Clay:
Begin by thoroughly conditioning your terracotta and peach clay separately until they are soft and pliable. Warm clay prevents cracking later. -
Roll out Sheets:
Roll each color into a slab approximately 3mm thick. You want them sturdy enough to hold the ridged texture but light enough to wear comfortably. -
Cut the Initial Shapes:
Using your round scalloped cutter, punch out one circle from each color. This scalloped edge will become the bottom fan of your earring. -
Create the Fan Shape:
Take your straight craft blade and cut the bottom third off each circle to create a flat edge, but discard the larger top piece. Wait, actually, cut slightly above the center line so you have slightly more than half a circle left—this becomes your fan canvas. -
Refine the Top Edge:
Use your blade to trim the straight cut edge into a gentle, narrow arch at the very center top. This narrow point is where the ridges will converge.
Fixing Smudges
Fingerprints on your raw clay? Lightly brush the surface with a tiny amount of baby oil or cornstarch before baking to smooth them out perfectly.
Step 2: Texturing and Refining
-
Mark the Center Line:
Take your needle tool and lightly press a line from the top center point down to the middle scallop at the bottom edge. This guide helps keep your pattern symmetrical. -
Create the Ridges:
Press the needle tool firmly into the clay to create deep radiating lines. Start from that top convergence point and angle them out to the indented points of the scalloped bottom edge. -
Deepen the Grooves:
Go over your lines a second time. I find that slightly rocking the tool widens the groove, making the ‘shell’ ridges look more pronounced and dimensional. -
Smooth the Edges:
Gently tap the outer scalloped edges with your finger to remove any sharp bits or burrs created by the cutter. Smoothness creates a professional finish. -
Pierce the Holes:
Using your needle tool or a small drinking straw, poke a hole near the top convergence point of each shell. Ensure there is at least 2mm of clay above the hole for strength.
Add Some Shine
After baking, lightly brush gold acrylic paint over the raised ridges (dry-brush style), or add a coat of gloss glaze for a wet-look seashell effect.
Step 3: Baking and Assembly
-
Bake the Clay:
Place your pieces on a ceramic tile or baking sheet lined with parchment paper. Bake according to your brand’s specific package instructions (usually 275°F/135°C for 30 minutes). -
Cool Down:
Allow the pieces to cool completely in the oven. This annealing process makes the clay stronger. -
Open Jump Rings:
Using two pairs of pliers, twist your jump rings open sideways (never pull them apart outwards) to preserve their circle shape. -
Connect the Hardware:
Thread an open jump ring through the hole in the clay shell. -
Attach Ear Wires:
Loop the French hook ear wire onto the open jump ring. Ensure the hook faces the correct direction so the textured side of the earring faces forward. -
Close the Rings:
Use your pliers to twist the jump ring back into a closed position, ensuring the ends meet flush without a gap.
Wear your coastal-inspired creations with pride or gift them on a nice card backing
Cutout Negative-Space Arches
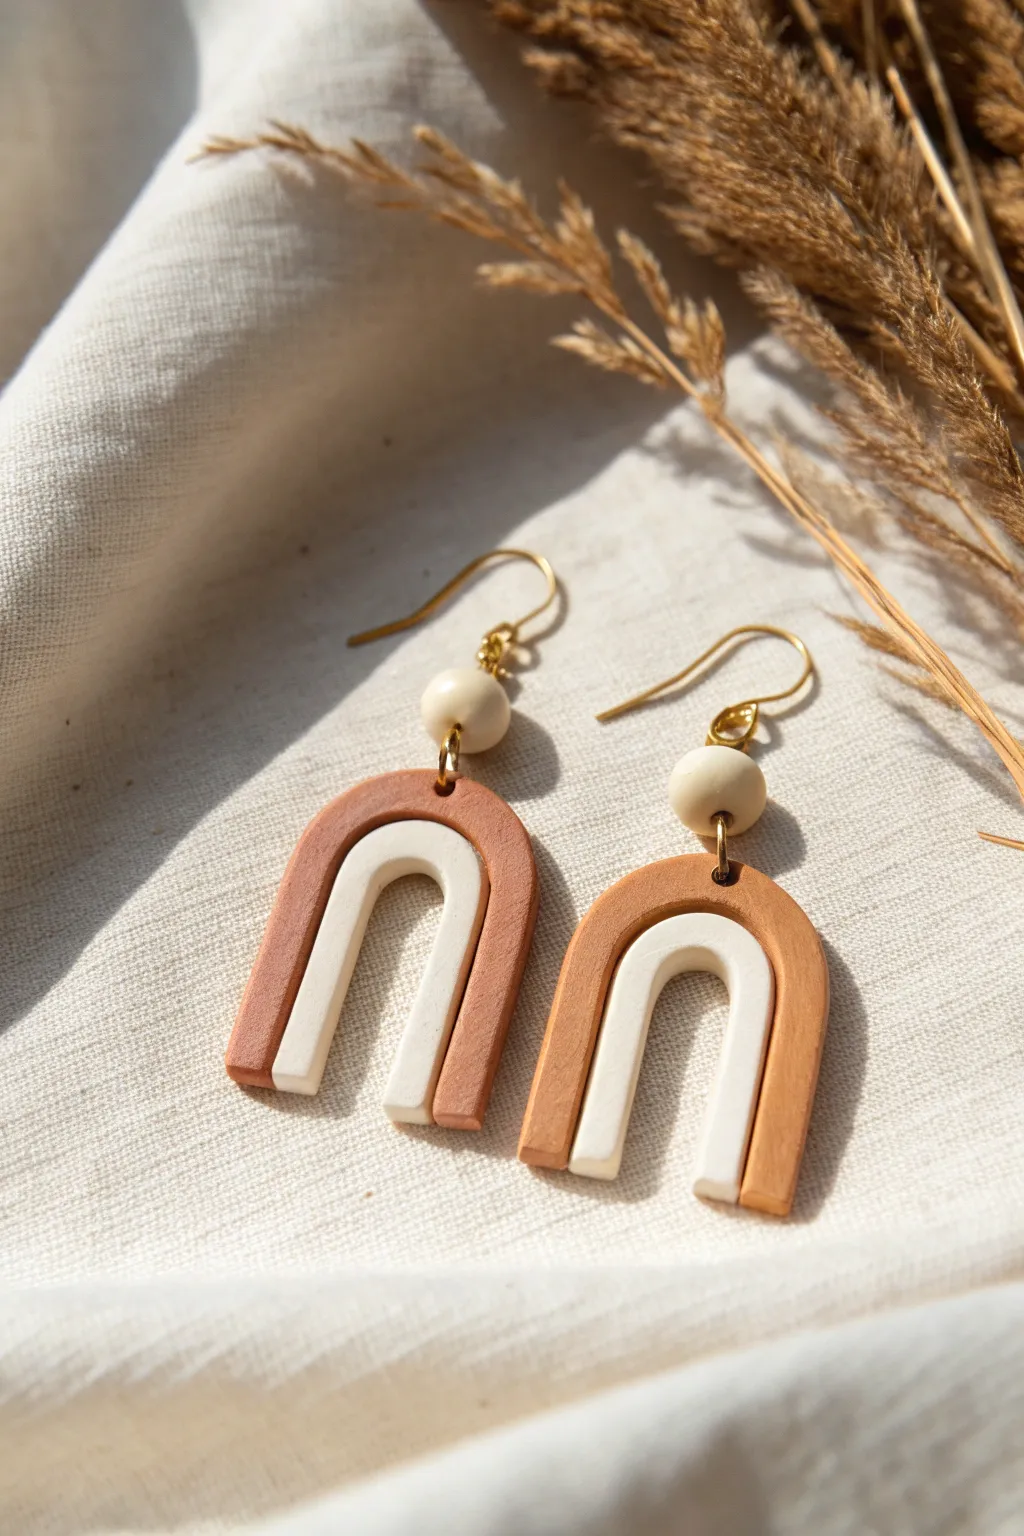
These simple yet striking earrings play with negative space by nesting a smaller cream arch within a larger terracotta frame. The warm, earthy tones combined with the geometric cutout design create a modern bohemian look that’s perfect for everyday wear.
Detailed Instructions
Materials
- Polymer clay in terracotta/rust
- Polymer clay in cream/off-white
- Sharp rectangular clay cutting blade
- Oval or arch-shaped clay cutters (two sizes)
- Acrylic rolling pin
- Mini hand drill or thick needle
- Parchment paper or ceramic tile
- Two gold earring hooks (fishhook style)
- Four gold jump rings (6mm)
- Two cream wooden or clay beads
- Flat-nose jewelry pliers
- Oven for baking
Step 1: Preparing the Clay
-
Condition the clay:
Start by warming the terracotta clay in your hands, kneading it until it is soft and pliable. Repeat this process separately with the cream clay, ensuring you wash your hands between colors to avoid staining the lighter clay. -
Roll out the sheets:
Using your acrylic rolling pin, roll both colors out onto a piece of parchment paper or a clean ceramic tile. Aim for an even thickness of about 3mm to 4mm for a sturdy finished earring. -
Check for bubbles:
Inspect the surface of your rolled clay sheets for any trapped air bubbles. If you spot any, gently pierce them with a needle and smooth the area with your finger.
Seamless Smoothness
Before baking, lightly brush the clay surface with a tiny amount of baby oil or cornstarch. This helps remove fingerprints and dust for a flawless finish.
Step 2: Cutting the Shapes
-
Cut the outer arch:
Take your larger arch cutter and press it firmly into the terracotta sheet to create two identical base shapes. -
Create the negative space:
Using a smaller arch cutter, carefully align it in the center of the terracotta shapes you just cut. Press down to remove the middle section, leaving you with a U-shaped terracotta frame. -
Cut the inner arch:
Now, use that same smaller arch cutter on the cream clay sheet to cut two solid arch shapes that will fit inside the frames. -
Refine the fit:
Depending on your specific cutters, you might need to trim the cream arches slightly. If these are nesting arches (where one fits inside the other), place the cream shape inside the terracotta frame on your work surface. If they are meant to hang independently, keep them separate. -
Create the nested effect:
For this specific design, the cream arch sits *inside* the terracotta arch. Gently place the cream piece inside the terracotta void. Gently press the seams together on the back or use a tiny bit of liquid clay on the edges to bond them into a single flat unit. -
Pierce holes:
Use a needle or a small tool to poke a hole at the very top center of the terracotta arch. Ensure the hole is large enough for your jump rings but not so close to the edge that the clay will tear.
Stuck in Cutter?
If clay sticks inside your cutters, dip the cutter edges into a small pile of cornstarch or water before pressing into the clay. It acts as a release agent.
Step 3: Baking and Finishing
-
Bake the pieces:
Transfer your parchment paper onto a baking sheet. Bake the clay according to the manufacturer’s instructions—usually around 275°F (135°C) for 15-30 minutes depending on brand and thickness. -
Cool down:
Once baked, turn off the oven and let the pieces cool completely before handling them. Warm clay is fragile, but cooled polymer clay is surprisingly durable. -
Sand the edges:
If there are any rough spots on the edges, use high-grit sandpaper or a precision knife to smooth them out for a professional finish. -
Prepare the bead link:
Take a gold headpin or use a piece of jewelry wire to create a link. Thread your cream bead onto the wire. Create a small loop at the bottom and a loop at the top using your pliers.
Step 4: Assembly
-
Connect the bead to the arch:
Open a jump ring using two pairs of pliers (twist sideways, don’t pull apart). Thread it through the hole in the terracotta arch and the bottom loop of your bead connector. Close the ring securely. -
Attach the hook:
Now, open the loop at the base of your earring hook (or use another small jump ring if needed). Attach it to the top loop of your bead connector. -
Final check:
Ensure all jump rings are closed tightly so there are no gaps for the clay or wire to slip through.
Pair these modern arches with a simple linen top to let their geometric beauty really shine
Clay Dangles With Simple Tassels
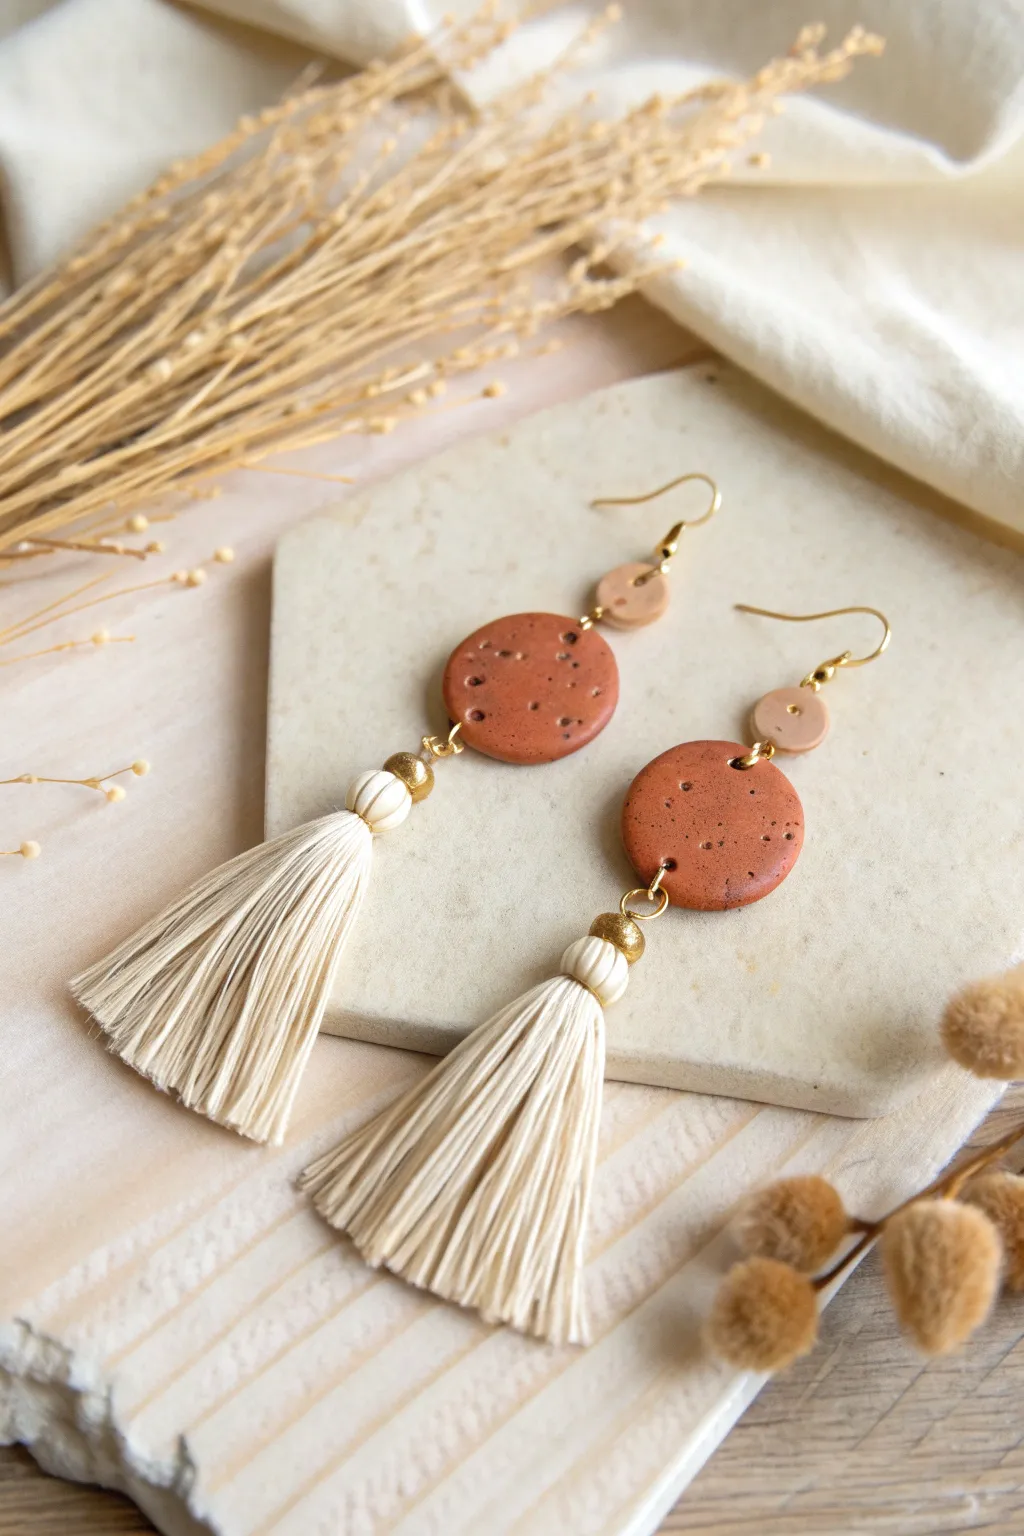
Embrace earthy tones and textures with these sophisticated dangle earrings featuring speckled terracotta clay and soft cream tassels. The combination of rigid geometric clay shapes and flowing fringe creates a beautiful contrast that elevates any casual outfit.
Step-by-Step Guide
Materials
- Terracotta colored polymer clay
- Beige or tan polymer clay
- Coarse black pepper or dried coffee grounds (for speckling)
- Cream embroidery floss or thin cotton yarn
- Gold earring hooks
- 6mm or 8mm Gold jump rings
- Gold tone bead caps or large hole beads (cone shape works best)
- Small round clay cutters (two sizes: approx 10mm and 20mm)
- Acrylic roller or pasta machine
- Needle tool or toothpick
- Flat nose pliers
- Cardboard piece (approx 2 inches wide)
- Super glue (optional)
- Sandpaper or Dremel (optional for finishing)
Step 1: Crafting the Clay Components
-
Prepare the terracotta clay:
Begin by conditioning the terracotta clay in your hands until it is soft and pliable. Once warm, mix in a pinch of coarse black pepper or dried coffee grounds to create the speckled stone effect seen in the photo. -
Roll and cut:
Roll the speckled terracotta clay into a sheet about 3mm thick. Use your larger round cutter to punch out two circles. These will form the main body of the earring. -
Prepare the accent clay:
Condition the beige or tan clay separately so colors don’t transfer. Roll this sheet to the same 3mm thickness. -
Cut the top circles:
Using the smaller round cutter, punch out two beige circles. Smooth the edges of all four cut circles gently with your fingertip to remove any sharp ridges. -
Create holes:
Use a needle tool to pierce holes for assembly. The large terracotta circles need a hole at the very top and very bottom (12 o’clock and 6 o’clock positions). The small beige circles need a hole at the top and bottom as well. -
Bake carefully:
Arrange your clay pieces on a ceramic tile or baking sheet lined with parchment paper. Bake according to your brand of clay’s instructions—usually around 275°F (130°C) for 15-30 minutes.
Step 2: Making the Tassels
-
Wrap the thread:
While the clay cools, wrap your cream embroidery floss around a 2-inch wide piece of cardboard about 20-30 times, depending on how full you want the tassel. -
Secure the bundle:
Cut a separate 6-inch piece of floss. Slide it under the wrapped threads at one end of the cardboard and tie it tightly with a double knot. This will be the top loop of your tassel. -
Cut and release:
Slide the scissors under the threads at the opposite end of the cardboard and cut through all the loops to release the bundle. -
Add the bead cap:
Thread both ends of the top tie string through a needle, then pass the needle up through your gold bead cap or cone bead, pulling the tassel head snugly inside the cap. -
Create a hanging loop:
Tie the two strings exiting the bead cap into a secure knot or loop right against the bead cap, then trim any excess string. I like to add a tiny dot of super glue here for extra security. -
Trim the fringe:
Comb the tassel threads straight with your fingers and trim the bottom straight across with sharp scissors to create a neat, blunt edge.
Smoother Edges
Before baking, dip your finger in a tiny bit of baby oil or cornstarch and gently rub the edges of your cut circles. This removes fingerprints and softens sharp production edges.
Step 3: Final Assembly
-
Connect the clay pieces:
Using two pairs of pliers, twist open a jump ring. Thread it through the bottom hole of a small beige circle and the top hole of a large terracotta circle, then close the ring securely. -
Attach the tassel:
Open another jump ring and thread it through the loop at the top of your tassel and the bottom hole of the terracotta circle. Close the ring. -
Add the ear wire:
Finally, open the loop at the base of your gold earring hook (or use a small jump ring) to attach it to the top hole of the beige circle. -
Repeat and wear:
Repeat the assembly process for the second earring to complete your matching pair.
Make it Textured
Before cutting your circles, gently press a piece of sandpaper or a textured sponge onto the raw clay surface to give it a realistic, stone-like pitted finish.
Now you have a stunning pair of handcrafted earrings ready to gift or keep for yourself